

Page 1
240EdwardsSt[eetrSE
Cleveland,Tennessee37311
Tel:423-4723333
Fax:423-478-6710
TRIM KIT INSTALLATION INSTRUCTIONS
SIDE BY SIDE REFRIGERATORS
RAX3300CXX AND RAX3600CXX
Read through these instructions thoroughly before proceeding. Proper installation is your responsibility.
WARNING: TO AVOID DANGER OF SUFFOCATION, KEEP ALL PLASTIC FILMS AND PLASTIC
BAGS AWAY FROM CHILDREN, DESTROY IMMEDIATELY AFTER OPENING. THE FILMS AND
BAGS ARE NOT TOYS !
Make sure you have all tools and parts necessary for correct installation. Special care should be taken when
removing parts from their packing to avoid possible damage. When installing decorator panels and perimeter
trims, work on one door at a time.
Read each step of the instructions carefully. Decorator panels and perimeter trim once applied cannot be easily
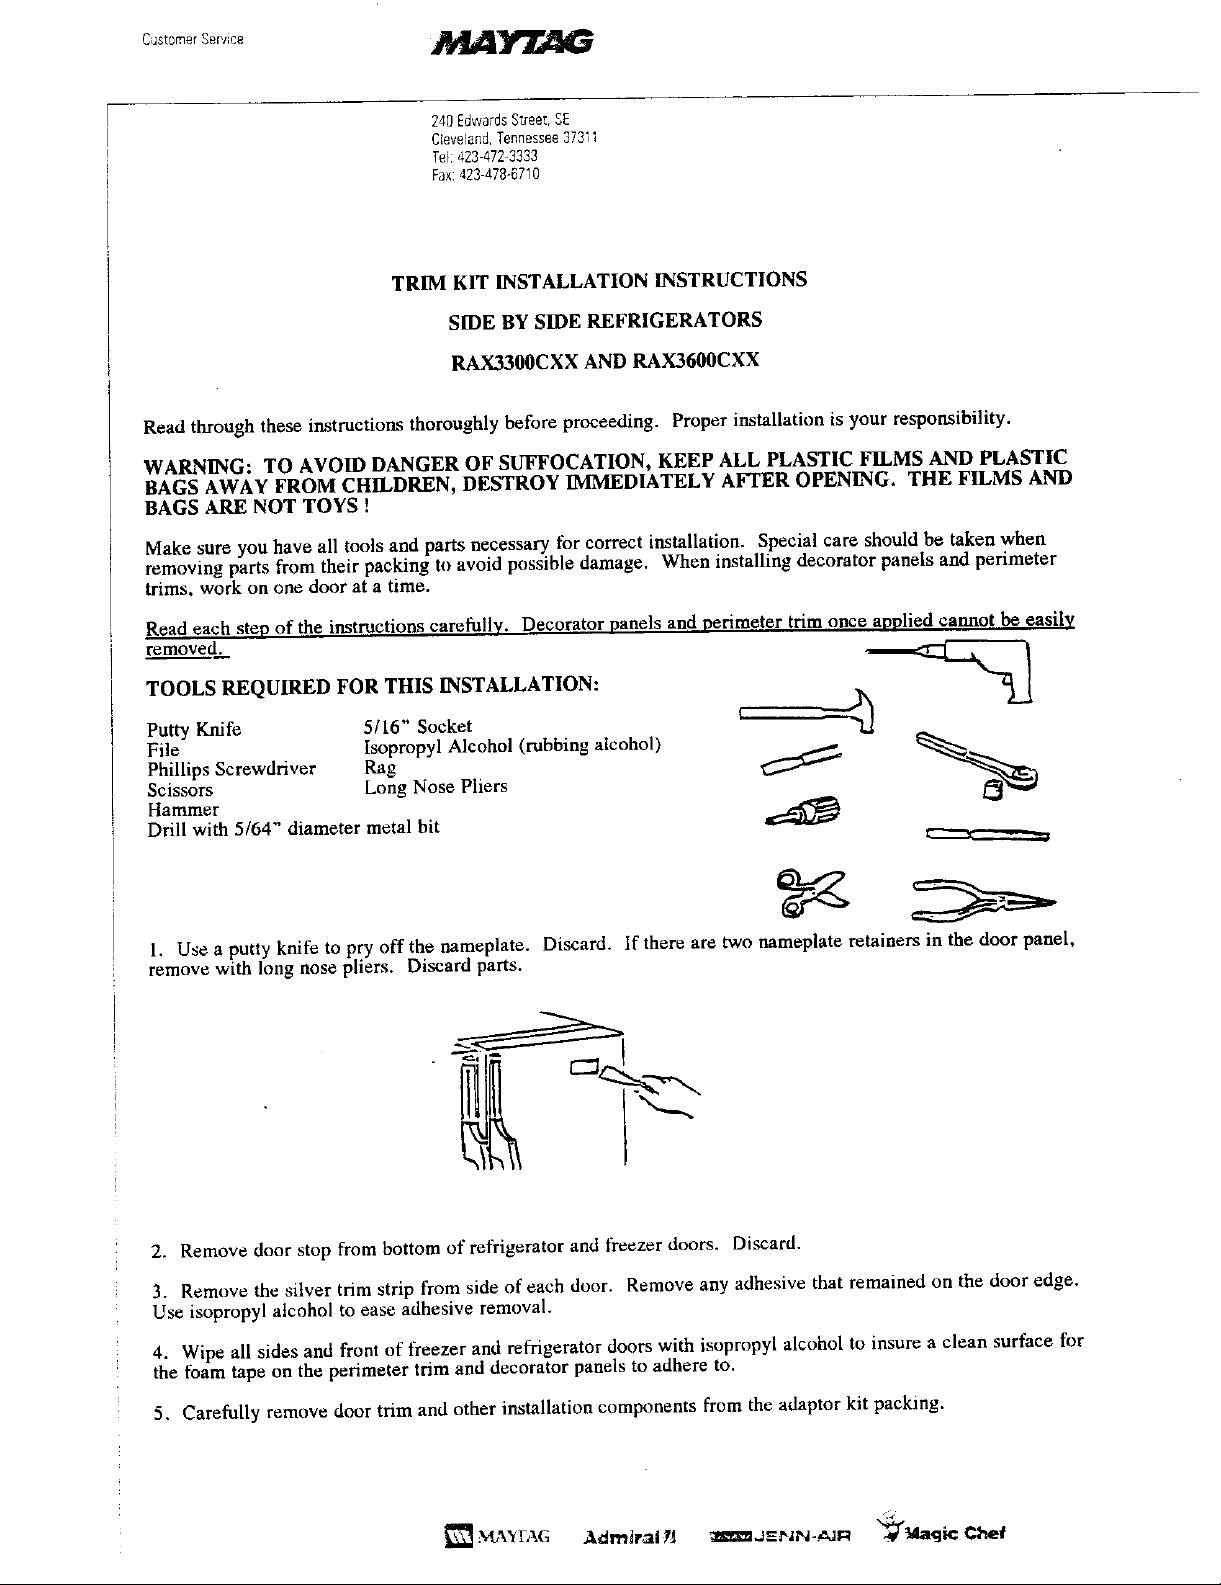
TOOLS REQUIRED FOR THIS INSTALLATION:
removed. '_ _[_
Putty Knife 5/16" Socket I -_.]
File Isopropyl Alcohol (rubbing alcohol) _ ___,_
Phillips Screwdriver Rag
Scissors Long Nose Pliers
Hammer
Drill with 5/64" diameter metal bit
1. Use a putty knife to pry off the nameplate. Discard. If there are two nameplate retainers in the door panel,
remove with long nose pliers. Discard parts.
"
2. Remove door stop from bottom of refi'igerator and freezer doors. Discard.
3. Remove the silver trim strip from side of each door. Remove any adhesive that remained on the door edge.
Use isopropyl alcohol to ease adhesive removal.
4. Wipe all sides and front of freezer and refrigerator doors with isopropyl alcohol to insure a clean surface for
the foam tape on the perimeter trim and decorator panels to adhere to.
5, Carefully remove door trim and other installation components from the adaptor kit packing.
[] _IA'ffAG Admiral _] _JEr,;N-CJl:_ ".'_41a_k::Chef
Page 2
Z40EdwardsStreetSE
C',eveiand.]enness_e373il
Tel:_23472-3333
Fax:423,i78670
NOTE: Check the vertical handle position by using one short perimeter trim piece. Using the trim piece as a
visual guide, first place it directly above the chromed handle endcap on the freezer door. Open and sight down
the top edge of the door panel If light can be seen between the top edge of the door panel and the foam
adhesive on the perimeter trim, the upper chromed endcap on the handle will need to be adiusted downward
until foam tape makes contact. If light cannot be seen, use the same procedure to check the refrigerator door.
If no adjustment is needed, proceed to Step 6.
If the upper portion of the handles need attjustment, proceed according to the following instructions:
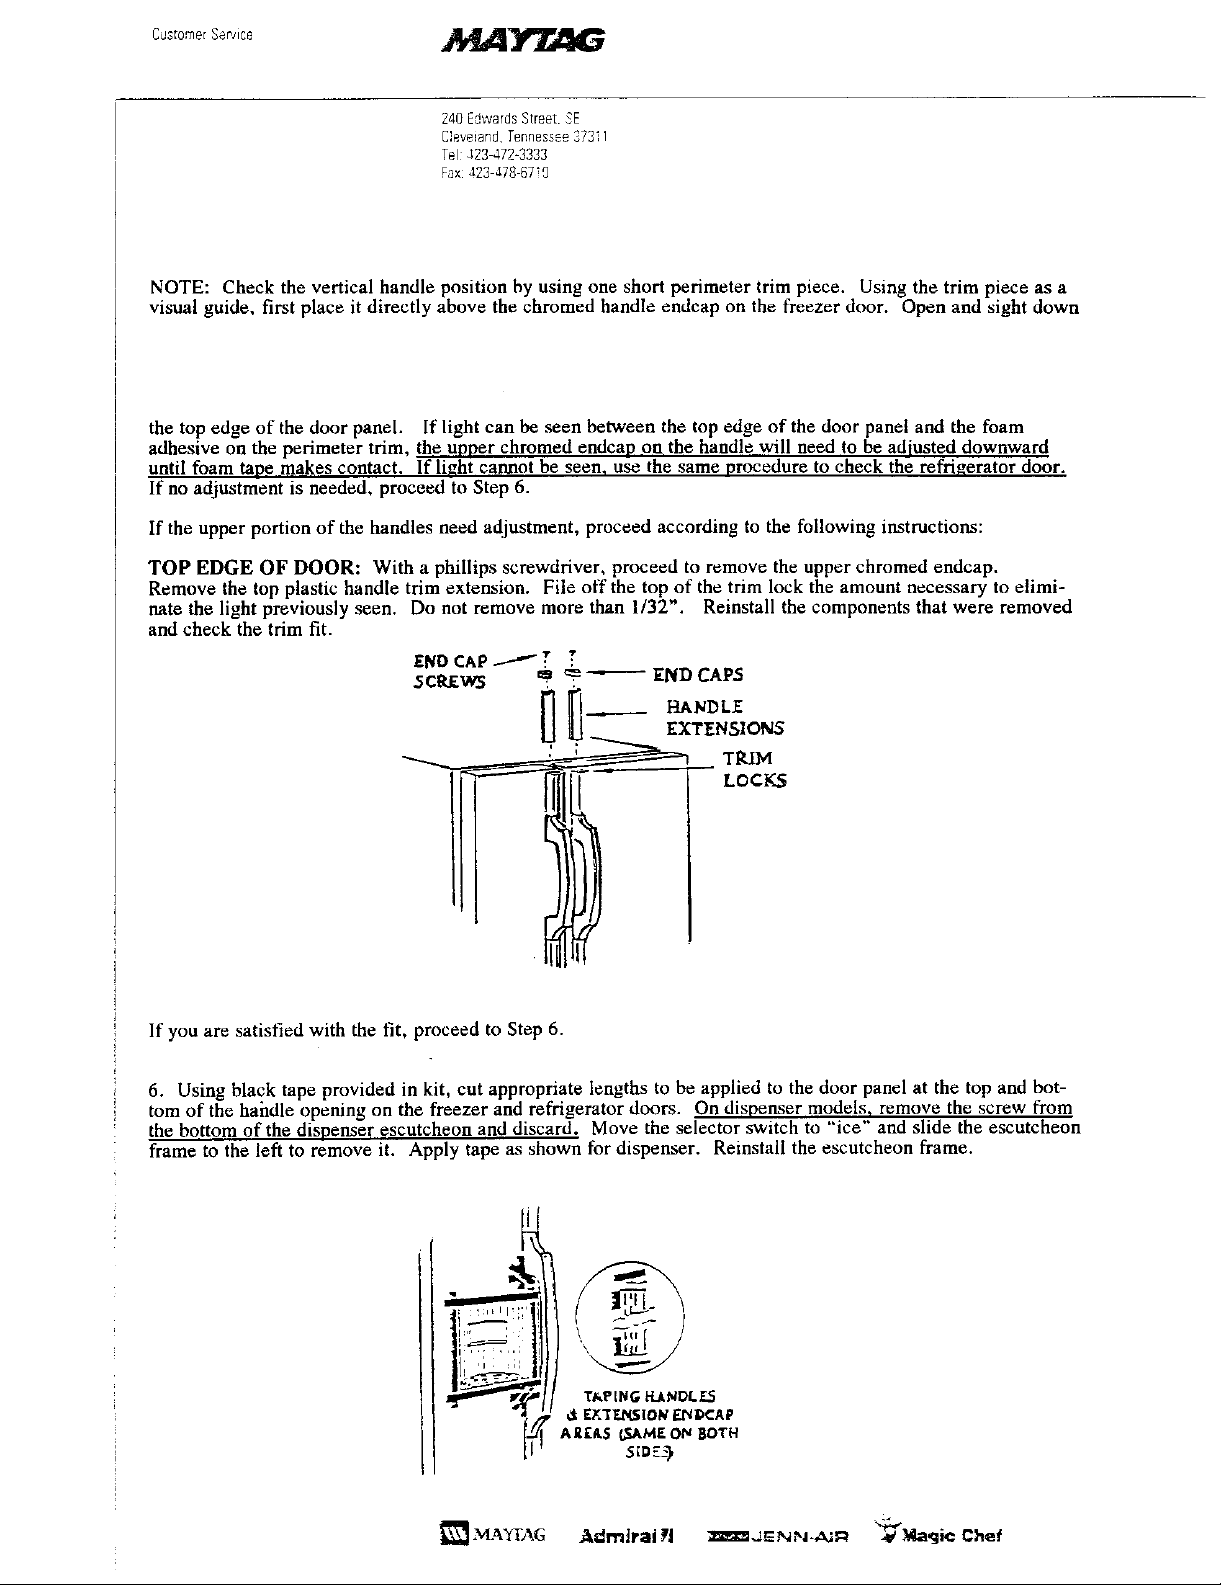
TOP EDGE OF DOOR: With a phillips screwdriver, proceed to remove the upper chromed endcap.
Remove the top plastic handle trim extension. File off the top of the trim lock the amount necessary to elimi-
nate the light previously seen. Do not remove more than 1/32". Reinstall the components that were removed
and check the trim fit.
£ND CAP _ z T
5C_W5 _ _ END CAPS
LI, Xr NSIONS
_ " LOCKS
If you are satisfied with the fit, proceed to Step 6.
6. Using black tape provided in kit. cut appropriate lengths to be applied to the door panel at the top and bot-
tom of the hahdle opening on the freezer and refrigerator doors. On dispenser models, remove the screw from
the bottom of the dispenser escutcheon and discard. Move the selector switch to "ice" and slide the escutcheon
frame to the left to remove it. Apply tape as shown for dispenser. Reinstall the escutcheon frame.
_ltt T_P[NG HJ.NDL E.S
_MATI-AG A_mlra| _| mJ=:N_-A;# "_:_a_jic Chef
d_EX_E.t_SIO_'_CAP
-_ AR[&$ _._kMEON BOTH
Page 3
240EdwardsStreet.SE
Cleveland,Tennessee37311
Tel:423a72-3333
Fax:423478-6710
Cut appropriate lengths of tape to be applied above the top chromed endcap and below the bottom chromed
endcap on both doors. Strips will also have to be placed on either side of the handle trim extension just below
the top chromed handle endcap and just above on the bottom endcap on both the freezer and refrigerator doors.
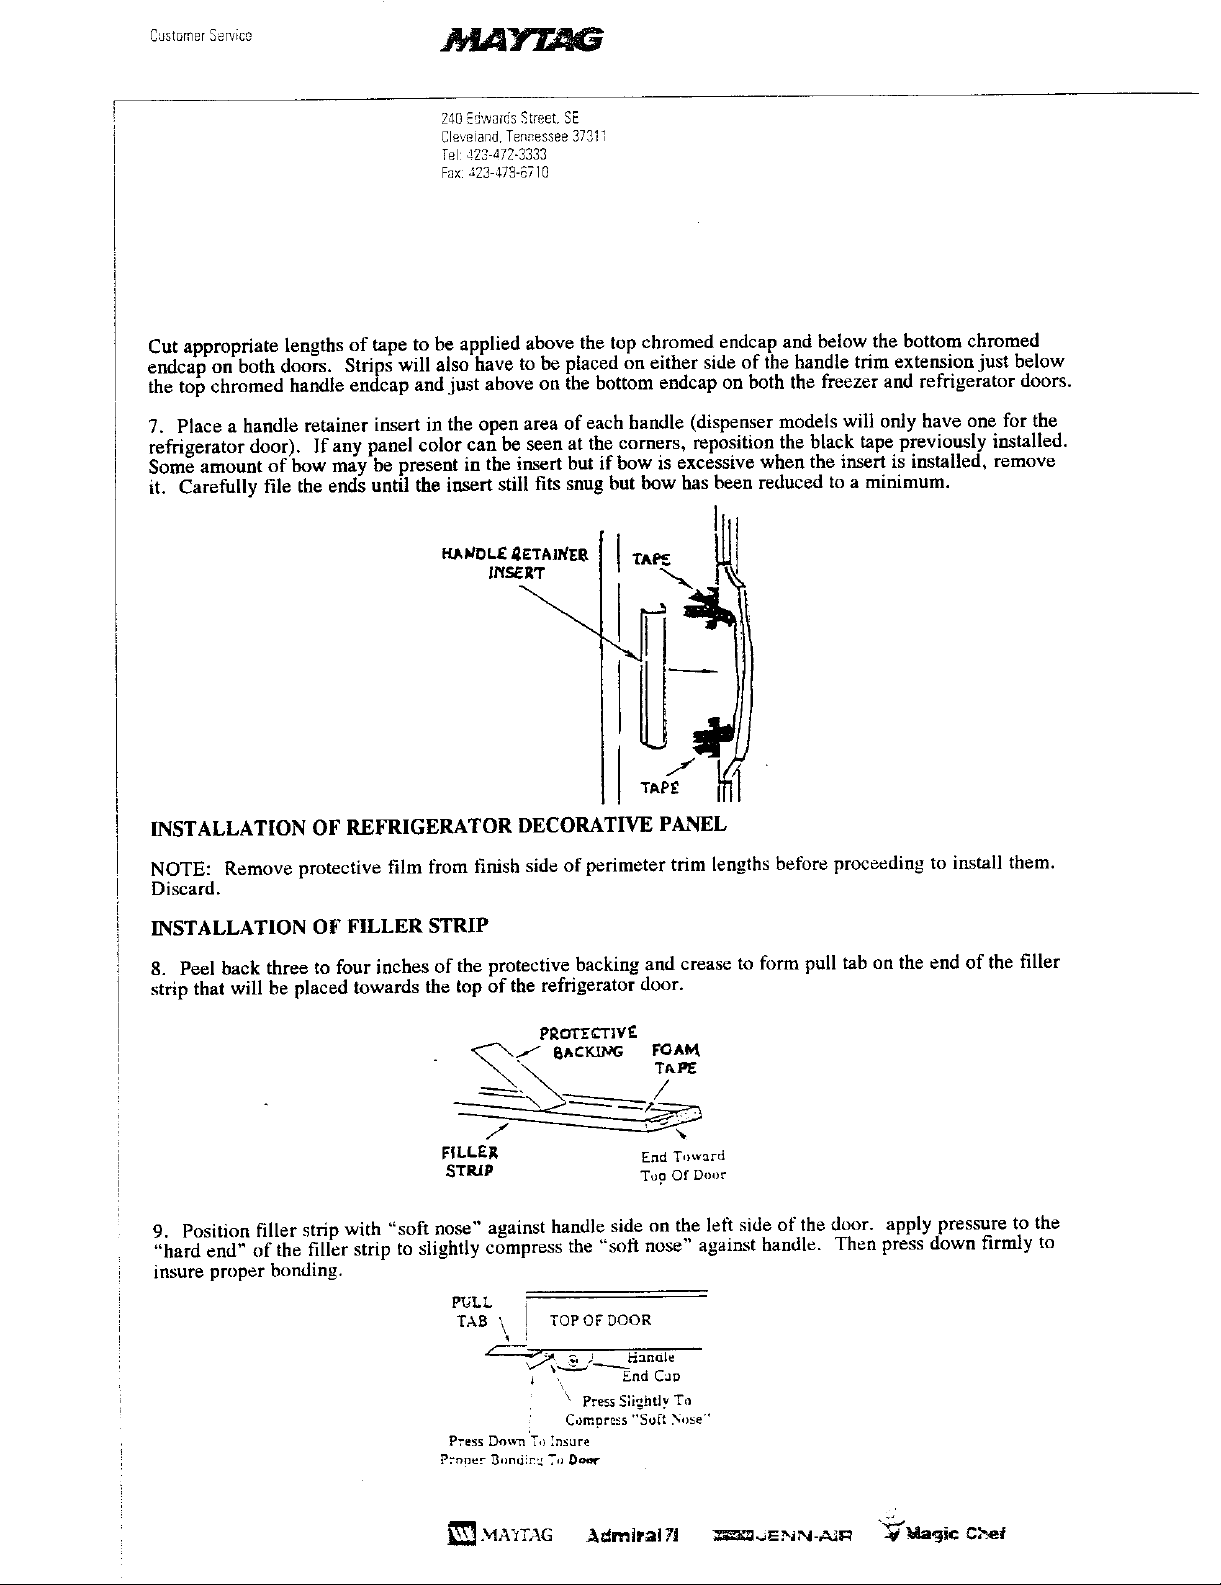
7. Place a handle retainer insert in the open area of each handle (dispenser models will only have one for the
refrigerator door). If any panel color can be seen at the comers, reposition the black tape previously installed.
Some amount of bow may be present in the insert but if bow is excessive when the insert is installed, remove
it. Carefully file the ends until the insert still fits snug but bow has been reduced to a minimum.
HA_DL£ ,_E'rAJ_Ee
TA_
J
TAP£
INSTALLATIONOF REFRIGERATORDECORATIVEPANEL
NOTE: Remove protective film from finish side of perimeter trim lengths before proceeding to install them.
Discard.
INSTALLATION OF FILLER STRIP
8. Peel back three to four inches of the protective backing and crease to form pull tab on the end of the filler
strip that will be placed towards the top of the refrigerator door.
PROT_'T]V£
./_ I_AC_ FOAM.
FILL£;_ EndToward
_TRIP Tug Of Door
9. Position filer strip with "soft nose" against handle side on the left side of the door. apply pressure to the
"hard end" of the filler strip to slightly compress the soft nose against band e. Then press down firmly to
insure proper bonding.
PULL [
TAB '\ TOPOF DOOR
F =_..__...____=n.te
1 ,, End Cap
\ PressSlightlyTo
: Comnre__s"Soft Nose"
PressDo%)_aT,)_nsure
P:'r,per 3ondin_ T,) O,,_,mr
i
Page 4
240EdwardsStreet,SE
Cleveiac_d,Ter_nessee3731?
Tel:423-472-3333
Fax:423-4786710
IMPORTANT: Once adhesive bonds to the door panel, it cannot be removed. Make sure you align filler strip
properly as you work towards the bottom of the door.
10. As you work toward the bottom of the door pull tape backing to expose adhesive to door panel.
INSTALLATION OF PERIMETER TRIM
NOTE: Holes must be drilled in the face of the door to mount the lower H-trim piece. Work very carefully
to properly locate these mounting holes.
11. Carefully cut out refrigerator door template from template sheet. Tape template to the face of the door so
that the edges of the template exactly line up with the edges of the door as printed on the template.
12. Drill 5/64" diameter holes through the face of the door where shown on the template. Use care to accu-
rately locate the holes.
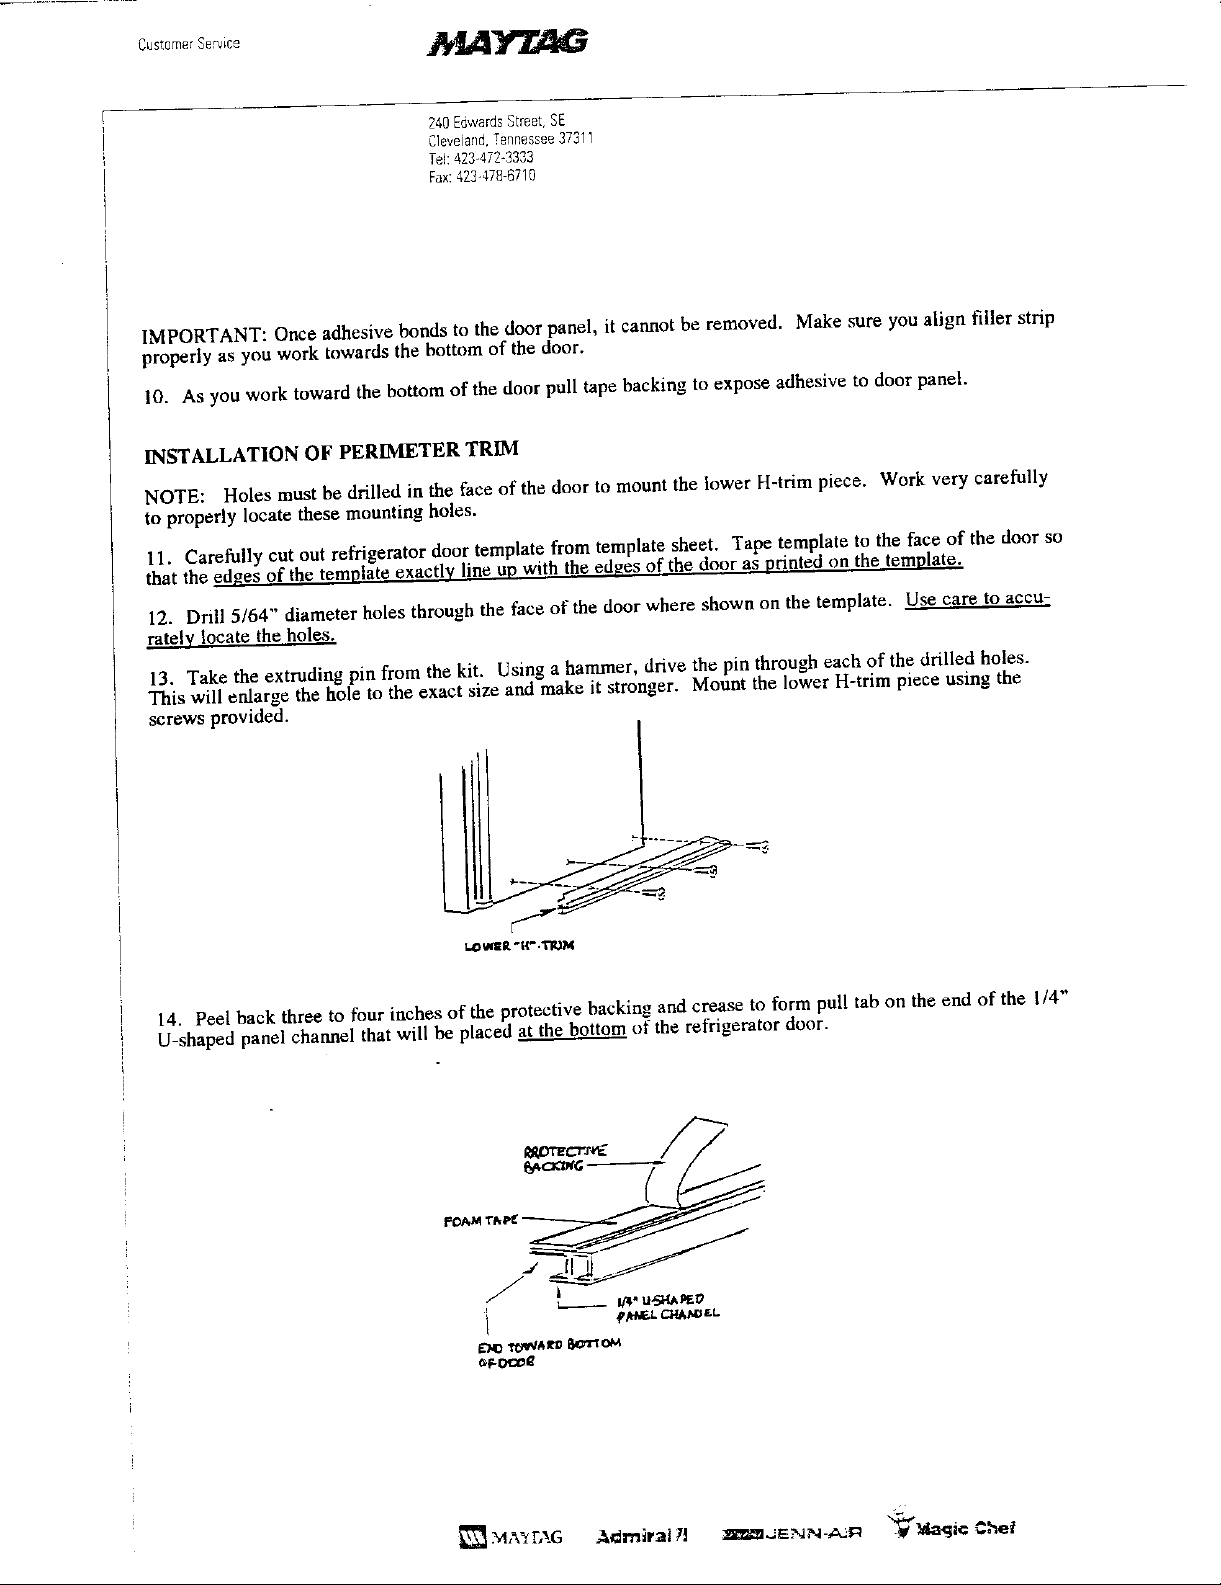
13. Take the extruding pin from the kit. Using a hammer, drive the pin through each of the drilled holes.
This will enlarge the hole to the exact size and make it stronger. Mount the lower H-trim piece using the
screws provided.
k_ I,IIIIZI "I1" .'['_IN
14, Peel back three to four inches of the protective backing and crease to form pull tab on the end of the 1/4"
U-shaped panel channel that will be placed at the bottom of the refrigerator door.
_OAM T&PI[
Page 5

24[3_dwardsStree[,SE
Cleveland,Tennessee373t!
[e] 423472-3333
Fax:a23,:78-67!0
15, Position 1/4" U-shaped panel channel so the end is against the lower H--trim and with soft nose against
_e right side of the handle. Apply pressure to the "hard side" of the panel channel to slightly compress the
soft nose against the handle. Then press down firmly to insure proper tape bonding,
F,._,_,_£Z. LOV,ER RIGHT COR.'_ER.
- PAN_ C.HA_EL
/ It. TIUI_
P
U._ I_, .
CHRO_ F_ _'_" C_ _ H.TetU _£C_
IMPORTANT: Once adhesive bonds to the door panel, it cannot be removed. Make sure you align panel
channel properly as you work towards the top of the door.
16. As you work up toward the top of the door, pull tape backing to expose adhesive to door panel Press
down firmly to insure bond.
17, Peel back approximately three to four inches of the protective backing from each end of the foam tape on
the refrigerator top and bottom perimeter trim. Crease to form pull tabs.
18. Set custom 1/4" thick panel into lower H-trim and U-shaped panel channel. (Custom 1/4" decorator panel
sizes are found on the last pace of these instructions.
. la, ti-_-IAD[DP_rEL _NI;£L
Page 6

,2,ustcrnerSepzice ._111_ _
240EdwardsStrae[,SE
Cleveiand,Tennessee2731T
Tel:42_-472-%%
Fax:423-,178-8710
19. Place upper H-trim piece onto panel and capture with top trim piece. Before removing the tape backing,
check that the top trim is flat against the top of the door, If the H-trim holds the tape away from the door,
remove the panel and shorten the panel to fit. Check the side trim piece the same way at this time. Using the
6 inch trim piece provided as a guide to form tight corners, install top trim to clamp H-trim against the face of
the door. Pull tabs previously creased to expose tape adhesive to door. Press down firmly along entire length
of part to insure proper bond. Proceed to install bottom trim using the 6 inch trim piece as a guide.
Ptlt//,_.tt_.4lql111_
i
X-TRIM p I
P/_I_aE[. -
I
TOP _F tlOOR
NOTE: One side trim piece has a magnet on the back and one H-trim side pieces has a notch to clear the dis-
penser escutcheon. Save these trim pieces for the freezer door.
20. Follow instructions outtined in Step 17 before you proceed to install side trim pieces, For the right side,
place the H-trim side piece onto the panel edge. Capture the H-trim piece with the side perimeter trim. Make
sure you form tight corners with the installed top and bottom trim. Pull tabs previously creased to expose
adhesive to the door panel side. Press firmly along the entire length of the part to insure proper bonding.
21. Install the left side trim piece (with no H-trim as outlined in Step 20 to clamp down filler strip.
A
["_ ,MA'/L&G Adnllra171 -'nere,J _ .'_N -,_ "_klagic Chef
Page 7

C0 0merSe ic
240EdwardsStreet,SE
C',evelanc,Tennessee37311
Tel:423-_72-3333
Fax:429--t78-6718
INSTALLATION OF FREEZER DECORATIVE PANEL
22. If you have a non-dispenser model, basically follow the same procedures as outlined in Steps 8 through 21
to install the freezer door decorator panel and trim, ten proceed to Step 38. If you have a dispenser model,
continue with Step 22.
INSTALLATION OF FILLER STRIP
23. Peel back three to four inches of the protective backing and crease to form pull tab on the end of the filler
strip that will be placed toward the top of the freezer door.
EadToward
TopOfDoor
24. Position filler strip with "soft nose" against the handle side on the right side of the door. Apply pressure to
the "hard end" of the filler strip to slightly compress the "soft nose" against the handle. Then press down
firmly to insure proper bonding.
PL'LL
TOPt)FOCOR ).
!
Er-dCa;re.s.,i...ti. tt,_is i
|
PrL_ _l_vrl T'o [n_urtz
pTrloer _,,odin,_' !t) O.,_e
IMPORTANT: Once adhesive bonds to the door panel, it cannot be removed. Make sure you align filler strip
properly as you work towards the bottom of door.
25. As you work toward the bottom of the door, pull tape backing to expose adhesive to the door panel.
_'_ MA_rAG &dmlral _J "Pi_'l'zUENN .#JR _#"_(ji¢:C,'_e|
Page 8
240EdwardsStreet,SE
C[eve!andrTennessee3731;
Tel:423-472-3333
Fax:422-a78-6710
INSTALLATION OF PERIMETER TRIM
NOTE: Holes must be drilled in the face of the door to mount the lower H-trim piece. Work very carefully to
properly locate these mounting holes.
26. Carefully cut freezer door template from template sheet. Tape template to the face of the door so that the
edges of the template exactly line up with the edges of the door as printed on the template.
27. Install lower H-trim piece following Steps 12 and 13.
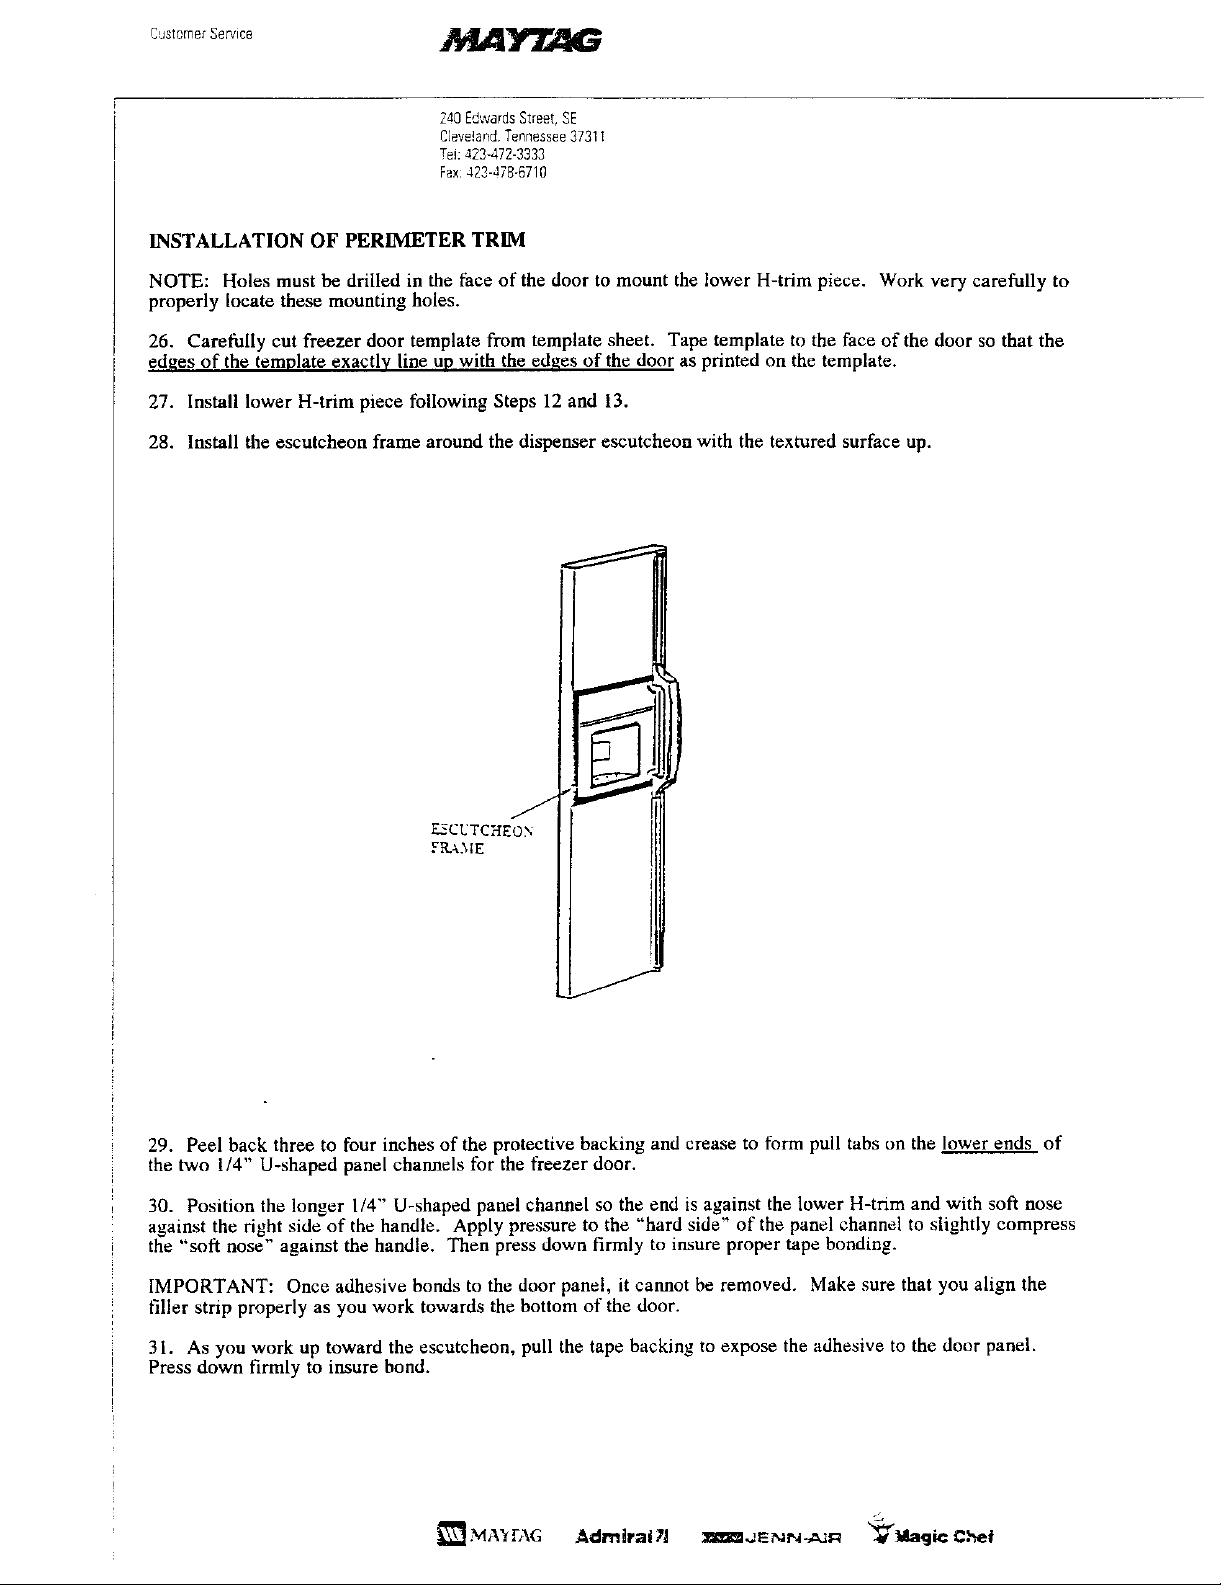
28. Install the escutcheon frame around the dispenser escutcheon with the textured surface up.
F-SCUTCHEOS
FRAME
J
29. Peel back three to four inches of the protective backing and crease to form pull tabs on the lower ends of
the two 1/4" U-shaped panel channels for the freezer door.
30. Position the longer 1/4" U-shaped panel channel so the end is against the lower H-trim and with soft nose
against the right side of the handle. Apply pressure to the "hard side" of the panel channel to slightly compress
the "soft nose" against the handle. Then press down firmly to insure proper tape bonding.
IMPORTANT: Once adhesive bonds to the door panel, it cannot be removed. Make sure that you align the
filler strip properly as you work towards the bottom of the door.
31. As you work up toward the escutcheon, pull the tape backing to expose the adhesive to the door panel.
Press down firmly to insure bond.
_ MA'_rAG Admiral 7| :I_im_ENN-A_ _'_]Mlagic C.het
Page 9

240EdwardsStreet.SE
C1eveand.Tennessee37311
Te!:_23.472-3333
fax_23-478-8710
32. Install the shorter H-trim piece starting from the escutcheon frame and working up, following the
instructions outlined in Steps 29 and 30.
33. Peel back approximately three to four inches of the protective backing from each end of the foam tape on
the freezer top and bottom trim. Crease to form pull tabs.
34. Slide the lower customer 1/4" thick panel into the lower H-trim, the escutcheon frame and panel channel
above the escutcheon.
35. Install top and bottom trim pieces following Step 19.
36. On the magnet backed side trim piece, peel back approximately three inches (half) of the protective back-
ing from the top of the foam tape and crease to form a pull tab.
37. Place the H-trim side piece onto the panels. Attache the magnetic trim piece to the left side (hinge side) of
the freezer door to capture the H-trim piece. Make sure you form tight corners with the top and bottom trim.
Pull off the tape backing to expose tape adhesive to the door edge. Press down firmly to insure proper bonding.
38. Install right side trim piece as in Step 21.
39. Use the template provided to locate the nameplate in the upper right band comer of the refrigerator door as
shown. Remove the protective backing from the nameplate and securely mount it to the decorator panel.
40. If there happens to be interference between the perimeter trim and the top hinge cover, extra shims have
been provided in the kit to be placed beneath the top hinge to alleviate any interference problems.
NOTE: Shoutd it ever become necessary to remove the dispenser escutcheon to service the ice/water dispenser,
the left hand magnetic side trim must be moved. Use care to avoid damage to the trim piece. If the trim piece
was removed without damage, remove the 6 inch piece of tape and apply a new strip of tape. Reinstall side
trim piece after fountain service.
IMPORTANT: ONCE YOU HAVE COMPLETED INSTALLATION OF THE KIT, CHECK THE FIT
OF THE PERIMETER TRIMS ON ALL CORNERS. IF THERE ARE ANY SHARP EDGES, CARE-
FULLY FILE OFF WITH A FINE TOOTH FILE TO FORM BEVELED CORNERS.
Page 10
2,¢i}EdwarasSIreet.SE
C]eve!a.qd.Ter_nessee37311
Tel:423472-3333
Fax:423-47867!g
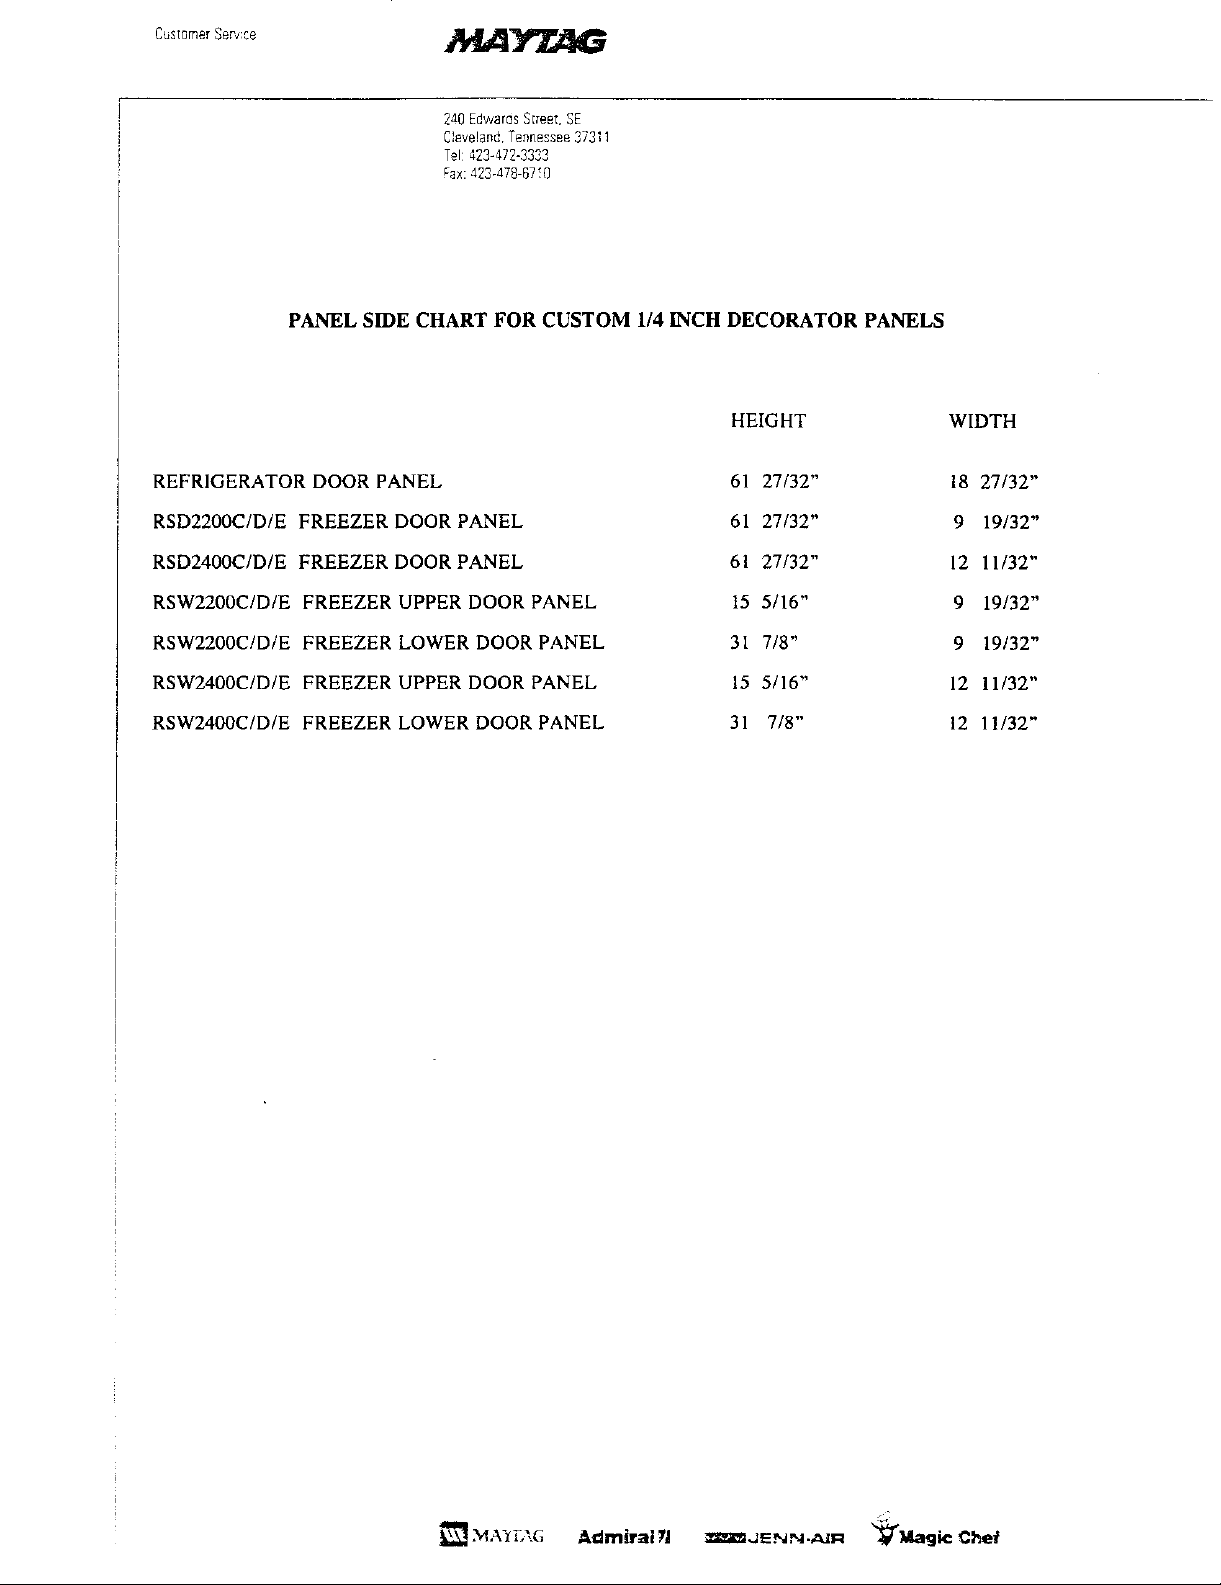
PANEL SIDE CHART FOR CUSTOM 1/4 INCH DECORATOR PANELS
HEIG HT WIDTH
REFRIGERATOR DOOR PANEL 61 27/32" 18 27/32"
RSD2200C/D/E FREEZER DOOR PANEL 61 27/32" 9 19/32"
RSD2400C/D/E FREEZER DOOR PANEL 61 27/32" 12 11/32"
RSW2200C/D/E FREEZER UPPER DOOR PANEL 15 5/16" 9 19/32"
RSW2200C/D/E FREEZER LOWER DOOR PANEL 3I 7/8" 9 19/32"
RSW2400C/D/E FREEZER UPPER DOOR PANEL 15 5/16" 12 11/32"
RSW2400C/D/E FREEZER LOWER DOOR PANEL 31 7/8" 12 11/32"
_,"_A_rAG AdmlraiTJ ,-_n_ENN-,n_R "_gie Chef
Page 11

240EdwardsStreet,SE
Cleveland.Tennessee37311
Tel:423-472-3333
Fax:423 478-6710
EASYINSTALLTRIMKIT PARTSUSEDIN 1/4INCHPANELINSTALLATION
FOR
MAYTAGSIDEBYSIDEREFRIGERATORS
RAX3300CXXAND RAX3600CXX
UPPER U4"
TOP U-SHAPED TOP
TRE_I PA,NEL CHA.N_'EL FII[ FR TRIM
SIDE
H-TFJM 1i *
SIDE .,_!
TOP H-TRLM
TOP H-TRD,[ _ SIDe"H-TRL'vI-_-
_---_-CL_ CEIEON _.. SIDE HA_) LE
I FRAME TRD,[
U
RETAL'NER
LOWER
H-TRD,[ LOWER
(Tobe_ed as U4" |
a guidei LOWER U-SH,LPED
I SIDE LNSERT _,_ SIDE
'o,l
LOWER U4" U-SHA2_ED TRLM
P.LNEL Cli&,NNEL 1
TRL'_I_ TRLM
H-TR_j
pA.NEL CHANNEL 1
RAX3300CXXAND RAX3600CXX
TOP
TOP" 114" TR_[
TRLM U-SHAPED
• SIDE H-TRL%! I PA,NEL CI-L_.,_NEL FITf Tn_
f maze
TOP H-TRI3[ SIDE !I SIDE H.TR_L_,[
RETALNER [ L_S ERT SIDE
LNSERT _ [ 51DE
_ TRI3I HA.",'DLEHANDLE _ RETAINER
TR I?,[_ _ TT,I_-I
f
LOWER
H-TRI_,[ H-TRL_I
LOWER LOWER
_" T7 '.!.I ?!ECE
4_,u_, LOWER C-SHAPED LOWE R
TRiM P \.*_EL C:-L_N?_EL TRI?,[
u
STP._P 114" !
MA'_TAGAdmlra|_J m JENN-_;_ '_iCagic C,%ef
 Loading...