

Page 1

Installer:Pleaseleavethismanualwith
thisappliance.
Consumer: Pleaseread and keep this
manualforfuturereference,Keepsalesre-
iiiii
ceiptand/orcancelledcheckas proofof
purchase,
TOP MOUNT REFRIGERATORTM-1
'_FE]'Y ...........................................................................Page 1
_[ATION ......................................................Pages 2-4
ModelNumber
SerialNumber
Dateof Purchase
If you have questions,write us (include
yourmodelnumberandphonenumber)or
call:
MaytagServicessM
Attn:CAIR®Center
RO.Box2370
Cleveland,TN37320-2370
1-800-688-9900U.S.A.
1-800-688-2002Canada
1-800-688-2080(U.S.A.TTYfor
hearingor speechimpaired)
(Uon.-Fri.,8a.m.-8p.m.EasternTime)
Internet:http://www.maytag.com
Forservice information,seepage 15.
TEMPERATURES...................................Page 5
_ICE SERVICE..........................................................Page6
"-_LOOKINGINSIDE........................................Pages7-8
STORAGETIPS................................Pages 9-10
_!FIG THEREFRIGERATOR.........................Page 11
&,CLEANING......................................Pages 11-12
_EP_TING SOUNDS............................................Page 13
YOUCALL................................................Page 14
RRANTY.............................................................Page 15
IDEDEL'UTILISATEUR...................................Page 16
iABEtUSUARIO................................................Page 32
Form No. B/04/03 Part No.111464-1
• . ; ° http://www.maytag.com 16010376 Litho U.S.A.
@2003 Maytag Appliance Sales Co.
Page 2

few days."If you are gettingridof your old
refrigerator, please follow the instructions
belowto help preventaccidents.
> Takeoff the doors.
Warning and Important Safety Instruc-
tions appearing in this manual are not
meant to cover all possible conditions
and situations that may occur. Common
sense, caution and care must be exer-
cised when installing, maintaining or
operating this appliance.
Always contact your dealer, distributor,
service agent or manufacturer about
problems or conditions you do not under-
stand.
RECOGNIZE SAFETY
SYMBOLS, WORDS,
LABELS
Use the refrigerator only for its intend-
ed purpose.
To prevent possibility of hazarddueto
electrical shock, never plug the refrig-
erator into a receptacle which has not
been grounded adequately and in
accordance with the local and national
electrical codes. See_, warning and
the grounding instructions that follow.
Unplug the refrigerator before clean-
ing or replacing a light bulb.
In case of powerfailure, minimize door
openings. If the power failure is of a
long duration, protectthe food by plac-
ing blocks of dry ice on top of the
packages or check with a local frozen
foods locker about temporary storage.
Frozenfoods which havethawed com-
pletely should not be refrozen.
Any electrical service cord that
becomes frayed or damaged should
be immediately repaired or replaced.
Never unplug your appliance by
pulling on the power cord.
Your refrigerator should not be operat-
ed inthe presence of explosivefumes.
Children should not climb, hang or
stand on the shelves of this refrigera-
tor.
IMPORTANT: Child entrapment and suf-
focation are not problems of the past.
Junkedor abandoned refrigeratorsare still
dangerous...even if they will sit for "just a
> Leave the
shelves in
place so
that child-
ren may
not easily
climb in-
side.
i.....................
This appliance is equipped with a three-
pronged grounding plug for your protec-
tion against possible electrical shock haz-
ards. It must be plugged into a grounding
receptacle. Where a standard two-prong
wall receptacle is encountered, it is the
personal responsibility and obligation of
the customer to have it replaced with a
properly grounded three-prong wall
receptacle. Do not under any circum-
stances, cut or remove the third (ground)
prong from the power cord. Do not use an
adapter plug.
POWER SUPPLY CORD
WITH 3-PRONG
GROUNDING PLUG
1
GROUNDlinG TYPE
WALL RECEPTACLE
Page 3
i
Yournew refrigerator was packed careful-
ly for shipment. Remove and discard
shelf packing clips (if used) located just
above each shelf where they hook onto
the frame. To remove plastic clips wiggle
the clips sideways and pull straight out.
IMPORTANT: Do not removefoam insu-
lation from the vents located in the ceiling
of the fresh food compartment.
> Allow for a free flow of air through the
front base grille.
> Install the refrigerator where the room
temperature will not go below 55° E
With temperatures below 55° F, the
refrigerator will not run frequently
enough to maintain proper tempera-
ture in the freezer.
> Allow a minimum1/2" clearance on the
sides, top and back for ease of instal-
lation. If refrigerator is placed with the
door hinge side against a wall, you
may want to allow additional space or
reversethe door swing (see page 4) so
the door can be opened wider.
> Use caution when installing the unit on
vinyl or hardwood floors so as not to
mark or otherwise damage the floor-
ing.A piece of plywood, a rug or other
material should be used to protect the
floor while positioning the unit.
> Refrigerator should remain upright for
at least 30 minutes before plugging in.
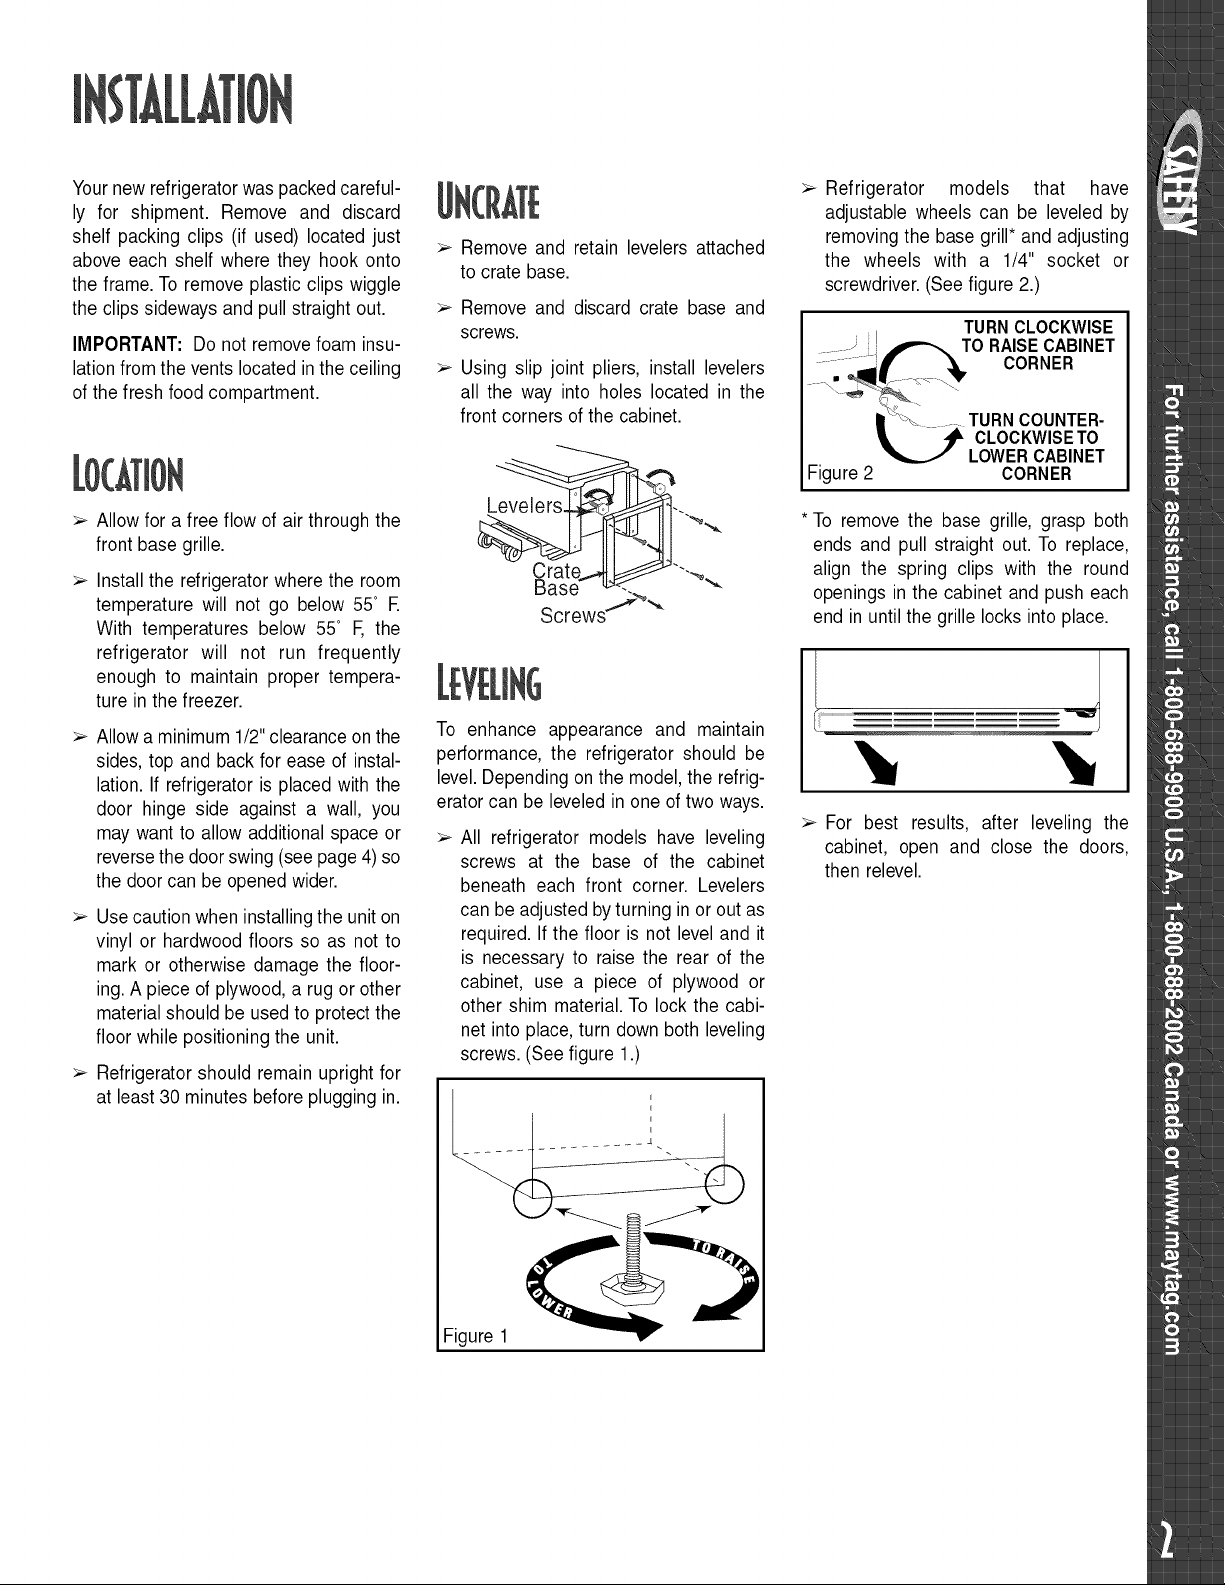
Remove and retain levelers attached
to crate base.
Remove and discard crate base and
screws.
Using slip joint pliers, install levelers
all the way into holes located in the
front corners of the cabinet.
Screws._ "_"_.
To enhance appearance and maintain
performance, the refrigerator should be
level. Depending on the model, the refrig-
erator can be leveled in one of two ways.
All refrigerator models have leveling
screws at the base of the cabinet
beneath each front corner. Levelers
can be adjusted by turning in or out as
required. If the floor is not level and it
is necessary to raise the rear of the
cabinet, use a piece of plywood or
other shim material.To lock the cabi-
net into place, turn down both leveling
screws. (See figure 1.)
> Refrigerator models that have
adjustable wheels can be leveled by
removing the base grill* and adjusting
the wheels with a 1/4" socket or
screwdriver.(See figure 2.)
TURNCLOCKWISE
TORAISECABINET
CORNER
TURN COUNTER-
CLOCKWISE TO
LOWER CABINET
Figure 2
*To remove the base grille, grasp both
ends and pull straight out. To replace,
align the spring clips with the round
openings in the cabinet and push each
end in untilthe grille locks into place.
> For best results, after leveling the
cabinet, open and close the doors,
then relevel.
CORNER
Figure 1
Page 4

)OR
REFRIGERATORDOORHANDLEWITHOUTEXTENSIONTRIM (IFNEEDED)
_) Door should be level when the cabinet is
ALIGN HANDLE OVER SCREW T _----_ SCREW DRIVER
HOLES. FIRST INSTALLTHE "A" _ "
SCREW TO SECURE _/ IS REQUIRED * The freezer door is too high.
FOLLOWED BY THE "B" SCREW. FOR Remove
DONOTOVERTIGHTEN. IlU/ INSTALLATION" Loosen hinge cap
S_NAPEXTENSION INTO f'-"_" v / _1PII_6
PLACE AT THE BOTTOM/] 1
OF THE HANDLE. _l x[ -,-- INSTALL SCREW IN
HANDLE,
,__J e L I -- Foam d'ior
\[
_ discard
AB NO. 2 PHILLIPS level.
HN/
HANDLE HOLE. DO _ spacer-
NOT OVER TIGHTEN. DO NOT
screws \_'._
TOPMOUNTHANDLEINSTALLATIONINSTRUCTIONS , ,
TOPOFFREEZERDOOR
ALIGN HANDLE OVER SCREW HOLES. /_
FIRST INSTALL THE "A" SCREWS TO --{ I I k//
SECURE HANDLE, FOLLOWED BY THE \ I I /;/
BSCREWS00NOTOVERT,GHTE .\ I I
f
NO. 2 PHILLIPS
-t_ SCREW DRIVER
IS REQUIRED
FOR
INSTALLATION.
• Both doors are too high.
Remove
Loose_n_ hinge cap
screws %-"
-- _ 6"
!
SCREW HOLES AT THE TOP ANDI \1 I. JII
BOTTOM OF THE DOORS ARE SIZED I L__II
FOR SELF THREADING SCREWS. DO I --'1"1---_u
NOT DRILL THEM TO A LARGER SIZE. A
!
5/16'
P
REFRIGERATORDOORHANDLEWITHEXTENSIONTRIM
NO.2 PHILLIPS SCREW DRIVER IS
REQUIRED FOR INSTALLATION.
O
SNAP TOP OF EXTENSION
INTO PLACE AT THE
BOTTOM OF THE
HANDLE.
ON CERTAIN MODELS
REMOVE BACKING
FROM TAPE.
AFTER
STEP 5
APPLY
PRESSURE.
3
_1_ ALIGN HANDLE OVER SCREW
HOLES. FIRST INSTALLTHE "A"
SCREW TO SECURE HANDLE,
FOLLOWED BY THE "B" SCREW.
DO NOT OVER TIGHTEN.
INSTALLSCREW IN HANDLE
HOLE, DO NOT OVER TIGHTEN.
SLIDE HANDLE
TENSION OVER
RACKET AT
BOTTOM OF
DOOR.
Loosenscrews and slide
lower hinge right to lower doors.
• Both doors are too low.
Remove
Loosen screws_ h_ge cap
Loosen screws and slide
lower hinge left to raise doors.
• Retighten screws after making
adjustments.
* Refer to installation instructions for
more information.
Page 5
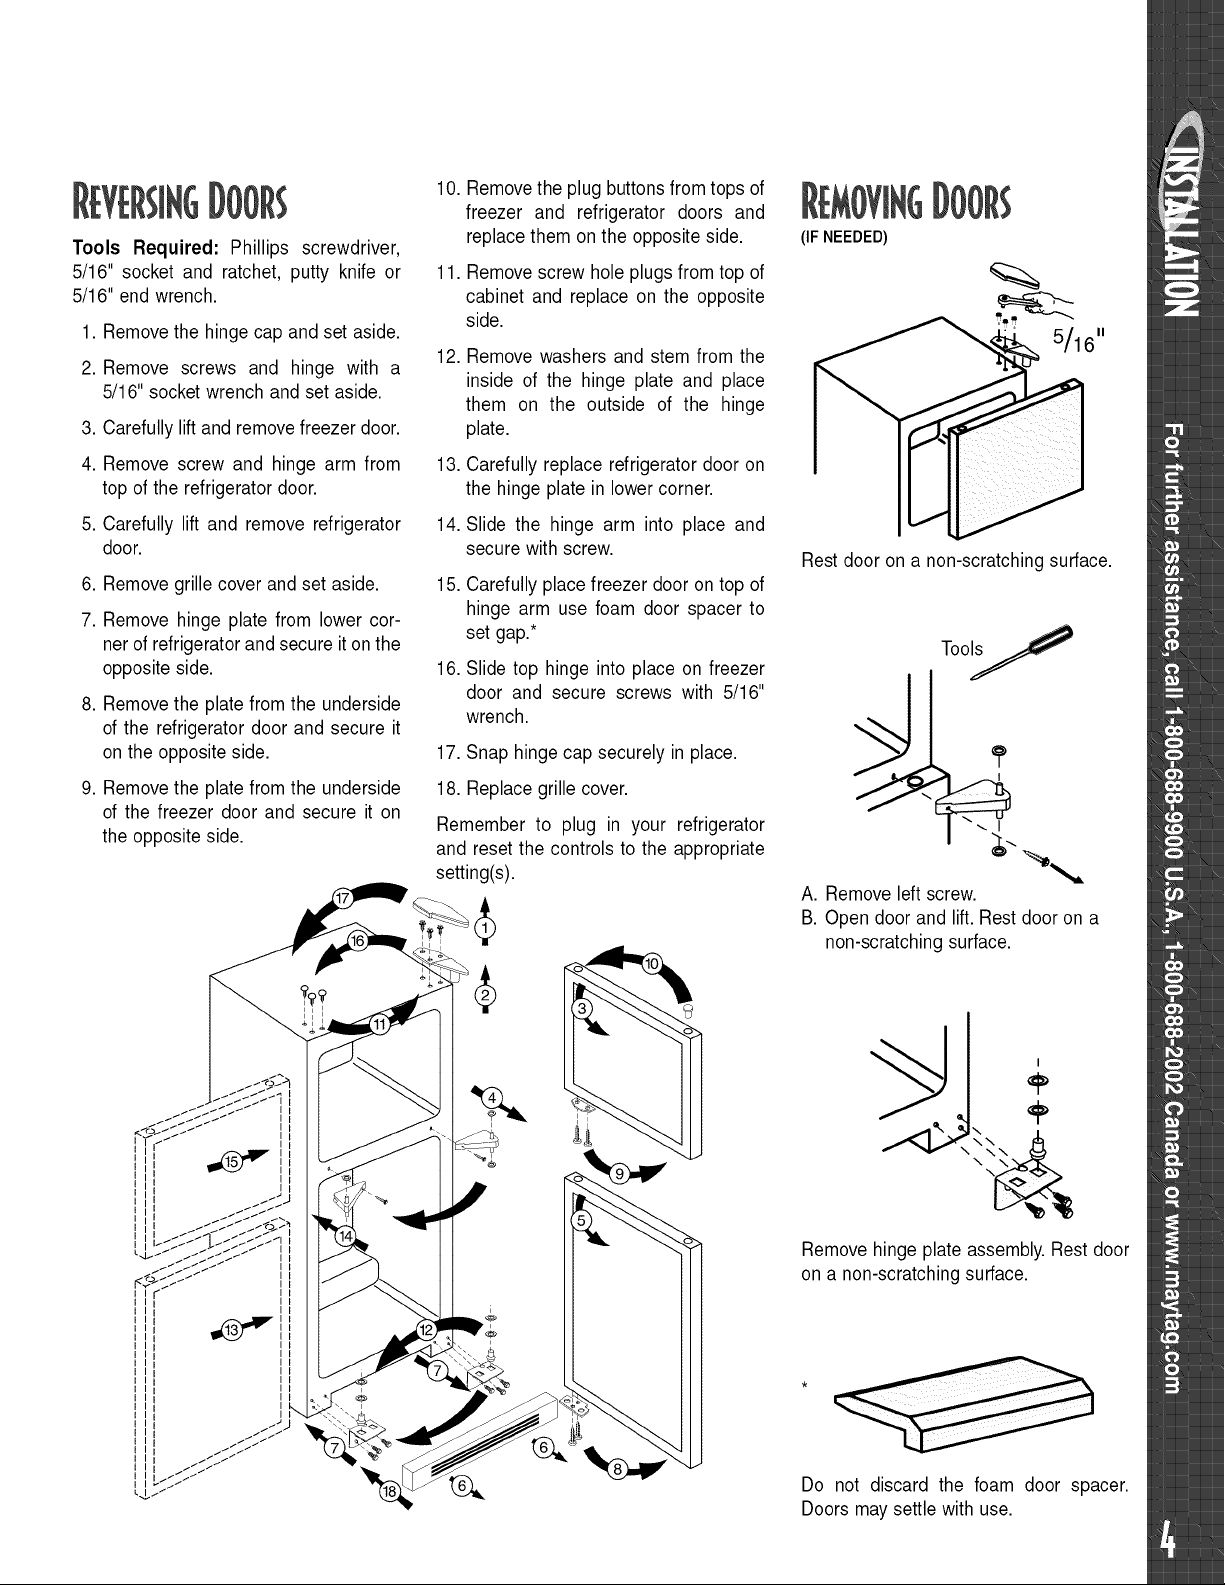
Tools Required: Phillips screwdriver,
5/16" socket and ratchet, putty knife or
5/16" end wrench.
1. Remove the hinge cap and set aside.
2. Remove screws and hinge with a
5/16" socket wrench and set aside.
3. Carefully lift and removefreezer door.
10.
Removethe plug buttonsfrom tops of
freezer and refrigerator doors and
replacethem onthe opposite side.
11.
Removescrew hole plugs from top of
cabinet and replace on the opposite
side.
12.
Remove washers and stem from the
inside of the hinge plate and place
them on the outside of the hinge
plate.
(IF NEEDED)
4. Remove screw and hinge arm from 13.
top of the refrigerator door.
5. Carefully lift and remove refrigerator 14.
door.
6. Remove grille cover and set aside. 15.
7. Remove hinge plate from lower cor-
ner of refrigerator and secure it on the
opposite side.
8. Remove the plate from the underside
of the refrigerator door and secure it
on the opposite side.
9. Remove the plate from the underside
of the freezer door and secure it on
the opposite side.
16.
17. Snap hinge cap securely in place.
18. Replace grille cover.
Remember to plug in your refrigerator
and reset the controls to the appropriate
setting(s).
Carefully replace refrigerator door on
the hinge plate in lower corner.
Slide the hinge arm into place and
secure with screw.
Carefully place freezer door on top of
hinge arm use foam door spacer to
set gap.*
Slide top hinge into place on freezer
door and secure screws with 5/16"
wrench.
Rest door on a non-scratching surface.
Toolsj
A. Remove left screw.
B. Open door and lift.Rest door on a
non-scratching surface.
J
Remove hinge plate assembly.Rest door
on a non-scratching surface.
÷
Do not discard the foam door spacer.
Doors may settle with use.
Page 6

YourrefrigeratorhasMaytag'sDualCoolTMfreshnessdesigntocontrolfreshandfrozenfoodtemperatures.Thecontrolsarelocated
atthetopfrontoftherefrigeratorcompartment.Thefreezercontrolturnsthecoolingsystemon.
1[TM
TM
After plugging the refrigerator in, set the
controls.
To adjust the controls, move the slide
to the left or right as desired.
The refrigerator control has settings
from 1 (warmest) to 9 (coldest).
Initially set this control on 5.
Thefreezer control has settings from 1
(warmest) to 9 (coldest). Initially set
this control on 5.
> Let the refrigerator run at least 8-12
hours before adding food.
At times, the front of the refrigerator cab-
inet may be warm to the touch. This is a
normal occurrence that helps prevent
moisturefrom condensing on the cabinet.
This condition will be more noticeable
when you first start the refrigerator, dur-
ing hot weather and after excessive or
lengthy door openings.
24 hours after adding food, you may
decidethat one or both compartments
should be colder or warmer. If so,
adjust thecontrol(s) asindicatedinthe
table below.
Except when starting the refrigerator,
do not change either control more
than one number at a time.
Allow 24 hours for temperatures to
stabilize before resetting.
Changing either control will have
some effect on the temperature of the
other compartment.
In order to ensure proper temperatures,
you need to permit air flow between the
refrigerator and freezer sections. As
shown in the illustration.
DO NOT block any of these vents with
food packages. If the vents are blocked,
airflow will be prevented and temperature
and moisture problems may occur.
Refrigerator too warm
Refrigerator too cold
Freezer too warm
Freezer too cold
Turn refrigerator OFF
NOTE: Sfiding the freezer control to OFF stops cooling in both compartments. It does
not shut off power to the refrigerator.
Slide the refrigerator control to next higher number.
Slide the refrigerator control to next lower number.
Slide the freezer control to next higher number.
Slide the freezer control to next lower number.
Slide the freezer control to OFE
5
II During the automatic defrost cycle......
you may notice a red glow/reflec-:;
tion in the vents on the back wall of ii
the freezer compartment and you i:
may hear the sound of water
!; droplets coming into contact with
the defrost heater. This is normal
during the defrost cycle.
Page 7

Some models are equipped with ice cube
traysand an ice storagebin.To releasethe
ice cubes from a tray, hold the tray upside
downover the bin and twist both ends.
Depending on the model you have cho-
sen, the ice bin either slides into rails
under an ice cube tray rack or stacks
neatly on top of the ice cube trays.
Wire Lever
Arm
Arm
To adjust the amount of ice produced:
(select models) Rotate the wire leverarm
to provide the desired levelof ice produc-
tion. The 100% setting provides maxi-
mum ice production.
It may be 8 to 12 hours before the ice
maker furnishes any usable ice cubes.
The first one or two batches will prob-
ably contain undersized and irregular
cubes because of air in the supply
line.
To remove the ice bin, pull it forward,
away from the ice maker.To avoidthe
ice maker dumping icewhile the bin is
removed,turn the ice maker off by lift-
ing the sensor arm.
To replace the ice bin, reverse the
above procedure. Turn the ice maker
on by lowering the sensor arm.
Beverage and foods should not be
placed in the ice storage binfor quick
chilling. These items can block the
sensor arm, causing the ice maker to
malfunction.
Turn off (arm up) the ice maker when
the water supply is to be shut off for
several hours.
Energy rating guides that are post-
ed on the refrigerator at the time of
purchase do not include optional
ice maker energy usage.
Some models are automatic ice maker
ready.The number of the appropriate ice
maker kit needed for installation into
these models appears on the data plate.
The kit contains installation instructions
and water connection instructions.
Other models have a factory installed ice
maker. Connect the ice maker to the
water supply as instructed in the separate
instructions furnished with the refrigera-
tor.Proper water flow and a level refrig-
erator is essential for optimal ice
maker performance.
After your refrigerator has been connect-
ed to the water supply, move the sensor
arm into the down position.The icemaker
will fill with water when the freezer reach-
es the proper temperature.
Some ice makers are equipped with an
adjustable sensor arm that allows you to
adjustthe amountof iceinyour icestorage
trayfor times when less ice is needed.
The initial batch may also contain
impurities from the new water supply
piping. Therefore, all cubes from the
first two or three batches should be
discarded.
When the ice cubes are ejected it is
normal for several cubes to be joined
together at the ends.They can easily
be broken apart. The ice maker will
continue to make ice until the supply
of ice cubes raises the sensor arm,
shutting the ice makeroff.
Certain sounds may accompany the
various cycles of the ice maker.The
motor may have a slight hum, the
cubes will rattle as they fall into an
empty storage pan and the water
valve may click or "buzz" occasionally.
If the ice is not used frequently,the ice
cubes will become cloudy, shrink, stick
together and taste stale. Emptythe ice
storage bin periodically and wash it in
lukewarmwater. Be sure to drythe bin
before replacing it.
Page 8
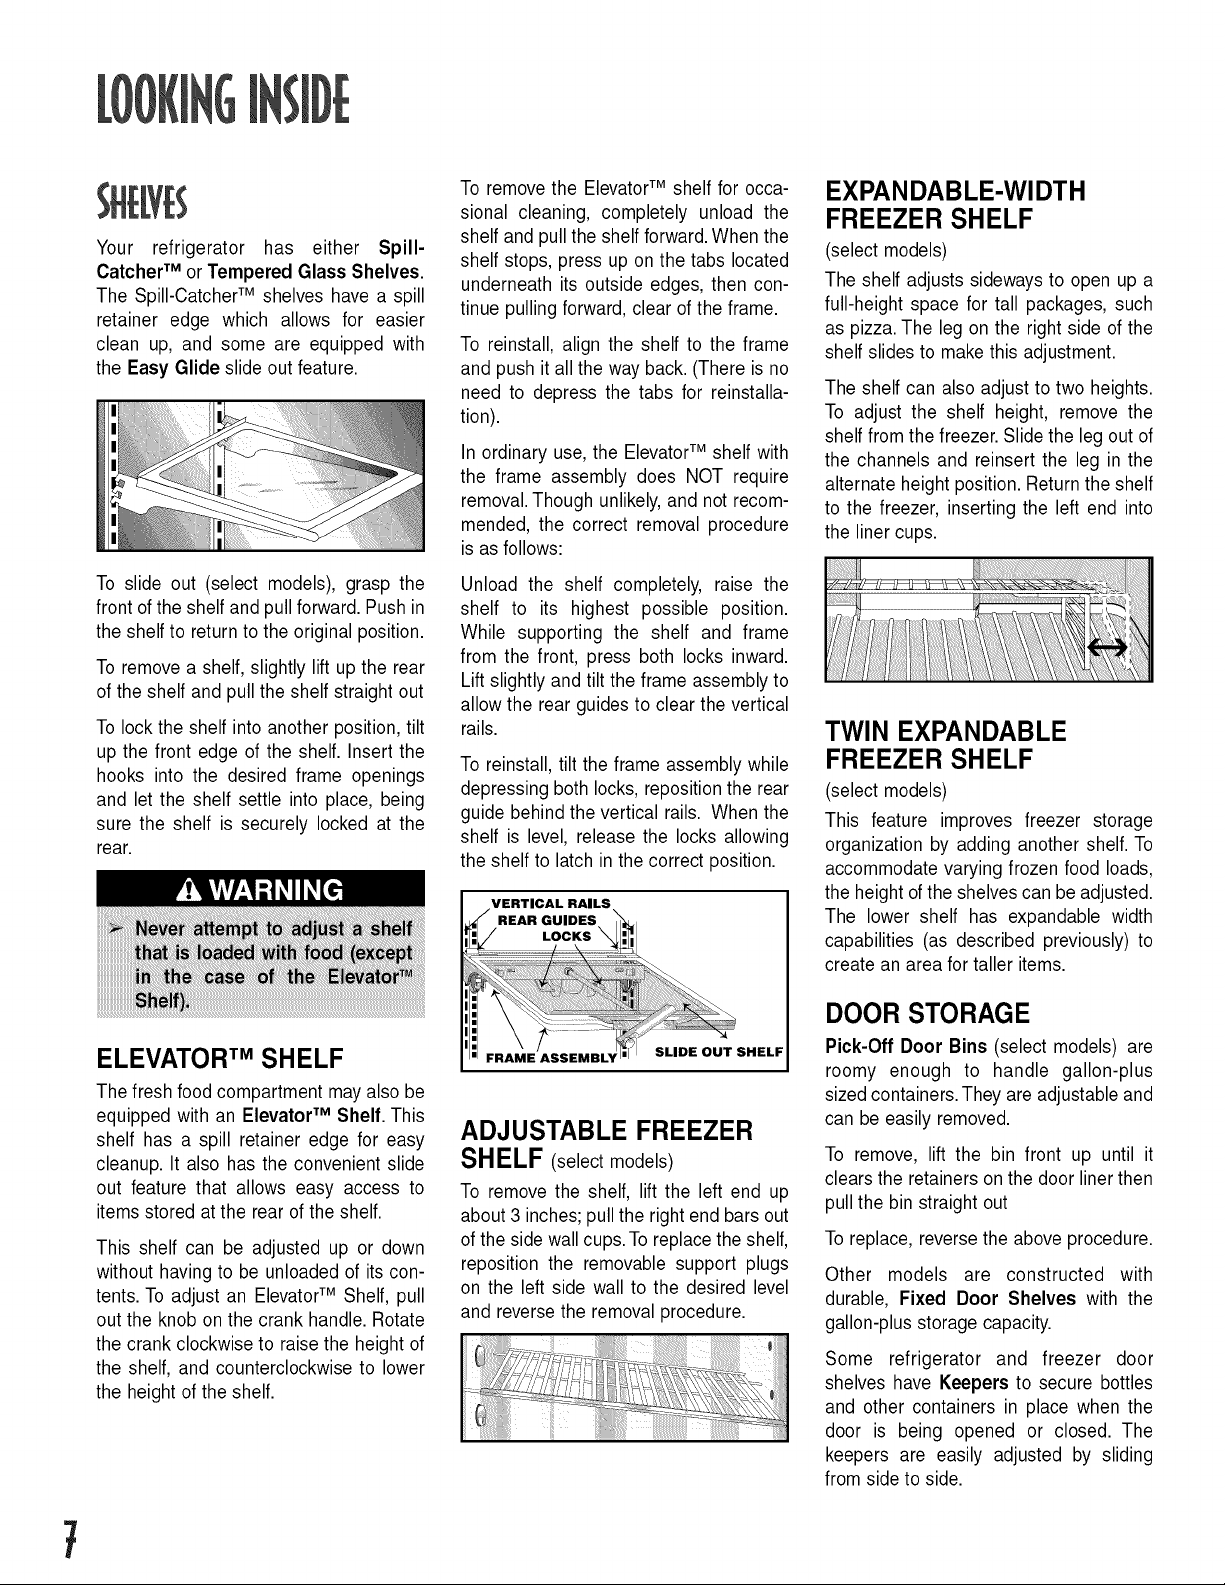
Your refrigeratorhas either Spill-
CatcherTM or Tempered Glass Shelves.
The Spill-CatcherTMshelves have a spill
retainer edge which allows for easier
clean up, and some are equipped with
the Easy Glide slide out feature.
To remove the ElevatorTMshelf for occa-
sional cleaning, completely unload the
shelf and pull the shelf forward. When the
shelf stops, press up on the tabs located
underneath its outside edges, then con-
tinue pulling forward, clear of the frame.
To reinstall, align the shelf to the frame
and push it all the way back. (There is no
need to depress the tabs for reinstalla-
tion).
In ordinary use, the ElevatorTMshelf with
the frame assembly does NOT require
removal.Though unlikely,and not recom-
mended, the correct removal procedure
is as follows:
EXPANDABLE-WIDTH
FREEZER SHELF
(select models)
The shelf adjusts sideways to open up a
full-height space for tall packages, such
as pizza. The leg on the right side of the
shelf slides to make this adjustment.
The shelf can also adjust to two heights.
To adjust the shelf height, remove the
shelf from the freezer. Slide the leg out of
the channels and reinsert the leg in the
alternate height position. Return the shelf
to the freezer, inserting the left end into
the liner cups.
To slide out (select models), grasp the
front of the shelf and pull forward.Push in
the shelf to return to the original position.
To remove a shelf, slightly lift up the rear
of the shelf and pull the shelf straight out
Tolock the shelf into another position, tilt
up the front edge of the shelf. Insert the
hooks into the desired frame openings
and let the shelf settle into place, being
sure the shelf is securely locked at the
rear.
ELEVATORTM SHELF
The fresh food compartment may also be
equipped with an Elevator TM Shelf. This
shelf has a spill retainer edge for easy
cleanup. It also has the convenient slide
out feature that allows easy access to
items stored at the rear of the shelf.
This shelf can be adjusted up or down
without having to be unloaded of its con-
tents. To adjust an ElevatorTMShelf, pull
out the knob onthe crank handle. Rotate
the crank clockwise to raise the height of
the shelf, and counterclockwise to lower
the height of the shelf.
Unload the shelf completely, raise the
shelf to its highest possible position.
While supporting the shelf and frame
from the front, press both locks inward.
Lift slightly and tilt the frame assembly to
allow the rear guides to clear the vertical
rails.
To reinstall, tilt the frame assemblywhile
depressing both locks, reposition the rear
guide behind the vertical rails. When the
shelf is level, release the locks allowing
the shelf to latch in the correct position.
ADJUSTABLE FREEZER
SHELF (select models)
To remove the shelf, lift the left end up
about 3 inches; pull the right end bars out
of the sidewall cups.To replacethe shelf,
reposition the removable support plugs
on the left side wall to the desired level
and reverse the removal procedure.
TWIN EXPANDABLE
FREEZER SHELF
(select models)
This feature improves freezer storage
organization by adding another shelf. To
accommodate varying frozen food loads,
the height ofthe shelvescan be adjusted.
The lower shelf has expandable width
capabilities (as described previously) to
create an area for taller items.
DOOR STORAGE
Pick-Off Door Bins (select models) are
roomy enough to handle gallon-plus
sized containers.They are adjustable and
can be easily removed.
To remove, lift the bin front up until it
clears the retainers on the door liner then
pull the bin straight out
Toreplace, reverse the above procedure.
Other models are constructed with
durable, Fixed Door Shelves with the
gallon-plus storage capacity.
Some refrigerator and freezer door
shelves have Keepers to secure bottles
and other containers in place when the
door is being opened or closed. The
keepers are easily adjusted by sliding
from side to side.
t
Page 9

The Tall Bottle Retainer (select models)
is designed to preventtall bottles from tip-
ping forward. It is easily adjusted by slid-
ing from side to side.
RACKS
The Multi-Can Rack (select models)
suspends from one of the spill-proof
refrigerator shelves. It hooks over the
wires found in the framework under the
shelf.The sloped design allows for cans
to roll forward as one is removed. (This
rack cannot be positioned under an
ElevatorTM shelf.)
The Multi-Use Rack (select models)
provides a place for horizontally storing
wine.The rack also can holdcanned bev-
erages or an egg carton.
Position the rackto rest on the left hand
side of a refrigerator shelf (this rack can-
not be positioned on an ElevatorTM shelf).
Your refrigerator has either a Snack
Center Drawer or an Adjusti-Temp TM
Drawer.
For models with the Adjusti-TempTM
Drawer, a control is located on the shelf
front above the drawer. Simply slide the
control knob left or right to adjust the in-
ternaltemperature ofthe drawer.
> For cheese storage, slide the control
to the left.To achieve a lowertemper-
ature within the drawer when storing
fresh meat, poultry or fish, slide the
control to the right.
I @/
The Snack Center drawer does not have
an adjustable temperature capability.
To remove the Snack Center Drawer or
Adjusti-Temp Drawer for cleaning:
> pull the drawer out until itstops
To replace the drawer, reverse the above
procedure.
This drawercan be positioned as desired
on either the left or right side ofthe refrig-
erator cabinet.
For best results, keep this drawer closed
tightly.
The Crispers provide storage for fruit
and vegetables.There is a humidity con-
trol located on the crisper shelf above
each of the crisper drawers.
> For fruit storage, slide the crisper con-
trol to the left to provide lower humidi-
ty conditions inthe drawer.
> For vegetable storage,slide the crisper
control to the right to provide higher
humidityconditions in the drawer.
I I
To remove a crisper drawer for cleaning:
> pull out the crisper until it stops
> tilt the drawerfront up and pull it out
To replace a crisper drawer:
> align the drawer in the tracks
> lift the drawer front and slide in
For best results, keep the crispers tightly
closed.
To remove the Crisper Top:
> lift the front edge of the shelf
> pull the shelf straight out
To replace the Crisper Top:
> set the rear bars on the support
> push the shelf back until thefront edge
can be lowered into place
Your refrigerator may come equipped
with an Egg Cradle (style may vary). It
can be removedto be washed or carried
to a work area.
To use the Dairy Compartment, raise
thecover.The dairy compartment may be
equipped with a Keeper to secure food
items in place. If your model has the dairy
keeper,simply slide itfrom side to side for
desired placement.
In some models, the dairy compartment
can be removed.
The SafeKeeper (select models) is a
combination pick-off bin and utility draw-
er. Positioning the lever (located on the
top right side of the bin) forward, allows
the opening of the drawer. The drawer
provides a convenient covered storage
area for items such as film, batteries and
medicine.
The Tilt Out Refrigerator Door Bins
(select models) are ideal for storing awk-
ward containers such as liter bottles and
bagged items. Bytilting the bins outward,
space is opened up to conveniently load
or retrieve contents.
The Slide Out Freezer Basket (select
models) isfound in the main freezer com-
partment. It isa convenient storage area,
providing easy access to items stored in
the rear of the freezer. Slide the basket
out to reach orstore frozenfoods.
Toremove the basket:
> pull the basket until it stops
> lift and pull the basket out
To replace the basket, reverse the
removal procedure.
The Drop Down Freezer Basket (select
models) isfound on the lower shelf of the
freezer door.This area provides space for
frozenfood items that tendto shift or slide
(such as bagged vegetables).
> lift the drawer up slightly and pull it out
Page 10
> Thefreshfoodcompartmentof a
refrigeratorshouldbekeptbetween
34°Fand40°Fwithanoptimumtem-
peratureof37° ETocheckthetem-
perature,placean appliancether-
mometerinaglassofwaterandplace
inthecenteroftherefrigerator.Check
after24hours.If thetemperatureis
above40° F adjustthecontrolsas
explainedonpage5.
> Avoidovercrowdingthe refrigerator
shelves.Thisreducesthecirculationof
air aroundthe foodandresultsin
unevencooling.
FRUITS AND VEGETABLES
> Storage in the crisper drawers traps
moistureto help preserve the fruit and
vegetable quality for longer time peri-
ods. (Refer to page 8).
> Sort fruits and vegetables before stor-
age and use bruised or soft items first.
Discard those showing signs of decay.
> Always wrap odorous foods such as
onions and cabbage so the odor does
not transfer to other foods.
> While vegetables need a certain
amount of moisture to remain fresh,
too much moisture can shorten stor-
age times (especially leafy vegeta-
bles). Drain vegetables well before
storing.
MEAT AND CHEESE
> Raw meat and poultry should be
wrapped securely so leakage and
contamination of other foods or sur-
faces does not occur.
Occasionally mold will develop on the
surface of hard cheeses (Swiss,
Cheddar, Parmesan). Cut off at least
an inch around and below the moldy
area. Keep your knife or instrument
out of the mold itself. The remaining
cheese will be safe and flavorful to eat.
Do NOT try to save individual cheese
slices, soft cheese, cottage cheese,
cream, sour cream or yogurt when
mold appears.
DAIRY FOOD
> Most dairy foods such as milk, yogurt,
sour cream and cottage cheese have >
freshness dates on their cartons for
appropriate length of storage. Store
these foods in the original carton and
refrigerate immediately after purchas-
ing and after each use. >
The freezer compartment of a refriger-
ator should be kept at approximately
0° E To check the temperature, place
an appliance thermometer between
the frozen packages and check after
24 hours. If the temperature is above
0°F,adjust the controlas described on
page 5.
A freezer operates more efficiently
when it is at least two-thirds full.
PACKAGING FOODS FOR
FREEZING
To minimize dehydration and quality
deterioration use aluminum foil, freez-
er wrap, freezer bags or airtight con-
tainers. Force as much air out of the
packages as possible and be sure
they are tightly sealed.Trapped air can
cause the food to dry out, change
color and develop an off-flavor (freez-
er burn).
> Overwrap fresh meats and poultry
with suitable freezer wrap prior to
freezing.
> Do not refreeze meat that has com-
pletely thawed.
LOADING THE FREEZER
Avoid adding too much warm food to
thefreezer at one time.This overloads
the freezer, slows the rate of freezing
and can raise the temperature of
frozen foods.
Leavespace betweenthe packagesso
cold air can circulate freely, allowing
foodto freeze as quickly as possible.
Avoid storing hard-to-freeze foods
such as ice cream and orange juice on
the freezer door shelves. These foods
are best stored in the freezer interior
wherethe temperaturevaries less with
door openings.
Refer to the Food Storage Chart on
page 10 for approximate storage
times.
Page 11
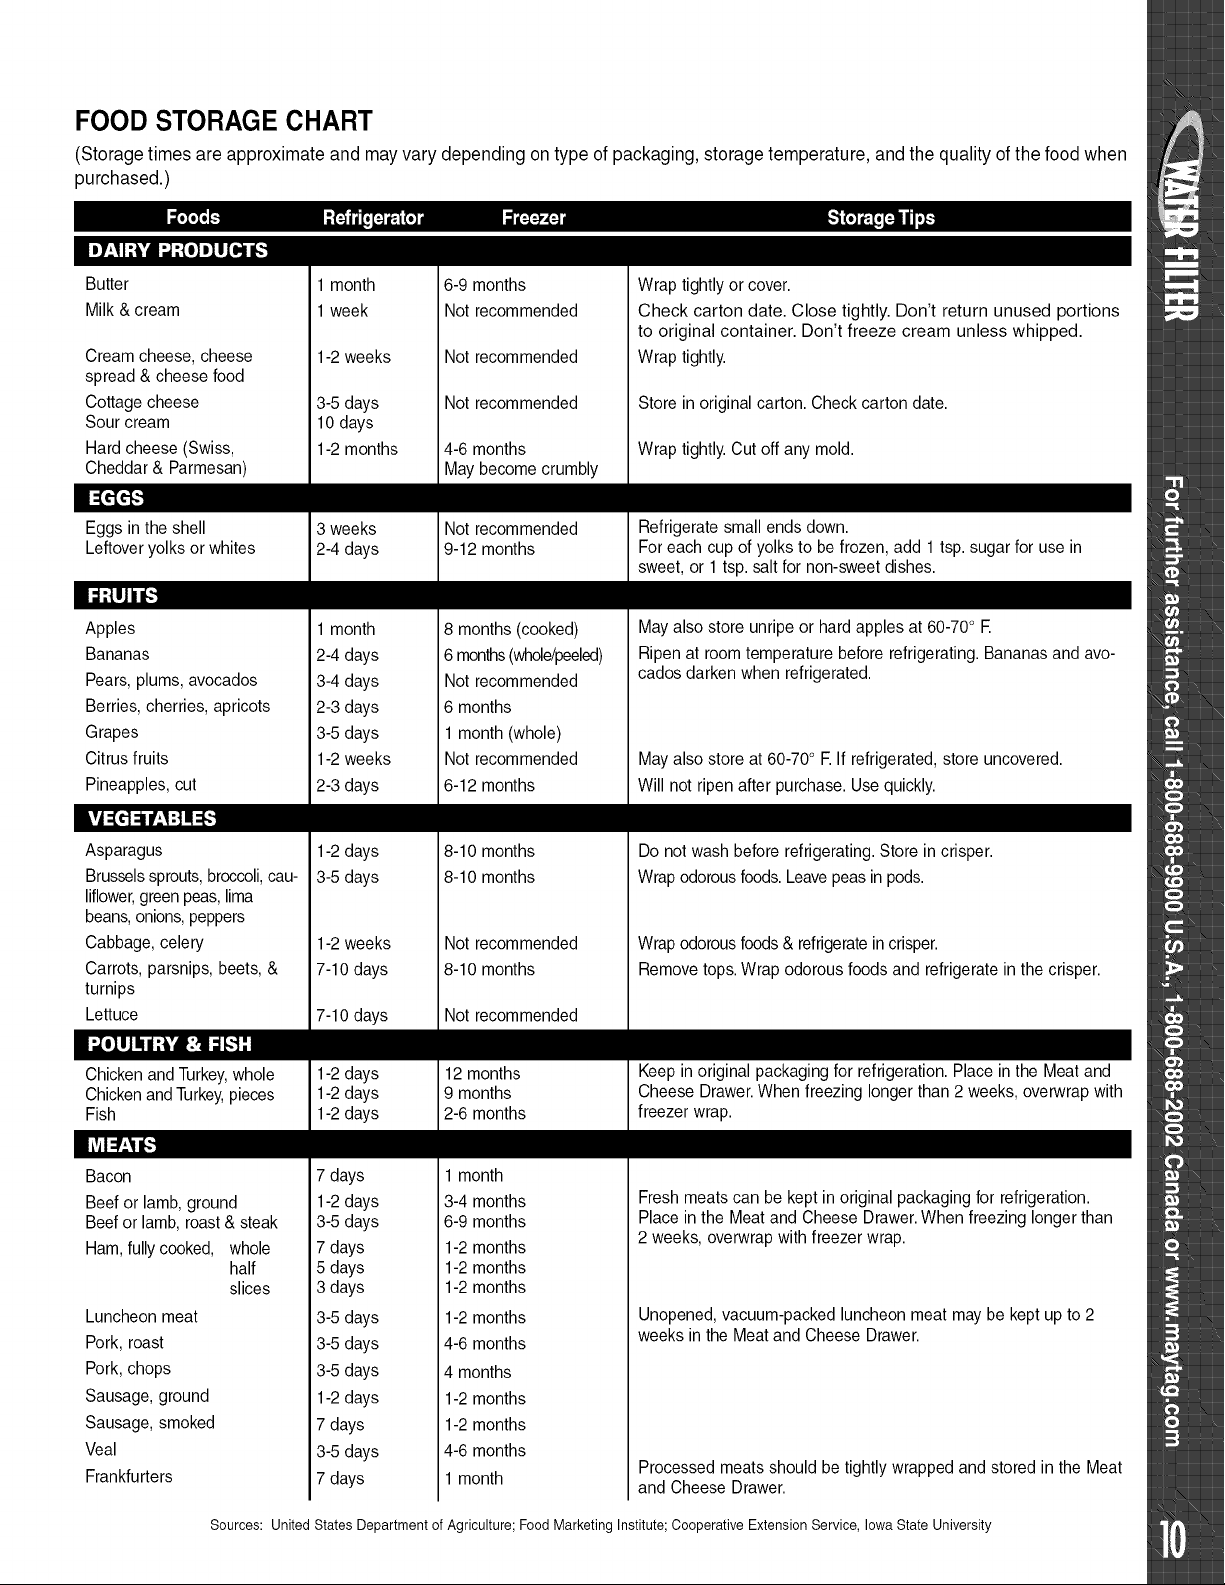
FOOD STORAGE CHART
(Storage times are approximate and may vary depending on type of packaging, storage temperature, and the quality of the food when
purchased.)
ED7-'II;:k'dI;,,1;{o]_lJ),]_']
Butter
Milk & cream
Cream cheese, cheese
spread & cheese food
Cottage cheese
Sour cream
Hardcheese (Swiss,
Cheddar & Parmesan)
1 month
1 week
1-2 weeks
3-5 days
10 days
1-2 months
6-9 months
Not recommended
Not recommended
Not recommended
4-6 months
May become crumbly
Wrap tightlyor cover.
Check carton date. Close tightly. Don't return unused portions
to original container. Don't freeze cream unless whipped.
Wrap tightly.
Store inoriginal carton. Check carton date.
Wrap tightly.Cut off any mold.
Eggs inthe shell
Leftoveryolks or whites
Apples
Bananas
Pears, plums, avocados
Berries, cherries, apricots
Grapes
Citrus fruits
Pineapples, cut
Asparagus
Brusselssprouts,broccoli,cau-
liflower,greenpeas, lima
beans,onions,peppers
Cabbage, celery
Carrots, parsnips, beets, &
turnips
Lettuce
Chicken and Turkey,whole
Chicken and Turkey,pieces
Fish
3 weeks
2-4 days
1 month
2-4 days
3-4 days
2-3 days
3-5 days
1-2 weeks
2-3 days
1-2 days
3-5 days
1-2 weeks
7-10 days
7-10 days
1-2 days
1-2 days
1-2 days
Not recommended
9-12 months
8 months (cooked)
6months(whole/peeled)
Not recommended
6 months
1 month (whole)
Not recommended
6-12 months
8-10 months
8-10 months
Not recommended
8-10 months
Not recommended
12 months
9 months
2-6 months
Refrigerate small ends down.
For each cup of yolks to be frozen, add 1 tsp. sugar for use in
sweet, or 1 tsp. salt for non-sweet dishes.
May also store unripe or hard apples at 60-70° E
Ripen at room temperature before refrigerating. Bananasand avo-
cados darken when refrigerated.
May also store at 60-70° E If refrigerated, store uncovered.
Will not ripen after purchase. Use quickly.
Do notwash before refrigerating. Store in crisper.
Wrap odorous foods.Leavepeas in pods.
Wrap odorous foods& refrigeratein crisper.
Remove tops. Wrap odorous foods and refrigerate in the crisper.
Keep in original packaging for refrigeration. Place in the Meat and
Cheese Drawer.When freezing longer than 2 weeks, overwrap with
freezer wrap.
Bacon
Beefor lamb, ground
Beefor lamb, roast & steak
Ham,fullycooked, whole
half
slices
Luncheon meat
Pork, roast
Pork,chops
Sausage, ground
Sausage, smoked
Veal
Frankfurters
Sources: United States Department of Agriculture; Food Marketing Institute; Cooperative Extension Service, Iowa State University
7 days
1-2 days
3-5 days
7 days
5 days
3 days
3-5 days
3-5 days
3-5 days
1-2 days
7 days
3-5 days
7 days
1 month
3-4 months
6-9 months
1-2 months
1-2 months
1-2 months
1-2 months
4-6 months
4 months
1-2 months
1-2 months
4-6 months
1 month
Fresh meats can be kept inoriginal packaging for refrigeration.
Place in the Meat and Cheese Drawer.When freezing longer than
2 weeks, overwrap with freezer wrap.
Unopened, vacuum-packed luncheon meat may be kept up to 2
weeks in the Meat and Cheese Drawer.
Processed meats should be tightly wrapped and stored inthe Meat
and Cheese Drawer.
Page 12

3. Disconnect the refrigerator from the
electrical outlet.
If you will be gone for a month or less,
leavethe controls at the usual settings.
During longer absences:
1. Remove all food.
2. Shut off the ice maker (if installed)and
the valve where you tapped into the
water line to supply the refrigerator.
Referto the chart onthe followingpage for
specific refrigeratorcleaning guidelines.
CLEANING UNDER THE
REFRIGERATOR
Yourrefrigeratorcanbe rolledout forclean-
ingthefloor underneath.Raisethe leveling
screws if engaged (see page 2). Pull the
refrigeratorstraightout fromthe wall.
REPLACING A
LIGHT BULB
Always use a standard 40 or 60 watt
appliance bulb.
Refrigerator
There are two light bulbs located under
the top of the refrigerator compartment,
on either side of the Dual CoolTM control
housing.
4. Clean and dry the refrigerator
thoroughly.
5. Leave the doors open to prevent
odors.
Freezer
The freezer light (select models) is locat-
ed on the back wall, near the upper right
corner.
To remove the bulb cover:
Grasp the top and bottom of the bulb
cover.Press in the areas of the attach-
ment tabs, applying enough pressure
to unhook the tabs. At the same time,
pivot the cover down and remove.
Unscrew the lightbulb and replace.
Replace the bulb cover by pivoting it
back into place and snapping the tabs
into the appropriate slots.
NO CLEANTM
COMMERCIAL-DUTY
CONDENSER
A clean condenser means more efficient
refrigerator operation. Thanks to the
unique design of the No CleanTM con-
denser there is no longer a need for rou-
tine condenser cleaning in normal home
usage surroundings.
Some operating environments may be
particularly dusty or greasy.In these situ-
ations,the condenser can be periodically
cleaned to insure maximumefficiency.
When moving, follow steps 1-4 under
Vacations. In addition, remove and care-
fully pack any items that are easily
removable. Ship the refrigerator in an
upright position with the doors taped
shut.
Locate the refrigerator away from heat
producing appliances such as the
range or dishwasher, heat vents and
direct sunlight.
Levelthe refrigerator and do not block
ventilation around the front grille.
Keep the freezer full to near capacity
so less cold air willescape during door
openings. When the freezer is less
than two-thirds full, place milk cartons
half full of water inthe freezer.
Let hot dishes cool slightly beforeput-
ting into the refrigerator or freezer.
Cover liquids.
Wipe moisture from the outside of
containers before placing them into
the refrigerator.
Avoid opening the doorstoo often.
> Carefully grasp the lightbulbby reach-
ing behind the bulb cover.
> Unscrew the light bulb and replace.
Page 13
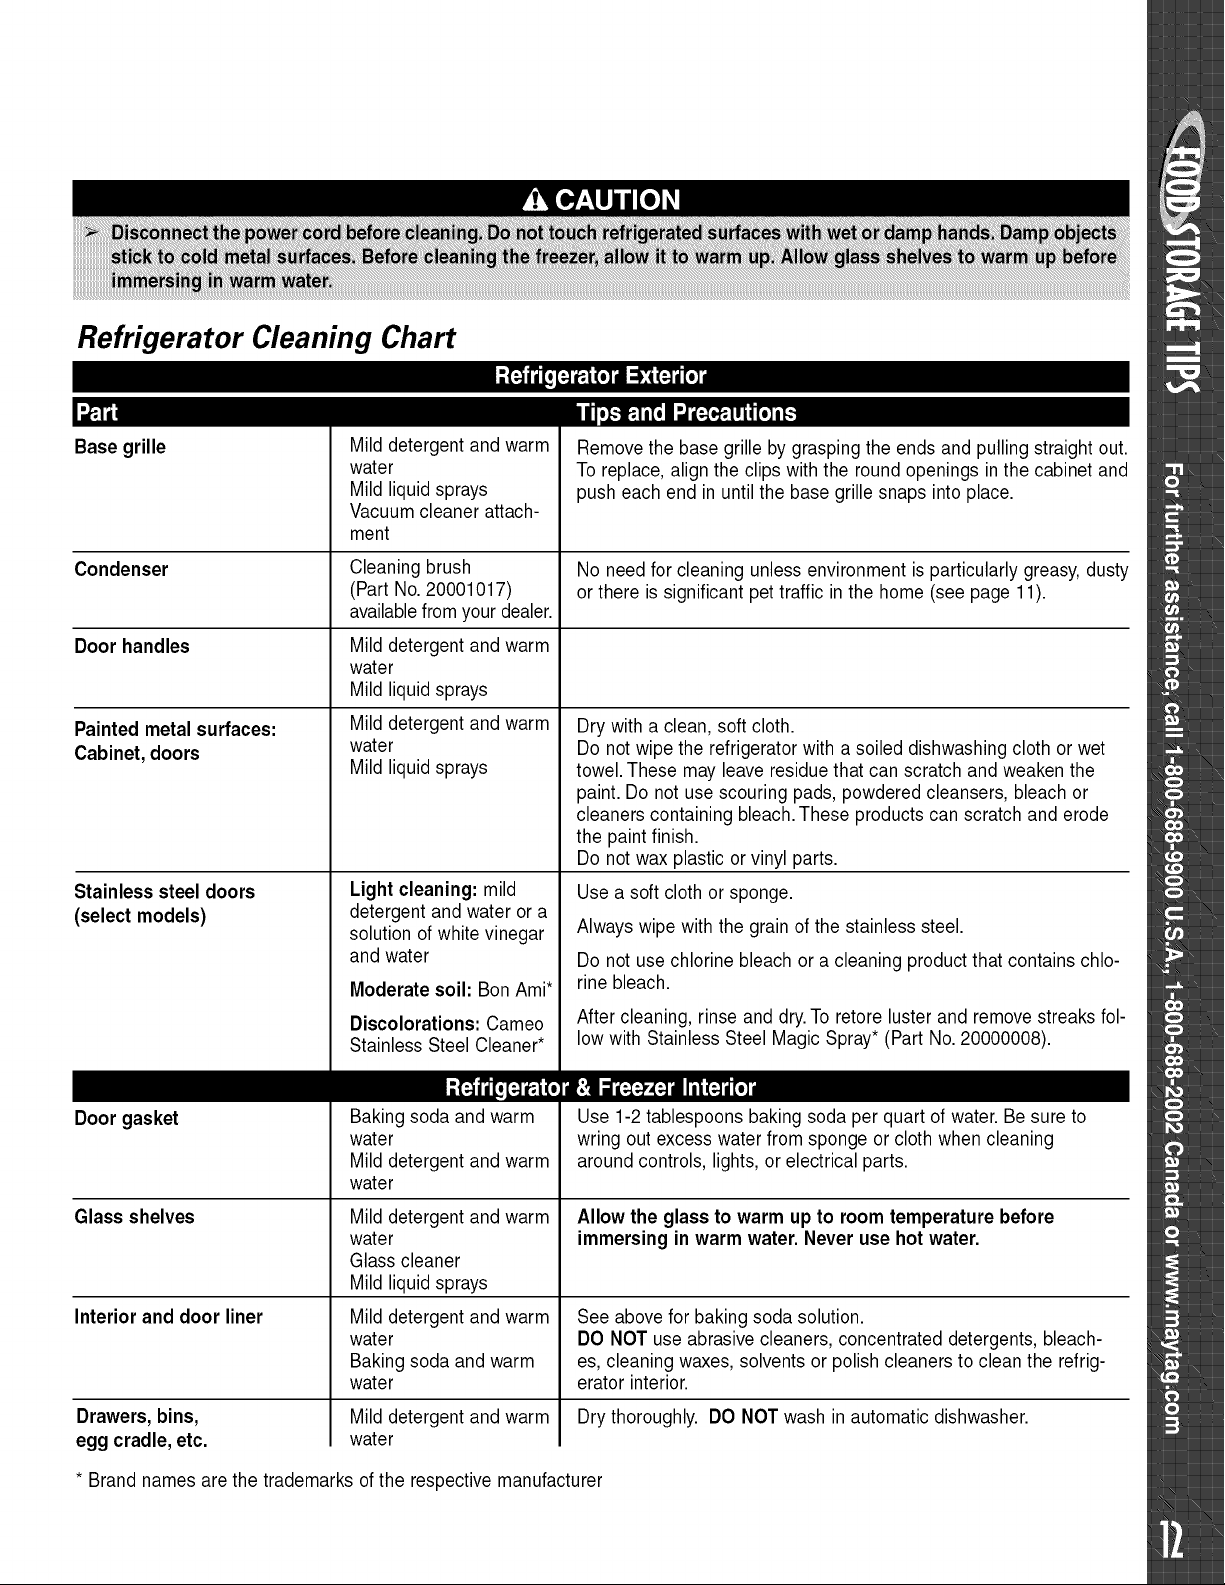
Refrigerator Cleaning Chart
Base grille
Condenser
Door handles
Painted metal surfaces:
Cabinet, doors
Stainless steel doors
(select models)
Mild detergent and warm
water
Mild liquid sprays
Vacuum cleaner attach-
ment
Cleaning brush
(Part No.20001017)
availablefrom your dealer.
Mild detergent and warm
water
Mild liquid sprays
Mild detergent and warm
water
Mild liquid sprays
Light cleaning: mild
detergent and water or a
solution of white vinegar
and water
Moderate soil: Bon Ami*
Discolorations: Cameo
Stainless Steel Cleaner*
Remove the base grille by grasping the ends and pullingstraight out.
Toreplace, align the clips with the round openings in the cabinet and
push each end in until the base grillesnaps into place.
No need for cleaning unless environment isparticularly greasy,dusty
or there is significant pet traffic in the home (see page 11).
Dry with a clean, soft cloth.
Do not wipe the refrigerator with a soiled dishwashingcloth or wet
towel.These may leave residue that can scratch and weaken the
paint. Do not use scouring pads, powdered cleansers, bleach or
cleaners containing bleach.These products can scratch and erode
the paint finish.
Do not wax plastic or vinyl parts.
Use a soft cloth or sponge.
Always wipe with the grain of the stainless steel.
Do not use chlorine bleach or a cleaning product that contains chlo-
rine bleach.
After cleaning, rinse and dry.To retore luster and remove streaks fol-
low with Stainless Steel Magic Spray* (Part No. 20000008).
Door gasket
Glass shelves
Interior and door liner
Drawers, bins,
egg cradle, etc.
* Brand names are the trademarks of the respective manufacturer
Bakingsoda and warm
water
Mild detergent and warm
water
Mild detergent and warm
water
Glass cleaner
Mild liquid sprays
Mild detergent and warm
water
Bakingsoda and warm
water
Mild detergent and warm
water
Use 1-2 tablespoons baking soda per quart of water.Be sure to
wring out excess water from sponge or cloth when cleaning
around controls, lights, or electrical parts.
Allow the glass to warm up to room temperature before
immersing in warm water. Never use hot water.
See abovefor baking soda solution.
DO NOT use abrasive cleaners, concentrated detergents, bleach-
es, cleaning waxes, solvents or polish cleaners to clean the refrig-
erator interior.
Dry thoroughly. DO NOT wash in automatic dishwasher.
Page 14
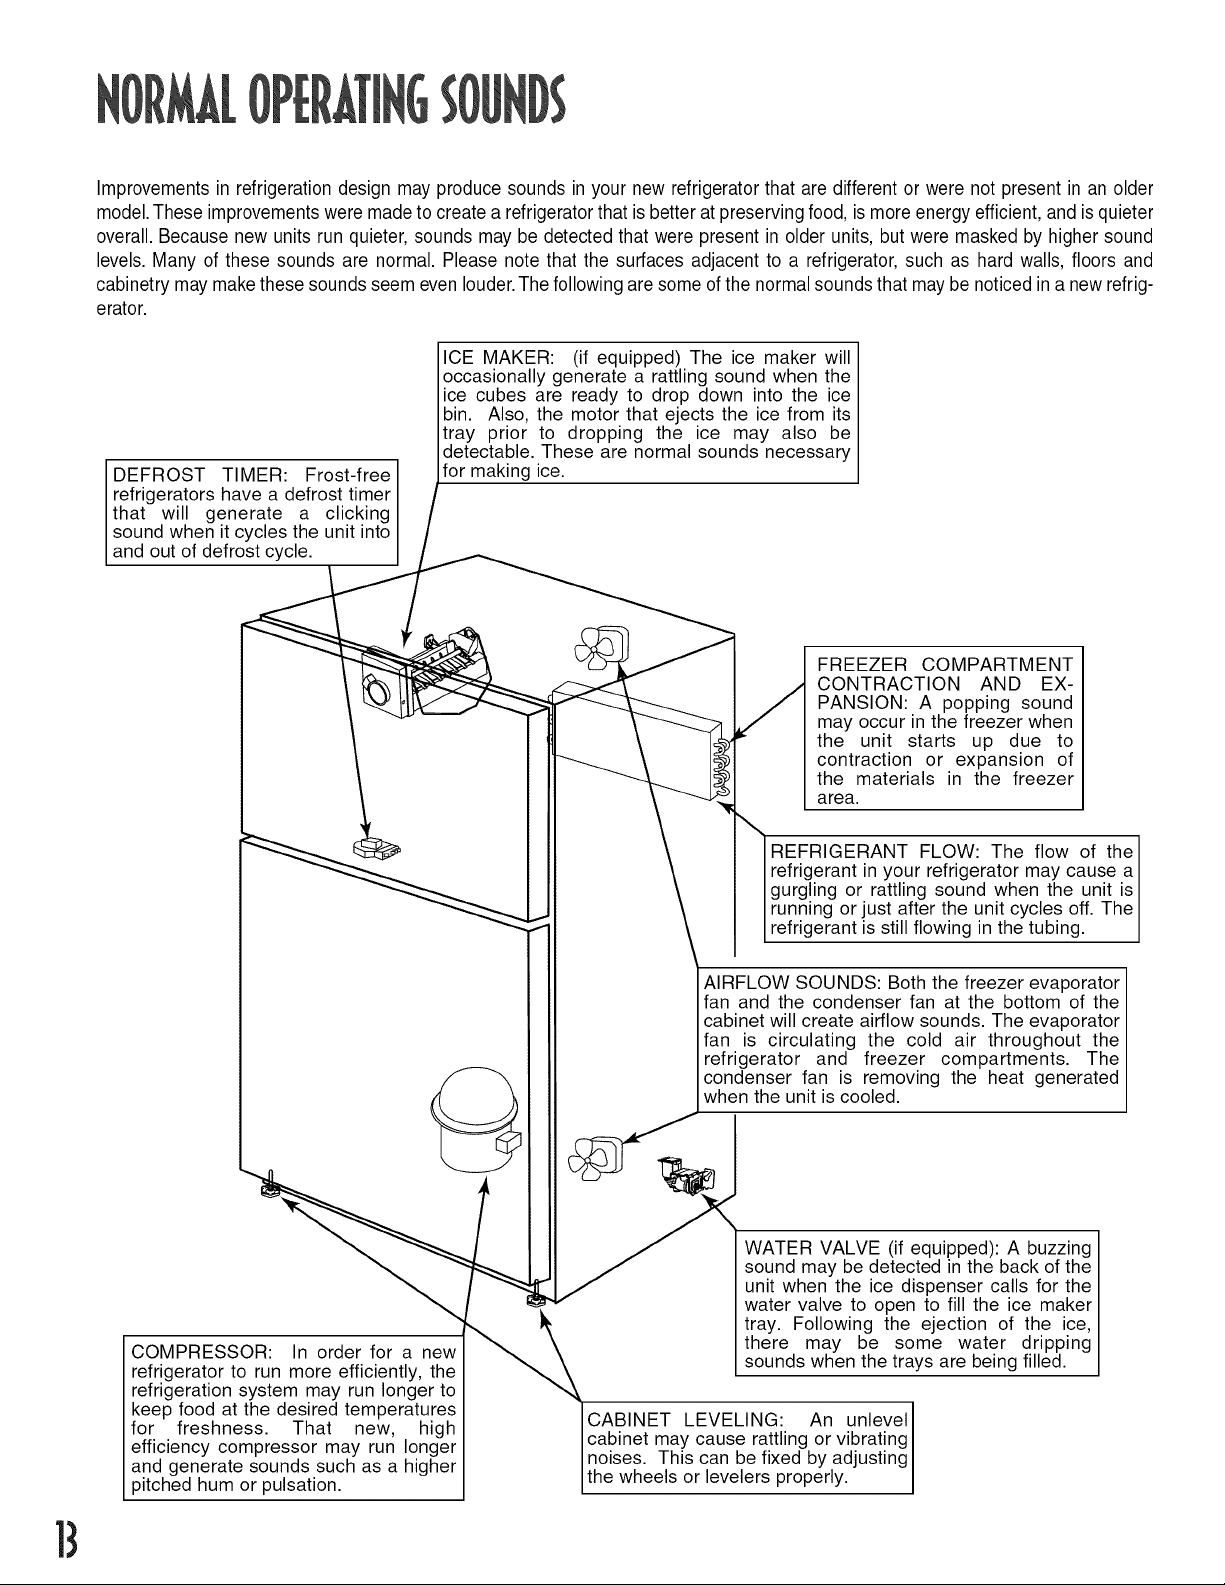
Improvementsinrefrigerationdesignmayproducesoundsinyournewrefrigeratorthataredifferentorwerenotpresentinanolder
model.Theseimprovementsweremadetocreatearefrigeratorthatisbetteratpreservingfood,ismoreenergyefficient,andisquieter
overall.Becausenewunitsrunquieter,soundsmaybedetectedthatwerepresentinolderunits,butweremaskedbyhighersound
levels.Manyofthesesoundsarenormal.Pleasenotethatthesurfacesadjacenttoarefrigerator,suchashardwalls,floorsand
cabinetrymaymakethesesoundsseemevenlouder.Thefollowingaresomeofthenormalsoundsthatmaybenoticedinanewrefrig-
erator.
ICE MAKER: (if equipped) The ice maker will
occasionally generate a rattling sound when the
ice cubes are ready to drop down into the ice
bin. Also, the motor that ejects the ice from its
tray prior to dropping the ice may also be
detectable. These are normal sounds necessary
DEFROST TIMER: Frost-free
refrigerators have a defrost timer
that will generate a clicking
sound when it cycles the unit into
and out of defrost cycle.
for making ice.
FREEZER COMPARTMENT
CONTRACTION AND EX-
PANSION: A popping sound
may occur in the freezer when
the unit starts up due to
contraction or expansion of
the materials in the freezer
area.
COMPRESSOR: In order for a new
refrigerator to run more efficiently, the
refrigeration system may run longer to
keep food at the desired temperatures
for freshness. That new, high
efficiency compressor may run longer
and generate sounds such as a higher
pitched hum or pulsation.
REFRIGERANT FLOW: The flow of the
refrigerant in your refrigerator may cause a
gurgling or rattling sound when the unit is
running or just after the unit cycles off. The
refrigerant is still flowing in the tubing.
AIRFLOW SOUNDS: Both the freezer evaporator
fan and the condenser fan at the bottom of the
cabinet will create airflow sounds. The evaporator
fan is circulating the cold air throughout the
refrigerator and freezer compartments. The
condenser fan is removing the heat generated
when the unit is cooled.
WATER VALVE (if equipped): A buzzing
sound may be detected in the back of the
unit when the ice dispenser calls for the
water valve to open to fill the ice maker
tray. Following the ejection of the ice,
there may be some water dripping
sounds when the trays are being filled.
CABINET LEVELING: An unlevel
cabinet may cause rattling or vibrating
I noises. This can be fixed by adjusting
[the wheels or levelers properly.
Page 15
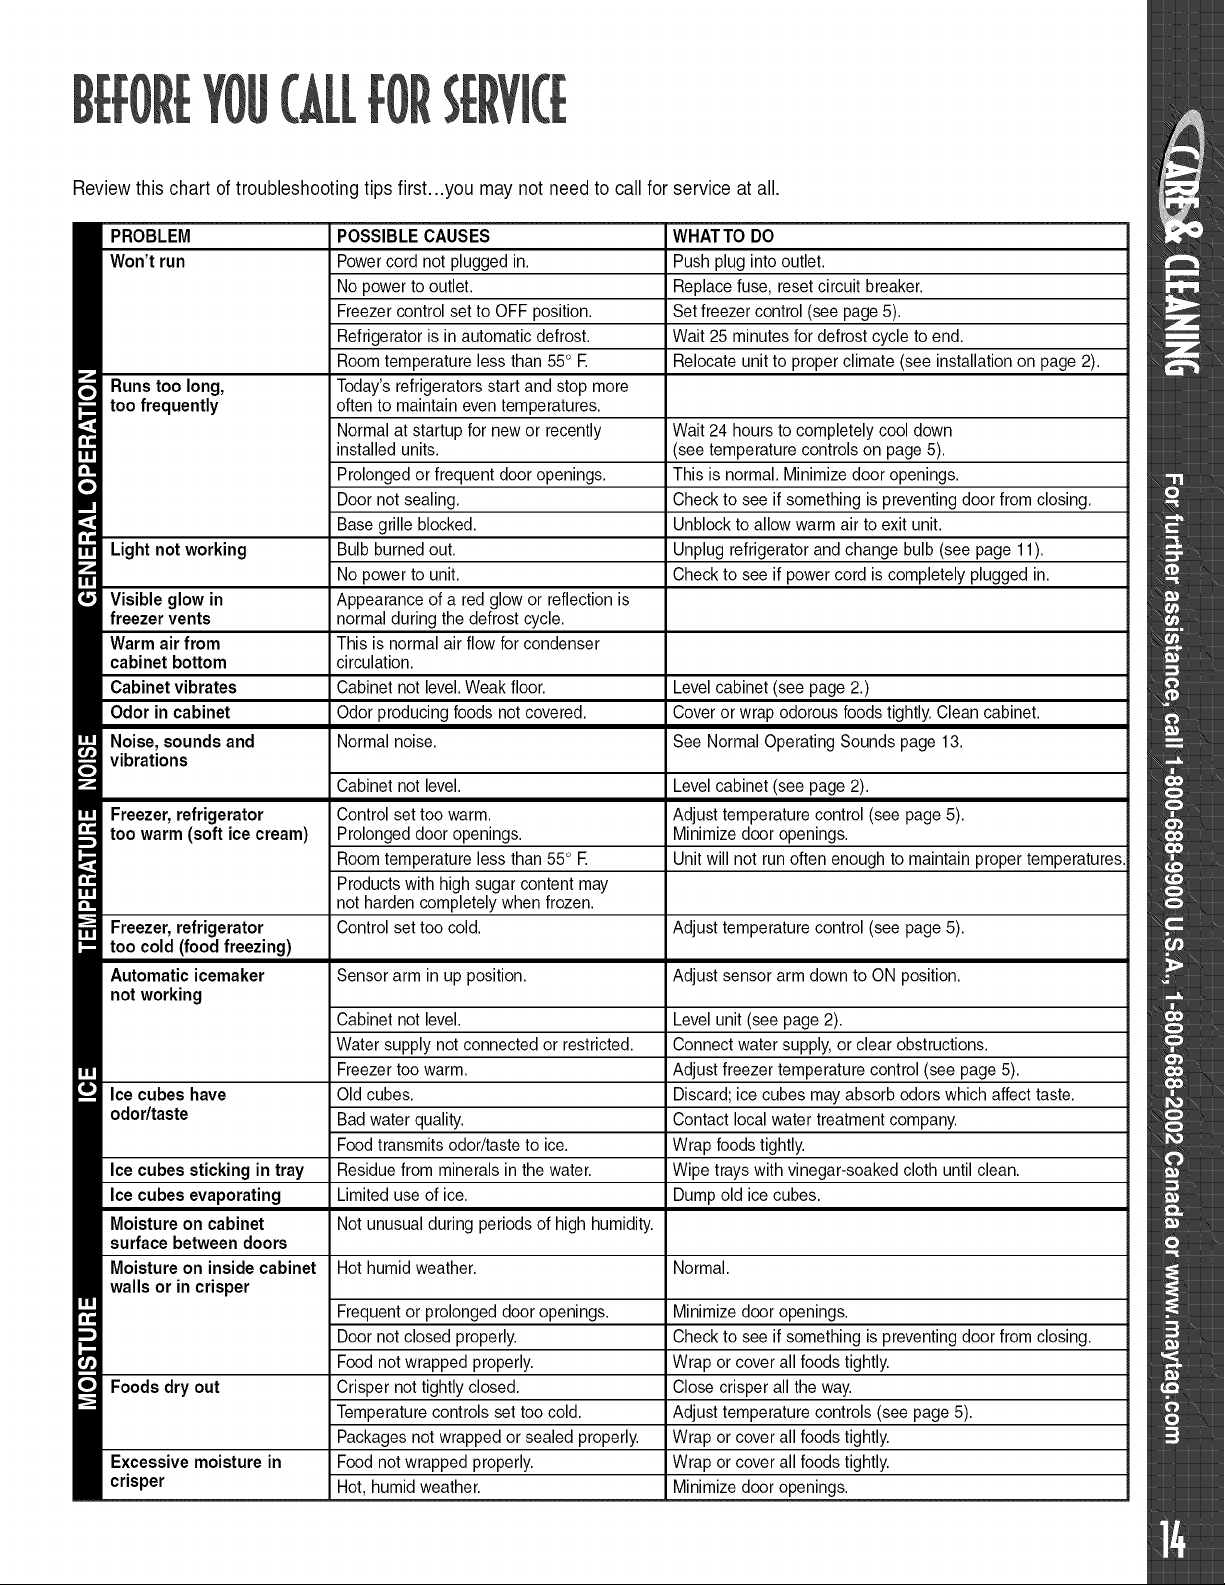
Reviewthis chart oftroubleshooting tips first...you may not need to call for service at all.
PROBLEM
Won't run
Runs too long,
i
too frequently
,=,
1
;I
|
Light not working
_1
1
Visible glow in
freezer vents
Warm air from
cabinet bottom
Cabinet vibrates
Odor in cabinet
Noise, sounds and
vibrations
J
Freezer, refrigerator
w
too warm (soft ice cream)
,=,
1
,'1
Freezer,refrigerator
toocold(foodfreezing)
Automatic icemaker
not working
Ice cubes have
odor/taste
Ice cubes sticking in tray
Ice cubes evaporating
Moisture on cabinet
surface between doors
Moisture on inside cabinet
walls or in crisper
Foods dry out
Excessivemoisturein
crisper
POSSIBLE CAUSES
Powercord not plugged in.
No power to outlet.
Freezer control set to OFF position.
Refrigerator is in automatic defrost.
Room temperature less than 55° E
Today's refrigerators start and stop more
often to maintain even temperatures.
Normal at startup for new or recently
installed units.
Prolonged or frequent door openings.
Door not sealing.
Base grille blocked.
Bulb burned out.
No power to unit.
Appearance of a red glow or reflection is
normal during the defrost cycle.
This is normal air flow for condenser
circulation.
Cabinet not level.Weak floor.
Odor producing foods not covered.
Normal noise.
Cabinet not level.
Control set too warm.
Prolonged door openings.
Room temperature less than 55° E
Products with high sugar content may
not harden completely when frozen.
Control set too cold.
Sensor arm in up position.
Cabinet not level.
Water supply not connected or restricted.
Freezer too warm.
Old cubes.
Bad water quality.
Food transmits odor/taste to ice.
Residue from minerals in the water.
Limited use of ice.
Not unusual during periods of high humidity.
Hot humid weather.
Frequent or prolonged door openings.
Door not closed properly.
Food notwrapped properly.
Crisper not tightly closed.
Temperature controls set too cold.
Packages not wrapped or sealed properly.
Food notwrapped properly.
Hot, humid weather.
WHATTO DO
Push plug into outlet.
Replace fuse, reset circuit breaker.
Set freezer control (see page 5).
Wait 25 minutes for defrost cycle to end.
Relocate unit to proper climate (see installation on page 2).
Wait 24 hours to completely cool down
(see temperature controls on page 5).
This is normal. Minimize door openings.
Check to see if something is preventing door from closing.
Unblock to allow warm air to exit unit.
Unplug refrigerator and change bulb (see page 11).
Check to see if power cord is completely plugged in.
Level cabinet (see page 2.)
Cover or wrap odorous foods tightly.Clean cabinet.
See Normal Operating Sounds page 13.
Level cabinet (see page 2).
Adjust temperature control (see page 5).
Minimize door openings.
Unit willnot run often enough to maintain proper temperatures.
Adjust temperaturecontrol (see page 5).
Adjust sensor arm down to ON position.
Level unit (see page 2).
Connect water supply, or clear obstructions.
Adjust freezer temperature control (see page 5).
Discard; ice cubes may absorb odors which affect taste.
Contact local water treatment company.
Wrap foodstightly.
Wipe trayswith vinegar-soaked cloth until clean.
Dump old ice cubes.
Normal.
Minimize door openings.
Check to see if something is preventing door from closing.
Wrap or cover all foods tightly.
Close crisper all the way.
Adjust temperature controls (see page 5).
Wrap or cover all foods tightly.
Wrap or cover all foods tightly.
Minimize door openings.
Page 16

SE
,
Conditions and damages resulting from any ofthe following:
a. Improper installation, delivery,or maintenance.
b. Any repair, modification, alteration, oradjustment not authorized bythe
manufacturer or an authorized servicer.
c. Misuse, abuse, accidents, or unreasonable use.
d. Incorrect electric current, voltage, or supply.
e. Improper setting of any control.
2. Warranties are void if the original serial numbers have been removed,
altered, or cannot be readily determined.
3. Light bulbs.
4. Products purchased for commercial or industrial use.
5. The cost of service or service call to:
a. Correct installation errors.
b. Instruct the user on the proper use of the product.
c. Transportthe appliance to the servicer.
,
Consequential or incidentaldamagessustained by any person as a result
of any breach of these warranties. Some states do not allowthe exclusion
or limitation of consequential or incidental damages, so the above exclu-
sion may not apply.
To purchase accessories or replacement parts not covered by your
product warranty:
Please have your model and serial numbers ready and call our parts
specialists at 1-877-232-6771 inside U.S.A.from 7 a.m.to 7 p.m.central
time Monday through Friday. Outside the U.S.A.,contact your localappli-
ance dealer or parts distributor.
Call the dealer from whom your appliance was purchased or call Maytag
ServicessM,Maytag Customer Assistance at 1-800-688-9900, USA or
1-800-688-2002 Canada to locate an authorized servicer.
Be sure to retain proof of purchase to verify warranty status. Referto WAR-
RANTY for further information on owner's responsibilities for war-
ranty service.
If the dealer or service company cannot resolve the problem, write to
Maytag ServicessM,Attn: CAIR® Center, P.O. Box 2370, Cleveland, TN
37320-2370, or call 1-800-688-9900 U.S.A. or 1-800-688-2002 Canada.
U.S.customers using TTY for deaf, hearing impaired or speech impaired,
call 1-800-688-2080.
NOTE: When writing or calling about a service problem, please include
the following information:
a.Your name, address and telephone number;
b. Model number and serial number;
c. Name and address ofyour dealer or servicer;
d. A clear description of the problemyou are having;
e. Proof of purchase (sales receipt).
User's guides, service manuals and parts information are available from
Maytag Servicess_,Maytag Customer Assistance.
MAYTAG, 403 west Fourth Street North , EO. Box 39 , Newton, Iowa 50208
Page 17

RCFRIGCRATEURA COMPARTIMENTS SUPERPOSES TM-1
MA AG
Installateur: Veuillezlaisser ce guide
avecI'appareil.
Consommateur: Veuillezlireet conser-
verce guidepourconsultationulterieure.
Conservezlafactured'achatou lecheque
annulecommepreuved'achat.
_-_SECURITE..............................................................................Page 17
Pages 18-20
Numerode modele
Numerodeserie
Datede rachat
Sivousavezdesquestions,veuillezecrire
ounousappeler(enincluantlenumerode
modeleetvotrenumerodetelephone)h:
MaytagServicessM
Attn:CAIR®Center
RO.Box2370
Cleveland,TN37320-2370
E.-U.1-800-688-9900
Canada1-800-688-2002
LesclientsdesE.-U.utilisantunATS
(pourhandicapd'auditionoud'elocution)
doiventcomposerle 1-800-688-2080.
(Dulundiau vendredide8 h &20h,
heuredeI'Est)
Internet:http://www.maytag.com
Pour des informationssur le service
aprbs-vente,voirpage31.
ETMAIF!TIEF!DESBOFIFIESTEMPiRATURES.........Page 21
_ITODUCTIOHDEGLACE..................................................Page 22
DURiFRIGiRAIEUR..............................Pages 23-24
POURLACONSERVATIONDESALIMENTS...Pages25-26
_ISAGEDURiFRIGiRATEUR..............................................Page 27
'_F!TflETIEF!ETFIETTOYAGE......................................Pages 27-28
29
_NT D_PPELEfl.............................................................Page 30
,_GAR,ANTIE..............................................................................Page 31
L_UiA DE[U_UARI0............................................... Page 32
• , _ ' http://www.maytag.com
Page 18

f p
Lesinstructionsdesecuriteimportanteset les
avertissementsparaissantdans ce guidene
sont pasdestines& couvrirtoutesles situa-
tionset conditionseventuellesqui peuventse
presenter,IIfautfairepreuvedebonsenset de
prudencelotsde I'installation,deI'entretienou
derutilisationde I'appareil,
Preneztoujourscontactavecvotrerevendeur,
distributeur,agentdeserviceoufabricant,au
sujetde problemesouconditionsquevousne
comprenezpas,
RECONNAISSEZ LES
I TIQUETTES, PHRASES
OU SYMBOLES SUR LA
SECURITE
Utiliserle refrigerateuruniquementpour
sonapplicationprevue,
Poureviterunrisquedechocelectrique,ne
jamais brancherle refrigerateursur une
prisedecourantquin'apaseteadequate-
ment reliee& la terre,conformementaux
prescriptionsdes codesnationalet local
des installationselectriques,Voir_i_
ci-dessousI'avertissementet les instruc-
tionsde liaison&laterre,
Debrancherlerefrigerateuravantdelenet-
toyeroude remplaceruneampoule,
En casde panned'electricit&eviterd'ou-
vrir les portes,SiI'interruptiondeI'alimen-
tation se prolonge,placerdes blocs de
glacecarboniquepar-dessusles paquets
pourprotegerlesalimentsplusIongtemps,
ou contacterun entrep6tfrigorifiquelocal
pourorganiserunstockagetemporaire,Ne
pas recongelerdesalimentssurgelesqui
ontete completementdecongeles,
Reparerou remplacertout cordond'ali-
mentationelectriquequia eteendommage
ou deterior&Nejamaistirersur le cordon
pourdebrancherI'appareil,
Nepasfairefonctionnerle refrigerateuren
presencedefumeeexplosive,
Nejamais laisserun enfantse tenir sur,
grimper sur, ou se suspendre & une
clayettede ce refrigerateur,
IMPORTANT: Les risquesd'enfermementet
d'etouffementd'un enfantdans un refrigera-
teurn'ontpasdisparu,Unrefrigerateuraban-
donne demeure dangereux._m6mes'il ne
resteainsiaccessiblequependantquelques
jours, Lorsqu'onse debarrassed'un vieux
refrigerateur,il faut appliquerlesinstructions
ci-dessouspourevitertoutaccident.
Demonterlesportes,
Laisser les
clayettesen
place pour
qu un
enfant ne
puisse pas
facilement
s'introduire
dans le re-
frigerateur,
Cetappareilest doted'unefichedebranche-
ment& 3 broches(pourliaison&la terre),ce
quiassureuneprotectionadequatecontreles
risquesdechocselectriques,Ondoit brancher
I'appareiluniquementsuruneprisedecourant
reliee & la terre, Si la prise de courant
disponiblene comporteque deux alveoles,
c'estauclientqu'incombentla responsabilite
etI'obligationpersonnelledelafaireremplacer
par une prisede courant& 3 alveolescon-
venablementreliee& la terre, On ne doit
jamais,quellesque soientles circonstances,
couperouarracherlatroisiemebroche(liaison
& la terre) de la fiche de branchement,Ne
jamaisutiliserunefiched'adaptation,
CORDOND'ALIMENTATION
AVEC FICHE DE BRANCHEMENT
,&.3 BROCHES
]7
PRISEDECOURANT
MURALERELEE
_,LATERRE
Page 19

i
Ce refrigerateura fait robjetd'un emballage
soign&Enleveretjeter lesagrafeseventuelle-
ment utilisees pour rimmobilisation des
clayettes (juste au-dessus de chaque
clayette-- accrochagesur le ch&ssis).Pour
enleverlesagrafesde plastique,fairebouger
lesagrafeslateralementettirerenlignedroite.
IMPORTANT: Ne pas enlever risolant en
moussedeseventssituesdansle plafonddu
compartimentd'alimentsfrais.
> Veiller& ce que I'air puissecirculerlibre-
ment&traverslagrillede plintheavant.
> Installerle refrigerateur&un endroitou la
temperatureambiantenebaisserapasau-
dessousde 13oC(55oF).Lorsquela tem-
peratureambianteest inferieure& 13o C
(55oF), le refrigerateurne fonctionnepas
assezfrequemmentpourle maintiende la
temperatureadequatedans le comparti-
mentdecongelation.
> Prevoirunespacelibred'aumoins1,5cm
(1/2po)sur lesc6tes,ausommetet &I'ar-
riere pour faciliterI'installation.Si le c6te
comportantlescharnieresdeporteestcon-
tre un mur, il est desirablequ'il y ait un
espacelibreplusimportantdece c6tepour
pouvoirouvrircompletementlesportesou
inverserleursensd'ouverture(page20).
> Dansle casd'unplancheren vinyleou en
bois,travaillerprudemmentlotsde I'instal-
lationpoureviterde laisserdes marques
sur le plancher ou de rendommager.
Utiliseruneplaquede contreplaqueou un
morceaude tapisou d'un autremateriau
pourprotegerle solIorsdu positionnement
derappareil.
Retireretconserverlesdispositifsdemise
&niveaufixes&labasededemenagement.
Retireretjeter la basede demenagement
etlesvis.
,_ raide d'une pince a joint coulissant,
installerles dispositifsde mise & niveau
dansles troussituesaux anglesavantde
lacaisse.
Dispqsitif,s____,_
e .raisea _'-,,t_ III"%_
n_veau J4_.t_t-.
d
Vis
PouroptimiserI'esthetiqueet la performance
du refrigerateur,il faut le placer d'aplomb.
Selonle modele,lerefrigerateurpeut6tremis
d'aplombdedeuxfa£ons.
Touslesmodelesde refrigerateurontdes
vis demise&niveau&labasedelacaisse,
sous chacundes coins avant.Ces pieds
peuvent6treajustesen lestournantdans
unsensouI'autre,aubesoin.Sileplancher
n'estpasdeniveauetqu'ilsoitnecessaire
de releverI'arrierede la caisse,utiliserun
morceaudecontreplaqueou autremateri-
audecalage.Pourimmobiliserlacaisseen
place,fairedescendrelesdeuxvisdemise
&niveau(voirfig.1).
Les modelesde refrigerateurqui com-
portent des roulettesreglablespeuvent
6tre mis & niveauen retirantla grille de
plinthe*eten reglantces roulettes&raide
d'untoumevisoud'unedouillede1/4pouce
(6,4mm)(voirfig.2).
ROTATIONHORAIRE
POUR SOULEVER LE
COIN DE LA CAISSE
ROTATIONANTI-
HORAIRE POUR
BAISSER LE COIN
Figure 2
Pour retirerla grillede plinthe,saisir les
deuxextremiteset tirerenlignedroite.Pour
la reinstaller,alignerles attachesavecles
ouverturesrondesdansla caisseet pous-
ser sur chaqueextremitepour I'embofte-
ment.
Pourde meilleursresultats,apresavoirmis
la caisse& niveau,ouvriret fermer les
portesetremettre&niveau.
DE LA CAISSE
> Le refrigerateurdoitresterverticalpendant
aumoins30 minutesavantd'6trebranch&
Figure 1
Page 20

POIGNI_EDEPORTEDERI_FRIGI_RATEURSANSGARNITURE
O
ALIGNER LA POIGN E SUR LES
TROUS DE VlS. INSTALLER
D ABORD LAVIS " A POUR
FIXER LA POIGN E, PUIS LAVIS
• B '. NE PAS TROP LES SERRER.
0
ENCLENCHER
L EXTR MIT CACHE-
VIS EN PLACE. LA
PARTIE INF RIEURE
DE LA POIGN E.
TOURNEVIS PHILLIPS
N° 2 NI_CESSAIRE
POUR L'INSTALLATION.
O
INSTALLER LA VIS DANS
LE TROU DE LA POIGN E.
NE PAS TROP LA SERRER.
(AU BESOIN)
La porte doit 6tre de niveau Iorsque la
caisse I'est.
• La porte du cong61ateurest trop
haute. Retirer le
Desserrer couvre-charniere
les vis"""_ ..._
-- _ -.f_t""'_'_6
po
,_ II (8mm)
, , _ Ne pas jeter la
cale d'espacement
en mousse de la porte.
INSTRUCTIONSD'INSTALLATIONDELAPOIGNI_E
SEMONTANTSURLEDESSUSDELAPORTEDUCONGI_LATEUR
ALIGNER LA POIGN E SUR LESTROUS NO
DE VIS. INSTALLER D ABORD LES VIS --{ I I 2 NI_CESSAIRE
• A POUR FIXER LA POIGN E, PUIS \ I I POUR L'INSTALLATION.
LES VI_ B -.NE PAS TROP LES SERRER. \ I I
REMARQUE : TOUS LES TROUS \ J I III
DE VIS POUR LE MONTAGE DE LA \ I I
POIGN E EN HAUT ET EN BAS \L._4_
DES PORTES SONT PRVUS '--'ff_
POUR DES VlS TARAUDEUSES. _
NE PAS AGRANDIR CES TROUS.
-_:_ TOURNEVIS PHILLIPS
[h
POIGNI_EDE PORTE DE RI_FRIGI_RATEURAVEC GARNITURE
TOURNEVISPHILLIPSN° 2
NI_CESSAIREPOUR
O L'INSTALLATION.
ENCLENCHERLE HAUTDELAGARNITURE
ENPLACE L EXTRMIT
INFRIEUREDE LA
POIGNE.
A
U ALIGNERLAPOIGNESUR
LESTROUSDEVlS. INSTALLER
DABORDLAVIS A POURFIXER
LAPOIGNE,PUISLAVIS B .
NEPASTROPLESSERRER.
O
INSTALLERLAVIS DANS
LETROUDELAPOIGNE.
NEPASTROPLASERRER.
I I
• Les deux portes sont trop hautes.
Retirer le
Desserrer couvre-charni6re
J- les v_"_'_5/16 po
II (8mm)
• I I 5/16 po
Desserrer les vis et coulisser la charniere
inferieure a droite pour baisser les portes.
• Les deux portes sont trop basses.
Retirer le
Desserrer couvre-charniere
les vis _b,._
-- -- _ [ 5/16 po
t II (8 mm)
OSUR CERTAINSMODELES,
RETIRERLENDOSDU
RUBAN.APRES
L'E-TAPE5,
APPUYERSUR
LERUBAN.
COULISSERLAGARNITUREDE
IGNE PAR-DESSUSLE
UPPORT LAPARTIE
INFRIEUREDELA
PORTE.
5/16 po
t (8 mm)
Desserrer les vis et coulisser la chame
inferieure a gauche pour relever les portes.
• Resserrer les vis apres avoirfini les
r_glages.
* Se reporter aux instructions d'installa-
fion pour obtenir plus d'informations.
Page 21

Outils necessaires: tournevisPhillips,cle &
rochetetdouillede5/16po(8mm),couteau&
masticou cleouvertede5/16po (8mm).
1.Retirerlecouvre-charniereetle mettrede
c6t&
2, Retirerlesvis etlacharniereavecunecle
&douillede 5/16po (8 mm)et lesmettre
dec6t&
3. Souleverdoucementla portedu congela-
teuret la retirer.
4, Enleverla vis et le bras de charnieredu
dessusde la portedurefrigerateur.
5, Souleverdoucementla portedu refrigera-
teuret la retirer.
6. Retirerle protecteurde grilleet le mettre
dec6t&
7, Retirer la plaquede charnieredu coin
inferieurdu refrigerateuret I'installerde
I'autrec6t&
8. Retirerla plaquedu dessousde la porte
du refrigerateuret I'installerde I'autre
c6t&
9. Retirerla plaquedu dessousde la porte
ducongelateuret I'installerdeI'autrec6t&
10.Retirer les boutons sur le dessus des
portesde refrigerateuret de congelateur
etles reinstallerde I'autrec6t&
11.Retirerles bouchonsdestrousde vis du
dessusde la caisseet les reinstallerde
I'autrec6t&
12.
Retirerlesrondelleset I'axedeI'interieur
delaplaquedecharniereetlesinstaller&
I'exterieurdela plaquedecharniere.
13.
Reinstallersoigneusementla porte du
refrigerateursurlaplaquedecharniereau
coininferieur.
14,Coulisserlebrasdecharniereen placeet
lefixeravecunevis,
15.
Installersoigneusementla portedu con-
gelateur sur le dessus du bras de
charniere en se servant de la cale
d'espacementpourmaintenirI'intervalle,*
16.
Coulisserlacharnieresuperieureenplace
surlaporteducongelateuretfixerlesvis&
I'aided'uneclede5/16po(8mm),
17,Bien enclencheren place le couvre-
charniere.
18.Remettrele protecteurdegrille.
Nepasoublierde rebrancherlerefrigerateuret
de reenclencherles commandesau reglage
voulu.
(AU BESOIN)
5/16 po
Poserlaportesurunesurfacenonrugueuse.
OutilsJ
A, Retirerla visgauche.
B, Ouvrirla porte et la soulever,Poser la
porte sur une surface non rugueuse.
Retirer I'ensemblede plaquede charniere.
Poserlaportesurunesurfacenonrugueuse,
Nepasjeterla caled'espacementen mousse
dela porte.Lesportespeuventsestabiliser&
I'usage,
Page 22

LerefrigerateurestdoteduconceptdefrafcheurDualCoolTMMaytagpourlestemperaturesdescompartimentsdecongelationetderefrigeration.
Lescommandessontsitueesenhaut,surledevantducompartimentderefrigeration.Lacommandeducongelateurmetenmarchelesystemede
refroidissement.
> Laisserlestemperaturesse stabiliserpen-
TM
dant 24 heures avant de modifier les
reglages.
Apresavoirbranchele refrigerateur,selection-
netlescommandes.
> Pour regler les commandes,deplacer le
curseur & gaucheou & droite selon le
besoin.
> La commandedu refrigerateurcomporte
desgraduationsallantde1 (temperaturela
plus elevee) & 9 (temperaturela plus
basse).Selectionnerinitialementla valeur
5 pourcettecommande.
> La commandedu congelateurcomporte
desgraduationsallantde1 (temperaturela
plus elevee) & 9 (temperaturela plus
basse).Selectionnerinitialementla valeur
5 pourcettecommande.
> Laisserlerefrigerateurfonctionnerpendant
au moins8 & 12 heuresavantd'y placer
desaliments.
Occasionnellement,la faceavantdela caisse
durefrigerateurpeut6trechaudeau toucher.II
s'agitd'un effet normalqui emp6chela con-
densationd'humiditesur la caisse.Ceci se
remarqueparticulierementlotsde la miseen
marche initiale du refrigerateur,par temps
chaudou apres une periode prolongeeou
excessivedesportes.
TM
> 24heuresapresI'additiond'aliments,ilest
possiblededeciders'il convientd'ajusterla
temperaturedans I'un ou I'autre ou les
deuxcompartiments.Danscecas,modifier
la positiondu ou des boutonsde com-
mande,selon les indicationsdu tableau
ci-dessous.
> Sauflots de la miseen marcheinitialedu
refrigerateur,nepaschangerlapositiondu
boutondecommandedeplusd'uneunite&
lafois.
> Une modificationdu reglagede I'un ou
I'autredesboutonsdecommandeentrafne
une modificationde la temperaturedans
I'autrecompartiment.
Pour assurer le maintiendes temperatures
appropriees,il est necessaireque la circula-
tion de I'air se fassecorrectemententre les
compartimentsde refrigerationet decongela-
tion,commeI'indiqueI'illustration.
NE bloqueraucunde : ....
ces events avec des _l _
aliments.S'ils etaient _
bloques, la circulation ,H_,,, _-_
de I'airseraitentravee, :_::_,_.:_ :
||1_1111
_ .........................
ce qui entrafneraitdes _::_
ture et d'humidit&
problemesde tempera-_::::
Compartimentde refrigeration Coulisserla commandede refrigerateurvers le chiffre
trop chaud superieur,
Compartimentde refrigeration Coulisserla commandede refrigerateurvers le chiffre
trop froid inferieur.
Compartimentdecongelation Coulisserla commandede congelateurvers le chiffre
trop chaud superieur,
Compartimentdecongelation Coulisserla commandede congelateurvers le chiffre
trop froid inferieur.
ARRCTdu refrigerateur PlacerlacommandedecongelateursurARRI_T(OFF).
REMARQUE: Si la commandede congelateurestsur ARRET(OFF),le refroidissementcesse
dansles deuxcompartiments.L'alimentationdurefrigerateurn'estpasinterrompue.
I Lors du cycle de degivrageautoma-
tique, I'on peut remarquer un reflet
rougeoyantdanslesevents,surlaparoi
arriere du compartimentde congela-
tion,et I'onpeutentendreaussilebruit
de gouttes d'eau venant en contact
i_ avecI'elementchauffantdusystemede !_
i! degivrage.Ceci est normal Iors du
degivrage.
Page 23

Certainsmodelescomportentdes moules&
gla£onset un bac&gla£ons.Pourlibererles
gla£onsd'un moule,retournerle mouleau-
dessusdubac et effectuerun mouvementde
torsionauxdeuxextremites.
Selonlemodelechoisi,lebac&gla£onscoulisse
dansdesrailssousunsupportous'empileavec
netteteau-dessusdesmoules&gla_ns.
II Les guidesde classificationd'energie
indiquessurlerefrigerateuraumoment
de I'achatnecomprennentpasI'utilisa-
tiond'unemachine&gla£onsenoption.
Certainsmodelessontpr6tspouruneinstalla-
tion de machine& gla£onsautomatique.Le
numerodunecessairede machine&gla£ons
appropriepour I'installationsur ces modeles
apparaftsurla plaquesignaletique.Leneces-
sairecomprendlesinstructionsd'installationet
de raccordementde I'eau.
D'autresmodelesont unemachine&gla£ons
installee& I'usine.Raccorderla machine&
gla£ons& la canalisationd'eaucommeil est
indiquedans les instructionsfournies& part
avecle refrigerateur.Une bonne circulation
d'eau et la raise _ niveau du refrigerateur
sont essentielles_ des performancesopti-
malesdela machine_gla£ons.
Apresle raccordementdu refrigerateur& I'ali-
mentationd'eau,abaisserlebrasdedetection.
La machine& gla£onsse remplitd'eau des
quela temperatureadequateest etablieavec
lecongelateur.
Certainesmachines& gla£onssont dotees
d'unbrasdedetectionreglable,qui permetde
choisirlaquantitedegla£onsdansle moule&
gla£onspourlesfoisouunequantiteinferieure
degla£onsestnecessaire.
Levier
detection
Pourreglerlaquantitedegla£onsproduits :
(certainsmodeles)Tournerleleviermetallique
pourproduirela quantitedesireedegla£ons.
Le reglage 100% assure une production
maximale.
II fautattendre8 &12 heuresavantquela
machinea.gla£onsproduisedesgla£ons
utilisables.Lepremieroulesdeuxpremiers
lots seront probablementconstituesde
gla£onsdepetitetailleetirreguliers,du fait
dela presenced'airdanslacanalisation.
Lepremierlotpeutegalementcontenirdes
impuretespresentesdanslanouvellecana-
lisationd'eau.Parconsequent,jetertousles
gla£onsdesdeuxou troispremierslots.
Lotsde I'ejectiondesgla£ons,ilestnormal
que plusieursgla£onssoient colles en-
sembleauxextremites.II est facilede les
separer.Lamachine& gla£onscontinuera
& produiredes gla£onsjusqu'& ce que
I'accumulationdegla£onsrelevelebrasde
detection, ce qui arr6te la machine &
gla£ons.
Certainssons peuventaccompagnerles
diverses phases de la production de
gla£ons: legerbourdonnementdumoteur,
chutede gla£onsdans le bac & gla£ons
vide et declic de I'electrovanneou, de
temps&autre,bourdonnement.
Si la consommationde gla£onsest faible,
les gla£onsaccumulesvont prendreun
aspecttrouble,secontracter,collerensemble
etprendreungoQt.Viderperiodiquementle
bacpourlelaver&I'eautiede.Veiller&bien
lesecheravantdele reinstaller.
Pourretirerle bac &gla£ons,le tirervers
I'avant puis I'enlever de la machine &
gla£ons.Pouremp6cherque la machine&
gla£onsneproduisedesgla£onsalorsque
le bac est enlev&arr6ter la machine&
gla£onsen relevantle brasdedetection.
Pourremettrele bac & gla£onsen place,
inverserla methodeci-dessus.Remettre
en marchela machine& gla£onsen bais-
santlebrasdedetection.
Neplacerdanslebac&gla£onsaucunali-
ment ou liquidepour un refroidissement
rapide.Cesarticlesentraveraientlesmou-
vements du bras de detection, ce qui
entrafneraitunmauvaisfonctionnementde
la machine&gla_ons.
Lorsque I'arrivee d'eau doit 6tre inter-
rompuependantplusieursheures,arr6ter
lamachine&gla£onsen relevantle brasde
detection.
Page 24

p r p
p
Le refrigerateurcomportedesetag_resSpill-
CatcherTM oudes clayettesenverre tremp&
Les etageresSpill-CatcherTMcomportentun
rebordde retenuequi permetun nettoyage
plusfacile.Certainessontegalementcoulis-
santes.
Pour coulisserI'etagere(certainsmodeles),
saisirI'avantdeI'etagereetlatirer parI'avant.
La pousseren placepour la remettre& sa
positiond'origine.
Pour retirer une etagere ou une clayette,
souleverlegerementI'arrieredecelle-ciet la
tirerdroitverssoi.
Pourimmobiliseruneetagereouuneclayette&
uneautreplace,souleverlebordavantdecelle-
ci. Introduireles crochetsdansles ouvertures
souhaiteesetlaisserI'etagereoulaclayettese
mettresolidementen place&I'arriere.
I TAG#RE A MANIVELLE
ELEVATORTM
Le compartimentd'alimentsfrais peut _tre
doted'uneetag_re_ manivelle ElevatorTM.
Celle-cicomporteun rebordde retenuequi
facilitelenettoyage.Elleestegalementcoulis-
sante, ce qui donne un acces facile aux
articlessetrouvant&la pattiearriere.
Cette etagere se releve ou s'abaissesans
avoir& retirer lesaliments.Pourajusterune
etagereElevatorTM,tirersur le boutonde la
manivelle.Toumerla manivelledansle sens
horairepourreleverI'etagereou dansle sens
antihorairepourlabaisser.
PourenleverI'etagereElevatorTMIorsd'unnet-
toyage,ladechargercompletementet la tirer
vers I'avant.Unefois queI'etageres'arr6te,
appuyersurlespattessitueessoussesbords
exterieurs,puislatirerversI'avantpourlafaire
sortir.
Pour la reinstaller,alignerI'etagereavec le
cadreet la pousserjusqu'au fond. (11n'est
alorspasnecessaired'appuyersurlespattes.)
II N'est PAS necessaire, lots de I'usage
courant,d'enleverI'etagereElevatorTMavec
soncadre.Bienqu'improbableetpasnonplus
recommandee, I'operation d'enlevement
approprieeest lasuivante:
DechargercompletementI'etagereetla relever
au maximum.Touten relevantI'etagereet le
cadre&partirde I'avant,appuyersur lesdeux
dispositifsdeverrouillage,etce,versI'interieur.
ReleverlegerementI'ensemblede cadreen
I'inclinant,pourpermettreauxguidesarrierede
sedegagerdesrailsverticaux.
Pour la reinstallation,inclinerI'ensemblede
cadretoutenappuyantsurlesdeuxdispositifs
de verrouillage,et repositionnerles guides
arriere derriereles rails verticaux.Une fois
I'etagerede niveau,tel&cheflesdispositifsde
verrouillagepourpermettre& I'etagerede se
Ioger&la bonneposition.
RAILS DE SUPPORT VERTICAUX
CADRE
CLAYETTE COULISSANTE
CLAYETTEREGLABLE
DE CONGELATEUR
(certains modeles)
Pourenleverla clayette,souleverI'extremite
gauched'environ3 po (7,5 cm); sortir les
barresd'extremitedu c6tedroitdes alveoles
dans la paroi. Pour remettre en place la
clayette,repositionnerlesbouchonsdesupport
amoviblessurlec6tegauchede la paroi,au
niveausouhait&et inverserla methodede
depose.
CLAYETTE DE
CONG#LATEUR A
LARGEUR EXTENSIBLE
(certains modeles)
Laclayettes'ajustelateralementpourdegager
unespacepermettantlerangementdescondi-
tionnementshauts,commelespizzas.Lapatte
du c6tedroitde la clayettecoulissepourper-
mettrecetajustement.
Laclayettepeut6treaussireglee&deuxhau-
teurs.Pourcela,retirerlaclayetteducongela-
teur.Coulisserla pattehorsdesrainureset la
reinserer& I'autreplace.Remettrelaclayette
dans le congelateuren introduisantle c6te
gauchedanslesalveolesde ladoublure.
DOUBLE CLAYETTE
EXTENSIBLE DE
CONGI LATEUR
(certains modeles)
Cettecaracteristiqueameliorele rangement
dansla partiecongelateurparI'additiond'une
autre clayette.Selon la dimensiondes ali-
mentscongeles,la hauteurdesclayettespeut
_tremodifiee.Laclayetteinferieureest exten-
sine en largeur (comme il a ete decrit
precedemment)pourcreerunespacepourles
articlesplushauts.
RANGEMENT DANS LA
CONTRE-PORTE
Les bacs de porte amovibles (certains
modeles) sont assez spacieux pour des
recipients de plus d'un gallon. IIs sont
reglableset peuvent_tre facilementenleves.
Pourenleverunbac,souleverI'avantjusqu'a.
cequ'ilseliberedesretenuessurladoublure
dela porte,puissortirlebactoutdroit.
Pourle remettreen place,inverserlesopera-
tionsci-dessus.
D'autresmodelessontfabriquesavecdesbal-
connetsfixes, durables,permettantle range-
mentdecontenantsd'ungallonet plus.
}3
Page 25

Certainsbalconnetsde refrigerateuretdecon-
gelateurcomportentdesretenuespourmain-
tenirlesflaconsetautrescontenantsen place
Iorsquela porteest ouverteou fermee.Ces
retenues sont facilement reglables par
coulissementd'unc6te&I'autre.
Le dispositif de retenue pour grandes
bouteilles(certainsmodeles)est prevupour
emp6cherlesgrandesbouteillesde s'incliner
vers I'avant.II est facilement reglablepar
coulissementd'unc6te&I'autre.
La temperaturen'est pas reglabledans le
tiroir central pour collation,
Pourenleverletiroir pourcollationou le bac
Adjusti-Tempafindeles nettoyer:
> ouvrirle tiroirou le bacjusqu'&laposition
debutee
> souleverlegerementletiroiroule bacpour
pouvoirI'extraire
Pour reinstallerle tiroirou le bac, proceder
inversement.
Lerefrigerateurpeut6treequiped'unoeufrier
(stylevariable).II est amoviblepourle lavage
ouuneautreutilisation.
Pourutiliserlecasierlaitier, releverlecouver-
cle. Le casier laitierpeut 6tre equiped'une
retenuepourmaintenirlesarticlesenplace.Si
le modelecomporteuneretenue,il suffitde la
coulisserd'unc6te&I'autre& I'emplacement
souhait&
Danscertainsmodeles,le casier laitierpeut
6treenlev&
SUPPORTS
Lesupportmulti-canettes(certainsmodeles)
s'accroche& I'unedesclayettesde refrigera-
teur& rebords,surlespartiesmetalliquesse
trouvantsousla clayette.I'inclinaisonpermet
aux canettesde rouleren avantau fur et &
mesurequ'unecanetteestenlevee.(Cesup-
port ne peut 6tre place sous une etagere
ElevatorTM.)
Le supportmulti-usages (certainsmodeles)
permet le rangement & I'horizontale de
bouteillesdevin.IIpeutaussiservirau range-
mentd'unebofte d'oeufsou de boissonsen
canettes.
Placerle supportsur le c6te gauched'une
clayettede refrigerateur(ce supportne peut
6treplacesuruneetagereElevatorZM.)
Le refrigerateurcomporteun tiroir central
pour collationou un bac Adjusti-TempTM
Pourles modelescomportantun bacAdjusti-
TempTM, une commandeest situee sur le
devantdelaclayette,au-dessusdubac.IIsuf-
fitde coulisserle bouton&gaucheou &droite
pourobtenirlatemperatureinternesouhaitee
dubac.
> Pour entreposerle fromage,coulisserla
commande a gauche. Pour la viande
frafche,lavolailleou le poisson,coulisser
la commande& droite pour obtenir une
temperatureplusbassedansle bac.
Onpeutinstallercetiroirsurlec6tegaucheou
lec6tedroitdansle refrigerateur,au choix.
Pour obtenirles meilleursr#sultats,veiller
toujoursbbn fermerle tiroir.
Lesbacs_legumespermettentI'entreposage
de fruitset legumes.Undispositifdecontr61e
de I'hygrometrieest situe sur I'etagere,au-
dessusdechacundesbacs.
> Pourla conservationde fruits,fairecoulis-
set la commandevers la gauche pour
minimiserI'humiditedanslebac.
> Pour la conservationde legumes,faire
coulisserla commandeversla droitepour
augmenterI'humiditedanslebac.
Deposed'unbac&legumespourle nettoyer:
> tirerle bacjusqu'&labutee
> souleverI'avantettirerpourextrairelebac
Reinstallationd'unbac&legumes:
> alignerlebacaveclesrailsdecoulissement
> souleverI'avantdubacetfaireglisserlebac
Pour obtenirles meilleursresultats,veiller
toujoursbienfermerlesbacs.
Deposede I'etag_reau-dessusdu bac:
> souleverle bordavantdeI'etagere
> tirerI'etagereen lignedroite
Reinstallation de I'etag_re au-dessusdu
bac:
> placerlesbarresarrieresurle support
Le compartiment SafeKeeper (certains
modeles)est unecombinaisondebacamovi-
ble et de tiroir pratique.II suffitde placeren
avantle levier(situeduc6tedroit,en hautdu
compartiment)pourouvrirlecompartiment.Ce
dernierpermetun rangementfermed'articles
commefilms,pileset medicaments.
Lesbacsdeporte basculantsde refrigera-
teur(certainsmodeles)conviennentparfaite-
mentau rangementdecontenantsdeformes
variees,commeflaconsd'unlitreetarticlesen
sacs.En faisantbasculerles bacsvers I'ex-
terieur,il est plusfacilede rangerles articles
oude lesprendre.
Le panier de congelateursur glissi_res
(certainsmodeles)setrouvedans lecompar-
timent principal de congelation. C'est un
espacede rangementpratique,permettantun
accesfacileaux articlesranges& I'arrieredu
congelateur.Coulisserle panier& I'exterieur
pouratteindreoupourrangerlesarticlescon-
geles,
Pourenleverle panier:
> letirerjusqu'&labutee
> lesouleveretletirerpourle sortir
Pour remettrele panier en place,proceder
inversement.
Lepanieramovibledecongelateur(certains
modeles)se trouvesur le balconnetinferieur
du congelateur. II permet le rangement
d'articlescongelesquionttendance&bouger
ou&glisser(commeleslegumesensachets).
> pousserI'etagereversI'arrierejusqu'&ce
qu'il soit possibled'effectuerla mise en
placecorrectedubordavant
Page 26

> Ondevraitmaintenirlatemperaturedansle
compartimentrefrigerateurentre1° Cet
4oC(34oFet40oF)(lavaleuroptimaleest
3oC[37oF]).PourcontrOlerlatemperature,
placerunthermometredansunverre
d'eau,au centredu compartiment
refrigerateur.NoterI'indicationduther-
mometreapres24heures.Silatempera-
tureestsuperieure&40C(40oF),ajuster
leboutondecommande,selonlesinstruc-
tionsdelapage21.
_--€:viterde placer trop de produitssur les
clayettesetetageresdu refrigerateur.Ceci
entravelacirculationdeI'airautourdesali-
mentset entrafneun refroidissementnon
uniforme.
FRUITS ET LI GUMES
I'humiditedesproduitsconservesdansles
bacs&legumesest retenue,ce quipermet
demaximiserla qualiteet ladureedecon-
servationdesfruitsetlegumes(page24).
Effectuerun tri desfruitset legumesavant
delesplacerdansle refrigerateur;veiller&
consommerd'abordlesarticlesamollisou
qui ont subi deschocs.Jeter les articles
manifestantun debutdedegradation.
Veillera toujoursenvelopperles aliments
tresodorants- oignons,choux,etc.- afin
que I'odeur ne soit pas transferee &
d'autresaliments.
Tandisqu'unecertainedosed'humiditeest
necessaire & la conservation de la
frafcheurdes legumes,un exces d'humi-
ditepeut reduirela dureedeconservation
(particulierementpour les legumesfeuil-
lus).Veiller& bien egoutterles legumes
avantde lesplacerdansle refrigerateur.
VIANDES ET FROMAGES
> On devrait parfaitement envelopper la
viandeou volaille non cuite pourqu'il ne
puisse y avoir aucune contamination
d'autres aliments ou des surfaces du
refrigerateur.
Occasionnellementunemoisissurepeutse
developper& la surfacede certainsfro-
magesdurs(gruyere,cheddar,parmesan).
Couperdans le fromage,jusqu'&2 cm
(1 pouce)autouret au-dessousde la zone
moisie.Veiller&ce que couteauou autre
instrumentne touchepas la zone moisie.
Le restedufromageconserverasasaveur
etpourra_treconsommesansdanger.NE
PAStenterde recupererapresI'apparition
de moisissure,tranchesde fromageindi-
viduelles,fromagemou,fromagecottage,
creme,cremesureouyaourt.
PRODUITS LAITIERS
> Unedatede peremptionindiquantla limite
deconservationapparaftgeneralementsur
I'emballagede la plupart des produits
laitierscommelait, yaourt,cremesureet
fromagecottage.Ondoitveiller &conser-
ver ces aliments dans leur emballage
d'origineet&lesrefrigererimmediatement
apresI'achatetapreschaqueprelevement.
La temperaturedans le compartiment
congelateurd'un refrigerateurdoit 6tre
maintenue&18° C(0°F).PourcontrOlerla
temperature,placerun thermometrepour
appareils menagers entre les paquets
d'alimentssurgeles. NoterI'indicationdu
thermometreapres 24 heures.Si la tem-
peratureest superieure& 18° C (0° F),
ajusterle boutondecommande,selonles
instructionsdela page21.
PRI PARATION DES
ALIMENTS POUR LA
CONGI LATION
> Pour minimiser la deshydratationet la
deterioration qualitative, utiliser feuille
d'aluminium,pelliculeplastique,et sachets
ou contenantsetanchespourcongelateur.
Expulserautantd'airquepossiblede I'em-
ballage,veiller&cequechaquepaquetsoit
parfaitementferm&I'air retenupeutprovo-
quer I'assechement des aliments, un
changementde couleur,ou le developpe-
mentd'unesaveurnonnaturelle(brOlures
decongelation).
Avant de les congeler, envelopperles
paquetsde viandefrafche et de volaille
avecun produitadequatd'emballagepour
congelation.
> Ne pascongelerde nouveauune piece
deviandecompl_tementdecongelee.
CHARGEMENT DU
CONGI LATEUR
> €:viterdeplacertropd'alimentstiedesdans
le congelateuren une seule fois. Ceci
soumetlecongelateur&unesurcharge,ce
quiralentitle refroidissementetpeutprovo-
querune augmentationdela temperature
desalimentsdej&congeles.
Laisserun espaceentreles paquetspour
queI'airfroidpuissecirculerlibrement,ce
quientrafneraunecongelationplusrapide.
€:viterde placer sur les balconnetsdu
congelateurdes produits&congelationdif-
ficilecommecremeglaceeoujusd'orange;
il est preferablede placercesproduits&
I'interieurducongelateurou latemperature
variemoinslotsdeI'ouverturedesportes.
Sereporterautableaude conservationdes
alimentsb la page26 pour connaitreles
dureesapproximativesde conservation.
Lefonctionnementdu congelateurestplus
efficaceIorsqu'ilest rempliauxdeuxtiers
ouplus.
Page 27

TABLEAU DE CONSERVATION DES ALIMENTS
(La duree de conservation est approximative et peut varier selon le typed'emballage, la temperature de conservation et la qualite du produit Iors de
son achat.)
Beurre
Laitetcreme
Fromage&la creme,tartinadede
fromageetproduitsaufromage
Fromagecottage
Cremesure
Fromagedur (gruyere,cheddar
et parmesan)
Oeufsen coquille,
Jaunesou blancs
Pommes
Bananes
Poires,prunes,avocats
Baies,cerises,abricots
Raisins
Agrumes
Ananas,d6coup6
Asperges
ChouxdeBruxelles,brocoli,
chou-fleur,petitspois,haricots
delima,oignons,poivrons
Chou,c61eri
Carottes,panais,betteraves
et navets
Laitue
1mois
1semaine
1-2semaines
3-5jours
10jours
1-2mois
3semaines
2-4jours
1mois
2-4jours
3-4jours
2-3jours
3-5jours
1-2semaines
2-3jours
1-2jours
3-5jours
1-2semaines
7-10jours
7-10jours
6-9mois
Nonrecommande
Nonrecommande
Nonrecommande
4-6mois
Peuts'6mietter
Nonrecommande
9-12mois
8mois(cuites)
6mois(entieres/pel6es)
Nonrecommande
6mois
1mois(entiers)
Nonrecommande
6-12mois
8-10mois
8-10mois
Nonrecommande
8-10mois
Nonrecommande
Bienempaqueteroucouvrir
VerifierladatesurI'emballage.Bienfermer.Nepasremettrelapartienonutiliseedansle
contenantd'origine.Nepascongelerlacr_me&moinsqu'ellenesoitfouettee.
Bienenvelopper.
Conserverdanslecontenantd'origine.Wrifier ladatesur lecartonnage.
Bienenvelopper.D6coupertoutepartiemoisie.
R6frigerer,pointeversle bas.
Pourchaquetassedejaunesd'oeuf,ajouter1c. &th6desucrepourles
p_.tisseriesou 1c.a.th6de selpourlesmetsnonsucres.
Egalement,conservationdepommesa chairfermeounonmoresa 15-210C(60-70°F).
FairemQrir#,latemp6ratureambianteavantdemettreau refrig6rateur.Les
bananeset lesavocatsnoircissentIorsqu'ilssontmisaurefrig6rateur.
Seconserventaussia 15-21°C(60-70°F).Aurefrig6rateur,conserversanslesrecouvrir.
NemQritpasapresI'achat.Utiliserrapidement.
Nepaslaveravantderefrig6rer.Rangerdanslebaca.legumes.
Envelopperlesalimentsdegageantuneodeur.Laisserlespetitspoisengousse.
Envelopperlesalimentsd6gageantuneodeuret lesrefrig6rerdanslebac&legumes.
Enleverlesfeuilles.Envelopperles alimentsd6gageantuneodeuret les
r6frig6rerclanslebac#,16gumes.
Pouletetdinde,entiers
Pouletetdinde,morceaux
Poisson
|vj I_,_L_ID]=[..',]
Bacon
Boeufouagneau,hach6
Boeufouagneau,rStietsteak
Jambon, entier,
entierementcult, moiti&
entranches
Viandesfroides
Rbtide porc
C6telettesdeporc
Saucisses&basedeviandehachee
Saucissesfum6es
Veau
Saucissesde Francfort
Sources: Department of Agriculture des Etats-Unis; Food Marketing Institute; Cooperative Extension Service, Universite d'etat de I'lowa
1-2 jours
1-2 jours
1-2 jours
7jours
1-2jours
3-5jours
7jours
5jours
3jours
3-5jours
3-5jours
3-5jours
1-2jours
7jours
3-5jours
7jours
12mois
9mois
2-6mois
1mois
3-4mois
6-9mois
1-2mois
1-2mois
1-2mois
1-2mois
4-6mois
4mois
1-2mois
1-2mois
4-6mois
1mois
ConserverdansI'emballaged'originepourla r6frigeration.Rangerdansle bac
a.viandeetfromage.Si la congelationestdeplusde2 semaines,reenvelopper
avecunemballagepourcongelation.
Lesviandesfraichespeuvent6treconserv6esclansleuremballaged'origine
pourla r6frigeration.Placerdanslebaca.viandeetfromage.Si lacongelation
estde plusde2semaines,r6envelopperavecun emballagepourcong61ation.
Lacharcuterienonouverte,emballeesousvide,peut6treconserv6ejusqu'&
2 semainesclanslebac#,viandeetfromage.
Bienenvelopperlesviandestransform6esetles rangerclanslebaca.viandeet
fromage.
Page 28

Pour une absence de un mois ou moins,
laisser les boutons de commande aux 3.
positionsde reglagehabituelles.
Pouruneabsencede plusIongueduree: 4.
1. Retirertouslesaliments.
.
Arr6terla machine& gla£ons(si elle est
installee)et fermerle robinetd'arr6tdela
canalisationd'eau.
Debrancherle refrigerateurde la prisede
courant.
Nettoyer et secher parfaitement le
refrigerateur.
.
Laisserles portesouvertespour eviterle
developpementd'odeurs.
p p
Pourundemenagement,executerlesetapes1
4 decritesauparagrapheVacances.Deplus,
enlevereternballersoigneusernenttoutarticle
facilernent arnovible. Faire transporter le
refrigerateurverticalernent;les portesdoivent
6treferrneeset irnrnobiliseesavec du ruban
adhesif.
Le tableaude la pagesuivantepresentedes
directivesspecifiquespou le nettoyagedu
refrigerateur.
NETTOYAGE SOUS LE
RI FRIGI RATEUR
IIestpossiblede faireroulerle refrigerateursur
lesolpourpouvoirnettoyerleplanchersousle
refrigerateur.Faired'abordremonterlesvisde
rnise&niveausi ellessontabaissees(page18).
TirerlerefrigerateurenlignedroitepourI'ecarter
dumur.
REMPLACEMENT D'UNE
AMPOULE
Utilisertoujoursuneampoulestandardde
40ou60W,pourappareilsmenagers.
Compartiment refrigerateur
IIy a deux lampesd'eclairageausommetdu
compartimentrefrigerateur,sur chaque cSte
dela commandeDualCooFM.
> Devisser/remplacerI'ampoule.
Compartiment congelateur >
Certainsmodelescomportentune lampesur
la paroiarriere,dansI'anglesuperieur/droit.
Pourenleverle cabochon: >
Saisir le cabochonen haut et en has.
Appuyerdansla zonedes pattesde fixa-
tion, en exer£antune pressionsuffisante
pour les degager.Simultanement,faire
pivoterle cabochonpourI'enlever.
Devisser/remplacerI'ampoule.
Reinstallerle cabochonen lefaisantpivo-
ter dans le sens inversepour la miseen
position,puisenemboftantles pattesdans
lesouverturesappropriees.
CONDENSEUR NO
CLEANTM POUR
SERVICE COMMERCIAL
Le refrigerateurfonctionneplusefficacement
si le condenseurestpropre.Gr&ce&la con-
ception particuliere du condenseur No
CleanTM,il n'estplusnecessaired'effectuerun
nettoyagede routineducondenseurdans le
cadrede I'utilisationresidentiellenormaledu
refrigerateur.
Certainsenvironnementsd'utilisationpeuvent
6tre particulierementpoussiereuxou grais-
seux.Dansuntel cas,ilfaudranettoyerperio-
diquementlecondenseurpourmaintenirI'effi-
caciteoptimale.
Installerle refrigerateur& distance des
sourcesde chaleur (cuisiniere,lave-vais-
selle,bouchesde chauffage)etdu rayon-
nementsolairedirect.
I_tablircorrectementI'aplombdu refrigera-
teuret nepasobstruerlesorificesdeven-
tilationde lagrilledeplintheavant.
Essayerdemaintenirle compartimentde
congelationaussipleinque possible;ainsi
rnoinsd'airfroids'echapperalotsde I'ou-
verturede la porte.Lorsquele comparti-
mentdecongelationestrempli&moinsdes
deuxtiers, il est utiled'y placerdes reci-
pientsdelait&demiremplisd'eau.
Laisserrefroidirlesplatschaudsavantde
lesplacerdansle refrigerateurou le con-
gelateur.
Couvrir/fermerlesrecipientsdeliquide.
Essuyerles recipientspourenlevertoute
trace d'eau avantde les placerdans le
refrigerateur.
I_viterd'ouvrirfrequemmentlesportesde
I'appareil.
> Saisir doucement I'ampoulederriere le
cabochon.
Page 29

Tableau de nettoyage du refrigerateur
Grilledeplinthe
Condenseur Brossedenettoyage(produit Aucunbesoindenettoyage,saufsiI'environnementestparticulierement
Poigneesde porte Eautiedeet detergentdoux
Surfacesmetalliquespeintes:
caisse,portes
Portesenacierinoxydable
(certainsmodbles)
Jointsdeporte
I_tagbresen verre
Doubluresinternes- porteet
interieur
connets,etc.
Eautiedeet detergentdoux
Liquidepulverisabledoux
Aspirateur
no20001017),disponible graisseuxou poussiereux,ous'ily aplusieursanimauxdecompagniedansla
chezledetaillant maison(voirpage27).
Liquidepulverisabledoux
Eautiedeet detergentdoux
Liquidepulverisabledoux
Nettoyageleger:detergent
douxet eauousolutionde
vinaigreblancetd'eau.
Saletemoyenne:BonAmi*
Decolorations:nettoyant
pouracierinoxydable
Cameo.*
Bicarbonatede sodiumet
eautiede
Eautiedeet detergentdoux
Eautiedeet detergentdoux
Produitde nettoyagedu
verre
Liquidepulverisabledoux
Eautiedeet detergentdoux
Bicarbonatede sodiumet
eautiede
Eautiedeet detergentdouxTiroirs,bacs,oeufrier,bal-
Pourenleverla grillede plinthe,saisirlesextremiteset tirerenlignedroite.
Pourla reinstaller,alignerlesattachesaveclesouverturesrondesdansla
caisseetpoussersurchaqueextremit&
Secheravecunlingedouxpropre.
Nepasessuyerle refrigerateuravecuneserviettehumideouuntorchon&vais-
sellesale;ilpourraityavoirsurcesarticlesdesresidussusceptiblesdedegra-
deroueraflerlapeinture.Nepasutilisernonplustamponde recurage,produit
denettoyageenpoudre,ouproduitde nettoyagecontenantunagentde
blanchiment.Cesproduitspeuventerafleretdegraderla peinturedefinition.
N'appliqueraucunecitesurlescomposantsenplastiqueou vinyle.
Utiliseruneepongeouun lingesouple.
EssuyertoujoursdanslesensdugraindeI'acierinoxydable.Nepasutiliserde
produitdeblanchimentchloreoudeproduitde nettoyagequicontientduchlore.
Apreslenettoyage,rinceretsecher.Pourredonnerdu lustreet enleverles
marques,fairesuivreparunepulverisationdeproduitMagicSpray*pouracier
inoxydable(node piece20000008).
Utiliser1-2cuil.&soupede bicarbonatedesodiumparlitred'eau.Veiller&
bienessorerI'excesd'eaude I'epongeou duchiffonavantdenettoyer
autourdescommandes,deslampesoudescomposantselectriques.
Laisserleverreserechauffer_ la temperatureambianteavantdeI'im-
mergerdansdeI'eautilde. NejamaisutiliserdeI'eauchaude.
Voirci-dessuspourlasolutionde bicarbonatedesodium.
NEPASutiliserdeproduitdenettoyageabrasif,detergentconcentr&agent
de blanchiment,solvantoucirenettoyantepournettoyerI'interieurdu
refrigerateur.
Secherparfaitement.NEPASlaverdansun lave-vaisselleautomatique.
* Les nomsde marquesontles marquesdecommercedes fabricantsrespectifs.
Page 30

Desameliorationsdanslaconceptiondusystemederefrigerationpeuventproduiredesbruitsdanslenouveaurefrigerateurquisontdifferentsouqui
n'etaientpaspresentsdansunancienmodele.Cesameliorationsonteterealiseespourproduireunrefrigerateurmeilleurpourlapreservationdesali-
ments,plusefficaceenenergieetplussilencieux.Parcequecesnouveauxappareilsfonctionnentdefa£onplussilencieuse,I'ondetectedessonsqui
etaientpresentsdanslesanciensappareils,maisquietaientmasquespardesniveauxdebruitpluseleves.Nombredecesbruitssontnormaux.II
fautnoterquelessurfacesadjacentes&unrefrigerateur,commelesmurs,lessolsetlesarmoires,peuventamplifiercesbruits.Voicilesbruitsnor-
mauxquipeuvent6treremarquesdansunrefrigerateurneuf.
MACHINE,&,GLA?ONS (le cas echeant) : La machine b.
gla?ons fait entendre de temps en temps un bruit de
crepitementIorsqueles gla?onssont pr_ts&tomberdans le
bac. Aussi, le moteur qui permet I'ejectiondes gla?ons du
moule avant la chute des gla?ons, peut aussi 6tre
decelable.Ce sont des bruits normaux, necessairesa la
MINUTERIEDE DI_GIVRAGE: Les
refrigerateurs sans givre ont une
minuterie de degivragequi emet un
declic Iorsqu'elle fait fonctionner le
cycede degvragepar ntermttence.
fabricationdesgla?ons.
DILATATION ET CONTRACTION DU
COMPARTIMENTDECONGELATION:
Un bruit sec peut se produire dans le
congelateurIorsqueI'appareilse meten
marchepar suite de la dilatation ou de
la contraction des materiaux dans la
zonedu compartimentdecongelation.
COMPRESSEUR: Pour qu'un refrig6rateur
fonctionnede fa?onplusefficace,le systeme
de refrig6rationpeut avoir&fonctionnerplus
Iongtempspour maintenir les aliments aux
temperatures souhaitees. Ce nouveau
compresseur,tr_s efficace,peut fonctionner
plusIongtempset produiredesbruitscomme
un ronronnementaiguou desvibrations.
CIRCULATIONDURI_FRIG#RANT: Lacirculation
du r6frig6rant dans le refrigerateurpeut faire un
bruit de gargouillis ou de crepitement Iorsque
I'appareilfonctionneoujuste apr_s la phased'arr_t
de I'appareil.Le refrigerantcircule en permanence
danslatubulure.
BRUITS DE CIRCULATION D'AIR : Le ventilateur de
I'evaporateur du congelateur et le ventilateur de
condenseur& la partieinferieurede la caisseentrainent
des bruits d'air. Le ventilateur de I'evaporateur fait
circulerrair froiddans lescompartimentsde refrigeration
et de congelation.Leventilateurde condenseur retirela
chaleur produiteIorsquerappareilest refroidi.
I_LECTROVANNE (le cas ech_ant) : Un
bourdonnement peut s'entendre & I'arriere de
rappareil Iorsquele distributeurde gla?onsfait
ouvrir I'electrovannepourremplir le moule de la
machine&gla?ons.ApresI'ejectiondes gla?ons,
il peut y avoir quelques bruits d'eau qui goutte
Iorsquele remplissagedes moulesa lieu.
MISE,&,NIVEAUDE LA CAISSE: Unecaisse presentant
un defaut de mise & niveau peutentrafnerdes bruitsde
vibration ou metalliques.Ceci peut s'arranger en reglant
lesroulettesou lesvis de raiseaniveau.
Page 31

Essayer les solutions suivantes si les anomalies indiqu_es se manifestent...
PROBLI_MES CAUSESPOSSIBLES SOLUTIONS
Ler_frigerateur ne Cordond'alimentationnonbranch& Brancherlafichedansla prise.
fonctionne pas Prisesans courant Remplacerlefusible.Reenclencherle disjoncteur.
Commandedecongelateur& lapositiond'ARRET(OFF) Reglerla commandeducongelateur(page21),
Refrigerateurencoursdedegivrageautomatique. Attendre25minutesquele degivragesetermine.
[. Temperatureambianteinferieure&13 °C (55°F). ReinstallerI'appareildansunenvironnementconvenable(voirinstallationpage18).
Lecompresseurfonctionne Lesrefrig@ateursd'aujourd'huise mettenten
,_ trop fr_quemmentoutrop marcheets'arr_tentplussouventafinde maintenir
Iongtemps destemp@aturesuniformes,
II Normalalamiseen marcheinitialepourlesappareils Attendre24heurespour un refroidissementcomplet(voircommandesde
• neufsouinstallesrecemment, temp@aturepage21).
t'll Ouverturesdesportesprolongeesoufrequentes. Ceciestnormal.Minimiserlesouverturesdeportes.
t'll
._ Lumiere ne Ampoulegrillee. Debrancherle refrig6rateuretchangerI'ampoule(page27).
•_ fonctionnant pas Aucuneelectricit6n'arrive&I'appareil. Verifiersilecordonestbienbranch&
| Luminescencevisible clans Uneluminescencerouge_treouun refletest normal
._ les 6vents ducongelateur Iorsdudegivrage,
Air tilde sortant du bas Ceciestnormal.IIs'agitde I'airqui acirculeaucontact
dela caisse ducondenseur.
Vibrationde la caisse Aplombdeficientde lacaisse.Plancherinsuffisamment Mettrela caissea niveau(page18).
Odeur clanslescompartiments Desalimentsgenerateursd'odeurne sontpas couverts, Lescouvriroubien lesenvelopper,Nettoyerlacaisse.
=_ Bruits, sons etvibrations Ceciestnormal, VoirBruitsNormauxpage29.
Etanch6it6deficientedes portes, Verifiersiquelquechosen'emp@hepaslesportesdese fermer,
Grilledeplintheobstruee. Degagerpourpermettre&I'air tiedede quitterI'appareil.
ferme,
Aplombdeficientde lacaisse. Mettrela caissea niveau(page18).
. et refrig_rateur- Ouverturesprolongeesdesportes. MinimiserI'ouverturedesportes.
I ompartimentscong61ateur Commanderegl6e&unetemperaturetropelevee. Reglerla commandedetemperature(page21).
temperature trop elev_e Temperatureambianteinferieure& 13°C(55°F). I'appareilnefonctionnepasassezpour maintenirlesbonnestemperatures.
(cr_meglac_e molle)
tl
Lesproduits&teneurelev6eensucrepeuventnepas
durcircompletementm_mecongeles.
Compartiments cong_lateuret Commandereglee&unetemperaturetropbasse. Reglerlacommandedetemperature(page21).
_1 refrig_rateur-temp_rature
basse(cong_lation des
aliments)
Machinea gla£ons ne Lebrasdedetectionest en positionrelevee. Baisserlebrasde detection& la positiondeMARCHE(ON).
fonctionne pas
Aplombdeficientde lacaisse. Mettrela caissea niveau(page18).
Arriveed'eaug_neeoufermee. RaccorderI'alimentationd'eauouenleverlesobstructions.
Temperaturetrop eleveedansle congelateur, Reglerla commandedetemperatureducongelateur(page21).
uneodeur MauvaisequalitedeI'eau. Prendrecontactaveclacompagnielocaledetraitementd'eau.
Les gla£onsont ungoet/ Glagonsanciens. Lesjeter.Lesglagonspeuventabsorberlesodeurs,cequimodifieleurgoOt.
Lanourrituretransmetlesodeurs/legoOtauxglagons. Bienenvelopperles aliments.
Gla£onscoil,s dans lemoule Residusdemin@auxdansI'eau. Essuyerlesmoulesavecun lingetrempedansle vinaigrejusqu'ace qu'ils
soientpropres.
I_vaporationdes gla_ons Utilisationlimiteede glagons. Jeterlesvieuxgla_ons.
Humidit_surla surfacede la Pasinhabituelpartempstreshumide.
caisseentre les portes
Humidit_surles parois Tempschaudethumide. Ceciestnormal.
internes oudans les bacs
Ouverturesprolongeesou frequentesdesportes. Minimiserlesouverturesdesportes.
-- Fermetureincorrected'uneporte. Verifiersiquelquechosen'emp@hepas laportede se fermer.
Alimentsincorrectementenveloppes. Bienenvelopperou recouvrirtousles aliments.
." Assechementdes aliments Bac&legumespasparfaitementferm& Bienlefermer.
ill
Commandesdetemp@aturetrop basses. Ajusterlescommandesdetemperature(page21).
Paquetsnon parfaitementscellesou enveloppes. Bienenvelopperou recouvrirtouslesaliments.
Humidit_excessivedans le bac Alimentsincorrectementenveloppes. Bien envelopperourecouvrirtousles aliments.
16gumes Tempschaudethumide. Minimiserlesouverturesdesportes.
Page 32

1. Lesdommagesou derangementsdus&:
a. Miseenservice,livraisonou entretieneffectuesincorrectement.
b. Toutereparation,modification,alterationet tout reglagenonautorisespar le
fabricantou parunprestatairedeserviceapres-venteagre&
c. Accidents,mauvaiseutilisationou usageabusifouderaisonnable.
d. Alimentationelectrique(tension,intensite)incorrecte.
e. Reglageincorrectd'unecommande.
2. Lesgarantiesnepeuvent@e honoreessi les numerosdeserie d'origineontete
enleves,modifiesoune sontpasfacilementlisibles.
3. Ampoules.
4. Appareilsachetesaux finsd'usagecommercialouindustriel.
5. Lesfraisde visited'unprestatairede serviceoudeserviceapres-venteencourus
pourlesraisonssuivantes:
a. Correctiond'erreursde miseenservice.
b. Initiationde I'utilisateur&I'emploideI'appareil.
c. Transportde I'appareilauxIocauxduprestatairedeservice.
6. Dommagessecondairesou indirectssubispartoutepersonnesuiteaunon-respect
de lagarantie.Certainsetatsou provincesne permettentpas I'exclusionou la limi-
tationdesdommagessecondairesou indirects;parconsequent,les limitationsou
exclusionsci-dessuspeuventnepass'appliquer&votrecas.
Pour acheter des accessoires ou des pi_ces de rechange non couverts par la
garantiedu produit :
Ayezvos numerosdemodeleetdes@iesouslamain.Appeleznossp@ialistes-
pi@es,encomposantle 1-877-232-6771auxEtats-Unis,entre7hdumatinet7 h
dusoir,heurecentrale,du lundiauvendredi.EndehorsdesEtats-Unis,contactez
votremarchandlocald'appareilsoupartiele distributeur.
! Contactezle detaillantou vous avez achete I'appareilou contactezMaytag
ServicesSM,service&la clientelede Uaytag,au 1-800-688-9900aux E.-U.,ou au
1-800-688-2002au CanadapourconnaftreI'adressed'unreparateuragre&
! Conservezla preuvede I'achatpourv@ifierle statutdela garantie.Reportez-vous
&la GARANTIEpourobtenirplusd'informationssurles responsabilitesdu proprie-
tairequantau serviceenvertude la garantie.
! Si le detaillantou I'etablissementde serviceapres-ventenepeutresoudrele pro-
bleme,@rivez&UaytagServicessM,Attn:CAIR®Center,RO.Box2370,Cleveland,
TN37320-2370,oucomposezle 1-800-688-9900aux I_.-U.ou 1-800-688-2002au
Canada.
PourlesclientsdesE.-U.avecATSdansle casd'unhandicapdeI'auditionou de
I'elocution,composezle 1-800-688-2080.
REMARQUE: Lorsde tout contactaupresde Uaytag Servicess_en raisond'un
problemeparticulier,veuillezfournirI'informationsuivante.
a.Vosnom,adresseetnumerodetelephone;
b.Numerode modeleet num@odeseriedeI'appareil;
c. Nometadressedudetaillantou du reparateur;
d.Descriptionclaireduproblemeobserve;
e.Preuved'achat(facturedevente).
! Lesguidesde I'utilisateur,lesmanuelsdeserviceetles cataloguesdepiecessont
disponiblesaupresdeUaytagServicesS_,service&laclienteledeUaytag.
MAYTAG, 403 west Fourth Street North , EO. Box 39 , Newton, Iowa 50208
Page 33

REFRIGERADOR CON COMPARTIMIENTO SUPERPUESTOTM-1
Instalador:Pot favordeje este manual
juntoconel electrodomestico.
Consumidor:Pot favor lea y conserve
este manual para referencia futura.
Conserveel recibo de compra y/o el
chequecanceladocomocomprobantede
compra.
_SEEURIDAD......................................................................Pagina 33
_[ON ...........................................................paginas 34-36
Nt_merode Modelo
Nt_merodeSerie
FechadeCompra
Si tienepreguntas,pot favorescribanos
(incluya el numero de modelo y su
nt_merodetelefono)o Ilamea:
MaytagServicesSM
Attn:CAIR®Center
P.O.Box2370
Cleveland,IN37320-2370
1-800-688-9900EE.UU.
1-800-688-2002Canada
1-800-688-2080(EE.UU.TTY para per-
sonas con problemasauditivoso del
habla)
(Delunesa viernes,desdelas8:00 a.m.
hastalas8:00p.m.HoradelEste)
Internet:http://www.maytag.com
Parainformacionsobreservicio,ver/a
pagina 47
@MPERATURAAPROP[_D_..........................................pagina 37
_ICACION DEHIE[O.............................................Pagina 38
_ YIST_DELINTERIOR..........................................Paginas 39-40
'IASPAPAALMACENARALIMENTOS.Paginas 41-42
_HAMIENTODELRffRIGERADOR...........................Pagina 43
__ADOYLIMPIEZA..............................................Paginas 43-44
'_POS DEFUNCIONAMIENTO.......................................Pagina 45
_HTESDESOLICITAflSEflVICIO........................................Pagina 46
_GAE_NTIA.........................................................................Pagina 47
...... ;_http://www.maytag.com LithoU.S.A.
Page 34

Lasadvertenciase instruccionesimportantes
sobreseguridadqueaparecenenestemanual
noesta.ndestinadasacubrirtodaslasposibles
circunstancias y situaciones que puedan
ocurrir.Se debeejercersentidocomt_n,pre-
cauci6n y cuidado cuando instale, realice
mantenimientoo hagafuncionarel artefacto.
Siemprep6ngaseen contacto con su dis-
tribuidor,agentedeservicioofabricantesi sur-
gen problemaso situacionesque usted no
comprenda.
RECONOZCA LOS
SIMBOLOS DE
SEGURIDAD,
ADVERTENCIAS,
ETIQUETAS
Use el refrigeradort_nicamentepara el
prop6sitoquehasidodiseSado.
Para prevenir la posibilidadde peligro
debido a choques electricos, nunca
enchufe el refrigerador en un toma-
corrienteque no hayasido debidamente
puestoa tierra segt_nlos c6digoselec-
triceslocalesynacionales.Verlaadverten-
cia,d_y lasinstruccionesde puestaa tier-
raqueseindicancontinuaci6n.
Desenchufe el refrigerador antes de
limpiarloo de reemplazarelfoco.
Encasede uncortedecorrienteelectrica,
tratedeabrirlapuertaIomenosposible.Si
la falla electricase prolongademasiado,
protejalosalimentoscolocandobloquesde
hielo seco encima de los paquetes o
averigLiesi puedealmacenarlosenuncon-
geladorprovisionallocal. Los alimentos
que se hayan descongeladocompleta-
mentenodebencongelarsede nuevo.
Si el cord6nelectricose deshilachao se
daSase debe repararo reemplazarde
inmediato. Nunca desenchufesu elec-
trodomesticotirandodelcord6nelectrico.
Su refrigeradorno debehacersefuncionar
cercadevaporesexplosivos.
No permitaque los niSosse suban,se
cuelgueno se patenen las parrillasdel
refrigerador.
IMPORTANTE:Losproblemasdeatrapamien-
toy asfixiadelos niSosnohanquedadorele-
gadosalpasado.Losrefrigeradoresdesecha-
dos o abandonados todavia son peli-
grosos...at_nsisevanadejaralli"solamente
pot unos dias."Siva a descartarsu refrige-
rador antiguo,pot favor siga las siguientes
instruccionespara ayudar a preveniracci-
dentes.
> Retire las
puertas.
> Deje las
parrillasen
su lugarde
modo que
losniSosno
puedan
entrar fa.cil-
mente.
Esteelectrodomesticoesta equipadocon un
enchufede tres clavijascon puestaa tierra
comoprotecci6ncontrael posiblepeligrode
choqueselectricos.Se debeenchufarenun
tomacorrientepuesto a tierra. Si s61ose
disponede un tomacorrienteesta.ndarpara
enchufede dos clavijas,el clientetiene la
responsabilidady obligaci6nde reemplazarlo
por un tomacorrientepara enchufede tres
clavijas debidamentepuesto a tierra. Por
ningunmotivecorteo retirela terceraclavija
(puestaatierra)delcableelectrico.Nouseun
adaptador. CORDONELECTRICOCON
ENCHUFEDETRESCLAVlJAS
CON PUESTAA TIERRA.
3}
TOMACORRIENTE
DELTIPO CON
PUESTAATIERRA
Page 35

i
Su refrigeradornuevofue empacadocuida-
dosamente para el embarque. Retire y
descartelos sujetadoresde empaque(si se
usaron)de las parrillasque se encuentran
inmediatamentearribade cadaparrilladonde
se enganchanen el marco. Paraquitarlos
sujetadores pl&sticos muevalos hacia los
ladosy lev&ntelosdirectamentehaciaafuera.
IMPORTANTE:No retire el aislamientode
espumade los respiraderosubicadosen el
techodelcompartimientodealimentosfrescos.
> Dejequeel airecirculelibrementeatraves
dela rejillainferiordelantera.
> Instaleel refrigeradoren unlugardondela
temperaturaambienteno descenderaa
menosde55oF(13oC). Contemperaturas
inferioresa55oF(13oC),el refrigeradorno
funcionaracon la suficiente frecuencia
paramantenerla temperaturacorrectaen
elcongelador.
> Dejeunespaciominimode1/2"(1,5cm)en
amboslados,arribay detrasdel refrige-
radorparafacilitarlainstalaci6n.Si el refri-
geradores colocadocon el lado de la
bisagradela puertacontraunapared,es
necesariodejarespacioadicionalo invertir
la puerta(verpa.gina36)paraquelapuer-
tapuedaabrirsemas.
Tengacuidado al instalarel refrigerador
sobrepisosde vinilo o maderade modo
quenoserayeno daSen.Sepuedeutilizar
un pedazode maderacontrachapada,una
alfombrau otro materialparaprotegerel
pisomientrasseinstalael refrigerador.
> El refrigeradordebe permanecervertical
duranteporIo menos30minutosantesde
serenchufado.
]E
Retirey conservelostornillosniveladores
quese encuentranen la basede lajaula
deembalaje.
Retirey descartela basede lajaulay los
tornillos.
Usandopinzasajustablesinstalelos nive-
ladoreshastael fondoenlosagujerosubi-
cadosenla esquinadelanteradelgabinete
delrefrigerador.
Paramejorarla aparienciay mantenerbuen
rendimiento,el refrigeradordebeestarnivela-
do. Dependiendodel modelo,el refrigerador
puedeset niveladodedosmaneras.
Todoslos modelosde refrigeradortienen
tornillosniveladoresen la basedel gabi-
nete debajode cada esquinadelantera.
Los niveladorespuedenset ajustados
gir&ndoloshacia adentroo haciaafuera
segunsea requerido. Si el piso no esta
niveladoyes necesarioelevarla parte
traseradel refrigerador,use unpedazode
maderacontrachapadauotromaterialsim-
ilar. Parabloquearelgabineteensulugar,
gire hacia abajo ambos tornillos nive-
ladores.(Verfigura1.)
_--Los modelosde refrigeradorque tienen
ruedasajustablespueden set nivelados
retirandolarejillainferior*y ajustandolas
ruedasconundestornilladoro casquillode
1/4".(Verfigura2.)
GIRE A LA DERECHA
PARASUBIR LA
ESQUINA DEL
GABINETE
GIRE A LA
IZQUIERDA PARA
BAJAR LA ESQUINA
Figura 2
* Parasacar la rejillainferior,sujeteambos
extremosy tire de la rejilladerechohacia
afuera. Paravolvera colocarla,alineelos
clipsa resorteconlas aberturasredondas
del gabinetey empujecadaextremodela
rejillainferiorhastaqueentreen sulugar.
> Paraobtenermejoresresultados,despues
de nivelarel gabinete,abra y cierre las
puertasy luegovuelvaanivelar.
DEL GABINETE
Figura 1
Page 36

lijAiNsTDAENiAPARTEsUPERiOR
JlJSTEDELAPBERTA
(SI ES NECESARIO
MANIJADELAPUERTADELREFRIGERADOR
SINLA MOLDURADEEXTENSION
_1ALINEE LA MANIJA SOBRE LOS AB _ SE RE"UIERE UN
AGUJEROSDE,OSTORNIUOS II_--C--_DESTO$NLLADOR
INSTALE PRIMERO ELTORNILLO _[_ / PH LLPS NO 2PARA
"A" PARAASEGURAR LA MANIJA _" }Ill / _ON.
Y DESPUES ELTORNILLO "B". jill I
NO,_PRIETEOEMASlAO0. IIHI
° 1111.
INSERTE A PRESION
LAEXTENSIONENLAII _1_:" ] _'#t_Z-J-- INSTALEELTORNILLOEN
PARTEINFERIORDE \1 qllF / J _ r_ ELAGUJERODELAMANIJA.
LA MANIJA. _ J_ NO APRIETE DEMASIADO
INSTRUCCIONESDEINSTALACIONDELAMANIJASUPERIOR
PARTESUPERIORDELAPUERTADELCONGELADOR
ALINEE LA MANIJA SOBRE LOS /--_j_l
AGUJEROS DE LOS TORNILLOS. I II III
INSTALEPRIMEROELTORNILLO"A" / I I I/\
PARAASEGURARLAMANIJAY "_ II L,/I
DESPUES LOS TORNILLOS "B". \ I I \/t
____) SE REQUIERE UN
DESTORNILLADOR
PHILLIPS NO. 2 PARA
LA INSTALACION.
\lt
\11
LOS TORNILLOS DE LA MANIJA EN LA \l t _11
PARTE SUPERIOR E INFERIOR DE LAS _-._11
PUERTAS ESTAN DIMENSIONADOS
PARA TORNILLOS _--
AUTORROSCANTES. NO AGRANDE
LOS AGUJEROS CON UN TALADRO.
La puerta deberia estar nivelada si el
gabinete esta nivelado.
• La puerta del congelador esta
demasiado alta.
Afloje los de la bisagra
tornillos _ \_._
Retire la tapa
II (8 mm)
_'L ]_1,,-Espaciadorde
espuma de la
puerta - NO Io
descarte
I
Ambas puertas estan demasiado
altas.
Afloje los de la bisagra
[- tornill°s_L_5/16"
Retirela tapa
II (8mm)
. I I 5/16 po
MANIJADELAPUERTADELREFRIGERADORCONMOLDURADEEXTENSION
SEREQUIEREUN DESTORNILLADOR
PHILLIPSNO.2 PARALA INSTALACION.
=_'___ 0 ALINEELAMANIJASOBRE LOSAGUJEROSDE
Ill LOS TORNILLOS.INSTALEPRIMEROEL
COLOQUEAPRESIONLA
PARTESUPERIORDE_'"'_
LAEXTENSIONEN/1 ///
LAPARTE I I I //
INFERIORDE | I __xl_U.
LAMANIJA.
0 ENClERTOSMODELOS
RETIREELFORRO
ADHESIVODELA
CINTA. DESPUE'S/ _.
DE,PASOS I I_
APLIQUE t II
PRESION.
!1t TORNILLO"A" PARAASEGURARLAMANIJA,
n SEGUIDODELTORNILLO"B". NOAPRIETE
!/_ DEMASIADO.
- 0
INSTALEELTORNILLO EN ELAGUJERO
DELA MANIJA. NO APRIETEDEMASIADO.
INSERTELAEXTENSIONDE LA
NIJAEN ELSOPORTE
ITUADOEN LAPARTE
INFERIORDE LA
PUERTA.
35
Afloje los tornillos y deslice la bisagra inferior
a la derecha para bajar las puertas.
• Ambas puertas estan demasiado
bajas.
Afloje los de la bisagra
tornillos ,_ _"
Retirela tapa
r-- -- ;-qr 5/16"
tL _ II (8 mm)
• _ 5/16 po
tL____=
®
Afloje los tornillos y desliee la bisagra inferior
a la izquierda para elevar las puertas.
• Vuelva a apretar los tornillos
despu6s de hacer los ajustes.
* Para mayor informaciSn consulte las
instrucciones de instalaciSn.
Page 37

,#
#ELASPgERTAS
HerramientasNecesarias: Destornillador
Phillips,Ilavede tuboy trinquetede 5/16",
cuchillopara enmasillaro Ilavede una sola
bocade5/16".
1.Retirela tapade la bisagray col6quelaa
unlado.
2. Retirelos tornillosy la bisagracon una
Ilavede tubode5/16"ydejea unlado,
3. Levantecuidadosamentey retirelapuerta
delcongelador.
4. Retireeltornilloyelbrazodelabisagrade
la partesuperiorde la puertadel refrige-
rador.
5. Levantecuidadosamentey retirelapuerta
delrefrigerador.
6, Retire la cubiertade la rejillainferiory
col6quelaa unlado,
7. Retirela palade la bisagrade la esquina
inferiordel refrigeradore instalelaen el
ladoopuesto.
10,
Retirelos taponessituadosen la parte
superiordelas puertasdel congeladory
del refrigeradory col6quelosen el lado
opuesto.
11,
Retirelostaponesdelos agujerosdelos
tornillosde la partesuperiordel gabinete
ycol6quelosenel ladoopuesto,
12,
Retirelasarandelasy virgulitasdel interi-
ordela paladelabisagraycol6quelasen
elexteriorde la palade labisagra,
13,
Vuelvaacolocarcuidadosamentelapuer-
tadelrefrigeradorenla paladela bisagra
enla esquinainferior,
14,
Inserteel brazode la bisagraen sulugar
yasegureloconuntornillo,
15,
Coloquecuidadosamentela puerta del
congeladorarribadelbrazodela bisagra,
Useelespaciadordeespumadelapuerta
para determinar el espacio entre las
puertas.*
16,
Insertelabisagrasuperiorensu lugaren
la puerta del congeladory apriete los
tornillosconlaIlavede5/16",
5//16"
Depositela puertasobreunasuperficiequeno
la raye.
Herramientj
8. Retirela palade la bisagradel ladoinfe-
rior de la puerta del refrigerador y
col6quelaen el ladoopuesto.
9. Retirelapaladelladoinferiordela puerta
del congeladory col6quelaen el lado
opuesto.
17.Instale a presi6nla tapa de la bisagra
firmementeensu lugar.
18,Vuelvaa colocarla rejillainferior.
Recuerdeenchufarsu refrigeradory volvera
programarloscontrolesen el (los) ajuste(s)
apropiado(s).
A. Retire el tornilloizquierdo
B. Abrala puerta g levfintela. Deposite la
puerta sobre una superficie que no la
raye.
Retireel conjuntode la pala de la bisagra.
Depositela puertasobreunasuperficiequeno
la ralle.
No descarteel espaciadorde espumade la
puerta. Laspuertasseasientanconel uso.
Page 38

Surefrigeradorest&equipadoconelcontroldefrescura'DualCool'tinMaytagparacontrolarInstemperaturasdelosalimentosfrescosycongelados.
Loscontrolesest&nubicadosenlapartesuperiordelanteradelcompartimientodelrefrigerador,Elcontroldelcongeladorponeenmarchaelsistema
deenfriamiento,
AJgSIBINt BDEL
TM
Despuesdeenchufarel refrigerador,ajustelos
controles,
Paraajustarloscontroles,muevael indi-
cador corredizo a la izquierda o a la
derechasegunsedesee.
El control del refrigeradortiene ajustes
desde 1 (m&s tibio) a 9 (m&s frio).
Inicialmentecoloqueestecontrolen el5,
El control del congeladortiene ajustes
desde 1 (m&stibio) hasta 9 (m&sfrio).
Inicialmente,ajusteestecontrolen5.
DejefuncionarelrefrigeradorporIomenos
de 8 a 12 hornsantesde colocarlos ali-
mentos,
A veces, la parte delanteradel refrigerador
puedesentirsecalienteal tacto. Estaes una
situaci6nnormalqueayudaa prevenirlacon-
densaci6nenel gabinete.Estacondici6nsera.
m&snotoriacuando el refrigeradorfunciona
por primeravez, durantetiempocalurosoy
despuesdeabrirla puertademaneraexcesi-
vao prolongada,
Si24hornsdespuesdecolocarlosalimen-
tos observaque uno o amboscompar-
timientosdebefianestar m&sffios o m&s
calientes,ajusteel (los)control(es)segun
seindicaen latablasiguiente,
Conla excepci6nde cuandose poneen
funcionamientoel refrigeradorpot primera
vez, no cambieningunode los controles
ma.sde unnumeroalavez.
> Espere24 hornsparaque la temperatura
seestabiliceantesde reajustar.
> Cualquiercambioen unode loscontroles
afectar&la temperaturadel otro compar-
timiento,
Paraasegurartemperaturasapropiadas,usted
debedejarqueel airecirculeentreel refriger-
adory el congeladorcomose muestraen la
ilustraciSn,
NObloqueeningunodeestosrespiraderos
con paquetesde alimentos, Si los respi-
raderosest&nbloqueados,seobstruir&elflujo
delaireyocurrir&nproblemasde temperatura
y humedad.
]]]]]]]]]]]]]]]]]]]]i_,]]]]]]]]]]]]]]]]]]]]
Refrigeradordemasiado
tibio
Refrigeradordemasiadofrio Desliceel controldel refrigeradoral numerosiguiente
Congeladordemasiadotibio Desliceel controldel refrigeradoral numerosiguiente
Congeladordemasiadofrio Desliceel controldel refrigeradoral numerosiguiente
ComoAPAGARel refrigerador Desliceel controldel congeladora la posici6n"OFF"
NOTA:AI deslizarel controldelcongeladora la posicidn"OFF",se detieneel enfriamientoen
amboscompartimientos.Peronosecortalaelectricidadal refrigerador.
Desliceel controldel refrigeradoral numerosiguiente
m&salto,
m&sbajo,
m&salto,
masbajo,
(Apagado)
3/
II Duranteelcicloautomaticodedescon-
gelaci6n,puedeobservarseunresplan-
dor/reflejorojoen los orificiosdeventi-
laci6nenlaparedposteriordelcompar-!i
timiento del congelador y oirse eli;
sonidodegotasdeaguacuandoentran
_; en contacto con el calentador de i_
i! descongelaci6n, Esto es normal
duranteel ciclode descongelaci6n,
Page 39

Algunosmodelosestanequipadosconbande-
jasde cubosdehieloy conun recipientepara
guardarhielo.El recipientecalzaperfectamente
sobrelasbandejasdeloscubosdehielo.Para
sacarloscubosdela bandeja,coloquelaban-
dejainvertidasobreelrecipienteytuerzaambos
extremosdelabandeja.
Dependiendodel modeloque ustedha selec-
cionado,elrecipientedelhielosedeslizayasea
en rielesdebajodela rejillade la bandejade
cubosdehieloo estacolocadosobrelasban-
dejasdecubosde hielo.
Algunas maquinas de hacer hielo estan
equipadasconun brazosensorajustableque
permiteajustar la cantidadde hielo en su
recipientede almacenamientodel hielopara
aquellasoportunidadesen que se necesita
menoshielo.
Paraajustarla cantidaddehieloproducida:
(modelosselectos)Girelamanecillade alam-
breparaproporcionarelniveldeseadode pro-
ducci6nde hielo.El ajuste100%proporciona
unaproducci6nde hielom&xima.
Puedentranscurrirde8a 12horasantesde
quela maquinadehacerhielocomiencea
producircubos de hielo utilizables. Los
primeros dos Iotes probablementecon-
tendrancubosmuypequeSoso de forma
irregulardebidoalairequepuedehaberen
latuberiadesuministrodeagua.
Parasacarel recipientedel hielo,tirede el
haciaadelante,alejandolode la maquina
de hacerhielo.Paraevitarque la maquina
de hacerhieloproduzcacuboscuandoel
recipientehaya sido quitado,apague la
ma.quinadehacerhielolevantandoelbrazo
sensor.
Paravolvera colocarelrecipientedel hielo,
inviertaelprocedimientoanterior.Pongaen
marchala ma.quinade hacerhielobajando
elbrazosensor.
Nose debencolocarbebidasnialimentos
en el dep6sitodel hieloparaenfriarlosra.-
pidamente.Estosarticulospuedenbloquear
elbrazosensor,afectandoel funcionamien-
todelamaquinadefabricarhielo.
Cuandoel suministrode aguavayaa set
interrumpidopot varias horas,apaguela
maquina de hacer hielo levantando la
manecilla.
Lasguias deconsumodeenergiaque
estan indicadasen el refrigeradoral
momentode la compra,noincluyenel
usodeenergiadela maquinade hacer
hieloopcional.
Algunosmodelosfabricanhielo automatica-
mente.El numerodel kit parafabricarhielo
apropiadoparasu instalaci6nenestosmode-
los, se encuentraen la placa de datos.El
juegocontienelasinstruccionesdeinstalaci6n
ylas instruccionesparalaconexi6ndel agua.
Otrosmodelostienenuna maquinade hacer
hielo instalada en la fabrica. Conecte la
ma.quinade hacerhieloalsuministrode agua
segunlasinstruccionesprovistaspotseparado
consurefrigerador.Esesencialunbuenflujo
de agua y un refrigerador nivelado para
obtener un optimo rendimiento de la
maquinade hacerhielo.
Despuesde que el refrigeradorhaya sido
conectadoal suministrode agua, muevael
brazosensor hacia abajo. La maquinade
hacerhieloseIlenaraconaguacuandoelcon-
geladoralcancelatemperaturacorrecta.
El Iote inicial tambien puede contener
impurezasprovenientesdelatuberianueva
del suministrode agua. Pot Io tanto,es
preferibledescartartodosloscubosde los
primerosdoso tresIotes.
Cuandoloscubosde hielosonexpulsados
esnormalquevarioscubossalganunidos.
Se podra.nsepararfacilmente.La maquina
de hacerhielo continuarahaciendohielo
hastaque la cantidadde cubosde hielo
producidalevanteel brazosensor,apagan-
doasila maquina.
Se puedenoff ciertosruidoscuandose
esta fabricandoel hielo. El motorpuede
hacerunlevezumbido,loscubossonaran
al caersobrela bandejavaciay la Ilavede
aguapuedeemitirunchasquidoo zumbido
devezencuando.
Si el hielono se usa con frecuencia,los
cubosseopacaran,disminuira.ndetamaSo,
sepegaranyadquiriranmalsabor.Vacieel
dep6sitodehieloperi6dicamentey limpielo
conaguatibia. Cerci6resedesecarbienel
dep6sitoantesdevolvera colocarloensu
lugar.
Page 40

Surefrigeradortieneya sea parrillas'Spill-
Catcher'TMoparrillasdevidriotemplado.Las
parrillas'Spill-CatcherTM tienenunhorderetene-
dordederramesquefacilitalalimpiezay algunas
estanprovistasdelacaracteristica'EasyGlide'
quepermitedeslizarlahaciaafuera.
Paradeslizarla parrillahaciaafuera(modelos
selectos),sujetela parte delanteray tire de
ella haciaadelante. Empujela parrillahacia
adentroparavolverlaasu lugar.
Parasacarunaparrilla,levanteligeramentela
partetraserade la parrillay tire de la parrilla
derechohaciaafuera.
ParabloquearunaparrillaenotraposiciSn,lev-
anteel bordedelanterode la parrilla. Inserte
los ganchosen las aberturasdeseadasdel
marcoy dejeque la parrillaentreensu lugar,
asegurandosede quequedefirmementeblo-
queadaen lapartedeatras.
PARRILLA ELEVATOR TM
El compartimientode losalimentosfrescos
puede estar equipado con una Parrilla
ElevatorTM. Estaparrillaestaequipadacon un
hordepara retenerderramespara facilitarla
limpieza.Tambienpuededeslizarsehaciaafuera
parapermitirfacilaccesoa los alimentosque
estanguardadosenlapartetraseradelaparrilla.
Estaparrillapuedeset cambiadadeposici6n,
haciaarribaohaciaabajo,sintenetquesacar
losalimentosqueesta.nenella.Paraajustarla
parrillaElevatorTM tirehaciaafueralaperillade
la manivela. Gire la manivelaa la derecha
paraelevarlaalturadelaparrillay a laizquier-
daparabajarlaalturadela parrilla.
Para sacar la parrilla ElevatorTM para su
limpiezaocasional,retiretodoslos alimentos
dela parrillay tire de laparrillahaciadelante.
Cuandola parrilla se detenga,oprima las
lengeetasubicadasdebajodelosbordesexte-
riores, luego continuetirandohacia delante
hastaquesesalgadelmarco.
Paravolvera instalarla parrillaalineela parri-
Ila con el marcoy empujelacompletamente
hacia atra.s.(No es necesariooprimir las
leng_etasparalareinstalaciSn).
Duranteusonormal,la parrillaElevatorTM con
elconjuntodelmarcoNOnecesitasersacada.
Aunque improbable y no se recomienda
hacerlo,el procedimientocorrectopararetirar
la parrillaesel siguiente:
Retire todos los alimentosde la parrilla y
leva.ntelaa su posiciSnma.selevadaposible.
Mientrassujetala parrillayelmarcodesdela
partedelantera,optimaambosseguroshacia
adentro.Levanteligeramentee inclineelcon-
junto del marcopara permitirque las guias
traserassalgandelosrielesverticales.
Paravolvera instalar,inclineel conjuntodel
marcoa la vez que oprimeambosseguros,
vuelvaa colocarla guiatraseradetra.sde los
rielesverticales.Cuandolaparrillaest&nive-
lad& suelte los segurospermitiendoque la
)arrillaseengancheensuposici6ncorrect&
RIELES VERTICALES
MARCO
PARRILLA DESLIZABLE
PARRILLA AJUSTABLE
DEL CONGELADOR
(modelos selectos)
Pararetirarlaparrilla,levanteelextremoizquier-
doaproximadamente3 pulgadas;retirelasba-
rrasdelextremoderechofueradelascavidades
de la pared.Paravolvera colocarla parrilla,
coloquenuevamentelos taponesde soporte
removiblesen la pared izquierdaa la altura
deseadae inviertaelprocedimientoanterior.
PARRILLA EXTENSIBLE A
TODO EL ANCHO DEL
CONGELADOR
(modelos selectos)
La parrillaseajustalateralmenteparaabrirun
espaciode mayoralturaparapaquetesaltos,
talescomodepizza.Lapatadelladoizquierdo
dela parrillase deslizaparaIograresteajuste.
La parrillaadem&sse puedeajustaren dos
alturas. Paraajustarla altura de la parrilla,
saquela parrilladel congelador.Deslicela
patafuerade lascanaletasyvuelvaa colocar
lapataenlaposiciSndealturaalterna.Vuelva
acolocarlaparrillaenel congelador,insertan-
do el extremoizquierdoen lascavidadesdel
forrodelcongelador.
PARRILLA GEMELA
EXTENSIBLE DEL
CONGELADOR
(modelos selectos)
Estacaracteristicamejorala organizaciSnde
losalimentosenelcongeladoragregandootra
parrilla. Paraacomodardiversostiposdeali-
mentoscongelados,se puedeajustarla altura
de las parrillas. La parrilla inferior puede
extenderselateralmente(como se describi5
anteriormente)ofreciendoespacioparaarticu-
losm&saltos.
ALMACENAMIENTO
EN LA PUERTA
Los compartimientosremoviblesde la
puerta(modelosselectos)son Io suficiente-
menteespaciososparaacomodarenvasesde
masde un gal6nde capacidad.Son ajusta-
hiesy puedenset retiradoscon facilidad.
Para retirar, levantela parte delanteradel
compartimientohacia arriba hasta que se
salgade los retenesdel forrode la puertay
luegotire del compartimientoderechohacia
afuera.
Paravolvera colocar,inviertael procedimien-
toanterior.
Page 41

Otrosmodelosestanequipadoscon
CompartimientosFijosdelaPuertacon
capacidadparaenvasesdemasdeungal6n.
Algunasparrillasdelapuertadelrefrigeradory
congeladortienenDivisionesparaasegurar
botellasyotrosenvasesensulugarcuandola
puertaseabreosecierra.Lasdivisionesseajus-
tanfacilmentedeslizandolasdeunladoalotro.
Elretendebotellasaltas(modelosselectos)
hasidodise_adoparaevitarquelasbotellas
altasseinclinenhaciadelante.Esfacilmente
ajustabledeslizandolodeunladoaotro.
PARRILLAS
Laparrilla paraenvasesmlJltiples(modelos
selectos)estasuspendidade unadelasparr-
illasapruebadederramesdelrefrigerador.Se
enganchasobrelosalambresdelmarcodeba-
jo de la parrilla. El disefioinclinadopermite
que los envasesruedenhaciadelante cada
vezquesesacauno. (Estaparrillano puede
instalarsedebajodeunaparrillaElevatorTM).
La parrillaparauso mlJltiple(modelosselec-
tos)ofreceunlugarparaguardarvinoen posi-
ci6n horizontal. La parrillatambien puede
sostenerbebidasenlatao unacajadehuevos.
Coloquela parrillade modoquedescanseen
el lado izquierdode una parrilladel refrige-
rador (esta parrilla no puede set colocada
sobreunaparrillaElevatorTM).
Surefrigeradortieneya seaunaGavetapara
Bocadilloso unaGavetaAdjusti-TempTM,
Para los modeloscon la gaveta Adjusti-
TempTM, se haprovistouncontrolen laparte
delanterasuperiordelagaveta.Simplemente
deslicelaperilladecontrola laizquierdao a la
derechaparaajustarlatemperaturainternade
lagaveta.
> Paraguardarqueso,desliceel controla la
izquierda. Para Iograruna temperatura
mas baja dentro de la gaveta cuando
guarde came fresca, came de ave o
pescado,desliceelcontrola laderecha.
La Gavetapara Bocadillos no tienetempe-
raturaajustable.
Parasacarlagavetaparabocadilloso lagave-
taAdjusti-Tempparasulimpieza:
> tirede lagavetahaciaafuerahastaeltope
levantelagavetaligeramentehaciaarribay
saquelahaciaafuera
Paravolveracolocarla gaveta,inviertaelpro-
cedimientoanterior.
Esta gavetapuede set colocadasegunse
deseeenel ladoizquierdoo derechodelgabi-
netedelrefrigerador.
Paramejoresresultados,mantengala gaveta
bbn cerrada.
Las gavetas de las verduras proporcionan
espacioparaguardarfrutasy verduras. La
gavetade las verdurastiene un control de
humedadenla parrillasituadasobrecadauna
delasgavetasdelasverduras.
Paraguardarfrutas,desliceelcontrolde la
gavetaa laizquierdaa fin de proporcionar
menoshumedaden lagaveta.
Paraguardarverduras,desliceel controla
la derecha para proporcionar mas
humedaden la gaveta.
Para retirarla gavetade las verduraspara
limpiarla:
> Tire de la gavetade las verdurashacia
afuerahastaeltope
Inclinehaciaarribalapartedelanterade la
gavetaytire deellahaciaafuera
Paravolver a colocar la gavetade las ver-
duras:
Alineelagavetaen losrieles
> Levantela parte delanterade la gavetay
deslicelahastasulugar.
Para obtenermejoresresultados,mantenga
las gavetasde las verdurasherm#ticamente
cerradas.
Para retirar la parrilla situada sobre la
gavetadelasverduras:
levanteelhordedelanterodela parrilla
tirede laparrilladirectamentehaciaafuera
Paravolvera colocarla parrilla dela gave-
tadelas verduras:
> coloque las barras posteriores en el
soporte
> empujelaparrillahaciaelfondohastaqueel
bordedelanteropuedaserbajadoasulugar
Surefrigeradorpuedevenirequipadocon una
bandeja para huevos (el estilo puede ser
diferente).Se puederetirarparalavarlao Ile-
varladondelanecesite.
Parausar el compartimientode productos
lacteos,levantelatapa. Elcompartimientode
productoslacteospuedeestarequipadoconuna
division para asegurarlos alimentosen sus
lugares.Sisumodelotieneunadivisi6neneste
compartimiento,simplementedeslicelode un
ladoal otroparacolocarloenellugardeseado.
En algunosmodelos,el compartimientode
productoslacteosesremovible.
Lagaveta'SafeKeeper'(modelosselectos)es
una combinaci6nde dep6sito removibley
gavetaparausosmt_ltiples.Sicolocalapalan-
ca (situadaen el costadoderechosuperior)
haciaadelante,lagavetase puedeabrir. La
gavetaofreceunespaciocerradoconveniente
paraguardartalesarticuloscomopilas,rollos
defotosy medicinas.
Losdepositosinclinables de la puerta del
refrigerador(modelosselectos)son ideales
para guardar envasesde formas extraSas
talescomobotellasde un litroy alimentosen
bolsas.Inclinandolosdep6sitoshaciaafuera,
quedaespacioabiertoparaguardaro sacar
convenientementelosarticulos.
La canastadeslizabledel congelador(mo-
delosselectos)se encuentraen el compar-
timientoprincipaldel congelador.Es un Area
convenientepara tenet facil acceso a los
articulosguardadosen la parte traseradel
congelador.Deslicela canastahaciaafuera
paraguardaro retiraralimentoscongelados.
Parasacarlacanasta:
> tirede lacanastahastaqueIlegueal tope
> levantey tiredela canastahaciaafuera
Paravolvera colocarla canasta,inviertael
procedimientoanterior.
La canasta para alimentos congelados
(modelosselectos)seencuentraen la parrilla
inferiorde la puertadel congelador. En la
canastase proveeespacioparaaquellosali-
mentoscongeladosquetiendena moverseo
deslizarse(talcomoverdurasen bolsas).
Page 42

Latemperaturadelcompartimientodeali-
mentosfrescosdelrefrigeradorsedebe
mantenerentre34oFy40oF(1oCy4oC).
Latemperaturaidealesde37oF(3oC).
Paraverificarlatemperatura,coloqueun
term6metroparaelectrodomesticosenun
vasodeaguaenelcentrodelrefrigerador.
Espere24horasantesdeverificarlatem-
peratura.Si latemperaturasobrepasa
40oF(40C)ajusteloscontrolessegunse
explicaenlapagina37.
Evitesobrecargarlasparrillasdelrefrige-
radorpuesestoreducelacirculaci6nde
airealrededordelosalimentosyocasiona
enfriamientoirregular.
FRUTAS Y VERDURAS
La gaveta de las verduras retiene la
humedadparaayudara preservarla fres-
curade las frutasy verduraspor perfodos
masprolongados.(Consultelapagina40).
Clasifiquelas frutasy verdurasantesde
guardarlasy consumaprimerolasquese
encuentren maduras o magulladas.
Descarteaquellasque muestrenseSales
dedescomposici6n.
Siempreenvuelvalosalimentosquedespi-
denolor talescomocebollasy repollode
modoque el olor no se transfieraa otros
alimentos.
Aunquelasverdurasnecesitanciertacan-
tidaddehumedadpararetenerla frescura,
demasiada humedad puede acortar el
tiempo de conservaci6n(especialmente
lasverdurascon hojas). Sequebien las
verdurasantesdeguardarlas.
QUESOS Y CARNES
> La camecruday de ave debeenvolverse
muybienparaqueno ocurranderramesy
contaminaci6ndeotrosalimentososuper-
ficies.
A vecesse puedeformarun mohoen la
superficiede los quesos duros (Suizo,
Cheddary Parmesano). Corte por Io
menos una pulgada(2 cm) alrededory
debajodelAreaafectada.Mantengaelcor-
tadoralejadodelmoho. El quesorestante
retendrasu saboty se puedecomersin
preocupaci6n.NOtrate de conservarlas
rodajas individualesde queso, queso
suave,reques6n,crema,nata cortadao
yogurcuandotenganse_alesdemoho.
PRODUCTOS LACTEOS
> Lamayoriadelos productoslacteoscomo
la leche,yogur,natacortaday reques6n >
muestranlafechade vencimientoen sus
envases para asegurar su correcta
duraci6n. Guardeestosalimentosen los
envasesoriginales y refrigerelosinme- >
diatamentey despuesdecadauso.
El compartimientodel congeladorde un
refrigeradordebe set mantenidoaproxi-
madamenteentrea0°F(-18oC).Paraver-
ificar la temperatura, coloque un ter-
m6metroparaelectrodomesticosentrelos
paquetescongeladosy espere 24 horas
antesde verificarla. Si la temperaturaes
superiora 0° F (-18o C), ajusteel control
comoseindicaen lapagina37.
Elcongeladorfuncionaramaseficazmente
si se ocupa pot Io menos dos terceras
partesdesucapacidad.
ENVOLTURA
DE ALIMENTOS PARA
SU CONGELAClON
Para reducirla deshidrataci6ny el dete-
riorode la calidad,usepapelde aluminio,
envolturaparaalimentoscongelados,bol-
sasespecialesparaalimentoscongelados
o envases hermeticamente cerrados.
Extraigala mayorcantidadposibledeaire
delpaquetey aseguresede queestebien
sellado,el aire atrapadopuede resecar,
cambiarde coloro dar mal sabor(que-
maduradecongelaci6n)a losalimentos.
> Envuelvabienlas carnesfrescasy deave
conenvolturaespecialparaalimentoscon-
geladosantesde guardarlas.
> No congelenuevamentela carneque se
hayadescongeladocompletamente.
COMO CARGAR EL
CONGELADOR
Evite guardar demasiados alimentos
calientesen el refrigeradorde una sola
vez. Esto sobrecarga el congelador,
reduce la velocidad de congelaci6ny
puedeelevarlatemperaturadelos alimen-
toscongelados.
Deje un espacioentre los paquetesde
maneraque el airepuedacircularlibre-
menteparaquelosalimentosse congelen
Iomasrapidoposible.
Eviteguardaralimentosdificilesdeconge-
lar talescomo heladoy jugo de naranja
concentradoen las parrillasde la puerta
delcongelador.Espreferibleguardarestos
alimentosen el interior del congelador
donde la temperaturafluctua menos al
abrirlapuerta.
ConsultelaTablade Conservacionde los
Alimentosenla pagina42paralos tiempos
dealmacenamientoaproximados.
4]
Page 43

TABLA DE CONSERVACION DE LOS ALIMENTOS
(Los tiempos de conservaci6n son aproximados y puedenvariar dependiendo del tipo de empaque, temperatura de almacenamientoy la calidad del
alimento cuandofue comprado.)
Mantequilla
Lechey Crema
Quesoencrema,pastadequeso
y alimentosde queso
Reques6n
CremaAcida
Quesoduro(Suizo,
Cheddary Parmesano)
Huevosenteros
Clarasoyemasrestantes
Manzanas
PIb,tanos
Peras,ciruelas,aguacate
Fresas,cerezas,damascos
Uvas
Frutasa.cidas
Pifia,cortada
Esparragos
Repollitosde Bruselas,br6coli,
coliflor,chicharos,frijoles,
cebollas,pimientos
Repollo,apio
Zanahorias,pastinaca,betarraga
y nabos
Lechuga
1mes
1semana
1a 2semanas
3a 5dias
10dias
1a 2 meses
3semanas
2a 4dias
1mes
2a 4dias
3a 4dias
2a 3dias
3a 5dias
1a 2semanas
2a 3dias
1a 2dias
3a 5dias
1a 2semanas
7a lOdias
7a lOdias
6a 9meses
No serecomienda
No serecomienda
No serecomienda
4a 6meses
Puedequedarmigajoso
No serecomienda
9a 12meses
8 meses(cocinadas)
6 meses
(enteros/pelados)
No serecomienda
6 meses
1mes(enteras)
No serecomienda
6a 12meses
8a 10meses
8a 10meses
No serecomienda
8a 10meses
No serecomienda
Envolverbienocubrir.
Verifiquelafechadelenvase.Cierrefirmemente.Novuelvaacolocarlasporciones
nousadasenelenvaseoriginal.Nocongelelacremaa menosqueseabatida.
Envolverbien.
Guardarenelenvaseoriginal. Verificarlafechadel envase.
Envolverbien.Cortarcualquiermoho.
Refrigerarcolocandoel extremopeque_ohaciaabajo.
Porcadatazadeyemasquesedeseecongelar,agregue1cucharaditadeazt_car
sisevanausarendulceso unacucharaditadesalsiesparaplatosnodulces.
Puedetambienguardarseverdesomanzanasdurasa unatemperaturade
60a70° F(15a 21oC).
Madurara temperaturaambienteantesde setrefrigeradas.Losplb,tanosy
losaguacatesseobscurecencuandosonrefrigerados.
Tambi6nse puedeguardara 60a 70°F (15a21oC). Si se refrigeran,
guardelassincubrirlas.
Nomadurarandespu6sde lacompra. User@idamente.
Nolaveantesde refrigerar.Guardeen lagavetadelasverduras.
Envuelvalos alimentosqueproducenolor. Dejeloschicharosenlas
vainas.
Envuelvalos alimentosqueproducenolory refrigereen lagavetadelas
verduras.
Retirelashojas. Envuelvalosalimentosque producenolory refrigereenla
gavetade lasverduras.
Polioy pavo,entero
Polioy pavo,presas
Pescado
Tocino
Resocordero,molida
Resoternera,asaday bistec
Jam6n,completamentecocido,
Fiambres
Cerdo,asado
Cerdo,chuletas
Salchichas,molidas
Salchichas,ahumadas
Ternera
Salchichas
Fuentes: Ministerio de Agricultura de los Estados Unidos; Instituto de Mercadotecnia de Alimentos; Servicio de Extensi6n Cooperativa, Universidad Estatal de Iowa.
entero
mitad
rebanadas
1a 2alias
1a 2alias
1a 2alias
7dias
1a 2dias
3a 5dias
7dias
5dias
3dias
3a 5dias
3a 5dias
3a 5dias
1a 2dias
7dias
3a 5dias
7dias
12meses
9 meses
2a 6meses
1rues
3a 4meses
6a 9meses
1a 2meses
1a 2meses
1a 2meses
1a 2meses
4a 6meses
4 meses
1a 2meses
1a 2meses
4a 6meses
1rues
Manteneren elenvaseoriginalpararefrigeraci6n.Coloqueen lagavetade
lacamey queso.Cuandocongeleporma.sde2 semanas,envuelvanueva-
menteconenvolturaparacongelador.
Lascarnesfrescaspuedenserguardadasenelenvaseoriginalparasu
refrigeraci6n.Col6quelasenla gavetadelacamey queso.Cuandocongele
pormb,sde2 semanas,envuelvanuevamenteconpapelparacongelador.
Losfiambressinabrirenvasadosal vaciopuedenser guardadosdurante2
semanasenla gavetadela camey queso.
Lascarnesprocesadasdebenser bienenvueltasy guardadasenla gaveta
dela camey queso.
Page 44

Si estarAausentemenosde un mes,dejelos
controlesenla posici6nnormal,
Duranteausenciasmasprolongadas:
1. Retiretodoslosalimentos.
,
Apaguela maquinade hacerhielo(siesta
instalada)y cierrelaIlavedelsuministrode
aguaal refrigerador.
,
Desenchufeel refrigerador.
4,
Limpiey sequeel refrigeradormeticulosa-
mente.
,
Dejelaspuertasabiertasparaevitarmalos
olores.
Parala mudanza,sigalos pasos1 al 4 de la
secci6n Vacaciones. AdemAs, retire y
empaqueconcuidadotodaslaspiezasquese
puedendesmontarfacilmente,Transporteel
refrigeradoren posici6nverticalconlaspuer-
tascerradasy aseguradasconcintaadhesiva.
Consultelatablaen la paginasiguientepara
las instruccionesespecificasde limpiezadel
refrigerador.
LIMPIEZA DEBAJO DEL
REFRIGERADOR
Elrefrigeradorpuederodarsehaciaafuerapara
limpiarelpisodebajodeel,Levantelostomillos
niveladoressiestanbloqueados(vetpagina34),
Tiredel refrigeradordirectamentehaciaafuera
delapared,
REEMPLAZO DE UN FOCO
Siempreuseun focoestandarde40 o 60
watts.
Congelador
La luz del congelador(modelosselectos)se
encuentraen la pared trasera,cercade la
esquinasuperiorderecha.
Parasacarlacubiertadelfoco:
Sujetela parte superiore inferiorde la
cubiertadelfoco,OptimaenelAreadelas
lengLietasde instalaci6n,aplicandosufi-
ciente presi6ncomo para desenganchar
las lengLietas. AI mismo tiempo,gire la
cubiertahaciaabajoy saquela.
Destornilleel focoy reemplacelo,
Vuelvaa colocarlacubiertadelfocogiran-
dola nuevamentea su lugary colocando
las lengLietasa presi6n en las ranuras
correspondientes.
CONDENSADOR
'NO CLEAN 'TMDE
USO COMERCIAL
Un condensadorlimpiosignificarendimiento
maseficazdel refrigerador.Graciasal diseSo
t_nicodelcondensador'NoClean'TM,yanohay
necesidaddeefectuarla limpiezarutinariadel
condensadorparausodomesticonormal.
AHORE[E([RI(IDA[
Coloqueel refrigeradorlejosdeotroselec-
trodomesticosquegenerencalorcomola
estufaoel lavavajillas,orificiosde calefac-
ci6ny luzsolardirecta.
Niveleel refrigeradory noobstruyalaven-
tilaci6nalrededorde la rejilladelantera.
Mantengael congeladorcasi Ilenopara
queescapemenosairefrioal abrirlapuer-
ta. Cuandodosterceraspartesdelconge-
ladorestenIlenas,coloquecajasdecart6n
de lechea medioIlenarcon agua en el
congelador.
Esperequelosalimentosseenfrienligera-
menteantes de colocarlosen el refrige-
radoro congelador.
Tapelosliquidos.
Limpie la humedaddel exterior de los
envasesantesdecolocarlosen el refrige-
rador.
> Evite abrir las puertas con demasiada
frecuencia.
Refrigerador
Hay dos focos situadosdebajode la parte
superiordel compartimientodel refrigerador,
en cada lado de la caja del control Dual
Cool TM.
> Sujete cuidadosamenteel foco que se
encuentradetrasdelacubierta.
> Destornilleel focoy reemplacelo.
4}
Algunosentornospuedenset muypolvorien-
tos o grasosos. En tales casos,el conden-
sadorse puedelimpiarperi6dicamentepara
asegurarel m&ximorendimiento.
Page 45

Tabla de Limpieza del Refrigerador
Rejillainferior
Condensador
Manijasdela puerta
Superficiesmetalicaspintadas:
gabinetes,puertas
Puertasdeaceroinoxidable
(modelosselectos)
Detergentesuavey aguatibia
Detergentesliquidossuaves
enaerosol
Accesoriode la aspiradora
Escobillade Limpieza(Pieza
No,20001017)disponiblede
suDistribuidor.
Detergentesuavey aguatibia
Detergentesliquidossuaves
enaerosol
Detergentesuavey aguatibia
Detergentesliquidossuaves
enaerosol
Limpiezaleve:detergente
suavey aguao unasoluci6n
deaguay vinagreblanco,
Suciedadmoderada:usar
'BonAmi'*
Descoloraciones:Limpiador
deAceroInoxidable'Cameo'*,
Retirela rejillainferiorsujetandolosextremosy tirandoladerechohacia
afuera, Paravolvera colocar,alineelos clipsconlasaberturasredondasdel
gabineteyempujecadaextremohaciaadentrohastaquela rejillainferior
entreensu lugara presi6n,
Nonecesitalimpiarloa menosqueesteubicadoen unlugargrasoso,
polvorientoo muytransitadoporanimalesdomesticos(Verpagina43).
Sequeconunpasosuaveylimpio,
Nuncalimpieelrefrigeradorcon unpasosucioo unatoallamojada,Estos
puedendejarresiduosquepuedenrayaro debilitarlapintura,No useespon-
jasde alambre,productosdelimpiezaenpolvo,blanqueadoro productosque
contenganblanqueador.Estosproductospuedenrayary corroerelacabado
de lapintura,
Nouseceraenlas piezasde plasticoo devinilo,
Useunpasoo unaesponjasuave.
Siemprelimpiesiguiendoel granodelaceroinoxidable,
Nouseblanqueadorconcloroni unproductode limpiezaquecontengablan-
queadorconcloro.
Despuesdela limpieza,enjuaguey seque.Pararestaurarel brilloyquitarlas
vetasuseel rociadorparaaceroinoxidable'StainlessSteelMagicSpray'*
(PiezaNo,20000008),
Juntadela puerta
Parrillasdevidrio
ParedInteriory
revestimientode lapuerta
Gavetas,depositos,bandeja
paraloshuevos,etc.
* Los nombresdelos productossonlasmarcasregistradasdelosrespectivosfabricantes.
Bicarbonatodesodayagua
tibia
Detergentesuavey aguatibia
Detergentesuavey aguatibia
Limpiavidrios
Detergentesliquidossuaves
enaerosol
Detergentesuavey aguatibia
Bicarbonatodesodayagua
tibia
Detergentesuavey aguatibia
Use1 o2 cucharadasde bicarbonatodesodapotcadacuartodegal6n
deagua,Asegt_resedeexprimirbienel pasoo laesponjaantesdelimpiar
alrededorde loscontroles,luceso piezaselectricas,
Elvidriodebeestara la temperaturaambienteantesdesumergirloen
aguatibia. Nuncauseaguacaliente.
Vealasindicacionesanterioresparalasoluci6ndebicarbonatodesoda,
NOuseproductosde limpiezaabrasivos,detergentesconcentrados,blan-
queadores,cerasde limpieza,solventesy abrillantadoresparalimpiarel
interiordelrefrigerador.
Sequeesmeradamente,NOloslaveenel lavavajillasautomatico,
Page 46

LasmejoraseneldiseSodelarefrigeraci6npuedenproducirsonidosensunuevorefrigeradorquesondiferentesoquenoexistianenelmodelo
antiguo,Estasmejorasfueronhechasparacrearunrefrigeradorqueseamejorparaconservarlosalimentos,queahorreenergiayqueengeneral
seamassilencioso,Debidoaquelosnuevosmodelosfuncionanmassilenciosamente,ahoraesposibledetectarsonidosqueestabanpresentesen
losmodelosmasantiguosperoquepasabaninadvertidosdebidoalosnivelesderuidomasaltos,Uuchosdeestossonidossonnormales,Potfavor
tomenotadequelassuperficiesadyacentesaunrefrigerador,talescomolasparedes,lospisosylaestanteriapuedenavecesaumentarelnivelde
estossonidos,Acontinuaci6nseindicanalgunosdelossonidosnormalesquepuedenestarpresentesenunrefrigeradornuevo,
MAQUlNADEHACERHIELO:(Si la tiene)Lam quinade
hacerhieloocasionalmentegenerar unsonidodegolpeteo
cuandoloscubos de hielocaen en el depsito del hielo.
CONTADOR DEL TIEMPO DE]
DESCONGELACION:Los refrigeradoresI
que no se descongelan tienen unI
contadordel tiempo de descongelacin i
que produce un chasquido cuandoel
refrigeradorcomienzao terminaun ciclo
dedescongelacin.
Ademstambin sepuedeo r el ruidoel motorqueempuja
el hielo des@ su bandeja antes de que caiga en el
depsito. Estosson sonidosnormalesnecesariospara la
fabricacin delhielo.
CONTRACCION Y EXPANSION DELI
COMPARTIMIENTODELCONGELADOR:I
Puedeocurrirunsonidocomoun estallido
en el congeladorcuando el refrigerador
comienza a funcionar debido a la
contraccino expandn de losmateriales
ene reade congeador.
COMPRESOR:Paraqueun refrigeradornuevo
funcione ms eficientemente,el sistema de
refrigeracin puede funcionar por un tiempo
ms prolongadoparaconservarlosalimentosa
la temperaturadeseadaparasu frescura. Este
nuevo compresor de alta eficiencia puede
funcionarpor perodos m s largos y generar
sonidostales como un zumbido agudo o un
sonidopulsante.
FLUJODELREFRIGERANTE:Elflujodel refrigerante
en su refrigerador puedecausar un sonido como
borboteo o golpeteo cuando el refrigerador est
funcionandoo justo despus de que el refrigerador
terminael cido. Elrefrigerantetodava est circulando
enlastuberas.
SONIDOS DE LA CIRCULACIONDEL AIRE: Tanto el
ventiladordel evaporadordel congeladorcomoel ventilador
del condensadoren la parte inferiordel gabinete crearn
sonidosdecirculacin delaire. Elventiladordelevaporador
est circulandoel aire fro a travs del compartimientodel
refrigeradory congelador.Elventiladordelcondensadorest
extrayendoelcalorgeneradocuandoel gabinetees enfriado.
VALVULADELAGUA (Sila tiene): Sepuededetectar
unzumbidoenla partetraseradel refrigeradorcuando
el distribuidordelhielo requierequelav Ivuladeagua
se abra para Ilenar la bandeja de la m quina de
fabricarhielo. Despus de que el hielo sale, puede
o rseel ruidode aguaquegoteacuandolasbandejas
estn siendoIlenadas.
NIVELADODELGABINETE: Un gabineteque no
est niveladopuede causar sonidosvibratorioso
golpeteo. Esto puede solucionarseajustandolos
tornillosoruedecillasniveladorasenformacorrecta.
45
Page 47

Consulte primero esta tabla de sugerencias para la soluci6n de averfas...
PROBLEMA
Nofunciona
Funcionadurantemuchotiempo,
condemasiadafrecuencia
1
G
[]
m
1
b
Laluz no trabaja
i
Resplandorvisibleen los
respiraderosdel congelador
Airetibio provenientedela
parteinferiordel gabinete.
Elgabinetevibra
Oloren el gabinete
Ruidos,sonidosy vibraciones
CAUSASPOSIBLES
Elcord6nelectricono estaenchufado.
Eltomacorrientenotienealmentaci6nel@trica.
Controldelcongeladorcolocadoen la posici6n"OFF"
(Apagado).
El refrigeradoresta endescongelaci6nautomatica.
Temperaturaambienteinferiora 55° F(13° C).
Losciclosdelos refrigeradoresmodernosson m_.s
m_.sfrecuentesparamantenertemperaturasuniformes.
Estoes normalcuandoel refrigeradores nuevooha
sidorecientementeinstalado.
Lapuertase abreduranteper[odosprolongadoso con
muchafrecuencia.
Lapuertano quedabiencerrada.
Larejillainferiorest,.bloqueada.
Elfocose quem6.
NoIlegaenergiael@tricaalrefrigerador.
Laaparici6ndeunbrillo o reflejo rojoes normal
duranteelciclodedescongelaci6n.
Esteesflujo deairenormalparalacirculaci6ndel
condensador.
Elgabinetenoestanivelado.Elsueloes debil.
Losalimentosqueproducenoloresnoestancubiertos.
Ruidonormal.
3osiblementeno es necesario solicitar servicio.
SOLUCION
Enchufeel refrigeradoren eltomacorriente.
Reemplaceel fusible,vuelvaa reponereldisyuntor.
Ajusteelcontroldelcongelador(verpagina37).
Espere25minutosparaque elciclode descongelaci6ntermine.
Vuelvaaubicarelrefrigeradorenunclimaapropiado(verinstalaci6nenlapagina34).
Espere24horashastaqueseenffiecompletamente(vercontrolesdela
temperaturaenla p_.gina37).
Estoes normal.Disminuyalasaperturasdela puerta.
Verifiqueparaversi algoest,.evitandoquela puertasecierre.
Desbloqueeparaque elaire tibiosalgadelrefrigerador.
Desenchufeel refrigeradory cambieel foco(verp_.gina43).
Verifiquesi el cord6nelectricoest,.bienenchufado.
Niveleelgabinete(verp_.gina34).
Cubrao envuelvalosalimentosque produzcanolor. Limpieelgabinete.
VerSonidosNormalesdeFuncionamientoen lap_.gina45.
Elgabinetenoestanivelado. Niveleel gabinete(verp_.gina34).
Elcongelador,refrigerador Controlajustadoa unatemperaturademasiadotibia Ajusteelcontroldelatemperatura(verpagina37),
. demasiadotibios (el helado Aperturasprolongadasdela puerta, Reduzcala frecuenciadeaperturade lapuerta.
heladoquedablando) La temperaturaambientees inferiora 55oF (130C). Refrigeradorno funcionaraIosuficientecomoparamantenerlatemperatura
m
• apropiada.
in
Losproductosconaltocontenidodeaz@ar puedenque
1 queno seendurezcancompletamentecuandoest_.n
,'1
congelados.
Congelador,refrigerador est_i Elcontrolestaenunajustedemasiadofib. Ajusteelcontroldelatemperatura(verpagina37).
demasiadofrios (congelacion
congelacionde losalimentos)
Lam_iquinade hacerhielo El brazosensorest,.en posici6nhaciaarriba. Bajeel brazosensora la posici6n"ON"(Encendido).
autom_iticanofunciona
Elgabinetenoestanivelado. Niveleel refrigerador(verpagina34).
Elsuministrodeaguano est,.conectadooestaobstruido. Conecteelsuministrodeaguao retirelasobstrucciones.
• Elcongeladorestademasiadotibio. Ajusteel controldelatemperaturadelcongelador(verpagina37).
[]
rll Los cubos dehielo tienen Cubosde hieloaSejos. Descartelos;loscubosdehielopuedenabsorberoloresqueafectantambienelsabor.
" olor/sabor
• Malacalidaddelagua. P6ngaseencontactoconlacompahfadetratamientodeagua.
Losalimentostransmitenolor/saboradel hielo. Envuelvabienlosalimentos.
Los cubos dehielo se pegan Residuodemineralesen el agua. Limpielasbandejasconun trapo humedecidoen vinagrehastaque queden
enla bandeja limpias,
Los cubos dehielo se evaporan Usolimitadodel hielo, Descarteloscubosde hieloaSejos.
Humedaden lasuperficie del Escomunduranteperbdosde altahumedad.
gabineteentre las puertas
Humedaden lasparedes Tiempoh0medocaliente. Normal,
interiores del refrigerador o
enla gavetadelas verduras Aperturasprolongadaso muyfrecuentesdela puerta. Reduzcalasaperturasde la puerta.
Lapuertano est,.cerradaen formacorrecta. Verifiquesi existealgoqueevitequela puertase cierre.
_/ Losalimentosnoenvueltosen formacorrecta. Envuelvaocubrabientodoslosalimentos.
Los alimentos sesecan Lagavetade las verdurasnoest,.biencerrada. Cierrebienlagavetade lasverduras.
=' Loscontrolesde la temperaturaest_.nen un ajuste Ajusteloscontrolesdelatemperatura(verp_.gina37).
• muyfrio.
Lospaquetesnoestanenvueltoso selladosenforma Envuelvaocubrabientodoslosalimentos.
correcta.
Humedadexcesivaen la Losalimentosnoestanenvueltosenformacorrecta. Envuelvaocubrabientodoslosalimentos.
gavetadelas verduras
TiempohOmedo,caliente. Reduzcalasaperturasde la puerta.
Page 48

LOQUENO(UBRENS ANTI]£
1. Situacionesy daSosresultantesdecualquieradelas siguienteseventualidades:
a. Instalaci6n,entregao mantenimientoinapropiados.
b. Cualquierreparaci6n,modificaci6n,alteraci6no ajuste no autorizadopor el
fabricanteo potuncentrodeservicioautorizado.
c. Ual uso,abuso,accidenteso usoirrazonable.
d. Corrienteelectrica,voltajeosuministroincorrecto.
e. Programaci6nincorrectadecualquierade loscontroles.
2. Lasgarantiasquedannulassi losnt_merosde serieoriginaleshansidoretirados,
alteradoso no sonfacilmentelegibles.
3. Focos.
.
Productoscompradosparausocomercialo industrial.
5.
El costodelservicioo Ilamadade serviciopara:
a. Corregirerroresdeinstalaci6n.
b. Instruiralusuariosobreel usocorrectodelartefacto.
c. Transportedel artefactoal establecimientodeservicio.
6. Los daSosconsecuenteso incidentalessufridospot cualquierpersonacomo
resultadodelincumplimientodeestagarantia. Enalgunosestadosnosepermite
la exclusi6no limitaci6nde daSosconsecuenteso incidentales,pot Io tanto la
limitaci6no exclusi6nanteriorpuedenoaplicarseen su caso.
Paracomprar los accesorios o los repuestos no cubiertos por la garantiadel
producto:
Potfavortengadisponibleel nt_merodemodeloyel numerodeseriey Ilamea nue-
strosespecialistasen repuestosal 1-877-232-6771en EE.UU.deLunesaViernes
desdelas7:00a.m.a las7:00p.m.,HoraCentral.Fueradelos E.E.U.U.,entreen
contactocona su distribuidorlocalde laaplicaci6no partela distribuidor.
! Llamealdistribuidordondecompr6suelectrodomesticooIlameaMaytagServicessM,
MaytagCustomerAssistanceal 1-800-688-9900,EE.UU.o al 1-800-688-2002
Canadaparaubicarunserviciode reparacionesautorizado.
I Asegt_resede conservarel cornprobantede cornpraparaverificarel estadode la
garantia. Consultelasecci6nsobrela GARANTIAparamayorinformaci6nsobre
lasresponsabilidadesdel propietarioparaserviciobajolagarantia.
! Si eldistribuidoro lacompaSiade servicionopuedenresolverel problema,escri-
ba a MaytagServicessM,Attn:CAIR®,Center,RO.Box2370,Cleveland,TN37320-
2370o Ilameal 1-800-688-9900,EE.UU.o al 1-800-688-2002,Canad&
Losclientesde EE.UU.queusanTTYparapersonasconimpedimentosauditivoso
delhabladebenIlamaral 1-800-688-2080.
NOTA:CuandoIlameo escribaacercadeunproblemadeservicio,potfavorincluya
la siguienteinformaci6n.
a.Sunombre,direcci6ny nt_merodetelefono;
b.Numerode modeloy nt_merodeserie;
c. Nombrey direcci6ndesudistribuidorotecnicodeservicio;
d.Unadescripci6nclaradelproblemaqueestaexperimentando;
e.Comprobantede compra(recibodecompra).
Lasguiasdelusuario,manualesdeservicioe informaci6nsobrelaspiezaspueden
solicitarsea MaytagServicess_,MaytagCustomerAssistance.
MAYTAG • 403 west Fourth Street North • P.O. Box 39 • Newton, Iowa 50208
Form No. B/04/03
Part No.111464-1
......... , http://www.maytag.com 16010376 Litho U.S.A.
@2003 Maytag Appliance Sales Co.
 Loading...