

Page 1
Use&CareGuide
Important Safety Instructions .................. 1-3
Features ........................................................ 4-7
Operation ................................................... 8-23
Microwave Operating Instructions .... 8-10
Sensor Operating Instructions .......... 11-12
Auto Defrost ................................................ 12
Rapid Defrost .............................................. 13
Auto Cook .................................................... 13
Convection Cooking ............................ 14-18
Combination/Speed Cooking ............ 19-22
Broiling ......................................................... 23
Heating/Reheating Guide .......................... 24
Model MMV6178AA
Combination Oven
Keep instructions for future reference.
Be sure manual stays with oven.
Form No. A/05/04 c2004 Maytag Appliances
Fresh Vegetable Guide ............................... 25
Maintenance .......................................... 26-27
Recommended Utensils ............................. 28
Troubleshooting ..................................... 29-30
Warranty ........................................................ 31
Guide d'utUisation et d'entretien .............. 32
Guia de Uso y Cuidado ............................... 64
3828WSA4207 Part No. 8112P265-60 Printed in Korea
Page 2

Importnn!SnfetyInstructions
What You Need to Know About
Safety Instructions
Warning and Important Safety Instructions appearing in
this manual are not meant to cover all possible conditions
and situations that may occur. Common sense, caution, and
care must be exercised when maintaining, or operating
microwave.
Always contact your dealer, distributor, service agent, or
manufacturer about problems or conditions you do not
understand.
Recognize Safety Symbols, Words,
Labels
Page 3
Importnn!Snfet¥Instructions
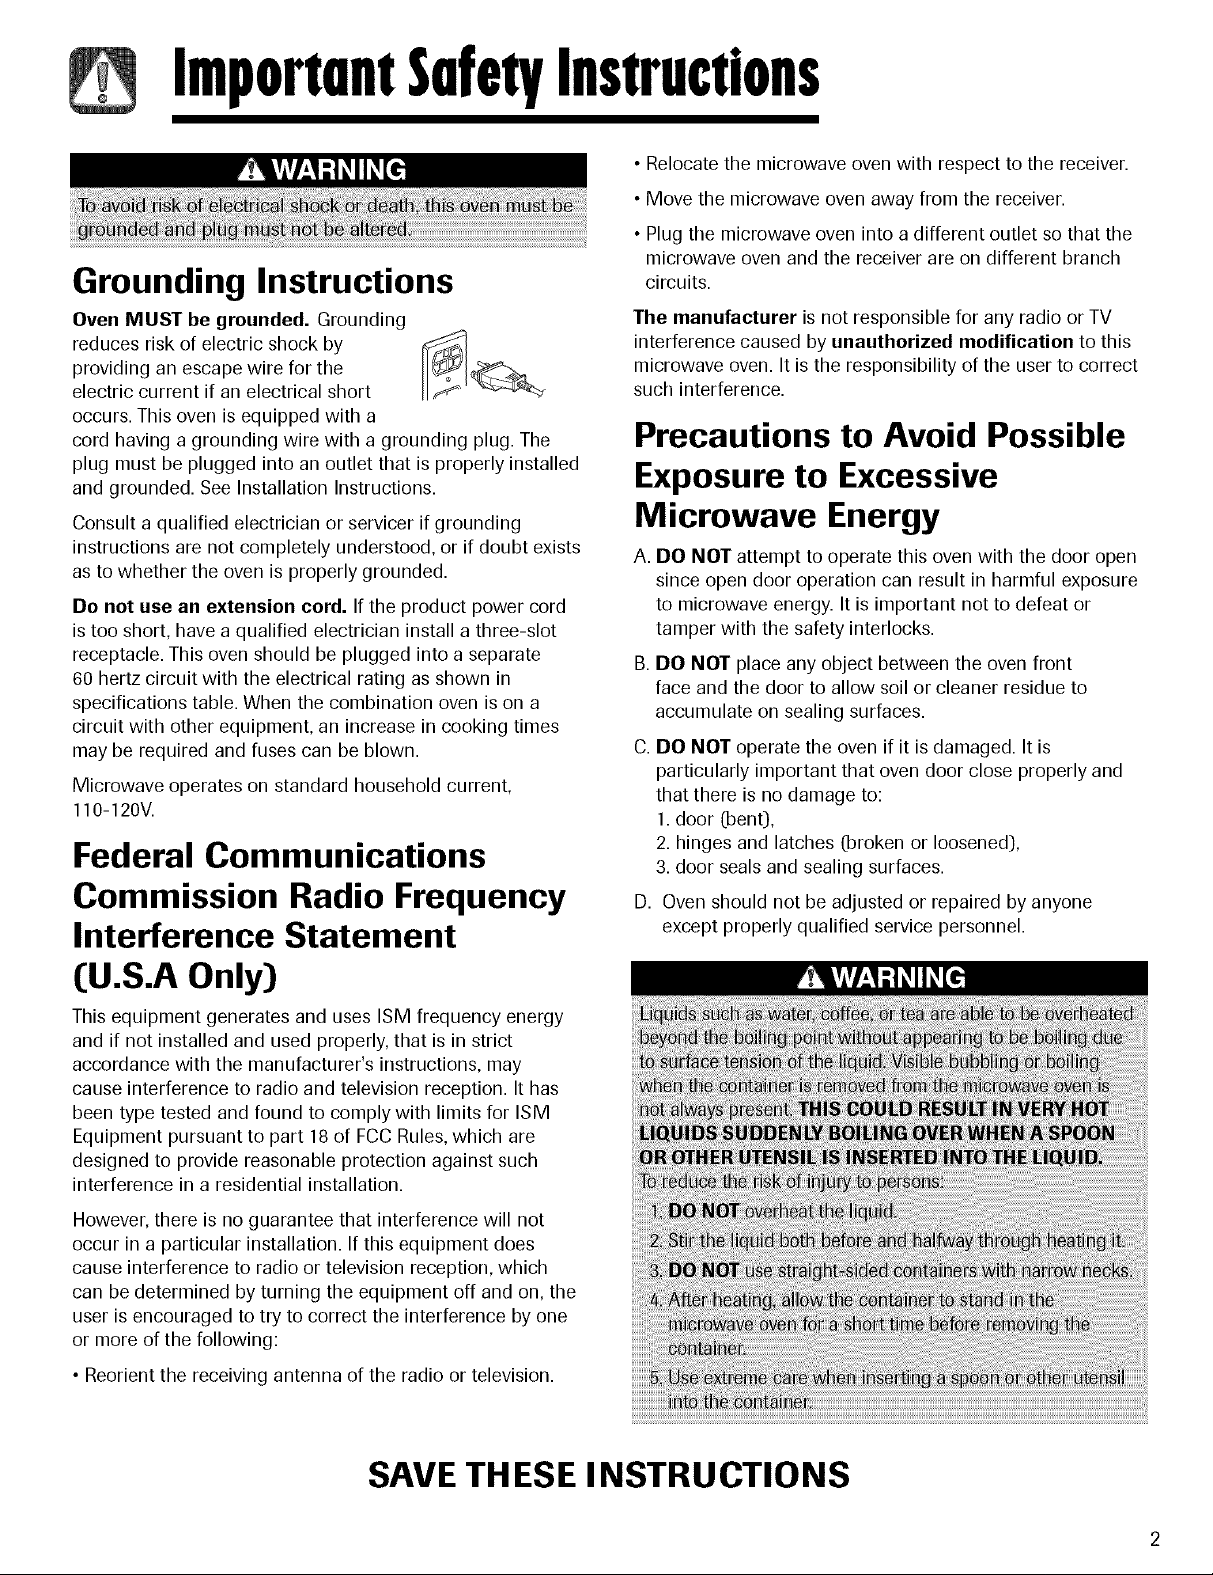
Grounding Instructions
Oven MUST be grounded. Grounding
reduces risk of electric shock by
providing an escape wire for the
electric current if an electrical short
occurs. This oven is equipped with a
cord having agrounding wire with a grounding plug. The
plug must be plugged into an outlet that is properly installed
and grounded. See Installation Instructions.
Consult a qualified electrician or servicer if grounding
instructions are not completely understood, or if doubt exists
as to whether the oven is properly grounded.
Do not use an extension cord. If the product power cord
is too short, have a qualified electrician install a three-slot
receptacle. This oven should be plugged into a separate
60 hertz circuit with the electrical rating as shown in
specifications table. When the combination oven is on a
circuit with other equipment, an increase in cooking times
may be required and fuses can be blown.
Microwave operates on standard household current,
110-120V.
Federal Communications
Commission Radio Frequency
Interference Statement
• Relocate the microwave oven with respect to the receiver.
• Move the microwave oven away from the receiver.
• Plug the microwave oven into a different outlet so that the
microwave oven and the receiver are on different branch
circuits.
The manufacturer is not responsible for any radio or TV
interference caused by unauthorized modification to this
microwave oven. It is the responsibility of the user to correct
such interference.
Precautions to Avoid Possible
Exposure to Excessive
Microwave Energy
A. DO NOT attempt to operate this oven with the door open
since open door operation can result in harmful exposure
to microwave energy. It is important not to defeat or
tamper with the safety interlocks.
B. DO NOT place any object between the oven front
face and the door to allow soil or cleaner residue to
accumulate on sealing surfaces.
C. DO NOT operate the oven if it is damaged. It is
particularly important that oven door close properly and
that there is no damage to:
1.door (bent),
2. hinges and latches (broken or loosened),
3.door seals and sealing surfaces.
D. Oven should not be adjusted or repaired by anyone
except properly qualified service personnel.
(U.S.A Only)
This equipment generates and uses ISM frequency energy
and if not installed and used properly, that is in strict
accordance with the manufacturer's instructions, may
cause interference to radio and television reception. It has
been type tested and found to comply with limits for ISM
Equipment pursuant to part 18of FCC Rules,which are
designed to provide reasonable protection against such
interference in a residential installation.
However, there is no guarantee that interference will not
occur in a particular installation. If this equipment does
cause interference to radio or television reception, which
can be determined by turning the equipment off and on, the
user is encouraged to try to correct the interference by one
or more of the following:
• Reorient the receiving antenna of the radio or television.
SAVE TH ESE INSTRUCTIONS
Page 4
ImportnntSnfet¥Instructions
SAVE THESE INSTRUCTIONS
Page 5
Features
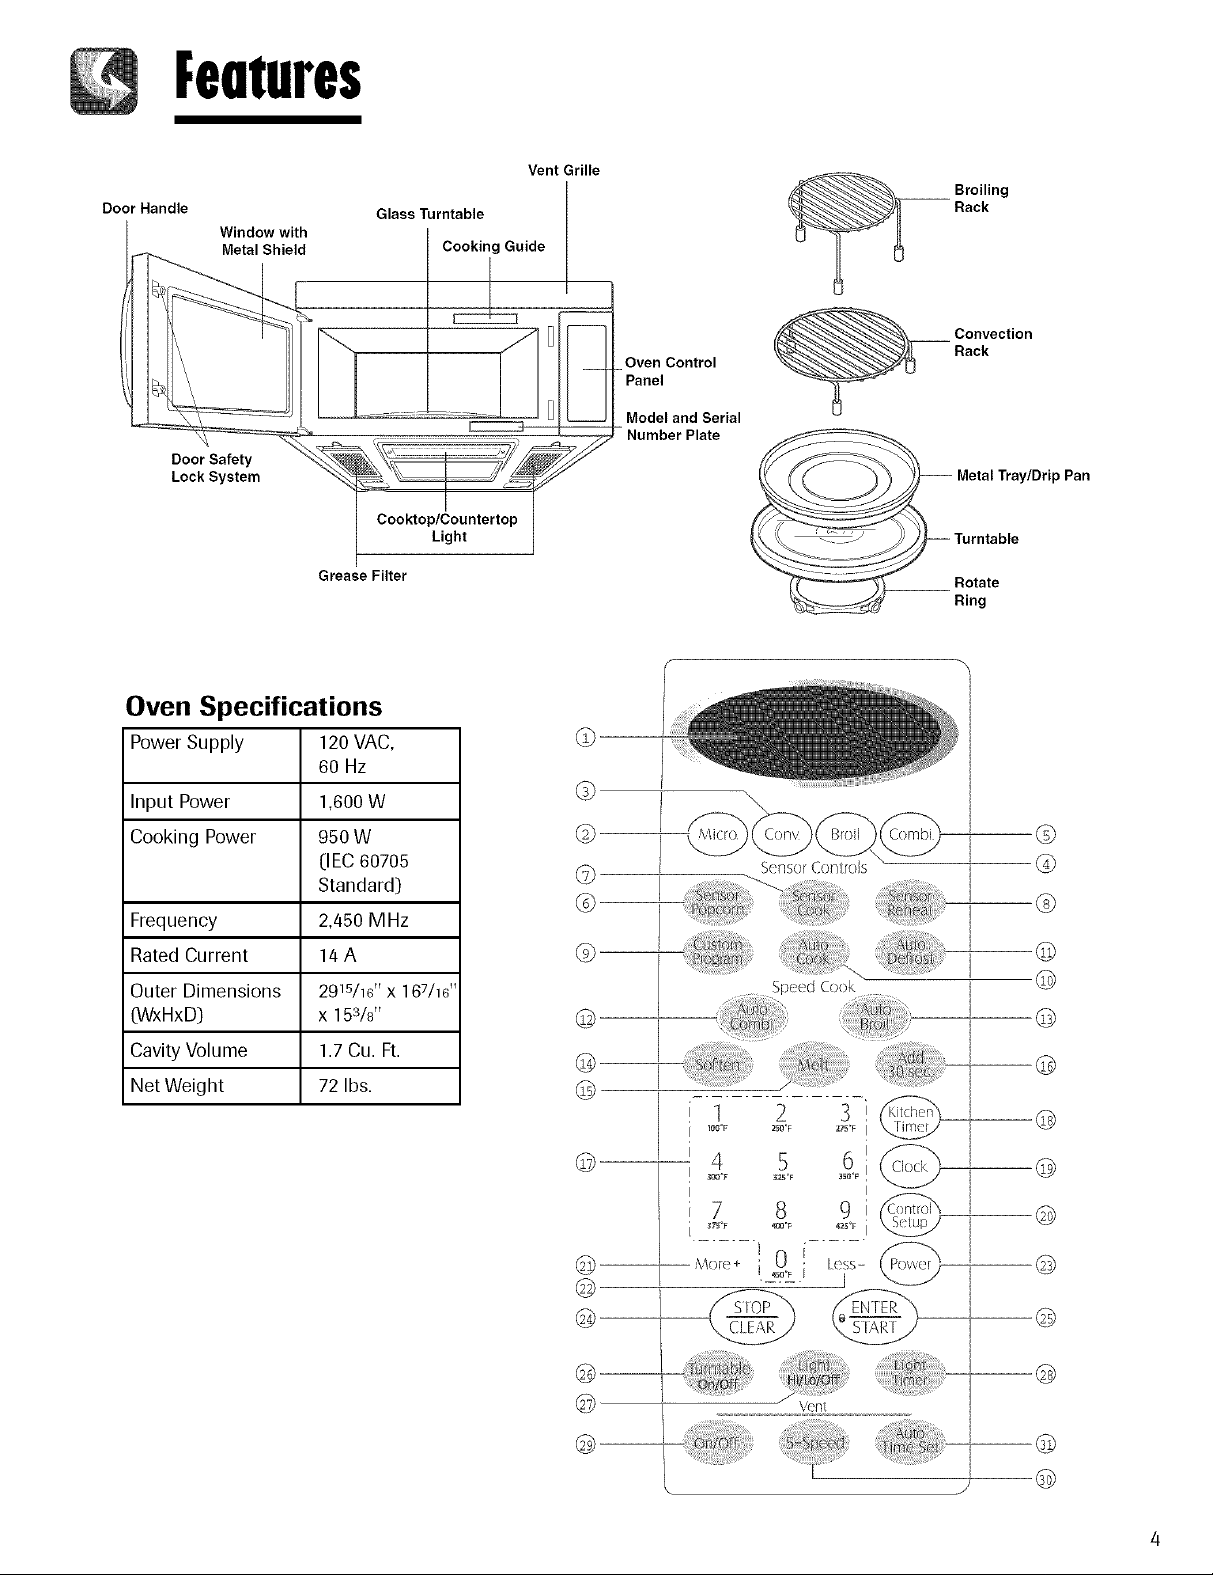
Vent Grille
Door Handle
Window with
Metal Shield
Door Safety
Lock System
Glass Turntable
Cooktop/Countertop
Grease Filter
Oven Specifications
Power Supply 120VAC,
60 Hz
Input Power 1,600W
Cooking Power 950 W
(IEC6O7O5
Standard)
Frequency 2,450 MHz
Rated Current 14A
Outer Dimensions 29W16" x 167/16"
(WxHxD) x 153/W'
Cavity Volume 1.7Cu. R.
Net Weight 72 Ibs.
Cooking Guide
Light
-Panel
©
®
@
@
@
©
@
®
Oven Control
Model and Serial
Number Plate
Rack
_I Broiling
Rack
Convection
_ etal Tray/Drip
Turntable
_Rotate
Ri°g
S( rlsor ConlroJs ................................... (_
I
Pan
®
@
@
@
@
@
@
©
@
@
(!!i
I
I
/
©
Page 6
Fentures
FEATURES
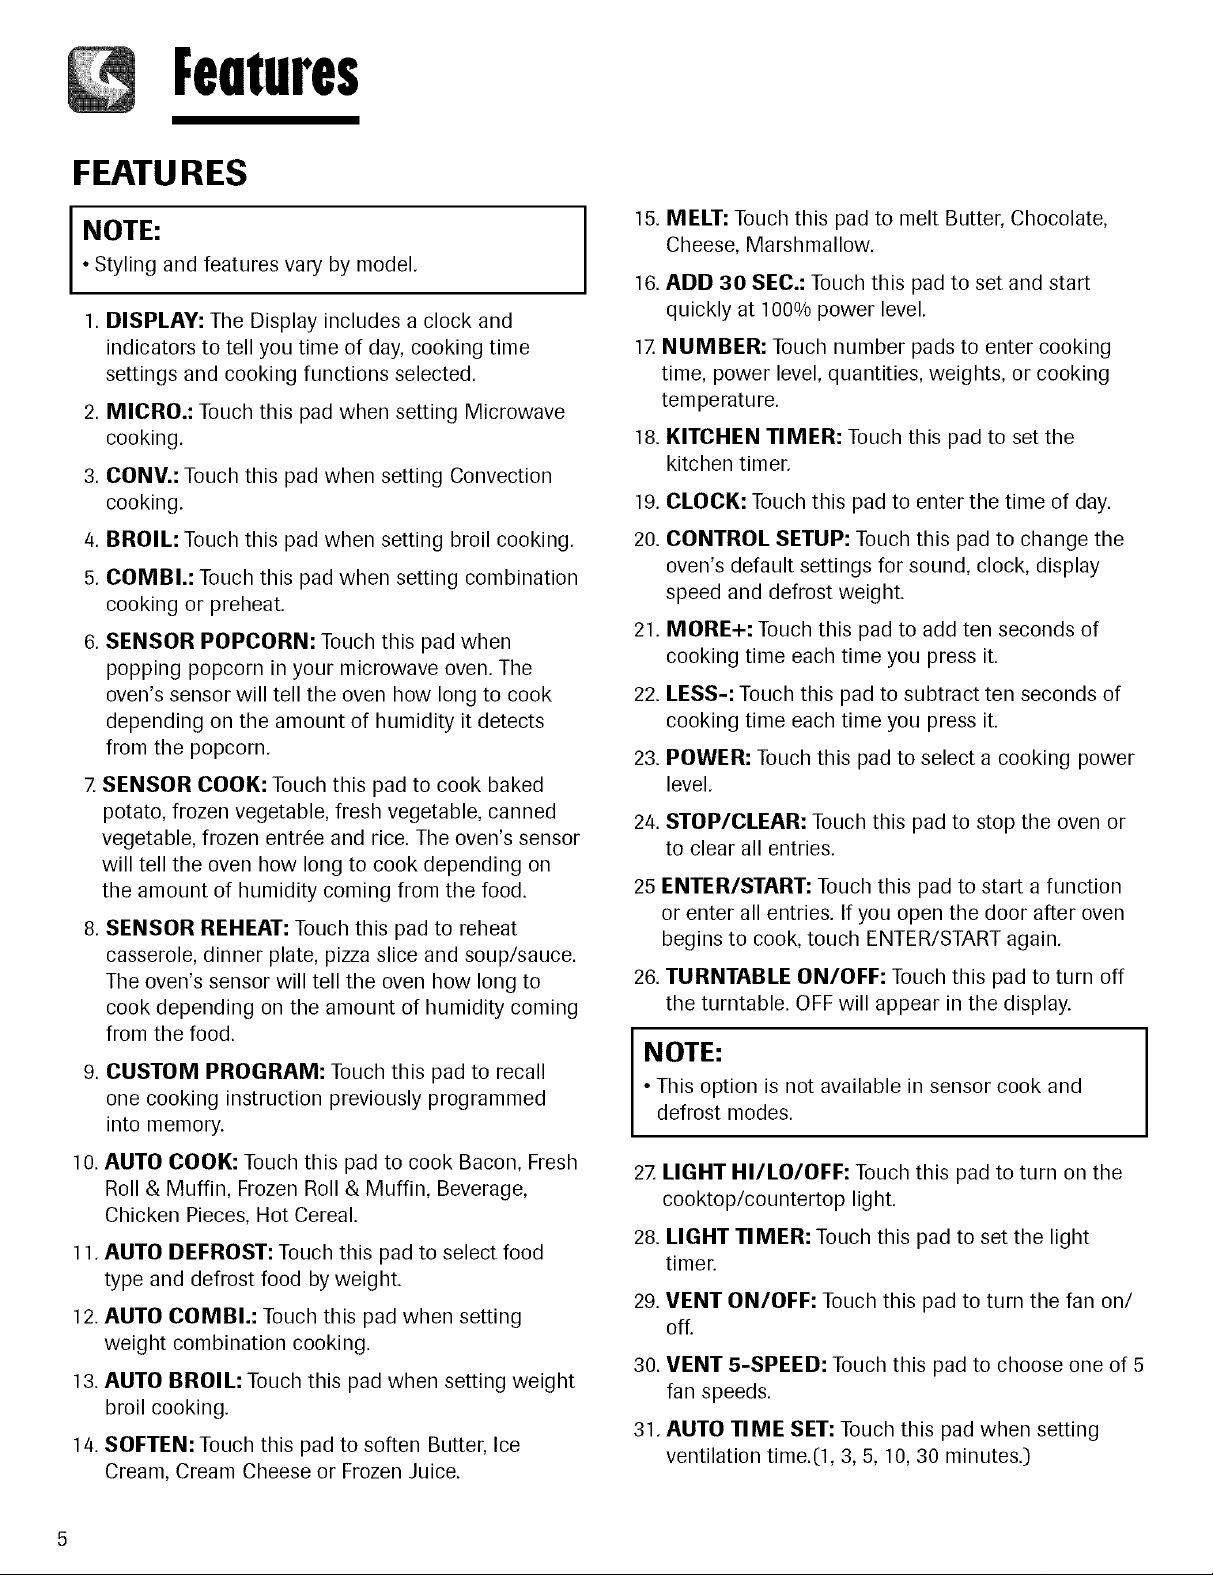
NOTE:
• Styling and features vary by model.
1. DISPLAY: The Display includes a clock and
indicators to tell you time of day, cooking time
settings and cooking functions selected.
2. MICRO.: Touch this pad when setting Microwave
cooking.
3. CONV.: Touch this pad when setting Convection
cooking.
/4.BROIL: Touch this pad when setting broil cooking.
5. COMBI.: Touch this pad when setting combination
cooking or preheat.
6. SENSOR POPCORN: Touch this pad when
popping popcorn in your microwave oven. The
oven's sensor will tell the oven how long to cook
depending on the amount of humidity it detects
from the popcorn.
7.SENSOR COOK: Touch this pad to cook baked
potato, frozen vegetable, fresh vegetable, canned
vegetable, frozen entree and rice. The oven's sensor
will tell the oven how long to cook depending on
the amount of humidity coming from the food.
8. SENSOR REHEAT: Touch this pad to reheat
casserole, dinner plate, pizza slice and soup/sauce.
The oven's sensor will tell the oven how long to
cook depending on the amount of humidity coming
from the food.
9. CUSTOM PROGRAM: Touch this pad to recall
one cooking instruction previously programmed
into memory.
15.
MELT: Touch this pad to melt Butter, Chocolate,
Cheese, Marshmallow.
I
16. ADD 30 SEC.: Touch this pad to set and start
quickly at 100% power level.
17.NUMBER: Touch number pads to enter cooking
time, power level, quantities, weights, or cooking
temperature.
18. KITCHEN TIMER: Touch this pad to set the
kitchen timer.
19.
CLOCK: Touch this pad to enter the time of day.
20.
CONTROL SETUP: Touch this pad to change the
oven's default settings for sound, clock, display
speed and defrost weight.
21.
MORE+: Touch this pad to add ten seconds of
cooking time each time you press it.
22.
LESS-: Touch this pad to subtract ten seconds of
cooking time each time you press it.
23.
POWER: Touch this pad to select a cooking power
level.
24.
STOP/CLEAR: Touch this pad to stop the oven or
to clear all entries.
25 ENTER/START: Touch this pad to start a function
or enter all entries. If you open the door after oven
begins to cook, touch ENTER/START again.
26. TURNTABLE ON/OFF: Touch this pad to turn off
the turntable. OFF will appear in the display.
NOTE:
• This option is not available in sensor cook and
defrost modes.
10. AUTO COOK: Touch this pad to cook Bacon, Fresh
Roll & Muffin, Frozen Roll & Muffin, Beverage,
Chicken Pieces, Hot Cereal.
11. AUTO DEFROST: Touch this pad to select food
type and defrost food by weight.
12. AUTO COMBI.: Touch this pad when setting
weight combination cooking.
13. AUTO BROIL: Touch this pad when setting weight
broil cooking.
14. SOFTEN: Touch this pad to soften Butter, Ice
Cream, Cream Cheese or Frozen Juice.
27.LIGHT HI/LO/OFF: Touch this pad to turn on the
cooktop/countertop light.
28. LIGHT TIMER: Touch this pad to set the light
timer.
29. VENT ON/OFF: Touch this pad to turn the fan on/
off.
30. VENT 5-SPEED: Touch this pad to choose one of 5
fan speeds.
31. AUTO TIME SET: Touch this pad when setting
ventilation time.(1, 3, 5, 10, 30 minutes.)
Page 7

Features
LEARN ABOUT YOUR
M ICROWAVE OVEN
This section discusses the concepts behind microwave
cooking and introduces you to the basics you need to
know to operate your microwave oven. Please read this
information before use.
CLOCK
This oven includes a 12-hour clock.
Example: To set 8:00 AM.
1. Touch CLOCK pad.
CONTROL SETU P
You can change the default values for beep sound,
clock, display speed and defrost weight mode.
See following chart for more information.
1 Sound ON/OFF 1 Sound ON
control 2 Sound OFF
2 Clock ON/OFF 1 Clock ON
control 2 Clock OFF
3 Scroll speed 1 Slow speed
2 Normal speed
3 Fastspeed
4 Weight mode 1 Lbs.
selected 2 Kg.
Example: To change weight mode
[from Lbs. to Kg.).
1. Touch CONTROL SETUP pad.
4
2. Touch number 4 pad.
800
4ceoF 45_oF ,_OoF
2. Enter the time by using the number
key pad.
3. Touch ENTER/START pad.
(Press number 1 for AM, number 2
for PM.)
4. Touch ENTER/START pad.
KITCHEN TIMER
You can use your microwave oven as a timer. Use the
Timer for timing up to 99 minutes, 99 seconds.
Example: To time 3 minutes.
1. Touch KITCHEN TIMER pad.
3OO
275°F 4S_°F 450_F
2. Enter the time by using the number
key pad.
3. Touch ENTER/START pad. When the
time is over, you will hear beeps and
END will display.
_0oF
2
3. Touch number 2 pad.
VENT FAN
The fan moves steam and other vapors from the
cooking surface.
Example: To set Level 4.
1. Touch ON/OFF pad. This shows the
last level until you select the fan
speed level.
2. Touch this pad until Level 4 appears
in the display.
Touch ON/OFF pad to turn off fan when desired.
NOTE:
• If the temperature from the range or cooktop below
the oven gets too hot, the exhaust fan in the vent
hood will automatically turn on at the LEVEL 5
setting to protect the oven.
It may stay on up to an hour to cool the oven. When
this occurs, the ON/OFF button will not turn the fan
off.
Page 8
Fentures
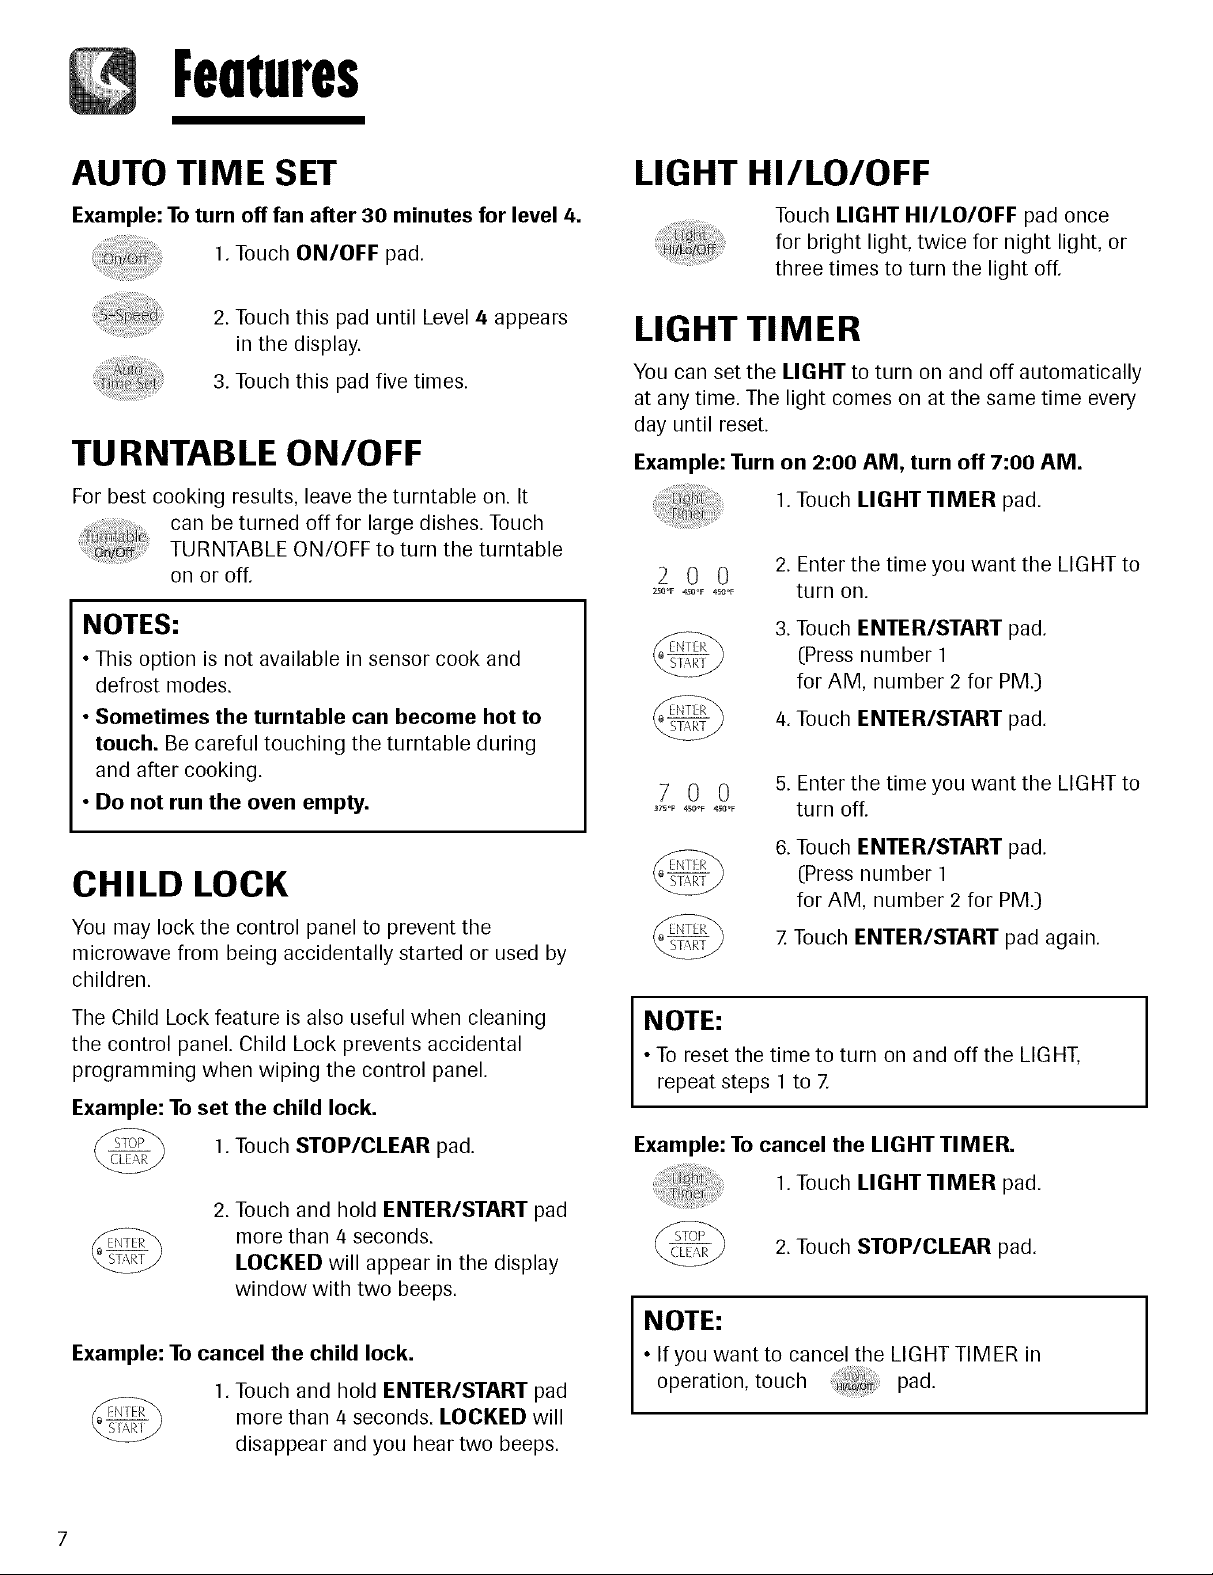
AUTO TIME SET
Example: To turn off fan after 30 minutes for level 4.
1. Touch ON/OFF pad.
2. Touch this pad until Level 4 appears
in the display.
3. Touch this pad five times.
TU RNTABLE ON/OFF
For best cooking results, leave the turntable on. It
can be turned off for large dishes. Touch
TURNTABLE ON/OFF to turn the turntable
on or off.
NOTES:
• This option is not available in sensor cook and
defrost modes.
• Sometimes the turntable can become hot to
touch. Be careful touching the turntable during
and after cooking.
• Do not run the oven empty.
LIGHT HI/LO/OFF
Touch LIGHT HI/LO/OFF pad once
for bright light, twice for night light, or
three times to turn the light off.
LIGHT TIMER
You can set the LIGHT to turn on and off automatically
at any time. The light comes on at the same time every
day until reset.
Example: Turn on 2:00 AM, turn off 7:00 AM.
1. Touch LIGHT TIMER pad.
2OO
ZS_oF 45_oF 4so_r
00
375"F 4_OF 4_F
2. Enter the time you want the LIGHT to
turn on.
3. Touch ENTER/START pad.
(Press number 1
for AM, number 2 for PM.)
/4.Touch ENTER/START pad.
5. Enter the time you want the LIGHT to
turn off.
CH ILD LOCK
You may lock the control panel to prevent the
microwave from being accidentally started or used by
children.
The Child Lock feature is also useful when cleaning
the control panel. Child Lock prevents accidental
programming when wiping the control panel.
Example: To set the child lock.
1. Touch STOP/CLEAR pad.
2. Touch and hold ENTER/START pad
more than/4 seconds.
LOCKED will appear in the display
window with two beeps.
Example: To cancel the child lock.
1. Touch and hold ENTER/START pad
more than 4 seconds. LOCKED will
disappear and you hear two beeps.
6. Touch ENTER/START pad.
(Press number 1
for AM, number 2 for PM.)
7 Touch ENTER/START pad again.
NOTE:
• To reset the time to turn on and off the LIGHT,
repeat steps 1 to 7.
Example: To cancel the LIGHT TIMER.
1. Touch LIGHT TIMER pad.
2. Touch STOP/CLEAR pad.
NOTE:
• If you want to cancel the LIGHT TIMER in
operation, touch _o_ pad.
Page 9
Operution
M ICROWAVE OPERATI NG
INSTRUCTIONS
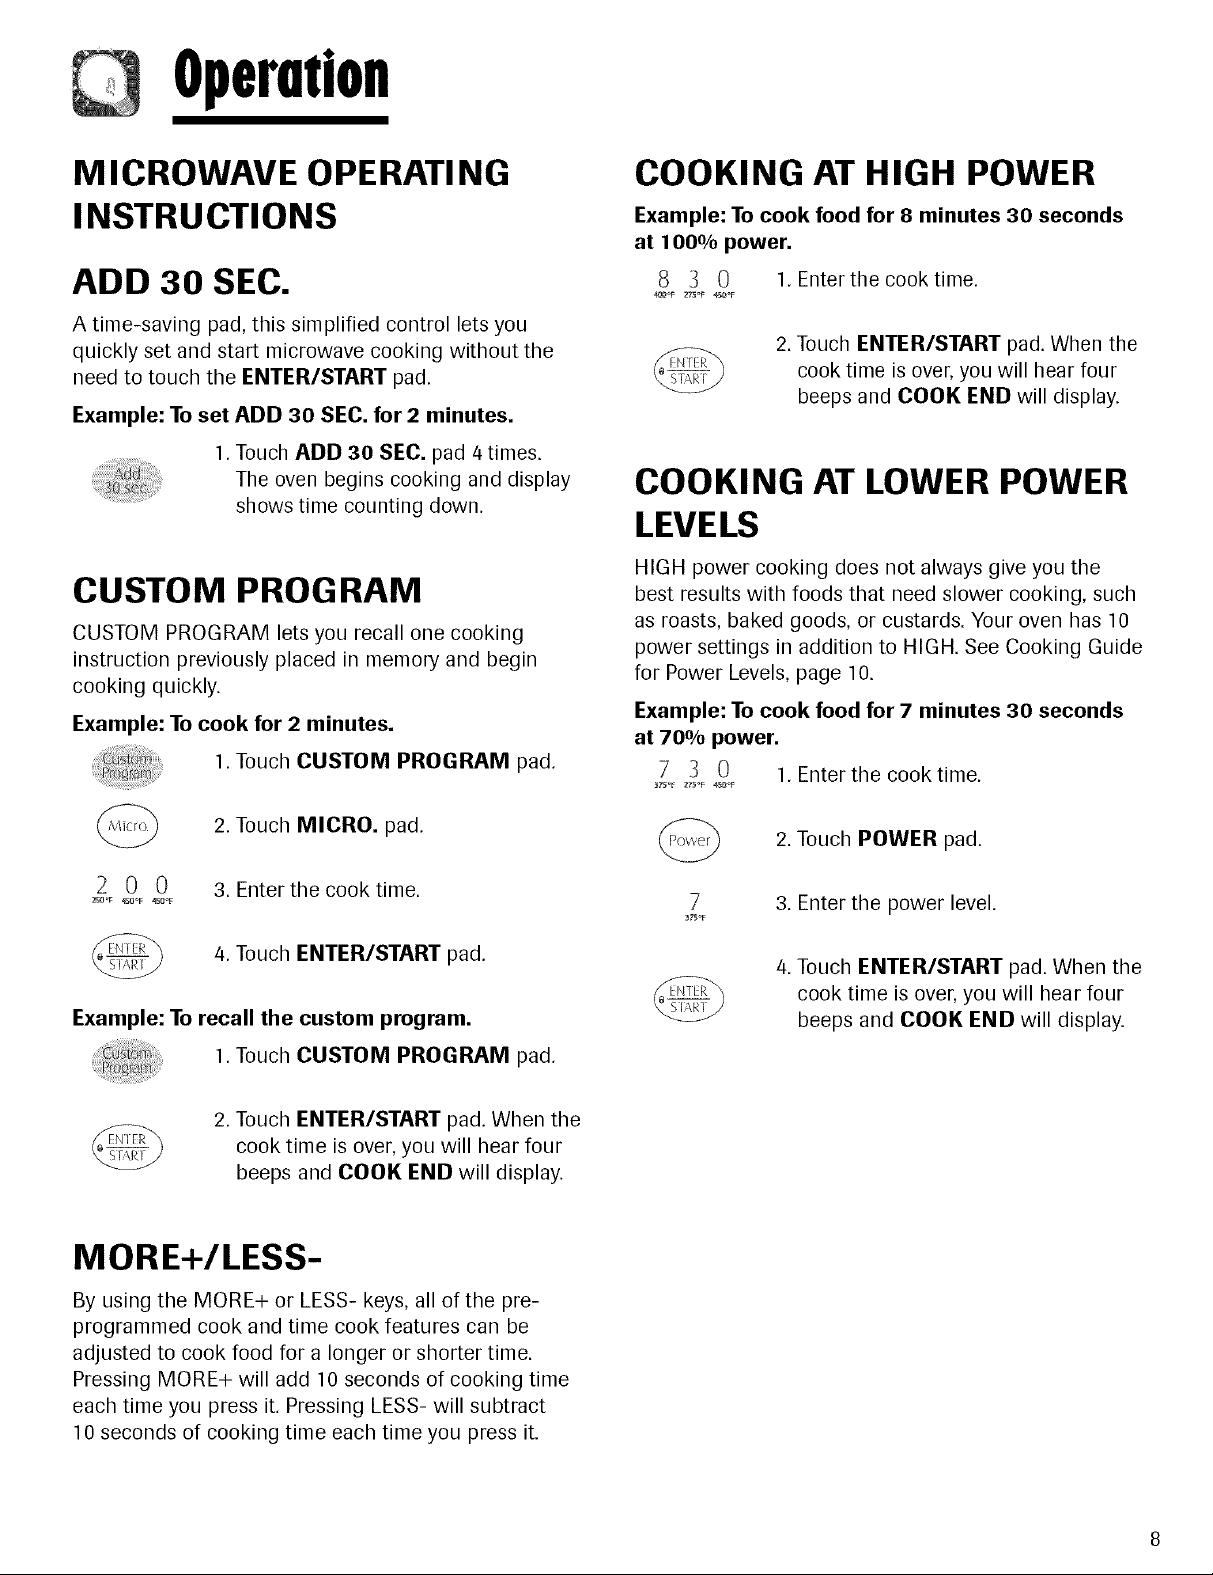
ADD 3O SEC.
A time-saving pad, this simplified control lets you
quickly set and start microwave cooking without the
need to touch the ENTER/START pad.
Example: To set ADD 30 SEC. for 2 minutes.
1. Touch ADD 30 SEC. pad 4 times.
The oven begins cooking and display
shows time counting down.
CUSTOM PROGRAM
CUSTOM PROGRAM lets you recall one cooking
instruction previously placed in memory and begin
cooking quickly.
Example: To cook for 2 minutes.
.... 1 Touch CUSTOM PROGRAM pad.
COOKING AT HIGH POWER
Example: To cook food for 8 minutes 30 seconds
at 100% power.
8 3 0 1. Enter the cook time.
400_ 27S"F _0°F
2. Touch ENTER/START pad. When the
cook time is over, you will hear four
beeps and COOK END will display.
COOKING AT LOWER POWER
LEVELS
HIGH power cooking does not always give you the
best results with foods that need slower cooking, such
as roasts, baked goods, or custards. Your oven has 10
power settings in addition to HIGH. See Cooking Guide
for Power Levels, page 10.
Example: To cook food for 7 minutes 30 seconds
at 700/0 power.
7 3 0 1. Enter the cook time.
_75_F 275°F 4_oF
2. Touch MICRO. pad.
0 0
2_ 450oF 450oF
Example: To recall the custom program.
3• Enter the cook time.
/4.Touch ENTER/START pad.
1. Touch CUSTOM PROGRAM pad.
2. Touch ENTER/START pad• When the
cook time is over, you will hear four
beeps and COOK END will display.
MORE+/LESS-
By using the MORE+ or LESS- keys, all of the pre-
programmed cook and time cook features can be
adjusted to cook food for a longer or shorter time.
Pressing MORE+ will add 10 seconds of cooking time
each time you press it• Pressing LESS- will subtract
10 seconds of cooking time each time you press it.
_75°F
2. Touch POWER pad.
7
3. Enter the power level•
4. Touch ENTER/START pad. When the
cook time is over, you will hear four
beeps and COOK END will display.
Page 10

Operation
COOKING WITH MORE THAN
ONE COOK CYCLE
For best results, some recipes call for one Power Level
for a certain length of time, and another Power Level
for another length of time. Your oven can be set to
change from one to another automatically, for up to
two cycles.
Example: To cook food for 3 minutes at 100%
power and then 700/0 power for 7 minutes
30 seconds.
30O
Z75°F 4_OOF _OOF
730
1. Enter the first cook time.
2. Touch MICRO. pad.
3. Enter the second cook time.
/4.Touch POWER pad.
5. Enter the power level.
MELT CHART
Butter, 1 1 - 3 sticks
Margarine
Chocolate 2 /4or 8 oz.
Cheese 3 8 or 16 oz.
Marshmallow /4 5 or 10 oz.
SOFTEN
[Butter, Ice Cream, Cream Cheese, Frozen Juice)
This oven uses low power to soften foods. Choose the
category of the food you are cooking and enter the
quantity.
See the SOFTEN CHART on this page for the settings
available.
1. Touch STOP/CLEAR pad.
2. Touch SOFTEN pad.
6. Touch ENTER/START pad. When the
cook time is over, you will hear four
beeps and COOK END will display.
MELT
([Butter, Chocolate, Cheese, Marshmallow)
This oven uses low power to melt foods. Choose the
category of the food you are cooking and enter the
quantity.
See the MELT CHART on this page for the settings
available.
1. Touch STOP/CLEAR pad.
2. Touch MELT pad.
2
2_OoF
2
_O_F
3. Choose food category.
/4.Touch number for food quantity.
250°F
25e_
2
2
3. Choose food category.
/4.Touch number for food quantity.
5. Touch ENTER/START pad.
SOFTEN CHART
Butter 1 1 - 3 sticks
Ice Cream 2 Pint, Quart,
Half gallon
Cream 3 3 or 8 oz.
Cheese
Frozen Juice /4 6, 12 or 16 oz.
5. Touch ENTER/START pad.
Page 11

Operation
COOKING GUIDE FOR POWER LEVELS
The 10 power levels in addition to HIGH allow you to choose the best power level for the food you are cooking.
Below are listed all the power levels, examples of foods best cooked at each level, and the amount of microwave
power you are using.
10 • Boil water.
(High) • Cook ground beet
• Make candy.
• Cook fresh fruits and vegetables.
• Cook fish and poultry.
• Preheat browning dish.
• Reheat beverages.
• Bacon slices.
9 • Reheat meat slices quickly.
• Saute onions, celery, and green pepper.
8 • All reheating.
• Cook scrambled eggs.
7 • Cook breads and cereal products.
• Cook cheese dishes, veal.
• Cook cakes, muffins, brownies, cupcakes.
6 • Cook pasta.
5 • Cook meats, whole poultry.
• Cook custard.
• Cook whole chicken, turkey, spare ribs, rib roast, sirloin roast.
4 • Cook less tender cuts of meat.
• Reheat frozen convenience foods.
3 • Thawing meat, poultry, and seafood.
• Cooking small quantities of food.
• Finish cooking casserole, stew, and some sauces.
2 • Soften butter and cream cheese.
• Heating small amounts of food.
1 • Soften ice cream.
• Raise yeast dough.
0 • Standing time.
10
Page 12
Operution
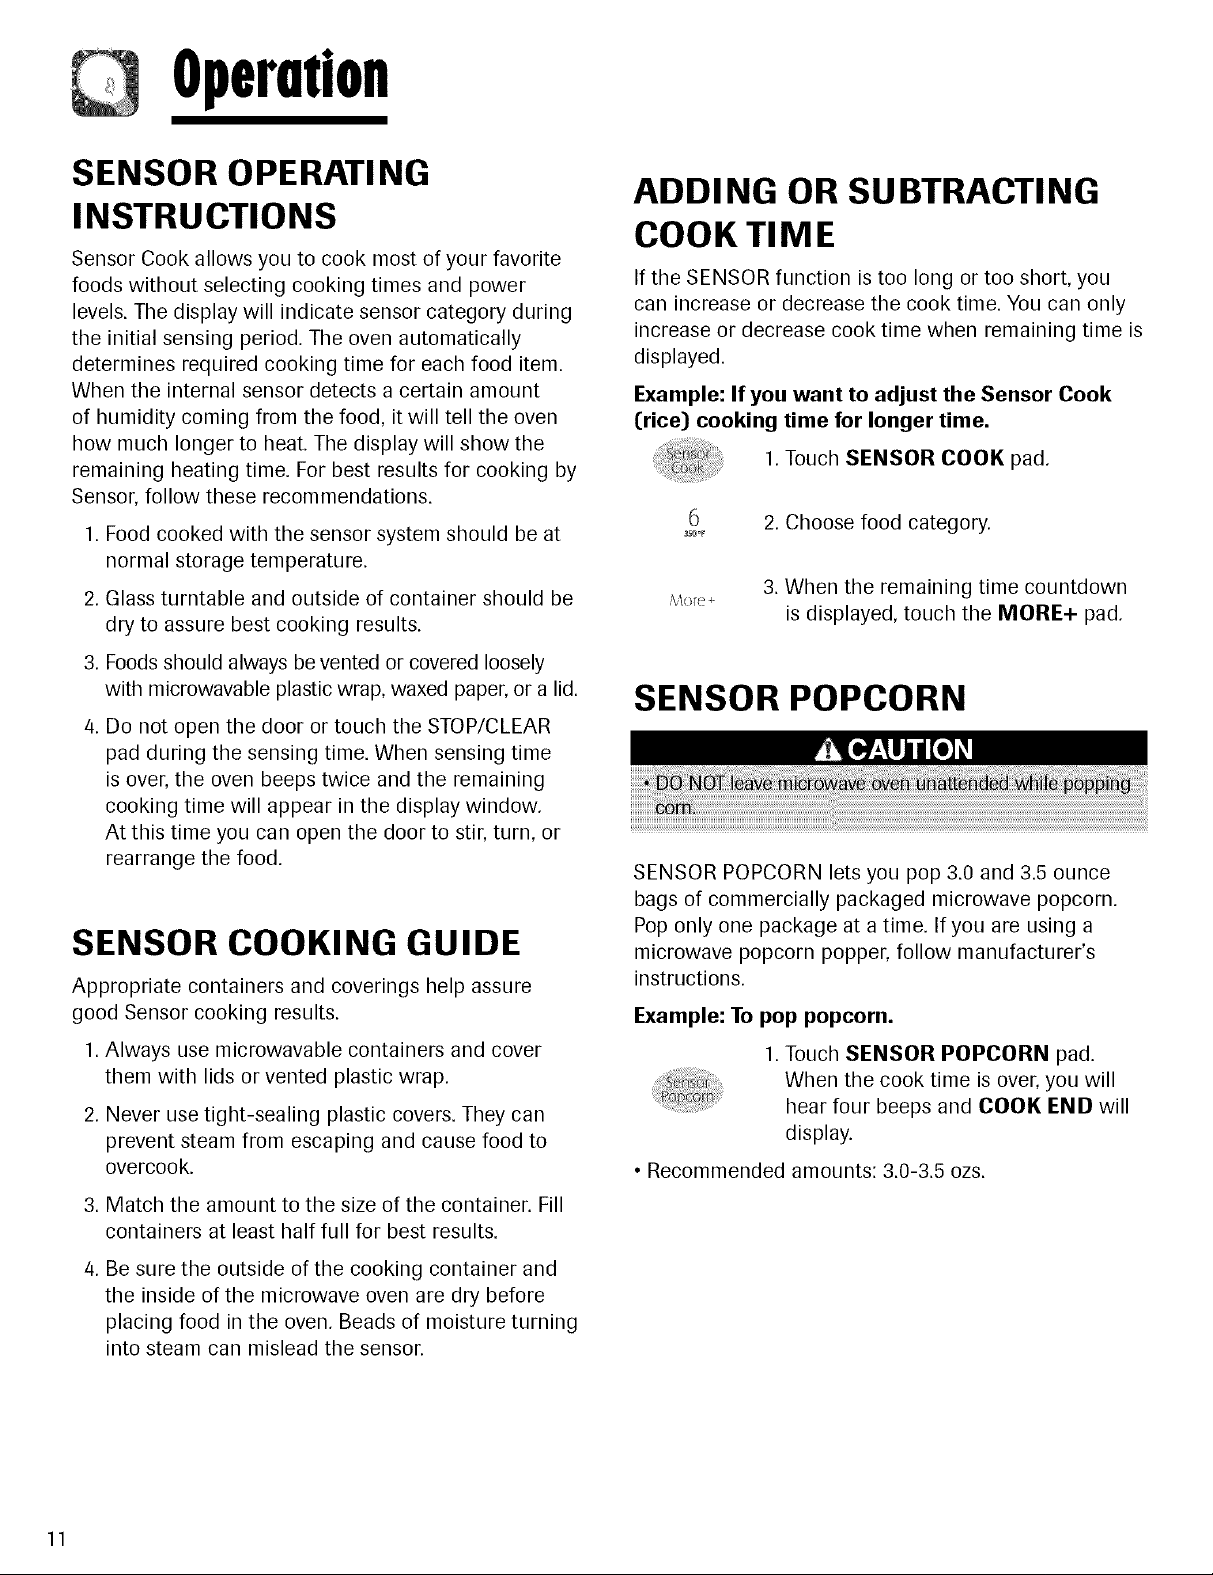
SENSOR OPERATI NG
INSTRUCTIONS
Sensor Cook allows you to cook most of your favorite
foods without selecting cooking times and power
levels. The display will indicate sensor category during
the initial sensing period. The oven automatically
determines required cooking time for each food item.
When the internal sensor detects a certain amount
of humidity coming from the food, it will tell the oven
how much longer to heat. The display will show the
remaining heating time. For best results for cooking by
Sensor, follow these recommendations.
1. Food cooked with the sensor system should be at
normal storage temperature.
2. Glass turntable and outside of container should be
dry to assure best cooking results.
3. Foods should always bevented or covered loosely
with microwavable plastic wrap, waxed paper, or a lid.
4. Do not open the door or touch the STOP/CLEAR
pad during the sensing time. When sensing time
is over, the oven beeps twice and the remaining
cooking time will appear in the display window.
At this time you can open the door to stir, turn, or
rearrange the food.
SENSOR COOKING GUIDE
Appropriate containers and coverings help assure
good Sensor cooking results.
1. Always use microwavable containers and cover
them with lids or vented plastic wrap.
2. Never use tight-sealing plastic covers. They can
prevent steam from escaping and cause food to
overcook.
3. Match the amount to the size of the container. Fill
containers at least half full for best results.
ADDI NG OR SU BTRACTI NG
COOK TIME
If the SENSOR function is too long or too short, you
can increase or decrease the cook time. You can only
increase or decrease cook time when remaining time is
displayed.
Example: If you want to adjust the Sensor Cook
Crice) cooking time for longer time,
1. Touch SENSOR COOK pad.
6
_50°F
2. Choose food category.
3. When the remaining time countdown
is displayed, touch the MORE+ pad.
SENSOR POPCORN
SENSOR POPCORN lets you pop 3.0 and 3.5 ounce
bags of commercially packaged microwave popcorn.
Pop only one package at a time. If you are using a
microwave popcorn popper, follow manufacturer's
instructions.
Example: To pop popcorn.
1. Touch SENSOR POPCORN pad.
When the cook time is over, you will
hear four beeps and COOl{ END will
display.
• Recommended amounts: 3.0-3.5 ozs.
4. Be sure the outside of the cooking container and
the inside of the microwave oven are dry before
placing food in the oven. Beads of moisture turning
into steam can mislead the sensor.
11
Page 13

Operation
SENSOR COOK
Using SENSOR COOK lets you heat common
microwave-prepared foods without needing to program
times and Cook Powers. SENSOR COOK has preset
Cook Power for 6 food categories.
Example: To cook rice.
1. Touch SENSOR COOK pad.
6
SENSOR COOK TABLE
Baked Potato 1 1- 4,
Frozen 2 1 -/4 cups
Vegetable
Fresh 3 1 - 4 cups
Vegetable
Canned /4 1 -/4 cups
Vegetable
Frozen Entree 5 10 - 21 ozs.
2. Choose food category.
7 - 10 oz. EA
AUTO DEFROST
Five defrost choices are preset in the oven. The defrost
feature provides you with the best defrosting method
for frozen foods, because the oven automatically sets
the defrosting times for each food item according
to the weight you enter. For added convenience, the
AUTO DEFROST includes a built-in tone mechanism
that reminds you to check, turn over, separate, or
rearrange the food during the defrost cycle. Five
different defrosting options are provided.
1. MEAT
2. POULTRY
3. FISH
4. BREAD
5. RAPID - only 1 lb.
After touching the AUTO DEFROST button once, select
the category by touching the numeric pad 1 (MEAT),
numeric pad 2 (POULTRY), numeric pad 3 (FISH),
numeric pad/4 (BREAD), and numeric pad 5 (RAPID
- only 1 Ib). Available weight ranges for Meat, Poultry
and Fish are 0.1 to 6.0 Ibs. The available weight range
for Bread is 0.1 to 1.0 lb.
Rice 6 1/2- 2 cups
When the cook time is over, you will hear four beeps
and COOK END will display.
SENSOR REHEAT
Using SENSOR REHEAT lets you reheat common
microwave-prepared foods without selecting cooking
times and power levels.
Example: To reheat 2 slices of pizza.
1. Touch SENSOR REHEAT pad.
4
_30_F
SENSOR REHEAT TABLE
Dinner plate 1 1 - 2 servings
Soup/Sauce* 2 1 - 4 cups
Casserole 3 1 - 4 cups
Pizza slice 4 I - 4 slices,
2. Choose food category.
thin crust
Example : To defrost 1.2 Ibs of meat.
1.Touch AUTO DEFROST pad.
1
1 2
I_F 2SO_F
2. Choose food category.
3. Enter the weight.
4. Touch ENTER/START pad.
NOTE:
• After you touch ENTER/START button, the display
counts down the defrost time. The oven will beep
once during the Defrost cycle. At this time, open
the door and turn, separate, or rearrange the food
as needed. Remove any portions that have thawed
then return frozen portions to the oven and touch
ENTER/START button to resume the defrost cycle.
The oven will not stop during the BEEP unless
the door is opened.
*Cover soups and sauces with plastic wrap. Turn wrap
back 1/2"for venting.
12
Page 14
Operution
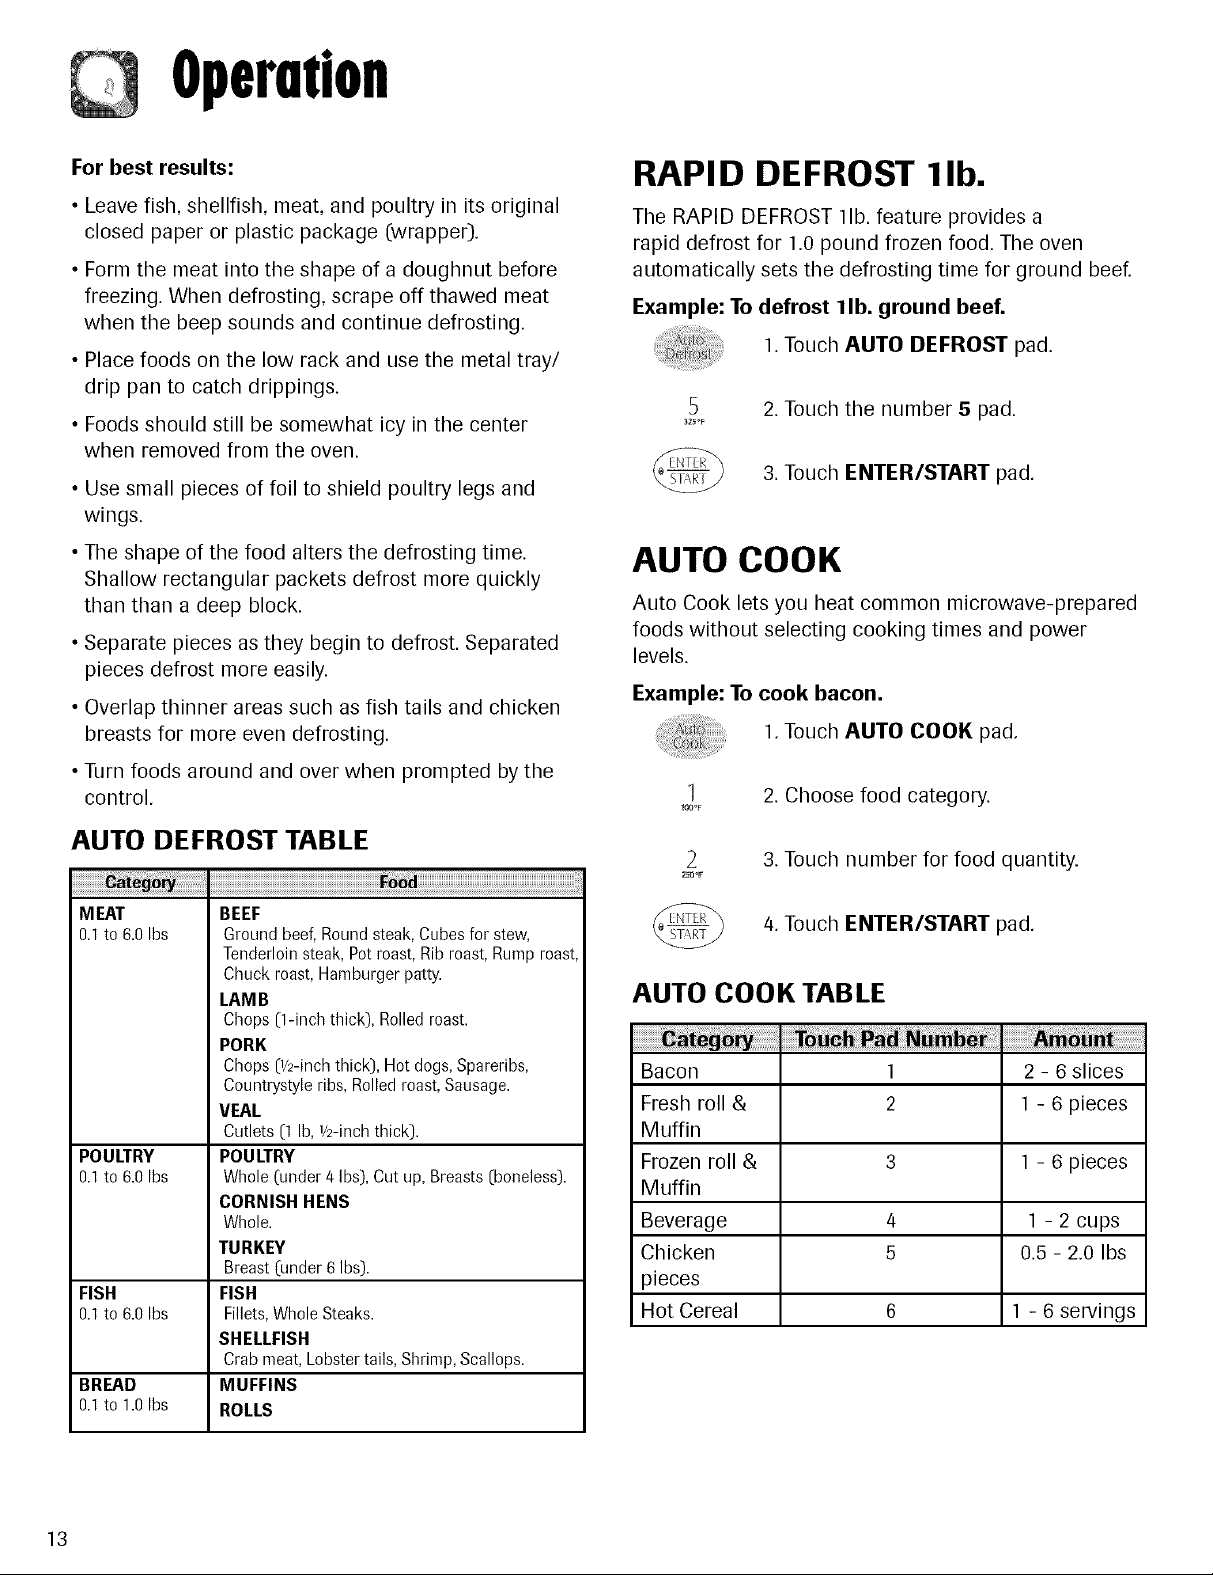
For best results:
• Leave fish, shellfish, meat, and poultry in its original
closed paper or plastic package (wrapper).
• Form the meat into the shape of a doughnut before
freezing. When defrosting, scrape off thawed meat
when the beep sounds and continue defrosting.
• Place foods on the low rack and use the metal tray/
drip pan to catch drippings.
• Foods should still be somewhat icy in the center
when removed from the oven.
•Use small pieces of foil to shield poultry legs and
wings.
• The shape of the food alters the defrosting time.
Shallow rectangular packets defrost more quickly
than than a deep block.
• Separate pieces as they begin to defrost. Separated
pieces defrost more easily.
• Overlap thinner areas such as fish tails and chicken
breasts for more even defrosting.
RAPID DEFROST lib.
The RAPID DEFROST lib. feature provides a
rapid defrost for 1.0 pound frozen food. The oven
automatically sets the defrosting time for ground beet
Example: To defrost 1lb. ground beef.
1.Touch AUTO DEFROST pad.
_25°F
5
2. Touch the number 5 pad.
3. Touch ENTER/START pad.
AUTO COOK
Auto Cook lets you heat common microwave-prepared
foods without selecting cooking times and power
levels.
Example: To cook bacon.
1.Touch AUTO COOK pad.
• Turn foods around and over when prompted by the
control.
AUTO DEFROST TABLE
iiiiiiiiiiiiiiiiiiiiiiiiiiiiiiiiiiiiiiiiiiiiiiiiiiiiiiiiiiiiiiiiiiiiiiiiiiiiiiiiiiiiiiiiiiiiiiiii
MEAT
0.1to 6.0 Ibs
POULTRY
0.1to 6.0 Ibs
FISH
0.1to 6.0 Ibs
BREAD
0.1to 1.0 Ibs
BEEF
Ground beef,Round steak, Cubes for stew,
Tenderloin steak, Pot roast, Rib roast, Rump roast,
Chuck roast, Hamburger patty.
LAM B
Chops (1-inch thick), Rolled roast.
PORK
Chops O/2-inchthick), Hot dogs, Spareribs,
Countrystyleribs, Rolledroast, Sausage.
VEAL
Cutlets _IIb,V2-inchthick).
POULTRY
Whole (under 4 Ibs),Cut up, Breasts (boneless).
CORNISH HENS
Whole.
TURKEY
Breast (under 6 Ibs).
FISH
Fillets,Whole Steaks.
SHELLFISH
Crabmeat, Lobster tails, Shrimp, Scallops.
MUFFINS
ROLLS
1
103_F
2
2_8or
2. Choose food category.
3. Touch number for food quantity.
4. Touch ENTER/START pad.
AUTO COOK TABLE
Bacon 1 2 - 6 slices
Fresh roll & 2 1 - 6 pieces
Muffin
Frozen roll & 3 1 - 6 pieces
Muffin
Beverage 4 1 - 2 cups
Chicken 5 0.5 - 2.0 Ibs
pieces
Hot Cereal 6 I - 6 servings
13
Page 15

Operution
CONVECTION COOKING
During convection cooking, a heating element is used
to raise the temperature of the air inside the oven.
Convection cooking temperature ranges from 100°F to
450°E It is best to preheat the oven when convection
cooking.
Lower oven temperature by 25°F from package
recommended temperature instructions. The
baking time may vary according to the food
condition or individual preference. Check
doneness at the minimum time and then adjust
time by touching the More+ or Less- pads.
CONVECTION RACK
Use the convection rack for convection and
combination cooking only. Do not use rack in
microwave-only mode unless recommended in this
guide.
For best results, place food on the Convection Rack.
M ETALTRAY/DRI P PAN
A metal drip pan has been included with your oven.
When roasting in the oven, place food directly on the
metal rack. Place the rack inside the metal drip pan.
Center the drip pan and rack on the glass turntable.
When cooking is complete, use potholders to remove
the drip pan and rack from the hot oven. Take care
not to spill the hot drippings. Remove food from the
rack. Do not use the metal tray/drip pan in microwave-
only mode unless recommended in this guide.
Convection
Suggested Internal Food
Temperatures
Ground Beef 160° F
Fresh Beef, Veal, Lamb Medium Rare 145° F
Medium 160° F
Well Done 170° F
Chicken, Turkey Whole 180° F
Breast 170° F
Pork Medium 160° F
Well Done 170° F
Ham, precooked 140° F
Egg Dishes, Casseroles 160° F
Leftovers, reheated 165° F
Metal Tray/Drip Pan
Rack
Turntable
NOTES:
• For any Convection or Combination cooking
of foods that drip grease, such as steak or
hamburger, use the metal tray/drip pan under the
rack to catch the grease.
• Do not use racks other than those provided with
your oven.
14
Page 16
Operation
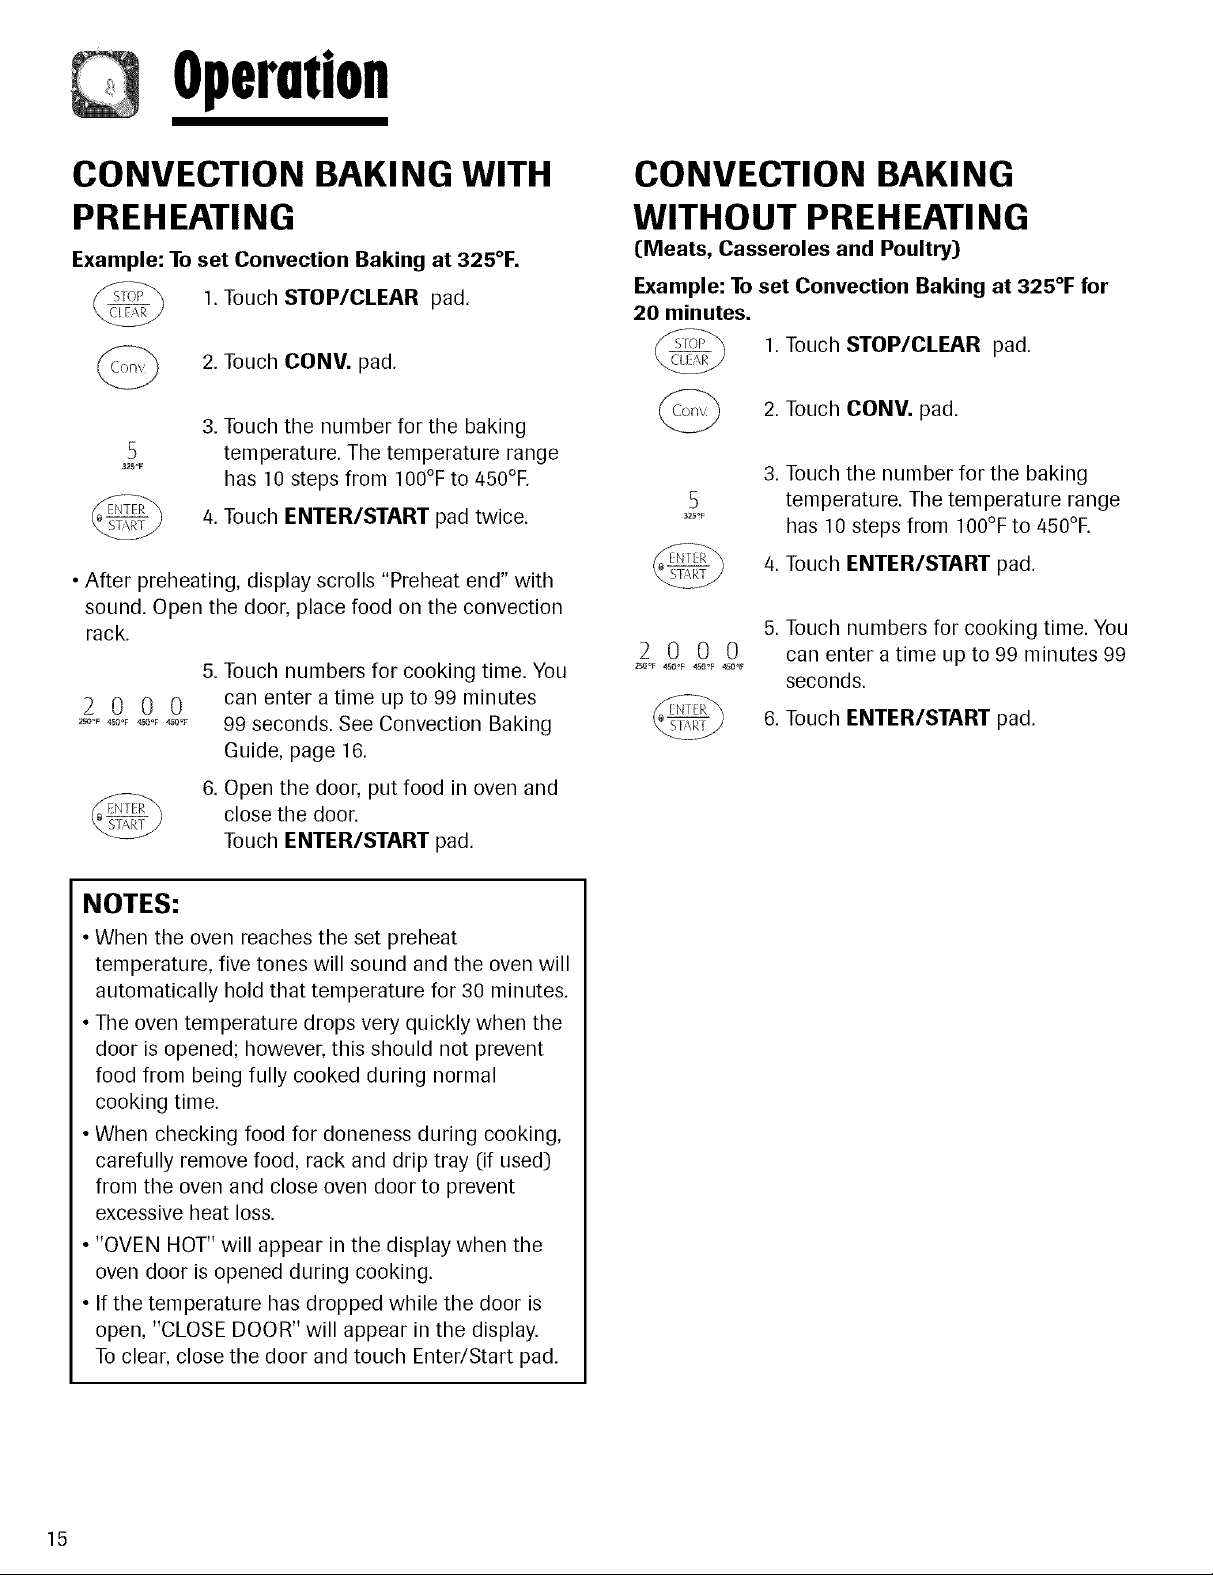
CONVECTION BAKING WITH
PREHEATING
Example: To set Convection Baking at 325°E
1.Touch STOP/CLEAR pad.
2. Touch CONY. pad.
3. Touch the number for the baking
5
32S_F
• After preheating, display scrolls "Preheat end" with
sound. Open the door, place food on the convection
rack.
2000
2_°F 450°F 4_°F 4_0_F
temperature. The temperature range
has 10 steps from 100°F to 450°E
/4.Touch ENTER/START pad twice.
5. Touch numbers for cooking time. You
can enter a time up to 99 minutes
99 seconds. See Convection Baking
Guide, page 16.
CONVECTION BAKING
WITHOUT PREHEATI NG
(Meats, Casseroles and Poultry)
Example: To set Convection Baking at 325°F for
20 minutes,
1. Touch STOP/CLEAR pad.
2. Touch CONV. pad.
3. Touch the number for the baking
5
32S°F
2000
25_°F _SO°F _S_°F 4S0_F
temperature. The temperature range
has 10 steps from 100°F to 450°E
/4.Touch ENTER/START pad.
5. Touch numbers for cooking time. You
can enter a time up to 99 minutes 99
seconds.
6. Touch ENTER/START pad.
6. Open the door, put food in oven and
close the door.
Touch ENTER/START pad.
NOTES:
• When the oven reaches the set preheat
temperature, five tones will sound and the oven will
automatically hold that temperature for 30 minutes.
• The oven temperature drops very quickly when the
door is opened; however, this should not prevent
food from being fully cooked during normal
cooking time.
• When checking food for doneness during cooking,
carefully remove food, rack and drip tray (if used)
from the oven and close oven door to prevent
excessive heat loss.
• "OVEN HOT" will appear in the display when the
oven door is opened during cooking.
• If the temperature has dropped while the door is
open, "CLOSE DOOR" will appear in the display.
To clear, close the door and touch Enter/Start pad.
15
Page 17

Operution
CONVECTION BAKING GUIDELINES
1. Always use the convection rack when convection baking. Place food directly on rack or place in metal tray and
then place tray on rack. For best results with foods such as french fries or cheese sticks, space items so that they
do not touch. Proper airflow is necessary for optimum performance.
2. Aluminum pans conduct heat quickly. For most convection baking, light, shiny finishes give best results because
they prevent overbrowning in the time it takes to cook the center areas. Pans with dull (satin-finish) bottoms are
recommended for cake pans and pie pans for best bottom browning.
3. Dark or non-shiny finishes, glass, and pyroceram absorb heat which may result in dry, crisp crusts.
4. Preheating the oven is recommended when baking foods by convection. Meats, casseroles and poultry do not
require preheating.
5. To prevent uneven heating and save energy, open the oven door to check food as little as possible.
Breads
Cakes
Refrigerated Biscuits
Corn Bread
Muffins
Popovers
Nut Bread or Fruit Bread
Yeast Bread
Plain or Sweet Rolls
Devil's Food
Fudge brownies
Coffee Cake
Cup Cakes
Fruit Cake (loaf)
Gingerbread
Butter Cakes, Cake Mixes
Layers
9x13
Tube Cake
Pound Cake
375%
350°F
425%
325°F
325°F
375°F
350°F
350°F
350°F
325°F
325%
275%
300°F
325°F
325°F
325°F
325°F
325°F
11 to14
35 to 40
18 to 22
45 to 55
60 to 70
16 to 23
13to 16
35 to 40
26 to 30
30 to 35
20 to 25
90 to 100
25 to 30
35 to 45
35 to 45
35 to 45
30 to 40
45 to 55
Allow additional time for large biscuits.
Remove from pans immediately and cool
slightly on wire rack.
Pierce each popover with a fork after removing
from oven to allow steam to escape.
Interiors will be moist and tender.
Lightly grease baking sheet.
Place cake pan on low rack.
Bake 2 layers of brownies at a time.
Interior will be moist and tender.
Place one layer on each rack (turntable on).
Turn end for end half way through baking.
Grease and flour pan.
Cool in pan 10 minutes before inverting on wire
rack.
Cookies Chocolate Chip 350°F 11 to 14
Sugar 350°F 11to 14
Place metal tray on low rack. Allow extra time
for frozen cookie dough.
Place metal tray on low rack.
NOTES:
• The oven temperature indicated in the chart above is recommended over the package instruction temperature.
• The baking times in the chart above are only guidelines for your reference. You need to adjust time according to
the food quantity, size, shape and temperature or to your preference. Check doneness at the minimum time and
then adjust time by touching the More+ or Less- pad.
16
Page 18
Operotion
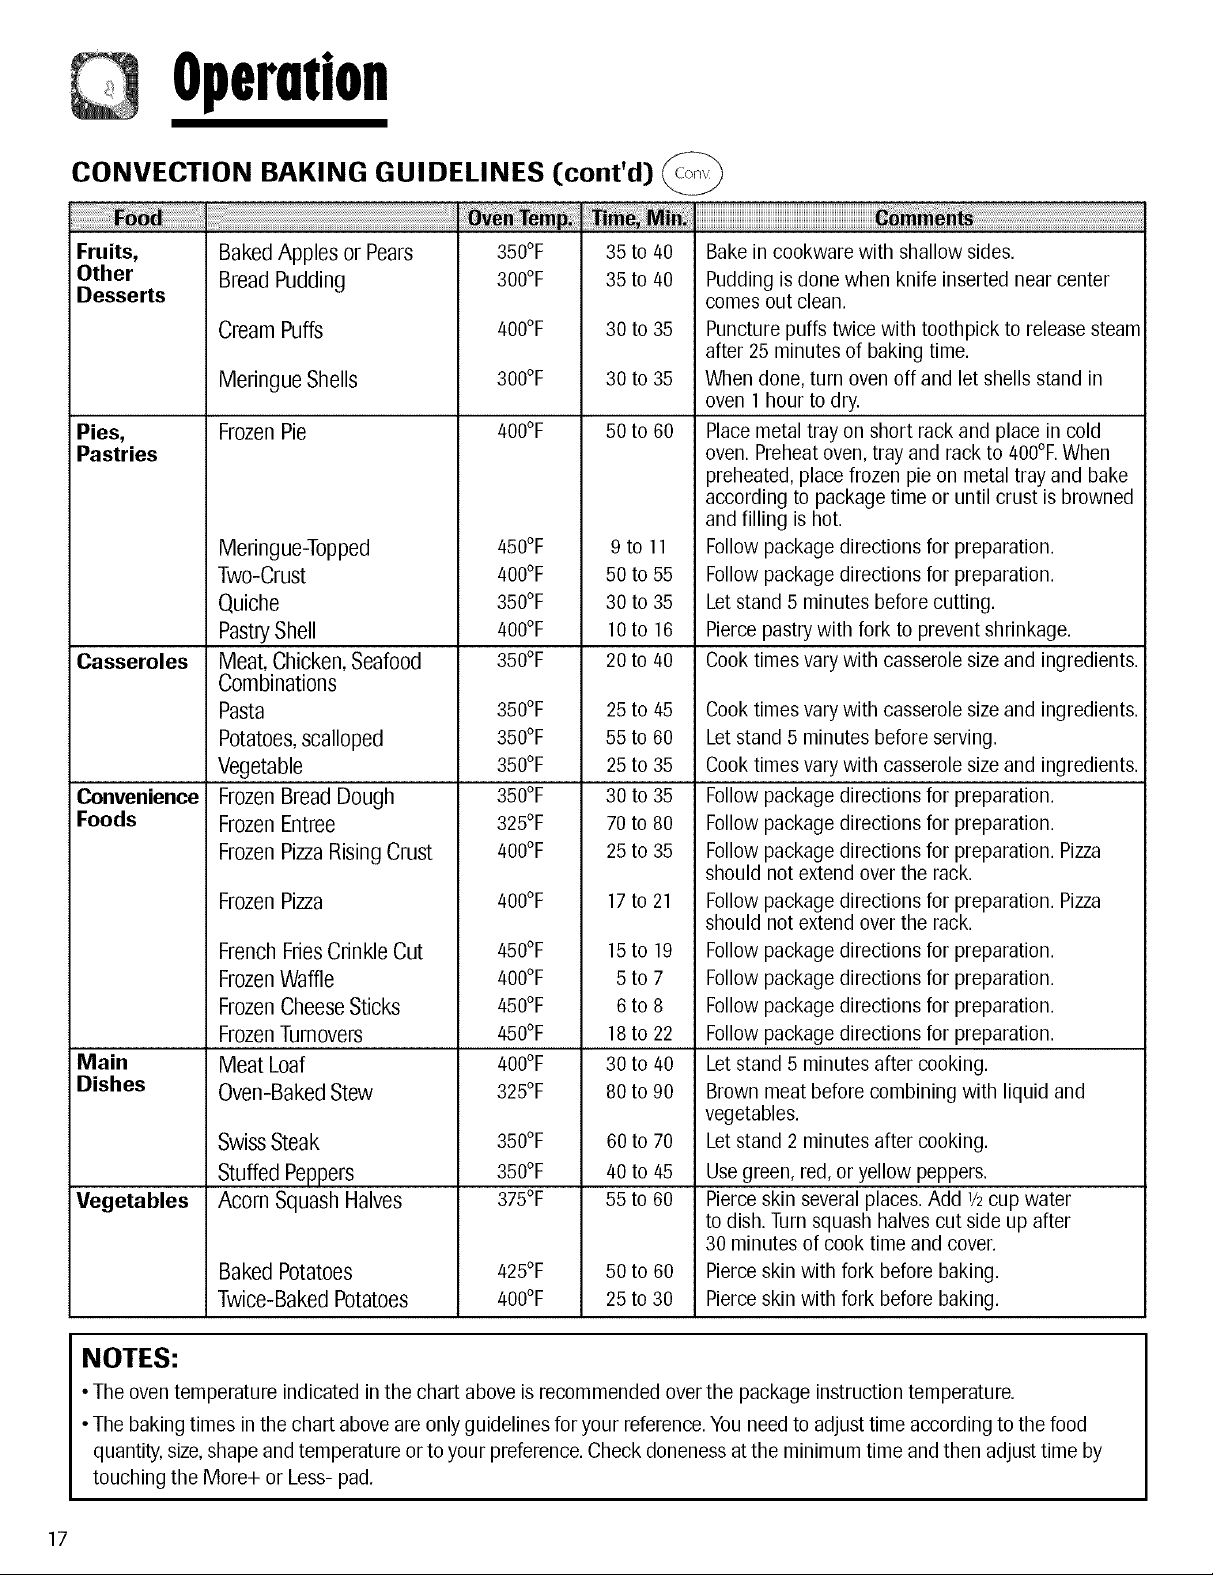
CONVECTION BAKING GUIDELINES [cont'd)
Fruits,
Other
Desserts
Pies,
Pastries
Casseroles
Convenience
Foods
Main
Dishes
Vegetables
Baked Apples or Pears 350°F
Bread Pudding 300°F
Cream Puffs 400%
Meringue Shells 300°F
Frozen Pie 400%
Meringue-Topped
Two-Crust
Quiche
PastryShell
Meat,Chicken,Seafood
450%
400%
350°F
400%
350°F
Combinations
Pasta
Potatoes,scalloped
Vegetable
FrozenBreadDough
FrozenEntree
FrozenPizzaRisingCrust
FrozenPizza
FrenchFriesCrinkleCut
FrozenWaffle
FrozenCheeseSticks
FrozenTurnovers
Meat Loaf
Oven-BakedStew
SwissSteak
StuffedPeppers
Acorn SquashHalves
BakedPotatoes
Twice-BakedPotatoes
350°F
350°F
350°F
350°F
325°F
400%
400%
450%
400%
450%
450%
400%
325°F
350°F
350°F
375°F
425%
400%
35 to 40
35 to 40
30 to 35
30 to 35
50 to 60
9to 11
50 to 55
30 to 35
10to 16
20 to 40
25 to 45
55 to 60
25 to 35
30 to 35
70 to 80
25 to 35
17to 21
15to 19
5to 7
6to 8
18to 22
30 to 40
80 to 90
60 to 70
40 to 45
55 to 60
50 to 60
25 to 30
Bake in cookware with shallow sides.
Pudding is done when knife inserted near center
comes out clean.
Puncture puffs twice with toothpick to release steam
after 25 minutes of baking time.
When done, turn oven off and let shells stand in
oven 1 hour to dry.
Placemetal tray on short rack and place in cold
oven. Preheat oven, tray and rack to 400%.When
preheated, place frozen pie on metal tray and bake
according to package time or until crust is browned
and filling is hot.
Follow package directions for preparation.
Follow package directions for preparation.
Let stand 5 minutes before cutting.
Pierce pastry with fork to prevent shrinkage.
Cook times vary with casserole size and ingredients.
Cook times vary with casserole size and ingredients.
Let stand 5 minutes before serving.
Cook times vary with casserole size and ingredients.
Follow package directions for preparation.
Follow package directions for preparation.
Follow package directions for preparation. Pizza
should not extend over the rack.
Follow package directions for preparation. Pizza
should not extend over the rack.
Follow package directions for preparation.
Follow package directions for preparation.
Follow package directions for preparation.
Follow package directions for preparation.
Let stand 5 minutes after cooking.
Brown meat before combining with liquid and
vegetables.
Let stand 2 minutes after cooking.
Use green, red, or yellow peppers.
Pierce skin several places. Add 1/2cup water
to dish. Turn squash halves cut side up after
30 minutes of cook time and cover.
Pierce skin with fork before baking.
Pierce skin with fork before baking.
NOTES:
•The oven temperature indicated in the chart above is recommended over the package instruction temperature.
•The baking times in the chart above are only guidelines for your reference.You need to adjust time according to the food
quantity, size, shape and temperature orto your preference. Check doneness atthe minimum time and then adjust time by
touching the More+ or Less- pad.
17
Page 19
Operation
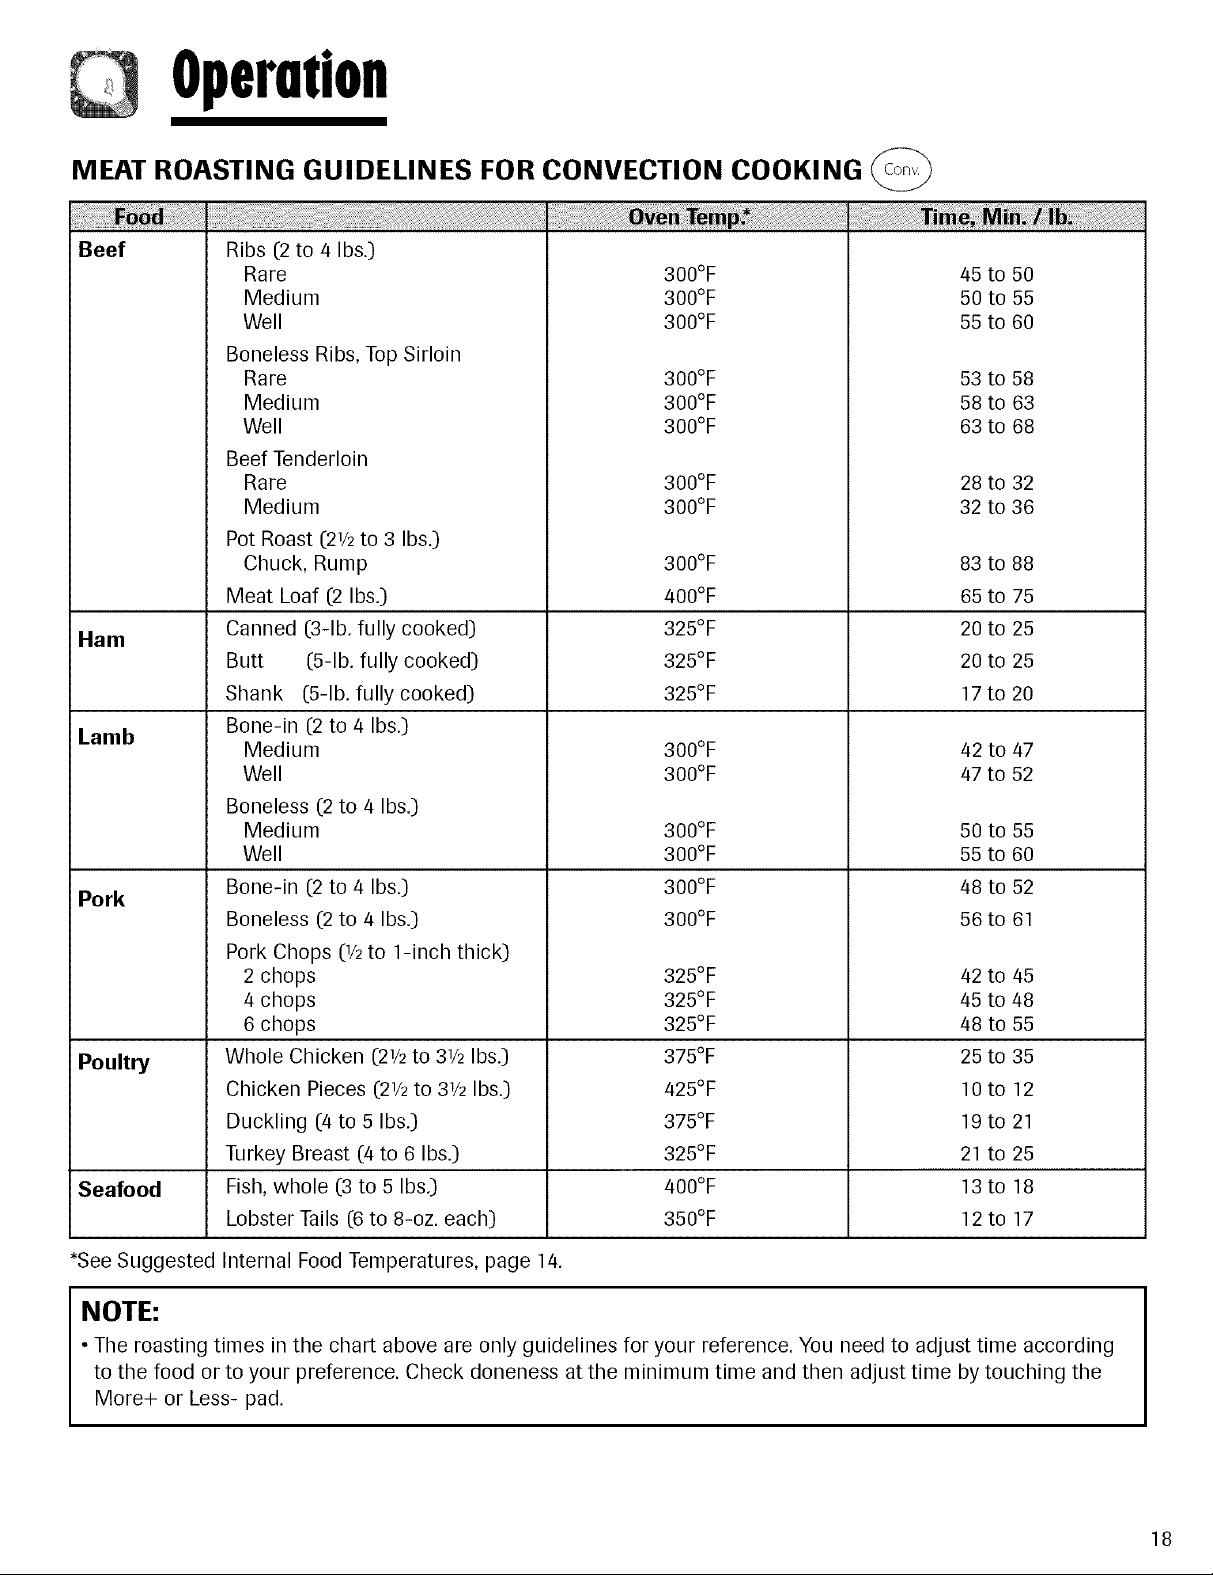
MEAT ROASTING GUIDELINES FOR CONVECTION COOKING
Beef
Ham
Lamb
Pork
Poultry
Seafood
Ribs (2 to 4 Ibs.)
Rare
Medium
Well
Boneless Ribs, Top Sirloin
Rare
Medium
Well
Beef Tenderloin
Rare
Medium
Pot Roast (21/2to 3 Ibs.)
Chuck, Rump
Meat Loaf (2 Ibs.)
Canned (3-lb. fully cooked)
Butt (5-lb. fully cooked)
Shank (5-lb. fully cooked)
Bone-in (2 to 4 Ibs.)
Medium
Well
Boneless (2 to 4 Ibs.)
Medium
Well
Bone-in (2 to 4 Ibs.)
Boneless (2 to 4 Ibs.)
Pork Chops (1/2to 1-inch thick)
2 chops
4 chops
6 chops
Whole Chicken (21/2to 31/2Ibs.)
Chicken Pieces (21/2to 31/2Ibs.)
Duckling (4 to 5 Ibs.)
Turkey Breast (4 to 6 Ibs.)
Fish, whole (3 to 5 Ibs.)
Lobster Tails (6 to 8-oz. each)
300°F
300°F
300°F
300°F
300°F
300°F
300°F
300°F
300°F
400°F
325°F
325°F
325°F
300°F
300°F
300°F
300°F
300°F
300°F
325°F
325°F
325°F
375°F
425°F
375°F
325°F
400°F
350°F
45
to 50
50
to 55
55
to 60
53
to 58
58
to 63
63
to 68
28
to 32
32
to 36
83
to 88
65
to 75
20
to 25
20
to 25
17
to 20
42
to 47
47
to 52
50
to 55
55
to 60
48
to 52
56
to 61
42 to 45
45 to 48
48 to 55
25 to 35
lOto 12
19 to 21
21 to 25
13to 18
12to 17
*SeeSuggested Internal Food Temperatures, page 14.
NOTE:
• The roasting times in the chart above are only guidelines for your reference. You need to adjust time according
to the food or to your preference. Check doneness at the minimum time and then adjust time by touching the
More+ or Less- pad.
18
Page 20
Operation
TIPS FOR COMBINATION
COOKING/SPEED COOK
This section gives you instructions to operate each
combination cooking function. Please read these
instructions carefully. Sometimes combination
microwave-convection cooking is suggested to get the
best cooking results since it shortens the cooking time
for foods that normally need a long time to cook. This
cooking process also leaves meats juicy on the inside
and crispy on the outside. In combination cooking,
the convection heat and microwave energy alternate
automatically. Your oven has three preprogrammed
settings that make it easy to use combination cooking.
HELPFUL HINTS FOR
COMBINATION COOKING/
SPEED COOK
1. Meats may be roasted directly on the metal rack
provided with your oven. Use the metal tray/drip pan
to catch drippings and grease.
2. Use small pieces of foil to shield poultry legs and
wings.
3. Less tender cuts of beef can be roasted and
tenderized using oven cooking bags.
4. When baking, check for doneness after cooking
time is up. If not completely done, let stand in oven
for a few minutes to complete cooking.
5. When checking food for doneness during cooking,
carefully remove food, rack and drip tray (if used)
from the oven and close oven door to prevent
excessive heat loss.
6. "OVEN HOT" will appear in the display when the
oven door is opened during cooking.
7. If the temperature has dropped while the door is
open, "CLOSE DOOR" will appear in the display.
To clear, close the door and touch Enter/Start pad.
PRECAUTIONS
,
All cookware used for combination cooking must be
both microwave-safe and ovenproof.
2.
During combination baking, some baking cookware
may cause arcing when it comes in contact with
the oven walls or metal accessory racks. Arcing is a
discharge of electricity that occurs when microwaves
come in contact with metal.
3. If arcing occurs, place a heatproof dish between the
pan and the metal rack.
4. If arcing occurs with other baking cookware, do not
use them for combination cooking.
19
Page 21
Operution
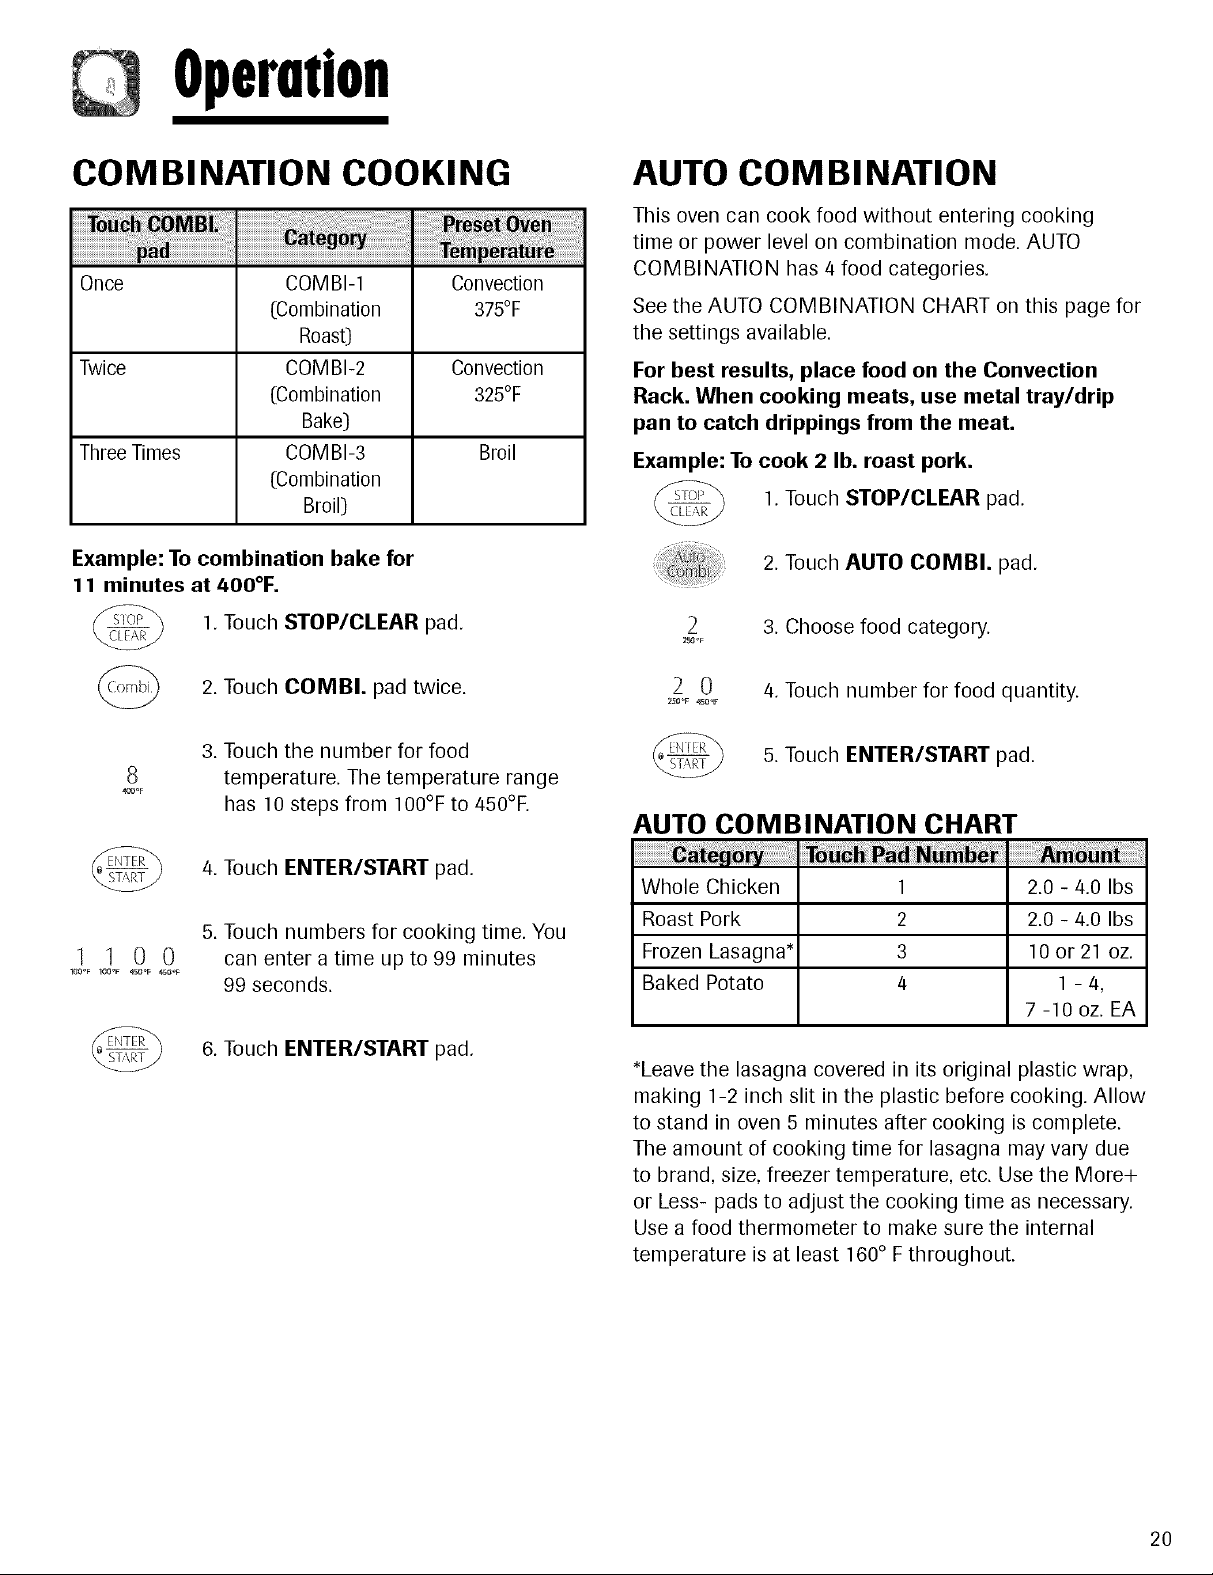
COMBINATION COOKING
Once
Twice
Three Times
Example: To combination bake for
11 minutes at 400°F.
1. Touch STOP/CLEAR pad.
2. Touch COMBI. pad twice.
3. Touch the number for food
8
4C_oF
temperature. The temperature range
has 10 steps from 100°F to 450°F.
COMBI-1
(Combination
Roast)
COMBI-2
(Combination
Bake)
COMBI-3
(Combination
Broil)
Convection
375°F
Convection
325°F
Broil
AUTO COM BI NATION
This oven can cook food without entering cooking
time or power level on combination mode. AUTO
COMBINATION has 4 food categories.
See the AUTO COMBINATION CHART on this page for
the settings available.
For best results, place food on the Convection
Rack. When cooking meats, use metal tray/drip
pan to catch drippings from the meat.
Example: To cook 2 lb. roast pork.
1. Touch STOP/CLEAR pad.
2. Touch AUTO COMBI. pad.
2
25g°F
2 0
2SO°F 4_0_r
AUTO COMBINATION CHART
3. Choose food category.
4. Touch number for food quantity.
5. Touch ENTER/START pad.
1 100
100OF 1_3_F 4r_OF 450oF
4. Touch ENTER/START pad.
5. Touch numbers for cooking time. You
can enter a time up to 99 minutes
99 seconds.
6. Touch ENTER/START pad.
Whole Chicken 1 2.0 - 4.0 Ibs
Roast Pork 2 2.0 - 4.0 Ibs
Frozen Lasagna* 3 10 or 21 oz.
Baked Potato 4 1 - 4,
7 -10 oz. EA
*Leave the lasagna covered in its original plastic wrap,
making 1-2 inch slit in the plastic before cooking. Allow
to stand in oven 5 minutes after cooking is complete.
The amount of cooking time for lasagna may vary due
to brand, size, freezer temperature, etc. Use the More+
or Less- pads to adjust the cooking time as necessary.
Use a food thermometer to make sure the internal
temperature is at least 160° Fthroughout.
20
Page 22
Operution
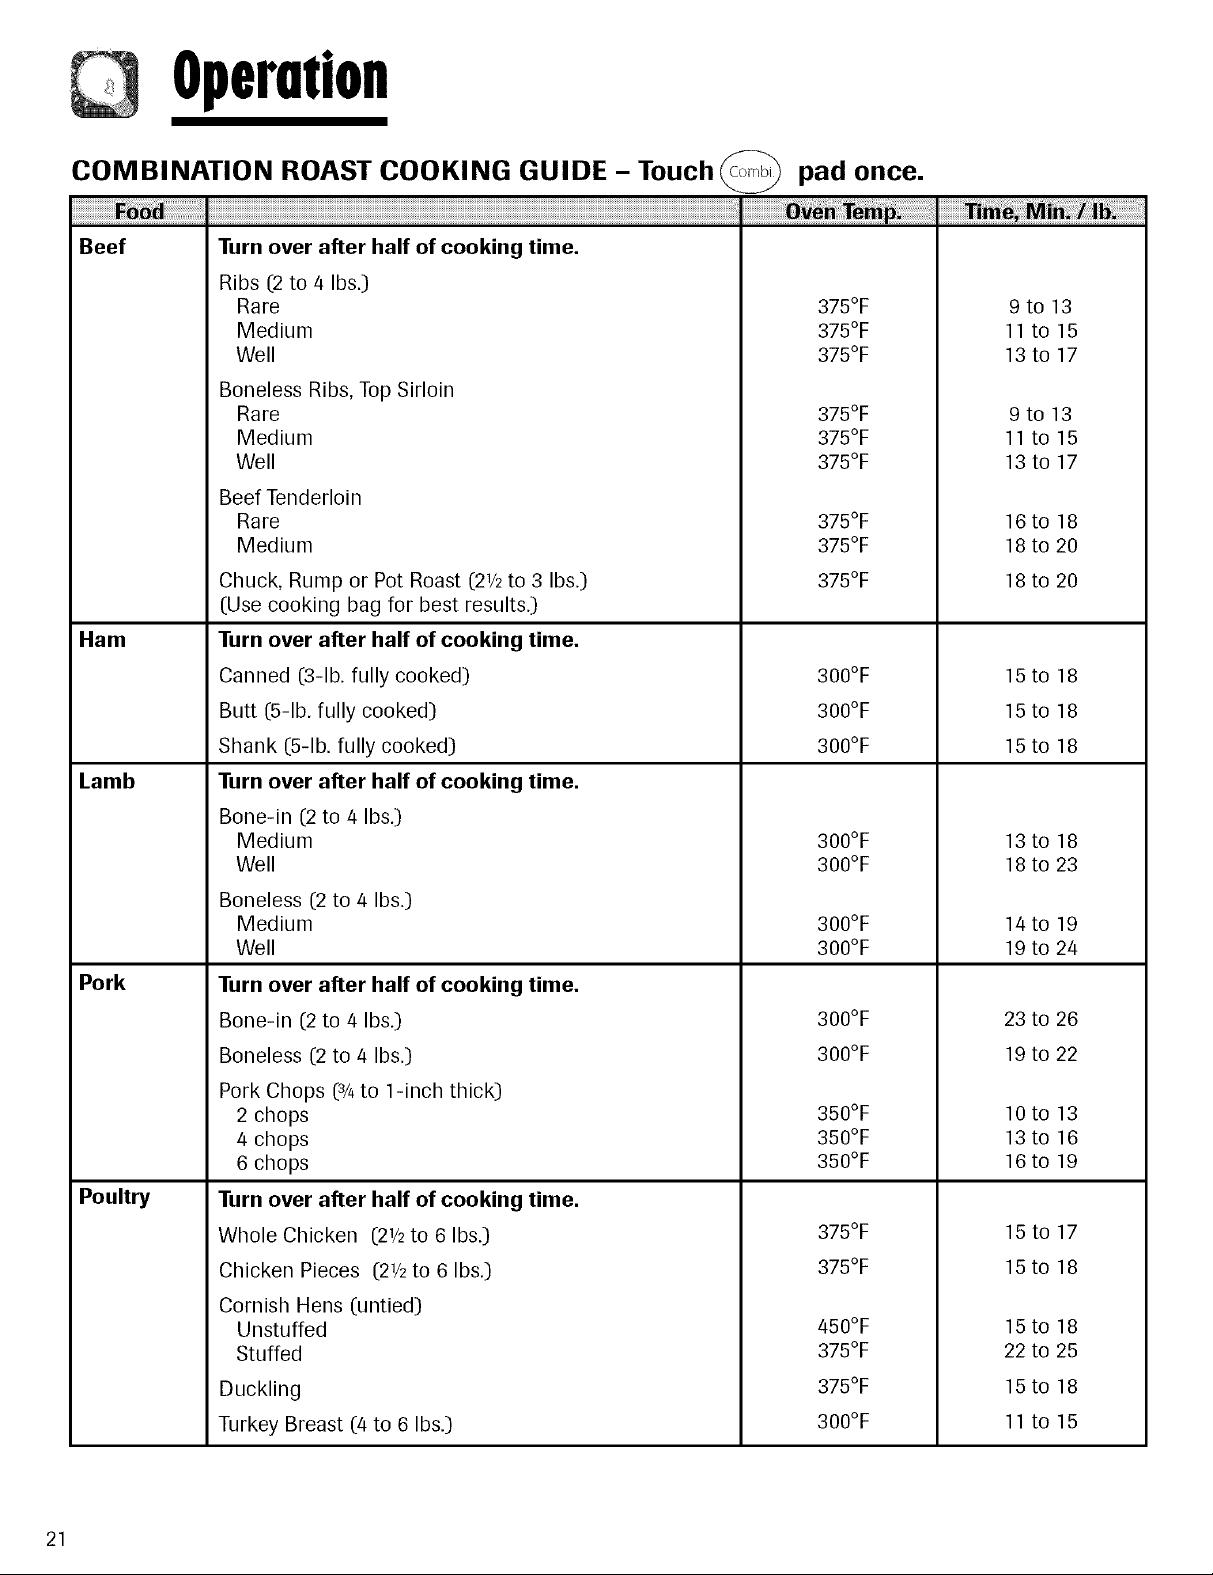
COMBINATION ROAST COOKING GUIDE - Touch pad once.
Beef
Ham
Lamb
Turn over after half of cooking time.
Ribs (2 to 4 Ibs.)
Rare
Medium
Well
Boneless Ribs, Top Sirloin
Rare
Medium
Well
Beef Tenderloin
Rare
Medium
Chuck, Rump or Pot Roast (21/2to 3 Ibs.)
(Use cooking bag for best results.)
Turn over after half of cooking time.
Canned (3-lb. fully cooked)
Butt (5-lb. fully cooked)
Shank (5-lb. fully cooked)
Turn over after half of cooking time.
Bone-in (2 to 4 Ibs.)
Medium
Well
375°F
375°F
375°F
375°F
375°F
375°F
375°F
375°F
375°F
300°F
300°F
300°F
300°F
300°F
9to 13
11 to 15
13 to 17
9to 13
11 to 15
13 to 17
16to 18
18 to 20
18to 20
15to 18
15to 18
15to 18
13to 18
18 to 23
Pork
Poultry
Boneless (2 to/4 Ibs.)
Medium
Well
Turn over after half of cooking time.
Bone-in (2 to/4 Ibs.)
Boneless (2 to 4 Ibs.)
Pork Chops (3/4to 1-inch thick)
2 chops
/4chops
6 chops
Turn over after half of cooking time.
Whole Chicken (21/2to 6 Ibs.)
Chicken Pieces (2_/2to 6 Ibs.)
Cornish Hens (untied)
Unstuffed
Stuffed
Duckling
Turkey Breast (4 to 6 Ibs.)
300°F
300°F
300°F
300°F
350°F
350°F
350°F
375°F
375°F
450°F
375°F
375°F
300°F
14to 19
19 to 2/4
23 to 26
19 to 22
lOto 13
13to 16
16to 19
15 to 17
15to 18
15to 18
22 to 25
15to 18
11 to 15
21
Page 23

Operution
COMBINATION ROAST COOKING GUIDE Ccont'd) - Touch
F_a, _ve_ Te_
Seafood Fish
l-lb. fillets
Lobster Tails (6 to 8-oz. each)
Shrimp (1 to 2 Ibs.)
Scallops (1 to 2 Ibs.)
350°F
350°F
350°F
350°F
pad once.
7to 10
lOto 15
9to 14
8to 13
NOTE:
• The roasting times in the chart above are only guidelines for your reference. You need to adjust time according
to the food quantity, size, shape or temperature or to your preference. Check doneness at the minimum time and
then adjust time by touching the More+ or Less- pad.
COMBINATION BAKE COOKING GUIDE - Touch _ pad twice.
Pies,
Pastries
Quiche
425°F
15 to 17
Let stand 5 minutes before cutting.
Convenience
Foods
Vegetables
Frozen Entree
Frozen Pizza Rolls,
Egg Rolls
Pizza
Baked Potatoes
375°F
450°F
450°F
450°F
39 to 43
4to 6
23 to 26
36 to 40
Follow package directions for preparation.
Follow package directions for preparation.
Follow package directions for preparation.
Pierce skin with a fork before baking.
Place on low rack.
22
Page 24

Opermion
BROIL COOKING
INTRODUCTION
This oven cooks the outside of foods much like
conventional radiant heat, while also penetrating the
surface so the inside cooks simultaneously. Broiling is
cooking under direct heat. This oven can broil or grill
meat, fish, poultry, and vegetables, or toast bread.
Your oven uses broil cooking whenever you use the
Broil Command Pads.
• Foods that are suitable for broiling should be tender,
moderately lean and no more than 1 inch thick. Fish
steaks, chicken breasts and hamburgers are ideal for
broiling.
• Always use the Broiling Rack.
• For even browning, turn the food over halfway
through broiling.
• Do not leave the door open for long periods of time
when using the broil element. This will cause the
oven temperature to drop and could affect cooking
performance.
BROILING RACK
Use the broiling rack for broil and auto broil cooking.
Do not use in microwave-only mode.
For best results, place food on the broiling rack.
When broiling meats, use metal tray/drip pan to catch
drippings from the meat.
3. Touch numbers for cooking time. You
2O00
2_OoF 4SOOF 4SO°F 450_
can enter a time up to 99 minutes 99
seconds.
4. Touch ENTER/START pad.
NOTES:
• If you open the door or touch STOP/CLEAR during
broiling, broiling will stop.
• To resume broiling, close the door and touch
ENTER/START.
• When broiling time ends, the display will show
"COOK END" and four tones will sound.
• After cooking, the display will return to the time of
day, when you open the door.
AUTO BROIL COOKING
[Hamburger, Beef Steak, Chicken Pieces, Fish
Steak)
Auto Broil lets you cook with broil heat, without setting
a cooking time. Choose the category of the food you
are cooking and enter the quantity.
See the Auto Broil Chart on this page for the settings
available.
1. Touch STOP/CLEAR pad.
2. Touch AUTO BROIL pad.
Broiling Rack
Metal Tray/Drip Pan
Turntable
BROIL COOKING
Example: To set Broil Cooking for 20 minutes.
1.Touch STOP/CLEAR pad.
2. Touch BROIL pad.
23
3. Touch numbers for cooking menu.
Example for setting 1. (Hamburger)
/4.Touch number for food quantity.
6. Touch ENTER/START pad.
I_O_F
1
1
AUTO BROIL CHART
Hamburger
Beef Steak
Chicken Breast
Fish Steak
1
2
3
4
1 - 6,/4 oz. patties
1 - 2 pieces
0.4 - 2.0 Ibs.
1 - 2 pieces
Page 25

Heating/ ReheatingGuide
To heat or reheat successfully in a microwave oven, it is important to follow several guidelines. Measure the amount
of food in order to determine the time needed to reheat. Arrange the food in a circular pattern for best results. Room
temperature food will heat faster than refrigerated food. Canned foods should be taken out of the can and placed
in a microwave-safe container. The food will heat more evenly if covered with a microwave-safe lid or vented plastic
wrap. Remove cover carefully to prevent steam burns. Use the following chart as a guide for reheating cooked food.
Sliced meat Place sliced meat on microwavable plate. Cover with plastic wrap
3 slices (1/4-inchthick) 1-2 minutes and vent. Note: Gravy or sauce helps to keep meat juicy.
Chicken pieces
1 breast 2-31/2minutes Place chicken pieces on microwavable plate. Cover with plastic
1 leg and thigh 11/2-3minutes wrap and vent.
Fish fillet
(6-8 oz.) 2-4 minutes Place fish on microwavable plate. Cover with plastic wrap and vent.
Lasagna Place lasagna on microwavable plate. Cover with plastic wrap and
1 serving (101/2oz.) 4-6 minutes vent.
Casserole
1 cup 1-31/2minutes COOK covered in microwavable casserole. Stir once halfway
4 cups 5-8 minutes through cooking.
Casserole - cream or cheese
1 cup 11/2-3minutes COOK covered in microwavable casserole. Stir once halfway
4 cups 31/2-51/2minutes through cooking.
Sloppy Joe or Barbecued Beef Reheat filling and bun separately.
1 sandwich 1 -21/2minutes Cook filling covered in microwavable casserole. Stir once.
(1/2cup meat filling) Heat bun as directed in chart below.
without bun
Mashed potatoes
1 cup 1-3 minutes COOK covered in microwavable casserole. Stir once halfway
4 cups 5-8 minutes through cooking.
Baked beans COOK covered in microwavable casserole. Stir once halfway
1 cup 11/2-3minutes through cooking.
Ravioli or pasta in sauce
1 cup 21/2-4minutes COOK covered in microwavable casserole. Stir once halfway
4 cups 71/2-11minutes through cooking.
Rice
1 cup 11/2-31/2minutes COOK covered in microwavable casserole. Stir once halfway
4 cups 4-61/2minutes through cooking.
Sandwich roll or bun
1 roll 15-30 seconds Wrap in paper towel and place on turntable.
Vegetables
1 cup 11/2-21/2minutes COOK covered in microwavable casserole. Stir once halfway
4 cups 4-6 minutes through cooking.
Soup COOK covered in microwavable casserole. Stir once halfway
1 serving (8 oz.) 11/2-21/2minutes through cooking.
24
Page 26

FreshVegetobleGuide
Artichokes
(8 oz. each)
Asparagus,
Fresh, Spears
Beans, Green &
Wax
Beets, Fresh
Broccoli, Fresh,
Spears
Cabbage, Fresh,
Chopped
Carrots, Fresh,
Sliced
Cauliflower,
Fresh, Whole
Flowerettes, Fresh
Celery, Fresh,
Sliced
Corn, Fresh
2 medium
4 medium
1lb.
1lb.
1lb.
1lb.
1lb.
2 cups
1lb.
4 cups
2 ears
5-8
3-6
7-11
12-16
4-8
4-7
2-4
7-11
21/2-41/2
6-8
5-9
Trim. Add 2 tsp water. Cover.
Add 1/2cup water. Cover.
Add 1/2cup water in 11/2qt. casserole.
Stir halfway through cooking.
Add 1/2cup water in 11/2qt. covered casserole.
Rearrange halfway through cooking.
Place broccoli in baking dish. Add 1/2cup water.
Add 1/2cup water in 11/2qt. covered casserole.
Stir halfway through cooking.
Add 1/4cup water in 1 qt. covered casserole.
Stir halfway through cooking.
Trim. Add 1/4cup water in 1 qt. covered casserole.
Stir halfway through cooking.
Add 1/2cup water in 11/2 qt. covered casserole.
Stir halfway through cooking.
Husk. Add 2 tbsp water in 11/2qt. baking dish.
Cover.
2-3 minutes
2-3 minutes
2-3 minutes
2-3 minutes
2-3 minutes
2-3 minutes
2-3 minutes
2-3 minutes
2-3 minutes
2-3 minutes
Mushrooms,
Fresh, Sliced
Parsnips, Fresh,
Sliced
Peas, Green,
Fresh
Sweet Potatoes
Whole Baking
(6-8 oz. each)
White Potatoes,
Whole Baking
(6-8 oz. each)
Spinach, Fresh,
Leaf
Squash, Acorn or
Butternut, Fresh
Zucchini, Fresh,
Sliced
Zucchini, Fresh,
Whole
1/2lb.
1lb.
4 cups
2 medium
4 medium
2 potatoes
4 potatoes
1lb.
1 medium
1lb.
1lb.
2-31/2
4-8
7-10
5-10
7-13
5-8
10-14
4-7
6-8
41/2-71/2
6-9
Place mushrooms in 11/2qt. covered casserole.
Stir halfway through cooking.
Add 1/2cup water in 11/2 qt. covered casserole.
Stir halfway through cooking.
Add 1/2cup water in 11/2qt. covered casserole.
Stir halfway through cooking.
Pierce potatoes several times with fork.
Place on 2 paper towels.
Turn over halfway through cooking.
Pierce potatoes several times with fork.
Place on 2 paper towels.
Turn over halfway through cooking.
Add 1/2cup water in 2 qt. covered casserole.
Cut squash in half. Remove seeds.
Place in 8 x 8-inch baking dish. Cover.
Add 1/2cup water in 11/2qt. covered casserole.
Stir halfway through cooking.
Pierce. Place on 2 paper towels.
Turn over and rearrange halfway through cooking.
2-3 minutes
2-3 minutes
2-3 minutes
2-3 minutes
2-3 minutes
2-3 minutes
2-3 minutes
2-3 minutes
2-3 minutes
25
Page 27
Maintenance
CARE AND CLEANING
For best performance and safety, keep the oven clean
inside and outside. Take special care to keep the inner
door panel and the oven front frame free of food or grease
build-up. Never use rough powder or pads. Wipe
the microwave oven inside and out, including the hood
bottom cover, with a soft cloth and a warm ([nothot) mild
detergent solution. Then rinse and wipe dry. Use a chrome
cleaner and polish on chrome, metal and aluminum
surfaces. Wipe spatters immediately with a wet paper
towel, especially after cooking chicken or bacon. Clean
your oven weekly or more often, if needed.
CONVECTIO N/B ROI LING
RACKS/DRI P PAN
Wash the convection and broiling racks and metal tray/drip
pan with a mild soap and a soft or nylon scrub brush. Dry
completely.Do not use abrasivescrubbers or cleaners to clean
racks and metal tray/drip pan.
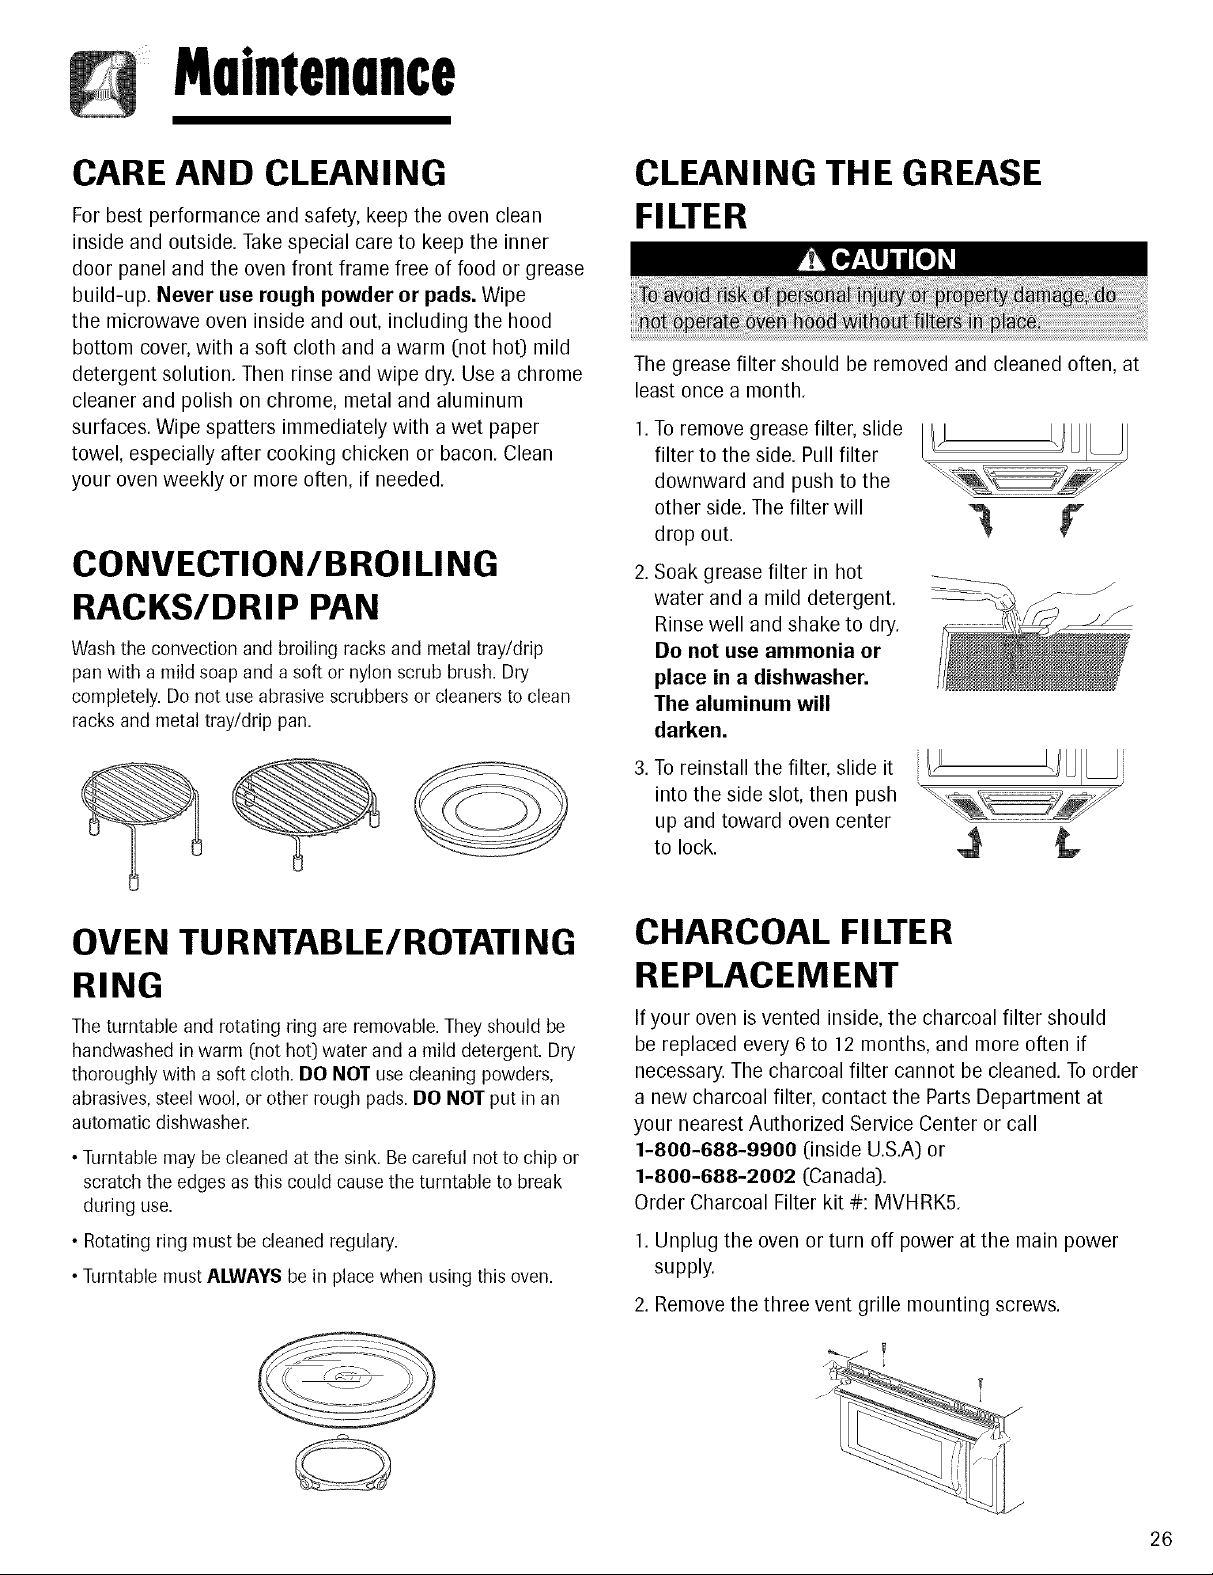
CLEANING THE GREASE
FILTER
The grease filter should be removed and cleaned often, at
least once a month.
1.To remove grease filter, slide
filter to the side. Pull filter
downward and push to the
other side. The filter will
drop out.
2. Soak grease filter in hot
water and a mild detergent.
Rinse well and shake to dry.
Do not use ammonia or
place in a dishwasher.
1"he aluminum will
darken.
OVEN TURNTABLE/ROTATI NG
RING
The turntable and rotating ring areremovable.Theyshould be
handwashed in warm (not hot)water and a mild detergent. Dry
thoroughly with a soft cloth. DO NOT use cleaning powders,
abrasives,steel wool,or other rough pads.DO NOT put in an
automatic dishwasher.
• Turntable maybe cleaned at the sink. Becareful not to chip or
scratch the edges as this could cause the turntable to break
during use.
• Rotating ring must be cleaned regulary.
•Turntable must ALWAYSbe in placewhen using this oven.
3.To reinstall the filter, slide it
into the side slot, then push
up and toward oven center
to lock.
CHARCOAL FILTER
REPLACEMENT
If your oven is vented inside, the charcoal filter should
be replaced every 6 to 12 months, and more often if
necessary. The charcoal filter cannot be cleaned. To order
a new charcoal filter, contact the Parts Department at
your nearest Authorized Service Center or call
1-800-688-9900 ([insideU.S.A) or
1-800-688-2002 (Canada).
Order Charcoal Filter kit #: MVHRK5.
1. Unplug the oven or turn off power at the main power
supply.
2. Remove the three vent grille mounting screws.
26
Page 28
Maintenance
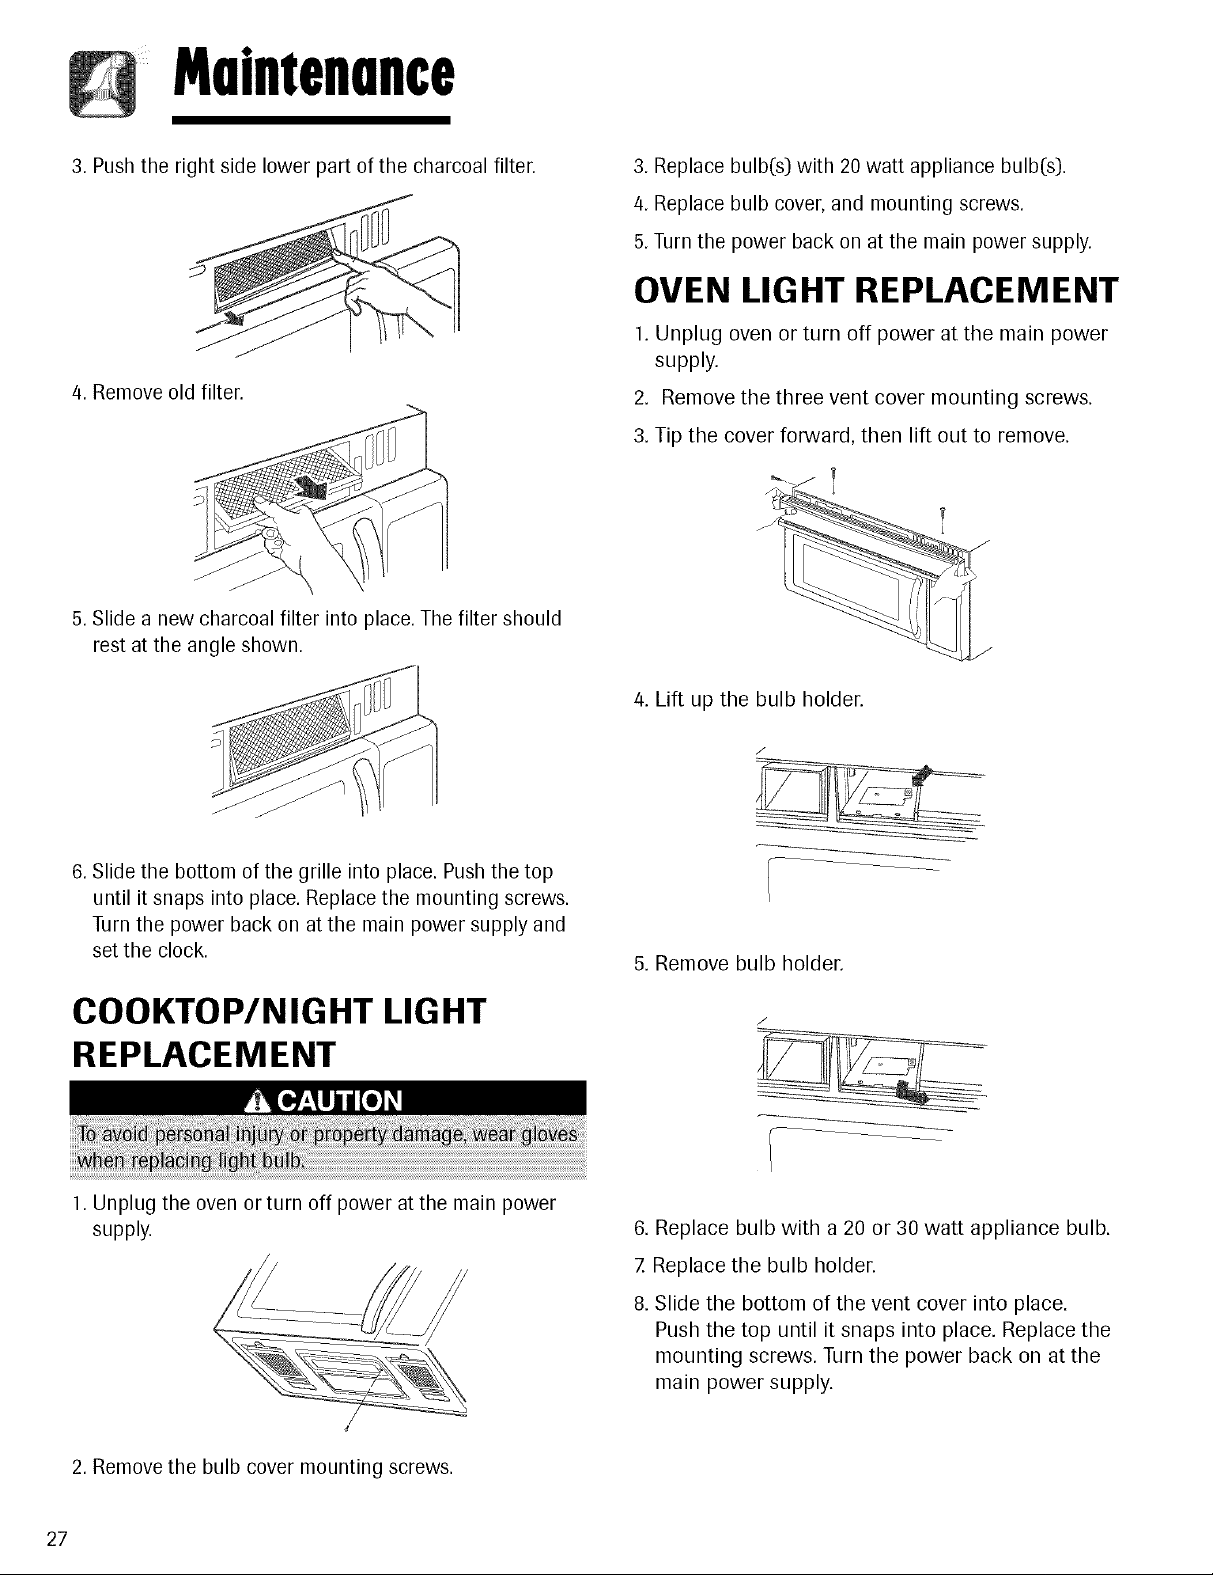
3. Push the right side lower part of the charcoal filter.
4. Remove old filter.
JJ
5. Slide a new charcoal filter into place. The filter should
rest at the angle shown.
3. Replace bulb(s) with 20 watt appliance bulb(s).
4. Replace bulb cover, and mounting screws.
5.Turn the power back on at the main power supply.
OVEN LIGHT REPLACEMENT
1. Unplug oven or turn off power at the main power
supply.
2. Remove the three vent cover mounting screws.
3. Tip the cover forward, then lift out to remove.
4. lift up the bulb holder.
6. Slide the bottom of the grille into place. Push the top
until it snaps into place. Replace the mounting screws.
Turn the power back on at the main power supply and
set the clock.
COOKTOP/NIGHT LIGHT
REPLACEMENT
1. Unplug the oven or turn off power atthe main power
supply.
5. Remove bulb holder.
/
6. Replace bulb with a 20 or 30 watt appliance bulb.
7.Replace the bulb holder.
8. Slide the bottom of the vent cover into place.
Push the top until it snaps into place. Replace the
mounting screws. Turn the power back on at the
main power supply.
2. Remove the bulb cover mounting screws.
27
Page 29
RecommendedUtensils
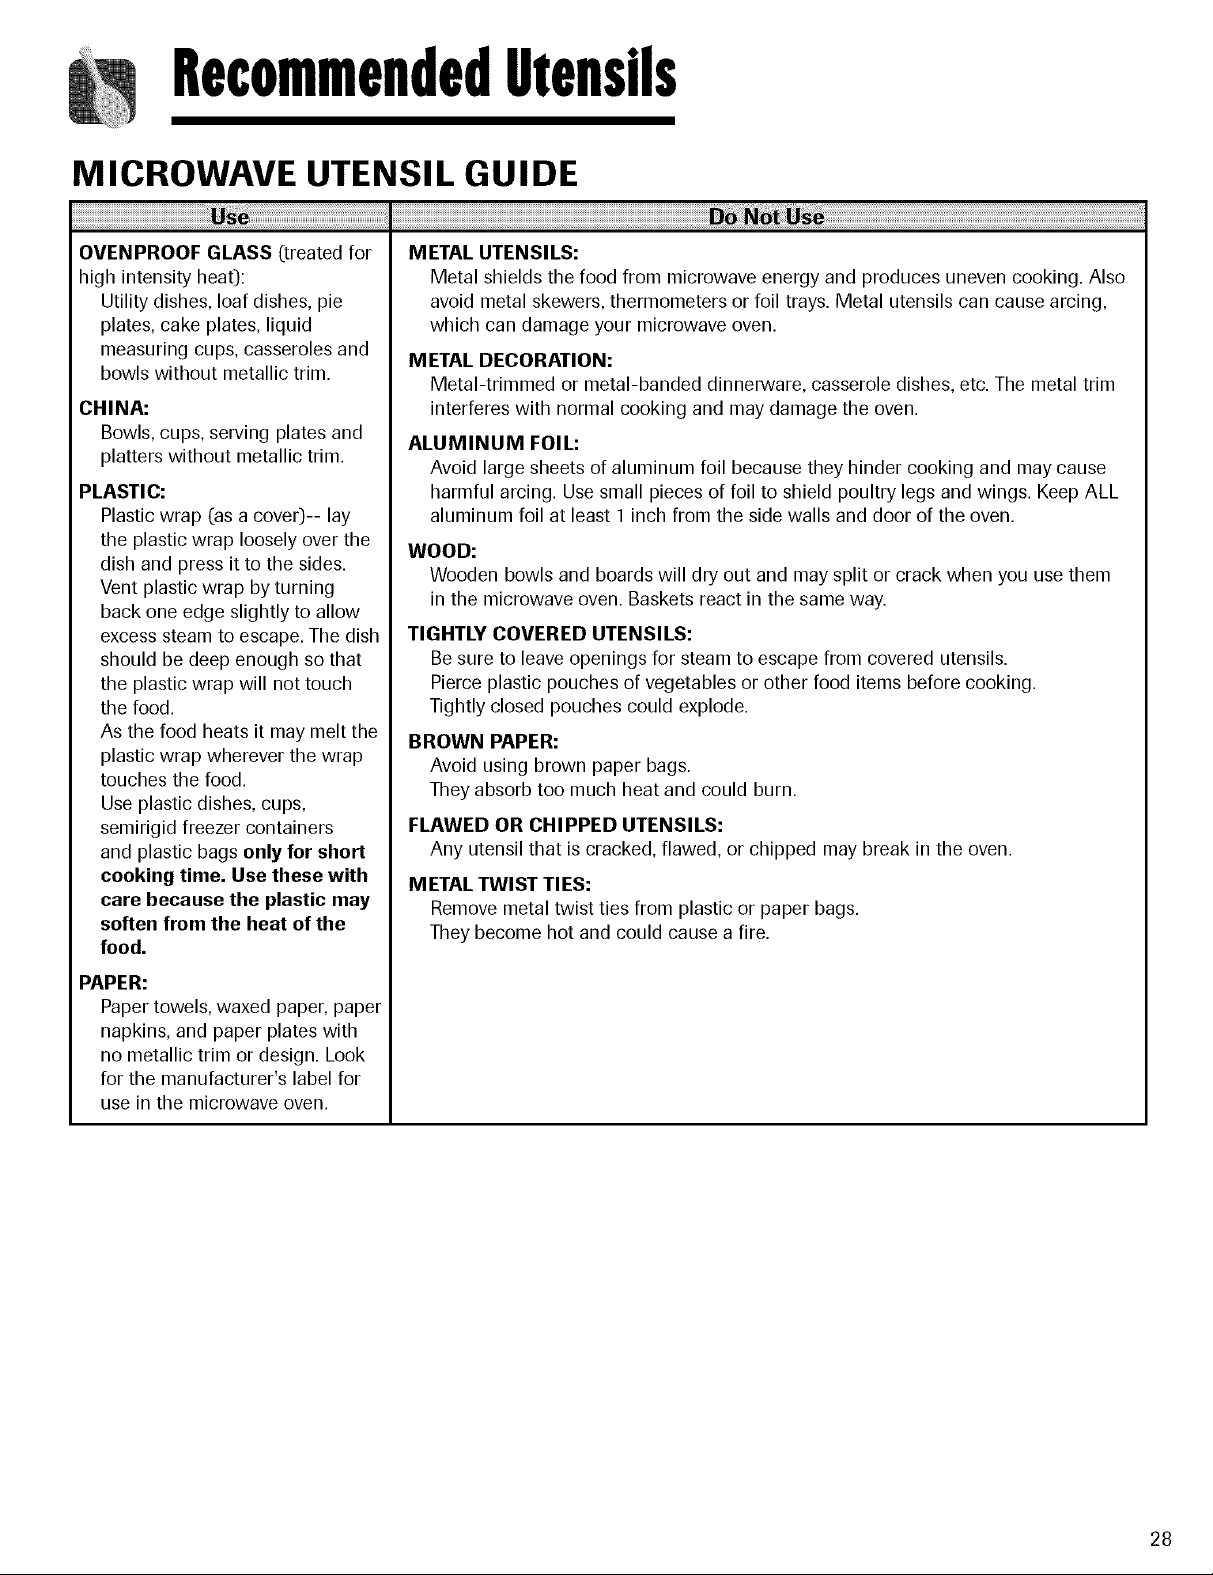
MICROWAVE UTENSIL GUIDE
OVENPROOF GLASS (:treatedfor
high intensity heat):
Utility dishes, loaf dishes, pie
plates, cake plates, liquid
measuring cups, casseroles and
bowls without metallic trim.
CHINA:
Bowls, cups, serving plates and
platters without metallic trim.
PLASTIC:
Plastic wrap (as a cover)-- lay
the plastic wrap loosely over the
dish and press it to the sides.
Vent plastic wrap by turning
back one edge slightly to allow
excess steam to escape. The dish
should be deep enough so that
the plastic wrap will not touch
the food.
As the food heats it may melt the
plastic wrap wherever the wrap
touches the food.
Use plastic dishes, cups,
semirigid freezer containers
and plastic bags only for short
cooking time. Use these with
care because the plastic may
soften from the heat of the
food.
METAL UTENSILS:
Metal shields the food from microwave energy and produces uneven cooking. Also
avoid metal skewers, thermometers or foil trays. Metal utensils can cause arcing,
which can damage your microwave oven.
METAL DECORATION:
Metal-trimmed or metal-banded dinnerware, casserole dishes, etc. The metal trim
interferes with normal cooking and may damage the oven.
ALUMINUM FOIL:
Avoid large sheets of aluminum foil because they hinder cooking and may cause
harmful arcing. Use small pieces of foil to shield poultry legs and wings. Keep ALL
aluminum foil at least 1 inch from the side walls and door of the oven.
WOOD:
Wooden bowls and boards will dry out and may split or crack when you use them
in the microwave oven. Baskets react in the same way.
TIGHTLY COVERED UTENSILS:
Be sure to leave openings for steam to escape from covered utensils.
Pierce plastic pouches of vegetables or other food items before cooking.
Tightly closed pouches could explode.
BROWN PAPER:
Avoid using brown paper bags.
They absorb too much heat and could burn.
FLAWED OR CHIPPED UTENSILS:
Any utensil that is cracked, flawed, or chipped may break in the oven.
METAL TWIST TIES:
Remove metal twist ties from plastic or paper bags.
They become [lot and could cause a fire.
PAPER:
Paper towels, waxed paper, paper
napkins, and paper plates with
no metallic trim or design. Look
for the manufacturer's label for
use in the microwave oven.
28
Page 30

Troubleshooting
BEFORE CALLING FOR SERVICE
Check the following list to be sure a service call is necessary. Reviewing additional information on items to check
may prevent an unneeded service call.
If nothing on the oven operates • check for a blown circuit fuse or a tripped main circuit breaker.
• check if oven is properly connected to electric circuit in house.
• check that controls are set properly.
• the light bulb is loose or defective.If the oven interior light does not
work
If oven will not cook • check that control panel was programmed correctly.
• check that door is firmly closed.
• check that Enter/Start pad was touched.
• check that timer wasn't started instead of a cook function.
If oven takes longer than normal to • be sure the Power Level is programmed properly.
cook or cooks too rapidly
If the time of day clock does not • check that the power cord is fully inserted into the outlet receptacle.
always keep correct time • be sure the oven is the only appliance on the electrical circuit.
If food cooks unevenly • be sure food is evenly shaped.
• be sure food is completely defrosted before cooking.
• check placement of aluminum foil strips used to prevent overcooking.
If food is undercooked • check recipe to be sure all directions (amount, time, and power levels)
were correctly followed.
• be sure microwave oven is on a separate circuit.
• be sure food is completely defrosted before cooking.
If food is overcooked • check recipe to be sure all directions (amount, power level, time, size of
dish) were followed.
If arcing (sparks) occur • be sure microwavable dishes were used.
• be sure wire twist ties were not used.
• be sure oven was not operated when empty.
• make sure metal rack (if used) is properly installed.
If the display shows a time • check that door is firmly closed.
counting down but the oven is not • check that timer was not started instead of a cooking function.
cooking
Vent fan starts automatically • if the temperature gets too hot around the microwave oven, the fan in the
vent hood will automatically turn on at the level 5 setting to cool the oven.
It may stay on up to an hour to cool the oven.
Fault Code - F and a number • touch the Stop/Clear pad to clear code.
appear in the display • if fault code continues to appear, call for service.
29
Page 31

Troubleshooting
QUESTIONS AND ANSWERS
iiiiiiiiiiiiiiiiiiiiiiiiiiiiiiiiiiiiiiiiiiiiiiiiiiiiiiiiiiiiiiiiiiiiiiiiiiiiiiiiiiiiiiiiiiiiiiiiiiiiiiiiiiiiiiiiiiiiiiiiiiiiiiiiiiiiiiiiiiiiiiiiiiiiiiiiiiiiiiiiiiiiiiiiiiiiiiiiiiiiiiiii.....
Can I use a rack in my microwave
oven so that I may reheat or cook
in two rack positions at a time?
Can I use either metal or aluminum Usable metal includes aluminum foil for shielding (use small, flat pieces).
pans in my microwave oven? Never allow metal to touch walls or door.
Sometimes the door of my This appearance is normal and does not affect the operation of your oven.
microwave oven appears wavy.
Is this normal?
What are the humming noises I This is the sound of the transformer when the magnetron tube cycles on
hear when my microwave oven is and off.
operating?
Why does the dish become hot As the food becomes hot it will conduct the heat to the dish.
when I microwave food in it? Use hot pads to remove food after cooking.
What does standing time mean? Standing time means that food should be covered for additional time after
Can I pop popcorn in my
microwave oven?
How do I get the best results?
Only use the rack that is supplied with your microwave oven.
Use of any other rack can result in poor cooking performance and/or
arcing and may damage your oven.
Dish may not be microwave safe.
cooking. This process allows the cooking to finish.
Yes. Pop packaged microwave popcorn following manufacturer's
guidelines or use the preprogrammed Popcorn pad.
Do not use regular paper bags. Use the listening test by stopping the
oven as soon as the popping slows to a pop every one or two seconds. Do
not try to repop unpopped kernels. You can also use special microwave
poppers. When using a popper, be sure to follow manufacturer's directions.
Do not pop popcorn in glass utensils.
Why does steam come out of the
air exhaust vent?
What are the best cooking utensils
to use when convection baking?
Are there special techniques to
know when combination cooking
meats?
Steam is normally produced during cooking.
The microwave oven has been designed to vent this steam out the top vent.
Use utensils with short sides to allow the hot air to surround the top of
your food for browning.
Large cuts of meat should be turned about halfway through the total
cooking time.
Place meat fat side down first, then fat side up for the final portion of
cooking time. This allows for even cooking and nicely browned fat for
presentation.
30
Page 32

Wnrrnnty
What is not covered by these
warranties:
• Replacement of household fuses, resetting of circuit
breakers, or correction to household wiring or plumbing.
• Normal product maintenance and cleaning, including
light bulbs.
• Products with original serial numbers removed, altered, or
not readily determined.
• Products purchased for commercial, industrial, rental, or
leased use.
• Products located outside of the United States or Canada.
• Premium service charges, if the servicer is requested to
perform service in addition to normal service or outside
normal service hours or area.
•Adjustments after the first year.
• Repairs resulting from the following:
- Improper installation, exhaust system, or maintenance.
- Any modification, alteration, or adjustment not
authorized by the manufacturer.
- Accident, misuse, abuse, fire, flood, or acts of nature.
- Connections to improper electrical current, voltage
supply, or gas supply.
- Use of improper pans, containers, or accessories that
cause damage to the product.
•Travel.
IN NO EVENT SHALL MAYTAG BE LIABLE FOR
INCIDENTAL OR CONSEQUENTIAL DAMAGES.
This warranty gives you specific legal rights, and you may
have others which vary from state to state. For example,
some states do not allow the exclusion or limitation of
incidental or consequential damages, so this exclusion
may not apply to you.
If you need service
• Call the dealer from whom your appliance was purchased
or call Maytag ServicessM, Maytag Customer Assistance
at 1-800-688-9900, USA and 1-800-688-2002,
Canada to locate an authorized servicer.
• Be sure to retain proof of purchase to verify warranty
status. Refer to WARRANTY for further information on
owner's responsibilities for warranty service.
• If the dealer or service company cannot resolve the
problem, write to Maytag ServicessM, Attn: CAIR(R>
Center, P.O.Box 2370,Cleveland, TN 37320-2370, or call
1-800-688-9900 USA and 1-800-688-2002 Canada.
U.S.customers using TTY for deaf, hearing impaired or
speech impaired, call 1-800-688-2080.
NOTE:
• When writing or calling about a service problem, please
include the following information:
a.Your name, address and telephone number;
b. Model number and serial number;
c. Name and address of your dealer or servicer;
d.A clear description of the problem you are having;
e. Proof of purchase (sales receipt).
• User's guides, service manuals and parts information
are available from Maytag ServicessM, Maytag Customer
Assistance.
31
Page 33

Guided'utilisotionetd'en etien
Modble MMV6178AA
Instructions de sbcuritb importantes .... 33-35
Caractbristiques ........................................ 36-39
Utilisation .................................................... 40-55
Instructions d'utilisation du four ......... 40-42
Instructions de cuisson avec capteur .. 43-44
D_cong_lation automatique ....................... 44
D_cong61ation rapide .................................. 45
Cuisson automatique ................................... 45
Cuisson avec convection ..................... 46-50
Cuisson rapide/cuisson combin_e .... 51-54
Cuisson au gril ............................................... 55
Guide de chauffage/r6chauffage ................. 56
Four combin_
Conserver ces instructions comme r_f_rences.
Ce guide doit _tre rang_ prbs du four.
Guide pour I_gumes frais ................................ 57
Entretien et nettoyage ............................... 58-59
Ustensiles recommandbs .............................. 60
Guide de dbpannage ................................ 61-62
Garantie .............................................................. 63
Guia de Uso y Cuidado ................................... 64
32
Page 34

Instructionsdesecurit6importnntes
Ce qu'il faut savoir sur les
instructions de s_curit_
Lesinstructions de s6curit_ importantes et les
avertissements paraissant dans ce guide ne sont pas
destin6s _ couvrir toutes les situations et conditions
6ventuelles qui peuvent se pr6senter. II faut faire preuve de
bon sens et de prudence Iorsde I'installation, de I'entretien
ou de I'utilisation d'un four _ micro-ondes.
Toujours prendre contact avec le d6taillant, ledistributeur,
I'agent de service ou le fabricant, au sujet de probl_mes ou
conditions que I'on ne comprend pas.
Reconnaitre les _tiquettes, phrases ou
symboles sur la s_curit_
33
Page 35

Instructionsdesecurit6importnntes
Instructions de liaison b la terre
II FAUT que ce four soit reli_ b la terre.
courant vers la terre, ce qui reduit le risque
La liaison _ la terre permet 1'6vacuation du II__
de choc electrique. Ce four est dote d'un
cordon avec fiche de branchement _ trois
broches, pour liaison _ la terre. On doit brancher la fiche sur
une prise de courant convenablement installee et reliee _ la
terre. Voir les instructions d'installation.
En cas de non comprehension des instructions de liaison
la terre ou en cas d'incertitude quant _ la qualite de la
liaison _ la terre de I'appareil, consulter un technicien ou
electricien qualifi&
Ne pas utiliser de rallonge _lectrique. Si le cordon de
I'appareil est trop court, faire installer une prise de courant
3 alveoles. Ce four doit etre branche sur un circuit
ind@endant de 60 hertz aux caracteristiques nominales
indiquees dans le tableau des specifications. Si le four
est branche sur le meme circuit qu'un autre equipement,
il pourrait en resulter une augmentation des durees de
cuisson avec risque que les fusibles ne grillent.
Le four _ micro-ondes fonctionne sur un courant domestique
standard de 110-120 volts.
I noncd sur les interfdrences
avec les fr quences radio -
Commission f d rale des
communications
• Modifier la position du four _ micro-ondes par rapport au
recepteur de radio ou de television.
• I_loignerle four _ micro-ondes du recepteur.
• Brancher le four _ micro-ondes dans une prisedifferente
de sorte que le four _ micro-ondes et le recepteur soient
alimentes par des circuits differents.
Le fabricant n'est pas responsable des interferences aux
ondes de radio et de televisioncausees par une modification
non autoris_e du four _ micro-ondes. II revient_ I'utilisateur
d'eliminer de telles interferences.
Precautions b observer pour
dviter une exposition excessive
I' nergie des micro-ondes
A. NE PAStenter de faire fonctionner ce four Iorsque la porte
est ouverte; le fonctionnement du four Iorsque la porte
est ouverte pourrait susciter une expositiondangereuse
I'energie des micro-ondes. II est important de ne pas
circonvenir ou modifier les dispositifs d'interverrouillage de
securite.
B.Veiller _ NE placerAUCUN objet entre la face avant du
four et la porte, et _ ne pas laisserdes souillures ou residus
de produits de nettoyages'accumuler sur lessurfaces de
contact porte/chassis.
C. NE PAS faire fonctionner le four s'il est endommag& IIest
particuli6rement important que la porte du four puissefermer
parfaitement et qu'il n'y ait aucune deterioration de :
1.porte (deformation],
2.charni6res et Ioquets (brises ou desserres),
3.joints de porte et surfaces de contact.
D.Seul un personnel qualifie est habilite _ executerdes
reglages ou reparations sur lefour _ micro-ondes.
seulement)
Cefour _ micro-ondes genere de I'energie _ des frequences
elevees; s'il n'est pas installe et utilise correctement,
c'est-_-dire en stricte conformite avec les instructions du
fabricant, le four peut susciter des interferences perturbant
la reception des ondes de radio et television. Cet appareil
a ete teste et il a ete trouve conforme aux limites imposees
par les specifications de la partie 18 des reglements de la
Commission federale des communications (FCC) - portant
sur les equipements ISM, et qui sont congus pour offrir une
protection raisonnable _ de telles interferences dans une
installation residentielle.
Cependant, il n'y a aucune garantie qu'aucune interference
ne se produira dans une installation en particulier. Si
cet equipement n'entraine pas d'interf@ence avec la
reception des ondes de radio et de television (effet qui
peut etre diagnostique par I'arret puis la mise en marche
de I'equipemenO, I'utilisateur est encourage _ essayer de
corriger la situation au moyen d'une ou de plusieurs des
mesures suivantes :
• Reorienter I'antenne de reception de television ou de radio.
CONSERVER CES INSTRUCTIONS
34
Page 36

Instructionsdesecurit6importnntes
35
CONSERVER CES INSTRUCTIONS
Page 37

Poign_e de
la )orte
Cnrncteristiques
Grille d'_vent
Plateau tournant
en verre
Hublot avec
_cran m_tallique
Guide de
cuisson
_Tr_pied de gril
Systbme de verrouilla(
de s_curit_
Lampe d'_clairage
Filtre _ graisse
Specifications du four
Alimentation 120V CA, 60 Hz
61ectrique
Puissance absorb6e 1600 W
Puissance de 950 W
cuisson (Norme C.E.I.60705)
Fr6quence 2450 MHz
Courant nominal 14A
Dimensions externes 29-]5/]6 po (76,0 cm]
(I x h x p] x 16-7/16po (41,8 cm]
x 15-3/8 po (39,1 cm]
Volume de la cavit6 1,7pi 3 (0,048 m 3]
Poids net 72Ib (32,7 kg]
-- -Tableau de
commande
Plaque signal_tique
- (num_ro de module
et num_ro de s_rie)({__ Plateau m_tallique/
K
_--.__._/ rotation
convection
Tr_pied de
Plateau tournant
Anneau de
@
@
\
@
@
Sensor (:onlrols "-- .....................................
@
@
Cook @
©
@
©
de r_cup_ration
@
©
@
®
®
©
©
@
@
@
@
36
Page 38

l:nrncteristiques
CARACTI RISTIOU ES
REMARQUE :
• Style et caracteristiques variables selon le modele.
1.AFFICHEUR : L'afficheur inclut une horloge et des
indicateurs; ils affichent I'heure, les durees de cuisson et les
fonctions de cuisson selectionnees.
2. MICRO. (MICRO-ONDES) :Appuyer sur cette touche
pour la programmation d'une cuisson aux micro-ondes.
3. CONV, (CONVECTION) :Appuyer sur cette touche pour la
programmation d'une cuisson avec convection.
4. BROIL (GRIL) : Appuyer sur cette touche pour la program-
mation d'une cuisson au gril.
5. COMBI, (COMBINAISON) : Appuyer sur cette touche
pour la programmation d'un prechauffage ou d'une cuisson
en mode combine.
6 SENSOR POPCORN (MA'I'S A I_CLATER AVEC
CAPTEUR) : Appuyer sur cette touche pour commander
une operation d'eclatement de ma)s dans le four a micro-
ondes. La duree de chauffage sera determinee par le
capteur en fonction de la quantite d'humidite Cruise par le
ma)s.
Z SENSOR COOK (CUISSON AVEC CAPTEUR) : Appuyer
sur cette touche pour commander la cuisson de divers mets
: potatoes de terre au four, legumes surgeles, legumes frais,
legumes en conserve, mets surgeles et riz. La duree de
chauffage sera determinee par le capteur en fonction de la
quantite d'humidite Cruise par le mets.
8 SENSOR REHEAT (RI_CHAUFFAGE AVEC CAPTEUR) :
Appuyer sur cette touche pour commander le rechauffage
de divers mets : mets en sauce, assiette de diner, pizza et
soupe/sauce. La duree de chauffage sera determinee par le
capteur en fonction de la quantite d'humidite Cruise par le
mets.
9 CUSTOM PROGRAM (PROGRAMME PERSONNALIS¢) :
Appuyer sur cette touche pour rappeler une instruction de
cuisson prealablement programmee en memoire.
10. AUTO COOK (CUISSON AUTOMATIO.UE) : Appuyer
sur cette touche pour commander la cuisson de bacon,
muffins et petits pains frais, muffins et petits pains congeles,
boissons, morceaux de poulet, cereales chaudes.
11 AUTO DEFROST (D¢CONGCLATION AUTOMATIO.UE) :
Appuyer sur cette touche pour selectionner le type d'aliment
et commander la decongelation en fonction du poids.
12. AUTO COMBI. (COMBINAISON AUTOMATIQUE) :
Appuyer sur cette touche pour la programmation d'une
cuisson par combinaison selon le poids.
13. AUTO BROIL (GRIL AUTOMATIO.UE) : Appuyer sur cette
touche pour programmer une cuisson au gril selon le poids.
1/4.SOFTEN (AMOLLISSEMENT) : Appuyer sur cette touche
pour amollir le beurre, la creme glacee, le fromage _ la
creme et les jus congeles.
15. MELT (FUSION) :Appuyer sur cette touche pour
commander la fusion du beurre, du chocolat, du fromage et
des guimauves.
16. ADD 30 SEC. (ADDITION 30 SECONDES) :Appuyer sur
cette touche pour commander le declenchement instantane
d'une operation de cuisson au niveau de puissance 100 %.
1ZTOUCHES NUMI_RIO.UES : Utiliser les touches
I
numeriques pour entrer les valeurs de duree de cuisson,
niveau de puissance, quantite, poids ou temperatures de
cuisson.
18. KITCHEN TIMER (MINUTERIE) :Appuyer sur cette
touche pour programmer la minuterie.
19. CLOCK (HORLOGE) : Appuyer sur cette touche pour
entrer I'heure exacte.
20. CONTROL SETUP (SI_LECTION DES PARAMi:TRES) :
Appuyer sur cette touche pour modifier les parametres
de programmation par defaut, utilises par le four pour
signaux sonores, horloge, vitesse d'affichage et poids pour
decongelation.
21. MORE+ (PLUS+) •Appuyer sur cette touche pour ajouter
dix secondes a la duree de cuisson (chaque pression).
22. LESS- (MOINS-) • Appuyer sur cette touche pour reduire
de dix secondes (chaque pression) la duree de cuisson dej8
programmee.
23. POWER (PUISSANCE) • Appuyer sur cette touche pour
selectionner le niveau de puissance de chauffage.
24. STOP/CLEAR (ARRItT/EFFACEMENT) : Appuyer
sur cette touche pour arreter le four ou effacer route
I'information entree.
25. ENTER/START (ENTRI_E/MISE EN MARCHE) :Appuyer
sur cette touche pour commander I'execution d'une fonction
ou pour enregistrer toutes les entrees. Si I'on ouvre la porte
du four apres le declenchement d'une cuisson, appuyer de
nouveau sur ENTER/START pour reprendre la cuisson.
26. TURNTABLE ON/OFF (PLATEAU TOURNANT -
MARCHE/ARRI_T) :Appuyer sur cette touche pour
commander la raise en marche ou I'arret du plateau
tournant. Le symbole OFF (ARRI_T) apparaft sur I'afficheur.
• Cette option n'est pas disponible pour les modes de
I EMARQUE :
decongelation et de cuisson commandee par capteur.
2Z LIGHT HI/LO/OFF (LAMPE - JOUR/NUIT/ARRf:T) :
Appuyer sur cette touche pour commander I'allumage ou
I'extinction de la lampe d'eclairage.
28. LIGHT TIMER (MINUTERIE D'I'CLAIRAGE) : Appuyer
sur cette touche pour programmer la minuterie de la lampe.
29. VENT ON/OFF (VENTILATEUR - MARCHE/ARRf:T) :
Appuyer sur cette touche pour commander la mise en
marche ou I'arret du ventilateur.
30. VENT 5-SPEED (VENTILATEUR - 5 VITESSES) :
Appuyer sur cette touche pour choisir I'une des cinq
vitesses de ventilateur,
31. AUTO TIME SET (DURI_E AUTOM. DE VENTILATION) :
Appuyer sur cette touche pour la programmation d'une
duree de ventilation (1, 3, 5, 10, 30 minutes).
37
Page 39

Cnrnct6ristiques
LE FOUR A MICRO-ONDES
On d6crit dans cette section los principes de fonctionnement
du four _ micro-ondes et los connaissances de base qui
permettront de I'utiliser. Lire cette information avant d'utiliser
le four.
CLOCK (HORLOGE)
L'appareil est dot6 d'une horloge (format 12heures}.
Exemple : Pour r_gler I'horloge sur 8 h OO.
1.Appuyer sur la touche CLOCK.
8 0 0 2. Entrer I'heure exacte _ I'aide des touches
_ooF_°.__°o, num6riques.
3.Appuyer sur la touche ENTER/START.
(Appuyer sur I pour AM/matin et sur 2
pour PM/soir.}
4.Appuyer sur la touche ENTER/START.
KITCHEN TIMER (MINUTERIE)
On peut utiliser I'horloge du four _ micro-ondes comme
minuterie, pour le d6compte d'une p6riode qui pout atteindre
99 minutes, 99 secondes.
CONTROL SETUP
(SELECTION DES PARAM RES)
II est possible de modifier les param6tres par ddaut, utilis6s
par le four pour signaux sonores, horloge, vitesse d'affichage
et poids de d6congelation.
Voir le tableau qui suit.
1 Signal sonore 1 Signal sonore ACTIF
- ACTIF/INACTIF 2 Signal sonore INACTIF
2 Horloge- 1 Horloge ACTIVE
ACTIVE/INACTIVE 2 HorlogeINACTIVE
3 Vitessede 1 Vitesse basso
ddilement 2 Vitesse normale
3 Vitesse 61ev6e
4 Mode de s61ection 1 Ib
du poids 2 kg
Exemple : Pour permuter le mode de s_lection du poids
(entre Ib et kg).
1.Appuyer sur CONTROL SETUP.
4
_O3oF
2. Appuyer sur la touche 4.
3. Appuyer sur la touche 2.
VENT (VENTILATEU R)
Leventilateur permet d'6vacuer la vapeur d'eau et d'autres
vapeurs 6mises par les aliments sur la table de cuisson.
Exemple : Pour le niveau 4.
1.Appuyer sur la touche ON/OFF.
Uafficheur indique le dernier niveau avant
de choisir un autre niveau de vitesse du
ventilateur.
Exemple : R_glage pour une p_riode de d_compte de
3 minutes.
1.Appuyer sur KITCHEN TIMER.
} 0 0 2. Entrer la dur6e de d6compte _ I'aide des
.............. touches num6riques.
3,
Appuyer sur la touche ENTER/START.
Lorsque la p6riode de d6compte est
6coul6e, I'appareil 6met des signaux
sonores et affiche le messageEND (FIN).
2. Appuyer sur cette touche jusqu'_
I'apparition du niveau 4 _ I'afficheur.
Appuyer sur la touche ON/OFF pour arr6ter le ventilateur
Iorsqu'on le d6sire.
REMARQUE :
• Si latemperature augmente excessivement _ partir de
la cuisini6re ou de la table de cuisson sous le four, le
ventilateur de la hotte d'extraction se met en marche
automatiquement au NIVEAU 5, pour prot6ger le four.
Leventilateur pout ainsi fonctionner pendant une p6riode
d'une heure pour le refroidissement du four. Lorsque ceci
se produit, on ne pout commander I'arr6t du ventilateur
avec la touche ON/OFE
38
Page 40

Cnrncterisdques
AUTO TIME S_ ([DURI:!:E
AUTOlViATIQUEDE VENTILATION)
Exemple : Arr_t du ventilateur apr_s 30 minutes au
niveau 4.
1.Appuyer sur la touche ON/OFF
2.Appuyer sur cette touche jusqu'_
I'apparition du niveau 4 _ I'afficheur.
3.Appuyer cinq lois sur cette touche.
TURNTABLE ON/OFF (PLATE/_U
TOURNANT - MARCH E/ARRET)
Pour obtenir les meilleurs rCsultats de cuisson, laisser le
plateau tournant fonctionner en permanence. Qn peut
commander I'arrCt du plateau tournant pour la cuisson
d'une grande quantit6 d'aliments. Appuyer sur la
touche TURNTABLE ON/OFF pour commander
la mise en marche ou I'arrCt du plateau tournant
REMARQUES :
• Cette option n'est pas disponible pour les modes de
dCcongClation et de cuisson commandCe par capteur.
• Le plateau tournant peut parfois s'_chauffer
consid_mblement. II faut 6tre prudent s'il est
nCcessaire de toucher le plateau tournant durant ou
apr6s la cuisson.
• Ne pas faire fonctionner le four sans y avoir plac_
des aliments.
VERROUILLAGE POUR
ENFANTS
II est possible de dCsactiver le tableau de commande
pour empCcher la mise en marche du four _ micro-ondes,
accidentellement ou par des enfants.
La fonction de verrouillage est 6galement utile Iorsqu'on doit
nettoyer le tableau de commande; ceci empCche I'entrCe
accidentelle de commandes durant le nettoyage.
Exemple :Verrouillage du tableau de commande.
1.Appuyer sur la touche STOP/CLEAR
LIGHT HI/LO/OFF
(LAMPE- JOU R/NUIT/ARRET)
Appuyer une lois sur LIGHT HI/LO/OFF
pour commander I'allumage avec I'intensit6
maximale; appuyer une seconde fois sur la
touche pour passer _ I'intensit6 d'illumination
nocturne; appuyer une troisi6me fois pour
commander I'extinction.
LIGHTTIMER
(MINUTERIE D'I_.CLAIRAGE)
On peut programmer I'appareil pour que la LAMPE
d'Cclairage s'allume et s'Cteigne automatiquement _ I'heure
choisie. La lampe s'allumera ensuite _ la m_.meheure
chaque jour, jusqu'_ une modification de la programmation.
Exemple : Allumage _ 2 h O0, extinction _ 7 h 00.
1.Appuyer sur la touche LIGHT TIMER.
20O
_0_F 4_0°F 450°F
0 0 5. Entrer I'heure d'EXTINCTION dCsirCe.
_75_F 4_oF 4_F
REMARQUE :
• Pour modifier la programmation de la minuterie
d'¢CLAIRAGE, r@Cter les 6tapes I _ Z
Exemple : D_sactivation de la MINUTERIE
D'I_CLAIRAGE.
2. Entrer I'heure d'ALLUMAGE dCsirCe.
3. Appuyer sur la touche ENTER/START.
(Appuyer sur I pour AM/matin et sur
2 pour PM/soir.)
4.Appuyer de nouveau sur la touche
ENTER/START.
6.Appuyer sur la touche ENTER/START.
(Appuyer sur I pour AM/matin et sur
2 pour PM/soir.]
7.Appuyer de nouveau sur la touche
ENTER/START.
2. Maintenir la pression sur la touche
ENTER/START pendant 4 secondes
ou plus. Le message LOCKED
(VERROUILLIt) apparait sur I'afficheur et
I'appareil 6met 2 signaux sonores.
Exemple : D_verrouillage du tableau de commande.
1.Maintenir la pression sur la touche
ENTER/START pendant 4 secondes
ou plus. Le message LOCKED
(VERROUILLIt) disparait de I'afficheur et
I'appareil 6met 2 signaux sonores..
39
1.Appuyer sur la touche LIGHT TIMER.
2.Appuyer sur la touche STOP/CLEAR
REMARQUE :
• Pour d_sactiver la MINUTERIE D'¢CLAIRAGE alors
qu'elle est programmCe, appuyer sur la touche .
Page 41

Utilisation
INSTRUCTIONS
D'UTILISATION DU FOUR
ADD 30 SEC.
(ADDITION 30 SECONDES)
Cette touche de commande rapide permet de commander
la mise en marche du four _ micro-ondes sans qu'il soit
n6cessaire d'appuyer sur ENTER/START.
Exemple : S_lection d'une p_riode de chauffage de
2 minutes avec la touche ADD 30 SEC.
1.Appuyer 4 fois sur ADD 30 SEC.
Le four se met en marche et affiche le
d6compte de la dur6e de cuisson.
CUSTOM PROGRAM
(PROGRAMME PERSONNALIS_
Cette touche permet de d6clencher imm6diatement
un programme de cuisson dont les instructions ont _t6
ant6rieurement programm@eset m6moris@es.
Exemple : P_riode de cuisson de 2 minutes.
1.Appuyer sur la touche CUSTOM
PROGRAM.
CUISSON AU NIVEAU DE
PUISSANCE ELEVE
Exemple : P_riode de cuisson de 8 minutes
30 secondes, au niveau de puissance 100 %.
8 3 0 1. Entrer la dur_e de cuisson.
_F ZlS°F 450_F
2.Appuyer sur ENTER/START. Lorsquela
dur6e de cuisson est 6coul6e, I'appareil
6met/4 signaux sonores et affiche COOK
END (FIN DE CUISSON).
CUISSON AUX NIVEAUX DE
PUISSANCE INFI_RIEURS
L'emploi de la puissance de chauffage HIGH (€LEVEE)
ne produit pas toujours les meilleurs r6sultats avec les
aliments qui n_cessitent une cuisson lente, comme r6ti,
pains et p_tisseries ou entremets. En plus de la puissance
61ev6e,le four offre un choix de 10 niveaux de puissance de
chauffage. Voir page 42 le Guide de cuisson - Tous niveaux
de puissance.
Exemple : P_riode de cuisson de 7 minutes
30 secondes, au niveau de puissance 70 %.
_TS°F ZTS°F 4SO°F
0 1. Entrer la dur_e de cuisson.
2.Appuyer sur la touche MICRO.
2 0 0 3. Entrer une dur6e de cuisson.
2_"F 4_oF 45_OF
4.Appuyer sur la touche ENTER/START.
Exemple : Rappel du programme personnalis&
....I:om 1.Appuyer sur la touche CUSTOM
PROGRAM.
Appuyer sur la touche ENTER/START.
Lorsque la p_riode de d6compte est
6coulee, I'appareil 6met/4 signaux sonores
et affiche le message COOK END (FIN
DE CUISSON).
MORE+/LESS- (PLUS+/MOINS-)
Lestouches MORE+ et LESS- permettent de modifier
la dur_e de cuisson pour une operation de cuisson
pr@rogramm6e ou pour une p6riode de cuisson minut6e.
Chaque pression sur MORE+ ajoute 10 secondes _ la dur_e
de cuisson. Chaque pression sur LESS- r_duit la dur6e de
cuisson de 10 secondes.
JT_°F
2. Appuyer sur la touche POWER.
7
3. Entrer le niveau de la puissance de
chauffage.
4. Appuyer sur la touche ENTER/START.
Lorsque la dur_e de cuisson est _coul6e,
I'appareil 6met 4 signaux sonores et
affiche COOK END (FIN DE CUISSON).
40
Page 42

Utillsation
PROGRAMME DE CUISSON A
PLUSIEURS PHASES
Pour I'obtention des meilleurs r6sultats, certaines recettes
stipulent I'emploi d'un niveau de puissance de chauffage
pendant une certaine p6riode, puis d'un autre niveau de
puissance de chauffage durant une autre p6riode. On peut
programmer le four pour qu'il ex6cute successivement
jusqu'_ deux p_riodes de chauffage.
Exemple : Cuisson d'un mets pendant 3 minutes au
niveau de puissance 100 %, puis durant 7 minutes
30 secondes au niveau de puissance 70 %.
3 0 0 1. Entrer la dur6e de cuisson pour la
............. premi6re p6riode.
2.Appuyer sur la touche MICRO.
7 3 0 3. Entrer la dur6e de cuisson pour la seconde
.............. p6riode.
4.Appuyer sur la touche POWER.
7
_75°F
5. Entrer le niveau de puissance de chauffage
pour la seconde p6riode.
Appuyer sur la touche ENTER/START.
Lorsque la dur6e de cuisson est _coul6e,
I'appareil 6met 4 signaux sonores et
affiche COOK END (FIN DE CUISSON).
TABLEAU DE FUSION
Beurre 1 1 _ 3 bStonnets
Chocolat 2 4 ou 8 oz (114 _ 227 g)
Fromage 3 8 ou 16 oz (227 _ 454 g)
Guimauves 4 5 ou 10 oz (142 _ 284 g)
SOFTEN (AMOLLISSEMENT)
(Beurre, cr_me glac_e, fromage & la cr_me, jus
congel_s)
Cefour utilise une puissance basse pour la fusion
d'aliments. Choisir la cat6gorie d'aliment _ faire fondre et
entrer la quantit&
Voir le TABLEAU D'AMOLLISSEMENT sur cette page, pour
connaitre les r_glages disponibles.
1.Appuyer sur la touche STOP/CLEAR
2.Appuyer sur la touche SOFTEN.
25g°F
2_oF
2
2
3. Choisir la cat6gorie d'aliment.
4.Appuyer sur la touche num_rique
correspondant _ la quantit&
5.Appuyer sur la touche ENTER/START.
MELT (FUSION)
CBeurre, chocolat, fromage, guimauves)
Ce four utilise une puissance basse pour la fusion
d'aliments. Choisir la cat6gorie d'aliment _ faire fondre et
entrer la quantit&
Voir le TABLEAU DE FUSION sur cette page, pour connaitre
les r6glages disponibles.
1.Appuyer sur la touche STOP/CLEAR
2.Appuyer sur la touche MELT.
2S0°_
2
_s0or
3. Choisir la cat6gorie d'aliment.
4.Appuyer sur la touche num_rique
correspondant _ la quantitd.
5.Appuyer sur ENTER/START.
TABLEAU D'AMOLLISSEM ENT
Beurre 1 1 _ 3 bStonnets
Creme 2 Chopine, pinte, demi-gallon
glac6e (V2L, 1 L, 2 L)
Fromage _ la 3 3 ou 8 oz (85 ou 227 g)
creme
Jus congel6s 4 6, 12 ou 16 oz
(177,355 ou 474 mL)
41
Page 43

Utilisation
GUIDE DE CUISSON - TOUS NIVEAUX DE PUISSANCE
L'appareil offre un choix de 10 niveaux de puissance de chauffage en plus de la puissance HIGH (F'-LEVI'E);on peut ainsi choisir
le niveau de puissance de chauffage le plus appropri6 pour I'aliment a cuire. Le tableau ci-dessous permet de choisir le niveau
de puissance de chauffage appropri6 pour divers aliments.
10 • I_bullition d'eau.
(Puissance 6levee) • Cuisson de boeuf hach&
• Pr@aration de bonbons/confiserie.
• Cuisson de 16gumeset fruits frais.
• Cuisson de poisson ou volaille.
• Pr6chauffage d'un plat de brunissage.
• RSchauffage de liquide.
• Tranches de bacon.
9 • R_chauffage rapide de tranches de viande.
• Cuisson d'oignons, de c_leri et poivrons verts (saut6s].
8 • R_chauffage.
• Cuisson d'ceufs brouill6s.
7 • Cuisson de pain et de produits de c6r6ales.
• Cuisson de mets a base de fromage, veau.
• Cuisson de gateaux, muffins, biscuits, etc.
6 • Cuisson de pates.
5 • Cuisson de viande, volaille entiere.
• Cuisson d'entremets.
• Cuisson de poulet entier, dinde, c6tes de porc, r6ti de c6tes, r6ti de Ionge.
4 • Toute cuisson de pi_ces de viande moins tendres.
• R6chauffage de mets pr@ar6s surgel6s.
3 • D6cong61ationde viande, volaille et produits de la mer.
• Cuisson d'une petite quantit6 d'aliments.
• Finde cuisson pour mets en sauce, ragoQts et certaines sauces.
2 • Amollissement de beurre et fromage a la cr_me.
• Chauffage d'une petite quantit6 d'aliments.
1 • Amollissement de cr_me glac_e.
• Lev6ede pate a pain (avec levure).
0 • P_riode d'attente.
42
Page 44

Utilisation
INSTRUCTIONS DE CUISSON
AVEC CAPTEU R
La fonction de contrOle de la cuisson par le circuit du
capteur permet de commander lacuisson d'un mets favori
sans devoir s_lectionner une dur6e de cuisson et une
puissance de chauffage. L'appareil affiche la cat_gorie
d'aliment durant la p6riode de d6tection initiale. Le four
micro-ondes d6termine automatiquement la dur6e de
cuisson n6cessaire pour chaque mets ou aliment. Lorsque
le capteur interne d6tecte une certaine quantit6 d'humidit6
6mise par I'aliment, il d6termine la dur6e de cuisson
restante; I'afficheur prSsente alors la durSe de cuisson
restante. Observer les recommandations suivantes pour
obtenir les meilleurs r6sultats pour une cuisson contrOl6e
par le capteur :
1.Entreprendre la cuisson sur des aliments qui se trouvent
une tempdrature de conservation normale.
2.Veiller _ ce que le plateau tournant enverre et la surface
ext6rieure du r_cipient soient secs.
3. Recouvrir de mani6re I_che les aliments avec un
couvercle, du papier paraffin_ ou une feuille de plastique
(pour four _ micro-ondes} ou laisser un 6vent.
Ne pas ouvrir la porte du four ni appuyer sur la touche
STOP/CLEAR durant la periode de d6tection. Lorsque la
p6riode de d6tection est 6coulee, le four 6met 2 signaux
sonores, et la dur_e de cuisson restante apparait sur
I'afficheur. A partir de ce moment, on peut ouvrir la porte
du four pour remuer ou retourner les aliments ou pour
modifier leur r@artition.
GUIDE DE CUISSON AVEC
CAPTEU R
Pour obtenir les meilleurs r6sultats Iorsd'une cuisson
contrOl6e par le capteur, employer les r6cipients appropri6s
et recouvrir les aliments.
1.Toujours utiliser un r6cipient pour four _ micro-ondes et
recouvrir avec un couvercle ou une feuille de plastique
(hisser un _ven0.
2. Ne jamais placer un couvercle ou film de plastique
6tanche sur un r6cipient; ceci emp6che I'_vacuation de
la vapeur et peut provoquer une cuisson excessive.
3.Adapter la quantit6 de nourriture _ la taille du r6cipient.
Pour obtenir les meilleurs r6sultats, remplir un r6cipient
50 % ou plus.
4. Avant de placer les aliments dans le four, vSrifier que
les surfaces internes du four et les surfaces externes du
r6cipient sont s6ches. La transformation en vapeur des
r6sidus d'eau peut provoquer une d6tection incorrecte
par le capteur.
AUG M ENTATION/DI M INUTION
DE LA DURI:t:EDE CUISSON
Si la dur6e de cuisson indiqu6e par la fonction de cuisson
avec CAPTEUR est trop Iongue ou trop courte, on peut la
faire varier dans un sens ou dans I'autre, mais seulement
avec le d_clenchement de la cuisson.
Exemple : Si on souhaite allonger la dur_e de cuisson
avec capteur (riz).
1.Appuyer sur SENSOR COOK.
6
3SOoF
_1ore+
2. Choisir la cat6gorie d'aliment.
3. Lorsque la dur6e restante est affich6e,
appuyer sur la touche MORE+.
SENSOR POPCORN ([MA|S A
I CLATER AVEC CAPTEUR)
La fonction SENSOR POPCORNvous permet de faire 6clater
au four a micro-ondes les grains de mars des sachets
commerciaux de 3 et 3,5 onces (85 et 99 g}. Ex6cuter le
processus sur un seul sachet a la fois. Dans lecas de
I'emploi d'un dispositif sp6cial pour 6clatement de marsau
four a micro-ondes, observer les instructions du fabricant.
Exemple : Preparation de ma'is_ _clater.
1.Appuyer une lois sur la touche SENSOR
POPCORN. Lorsque la dur6e de
chauffage est 6coul6e, I'appareil 6met
4 signaux sonores et affiche le message
COOK END (FIN DE CUISSON)
• Quantit6 recommand6e •3 _ 3,5 onces (85 _ 99 g}.
43
Page 45

Utilisation
SENSOR COOK
(CUISSON AVEC CAPTEU R)
La touche SENSOR COOK permet de commander une
cuisson aux micro-ondes d'aliments courants, sans devoir
s61ectionner d'abord la dur6e de cuisson et la puissance
de chauffage. La fonction CUISSON AVEC CAPTEURest
associde _ des puissances de chauffage pr6sdlectionn6es
pour 6 cat6gories d'aliment.
Exemple : Cuisson du riz.
1.Appuyer sur SENSOR COOK.
6
_50°F
TABLEAU DE CUISSON AVEC CAPTEUR
Pommes de terre
au four
L6gumes surgel6s
L6gumes frais
L6gumes en
conserve
Mets surgel6s
Riz
Lorsque la dur_e de chauffage est 6coul6e, I'appareil emet
4 signaux sonores et affiche le message COOK END (FIN
DE CUISSON)
2. Choisir la cat6gorie d'aliment.
iiiii .iiiiiiiiiiiiiiiiiiiiiiiiiiiiiiiiiiiiiiiiiiiiiiii
1 1 _ 4 (7 _ 10oz/198 _ 284 g)
chacune
2 1_/4 tasses (227 _ 908 g)
3 1_/4 tasses (227 _ 908 g)
/4 1 _/4 tasses (227 _ 908 g)
5 10 _ 21 oz (28/4_ 596 g)
6 V2_ 2 tasses (11/4_/454 g)
AUTO DEFROST
(DECO NGI'-'_LATION
AUTOMATIQU E)
Cinq choix de d6congelation sont pr6s61ectionn6s dans
le four. La fonction d6cong61ation offre la meilleure
m6thode de d6cong61ation des aliments surgel6s, le four
choisissant automatiquement les dur6es n6cessaires selon
chaque aliment, en fonction du poids entr& De plus, la
fonction de DI_CONGI_LATIONAUTOMATIQUE comprend
un m6canisme de signalisation incorpor6 qui rappelle
I'utilisateur de v6rifier, de retourner, de s@arer ou de
redisposer la nourriture pendant le cycle de d6congelation.
Cinq options sont disponibles :
1. VIANDE
2. VOLAILLE
3. POISSON
4. PAIN
5. RAPIDE - seulement 1 Ib (/450g)
Apres avoir appuy6 une lois sur AUTO DEFROST,
s61ectionner la cat6gorie d'aliment en appuyant sur les
touches num6riques 1 (MEAT/VIANDE), 2 (POULTRY/
VOLAILLE), 3 (FISH/POISSON),/4 (BREAD/PAIN) et
5 (RAPID - only 1 Ib/RAPIDE - seulement 1 Ib//450 g). Les
gammes de poids vont de 0,1 _ 6,0Ib (/45g _ 2,7 kg) pour la
viande, la volaille et le poisson, et de 0,1_ 1Ib (/45_/450 g)
pour le pain.
Exemple : D_cong_lation de 1,2 Ib (0,5 kg) de viande.
1.Appuyer sur AUTO DEFROST.
SENSOR REHEAT
(RI CHAU FFAGEAVEC CAPTEUR)
La touche SENSOR REHEATpermet de commander une
cuisson aux micro-ondes d'aliments courants, sans devoir
s61ectionner d'abord la dur6e de cuisson et le niveau de
puissance.
Exemple : R_chauffage de deux parts de pizza.
1.Appuyer sur SENSOR REHEAT.
4
_0oF
TABLEAU DE RI_CHAUFFAGE AVEC
CAPTE UR
Assiette de diner
Soupe/sauce
Mets en sauce*
Part de pizza
*Recouvrir les soupes et les sauces avec une feuille de
plastique. Laisser un 6vent de V2po (1,25 cm).
2.S61ectionner la cat_gorie d'aliment.
ii .iiiiiiiiiiiiiiiiiiiiiiiiiiiiiiiiiiiiiiiiiiiiii
1 1 _ 2 portions
2 1 _/4 tasses (237 _ 9/46mL)
3 1 _/4 tasses (237 _ 9/46mL)
/4 1 _/4 parts, aveccroQte fine
1
I{X_"F
1 2 3. Entrer le poids.
I_F Z93oF
2. Choisir la catSgorie d'aliment.
/4.Appuyer sur la touche ENTER/START.
REMARQUE :
• Apr_s avoir appuy_ sur le bouton ENTER/START,
I'afficheur d6compte la dur6e de d6cong61ation.
Lefour 6met un signal sonore durant le cycle de
d6cong61ation. Ace moment, ouvrir la porte et tourner,
s@arer ou redisposer I'aliment selon le besoin. Retirer
toutes les portions qui ont d6congel6, puis remettre
les portions encore congel6es dans le four et appuyer
sur le bouton ENTER/STARTpour poursuivre le cycle
de d6congSlation. Le four ne s'arrete pas pendant
I'_mission du signal sonore, _ moins que I'on
n'ouvre la porte.
44
Page 46

Utilisation
Pour de meilleurs r_sultats :
• Laisser le poisson, les mollusques/crustac6s, la viande et
la volaille dans leur emballage plastique ou papier ferm6
d'origine.
• Fagonner la viande en forme de beignes avant de la
congeler. Lors de la d6cong61ation, enlever la viande d_j_
d_congel6e sur I'ext_rieur Iorsque le signal sonore retentit,
et continuer la d6cong61ation.
• Placer raliment sur le tr@ied de convection et utiliser le
plateau m6tallique/de r6cup6ration pour r6colter los jus.
• L'aliment comportera encore des parties congel6es au
centre, Iorsqu'il sera retir6 du four.
• Prot6ger avec des petits morceaux de feuille d'aluminium
los ailes et extr6mit6s des pattes de volaille.
• La forme de I'emballage a une influence sur la dur6e de
d6cong61ation. Un paquet peu @ais se d6cong6le plus
rapidement qu'un bloc @ais.
•S@arer los morceaux apr6s le d6but de la d6cong61ation.
La d6cong61ation en sera facilit6e.
• Pour une ddcong61ation plus uniforme, faire chevaucher los
parties plus minces comme los queues de poisson et los
poitrines de poulet.
• Retourner los aliments Iorsque la commando I'indique.
TABLEAU DE DI CONGF!LATION
AUTOMATIQU E
DI CONGI LATION RAPIDE 1 Ib
(450 g)
Lafonction de DI_CONGCLATIONRAPIDE 1 Ib (450 g)
permet de commander une pSriode de d6congSlation rapide
pour 1 Ib (450 g) d'aliments surgel6s. Le four s61ectionne
automatiquement la dur6e de d6cong61ation pour le bceuf
hach6.
Exemple : D_cong_lation de 1 Ib (450 g) de boeufhach&
1.Appuyer sur AUTO DEFROST.
5
3ZSoF
2. Appuyer sur la touche 5.
3. Appuyer sur la touche ENTER/START.
AUTO COOK
(CU ISSON AUTOMATIQU E)
La touche AUTO COOK permet de commander une
cuisson aux micro-ondes d'aliments courants, sans devoir
sdlectionner d'abord la dur6e de cuisson et le niveau de
puissance.
Exemple : Preparation de bacon.
...........1. Appuyer sur la touche AUTO COOK.
VIANDE B_UF
0,1_ 6 Ib Bceufhach& steakde ronde,cubes deviande
(45 g _2,7kg) _ ragoQt, steakde filet,viandepour pot au feu,
rStide c6tes,rStidecroupe foul6, r6ti de palette,
steakette(hamburger)
AGNEAU
C6telettes (1 po/2,5 cm d'6paisseur), r6ti roul6
PORC
C6telettes (1/2 po/1,25 cm), hot dogs, c6tes
lev6es,travers,r6ti roul&saucisses
VEAU
Escalopes (1 Ib/450 g, 1/2po/1,2 cm d'6paisseur)
VOLAILLE VOLAILLE
0,1 _ 6 Ib Poulet entier (moins de 4 Ib/l,8 kg), viande de
(45g _2,7kg) poitrinecoupee(sansos)
POULETDECORNOUAILLES
Entier
DINDE
Viande de poitrine 0noins de 6 Ib/2,7 kg)
POISSON POISSON
0,1_ 6 Ib Filets,darnes,entier
(45 g _2,7kg) CRUSTAC_S/MOLLUSQUES
Chairde crabe,queuesde homard,crevettes,
p6toncles
PAIN
0,1 _ 1 Ib
(45 _ 450 g)
MUFFINS
PETITSPAINS
] 2. Choisir la cat6gorie d'aliment.
100°F
3. Appuyer sur la touche num6rique
correspondant a la quantit6.
4. Appuyer sur la touche ENTER/START.
TABLEAU DE CUISSON AUTOMATIQUE
Bacon 1 2 _ 6 tranches
Muffins et petits 2 1 _ 6
pains frais
Muffins et petits 3 1 _ 6
pains congel6s
Boisson 4 1 _ 2 tasses
(237 _ 474 mL]
Morceaux de poulet 5 0,5 _ 2 Ib (0,2 _ 0,9 kg)
C6r6ales chaudes 6 1 _ 6 portions
45
Page 47

Utilisation
CU ISSON AVEC CONVECTION
Lors de la cuisson avec convection, un 616mentchauffant est
utilis_ pour augmenter la temperature de Fair_ I'int6rieur du
four. Les temp6ratures de cuisson avec convection vont de
1O0_ 450 °F (:38_ 232 °C]. IIest prdfdrable de prdchauffer le
four Iors d'une cuisson avec convection.
Baisser la temperature dufour de 25 °F (15 °C)
par rapport b la temperature recommand_e sur
I'ernballage. La dur_e de cuisson peut varier selon
I'_tat de I'aliment ou les preferences individuelles.
V_rifier que I'aliment est cult b la dur_e minimale
indiqu_e, puis ajuster la dur_e en appuyant sur les
touches More+ ou Less-.
TRI PIED DE CONVECTION
Utiliser le tr@ied de convection seulement pour la cuisson
avec convection et la cuisson combin6e. Ne pas utiliser le
tr@ied de convection en mode micro-ondes seulement,
moins que cela ne soit recommandd dans ce guide.
Pour de meilleurs r_sultats, placer I'aliment sur le
tripled de convection.
PLATEAU MI TALLIQU E/DE
RI CU PI RATION
Un plateau m6tallique de r6cup6ration est fourni avec le
four. Pour r6tir un aliment dans le four, le placer directement
sur le tr@ied de convection mdtallique. Placer ensuite le
tr@ied _ I'int_rieur du plateau de rdcup6ration. Centrer le
tr@ied et le plateau de r6cup6ration sur le plateau toumant.
Lorsque la cuisson est termin6e, se servir de gants isolants
pour retirer le tr@ied de convection et le plateau du four
chaud. Ne pas renverser les jus tres chauds. Enlever
I'aliment du tr@ied. Ne pas utiliser le plateau m6tallique de
r6cup6ration en mode micro-ondes seulement, _ moins que
cela ne soit recommand6 dans ce guide.
Tempbratures internes suggbrbes
iiiiiiiiiiiiiiiiiiiiiiiiiiiiiiiiiiiiiiiiiiiiiiiiiiiiiiiiiiiiiiiiiiiiiiiiii
Bceuf hach6 160 °F (:71°C)
Bceuf,veau, agneau Saignant 145 °F (:63°C)
(:fraisl) A point 160 °F (:71°C)
Bien cuit 170°F (:77°C)
Poulet, dinde Entier 180 °F (:82°C)
Poitrine 170 °F (:77°C)
Porc A point 160 °F (:71°C)
Bien cuit 170°F (:77°C)
Jambon, pr6cuit 140 °F (:60°C)
Plats aux ceufs, mets en sauce 160 °F (71 °C]
Restes, r_chauff6s 165 °F (:74°C)
Trepied de
convection
Plateau metallique/
de recuperation
I
Plateau tournant
REMARQUES :
• Pour toute cuisson d'aliments avec convection ou en
mode combin6, quand il y a risque d'_gouttement de
graisse, comme pour les steaks ou les hamburgers,
utiliser le plateau de r_cup_ration sous le tr@ied de
convection pour recueillir la graisse.
• Ne pas utiliser des grilles autres que celles fournies
avec le four.
46
Page 48

Utilisation
CU ISSON COU RANTE
AVEC CONVECTION ET
PRI CHAUFFAGE
Exemple : Programmation d'une cuisson avec
convection b 325 °F (163 °C).
1.Appuyer sur la touche STOP/CLEAR.
2.Appuyer sur la touche CONV.
3,
Appuyer sur la touche num6rique
5
3_5_F
•Apr6s le pr6chauffage, I'afficheur indique PREHEATEND
(FIN DU PRI-'-CHAUFFAGE)en 6mettant un signal sonore.
Ouvrir la porte, placer I'aliment sur le tr@ied de convection.
2OOO
2_°F 45_°F 4S_°F 4S0_F
correspondant _ la temp6rature de
cuisson. La gamme de tempSratures
comprend 10 niveaux, de 100 _ 450 °F
(38 _ 232 °C).
4.Appuyer deux lois sur ENTER/START.
Appuyer sur les touches num6riques
correspondant _ la dur6e de cuisson. On
peut programmer une dur6e allant jusqu'_
99 minutes, 99 secondes. Voir le guide
de cuisson courante avec convection _ la
page 48.
CU ISSON COU RANTE AVEC
CONVECTION SANS
PRECHAUFFAGE
(Viande, mets en sauce et volaille)
Exemple : Programmation d'une cuisson avec
convection _] 325 °F (163 °C) pendant 20 minutes.
1.Appuyer sur la touche STOP/CLEAR
2. Appuyer sur la touche CONV.
3. Appuyer sur la touche num6rique
5
2OOO
correspondant _ la temp6rature de
cuisson. La gamme de tempSratures
comprend 10 niveaux, de 100 _ 450 °F
(38 _ 232 °C).
4. Appuyer sur la touche ENTER/START
5. Appuyer sur les touches num6riques
correspondant _ la dur6e de cuisson. On
peut programmer une dur6e allant jusqu'_
99 minutes, 99 secondes.
6. Appuyer sur la touche ENTER/START.
6. Ouvrir la porte, placer I'aliment dans le
four et fermer la porte.
Appuyer sur ENTER/START
REMARQUES :
• Lorsque le four atteint la temp6rature de prdchauffage
s61ectionn6e, cinq signaux sonores retentissent et le four
maintient automatiquement cette temp6rature pendant
30 minutes.
• La temp6rature du four baisse tr6s rapidement une
fois la porte ouverte; cependant, ceci ne devrait pas
emp6cher la nourriture de bien cuire, Iors d'une dur6e de
cuisson normale.
• Pour v6rifier, pendant la cuisson, si un aliment est cuit,
I'enlever doucement du four, avec le tr@ied et le plateau
de r6cup6ration (le cas 6ch6an0 et fermer la porte du
four pour 6viter une trop grande d@erdition de chaleur.
• OVEN HOT (FOUR TRI_SCHAUD) parait _ I'afficheur si
la porte du four est ouverte en cours de cuisson.
•Si la temp6rature a baiss6 pendant I'ouverture de la
porte, CLOSE DOOR (FERMER LA PORTE)parait
I'afficheur. Pour effacer ce message, fermer la porte et
appuyer sur la touche Enter/Start.
47
Page 49

Utilisation
GUIDE DE CUISSON COURANTE AVEC CONVECTION
1.Toujours utiliser le tr@ied de convection pour la cuisson avec convection. Placer I'aliment directement sur le tr@ied ou sur
le plateau metallique, que I'on pose ensuite sur le tr@ied. Pour de meilleurs resultats avec des aliments comme frites ou
bStonnets au fromage, espacer les differents articles pour eviter qu'ils ne se touchent. Une bonne circulation de Fair est
necessaire _ I'obtention de performances optimales.
2. Les recipients en aluminium conduisent rapidement la chaleur. Pour la majorite des operations de convection, les ustensiles
presentant un fini brillant et clair donnent de meilleurs resultats, parce qu'ils empechent que I'aliment prenne une coloration
trop importante pendant la duree necessaire pour cuire les parties centrales. Les ustensiles _ fond presentant un fini satine
et terne, comme pour les g_teaux et les tartes, sont recommandes pour obtenir le meilleur brunissage du fond.
3. Lesfinis fonces ou non brillants, en verre et ceux en Pyroceram (vitroceramique) absorbent la chaleur, ce qui peut donner
des croQtes seches et friables.
4. Le prechauffage du four est recommande Iors de la cuisson avec convection. La cuisson de viande, mets en sauce et volaille
ne necessite pas de prechauffage.
5. Pour empecher un chauffage inegal et pour economiser I'energie, ouvrir aussi peu souvent que possible la porte du four, pour
verifier le degre de cuisson de I'aliment.
Pains
G_teaux
Biscuits refrig@6s
Pain au mais
Muffins
Pain aux noix, pain aux fruits 325 °F
Pain b la levure 375 °F
Petits pains sucres ou ordinaires 350 °F
G_teau des anges 350 °F
Brownies au fudge 350 °F
Brioche 325 °F
Petits g_teaux 325 °F
G_teau aux fruits 275 °F
G_teau au gingembre 300 °F
G_teaux au beurre, b melange 325 °F
375 °F (190 °C)
350 °F 077 °C]
425 °F (218°C]
[163 °C)Popovers 325 °F
(163 °C)
[190 °C)
[177 °C]
[177 °C]
[177 °C]
(163 °C)
(163 °C)
0 35 °c)
[149 °C]
(163 °C)
11_14
35 _ 40
18_22
45 b 55
60 _ 70
16_ 23
13 _ 16
35 _ 40
26 b 30
30 _ 35
20 _ 25
g0 _ 100
25 _ 30
35 b 45
pr@are
G_teaux _ etages 325 °F
G_teau de 9 x 13 po (23 x33 cm) 325°F
Savarin 325 °F
Quatre-quarts 325 °F
G_teaux (177 °C) 11 b 14
sees
Aux copeaux de chocolat 350 °F
Au sucre 350 °F
(163 °C)
(163 °C)
(163 °C)
(163 °C)
(177 °C) 11 b 1/4
35 _ 45
35 _ 4.5
30 b 40
45 b 55
Prevoir une dur6e plus Iongue pour de plus gros biscuits.
Les retirer imm6diatement des ustensiles et les refroidir
16gSrementsur une grille.
Percer chaque popover _ I'aide d'une fourchette apr_s
I'avoir retir6 du four, pour laisser la vapeur s'echapper.
L'interieur doit 6tre moelleux et tendre.
Graisser 16g_mment la plaque _ g_teaux.
Mettre la plaque _ g_teaux sur le tr@ied de convection.
Cuire 2 couches de brownies b la lois.
L'int@ieur doit 6tre moelleux et tendre.
Placer une couche (ou _tage) sur chaque tr@ied (plateau
tournant en marche).
Le tourner de 180° _ mi-cuisson.
Graisser et fariner I'ustensile.
Laisser refroidir dans I'ustensile 10 minutes, avant de le
retourner sur le tripled m6tallique.
Placer sur le plateau m_tallique, pos6 sur le tr@ied de
convection. Prevoir une dur_e plus Iongue si la pate est
congelee.
Placer sur le plateau m_tallique, pose sur le tr@ied de
convection.
REMARQUES :
• La temperature du four indiquee dans le tableau ci-dessus est recommandee b la place de la temperature donnee dans les
instructions paraissant sur I'emballage.
• Lesdurees de cuisson donnees dans le tableau ci-dessus ne sont fournies qu'_ titre indicatif. II faudra ajuster la duree
selon la quantite, la taille, la forme et la temperature de I'aliment, ou selon ses preferences personnelles. Verifier le degre de
cuisson _ la duree minimale indiquee, puis ajuster la duree en appuyant sur les touches More+ ou Less-.
48
Page 50

Utilisation
GUIDE DE CUISSON COURANTE AVEC CONVECTION (suite)
Fruits,
autres
desserts
Tartes,
p&tisseries
Mets en
sauce
Aliments
tout pr_ts
Plats de
r_sistance
L_gumes
Poires ou pommes au four
Pudding
Choux _ la creme
Coquilles de meringue
Tarte surgelee
Recouvertes de meringue
A deux abaisses
Quiche
CroOte de p_te
Combinaisons viande, poulet,
fruits de mer
P_tes
Pommes de terre, en gratin
Legumes
P_te _ pain surgelee
Mets surgeles
CroQte de pizza surgelee
Pizza surgelee
Frites, coupe ondulee
Gaufre surgelee
B_tonnets surgeles au
fromage
Chaussons surgeles
Pain de viande
RagoOt cult au four
Steak _ la suisse
Poivrons farcis
Moities de courge reine-de-
table
Pommes de terre au four 425 °F (218 °C) 50 _ 60
Pommes de terre cuites 2 lois 400 °F (205 °C) 25 _ 30
350 °F 077 °C)
300 °F (149 °C)
/400°F (205 °C}
300 °F (149 °C)
400 °F (205 °C]
450 °F (232 °C)
400 °F (205 °C]
350 °F 077 °C)
400 °F (205 °C)
350 °F 077 °C)
350 °F (177 °C)
350 °F 077 °C)
350 °F 077 °C)
350 °F 077 °C)
325 °F (163 °C)
400 °F (205 °C]
400 °F (205 °C]
450 °F (232 °C)
400 °F (205 °C)
450 °F (232 °C)
450 °F (232 °C)
400 °F (205 °C)
325 °F (163 °C)
350 °F (177 °C)
350 °F (177 °C)
375 °F (190 °C)
35 _ 40
35 _ 40
30 _ 35
30 _ 35
50 ) 60
9_11
50 _ 55
30 _ 35
10 _ 16
20 _ 40
25 _ 45
55 _ 60
25 _ 35
30 _ 35
70 _ 80
25 _ 35
17 _ 21
15 _ 19
5_17
6_18
18_22
30 _ 40
80 _ 90
60 _ 70
40 _ 45
55 _ 60
Cuisson dans des ustensiles peu profonds.
Le pudding est termine Iorsqu'un couteau insere pres du centre ressort
propre.
Percer les choux deux lois _ I'aide d'un cure-dent pour liberer la
vapeur, apres 25 minutes de cuisson.
Une fois la cuisson terminee, arr_.ter le four et laisser les coquilles
reposer au four 1 heure, pour sechen
Placer le plateau metallique sur le trepied de convection et mettre dans
le four non prechauffe. Prechauffer le four, le plateau et le trepied
400 °F (205 °C). Pendant le prechauffage, placer la tarte surgelee sur
le plateau metallique et faire cuire en respectant la duree indiquee sur
I'emballage ou jusqu'_ ce que la croQte soit doree et que la garniture
soit tres chaude.
Pour la preparation, suivre les instructions indiquees sur I'emballage.
Pour la preparation, suivre les instructions indiquees sur I'emballage.
Laisser reposer 5 minutes avant de la decouper.
Percer la p_te avec les dents d'une fourchette, pour eviter qu'elle ne
retrecisse.
Les durees de cuisson varient selon les ingredients et la dimension du plat.
Les durees de cuisson varient selon les ingredients et la dimension du plat.
Laisser reposer 5 minutes avant de servin
Les durees de cuisson varient selon les ingredients et la dimension du plat.
Pour la preparation, suivre les instructions indiquees sur I'emballage.
Pour la preparation, suivre les instructions indiquees sur I'emballage.
Pour la preparation, suivre les instructions indiquees sur I'emballage. La
pizza ne dolt pas depasser du trepied.
Pour la preparation, suivre les instructions indiquees sur I'emballage. La
pizza ne doit pas depasser du trepied.
Pour la preparation, suivre les instructions indiquees sur I'emballage.
Pour la preparation, suivre les instructions indiquees sur I'emballage.
Pour la preparation, suivre les instructions indiquees sur I'emballage.
Pour la preparation, suivre les instructions indiquees sur I'emballage.
Laisser reposer 5 minutes apres la cuisson.
Brunir la viande avant de la melanger avec liquide et legumes.
Laisser reposer 2 minutes apr6s la cuisson.
Choisir des poivrons verts, rouges ou jaunes.
Percer la peau en plusieurs endroits. Ajouter V2tasse (120 mL) d'eau au
plat. Disposer les moities de courge c6te coupe vers le haut, apr8s
30 minutes de cuisson, puis les recouvrir.
Percer la peau avec une fourchette, avant la cuisson.
Percer la peau avec une fourchette, avant la cuisson.
REMARQUES :
•La temperature du four indiqu6e dans le tableau ci-dessus est recommand6e _ la place de la temp6rature donn6e dans les
instructions paraissant sur I'emballage.
• Lesdur_es de cuisson donn_es dans le tableau ci-dessus ne sont fournies qu'_ titre indicatif. II faudra ajuster la dur6e
selon la quantit6, la taille, la forme et la temp6rature de I'aliment, ou selon ses prd6rences personnelles. V6rifier le degr6 de
cuisson _ la dur6e minimale indiqu6e, puis ajuster la dur6e en appuyant sur les touches More+ ou Less-.
49
Page 51

Utilisation
GUIDE DE ROTISSAGE DE VIANDE POUR UNE CUISSON AVEC CONVECTION
;_ii_, Te_ _ fo_
Boeuf
Jambon En conserve (3 Ib/1,4 kg, tout cuit]
COtes(2 _ 4 Ib/O,9_ 1,8kg)
Saignant
A point
Bien cuit
COtesdOsossOes,haut de surlonge
Saignant
A point
Bien cuit
Filet
SaJgnant
A point
Pot au feu (21/2_ 3 Ib/1,1 _ 1,4kg)
Palette, croupe
Pain de viande (2 Ib/0,9 kg)
Soc (5 Ib/2,3 kg, tout cuit]
Jarret (5 Ib/2,3 kg, tout cuit]
300 °F (149 °C]
300 °F (149 °C)
300 °F (149 °C]
300 °F (149 °C]
300 °F (149 °C]
300 °F (149 °C]
300 °F (149 °C]
300 °F (149 °C]
300 °F (149 °C)
400 °F (205 °C]
325 °F (163 °C)
325 °F (163 °C)
325 °F (163 °C]
45 _ 50
50 _ 55
55 _ 60
53 _ 58
58 _ 63
63 _ 68
28 _ 32
32 _ 36
83 _ 88
65 _ 75
20 _ 25
20 _ 25
17_ 20
Agneau Avec os (2 _ 4 Ib/0,9 _ 1,8 kg]
A point
Bien cuit
D6soss6 (2 _ 4 Ib/0,9 _ 1,8kg)
A point
Bien cuit
Porc Avec os (2 _ 4 Ib/0,9 _ 1,8 kg]
D6soss6 (2 _ 4 Ib/0,9 _ 1,8kg]
C0telettes de porc (1/2_ 1 po/1,2 _ 2,5 cm)
2 c0telettes
4 c0telettes
6 c0telettes
Volaille Poulet entier (21/2_ 31/2Ib/1,1 _ 1,6kg)
Morceaux de poulet (21/2_ 31/2Ib/1,1 _ 1,6kg)
Caneton (4 _ 5 Ib/1,8 _ 2,3 kg)
Poitrine de dinde (4 _ 6 Ib/1,8 _ 2,7 kg)
Fruits de Poisson, entier (3 _ 5 Ib/1,4 _ 2,3kg)
met
Queues de homard (6 _ 8 oz/171 _ 227 g chacune]
*Voir Temp6ratures internes sugg6r6es, page 46.
*'1 Ib = 0,45 kg
300 °F (149 °C]
300 °F (1/49 °C]
300 °F (149 °C]
300 °F (149 °C]
300 °F (149 °C]
300 °F (149 °C]
325 °F (163 °C)
325 °F (163 °C)
325 °F (163 °C)
375 °F (190 °C)
425 °F (218 °C]
375 °F (190 °C]
325 °F (163 °C]
400 °F (205 °C]
350 °F (177 °C]
42 _ 47
47 _ 52
50 _ 55
55 _ 60
/48_ 52
56 _ 61
/42_/45
45 _ 48
48 _ 55
25 _ 35
10 _ 12
19 _ 21
21 _ 25
13 _ 18
12 _ 17
REMARQUE :
• Les dur_es de rOtissage donn6es dans le tableau ci-dessus ne sont fournies qu'_ titre indicatif. II faudra ajuster la dur_e
selon ses prd6rences personnelles. VSrifier le degr_ de cuisson _ la dur_e minimale indiqu6e, puis ajuster la dur6e en
appuyant sur les touches More+ ou Less-.
5O
Page 52

Utilisation
CONSEILS POUR LA CUISSON
RAPIDE/CUISSON COMBINI E
Cette section donne des instructions pour ex_cuter chaque
fonction de cuisson combin6e. Lire ces instructions
attentivement. Parfois, une cuisson en mode combin6
micro-ondes/convection est sugg6r6e pour obtenir les
meilleurs r6sultats, puisqu'elle raccourcit la dur6e de cuisson
des aliments qui normalement n_cessitent une Iongue
dur6e pour cuire. Cette m6thode de cuisson laisse aussi les
viandes juteuses _ I'int6rieur et croustillantes _ I'ext_rieur.
Lors de cuisson combin6e, 1'6nergiedes micro-ondes et
la chaleur par convection agissent automatiquement en
alternance. Le four comporte trois programmes pr6r6gl6s qui
facilitent I'utilisation de la cuisson combin6e.
CONSEILS UTILES POUR LA
CUISSON RAPIDE/CUISSON
COMBINf:E
On peut rOtir les viandes directement sur le tr@ied
m6tallique fourni avec le four. Utiliser le plateau
m6tallique/de r6cup6ration pour r6colter les jus et la
graisse.
2,
Utiliser des petits morceaux de feuille d'aluminium pour
prot6ger les ailes et extr6mit6s des pattes de volaille.
3.
On peut rOtir et attendrir des coupes de bceuf moins
tendres _ I'aide de sachets de cuisson.
Une fois la cuisson termin_e, v6rifier si I'aliment est
cuit. Sinon, laisser reposer dans le four quelques minutes
pour parfaire la cuisson.
5. Pour v6rifier, pendant la cuisson, si un aliment est cuit,
I'enlever doucement du four, avec le tr@ied et le plateau
de rdcup6ration (le cas dchdanO et fermer la porte du four
pour dviter une trop grande d@erdition de chaleur.
6. OVEN HOT (FOURTRI_SCHAUD) parait _ I'afficheur si la
porte du four est ouverte en cours de cuisson.
7 Si la temp6rature a baiss6 pendant I'ouverture de la porte,
CLOSE DOOR (FERMER LA PORTE)parait _ I'afficheur.
Pour effacer ce message, fermer la porte et appuyer sur la
touche Enter/Start.
PRI CAUTIONS
1.Tous les ustensiles utilis6s pour la cuisson combin6e
doivent pouvoir _.treutilis6s dans un four ordinaire comme
dans un four _ micro-ondes.
Lorsde la cuisson combin6e, il est possible que certains
ustensiles entrainent la formation d'arcs 61ectriques,
Iorsqu'ils entrent en contact avec les parois du four ou
des tr@ieds mdtalliques en accessoires. La formation
d'6tincelles est une d6charge d'61ectricit6 qui se produit
Iorsque les micro-ondes entrent en contact avec le m6tal.
3,
Encas d'6tincelles, placer un plat r6sistant _ la chaleur
entre I'ustensile et les tr@ieds m6talliques.
4.
Encas d'6tincelles produites avec d'autres ustensiles de
cuisson, ne pas utiliser ces ustensiles pour lacuisson
combin6e.
51
Page 53

Utilisation
CUISSON COMBINI E
Une fois COMBI-1 Convection
(ROtissage 375 °F (190 °C]
combin6)
Deux fois COM BI-2 Convection
(Cuisson 325 °F (163 °C]
combin6e)
Trois fois COMBI-3 Gril
(Gril combin6)
Exemple : Cuisson combin_e pendant 11 minutes
400 °F (205 °C).
1.Appuyer sur la touche STOP/CLEAR
2.Appuyer deux fois sur COMBI.
Appuyer sur la touche num6rique
8
400_F
1100
100oF 10_oF 450_F 450OF
correspondant _ la temp6rature d6sir6e. La
gamme de temp6ratures comprend
10 niveaux, de 100_ 450 °F (38 _ 232 °C).
4.Appuyer sur la touche ENTER/START.
Appuyer sur les touches num6riques
correspondant _ la dur6e de cuisson. On
peut programmer une dur6e allant jusqu'_
99 minutes, 99 secondes.
6.Appuyer sur la touche ENTER/START.
AUTO COMBINATION
(CUISSON AUTOMATIQU E
COMBINEE)
Ce four peut cuire des aliments en mode combin6 sans qu'il
soit n6cessaire d'enregistrer la dur6e de cuisson ou le niveau
de puissance. La CUISSON AUTOMATIQUE COMBINCE
comporte/4 cat6gories d'aliment.
Voir le TABLEAU DE CUISSON AUTOMATIQUE COMBINCE
sur cette page pour connaitre les r6glages disponibles.
Pour de meilleurs r_sultats, placer I'aliment sur le
tr_pied de convection. Utiliser le plateau m_tallique/de
r_cup_ration pour r_colter les jus Iorsque Yon fait cuire
de la viande.
Exemple : Cuisson de 2 Ib (0,9 kg) de r6ti de porc.
1.Appuyer sur la touche STOP/CLEAR
2.Appuyer sur la touche AUTO COMBI.
2
2_3_F
0
_0°F 450°F
TABLEAU DE CUISSON AUTOMATIQUE
COMBINI E
Poulet entier 1 2 _/4 Ib (0,9 _ 1,8 kg]
ROti de porc 2 2 _/4 Ib (0,9 _ 1,8 kg]
Lasagnes surgel6es* 3 10 _ 21 oz (284 _ 599 g]
Pomme de terre au four /4 1 _/4 (7 _ 10 oz/198
3. Choisir la cat6gorie d'aliment.
4.Appuyer sur la touche num6rique
correspondant _ la quantit&
5.Appuyer sur la touche ENTER/START.
28/4g) chacune
*Laisser les lasagnes recouvertes de leur emballage
plastique d'origine, perc6 de fentes de 1 _ 2 po (2,5_ 5 cm)
avant la cuisson. Laisser reposer 5 minutes dans le four une
lois la cuisson termin6e. La dur6e de cuisson peut varier
selon la marque, la quantit6, la temp6rature du cong61ateur,
etc. Ajuster au besoin la dur6e _ I'aide des touches More+
et Less-.V6rifier avec un thermom6tre prSvu pour la cuisine,
que la tempSrature interne des lasagnes est partout d'au
moins 160 °F (71 °C).
52
Page 54

Utilisation
GUIDE DE
B0euf
Jambon
Agneau
ROTISSAGE COMBINI
Retourner b mi-cuisson.
COtes {2 _ 4 Ib/0,9 _ 1,8 kg}
Saignant
A point
Bien cult
COtes dOsossOes, haut de surlonge
Saignant
A point
Bien cuit
Filet
Saignant 375
A point 375
Palette, croupe ou pot au feu {21/2_ 3 Ib/1,1 _ 1,4 kg) 375
{Utiliser un sachet de cuisson pour les meilleurs rOsultats.}
Retourner _ mi-cuisson.
En conserve (3 Ib/1,4 kg, tout cuit}
Soc {5 Ib/2,3 kg, tout cuit}
Jarret (5 Ib/2,3 kg, tout cuit}
Retourner _ mi-cuisson.
- Appuyer une fois sur la touche
375 °F [190 °C)
375 °F [190 °C)
375 °F [190 °C}
375 °F (190 °C]
375 °F (190 °C]
375 °F 090 °C}
300 °F [149 °C)
300 °F ([149 °C}
300 °F ([149 °C)
°F [190 °C)
°F 090 °C)
°F [190 °C}
9_113
11_15
13 _ 17
9_113
11_15
13 _ 17
16_ 18
18 _ 20
18 _ 20
15_ 18
15_ 18
15_ 18
Pore
"1 Ib = 0,45kg
Avec os {2 _ 4 Ib/0,9 _ 1,8 kg}
A point
Bien cuit
DOsoss6 {2 _ 4 Ib/0,9 _ 1,8 kg)
A point
Bien cuit
Retourner _ mi-cuisson.
Avec os (2 _ 4 Ib/0,9 _ 1,8 kg)
DOsoss6 (2 _ 4 Ib/0,9 _ 1,8 kg)
C0telettes de porc (3/4_ 1 po/1,9 _ 2,5 cm)
2 c0telettes
4 c0telettes
6 c0telettes
300 °F [149 °C)
300 °F ([149 °C)
300 °F [149 °C)
300 °F [149 °C}
300 °F [149 °C)
300 °F [149 °C)
350 °F [177 °CD
350 °F [177 °CD
350 °F [177 °C}
13_ 18
18 _ 23
14_ 19
19_ 24
23 _ 26
19_ 22
10_ 13
13_ 16
16_ 19
53
Page 55

Utillsation
GUIDE DE ROTISSAGE COMBINI_ (suite) - Appuyer une fois sur la touche
. Te_fo_
Volaille
Fruits de mer
Retourner b mi-cuisson.
Poulet entier ([21/2_ 6 Ib/1,1 _ 2,7kg)
Morceaux de poulet ([21/2_ 6 Ib/1,1 _ 2,7 kg]
Poulet de Cornouailles ([non ficel6)
Non farci
Farci
Caneton
Poitrine de dinde ([4_ 6Ib/1,8 _ 2,7 kg)
Poisson
Filets de 1 Ib ([[450g)
Queues de homard ([6_ 8 oz/171 _ 227 g chacune)
Crevettes ([1_ 2 Ib/450 _ 900 g)
P6toncles ([1_ 2 Ib/450 _ 900 g]
375 °F (190 °C)
375 °F (190 °C]
450 °F ([232 °C]
375 °F ([190 °C]
375 °F ([190 °C]
300 °F ([149 °C]
350 °F ([177 °C]
350 °F ([177 °C]
350 °F ([177 °C]
350 °F ([177 °C]
15 _ 17
15 _ 18
15 _ 18
22 _ 25
15 _ 18
11 _ 15
10 _ 15
7_110
9_ 14
8_13
"1 Ib = 0,45kg
REMARQUE :
• Les dur6es de rOtissagedonn6es dans le tableau ci-dessus ne sont fournies qu'_ titre indicatif. II faudra ajuster la dur6e
selon la quantit6, la taille, la forme et la temp6rature de I'aliment, ou selon ses pr6f6rences personnelles. Wrifier le degr6 de
cuisson _ la dur6e minimale indiqu6e, puis ajuster la dur6e en appuyant sur les touches More+ ou Less-.
GUIDE DE CUISSON COURANTE COMBINI_E - Appuyer deux fois sur la touche
Te_;fo_, __,
Tartes,
p_tisseries
Aliments
tout pr_ts
L_gumes
QuJche
Mets surgel6s
Rouleaux de pate
pizza surgel6e, p_t_s
imp_riaux
Pizza
Pommes de terre au
four
/425°F ([218 °C)
375 °F ([190 °C)
/450 °F ([232 °C)
450 °F ([232°C)
450 °F ([232°C)
15 _ 17
39 _ 43
4_t6
Laisser reposer 5 minutes avant de la
d6couper.
Pour la pr@aration, suivre les instructions
indiqu6es sur I'emballage.
Pour la pr@aration, suivre les instructions
indiqu6es sur I'emballage.
Pour la pr@aration, suivre les instructions
indiqu6es sur I'emballage.
Percer la peau avec une fourchette, avant la
cuissorl.
Placer les pommes de terre sur le tr@ied de
convection.
54
Page 56
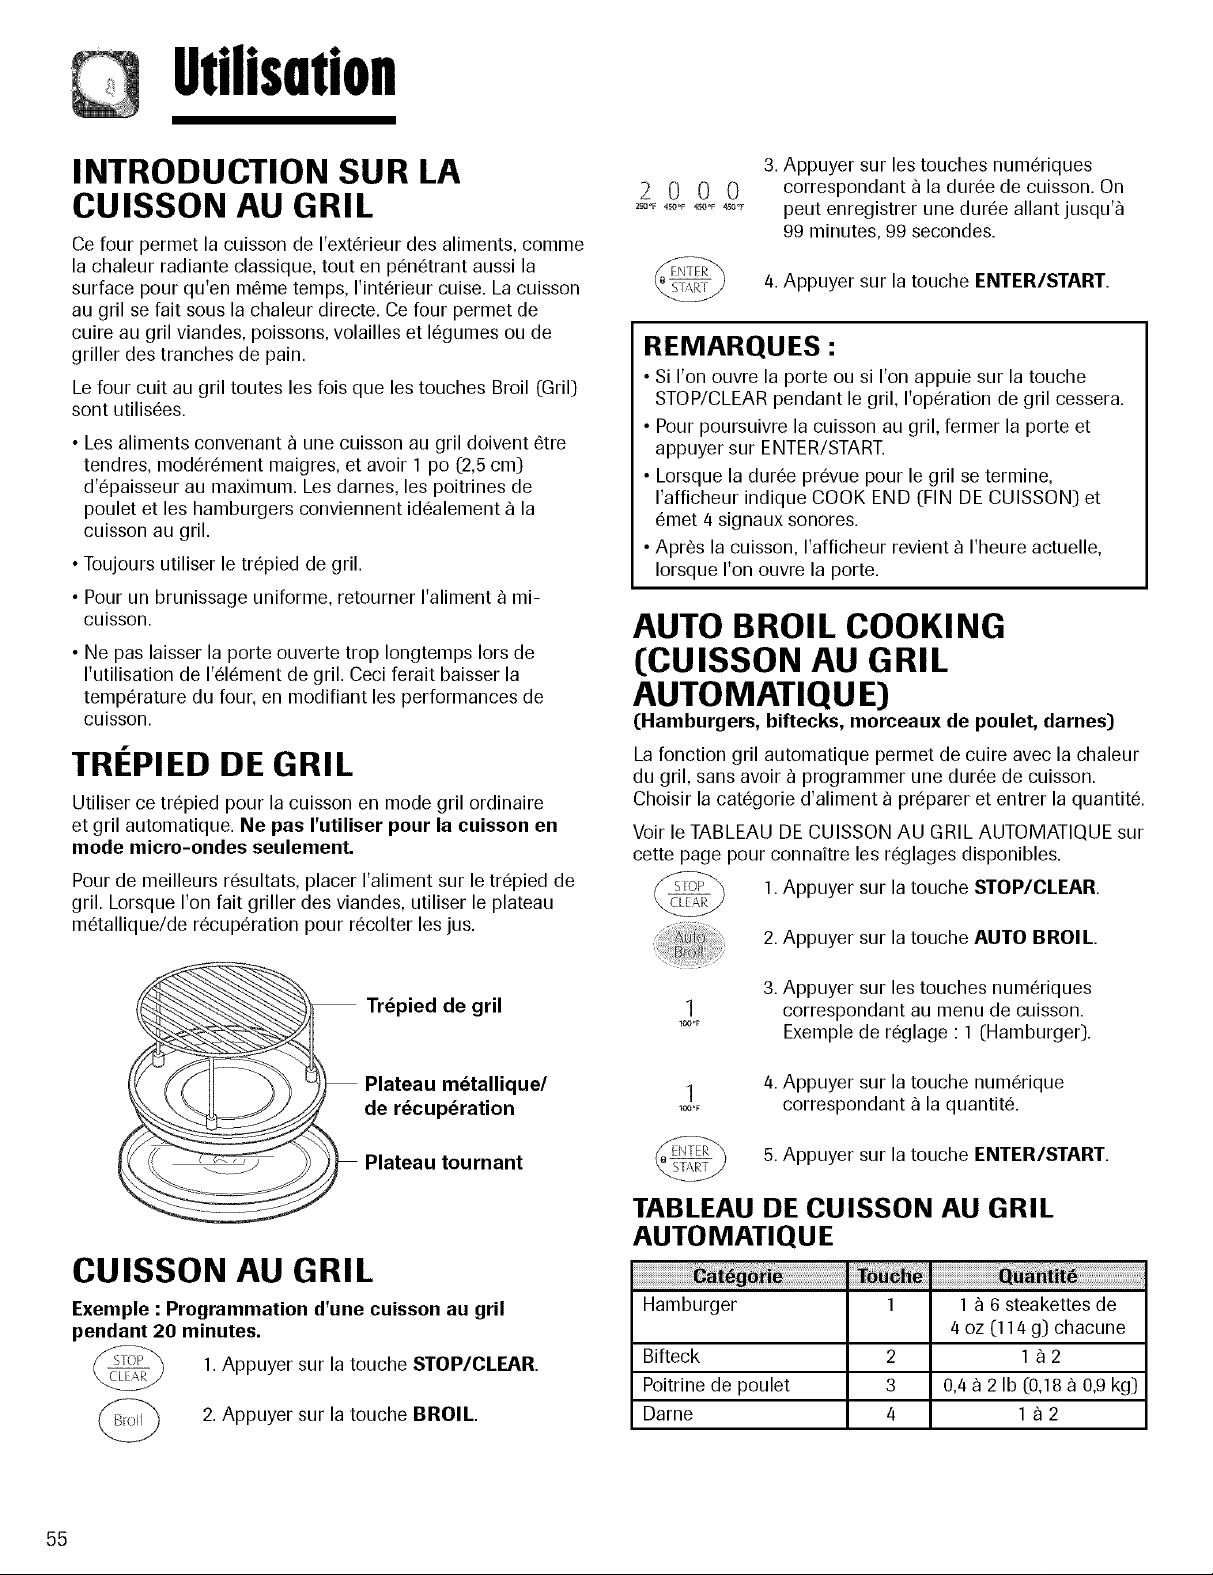
Utillsation
INTRODUCTION SUR LA
CUISSON AU GRIL
Ce four permet la cuisson de I'ext6rieur des aliments, comme
la chaleur radiante classique, tout en p6n6trant aussi la
surface pour qu'en m6me temps, I'intSrieur cuise. La cuisson
au gril se fait sous la chaleur directe. Ce four permet de
cuire au gril viandes, poissons, volailles et 16gumes ou de
griller des tranches de pain.
Le four cuit au gril toutes les lois que les touches Broil (Gril)
sont utilis6es.
• Les aliments convenant _ une cuisson au gril doivent 6tre
tendres, mod6rdment maigres, et avoir 1 po (2,5cm)
d'@aisseur au maximum. Les dames, les poitrines de
poulet et les hamburgers conviennent id6alement _ la
cuisson au gril.
•Toujours utiliser le tr@ied de gril.
• Pour un brunissage uniforme, retourner I'aliment _ mi-
cuisson.
• Ne pas laisser la porte ouverte trop Iongtemps Iors de
I'utilisation de 1'616mentde gril. Ceci ferait baisser la
temp6rature du four, en modifiant les performances de
cuisson.
TREPIED DE GRIL
Utiliser ce tr@ied pour la cuisson en mode gril ordinaire
et gril automatique. Ne pas I'utiliser pour la cuisson en
mode micro-ondes seulement.
Pour de meilleurs r6sultats, placer I'aliment sur le tr@ied de
gril. Lorsque I'on fait griller des viandes, utiliser le plateau
m6tallique/de r6cup6ration pour r6colter les jus.
3. Appuyer sur les touches num6riques
2O00
2_OoF 450OF 4S0°F 450_
correspondant _ la dur6e de cuisson. On
peut enregistrer une dur6e allant jusqu'_
99 minutes, 99 secondes.
4.Appuyer sur la touche ENTER/START.
REMARQUES :
• Si I'on ouvre la porte ou si I'on appuie sur la touche
STOP/CLEAR pendant le gril, I'op6ration de gril cessera.
• Pour poursuivre la cuisson au gril, fermer la porte et
appuyer sur ENTER/START.
• Lorsque la dur6e pr6vue pour le gril se termine,
I'afficheur indique COOK END (FIN DE CUISSON) et
6met 4 signaux sonores.
• Apr6s la cuisson, I'afficheur revient _ I'heure actuelle,
Iorsque I'on ouvre la porte.
AUTO BROIL COOKING
(CUISSON AU GRIL
AUTOMATIQU E)
(Hamburgers, biftecks, morceaux de poulet, dames)
La fonction gril automatique permet de cuire avec la chaleur
du gril, sans avoir _ programmer une dur6e de cuisson.
Choisir la cat6gorie d'aliment _ pr@arer et entrer la quantit&
Voir le TABLEAU DE CUISSON AU GRIL AUTOMATIQUE sur
cette page pour connaitre les r6glages disponibles.
1.Appuyer sur la touche STOP/CLEAR
2. Appuyer sur la touche AUTO BROIL.
Tr_pied de gril
b lateau m_tallique/
de r_cup_ration
_ Plateau tournant
CUISSON AU GRIL
Exemple : Programmation d'une cuisson au gril
pendant 20 minutes.
1.Appuyer sur la touche STOP/CLEAR.
2.Appuyer sur la touche BROIL.
55
3. Appuyer sur les touches num6riques
correspondant au menu de cuisson.
Exemple de r6glage • 1 (Hamburger).
4. Appuyer sur la touche num6rique
correspondant _ la quantit6.
5. Appuyer sur la touche ENTER/START.
lC_F
IO_"F
1
1
TABLEAU DE CUISSON AU GRIL
AUTOMATIQUE
Hamburger 1 1 _ 6 steakettes de
4 oz (114 g) chacune
Bifteck 2 1 _ 2
Poitrine de poulet 3 0,4_ 2 Ib (0,18_ 0,9 kg)
Darne 4 1 _ 2
Page 57

Guidedechuuffuge/rGchuuffuge
Pour bien chauffer ou r6chauffer un aliment dans un four _ micro-ondes, il est important de suivre plusieurs directives. Mesurer
la quantit6 d'aliment de fa(_on_ d6terminer la durSe de r6chauffage n6cessaire. Disposer I'aliment de fa(_oncirculaire pour
obtenir les meilleurs r6sultats. Un aliment _ temp6rature ambiante r6chauffera plus rapidement qu'un aliment r6frig6r& Les
aliments devraient 6tre sortis des boites de conserve et 6tre plac6s dans un r6cipient pr6vu pour la cuisson aux micro-ondes.
L'aliment se r6chauffera de faoon plus uniforme s'il est recouvert d'un couvercle pr6vu pour les micro-ondes ou d'une pellicule
en plastique avec 6vent. Retirer soigneusement le couvercle, afin d'6viter de se brQler par la vapeur. Utiliser le tableau suivant
comme guide pour le r6chauffage d'aliments cuits.
Tranches de viande
3 tranches 1 - 2 minutes
(V4po/O,6cm d'@aisseur)
Morceaux de poulet
I poitrine
I patte et 1 cuisse
Filet de poisson
(6 _ 8 oz/171 _ 227 g]
Lasagnes
1 portion (IOV_oz/300 g)
Mets en sauce
I tasse (237 mL]
4 tasses (948 mL]
Mets en sauce _ la cr6me ou au fromage
I tasse (237 mL]
4 tasses (948 mL]
SandwichSloppyJoeou bceufau barbecue
I sandwich
(V2tasse/118 mL degarniture de viande]
sans pain
Pommes de terre en pur6e
1 tasse (237 mL]
4 tasses (948 mL)
Haricots au four
1 tasse (237 mL)
Raviolis ou pates en sauce
1 tasse (237 mL] 2V2- 4 minutes ondes.
4 tasses (948 mL) 7V2- 11 minutes Remuer _ mi-cuisson.
Riz FAIRECUIRE avec couvercle dans un plat pour four _ micro-
1 tasse (237 mL] 1V2- 3V2minutes ondes.
4 tasses (948 mL) 4 - 6V2minutes Remuer _ mi-cuisson.
Petit pain _ sandwich L'enrouler dans un papier essuie-tout et le placer sur le plateau
1 15 - 30 secondes tournant.
L6gumes FAIRECUIRE avec couvercle dans un plat pour four _ micro-
] tasse (237 mL] 1V2- 2V2minutes ondes.
4 tasses (948 mL] 4 - 6 minutes Remuer _ mi-cuisson.
Soupe FAIRECUIRE avec couvercle dans un plat pour four _ micro-
] portion (8 oz/237 mL] 1V2- 2V2minutes ondes.
2 - 3V2minutes
1V2- 3 minutes
2 - 4 minutes
4 - 6 minutes
1 - 3V2minutes
5 - 8 minutes
1V2- 3 minutes
3V2 - 5V2minutes
1 - 2V2minutes
1 - 3 minutes
5 - 8 minutes
1V2- 3 minutes
Placer les tranches de viande sur une assiette pour four _ micro-
ondes.
Recouvrir avec une pellicule plastique et laisser un 6vent.
Remarque : La sauce ou lesjus rendent la viande moelleuse.
Placer les morceaux de poulet sur une assiette pour four _ micro-
ondes.
Recouvrir d'une pellicule plastique avec 6vent.
Disposer le poisson sur une assiette pour four _ micro-ondes.
Recouvrir d'une pellicule plastique avec 6vent.
Disposer les lasagnes sur une assiette pour four _ micro-ondes.
Recouvrir d'une pellicule plastique avec event.
FAIRECUIRE avec couvercle dans un plat pour four _ micro-
ondes.
Remuer _ mi-cuisson.
FAIRECUIRE avec couvercle dans un plat pour four _ micro-
ondes.
Remuer _ mi-cuisson.
R6chauffer la garniture et le pain s@ar6ment.
Fairecuire la garniture en la recouvrant dans un plat pour four
micro-ondes. La remuer une fois.
Fairer6chauffer le pain comme il est indiqu6 ci-dessous.
FAIRECUIRE avec couvercle dans un plat pour four _ micro-
ondes.
Remuer _ mi-cuisson.
FAIRECUIRE avec couvercle dans un plat pour four _ micro-
ondes. Remuer _ mi-cuisson.
FAIRECUIRE avec couvercle dans un plat pour four _ micro-
Remuer _ mi-cuisson.
56
Page 58

Guidepourlegumesfruis
Artichauts 2 moyens 5 - 8 mn Pr@arer. Ajouter 2 cuill6res _ th6 d'eau. Couvrir. 2- 3 mn
(8 oz/227 g chacun} 4 moyens 10 - 13 mn
Asperges fraiches I Ib (0,45 kg} 3 - 6 mn Ajouter V2tasse (118 mL} d'eau. Couvrir. 2 - 3 mn
Haricots, verts et jaunes I Ib (0,45 kg} 7 - 11 mn Ajouter V2tasse (118 mL} d'eau dans un r6cipient 2 - 3 mn
d'l V2pinte (1,5 L}. Remuer _ mi-cuisson.
Betteraves, fraiches I Ib (0,45 kg} 12 - 16 mn Ajouter V2tasse (118 mL} d'eau dans un 2 - 3 mn
r6cipient d'l V2pinte (1,5 L},avec couvercle.
Redisposer _ mi-cuisson.
Brocoli, frais, bouquets IIb (0,45 kg} 4 - 8 mn Placer le brocoli dans un plat de cuisson au 2 - 3 mn
four. Ajouter V2tasse (118 mL} d'eau.
Chou, frais, hach6 1 Ib (0,45 kg} 4 - 7 mn Ajouter V2tasse (118 mL} d'eau dans un 2- 3 mn
r6cipient d'l V2pinte (1,5 L},avec couvercle.
Remuer _ mi-cuisson.
Carottes, fraiches, 2 tasses 2 - 4 mn Ajouter V4tasse (59 mL} d'eau dans un 2 - 3 mn
en tranches (474 mL} r6cipient d'l pinte (1 L},avec couvercle. Remuer
Chou-fieur, 1 Ib (0,45 kg} 7 - 11 mn Pr6parer. Ajouter V4tasse (59 mL} d'eau dans 2 - 3 mn
frais, entier un r6cipient d'l pinte (1 L}, avec couvercle.
frais, bouquets Remuer _ mi-cuisson.
21/2- 41/2mn Ajouter V2tasse (118 mL} d'eau dans un
C61eri,frais, en tranches 4 tasses(948 mL} 6 - 8 mn Remuer _ mi-cuisson. 2- 3 mn
Mafs, frais 2 @is 5 - 9 mn Cplucher. Ajouter 2 cuill6res _ soupe d'eau dans 2 - 3 mn
Champignons, V2Ib (0,3 kg} 2 - 31/2mn Placer les champignons dans un plat d'l V2pinte 2 - 3 mn
frais, en tranches (1,5 L},avec couvercle. Remuer _ mi-cuisson.
Panais,frais 1 Ib (0,45 kg} 4 - 8 mn Ajouter V2tasse (118 mL} d'eau dans un 2 - 3 mn
en tranches r6cipient d'l V2pinte (1,5 L},avec couvercle.
Petits pois, 4 tasses (948mL} 7 - 10 mn Ajouter V2tasse (118 mL} d'eau dans un 2 - 3 mn
frais r6cipient d'l V2pinte (1,5 L},avec couvercle.
Patates douces, 2 moyennes 5 - 10 mn Percer plusieurs fois les pommes de terre _ 2 - 3 mn
enti6res 4 moyennes 7 - 13 mn I'aide d'une fourchette. Les placer sur 2 papiers 2 - 3 mn
(6 _ 8 oz/170 _ 227 g essuie-tout. Les retourner _ mi-cuisson.
chacune}
Pommes de terre 2 5 - 8 mn Percer plusieurs fois les pommes de terre _ 2 - 3 mn
blanches, enti_res 4 10 - 14 mn I'aide d'une fourchette. Les placer sur 2 papiers 2- 3 mn
(6 _ 8 oz/170 _ 227 g essuie-tout. Les retourner _ mi-cuisson.
chacune}
I_pinards,frais, 1 Ib (0,45 kg} 4 - 7 mn Ajouter V2tasse (118 mL} d'eau dans un 2 - 3 mn
en feuilles r6cipient de 2 pintes (2 L}, avec couvercle.
Courges, fraiches, 1moyenne 6 - 8 mn Couper la courge en deux. Retirer les graines. 2 - 3 mn
reines-de-table Placer dans un plat pour cuisson au four de
ou musqu6es 8 x 8 po (20 x 20 cm}. Couvrir.
Courgettes, fraiches, 1 Ib (0,45 kg} 41/2- 71/2mn Ajouter 1/2tasse (118 mL} d'eau dans un 2 - 3 mn
en tranches r6cipient d'l V2pinte (1,5 L},avec couvercle.
Courgettes, fraiches, IIb (0,45 kg} 6 - 9 mn Les percer et les placer sur 2 papiers essuie-tout. 2 - 3 mn
enti_res Les retourner et les redisposer _ mi-cuisson.
mi-cuisson.
r6cipient d'l V2pinte (1,5 L},avec couvercle.
un plat pour cuisson au four d'l V2pinte (1,5 L}.
Couvrir.
Remuer _ mi-cuisson.
Remuer _ mi-cuisson.
Remuer _ mi-cuisson.
57
Page 59

|ntretienetnettoyoge
INSTRUCTIONS
Pour optimiser la performance et la s6curit6 de I'appareil,
veiller _ la propret6 du four, _ I'int6rieur et _ I'ext6rieur.
Veiller particuli6rement _ emp6cher toute accumulation de
r6sidus alimentaires ou de graisse sur le cadre avant du
four et la surface interne du panneau de porte. Ne jamais
utiliser un tampon abmsif ou un produit en poudre
abrasif. Essuyer les surfaces internes et externes du four
micro-ondes, y compris le couvercle inf_rieur de la hotte
d'aspiration, avec un chiffon doux et une solution d'eau ti6de
et de d6tergent. Ensuite, rincer et essuyer pour s6cher. Sur
les surfaces de chrome, m6tal ou aluminium, utiliser un
produit de polissage du chrome. I_liminer imm6diatement les
6claboussures avec un papier essuie-tout, particuli6rement
apr6s la cuisson de poulet ou de bacon. Nettoyer le four
chaque semaine, ou plus fr6quemment, selon le besoin.
TRI PIEDS DE CONVECTION/
GRIL, PLATEAU ME'I'ALLIQUE/DE
RECUPI[RATION
Laver les tr@ieds de gril et de convection, et le plateau
m6tallique/de r_cup6ration, _ I'aide d'un savon doux et
d'une brosse _ r6curer douce ou en nylon. Bien les s6cher.
Ne pas utiliser de nettoyant ou de produits _ r6curer abrasifs
pour nettoyer ces pi6ces.
NETTOYAGE DU FILTRE ,it
GRAISSE
On doit d_monter fr_quemment le filtre _ graisse pour le
nettoyer, au moins une lois par mois.
1.Pour la d_pose du filtre _ !,jL J_)]U
graisse, faire glisser le filtre
lat6ralement. Tirer vers le bas
et pousser vers I'autre cot&
Le filtre pourra sortir.
Faire tremper le filtre
graisse dans de I'eau chaude
avec un d6tergent doux.
Bien rincer et secouer pour
s6cher. Ne jamais utiliser
un produit contenant
de I'ammoniaque, et ne
jamais laver le flltre dans le lave-vaisselle; le filtre
d'aluminium prendrait une teinte sombre.
Pour r6installer le filtre, faire
glisser le filtre dans la rainure
lat6rale, puis pousser vers le
haut et vers le centre du four
pour la mise en place.
PLATEAU TOU RNANT/
ANNEAU DE ROTATION
Le plateau tournant et I'anneau de rotation sont amovibles.
IIsdoivent 6tre lav6s _ la main, dans de I'eau ti6de (non
chaude] additionn6e d'un d6tergent doux. Bien les
sScher _ I'aide d'un linge souple. NE PAS utiliser de
poudre de nettoyage, d'abrasif, de laine d'acier ou autre
tampon rugueux. NE PAS les laver dans un lave-vaisselle
automatique.
• Le plateau tournant peut _.trenettoy6 _ 1'6vier.Faire
attention de ne pas 1'6cailler ni d'6gratigner les bords, ceci
pouvant faire casser le plateau en cours d'utilisation.
• L'anneau de rotation doit _.trenettoy6 r6guli6rement.
• Le plateau tournant doit TOUJOURS _.treen place Iors de
I'utilisation de ce four.
REMPLACEMENT DU FILTRE A
CHARBON
Si la hotte associ6e au four recycle I'air _ I'int6rieur de la
pi6ce, on doit remplacer le filtre _ charbon _ intervalles de
6 _ 12 mois,ou plus fr6quemment selon le besoin. IIn'est pas
possible de nettoyer le filtre _ charbon. Pour commander un
filtre _ charbon, contacter le d@artement des pi6ces du plus
proche centre de serviceagr66, ou composer le
1-800-688-9900 [I_.-U.] ou 1-800-688-2002 [Canada].
Commander le filtre _charbon n° MVHRK5.
1.D6brancher le four ou interrompre I'alimentation du circuit
au niveau du tableau de distribution.
2. Oter les trois vis de montage de la grille d'6vent.
58
Page 60

|ntretienetnettofoge
3. Appuyer sur le c6t6 droit inf6rieur du filtre _ charbon.
4. Enlever I'ancien filtre.
5.Mettre en place un filtre _ charbon neuf. Lefiltre doit 6tre
inclin6 comme on le voit sur I'illustration.
3. Remplacer chaque ampoule grill6e par une ampoule de
20 watts pour appareil m6nager.
4. R6installer le cabochon et les vis de montage.
5. R6tablir I'alimentation 61ectrique de I'appareil.
REMPLACEMENT DE
L'AMPOULE DE LA LAMPE DU
FOUR
1.Debrancher le four ou interrompre I'alimentation du circuit
au niveau du tableau de distribution.
2. Oter les trois vis de montage de la grille d'6vent.
3. Tirer la grille vers I'avant, puis la soulever pour I'enlever.
6.Coulisser la partie inf6rieure de la grille en place. Appuyer
sur la partie sup6rieure jusqu'_ emboitement. R6installer
les vis de montage. R6tablir I'alimentation 61ectrique de
I'appareil, et r6gler I'horloge.
REMPLACEMENT DE
L'AMPOULE DE LA LAMPE DU
PLAN DE TRAVAIL
1. Debrancher le four ou interrompre I'alimentation du circuit
au niveau du tableau de distribution.
4. Soulever le porte-ampoule.
5. Retirer le porte-ampoule.
6. Remplacer I'ampoule grill6e par une ampoule de
20 ou 30 watts pour appareil m6nager.
7 R6installer le porte-ampoule.
8. Coulisser la partie inf6rieure de la grille en place. Appuyer
sur la partie sup6rieure jusqu'_ emboitement. Reinstaller
les vis de montage. R6tablir I'alimentation 61ectrique de
I'appareil.
2.Oter les vis de montage du cabochon.
59
Page 61

Ustensilesrecommundes
GUIDE DES USTENSILES POUR FOUR A MICRO-ONDES
iiiiiiiiiiiiiiiiiiiiiiiiiiiiiiiiiiiiiiiiiiiiiiiiiiiiiiiiiiiiiiiiiiiiiiii_ _iiiiiiiiiiiiiiiiiiiiiiiiiiiiiiiiiiiiiiiiiiiiiiiiiiiiiiiiiiiiiiiiiiiiiiiiiiiiiiiiiiiiiiiiiiiiiiiiiiiiiiiiiiiiiiiiiiiiiiiiiiiiiiiiiiiiiiiiiiiiiiiiiiiiii_i
VERRE SPI_CIAL FOUR I:trait6 pour
chaleur tr_s forte:) :
Plats courants, moules _ pain, plats
tarte, plats _ g_teau, tasses
mesurer, cocottes et plats creux sans
bordure m6tallique.
PORCELAINE :
Plats creux, tasses, assiettes et plats
de service sans garniture m6tallique.
PLASTIQU ES :
Pellicule plastique (:pourrecouvrir)
-- 6tirer la pellicule sans la serrer
par-dessus le plat et I'appuyer sur
les cOt6s.
Pr6voir une a6ration en retournant
I_g6rement un bord pour permettre
la vapeur de s'6chapper. Le plat
doit _.treassez profond pour que la
pellicule plastique ne touche pas la
nourriture.
Lors du chauffage d'un aliment, la
pellicule plastique risque de fondre
si elle est en contact avec I'aliment.
N'utiliser tasses, contenants
semi-rigides pour cong_lateur,
sachets et plats en plastique
que pour une courte dur_e de
cuisson. Le plastique en effet
risque de se ramollir par suite de
la chaleur des aliments.
PAPIER :
Papier essuie-tout, papier cir6,
serviettes en papier et assiettes en
papier sans garniture ou d6coration
m6tallique. Voir 1'6tiquettedu
fabricant pour confirmer rutilisation
possible dans le four _ micro-ondes.
USTENSI LES MI_TALLIQUES :
Le m6tal emp_.che1'6nergiedes micro-ondes d'atteindre I'aliment, ce
qui produit une cuisson in6gale. I_viter aussi les brochettes en m_tal, les
thermom6tres ou plateaux en aluminium. Les ustensiles m6talliques peuvent
entrainer la production d'arcs electriques risquant d'endommager le four
micro-ondes.
DECORATION MI_TALLIQUE :
Cocottes, assiettes _ diner _ bordure ou garniture m6tallique, etc. Le m6tal
g_.nela cuisson normale et peut endommager le four.
FEUILLES D'ALUMINIUM :
Cviterles grandes feuilles d'aluminium parce qu'elles g_.nent la cuisson et
peuvent entrainer la formation dangereuse d'arcs. Utiliser de petits morceaux
de papier aluminium pour prot6ger les ailes et les pattes de volaille.
S'assurer que TOUT le papier aluminium se trouve _ au moins I po 1:2,5cm)
des parois et de la porte du four.
BOIS :
Lesplanches et bols en bois vont se dess6cher et peuvent se fendiller ou
se fendre si on les utilise dans le four _ micro-ondes. Les paniers peuvent
r_agir de la m_.mefagon.
USTENSILES ,b,COUVERCLES FERMI_S HERMI_TIQUEMENT :
S'assurer de laisser des _vents pour que la vapeur s'6chappe des ustensiles
avec couvercle. Percer les sachets de 16gumesen plastique et autres
articles, avant la cuisson. Des sachets herm6tiquement ferm6s risqueraient
d'exploser.
PAPIER D'EMBALLAGE :
I_viterd'utiliser des sacs d'emballage en papier.
IIsabsorbent trop la chaleur et pourraient brt_ler.
USTENSILES AVEC DCFAUTS OU I_CAILLI_S:
Tout ustensile qui est fissure, _caill_ ou pr_sente des d_fauts risque de
casser dans le four.
ATTACHES EN MI_TAL :
Retirer les attaches en m_tal des sachets en papier ou plastique.
Elles peuvent s'Schauffer et risquent d'entrainer un feu.
6O
Page 62

6uidededepunnuge
AVANT DE CONTACTER UN SERVICE DE DI PANNAGE
Verifier la liste suivante pour s'assurer qu'un service de d@annage est vraiment necessaire. Revoir les informations
supplementaires sur les differents articles pour empecher tout appel de service qui ne serait pas necessaire.
Si rien sur le four ne marche * verifier si un fusible n'est pas grille ou un disjoncteur, declench&
•verifier si le four est correctement raccorde au circuit electrique de la maison.
•verifier que les commandes sont correctement reglees.
Si la lampe interieure du four ne • I'ampoule est peut-etre devissee ou defectueuse.
fonctionne pas
Si le four ne chauffe pas • verifier que le tableau de commande aete correctement programme.
•verifier que la porte est bien fermee.
•verifier que I'on a bien appuye sur la touche Enter/Start.
•verifier que la minuterie n'a pas ete mise en marche au lieu d'une fonction de
cuisson.
Si le four prend plus de temps que •s'assurer que le niveau de puissance est correctement programme.
normalement _ cuire ou cuit trop
rapidement
Si I'horloge n'indique pas toujours • verifier que le cordon est bien introduit dans la prise.
I'heure exacte •s'assurer que le four est le seul appareil branche sur ce circuit.
Si la nourriture cuit de fa(_oninegale • s'assurer que la nourriture est presentee de fa(_onuniforme.
•s'assurer que la nourriture est completement decongelee avant la cuisson.
•s'assurer de la disposition des bandes en papier aluminium utilisees pour
empecher une surcuisson.
Si la nourriture n'est pas assezcuite * verifier la recette pour s'assurer que toutes les instructions (quantite, duree
et niveaux de puissance) ont ete correctement suivies.
•s'assurer que le four _ micro-ondes est branche sur un circuit ind@endant.
•s'assurer que la nourriture est completement decongelee avant la cuisson.
Si la nourriture est trop cuite *verifier la recette pour s'assurer que toutes les instructions (quantite, niveau de
puissance, duree, taille du plat) ont ete suivies.
Encas d'arcs electriques (etincelles) * s'assurer que les plats utilises peuvent supporter les micro-ondes.
•s'assurer qu'aucune attache metallique n'a ete utilisee.
•s'assurer que le four n'a pas ete mis en marche alors qu'il etait vide.
•s'assurer que la grille en metal (]e cas echeant) est correctement installee.
Si I'afficheur indique un decompte *verifier que la porte est bien fermee.
mais que le four ne cuit pas • verifier que la minuterie n'a pas ete mise en marche au lieu d'une fonction de
cuisson.
Leventilateur se met en marche •si la temperature devient trop elevee autour du four _ micro-ondes, le ventilateur
automatiquement de la hotte d'extraction se met automatiquement en marche au reglage de
niveau 5 pour refroidir lefour. II peut rester en marche pendant une heure au
maximum pour refroidir le four.
Code d'anomalie - F et un numero • appuyer sur la touche Stop/Clear pour effacer le code.
paraissent _ I'afficheur • si le code d'anomalie continue d'apparaitre, contacter le service apres-vente.
61
Page 63

Guidededepunnuge
QUESTIONS ET RI PONSES
Puis-je utiliser une autre grille dans
mon four _ micro-ondes pour que je
puisse r6chauffer ou cuire sur deux
grilles en m6me temps?
Puis-je utiliser des ustensiles en m6tal
ou en aluminium dans le four _ micro-
ondes?
Parfois, la porte du four _ micro-ondes Cette apparence est normale et ne modifie pas le fonctionnement du four _ micro-
semble onduler, ondes.
Est-ce normal?
Quels sont les bourdonnements que C'est le bruit du transformateur Iorsque le magn_tron se met en marche par
j'entends Iorsque le four _ micro- intermittence.
ondes fonctionne?
Pourquoi le plat devient-il tres chaud
Iorsque je fais cuire de la nourriture
dans le four _ micro-ondes?
Qu'est-ce que la pdriode d'attente?
Puis-je faire 6clater du mars dans le
four? Comment obtenir les meilleurs
r6sultats?
Pourquoi de la vapeur sort-elle de
1'6vent?
Quels sont les meilleurs ustensiles
pour la cuisson avec convection?
Existe-t-il des techniques sp6ciales Retourner les gros morceaux de viande _ mi-cuisson. Placer d'abord le cOtegras
pour la cuisson combin6e de viandes? de la viande vers le bas, puis le cOtegras vers le haut pour la derni6re partie de la
N'utiliser que la grille qui est fournie avec le four _ micro-ondes.
L'utilisation de toute autre grille pourrait entrainer de m6diocres performances de
cuisson et/ou la production d'arcs et endommager le four.
Le m6tal utilisable comprend le papier aluminium pour prot6ger certaines parties
(utiliser de petits morceaux plats).
Ne jamais laisser le m6tal entrer en contact avec les parois ou la porte.
Lorsque la nourriture devient tr6s chaude, elle conduit la chaleur jusqu'au plat.
Utiliser des maniques pour retirer la nourriture apr6s lacuisson.
Le plat n'est peut-6tre pas utilisable dans un four _ micro-ondes.
La p6riode d'attente est la p6riode apr6s la sortie du four de I'aliment, couvert, pour
continuer la cuisson. Ce processus permet _ la cuisson de se terminer.
Oui. II est possible de faire 6clater du mars special pour four _ micro-ondes
en suivant les instructions du fabricant ou en utilisant la touche Popcorn
pr@rogramm_e.
Ne pas utiliser de sachets en papier ordinaire. Utiliser le test d'6coute en arr_.tant le
four des que I'on n'entend plus qu'un 6clatement toutes les secondes ou toutes les
deux secondes. Ne pas essayer de faire 6clater des grains qui n'auraient pas encore
6clat& II est possible d'utiliser des dispositifs spSciaux pour 1'6clatement du mars en
four _ micro-ondes. Avec ceux-ci, s'assurer de suivre les instructions du fabricant.
Ne pas faire 6clater de mars dans des ustensiles en verre.
De la vapeur est normalement produite Iors de la cuisson. Le four _ micro-ondes a
6t6 con(_upour laisser 6chapper cette vapeur par 1'6ventsup_rieur.
Utiliser des ustensiles peu profonds pour que Fair chaud puisse atteindre le dessus
des aliments et le brunir.
cuisson. Ainsi, la cuisson est uniforme et la graisse, bien rissol6e.
62
Page 64

Garantie
• Les frais de service suppl6mentaires dans le cas ot] un
r@arateur doit effectuer des r@arations en plus des
r@arations normales, en dehors des heures de service
normales ou encore dans une r6gion _ I'ext6rieur de son
district habituel.
• Des r6glages apr8s la premi6re ann6e.
• Des r@arations r6sultant de raisons suivantes :
- Installation, syst8me d'6vacuation ou entretien incorrects.
- Toute modification ou tout r6glage non autoris6s par le
fabricant.
- Tout accident, mauvaise utilisation, usage abusif,
incendie, inondation ou catastrophe naturelle.
- Raccordement incorrect _ I'alimentation de gaz ou
I'alimentation 61ectrique,de tension ou intensit_
incorrecte.
- Utilisation d'ustensiles, contenants ou accessoires
incorrects qui endommagent le produit.
• D6placement.
Si I'intervention d'un
d panneur est n cessaire :
• Contacter le d6taillant chez qui I'appareil a 6t6 achet6,
ou contacter Maytag ServicessM, service _ la clientSle de
Maytag au 1-800-688-9900 aux I_.-U.et
1-800-688-2002 au Canada, pour obtenir les
coordonn6es d'une agence de service agr66e.
• Veiller _ conserver la facture d'achat pour justifier de la
validit6 de la garantie. Pour d'autres informations en ce
qui concerne les responsabilit6s du propri6taire _ 1'6gard
du service sous garantie, voir le texte de la GARANTIE.
• Si le d6taillant ou I'agence de service apr6s-vente ne
peut r_soudre le probl6me, ecrire _ Maytag ServicessM,
attention CAIR_R'Center, P.O.Box 2370, Cleveland,
TN 37320-2370 ou t61@honer au 1-800-688-9900 aux
I_.-U.ou 1-800-688-2002 au Canada.
REMARQUE :
• Lorsde tout contact concernant un probleme, fournir
Ne sont pas couverts par ces
garanties :
• Le remplacement de fusibles, le r_enclenchement de
disjoncteurs ou la correction du r6seau de plomberie ou
de I'alimentation 61ectrique.
• Le nettoyage et I'entretien normaux du produit, y compris
le remplacement d'ampoules.
• Le produits dont les num_ros de s_rie d'origine ont _t6
enlev_s, modifi6s ou ne sont pas facilement visibles.
• Les produits achet6s _ des fins commerciales,
industrielles ou de location.
• Les produits situ6s _ I'ext6rieur des I_tats-Unis ou du
Canada.
EN AUCUN CAS MAYTAG NE SERA TENUE RESPONSABLE DE DOMMAGES DIRECTS OU INDIRECTS.
Cette garantie conf6re _ I'acheteur des droits juridiques sp6cifiques. L'acheteur peut 6galement jouir d'autres droits, variables
d'un 6tat _ un autre ou d'une province _ une autre. Par exemple, certains etats ou provinces ne permettent pas I'exclusion ou
la limitation de dommages directs ou indirects. Cette limitation peut donc ne pas s'appliquer dans lecas de I'acheteur.
63
I'information suivante •
a. Nom, adresse et num6ro de tSl@hone du client;
b. Num6ro de mod6le et num6ro de s6rie de I'appareil;
c. Nom et adresse du d6taillant ou de I'agence de service;
d. Description claire du probl6me observ6;
e. Preuved'achat (facture de vente).
• Les guides d'utilisation, les manuels de service et les
renseignements sur les pi_ces sont disponibles aupres
de Maytag ServicessM, service _ laclientele de Maytag.
Page 65

7g;;!_!_!!!_jiiiiiijiis_/%
I
I
GuiudeUsoyCuidodo
Modelo MMV6178AA
Instrucciones Importantes
sobre Seguridad .................................... 65-67
Caracteristicas ........................................ 68-70
Funcionamiento ...................................... 71-87
Instrucciones de Funcionamiento
del Homo de Microondas .................. 71-74
Instrucciones de Funcionamiento
del Sensor .................................................... 75
Descongelaci6n Autom_tica ................... 76
Descongelaci6n Rapida ........................... 77
Cocci6n Autom_tica .................................. 77
Cocci6n pot Convecci6n .................... 78-82
Cocci6n Combinada/R_pida ............. 83-86
Cocci6n con Asador .................................. 87
Guia de Calentamiento/
Recalentamiento .......................................... 88
Guia de Verduras Frescas .......................... 89
Mantenimiento ...................................... 90-91
Utensilios Recomendados ........................ 92
Localizaci6n y Soluci6n de Averias .... 93-94
Garantia ......................................................... 95
Homo de Microondas Combinado
Conserve las instrucciones para referencia futura.
Aseg_rese de que este manual permanezca con el homo.
64
Page 66

InstruccionesImportontessobreSeguridod
Informaci6n Sobre las
Instrucciones de Seguridad
Lasadvertencias e instrucciones importantes sobre
seguridad que aparecen en este manual no estan destinadas
a cubrir todas las posibles circunstancias y situaciones que
puedan ocurrir. Se debe ejercer sentido comt_n, precauci6n
y cuidado cuando instale, efectt_e mantenimiento o cuando
use el microondas.
Siempre p6ngase en contacto con su distribuidor, agente de
servicio o fabricante si surgen problemas o situaciones que
usted no comprenda.
Reconozca los Simbolos, Advertencias
y Etiquetas de Seguridad
65
Page 67

InstruccionesImportontessobreSeguridod
Instrucciones para la
Puesta a Tierra
Elhomo DEBE ser puesto a tierra.
La puesta a tierra reduce la posibilidad
de un choque elOctrico ofreciendo un
alambre de escape para la corriente
elOctrica si ocurre un cortocircuito. Este
horno esta equipado con un cordon elOctrico provisto de un
enchufe con puesta a tierra. Elenchufe debe ser enchufado
en un tomacorriente que est6 debidamente instalado y
puesto a tierra. Ver las instrucciones de instalaciOn.
Consulte a un electricista o tOcnico calificado si no
comprende bien las instrucciones de puesta a tierra o si
tiene dudas respecto a la puesta a tierra del horno.
No use un cordon de extension. Siel cordon elOctrico
del aparato es demasiado corto, solicite a un electricista
calificado que instaleun tomacorriente de tres alv_olos.
Estehorno debe ser enchufado en un circuito separado de
60 Hzy usadocon laalimentaciOn elOctrica mostrada en
latabla de especificaciones. Cuando el horno comparte el
circuito con otros equipos, pueden ser necesarios tiempos
de cocciOn mas largosy los fusibles se pueden fundir.
Elhomo de microondas funciona con la corriente est_ndar
del hogar de 110 - 120V.
Declaraci6n de Interferencia de
Radiofrecuencia de la Comisi6n
Federal de Comunicaciones
• Ubique en otro lugar el horno de microondas con respecto
al receptor.
• Mueva el horno de microondas a un lugar alejado del
receptor.
• Enchufe el microondas en un tomacorriente diferente de
modo que el microondas y el receptor estOnen circuitos
diferentes.
Elfabricante no es responsable de ninguna interferencia
de radio o television causada por la modificaci6n no
autorizada a este horno de microondas. Es responsabilidad
del usuario corregir tal interferencia.
Precauciones para Evitar
Posible Exposici6n a Energ(a de
Microondas Excesiva
A. NO intente hacer funcionar este horno con la puerta
abierta pues se puede producir exposiciOn perjudicial a
la energfa de microondas. Esimportante no modificar ni
alterar los entrecierres de seguridad.
B.NO coloque ningt_n objeto entre la parte delantera del
horno y la puerta ni deje que se acumulen suciedad o
residuos de limpiadores en las superficies de sellado.
C. NO haga funcionar este horno si est_ da_ado. Es
particularmente importante que la puerta del horno cierre
bien y que no se haya da_ado:
1.la puerta (doblada)
2. las bisagras y pestillos (rotos o sueltos)
3. las juntas de la puerta y las superficies de sellado.
D. El horno no debe ser ajustado ni reparado por ninguna
persona que no sea personal de servicio calificado.
(EE.UU. Solamente)
Este equipo genera y usa energfa de frecuencia ISM y si no
es instalado y usado en forma debida, es decir, en estricto
cumplimiento con las instrucciones del fabricante, puede
causar interferencia con la recepciOn de la radio y de la
television. Se ha comprobado y confirmado que cumple
con los limites estipulados para equipos ISM (Industriales,
Cientfficos, MOdicos) en virtud de la secciOn 18 de los
reglamentos de la FCC,que han sido disef_ados para
proveer protecciOn razonable contra tal interferencia en una
instalaciOn residencial.
Sin embargo, no se garantiza que no ocurrira interferencia
en alguna instalaciOn determinada. Si este equipo causa
interferencia con la recepciOn de radio y de television, Io
cual puede ser determinado apagando y encendiendo el
equipo, se recomienda que el usuario trate de corregir
la interferencia mediante una o mas de las siguientes
recomendaciones:
• Cambie de direcciOn la antena de recepciOn de la radio o
television.
CONSERVE ESTAS INSTRUCCION ES
66
Page 68
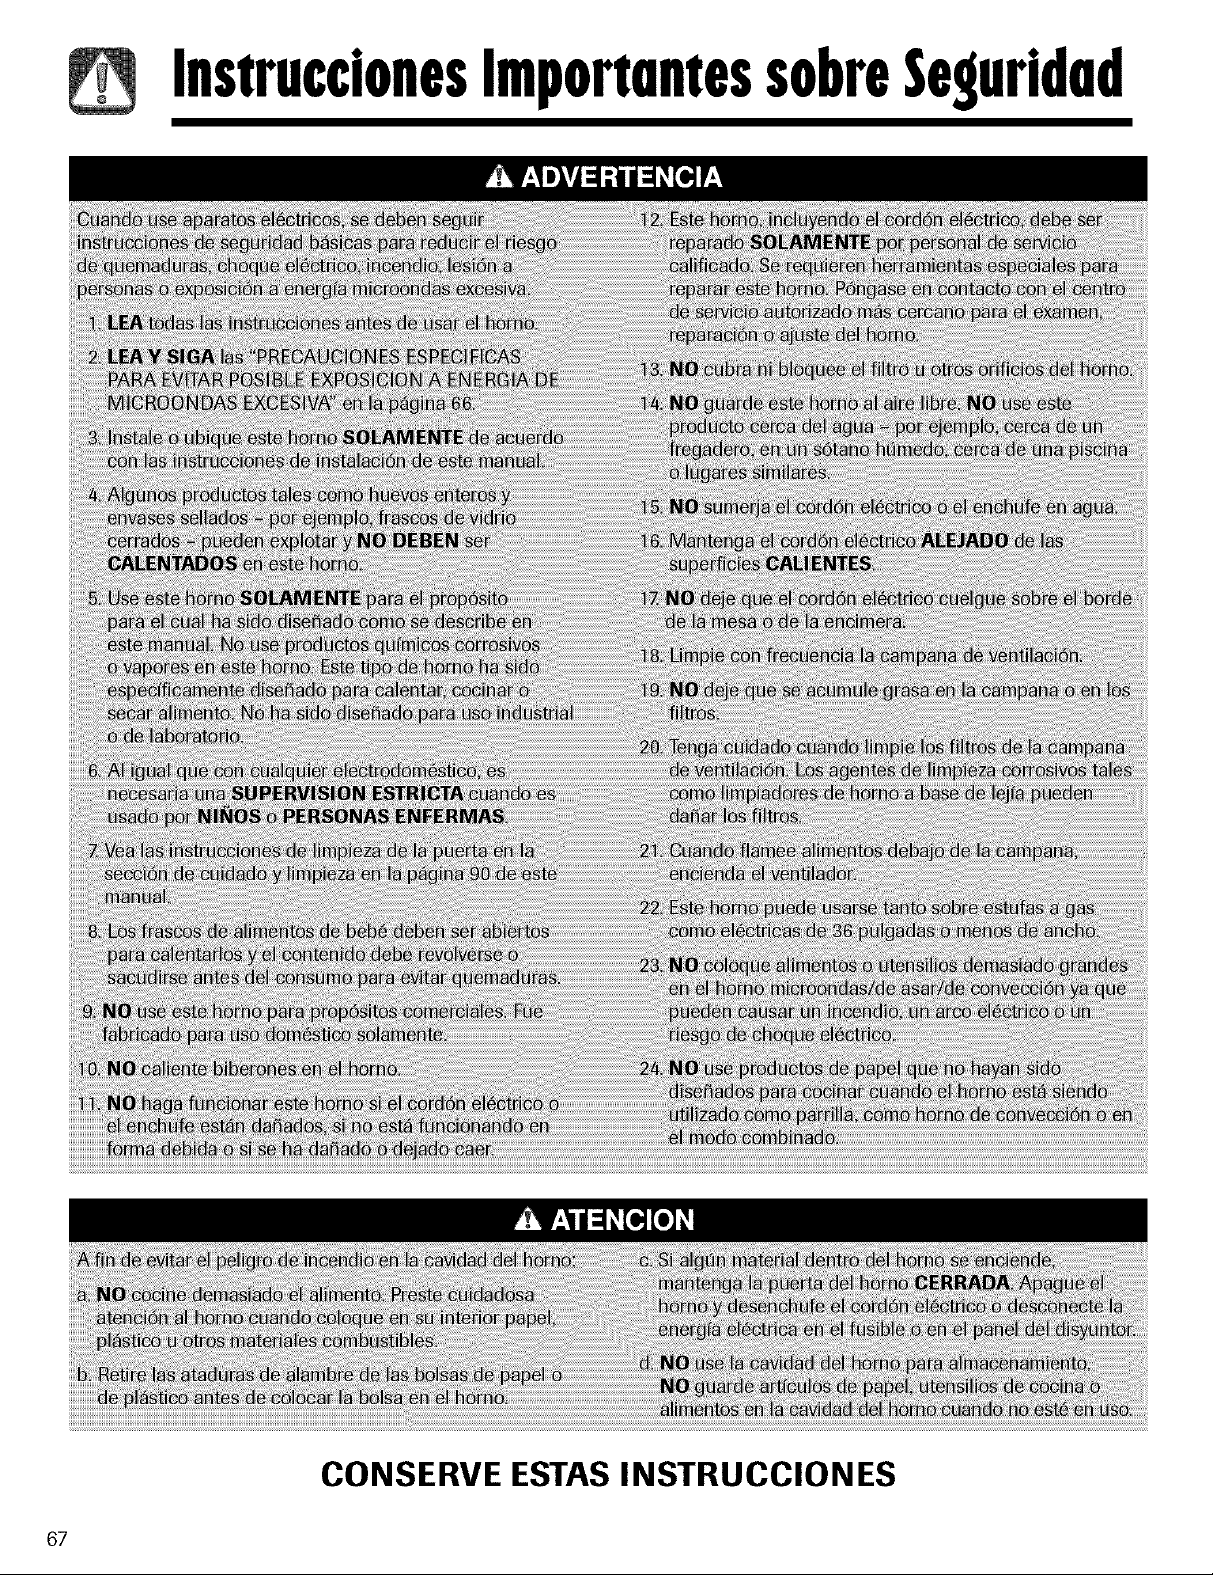
InstruccionesImportantessobreSeguridad
67
CONSERVE ESTAS INSTRUCCIONES
Page 69
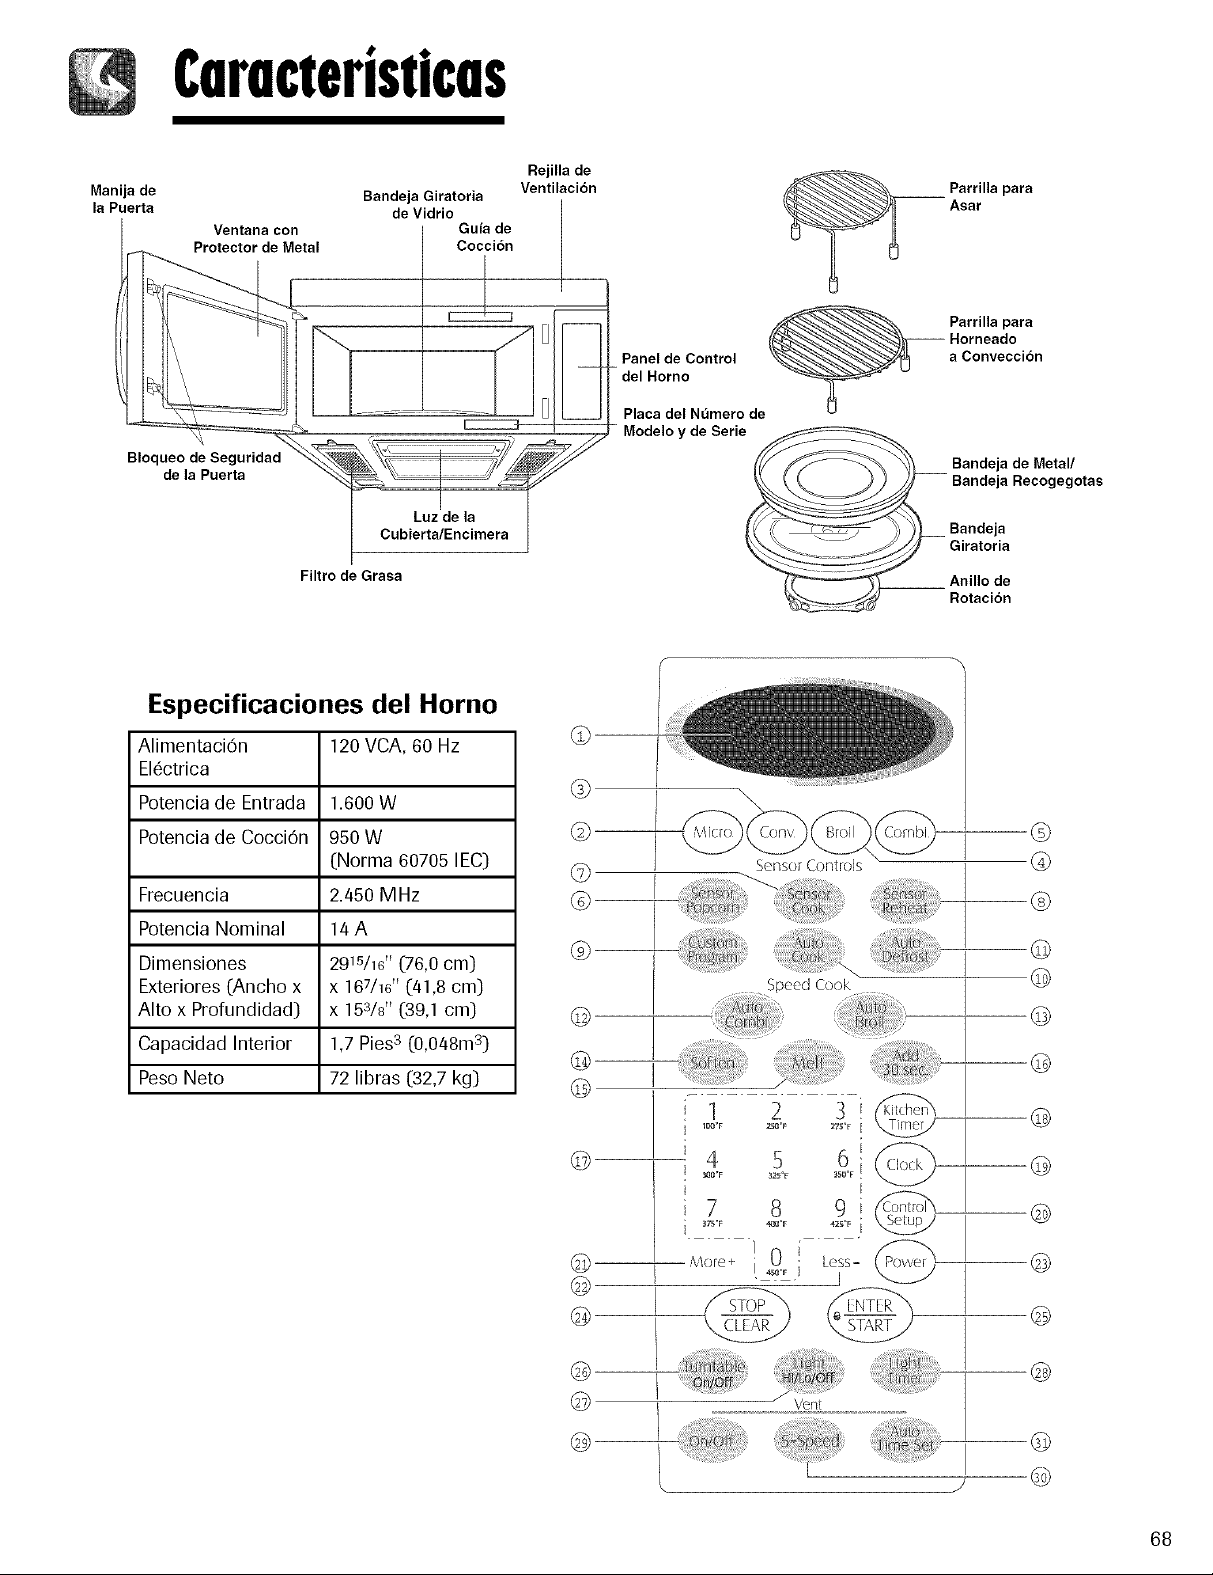
Cnrncteristicns
Manija de Bandeja Giratoria
la Puerta de Vidrio
Ventana con Gufa de
Protector de Metal Cocci6n
Bloqueo de Seguridad
de la Puerta
Luz de la
Cubierta/Encimera
Filtro de Grasa
Rejilla de
Ventilacibn
Panel de Control
del Homo
Placa del N=3mero de
Modelo y de Serie
Parrilla para
Asar
Parrilla para
-- Horneado
a Conveccibn
Bandeja de Metal/
Bandeja Recogegotas
_ Bandeja
Giratoria
Anillo de
Rotacibn
Especificaciones del Horno
AlimentaciOn 120 VCA, 60 Hz
EI6ctrica
Potencia de Entrada 1.600 W
Potencia de CocciOn 950 W
(Norma 60705 IEC]
Frecuencia 2.450 MHz
Potencia Nominal 14 A
Dimensiones 29W16"(76,0cm]
Exteriores (Ancho x x 167/16"(41,8cm]
Alto x Profundidad] x 153/s" (39,1 cm]
Capacidad Interior 1,7 Pies3 (0,048m3]
Peso Neto 72 libras (32,7 kg]
©
©
®
@
©
@
®
©
@
........ ....... ;,,.......................
cod Cook
i 1 2 3 _
i 100, F
_O_F _25_F
i i
_ 7 8 9_.
i _7_"F a4_s_F 42_F [
More+ i 40r i Less=
Z_O_F 27_F [
• . [
@
@
@
@
@
@
@
@
©
N:
©
[
68
Page 70

Caracteristicas
CARACTERISTICAS
NOTA:
• El estilo y las caracterfsticas varfan segt_nel modelo.
'DISPLAY' (Pantalla Digital): La pantalla incluyeun
reloj e indicadores que muestran la hora del dfa, los
ajustes de tiempo de cocciCn y las funciones de cocciCn
seleccionadas.
2. 'MICRO: (Microondas): Oprima esta tecla para
cocinar con microondas.
3. 'CONV.' (Convecci6n): Oprima esta tecla para cocinar
con convecciCn.
/4.'BROIL' (Asador): Optima esta tecla para cocinar con
asador.
5. 'COMBI.' (CombinaciCn): Optima esta tecla para
cocinar o precalentar con una combinaciCn de las
opciones anteriores.
6. 'SENSOR POPCORN' (Palomitas de Ma|z con
Sensor): Oprima esta tecla cuando prepare palomitas
de mafz en su horno de microondas. Elsensor del horno
calculara el tiempo de cocciCn dependiendo de la
cantidad de humedad que detecte en el mafz.
Z 'SENSOR COOK' (Cocci6n con Sensor): Oprima esta
tecla para cocinar papas al horno, verduras congeladas,
frescas o enlatadas, platillos principales congelados y
arroz. Elsensor del horno calculara el tiempo de cocciCn
dependiendo de la cantidad de humedad que despida el
alimento.
8. 'SENSOR REHEAT' (Recalentar con Sensor): Oprima
esta tecla para recalentar cacerolas, platos de servir y
sopas/salsas. El sensor del horno calculara el tiempo de
cocciCn dependiendo de la cantidad de humedad que
despida el alimento.
9. 'CUSTOM PROGRAM' (Programa Personalizado):
Oprima esta tecla para usar una instrucciCn de cocciCn
previamente guardada en la memoria.
10.'AUTO COOK' (CocciCn Automdtica): Optima esta
tecla para cocinar tocino, panecillos y tortas enrolladas
frescas o congeladas, bebidas, piezas de polio o cereal
caliente.
11.'AUTO DEFROST' (Descongelaci6n Automdtica):
Oprima esta tecla para seleccionar el tipo de alimento y
descongelar alimentos segt_nel peso.
12.'AUTO COMBI: (Combinaci6n Automdtica): Oprima
esta tecla para seleccionar la cocciCn por combinaciCn
segt_n los pesos.
13.'AUTO BROIL' (Asado Automzitico): Optima esta tecla
para seleccionar el asado por peso.
1/4.'SOFTEN' (Suavizar): Oprima esta tecla para suavizar
mantequilla, helado, queso crema y jugos congelados.
15.'MELT' (Derretir): Optima esta tecla para derretir
mantequilla, chocolate, queso y malvaviscos.
16.'ADD 30 SEC: (Agregar 30 segundos): Optima esta
tecla para ajustar y comenzar rapidamente en el nivel de
potencia de 1000/0.
17 'NUMBER' (Ndmero): Optima las teclas num_ricas
I
para indicar el tiempo de cocciCn, el nivel de potencia, las
cantidades, los pesos o las temperaturas de cocciCn.
18.'KITCHEN TI MEW (Temporizador de la Cocina):
Optima esta tecla para ajustar el temporizador de la
cocina.
19.'CLOCK' (Reloj): Optima esta tecla para colocar la hora
del dfa.
20.'CONTROL SETUP' (Ajuste del Control): Oprima esta
tecla para cambiar los ajustes de fabrica del horno para
el sonido, el reloj, la velocidad de la pantalla y el peso de
descongelaciCn.
21.'MORE+' (Mds+): Oprima esta tecla para agregar 10
segundos al tiempo de cocciCn cada vez que la oprima.
22.'LESS-' (Menos-): Optima esta tecla para quitar 10
segundos al tiempo de cocciCn cada vez que la oprima.
23.'POWER' (Potencia): Oprima esta tecla para
seleccionar un nivel de potencia de cocciCn.
24.'STOP/CLEAR' (Apagar/Anular): Optima esta tecla
para apagar el horno o anular todas las entradas.
25.'ENTER/START' (Aceptar/Puesta en Marcha):
Optima esta tecla para poner en marcha una funciCn
o aceptar las funciones seleccionadas. Si usted abre la
puerta despuCs de que el horno comienza a cocinar,
oprima la tecla 'ENTER/START' nuevamente.
26.'TURNTABLE ON/OFF' (Bandeja Giratoria
Encendida/Apagada): Optima esta tecla para apagar
la bandeja giratoria. La palabra 'OFF' aparecer_ en la
pantalla.
• Esta opciCn no esta disponible en los modos de cocciCn
I OTA:
y descongelaciCn con sensor.
27 'LIGHT HI/LO/OFF' (Luz Alta/Baja/Apagada):
Oprima esta tecla para encender la luz de la cubierta/
encimera.
28.'LIGHT TIMER' (Temporizador de la Luz): Optima
esta tecla para ajustar el temporizador de la luz.
29.'VENT ON/OFF' (Ventilador Encendido/Apagado):
Oprima esta tecla para encender o apagar el ventilador.
30. 'VENT 5-SPEED' (Ventilador de 5 Velocidades):
Optima esta tecla para seleccionar una de 5 velocidades
del ventilador.
31. 'AUTO TIME SET' (Ajuste Automdtico de
Tiempo): Optima esta tecla para ajustar el tiempo de
funcionamiento del ventilador (1, 3, 5, 10 o 30 minutos).
69
Page 71
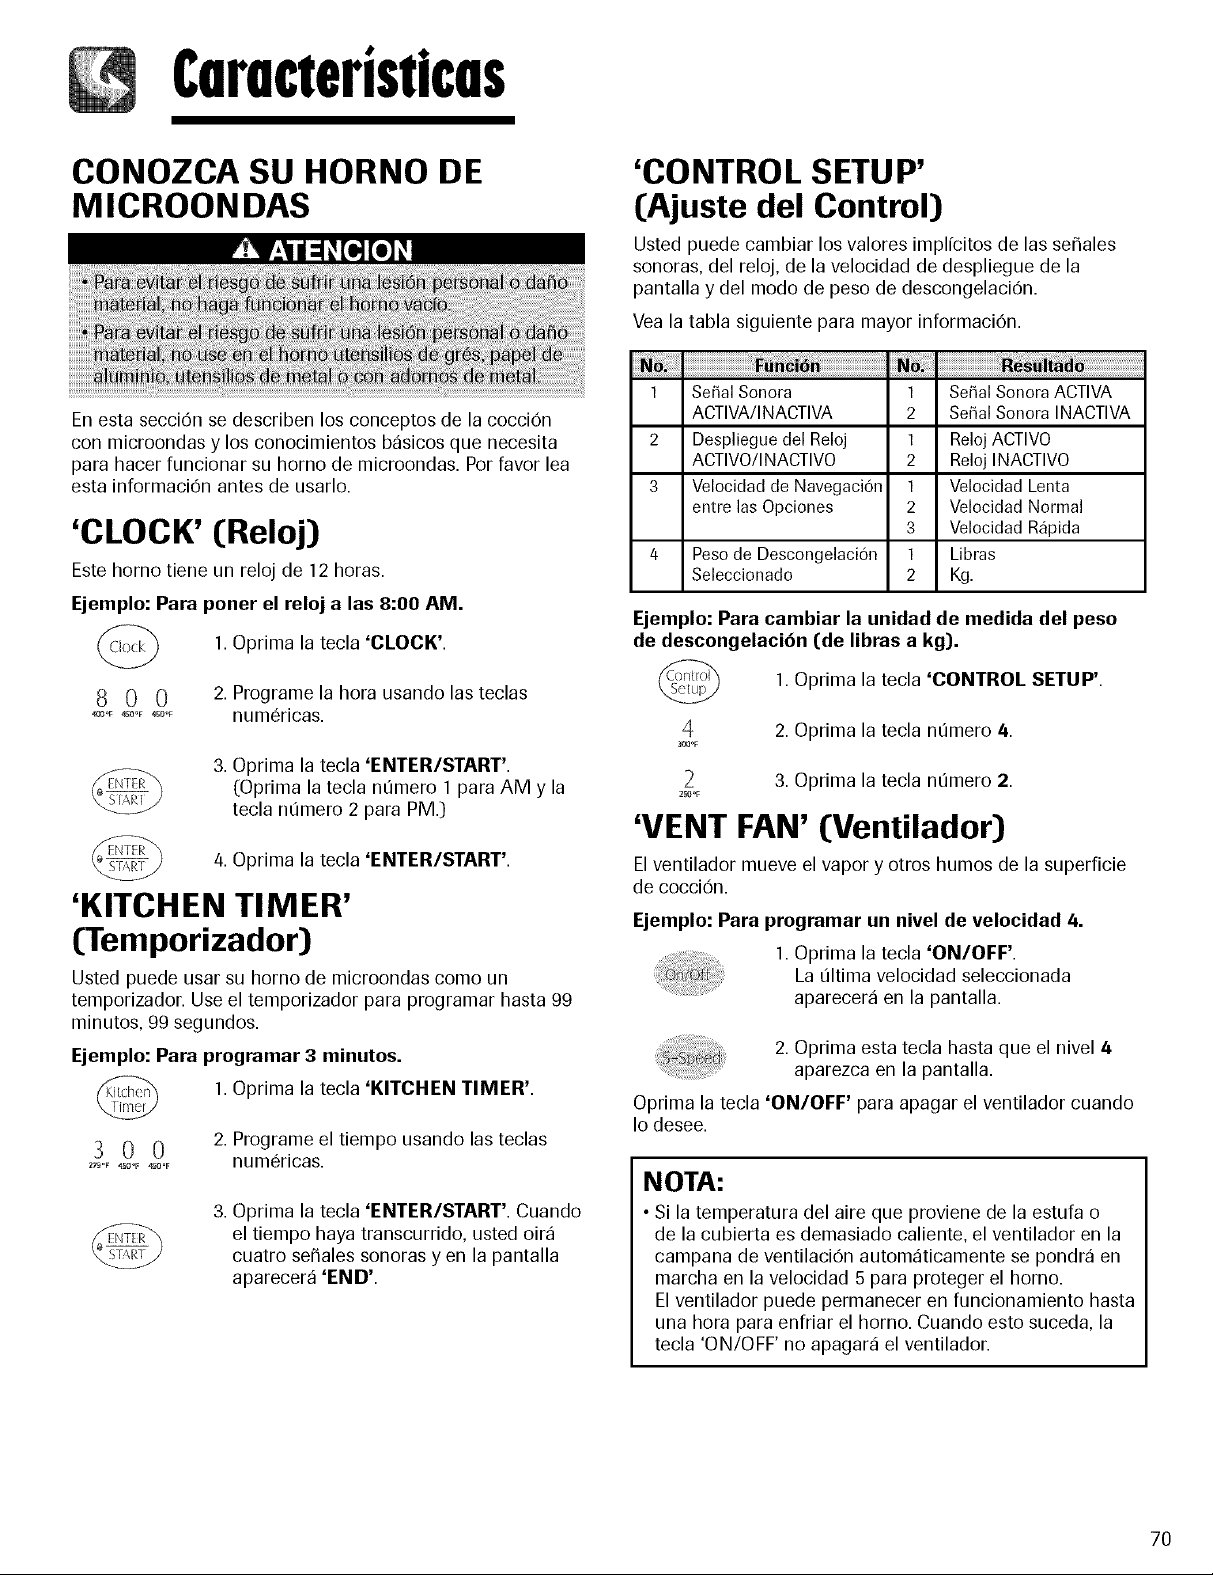
Cnrncteristicns
CONOZCA SU HORNO DE
M ICROON DAS
En esta secciOn se describen los conceptos de la cocciOn
con microondas y los conocimientos basicos que necesita
para hacer funcionar su horno de microondas. Por favor lea
esta informaciCn antes de usarlo.
'CLOCK' (Reloj)
Este horno tiene un reloj de 12 floras.
Ejemplo: Para poner el reloj a las 8:00 AM.
1.Oprima la tecla 'CLOCK'.
S 0 0 2. Programe la hora usando las teclas
<_°__0__0°_ numCricas.
3. Oprima la tecla 'ENTER/START'.
(:Oprima la tecla nt_mero 1para AM y la
tecla nt_mero 2 para PM.)
4.Oprima la tecla 'ENTER/START'.
'KITCHEN TIMER'
(Temporizador)
Usted puede usar su horno de microondas como un
temporizador. Use el temporizador para programar hasta 99
minutos, 99 segundos.
Ejemplo: Para programar 3 minutos.
1.Oprima la tecla 'KITCHEN TIMER'.
3 0 0 2.Programe el tiempo usando las teclas
_7_o__o_4_o_ numCricas.
Oprima la tecla 'ENTER/START'. Cuando
el tiempo haya transcurrido, usted oira
cuatro se_ales sonoras yen la pantalla
aparecer_ 'END'.
'CONTROL SETU P'
(Ajuste del Control)
Usted puede cambiar los valores implfcitos de las se_ales
sonoras, del reloj, de la velocidad de despliegue de la
pantalla y del modo de peso de descongelaciOn.
Vea la tabla siguiente para mayor informaciOn.
1 SePalSonora 1 SePalSonoraACTIVA
ACTIVA/INACTIVA 2 SePalSonoraINACTIVA
2 Desplieguedel Reloj 1 RelojACTIVO
ACTIVO/INACTIVO 2 RelojINACTIVO
3 Velocidadde Navegacion 1 VelocidadLenta
entrelasOpciones 2 VelocidadNormal
3 VelocidadR_pida
4 PesodeDescongelacion 1 Libras
Seleccionado 2 Kg.
Ejemplo: Para cambiar la unidad de medida del peso
de descongelaci_n (de libras a kg).
1.Oprima la tecla 'CONTROL SETUP'.
4 2. Oprima la tecla nt_mero 4.
_e3oF
2,_oF
3. Oprima la tecla nOmero 2.
'VENT FAN' (Ventilador)
Elventilador mueve el vapor y otros humos de la superficie
de cocciOn.
Ejemplo: Para programar un nivel de velocidad 4.
1.Oprima la tecla 'ON/OFF'.
La t_ltima velocidad seleccionada
aparecera en la pantalla.
2. Oprima esta tecla hasta que el nivel 4
aparezca en la pantalla.
Oprima la tecla 'ON/OFF' para apagar el ventilador cuando
Io desee.
NOTA:
• Si latemperatura del aire que proviene de la estufa o
de la cubierta es demasiado caliente, el ventilador en la
campana de ventilaciOn automaticamente se pondra en
marcha en la velocidad 5 para proteger el horno.
Elventilador puede permanecer en funcionamiento hasta
una hora para enfriar el horno. Cuando esto suceda, la
tecla 'ON/OFF no apagar_ el ventilador.
70
Page 72

Funcionnmiento
'AUTO TIME SET'
I:Ajuste Autom_itico de Tiempo)
Ejemplo: Para apagar el ventilador despu_s de
30 minutos en el nivel 4.
1.Oprima la tecla 'ON/OFF'.
2.Oprima esta tecla hasta que el nivel 4
aparezca en la pantalla.
3. Oprima esta tecla 5 veces.
'TU RNTABLE ON/OFF' (Bandeja
Giratoria Encendida/Apagada)
Para obtener mejores resultados de la cocciOn,mantenga
activa la bandeja giratoria. Se puede desactivar
cuando use platos grandes. Optima la tecla
'TURNTABLE ON/OFF para activar o desactivar
la bandeja giratoria.
NOTAS:
• Esta opci0n no esta disponible en los modos de cocci0n
y descongelaciOn con sensor.
•Algunas veces la bandeja giratoria estd muy
caliente. Tenga cuidado al tocar la bandeja durante y
despu6s de la cocciOn.
• No haga funcionar el homo vacio.
'LIGHT HI/LO/OFF'
(Luz Alta/Baja/Apagada)
Oprima la tecla 'LIGHT HI/LO/OFF' una
vez para luz brillante, dos veces para luz
nocturna o tres veces para apagar la luz.
'LIGHT TIMER'
emporizador de la Luz)
Usted puede ajustar la LUZ para encenderse y apagarse
automaticamente en cualquier momento. La luz se enciende
a la misma hora todos los dfas hasta que sea reprogramada.
Ejemplo: Para que la luz se encienda a las 2:00 AM y
se apague a las 7:00 AM.
1.Oprima la tecla 'LIGHT TIMER'.
200
0 0
375°F 4_OF ._O=F
2. Indique la hora en que usted desea que
la LUZ se encienda.
3. Oprima la tecla 'ENTER/START'.
(Optima el n0mero 1 para AM, y el
n0mero 2 para PM).
4. Oprima la tecla 'ENTER/START'.
5. Indique la hora en que usted desea que
la LUZ se apague.
BLOQUEO PARA NINOS
Usted puede bloquear el panel de control para evitar que
el microondas sea accidentalmente puesto en marcha o
usado por los nifios. La caracterfstica de bloqueo para nifios
tambi6n es 0til cuando limpie el panel de control. Elbloqueo
ademas evita la programaciOn accidental cuando se est_
limpiando el panel de control.
Ejemplo: Para programar el bloqueo para nifios.
1.Oprima la tecla 'STOP/CLEAR'.
2.Oprima y mantenga oprimida latecla
'ENTER/START' durante mas de
4 segundos. La palabra 'LOCKED'
(Bloqueado) aparecera en la pantalla y se
escucharan dos sefiales sonoras.
Ejemplo: Para cancelar el bloqueo para nifios.
1.Oprima y mantenga oprimida latecla
'ENTER/START' durante mas de
4 segundos. La palabra 'LOCKED'
desaparecera y usted oira dos sefiales
sonoras.
6. Oprima la tecla 'ENTER/START'.
(Optima el n0mero 1 para AM, y el
n0mero 2 para PM).
Z Oprima la tecla 'ENTER/START'
nuevamente.
• Paracambiar la hora en que la LUZ se enciende y
I NOTA:
apaga, repita del paso I al Z
Ejemplo" Para cancelar el temporizador de la luz.
1.Oprima la tecla 'LIGHT TIMER'.
2. Oprima la tecla 'STOP/CLEAR'.
NOTA:
• Si usteddesea cancelar el TEMPORIZADOR DE LA LUZ
cuando est6 en funcionamiento, oprima la tecla
71
Page 73

iunclonnmiento
INSTRUCCIONES DE
FUNCIONAMIENTO DEL
HORNO DE MICROONDAS
'ADD 30 SEC.'
(Agregar 30 Segundos)
Esta tecla ahorra tiempo y le permite programar rapidamente
y poner en marcha la cocciOn sin la necesidad de oprimir la
tecla 'ENTER/START'.
Ejemplo: Para programar un periodo de dos minutos.
1.Oprima la tecla 'ADD 30 SEC; 4 veces.
El horno comienza a cocinar y muestra la
cuenta regresiva del tiempo.
'CUSTOM PROGRAM'
(Programa Personalizado)
CUSTOM PROGRAM le permite usar una instrucciOn de
cocciOn previamente guardada en la memoria y comenzar a
cocinar rapidamente.
Ejemplo: Para cocinar alimento durante 2 minutes.
1.Oprima la tecla 'CUSTOM PROGRAM'.
COCCION CON NIVELES DE
POTEN CIA ALTOS
Ejemplo: Para cocinar alimento durante 8 minutos,
30 segundos a un nivel de potencia de 1000/o.
8 ] 0 1. Indique el tiempo de cocci6n.
4_3°F _7S_F _0°F
2. Oprima la tecla 'ENTER/START'. Cuando
se acabe el tiempo de cocciOn, usted oira
cuatro se_ales sonoras yen la pantalla
aparecera 'COOK END'.
COCCION CON NIVELES DE
POTEN CIA IN FERIORES
La cocciOn en el nivel de potencia 'HIGH' no siempre le da
los mejores resultados con los alimentos que necesitan ser
cocinados mas lentamente, tales como asados, alimentos
homeados o fianes. Su homo tiene 10 ajustes de potencia
adem4s de 'HIGH'.
Ejemplo: Para cocinar alimento durante 7 minutes,
30 segundos a un nivel de potencia de 700/o.
7 3 0 1.Programe el tiempo de cocciOn.
37_.F 27S°F _O_F
2. Oprima la tecla 'POWER'.
2. Oprima la tecla 'MICRO"
200
2_"F 4S0°F _°F
Ejemplo: Para usar el programa guardado
anteriormente en la memoria.
3. Programe el tiempo de cocciOn.
4.Oprima la tecla 'ENTER/START'.
1.Oprima la tecla 'CUSTOM PROGRAM'.
2.Oprima la tecla 'ENTER/START'. Cuando
se termina el tiempo de cocciOn, usted
oira cuatro se_ales sonoras yen la
pantalla aparecera 'COOK END'.
'MORE+/LESS-' ([M_is+/Menos-)
Usando las teclas 'MORE+' o 'LESS-: todas las caracteristicas
de cocciOn y de tiempo de cocciOn pueden ser ajustadas para
cocinar el alimento por un tiempo mas largo o mas corto. Si
oprime 'MORE+', agregara 10segundos de tiempo de cocciOn
cada vez que oprima la tecla. Si oprime 'LESS-',quitara
10 segundos del tiempo de cocciOn cada vez que la oprima.
3. Programe el nivel de potencia.
Oprima la tecla 'ENTER/START'. Cuando
se termina el tiempo de cocciOn, usted
oira cuatro se_ales sonoras yen la
pantalla aparecera 'COOK END'.
72
Page 74

I:uncionnmiento
PARA COCINAR USANDO
VARIOS NIVELES DIFERENTES
DE POTENCIA
Para obtener los mejores resultados, algunas recetas
recomiendan un nivel de potencia durante un periodo de
tiempo y otro nivel de potencia para otro perfodo de tiempo.
Su horno puede ser programado para cambiar de uno a otro
automaticamente hasta dos ciclos.
Ejemplo: Para cocinar alimento durante 3 minutes a
un nivel de potencia de 100% y luego a un nivel de
potencia de 70% durante 7 minutos, 30 segundos.
3 () 0 1.Programe el primer tiempo de cocci0n.
ZTS°F _0_F _O°F
2. Oprima la tecla 'MICRO'.
7 3 0 3. Programe el segundo tiempo de cocciOn.
_75°_ 275°F 4S_°F
4.Oprima la tecla 'POWER'.
5.Indique el nivel de potencia.
Oprima la tecla 'ENTER/START'. Cuando
se acabe el tiempo de cocciOn,usted oira
cuatro se_ales sonoras yen la pantalla
aparecera 'COOK END'.
'M ELT' (Derretir)
(Mantequilla, Chocolate, Queso y Malvaviscos)
El horno utiliza un ajuste de potencia bajo para derretir
alimentos. Seleccione la categorfa del alimento que esta
preparando e introduzca la cantidad.
Consulte los ajustes disponibles en la TABLA DE DERRETIR.
1.Oprima la tecla 'STOP/CLEAR'.
'SOFTEN' (Suavizar)
(Mantequilla, Helado, Queso Crema y Jugos
Congelados).
Elhorno utiliza un ajuste de potencia bajo para suavizar
alimentos. Seleccione la categorfa del alimento que est_
preparando e introduzca la cantidad.
Consulte los ajustes disponibles en la TABLA DE SUAVIZAR.
1.Oprima la tecla 'STOP/CLEAR'.
2. Oprima la tecla 'SOFTEN'.
2
Z_O°F
2
:_OoF
TABLA DE SUAVIZAR
Mantequilla 1 1 a 3 barras
Helado 2 Pinta (11/2L), 1/4gal (:1L),
Queso Crema 3 3 u 8 oz/85 o 227 g
Jugos 4 6, 12 o 16 oz/
Congelados 177,355 o 474 mL
3. Seleccione la categorfa del alimento.
4. Oprima la tecla para seleccionar la
cantidad de alimento.
5. Oprima la tecla 'ENTER/START'.
V2gal (:2L)
2.Oprima la tecla 'MELT'.
2S0°_
2
3. Seleccione la categorfa del alimento.
4.Oprima la tecla para seleccionar la
cantidad de alimento.
5.Oprima la tecla 'ENTER/START'.
TABLA DE DERRETIR
Mantequilla, 1 1 a 3 barras
Margarina
Chocolate 2 4 o 8 oz/114 o 227 g
Queso 3 8 o 16 oz/227 o 454 g
Malvaviscos 4 5 o 10 oz/142 o 284 g
73
Page 75

Funcionnmiento
GUIA DE COCCION PARA LOS DISTINTOS NIVELES DE POTENCIA
Los 10 niveles de potencia, ademas del nivel 'HIGH' (Alto), le permiten seleccionar el mejor nivel de potencia para el alimento
que esta cocinando. A continuaciOn se indican todos los niveles de potencia, ejemplos de alimentos que se cocinan mejor en
cada nivel.
10 • Hervir agua.
High (Alto) • Cocinar came de res molida.
• Hacer dulces.
• Cocinar frutas y verduras frescas.
• Cocinar pescado y carne de ave.
• Precalentar un plato para dorar.
• Recalentar bebidas.
• Rebanadas de tocino.
9 • Recalentar rapidamente rebanadas de carne.
•Sofreir cebollas, apio y pimientos verdes.
8 •Todo tipo de recalentamiento.
• Cocinar huevos revueltos.
7 • Cocinar panes y productos a base de cereales.
• Cocinar platillos con queso, ternera.
• Cocinar pasteles, panquecitos, bizcochitos de chocolate.
6 • Cocinar fideos.
5 • Cocinar carnes, polio entero.
• Cocinar budines.
• Cocinar pollos enteros, pavo, costillas, asado de costillas, asado de Iomo.
4 • Cocinar cortes de carne menos tiernos.
• Recalentar alimentos congelados.
3 • Descongelar came de res, de ave y mariscos.
• Cocinar pequeffas cantidades de alimento.
•Terminar la cocci6n de una cacerola, estofado y algunas salsas.
2 •Ablandar mantequilla y queso crema.
• Calentar cantidades pequeffas de alimento.
1 • Suavizar helado.
• Leudar masa con levadura.
0 • Perfodo de espera.
74
Page 76

Funclonnmiento
INSTRUCCIONES DE
FUNCIONAMIENTO DEL
SENSOR
La cocciOn por sensor le permite cocinar la mayorfa de sus
alimentos favoritos sin seleccionar los tiempos de cocciOn
ni los niveles de potencia. Lapantalla mostrar_ la categoria
con sensor durante el perfodo de detecciOn inicial. El horno
determina automaticamente el tiempo de cocciOn requerido
para cada alimento. Cuando el sensor interno detecta una
cierta cantidad de humedad proveniente del alimento,
informara al horno sobre cuanto mas tiempo debe calentar.
La pantalla mostrara el tiempo de calentamiento restante.
Para obtener mejores resultados de la cocciOn por sensor,
siga estas recomendaciones.
1.Los alimentos cocinados con el sistema sensor deben
estar a temperatura normal de conservaciOn.
2. La bandeja giratoria y la parte exterior del envase deben
estar secos para asegurar los mejores resultados de la
cocciOn.
3,
Los alimentos deben estar siempre cubiertos
holgadamente con envoltura de pl_stico, papel encerado
o con una tapa.
No abra la puerta ni oprima la tecla 'STOP/CLEAR'
durante la detecciOn. Cuando se acaba el tiempo de
detecciOn, el horno emite dos se_ales sonoras y el resto
del tiempo de cocciOn aparece en la pantalla. En este
momento usted puede abrir la puerta para revolver, dar
vuelta o reorganizar el alimento.
GUIA DE COCCION POR
SENSOR
Para asegurar buenos resultados con la cocciOn por sensor,
use envases y tapas apropiadas.
1.Siempre use envases resistentes al microondas y
ct_bralos con tapas o envoltura de plastico ventilada.
2. Nunca use tapas de pl_stico hermCticas. Estas pueden
evitar que escape el vapor y el alimento puede
sobrecocerse.
3,
Haga coincidir la cantidad de alimento con el tama_o del
envase. Llene los envases por Io menos hasta la mitad
para obtener mejores resultados.
Asegt_rese de que la parte externa del envase y el
interior del horno de microondas estCn secos antes de
colocar el alimento en el homo. Las gotas de humedad
se convierten en vapor, Io cual puede dar la informaciOn
incorrecta al sensor.
AUMENTO O REDUCCION DEL
TIEMPO DE COCCION
Si la funciOn del SENSOR es demasiado larga o demasiado
corta, usted puede aumentar o disminuir eltiempo de
cocciOn. Usted puede solamente aumentar o disminuir
tiempo de cocciOn mientras se muestre el tiempo restante
en la pantalla.
Ejemplo: Si usted desea ajustar el tiempo de cocci6n
por sensor (arroz) para un periodo rods largo.
1.Oprima la tecla 'SENSOR COOK'.
6
35OoF
,More+
2. Seleccione la categorfa del alimento.
3. Cuando se muestre el tiempo restante,
oprima la tecla 'MORE+'.
'SENSOR POPCORN' (Palomitas
de Maiz con Sensor)
La tecla 'SENSOR POPCORN'le permite preparar en el
microondas bolsas de palomitas de mafz comercialmente
envasadas de 3,0 y 3,5onzas (85 y 99 g). Preparesolamente
un paquete a la vez.Si usted esta usando un dispositivo
especial para preparar palomitas de mafz en el microondas,
siga las instrucciones del fabricante del dispositivo.
Ejemplo: Para preparar palomitas de mafz.
1.Oprima la tecla 'SENSOR POPCORN'.
Cuando termine el tiempo de cocciOn,
usted escuchara cuatro se_ales sonoras y
en la pantalla aparecera 'COOK END'.
• Cantidades recomendadas: 3,0 a 3,5 onzas (85 a 99 g).
75
Page 77

|unclonnmiento
'SENSOR COOK'
[CocciOn con Sensor)
La tecla 'SENSOR COOK' le permite calentar alimentos
preparados en el microondas sin necesidad de programar
los tiempos de cocciOn ni los niveles de potencia. La opciOn
'SENSOR COOK' tiene programados niveles de potencia
para 6 categorias de alimentos.
Ejemplo: Para cocinar arroz.
1. Optima la tecla 'SENSOR COOK'.
6
35_°F
TABLA DE COCCION CON SENSOR
Papas al Homo 1 1 a 4 papas, 7 a 10 oz
Verduras 2 I a 4 tazas
Congeladas
Verduras Frescas 3 I a/4 tazas
Verduras 4 1 a 4 tazas
Enlatadas
Platillo Principal 5 10 a 21oz/
Congelado 28/4a 596 g
Arroz 6 V2a 2 tazas
2. Seleccione la categor[a de alimento.
(198 a 28/4 g) c/u
'AUTO DEFROST'
[DescongelaciOn Autom tica)
Su horno microondas ha sido programado con cinco
secuencias de descongelaciOn. 'AUTO DEFROST'es la
mejor manera de descongelar alimentos congelados,
ya que el horno ajusta automaticamente los tiempos de
descongelaciOn de cada arUculo de acuerdo con el peso que
usted introduzca. Para mayor comodidad, 'AUTO DEFROST'
incluye un mecanismo de sonidos incorporados que le
recuerda cu_ndo debe revisar, voltear, separar o acomodar
el alimento durante el ciclo de descongelaciOn. El horno
ofrece cinco opciones de descongelaciOn:
1. CARNES
2. CARNE DE AVE
3. PESCADO
4. PAN
5. RAPIDA - sOloalimentos de 1 Ib (0,45 kg]
DespuOsde oprimir la tecla S¢UTODEFROST'una vez,
seleccione la categorfa de alimento oprimiendo la tecla
numOrica I (CARNES), 2 (CARNE DE AVE),3 (PESCADO),
4 (PAN) o 5 (RAPIDA - sOloalimentos de I Ib/0,45 kg). Las
opciones de peso disponibles para los tres tipos de came
son de 0,1 a 6,0Ibs (45 g a 2,7 kg), y las opciones de peso
disponibles para el pan son de 0,1a 1,0 Ibs (45 g a 450 g).
Ejemplo: Para descongelar 1,2 libras (0,5 kg) de came
de res.
1.Oprima la tecla 'AUTO DEFROST'.
Cuando se acaba el tiempo de cocciOn, usted oira cuatro
seffales sonoras yen la pantalla aparecera 'COOK END'.
'SENSOR REHEAT'
[Recalentar con Sensor)
La tecla 'SENSOR REHEAT'le permite recalentar alimentos
comunes preparados en microondas sin necesidad de
programar el tiempo ni el nivel de potencia.
Ejemplo: Para recalentar 2 rebanadas de pizza.
1. Oprima la tecla 'SENSOR REHEAT'.
4
TABLA DE RECALENTAMIENTO CON
SENSOR
Plato con 1 1a 2 porciones
Comida
Sopas/Salsas* 2 1 a/4 tazas
Cacerola 3 1 a 4 tazas
Rebanada de 4 1a 4rebanadas,
Pizza borde delgado
2.Seleccione la categorfa del alimento.
1
100°F
1 3. Indique el peso.
100°F 2_=F
2. Seleccione la categorfa de alimento.
4. Oprima la tecla 'ENTER/START'.
NOTA:
• Cuando se oprime la tecla 'ENTER/START',la
pantalla cambia a lacuenta regresivadel tiempo de
descongelaciOn. El horno emitira una seffal sonora
durante el ciclo de descongelaciOn. Cuando escuche
la seffal sonora, abra la puerta y d6 vuelta al alimento,
separelo o arr6glelo como sea necesario. Retire
cualquier porciOn que ya se hayadescongelado y
coloque las porciones que todav[a estan congeladas en
el horno. Optima la tecla 'ENTER/START' para reanudar
el ciclo de descongelaciOn. El homo no se apagar_i
durante la SEI_IALSONORA a menos que la puerta
sea abierta.
*Cubra las sopas y las salsas con envoltura plastica. Ventile
levantando la envoltura W' (1,25 cm).
76
Page 78

|unclonnmiento
Para obtener mejores resultados:
• Deje el pescado, los mariscos y las carnes en su empaque
original de plastico o papel (envoltura}.
• Moldee la came en forma de rosquilla antes de congelarla.
Durante la descongelaci6n, retire la came descongelada
cuando escuche la sepal sonora y contint_e descongelando
el resto de la came.
• Coloque los alimentos sobre la parrilla inferior y use la
bandeja de metal/recogegotas para atrapar los goteos.
• El alimento debe estar todavfa un poco helado en el centro
cuando se saque del horno.
• Use piezaspeque_as de papel de aluminio para proteger
las patas y alas de carne de ave.
• La forma del alimento altera el tiempo de descongelaci6n.
Los paquetes pianos y rectangulares se descongelan mas
r_pidamente que los bloques profundos.
•Separe las piezas a melida que comienzan a
descongelarse. Las piezas separadas se descongelan m_s
rapidamente.
•Superponga los alimentos en las areas mas delgadas tales
como las colas de pescado y las pechugas de polio para
una descongelaciOn mas uniforme.
•Voltee los alimentos cuando Io indique el control.
TABLA DE DESCONGELACION
AUTOMATICA
DESCONGELACION RAPIDA-
1 lb. (450 g]
La caracterfstica de descongelaciOn rapida - 1Ib (450 g)
ofrece descongelaciOn rapida para una libra de alimento
congelado. El homo automaticamente programa el tiempo
de descongelaciOn para carne de res molida.
Ejemplo: Para descongelar 1 libra (450 g) de carne de
res molida.
1.Oprima la tecla 'AUTO DEFROST'.
2. Oprima la tecla nt_mero 5.
3. Oprima la tecla 'ENTER/START'.
'AUTO COOK'
(Cocci( n Autom tica)
La tecla 'AUTO COOK' le permite calentar alimentos
comunes preparados en microondas sin necesidad de
programar el tiempo ni el nivel de potencia.
Ejemplo: Para cocinar tocino.
1.Oprima la tecla 'AUTO COOK'.
100_r
1
2. Seleccione la categorfa del alimento.
CARNES CARNEDE RES
0,1a 6,0Ibs Carnemolida,filetes redondo,cubosde carne
(45 g a2,7kg} para guisos, filetes, asadosde cazuela,de costilla,
de punta traseraode paletillay hamburguesas.
CARNEDE CORDERO
Chuletas(de 1pulgada/2,5cm degrueso}y
asadoamarrado.
CARNEDE CERDO
Chuletas(de1/2pulgada/1,2cmde grueso},
salchichasparaperroscalientes,costillasdecerdo
ycostillasgrandes.Asadoamarradoysalchichas.
CARNEDETERNERA
Chuletas (de 1 Ib/450gy de 1/2pulg/1,2 cmde
grueso].
CARNEDE CARNEDEAVE
AVE Entera{menosde 4 Ibs/1,8kg},cortes,pechugas
0,1a 6,0Ibs (deshuesadas].
(45 g a2,7kg] GALLINASCORNUALLAS
Enteras.
PAVO
Pechuga(menosde6 Ibs/4kg].
PESCADO PESCADO
0,1a 6,0Ibs Filetes,pescadoentero.
(45g a2,7kg} MARISCOS
Camede cangrejo,colasde langosta,camarones
yescalopes.
PAN
0,1 a 1,0 Ibs
(45 a 450 g}
77
PANECILLOS
BIZCOCHOS
2
2_OoF
3. Oprima la tecla correspondiente a la
cantidad de alimento.
4. Oprima la tecla 'ENTER/START'.
TABLA DE COCCION AUTOMATICA
Tocino 1 2 a 6 rebanadas
Panecillos y 2 1a 6 piezas
panes frescos
Bizcochos 3 1 a 6 piezas
y panes
congelados
Bebidas /4 1a 2 tazas
Piezasde polio 5 0,5a 2,0 Ibs
(200 a 900 g)
Cereal caliente 6 I a 6 porciones
Page 79

Funcionnmiento
COCCION POR CONVECCION
En el horneado por convecciOn se usa un elemento
calefactor para elevar la temperatura del aire dentro del
horno. Las temperaturas de horneado por convecci0n estan
entre los 100°F (38°C) y los 450°F(232°C). Esconveniente
precalentar el horno cuando se usa el horneado por
convecci0n.
Reduzca 25°F (15°C) de la temperatura recomendada
en las instrucciones de cocciOn. Los tiempos de
horneado pueden variar de acuerdo con la condiciOn
del alirnento o con las preferencias personales.
Verifique el nivel de cocciOn del alirnento despu_s
de que el tiernpo rninirno haya transcurrido y ajdstelo
usando las teclas 'More+' o 'Less-'.
PARRILLA DE CONVECCION
Use la parrilla de convecci0n solamente para cocinar por
convecci0n o en modo combinado. No utilice la rejilla
cuando cocine en la funci0n de microondas solamente, a
menos que se indique en esta gufa.
Para obtener los mejores resultados, coloque el
alirnento en la parrilla de convecciOn.
BAN DEJA DE M ETAL/BAN DEJA
RECOGEGOTAS
Se ha incluido una bandeja recogegotas de metal con
su horno. Cuando ase en el homo, coloque el alimento
directamente sobre la parrilla de metal y coloque la parrilla
dentro de la bandeja recogegotas de metal. Coloque la
bandeja y la parrilla en el centro de la bandeja giratoria.
Cuando termine la cocciOn, use un tomaollas para retirar la
bandeja recogegotas y la parrilla del horno caliente Tenga
cuidado de no derramar el liquido caliente del goteo.
Retire el alimento de la parrilla. No use la bandeja de metal/
bandeja recogegotas en el modo de microondas solamente
a menos que Io recomiende esta gufa.
Temperaturas Internas Sugeridas
para los Alimentos
Carne de Res Molida 160°FC71°C)
Carne fresca de res, Semicruda 145°F(63°C)
ternera, condero A medio cocer 160°F C71°C)
Bien cocida 170°F(77°C)
Polio, Pavo Entero 180°F (82°C)
Pechuga 170°F(77°C)
Cerdo A medio cocer 160°F(71°C)
Bien cocido 170°F(77°C)
Jam0n, precocido 140°F(60°C)
Platos con huevo, Cacerolas 160°FL'71°C)
Sobras, recalentadas 165°F(74°C)
Parrilla para Horneado
a Conveccion
Bandeja de Metal/
Bandeja recogegotas
Bandeja Giratoria
NOTAS:
• Para la cocciOn por convecciOn, combinaciOn o asado de
cualquier alimento que libere grasa tal como un biftec
o una hamburguesa, le recomendamos que coloque la
bandeja recogegotas debajo de la parrilla para atrapar la
grasa
• SOlouse la parrilla provista con su horno
78
Page 80

iunclonnmiento
HORNEADO POR CONVECCION
CON PRECALENTAM IENTO
Ejemplo: Para hornear por convecci6n a 325°F (163°C).
1. Optima la tecla 'STOP/CLEAR'.
2. Oprima la tecla 'CONV:
3,
Optima la tecla num6rica que corresponde
5
_2S_F
• Despu6s de precalentar, 'Preheat End' se despliega en la
pantalla y usted escucha una seNal sonora. Abra la puerta
y coloque el alimento en la parrilla de convecciOn.
2000
2_J°F 4_O°F 4_°_ 4_0_F
a la temperatura de horneado. La
temperatura tiene 10 ajustes entre 100°F
(38°C}y 450°F (232°C}.
4. Oprima la tecla 'ENTER/START' dos
veces.
Optima las teclas num6ricas
correspondientes para introducir el tiempo
de cocci6n. Usted puede programar el
horno para funcionar hasta por
99 minutos, 99 segundos. Vea la gufa de
horneado por convecciOn en la pagina 80.
COCCION POR CONVECCION
SIN PRECALENTAM IENTO
{Carnes, Cacerolas y Carne de Ave)
Ejemplo: Para hornear por convecci6n a 325°F (163°C)
durante 20 minutos.
1.Oprima la tecla 'STOP/CLEAR'.
2. Oprima la tecla 'CONV.'
3. Optima la tecla num6rica que corresponde
5
325°F
200O
2_F 450oF 4_3oF 4_OoF
a la temperatura de horneado. La
temperatura tiene 10 ajustes entre 100°F
(38°C} y 450°F (232°C_).
4. Oprima la tecla 'ENTER/START'.
5. Optima las teclas num6ricas
correspondientes para introducir el tiempo
de cocci6n. Usted puede programar el
horno para funcionar hasta por
99 minutos, 99 segundos.
6. Oprima la tecla 'ENTER/START'.
6.Abra la puerta, coloque el alimento en el
horno y cierre la puerta. Optima la tecla
'ENTER/START'.
NOTAS:
• Cuando el horno alcanza la temperatura indicada, usted
escuchara cinco seNalessonoras. El horno mantendra la
temperatura durante 30 minutos.
• La temperatura del homo cae rapidamente cuando se
abre la puerta; sin embargo, esto no debe evitar que la
comida se cocine completamente durante el tiempo de
cocciGn normal.
• Cuando verifique el nivel de cocciOn del alimento, retire
el alimento, la parrilla y la bandeja de goteo (si se usa)
del horno y cierre la puerta del horno para evitar la
p6rdida excesiva de calor.
• 'OVEN HOT' (:HomoCaliente) se mostrara en la pantalla
cuando se abra la puerta durante lacocciOn.
•Si la temperatura cae mientras la puerta esta abierta,
'CLOSEDOOR' (Cierre la Puerta) se mostrara en la
pantalla. Para anular este mensaje, cierre la puerta y
optima la tecla 'Enter/Start'.
79
Page 81

iunclonnmiento
GU|A DE HORNEADO POR CONVECCION
1. Use siempre la parrilla de convecci0n para hornear por convecci0n. Coloque el alimento directamente sobre la parrilla o
colOquelo en una bandeja de metal y luego coloque esa bandeja sobre la parrilla. Para obtener los mejores resultados con
alimentos tales como las papas a la francesa o los palitos de queso, deje suficiente espacio entre los artfculos de modo que
no se toquen entre ellos. Un flujo de aire apropiado es necesario para un rendimiento 6ptimo.
2. Los utensilios de aluminio conducen el calor rapidamente. Para la mayorfa de los horneados por convecciOn, las superficies
claras y brillantes proporcionan mejores resultados ya que evitan que el alimento se dore demasiado en el tiempo que toma
cocinar el centro del mismo. Los utensilios con rondos opacos (de acabado satinado) se recomiendan para preparar tortas y
pasteles para que la base quede bien dorada.
3. Losacabados oscuros o sin brillo, el vidrio y la piroceramica absorben el calor, Io que puede resultar en cascaras mas secas
y crujientes.
4.Se recomienda que se precaliente el horno cuando se hornee por convecciOn. Las carnes, cacerolas y carne de ave no
requieren precalentamiento.
5. Paraevitar el calentamiento irregular y ahorrar energfa, abra la puerta para verificar el alimento Io menos posible.
iiiiiiiiiiiiiiiiiiiiiiiiiiiiiiiiiiiiiiiiiiiiiiiiiiiiiiiiiiiiiiiiiiiiiiiiiiiiiiiiiiiiiiiiiiiiiiiiiiiiiiiiiiiiiiiiiiiiiiiiiiiiiiiiiiiiiiiiiiiiiiiiiiiiiiiiiiiiiiiiiiiiiiiiiiiiiiiiiiiiiiiiiiiiiiiiiiiiiiiiiiiiiiiiiiiiiiiiiiiiiiiiiiiiiii i!iiiiiiiii !
Panes
Galletas Refrigeradas
Pan de maiz
Panecillos
Panecillos ligeros
Pan de nuez o de frutas
Pan con levadura
375°F/190°C
350°F/177°C
425°F/218°C
325°F/163°C
325°F/163°C
375°F/190°C
11a14
35 a 40
18a22
45 a 55
60 a 70
16a23
Aumenteeltiempode horneadoparalasgalletasmasgrandes.
Retire de las bandejas inmediatamente y enfrie levemente
sobre la rejilla.
Perfore cada panecillo ligero con un tenedor antes de
sacarlo del homo para permitir que salga el vapor.
El interior debe estar humedo y blando.
Pan dulce o normal
Tortas
Galletas Con trozos de chocolate 350°F/177°C 11 a 14
Tortas esponjosas
Bizcochos de chocolate
Torta de caf6
Ponquecitos
Torta de fruta (de molde)
Pan de jengibre
Tortas de mantequilla,
mezclas para tortas
Capas
9x13
Torta de tubo
Torta de ponque
De az0car 350°F/177°C 11 a 14
350°F/177°C
350°F/177°C
350°F/177°C
325°F/163°C
325°F/163°C
275°F/135°C
300°F/149°C
325°F/163°C
325°F/163°C
325°F/163°C
325°F/163°C
325°F/163°C
13 a 16
35 a/40
26 a 30
30 a 35
20 a 25
90 a 100
25 a 30
35 a 45
35 a 45
35 a 45
30 a 40
45 a 55
Engrase levemente la bandeja para hornear.
Coloque la bandeja en la parrilla inferior.
Hornee 2 capas de bizcochos de chocolate a la vez.
El interior debe estar h0medo y blando.
Coloque una capa en cada parrilla (bandeja giratoria encendida).
Voltee a la mitad del horneado.
Engrase y esparza harina sobre la bandeja.
Enfrie en la bandeja por 10 minutos antes de voltear en la
parrilla.
Coloque la bandeja de metal en la parrilla inferior. Aumente
el tiempo de horneado para la masa congelada.
Coloque la bandeja de metal en la parrilla inferior.
NOTAS:
•Se recomienda que se use la temperatura indicada en la tabla en vezde la presente en las instrucciones del empaque.
• Lostiempos de horneado indicados en la tabla son solo gufas para su referencia. Usted debe ajustar el tiempo de acuerdo
con la cantidad, tama_o, forma y temperatura del alimento y con su preferencia. Verifique el nivel de cocci6n del alimento
una vez que haya transcurrido el tiempo mfnimo de cocci6n y ajuste el tiempo oprimiendo las teclas 'More+' o 'Less-'.
8O
Page 82

|unclonnmiento
GUIA DE HORNEADO POR CONVECCION (cont.)
Frutas y otros Manzanas operas horneadas 350°F/177°C 35 a 40 Hornee en un utensilio con lados llanos.
postres Pudin de pan 300°F/149°C 35 a 40 El pudin est_ listo cuando se puede insertar un cuchillo en
el medio y el mismo sale limpio.
Pasteles y
reposteria
Cacerolas
Alimentos de
conveniencia
Platos
principales
Verduras
Ponqu6s de crema
Suspiros
Pasteles congelados
Cubiertos de crema batida
Capa doble
Quiche
Base de pasteleria
Came, polio, mariscos y
combinaciones
Pasta
Papas,sancochadas
Verduras
Masa para pan congelada
Platillo principal congelado
Pizza congelada con masa
leudante
Pizza congelada
Papasa la francesa
Barquilla congelada
Palitos de queso congelados
Pastelitos congelados
Pastel de came
Estofado horneado
Filete suizo
Pimentones rellenos
Mitades de calabaza
Papas horneadas
Papas horneadas dos veces
400°F/205°C
300°F/149°C
400°F/205°C
450°F/232°C
400°F/205°C
350°F/177°C
400°F/205°C
350°F/177°C
350°F/177°C
350°F/177°C
350°F/177°C
350°F/177°C
325°F/163°C
400°F/205°C
400°F/205°C
375°F/190°C
400°F/205°C
450°F/232°C
450°F/232°C
400°F/205°C
325°F/163°C
350°F/177°C
350°F/177°C
375°F/190°C
425°F/218°C
400°F/205°C
30 a 35
30 a 35
50 a 60
9 a 11
50 a 55
30 a 35
10 a 16
20 a 40
25 a 45
55 a 60
25 a 35
30 a 35
70 a 80
25 a 35
17 a 21
15 a 19
5a7
6a8
18a22
30 a/40
80 a 90
60 a 70
40 a 45
55 a 60
50 a 60
25 a 30
Perfore el ponqu6 dos veces con un palillo de dientes para
liberar el vapor despu6s de 25 minutos en el homo.
Cuando est6n listos, apague el homo y deje enfriar en el
mismo por 1 hora.
Coloque la bandeja de metal en la parrilla inferior y
col6quela en el homo fifo. Precaliente el homo, la bandeja y
la parrilla a 400°F (204°C). Cuando se hayan precalentado,
coloque el pastel congelado en la bandeja de metal y hornee
de acuerdo con las instrucciones del empaque o hasta que
la masa est6 dorada y el relleno est6 caliente.
Siga las instrucciones del empaque para la preparacion.
Siga las instrucciones del empaque para la preparacion.
Deje reposar por 5 minutos antes de cortar.
Perfore la base con un tenedor para evitar el encogimiento.
Los tiempos de cocci6n variar_n segun el tama_o y los
ingredientes de la cacerola.
Los tiempos de cocci6n variar_n segun el tama_o y los
ingredientes de la cacerola.
Deje reposar por 5 minutos antes de servir.
Los tiempos de cocci6n variar_n segt]n el tama_o y los
ingredientes de la cacerola.
Siga las instrucciones del empaque para la preparaci6n.
Siga las instrucciones del empaque para la preparaci6n.
Siga las instrucciones del empaque para la preparaci6n. La
pizza no debe ser mas grande que la parrilla.
Siga las instrucciones del empaque para la preparaci6n. La
pizza no debe ser mas grande que la parrilla.
Siga las instrucciones del empaque para la preparaci6n.
Siga las instrucciones del empaque para la preparaci6n.
Siga las instrucciones del empaque para la preparaci6n.
Siga las instrucciones del empaque para la preparaci6n.
Deje reposar por 5 minutos despues de cocinar.
Dore la came antes de combinarla con los liquidos y
verduras.
Deje reposar por 2 minutos despues de cocinar.
Use pimentones verdes, rojos o amarillos.
Perfore la concha varias veces. A_ada 1/2taza de agua al
plato. Voltee las mitades de calabaza con el lado cortado
hacia arriba a los 30 minutos de coccion y cQbralas.
Perfore la concha con un tenedor antes de hornear.
Perfore la concha con un tenedor antes de hornear.
NOTAS:
•Se recomienda que se use la temperatura indicada en la tabla en vezde la presente en las instrucciones del empaque
• Los tiempos de homeado indicados en la tabla son solo gu[as para su referencia Usted debe ajustar el tiempo de acuerdo
con la cantidad, tama_o, forma y temperatura del alimento y con su preferencia Verifique el nivel de cocciOn del alimento
una vez que haya transcurrido el tiempo mfnimo de cocci6n y ajuste el tiempo oprimiendo las teclas 'More+' o 'Less-'
81
Page 83
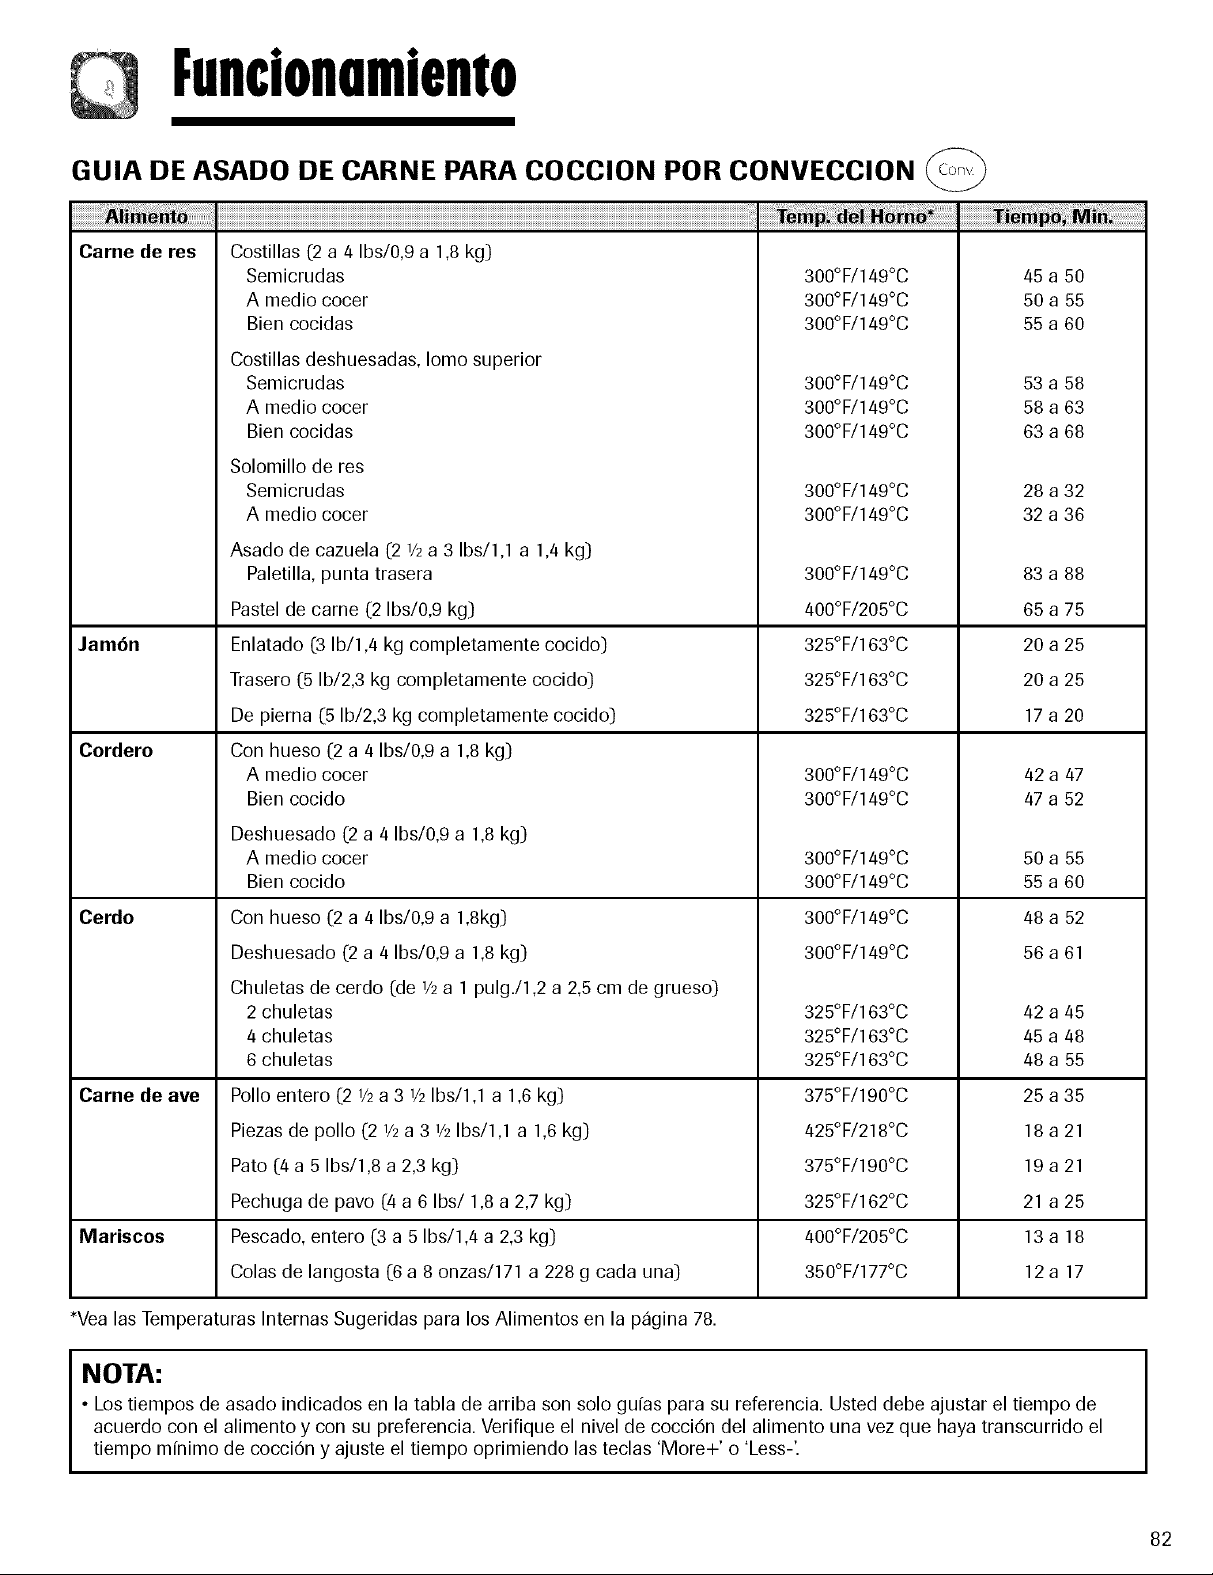
Funcionnmiento
GUIA DE ASADO DE CARNE PARA COCCION POR CONVECCION
Carne de res
Jam6n
Cordero
Costillas (2 a 4 Ibs/0,9 a 1,8kg)
Semicrudas
A medio cocer
Bien cocidas
Costillas deshuesadas, Iomo superior
Semicrudas
A medio cocer
Bien cocidas
Solomillo de res
Semicrudas
A medio cocer
Asado de cazuela (2 1/2a 3 Ibs/1,1 a 1,4kg)
Paletilla, punta trasera
Pastel de came (2 Ibs/0,9 kg)
Enlatado (3 Ib/1,4 kg completamente cocido)
Trasero (5 Ib/2,3 kg completamente cocido)
De pierna (5 Ib/2,3 kg completamente cocido)
Con hueso (2 a 4 Ibs/0,9 a 1,8 kg)
A medio cocer
Bien cocido
300°F/149°C
300°F/149°C
300°F/149°C
300°F/149°C
300°F/149°C
300°F/149°C
300°F/149°C
300°F/149°C
300°F/149°C
400°F/205°C
325°F/163°C
325°F/163°C
325°F/163°C
300°F/149°C
300°F/149°C
45 a 50
50 a 55
55 a 60
53 a 58
58 a 63
63 a 68
28 a 32
32 a 36
83 a 88
65 a 75
20 a 25
20 a 25
17a 20
42 a 47
47 a 52
Deshuesado (2 a 4 Ibs/0,9 a 1,8kg)
Cerdo
A medio cocer
Bien cocido
Con hueso (2 a 4 Ibs/0,9 a 1,Skg)
Deshuesado (2 a 4 Ibs/0,9 a 1,8kg)
300°F/149°C
300°F/149°C
300°F/149°C
300°F/149°C
50 a 55
55 a 60
/48 a 52
56 a 61
Chuletas de cerdo (de V2a 1pulg./1,2 a 2,5 cm de grueso)
Carne de ave
Mariscos
2 chuletas
4 chuletas
6 chuletas
Polio entero (:21/2a 3 V2Ibs/1,1 a 1,6kg)
Piezas de polio (2 1/2a 3 V2Ibs/1,1 a 1,6 kg)
Pato (4 a 5 Ibs/1,8 a 2,3kg)
Pechuga de pavo (4 a 6 Ibs/1,8 a 2,7 kg)
Pescado, entero (3 a 5 Ibs/1,4 a 2,3 kg)
Colas de langosta (6 a 8 onzas/171 a 228 g cada una)
325°F/163°C
325°F/163°C
325°F/163°C
375°F/190°C
425°F/218°C
375°F/190°C
325°F/162°C
400°F/205°C
350°F/177°C
42 a 45
45 a 48
48 a 55
25 a 35
18a21
19 a 21
21 a 25
13a18
12a 17
*Yea lasTemperaturas Internas Sugeridas para los Alimentos en la pagina 78.
NOTA:
• Lostiempos de asado indicados en la tabla de arriba son solo gufas para su referencia. Usted debe ajustar el tiempo de
acuerdo con el alimento y con su preferencia. Verifique el nivel de cocciOn del alimento una vez que haya transcurrido el
tiempo mfnimo de cocciOn y ajuste el tiempo oprimiendo las teclas 'More+' o 'Less-'.
82
Page 84

|unclonnmiento
CONSEJOS PARA LA COCCION
CO M BI NADA/RAPI DA
Esta secciOn le proporciona instrucciones para usar
la funci6n de cocci6n combinada. Porfavor lea estas
instrucciones con cuidado. En algunas oportunidades
se sugiere la combinaci6n del microondas con el horno
de convecci6n para obtener los mejores resultados ya
que se reduce el tiempo de cocci6n de los alimentos que
generalmente se cocinan durante mucho tiempo. Este
proceso de cocci6n tambi6n deja las carnes jugosas por
dentro y crujientes por fuera. En la cocci6n combinada
se alternan las energfas del calor de la convecci6n y del
microondas automaticamente. Su horno ofrece dos ajustes
preprogramados que facilitaran el uso de la cocci6n
combinada.
SUGERENCIAS PARA LA
COCCION COMBINADA/
RAPI DA
Las carnes se pueden asar directamente sobre la parrilla
de metal proporcionada con el horno. Use la bandeja de
metal/bandeja recogegotas para atrapar los goteos y la
grasa.
2,
Use pedazos peque_os de papel de aluminio para
proteger la patas y alas de carne de ave.
3.
Los cortes de carne de res menos tiernos pueden ser
suavizados y asados usando bolsas para cocinar en horno.
/4.
Cuando hornee, verifique el nivel de ooociOndespu6s de
que haya terminado el tiempo de cocciOn. Si el alimento
no esta completamente listo, d_jelo reposar en el horno
por varios minutos para que se termine de cocinar.
Cuando verifique el nivel de cocci6n del alimento, retire el
alimento, la parrilla y la bandeja de goteo (si se usa) del
horno y cierre la puerta del horno para evitar la p6rdida
excesiva de calor.
6,
'OVEN HOT' (Homo Caliente) se mostrara en la pantalla
cuando se abra la puerta durante lacocci6n.
z
Si la temperatura cae mientras la puerta esta abierta,
'CLOSE DOOR' (Cierre la Puerta) se mostrara en la
pantalla. Para anular este mensaje, cierre la puerta y
optima la tecla 'Enter/Start'.
ADVERTENCIAS
1.Todos los utensilios que se utilicen en la cocci6n
combinada deben ser resistentes al microondas y al
horno.
Durante el horneado combinado, algunos utensilios
pueden causar arcos el_ctricos si Ilegan a tocar las
paredes del horno o las parrillas metalicas. Los arcos son
causados por el contacto de las microondas con el metal.
3,
Si esto ocurre, coloque un plato resistente al calor entre el
utensilio y la parrilla de metal.
4.
Si esto ocurre con otros utensilios para hornear, no los
utilice cuando use la funci(_n de cocci(_ncombinada.
83
Page 85

Funcionnmiento
COCCION COM BI NADA
Una vez
Dos veces
Tres veces
Ejemplo: Para usar la funci6n de cocci6n combinada
por 11 minutos a 400°F (205°C].
1.Oprima la tecla 'STOP/CLEAR'.
2.Oprima la tecla 'COMBI.' dos veces.
3,
Oprima la tecla num6rica correspondiente
8
40_oF
1100
1calf l_°F 4_°F 4S0°F
para seleccionar la temperatura del
alimento. La temperatura tiene 10 ajustes
entre 100°F (38°C} y 450°F (232°C}.
4.Oprima la tecla 'ENTER/START'.
5,
Oprima las teclas num6ricas
correspondientes para seleccionar
el tiempo de cocci6n. Usted puede
programar el horno para que funcione por
un tiempo de hasta 99 minutos,
99 segundos.
6.Oprima la tecla 'ENTER/START'.
COMBI-1
(Asado
combinado)
COMBI-2
(Horneado
combinado)
COMBI-3
(Asado a
la parrilla
combinado)
Convecci6n-
375% (190°C)
ConvecciOn-
325°F (163°C)
Asado a la parrilla
AUTO COM BINATION
[COM BINACION AUTOMATICA]
Este horno puede cocinar alimentos sin que usted
introduzca el tiempo de cocci0n o el nivel de potencia. La
COMBINACION AUTOMATICA cuenta con 4 categorfas de
alimento.
Vea los ajustes disponibles en la TABLA DECOMBINACION
AUTOMATICA en esta p_gina.
Para obtener los mejores resultados, coloque el
alimento en la parrilla de convecci6n. Cuando cocine
carnes, use la bandeja de metal/bandeja recogegotas
para atrapar los goteos.
Ejemplo: Para asar 2 Ib (900 g) de cerdo.
1.Oprima la tecla 'STOP/CLEAR'.
2. Oprima la tecla 'AUTO COMBI.'
2
_0oF
2 0
258.F 4sooF
TABLA DE COMBINACION AUTOMATICA
Polio entero 1 2,0 a 4,0 Ibs
Asado de cerdo 2 2,0 a 4,0 Ibs
Lasaffa 3 10 o 21 oz
congelada* (284 o 599 g)
Papa horneada 4 1 a 4, 7 a 10 oz
3. Seleccione la categorfa del alimento.
4. Oprima las teclas num6ricas
correspondientes para seleccionar la
cantidad de alimento.
5. Oprima la tecla 'ENTER/START'.
(0,9 a 1,8 kg)
(0,9 a 1,8 kg)
(198 a 284 g) c/u
*Deje la lasa_a cubierta en su empaque original y haga
un corte de 1 a 2 pulgadas (2,5 a 5 cm) en la envoltura de
plastico antes de cocinar. Deje reposar en el horno durante
5 minutos cuando haya terminado la cocci0n. El tiempo de
cocci0n de la lasa_a puede variar dependiendo de la mama,
tamafio, temperatura del congelador, etc. Use las teclas
'More+' o 'Less-' para ajustar el tiempo de cocci6n segt_n
sea necesario. Use un term0metro para alimentos para
asegurarse de que la temperatura interna sea por Io menos
160°F (71°C) en toda la lasa_a.
84
Page 86

iunclonnmiento
GUIA DE COCCION DE ASADO COMBINADO - Oprima la tecla
Came de res
Jam6n
Cordero
Voltee despu_s de que la mitad del tiempo de cocci6n
haya transcurrido.
Costillas (2 a 4 Ibs/0,9 a 1,8kg)
Semicrudas
A medio cocer
Bien cocidas
Costillas deshuesadas, Iomo superior
Semicrudas
A medio cocer
Bien cocidas
Solomillo de res
Semicrudas
A medio cocer
Paletilla, punta trasera 0 asado de cazuela ([21/2a 3 Ibs/1,1
a 1,4 kg) ([Usebolsa para cocinar para obtener mejores
resultados._)
Voltee despu_s de que la mitad del tiempo de cocci6n
haya transcurrido.
Enlatado ([3Ib/1,4 kg completamente cocido)
Trasero ([5Ib/2,3 kg completamente cocido_)
De pierna ([5Ib/2,3 kg completamente cocido_)
Voltee despu_s de que la mitad del tiempo de cocci6n
haya transcurrido.
Con hueso ([2a/4 Ibs/0,9 a 1,8 kg)
A medio cocer
Bien cocido
375°F/190°C
375°F/190°C
375°F/190°C
375°F/190°C
375°F/190°C
375°F/190°C
375°F/190°C
375°F/190°C
375°F/190°C
300°F/149°C
300°F/149°C
300°F/149°C
300°F/149°C
300°F/149°C
tlrla vez.
9a13
11 a 15
13 a 17
9a13
11 a 15
13 a 17
16 a 18
18a 20
18a 20
15 a 18
15 a 18
15 a 18
13 a 18
18a 23
85
Cerdo
Deshuesado ([2a 4 Ibs/0,9 a 1,8 kg)
A medio cocer
Bien cocido
Voltee despu_s de que la mitad del tiempo de cocci6n
haya transcurrido.
Con hueso ([2a/4 Ibs/0,9 a 1,8 kg
Deshuesado ([2a 4 Ibs/0,9 a 1,8 kg)
Chuletas de cerdo ([de3/4a I pulg./1,9 a 2,5 cm de grueso_)
2 chuletas
4 chuletas
6 chuletas
300°F/149°C
300°F/149°C
300°F/149°C
300°F/149°C
350°F/177°C
350°F/177°C
350°F/177°C
14 a 19
19a 24
23 a 26
19a 22
10 a 13
13 a 16
16 a 19
Page 87

Funcionnmiento
GUIA DE COCCION DE ASADO COMBINADO [cont.) - Oprima la tecla _ una vez.
Carne de ave Voltee despu_s de que la mitad del tiempo de cocci6n
haya transcurrido.
Polio entero (:21/2a 6 Ibs/1,1 a 2,7 kg_
Piezasde polio (:2V2a 6 Ibs/1,1 a 2,7kg]
Gallinas de Cornualla (sin amarra(]
Sin relleno
Rellenas
Pato
Pechuga de pavo (4 a 6 Ibs/1,8 a 2,7 kg)
Mariscos Pescado
Filetes de 1 Ib/450 g
Colas de langosta (:6a 8 onzas/171 a 228 g cada una]
Camarones (:1a 2 Ibs/450 a 900 g]
Escalopes (:1a 2 Ibs/450 a 900 g]
375°F/190°C
375°F/190°C
450°F/232°C
375°F/190°C
375°F/190°C
300°1:/149°C
350°F/177°C
350°F/177°C
350°F/177°C
350°F/177°C
15 a 17
15a 18
15a 18
22 a 25
15a 18
11a15
7a]O
lOa 15
9a14
8a13
NOTA:
• Los tiempos de asado indicados en la tabla son solo gufas para su referencia. Usted debe ajustar el tiempo de acuerdo con
la cantidad, tama_o, forma y temperatura del alimento y con su preferencia. Verifique el nivel de cocciOn del alimento una
vez que haya transcurrido el tiempo mfnimo de cocciOn y ajuste el tiempo oprimiendo las teclas 'More+' o 'Less-'.
GUIA DE COCCION DE HORNEADO COMBINADO - Oprima la tecla
Pastelesy Quiche 425%/218°C
reposter|a
Alimentosde Platillo principal 375°F/190°C
conveniencia congelado
Pizzaenrollada y rollos /450°F/232°C
de huevo congelados
Pizza /450°F/232°C
Verduras Papas horneadas /450°F/232°C
15 a 17
39 a 43
4a6
23 a 26
36 a 40
Dejereposarpor 5minutosantesde
cortar.
Sigalasinstruccionesdelempaqueparala
preparaci(_n.
Sigalasinstruccionesdelempaqueparala
preparaciOn.
Sigalasinstruccionesdelempaqueparala
preparaciOn.
Perforelaconchaconun tenedorantesde
hornear.Coloquelasverdurasen laparrilla
inferior.
dos veces.
86
Page 88

Funcionnmiento
COCCION CON ASADOR
INTRODUCCION
Este horno cocina la parte exterior de los alimentos
de manera muy similar a come Io hacen los hornos
convencionales de calor radiante mientras penetra la
superficie para cocinar el interior simultaneamente. El asado
es un m6todo de cocciOn en el que el alimento se coloca
bajo calor directo. Este horno puede asar carnes, pescado,
carne de ave y verduras bajo calor o a la parrilla o tostar
pan.
Este horno usa la cocciOn con asador cada vez que se
utilizan las teclas de asar del panel de control.
• Los alimentos adecuados para asar deben ser blandos,
moderadamente magros y de un grosor de menos de
I pulgada (2,5 cm). Elpescado, los filetes, las pechugas de
polio y las hamburguesas son ideales para asar.
• Siempre use la parrilla para asar.
• Para obtener un dorado uniforme, voltee el alimento a la
mitad del tiempo de cocci6n.
• No deje la puerta del horno abierta per largos perfodos
de tiempo cuando use el elemento de asar. Esto hara que
la temperatura del horno descienda y podrfa afectar el
rendimiento de la cocciOn.
PARRI LLA PARA ASAR
Use la parrilla para asar cuando cocine con las funciones
de asado y asado automatico. No use la parrilla con la
funci6n de micreendas solamente.
Para obtener los mejores resultados, coloque el alimento
sobre la parrilla para asar. Cuando hornee las carnes, use
la bandeja de metal/bandeja recogegotas para atrapar los
goteos de la came.
Parrilla para Asar
Bandeja de Metal/
Bandeja Recogegotas
3. Oprima las teclas num6ricas
2OOO
29#°F 4_O_F 4_°F 450_r
correspondientes para introducir el tiempo
de cocci6n. Usted puede programar el
horno para funcionar durante 99 minutes,
99 segundos.
4.Oprima la tecla 'ENTER/START'.
NOTAS:
• Si abre la puerta u oprime la tecla 'STOP/CLEAR' durante
el asado, el horno dejar_ de asar.
• Para reiniciar el asado, cierre la puerta y oprima la tecla
'ENTER/START'.
• Cuando el tiempo de asar haya transcurrido, aparecer_
'END' en la pantalla y usted oira cuatro sefiales sonoras.
• Despu_s del asado, la pantalla desplegar_ la hera del dfa
cuando abra la puerta.
COCCION CON ASADO
AUTOMATICO
(Hamburguesas, Filetes de Res, Piezas de Polio, Filete
de Pescado)
La tecla 'Auto Broil' le permite cocinar con calor de asador
sin seleccionar un tiempo de cocciOn. Seleccione la
categorfa del alimento que esta preparando e introduzca la
cantidad.
Consulte la TABLA DE ASADO AUTOMATICO en esta
pagina para ver los ajustes disponibles.
1.Oprima la tecla 'STOP/CLEAR'.
2.Oprima la tecla 'AUTO BROIL'.
3. Oprima las teclas para el menu de cocciOn.
Per ejemplo, el ajuste I (Hamburguesa).
4.Oprima la tecla num6rica correspondiente
a la cantidad de alimento.
5.Oprima la tecla 'ENTER/START'.
lOO_F
IO0_F
1
1
Bandeja Giratoria
COCCION CON ASADOR
Ejemplo: Para asar por 20 minutos.
1.Oprima la tecla 'STOP/CLEAR'.
2. Oprima la tecla 'BROIL'.
87
TABLA DE ASADO AUTOMATICO
Hamburguesa 1 1 a 6 hamburguesas
de 4 oz (14 g) c/u
Filete de res 2 1 a 2 filetes
Pechuga de 3 0,4 a 2 Ibs/
polio 180 a 900 g
Filete de 4 1 a 2 filetes
pescado
Page 89

GuiadeCalentamiento/Re©alentamiento
Para calentar o recalentar alimentos exitosamente en un horno microondas, es importante seguir ciertas normas. Mida la
cantidad de alimento para poder determinar el tiempo necesario para el recalentamiento. Organice los alimentos en un patron
especffico para obtener los mejores resultados. Elalimento a temperatura ambiente se calentara m_s rapido que el alimento
refrigerado. Losalimentos enlatados deben sacarse de las latas y ser colocados en un envase adecuado para microondas. El
alimento se calentara de manera mas uniforme si se cubre con una tapa para microondas o con envoltura de plastico ventilada.
Retire la tapa con cuidado para evitar quemaduras por vapor. Use la siguiente tabla como gufa para recalentar alimentos
cocinados.
Came rebanada
3 rebanadas
(de ]/4de pulg./O,6 cm de grueso)
Piezas de polio
1pechuga
1pata y muslo
Filete de pescado
(6 a 8 oz/170 a 225 g)
Lasa_a
1porcion (10 ]/2oz/300 g)
Cacerola
1taza
4tazas
Cacerola - crema o queso
1taza
4tazas
'Sloppy Joe' o came de res a la parrilla
I emparedado
0/2taza de relleno de came)
sin pan
Pur_ de papas
1taza
4 tazas
Frijoles horneados
1taza
Ravioli o pasta en salsa
1taza
4 tazas
Arroz
1taza
4 tazas
Pan o panecillo de emparedado
I pan
Verduras
1taza
4 tazas
Sopa
1 porci6n(8oz/225 g)
1 a 2 minutos
2 a 3 V2minutos
I V2a 3 minutos
2 a 4minutos
4 a 6minutos
I a 3 V2minutos
5 a 8minutos
I V2a 3 minutos
3]/_a 5V_minutos
I a 2 V2minutos
1 a 3minutos
5 a 8minutos.
I V2a 3 minutos
2 V2a 4 minutos
7V2a 11 minutos
I V2a 3V2minutos
4 a 6 V2minutos
15 a 30 segundos
1 1/2a 2 _/_minutos
4 a 6 minutos
1 _/_a 2 _/_minutos
Coloque la came rebanada en un plato para microondas.
Cubra con envoltura de pl_stico y ventile.
Nota: La salsa o salsa espesa ayuda a mantener la came jugosa.
Coloque las piezas de polio en un plato para microondas.
Cubra con envoltura de pl_stico y ventile.
Coloque el pescado en un plato para microondas.
Cubra con envoltura de pl_stico y ventile.
Coloque la lasa_ia en un plato para microondas.
Cubra con envoltura de pl_stico y ventile.
COCINE en una cacerola para microondas cubierta.
Agite una vez a la mitad de la cocci6n.
COCINE en una cacerola para microondas cubierta.
Agite una vez a la mitad de la cocci6n.
Recaliente el relleno y el pan separadamente.
Cocine el relleno en una cacerola para microondas cubierta. Agite 1 vez.
Caliente el pan como se indica m_s adelante en esta tabla.
COCINE en una cacerola para microondas cubierta.
Agite una vez a la mitad de la cocci6n.
COClNE en una cacerola para microondas cubierta.
Agite una vez a la mitad de la coccion.
COCINE en una cacerola para microondas cubierta.
Agite una vez a la mitad de la coccion.
COCINE en una cacerola para microondas cubierta.
Agite una vez a la mitad de la coccion.
Envuelva en una toalla de papel y coloque en la bandeja giratora.
COCINE en una cacerola para microondas cubierta.
Agite una vez a la mitad de la cocci6n.
COClNE en una cacerola para microondas cubierta.
Agite una vez a la mitad de la cocci6n.
88
Page 90

GuiudeVerdurusFrescus
Alcachofas 2 medianas 5 a 8 Recorte. A_ada 2 cucharaditas de agua. Cubra. 2 a 3 min.
(8 oz/226 g cada una) 4 medianas 10 a 13
Esp_rragos, frescos, tallos I Ib/0,45 kg 3 a 6 A_ada V2taza de agua. Cubra 2 a 3 rain.
Frijoles, verdes y dorados I Ib/0,45 kg 7 a 11 A_ada _/2taza de agua en una cacerola de 1 1/2cuartos de 2 a 3 rain.
galon (1,5 L). Agite a la mitad del tiempo de cocci6n.
Remolacha, fresca I Ib/0,45 kg 12 a 16 A_ada _/2taza de agua en una cacerola cubierta de 2 a 3 rain.
I 1/2cuartos de gal6n (1,5 L). Vuelva a acomodar el alimento a
la mitad del tiempo de coccion.
Br_coli, fresco, tallos I Ib/0,45 kg 4 a 8 Coloque el brocoli en un plato para hornear. A_ada _/2taza de 2 a 3 rain.
agua.
Repollo, fresco, picado I Ib/0,45 kg 4 a 7 A_ada _/2taza de agua en una cacerola cubierta de 2 a 3 rain.
I 1/2cuartos de gal6n (1,5 L). Agite a la mitad del tiempo de
cocci6n.
Zanahorias, frescas, 2 tazas 2 a 4 A_ada V4de taza de agua en una cacerola cubierta de 2 a 3 rain.
rebanadas I cuarto de galen (1 L). Agite a la mitad del tiempo de
cocci6n.
Coliflor, fresco, entero, I Ib/0,45 kg 7 a 11 Recorte. A_ada _/4de taza de agua en una cacerola cubierta de 2 a 3 min.
hojas de colifior, I cuarto de galon (1 L). Agite a la mitad del tiempo de coccion.
frescas 2 tazas 2 1/2a 41/2 Rebane. A_ada 1/2taza de agua en una cacerola cubierta de
I 1/2cuartos de gal6n (1,5 L).
Apio, fresco, rebanado 4 tazas 6 a 8 Agite a la mitad del tiempo de cocci6n. 2 a 3 rain.
Maiz, fresco 2 mazorcas 5 a 9 Descascare. A_ada 2 cucharadas de agua en un plato para 2 a 3 rain.
para hornear de 1 ]/2cuartos de galon (1,5 L). Cubra.
Hongos, frescos, 1/2Ib/0,3 kg 2 a 3 ]/2 Coloque los hongos en una cacerola cubierta de I 1/2cuartos 2 a 3 rain.
rebanados de gal6n (1,5 L). Agite a la mitad del tiempo de cocciSn.
Chirivias, frescas, I Ib/0,45 kg 4 a 8 A_ada ]/2 taza de agua en una cacerola cubierta de 2 a 3 rain.
rebanadas I 1/2cuartos de gal6n (1,5 L). Agite a la mitad del tiempo de
Guisantes, verdes, frescos 4 tazas 7 a 10 A_ada ]/2 taza de agua en una cacerola cubierta de 2 a 3 rain.
Batatas (papas dulces), 2 medianas 5 a 10 Perfore las batatas varias veces con un tenedor. 2 a 3 rain.
horneadas enteras 4 medianas 7 a 13 Coloque sobre 2 toallas de papel.
(6 a 8 oz/170 a 226 g) Voltee a la mitad del tiempo de coccion.
Papas blancas, 2 papas 5 a 8 Perfore las papas varias veces con un tenedor. 2 a 3 rain.
horneadas enteras 4 papas 10 a 14 Coloque sobre 2 toallas de papel.
_6 a 8 oz/170 a 226 g) Voltee a la mitad del tiempo de coccion.
Espinaca, fresca, hoja ] Ib/0,45 kg 4 a 7 A_ada ]/2 taza de agua en una cacerola cubierta de 2 cuartos 2 a 3 min.
Calabaza, de bellota o de 1 medianas 6 a 8 Corte la calabaza por la mitad. Retire las semillas. Coloque en 2 a 3 rain.
nogal, fresca un plato de 8" x 8" (20 cmx 20 cm). Cubra.
Calabacin, fresco, I Ib/0,45 kg 4 1/2a 7 1/2 A_ada ]/2taza de agua en una cacerola cubierta de 2 a 3 rain.
rebanado I 1/2cuartos de galSn (1,5 L). Agite a la mitad del tiempo de
Calabacin, fresco, entero I Ib/0,45 kg 6 a 9 Perfore. Coloque sobre 2 toallas de papel. Voltee y reorganice 2 a 3 rain.
cocci6n.
I 1/2cuartos de gal6n (1,5 L). Agite a la mitad del tiempo de
cocci6n.
de galon 1:2L_.
cocciSn.
a la mitad del tiempo de coccion.
89
Page 91

Mantenimiento
CU IDADO Y LIM PI EZA
Para un mejor rendimiento y seguridad, mantenga el interior
y el exterior del horno limpios. Preste especial cuidado para
que el panel interior de la puerta y el marco delantero del
horno se mantengan limpios y sin acumulaciOn de restos
de alimentos o grasa. Nunca use polvos abrasivos o
esponjas duras. Limpie el interior y el exterior del horno
de microondas, incluyendo la cubierta inferior de la
campana, con un pafio suave y una soluciOncon detergente
suave tibio (no caliente). Luego enjuague y seque. Use un
limpiador de cromo y frote el cromo y las superficies de
metal y aluminio. Limpie inmediatamente las salpicaduras
con toallas de papel ht_medas, especialmente despuOs de
cocinar polio o tocino. Limpie su horno semanalmente o m_s
a menudo si es necesario.
PARRILLA DE CONVECCION/
PARA ASAR Y BANDEJA
DE M ETAL/BAN DEJA
RECOGEGOTAS
Lave la parrilla de convecciOn, la parrilla para asar y la
bandeja de metal/bandeja recogegotas con un jabOn suave y
un cepillo de fregar de nylon. Seque completamente. No use
fregadores o limpiadores abrasivos para limpiar la parrilla o
la bandeja de metal/bandeja recogegotas.
LIMPIEZA DEL FILTRO DE
GRASA
El filtro de grasa debe ser retirado y limpiado a menudo, por
Io menos una vez al mes.
Para retirar el filtro de grasa,
deslice el filtro hacia el lado.
Tire del filtro hacia abajo y
empuje hacia el otro lado. El
filtro caer&
Remoje el filtro de la grasa en
agua caliente y un detergente
suave. Enjuague bien y
sacuda para secar. No use
ameniace ni coloque en
un lavavajillas. El filtro de
aluminio se oscurecerd.
Para volver a instalar el filtro,
deslfcelo en la ranura lateral,
luego empuje hacia arriba
y hacia el centro del horno
para encajarlo en su lugar.
II I-/U
BAN DEJA GIRATORIA/AN ILLO
DE ROTACION
La bandeja giratoria y el anillo de rotaciOn se pueden retirar
del horno y deben ser lavados a mano en agua tibia (no
caliente) con un detergente suave. Seque bien con un paso
suave. NO use polvos de limpieza o esponjas abrasivas, de
lana de acero o de otros materiales asperos. NO los coloque
en un lavavajillas automatico.
• La bandeja giratoria puede ser limpiada en el fregadero.
Tenga cuidado de no picar o rayar los bordes, ya que esto
puede causar que la bandeja se rompa durante el uso.
• El anillo de rotaciOn debe ser limpiado con frecuencia.
• La bandeja giratoria SIEMPRE debe estar en su lugar
cuando se use este horno.
REEMPLAZO DEL FILTRO DE
CARBON
Si su horno esventilado hacia el interior, el filtro de carbon
debe ser reemplazado cada 6a 12meses y mas a menudo si
es necesario. Elfiltro de carbon no puede ser limpiado. Para
hacer un pedido de un nuevo filtro de carbon, pOngaseen
contacto con el departamento de repuestos de su centro de
servicio autorizado mas cercano o Ilameal 1-800-688-9900
(en EE.UU.)oal 1-800-688-2002 (en Canada).
Pida el juego de filtro de carbon #MVHRK5.
1.Desenchufe el horno o corte la energfa elOctrica en el
interruptor principal.
2. Retire los tres tornillos de montaje de la rejilla de
ventilaciOn.
90
Page 92

Mantenimiento
3. Oprima el lado inferior derecho del filtro de carbon.
4. Retire el filtro antiguo.
5. Instale el nuevo filtro de carbon. El filtro debe quedar
instalado en el angulo que se muestra.
3. Reemplace el(los] foco(s] con foco(s] para
electrodomOsticos de 20 watts.
4. Vuelva a colocar la cubierta del foco y los tornillos de
montaje.
5. Enchufe el homo o conecte la corriente desde el
interruptor principal.
REEMPLAZO DE LA LUZ DEL
HORNO
1.Desenchufe el horno o corte la energfa elOctrica en el
interruptor principal.
2. Retire los tres tornillos de montaje de la cubierta de
ventilaciOn.
3. Incline la cubierta hacia adelante y luego levantela hacia
afuera para sacarla.
I
6. Deslice la parte inferior de la rejilla hacia su lugar. Empuje
la parte superior hasta que entre a presiOn en su lugar.
Vuelva a colocar los tornillos de montaje. Enchufe el horno
y ajuste el reloj.
REEMPLAZO DE L,q,LUZ DE LA
CU BIERTA/LUZ NOCTU RNA
1. Desenchufe el horno o corte la energfa elOctrica en el
interruptor principal.
/
2. Retire los tornillos de montaje de la cubierta del foco.
4. Levante el portafoco.
/
5. Retire el portafoco.
/
6. Reemplace el foco con un foco para electrodomOsticos de
20 o 30 watts.
Z Vuelva a colocar el portafoco.
8. Deslice la parte inferior de la rejilla hacia su lugar. Empuje
la parte superior hasta que entre a presiOn en su lugar.
Vuelva a colocar los tornillos de montaje. Conecte la
energfa elOctrica en el interruptor principal.
91
Page 93

UtensiliosRecomendudos
GUIA DE UTENSILIOS PARA EL HORNO DE MICROONDAS
VIDRIO RESISTENTE A HORNOS DE
MICROONDAS (tratado para calor de
alta intensidad):
Platos de uso general, platos para
pastel de came, platos de pay, platos
para pasteles, tazas de medir Ifquidos,
cacerolas y tazones sin adornos
metalicos.
LOZA:
Tazones,tazas, platos de servir y
bandejas sin adornos metalicos.
PLASTICO:
Envoltura de plastico (como una
cubierta) - coloque el plastico
holgadamente sobre el plato y
oprfmalo en los lados.
Ventile la envoltura de plastico
doblando hacia arras levemente un
borde para permitir que escape el
exceso de vapor. El plato debe ser Io
suficientemente profundo de modo
que la envoltura de plastico no
toque el alimento.
A medida que el alimento se
calienta, el plastico se puede derretir
en los lugares en que toca el
alimento.
Use tazas y platos de plastico,
contenedores semirfgidos para el
congelador y bolsas de plastico
solamente para cocci6n de corto
tiempo. Use estos art|culos con
cuidado pues el pldstico puede
ablandarse a causa del calor del
alimento.
PAPEL:
Toallas de papel, papel encerado,
servilletas de papel y platos de papel
sin dise_os o adornos metalicos.
Vea las instrucciones en la etiqueta
del fabricante para uso en horno de
microondas.
UTENSILIOS DE METAL:
El metal protege el alimento de la energfa del microondas y produce cocciOn
no uniforme. Evite usar tambi6n palillos de metal, termOmetros o bandejas
de aluminio. Los utensilios de metal pueden causar arco el6ctrico Io cual
puede dafiar su horno de microondas.
DECORACION DE METAL:
La Ioza, cacerolas, platos etc. adornados con metal o con una banda de
metal. Eladorno de metal interfiere con la cocciOn normal y puede dafiar el
horno.
PAPEL DE ALUMINIO:
Evite las hojas grandes de papel de aluminio pues elias evitan la cocciOn y
pueden causar arco el6ctrico perjudicial. Use pequef_ospedazos de papel
de aluminio para proteger las patas y las alas de los pollos. Mantenga TODO
el papel de aluminio por Io menos a 1 pulgada de las paredes y de la puerta
del horno.
MADERA:
Lostazones de madera y las tablas se secaran y pueden partirse o agrietarse
cuando usted las use en el horno de microondas. Lascestas reaccionan de
la misma manera.
UTENSILIOS CON TAPAS MUY APRETADAS:
Asegt_resede dejar aberturas para que escape el vapor de los utensilios que
estan tapados. Perfore las bolsas de plastico de vegetales u otros artfculos
alimenticios antes de cocinar. Las bolsas herm6ticamente cerradas pueden
explotar.
PAPEL DE ESTRAZA:
Evite usar bolsas de papel de estraza.
Eliasabsorben demasiado calory pueden quemarse.
UTENSILIOS AGRIETADOS O PICADOS:
Cualquier utensilio que est_ agrietado, picado o deformado puede quebrarse
en el horno.
ATADURAS DE METAL:
Retire las ataduras de metal de las bolsas de papel o de plastico.
Eliasse calientan demasiado y pueden causar un incendio.
92
Page 94

Locolizoci6ny$olucio.deAverios
ANTES DE SOLICITAR SERVICIO
Verifique Io siguiente para comprobar si es necesario hacer una Ilamada de servicio. Posiblemente si revisa la informaciOn
adicional incluida a continuaciOn, se puede evitar una Ilamada de servicio innecesaria.
iiiiiiiiiiiiiiiiiiiiiiiiiiiiiiiiiiiiiiiiiiiii_'iiiiiiiiiiiiiiiiiiiiiiiiiiiiiiiiiiiiiiiiiiiiiiiiiiiiiiiiiiiiiiiiiiiiiiiiiiiiiiiiiiiiiiiiiiiiiiiiiiiiiiiiiiiiiiiiiiiiiiiiiiiiiiiiiiiiiiiiiiiiiiiiiiiiiiiiiiiiiiiiiiiiiiiiiiiiiiiiiiiiiiiiiiiiiiii
Si nada funciona en el • verifique si hay un fusible del circuito fundido o si se ha disparado el disyuntor principal.
horno • verifique si el horno esta debidamente conectado a un circuito el6ctrico del hogar.
•verifique si los controles estan debidamente ajustados.
Si la luz interior del horno no • el foco puede estar suelto o defectuoso.
funciona
Si el horno no cocina •verifique si el panel de control esta programado correctamente.
•verifique si la puerta esta firmemente cerrada.
•verifique si se ha oprimido la tecla 'Enter/Start'.
•verifique si se puso en marcha el temporizador en vezde una funci6n de cocci6n.
Si el homo demora mas •verifique si se program6 debidamente el nivel de potencia.
de Io normal en cocinar o
cocina muy rapidamente
Si el reloj no siempre indica •verifique si el cord6n el6ctrico esta totalmente insertado en el tomacorriente.
la hora correcta del dfa •verifique si el horno es el t_nicoartefacto en el circuito el6ctrico.
Si el alimento no se cocina •asegt_resede que el alimento tenga forma pareja.
en forma pareja • asegt_rese de que el alimento est_ completamente descongelado antes de cocinarlo.
•verifique la colocaci6n de las franjas de aluminio usadas para evitar sobrecocci6n.
Si el alimento no se cocina •verifique la receta para asegurarse de que todas las instrucciones (cantidad, tiempo y niveles
bien de potencia] fueron correctamente seguidas.
•asegt_resede que el microondas est6 en un circuito separado.
•asegt_resede que el alimento est6 completamente descongelado antes de cocinarlo.
Si el alimento queda • verifique la receta para asegurarse de que todas las instrucciones (cantidad, tiempo, niveles
demasiado cocinado de potencia y tama_o del plato) fueron seguidas.
Si ocurre arco el_ctrico • asegt_resede usar platos resistentes al microondas.
(chispas) •asegt_rese de no usar ataduras de alambre.
• asegt_resede no hacer funcionar el microondas cuando est6 vacfo.
•asegt_resede que la parrilla de metal (si se usa) est6 debidamente instalada.
Si la pantalla muestra la • verifique si la puerta esta bien cerrada.
cuenta regresiva del tiempo • verifique si se puso en marcha el temporizador en vez de una funci6n de cocci6n.
pero el horno no esta
cocinando
Elventilador comienza a • si la temperatura esta demasiado caliente alrededor del horno de microondas, el
funcionar automaticamente ventilador en la campana de ventilaci6n se encendera automaticamente en el nivel 5 para
enfriar el horno. Puede quedar encendido hasta una hora para enfriar el horno.
C6digo de falla - 'F'y un •oprima la tecla 'Stop/Clear' para borrar el c6digo de la pantalla.
nt_mero se muestran en la • si el c6digo vuelve a aparecer, solicite servicio.
pantalla.
93
Page 95

Localizaci6ny$oluci6ndeAverias
PREGUNTAS Y RESPU ESTAS
_,Puedousar una parrilla en mi horno
de microondas de modo que pueda
recalentar o cocinar en dos posiciones
de parrillas al mismo tiempo?
4Puedo usar utensilios de aluminio o
de metal en mi horno de microondas?
Algunas veces la puerta de mi horno Esta apariencia es normal y no afecta el funcionamiento de su horno.
de microondas se ve ondulada. 4Es
esto normal?
4Qu_ son esos zumbidos que escucho Es el sonido del transformador cuando el tubo de magnetr6n pasa por el ciclo de
cuando el horno de de microondas encendido y apagado.
est4 funcionando?
gPor qu_ se calienta el plato que con-
tiene el alimento?
gQu6 significa tiempo de reposo?
4Puedo hacer palomitas de mafz en mi
horno de microondas? 4C6mo obtengo
los mejores resultados?
Solamente use la parrilla suministrada con su horno de microondas.
El uso de cualquier otra parrilla puede resultar en rendimiento deficiente de la
cocci6n y/o arco el6ctrico y puede da_ar su horno.
Se puede usar papel de aluminio para protecciOn (use pedazos peque_os y
pianos). Nunca deje que el metal toque las paredes o la puerta del horno.
A medida que el alimento se calienta, el calor pasa al plato.
Use tomaollas para retirar el alimento despu6s de cocinar.
Puede que el plato no sea resistente al microondas.
Tiempo de reposo significa que el alimento debe taparse para tiempo de cocci6n
adicional. Este proceso permite que la cocci6n termine.
Sf. Prepare las palomitas de mafz en el horno de microondas siguiendo las
instrucciones del fabricante o use la tecla preprogramada 'Popcorn' (palomitas de
mafz). No use bolsas de papel regulares. Use la prueba de escuchar deteniendo
el horno tan pronto como el mafz deja de reventar cada uno o dos segundos. No
trate de volver a cocinar los granos de mafz que no se reventaron. Usted puede
tambi6n usar dispositivos especiales para preparar palomitas de mafz en hornos de
microondas. Cuando los use, asegt_rese de seguir las instrucciones del fabricante.
No prepare palomitas de mafz en utensilios de vidrio.
4Por qu6 sale vapor por el
respiradero?
_,Cuales son los mejores utensilios
para el horneado por convecci6n?
_,Hay t_cnicas especiales para saber
cuando usar la cocci6n combinada
para cocinar carnes?
El vapor es producido normalmente durante la cocci6n. El horno de microondas ha
sido diseSado para ventilar este vapor por el respiradero superior.
Use utensilios con lados cortos para permitir que el aire caliente rodee la parte
superior del alimento para dorarlo.
Los cortes grandes de carne deben voltearse a la mitad del tiempo de cocci6n.
Coloque el lado con grasa hacia abajo primero y volt_elo hacia el final del tiempo de
cocci6n. Esto permite que la carne se cocine de manera pareja y que la grasa quede
dorada y presentable.
94
Page 96

Garamia
• Costos de servicio adicionales, si el t6cnico debe realizar
servicio extraordinario fuera de Io normal o fuera de las
horas o del area de servicio normal.
• Ajustes despu6s del primer afro.
• Reparaciones resultantes de Io siguiente:
- InstalaciOn, sistema de escape o mantenimiento
incorrectos.
- Cualquier modificaciOn, alteraci6n o ajuste no
autorizado por el fabricante.
- Accidente, mal uso, abuso, incendio, inundaci6n o
hechos fortuitos.
- Conexiones a suministro de gas, suministro de voltaje o
corriente el6ctrica incorrectas.
- Uso de utensilios, contenedores o accesorios no
apropiados que puedan causar da_os al producto.
• Viaje.
Si usted necesita servicio
• Llameal distribuidor donde compr6 su electrodom6stico o
Ilame a Maytag ServicessM, Maytag Customer Assistance
al 1-800-688-9900 en EE.UU.y al 1-800-688-2002 en
Canada para ubicar un t6cnico autorizado.
• AsegOrese de conservar el comprobante de compra para
verificar el estado de la garantfa. Consulte la secci6n
sobre la GARANTIA para mayor informaci6n sobre las
responsabilidades del propietario para el servicio bajo la
garantia.
• Si el distribuidor o la compa_fa de servicio no pueden
resolver el problema, escriba a Maytag ServicessM,Attn:
CAIR R;Center, P.O.Box 2370, Cleveland, TN 37320-2370
o Ilame al 1-800-688-9900 en EE.UU.y al
1-800-688-2002 en Canada.
NOTA:
• Cuando Ilame o escriba acerca de un problema de
servicio, por favor incluya la siguiente informaci6n:
a. Su nombre, direcci6n y nOmero de teldono;
b. NOmero de modelo y nOmero de serie;
c. NOmero y direcci6n de su distribuidor o t6cnico de
Lo que no cubren estas
garantias
• Reemplazo de los fusibles del hogar, reposici6n de los
disyuntores o correcci6n del alambrado o plomeria del
hogar.
• Mantenimiento y limpieza normales del producto,
incluyendo focos.
• Productos cuyos numeros de serie originales fueron
removidos, alterados o no son facilmente legibles.
• Productos comprados para uso comercial, industrial o de
arriendo.
• Productos situados afuera de los Estados Unidos o
Canad&
BAJO NINGUNA CIRCUNSTANCIA MAYTAG SERA RESPONSIBLE DE DAI_IOSINCIDENTALES O CONSECUENTES.
Esta garantia le otorga derechos legales especificos y usted puede tener otros derechos que varian de un estado a otro. Por
ejemplo, algunos estados no permiten la exclusi6n o limitaci6n de da_os incidentales o consecuentes, por Io tanto esta exclusi6n
puede que no se aplique en su caso.
Form No. A105/04 2004 Maytag Appliances 3828W5A4207 Part No. 8112P265-60 Printed in Korea
95
servicio;
d. Una descripci6n clara del problema;
e. Comprobante de compra (recibo de compra].
• Las gufas del usuario, manuales de servicio e informaciOn
sobre las piezas pueden solicitarse a Maytag Services sM,
Maytag Customer Assistance.
 Loading...