

Maytag MMV5165AAW, MMV5165AAS, MMV5165AAQ, MMV5165AAB, MMV5165AA Owner’s Manual

Use&CoreGuide
Model M MV5165AA
Important Safety Instructions .................. 2-4
Features ........................................................ 5-6
Operating Instructions ........................... 7-20
Care and Cleaning ................................ 21-22
Cooking Utensils ......................................... 23
Troubleshooting ..................................... 24-25
Warranty ........................................................ 26
Guide d'utUisation et d'entretien ............. 27
Guia de uso y cuidado ................................ 53
Keep instructions for future reference.
Be sure Use & Care Guide stays with oven.
Form No. A/07/04 c2004 Maytag Appliances 3828W5A4204 Part No. 8112P263-60

ImportnntSnfet¥Instructions
What You Need to Know About
Safety Instructions
Warning and Important Safety Instructions appearing in
this Use & Care Guide are not meant to cover all possible
conditions and situations that may occur. Common sense,
caution, and care must be exercised when installing,
maintaining, or operating microwave.
Always contact your dealer, distributor, service agent, or
manufacturer about problems or conditions you do not
understand.
Recognize Safety Symbols, Words,
Labels

0 ImportnntSnfen/Instructions
• Move the microwave oven away from the receiver.
• Plug the microwave oven into a different outlet so that the
microwave oven and tile receiver are on different branch
circuits.
The manufacturer is not responsible for any radio or
Grounding Instructions
Oven MUST be grounded. Grounding
reduces risk of electric shock by
providing an escape wire for the
electric current if an electrical short
occurs. This oven is equipped with a
cord having a grounding wire with a grounding plug. The
plug must be plugged into an outlet that is properly
installed and grounded. See installation instructions.
Consult a qualified electrician or servicer if grounding
instructions are not completely understood, or if doubt
exists as to whether the oven is properly grounded.
Do not use an extension cord. If the product power cord
is too short, have a qualified electrician install a three-slot
receptacle. This oven should be plugged into a separate
60 hertz circuit with the electrical rating as shown in
specifications table. When the oven is on a circuit with other
equipment, an increase in cooking times may be required
and fuses can be blown.
Microwave operates on standard household current, 110-120V.
Federal Communications
television interference caused by unauthorized
modification to this microwave oven. It is the responsibility
of the user to correct such interference.
Precautions to Avoid Possible
Exposure to Excessive
Microwave Energy
A. DO NOT attempt to operate this oven with the door open
since open door operation can result in harmful exposure
to microwave energy. It is important not to defeat or
tamper with tile safety interlocks.
B. DO NOT place any object between the oven front
face and the door to allow soil or cleaner residue to
accumulate on sealing surfaces.
C. DO NOT operate the oven if it is damaged. It is
particularly important that oven door close properly and
that there is no damage to:
1.door (bent),
2. hinges and latches (broken or loosened),
3. door seals and sealing surfaces.
D. Oven should not be adjusted or repaired by anyone
except properly qualified service personnel.
Commission Radio Frequency
Interference Statement
(U.S.A. Only)
This equipment generates and uses ISM frequency energy
and if not installed and used properly, that is in strict
accordance with the manufacturer's instructions, may
cause interference to radio and television reception. It has
been type tested and found to comply with limits for ISM
Equipment pursuant to part 18 of FCC Rules, which are
designed to provide reasonable protection against such
interference in a residential installation.
However, there is no guarantee that interference will not
occur in a particular installation. If this equipment does
cause interference to radio or television reception, which
carl be determined by turning the equipment off and on, the
user is encouraged to try to correct the interference by one
or more of the following:
• Reorient the receiving antenna of the radio or television.
• Relocate the microwave oven with respect to the receiver.
SAVE THESE INSTRUCTIONS

ImportnntSnfet¥Instructions
SAVE THESE INSTRUCTIONS

|entures
Door Handle
@
@
@
@
@
Window with
Metal Shield
Door Safety
Lock System
Model and Serial
Number Plate
Metal Rack
Glass Tray
Cooking Guide
Cooktop/Countertop Light
Grease Filter
Vent Grille
M iVlV5165AA
SensorCorltroB
PODCOI R D_
Loc Reheat
)e/rosl Delrost
L OnlR)l ( [l*,tl /
_ctu ) _od am 30 Se_ I OSS-
1 2 3 4 5
6 7 8 9 0
(k)(k Jirne Le\(I warn/
_()la[
• _'_' r_ Rapid
Cook
MOFO +
ENiER
Panel
@
@
@
OVEN SPECI FICATIONS
Power Supply 120 VAC,
60 Hz
Input Power 1,560W
Cooking Power 1,000 W
[]EC60705
Standard)
Frequency 2,450 MHz
Rated Current 13.3A
Outer Dimensions 29mAi' x 167/Z'
(WxHxD] x 153/8''
Cavity Volume 1.6Cu. Ft.
Net Weight 54 Ibs.
FEATURES
DISPLAY: The display includes
a clock and indicators to tell you
time of day, cooking time settings
and cooking functions selected.
POPCORN: Touch this pad when
popping popcorn in your microwave
oven. The oven's sensor will tell the
oven how long to cook depending
on the amount of humidity it detects
from the popcorn. See page 11 for
more information.
3. BAKED POTATO:Touch this pad
to cook potatoes. The oven's sensor
will tell the oven how long to
cook depending on the amount of
humidity it detects from the potato.
See page 12 for more information.
4. REHEAT: Touch this pad to reheat
casserole, dinner plate, and soup/
sauce. The oven's sensor will tell the
oven how long to cook depending
on the amount of humidity coming
from the food. See page 12 for more
information.
Light Li_hL Kitchen
]imcr H/Lo/OF ]imer
Vent
5 Speed Tirrm' Se_ --
Au[o
@
@

|entures
5. COOK: Touch this pad to cook
frozen entree, casserole, and rice.
Tile oven's sensor will tell the oven
how long to cook depending on the
amount of humidity coming from
the food. See page 12 for more
information.
6. VEGETABLE: Touch this pad
to cook vegetables. The oven's
sensor will tell the oven how long
to cook depending on the amount
of humidity it detects from the
vegetables. See page 12 for more
information.
Z PIZZA SLICE: Touch this pad to
reheat pizza. The oven's sensor
will tell the oven how long to
cook depending on the amount of
humidity it detects. See page 11 for
more information.
8. CUSTOM PROGRAM: Touch this 1Z
pad to recall one cooking instruction
previously programmed into memory.
See page 9 for more information.
9. MORE+: Touch this pad to add ten
seconds of cooking time each time 18.
you press it. See page 9 for more
information.
10.LESS-: Touch this pad to subtract
ten seconds of cooking time each
time you press it. Seepage 9 for
more information.
11.AUTO DEFROST: Meat, poultry,
12.TIME DEFROST: Touch this pad
13. RAPID DEFROST: This pad
14. NUMBER: Touch number pads
15. POWER LEVEL: Touch this pad to
16. COOK TIME: Touch this pad to
19.
fish. Touch this pad to select food
type and defrost food by weight.
See page 1/4for more information.
to defrost most other frozen foods.
See page 15 for more information.
provides RAPID defrost for 1.0
pound of frozen food. See page 15
for more information.
to enter cooking time, power level,
quantities, or weights.
select a cooking power level.
set a cooking time. See page 9 for
more information.
HOLD WARM: Touch this pad to
keep hot, cooked foods warm in
your microwave oven for up to 99
minutes 99 seconds. See page 8 for
more information.
STOP/CLEAR: Touch this pad to
stop the oven or to clear all entries.
ENTER/START: Touch this pad
to start a function. If you open the
door after oven begins to cook,
touch ENTER/START again.
20. CONTROL SETUP: Touch this
pad to change the oven's default
settings for sound, clock, display
speed and defrost weight. See page
7 for more information.
21.
ADD 30 SEC.: Touch this pad
to set and start quickly at 100%
power level. See page 8 for more
information.
22.VENT 5 SPEED: Touch this pad to
choose one of 5 fan speeds. See
page 7 for more information.
23. CLOCK: Touch this pad to enter the
time of day. See page 7 for more
information.
24. LIGHT TIMER: Touch this pad to
set the light timer. See page 8 for
more information.
25. KITCHEN TIMER: Touch this pad
to set the kitchen timer. See page 7
for more information.
26.VENT ON/OFF: Touch this pad to
turn the fan on or of[ See page 7
for more information.
2Z
LIGHT HI/LO/OFF: Touchthis pad
to turn on the cooktop/countertop
light. See page 8 for more
information.
28.VENT AUTO TIME SET:Touch this
pad when setting ventilation time.
(1,3, 5, 10,30 minutes.) See page 7
for more information.
Operndn9Instructions
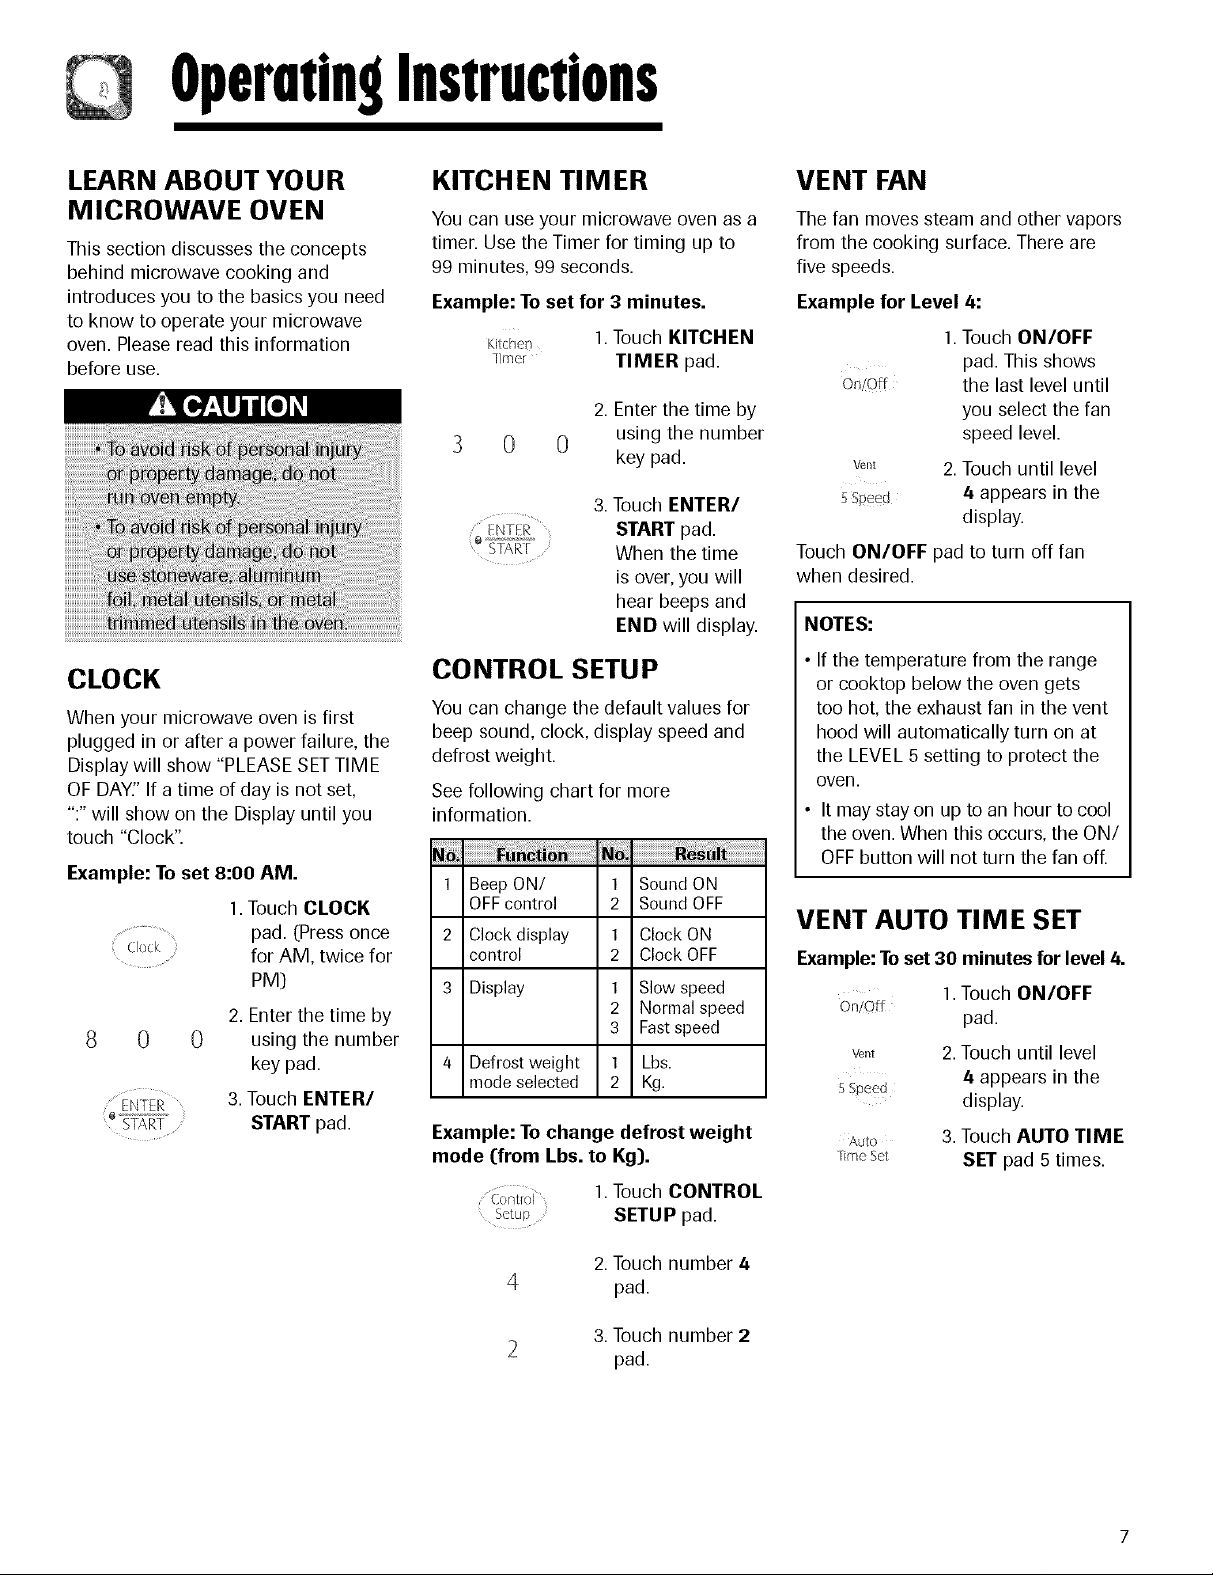
LEARN ABOUT YOUR
M ICROWAVE OVEN
This section discusses the concepts
behind microwave cooking and
introduces you to the basics you need
to know to operate your microwave
oven. Pleaseread this information
before use.
CLOCK
When your microwave oven is first
plugged in or after a power failure, the
Display will show "PLEASESETTIME
OF DAY:' If atime of day is not set,
":"will show on the Display until you
touch "Clock".
Example: To set 8:00 AM.
1.Touch CLOCK
; Clock
0
/ ENTER
SI}\RT
pad. (Press once
for AM, twice for
PM)
2. Enter the time by
0 using the number
key pad.
3.Touch ENTER/
START pad.
KITCHEN TIMER
You can use your microwave oven as a
timer. Use the Timer for timing up to
99 minutes, 99 seconds.
Example: To set for 3 minutes.
Kitchen 1. Touch KITCHEN
Ifrner TIMER pad.
2. Enter the time by
0 using the number
key pad.
3. Touch ENTER/
ENTER START pad.
START When the time
is over, you will
(lear beeps and
END will display.
CONTROL SETUP
You can change the default values for
beep sound, clock, display speed and
defrost weight.
See following chart for more
information.
1 Beep ON/ 1 Sound ON
OFF control 2 Sound OFF
2 Clock display 1 Clock ON
control 2 Clock OFF
3 Display 1 Slow speed
2 Normal speed
3 Fast speed
4 Defrost weight 1 Lbs.
mode selected 2 Kg.
Example: To change defrost weight
mode (from Lbs. to Kg).
(-onhol 1 Touch CONTROL
SETUP pad.
VENT FAN
The fan moves steam and other vapors
from the cooking surface. There are
five speeds.
Example for Level 4:
1.Touch ON/OFF
pad. This shows
the last level until
you select the fan
speed level.
vent 2. Touch until level
ssp_ed 4 appears in the
display.
Touch ON/OFF pad to turn off fan
when desired.
NOTES:
• If the temperature from the range
or cooktop below the oven gets
too (lot, the exhaust fan in the vent
hood will automatically turn on at
the LEVEL 5 setting to protect the
oven.
• It may stay on up to an hour to cool
the oven. When this occurs, the ON/
OFFbutton will not turn the fan oft
VENT AUTO TIME SET
Example:Toset 30 minutes forlevel4.
On!Off
wnt 2.Touch until level
5Speed Li.appears in the
Auto 3. Touch AUTO TIME
_meset SET pad 5 times.
1.TouchON/OFF
pad.
display.
2.Touch number 4
pad.
3. Touch number 2
pad.

Operntin9Instructions
CHILD LOCK
You may lock the control panel to
prevent the microwave from being
accidentally started or used by
children.
The Child Lock feature is also useful
when cleaning the control panel. Child
Lock prevents accidental programming
when wiping the control panel.
Example: To set the child lock.
1.Touch STOP/
CLEAR pad.
2. Touch and hold
ENTER/START
...... pad more than
ENTER 4 seconds.
_} tART'j_ LOCKED will
appear in the
display window
with two beeps.
Example: To cancel
the child lock.
1.Touch and hold
ENTER/START
ENIER
pad more than
4 seconds.
LOCKED will
disappear and
you hear two
beeps.
LIGHT HI/LO/OFF
Touch LIGHT HI/
LO/OFF pad once
Li¢_ht for bright light,
Hr/_o/off twice for night light,
or three times to
turn the light oft
ADD 3O SEC.
A time-saving pad, this simplified
control lets you quickly set and start
microwave cooking without the need to
touch the ENTER/START pad.
Example: To set ADD 30 SEC. for
2 minutes.
1.TouchADD 30
SEC. pad 4 times.
Acd
30 Sec
Theoven begins
cooking and
display showstime
counting down.
LIGHTTIMER
You can set the LIGHT to turn on and
off automatically at any time. The light
comes on at the same time every day
until reset.
Example: Turn on 2:00 AM, turn off
7:00 AM.
1.Touch LIGHT
TIMER pad.
niT/@r
0
Li_h
Timer
0 0 you want the
ENI_I_ 5. Touch ENTER/
e START START pad.
NOTE:
• To reset the time to turn on and off
the LIGHT, repeat steps 1 to 5.
Example: Tocancel the LIGHT
TIMER.
I]r,_/er
NOTE:
• If you want to cancel the LIGHT
TIMER in operation, touch
the _ht pad.
Fli/ldOff
(Press once for
AM, twice for
PM.}
2. Enter the time
0 you want the
LIGHT to turn on.
3. Touch LIGHT
TIMER pad
again. (Press
once for AM,
twice for PM.}
4. Enter the time
LIGHT to turn off.
1.Touch LIGHT
TIMER pad.
2.Touch STOP/
CLEAR pad.
HOLD WARM
You can keep cooked food warm in
your microwave oven for up to
99 minutes 99 seconds. You can use
HOLD WARM by itself or to follow a
cooking cycle automatically.
1.Touch HOLD
_alrll WARM pad.
ENTER 2.Touch ENTER/
'S'i:_:i_ START pad.
NOTES:
• HOLD WARM operates for up to
99 minutes 99 seconds.
• Food cooked covered should be
covered during HOLD WARM.
• Pastry items (pies, turnovers, etc.)
should be uncovered during HOLD
WARM.
• Complete meals kept warm on a
dinner plate can be covered during
HOLD WARM.
Liquid 1-2cups
Dry 5-10 ozs.
To make HOLD WARM automati-
cally follow another cycle:
•While you are programming the
cooking instructions, touch HOLD
WARM before touching ENTER/
START.
• When the last cooking cycle is over,
you will hear two beeps and "HOLD
WARM" will appear in the oven
display.
• You can set HOLD WARM to follow
AUTO DEFROST,or multi-cycle
cooking.
 Loading...