


Operating Instructions
Tumble dryer
Dear Maytag customer,
Thank you for choosing this quality product from
Scandinavia, made in Vara, Sweden.
We want you to feel assured that the inside of your new
machine is just as good as the outside and that the ethics and
standards that went into the production of this machine are
just as high as the quality and performance that you will
receive from it. We hope that this product will give you many
years of pleasure.
To get the most out of your new machine, we recommend that
you read the Use & Care Guide before using the machine.
MDE9601

2
Contents
Contents 2
Before using your machine
for the first time
Do not tumble-dry
Safety instructions 4
General 4
Installation 4
Safety 4
Stopping a programme 4
Packing material 4
Disposal 4
Child safety 5
General 5
Parts of the tumble dryer 6
Front panel 7
Options buttons 7
Advice and tips before you tumble-dry 8
Has it been spun? 8
Laundry labels 8
Materials that must not be
tumble-dried 8
And do not tumble-dry... 8
Tumble-drying 9
Sort your fabrics 9
Turn on the main power switch 9
Open the door and load the washing 9
Select programme 9
Iron Dry 9
Select options 9
Press the Start button 10
Drying programme finished 10
Once drying has finished 11
Consumption values 12
Care and cleaning
Cleaning the fluff filter 13
Cleaning the outside of the machine 13
Troubleshooting 14
The machine will not start 14
Overheating cut-out 14
Drying takes too long 14
13
Technical information
Technical data 15
3
3
Service 16
Before contacting the service division 16
Installation 17
Positioning the tumble dryer 17
Adjusting the feet 18
Air evacuation 18
Connection to evacuation duct 19
Installation in a hot environment 19
Accessories 20
Electrical installation 21
Door hanging 22
Own notes 24-26
Search words 27
Quick guide 28
15

Before using your machine for the first time
Do not tumble-dry
Certain materials are sensitive to tumbledrying. Always check and follow an item’s
laundry label. You can read more on page 9,
“Before tumble-drying”.
Note!
When starting the tumble dryer for the first
time or after a long period without use, you
may notice a slight thumping sound. This is
completely normal and will stop after a few
loads.
See the Quick guide on the last page.
3

4
Safety instructions
General
• Read and keep the Use & Care Guide!
• Electrical installation, if required, should
be carried out by qualified professionals.
• The machine should only be used for
tumble-drying as described in these
instructions.
• Repairs and maintenance relating to
safety or performance must be carried out
by a qualified professional.
• Damaged mains cables must only be
replaced by a qualified professional.
• Sufficient ventilation is required to prevent smoke from open fires or fumes
from equipment burning other fuels being
sucked into the room.
Installation
See the “Installation” chapter.
Packing material
Sort waste in accordance with local guidelines.
Disposal
When the machine has reached the end of
its service life and is to be disposed of, it
should immediately be made unusable.
Contact your local authority for information
about where your old machine should be
disposed of and recycled in the proper way.
The machine is manufactured and labelled
to facilitate recycling.
Caution
During operation, the back of the tumble
dryer will get very hot. Leave the machine to
cool completely before touching the back.
Safety
The machine must not be used for drying
items that have been dry-cleaned at home
or fabrics that may contain residues of flammable liquids.
The tumble dryer is protected by an overheating cut-out. This shuts off the machine
if the temperature gets too high.
Stopping a programme
You can stop a drying programme by:
• opening the door; the drum stops automatically,
• or by pressing the main power switch.
• When you want to resume tumble-drying,
simply close the door and press the Start/
Stop button.
• You can also stop a programme by pressing the Start/Stop button for three seconds.

Child safety
General
Do not allow children to play with the
tumble dryer.
The tumble dryer has a magnetic catch,
allowing the door to be opened from the
inside. The door has a door-switch that automatically stops the tumble dryer when the
door is opened. The tumble dryer does not
start automatically when the door closes
(e.g. if a child closes the door from inside).
5
6
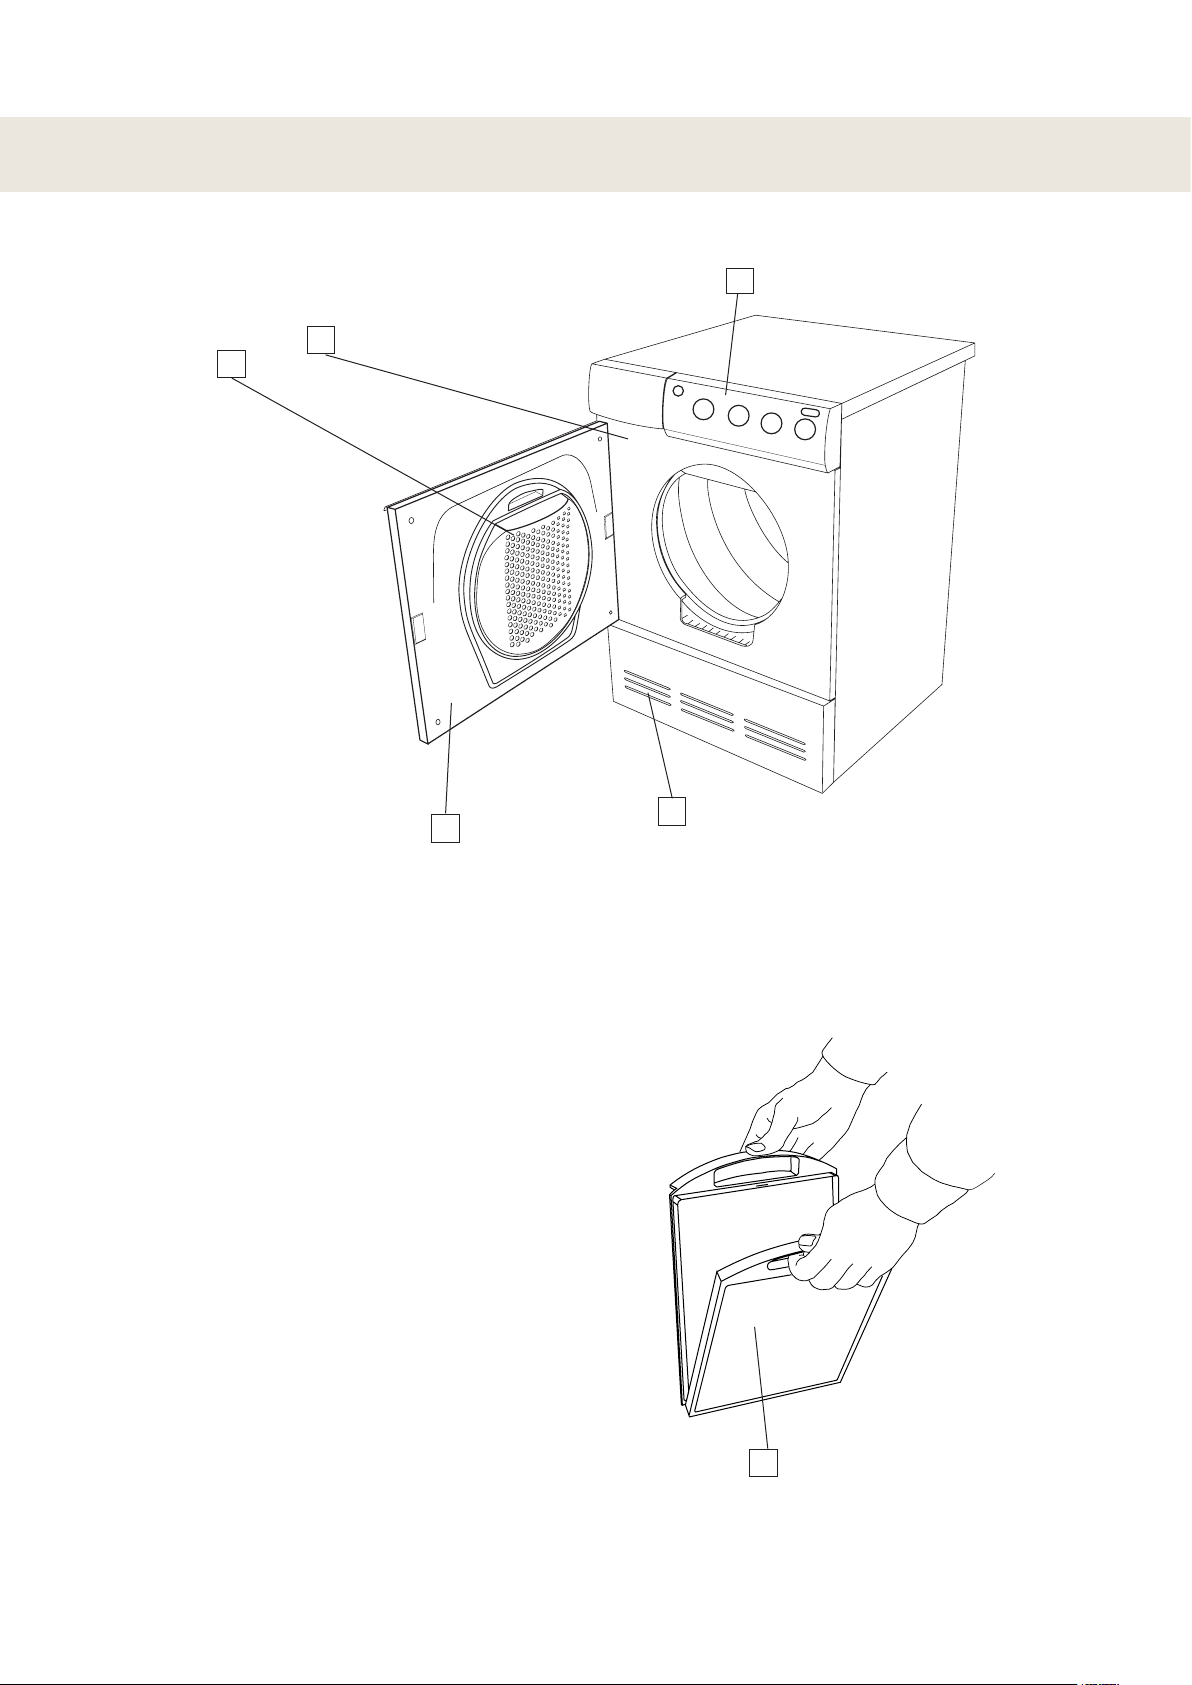
Parts of the tumble dryer
2
1
3
1. Fluff filter holder
2. Type plate
3. Panel
4. Outer door
4
5
5. Fan (behind the front plate)
6. Fluff filter
6
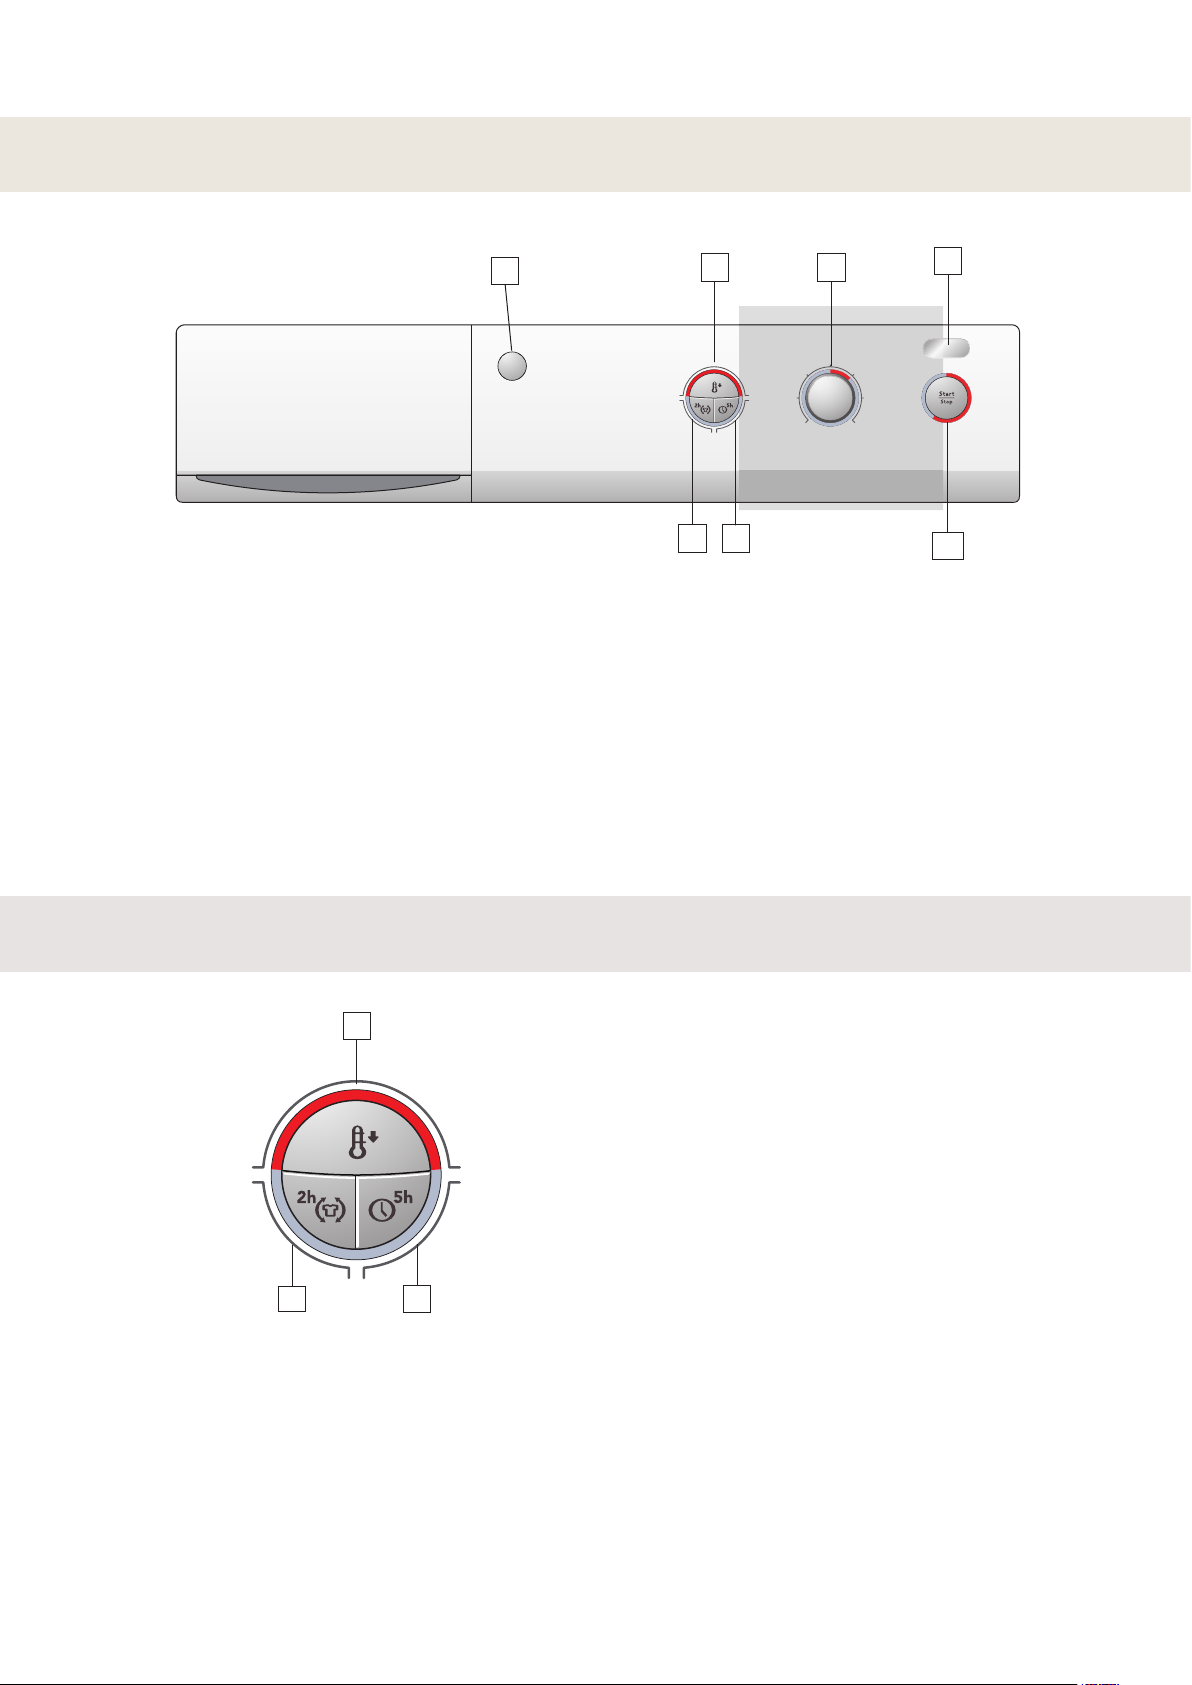
Front panel
1. Main power switch
2-4. Options buttons
5. Programme selector
6. Display
7. Start/Stop
1
2
3 4
5
6
7
Options buttons
2
3
2. Button for selecting Low Temperature
3. Button for selecting Anti-crease Programme
4. Button for selecting Delayed Start 5 h
4
7

8
Advice and tips before you tumble-dry
Here are some tips that may help you before you begin tumble-drying.
Has it been spun?
Items to be tumble-dried should be spun at
1000 rpm or faster. Better spinning saves
both energy and drying time.
Laundry labels
Materials that can be tumble-dried
This symbol means that the material is suitable for tumble-drying. Fabrics best suited
to tumble-drying are cotton fabrics, terry
cloth and synthetic fibres. Garments will be
softer and lighter when tumbled than when
hung out to dry.
Note!
Wear to fabrics in the tumble dryer is insignificant. The fluff that gets caught in the
fluff filter is dust and fibre remnants formed
when the items are used.
Materials that must not be
tumble-dried
This symbol means that the material is not
suitable for tumble-drying.
Certain materials may melt or become a fire
hazard if exposed to heat, and others lose
their shape or shrink.
And do not tumble-dry...
• materials labelled “Do not dry near heat”,
• garments that have been dry-cleaned at
home,
• foam plastic,
• fibreglass material,
• wool must not be tumble-dried due to the
risk of felting.
4
3
2
1
Tumble-drying
5
Below are step-by-step instructions to
help you achieve the best possible tumbledrying results.
Sort your fabrics
You will achieve the most uniform drying results if the items are the same
material.
Do up zips and buttons, fasten belts, sort
the items and adjust load and temperature.
Turn on the main power
switch
Open the door, load the items
and then close the door
Select programme
The choice of programme depends
on what you intend to do with the
items after tumbling. The programme
options are Extra Dry, Dry, Normal Dry, Iron
Dry, Timed programme and Airing.
Extra Dry
This programme is for items that are particularly difficult to dry, e.g. jeans with very
thick seams.
Note!
Knit fabrics in particular are prone to shrinkage. Use the Dry, Normal Dry or Iron Dry
programmes for such items. Stretch clothes
back into shape immediately after drying.
Dry, Normal Dry
These programmes shut off the heat once
the load is dry without being “bone-dry”.
The Dry programme shuts off the heat
slightly later than Normal Dry. Use trial and
error to find out what works best. Use these
programmes when you want items to be
completely dry.
Iron Dry
This programme shuts off the heat once
the load is just damp enough for ironing or
pressing.
Timed dry 60 min
The Timed dry programme has a fixed drying time and tumble-dries the load for 60
minutes.
Air fluff 60 min
Use the Air fluff programme when you just
want to refresh, air or soften up items.
Select options
By selecting options, you can tailor
drying programmes to suit your own
laundry requirements. The machine
remembers which settings and options
you choose for each programme and uses these
(with one exception
- Delayed Start) the next
time you select the programme in question. You
can, of course, change
them again if you wish.
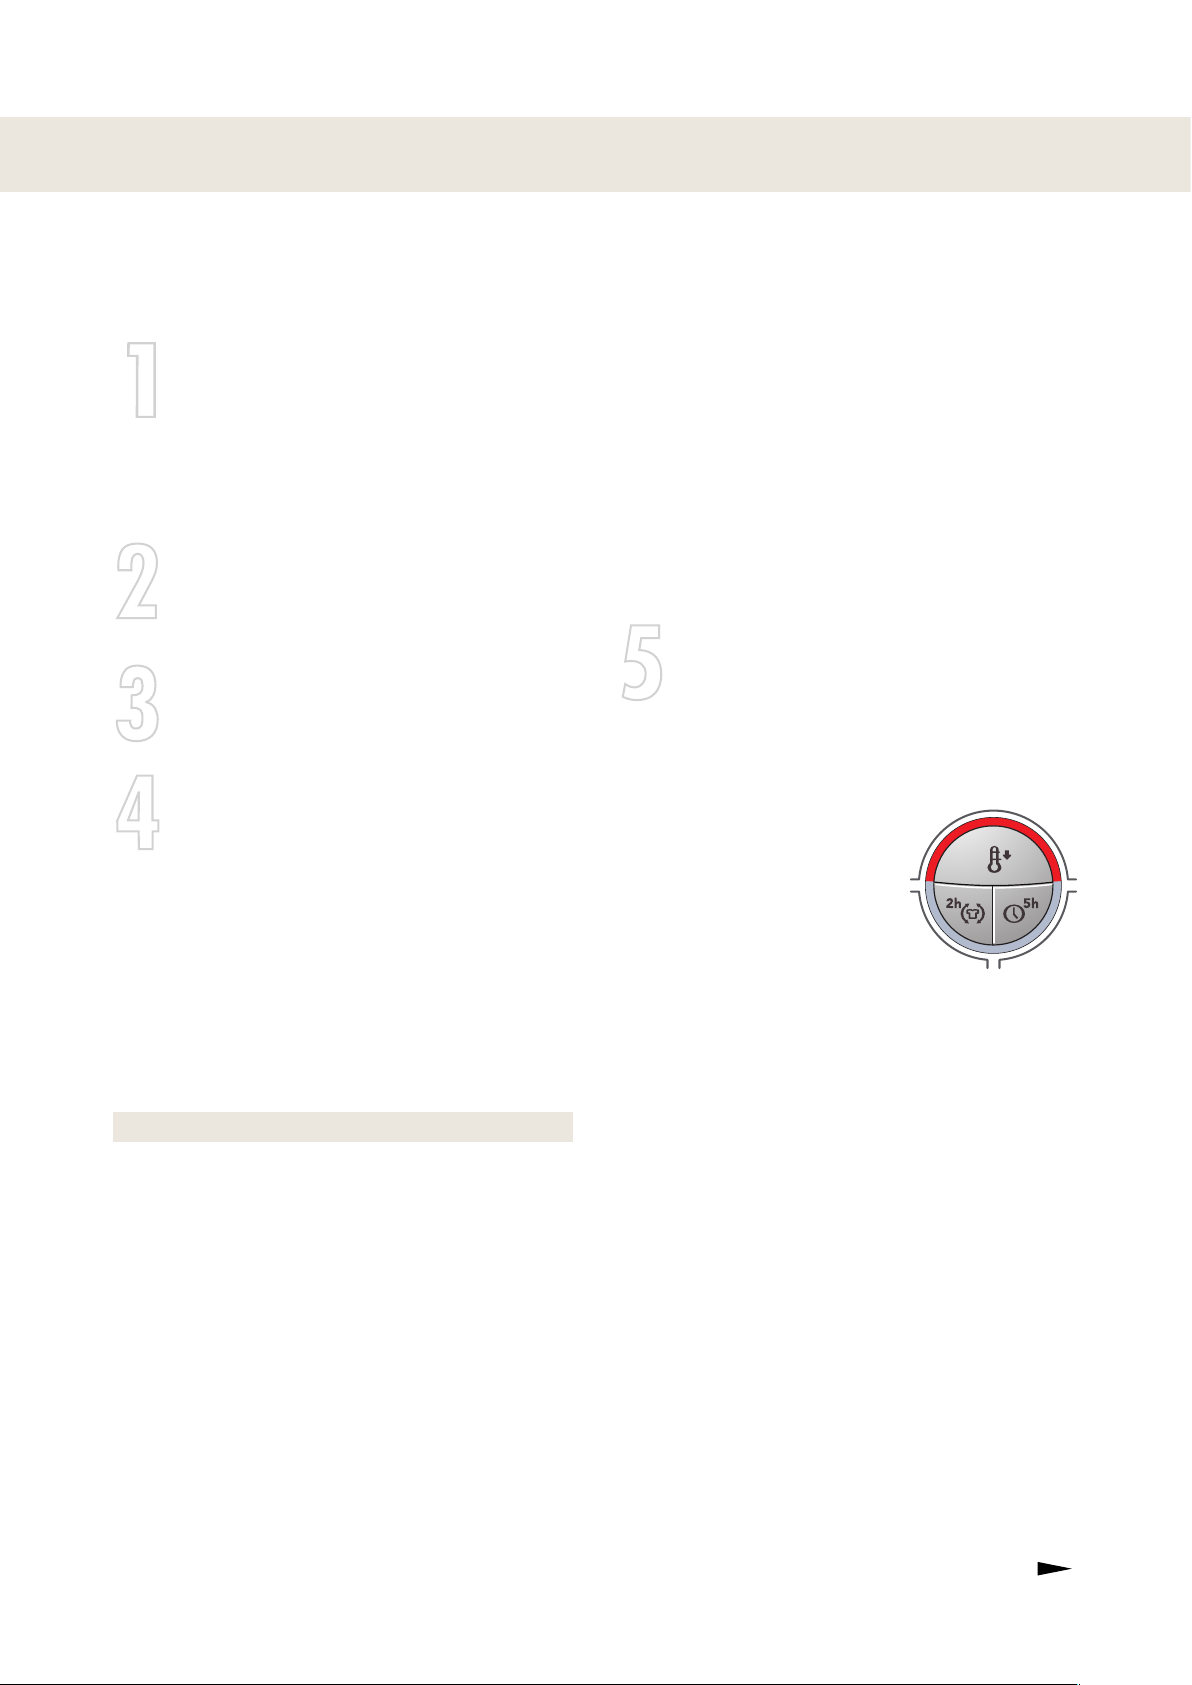
Low Temperature
Select or deselect Low Temperature by
pressing the Temperature button.
Once Low Temperature has been selected,
the red field next to the button lights up.
Anti-crease
This option means that the drum will rotate
three seconds per minute for two hours
once the drying programme has finished.
This option prevents the items remaining in
the same position and becoming creased.
A useful feature if you are not able to remove the load as soon as tumble-drying
has finished.
A lighted red field by the button indicates
that the Anti-crease option has been activated.
9

10
7
1
2
Delayed Start
6
Select or deselect this option by pressing
the Delayed Start button. The machine will
start the programme 5 hours after you press
the selection + Start/Stop button.
A lighted red field by the button indicates
that the option has been activated. If you
change your mind, press the Start/Stop
button for 3 seconds. You can now start the
machine as usual
Press the Start button
Drying time remaining
An estimate of the remaining drying time
will be shown in the display within 2 minutes of the drying programme starting. For
example, 1:35 means that approximately 1
hour and 35 minutes remain until the load
achieves the selected level of dryness. If
the Anti-crease option has been selected,
the drum will rotate every minute for two
hours after cooling.
If you want to stop or change a
programme
Press and hold the Start/Stop button for
three seconds. The red field next to the button goes out.
Drying programme finished
The text in the display indicates
that the programme has finished.
If the Anti-crease option has been
selected, the drum will rotate every minute
for two hours after cooling.
Important!
• Clean the fluff filter after each load.
Caution!
If the fluff filter becomes clogged, the machine’s automatic overheating cut-out may
be triggered. To enable the machine to be
restarted, the filter must be cleaned and
the machine allowed to cool for around 30
minutes.
Cleaning the fluff filter
1. Grasp the filter handle and pull it towards
you.
2. Pull the filter out of its holder.
3. Open the filter and remove the fluff by
hand.
4. Fold the filter up and re-insert it into its
holder. The filter may need to be cleaned
if limescale deposits occur, see “Care and
cleaning” chapter.
Note!
The programme is not affected if the programme selector is changed after the programme starts.
To load or remove washing
If you want to load or remove washing
once you have started the machine, open
the door and the machine will stop automatically. Load more washing, close the
door and press the Start/Stop button.

Once drying has finished
8
Switch off the main power switch.
Remove the clothes, and close the
door to prevent small children from
climbing into the machine.
11

12
Consumption values
For the consumption values given below, the following prerequisites apply:
Temperature of intake air: 20 °C.
Moisture content of intake air: 65 %.
Drying temperature: Normal or low.
Element power: 1950 W.
Before tumble-drying, cotton fabrics are spun at 800 and 1600 rpm (long spin).
Before tumble-drying, other fabrics (crease-resistant and acrylic) are spun at 800 rpm (short
spin).
Energy
Programme
time (approx. min.)
800 rpm 1600 rpm
Programme Material Temperature
Extra Dry
Dry
Dry
Normal Dry
Normal Dry
Normal Dry
Iron Dry
Cotton, linen Normal 6.0 4.1 3.2 130 105
Cotton, linen Normal 6.0 3.7 2.9 120 90
Crease-resistant,
polyester/cotton
Cotton, linen Normal 6.0 3.5 2.6 110 85
Crease-resistant,
polyester/cotton
Acrylic, rayon,
acetate Low 3.0 1.8 - 55 -
Cotton, linen Normal 6.0 2.8 1.9 85 55
Normal 3.0 1.6 - 50 -
Normal 3.0 1.5 - 50 -
Max. load
(kg)
consumption
(approx. kWh)
800 rpm 1600 rpm

Care and cleaning
1
2
Cleaning the fluff filter
The fluff filter must be cleaned after each
load.
If you have very hard water, this can cause
limescale deposits in the fluff filter. Check
for any limescale deposits when cleaning
the fluff filter and, if necessary, wash down
the filter by hand.
1. Grasp the filter handle and pull it towards
you.
2. Pull the filter out of its holder.
Cleaning the outside of
the machine
Clean the outside of the machine and the
programme panel with a mild cleaner.
Do not use any solvents, as these can
damage the machine. Do not hose down or
spray the machine with water.
Note!
Do not allow dust to accumulate around the
machine. Keep the area around the tumble
dryer clean and cool; dust, heat and moisture prolong drying times.
3. Open the filter and remove the fluff from
all sides by hand. Use a soft dry cloth to
remove any coating.
4. Replace the filter in its holder.
Note!
If you have hard water, the filter should be
washed down with water to get rid of any
limescale deposits.
Dry the filter carefully with a towel.
13

14
Troubleshooting
The machine will not start
Check
• that the outer door is properly closed
• that the main power switch is pressed
• that you have set the programme correctly
• that the Delayed Start option has not been
selected. If so, the time remaining until start
will be shown in full hours in the display
(e.g. 5, 4, 3h). To cancel the programme,
see page 10
• that any plug is connected
• that your home’s fuses (circuit breakers)
are intact, swap two circuit breakers. You
cannot always tell from outside if a circuit
breaker is broken
• that the overheating cut-out has not been
triggered (see below).
Overheating cut-out
The overheating cut-out shuts off the tumble dryer if the temperature is too high, e.g.
because dust is clogging the fluff filter.
• Clean the filter.
• The overheating cut-out will reset automatically once the machine has cooled.
Drying takes too long
• Make sure that the tumble dryer has access to more cold air, e.g. by opening doors
and/or windows.

Technical information
Technical data
Height: 850 mm
Width: 595 mm
Depth: 585 mm
Weight: 47 kg
Cylinder volume:
Max. drying capacity: 6.0 kg
RPM: 52 rpm
Rated power: See type plate.
Drying drum material:
Outer casing material: Powder-coated and hot-galvanized sheet
Setup: Stacking or freestanding.
Standard tests
Europe:
111 l
Stainless steel.
steel or stainless steel.
Drying performance: EN 611 21 (95/13/EEC).
Dry, 6.0 kg cotton, temperature Normal.
Energy declaration: EN 611 21 (95/13/EEC).
Dry, 6.0 kg cotton, temperature Normal.
The machine has been tested for single-
phase 10/16A.
Test method noise measurement: IEC 60 704-2-6.
15

16
Service
Before contacting the service
division,
you should find out whether the fault is
anything you can take care of yourself. See
the chapters “Troubleshooting” and “Care
and cleaning”. If you do need to contact
the service division after all, make sure you
know the model designation, type designation and serial number.
The model designation can be found in the
stamped hole on the first page of the Use &
Care. Type designation and serial number
can be found on the type plate.
Type plate

Installation
Positioning the tumble dryer
The tumble dryer can be positioned as
freestanding or in a stack. Remember that
the tumble dryer produces heat and should
therefore not be located in a room that is
too small. If the room is very small, drying
will take longer due to the limited quantity of
air.
Caution!
The machine must not be installed behind a
lockable door, a sliding door or a door with
hinges on the opposite side to those of the
tumble dryer.
Advice!
To improve ventilation, leave the door to
the room where the tumble dryer is located
open.
Caution!
Any electrical installation must be carried
out by authorised professionals.
How to fit the stacker:
1. Undo the two screws indicated on the
back of the washing machine.
2. Secure the anti-tilt device using the
screws as shown in the picture.
A. Freestanding
The tumble dryer can be positioned beside
the washing machine.
B. Stacking
The tumble dryer can be placed on top of
an Asko washing machine. In this case you
use the stacking attachments that come
with the machine:
2 foot cups. These can be found in a bag in
the drum.
2 anti-tilt devices. These come attached to
the bottom left corner on the back of the
machine.
Extending plates can be ordered from your
local retailer.
3. Attach the plastic cups that will hold the
tumble dryer’s front feet to the washing machine’s top cover. This is essential, as once
the tumble dryer’s feet are resting in the
plastic cups you know the dryer is correctly
positioned on the washing machine.
17

18
Break off tag A on the cup fitted on the right
1
2
3
side and tag B on the cup fitted on the left
side. Then remove the paper from the selfadhesive surface under the plastic cups.
A
B
4. Fit the plastic cups so that the “tags”
marked with arrows are against the front
edge of the cover and side edge and press
firmly onto the cover. Then break off the
remaining tags.
5. Push the tumble dryer in under the metal
angles, keeping the front edge raised 1 - 2 cm.
Air evacuation
Waste air from the tumble dryer must be
conducted to an evacuation duct or to an
outlet through the wall by means of the accompanying vent hose.
Connection to the tumble dryer
The tumble dryer has three options for air
evacuation: at the back, on the right side
and on the left side. One hole is open when
delivered. The other two have covers.
The tumble dryer comes with a connector
(1), a plastic band (2) and a vent hose (3).
6. Lower the tumble dryer’s front feet into
the plastic cups and adjust so that the dryer
is balanced.
Adjusting the feet
Screw the feet in or out so that the tumble
dryer is steady and balanced on the floor or
on the washing machine. Then tighten the
locking nuts.
Fit the air evacuation system as follows:
1. Slip the vent hose onto the connector
and secure using the plastic band.
2. Remove the plastic cover if you want to fit
the vent hose to one of the holes other than
the one already open.
3. Insert the connector with the vent hose
into the opening.
4. Place the cover over the open hole.
Locking nut

Connection to evacuation duct
The vent hose must use the shortest and
straightest route possible from the tumble
dryer to the evacuation duct. Trim or cut the
vent hose if it is too long. If necessary, the
vent hose can be extended to a maximum
of 8 metres (inner diameter 102 mm). If a
longer hose is needed, a larger inner diameter is required in order to maintain the
tumble dryer’s fan capacity.
Any bends must be as gradual as possible.
If 90º bends are necessary, there must be
no more than four. Multiple bends reduce
the tumble dryer’s fan capacity.
a
Installation in a hot environment
When installing in small rooms with high atmospheric humidity where there is a risk of
the temperature exceeding 25 °C, there is a
risk of condensation water accumulating in
a kink and obstructing the air flow, resulting
in poor drying.
In such situations the hose must be fitted
horizontally (b) or downwards (c) from the
tumble dryer.
a
Examples of
installations
b
c
Caution!
Air from the tumble dryer must not be fed
through ducts used for equipment that
burns gas or other fuels.
19

20
Accessories
If the vent hose runs to an outlet in the
wall, you can prevent the inflow of cold air
by fitting a ventilation grill. This grill can be
installed either outside or inside.
If there is only one evacuation duct from the
room, a “draught check” must be fitted.
Draught check
These accessories can be purchased from
your retailer.

Electrical installation
The machine must only be connected to an
earthed wall socket.
Connection on delivery
The machine is supplied as single-phase,
230V, heat output 2500W (see type plate)
and has a 16A fuse. Any earth fault fuses
must be type A.
Alternative connection
It is possible to switch over from
output 2500) to 10A (heat output 1950W).
Switching must be carried out as follows:
1. Shut off the power.
2. Press and hold the Start/Stop button, and
switch on the power.
3. Release the Start/Stop button once the
programme indicator lights up.
4. Press the Start/Stop button 5 times
(within 10 seconds).
5. Adjust the programme selector so that
the Extra Dry light comes on (10 o’clock).
6. Press the Start/Stop button to store the
setting.
16A (heat
If you want to reset the machine to a 16A
connection:
1. Repeat steps 1-4.
2. In step 5, adjust the programme selector
so that the Extra Dry light goes out.
3. Press the Start/Stop button to store the
setting.
The machine now has a 16A connection.
21

22
Door hanging
The tumble dryer comes with the door hung
on the left. However, it is possible to change
the door to right hung.
Proceed as follows:
1. Remove the lower front plate and undo
the three screws holding the hinge attachment.
2. Angle the lower edge of the door out to
the left while turning the hinge attachment
as indicated by the arrows.
5. Next you must move the plastic plugs on
the upper and lower edges of the door. Use
a flat screwdriver.
6. Unscrew the two screws on the sides of
the door, around five millimetres, to allow
the door magnet and cover washer on the
inside of the door to be removed.
7. Then remove the door magnet (1) and
cover washer (2).
1
Hinge attachment
3. Move the hinge pin. For right hanging,
the hinge attachment must then be turned
upside down.
Hinge pin
4. Then move the hinge pin in
the panel’s lower edge.
2
8. Insert the door magnet in place of the
cover washer.

9. Insert the cover washer in place of the
2
2
1
2
2
1
3
2
door magnet.
10. Insert the screws so that the door magnet and cover washer are held in place.
11. Remove the screw indicated.
12. Then fit the door securely on the right
side of the machine.
13. Secure the hinge attachment using the
screws in the sequence shown in the picture.
14. Replace the screw unfastened in
point 11.
15. Replace the lower front plate.
23

24
Own notes

Own notes
25

26
Own notes

Search words
A
Anti-crease 7, 9
C
Care 13
Child safety 5
Cleaning 10, 13
Cotton 8
D
Display 7, 10
Disposal 4
Door hanging 22
Do not tumble-dry 3, 8
E
Electrical installation 4, 17, 21
F
Felting 8
Fluff filter 6, 13
Service
Sort 4
Spinning 8
16
T
Technical information 15
Temperature 7, 9
Troubleshooting 14
W
Wool 8
I
Installation 17, 21
L
Laundry labels 3, 8
O
Options 7, 9
Overheating cut-out 4, 10, 14
P
Packaging 4
Programmes 7, 9
Q
Quick guide 28
S
Safety 4
27

Quick guide
1
2
4
3
5
6
7
Air fluff
60 min
Extra dry
Normal dr
y
Iron dr
y
Timed dry
60 min
Dry
Fabrics
Sort fabrics of
the same kind to
ensure as uniform drying as
possible.
Press the main power switch
Place the laundry in the
machine
• Close the door.
Select a programme and any
options
• Turn the Programme selector to the
required programme.
Press the Start/Stop button
Drying programme finished
• The text in the display indicates
that the programme has finished.
• Clean the fluff filter after each load.
Once tumble-drying has
finished
• Switch off the main power switch,
and close the door.
28
• Select any options and settings.
Item No.: 80 799 90. Rev. 01 We reserve the right to make changes.
Printed on environmentally-friendly paper that meets the demands of the Swedish environmental organisations Miljöförbundet and
Naturskyddsföreningen.
 Loading...