

Page 1
Should you need assistance, it is helpful to have the
complete model and serial number identification of your
refrigerator. This is on a data plate located at the top of
the fresh food compartment. Record these numbers
below for easy access.
NEWTON IA m_c.t_.
FOR ICEMAKER OPTION R_._r_ 115V HHZ
USEKIT _m_w_m_v_D = : i
Model Number
Serial Number
Revisio_mber
Date of Purchase
Guide de IJUtilisateur.i ............................ ..A ........... 20
Guia del Usumi()..L..... ............................................. 40
For additional questions, please contact us:
Maytag Appliances Sales Company
1-800-688-9900 USA
1-800-688-2002 CANADA
1-800-688-2080 TTY USA
(Mon.-Fri., 8am-8pm Eastern Time)
lnternet: http://www.maytag.com
: i.o
safe rereferen_e:,_ooJaf t
}VIAYIAG
Page 2
WARNIN6 -- When using your
appliance, always foJiow basic precau-
tions, including the following:
• Use the refrigerator only for its intended purpose.
• To prevent possibility of hazard due to electrical
shock, never plug the refrigerator into a receptacle
which has not been grounded adequately and in accor-
dance with the local and national electrical codes. See
the _ warning and grounding instructions.
• Unplug the refrigerator before cleaning or replacing a
light bulb.
• In case of power failure, minimize door openings. If
the power failure is of a long duration, protect the
food by placing blocks of dry ice on top of the pack-
ages or check with a local frozen foods locker about
iiiiiiiiiiiiiiiiiiiiiiiiii!iiiiiiiiiiiiiiiiiiii
iiiiiiiiiiiiiiiiiiiiiiiiiiiiiiiiiiiiiiiiiiiiiii
temporary storage. Frozen foods which have thawed
completely should not be refrozen and should be dis-
carded.
iiiiiiiiiiiiiiiiiiiiiiiiiiiiiiiiiiiiiiiiiiiiiii
iiiiiiiiiiiiiiiiiiiiiiiiiiiiiiiiiiiiiiiiiiiiiii
_#####;######
iiiiiiiiiiiiiiiiiiiiiiiiiiiiiiiiiiiiiiiiiiiiiii
iiiiiiiiiiiiiiiiiiiiiiiiiiiiiiiiiiiiiiiiiiiiiii
• Any electrical service cord that becomes frayed or dam-
aged should be immediately repaired or replaced. Never
unplug your appliance by pulling on the power cord.
* Your refrigerator should not be operated in the pres-
ence of explosive fumes.
o Children should not climb, hang or stand on the
shelves of this refrigerator.
_N/NG _ T_Js applia.ce is designed
_o operate o. a normal _5 volt. 15 amp_ 60
cycle iineo There should be a separate.
g_ou,ded circuit serving this app|ia,ce o, ly.
Do not use _ extensio, ¢or_ Do ,or use
any device tha_ will alter the e_ect_Jca| pe_
forma.ce of this appli_,ce.
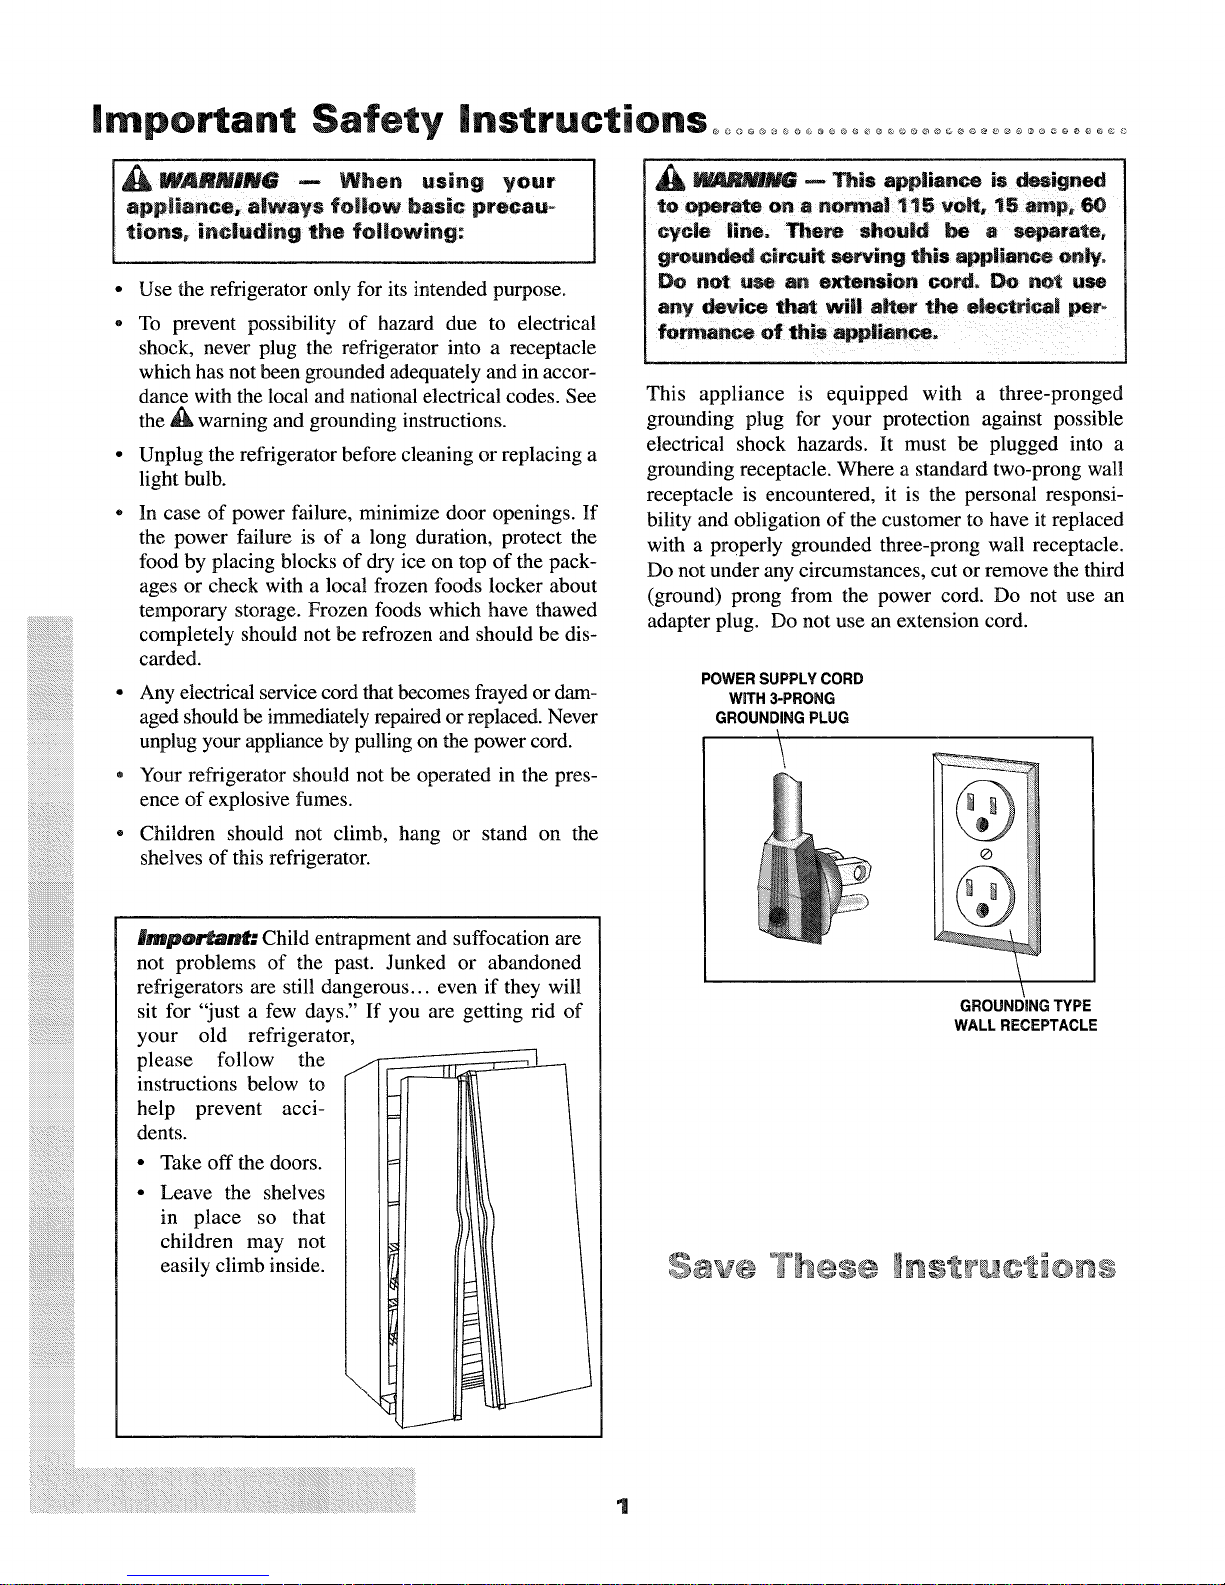
This appliance is equipped with a three-pronged
grounding plug for your protection against possible
electrical shock hazards. It must be plugged into a
grounding receptacle. Where a standard two-prong wal!
receptacle is encountered, it is the personal responsi-
bility and obligation of the customer to have it replaced
with a properly grounded three-prong wall receptacle.
Do not under any circumstances, cut or remove the third
(ground) prong from the power cord. Do not use an
adapter plug. Do not use an extension cord.
POWER SUPPLY CORD
WITH 3-PRONG
GROUNDING PLUG
iiiiiiiiii!iiiiiii!iiiiiiiiiiiiiiiql;iiiiiii
333111133131
iiiiiiiiiiiiiiiiiiiiiiiiiiiiiiiiiiiiiiiiiiiiiii
3313311SIIII
iiiiiiiiiiiiiiiiiiiiiiiiiiiiiiiiiiiiiiiiiiiiiii
iiiiiiiiiiiiiiiiiiiiiiiiiiiiiiiiiiiiiiiiiiiiiii
iiiiiiiiiiiiiiiiiiiiiiiiiiiiiiiiiiiiiiiiiiiiiii
iiiiiiiiiiiiiiiiiiiiiiiiiiiiiiiiiiiiiiiiiiiiiii
in_p@r_ant: Child entrapment and suffocation are
not problems of the past. Junked or abandoned
refrigerators are stil! dangerous.., even if they will
sit for "just a few days." If you are getting rid of
your old refrigerator,
please follow the /
instructions below to
help prevent acci-
dents.
• Take off the doors.
• Leave the shelves
in place so that
children may not
easily climb inside.
GROUNDING TYPE
WALL RECEPTACLE
1
Page 3
Your new refrigerator was packed carefully for ship-
ment. Remove and discard shelf packing clips (if used)
located just above each shelf where they hook onto the
frame. To remove plastic clips wiggle the clips sideways
and pull straight out.
Locado
Allow for a free flow of air through the front base
grille.
Install the refrigerator where the room temperature
will not go below 55 ° E With temperatures below 55 °,
the refrigerator wi!l not run frequently enough to
maintain proper temperature in the freezer.
Allow a minimum 1/2" clearance on the sides, top
and back for ease of installaron. If the refrigerator is
placed with the door hinge side against a wall, you
may want to allow additional space so the door can be
opened wider.
Use caution when installing the unit on vinyl or hard-
wood floors so as not to mark or otherwise damage
the flooring. A piece of plywood, a rug or other mate-
rial should be used to protect the floor while posi-
tioning the unit.
LeveJ r g
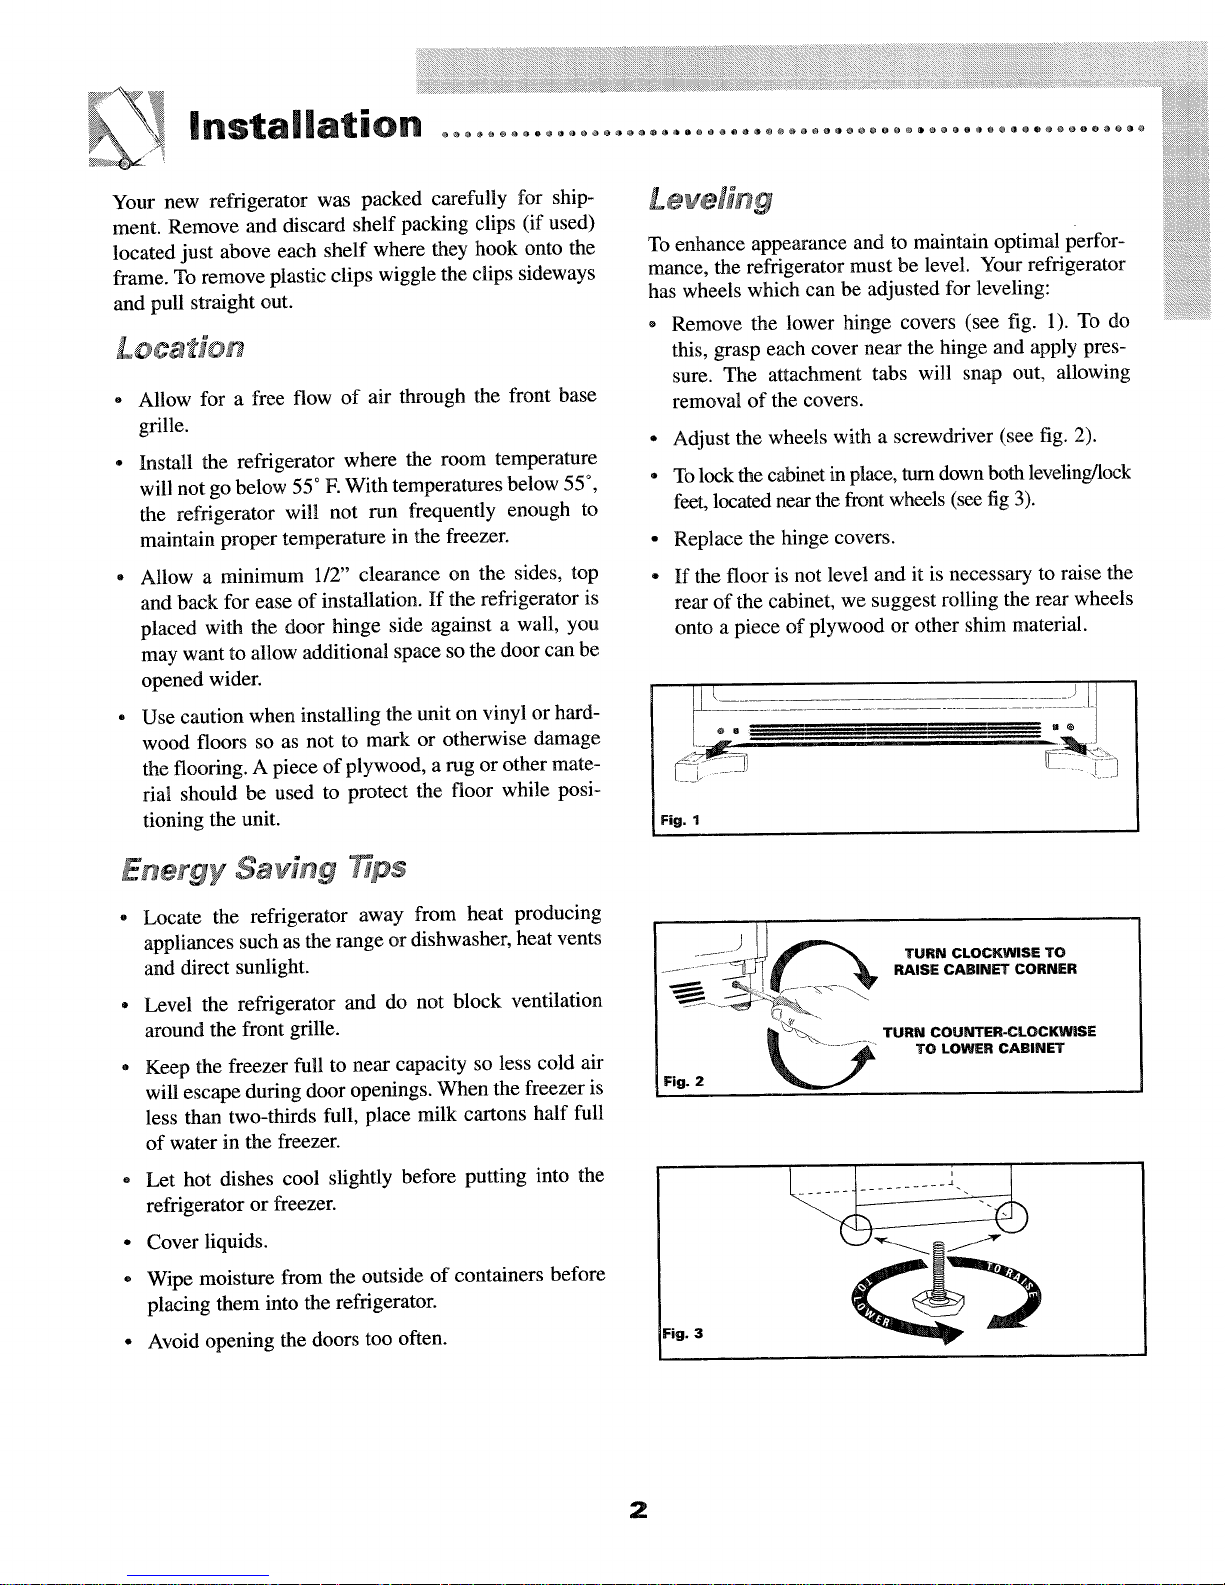
To enhance appearance and to maintain optimal perfor-
mance, the refrigerator must be level. Your refrigerator
has wheels which can be adjusted for leveling:
Remove the lower hinge covers (see fig. 1). To do
this, grasp each cover near the hinge and apply pres-
sure. The attachment tabs will snap out, allowing
removal of the covers.
• Adjust the wheels with a screwdriver (see fig. 2).
° To lock the cabinet in place, turn down both leveling/lock
feet, located near the front wheels (see fig 3).
• Replace the hinge covers.
• If the floor is not level and it is necessary to raise the
rear of the cabinet, we suggest rolling the rear wheels
onto a piece of plywood or other shim material.
i
i Fig. I
Eneygy Saving Tips
Locate the refrigerator away from heat producing
appliances such as the range or dishwasher, heat vents
and direct sunlight.
Level the refrigerator and do not block ventilation
around the front grille.
Keep the freezer full to near capacity so less cold air
will escape during door openings. When the freezer is
less than two-thirds full, place milk cartons half full
of water in the freezer.
o Let hot dishes cool slightly before putting into the
refrigerator or freezer.
• Cover liquids.
° Wipe moisture from the outside of containers before
placing them into the refrigerator.
• Avoid opening the doors too often.
TURN CLOCKWISE TO
RAISE CABINET CORNER
TURN COUNTER-CLOCKWISE
TO LOWER CABINET
Fig. 3
2
Page 4
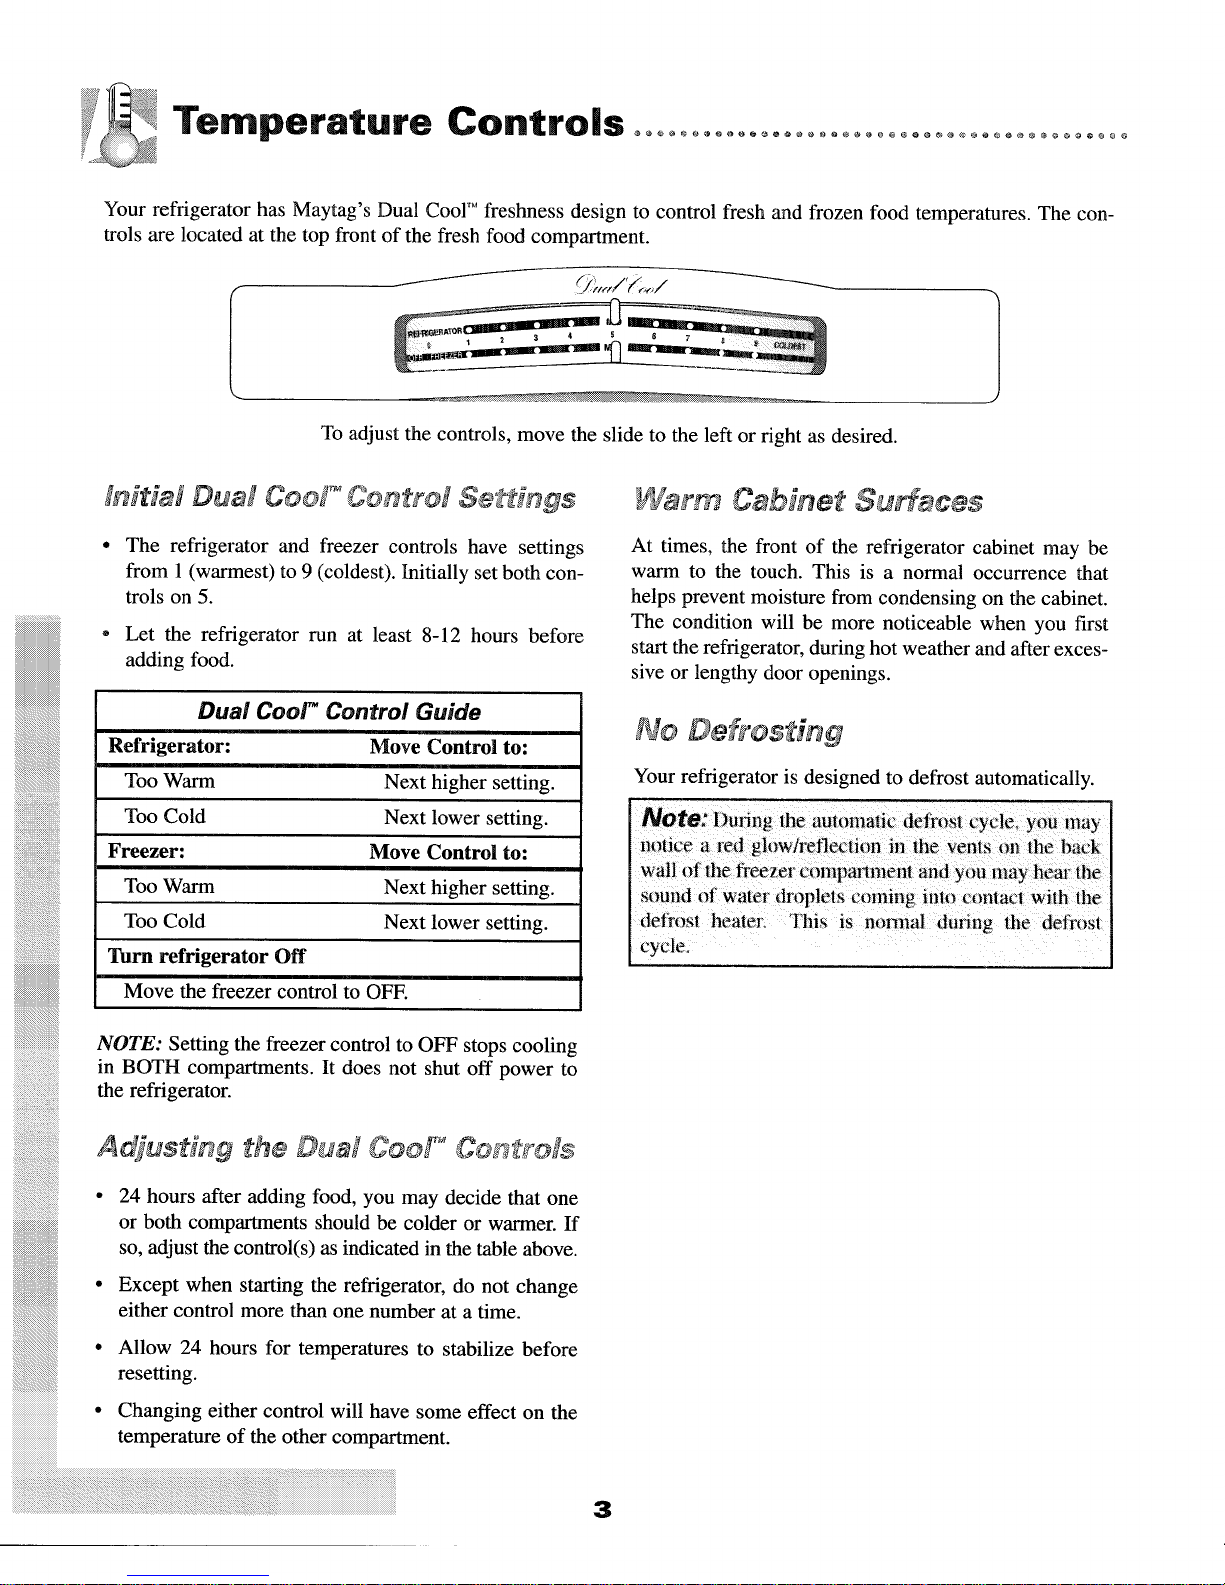
Your refrigerator has Maytag's Dual Cool TM freshness design to control fresh and frozen food temperatures. The con-
trois are located at the top front of the fresh food compartment.
To adjust the controls, move the slide to the left or right as desired.
The refrigerator and freezer controls have settings
from 1 (warmest) to 9 (coldest). Initially set both con-
trols on 5.
Let the refrigerator run at least 8-12 hours before
adding food.
Refrigerator:
Too Warm
Too Cold
ilililililililililililililililililililililililil
iiiiiiiiiiiiiiiiiiiii_iiiiiiiiiiiiiiiiiiiiii
iiiiiiiiiiiiiiiiiiiiiiiiiiiiiiiiiiiiiiiiiiiiii
iiiiiiiiiiiiiiiiiiiiiiiiiiiiiiiiiiiiiiiiiiiiiii
Freezer:
Too Warm
Too Cold
Turn refrigerator Off
Move the freezer control to OFF.
NOTE: Setting the freezer control to OFF stops cooling
in BOTH compartments. It does not shut off power to
the refrigerator.
Ae usdng the Ds,
DuM CooF' C#,,Q##J Se'Z't]n#s
Dual CooF Control Guide
Move Control to:
Next higher setting.
Next lower setting.
Move Control to:
Next higher setting.
Next lower setting.
Warm C, bkQet _u#_eces
At times, the front of the refrigerator cabinet may be
warm to the touch. This is a normal occurrence that
helps prevent moisture from condensing on the cabinet.
The condition will be more noticeable when you first
start the refrigerator, during hot weather and after exces-
sive or lengthy door openings.
bJo
Your refrigerator is designed to defrost automatically.
Note: During the automatic defrost cycle, you may
notice a red gh)wh'eflection in the venls on the back
wall of tile freezer compartment and you may hear the
sound of water droplels coming into contact with the
defrost heater_._' This is nornial during the defrosl
cycle
24 hours after adding food, you may decide that one
or both compartments should be colder or warmer. If
so, adjust the control(s) as indicated in the table above.
Except when starting the refrigerator, do not change
either control more than one number at a time.
Allow 24 hours for temperatures to stabilize before
resetting.
Changing either control will have some effect on the
temperature of the other compartment.
3
Page 5
£keI , s
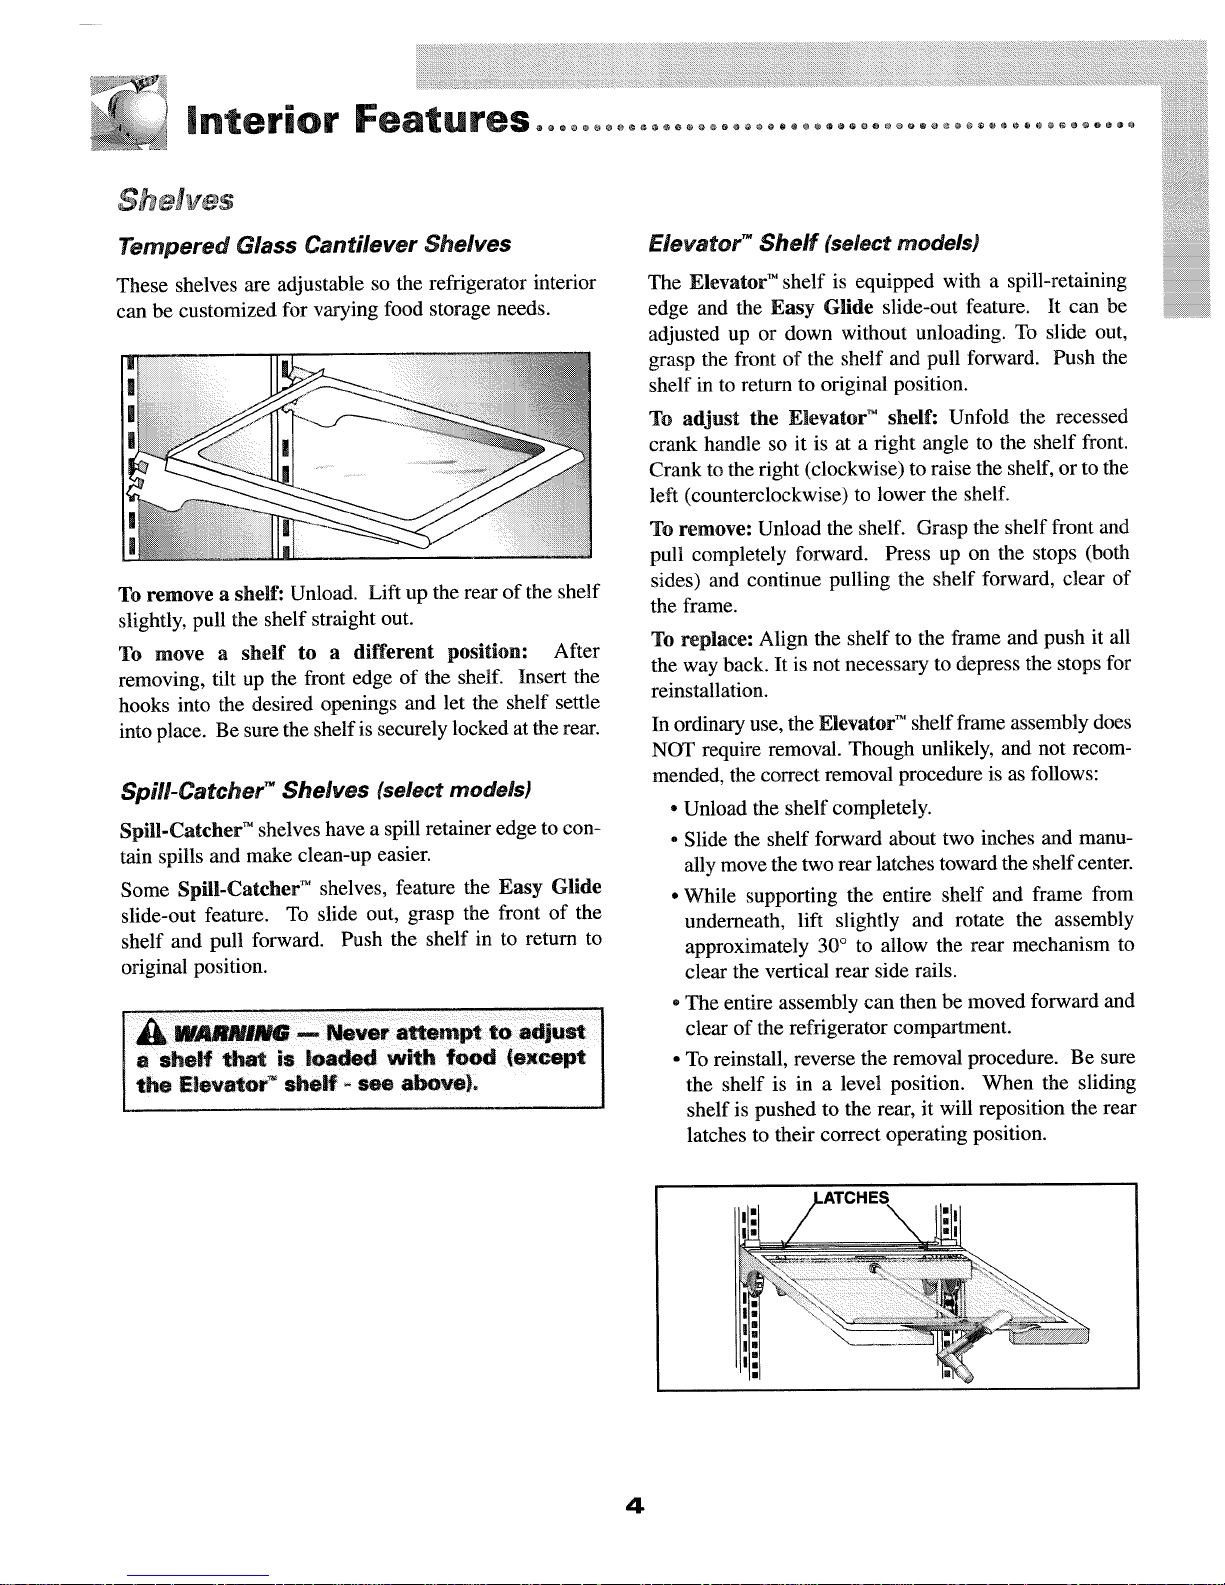
Tempered Glass Cantilever Shelves
These shelves are adjustable so the refrigerator interior
can be customized for varying food storage needs.
To remove a shelf: Unload. Lift up the rear of the shelf
slightly, pull the shelf straight out.
To move a shelf to a different position: After
removing, tilt up the front edge of the shelf. Insert the
hooks into the desired openings and let the shelf settle
into place. Be sure the shelf is securely locked at the rear.
Spill-Catcher TM Shelves (select models)
Spill-Catcher TM shelves have a spill retainer edge to con-
tain spills and make clean-up easier.
Some Spill-Catcher" shelves, feature the Easy Glide
slide-out feature. To slide out, grasp the front of the
shelf and pull forward. Push the shelf in to return to
original position.
Elevator" Shelf (select models)
The Elevator TM shelf is equipped with a spill-retaining
edge and the Easy Glide slide-out feature. It can be
adjusted up or down without unloading. To slide out,
grasp the front of the shelf and pull forward. Push the
shelf in to return to original position.
To adjust the Elevator TM shelf: Unfold the recessed
crank handle so it is at a right angle to the shelf front.
Crank to the right (clockwise) to raise the shelf, or to the
left (counterclockwise) to lower the shell
To remove: Unload the shell Grasp the shelf front and
pull completely forward. Press up on the stops (both
sides) and continue pulling the shelf forward, clear of
the frame.
To replace: Align the shelf to the frame and push it all
the way back. It is not necessary to depress the stops for
reinstallation.
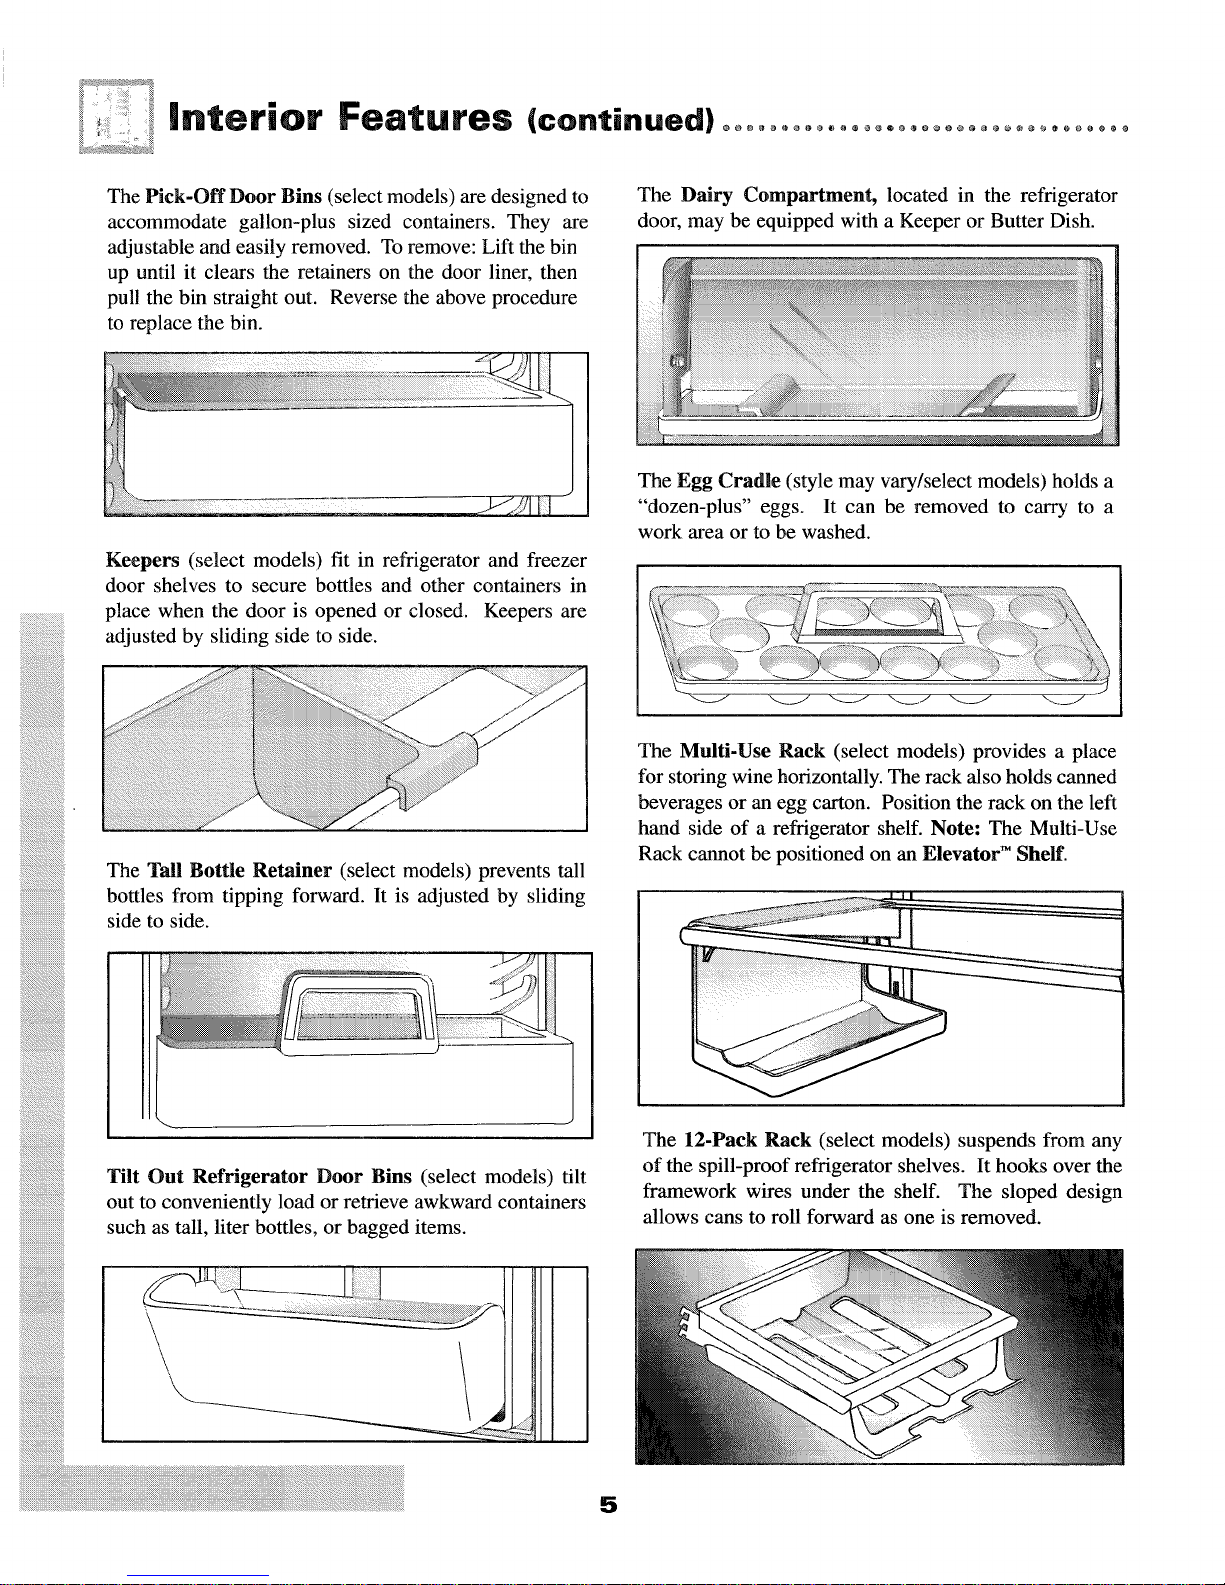
In ordinary use, the Elevator TM shelf frame assembly does
NOT require removal. Though unlikely, and not recom-
mended, the correct removal procedure is as follows:
• Unload the shelf completely.
o Slide the shelf forward about two inches and manu-
ally move the two rear latches toward the shelf center.
• While supporting the entire shelf and frame from
underneath, lift slightly and rotate the assembly
approximately 30 ° to allow the rear mechanism to
clear the vertical rear side rails.
• The entire assembly can then be moved forward and
clear of the refrigerator compartment.
• To reinstall, reverse the removal procedure. Be sure
the shelf is in a level position. When the sliding
shelf is pushed to the rear, it will reposition the rear
latches to their correct operating position.
4
Page 6
The Pick-Off Door Bins (select models) are designed to
accommodate gallon-plus sized containers. They are
adjustable and easily removed. To remove: Lift the bin
up until it clears the retainers on the door liner, then
pull the bin straight out. Reverse the above procedure
to replace the bin.
Keepers (select models) fit in refrigerator and freezer
door shelves to secure bottles and other containers in
place when the door is opened or closed. Keepers are
iiiiiiiiiiiiiiiiiiiiiiiiiiiiiiiiiiiiiiiiiiiiii
adjusted by sliding side to side.
The Dairy Compartment, located in the refrigerator
door, may be equipped with a Keeper or Butter Dish.
The Egg Cradle (style may vary/select models) holds a
"dozen-plus" eggs. It can be removed to carry to a
work area or to be washed.
i
ii%iii!iiiiiiiiiiiii!iiiill
The Tall Bottle Retainer (select models) prevents tall
bottles from tipping forward. It is adjusted by sliding
side to side.
Tilt Out Refrigerator Door Bins (select models) tilt
out to conveniently load or retrieve awkward containers
such as tall, liter bottles, or bagged items.
The Multi-Use Rack (select models) provides a place
for storing wine horizontally. The rack also holds canned
beverages or an egg carton. Position the rack on the left
hand side of a refrigerator shelf. Note: The Multi-Use
Rack cannot be positioned on an Elevator _ Shelf.
The 12-Pack Rack (select models) suspends from any
of the spill-proof refrigerator shelves. It hooks over the
framework wires under the shelf. The sloped design
allows cans to roll forward as one is removed.
5
Page 7
F ,eeze Cempartment
The freezer shelves (wire or glass) rest on support rails
molded into the wall of the freezer. Select models offer
freezer shelves that slide forward for easier access to
items at the rear of the shelf.
To remove a freezer shelf: Completely unload the shelf
and lift straight up. Tilt the shelf sideways and pull it
straight out. To replace, reverse the above procedure.
The freezer basket(s) (number will vary by model) slide
out for more convenient access to the frozen foods. The
basket(s) rest and slide on support rails molded into the
wall of the freezer.
To remove a freezer basket: Slide the basket out until
it stops. Depress tabs located at the rear of each side of
the basket, continue sliding forward until basket is out.
To replace, line the basket up with the support rails and
slide it into place.
StairStep" Freezer Baskets (select models)
StairStep TM freezer baskets interact for easier access to
contents in the lower part of the freezer.
Pull the lower basket forward to gain access to its con-
tents. Continue pulling the lower basket to open the
upper basket as well. Reverse to close both baskets.
Pulling the upper basket open provides access to its con-
tents. The lower basket will also move forward however
it will not open.
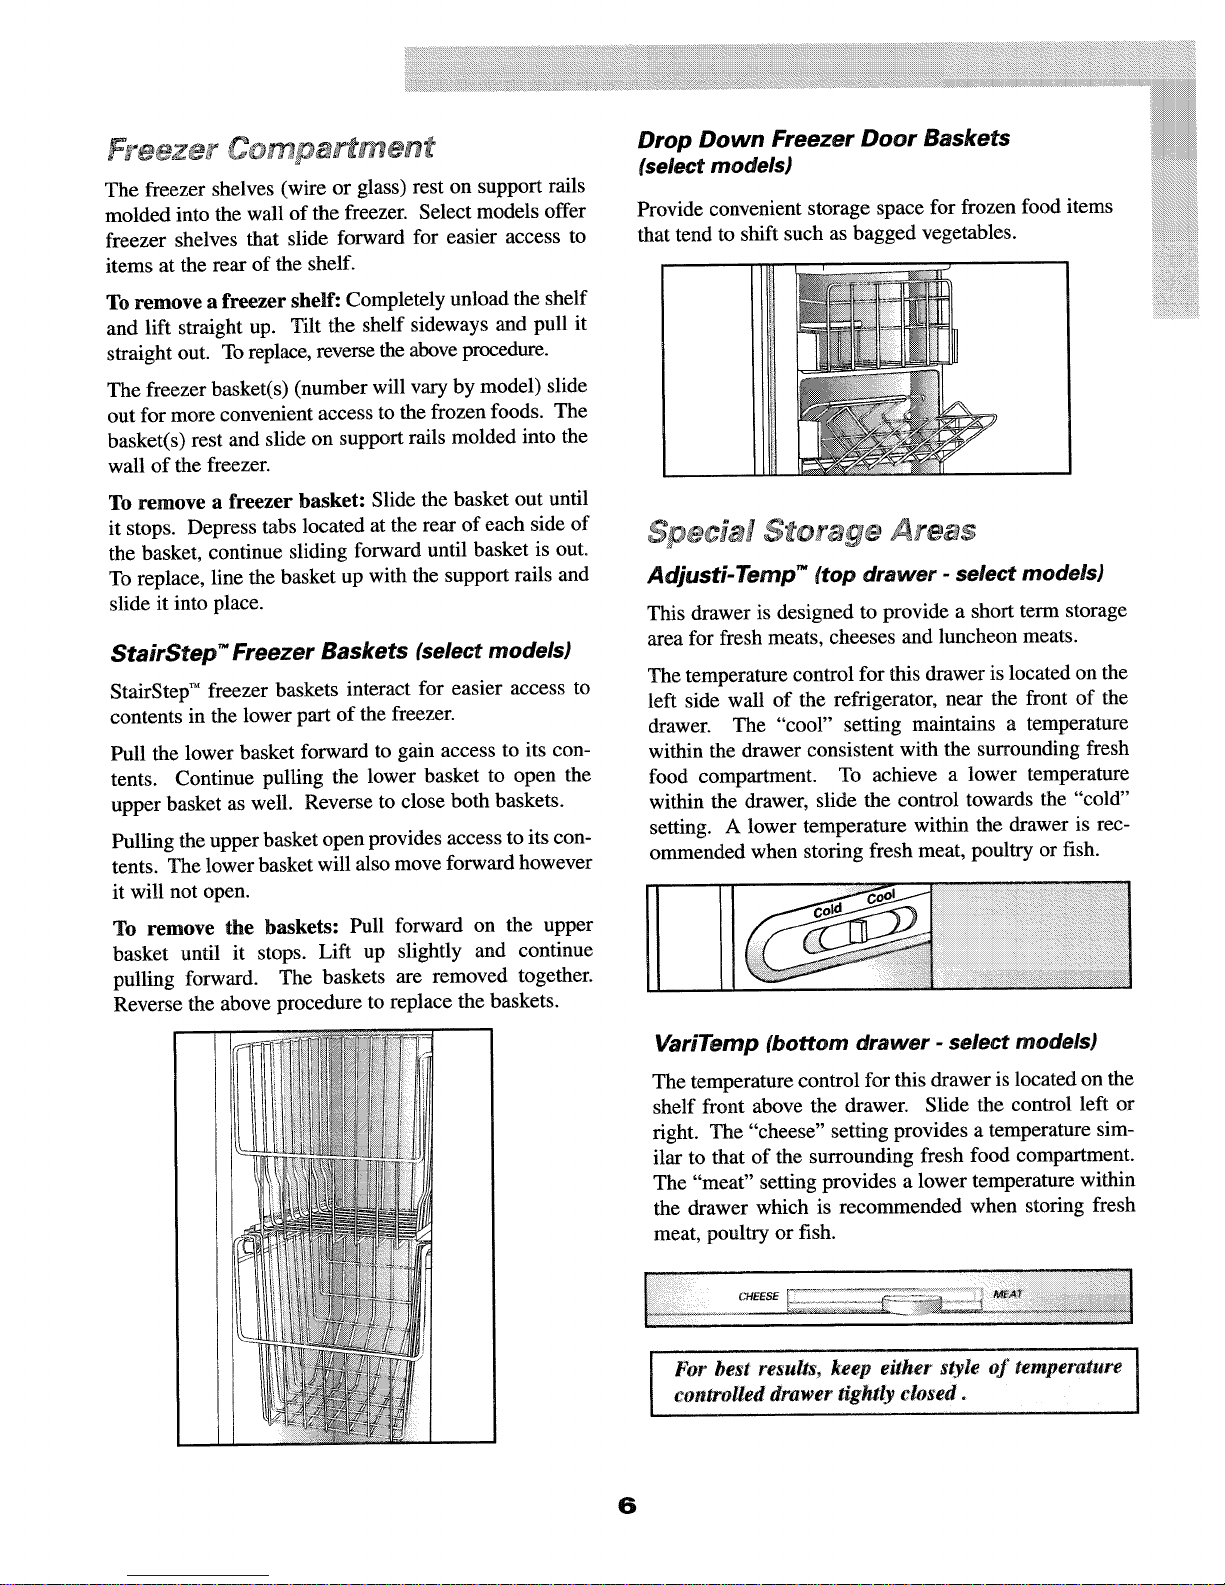
Drop Down Freezer Door Baskets
(select models)
Provide convenient storage space for frozen food items
that tend to shift such as bagged vegetables.
Sped ] S or ge Areas
Adjusti-Temp" (top drawer - select models)
This drawer is designed to provide a short term storage
area for fresh meats, cheeses and luncheon meats.
The temperature control for this drawer is located on the
left side wall of the refrigerator, near the front of the
drawer. The "cool" setting maintains a temperature
within the drawer consistent with the surrounding fresh
food compartment. To achieve a lower temperature
within the drawer, slide the control towards the "cold"
setting. A lower temperature within the drawer is rec-
ommended when storing fresh meat, poultry or fish.
To remove the baskets: Pull forward on the upper
basket until it stops. Lift up slightly and continue
pulling forward. The baskets are removed together.
Reverse the above procedure to replace the baskets.
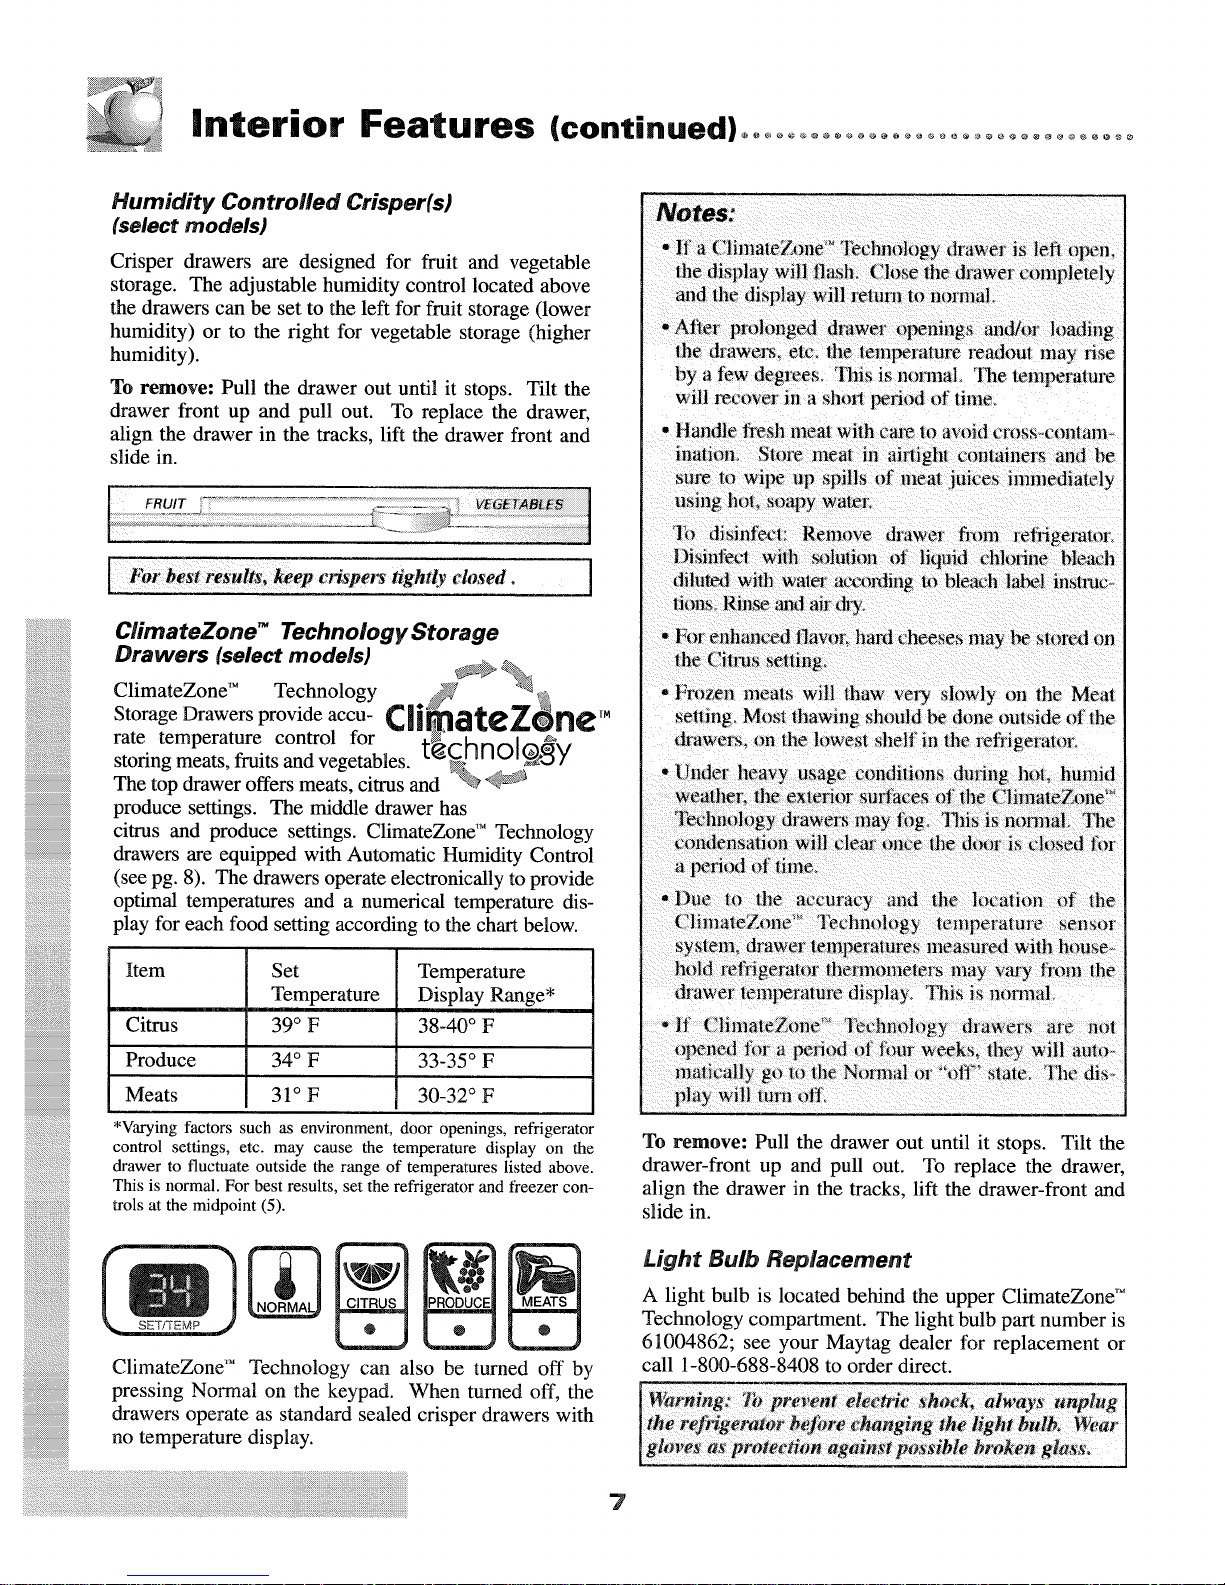
VariTemp (bottom drawer - select models)
The temperature control for this drawer is located on the
shelf front above the drawer. Slide the control left or
right. The "cheese" setting provides a temperature sim-
ilar to that of the surrounding fresh food compartment.
The "meat" setting provides a lower temperature within
the drawer which is recommended when storing fresh
meat, poultry or fish.
CHEESE
For best resu_ keep either style of temperalut_
controlled drawer tightly closed, i
6
Page 8
Interior Features (continued) ......... o................................
Humidity Controlled Crisper(s)
(select models)
Crisper drawers are designed for fruit and vegetable
storage. The adjustable humidity control located above
the drawers can be set to the left for fruit storage (lower
humidity) or to the right for vegetable storage (higher
humidity)•
To remove: Pull the drawer out until it stops. Tilt the
drawer front up and pull out. To replace the drawer,
align the drawer in the tracks, lift the drawer front and
slide in.
ClimateZone TM Technoiogy Storage
Drawers (select models)
"If a ClimaleZ_ me_°Technology drawer is left open,
-After prolonged drawer openings _md/or loading
Ihe drawers, etc. lhe lemperalure readoul may rise
by a few degrees, This is normal The temperature
wilt recover in a short lYeriod of time
- Handle fi'esh meat with care lo avoid crossoconlam-
inalion, Stem meat in airtight containers and be
stu_ to wipe up spills of meat juices immediately
using ho|, soapy wateE
qb disinfecl: Remove drawer fi'om refi{geratoE
I_sinl=ect with _}lulioll of lkluid chlorine bleach
diluted with wmer according m ble_h label inslruc-.
lions, Rinse and air d_y+
* For enhanced flawm hard cheeses may be stored on
ChmateZone Technology S "_ _' ®
• Draw'ers """- --_--"_----.a_ _ ,_
Storage
provide accu- ,llma : one
rate temperature control for 17_ic'n_\,," '
storing meats, fruits and vegetables. 1_ '1"101_,_-9/
The top drawer offers meats, citrus and _'%>@z_
produce settings. The middle drawer has
citrus and produce settings. ClimateZone '" Technology
drawers are equipped with Automatic Humidity Control
(see pg. 8). The drawers operate electronically to provide
optimal temperatures and a numerical temperature dis-
play for each food setting according to the chart below.
Item Set Temperature
Temperature Display Range*
Citrus 39 ° F 38-40 ° F
Produce 34 ° F 33-35 ° F
Meats 31 ° F 30-32 ° F
iiiiiiiiiiiiiiiiiiiiiiiiiiiiiiiiiiiiiiiii_
ii!iiiiiiiii!ii!_iiiii!iil)!iiii!iiii_il
i!i!i!ii!i!iii!i!ii!i!i!i!i!!i!i!i!i!i!i!i
*Varying factors such as environment, door openings, refrigerator
control settings, etc. may cause the temperature display on the
drawer to fluctuate outside the range of temperatures listed above.
This is normal. For best results, set the refrigerator and freezer con-
trois at the midpoint (5).
-Frozen meals will thaw ve]y slowly on the Meat
selling, Mosl lhawing should be done outside of the
drawers, on the Iowesl shelf in the refrigerator,
, Untle__heavy usage conditions duIJng II{_Lhumid
weather the extent r smtaces ot the {,hmateZone
a 0eriod of time_
o Due to the accuracy and the localion of the
(:hltlateZone lechnology tt:mperalme senso_
drawer temperature display This is normal.
mal_.ally go to lhe Normal o_ ol:t stale, I he d_s--
play will mm olt
To remove: Pull the drawer out until it stops. Tilt the
drawer-front up and pull out. To replace the drawer,
align the drawer in the tracks, lift the drawer-front and
slide in.
Light Bulb Replacement
ClimateZone '_' Technology can also be turned off by
pressing Normal on the keypad. When turned off, the
drawers operate as standard sealed crisper drawers with
no temperature display.
: ::: :::: :: : : :: : :::::::::::::::::::::::::::::::::::::::::::::::::::::i
: : : : : :: :: : :: : :: : :: :::: : : : ::: : : ::::: ::: : : : ::: :: :::::::::::::::::::::::::::::::::::::::::::::::::: ::::::
? ?
iii i iiii
A light bulb is located behind the upper ClimateZond"
Technology compartment. The light bulb part number is
61004862; see your Maytag dealer for replacement or
call 1-800-688-8408 to order direct.
7
Page 9
To remove the compartment assembly for bulb
replacement: Unload and remove shelf located above
the ClimateZone ''_ Technology drawers. Unload and
remove the drawer. Remove two 1/4" hex screws located
on the left hand side. Lift the top compartment assembly
upward (approx. 1 inch) and pull forward (approx. 2-3
inches). The assembly should rest on its supports.
Replace the bulb: Unscrew bulb and replace.
Caution: Handle the light bulb with care to prevent
breakage. The bulb may be hot from use.
To replace: Lift the assembly back into its original
position. Align the screw holes. Make sure the
assembly is pushed firmly to the left of the refrigerator
cavity. Replace the two screws. Replace the drawers
into the assemblies, replace the shelf above the assem-
blies, and reconnect the power to the refrigerator.
Removal of the Compartment Assemblies
for Cleaning
Unload and remove shelf located above the
ClimateZone" Technology drawers. Unload and
remove the drawers. Remove two 114" hex screws
located on the left side. Lift the top compartment
assembly upward (approx. 1 inch) and pull forward
(approx. 2-3 inches). The assembly should rest on its
supports. Disconnect the power cords to free the
assembly, then pull completely out. Repeat with second
compartment assembly.
To replace: Lift the lower assembly back into its original
position leaving enough space to reach the power cords.
Reconnect the assembly power cords. Push the assembly
in all the way to the original position. Align the screw
holes. Make sure the assembly is pushed firmly to the
left of the refrigerator cavity. Replace the two screws.
Repeat with top assembly. Replace the drawers into the
assemblies, replace the shelf above the assemblies, and
reconnect the power to the refrigerator.
This material controls the flow of moisture out of the
crisper to provide the optimum environment for your
food. If a food spill should occur on the air vent or
fabric-like material, wipe with a clean, damp cloth.
I
*Maytag Automatic Humidity Control system features a unique,
patented material called Shape Memory Polymer (SMP) that when
laminated to fabric, becomes DIAPLEX. DIAPLEX is manufac-
tured by Mitsubisbi. DiAPLE ,
The Intelligent Texture
ChillKeepeF (select models)
The ChillKeeper '' compartment is located in the refrig-
erator door and is designed to quick chill items and to
store beverages. The ChillKeeper '' shelf can be
detached, inverted and snapped onto the uppermost tabs
in the compartment if two-tier storage is not needed.
To open: Grasp the opening on the right side of the
compartment cover and swing to the left, The cover will
automatically latch when closed.
NOTE: If the latching mechanism is accidentally dislo-
cated, place the eraser end of a pencil next to the latch
and apply gentle pressure to the right.
The ChillKeeper'" control is located on the left wall of the
refrigerator. Move the slide to "Cold" to provide colder
temperatures in the ChillKeeper '_'.
The ChillKeeper '' utility drawer is located at the bottom
of the compartment. The lockable utility drawer pro-
vides storage for items such as batteries, film and pre-
scription medications. The lock is located on the left
side of the drawer. To unlock and open the drawer, move
the pin to the "Unlock" position and slide the drawer
out. To close, slide the drawer back in and move the pin
into the "Lock" position.
iiii_i_iJil
_iii_Ji¸¸
iiiiiiiiiiiiiiiiiiiiiiiiiiii_
Snack Center Drawer (select models)
Provides a convenient storage area for miscellaneous
food and snack items. This drawer does not have the
adjustable temperature and humidity capabilities.
Automatic Humidity Control (select models)
Some crispers are equipped with an automatic humidity
control system, eliminating the need for manual humidity
slide controls on the drawer. A fabric-like material*
covers small airvents in the shelf insert above the crispers.
8
Page 10
Ice Service
The freezer compartment is equipped with ice cube
trays and an ice storage bin. The bin stacks on top of the
stacked ice cube trays. To release the ice cubes from a
tray, hold the tray upside down over the bin and twist
both ends.
The refrigerator is automatic ice maker ready. The
number for the ice maker kit needed appears on the data
plate (see front cover).
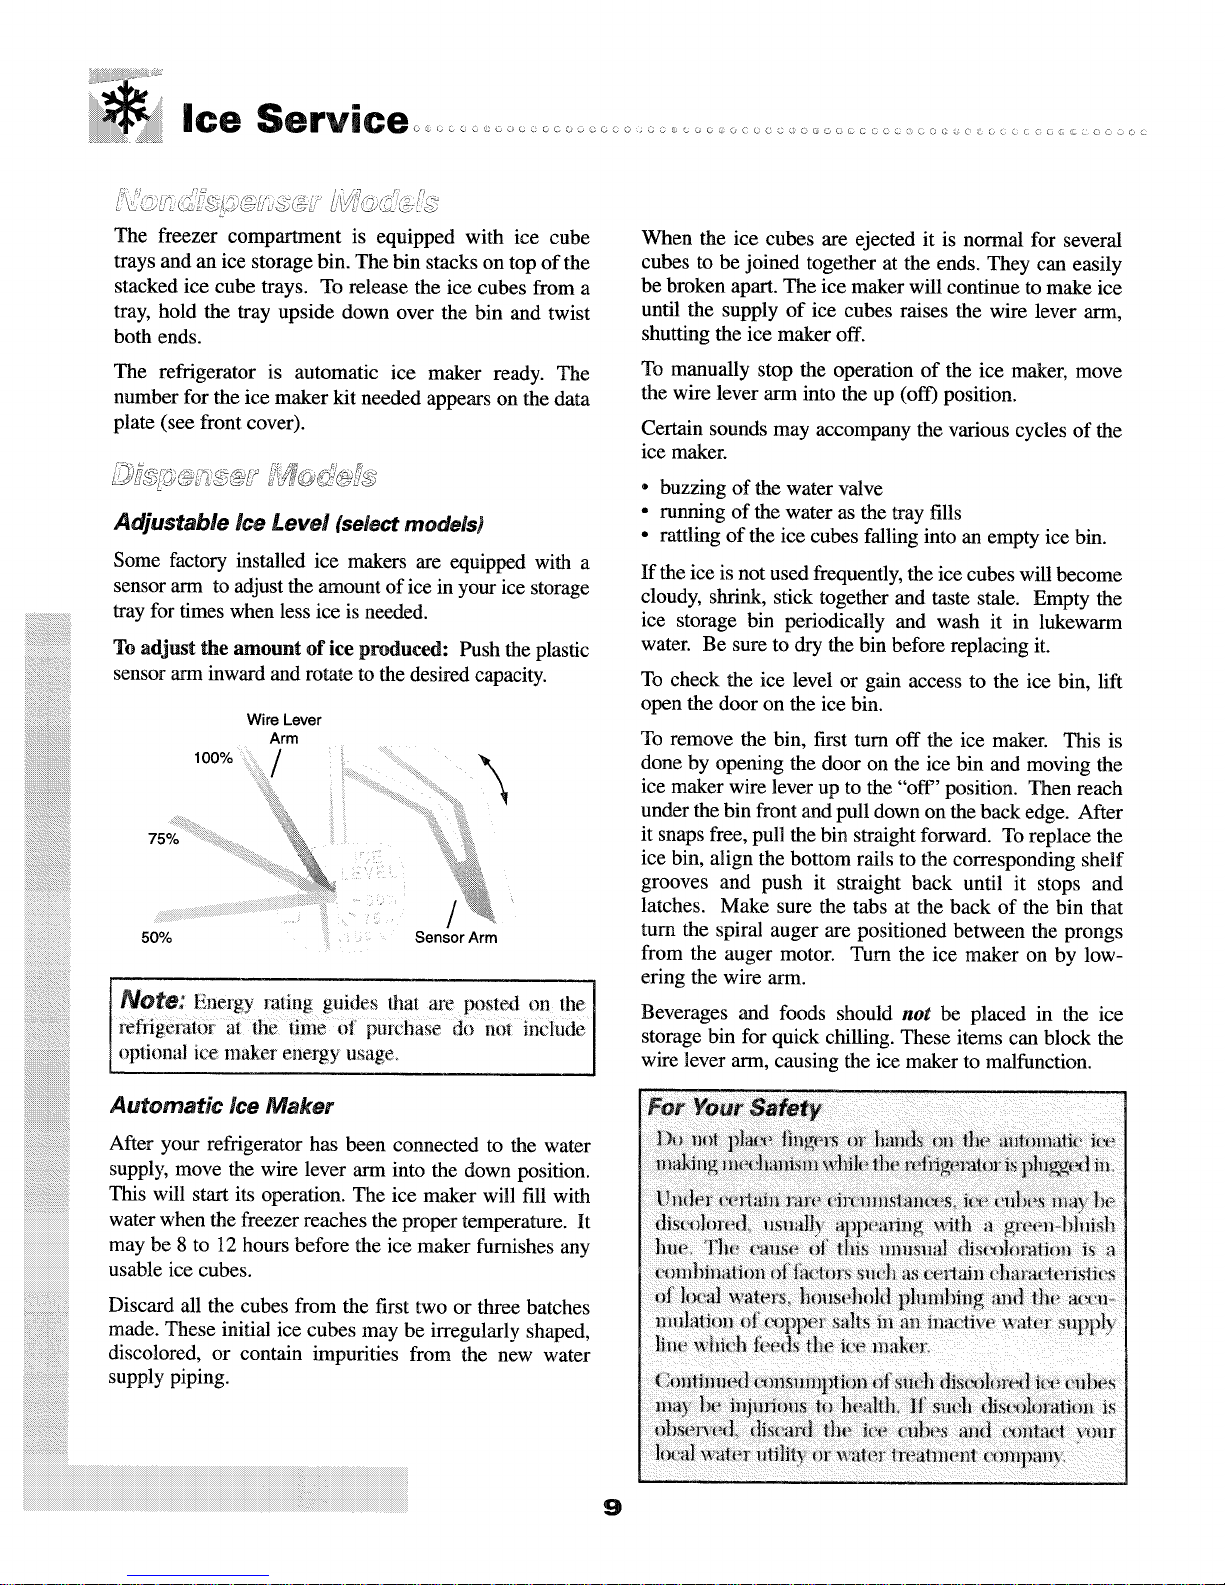
Adjustable ice Level (select models)
Some factory installed ice makers are equipped with a
sensor arm to adjust the amount of ice in your ice storage
ISIIIIIIIIIIIIIIIIIIIIIIIIIIIIIIIIIIIIIIIIIIII
_####;#######
iiiiiiiiiiiiiiiiiiiiiiiiiiiiiiiiiiiiiiiiiiiiii_
tray for times when less ice is needed.
To adjust the amount of ice produced: Push the plastic
sensor arm inward and rotate to the desired capacity.
iiiiiiiiiiiiiiiiiiiiiiiiiiiiiiiiiiiiiiiiiiiiiii
INote: ,2,in th., po.,edo,,the]
refrige_al0i _tt_e lime 0f pUrchaSe dO noi include I
optioilal ice maker energy usage. ]
Automatic ice Maker
Afteryourrefrigeratorhas beenconnectedtothe water
supply, move the wire lever arm into the down position.
This will startits operation. Theicemakerwill fill with
waterwhenthefreezerreachesthepropertemperature. It
maybe8to 12hoursbeforetheicemakerfurnishesany
usableicecubes.
Discardallthecubesfromthefirsttwoorthreebatches
made. These initial ice cubes maybe irregularly shaped,
iiiiiiii!iiiiiiiiiiiiiiiiiiiiiiiliiiiiiiiiiiii
discolored, or contain impurities from the new water
supply piping.
When the ice cubes are ejected it is normal for several
cubes to be joined together at the ends. They can easily
be broken apart. The ice maker will continue to make ice
until the supply of ice cubes raises the wire lever ann,
shutting the ice maker off.
To manually stop the operation of the ice maker, move
the wire lever arm into the up (off) position.
Certain sounds may accompany the various cycles of the
ice maker.
• buzzing of the water valve
• running of the water as the tray fills
• rattling of the ice cubes falling into an empty ice bin.
If the ice is not used frequently, the ice cubes will become
cloudy, shrink, stick together and taste stale. Empty the
ice storage bin periodically and wash it in lukewarm
water. Be sure to dry the bin before replacing it.
To check the ice level or gain access to the ice bin, lift
open the door on the ice bin.
To remove the bin, first turn off the ice maker. This is
done by opening the door on the ice bin and moving the
ice maker wire lever up to the "off" position. Then reach
under the bin front and pull down on the back edge. After
it snaps free, pull the bin straight forward. To replace the
ice bin, align the bottom rails to the corresponding shelf
grooves and push it straight back until it stops and
latches. Make sure the tabs at the back of the bin that
turn the spiral auger are positioned between the prongs
from the auger motor. Turn the ice maker on by low-
ering the wire arm.
Beverages and foods should not be placed in the ice
storage bin for quick chilling. These items can block the
wire lever ann, causing the ice maker to malfunction.
m
For Your Safety
l)u not I)M_: )in_{,ws or hands ,mth( mfl:_)matic i_:_
u ak_)gm ,(,,ha)n,sm_ h_l( ih( _( In_( )ahn )s I)|u_('(l m
I!nd(,r e('lJ:ain rim' (-ircm)islmm_>s. ice _'ubes )))av ]x:>
combination of l_eh)rs su( 1_as c_Main c])arat,h_rislJcs
Conthmed (,_)llSUml)li_)ll OI:sIWII (]is_)h m-'d i_- ('ul)(,s
may 1)(, inlmJous to health If s_M_ diseolormon is
(_l_serv_,(l, dis_-ar(| the ic_- m)l)('s and _mta('t your
])wa] wal(,r utilit_ ()r wat(_r lwatnm)lt om]pa))\
9
Page 11
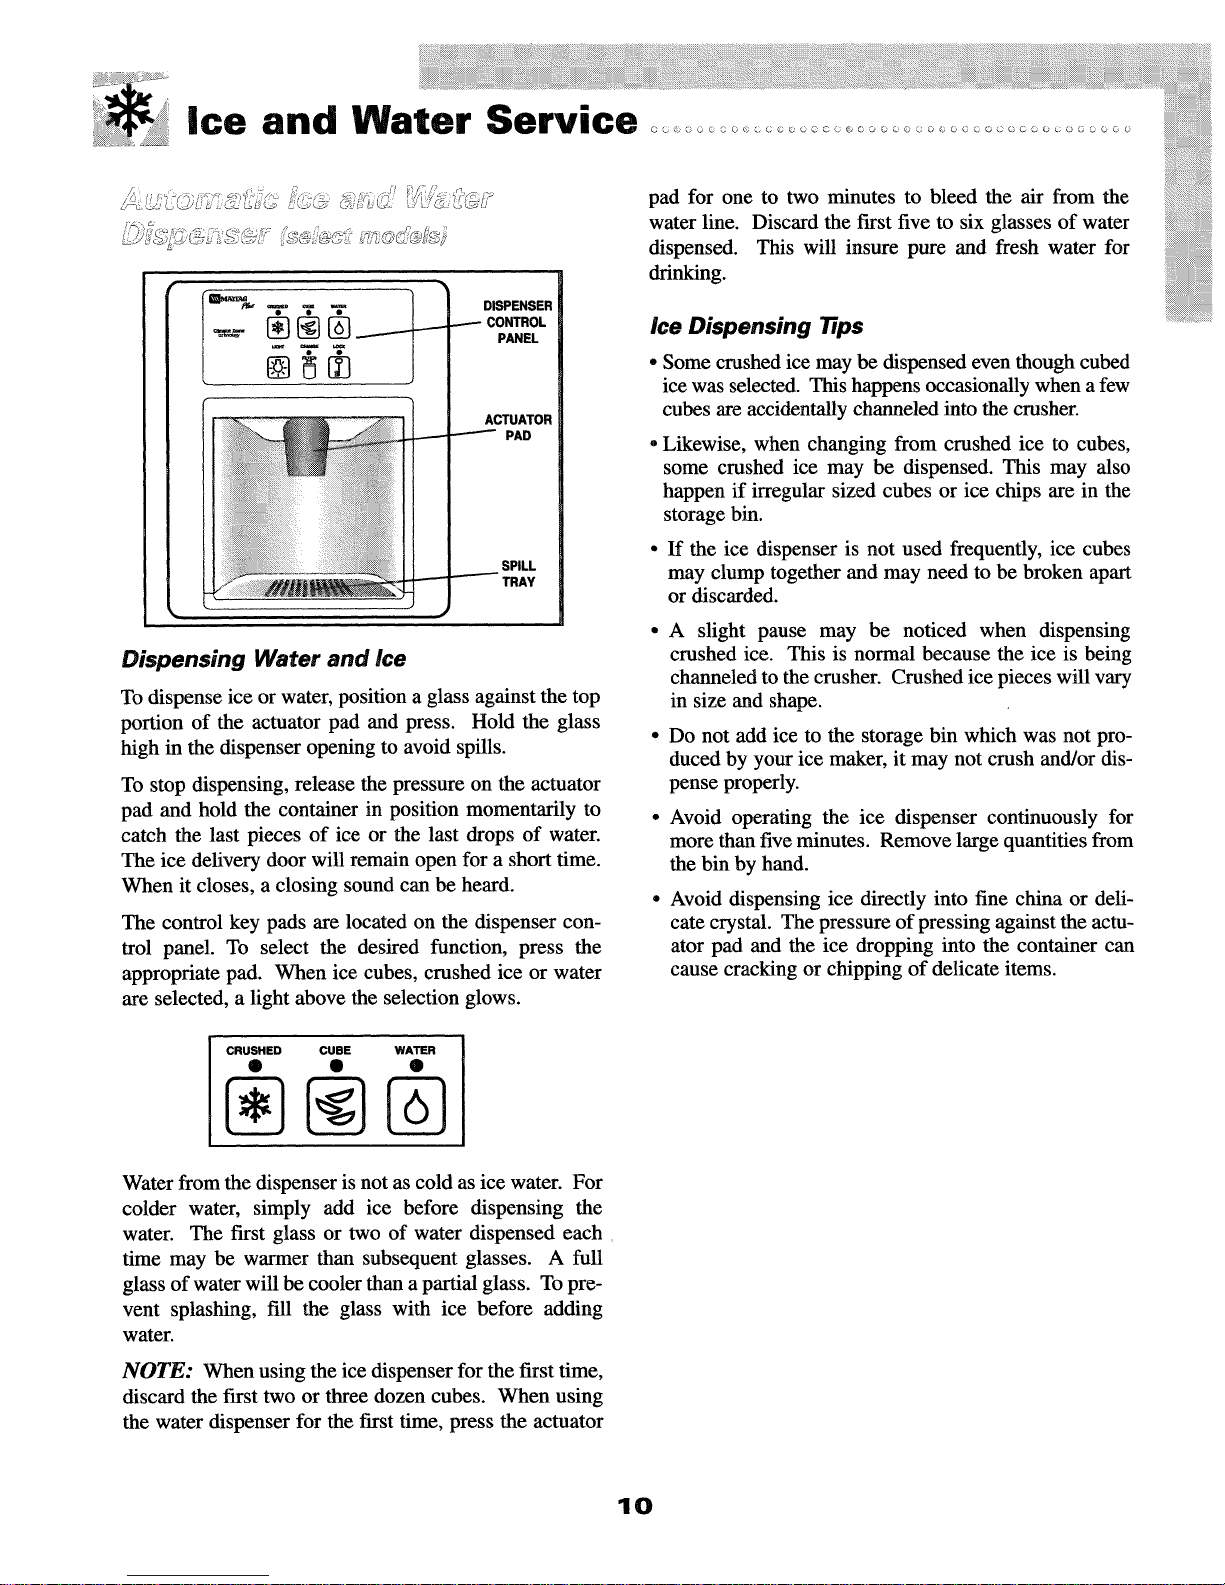
DISPENSER
.------ CONTROL
PANEL
ACTUATOR
PAD
pad for one to two minutes to bleed the air from the
water line. Discard the first five to six glasses of water
dispensed. This will insure pure and fresh water for
drinking.
ice Dispensing Tips
• Some crushed ice may be dispensed even though cubed
ice was selected. This happens occasionally when a few
cubes are accidentally channeled into the crusher.
Likewise, when changing from crushed ice to cubes,
some crushed ice may be dispensed. This may also
happen if irregular sized cubes or ice chips are in the
storage bin.
SPILL
TRAY
Dispensing Water and Ice
To dispense ice or water, position a glass against the top
portion of the actuator pad and press. Hold the glass
high in the dispenser opening to avoid spills.
To stop dispensing, release the pressure on the actuator
pad and hold the container in position momentarily to
catch the last pieces of ice or the last drops of water.
The ice delivery door will remain open for a short time.
When it closes, a closing sound can be heard.
The control key pads are located on the dispenser con-
trol panel. To select the desired function, press the
appropriate pad. When ice cubes, crushed ice or water
are selected, a light above the selection glows.
CRUSHED CUBE WATER
® • •
• If the ice dispenser is not used frequently, ice cubes
may clump together and may need to be broken apart
or discarded.
A slight pause may be noticed when dispensing
crushed ice. This is normal because the ice is being
channeled to the crusher. Crushed ice pieces will vary
in size and shape.
Do not add ice to the storage bin which was not pro-
duced by your ice maker, it may not crush and/or dis-
pense properly.
Avoid operating the ice dispenser continuously for
more than five minutes. Remove large quantities from
the bin by hand.
Avoid dispensing ice directly into fine china or deli-
cate crystal. The pressure of pressing against the actu-
ator pad and the ice dropping into the container can
cause cracking or chipping of delicate items.
Water from the dispenser is not as cold as ice water. For
colder water, simply add ice before dispensing the
water. The first glass or two of water dispensed each
time may be wanner than subsequent glasses. A full
glass of water will be cooler than a partial glass. To pre-
vent splashing, fill the glass with ice before adding
water.
NOTE: When using the ice dispenser for the first time,
discard the first two or three dozen cubes. When using
the water dispenser for the first time, press the actuator
10
Page 12
iiii ice and Water Service |continued) ...... o.......... ............ ,,
Spill Tray
DO NOT pour water into the Spill Tray grille at the
bottom of the dispenser area. This is a spill area, NOT
a drain. Normal, small spills will evaporate. Larger
spills should be wiped up with a soft cloth or sponge.
The grille slides out for clean up. It is recommended to
clean the spill area occasionally to prevent mineral
deposits.
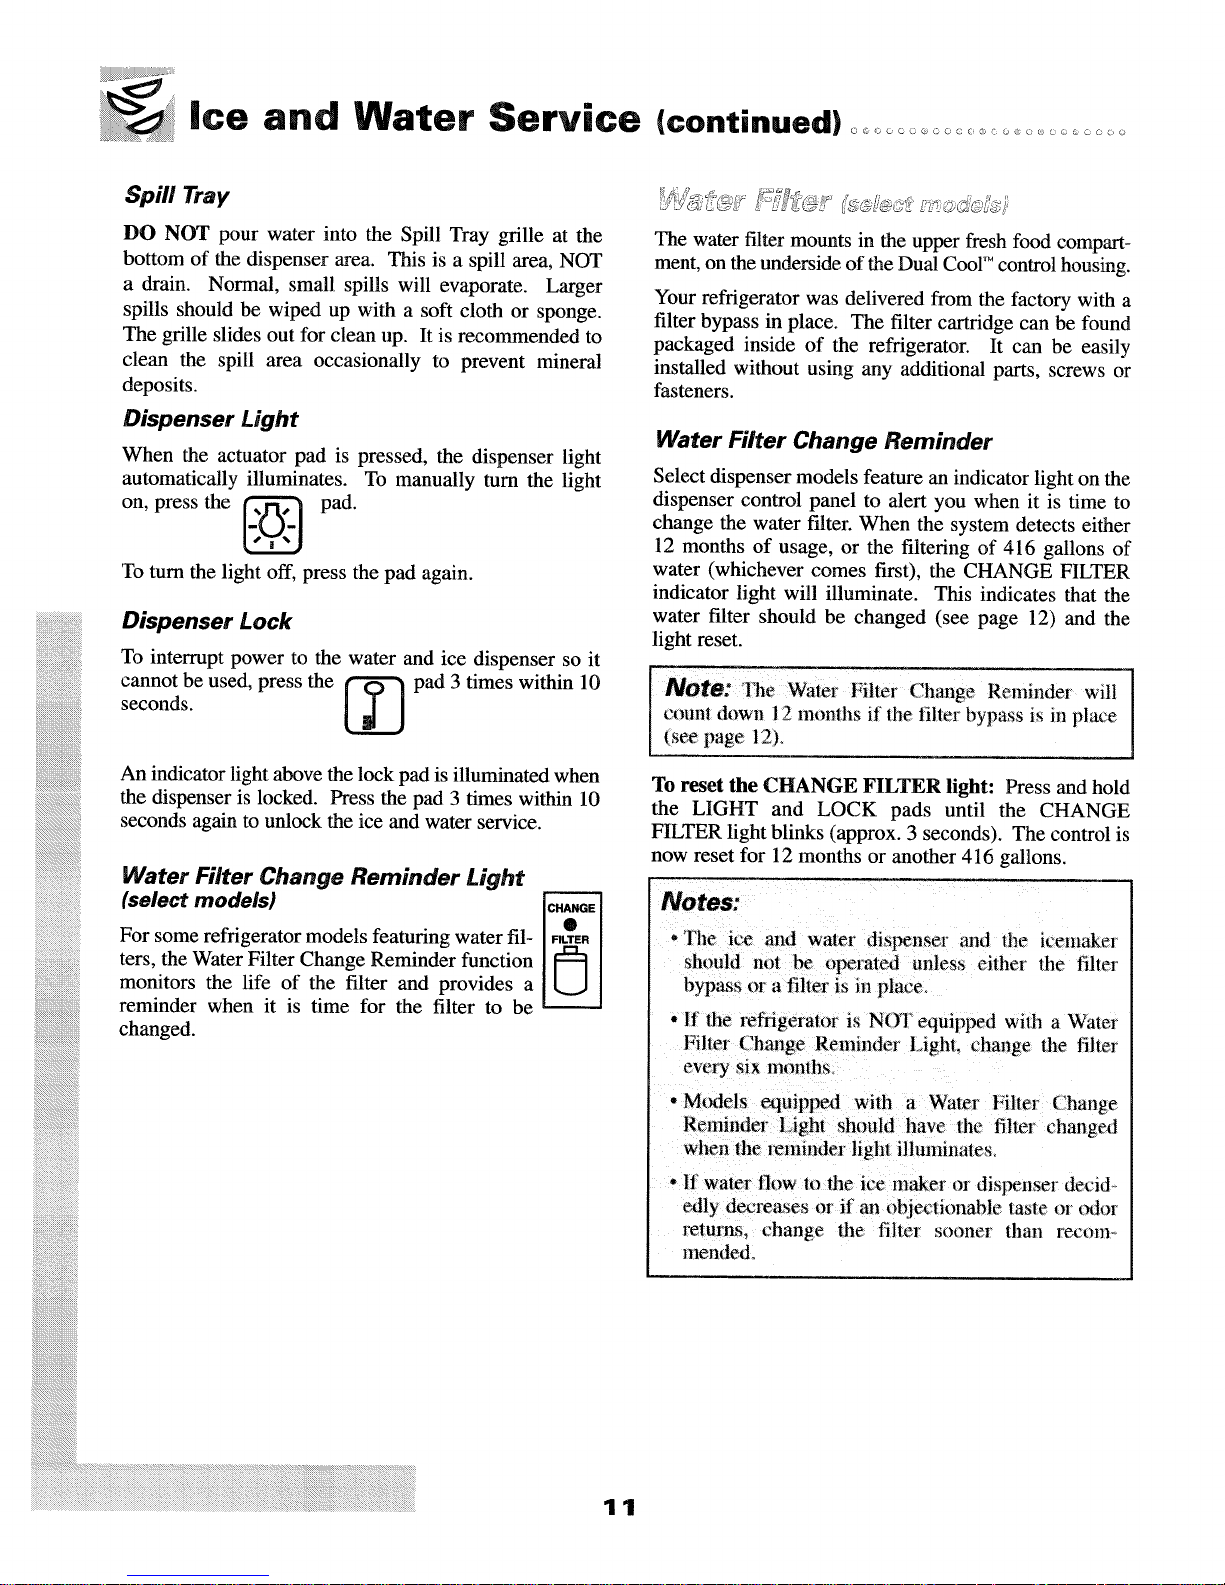
Dispenser Light
When the actuator pad is pressed, the dispenser light
automatically illuminates. To manually turn the light
on, press the _ pad.
To turn the light off, press the pad again.
Dispenser Lock
To interrupt power to the water and ice dispenser so it
cannot be used, press the _ pad 3 times within 10
seconds.
W
An indicator light above the lock pad is illuminated when
::2::2
the dispenser is locked. Press the pad 3 times within 10
seconds again to unlock the ice and water service.
iiii iiiiiiiiiiiiii i iii il
Water Filter Change Reminder Light
iiiiiiiiiiiiiiiiiiiiiiiiiiiiiiiiiiiiiiiiiiiiiii_
iiiiiiiiiiiiiiiiiiiiiiiiiiiiiiiiiiiiiiiiiiiiiii'
For some refrigerator models featuring water ill-
ters, the Water Filter Change Reminder function
(select models)
monitors the life of the filter and provides a
reminder when it is time for the filter to be
changed.
The water filter mounts in the upper fresh food compart-
ment, on the underside of the Dual Cool TM control housing.
Your refrigerator was delivered from the factory with a
filter bypass in place. The filter cartridge can be found
packaged inside of the refrigerator. It can be easily
installed without using any additional parts, screws or
fasteners.
Water Filter Change Reminder
Select dispenser models feature an indicator light on the
dispenser control panel to alert you when it is time to
change the water filter. When the system detects either
12 months of usage, or the filtering of 416 gallons of
water (whichever comes first), the CHANGE FILTER
indicator light will illuminate. This indicates that the
water filter should be changed (see page 12) and the
light reset.
Note: l]_e Water Filter Change Reminder will
coun_ down 12 months if the filter bypass is in place
[ (sere page 12).
To reset the CHANGE FILTER light: Press and hold
the LIGHT and LOCK pads until the CHANGE
FILTER light blinks (approx. 3 seconds). The control is
now reset for 12 months or another 416 gallons.
Notes:
.The ice and water dispenser and "die icemaker
should not_ operated unless either the filte_
bypass or a filter is in place_
• It the _fiige_atot is NOT equipped with a Water
I flteI (hange Remu de_., ght, change the filter
ever), six lnonths
• Models _uippext with a Water Filter Change
Reminder IJght should llave the filter changed
when the l_:lninder ligllt illuminates,
-If water flow lo the ice maker or dispenser decid_-
edly decreases or if an objectionable taste o_ odor
returns, change the filter sooner than recom_
mended.
11
Page 13

Initial Filter Cartridge Installation
1. Twist the cap of the filter bypass 1/4 turn counter-
clockwise (as viewed from the bottom) so the ears on
the plug can disengage. Remove the filter bypass
from the filter head apparatus.
[ sti-,i ,t futur youd ooseto !
[ use the water and ice dispenser wilhout a filler, ]
2, Carefully remove the filter from its packaging.
3. Apply the month sticker to the cartridge as a
reminder to replace the filter when recommended.
4, Remove the red cap from the filter.
5. Lubricate the O-ring with food grade vegetable oil.
6. Line up the cartridge ears so it can be inserted into the
filter head. The unlocked symbol will line up with
the indicator line that is molded into the light shield
area. Rotate the cartridge into the head. Twist the
cartridge 1/4 turn clockwise to lock it into place. You
will feel a stop and the locked symbol should now be
lined up with the indicator line.
7. Lower the icemaker wire lever arm into the down
(ON) position.
8. Dispense water through the dispenser for 10 minutes.
9. Carefully check for leaks.
Replacing the Filter Cartridge
1. Twist the filter cartridge 1/4 turn counterclockwise
(as viewed from the bottom) so that ears on the car-
tridge are able to disengage from the head. The
unlocked symbol will be lined up with the indicator
line that is molded into the light shield area. Twist
gently until the cartridge is free from the head, but
DO NOT pull. Avoid tipping the cartridge to prevent
spillage. Dispose of the used cartridge.
2. Carefully remove the replacement filter from its
packaging, (Read the label carefully to be sure you
have the correct replacement filter cartridge).
3. Follow steps 3 through 9 under Initial Filter Cartridge
Installation.
I NOLO: Filter liti_ may tx_ atl?_qed b_, abn_:umal feed
\_aler: conditkms or unusual incidents _such as h _drant
flushes; reservoir tUmovm 0r Varying local water Condi_
[rio.s: :
Periods of Non-Use
If the refrigerator has been out of use for more than 2
weeks (ie: placed in storage or has been moved) the
filter should be replaced when the refrigerator is put
back into service.
Special Notices
It is essential that operation, maintenance and filter
replacement requirements be carried out as scheduled.
This product is for cold water use only.
Do not use with water that is microbiologically unsafe,
or of unknown quality without adequate disinfection
before or after the system. Systems certified for cyst
reduction may be used on disinfected water that may
contain filterable cysts.
For your own knowledge and safety, it is recommended
that your water quality be periodically tested.
The contaminants or other substances removed or
reduced by this water treatment system are not neces-
sarily in your water. The feed water connection must
conform to applicable plumbing codes.
Notes:
• l_eave the _effigerator dotn open while removing
and installing filters or plugs; this will prevenl water
li'om flowing through the system and running into
the fresh fired compartment. As an added precau..
lion. mm off the ice maker by moving file wire level
arm into the up (OFF} position
* A newly installed water filter ca1_idge may cause
water to temporarily sptnl fl-om the dispenser,
12
Page 14
_aaa_aaaaaaa
Ice and Water Service (continued) .........................
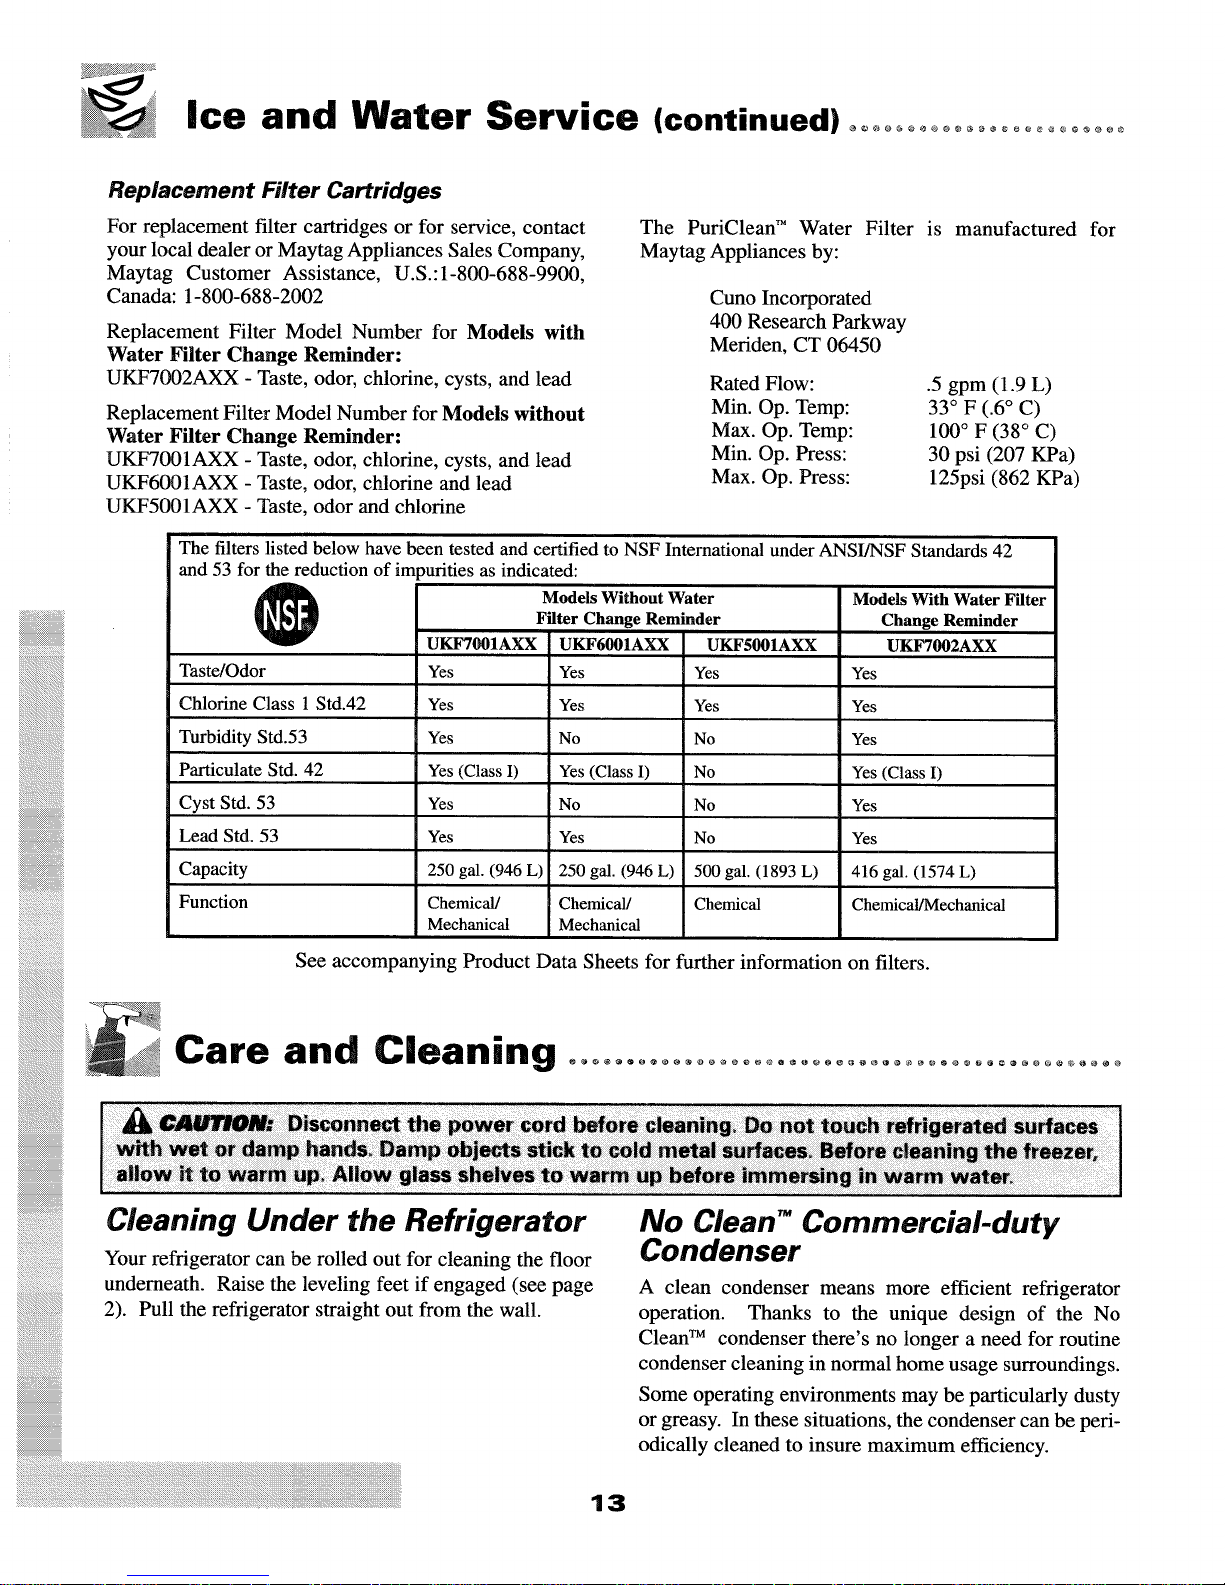
Replacement Filter Cartridges
For replacement filter cartridges or for service, contact
your local dealer or Maytag Appliances Sales Company,
Maytag Customer Assistance, U.S.:1-800-688-9900,
Canada: 1-800-688-2002
Replacement Filter Model Number for Models with
Water Filter Change Reminder:
UKF7002AXX - Taste, odor, chlorine, cysts, and lead
Replacement Filter Model Number for Models without
Water Filter Change Reminder:
UKFT001AXX - Taste, odor, chlorine, cysts, and lead
UKF6001AXX -Taste, odor, chlorine and lead
UKF5001AXX - Taste, odor and chlorine
The filters listed below have been tested and certified to NSF International under ANSI/NSF Standards 42
and 53 for the reduction of impurities as indicated:
Models Without Water Models With Water Filter
Filter Change Reminder Change Reminder
UKFT001AXX
Taste/Odor
Chlorine Class 1 Std.42
Turbidity Std.53
Particulate Std. 42
Cyst Std. 53
Lead Std. 53
Capacity
Function
Yes
Yes
Yes
Yes (Class I)
Yes
Yes
250 gal. (946 L)
Chemical/
Mechanical
The PuriClean TM Water Filter is manufactured for
Maytag Appliances by:
UKF6001AXX
Yes
Yes
No
Yes (Class I)
No
Yes
250 gal. (946 L)
Chemical/
Mechanical
Cuno Incorporated
400 Research Parkway
Meriden, CT 06450
Rated Flow:
Min. Op. Temp:
Max. Op. Temp:
Min. Op. Press:
Max. Op. Press:
UKF5001AXX
Yes
Yes
No
No
No
No
500 gal. (1893 L)
Chemical
.5 gpm (1.9 L)
33 ° F (.6 ° C)
100 oF (38 ° C)
30 psi (207 KPa)
125psi (862 KPa)
UKF7002AXX
Yes
Yes
Yes
Yes (Class I)
Yes
Yes
416 gal. (1574 L)
Chemical/Mechanical
See accompanying Product Data Sheets for further information on filters.
Cleaning Under the Refrigerator
Your refrigerator can be rolled out for cleaning the floor
iiiiiiiiiiiiiiiiiiii_iiiiiiiiii_i_i_iiiiiiiiiii
underneath. Raise the leveling feet if engaged (see page
2). Pull the refrigerator straight out from the wall.
No Clean TM Commercial-duty
Condenser
A clean condenser means more efficient refrigerator
operation. Thanks to the unique design of the No
Clean TM condenser there's no longer a need for routine
!!!!!!!!!!!!!!!!!!!!!!!!!!!!!!!!!!!!!i!!!!i!!!!!!
condenser cleaning in normal home usage surroundings.
Some operating environments may be particularly dusty
or greasy. In these situations, the condenser can be peri-
odically cleaned to insure maximum efficiency.
13
Page 15
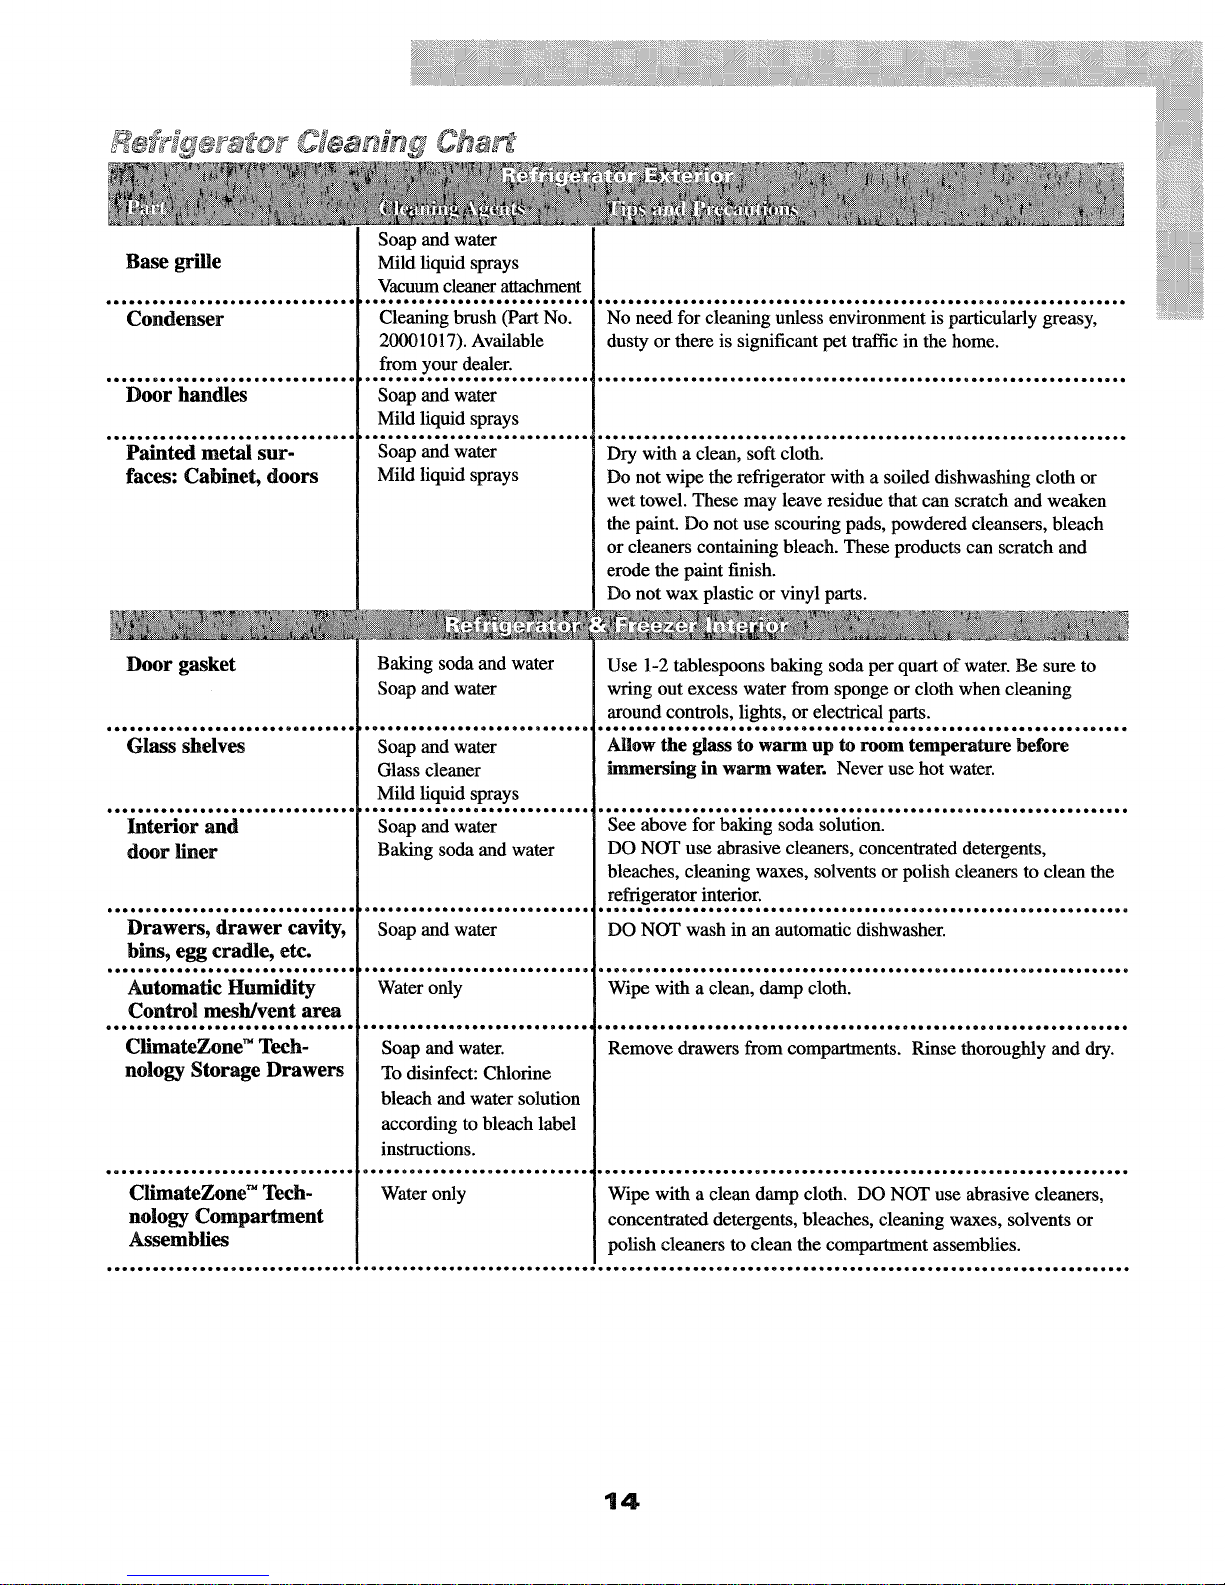
Soap and water
••••oeoeeeeoeoeooeeeeee••to•oeeeeeeeo•oooo•oeooeo_Qeoee•oeoeeeoeoe••
No need for cleaning unless environment is particularly greasy,
dusty or there is significant pet traffic in the home.
• e • • • • ••coo• •o .•o_••• •••o*•••eoeeeo• eeoc••• ••o*••••••••eeQe•• 0• ••• • •
Dry with a clean, soft cloth.
Do not wipe the refrigerator with a soiled dishwashing cloth or
wet towel. These may leave residue that can scratch and weaken
the paint. Do not use scouring pads, powdered cleansers, bleach
or cleaners containing bleach. These products can scratch and
erode the paint finish.
Do not wax plastic or vinyl parts.
Baking soda and water
Soap and water
• oQoee•o 00 •0 e• •_ • • el• • • • o _• •co
Soap and water
Glass cleaner
Mild liquid sprays
Use 1-2 tablespoons baking soda per quart of water. Be sure to
wring out excess water from sponge or cloth when cleaning
around controls, lights, or electrical parts.
• • • • • e• oa • • • • ,• ioo• o• o• •• • 0• oeeoee **•eoe• • oe • •**ee• 0_ •*••• • oe • •eoe• e
Allow the glass to warm up to room temperature before
immersing in warm water. Never use hot water.
14
Page 16

Food Storage Tips ................................ ............. .°°o
Fresh Food S,orage
• The fresh food compartment of a refrigerator should
be kept between 34°F and 40°F with an optimum
temperature of 37°E To check the temperature,
place an appliance thermometer in a glass of water
and place in the center of the refrigerator. Check
after 24 hours. If the temperature is above 40°F
adjust the controls as explained on page 3.
• Temperatures measured elsewhere in the refriger-
ator may vary from crisper readout temperatures
(select models) due to location of crisper thermostat.
• Avoid overcrowding the refrigerator shelves. This
reduces the circulation of air around the food and
results in uneven cooling.
Fruit and Vegetables
• Store in the crisper drawers to help preserve the fruit
and vegetable quality for longer time periods.
• Sort fruits and vegetables before storage and use
bruised or soft items first. Discard those showing
signs of decay.
• Always wrap odorous foods such as onions and cab-
bage so the odor does not transfer to other foods.
Frozen Food S orage
The freezer compartment of a refrigerator should be
kept at 0°F or lower. To check the temperature,
place an appliance thermometer between the frozen
packages and check after 24 hours. If the tempera-
ture is above 0°F, adjust the control as described on
page 3.
• A freezer operates more efficiently when it is at least
two-thirds full.
Packaging Foods for Freezing
To minimize dehydration and quality deterioration
use aluminum foil, freezer wrap, freezer bags or air-
tight containers. Force as much air out of the pack-
ages as possible and be sure they are tightly sealed.
Trapped air can cause the food to dry out, change
color and develop an off-flavor (freezer burn).
• Overwrap fresh meats and poultry with suitable
freezer wrap prior to freezing.
• Do not refreeze meat that has completely
thawed.
Loading the Freezer
• While vegetables need a certain amount of moisture
to remain fresh, too much moisture can shorten
storage times (especially lettuce). Drain vegetables
well before storing.
Meat and Cheese
• Raw meat and poultry should be wrapped securely
so leakage and contamination of other foods or sur-
faces does not occur.
• Occasionally mold will develop on the surface of
hard cheeses (Swiss, Cheddar, Parmesan). Cut off at
least an inch around and below the moldy area. Keep
your knife or instrument out of the mold itself. The
remaining cheese will be safe and flavorful to eat. Do
NOT try to save individual cheese slices, soft cheese,
cottage cheese, cream, sour cream or yogurt when
mold appears.
Dairy Food
* Most dairy foods such as milk, yogurt, sour cream and
cottage cheese have freshness dates on their cartons
for appropriate length of storage. Store these foods in
the original carton and refrigerate immediately after
purchasing and 'after each use.
.Avoid adding too much warm food to the freezer at
one time. This overloads the freezer, slows the rate of
freezing and can raise the temperature of frozen
foods.
Leave space between the packages so cold air can
circulate freely, allowing food to freeze as quickly as
possible.
Avoid storing hard-to-freeze foods such as ice cream
and orange jnice on the freezer door shelves. These
foods are best stored in the freezer interior where
the temperature varies less with door openings.
15
Page 17
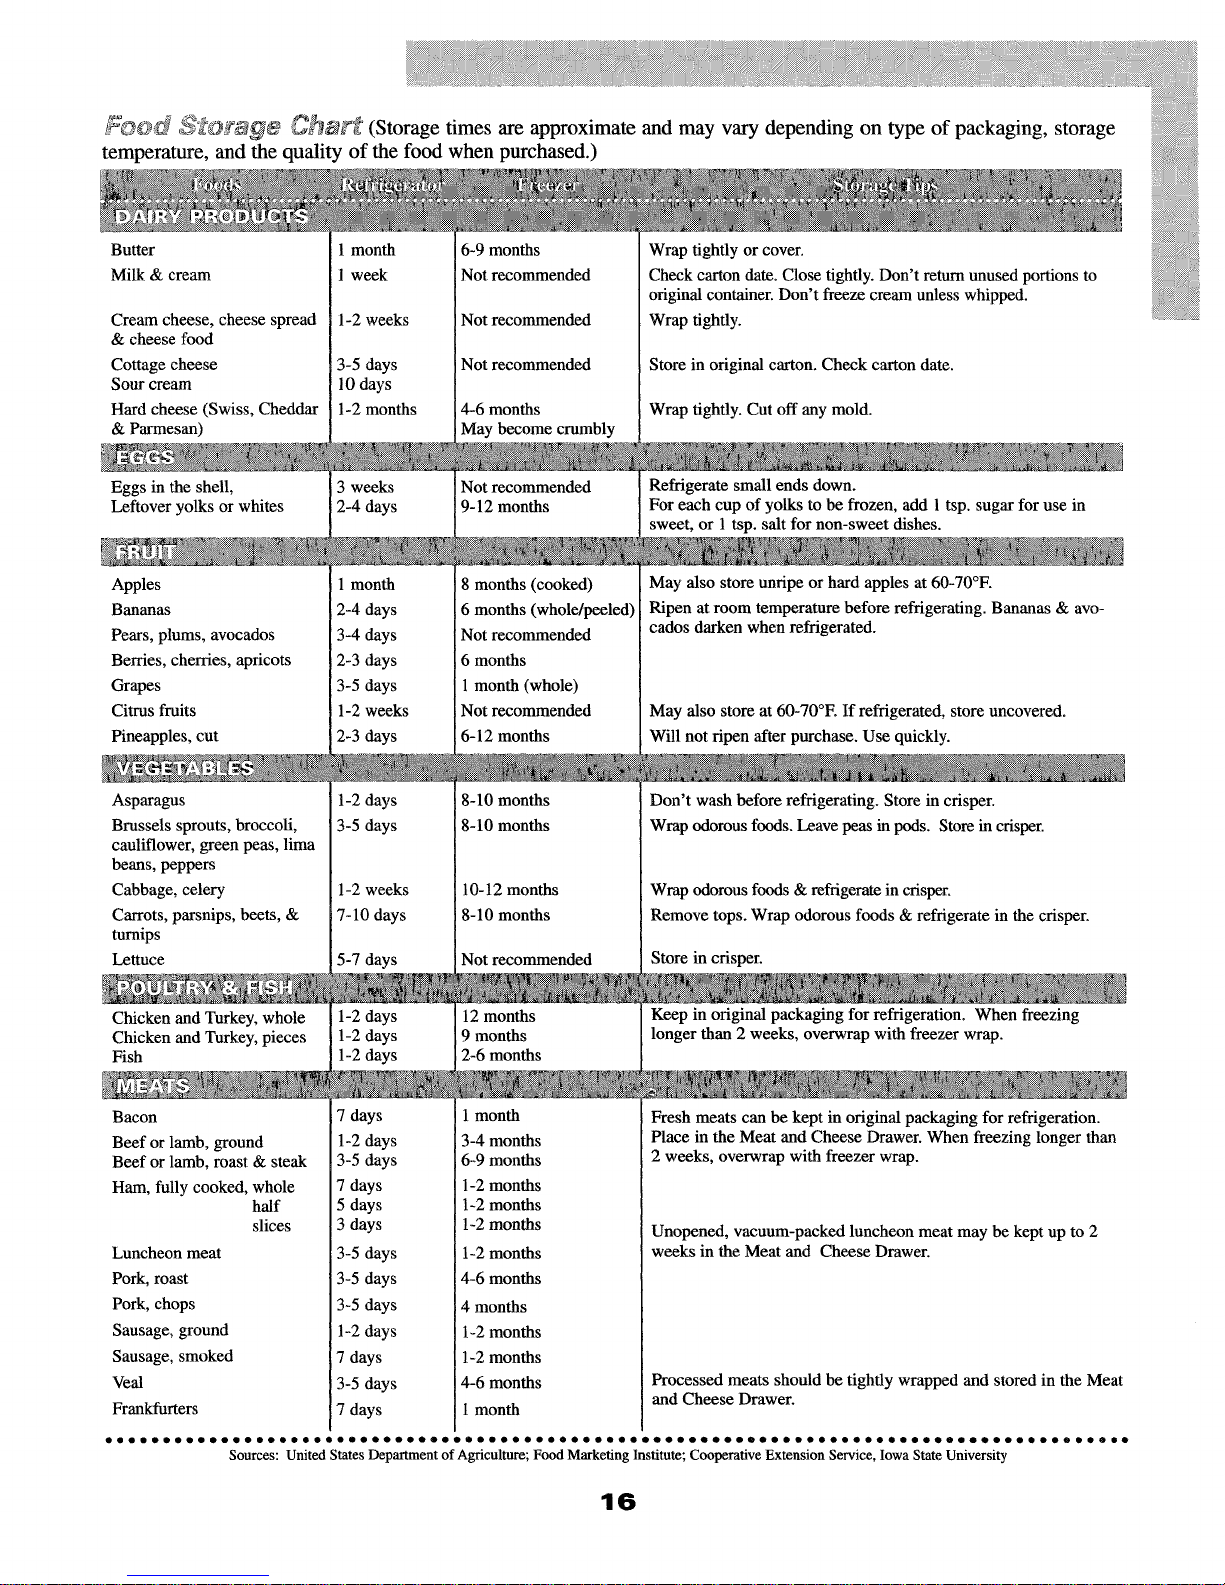
,_*_= _ _W_ (Storage times are approximate and may vary depending on type of packaging, storage
temperature, and the quality of the food when purchased.)
Butter
Milk & cream
Cream cheese, cheese spread
& cheese food
Cottage cheese
Sour cream
Hard cheese (Swiss, Cheddar
& Parmesan)
Eggs in the shell,
Leftover yolks or whites
Apples
Bananas
Pears, plums, avocados
Berries, cherries, apricots
Grapes
Citrus fruits
Pineapples, cut
Asparagus
Brussels sprouts, broccoli,
cauliflower, green peas, lima
beans, peppers
Cabbage, celery
Carrots, parsnips, beets, &
turnips
Lettuce
1 month
1 week
1-2 weeks
3-5 days
10 days
1-2 months
3 weeks
2-4 days
1 month
2-4 days
3-4 days
2-3 days
3-5 days
1-2 weeks
2-3 days
1-2 days
3-5 days
1-2 weeks
7-10 days
5-7 days
6-9 months
Not recommended
Not recommended
Not recommended
4-6 months
May become crumbly
Not recommended
9-12 months
8 months (cooked)
6 months (whole/peeled)
Not recommended
6 months
1month (whole)
Not recommended
6-12 months
8-10 months
8-10 months
10-12 months
8-10 months
Not recommended
Wrap tightly or cover.
Check carton date. Close tightly. Don't return unused portions to
original container. Don't freeze cream unless whipped.
Wrap tightly.
Store in original carton. Check carton date.
Wrap tightly. Cut off any mold.
Refrigerate small ends down.
For each cup of yolks to be frozen, add 1 tsp. sugar for use in
sweet, or 1 tsp. salt for non-sweet dishes.
May also store unripe or hard apples at 60-70°E
Ripen at room temperature before refrigerating. Bananas & avo-
cados darken when refrigerated.
May also store at 60-70°E If refrigerated, store uncovered.
Will not ripen after purchase. Use quickly.
Don't wash before refrigerating. Store in crisper.
Wrap odorous foods. Leave peas in pods. Store in crisper.
Wrap odorous foods & refrigerate in crisper.
Remove tops. Wrap odorous foods & refrigerate in the crisper.
Store in crisper.
Chicken and Turkey, whole
Chicken and Turkey, pieces
Fish
Bacon
Beef or lamb, ground
Beef or lamb, roast & steak
Ham, fully cooked, whole
half
slices
Luncheon meat
Pork, roast
Pork, chops
Sausage, ground
Sausage, smoked
Veal
Frankfurters
. . o o o o o o o o .SOolrces:OUnltedStalesDep_rt_n;n_ if Ag_cul_u_e_ Fo_d°M_rkelng Inst_tut_ Coo;r_tiv;Exte_s_ol Serv_ce,I_wa State Univelsl; . ° ° ." ° ° ° " .
1-2 days
1-2 days
1-2 days
7 days
1-2 days
3-5 days
7 days
5 days
3 days
3-5 days
3-5 days
3-5 days
1-2 days
7 days
3-5 days
7 days
12 months
9 months
2-6 months
1 month
3-4 months
6-9 months
1-2 months
1-2 months
1-2 months
1-2 months
4-6 months
4 months
1-2 months
1-2 months
4-6 months
1 month
Keep in original packaging for refrigeration. When freezing
longer than 2 weeks, overwrap with freezer wrap.
Fresh meats can be kept in original packaging for refrigeration.
Place in the Meat and Cheese Drawer. When freezing longer than
2 weeks, overwrap with freezer wrap.
Unopened, vacuum-packed luncheon meat may be kept up to 2
weeks in the Meat and Cheese Drawer.
Processed meats should be tightly wrapped and stored in the Meat
and Cheese Drawer.
16
Page 18
Storage and Maintenance of Refrigerator° ....... o
If you will be gone for a month or less, leave the con-
trols at the usual settings.
During longer absences:
a) remove all food,
b)
shut off the ice maker (if installed) and the valve
where you tapped into the water line to supply the
refrigerator,
c)
disconnect the refrigerator from the electrical outlet,
d)
remove the filter cartridge (select models) and
install the filter bypass (see pages 12-13), dispose of
the used cartridge. A new cartridge can be installed
when the refrigerator is put back into service.
e) clean and dry the refrigerator thoroughly,
f) leave the doors open to prevent odors.
Moving
When moving, follow steps a-f under Vacations. In
addition, remove and carefully pack any items that are
easily removable. Ship the refrigerator in an upright
position with the doors taped shut and shelves secured.
Always use a standard 40 or 60 watt appliance bulb when replacing a fresh food or
freezer compartment bulb.
Refrigerator
There are two light bulbs located at the top of the refrig-
erator compartment, on the underside of the Dual Cool TM
control housing.
To replace a light bulb(s), remove the control cover
from the control housing:
• grasp the control cover at the two rear "finger tabs".
These are located at the upper rear of the fresh food
compartment, behind the light shields.
• pull down slightly to clear the retainer tabs and slide
the cover forward until it is free.
• replace the bulb(s) with a 60-watt, standard base
appliance bulb(s).
• After replacing the bulb(s), align the control cover on
to the ribs on the control housing and slide it straight
back until it snaps onto the retainer tabs.
On select models, there is an additional light located
behind the top crisper drawer. To replace see page 7.
Freezer
The freezer light is located on the back wall of the
freezer compartment.
To replace:
- unhook the tabs on the top of the light shield by
pressing in with the thumb on the center top of the
light shield
• pivot the shield down
unscrew the bulb when cool and replace it with a
standard 40-watt appliance bulb
replace the bulb cover by pivoting it back into place
and snapping the tabs into the appropriate slots.
Dispenser Light (dispenser models only1
To replace:
- Locate the light bulb in the dispenser area to the left
of the actuator.
Unscrew the used bulb and remove.
, Replace the bulb, using a 120V, 7-watt bulb.
17
Page 19

* the temperature control turned to "Off"
. the power cord not plugged in
Won't run • no power at the electrical outlet
• the circuit breaker tripped or the house fuse blown
• o • •e•oe*•e •
Runs too long/too • prolonged door openings
frequently • too many door openings
o••• •• • • e• eeiDio*el,o*eooaeeooleeoo el em_,*_D_,ea**e_e*,*e*o.*,e_oe_eoe_e_e, •
....................................... .•'the•cabinet not level .....
Noisy operation • a weak floor
............................................. • odor producing foods should be covered or wrapped
Odor in cabinet • the interior needs cleaning
"'"'"'Warm"air'"'"'"'""'""Ü'"'"'"'"'"'fromcabinet bottom ........_..................n._..._........__..................................._....._normal air flow for conde ser circulation
Cabinet vibrates • a weak floor
• refrigerator is in automatic defrost
e*e,eo**e*ltlee _o eeooo Q_e t oooo_Qoeoeoemoeooeo*ollooeoe_oooeooeeeooooeo-a • eeoemeioooeoe
modem refrigerators larger and run colder which requires more running time to
provide more stable temperatures
• the base grille blocked
• the door not sealing (due to a package or a container holding door open)
• warm room temperature
• the cabinet not level
{{
iiiiiiiiiiiiiiiiiiiiiiiiiiiiiiiiiiiiiiiii
iiiiiiiiiiiiiiiiiiiiiiiiiiiiiiiiiiiiiiil
iiiiiiiiiiiiiiiiiiiiiiiiiiiiiil
Moisture on inside cabinet walls • door not closed properly
• can occur during hot, humid weather with frequent or prolonged door openings
Excessive moisture in or around crisper • food not wrapped properly
• hot, humid weather
.....................................No"temperature""" readout" "inthe * the nor_I_al"setting has been chosen .........
ClimateZone TM Technology (select • the drawer has not been opened for four weeks
models) drawer display
ClimateZone TM temperature readout is "-'_or bes_ resu_ts_refrigerator _1" freezer'con_r'ols'st_oul'd b'e se_a; _he'r_i_t'_5)'ievel's .......
• After drawer openings, the addition of a new load or changing settings, the readout
not within target range may vary The temperature will recover in a short period of time
Refrigerator or freezer compartment • the refrigerator or freezer control set too warm
too warm • prolonged door openings
Refrigerator compartment too cold * the refrigerator control set too cold
...............................................Sizzling sound in freezer :""a'no'_ai sou'n'dcanse_t"_y,defros't'water _tnpping "on'd'e'f_os_mechanism ° ................
............................................... tt_eappear ........................... n _s...................................
Visible glow in the freezer vents ": ance of a red glow or reflectio normal during the defrost cycle ......
• 1•• •e_o.oQ • J •, •oct•o•••• •o• eeeeoeeoo,eeooto•
Freezer not freezing properly
o_,**ooootooot,_*oe_oooloo•o*oe=eoIeDoot=ooo
Water Filter Change Reminder light
(select models) comes on when the filter
bypass is in place
•":"p;oauc;s ";;ffr';o;;en;may'no; w enT;o;gni';ge
concentrated juice, etc.)
• adjust freezer control to a colder setting
• This is normal. The control will count down 12 months or 416 gallons whether the
filter or the filter bypass is in place. Reset the light (see pg 11)
eo*eooe**ooeotoooo_eoe * oio_mo•_*o_*e,ee *oo*oo•oooe ol oetoo•e_eo_Qooo_e
......................................" " "''" cold air moving over ;1;eIce cubes causes shrinkage especiall; w_th"_i'mited usage
Ice cubes evaporate This is normal
stop in OFF (up)position
Automatic ice maker not operating • the water supply turned off
• the water pressure too low
• the freezer too warm
Front cabinet surface warm to the touch • special design to limit condensation during periods of high humidity
ice jam in the dispenser
Ice dispenser not operating • ice maker not operating
• lock switch on
water supply turned off
Water dispenser not operating • water pressure too low
• lock switch on (see pg. 10)
NOTE: Fore.her assis_ con_t_ Maytag AppliancesSales Comlmny_Maytag Customer Ass_m:e: UoS, 1:800_68&9900m Ca_ 1800_6&_2002
18
Page 20

_ One Year
Fm°one (1_year fi_.m_the _ of original retail,ptw_e_ m_ypartt_ fails in normal borne use will be _it_d or repla_:ed_e of charge
I_e Make_- when pu_ha_ with the refrigerator and inslail_ by the deai_ _ k'e maker _1| be _nsi_ part of the _frig_tor fi_r
wan_nff pm_,
this wm_anty lX_it_t _ will _ lmrvide _ _ffchmge, all lal_' and in-h_m_e se_i_ requi_ m replace the t_fective part.
l)nnited W_ty _ Cedter _
t_m mileage and tr_ml_Jmtitm
United St'_s or Canada.
do not alhw__the exclusion
iiiiiiiiiiiiiiiiiiiiiiiiiiiiiiiiiiiiiiiiiiiiiiiiii
To locate an authorized service company in your area contact the Maytag dealer from whom your appliance was purchased; or call Maytag
iiiiiiiiiiiiiiiiiiiiiiiiil
Appliances Sales Company, Maytag Customer Assistance at the number listed below. Should you not receive satisfactory warranty service, please
call or write:
i_i!_i_i!i_ili!_i!i!i!i!i:i
Maytag Appliances Sales Company
Attn: CAIR s_ Center
P.O. Box 2370
Cleveland, TN 37320-2370
U.S. 1-800-688-9900
CANADA 1-800-688-2002
U.S. customers using TTY for deaf, hearing impaired or speech impaired, call 1-800-688-2080.
NOTE:
iiiiiiiiiiii_iiiiiiiiiil
iiiiiii:_iiii_iiiiiiiiiill
What Is Not Covered By These Warranties:
iiiiiiiiiiiiiiiiiiiiiiiii
User's Guides, service manuals and parts catalogs are available from Maytag Appliances Sales Company, Maytag Customer Assistance.
When writing about an unsolved service problem, please include the following information:
(a) Your name, address and telephone number;
(b) Model number, serial number, and revision number (found on the top front interior of the refrigerator compartmen0;
(c) Name and address of your dealer and the date the appliance was bought;
(d) A clear description of the problem you are having;
(e) Proof of purchase (sales receipt).
1. Conditions and damages resulting from any of the following:
a. Improper installation, delivery, or maintenance.
b. Any repair, modification, alteration or adjustment not autho-
rized by the manufacturer or an authorized servicer.
c. Misuse, abuse, accidents, or unreasonable use.
d. Incorrect electric current, voltage or supply.
e. Improper setting of any control.
2. Warranties are void if the original serial numbers have been
removed, altered, or cannot be readily determined.
3. Light bulbs.
4. Products purchased for commercial or industrial use.
5. The cost of service or service call to:
a. Correct installation errors.
b. Instruct the user on proper use of the product.
c. Transport the appliance to the servicer.
6. Consequential or incidental damages sustained by any
person as a result of any breach of these warranties.
Some states do not allow the exclusion or limitation of
consequential or incidental damages, so the above
exclusion may not apply.
MAYTAG * One Dependability Square • Newton, Iowa 50208
_:_g_, h/t!.//www, may/a#. €orn
19
Page 21

I
Si wins avez /_soin ffaide, il sera utile d'avoir les
num+ros de modNe el de s6rie de votre r6frig6rateur.
Vous ]es trouverez sur ]a plaque signal6tique qui se
trouve au haul du com paa+iment pour produits frais.
Notez ces chiffres ci:dessous pour vous permettre d'y
avoir facilement acc_s.
NEWTON IA _I_
_l+ments +m_¢nrs _t+ R_fri em+...... +......,++._+28
Ser+tce de (/+lace et + Eau+:................... -,.+_-. ......29+33
Avanl d'Appeler le Service de [_.pmmage ................38
Garant_e .................................................. 39
Pour toutes questions suppl6mentaires, n'h6sitez pas
nous contacter:
++ + + : •
Maytag Appliance Sales Company
1-800-688-2002 CANADA
(Lundi-vendredi, 8 h _t8 h, heure de l'est)
Intemet: http//www.maytag.com
FOR I_EM_I{I=R OPTION _, _e 11_ _HZ
Num6ro de module
Num6ro de s6rie
I Num6ro de r6vision
I Date d'achat
+MAYI'AG
Page 22

iiiiiiiiiiiiiiiiiiiiiiiiiiiiiiiiiiiiiiiiiil
Utiliser le r6frig6rateur uniquement pour l'utilisation
pour laquelle il est pr6vu.
Pour 6viter tout risque d'61ectrocution, ne jamais
brancher le r6frig6rateur dans une prise qui n'est pas
correctement reli6e _ la terre, conform6ment aux
codes de l'61ectricit6 locaux et nationaux. Voir la mise
en garde _ et les consignes de mise _ la terre.
D6brancher le r6frig6rateur avant de le nettoyer ou de
remplacer une ampoule.
En cas de panne de courant, ouvrir les portes le moins
souvent possible. Si la panne dure un certain temps,
prot6ger les aliments en mettant des morceaux de
glace carbonique sur le dessus ou v6rifier avec les
fournisseurs locaux s'il est possible de mettre tempo-
rairement les aliments dans un casier frigorifique. Ne
pas recongeler les aliments qui ont compl&ement
d6congel6; les jeter.
Tout cordon 61ectrique qui se trouve endommag6 ou
effiloch6 doit _tre imm6diatement r6par6 ou rem-
plac6. Ne jamais d6brancher l'appareil en tirant sur le
cordon.
de 115 volts, 15 amp6res et 60 hertz. II
est recomrnand6 _ I® brancher sur un
c|_uit s6pa_ et _li6 _ ia terre qui lui
trique _ _t appareiL
Cet appareil est 6quip6 d'une fiche avec mise _ la terre
?_trois broches pour votre protection contre les risques
d'61ectrocution. I1 doit _tre branch6 darts une prise reli6e
la terre. Si la prise murale dans laquelle l'appareil doit
_tre branch6 est _tdeux trous, la responsabilit6 et l'oblig-
ation reviennent au client de la faire remplacer par une
prise h trois trous correctement reli6e _ la terre. Ne pas
couper ni enlever, en aucune circonstance, la troisi_me
broche de la fiche. Ne pas utiliser d'adaptateur. Ne pas
utiliser de rallonge.
Cordon d'alimentation avec fiche
de mise _ la terre _ trois broches.
..........
Ne pas faire fonctionner le r6frigfrateur en pr6sence
de gaz explosifs.
_iiiiiiiiiiiiiiiiiiiiiiiiiiiiiiiiiiiiiiiiii
_!!iiiiiiiiii_iii!iiiiiiii!ii!!iiiiiiii!_
_iiiiiiii!ii!i!iiiiiiiiiiiiiiiiiiiiiiiiiii_
Ne pas laisser les enfants grimper sur les tablettes du
r6frig6rateur ni s'y accrocher, ni s'y tenir debout.
important: Les enfants qui se trouvent enferm6s
darts un r6frigfrateur et y suffoquent ne sont pas un
probl_me du pass6. Les r6frig6rateurs mis au rebut
ou laiss6s dans la rue con-
tinuent h _tre dangereux...
m_me s'ils sont laiss6s
<< pour quelques jours
seulement >). Pour se
d6barrasser d'un vieux
r6frig6rateur, suivre les
indications ci-dessous pour
aider h 6viter les accidents.
• Enlever les portes.
• Laisser les tablettes en
place _ l'int6rieur de
faqon _ ce qu'il n'y ait
pas de place pour qu'un
enfant monte dedans.
Prise murale permettant
la raise _ la terre.
21
Page 23

Votre nouveau r6frig6rateur a 6t6 emball6 avec soin aux
fins d'exp6dition. Enlever et jeter les attaches de trans-
port (si elles ont 6t6 utilis6es) qui se trouvent juste au-
dessus de chaque tablette au point ofaelle s'accroche sur
le chassis. Pour enlever ces attaches, les faire jouer d'un
c6t6 _ l'autre, puis firer dessus.
I1 doit y avoir libre circulation d'air au niveau de la
grille de ventilation se trouvant _tl'avant et au bas de
l'appareil.
Placer le r6frig6rateur dans une piece o_ la temp6ra-
ture ambiante ne risque pas de descendre au-dessous
de 13° C (55 ° F) car il ne se mettrait pas assez sou-
vent en marche pour maintenir la temp6rature voulue
dans le cong61ateur.
Laisser un d6gagement d'un minimum de 13 mm
(1/2 po) sur les c6t6s, au haut et h l'arri_re du
r6ffig6rateur pour en faciliter la mise en place. S'il
est plac6 avec le c6t6 charni_res contre un mur, il est
pr6f6rable de laisser un espace addifionnel pour per-
mettre l'ouverture complete de la porte.
Le r6frig6rateur sera d'autant plus esth6tique et perfor-
mant s'il est de niveau. Le r6frig6rateur a des roulettes
qui peuvent _tre r6gl6es pour assurer la mise de niveau
de l'appareil:
Enlever le couvre-charniEres inf6rieur (voir fig. I).
Pour cela, saisir chaque couvre-charniEre prEs de la
charniEre et faire pression. Les pattes de fixation se
d6senclenchent, ce qui permet d'enlever les couvre-
charniEres.
R6gler les roulettes _ l'aide d'un toumevis (voir fig. 2).
Pour bloquer le r6frig6rateur en place, abaisser les
deux pieds de blocage, qui se trouvent prEs des
roulettes avant (voir fig. 3).
Remettre les couvre-charniEres.
o
Si le plancher n'est pas de niveau et qu'il est nfces-
saire de sur61ever l'arriEre du r6frig6rateur, il est con-
seill6 de faire reposer les roulettes sur un morceau de
contreplaqu6 ou autre cale de ce genre.
Faire attention _ ne pas laisser de marques ou ab_mer
le plancher lors de la mise en service de l'appareil sur
une plancher en vinyle ou en parquet. Un morceau de
contreplaqu6, de moquette ou d' autre mat6riau devra
atre utilis6 pour prot6ger le plancher pendant la mise
en place de l'appareil.
_ _
v.DSlJ _ _.,_ _ k LJ_--Jk._kkMk'Gk_k
• Placer le r6frig_rateur loin d'appareils produisant de
la chaleur tels que cuisiniEre ou lave-vaisselle, de
bouches d'air de chauffage et de la lumiEre du soleil.
Mettre le r6frig6rateur de niveau et ne pas bloquer la
circulation de l'air devant la grille de ventilation
avant.
Garder le cong61ateur aussi plein que possible pour
que moins d'air froid ne s'6chappe lorsque la porte
est ouverte. Quand le cong61ateur est moins d'aux
deux tiers plein, mettre des cartons _t lait _t moiti6
pleins d'eau dans le cong61ateur.
Laisser les plats chauds refroidir l_gErement avant de
les mettre au r6ffig6rateur ou au cong61ateur.
Couvrir les liquides.
Fig. 1
TOURNER DANS LE SENS
HORAIR_= POUR I_LEVIER LE
COIN DU RI_FRIGERATEUR
TOURNER DANS LE SI=NS A_TI-
HORAIRE POUR ABAISSER LE
Fig. 2
_ ELEVER LE
COIN DU REFRIGERATEUR
_ _ COINOU
A_AISSER LE COIN _ __ RIEFRIGI_RATEUR
OU R_FRIG_RATEUR _1_ )
Fig. 3
Essuyer les contenants humides avant de les mettre
dans le r6frig6rateur.
l_viter d'ouvrir les portes trop souvent.
22
Page 24

..... age des
Votre r6frig6rateur est dot6 de la fonction Dual CooF _ de Maytag pour r6gler la temp6rature des deux compartiments.
Les thermostats se trouvent en haut et h l'avant du compartiment pour produits frais.
• Le r6frig6rateur et le cong61ateur ont des r6glages
allant de 1 (le moins froid) _t 9 (le plus froid). Au
d6part, r6gler le thermostat sur 5.
, Laisser le r6frig6rateur fonctionner au moins 8 _ 12
heures avant d'ajouter les aliments.
Guide de rdglage du _hermostat Dual CooF
R_frlg_rateur: R_glage:
i!_ii!!iiii!iiiiYiYiiiiii!iiiY!iii
iiiiiiiiiiiiiiiiiiiiiiiiiiYliiiiiiiiiiiiiii
Pas assez froid Monter sur le r6glage suivant
Trop froid Descendre sur le r6glage pr6c6dent
Cong61ateur: R6glage:
Pas assez froid Monter sur le r6glage suivant
ii!i!71!71_
2 3 4 5 _ ................. ........
Pour r6gler le thermostat, faire glisser le s61ecteur vers la droite ou vers la gauche selon le cas.
, Attendre que la temp6rature se stabilise pendant 24
heures avant de modifier _ nouveau le r6glage.
• La modification du thermostat d'un compartiment
affecte la temp6rature dans l'autre.
Parfois, l'avant du r_frig_rateur peut ave tilde au
toucher. Ceci est dfi h une fonction normale du
r_frig_rateur, qui permet d'emp_cher la formation de
condensation sur l'ext_rieur de l'appareil. Cette situa-
tion se pr_sente particuli_rement quand le r_frig_rateur
est mis en route au d_part, ainsi que pendant les p6ri-
odes de grande chaleur et si la porte est ouverte trop
souvent ou de faqon prolong6e.
_ _@_ _3_J7,_°_ _
Trop froid Descendre sur le r6glage pr6c6dent
]_teindre le r_frig_rateur
Mettre le thermostat du cong61ateur sur OFF (arr_t).
iiiii!iiiiiiiiiiiiiiiiiiiiiiiiiiiiiiiiiiiiiiii
iiiiiiiiiiiiiii_iiiiiiiiiiiiiiiiiiiiiiiiiiiiiiii
iiiiiiiiiiiiiiiiiiiiiiiiiiiiiiiiiiiiii)iiiiii
_###;########_
REMARQUE : Lorsque le thermostat du compartiment
r6frig6rateur est mis sur OFF (arr&), le r6frig6rateur
cesse de produire du froid darts les DEUX comparti-
ments. L'appareil continue _t_tre sous tension.
24 heures apr_s avo_r ajout6 les aliments, si l'un ou
l'autre compartiment semble trop ou pas assez froid,
modifier le thermostat tel qu'indiqu6 dans le tableau
ci-dessus.
Sauf lors de la mise en marche initiale du rdfrig6ra-
teur, ne pas modifier l'un ou l'autre thermostat de
plus d'un chiffre _tla fois.
Votre r6frig6rateur est h d6givrage automatique.
F_=_arq_J_: Au tours du cycle de d_givrage
aulomafique, il esl 1,x_ssible qu'une lueur ou un reflel
rouge soit visible dans les fends de ventilation sur la
contacl avec la sul_itce de la r6sislance de d6gwrage.
Ceci esl compl_,temen! normal pendanl te cycle de
d_giwage.
23
Page 25

Ces tablettes sont r6glables, de fa_on ?ipouvoir modifier
l'agencement int6rieur du r6frig6rateur en fonction des
besoins de rangement.
Pour enlever une tablette: La vider. Soulever l_gOre-
ment l'anibre de la tablette et la sortir.
Pour mettre une tablette _ une hauteur diff_rente:
Apr_s avoir retir_ la tablette, relever l_g_rement le
rebord avant de la tablette. InsUrer les crochets dans les
ouvertures d_sir_es et laisser la tablette descendre en
place. S'assurer qu'elle est fermement en place 5 Far-
fi_re.
Tablettes Spill-Catcher TM (modUles sdlec-
ffonn$s)
Les tablettes Spill-Catcher TM ont un rebord qui emp_che
les liquides renvers6s de s'6couler de la tablette et
facilite le nettoyage.
Certaines des tablettes Spill-Catcher TM sont dot6es du
syst_me Easy Glide, qui permet de les tirer comme des
bacs. Pour les firer, saisir l'avant de la tablette et tirer
vers sol. Repousser la tablette pour la remettre en place.
La tablette Elevator" est dot6e d'un rebord pour
empOcher que les liquides ne s'6coulent et du systEme
Easy Glide qui permet de tirer la tablette comme un
bac. I1 est possible de la monter ou de la descendre sans
la vider. Pour tirer sur la tablette, saisir l'avant et tirer
vers sol. Repousser la tablette pour la remettre en place.
Pour r_gler la tablette Elevator TM : D_,ployer ta maniv-
elle encastr_e de faqon 5 ce qu'elle soit h angle droit de
l'avant de la tablette. La tourner vers la droite (sens
horaire) pour lever la tablette et vers la gauche (sens
anti-horaire) pour l'abaisser.
Pour enlever la tablette : Vider la tablette. Saisir l'a-
vant et tirer complbtement vers sol. Appuyer sur les
buttes (de chaque c6t6), puts continuer _ tirer sur la
tablette jusqu'h ce qu'elle sorte de son ch_tssis.
Pour la remettre ela place : Centrer la tablette par rap-
port au ch_ssis et la pousser h fond vers l'arribre. I1 n'est
pas n_cessaire d'appuyer sur les buttes pour qu'elle se
mette en place.
En g_n_ral, le chiissis de la tablette Elevator TM n'a PAS
besoin d'atre retir& Bien que cela risque peu d'arriver et
que cela soit d_conseill_, la marche h suivre conecte
pour le refirer du r_frig_rateur est la suivante:
• Vider la tablette de tout son contenu.
, Faire coulisser la tablette vers sol sur environ 5 cm
(2 po) et d6placer manuellement les deux dispositifs
de verrouillage arri_re vers le centre de la tablette.
-Tout en soutenant la tablette et le chassis par le
dessous, soulever le tout 16g_rement et le faire pivoter
d'environ 30 ° pour permettre au m6canisme arri_re
de sortir des goutti_res verticales des c6t6s 5l'arribre.
° La tablette et le chassis peuvent alors _tre tir6s vers
sol pour les sortir du r6frig6rateur.
° Pour les remettre en place, proc6der comme pr6c6dem-
ment, mats _ l'inverse. S' assurer que la tablette est bien
de niveau. Lorsque la tablette est couliss6e vers Far-
ri_re, elle repositionne les dispositifs de verrouillage
arri_re dans la bonne position de fonctionnement.
DisposRifs de
VerrouiHage
24
Page 26

E|6ments lnt6rieurs du R6frig6rateur (continuer)
Les Bacs Amovibles (modUles s61ectionn6s) sont
con_us pour permettre de ranger des contenants de plus
de 3,8 litres (1 gallon). Ils sont r6glables et faciles
enlever. Pour les enlever : Soulever le bac jusqu'_ ce
qu'il soit d6gag6 des disposififs de retenue de la contre-
porte, puis le refirer. Proc6der _t l'inverse pour le
remettre en place.
Les Arr_toirs (mod$1es s61ectionn6s) s'insSrent dans
les balconnets de porte du cong6lateur et du r6frig6ra-
teur pour emp_cher les bouteilles et autres r6cipients de
!i!iii!iiii!iiiiiiiiiii!i!i!iiiiiii!iljiiiiiiil
iiiiiiiiiiiiii_'iii:i:iiiii:iiiiiiiiiiiiiiiii
iiiiiiiiiiiiiiiiiiiiii_iiiiiiiiiiiii
iiiiiiiiii?iiiiiiiiiiiiiiiiiiiiiiiiiiiiiiiiii
se renverser ou de tomber lors de l'ouverture et de la fer-
meture de la porte. Soulever 16g_rement l'arr&oir et le
faire coulisser h l'endroit voulu.
Le Stabilisateur pour Grande Bouteille (modUles
s61ectionn6s) emp_che les grandes bouteilles de bas-
culer vers l'avant. I1 se glisse vers la droite ou la gauche.
Le compartiment pour produits laitiers, qui se trouve
dans la porte du r6frig6rateur, peut _tre 6quip6 d'un arr_-
toir ou d'un beurrier.
L'oeufrier (styles vari6s/mod_les s61ectionnfs) peut
contenir une douzaine d'oeufs ou plus. I1 est amovible,
ce qui permet de l'avoir _tport6e de main sur la surface
de travail.
Le support polyvalent (modUles s61ectionn6s) offre un
emplacement o_h ranger une bouteille de vin horizon-
talement. I1 permet aussi de ranger des canettes ou un
carton d'oeufs. Le mettre du c6t6 gauche d'une tablette
de r6frig6rateur. Remarque: Le support polyvalent ne
peut pas _tre plac6 sur une tablette Elevator TM.
iiiiiii!ii!iiiiiiiii!iiiiiiiiii!!iiiiiiiii
iiiiiiiii!iii!iiiii:iiiii!iii!i'i!!ii!iiiiii
Les Bacs de Porte Basculants (modUles s61ectionn6s)
basculent pour faciliter le rangement ainsi que l'acc_s
des articles en hauteur ou peu faciles _ manipuler tels
que des houteilles d'un litre ou des aliments en sacs.
ililililililililili211iiii:iiiiiii_ililililili
ilililililililililililililililililijiiiilililil
ilililililililiiiii_ilililililililiiii_ililil
Le support de canettes (modUles s61ectionn6s) s'ac-
croche _ n'importe quelle tablette de r6frig6rateur anti-
d6bordement. I1 s'accroche sur les ills du chassis, sous
la tablette. Sa forme 16g_rement inclin6e permet aux
canettes de fouler vers l'avant lorsqu'on en prend une.
25
Page 27

Les clayettes m6talliques comme les tablettes en verre
reposent sur des goutti_res moulfes dans la paroi du
cong61ateur. Certains mo@les s61ectionn6s sont dot6s
de tablettes coulissantes pour faciliter l'acc_s aux arti-
cles qui se trouvent _ l'arfi_re.
Pour enlever une tablette de cong_lateur: Vider la
totalit6 de la tablette et la soulever directement vers le
haut. L'incliner lat6ralement et la retirer du cong61ateur.
Pour la remettre en place, proc6der _ l'inverse.
Le ou les paniers du cong61ateur (leur nombre varie en
fonction du mo@le) sont coulissants pour faciliter
!'acc_s aux aliments congel6s. Le ou les paniers
reposent et coulissent sur des goutti_res moul6es darts la
paroi du cong61ateur.
Pour retirer le partier du cong_lateur: Coulisser le
panier vers soi jusqu'_ ce qu'il s'arr_te. Appuyer sur les
pattes qui se trouvent de chaque c6t6 du panier _ Far-
ri_re et continuer _ tirer sur le panier jusqu'h ce qu'il
soit sorti. Pour le remettre en place, le centrer sur les
goutti_res et le coulisser en place.
Paniers do cong_lateur StairStep TM (mod-
Ules s#lectionn_s)
Les paniers de cong61ateur StairStep TM fonctionnent
ensemble pour faciliter l'acc_s au contenu de la partie
inf6rieure du cong61ateur.
Tirer le panier inf6rieur vers soi pour acc6der _ son con-
tenu. Continuer "_le tirer pour ouvrir le partier sup6rieur
6galement. Proc6der inversement pour fermer les deux
paniers.
Tirer sur le panier sup6rieur pour acc6der _ son contenu.
Le panier inf6rieur se trouvera 6galement tir6 mais il ne
S' ouvrira pas.
Pour refirer les paniers : Tirer le panier sup6rieur vers
soi jusqu'h ce qu'il s'arrate. Le soulever 16g_rement et
continuer h tirer vers sol. Les paniers se retirent
ensemble. Proc6der
paniers en place.
inversement pour remettre les
Paniers de Porte de Congdlateur
Rabatt_nts (modUles s_lectionn_s)
!Is assurent un espace de rangement pratique pour les
aliments congel6s qui <<bougent >>,comme les 16gumes
en sachet.
Ysp ees de angeme t
Adjus*i-Temp +(bac sup_ri_ur - moddles
sdlectionnds)
Ce bac est con_u pour assurer un espace de rangement
court terme pour la viande fraiche, le fromage et la char-
cuterie.
Le thermostat de ce bac se trouve sur la paroi gauche du
r6frig6rateur, pros de l'avant du bac. Le r6glage <<cool +
(frais) maintient une temp6rature similaire _ celle du
compartiment pour produits frais. Pour avoir une tem-
p6rature plus froide dans ce bac, faire coulisser le ther-
mostat vers le r6glage <<cold + (froid). II est recom-
mand6 d' avoir une temp6rature plus froide que le reste
du r6frig6rateur dans ce bac lorsqa'il contient de la
viande, de la volaiUe ou du poisson frais.
VariT_m_ (bac infdrieur- mod_l_s sdlec-
tionn_s)
Le thermostat de ce bac se trouve '_l'avant de la tablette
qui se trouve au-dessus du bac. Le faire coulisser vers la
droite ou vers la gauche. Le r6glage + cheese + (fro-
mage) assure une temp6rature similaire h celle du com-
partiment pour produits frais. Le r6glage <<meat >>
(viande) assure une temp6rature plus froide dans le bac
et il est recomman@ lorsqu'il contient de la viande, de
la volaille ou du poisson frais.
t__t_ LL:Lti.j
¸¸,
Pour des re'sMtats opS_mums, garderPun etl'mdreq
++p++++++,+++.++r++r+c,,.tr0t + ]
2_
Page 28

8ac(,) i, L_gurn_s _ HumMi,# Contr#iee
(modUles s_c*ionnes)
Les bacs 5 ldgumes sont pr6vus pour le rangement de
fruits et de 16gumes. Le s61ecteur de contr61e de l'hu-
midit6 se trouve au-dessus des bacs et peut _tre gliss6
vers la gauche pour une conservation des fruits
(humidit_ moins 61ev_e) ou vers la droite pour une con-
servation des 16gumes (humidit6 plus 61ev6e).
Pour enlever le(s) bat(s): Tirer le bac vers soi jusqu+h
ce qu'il s'arr_teo Relever l'avant et liter. Pour remettre
le bac en place, le centrer sur les gouttiOres, re]ever l'a-
vant du bac et te glisser en place.
P_mr des r6st+Ra_s optimums, ga+rder les bacs i_
_g_mes Men fi_rm_s.
Bats de Rangern_n# Cfima#_Zone TM
T_chnoiogy (modUles _ectionn_s)
Les bacs de rangement ClimateZone _M_>_+
Technology foumir pr6cis contr61e de Cli+_a_Z_rl_,
temperature pour rangement des viandes, t_chnol_g
des fruits et des 16gumes. Le bac sup_rieur N_g_
offre r_glage pour viandes, agrumes et produits, Le bac du
milieu est pr6vu pour les agrumes et les produits frais, Les
bacs ClimateZonC" Technology sont 6quip6s d'un dis-
positif de contr61e autolnatique de l'humidit6 (voir page
28). Les bacs sont r6g!6s pour fournir des temp6ratures
optimum et un affichage num_rique de la tempdrature aux
r6glage choisi, en fonction du tableau ci-dessous.
iiiiiiiii!iiii_ii_iiiiiiiiiiiiiiiiiiiiiiiill
iiiiiiiii!iiiiiiiiiiiiiiiiii_iiiiiii!iiiiiiii
iiiiiiiiiiiiiiiiiiiiiiiiiiiiiiiiiiiiiiiiiiii
,7'Divers facteurs comme l'environnement, l'ouverture des portes, le
r_glage des commandes du r_frigdrateur etc., peuvent faire fluctuer
l'affichage de la temperature sur le bac au-del_t des plages de temp6ra-
lure pr_sent_es ci-haut. Ceci est normal. Pour de meilleurs r_sultats,
r_glez les commandes du r_frig_rateur et du cong61ateur au milieu (5)+
La fonction ClimateZone '_ Technology peut 6galement
iiiii{iiiiiiiiiiiiiiiiiiiiiiiiiiiiiiiiii
iiiiiiiiii:_iiiiiiiiiiiii_iiiiiiiiiiiiiiiill
iiiiiiiiiiiiiiiiiiiiiiiiiiiiiiiiiiiiiiiiii_
_tre 6teinte en appuyant sur <<Normal >>sur le clavier.
Lorsque la fonction n'est pas s61ectionn6e, les bacs
fonctionnent comme des bacs herm6tiques _ 16gumes
frais standard, sans affichage de la temp6ramre.
Article
Agrumes
Produits
Viandes
Temperature
de conservation
39 °F (4 °C)
34 °F (1 °C)
31 °F (- 0,5 °C)
Affichage des Plages
38-40 ° F
33-35 ° F
30-32 ° F
Ney_gorl_ues:
si m_ tmc ClimateZo_e tk:chnology est laiss6
ouvert+ !'at]]chage cligno;e+ Fermer Ie tiroir corn+
pl_t_emem et I+affichage rv:_iendra 5 Ia nommle,
Si un bac est laissd ouver! de f_'o_ pmhmgde ct/ou
pendani le remplisu, age des bacs ou autre, Fafl_chage
peut mdique_ une tempdraturc p!us dlevde de
quelques deg:r_Ss.Ceci est tamhal+ I,a _emp_4_ature
revie_dr_+ _apidemenl a la normaie,
° Manipuier ta viande ha{_he avec soin pore __,+vi_e_h_
contamhm{i,m Ramger la xim_de dai:ts des c_lltelta_lls
herm6thlues el _eitler 5 essuyer tout jus de viande
qui a could imm6diatemen_ en utilisanl de l'eau
sawmneuse _r;+-schaude_
Po_l_ ddsintk_cter le bac: Vider ie bac de r6ti_igdratem _+
Ddsinfecler ii l'eau de ravel en suivant te mode
d'emploi du fabricam+ Rmcer i+_imd et laisser sdcher:
'+Pour un goiil plus savoureux, conserver les fromages
i_pfiie lemm sur It re'glage <<Citrus _,(ag_umes)+
0+1_avi;mde co+:_geldese d6cong[qera tr_s lentemenl au
r6glage ¢ Meal ++.I,a plupa,_ du temps, ia d+congdla.+
_ion delta se +)ire _'1Fextdrieur des bacs+ sur la
tablette la plus basse du rdfdgerateur+
* Si le r+li{g&ateur est tins ulilis6 dans un climat chaud el
humide, ies surii_ces ext+rieures des hacs Clim.eTJme'"
%_dmohgy wuvent se _rouvm' camvertes & buOe+Ce+ci
est nomml. La contkmsalion dispara+l une tois la pt_le
R:rm@ i+endant un ce_lain temps+
+ En raison de Fexactitude et de Femplacement du
syst+me de d4tection de la temperature
Clm:m_eZone _'_lk+chnoh>gy, la tempOrature dans les
bacs mesur_e _ l+aide d'un thermom_ne pore
refrigd_at:eur _ usage m6nager peut _tm ditIt._ren_e de
celle all]ch6e+ Ceci est normal.
+Si les hats ClhnateZone" Technology ne sonl pas
ouverts pendant qualm semames, _ls se mettent
automatiquemenl en eOl:Idition _< normale >>ou
d'arr+t+ I,;afliehage s+61einL
Pour retirer le bae: Tirer le bac vers soi jusqu'?_ ce qu'il
s'arrete. Relever l'avant du bac et tirer. Pour remettre le
bac en place, le centrer sur les goutti_res, relever l'avant
du bac et le glisser en place.
Remplacoment de I'arnpo_le
L'ampoule se trouve delTi_re l'compartiment du bac
ClimateZone _' Technology sup6rieur. Son num6ro de
r4f4rence est le 61004862; voir votre d6taillant Maytag
pour la remplacer ou appeler le 1-800-688-8408 _tcom-
mander directement.
A_ention: Afin d'&,iter _es _qsques d¥1ectrocution,
toujour_ + d_brancher le rdfrig_rateur avant de
changer l'ampoule_ Porter des gants pour se prot_ger
de bris de verre &,entuels+
27
Page 29

Pour enlever l'compartiment du bac pour remplacer
ramponle: Vider la tablette qui se trouve au-dessus des
bacs ClimateZone'" Technology et l'enlever. Vider le bac
et l'enlever. Retirer les deux vis "_t_te hexagonale de 1/4
po qui se trouvent sur la gauche. Soulever l'assemblage
du compartiment sup6rieur d'environ 1 po (2,5 cm) et
tirer vers sol d'environ 2 h 3 po (6 h 8 cm). L'assemblage
doit reposer sur les soutiens.
Remplacer rampotfle: D6visser l'ampoule et la remplacer.
Prudence: Manipuler l'ampoule avec soin pour 6viter
qu'elle ne se casse. Par ailleurs, elle peut _tre brfilante.
Pour remettre l'assemblage en place: Faire remonter
l'assemblage dans sa position d'origine. Afin que les
trous de vis soient bien centr6s. S'assurer que l'assem-
blage est pouss6 fermement vers la gauche de la cavit6
du r6frig6rateur. Remettre tes deux vis. Remettre les
bacs dans leur assemblage, remettre le tablette ci-dessus
leur assemblage, et rebrancher le r6frig6rateur.
Retrait dos Assemblages de
Compartiment pour le Nettoyage
Vider la tablette qui se trouve au-dessus des bacs
ClimateZone '_'Technology et l'enlever. Vider les bacs et
les enlever. Retirer les deux vis _lt_te hexagonale de 74
po qui se trouvent sur la gauche, Soulever l'assemblage
du tiroir sup6rieur d'environ 1 po (2,5 cm) et tirer vers
soi d'environ 2 _ 3 po (6 "_8 cm). L'assemblage doit
reposer sur les soutiens. D_brancher les cordons d'ali-
mentation pour pouvoir retirer l'assemblage, puis le
retirer. Faire de mame avec le deuxibme assemblage.
Pour remettre en place: Faire remonter l'assemblage
infdrieur dans sa position d'origine en laissant suffisam-
ment d'espace pour pouvoir atteindre les cordons d'ali-
mentation. Rebrancher les cordons d'alimentation de
l'assemblage. Pousser l'assemblage jusqu'h ce qu'il
position d'origine. Afin que les trous de vis soient bien
centr_s. S'assurer que l'assemblage est pouss_ ferme-
ment vers la gauche de la cavit_ du rfifrig_rateur.
Remettre les deux vis. Faire de m_me avec l'assemblage
sup_rieur. Remettre les bacs dans leur assemblage,
remettre le tablette ci-dessus leur assemblage, et
rebrancher le r_frig_rateur.
Bac _ collations (modUles selectionnes)
Il offre un emplacement pratique pour ranger divers ali-
ments et articles. II n'a pas de thermostat ni de contr61e
de l'humidit6.
Contr61e Automatique de i'Humidite (mod-
Ules selectionnes)
Certains bacs _ I_gumes frais sont _quip_s d'un syst_me
automatique de contr61e de l'humiditd, ce qui _limine la
n_cessitd de sdlecteurs manuets d'humidit_ sur le bac.
Un matdriau de type tissu* recouvre les petites ouver-
tures de ventilation dans le insdrer de tablette ci-dessus
l'bac de rangement. Ce matdriau contr61e le ddbit d'hu-
midit_ vers l'extdrieur du bac _ildgumes pour assurer un
environnement optimum pour la nourriture. Si de la
nourriture se trouve dclabouss_e sur le matdriau ou l'ou-
verture, l'essuyer avec un linge propre et humide.
iiiii!;ii!!_
*Le syst_?me de contrNe automatique de 1'humiditO se compose d' un
mat_riau unique brevet_ appel_ polym_re g m_moire de tk_rme
(Shape Memory Polymer ou SMP) qui, lorsqu'il est lamin_ sur un
tissu, devient du DIAPLEX. Le DIAPLEX est fabriqu_ par
Mitsubishi. DiAPLE (,
ChillKeeper TM (modeles selec_ionn_s)
Le compartiment ChillKeeper'" se trouve dans la porte
du r6frig6rateur et s'utilise pour rafrai'chir rapidement
des articles et garder des boissons au frais. La tablette
ChillKeepeF' peut _tre d6tach6e, invers6e et enclench6e
sur les pattes sup6rieures si l'espace de rangement a
deux 6tages du compartiment n'est pas n6cessaire.
Pour l'ouvrir: Saisir t'ouverture du c6t6 droit du cou-
vercle du compartiment et le passer '_ gauche. Le cou-
vercle s'enclenche automatiquement lorsqu'on le ferme.
REMARQUE: Si le m6canisme de fermeture se trouve
accidenteJlement d61og6, mettre la pattie d'un crayon
papier portant l'efface prEs du m6canisme et pousser
doucement vers la droite.
Le thermostat du ChillKeeper'" se trouve sur la paroi
gauche du r6frig6rateur. Glisser le
s61ecteur sur <<cold >>(froid) pour
abaisser la temp6rature _ 1'int6rieur
du ChillKeeper '_'.
Le bac utilitaire du ChillKeeper '_' se trouve au bas du
compartiment. Ce bac verrouillable permet de ranger
des articles comme des piles, des pellicules pho-
tographiques ou des m6dica-
ments sur ordonnance. Le
systEme de verrouillage se
trouve _ gauche du bac. Pour
d6verrouiller et ouvrir le bac,
placer la goupille sur la posi-
tion << unlock >> (d_ver-
rouiller) et tirer sur le bac.
Pour le fermer, le pousser et
mettre la goupille sur la posi-
tion <<lock >>(verrouiller).
The Intelligertt Texture
i i
28
Page 30

Le compartiment du cong_lateur est dote de moules
cubes de glace et d'un bac 5 glace. Le bac se place au-
dessus des boules. Pour retirer les cubes de glace du moule,
tenir le moule "_l'envers au-dessus du bac et le tordre.
Le rEfrigErateur est pr& pour l'installation d'un appareil
_tglace. Le numEro de r6fErence du nEcessaire de pose
d'un apparel h glace se trouve sur la plaque signal6tique
(voir couverture avant).
Niveau de Glace R_glable (moddles s61ec-
*iennes)
Les appareils £ glace install6s en usine sont 6quipEs
d'un bras d6tecteur de rEgler le niveau de glace dans le
bac _tglace lorsque la consommation diminue.
Pour r_gler le niveau de glace produite: Pousser le
bras d6tecteur en plastique vers l'intErieur et le placer
la capacitE d6sirEe.
Bras-levier
M_tallique
100% /
............................\
i_iiiiiiiii!iiij!iiiiiiiiiiiiiiiTiiiiiiiiiiii!
R_t_rq_@: 15s guidesde conso,nmationd'6,>l
ergi:e collOs stir le r6flig6rateur au moment de l'achat I
n_ tiennent pas compte de ]a consommathm d'6nergie [
iiii]]ii]iii]]ii]
dr,,l'appa_eii i gtace opfionnel. [
iiiiiiiiiiiiiiiiiiiiiiiiiiiiiiiiiiiiiiiiiiiiiiiAppareil _ Giace Automatique
iiiiiiiiiiiiiiiiiiiiiiiiiiiiiiiiiiiiiiiiiiiiiiilUnefoislerEfrigErateurraccordE£1'alimentationeneau,
iiiiiiiiiiiiiiiiiiiiiiiiiiiiiiiiiiiiiiiiiiiiiii!abaisserlelevierm6tallique. Cecimetl'appareilenfonction.
iiiiiiiiiiiiiiiiiiiiiiiiiiiiiiiiiiiiiiiiiiiiiii!lseremplitd'eauunefoisquelecongElateuratteintlatem-
p6ramre int6rieure appropri6e. I1pourra falloir 8 £ 12 heures
!i!i!i!i!i!i!i!i!iii!i!i!i!i!i!i!i!i!i!i!i!i!i!!avantquel'appareilnefoumissedescubesutilisables.
Jeter les cubes de glace produits les deux ou trois premieres
fois. Ils pourront _tre de forme irrEguliEre, d6colorEs ou con-
tenir des hnpuretEs provenant de la nouvelle conduite d'eau.
Lorsque les cubes de glace sont EjectEs, il est normal que
plusieurs cubes soient attaches ensemble par leurs
iiiiiiiiiiiiiiiiiiiiiiiiiiiiiiiiiiiiiiiiiiiiiii!extrEmit6s. IlestfaciledelessEparer. L'appareil£glace
!i!i!i!i!i!i!i!i!i!i!i!i!i!i!i!i!i!i!i!i!i!i!i!continuera _t faire des cubes jusqu'5 ce qu'il yen ait
iiiiiiiiiiiiiiiiiiiiiiiiiiiiiiiiiiiiiiiiiiiiiiiassez pourfaire releverle bras-levierm6tallique, ce qui
iiiiiiiiiiiiiiiiiiiiiiiiiiiiiiiiiiiiiiiiiiiiiiiarr&el'appareil.
7 " }
5 _ >'<
.......
50% Bras D_tecteur
/%
Pour faire arr&er l'appareil h glace manuellement,
relever le bras-levier mEtallique.
Le fonctionnement de l'appareil £ glace peut s'accom-
pagner de certains bruits.
• bourdonnement de l'Electrovanne
• eau qui coule pour remplir les moules _tglace
• cubes qui s'entrechoquent en tombant dans le bac vide
Les cubes de glace qui restent dans le bac i glace pen-
dant un certain temps peuvent devenir opaques, prendre
un gofit, s'agglom6rer ou diminuer de taille. Vider le bac
glace de temps i autre et le laver £ l'eau tiEde. Veiller
sEcher le bac 5 glace avant de le relnettre en place.
Pour v6rifier le niveau de glace ou avoir accEs au bac
glace, soulever le portillon du bach glace.
Pour enlever le bac, d'abord couper l'alimentation en
eau. Pour cela, ouvrir le portillon du bac i glace et
relever le bras-levier m6tallique pour le mettre sur la
position <_off >>(arr_t). Ensuite, passer la main sous l'a-
vant du bac et tirer sur son rebord arriEre. Une fois qu'il
se dEsenclenche, tirer le bac vers sol. Pour remettre le
bac £ glace en place, centrer les rails du dessous sur les
gouttiEres correspondantes dans la tablette et le pousser
fond, jusqu'£ ce qu'il s'arr&e et s'enclenche en place.
S'assurer que les pattes ?al'arriEre du bac qui font tourner
le m6canisme d'6jection des cubes se trouvent bien entre
les broches du moteur du mEcanisme. Mettre l'appareil
en marche en abaissant le bras-levier mEtallique.
Ne pas placer des boissons ou aliments 1_refroidir dans
le bac ?_glace. Ils pourraient bloquer le bras-levier et
provoquer des problbmes dans le fonctionnement de
l'appareil £ glace.
29
Page 31

PANNEAU DE
COMMANDE
_DUDISTRIBU-
TEUR
MECAN_SME
DECLEN-
CHEMENT
TROP-
Distribution d'Eau et de Gla_ons
Pour prendre de l'eau ou de la glaqon, mettre un verre •
contre la partie sup_rieure du m6canisme de d6clenche-
ment et appuyer. Tenir le verre pros de l'ouverture pour
6viter que la glace ne tombe _ c6t6.
Pour arr&er de prendre de !'eau ou de la glace, cesser
d'appuyer sur le m6canisme de d6clenchement mais
laisser le r6cipient sous l'ouverture pour recevoir les
derniers cubes ou gouttes d'eau. Le portillon de service
de cubes de glace reste ouvert un court moment et pro-
duit un bruit caract6ristique lorsqu'il se ferme.
Les touches de commande se trouvent sur le panneau de
commande du distributeur. Pour s_lectionner la fonction
d6sir_e, appuyer sur la touche correspondante. Lorsque •
des cubes, de la glace pil6e ou de l'eau sont sflec-
tionn6s, un voyant s'allume au-dessus de la s61ection.
CRUSHED CUBE WATER
sation du distributeur d'eau, appuyer sur le m6canisme
de d6clenchement pendant une ou deux minutes pour
purger Fair de la conduite. Jeter les cinq ou six premiers
verres d'eau pour s'assurer une eau pure et fra_che.
Consefis d'Utilisation du Distributeur
• I1 arrive que le distributeur produise de la glace pil6e
alors que des cubes ont 6t6 s61ectionn6s. Ceci arrive de
temps h autre, quand quelques cubes de glace se trou-
vent accidentellement dirig6s vers l'appareil h piler la
glace.
• De mSme, quand on passe de la glace pil6e aux cubes,
il arrive que l'appareil produise un peu de glace pil6e.
Ceci arrive 6galement lorsqu'il y a des gla_ons de taille
irr6guli_re ou de petits morceau× de glace dans le bac
glace.
• Sile distributeur de glace n'est pas utilis6 souvent, les
glaqons peuvent s'agglom6rer et devoir 6tre s6par6s
ou jet6s.
On notera qu'il y a un temps d'arrSt avant la produc-
tion de glace pil6e. Ceci est normal car la glace doit
d'abord passer dans l'appareil h piler la glace. La
glace pil_e varie darts sa taille et darts sa forme.
• Ne pas ajouter de la glace autre que celle produite par
l'appareil _ glace dans le bac _ glace. Elle pourrait ne
pas passer correctement dans le distributeur ou ne pas
_tre pil6e correctement.
• l£viter de faire fonctionner le distributeur de glace de
fa_on continue pendant plus de cinq minutes. Si de
grandes quantit6s de glace sont n6cessaires, les
prendre directement dans le bac _ glace.
Ne pas mettre de glace directement dans des verres
fragiles, de la porcelaine d61icate ou des articles en
cristal fin car ils pourraient se fSler ou casser en raison
de la pression du r6c_pient contre le mfcanisme de
d6clenchement alli6e au choc des cubes de glace
contre les parois.
L'eau qui sort du distr_buteur n'est pas glac6e. Pour
avoir de l'eau plus froide, ajouter simplement quelques
cubes de glace avant de prendre l'eau. En g6n6ral, le
premier verre ou deux pourra 8tre moins froid que les
suivants. Un verre compl&ement plein sera plus froid
qu'un demi-verre. Pour 6viter les 6claboussures, mettre
la glace avant l'eau.
REIgL4ROUE: Lors de la premiere util_sation de l'ap-
pareil ?_ glace, jeter les deux ou trois premibres
douzaines de cubes de glace. Lors de la premibre utili-
3O
Page 32

Trop-plein
NE PAS jeter d'eau dans la grille du trop-pleha au bas du
distributeur. Ceci est un trop-plein, PAS un bac d'6coule-
merit. I1 assure l'6vaporation des petites quantit6s d'eau
qui se trouvent normalement 6clabouss6es. Des quantit6s
plus importantes de liquide devront _tre essuy6es 5 l'aide
d'une 6ponge ou d'un linge dou×. La grille est amovible
(elle coulisse) pour permettre le nettoyage. I1 est recom-
mand6 de nettoyer occasionnellement le trop-plein pour
emp_cher les d6p6ts de min6raux.
_:clMrage du Distributeur
Lorsqu'on appuie sur le m_canisme de d_clenchement,
le distributeur s'6claire automatiquement. Pour allumer
cette lumi_re "ala main, appuyer sur la touche.
Pour l'6teindre, appuyer _ nouveau.
Verrouillage du distributeur
Pour couper le courant au distributeur d'eau et de glace afin
d'emp_cher son utilisation, appuyer sur la touche
trois fois en 10 secondes.
Un voyant s'allume au-dessus de la touche lorsque le
distributeur est verrouill6. Pour remettre le distributeur
en fonction, appuyer h nouveau sur la touche trois fois
en l0 secondes.
E-clairage du Rappei de Changement du
Fi#re _ Eau (modeles sdlectionn_s)
Dans le cas de certaines modNes de r_frig_ra- ICH_ I
teurs 6quip6s d'un filtre _ eau, la fonction de
rappel de changement du filtre _ eau contr61e la
dur6e d'utilisation du filtre et rappelle quand
celui-ci doit _tre chang&
_iiiiiiiiiiiiiiiiiiiiiiiiiiiiiiiiiiiiiiiii
iiiiiiiiiiiiiiiiiiiiiiiiiiiiiiiiiiii
iiiiiiii_iiiiiiiiiiiiiiiii{iiiiiiiiiiiiii
iiiii!!_iii!iiiiiiii!!iiiiii!_i_i!!iii
ii!ii)iiiiiiiii_iiiiiiiiiiiiiiiiiiiiiii
Service de Giace et d'Eau (continuer) .....................
Le filtre _teause pose dans la partie sup6rieure du com-
partiment pour produits frais, sous le logement du ther-
mostat Dual Cool '".
Le r6frig6rateur est livr6 de l'usine 6quip6 d'une d6riva-
tion pour filtre _t eau. La cartouche de filtre se trouve
dans son emballage, h l'int6rieur du r6frig6rateur. Elle
s'installe facilement, sans pi_ces ou visserie addition-
nelles.
Rappei de Changement du Fi#re _ Eau
Certaines modNes de r_frig_rateurs _quip_s d'un dis-
tributeur se caract6ristique un voyant s'allume se trou-
vent sur le panneau de commande du distributeur
rappel quand celui-ci doit _tre change. Lorsque le sys-
t_me d6 tecte soit une dur6e d'utilisation de 12 roots,
soit le filtrage de 416 gallons (1585 litres) d'eau (le pre-
mier qui se produit), le voyant CHANGE FILTER
(changer le filtre) s'allume. Ceci indique qu'il faut
changer le filtre _ eau (voir page 32). Le voyant s'6teint
tA_3
une fois le filtre chang&
Pour r6enclencher la fonction CHANGE FILTER
(changer le filtre): Appuyer de faqon continue sur les
touches LOCK (verrouillage) et LIGHT (6clairage)
jusqu"_ ce que le voyant CHANGE FILTER clignote
(environ 3 secondes). La fonction est maintenant r6en-
clench6e pour 12 mois ou 416 autres gallons (1585
litres).
• l,,e"distribuleur d'eau e!- de- glace _:t 1aI pmefl
glace ne doivent pas _lre utilis_,s sans que la ddrb-
ration du filt_e ou le filtre soil en place.
• Les modules compo_ant le _clairage de rap[_l de
changen_enl tie filtre g eau aurait dfi le fillre 'a eau
change Iorsque le w)yant du rapp, el s'allume,
_##::#########
_###########_:
_##::#######::_#
_###########_:_
Si le debit d eau au distributeur ou 'a Fappareil ?_
glace dimimm ti)rlement ou que Feau prd_senle
nouveau un gofit ou une odeur d_sagr_able.,
31
Page 33

1. D6visser le capuchon de la d6rivation du filtre d'un
quart de tour (sens anti-horaire vu du dessous) de
faqon h ce que les ailettes de l'obturateur se d_gagent.
Retirer la d6rivation du filtre de la t_te du filtre.
Ne p_s m_tiic-_ du _iltre
meitre
d!_i_:N_ei le d leim s
.
Retirer soigneusement le filtre de son emballage.
3.
Appliquer Á'auto-collant indiquant le mois sur la car-
touche pour rappeler de changer le filtre que recom-
mander.
4. Enlever le capuchon rouge du filtre.
5. Lubrifier le joint torique avec de !'huile v6g_tale ali-
mentaire.
6. Aligner les ailettes de la cartouche de faqon _ ce
qu'elle puisse _tre ins_rde dans la tote du filtre. Le
symbole de ddverrouillage se met dans l'alignement
du repEre moul6 dans la zone du couvre-ampoule.
Engager la cartouche dans la tote du filtre. La visser
d'un quart de tour (sens horaire) pour la bloquer en
place. Elle bute, de fa_on _lce qu'il ne soit pas pos-
sible de la visser plus loin et le symbole de verrouil-
lage dolt maintenant _tre align_ sur le rep_re.
7. Abaisser le bras-levier m_tallique de l'appareil
glace en position de marche (ON).
8. Faire couler de l'eau du distributeur pendant 10 min-
utes.
9. V_rifier soigneusement qu'il n'y a pas de fuites.
Remplacement de la Cartouche du Fiitre
I. D6visser la cartouche du filtre d'un quart de tour
(sens anti-horaire vu du dessous) de fa9on _t ce que
les ailettes de la cartouche puissent se d6gager de la
t_te. Le symbole de d6verrouillage s'aligne sur le
repEre mould dans la zone du couvre-ampoule.
Tourner doucement jusqu"_ ce que la cartouche sorte
de la t_te mais NE PAS tirer, l_viter d'incliner la car-
touche pour 6viter de renverser l'eau qui s'y trouve.
Mettre la cartouche us6e au rebut.
.
Retirer le filtre de rechange de son emballage avec
soin. (Lire soigneusement l'_tiquette pour v_rifier
qu'i! s'agit bien d'une cartouche de rechange appro-
pride.)
.
Suivre les dtapes 3 fi 9 de la section Pose de la pre-
miere cartouche de filtre.
iiiiiiiiiiiiiiiiiiiiiiiiiiiiiiTiiiiiiiii
[ Remasqse: dui,), par ]
; 3; )
f veltement de r4Se_;w:!hou condhions va_:i_Sesconcer,-, |
L nanl l'alimentali(;m d'eml: locale, ]
P_riodes de IVon-utifisation
Si le r_frigdrateur n'est pas utilis6 pendant plus de 2
semaines (il a 6t_ remis_ ou d_m_nag_), remplacer le
filtre lorsque le r6frig_rateur est remis en fonction.
Noter
I1 est essentiel que les consignes relatives au fonction-
nement, g l'entretien et au remplacement du filtre soient
observ_es aux intervalles indiqu6s. Cet article doit _tre
utilis6 avec de l'eau froide seulement.
Ne pas l'utiliser avec de l'eau d'une qualit6 douteuse ou
qui ne satisfait pas aux critEres de salubrit6 sur le plan
microbiologique sans avoir assur_ sa d_sinfection en
amont ou en ava! du filtre. Les filtres homologuds pour
leur capacit_ de r_duction d'organismes kystiques peu-
vent _tre utilisds sur de l'eau d_sinfect_e pouvant con-
tenir des organismes kystiques filtrables.
I1 est recommand_, aux fins de renseignements et de
s6curit_, de faire v6rifier la qualit_ de son eau p_ri-
odiquement.
Les contaminants ou autres substances dont Áapr6sence
est 61imin6e ou r6duite par ce systbme de filtrage d'eau
ne sont pas n6cessairement pr6sents dans l'eau utilis6e.
Le raccordement _ l'alimentation en eau doit _tre con-
forme aux codes de Áaplomberie en vigueur.
Rornarq_es:
Laisser la porte du r6frig6raieul ( uve:rle l_ndani le
ue de Feau
se d6vei se dons le compar!ilnent i_mr pmduits frais
l ¢ •I our plus df prt?cautions, amTter l'apparei! g glace
en teleran! If br_s_.levier mOtallique en position
d'am_i €OFI:;<t,
= Une carlouche de filtre nouvetlement inslaltO:e
faire cracholer le disiribuielm
32
Page 34

Rechange de Cartouches de Filtre
Pour se procurer des cartouches de filtre de rechange ou
pour tout service apr_s-vente, contacter votre d6taillant
local ou le service-clients de la compagnie de vente
d'appareils 61ectro-m6nagers au 1-800-688-2002 au
Canada ou au 1-800-688-9900 aux l_tats-Unis.
Rechage de Ffltre Num6ro de Mod61e pour les modules
comportant le syst_me de rappel de changement de
filtre _ eau:
UKF7002AXX - Gofit, odeur, chlore, organismes kys-
tiques et plomb
Rechage de Filtre Num6ro de Mod61e pour les modules
sans comportant le syst_me de rappel de change-
ment de filtre _teau:
UKF7001AXX - Gofit, odeur, chlore, organismes kys-
tiques et plomb
Les filtre indiquTs ci-dessous ont Stre test6s et sont
ANSUNSF 42 et 53 pour la rTduction des impuretTs indiqu6es:
ModUles sans le syst_me de rappel de
changement de filtre _ eau
Gofit/Odeur
Chlore Classif. I, norme 42
TurbiditT, norme 53
Particules, norme 42
Orgo kystiques, norme 53
Plomb, norme 53
Capacit6
Fonction
UKF7001AXX
Oui
Oui
Oui
Oui (classif. I)
Oui
Oui
250 gal. (946 L)
Chimique/
M6canique
UKF6O01AXX
Oui
Oui
Non
Oui (classif. I)
Non
Oui
250 gal. (946 L)
Chimique/
M6canique
Voir la fiche signal&ique qua accompagne le filtres pour plus de renseignement.
UKF6001AXX - Gofit, odeur, chlore et plomb
UKF5001AXX - Gofit, odeur, et chlore
Le filtre heau PuriCleaff" est fabriqu6 pour la com-
pagnie Maytag par:
Cuno Incorporated
400 Research Parkway
Meriden, CT 06450
D6bit nominal:
Temp. fonct, min.:
Temp. fonct, max.:
Press. fonct, min.:
Press. fonct, max.:
homologuTs NSF International conform6ment aux normes
UKF5001AXX
Oui
Oui
Non
Non
Non
Non
500 gal. (1893 L)
Chimique
0,5 gpm (1,9 1/mn)
33 °F (0,6 °C)
100 °F (38 °C)
30 psi (207 kPa)
125 psi (862 kPa)
ModUles avec le syst_me de rappel
de changement de filtre it eau
UKF7002AXX
Oui
Oui
Oui
Oui (classif. I)
Oui
Oui
416 gal. (1574 L)
Chimique/M&anique
Nettoyage Sous le R frig rateur
Le r6frig6rateur est _quip6 de roulettes et peut &re tir_
iii!ii!!iiiiiiii!iiiiii_iiiiiiiiiiii_iiiii!
iiiiiiiiiiiiiiiiiiiiiiiiiiiiiiiiiiiiiiiiiiiiii
iiiiiiiiiiiiiiiiiii_ilili_iiiiiii!iiiiiiiiiiii
iiiiiiiiiiiiiiiiiiiiiiiiiiiiiiiiiiiiiiiiiiii
pour nettoyer derriere et dessous. Relever les pieds
r6glables s'ils sont bloqu6s (voir page 22). Tirer le
r6fdg6rateur directement vers sol.
Condenseur No Clean TM de
Puissance CommerciMe
Un condenseur propre fonctionne plus efficacement.
Grace _ la conception unique du condenseur No Clean%
il n'est plus n&essaire de nettoyer r6guliErement le con-
denseur dans les conditions norrnales d'usage m6nager.
Certains environnements pourront &re particuliErement
poussi6reux ou graisseux. Dans de telles conditions, le
condenseur pourra &re nettoy6 p&iodiquement pour
assurer un fonctionnement d'une efficacit6 maximum.
33
Page 35

Grille de ventilation Eau savonneuse
Nettoyeurs _ vaporise doux
Accessoire d'aspirateur
Condenseur Brosse de nettoyage (r6f. n° A nettoyer uniquement si l'environnement est poussi6reux, grais-
20001017). Disponible seux ou s'il y a des animaux domestiques darts la maison.
chez votre marchand.
Poign6es de porte Eau savonneuse
Nettoyeurs _ivaporiser doux
Surfaces m6tail_ques
pe_ntes: armoire,
Eau savonneuse Essuyer avec un linge sec et propre.
Nettoyeurs ?ivaporiser doux Ne pas essuyer le r6frig6rateur avec un linge ?ivaisselle sale ou une
portes
Joint de la porte
Bicarbonate de soude et eau Utiliser 1 ou 2 cuillbres _isoupe de bicarbonate de soude par litre
Eau savonneuse (pinte) d'eau. Bien essorer l'exc_s d'eau de l'6ponge ou du linge
Tablettes en verre
Eau savonneuse La_sser les tablettes passer _ temperature ambiante avant les
Nettoyeur pour verre plonger darts l'eau chaude. Ne jamais utiliser d'eau tr_s chaude.
Nettoyeurs "_vaporiser doux
Cuve int6rieure et
habillage int_rieur de
Eau savonneuse Voici ci-dessous pour la concentration de la solution de bicar-
Bicarbonate de soude et eau bonate de soude.
la porte
t*_*otloooooomoooo*moo*_oo oo_o=
• ,_oooo_ooooomlooooooo_.oottIQo,
Tiroirs, bacs, oeufrier, Eau savonneuse
etc.
Cr_pine et ouvertures
Eau suelement Essuyer avec un linge propre humide.
de ventilation du sys-
t_me de contr61e
automatique de l'hu-
midit_
Tiroirs de rangement
technologie
ClimateZone TM
®, *
Eau et savon. Retirer les tiroirs de leurs comparfiments. Rincer _ fond et laisser
Pour d6sinfecter : Solution s6cher.
d'eau et de javellisant au
chlore, selon les instruc-
tions inscrites sur l'6ti-
quette du javellisant.
serviette humide. Us peuvent laisser des r6sidus qui 6gratignent ou
6caillent la peinture. Ne pas utiliser de tampons _ r6curer, de poudre
?i r6curer, de javellisant ou de produits nettoyants contenant du
javellisant. Ces produits peuvent 6gratigner et abimer la peinture.
Ne pas cirer les surfaces en plastique ou en vinyle.
avant de nettoyer autour des s61ecteurs, thermostats, ampoules ou
616ments 61ectriques.
NE PAS ufiliser de nettoyeurs abrasifs, de d6tergents concentr6s,
de javellisants, de cires nettoyantes, de solvants ou de nettoyeurs
polissants pour nettoyer l'int6rieur du r6frig6rateur.
NE PAS laver au lave-vaisselle.
Assemblages de com-
Eau et savon. Essuyer avec un linge propre et humide. NE PAS utiliser de pro-
parthnents h tech-
noiog_e ClimateZone TM
duits abrasifs, de d6tergents concentr6s, de javellisants, de cires
nettoyer, de solvants ou de cires _tpolir pour nettoyer les compar-
timents.
34
Page 36

des Pred its
, Le compartiment pour produits ffais dolt _tre gard_
entre 34 ° et 40 ° F (1° et 4,5 ° C), la temperature
optimum _tant 37 ° F (3° C). Pour v_rifier la tempera-
ture, mettre un thermomEtre h appareils m_nagers
dans un verre d'eau et le mettre au centre du r_ffig_ra-
teur. V_rifier au bout de 24 heures. Si la temperature
est sup_rieure h 40 ° F (4,5 ° C), baisser le thermostat
tel qu'indiqu_ page 23.
Les temperatures mesurSes en d'autres points du
r_frig_rateur peuvent varier par rapport _ la temp_.ra-
ture dans le bac/i l_gumes frais (modEles sdlectionnds),
en raison de l'emphtcement du thermostat du bac.
l_viter de mettle trop d'articles sur les tablettes. Ceci
r_duit la circulation de Fair autour de la nourriture et
produit un refroidissement inO.gulier.
Fruits et Legumes
® Le bac/1 l_gumes frais est con_u pour retenir l'humidit_
afin de conserver fruits et ldgumes plus longtemps.
* Trier les fruits et les ldgumes avant de les ranger et
d'ahord utiliser les articles un peu abtmds ou mous.
Jeter ceux qui pr_sentent des signes de pourrissement.
Toujours envelopper les aliments qui ont une odeur
forte, tels que les oignons et le chou, pour _viter que
leur odeur nese transmette _ d'autres aliments.
Siles l_gumes exigent un peu d'humidit_ pour garder
leur fra_'cheur, une trop grande humiditd peut les faire
pourir (la laitue en particulier). Bien _goutter les
ldgumes avant de les ranger.
Viande et Fromage
. La viande et la volaille crues doivent _tre bien embal-
16es pour ne pas d6goutter et 6viter la contamination
d'autres aliments ou surfaces.
* II arrive que de la moisissure se d6veloppe/1 la surface
de fromages /1 pfite ferme (gruyEre, cheddar,
parmesan). Couper sur une largeur au moins un pouce
(2,5 cm) sur le pourtour de la partie moisie et autant en
profondeur. Ne pas permettre le contact entre le
couteau ou outil et la partie moisieo Le reste du fro-
mage garde tout son gofit et peut fitre mang6. Ne PAS
essayer de r6cup6rer du fromage en tranches, du fro-
mage _ p_te molle, du fromage cottage, de la creme,
de la creme sfire ou du yoghourt s'ils moisissent.
Produits Laitiers
* La plupart des produits laitiers, comme le lait, le
yogourt, la creme sfire et le frornage cottage ont une
date de conservation indiqu_e sur l'emballage.
Conserver ces aliments dans leur emballage d'origine
et les r_frigdrer imm_diatement awes les avoir
achet_s et aprEs s'_tre servi.
Cey e vade A ime t
°
Le compartiment du congdlateur dolt _tre/1 0 °F (- 18°
C) ou moins. Pour vdrifier la temperature, placer un
thermomEtre/1 appareils mdnagers entre los paquets et
vdrifier au bout de 24 heures. Si la temperature est
supdrieure 5 0 ° F (-18 ° C), baisser le thermostat tel
qu'indiqud page 23.
Le congdlateur fonctionne plus efficacement s'il est
plein aux deux tiers.
ErnbMlage des Ailments pour la
Congelation
° Pour _viter que les aliments nese dessEchent et que
leur qualit6 nese d6t6riore, utiliser des feuilles d'alu-
minium, de l'emballage plastique pour cong61ateur,
des sacs en plastique ou des r6cipients herm6tiques.
l_liminer autant d'air que possible des emballages et
s'assurer qu'ils sont ferm6s herm6tiquement. S'il y a
de l'air dans !'emballage, l'aliment peut se dess6cher,
se d6colorer ou prendre un gofit (brfilure de cong61a-
tion).
• Envelopper les paquets de viande ou de volaille
frMche dans un emballage convenant pour le cong_la-
teur avant de les congeler.
o Ne pas reeong_ler des aliments qui se sont com-
plbtement d6eongel_s.
Chargement du Congelateur
* t_viter d'ajouter trop d'aliments non congel_s/1 la fois
dans le cong_lateur. Ceci surcharge le cong_lateur,
ralentit la cong_lation et peut augmenter la tempera-
ture des aliments congeMs.
- Laisser de l'espace entre les paquets, de fa(;on/1 ce
que Fair circule librement et congEle ainsi plus rapi-
dement les aliments.
° t_viter de conserver les aliments difficiles/1 congeler
tels que la creme glac_e et le jus d'orange dans les
bacs de porte du congdlateur. Ces aliments se con-
servent mieux /1 l'int_rieur du cong_lateur, dont la
tempdrature n'est pas aussi affect_e par l'ouverture et
3B
Page 37

t_-_ CS_@C@_?_@Y_©_ (Ces dur6es de conservation peuvent varier en fonction de la temperature, des emballages utilis6s,
et la qualit6 de la nourrimre lorsque achat.)
Beurre
Lait et cr_me
Fromage _tla cr_me, fromage
h tartiner et pr6parations au
fromage
Fromage cottage
Cr_me sore
Fromage _ p_te cuite
(gruyere, cheddar, parmesan)
Oeufs dans leur coquille
Restes de jaunes ou de
blancs d'oeufs
Pommes
Bananes
Poires, prunes, avocats
Baies, cerises, abricots
Raisin
Agmmes
Ananascoup6
1 mois
1 semaine
1 _ 2 semaines
3 ?_5 jours
10 jours
1 _ 2 mois
3 semaines
2 "a4 jours
1 mois
2 _ 4 jours
3 h 4 jours
2 _ 3 jours
3 "_5 jours
1 h 2 semaines
2 _ 3 jours
6 _ 9 ranis
D6conseill6
D6conseill6
D6conseill6
4 _t6 mois
Peut devenir friable
D6conseill6
9 _t 12 mois
8 mois (cuire)
6 mois (entier, _corcher)
D6conseill6
6 mois
1mois, entier
D6conseill6
6 _ 12 mois
Bien envelopper ou couvrir.
V6rifier la date indiqu6e sur le carton. Bien fermer. Ne pas remettre
de lait ou de cr_me non utilis6s dans le contenant d'origine. Ne pas
congeler la cr_me, sauf si elle est fouettO, e,.
Bien envelopper.
Garder dans l'emballage d'origine. V6rifier la date indiqu6e sur le carton.
Bien envelopper. Couper la partie moisie.
R6frig6rer avec l'extr6mit6 la plus pointue vers le bas.
Pour chaque tasse de jaune d'oeuf h cnngeler, ajouter 1 cuill_re a th6
de sucre, pour l'utilisation dans des pr6parations sucr6es, ou 1 cuil-
l_re '_ th6 de sel, pour l'utilisation dans les pr6parations non sucr_es.
Les potatoes non mores ou dures peuvent @tregard6es entre 15 et 21 ° C
(60 a 70° F).
Les mfuir _ temp6ramre ambiante avant de les mettre au r6fiig_rateur.
Les bammes et les avocats brunissent lorsqu'ils sont conserv6s au
r6frig6vateur.
Peuvent 6galement _tre gard6s entre 15 et 21 °C (60 i_ 70 °F). S'ils
sont r6frig6r6s, ne pas les couvrir.
Ne mOrit pals une fois achet6. Utiliser rapidement.
Asperges
Choux de Bruxelles,brocoli,
chou-fleur,petits pois,
haricotsde lima, pimentset
laitue
Chou, c61eri
Carottes, panais, betteraves et
navets
Laitue
Poulet et dinde, entier
Poulet et dinde, morceanx
Poisson
Bacon
Boeuf ou agneau hach6
R6ti de boeuf ou d'agneau et
bifteck
Jambon cuit entier
Demi-jambon
Jambon en tranches
Viandes froides
R6ti de porc
C6telettes de porc
Chair a saucisse
Saucisse fum6e
Veau
Saucisses de Francfort
® ib o ID e • ¢D _ ® Q o old o ® o ® o o
Sources : Minist_re am6ricain de l'agriculture, Food Marketing Institute, service agricole Cooperative Extension Service, Iowa State University
1 _ 2 jours
3 h 5 jours
1 _t 2 semaines
7 _t 10 jours
5 _t 7 jours
1 h 2 jours
1 _t 2 jours
1 "_2 jours
7 jours
1 h 2 jours
3 "_5 jours
7 jours
5 jours
3 jours
3 h 5 jours
3 h 5 jours
3 h 5 jours
1 h 2 jours
7 jours
3 "_5 jours
7 jours
8 h 10 mois
10 _ 12 mois
8 _ 10 mois
D6conseill6
12 mois
9 mois
2 _ 6 mois
1 mois
3 _ 4 mois
6 h 9 mois
1 h 2 mois
1 '_ 2 mois
1 _t 2 mois
1 h 2 mois
4 _ 6 mois
4 mois
l _ 2 mois
1 _ 2 mois
4 _t 6 mois
1 mois
Ne pas laver avant de r6frig6rer. Mettre dans le bac g produits frais.
Emballer les 16gumes ayant une odeur. Conserver les petits pois non
6coss6s. Mettre dans le bac g produits frais.
Emballer les 16gumes ayant une odeur avant de les mettre darts le
bac a produits frais.
Enlever les feuilles. Emballer les 16gumes ayant une odeur avant de
les mettre dans le bac_ produits frais.
R6frig6rer dans son emballage d'origine. Pour une dur6e de con-
g61ation sup6rieure h 2 semaines, envelopper le paquet dans un
emballage pour cong61ateur.
La viande fra_che peut _tre r6frig6r6e dans son emballage d'origine.
Mettre dans le bac _t viande et fromage. Pour une dur6e de con-
g61ation sup6rieure _t 2 semaines, envelopper le paquet dans un
emballage pour cong61ateur.
Les viandes froides emball6es sous vide dont l'emballage n'a pas
6t6 ouvert se gardent jusqu'5 deux semaines darts le bach viande et
fromage.
Les viandes pr6par6es doivent &re emball6es herm6tiquement et
rang6es dans le bac _ viande et fromage.
3_
Page 38

Pour les vacances d'un mois ou moins, laisser les ther-
mostats sur leur r6glage habituel.
En cas d'absence prolong6e:
a) enlever tousles aliments;
b) arr_ter l'appareil _ glace (sile r_frigSrateur en est
c) d6brancher le r6frig6rateur de sa prise murale;
d) retirer la cartouche du filtre (modUles s61ectionn6s)
iiiiiiiiiiiii!i!i!iiiiiiiiii_iiiiiiiiiii
iiiiiii_i!iiiiiiiiiiiiiiiiiiiiii!ii_iiiii
Teujours utiliser une ampoule standard de 40 ou 60 W pour appareils m_nagers pour le compartiment con-
g_lateur et r_frig_rateur.
_i_iiiiiiiiiiiiiiiiiiiiiiiiiiiiii
R6frig6rateur
I1y a deux ampoules au haut du compartiment r6frig6ra-
teur, sous le logement du thermostat Dual Coo! ''.
Pour remplacer une ampoule (ou les deux), retirer le
couvre-thermostat du logement des commandes:
• Saisir le couvre-thermostat au niveau des deux
• Tirer 16g6rement dessous pour d6gager les pattes de
• Remplacer la ou les ampoules par des ampoules pour
• Une Ibis la ou les ampoules remplac6es, centrer le
Certains modules sont 6galement dot6s d'une autre
ampoule derriere le bac h ldgumes frais du haut. Pour la
remplacer, voir page 28.
6quip6) et fermer l'alimentation en eau au niveau du
robinet qui amine l'eau au r6frig6rateur;
et raccorder la d6rivation du filtre (voir pages 32-
33), mettre la cartouche us6e au rebut. Une nouvelle
cartouche pourra _tre mise lorsque le r6frig6rateur
sera remis en service;
o o© @_-,o o ©,<._©© ©o@© o O ¢;0 © 0 0© ©0 © OC O 0 @ 0 0 O0 ®oot; 0 O 0 0 © 0 o o
,:<pattes >>de l'arri_re. Celles-ci se trouvent au haut et
l'arribre du compartiment pour produits frais, der-
ribre les couvre-ampoules.
retenue et faire glisser le couvre-thermostat vers soi
jusqu'_t ce qu'il soit d6gag6.
appareils 61ectro-m6nagers _ culot standard de 60 W.
couvre-thermostat sur les rainures du logement des
commandes et le glisser _tfond vers l'arribre jusqu'a
ce qu'il s'enclenche sur les pattes de retenue.
e) nettoyer le r6ffig6rateur h fond en s6chant bien;
f) laisser les portes ouvertes pour empacher la forma-
tion d'odeurs.
En cas de d6m6nagement, suivre les &apes a h f sous
D6parts en vacances. Par ailleurs, retirer et emballer
soigneusement tout article facilement amovible.
D6placer le r6frig6rateur en position verticale, avec les
portes maintenues ferm6es par du ruban adh6sif et les
tablettes en s6curit&
Cong61ateur
L'ampoule du cong61ateur se trouve sur la paroi arri_re
du compartiment cong61ateur.
Pour la remplacer:
• D6crocher les pattes au haut du couvre-ampoule en
appuyant du pouce dans la partie sup6rieure du centre
du couvre-ampoule.
• Faire pivoter le couvre-ampoule vers le bas.
• D6visser l'ampoule une fois celle-ci froide et la rem-
placer par une ampoule pour appareils 61ectro-
m6nagers standard de 40 W.
• Remettre le couvre-ampoule en place en le faisant
pivoter vers le haut, puis r6enclencher les pattes dans
les fentes voulues.
Ampoule du Distribute_r (mod_ies _ dis-
tributeur seulement)
Pour la remplacer:
• Rep6rer l'emplacement de l'ampoule au niveau du
distributeur, _ gauche du m6canisme d'actionnement.
- D6visser l'ampoule us6e et l'enlever.
, Remplacer l'ampoule en utilisant une ampoule de
120 V et 7 W.
37
Page 39

iiiiiiiiiiiiiiiiiiiiiiiiiiiiiiiiiiiiiiiiiiiiiiiiiiiiiiiiiiiiiiiiiiiiiiiiiiiiiiiiiiiiiiiiiiiiiiiiiiiiiiiiiiiiiiiiiiiiiiiiiiiiiiiiiiiiiiiiiiiiiiiiiiiiiiiiiiiiiiiiiiiiiiiiiiiiiiiiiiiiiiiiiiiiiiiiiiiiiiiiiiiiiiiiiiiiiiiii_iiiiiiiiiiiii_i_i_iii_i_iii_i_iiiiiiiiiiiiiii_i_i_i_iii_iiiii_i_i_i_iii_iii_i_iiiii_i_i_iii_i_iiiiiii_iii_i_i_i_i_i_iiiii_i_iiiiiiii_i_i_i_i_i_i_i_i_i_i_i_i_i_i_i_i_i_i_i_i_i_i_i_i_i_i_i_i_i_i_i_i_i_i_i_i_i_i_i_i_i_i_i_i_i_i_i_i_i_iiiiiiiiiiiiiiiiiiiiiiiiiiiiiiiiiiiiiiiiiiiiiiiiiiiiiiiiiiiiiiiiiiiiiiiiiiiiiiiiiiiiiiiiiiiiiiiiiiiiiiiiiiiliiiiiiiiiiiiiiiiiiiiiiiiiiiiiiiiiiiiiiiiiiiiiiiiiiiiiiiiiiiiiiiiiiiiiiiiliiiiiiiiiiiiiiiiiiiiiiiiiiiiiiiiiiiiiiiiiiiiiiiiiiiiiiiiiiiiiiiiiiiiiiiiiiiiiliiititiiitiiiii
x . ! _iiiiiiiiiiiiii_i_i_ii_iiiiiii_iii_!
Avant
Ne fouctionne pas • la prise de courant n'est pas sous tension
ooeee,*e,e*,o,,eeeeoolooaeeeoeeeeeeeeeelomee_, e_oeeeeeeoeee_eeeoeee_e_eee_ee_eeeee_eeeeee_e_e_eee_ee_ee_e_e_eeeee_eeee_e_e _
Fonctionne trop longtemps/trop • ouverture des portes prolong_e
fr_quemment • grille inf6rieure obstm_e
• eee_e_e_e_oeoeeeeeoeeeoeeeee_eoeeeeeeeeeeee_ ,eoeeeeeeoe_o_eoeoeoeooe*eo_eeeeoeo • ooe_ee_o_eeeeeoee,eeeeeo_eeeeeeeoeo_e_*eoeoeoeo_
Foncfionnement bruyant • le plancher est insuffisamment solide
eeeeeeeeee_eeeloeeee*e*eeeeeeeeeeeeoeeeee*eee •
Odeur darts le r6frig6rateur • les aliments dont l'odeur est forte doivent 8tre envelopp6s ou couverts
e••eeeeoeeeee_eoeeeo*_eo••®•eeoo_ooeeeoeo_e•• ••e_eeee_eeee_eeeee_eeeeeeeeeeeee•••e•eeee_ee_eeeee_••ee_e_e_eee_oe_ee_*eee_eeeee_ e
De Pair chaud souffle du bas du r6fi'ig6rateur • _coulement d'air normal en provenance du condenseur
• ooeee • • _ee ••e ee eoeeee eoeee eeeoo••e•eeeeoeee_ eeo_,o•ee_eee*_eeeeee•e e •e _e ee eeoo e_e,e_ee_ e_eeeoee_eee • • • • eoo**oe_ ee e •• eeee_ooe_oo
Le r6frig6rateur vibre • le r6frig6rateur n'est pas de niveau
eeeoeoeeeoe_eeoee_eeeoe_,eeeeeeoe_eoeeeoeoeee e_e_e_eeee_e_e_ee_e_ee_eeeee_eo_eeeeeee_ee_e_eee_e_e_ee_eee_e_e_e_e _
Condensation sur les surfaces int6rieures ff6quemment ou de fa_on prolong6e
• e_eeeeee_ eeee• ee • oeoeoee •oe•e••eee• •o• •e••• oe e••• _eee_e_ooeoee e_eoeo_eeooooeo eeee ee_e e_eeoeee.eo_e • eee_oee_oeoeee eooeoeeee oee•o
Condensation excessive darts le bac h • les aliments ne sont pas emball6s correctement
16gumes frais - il fait un temps chaud et humide
e*e • • • oee® • • •e •• oee_eeee*oe_eeeee•eeeooeeo*e*,
L'afficheur _tteclmologie ClimateZone _ sur - le r6glage normal a _t6 choisi
le tiroir (certalns modules) n'affiche aucune • le tiroir n'a pas 6t6 ouvert depuis quatre semaines
temp6rature.
.........................................." "" a
L'affichage de la temp6rature ClimateZone _c • po obtenir de meilleurs r_sult ts, 1 s comm des du g_rateur et du cong61ateur
ne se trouve pas dans la plage vis_e, doivent _tre r_gl6es au milieu (5)
e_ •ee••o •e••• _,e • • eeeeeeooeee_ *oe_e*oeeoeoo_ • eeeeoeeoo_ • eeeeeeee_ • eooo_eooo eeoeee_oooe eoeoa_ee_eeoeoe • oeeee, • •e•o o•o• o•eee•• • • • ••e• • •
Compartiment r6frig6rateur ou cong61ateur • thermostat du r6frig6rateurou cong61ateur sur un r6glage insuffisamment froid
insuffisamment froid o ouvertures prolong6es de la porte
........................................• °" • ° "° ° ouve_t_es °pro_ong'6"esde°l'apo_e
Compartiment r_frig_rateur trop froid " ...................................................
........................................." " •" " b'ruitnormalcause•par 1;e r vrage
Gr6sillements dans le eong_lateur " au de d6givage qui tombesur lar6sistancede d6gi
d Appeier Je Se ice de D6pannage, ooo ........
. le thermostat est sur <<Off >>(arr_t)
• le r6frig6rateur n'est pas branch6
. le disjoncteur ou le fusible de la maison a saut6
• le r6frig6rateur est en cours de d_givrage automatique
• les r6frig6rateurs modernes sont plus grands et assurent une r6ffig&ation h temp6rature
plus froide, ce qui exige qu'ils tournent plus longtemps pour une temp&amre plus stable
• ouverture des portes trop fr6quente
• la porte ne ferme pas herm6tiquement (un paquet ou un r6cipient l'emp_che de se fermer)
• temp6rature61ev6e dans la piece
• le r6frig&ateur n'est pas de niveau
ee_oeeeeeeeeeoeeeeeee_oe*ee_eeeo_oeeeeeo ee_eoeeeo_oeee_eeee*oeoeeeoo_eeeeeeoeoeee_ e
• l'int6rieur du r6frig6rateur a besoin d'Stre nettoy6
• le plancher est insuffisamment solide
• ceci peut se produire par temps chand et humide lorsque les portes sont ouvertes
• la porte ne se ferme pas correctement
• e_ • • eo_ee_eeeeee ee • • e_eeee_e*eeeeo_ee • • •e eeeee_eoeeeeoeeeeeeeeoe •oo•e e_ooooeeeeoeee
• _oee_o _ee_e_eeeeeo_oo_eeeeoeooe ooe ooeoeee oeoeeeee_ eeeeeeeeeeeeeo_aooeeee.eeoeoo
o _t la suite d'une ouverture de bac, d'un ajout de produits ou d'un changement de r6glage,
raffichage peut changer L'affichage ant6rieur reviendra momentan6ment
""Laisemen't"an" "de" en""-"ug"i i'semenloure fet'rou e"estgo 71 "le"S ,c(g"de' l k vragg..................
i ; i iiiiiiiiiiiiiiiiiiiiiiiiiiiiiiiiiiiiiiiiiiiiiiiiiiiiiiiii i i i
tilationdu cong_lateur
................................................ :" ]esproduiisncl_es'ensucre'peuven[ne'pas'd_cir'com'pl'_iement'[orsqu"i[ssoni'co;: .....
Cong_lation insuffisante gel6s (cr_me glac_, jus de fruit, etc.)
e_e • eeeeoeeeeeooeeoeeeoeeeeooeeoeeeoeee_eeeoe, _°eeeeeee_eeeee_ee_eee_eee_ee_e_eeeee°ee_e_e_®_eee*ee_eeeee°_ee_eeee_ee_ _
Le voyant de rappel de changement du filtre • Cet &at est normal. La commande fait le d6compte de 12 mois ou de 1 572 litres (416
h eau (certains modules) s'allume lorsque le gallons), peu importe que le filtre ou le circuit de d6rivation du filtre soit install&
circuit de d_rivation du filtre est installS. Eteindre le voyant (voir la page 3 l).
oo••e•••• ••e ••• eo•• •eeeoeo • oaee.eoeoe eeee oeooeoee,eeoeoeo eoeeeeeee eeeeeeoeoeoeo .e*ee**o
Les cubes de glace s'_vaporent • l' ent de l' o sur les gla_ons vaporer sne sont pas u s
• •••°°o•••• oeoeeeeee*ee* eeeeooeeeooeo*ee*e_ _ • e•ee •°••e•ee • °••• •••• • oo••• •° • eooe_ooeeoe oeoeeeoeoeeee ee eeeeooeeoo eeoeoeeoe oeooeoeeoee •
L'appareil h place ne fonctionne pas • l'arriv_e d'eau est ferm6e
.....................................................Surface avant ti_le • con'cept]on'sp_iale ..... des't_n6e'a r6duire............. la formafio'n ...........de condensati'on ...........pendant les pen- .....
• oee oooe_e_eeoo_e ee_e*eee eoe_eoe oe
• mettre le thermostat du cong_lateur sur un r_glage plus froid
r6guli_rement; ceci est normal
• le bras-levier est en position d'arr&
• la pression de l'eau est trop faible
• le cong_lateur n'est pas suffisamment froid
odes de chaleur humide
............. g a;; Y&';ii; ,dd r".............. '..............................
Le distributeur de glace ne fonctionne pas • l'appareil _ glace ne fonctionne pas
eeeeoeoeeoeeeeee_eeo_eeeee_eeeoeeeoeo,eoeo_eo_ e_e_e_ee_eeeeeeeeeeeee_e•e_e_e*_e_e_e_e_e_ee_e*_eeeee_ee¢_eee_eeee_ee_ee_eee •
Le distributeur d eau ne fonctionne pas • la pression de l'eau est trop faible
oeoeooeeee*eo ooeoeooe_ee_eo_ee eooe_eoeeeo • _eeoeooo _oeo_e*eoe eeoeeeee oeoeeeoeee _oo• ••ooee•e••• o•• ••e• •e•e • •••o•o•o••• •oeo• ••••e•• •
• le commutateur de verrouillage est allum6
• l'ardv6e d'ean est ferm6e
• le commutateur de verrouillage est allum6 (voir pg. 31)
38
Page 40

G81'8
Pour localiser une entreprise de service apr_s-vente agr66e dans votre r_gion, contacter le d6taillant Maytag o_ le r6frig6rateur a 6t6 achet6 ou
encore contacter le service-clients Maytag de la compagnie de vente Maytag Appliances au num_ro indiqu6 ci-dessous. Si les prestations de
garantie ne vous donnent pas satisfaction, veuillez appeler ou &rire h:
Maytag Appliances Sales Company
c/o CAIR sMCenter CANADA: 1-800-688-2002 I{.-U.: 1-800-688-9900
P.O. Box 2370
Cleveland, TN 37320-2370, t_.-U.
REMARQUE: Lors de toute communication au sujet d'un probl_me de service apr_s-vente non r6solu, pri&e de foumir les renseignements suivants:
(a) vos nom, adresse et num6ro de t616phone;
(b) num6ros de module, de s6rie et de r6vision (se trouvant au haut et "_l'avant de l'int6rieur du compartiment r6frig6rateur);
(c) nom et adresse du d6taillant et date d'achat;
(d) description claire du probl_me rencontr6;
(e) preuve d'achat (coupon de caisse).
Ne sont pas couverts par cette garantie:
1. Les dommages ou d6rangements dfis _:
a. Mise en service, livraison ou entretien effectu6s incorrectement
b. Toute r6paration, modification, alt6ration et tout r6glage non
autoris6s par le fabricant ou par un prestataire de service
apr_s-vente agr66.
c.Accidents, mauvaise utilisation ou usage abusif ou
d6raisonnable.
d. Raccordement _ une alimentatiom une tension ou une prise
incorrectes.
e. R6glage incorrect d'une commande ou thermostat quelconque.
2. Les garanties sont nulles si les num6ros de s6rie d'origine ont 6t6
enlev6s, modifi6s ou ne sont pas facilement lisibles.
3. Ampoules 61ectriques.
4. Appareils achet6s h des fins commerciales ou indus-
trielles.
5. Les frais de visite d'un prestataire de service ou de ser-
vice apr_s-vente encourrus pour les raisons suivantes:
a. Correction d'erreurs de mise en service.
b. Initiation de l'utilisateur _ l'emploi de l'appareil.
c. Transport de 1'appareil aux locaux du prestataire de
service.
6. Dommages indirects ou accessoires subis par toute per-
sonne suite _ttoute rupture de garantie.
Certaines provinces ne permettent pas l'exclusion ou la
limitation des dommages indirects ou accessoires, et les
limitations ou exclusions ci-dessus peuvent ne pas s'ap-
pliquer "_votre cas.
Les guides de l'utilisateur, les manuels de r6paration et les catalogues de pi_ces sont disponibles aupr_s du service-clients de la compagnie de
vente Maytag Appliances. MAY]'AG • One Dependability Square • Newton, Iowa 50208
39
Page 41

lnst ones de S .................. .4I
lnstalaci6n ................................................................ 42
Controles de Tern ra ........................................ 43
Caracterfsticas Intemas ...................................... 44,°48
Servicio de Hielo y Agua ..................................... 49°53
Aimacenamiento y Manteni ......................... 57
Antes de Llamar .................................................. 58
En caso de necesitar ayuda, resulta filil contar con la
identificaci6n completa referenle M el modelo y ndmero
de serie de su refiJgerador, Esta informaci6n figura en
la placa infonnativa colocada en la parte superior del
compartimiento para alhnentos frescos. Anote los
nfimeros que se consignan a confinuaci6n para un f_icil
acceso_
NEWTON IA m_u.Nt3.
USA 50208 _-v. M.
FOR ICEMAKER OPTION _c._n.6 115V 6OHZ
USE KIT _ _,..g J_o._ ",_N_ ;r_OMDC_
mx._ oz.
N0mero de Modelo
N0mero de Serie
Ndmero de Revisidn
Fecha de Compra
Si tiene preguntas adicionales, sfrvase comunicarse con
nosotros a:
Maytag Appliances Sales Company
1-800-688-9900 EE.UU.
1-800-688-2002 CANADA
(de lunes a viernes; de 8 am a 8 pm hora del Este)
Internet: http://www.maytag.com
MAYrAG
Page 42

lnstrucciones de Seguridad Importantes ......... oooo.....
i__i_iiiiiiiiiiiiiiiiiiiiiiiii@
• Use el refrigerador s61o para el prop6sito para el que
est_i destinado.
• Para evitar posibles riesgos como consecuencia de
choque el6ctrico, nunca enchufe el refrigerador a un
tomacorriente clue no haya sido conectado adecuada-
mente a tierra y de acuerdo con los normas el4ctricas
nacionales. Vea la serial de Ak advertencia y las
instrucciones de conexi6n a tierra.
• Desenchufe el refrigerador antes de proceder a
limpiarlo o reponer el foco.
• En caso de corte de energia el6ctrica, procure abrir la
puerta lo menos posible. Si el corte de energia el6ctrica
es prolongado, proteja los alimentos colocando bloques
de hielo seco sobre los paquetes o consulte a una c4mara
frigorffica de alimentos de su localidad para el almace-
namiento temporal de los mismos. Los alimentos con-
gelados que se hayan descongelado por completo no
deber4n volverse a congelar y deber4n desecharse.
• Cualquier cable de servicio el6ctrico que se desgaste o
dafie debe repararse o reponerse de inmediato. Nunca
desenchufe su aparato tirando del cable el6ctrico.
• No deber_i poner en funcionamiento su refrigerador
en presencia de gases explosivos.
• Los nifios no deber_in subirse, colgarse o pararse en
los anaqueles del refrigerador.
Este aparato est_i equipado con un enchufe de tres patas
conectado a fierra para su protecci6n contra posibles
riesgos de choque el6ctfico. Debe enchufarse a un
tomacorriente de conexi6n a tierra. En donde haya un
tomacorriente de pared de dos patas estS_ndar, es respon-
sabilidad y obligaci6n personal del cliente reemplazarlo
por un tomacorriente de pared de tres patas conectado
adecuadarnente a tierra. Bajo ninguna circunstancia,
corte o retire la tercera pata (a tierra) del cable de
energfa el6ctrica. No use un tap6n de adaptador. No use
un cable de extensi6n.
CABLEDEALIMENTACi0N DE
ENERG|AEL_CTRICACON
ENCHUFEDE CONEXI_)NA
TIERRADE3 PATAS.
Importante: E1 riesgo de que un nifio quede
atrapado y se ahogue no son problemas del pasado.
Los refrigeradores arrojados a la basura o abandon-
ados constituyen atin un peligro...incluso si van a
dejarse sin funcionar %61o
por unos dfas". En caso
de que se est6 desha-
ciendo de su refrigerador,
siga las siguientes
instrucciones que lo ayu-
dar4n a evitar accidentes.
• Retire las puertas.
• Deje las parrillas en su
lugar de modo que los
nifios no puedan
subirse con facilidad
adentro.
TOMACORR_ENTE DE PARED
TJPO CONEXION A TIERRA
4.t
Page 43

Instalaci6n°oo, ................... ............ ..... .oo.o,o...... ...... o,o
Su nuevo refrigerador fue embalado cuidadosamente
para su transporte. Retire y deseche los sujetadores de
embalaje (si los hubiere) de las parrillas que est,Sn justo
encima de cada parrilla en donde se enganchan al
armaz6n. Para refirar los sujetadores de pl_stico mueva
los sujetadores lateralmente y jale derecho hacia afuera.
Ubica¢56n
Permita que el aJre fluya fluir libremente a trav6s de
la rejilla de base frontal.
Instale el refrigerador en donde la temperatura ambi-
ente no descienda por debajo de 55°F (13°C). Con
temperaturas por debajo de los 55°F (13°C), el
refrigerador no funcionar_i con la frecuencia sufi-
ciente para mantener la temperatura adecuada en el
congelador.
Deje un espacio libre minimo de 1/2" (1 cm) a los
lados, arriba y atr_s para facilitar la instalaci6n. Si el
refrigerador se coloca con el lado de las bisagras de la
puerta contra la pared, es posible que opte por dejar un
espacio adicional para abrir la puerta m_ ampliamente.
tViveia¢i6n
Para mejorar la apariencia y mantener un rendimiento
6ptimo, nivele el refrigerador. Su refrigerador tiene
ruedas que pueden ajustarse para nivelarse:
Retire las cubiertas de la bisagra inferior (ver figura
1). Para hacerlo, sostenga cada cubierta cerca de la
bisagra y presione. Las lengfietas de fijaci6n se
soltar_n, permifiendo retirar las cubiertas.
o
Ajuste las ruedas con un desarmador (ver figura 2).
e
Para asegurar la caja en su lugar, doble hacia abajo
las patas ajustables/de cierre, que se encuentran cerca
de 1as ruedas delanteras (ver figura 3).
Vuelva a colocar las cubiertas de las bisagras.
En caso de que el piso no est6 nivelado y sea nece-
sario levantar la parte posterior de la caja del refrig-
erador, sugerimos hacer rodar las ruedas posteriores
en una pieza de madera contrachapada u otro material
de relleno.
En caso de que instale el aparato sobre un piso de
vinflico o madera dura tenga cuidado de no rayar o
dafiar el piso. Para colocar el refrigerador utilice una
pieza de madera contrachapada, una alfombra u otro
material para proteger el piso.
Conse]os Ahcrrar Energia
Coloque el refrigerador alejado de aparatos que
generen calor como lavaplatos y respiraderos asi
como de la luz solar directa.
Nivele el refrigerador y no bloquee la venfilaci6n
alrededor de la rejilla frontal.
Mantenga el congelador lleno hasta casi la totalidad
de su capacidad para que al momento de abrir la
puerta se escape la menor canfidad de aire frio
posible. Cuando ocupe menos de dos tercios de la
capacidad del congelador, coloque cajas de leche a
medio llenar o agua.
Deje enfriar los alimentos calientes antes de colo-
carlos en el refdgerador o en el congelador
o
Tape los liquidos.
Q
Antes de colocar recipientes en el refrigerador
asegtirese de secarlos bien por fuera.
'I ......_J
Fig. 1
GIRE EN SENTIDO HORARIO
PARA LEVANTAR LA
ESQUINA DE LA CAJA DEL
REFRIGERADOR
GIRE EN SENTIDO ANTIHO-
RARtO PARA BAJAR LA
CAJA DEL REFRIGERADOR
Fig. 3
• Evite abrir las puertas con demasiada frecuencia.
42
Page 44

Controles de
Su refrigerador tiene el disefio de frescura Dual Cool TM de Maytag para controlar las temperaturas de los alimentos
frescos y congelados.
frescos.
Para ajustar los controles, mueva el cursor hacia la izquierda o derecha segdn se desee.
A]_ste de _es Centyeies _m_a_g_s
D_J Ceoa_
Los controles se encuentran en la parte frontal superior del compartimiento para alimentos
Los controles del refrigerador y congelador tienen
posiciones de 1 (m_is caliente) a 9 (m_is fdo).
Inicialmente ajuste ambos controles en 5.
Deje funcionar el refrigerador por lo menos de 8 a 12
horas antes de colocar los alimentos.
Guia de Control Dual Coot
Refrigerador: Mueva el Control hacia:
Demasiado Caliente Siguiente posici6n m_s alta.
Demasiado Frio Siguiente posici6n m_s baja.
Con_elador: Mueva el Control haeia:
Demasiado Caliente Siguiente posici6n m_s alta.
Demasiado Frio Siguiente posici6n m_is baja.
Apagar el refrigerador
Coloque el control del congelador en OFF.
NOTA: A1 fijar el control del congelador en OFF se
interrumpe el enfriamiento en AMBOS compar-
timientos, pero no se corta la energia eldctrica del
refrigerador.
Mantenga las temperaturas por 24 horas para que se
estabilicen antes de volver a fijarlas.
Cambiar un control tendril algtin efecto sobre la tem-
peratura del otro compartimiento.
Suje_A_°¢s_s C°afSe_tesde_
Refr_gerader
En ocasiones, la parte frontal de la caja del refrigerador
esUi caliente al tacto. Esto es algo normal que evita que
la humedad se condense en el refrigerador. La condi-
ci6n se notar_i m_is cuando ponga a funcionar su refrig-
erador por primera vez, en un clima caliente y despuds
de abrir la puerta con frecuencia y durante largo rato.
_0 Ne_es_ta
Su refrigerador est_i
autom_iticamente.
disefiado para descongelarse
Regu_¢i6_ de Jo_ Cor_treges
DuaJ CooY _
24 horas despuds de colocar alimentos, puede decidir
si uno o ambos compartimientos deben enfriarse o
calentarse. De ser asf, regule el/los control(es) con-
forme se indica en la tabla que figura lineas arriba.
Salvo cuando ponga el refrigerador en fun-
cionanaiento, no cambie ningtin control m_is de un
ndmero a la vez.
43
Page 45

Caracteristicas lnternas o...... ................................
Tablas Cantilever de Vidrio Templado
Estas tablas son ajustables para que la parte interior del
refrigerador pueda acomodarse para variar las necesi-
dades de almacenamiento de los alimentos.
Para retirar una tabla: DescArguela. Levante ligera-
mente la parte posterior de la tabla y j_ela directamente
hacia afuera.
Para cambiar de posici6n una tabla: Despu6s de reti-
rarla, incline hacia arriba el borde frontal de la tabla.
Inserte los ganchos en los orificios deseados y haga que
la tabla se coloque en su lugar. Asegdrese de que la
tabla est6 bien asegurada en la parte posterior.
Tabla SpilI-Catcher'(modelos selectos)
Las tablas Spill-Catcher TM fienen un borde para retener
derrames que permite contenerlos y hacer la limpieza
mds f_icil.
Algunas tablas Spill-Catcher TM presentan la caracteris-
tica de deslizarse hacia afuera Easy Glide. Para
deslizarla hacia afuera, sujete la parte frontal de la tabla
y jale hacia adelante. Empuje la tabla para regresarla a
su posici6n original.
Tabla Elevator TM (modelos selectos)
La tabla Elevator TM est,5 equipada con un borde para
retener derrames y la caracterfstica de correrse hacia
afuera Easy Glide. Puede ajustarse arriba o abajo sin
descargarse. Para correrla hacia afuera, sujete la parte
frontal de la tabla y jale hacia adelante. Empuje la tabla
de regreso a su posici6n original.
Para ajustar la parrilla Elevator': Desdoble la
manivela ranurada para que forme _ngulo recto con la
parte frontal de la tabla. Gire la manivela hacia la
derecha (sentido horatio) para levantar la tabla, o hacia
la izquierda (sentido antihorario) para bajarla.
Para retirarla: Descargue la tabla. Sujete la parte
frontal de la tabla y jale completamente hacia adelante.
Presione los topes (ambos lados) y siga jalando la tabla
hacia adelante, libre del armaz6n.
Para reponerla: Alinee la tabla con la estructura y
emptijela hasta el fondo. No es necesario apretar los
topes para reinstalaci6n.
Bajo uso normal, NO es necesario retirar el armaz6n de
la tabla Elevator TM. Aunque improbable, y no recomen-
dado, el procedimiento correcto para efectuar el retiro es
el siguiente:
o
Descargue la tabla por completo.
e
Deslice la tabla hacia adelante aproximadamente dos
pulgadas (cinco cenffmetros) y mueva manualmente
los dos sujetadores posteriores hacia el centro de la
tabla.
• Mientras sostiene toda la tabla y el armaz6n desde
abajo, levante ligeramente y gire el montaje aproxi-
madamente 30 ° para permitir que el mecanismo poste-
rior se libere de los rieles verticales del lado posterior.
, E1 montaje completo puede luego rnoverse hacia ade-
lante y sacarse del compartimiento del refrigerador.
• Para reinstalarla, invierta el procedimiento de retiro.
Asegfirese de que la tabla est6 nivelada. Cuando se
empuje la tabla corrediza hacia atrds, repondrfi a los
sujetadores posteriores a su posici6n de fun-
cionamiento correcta.
SUJETADORES
44
Page 46

Caracteristicas intemas (continuar ) .......... 0.......... 0
Los Anaqueles Desmontables de la Puerta (modelos
selectos) est_ disefiados para acomodar recipientes de
una capacidad de algo m_s de un gal6n (cuatro litros),
los mismos que son ajustables y fficiles de retirar. Para
retirarlos: Levante el anaquel hasta aflojar los sujeta-
dotes en el revestimiento de la puerta, luego jale el
anaquel en forma recta. Invierta el procedimiento ante-
rior para volver a colocar el anaquel.
Los Guarda (modelos selectos) encajan en los
anaqueles de la puerta del refrigerador y congelador
para asegurar botellas y otros recipientes en su sitio
cuando se abra o cierre la puerta. Los cajones se ajustan
deslizfindolos de un lado a otro.
i
E1 Sujeiador de Botellas Alias (modelos selectos) evita
que las botellas altas se inclinen hacia adelante. Se
ajusta cord6ndolo de un 1ado a otro.
E1 Comparfimiento para Productos Lficteos, ubicado
en la puerta del refrigerador, puede estar equipado con
un Guarda o Mantequillera.
E1 Portahuevos (el estilo puede variar/modelos
selectos) contiene "algo m_is de una docena" de huevos.
Puede desmontarse para cargarse fuera del refrigerador
o lavarse.
La Rejilla Multiusos (modelos selectos) proporciona
un lugar para almacenar vino horizontalmente. La
rejilla tambi6n sostiene bebidas enlatadas o una caja de
huevos. Coloque la rejilla al lado derecho de una par-
rilla del refrigerador. Nota: La Rejilla Multiusos no
)uede colocarse sobre una Parrilla Elevator TM.
iiiiiiii
Los Anaqueles de la Puerta del Refrigerador
Inclinados Hacia Afuera (modelos selectos) se
inclinan hacia afuera para cargar o retirar adecuada-
mente contenidos diffciles de acomodar como botellas
de litro, altas o articulos embolsados.
iiiiiiiiiiiiiiiiii_iiii
iiiiiii!ii!!iiii!ii!!i!!_iiiiii
La Rejilla para 12 Unidades (modelos selectos) se
cuelga de cualqtfiera de las parrillas del refrigerador a
prueba de derrames. Se engancha en los alambres del
armaz6n debajo de la parrilla. E1disefio inclinado permite
que las latas meden hacia adelante cuando se retira una.
45
Page 47

Las parrillas del congelador (alambre o vidrio) se
apoyan en fieles de soporte moldeados en la pared del
congelador. Los modelos selectos ofrecen parrillas de
congelador que se corren hacia adelante para facilitar el
acceso a los artfculos en la parte posterior de la parrilla.
Para retirar una parrilla del eongelador: Descargue
por completo la parrilla y levintela derecho hacia
afuera. Incline la parrilla lateralmente y jilela en forma
recta. Para reponefla, invierta el procedimiento anterior.
La/las canastilla(s) del congelador (el ndmero variari
segfin el modelo) se desliza(n) hacia afuera para tener
un acceso mils conveniente a los alimentos congelados.
Se apoyan y se deslizan sobre rieles de soporte mold-
eados en la pared del congelador.
Para retirar una canastilla del eongelador: Corra la
canastilla hacia afuera hasta que se detenga. Baje las
lengtietas ubicadas en la parte posterior de cada lado de
la canastilla, siga deslizindola hacia adelante hasta que
salga. Para volver a colocar la canastilla, alin6ela con
los rieles de soporte y deslfcela hacia su lugar.
Canastillas StairStep TM de Congelador
(modelos selectos)
Las canastillas StairStep" de congelador interactfian
para facilitar el acceso a los contenidos en la parte infe-
rior del congelador.
Jale la canastilla inferior hacia adelante para tener
acceso a su contenido. Continfie jalfindola para abrir
tambi6n la canastilla superior. Invierta el procedimiento
para cerrar ambas canastillas.
Jalar por completo la canastilla superior permite el
acceso a su contenido. La canastilla inferior se moverfi
tambi6n hacia adelante aunque no se abriri.
Para retirar las canastillas: Jale hacia adelante la
canastiUa superior hasta que se detenga. Levintela lig-
eramente y siga jalando hacia adelante. Las canastillas
salen juntas. Invierta el procedimiento anterior para
volver a colocar las canastillas en su lugar.
Canastillas Descendentes de la Puerta del
Congelador (modelos selectos)
Proporciona un espacio de almacenamiento adecuado
para alimentos congelados que tienden a moverse, tales
como verduras embolsadas.
Areas cspe#mJe de
Alrn cen rr Jer to
Adjusti- Temp TM (caj6n superior-modelos selectos)
Este caj6n esti disefiado para proporcionar un firea de
almacenamiento a largo plazo para carnes frescas,
quesos y embutidos.
E1 control de temperatura para este caj6n se encuentra
en la pared lateral izquierda del refrigerador, cerca de la
parte frontal del caj6n. La posici6n "cool" (fresco)
mantiene una temperatura dentro del caj6n consistente
con la que circunda en el compartimiento para alimentos
frescos. Para obtener una temperatura mils baja dentro
del caj6n, mueva el control hacia la posici6n "cold"
(frfo). Se recomienda una temperatura mis baja dentro
del caj6n en caso se almacene came roja, came de ave o
de pescado fresca.
VariTemp (caj6n inferior-modelos selectos)
E1 control de temperatura para este caj6n se encuentra
en la parte frontal de la parrilla arriba del caj6n. Mueva
el control a la izquierda o a la derecha. La posici6n
"cheese" (queso) proporciona una temperatura similar a
la que circunda en el compartimiento para alimentos
frescos. La posici6n "meat" (came) proporciona una
temperatura mis baja dentro del caj6n que es la que se
recomienda para almacenar came roja, came de ave o
came de pescado fresca.
CHEESE
Para obtener mejores resultados, mantenga el cajun [
herm#ticamente cerrado a fin de eontrolar I
cualquiera de los dos tipos de temperamra. I
46
Page 48

Caracteristicas Internas (continuar )oo ....... o...........
Caj6n(es) para Frutas y Verduras para
Contro]ar la Humedad (modelosselectos)
Los cajones para frutas y verduras est_in disefiados para
almacenar frutas y verduras. E1 control de humedad reg-
ulable ubicado arriba de los cajones puede posicionarse a
la izquierda para lograr un almacenamiento de frutas
(humedad m_s baja) o a la derecha para lograr un alma-
cenamiento de verduras (humedad m_is alta).
Para retirarlo: Jale el caj6n hacia afuera hasta que se
detengao Incline la parte frontal del caj6n hacia ardba y
j_ile!o. Para volver a colocar el caj6n alinee el caj6n en
los rieles, levante la parte frontal del caj6n y deslfcelo
hacia adentro.
Cajones de Alrnacenamiento ClimateZone TM
Technology (modelos selectos)
Los Cajones de Almacenamiento Clii
ClimateZone'" Technology proporcionar
preciso control de la temperatura para alma-
cenar de las carnes, frutas y productos. E1 cajdn superior
ofrecer marcos de almacenar para las carnes, cftricas y
productos. E1 cajdn del medio ofrecer marcos de alma-
cenar para las cRricas y productos. Los cajones
ClimateZone'" Technology estfin equipados con un
Control de Humedad Autom_tico (ver p_igina 48). Los
cajones funcionan electrdnico para proporcionar temper-
aturas 6ptimas y un indicador de temperatura num_rico.
Artfculo
Cftricos
Producto
Carnes
*Tales factores como el medio ambiente, las aperturas de la puerta,
los ajustes del control del refrigerador, etc. pueden afectar el
despliegue de la temperatura en la gaveta de modo que fluctde fuera
de los lfmites de temperatura arriba indicados. Esto es normal. Para
obtener mejores resultados, coloque los controles del refrigerador y
del congelador en el punto medio (5).
Temperatura
de Almacenamiento
!lm,.
39°F (4°C)
34°F (I°C)
3I°F (-0.6°C)
Lfmites del Indicador
de Temperatura*
38-40 ° F
33-35 ° F
30-32 ° F
ClimateZone TM Technology tambi6n puede apagarse pre-
sionando "Normal" en el panel. Cuando los cajones se
apagan, funcionan como cajones para alimentos frescos
sellados est_ndares sin indicador de temperatura.
Para retirarlo: Jale el caj6n hacia afuera hasta que se
detenga. Incline la parte frontal del caj6n hacia arriba y
retirelo. Para volver a colocar el caj6n, alfneelo en los deles,
levante la parte frontal del caj6n y desgcelo hacia adentro.
Cambio de Bombilla
Detrds de la parte superior del compartimiento
ClimateZone TM Technology se encuentra un bombilla. E1
ntimero de parte de la bombilla es 61004862; para reem-
plazarlo visite a su distribuidor de Maytag o
comuniquese gratis al tel6fono 1-800-688-8408 para
ord6nelo directamente.
47
Page 49

............................. i
Para ret_rar el montaje del compartimiento para Control de Humedad Autom_tico (modelos
cambio de bombilla: Descargue y retire la parrilla ubi- selectos)
cada sobre los cajones ClimateZone '' Technolo_v ....... :_!i_.i:_:S.!:_":
..... '_" Algunos compammlentos para alimentos trescos estfin ii::_i;!_'i_i_,
uescargue y retire el caj6n. Retire dos tornillos hexag- e_ui-ados con un si .............. "........... ' -'_
onales "_e 1"_'' "'_ _ "-- " _-' '- _ " . _ . . _ , q p 2 _tcma aUtolnatlco uc conuol uc
montaje del compartimeinto superior (aproximadamente controles de humedad que se mueven manualmente en el
(aproximadamente 2-3 pulgadas (6-8 centfmetros). E1
montaje deber_i sostenerse en los soportes.
Cambio de bombilla: Destornille la bombilla y c'_n-
bielo. Precauci6n: Sostenga la bombilla con cuidado
para evitar que se rompa. La bombilla puede estar
caliente por el uso.
Para volverlo a colocar: Levante el montaje de regreso a
su posici6n original. Alinear los agujeros de los tornillos.
Asegdrese de empujar firmemente el montaje hacia la
izquierda de la cavidad del refrigerador. Vuelva a colocar
los dos tornillos. Vuelva a colocax los cajones en los mon-
tajes, y vuelva a colocar la tabla abrria los montajes, y
vuelva a conectar la energfa eMctrica al refrigerador.
Retiro de los Montajes dei Compartimiento
para Limpiar
Descargue y retire la parrilla colocada arriba de los
cajones Climate Zone Technology". Descargue y retire
los cajones. Retire dos tornillos hexagonales de 1/4" (0,6
cm) del lado izquierdo. Levante el montaje del caj6n supe-
rior hacia arriba (aproximadamente 1 pulgada (2,54 cen-
tfmetro)) y jale hacia adelante (aproximadamente 2-3 pul-
gadas (6-8 centfmetros)). E1 montaje del caj6n deber_
apoyarse en los soportes. Desconecte los cables de energfa
eMctrica para liberar el montaje, luego jale por completo.
Repita la operaci6n con el montaje del segundo caj6n.
Para reponerlo: Levante el montaje inferior de regreso
a su posici6n original dejando espacio suficiente para
alcanzar los cables de energfa eMctrica. Vuelva a
conectar los cables de energfa eMctrica del montaje.
Alinear los agujeros de los tornillos. Empuje por com-
pleto el montaje a su posici6n original. Asegdrese de
empujar firmemente el montaje a la izquierda de la
cavidad del refrigerador. Vuelva a colocar los dos
tornillos. Repita la operaci6n con el montaje superior.
Vuelva a colocar los cajones en los montajes, y vuelva a
colocar Ia tabla abrria los montajes, y conecte la energfa
eMctrica al refrigerador.
Cajdn Central para Bocadillos (modelos
selectos)
Proporciona un _ea de almacenamiento adecuada para
alimentos y bocadillos varios. Este caj6n no tiene
capacidades de temperatura y humedad regulables.
U /'-I" _,U,U _Ill) Ut31I_IUO lZquleroo. Levante el humedad, caracterfstica que elimina la necesidad de
1 pulgada (2,54 centfmetros)) y jale hacia adelante caj6n. Un material parecido a la malla* cubre pequefios
respiraderos de aire en la incerci6n de la tabla abrria los
cajones fresco. Este material controla el flujo de
hdmedad afuera de! compartimiento para alimentos
frescos a fin de proporcionar el ambiente 6ptimo para
sus alimentos. En caso de que algfn alimento se der-
rame sobre el respiradero o el material de malla,
lfmpielo con un patio htimedo limpio.
*El sistema de Control de Humedad Automfitico Maytag se carac-
teriza por contar con un material finico patentado llamado Polfmero
con Memoria de Forma (SMP por sus siglas en inglfs) que cuando se
lamina en tela, se convierte en DIAPLEX. DIAPLEX es fabricado
por Mitsubishi. [_]_,,i[ii_&
ChillKeepeF (modelos selectos)
E1 compartlmiento ChillKeeper '_ estti ubicado en la
puerta del refrigerador y est_i disetiado para enfriar los
productos de una manera rfipida y para almacenar
bebidas. E1 anaquel ChillKeeper '' puede desprenderse,
voltearse y desengancharse de las lengiietas m_is altas
del compartimiento en caso de que no se necesite ocupar
dos tercios del espacio de almacenamiento.
Para abrirlo: Sujete el orificio al lado derecho de la
cubierta del compartimiento y gire hacia la izquierda. La
cubierta quedar_i autom_iticamente enganchada al cerrarse.
NOTA: En caso de que el mecanismo de enganche se
disloque accidentalmente, coloque el extremo del bor-
rador de un hipiz junto al sujetador y aplique presi6n
suave hacia la derecha.
El control ChillKeeper '' se encuentra en la pared
izquierda del refrigerador. Mueva el I 1[
cursor a la posici6n "Cold" para pro- [ I]
porcionar temperaturas m_is frfas en I]l
el ChillKeeper . I I I
E1 caj6n de servicio ChillKeeper 'Mestfi ubicado en la parte
inferior del compartimiento. E1 cajdn de servicio o_se-
gurable proporciona almacenamiento a artfculos tales
como baterfas, rollos de pelfcula y medicamentos pre-
scritos. E1 seguro se encuentra
al lado izquierdo del caj6n. Para
quitar el seguro y abrir el caj6n,
mueva el pasador a la posici6n
"Unlock" (Cerrado) y corra el
caj6n hacia afuera. Para cerrar,
corra el caj6n de regreso y
mueva el pasador hacia la posi- _,, •
ci6n "Lock" (con seguro).
The Intelligerrt Texture
48
P
Page 50

El compartimiento del congelador estfi equipado con
cubetas para hacer hielo y un dep6sito para almacenar
hielo. E1 dep6sito se apila en la parte superior de las
cubetas de hielo apiladas. Para sacar los cubos de hielo
de una cubeta, sostenga la cubeta al rev6s, por sus
extremos, y tu&zala suavemente.
E1 refrigerador es una imiquina autom_itica para hacer
hielo rdpido. E1 ndmero para el equipo de la mfiquina de
hacer hielo aparece en la placa informativa (ver pantalla).
Nivel de Hielo Regulable (modelos selectos)
Las mdquinas de hacer hielo instaladas en f,ibrica estfin
equipadas con un brazo de sensor que permite regular la
cantidad de hielo de su cubeta para aquellos momentos
en que se necesite menos hielo.
Para regular la eantidad de hielo produeido:
Empuje el brazo de a_azo de Palanca
sensor phistico deMetal
hacia adentro y
gire para la
capacidad
deseada. 750 _'!
i
50%
Brazo de Sensor
Nora: L_s indicackmes sobre ]a potencia de energia
Para detener manualmente el funcionamiento de la m_iquina
para hacer hielo, suba el brazo de la palanca de metal.
Algunos sonidos pueden acompafiar los diversos ciclos
de la mfiquina para hacer hielo.
• zumbido de la v_vula de agua
• chorro del agua cuando se llena la cubeta
• ruido que hacen los cubos de hielo al caer en un
dep6sito para hielo vacfo.
En caso de que el hielo no se use con frecuencia, los
cubos de hielo se tornarfin nublados, pegajosos, se
reducirfin y tendrfin un olor rancio. Vacfe peri6dica-
mente el dep6sito para almacenar hielo y 14velo con agua
tibia. Asegdrese de secarlo antes de volverlo a colocar.
Para revisar el nivel de hielo o tenet acceso al dep6sito
de hielo, levante y abra la puerta de este dep6sito.
Para retirar el dep6sito, primero apague la m_iquina de
hacer hielo. Esto se hace abriendo la puerta del dep6sito
de hielo y subiendo la palanca de metal de la m_iquina
para hacer hielo a la posici6n "off' (apagado). Luego,
agarre debajo de la parte frontal del dep6sito y jale hacia
abajo en el borde posterior. Despu6s de que se desen-
ganche y quede libre, jale el dep6sito en forma recta.
Para volver a colocar el dep6sito de hielo, alinee los
deles inferiores con las hendiduras de las parrillas cor-
respondientes y empdjelo de regreso en forma recta
hasta que se detenga y se enganche. Asegdrese de que
las lengiietas en la parte posterior del dep6sito que dan
vuelta a la barrena en espiral, se encuentren colocadas
entre las patas del motor de la barrena. Encienda la
mfiquina para hacer hielo bajando el brazo de metal.
No se deben colocar bebidas ni alimentos en el dep6sito
para almacenar hielo para que enfrfen r_ipido. Estos
artfculos pueden bloquear el brazo de la palanca de
metal, dando lugar a que la m_iquina para hacer hielo
funcione defectuosamente.
iiii!iiiiii iiiiiii i ii iiiiiii iiiiii "i " iiiiii h i i!iiiiiiiiiiiiiiiiiiiiiiiiiiiiiiiiiiiiiiiiiiiiiiiiiiiiiiiiiiiiiiiiiiiiiiiiiiiiiiiiiiiiiiiiiiiii iiiiiiiiiiiiiiiiiiiiiiiiiiiiiiiiiiiiiiii
!!!!!!_ !!!_! i_ !!!_!_ _i!!!d_!!! _i_)i_iii_U_iii_]ii h_i_]iOiiii_i_iiiiiiiii::_i_:_iii_iiiiiiiiiiiiiiiiiiiii_iiiiiiiiiiiiiiiiiiiiiiii_iiiiiiiiiiiiiii_iiiiiiiiiiiiiiiiii_i_i_iiiiiii_iiiiiiii_i_iiiiiii::iiiiiiiiiiiiiiiiiiiiiiiiiiiiiiiiiiiiiiiiiiiiiiiii::iiiiiiiiiiiiiiiiiiiii::iiiiiiiii:iiiii_iiiiiiii::iiiiiiiiiiii!iiiiiiiiiiiiiiiiiii:iiiiiiii
49
Page 51

Servicio de Agua y Heilo
/;'A,/_._,_,,,..._ , sly:,. "_ , :' 7 "'
NOTA: Cuando use el dispensador de hielo por primera
vez, deseche las primeras dos o tres docenas de cubos.
Cuando use el dispensador de agua por primera vez, pre-
sione el pulsador de accionamiento por uno o dos min-
utos para que salga el aire existente en la tuberfa de
agua. Deseche los primeros cinco o seis vasos de agua
suministrada. Esto asegurar_i agua fresca y pura para
beber.
Pulsador de
Acclona-
Bandeja para
Salpicaduras
-y Derrames
Suministro de Agua y Hieio
Para suministrar agua o hielo, coloque un vaso contra la
parte superior del pulsador de accionamiento y presione.
Sostenga el vaso en alto en el orificio del dispensador a
fin de evitar derrames.
Para interrumpir el suministro, libere la presi6n ejercida
sobre el pulsador de accionamiento y mantenga el recip-
iente en su posici6n por un momento para recibir los
61fimos trozos de hielo o las tiltimas gotas de agua que
caen. La puerta para el suministro de hielo permanecer_
abierta por corto tiempo. Cuando se cierra, se puede
escuchar un sonido de cierre.
Las teclas num6ficas de control se encuentran en el
panel de control del dispensador. Para seleccionar la
funci6n deseada, presione la tecla apropiada. Cuando se
selecciona cubos de hielo, hielo triturado o agua, se
enciende una luz arriba de la selecci6n.
CRUSHED CUBE WATER
@ • •
Consejos para el Suministro de Hielo
- Es posible que caiga un poco de hielo triturado incluso
cuando se haya seleccionado la opci6n de cubos de
hielo. Esto sucede ocasionalmente cuando algunos
cubos de hielo son canalizados al triturador de manera
accidental.
• Probablemente, cuando cambie de la opci6n de hielo
triturado a cubos de hielo, caerzi algo de hielo tritu-
rado. Esto puede suceder en caso de queen el
dep6sito de almacenarniento haya cubos de hielo o
pequefios trozos de hielo de tamafios irregulares.
• Si el dispensador de hielo no se usa con frecuencia, los
cubos de hielo pueden agruparse en un bloque yes
posible que sea necesario separarlo o desecharlo.
• Cuando se suministre el hielo tfiturado podr_i notarse
una ligera pausa. Esto es normal debido a que el hielo
se est_i canalizando hacia el triturador. Los trozos de
hielo triturado variar_in en tamafio y forma.
• No afiada al dep6sito de almacenamiento hielo que no
se haya producido en su m_iquina de hacer hie!o, pues
es probable que 6ste no se triture y/o distribuya
apropiadamente.
• Evite hacer funcionar el dispensador de hielo por m_is
de cinco minutos seguidos. En caso de que necesite
grandes cantidades de hielo, Mquelo del dep6sito
manualmente.
• Evite distfibuir hielo directamente en vajilla de porce-
lana o cristal delicado. La presi6n de presionar contra
el pulsador de accionamiento y el hielo cayendo en el
recipiente pueden ocasionar que estos artfculos deli-
cados se rompan o desportillen.
E1 agua del dispensador no es tan fria como el agua
helada. Para obtener agua m_s fria, simplemente afiada
hielo antes de suministrar el agua. E1primer o segundo
vaso de agua suministrada puede ser cada vez m_is tibia
que los vasos siguientes. Un vaso lleno de agua ser_i
m_is frfo que un vaso semilleno. Para evitar que el agua
salpique, primero llene el vaso con hielo y luego afiada
el agua.
50
Page 52

Bandeja para Salpicaduras y Derrames
No vierta agua en la rejilla de la Bandeja para
Salpicaduras y Derrames que se encuentra en la parte
inferior del _ea del dispensador. I_sta es un _ea de
salpicaduras y derrames, NO un desagtie. Las salpica-
duras normales pequefias se evaporar_in. Las salpica-
duras m_ grandes deber_ limpiarse con un patio suave
o esponja. La rejilla es desmontable para poder
limpiarla. Se recomienda limpiar el _ea de salpica-
duras y derrames de vez en cuando a fin de evitar la
fonnaci6n de dep6sitos minerales.
I.uz del Dispensador
Cuando se presiona el pulsador del dispensador, [_'_J)'.[
autom_iticamente se enciende la luz del dispensador.
Para encender manualmente la luz, presione el pulsador.
Para apagar la luz, presione nuevamente el pulsador.
Cierre del Oispensador
Para co_r la energfa eMctrica del dispensador de
agua y hielo a fin de que no pueda usarse, presione
el pulsador 3 veces en un lapso de 10 segundos.
_i_iiiii!!iiiii!iii!ii_i!!iiiiiiii_i
iiiiiiiiiii!ii!iiiii!i!!iiii!iiii
Cuando el dispensador est_i cerrado, se enciende una
luz indicadora arriba del pulsador de cierre. Para abrir
iiiiiiiiiiiiiiiiiiiiiiiiiiiii
el servicio de agua y hielo, presione nuevamente el pul-
sador 3 veces en un lapso de 10 segundos.
Luz del Alerta de Cambio de FiRro de Agua
(modelos selectos)
En el caso de los filtros de agua que caracterizan
a algunos modelos de refrigeradores, la funci6n de
Alerta de Cambio de Filtro de Agua monitorea el
_aaaaaaaaaaa
aaaaaaaaaaaa
tiempo de duraci6n del filtro y proporciona un
aviso cuando es el momento de cambiarlo.
Servicio de Agua y Hei|o (continuar ) ..........................
E1 filtro de agua se coloca en el compartimiento supe-
rior para alimentos frescos, debajo de la caja del control
Dual Cool TM .
Su refrigerador fue entregado de fibrica con una
derivaci6n de filtro en su lugar. E1 cartucho del filtro
puede encontrarse embalado dentro del refrigerador.
Puede instalarse f_icilmente sin necesidad de utilizar
piezas, tornillos o sujetadores adicionales.
Alerta de Cambio de Filtro de Agua
ModeMs selectos de dispensador segunda caracterizan
con una luz indicadora se encuentran en el panel de con-
trol del dispensador a alerta cuando es el tiempo a
cambio el filtro de agua. Cuando el sistema detecta
queya han transcurrido 12 meses de uso o que ya se han
filtrado 416 galones (1575 litros) de agua (lo que ocurra
primero), se enciende la luz del indicador de CHANGE
FILTER (Filtro De Carnbio). Esto indica que debe cam-
biarse el filtro de agua (ver p£gina 52) y debe reini-
cializarse el mecanismo de la luz.
Para reinicializar el mecanismo de la luz del FILTRO
DE CAMBIO: Presione y mantenga los botones de
LIGHT (Luz) y LOCK (Cierre) hasta que la luz del
CHANGE FILTER (Filtro De Cambio) oscile (aproxi-
madamente 3 segundos). E1 control estA ahora reinicial-
izado por 12 meses u otros 416 galones (1575 litros).
• Para m(_lelos equipar con la luz dei alerla de cambio
de t]ltro de atua. el filtm de atua &_ de cambiarIo
cuando se enciende la luz del indicadora de a|e_a,
• Si el flujo de agua hacia la m_iquina para hace_ hielo
o el dispensador disminuye basmnle o si despide un
saner u _tor dudoso, cambie el filtm de inmediato
que re_2Olllen_r_
51
Page 53

lnstalaci6n Inicial de Cartuchos del Filtro
1. Gire la tapa de la derivaci6n de filtro 1/4 de vuelta en
sentido antihorario (como se aprecia desde la parte
inferior) de modo que las orejas del enchufe puedan
desengancharse. Retire la derivaci6n de filtro del
cabezal del mismo.
No se deshaga de esta derivacidn de fillm. Gu;_rdela
para usarla en un futuro, en caso de que ople por usar
el dispensador de agua y hielo sin un film).
2. Desempaque el filtro con cuidado.
3. Coloque la etiqueta adhesiva del mes en el cartucho
que recuerda que debe reemplazarse el filtro cuando
recomendar.
4. Retire la tapa roja del filtro.
5. Lubrique el anillo en "O" con aceite vegetal
comestible.
6. Alinee las orejas del cartucho para que pueda inser-
tarse en el cabezal del filtro. El sfmbo!o no cerrado
se alinearfi con la lfnea indicadora que est_i moldeada
en el _irea de pantalla de alumbrado. Gire el cartucho
en el cabezal. Gire el cartucho 1/4 de vuelta en sen-
tido horario para cerrarlo en su lugar. Usted sentir_i
un tope y el sfmbolo cerrado deber_i ahora estar alin-
eado con la lfnea indicadora.
7. Baje la palanca de brazo de metal de la m_iquina de
hacer hielo hasta la posici6n (ON).
8. Suministre agua a trav6s del dispensador durante 10
minutos.
9. Revise cuidadosamente por si existen fugas.
Cambio de Cartucho de Filtro
l. Gire el cartucho de filtro 1/4 de vuelta en sentido
antihorario (como se aprecia desde la parte inferior)
de modo que las orejas del cartucho puedan desen-
gancharse de la cabeza. E1 sfmbolo no cerrado se
alinear_i con la lfnea indicadora que esui moldeada en
el firea de pantalla de alumbrado. Gire suavemente
el cartucho de la eabeza hasta que est6 suelto, pero
NO jale. Trate de no inclinar el cartucho para evitar
salpicaduras. Desh_igase del cartucho usado.
2. Desempaque cuidadosamente el filtro a cambiar.
(Lea cuidadosamente la etiqueta para asegurarse de
tener el cartucho de filtro correcto a cambiar).
3. Siga los pasos 3 a 9 que se encuentran en el punto
Instalaci6n de Cartucho de Filtro Inicial.
Noto*: El tiempo de duracidn del filtro puede set
at:e<lado por c(mdiciones det agua de alimenlacidn
anonnales o incidenl_s inusuales lMes colno chorms
de la mma de agua, cambio de tanque o condiciones
de agua locales variables,
Periodos Sin Uso
Si se ha dejado de utilizar el refrigerador durante m_is de
2 semanas (es decir, se ha ahnacenado o trasladado), se
deber_i reponer el filtro cuando se vuelva a encender el
refrigerador.
Consejos Especiales
Es fundamental que los requerimientos de fun-
cionamiento, mantenimiento y cambio de filtro se real-
icen segdn lo programado. Este producto solamente
deber_i utilizarse con agua frfa.
No lo utilice con agua que pueda estar contaminada con
microbios o de calidad desconocida sin desinfecci6n
adecuada antes o despu6s del sistema. Pueden utilizarse
sistemas certificados para reducci6n de n6dulos en el
agua desinfectada que pueda contener n6dulos filtrables.
Para su conocimiento y seguridad propios, se recomienda
someter peri6dicamente a prueba la calidad del agua.
Los contaminantes u otras sustancias extrafdas o
reducidas mediante este sistema de tratamiento de agua
no se encuentran necesariamente en su agua. E1 tubo
abastecedor de agua deberfi cumplir con los c6digos de
gasfiterfa aplicables.
Notas:
• Mantenga abierlo el mfrigerador n_iemras retira e
instala filtros o enchul{_s; esto evimr_ que e/ agua
fluya a trav4s de! sistema y corra al imerior del com-
par_thnienm para alimenh)s frescos, Como olra
medida de precaucidno apague la mfiquma para
hace_: hielo subiendo el braz_ de pahmca de meta!
hasta la posicidn (OFF)_
, Un calucho de filtro de agua recidn instalado puede
hater que et agua del dispensador salga temporal..
menle ell forma de chorro.
$2
Page 54

Servicio de Agua y Heilo (continuar )oo°....... o........
Repuesto para Cartuchos de Fiitro
En caso de necesitar cambiar los cartuchos de filtro o
servicio t6cnico, comunfquese con su distribuidor local
o con Maytag Appliances Sales Company, Maytag
Customer Assistance (Servicio al Cliente), Estados
Unidos: 1-800-688-9900, Canadfi: 1-800-688-2002.
Numeros de repuesto para Cartuchos de Filtro para los
modelos con sistema recordatorio de cambio dei
filtro de agua:
UKF7002AXX - Sabor, olor, cloro, n6dulos y plomo
Numeros de repuesto para Cartuchos de Filtro para los
modelos con no sistema recordatorio de cambio de|
filtro de agua:
UKF7001AXX - Sabot, olor, cloro, n6dulos y plomo
E1 filtro que se enumeran a continuaci6n han sido probados y certificados para NSF International bajo las
Normas ANSI/NSF 42 y 53 para la reducci6n de impurezas como se indica:
Para los modelos con no sistema
recordatorio de cambio del _tro de agua
Sabor/Olor
Clase de Cloro 1 Norma 42
Turbiedad Norma 53
Particulado Norrna 42
N6dulo Norma 53
Plomo Norma 53
UKFT001AXX
SI
SI
Si
SI (Clase I)
SI
Si
UKF6001AXX
SI
Sf
No
SI (Clase I)
No
SI
UKF6001AXX - Sabor, olor, cloro y plomo
UKF5001AXX - Sabor, olor y cloro
E1 filtro de Agua PuriClean TM es fabricado para Maytag
Appliances por:
Cuno Incorporated
400 Research Parkway
Meriden, CT 06450
Flujo Nominal:
Temperatura de Trabajo Minima:
Temperatura de Trabajo MAxima:
Presi6n de Trabajo Minima:
Presi6n de Trabajo MAxima:
Para los modelos con sistema recorda-
torio de cambio del filtro de agua
UKF5001AXX
SI
SI
No
No
No
No
UKYV002AXX
SI
St
SI
SI (Clase I)
SI
SI
0,5 gmp (1,9 L)
33°F (0,6°C)
]00oF(38oc)
30psi (207 KPa)
125psi (862 Kpa)
iiiiiiiiiiiii_iiiiiiiiiiiiiiiiiiiiiiiiiiiiiiill
ililililililililililililililililililililiiiiiii
iiiililililiiii_ililililililiiii_ililililij
iiiiiiiiiiiiiiiiiiiiiiiiiiiii_iiiiiiiiiiiiii_
ilililililiiiiiiilililililili_ilililililililili
_iiiiiiiiiiiiiiiiiiiiiiiiii_ii_iiiiiiiiiii!ii
Limpieza Debajo del Refrigerador
Puede jalar su refrigerador hacia afuera haci6ndolo rodar
para limpiar el piso que se encuentra debajo de 6ste.
Levante las paras ajustables en caso se encuentren engan-
chadas (ver pfigina 42). Jale el refrigerador alejfindolo
Capacidad
Funci6n
Para mayor informaci6n rernftase a la Hoja de Informaci6n del Producto que se adjunta a filtros.
250 gal. (946 L)
Qufmica/
Mecfinica
250 gal. (946 L)
Quimica!
MecAnica
500 gal. (1893 L)
Quimica
416 gal. (1574 L)
Qufmica/Mecdnica
Cuidado y Limpieza .......... o......... o.........................
Condensador de Rendimiento
Comerciai No Clean TM
Un condensador hace que el refrigerador funcione con
mayor eficiencia. Gracias al disefio dnico del conden-
sador No Clean TM ya no se necesita realizar la limpieza
de rutina en el ambiente de uso dom6stico normal.
Algunos ambientes de funcionamiento pueden estar par-
ticularmente empolvados o grasientos. En estos casos,
el condensador puede limpiarse peri6dicamente para
asegurar una maxima eficiencia.
53
Page 55

deJRefMger dey
Jabdn y agua
Re•ilia de base Rociadores de lfquido suave
• ooooo, •oo • o teoel el Joo*e• •o • • • • • J,i ee • 1o • • o_ • Q• • • •l _• •* •o • •• ••a • •• • • ••_o• ••.•o* • • •t •o •• •• o• • • • • oi •• • • •• • • •• • o• o• •• •_ •o •• • * •• •o •• •• •
Condensador Escobilla limpiadora (Parte No se necesita a menos que el ambiente est_ particularmente
Manijas de puerto Jab6n y agua
Superficies met_licas Jab6n y agua Seque con un patio suave y limpio.
pintadas: Cab•ha, Rociadores de lfquido suave No limpie el refrigerador con una toalla o patio hdmedo para lavar
puertas platos que est_ sucio. Estos pueden dejar residuos que pueden
Empaquetadura de la Bicarbonato de soda y agua Use 1-2 cucharadas de bicarbonato de soda por un cuarto de gal6n
puerto Jab6n y agua (un litro) de agua. Asegdrese de exprimir el exceso de agua de la
Parrillas de vidrio Jab6n y agua Haga que el vidrio se caliente a temperatura ambiente antes
Revestimiento interior y
de la puerta
Cajones, cavidad para los
cajones, dep6sitos, por-
tahuevos, etc.
Area de malla/respiradero
de Control de Humedad
Automfitico
Gavetas de almacenamiento
ClimateZone TM Technology
Aspirador de polvo
No. 20001017), Disponible grasiento, empolvado o circulen demasiadas mascotas.
con su distribuidor
Rociadores de lfquido suave
rayar y debilitar la pintura. No use patios de limpieza, limp•adores
en polvo, blanqueador o limp•adores que contengan blanqueador.
Estos productos pueden rayar y desgastar el acabado de pintura.
No encere las partes pl_isticas o vinflicas.
esponja o patio cuando limpie alrededor de los controles, luces o
partes eWctricas
Limpiador de vidrios de sumergirlo en agua tibia. Nunca use agua caliente.
Rociadores de lfquido suave
Jab6n y agua
Bicarbonato de soda y agua
Jab6n y agua
•_ooeiooiQiollo••••lt••l•••••
Agua solamente
Jab6n y agua
Para desinfectar: Use una
soluci6n de blanqueador de
cloro y agua, preparada de
acuerdo con las instruc-
ciones de la etiqueta del
blanqueador.
Vea abajo para solucidn de bicarbonato de soda.
NO utilice limp•adores abrasivos, detergentes concentrados, blan-
queadores, ceras, solventes o limp•adores pulidores para limpiar
el interior del refrigerador.
NO utilice lavadora de platos automfitica para lavar.
Limpie con un patio hdmedo limpio.
Saque las gavetas de su comparfimiento. Enju(tguelas completa-
mente y s6quelas.
Conjuntos de gavetas Agua solamente Limpie los conjuntos de gavetas con un patio limpio y h_medo.
ClimateZone '" Technology NO utilice limp•adores abrasivos, detergentes concentrados,
blanqueadores, ceras de limpieza, solventes ni limp•adores de
pulido para limpiar los conjuntos de gavetas.
54
Page 56

Consejos para eJ AJmacenamie.to de Aiimento$
A macenamien o
de A}imen os
Frescos
e
El compartimiento para alimentos frescos de un
refrigerador debe mantenerse a 34°F (I°C) y 40°F
(4°C) con una temperatura 6ptima de 37°F (3°C).
Para revisar la temperatura, coloque un term6metro
para artefactos en un vaso de agua y p6ngalo en el
centro del refrigerador. Revise despu6s de 24 horas.
Si la temperatura llega a mils de 40°F (8°C) regule los
controles conforme se explic6 en la p_igina 43.
Las temperaturas medidas en otra parte del refriger-
ador pueden diferir de las temperaturas lefdas en el
caj6n para frutas y verduras (modelos selectos) debido
a la ubicaci6n del termostato del caj6n para frutas y
verduras.
• Evite atestar de productos las parrillas
ador. Esto reduce la circulaci6n de aire
los alimentos y provoca un enfriamiento
Frutas y Verduras
e
E1 almacenamiento en los cajones para frutas y ver-
duras preservar la calidad de las frutas y verduras por
largos periodos de tiempo.
* Seleccione las frutas y verduras antes de almacenarlas
y utilice primero las que presenten magulladuras o
est6n blandas. Deseche aqu6llas de muestren signos
de descomposici6n.
• Envuelva siempre los alimentos de olor fuerte como la
cebolla y la col a fin de que el olor no se transmita a
otros alimentos.
• Mientras que las verduras necesitan cierta cantidad de
humedad para conservarse frescas, demasiada
humedad puede acortar los tiempos de almace-
namiento (en especial de la lechuga). Escurra bien las
verduras antes de almacenarlas.
Came y Queso
• La came roja y la came de ave cruda deben empa-
quetarse de manera segura para evitar que ocurra el
derrame y la contaminaci6n de otros alimentos o
superficies.
- Ocasionalmente, la superficie de los quesos fuertes
(Suizo, Cheddar, Parmesano) se cubrir_i de moho.
Corte por lo menos 3 cm alrededor y debajo del _irea
con moho. Su cuchillo o instrumento no deber_i tocar
el moho. El queso restante estar_i intacto y sabroso
para comer. NO trate de salvar tajadas de queso indi-
viduales, queso suave, queso cabafia, queso crema,
crema agria o yogur cuando presenten moho.
del refriger-
alrededor de
desigual.
Productos Lacteos
. La mayorfa de productos l_icteos tales como leche,
yogur, crema agria y queso cabafia tienen fecha de
expiraci6n en la caja para un tiempo apropiado de
almacenamiento. Almacene estos alimentos en la caja
original y refrig6relos inmediatamente despu6s de
comprarlos y despu6s de cada uso.
AJmac n miento de Adimen os
CongeJados
• El compartimiento del congelador de un refrigerador
debe mantenerse a 0°F (-18°C) o menos. Para revisar
la temperatura, coloque un term6metro para artefactos
entre los paquetes congelados y revise despu6s de 24
horas. Si la temperatura es superior a 0°F (-18°C),
regule el control conforme se describe en la pzlgina 43.
Un congelador funciona m_is eficientemente cuando
est_i ocupado en por lo menos dos tercios de su
capacidad.
Procedimiento para Envo/ver Aiimentos
para Congelar
• Para reducir al mfnimo la deshidrataci6n y el deterioro
de la calidad use papel aluminio, envoltura para con-
gelador, bolsas para congelador o contenedores her-
m6ticos. Saque tanto aire de los paquetes como sea
posible y asegdrese de que est6n herm6ticamente sel-
lados. E! aire captado puede hacer que los alimentos
se sequen, cambien de color y desarrollen un real
sabor (quemadura del congelador).
• Envuelva bien las carnes rojas y las cames de ave
frescas utilizando envoltura para congelador adecuada
antes de congelarlas.
• No vuelva a eongelar la came que se ha desconge-
lado per completo.
Carga del Congelador
• Evite almacenar demasiados alimentos en el conge-
lador en una sola vez. Esto sobrecarga el congelador,
disminuye la velocidad de congelamiento y puede
elevar la temperatura de los alimentos congelados.
• Deje un espacio entre los paquetes para que el aire frio
pueda circular libremente, permitiendo que los ali-
mentos se congelen lo m_is r@ido posible.
• Evite almacenar alimentos dif/ciles de congelar como
helado y jugo de naranja en los anaqueles de la puerta
del congelador. Estos alimentos se almacenan mejor
en el interior del congelador en donde la temperatura
varfa menos cuando se abre cada vez la puerta.
55
Page 57

:::.'_,_-:c_:. :._ '_:_.:,__v;_ :.:_:v:_<:._:c.s,(Los tiempos de almacenamiento son aproximados y pueden variar depen-
diendo del tipo de envoltura, la temperatura de almacenamiento y la calidad de los alimentos al momento de comprarlos).
Mantequilla
Leche y crema
Queso crema, queso para
untar y alimentos con queso
Queso cabafia
Crema agria
Queso fuerte (suizo, cheddar
y parmesano
Huevos en c_iscara
Claras o yemas por separado
Manzanas
Plfitanos
Peras, ciruelas, paras
Bayas, cerezas, melocotones
Uvas
Frutas cftricas
Pifia en trozos
Espfirragos
Col de bmselas, br6coli, col-
iflor, arvejas, frijoles, pimientos
Col, apio
Zanahorias, chirivfas, betar-
ragas y nabos
Lechuga
1 irles
1 semana
1-2 semanas
3-5 d{as
10 dfas
1-2 meses
3 semanas
2-4 dfas
1 rues
2-4 dfas
3-4 dfas
2-3 dfas
3-5 dfas
1-2 semanas
2-3 dfas
l-2 dfas
3-5 dfas
1-2 semanas
7-10 dfas
5-7 dfas
6-9 meses
No recomendado
No recomendado
No recomendado
4-6 mese
Puede volverse desmenuzable
No recomendado
9-12 meses
8 meses (cocinadas)
6 meses (enteros/pelados)
No recomendado
6 meses
1 mes (enteros)
No recomendado
6-12 meses
8-10 meses
8-10 mese
10-12 meses
8-10 meses
No recomendado
Envudlvala fuertemente o cfibrala.
Revise la fecha de expiraci6n de la caja. Cidrrela hermdticamente.
No vuelva a poner las porciones no utilizadas en el envase orig-
inal. No congele la crema a menos que se trate de crema batida.
Envudlvalos fuertemente.
Almac6nelo en el envase original. Verifique la fecha de expiraci6n
en el envase.
Envudlvalos bien. Retire el moho reban_indolo.
Refrigere pequefios sobrantes abajo.
Para cada taza de yemas a congehuse, afiada 1 cuch_adita de azdcar
para usarlas en dulces 6 1 cucharadita de sal para platos no dulces.
Tambidn se pueden almacenar manz_anas no maduras a 60-70°F (16-21°C).
Hzigalos madurar a temperamra ambiente antes de refrigerarlos.
Los pl_itanos y las paltas se ennegrecen cuando se refrigeran.
Puede almacenarlas tambidn a 60-70°F (16-21 °C). Si las refrigera,
almacdnelas descubiertas.
No madurarzi despuds de comprarla, l)sela rtipidamente.
No los lave antes de lefrigerar. Almacdnelos en el caj6n para fmras y verdures.
Envuelva los alhnentos olorosos y refrigere en el caj6n para frutas y verduras.
Envuelva los alirnentos olorosos y refrigere en el caj6n para fruhasy verdures.
Retire los topes. Envuelva los alimentos olorosos y refrigere en el
caj6n para frutas y verduras.
Almacdnela en el caj6n para frutas y verduras.
Pollo y pavo, entero
Pollo y pavo, trozado
Pescado
Tocino
Res o cordero, molida
Res o cordero, asado y bistec
Jam6n, completamente cocinado
entero
mitad
tajadas
Embutidos
Cerdo, asado
Cerdo, chuletas
Salchicha, entera
Salchicha, ahumada
Ternera
Salchicha alemana
• _uentes_ l_ep_r_arn_nto _eP_gncu_tura _elosL_os ]Jnldos_ _nst_tu_o LeCeomercial_zac_on _e _l_me_os; _er_icio _le _x]e_siond_ _oop_rat_va;°l_mv_rsi_ad e
del Estado de Iowa.
1-2 dfas
1-2 dfas
1-2 dfas
7 dfas
1-2 dias
3-5 dfas
7 dfas
5 dfas
3 dias
3-5 dfas
3-5 dfas
3-5 dfas
1-2 dias
7 dfas
3-5 dias
7 dfas
12 meses
9 meses
2-6 meses
I rues
3-4 meses
6-9 meses
1-2 meses
1-2 meses
1-2 meses
1-2 meses
4-6 meses
4 meses
1-2 meses
1-2 meses
4-6 meses
1 mes
Consdrvelo en la envoltura original para reffigeraci6n. Cuando se
congele durante m_isde 2 semanas, envuelva bien con envoltura de
congelador.
Las carnes frescas pueden conservarse en el envase original para
refrigeraci6n. Col6quelas en el Caj6n para Came y Queso.
Cuando las congele por mils de 2 semanas, envudlvalas con
envoltura especial para congelador.
La came de embutidos envasada al vacfo, sin abrir puede conser-
varse pot mils de 2 semanas en el Caj6n para Carnes y Queso.
Las cames procesadas deber_in envolverse bien y almacenarse en
el Caj6n para Carnes y Queso..
5G
Page 58

Aimacenamiento y MantenimientOo ................... o
Va_aciones
En caso de que salga de vacacion es por un rues o
menos, deje los controles en la posiciones usuales.
En caso se ausente por m_is tiempo:
a) retire todo los alimentos,
b)
c)
d)
Cambio Fo o
Use siempre un foco estandar para el aparato de 40 6 60 va_ios cuando cambie un foco del com-
partimiento para alimentos frescos o del congelador.
iiiiiiiiiiiiiiiiiiiiiiiiiiiiiiiiiiiiiiiiiiii
Refrigerador
Existen dos focos ubicados en la parte superior del
compartimiento del refrigerador, debajo de la caja de
control Dual Cool '_'.
Para cambiar el/los foco(s), retire la cubierta de la caja
de control:
- luego de volver a colocar el/los foco(s), alinee la
En los modelos selectos, existe un foco adicional ubi-
cado detrfis del caj6n superior para alimentos frescos.
Para volverlo a colocar vea la p_igina 48.
cierre la mziquina para hacer hielo (en caso de que
estg instalada) y la vfilvula en donde conectd la
tuberia de agua para suministrar al refrigerador,
desconecte el refrigerador del tomacorriente,
retire el cartucho de filtro (modelos selectos) e
instale la derivacidn de filtro (ver pfiginas 52-53),
deshfigase del cartucho usado. Podrfi instalarse un
cartucho nuevo cuando el refrigerador se ponga de
nuevo en funcionamiento.
sostenga la cubierta de control por las dos
"lengtietas" posteriores que se encuentran en la parte
posterior superior del compartimiento para alimentos
frescos, detnis de los protectores de foco.
jale ligeramente hacia abajo para liberar las
lengtietas de retenci6n y deslice la cubierta hacia
adelante hasta que quede libre.
reemplace el/los foco(s) con un/unos foco(s) de
bases esttindar de 60 vatios.
cubierta de la caja de control con las nervaduras de la
caja de control y deslfcela derecho hacia atrfis hasta
que se tope con las lengtietas de retenci6n.
Nora Desc_iiiectai_d la :cite refii
] es_a de t
[ [
e) limpie y seque el refrigerador por completo,
f) deje las puertas abiertas para evitar olores.
; i
Mu cl nz
Cuando se mude, siga los pasos a-f que se encuentran en
el punto Vacaciones. Asimismo, retire y envuelva cuida-
dosamente los artfculos que puedan retirarse con facil-
idad. Traslade el refrigerador en posicidn vertical con
las puertas cerradas y aseguradas con cintas adhesivas y
las tablas seguridad.
Congelador
E1 foco del congelador est_i ubicado en la pared poste-
rior del compartimiento del congelador.
Para cambiarlo:
. desenganche las lengtietas en la parte superior del
protector del foco presionando con el pulgar en la
parte central superior del protector de foco.
®
gire el protector hacia abajo
o
destornille el foco cuando se enfrfe y cfimbielo por un
foco est_indar de 40 vatios
• vuelva a colocar la cubierta del foco hacigndola girar
de vuelta a su lugar y suelte las lengtietas en las hen-
diduras adecuadas.
Foco del Dispensador Is61o modelos de dis-
pensador)
Para cambiarlo:
• Coloque el foco en el _irea del dispensador a la
izquierda del accionador.
• Destornille el foco usado y retffelo.
• Cambie el foco, usando un foco de 7 vatios, 120V.
57
Page 59

• el control de temperatura estil en "off" (apagado)
No funciona
on•we• ** ooo •oeolooe*o**e_ eooo**Qe eo**o*oe ouel
Funciona much• tiempo/con
mucha frecuencia
Funcionamiento ruidoso • el refrigerador no estil bien nivelado
....................Olor en'el refrigerador*""..,.o............ee ..e.. . ]ose_]_cnt.os.quee(_esp_cn.ol_¥uer_eO(_€l_en.cut_;irseo.envo]verse .....................
Aire caliente de la part° inferior del refrigerador • flujo de aim normal para la circulaci6n del condensador
El refrigerador vibra • el piso es d6bil
Humedad en las paredes interiores del
refrigerador
Humedad excesiva en el caj6n para frutas y
verduras o alrededor del mismo
No aparece la lectura de la temperatura en
la pantalla de la gaveta ClimateZone TM
Technology (ciertos model•s)
La lectura de la temperatnra Climate
Zone m no estd dentro de los limites
deseados.
*ee*eoo*oeo***le*eeloo_o**o® *e • oe e**ee none* *_
El compartimiento del refrigerador o con-
gelador est,4 demasiado caliente . se mantiene la puerta abierta por periodos prolongados
El compartimiento del refrigerador est_i • el control de temperatura marca demasiado fifo
demasiado frio
soniaochirri nteenelcongelaaor • un;On;dono;mar bor"gl'ko;go'dg
Luminosidad visible en los respiraderos del • la aparici6n de una luminosidad o reflejo rojo es normal durante el ciclo de desconge-
congelador lamiento
"El"congelador no"c onge'la" apre;piadamente ..... "-"*los*productos con alto conten]_to'de '_uc_" no" pue_ten" en_lurecerse por* co_pleto'cu'_a_lo""
"_a "1_"_le"a_t'vertencia "de"_1_1o "de _tl-O "(tel ";"_StO esenorm'al_ ]_1"con;to'l" comcnzara un'a"cuenta "regresi*va_te ]2*me'ses o'4 [6 g alones; ya
agua (ciertos modelos) se enciende cuando el sea que est6 colocado el filtro, o el dispositivo de desviaci6n del filtro. Reajuste la luz
disposifivo de desviaci6n del filtro est_ colocado (consulte la pilgina 51).
Los cubos de hielo se evaporan cialmente con uso limitado. Esto es normal.
................................ • el movimiento de air° fifo sobre "los cubos de hie[o hace que'l'os cub'osse encojan, espe-
• el cable de energfa el6ctrica no es_ encbufado
• no hay energfa el6ctrica
• el interruptor automiltico se desenganch6 o el fusible de la casa se quem6
• el refrigerador estil en la posici6n de descongelamiento automiltico
_*eoo_o_ooo_oeee**_eoeeo_e_eo*eeoao*eI*o_oo_*o**Ioooeooeo*oe*_ooooo•*oeeg_*_o_oeoo_eo
, los refrigeradores modemos son mils grandes y enfrfan mils, lo cual requiem mayor
tiempo de funcionamiento para proporcionar temperaturas mils °stables
• se mantiene la puerta abierta por periodos prolongados
• la rejilla de base estil bloqueada
• se abren las puertas con mucha frecuencia
• la puerta no cierra correctamente (debido a un paquete o un recipient° que la mantiene abierta)
• la temperatura de la habitaci6n es caliente
• el piso es d6bil
. el interior necesita limpieza
• el refrigerador no estfi bien nivelado
° puede ocurrir en climas cAlidos, hdmedos con apertura de puertas frecuente o prolon-
gadas
° la puerta no cierra correctamente
., :e ]os*ahment'osno'est_" envue]{os o"sel'la_los'_]e m_'era'al_roplada .......................
• el clima es cillido, hfimedo
"","" e;a se "selecciono *el"aj'uste° nodal ...................................................
• no se ha abierto |a gaveta durante cuatro semanas
e,e *par*amejores" resultados_ ]o; cont_o;es del re'f'rigerador" ye_]el congelador'del_ncoloc"arse* *
en el punt• medio (5)
• despu6s de abrir las gavetas, de agregar una nueva carga o cambiar los ajustes, la lectura
de la temperatura puede variar. La temperatura correcta reapareceril en un peffodo de
tiempo corto
• ;e eel.control" de*temperatura" marca _tem _ia'do ca]iente" ..................................
descongelamiento
se ponen a congelar (helado, jug• concentrado, etc.)
• regule el control del congelador a una posici6n mils frfa
La mfiquina para hacer hielo no est_ funcio- • el abastecimiento de agua estfi apagado
nando • la presi6n de agua es demasiado baja
La superficie frontal del refrigerador estfi • Disefio especial para limitar la condensaci6n durante periodos de humedad alta.
caliente al taeto
El dispensador de hielo no es_ funcionando ° la milquina para hacer hielo no funciona
E1 dispensador de agua no est_ funcionando
• .................................................................................................................... "*"el abastecimiento de agua •st °°
° el brazo de la palanca estil en posici6n OFF (arriba)
• el congelador est_ demasiado caliente
• atascammnto _e _mlo en ef dlspensador
• el encendido estil cerrado
• la presi6n de agua es demasiado baja
• el encendido estil cerrado (consult• la pilgina 5 l)
58
Page 60

Garant[a
,,r........
Garantia 'Ibtal de Un A_
l)uranle an Ill afio ttmla&, a partil de la fecha tie compra original al pt_r menoro se reparar',t o cambiani tin ct_m algum_ cualquier parle qtm
falle de,n_o del uso dom_slico normal.
MAquina pare hacer Hieh_ _,cuando se cxm_pra con el refrigerador yes instafada l_:)r el dislribuidor se considera pane del refrigera&_ pm_a
efectos de la garantia_
Garanfia Limitada - Uomponentes Prindpales de Refrigeraci6n
Desde el S_.do hasta el Quinto Afio:
[_Sl_S del primer afio contado a partir tie la fecha tte compm original al I_)r meno_ hasla el final del quimo afio. Maytag APlfliances
repamni o mlmndr_L a su elecci6n, sin c_st_) alguno_ la_ panes _ la mano de obra. cuatquier pane del sistema de _frigeracidn sellado
{que consla del comple_)r_ evalx)rador, con_iensador,, secadt_, y t_b(_s de conexi6n_ asi co]no el revesfimient_ del refrigemdor {sill
incfuir el revestimienm de la puerla) que falle denim det uso &_m0.slico normal l_s cmgos de gasms de viaje y transl)o_ie, en caso
requieran, ta)m_Nn por cuenta del pmpielario
Garantia I Jmitada - Filtro de Agua Pur_Ciean%
Cnn |_s]_1o al carluclm tie fiitro de agua, Maytag Appliances rv.i_._mh_i cualquier p_'te del carlucho tie filtro de agua que falle debi&_
a ilu _figJto en la tab_caci6_ o los materiales por un petqodo de Treinla l)i_s _¥mtados a p_trrir de la [_'cha tie (_nnpr. origomL Esta
es una gm'antia total tie 30 d/as, y dnrante el i_nodo tie vigencia _ esta garantta tm_biSn prol_rcionaremos libre de ca[go, toda la
man_ de obra v el se_xicio en el hogar que _ mq_fien_ para re_mpla_ar la pieza det?z:mosa
Gal_ntia Limitada - l)|r_ts Pal_:
Segundo Afio:
IAtS palleso fueled tie his conlllonentes princil_le._; de l_fiJgeraci6n, que fallen denim _l uso t|ont_stit;_ n_mllal durmnte el seglnldo _o
despu_s de la le.cha _ compm al N)r menor serfi reparada o se pmpo_x_ionarfi la misma pie_a tibre de cargo, asumien&) el Nopie_ario
los dem',ts cost._, incluyendo mzmo de _:fl_ra,_aslos de via}e y _ranspone
Nrv_ lomar nota de que: La garanlfa total y las garant_as timitmas se aplican cuamlo el retMgerador se encuentra dentro del l_Titorio de
iiiiiiiiiiiiiiiiiiiiiiiiiiii!
los Eslados Unidos o ( _mlad£ l.os refi_gerado_es que se encuentren en cualquier otto tugar estfin cubienos l_n' ga_znffa_s|imitmlas que s6lo
incluyen las pmles que fi_llen durante el primer afio_
LIMI'IA( ?]ONES Dig LA R_SlqlNSABILIDAD
El garame no _r,5 res[_msable por ningdn dafio incidental o indi_cta incluyendo l_rdida de alimen|os Algun_s e_ados no i_nniten la
exclusion o limih_xfi6n de los dafios indirectos_ tte manera que la limitacidn o exclusidn antes meucionada puede no aplicarse a usted
Las garanltas esp_oiflca_s exp_sadas anterio_ente son tas I)NICAS garantia_s prolmrdonadas lmr el fabricante. Es_a garantia le
confiere deree.hos legalesespedficos, pudiendo tambi_n tenet ol_ dereehos que varian de un estado a otto°
iiiiiii
iiiiiiiiiiiiiiiiiiiiiiiiiiiiiiiiiiiii
iiiiiiiiiiiiii_i_iiiii!iiiiiiiiiiiii_i_iiiiiii_i
........::==!:. :::
Para R÷¢ibir Servicio de Ga a tia
Para ubicar una compafifa de servicio autorizada en su zona pdngase en contacto con el distribuidor de Maytag de quien compr6 su aparato; o
•. comunfquese con Maytag Appliances Sales Company, Maytag Customer Assistance (Servicio al Cliente) a los ndmeros que se indican a con-
tinuaci6n. En caso de que el servicio de garantfa recibido no sea satisfactorio, llame o escriba a:
Maytag Appliances Sales Company Estados Unidos 1-800-688-9900
• SM
Atenc_6n: CAIR Center Canadfi 1-800-688-2002
P.O. Box 2370
Cleveland, TN 37320-2370
Nora:
iiiiiiiiiiiiiliii111111111111
ililililililiiii!iiiiiiilili
Lo Que No Cubren Estas Garantfas:
_iii_iiiiiiiiiiiiiiiiiiiiiii_
iiiiiiiiiiiiiiiiiiiiiiiiiiiii
E1 manual del Usuario, los manuales de servicio y cat_ilogos de las partes se encuentran disponibles en Maytag Appliances Sales Company,
Cuando escriba acerca de un problema de servicio no resuelto, incluya la siguiente informaci6n:
(a) Su nombre, direcci6n y nfimero de telSfono;
(b) Ndmero de modelo, ndmero de serie y nfimero de revisi6n (que se encuentran en la pane interior frontal superior del compar-
timiento del refrigerador);
(c) Nombre y direcci6n de su distribuidor y la fecha de compra del aparato;
(d) Una descripci6n clara del problema que tenga;
(el Comprobante de compra (recibo de venta).
1. Condiciones y dafios resultantes de cualquiera de las siguientes even-
tualidades:
a. Instalaci6n, entrega o mantenimiento inapropiados.
b. Alguna reparaci6n, modificaci6n, alteraci6n o ajuste no autorizado
por el fabricante o un establecimiento de servicio autorizado.
c. Uso indebido, abuso, accidentes o uso inmoderado.
d. Corriente el6ctrica, voltaje o suministro incorrectos.
e. Regulaci6n inadecuada de alguno de los controles.
2. Las garantfas quedan nulas si los ndmeros de serie originates han
sido retirados, alterados o no se pueden determinar ftlcilmente.
4. Productos comprados para uso comercial o industrial.
5. E1costo de servicio o llamada para servicio para:
a. Corregir errores de instalaci6n.
b. Instruir al usuario sobre el uso adecuado del producto.
e. Transportar el aparato al establecimiento de servicio.
6. Los dafios indirectos o incidentales sufridos por una per-
sona como resultado del incumplimiento de estas garantfas.
Algunos estados no permiten la exclusi6n o limitaci6n de
los dafios indirectos o incidentales, por lo tanto la exclusi6n
anterior no es aplicable.
3. Focos.
MAYTAG * One Dependability, Square * Newton, Iowa 50208
Form No.A/l/00 Part No. 111209-1
MCS Part No.61005032 ...... . !/ll,u.'//ewt¢. _ayla#. tam Litho U.S.A.
 Loading...