

Page 1
_t
:_ tt
;;iiii
;!ii_
t
Congratulations on your purchase
of a Maytag Performa TM refrigerator! Your
! t
satisfaction is very important to us, so please
read this guide very carefully. You will find
instructions on the proper operation and mainte-
nance of your new appliance. Table of
Save time and money. If something should go wrong,
we suggest consulting the "Before You Call" section. Safety Instructions_i
It is designed to help you solve basic problems before Installation ............ ..
consulting a servicer.
TemperatureControls
If you have questions, write us (include your model
number and phone number) or call: Looking inside ..................
Maytag Appliances Sales Company Ice Service ....................... 6
Attn: CA/R ®Center Food Storage Tips ................. 7
P.O. Box 2370
Cleveland, TN 37320-2370 Storingthe Refrigerator,
1-800-688-9900 USA Care & Cleaning................... 8
1-800-688-2002CANADA Cleaning Chart .................... 9
1-800-688-2080 USA TTY (for deaf, hearing
impaired or speech impaired) Before You Call................... 10
(Mon.-Fri., 8am-8pm Eastern Time) Warranty ........................ 11
Internet: http: / / www.maytag.com
Guidede L'Utilisateur ............. 12
Guia del Usuario ................. 24
PartNo.111208-1 FormNo.A/02/00 MCS PartNo. 61005031 Litho U.S.A.
Page 2
For Future Assistance
Have complete model and serial number identification of Have proof of original date of purchase, Keep your sa
your refrigerator. This is located on a data plate inside the slip, proof of original purchase date is needed for w
refrigerator compartment, on the upper left side. Record ranty service.
these numbers below for easy acccess.
ModelNumber NOTE: In our continuing effort to improve the quaf
ity of our appliances, it may be necessary to makl
changes to the appliance without revising thi=
Serial Number guide.
Important Safety Instructions
[ _ WARNING: Whenusing appliance, follow basic precautions, including the following:
your always
• Use the refrigerator only for its intended purpose. • Children should not climb, hang or stand on
• To prevent possibility of hazard due to electrical shock, shelves of this refrigerator.
never plug the refrigerator into a receptacle which has
not been grounded adequately and in accordance with
the local and national electrical codes. See _ warning Important: Child entrapment and suffocation are 1
and the grounding instructions below, problems of the past. Junked or abandoned refrige
tors are still dangerous.., even if they will sit for "ju:
• Unplug the refrigerator before cleaning or replacing a few days." If you are getting rid
light bulb. of your old refrigerator, please
• In case of power failure, minimize door openings. If the follow the instructions below to
power failure is of a long duration, protect the food by help prevent accidents.
placing blocks of dry ice on top of the packages or • Take off the doors.
check with a local frozen foods locker plant about tern- • Leave the shelves in place so
porary storage. Frozen foods which have thawed corn- that children may not easily
pletely should not be refrozen, climb inside.
• Any electrical service cord that becomes frayed or dam-
aged should be immediately repaired or replaced. Never
unplug your appliance by pulling on the power cord.
• Your refrigerator should not be operated in the pres-
ence of explosive fumes.
_k WARNING -- This appliance is designed to operate on a normal 115 volt, 15 amp, 60 cycle line. The
should be a separate, grounded circuit serving this appliance only. Do not use an extension cord. L
not use any device that will alter the electrical performance of this appliance,
Power supply cord with 3-prong
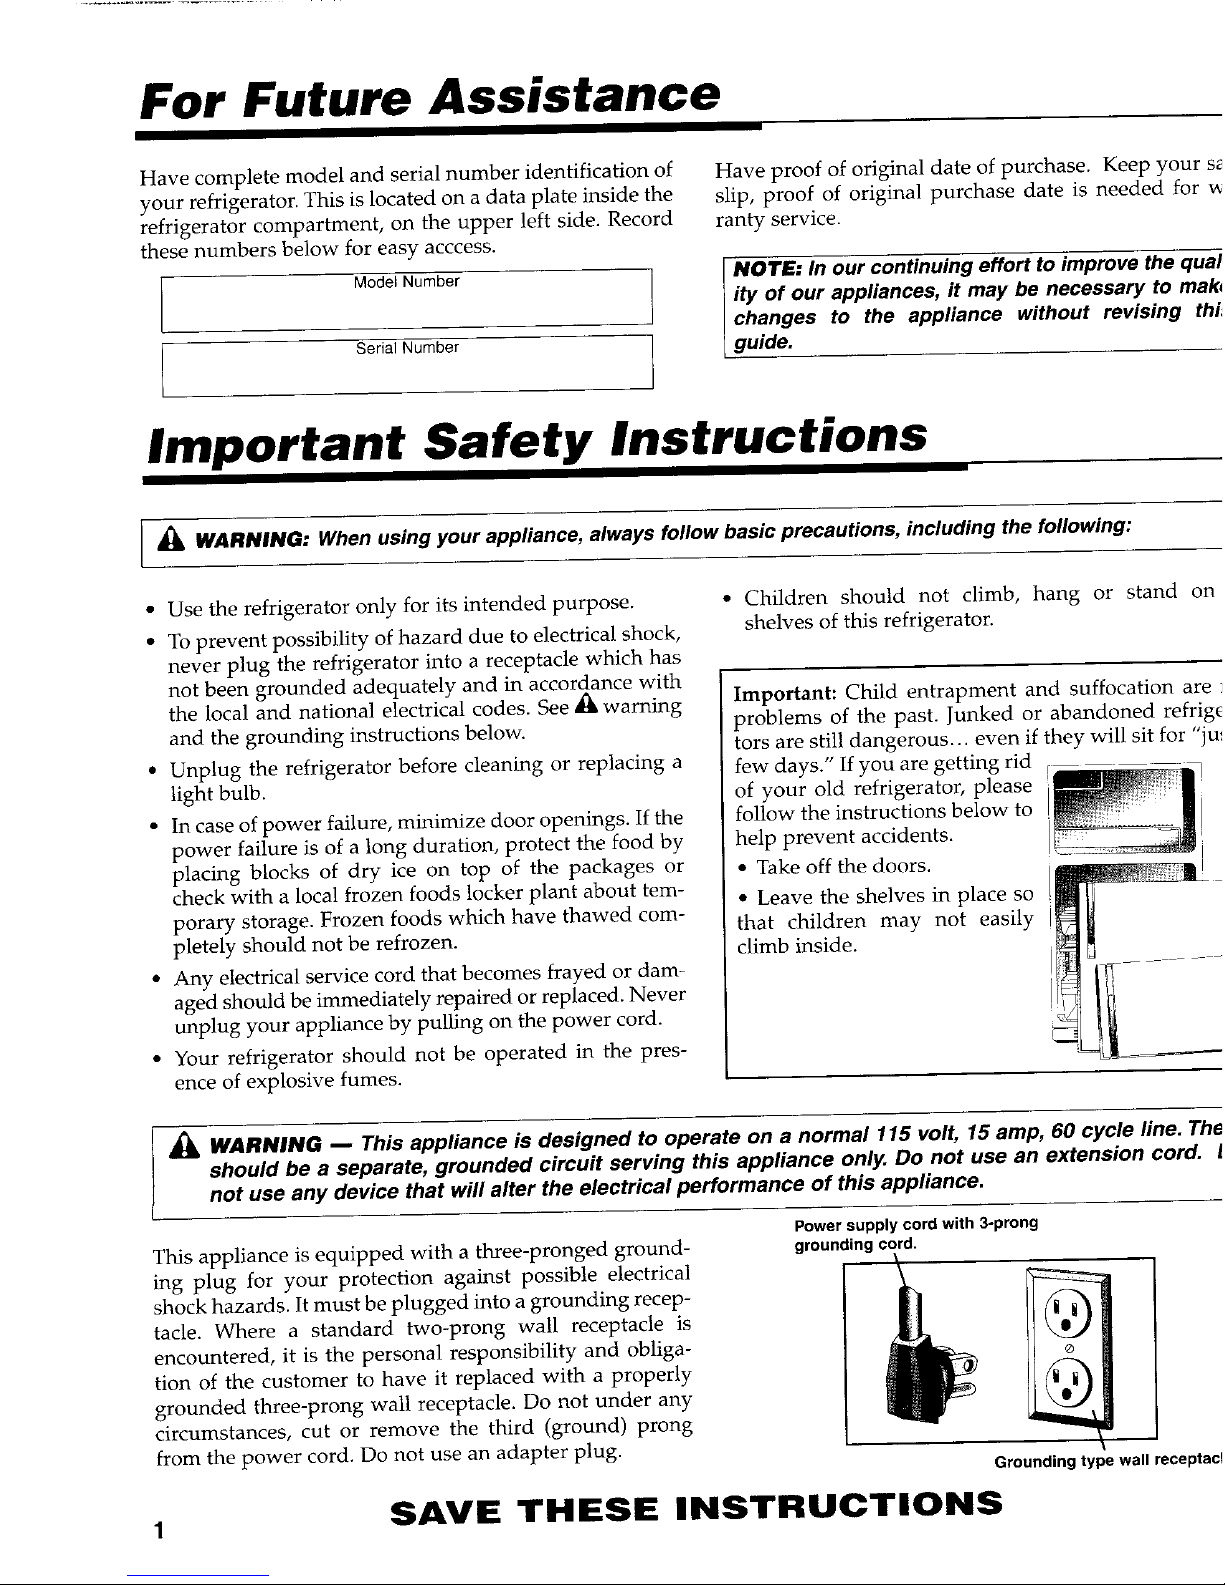
This appliance is equipped with a three-pronged ground- groundingcord.
ing plug for your protection against possible electrical I _ _
shock hazards. It must be plugged into a grounding recep-
tacle. Where a standard two-prong wall receptacle is
encountered, it is the personal responsibility and obliga-
tion of the customer to have it replaced with a properly
grounded three-prong wall receptacle. Do not under any I
circumstances, cut or remove the third (ground) prong
I
from the power cord. Do not use an adapter plug.
Groundingtype wall receptacl
SAVE THESE INSTRUCTIONS
1
Page 3
Installation
Yournew refrigerator was packed carefully for shipment. Remove and discard shelf packing clips (if used) located just abov,
each shelf where they hook onto the frame. To remove plastic clips wiggle the clips sideways and pull straight out.
Location Leveling
• Allow for a free flow of air through the front base Your refrigerator is equipped with front and back rolle
grille, so it can be moved away from the wall for cleaning. "
enhance its appearance and to maintain performan(
• Install the refrigerator where the room temperature your refrigerator should be level.
will not go below 55° E With temperatures below 55°,
the refrigerator will not run frequently enough to For refrigerator models with adjustable wheels:
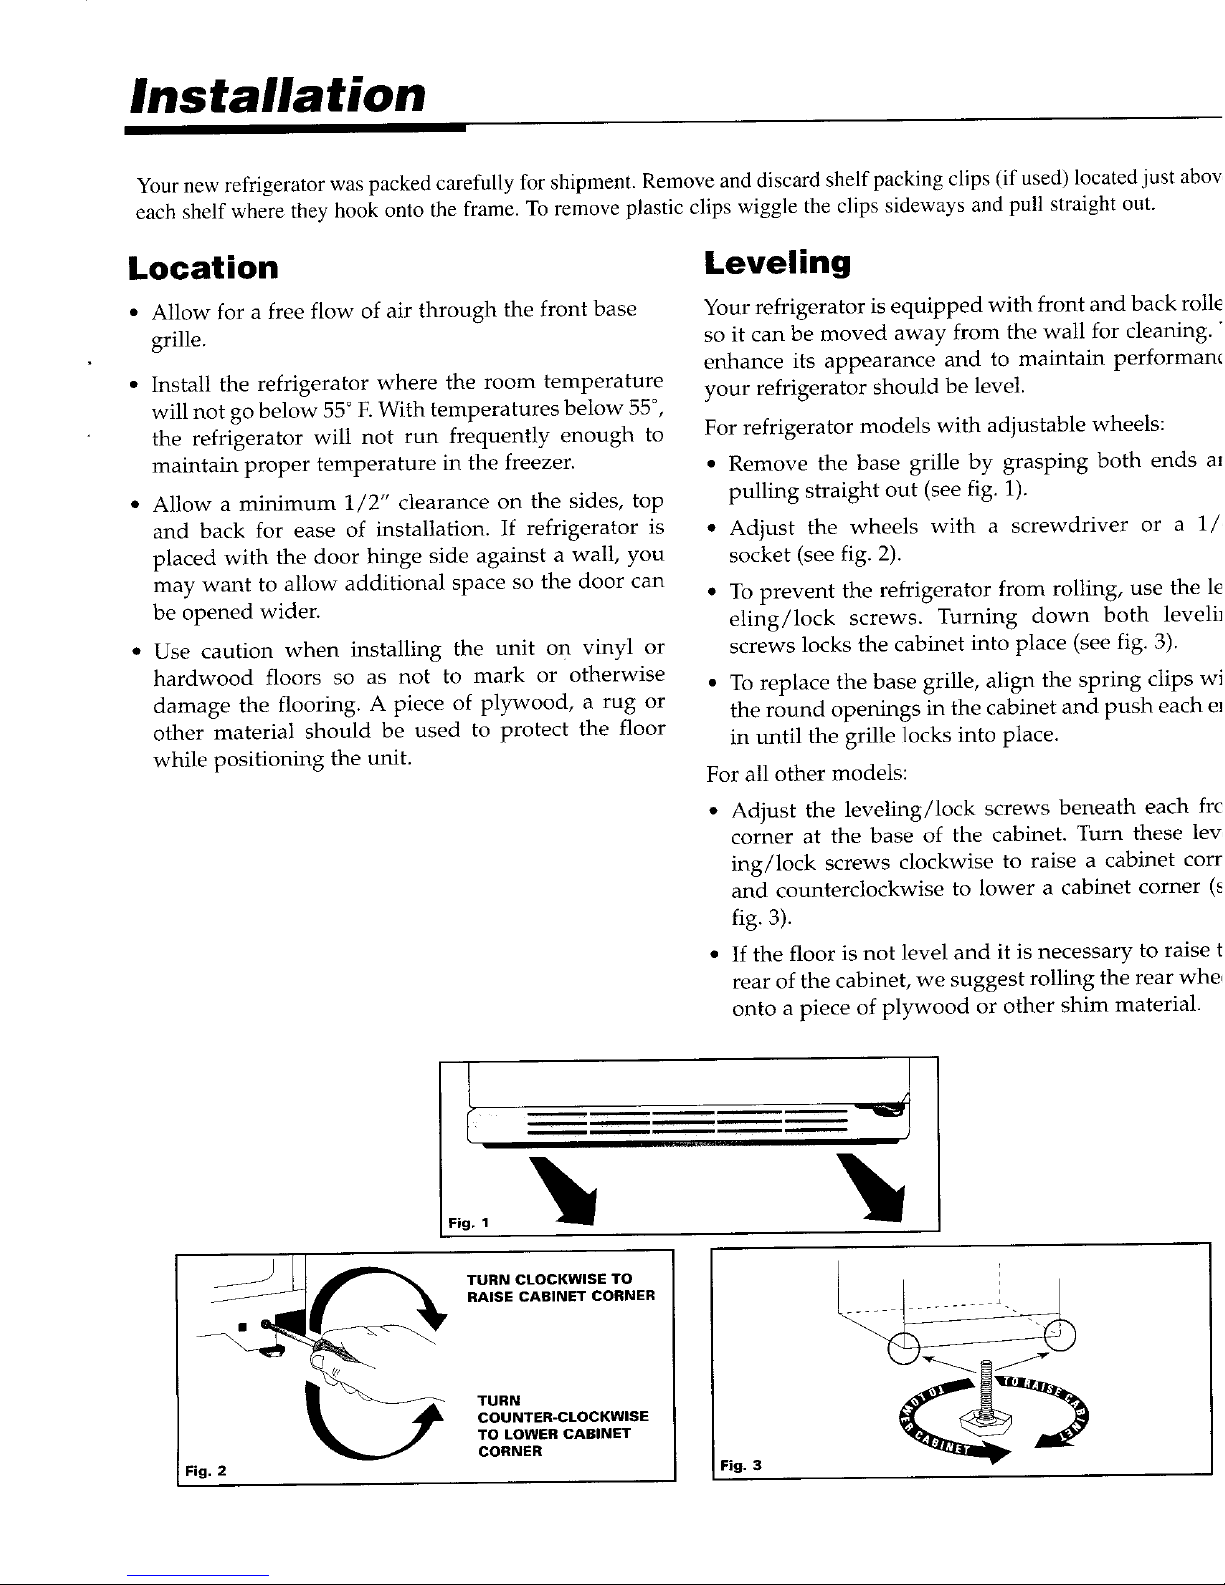
maintain proper temperature in the freezer. • Remove the base grille by grasping both ends ar
• Allow a minimum 1/2" clearance on the sides, top pulling straight out (seefig.1).
and back for ease of installation. If refrigerator is • Adjust the wheels with a screwdriver or a 1/_
placed with the door hinge side against a wall, you socket (see fig. 2).
may want to allow additional space so the door can • To prevent the refrigerator from rolling, use the le
be opened wider, eling/lock screws. Turning down both levelil
• Use caution when installing the unit on vinyl or screws locks the cabinet into place (see fig. 3).
hardwood floors so as not to mark or otherwise • To replace the base grille, align the spring clips wi
damage the flooring. A piece of plywood, a rug or
the round openings in the cabinet and push each el
other material should be used to protect the floor in until the grille locks into place.
while positioning the unit.
For all other models:
• Adjust the leveling/lock screws beneath each frc
corner at the base of the cabinet. Turn these lev,
ing/lock screws clockwise to raise a cabinet corr
and counterclockwise to lower a cabinet corner (s
fig. 3).
• If the floor is not level and it is necessary to raise t
rear of the cabinet, we suggest rolling the rear wheq
onto a piece of plywood or other shim material.
Fig, 1
I
TURN CLOCKWISE TO
RAISE CABINET CORNER _
COUNTER-CLOCKWISE
TO LOWER CABINET
CORNER
Fig. 2 Fig. 3
Page 4
Temperature Controls
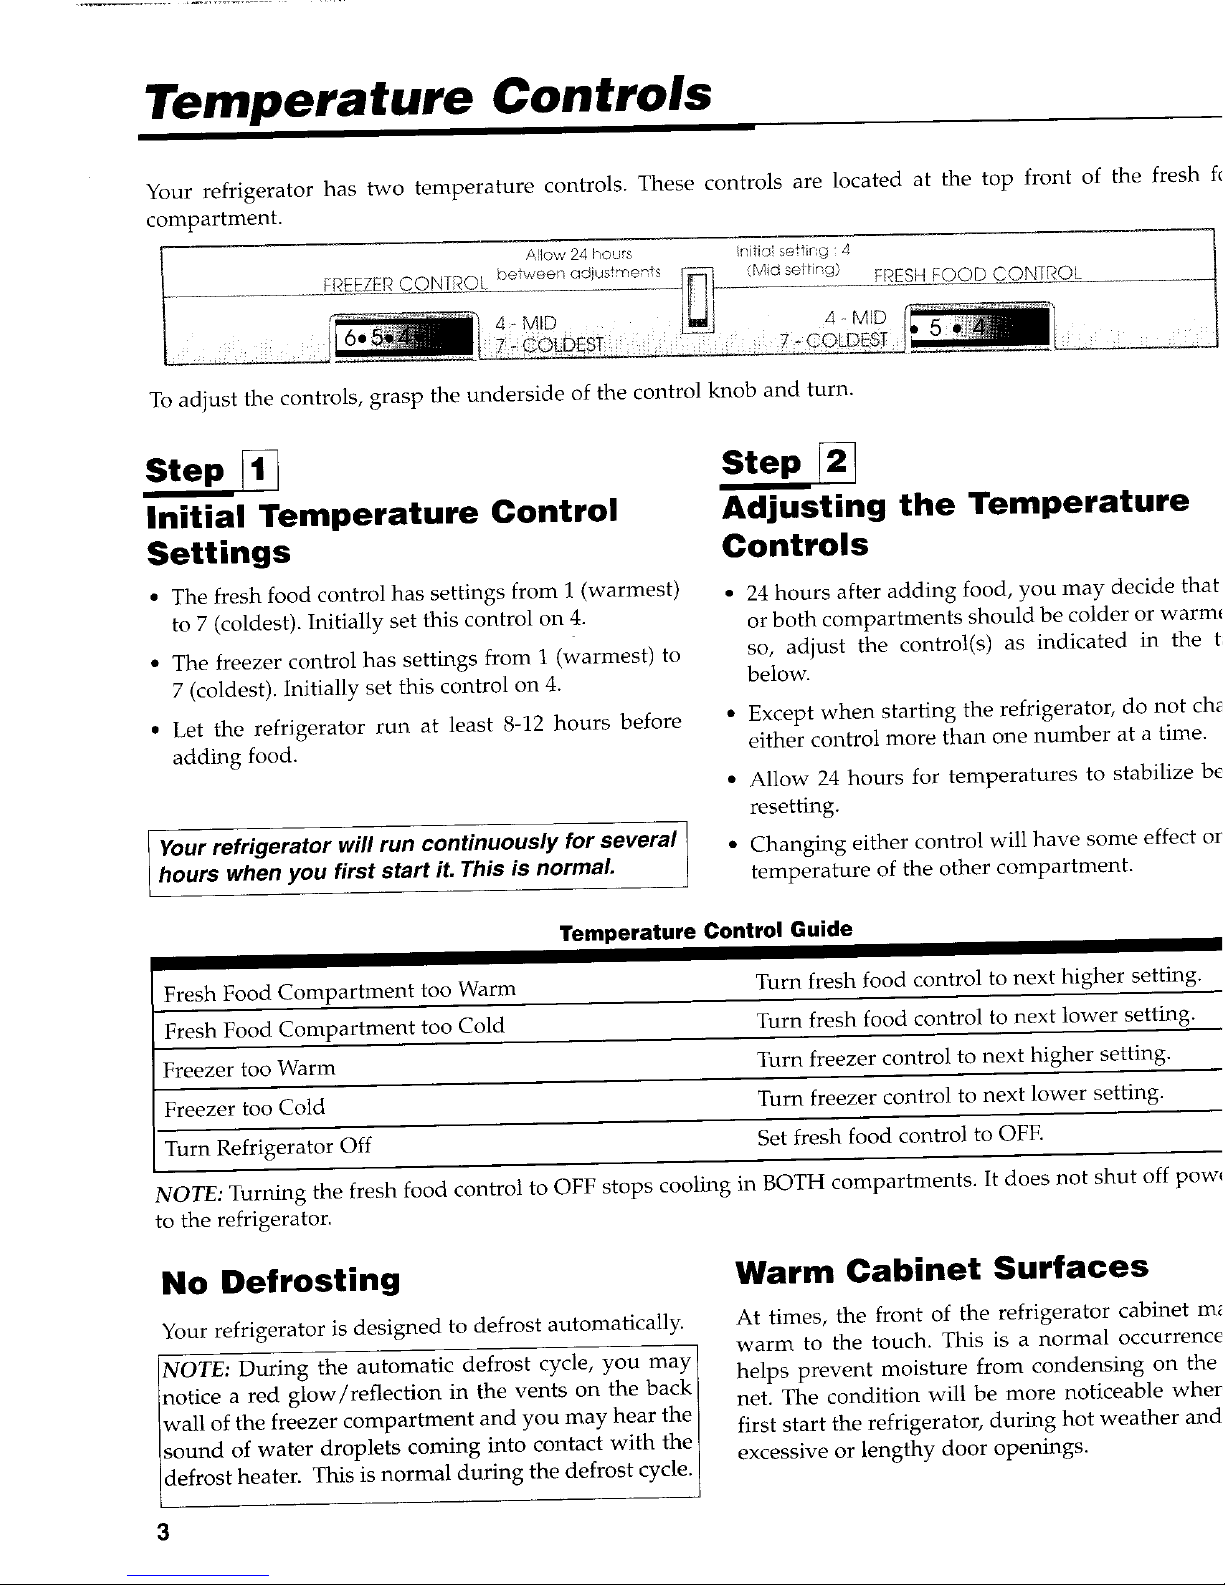
Your refrigerator has two temperature controls. These controls are located at the top front of the fresh f_
compartment.
Allow 24 hours Initio setting : 4
FREEZEPCON f_OL between aaiustments (Mid selting) FI?ESHFOOD CONTF_OL
4=MD .... _ID
To adiust the controls, grasp the underside of the control knob and turn.
Initial Temperature Control Adjusting the Temperature
Settings Controls
• The fresh food control has settings from 1 (warmest) • 24 hours after adding food, you may decide that
to 7 (coldest). Initially set this control on 4. or both compartments should be colder or warm_
• The freezer control has settings from 1 (warmest)to so, adjust the control(s) as indicated in the t;
7 (coldest). Initially set this control on 4. below.
• Let the refrigerator run at least 8-12 hours before • Except when starting the refrigerator, do not ch_
adding food. either control more than one number at a time.
• Allow 24 hours for temperatures to stabilize be
resetting.
Your refrigerator will run continuously for several • Changing either control will have some effect or
hours when you first start it. This is normal, temperature of the other compartment.
Temperature Control Guide
Fresh Food Compartment too Warm Turn fresh food control to next higher setting.
Fresh Food Compartment too Cold Turn fresh food control to next lower setting.
Freezer too Warm Turn freezer control to next higher setting.
Freezer too Cold Turn freezer control to next lower setting.
Turn Refrigerator Off Set fresh food control to OFF.
NOTE: Turning the fresh food control to OFF stops cooling in BOTH compartments. It does not shut off pow_
to the refrigerator.
No Defrosting Warm Cabinet Surfaces
Your refrigerator is designed to defrost automatically. At times, the front of the refrigerator cabinet m_
warm to the touch. This is a normal occurrence
NOTE: During the automatic defrost cycle, you may helps prevent moisture from condensing on the
notice a red glow/reflection in the vents on the back
net. The condition will be more noticeable whet
wall of the freezer compartment and you may hear the first start the refrigerator, during hot weather and
sound of water droplets coming into contact with the
excessive or lengthy door openings.
defrost heater. This is normal during the defrost cycle.
a
Page 5

Looking Inside
Shelves
The Tempered Glass Cantilever Shelves in your refrig-
erator are adjustable, allowing you to customize the
interior to meet your food storage needs.
To remove a shelf:
• slightly lift up the rear of the shelf
• pull the shelf straight out Some models have shelves with 2 sets of hooks on th,
To lock the shelf into another position: back. These hooks lock into the rails found on the bac
refrigerator wall.
• tilt up the front edge of the shelf
Other models have shelves with I set of hooks on the bact
• insert the hooks into the desired frame openings These hooks lock into the middle rail on the back refrige _
• let the shelf settle into place ator wall. The outer edges of these shelves are support_
by rails formed into the side of the refrigerator cabinet.
Additionally, your refrigerator may have I Tempered Glass Full Width Shelf. In some models, this shelf slides ou
on support rails located on the cabinet walls. This provides convenient access to items located at the rear of the shel_
To remove the full width shelf: To reinsert the shelf:
• lift the front end of the shelf • rest the shelf on to the matching support rails.
• pull the shelf straight out
Your refrigerator is equipped with an adjustable
Freezer Shelf. The shelf can be adjusted to accommo-
date a variety of frozen food loads. 0
To remove the shelf:
!
• lift the end up about 3 inches
• pull the right end bars out of the cups in the side
wall ....
To replace the shelf:
• reposition the removable support plugs on the left _ WARNING _ Never attempt to adjust a
side wall to the desired level shelf that is loaded with food.
• reverse the removal procedure
Special Storage Areas Toreplacethedrawer:
Select refrigerator models have a Snack Center . reverse the above procedure
Drawer designed to provide a short term storage area This drawer can be positioned as desired on eith,
for fresh meats, cheeses and luncheon meats, left or the right side of the refrigerator cabinet.
To remove the Snack Center Drawer for cleaning: I For best results, keep the drawer tightly clos
• pull the drawer out until it stops
• lift the drawer up slightly and pull it out
Page 6

Looking Inside
The Crispers provide storage for fruit and vegetables. To remove a crisper drawer for cleaning:
Your refrigerator has either 1 or 2 humidity controls • pull out the crisper until it stops
located on the crisper shelf above the crisper drawers.
• tilt the drawer front up and pull it out
For optimal fruit storage, slide the crisper control to the
To replace a crisper drawer:
left to provide lower humidity conditions in the
drawer. • align the drawer in the tracks
For optimal vegetable storage, slide the crisper control • lift the drawer front and slide in
to the right to provide higher humidity conditions in
the drawer.
For best results, keep the crispers tightl
FRuit closed.
The Crisper Shelf Top serves as the lower refrigerator she!f.
To remove the crisper shelf: To replace the crisper shelf:
• lift the front edge of the shelf • set the rear bars on the support
• pull the shelf straight out • push the shelf back until the front edge can be i
ered into place
To use the roomy Dairy Compartment, simply raise The Egg Cradle (style may vary)holds a "dozen-p
the cover, eggs. It can be removed to be washed or carried
work area.
Energy Saving Tips
• Locate the refrigerator away from heat producing • Keep the freezer full to near capacity so less col,
appliances such as the range or dishwasher, heat will escape during door openings. When the fre
vents and direct sunlight, is less than two-thirds full, place milk cartons
• Level the refrigerator and do not block ventilation full of water in the freezer.
around the front grille. • Wipe moisture from the outside of containers b
• Let hot dishes cool slightly before putting into the placing them into the refrigerator.
refrigerator or freezer. • Avoid opening the doors too often.
• Cover liquids.
5
Page 7

Ice Service
Ice Cube Trays • The initial batch may also contain impurities from tt
new water supply piping. Therefore, all cubes fro]
Some models are equipped with ice cube trays and an
the first two or three batches should be discarded.
ice storage bin. The bin stacks neatly on top of the ice
cube trays. To release the ice cubes from a tray, hold the • When the ice cubes are ejected it is normal for sever,
tray upside down over the bin and twist both ends. cubes to be joined together at the ends. They ca
easily be broken apart. The ice maker will continue 1
make ice until the supply of ice cubes raises the wiJ
Automatic Ice Maker (optional) lever arm, shutting the ice maker off.
NOTE: Energy rating guides that are posted on the refrig- I • Certain sounds may accompany the various cycles (
erator at the time of purchase do not include optional ice the ice maker. The motor may have a slight hum, ff
maker energy usage, cubes will rattle as they fall into an empty storage pa
and the water valve may click or "buzz" occasiona H
Some models are automatic ice maker ready. The
number of the appropriate ice maker kit needed for • If the ice is not used frequently, the ice cubes will becon"
installation into these models appears on the data plate, cloud}_ shrink, stick together and taste stale. Empty t2
The kit contains installation instructions and water con- ice storage bin periodically and wash it in lukewan
nection instructions, water. Be sure to dry the bin before replacing it.
• To remove the ice bin, pull it forward, away from tk
Other models have a factory installed ice maker. The
ice maker. To avoid the ice maker dumping ice whil
water inlet tubing assembly required to complete the
the bin is removed, turn the ice maker off by liftin
water connection to the water valve is located in a bag the wire lever.
inside the refrigerator. Connect the ice maker to the
water supply as instructed in the separate instructions • To replace the ice bin, reverse the above procedur,
furnished with the refrigerator. Turn the ice maker on by lowering the wire lever arn
• Beverages and foods should not be placed in the i(
storage bin for quick chilling. These items can block ff
wire lever arm, causing the ice maker to malfunction
• Turn off (arm up) the ice maker when the wat_
supply is to be shut off for several hours.
For Your Safety
Do not place fingers or hands on the automatic i(
making mechanism while the refrigerator is plugge
in. This will help protect you from possible injury.
will also prevent interference with moving parts of tb
ejector mechanism and the heating element th;
releases the cubes.
Under certain rare circumstances, ice cubes may be di_
colored, usually appearing with a green-bluish hu.
• After your refrigerator has been hooked up to the The cause of this unusual discoloration can be a con
water supply, move the wire lever arm into the down bination of factors such as certain characteristics
position. This will start its operation. The ice maker local waters, household plumbing and the accumui_
will fill with water when the freezer reaches the tion of copper salts in an inactive water supply li_
proper temperature, which feeds the ice maker.
• It may be 8 to 12 hours before the ice maker furnishes Continued consumption of such discolored ice cube
any usable ice cubes. The first one or two batches will may be injurious to health. If such discoloration
probably contain undersized and irregular cubes observed, discard the ice cubes and contact your deale
because of air in the supply line. to purchase and install a water line filter.
Page 8

Food Storage Tips
Fresh Food Storage Frozen Food Storage
• The fresh food compartment of a refrigerator should • Tire freezer compartment of a refrigerator should
be kept between 34°F and 40°F with an optimum kept at 0°F or lower. To check the temperature, pl_
temperature of 37°R To check the temperature, place an appliance thermometer between the frozen pa.
an appliance thermometer in a glass of water and ages and check after 24 hours. If the temperature
place in the center of the refrigerator. Check after 24 above 0°F, adjust the control as described on page
hours. If the temperature is above 40°F adjust the
controls as explained on page 3. • A freezer operates more efficiently when it is at le
two-thirds full.
• Avoid overcrowding the refrigerator shelves. This
reduces the circulation of air around the food and PackagingFoods for Freezing
results in uneven cooling. • To minimize dehydration and quality deteriorat
use aluminum foil, freezer wrap, freezer bags or i
Fruits and Vegetables tight containers. Force as much air out of the pa
• Storage in the crisper drawers traps moisture to help ages as possible and be sure they are tightly seal
preserve the fruit and vegetable quality for longer Trapped air can cause the food to dry out, chal
time periods. (Refer to page 5). color and develop an off-flavor (freezer burn).
• Sort fruits and vegetables before storage and use • Overwrap fresh meats and poultry with suit_
bruised or soft items first. Discard those showing freezer wrap prior to freezing.
signs of decay. • Do not refreeze meat that has completely thawe,
• Always wrap odorous foods such as onions and cab-
bage so the odor does not transfer to other foods. Loading the Freezer
• While vegetables need a certain amount of moisture • Avoid adding too much warm food to the freeze
to remain fresh, too much moisture can shorten stor- one time. This overloads the freezer, slows the rat
age times (especially lettuce). Drain vegetables well freezing and can raise the temperature of fro
before storing, foods.
• Leave a space between the packages so cold air
Meatand Cheese circulate freely, allowing food to freeze as quickl I
• Raw meat and poultry should be wrapped securely possible.
so leakage and contamination of other foods or sur-
faces does not occur. • Avoid storing hard-to-freeze foods such as ice crq
and orange juice on the freezer door shelves. T1
• Occasionally mold will develop on the surface of foods are best stored in the freezer interior where
hard cheeses (Swiss, Cheddar, Parmesan). Cut off at temperature varies less with door openings.
least an inch around and below the moldy area. Keep
your knife or instrument out of the mold itself. The
remaining cheese will be safe and flavorful to eat. Do
NOT try to save individual cheese slices, soft cheese,
cottage cheese, cream, sour cream or yogurt when
mold appears.
Dairy Food
• Most dairy foods such as milk, yogurt, sour cream
and cottage cheese have freshness dates on their car-
tons for appropriate length of storage. Store these
foods in the original carton and refrigerate immedi-
ately after purchasing and after each use.
7
Page 9

Storing the Refrigerator
Vacations Moving
If you will be gone for a month or less, leave the con- When moving, follow steps a-d under VacatR
trols at the usual settings, addition, remove and carefully pack any items tl
During longer absences: easily removable. Ship the refrigerator in an u
a) remove all food, position with the doors taped shut.
b) shut off the ice maker (if installed) and the valve
where you tapped into the water line to supply the
refrigerator,
c) disconnect the refrigerator from the electrical
outlet,
d) clean and dry the refrigerator thoroughly,
e) leave the doors open to prevent odors.
Care & Cleaning
Refer to the chart on the following page for specific No Clean TM Commercial-dutl
refrigerator cleaning guidelines. Condenser
power cord before cleaning. ] A clean condenser means more efficient refrig
Disconnect the
operation. Thanks to the unique design of tl_
Cleaning Under the Refrigerator Clean'" condenser, there is no longer a need for r(
condenser cleaning in normal home usage surr,
Your refrigerator can be rolled out for cleaning the floor ings.
underneath. Raise the locking feet if engaged (see page Some operating environments may be partic
2). Pull the refrigerator straight out from the wall. dusty or greasy. In these situations, the condens_
be periodically cleaned to insure maximum effici
Replacing a Light Bulb
CAUTION: Disconnect the power cord before replacing light bulb(s). Wear gloves as protec;
against possible broken glass.
Always use a standard 40 or 60 watt appliance bulb.
Refrigerator Freezer
There is a light bulb located under the top of the refrig- Some models are equipped with a freezer light_
erator compartment, light is located on the back wall of the freezer con
• To remove the bulb cover: ment, near the upper right corner.
Squeeze the tabs at the base of the cover. Using To remove the bulb cover:
gentle downward pressure, the bulb cover should • Grasp the top and bottom of the bulb cover. Press
snap out. areas of the attachment tabs, applying enough pr_
• Unscrew the lightbulb and replace, to unhook the tabs. At the same time, pivot the
• Replace the bulb cover by snapping the tabs back down and remove.
into the appropriate slots. • Unscrew the lightbulb and replace.
• Replace the bulb cover by pivoting it back into plac
snapping the tabs into the appropriate slots.
Page 10

Care and Cleaning
_k CAUTION: Disconnect the power cord before cleaning. Do not touch refrigerated surfaces with
wet or damp hands. Damp objects stick to cold metal surfaces. Before cleaning the freezer, allow it to
warm up. Allow glass shelves to warm up before immersing in warm water.
Refrigerator Cleaning Chart
Soap and water Remove the base grille by grasping the ends and
Base grille Mild liquid sprays pulling straight out. To replace, align the clips with the
Vacuum cleaner round openings in the cabinet and push each end in
attachment until the base grille snaps into place.
Cleaning brush (Part No need for cleaning unless environment is particu-
No. 20001017). larly greasy, dusty or there is significant pet traffic in
Condenser Available from the home (see page 8).
your dealer.
Soap and water
Door handles Mild liquid sprays
Painted metal Soap and water Dry with a clean, soft cloth.
surfaces: Mild liquid sprays Do not wipe the refrigerator with a soiled dishwash-
Cabinet, doors ing cloth or wet towel. These may leave residue that
can scratch and weaken the paint. Do not use scouring
pads, powdered cleansers, bleach or cleaners contain-
ing bleach. These products can scratch and erode the
paint finish.
Do not wax plastic or vinyl parts.
Refrigerator & Freezer Interior
Baking soda and Use 1-2 tablespoons baking soda per quart of water.
Door gasket water Be sure to wring out excess water from sponge or
Soap and water cloth when cleaning around controls, lights, or electri-
cal parts.
Soap and water Allow the glass to warm up to room temperature
Glass shelves Glass cleaner before immersing in warm water. Never use hot
Mild liquid sprays water.
Soap and water See above for baking soda solution.
Interior and door Baking soda and DO NOT use abrasive cleaners, concentrated deter-
liner water gents, bleaches, cleaning waxes, solvents or polish
cleaners to clean the refrigerator interior.
Drawers, bins, egg Soap and water Dry thoroughly. Do Not wash in automatic diswasher.
cradle, etc.
9
Page 11

Care and Cleaning
_k CAUTION: Disconnect the power cord before cleaning. Do not touch refrigerated surfaces with
wet or damp hands. Damp objects stick to cold metal surfaces. Before cleaning the freezer, allow it tc
warm up. Allow glass shelves to warm up before immersing in warm water.
Refrigerator Cleaning Chart
Soap and water Remove the base grille by grasping the ends an
Mild liquid sprays pulling straight out. To replace, align the clips with tJ:
Base grille
Vacuum cleaner round openings in the cabinet and push each end i
attachment until the base grille snaps into place.
Cleaning brush (Part No need for cleaning unless environment is partict
No. 20001017). larly greasy, dusty or there is significant pet traffic i
Condenser Available from the home (see page 8).
your dealer.
Soap and water
Door handles Mild liquid sprays
Painted metal Soap and water Dry with a clean, soft cloth.
surfaces: Mild liquid sprays Do not wipe the refrigerator with a soiled dishwash
Cabinet, doors ing cloth or wet towel. These may leave residue tha
can scratch and weaken the paint. Do not use scourin I
pads, powdered cleansers, bleach or cleaners contain
ing bleach. These products can scratch and erode th,
paint finish.
Do not wax plastic or vinyl parts.
-'_:__ [*[:JP.|(_a];r;Jmi l=_=y_[:-]dlI_ _J'j [o]
Baking soda and Use 1-2 tablespoons baking soda per quart of watei
Door gasket water Be sure to wring out excess water from sponge oJ
Soap and water cloth when cleaning around controls, lights, or electri.
cal parts.
Soap and water Allow the glass to warm up to room temperatur_
Glass shelves Glass cleaner before immersing in warm water. Never use hol
Mild liquid sprays water.
Soap and water See above for baking soda solution.
Interior and door Baking soda and DO NOT use abrasive cleaners, concentrated deter-
liner water gents, bleaches, cleaning waxes, solvents or polish
cleaners to clean the refrigerator interior.
Drawers, bins, egg Soap and water Dry thoroughly. Do Not wash in automatic diswasher.
cradle, etc.
9
Page 12

Before You Call
Check these points if your refrigerator...
• temperature control turned to "Off"
• power cord not plugged in
Won'tRun • no power at the electrical outlet
• circuit breaker tripped or the house fuse blown
• refrigerator is in automatic defrost
modem refrigerators are larger and run colder, which requires more ru_ning time to
provide more stable temperatures
• prolonged door openings
Runstoo long/toofrequently * base grille blocked
• too many door openings
• door not sealing (due to a package or a container holding door open)
....... , ,,,, ,,
• cabinet not level
Noisyoperation . weak floor
• odor producing foods should be covered or wrapped
Odor in cabinet • interior needs cleaning
Warmair from cabinetbottom • normalairflowforcondensercirculation
• cabinet not level
Cabinetvibrates • weak floor
• hot, humid weather
Moisture on insidecabinet walls * frequent or prolonged door openings
• door not closed properly
• food not wrapped properly
Excessivemoistureincrisper • hot, humid weather
• packages not wrapped or sealed properly
Foodsdryout (freshor frozen) • crisper not tightly closed
• temperature control set too cold
• bulb burned out
Cabinetlight notworking • no power at the outlet
• refrigerator control set too warm
Refrigerator compartment too warm • pcolonged door openings
Refrigerator compartment too cold • refrigerator controlsettoocold
• freezer control set too warm
Freezercompartmenttoo warm • prolonged door openings
Sizzling sound in freezer • a normal sound caused by defrost water dripping on defrost mechanism
Visibleglowin the freezer vents • appearance of a red glow or reflection is normal during the defrost cycle
• products with high sugar content may not harden completely when frozen (ice
Freezernot freezing properly cream, concentrated juice, etc.)
• adjust freezer control to a colder setting
• trays may be coated with residue film from minerals in the water. Wipe trays with
Ice cubes stickingin tray vinegar-soaked cloth until clean. If residue is hear); clean trays each time
tile refrigera _oris cleaned.
° cold air moving over the ice cubes causes shrinkage, especially with limited usage.
Ice cubes evaporate This is normal.
• stop arm in OFF (up) position
• water supply turned off
Automatic ice maker not operating • water pressure too low
• freezer too warm
Frontcabinetsurface • special design to limit condensation during periods of high hmnidity
warmto the touch
 Loading...