

Page 1
HCB-40WX
Handheld 40 Channel
CB/Weather Radio
OWNER'S MANUAL
English/Spanish
Page 2

TABLE OF CONTENTS
Product Description 1
FCC Regulations 1
Performance Features 2
Package Contents 3
Controls and Functions 4
Battery Installation 7
Battery Charging and External
Power Sources 8
Operating Instructions 9
Feature Button Operation 10
Using the Weather Channels 11
Antenna Information 13
Radio Communication Codes 15
CB Channel Frequency Chart 16
Troubleshooting Chart 17
Specifications 18
Optional/Replacement Accessories 19
Other Maxon Products 19
Warranty Service Instructions 20
Warranty Statement 21
Before operating your Maxon Citizens Band Radio,
read this Owner's Manual carefully. If you have a
problem, refer to the "Troubleshooting" section of
this manual before returning your radio for repairs.
Page 3

TABLA DE CONTENIDO
Controles y Funciones 4
Descripción del Producto 22
Regulaciones de la FCC
(Comisión Federal de Comunicaciones) 22
Características de Funcionamiento 23
Contenido del Paquete 24
Instalación de la Batería 25
Carga de Baterías y Fuentes de
Alimentación Externas 26
Instrucciones de Operación 27
Cómo Usar los Botones de Funciones 28
Uso de los Canales Meteorológicos 29
Información Sobre la Antena 31
Tabla de Frecuencia del Canal
(Banda Ciudadana) 33
Tabla de Localización y Reparación
de Averías 34
Especificaciones 35
Accesorios Maxon 36
Otros Productos Maxon 36
Instrucciones Servicio de Garantía 37
Aclaración de la Garantía 38
Antes de hacer funcionar su radio de Banda
Ciudadana de Maxon lea detenidamente este Manual
del Propietario. Si tiene unproblema, refiérase a la
sección "Localización y Reparación de Averías" de este
manual antes de devolver su radio para la reparación.
Page 4

1
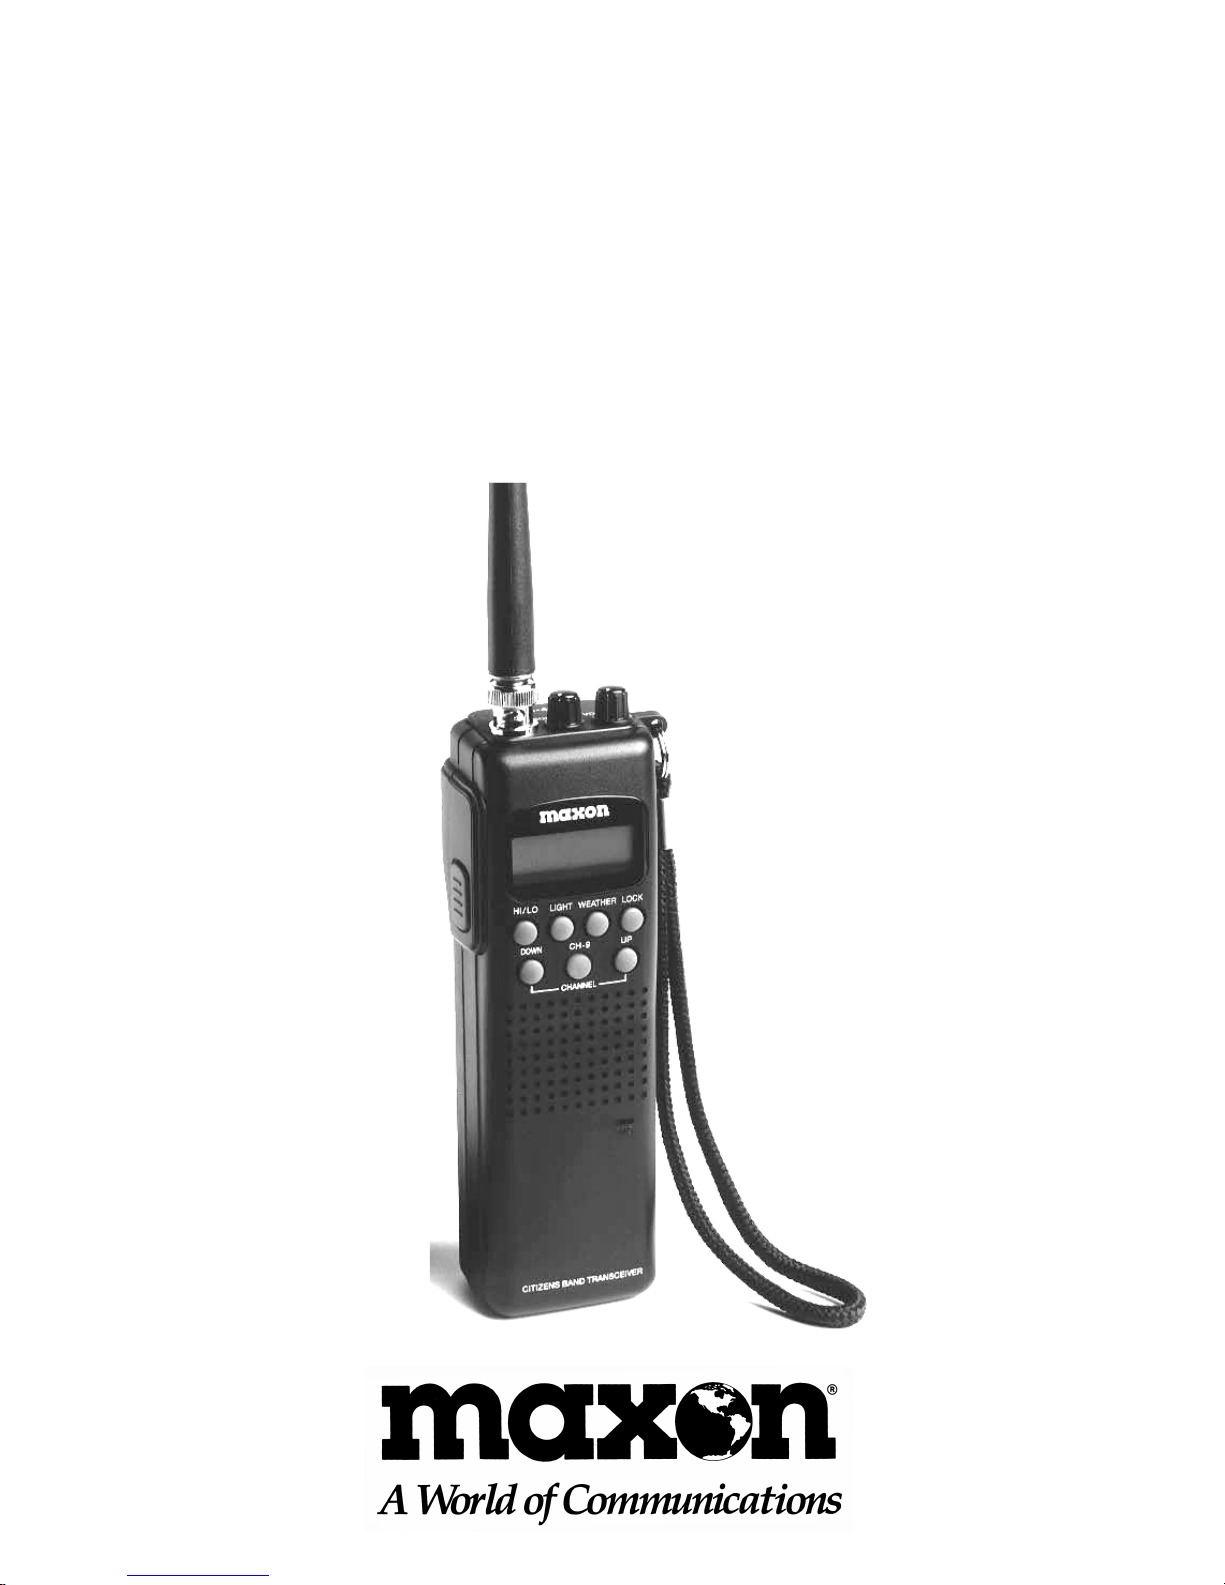
PRODUCT DESCRIPTION
Thank you for choosing the Maxon
HCB-40WX CB/Weather Radio.
The HCB-40WX is a compact, portable Citizen's
Band radio designed to operate in the 26.965 to
27.405 MHz band. This lightweight unit features
10 weather channels, including 7 NOAA frequencies and 3 international marine frequencies. The
HCB-40WX provides maximum RF output power
and can be battery or vehicle powered.
This model requires either 9 AA rechargeable
Ni-Cad batteries or 9 AA alkaline batteries, not
included. It can also be powered by the 12V DC
power cord included with the radio.
YOU DO NOT NEED AN FCC LICENSE TO
OPERATE THIS RADIO IN THE UNITED STATES.
However, you must know and be familiar with
Part 95 of the FCC Rules in regard to Subpart D
of the Citizens Band Radio Service. (A copy is
enclosed with the unit.)
Page 5

2
PERFORMANCE FEATURES
• Maximum legal RF output power (4 W) with high
level modulation (in accordance with FCC Part
95 Rules)
• Compander circuitry eliminates background static
and improves audio quality
• Receives current National Weather Service
broadcasts on one or more of seven separate
frequencies and periodic marine weather
information on three separate frequencies
• Can be used as a portable CB radio (powered
by Ni-Cad or alkaline batteries) or used with
provided 12V DC power cord in a vehicle or
boat
• Direct access to Emergency Channel 9
• Accessory jacks allow "hands-free" operation
when used with an optional voice-operated/
push-to-talk mini-VOX headset with boom
microphone (WTA-13G)
• HI/LO power selector button conserves battery
power
• Phase Locked Loop synthesizer provides clear
voice transmission and reception on all CB
channels
• Built-in Automatic Gain Control (AGC)
and Automatic Noise Limiter (ANL) provide
constant sound level (from weak or strong
signals) and clear reception
• Automatic modulation control eliminates "peak"
and "valley" transmission signals
• Last channel memory recalls last channel
displayed
• Battery charging jack used with optional AC/DC
wall battery charger (DV-7210)
Page 6

3
PACKAGE CONTENTS
Main CB unit with attached belt clip and
carrying strap
"Rubber Duck" antenna
12V DC power cord with cigarette lighter plug
Owner's manual
Copy of FCC Part 95, Subpart "D"
Copy of NOAA Weather Radio Network
frequency card
Page 7

4
CONTROLS AND FUNCTIONS
CONTROLES Y FUNCIONES
A. Channel Up/Down Buttons - Selects any one of 40
channels available • Botones de Subida y Bajada de
Canales - Selecciona cualquiera de los 40 canales
disponibles
B. Emergency Channel 9 Button - Provides direct access
to Emergency Channel 9 (not active in weather mode)
• Botón del Canal 9 de Emergencia - Provee acceso
directo al Canal 9 de Emergencia (no está activo en
modalidad meteorológica)
C. HI/LO Power Selector Button - Controls output power level
• Botón de Potencia HI/LO (alta/baja) - Controla el nivel
de la potencia de salida
D. Light Button - Illuminates the display window • Botón de
Luz - Ilumina la pantalla de visualización
E. Weather Button - Selects CB or weather operation • Botón
del Tiempo - Selecciona la operación de CB o del tiempo
F. Lock Button - Locks the keypad from operation • Botón
de Traba - Traba el teclado para evitar su funcionamiento
G. Push-To-Talk Button - Permits radio transmissions • Botón
"Presione Para Hablar" (P-T-T) - Permite la transmisión por
radio
H. LCD Display - Identifies CB or weather channel number
selections, TX (transmit), WX (weather) mode, EMG (Ch. 9),
LOCK (keypad locked), BATT (battery low), LOW (power
level) and signal/power strength • Pantalla de LCD -
Identifica las selecciones de CB o los números de canales
del tiempo, TX (transmisión), modalidad de WX (tiempo),
EMG (canal 9), LOCK (teclado trabado), BATT (carga baja de
la batería, LOW (nivel de potencia) e intensidad de la señal/
potencia
I. Antenna Jack - Connects the unit's "Rubber Duck" antenna,
an optional telescopic antenna or any Citizen's Band/50
Ohm mobile or base antenna • Jack de Antena - Conecta
la antena de hule "Rubber Duck" de la unidad, a una antena
telescópica opcional o a cualquier antena móvil o de
base de banda ciudadana / 50 Ohmios
Page 8
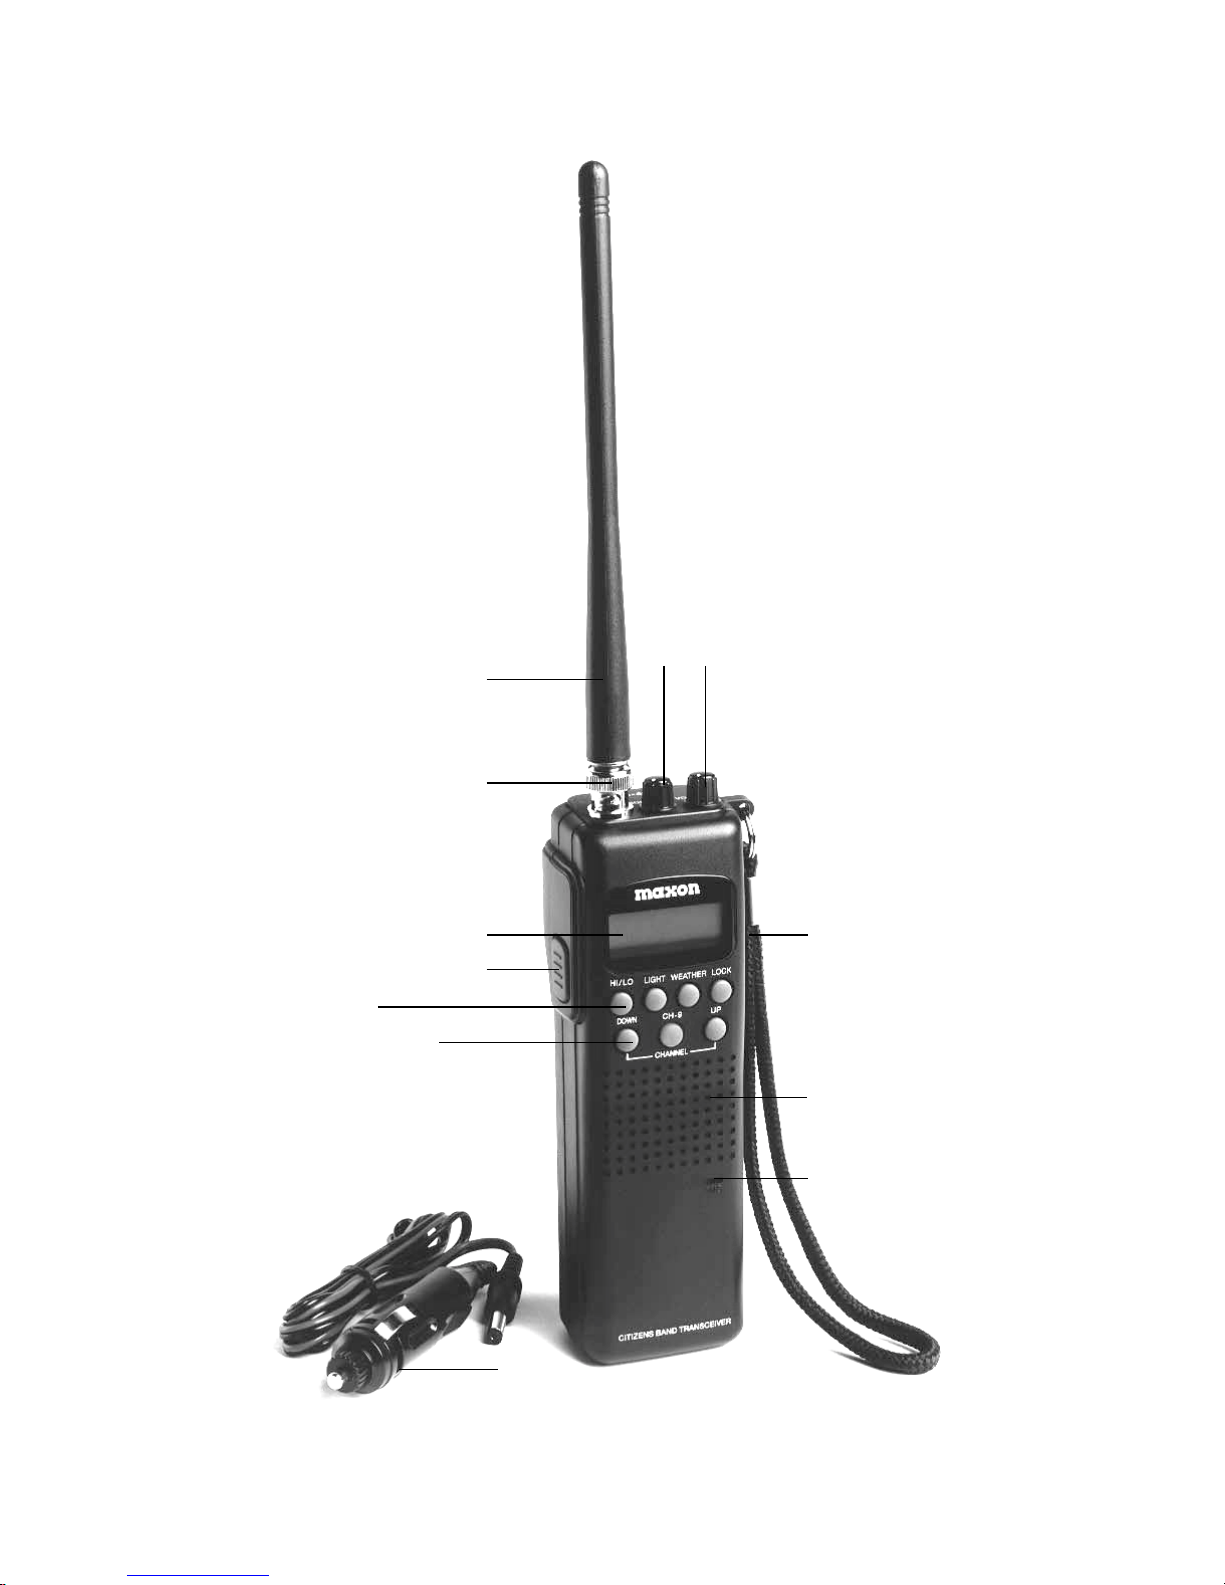
5
A B
C D E F
G
H
I
J
K L
M
N
O
P
Page 9

6
J. "Rubber Duck" Antenna with BNC Connector • Antena
de hule "Rubber Duck" con conector BNC
K. Squelch Control - Allows background noise to be eliminated
when no signal is present • Control de Silenciador - Permite
la eliminación de ruidos de fondo cuando no hay señal
L. Off/On-Volume Control - Used to turn the radio on or off
and to adjust the listening volume • Control de Volumen -
Se usa para encender o apagar el radio y para ajustar el
volumen
M. Carrying Strap • Asa de Transporte
N. Speaker - Broadcasts incoming signals
• Altavoz - Radiodifunde las señales entrantes
O. Built-in Electret Condenser Microphone - Transmits
voice signals during CB operation • Micrófono
Condensador con Electrodo Laminar Incorporado -
Transmite las señales de voz durante el funcionamiento
de CB
P. 12V DC Power Cord - Provides power to radio when
used in vehicle or boat • Cordón Eléctrico de 12 VCC -
Suministra potencia al radio cuando se usa en un vehículo
o bote
Accessory Jacks - Used with optional accessories (not
shown) • Jacks Auxiliares - Usados con accesorios
opcionales (no mostrados)
12V DC Power/Charge Jack - Provides external power to
radio or charges installed Ni-Cad batteries (not shown)
• Jack de Potencia /Carga de 12 VCC - Suministra potencia
externa al radio o carga las baterías de Ni-Cad instaladas (no
mostrado)
Belt Clip - Securely holds radio when beltworn (not
shown) • Grapa de Centurón - Se usa para llevar el radio
en el cinturón o en cualquier otra parte conveniente (no
mostrados)
Battery Compartment - Houses 9 AA alkaline or Ni-Cad
batteries (not shown) • Compartimiento de Baterías -
Guarda 9 baterías alcalinas AA o de Ni-Cad (no mostrados)
Page 10

BATTERY INSTALLATION
1) Remove the battery compartment cover on
the back of the unit. Locate the battery charge
switch (inside the middle well of the radio's
battery compartment) and set the switch
to the "Al" (down) position for AA alkaline
batteries or the "Ni" (up)position for AA
Ni-Cad batteries. NOTE: Proper switch
setting protects from accidental charging
of non-rechargeable batteries.
2) Once the battery charge switch is in the correct
position, insert either 9 new AA alkaline or
Ni-Cad batteries. DO NOT mix battery types.
Follow the polarity diagrams embossed in the
battery compartment.
3) Check the battery condition by turning the
off/on-volume control clockwise. If the battery
low ("BATT") icon shows on the display, the
batteries need to be recharged or replaced
immediately.
NOTE: Ni-Cad batteries are typically in a "discharge" condition when they are purchased. If
you are using nickel cadmium batteries, you will
need to charge them before operating your radio.
The best way to accomplish this is to use Maxon's
DV-7210 AC/DC Wall Charger and charge them all
at once while installed in the unit. Plug the AC/DC
wall charger into the radio's 12V DC power/charge
jack. The charging time will be 14-16 hours.
CAUTION: DO NOT operate the radio while
the batteries are being charged. DO NOT
attempt to recharge alkaline or carbon zinc
batteries.
7
Page 11

8
BATTERY CHARGING AND
EXTERNAL POWER SOURCES
NOTE: The provided 12V DC power cord is
intended ONLY for DC operation, not for
charging batteries. The power jack located on
the radio enables you to use the 12V DC power
cord to power the radio directly from your
vehicle's electrical system.
Use Maxon's optional AC/DC Wall Battery
Charger (DV-7210) for recharging the nickel
cadmium batteries in the radio. NOTE: Recharge
nickel cadmium batteries only.
For maximum performance and to ensure maximum
range always keep fresh batteries in your radio. If
you do not wish to recharge the batteries periodically, use standard carbon zinc or alkaline batteries.
You can operate the HCB-40WX in your home
by using a standard 120V AC outlet. Contact your
local electronics retailer for a 120V AC to 12V DC
(1500 mA minimum current capacity) power
converter. It must be equipped with a coaxial
barrel-type plug having an inside barrel diameter
of 0.085 inch (2.1mm).
NOTE: If you choose to use nickel cadmium
batteries when operating your HCB-40WX radio,
please follow proper procedures for recycling/
disposal. Contact one of the following facilities
for more information:
West Coast - Kinsbursky Brothers Inc.
1-800-548-8797
East Coast - INMETCO
412/758-2802
Page 12

9
OPERATING INSTRUCTIONS
Once you have properly installed the batteries
and the antenna is attached, you are ready to
adjust your radio for optimum reception and
voice transmission.
1) Turn the off/on-volume control clockwise.
Adjust to a comfortable volume level.
2) Set to the desired CB channel.
3) Adjust the squelch control knob to reduce any
undesirable background noise when no signal
is being received. To do this, select a channel
where no signals are present, or wait until
signals cease on your channel. Then, rotate
the squelch control knob clockwise to a point
where the background noise ceases.
NOTE: When the squelch is set properly, the
speaker will remain quiet until a signal is received.
In order to receive weak signals, do not set the
squelch too high.
To Transmit: Hold the radio 2-3 inches from your
mouth, press the push-to-talk button (P-T-T) located
on the side of the radio and speak into the microphone area. For best results speak slowly and in a
normal tone of voice.
To Receive: Release the push-to-talk button.
NOTE: When using the HCB-40WX as a beltworn
radio (with a headset or speaker/microphone), the
user will experience a slightly shorter transmit and
receive range.
Page 13

10
Feature button operation
HI/LO Power
Selector Button: In HI position, provides maxi-
mum output power (4 W when
powered by DC power cord); in
LO position, provides batterysaving 1 W operation (for short
range transmissions). In LO
position, the "LOW" icon will
display.
Light Button: Illuminates the display for 6-8
seconds. Can be pressed any
time the radio is powered on.
Lock Button: Locks the keypad to prevent
accidental keypress. The "LOCK"
icon will display. To return the
keypad to "active" condition,
press the lock button.
Emergency
Channel 9: Provides direct access to
Emergency Channel 9. The
"EMG" icon will display along
with the channel number. To
return to normal CB channels,
press the CH-9 button again.
Channel
UP/DOWN
Buttons: Selects the next higher or lower
channel. Holding the channel
buttons down changes channels
more rapidly.
Page 14

11
USING THE WEATHER CHANNELS
The National Weather Service uses several special
radio frequencies to provide continuous reports of
local weather conditions and forecasts throughout
the United States. Taped weather messages are
repeated every four to six minutes on a 24-hour
basis and are routinely revised every one to three
hours, or more frequently if needed.
During severe weather, the routine weather broadcasts will be interrupted with special weather
warning messages.
The HCB-40WX is designed to receive all of these
special weather frequencies plus three international
marine frequencies. A NOAA Weather Radio
Network Frequency card is enclosed to identify
the frequencies specifically broadcast for your
geographical area.
The HCB-40WX receives CB, National Weather
Service and international marine weather broadcast
frequencies as listed below:
CB Channels 1-40 26.965 to 27.405 MHz
Weather Channel 01 WX 162.550 MHz
02 WX 162.400 MHz
03 WX 162.475 MHz
04 WX 162.425 MHz
05 WX 162.450 MHz
06 WX 162.500 MHz
07 WX 162.525 MHz
Int'l Marine 08 WX 161.650 MHz
09 WX 161.775 MHz
00 WX 163.275 MHz
Page 15

To Operate: Turn the off/on-volume control
clockwise and press the weather button on the
front keypad. The "WX" icon will be displayed
along with the weather channel number.
Use the weather frequency card to select the proper
frequency for your area. Select the weather channel
by using the channel up/down buttons. Readjust the
volume if necessary.
To return to CB operation, simply press the weather
button again; the "WX" icon will disappear and the
unit will return to the last CB channel displayed.
12
Page 16

ANTENNA INFORMATION
The maximum allowable CB transmitting power
output is limited by FCC regulations. The antenna
is a major component in the strength of the radio's
transmission signal and its reception range. The
radio requires a 50 Ohm mobile or base antenna.
For greater range and clarity, we recommend a
vertically polarized telescopic antenna (like
Maxon's optional WTA-1) or mobile magnetic
mount CB/weather antenna (Maxon's optional
WTA-4W).
The "Rubber Duck" antenna included with this
radio is suited for applications where maximum
range is not needed.
To convert the HCB-40WX portable to a base
radio: Disconnect the "Rubber Duck" or telescopic
antenna and connect your base station antenna.
The HCB-40WX has a female BNC connector,
therefore you will need to adapt your base station
antenna accordingly.
WARNING: When installing or removing a base
station antenna, do so with extreme caution. If the
antenna falls, LET IT GO. It could come in contact
with an overhead power line and cause severe
injury or death to anyone attempting to catch it.
If the antenna does come in contact with a power
line, DO NOT ATTEMPT TO REMOVE IT...CALL
YOUR LOCAL POWER COMPANY.
To convert the HCB-40WX portable to a mobile
radio: Disconnect the "Rubber Duck" or telescopic
antenna and connect your vehicle/ boat's mobile
13
Page 17

CB antenna (or optional magnetic mount antenna
WTA-4W). NOTE: Mobile antennas utilize the
vehicle's metal body as the "ground" plane. When
mounted on the corner of the vehicle, this type of
antenna tends to become slightly directional by the
particular corner it is facing. (This slight directional
characteristic will only occur when transmitting/
receiving over an extreme distance).
14
Page 18

RADIO COMMUNICATION CODES
Citizens Band radio operators have universally adopted
the "10" Code for standard questions and answers. It
enables them to communicate faster, easier and more
understandably in noisy surroundings.
The following are some of the most common codes and
their descriptions.
When using the code 10-1, you would say, "Ten one",
not "One zero dash one".
Code Description
10-1
10-2
10-3
10-4
10-5
10-6
10-7
10-8
10-9
10-10
10-11
10-12
10-13
10-16
10-17
10-18
10-19
10-20
10-21
10-22
10-23
10-24
10-25
10-26
10-27
10-28
10-29
10-30
10-32
10-33
10-34
Receiving poorly.
Receiving well.
Stop transmitting.
OK, message received.
Relay message.
Busy, stand by.
Out of service; leaving
the air.
In service, subject to call.
Repeat message.
Transmission completed,
standing by.
Talking too fast.
Visitors present.
Advise weather/
road conditions.
Make pickup at_______.
Urgent business.
Anything for us?
Nothing for you;
return to base.
My location is_______.
Call by telephone
Report in person to_____.
Stand by.
Completed last assignment.
Can you contact?
Disregard last information.
I am moving to channel_.
Identify your station.
Time is up for contact.
Does not conform
to FCC rules.
I will give you a radio check.
Emergency traffic.
Trouble at this station.
15
Code Description
10-35 Confidential information.
10-36 Correct time is________.
10-37 Wrecker needed at ____.
10-38 Ambulance needed at__.
10-39 Your message delivered.
10-41 Please turn to channel_.
10-42 Traffic accident at______.
10-43 Traffic tie-up at________.
10-44 I have a message for you.
10-45 All units within range
report.
10-50 Break channel.
10-60 What is next message
number?
10-62 Unable to copy; use phone.
10-63 Network directed to.
10-64 Network clear.
10-65 Awaiting your next
message/assignment.
10-67 All units comply.
10-70 Fire at _______________.
10-71 Proceed with transmission
in sequence.
10-77 Negative contact.
10-81 Reserve hotel room at___.
10-82 Reserve room for_______.
10-84 My telephone number is_.
10-85 My address is_________.
10-91 Talk closer to microphone.
10-93 Check my frequency on
this channel.
10-94 Please give me a long
count.
10-99 Mission completed; all
units secure.
10-200 Police needed at_______.
Page 19

Channel:
16
CB CHANNEL FREQUENCY CHART
26.965 MHz
26.975 MHz
26.985 MHz
27.005 MHz
27.015 MHz
27.025 MHz
27.035 MHz
27.055 MHz
27.065 MHz Emergency Channel
27.075 MHz
27.085 MHz
27.105 MHz
27.115 MHz
27.125 MHz
27.135 MHz
27.155 MHz
27.165 MHz
27.175 MHz
27.185 MHz Highway Channel
27.205 MHz
27.215 MHz
27.225 MHz
27.255 MHz
27.235 MHz
27.245 MHz
27.265 MHz
27.275 MHz
27.285 MHz
27.295 MHz
27.305 MHz
27.315 MHz
27.325 MHz
27.335 MHz
27.345 MHz
27.355 MHz
27.365 MHz
27.375 MHz
27.385 MHz
27.395 MHz
27.405 MHz
1
2
3
4
5
6
7
8
9
10
11
12
13
14
15
16
17
18
19
20
21
22
23
24
25
26
27
28
29
30
31
32
33
34
35
36
37
38
39
40
Page 20

No sound or LCD Display
LCD illuminated, but no sound
No voice reception
Poor reception
Unclear reception
Transmission problems
This portable Citizens Band radio has been manufactured in accordance with Maxon's exacting quality
control standards. It should be handled with reasonable care. Avoid exposing it to dirt or moisture.
If you experience
problems, please
refer to this
Troubleshooting Chart.
TROUBLESHOOTING CHART
WARNING: DO NOT ATTEMPT TO MAKE
ANY INTERNAL ADJUSTMENTS. Any internal
adjustments must be made only by qualified
technical personnel. Internal adjustments and/
or modifications can lead to illegal operation
as defined by FCC Rules and Regulations, Part
95. Illegal operation can result in serious consequences.
17
POSSIBLE PROBLEMS:
POSSIBLE SOLUTIONS:
Check batteries for proper contact
Check battery condition
Check squelch adjustment
Check power off/on-volume control
Change to active channel
Check antenna connection
Fully depress push-to-talk button
Change physical location
Page 21

SPECIFICATIONS
GENERAL
CB Channels: 40
Weather Channels: 10
Frequency Range: 26.965 to 27.405 MHz
Weather Frequencies: 01 WX 162.550 MHz
02 WX 162.400
03 WX 162.475
04 WX 162.425
05 WX 162.450
06 WX 162.500
07 WX 162.525
08 WX 161.650
09 WX 161.775
00 WX 163.275
CB/Weather
Frequency Control: Phase Locked Loop (P-L-L)
synthesizer
Operating Temperature
Range: -4
o
F to +122
o
F
Channel Display: Liquid Crystal Display (LCD)
Power Source: 9 AA Alkaline or Ni-Cad
batteries (not included)
Dimensions: 7-1/4" H x 2-1/4" W x 1-3/4" D
Weight: 9.6 oz.
RECEIVER
Receiving System: AM Dual conversion
superheterodyne
TRANSMITTER
RF Output Power: 4 W (Maximum FCC allowable)
Specifications are subject to change without notice.
18
Page 22

OPTIONAL / REPLACEMENT
MAXON ACCESSORIES
These Maxon HCB-40WX accessories are available
from your local Maxon CB distributor/retailer.
DV-7210 AC/DC Wall battery charger for
recharging Ni-Cad batteries
WTA-1 Telescopic antenna with BNC
connector (extends to 44")
WTA-2W Replacement "Rubber Duck" antenna
with BNC connector
WTA-4W Magnetic mount mobile CB/weather
antenna
WTA-13G Voice-operated/push-to-talk
mini-VOX headset with boom mic
QPA-1425 Lapel speaker/microphone with
coiled cord
OTHER MAXON PRODUCTS
WX-70 7 Channel weather monitor has a
choice of 3 warning signal modes
FRS-214 Deluxe Family Radio Service radio
operates on one of 14 license-free
channels
Maxon manufactures a full line of personal
electronics products, including handheld and
mobile CB radios, GMRS/DOT two-way radios,
49 MHz personal communicators, FRS radios
and weather monitors. Look for Maxon brand
products in quality retail stores nationwide.
19
Page 23

FOR YOUR RECORDS
Purchase Date:
Purchased From:
Serial Number:
KEEP THIS INFORMATION
IN A SAFE PLACE.
WARRANTY SERVICE INSTRUCTIONS
1) Refer to the Operating Instructions section of
this Owner’s Manual for proper operation and
adjustments.
2) Refer to the basic Troubleshooting Chart for
possible solutions.
3) If the problem cannot be corrected by refer-
ence to this Owner's Manual, return the
product with proof of purchase (a sales receipt)
to the place of purchase, or call Maxon’s
Customer Service Department for assistance,
1-800-821-7848, Ext. 499.
20
Page 24

LIMITED WARRANTY STATEMENT
The Consumer Products Division of Maxon America, Inc.,
(hereinafter referred to as "Maxon"), warrants that its Products and
their included accessories will be free from defects in workmanship
or materials under normal use for a period of one (1) year from date
of purchase by the original end user, provided that the buyer has
complied with the requirements stated herein.
If the Product fails to function under normal use because of manufacturing defect(s) or workmanship during the one (1) year period
following the date of purchase, it will be replaced or repaired at
Maxon's option at no charge when returned to the place of purchase. The defective unit must be accompanied by proof of the
date of purchase in the form of a sales receipt.
Maxon's sole obligation hereunder shall be to replace or repair
the product covered in this Warranty. Replacement, at Maxon's
option, may include a similar or higher-featured product. Repair
may include the replacement of parts or boards with functionally
equivalent reconditioned or new parts or boards. Replaced parts,
accessories, batteries or boards are warranted for the balance of
the original time period. All replaced parts, accessories, batteries
or boards become the property of Maxon America, Inc.
Maxon shall have no obligation to make repairs or to cause
replacement required which result from normal wear and tear
or necessitated in whole or in part by catastrophe, the fault or
negligence of the user, improper or unauthorized alterations, repairs
to the Product, incorrect wiring, use of the Product in a manner for
which it was not designed, or by causes external to
the Product. This warranty is void if the serial number is altered,
defaced or removed.
The purchaser shall provide for removal of the defective Product
and installation of its replacement.
THE EXPRESS WARRANTIES CONTAINED HEREIN ARE IN LIEU
OF ALL OTHER WARRANTIES, EITHER EXPRESSED OR IMPLIED
OR STATUTORY, INCLUDING, WITHOUT LIMITATION, ANY
WARRANTY OF MERCHANTABILITY OR FITNESS FOR A
PARTICULAR PURPOSE.
FOR ANY PRODUCT WHICH DOES NOT COMPLY WITH THE
WARRANTY SPECIFIED, THE SOLE REMEDY WILL BE REPAIR
OR REPLACEMENT. IN NO EVENT WILL MAXON AMERICA, INC.
BE LIABLE TO THE BUYER OR ITS CUSTOMERS FOR ANY
DAMAGES, INCLUDING ANY SPECIAL, INCIDENTAL, INDIRECT
OR CONSEQUENTIAL DAMAGES, OR THE LOSS OF PROFIT,
REVENUE OR DATA ARISING OUT OF THE USE OF OR THE
INABILITY TO USE THE PRODUCT.
This warranty is void for sales and deliveries outside of the U.S.A.
21
Page 25

22
DESCRIPCION DEL PRODUCTO
Gracias por seleccionar el Radio
CB/Meteorológico HCB-40WX de Maxon.
El HCB-40WX de Maxon es un radio de Banda
Ciudadana portátil y compacto que ha sido
diseñado para funcionar en la banda de 26,965
a 27,405 MHz. Esta unidad liviana tiene 10
canales de información sobre las condiciones
del tiempo, incluyendo 7 frecuencias separadas
NOAA y 3 frecuencias marítimas internacionales.
El HCB-40WX proporciona una potencia máxima
de RF y puede alimentarse por medio de batería o
en el vehículo.
Este modelo requiere 9 baterías de Ni-Cad
recargables AA o 9 baterías alcalinas AA, que
no se incluyen. Puede también electrificarse a
través de un cordón eléctrico de 12 VCC que se
incluye con el radio.
NO NECESITA UNA LICENCIA DE LA FCC
PARA HACER FUNCIONAR ESTE RADIO EN
LOS ESTADOS UNIDOS. Sin embargo, debe
conocer y estar familiarizado con la Parte 95
de las Reglas de la FCC en relación con la
Subparte D del Servicio de Radio de Banda
Ciudadana. (Con la unidad se anexa una copia).
Page 26

23
CARACTERISTICAS DE
FUNCIONAMIENTO
• Potencia de salida de Frecuencia de Radio máxima
legal (4 W) con modulación de alto nivel (en
conformidad con la Parte 95 de las Reglas de la FCC)
• El circuitro Compander elimina la estatica y mejora
la qualidad audital
• Recibe transmisiones del Servicio Meteorológico
Nacional en una o más de siete frecuencias
separadas e información meteorológica marítima
periódica en tres frecuencias separadas
• Puede utilizarse como un radio de CB portátil
(electrificado por baterías de Ni-Cad o alcalinas)
o con el cordón eléctrico provisto de 12 VCC
en un vehículo o bote
• Acceso directo al Canal 9 de Emergencia
• Los jacks auxiliares permiten el funcionamiento
"sin usar las manos" cuando se usa con un auricular
opcional con micrófono dejirafa y unidad pequeña
VOX (transmisión operada por voz) (WTA-13G)
• Botón selector de potencia HI/LO (alta/baja)
ahorra la energía de la batería
• Sintetizador de bucle de sincronización de fase
proporciona una transmisión y recepción de voz
clara en todos los canales de CB
• El Control de Ganancia Automático (AGC) integrado
y el Limitador Automático de Ruido (ANL) facilitan
un nivel de sonido constante (desde señales débiles
hasta señales fuertes) y clara recepción
• Control automático de modulación elimina señales
de transmisión de "pico" y "valle"
• Memoria de último canal recuerda último canal
mostrado
• Jack de carga de baterías usado con cargador de
baterías de pared opcional de CA/CC (DV-7210)
Page 27

CONTENIDO DEL PAQUETE
Unidad principal de CB con presilla de correa
acoplada y asa de transporte
Antena de hule "Rubber Duck"
Cordón eléctrico de 12 VCC con enchufe para
encendedor de cigarrillos
Manual del dueño
Copia de la Parte 95 de la FCC, Subparte "D"
Copia de la Tarjeta de Referencia para la Frecuencia
de Red de Radio Meteorológico de la NOAA
24
Page 28

INSTALACIÓN DE LA BATERÍA
1) Quite la tapa del compartimiento de la batería
que está en la parte posterior de la unidad.
Localice el interruptor de cargar baterías
(dentro del hueco central delcompartimi
ento de batería del radio) y fije el mismo
en la posición "AI" (hacia abajo) para baterías
alcalinas AA o en la posición "Ni" (hacia arriba)
para baterías de Ni-Cad AA. NOTA: La fijación
correcta del interruptor protege contra la carga
accidental de baterías no recargables.
2) Una vez que el interruptor de carga de
baterías esté en la posición correcta, inserte
9 baterías alcalinas AA o de Ni-Cad. NO
mezcle distintos tipos de baterías. Siga los
diagramas de polaridad grabados en el
compartimiento de baterías.
3) Verifique la condición de las baterías girando
en el sentido de las manecillas del reloj el
control de encendido/apagado de potenciavolumen. Si el ícono de carga baja de la
batería ("BATT") aparece en la pantalla, las
baterías deben recargarse o reemplazarse
inmediatamente.
NOTA: Cuando se compran las baterías de Ni-Cad,
éstas típicamente se encuentran en condición de
"descarga". Si está usando baterías de niquelcadmio, necesitará cargarlas antes de poner a
funcionar su radio. La mejor forma de lograr esto es
usando el Cargador de Pared de CA/CC DV-7210
de Maxon y cargarlas todas de una vez instaladas en
la unidad. Enchufe el cargador de pared de CA/CC
en el jack de potencia/carga de 12 VCC del radio.
El tiempo de carga será de 14 a 16 horas.
ATENCION: NO haga funcionar el radio mientras
las baterías se estén cargando. NO intente recargar
baterías alcalinas o de zinc de carbono.
25
Page 29

CARGA DE BATERIAS Y FUENTES DE
ALIMENTACION EXTERNAS
NOTA: El cordón eléctrico de 12 VCC provisto
es solo para el funcionamiento con corriente
continua, no para cargar baterías. El jack de
potencia ubicado en el radio le posibilitará usar
el cordón eléctrico de 12 VCC para alimentar el
radio directamente desde el sistema eléctrico a
su vehículo.
Use el Cargador de Baterías de Pared Opcional
CA/CC de Maxon (DV-7210) para recargar las
baterías de niquel-cadmio en el radio. NOTA:
Recargue baterías de niquel-cadmio solamente.
Para lograr un máximo rendimiento y asegurar
el alcance máximo, mantenga siempre baterías
nuevas en su radio. Si no desea recargar las baterías
periódicamente, utilice baterías estándares de zinc
de carbono o alcalinas.
Usted puede hacer funcionar el HCB-40WX en su
casa mediante la utilización de un tomacorriente
estándar de 120 VCA. Contacte al distribuidor de
componentes electrónicos de su localidad para
obtener un transformador de corriente (con
capacidad de corriente mínima de 1.500 mA) de
120 VCA a 12 VCC. Este transformador debe venir
equipado con un enchufe macho coaxial tipo
cilindro que posea un diámetro interior de 0,085
pulgada (2,1 mm).
AVISO: Si usted usa baterías "niquel-cadmio"
cuando está operando su radio modelo HCB-40WX,
por favor siga las siguientes instrucciones para botar
26
Page 30

o reciclar y contacte una de las direcciones a
continuacion para conseguir más información.
Este del Pais - Kinsbursky Brothers Inc.
1-800-548-8797
Oeste del Pais - INMETCO
412/758-2802
INSTRUCCIONES DE OPERACION
Una vez que haya instalado correctamente las
baterías y la antena esté acoplada, usted está listo
para ajustar su radio para una óptima recepción y
transmisión de voz.
1) Gire el control de encendido/apagado
de potencia-volumen en el sentido de
las manecillas del reloj. Ajústelo al
nivel normal del volumen del radio.
2) Fije el canal de CB deseado.
3) Ajuste el botón de control de silenciador para
reducir cualquier ruido de fondo no deseado
cuando no se esté recibiendo señal. Para hacer
esto, seleccione un canal donde no hayan
señales, o espere hasta que las señales terminen
en su canal. Luego gire el botón de control del
silenciador en el sentido de las manecillas del
reloj hasta un punto donde cese el ruido de
fondo.
NOTA: Cuando el silenciador es fijado correctamente, el altavoz se mantendrá en silencio hasta
que se reciba una señal. Para recibir señales
débiles, no fije el silenciador muy alto.
27
Page 31

Para transmitir: Sujete el radio a una distancia
entre 2 o 3 pulgadas de su boca, presione el
botón de presionar para hablar (P-T-T) ubicado
en el lateral del radio y hable dirigiendo su voz
hacia el área del micrófono. Para obtener mejores
resultados hable lentamente y en un tono de voz
normal.
Para recibir: Suelte el botón de presionar para
hablar.
NOTA: Cuando use el HCB-40WX como un radio
para ajustar en el cinto (con un auricular o altavoz/
micrófono), el usuario experimentará un alcance de
transmisión y recepción ligeramente más reducido.
Cómo usar los botones de funciones
Potencia HI/LO
(alta/baja)
Botón Selector: En la posición HI, provee potencia
de salida máxima (4 vatios cuando
se usa un cable eléctrico de
corriente continua); en la posición
LO, provee operación de 1 vatio
que ahorra la carga de la batería
(para transmisiones de corto
alcance). En la posición LO,
aparece el ícono de "LOW".
Botón de Luz: Ilumina la pantalla de 6 a 8
segundos. Puede oprimirse en
cualquier momento en que el
radio esté encendido.
Botón de Traba: Traba el teclado para evitar que se
oprima una tecla accidentalmente.
El ícono de "LOCK" aparecerá en la
pantalla. Para regresar el teclado al
estado "activo", oprima de nuevo el
botón de traba.
28
Page 32

Canal 9 de
Emergencia: Provee acceso directo al Canal 9
de Emergencia. El ícono de "EMG"
aparecerá en la pantalla junto con
el número del canal. Para regresar
a los canales normales de CB,
oprima de nuevo el botón CH-9.
Botones para
desplazarse
HACIA ARRIBA/
HACIA ABAJO
por los canales: Selecciona el próximo canal
más alto o más bajo. Mantener
oprimidos los botones de canales
cambia los canales más
rápidamente.
USO DE LOS CANALES
METEOROLOGICOS
El Servicio Meteorológico Nacional usa varias
frecuencias de radio especiales para dar informes
continuos sobre las condiciones meteorológicas
locales y pronósticos del tiempo a todo lo largo de
los Estados Unidos. Los mensajes meteorológicos
grabados se repiten cada 4 a 6 minutos durante las
24 horas del día, y se revisan habitualmente cada
una a tres horas o con más frecuencia si es
necesario.
Durante condiciones climáticas difíciles, las
radiodifusiones meteorológicas habituales
serán interrumpidas con mensajes especiales
sobre el tiempo.
El HCB-40WX se ha diseñado para recibir todas
estas frecuencias meteorológicas especiales, además
de tres frecuencias marítimas internacionales. Se
adjunta una Tarjeta de Referencia de la Frecuencia
de Red Meteorológica de NOAA para identificar
29
Page 33

las frecuencias que específicamente se
radiodifunden para su zona geográfica.
El HCB-40WX recibe las frecuencias de
transmisión del Servicio Meteorológico Nacional
y de las condiciones del tiempo marítimo
internacional que se indican a continuación.
Canales de CB 1-40 26,965 a 27,405 MHz
Canal meteorológico 01 WX 162.550 MHz
02 WX 162.400 MHz
03 WX 162.475 MHz
04 WX 162.425 MHz
05 WX 162.450 MHz
06 WX 162.500 MHz
07 WX 162.525 MHz
Marítimo internacional 08 WX 161.650 MHz
09 WX 161.775 MHz
00 WX 163.275 MHz
Para operar: Gire el control de encendio/apagado
de potencia-volumen hacia la derecha y oprima el
botón del tiempo en el teclado delantero. El ícono
de "WX" aparecerá junto con el número del canal
del tiempo.
Utilice la tarjeta de referencia de frecuencias
meteorológicas para seleccionar la frecuencia
adecuada para su área. Seleccione el canal del
tiempo adecuado utilizando los botones para
desplazarse hacia arriba o hacia abajo por los
canales. Reajuste el volumen si es necesario.
Para regresar a la operación de CB, sencillamente
oprima de nuevo el botón del tiempo; el ícono de
"WX" desaparecerá y la unidad regresará al último
canal de CB visualizado.
30
Page 34

INFORMACION SOBRE LA ANTENA
La salida de potencia de transmisión máxima
permitida está limitada por las regulaciones de
la FCC. La antena es un componente importante
en la intensidad de la señal de transmisión del radio
y en su alcance de recepción. El radio requiere de
una antena móvil o de base de 50 Ohmios.
Para mayor alcance y nitidez, recomendamos una
antena telescópica polarizada verticalmente (como
la WTA-1 opcional de Maxon) o una antena de CB
y meteorológica montada magnéticamente y móvil
(WTA-4W opcional de Maxon).
La antena de hule "Rubber Duck" incluida con este
radio es adecuada para aquellas aplicaciones donde
no se necesita alcance máximo.
Para convertir el HCB-40WX portátil en un radio
de base: Desconecte la antena de hule "Rubber
Duck" o telescópica y conecte su antena de
estación base. El HCB-40WX tiene un conector
BNC hembra, por lo tanto necesitará adaptar su
antena de estación base en correspondencia.
ADVERTENCIA: Cuando instale o quite una
antena de estación base, hágalo con extremo
cuidado. Si la antena se cae, DEJELA CAER,
pues puede entrar en contacto con el tendido
eléctrico elevado y causar lesión grave o muerte
a cualquiera que intente cogerla. Si la antena
entra en contacto con el tendido eléctrico,
NO INTENTE QUITARLA... LLAME A SU
COMPAÑIA ELECTRICA LOCAL.
Para convertir el HCB-40WX portátil en un radio
móvil: Desconecte la antena de hule "Rubber
Duck" o telescópica y conecte su antena de CB
31
Page 35

móvil del vehículo/bote (o antena opcional
montada magnéticamente WTA-4W). NOTA: Las
antenas móviles utilizan el cuerpo metálico del
vehículo como el plano de "conexión a tierra".
Cuando están montadas en la esquina de un
vehículo, ese tipode antena tiende ligeramente
a recibir o transmitir con mayor eficacia por la
esquina en particular a la cual está mirando.
(Esta característica de ligera orientación ocurrirá
sólo cuando transmita/reciba entre distancias
muy alejadas).
32
Page 36

TABLA DE FRECUENCIA DEL CANAL
DE CB (BANDA CIUDADANA)
Canal:
26.965 MHz
26.975 MHz
26.985 MHz
27.005 MHz
27.015 MHz
27.025 MHz
27.035 MHz
27.055 MHz
27.065 MHz Canal 9 de Emergencia
27.075 MHz
27.085 MHz
27.105 MHz
27.115 MHz
27.125 MHz
27.135 MHz
27.155 MHz
27.165 MHz
27.175 MHz
27.185 MHz Canal de Carretera
27.205 MHz
27.215 MHz
27.225 MHz
27.255 MHz
27.235 MHz
27.245 MHz
27.265 MHz
27.275 MHz
27.285 MHz
27.295 MHz
27.305 MHz
27.315 MHz
27.325 MHz
27.335 MHz
27.345 MHz
27.355 MHz
27.365 MHz
27.375 MHz
27.385 MHz
27.395 MHz
27.405 MHz
1
2
3
4
5
6
7
8
9
10
11
12
13
14
15
16
17
18
19
20
21
22
23
24
25
26
27
28
29
30
31
32
33
34
35
36
37
38
39
40
33
Page 37

Verifique que las baterías tengan buen contactot
Verifique las condiciones de las baterías
Verifique el ajuste del silenciador
Verifique el control de encendido/apagado de potencia-volumen
Cambie al canal activo
Verifique la conexión de la antena
Presione completamente el botón de presionar para hablar
Cambie la ubicación física
TABLA DE LOCALIZACION Y
REPARACION DE AVERIAS
Este radio de Banda Ciudadana portátil ha sido fabricado
en conformidad con las exigentes normas de control de
calidad de Maxon. El mismo debe manipularse con
cuidado razonable. Evite exponerlo a suciedades y
a la humedad.
Si presenta problemas,
por favor refiérase a
esta Tabla de
Localización y
Reparación de Averías.
POSIBLES PROBLEMAS:
ADVERTENCIA: NO INTENTE HACER NINGUN
AJUSTE INTERNO. Cualquier ajuste interno debe
ser realizado por personal técnico calificado. Los
ajustes internos y/o modificaciones pueden llevar
al funcionamiento ilegal tal como se define por
las Reglas y Regulaciones de la FCC, Parte 95.
El funcionamiento ilegal puede traer serias
consecuencias.
Ningún sonido o pantalla LCD
LCD ilumina, pero sin sonido
Ninguna recepción de voz
Recepción pobre
Recepción borrosa
Problemas de transmisión
34
POSIBLES SOLUCIONES:
Page 38

ESPECIFICACIONES
GENERALES
Canales de CB: 40
Canales
Meteorológicos: 10
Alcance de Frecuencia
de CB: 26.965 a 27.405 MHz
Frecuencias
Meteorológicas: 01 WX 162.550 MHz
02 WX 162.400
03 WX 162.475
04 WX 162.425
05 WX 162.450
06 WX 162.500
07 WX 162.525
08 WX 161.650
09 WX 161.775
00 WX 163.275
Control de frecuencia de
CB/Meteorológica: Sintetizador de bucle de
sincronización de fase
Límites de la Temperatura
Operativa: -20
o
C to +50
o
C
Pantalla de Canales: Pantalla de cristal líquido (LCD)
Fuente de Energía: Baterías 9 AA alcalinas o Ni-Cad
(no se incluyen)
Dimensiones
(
alto x ancho x hondo): 184 x 57 x 44 mm
Peso: 272 gm.
RECEPTOR
Sistema Receptor: Doble conversión
superheterodina de AM
TRANSMISOR
Potencia de Salida de
Frecuencia de Radio: 4 W (máximo permitido por
la FCC)
Especifications sujetas a cambio sin avisos.
35
Page 39

REPUESTOS ACCESORIOS
MAXON/OPCIONALES
Estos accesorios opcionales del HCB-40WX
de Maxon se encuentran disponibles por el
distribuidor/vendedor minorista de CB de
Maxon de su localidad.
DV-7210 Cargador de baterías de pared de CA/
CC para recargar baterías de Ni-Cad
WTA-1 Antena telescópica con conector BNC
(se extiende hasta 44 pulgadas)
WTA-2W Antena de hule "Rubber Duck"
de repuesto con conector BNC
WTA-4W Antena de CB y meteorológica móvil
montada magnéticamente
WTA-13G Auricular pequeño VOX de presionar
para hablar operado por voz con
micrófono de jirafa
QPA-1425 Altavoz/micrófono de solapa con
cordón retráctil
OTROS PRODUCTOS MAXON
WX-70 Receptor meteorológico de 7 canales
con 3 diferentes módulos para señal
de emergencia
FRS-214 El radio del Servicio de Radiodifusión
Familiar de lujo opera en uno de 14
canales sin licencia
Maxon fabrica una línea completa de productos
electrónicos de uso personal, incluyendo radios
CB portátiles y móviles, radios de dos-vías GMRS/
DOT, comunicadores personales de 49 MHz, radios
FRS y monitores de estado del tiempo. Busque los
productos de marcas de Maxon en tiendas de venta
al detalle por todo el país.
36
Page 40

PARA SU INFORMACIÓN
Fecha de Compra:
Lugar de Compra:
Numero de Serie:
GUARDE ESTA INFORMACIÓN
EN UN LUGAR SEGURO
INSTRUCCIONES SERVICIO
DE GARANTÍA
1) Refiera a la seccíon de Instrucciones de
Operacion en su manual de operaciones
para operaciones y ajustes apropiados.
2) Refiera a tabla de localización y reparación
de averías.
3) Si el procedimiento anterior no corrije el
problema que usted esta experimentando
devuelva el producto (con el recibo de
compra) al lugar en el cual lo compró,
o llame al Departamento de Servicio
para el cliente de Maxon para asistirle,
1-816-891-6320, extensión 499.
37
Page 41

ACLARACIÓN DE LA GARANTÍA
LIMITADA
La División de Productos para el Consumidor de Maxon America,
Inc. (de aquí en adelante referido como "Maxon"), garantiza que
sus Productos y los accesorios incluidos estarán libres de defectos
de mano de obra o materiales bajo un uso normal por un período
de un (1) año partir de la fecha de compra por el usuario original,
siempre y cuando el comprador haya cumplido con los
requerimientos aquí declarados.
Si este producto no funciona bajo condiciones normales de uso
debido a defecto(s) de fabricación o mano de obra durante el
período de un (1) año después de la fecha de compra, será
reemplazado o reparado a opción de Maxon sin cargos, una
vez retornado al lugar de compra. La unidad defectuosa tiene
que estar acompañada de una prueba de la fecha de compra
en forma de un recibo de compra.
Maxon no tendrá obligación alguna de hacer reparaciones ni
ningún reemplazo que se requiera debido al desgaste normal
o que se necesite total o parcialmente debido a una catástrofe,
falta o negligencia del usuario, alteraciones impropias o no
autorizadas, reparaciones hechas al Producto, cableado incorrecto,
uso del Producto de una manera para la cual no
fue diseñado, o por causas externas al Producto. Esta garantía
es nula si se altera, borra, o remueve el número de serie.
El comprador deberá hacerse responsable de remover el
Producto defectuoso e instalación de su repuesto.
LAS GARANTÍAS EXPRESAS AQUI CONTENIDAS
SUSTITUYEN TODAS LA OTRAS GARANTÍAS, YA SEAN
EXPRESAS, O IMPLICITAS, O ESTATUTARIAS, INCLUYENDO,
SIN LIMITACION, CUALQUIER GARANTIA DE BUENA
CALIDAD O IDONEIDAD PARA UN PROPOSITO PARTICULAR.
PARA CUALQUIER PRODUCTO QUE NO CUMPLA CON
LA GARANTIA ESPECIFICADA, EL UNICO REMEDIO SERA
LA REPARACION O REEMPLAZO. MAXON AMERICA, INC.
EN NINGÚN CASO SERÁ RESPONSABLE AL COMPRADOR O A
SUS CLIENTES POR NINGÚN DAÑO, INCLUYENDO DAÑOS
ESPECIALES, INCIDENTALES, INDIRECTOS O CONSECUENTES,
NI POR LA PÉRDIDA DE GANANCIAS, INGRESOS O DATOS
QUE SURJA DEL USO O LA INHABILIDAD DE USAR ESTE
PRODUCTO.
Esta garantía es nula para ventas y envíos fuera de los Estados
Unidos.
38
Page 42

Thank you for choosing Maxon!
¡Gracias por escoger a Maxon!
For more information, contact:
Para obtener más información,
comuníquese con:
Maxon America, Inc.
Consumer Products Division
10828 NW Air World Drive
Kansas City, Missouri 64153
(Within USA) Phone: 1-800-821-7848, Ext. 399
(Outside USA) Phone: 1-816-891-6320, Ext. 399
Fax: 816/891-8815
U.S. P/N: 680-090-0001 Rev. B
Printed in Philippines
Impreso en Filipinas
 Loading...