

Page 1
modular stroller
CV053
User Guide
Mode d’emploi
French Guide Included
Mode d’emploi
en français inclus
©2009 Dorel Juvenile Group. All Rights Reserved. Tous droits réservés.
www.maxi-cosi.com (800) 951-4113
Made in CHINA. Fabriqué en CHINE.
Styles and colors may vary. Les styles et les couleurs peuvent varier.
Distributed by (Distribué par) Dorel Juvenile Group, Inc., 2525 State St., Columbus, IN 47201-7494
Dorel Distribution Canada, 873 Hodge, St-Laurent, QC H4N 2B1
05/29/09 4358-4910
Page 2

FOR THE SAFETY OF YOUR CHILD, PLEASE READ
THE FOLLOWING WARNINGS AND ASSEMBLY
INSTRUCTIONS AND KEEP FOR FUTURE REFERENCE.
•
Adult assembly required.
• NEVER LEAVE CHILD UNATTENDED. ALWAYS keep
child in view when in stroller.
• AVOID SERIOUS INJURY from falling or sliding out.
ALWAYS use seat belt. Check frequently to make sure
it is secure.
• ALWAYS keep fingers away from moving parts, when
folding, unfolding or adjusting stroller to prevent
finger entrapment.
• ALWAYS make sure stroller is FULLY OPEN AND
LOCKED before using.
• NEVER put hot liquids in the cup holder.
• ALWAYS use the brakes when stroller is stopped.
• ALWAYS remove protective material and poly bags
and dispose before assembly.
• NEVER use stroller on stairs or escalators.
• NEVER rollerblade with stroller.
• NEVER allow children to play with or hang onto the stroller.
• NEVER allow children to climb into the stroller
unassisted. Stroller may tip over and injure child.
WARNING
Warnings i
Parts and Features 1
Assembly 2-4
To Use 5-9
Care and Maintenance 10
Replaceable Parts 10
Warranty 10
Table of Contents
• NEVER place or hang parcels, bags or accessories on the
handle or canopy. The stroller may tip over or the canopy
may collapse.
• This product will become unstable if a parcel bag or rack
is used when there is no provision for one.
• This product may become unstable if a parcel bag, other
than the one recommended by the manufacturer is used.
• This product will become unstable if the manufacturer’s
recommended load is exceeded.
• DO NOT carry additional children, goods or accessories
in or on this product except as recommended in the
manufacturer’s instructions.
• N EVER place more than 1.0-LB. (0.5-kg) in the cup holder.
• NEVER place more than 11-LBS. (5-kg) in the storage
basket. If weight is exceeded, hazardous unstable
conditions may exist.
• STROLLER is only for use with children up to 50-LBS.
(22.73-kg), and WHEN SEATED, the midpoint of the
child’s head is at or below the top of the stroller seat.
• ONLY use this stroller with ONE child at a time.
• STROLLER is for use with children who can sit up
unassisted, and is NOT recommended for newborns.
• Keep tires at recommended pressure of 35-psi.
i
Warnings
Page 3

1
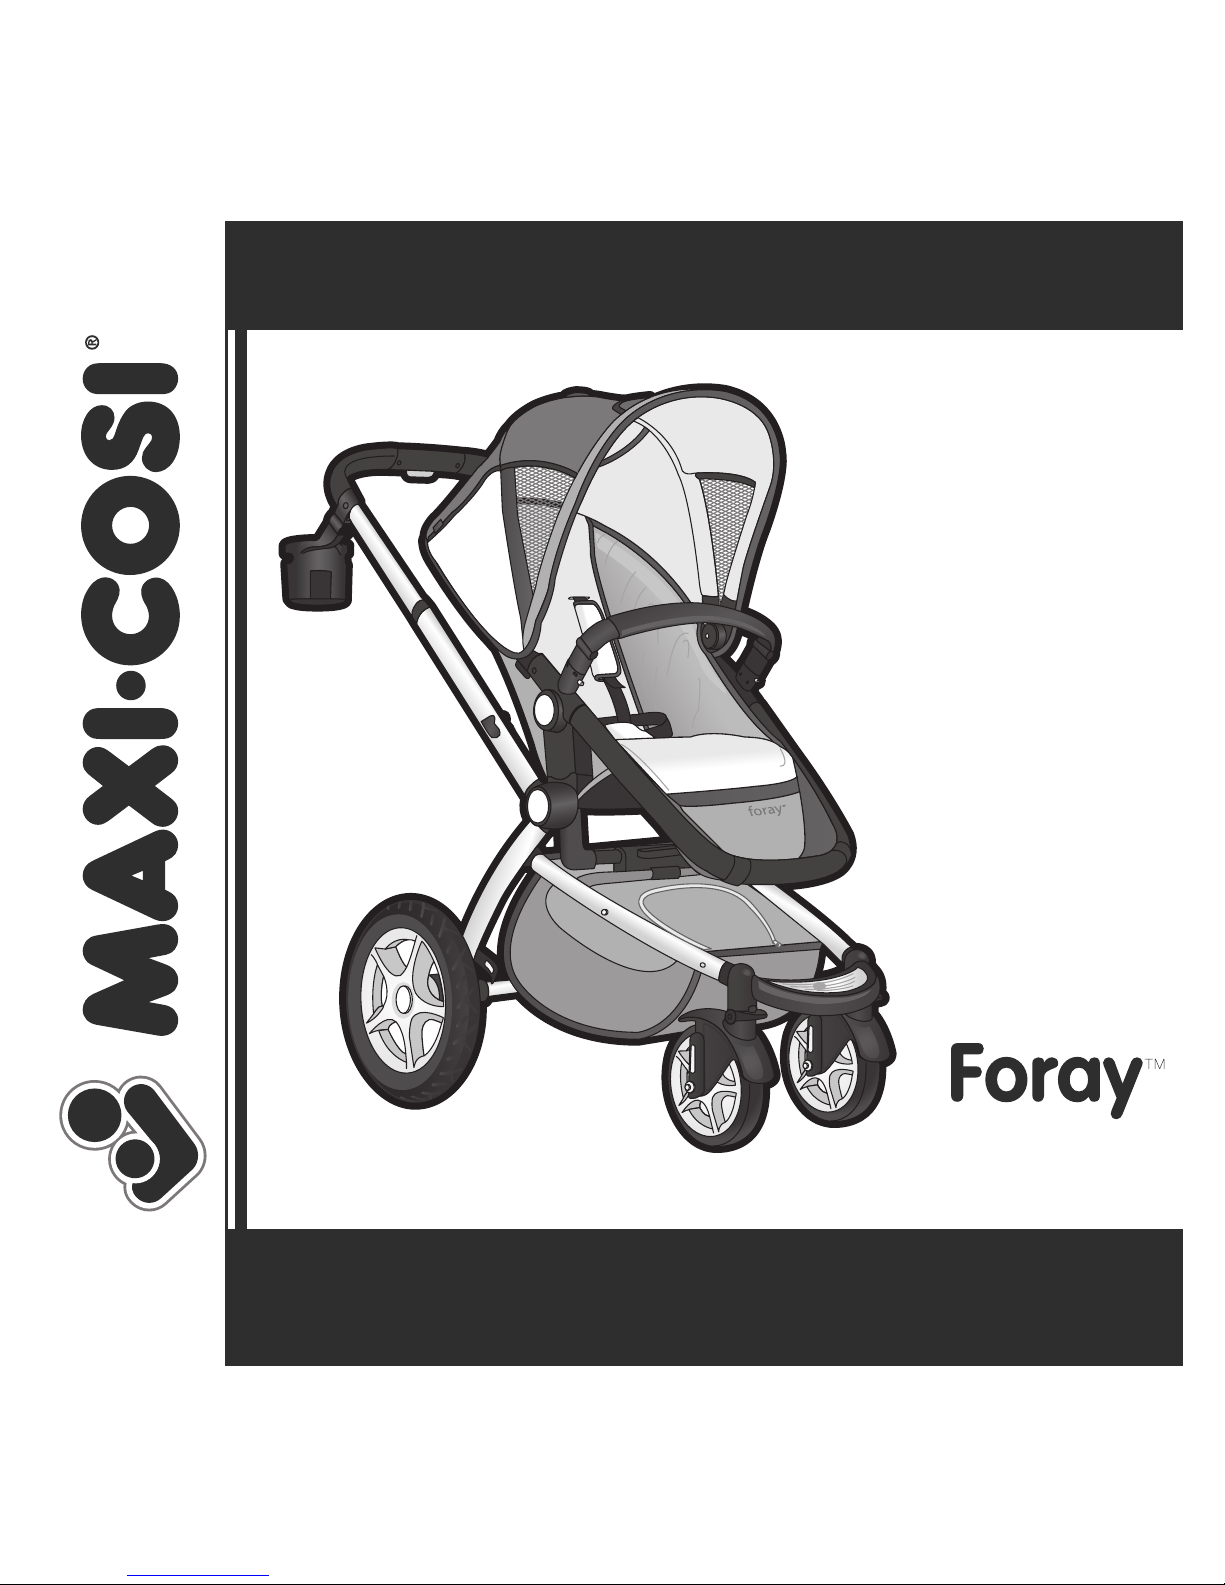
Parts and Features
A
Canopy
Seat
Adjustable height handle
Cup holder
Rear wheels (2)
Bumper bar (with pad)
Front wheels (2)
Rainshield (in storage basket)
Fold lock
Towers
A
B
C
E
F
G
D
H
I
J
• Lay out and identify all parts.
• Do not return this product to the place of
purchase. If any parts are missing, call Consumer
Relations at (800) 951-4113. Or visit our website at
www.maxi-cosi.com.
• Include the model number and manufacture date
(found on stroller frame) and a brief description
of the part.
• Keep these instructions for future use.
• Maxi-Cosi® MicoTM Infant Car Seat sold separately.
B
E
D
F
H
G
C
I
J
Page 4

2
Assembly
1 Unlock Stroller
Release the fold lock from the
post at the side of the frame
(Figure 1).
1
2 Unfold Stroller
Pull front of the stroller frame
upward until you hear a “click”
(Figure 2).
2
2a
Next, stand at the back of the
stroller. Press button (labeled 2)
with your left hand, then pull the
handlebar upward until you hear
a “click” (Figure 2a).
Push down on handlebar to
confirm stroller is locked open.
Page 5

4a4
3
Assembly
3
5
3 Install Rear Wheels
Insert the rear wheel axle into the
frame until you hear a “click” (Figure
3). Repeat for other rear wheel. Pull to
confirm wheels are assembled securely.
NOTE: To remove rear wheel press
release button (Figure 3).
NOTE: If wheels begin to squeak, spray
lubricant on the axles.
4 Install Front Wheels
Position front wheel with pin toward the
back of the stroller. Align pin with notch
and press front wheel into the frame until
you hear a “click” (Figure 4). Repeat for
other front wheel. Pull down to confirm
wheels are assembled securely.
NOTE: To remove front wheel, rotate
wheels to side (as shown). Insert long
thin screwdriver into hole on hub to
depress pin, then pull wheel out (Figure
4).
Release
Button
5 Install Seat
Lower seat onto towers
until you hear
each side “click” (Figure 5). Pull up to
confirm seat is assembled securely.
NOTE: Seat may face front or rear
(Figure 5a).
To remove seat,
press both
release buttons
while lifting
seat up.
5a
Towers
Pin
Page 6

4
Assembly
8a
8
7
7 Canopy
Press the adhesive patch to the back of
the seat. Press clips onto each side of
the seat (Figure 7).
NOTE: You can extend canopy by
unzipping the canopy zipper.
8 Bumper Bar
Press the posts of the bumper bar into
the holes on
the frame until you hear
“click” (Figure 8). Pull to confirm it is
assembled securely.
To remove bumper bar press the release
buttons (Figure 8a).
6 Cup Holder
Align cup holder with slot and slide
down into position
(Figure 6).
6
Clips
Release
Buttons
9 Check Tire Pressure Ensure rear tire pressure is at 35 psi.
CAUTION:
• Never hang parcels or accessories from
the cup holder as the stroller may tip
over.
• Never place more than 1-LB (0.5-kg)
in the cup holder.
Page 7

5
To Use
12
10
10 Parking Brake
Always use the parking
brake, even when standing
still for only a few moments!
Push down on the pedal
between the rear wheels to
set the parking brake (Figure
10). Push again to release the
parking brake.
12 Adjust Handlebar
Height
Squeeze the adjustment button
and slide the handlebar to
desired height (Figure 12).
The handlebar will “click”
into place.
NOTE: There are four height
positions.
11
11 Swivel Wheel
TIP: Lock the swivel wheels
when using the stroller in a
straight direction for a long
period.
To lock, turn the front
wheels into the backward
position and push the swivel
wheel locks upward until you
hear a “click” (Figure 11).
To unlock, push the swivel
wheel locks down.
Page 8

6
To Use
13
13 Adjust Recline
The front and rear-facing
seat can be adjusted to three
positions; a sitting, reclined
and semi-reclined position.
Push the buttons on both
sides and tilt the seat to the
desired position (Figure 13).
Seat “clicks” when locked in
place.
NOTES: The seat can be positioned facing backward or forward. The seat is suitable for
children from 6 months to age 4 (maximum 50-LBS. / 22.73-kg). If your child is unable to
sit up unassisted, use the reclined or semi-reclined positions only.
UPRIGHT
SEMIRECLINED
RECLINED
14
14 Rainshield
Open canopy. Zip top of
rainshield to canopy. At the
footrest, pull elastic underneath
(Figure 14).
WARNING – SUFFOCATION HAZARD
• Be sure rainshield doesn’t cover the child’s face.
Page 9

7
To Use
15 To Use Restraint
System
Place your child
in the stroller, with the
crotch strap between the
child’s legs. Slide each clip
into buckle until you hear
a “click” (Figure 15).
Tighten straps snugly
around your child
(Figure 15a).
WARNING
• NEVER LEAVE CHILD UNATTENDED. ALWAYS keep child in view when in stroller.
• AVOID SERIOUS INJURY from falling or sliding out. ALWAYS use seat belt. Check
frequently to make sure it is secure. Belts must be threaded exactly as shown (Figure 15b).
• Failure to follow these instructions could result in the serious injury or death of your child.
15
15a
15b
16 Adjust Restraint Height
The shoulder straps have
three height positions for your
growing child. Push each anchor
through the seat back and into
the desired slot (Figure 16). Be
sure the anchors lay flat against
the seat back.
Anchors
WARNING:
• For proper installation of the restraint system, make sure both anchors lay flat
against the back board.
• NEVER use stroller without BOTH restraint and crotch straps.
16
Page 10

8
To Use
17
17b
17 Fold Stroller
NOTE: The front wheel swivel locks must be
disengaged to fold stroller. Unlock swivel wheels if
they are locked.
1. Remove seat.
2. Swivel in cup holder.
3. Adjust handlebar height to lowest position.
4. Slide lever down (labeled 1) and press side
button (labeled 2) then rotate handlebar down
(Figure 17).
5. Press lever down (labeled 3) and lift stroller by
the rotating handle (labeled 4) (Figure 17a).
6. Engage fold lock (Figure 17b).
17a
Handle
Lever
Page 11

9
To Use
To avoid serious injury:
• Please refer to the manufacturer’s instructions for the use of your
infant car seat.
• ALWAYS install car seat facing to the rear of the stroller.
• ALWAYS use the restraint system in the car seat.
WARNING
18 To Attach Mico
TM
Infant Car Seat
Push the parking brake down. Remove stroller
seat.
Car seat must face the
handlebar. Lower car seat onto towers
until both sides “click” (Figure 18).
18
18a
To remove car seat, press both buttons on car
seat (Figure 18a). Lift car seat up.
Page 12

Care and Maintenance
• Spot clean pad with cold water and mild soap. Air dry.
• Periodically check for loose screws, worn parts, torn material or
loose stitching. Tighten or replace parts as needed.
• If desired, remove bumper bar pad to clean by sliding it off
bumper bar.
• Front wheel assembly
• Rear wheels
• Seat
• Rainshield
• Bumper bar with bumper bar pad
• Canopy
• Storage basket
•
To order parts call (800) 951-4113.
•
Include the model number and manufacture date (found on the
stroller) and a brief description of the part.
Replaceable Parts
Two-Year Limited Warranty
Dorel Juvenile Group, Inc. warrants to the original purchaser that this product (
ForayTM Stroller
), is free from material and
workmanship defects when used under normal conditions for a period of two (2) years from the date of purchase. Should
the product contain defects in material or workmanship Dorel Juvenile Group, Inc., will repair or replace the product, at
our option, free of charge. Purchaser will be responsible for all costs associated with packaging and shipping the product
to Dorel Juvenile Group Consumer Relations Department at the address noted on the front of this document and all other
freight or insurance costs associated with the return. Dorel Juvenile Group will bear the cost of shipping the repaired
or replaced product to the purchaser. Product should be returned in its original package accompanied by a proof of
purchase, either a sales receipt or other proof that the product is within the warranty period. This warranty is void if the
owner repairs or modifies the product or the product has been damaged as a result of misuse.
This warranty excludes any liability other than that expressly stated previously, including but not limited to, any incidental
or inconsequential damages.
SOME STATES DO NOT ALLOW THE EXCLUSION OR LIMITATION OF INCIDENTAL OR CONSEQUENTIAL DAMAGES,
SO THE ABOVE LIMITATION OR EXCLUSION MAY NOT APPLY TO YOU.
THIS WARRANTY GIVES YOU SPECIFIC LEGAL RIGHTS, AND YOU MAY ALSO HAVE OTHER RIGHTS THAT MAY VARY
FROM STATE TO STATE.
Page 13

CV053
User Guide
Mode d’emploi
©2009 Dorel Juvenile Group. All Rights Reserved. Tous droits réservés.
www.maxi-cosi.com (800) 951-4113
Made in CHINA. Fabriqué en CHINE.
Styles and colors may vary. Les styles et les couleurs peuvent varier.
Distributed by Dorel Juvenile Group, Inc., 2525 State St., Columbus, IN 47201-7494
Dorel Distribution Canada, 873 Hodge, St-Laurent, QC H4N 2B1
05/29/09 4358-4910
Page 14

i
Mises en garde
POUR LA SÉCURITÉ DE VOTRE ENFANT, VEUILLEZ LIRE
LES MISES EN GARDE SUIVANTES ET LE MODE D’EMPLOI
ET CONSERVEZ POUR RÉFÉRENCE ULTÉRIEURE.
• Doit être assemblé par un adulte.
• N E JAMAIS LAISSER UN ENFANT SANS SURVEILLANCE.
TOUJOURS avoir l’enfant bien en vue quand il est dans
la poussette.
• ÉVITEZ LES BLESSURES GRAVES à la suite d’une chute.
TOUJOURS utiliser la ceinture de sécurité. Vérifiez souvent
qu’elle est bien attachée.
• TOUJOURS garder les doigts loin des pièces mobiles au
moment de plier, déplier ou d’ajuster la poussette afin
d’éviter de se pincer les doigts.
• TOUJOURS s’assurer que la poussette est OUVERTE
COMPLÈTEMENT ET VERROUILLÉE avant utilisation.
• NE JAMAIS placer de liquides chauds dans les porte-gobelets.
• TOUJOURS appliquer les freins lorsque la poussette est
arrêtée.
• TOUJOURS enlever le matériel protecteur et les sacs en
polyéthylène et les jeter avant d’assembler.
• NE JAMAIS utiliser la poussette dans les marches ou les
escaliers roulants.
• NE JAMAIS faire du patin à roues alignées avec la poussette.
• NE JAMAIS permettre à des enfants de jouer avec ou se
suspendre à la poussette.
• NE JAMAIS permettre à des enfants de grimper dans la
poussette sans aide. La poussette pourrait renverser et
blesser un enfant.
MISES EN GARDE
Mises en garde i
Pièces et Caractéristiques 1
Assemblage 2-4
Utilisation 5-9
Table des matières
• N E JAMAIS placer plus de 0,5 kg (1 lb) dans le porte-
gobelet.
• NE JAMAIS placer ou suspendre de colis, sacs ou
accessoires sur la poignée ou l’auvent. La poussette
pourrait renverser ou l’auvent s’affaisser.
• Ce produit deviendra instable si un sac ou un support à
colis est utilisé alors qu’il n’y a pas d’endroit prévu pour
en avoir un.
• Ce produit deviendra instable si un sac à colis, autre que
celui recommandé par le fabricant est utilisé.
• Ce produit deviendra instable si la charge recommandée
par le fabricant est excédée.
• NE PAS transporter d’enfants supplémentaires, de
marchandises ou d’accessoires dans ou sur ce produit à
l’exception de ce qui est recommandé dans les instructions
du fabricant.
• NE JAMAIS placer plus de 5 kg (11 lb) dans le panier de
rangement. Si la charge est excédée, des conditions
instables dangereuses peuvent exister.
• LA POUSSETTE doit être utilisée seulement par des
enfants dont le poids n’excède pas 22,73 kg (50 lb) et
LORSQU’ASSIS, le milieu de la tête de l’enfant ne dépasse
pas le dessus du siège de la poussette.
• Utilisez cette poussette avec UN enfant à la fois SEULEMENT.
• La POUSSETTE doit être utilisée avec des enfants qui
peuvent s’asseoir sans aide, et n’est PAS recommandée
pour les nouveau-nés.
Soin et Entretien 10
Pièces de remplacement 10
Garantie 10
Page 15

1
Pièces et Caractéristiques
A
Auvent
Siège
Poignée ajustable
Porte-gobelet
Roues arrière (2)
Barre protectrice (avec coussin)
Roues avant (2)
Housse contre les intempéries (dans le panier de rangement)
Verrou de pliage
Tours
A
B
C
E
F
G
D
H
I
• Déballez et identifiez toutes les pièces.
• Ne pas retourner ce produit au magasin. Si des
pièces sont manquantes, appelez le Service à la
clientèle au (800) 951-4113. Ou visitez notre site
internet au www.maxi-cosi.com.
• Inclure le numéro de modèle et la date de fabrication
(trouvé sur le cadre de la poussette) et une brève
description de la pièce.
• Conservez ces instructions pour utilisation ultérieure.
• Siège d’auto pour bébé Maxi-Cosi® Mico
TM
vendu
séparément.
B
E
D
F
H
G
C
I
J
J
Page 16

2
Assemblage
1 Déverrouiller la poussette
Dégagez le verrou de pliage du
support sur le côté du cadre
(Figure 1).
1
2 Déplier la poussette
Remontez le devant du cadre
de la poussette jusqu’à ce
que vous entendiez un déclic
(Figure 1).
2
2a
Appuyez sur le bouton (marqué 2)
avec votre main gauche, puis tirez
la poignée vers le haut jusqu’à
ce que vous entendiez un déclic
(Figure 2a).
Poussez sur la poignée pour
vous assurer que la poussette est
verrouillée en position ouverte.
Page 17

3
Assemblage
4a
3
5
3 Installation des roues arrière
Insérez l’essieu de roue arrière sur le cadre
jusqu’à ce que vous entendiez un déclic
(Figure 3). Répétez pour l’autre roue. Tirez
sur les roues pour vous assurer qu’elles
sont assemblées correctement.
NOTE : Pour enlever la roue arrière pour
le rangement, appuyez sur le bouton de
dégagement.
NOTE : Si les roues commencent à grincer,
vaporisez un lubrifiant sur les essieux.
4 Installation des roues avant
Placez la roue avant avec la tige orientée
vers l’arrière de la poussette. Alignez la tige
avec l’encoche et insérez la roue avant dans
le cadre jusqu’à ce que vous entendiez un
déclic (Figure 4).Répétez pour l’autre roue
avant. Tirez sur les roues pour vous assurer
qu’elle sont assemblées correctement.
NOTE :
Pour enlever la roue avant, faites tourner
les roués sur le côté (comme montré, Figure 4a).
Insérez le tournevis long et mince dans le trou du
moyeu pour déloger la tige, puis sortez la roue.
Bouton de
dégagement
5 Installation du siège
Abaissez le siège sur les tours jusqu’à
ce que vous entendiez un déclic de
chaque côté (Figure 5). Tirez sur le siège
pour vous assurer qu’il est assemblé
correctement.
NOTE : Le siège peut faire face à l’avant
ou l’arrière de la poussette (Figure 5a).
Pour enlever le siège,
appuyez sur les deux
boutons de dégagement
tout en soulevant le siège.
5a
Tours
4
Tige
Page 18

4
Assemblage
8a
8
7 Auvent
Pressez la bande adhésive au dos du
siège. Insérez les attaches de chaque
côté du siège (Figure 7).
NOTE : Vous pouvez allonger l’auvent en
dézippant le zipper sur l’auvent.
8 Barre protectrice
Insérez les tenons de la barre
protectrice dans les trous sur le cadre
jusqu’à ce que vous entendiez un
déclic (Figure 8). Tirez sur la barre
pour vous assurer qu’elle est
assemblée correctement.
Pour enlever la barre protectrice,
appuyez sur les boutons de
dégagement (Figure 8a).
6 Porte-Gobelet
Alignez le porte-gobelet avec la fente
et glissez-le en place (Figure 6).
6
Boutons de
dégagement
9 Vérifiez la pression des pneus Assurez-vous que la pression des pneus est à 35 psi.
ATTENTION :
• Ne jamais suspendre de colis ou
d’accessoires au porte-gobelet car la
poussette pourrait renverser.
• Ne jamais placer plus de 0,5 lg (1 lb)
dans le porte-gobelet.
7
Attaches
Page 19

5
Utilisation
12
10
10 Frein
Toujours appliquer les freins,
même si vous arrêtez qu’un
petit moment! Appuyez
sur la pédale entre les roues
arrière pour appliquer le
frein (Figure 10). Poussez
de nouveau pour dégager le
frein.
12 Ajuster la hauteur de la
poignée
Pressez le bouton de réglage et
glissez la poignée à la hauteur
désirée (Figure 12). La poignée
s’enclenchera en place.
NOTE : Il y a quatre positions
de hauteur.
11
11 Roue pivotante
CONSEIL: Verrouillez les roues
pivotantes lorsque vous utilisez
la poussette en direction droite
pour un long moment.
Pour verrouiller, tournez les roues
avant vers l’arrière et remontez
les verrous des roues pivotantes
jusqu’à ce que vous entendiez un
déclic (Figure 11).
Pour déverrouiller, abaissez les
verrous de roue pivotante.
Page 20

6
Utilisation
13
13 Ajustement de
l’inclinaison
Le siège orienté vers l’avant ou
vers l’arrière peut être ajusté
à trois positions : une position
assise, inclinée et semi-inclinée.
Poussez les boutons de chaque
côté et inclinez le siège à la
position désirée (Figure 13). Le
siège s’enclenchera lorsqu’il sera
verrouillé en place.
NOTES: Le siège peut être placé face vers l’arrière ou vers l’avant. Le siège convient aux
enfants de 6 mois à 4 ans (poids maximum 22,73 kg / 50 lb). Si votre enfant est incapable
de se tenir assis, utilisez la position inclinée ou semi-inclinée seulement.
ASSIS
SEMIINCLINÉ
INCLINÉ
14
14 Housse contre les
intempéries
Dépliez l’auvent. Zippez le dessus
de la housse à l’auvent. Tirez
l’élastique autour du repose-pieds
(Figure 14).
AVERTISSEMENT – RISQUE DE SUFFOCATION
• Assurez-vous que la housse contre les intempéries ne couvre pas le visage de l’enfant.
Page 21

7
Utilisation
15 Utilisation de la
ceinture de sécurité
Placez votre enfant dans la
poussette avec la courroie
d’entrejambes entre les jambes
de l’enfant. Glissez chaque
attache dans la boucle jusqu’à
ce que vous entendiez un
déclic (Figure 15). Serrez les
sangles autour de votre enfant
(Figure 15a).
AVERTISSEMENT
• NE JAMAIS LAISSER UN ENFANT SANS SURVEILLANCE. TOUJOURS avoir l’enfant bien en vue
quand il est dans la poussette.
• ÉVITEZ LES BLESSURES GRAVES à la suite d’une chute. TOUJOURS utiliser la ceinture de
sécurité. Vérifiez souvent qu’elle est bien attachée. Les ceintures doivent être enfilées exactement
comme montré (Figure 15b).
• À défaut de suivre ces instructions, votre enfant pourrait subir des blessures graves ou mortelles.
15
15a
15b
16 Ajustement de la hauteur de la
ceinture
Les sangles d’épaule peuvent être
ajustées à trois positions pour s’adapter à
la grandeur de l’enfant. Poussez chaque
ancrage dans le dossier du siège et dans
la fente désirée (Figure 16). Assurez-vous
que les ancrages reposent à plat contre
le dossier du siège.
Ancrages
AVERTISSEMENT
• Pour une installation correcte de la ceinture de sécurité, assurez-vous que les deux
ancrages reposent à plat contre le dossier.
• NE JAMAIS utiliser la poussette sans la ceinture de sécurité ET la courroie d’entrejambes.
16
Page 22

8
Utilisation
17
17b
17 Plier la poussette
NOTE : Les verrous de la roue pivotante avant
doivent être désengagés pour plier la poussette.
Déverrouillez les roues pivotantes si celles-ci sont
verrouillées.
1. Enlevez le siège.
2. Faire pivoter le porte-gobelet.
3. Ajustez la hauteur de la poignée à la position la
plus basse.
4. Glissez le levier vers le bas (étiqueté 1) et
pressez sur le bouton latéral (étiqueté 2) puis
pivotez la poignée vers le bas (Figure 17).
5. Abaissez le levier (étiqueté 3) et soulevez la
poignée (étiqueté 4) (Figure 17a).
6. Accrochez le verrou de pliage (Figure 17b).
17a
Poignée
Levier
Page 23

9
Utilisation
Pour éviter les blessures graves:
• Veuillez vous référer aux instructions du fabricant pour utiliser votre
siège d’auto pour bébé.
• TOUJOURS installer le siège d’auto face vers l’arrière de la poussette.
• TOUJOURS utiliser les ceintures de sécurité dans le siège d’auto.
AVERTISSEMENT
18 Fixer le siège d’auto pour bébé Mico
TM
Appliquez le frein. Enlevez le siège de la poussette.
Le siège d’auto doit faire face à la
poignée.
Abaissez le siège d’auto dans les tours jusqu’à ce
que les deux côtés s’enclenchent (Figure 18).
18
Pour enlever le siège d’auto, appuyez sur les deux
boutons du siège d’auto (Figure 18a). Soulevez le
siège d’auto.
18a
Page 24

Soin et Entretien
• Nettoyez les taches sur le coussin avec de l’eau froide et un savon
doux. Séchez à l’air.
• De temps à autres, vérifiez pour des vis desserrées, des pièces
usées, du matériel déchiré ou décousu. Serrez ou remplacez les
pièces au besoin.
• Si désiré, enlevez le coussin de la barre protectrice pour le nettoyer.
• Assemblage de la roue avant
• Roues arrière
• Siège
• Housse contre les intempéries
• Barre protectrice avec coussin
• Auvent
• Panier de rangement
•
Pour commander des pièces, appelez le (800) 951-4113.
•
Inclure le numéro de modèle et la date de fabrication (trouvé
sur la poussette) et une brève description de la pièce.
Pièces de remplacement
Garantie limitée de deux ans
Dorel Juvenile Group, Inc. garantit à l’acheteur initial que ce produit (
ForayTM) est exempt de tous défauts
de matériau et de main d’oeuvre si utilisé dans des conditions normales pour une période de deux
(2) ans de la date d’achat. Si le produit présentait des défauts de matériaux ou de main d’oeuvre,
Dorel Juvenile Group, Inc., réparera ou remplacera le produit, à son choix, sans frais. L’acheteur sera
responsable des coûts associés à l’emballage et à la livraison du produit au Service à la clientèle de
Dorel Juvenile Group à l’adresse indiqué sur le devant de ce document et pour tous les coûts de
transport et d’assurance associés au retour. Dorel Juvenile Group assumera les frais d’expédition du
produit réparé ou remplacé à l’acheteur. Le produit doit être retourné dans son emballage original
accompagné d’une preuve d’achat, soit un coupon de caisse ou toute autre preuve que le produit est
toujours dans la période de garantie. Cette garantie est nulle et non avenue si le propriétaire répare
ou modifie le produit ou si le produit a été endommagé à la suite d’une mauvaise utilisation.
Cette garantie exclut toute responsabilité autre que celle expressément indiquée précédemment,
incluant mais ne se limitant pas aux dommages fortuits ou sans conséquences.
 Loading...