

Page 1

3LQQDFOH
6WXGLR'HOX[H
3URIHVVLRQDO4XDOLW\0RYLH0DNLQJ
4XLFN,QVWDOO*XLGH
6FKQHOOLQVWDOODWLRQ
0DQXHOG·LQVWDOODWLRQUDSLGH
6QHOOH,QVWDOODWLH
*XLGDUDSLGDDOOLQVWDOOD]LRQH
*XtDGHLQVWDODFLyQUiSLGD
41001579
Page 2

© Pinnacle Systems 2002
All rights reserved.
No part of this manual may be reproduced or transferred to other media without explicit
written permission from Pinnacle Sysrems., Braunschweig, Germany.
All brand or product names are trademarks or registered trademarks of their respective
holders.
© Pinnacle Systems 2002
Alle Rechte vorbehalten.
Kein Teil dieses Handbuchs darf ohne ausdrückliche schriftliche Genehmigung von
Pinnacle Systems, Braunschweig, reproduziert oder anderweitig übertragen werden.
Alle Marken- und Produktnamen sind Warenzeichen oder eingetragene Warenzeichen
der jeweiligen Hersteller.
© Pinnacle Systems 2002
Tous droits réservés.
Toute reproduction ou représentation intégrale ou partielle, par quelque procédé que ce
soit, du présent manuel est interdite sans l'autorisation expresse par écrit de Pinnacle
Systems , Brunswick.
Tous les noms de marques et de produits sont des marques ou des marques déposées des
constructeurs respectifs.
© Pinnacle Systems 2002
Alle rechten voorbehouden.
Geen enkel deel van deze handleiding mag zonder uitdrukkelijke schriftelijke
toestemming van Pinnacle Systems, Braunschweig, gereproduceerd of op enige andere
wijze overgenomen worden.
Alle andere merk- en productnamen zijn handelsmerken of gedeponeerde
handelsmerken van de betreffende fabrikant.
© Pinnacle Systems 2002
Tutti i diritti sono riservati.
Nessuna parte di questo manuale può essere riprodotta o trasmessa in qualsiasi forma o
mezzo senza la preventiva autorizzazione scritta di Pinnacle Systems , Braunschweig.
Tutti gli altri nomi di marche e prodotti sono marchi o marchi registrati dei vari
produttori.
© Pinnacle Systems 2002
Reservados todos los derechos.
No se permite reproducir o transferir parte alguna de este manual a otro tipo de soporte
sin la autorización por escrito por parte de Pinnacle Systems , Braunschweig.
El resto de las denominaciones de marca y de producto son marcas de fábrica o marcas
registradas de los fabricantes correspondientes.
Page 3

3LQQDFOH
6WXGLR'HOX[H
3URIHVVLRQDO4XDOLW\0RYLH0DNLQJ
4XLFN,QVWDOO*XLGH
Page 4

%HIRUH<RX%HJLQ
Important:
Install your AVDV board in your PC as described in the instructions below,
prior to
This chapter tells you which computer system components are required for the
operation of
contents.
Pinnacle Studio Deluxe includes an AVDV video capture board.
installing the Pinnacle Studio software.
STUDIO DELUXE
and what is included in the
STUDIO DELUXE
package
6\VWHP5HTXLUHPHQWV
Please make sure your system meets the following requirements before
installing
•
•
•
•
•
•
•
•
•
•
•
•
•
STUDIO DELUXE
Intel Pentium or AMD Athlon 500 MHz or higher
128 MB RAM (256 MB Recommended)
Windows 98SE, Millennium, 2000, or XP
DirectDraw compatible sound and graphics cards
Mouse
CD-ROM drive
One Free 32-bit PCI slot
500 MB of disk space to install all software
120 MB of disk space for every 20 minutes of video captured at preview
quality (4 GB for every 20 minutes of finished movie). (DV capture
only)
4 GB for every 20 minutes of Analog video or full quality DV video
captured
Hard disk must be capable of sustained data transfer rates of at least 4
MB per second (dedicated hard drive for video capture recommended)
Optional: CD-R or CDRW drive for creating Video CDs or
SuperVideo CDs
Optional: DVD-R DVD-RW or DVD+RW drive for creating DVDs
:
Studio Deluxe
2
Page 5
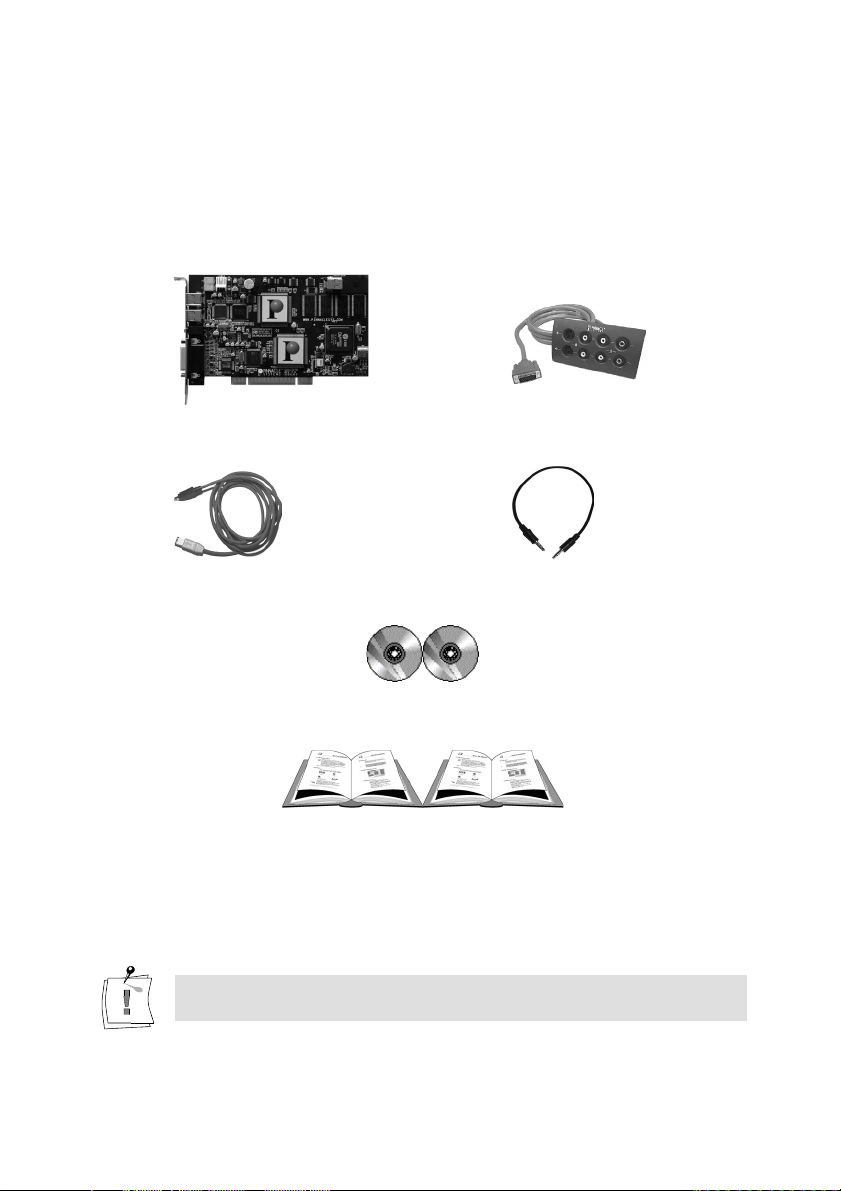
3DFNDJH&RQWHQWV
Please make sure your
installation. The system includes*:
AVDV board blueBOX
IEEE-1394 cable Audio loop-through cable
Pinnacle Studio, and Hollywood FX Plus for Studio CD-ROMs
STUDIO DELUXE
system is complete before you begin the
Pinnacle Studio Manual and this Quick Install Guide
*Contents or Appearance may vary
If any parts are missing, please contact your retailer.
Computer components are sensitive to electrostatic charge. Do not
take the AVDV board out of its antistatic package until you install it.
Quick Install Guide
3
Page 6

Installing Pinnacle Studio Deluxe
Defragmenting the hard disk
Before installing and configuring the AVDV board, you should defragment
your hard disk/s. You find the Windows defragmentation utility under
Programs > Accessories > System Tools > Disk Defragmenter.
SECTION 1: INSTALLING THE AVDV BOARD
In the interest of your own safety and to avoid damage to your AVDV board or
your computer, please pay special attention to the following:
Computer components are sensitive to static charge. Divert any
•
electrostatic charge from your person before touching the components with
your hands or any tools.
Before opening the computer make sure that the AC power plug is
•
disconnected.
To install the AVDV board into your computer:
1. Discharge any static electricity from your person by touching the
metal case of your computer.
2. Switch off the computer and all peripheral devices. Disconnect the AC
power cord and all necessary cables.
3. Loosen the screws of the computer’s cover and remove the cover.
4. Select a free PCI slot.
5. Remove the slot shield at the back of the computer (see your
computer’s user guide for specific directions).
Insert the board carefully into the selected slot. Hold the board at the
6.
top edge and push both ends simultaneously into the slot. Press the
board’s top edge to ensure that the board is firmly seated in the slot.
If the board cannot be inserted without problems, do not force the
board into place (the contacts at the connector could bend). Instead,
pull the board out carefully and try again.
Start >
Studio Deluxe
4
Page 7

7. Once the board is seated firmly, tighten the screws and reassemble the
computers casing. Reconnect all external cables, including the AC
power cord.
8. The AVDV hardware installation is completed. You may now restart
your computer.
SECTION 2: INSTALLING THE AVDV DRIVER
Before opening and installing the Studio software, please read the license
agreement in Appendix F of the Studio User Guide. Opening the CD-ROM
package means you concur with the license agreement terms. If you choose not
to comply with these terms, keep the software package unopened, and return
the complete Studio Deluxe package to your point of purchase.
1. After the AVDV board installation, turn your computer on.
2. The Windows Add New Hardware wizard will automatically detect
the card.
3. Please cancel the HW installation, the drivers for Studio Deluxe will
be installed after you install the Studio software
4. Now, after canceling the windows driver installation please insert your
Studio CD-ROM into your CD-ROM drive.
Quick Install Guide
5
Page 8

SECTION 3: INSTALLING THE PINNACLE STUDIO SOFTWARE
1. If you have Autorun enabled for your CD-ROM, Setup will run
automatically.
Note: If you do not have Autorun enabled, navigate to your CD-ROM
drive, and double-click on Setup.exe and continue with Step 2.
2. Select the language of your choice and click “OK”.
3. Enter your serial number (found on the outside back cover of the
Pinnacle Studio User Guide). Then click “Next.”
4. Agree to the software license terms (click “I Agree”). If you do not
accept or understand the terms, you should promptly return this
product to your dealer.
5. Choose “Typical” installation (recommended). Only advanced
computer users should choose “Custom.”
6. Click “Next” until you are asked to create a Studio 7 shortcut on your
desktop, then click “Yes.”
7. Driver Installation After the Studio software is installed, the drivers
for the AVDV board will be installed. When installing the drivers on
Windows XP or Windows 2000, a Windows dialog box may appear to
tell you that the drivers have not passed Windows logo testing. The
drivers have been tested extensively by Pinnacle Systems and are
compatible with Windows. You may disregard the Windows dialog
box and click the "Continue" to install the drivers
8. Restart. In some cases, you may be instructed to restart your PC.
9. Registration. Next, you will be given the opportunity to register your
copy of Studio. You can quickly and easily register using your
Internet connection. Registration is important for three reasons:
Registration allows Pinnacle Systems to inform you of free
•
upgrades to the Studio software
Registration makes you eligible for special offers and promotions
•
from Pinnacle Systems
Studio Deluxe
6
Registration is required to receive technical support
•
Page 9

SECTION 4:
INSTALLING THE HOLLYWOOD FX PLUS FOR STUDIO SOFTWARE
1. If you have Autorun enabled for your CD-ROM, Setup will run
automatically.
Note: If you do not have Autorun enabled, navigate to your CD-ROM
drive, and double-click on Setup.exe and continue with Step 2.
2. Enter your serial number (found on the Hollywood FX Plus for Studio
CD sleeve). Then click “Next.”
3. Choose “Install Hollywood FX Plus”
4. Click “Next” until you are asked to enter your serial number again. If
the serial number is not already filled in, re-enter it, then click “OK.”
5. Registration. Next, you will be given the opportunity to register your
copy of Hollywood FX Plus and join Club Hollywood. You can
quickly and easily register using your Internet connection.
Registration is important for three reasons:
Registration allows Pinnacle Systems to inform you of free
•
upgrades to the Hollywood FX Plus software
Access to additional FX and upgrades online at Club Hollywood
•
Registration makes you eligible for special offers and promotions
•
from Pinnacle Systems
Registration is required to receive technical support
•
Quick Install Guide
7
Page 10
SECTION 5:
CONNECTING THE blueBOX AND THE VIDEO DEVICES
The following chapter tells you how to connect your video devices to the
Pinnacle AVDV board via the blueBOX,
with the computer turned off
so you will need the appropriate cables.
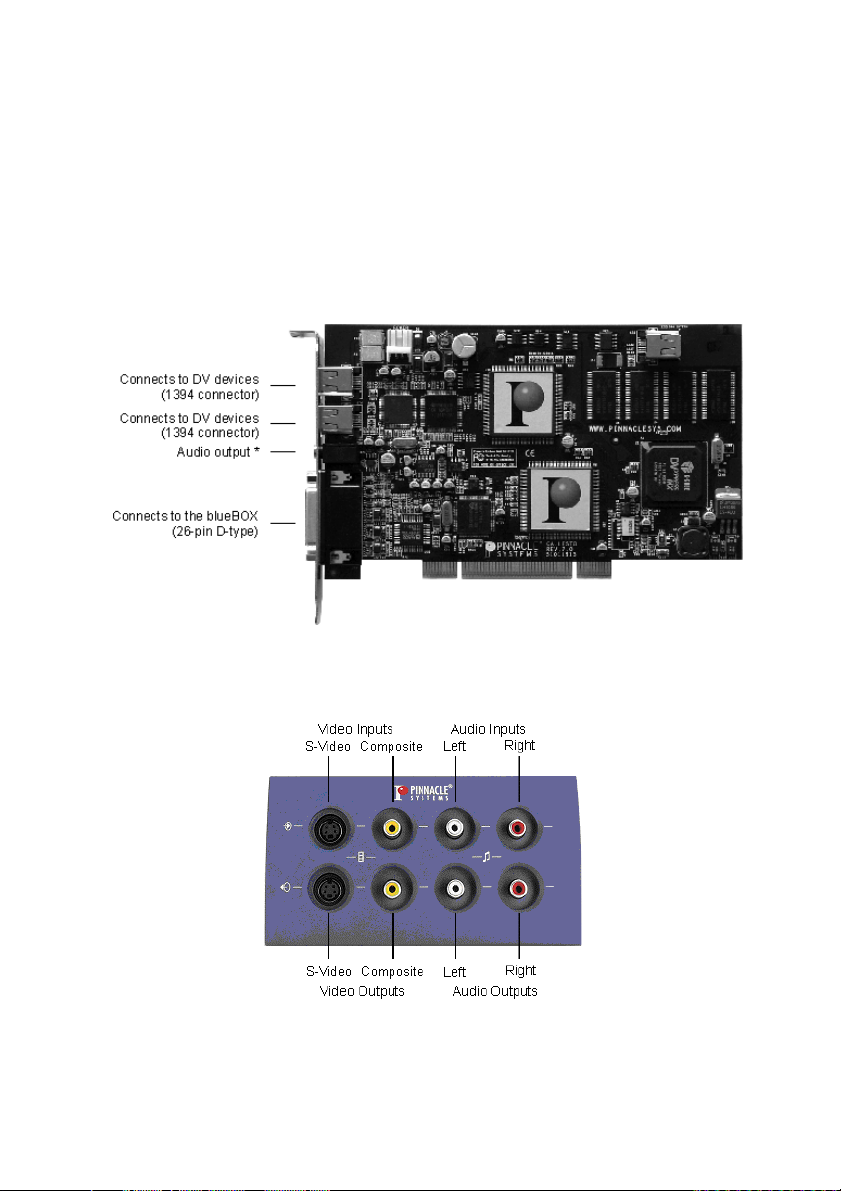
The following illustration shows the AVDV board with its connections:
The following illustration shows the connections of the blueBOX:
. To do
Studio Deluxe
8
Page 11
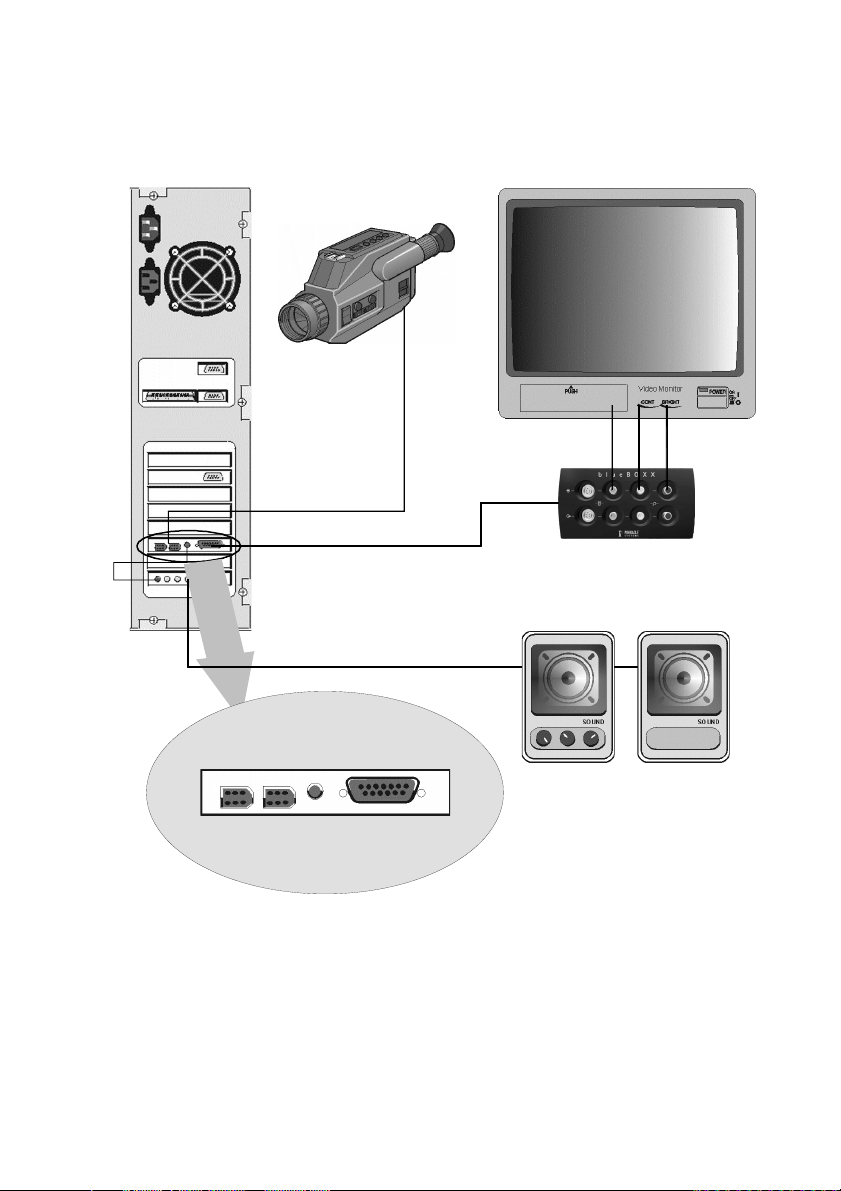
+RZWR&RQQHFW9LGHRDQG$XGLR'HYLFHV
DV Camcorder
Audio Out to Soundboard Line in
to Soundboard
DV Devices
IEEE
blueBOX
AudioVideo
Audio Out Soundboard
Audio Out
Speakers
blueBOX
Input
Output
Quick Install Guide
9
Page 12

&RQQHFWLQJWKHEOXH%2;
Via the blueBOX you can connect your analog video devices or an external
monitor to your AVDV board. Connect the blueBOX to the AVDV board
directly via the cable of the blueBOX.
blueBOX Out AVDV Board
blueBOX-Cabel ¾ D-Sub26-Connector
&RQQHFWLQJWKH$XGLRORRSWKURXJK
For audio monitoring using your PC speakers, connect the Audio Output on the
back of the AVDV board to the Audio Line-IN of your sound board using the
Audio loop-through cable included in the package.
&RQQHFWLQJWKH9LGHR'HYLFHV
In the following, the options for cabling your video source—referred to as the
player—are described. The player provides the video and audio signals that
you want to digitize (“capture”) to your hard disk and then edit on your PC.
Subsequently, connections to the recorder are explained. The recorder is the
device—typically a VCR—that you would like to output your final production
to.
Player: DV device
Devices that connect to the board include any DV or Digital 8 format video
camcorder or recorder that has an IEEE-1394/DV connector. On many devices,
this connector is labeled “i.Link”.
To connect your DV camcorder/VCR to the
, use the IEEE-1394 DV cable included in the
DELUXE
package.
1. Connect the IEEE-1394 cable to the Pinnacle
AVDV.
Connect the 6-pin connector of the IEEE 1394 DV cable to one of the 1394
data ports of your AVDV.
Studio Deluxe
10
STUDIO
Page 13

2. Connect the IEEE-1394 cable to the DV device.
Connect the 4-pin connector of the IEEE 1394 AV cable to the DV IN/OUT
or the DV OUT connector of your DV camcorder/VCR.
Video and Audio signals are transferred via the IEEE-1394 cable so no other
connection is required to connect your DV device as a player.
Player: S-Video device / Composite video device
S-Video
Choose this type of connection if your player has an S-Video output.
The following table gives an overview of the connections:
Player Out blueBOX In
S-Video Output
Audio Output L
Audio Output R
S-Video Input
¾
Audio Input L
¾
Audio Input R
¾
Composite video
Choose this type of connection if your player has a Composite video output.
The following table gives an overview of the connections:
Player Out blueBOX In
Composite Video Output
Audio Output L
Audio Output R
Composite Video Input
¾
Audio Input L
¾
Audio Input R
¾
Quick Install Guide
11
Page 14
If your player is equipped with S-Video outputs as well as with Composite
video outputs, please choose S-Video, as this will provide a higher level of
video quality.
If your player has a SCART connector, you will need an appropriate adapter.
This adapter is available wherever video recorders are being sold.
Recorder: DV device
PAL device:
Studio Deluxe sold in North America are not compatible with PAL
video. Many PAL devices sold in Europe usually have only a DV
. These can be identified by the label DV OUT (and not DV
output
IN/OUT) on the DV connector. Such devices do
recording of DV data back to videotape. Note that with
, you can of course use the analog outputs to play your
DELUXE
finished DV project to an analog VCR.
Devices that connect to the board include any DV or Digital 8 format video
equipment that has an IEEE-1394/DV connector. On many devices, this
connector is labeled “i.LINK”.
If you have not already done so, connect your DV camcorder/VCR to the
AVDV board. Use the IEEE-1394 AV cable included in the package.
not
support
STUDIO
1. Connect the IEEE-1394 cable to the AVDV.
Connect the 6-pin connector of the IEEE-1394 DV cable to one of the 1394
data ports of your AVDV.
2. Connect the IEEE-1394 cable to the DV device.
Connect the 4-pin connector of the IEEE-1394 AV cable to the DV
IN/OUT connector of your DV camcorder/VCR.
Studio Deluxe
12
Page 15

Pinnacle
STUDIO DELUXE
can output either to DV or to analog, but not both at
the same time. You can select the active output later in Studio by choosing
Options/Make Tape.
Recorder: S-Video device / Composite video device
S-Video
Choose this type of connection if your recorder has an S-Video input.
The following table gives an overview of the connections:
blueBOX Out Recorder In
S-Video Output
Audio Out put L
Audio Out put R
Composite Video
Choose this type of connection if your recorder has a Composite input.
The following table gives an overview of the connections:
blueBOX Out Recorder In
Composite Video Output
Audio Output L
Audio Output R
S-Video Input
¾
Audio Input L
¾
Audio Input R
¾
Composite V ideo Input
¾
Audio Input L
¾
Audio Input R
¾
If your player is equipped with S-Video outputs as well as with Composite
video outputs, please choose S-Video, as this will provide a higher level of
video quality.
If your player has a SCART connector, you will need an appropriate adapter.
This adapter is available wherever video recorders are being sold.
Quick Install Guide
13
Page 16

Now, have some fun…
Now that you have installed Studio Deluxe, you can use it immediately. We
strongly recommend you take this opportunity to experience Studio Deluxe
digital video editing.
In Chapter 3 of the Studio User Guide, you’ll find a quick, easy and enjoyable
tour through the important parts of Studio Deluxe. You can begin right now—
the tour requires no hardware setup, and all the files are pre-organized on your
CD-ROM.
SECTION 7: TECHNICAL NOTES
1. Updates
The first time you run Studio you will be prompted to check the Pinnacle
Systems website for updated software. We strongly recommend you go
through this automated online version checking procedure, and download
and install the update if one is available.
We also recommend that you check for new updates periodically. You can
do this by selecting the Help/Software Updates menu command.
2. Preview Performance of Hollywood FX transitions
Because Hollywood FX are complex 3D transitions, previews work
differently than with other effects.
If your graphics board supports the 3D routines used by Hollywood FX,
Studio can use the 3D accelerator hardware on your graphics board for realtime previews. Currently graphics boards using the Nvidia Geforce 2,
Nvidia GeForce 3 and ATI Radeon chips support this. If your graphics
board uses one of these chips, select Hardware Acceleration in Setup >
Edit. (You may need to install the latest drivers for your graphics board)
If you don’t have hardware 3D acceleration, Studio uses software
acceleration. Due to the complex nature of these 3D transitions, previews
work differently than do 2D transitions:
When you preview in the Player Window, Hollywood FX plays at reduced
resolution. Depending on your PCs performance, real-time previews may
not be possible. Playback speeds may be as low as a few frames per second.
This affects preview only-when you Make Movie; your transition is
rendered at full resolution and frame rate.
Studio Deluxe
14
Page 17

When you preview with the scrubber and hold down the Alt key, the
transition plays at full resolution but--depending on your PC’s capabilities-may not play in real time. Again, this affects preview playback only. When
you Make Movie the transition is rendered at full resolution and frame rate.
3. Hard disks for capture
For video editing we recommend you use a second hard disk in your system
for capturing and playback. The hard disk must be capable of playing
reading and writing at a sustained rate of 4 MB per second. This can be a
fast EIDE hard disk. For best results, enable your hard disk as follows:
Open the Windows 98 SE Device Manager and click Drives, Settings and
enable the DMA checkbox.
4. DV Camcorder support
If you get an error message from Studio when you switch to capture mode,
you may have to make a special setting in Windows to support your
camcorder. From Windows device manager, select the "1394 Bus
Controller" device (OHCI Compliant IEEE 1394 Host Controller) and click
the "Properties" button. Go to the "Settings" tab. Check the box labeled
"Support Non-Compliant Devices". Now restart your computer. Windows
should detect your camcorder when it is plugged in and load the appropriate
DV camcorder drivers. This should allow Studio DV / Studio DVplus to
capture video from your camcorder.
5. SmartCapture and Analog sources
Preview quality capture is only available when capturing from a DV source.
Video captured from analog sources is always saved at full quality
6. SmartCapture on DV tapes with multiple timecode segments
When you use the SmartCapture feature by capturing in preview quality,
you must only capture a single timecode segment. If you have a blank spot
on your tape that causes the timecode to reset to zero, you need to capture
this section separately. When recapturing the video in full quality to make
the final movie, Studio uses timecode to locate the correct section of tape,
and if the timecode resets within a single capture it will not be possible to
do so. Studio automatically stops capturing (for preview-quality captures) if
a break in timecode is detected.
Quick Install Guide
15
Page 18

SECTION 8: TROUBLESHOOTING AND TECHNICAL SUPPORT
Before you begin troubleshooting, make sure of the following:
1. You have all current Operating System updates for Windows. If not, go
to http://windowsupdate.microsoft.com/default.htm
and download them.
2. All other installed hardware is functioning normally with the latest
drivers, and is not flagged in Device Manager (Start > Settings >
Control Panel > System > Device Manager). If any devices are flagged,
you should resolve these issues before starting installation.
INSTALLATION
Problem: Images are missing from the recording, or the video is jerky.
Possible cause:
Solution
When working with some UDMA hard disks, the playback may
“jump” when file is played back at higher data rates. This can be
traced back to the fact that the hard disk carries out a recalibration
while reading the file, thus interrupting playback.
This problem is not caused by Studio, but is the result of the manner in
which the hard disk operates and interacts with other system
components.
There are several solutions you can use to increase the speed of your
hard disk:
1. Enable DMA for your hard disk (see the next section for
instructions).
2. End task on background applications.
Before opening your Studio product, hold down the Ctrl and Alt
keys on the keyboard, then hit Delete. This will open the Close
Program window. Click on the individual applications listed in
the Close Program window and select End Task. Do this for all
applications listed in Close Programs EXCEPT Explorer and
Systray.
Your hard disk’s transfer speed is too low.
Studio Deluxe
16
Page 19

3. Click on Start > Programs > Accessories > System Tools >
ScanDisk.
4. Make sure Thorough is checked, and click Start (this may take
awhile).
5. After scandisk is done, Click on Start > Programs > Accessories
> System Tools > Disk Defragmenter (this may take awhile).
6. Turn off Energy-saving features (point your mouse on your
desktop, right click, and select Properties > Screensaver > (under
Energy… Settings). Make sure everything under Settings for…
power schemes is set to Never.
7. Go to Start > Settings > Control Panel > System. Click on the
Performance tab, then File System, then the Troubleshooting tab.
8. Click to the left of Disable write-behind caching for all drives
option to select it, and click OK.
9. Under the hard-disk tab, set the Read-ahead optimization option
to None.
In general, this will result in an increase in the data transfer rate.
CAUTION: In some hard disks, this can result in a decrease in the write
rate!
General Note: Video Editing programs do not multi-task very well. Do not use
any other program while Making Movie (videotape or CD) or Capturing.
Enabling DMA for your Hard disk
DMA is an abbreviation of direct memory access, a technique for transferring
data from main memory to a device without passing it through the CPU.
Enabling DMA for a hard drive can significantly improve data transfer rates
and improve system performance.
Under the Windows 2000 and XP operating systems DMA is enabled by
default. This is not the case with Windows 98 / Millennium edition.
Quick Install Guide
17
Page 20

To enable DMA on a Windows 98 / Millennium system:
1.
Go to
2. Click to the next tab called Device Manager.
3. Open the Disk drives category.
4. There should be an item called GENERIC IDE DISK TYPExx (xx
5. Highlight this item and click on Properties.
6. Click on the Settings tab and locate a checkbox called DMA.
7. Check this option and press OK in the warning box that follows.
8. Press OK on the Properties box and close the device manager.
9. Restart the system.
Start -> Settings -> Control Panel and open the System
icon.
can be any number)
TECHNICAL SUPPORT.
Pinnacle Systems has FREE 24 x 7, self-service troubleshooting
assistance. 24 hours a day, 7 days a week, you have threee two ways
to find answers to your questions.
To access technical support got to
http://www.pinnaclesys.com/support/studio
Then and Click “Studio Deluxe” From here you may choose the
following support options
FAQs (Frequently Asked Questions).
1.
View 100's ofover 100 technical questions and their solutions on a
wide range of subjects. This is the best way to get your questions
answered. Here you can easily find answers to the most common
questions, as well as download the latest updates.
with the 20 most commonly read questions listed. It is also easy to
sort the documents by problem category, by using the "Category"
pull down menu.
Ask a Question, Find an Answer.
2.
question to see a list of the most likely solutions. Using this
natural language search, you can type in your question or the
symptom of your problem, such as "I am having problems
outputting to tape" or "I get an error message when I try to
They are sorted
Simply type in your
Studio Deluxe
18
Page 21

capture". If you do not get relevant solutions, try rephrasing your
question. For example, instead of entering "I get an error", try "I
get an error that states that my data rate is below 4000 kbs when I
capture".
You can also select a Category from the pull down list to see
questions/issues grouped together. For example, if you have a
question about installing the hardware or software, choose the
Category "Setup, Install and Configuration Issues" to see the top
10 installation questions. The categories follow the main features
of Studio 8, Capture, Edit, Make and Output, along with some
other general categories.
Discussion Forum.
3.
registered to use this FREE service.
online Discussion Forum to see if someone has already
encountered your question. Post your question on the Discussion
Forum and get help from Pinnacle Systems and other users. This
forum is also searchable so you can—for example—type in
“dropping frames and discussions with solutions on this topic will
be displayed.
Once you post to the Discussion Forum, you can get an email
notification when someone has replied to your question. To get
email notification, after you post your question, simply click on
the Email button in the upper right hand corner of the Discussion
Forum browser window, then click OK.
Email Support.
4.
questions using our website, Pinnacle Systems also offers
troubleshooting and technical support by email. Email is usually
responded to within 48 hours (excluding weekends and holidays).
Use the Ask a Question section of the support web site to submit
an email. Before the email is submitted, 5 suggested solutions to
your issue will be presented to you. Please review them. Over 70%
of customer that begin to submit their question, find their answer
in these suggested solutions.
There are nearly 100,000 users that have
Search Pinnacle Systems’
If you are unable to find answers to your
Quick Install Guide
19
Page 22

SECTION 9: WARRANTY
Pinnacle End User License Agreement
This End User License Agreement (“License”) is a legal agreement between
you and Pinnacle Systems (“Pinnacle”) regarding Pinnacle’s software and the
accompanying documentation (collectively, the “Software”). CAREFULLY
READ THE FOLLOWING LICENSE. USING THIS SOFTWARE
INDICATES YOUR ACCEPTANCE OF THIS LICENSE. IF YOU DO NOT
ACCEPT OR UNDERSTAND THE TERMS OF THIS LICENSE, YOU
SHOULD NOT INSTALL THE SOFTWARE AND PROMPTLY RETURN
THIS PRODUCT TO YOUR VALUE-ADDED RESELLER.
1. License Grant
. Subject to the restrictions set forth below, this License
grants you a non-exclusive, perpetual license to (a) install the Software on only
one computer; (b) use or authorize use of the Software on only one computer;
(c) make one copy of the Software, in machine-readable form, solely for
backup purposes; provided you include all copyright and other proprietary
rights notices on the copy and (d) transfer the Software and this License to
another party if the other party agrees to accept the terms and conditions of this
License. If you transfer the Software, you must at the same time either transfer
all copies to the same party or destroy any copies not transferred. If you
transfer possession of any copy of the Software to another party, your License
is automatically terminated.
2. License Restrictions.
You may not, or allow any third party to, (a) rent,
lease, sell, loan or otherwise transfer the Software or any of your rights and
obligations under this License; (b) install the Software on a network for use by
multiple users, unless each user has purchased a license; (c) reverse-engineer,
decompile or disassemble the Software or hardware in whole or in part; (d)
remove or destroy any copyright notices or other proprietary markings of the
Software or any third-party software; (e) modify or adapt the Software, merge
the Software into another program or create derivative works based on the
Software; (f) make copies of or distribute, for profit or otherwise, the Software,
except as expressly provided above; (g) make any alteration, modification,
connection, disconnection, improvement or adjustment of any kind to or use
the Software except as explicitly contemplated in the enclosed documentation
and in this License and (h) sublicense, transfer or assign this License or any of
the rights and obligations granted under this License, except as explicitly
contemplated in this License. Any purported transfer or assignment will be
void.
Studio Deluxe
20
Page 23

3. Export Restrictions.
The export and re-export of Pinnacle software
products are controlled by the United States Export Administration Regulations
and such software may not be exported or re-exported to any country to which
the United States embargoes goods. In addition, Pinnacle software may not be
distributed to persons on the Table of Denial Orders, the Entity List, or the List
of Specially Designated Nationals. By downloading or using a Pinnacle
software product you are certifying that you are not a national of any country to
which the United States embargoes goods and that you are not a person on the
Table of Denial Orders, the Entity List, or the List of Specially Designated
Nationals.
4. Ownership.
The license granted hereunder does not constitute a transfer or
sale of ownership rights in or to the Software. Except for the license rights
granted above, Pinnacle retains all right title and interest in and to the Software
including all intellectual property rights therein. The Software is protected by
applicable intellectual property laws, including United States copyright laws
and international treaties.
5. Third Party Proprietary Property.
This Software may contain the
proprietary property of others, which has been licensed to Pinnacle, your use of
the Software is expressly conditioned on your agreement not to remove any
copyright notices or other proprietary markings of the third party software.
6. Security.
You acknowledge and agree that in order to protect the integrity of
certain third party content, Pinnacle and/or its licensors may provide for
Software security related updates that will be automatically downloaded and
installed on your computer. Such security related updates may impair the
Software (and any other software on your computer which specifically depends
on the Software) including disabling your ability to copy and/or play "secure"
content, i.e. content protected by digital rights management. In such an event,
Pinnacle and/or its licensors shall use reasonable efforts to promptly post
notices on Pinnacle’s web site explaining the security update and providing
instructions to end-users for obtaining new versions or further updates of the
Software that restore access to secure content and related features.
7. Term and Termination.
This License shall be effective upon installation of
the Software and shall terminate upon the earlier of (a) your failure to comply
with any term of this License; (b) return, destruction or deletion of all copies of
the Software in your possession or (c) transfer of the Software and this License
to another party in accordance with Section 1(d). Pinnacle’s rights and your
obligations shall survive termination of this License.
Quick Install Guide
21
Page 24

8. Limited Warranty.
Pinnacle warrants to the original licensee that the
Software, as delivered, will perform in accordance with the accompanying
documentation for a period of 30 days from the date of the original purchase
(“Limited Warranty”). Pinnacle’s entire liability and your exclusive remedy for
breach of the preceding Limited Warranty shall be, at Pinnacle’s sole option,
repair or replacement of the Software that does not meet the warranty set forth
herein and that is returned to Pinnacle. This limited warranty shall be void if
failure of the Software has resulted from any accident, abuse, misuse or
misapplication by you. Any replacement Software will be warranted for the
remainder of the original warranty period or 30 days, whichever is longer.
9. NO OTHER WARRANTIES.
EXCEPT AS SET FORTH ABOVE, THE
SOFTWARE IS PROVIDED ON AN “AS IS” BASIS. YOU ASSUME ALL
RESPONSIBILITIES FOR THE QUALITY AND PERFORMANCE OF THE
SOFTWARE. TO THE MAXIMUM EXTENT PERMITTED BY
APPLICABLE LAW, PINNACLE DISCLAIMS ALL WARRANTIES,
EITHER EXPRESS OR IMPLIED, INCLUDING BUT NOT LIMITED TO
IMPLIED WARRANTIES OF MERCHANTABILITY,
NONINFRINGEMENT, AND FITNESS FOR A PARTICULAR PURPOSE.
LICENSOR DOES NOT WARRANT THAT THE FUNCTIONS
CONTAINED IN THE SOFTWARE WILL MEET YOUR
REQUIREMENTS, BE UNINTERRUPTED OR ERROR FREE.
10. LIMITATION OF LIABILITY.
YOU AGREE THAT IN NO EVENT
WILL PINNACLE BE LIABLE FOR ANY CONSEQUENTIAL, SPECIAL,
INDIRECT, INCIDENTAL OR PUNITIVE DAMAGES WHATSOEVER,
EVEN IF PINNACLE HAS BEEN ADVISED OF THE POSSIBILITY OF
SUCH DAMAGES. IN NO EVENT SHALL PINNACLE’S LIABILITY
EXCEED THE TOTAL AMOUNT OF THE FEES PAID FOR THE
SOFTWARE. Some states/jurisdictions do not allow the limitation or exclusion
of incidental or consequential damages in certain circumstances, so the above
limitations may not apply in some circumstances.
Studio Deluxe
22
Page 25

11. General.
This License is governed by the laws of the State of California
and by the federal laws of the United States, without reference to conflict of
laws principles. The federal and state courts within the County of Santa Clara,
California shall have excusive jurisdiction to adjudicate any dispute arising out
of this License and you hereby consent to the personal jurisdiction of the
federal and state courts within the County of Santa Clara, California. This
License is the entire agreement between you and Pinnacle and supersedes any
other communication with respect to the Software. No modification of or
amendment to this License will be effective unless in writing signed by both
parties. If any provision of this License is held invalid or unenforceable, the
remainder of this License will continue in full force and effect.
Quick Install Guide
23
Page 26

Anbieter /
Anschrift /
Produkt /
Konformitätserklärung nach ISO/IEC Guide 22
Declaration of conformity in accordance with
ISO/IEC Guide 22
Nr. / No 1.01
:
Supplier
: Frankfurter Strasse 3c
Address
:
Product
Pinnacle Systems GmbH
38122 Braunschweig, Germany
DV500 / DV500 PLUS
Das oben beschriebene Produkt ist konform mit: /
Dokument-Nr.
Document No.
EN 55022 : 1998
Class B
EN 55024 : 1999 Störfestigkeitseigenschaften für Einrichtungen der Informationstechnik - Grenzwerte und Prüfverfahren
EN 61000-4-2 : 1995
+ A1 : 1998
EN 61000-4-3 : 1996
+ A1 : 1998
EN 61000-4-4 : 1995 Störfestigkeit gegen schnelle transiente elektrische Störgrößen/BURST
EN 61000-4-6 : 1996 Störfestigkeit gegen leitungsgeführte Störgrößen, induziert durch hochfrequente Felder
ENV 50204 : 1995 Störfestigkeit gegen hochfrequente elektromagnetische Felder von digitalen Funktelefonen
EN 61000-3-2 : 1998
+ A14 : 2000
EN 61000-3-3 : 1996 Grenzwerte für Spannungsschwankungen und Flicker
EN 60950 : 2000 Sicherheit von Einrichtungen der Informationstechnik
Titel
Title
Grenzwerte und Messverfahren für Funkentstörungen von Einrichtungen der Informationstechnik
Limits and methods of measurement of radio interference characteristics of information technology equipment
Immunity characteristics for information technology equipment - limits and methods of measurement
Störfestigkeit gegen Entladung statischer Elektrizität
Electrostatic discharge immunity test
Störfestigkeit gegen hochfrequente elektromagnetische Felder
Radiated, radio-frequency, electromagnetic field immunity test
Electrical fast transient/burst immunity test
Immunity to conducted disturbances, induced by radio-frequency fields
Radiated electromagnetic field from digital radio telephones - Immunity test
Grenzwerte für Oberschwingungsströme
Limitations for harmonic currents
Limitations of voltage fluctuations and flicker
Safety of information technology equipment
The product described above is in conformity with:
Dieser Erklärung liegt zugrunde: Prüfbericht(e) des EMV-Prüflabors
This certification is based on: Test report(s) generated by EMI-test laboratory
Braunschweig, 14. November 2001 /
November 14th, 2001
.................................. ..................................
Bernd Riemann Oliver Hellmold
Entwicklungsleiter Hardware Finanzdirektor /
Engineering Manager Hardware
Studio Deluxe
24
(Rechtsverbindliche Unterschrift
Director Finance
/ Legally Binding
)
Page 27

FCC Compliance Statement
F
OR YOUR OWN SAFETY
NOTE: Shielded cables should be used for a composite interface. This is to ensure
continued protection against radio frequency interference.
FCC W
NOTE: This equipment has been tested and found to comply with the limits for a Class
B digital device, pursuant to Part 15 of the FCC Rules. These limits are designed to
provide reasonable protection against harmful interference in a residential installation.
This equipment generates, uses and can radiate radio frequency energy and, if not
installed and used in accordance with the instructions, may cause harmful interference
to radio communications. However, there is no guarantee that interference will not occur
in a particular installation. If this equipment does cause harmful interference to radio or
television reception, which can be determined by turning the equipment off and on, the
user is encouraged to try to correct the interference by one or more of the following
measures:
•
•
•
•
C
Changes or modifications not expressly approved by the party responsible for
compliance could void the user's authority to operate the equipment.
Shielded interface cable must be used in order to comply with the emission limits.
L
This device complies with Part 15 of the FCC Rules. Operation is subject to the
following two conditions: (1) this device may not cause harmful interference, and (2)
this device must accept any interference received, including interference that may cause
undesired operation.
ARNING STATEMENT
Reorient or relocate the receiving antenna.
Increase the separation between the equipment and receiver.
Connect the equipment into an outlet on a circuit different from that to which the
receiver is connected.
Consult the dealer or an experienced radio/TV technician for help.
AUTION
ABEL WARNING
Tested To Comply
With FCC Standards
FOR HOME OR OFFICE USE
DV500
DV500 PLUS
Quick Install Guide
25
Page 28

Notes
Studio Deluxe
26
Page 29

3LQQDFOH
6WXGLR'HOX[H
)U)LOPSURGXNWLRQHQLQ3URILTXDOLWlW
6FKQHOOLQVWDOODWLRQ
Page 30

%HYRU6LHEHJLQQHQ
Achtung:
AVDV-Videoaufnahme-Karte. Bauen Sie Ihre AVDV-Karte wie unten
beschrieben in Ihren PC ein,
installieren.
Im folgenden erfahren Sie, welche Hard- und Softwarekomponenten Sie für
den ordnungsgemässen Betrieb von
Komponenten sich im Lieferumfang von
Im Lieferumfang von Pinnacle Studio Deluxe befindet sich eine
Sie die Studio-Software von Pinnacle
bevor
STUDIO DELUXE
STUDIO DELUXE
benötigen und welche
befinden.
6\VWHPDQIRUGHUXQJHQ
Bitte überprüfen Sie vor Installation von
folgenden Anforderungen erfüllt:
•
Intel Pentium oder AMD Athlon 500 MHz oder höher
•
128 MB RAM (256 MB empfohlen)
•
Windows 98SE, Millennium, 2000 oder XP
•
DirectDraw kompatible Sound- und Grafikkarten
•
Maus
•
CD-ROM-Laufwerk
•
Ein freier 32-Bit PCI-Steckplatz
•
500 MB freier Festplattenspeicher für die Softwareinstallation
•
120 MB freier Festplattenspeicher pro 20 Minuten Videoaufnahme in
Vorschauqualität (4 GB pro 20 Minuten fertiger Filmproduktion). (nur
für DV-Aufnahme)
•
4 GB pro 20 Minuten Analogvideo oder DV-Video in voller Qualität
•
Festplatte muß in der Lage sein, eine Datentransferrate von mindestens
4 MB pro Sekunde aufrechtzuhalten (spezielle Festplatten für
Videoaufnahmen empfohlen)
•
Optional: CD-R- oder CDRW-Laufwerk, um Video-CDs oder
SuperVideo-CDs zu erstellen
•
Optional: DVD-R DVD-RW- oder DVD+RW-Laufwerk, um DVDs zu
erstellen
STUDIO DELUXE
, ob Ihr System die
Studio Deluxe
2
Page 31

/LHIHUXPIDQJ
Überprüfen Sie die Vollständigkeit von
Installation beginnen. Das System umfasst die folgenden Komponenten*:
AVD Karte blueBOX
IEEE-1394 Kabel Audio-Durchschleifkabel
Pinnacle Studio und Hollywood FX Plus für Studio CD-ROMs
STUDIO DELUXE
, bevor Sie mit der
Pinnacle Studio Handbuch, sowie die vorliegende Schnellinstallation
*Inhalt bzw. Aussehen kann variieren.
Bitte setzen Sie sich mit Ihrem Händler in Verbindung, falls eines der
genannten Teile fehlen sollte.
Die Hardwarekomponenten eines Computers sind gegenüber elektrostatischer Aufladung sehr empfindlich. Bitte nehmen Sie Ihre AVDVKarte nicht aus ihrer antistatischen Verpackung heraus, bevor Sie diese
installieren.
Schnellinstallation
3
Page 32

Pinnacle Studio Deluxe-Installation
Defragmentieren der Festplatte
Vor Installation und Konfiguration Ihrer AVDV-Karte sollten Sie Ihre
Festplatte(n) defragmentieren. Ein entsprechendes Windows-Hilfsprogramm
finden Sie unter Start > Programme > Zubehör > Systemprogramme >
Defragmentierung.
ABSCHNITT 1: INSTALLATION DER AVDV-KARTE
Bitte beachten Sie im Interesse Ihrer eigenen Sicherheit und zur Vermeidung
von Schäden an AVDV-Karte oder Ihrem Computer die folgenden Hinweise:
Die Hardwarekomponenten eines Computers sind gegenüber
•
elektrostatischer Aufladung sehr empfindlich. Bitte entladen Sie deshalb
eventuelle elektrostatische Aufladungen von Ihrem Körper, bevor Sie diese
Komponenten mit Ihren Händen bzw. mit irgendwelchen Werkzeugen
berühren.
Bitte achten Sie vor dem Öffnen der Computerabdeckung unbedingt
•
darauf, dass das Netzkabel nicht mehr mit Computer und dem Netzstecker
verbunden ist.
Beachten Sie bei Installation der AVDV-Karte die folgenden Punkte:
1. Entladen Sie elektrostatische Aufladungen von Ihrem Körper, indem
Sie die Metallabdeckung Ihres Computers berühren.
2. Schalten Sie den Computer sowie alle Peripheriegeräte aus und
entfernen Sie sämtliche Netz- sowie sonstigen Kabel.
3. Lösen Sie die Schrauben Ihrer Computerabdeckung und nehmen Sie
die Abdeckung ab.
4. Wählen Sie einen freien PCI-Steckplatz.
5. Entfernen Sie die Kartenblende auf der Rückseite Ihres PCs (siehe
dazu auch die Bedienungsanleitung zu Ihrem Computer).
6.
Fügen Sie die Karte behutsam in den gewählten Steckplatz ein. Halten
Sie dazu die Karte an der Oberkante fest und drücken Sie diese mit
beiden Enden gleichzeitig vorsichtig in den Steckplatz hinein.
Drücken Sie noch einmal auf die Oberkante der Karte und prüfen Sie,
ob diese
Sollten Sie die Karte nicht problemlos einpassen können,
wenden Sie auf keinen Fall Gewalt an (u. a. könnten die
fest in den Steckplatz eingepasst ist.
Studio Deluxe
4
Page 33

Kontaktstifte verbogen werden), sondern ziehen Sie die Karte
vorsichtig wieder heraus und versuchen Sie es erneut.
7. Sobald die Karte fest in ihrem Steckplatz sitzt, können Sie die
Schrauben wieder anziehen und die Abdeckung Ihres
Computers wieder einbauen. Schliessen Sie sämtliche zuvor
entfernten Kabel einschliesslich des Netzkabels wieder an.
8. Die Installation Ihrer AVDV-Karte ist damit abgeschlossen und
Sie können Ihren Computer neu starten.
ABSCHNITT 2: INSTALLATION DER AVDV-TREIBER
Bitte lesen Sie vor dem Öffnen und Installieren Ihrer Studio-Software die in
Anhang F des Studio-Benutzerhandbuches enthaltene Lizenzvereinbarung, da
Sie mit Öffnen der CD-ROM-Verpackung Ihr Einverständnis mit den in dieser
Vereinbarung enthaltenen Bedingungen abgeben. Sollten Sie damit nicht
einverstanden sein, lassen Sie die CD-ROM-Verpackung ungeöffnet und geben
Sie das gesamte Studio Deluxe-Paket dorthin zurück, wo Sie es erworben
haben.
1. Schalten Sie nach der Installation der AVDV-Karte Ihren Computer
wieder an.
2. Der Windows-Assistent Neue Hardware hinzufügen wird die neue
Karte automatisch entdecken.
3. Bitte brechen Sie die Hardware-Installation an dieser Stelle ab, da die
Treiber für Studio Deluxe erst nach der Installation von Studio
installiert werden.
4. Legen Sie nach Abbruch der Windows-Treiberinstallation Ihre Studio
CD-ROM in das CD-ROM-Laufwerk Ihres Computers ein.
ABSCHNITT 3:
INSTALLATION DER PINNACLE STUDIO SOFTWARE
1. Wenn auf Ihrem System die Autorun-Funktion aktiviert ist, wird das
Installationsprogramm automatisch aufgerufen.
Hinweis: Ist diese Funktion nicht aktiviert, navigieren Sie zu Ihrem
CD-ROM-Laufwerk, doppelklicken Sie auf Setup.exe und fahren Sie
fort mit Schritt 2.
Schnellinstallation
5
Page 34

2. Wählen Sie die gewünschte Sprache und bestätigen Sie mit „OK“.
3. Geben Sie Ihre Seriennummer ein (diese befindet sich aussen auf der
Rückseite des Pinnacle Studio-Handbuches). Klicken Sie dann auf
„Weiter“.
4. Stimmen Sie der Lizenzvereinbarung zu (klicken Sie auf „Ich stimme
zu“). Gehen Sie nicht damit konform bzw. können Sie die
Bedingungen nicht verstehen, sollten Sie das Produkt umgehend an
Ihren Händler zurückgeben.
5. Wählen Sie „Typische“ Installation (empfohlen). Nur erfahrene
Anwender sollten die Option „Benutzerdefiniert“ wählen.
6. Klicken Sie so oft auf „Weiter“, bis Sie danach gefragt werden, ob auf
Ihrem Desktop ein Shortcut zu Studio 8 angelegt werden soll. Klicken
Sie dann auf „Ja“.
7. Treiber Installation Nachdem die Studio-Software installiert wurde,
werden die Treiber für die ADTV-Karte installiert. Bei Installation für
Windows XP oder Windows 2000 kann eine Dialogbox Sie darauf
hinweisen, dass die Treiber den Windows Logo-Test nicht bestanden
haben. Die Treiber wurden von Pinnacle Systems intensiv getested
und sind mit Windows kompatibel. Sie können daher die Windows
Dialogbox ignorieren und auf „Weiter“ klicken, um mit der
Installation der Treiber fortzufahren.
8. Systemstart. Sie werden ggf. zum Neustart Ihres Systems aufgefordert.
9. Registrierung. Zum Abschluss erhalten Sie die Möglichkeit, Ihre
Studioversion mit Hilfe Ihres Internetanschlusses registrieren zu
lassen, wobei drei wichtige Gründe für eine Registrierung sprechen:
Mit Ihrer Registrierung verfügt Pinnacle Systems über die Option,
•
Sie über kostenfreie Studio-Upgrades zu informieren.
Zudem können Sie von Pinnacle Systems spezielle Angebote und
•
Promotions erhalten.
Eine Registrierung ist immer notwendig, wenn Sie technischen
•
Support anfordern.
Studio Deluxe
6
Page 35

ABSCHNITT 4: INSTALLATION
VON HOLLYWOOD FX PLUS FÜR STUDIO-SOFTWARE
1. Wenn auf Ihrem System die Autorun-Funktion aktiviert ist, wird das
Installationsprogramm automatisch aufgerufen.
Hinweis: Ist diese Funktion nicht aktiviert, navigieren Sie zu Ihrem
CD-ROM-Laufwerk, doppelklicken Sie auf Setup.exe und fahren Sie
mit Schritt 2 fort.
2. Geben Sie Ihre Seriennummer ein (diese befindet sich auf der CDHülle von Hollywood FX Plus für Studio CD). Klicken Sie dann auf
„Weiter“.
3. Wählen Sie „Hollywood FX Plus installieren“.
4. Klicken Sie so oft auf „Weiter“, bis Sie zur nochmaligen Eingabe der
Seriennummer aufgefordert werden. Sollte diese noch nicht angezeigt
werden, geben Sie sie nochmals ein und bestätigen Sie mit „OK“.
5. Registrierung. Sie erhalten nun die Gelegenheit, Ihre Hollywood FX
Plus-Version registrieren zu lassen und dem Club Hollywood
beizutreten. Sie können sich schnell und komfortabel über Ihren
Internetanschluss registrieren lassen, wobei drei wichtige Gründe für
eine Registrierung sprechen:
Mit Ihrer Registrierung verfügt Pinnacle Systems über die Option,
•
Sie über kostenfreie Upgrades in Kenntnis zu setzen.
Sie erhalten Onlinezugriff auf eine Vielzahl von weiteren FX-
•
Effekten mit entsprechenden Software-Upgrades.
Mit Ihrer Registrierung qualifizieren Sie sich für spezielle
•
Angebote und Promotions von Pinnacle Systems.
Eine Registrierung ist immer notwendig, wenn Sie technischen
•
Support anfordern.
Schnellinstallation
7
Page 36

ABSCHNITT 5: ANSCHLUSS VON BLUEBOX UND VIDEOGERÄTEN
In diesem Abschnitt erhalten Sie Informationen darüber, wie Sie Ihre Videogeräte mit Hilfe von geeigneten Kabeln über die blueBOX
ausgeschaltetem Computer
an Ihre Pinnacle AVDV-Karte anschliessen
bei
können.
Hier eine Abbildung der AVDV-Karte mit ihren Anschlüssen:
Anschluss für DV-Geräte
$QVFKOXVV
Anschluss für DV-Geräte
$QVFKOXVV
$XGLR$XVJDQJ
blueBOX-Anschluss
(26-Pin, Typ D)
Die folgende Abbildung zeigt die einzelnen Anschlüsse der blueBOX:
Studio Deluxe
8
Videoeingänge Audioeingänge
-
S-Video Composite Links Rechts
Videoausgänge Audioausgänge
Page 37

$QVFKOLHVVHQYRQ9LGHRXQG$XGLR*HUlWHQ
DV Camcorder
Audio Out an Soundkarte Line in
zur Soundkarte
DV-Geräte
IEEE
blueBOX
AudioVideo
Audio Out Sondkarte
Audio Out
Lautsprecher
blueBOX
Eingang
Ausgang
Schnellinstallation
9
Page 38

$QVFKOLHVVHQGHUEOXH%2;
g
Mit Hilfe der blueBOX können Sie analoge Videogeräte oder einen externen
Monitor mit Ihrer AVDV-Karte verbinden, wobei Sie die blueBOX mit Hilfe
des entsprechenden Kabels direkt an die AVDV-Karte anschliessen.
blueBOX-Ausgan
blueBOX-Kabel ¾ D-Sub26-Anschluss
AVDV-Karte
$QVFKOLHVVHQGHV$XGLR'XUFKVFKOHLINDEHOV
Zum Überwachen der enthaltenen Audioteile über Ihre PCLautsprecher müssen Sie den Audioausgang auf der Rückseite
Ihrer AVDV-Karte mit Hilfe des im Lieferumfang enthaltenen
Audio-Durchschleifkabels mit dem entsprechenden Eingang (Line-IN) Ihrer
Audiokarte verbinden.
$QVFKOLHVVHQYRQ9LGHRJHUlWHQ
Nachfolgend erhalten Sie die Beschreibungen der jeweils möglichen
Verkabelungsoptionen Ihrer Videoquelle, auf die aus Gründen der Einfachheit
immer als Player Bezug genommen wird. Der Player liefert dabei die Videound Audiosignale, die Sie zur Weiterverarbeitung auf die Festplatte Ihres PCs
digitalisieren („aufnehmen“).
Danach werden die einzelnen Anschlüsse an den Rekorder erläutert, wobei es
sich hierbei in der Regel um einen Videorekorder handeln dürfte, auf den Sie
Ihre fertige Filmproduktion ausgeben.
Player: DV-Gerät
Unter den möglichen Geräten, die an die Karte angeschlossen werden können,
befinden sich auch DV- oder Digital 8-Video-Camcorder bzw. Rekorder mit
integriertem IEEE-1394/DV-Anschluss. Auf vielen Geräten wird dieser
Anschluss auch als “i.Link” bezeichnet.
Studio Deluxe
10
Page 39

Verwenden Sie zum Anschliessen Ihres DV-Camcorders/
g
g
g
g
gang
Videorekorders an
STUDIO DELUXE
das im Lieferumfang
enthaltene IEEE-1394 DV-Kabel.
1. Verbinden Sie das IEEE-1394-Kabel mit Ihrer
Pinnacle AVDV-Karte.
Verbinden Sie den 6-Pin-Anschluss des IEEE-1394
DV-Kabels mit einer der 1394-Datenbuchsen Ihrer AVDV-Karte.
2. Verbinden Sie das IEEE-1394-Kabel mit Ihrem DV-Gerät.
Verbinden Sie den 4-Pin-Anschluss des IEEE-1394 AV-Kabels mit der
DV IN/OUT- bzw. der DV OUT-Buchse Ihres Camcorders/
Videorekorders.
Video- und Audiosignale werden nun gemeinsam via IEEE-1394-Kabel
übertragen; für den Anschluss Ihres DV-Gerätes als Player werden damit keine
weiteren Verbindungen benötigt.
Player: S-Video-Geräte / Composite-Video-Geräte
S-Video
Wählen Sie diese Anschlussart, wenn Ihr Player über einen S-Video-Ausgang
verfügen sollte.
Hier ein Überblick über die dabei relevanten Anschlüsse:
Player-Ausgan
S-Video-Ausgan
Audio-Ausgang L
Audio-Aus
R
blueBOX-Eingan
S-Video-Eingan
¾
Audio-Eingang L
¾
Audio-Eingang R
¾
Schnellinstallation
11
Page 40

Composite-Video
g
g
g
g
gang
Wählen Sie diese Anschlussart, wenn Ihr Player über einen Composite-VideoAusgang verfügen sollte.
Hier ein Überblick über die dabei relevanten Anschlüsse:
Player-Ausgan
Composite-Video-Ausgan
Audio-Ausgang L
Audio-Aus
R
blueBOX-Eingan
Composite-Video-Eingan
¾
Audio-Eingang L
¾
Audio-Eingang R
¾
Sollte Ihr Player sowohl über S-Video- als auch Composite-Video-Ausgänge
verfügen, sollten Sie aus Gründen der höherwertigeren Videoqualität den SVideo-Ausgang wählen.
Besitzt Ihr Player einen SCART-Anschluss, benötigen Sie einen Adapter, den
Sie überall dort beziehen können, wo Videorekorder verkauft werden.
Rekorder: DV-Geräte
PAL-Geräte:
Die in Nordamerika verkauften Studio Deluxe-Versionen sind nicht
PAL-kompatibel. Viele der in Europa abgesetzten PAL-Geräte
verfügen meist nur über einen DV-
Ausgang
Aufschrift DV OUT (und nicht DV IN/OUT) in der Umgebung der
DV-Buchse erkennen. Mit diesen Geräten ist ein Zurückschreiben
von DV-Daten auf Videoband
dass Sie mit
STUDIO DELUXE
natürlich auch die Analogausgänge
möglich. Bitte beachten Sie,
nicht
verwenden können, um Ihre fertigen DV-Filmprojekte auf einen
analogen Videorekorder auszugeben.
. Sie können dies an der
Auch DV- oder Digital 8-Video-Geräte mit integriertem IEEE-1394/DVAnschluss können an Ihre AVDV-Karte angeschlossen werden. Auf vielen
Geräten wird dieser Anschluss auch als “i.Link” bezeichnet.
Bitte verbinden Sie Ihren DV-Camcorder/Videorekorder mit der AVDV-Karte.
Verwenden Sie dazu das im Lieferumfang enthaltene IEEE-1394 AV-Kabel.
Studio Deluxe
12
Page 41

1. Anschliessen des IEEE-1394-Kabels an die AVDV-Karte.
g
g
Verbinden Sie den 6-Pin-Anschluss Ihres IEEE-1394 DV-Kabels mit einem
der 1394-Datenbuchsen Ihrer AVDV-Karte.
2. Anschliessen des IEEE-1394-Kabels an ein DV-Gerät.
Verbinden Sie den 4-Pin-Anschluss des IEEE-1394 AV-Kabels mit der DV
IN/OUT-Buchse Ihres DV-Camcorders/Videorekorders.
Mit Hilfe von Pinnacle
STUDIO DELUXE
können Sie entweder DV- oder analoge
Videoausgaben realisieren, nicht jedoch beide Arten gleichzeitig. Unter Studio
(„Optionen/Band erstellen“) können Sie später den jeweils als aktiv
gewünschten Ausgang festlegen.
Rekorder: S-Video-Geräte / Composite-Video-Geräte
S-Video
Wählen Sie diese Anschlussart, wenn Ihr Rekorder über einen
S-Video-Eingang verfügen sollte.
Hier ein Überblick über die dabei relevanten Anschlüsse:
blueBOX-Ausgan
S-Video-Ausgang
Audio-Ausgang L
Audio-Ausgang R
Rekorder-Eingan
¾
S-Video-Eingang
¾
Audio-Eingang L
¾
Audio-Eingang R
Schnellinstallation
13
Page 42

Composite- Video
g
g
g
g
gang
Wählen Sie diese Anschlussart, wenn Ihr Rekorder über einen CompositeEingang verfügen sollte.
Hier ein Überblick über die dabei relevanten Anschlüsse:
blueBOX-Ausgan
Composite-Video-Ausgan
Audio-Ausgang L ¾ Audio-Eingang L
Audio-Aus
R ¾ Audio-Eingang R
Rekorder-Eingan
¾ Composite-Video-Eingan
Bei Vorhandensein von S-Video- und Composite-Video-Eingängen, sollten Sie
sich aus Gründen der höherwertigeren Videoqualität für S-Video entscheiden.
Besitzt Ihr Rekorder einen SCART-Anschluss, benötigen Sie einen Adapter,
den Sie überall dort beziehen können, wo Videorekorder verkauft werden.
Und nun wünschen wir Ihnen viel Spaß…
Nach erfolgreicher Installation von Studio Deluxe können Sie sofort loslegen.
Wir empfehlen Ihnen sogar, diese Gelegenheit zu nutzen und sich ein wenig
mit Ihrem neuen digitalen Videoschnittsystem Pinnacle Studio Deluxe vertraut
zu machen.
In Kapitel 3 des Benutzerhandbuches von Pinnacle Studio finden Sie eine
einfache und kurze Übung für eine beispielhafte Filmproduktion, die Sie
schnell und bestimmt mit viel Freude durch die wichtigsten Programmteile von
Studio Deluxe führen wird. Sie können sofort damit beginnen, ohne dass Sie
irgendwelche Hardware installieren müssen. Alle benötigten ÜbungsDateien befinden sich fix und fertig auf Ihrer Studio Deluxe-CD-ROM.
Studio Deluxe
14
Page 43

ABSCHNITT 7: TECHNISCHE HINWEISE
1. Updates
Wenn Sie Studio zum erstenmal ausführen, werden Sie gefragt, ob Sie die
Pinnacle Systems-Webseite für Software-Updates aufsuchen möchten. Wir
empfehlen Ihnen auf jeden Fall, an dem Online-Check teilzunehmen und –
falls vorhanden – das betreffende Update herunterzuladen und auf Ihrem
System zu installieren.
Zudem sollten Sie diese Webseite hin und wieder besuchen, um nach neuen
Updates Ausschau zu halten. Wählen Sie hierzu die Optionen „Hilfe/
Software-Updates“.
2. Die Vorschau-Leistung von Hollywood FX-Effekten
Hollywood FX ist für komplexe 3D-Übergänge konzipiert, weshalb sich die
integrierte Vorschaufunktion im Verhältnis zu herkömmlichen Effekten
unterscheidet.
Solange die verwendete Grafikkarte die 3D-Programmroutinen von
Hollywood FX unterstützt, kann Studio mit Hilfe der auf der Grafikkarte
integrierten 3D-Beschleuniger-Hardware die Übergänge in Echtzeit
umsetzen. Unter den heute erhältlichen Grafikkarten sind es zur Zeit die
Karten mit integriertem Nvidia GeForce 2-, Nvidia GeForce 3- sowie ATI
Radeon-Chip, die diese Echtzeit-Funktion unterstützen. Sollte Ihre Grafikkarte über einen dieser Chips verfügen, können
Sie unter Setup > Bearbeiten die Option „Hardware-Beschleunigung“
aktivieren, wobei u. U. die aktuellsten Treiber für Ihre Grafikkarte
installiert sein müssen.
Sollten Sie über keine 3D-Hardware-Beschleunigung verfügen, verwendet
Studio die Software-Beschleunigung, wobei aufgrund der Komplexität der
generierten 3D-Übergänge die Vorschaufunktion anders arbeitet als dies bei
2D-Übergängen der Fall ist:
Wenn Sie Ihre Vorschau über das Playerfenster ablaufen lassen, werden die
betreffenden Hollywood FX-Übergänge mit reduzierter Auflösung
wiedergegeben, wobei in Abhängigkeit von der auf Ihrem PC möglichen
Leistung eine Vorschau in Echtzeit u. U. nicht erzielt werden kann. Die
erzeugte Wiedergabegeschwindigkeit beträgt hier ggf. nur wenige
Einzelbilder in der Sekunde. Dies gilt allerdings nur für die Vorschau,
zumal bei der endgültigen Filmerstellung der betreffende Übergang mit
voller Auflösung und Einzelbildrate gerendert wird.
Schnellinstallation
15
Page 44

Bei einer Scrubbing-Vorschau mit Hilfe des Schiebereglers bei gedrückter
Alt-Taste wird der Übergang zwar bei voller Auflösung, jedoch in
Abhängigkeit von Ihrer PC-Leistung u. U. nicht in Echtzeit abgespielt. Dies
gilt auch hier lediglich für die Vorschau und nicht für die endgültige
Filmerstellung, bei der Ihr Videofilm in voller Auflösung und
Einzelbildrate gerendert wird.
3. Festplatten für die Aufnahme
Für die Video-Bearbeitung empfehlen wir Ihnen die Verwendung einer
zweiten Festplatte zum Einlesen und zur Wiedergabe. Diese Festplatte muss
in der Lage sein, bei der Wiedergabe, beim Einlesen und beim Schreiben
eine konstante Datenrate in Höhe von 4 MB/Sek. aufrechtzuerhalten, wobei
es sich durchaus um eine schnelle EIDE-Festplatte handeln kann. Beste
Resultate erzielen Sie, wenn Sie unter Windows 98 SE Ihren GeräteManager öffnen, unter „Laufwerke“ auf den betreffenden Eintrag
doppelklicken, die „Einstellungen“ wählen und das Kontrollkästchen
„DMA“ aktivieren.
4. DV-Camcorder-Support
Sollten Sie während des Umschaltens in den Aufnahmemodus von Studio
eine Fehlermeldung erhalten, müssen Sie zur Unterstützung Ihres
Camcorders eine spezielle Windows-Einstellung vornehmen. Wählen Sie
im Windows-Geräte-Manager unter „1394 Bus Controller“ den Eintrag
„OHCI-kompatibler IEEE-1394 Host Controller“ und klicken Sie auf den
Button „Eigenschaften“. Wählen Sie nun den Tab „Einstellungen“ und
aktivieren Sie das Kontrollkästchen „Inkompatible Geräte unterstützen“.
Starten Sie nun Ihr System neu. Nun sollte Ihr Camcorder von Windows
erkannt werden, falls dieser eingeschaltet ist und die geeigneten DVCamcorder-Treiber laden, womit Studio DV / Studio DVplus das auf Ihrem
Camcorder enthaltene Videomaterial problemlos auf Ihre Festplatte
einlesen müsste.
5. SmartCapture und analoge Quellen
Das Einlesen von Videomaterial in Vorschauqualität funktioniert nur in
Kombination mit einer DV-Quelle. Videomaterial von analogen Videoquellen kann hingegen nur in voller Videoqualität gespeichert werden.
Studio Deluxe
16
Page 45

6. SmartCapture auf DV-Bändern mit mehren Timecode-Segmenten
Bei Verwendung der SmartCapture-Funktion in Zusammenhang mit
Aufnahmen in Vorschauqualität kann immer nur ein einzelnes TimecodeSegment eingelesen werden. Sollte sich auf Ihrem Band ein Leerbereich
befinden, der den Timecode auf Null zurücksetzen muss, muss der
betreffende Bereich separat aufgenommen werden. Beim wiederholten
Aufnehmen des betreffenden Videomaterials für die fertige Filmproduktion
in voller Qualität verwendet Studio zur Lokalisierung des richtigen
Bandbereichs den betreffenden Timecode. Wird der Timecode nun während
einer Einzelaufnahme zurückgesetzt, ist dies nicht mehr möglich; die
Aufnahme (dies gilt für Aufnahmen in Vorschauqualität) wird automatisch
von Studio angehalten, sobald ein Bruch im Timecode ausgemacht wird.
ABSCHNITT 8: FEHLERBEHEBUNG/TECHNISCHER SUPPORT
Bitte überprüfen Sie noch vor Fehlerbehebung, die folgenden Punkte:
1. Sie haben alle aktuellen Betriebssystem-Updates für Windows
installiert. Falls nicht, bitte unter http://windowsupdate.microsoft.com
/default.htm herunterladen.
2. Alle anderen auf Ihrem System installierten Hardware-Komponenten
arbeiten zufriedenstellend und sind mit den aktuellsten Gerätetreibern
ausgestattet. Im Geräte-Manager (Start > Einstellungen >
Systemsteuerung > System > Geräte-Manager) werden keine
Komponenten angezeigt, die mit einem Flaggensymbol als nicht
funktionsfähig versehen sind. Sollte dies nicht der Fall sein, sollten Sie
noch vor Installation die betreffenden Hardware-Probleme bereinigen.
INSTALLATION
Problem: In meinen Aufnahmen fehlen Bilder bzw. die Aufnahmen
ruckeln.
Mögliche Ursache:
Die Datentransferrate Ihrer Festplatte ist zu niedrig.
Lösung
In Kombination mit einigen UDMA-Festplatten kann es vorkommen,
dass die Wiedergabe nicht ruckelfrei erfolgt, wenn die Datei bei
höheren Datenraten abgespielt wird. Dies wiederum kann darauf
zurückzuführen sein, dass bei der betreffenden Festplatte noch
während der Dateiwiedergabe eine Rekalibrierung durchgeführt wird,
die das Playback unterbricht.
Schnellinstallation
17
Page 46

Die Ursache dieses Problems liegt nicht bei Studio, sondern an der Art
und Weise, wie eine Festplatte funktioniert und mit anderen
Systemkomponenten interagiert.
Lösungen zur Steigerung Ihrer Festplattengeschwindigkeit:
1. Aktivieren Sie für Ihre Festplatte die DMA-Funktion (siehe
hierzu den folgenden Abschnitt).
2. Beenden Sie im Hintergrund laufende Anwendungen bzw. Tasks.
Halten Sie noch vor dem Öffnen Ihrer Studio-Anwendung die
Tasten Strg und Alt gedrückt und aktivieren Sie danach die Taste
Entf. Das Dialogfenster Anwendung schließen wird aufgerufen.
Klicken Sie einzeln auf die aufgeführten Anwendungen und
aktivieren Sie MIT AUSNAHME der Einträge Explorer and
Systray jeweils die Schaltfläche Task beenden.
3. Wählen Sie Start>Programme>Zubehör>
Systemprogramme>ScanDisk.
4. Aktivieren Sie unbedingt die Option Intensiv und klicken Sie auf
Start (dies kann eine Weile dauern).
5. Klicken Sie nach Abschluss der ScanDisk-Operation auf Start >
Program-me>Zubehör>Systemprogramme>Defragmentierung
(dies kann eine Weile dauern).
6. Schalten Sie die Energiesparfunktionen aus (positionieren Sie den
Mauszeiger auf einen beliebigen Punkt Ihres Desktops, klicken
Sie mit der rechten Maustaste und wählen Sie Eigenschaften >
Bildschirmschoner > (hier unter Energiesparfunktionen des
Bildschirms… Einstellungen). Achten Sie darauf, dass die unter
Einstellungen für Energieschema Immer an aufgeführten Einträge
alle auf Nie eingestellt sind.
7. Wählen Sie Start > Einstellungen > Systemsteuerung > System.
Klicken Sie auf den Tab Leistungsmerkmale, danach auf
Dateisystem und auf den Tab Problembehandlung.
8. Aktivieren Sie das Kontrollkästchen links neben Verzögertes
Schreiben für alle Laufwerke deaktivieren; bestätigen Sie mit OK.
9. Positionieren Sie unter dem Tab Festplatte den Schieberegler für
Leseoptimierung (Read-ahead) auf Keine.
Mit Hilfe der genannten Maßnahmen lässt sich in der Regel die Datentransferrate erhöhen.
Studio Deluxe
18
Page 47

ACHTUNG: Bei einigen Festplatten können diese Maßnahmen allerdings
die Schreibrate herabsetzen!
Allgemeiner Hinweis: Da Videobearbeitungs-Programme in der Regel nicht
unbedingt für den Multitaskingbetrieb optimiert sind, sollten Sie während der
Filmerstellung (auf Videoband oder CD) keine anderen Programme einsetzen.
Aktivierung der DMA-Funktion für Ihre Festplatte
„DMA“ ist die Abkürzung für Direct Memory Access (direkter
Speicherzugriff), also ein Verfahren, bei dem die Daten ohne Hilfe des
Prozessors (CPU) übertragen werden.
Die Aktivierung der DMA-Funktion kann für eine Festplatte den Datenverkehr
signifikant erhöhen und damit auch die System-Leistung entscheidend
verbessern.
Unter Windows 2000 und Windows XP ist die DMA-Funktion standardmäßig
aktiv geschaltet; nicht hingegen bei den Betriebssystemen Windows 98 und
Millennium.
DMA-Aktivierung unter Windows 98 / Millennium:
1. Wählen Sie Start
Einstellungen
->
Systemsteuerung und öffnen Sie
->
das Symbol System.
2. Aktivieren Sie die Registerkarte Geräte-Manager.
3. Öffnen Sie die unter Laufwerk enthaltenen Einträge.
4. Ein Eintrag mit der Bezeichnung GENERIC IDE DISK TYPExx sollte
angezeigt werden (xx kann eine beliebige Nummer darstellen).
5. Markieren Sie diesen Eintrag und klicken Sie auf Eigenschaften.
6. Aktivieren Sie den Tab Einstellungen und lokalisieren Sie ein
Kontrollkästchen mit der Bezeichnung DMA.
7. Aktivieren Sie dieses Kontrollkästchen und klicken Sie in dem darauf
als Warnhinweis aufgerufenen Dialogfenster auf OK.
8. Klicken Sie auch in dem Dialogfenster Eigenschaften auf OK und
schließen Sie den
Geräte-Manager
.
9. Starten Sie Ihr System neu.
Schnellinstallation
19
Page 48

TECHNISCHER SUPPORT.
Pinnacle Systems hält einen durchgehenden Self-Service bereit, den
Sie an 7 Tagen in der Woche rund um die Uhr nutzen können. Sie
verfügen dabei über drei Möglichkeiten, um die für Ihre Fragen
Antworten zu finden:
Für Zugang zum Technischen Support gehen Sie bitte zu
http://www.pinnaclesys.com/support/studio
Klicken Sie auf „Studio Deluxe“. Von hier aus können Sie unter den
fogenden Support-Optionen auswählen:
Häufig gestellte Fragen (FAQ).
1.
großen Anzahl von Themengebieten Hunderte von
technischen Fragen und deren Lösungen. Dies ist der beste
Weg, um Antworten auf Ihre Fragen zu finden. Hier
erhalten Sie ganz einfach die Antworten zu den gängigsten
Problemen. Die neuesten Updates können Sie hier ebenfalls
herunterladen. Die Fragen werden in der Reihenfolge der 20
meistgelesenen Fragen angezeigt. Sie können die
Dokumente aber auch einfach nach Problemkategorie
sortieren. Verwenden Sie dazu das „Kategorie“-PulldownMenü.
Stellen Sie eine Frage und erhalten Sie eine Antwort.
2.
Geben Sie einfach Ihre Frage ein, um eine Liste der
naheliegendsten Lösungen zu erhalten. Mit Hilfe dieser
natürlichen Sprachsuche können Sie Ihre Frage oder das
Symptom Ihres Problems eingeben, wie etwa „Ich habe Probleme
bei der Ausgabe auf Band“ oder „Ich erhalte Fehlermeldungen,
wenn ich versuche, eine Aufnahme zu machen“. Sollten Sie keine
zufriedenstellenden Lösungen erhalten, formulieren Sie bitte Ihre
Frage anders. Zum Beispiel könnten Sie statt „Ich erhalte
Fehlermeldungen“ folgende Formulierung verwenden „Ich erhalte
Fehlermeldungen, die anzeigen, dass meine Datenrate unter 4000
KB liegt, wenn ich aufnehme“
Eine weitere Möglichkeit bietet Ihnen die Pulldown-Liste für
„Kategorie“, wo Sie die Fragen und Probleme in Gruppen
unterteilt finden. Wenn Sie zum Beispiel eine Frage zur
Installation von Hardware oder Software haben, wählen Sie die
Hier finden Sie zu einer
Studio Deluxe
20
Page 49

Kategorie „Setup-, Installations- und Konfigurationsprobleme“,
um die 10 meistgestellten Fragen dazu zu erhalten. Die
Kategorien behandeln die Hauptfunktionen von Studio 8,
Aufnahme, Bearbeiten, Erstellen und Ausgabe, aber ebenso einige
andere allgemeine Kategorien.
Diskussionsforum.
3.
registriert, die diesen KOSTENLOSEN Service nutzen. Besuchen
Sie das Online-Diskussionsforum von Pinnacle Systems, um zu
sehen, ob Ihre Frage schon von jemand anderem gestellt wurde.
Platzieren Sie Ihre Frage im Diskussionsforum und Sie erhalten
Hilfe von Pinnacle Systems oder anderen Nutzern. Sie können in
diesem Forum aber auch die Suchfunktion anwenden. Geben Sie
zum Beispiel „ausgelassene Einzelbilder“ ein und es werden
Diskussionsbeiträge zu diesem Thema mit entsprechenden
Lösungen angezeigt.
Sobald Sie eine Frage im Diskussionsforum platziert haben,
erhalten Sie eine E-Mail-Benachrichtigung, wenn jemand auf Ihre
Frage geantwortet hat. Um eine E-Mail-Benachrichtigung nach
dem Einreichen einer Frage zu erhalten, klicken Sie einfach auf
den E-Mail-Button im rechten oberen Eck des Browserfensters.
Bestätigen Sie anschließend mit OK.
E-Mail-Support.
4.
Antworten auf Ihre Fragen finden konnten, bietet Ihnen Pinnacle
Systems ebenfalls Troubleshooting und technischen Support per
E-Mail. E-Mails werden gewöhnlich innerhalb von 48 Stunden
beantwortet (mit Ausnahme von Wochenenden und Feiertagen).
Bitte verwenden Sie den Abschnitt „Eine Frage stellen“ auf
unserer Support-Website, um eine E-Mail einzureichen. Bevor die
E-Mail eingereicht wird, werden Ihnen 5 Lösungen zu Ihrem
Problem vorgeschlagen. Bitte lesen Sie diese genau. Mehr als
70% der Kunden finden bereits in diesen vorgeschlagenen
Lösungen Antworten auf deren Fragen.
Es sind beinahe 100.000 Nutzer
Falls Sie mit Hilfe unserer Website keine
Schnellinstallation
21
Page 50

ABSCHNITT 9: GEWÄHRLEISTUNG
Pinnacle Endnutzer-Lizenzvertrag
Dieser Endnutzer-Lizenzvertrag (nachstehend „Lizenz“) begründet einen
rechtsverbindlichen Vertrag über diese Software und die beiliegende
Dokumentation (zusammen „Software“) zwischen Ihnen und Pinnacle Systems
(nachstehend „Pinnacle“). LESEN SIE DIE BESTIMMUNGEN DIESER
LIZENZ BITTE SORGFÄLTIG DURCH. MIT DER NUTZUNG DER
SOFTWARE ERKLÄREN SIE SICH MIT DIESER LIZENZ
EINVERSTANDEN. ERKLÄREN SIE SICH MIT DEN BESTIMMUNGEN
DIESER LIZENZ NICHT EINVERSTANDEN ODER HABEN SIE
SCHWIERIGKEITEN, DIESE ZU VERSTEHEN, INSTALLIEREN SIE DIE
SOFTWARE NICHT UND SCHICKEN SIE DAS PRODUKT
UNVERZÜGLICH AN IHREN EINZELHÄNDLER ZURÜCK.
1. Lizenzerteilung
. Vorbehaltlich der nachfolgenden Beschränkungen, wird
Ihnen hiermit eine nicht ausschließliche, unbefristete Lizenz erteilt, um (a) die
Software auf einem (1) Computer zu installieren; (b) die Software auf einem
(1) Computer zu nutzen oder deren Nutzung auf einem (1) Computer zu
genehmigen; eine Kopie der Software in maschinenlesbarer Form
ausschließlich zu Sicherungszwecken anzufertigen, wobei alle
urheberrechtlichen und sonstigen Hinweise auf gesetzlich geschützte Rechte
auf der Kopie anzubringen sind und (d) um die Software und diese Lizenz auf
Dritte zu übertragen, soweit der Dritte die Lizenzbestimmungen anerkennt.
Mit
der Übertragung der Software müssen gleichzeitig auch alle Kopien auf den
Dritten übertragen werden. Nichtübertragene Kopien sind zu vernichten. Wird
der Besitz an einer Softwarekopie auf einen Dritten übertragen, erlischt die
Lizenz.
2. Lizenzbeschränkungen.
Sie dürfen (a) die Software oder die Rechte und
Pflichten aus dieser Lizenz nicht vermieten, verleihen, verkaufen oder
anderweitig übertragen oder dies einem Dritten gestatten; (b) die Software auf
einem Netzwerk zur Nutzung durch mehrere Nutzer nur dann installieren, wenn
alle Nutzer eine Lizenz erworben haben; (c) die Soft- oder Hardware weder
ganz noch teilweise durch Reengineering verändern, dekompilieren oder
zerlegen; (d) Hinweise auf Urheberrechte oder auf andere gesetzlich geschützte
Rechte von dieser Software oder einer Fremdsoftware nicht entfernen oder
vernichten; (e) die Software nicht verändern oder anpassen, mit anderen
Programmen verbinden oder von der Software abgeleitete Werke schaffen; (f)
keine Kopien der Software anfertigen oder gewerbsmäßig vertreiben, soweit
dies vorstehend nicht ausdrücklich gestattet ist; (g) keine Änderungen,
Studio Deluxe
22
Page 51

Verbindungen, Trennungen, Verbesserungen oder Anpassungen irgendwelcher
Art an der Software oder zu deren Nutzung vornehmen, soweit dies nicht
ausdrücklich in der beiliegenden Dokumentation und in dieser Lizenz
vorgesehen ist und (h) diese Lizenz sowie die Rechte und Pflichten daraus
nicht in Unterlizenz vergeben, übertragen oder abtreten, soweit dies nicht
ausdrücklich in dieser Lizenz vorgesehen ist. Der Versuch einer Übertragung
oder Abtretung ist unwirksam.
3. Ausfuhrbeschränkungen.
Die Ausfuhr und Wiederausfuhr von Pinnacle
Softwareprodukten unterliegen den Ausfuhrvorschriften der Vereinigten
Staaten und dürfen nicht in ein Land ausgeführt oder wiederausgeführt werden,
das einem Warenembargo der Vereinigten Staaten unterliegt. Darüber hinaus
darf Pinnacle-Software nicht an Personen ausgegeben werden, die auf der
Ausschlussliste (Denial Orders), der Liste sanktionierter Instanzen (Entity List)
oder der Liste speziell designierter Staatsangehöriger (Specially Designated
Nationals) geführt werden. Mit dem Herunterladen bzw. der Nutzung eines
Pinnacle-Softwareproduktes erklären Sie, dass Sie kein Staatsangehöriger eines
Landes sind, das einem Warenembargo der Vereinigten Staaten unterliegt und
dass Sie nicht auf den Ausschlusslisten der Denial Orders, Entity List oder der
Specially Designated Nationals geführt werden.
4. Eigentum.
Die nach diesem Vertrag erteilte Lizenz beinhaltet keine
Übertragung oder Veräußerung von Eigentumsrechten an der Software. Mit
Ausnahme der oben gewährten Lizenzrechte behält sich Pinnacle alle Rechte
und geistigen Eigentumsrechte an der Software vor. Diese Software ist durch
geltende Gesetze zum Schutz geistigen Eigentums, durch das Urheberrecht der
Vereinigten Staaten und durch internationale Abkommen geschützt.
5. Gesetzlich geschütztes Eigentum Dritter.
Diese Software kann gesetzlich
geschütztes, an Pinnacle lizensiertes Eigentum Dritter enthalten. Die Nutzung
der Software erfolgt in diesem Fall ausdrücklich mit der Maßgabe, dass
Urheberrechtshinweise oder andere Hinweise auf gesetzlich geschützte Rechte
Dritter nicht entfernt werden dürfen.
6. Sicherheit.
Um die Integrität von Softwareteilen Dritter bzw. die ihrer
Lizenzgeber zu wahren, erklären Sie sich damit einverstanden, dass
Sicherheitsaktualisierungen von Pinnacle automatisch heruntergeladen und auf
ihrem Computer installiert werden. Diese Sicherheitsaktualisierungen können
die Software (und andere Software ihres Computers, die funktionell von der
lizensierten Software abhängt) so beeinträchtigen, dass Sie keinen „sicheren“
Inhalt, d.h. durch Digital-Rights-Management (Schutz von Rechten an digitalen
Inhalten) geschützten Inhalt, mehr kopieren können. In diesem Fall bemühen
sich Pinnacle bzw. Ihre Lizenzgeber, solche Sicherheitsaktualisierungen
Schnellinstallation
23
Page 52

unverzüglich auf Pinnacles Webseite zu erläutern und die Endnutzer darüber zu
informieren, wie sie neue Softwareversionen bzw. nachfolgende
Aktualisierungen zur Wiederherstellung des Zugriffs auf sichere Inhalte und
damit verbundene Funktionen erhalten können.
7. Laufzeit und Erlöschen.
Die Lizenz wird mit der Installierung der Software
wirksam und erlischt, sobald eines der folgenden Ereignisse eintritt: (a)
Nichteinhaltung einer Lizenzbestimmung, (b) Rückgabe, Vernichtung,
Löschung aller in Ihrem Besitz befindlichen Kopien der Software oder (c)
Übertragung der Software und der Lizenz auf einen Dritten gemäß Ziffer 1(d).
Pinnacles Rechte und Ihre Pflichten gelten auch nach Erlöschen dieser Lizenz.
8. Beschränkte Garantie
Pinnacle garantiert dem ursprünglichen
Lizenznehmer für 30 Tage ab dem ursprünglichen Kaufdatum, dass die
Software, wie geliefert, gemäß der beiliegenden Dokumentation funktioniert
(„beschränkte Garantie“). Pinnacles einzige Haftung und Ihr ausschließliches
Recht wegen Verletzung der vorstehenden beschränkten Garantie ist, nach
Pinnacles Wahl, auf die Reparatur oder den Ersatz der nicht garantiemäßigen
und an Pinnacle zurückgegebenen Software beschränkt. Diese beschränkte
Garantie ist ungültig, wenn die Fehlfunktion durch Missgeschick, Missbrauch,
missbräuchliche oder falsche Verwendung verursacht worden ist.
Ersatzsoftware wird für den jeweils längeren Zeitraum der Restlaufzeit der
ursprünglichen Garantiezeit oder eines Zeitraums von 30 Tagen garantiert.
9. KEINE ANDEREN GARANTIEN.
SOWEIT VORSTEHEND NICHTS
ANDERES BESTIMMT, WIRD DIE SOFTWARE „OHNE
MÄNGELGEWÄHR“ ZUR VERFÜGUNG GESTELLT. SIE
ÜBERNEHMEN DIE VERANTWORTUNG FÜR DIE QUALITÄT UND
FUNKTION DER SOFTWARE. SOWEIT GESETZLICH ZULÄSSIG,
SCHLIESST PINNACLE ALLE AUSDRÜCKLICHEN ODER
STILLSCHWEIGENDEN GARANTIEN, INSBESONDERE DER
HANDELSÜBLICHEN QUALITÄT, NICHTVERLETZUNG VON
RECHTEN UND EIGNUNG FÜR EINEN BESTIMMTEN ZWECK, AUS.
DER LIZENZGEBER ÜBERNIMMT KEINE GEWÄHR DAFÜR, DASS DIE
SOFTWAREFUNKTIONEN IHREN ANFORDERUNGEN ENTSPRECHEN
ODER OHNE UNTERBRECHUNG UND FEHLERFREI ARBEITEN.
Studio Deluxe
24
Page 53

10. HAFTUNGSBESCHRÄNKUNG.
PINNACLE HAFTET NICHT FÜR
FOLGESCHÄDEN, SPEZIELLE, MITTELBARE, BEILÄUFIG
ENTSTANDENE ODER INDIREKTE SCHÄDEN ODER AUF STRAFE
EINSCHLIESSENDEN SCHADENSERSATZ. DIES GILT AUCH DANN,
WENN PINNACLE AUF DIE MÖGLICHKEIT SOLCHER SCHÄDEN
HINGEWIESEN WORDEN IST. IN KEINEM FALL ÜBERSTEIGT
PINNACLES HAFTUNG DEN FÜR DIE SOFTWARE GEZAHLTEN
GESAMTPREIS. Die vorstehenden Beschränkungen gelten nicht in
Bundesstaaten/Ländern, in denen eine Beschränkung oder ein Ausschluss von
beiläufig entstandenen Schäden oder Folgeschäden unter gewissen Umständen
unzulässig ist.
11. Allgemeines.
Diese Lizenz unterliegt ungeachtet bestehender
Kollisionsnormen dem Recht des US-Bundesstaates Kalifornien und dem
Recht der Vereinigten Staaten. Die Bundesgerichte und bundesstaatlichen
Gerichte in Santa Clara County, Kalifornien, sind ausschließlich für die
Entscheidung von Streitigkeiten aus dieser Lizenz zuständig. Diese Lizenz
enthält alle zwischen den Parteien getroffenen vertraglichen Vereinbarungen
und ersetzt alle anderen Vereinbarungen bezüglich der Software. Änderungen
und Ergänzungen dieser Lizenz bedürfen der Schriftform und müssen von
beiden Parteien unterzeichnet sein. Die Unwirksamkeit oder Uneinklagbarkeit
einer Lizenzbestimmung lässt die Wirksamkeit der übrigen Bestimmungen
unberührt.
Schnellinstallation
25
Page 54

Anbieter /
Anschrift /
Produkt /
Konformitätserklärung nach ISO/IEC Guide 22
Declaration of conformity in accordance with
ISO/IEC Guide 22
Nr. / No 1.01
:
Supplier
: Frankfurter Strasse 3c
Address
:
Product
Pinnacle Systems GmbH
38122 Braunschweig, Germany
DV500 / DV500 PLUS
Das oben beschriebene Produkt ist konform mit: /
Dokument-Nr.
Document No.
EN 55022 : 1998
Class B
EN 55024 : 1999 Störfestigkeitseigenschaften für Einrichtungen der Informationstechnik - Grenzwerte und Prüfverfahren
EN 61000-4-2 : 1995
+ A1 : 1998
EN 61000-4-3 : 1996
+ A1 : 1998
EN 61000-4-4 : 1995 Störfestigkeit gegen schnelle transiente elektrische Störgrößen/BURST
EN 61000-4-6 : 1996 Störfestigkeit gegen leitungsgeführte Störgrößen, induziert durch hochfrequente Felder
ENV 50204 : 1995 Störfestigkeit gegen hochfrequente elektromagnetische Felder von digitalen Funktelefonen
EN 61000-3-2 : 1998
+ A14 : 2000
EN 61000-3-3 : 1996 Grenzwerte für Spannungsschwankungen und Flicker
EN 60950 : 2000 Sicherheit von Einrichtungen der Informationstechnik
Titel
Title
Grenzwerte und Messverfahren für Funkentstörungen von Einrichtungen der Informationstechnik
Limits and methods of measurement of radio interference characteristics of information technology equipment
Immunity characteristics for information technology equipment - limits and methods of measurement
Störfestigkeit gegen Entladung statischer Elektrizität
Electrostatic discharge immunity test
Störfestigkeit gegen hochfrequente elektromagnetische Felder
Radiated, radio-frequency, electromagnetic field immunity test
Electrical fast transient/burst immunity test
Immunity to conducted disturbances, induced by radio-frequency fields
Radiated electromagnetic field from digital radio telephones - Immunity test
Grenzwerte für Oberschwingungsströme
Limitations for harmonic currents
Limitations of voltage fluctuations and flicker
Safety of information technology equipment
The product described above is in conformity with:
Dieser Erklärung liegt zugrunde: Prüfbericht(e) des EMV-Prüflabors
This certification is based on: Test report(s) generated by EMI-test laboratory
Braunschweig, 14. November 2001 /
November 14th, 2001
.................................. ..................................
Bernd Riemann Oliver Hellmold
Entwicklungsleiter Hardware Finanzdirektor /
Engineering Manager Hardware
Studio Deluxe
26
(Rechtsverbindliche Unterschrift
Director Finance
/ Legally Binding
Page 55

3LQQDFOH
6WXGLR'HOX[H
5pDOLVDWLRQGHILOPVGHTXDOLWpSURIHVVLRQQHOOH
0DQXHOG·LQVWDOODWLRQ
UDSLGH
Page 56

$YDQWGHFRPPHQFHU
Important :
AVDV. Installez la carte AVDV sur votre PC comme expliqué dans les
instructions ci-dessous,
Dans ce chapitre, vous trouverez toutes les indications concernant la
configuration nécessaire de votre système informatique pour utiliser
DELUXE
Pinnacle Studio Deluxe comprend une carte d'acquisition vidéo
d’installer le logiciel Pinnacle Studio.
avant
ainsi que les détails relatifs au contenu du coffret
STUDIO DELUXE
STUDIO
.
&RQILJXUDWLRQGXV\VWqPH
Veuillez vous assurer que votre système répond bien aux exigences suivantes
avant d’installer
•
processeur Intel Pentium ou AMD Athlon 500 MHz ou supérieur
•
128 Mo de RAM (256 Mo recommandé)
•
Windows 98SE, « Millennium », 2000 ou XP
•
carte graphique et carte son compatibles DirectDraw
•
souris
•
lecteur de CD-ROM
•
connecteur PCI de 32 bits libre
•
500 Mo despace disque pour linstallation du logiciel
120 Mo despace disque pour toute séquence vidéo de 20 minutes
•
acquise en qualité Aperçu (4 Go pour 20 minutes de film terminé)
(pour lacquisition DV uniquement)
•
4 Go pour toute séquence de 20 minutes en vidéo analogique ou en
vidéo acquise en qualité DV
•
le disque dur doit être capable de maintenir des taux de transfert d'au
moins 4 Mo par seconde (un disque dur consacré uniquement à
lacquisition vidéo est recommandé)
facultatif : lecteur CD-R ou CDRW pour la création de CD Vidéo ou
•
Super Vidéo
facultatif : lecteur DVD-R, DVD-RW ou DVD+RW pour la création de
•
DVD.
STUDIO DELUXE
:
Studio Deluxe
2
Page 57

&RQWHQXGXFRIIUHW
Assurez-vous qu'aucun élément ne manque en vérifiant le contenu du coffret de
STUDIO DELUXE
avant de commencer l'installation. Le système comprend*:
Carte AVDV blueBOX
Câble IEEE-1394 Câble audio loop-through
CD-ROM Pinnacle Studio et Hollywood FX Plus for Studio
Manuel Pinnacle Studio et ce guide d’installation rapide
* Le contenu ou l'aspect peuvent varier.
Si un élément du contenu manque, veuillez contacter votre revendeur.
Les composants informatiques sont sensibles aux charges
électrostatiques. Ne pas sortir la carte AVDV du sachet de protection
antistatique avant l'installation.
Manuel d’installation rapide
3
Page 58

Installation de Pinnacle Studio Deluxe
Défragmentation du disque dur
Avant l'installation et la configuration de la carte AVDV, il est recommandé de
procéder à la défragmentation du ou des disques durs. Vous trouverez
l'utilitaire de défragmentation de Windows sous
Accessoires > Outils système > Défragmenteur de disque.
SECTION 1 : INSTALLATION DE LA CARTE AVDV
Pour votre propre sécurité et afin d'éviter toute détérioration de votre carte
AVDV ou de votre ordinateur, prenez les précautions suivantes :
•
les composants informatiques sont sensibles aux charges électrostatiques.
Avant de toucher les composants avec les mains ou des outils, déchargez
l'électricité statique de votre corps.
•
N’ouvrez l'ordinateur qu’une fois que vous vous êtes assuré que le câble
d'alimentation électrique est bien débranché du secteur.
Pour installer la carte AVDV sur votre ordinateur :
déchargez l'électricité statique de votre corps en touchant le boîtier
1.
métallique de votre ordinateur.
Eteignez l'ordinateur et tous les périphériques. Débranchez le câble
2.
d'alimentation du secteur et tous les autres câbles.
Dévissez le capot de l'ordinateur et retirez-le.
3.
Choisissez un connecteur d'extension PCI libre.
4.
Retirez le cache des connecteurs d'extension à l'arrière de l'ordinateur
5.
(consultez le guide de l'utilisateur de votre ordinateur pour des
instructions plus détaillées).
Insérez la carte avec précaution dans le connecteur d'extension en la
6.
tenant par le haut et en veillant à bien insérer les deux extrémités en
même temps dans le connecteur.
enfichée dans le connecteur en appuyant sur le haut de la carte.
Démarrer > Programmes >
Assurez-vous que la carte est bien
Studio Deluxe
4
Page 59

Si vous vous avez du mal à insérer la carte, ne forcez pas (risque de
détérioration des contacts du connecteur)
et réessayez.
Une fois la carte correctement enfichée, serrez les vis et remettez le
7.
boîtier de l'ordinateur en place.
ainsi que le câble d'alimentation électrique.
L'installation matérielle AVDV est terminée. Vous pouvez redémarrer
8.
votre ordinateur.
SECTION 2 : INSTALLATION DU PILOTE AVDV
Avant d’ouvrir et d’installer le logiciel Studio, veuillez prendre connaissance
de la licence d'utilisation dans l'Annexe F du guide de l'utilisateur Studio. Si
vous ouvrez l'emballage du CD-ROM, cela signifie que vous acceptez les
termes du contrat de licence. En cas de désaccord avec les termes du présent
contrat de licence, n’ouvrez pas le coffret Studio Deluxe et retournez-le au
distributeur auprès duquel vous vous l'êtes procuré.
1. Une fois la carte AVDV installée, allumez votre ordinateur.
2. L’assistant Ajout de nouveau matériel de Windows détecte
automatiquement la carte.
3. Annulez l'installation matérielle, les pilotes pour Studio Deluxe seront
installés après le logiciel Studio.
4. Après avoir refermé la fenêtre d'installation du pilote, insérez votre
CD-ROM Studio dans le lecteur.
Reconnectez tous les câbles externes
Retirez doucement la carte
.
Manuel d’installation rapide
5
Page 60

SECTION 3 :
INSTALLATION DU LOGICIEL PINNACLE STUDIO
1. Si la fonction Autorun est activée pour votre CD-ROM, l’installation
sera lancée automatiquement.
Remarque : si vous n'avez pas activé Autorun, ouvrez la fenêtre de
votre lecteur de CD-ROM puis effectuez un double-clic sur Setup.exe
et passez à l'étape 2.
2. Sélectionnez la langue de votre choix et cliquez sur OK.
3. Saisissez votre numéro de série (qui se trouve au dos du Guide de
l’utilisateur Pinnacle Studio). Cliquez sur « Suivant ».
4. Acceptez les termes du contrat de licence du logiciel. (cliquez sur «
J’accepte »). Si vous n’acceptez pas ou ne comprenez pas les
conditions d'utilisation, veuillez retourner rapidement ce produit au
distributeur auprès duquel vous vous l’êtes procuré.
5. Sélectionnez l’installation « Typique » (recommandé). Seuls les
utilisateurs avancés devraient choisir l’option « Personnalisée ».
6. Cliquez sur « Suivant » jusqu'à ce que l'assistant vous propose de créer
un raccourci pour Studio 7 sur votre bureau puis cliquez sur “Oui”.
7. Installez le pilote. Après l’installation du logiciel Studio, les pilotes
pour la carte ADVD seront installés. Si vous installez les pilotes sur
Windows XP ou Windows 2000, il est possible qu’une boîte de
dialogue Windows apparaisse pour vous informer que les pilotes n’ont
pas passé le test de logo de Windows. Toutefois, les pilotes ont été
rigoureusement testés par Pinnacle Systems et ils sont compatibles
avec Windows. Vous pouvez ignorer la boîte de dialogue de
Windows et cliquer sur « Continuer » pour installer les pilotes.
8. Redémarrez. Dans certains cas, il peut vous être demandé de redémarrer
votre ordinateur.
9. Enregistrez. Ensuite, vous aurez la possibilité d’enregistrer votre copie
de Studio. Simple et rapide, la procédure d'enregistrement se fait sur
Internet. L’enregistrement est important pour trois raisons :
il permet à Pinnacle Systems de vous informer des mises à jour
•
gratuites de votre logiciel Studio.
il vous permet de recevoir les offres spéciales et les promotions
•
de Pinnacle Systems
il est enfin nécessaire pour bénéficier de l'assistance technique.
•
Studio Deluxe
6
Page 61

SECTION 4 :
INSTALLATION DU LOGICIEL HOLLYWOOD FX FOR STUDIO
1. Si la fonction Autorun est activée pour votre CD-ROM, l’installation
sera lancée automatiquement.
Remarque : si Autorun n’est pas activé, ouvrez la fenêtre de votre
lecteur de CD-ROM puis effectuez un double-clic sur Setup.exe et
passez à l'étape 2.
2. Entrez votre numéro de série (imprimé la pochette du CD Hollywood
FX Plus for Studio. Cliquez sur « Suivant ».
3. Choisissez « Installer Hollywood FX Plus ».
4. Cliquez sur « Suivant » jusqu'à ce que l'assistant vous demande de
nouveau d'entrer votre numéro de série. Si le numéro de série n'est pas
encore inscrit, entrez-le de nouveau puis cliquez sur « OK ».
5. Enregistrez. Vous aurez ensuite la possibilité d'enregistrer votre logiciel
Hollywood FX Plus et d'adhérer au Club Hollywood. Simple et rapide,
la procédure d'enregistrement se fait sur Internet. L’enregistrement est
important pour plusieurs raisons :
il permet à Pinnacle Systems de vous informer des mises à jour
•
gratuites de votre logiciel Hollywood FX Plus
il vous donne accès à des FX supplémentaires et aux mises à jour
•
en ligne au Club Hollywood
il vous permet de recevoir les offres spéciales et les promotions
•
de Pinnacle Systems
il est enfin nécessaire pour bénéficier de l'assistance technique.
•
Manuel d’installation rapide
7
Page 62

SECTION 5 : BRANCHEMENT DU BOÎTIER
DE CONNEXION blueBOX ET DES PÉRIPHÉRIQUES VIDÉO
Le chapitre suivant explique comment raccorder les périphériques vidéo à la
carte Pinnacle AVDV par le boîtier de connexion blueBOX,
devant être éteint
. Pour ce faire, vous devrez disposer des câbles adéquats.
l'ordinateur
L'illustration ci-dessous montre la carte AVDV et les branchements :
Connexion au périphérique
DV (connecteur 1394)
Connexion au périphérique
DV (connecteur 1394)
Sortie audio*
Connexion à blueBOX (type
D 26 broches)
L'illustration ci-dessous montre les branchements de la blueBOX :
Studio Deluxe
8
(QWUpHVYLGpR(QWUpHVDXGLR
69LGHR&RPSRVLWH*DXFKH'URLWH
S-Video Composite Gauche Droite
Sorties vidéo Sorties audio
Page 63

5DFFRUGHPHQWGHVSpULSKpULTXHVYLGpRHWDXGLR
Caméscope DV
Sortie Audio AVDV vers carte son Line in
Sortie Audio
vers carte son
Périphériques DV
IEEE
blueBOX
AudioVidéo
Sortie Audio carte son
Haut-parleurs
blueBOX
Entrée
Sortie
Manuel d’installation rapide
9
Page 64

5DFFRUGHPHQWGXERvWLHUGHFRQQH[LRQEOXH%2;
Le boîtier de connexion blueBOX vous permet de raccorder vos périphériques
analogiques vidéo ou un moniteur externe à votre carte AVDV. Raccordez la
blueBOX à la carte AVDV directement par le câble de la blueBOX.
blueBOX Out Carte AVDV
Câble blueBOX
Connecteur D-Sub26
¾
5DFFRUGHPHQWGXFkEOHDXGLRORRSWKURXJK
Pour le contrôle audio au moyen des haut-parleurs de votre PC, raccordez la
sortie audio à l'arrière de la carte AVDV au connecteur Audio Line-IN de votre
carte son au moyen du câble audio loop-through fourni dans le coffret.
5DFFRUGHPHQWGHVSpULSKpULTXHVYLGpR
La section suivante décrit les options de connexion de votre source vidéo ou
lecteur. Le lecteur fournit les signaux vidéo et audio à numériser
(« acquisition ») sur votre disque dur en vue de leur édition sur PC.
La section suivante décrit les branchements à l'enregistreur. L'enregistreur est
le périphérique, en général un magnétoscope, sur lequel est prévue la sortie de
la production finale.
Lecteur : périphérique DV
Tout caméscope ou magnétoscope DV ou Digital 8 doté d'un connecteur IEEE1394/DV peut être relié à la carte. Sur la plupart des périphériques, ce
connecteur est dénommé « i.Link ».
Pour relier votre caméscope DV ou VCR à
, utilisez le câble IEEE-1394 DV fourni dans le
DELUXE
coffret.
1. Connectez le câble IEEE-1394 à Pinnacle AVDV.
Raccordez le connecteur à 6 broches du câble IEEE
1394 DV à l'un des ports de données 1394 de votre AVDV.
Studio Deluxe
10
STUDIO
Page 65

2. Connectez le câble IEEE-1394 au périphérique DV.
Raccordez le connecteur à 4 broches du câble IEEE 1394 AV au connecteur
DV IN/OUT ou au connecteur DV OUT de votre caméscope DV ou
magnétoscope.
Les signaux vidéo et audio sont transmis par le câble IEEE-1394. Aucune autre
connexion n'est par conséquent requise pour le branchement de votre
périphérique DV comme lecteur.
Lecteur :
périphérique S-Video / périphérique vidéo Composite
S-Video
Choisissez ce type de connexion si votre lecteur dispose d'une sortie S-Video.
Le tableau suivant résume les différentes connexions :
Sortie Lecteur Entrée blueBOX
Sortie S-Video
Sortie audio L
Sortie audio R
Entrée S-Video
¾
Entrée audio L
¾
Entrée audio R
¾
Composite video
Choisissez ce type de connexion si votre lecteur dispose d'une sortie vidéo
Composite.
Manuel d’installation rapide
11
Page 66

Le tableau suivant résume les différentes connexions :
Sortie Lecteur Entrée blueBOX
Sortie vidéo Composite
Sortie audio L
Sortie audio R
Entrée vidéo Composite
¾
Entrée audio L
¾
Entrée audio R
¾
Si votre lecteur est doté aussi bien de sorties S-Video que de sorties vidéo
Composite, choisissez de préférence S-Video. Vous obtiendrez ainsi une vidéo
de qualité supérieure.
Si votre lecteur est équipé d'un connecteur SCART, vous devrez utiliser un
adaptateur adéquat, en vente chez tout revendeur de magnétoscopes.
Enregistreur : périphérique DV
Périphérique PAL :
Les versions de
Studio Deluxe
Nord ne sont pas compatibles avec la vidéo PAL. La plupart des
périphériques PAL vendus en Europe sont dotés d'une sortie DV
seulement. L'étiquette du connecteur DV porte parfois la mention
DV OUT (et non DV IN/OUT) Ce type de périphérique
l’enregistrement de données DV sur cassette vidéo. Notez
pas
qu'avec
STUDIO DELUXE
, vous pouvez utiliser les sorties analogiques
pour lire votre projet DV terminé sur un magnétoscope analogique.
commercialisées en Amérique du
ne permet
Tout équipement vidéo prenant en charge le format DV ou Digital 8 doté d'un
connecteur IEEE-1394/DV peut être relié à la carte. Sur de nombreux
périphériques, ce connecteur est dénommé « i.Link ».
Reliez, si ce n'est pas encore fait, votre caméscope DV ou VCR à la carte
AVDV. Utilisez pour ce faire le câble IEEE-1394 AV fourni dans le coffret.
Studio Deluxe
12
Page 67

1. Connectez le câble IEEE-1394 à AVDV.
Raccordez le connecteur à 6 broches du câble IEEE -1394 DV à l'un des
ports de données 1394 de votre AVDV.
2. Connectez le câble IEEE-1394 au périphérique DV.
Branchez le connecteur à 4 broches du câble IEEE-1394 DV sur le
connecteur DV Entrée/Sortie (DV IN/OUT) de votre magnétoscope ou
caméscope DV.
Pinnacle
STUDIO DELUXE
permet la sortie en DV comme en analogique ;
toutefois, la sortie simultanée dans ces deux formats n'est pas possible. Vous
pouvez choisir la sortie active ultérieurement dans Studio (Options/Créer
cassette).
Enregistreur :
périphérique S-Video / périphérique vidéo Composite
S-Video
Choisissez ce type de connexion si votre enregistreur dispose d'une entrée SVideo.
Le tableau suivant résume les différentes connexions :
Sortie blueBOX Entrée Enregistreur
Sortie S-Video
Sortie audio L
Sortie audio R
Entrée S-Vidéo
¾
Entrée audio L
¾
Entrée audio R
¾
Manuel d’installation rapide
13
Page 68

Composite video
Choisissez ce type de connexion si votre enregistreur dispose d'une entrée
vidéo Composite.
Le tableau suivant résume les différentes connexions :
Sortie blueBOX Entrée Enregisteur
Sortie vidéo Composite
Sortie audio L
Sortie audio R
Entrée vidéo Composite
¾
Entrée audio L
¾
Entrée audio R
¾
Si votre lecteur est doté aussi bien de sorties S-Video que de sorties vidéo
Composite, choisissez de préférence S-Video. Vous obtiendrez ainsi une vidéo
de qualité supérieure.
Si votre lecteur est équipé d'un connecteur SCART, vous devrez utiliser un
adaptateur adéquat, en vente chez tout revendeur de magnétoscopes.
À vous de jouer…
Maintenant que vous avez installé Studio Deluxe, vous pouvez vous lancer sans
plus attendre ! Nous vous recommandons vivement de commencer par vous
familiariser avec le montage vidéo numérique dans Studio Deluxe. Dans le
chapitre 3 du manuel de l'utilisateur de Studio, vous trouverez une présentation
rapide, simple et attrayante des principales fonctions de Studio Deluxe. Alors,
c'est parti : cette présentation ne requiert aucune configuration du matériel et
tous les fichiers sont pré-organisés sur votre CD-ROM.
SECTION 7 : REMARQUES TECHNIQUES
1. Mises à jour
Lors de la première utilisation de Studio, l'assistant vous invite à consulter
le site Web de Pinnacle Systems afin de vous procurer une éventuelle mise
à jour. Nous vous recommandons vivement d'effectuer cette procédure de
vérification en ligne entièrement automatique et de télécharger puis
d'installer toute mise à jour disponible le cas échéant.
Studio Deluxe
14
Page 69

Nous vous recommandons également de consulter régulièrement le site à
cet effet. Pour ce faire, utilisez la commande du menu Aide/Mise à jour de
logiciel.
2. Aperçu des performances des transitions Hollywood FX
Les transitions Hollywood FX étant des transitions 3D complexes, leur
prévisualisation est différente de celle des autres effets.
Si votre carte graphique prend en charge les routines 3D utilisées par
Hollywood FX, Studio peut utiliser l'accélérateur matériel 3D de votre carte
graphique pour la prévisualisation en temps réel. Actuellement, les cartes
graphiques architecturées autour de Nvidia Geforce 2, Nvidia GeForce 3 et
ATI Radeon assurent cette prise en charge. Si votre carte graphique utilise
l'une de ces cartes, sélectionnez Utiliser l'accélération matérielle dans
Configurer/Editer. (Vous devrez éventuellement installer la version des
pilotes la plus récente pour votre carte graphique)
En l'absence d'accélération matérielle3D, Studio utilise l'accélération
logicielle. Du fait de la complexité des transitions3D, la prévisualisation ne
s'effectue pas de la même manière que pour les transitions 2D :
En prévisualisation dans la fenêtre du lecteur, Hollywood FX est lu avec
une résolution réduite. La possibilité d'effectuer une prévisualisation en
temps réel dépend des performances de votre PC : la vitesse de lecture peut
être extrêmement basse et se réduire à quelques images seulement par
seconde. Cela concerne uniquement la prévisualisation, votre montage
définitif sera lui rendu en pleine résolution et avec la fréquence image qui
convient.
Si vous effectuez la prévisualisation à l'aide du curseur tout en maintenant
enfoncée la touche Alt, la lecture de la transition s'effectue à la résolution
maximale, toutefois, elle sera possible en temps réel seulement si la
puissance du PC le permet. Cette restriction concerne là aussi uniquement
la prévisualisation. Dans le montage définitif, la transition sera rendue en
pleine résolution et avec la fréquence image qui convient.
Manuel d’installation rapide
15
Page 70

3. Disques durs pour l'acquisition vidéo
Pour le montage vidéo, nous vous recommandons d'équiper votre système
d'un second disque dur dédié à l'acquisition et à la lecture vidéo. Le disque
dur doit pouvoir assurer la lecture et l'enregistrement à un taux continu de 4
Mo par seconde. Vous pourrez choisir par exemple un disque dur EIDE
rapide. Pour de meilleurs résultats, effectuez le réglage suivant : ouvrez le
gestionnaire de périphériques de Windows 98 SE et cliquez dans
« Lecteurs » sur la mention correspondant à votre disque dur, choisissez
l'onglet « Paramètres » et activez l'option DMA.
4. Prise en charge des caméscopes DV
Si un message d'erreur s'affiche lors de la commutation de Studio en mode
d'acquisition, vous devrez effectuer dans Windows un réglage qui permettra
la prise en charge de votre caméscope. Dans le gestionnaire de
périphériques de Windows, sélectionnez « 1394 Bus Controller »
(Contrôleur d'hôte OHCI Compliant IEEE 1394) et cliquez sur
« Propriétés ». Sous l'onglet « Paramètres », cochez la case « Support NonCompliant Devices ». Redémarrez ensuite votre ordinateur. Windows doit à
présent détecter votre caméscope lorsque celui-ci est raccordé et charger les
pilotes appropriés. Vous pourrez ainsi réaliser l'acquisition vidéo sans
problèmes avec Studio DV / Studio DVplus à partir de votre caméscope.
5. SmartCapture et sources analogiques
L'acquisition en qualité de prévisualisation est possible uniquement lors de
l'acquisition à partir d'une source DV. A partir de sources analogiques,
l'acquisition vidéo se fait toujours en qualité optimale.
6. SmartCapture sur cassettes DV avec segments de time-code
multiples
Lorsque vous utilisez la fonction SmartCapture pour l'acquisition en qualité
de prévisualisation, capturez toujours un segment de time-code unique. Si la
bande comporte un blanc entraînant la remise à zéro du time-code, vous
devrez effectuer séparément l'acquisition de cette séquence. En effet, lors de
l'acquisition de la vidéo en qualité optimale pour le montage définitif,
Studio utilise le time code pour repérer la section de la bande
correspondante : cela est impossible si le time code est remis à zéro durant
une même séquence. Studio stoppe automatiquement l'acquisition (lors de
l'acquisition en qualité de prévisualisation) en cas d'interruption du time
code.
Studio Deluxe
16
Page 71

SECTION 8 : DÉPANNAGE ET ASSISTANCE TECHNIQUE
Avant de commencer le processus de dépannage,, vérifiez les points
suivants :
1. Vous disposez bien des mises à jour nécessaires pour votre
système d'exploitation Windows. Si tel n’est pas le cas, vous
pouvez les télécharger à partir du site
http://windowsupdate.microsoft.com/default.htm.
2. Tous les autres dispositifs matériels installés fonctionnent
normalement avec la dernière version des pilotes et aucun conflit
n'est signalé dans le Gestionnaire de périphériques (Démarrage >
Paramètres > Panneau de configuration > Système >
Gestionnaire de périphériques). En cas de conflit de
périphériques, veuillez supprimer l'erreur avant de commencer
l'installation.
INSTALLATION
Problème : certaines images manquent dans l'enregistrement, ou bien la
vidéo est saccadée.
Cause possible :
Solution
Avec certains modèles de disque dur UDMA, des « sautes » peuvent
se produire durant la lecture du fichier à un débit de données élevé.
Cela est dû au fait que le disque dur procède à un recalibrage durant la
lecture du fichier et interrompt ainsi la lecture.
Ce problème ne provient pas de Studio mais est lié au mode de
fonctionnement du disque dur et à son interaction avec les autres
composants du système.
Il existe plusieurs moyens d'augmenter la vitesse de votre disque dur :
1. Activez DMA pour votre disque dur (voir les instructions à la
section suivante).
la vitesse de transfert de votre disque dur est trop basse.
Manuel d’installation rapide
17
Page 72

2. Terminez les tâches en arrière-plan.
Avant d'ouvrir Studio, maintenez les touches Ctrl et Alt enfoncées
simultanément tout en appuyant sur Supprimer. La fenêtre de
fermeture de programme s'ouvre. Choisissez Fin de tâche pour les
différentes applications répertoriées dans la liste du Gestionnaire
de tâches et refermez ainsi toutes les applications de la liste sauf
Explorateur et Systray.
3. Cliquez sur Démarrage > Programmes > Accessoires > Outils
système > ScanDisk
4. Assurez-vous que l'option Minutieuse est cochée et cliquez sur
Démarrer (cette opération peut être assez longue).
5. Une fois le scandisk terminé, cliquez sur Démarrage >
Programmes > Accessoires > Outils système > Défragmenteur de
disque (cette opération peut être assez longue).
6. Désactivez les fonctions d'économie d'énergie (placez le pointeur
de la souris sur votre bureau, cliquez avec le bouton droit de la
souris et sélectionnez Propriétés > écran de veille > (sous Gestion
de l'alimentation… Paramètres). Assurez-vous que tous les
Paramètres du mode de gestion de l'alimentation sont sur Jamais.
7. Sélectionnez Démarrage > Paramètres > Panneau de
configuration > Système. Cliquez sur l'onglet Performances, puis
sur Système de fichiers… et choisissez l'onglet Dépannage.
8. Cliquez à gauche de l'option Désactiver le cache en écriture
différée pour tous les lecteurs afin de la sélectionner puis cliquez
sur OK.
9. Dans l'onglet Disque dur, placez le curseur d'optimisation cache
en lecture (Read-ahead) sur Aucune.
En général, vous obtiendrez ainsi une accélération du débit de données.
ATTENTION : sur certains disques durs, cela peut entraîner une baisse de
la vitesse d'écriture !
Remarque : les programmes de montage vidéo ne fonctionnent pas de manière
satisfaisante en multi-tâches. N'utilisez aucun autre programme durant
l'enregistrement du film (sur bande vidéo ou CD) ou l'acquisition.
Studio Deluxe
18
Page 73

Activer DMA pour votre disque dur
DMA est l'abréviation de direct memory access ou accès direct à la mémoire.
Cette technique permet le transfert de données de la mémoire centrale à un
périphérique sans passer par le processeur central.
L'activation de DMA pour un disque dur permet d'augmenter considérablement
le taux de transfert de données et d'améliorer les performances du système.
Sous les systèmes d'exploitation Windows 2000 et XP, DMA est activé par
défaut. Ce n'est en revanche pas le cas pour Windows 98 / Millennium.
Pour activer DMA sur un système Windows 98 / Millennium :
1. Sélectionnez Démarrage
Paramètres > Panneau de configuration
>
Système.
2. Cliquez sur l'onglet Gestionnaire de périphériques.
3. Ouvrez Lecteurs de disque.
4. La mention GENERIC IDE DISK TYPExx (xx correspondant à un
numéro quelconque) doit normalement apparaître.
5. Sélectionnez cette ligne et cliquez sur Propriétés.
6. Cliquez sur l'onglet Paramètres et recherchez la case d'option DMA.
7. Cochez cette option et appuyez sur OK pour confirmer le message
d'avertissement affiché.
8. Appuyez sur OK dans la boîte de dialogue Propriétés et refermez le
Gestionnaire de périphériques.
9. Redémarrez le système.
>
Manuel d’installation rapide
19
Page 74

Assistance technique.
Pinnacle Systems propose une assistance dépannage libre-service et
GRATUITE 24 heures sur 24, 7 jours sur 7. Vingt-quatre heures sur
vingt-quatre et sept jours sur sept, Pinnacle Systems vous propose
trois manières de trouver des réponses à vos questions.
Pour accéder au service d'assistance technique, rendez-vous à
l’adresse suivante :
Cliquez sur « Studio Deluxe ». Depuis cette page, vous avez accès
aux options d'assistance suivantes :
FAQ (Foire aux Questions).
1.
100 questions techniques et leurs solutions dans un large éventail
de domaines. Cest la meilleure façon dobtenir des réponses à vos
questions. Vous y trouverez facilement les réponses aux questions
les plus courantes et pourrez également télécharger les dernières
mises à jour. Elles sont classées selon une liste des 20 questions les
plus fréquemment posées. Par ailleurs, rien nest plus simple que
de trier les documents par type de problème en utilisant le menu
déroulant « Catégorie ».
Posez une question et trouvez la réponse.
2.
de saisir votre question pour afficher une liste des meilleures
solutions possibles. En utilisant cette recherche en langage
naturel, vous pouvez saisir votre question ou le symptôme de
votre problème, comme « Je n’arrive pas à transférer mon film sur
cassette » ou « Je reçois un message d’erreur lorsque j’essaie de
faire une acquisition ». Si les solutions qui vous sont proposées
ne sont pas pertinentes, essayez de reformuler votre question. Par
exemple, au lieu de saisir « Je reçois une message d’erreur »,
essayez « Je reçois un message d’erreur me disant que mon taux
de transfert est inférieur à 4000 Kbps lorsque je fais une
acquisition ».
Vous pouvez également sélectionner une catégorie dans la liste
déroulante pour afficher ensemble les questions et les problèmes.
Par exemple, si vous avez une question portant sur l’installation
de votre matériel ou de votre logiciel, choisissez la catégorie «
Problèmes d’installation et de configuration » afin d’afficher les
10 questions les plus souvent posées à propos de l’installation.
Les catégories suivent les principales fonctions de Studio 8,
Capturer, Editer, Créer et Transférer ainsi que d’autres
caractéristiques générales.
http://www.pinnaclesys.com/support/studio8
Consultez une liste de plus de
Il vous suffit
Studio Deluxe
20
Page 75

Forum de discussion.
3.
déjà enregistrés pour pouvoir utiliser ce service GRATUIT.
Faites une recherche dans le forum de discussion en ligne de
Pinnacle Systems afin de savoir si votre question a déjà été posée.
Envoyez vos questions au forum de discussion et obtenez l’aide
de Pinnacle Systems et des autres utilisateurs. Vous pouvez
également effectuer une recherche dans ce forum à l’aide de
mots-clés. Saisissez par exemple « perte d'images » afin
d’afficher les discussions et les solutions portant sur ce sujet.
Une fois votre question envoyée au forum de discussion, vous
avez la possibilité d’être informé par courrier électronique
lorsqu’une réponse a été donnée à votre question. Pour recevoir
une notification par courrier électronique après avoir posé votre
question, il vous suffit de cliquer sur le bouton Email en haut à
droite de la fenêtre du forum de discussion, puis de cliquer sur
OK.
4.
Assistance par courrier électronique.
à trouver les réponses à vos questions sur notre site Internet,
Pinnacle Systems propose également un service de dépannage et
d'assistance technique par courrier électronique. Nous répondons
généralement à votre courrier électronique sous 48 heures (hors
week-ends et congés). Utilisez la section Poser une question de la
page Assistance de notre site Internet pour nous envoyer un
courrier électronique. Avant que le courrier électronique ne soit
envoyé, cinq solutions à votre problème vous seront suggérées.
Veuillez en prendre connaissance. Plus de 70% des clients qui
commencent à soumettre des questions trouvent leur réponse dans
les solutions qui leur sont suggérées.
Près de 100 000 utilisateurs se sont
Si vous n’arrivez pas
Manuel d’installation rapide
21
Page 76

SECTION 9 : GARANTIE
Accord de licence d'utilisateur final de Pinnacle
Cet accord de licence d'utilisateur final (« Licence ») est un accord juridique
entre vous et Pinnacle Systems (« Pinnacle ») concernant le logiciel de
Pinnacle et sa documentation (le « Logiciel »). LISEZ ATTENTIVEMENT LA
LICENCE SUIVANTE. L'UTILISATION DU LOGICIEL SIGNIFIE QUE
VOUS ACCEPTEZ CETTE LICENCE. SI VOUS N'EN ACCEPTEZ OU
N'EN COMPRENEZ PAS LES TERMES, N'INSTALLEZ PAS LE
LOGICIEL ET RENVOYEZ IMMÉDIATEMENT LE PRODUIT AU
REVENDEUR À VALEUR AJOUTÉE AUPRÈS DUQUEL VOUS VOUS
L'ÊTES PROCURÉ.
1. Octroi de licence.
Sous réserve des restrictions énoncées ci-dessous, cette
Licence vous accorde le droit non exclusif et perpétuel de (a) installer le
Logiciel sur un ordinateur unique ; (b) utiliser ou autoriser l'utilisation du
Logiciel sur un ordinateur unique ; (c) faire une copie du Logiciel, dans une
forme lisible par les ordinateurs, uniquement à des fins de sauvegarde, à
condition que vous incluiez tous les avis sur le copyright et toutes les marques
privatives sur cette copie, et (d) transférer le Logiciel et cette Licence à un tiers
si celui-ci accepte les termes et conditions de cette Licence. Si vous transférez
le Logiciel, vous devez transférer en même temps toutes ses copies à la même
personne, ou détruire les copies que vous n'avez pas transférées. Si vous
transférez une copie du Logiciel à une autre personne, votre Licence sera
automatiquement résiliée.
2. Restrictions concernant la licence.
Vous n'êtes pas autorisé, ni n'avez le
droit d'autoriser quiconque, à (a) louer, bailler, vendre, prêter ou transférer de
quelque manière que ce soit le Logiciel ou n'importe lesquels de vos droits et
obligations dans le cadre de cette Licence ; (b) installer le Logiciel sur un
réseau en vue de son utilisation par plusieurs utilisateurs, sauf si chacun de ces
utilisateurs a acheté une licence d'utilisation ; (c) rétroconcevoir, décompiler ou
désassembler le Logiciel ou le matériel, en tout ou en partie ; (d) supprimer ou
détruire tout avis sur le copyright ou autres marques privatives du Logiciel ou
de logiciels de tierces parties ; (e) modifier ou adapter le Logiciel, fusionner le
Logiciel avec un autre programme ou créer des oeuvres dérivées basées sur le
Logiciel ; (f) faire des copies du Logiciel ou distribuer celui-ci, dans un but
lucratif ou non, sauf tel qu'expressément prévu plus haut ; (g) effectuer toute
altération, modification, connexion, déconnexion, amélioration ou mise au
point du Logiciel ou utiliser celui-ci d'une manière autre que celle décrite
explicitement dans la documentation qui l'accompagne et dans cette Licence, et
Studio Deluxe
22
Page 77

(h) offrir en sous-licence, transférer ou céder cette Licence ou n'importe
lesquels des droits et obligations qui vous sont octroyés dans le cadre de celleci, sauf tel que prévu explicitement dans cette Licence. Tout transfert ou
cession prétendus seront considérés sans effet.
3. Restrictions concernant l'exportation.
L'exportation et la réexportation
des produits logiciels Pinnacle sont régies par les réglementations de
l'administration de l'exportation des États-Unis d'Amérique (United States
Export Administration Regulations), et il est interdit d'exporter ou de réexporter
ces produits à tout pays vers lequel les États-Unis d'Amérique interdisent
l'exportation de marchandises. De plus, il est interdit de distribuer les logiciels
Pinnacle aux personnes qui figurent sur les listes Table of Denial Orders,
Entity List ou List of Specially Designated Nationals. En téléchargeant ou
utilisant un produit logiciel Pinnacle, vous certifiez que vous n'êtes pas
ressortissant d'un pays vers lequel les États-Unis d'Amérique interdisent
l'exportation de marchandises, et que vous ne figurez pas dans les listes Table
of Denial Orders, Entity List ou List of Specially Designated Nationals.
4. Propriété.
La licence octroyée par la présente ne constitue pas le transfert ou
la vente des droits de propriété du Logiciel. À l'exception des droits de licence
octroyés ci-dessus, Pinnacle conserve tous ses droits sur le Logiciel, y compris
ses droits de propriété intellectuelle. Le Logiciel est protégé par les lois sur la
propriété intellectuelle pertinents, y compris les lois sur le copyright des ÉtatsUnis d'Amérique et des traités internationaux.
5. Propriété exclusive de tierces parties.
Ce Logiciel peut contenir la
propriété exclusive de tierces parties, cédée sous licence à Pinnacle. Votre
utilisation du Logiciel est expressément sujette à votre accord de ne pas
supprimer tout avis sur le copyright ou toute marque privative du logiciel de
tierces parties.
6. Sécurité.
Vous acceptez qu'afin de protéger l'intégrité de certains contenus
de tierces parties, Pinnacle et/ou ses concédants de licence puissent télécharger
et installer automatiquement sur votre ordinateur des mises à jour du Logiciel
reliées à la sécurité. Ces mises à jour peuvent nuire au Logiciel (et à tout autre
logiciel qui en dépend), en vous empêchant notamment de copier et/ou de lire
un contenu sécurisé, c'est-à-dire protégé par la gestion des droits numériques.
Dans ce cas, Pinnacle et/ou ses concédants feront un effort raisonnable pour
afficher rapidement sur le site Web de Pinnacle des avis expliquant la mise à
jour reliée à la sécurité, et des instructions destinées aux utilisateurs finaux sur
la manière de se procurer une nouvelle version ou une mise à jour du Logiciel
leur permettant de bénéficier à nouveau de l'accès à un contenu sécurisé et aux
fonctionnalités associées.
Manuel d’installation rapide
23
Page 78

7. Termes et résiliation.
Cette Licence entrera en vigueur dès l'installation du
Logiciel et sera résiliée suivant : (a) votre non-respect de l'un des termes de
cette Licence ; (b) le renvoi, la destruction ou l'effacement de toutes les copies
du Logiciel en votre possession, ou (c) le transfert du Logiciel et de cette
Licence à un tiers conformément à la Section 1(d). Les droits de Pinnacle et
vos obligations resteront en vigueur après la résiliation de cette Licence.
8. Garantie limitée.
Pinnacle garantit au détenteur d'origine de la licence que
le Logiciel fonctionnera conformément à la documentation qui l'accompagne
pendant une période de 30 jours après sa date d'achat (« Garantie limitée »). La
responsabilité de Pinnacle et votre seule voie de recours en cas de rupture de la
Garantie limitée se limitent, à la discrétion de Pinnacle, à la réparation ou au
remplacement du Logiciel renvoyé à Pinnacle ne satisfaisant pas aux exigences
de cette garantie. Cette Garantie limitée sera annulée si la défaillance du
logiciel est dûe à un accident, un mauvais traitement, ou une utilisation abusive
ou incorrecte. Tout Logiciel de remplacement sera garanti pendant le reste de la
période de garantie originale, ou 30 jours, selon celle de ces deux périodes qui
est le plus longue.
9. AUCUNE AUTRE GARANTIE N'EST OFFERTE.
À L'EXCEPTION
DE CE QUI PRÉCÈDE, LE LOGICIEL EST LIVRÉ « TEL QUEL ». VOUS
ASSUMEZ TOUTE RESPONSABILITÉ EN MATIÈRE DE QUALITÉ ET
DE PERFORMANCE DU LOGICIEL. DANS TOUTE LA MESURE
AUTORISÉE PAR LA LOI EN VIGUEUR, PINNACLE DÉCLINE TOUTE
GARANTIE, EXPRESSE OU IMPLICITE, Y COMPRIS, MAIS SANS S'Y
LIMITER, TOUTE GARANTIE IMPLICITE DE COMMERCIALITÉ,
D'ABSENCE DE CONTREFAÇON ET D'APTITUDE À L'EMPLOI. LE
CONCÉDANT DE LICENCE NE GARANTIE PAS QUE LES
FONCTIONNALITÉS DU LOGICIEL SATISFAIRONT À VOS BESOINS,
FONCTIONNERONT DE MANIÈRE CONTINUELLE OU NE
PRÉSENTERONT AUCUN DÉFAUT.
10. LIMITATION DE RESPONSABILITÉ.
VOUS ACCEPTEZ QU'EN
AUCUN CAS PINNACLE NE SAURAIT ÊTRE TENU RESPONSABLE DE
QUELQUES DOMMAGES ACCESSOIRES, PARTICULIERS, INDIRECTS
OU PUNITIFS QUE CE SOIT, MÊME SI PINNACLE A ÉTÉ PRÉVENU DE
LA POSSIBILITÉ DE TELS DOMMAGES. EN AUCUN CAS LA
RESPONSABILITÉ DE PINNACLE NE SAURAIT DÉPASSER LE PRIX
TOTAL PAYÉ POUR LE LOGICIEL. Certains pays n'autorisant pas la
limitation ou l'exclusion des dommages accessoires, il se peut que les
limitations ci-dessus ne s'appliquent pas à vous.
Studio Deluxe
24
Page 79

11. Général.
Cette Licence est régie par les lois de l'état de Californie et les
lois fédérales des États-Unis d'Amérique, et ne fait pas référence aux principes
de conflits de lois. Les cours fédérale et d'État du comté de Santa Clara,
Californie auront juridiction pour juger toute dispute provenant de cette
Licence, et vous consentez à la juridiction personnelle des cours fédérales et
d'État du comté de Santa Clara, Californie. Cette licence représente le seul
accord entre vous et Pinnacle, et remplace toute autre communication relative
au Logiciel. Aucune modification de cette Licence n'entrera en vigueur, sauf si
elle est effectuée par écrit et signée par les deux parties. Si une disposition de
cette Licence est jugée nulle ou inapplicable, le reste de cette Licence restera
pleinement en vigueur.
Manuel d’installation rapide
25
Page 80

Anbieter /
Anschrift /
Produkt /
Konformitätserklärung nach ISO/IEC Guide 22
Declaration of conformity in accordance with
ISO/IEC Guide 22
Nr. / No 1.01
:
Supplier
: Frankfurter Strasse 3c
Address
:
Product
Pinnacle Systems GmbH
38122 Braunschweig, Germany
DV500 / DV500 PLUS
Das oben beschriebene Produkt ist konform mit: /
Dokument-Nr.
Document No.
EN 55022 : 1998
Class B
EN 55024 : 1999 Störfestigkeitseigenschaften für Einrichtungen der Informationstechnik - Grenzwerte und Prüfverfahren
EN 61000-4-2 : 1995
+ A1 : 1998
EN 61000-4-3 : 1996
+ A1 : 1998
EN 61000-4-4 : 1995 Störfestigkeit gegen schnelle transiente elektrische Störgrößen/BURST
EN 61000-4-6 : 1996 Störfestigkeit gegen leitungsgeführte Störgrößen, induziert durch hochfrequente Felder
ENV 50204 : 1995 Störfestigkeit gegen hochfrequente elektromagnetische Felder von digitalen Funktelefonen
EN 61000-3-2 : 1998
+ A14 : 2000
EN 61000-3-3 : 1996 Grenzwerte für Spannungsschwankungen und Flicker
EN 60950 : 2000 Sicherheit von Einrichtungen der Informationstechnik
Titel
Title
Grenzwerte und Messverfahren für Funkentstörungen von Einrichtungen der Informationstechnik
Limits and methods of measurement of radio interference characteristics of information technology equipment
Immunity characteristics for information technology equipment - limits and methods of measurement
Störfestigkeit gegen Entladung statischer Elektrizität
Electrostatic discharge immunity test
Störfestigkeit gegen hochfrequente elektromagnetische Felder
Radiated, radio-frequency, electromagnetic field immunity test
Electrical fast transient/burst immunity test
Immunity to conducted disturbances, induced by radio-frequency fields
Radiated electromagnetic field from digital radio telephones - Immunity test
Grenzwerte für Oberschwingungsströme
Limitations for harmonic currents
Limitations of voltage fluctuations and flicker
Safety of information technology equipment
The product described above is in conformity with:
Dieser Erklärung liegt zugrunde: Prüfbericht(e) des EMV-Prüflabors
This certification is based on: Test report(s) generated by EMI-test laboratory
Braunschweig, 14. November 2001 /
November 14th, 2001
.................................. ..................................
Bernd Riemann Oliver Hellmold
Entwicklungsleiter Hardware Finanzdirektor /
Engineering Manager Hardware
Studio Deluxe
26
(Rechtsverbindliche Unterschrift
Director Finance
/ Legally Binding
)
Page 81

3LQQDFOH
6WXGLR'HOX[H
3URIHVVLRQHOH.ZDOLWHLWLQ)LOPSURGXFWLH
+DQGOHLGLQJ
6QHOOH,QVWDOODWLH
Page 82

9RRUGDWXEHJLQW
Belangrijk:
inbegrepen. Installeer uw AVDV kaart in uw computer volgens de instructies
hieronder,
In dit hoofdstuk vindt u aan welke vereisten uw computer moeten voldoen om
te werken met
Bij Pinnacle Studio Deluxe zit een AVDV video opname kaart
alvorens
de Pinnacle Studio software te installeren.
STUDIO DELUXE
en waaruit de
STUDIO DELUXE
inhoud bestaat.
6\VWHHP9HUHLVWHQ
Verzeker u zelf ervan dat uw computersysteem aan de volgende vereisten
voldoet voordat u begint met installeren van
•
Intel Pentium of AMD Athlon 500 MHz of hoger
•
128 MB RAM (256 MB Aanbevolen)
•
Windows 98SE, Millennium Edition, 2000, of XP
•
DirectDraw compatible geluids- en grafische kaarten
•
Muis
•
CD-ROM drive
•
Een vrij 32-bit PCI slot
•
500 MB vrije ruimte op de harde schijf voor de installatiesoftware
•
120 MB vrije ruimte op de harde schijf voor elke 20 minuten video
opgenomen met preview kwaliteit (4 GB voor elke 20 minuten voor
eindproduct film). (alleen DV opname)
•
4 GB voor elke 20 minuten opgenomen analoge video of volledige
kwaliteit DV video
•
Harde schijf moet tenminste gegevensoverdracht van minimaal 4 MB
per seconde ondersteunen (op de toegewezen harde schijf voor video
opname )
•
Naar keuze: CD-I of CDRW drive om Video CD of SuperVideo CDs te
maken
•
Naar keuze: DVD-R DVD-RW of DVD+RW drive om DVDs te maken
STUDIO DELUXE
:
Studio Deluxe
2
Page 83

,QKRXG9HUSDNNLQJ
Verzeker u zelf dat uw
installatie begint. Inbegrepen zijn *:
AVDV kaart blueBOX
IEEE-1394 kabel Audio verbindingskabel
Pinnacle Studio, en Hollywood FX Plus voor Studio CD-ROMs
STUDIO DELUXE
systeem compleet is voordat u met de
Pinnacle Studio Handleiding en deze gids voor snelle installatie
*Inhoud of Vorm kan variëren
Is het pakket niet compleet, neem dan contact op met uw leverancier.
Computeronderdelen zijn gevoelig voor statische elektriciteit.. Haal
de AVDV kaart niet uit de antistatische verpakking voordat u gaat
installeren.
Snelle Installatie
3
Page 84

Pinnacle Studio Deluxe installeren
De harde schijf defragmenteren
Voor installatie en configuratie van de AVDV kaart, moet u uw harde schijf
(schijven) defragmenteren. U vindt het Windows defragmentatie programma
onder
Start > Programma’s > Bureau Accessoires > Systeemwerkset >
Schijf defragmentatie.
DEEL 1: DE AVDV-KAART INSTALLEREN
Let voor uw eigen veiligheid en ter voorkoming van schade aan uw AVDVkaart en/of uw computer op de volgende aanwijzingen:
De hardware-componenten van een computer zijn erg gevoelig voor
•
statische elektriciteit. Leid daarom eventuele elektrostatische ladingen van
uw lichaam af, voordat u de componenten met uw handen of met
gereedschap aanraakt.
Haal de stekker uit het stopcontact voordat u de computer openmaakt.
•
De AVDV – kaart installeren in de computer:
1.
Leidt alle eventueel aanwezige statische ladingen van uw lichaam af
door het metalen omhulsel van uw computer aan te raken.
2. Schakel uw computer en de aanwezige randapparatuur uit. Trek alle
stekkers uit de stopcontacten en verwijder alle aanwezige kabels.
3.
Draai de schroeven los van uw computerkap en haal deze weg
4. Kies een vrij PCI slot.
5.
Verwijder het betreffende afdekplaatje aan de achterkant van uw
computer (lees hiervoor eventueel de bedieningshandleiding van uw
computer door)
.
.
Studio Deluxe
4
Page 85

6.
Steek de kaart voorzichtig in het uitgekozen slot. Houd daarvoor de
kaart aan de bovenkant vast en schuif voorzichtig de beide uiteinden
gelijktijdig in het slot. Druk nog een keer voorzichtig op de bovenkant
van de kaart om vast te stellen of ze ook vast in het slot zit. Als u de
kaart niet gemakkelijk in het slot kunt steken, mag u in geen geval
geweld gebruiken (de contactpunten kunnen daardoor worden
verbogen), maar trek de kaart er weer voorzichtig uit en probeer het
nog eens
7.
Zodra de kaart vast in het slot zit, kunt u de schroeven weer
vastdraaien en de computerkap weer installeren. Sluit alle kabels weer
aan.
8.
De installatie van uw AVDV-kaart is daarmee afgesloten en u kunt uw
computer nu starten.
DEEL 2: DE AVDV DRIVER INSTALLEREN
Lees vóór het openen en installeren van uw Studio-software de
gebruiksrechtovereenkomst in Appendix F van het StudioGebruikershandboek. Als u de verpakking opent, gaat u automatisch akkoord
met de in deze overeenkomst opgenomen voorwaarden. Als u het niet eens bent
met deze voorwaarden, maak de CD-ROM-verpakking dan niet open en geef
het gehele Studio Deluxe-pakket weer aan uw leverancier terug.
1. Zet uw computer aan na de installatie van de AVDV-kaart.
2. De Windows wizard Nieuwe Hardware toevoegen zal de kaart
automatisch herkennen.
3. Annuleer de installatie via de wizard, de stuurprogramma’s (drivers)
voor Studio Deluxe worden geïnstalleerd nadat u de Studio software
installeert.
4. Leg nu de Studio CD-ROM in de CD-ROM drive.
.
Snelle Installatie
5
Page 86

DEEL 3: DE PINNACLE STUDIO SOFTWARE INSTALLEREN
1. Als op uw systeem de autorun-functie is geactiveerd, wordt het
installatie-programma automatisch opgeroepen.
Aanwijzing: Is deze functie niet geactiveerd, ga dan via de Verkenner
naar uw CD-ROM-drive, dan dubbelklikken op het bestand Setup.exe
en doorgaan met stap 2.
2. Selecteer de taal van uw keuze en klik op “OK”.
3. Voer uw serienummer in (op de achterkant van de Pinnacle Studio
Gebruikershandleiding). Klik dan op “Volgende”.
4. Ga akkoord met de software voorwaarden (klik “I ga akkoord”). Gaat
u niet akkoord of begrijpt u de voorwaarden niet, dan moet u dit
product meteen retourneren bij uw leverancier.
5. Kies “Standaard” installatie (aanbevolen). Alleen ervaren
computergebruikers kunnen kiezen voor “Aangepast”.
6. Klik “Volgende” totdat u gevraagd wordt of u een snelkoppeling voor
a Studio 7 op uw bureaublad wilt, klik dan op “Ja”.
7. Driver installatie Nadat de Studio software is geïnstalleerd, zijn de
drivers voor de AVDV-kaart aan de beurt. Bij het installeren van de
drivers met Windows XP of Windows 2000, kan er een Windows
dialoogvenster verschijnen met de mededeling dat de drivers de
Windows logo test niet hebben doorstaan. De drivers zijn echter
uitgebreid getest door Pinnacle Systems en zijn compatible met
Windows. U kunt dit Windows dialoogvenster negeren en op
"Doorgaan" klikken om de drivers te installeren.
8. Herstarten. In sommige gevallen, krijgt u de instructie dat u uw
computer moet herstarten.
9. Registratie. U krijgt nu de mogelijkheid om uw kopie van Studio te
registreren. Dit kan eenvoudig en snel via Internet. Registratie is
belangrijk om drie redenen:
Door registratie kan Pinnacle Systems u informeren over gratis
•
upgrades van de Studio software
Pinnacle Systems verzorgt speciale aanbiedingen voor
•
geregistreerde gebruikers
Registratie is nodig om technische ondersteuning te krijgen
•
Studio Deluxe
6
Page 87

DEEL 5: HOLLYWOOD FX PLUS VOOR STUDIO INSTALLEREN
1. Als op uw systeem de autorun-functie is geactiveerd, wordt het
installatie-programma automatisch opgeroepen.
Aanwijzing: Is deze functie niet geactiveerd, ga dan via de Verkenner
naar uw CD-ROM-drive, dan dubbelklikken op het bestand Setup.exe
en doorgaan met stap 2.
2. Typ uw serienummer (te vinden op het Hollywood FX Plus voor
Studio CD hoesje). Klik dan op “Volgende”.
3. Kies “Installeer Hollywood FX Plus”
4. Klik “Volgende” totdat u gevraagd wordt om opnieuw het
serienummer in te typen. Is het serienummer niet automatisch
ingevuld, doe dit dan nu en klik op “OK”.
5. Registratie. U krijgt nu de kans om uw kopie van Hollywood FX Plus
te registreren en bij de Club Hollywood te gaan. Registreren kan snel
en makkelijk via Internet. Registratie is belangrijk om drie redenen:
Registratie maakt het mogelijk dat Pinnacle Systems u informeert
•
wanneer er gratis upgrades zijn voor de Hollywood FX Plus
software
Toegang tot extra FX en upgrades online via Club Hollywood
•
Via registratie komt u in aanmerking voor speciale aanbiedingen
•
van Pinnacle Systems
Registratie is vereist voor het verkrijgen van technische
•
ondersteuning
Snelle Installatie
7
Page 88

DEEL 6: DE BLUEBOX EN DE VIDEO APPARATEN VERBINDEN
p
In dit gedeelte staat informatie hoe u uw videoapparaten met behulp van
geschikte kabels via de blueBOX
bij uitgeschakelde computer
aan uw
Pinnacle AVDV-kaart kunt aansluiten.
In de volgende afbeelding staat de AVDV-kaart met de nodige aansluitingen:
Aansluiting voor DV-apparaten
Aansluiting voor DV-apparaten
(1394-aansluiting)
(1394-aansluiting)
Audio-uitgang*
blueBOX-aansluiting
(26-pin, type D)
De volgende afbeelding toont de afzonderlijke aansluitingen van de blueBOX:
Video-ingangen Audio-ingangen
S-Video Com
osite Links Rechts
Studio Deluxe
8
S-Video Composite Links Rechts
Video-uitgangen Audio-uitgangen
Page 89

9LGHRHQ$XGLRDSSDUDWHQDDQVOXLWHQ
DV Camcorder
Audio-uitgang naar Line In (soundkaart)
Audio-uitgang
naar soundkaart
DV-Appar.
IEEE
blueBOX
AudioVideo
Audio-uitgang soundkaart
Luidsprekers
blueBOX
Ingang
Uitgang
Snelle Installatie
9
Page 90

'HEOXH%2;YHUELQGHQ
g
g
Met behulp van de blueBOX kunt u analoge videoapparaten of een externe
monitor met uw AVDV-kaart verbinden, waarbij u de blueBOX met behulp
van de desbetreffende kabel direct aan de AVDV-kaart aansluit.
blueBOX-uitgan
blueBOX-kabel
AVDV-kaart
D-Sub26-aansluitin
¾
'H$XGLRYHUELQGLQJVNDEHOVDDQVOXLWHQ
Om geluid via uw PC speakers te beluisteren, moet u de Audio Output op de
achterkant van de AVDV-kaart verbinden met de Audio Line-IN van uw
geluidskaart via de verbindingskabel uit het pakket.
9LGHR$SSDUDWHQYHUELQGHQ
In het volgende deel worden de opties beschreven hoe u uw videobron – de
player of speler genoemd – moet bekabelen. Via de player komen de video en
audio signalen die u wilt opnemen en bewerken op uw computer terecht.
Daarna worden de verbindingen naar de recorder uitgelegd. The recorder is het
apparaat—meestal een videorecorder (VCR)—waar u het eindproduct naar wilt
uitvoeren.
Player: DV apparaat
Tot de mogelijke apparaten, die aan de kaart kunnen worden aangesloten,
behoren ook DV- of digital 8-video-camcorders resp. recorders met
geïntegreerde IEEE-1394/DV-aansluiting. Bij vele apparaten wordt deze
aansluiting ook “i.Link” genoemd.
Om uw DV camcorder/VCR met de
STUDIO DELUXE
IEEE-1394 DV kabel uit het pakket.
1. Verbindt de IEEE-1394 kabel met de Pinnacle
AVDV.
Steek de 6-pins connector van de IEEE 1394 DV kabel
in een van de 1394 data poorten van uw AVDV.
Studio Deluxe
10
te verbinden, gebruik de
Page 91

2. Verbindt de IEEE-1394 kabel met het DV apparaat.
g
g
g
g
g
g
gang
Steek de 4-pins connector van de IEEE 1394 AV kabel in de DV IN/OUT
of de DV OUT connector van uw DV camcorder/VCR.
Video en Audio signalen worden getransporteerd via de IEEE-1394 kabel,
daarom is er geen andere verbinding nodig om uw DV apparaat als player te
gebruiken.
Player: S-Video apparaat / Composite video apparaat
S-Video
Kies dit type verbinding als uw speler een s-video uitgang heeft.
In de volgende tabel een overzicht van de verbindingen:
Player-uitgan
S-video-uitgang
Audio-uitgang L
Audio-uitgang R
blueBOX-ingan
S-video-ingang
¾
Audio-ingang L
¾
Audio-ingang R
¾
Composite video
Kies dit type verbinding als uw player een uitgang heeft voor Composite video.
In de volgende tabel een overzicht van de verbindingen:
Player-uitgan
Composite-video-uitgan
Audio-uitgang L
Audio-uit
R
blueBOX-ingan
Composite-video-ingan
¾
Audio-ingang L
¾
Audio-ingang R
¾
Snelle Installatie
11
Page 92

Mocht uw player over S-video- en over Composite-video-uitgangen
beschikken, kies dan omwille van hogere beeldkwaliteit voor de S-videouitgang.
Als uw player een SCART-aansluiting bezit, heeft u een adapter nodig, die u
overal daar kunt kopen waar videorecorders worden verkocht.
Recorder: DV apparaat
PAL apparaat:
De in Noord-Amerika verkochte Studio Deluxe-versies zijn niet
PAL-compatibel. Vele in Europa verkochte PAL-apparaten
beschikken meestal alleen over een DV-
uitgang:
DV IN/OUT). Met deze apparaten is terugschrijven van DVgegevens op videoband
mogelijk. U kunt met
niet
natuurlijk ook de analoge uitgangen kunt gebruiken om uw
definitief filmprodukt op een videorecorder weer te geven.
Ook DV- of digital 8-video-apparaten met geïntegreerde IEEE-1394/DVaansluiting kunnen op uw AVDV-kaart worden aangesloten. Bij vele apparaten
wordt deze aansluiting ook “i.Link” genoemd.
Als u dat nog niet gedaan heeft, verbindt u dan uw DVcamcorder/videorecorder met de AVDV-kaart en gebruik daarvoor de
geleverde IEEE-1394 AV-kabel.
DV OUT (en niet
STUDIO DELUXE
1. Verbindt de IEEE-1394 kabel met de AVDV.
Steek de 6-pins connector van de IEEE-1394 DV kabel in een van de 1394
data poorten van uw AVDV.
2. Verbindt de IEEE-1394 kabel met het DV apparaat.
Steek de 4-pins connector van de IEEE-1394 AV kabel in de DV IN/OUT
connector van uw DV camcorder/VCR.
Studio Deluxe
12
Page 93

Pinnacle
g
g
g
gang
gang
g
g
g
gang
gang
STUDIO DELUXE
kan uitvoeren naar DV en naar analoog, maar niet
tegelijkertijd. U kunt de wijze later in Studio instellen door te kiezen voor
Opties/Maak band.
Recorder: S-Video apparaat / Composite video apparaat
S-Video
Kies dit type verbinding als uw recorder een S-Video ingang heeft.
De volgende tabel geeft een overzicht van de verbindingen:
blueBOX-uitgan
S-video-uitgan
Audio-uitgang L
Audio-uit
R
Recorder-ingan
S-video-in
¾
Audio-ingang L
¾
Audio-ingang R
¾
Composite Video
Kies dit type verbinding als uw recorder een Composite ingang heeft.
De volgende tabel geeft een overzicht van de verbindingen:
blueBOX-uitgan
Composite-video-uitgan
Audio-uitgang L
Audio-uit
R
Recorder-ingan
Composite-video-in
¾
Audio-ingang L
¾
Audio-ingang R
¾
Mocht uw player over S-video- en over Composite-video-uitgangen
beschikken, kies dan omwille van hogere beeldkwaliteit voor de S-videouitgang.
Als uw player een SCART-aansluiting bezit, heeft u een adapter nodig, die u
overal daar kunt kopen waar videorecorders worden verkocht.
Snelle Installatie
13
Page 94

Nu veel plezier gewenst …
Nu u Studio Deluxe heeft geinstalleerd, kunt u meteen aan de slag. We raden u
van harte aan de kans te nemen om ervaring op te doen met Studio Deluxe
digitale video bewerking.
In Hoofdstuk 3 van de Studio Gebruikershandleiding vindt u een snelle,
gemakkelijke en leuke uitleg door de belangrijke onderdelen van Studio
Deluxe. U kunt meteen aan de slag – de rondgang vereist geen setup van de
hardware en de bestanden zijn allemaal aanwezig op uw CD-ROM.
DEEL 7: TECHNISCHE OPMERKINGEN
1. Updates
Bij het eerste gebruik van Studio wordt u gevraagd of u de Pinnacle
Systems-website voor software-updates wilt opzoeken. Wij adviseren u in
ieder geval aan de online-check deel te nemen en – indien aanwezig – het
betreffende update te downloaden en op uw systeem te installeren.
Bovendien raden wij u aan deze website regelmatig te bezoeken om naar
nieuwe updates uit te kijken. Kies hiervoor de opties “Help/Software
updates”.
2. Preview Performance van Hollywood FX overgangen
Omdat Hollywood FX ingewikkelde 3D overgangen zijn, werkt preview
anders dan bij andere effecten.
Als uw grafische kaart de 3D routines die Hollywood FX gebruikt
ondersteunt, kan Studio de 3D hardwareversneller op de grafische kaart
gebruiken voor real-time previews. Op het moment ondersteunen grafische
kaarten met de Nvidia Geforce 2, Nvidia GeForce 3 en ATI Radeon chips
dit. Gebruikt uw grafische kaart een van deze chips, selecteer dan hardware
versnelling in Setup > Bewerken. (U moet misschien de drivers van de
grafische kaart vernieuwen)
Als u geen 3D hardwareversneller heeft, gebruikt Studio software
versnelling. Vanwege het complexe karakter van deze 3D overgangen
werkt preview anders dan bij 2D overgangen:
Wanneer u het resultaat bekijkt in het Spelervenster, speelt Hollywood FX
af op verminderde resolutie. Afhankelijk van de prestatie van uw PC is het
wellicht niet mogelijk om in real-time te bekijken. Afspeelsnelheden
kunnen zo laag zijn als een paar frames per seconde. Dit is alleen van
invloed op preview, als u de film gaat maken wordt uw overgang in
volledige resolutie en framerate gerenderd.
Studio Deluxe
14
Page 95

Gebruikt u de schuifregelaar om te previewen, samen met het indrukken
van de Alt toets, speelt de overgang af in volledige resolutie maar—
afhankelijk van de capaciteit van de PC—niet in real time. Opnieuw, dit is
alleen van invloed op het afspelen. Wanneer u de film maakt, wordt de
overgang in volledige resolutie en framerate gerenderd.
3. Harde schijf voor opname
Voor video bewerking raden we u aan een tweede harde schijf in uw
computer te zetten voor het opnemen en afspelen. De harde schijf moet in
staat zijn om op een snelheid van 4 MB per seconde te kunnen afspelen,
lezen en schrijven. Dit kan een snelle EIDE harde schijf zijn. Voor de beste
resultaten, stel de harde schijf als volgt in: Open de Windows 98 SE
Apparaat Beheer en click Schijven, Instellingen en vink het hokje DMA
aan.
4. DV Camcorder ondersteuning
Indien u tijdens het omschakelen in de opnamemodus van Studio een
foutmelding ontvangt, moet u ter ondersteuning van uw camcorder een
speciale Windows-instelling uitvoeren. Kies in het Windowsapparaatbeheer onder "1394 Bus Controller" de invoer “OHCI Compliant
IEEE 1394 Host Controller” en klik op het schakelsymbool
"Eigenschappen". Kies nu het tabblad “Instellingen” en activeer het
controlevakje ter ondersteuning van niet-compatibele apparaten. Start nu
uw systeem opnieuw. Nu wordt uw camcorder door Windows gevonden als
deze is ingeschakeld en de geschikte DV-camcorder-drivers zijn geladen,
waarmee uw Studio DV / Studio DVplus-toepassing het op uw camcorder
opgenomen videomateriaal zonder problemen op uw harde schijf moet
kunnen inlezen.
5. SmartCapture en Analoge bronnen
Preview kwaliteit opname is alleen mogelijk met materiaal van DV bron.
Video opgenomen van een analoge bron wordt altijd in volledige kwaliteit
opgeslagen.
6. SmartCapture op DV banden met meerdere timecode segmenten
Bij gebruik van de SmartCapture-functie bij opnames in preview kwaliteit
kan steeds maar een timecode-segment worden ingelezen. Indien er op uw
band een leeg gedeelte aanwezig is, dat de timecode op nul teruggezet,
moet het betreffende gedeelte apart worden ingelezen. Bij het opnieuw
inlezen van het videomateriaal voor het definitieve filmproduct in volledige
kwaliteit, gebruikt Studio de timecode om het goede deel van de band te
vinden. Als de timecode tijdens een afzonderlijke opname op nul is
teruggezet, is dit niet meer mogelijk; de opname (dit geldt voor opnames in
Snelle Installatie
15
Page 96

preview kwaliteit) wordt automatisch door Studio gestopt, zodra een breuk
in de timecode wordt ontdekt.
DEEL 8:
PROBLEMEN OPLOSSEN EN TECHNISCHE ONDERSTEUNING
Voordat u begint, controleer eerst het volgende:
1. U heeft alle actuele besturingssysteem-updates voor Windows
geïnstalleerd. Zo niet, moet u deze hier downloaden:
http://windowsupdate.microsoft.com/default.htm.
2. Alle andere op uw systeem geïnstalleerde hardware-componenten
werken goed en zijn voorzien van de nieuwste apparaatdrivers. Zijn er
in het apparaatbeheer (Start > Instellingen > Configuratiescherm >
Systeem > Apparaatbeheer) componenten aangegeven met een
vlagsymbool, dan leveren deze problemen op. Die moet u oplossen
voordat u met installeren begint.
INSTALLATIE
Probleem: In mijn video’s ontbreken beelden of de opnames verschuiven.
Mogelijke oorzaak:
Oplossing:
Bij het werken met sommige UDMA harde schijven kan het afspelen
“springerig” zijn wanneer het bestand afgespeeld wordt met hogere
data rates. Een mogelijke oorzaak is dat de harde schijf een
recalibratie uitvoert tijdens het lezen van het bestand, en zo het
afspelen onderbreekt.
Dit probleem wordt niet veroorzaakt door Studio, maar is het resultaat
van de manier waarop de harde schijf werkt en reageert op andere
systeem componenten.
Studio Deluxe
16
De overdracht snelheid van de harde schijf is te laag.
Page 97

Er zijn verschillende oplossingen die u kunt gebruiken om de snelheid
van uw harde schijf op te voeren:
1. Activeer DMA voor uw harde schijf (zie het volgende deel voor
instructies).
2. Beëindig programma’s die op de achtergrond draaien.
Voordat u Studio opent, houd de toetsen Ctrl en Alt ingedrukt en
klik op Delete. Hiermee opent u het venster Programma afsluiten.
Klik op de afzonderlijke programma’s in de lijst en selecteer Taak
beëindigen. Do dit met alle programma’s in de lijst BEHALVE
bij Explorer en Systray.
3. Klik op Start > Programma’s > Bureau Accessoires > Systeem
Werkset > Schijfcontrole.
4. Selecteer de optie Uitvoerig , en klik Start (dit kan even duren).
5. Als de schijfcontrole klaar is, klik dan op Start > Programma’s >
Bureau Accessoires > Systeem Werkset > Disk Defragmentatie
(dit kan even duren).
6. Schakel de opties uit voor energiebesparing (richt de muis op het
bureaublad, dubbelklik met de rechter muisknop, en selecteer
Eigenschappen > Screensaver > (onder Energie… Instellingen).
Zorg ervoor dat alles onder Instellingen voor energieschema’s
ingesteld staat op Nooit.
7. Ga naar Start > Instellingen > Configuratiescherm > Systeem.
Klik op de tab Prestaties, dan Bestandssysteem, dan de tab
Probleemoplossing.
8. Klik links van Deactiveer write-behind caching voor alle schijven
optie om deze te selecteren en klik OK.
9. Onder de tab harde schijf, stel de optie Lees optimalisering in op
Geen.
In het algemeen zal dit resulteren in een verbetering van de data transfer
rate. WAARSCHUWING: In sommige harde schijven kan dit het
omgekeerde resultaat hebben!
Aanwijzing: Video bewerkingsprogramma’s zijn niet erg geschikt voor het
uitvoeren van meerdere taken tegelijk. Gebruik geen andere programma’s als u
de film maakt (op videoband of CD) of tijdens Opname..
Snelle Installatie
17
Page 98

DMA activeren voor uw harde schijf
DMA is een afkorting voor direct memory access, een techniek voor het
overzetten van data van het hoofd geheugen naar een apparaat zonder het door
het CPU te laten lopen.
DMA activeren voor een harde schijf kan de data transfer rates en de
systeemprestaties behoorlijk verbeteren.
Onder Windows 2000 en XP is DMA standaard geactiveerd. Dit is niet het
geval bij Windows 98 / Millennium Edition.
DMA activeren op een Windows 98 / Millennium systeem:
1. Go naar Start
Instellingen
->
Configuratiescherm en open het
->
Systeem icoon.
2. Klik naast de tab Apparaatbeheer.
3. Open de Disk drives categorie.
4. Er zou een item moeten zijn genaamd GENERIC IDE DISK TYPExx
(xx kan elk nummer zijn)
5. Accentueer dit item en klik op Eigenschappen.
6. Klik op de tab Instellingen en zoek een vak met de naam DMA.
7. Vink deze optie aan en klik op OK in het waarschuwingsvenster dat
verschijnt.
8. Klik op OK in de box Eigenschappen en sluit Apparaatbeheer.
9. Herstart het systeem.
Studio Deluxe
18
Page 99

TECHNISCHE ONDERSTEUNING.
Pinnacle Systems heeft een gratis 24 x 7, self-service hulpservice bij
problemen. 24 uur per dag, 7 dagen per week, zijn er drie manieren
om een antwoord op uw vragen te krijgen.
Voor technische ondersteuning ga naar:
http://www.pinnaclesys.com/support/studio
Klik op “Studio Deluxe”. Hier kunt u uit de volgende opties kiezen:
FAQs (Frequently Asked Questions).
1.
technische vragen en de antwoorden op tal van
onderwerpen. Dit is de beste manier om een antwoord te
krijgen op vragen. De meest gebruikelijke vragen worden
beantwoord, en de laatste updates zijn te downloaden. De
20 meest gestelde vragen staan voorop. Documenten
selecteren per probleem is gemakkelijk via het menu
"Categorie".
Stel een vraag, vindt een antwoord.
2.
zie een lijst met de meest waarschijnlijke oplossingen.
bijvoorbeeld een symptoom intypen als "Ik heb problemen met
het uitvoeren naar videoband" of "Ik krijg een foutmelding als ik
probeer op te nemen". Krijgt u geen relevante oplossingen,
probeer dan de vraag iets anders te stellen. Bijvoorbeeld in de
plaats van "Ik krijg een foutmelding", probeer "Ik krijg een
foutmelding dat mijn data rate minder is dan 4000 kbs als ik
opneem".
U kunt ook een Categorie selecteren van het menu om groepen
vragen te zien. Bijvoorbeeld, als u een vraag heeft over het
installeren van hardware of software, kies de Categorie "Setup,
Installatie en Configuratie Onderwerpen" om de top 10 te zien
van installatie vragen. De categorieën volgen de hoofdindeling van
Studio 8, Opname, Bewerken, Maken en Uitvoeren, samen met
andere algemene onderwerpen.
Bekijk ruim 100
Typ uw vraag in en
U kunt
Snelle Installatie
19
Page 100

Discussie Forum.
3.
aangemeld hebben bij deze GRATIS service. Zoek in Pinnacle
Systems online Discussie Forum of iemand anders al uw vraag
heeft ingevoerd. Plaats uw vraag op het forum en krijg hulp van
Pinnacle Systems en andere gebruikers. Dit forum is ook
doorzoekbaartype een omschrijving in en de discussies over dit
onderwerp worden weergegeven.
Als u een vraag geplaatst heeft op het Discussie Forum, kunt u per
email bericht krijgen als iemand erop geantwoord heeft. Nadat u
uw vraag gesteld heeft op het forum, klik dan op de email knop in
de bovenste rechter hoek van het venster, en dan op OK.
Ondersteuning per email
4.
vragen, dan kunt u per email uw vraag stellen aan Pinnacle
Systems. Email wordt meestal binnen 48 uur beantwoord
(weekenden en vrije dagen uitgezonderd). Gebruik de Stel een
Vraag-afdeling op de ondersteuningswebsite om een email te
sturen. Voordat de email wordt verzonden, worden vijf
oplossingen voor uw probleem voorgesteld. Bekijk deze
alstublieft, meer dan 70% van de klanten vinden hier een
antwoord.
HYPERLINK
Er zijn bijna
. Vindt u geen antwoorden op uw
100,000 gebruikers die zich
Studio Deluxe
20
 Loading...