

Page 1

Table of Contents
FCC Class B/ CE Compliance ...................................... 2
Overview ................................................................................................ 3
Features ................................................................................................. 4
Hardware Installation ...................................................... 4
About the Parallel Cable .............................................. 4
Typical System Set-Up ...................................................... 6
Software Installation (Drivers) .......................... 6
Windows 98 Driver Installation ................................................................ 7
Windows 95 Driver Installation ................................................................ 8
Windows 3.1 Driver Installation ............................................................... 9
1st-Time Windows Driver Installation ..................................................... 9
Updating the Windows Driver ................................................................ 11
MIDI Application Set-Up Examples ............. 11
Cakewalk for Windows (v. 2.0 & Later) ................................................. 11
Cakewalk for DOS (v. 4.0 & Later) .......................................................... 12
About Your PC Port Address .................................. 14
Basic Trouble-Shooting ................................................. 14
Advanced Trouble-Shooting .................................. 15
2X4DIAG.EXE ............................................................................................ 15
1. Hardware ........................................................................................ 16
2. MIDI Input/Output ...................................................................... 16
3. Internal Buffer Test ........................................................................ 17
4. Receive Interrupt Test ................................................................... 17
Symptoms/Solutions ........................................................ 18
Windows ..................................................................................................... 18
DOS ............................................................................................................. 19
Lifetime Limited Warranty ...................................... 20
Portman 2x4
™
MANUAL
1
Version P2x4: 060299
Page 2

2
FCC Class B/European CE Compliance
WARNING: This equipment has been tested and found to comply with the
limits for a CLASS B digital device, pursuant to Part 15 of the FCC Rules.
These limits are designed to provide reasonable protection against harmful
interference in a residential installation. This equipment generates, uses
and can radiate radio frequency energy and, if not installed and used in
accordance with the instructions contained in this manual, may cause
harmful interference to radio and television communications. However,
there is no guarantee that interference will not occur in a particular installation.
If this equipment does cause harmful interference to radio or television
reception, which can be determined by turning the equipment off and on,
the user is encouraged to try to correct the interference by one or more of
the following measures: 1) reorient or relocate the receiving antenna; 2)
increase the separation between the equipment and the receiver; 3) connect
the equipment into an outlet on a circuit different from that of the receiver;
4) consult the dealer or an experienced audio television technician.
NOTE: Connecting this device to peripheral devices that do not comply
with CLASS B requirements or using an unshielded peripheral data cable
could also result in harmful interference to radio or television reception.
The user is cautioned that any changes or modifications not expressly
approved by the party responsible for compliance could void the user’s
authority to operate this equipment.
To ensure that the use of this product does not contribute to interference, it
is necessary to use shielded I/O cables.
IMJPORT2X4
This product also complies with European CE requirements.
Page 3

3
Overview
Thank you for purchasing Portman 2x4.
Portman 2x4 is a professional 2 In/4 Out MIDI interface that connects
externally to the parallel printer port on any IBM or compatible PC computer.
When using Portman with a MIDI application, you will have to make sure
that the correct Portman MIDI driver is installed for your application.
Fortunately, all Windows applications use the same driver and this is
included on the diskette that comes with your Portman. If you have a DOS
MIDI application, you should check and make sure that the correct driver
is included on the diskette and that it is loaded properly.
If you have any questions, comments, or suggestions about Portman 2x4 or
any MIDIMAN product, we invite you to contact us directly at:
MIDIMAN
Technical Assistance: (626) 445-8495
45 E. Saint Joseph Street
Arcadia CA 91006-2861
Fax: (626) 445-7564
World Wide Web: www.midiman.net
Page 4

4
Features
PORTMAN 2x4 has the following features:
• 2 completely independent MIDI Ins and 4 MIDI Outs.
• Extremely Portable. Works with laptops, and notebooks, as well as
desktops.
• No internal installation is required. Connects via standard Centronicscompatible printer cable.
• Runs on any PC including XT/286/386/486 compatible computers — at
any speed.
• Compatible with any sequencer that supports the Windows Multimedia
Environment.
• Windows and Cakewalk DOS drivers included.
• Power adaptor and Centronics cable provided.
Hardware Installation
1. Make sure that you have turned off power to your computer.
2. If you have more than one parallel (printer) port installed in your computer, choose one and connect PORTMAN to it via a standard (fully
Centronics-compatible) PC printer cable. There should be one included
in the PORTMAN box. Then plug one end of the power adaptor into
PORTMAN and the other into the AC power source. The computer is
now ready to be turned back on. Turn it on.
About the Parallel Cable
PORTMAN comes with a suitable parallel cable. However, if you need to
replace this cable or want a longer one there are certain requirements that
you should be aware of. The PORTMAN 2x4 appears to be able to work
with any printer cable. This unfortunately is not the case. A Centronics
cable that works with your printer won’t always work with the PORTMAN
2x4. There are two reasons for this:
1. The PORTMAN runs at a much higher data rate than a printer and
therefore often requires a shorter (6 feet or less) and higher quality cable
with all of its ground wires present.
2. PORTMAN uses some of the signals of the Centronics cable that are
unneeded by a printer. The PORTMAN therefore requires a cable that
has all 25 wires present and connected according to Centronics specification.
Page 5

5
If you are having trouble with the PORTMAN using your present printer
cable, you can purchase one either directly from MIDIMAN, through a
MIDIMAN Dealer or from your local electronics store.
MIDIMAN has found at least one easily obtainable cable that is known to
work with the PORTMAN 2x4. It is made by GC Electronics and has Part
#45-201-BU.
In the event that you are going to purchase a cable yourself and you can
not find the GC Electronics cable, you can use this chart as a guide to find a
compatible cable:
Line Name
DB25s (25 pin end) Centronics
-Strobe* 1 1
D0 2 2
D1 3 3
D2 4 4
D3 5 5
D4 6 6
D5 7 7
D6 8 8
D7 9 9
-ACK* 10 10
Busy 11 11
PE 12 12
SLCT 13 13
-AUTOFD* 14 14
-Error* 15 32
-INIT* 16 31
-SLCT In* 17 36
Ground 18 thru 25** 16,19-30,33
* A dash in front of a line name denotes a line that is functionally
active when low.
** The ground lines on the DB25s end of the cable can tie to any of
the ground pins on the Centronics side, but they must run as
separate wires and not share any pin at the Centronics end (none
bridged or tied together).
Typically, if you ask your dealer for a 6-foot Centronics cable with all 25
wires connected, you will get a cable that matches the above table.
Note: Cables lengths of up to 30 feet have been found to work just fine
Page 6
6
in tested systems.
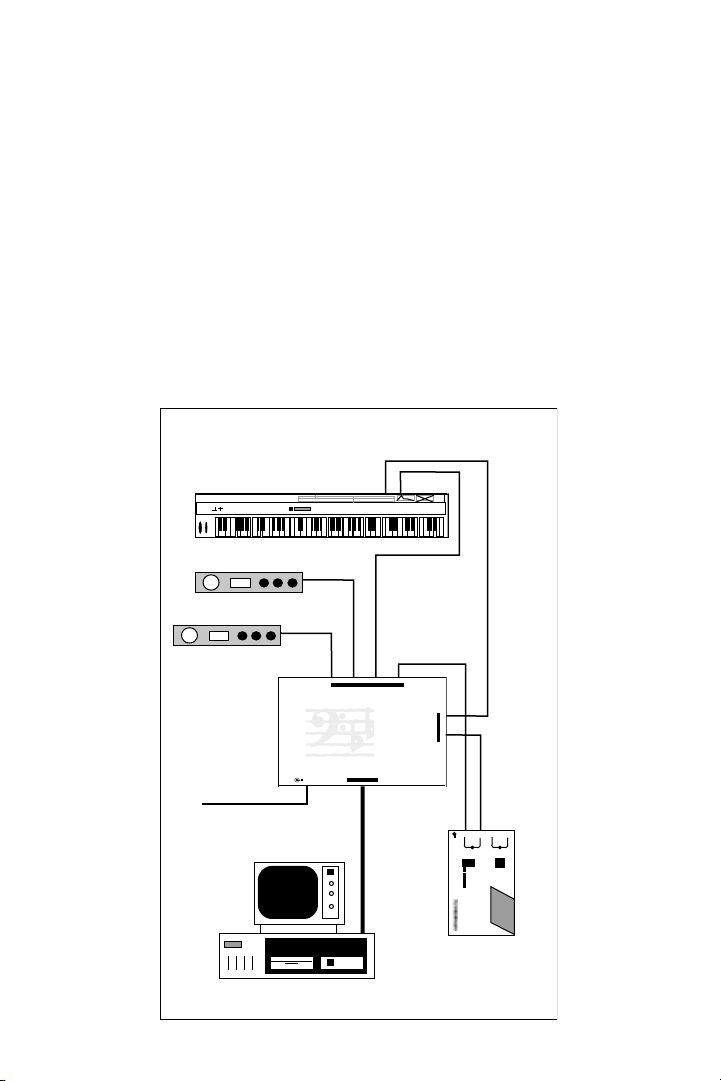
Typical System Set-Up
The diagram below shows a typical set-up using the PORTMAN 2x4. Your
required set-up may vary slightly from this but this general set-up should
be followed.
Software Installation (Drivers)
Software installation varies according to the MIDI application(s) you are
using. Most programs require a special piece of software known as a
“MIDI Driver” in order to communicate with the PORTMAN interface
hardware. Others have built-in PORTMAN support and may require you
Master Keyboard
Master Keyboard
MIDI Sound Module
MIDI Sound Module
To Wall Wart
Power Supply
PC Computer
MIDI Out
MIDI In
MIDI In
1 2 3 4
PORTMAN
MIDI INTERFACE
CENTRONICS
9VDC
▲
To Centronics (Printer)
Connector
▲▲
▲▲
MIDI OUT
2x4
PC PARALLEL
1
▲
MIDI In
TM
▲
MIDI IN
▲
2 1
MIDI In
+
9 vdc
MIDI Sync Box
MIDI Out
OUT
OUT
IN
IN
TAPE
MIDI
WRITE
On Off
---
---
SONG POINTER - (Off)
DIRECT LOCK (Map R/W)
DUPLICATE - (Plus Mode)
MERGE
24 DF 3025
SMPTE FORMAT
Syncman
SMPTE/Song Pointer Sync Box
TM
Page 7

7
to configure your application for use with PORTMAN via a dialog box or
menu item.
Some manufacturers may provide PORTMAN MIDI driver software along
with their application software, while others may offer supplemental disks
that include a PORTMAN MIDI driver. Please consult the user’s guide
associated with your MIDI application(s) for instructions regarding MIDI
interface driver installation. Included with your PORTMAN 2x4 hardware
is a disk of PORTMAN software with drivers for Windows and Cakewalk
for DOS.
Windows 98 Driver Installation
1. Select “Add New Hardware” from the Control Panel. Press the “Next>”
button.
2. Click “Next>” again.
3. The system will now search for Plug and Play hardware.
4. If Windows does find a device, it will not be the PORTMAN 2X4 (it is
not PnP). If this is the case, click on “No, the device isn’t in the list.”
Click the “Next>” button. If Windows does not find a Plug and Play
device, skip to step 5.
5. Click “No, I want to select the hardware from a list,” because you do
not want the system to search for the hardware.
6. Scroll down the list of Hardware Types and select “Sound, Video and
Game Controllers.” Click “Next>.”
7. Click on “Have Disk....”
8. Insert the PORTMAN 2X4 Drivers and Diagnostics disk in Drive A:\
and click “OK.”
9. The PORTMAN 2X4 driver appears in the list. Click on “OK.”
10. Click on “Finish.” Windows will copy the driver files.
11. Check the “Enable Interface” box and select the proper Port Address
and IRQ settings that match the actual hardware settings of your computer’s printer port.
Typically, LPT1 will be address 3BCh or 378h on a desktop computer.
Also typically, if LPT2 is installed, it will be at address 278h. Usually
LPT1 uses IRQ7 and LPT2 uses IRQ5. You may also select other “nonstandard” IRQs if required to do so — checking the “Use Custom
Port/IRQ” checkbox will make “non-standard” IRQs available for driver use.
If you are unsure of what your Port Address is, please see the section in
this manual titled “About Your Printer Port,” or consult your computer’s owner’s manual.
12. Once the Port Address and IRQ are selected, press the <OK> button.
Page 8

8
13. In order for Windows to complete the new driver installation, you will
be required to exit and restart Windows. Select the <Restart Now> button to do so.
14. Windows will restart.
IMPORTANT: With Windows 98 make sure to click on the “Enable Driver”
box. If you fail to do this the PORTMAN 2x4 driver will not be enabled.
Windows 95 Driver Installation
1. Select “Add New Hardware” from the Control Panel. Press the
“Next>” button.
2. Click radio button “No” because you do not want Windows to search
for new hardware. Click on “Next>”.
3. Scroll down in the box and select “Sound, video and game controllers”.
Click on “Next>”.
4. Click on “Have Disk...”.
5. Insert the factory supplied driver disk in Drive A: and click on “OK”.
6. Select the Midiman PORTMAN 2X4 driver from the list box and click
on “OK”.
7. Click on “Finish”. Windows will copy the driver files.
8. Check the “Enable Interface” box and select the proper Port Address
and IRQ settings that match the actual hardware settings of your computer’s printer port.
Typically, LPT1 will be address 3BCh or 378h on a desktop computer.
Also typically, if LPT2 is installed, it will be at address 278h. Usually
LPT1 uses IRQ7 and LPT2 uses IRQ5. You may also select other “nonstandard” IRQs if required to do so — checking the “Use Custom
Port/IRQ” checkbox will make “non-standard” IRQs available for driver use.
If you are unsure of what your Port Address is, please see the section in
this manual titled “About Your Printer Port,” or consult your computer’s owner’s manual.
9. Once the Port Address and IRQ are selected, press the <OK> button.
10. In order for Windows to complete the new driver installation, you will
be required to exit and restart Windows. Select the <Restart Now> button to do so.
10. Windows will restart.
IMPORTANT: With Windows 95 make sure to click on the “Enable Driver”
box. If you fail to do this the PORTMAN 2x4 driver will not be enabled.
Page 9

9
Windows 3.1 Driver Installation
If you are going to use PORTMAN with Microsoft Windows 3.1 (or later
revision), you will need to install the PORTMAN Windows 3.1 MIDI drivers, supplied on floppy disk. In order to work with Windows in both
Standard Mode and 386 Enhanced Mode, PORTMAN 2x4 requires the
installation of the Windows Device Driver, PP2X4WIN.DRV, and the
Windows Virtual Device Driver, PCP2X4.386. Both are installed simultaneously in the same installation process which follows:
The installation of PORTMAN Windows MIDI drivers is simplified by
using the Windows Control Panel “Drivers” applet. In addition to
installing the Windows MIDI drivers, you will also have to set up your
Windows MIDI applications to take advantage of the installed PORTMAN
2x4 driver.
1st-Time Windows Driver Installation
If there is no current PORTMAN 2x4 Windows MIDI driver installed on
your system, follow these steps to install the PORTMAN Windows
driver(s):
1. Start Windows as you usually do.
2. Open the Windows Control Panel application (usually in your Main
program group).
3. Start the Drivers applet.
4. Check for a “MIDIMAN PORTMAN 2x4” entry in the Installed Drivers
list. If one exists, the PORTMAN driver (or a previous version of the
driver) has already been installed. Discontinue this FIRST-TIME WINDOWS DRIVER INSTALLATION procedure and instead follow the
UPDATING THE WINDOWS DRIVER procedure. If one does not exist,
then please continue.
5. Push the [Add] button.
6. Select the “Unlisted or Updated Driver” entry and push the [OK] button.
7. You will be prompted for a disk drive from which to read the Windows
3.1 drivers. Insert your PORTMAN 2x4 master disk into your floppy
disk drive and, if necessary, enter the disk drive specification (usually
A: or B:) in the prompt box. Click on [OK].
8. When the “Add Unlisted or Updated Driver” Window pops up, select
the “MIDIMAN PORTMAN 2x4” and click on [OK].
9. The PORTMAN driver set-up dialog box will then appear. Make your
set-up choices now. At the bottom of the box, for future reference, will
Page 10

10
be your driver version number. Also there will be check-boxes for special functions to be described later.
At this point it will be necessary for you to know the port address of the
parallel port your PORTMAN is connected to and enter it in the set-up
box.
Typically, LPT1 will be address 3BC on a desktop computer with a
monochrome display. On color systems or most laptops, however, the
address of LPT1 is 378.
If you are unsure of what your port address is or how to find out,
please see the section in this manual titled “About Your PC Port
Address” (page 13), or you can consult your computer owner’s manual.
There is also a utility on your disk called LPT.EXE that will find the
address of any parallel ports that are enabled on your computer. (Be
sure to run this program from DOS, since Windows can complicate the
running of hardware diagnostic software.)
Note: IRQ numbers are typically chosen automatically based on the
LPT number setting. Address 3BC or 378 for LPT1 will almost always
use IRQ 7. So this will be set automatically from the main screen of the
set-up dialog box. Likewise, LPT2, which will usually be address 278,
will almost always be IRQ 5, and also chosen automatically.
10. Once the proper set-up is selected, press the [OK] button.
11. In order for Windows to install the new driver completely, you will be
required to exit and restart Windows.
12. After restarting Windows, run your MIDI application(s). You will need
to set up each MIDI application individually. From within the application(s), select the MIDIMAN PORTMAN 2x4 as the current MIDI device
(the selection procedure will depend on the application) in order for the
application to communicate with your PORTMAN interface properly.
IMPORTANT: If you encounter problems using the PORTMAN 2X4
with Windows, verify that Windows has loaded the PORTMAN 2X4 driver. In Windows 98 or 95, go to Control Panel, open Multimedia, click
Devices (Advanced in Win95), and open the MIDI Devices &
Instruments list. In Windows 3.1, this can be done by opening the
Control Panel icon in the Main Group and double clicking on the
Drivers icon.
Important Note for Windows 98, 95, and Windows 3.11 for Work Groups
Users
Both Windows for Work Groups and Windows 98 & 95 load a virtual print
driver for networked printers. This driver will interfere with the PORT-
Page 11

11
MAN 2x4 driver and could cause your computer to lock when running a
MIDI sequencing program. To alleviate this problem, edit the SYSTEM.INI
file in your Windows directory (This is done either with the DOS editor,
Windows Notepad application, or the SYSEDIT program in Windows 95).
After you have opened SYSTEM.INI, place a semicolon (;) in front of the
line in the [386Enh] section that reads “device=*vpd”, save the file, and
restart Windows.
Updating the Windows Driver
If you already have a copy of the PORTMAN Windows driver installed on
your system and wish to update it with a newer version, you will need to
remove the current (older) driver and re-install the newer PORTMAN driver. Follow these steps to remove the current driver from your system:
1. Start Windows as you usually do.
2. Open the Windows Control Panel application from My Computer or
Settings in the Start Menu (in your Main program group in Win 3.1).
3. Double click Multimedia. In Windows 98 click Devices, In 95 click
Advanced. In Windows 3.1, start the Drivers applet.
4. Check for a “MIDIMAN PORTMAN 2x4” entry in the Installed Drivers
list. If none exists, you know the driver is not installed - discontinue
this procedure and follow the FIRST-TIME WINDOWS DRIVER
INSTALLATION procedure instead. If the entry exists, then highlight it
(click Properties in 98 & 95) and select [Remove].
5. In order for Windows to install the new driver, you will be required to
exit and restart Windows.
6. After exiting and restarting Windows, follow the FIRST-TIME WINDOWS DRIVER INSTALLATION procedure to install the updated
PORTMAN driver.
MIDI Application Set-Up Examples
Cakewalk for Windows (Version 2.0 & Later)
Once the PORTMAN Windows driver is installed, Cakewalk for Windows
has to be set up to take advantage of the PORTMAN MIDI interface. Under
the Settings Menu in Cakewalk, select MIDI Devices. A “MIDIMAN PORTMAN 2x4” entry should be available under both Input Devices and Output
Devices. Select (highlight) PORTMAN under Input and Output. For
Output, you may also want to press the [move selected devices to top] button. Then press the [OK] button.
Page 12

12
Once the MIDI Device is set to MIDIMAN PORTMAN 2x4, the PORTMAN
interface becomes available as a selectable port in the Track/Measure window of each and every track.
Cakewalk for DOS (Version 4.0 & Later)
Note: The following procedures require a basic understanding of common
DOS commands. These commands are examples only and may not apply
directly to your experience or system. If you do not understand these commands, consult a DOS manual or seek the help of a more experienced IBM
or compatible computer user.
Cakewalk for DOS (Version 4.0 and later only) supports the use of an
installable Port Device (IPD). You will find the PORTMAN IPD on a MIDIMAN or Twelve Tone-supplied disk. The filename is “PCP2x4CW.DRV”.
On the MIDIMAN PORTMAN master disk it will be located at the following path:
[drive]:\PCP2x4CW.DRV
In order to install the PORTMAN IPD, you will need to copy it to (and then
rename it once it is in) the directory where your CAKEWALK.EXE file is
located. For the purpose of these examples, we will assume that this directory will be:
C:\CAKEWALK
Note: You may first wish to save (backup) the old MIDI driver that’s
already in the directory by renaming it. You can do this by first changing to
that directory and then typing:
rename midiport.drv midiport.bak [Enter]
Follow these steps to install your Cakewalk for DOS PORTMAN driver:
1. To copy the driver, first change to the directory where pmanpcak.drv is
located and then type:
copy pcp2x4cw.drv c:\CAKEWALK [Enter]
Page 13

13
2. Next, change to the directory where CAKEWALK.EXE is located and
rename the PORTMAN driver by typing:
rename pcp2x4cw.drv midiport.drv [Enter]
3. Before running Cakewalk for the first time, and after installing the
PORTMAN driver, execute Cakewalk as follows:
CAKEWALK.EXE/s
4. From the list of choices, select (3) for MIDI Interface Set-Up. This
should bring you to a screen titled:
“<<MIDI INTERFACE SETUP>>”
5. Enter the Port Address and IRQ number of the parallel port the PORTMAN is connected to. Enter this data in the space provided by the setup window. This dialog box will have four areas dedicated to the information necessary to run Cakewalk using the PORTMAN 2X4. The display should look something like this:
Interface type is MIDIMAN PORTMAN 2x4, version 1.xx
Port: 1=3BCh, 2=378h, 3=278h ——-
IRQ Number (default=IRQ7) ——-
Note: If you are not sure what these settings are, or you are not sure how
to find out, then please see the section titled “About Your PC Port
Address” immediately following this section in the manual, or you can
consult your computer owner’s manual.
6. After you have made your settings, exit the Cakewalk set-up utility and
execute Cakewalk normally.
Page 14

14
About Your PC Port Address
The driver for the PORTMAN 2x4 needs to be configured according to the
Port Address and the Interrupt Request Number (IRQ) of the parallel port
that you have the PORTMAN physically connected to. Basically, this information describes where everything is and the priority of each device connected to or installed in your computer.
There are a couple of ways to identify your Port’s Address and IRQ. In
Windows 98 or 95, go to the Control Panel from either settings or My
Computer. Open System, click Device Manager, and open the “Ports” list.
Highlight a Printer Port, click Properties, then click Resources. Here you
will view the Interrupt Request, and the Input/Output range, which is the
same as “Address.”
Another way is to run the included program called LPT.EXE. This program
must be run from DOS. If you are presently in Windows, you must go to
Shut Down, and Restart in MS-Dos Mode, or otherwise quit (Exit
Windows) your Windows session before executing LPT.EXE. The program
is on your PORTMAN software diskette located at the following path:
[drive]:\LPT.EXE
The LPT.EXE program is simple to run having on-screen instructions. It
will tell you how many parallel ports it finds and what their port addresses
are. Use this information to help make your selection in the necessary driver set-ups. For other methods of finding this information, or if you are
not exactly sure which LPT port the PORTMAN is connected to, please
consult your computer manual or consult the manufacturer directly.
Basic Trouble-Shooting
If you are having problems using PORTMAN, you should first check the
following:
1. Are all your cables working and plugged in properly?
2. Are you using a high quality printer cable 6 feet or less in length that
matches the full Centronics specification as described in the “About the
Parallel Cable” section found on pages 4 and 5 of this manual?
3. If you are using Windows, have you installed PORTMAN 2x4 Windows
MIDI Drivers and set up the Windows MIDI application to communi-
Page 15

15
cate with PORTMAN 2x4?
4. If you are using a DOS MIDI application, does it require a special set-up
or MIDI driver?
If after checking the above quick-fix ideas you do not find an answer to
your questions, please consult the “Advanced Trouble-Shooting” section
below.
Advanced Trouble-Shooting
P2X4DIAG.EXE
In the event that you are having trouble getting the PORTMAN to be recognized in your system or getting the system to behave normally, it is always
a good idea to test the PORTMAN using the diagnostics that we have provided.
We assume if you have gotten this far that you have already gone through
the “quick-fixes” listed in the above “Basic Trouble-Shooting” section, and
that you have already gone through the basic instructions in this manual
and have a good understanding of your set-up. The PORTMAN diagnostic
test can be found on your PORTMAN master disk located at the following
path:
[drive]:\P2X4DIAG.EXE
This test must be run from DOS. In Win3.1, exit windows; in Win98 or
Win95, go to Shut Down and choose restart in MS-DOS mode. When you
run P2X4DIAG.EXE, you will get a title screen showing the test revision
number and a list of settings. By this time you should know what your Port
Address and IRQ settings are. If you don’t, go back and read the installation instructions over, since you will need those numbers to run the test.
The test itself is quite simple. Just use the arrow keys to move from one line
to the next and the space bar to move through the different options for each
setting until they match your address and IRQ (usually address 378 and
IRQ 7). Connect a single MIDI cable from In 1 to Out , plus a single MIDI
cable from In 2 to Out 2 in order to perform the “Loopback” test. Now
move the cursor to the “Run Tests” line and press [enter]. After you have
successfully completed this test, you may change the “Loopback” setting,
reconnect the looped MIDI cable to the ports you have chosen, and rerun
the test.
Page 16

16
P2X4DIAG.EXE will test the following four areas:
1. Hardware
This will indicate whether the PORTMAN, your computer, and the
Centronics cable are all properly connected and working.
If your PORTMAN fails this test, it could mean a bad PORTMAN or other
hardware failure, but most often it means one of a few very specific things:
a.) You have made the incorrect port settings in 2X4DIAG.
b.) The 2X4 is not plugged in.
c.) Your cable is not fully Centronics-compatible.
2. MIDI Input/Output
If your PORTMAN fails this test, it indicates a bad MIDI connection. It
could also be an indication of a specific communication problem.
If this part of the test fails, reporting:
Transmit/Receive Test: Fail Tx=0h Rx=Timeout
a.) Make sure that your cables are good.
b.) Make sure that you have a MIDI cable connected between the correct
MIDI In of the 2X4 and the correct MIDI Out. Your MIDI instruments
should not be connected for this test. It is a closed loop test with one
Out 1
9VDC
▲
▲▲
1 2 3 4
▲▲
MIDI OUT
PORTMAN
2x4
PC PARALLEL
MIDI INTERFACE
CENTRONICS
▲
1
MIDI Cable
TM
MIDI IN
2 1
In 1
▲
▲
Page 17

17
MIDI cable connected between the MIDI jacks of the PORTMAN.
3. Internal Buffer Test
Your PORTMAN 2x4 should never fail the Internal Buffer Test. This test
checks the PORTMAN’s ability to handle the flow of data through its circuit and failure probably indicates a bad chip in the PORTMAN. If you
think this is the case, please contact MIDIMAN Product Support.
4. Receive Interrupt Test
This test checks the reception of data from the PORTMAN into the computer’s parallel port. This test, like the buffer test, should never fail. If it does,
there are a few things to check.
Most computers use IRQ 7 for LPT1 and IRQ 5 for LPT2. If you have the
PORTMAN connected to LPT1 on your computer and have I=7 set in
2X4DIAG.EXE, but it fails the Receive Interrupt Test, you could have a
computer with IRQ 5 assigned to LPT1. Try that in 2X4DIAG.EXE.
If you are unsure of what your port IRQ is or how to find out, please see
the section in this manual titled “About Your PC Port Address” (page 13),
or you can consult your computer owner’s manual.
It is also possible that you have a computer that does not have an IRQ
attached to its parallel port. It may still be possible within Windows 98 or
95 to assign an IRQ by going to the Device Manager/Ports/Printer
Port/Resources and choosing a different “basic configuration.” You may
be able to add an inexpensive add-on card to give this machine more LPT
ports if it is a desktop. It is also possible that the IRQ is disabled on your
parallel port and simply needs to be switched on. For information regarding this, consult your computer owner’s manual or computer manufacturer
directly.
Page 18

18
Symptoms/Solutions
Even when the PORTMAN 2x4 passes its own diagnostic test, it is still possible that you may have other concerns. Below you will find a
questions/answers-style reference on many such topics. Before consulting
any of the information below, however, make sure that you have already
looked through the other chapters in this manual that may pertain to your
situation.
SYMPTOM: The PORTMAN tests fine with the diagnostic software, but
won’t work or isn’t found by other (commercial) software.
SOLUTION: It is most likely that you don’t have your software set up yet.
In Windows, check to see that you have the PORTMAN 2x4 MIDI Device
Driver installed in Windows, and that you have each MIDI application set
up to look for the PORTMAN as a MIDI device. In DOS, verify that your
program has support for the PORTMAN, and that you have the latest version of that program. Also, check to see that you have the latest versions of
any necessary PORTMAN 2x4 drivers installed in the program.
SYMPTOM: The PORTMAN transmits MIDI garbage to my instruments,
such as random note errors and streams of program changes.
SOLUTION: What is most likely happening here is that your computer,
probably a laptop, is not transmitting information as fast as the PORTMAN
is expecting it to. Go over the P2X4DIAG.EXE discussion starting on page
14. This should suggest a solution to the difficulty.
Windows
SYMPTOM: I only have one parallel port on my computer, so I have to
remove the PORTMAN driver from Windows in order to use another
device on the port.
SOLUTION: In the PORTMAN 2x4 Driver set-up you will find a checkbox to temporarily disable the PORTMAN. With this checked, and after
rebooting Windows, the PORTMAN MIDI Driver will not be activated
again until the box is unchecked.
SYMPTOM: When booting up Windows, I get the messages “Output
Page 19

19
Hardware not Detected/Input Hardware not Detected.”
SOLUTION 1: These messages always pop up when you go into Windows
with the PORTMAN 2x4 disconnected. If, for instance, you only have one
parallel port on your computer, but need to use a printer or other device on
that port, there is a check-box in the PORTMAN 2x4 Driver set-up that will
allow you to disable this message upon rebooting.
SOLUTION 2: It is most likely that you do not have a PORTMAN 2x4
MIDI Driver for Windows installed in your system, or that your driver is
not set up correctly for your parallel port. Please see Windows Driver
Installation and “About Your PC Port Address” (page 13) for more instructions.
SYMPTOM: My Windows MIDI program crashes when I try to use it.
SOLUTION: This is not a likely occurrence and not necessarily related to
the PORTMAN directly. The first thing to do is remove the PORTMAN
MIDI driver from your Windows Control Panel. After rebooting Windows
without the PORTMAN driver installed, check to see if the program still
fails in the same way. If it does, contact the manufacturer of your MIDI
program.
If it doesn’t, then it could be related to the PORTMAN 2x4 MIDI driver.
Contact MIDIMAN Technical Support to verify that you have the latest driver version.
DOS
SYMPTOM: My PORTMAN works fine with my Windows MIDI pro-
grams, but it isn’t found by my DOS MIDI programs.
SOLUTION 1: Make sure that you have each of your DOS programs set up
correctly. In Windows, MIDI programs take advantage of global
Multimedia drivers which often-times require no further set-up. DOS
MIDI programs, on the other hand, each need to be set up individually
according to the particular manufacturer’s instructions. Sometimes support is built-in; sometimes a driver must be installed separately.
SOLUTION 2: Not all DOS MIDI programs have support for the PORTMAN. Check with the software manufacturer to confirm that they support
the PORTMAN.
Page 20

20
Limited Lifetime Warranty
MIDIMAN warrants that this product is free of defects in materials and
workmanship under normal use so long as the product is owned by the
original purchaser and that purchaser has registered his/her ownership of
the product by sending in the completed warranty card.
In the event that MIDIMAN receives written notice of defects in materials
or workmanship from such an original purchaser, MIDIMAN will either
replace the product, repair the product, or refund the purchase price at its
option. In the event any repair is required, shipment to and from MIDIMAN and a nominal handling charge shall be born by the purchaser. In the
event that repair is required, a Return Authorization number must be
obtained from MIDIMAN. After this number is obtained, the unit should
be shipped back to MIDIMAN in a protective package with a description of
the problem and the Return Authorization clearly written on the package.
In the event that MIDIMAN determines that the product requires repair
because of user misuse or regular wear, it will assess a fair repair or
replacement fee. The customer will have the option to pay this fee and
have the unit repaired and returned, or not pay this fee and have the unit
returned unrepaired.
The remedy for breach of this limited warranty shall not include any other
damages. MIDIMAN will not be liable for consequential, special, indirect,
or similar damages or claims including loss of profit or any other commercial damage, even if its agents have been advised of the possibility of such
damages, and in no event will MIDIMAN’s liability for any damages to the
purchaser or any other person exceed the price paid for the product,
regardless of any form of the claim. MIDIMAN specifically disclaims all
other warranties, expressed or implied. Specifically, MIDIMAN makes no
warranty that the product is fit for any particular purpose.
This warranty shall be construed, interpreted, and governed by the laws of
the state of California. If any provision of this warranty is found void,
invalid or unenforceable, it will not affect the validity of the balance of the
warranty, which shall remain valid and enforceable according to its terms.
In the event any remedy hereunder is determined to have failed of its
essential purpose, all limitations of liability and exclusion of damages set
forth herein shall remain in full force and effect.
P2X4: 060299
 Loading...