

Page 1

OZONIC
37-Key Audio/MIDI Interface and Controller
Quick Start Guide
This guide is intended to help get you started quickly.
In order to achieve optimal usage of your new Ozonic,
we recommend that you carefully study the enclosed
product manual, either after completing the process
described in this guide or before.
Page 2

Table of Contents
English .............................................................................................................................................................. 3
Installation Instructions for Windows XP .................................................................................................... 3
Installation Instructions for Mac OS X ......................................................................................................... 4
Connecting Your Equipment to the FireWire Series Interface .................................................................... 5
Using the FireWire Control Panel ............................................................................................................... 6
Technical Info ................................................................................................................................................
Additional Information and Support ............................................................................................................7
Français ............................................................................................................................................................ 9
Instructions d’installation pour Windows XP .............................................................................................. 9
Instructions d’installation pour Mac OS X ..................................................................................................11
Connexion de votre matériel à l’interface FireWire ..................................................................................12
Utilisation du Panneau de configuration FireWire ...................................................................................
Informations complémentaires et assistance ...........................................................................................13
Deutsch ...........................................................................................................................................................15
Installation unter Windows XP ...................................................................................................................15
Treiber-Installation unter Mac OS X ...........................................................................................................
Anschluss Ihres Equipments an das FireWire-Interface ...........................................................................18
Das FireWire Control Panel .......................................................................................................................18
Weitere Infos und Hilfe ...............................................................................................................................19
Español ............................................................................................................................................................21
Instrucciones de instalación para Windows XP ........................................................................................21
Instrucciones de instalación para MacOS X ............................................................................................23
Conexión de su equipo a una interfaz de la serie FireWire .................................................................... 24
Uso del “Panel de control FireWire”. ........................................................................................................ 24
Información adicional y soporte ............................................................................................................... 25
7
12
17
Italiano ............................................................................................................................................................ 27
Istruzioni per l’installazione in Windows XP ............................................................................................. 27
Istruzioni di installazione in Mac OS X ...................................................................................................... 29
Collegare l’apparecchiatura all’interfaccia FireWire Series ..................................................................... 30
Utilizzo del Pannello di controllo FireWire ............................................................................................... 30
Informazioni aggiuntive e assistenza ........................................................................................................ 31
日本語 ............................................................................................................................................................. 33
WindowsXPでのインストール .............................................................................................................33
MacOSXでのインストール .................................................................................................................. 35
Ozonicの接続 ..........................................................................................................................................36
FireWireコントロールパネル・ソフトウェアの使用方法 ..................................................................... 36
サポート関連情報 .....................................................................................................................................
37
Page 3
English
Installation Instructions for Windows XP
NOTE: Please do not connect your Ozonic to your computer until the appropriate driver files have been
installed in your system. Be sure to leave your FireWire audio device disconnected until instructed to
connect it below.
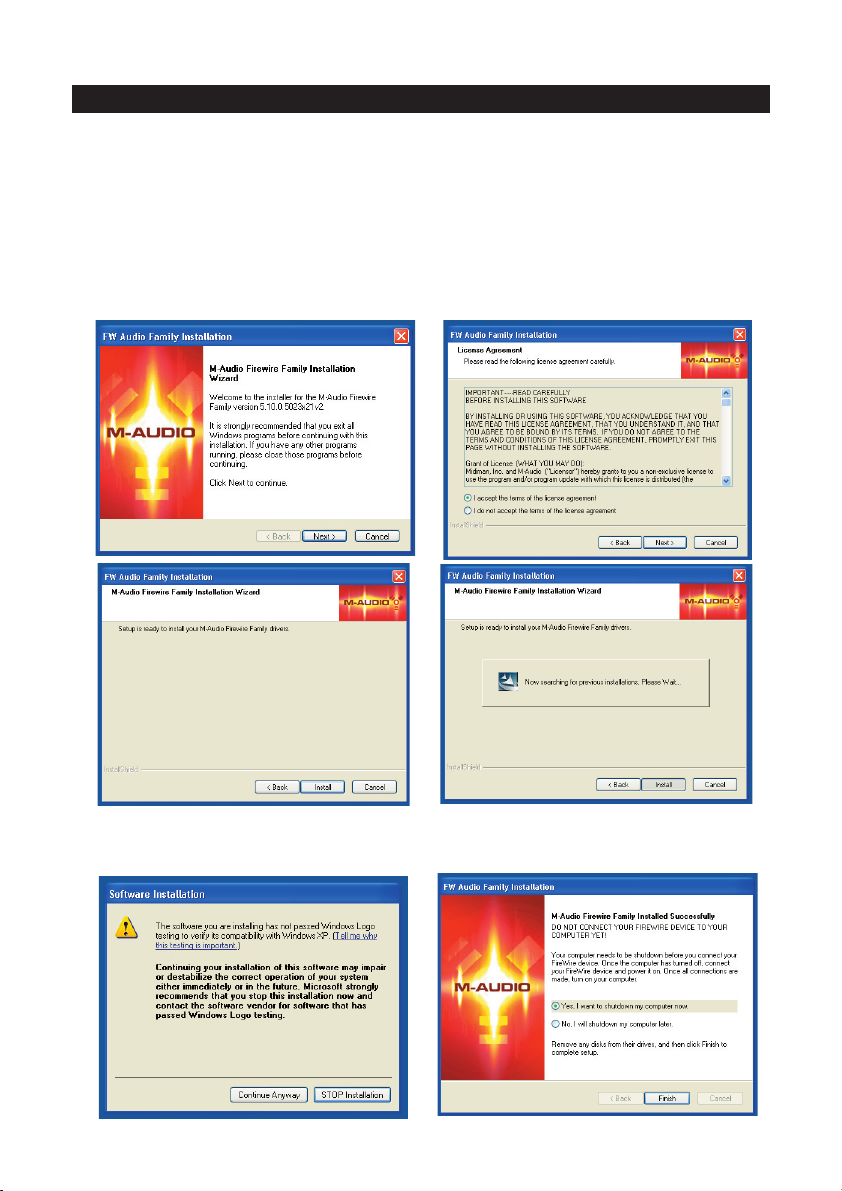
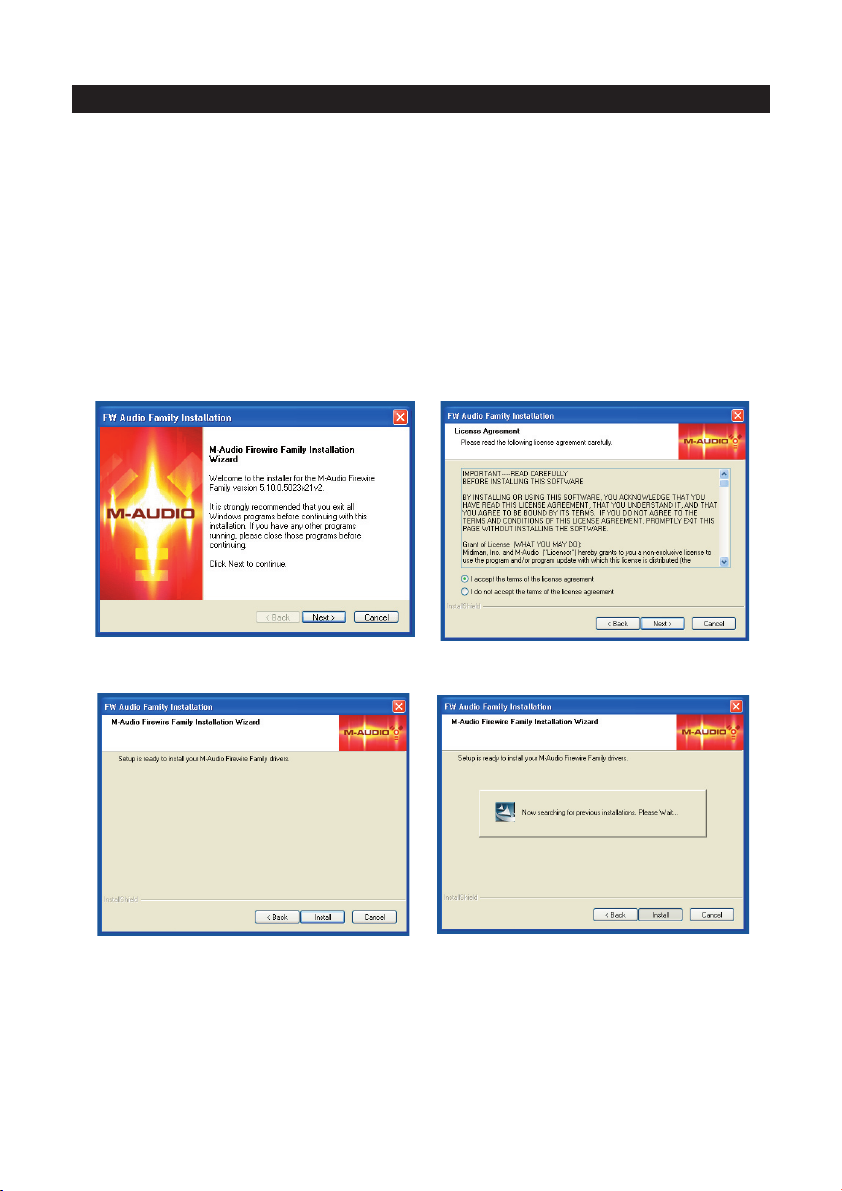
1. Insert the Ozonic Driver CD-ROM into your computer’s CD-ROM drive.
2. The computer will automatically display the interactive install screen shown below. If your computer
fails to auto-launch the installer, you may manually start the installer by clicking on Start>My
Computer>FireWire Series.
3. Follow the on-screen directions to choose your language and product. Once you select your
product, click “Install Drivers” to begin copying needed files to your system.
4. Follow the driver installer’s on-screen directions.
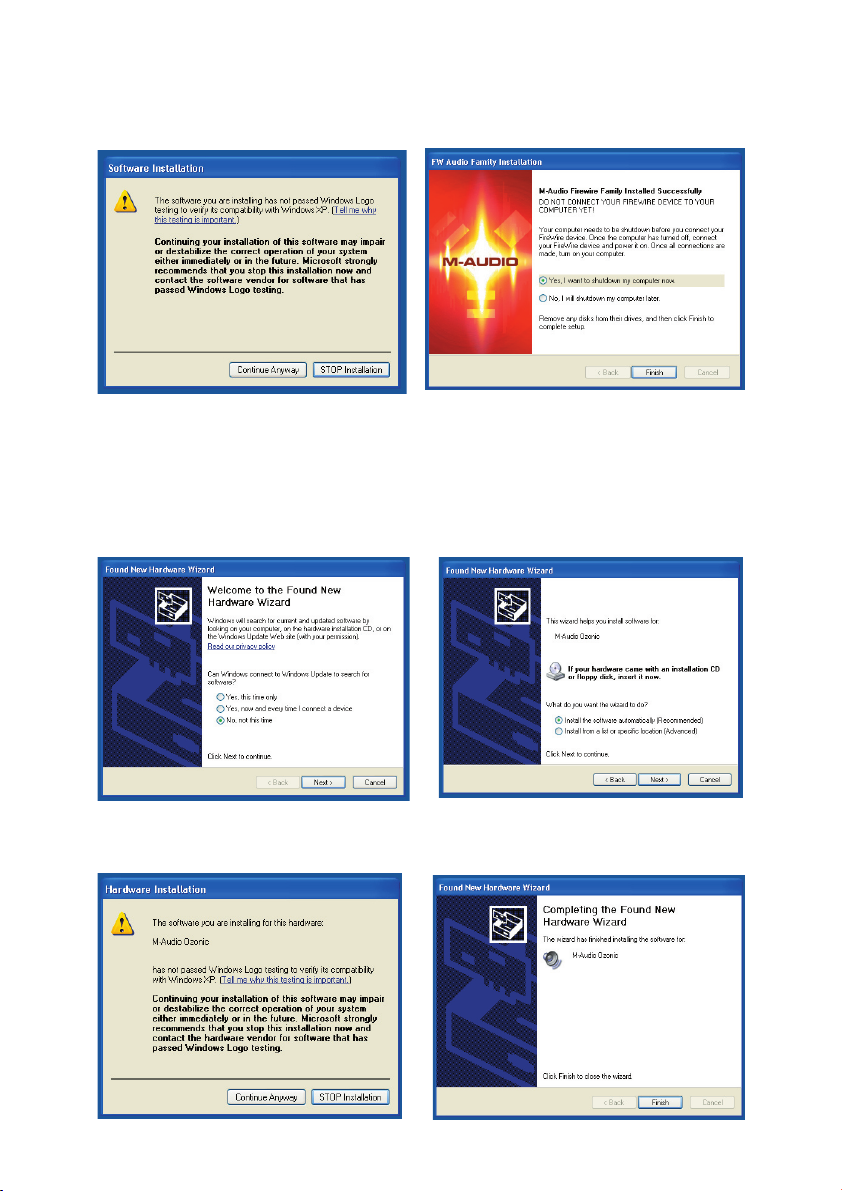
5. At various points in this installation process, you may be notified that the driver being installed has
not passed Windows Logo Testing. Click “Continue Anyway” to proceed with the installation.
6. Once the driver installation is completed, shut down your computer.
3
Page 4
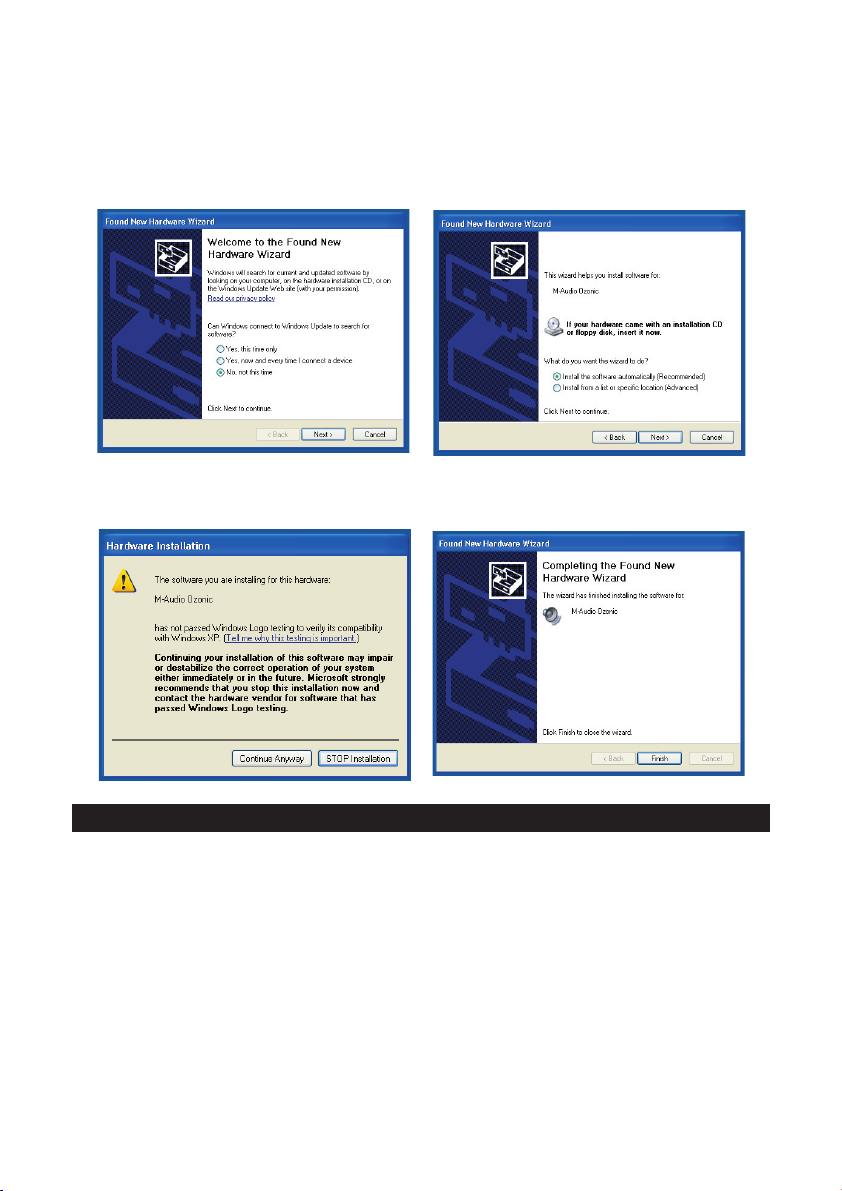
7. When your computer has fully turned off, you may connect your FireWire series interface to an
available FireWire port. If you are using a 4-pin port, you will need to use the included power supply
to provide power to the unit.
8. Turn on the FireWire device and then turn on your computer.
9. When Windows boots up, it will identify the new FireWire interface and will display a “Found New
Hardware” wizard like the one seen below.
10. Choose “Install software automatically” and click “Next.”
11. Once the wizard has completed, you may click “Finish.”
12. Once the “Found New Hardware” wizard has finished, you will see a message pop-up that says
“Your new hardware is installed and ready to use.”
Installation Instructions for Mac OS X
NOTE: Please do not connect your Ozonic to your computer until the appropriate driver files have been
installed in your system. Be sure to leave your FireWire audio device disconnected until instructed to
connect it below.
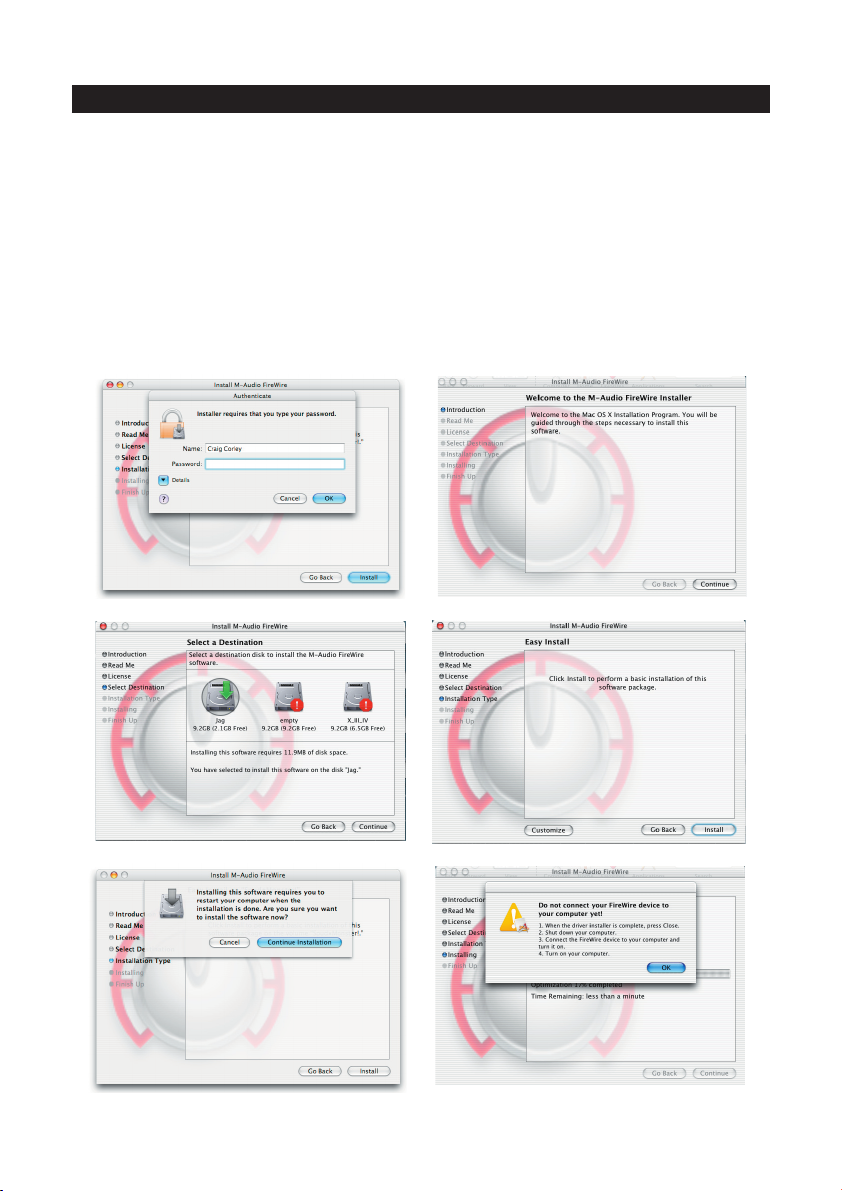
1. Insert the FireWire Driver CD-ROM into your computer’s CD-ROM drive.
2. Double-click the CD icon when it appears on your desktop to view the contents of the CD.
3. Double-click the “Mac OS X Start Here” icon to begin the driver selector.
4. Select your product from the list on the welcome screen then click “Install Drivers.”
5. The driver installer will launch. Follow the on-screen directions.
4
Page 5
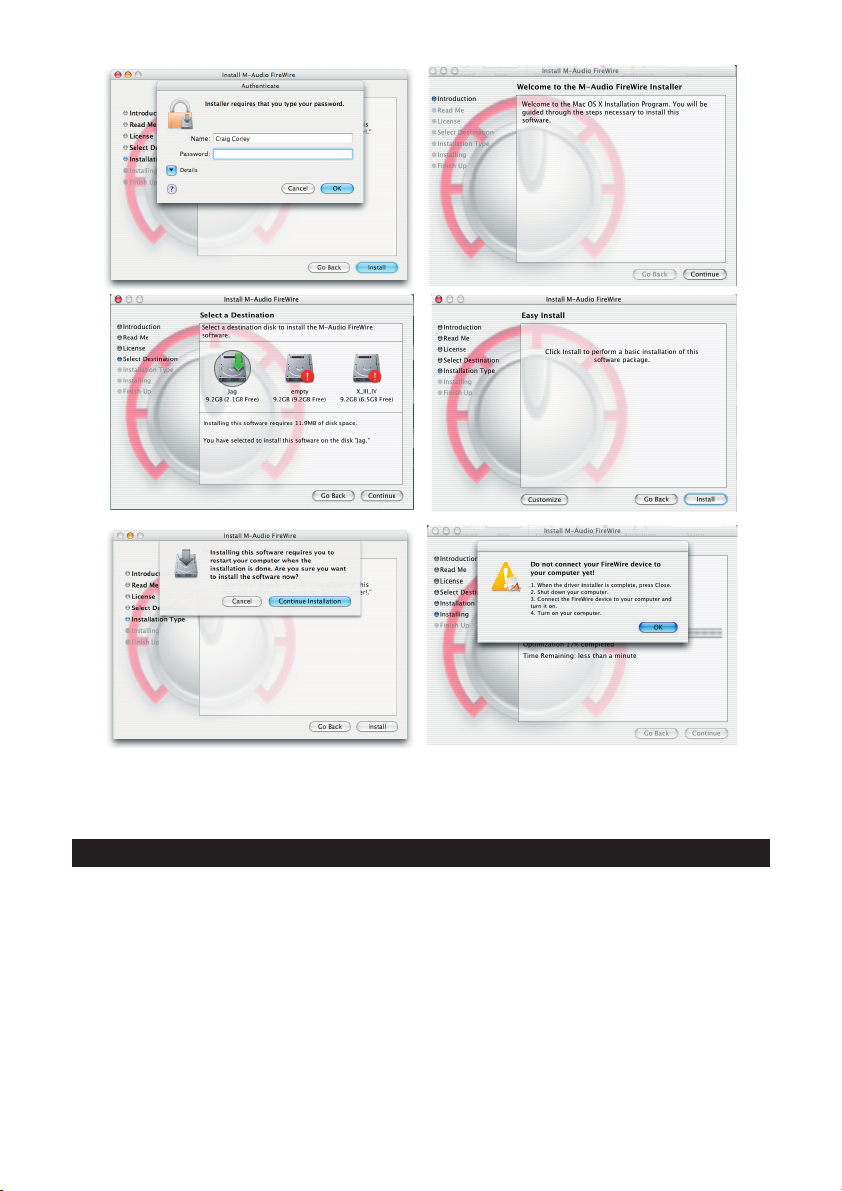
6. When the installer is finished, shut down your computer.
7. When your computer is off, you may connect your FireWire audio interface and power it on.
8. Turn on your computer. When the computer has fully booted, your FireWire interface will be ready
to use.
Connecting Your Equipment to the FireWire Series Interface
< The Ozonic has multiple outputs that can serve a number of purposes. However, regardless of the
number of available outputs on your particular device, Outs 1 & 2 will always serve as your default
left and right outputs. Please connect Outs 1 & 2 to the left and right channels, respectively, of your
speakers, mixer, or other monitoring system.
< You may also connect a pair of headphones to the headphone jack on the back of the unit allowing
for monitoring or pre-listening in private.
< The inputs on the back of the FireWire interface accept line-level signals, such as those from
keyboards, mixers, and CD players, as well as XLR and ¼” jacks which will accept instrument and
mic level signals for recording from sources such as vocal microphones, guitars, and basses. If you
wish to use the rear line inputs, make sure the Mic/Line buttons on the front of the FireWire device
are in the “in” position. Switching to the “out” position will allow the front mic/instrument inputs to
be used instead.
5
Page 6
For more detailed information and an explanation of all available inputs and outputs, including digital
formats, please refer to your product’s User Manual located on the FireWire Driver CD.
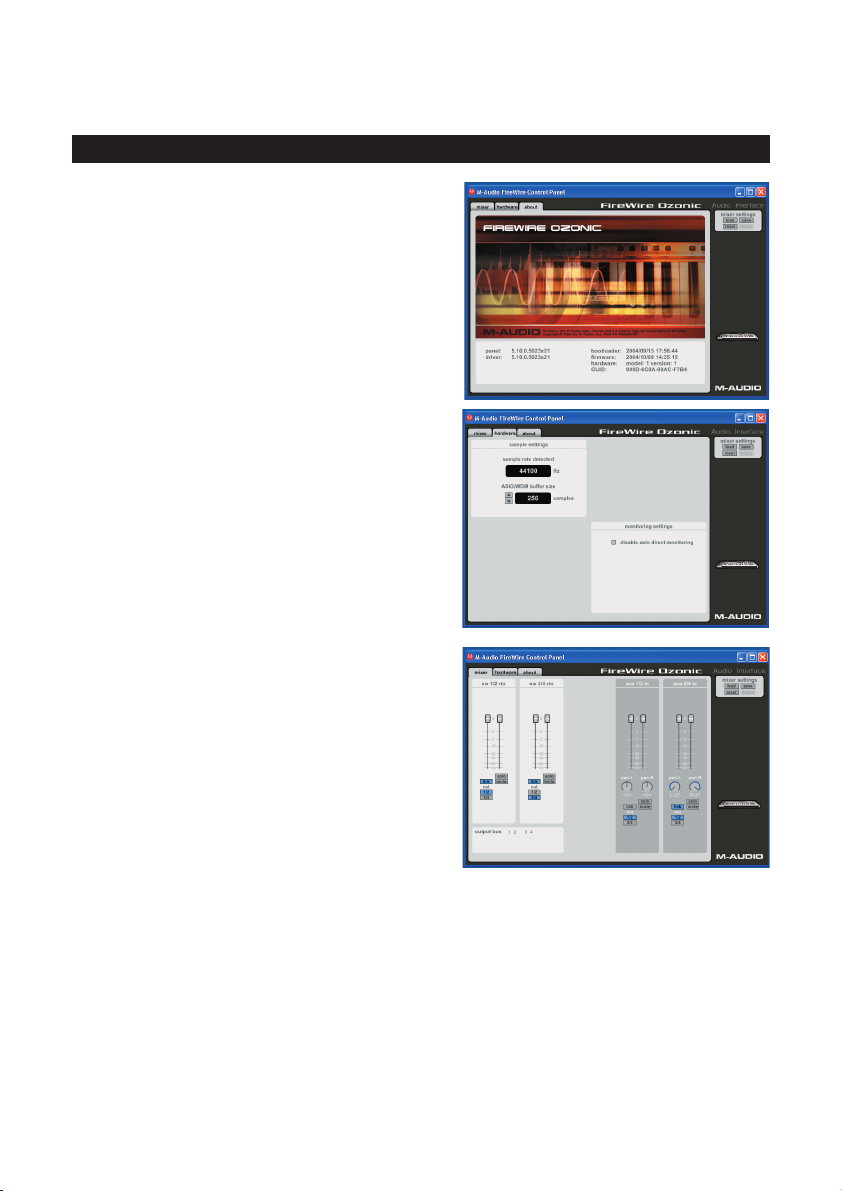
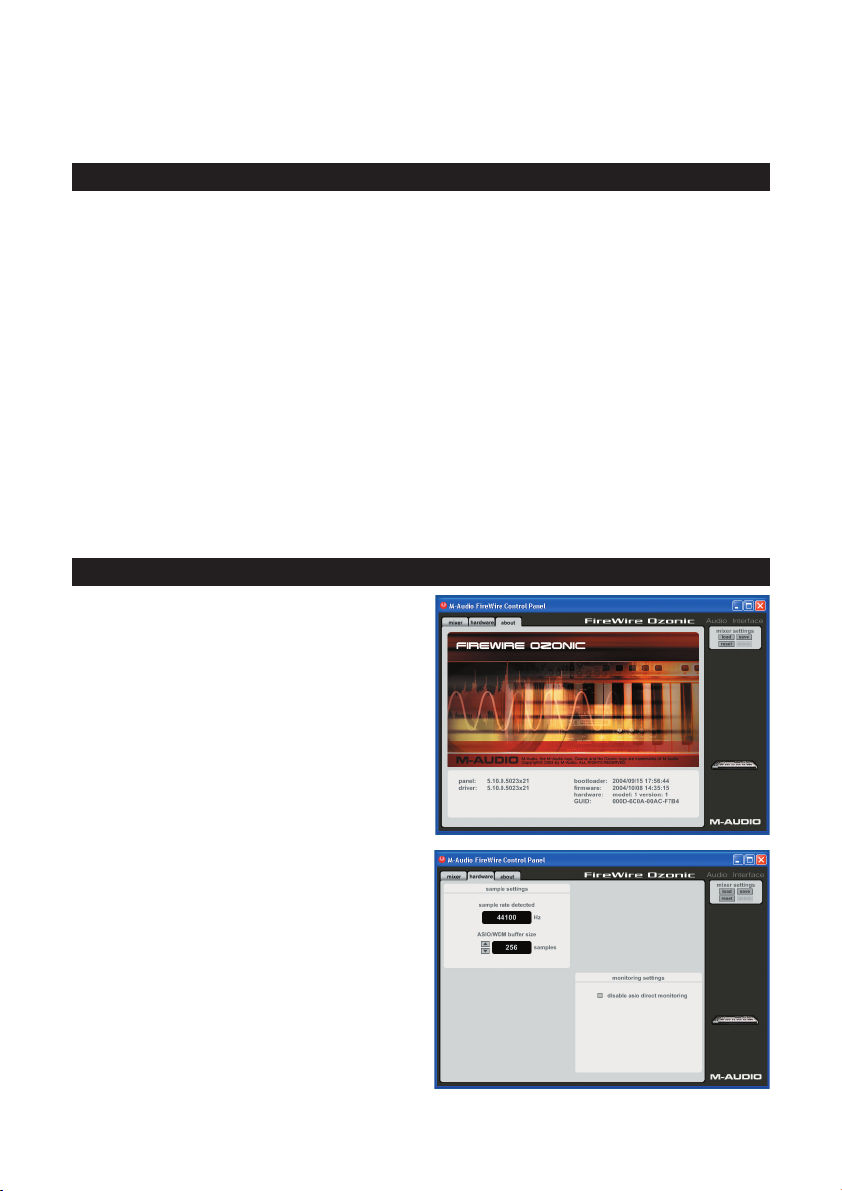
Using the FireWire Control Panel
On a PC, you can access the FireWire Control Panel by
double-clicking the M-Audio icon in your computer’s
system tray. For Mac OS X users, the Control Panel
can be launched from the icon found in the System
Preferences panel.
The default settings for the FireWire Control Panel will
ensure that normal audio playback is routed to Outs
1 & 2 of your FireWire device and to the headphones.
The Control Panel will also allow you to change these
default output routings when necessary, as well as set
the function of the front-mounted rotary encoder (by
default, the encoder will control the output volume) and
also select digital sync options. For standard use, there
will be no need to change the default settings.
When it’s time to record an external source, such as a
vocal, guitar track, or keyboard part, you will want to
monitor your input. Monitoring will allow you to hear the
signal being fed into the inputs while also blending it with
the output signals coming from the computer. This way,
you can hear your new parts live as you’re recording
them along with the output of previous parts, which
is called “overdubbing.” Most recording applications
will handle the input monitoring for you automatically,
but you do have the option of enabling the monitoring
manually from the Control Panel.
For a more detailed explanation of all Control Panel
routings and functions, refer to the User Manual for your
product located on the FireWire Driver CD.
6
Page 7

Technical Info
Modifications not authorized by the manufacturer may void users authority to operate this device.
Note: This equipment has been tested and found to comply with the limits for a Class B digital device,
pursuant to Part 15 of the FCC Rules. These limits are designed to provide reasonable protection against
harmful interference in a residential installation. This equipment generates, uses and can radiate radio
frequency energy and, if not installed and used in accordance with the instructions, may cause harmful
interference to radio communications. However, there is no guarantee that interference will not occur in
a particular installation. If this equipment does cause harmful interference to radio or television reception,
which can be determined by turning the equipment off and on, the user is encouraged to try to correct the
interference by one or more of the following measures:
< Reorient or relocate the receiving antenna.
< Increase the separation between the equipment and receiver.
< Connect the equipment into an outlet on a circuit different from that to which the receiver is
connected.
< Consult the dealer or an experienced radio/TV technician for help.
VST is a trademark of Steinberg Soft– und Hardware GmbH
ASIO is a trademark of Steinberg Soft– und Hardware GmbH
DirectX is copyright 2002 Microsoft
Sound Studio II, PictureBoard and Music Teacher are copyright 2003 Evolution Electronics Ltd
All rights reserved
Ozonic
Tested to comply with
FCC standards
FOR HOME OR STUDIO USE
ESD and Fast Transient may cause the unit to temporarily malfunction.
Switch off and on again to restore normal operation.
Additional Information and Support
We recommend checking the M-Audio website regularly for driver updates and additional information. The
web address for the site is www.m-audio.com. You’ll find links to drivers, news stories, FAQ’s, additional
products, and tech support.
7
Page 8

8
Page 9
Français
Instructions d’installation pour Windows XP
REMARQUE : ne connectez pas l’Ozonic à votre ordinateur tant que les fichiers de pilote appropriés n’ont
pas été installés sur votre système. Ne branchez pas votre appareil audio FireWire tant que cela ne vous
a pas été demandé (voir instruction ci-dessous).
1. Insérez le CD-ROM des pilotes de l’Ozonic dans le lecteur de CD-ROM de votre ordinateur.
2. Ce dernier affiche automatiquement l’écran d’installation interactive illustré ci-dessous. Si votre
ordinateur ne lance pas automatiquement le programme d’installation, effectuez cette manœuvre
manuellement en cliquant sur Démarrer>Poste de travail>FireWire Series.
3. Suivez les instructions à l’écran pour sélectionner votre langue et votre produit. Une fois votre produit
sélectionné, cliquez sur “Install Drivers” pour que commence la copie des fichiers nécessaires sur
votre système.
4. Suivez les instructions à l’écran données par le programme d’installation du pilote.
9
Page 10
5. A différents stades de l’installation, il est possible que des messages vous indiquent que le pilote
n’a pas passé le test du logo Windows. Cliquez dans ce cas sur Continuer afin de poursuivre
l’installation.
6. Une fois l’installation du pilote terminée, éteignez votre ordinateur.
7. Une fois votre ordinateur complètement éteint, vous pouvez connecter votre interface FireWire sur
un port FireWire disponible. Si vous choisissez un port 4 broches, il vous faudra brancher le bloc
d’alimentation fourni pour assurer l’alimentation de l’unité.
8. Allumez l’appareil FireWire puis l’ordinateur.
9. Au démarrage, Windows identifiera la nouvelle interface FireWire et affichera un assistant “Nouveau
matériel détecté” tel que celui illustré ci-dessous.
10. Sélectionnez l’option Installer le logiciel automatiquement, puis cliquez sur Suivant.
11. Une fois l’assistant terminé, cliquez sur Terminer.
12. Dès que l’assistant “Nouveau matériel détecté” sera terminé, vous verrez apparaître un message
contextuel indiquant que le matériel est installé et prêt à être utilisé.
10
Page 11
Instructions d’installation pour Mac OS X
REMARQUE : ne connectez pas l’Ozonic à votre ordinateur tant que les fichiers de pilote appropriés n’ont
pas été installés sur votre système. Ne branchez pas votre appareil audio FireWire tant que cela ne vous
a pas été demandé (voir instruction ci-dessous).
1. Insérez le CD-ROM des pilotes FireWire dans le lecteur de CD-ROM de votre ordinateur.
2. Double-cliquez sur l’icône de CD lorsqu’elle apparaît sur votre bureau afin de visualiser le contenu
du CD.
3. Double-cliquez sur l’icône “Mac OS X Start Here” pour lancer le sélecteur de pilotes illustré cidessous.
4. Dans la liste de l’écran de bienvenue, sélectionnez votre produit puis cliquez sur “Install Drivers”
(installer les pilotes).
5. L’installation du pilote démarrera alors. Suivez les instructions qui s’affichent à l’écran.
11
Page 12
6. Une fois le programme d’installation terminé, éteignez votre ordinateur.
7. Une fois votre ordinateur éteint, vous pouvez connecter votre interface audio FireWire et l’allumer.
8. Mettez en marche votre ordinateur. Une fois que votre ordinateur aura complètement démarré,
votre interface FireWire sera prête à l’emploi.
Connexion de votre matériel à l’interface FireWire
< L'Ozonic est équipé de plusieurs sorties qui peuvent servir à des fins multiples. Mais quel que soit le
nombre de sorties disponibles sur votre appareil, les sorties 1 et 2 vous serviront toujours de sorties
gauche et droite par défaut. Veuillez connecter les sorties 1 et 2, respectivement, aux canaux
gauche et droit de vos haut-parleurs, mélangeur ou de tout autre système de monitoring.
< Vous pouvez aussi brancher un casque sur la prise casque de l'arrière de l’unité afin de pouvoir
bénéficier d’un monitoring ou d’une pré-écoute en solo.
< Les entrées de l’arrière de l’interface FireWire reçoivent des signaux de niveau ligne du type de
ceux provenant de claviers, mélangeurs ou lecteurs CD. Quant à elles, les prises jack 6,35 mm
et symétriques reçoivent des signaux de niveau micro et instrument permettant l’enregistrement
de sources telles que les micros vocaux, les guitares ou les basses. Si vous souhaitez utiliser les
entrées de ligne du panneau arrière, assurez-vous que les boutons Mic/Line du panneau avant
soit en position “in” (enfoncée). S’ils sont en position “out” (relâchée), ce sont les entrées micro/
instrument du panneau avant qui seront utilisées à la place.
Pour plus d’informations et pour en savoir plus sur les entrées et sorties disponibles ainsi que sur les
formats numériques, veuillez vous référer au Manuel de l’utilisateur correspondant à votre produit et
figurant sur le CD des pilotes FireWire.
Utilisation du Panneau de configuration FireWire
Sur PC, vous pouvez accéder au panneau de
configuration de FireWire en double-cliquant sur
l’icône M-Audio de la barre d’état système de votre
ordinateur. Les utilisateurs Mac OS X doivent lancer
le panneau de configuration à partir de l’icône
figurant dans le panneau Préférences Système.
Les réglages par défaut du Panneau de contrôle
FireWire prévoient l’envoi de la lecture audio
normale vers les sorties 1 et 2 de votre appareil
FireWire et vers le casque. Le Panneau de contrôle
vous permet de modifier si nécessaire ces réglages
par défaut, de définir le rôle de l’encodeur tournant
avant (par défaut, cet encodeur contrôle le volume
de sortie) ou encore de sélectionner des options de
synchronisation numérique. Une utilisation standard
ne requiert pas de modification de ces réglages par
défaut.
Lorsqu’il sera temps pour vous d’enregistrer une
source externe telle qu’une voix, une piste de guitare
ou une partie de clavier, il vous faudra monitorer votre
entrée. Le monitoring vous permettra d’entendre
le signal reçu par les entrées tout en l’incorporant
aux signaux de sortie issus de l’ordinateur. Vous
pourrez ainsi entendre vos nouvelles pistes en direct
12
Page 13

tout en les enregistrant avec la sortie des pistes antérieures, un procédé appelé «réenregistrement». Si la
plupart des logiciels d’enregistrement peuvent se charger du monitoring d’entrée à votre place, il vous est
possible d’activer le monitoring manuellement à partir du Panneau de configuration.
Pour une explication plus détaillée de tous les routings et fonctions disponibles avec le Panneau de
configuration, référez-vous au Manuel de l’utilisateur correspondant à votre produit et figurant sur le CD
des pilotes FireWire.
Informations complémentaires et assistance
Nous vous recommandons de consulter régulièrement le site Web M-Audio afin d’obtenir les dernières
mises à jour de pilote et des informations complémentaires. L’adresse Web de ce site est la suivante
: www.m-audio.fr. Vous y trouverez également des liens vers des pilotes, des articles, une base de
connaissances, des produits supplémentaires ainsi qu’une assistance technique.
Ozonic
Tested to comply with
FCC standards
FOR HOME OR STUDIO USE
L’ESD et le “Fast Transient” peuvent rendre l’appareil
temporairement inopérant. Eteignez et rallumez pour rétablir
le fonctionnement de l’appareil.
13
Page 14

14
Page 15

Deutsch
Installation unter Windows XP
NOTE: Schließen Sie Ozonic bitte erst dann an Ihren Computer an, wenn die Installation der erforderlichen
Treiber abgeschlossen ist. Schalten Sie Ihr FireWire-Audiogerät erst ein, wenn Sie dazu aufgefordert
werden.
1. Legen Sie die Ozonic Treiber-CD in das CD-Laufwerk Ihres Computers ein.
2. Es erscheint das abgebildete Installer-Fenster. Falls der Installer nicht automatisch startet, öffnen
Sie ihn über Start > Arbeitsplatz > FireWire Series.
3. Folgen Sie der Bildschirmführung und wählen Sie die Installationssprache und das zu installierende
Produkt aus. Klicken Sie anschließend auf “Install Drivers”, um den Installationsvorgang zu
starten.
4. Folgen Sie der Bildschirmführung.
15
Page 16

5. Während der Installation erscheint mehrfach die Meldung, dass die Treibersoftware noch nicht für
Windows zertifiziert wurde. Klicken Sie auf “Installation fortsetzen”.
6. Fahren Sie nach erfolgreicher Treiberinstallation Ihren Computer herunter.
7. Schließen Sie Ihr FireWire-Interface an einen freien FireWire-Port an. Wenn Sie einen 4-Pin-Anschluss
benutzen, muss das Gerät an die mitgelieferte Stromversorgung angeschlossen werden.
8. Schalten Sie das FireWire-Gerät und anschließend Ihren Computer ein.
9. Sobald er hochgefahren ist, erkennt Windows das neue FireWire-Interface und öffnet den
Hardware-Assistenten (Abb.).
10. Wählen Sie die Option “Software automatisch installieren” und klicken Sie auf “Weiter”.
11. Der Hardware-Assistent meldet, dass die Installation abgeschlossen ist. Klicken Sie auf “Fertig
stellen”.
12. Es erscheint die Nachricht, dass die Hardware installiert wurde und verwendet werden kann.
16
Page 17

Treiber-Installation unter Mac OS X
NOTE: Schließen Sie Ozonic bitte erst dann an Ihren Computer an, wenn die Installation der erforderlichen
Treiber abgeschlossen ist. Schalten Sie Ihr FireWire-Audiogerät erst ein, wenn Sie dazu aufgefordert
werden.
1. Legen Sie die Ozonic Treiber-CD in das CD-Laufwerk Ihres Computers ein.
2. Doppelklicken Sie das CD-Symbol auf dem Desktop, um den Inhalt der CD anzuzeigen.
3. Doppelklicken Sie das “Mac OS X Start Here” -Symbol. Es erscheint die Treiberauswahl.
4. Wählen Sie Ihr Gerät aus der Liste im Willkommensfenster und klicken Sie auf “Install Drivers”.
5. Der Treiber-Installer wird gestartet. Folgen Sie der Bildschirmführung.
6. Fahren Sie nach erfolgreicher Treiberinstallation Ihren Computer herunter und schalten Sie ihn
aus.
7. Schließen Sie Ihr FireWire-Audio-Interface an einen freien FireWire-Port an und schalten Sie es ein.
8. Schalten Sie anschließend Ihren Computer ein. Ihr FireWire-Interface ist nun betriebsbereit.
17
Page 18

Anschluss Ihres Equipments an das FireWire-Interface
< Die Anschlüsse von Ozonic können verschiedene Funktionen erfüllen. Ausgänge 1 und 2 sind
allerdings immer Ihre Standard-L/R-Ausgänge, egal wie viele Ausgänge an Ihrem Gerät verfügbar
sind. Schließen Sie an Ausgang 1 und 2 jeweils den linken und rechten Kanal Ihrer Lautsprecher,
Ihres Mischpults oder Monitoring-Systems an.
< Schließen Sie bei Bedarf einen Kopfhörer an die Kopfhörerbuchse an der Geräterückseite an.
< Die Eingänge an der Rückseite des FireWire-Interface sind für Line-Signale eingerichtet (z.B. von
einem Keyboard, Mischpult oder CD-Player) sowie für XLR- und 6,3 mm-Klinkenstecker (Instrumentund Mikrofonsignale, etwa für die Aufnahme von Stimme, Gitarre und Bass). Stellen Sie sicher,
dass die Mic/Line-Buttons an der Vorderseite des FireWire-Gerätes in der IN-Position stehen, wenn
Sie die Line-Eingänge an der Geräterückseite verwenden möchten. Schalten Sie diese auf OUT,
werden die Mic- und Instrumenteneingänge an der Vorderseite aktiviert.
Nähere Informationen zu den verfügbaren analogen und digitalen Ein- und Ausgängen entnehmen Sie
bitte dem Handbuch für Ihr Produkt auf der FireWire-Treiber-CD.
Das FireWire Control Panel
Unter Windows öffnen Sie das FireWire Control Panel einfach per Doppelklick auf das M-Audio-Symbol in
der Task-Leiste. Mac-Nutzer finden das Control Panel in den Systempräferenzen.
Ab Werk wird das FireWire Control Panel so
konfiguriert, dass normale Audiowiedergabe an
Ausgänge 1 und 2 Ihres FireWire-Gerätes und
an den Kopfhörerausgang geroutet wird. Am
Control Panel können Sie diese Einstellung bei
Bedarf ändern, die Funktion des Drehreglers an
der Gerätevorderseite bestimmen (standarmäßig
Ausgangslautstärke) und die gewünschten
Digital Sync-Optionen auswählen. Für normalen
Betrieb müssen diese Standardeinstellungen
zunächst nicht verändert werden.
Bei Aufnahmen externer Klangquellen
etwa für den Vocal Part, den Gitarren- oder
Keyboardtrack, können Sie das Eingangssignal
abhören. Über die Monitoring-Funktion können
Sie das Signal an den Eingängen mit dem
Signal aus den Ausgängen des Computers
zusammenmischen. Auf diese Weise hören Sie
die neuen Live-Parts während der Aufnahme
zusammen mit bereits aufgenommenen
Tracks -- das so genannte Overdubbing. Die
allermeisten Recording-Programme machen
Eingangs-Monitoring automatisch, Sie können
diese Funktion aber auch manuell am Control
Panel aktivieren.
18
Page 19

Nähere Informationen zu den einzelnen Funktionen und Anschlussmöglichkeiten des Control Panels
entnehmen Sie bitte dem Handbuch für Ihr Produkt auf der FireWire-Treiber-CD.
Weitere Infos und Hilfe
Besuchen Sie regelmäßig unsere Website für weiterführende Informationen und Treiber-Updates.
Homepage: http://www.m-audio.de Von dort geht es zu den Treiberseiten, News, FAQ, Infos zu neuen
Produkten und zur technischen Unterstützung.
Ozonic
Tested to comply with
FCC standards
FOR HOME OR STUDIO USE
Elektrostatische Entladungen und Spannungsspitzen können
das Gerät kurzzeitig ausfallen lassen. Schalten Sie das Gerät
aus und wieder ein, um wieder zu reaktivieren.
19
Page 20

20
Page 21

Español
Instrucciones de instalación para Windows XP
NOTA: Por favor, no conecte Ozonic a su computadora hasta que haya instalado los controladores
adecuados en su sistema. Asegúrese de no conectar su dispositivo FireWire de audio hasta que lo
requieran las instrucciones.
1. Introduzca el CD-ROM de controladores de Ozonic en la unidad de CD-ROM.
2. La computadora mostrará automáticamente la pantalla de instalación interactiva que se muestra a
continuación. Si su computadora no ejecuta automáticamente el instalador, inícielo manualmente
pulsando Inicio >Mi PC>FireWire Series.
3. Siga las instrucciones que aparecerán en pantalla para seleccionar su idioma y producto. Una vez
haya seleccionado su producto, pulse “Instalar controladores” para copiar los archivos necesarios
en su sistema.
4. Siga las instrucciones del instalador que aparecerán en pantalla.
21
Page 22

5. En varios momentos de la instalación, puede que el sistema le indique que los controladores que
está instalando no han pasado la prueba del logotipo de Windows. Seleccione “Continuar” para
proseguir con la instalación.
6. Cuando la instalación de los controladores haya finalizado, apague la computadora.
7. Una vez apagada, conecte su interfaz de la
serie FireWire a un puerto FireWire libre. Si sólo dispone de puertos de 4 pins, tendrá que utilizar la
fuente de alimentación para proporcionar corriente a la unidad.
8. Ponga en marcha el dispositivo FireWire y a continuación la computadora.
9. Al iniciar Windows, el sistema identificará la nueva interfaz FireWire y mostrará un asistente para
“Nuevo hardware encontrado” como el que se muestra a continuación.
10. Seleccione la opción predeterminada “Instalar automáticamente el software (recomendado)” y a
continuación pulse “Siguiente”.
11. Una vez haya finalizado el asistente, pulse “Finalizar”.
12. Después de finalizar el asistente para “Nuevo hardware encontrado”, aparecerá un mensaje en la
pantalla que le informa que “Su nuevo hardware está listo para ser utilizado”
22
Page 23

Instrucciones de instalación para MacOS X
NOTA: Por favor, no conecte Ozonic a su computadora hasta que haya instalado los controladores
adecuados en su sistema. Asegúrese de no conectar su dispositivo FireWire de audio hasta que lo
requieran las instrucciones.
1. Introduzca el CD-ROM de controladores FireWire en la unidad de CD-ROM.
2. Para explorar el contenido del CD, haga doble clic sobre el icono del CD que aparecerá en su
escritorio
3. Haga doble clic en el icono “Mac OS X Start Here” para iniciar el selector de controladores mostrado
a continuación.
4. Seleccione su producto de la lista de la pantalla de bienvenida y a continuación, pulse “Install
Drivers.”
5. Se ejecutará el instalador de los controladores. Siga la instrucciones que aparecerán en la
pantalla.
23
Page 24

6. Cuando el instalador haya finalizado, apague la computadora.
7. Una vez apagada, conecte la interfaz de audio FireWire y póngala en marcha.
8. Ponga en marcha el ordenador. La interfaz FireWire estará lista para utilizar cuando la computadora
se haya iniciado por completo.
Conexión de su equipo a una interfaz de la serie FireWire
< Ozonic dispone de múltiples salidas que pueden utilizarse para diferentes propósitos. No obstante,
independientemente del número de salidas disponibles en su dispositivo particular, las salidas 1
y 2 (Outs 1 y 2) siempre funcionarán como sus salidas predeterminadas izquierda y derecha.
Por favor, conecte las salidas 1 y 2 a los canales izquierdo y derecho, respectivamente, de sus
altavoces, mezclador o de cualquier otro sistema de monitorización.
< Además, también puede conectar unos auriculares a la salida de auriculares de la parte trasera
de la unidad para escuchar la monitorización o una pre-escucha privada.
< Las entradas de la parte posterior de la interfaz FireWire aceptan señales con nivel de línea, como
las de un teclado, mezclador o reproductor de CD, mientras que los conectores XLR y jacks de
1/4” aceptan señales con nivel de micrófono y de instrumento, por lo que permiten grabar fuentes
como un micrófono de voz, una guitarra o un bajo, por ejemplo. Si desea utilizar las entradas
de línea posteriores, asegúrese de que los botones Mic/Line de la parte frontal del dispositivo
FireWire están pulsados. Si no están pulsados, es decir, si están en la posición “hacia fuera”, podrá
utilizar en su lugar las entradas frontales de micro/instrumento.
Si desea una información detallada y una explicación de todas las entradas y salidas disponibles,
incluyendo los formatos digitales, por favor, consulte el Manual de usuario que encontrará en el CD de
controladores FireWire (FireWire Driver CD).
Uso del “Panel de control FireWire”.
En un PC, puede acceder al Panel de control FireWire haciendo doble clic sobre el icono de M-Audio
situado en la Bandeja del sistema. Para los usuarios de Mac OS X, el Panel de control se puede abrir
mediante el icono que se encuentra en las Preferencias del Sistema.
Los ajustes predeterminados del Panel de
control FireWire garantizan que la reproducción
de audio se dirige tanto a las salidas 1 y 2 de
su dispositivo FireWire como a los auriculares. El
Panel de control también permite cambiar estas
asignaciones de salidas predeterminadas, así
como establecer la función del control giratorio
frontal (por defecto, este encoder controla
el volumen) y determinar opciones relativas
a la sincronía digital. Para las aplicaciones
habituales, no tendrá necesidad de cambiar los
ajustes predeterminados.
24
Page 25

Si tiene que grabar una fuente de señal externa,
como por ejemplo una voz, una guitarra o un
teclado, necesitará monitorizar la entrada. La
monitorización le permite escuchar la señal
entrante a la vez que la mezcla con las señales
de salida procedentes de la computadora. De
este modo, podrá escuchar las nuevas partes
en vivo mientras las graba a la vez que escucha
las partes anteriores ya grabadas, lo cual es un
método llamado “overdubbing”. La mayoría
de aplicaciones musicales de grabación
controlarán la monitorización de entrada
automáticamente, aunque tiene la posibilidad
de activarla manualmente desde el Panel de
control.
Para una explicación más detallada acerca
del direccionamiento y de las funciones del
Panel de control, consulte el Manual de usuario
de su producto que encontrará en el CD de
controladores FireWire.
Información adicional y soporte
Le recomendamos visitar regularmente la página de M-Audio para obtener actualizaciones de
controladores e información adicional. La dirección de la página web es www.m-audio.com. En ella
encontrará links a controladores, noticias, preguntas más frecuentes (FAQs), productos adicionales e
información técnica.
Ozonic
Tested to comply with
FCC standards
FOR HOME OR STUDIO USE
Las descargas Electrostáticas y Variaciones de Voltaje pueden
causar que la unidad funcione mal temporalmente. Dado el caso,
por favor apague la unidady préndala de nuevo para volver a su
operación normal.
25
Page 26

26
Page 27

Italiano
Istruzioni per l’installazione in Windows XP
NOTA: non collegare Ozonic al computer finché non sono stati installati nel sistema i driver appropriati.
Accertarsi che la periferica audio FireWire sia scollegata e collegarla solo quando vene indicato di
seguito.
1. Inserire il CD del driver di Ozonic nell’unità CD-ROM del computer.
2. Il computer visualizzerà automaticamente la schermata di installazione interattiva illustrata di
seguito. Se ciò non accade, occorre avviare manualmente il programma di installazione facendo
clic su Start>Risorse del computer>FireWire Series.
3. Seguire le istruzioni sullo schermo per scegliere la propria lingua e il prodotto. Una volta selezionato
il prodotto, fare clic su “Installa driver” per iniziare a copiare i file necessari nel sistema.
4. Seguire le istruzioni del programma di installazione sullo schermo.
27
Page 28

5. In vari punti del processo di installazione potrebbe essere segnalato che il driver in installazione non
ha superato il test del logo di Windows. Premere “Continuare” per procedere con l’installazione.
6. Una volta completata l’installazione, spegnere il computer.
7. A computer completamente spento, è
possibile collegare l’interfaccia della serie FireWire in una porta FireWire disponibile. Se si utilizza la
porta a 4 pin, è necessario l’alimentatore incluso per alimentare l’unità.
8. Accendere prima il dispositivo FireWire, quindi il computer.
9. All’avvio di Windows, viene identificata la nuova interfaccia FireWire e visualizzata l’Installazione
guidata nuovo hardware, simile a quella riportata di seguito.
10. Scegliere l’opzione “Installa il software automaticamente” e fare clic su Avanti.
11. Una volta completata l’installazione guidata, fare clic su “Fine”.
12. A questo punto apparirà un messaggio popup con la dicitura “Il nuovo hardware è installato e
pronto all’uso”.
28
Page 29

Istruzioni di installazione in Mac OS X
NOTA: non collegare Ozonic al computer finché non sono stati installati nel sistema i driver appropriati.
Accertarsi che la periferica audio FireWire sia scollegata e collegarla solo quando vene indicato di
seguito.
1. Inserire il CD del driver FireWire nell’unità CD-ROM del computer.
2. Fare doppio clic sull’icona del CD quando questa appare sulla scrivania per visualizzare il contenuto
del CD.
3. Fare doppio clic sull’icona “Mac OS X Start Here” per avviare il selettore del driver illustrato qui di
seguito.
4. Selezionare il prodotto dall’elenco sulla finestra di benvenuto, quindi fare clic su “Install Drivers.”
5. Viene avviata l’installazione del driver. Seguire le istruzioni sullo schermo.
6. Alla fine dell’installazione spegnere il computer.
7. A computer spento, è possibile collegare l’interfaccia audio FireWire e accenderla.
8. Accendere il computer. Quando il computer si è avviato completamente, l’interfaccia FireWire è
pronta all’uso.
29
Page 30

Collegare l’apparecchiatura all’interfaccia FireWire Series
< Ozonic dispone di uscite multiple adatte a numerosi scopi. Tuttavia, a prescindere dal numero di
uscite disponibili sullo specifico dispositivo, le uscite 1 e 2 serviranno sempre come uscite sinistra
e destra predefinite. Collegare le uscite 1 e 2 ai canali sinistro e destro, rispettivamente, degli
altoparlanti, del mixer o di altri sistemi di monitoraggio.
< È inoltre possibile collegare le cuffie all’apposita presa sul retro dell’unità, consentendo il
monitoraggio o il pre-ascolto in privato.
< Gli ingressi sul retro dell'interfaccia FireWire accettano segnali di livello linea, quali quelli di tastiere,
mixer e lettori CD, nonché prese XLR e da ¼” che accettano segnali di livello strumento e microfono
per la registrazione di tali sorgenti sonore, quali microfoni vocali, chitarre e bassi. Se si desidera
utilizzare questi ingressi di linea posteriori, accertarsi che i pulsanti Mic/Line sulla parte frontale del
dispositivo FireWire siano in posizione “in”. Commutando la posizione su “out” si consente l’utilizzo
degli ingressi mic/instrument anteriori.
Per informazioni più dettagliate e una spiegazione di tutti gli ingressi e uscite disponibili, inclusi i formati
digitali, consultare il Manuale per l’utente del prodotto, che si trova sul CD del driver FireWire.
Utilizzo del Pannello di controllo FireWire
In Windows è possibile aprire il pannello di FireWire facendo doppio clic sull’icona M-Audio nella barra
delle applicazioni. Per gli utenti Mac OS X, il pannello di controllo può essere avviato dall’icona che si trova
nel pannello Preferenze di sistema.
Le impostazioni predefinite del pannello
di controllo di FireWire assicurano che la
riproduzione audio normale sia instradata
alle uscite 1 e 2 del dispositivo FireWire e alle
cuffie. Il pannello di controllo consente inoltre
di modificare queste opzioni di instradamento
se necessario, nonché di impostare la funzione
del codificatore rotativo montato anteriormente
(per impostazione predefinita, il codificatore
controllerà il volume di uscita) e anche
selezionare opzioni di sincronizzazione digitale.
Per l’uso standard, non ci sarà bisogno di
modificare le impostazioni predefinite.
Quando è il momento di registrare una
sorgente esterna, quale voci, chitarra o
tastiera, è opportuno monitorare l’ingresso. Il
monitoraggio consente di ascoltare il segnale
in arrivo a questi ingressi e nel contempo di
miscelarlo con i segnali di uscita provenienti dal
computer. In questo modo, è possibile ascoltare
nuove parti dal vivo mentre le si sta registrando
insieme alle parti precedenti, operazione nota
come “overdubbing”. La maggior parte delle
applicazioni di registrazione gestiscono il
monitoraggio degli ingressi automaticamente,
ma si ha inoltre l’opzione di attivare il
monitoraggio manualmente dal pannello di
controllo.
30
Page 31

Per una spiegazione più dettagliata degli instradamenti e funzioni del pannello di controllo, consultare il
Manuale dell’utente del prodotto che si trova sul CD del driver FireWire.
Informazioni aggiuntive e assistenza
Si consiglia di visitare regolarmente il sito di M-Audio per gli aggiornamenti dei driver e informazioni
supplementari. L’indirizzo web del sito è www.m-audio.com. Sono presenti collegamenti ai driver, novità,
domande frequenti e assistenza tecnica.
Ozonic
Tested to comply with
FCC standards
FOR HOME OR STUDIO USE
ESD e transienti rapidi possono causare temporanei
malfunzionamenti dell’unità. Spegnerla e riaccenderla
nuovamente per ripristinare il normale funzionamento.
31
Page 32

32
Page 33

日本語
Windows XP
注意:コンピュータに
しないで下さい。
し、その後
FireWire
を接続して下さい。
Ozonic
でのインストール
ドライバソフトウェアの適切なインストールが終了するまで
Ozonic
機器(
)の接続が外してあることを確認してから、以下の手順でインストールを終了
Ozonic
をコンピュータに接続
Ozonic
コンピュータの
1.
コンピュータには自動的に以下の画面が表示されます。インストーラーが作動せず以下の画面が表示されない
2.
場合は、スタート
画面の指示に従い、言語を選択し、続いて製品名を選択します。「ドライバのインストール」をクリックする
3.
と、コンピュータに必要なファイルがコピーされます。
画面の指示に従ってドライバのインストールを進めます。
4.
ドライブに
CD-ROM
マイコンピュータ
>
のドライバ
Ozonic
>FireWire Series
を挿入します。
CD-ROM
からインストーラーを起動させて下さい。
33
Page 34

インストールの途中で「ロゴテストに合格していません」のメッセージが表示されますが、「続行」をクリック
5.
してインストールを続けます。
ドライバのインストールが完了したら、
6.
をシャットダウンしコンピュータの電源を切ります。
Windows
コンピュータの電源を
7.
す。コンピュータの
必要があります。
8. Ozonic
9. Windows
10.
11.
12.
の電源をONにした後で、コンピュータの電源をONにします。
が起動すると、新しい
ウェアの検出ウィザード」が表示されます。
「ソフトウェアを自動的にインストールする」を選択し「次へ」をクリックします。
ウィザードが終了したら、「完了」をクリックします。
「 新しいハードウェアの検出ウィザード」が終了すると、「新しいハードウェアがインストールされ、使用準
備ができました」というメッセージがシステムトレイからポップアップします。
FireWire
にしたら、
OFF
端子が4ピンの場合には、付属の電源アダプタを使用して
FireWire
をコンピュータの
Ozonic
インターフェイス(
FireWire
)が認識され、下図の通り「新しいハード
Ozonic
端子に接続して
Ozonic
に電源供給を行う
Ozonic
の電源を入れま
34
Page 35

Mac OS X
注意:コンピュータへドライバファイルをインストールする前に、
手順に従い、
その後に接続を行って下さい。
1.
2.
3. 「 Mac OS X Start Here
4.
5.
でのインストール
機器(
FireWire
コンピュータの
画面にCDのアイコンが表示されたらダブルクリックしてCDの内容を確認します。
されます。
リストから
ドライバのインストーラーが起動します。画面の表示に従ってドライバのインストールを進めます。
CD-ROM
Ozonic
)の接続が外してあることを確認してから、以下の手順でインストールを終了し、
Ozonic
ドライブにドライバ
」のアイコンをクリックすると下図の通り、製品名に対応するドライバのリストが表示
を選択して、次に「ドライバのインストール」をクリックします。
CD-ROM
を挿入します。
OzonicをMacintosh
へ接続しないで下さい。以下の
インストールが完了したら、コンピュータを終了して電源を切ります。
6.
コンピュータの電源が
7.
コンピュータの電源を入れます。コンピュータが起動すると
8.
の状態で、
OFF
をコンピュータに接続し
Ozonic
35
Ozonic
の電源を入れます。
Ozonic
は使用可能な状態になります。
Page 36

Ozonic
の接続
<
<
< リアパネルにある入力端子は、キーボード、ミキサー、
入出力に関する詳しい解説は
の中にあります。
ROM
FireWire
Wi ndows
トレ イにあ る
コン トロールパ ネル・ ソフト ウェア が起動しま す。
Mac OS X
テム環境設定から
クして下さい。
コントロールパネル・ソフトウェアのデフォルト設定
では、オーディオは
ドフ ォンにルー ティン グされ ます。 コントロー ルパ
ネル・ソフトウェアで必要に応じてデフォルトの出力
ルーティ ングや トップ パネル にあるロー タリー エン
コーダー(デフォルトでは出力音量を調整します)の
機能の設定、デジタルの同期(シンク)の方法などの
選択などが可能です。標準的な使い方では、デフォル
ト設定を変更する必要はありません。
ボーカル、ギタートラック、キーボードパートなどの
外部音源から録音する場合、入力信号をモニタリング
することもできます。モニタリングで入力端子に入っ
て来る信号を聞くことができるばかりか、その信号を
コンピュータから入って来る出力信号と組み合わせる
こともできます。この方法を使って、新しいパートを
録音しながらリアルタイムにモニターでき、同時に以
前のパートが出力されることになります。これは多重
録音と呼ばれる録音方法です。ほとんどの録音用のア
プリケーションで自動的に入力モニタリングができま
すが、コントロールパネル・ソフトウェアを使って手
動でモニタリングを有効にすることもできます。
には、多目的に使用できる複数の出力端子が装備されています。2チャンネルのステレオ使用時には、デ
Ozonic
フォルトで出力
ピーカー、ミキサーやその他モニタリングシステム等を接続します。
リアパネルのヘッドフォン端子には、ヘッドフォンを接続できます。モニタリングや試聴などに便利です。
Ozonic
端子や
XLR
ルの信号を受信してレコーディングなどに使用します。リアパネルのライン入力を使用するには、フロントパ
ネルの
Mic/Line
外に出た状態では、マイク
コントロールパネル・ソフトウェアの使用方法
コン ピ ュータで は 、画面右 下 のシステ ム
のア イコン をダブ ルクリック すると
M
端子を左右の出力端子として使用します。出力
1/2
CD
端子にボーカルマイクロフォン、ギター、ベース等を接続し、インストゥルメントやマイクレベ
1/4
ボタンを押してボタンが中に入った状態にしておく必要があります。もう一度押してボタンが
インストゥルメント入力が使用できます。
/
のユーザーマニュアルに記載されています。
Ozonic
端子には、それぞれ左右のチャンネルにス
1/2
プレーヤー等のラインレベル信号を受信します。
マニュアルは、ドライバ
Ozonic
をお使いの場合は、アップルメニューのシス
のアイコンをダブルクリッ
M-Audio
の出力端子
Ozonic
またはヘッ
1/2
CD-
36
Page 37

コントロールパネルの詳しい解説は、
FireWire
ドライバ
CD-ROM
の中にあります。
サポート関連情報
M-Audio
M-Audio
等の情報が満載です。
のウェブ サイトを定 期的 にご覧 にな ってドライ バアップデ ート 等のサ ポー ト関連情報 をご確認下 さい。
のウェブサイトのアドレスは
のユーザーマニュアルに記載されています。
Ozonic
www.m-audio.com
です。ドライバ情報、ニュース、
マニュアルは、
Ozonic
やテクニカルサポート
FAQ
Ozonic
Testedtocomplywith
FCCstandards
FORHOMEORSTUDIOUSE
静電気放電(ESD)や電磁波(Fast Transient)は製品に一時的な誤作動を引き起こす可能性があり
ます。正常に動作するまで電源スイッチON/OFFの切り換えを繰り返して下さい。
37
Page 38

38
Page 39

39
Page 40

041019_OZONIC_QS_01
 Loading...