

Page 1
Quickstart Guide
English ( 3 – 12 )
Guía de inicio rápido
Español ( 13 – 22 )
Guide d’utilisation rapide
Français ( 23 – 32 )
Guida rapida
Italiano ( 33 – 42 )
Schnellstart-Anleitung
Deutsch ( 43 – 53 )
Appendix
English ( 55 )
Page 2

2
Page 3
Quickstart Guide (English)
Introduction
Box Contents
Oxygen Pro Mini USB Cable
Quickstart Guide Safety & Warranty Manual
Software Download Card
Important: Visit m-audio.com to download the complete User Guide.
Support
For the latest information about this product (system requirements, compatibility
information, etc.) and product registration, visit m-audio.com.
For additional product support, visit m-audio.com/support.
3
Page 4
Setup
Items not listed under Introduction > Box Contents are sold separately.
1. Plug the USB cable provided with your Oxygen Pro Mini keyboard to a free USB port on
your computer.
2. Plug the other end of the USB cable into the USB input on the Oxygen Pro Mini keyboard.
Note: In addition to sending data, the USB cable powers the keyboard. If you will be
connecting Oxygen Pro Mini to a USB hub that has other devices connected to it, then
we recommend using a powered USB hub.
Software
We’ve included MPC Beats, Pro Tools | First M-Audio Edition, and Ableton Live Lite with your
Oxygen Pro Mini so you can get started making music with professional software right out of the
box. Additionally, we’ve included a set of Expansion Packs and AIR virtual instrument plugins
for you to use with your DAW.
To download the included MPC Beats, Pro Tools | First M-Audio Edition, or Ableton Live
Lite software, register your Oxygen Pro Mini on m-audio.com and follow the installation
instructions in your User Account. If you will be using Ableton Live Lite, we recommend
visiting ableton.com to check for any available software updates. For help configuring either
DAW with Oxygen Pro Mini, see Pro Tools | First M-Audio Edition Setup or Ableton Live
Lite Setup.
4
Page 5

To download the included AIR virtual instrument plugins, follow the instructions on the
software download card in the box. After installation, most DAWs will not load virtual
instrument plugins automatically; you may need to manually choose a plug-in folder for your
software to scan. The plugin folders for Pro Tools | First M-Audio Edition and Ableton Live
Lite depend on your operating system, as indicated below.
Pro Tools | First M-Audio Edition/AAX plugin folders:
• Windows (32-bit): C:\Program Files (x86)\Common Files\Avid\Audio\Plug-Ins
• Windows (64-bit): C:\Program Files\Common Files\Avid\Audio\Plug-Ins
• MacOS: Macintosh HD/Library/Application Support/Avid/Audio/Plug-Ins
Ableton/VST Plugins:
• Windows (32-bit): C:\Program Files (x86)\VSTplugins
• Windows (64-bit): C:\Program Files\VSTplugins
• MacOS: Macintosh HD/Library/Audio/Plugins/VST
To set your plugin folder in Ableton Live Lite:
1. Go to the Preferences menu.
2. Select the File Folder tab. Under Plug-In Sources, click Browse and select the appropriate plugin
folder (as indicated above).
3. After making your selection, the Use VST Custom Plug-In Folder button should be ON. If
it is not, click the button to turn it on. You can then exit the Preferences menu.
5
Page 6

Ableton Live Lite Setup
1. First, connect Oxygen Pro Mini to your computer. Then launch Ableton Live Lite.
2. Open the Ableton Live Lite Preferences window. If you are using a Mac, go to Live >
Preferences. If you are using a PC, go to Options > Preferences.
3. Select the Link / MIDI tab on the left. Under the MIDI Ports section, adjust the settings as
follows:
Under Control Surfaces, for Input and Output select Oxygen Pro Mini.
Next to Input: Oxygen Pro Mini, select On in the Track and Remote columns.
Next to Output: Oxygen Pro Mini, select On in the Track and Remote columns.
4. Close the Preferences window.
5. To add an instrument or plugin to trigger with Oxygen Pro Mini, select Instruments or
Plug-ins in the Categories column.
6. In the Name column to the right of the Categories column, locate the Instrument or Plug-
in of your choice. Click-and-drag the instrument to a MIDI track in Ableton Live Lite to
load the instrument.
The Instrument can now be triggered with Oxygen Pro Mini.
6
Page 7
Pro Tools | First M-Audio Edition Setup
1. Connect Oxygen Pro Mini to your computer. Then launch Pro Tools | First M-Audio
Edition.
2. Open or Create a Project.
3. Select the Setup pulldown menu and open MIDI Input Devices. Enable MIDI Input from
the Oxygen Pro Mini by clicking the box next to Oxygen Pro Mini.
4. Create a new instrument track by selecting the Track pulldown menu and clicking New.
5. In the New pulldown menu, select Stereo and then Instrument Track.
6. In the newly created track, add an Insert to your track by clicking in your track's Inserts A-
E and selecting Multichannel Plugin > Instrument. Select the instrument you would like
to use, such as Xpand!2 (Stereo).
The plugin can now be triggered with Oxygen Pro Mini.
Preset Editor
To download the included Preset Editor software, follow the instructions on the software
download card in the box. This software can be used to create custom MIDI mappings for you
to load onto Oxygen Pro Mini. For more information on operating the keyboard with one of the
custom presets selected, see the following section. The Preset Editor also comes with its own
Editor User Guide.
7
Page 8
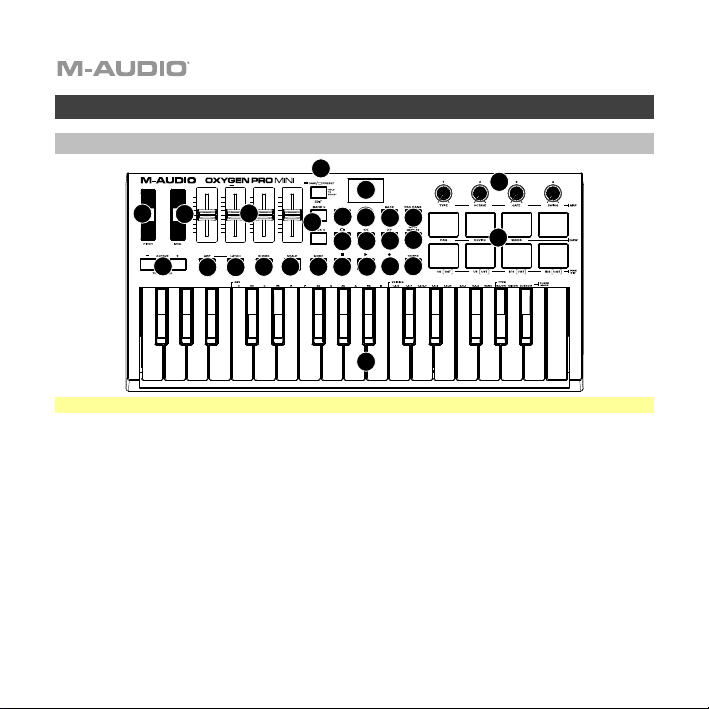
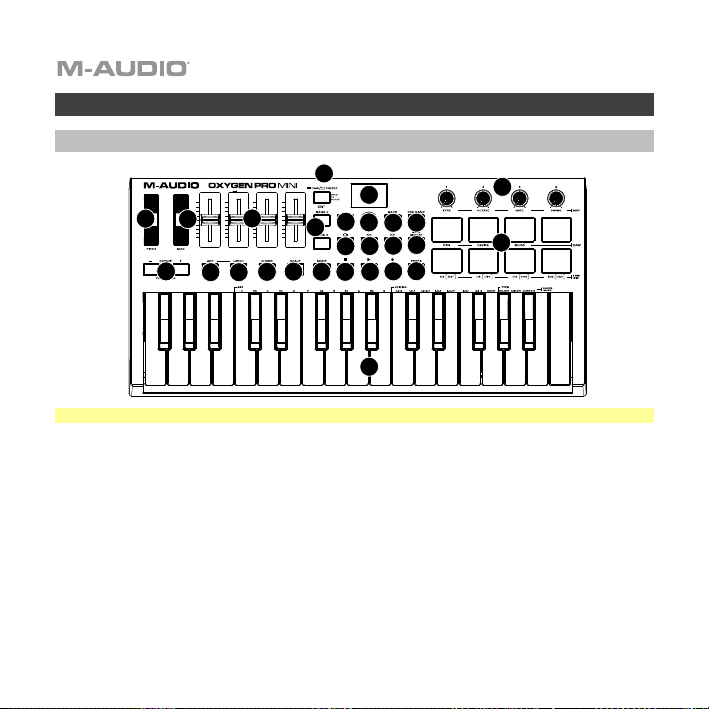
Basic Operation
Top Panel
5
6
23
24
21
25
26
16
27
9
7
10
12
13 14
11
15
20
8
18
17
3
4
2
22
19
1
Important: Visit m-audio.com to download the complete User Guide.
1. Keybed: Using the Octave buttons, you can access the full 88-note keyboard range of a large
piano keyboard. The Oxygen Pro Mini keybed has 2 1/2 playable octaves. The range of the
keyboard is approximately in the middle of an 88-note keyboard.
2. OCTAVE +/-: The assignable octave buttons are used to shift the keyboard up or down in one-
octave increments (12 semitones at a time). This extends the range of the keyboard up to four
octaves in either direction, which lets you play notes that lie outside of the 32 keys. Hold Shift
and press these buttons to adjust the pitch range of the keys up or down one semitone. To return
the octave shift to 0, press both the Octave buttons together.
3. PITCH Wheel: Roll this wheel up and down from the center position to bend the pitch of the
keyboard while playing. The default range of the pitch-bend will vary between software synths.
The wheel is spring mounted and will return to the center position when released.
8
Page 9
4. MOD Wheel: Move this wheel to send continuous controller data—MIDI CC #01 (modulation), by
default.
5. DAW / PRESET [EDIT] Button: Press this button to set Oxygen Pro Mini to operate in
DAW Mode or Preset Mode. When in DAW Mode, this button’s LED will be brightly lit. When in
Preset Mode, this button’s LED will be off. Hold Shift and press this button to edit a Preset or
User DAW. After editing the Preset or User DAW, press this button again to save your changes to
the User DAW or Preset. Press and hold the button to open the DAW/Preset Select menu on the
Display.
6. Display: The main Display screen shows the status of the last used control. Use this screen to
monitor parameter levels as you adjust controls on the keyboard. Also, use the Display along
with the Select/Scroll Encoder to view and edit keyboard settings.
7. Select/Scroll Encoder: If you are entered into one of the Display’s Edit menus, turn this knob to
change settings/parameters and press the knob to confirm a selection.
If you are not viewing any of the edit menus, turning the encoder and pressing the encoder will
each function as separate MIDI controls. When operating with a DAW, the assigned controls will
be predetermined. When operating with a preset or the User DAW selected, the controls can be
edited.
8. BACK Button: If you have entered into one of the Display’s Edit menus, press this button to go
back to the main Display screen.
If you are not viewing one of the Edit menus, this button will be assigned to a control. When
operating with a DAW, the assigned control will be predetermined. When operating with a preset
or the User DAW selected, the control can be edited.
When editing a Preset or DAW name press the Shift button and the Back button to delete a
letter.
9
Page 10
9. SHIFT Button: Hold the Shift Button while moving or pressing controls or buttons on the
keyboard to access their secondary functions.
10. << Button: Depending on what screen is selected in your DAW, this button will either rewind the
open song or move down in the active window.
11. >> Button: Depending on what screen is selected in your DAW, this button will either fast
forward the open song or move up in the active window.
12. Loop Button: Press this button to activate/deactivate the loop function in your DAW.
13. Stop Button: Press this button to stop the open song in your DAW. Double-press this button
to stop the open song and return the playhead to the beginning of the song. Press Shift and this
button to send a MIDI panic message to turn off all Note messages and return all controls to
zero.
14. Play Button: Press this button to play the song in your DAW.
15. Record Button: Press this button to activate recording in your DAW.
16. BANK >, BANK < Buttons: If operating in DAW Mode or one of the custom presets, use these
buttons to switch the currently selected bank for the Sliders, Knobs, and Function Buttons.
Press Shift and the Bank < button to lock the Shift modifier ARP knob controls. This is useful for
changing ARP parameters during a live performance. Press Shift and the Bank > button to lock
the Shift modifier Pad controls. This is useful for making edits while mixing a song. To return the
knobs or pads to their normal mode, press the Shift button and the Bank < button or Bank >.
17. TEMPO Button: Tap this button to set Oxygen Pro Mini’s tempo or press and hold it to pull up
the Tempo Edit menu on the Display, where you can use the Select/Scroll Encoder to manually
enter the tempo and choose to sync Oxygen Pro Mini’s tempo with your DAW. The tempo setting
affects the keyboard’s arpeggiator and note repeat functions.
18. NOTE REPEAT [LATCH] Button: Press this button to activate the note repeat function for the
Pads. To latch the note repeat function, hold Shift
Repeat is active, use the Select/Scroll Encoder to change the current Time Division setting of
the Arpeggiator and pad Note Repeat.
10
and then press this button. While Note
Page 11
19. Pads (8): Use these velocity-sensitive pads to send MIDI Note On/Off messages or perform other
MIDI assignments (if using a preset or DAW).
20. PAD BANK Button: Press this button to switch to a different pad bank. There are two pad banks
available.
21. Sliders (4): Push this slider up/down to perform the assigned controls. When operating with a
DAW, the assigned controls will be predetermined. When operating with a preset or the User
DAW selected, the controls can be edited.
22. KNOBS: Turn these knobs left/right to perform their assigned controls. When operating with a
DAW, the assigned controls will be predetermined. When operating with a preset or the User
DAW selected, the controls can be edited. Hold Shift while turning a knob to edit arpeggiator
settings.
23. ARP Button: Press this button to activate the arpeggiator. Hold Shift and press this button to
edit the arpeggiator’s settings.
24. LATCH Button: Press this button to toggle the arpeggiator from momentary to latch Mode.
25. CHORD Button: Press this button to activate Chord Mode. Hold Shift and press this button to
edit the Chord Mode settings.
26. SCALE Button: Press this button to activate Scale Mode. Hold Shift and press this button to edit
the Scale Mode settings.
27. MODE Button: Press this button to change the current fader buttons mode when in DAW and
Preset mode. When in DAW mode, you can select between the buttons controlling either the
main silkscreened functions or a DAW specific control message. When in Preset mode, you can
select between the buttons controlling either the main silkscreened functions or a MIDI message.
Hold Shift and press this button to view and edit the Global settings.
11
Page 12
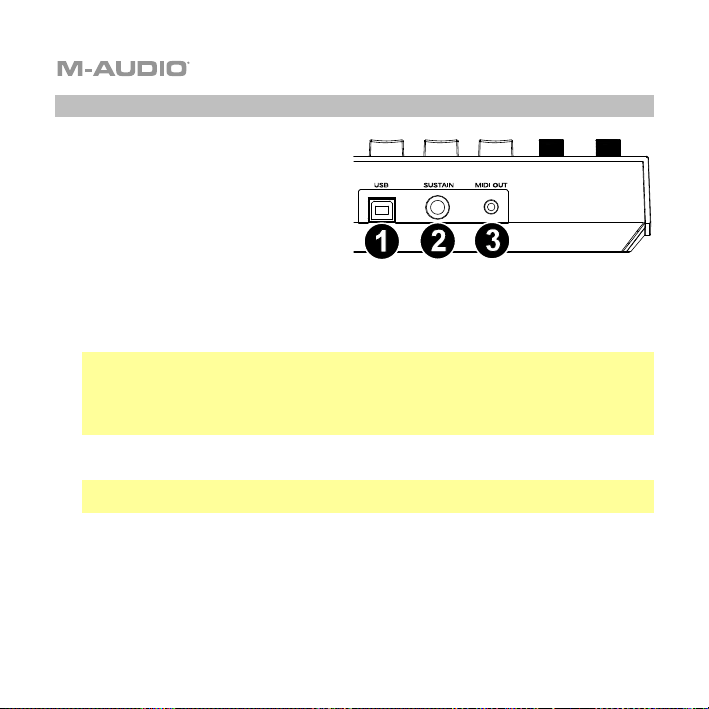
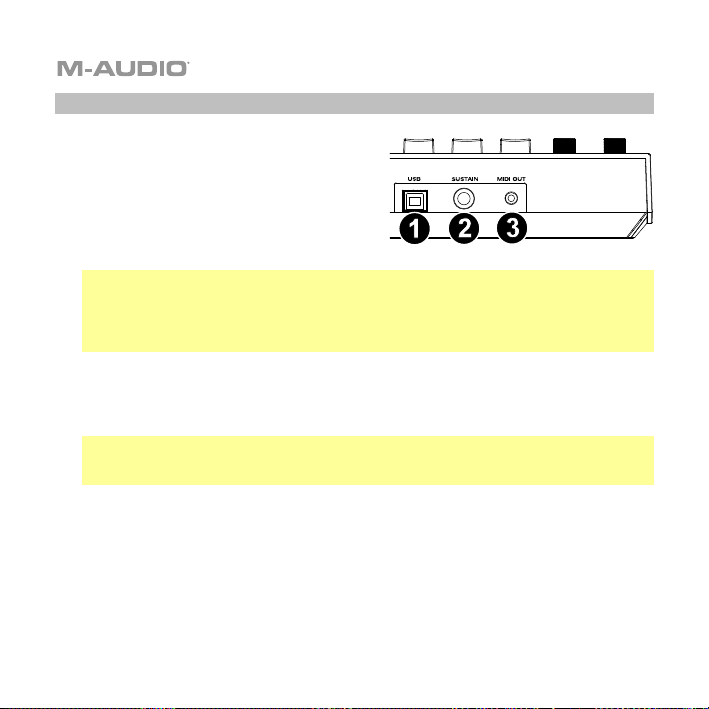
Rear Panel
1. USB Port: When connected to a
computer, the USB port delivers power
to the keyboard and transmits MIDI
data.
2. Sustain Pedal Input: This input
accepts a momentary-contact foot
pedal (not included). When pressed, the
pedal by default will sustain the sound
you are playing without you having to
keep your fingers pressed down on the
keys. The sustain pedal input can be
remapped to perform a custom MIDI
assignment.
Note: The polarity of the sustain pedal is determined by the keyboard upon startup. When
an Oxygen Pro Mini keyboard is powering up, the sustain pedal is assumed to be in the
"up" (Off) position. It is important that the sustain pedal is not in the down position before
starting up the keyboard, as the pedal will then operate in reverse, and notes will sustain
when the pedal is not pressed.
3. MIDI Out: Use a 1/8” TRS to 5-pin MIDI cable (sold separately) to connect this port to a
hardware synth or other MIDI device.
Note: The MIDI output port can send MIDI from the Oxygen Pro Mini, your connected
computer, or both. Go into the Global Settings to set what is sent to the MIDI Out.
12
Page 13
Guía de inicio rápido (Español)
Introducción
Gracias por comprar el Oxygen Pro Mini. En M-Audio, sabemos que usted se toma la música
en serio. Por eso es que diseñamos nuestros equipos con una sola cosa en mente—hacer que
pueda tocar su mejor interpretación.
Contenido de la caja
Oxygen Pro Mini Cable USB
Guía de inicio rápido Manual sobre la seguridad y garantía
Tarjeta de descarga de software
Importante: Visite en m-audio.com para descargar la guía de usuario completa.
Soporte
Visite m-audio.com para ver y descargar la documentación más reciente, los requisitos del
sistema y demás información relativa a su producto.
Para obtener soporte adicional del producto, visite m-audio.com/support.
13
Page 14

Instalación
Los elementos que no se enumeran en Introducción > Contenido de la caja se venden por
separado.
1. Enchufa el cable USB provisto con tu teclado Oxygen Pro Mini a un puerto USB libre en tu
ordenador.
2. Enchufa el otro extremo del cable USB en la entrada USB del teclado Oxygen Pro Mini.
Nota: Además de enviar datos, el cable USB alimenta el teclado. Si planea utilizar el
Oxygen Pro Mini conectado a un concentrador USB que tiene otros dispositivos
conectados a él, recomendamos utilizar un concentrador USB alimentado.
Software
Hemos incluido MPC Beats, Pro Tools | First M-Audio Edition, y Ableton Live Lite con su
Oxygen Pro Mini de modo que puede comenzar a hacer música con software profesional en
cuanto lo saca de la caja. Adicionalmente, hemos incluido un conjunto de paquetes de
expansión y plugins de instrumentos virtuales de AIR para que los utilice con su DAW.
Para descargar el software MPC Beats, Pro Tools | First M-Audio Edition, o Ableton Live
Lite incluido, registre su Oxygen Pro Mini en m-audio.com y siga las instrucciones de
instalación en su Cuenta de usuario. Si planea utilizar Ableton Live Lite, la recomendamos
visitar ableton.com para comprobar si existen actualizaciones de software disponibles. Para
obtener ayuda sobre cómo configurar cualquiera de esas DAW con Oxygen Pro Mini, consulte
Configuración de Pro Tools | First M-Audio Edition o Configuración de Ableton Live Lite
Setup a continuación.
14
Page 15
Para descargar los plugins de instrumentos virtuales de AIR, siga las instrucciones que se
encuentran en la tarjeta de descarga del software en la caja. Tras la instalación, la mayoría de
las DAW no cargarán los plugins de instrumento virtual automáticamente; es posible que
tenga que seleccionar una carpeta que contenga plugins manualmente para que su software
la escanee. Las carpetas de plugins del Pro Tools | First M-Audio Edition y el Ableton Live
Lite dependen de su sistema operativo, como se indica a continuación.
Carpetas de plugins Pro Tools | First M-Audio Edition/AAX:
• Windows (32 bits): C:\Program Files (x86)\Common Files\Avid\Audio\Plug-Ins
• Windows (64 bits): C:\Program Files\Common Files\Avid\Audio\Plug-Ins
• MacOS: Macintosh HD/Library/Application Support/Avid/Audio/Plug-Ins
Plugins de Ableton/VST:
• Windows (32 bits): C:\Program Files (x86)\VSTplugins
• Windows (64-bits): C:\Program Files\VSTplugins
• MacOS: Macintosh HD/Library/Audio/Plugins/VST
Cómo establecer su carpeta de plugins en Ableton Live Lite:
1. Vaya al menú Preferences (Preferencias).
2. Seleccione la pestaña File Folder (Carpeta de archivos). Bajo Plug-In Sources (Fuentes
de plugin) haga clic en Browse (Explorar) y seleccione la carpeta de plugins apropiada (tal
como se indica más arriba).
3. Después de hacer su selección, el botón Use VST Custom Plug-In Folder (Usar carpeta
de plugins VST personalizada) debe estar en ON (encendido). Si no lo está, haga clic en el
botón para encenderlo. Luego podrá salir del menú Preferences.
15
Page 16

Configuración
1. Primero conecte el Oxygen Pro Mini a su ordenador. Luego abra Ableton Live Lite.
2. Abra la ventana Preferences
Live > Preferences
Preferences
3. Seleccione la pestaña Link / MIDI (Enlace / MIDI) del lado izquierdo. Dentro de la
sección MIDI Ports (Puertos MIDI) configure los ajustes de la siguiente manera:
Dentro de Control Surfaces (Superficies de control), para Input (entrada) y Output
(salida) seleccione Oxygen Pro Mini.
Junto a Input: Oxygen Pro Mini, seleccione On (activado) en las columnas Track y
Remote (Pista y Remoto).
Junto a Output: Oxygen Pro Mini, seleccione On (activado) en las columnas Track y
Remote (Pista y Remoto).
4. Cierre la ventana Preferences (Preferencias).
5. Para añadir un instrumento o plugin a fin de ejecutarlo desde el Oxygen Pro Mini,
seleccione Instruments (Instrumentos) o Plug-ins en la columna Categories
(Categorías).
6. En la columna Name (Nombre) justo a la derecha de la columna Categorías, localice el
Instrumento o Plugin de su elección. Haga clic y arrastre el instrumento sobre una pista
MIDI en Ableton Live Lite para cargarlo.
El instrumento ahora puede ejecutarse con el Oxygen Pro Mini.
16
de Ableton Live Lite
de Ableton Live Lite. Si está utilizando una Mac, vaya a
(Vivo > Preferencias). Si está utilizando una PC, vaya a Options >
(Opciones > Preferencias).
Page 17

Configuración de Pro Tools | First M-Audio Edition:
1. Conecte el Oxygen Pro Mini a su ordenador. Luego ejecute Pro Tools | First M-Audio
Edition.
2. Abra o cree un proyecto.
3. Seleccione el menú desplegable Setup y abra MIDI Input Devices (Dispositivos de
entrada MIDI). Habilite MIDI Input (Entrada MIDI) desde Oxygen Pro Mini haciendo clic en
la casilla junto al Oxygen Pro Mini.
4. Cree una pista de instrumento nuevo, seleccionando el menú desplegable Track (pista) y
haciendo clic en New (Nueva).
5. En el menú desplegable New (Nuevo), seleccione Stereo y luego Instrument Track (Pista
de instrumento).
6. En la pista recientemente creada, añada un inserto en su pista haciendo clic en Inserts A-
E (Insertos A-E) y seleccionando Multichannel Plugin > Instrument (Plugin multicanal >
Instrumento). Seleccione el instrumento que desea utilizar, como por ejemplo Xpand!2
(estéreo).
El plugin ahora puede ejecutarse con el Oxygen Pro Mini.
Editor de presets:
Para descargar el software de edición de presets
encuentran en la tarjeta de descarga del software en la caja. Este software se puede utilizar
para crear mapeos MIDI personalizados para cargar en el Oxygen Pro Mini. Para obtener más
información sobre cómo operar el teclado con uno de los presets personalizados
seleccionados, consulte la siguiente sección. El editor de presets también viene con su propia
Guía del usuario del Editor.
, siga las instrucciones que se
17
Page 18

Funcionamiento básico
Panel superior
3
2
Importante: Visite en m-audio.com para descargar la guía de usuario completa.
1. Placa del teclado: Con los botones Octave, se puede acceder a la extensión completa de 88
teclas de un piano grande. Las teclas del Oxygen Pro Mini cubren 2½ octavas. La tesitura del
teclado está aproximadamente al medio de un teclado de 88 notas.
2. OCTAVA (octave) +/-: Los botones de octava asignables se usan para subir o bajar el teclado en
pasos de una octava (12 semitonos por vez). Esto amplía la tesitura del teclado hasta cuatro
octavas en cualquier dirección, lo que te permite tocar notas fuera de las 32 teclas. Mantenga
pulsado Shift y pulse estos botones para ajustar el rango de tono de las teclas en un semitono
hacia arriba o hacia abajo. Para devolver el cambio de octava a su estado original (volver a 0),
presione ambos botones de octava juntos.
3. Rueda de inflexión de tono: Gire esta rueda hacia arriba y hacia abajo desde la posición central
para flexionar el tono del teclado mientras toca. El rango predeterminado de la inflexión de tono
varía en función de los sintetizadores de software. La rueda está montada mediante resortes y
regresará a su posición central al soltarse.
18
21
4
23
24
25
26
16
5
27
6
9
7
10
12
13 14
1
11
15
22
20
8
18
17
19
Page 19

4. Rueda de MOD (modulación): Mueva esta rueda para enviar datos de controlador continuo—
MIDI CC #01 (modulación), por defecto.
5. Botón DAW /PRESET [EDIT]: Pulse este botón para configurar al Oxygen Pro Mini para
que funcione en modo de DAW o en modo de preset. En el modo de DAW, el LED de este botón
se iluminará intensamente. En el modo de preset, el LED de este botón estará apagado.
Mantenga pulsado Shift y pulse este botón para editar un preset o DAW de usuario. Tras editar
el preset o DAW de usuario, pulse este botón nuevamente para guardar sus cambios realizados
al preset o DAW de usuario. Mantenga pulsado el botón para abrir el menú de selección de
DAW/Preset en la pantalla.
6. Pantalla: La pantalla principal muestra el estado del último control utilizado. Utilice esta pantalla
para monitorear los niveles del parámetro a medida que ajusta los controles del teclado.
Además, utilice la pantalla junto con el codificador Select/Scroll para ver y editar los ajustes
del teclado.
7. Codificador Select/Scroll: Si se encuentra dentro de uno de los menús de edición de la
pantalla, gire este codificador para modificar los ajustes/parámetros y pulse el codificador para
confirmar una selección.
Si no está visualizando ninguno de los menús de edición, tanto girar como impulsar el
codificador funcionarán como controles MIDI separados. Al operar con una DAW, los controles
asignados serán predeterminados. Al operar con un preset o con la DAW de usuario
seleccionada, los controles se pueden editar.
8. Botón BACK (Volver): Si se encuentra dentro de uno de los menús de edición de la pantalla,
pulse este botón para volver a la pantalla principal.
Si no está visualizando ninguno de los menús de edición, este botón estará asignado un control.
Al operar con una DAW, el control asignado será predeterminado. Al operar con un preset o con
la DAW de usuario seleccionada, el control se puede editar.
Al editar un Preset o nombre de DAW, pulse el botón Shift (función secundaria) y el botón Back
(volver) para borrar una letra.
9. Botón de función secundaria SHIFT: Mantenga pulsado el botón Shift mientras mueve o pulsa
controles o botones en el teclado para acceder a sus funciones secundarias.
10. Botón <<: En función de la pantalla seleccionada en su DAW, este botón rebobinará la canción
abierta o se desplazará hacia abajo en la ventana activa.
19
Page 20

11. Botón >>: En función de la pantalla seleccionada en su DAW, este botón hará un avance rápido
de la canción abierta o se desplazará hacia arriba en la ventana activa.
12. Botón de bucle: Pulse este botón para activar/desactivar la función de bucle en su DAW.
13. Botón Parar: Pulse este botón para detener la canción abierta en su DAW. Pulse el botón dos
veces para parar la canción abierta y regresar el cabezal de reproducción al comienzo de la
misma. Pulse Shift junto con este botón para enviar un mensaje de pánico MIDI a fin de
desactivar todos los mensajes de notas y regresar todos los controles a cero.
14. Botón de reproducción: Pulse este botón para reproducir una canción en su DAW.
15. Botón de grabación: Pulse este botón para activar la grabación en su DAW.
16. Botones de BANCO >, BANCO <: Si está operando en modo de DAW o alguno de los presets
personalizados, utilice estos botones para conmutar el banco actualmente seleccionado para los
deslizador, perillas, y botones de función. Pulse Shift y el botón Bank < (banco) para
bloquear los controles de las perillas de ARP del modificador Shift. Esto resulta útil para
modificar los parámetros de ARP durante una actuación en vivo. Pulse Shift y el botón Bank >
para bloquear los controles de Pad del modificador Shift. Eso resulta útil para realizar ediciones
mientras se mezcla una canción. Para regresar las perillas o pads a su modo normal, pulse el
botón Shift y el botón Bank < o Bank >.
17. Botón TEMPO: Toque este botón para ajustar el tempo del Oxygen Pro Mini o manténgalo
pulsado para desplegar el menú de edición de tempo en la pantalla, en donde podrá utilizar el
codificador Select/Scroll para introducir manualmente el tempo y seleccionar si desea
sincronizar el tempo del Oxygen Pro Mini con su DAW. El ajuste del tempo afecta al arpegiador y
a las funciones de repetición de nota del teclado.
18. Botón de REPETICIÓN de NOTA [LATCH]: Pulse este botón para activar la función de
repetición de nota para los pads. Para usar la función de repetición de nota en comportamiento
permanente, mantenga pulsado Shift y luego pulse este botón. Mientras Note Repeat
(repetición de nota) esté activo, utilice el codificador Select/Scroll para modificar el ajuste
actual de la división de tiempo del arpegiador y la característica Note Repeat del pad. Para
usar la función de repetición de nota en comportamiento momentáneo o permanente, mantenga
pulsado Shift y luego pulse este botón.
19. Pads (18): Utilice estos pads sensibles la velocidad para enviar mensajes de activación/desactivación de
nota MIDI o efectuar otras asignaciones MIDI (si está utilizando un preset o la DAW).
20
Page 21

20. Botón del banco de pad: Presione este botón para cambiar a un banco de almohadillas
diferente. Hay dos bancos de almohadillas disponibles.
21. Deslizador (4): Mueva este deslizador hacia arriba y hacia abajo para efectuar los controles
asignados. Al operar con una DAW, los controles asignados serán predeterminados. Al operar
con un preset o con la DAW de usuario seleccionada, los controles se pueden editar.
22. KNOBS: Gire estas perillas hacia la izquierda y hacia la derecha para efectuar sus controles
asignados. Al operar con una DAW, los controles asignados serán predeterminados. Al operar
con un preset o con la DAW de usuario seleccionada, los controles se pueden editar. Mantenga
presionada la tecla Shift mientras gira una perilla para editar la configuración del arpegiador.
23. Botón ARP: Pulse este botón para activar el arpegiador. Mantenga pulsado Shift y pulse este
botón para editar los ajustes del arpegiador.
24. Botón de comportamiento permanente: Pulse este botón para conmutar el arpegiador entre
comportamiento momentáneo y comportamiento permanente.
25. Botón de acorde: Pulse este botón para activar el modo de acorde. Mantenga pulsado Shift y
pulse este botón para editar los ajustes del modo de acorde.
26. Botón de escala: Pulse este botón para activar el modo de escala. Mantenga pulsado Shift y
pulse este botón para editar los ajustes del modo de escala.
27. Botón de MODO: presione este botón para cambiar el modo actual de los botones de fader
cuando esté en modo DAW y preestablecido. Cuando está en modo DAW, puede seleccionar
entre los botones que controlan las funciones principales serigrafiadas o un mensaje de control
específico DAW. Cuando esté en el modo Predeterminado, puede seleccionar entre los botones
que controlan las funciones principales serigrafiadas o un mensaje MIDI. Mantenga presionada la
tecla Shift y presione este botón para ver y editar la configuración global.
21
Page 22
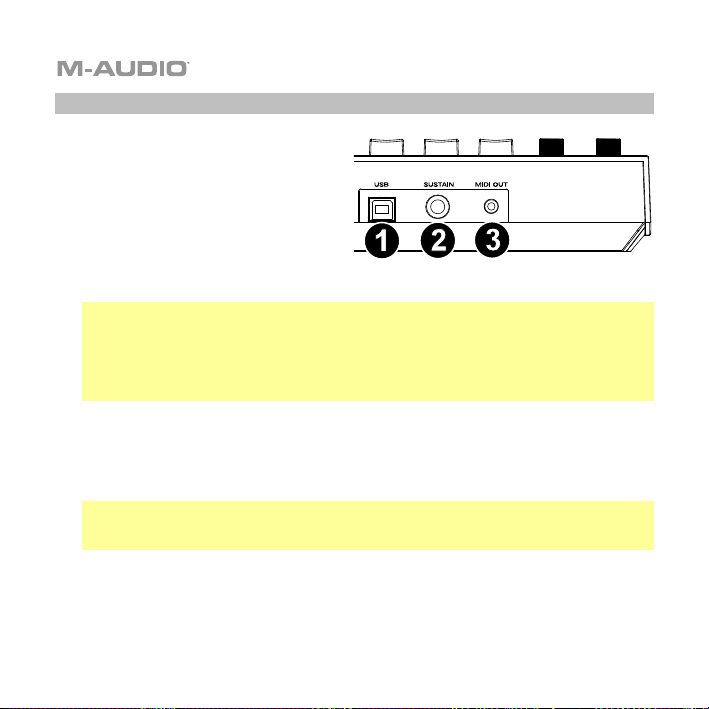
Panel trasero
1. Entrada para pedal de sostenido:
Esta entrada acepta pedales de
sostenido de contacto momentáneo (no
incluido). Cuando se lo presiona, el
pedal por defecto sostiene las notas
que está tocando sin que tenga que
mantener sus dedos pulsando las
teclas. La entrada del pedal sostenido
se puede reprogramar para efectuar
una asignación de MIDI personalizada.
Nota: La polaridad del pedal de sostenido está determinada por el teclado al momento
del encendido. Cuando el teclado Oxygen Pro Mini se está encendiendo, se asume que el
pedal de sostenido está la posición "hacia arriba" (desactivado). Es importante que el
pedal de sostenido no esté en la posición hacia abajo durante el encendido, de lo
contrario el pedal invertirá su funcionamiento y sostendrá las notas cuando no está
pisado.
2. Puerto USB: Al conectarlo a un ordenador, el puerto USB suministra energía al teclado y
transmite los datos de MIDI.
3. Salida MIDI: Utilice un cable MIDI de cable de 1/8" TRS a 5 patillas MIDI (se vende por
separado) para conectar este puerto a un sintetizador de hardware u otro dispositivo MIDI
externo.
Nota: El puerto de salida MIDI puede enviar MIDI desde el Oxygen Pro Mini, su ordenador
conectado, o ambos. Vaya a los ajustes globales para configurar lo que se envía por la
salida MIDI.
22
Page 23
Guide d’utilisation rapide (Français)
Présentation
Contenu de la boîte
Oxygen Pro Mini Câble USB
Guide d’utilisation rapide Consignes de sécurité et informations concernant la garantie
Carte de téléchargement de logiciel
Important : Visitez m-audio.com afin de télécharger son guide d’utilisation complet.
Assistance
Veuillez visiter m-audio.com pour consulter et télécharger la documentation la plus récente, la
configuration requise et les autres informations sur le produit.
Pour de l’assistance supplémentaire, veuillez visiter m-audio.com/support.
23
Page 24

Démarrage
Les éléments qui ne figurent pas dans Présentation > Contenu de la boîte sont vendus
séparément.
1. Branchez le câble USB fourni avec votre clavier Oxygen Pro Mini sur un port USB
disponible de votre ordinateur.
2. Branchez l’autre extrêmité du câble USB sur l’entrée USB du clavier Oxygen Pro Mini.
Cet unique câble USB permet non seulement d’alimenter le clavier, mais également
d’échanger les données entre le clavier et l’ordinateur.
Remarque : En plus de transmettre des données, le câble USB sert à alimenter le
clavier. Si vous reliez l’Oxygen Pro Mini à un concentrateur USB auquel d'autres
appareils sont connectés, nous vous recommandons d'utiliser un concentrateur USB
branché à une alimentation secteur.
Logiciel
Nous avons inclus MPC Beats, Pro Tools | First M-Audio Edition, et Ableton Live Lite avec
votre Oxygen Pro Mini pour que vous puissiez commencer à créer de la musique avec un
logiciel professionnel dès la sortie de la boîte. De plus, nous avons inclus des modules
d'extension et des plug-ins d'instruments virtuels AIR que vous pouvez utiliser avec votre
DAW.
Pour télécharger le logiciel MPC Beats, Pro Tools | First M-Audio Edition ou Ableton Live
Lite, veuillez enregistrer l’Oxygen Pro Mini sur le site m-audio.com et suivre les instructions
d’installation à partir de votre compte utilisateur. Si vous utilisez Ableton Live Lite, nous vous
recommandons de visiter le site ableton.com afin de vérifier s’il y a des mises à jour
disponibles. Veuillez consulter la section Installation Pro Tools | First M-Audio Edition ou
Installation Ableton Live Lite ci-dessous pour des instructions plus spécifiques sur la
configuration des ces logiciels audionumériques.
24
Page 25

Pour télécharger les plug-ins d'instruments virtuels AIR, veuillez suivre les instructions sur
la carte de téléchargement de logiciel. La plupart des logiciels audionumériques ne chargent
pas automatiquement les plug-ins d'instruments virtuels après l’installation, il est possible que
vous ayez à sélectionner manuellement un dossier de plug-in. Les dossiers de plug-ins pour
Pro Tools | First M-Audio Edition et Ableton Live Lite varient en fonction de votre système
d'exploitation, comme indiqué ci-dessous.
Dossiers de plug-ins Pro Tools | First M-Audio Edition/AAX :
• Windows (32 bits) : C:\Program Files(x86)\Common Files\Avid\Audio\Plug-Ins
• Windows (64 bits) : C:\Program Files\Common Files\Avid\Audio\Plug-Ins
• MacOS : Macintosh HD/Library/Application Support/Avid/Audio/Plug-Ins
Plug-ins Ableton/VST :
• Windows (32 bits) : C:\Program Files(x86)\VSTplugins
• Windows (64 bits) : C:\Program Files\VSTplugins
• MacOS : Macintosh HD/Library/Audio/Plugins/VST
Pour définir le dossier de plug-ins dans Ableton Live Lite :
1. Allez dans le menu Preferences.
2. Cliquez sur l’onglet File Folder. Sous Plug-In Sources, cliquez sur Browse et
sélectionnez le dossier des plug-ins approprié, comme indiqué ci-dessus.
3. Après avoir effectué votre sélection, le bouton Use VST Custom Plug-In Folder devrait
être activé. Si ce n’est pas le cas, cliquez sur le bouton pour l’activer. Vous pouvez ensuite
quitter le menu Preferences.
25
Page 26

Installation de Ableton Live Lite :
1. Commencez par relier l’Oxygen Pro Mini à votre ordinateur. Lancez ensuite Ableton Live
Lite.
2. Ouvrez la fenêtre Preferences dans Ableton Live Lite. Si vous utilisez un Mac, cliquez sur
> Preferences. Si vous utilisez un PC, cliquez sur Options > Preferences.
Live
3. Sélectionnez l'onglet Link/MIDI à gauche. Sous la section MIDI Ports, ajustez les
réglages comme indiqué ci-dessous :
Sous Control Surfaces, pour Input et Output, sélectionnez Oxygen Pro Mini.
À côté de Input : Oxygen Pro Mini, sélectionnez le bouton On dans les colonnes Track et
Remote.
À côté de Output : Oxygen Pro Mini, sélectionnez le bouton On dans les colonnes Track
et Remote.
4. Fermez la fenêtre Preferences.
5. Pour ajouter un instrument ou un plug-in qui pourra être déclenché avec l'Oxygen Pro
Mini, sélectionnez Instruments ou Plug-ins dans la colonne Categories.
6. Dans la colonne Name à droite de la colonne Categories, recherchez l'instrument ou le
plug-in que vous souhaitez ajouter. Cliquez et glissez l'instrument sur une piste MIDI dans
Ableton Live Lite pour charger l'instrument.
L'instrument peut maintenant être déclenché par l’Oxygen Pro Mini.
26
Page 27

Installation de Pro Tools | First M-Audio Edition
1. Reliez l’Oxygen Pro Mini à votre ordinateur. Lancez ensuite Pro Tools | First M-Audio
Edition
2. Ouvrez ou créez un projet.
3. À partir du menu déroulant Setup, sélectionnez l’option MIDI Input Devices. Activez MIDI
Input de l’Oxygen Pro Mini en cochant la case à côté d’Oxygen Pro Mini.
4. Pour créer une nouvelle piste d'instrument, sélectionnez l’option New à partir du menu
déroulant Track.
5. À partir du menu déroulant New, sélectionnez l’option Stereo, puis Instrument Track.
6. Dans la nouvelle piste, ajoutez un insert en cliquant sur les Inserts A-E de la piste et en
sélectionnant l’option Multichannel Plugin > Instrument. Sélectionnez ensuite
l'instrument que vous souhaitez utiliser, comme Xpand!2 (stéréo).
Le plug-in peut maintenant être déclenché par l’Oxygen Pro Mini.
Logiciel de modification des préréglages
Pour télécharger le logiciel Preset Editor, veuillez suivre les instructions sur la carte de
téléchargement de logiciel fournie. Ce logiciel peut être utilisé pour créer des mappages MIDI
personnalisés qui pourront ensuite être chargés sur l’Oxygen Pro Mini. Afin d’en savoir plus
sur l'utilisation du clavier avec l'un des préréglages personnalisés, veuillez consulter la section
suivante. Le logiciel Preset Editor est également livré avec son propre guide d'utilisation.
27
Page 28

Fonctionnement de base
Panneau supérieur
Important : Visitez m-audio.com afin de télécharger son guide d’utilisation complet.
1. Plateau de clavier : À l’aide des boutons Octave, vous pouvez accéder à toutes les plages d’un
clavier de 88 touches, tel que celui d’un piano à queue. Le clavier du Oxygen Pro Mini dispose de
2 octaves et demi jouables. La plage de notes couverte par le clavier se situe approximativement
au milieu d’un clavier 88 touches.
2. OCTAVE +/-: Les boutons assignables Octave permettent de modifier la plage de notes du
clavier vers le haut ou vers le bas par incrément d’une octave (12 demi-tons à la fois). Elle peut
être étendue jusqu’à quatre octaves dans chaque direction, ce qui permet de jouer des notes
situées hors de la plage couverte par les 32 touches. Maintenir la touche Shift et appuyer sur une
de ces touches permet d'augmenter ou de diminuer la plage de hauteur tonale des touches d’un
demi-ton. Pour revenir sur l’octave d’origine, appuyez simultanément sur les deux boutons
Octave.
3. Molette de la PITCH (hauteur tonale) : Faire rouler cette molette de haut en bas à partir de la
position centrale permet de modifier la hauteur tonale du clavier en jouant. La plage de
modification de hauteur tonale par défaut varie selon le synthétiseur logiciel. Cette molette est
équipée d'un ressort et revient à sa position initiale lorsqu'elle est relâchée.
28
5
6
3
2
21
4
23
16
26
25
24
27
9
12
13 14
20
7
8
18
11
10
17
15
1
22
19
Page 29
4. Molette de MOD (modulation) : Cette molette transmet des données de contrôleur en continu—
MIDI CC #01 (modulation), par défaut.
5. Bouton DAW / PRESET [EDIT]: appuyez sur ce bouton pour régler Oxygen Pro Mini afin
qu'il fonctionne en mode DAW ou en mode Preset. En mode DAW, la LED de ce bouton est
allumée. En mode Preset, la LED de ce bouton sera éteinte. Maintenez Shift et appuyez sur ce
bouton pour modifier un DAW prédéfini ou utilisateur. Après avoir modifié le Preset ou le DAW
utilisateur, appuyez à nouveau sur ce bouton pour enregistrer vos modifications dans le DAW
utilisateur ou le Preset. Maintenez le bouton enfoncé pour ouvrir le menu DAW / Preset Select sur
l'écran.
6. Écran (BACK) [DELETE] : La fenêtre principale affiche l'état de la dernière commande utilisée. Il
permet de contrôler le niveau des paramètres lorsque vous ajustez les commandes sur le clavier.
L'encodeur Select/Scroll permet d’afficher et de modifier les réglages du clavier.
7. Encodeur Select/Scroll : Lorsqu’un des menus de modification est affiché, tourner l’encodeur
permet de modifier les réglages/paramètres et l’enfoncer permet de confirmer la sélection.
Si aucun menu de modification n’est affiché, tourner l'encodeur et appuyer sur l'encodeur
fonctionnent comme des commandes MIDI distinctes. En mode DAW, les commandes assignées
sont prédéterminées. Lorsqu’un préréglage ou le User DAW est sélectionné, les commandes
assignées sont modifiables.
8. Touche Back : Lorsqu’un menu de modification est affiché, appuyer sur cette touche permet de
revenir à la fenêtre principale.
Si aucun menu de modification n’est affiché, cette touche sera assignée à une commande.
Lorsqu’un DAW est sélectionné, les commandes assignées sont prédéterminées. Lorsqu’un
préréglage ou le User DAW est sélectionné, les commandes assignées sont modifiables. Lors de
la modification d'un nom de préréglage ou de DAW, appuyez sur la touche Shift et la touche
Back pour supprimer une lettre.
9. Touche SHIFT : Maintenir la touche Shift enfoncée tout en utilisant une des commandes ou des
touches permet d’accéder aux fonctions secondaires des touches.
10. Touche << : En fonction de la fenêtre sélectionnée dans votre DAW, cette touche permet de faire
un retour arrière sur la piste sélectionnée ou de déplacer le curseur dans le bas de la fenêtre.
11. Touche >> : En fonction de la fenêtre sélectionnée dans DAW, cette touche permet de faire une
avance rapide sur la piste sélectionnée ou de déplacer le curseur dans le haut de la fenêtre.
29
Page 30

12. Touche de bouclage : Cette touche permet d’activer ou de désactiver la fonction de bouclage
dans votre DAW.
13. Touche d’arrêt de lecture : Cette touche permet d’arrêter la lecture de la piste dans votre DAW.
Enfoncer cette touche deux fois permet d’arrêter la lecture de la piste sélectionnée et de
repositionner le curseur de lecture au début de la piste. Maintenir la touche Shift enfoncée, puis
enfoncez cette touche permet de transmettre un message de désactivation de toutes les notes
(MIDI Panic/All Notes Off) et de remettre le réglage de toutes les commandes à zéro.
14. Touche de lecture : Cette touche permet de faire jouer la piste sélectionnée dans votre DAW.
15. Touche d’enregistrement : Cette touche permet de lancer l’enregistrement dans votre DAW.
16. Touches des BANQUES >, BANQUES < : Ces touches permettent de changer la banque
sélectionnée pour les curseurs, les boutons, et les touches de fonction. Appuyez sur la touche
Shift et sur la touche Bank < pour verrouiller les fonctions secondaires du bouton ARP. Ceci
s’avère utile pour modifier les paramètres ARP pendant une prestation en direct. Appuyez sur la
touche Shift et sur la touche Bank < pour verrouiller les fonctions secondaires des pads. Ceci
s’avère utile pour effectuer des modifications lors du mixage d'une chanson. Pour ramener les
boutons ou les pads à leur mode de fonctionnement normal, appuyez sur la touche Shift et la
touche Bank < ou Bank >.
17. Touche TEMPO : Taper cette touche permet de définir le tempo de l'Oxygen Pro Mini, alors que
le maintenir enfoncer permet d’afficher le menu de modification du tempo, à partir duquel il est
possible d’entrer manuellement le tempo et de choisir de synchroniser le tempo de l'Oxygen Pro
Mini à celui du DAW. Le réglage du tempo affecte les fonctions de l'arpégiateur et de répétition
de la note du clavier.
18. Touche de RÉPÉTITION de la NOTE [LATCH] : Cette touche permet d’activer la fonction de
répétition de notes des pads. Maintenir la touche Shift enfoncée puis appuyer sur cette touche
permet de verrouiller et de déverrouiller la fonction de répétition de la note. Lorsque la fonction
Note Repeat est active, utilisez l’encodeur Select/Scroll pour changer le réglage de la division
temporelle de l'arpégiateur et de la fonction Note Repeat du pad. Maintenir la touche Shift
enfoncée puis appuyer sur cette touche permet de verrouiller et de déverrouiller la fonction Note
Repeat.
30
Page 31

19. Pads (8) : Ces pads sensibles à la dynamique permettent de transmettre des messages
d'activation et de désactivation des notes MIDI ou d’effectuer d'autres affectations MIDI (lors de
l’utilisation d’un préréglage ou du DAW).
20. Bouton PAD BANK : Appuyez sur ce bouton pour passer à une autre banque de pads. Deux
banques de pads sont disponibles.
21. Curseurs (4) : Pousser ces curseurs vers le haut ou vers le bas permet d’effectuer les
commandes qui leur sont assignées. Lorsqu’un DAW est sélectionné, les commandes assignées
sont prédéterminées. Lorsqu’un préréglage ou le User DAW est sélectionné, les commandes
assignées sont modifiables.
22. KNOBS (Boutons) : Tourner ces boutons vers la gauche et vers la droite permet d’effectuer les
commandes qui leur sont assignées. Lorsqu’un DAW est sélectionné, les commandes assignées
sont prédéterminées. Lorsqu’un préréglage ou le User DAW est sélectionné, les commandes
assignées sont modifiables. Maintenez Shift tout en tournant un bouton pour modifier les
paramètres de l'arpégiateur.
23. Touche ARP : Cette touche permet d'activer l'arpégiateur. Maintenir la touche Shift enfoncée
puis appuyer sur cette touche permet de modifier les réglages de l'arpégiateur.
24. Touche de verrouillage : Cette touche permet d’alterner entre le mode de fonctionnement
momentané et verrouillé de l’arpégiateur.
25. Touche Chord : Cette touche permet d’activer le mode Chord. Maintenir la touche Shift
enfoncée puis appuyer sur cette touche permet de modifier les réglages du mode Chord.
26. Touche Scale : Cette touche permet d’activer le mode Scale. Maintenir la touche Shift enfoncée
puis appuyer sur cette touche permet de modifier les réglages du mode Scale.
27. Bouton MODE : appuyez sur ce bouton pour changer le mode actuel des boutons de fader en
mode DAW et Preset. En mode DAW, vous pouvez choisir entre les boutons contrôlant les
principales fonctions sérigraphiées ou un message de contrôle spécifique à la DAW. En mode
Preset, vous pouvez choisir entre les boutons contrôlant les principales fonctions sérigraphiées
ou un message MIDI. Maintenez Shift et appuyez sur ce bouton pour afficher et modifier les
paramètres globaux.
31
Page 32

Panneau arrière
1. Entrée pour pédale de sustain : Cette entrée
prend en charge une pédale à contact momentané
(non fournie). Lorsque cette pédale est enfoncée,
le son joué est maintenu sans avoir à garder les
doigts sur les touches. L'entrée pour pédale de
sustain peut être remappée afin d’effectuer une
commande MIDI personnalisée.
Remarque : La polarité de la pédale de sustain est
déterminée par le clavier au démarrage. Lorsque
l’Oxygen Pro Mini est mis sous tension, la pédale
de sustain est supposée être en position
« relevée » (désactivée). Il est important que la
pédale de sustain ne soit pas en position abaissée
avant de mettre le clavier sous tension, car la
pédale fonctionnera alors en sens inverse et les
notes seront maintenues lorsque la pédale n'est
pas enfoncée.
2. Port USB : Lorsque relié à un ordinateur, ce port permet d’alimenter le clavier et de transmettre
des données MIDI.
3. Sortie MIDI : Utilisez un câble MIDI à cinq broches standard 1/8" TRS afin de brancher cette
sortie à l’entrée d’un synthétiseur matériel ou d’un autre appareil MIDI.
Remarque : La sortie MIDI peut transmettre des données MIDI depuis l’Oxygen Pro Mini, votre
ordinateur ou les deux. Accédez au menu des réglages principaux pour définir ce qui est
transmis à la sortie MIDI.
32
Page 33

Guida rapida (Italiano)
Introduzione
Contenuti della confezione
Oxygen Pro Mini Cavo USB
Guida rapida Istruzioni di sicurezza e garanzia
Scheda per il download del software
Importante: recarsi su m-audio.com per scaricare la guida per l’uso completa.
Assistenza
Recarsi alla pagina m-audio.com per visualizzare e scaricare la documentazione
più recente, requisiti di sistema e altre informazioni in merito a questo prodotto.
Per ulteriore assistenza sul prodotto, recarsi alla pagina m-audio.com/support.
33
Page 34

Configurazione
Elementi non elencati sotto Introduzione > Contenuti della confezione sono venduti
separatamente.
1. Inserire il cavo USB fornito con Oxygen Pro Mini a una porta USB disponibile sul computer.
2. Collegare l’altra estremità USB all’ingresso USB sulla tastiera Oxygen Pro Mini.
Nota bene: oltre a inviare i dati, il cavo USB alimenta la tastiera. Se si desidera collegare
l’Oxygen Pro Mini a un hub USB cui sono collegati altri dispositivi, si consiglia di utilizzare
un hub USB alimentato.
Software
Con il Oxygen Pro Mini abbiamo incluso il MPC Beats, Pro Tools | First M-Audio Edition, e
Ableton Live Lite in modo da consentirvi di iniziare immediatamente a fare musica con
software professionale. Inoltre, abbiamo incluso un set di Pacchetti espansione e plugin AIR
per strumenti virtuali da utilizzare con il proprio DAW.
Per scaricare il software MPC Beats, Pro Tools | First M-Audio Edition o Ableton Live Lite
in dotazione, registrare il proprio Oxygen Pro Mini su m-audio.com e seguire le istruzioni per
l’installazione presenti nel proprio account utente. Se si desidera utilizzare l’Ableton Live Lite,
si raccomanda di recarsi alla pagina ableton.com per verificare l’eventuale disponibilità di
aggiornamenti del software. Per ottenere aiuto nella configurazione di un DAW con l’Oxygen
Pro Mini, si veda Configurazione Pro Tools | First M-Audio Edition Setup o Configurazione
Ableton Live Lite Setup qui di seguito.
34
Page 35

Per scaricare i plugin AIR per strumento virtuale in dotazione, seguire le istruzioni presenti
sulla scheda di download del software contenuta nella confezione. In seguito all’installazione,
la maggior parte dei DAW non caricherà automaticamente i plugin per strumenti virtuali;
potrebbe essere necessario scegliere manualmente una cartella per i plug-in che possa essere
scansionata dal software. Le cartelle dei plugin per Pro Tools | First M-Audio Edition e
Ableton Live Lite dipendono dal proprio sistema operativo, come indicato qui di seguito.
Cartelle plugin di Pro Tools | First M-Audio Edition/AAX:
• Windows (32-bit): C:\Program Files (x86)\Common Files\Avid\Audio\Plug-Ins
• Windows (64-bit): C:\Program Files\Common Files\Avid\Audio\Plug-Ins
• MacOS: Macintosh HD/Library/Application Support/Avid/Audio/Plug-Ins
Plugin Ableton/VST :
• Windows (32-bit): C:\Program Files (x86)\VSTplugins
• Windows (64-bit): C:\Program Files\VSTplugins
• MacOS: Macintosh HD/Library/Audio/Plugins/VST
Per configurare la cartella dei plugin in Ableton Live Lite:
1. Recarsi al menu Preferiti.
2. Selezionare la scheda Cartella file (File Folder). Sotto Plug-In Sources, fare clic su Browse e
selezionare la giusta cartella plugin (come indicato in alto).
3. Dopo aver effettuato la scelta, il tasto Use VST Custom Plug-In Folder dovrebbe essere
attivo. Se non lo è, cliccare sul tasto per attivarlo. Si può quindi uscire dal menu Preferiti.
35
Page 36

Configurazione Ableton Live Lite
1. Innanzitutto, collegare l’Oxygen Pro Mini al computer. Quindi lanciare Ableton Live Lite.
2. Aprire la finestra Preferiti di Ableton Live Lite. Se si utilizza un Mac, recarsi su Live >
Preferences. Se si utilizza un PC, recarsi su Opzioni > Preferiti.
3. Selezionare la scheda Link / MIDI a sinistra. Sotto la sezione Porte MIDI, regolare le
impostazioni come segue:
Sotto Superfici di controllo, per Ingresso e Uscita selezionare Oxygen Pro Mini.
Vicino a Ingresso: Oxygen Pro Mini, selezionare On nelle colonne Track e Remote.
Vicino a Uscita: Oxygen Pro Mini, selezionare On nelle colonne Track e Remote.
4. Chiudere la finestra Preferences (Preferiti).
5. Per aggiungere uno strumento o un plugin da attivare con l’Oxygen Pro Mini, selezionare
Instruments o Plug-ins sotto la colonna Categorie.
6. Nella colonna Name a destra della colonna Categories, individuare lo strumento o il
plugin desiderato. Cliccare e trascinare lo strumento su una traccia MIDI in Ableton Live
Lite per caricarlo.
Lo strumento può ora essere attivato con l’Oxygen Pro Mini.
36
Page 37

Configurazione di Pro Tools | First M-Audio Edition
1. Collegare l’Oxygen Pro Mini al computer. Lanciare Pro Tools | First M-Audio Edition.
2. Selezionare Apri o Crea progetto.
3. Selezionare il menu a discesa Setup e aprire MIDI Input Devices (dispositivi di ingresso
MIDI). Abilitare MIDI Input da Oxygen Pro Mini facendo clic sulla casella accanto
all’Oxygen Pro Mini.
4. Creare una nuova traccia strumentale selezionando il menu a discesa Track e facendo
clic su New.
5. Nel menu a discesa New, selezionare Stereo e quindi Instrument Track.
6. Nella nuova traccia creata, aggiungere un inserto alla traccia facendo clic su Inserts A-E
della traccia stessa e selezionando Multichannel Plugin > Instrument. Selezionare lo
strumento che si desidera utilizzare come Xpand!2 (Stereo).
Il plugin può ora essere attivato con l’Oxygen Pro Mini.
Preset Editor
Per scaricare il software Preset Editor in dotazione, seguire le istruzioni presenti sulla
scheda di download del software contenuta nella confezione. Questo software può essere
utilizzato per creare mappature MIDI personalizzate da caricare sull’Oxygen Pro Mini. Per
maggiori informazioni sull’uso della tastiera con uno dei preset personalizzati selezionati. Il
Preset Editor è inoltre fornito con la propria Guida per l’uso specifica.
37
Page 38
Operazioni base
Pannello superiore
23
21
24
3
4
2
Importante: recarsi su m-audio.com per scaricare la guida per l’uso completa.
1. Tastiera: I pulsanti Octave consentono di accedere all’intervallo completo di 88 note disponibili
sulla tastiera di un piano standard. La tastiera Oxygen Pro Mini può riprodurre due mezze ottave.
L’intervallo della tastiera corrisponde all’incirca alla parte centrale di una tastiera con 88 note.
2. OCTAVE +/-: I pulsanti Octave consentono di eseguire lo shift verso l’alto o verso il basso in
incrementi di un’ottava, o 12 semitoni alla volta. Ciò consente di estendere l’intervallo della
tastiera fino a quattro ottave in entrambe le direzioni, e di suonare note non incluse nei 32 tasti.
Tenere premuto Shift e premere questi tasti per regolare l’intervallo del pitch dei tasti di un
semitono in alto o in basso.
Per riportare lo shift dell’ottava a 0, premere entrambi i pulsanti Octave insieme.
38
25
26
16
27
5
6
9
7
10
12
13 14
1
8
11
15
20
18
17
22
19
Page 39

3. Rotella di del PITCH: alzare o abbassare questa rotella partendo dalla posizione centrale per
effettuare il bend del pitch della tastiera mentre si suona. L’intervallo predefinito di bend del pitch
varia a seconda del sintetizzatore software. La rotella è a molla e tornerà alla posizione centrale
quando rilasciata.
4. Rotella di MOD (modulazione): girare questa rotella per inviare dati controller continui—MIDI
CC #01 (modulazione), in via predefinita.
5. Pulsante DAW / PRESET [EDIT]: premere questo pulsante per impostare Oxygen Pro Mini
in modo che funzioni in modalità DAW o Preset. In modalità DAW, il LED di questo pulsante si
illumina intensamente. In modalità preimpostazione, il LED di questo pulsante si spegne. Tenere
premuto Shift e premere questo pulsante per modificare una DAW preimpostata o utente. Dopo
aver modificato la preimpostazione o la DAW utente, premere nuovamente questo pulsante per
salvare le modifiche nella DAW o nella preimpostazione utente. Premere e tenere premuto il
pulsante per aprire il menu DAW / Preset Select sul display.
6. Display: la schermata principale del Display mostra lo stato dell’ultimo comando utilizzato.
Servirsi di questa schermata per monitorare i livelli dei parametri mentre si regolano i comandi
sulla tastiera. Servirsi inoltre del Display con il comando Select/Scroll Encoder per visualizzare
e modificare le impostazioni della tastiera.
7. Select/Scroll Encoder: se ci si trova in uno dei menu di modifica (Edit) del Display, girare questo
codificatore per modificare le impostazioni/i parametri e premerlo per confermare una scelta.
Se non si visualizza alcuno dei menu di modifica (Edit), girando il codificatore e premendolo, si
vedrà ciascuna funzione sotto forma di comandi MIDI distinti. Quando si lavora con un DAW, i
comandi assegnati saranno predeterminati. Quando si lavora con un preset o con il DAW Utente
selezionato, i comandi possono essere modificati.
8. Tasto BACK: se ci si trova in uno dei menu di modifica (Edit) del Display, premere questo tasto
per tornare alla schermata principale.
Se non si visualizza uno dei menu di modifica (Edit), questo tasto sarà assegnato a un comando.
Quando si lavora con un DAW, i comandi assegnati saranno predeterminati. Quando si lavora
con un preset o con il DAW Utente selezionato, i comandi possono essere modificati.
Al momento di modificare il nome di un Preset o di un DAW, premere il tasto Shift e il tasto Back
per cancellare una lettera.
39
Page 40

9. Tasto SHIFT: tenere premuto il tasto Shift mentre si muovono o si premono i comandi o i tasti
sulla tastiera per accedere alle rispettive funzioni secondarie.
10. Tasto <<: a seconda di quale schermo viene selezionato nel DAW, questo tasto riavvolgerà la
canzone aperta o si muoverà verso il basso nella finestra attiva.
11. Tasto >>: a seconda di quale schermo viene selezionato nel DAW, questo tasto farà avanzare
rapidamente la canzone aperta o si muoverà verso l’alto nella finestra attiva.
12. Tasto Loop: premere questo tasto per attivare/disattivare la funzione di loop nel DAW.
13. Tasto Stop: premere questo tasto per fermare la canzone aperta nel DAW. Premere due volte
questo tasto per fermare la canzone aperta e far tornare la testina di riproduzione all’inizio della
canzone. Premere Shift e questo tasto per inviare un messaggio MIDI panic per spegnere tutti i
messaggi Note e azzerare tutti i comandi.
14. Tasto di riproduzione (Play): premere questo tasto per riprodurre la canzone aperta nel DAW.
15. Tasto di regisrazione (Record): premere questo tasto per attivare la registrazione nel DAW.
16. Tasti BANK >, BANK < (BANCO): se si lavora in modalità DAW o su uno dei preset
personalizzati, servirsi di questi tasti per commutare il banco attualmente selezionato per cursori,
manopole, e tasti funzione. Premere Shift e il tasto Bank < per bloccare i comandi di modifica
Shift della manopola ARP. Questo è utile per modificare i parametri ARP durante un’esibizione
dal vivo. Premere Shift e il tasto Bank > per bloccare i comandi di modifica Shift dei Pad.
Questo è utile per apportare modifiche durante il mixaggio di una canzone. Per far tornare
manopole o pad alla loro modalità normale, premere il tasto Shift e il tasto Bank < o Bank >.
17. Tasto TEMPO: toccare questo tasto per impostare il tempo dell’Oxygen Pro Mini oppure tenerlo
premuto per far comparire il menu Tempo Edit a Display, dove si può utilizzare Select/Scroll
Encoder per inserire manualmente il tempo e scegliere di sincronizzare il tempo dell’Oxygen Pro
Mini con il proprio DAW. L’impostazione del tempo influisce sulle funzioni di arpeggiatore e note
repeat della tastiera.
18. Tasto NOTE REPEAT [LATCH]: premere questo tasto per attivare la funzione note repeat dei
pad. Per bloccare o sbloccare la funzione note repeat, tenere premuto Shift e premere questo
tasto. Quando Note Repeat è attivo, servirsi dello Select/Scroll Encoder per modificare le
impostazioni di Time Division correnti dell’Arpeggiatore e del pad Note Repeat. Per bloccare o
sbloccare la funzione note repeat, tenere premuto Shift e premere questo tasto.
40
Page 41

19. Pads (8): servirsi di questi pad sensibili alla velocità per inviare messaggi MIDI Note On/Off o
eseguire altre assegnazioni MIDI (se si utilizza un preset o il DAW).
20. Tasto PAD BANK: Premere questo pulsante per passare a un pad bank diverso. Sono disponibili
due pad bank.
21. Cursori (4): spingere questi cursori in alto/in basso per eseguire i comandi ad essi assegnati.
Quando si lavora con un DAW, i comandi assegnati saranno predeterminati. Quando si lavora
con un preset o con il DAW Utente selezionato, i comandi possono essere modificati.
22. KNOBS (Manopole): girare queste manopole a destra/sinistra per eseguire i comandi ad esse
assegnati. Quando si lavora con un DAW, i comandi assegnati saranno predeterminati. Quando si
lavora con un preset o con il DAW Utente selezionato, i comandi possono essere modificati.
Tenere premuto Shift mentre si gira una manopola per modificare le impostazioni
dell'arpeggiatore.
23. Tasto ARP: premere questo tasto per attivare l’arpeggiatore. Tenere premuto Shift e premere
questo tasto per modificare le impostazioni dell’Arpeggiatore.
24. Tasto LATCH: premere questo tasto per commutare l’arpeggiatore dalla modalità momentanea a
quella di blocco.
25. Tasto Chord: premere questo tasto per attivare la modalità di accordo Tenere premuto Shift e
premere questo tasto per modificare le impostazioni della modalità Accordo.
26. Tasto Scale: premere questo tasto per attivare la modalità di scala. Tenere premuto Shift e
premere questo tasto per modificare le impostazioni della modalità scala.
27. Pulsante MODE: premere questo pulsante per cambiare la modalità corrente dei pulsanti del
fader in modalità DAW e Preset. In modalità DAW, è possibile selezionare tra i pulsanti che
controllano le principali funzioni serigrafate o un messaggio di controllo specifico DAW. Quando
si è in modalità Preset, è possibile selezionare tra i pulsanti che controllano le principali funzioni
serigrafate o un messaggio MIDI. Tenere premuto Shift premere questo pulsante per visualizzare
e modificare le impostazioni globali.
41
Page 42
Pannello posteriore
1. Ingresso pedale sustain: questo ingresso
accoglie un pedale a contatto momentaneo
(non in dotazione). Quando premuto, questo
pedale sostiene in via predefinita il suono
riprodotto senza dover continuare a premere i
tasti con le dita. L’ingresso del pedale sustain
può essere rimappato per eseguire
un’assegnazione MIDI personalizzata.
Nota bene: la polarità del pedale sustain è determinata dalla tastiera all'avviamento.
Quando una tastiera Oxygen Pro Mini si sta accendendo, si suppone che il pedale sustain
sia in posizione "sollevata" (Off). È importante che il pedale sustain non sia in posizione
abbassata prima di avviare la tastiera, in quanto il pedale in quel caso funzionerà al
contrario e le note saranno sostenute quando il pedale non viene premuto.
2. Porta USB: quando collegata a un computer, la porta USB fornisce alimentazione alla
tastiera e trasmette dati MIDI.
3. Uscita MIDI: Utilizzare un cavo MIDI da 1/8" TRS a 5 pin MIDI (venduto separatamente)
per collegare questa porta a un sintetizzatore hardware o ad un altro dispositivo MIDI.
Nota bene: la porta di uscita MIDI può inviare MIDI dall’Oxygen Pro Mini, dal computer
connesso o da entrambi. Recarsi su Impostazioni Globali per stabilire cosa viene inviato
all’uscita MIDI.
42
Page 43

Schnellstart-Anleitung (Deutsch)
Einführung
Lieferumfang
Oxygen Pro Mini USB-Kabel
Schnellstart-Anleitung Sicherheitshinweise und Garantieinformationen
Software-Download-Karte
Wichtig: Besuchen Sie m-audio.com, um das komplette Benutzerhandbuch herunter
zu laden.
Kundendienst
Besuchen Sie m-audio.com, um die neueste Dokumentation, Systemanforderungen
und andere Informationen über Ihr Produkt aufzurufen und herunterzuladen.
Für zusätzlichen Produkt-Support besuchen Sie m-audio.com/support.
43
Page 44

Setup
Teile, die nicht unter Einführung > Lieferumfang angegeben sind, sind separat erhältlich.
1. Schließen Sie das im Lieferumfang Ihres Oxygen Pro Mini enthaltene USB-Kabel an einen freien
USB-Anschluss Ihres Computers an.
2. Verbinden Sie das andere Ende des USB-Kabels mit dem USB-Anschluss des Oxygen Pro
Mini-Keyboards.
Hinweis: Zusätzlich zum Senden von Daten versorgt das USB-Kabel das Keyboard mit Strom.
Wenn Sie das Oxygen Pro Mini an einen USB-Hub anschließen, an den andere Geräte
angeschlossen sind, empfehlen wir die Verwendung eines USB-Hubs mit Stromversorgung.
Software
Wir liefern Oxygen Pro Mini mit MPC Beats, Pro Tools | First M-Audio Edition, und Ableton Live Lite
aus, damit Sie Ihre Musikproduktion gleich mit professioneller Software starten können. Darüber hinaus
haben wir eine Reihe von Erweiterungspaketen und AIR-Plugins für virtuelle Instrumente zur
Verwendung mit Ihrer DAW hinzugefügt.
Um die mitgelieferten MPC Beats, Pro Tools | First M-Audio Edition, oder Ableton Live Lite
Software herunterzuladen, registrieren Sie Ihren Oxygen Pro Mini auf m-audio.com und befolgen Sie
die Installationsanweisungen in Ihrem Benutzerkonto. Wenn Sie Ableton Live Lite verwenden,
empfehlen wir, ableton.com zu besuchen, um nach verfügbaren Software-Updates zu suchen. Hilfe
zum Konfigurieren einer DAW mit Oxygen Pro Mini finden Sie unter Pro Tools | First M-Audio
Edition Setup oder Ableton Live Lite Setup unten.
Befolgen Sie zum Herunterladen der enthaltenen Plugins für virtuelle AIR-Instrumente die
Anweisungen auf der Software-Download-Karte in der Verpackung. Nach der Installation laden die
meisten DAWs Plugins für virtuelle Instrumente nicht automatisch. Möglicherweise müssen Sie
manuell einen Plug-In-Ordner auswählen, den Ihre Software scannen soll. Die Plugin-Ordner für Pro
Tools | First M-Audio Edition und Ableton Live Lite hängen von Ihrem Betriebssystem ab, wie unten
angegeben.
44
Page 45
Pro Tools | First M-Audio Edition/AAX-Plugin-Ordner:
• Windows (32-bit): C:\Programme (x86)\Gemeinsame Dateien\Avid\Audio\Plug-Ins
• Windows (64-bit): C:\Programme\Gemeinsame Dateien\Avid\Audio\Plug-Ins
• MacOS: Macintosh HD/Library/Application Support/Avid/Audio/Plug-Ins
Ableton/VST Plugins:
• Windows (32-bit): C:\Program Files (x86)\VSTplugins
• Windows (64-bit): C:\Program Files\VSTplugins
• MacOS: Macintosh HD/Library/Audio/Plugins/VST
So legen Sie Ihren Plugin-Ordner in Ableton Live Lite fest:
1. Navigieren Sie in das Menü Einstellungen.
2. Wählen Sie die Registerkarte Dateiordner. Klicken Sie unter Plug-In-Quellen auf
Durchsuchen und wählen Sie den entsprechenden Plugin-Ordner aus (wie oben
angegeben).
3. Nach der Auswahl muss die Schaltfläche Verwenden der VST Custom Plug-In Folder
AKTIVIERT sein. Wenn dies nicht der Fall ist, klicken Sie zur Aktivierung auf die
Schaltfläche. Sie können dann das Menü Einstellungen verlassen.
45
Page 46
Ableton Live Lite Setup
1. Schließen Sie zuerst Oxygen Pro Mini an Ihren Computer an. Starten Sie dann Ableton
Live Lite.
2. Öffnen Sie danach das Einstellungen-Fenster in Ableton Live Lite. Wenn Sie einen Mac
verwenden, gehen Sie zu Live > Einstellungen. Wenn Sie einen PC verwenden, gehen Sie
zu Optionen > Einstellungen.
3. Wählen Sie links die Registerkarte Link / MIDI. Passen Sie die Einstellungen im Abschnitt
MIDI Ports wie folgt an:
Wählen Sie unter Steuerflächen für Eingabe und Ausgabe Oxygen Pro Mini aus.
Neben Eingang: Oxygen Pro Mini, wählen Sie Ein in den Kolumnen Track und Remote.
Neben Ausgang: Oxygen Pro Mini, wählen Sie Ein in den Kolumnen Track und Remote.
4. Schließen Sie das Eigenschaften-Fenster.
5. Um ein Instrument oder Plugin zum Triggern mit dem Oxygen Pro Mini hinzuzufügen,
wählen Sie in der Spalte Kategorien die Option Instrumente oder Plug-Ins.
6. Suchen Sie in der Spalte Name rechts neben der Spalte Kategorien das Instrument oder
das Plug-In Ihrer Wahl. Klicken und ziehen Sie das Instrument auf eine MIDI-Spur in
Ableton Live Lite, um das Instrument zu laden.
Das Instrument kann jetzt mit Oxygen Pro Mini getriggert werden.
46
Page 47

Pro Tools | First M-Audio Edition Setup
1. Schließen Sie zuerst Oxygen Pro Mini an Ihren Computer an. Starten Sie dann Pro Tools |
First M-Audio Edition.
2. Öffnen oder erstellen Sie ein Projekt.
3. Wählen Sie das Setup-Pulldown-Menü und öffnen Sie MIDI-Eingabegeräte. Aktivieren
Sie den MIDI Eingang vom Oxygen Pro Mini, indem Sie auf das Feld neben Oxygen Pro
Mini klicken.
4. Um eine neue Instrumentenspur zu erstellen, wählen Sie das Pulldown-Menü Track und
wählen Sie Neu.
5. Wählen Sie im Pulldown-Menü Neu die Option Stereo und dann Instrument-Track.
6. Fügen Sie Ihrem neu erstellten Track ein Insert hinzu, indem Sie in die Inserts A-E Ihres
Tracks klicken und Mehrkanal-Plugin > Instrument auswählen. Wählen Sie das
Instrument aus, das Sie verwenden möchten, z. B. Xpand! 2 (Stereo).
Das Plugin kann jetzt mit Oxygen Pro Mini getriggert werden.
Preset-Editor
Befolgen Sie zum Herunterladen der mitgelieferten Preset Editor-Software, die
Anweisungen auf der Software-Download-Karte in der Box. Mit dieser Software können Sie
benutzerdefinierte MIDI-Zuordnungen erstellen, die Sie auf Oxygen Pro Mini laden können.
Weitere Informationen zum Bedienen des Keyboards mit einer der ausgewählten
benutzerdefinierten Presets finden Sie im folgenden Abschnitt. Der Preset-Editor verfügt
außerdem über ein eigenes Editor-Benutzerhandbuch.
47
Page 48

Einfacher Betrieb
Oberseite
23
24
21
25
3
4
2
Wichtig: Besuchen Sie m-audio.com, um das komplette Benutzerhandbuch herunter zu laden.
1. Klaviatur: Mit Hilfe der OCTAVE-Taster können Sie den vollen Tonumfang eines großen Piano-
Keyboards mit 88 Tasten nutzen. Die Oxygen Pro Mini-Klaviatur verfügt über 2 1/2 spielbare
Oktaven. Der Tonumfang des Keyboards liegt ungefähr in der Mitte eines 88-Tasten-Keyboards.
2. OKTAV (OCTAVE) +/- : Mit den zuweisbaren Oktav-Tastern kann man die Noten des Keyboards
in Oktavenschritten (um jeweils 12 Halbtöne) auf- und abwärts versetzen. Sie können den
Oktavbereich des Keyboards um ein Vierfaches in beide Richtungen erweitern und auf diese
Weise auch Töne spielen, die außerhalb der 32 Tasten liegen.
Halten Sie Shift gedrückt und drücken Sie diese Tasten, um den Pitch-Bereich der Tasten um
einen Halbton nach oben oder unten anzupassen.Um die Oktavierung wieder zurückzusetzen,
Drücken Sie beide Oktavtasten gleichzeitig.
48
26
16
27
5
6
7
10
14
8
11
15
20
18
17
9
12
13
22
19
1
Page 49
3. PITCH-Rad: Bewegen Sie dieses Rad von der Mittelposition auf und ab, um die Tonhöhe des
Keyboards während des Spielens zu verändern. Der Standardbereich des Pitch-Bend variiert
zwischen den Software-Synthesizern. Dieses Rad ist federmontiert und kehrt in die mittlere
Raststellung zurück, wenn es losgelassen wird.
4. Modulationsrad: Wenn dieses Rad bewegt wird, werden standardmäßig Continuous Controller
Daten, MIDI CC #01 (Modulation), gesendet.
5. DAW / PRESET-Taste [EDIT]: Drücken Sie diese Taste, um Oxygen Pro Mini so
einzustellen, dass es im DAW-Modus oder im Preset-Modus arbeitet. Im DAW-Modus leuchtet
die LED dieser Taste hell. Im voreingestellten Modus erlischt die LED dieser Taste. Halten Sie die
Shift-Taste gedrückt und drücken Sie diese Taste, um eine Voreinstellung oder eine BenutzerDAW zu bearbeiten. Drücken Sie nach dem Bearbeiten der Voreinstellung oder der BenutzerDAW diese Taste erneut, um Ihre Änderungen an der Benutzer-DAW oder der Voreinstellung zu
speichern. Halten Sie die Taste gedrückt, um das Menü DAW / Preset Select auf dem Display zu
öffnen.
6. Display: Das Haupt-Display zeigt den Status des zuletzt verwendeten Steuerelements an.
Verwenden Sie diesen Bildschirm, um die Parameterebenen zu überwachen, während Sie die
Steuerelemente am Keyboard anpassen. Verwenden Sie außerdem das Display zusammen mit
dem Select/Scroll Encoder, um die Keyboard-Einstellungen anzuzeigen und zu bearbeiten.
7. Select/Scroll Encoder: Wenn Sie sich in einem der Display-Bearbeitungsmenüs befinden,
drehen Sie diesen Encoder, um Einstellungen / Parameter zu ändern, und drücken Sie den
Encoder, um eine Auswahl zu bestätigen.
Wenn Sie keines der Bearbeitungsmenüs anzeigen, fungieren Drehen/Drücken des Encoders
jeweils als separate MIDI-Regler. Beim Betrieb mit einer DAW werden die zugewiesenen
Steuerelemente vorgegeben. Wenn Sie mit einem Preset oder der ausgewählten Benutzer-
DAW arbeiten, können die Steuerelemente bearbeitet werden.
49
Page 50

8. Taste Zurück (BACK): Wenn Sie sich in einem der Display-Bearbeitungsmenüs befinden,
drücken Sie diese Taste, um zum Haupt-Display zurückzukehren.
Wenn Sie keines der Bearbeitungsmenüs anzeigen, wird diese Taste einem Steuerelement
zugewiesen. Beim Betrieb mit einer DAW werden die zugewiesenen Steuerelemente vorgegeben.
Wenn Sie mit einem Preset oder der ausgewählten Benutzer-DAW arbeiten, können die
Steuerelemente bearbeitet werden.
Drücken Sie beim Bearbeiten eines Preset- oder DAW-Namens die Umschalttaste und die
Zurück-Taste, um einen Buchstaben zu löschen.
9. Shift-Taste: Halten Sie die Shift-Taste gedrückt, während Sie Steuerelemente oder Tasten am
Keyboard bewegen oder drücken, um auf deren sekundäre Funktionen zuzugreifen.
10. << Taste: Je nachdem, welcher Bildschirm in Ihrer DAW ausgewählt ist, spult diese Taste
entweder den geöffneten Song zurück oder bewegt sich im aktiven Fenster nach unten.
11. >> Taste: Je nachdem, welcher Bildschirm in Ihrer DAW ausgewählt ist, spult diese Taste
entweder den geöffneten Song vorwärts oder bewegt sich im aktiven Fenster nach oben.
12. Loop-Taste: Drücken Sie diese Taste, um die Loop-Funktion in Ihrer DAW zu
aktivieren/deaktivieren.
13. Stopp-Taste: Drücken Sie diese Taste, um den geöffneten Song in Ihrer DAW zu stoppen.
Drücken Sie diese Taste zweimal, um den geöffneten Song anzuhalten und den Abspielkopf an
den Anfang des Songs zurückzusetzen. Drücken Sie Shift und diese Taste, um eine MIDIPanikmeldung zu senden, um alle Note-Meldungen auszuschalten und alle Steuerelemente auf
Null zurückzusetzen.
14. Wiedergabe-Taste: Drücken Sie diese Taste, um den Song in Ihrer DAW abzuspielen.
15. Aufnahmetaste: Drücken Sie diese Taste, um die Aufnahme in Ihrer DAW zu aktivieren.
50
Page 51

16. BANK >, BANK <-Tasten: Wenn Sie im DAW-Modus oder in einer der benutzerdefinierten
Presets arbeiten, können Sie mit diesen Tasten die aktuell ausgewählte Bank für die
Schieberegler, Regler, und Funktionstasten wechseln. Drücken Sie die Umschalttaste und
die Taste Bank <, um die ARP-Regler des Umschalt-Modifikators zu sperren. Dies ist nützlich,
um ARP-Parameter während einer Live-Performance zu ändern. Drücken Sie die Umschalttaste
und die Taste Bank >, um die Umschalt-Modifikator Pad-Controllen zu sperren. Dies ist nützlich,
um Änderungen beim Mischen eines Songs vorzunehmen. Um die Regler oder Pads in den
normalen Modus zurückzusetzen, drücken Sie die Umschalttaste und die Bank <-Taste oder
Bank >.
17. TEMPO-Taste: Tippen Sie auf diese Taste, um das Tempo von Oxygen Pro Mini einzustellen,
oder halten Sie sie gedrückt, um das Tempo- Bearbeitungsmenü auf dem Display aufzurufen.
Dort können Sie das Tempo mit dem Select/Scroll Encoder manuell eingeben und Oxygen Pro
Mini mit dem Tempo Ihrer DAW synchronisieren. Die Tempoeinstellung wirkt sich auf die
Arpeggiator- und Notenwiederholungsfunktionen des Keyboards aus.
18. Notenwiederholungstaste (NOTE REPEAT) [LATCH]: Drücken Sie diese Taste, um die
Notenwiederholungsfunktion für die Pads zu aktivieren. Halten Sie Shift gedrückt und drücken
Sie diese Taste, um die Notenwiederholungsfunktion zu halten oder aufzuheben. Verwenden Sie
bei aktivierter Notenwiederholung den Select/Scroll-Encoder, um die aktuelle
Zeitteilungseinstellung des Arpeggiators und der Notenwiederholung zu ändern. Halten Sie
Umschalten gedrückt und drücken Sie diese Taste, um die Notenwiederholungsfunktion zu
halten oder aufzuheben.
19. Pads: Verwenden Sie diese geschwindigkeitsabhängigen Pads, um MIDI Note On/Off-
Nachrichten zu senden oder andere MIDI-Zuweisungen durchzuführen (wenn Sie ein Preset oder
die DAW verwenden).
20. PAD BANK-taste: Drücken Sie diese Taste, um zu einer anderen Pad-Bank zu wechseln. Es
stehen zwei Pad-Bänke zur Verfügung.
21. Schieberegler (4): Schieben Sie diese Schieberegler nach oben/unten, um die zugewiesenen
Steuerfunktionen auszuführen. Beim Einsatz mit einer DAW sind die zugewiesenen
Steuerelemente vorgegeben. Wenn Sie mit einem Preset oder der ausgewählten
DAW arbeiten, können die Steuerelemente bearbeitet werden.
Benutzer-
51
Page 52

22. KNOBS (REGLER): Drehen Sie diese Regler nach links/rechts, um die zugewiesenen
Steuerfunktionen auszuführen. Beim Betrieb mit einer DAW sind die zugewiesenen
Steuerfunktionen vorgegeben. Wenn Sie mit einem Preset oder der ausgewählten Benutzer-
DAW arbeiten, können die Steuerelemente bearbeitet werden. Halten Sie die Umschalttaste
gedrückt, während Sie einen Knopf drehen, um die Arpeggiator-Einstellungen zu bearbeiten.
23. ARP-Taste: Drücken Sie diese Taste, um den Arpeggiator zu aktivieren. Drücken Sie Shift und
diese Taste, um die Einstellungen des Arpeggiators zu konfigurieren.
24. LATCH-Taste: Drücken Sie diese Taste, um zwischen den Arpeggiator-Modi Temporär und
Halten zu wechseln.
25. Akkordtaste: Drücken Sie diese Taste, um den Akkordmodus zu aktivieren. Halten Sie Shift
gedrückt und drücken Sie diese Taste, um die Einstellungen für den Akkordmodus zu bearbeiten.
26. Tonleitertaste: Drücken Sie diese Taste, um den Tonleiter-Modus zu aktivieren. Halten Sie Shift
gedrückt und drücken Sie diese Taste, um die Einstellungen für den Tonleiter-Modus zu
bearbeiten.
27. MODUS Taste: Drücken Sie diese Taste, um den aktuellen Fader-Tastenmodus im DAW- und
Preset-Modus zu ändern. Im DAW-Modus können Sie zwischen den Tasten wählen, die entweder
die wichtigsten Siebdruckfunktionen oder eine DAW-spezifische Steuermeldung steuern. Im
Preset-Modus können Sie zwischen den Tasten wählen, die entweder die wichtigsten
Siebdruckfunktionen oder eine MIDI-Nachricht steuern. Halten Sie die Umschalttaste gedrückt
und drücken Sie diese Taste, um die globalen Einstellungen anzuzeigen und zu bearbeiten.
52
Page 53

Rückseite
1. Sustain Pedal-Eingang: Sie können an diese Eingänge
ein Tast-Fußpedal anschließen (nicht im Lieferumfang
enthalten). Wird das Pedal betätigt, so wird es den
von Ihnen gespielten Ton halten, ohne dass Sie die
Tasten gedrückt halten müssen. Der Sustain-PedalEingang kann neu zugeordnet werden, um eine
benutzerdefinierte MIDI-Zuweisung durchzuführen.
Hinweis: Die Polarität des Sustain-Pedals wird bei der Inbetriebnahme durch das Keyboard
bestimmt. Wenn ein Oxygen Pro Mini-Keyboard eingeschaltet wird, wird angenommen, dass sich
das Sustain-Pedal in der Position "up" (Aus) befindet. Es ist wichtig, dass sich das Sustain-Pedal
vor dem Einschalten des Keyboards nicht in der unteren Position befindet, da das Pedal dann
"verkehrt" funktioniert und die Noten gehalten werden, wenn das Pedal nicht gedrückt wird.
2. USB-Anschluss: Der USB-Port versorgt das Keyboard mit Strom und überträgt MIDI-Daten,
wenn es an einen Computer angeschlossen ist.
3. MIDI Out: Verwenden Sie ein 1/8” TRS bis 5-poliges MIDI-Kabel MIDI-Kabel (separat erhältlich),
um diesen Port mit einem Hardware-Synthesizer oder einem anderen MIDI-Gerät zu verbinden.
Hinweis: Der MIDI-Ausgangsport kann MIDI-Daten vom Oxygen Pro Mini, Ihrem
angeschlossenen Computer oder von beiden Quellen senden. Gehen Sie in die globalen
Einstellungen, um festzulegen, was an den MIDI-Ausgang gesendet wird.
53
Page 54

54
Page 55

Appendix (English)
Technical Specifications
Power
Dimensions
(width x depth x height)
Weight
Specifications are subject to change without notice.
Trademarks & Licenses
M-Audio and AIR Music Technology a trademark of inMusic Brands, Inc., registered in the U.S. and
other countries.
AAX, Avid, and Pro Tools are registered trademarks of Avid Technology, Inc. in the U.S. and other
countries.
Ableton is a trademark of Ableton AG.
Apple Store, iPad and macOS are trademarks or service marks of Apple Inc., registered in the U.S.
and other countries.
Windows is a registered trademark of Microsoft Corporation in the United States and other countries.
All other product names, company names, trademarks, or trade names are those of their respective
owners.
via USB port
15.8” x 7.52” x 2.56” / 401 mm x 191 mm x 65 mm
2.65 lbs. / 1.2 kg
55
Page 56

Manual Version 1.1
 Loading...