

Page 1
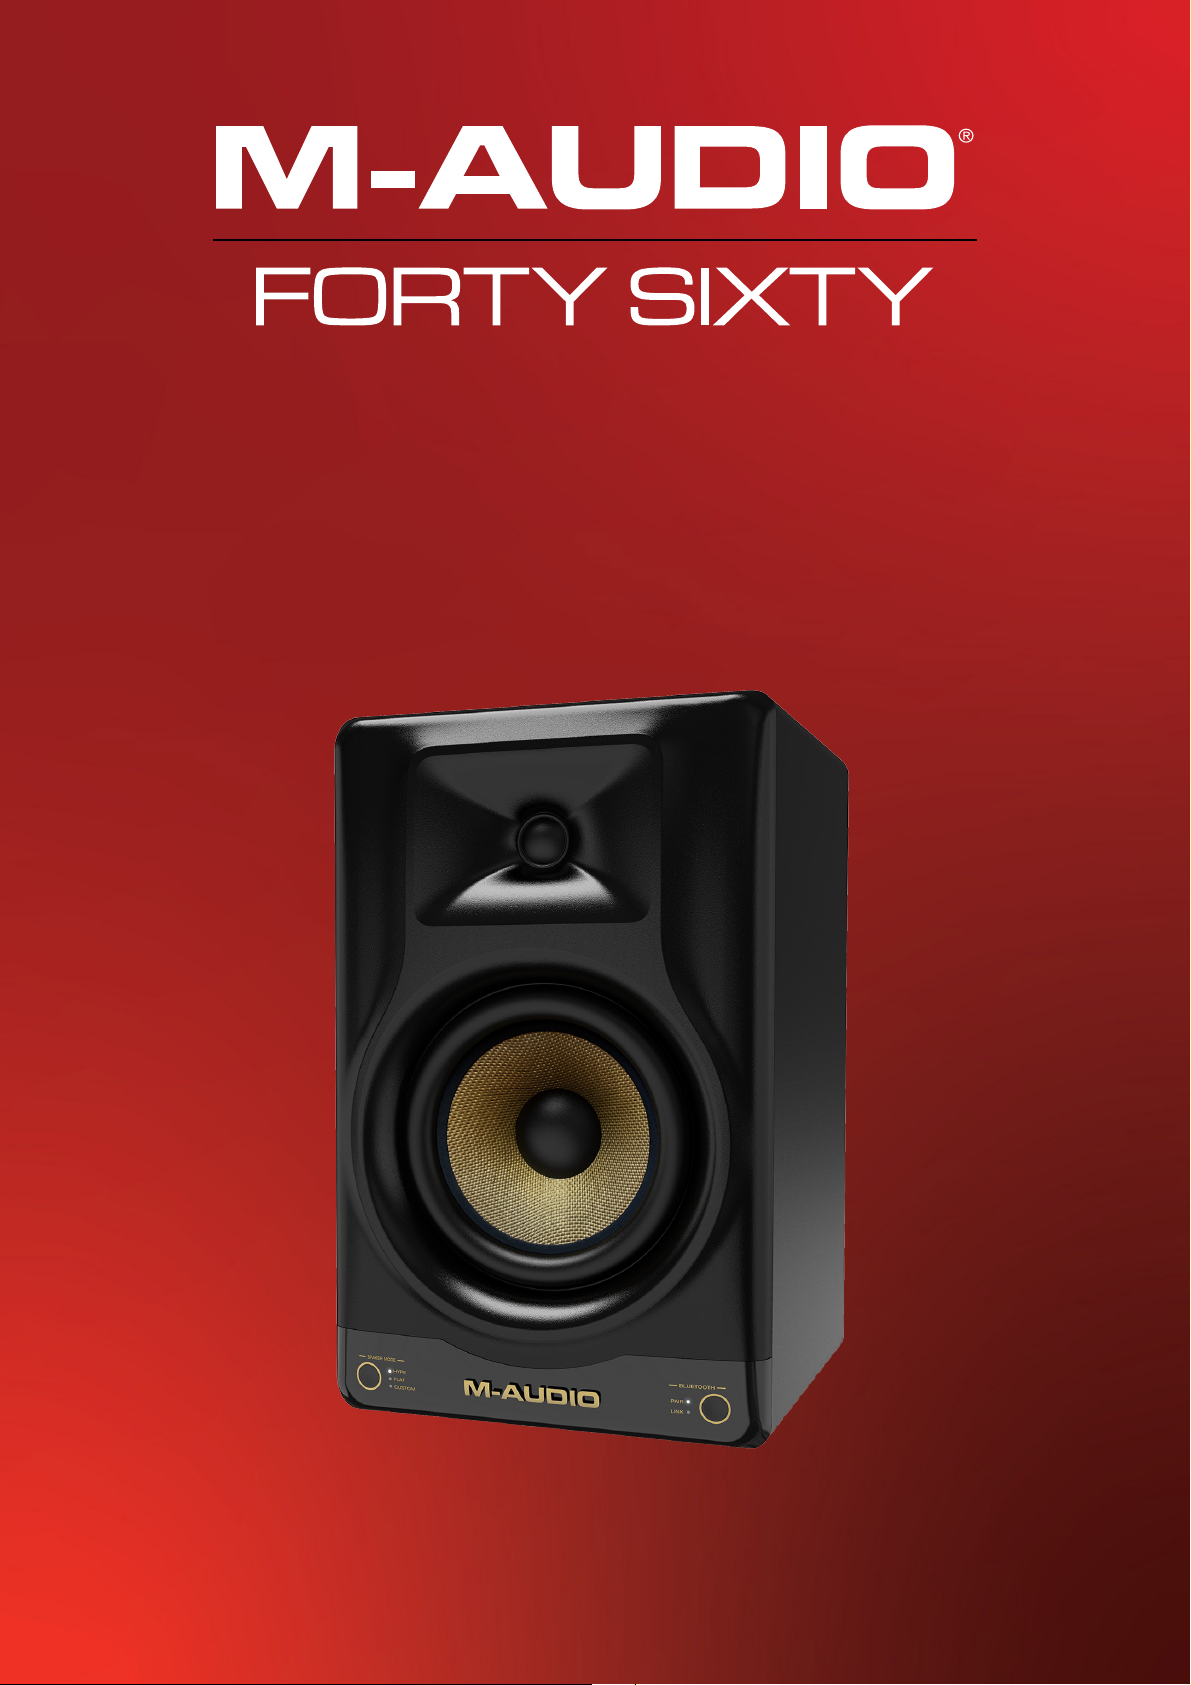
User Guide
1
Page 2

TABLE OF CONTENTS
(1.0) INTRODUCTION ................................................................................................................... 3
(1.1) Box Contents .......................................................................................................................................................... 3
(1.2) Support .................................................................................................................................................................... 3
(2.0) SETUP ................................................................................................................................... 4
(2.1) Connection Diagram ...................................................................................................... ..................................... 4
(2.2) Precautions ............................................................................................................................................................ 5
(2.3) Configuration ........................................................................................................................................................ 5
(2.3.1) XLR Balanced Connection .......................................................................................................................................... 5
(2.3.2) TRS Balanced/Unbalanced Connection ............................................................................................................... 5
(2.3.3) Connecting to Preamp or Computer Outputs ................................................................................................... 5
(2.3.4) Using Isolation Pads ..................................................................................................................................................... 5
(2.3.5) Speaker Placement ....................................................................................................................................................... 6
(2.3.6) Speaker Height ............................................................................................................................................................... 6
(2.3.7) Speaker Orientation ..................................................................................................................................................... 6
(3.0) FEATURES ............................................................................................................................ 7
(3.1) Front Panel ............................................................................................................................................................. 7
(3.2) Rear Panel .............................................................................................................. ................................................ 8
(4.0) OPERATION ....................................................................................................................... 10
(4.1) Pairing a Bluetooth® Device ........................................................................................................................... 10
(4.2) Stereo-Link™: Connecting Two Speakers ................................................................................................ 10
(4.3) App Control ............................................................................................................. ............................................. 11
(5.0) TROUBLESHOOTING ......................................................................................................... 12
(6.0) APPENDIX ........................................................................................................................... 13
(6.1) Technical Specifications ................................................................................................................................... 13
(6.2) Trademarks & Licenses ................................................................................................... ................................. 13
2
Page 3
(
1.0) INTRODUCTION
Thank you for purchasing this Forty Sixty speaker. At M-Audio, performance and reliability mean as much
to us as they do to you. We design our equipment with only one thing in mind—to make your sound the
best it can be.
The Forty Sixty speaker is designed to be versatile. Meeting your needs for music production, live
streaming, or podcasting, it is focused on delivering precise sonic imaging. The Forty Sixty speaker is selfpowered, accepting a line-level signal from a variety of sources. Also, use the M-Audio Studio Control App
to create custom EQ curves to further shape the sound or adjust for the speaker position in your acoustic
space.
(1.1) Box Contents
Forty Sixty Speaker
Isolation Pad
Power Cable
Quickstart Guide
Safety & Warranty Manual
(1.2) Support
For the latest information about this product (system requirements, compatibility information, etc.) and
product registration, visit m
For additional product support, visit m
-audio.com.
-audio.com/support.
3
Page 4
(
2.0) SETUP
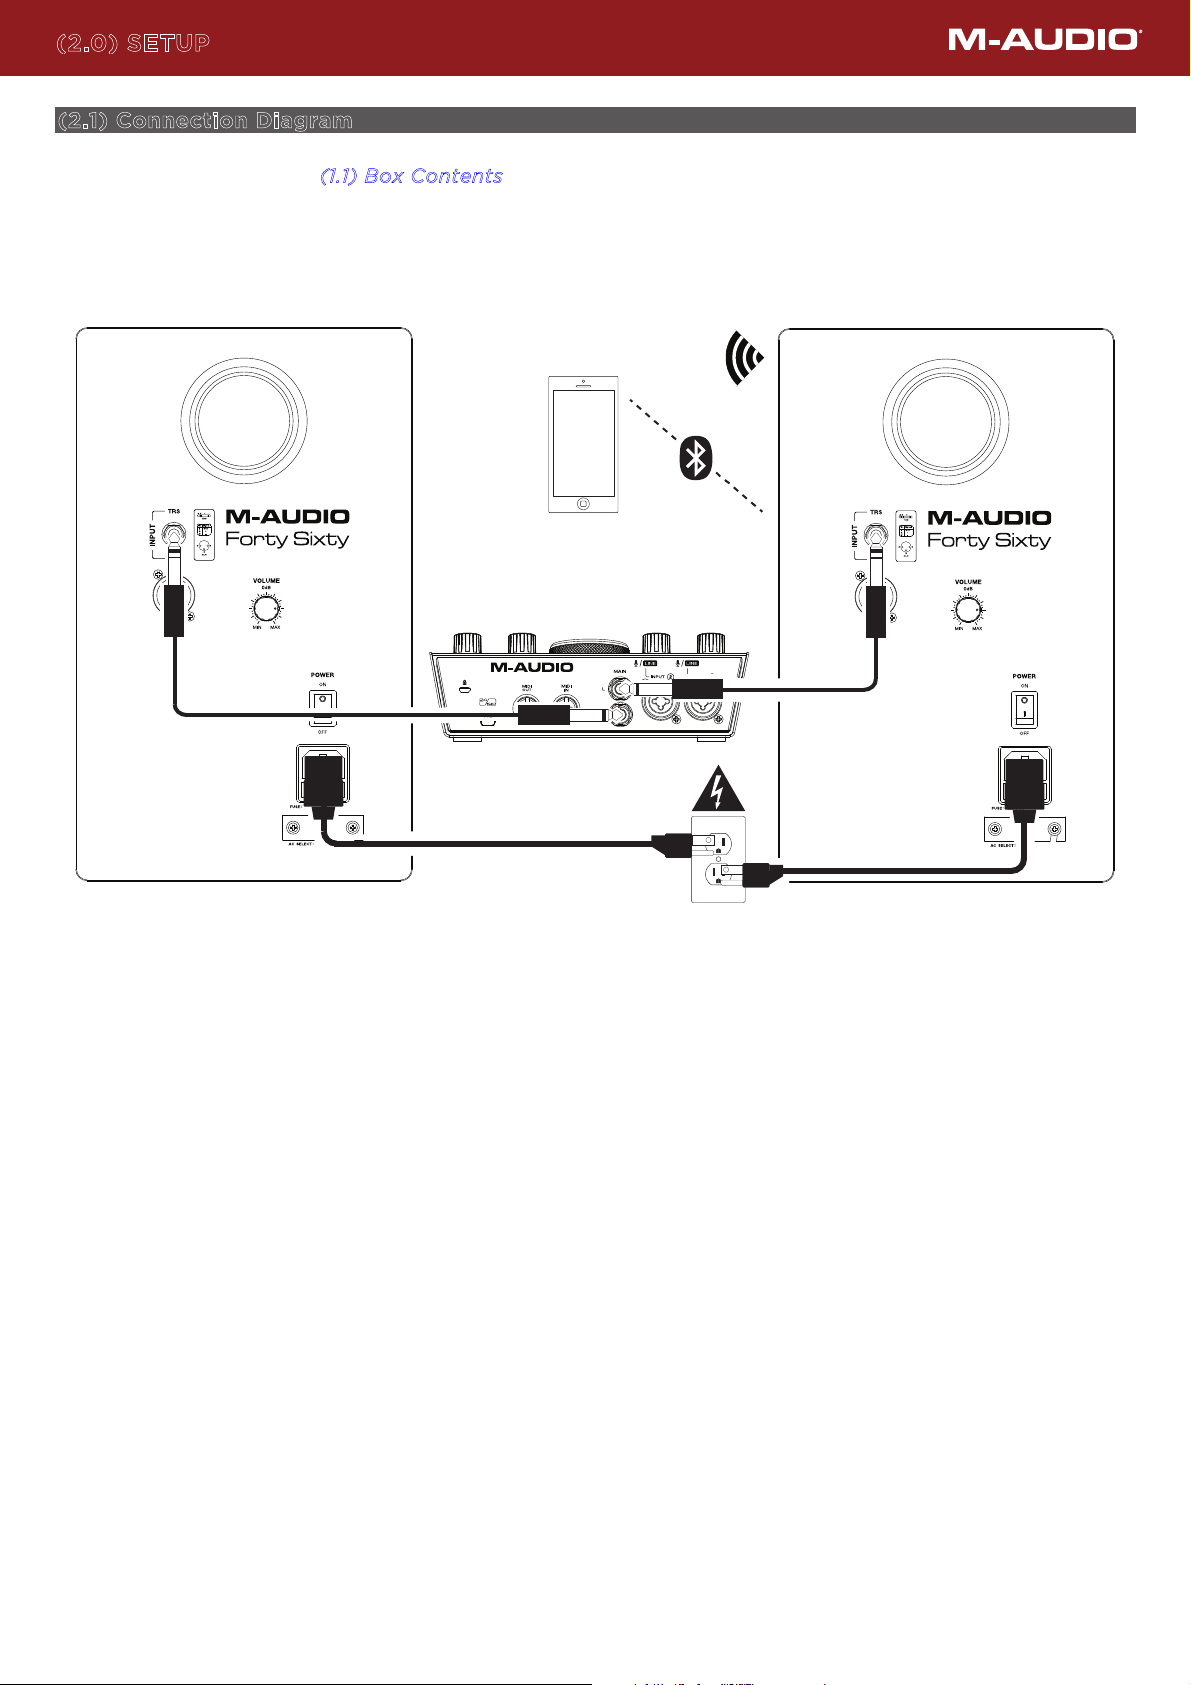
(2.1) Connection Diagram
Items not listed under the (1.1) Box Contents are sold separately.
Smartphone
Audio
Interface
Power
4
Page 5
(2.2) Precautions
• Handling: Please do not touch the speaker cone. The speaker is packaged in the box tightly, so your
attention is required when taking the monitor out of the box. To avoid possible damage to the speaker
unit, hold both sides of the monitor in order to pull it out of the box. The speaker cone should not be
touched in order to avoid damage even after it is out of the box.
orrect Power Operation: Since the speaker contains its own amplifier, it must be connected to a
• C
power outlet using the detachable AC cable provided. Before connecting power, please make sure that
the Voltage-Select Switch located on the speaker's rear panel is set to the appropriate position, as
described in the rear-panel features list appearing earlier in this manual.
WARNING! Use of improper Voltage-Select Switch combinations may result in hazardous conditions
and/or damage to speaker components not covered by speaker warranty.
Note: This product does not have a standby/low-power mode.
• C
onnections: You can connect either an XLR balanced cable or TRS balanced/unbalanced cable from
the input of each speaker to your corresponding preamp, computer, mixer, or game console outputs.
We recommend that you use high-quality balanced or unbalanced cables for input connections. Also,
ALWAYS turn o the power of the speaker and turn the volume of the speaker down to a minimum
before making the necessary connections.
Note: When using an unbalanced cable there is a greater chance of experiencing noise issues. If you are
using an unbalanced cable and you are experiencing noise issues, try connecting a balanced TRS cable
or XLR cable.
(2.3) Configuration
The arrangement and placement of your Forty Sixty speaker on speaker stands or your desktop
workstation may aect the performance of the speakers. Use the following tips to achieve the best
performance out of your speakers.
(2.3.1) XLR Balanced Connection
Assure that the power switch of the speaker is turned o and that the volume control of the speaker is
turned down to a minimum. Connect the male end of an XLR balanced cable to the balanced input of the
speaker.
(2.3.2) TRS Balanced/Unbalanced Connection
Assure that the power switch of the speaker is turned to o and that the volume control of the speaker is
turned down to a minimum. Connect the male end of a TRS balanced or TS unbalanced cable to the TRS
input of the speaker.
(2.3.3) Connecting to Preamp or Computer Outputs
Before connecting, make sure the output device's power has been turned o. Plug the XLR balanced, TRS
balanced or TS unbalanced cable to the corresponding output connectors of a pre
amplifier, audio
interface, mixer, computer, or game console.
(2.3.4) Using Isolation Pads
If possible, place your speakers on speaker stands instead of your desktop. Desks tend to resonate
sympathetically at low frequencies and may adversely aect the bass response of your monitors. If speaker
stands are not possible due to space restrictions and you notice a buildup in bass, use the included foam
isolation pad to isolate the speaker from the surface and the room environment to prevent vibrations. The
isolation pad improves the sound quality and makes your listening experience more enjoyable. The isolation
pad will also keep your setup stable, protecting the speakers from slipping or falling.
5
Page 6
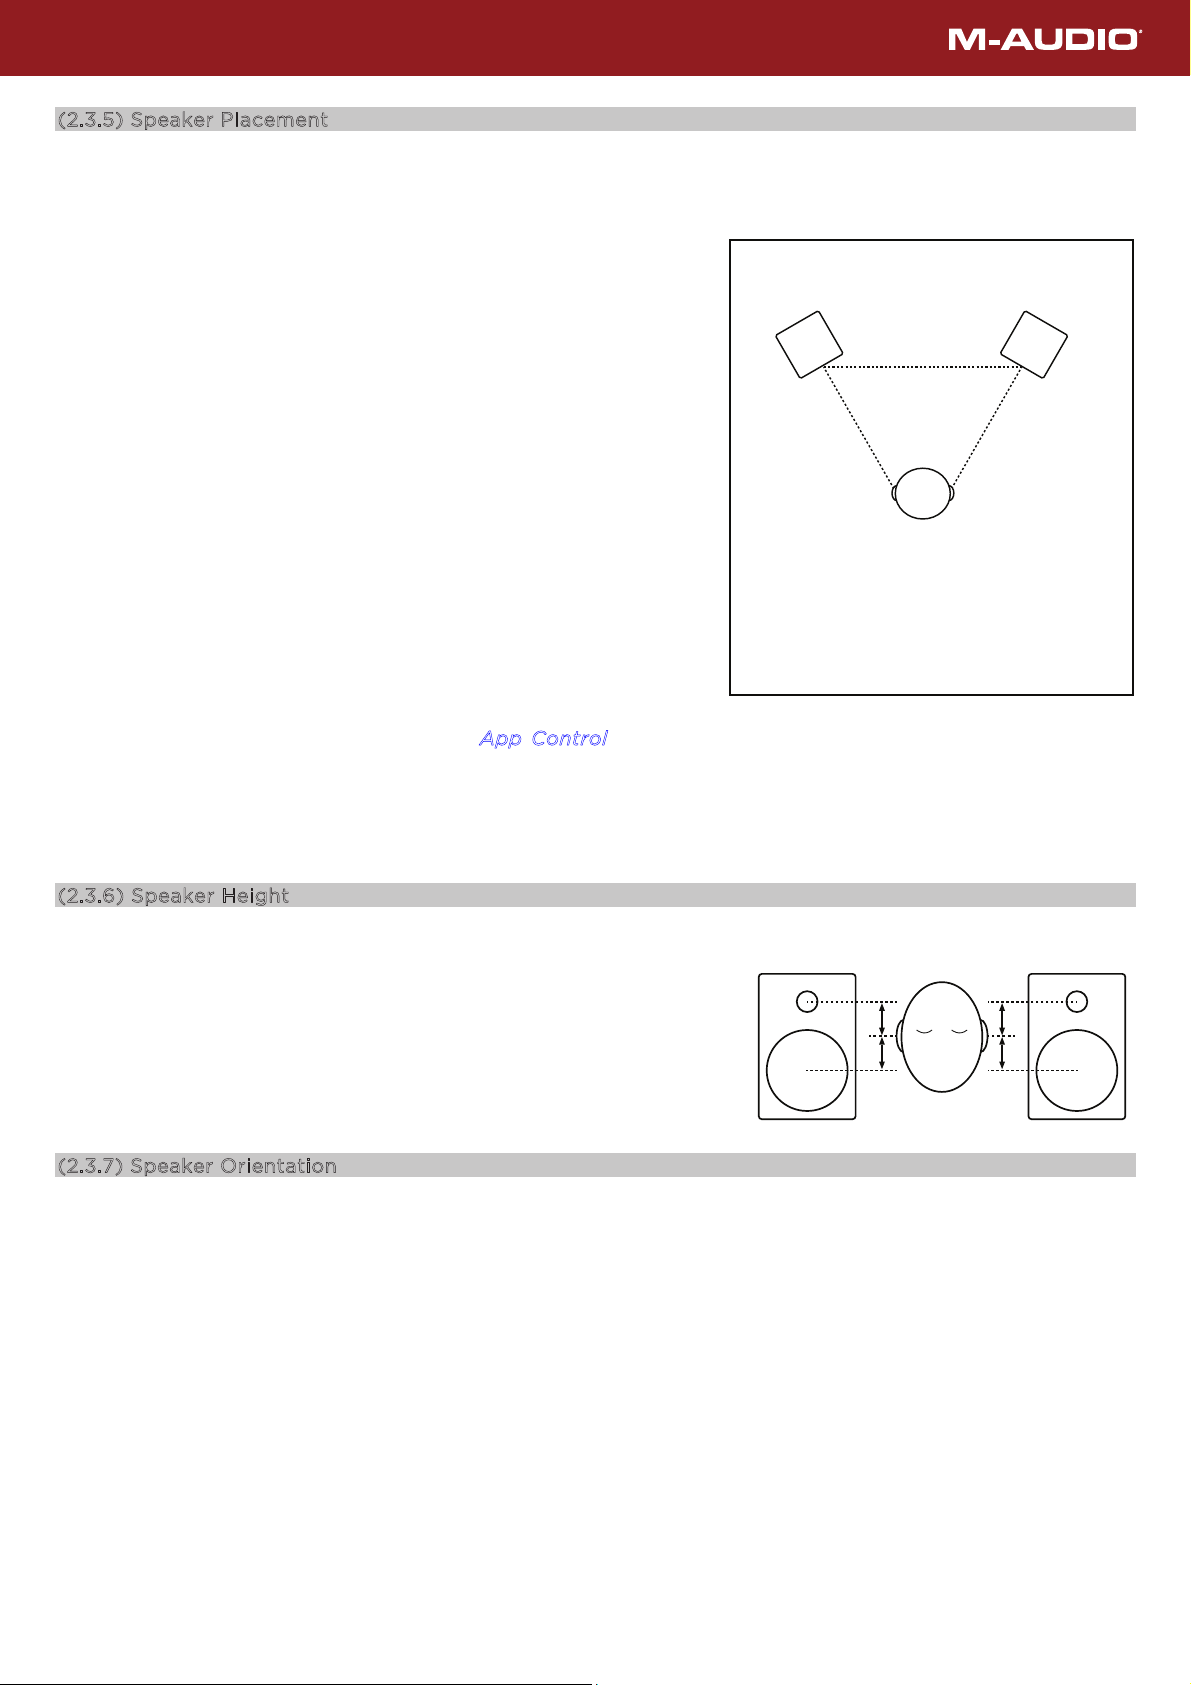
(2.3.5) Speaker Placement
The placement of your speakers has a huge impact on how well
they will perform in your studio. Although nearfield studio
monitors are designed to be more forgiving when it comes to
placement, you should do your best to make sure they form an
equilateral triangle relative to your head. In other words, make
sure that each speaker is equally distant from both your head as
well as the other speaker. Once each speaker has been placed,
rotate the speakers slightly so that the drivers are pointing
toward the listener.
Take a look at the diagram on the right. Notice that the distance
from the listener’s head to each speaker is the same as the
distance between the left and right speakers. Also note that the
ers are turned slightly so that the drivers are facing the
speak
listener.
Left Speaker
Right Speaker
Listener
This is an ideal setup but if it is not practical (or possible) to do
this, try to match this setup as closely as possible.
Additionally, placing your speaker close to a wall may result in
unwanted low-end reflections. Placing a speaker in a corner
may increase these reflections even more. For best results,
position speakers away from walls and corners, and if you are
still experiencing excess low end, use the M-Audio Studio
Control App to create your own custom EQ voicing to
attenuate the lower frequencies. See the A
pp Control section
for more details.
This is an ideal setup but if it is not practical (or possible) to do
this, try to match this setup as closely as possible.
(2.3.6) Speaker Height
The ideal height for speaker is so that the speaker is parallel to the
ground and that the midpoint of the woofer and tweeter is at ear
height.
The diagram to the right demonstrates the ideal placement height
of the speakers relative to the listener. Notice that the listener’s
ears are directly between the woofer and tweeter.
(2.3.7) Speaker Orientation
The speakers and listener
should be at the three
corners of a triangle having
equal length sides.
tweeter/woofer midpoint
If possible, place the speakers in their upright position and avoid laying the speakers on their sides. The
woofer and tweeter are vertically aligned and will provide the best performance when the speakers are
placed upright. Placing them on their sides may create strong reflections from nearby surfaces resulting in
spectrally unbalanced sound.
6
Page 7
(
3.0) FEATURES
(3.1) Front Panel
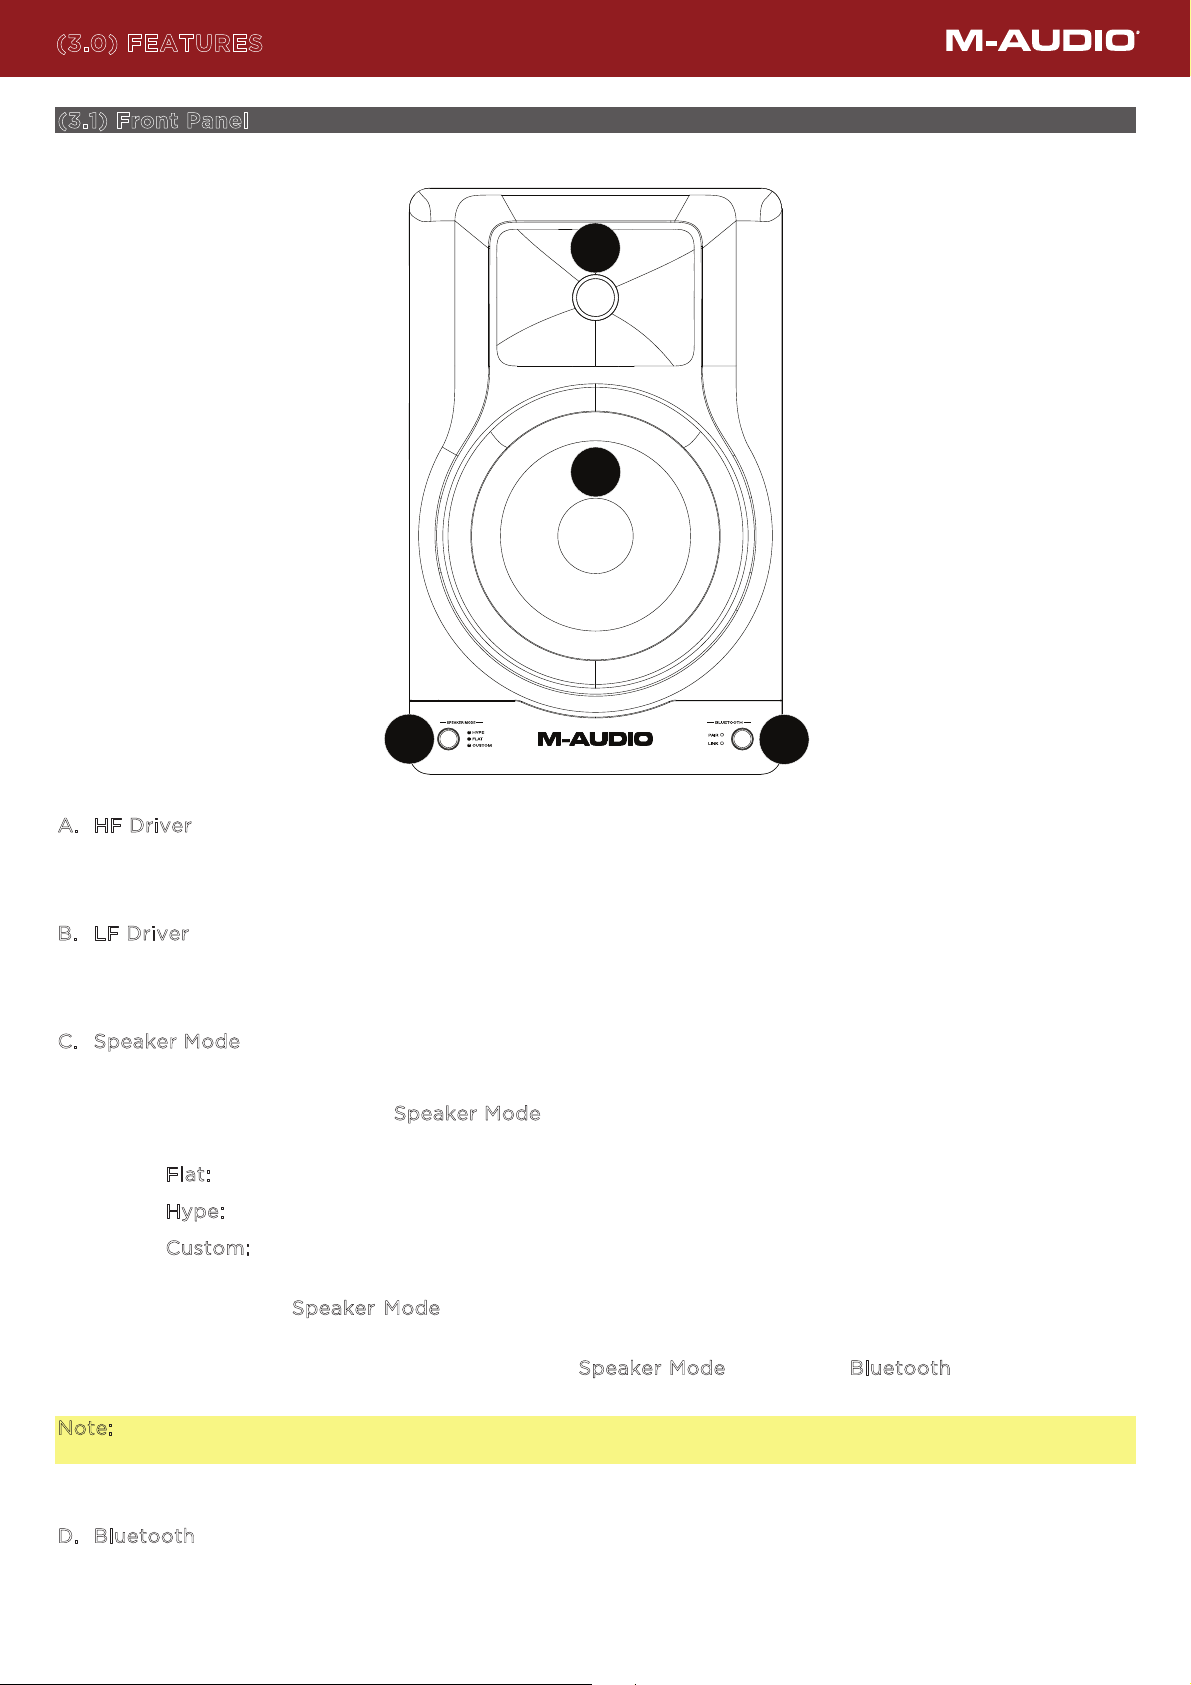
A
B
C
A. HF Driver
The tweeter outputs the high frequencies.
. LF Driver
B
The woofer outputs the low frequencies.
. Speaker Mode
C
Press to toggle between dierent EQ voicings.
Quickly press and release the S
Use the M-Audio Studio Control App to select or create your own Custom EQ voicing.
lat: This gives a relatively flat frequency response for transparent mixing of audio.
• F
• H
ype: The bass response is maximized and high frequency shelving or “sizzle” is increased.
• C
ustom: The frequency response is “flat” by default but adjustable via the M-Audio Studio
Control App.
Press and hold the S
and hold again to unmute.
peaker Mode button to mute the speaker or stereo-linked pair of speakers. Press
peaker Mode button to cycle through dierent EQ voicings (see below).
D
To turn o front panel LEDs, press and hold the S
hold these buttons again to turn on the front panel LEDs.
Note: If your speakers are Stereo-Linked™, muting and turning o the front panel LEDs will aect both
speakers. You only need to perform the function on one of the speakers for it to aect both.
. Bluetooth
D
Use this button to pair your Bluetooth device or stereo-link™ two speakers together.
peaker Mode button and Bluetooth button. Press and
7
Page 8
(3.2) Rear Panel
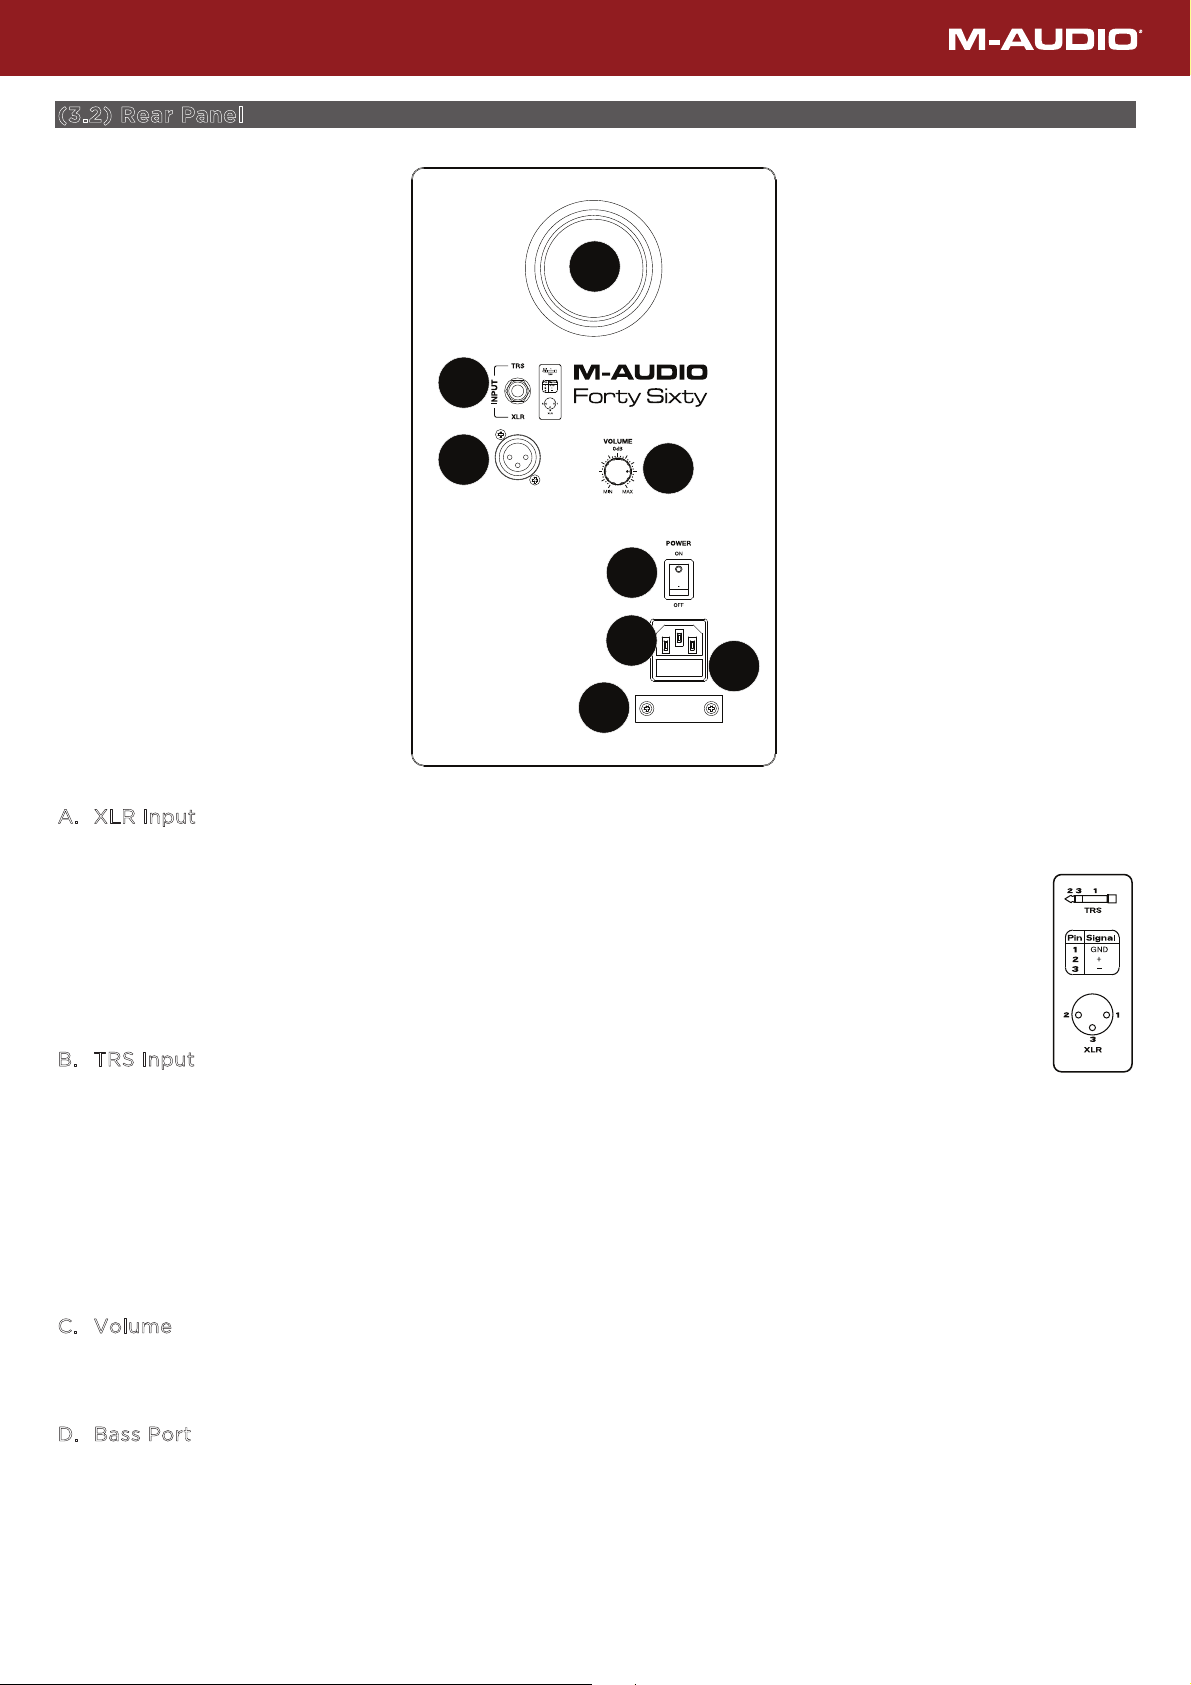
D
B
A
C
E
F
G
H
A. XLR Input
This jack accepts XLR input connections with either balanced or unbalanced wiring. The input wiring of
an XLR connector should be as follows:
• XLR Pin 1: signal ground (shield)
• XLR Pin 2: signal positive (+)
• XLR Pin 3: signal negative (–)
B
. TRS Input
This jack accepts 1/4" (6.35 mm) connections with either balanced or unbalanced wiring. For balanced
wiring, a three-conductor TRS plug is necessary. The input wiring of a TRS connector should be as
follows:
• TRS Tip: signal positive (+)
• TRS Ring: signal negative (–)
• TRS Sleeve: signal ground (shield)
. Volume
C
Use the volume control to set the speaker output level as needed.
. Bass Port
D
This port aids in reproduction of very low frequencies by discharging frequencies below 60 Hz and acts
as a cooling mechanism to prevent overheating. This port should not be blocked, and should be at least
2" away from the nearest wall.
8
Page 9
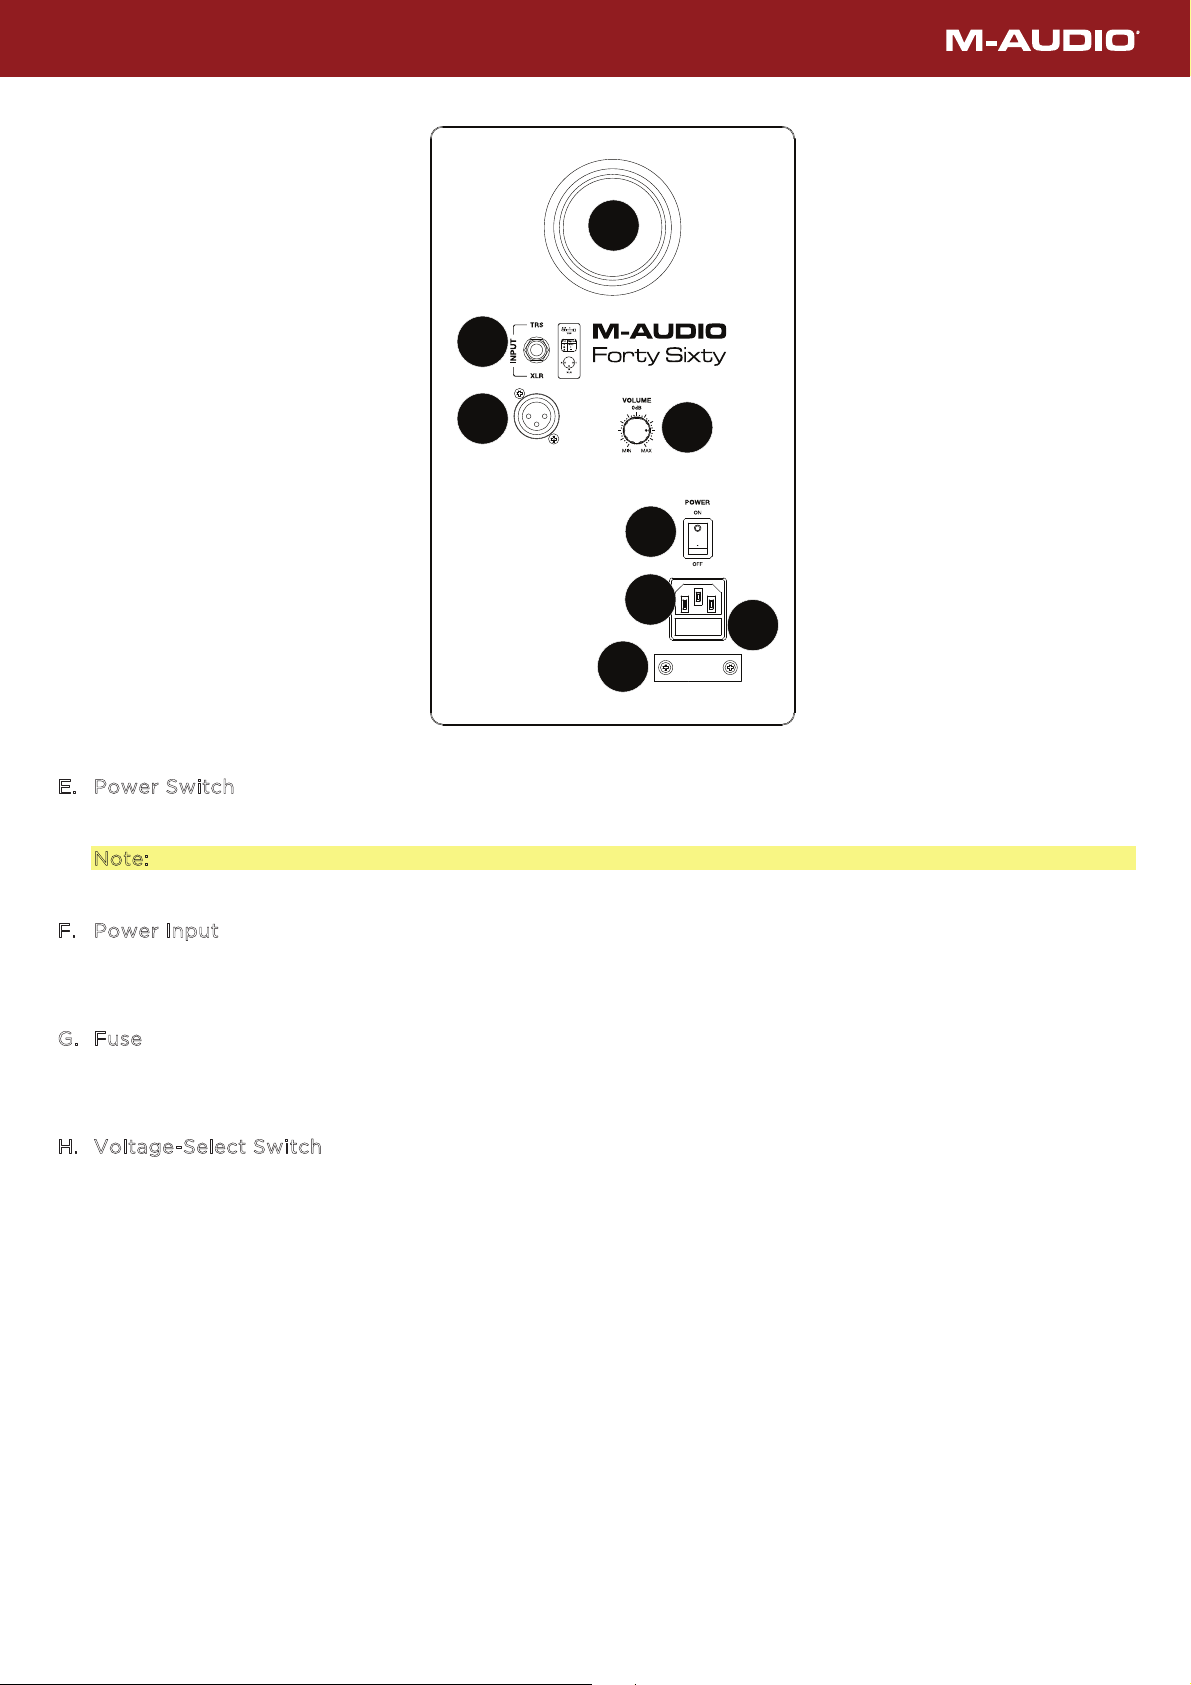
D
B
A
E
F
H
. Power Switch
E
Press to turn the speaker on or o.
Note: This product does not have a standby/low-power mode.
. Power Input
F
Connect the included power cable here.
. Fuse
G
C
G
Holds the external main fuse.
. Voltage-Select Switch
H
This switch provides two selections to match the "house supply" mains voltage of the country or
location in which the speaker is used. The 120V setting is correct for the USA, while the 240V setting is
correct for most of the UK and Europe.
9
Page 10
(
4.0) OPERATION
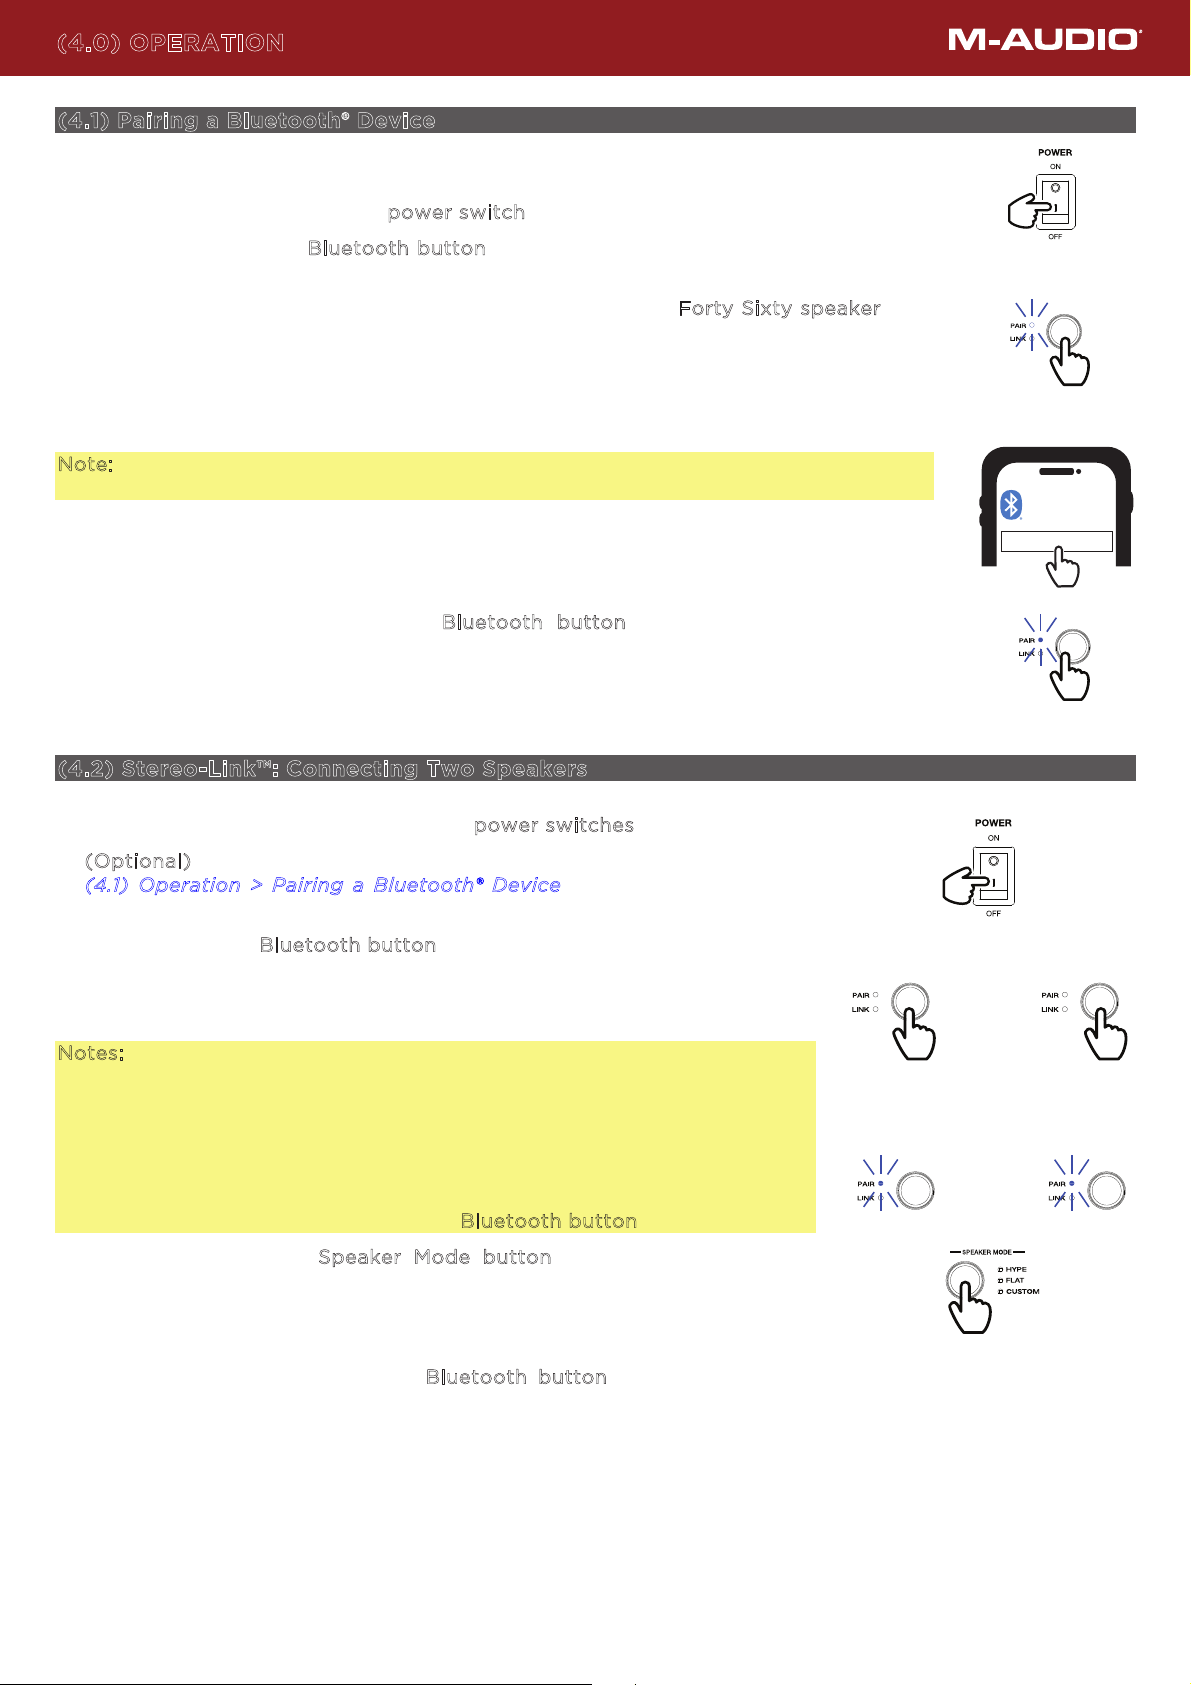
(4.1) Pairing a Bluetooth® Device
1. Turn on your Bluetooth device.
2. Turn on the speaker using the p
3. Press and release the B
luetooth button. The LED will blink white when pairing with
ower switch.
no device connected.
4. Navigate to your Bluetooth device’s setup screen, find the F
orty Sixty speaker, and
connect. Once a device has successfully connected, the LED will remain lit white to
indicate that a device is paired.
5. Start playback from your Bluetooth device.
6. Make sure your Bluetooth device’s volume is turned up.
Note: Bluetooth and Analog input sources will both be heard through the speakers
simultaneously.
The speakers will automatically reconnect with previously paired devices when they are
within range.
To disconnect, press and hold the Bluetooth button on the speaker or turn o
Bluetooth in your device’s Bluetooth settings.
(4.2) Stereo-Link™: Connecting Two Speakers
Press
Press and release
BLUETOOTH
FORTY SIXTY
1. Power on both speakers by using their power switches.
2. (
Optional) Connect a Bluetooth device by following the steps in section
4.1) Operation > Pairing a Bluetooth® Device to ensure proper stereo
(
placement.
3. Double press the B
luetooth button on both speakers. The LEDs will blink
white while establishing the link. When the two speakers have
successfully linked, the LEDs on both speakers will be lit solid white to
indicate they are paired.
Notes:
Bluetooth and Analog input sources will both be heard through the
speakers simultaneously.
When Stereo-Linked™, if a speaker is connected to a Bluetooth device, this
will become the "Stereo Left" speaker when playing stereo-mixed tracks via
Bluetooth. To swap stereo-left and right positions without moving the
physical speakers, press and release the Bluetooth button on a speaker.
4. When linked, press a S
peaker Mode button to toggle between Flat,
Hype, and Custom EQ voicings.
The speakers will automatically relink to the last linked pair when powered
on.
To disconnect, press and hold the B
luetooth button on one of the two
speakers.
10
Speaker 1
Press 2x
Press
Speaker 2
Press 2x
Page 11
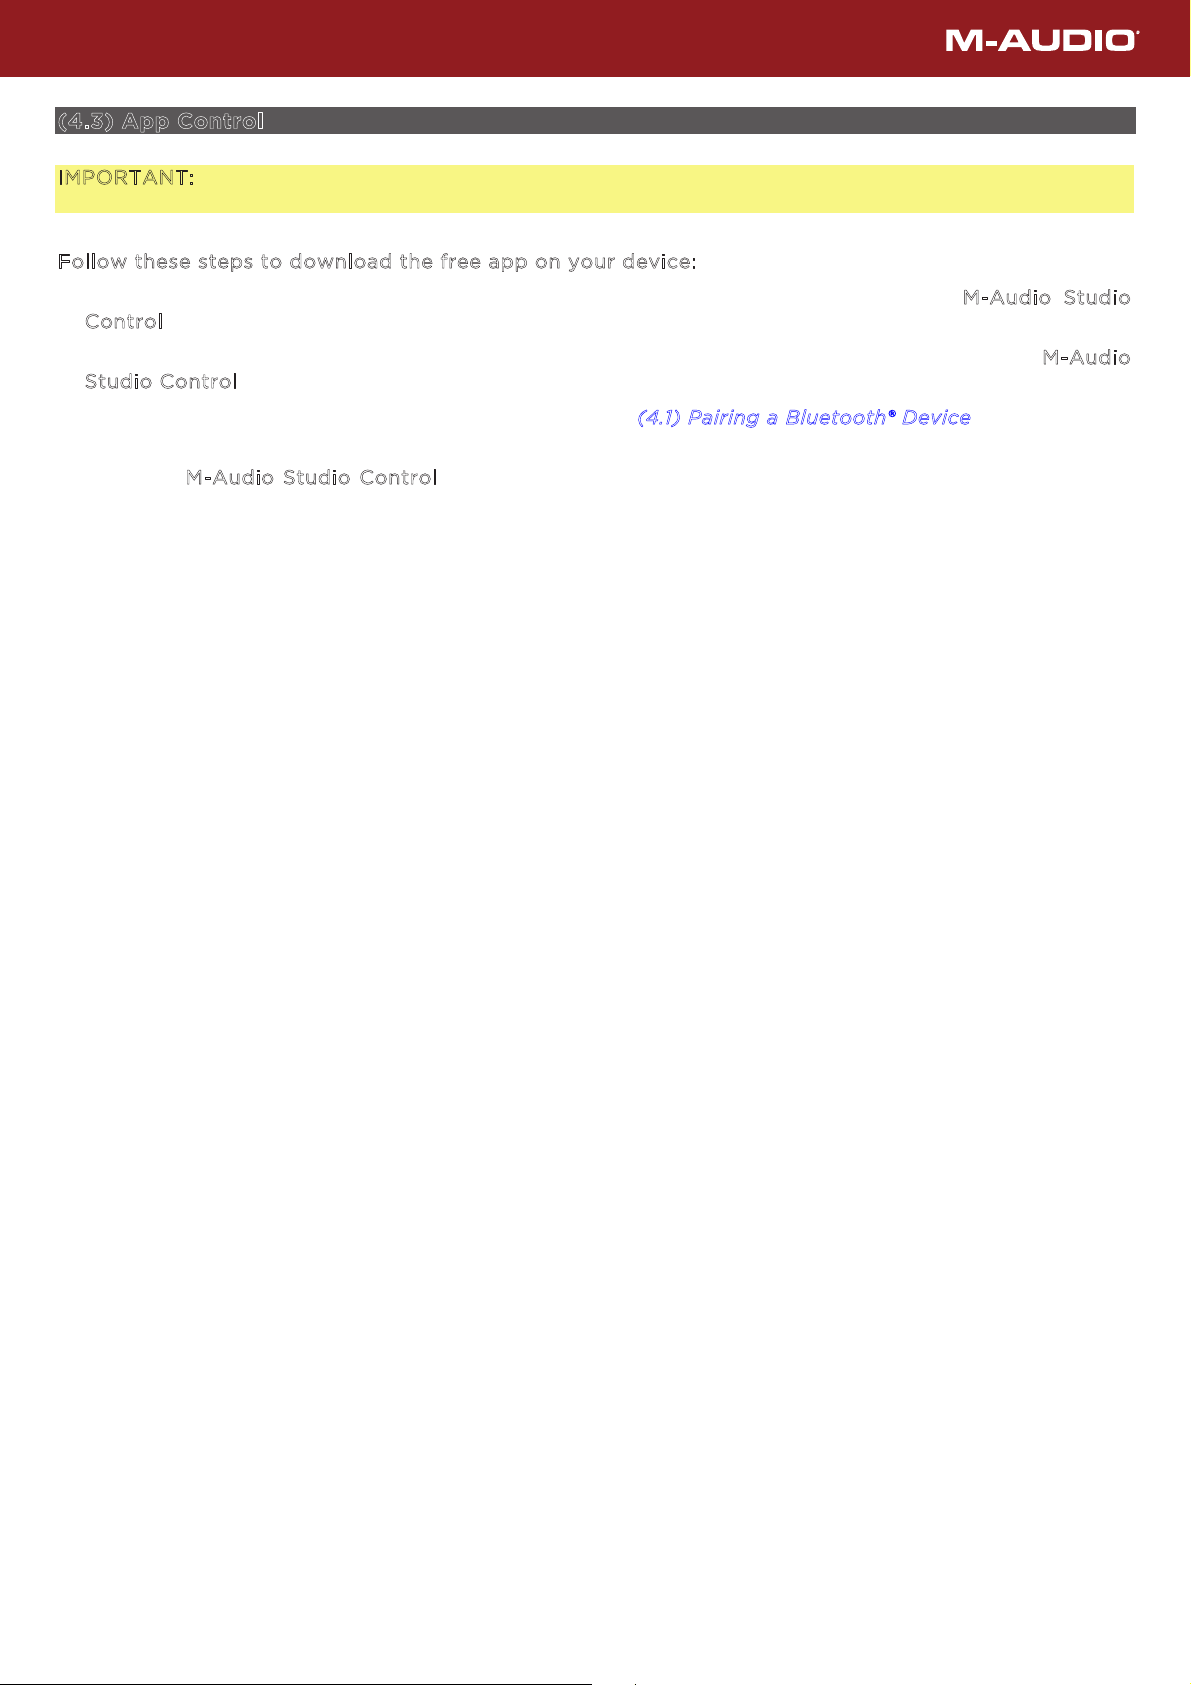
(4.3) App Control
IMPORTANT: To ensure the best possible experience with the app, use the most current Android OS or
iOS on your device.
F
ollow these steps to download the free app on your device:
1. Open the Apple App Store or Google Play on your device. Then, search for the M
ontrol App.
C
-Audio Studio
2. Follow the on-screen instructions to download and install the app. Once downloaded, the M
tudio Control App will appear on your device's home screen.
S
3. Connect your device to speaker via Bluetooth. See the (
4.1) Pairing a Bluetooth® Device to learn how to
do this.
4. Open the M
-Audio Studio Control App. If prompted, allow the app to access your device's Bluetooth
and Location Services.
5. Follow directions in the app to connect the speaker.
6. Use the app to control various functions of the speaker such as:
• Select EQ presets
• Create a custom EQ setting
• Compensate for the position of the speakers in your acoustic space
-Audio
11
Page 12
(
5.0) TROUBLESHOOTING
If the sound is distorted: Try lowering the volume control of your sound source.
hear a hum when cables are connected:
I
• Disconnect cables from the input jacks to see if it’s a faulty cable.
• Use balanced cabling connections whenever possible.
• Make sure the signal cables are not placed near power cables.
• Connect all audio equipment power cables to outlets which share a common ground.
hear a buzz from the speakers when my phone is near them:
I
• Move the phone away from the speakers to reduce interference.
f there is too much bass: Try adjusting the EQ control in the M-Audio Studio Control App to lower the
I
bass level. This will allow you to play the music louder before clipping (distortion) occurs.
f you cannot connect your audio device to your speaker via Bluetooth:
I
• Have your audio device (e.g., smartphone or tablet) and the speaker as close together as possible while
trying to connect. Make sure both the audio device and the speaker are unobstructed by walls, furniture,
etc.
• Reset the Bluetooth connection on the speaker to disconnect the speaker from any other audio device
and restart the search process. If this does not work right away, power o the speaker and then power
it back on.
• Reset the Bluetooth connection on your audio device by turning Bluetooth o and back on. You can
find this under the Bluetooth menu in the Settings for your phone or other audio device.
If this does not work, and you have connected to the speaker before, find the speaker in the list of
available or previously connected devices
icon located next to it and then select U
in your audio device's Bluetooth menu, tap the "gear" or “i”
npair or Forget. Turn the speaker o and back on and try
pairing again once it reappears in your available devices list.
Note: If the speaker has been paired to another audio device recently that is still within range, you may
need to repeat this process with that audio device to fully disconnect.
12
Page 13
(
6.0) APPENDIX
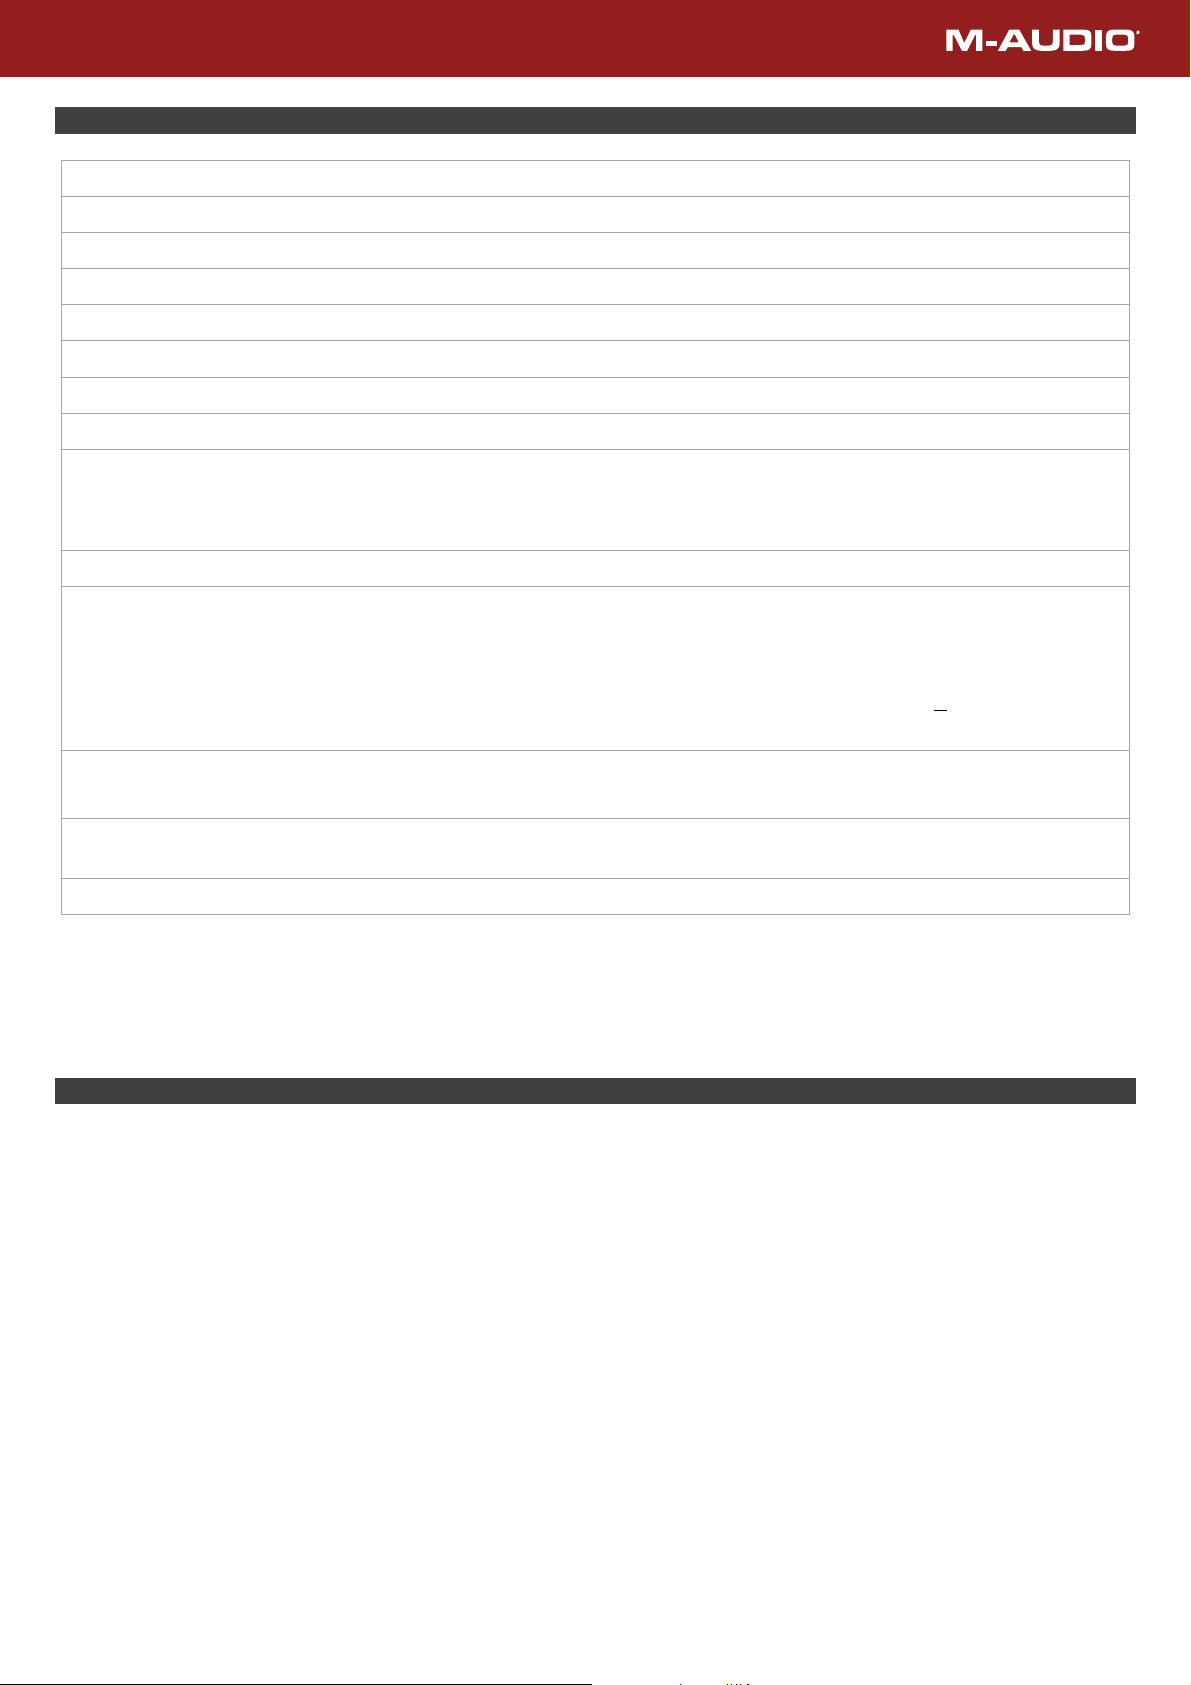
(6.1) Technical Specifications
Tweeter 1.0” / 25.4 mm
Woofer 6.5” / 165.1 mm
Frequency Response 39 Hz – 22 kHz (-10dB)
Max SPL 113 dB
Coverage Pattern 120° x 90°
Enclosure Ported Vinyl Wrapped MDF
Power Configuration Bi-Amplified Class AB
Power Amplification 100W total (60W LF / 40W HF)
Line Inputs Connectors: (1) XLR, (1) 1/4” TRS
Maximum Input Level: +18 dBu
Input Impedance: 20 kΩ / 10K
Converter SNR >120 dB
Bluetooth Specifications Profile: A2DP
Version: 5.3
Frequency Bands: 2400 – 2483.5 MHz
Maximum Radio-Frequency Power: <20 dBm (EIRP)
Range: Up to 100 feet / 30.5 meters*
Power Connection: IEC
Voltage: 100–240 VAC, 50/60 Hz, 100 W
Dimensions
(height x width x depth)
13.2” x 8.5” x 8.6” / 335 x 216 x 218 mm
Weight 15.8 lbs. / 7.2 kg
Specifications are subject to change without notice.
* Bluetooth and wireless reception and range are affected by walls, obstructions, and movement. For optimal performance, place the
product in the center of the room so it is unobstructed by walls, furniture, etc. Battery life may vary based on temperature, age, and
volume usage of product.
(6.2) Trademarks & Licenses
M-Audio is a trademark of inMusic Brands, Inc., registered in the U.S. and other countries.
The Bluetooth word mark and logos are owned by the Bluetooth SIG, Inc. and any use of such marks by M-Audio is under license.
All other product names, company names, trademarks, or trade names are those of their respective owners.
13
Page 14
Manual Version 1.1
 Loading...