

Page 1
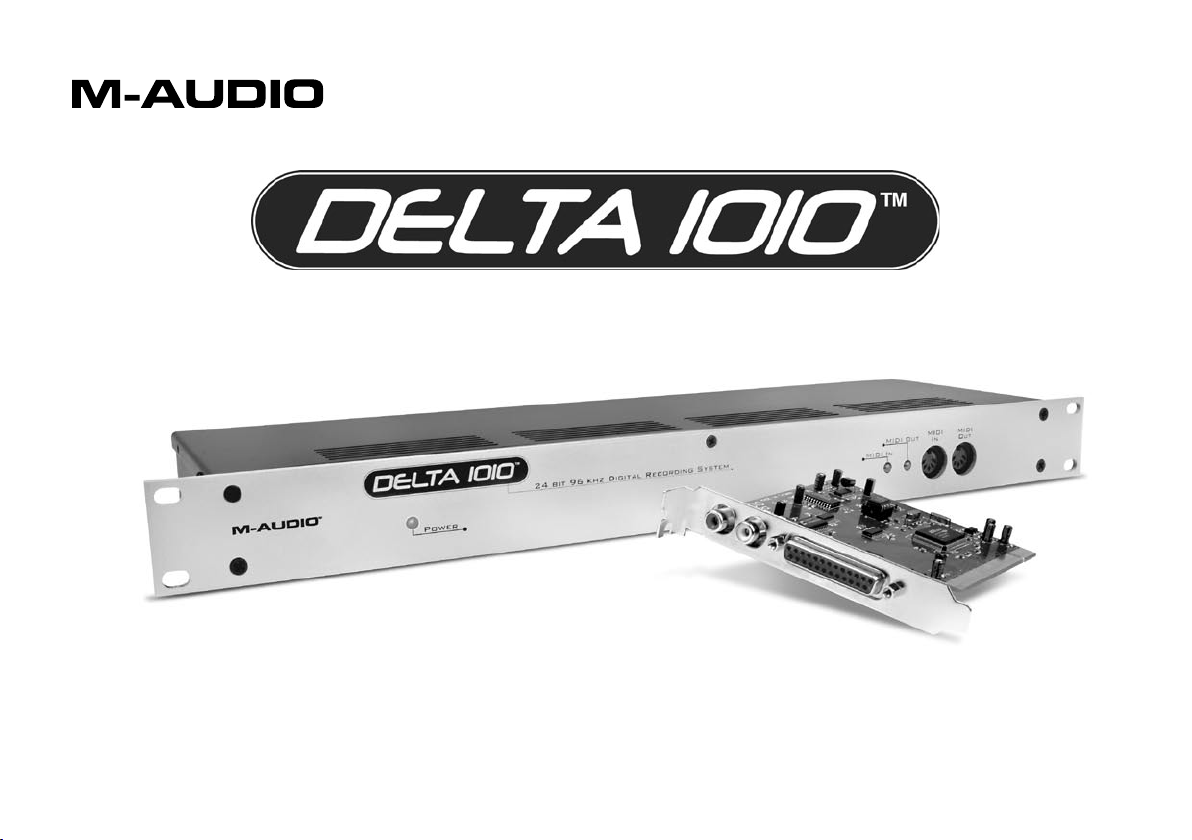
10 in 10 out PCI Digital Recording System with S/PDIF
Quick Start Guide
Page 2
Delta 1010 Quick Start Guide
| 1
Installation For Windows XP Users
IMPORTANT: Do NOT install the Delta 1010 PCI card in your computer until the M-Audio drivers have been installed. The
instructions below will indicate when the PCI card should be installed.
IMPORTANT:
Always shut down the computer before connecting or disconnecting the host cable.
1. We recommend that you download the most recent Delta
1010 drivers by going to the Support > Drivers page at
www.m-audio.com. This ensures that you have the newest
drivers available. If you do not have Internet access, insert
the Delta Series CD-ROM into your computer to install the
drivers that came with Delta 1010 interface.
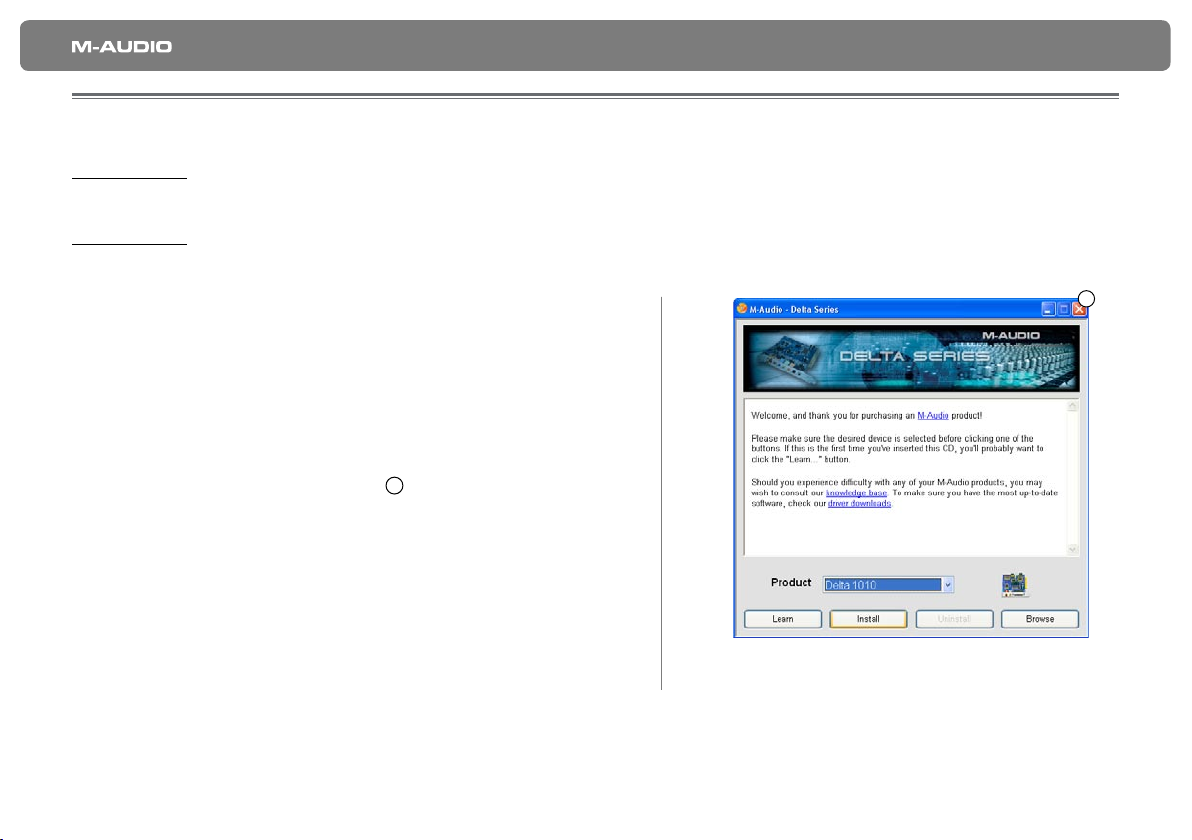
a. If you are installing drivers from the Delta Series
b. If you are installing drivers from www.m-audio.com,
2. Follow the driver installer’s on-screen directions.
Never connect the Delta 1010 rack-mount interface with the PCI Host Adapter card while your computer is running.
CD-ROM, the computer will automatically display
the interactive install screen
is inserted. If your computer fails to launch this
application, you can manually start it by clicking on
Start > My Computer > Delta Series CD-ROM. Next,
select Delta 1010 from the menu and click “Install.”
simply double-click the file once it has finished
downloading.
1
when the CD-ROM
1
Page 3
2
|
Delta 1010 Quick Start Guide
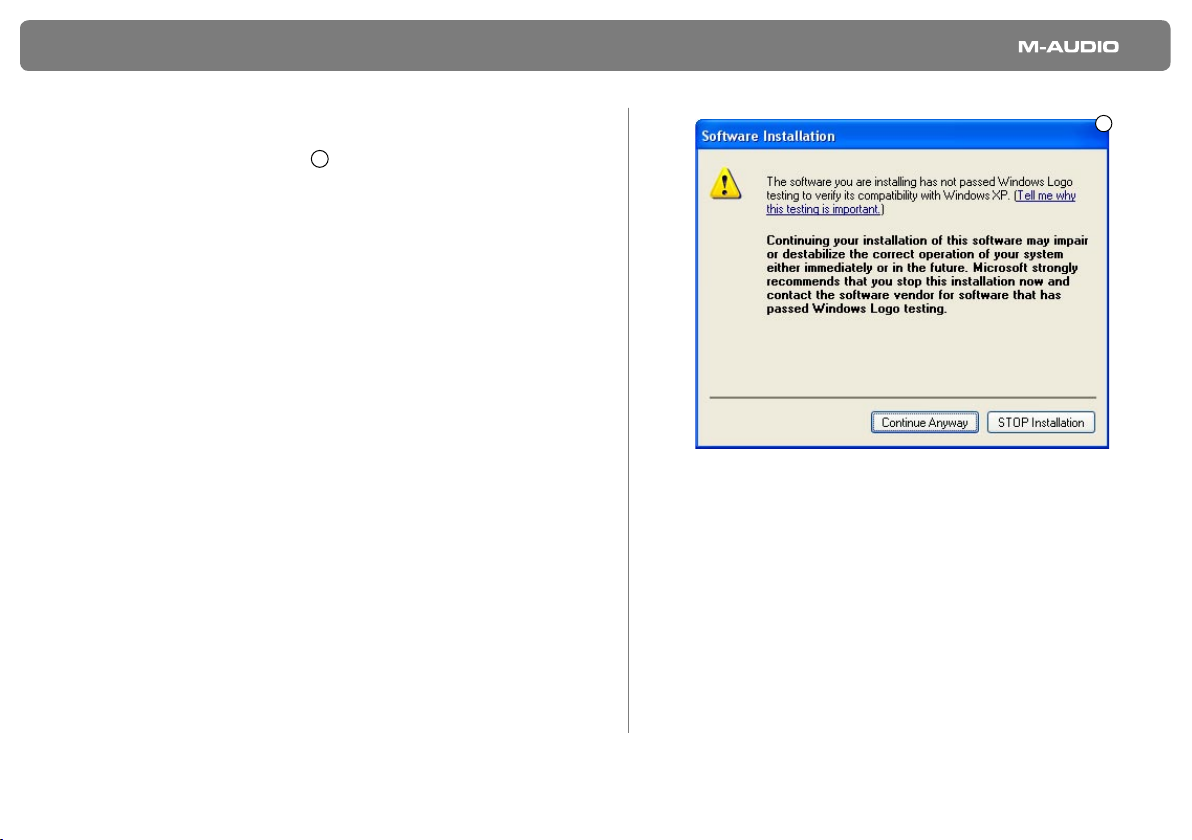
3. At various points in this installation process, you may be
notified that the driver being installed has not passed
Windows Logo Testing
proceed with the installation.
4. Once the driver installer has completed, select “Yes, I
want to shutdown my computer now” and click “Finish.”
5. When your computer has turned off, disconnect the AC
power cable and open your computer’s case.
6. Touch your computer’s metal chassis to ground yourself
before coming in contact with any electronic components
inside the computer. Uncontrolled discharge of excess
static electricity may cause damage to electronic
components.
7. Each unused PCI slot should have a metal bracket that
covers the slot’s accompanying access hole on the rear of
the computer. Select one available PCI slot and remove
its metal bracket. Be sure to save the bracket screw
(brackets are usually held in place by one screw) as you
will need it later.
Note: Note: Some of your motherboard’s PCI slots may
be sharing resources with some of your computer’s other
components (e.g. the USB controller or the AGP slot).
This may result in performance issues that are often
difficult to pin down and resolve. As a preventive measure,
please check your motherboard’s documentation in order
to find an available PCI slot that does NOT internally
share resources.
2
. Click “Continue Anyway” to
2
Page 4
Delta 1010 Quick Start Guide
| 3
8. Insert your Delta 1010 PCI Host Adapter card into your
chosen PCI slot. Secure the Delta 1010 PCI card in place
using the bracket screw from the previous step. Close the
computer case.
9. Connect the rack-mount portion of the interface to the
Delta PCI card. Plug in the power adapter into the rear of
the rack-mount portion of the Delta 1010, then reconnect
the computer’s power cord. Finally, turn on the computer.
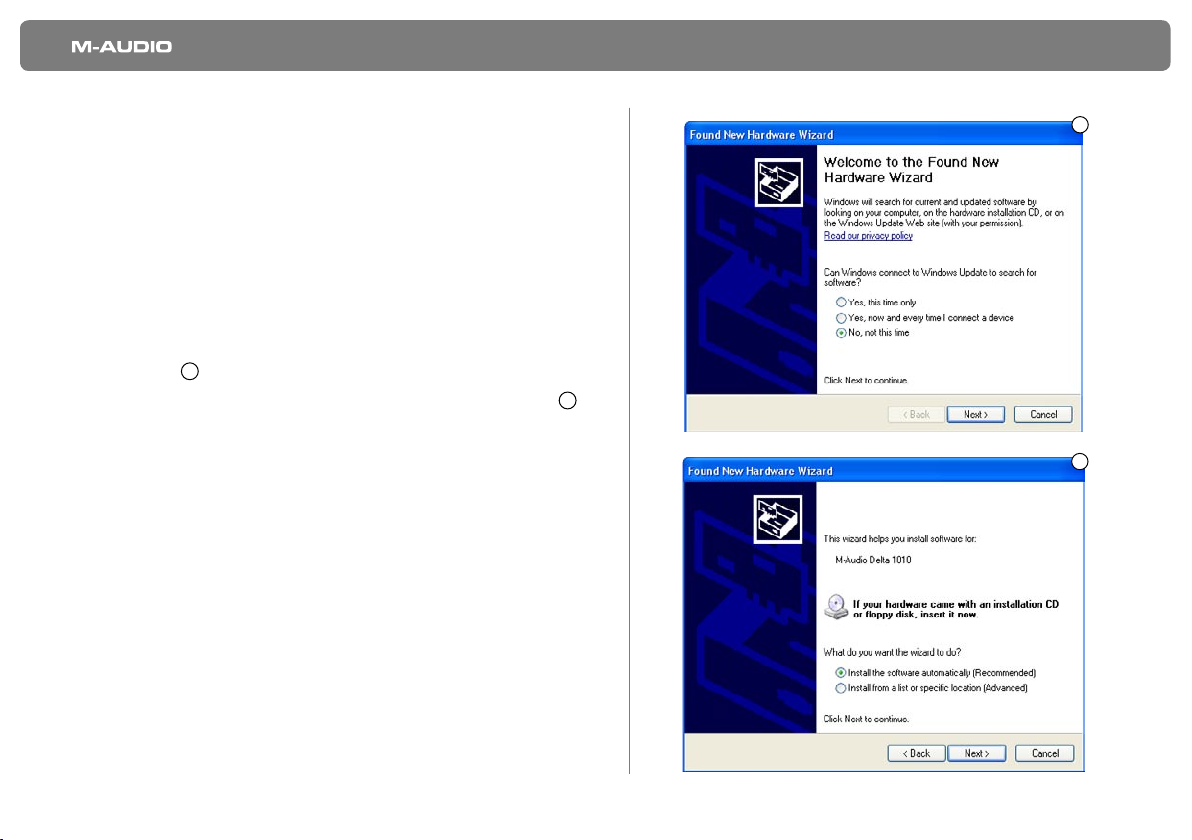
10. When Windows boots up, it will identify the new Delta
1010 hardware and will ask if you want to search the
Internet for a driver. Select “No, not this time” and press
3
“Next”
11. Windows will display a “Found New Hardware” Wizard
12. Choose “Install software automatically” and click “Next”.
13. Once the wizard is completed, click “Finish”.
14. Once the installation is complete, you will see a message
pop up stating, “Your new hardware is installed and ready
to use.”
.
3
4
.
4
Page 5
|
4
Mac OS X Installation
Delta 1010 Quick Start Guide
1. If possible, we recommend that you download the most
recent Delta 1010 drivers by going to the Support >
Drivers page at www.m-audio.com. This ensures that
you’ll have the newest drivers available. If you do not have
Internet access, insert the Delta Series CD-ROM into your
computer to install the drivers that came with your Delta
1010 interface.
a. If you are installing drivers from the Delta Series
CD-ROM, a CD-ROM icon will appear on your
desktop once the disc is inserted into your computer.
Double-click this icon to view the contents of
the disc. Next, double-click “Open Me.” Finally,
select Delta 1010 from the drop-down menu on the
welcome screen and click “Install.”
b. If you are installing drivers from www.m-audio.com,
the downloaded file should automatically mount and
display its contents on the desktop. If this file does
not mount automatically, simply double-click the file
once it has finished downloading to view its contents.
Next, double-click the installer package.
2. Follow the driver installer’s on-screen instructions.
3. Click “Restart” once the installer has completed the
installation.
4. Once your machine has booted, shut down the computer
and disconnect the power cable.
5. Open your computer’s case.
6. Touch your computer’s metal chassis to ground yourself
before coming in contact with any electronic components
inside the computer. Uncontrolled discharge of excess
static electricity may cause damage to electronic
components.
7. Each unused PCI slot should have a metal bracket that
covers the slot’s accompanying access hole on the rear of
the computer. Select one available PCI slot and remove
its metal bracket. Be sure to save the bracket screw
(brackets are usually held in place by one screw) as you
will need it later.
8. Insert your Delta 1010 PCI Host Adapter card into your
chosen PCI slot. Secure the Delta 1010 PCI card in place
using the bracket screw from the previous step. Close the
computer case.
9. Close the case and connect the rack-mount portion of
the interface to the Delta PCI card inside your computer.
Plug in the power adapter to the rack-mount portion of
the interface, then reconnect the computer’s power cord.
Finally, turn on the computer.
10. When the computer has restarted, your Delta 1010
interface will be ready to use.
Page 6
Delta 1010 Quick Start Guide
In
Out
9 V A C
8 7
8 7
66554433221
1
+4 -10
Mic
Guitar
Keyboards, Mixers, etc.
Delta 1010
Mixer, Powered Speakers
Sound System, et
c
Computer
Delta 1010 and the
M-Audio product line are
produced by MIDIMAN
Wordclock
In Out
Ins
Outs
9V AC
Preamplifier
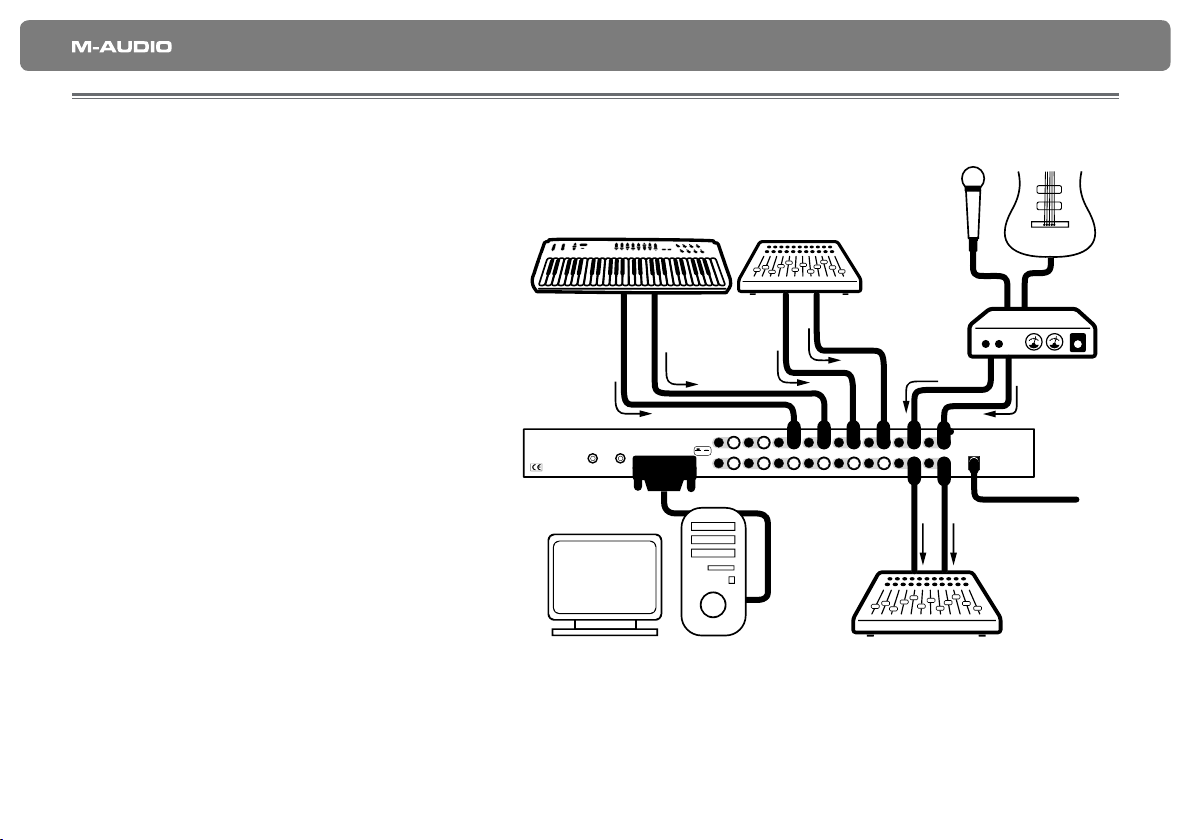
Connecting Your Equipment to the Delta 1010
< Delta 1010 has a total of 10 outputs which
can be used for a variety of purposes. By
default, analog outputs 1 and 2 serve as
your “main” outputs. Connect channels 1
and 2 to the left and right inputs of your
mixer, powered speakers, or other audio
destination.
< Delta 1010 accepts line-level signals.
Connect your line-level instruments
(keyboards, mixers, etc.) to any available
input on the rack-mount box. If you wish to
record microphones or the direct output of
an electric guitar, bass, or other instrumentlevel device, you must first raise the signal
to line-level using a preamplifier.
< If you own any devices with S/PDIF or
Word Clock inputs or outputs, connect
these devices to the appropriate S/PDIF
and Word Clock connectors on the
interface. The S/PDIF jacks are located on
the PCI Host Adapter Card while the Word
Clock connectors are found on the back of
the rack-mount portion of the interface.
| 5
For more detailed information about all of the available inputs and outputs, please refer to the Delta 1010 User Guide located
on the Delta Series CD-ROM.
Page 7
Delta 1010 Quick Start Guide
6
|
Opening the Delta Series Control Panel
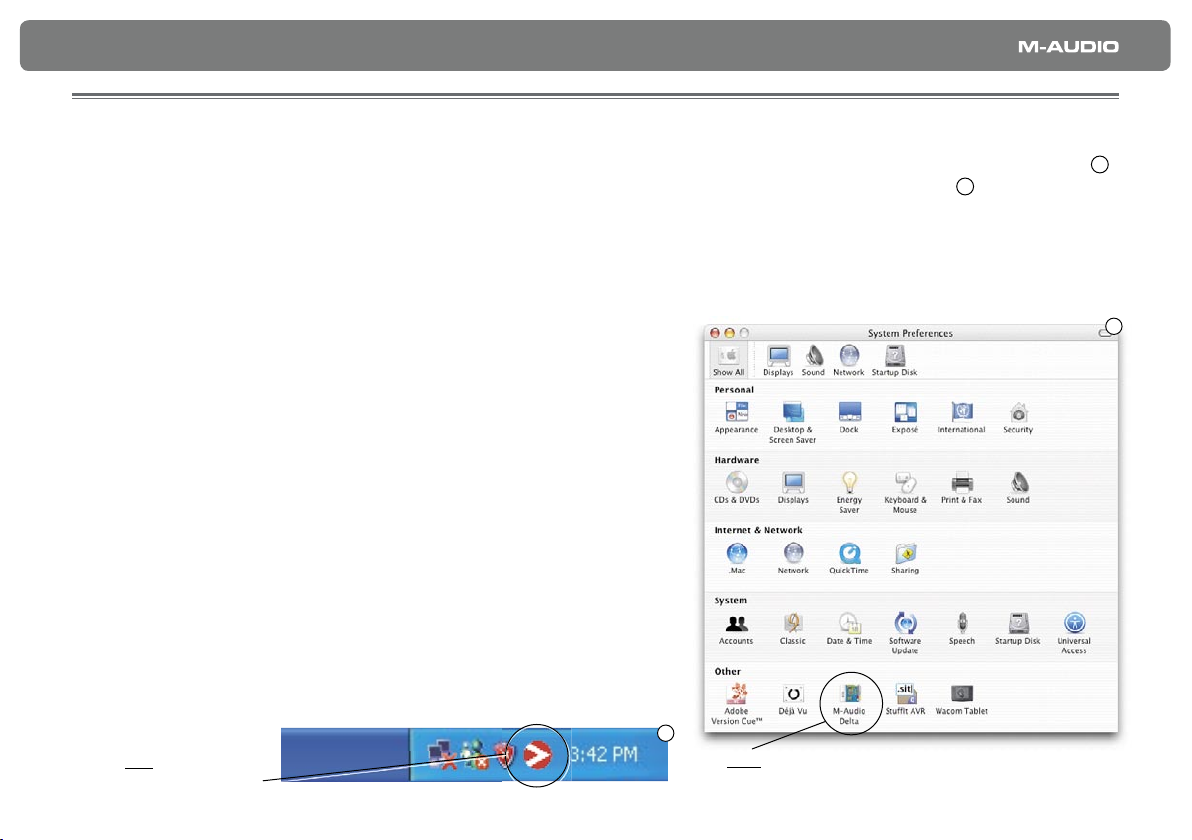
PC users can access the Delta Control Panel by double-clicking the M-Audio icon in the system tray on the lower right of the screen
5
.
Mac OS X users can open the Control Panel by clicking the M-Audio icon found in the System Preferences panel 6.
The default settings for the Delta Control Panel will ensure that your software’s audio outputs 1/2 are routed to Delta 1010’s physical
outputs 1/2, software outputs 3/4 are routed to the physical outputs 3/4, and so on. However, the Control Panel will allow you to alter
the output routings if necessary as well as to confi gure various other options (digital sync source, sample rate, buffer size, etc.) In
many cases, there will be no need to change the default settings.
When it’s time to record an external source, such as a vocal, guitar track,
or keyboard part, you will want to monitor your input. Monitoring will allow
you to hear the signal being fed into the inputs while blending it with the
output signals coming from the computer. This way, you can hear your own
performance in the headphones as you play along to previously recorded parts
playing back from your computer.
Start by selecting the Monitor Mixer radio button in the leftmost column of the
Control Panel’s Patchbay/Router tab. This routes the Monitor Mixer’s output to
the Delta 1010’s physical outputs 1/2. You can now use the Monitor Mixer to
adjust and mix signals from Delta 1010’s analog and digital inputs, as well as
signals entering the mixer from your audio software.
Note: Adjusting the levels in the Monitor Mixer does not affect the actual level
of the signal being recorded into audio application. Adjust the recording level
at the sound source and/or use the +4/-10 switches on the back of the rackmount interface.
For a full account of all Control Panel routings and functions, refer to the Delta
1010 User Guide located on the Delta Series CD-ROM.
5
PC: double-click the
M-Audio icon
6
Mac: click the M-Audio icon found in the System
Preferences panel
Page 8
Delta 1010 Quick Start Guide
| 7
Additional Information and Support
The M-Audio website (www.m-audio.com) contains the latest Delta 1010 drivers as well as useful links to news stories, FAQs, and
technical support. We recommend checking this site periodically to ensure you have the latest drivers and most up-to-date information
about your M-Audio products.
Warranty Terms and Registration
Warranty Terms
M-Audio warrants products to be free from defects in materials and workmanship, under normal use and provided that the product is
owned by the original, registered user. Visit www.m-audio.com /warranty for terms and limitations applying to your specific product.
Warranty Registration
Immediately registering your new M-Audio product entitles you to full warranty coverage and helps M-Audio develop and manufacture
the finest quality products available. Register online at www.m-audio.com/register to receive FREE product updates and for the
chance to win M-Audio giveaways.
Page 9
|
8
Delta 1010 Quick Start Guide
© 2006 Avid Technology, Inc. All rights reserved. Product features, specifications, system requirements and availability are subject to
change without notice. Avid, M-Audio, Tampa and Delta 1010 are either trademarks or registered trademarks of Avid Technology, Inc.
All other trademarks contained herein are the property of their respective owners.
Delta 1010
Tested to comply with
FCC standards
FOR HOME OR STUDIO USE
WARNING: This product contains chemicals, including lead, known to the State of California to cause cancer, and birth defects or
other reproductive harm. Wash hands after handling.
Page 10
M-Audio USA
070201_Delta1010_QSG_EN03
Technical Support
Sales
Web
M-Audio U.K.
WD17 1LA, United Kingdom
Technical Support
Sales
Web
|
5795 Martin Rd., Irwindale, C A 91706
web: www.m-audio.com/tech
tel (pro products): (626) 633-9055
tel (consumer products): (626) 633-9066
fax (shipping): (626) 633-9032
e-mail: [email protected]
tel: 1-866-657-6434
fax: (626) 633-9070
www.m-audio.com
|
Floor 6, Gresham House, 53 Clarenden Road, Watford
e-mail: [email protected]
tel: (Mac support): +44 (0)1765 650072
tel: (PC support): +44 (0)1309 671301
tel: +44 (0)1923 204010
fax: +44 (0)1923 204039
www.maudio.co.uk
M-Audio Germany
Technical Support
Sales
Web
M-Audio Canada
Quebec G2E 5B7, Canada
Technical Support
Sales
Web
|
Kuhallmand 34, D-74613 Ohringen, Germany
e-mail: [email protected]
tel: +49 (0)7941 - 9870030
fax: +49 (0)7941 98 70070
e-mail: [email protected]
tel: +49 (0)7941 98 7000
fax: +49 (0)7941 98 70070
www.m-audio.de
|
1400 St-Jean Baptiste Ave. #150, Quebec City,
email: [email protected]
phone: (418) 872-0444
fax: (418) 872-0034
e-mail: [email protected]
phone: (866) 872-0444
fax: (418) 872-0034
www.m-audio.ca
M-Audio France
WD17 1LA, United Kingdom
Renseignements
Commerciaux
Assistance Technique
Assistance Technique
Site Web
|
Floor 6, Gresham House, 53 Clarenden Road, Watford
tel : 0 810 001 105
e-mail : [email protected]
PC : 0 0820 000 731
MAC : 0 0820 391 191
e-mail : [email protected] | [email protected]
fax : +33 (0)01 72 72 90 52
www.m-audio.fr
 Loading...