

Page 1
Operating
Instructions
rr •• -T *
SBS HQ
Video Cassette Recorder
PAL
NV-G21 Series
. -I"«
_____
■ National
Before attempting to connect, operate or adjust this product, please read these instructions completely.
Page 2

CONTENTS
Page
4 CONTROLS AND COMPONENTS
6 FEATURES
7 INSTALLATION, TUNING THE TV SET TO THE VIDEO PLAYBACK CHANNEL
8 SETTING THE CLOCK TO THE PRESENT TIME
10 SETTING THE TUNER IN THE VTR
11 THE VIDEO CASSETTE
12 PLAYBACK
15 RECORDING
16 SUPER OTR FUNCTION (ONE-TOUCH TIMER RECORDING)
18 TIMER RECORDING
21 CAMERA RECORDING
22 DUBBING (COPYING)
23 INFRA-RED REMOTE CONTROLLER
24 BEFORE REQUESTING SERVICE
26 CAUTIONS
27 SPECIFICATIONS
Page 3
■ National
^Operating Instructions for
*the Digital Scanner
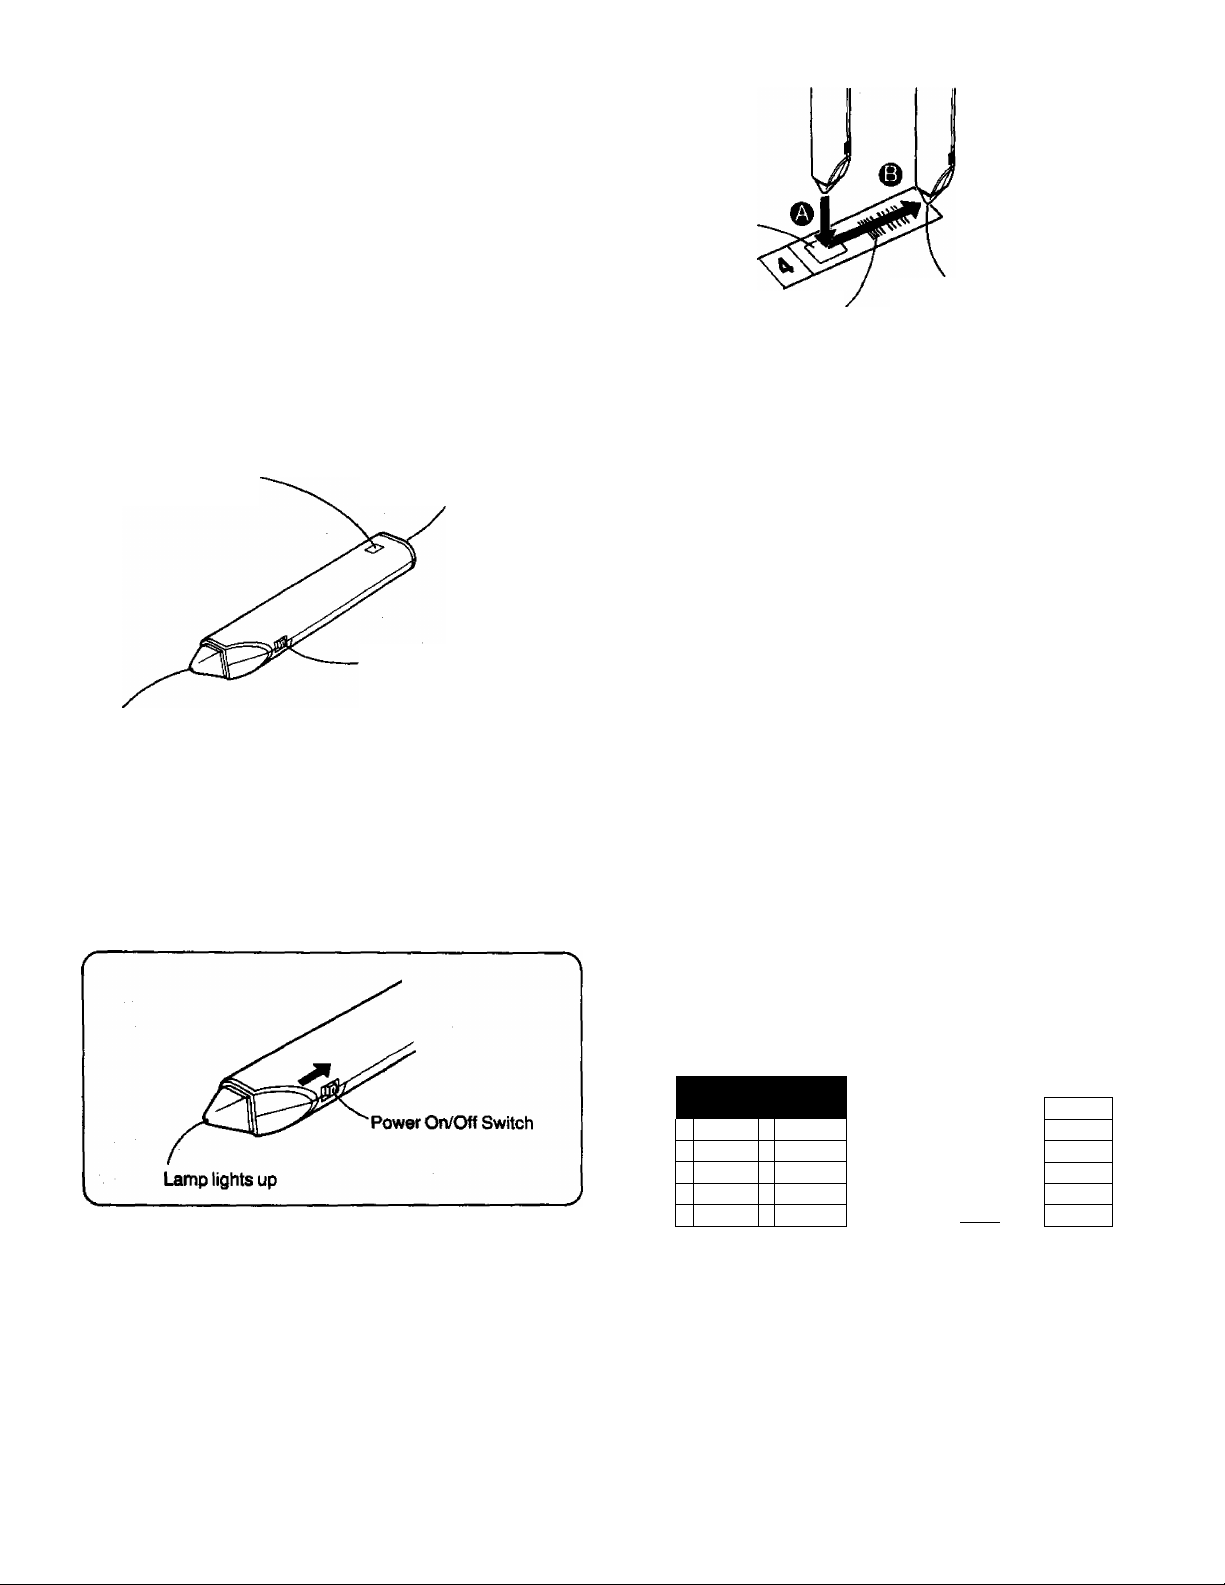
This Digital Scanner lets you progran^me timer recordings by
tracing the corresponding bar codes on the supplied Program
ming Sheet and then transmitting the data to the VTR.
Names and Functions
Transmit Button
Press to transmit the
programming data
to the VTR.
Bar Code Reading Section
When the scanner is turned on, the red lamp will be lit.
Transmitting Section
The programmed data
is transmitted from
here to the VTR.
Power On/Off Switch
The “Beep”
sound indicates
that the barcode
Small Box
Trace the barcode
Bar Code
•It the bar code is traced slowly, it cannot be read
correctly.
•When there is no “Beep" sound, the reading of the bar
code is incomplete. Trace the bar code again.
•When using the Programming Sheet, put It on a flat
surface. Reading bent the bar codes or reading them
whilst holding them in your hand may cause incorrect
operation.
•Do not deviate from the bar code, nor stop tracing
halfway.
>Do not slant the scanner to trace the bar code.
completely past the last bar.
was read
completely.
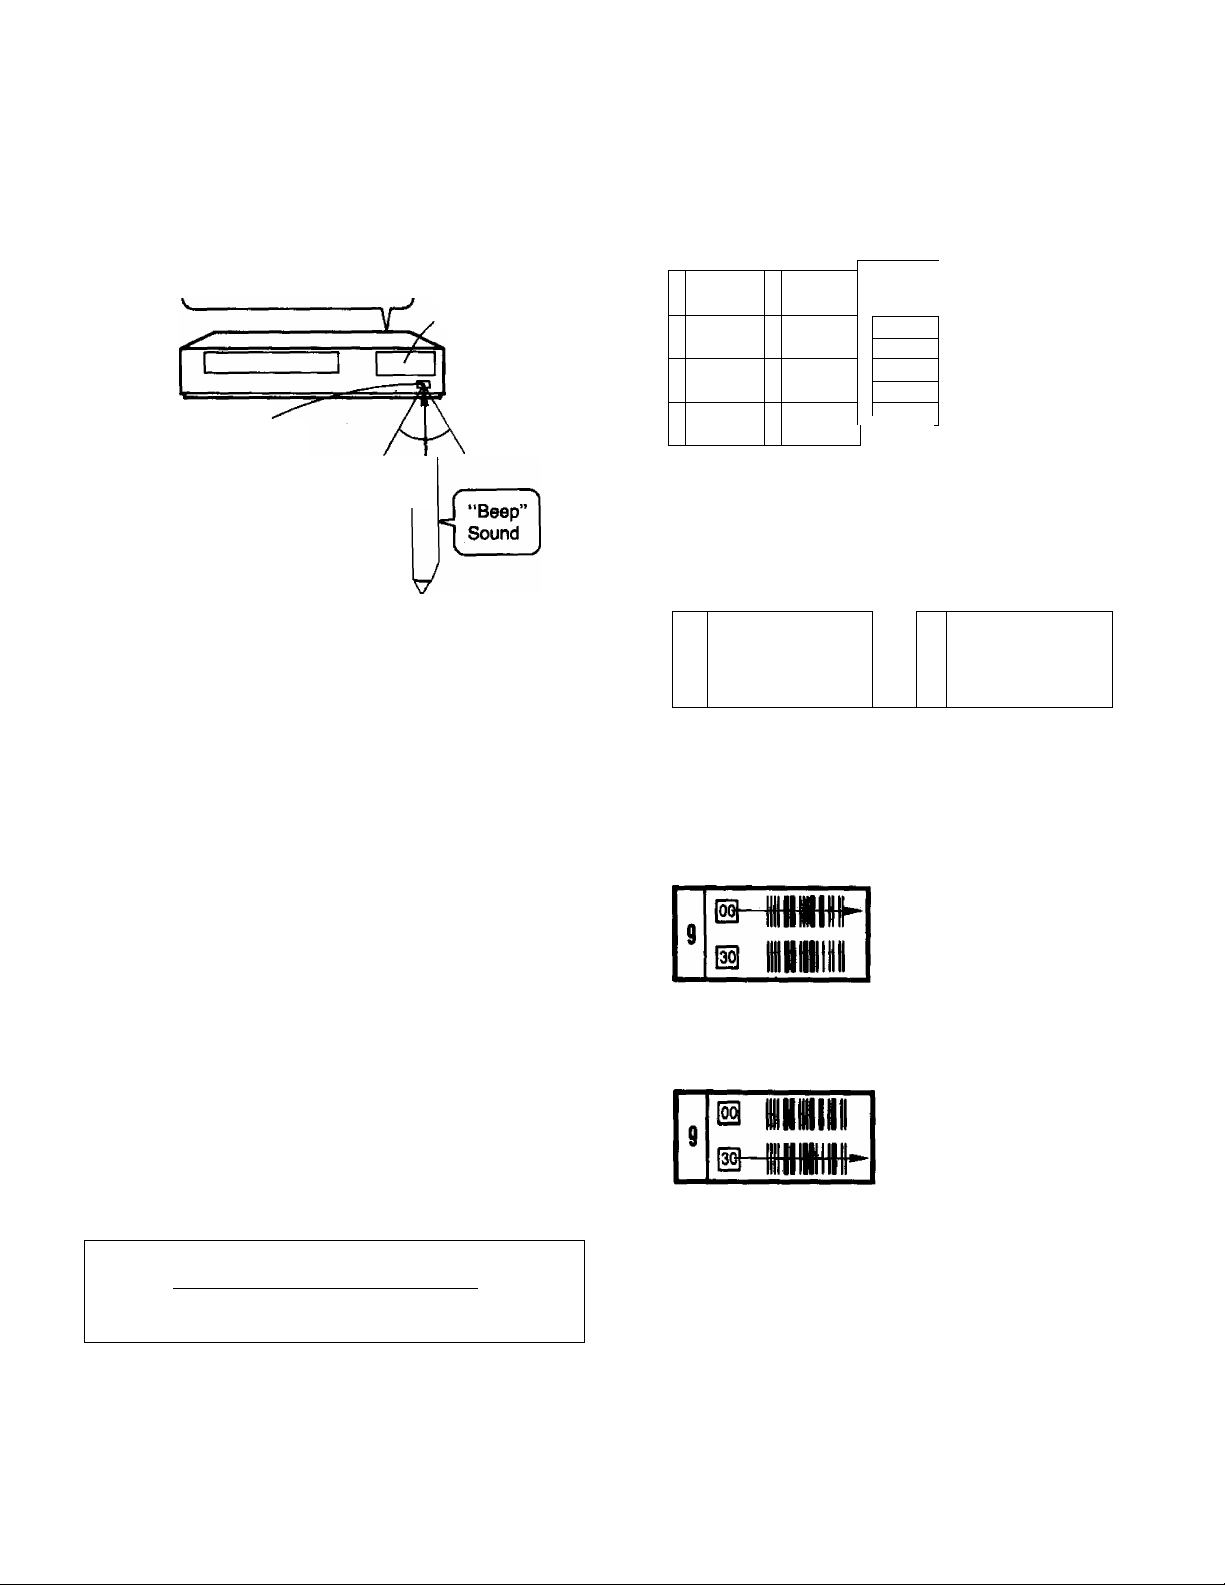
Programming a Timer Recording
Example: When programming a timer recording for a pro
gramme that will be broadcast on channel position 4
on the 3rd of the month, from 7:00 to 7:30, trace the
bar codes in the order of the numbered arrows
shown below.
How to Operate the Digital Scanner
Before using the Digital Scanner, batteries must be inserted.
Turning the Digital Scanner On
Set Power On/Off Switch to “ON”.
•If no operation is performed for more than 25 seconds, the
scanner will automatically switch over to the power-saving
standby condition and the lamp will go off. (in this case, if bar
codes have already been read but not yet transmitted to the
VTR, the data will be cancelled.)
•When the Power On/Off Switch is set to “ON” but the lamp is
not lit, sot the switch to “OFF” and then to “ON” again.
^Tracing the Bar Codes
^ Place the Digital Scanner vertically on the Small Box.
© Trace the bar code quickly in the direction of the arrow.
O Trace the bar code for “CHANNEL".
o Trace the bar code for “DATE”.
0 Trace the bar code for “START TIME".
0 Trace the bar code for "END TIME”.
©CHANNEL 0®DATE >@STARTT1ME >®ÉHDTtME
I lia III) lilla nil I
DErrUBIË^
4 4
T
□ m\
6
□ III!
Î
□ m\\\
1
□ III!
•The "Bee Bee Bee Bee Beeeeep” sound signals that the
scanner is now ready for data transmission.
•When no sound is heard, read the bar codes once again.
•If more than one bar code is traced in the same group,
only the last tracing will be effective.
•The bar codes for the time from “0:00” (midnight) to
“4:59" in the morning are on the back of the Programming
Sheet.
•If the “CANCEL” bar code is read, all bar codes that have
been read so far will be cancelled.
T
T
7i
1
□ ill!
□ III!
□ nil
□ nil
□ III!
llilll
limi
limi
W
nilll
@ mill
n iiiii
iw-
@ limi
@ IIWII m ||■lll
@ limi
m mill
a mu
m
a
m
a
m
E
111
III
III!
nil
III!
J!!L
Page 4
Keep pressing the Transmit Button and confirm that the
0
programmed data on the Multi-Function Display of the VTR
are as desired.
After releasing the button, the data will continue to be
displayed for about 12 seconds.
“Beep-beep-beep-beepbeep. .sound indicates
programming is completed.
Point the scanner at
the Infra-red Remote
Control Receiver Window
of the VTR and press
the Transmit Button,
Transmit Button
Transmission is possible from a
distance of up to 7 m from the VTR.
•If the transmission was not received correctly, the
“Beep-Beep, Beep-Beep" sound from the VTR will warn
you. In this case, perform transmission again.
•The transmission is possible when the VTR is turned on
but is not in any of the recording or playback operation
modes. It is also possible when the VTR is in the timer
recording standby mode (Q indication is tit).
•The programming will be done on the next lower unoccu
pied timer programme number (7~1).
If all programme numbers are occupied, the “Beep-Beep,
Beep-Beep" sound from the VTR will warn you that the
programming cannot be made.
•When the Transmit Button is pressed, the VTR will
automatically be put into the timer recording standby
condition and the VTR wilt be turned off.
•To operate the VTR before the timer recording will be
performed, press the Timer Rec. Button to suspend №e
timer recording standby condition. After using the VTR, be
sure to press the Timer Rec. Button again, otherwise the
timer recording will not be made.
[
For Programming Mora Than One Timer Recording in
Multi-Function
Display
Approx. 60°
^ucceealon
(Repeat the following operation steps (T)-®.
(T) Trace the "CANCEL” bar code on the Programming Sheet.
(—”
CANCEL
How to Trace the Bar Codes for Start and End Times
There are two kinds of time bar codes on the Programming
Sheet; time bar codes selectable in 30-minute steps and in
1-minute steps.
Time Bar Codes in
30-minute Steps
^ o®e^
m
limn
s
s
IIMIII
m
IIMIII
1
IS IIMIII
IS null
I
m
Miiii
m
limi
1
m
mill
(T) Setting the Time in 30-minute Steps
•Trace the appropriate bar code in the 30-minute-step
column only.
For example: when setting For example: when setting
B nmi
s
B
iniH
m
t
IS IIMIII
is
HIIIII
7
@
nini
m
1
m
to “9:00" to “9:30"
®HinmHiiih
9
Vs-
(g) Setting the Time in 1-minute Steps
@ imii
•When setting to a minute between 1 and 29, trace the
appropriate “-hMIN" bar code after tracing the bar
code.
For example: when setting to “9:12"
IIHIII
limi
inni
Si»-
31
32
33
»4
33
□ IMI
CD mi
m IMI
Q mi
[3 mi
iJil
'Time Bar Codes in
1-minute Steps
is IIMIII
9
n MIBtlF
42
This figure shows
the minute.
»When setting to a minute between 31 and 59, trace the
appropriate “+MIN” bar code after tracing the ^ bar
code.
For example: when setting to “9:42"
This figure shows
the minute.
/
42
d-m
•When a timer bar code with or minutes is traced
for the end time, the “Bee Bee Bee Bee Beeeeep” sound
which indicates reading completion is heard. When
subsequently tracing a "-i-MIN" bar code after tracing @
or to choose another minute setting, the reading
completion sound will be heard again.
© Trace the bar codes for “CHANNEL", “DATE”, “START
p TIME^' and "END TIME”.
© CcNifirm that the present time is displayed on the Multi-
Function Display of the VTR, and transmit the data.
•If the next timer programming data are transmitted while
the previous timer programming data are stiil being
the displayed timer recording data wilt be
Page 5
For Everyday Recording
© Turn on the Digital Scanner and trace the "CHANNEL” bar
code.
To Confirm the Programme of a Timer Recording
To perform this operation, the VTR must be turned on or it must
be in the timer recording standby mode (Q indication is lit).
® Trace the "EVERYDAY" bar code.
r
----------
----EVERYDAY
1
______ ______ _ __
@ Trace the “START TIME” and then the "END TIME” bar
codes, and transmit the data to the VTR.
•Everyday recording will be performed from that day on.
•If a "DATE” bar code is traced after tracing the "EVERY
DAY” bar code, everyday recording will not be performed.
For Everyweek Recording
® Turn on the Digital Scanner and trace the “CHANNEL” bar
code.
© Trace the bar code for the desired day of the week among
the "EVERYWEEK” bar codes.
m
a
EVERYWEEK
Sunday MondayTuesday
Wednesday
Thursday —
Friday
-------------
□ II
□ II
□ II
Id lil 1
□ II
ID MI 1
© Trace the “CHECK” bar code.
\
—
-------
\
CHECK
1 U Tltlllli
V
j
_______
© Perform transmission.
•After releasing the Transmit Button, the programmed data
will be displayed for about 8 seconds (for about 25
seconds, if the Q indication is not tit) on the Multi-Function
Display.
•At every push of the Transmit Button, the timer program
me number advances to the next higher number.
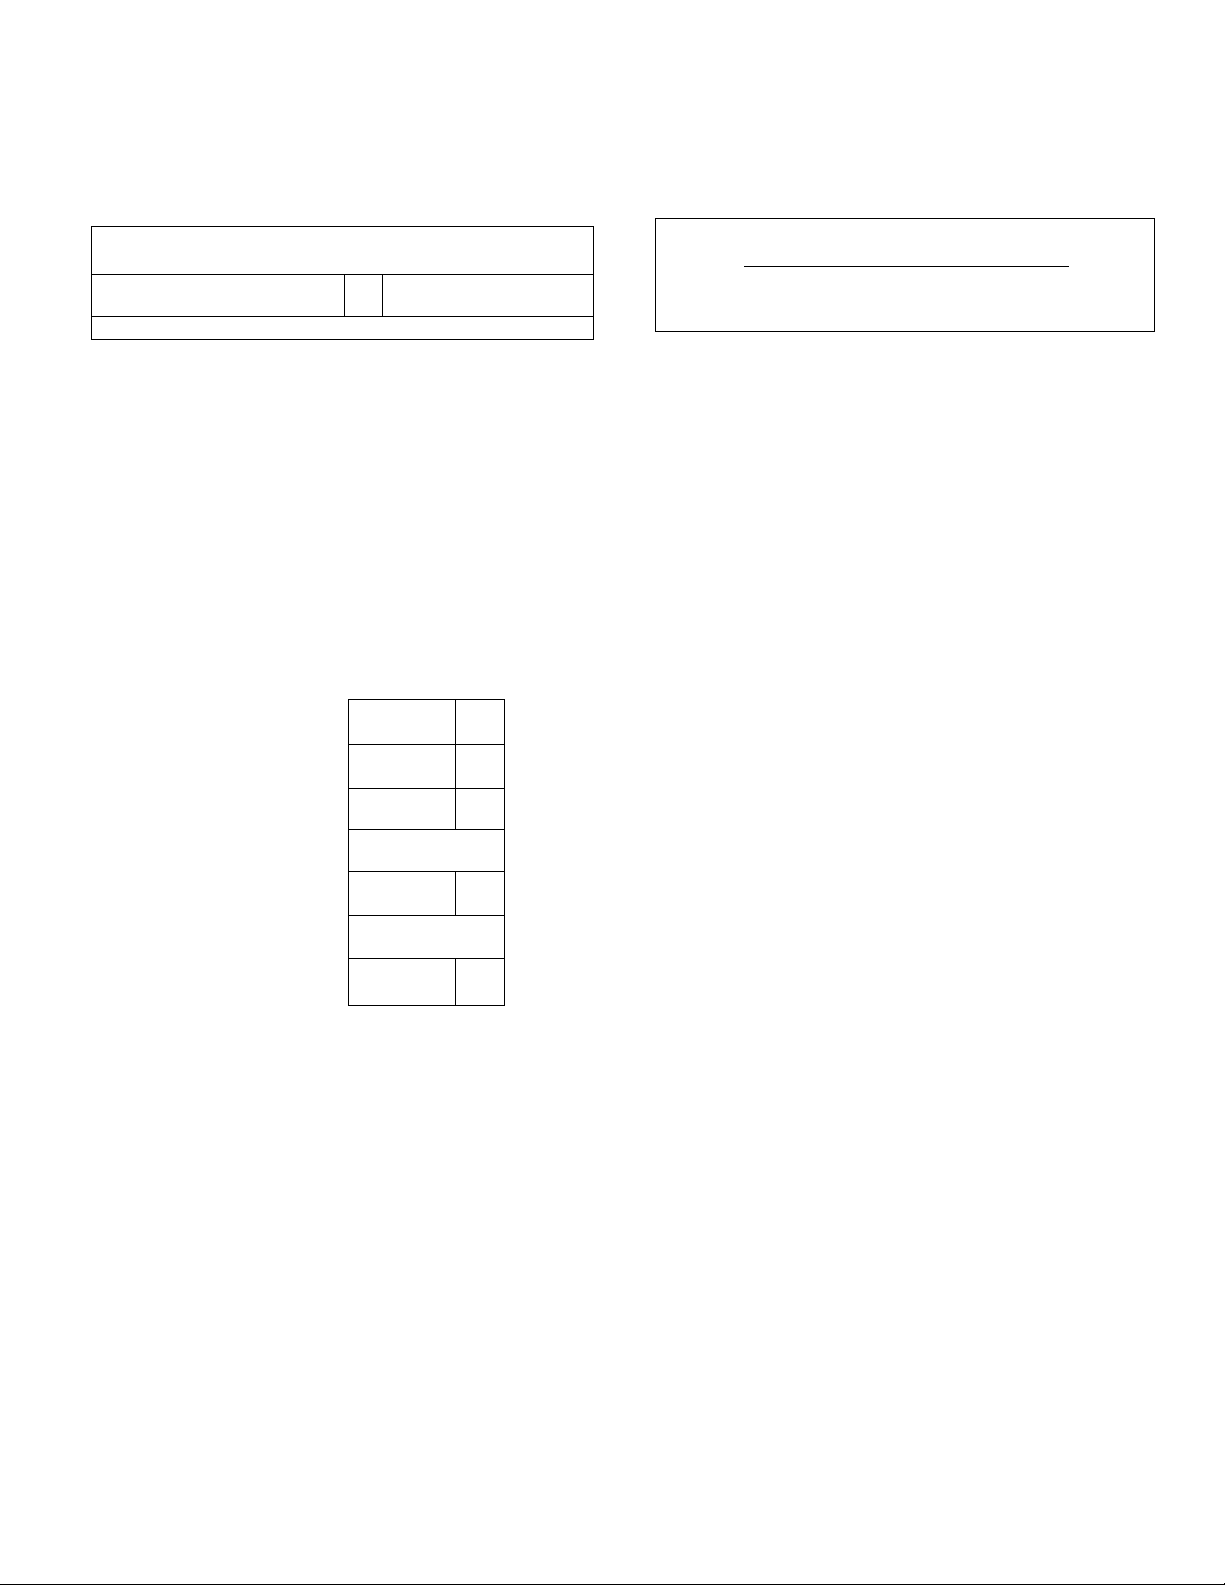
To Cancel a Programmed Timer Recording
To perform this operation, the VTR must be turned on but not be
in any of the recording or playback operation modes, or it must
be in the timer recording standby mode (Q indication is lit).
To cancel a programmed timer recording, its data must be
displayed on the Multi-Function Display. If they are no longer
displayed, first, trace the "CHECK” bar code and perform
transmission (several times, if necessary, until the programme
you want to cancel is displayed).
Then, within 8 seconds (within 25 seconds, if the [3 indication is
not lit):
© Trace the "CANCEL” bar code.
© Perform transmission.
•To programme a new timer recording, perform the
programming from the beginning.
__
J
Saturday
@ Trace the "START TIME” and then the “END TIME” bar
codes, and transmit the data to the VTR.
•Everyweek recording will be performed from that week on.
•If a "DATE” bar code is traced after tracing the "EVERY
WEEK'' bar code, everyweek recording will not be
performed.
II
□
Cautions
•Treat the Programming Sheet with care. If the sheet gets
dirty or scratched, the bar code reading may become
impossible.
•Protect the Digital Scanner from strong shocks and
vibration. Keep it away from water and places with high
temperature and humidity.
Page 6
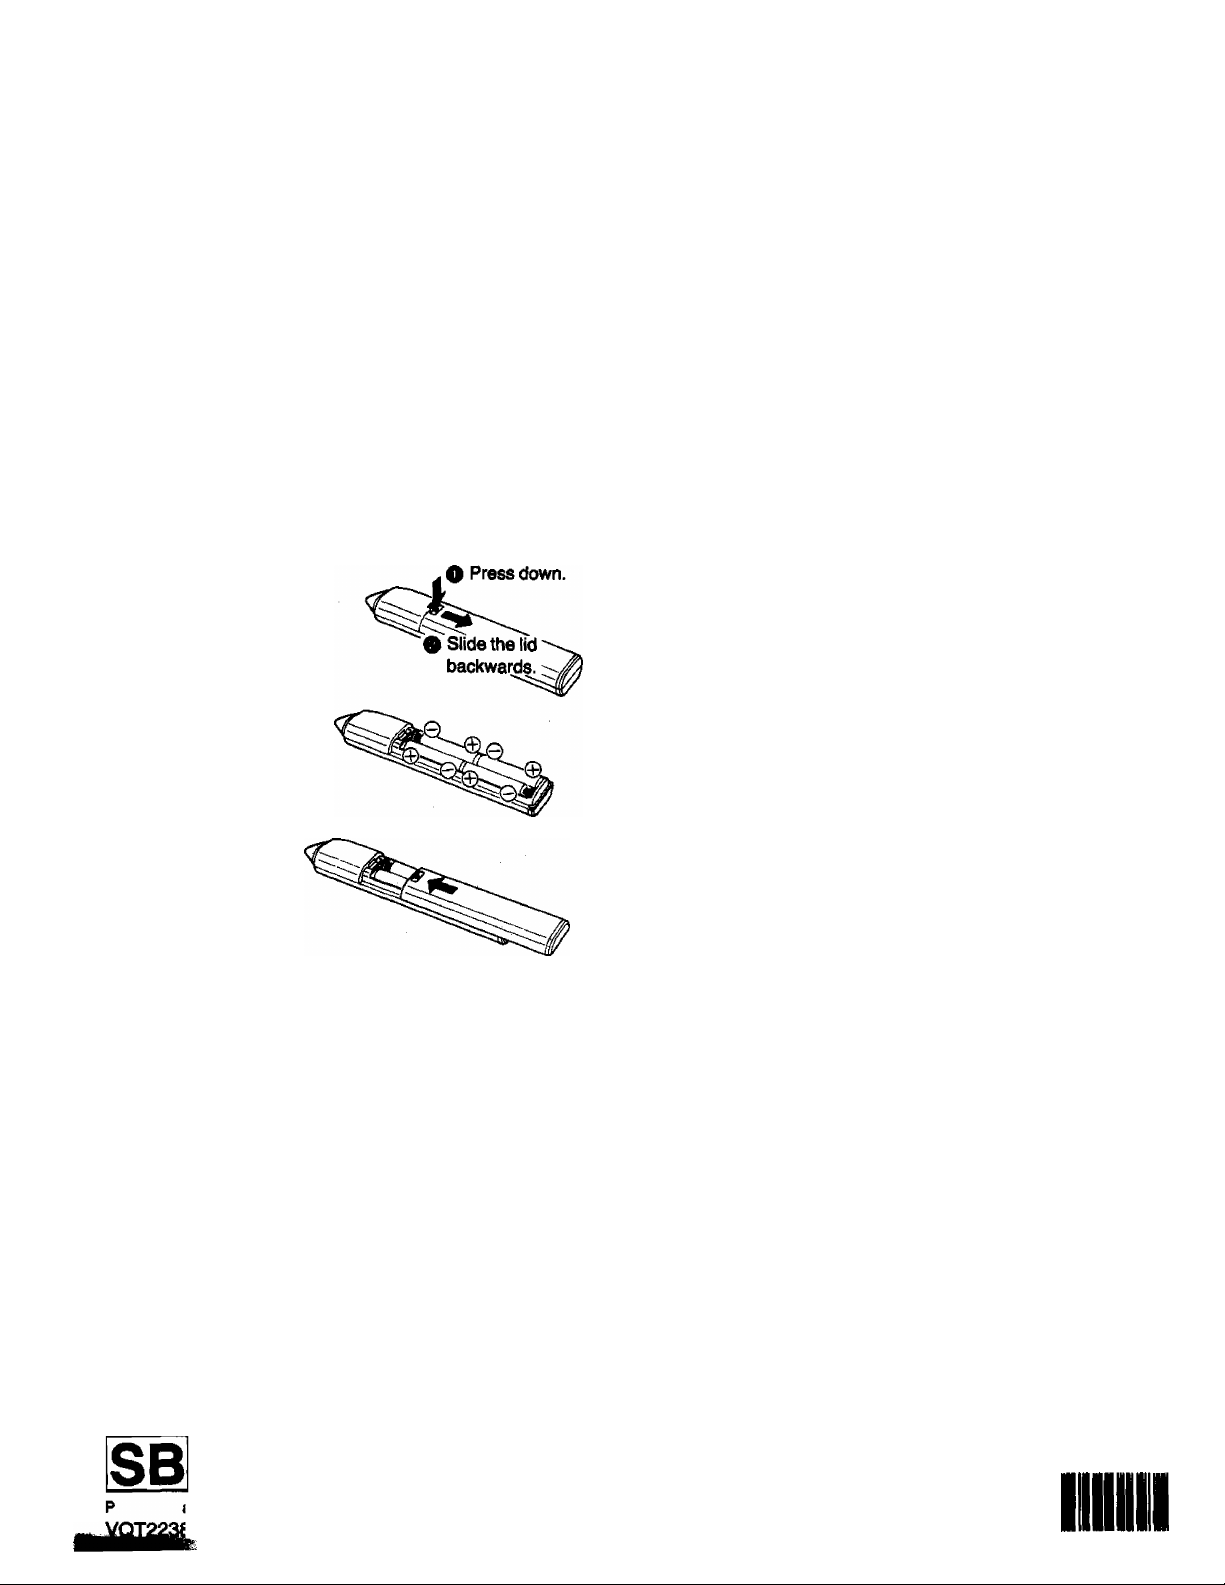
I^Qwer Source for the Digital Scanner SpecifIcatlona
M The Digital Scanner is powered by 4 lEC “R03” size
batteries. The life of the batteries is about one year, however,
it depends on the frequency of use. Inspect and if necessary,
replace the batteries once a year.
CAUTION FOR BATTERY REPLACEMENT
«Load the new batteries with their polarities (0 and 0) aligned
correctly.
•Do not apply heat to batteries, or internal short-circuit may
occur.
•If you do not intend to use the Digital Scanner for a long period
of time, remove the batteries and store them in a cool and dry
place.
•Remove spent batteries immediately and dispose of them.
•Do not use old and new batteries together. (Also never use an
alkaline battery with a manganese battery.)
Load the batteries as follows:
O Remove the lid on the
rear of the scanner.
Load 4 lEC "R03” size
batteries as shown in the
illustration with their
polarities (0 and 0)
aligned correctly.
Power Source:
Dimensions:
Weight:
Accessories;
Weight and dimensions shown are approximate.
Specifications are subject to change without notice.
DC6V
20.5(W)x31 (H)x157(D)mm
Approx. 45 g (without batteries)
4 pcs. lEC “R03" size batteries
Programming Sheet
Replace the lid.
Ascommandation
To save battery power, make sure to set the Power On/Off
iSwiich to "OFF" after using the Digital Scanner. When the
paQpriee are exhausted, the bar code reading can no longer be
performed.
Matsushita Electric Trading Co., Ltd.
P.O. Box 286, Central Osaka, Japan
Printed in Japan
И
F0187T1027-10000 CD
II
Page 7

IMPORTANT
Your attention is drawn to the fact that
recording of pre-recorded tapes or discs or
other published or broadcast material may
infringe copyright laws.
FOR YOUR SAFETY
WARNING
TO PREVENT FIRE OR SHOCK HAZARD,
bo NOT EXPOSE THIS EQUIPMENT TO
RAIN OR MOISTURE.
NV-G21A; Australian model
NV-G21EA: New Zealand model
rnmmmmMammmmMmmmmmM-mMBmMmmmMi
is the safety information.
DO NOT REMOVE OUTER COVER. f
To prevent electric shock, do not remove cover, li
No user serviceable parts inside. Refer servicing 'f
to qualified service personnel. fJ
„J
Page 8
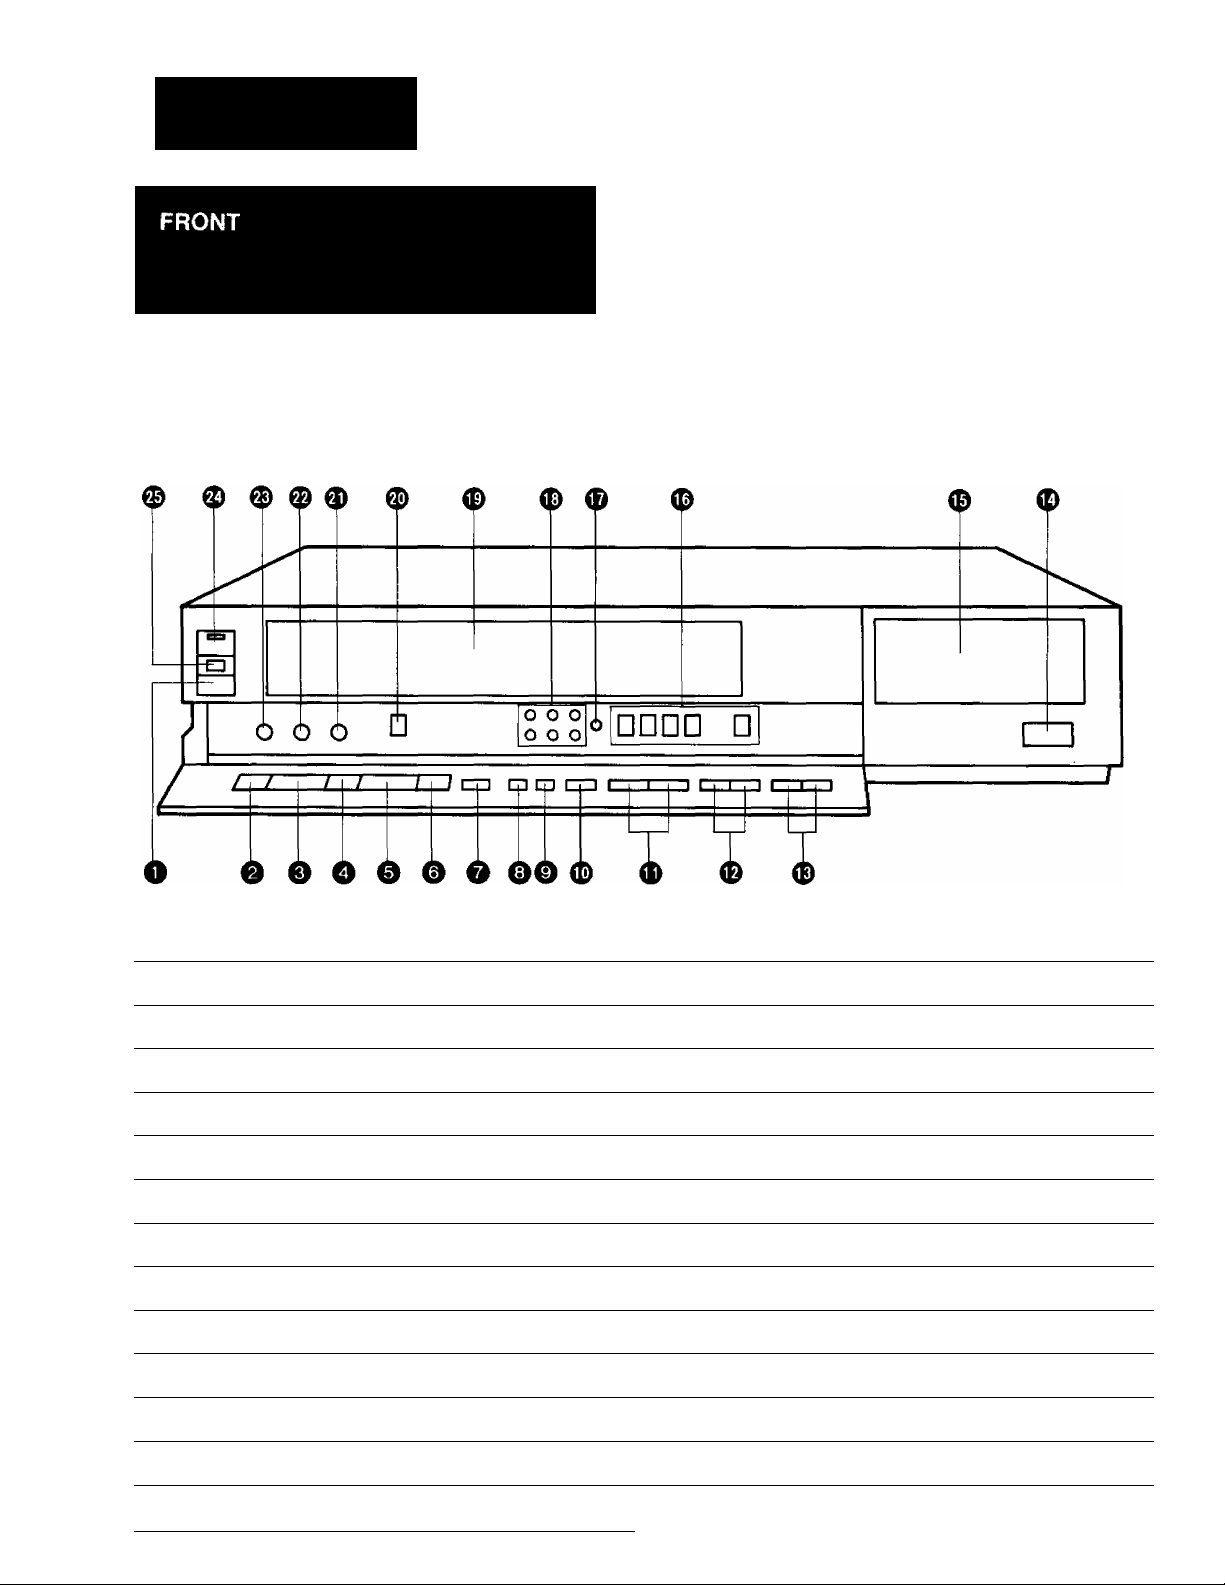
CONTROLS AND COMPONENTS
No. Description
• ^ «1. «
« * « # « »
Page
No. Description
o
Page
O Eject Button (^)
11
0 Rewind ◄◄/Review @ Button 12
0 Play Button (►)
0 Fast Forward ►►/Cue © Button
0 Stop Button (■)
0 Pause/Still Button (11)
0 Record Button (•)
0 Reset Button
0 Memory/Search Lock Button
12
12
14
13
15 0 Edit Switch
12
12 0 Slow Tracking Control
0 VTR/TV Selector
0 Channel Selection Up and Down Buttons 10
0 OTR On Buttons
0 OTR Off Buttons
17
16
0 Infra-red Remote Control Receiver Window
0 Multi Function Display
0 Timer Controls
0 Clock Button
0 Tuner Set-up Controls
23
5
8
8
10
0 Cassette Compartment 11
22
0 Picture Sharpness Control
7
0 Tracking Control
© VTR On/Off Switch with Indicator
0 Cassette-in Indicator
12
13
12
7
11
Page 9
Multi Function Display
0 ®
VTR
U U O O M /ON Q Q . Q Q
U U O Od U U'U U.
SU MO TU WE TH FR SA
OTR-
He]
No. Description
(T) Tape Running Display
{§) Double Speed Indicator
@ Memory Indicator 12
(4) Tape Counter Indicator 12
(5) Search Lock Indicator
(6) Tape Counter Display
(7) Timer Programme Number
X2
COUNT
® ® ®
Page
12
13
13
12
18 0 Recording Indicator 15
REAR
W
M
T O • © ' o o o
<Z)
u • m • u. u u
-t
^ ^ C- When dew forms:
° Dew Indicator
No. Description
(8) Timer Recording Indicator
(9) OTR Indicator
® Clock Display
0 Date Display 8
® Channel Display
® VTR Indicator
Page
19
16
8
10
7
No. Description
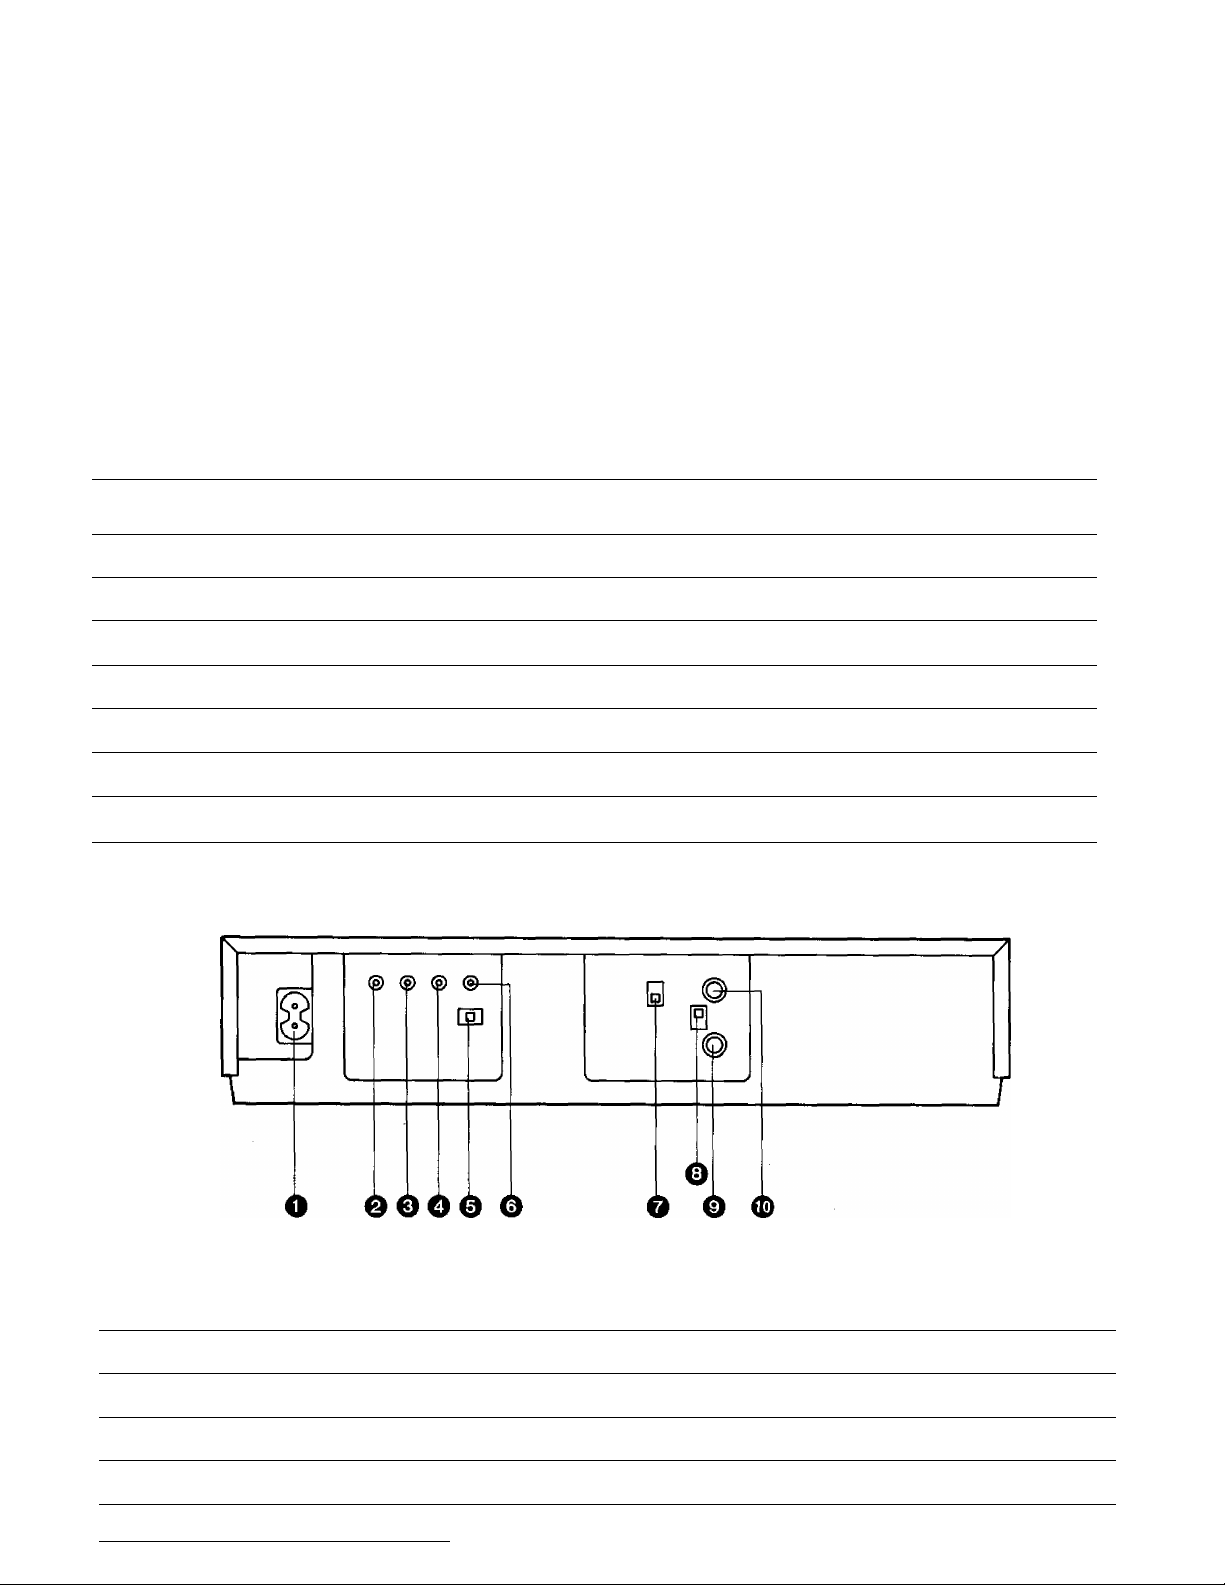
0 AC Mains Lead Socket
0 Audio Input Socket
0 Video Input Socket
0 Audio Output Socket
0 Colour Mode/Test Signal Switch
Page
7
21
21
22
7
No. Description Page
0 Video Output Socket
0 Video Playback Channel Selector
0 RF Signal Level Switch
0 RF Input Socket
0 RF Output Socket
22
7
7
7
7
Page 10

FEATURES
; ~- --Tr/j*: -*'J
1 r r i
■S'* '*•»!. "'■'i.r
* •t. ^
Stim Design and Front Loading System
This highly functional design allows loading the video
cassette from the front, thus minimizing the space required
for the VTR.
Multi-Function Display
Whenever an operation button is pressed, the activated
function is immediately indicated on this easy-to-see
display. It shows you at a glance, in what operation mode
the VTR is functioning.
Infra-red Remote Controller
The Infra-red Remote Controller unit allows operation of
various functions from the comfort of your favourite viewing
position.
Picture Sharpness Control
With this control, the contours of the playback picture can
be made sharper or softer.
Super Still, Super Still Advance and Double Super
Fine Slow Playback
Super Still, Super Still Advance and Double Super Fine
Slow Playback are possible with superb picture quality with
minimum noise and jitter.
Super OTR Function (One-Touch Timer Recording)
This convenient function makes it possible to easily
programme the VTR for recording of TV programmes with
immediate start or with start within 24 hours and with the
starting time and ending time precisely to the minute, and
the VTR will automatically turn itself off when the recording
ends.
Digital Scanner
This Digital Scanner lets you programme timer recordings
by tracing the corresponding bar codes on the supplied
Programming Sheet and then transmitting the data to the
VTR.
Auto Operation
This VTR automatically turns itself “ON" when a video
cassette is inserted even if it was turned off. When the tab
of the inserted cassette is broken out, playback will start
automatically. Also, even if the VTR is off, when the Eject
Button is pressed, it automatically turns itself on to eject the
cassette tape and turns itself off again.
When a video cassette tape with a broken out tab is
inserted and the VTR is switched over to recording, OTR
and timer recording, the cassette tape will be automatically
ejected.
When the tape reaches its end (except during OTR and
timer recording), it will automatically rewind to the begin
ning.
If the VTR On/Off button is pressed during the rewind mode
including Auto Rewind, the VTR will eject the cassette and
turn itself off when rewinding is completed.
1-Month Calendar Timer
The clock/timer of the NV-G21 is programmed with the
calendar up to the end of 2001. Therefore it knows exactly
what day of the week it is on any given date. Programming
of as many as 8 timer recordings is possible up to one
month in advance.
Lap Time Counter
The new Lap Time Counter is a great improvement over the
approximate counter systems of conventional VTRs. It
gives you an exact reading of the elapsed tape time in
hours, minutes and seconds, and makes it easy to calculate
the tape time left on a cassette.
Reception of up to 16 TV Stations
The built-in tuner in this video recorder allows pretuning of
16 TV stations. So this VTR can accommodate virtually any
increase in available TV programmes in the future.
HQ (High Quality) Picture System
Video recorders carrying the HQ symbol mark feature the
new VHS High Quality Picture System. This system
assures complete compatibility with VTRs that use the
conventional VHS system.
Page 11
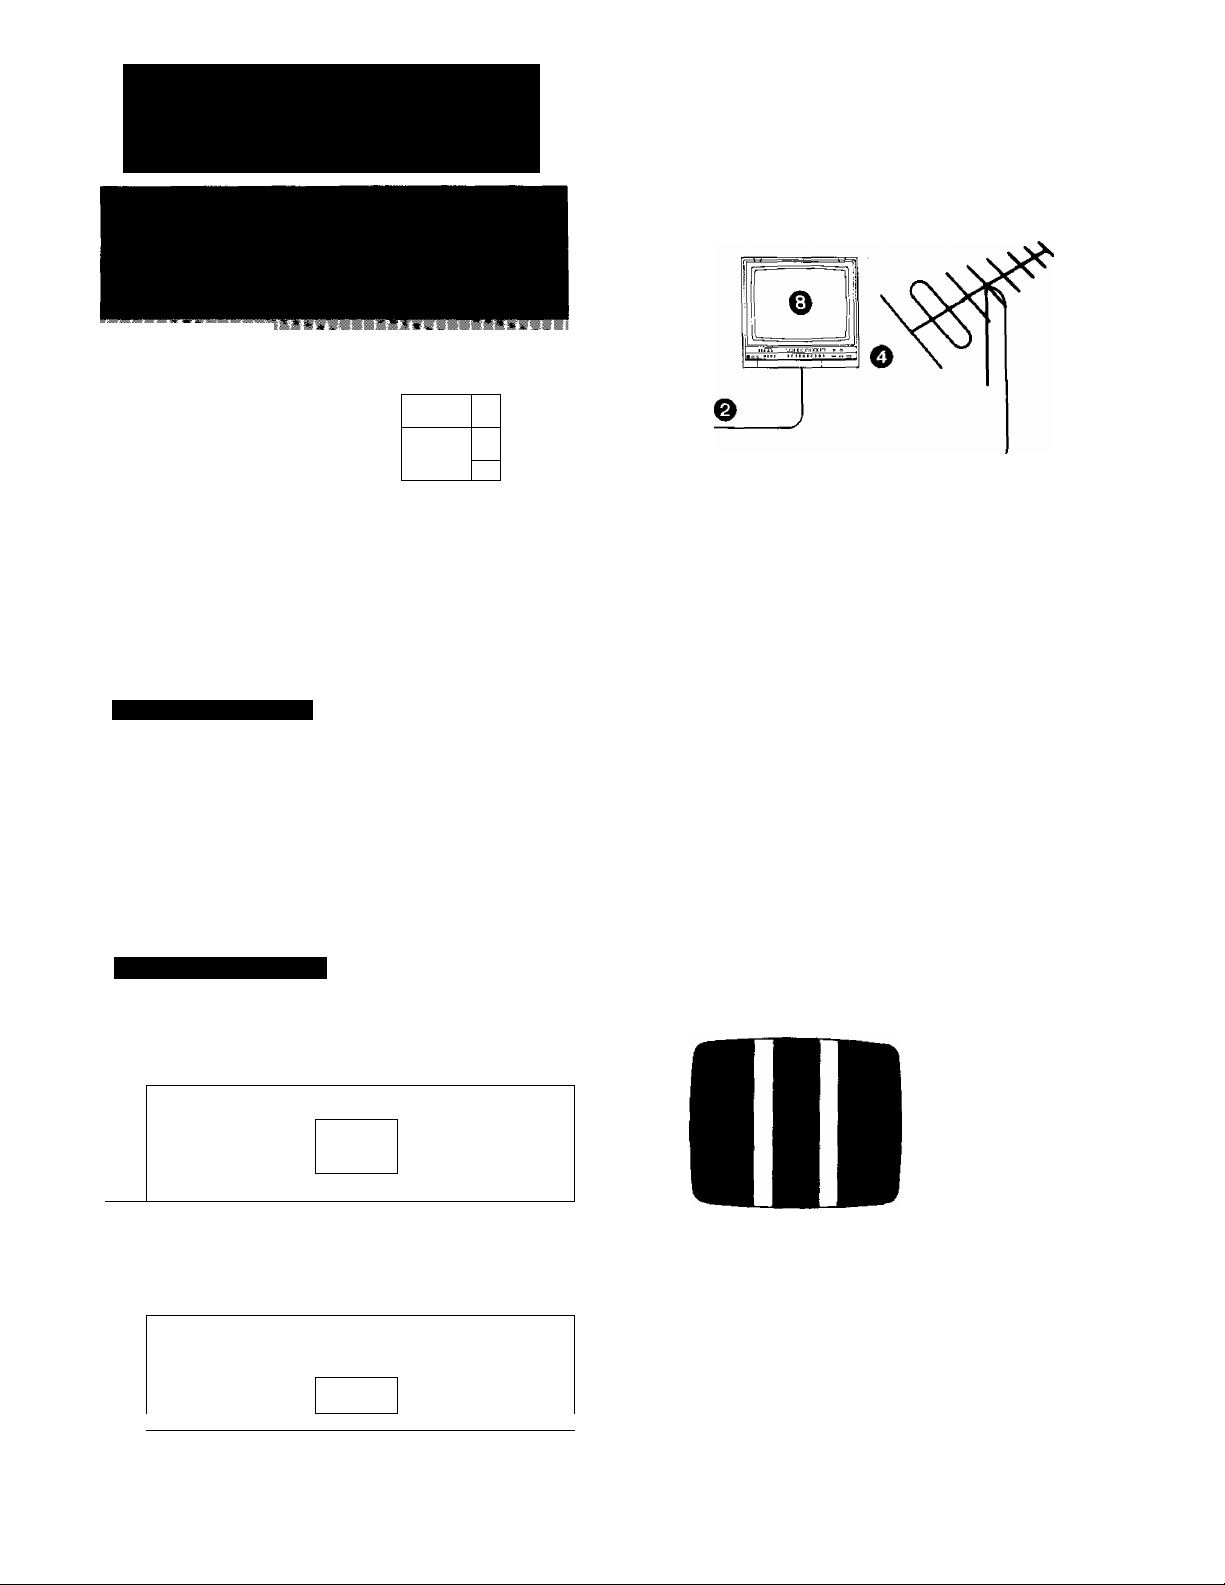
INSTALLATION, TUNING
THE TV SET TO THE VIDEO
NV-G21A:
FOR YOUR SAFETY
Install any external aerial to AS 1417.1,
PLAYBACK CHANNEL
lliiill
® ® ® ®
Ei
0
o ©
-------
TEST signal
□
COLOUR/
COLOUR
AU TO
TEST -
Connection to a TV Set
^ Connect the external aerial to the RF Input Socket on
the VTR.
^ c
A
L
¡a—
[—Video Playback Channel Selector
This switch is used to select the Video Playback channel
which is not occupied with any TV station. [NV-G21 A: 0 or
1; NV-G21EA: 2 or 3].
-RF Signal Level Switch:
Used to attenuate the reception of the VHF and/or UHF
aerial signals.
If the reception is normal, set to “HIGH”. If the signal is
strong (stripes appear in the upper part of the picture), set
to “LOW”.
0 Set the Colour Mode/Test Signal Switch to “TEST”.
(REAR PANEL)
^ Connect the aerial terminal on your TV set to the RF
Output Socket on the VTR with the supplied DIN-DIN
Coaxial Cable.
0 Connect the AC Mains Lead (Supplied) to the AC
Mains Socket of the VTR, and a mains outlet.
Video Playback Channel
0 Turn the TV set on.
0 Press the VTR On/Off Switch to turn the VTR On.
(FRONT PANEL)
VTR
L
_________
•The indicator will light up.
0 Set the VTR/TV Selector to “VTR”.
(FRONT PANEL)
VTR/TV
colour
AUTO
TEST
COLOUR/
TEST SIGNAL
Tune the selected programme position (channel) of the
©
TV set to the VHF channel shown below for your
model. Confirm on the TV set that the received test
pattern is as shown below.
NV-G21A VHF channel 0 or 1*
NV-G21EA VHF channel 2 or 3
NV-G21A only
’In some areas chan
nel 0 may be used by
local TV station. In
this case switch to
channel 1.
J
0 Set the Colour Mode/Test Signal Switch to “AUTO”.
Your TV is now ready to receive the RF output signal
from the VTR,
\
________________
•VTR Indicator will appear in the Multi-Function Display.
J
•If, during recording or playback, the colour is not
satisfactory, it can be stabilized by setting Colour
Mode/Test Signal Switch to COLOUR.
Page 12
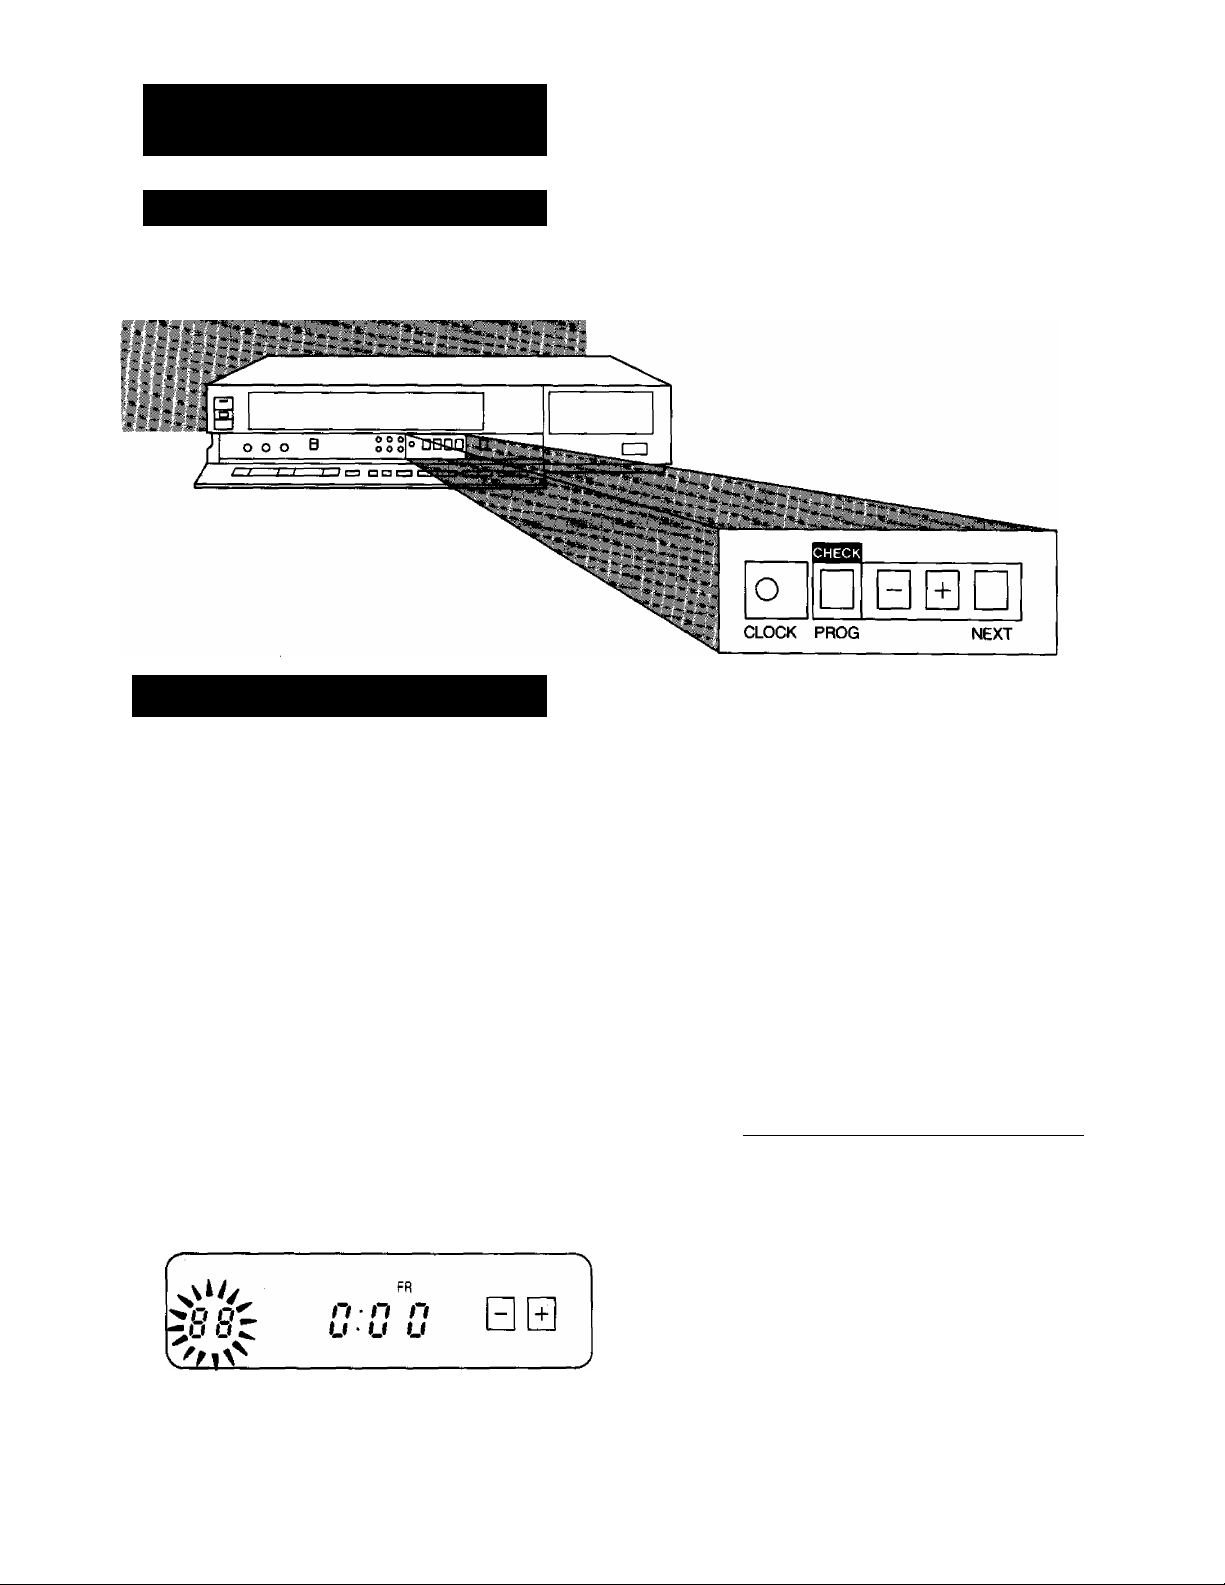
SETTING THE CLOCK TO
THE PRESENT TIME
The built-in digital clock employs the 24-hour system.
For Example; Set the clock for October, 8,1988.
Saturday, 12:35.
•Connect the VTR to the mains outlet.
•Press the VTR On/Off Switch to turn the VTR On.
•Open the Controls cover.
O When connecting this VTR to the mains or after a long
power failure, both the date and time indications flash.
z O "i rp
Q Press the Clock Button to start the date and time
setting.
TH
n • n n
Zu iC
0 Press the {+) or {-) Button to set the year.
U ■ U U
O
CLOCK
0 Press the (+) or (-) Button to set the month.
SA
n • $1 n
u u u
□0
0 Press the Next Button.
—
SA
n
■ n
n
u
u ■
u
0 Press the (+) or (-) Button to set the day.
SA
n • n n
U ' u u
□ 0
0 Press the Next Button.
□
NEXT
0 Press the Next Button.
i M W
V
FR
n • n n
u • u u
□
NEXT
I I O f I f
-- u -jLI U
SA
□
NEXT
Page 13

The present time is displayed continuously even if the
VTR is turned off.
Power Back-up System:
In case of a power failure, the back-up system retains
the present time memory for about 60 minutes.
However, it takes more than one hour for the back-up
circuit to become operational, after the VTR has been
connected to the mains.
O
CLOCK
This Button is used to start and
finish the time setting.
0 Press the (-I-) or (-) Button to set the hour.
SA
n ri
O D L ZU U
□ 0
□
PROG
YEAR Mode „
B
B
MONTH m
Mode '—'
B
DAY Mode
B
□
B
B
Unnecessary for Time setting
I^ST-^'1988...2000 --2001 —|
1 ^87 -^2001... 1989--H 988 —|
1-*-2--3
1^12-1-11
JAN. MAR. MAY. JUL. AUG. OCT.
DEC,
1-^2-*^..,29-1-30-*-31—I
1-^31 ->^0...4 ^3 ^2-----1
1 —30--29
..........
10-1-11—12-.
L _ n
.........
4--3--2
---------
1
________
{
_____________
APR. JUN. SEP. NOV.
1-i-2*-3
.........
29--30
t
________________
........
i
_______________
□
4 »3 —2 —,
,
□
I
□
0 Press the Next Button.
o * lùfi nC
U D I L
0 Press the (-i-) or {-) Button to set the minute.
O * lOZ* cc
u 0 t L j#V
^ 0 Press the Clock Button when the present time be-
" comes exactly 12:35'00".
SA
O *DDC
□
NEXT
□ 0
o
CLOCK
HOUR Mode
MINUTE Mode
B
B
B
B
B
□
B
NEXT
FEB.
1—2—3..,27_^28 or 29
i
___________________
1_^29 or28_^27...3-^
0-^1 -^2-i^3...21 -^22 ^23-,
r 1
0-1-23-^22
........
3—2-1-1
□
-----
< I
00^01 — 02
♦ 1
00—59 1-58-1-57...02-^01 —
t.
_________________________
YEAR ^ MONTH -i- DAY
HOUR-1^ MINUTE
.......
57 — 58 *-59-,
,
Page 14
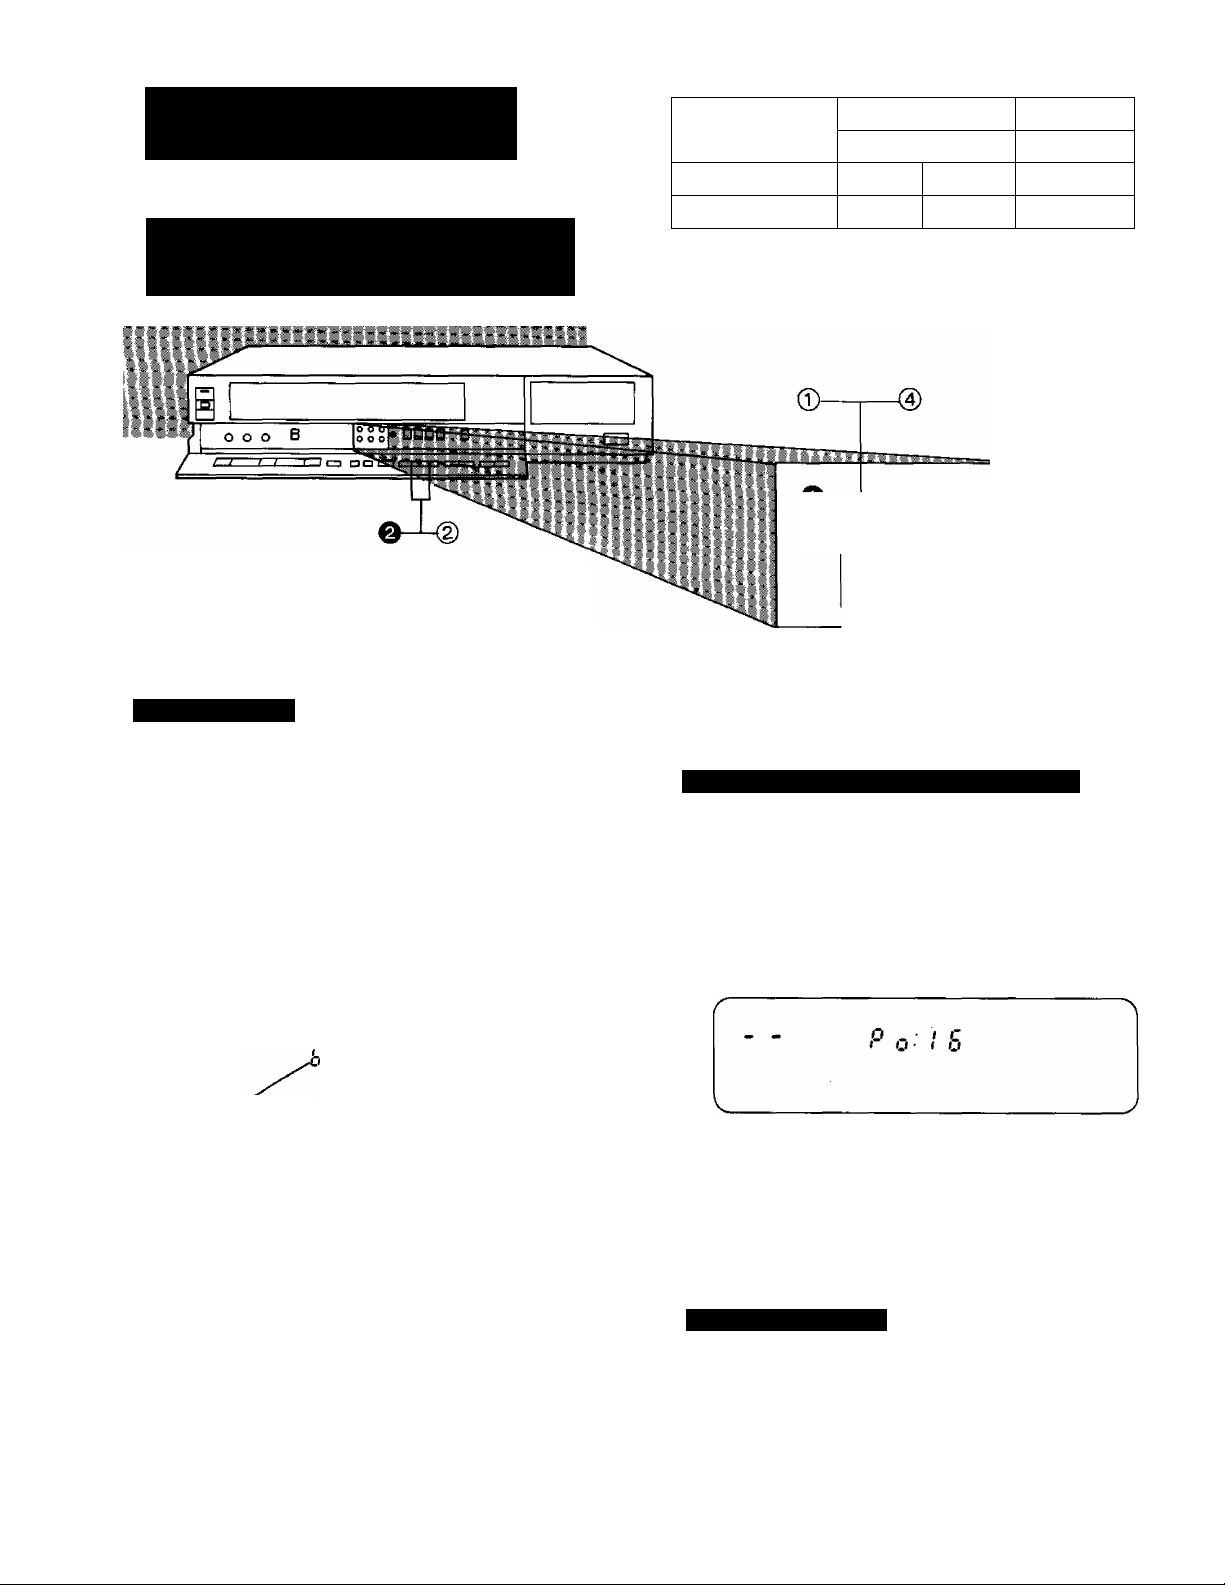
SETTING THE TUNER IN THE VTR
The tuner in the VTR makes it possible to receive TV
broadcasts and to record these programmes without having
to turn on the TV set. The reception channels in the TV
bands shown on the right can be received.
Preparation
•Turn the TV set on and select the programme position
(channel) which you have tuned to the video playback
channel.
•Press the VTR On/Off Switch to turn the VTR On.
•Set the VTR/TV Selector to “VTR”.
Tuning Procedure
^ Press the PRESET/NORMAL Button.
The indication on the Multi-Function Display changes
from the clock indication to the position indication.
O Press the Channel Up or Down Button to select a
programme position (channel) which you want to tune
to a TV station.
0 Press the BAND/AFC Button to select “I", “III”, or “U”
Position.
Display of the programme positions 1-16
" f ----
^
1 ^ ^ . - , „ _
w i
___
Ч
■‘“.Шай*::--
__
** *'*■-■ ^**——-■ - ■
0-5
1-3
5 A-11
4-11
21-69
21-69
•The tuner in the VTR can be preset up to 16 stations.
О PR^ET BAND CLEAR
_ OOO 0®
© NORMAL AFC
0-0 0+1
«ST hu™,bs=l
0 Press the PRESET/NORMAL Button again.
The indication on the Multi-Function Display changes
to the clock indication.
Blanking of Unoccupied Programme Positions
© Press the PRESET/NORMAL Button.
© Press the Channel Up or Down Button to select a
programme position (channel) which you want to tune
to a TV station,
(3) Press the CLEAR Button (“__" will be displayed in the
Programme Position Indication).
'P o /
E
Indicatidhof the
selected TV band
Selection of the
programme position
O Press the SEARCH (-k) or (-) Button until the picture
of the desired station on your TV is satisfactory.
•If the Search (-k) or (-) Button is pressed while
pressing the Fast Button, the stations will change
quickly.
During the station search
(The position indication
flashes on and off.)
Tuned condition/
When a station is
tuned
viiiimi
i r o-
TUf
>!MTnTTf
b-!
) ■' ‘
p 0.
b:!
I ►
•The tuned station is automatically memorized.
Repeat steps ^or each channel you want to tune to a
•Repeat steps d) and @ for any programme positions
on which no stations are to be tuned. Aftenwards,
these programme positions will be skipped during
Up/Down selection of the programme position on the
VTR.
(4) Press the PRESET/NCRMAL Button again.
Fine Tuning Procedure
If fine tuning is necessary, for example for a weak station
which is close to a strong station:
1. Make sure that the PRESET/NCRMAL Button is in the
Off condition, i.e. the Multi-Function Display shows the
present time.
2. Press the SEARCH “ or Button to obtain the best
tuning condition.
•To return the tuninig to its former state, press the
BAND/AFC Button.
Page 15
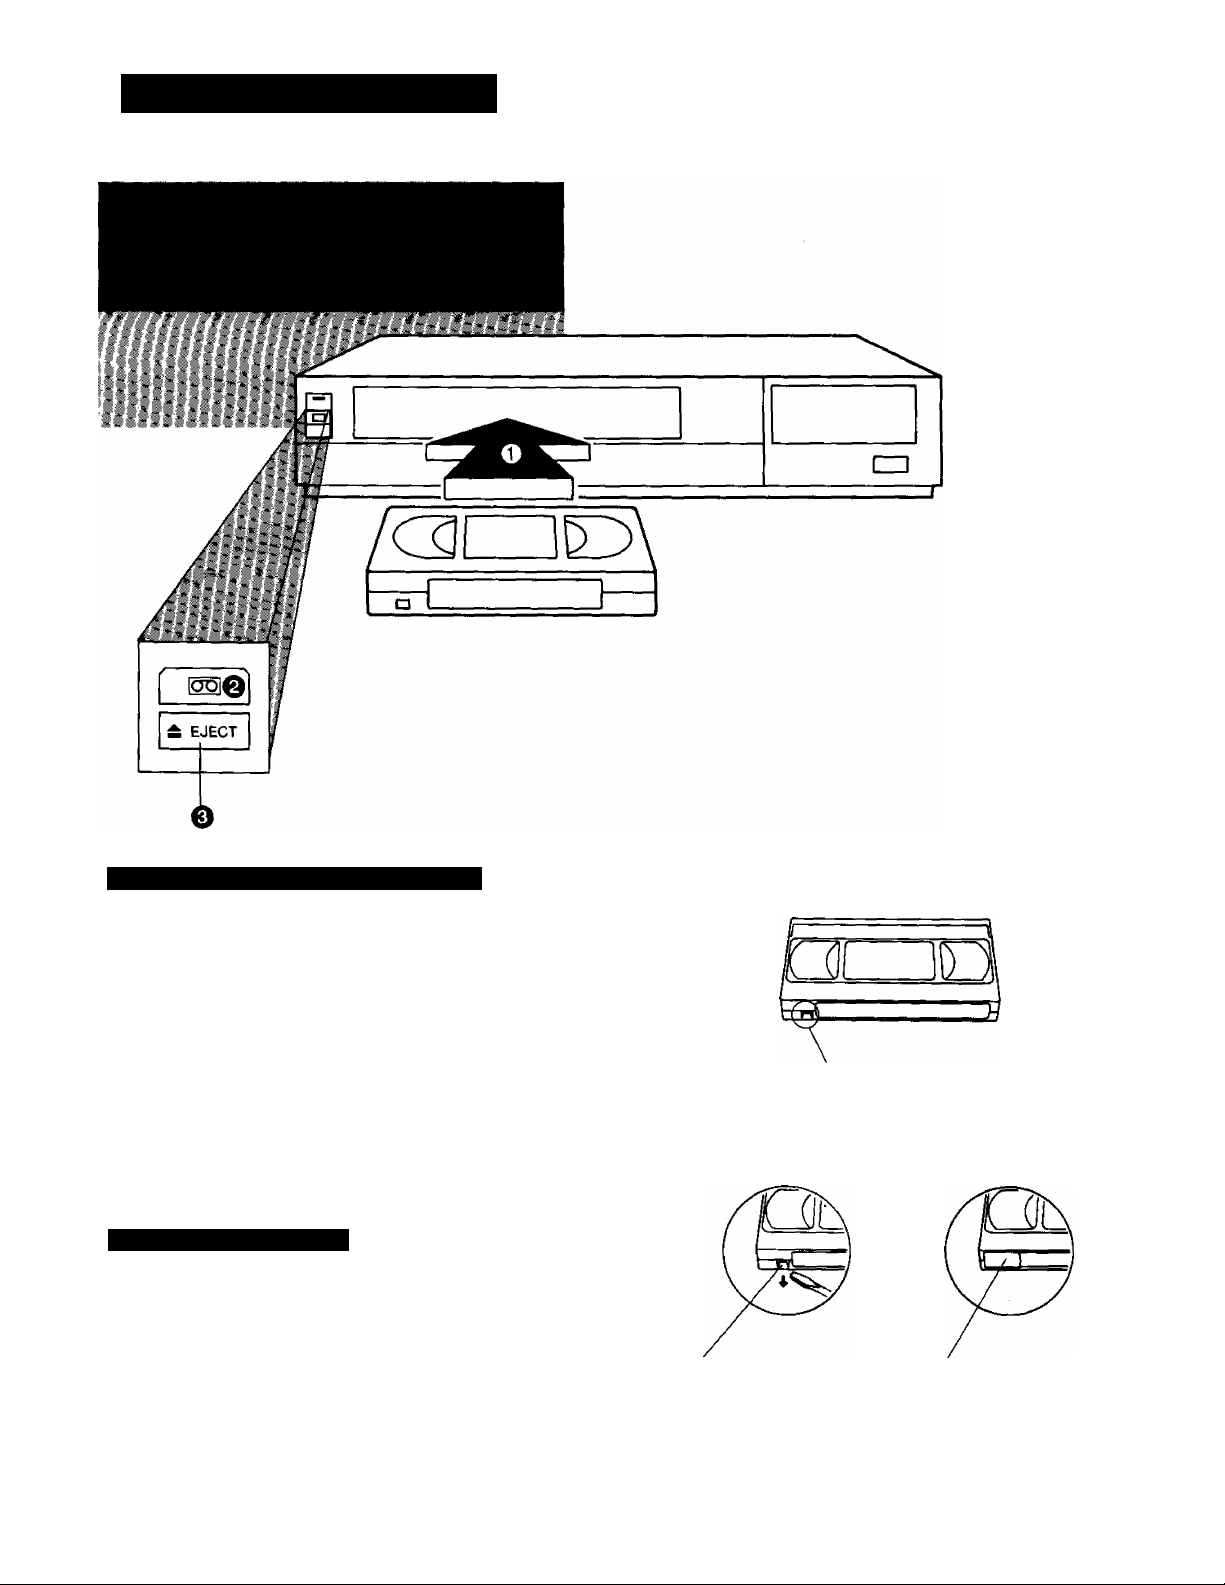
THE VIDEO CASSETTE
Inserting a Video Cassette (Auto Operation)
O Insert the video cassette as shown. The VTR will be
turned on automatically and the cassette will automati
cally be drawn into the VTR.
0 When a video cassette is inserted, the “BB" indicator
will light up.
Note:
•When a video cassette with broken out erasure prevention
tab (for example a pre-recorded tape) is inserted, play
back will start immediately.
•Use SKI video cassette tapes only.
Removing a Video Cassette
o Press the Eject Button (A).
Even if the VTR is off, the VTR automatically turns itself on
when the Eject Button is pressed, and the cassette tape is
ejected. After that, the VTR will turn itself off again.
Erasure Prevention Tab
To prevent accidental
erasure
Break off the tab with
a screwdriver.
To record again
Cover the hole with
adhesive tape.
Page 16
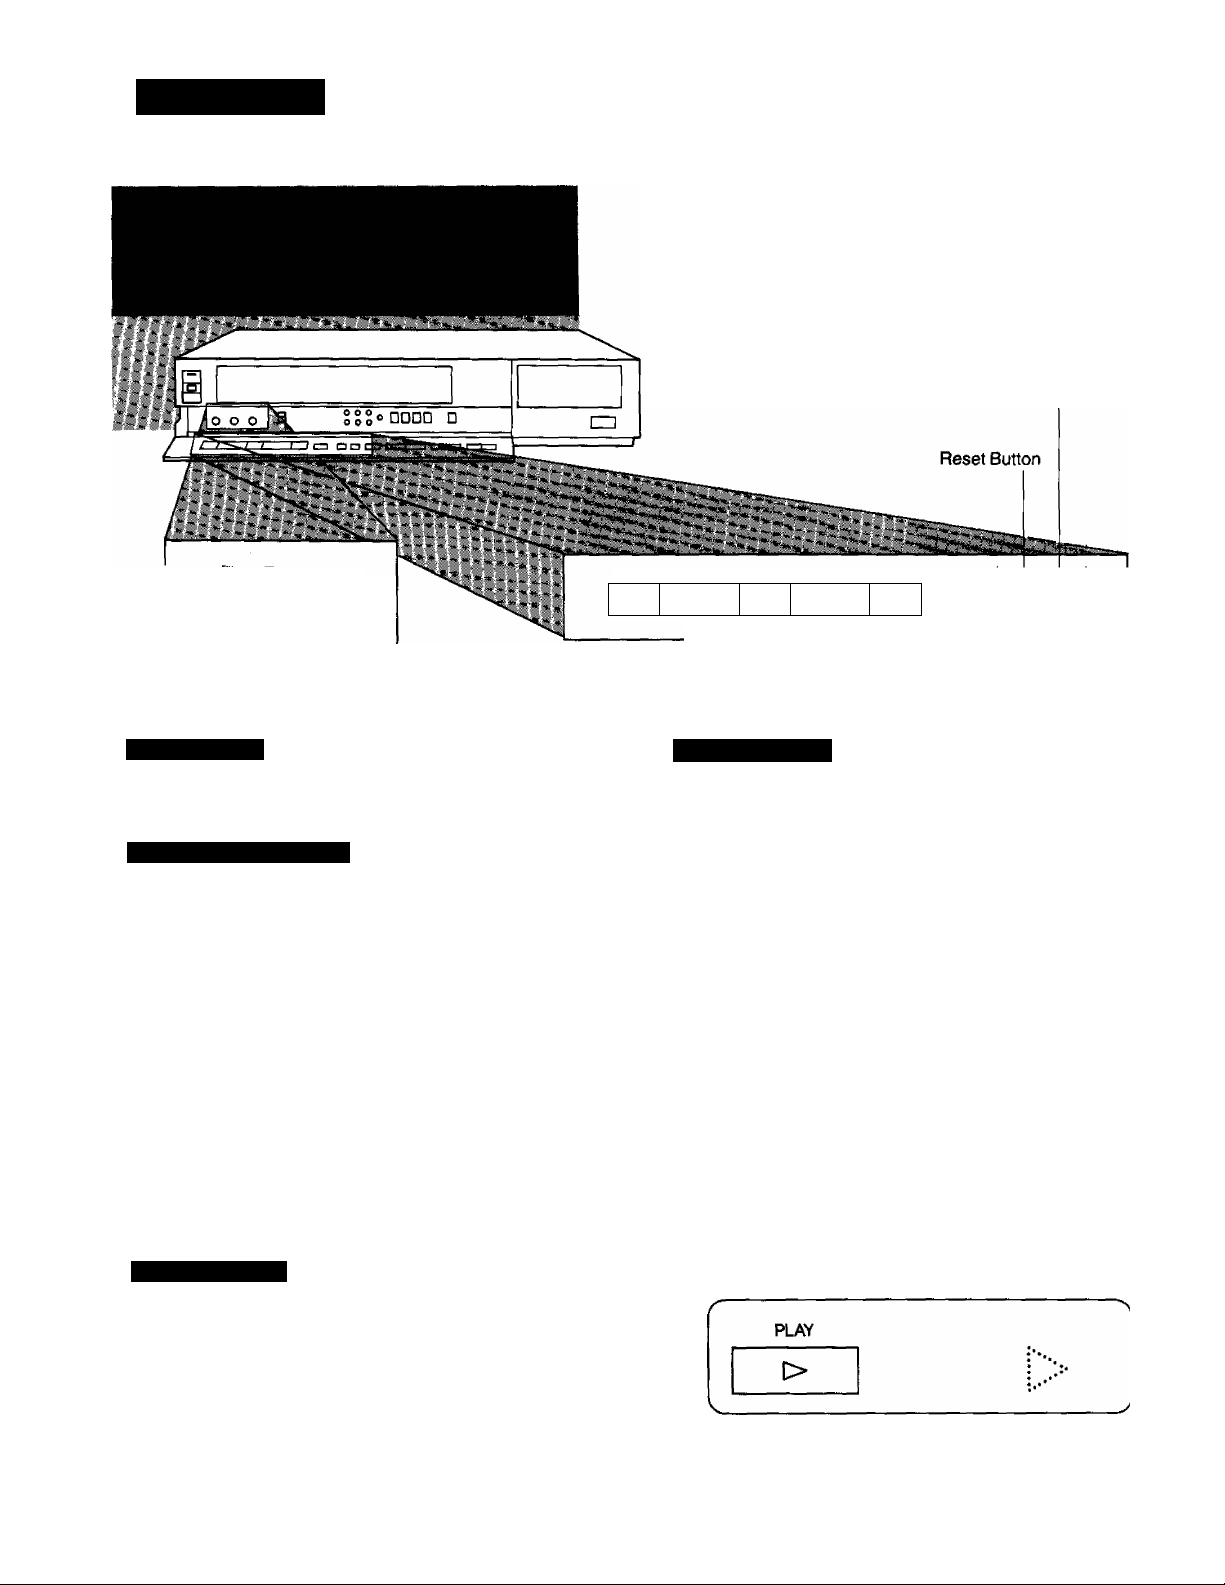
PLAYBACK
Q
KING
----
SLOW PCT JRE
Preparation
•Make sure that the Timer Record Button is set to “Off”,
•insert a recorded video cassette.
When a video cassette is already inside the VTR, press
the VTR On/Off Switch to turn it on.
•Turn the TV set on and select the video playback channel.
•Make sure that the Edit Switch is set to Off.
Memory/Search Lock Button
REW/®
-----------
PLAY
-----------
©/FF STOP PAUSE/STILL REC* RES ET MEMORY/
«1
[>
!>l>
□
DO
Baa
Tracking Control Picture Sharpness
Control
Auto Operation
When a video cassette which has the erasure prevention
tab removed is inserted, playback will start automatically.
Rewind and Fast Forward
Press the Rewind ◄◄/Review © Button to rewind the
tape.
REW/®
<30
Press the Fast Forward ►►/Cue Q Button to wind the
tape forward rapidly.
®/FF
t»
Memory Function
The Memory function makes it simple and fast to find a
certain position on the tape later again, simply by pressing
the Reset Button at that position to set the tape counter to
“0:00.00” and by pressing the Memory/Search Lock
Button. During Rewind or Fast Forward, the tape will then
stop at approximately the desired position.
Memory—
Indication
n n n n n
u • u u u u
Lap Time Counter
It shows the elapsed recording or playback time.
-r
^ U
n n n n
u u. u u
Hours
Seconds
Minutes
The indication will appear when the tape is
rewound further than the tape counter position
“0:00.00".
If the figures on the Tape Counter do not change
during Fast Forward, Rewind or any of the playback
functions, this means that nothing is recorded on that
tape section.
The tape counter is automatically reset to “0:00.00"
every time a tape is ejected.
Normal Playback
Press the Play Button (►).
•Adjust the Tracking Control on the VTR if the image is
partially obscured by bands of noise.
•Control the picture as you like with the Picture Sharpness
Control (sharp or soft contours).
Page 17
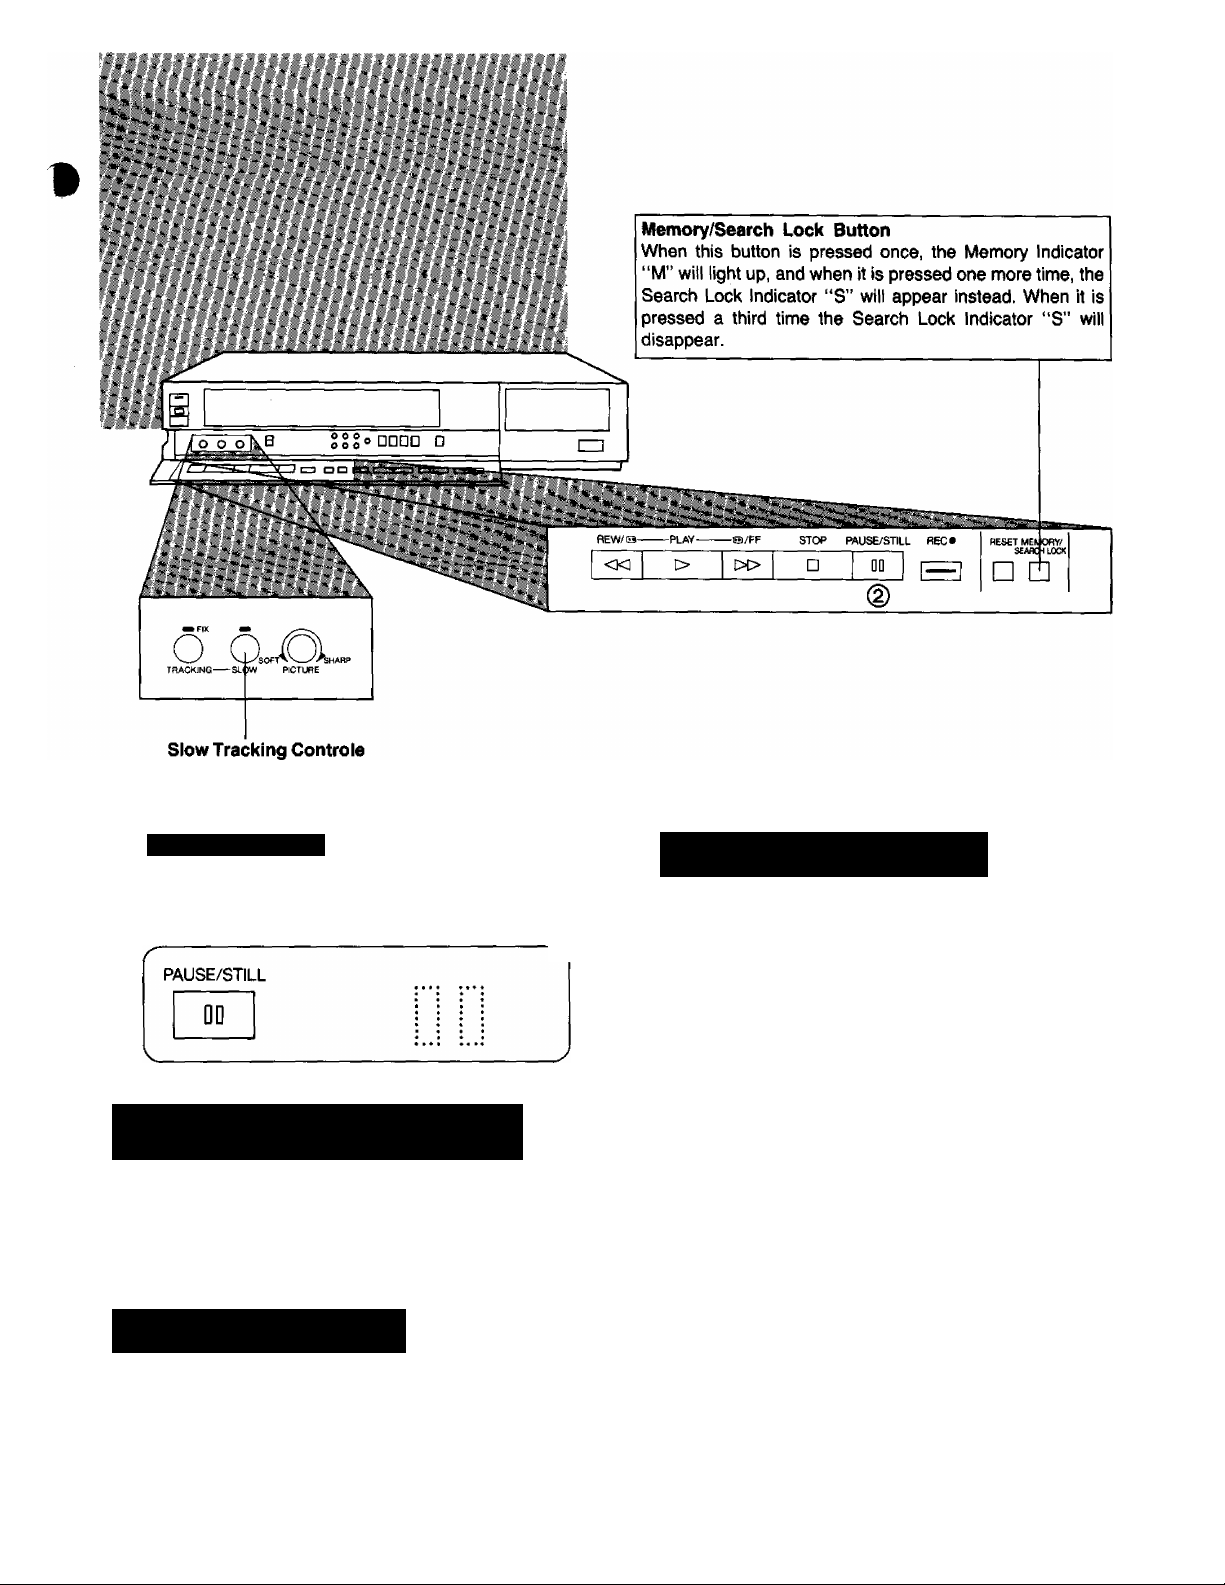
Super Still Playback
When the VTR is in the playback mode, press the
Pause/Still Button (I I) to view a super still-picture. To
continue the normal playback, press this button again.
0 Double Speed Playback (Remote Controller
only)
When the VTR is in the playback mode, press the Double
Speed Playback Button on the Infra-red Remote Controller
to view a double speed playback picture. To continue the
normal playback, press the Play Button.
0 Super Still Advance Playback
(Remote Controller only)
Press the Still Advance Button (»►) on the Remote
Controller unit while the VTR is in the still playback mode.
Each time you press this button, the still-picture will
advance one frame.
0 Double Super Fine Slow Playback
(Remote Controller only)
During normal playback, the Slow-motion playback can be
activated by pressing the Slow Button {t*) on the Remote
Controller unit. Slow-motion playback between and %
of the normal speed can then be obtained by using the Slow
{+) or (-) Button.
•Press the Play Button (►) to continue the normal
playback.
•If the Slow playback operation continues for more than 5
minutes, the VTR automatically switches over to the stop
mode.
•While playing back a tape in the Super Still or Double
Super Fine Slow playback mode on a TV set equipped
with an automatic vertical hold control, the picture may
shake vertically. In this case, set the TV set’s vertical hold
(AUTO/MANUAL) selector to the “MANUAL” position,
and adjust the vertical hold control.
Stow Tracking Control
•When noise bars appear during Super Still, Super Still
Advance or Double Super Fine Slow playback, switch
over to slow playback and adjust the Slow Tracking
Control to reduce the noise bars.
•It may not be possible to eliminate the noise bars
completely.
Page 18
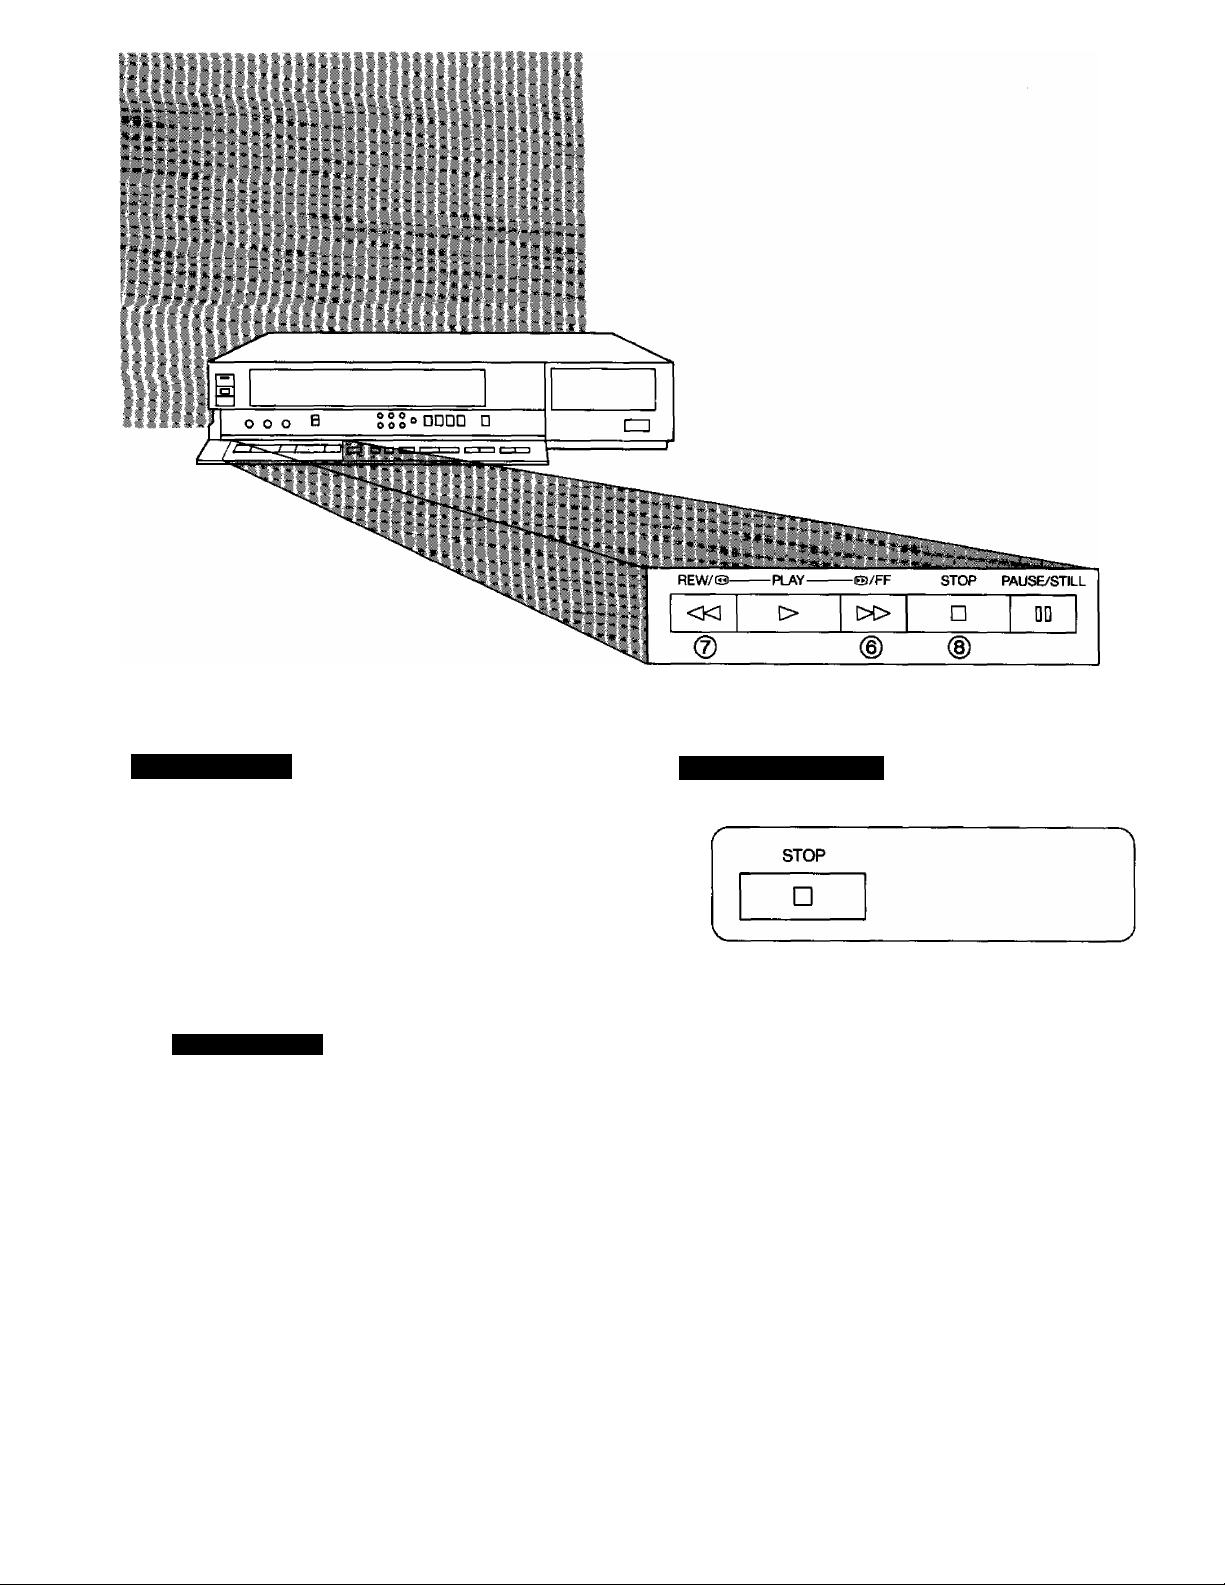
^ Cue Playback
When the Fast Forward ►►/Cue Q Button is kept pressed
while the VTR is in the playback mode, the tape will be
played back in fonward direction at about 5 times normal
playback speed.
63/FF
>o
Review Playback
When the Rewind ◄◄/Review @ Button is kept pressed
while the VTR is in the playback mode, the tape will be
played back in reverse direction at about 5 times normal
playback speed.
O To Finish Playback
Press the Stop Button (■) to stop the playback.
REW/®
«I
To make possible Cue or Review playback without having
to keep the respective button pressed, first press the
Memory/Search Lock Button so that the Search Lock
Indicator “S" appears in the Multi-Function Display, and
then press the Fast Forward ►►/Cue Button © or the
Rewind ◄◄/Review © Button.
To switch the VTR back to normal playback, press the Play
Button (►).
•When Cue or Review playback continues for more than 10
minutes, the VTR switches back to the normal playback
mode.
•The sound will be played back only during normal
playback.
•If you leave the VTR in the still playback mode for
more than 5 minutes, the VTR will automatically
switch over to the Stop mode, to protect the tape
and the video heads.
•Noise which takes the form of horizontal bars
appears on the TV in the Cue and Review playback
modes. This is not an indication of a malfunction.
•The top of the picture may become distorted in the
Cue or Review mode. This is not an indication of a
malfunction.
•When the picture rolls vertically in the Cue or
Review mode, adjust the vertical hold control on the
TV set.
Page 19
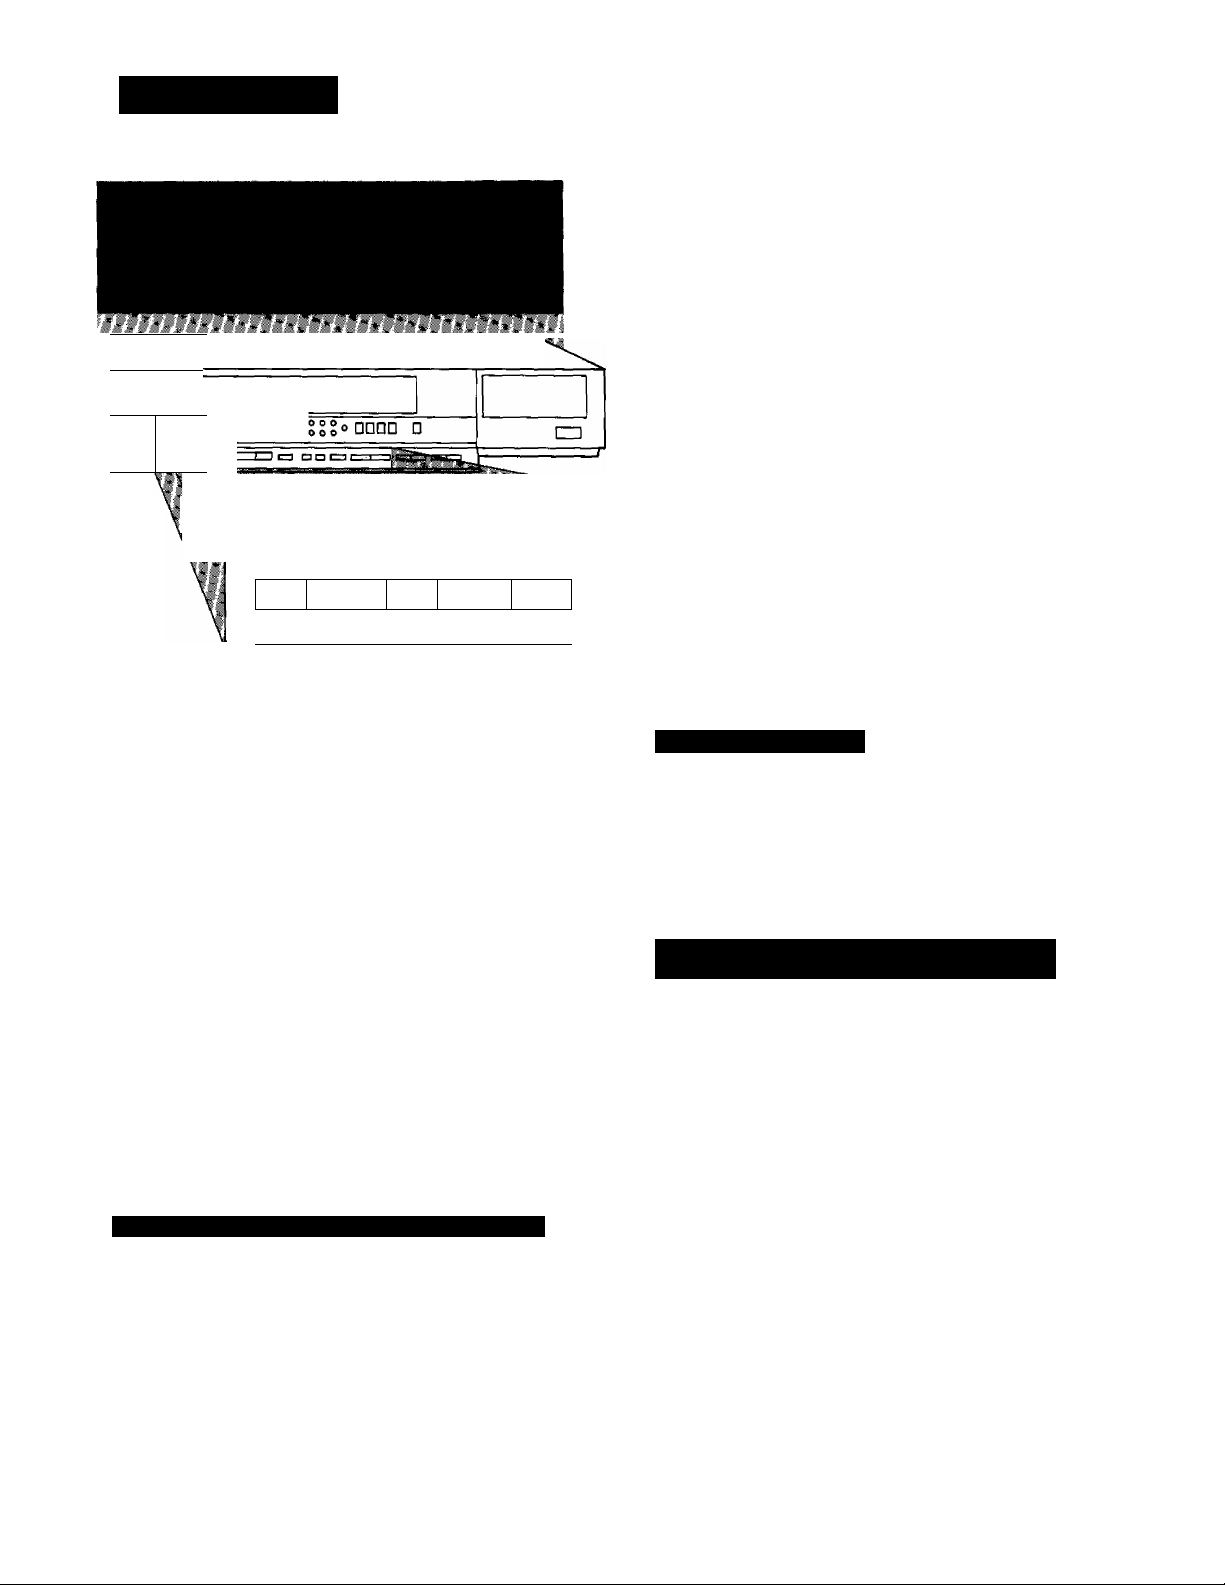
RECORDING
itm^
tmS 1-
II i
■11.=:
o o
È
• * **' ' ' ■' ' ‘ “ " “ : " * : '
<X]
t> oo
STOP PAUSE/STILL REC*
□
DD
o
e
Preparation
•Insert a video cassette with the erasure prevention tab
intact.
When a video cassette is already inside the VTR, press
the VTR On/Off Switch to turn it on.
•Make sure that the Timer Record Button is set to “Off”.
•Reset the Tape Counter to “0:00.00”.
•Set the VTR/TV Selector to “VTR”.
B □ □ □
Select on the VTR, the programme position (channel)
to be recorded. In order to confirm proper reception,
turn on the TV set and select the video playback
channel.
n
U
0 Press the Record Button (•).
REC#
When a video cassette with broken out tab is inserted,
it will be automatically ejected.
•During recording, the programme position (channel)
on the VTR cannot be changed.
If You Wish to Avoid Recording Unwanted Material
0 Press the Pause/Still Button (I I) to stop the tape
temporarily.
REC
To Finish the Recording
0 Press the Stop Button (■).
STOP
□
Recording One TV Programme While Watching
Another
You can watch one programme on the TV while recording
another on the VTR.
1. Record (following steps O O)-
2. Set the VTR/TV Selector to “TV”.
3. Select the desired programme position (channel) on
your TV set.
PAUSE/STILL
00
•Press the Pause/Still Button ( II) again to continue
the recording.
•If you leave the VTR in the pause mode for more than
5 minutes, the VTR will automatically switch over to
the stop mode to protect the tape and the video
heads.
REC
•Ensure all cables from the Video Input and Audio
Input sockets are disconnected before starting the
recording. If they remain connected, it is impossible
to record TV programmes.
Page 20
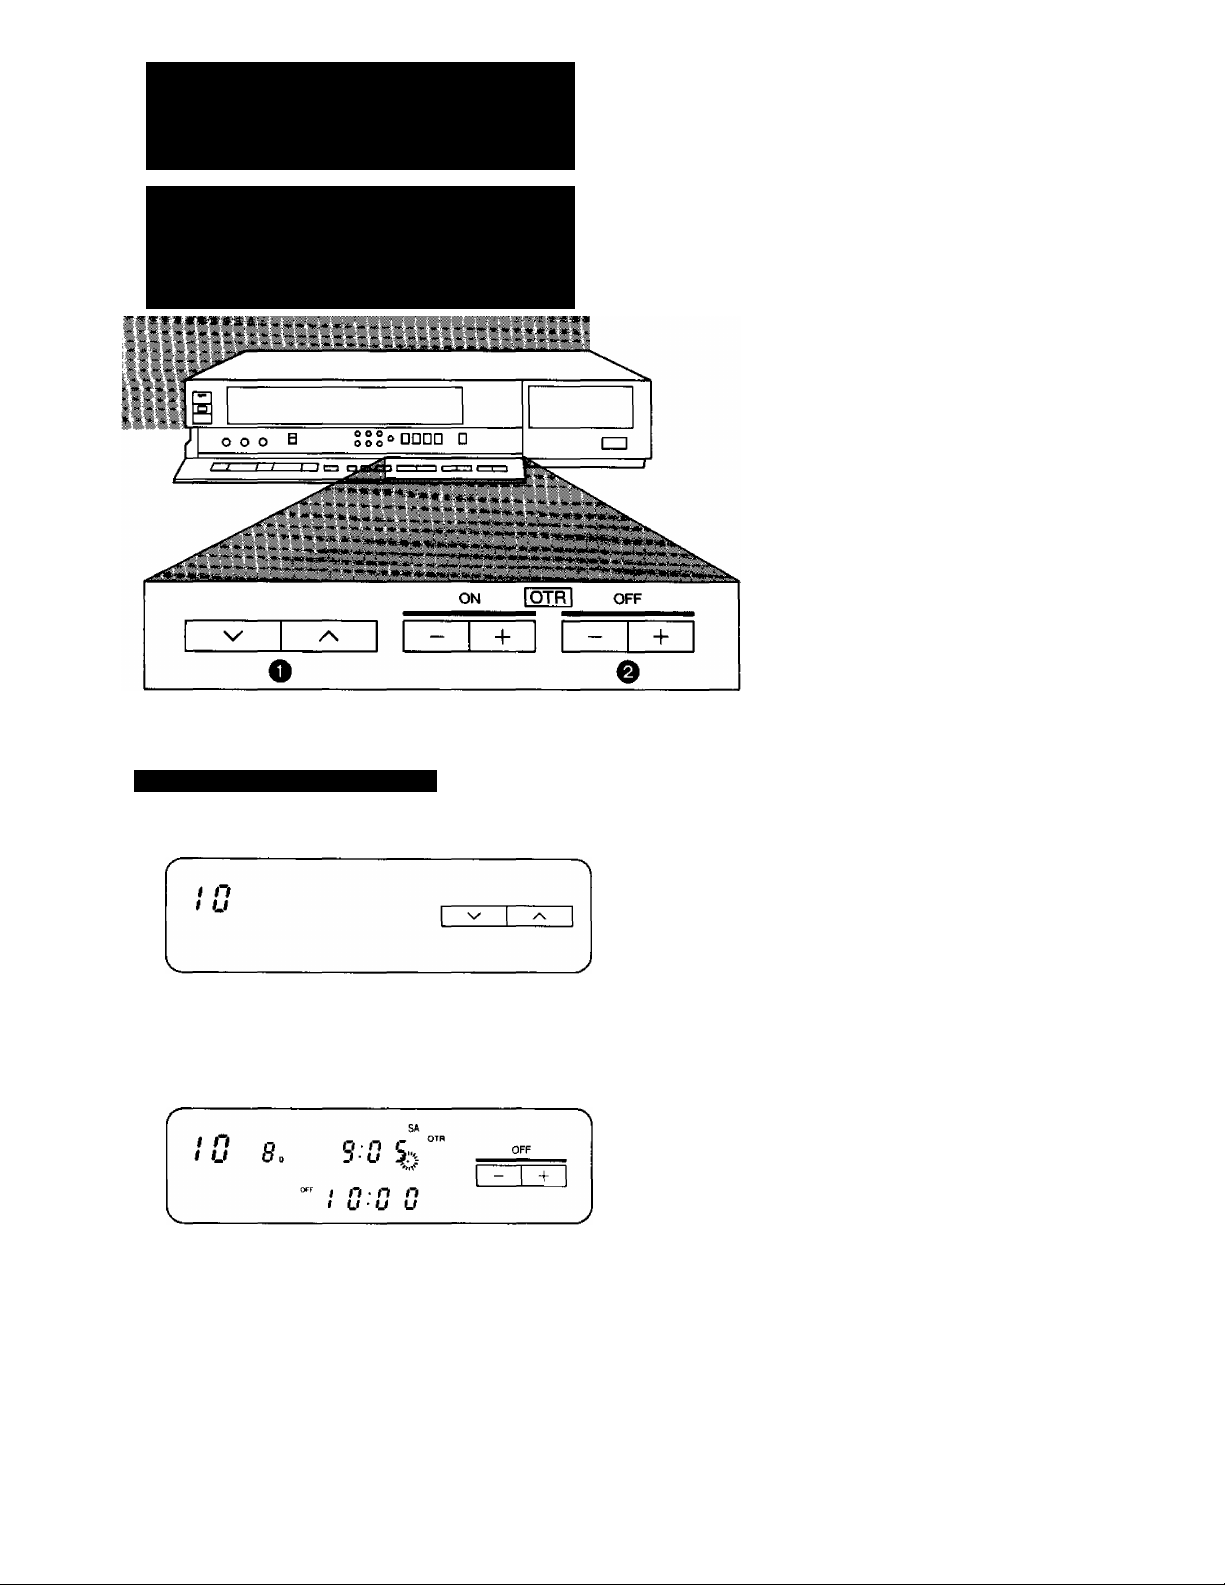
SUPER OTR FUNCTION
(ONE-TOUCH TIMER
RECORDING)
This convenient function makes it possible to easily pro
gramme the VTR for recording of TV programmes with
immediate start or with start within 24 hours and with the
starting time and ending time precisely to the minute, and
the VTR will automatically turn itself off when the recording
ends.
Preparation
•Insert a video cassette with the erasure prevention tab
intact.
When a video cassette is already inside the VTR, press
the VTR On/Off Switch to turn it on,
•Make sure that the clock shows the present time correctly.
•Set the VTR/TV Selector to “VTR”.
OTR Function with Immediate Start
O Select the programme position (channel) to be re
corded.
0 Set the desired ending time of the OTR by pressing
OTR Off (-h) or (-) Button. (For example, the present
time is 9:05, and the ending time of the TV programme
is 10:00.)
When the tab of the inserted video cassette is broken
out, it will be automatically ejected.
•The “OTR” indicator will be displayed.
•The VTR will automatically switch off, when the OTR is
completed. To turn the VTR on again, press the VTR
On/Off Switch,
•When the tape reaches its end during an OTR
recording the VTR will turn itself off.
•Ensure all cables from the Video Input and Audio
Input sockets are disconnected before starting the
recording. If they remain connected, it is impossibie
to record TV programmes.
Page 21
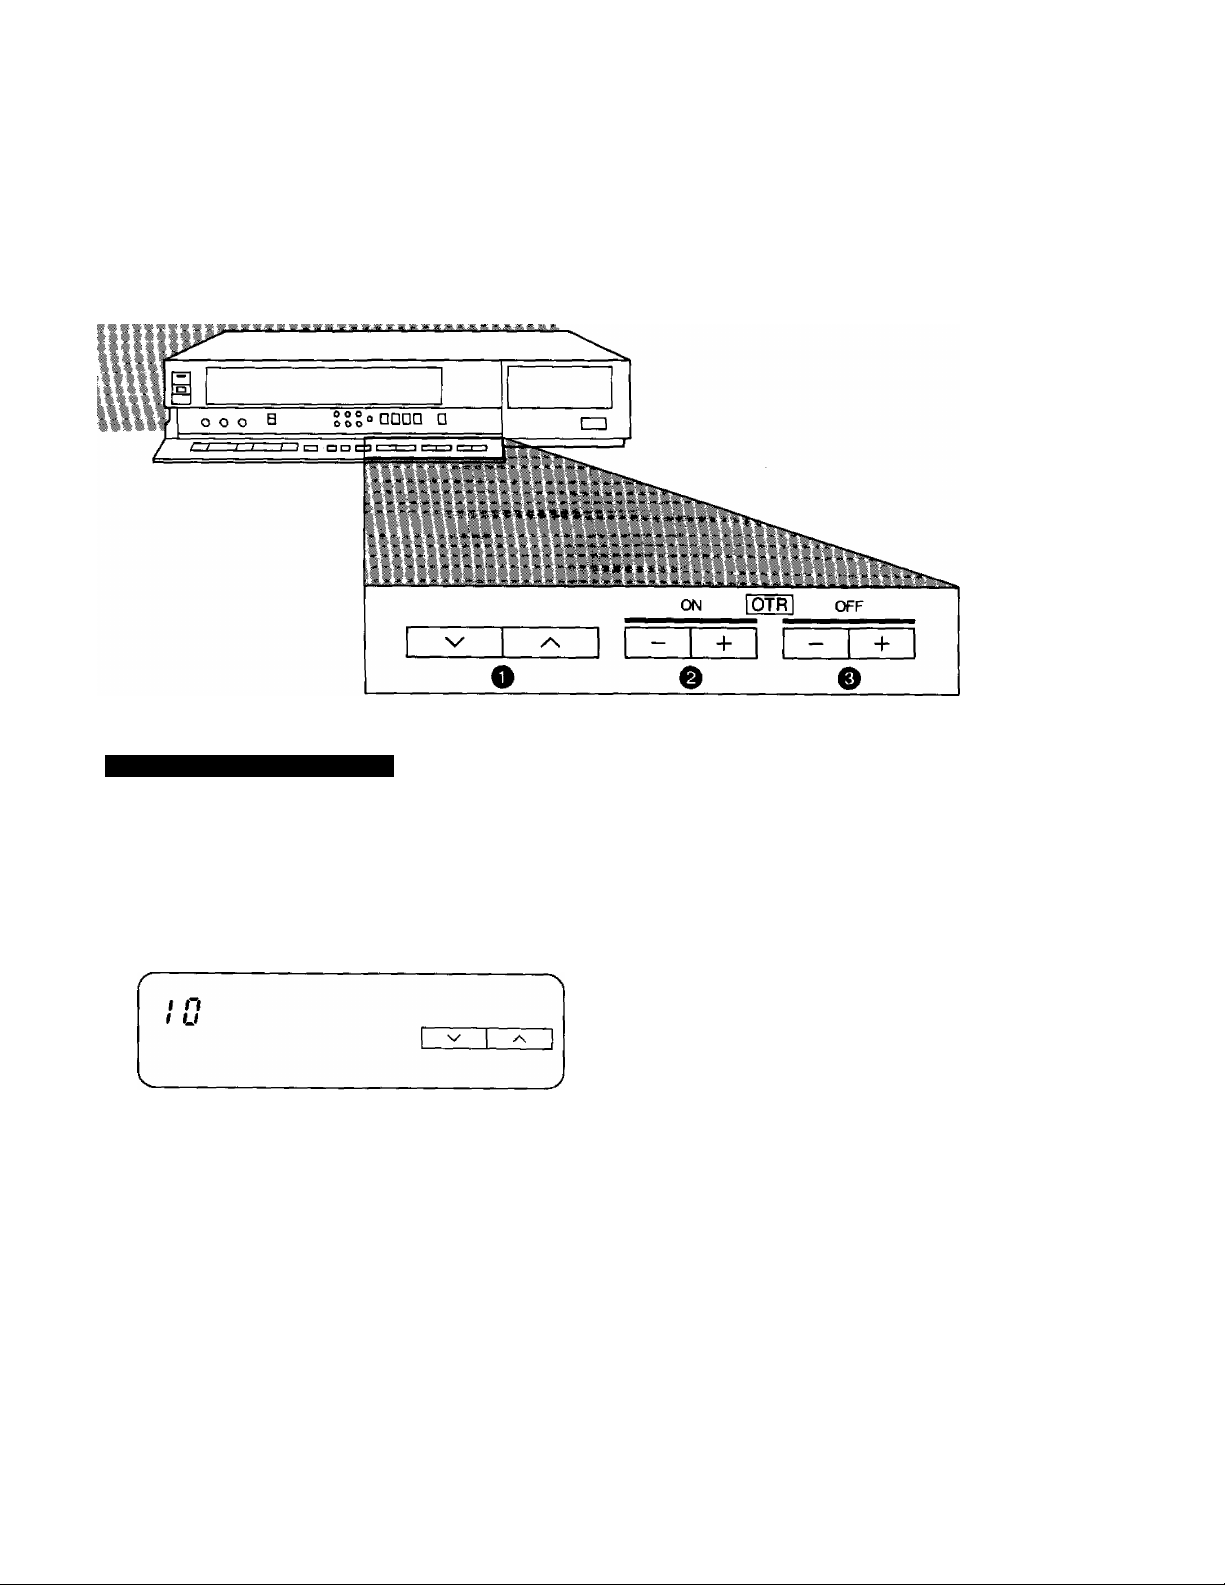
OTR Function with Deferred Start
It is possible to programme an OTR recording for a TV
programme which will start immediately or within the next
24 hours.
(For example, OTR recording of a TV programme broad
cast from 10:30 to 11:00.)
O Select the programme position (channel) to be re
corded.
^ Press the OTR On (+) or (-) Button to set the OTR
starting time to 10:30.
I O I-, ON 1 O ■ T n
t U So I u- 5 U
'Z Off Z
•The "OTR" indicator will be displayed.
0 Press the OTR Off (-f-) or (-) Button to set the OTR
ending time to 11:00.
I n
t u
Q »• t n - 3
O 0 t u- J u
I t • ñ n
t * u u
13ZX]
•After selecting the delay time for the OTR start in step O,
the OTR Off (-»-) or (-) Button must be pressed within 8
seconds to select the OTR ending time, otherwise the
selected starting time will be cancelled.
•The VTR will automatically switch off, when the OTR is
completed. To turn the VTR on again, press the VTR
On/Off Switch.
•Make sure that the OTR Function (One-Touch
Timer Recording) does not overlap a programmed
timer recording. An OTR always takes precedence
over a timer recording.
•If you want to confirm the present time or the tape
counter position before the programmed OTR is
performed, or to check the tape counter position
during the OTR, press the Check/Programme But
ton. To return the display to the previous indication,
press this button once more.
•It is possible to change the OTR starting time before
the recording starts.
•It is possible to perform any VTR operation (except
Timer Recording) before the recording starts.
•It is possible to change the OTR ending time even
during the recording.
•To interrupt an OTR, press the VTR On/Off Switch
to turn the VTR off.
•When quickly and repeatedly pressing the OTR On
(-H) or (-) Button or the OTR Off (+) or (-) Button,
the corresponding time indication changes in 1minute steps. When it is kept pressed, the indication
changes in 10-minute steps.
Page 22
TIMER RECORDING
□
1
If
/ i i 1 CZ3 go a
D 0 0 0
0 O 0 □ 0 0 0
roeaia^
Preparation
•Make sure that the clock shows the present time correctly,
•insert a video cassette with the erasure prevention tab
intact.
When a video cassette is already inside the VTR, press
the VTR On/Off Switch to turn it on.
•Make sure that the Timer Record Button is set to “Off”.
9!I38!
o
□
□ □□□ □
PROG
aocK
NEXT TIMER FIECB
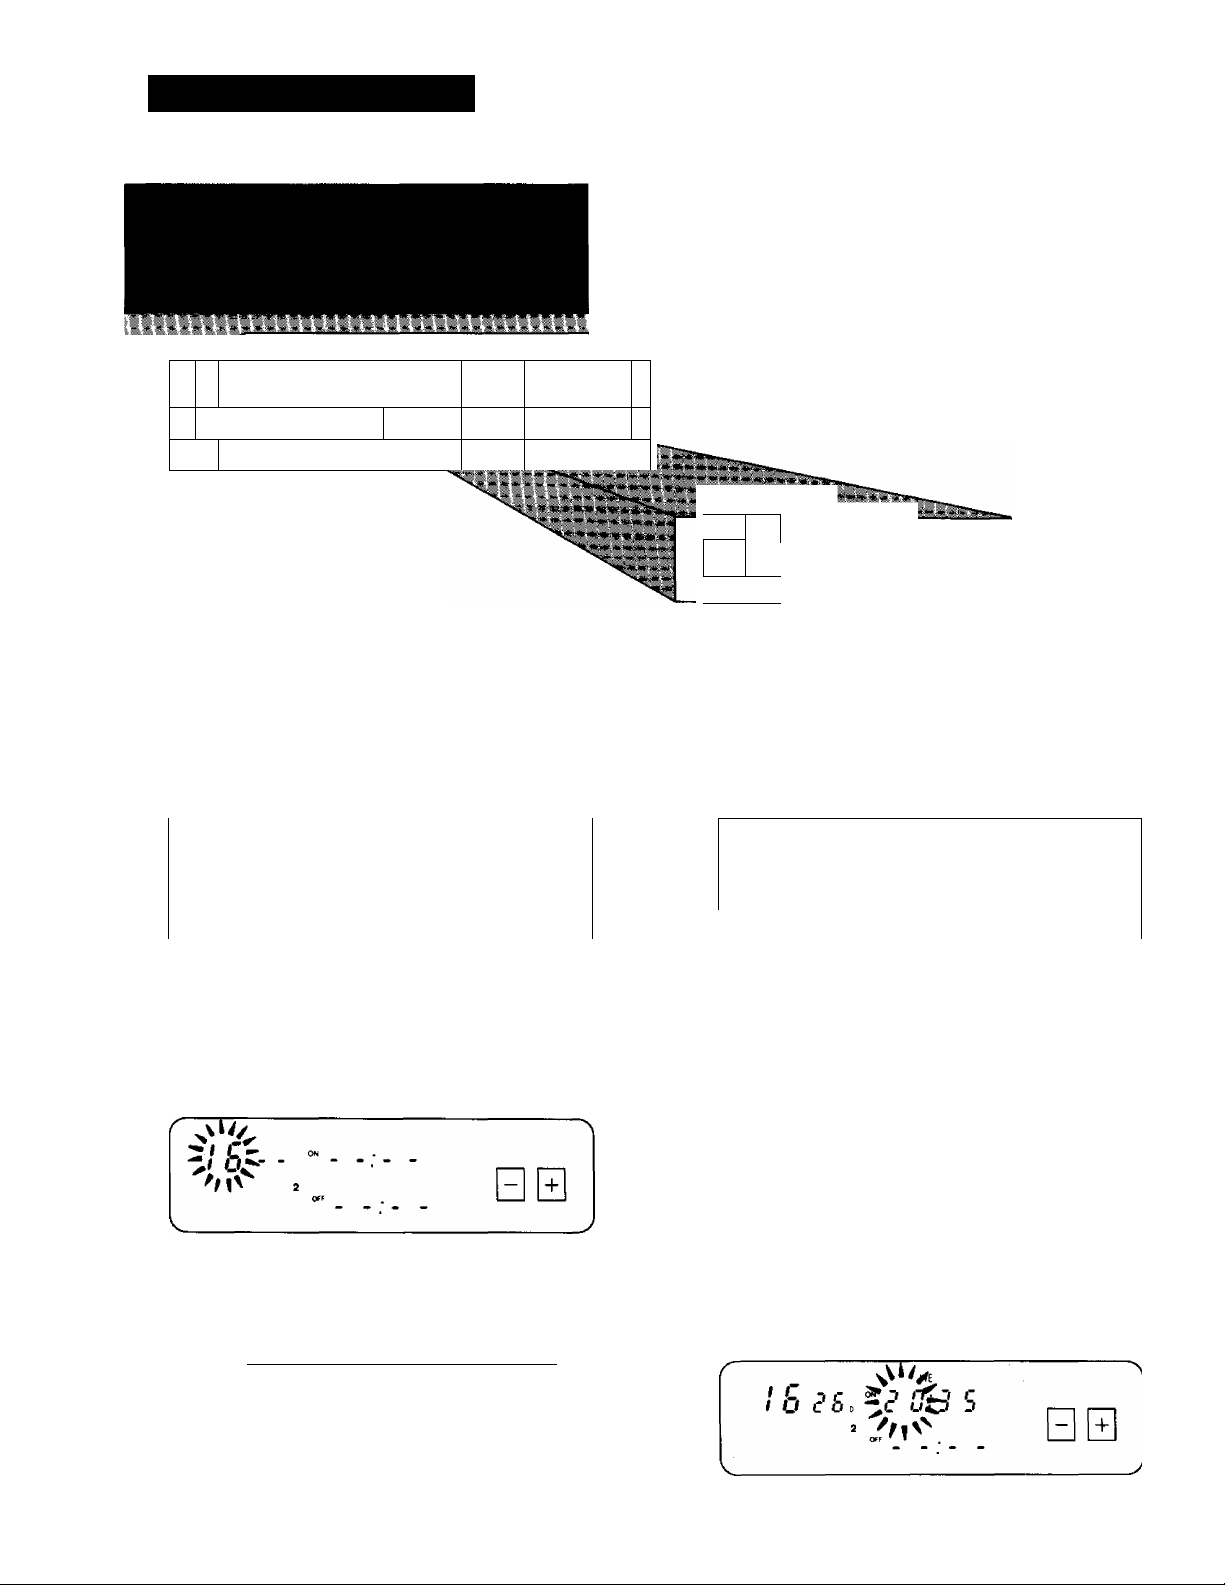
For Example:
Programming a timer recording for a TV programme that
will be broadcast on Wednesday, October 26, from 20:00 to
22:45, on programme position (channel) 16, on timer
programme number 2. (Present date=October 8, 1988)
0 Press the Check/Programme Button to select the next
______
\
Ci-
'MV .
Q Press the (+) or (-) Button to select the programme
position (channel) on which the TV programme will be
broadcast.
OFT ^
□
PROG
O Press the (+) or (-) Button to set the date.
1 T ^ ON
1 or - - - ‘ -
\V w V WE
L .
0 Press the Next Button.
lb <?5. '-I S
, >'M''
A
□ 0
J
□
NEXT
0 Press the Next Button.
'OFF ,
0 Press the (+) or (-) Button to select the hour of the
starting time of the TV programme.
SA
□
NEXT
Page 23
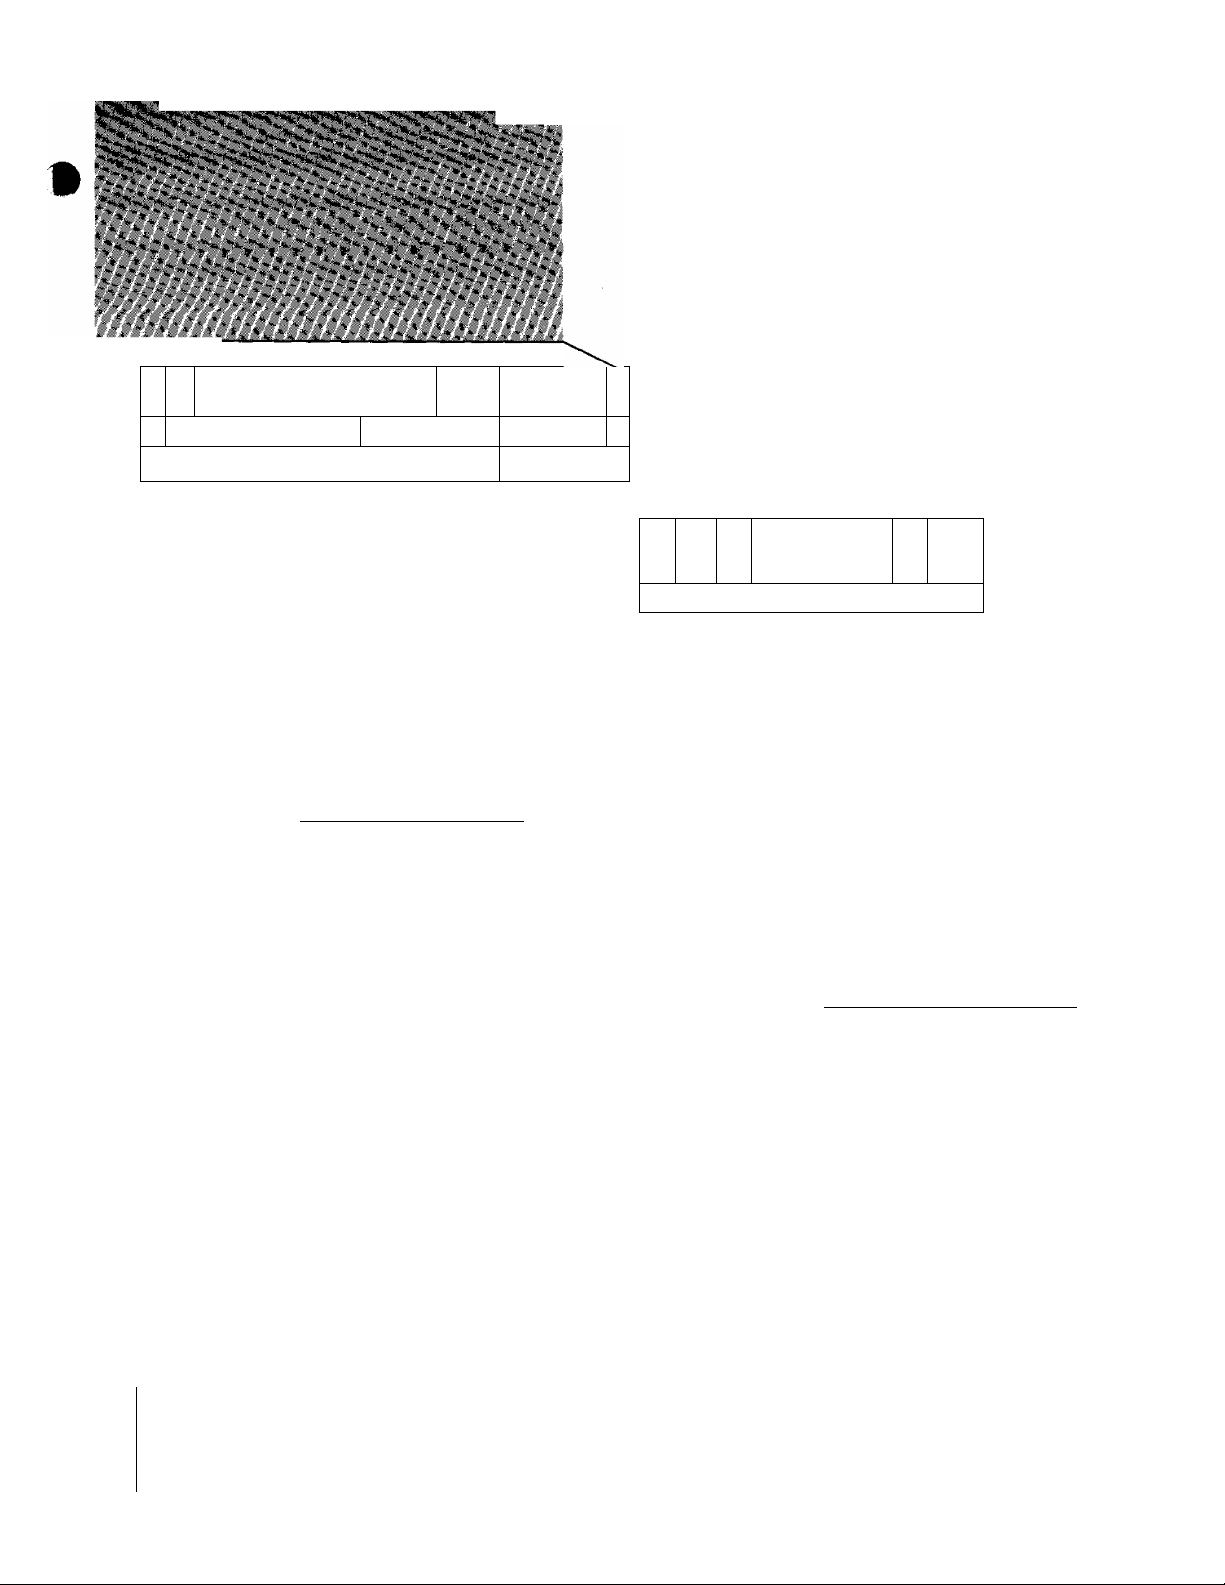
mm^
.t Ht**.
fj
>o
4
P iz. -L.'
Press the Next Button.
0 O 0 B oo o
/ 6 гs es^sz
5'SflQD □
.5^
' X ^i*"'l ‘> '>
0
NEXT
— ■*■
xJl—i
o
' CLOCK PROG NEXT TIMER REC S
© Press the (+) or (-) Button to select the hour of the
end time of the TV programme.
<D Press the Next Button.
1E0D )
I 6 г6
^ J n ■ n n
C u- u u
'Cj n
--C C^U u
----------
00
© Press the (+) or (-) Button to select the minute of the
starting time of the TV programme.
WE^Vi/^
16 es
© Press the Next Button.
r"
/6 86.
V
________
»*5 n-n rt
Jl ri>n n*^
c u3u
'/n<^
t uu u
ty^n n
-5P uZi-f w
------
□ 0
0
NEXT
WE
D n-n n
t U’U U
-yVWy
C u C
--------------------------
0
Press the (+) or (-) Button to select the minute of the
end time of the TV programme.
—
c 3 n • n n
г
bo C U’U u
2
© Press the Timer Record Button.
8. I ¿'9 ^¡3
—
WE
00
t? Sr
0
TIMER REC E
0
NEXT
Page 24
For Everyday Recording
For example:
Programme time for timer recording every day from
20:00-22:45 on timer programme number 7.
Programming for everyday recording can be made on any
of the timer programme numbers 1-7.
Execute the operation steps Q to O as described on page
18.
To Confirm the Programme of a Timer Recording
—Make sure that the VTR is turned on.
—Make sure that the Timer Record Button is set to “On".
Select the programme number to be checked, by repeated
ly pressing the Check/Programme Button.
The preset channel and start and ending times of the timer
recording will be indicated for about 8 seconds.
O Press the (-) Button once, so that all day indication will
appear together.
_ ^ SU MO ru WE EH FR SA ^
E
Perform the operation steps 0 to (D described on pages 18
and 19.
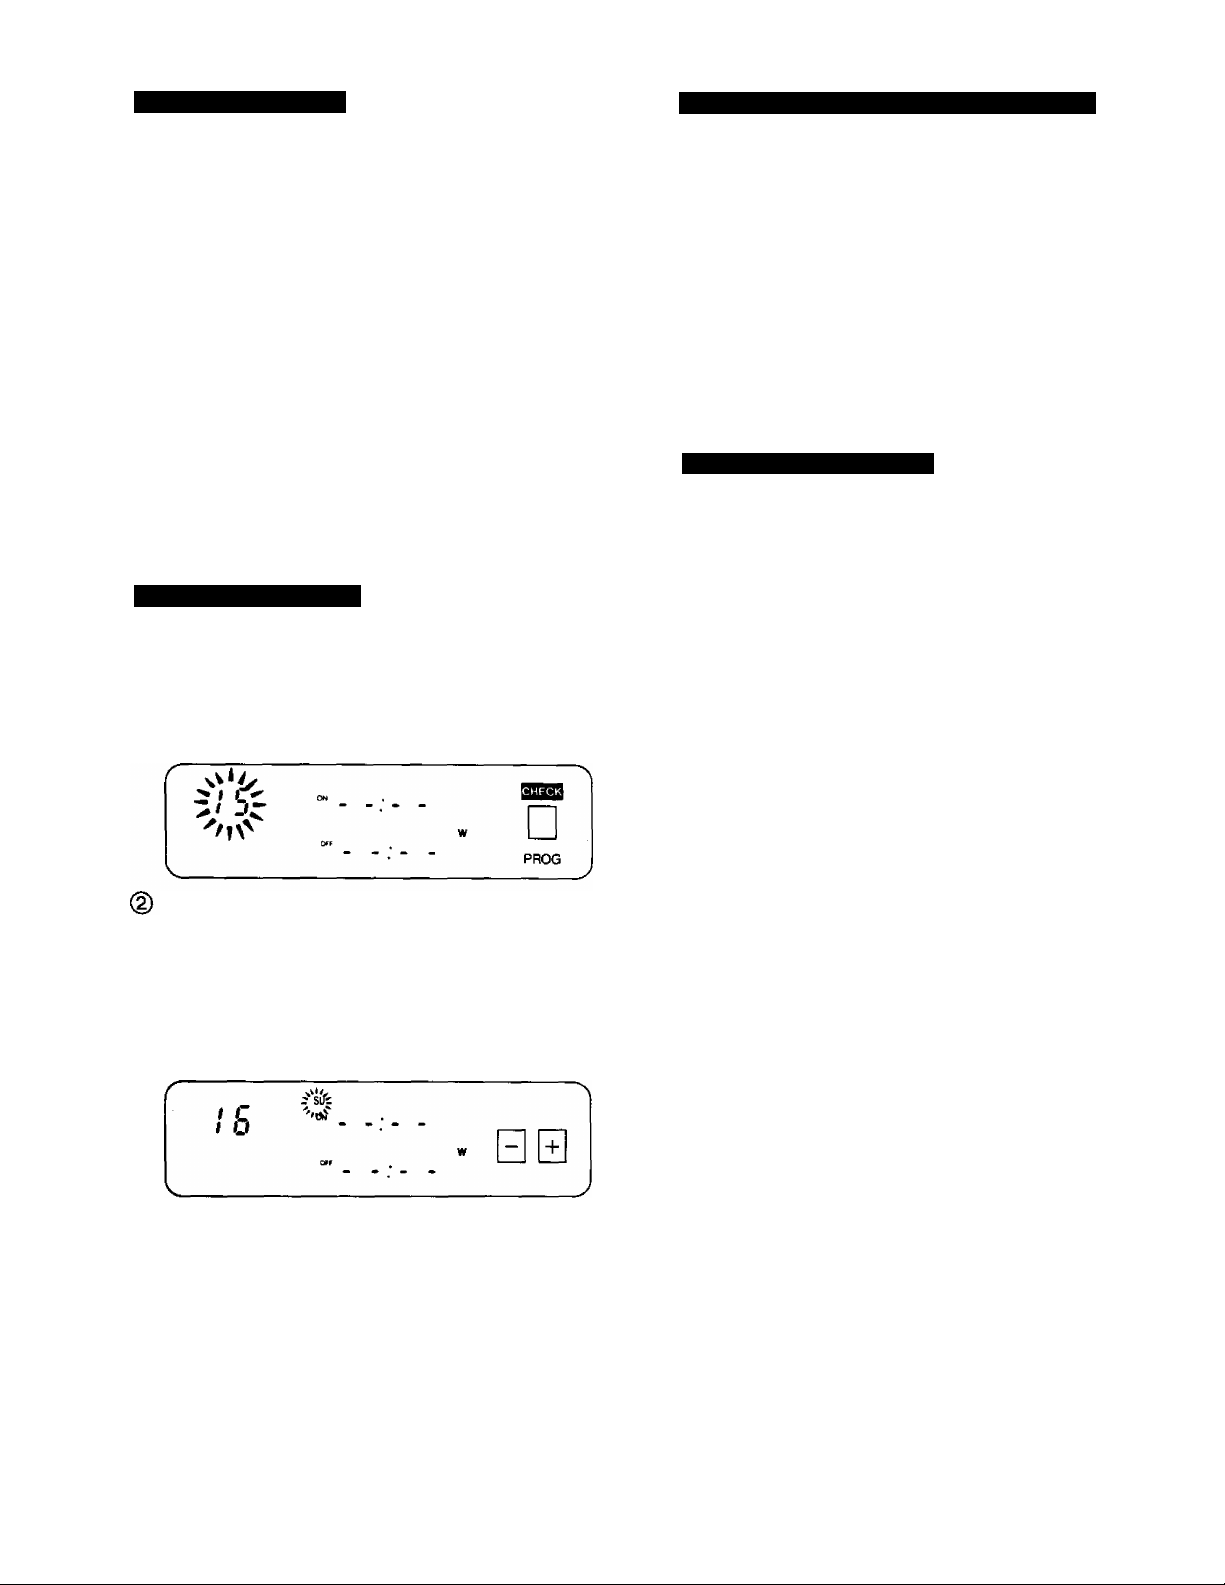
For Everyweek Recording
For example:
Programming a timer recording for a TV programme that is
broadcast every week on Sunday, from 20:00 to 22:45.
(T) Press the Check/Programme Button 8 times, so that
“W” indication will appear.
Press the (+) or (-) Button to select the programme
position (channel) on which the TV programme will be
broadcast.
/ J C Jl n - n n
I U C O 0 L u - U U
□
s
To Cancel a Timer Recording
Make sure that;
—the VTR is turned on.
—the Timer Record Button is set to “Off”.
O Press the Check/Programme Button repeatedly, until
the number of the timer programme that you want to
cancel is displayed.
^ Press the (-I-) and (-} Button simultaneously for more
than 3 seconds.
PROG
@ Press the Next Button.
(4) Press the (+) or (-) Button to select the day ot the
week, on which the programme will be broadcast.
Perform the operation steps 0 to 0 described on pages 18
and 19.
•Ensure all cables from the Video Input and Audio
Input sockets are disconnected before starting the
recording. If they remain connected, it is impossible
to record TV programmes.
•It is impossible to confirm programmes of timer
recordings while an OTR is being performed.
•To turn the VTR on and use it for playback or
recording before the timer recording is performed,
turn the Timer Record Button Off.
•When the Timer Record Button is set to “On” but no
video cassette is inserted or no timer recording has
been programmed, the Timer Recording Indicator
□ will flash to inform that the timer recording cannot
be performed.
•After the programmed timer recording has been
made, set the “Timer Record” Button to “Off”,
othenwise the VTR cannot be operated normally.
•During recording, the programme position (channel)
on the VTR cannot be changed.
•When you want to watch TV after setting a timer
recording, select the desired channel on the TV set.
•To cancel a timer recording during recording, set
the Timer Record Button to “Off”.
Page 25
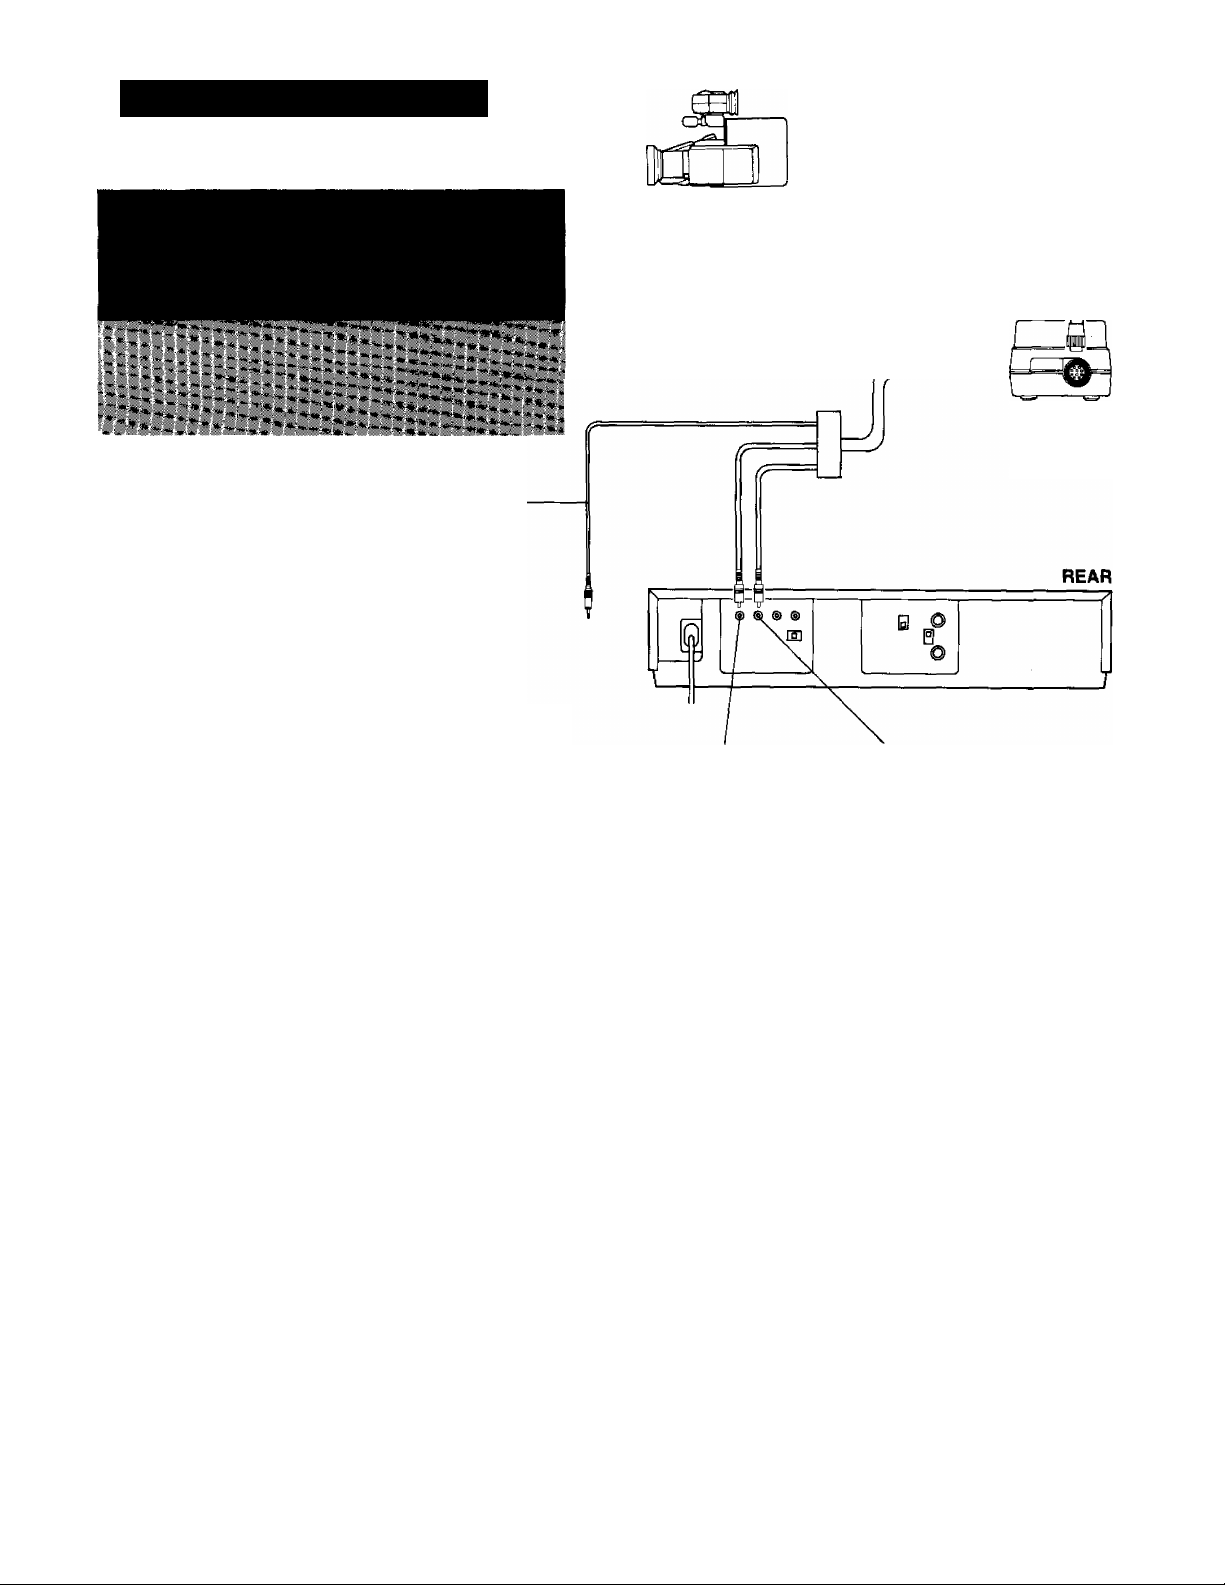
CAMERA RECORDING
Remote Control Plug:
No Connection
CAMERA
(Optional)
CAMERA AC
Adaptor
(Optional)
Preparation
•Connect the video camera via the Camera AC Adaptor to
the VTR as shown in the illustration above.
•Insert a video cassette with erasure prevention tab intact.
When a video cassette is already inside the VTR, press
the VTR On/Off Switch to turn it on.
•Make sure that the Timer Record Button is set to “Off”.
•Set the VTRrrv Selector to “VTR”.
^ Turn the Camera AC Adaptor on and make the
necessary adjustments on the camera.
Refer to the operating instructions of the camera you
are using.
@ Press the Record Button {•) on the VTR to start
recording.
REC<
Avoid recording unwanted material:
Press the Pause/Still Button (II) of the VTR, and the
recording will stop temporarily. To restart recording, press
the Pause/Still Button (II) , again.
Ш- \
REC
AUDIO IN
VIDEO IN
0 Press the Stop Button (■) on the VTR to stop
recording.
STOP
□
•If you leave the VTR in the pause mode for more
than 5 minutes, the VTR will stop automatically to
protect the tape and the video heads.
•Even if the video camera is equipped with video
recorder remote control functions, this VTR can not
be remotely-controlled from the camera.
•Disconnect all cables from the Video Input and
Audio Input sockets after finishing camera record
ing.
If they remain connected, it is impossible to record
TV programmes.
Page 26
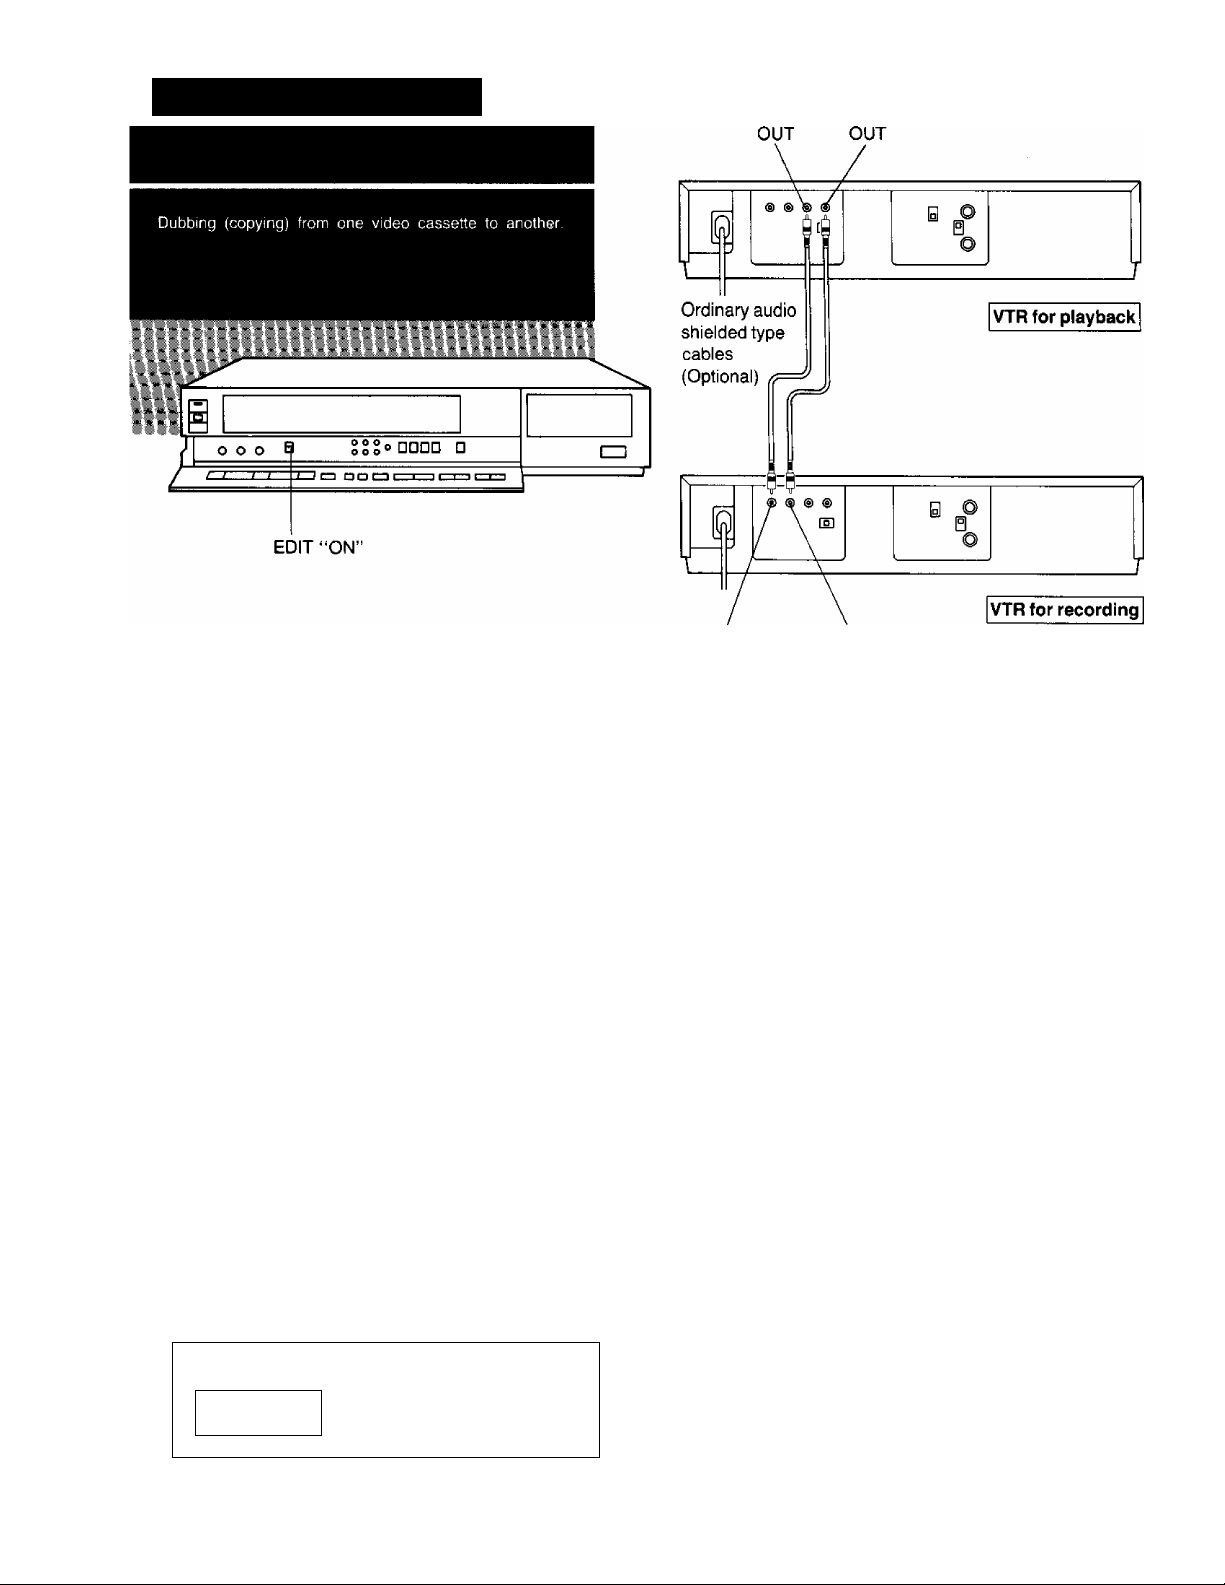
DUBBING (COPYING)
AUDIO VIDEO
AUDIO IN VIDEO IN
Preparation
•Press the VTR On/Off Switches to turn both VTRs On.
•Make the connection between the two VTRs as shown
above.
•Make sure that the Edit Switches of both the recording
and playback VTRs (if equipped) are in the “On” position.
Set these switches to “Off” for ordinary use of the VTRs.
^ Place the recorded cassette in the playback VTR and a
blank video cassette with the erasure prevention tab
intact in the recording VTR.
0 Press the Record Button (•) on the recording VTR.
REC*
^ Press the Play Button (►) on the playback VTR.
PLAY
>
O Press the Stop Button (■) on both VTRs to stop the
dubbing.
r
STOP
□
REC
•To assure smooth, noiseless cuts when interrupting
the recording, always use the Pause/Still Button
(II) .
•To obtain smooth cuts when starting the recording
from the stop mode:
1. Play back the last part of the previously recorded
material to confirm its ending point, and then
press the Pause/Still Button (II).
2. Press the Record Button (•).
(The VTR is still in the pause mode.)
3. To start recording, press the Pause/Still Button
(II) again.
•The picture quality of a re-recorded tape is not as
y
good as that of the original.
•Ensure all cables from the Video Input and Audio
Input sockets are disconnected after finishing the
recording. If they remain connected, it is impossible
to record TV programmes.
Page 27
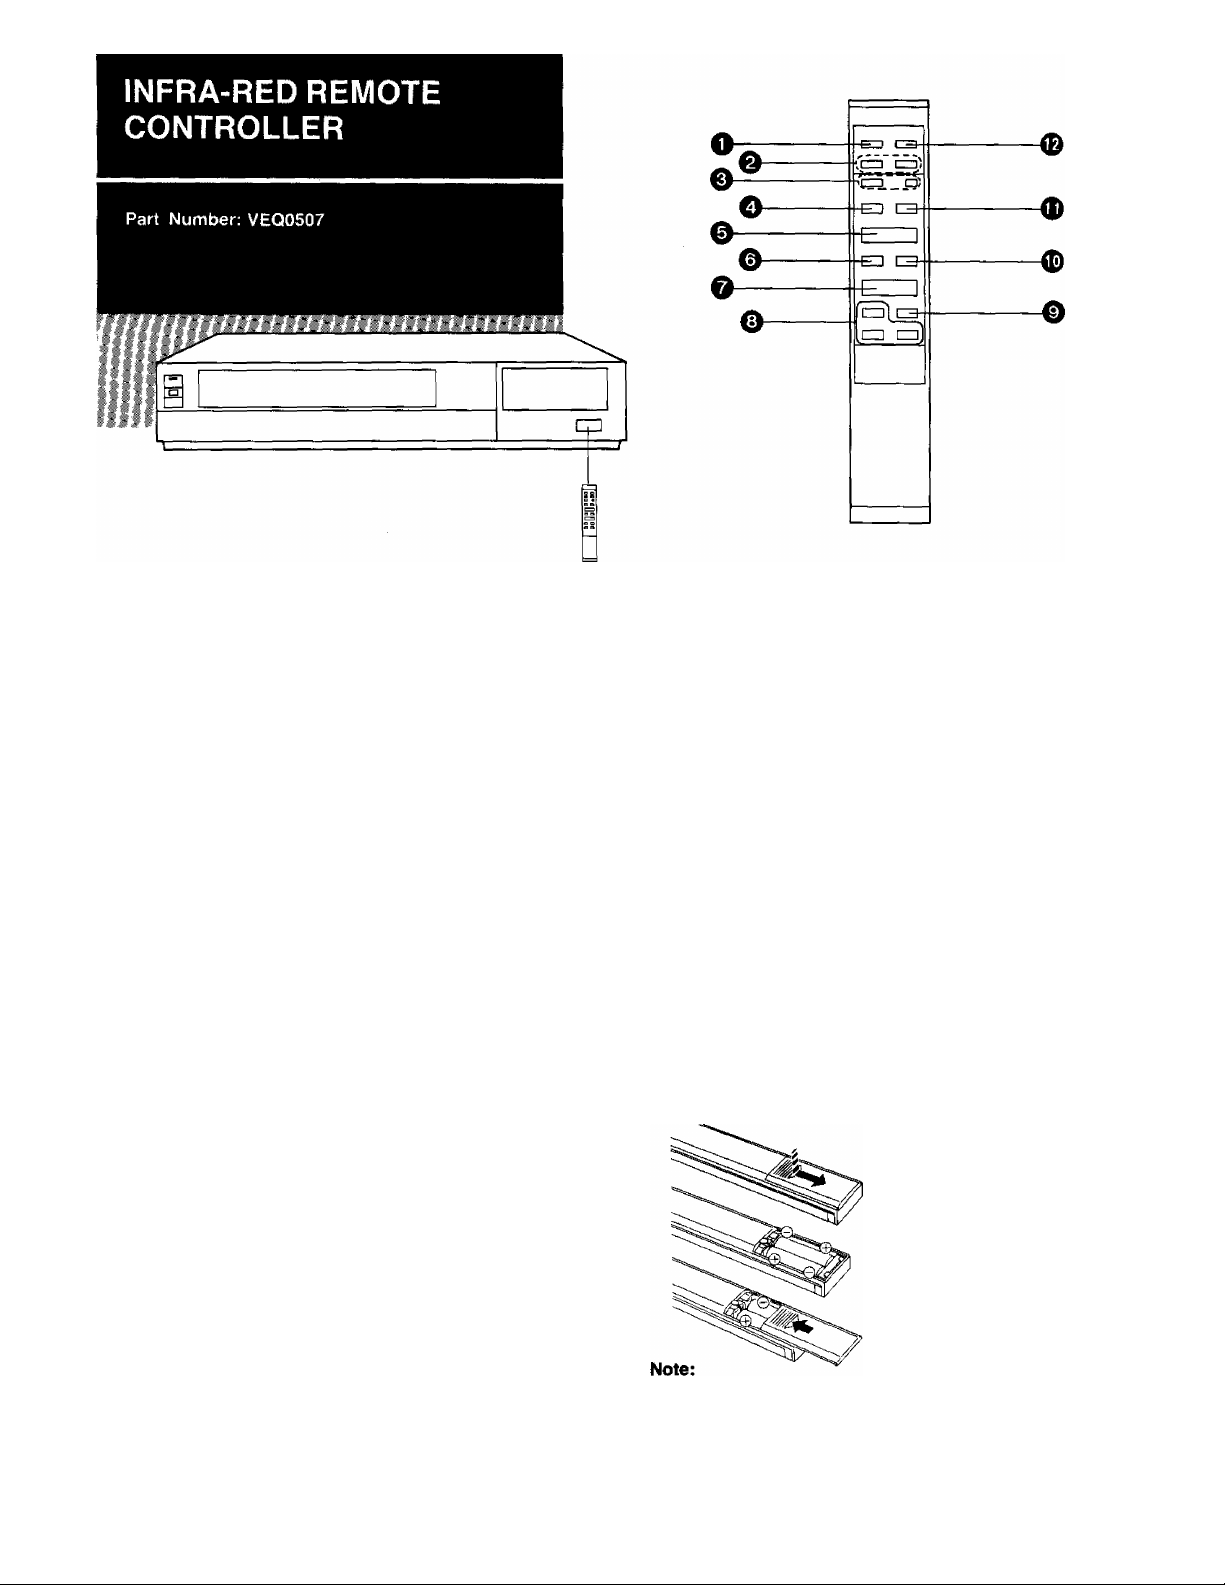
O VTR On/Off Switch
For turning the VTR on and off.
Power Source for the Infra-red Remote
Controller
^ Programme Position (Channei) Selector Buttons
O Record Buttons (•)
To start recording, press the both buttons simul
taneously.
O Pause/Still Button (II)
0 Stop Button (■)
0 Rewind '4'4/Review @ Button
When this button is kept pressed during playback, the
VTR changes over to the Review playback mode.
O Play Button (^}
O Slow Button (!•-)
Press the Slow Button for slow-motion playback at Vio
of normal speed. The stow playback speed can be
varied between V25 and Vs of normal speed by using
the and Buttons.
Note:
If the VTR is left in the slow playback mode for more
than 5 minutes, the VTR will automatically switch over
to the stop mode, to protect the tape and the video
heads.
•Adjust the Slow Tracking Control if necessary.
© Double Speed Playback Button (X2)
<D Fast Forward ^^/Cue @ Button
When this button is kept pressed during playback, the
VTR changes over to the Cue playback mode.
Still Advance button (!!►)
(D
VTR/TV Selector
0
■ The Infra-red Remote Controller is powered by two I EC
“R6” size batteries. The life of the batteries is about one
year, however, it depends on the frequency of use.
Inspect and if necessary, replace the batteries once a
year.
CAUTION FOR BATTERY REPLACEMENT
•Load the new batteries with their polarities (0 and ©)
aligned correctly.
•Do not apply heat to batteries, or internal short-circuit may
occur.
•If you do not intend to use the Remote Controller for a long
period of time, remove the batteries and store them in a
cool and dry place.
•Remove spent batteries immediately and dispose of them.
•Do not use an old and a new batteries together. (Also
never use an alkaline battery with a manganese battery.)
Load the batteries as follows:
O Remove the battery com
partment lid.
© Place two batteries in the
battery compartment as
indicated inside the bat
tery compartment.
o Replace the lid.
•The infra-red beam should be transmitted directly at the
Infra-red Remote Control Receiver on the front of the
VTR.
•Direct sunlight may interfere with the beam.
•The iightsensing angle of the Infra-red Remote Control
Receiver window in the VTR is about 60°.
•The unit should be used within a range of about 7 meters
Page 28

BEFORE REQUESTING SERVICE
Before requesting service, check the following points once
again.
SYMPTOM
Power doesn’t turn on.
Power is on but unit doesn’t
operate.
TV programmes cannot be
recorded.
OTR Function (One-Touch Timer
Recording) cannot be performed.
Unattended timer recording
cannot be performed.
CAUSE
Mains lead is not connected.
The “Timer Record” Button is set to “On”.
Dew condensation inside the VTR.
Safety devices are operating.
Connection of aerial lead is not correct.
Reception channel is not properly tuned.
Cables are connected to the Video Input and
Audio Input Sockets.
Clock is flashing “0:00”.
Recording start or recording stop time setting
is incorrect.
The “Timer Record” Button is set to “Off”,
REMEDY
Connect mains lead to mains outlet.
Set the “Timer Record” Button to “Off”.
Wait until the Dew Indicator ” goes off.
Turn off the VTR On/Off Switch, disconnect
mains cord from outlet, then reconnect mains
cord to mains outlet and turn on the VTR
On/Off Switch again.
Connect aerial lead correctly.
Tune reception channel.
Disconnect all cables from the Video Input
and Audio Input Sockets.
Set clock to present time.
Set recording start and recording stop time
correctly.
Set the “Timer Record” Button to “On”.
Unattended timer recording
cannot be programmed.
Clock shows incorrect time.
Clock is flashing at “0:00”.
The One-Touch Timer Recording is now
being performed.
Adjust clock to present time.
Set clock time and perform timer setting.
Programme the timer recording after the
One-Touch Timer Recording has finished.
Page 29

. ■ ■ -
.......................
■ - -
.....................
...
SYMPTOM
If you attempt to carry out
Recording, Timer Recording, or
OTR, the cassette will be
automatically ejected.
Playback picture is not
reproduced.
Playback picture is not in colour.
Playback picture has large
amounts of “snow”.
Remote Controller does not work.
CAUSE
Accidental erasure prevention tab on the
cassette is broken out.
Connection with television set is not correct.
TV set is not tuned to the video playback
channel.
Reception channel was not adjusted correctly
during recording.
TV set is not properly tuned to the video
playback channel of the VTR.
The video heads are clogged with dirt.
The video heads are abraded.
Tape is old and/or defective.
Remote Controller is not being pointed at
Infra-red Receiver window on the VTR.
REMEDY
Cover tab hole with adhesive tape.
Connect the VTR to the television set
correctly.
Tune TV set to the video playback channel of
the VTR.
Readjust reception channel correctly,
Properly tune the TV set to the video playback
channel of the VTR.
Consult qualified service personnel.
Consult qualified service personnel.
Use new tape.
Point the Remote Controller at Infra-red
Receiver Window on the VTR.
Distance is too far.
An obstacle is between Remote Controller
and VTR.
Batteries are exhausted.
Battery polarities (-1-, -) are reversed.
Use the Remote Controller within 7 m from
the VTR.
Remove obstacle.
Replace batteries.
Insert batteries correctly.
Page 30

CAUTIONS
Avoid Sudden Changes in Temperature
If the VTR is suddenly moved from a cold place to a warm
place, moisture may form on the tape and inside the VTR.
In this case, the Dew Indicator “ d ” will flash on and off and
the VTR will not operate.
Humidity and Dust
Avoid places where there is high humidity or much dust,
which may cause damage to internal parts.
Do Not Obstruct the Ventilation Holes
The ventilation holes prevent abnormal increase of temper
ature. Do not block or cover these holes. Especially avoid
soft materials such as cloth or paper.
Keep away from High Temperature
Keep the VTR away from extreme direct heat such as direct
sunlight, heating radiators, or closed automobiles.
Keep Magnets Away
Never bring a magnet or magnetized object near the VTR
because it will adversely affect the performance of the VTR.
No Fingers or Other Objects Inside
Touching internal parts of this VTR is dangerous, and may
cause serious damage to the VTR. Do not attempt to
disassemble the VTR. There are no user serviceable parts
inside.
Keep Water Away
Video Head Clogging
The video heads are the means by which the recorder
places picture signals on the tape during recording, and
reads picture signals from the tape during playback. If these
heads become dirty and clogged from long use, the signals
can no longer be recorded correctly, and the playback
picture will be distorted accordingly. This is the case, for
example, if during the playback of a tape which you know to
have good quality, the sound is reproduced normally, but no
picture is seen, or the picture is greatly distorted. If this is
the case, have the recorder checked by qualified service
personnel.
If Dew Condensation Forms in the VTR
Condensation may form in the VTR if:
•The VTR is in a room where the heater has just been
turned on.
•The VTR is in a room with steam or high humidity.
•The VTR is brought from cold surroundings into a
well-heated room.
•When the VTR is suddenly brought from cool surround
ings, such as an air-conditioned room or car, to a place
which is hot and humid.
When dew forms in the VTR: (Refer to page 5)
The Dew Indicator “с/ ” on the Multi-Function Display will
flash on and off and all the function buttons are made
non-operational to protect the tape and the video heads.
When the Dew Indicator flashes, wait until this indicator
disappears.
Keep the VTR away from flower vases, tubs, sinks, etc.
CAUTION; If liquids are spilled into the VTR, serious
damage could occur. If you spill any liquid into the VTR,
consult qualified service personnel.
Cleaning the VTR
Wipe the VTR with a clean, dry cloth. Never use cleaning
fluid, or other chemicals. And do not use forced air to
remove dust.
Stacking
Place the VTR in a horizontal position, and do not place
anything heavy on it.
•If dew condensation forms inside the VTR while the VTR
On/Off Switch is off, it will turn on automatically and the
Dew Indicator will flash on and off. As soon as the dew
condensation has been dissolved, the VTR will turn itself
off again.
Page 31

SPECIFICATIONS
NV-G21A, EA
. 5 mmm.'
Power Source:
|i Power Consumption;
Video Recording System;
Tape Speed:
Tape Format:
Record/Playback Time:
FF/REWTime:
*
NV-G21A: 240 V AC 50-60 Hz
NV-G21 EA: 230 V AC 50-60 Hz
Approx. 22 watts
^ mm-m-w m wmmmmmmmwmmmmmm-m m
2 rotary heads, helical scanning system
23.39 mm/sec.
EE tape
240 min. with NV-E240
Less than 5.5 min. with NV-E180
VIDEO
Television System:
Modulation System:
CCIR; 625 lines, 50 fields, PAL colour signal
Luminance: FM azimuth recording
Colour signal: converted subcarrier phase shift recording
Input Level:
Output Level:
VIDEO IN (PHONO): 1.0 Vp-p,
VIDEO OUT (PHONO); 1.0 Vp-p,
RF Modulated: NV-G21A: VHF channel 0 or 1,
AUDIO
Input Level;
Output Level:
Audio Track:
Video Horizontal Resolution:
Signal-to-Noise Ratio:
AUDIO IN (PHONO);
AUDIO OUT (PHONO):
1 track monaural
Colour: more than 240 lines
Video; more than 43 dB
Audio; more than 43 dB
Audio Frequency Response:
Operating Temperature:
Operating Humidity:
Weight:
Dimensions:
Standard Accessories:
80 Hz-10 kHz
5°C-40°C
35%-80%
4.9 kg
380 (W)x82 (H)x342 (D) mm
1 pc. DIN-DIN coaxial cable
1 pc. Infra-red remote controller
1 pc. AC Mains Lead
1 pc. Digital Scanner
Weight and dimensions shown are approximate.
Specifications are subject to change without notice.
NV-G21EA: VHF channel 2 or 3,
75 ohm, unbalanced
75 ohm, unbalanced
75 ohm, unbalanced
75 ohm, unbalanced
-10 dB, more than 50 kohm, unbalanced
-8 dB, less than 1 kohm, unbalanced
#
Page 32

F0187W1027-10000 CD
in Japan
Matsushita Electric Trading Co., Ltd.
P.O. Box 288, Central Osaka, Japan
 Loading...