

Page 1
A
B
C
1
2
A
B
C
D
1
2
日期
签字
底图总号
旧底图总号
描校
描图
借(通)用件登记
日期
日期
标准化
处数
工艺
审核
设计
标记
更改文件号
审定
批准
校对
签名
张
第张共
广东美的集团股份有限公司
数
量
阶段标记
量重
比例
D
美的洗涤电器制造有限公司
REV.
1
1
1
01
英文用户手册
英国
MS452S/W(9239A)
MATSUI
6710002774
技术要求
印刷颜色为
该用户手册里的彩色图片也按黑白制作
规格为
最后一页为封底如果供应商的排版需要加空白页
请加在封底之前
:
1.PANTONEBLACKC
2.
3.A4
4.,,
105G双铜
Page 2
MS452S/W/WE/WN
Page 3
ThismanualcontainssectionsofSafety
Instructions,OperatingInstructions,
InstallationInstructionsandTroubleshooting
Tipsetc.Carefullyreadingitbeforeusingthe
dishwasherwillhelpyoutouseandmaintain
thedishwasherproperly.
ToreviewthesectiononTroubleshootingTips
willhelpyoutosolvesomecommonproblems
byyourselfandreducetheneedtoaskforthe
helpofprofessionaltechnicians.
Themanufacturer,followingapolicyofconstant
developmentandup-datingoftheproduct,may
makemodificationswithoutgivingpriornotice.
Thisproducthasbeenwettestedtoensure
correctoperation.Asaresultsomewater
canremaininsidetheunit.Thisisnormal
andsafe.Pleaseremoveanywaterdroplets
fromtheexteriorifnecessary.
ThankYou!
..................1
ControlPanel........................4
DishwasherFeatures.................4
WashCycleTable....................5
TurningOntheAppliance..............5
Salt................................6
Detergent...........................7
RinseAid...........................8
LoadingtheDishwasherRack........9-11
FilteringSystem......................12
CaringfortheDishwasher..........13-14
AboutElectricityconnection..........14
Beforecallingforservice..........15,16
Faultcodes.........................17
Installationofdishwasher............2,3
Page 4
Page 5
450mm
2
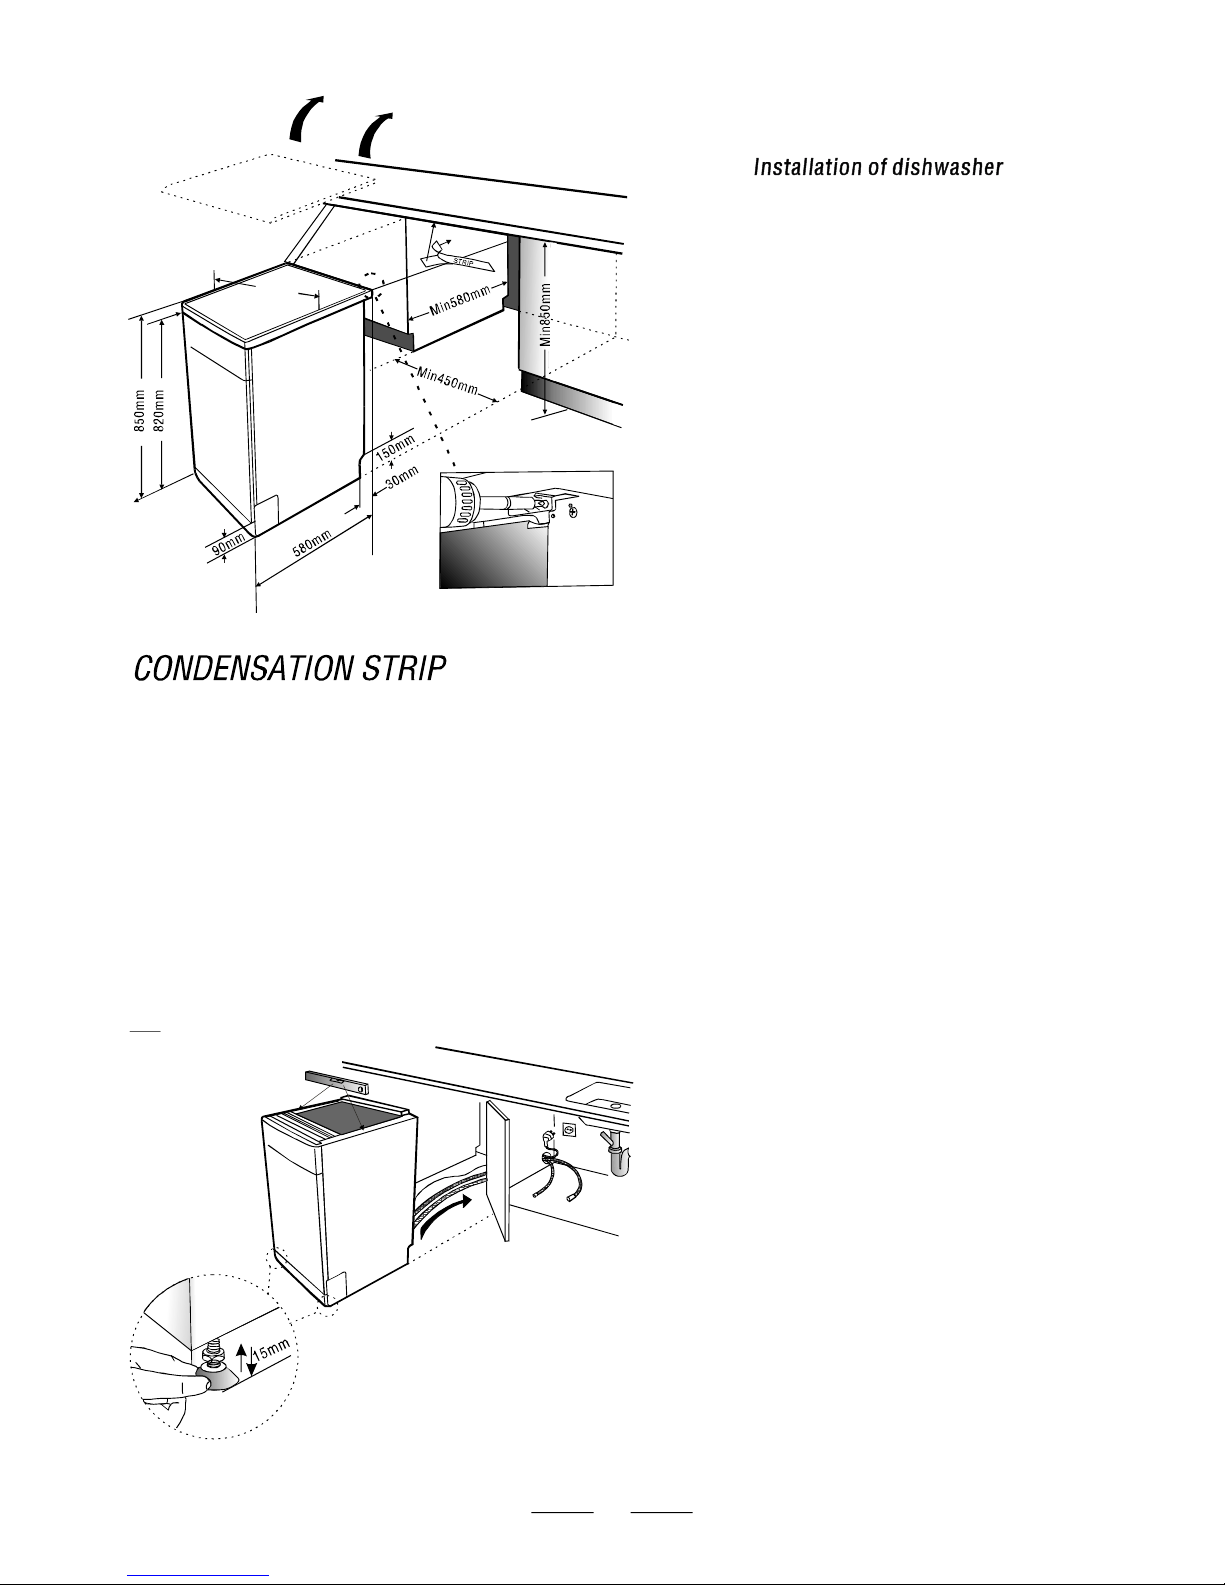
Removeallpackagingbeforepositioningthe
machine.
Seethefollowingdiagram.Ensurethereisa
clearanceeachsideofthemachinetoallow
slightsidewaysmovementforservicing
Worktopofyourdishwasherisremovable
ifrequired.Heightwithouttheworktopis
820mm.ThisisapplicabletoMS452S,
MS452W,andMS452WEonly.
Byremovingthemachine'sworktop,youcan
installitunderaclosefittingsinkunitora
pre-existingtopifthedimensionsofthe
recesscorrespondtothoseshowninthe
picture.
Toremovetheworktop,pleaseremovetwo
screwsasshownattherearoftheworktop
oneitherside,liftuptherearsection,and
pushforwardtoreleaseoffthelugatthe
frontsectionoftheapplianceandliftup.
Removethepolystyreneblockandifyou
wishsaveforfuturere-use.
Positionthemachinenexttoawatertapand
adrain.
Wheninsertingthemaching,ensurethatthe
waterinletanddrainhosesarenotkinkedor
squashed.
Caremustbetakentoensurethatthe
appliancedoesnotstandontheelectrical
supplycable.
Goodlevellingisessentialforcorrectclosure
andsealingofthedoor.
Whentheapplianceiscorrectlylevelled,the
doorwillnotcatchontheinnerlineroneither
sideofthecabinet.
Ifthedoordoesnotclosecorrectly,loosen
ortightentheadjustablefeet,untilthe
machineisperfectlylevel.
"Forallthebuilt-inmodelsandsomefreestandingmodels
(whenyoutakeoffthetopboardandputtheunitintothecabinet),
thiscondensationstripmustbefittedtotheundersideoftheworktop
aboveyourdishwashertoprotectitagainstanymoisture.Itspurpose
istodeflectsteamrisingfromyourappliancetoprotectyourworktop's
underside.
•
•
•
Thestripislocatedinsideyourdishwasher.
Ensurethesurfaceiscleanpriortostickingto
undersideoftheworktop.
Separatethebackingpaperfromthestrip.
Sticktotheundersideoftheworktop.•
Note:Failuretoattachstripcouldresultindamagetotheundersideofyour
worksurface!
Page 6
3
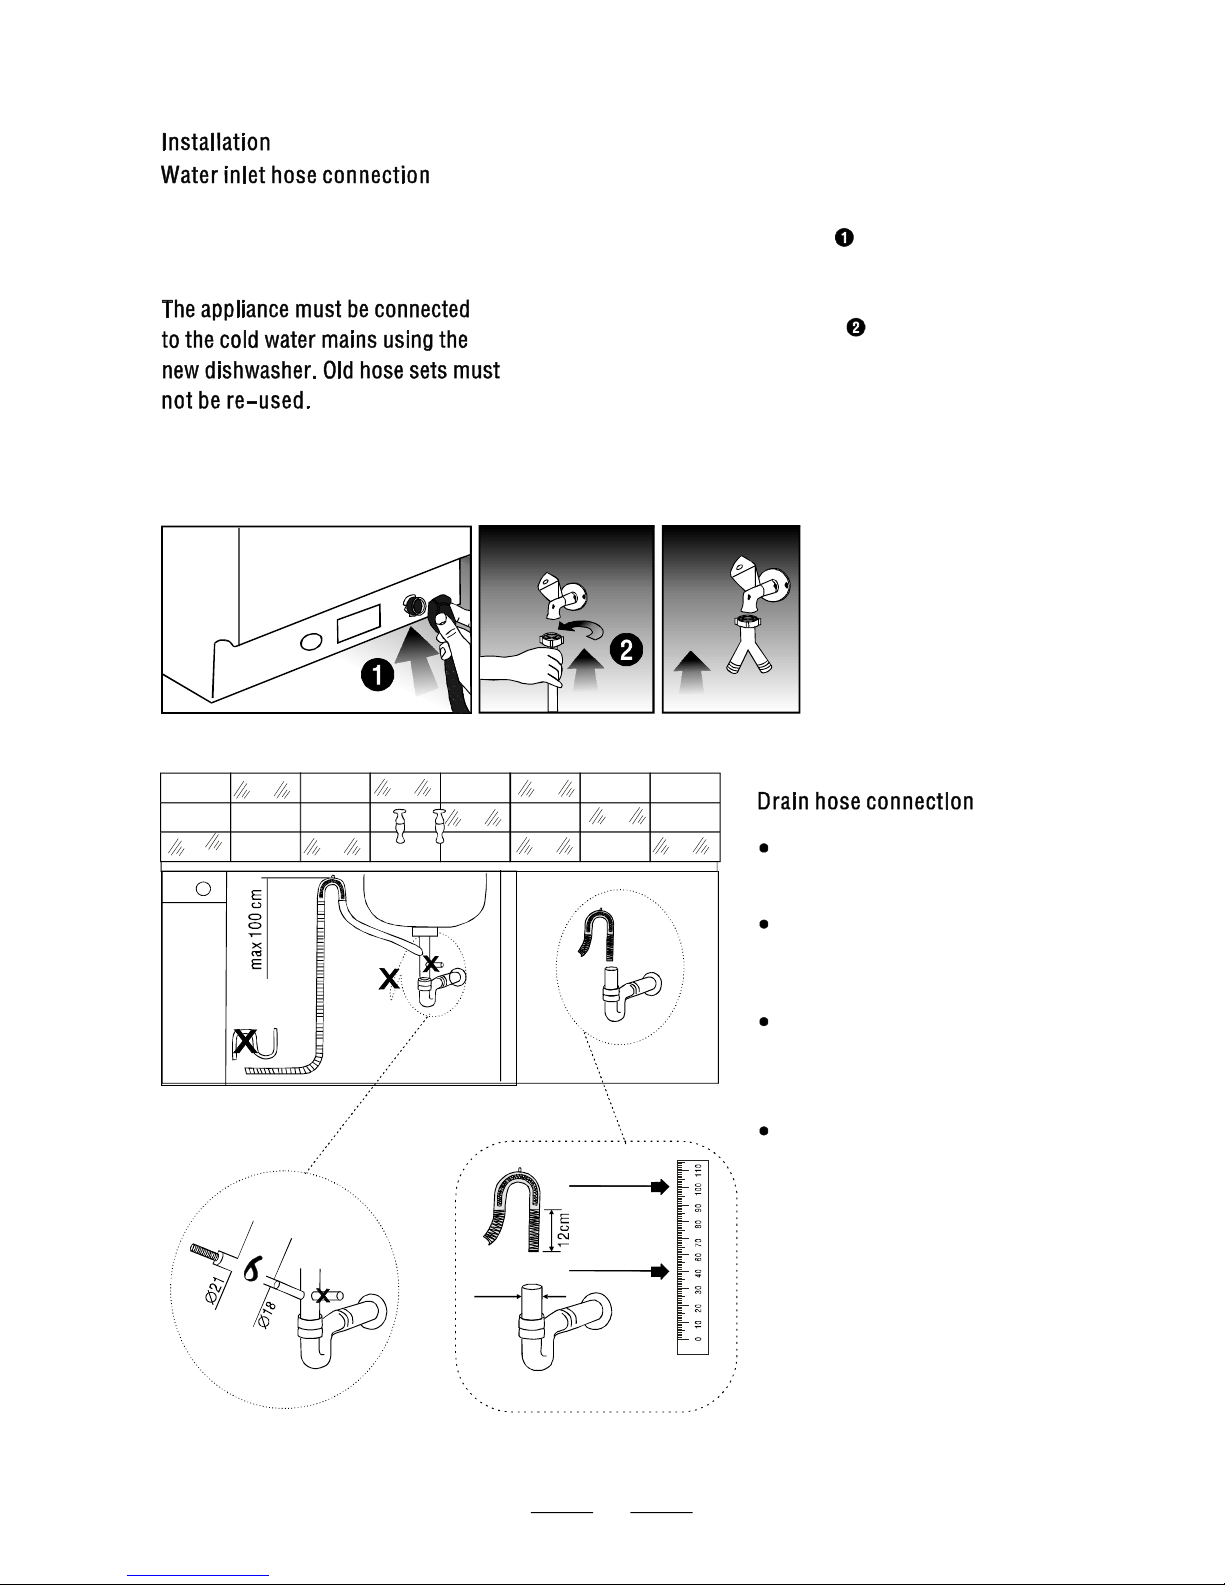
Makesureyourplumbingissuitabletoinstall
withthenewdishwasher.Ifindoubtcontacta
qualifiedplumber.
Thewaterpressurecomingfromthewater
mainssupplyneedtobeataminimumof0.4
andtomaximumof10bars.
max100cm
min40cm
min4cm
Fitthedrainagehoseofyourmachine
tothedrainagepipewithoutbending.
washingprocess.
Secureyourhosefirmlytothewaste
pipetoavoiditcomingoffduringthe
drainagesystem.
Thewastepipemustonlybeconnected
intothefouldrainsandnotsurfacewater
Firstconnectwaterinlethosetoyour
dishwasherasEnsureblackrubbersealis
inplace.
Thenconnectthestraightendtoyourwater
mainssupplyasEnsureblackrubbersealis
inplace.
Turnonthetapandcheckforleakagesafter
connectingthehose.
Pleaseensurethetapisturnedoffwhenthe
machineisnotused.
Ifyouonlyhavecoldwatermains:
TheYadaptorcanbeusedto
provideyouwiththeadditional
coldwaterfeedyouneedforthe
dishwasher.Yadaptorisavailable
frommostDIYstores.
Thehoseshouldbeplacedbetween
40cmand100cmfromthefloorlevel
andmustnotbeextendedotherwisethe
machinemaynotbeabletooexpelthe
wastewaterproperly.
Page 7
6
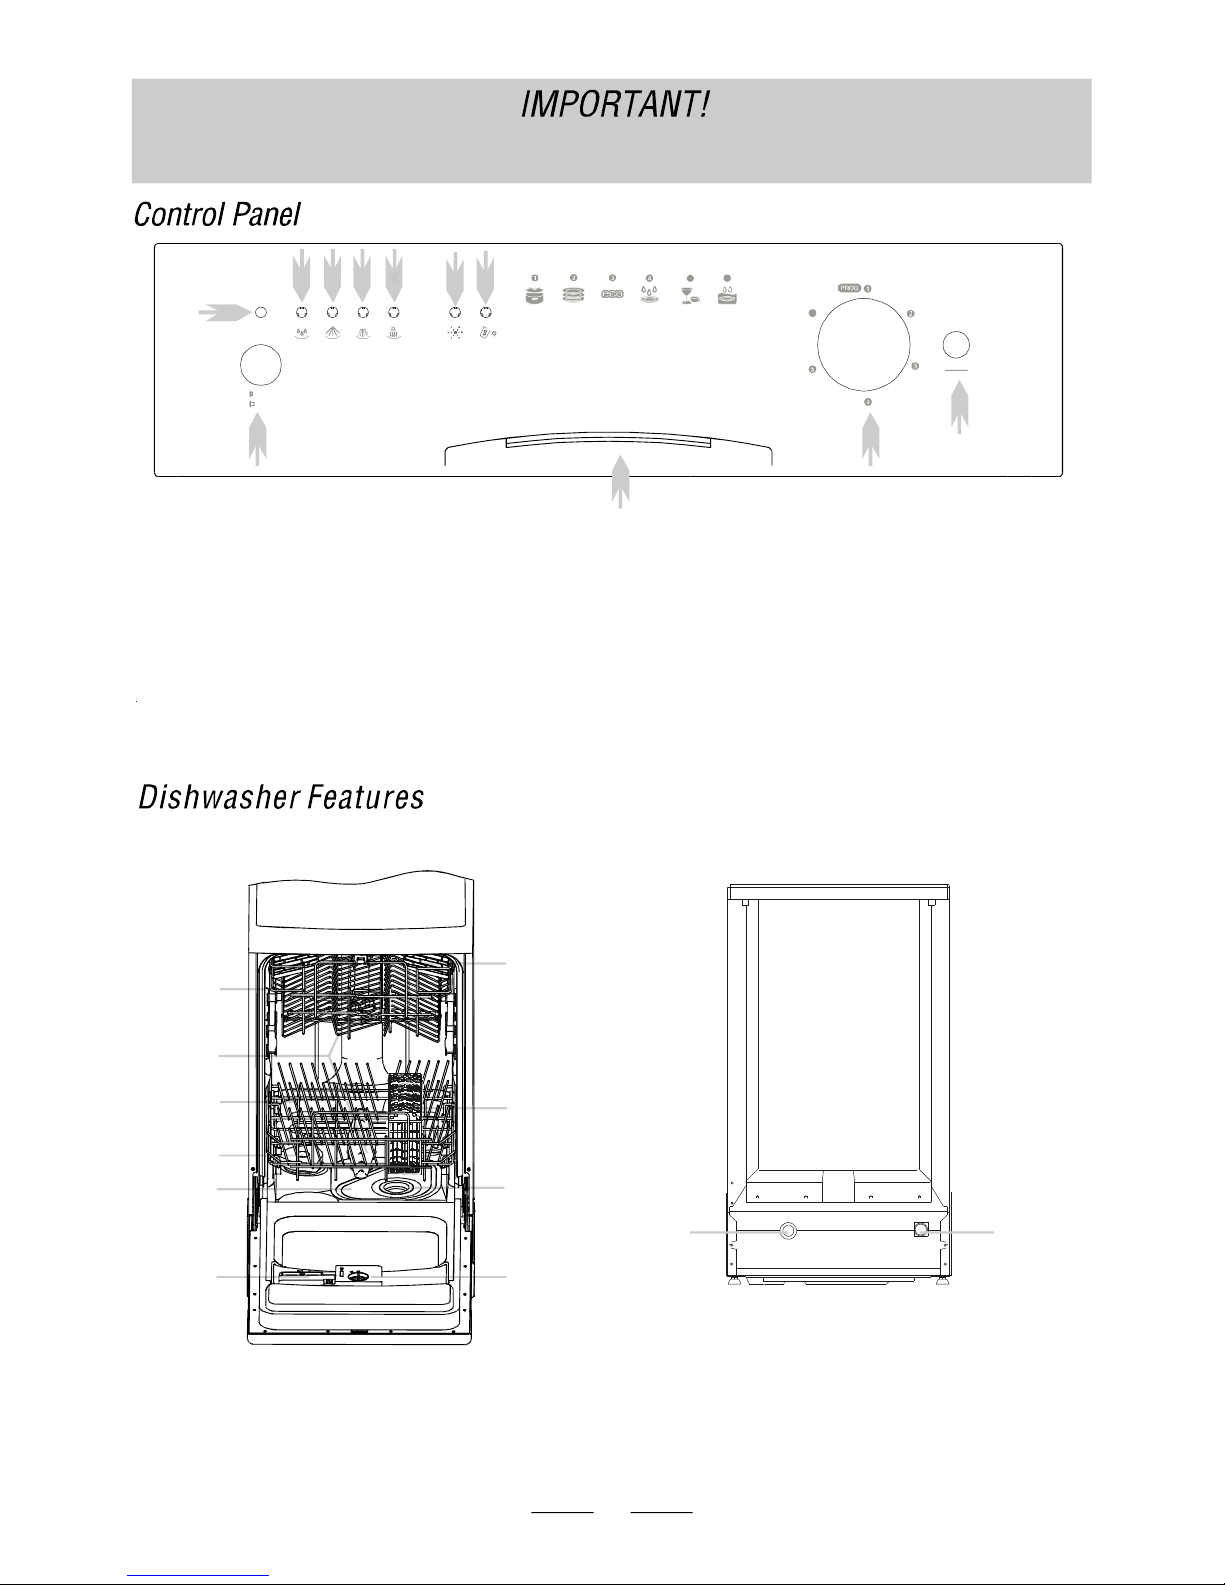
RINSESTRONG NORMAL ECONOMY SOAK
ON
OFF
START
RESET
Togetthebestperformancefromyourdishwasher,readalloperatinginstructionsbeforeusingitforthe
firsttime.
6Start/PauseButton:Tostartorpausethedishwasher,
theprocesspilotlampwillilluminatewhenstart.
9PowerLight:Towhenthedishwasheris
poweron.
illuminate
10SaltWarningLight:Towhenthesaltreservoir
needsrefilling.
illuminate
11RinseAidWarningLight:Toilluminatewhenthe
dispenserneedstoberefilling.
1Pre-rinselight:ToilluminatewhenPre-rinse.
2Washlight:Toilluminatewhenwash.
3Rinselight:Toilluminatewhenrinse.
4Dryinglight:Toilluminatewhendrying.
5DoorHandle:Toopenthedoor.
7WashingProgramSelector:Turnthedialclockwise
toselectwashingcycles.
4
21
10
11
6
5
8
9
7
43
8ON/OFFButton:Toturnon/offthedishwasher.
RAPID
5
6
11
12
1
2
3
4
5
6
7
8
9
10
UpperRack
SprayArms
LowerRack
SaltReservoir
DetergentDispenser
CutleryBasketMainFilter
CupShelf
5
6
7
8
RinseAidReservoir
CoarseFilter
Drainhoseconnector
Inlethoseconnector
9
10
12
11
3
2
1 4
Page 8

5
Ifallthelightsareblinking,thismeansthemachineisoutoforder.Pleaseturnoffthedishwasher,disconnectitfromthepower
supplyanddisconnectitfromthewaterinlet.Callaqualifiedtechnician.
4
5
6
7
8
PresstheON/OFFbutton.
Pressthebuttontostartthewashing.
Start/Reset
PressON/OFFbuttonagaintoturnoffthedishwasher
whenthewashcycleiscompleted.
Inserttheplugintothesocket.
Thepowersupplyis220-240VAC50Hz.Makesurethat
thewatersupplyisturnedontofullpressure.
Thecontrolpanelshowsthestatusofthedishwasher.
a)Alltheprogramlightsareoffmeanstheunitisonstandby
mode.
b)Programlightisnotblinkingmeanstheunitisonpause.
c)Programlightisblinkingmeanstheunitisrunning.
Tochangetheprogrammeifthewashingcyclehasalready
started,pleasefollowthestepsbelow.
NOTE:Ifyouopenthedishwasher'sdoorduringthewashing
cycleandthencloseit,thedishwasherwillcontinuethe
currentwashingprogrammeafter10seconds.However,ifthe
doorisnotclosedcorrectlyafter1minute,thedishwasherwill
makeanaudiblesoundat1minuteintervals.
Pots,plates,glassesand
lightlysoiledpans.
Normallysoiled.
Pre-wash
-wash
Wash(47 ℃)
Rinse(70 ℃)
Drying
Pre
Pots,plates,casseroledishes.
Dishesthathavebeensitting
withdriedfoodonthemfor
awhile.
Plates.glasses,andbowls.
Lightlysoiled.
Normal
Strong
Economy
Mainwash(20g)
Pre-wash
-wash(0℃
Wash(50℃)
Rinse
Rinse(70℃)
Drying
Pre5)
Wash(40 ℃)
Rinse(60 ℃)
Drying
Wash(45 ℃)
Rinse(70)
Drying
℃
NormalWash
(EN50242)
Fordishesthatneedtobe
rinsedanddriedonly.
Rinse
Torinsedishesthatyouplan
towashlaterthatday.
Soak
Pre-wash
Ashorterwashforlightly
soiledloadsthatdonot
needdrying.
Rapid
Wash(40 ℃)
Rinse(55 ℃)
Rinse
Pre-wash(4g)
Mainwash(20g)
Pre-wash(4g)
Mainwash(20g)
Mainwash(15g)
Mainwash(15g)
X
X
1
Pulloutthelowerandupperracks,loadthedishesand
pushtheracksback.Itisrecommendedloadingthelower
rackfirst,thentheupperone.
3
Makesurethedoorisproperlyclosed.
Pourinthedetergent(seethesectionsforSalt,Detergent
andRinseAid).
Selectyourdesiredwashingprogrambyturningthedial
totherespectivewashingcycle.
2
1.Openthedoorslightlytocheckiftheunithasdispensed
thedetergentordetergenttablet.Thiswilldependonhow
longthewashingcyclewasrunningfor.
2.Ifthedetergentdispenserlidisopened,wesuggestyou
toallowthewashcycletocomplete.
3.Ifthedetergentdispenserlidisstillclosed,press
Start/Resetbuttonformorethan3seconds.Thiswillcancel
thecurrentprogramme.
4.Closethedishwasherdoorandre-selectthewashing
programbyturningtheprogramdial.
5.PressStart/Resetbuttonagaintostartwashing.
X
Page 9

6
Pleasefollowthestepsbelowtopourthesaltintothesaltreservoiranditmustbesettocorrespondtothewater
hardnesslevelinyourarea.
Ifthewaterinyourareaishard,depositwillformonyourdishesandutensils.Assuch,thisappliancecontainsasaltreservoirfor
youtoreducethehardnessofwater.
1.Thesaltwarninglightwillilluminatewhenthereservoirisrunningoutofsalt
andrequiredre-filling.
2.Thesaltwarninglightwillceasetoilluminatewithinafewdaysdependingon
howquicklythesaltdissolves.
3.Becarefulnottooverfillthereservoir.Wipeupanyspills.
Fig1 Fig2
1.Removethelowerbasketandunscrewthereservoircap.(Fig1)
2.Fillthereservoirwithapproximately500mlofwater(firstuseonly).
3.Placethefunnelprovidedoverthesaltreservoir.(Fig2)
4.Placeapproximately1.2kgofsaltdependingonthebrandused.
5.Cleananyexcesssaltfromaroundthereservoiropeningandthen
screwthecaponagainfirmly.
6.Runtherapidwashprogrammeimmediately(withoutanycrockeryin
thedishwasher)toremoveanytracesofsaltfromthecompartment.
Page 10

7
Onlyusedetergentsspecificallydesignedforuseindishwashers.Nocountertopdetergentandbleachcanbeused.
Tobemoreenvironmentallyfriendly,pleaseusenomorethanthecorrectamountofdetergent.
Dishwasherdetergentanddetergenttabletareirritant.
Pleasekeepoutofthereachofchildren.
-Irritatingtoeyes.
-Avoidcontactwitheyes.Incaseofcontactwitheyes,
rinseimmediatelywithplentyofwaterandseekmedical
advice.
-Ifswallowed,seekmedicaladviceimmediately.
Pre-wash
detergent
chamber
Mainwash
detergent
chamber
dH
mmol/l
0~140~8 0~1.4
/
0 /
14~398~22 1.4~3.9 - 20 60
39~8022~45 3.9~8 Mid 40 30
>80>45 >8
+
60 20
fH
0~10
10~28
28~56
>56
Clark
WATERHARDNESS
SelectorPosition
Saltconsumption
(gram/cycle)
Autonomy
(cycles/1.2kgs)
1.Removethelowerbasketandunscrewthereservoircap.
2.Thereisanarrowshapedindicatorinthereservoir,whichallowsyoutoturn.
Youmayturnittothe"-"or"+"settingsbasedonthewaterhardnessinyourarea.
Itisrecommendedthatadjustmentsshouldbemadeinaccordancewiththefollowingchart.
Tooptimiseandcustomisethelevelofsaltconsumption,pleasefollowthestepsbelowtoadjustthesaltconsumption.
1°dh(Germandegree)=1.25mmol/l
1°fh(Frenchdegree)=0.1788mmol/l
1°clark(Britishdegree)=1.78mmol/l
Addingthedetergentordetergenttablet
Pleasefollowthestepsbelowtofillthedetergentdispenser.
1.Pushthebuttononthelidofthedetergentdispenserinthe
directionofthearrowuntiltheflapspringsopen.
2.Fillthedetergentdispenserwithdetergentpowderorinsert
thedetergenttablet.Themarkingindicatesthedosinglevel.
TIP:Youcanchoosetoaddadetergenttabletaloneortoadd
detergentpowertobothmainwashdetergentchamberand
thepre-washdetergentchamberforyourselectedwashcycle.
1.Allprogrammeswithprewashneedanadditionaldetergent
dosage(pleaserefertothewashcycletable)thatmustbe
placedinthepre-washdetergentchamber.Thisdetergentwill
takeeffectduringthepre-washphase.
2.Closethelidfirmlysothatitclicksintoplace.
Page 11

Ifthereisnorinseaidwarninglightinthecontrolpanel,youcanjudgetheamountofrinseaidbythefollowingmeans.The
blackdotontherinseaiddispenserindicatestheamountofrinseaidinthedispenser.Astherinseaiddiminishes,thesizeof
theblackdotdecreases.Youshouldneverlettherinseaidgetbelow1/4full.
Astherinseaiddiminishes,thesizeoftheblackdotontherinse
aidlevelindicatorchanges,asillustratedbelow.
Full
3/4full
1/2full
1/4full-Shouldrefilltoeliminatespotting
Empty
Therinseaidreservoirhas6settings.Boththerecommendedsettingandthefactorysettingis"4."
Ifthedishesareordryingproperlyorarespotted,adjustthedialtothenexthighernumberuntil
yourdishesarespot-free.
8
Rinseaidhelpstoensurewaterdoesnotclingandleavemarkson
crockeryduringthedryingphaseandhelpcrockerytodryfasterafter
ithasbeenwashed.Onlypourrinseaidthatisfordomesticdishwasher
intothereservoir.Thismodelisdesignedtouseliquidrinseaidsonly.
Pleasefollowthestepsbelowtopourtherinseaidintothestorage
reservoir,andtheamountwilldispenseautomatically.
1.TurnthecapandopenasindicatedinFig1.
2.Whenthecapopenmarkingisaligned,youmayliftthecapup.
3.Pourtherinseaiduntilthelevelindicatorturnscompletelyblack
incolourandclosethecap.
Becarefulnottooverfillthereservoir.Wipeupanyspills.The
approximatevolumeoftherinseaidreservoiris110ml.
NOTE:Ifthewaterhardnessinyourareaissoft,youmaynotneedto
rinseaidasitmaycausewhitefilmtodeveloponyourdishes.
Rinseaidwarninglightwillilluminatewhenthereservoirisrunning
outofrinseaidandrequiredre-filling.
Alternatively,youcanjudgetheamountofrinseaidbycheckingthe
rinseaidindicatorrightnexttothereservoir'scap.Whenthe
indicatorisblack,itmeansitisfull.Whenitisclear,itmeansitis
almostempty.
Fig1
Fig3
Fig2
Page 12

Scrapeoffanylargeamountsofleft-overfood.Itisnotnecessarytorinsethedishesunderrunningwater.
Placeobjectsinthedishwasherinfollowingway
1.Itemssuchascups,glasses,pots/pans,etc.arestoodupsidedown.
2.Curveitems,orthosewithrecesses,shouldbeataslantsothatwatercanrunoff.
3.Theyarestackedsecurelyandcannottipover.
4.Theydonotpreventthesprayarmsfromrotatingwhilewashingtakesplace.
Verysmallitemsshouldnotbewashedinthedishwasherastheycouldeasilyfalloutofthebasket.
Removingthedishes
Topreventwaterdrippingfromtheupperontothedishesinthelower,wesuggestthatyouemptythelowerbasket
firstandthentheupper.
basketbasket
basket
Theupperbasketisdesignedtoholdmoredelicateandlighterdishwaresuchasglasses,coffeeandteacupandsaucers,as
wellasplates,smallbowlsandshallowpans(aslongastheyarenottoodirty).
Positionthedishesandcookwaresothattheywillnotgetmovedbythesprayofwater.
Theheightoftheupperbasketcanbeadjustedbyplacingthewheelsondifferentheightoftherails.Fortheplacementmethod
oftheupperbasket,pleaserefertotheillustrationsin"AdjustingtheUpperBasket"section.
9
Theheightoftheupperbasketcanbeadjustedinordertocreatmorespaceforlargeutensilsbothfortheupper/lowerbasket.
Theupperbasketcanbeadjustedforheightbyplacingthewheelsondifferentheightoftherails.
Longitems,servingcutlery,saladserversandknivesshouldbeplacedontheshelfsothattheydonotobstructtherotationofthe
sprayarms.Theshelfcanbefoldedbackorremovedwhennotrequiredforuse.
1
Cups
2 Smallservingbowl
3
Largeservingbowl
4 Glasses
Saucers
5
6 Dish
1
2
3
4
6
5
Page 13

10
1
Ovalplatter
3
Soupplates
Dessertdishes
4
2
Dinnerplates
5
Cutlerybasket
2
3
4
1
5
4
Wesuggestthatyouplacelargeitemsandthemostdifficulttocleanitemsaretobeplacedintothelowerbasket:suchaspots,
pans,lids,servingdishesandbowls,asshowninthefigurebelow.
Itispreferabletoplaceservingdishesandlidsonthesideofthebasketinordertoavoidblockingtherotationofthe
topsprayarm.
Pots,servingbowls,etc,mustalwaysbeplacedtopdown.
Deeppotsshouldbeslantedtoallowwatertoflowout.
Thebottom sothatlargerormorepotsandpanscanbeloaded.
featuresfoldingspikes
Pleaseberemindedthat:
Forbetterstackingofpotsandpans,thespikescanbefoldeddownaspicturebelow.
● Itemssuchascups,glasses,pots,pans,andetc.shouldstandupsidedown.
● Curveditemsorthosewithrecessesshouldbeataslantsothatwatercanrunoff.
● Pleasestackyoursoildishessecurelyandensuretheywillnottipover.
● Ensureyoursoileddisheswillnotpreventthesprayarmsfromrotatingwhilewashingtakesplace.
● Verysmallitemsshouldbenotbewashedinthedishwasherastheycouldeasilyfalloutofthebasket.
basket
Page 14

Whentheworkingcyclehasfinished,atonewillsoundforfor8seconds.Turnofftheappliance
bypressingtheON/OFFbuttonandopenthedoorofthedishwasher.Waitafewminutesbefore
unloadingthedishwashertoavoidhandlingthedishesandutensilswhiletheyarestillhotand
moresusceptibletobreakage.Theywillalsodrybetter.
11
Donotletanyitemextendthroughbottom.
Teaspoons
4
Soupspoons
2
Forks
1
Servingfork
8
Servingspoon
6
Knife
5
3 Dessertspoons
7
Gravyladle
1
1
1
1
1
4
7
8
1
1
1
6
2
2
2
2
2
2
2
2
5
5
5
5
5
5
5
5
3
3
3
6
4
4
4
4
4
4
4
3
3
3
3
3
6
Cutleryshouldbeplacedinthecutlerybasketwithhandlesatthebottom.Iftherackhassidebaskets,thespoonshould
beloadedindividuallyintotheappropriateslots,especiallylongutensilsshouldbeplacedinthehorizontalpositionatthe
frontofthebasketasshown.
Woodencutleryandutensils-thesewillleachoutandbecomeunsightly.
Sensitiveornamentalglasses,craftutensilandvases,specialantiqueorirretrievableutensils.Theseornamentsarenot
Plasticpartsthatarenotsuitabletobewashedinhotwater.
Copperandtinutensils.
Utensilswhicharesoiledwithash,wax,lubricatinggreaseorink.
Absorbentmaterialssuchasspongesandcloths.
Aluminumandsilverpartshaveatendencytodiscolourandfadeduringwashcycle.Sometypesofglassmayturn
cloudyafterrepeatedwashcycles.
Considerbuyingutensilswhichareidentifiedasdishwasher-proof.
Possiblecauses:
Typeofglassormanufacturingprocess.
Chemicalcompositionofdetergent.
Watertemperatureanddurationofdishwasherprogramme.
Suggestions:
Useglasswareorporcelaindishesthathavebeenmarkeddishwasher-proofbythemanufacturer.
""
Useamilddetergentthatisdescribedaskindtodishes.Ifnecessary,seekfurtherinformationfromdetergentmanufacturers.""
Topreventdamage,takeglassandcutleryoutofthedishwasherassoonaspossibleaftertheprogrammehasended.
Forparticularitems,selectalowtemperatureprogramme.
designedtobecleanedindishwasher.
Page 15

12
Thefilterpreventlargerremnantsoffoodorotherobjectsfromgettinginsidethepump.Thisresiduecan
occasionallyclogupthefilters.
Thefiltersystemconsistsofacoarsefilter,aflat(Mainfilter)
Andamicrofilter(Finefilter).
Mainfilter
Foodandsoilparticlestrappedbythisfilterarepulverizedbya
specialjetonthelowersprayarmandwasheddownthe
drain.
Coarsefilter
Largeritems,suchaspiecesofboneorglass,thatcouldclog
thedrainaretrappedinthecoarsefilter.Toremoveanitem
caughtinthisfilter,gentlysqueezethetapsonthetopofthis
filterandliftitout.
Finefilter
Thisfilterholdssoilandfoodresidueinthesumpareaand
preventsitfrombeingredepositonthedishesduringacycle.
-Inspectthefiltersforobstructionseverytimethedishwasherhasbeenused.
-Byunscrewingthecoarsefilter,youcanremovethefiltersystem.Removeanyfoodremnantsandcleanthe
filtersunderrunningwater.
1
2
3
2
3
1
2
3
step1:UnscrewtheC
,
andthengentlyliftitup.
oarsefilter
step2:GentlylifttheMainfilterup
.
step3:GentlylifttheFinefilterup
.
NOTE:
1
Toinstallthefiltersystemback,pleasedothefollowing:
1.GentlyinserttheFinefilterbacktotheFilteringSystem.
2.GentlyinserttheMainFilterbacktotheFilteringSystem.
3.GentlyinserttheCoarseFilterbacktotheFilteringSystem,andscrewbacktheFilterCylindersecurely.
Page 16

13
Neverrunthedishwasherwithoutthefiltersinplace.
Ifyourdishwasherisleftinanunheatedplaceoverthewinter,askaservicetechnicianto:
Cutoffelectricalpowertothedishwasher.
Turnoffthewatersupplyanddisconnectthewater
inletpipefromthewatervalve.
Drainwaterfromtheinletandwatervalve.pipe
(Useapantocatchthewater.)
Reconnectthewaterinlettothe
watervalve.
pipe
Removethefilterinthetubthebottom
anduseaspongetosoakupwater
insump.
5
4
3
2
1
Itisnecessarytocleanthesprayarmsregularlyforremovingtheaccumulationofscale
forthehardwaterandthuspreventblockingofsprayarmjetsandbearings.Toremove
thesprayarm,screwoffthenuttotakeoutthewasherontopofthesprayarmandremove
thearm.Washthearmsinsoapyandwarmwateranduseasoftbrushtocleanthejets.
Replacethemafterrinsingthemthoroughly.
1
Close
2
3
Filterassembly
Forbestperformanceandresults,thefilterassemblymustbecleanregularly.Thefilter
efficientlyremovesfoodparticlesfromthewashwater,allowingittoberecirculated
duringthecycle.Forthisreason,itisagoodideatoremovethelargerfoodparticles
trappinginthefilteraftereachwashcyclebyrinsingthesemicircularfilterandcup
underrunningwater.Toremovethefilterassembly,pullonthecuphandleinthe
upwarddirection.Theentirefilterassemblyshouldbecleanedonceaweek.Toclean
thecoarsefilterandthefinefilter,useacleaningbrush.Reassemblethefilterpartsas
showninthefiguresleftandreinserttheentireassemblyinthedishwasher,positioning
initsseatandpressingdownward.Thedishwashermustneverbeusedwithoutthefilters.
Improperreplacementofthefiltermayreducetheperformanceleveloftheappliance
anddamagedishesandutensils.
Page 17

14
Neveruseaspraycleanertocleanthedoorpanelasitmaydamagethedoorlockandelectricalcomponents.
Abrasiveagentorsomepapertowelshouldnotbeusedbecauseoftheriskofscratchingorleavingspotsonthe
stainlesssteelsurface.
Tocleantheedgearoundthedoor,youshoulduseonlyasoftwarm,dampcloth.Toavoid
penetrationofwaterintothedoorlockandelectricalcomponents,donotuseaspraycleaner
ofanykind.
Also,neveruseabrasivecleanersorscouringpadsontheoutersurfacesbecausetheywill
scratchthefinishing.Somepapertowelsmayalsoscratchorleavemarksonthesurface.
Aftereverywash,turnoffthewatersupplytothe
applianceandleavethedoorslightlyopensothat
moistureandodoursarenottrappedinside.
Beforecleaningorperformingmaintenance,always
removetheplugfromthesocket.
Tocleantheexteriorandrubberpartsofthedishwasher,
donotusesolventsorabrasivecleaningproducts.
Onlyuseaclothwithwarmsoapywater.
Toremovespotsorstainsfromthesurfaceofthe
interior,useaclothdampenedwithwaterwithalittle
whitevinegar,oracleaningproductmadespecifically
fordishwashers.
Itisrecommendedthatyourunawashcyclewiththe
dishwasheremptyandthenremovetheplugfromthe
socket,turnoffthewatersupplyandleavethedoor
oftheapplianceslightlyopen.Thiswillhelpthedoor
sealstolastlongerandpreventodoursfromforming
withintheappliance.
Iftheappliancemustbemoved,trytokeepitinthevertical
position.Ifabsolutelynecessary,itcanbepositionedon
itsback.
Oneofthefactorsthatcauseodorstoforminthe
dishwasherisfoodthatremainstrappedintheseals.
Periodiccleaningwithadampspongewillpreventthis
fromoccurring.
Pleaseseetheratinglabletoknowtheratingvoltageandconnectthedishwashertotheappropriatepowersupply.Userequired
fuse13amp.Fusedelectricalsupplyisrequired-copperwireonly.Timedelayfuseorcircuitbreakerrecommendedandprovide
separatecircuitservingonlythisappliance.Outletshouldbeplacedinadjacentcabinet.
Ensurethevoltageandfrequencyofthepowerbeingusedcorrespondtothoseon
theratingplate.Onlyinserttheplugintoanelectricalsocketwhichisearthedproperly.Ifthe
electricalsockettowhichtheappliancemustbeconnectedisnotappropriateforthe,
replacethesocket,ratherthanusingaadaptorsorthelikeastheycouldcauseoverheating
andburns.
plug
Page 18

15
Fuseblown,orthe
circuitbreakertripped
Replacefuseorresetcircuitbreaker.Removeanyother
appliancessharingthesamecircuitwiththedishwasher
Utensilsarenotsecure
inthebasketsorsomething
smallhasdroppedinto
thebasket
Toensureeverythingissecuredinthedishwasher.
Motorhums Dishwasherhasnotbeenusedregularly.Ifyoudonotuseit
often,remembertosetittofillandpumpouteveryweek,
whichwillhelpkeepthesealmoist.
Improperdetergent
Spilledrinseagent Alwayswipeuprinseagent
spillsimmediately.
Detergentwith
colourantwasused
Makesurethatthedetergentistheonewithoutcolourant.
Rinseagentdispenser
isempty
Makesurethattherinseagentdispenseisfilled.
Improperprogram
Improperrackloading Makesurethattheactionofthedetergentdispenserand
sprayarmsarenotblockedbylargedishware.
Extremelyhardwater
Lowinlet
temperature
Overloadingthe
dishwasher
Improperloading
Oldordamppowder
detergent
Emptyrinseagent
dispenser
Incorrectdosageof
detergent
Toremovespotsfromglassware:
Takeoutallmetalutensilsoutofthedishwasher.
Donotadddetergent.
Choosethelongestcycle.
Startthedishwasherandallowittorunforabout
18to22minutes,thenitwillbeinthemainwash.
Openthedoortopour2cupsofwhitevinegar
intothebottomofthedishwasher.
Closethedoorandletthedishwashercomplete
thecycle.Ifthevinegardoesnotwork:Repeat
asabove,exceptuse1/4cup(60ml)ofcitricacid
crystalsinsteadofvinegar.
Someaudiblesoundsare
normal
'
Makesurethedishwasheristurnedonandthedooris
closedsecurely.
Checkthatthewatersupplyisconnectedproperlyand
thewateristurnedon.
Makesurethepowercordisproperlypluggedintothe
wallsocket.
Powersupplyisnot
turnedon
Waterpressureislow
'
Overflow
Thesystemisdesignedtodetectanoverflow.Whenit
does,itshutsoffthecirculationpumpandturnsonthe
drainpump.Pleasecontactaqualifiedtechnicianfor
assistant.
Selectprogramwithheavycleaningoption.
Useonlythespecialdishwasherdetergenttoavoidsuds.
Ifthisoccurs,openthedishwasherandletsudsevaporate.
Combinationofsoft
waterandtoomuch
detergent
Uselessdetergentifyouhavesoftwaterandselecta
shortestcycletowashtheglasswareandtogetthemclean.
Soundfromsprayersanddetergentcup
opening.
Page 19

Teaorcoffeestains usingasolutionof1/2cupofbleachand3cupswarmwater
toremovethestainsbyhand.
Irondepositsinwater
cancauseanoverallfilm
Youhavetocallawatersoftenercompanyforaspecialfilter.
Hardwaterminerals Tocleantheinterior,useadampspongewithdishwasher
detergentandwearrubbergloves.Neveruseanycleanerother
thandishwasherdetergentfortheriskoffoamingorsuds.
Dishesblockdetergent
cups
Re-loadingthedishesproperly.
Normalphenomenon
Thereissomesteamcomingthroughtheventbythedoor
latchduringdryingandwaterdraining.
Aluminumutensilshave
rubbedagainstdishes
Useamildabrasivecleanertoeliminatethosemarks.
Thisisnormal Asmallamountofcleanwateraroundtheoutleton
thetubbottomatthebackofthetubkeepsthewater
seallubricated.
Becarefulnottooverfilltherinseaiddispenser.
Spilledrinseaidcouldcauseoversudsingandlead
tooverflowing.Wipeawayanyspillswithadampcloth.
Makesurethedishwasherislevel.
Overfilldispenserorrinse
aidspills
Dishwasherisntlevel
'
Flexibledoorlookcause
displacement
Loosethescrewoffixingdoorlockandadjusttoa
suitableplace.Thenfixthescrewagain.
16
Page 20

Thissymbolontheproductorintheinstructionsmeansthatyourelectricalandelectronic
equipmentshouldbedisposedattheendofitslifeseparatelyfromyourhouseholdwaste.There
areseparatecollectionsystemsforrecyclingintheEU.Formoreinformation,pleasecontactthe
localauthorityoryourretailerwhereyoupurchasedtheproduct.
17
DIMENSION(WITHTHETOPCOVER): 450X580X850(MM)
DIMENSION(WITHOUTTHETOPCOVER
):450X580X820(MM)
RATEDVOLTAGE:230V/50HzRATEDPOWER:1930W
ARATEDENERGYEFFICIENCYBRATEDWASHPERFORMANCE
BRATEDDRYINGPERFORMANCE8PLACESETTINGS
6WASHPROGRAMMESTWO-SPRAYARMS
ELECTRONICCONTROLHEIGHTADJUSTABLEUPPERBASKET
Page 21

DSGRetailLimitedisresponsibleforaftersalesserviceandanyclaimsinrespectofthis
licensedproduct.IfyouhaveaqueryabouttheproductpleasecontactourCurrysproduct
supportline(08701)565550
VisitPartmaster.co.uktodayfortheeasiestwaytobuyelectricalsparesandaccessories.
Withover1millionsparesandaccessoriesavailablewecandeliverdirecttoyourdoorthe
verynextday.
Visit
orcall
CallschargedatNationalRate.
www.partmaster.co.uk
08706001338
(UKcustomersonly)
Partmaster
.co.uk
DSGRetailLtd · 200TheCampus · MarylandsAvenue · HemelHempstead · Herts · HP27TG
 Loading...