

Page 1
MS3WN/MF3WN
Page 2

1
Carefully read this manual before installation
Reading this manual will help to understand the connections of inlet, drain hoses and
power cord, and to find a optimal position for the dishwasher.
Notes
●
The installation of the pipes
and electrical equipment
should be made by a qualified
person.
Electrical Shock Hazard
Disconnect electrical
p
ower before
carrying out any re-wiring.
Failure to do so can result in death or
electrical shock.
The installation position of the dishwasher should be near the existing inlet ,drain hoses and
power cord.
One side of the cabinet sink should be chosen to facilitate the connection of drain hoses of
the dishwasher.
Preparations should be made before moving the dishwasher to the installation place.
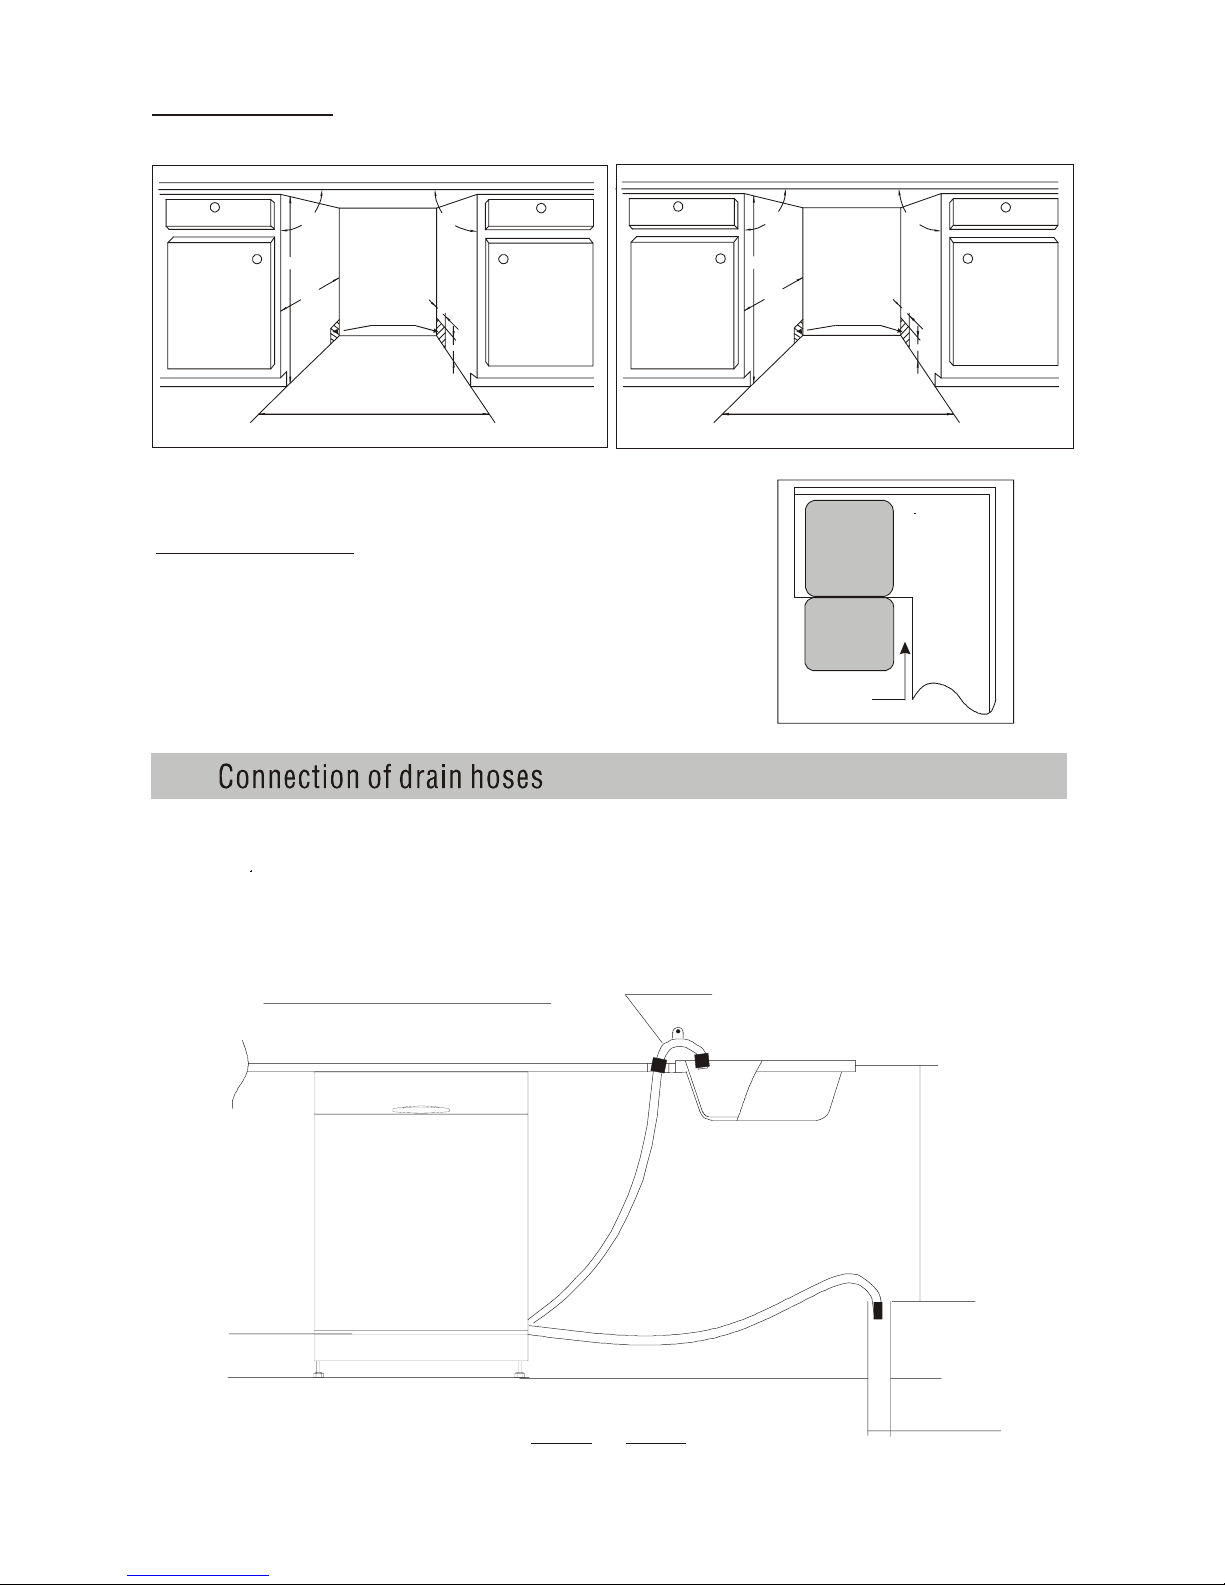
Choose a
p
lace near the sink to facilitate the installation of inlet and drain hoses
(see Figure 1).
If dishwasher is installed at the corner of the cabinet, there should be some s
p
ace
(see Figure 2) when the door is opened.
2
1
Installation preparation
Installation instruction
Note: please check the accompanying installation accessories are provided.
●
●
Page 3
Minimum space when
the door is opened
【Figure2】
Cabinet dimensions
【Figure1A,1B】
Cabinet
Dishwasher
Door of
dishwasher
Mini mum space of 50mm
Less than 5mm between the top of dishwasher and
cabinet and the outer door aligned to cabinet.
90 °
90 °
450 mm
820mm
100
580mm
80
Space between cabinet
bottom and floor
Electrical, drain and
water supply line
entrances
●
Insert the drain hos e i nto a drain pipe with a mini mum diameter of 4cm, or let it ru n i nto the sink ,
making sure to avoid bending or crimping . Use the speical plastic support that comes with the
appliance (Figure3). The free end of the hose must be at a height between 400 and 1000mm and
must not be immersed in water to avoid back flow. A TTENTION: The special plastic hose
support must be solidly fastened to the wall to prevent the drain hose fro m moving and allowing
water spilling outside the drain pipe.
Drain pipe connection
【Figure3】
Drain hose hook
Min 400mm
Max 1000mm
φ40mm
2
90 °
90 °
600 mm
820mm
100
580mm
80
Space between cabinet
bottom and floor
Electri cal, drain and
water supply line
entrances
Model:MS3WN_【Figure1A】 Model:MF3WN_【Figure1B】
Page 4

qualified plumber.
maximum of 10 bars.
Make sure your plumbing is suitable to install
your new dishwasher. If in doubt contact a
The water pressure coming from the water
mains supply must be a minimum of 0.4 and a
First connect water inlet hose to your
dishwasher Ensure black rubber seal is
in place.
Then connect the straight end to your water
mains supply Ensure black rubber seal is
in place.
Please turn on the tap and check for leakages
after connecting the hose.
Please ensure the tap is turned off when the
machine is not used.
If you only have one cold water
feed
(
For example for your
washing machine don't worry.
a Y adaptor will provide you with
the additional cold water feed
you need for your dishwasher.
Y adaptor is available from most
DIY stores.
max 100 cm
min 40 cm
min 4cm
max 100 cm
12cm
Fit the drainage hose of your machine
to the drainage pipe without bending.
washing process.
Secure you r hose fir mly to the w aste
pipe to avoid it coming off during the
drainage system.
The waste
pip
e must only be connected
into the foul drains and not surface water
The hose should be placed between
40 cm and 100 cm from th e floor lev el
and must not be extended otherwise the
machine may not empty the waste water.
3
Page 5

【Figure 4】
Installation steps
Connect the inlet, and drain hoses, and power cord .
Put the dishwasher into the slide rail.
Pushing the dishwasher into the cabinet.
Level the dishwasher and raise to work-top height by adjusting the four leveling legs individually.
Fixing the dishwasher into the cabinet by two countersunk head screw.
1
2
3
4
5
According to the arrow illustrated figure 4 adjust the feet to raise or lower down the dishwasher
and keep it level.
Dishwasher installation steps
●
5
3
4
2
SCREW
CONE GEAR
4
Page 6

screw
plinth
1
Unscrew the tw screws and remove the plinth from the dishwasher. [Figure a
]
o
2
Unscrew adjust the distance of left and right plinth tab to your need.
The adjustable range is from 39mm to 134mm. [Figure b]
the two screws and
●
Installation the plinth
3
Fix the plinth on the plinth tab. According to your need to adjust the plinth height, the
adjustable range is from 56mm to 122mm. [Figure c]
[Figure a]
[Figure b]
[Figure c]
plinth
plinth tab
122
56
5
Page 7

6
●
Attention
●
Start of dishwasher
The followings should be checked before starting the dishwasher.
Whether the dishwasher is level and fixed
Whether the inlet valve is opened
Whether there is leakage at the connection
Whether the appliance is pluged into on electricl supply
Whether the power is switched on
Whether the inlet and drain hoses are knotted
All packing materials and printings should be taken out from the dishwasher
1
2
3
4
5
6
7
After installation, please keep this installation manual safe with the instruction manual.
The content of this manual is very helpful to the user.
Illustration of feet adjustment
Check Level
Side To Side
Check
Level
Front
to Back
The dishwasher must be level for the racks to operate correctly and to give maxi mum wash
performance.
Place a spirit level on the door and the lower rack rail as shown in diagram 1 to check that
the dishwasher is level.
It is easy to level the dishwasher by adjusting the four leveling legs individually from the front
of the dishwasher.
2.1 Refer to Remark A diag ram 2 below for adjustment of the rear legs,turn the screw clockwise to
lower the rea r legs until the correct height is obtained.
2.2 Refer to Remark B diagram 2 below ad justment of the front legs to obtain the correct height.
leveli ng the dishwa sher please be caref ul not to allow the dishwasher to
1
2
3
When tip over.
1
2
Remark A adjuster pole to
adjust the height of back foot.
Remark B to adjust the height
of front foot by spanner.
Page 8

The manufacturer, following a policy of constant
develo
p
ment and up-dating of the product, may make
modifications without giving prior notice.
 Loading...