

Page 1
user guide
Freestanding Electrical Cooker
Page 2

2
Getting to know your Freestanding Cooker . . . . . . . .. . . . . . . . . . . . . .3
Important safety notes. . . . . . . . . . . . . . . . . . . . . . . . . . . . . . . . . . . . . . 6
Control panel . . . . . . . . . . . . . . . . . . . . . . . . . . . . . . . . . . . . . . . . . . . . 10
Instructions for use . . . . . . . . . . . . . . . . . . . . . . . . . . . . . . . . . . . . . . . 13
Hints and tips . . . . . . . . . . . . . . . . . . . . . . . . . . . . . . . . . . . . . . . . . . . . 16
Troubleshooting . . . . . . . . . . . . . . . . . . . . . . . . . . . . . . . . . . . . . . . . . . 20
Specifications . . . . . . . . . . . . . . . . . . . . . . . . . . . . . . . . . . . . . . . . . . . .21
Contents
Page 3

3
Thank you for choosing this Matsui freestanding cooker. We hope the
following information will help you to familiarise yourself with the features
of the cooker, and to use it successfully and safely.
Please read the instructions in this user guide before using the cooker and
keep it for future reference.
This Instruction book is valid for serval Matsui models.
Getting to know your Freestanding Cooke
r
Page 4
4
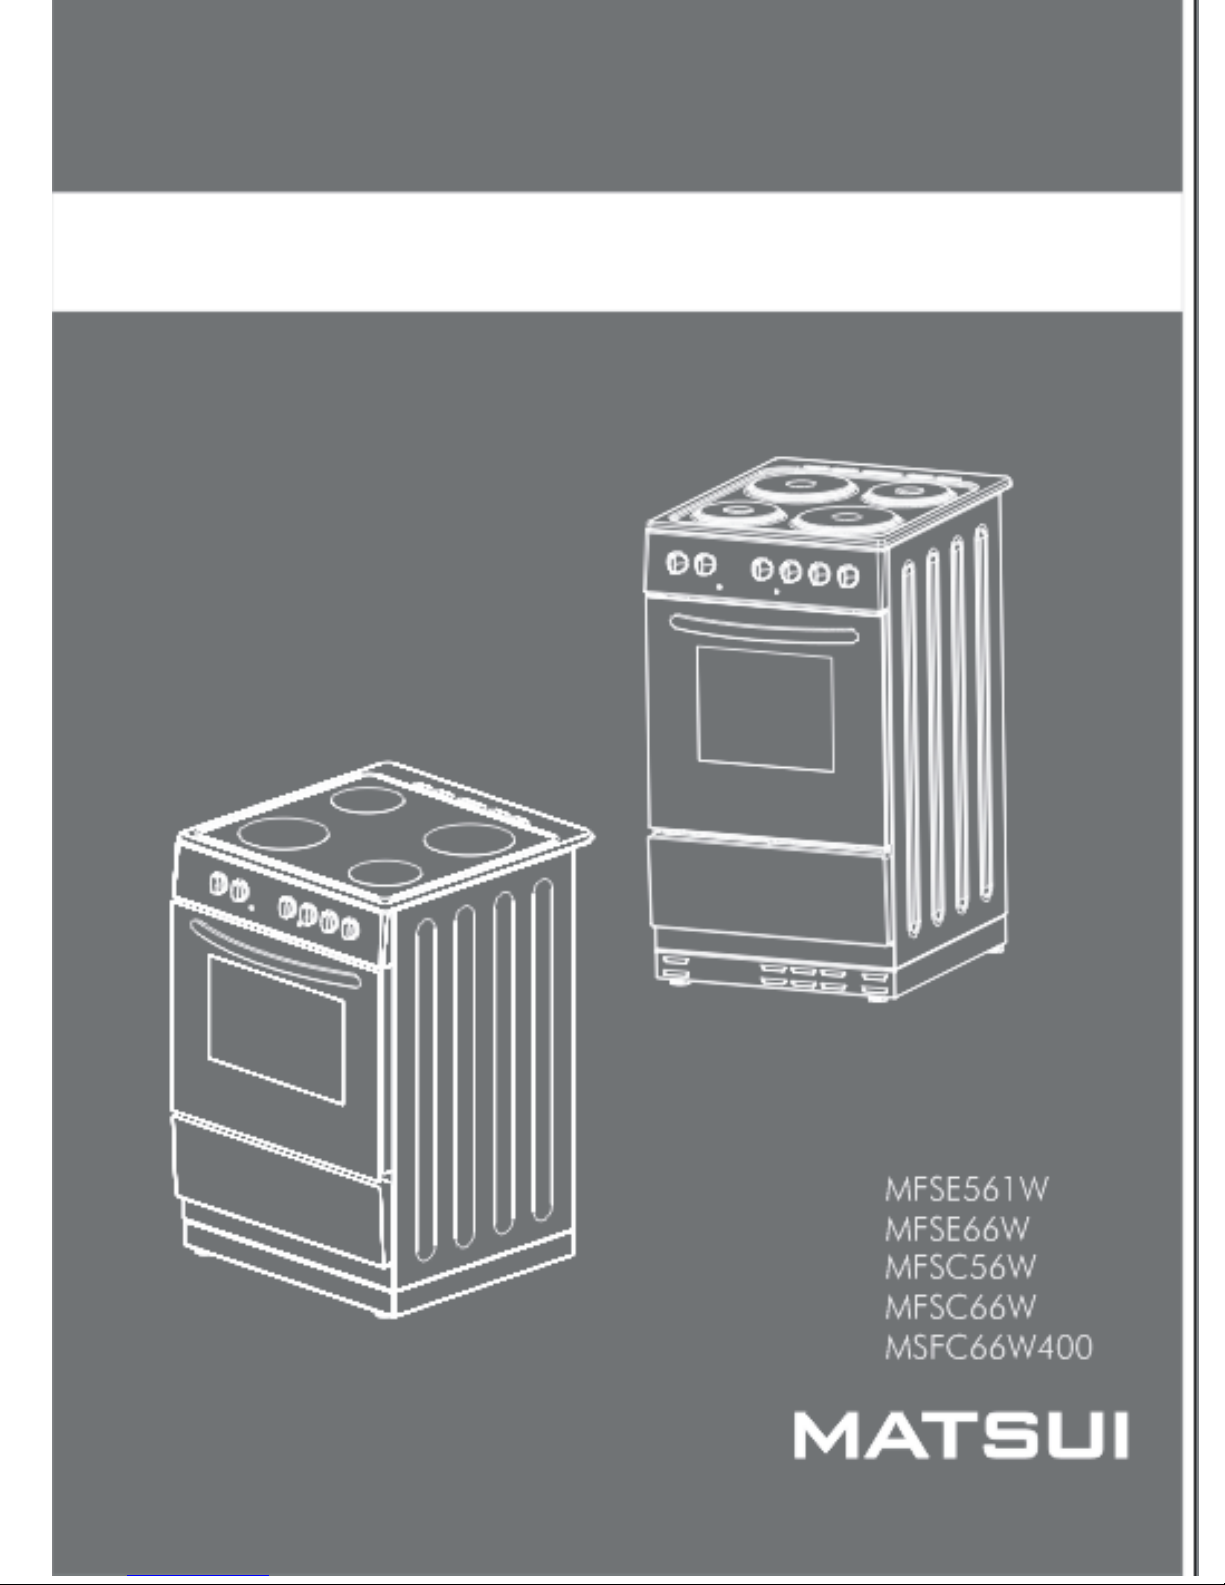
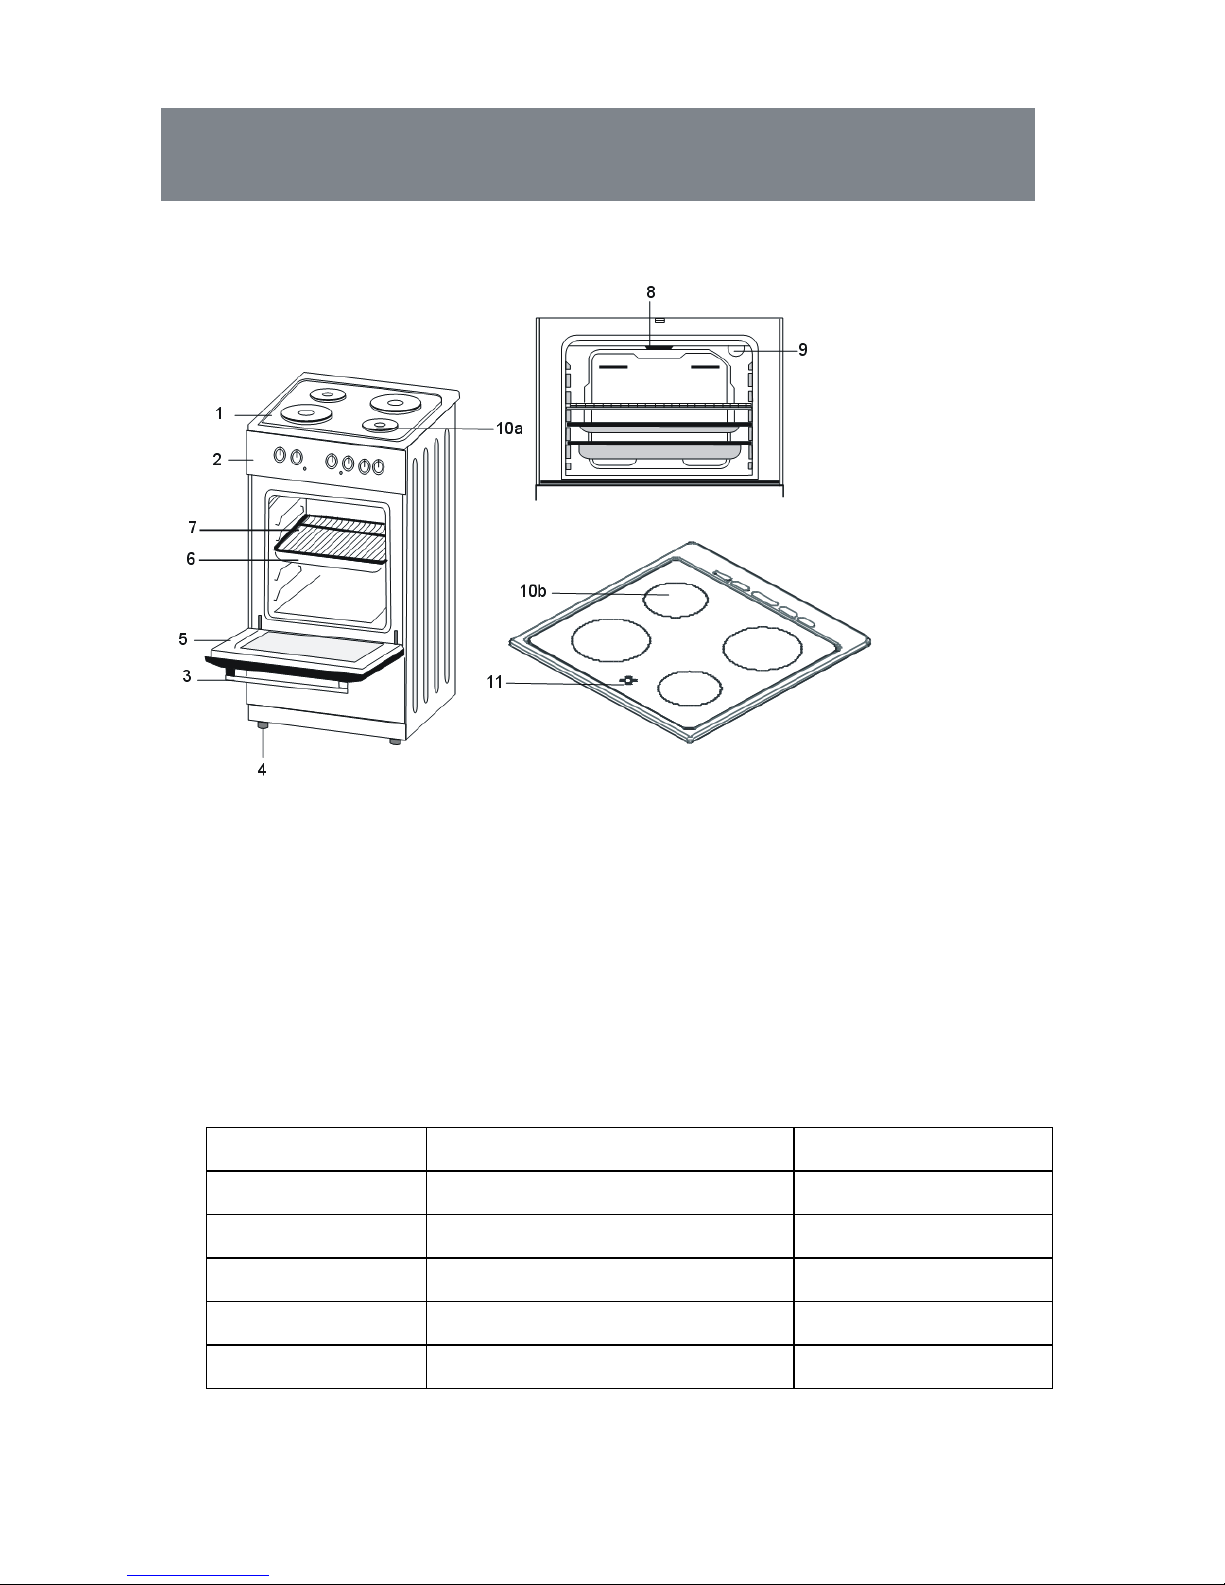
Freestanding Cooker
Identifying parts of your Cooker:
1. Cooker Top(Hob) 7. Wire Grid
2. Control Panel 8. Grill
3. Oven Door Handle 9. Oven Lamp
4. Adjustable Feet 10. Cooking zone (a.Hotplate – b.Ceramic)
5. Oven Door 11. Hot Surface Indicator (b. Ceramic)
6. Oven Tray
Model Size WxDxH(cm) Type
MFSE561W 50x60x90 ELECTRIC(10a)
MFSE66W 60x60x90 ELECTRIC(10a)
MFSC56W 50x60x90 CERAMIC(10b)
MFSC66W 60x60x90 CERAMIC(10b)
MSFC66W400 60x60x90 CERAMIC(10b)
Getting to know your Freestanding Cooker
Page 5

5
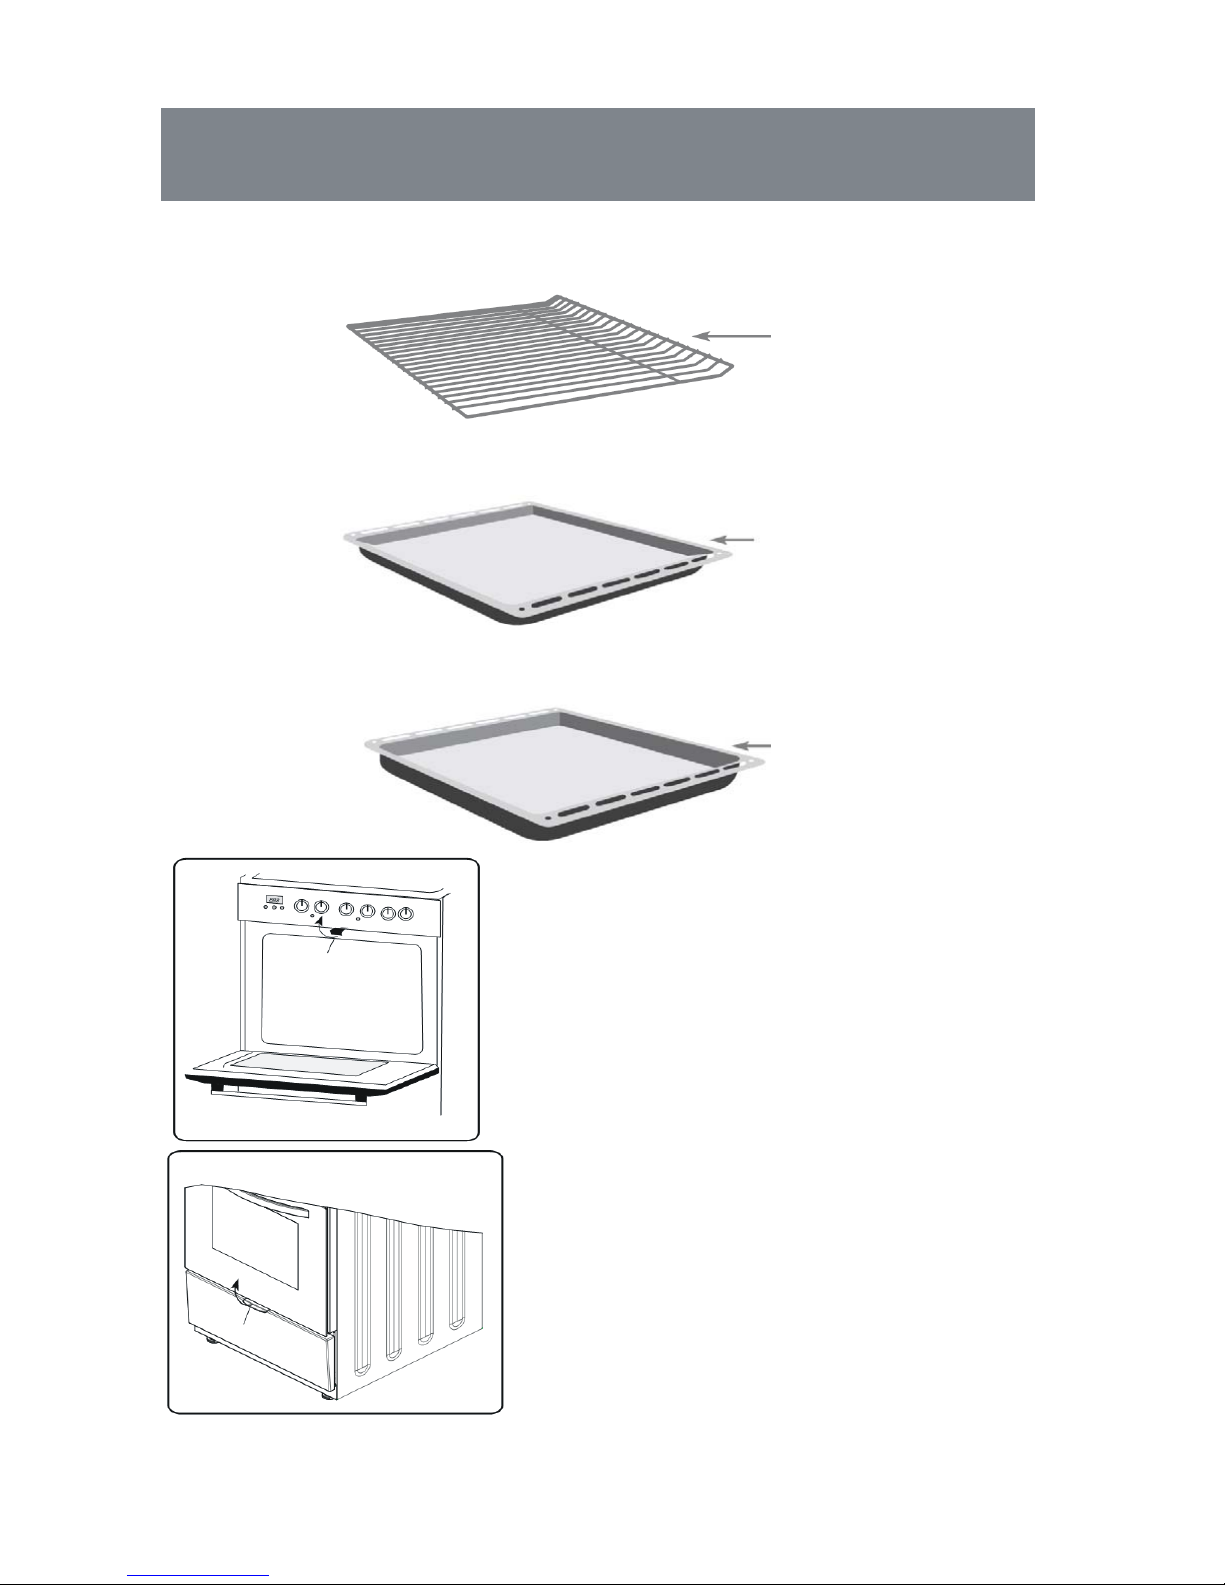
Wire Grid x 1
Shallow Tray x 1
Deep Tray x 1
Child Lock: To open the door, press
the child lock upwards then pull the
door towards you then release the
door lock.
Close the door in the normal manner,
the door lock will automatically
engage.
Flap Drawer: To open the flap
drawer lift the handle and pull the
drawer cover towards yourself. A
slight push will be enough to close the
drawer.
Getting to know your Freestanding Cooker
Page 6

6
We have included this section for your safety. Please read this information
carefully before using your cooker.
General Safety
These warnings are provided in the interest of your safety. Read this
manual carefully before using the appliance.
Please keep this manual in a safe place and pass on the instruction manual
to the new owner if you sell the appliance.
The serial number is also included in the IB, for servicing issues please
quote this number or provide it to the service engineer.
The appliance must be installed by a qualified electrician.
This appliance is not intended for use by persons(including children) with
reduced physical, sensory and mental capabilities, or lack of experience
and knowledge, unless they have been given supervision or instruction
concerning use of the appliance by a person responsible for their safety.
Before Installation
Transport damage
After removing the packaging, check if there is any damage, if found never
attempt to use the appliance, please contact the store where purchased.
Important safety notes
Page 7

7
Electrical Connection
The electrical connection of this cooker should be carried out by a qualified
electrician, according to the instructions in this guide and in compliance with
the current regulations.
The cooker may only be connected by an approved specialist. Losses resulting
from damage caused by incorrect connection will invalidate warranty claims.
Check that the electricity supply matches that of the rating plate before
connecting the appliance.
This appliance has been designed for domestic use only.
Child safety
Do Not allow children to play with any part of the packaging.
Do Not allow children to be near the appliance unsupervised, accessible parts
may be hot during use. Ensure that children do not play with the appliance.
Do Not allow children to climb or sit on oven door.
Important safety notes
Page 8

8
Do Not stand and sit on the oven door.
Do Not place the baking tray, aluminium foil or dishes on the oven floor.
This will cause heat accumulation. The baking and roasting times will no
longer be correct and the enamel may become damaged.
Do Not hold or carry the cooker by the door handle. The door handle cannot
hold the weight of the cooker and may break off.
Do Not place combustible items in the oven. There is a risk of fire.
Do Not use adaptors, multiple sockets and or extension leads.
Do Not trap cables of electrical appliances in the hot oven door. The cable
insulation could melt. There is a risk of short-circuiting.
Do Not change or repair the supply cable by yourself. Always contact an
authorised service agent.
Do check the door seals regularly. If the oven seal is very dirty, the oven
door will no longer close properly when the oven is in use. The fronts of
adjacent units could be damaged. Keep oven seal clean.
Do open the oven door carefully when cooking. Hot steam may escape.
Do leave the appliance to cool down before touching the internal parts of the
oven. Some parts of the appliance may remain hot for a long time after it has
been switched off. It is recommended to leave the appliance to cool down
with the door closed. Do not allow anything to become trapped in oven door.
Even if you only leave the oven door open slightly, the fronts of adjacent
units may become damaged over time.
Do keep the oven door closed during grilling mode.
Important safety notes
Page 9

9
For ceramic models
Do Not cut bread on the glass of the hob. Glass panels should not be used as
working surfaces.
Do Not use the cooking zones with empty cookware or without cookware,
placed on the zone.
When the oven is not in use, make sure the control dials are in the ‘0’ (off)
position.
Safety when cleaning:
For cleaning, the appliance must be switched off and allowed to cool down.
Do Not use steam cleaners for cleaning the cooking hobs and oven cavity.
Do Not use harsh, abrasive cleaners or sharp metal scrapers to clean the oven
door glass since they can scratch the surface ,which may result shattering of
the glass.
Note: Every care is taken to ensure the safety of the customer. Glass can
break. Be very carefull when cleaning the galss as not to scratch it. Do not
knock or hit the glass with the accessories.
Important safety notes
Page 10
10
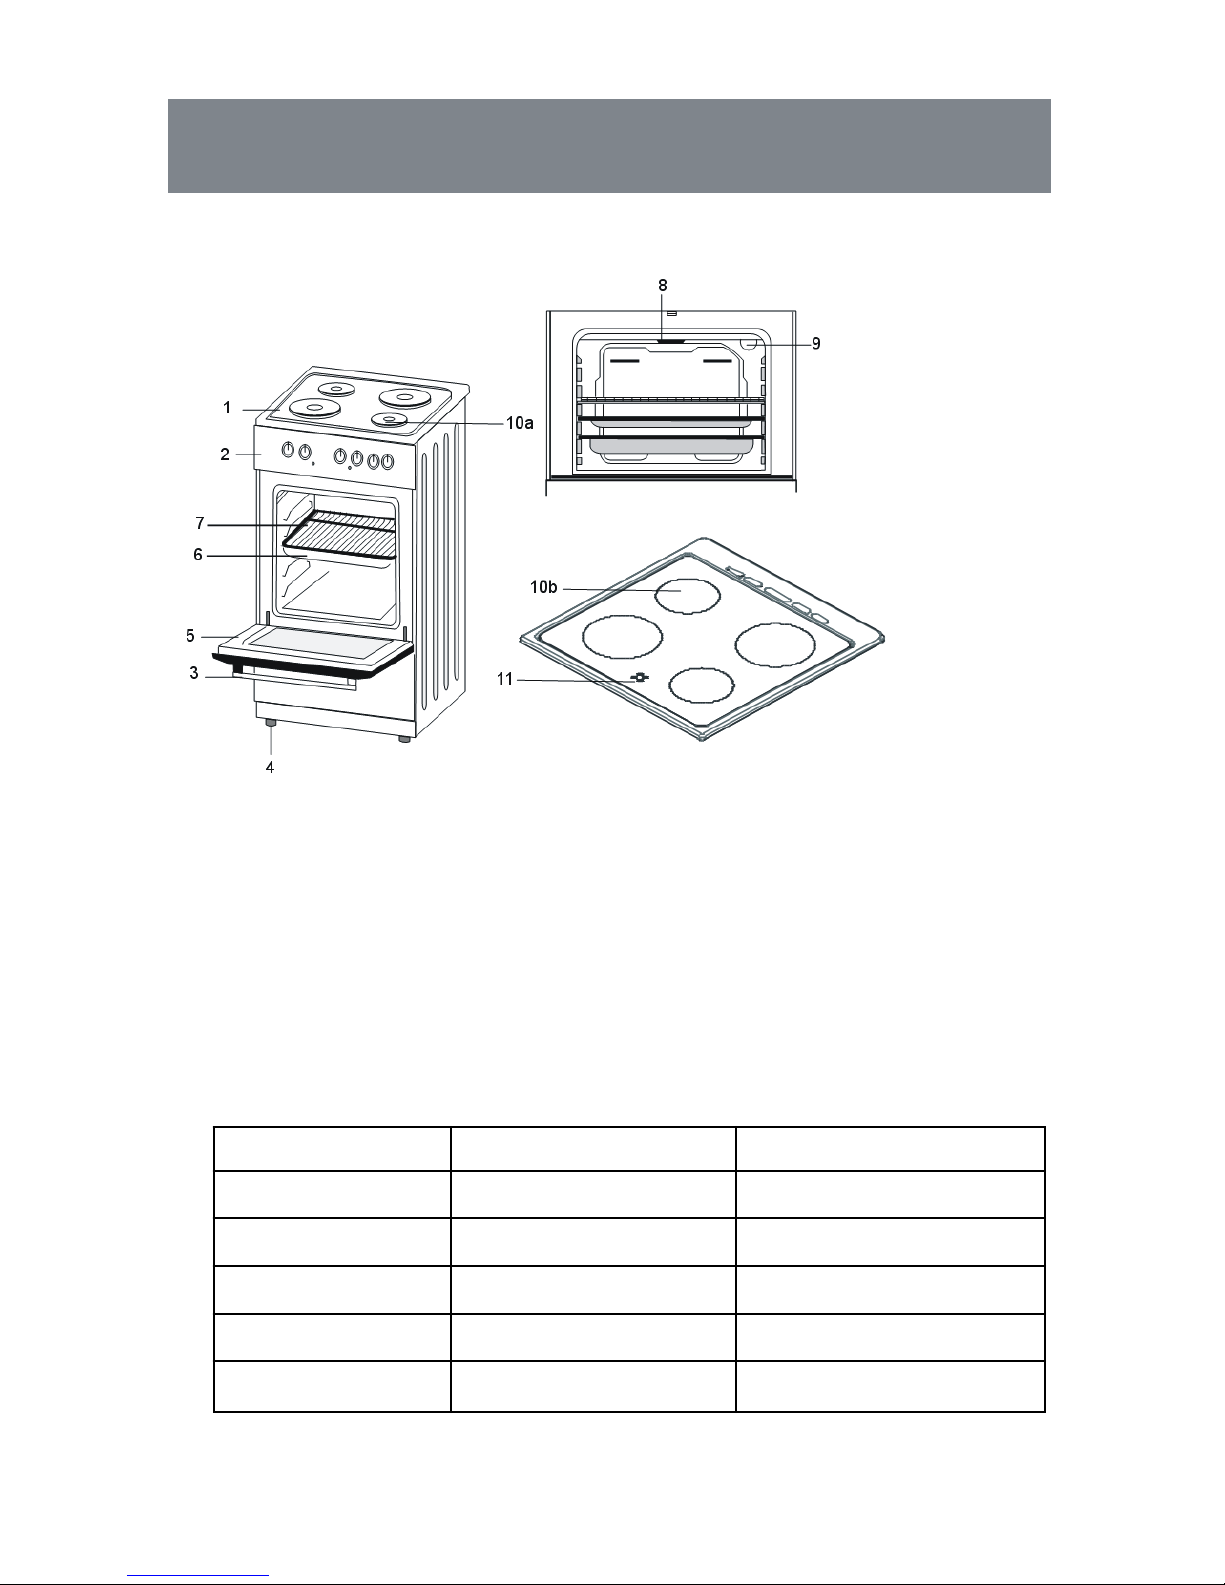
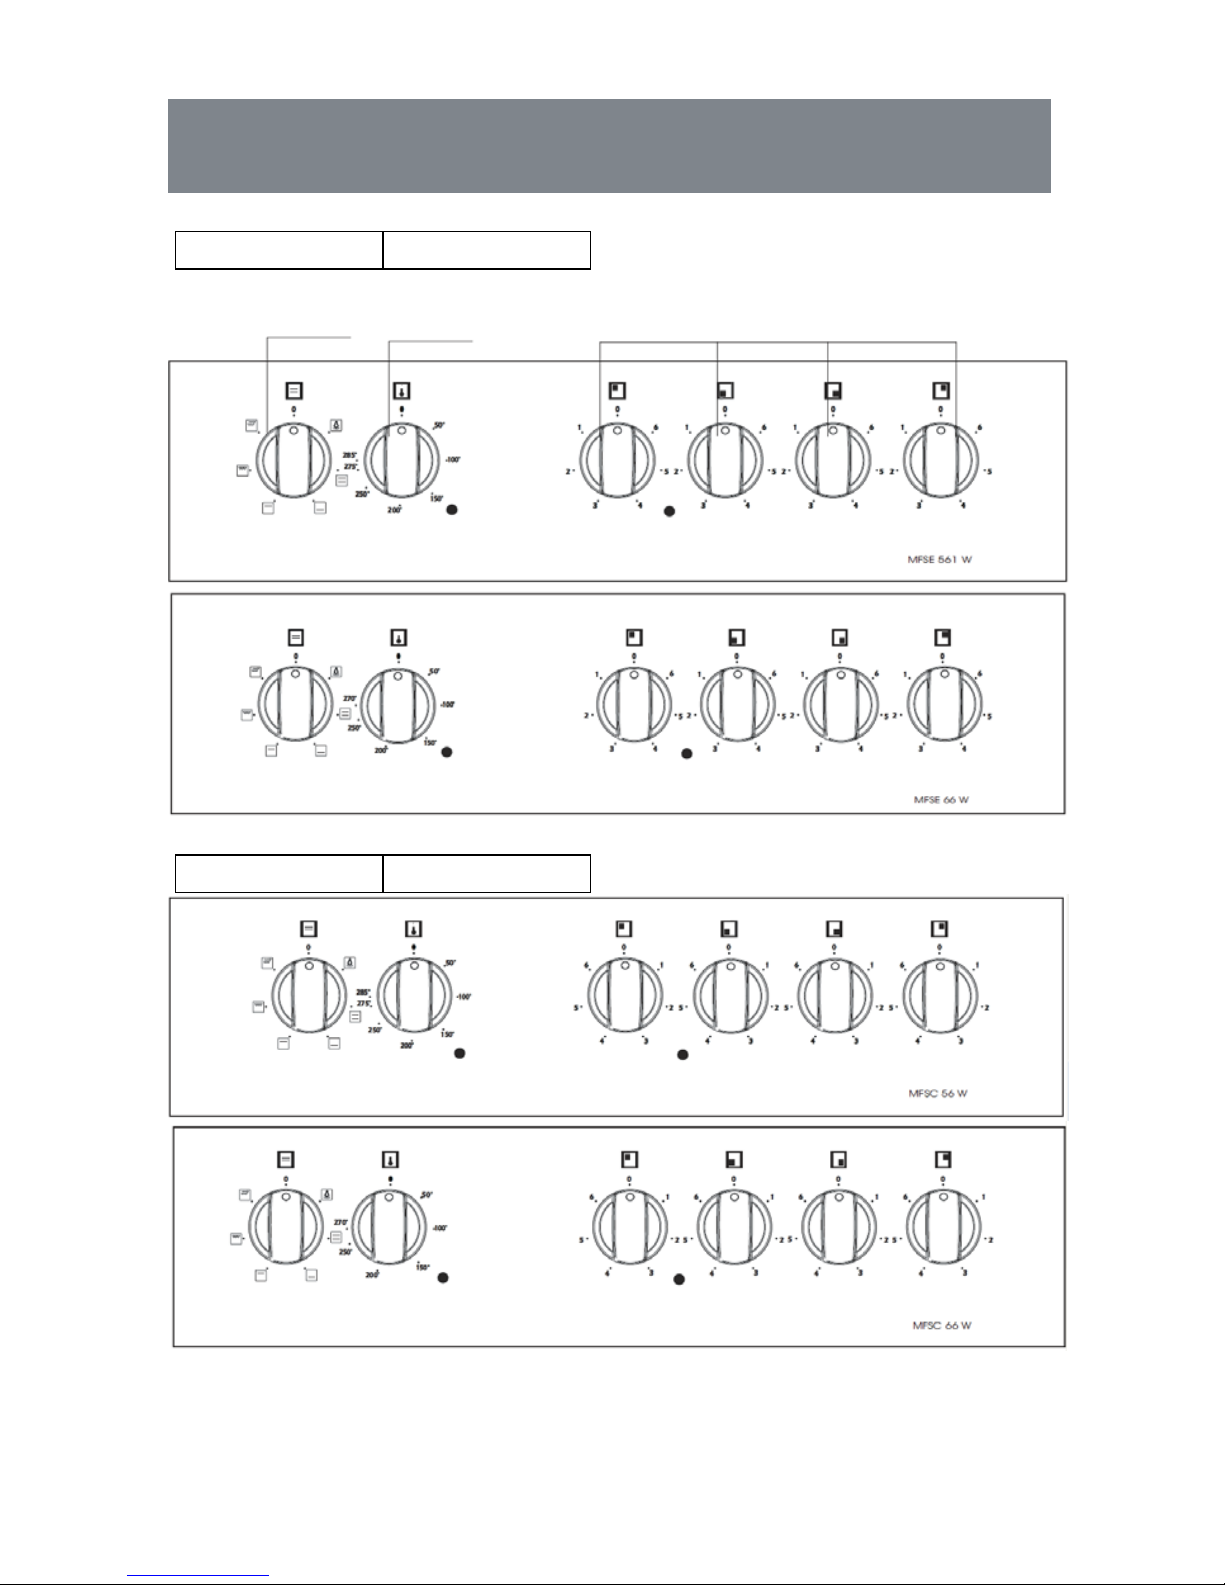
Models
MSFE561W MSFE66W
Oven Function Knob Thermostat Knob Hob Control Knobs
Models
MSFC56W MSFC66W
Control Panel
Page 11
11
Models
MSFC66W400
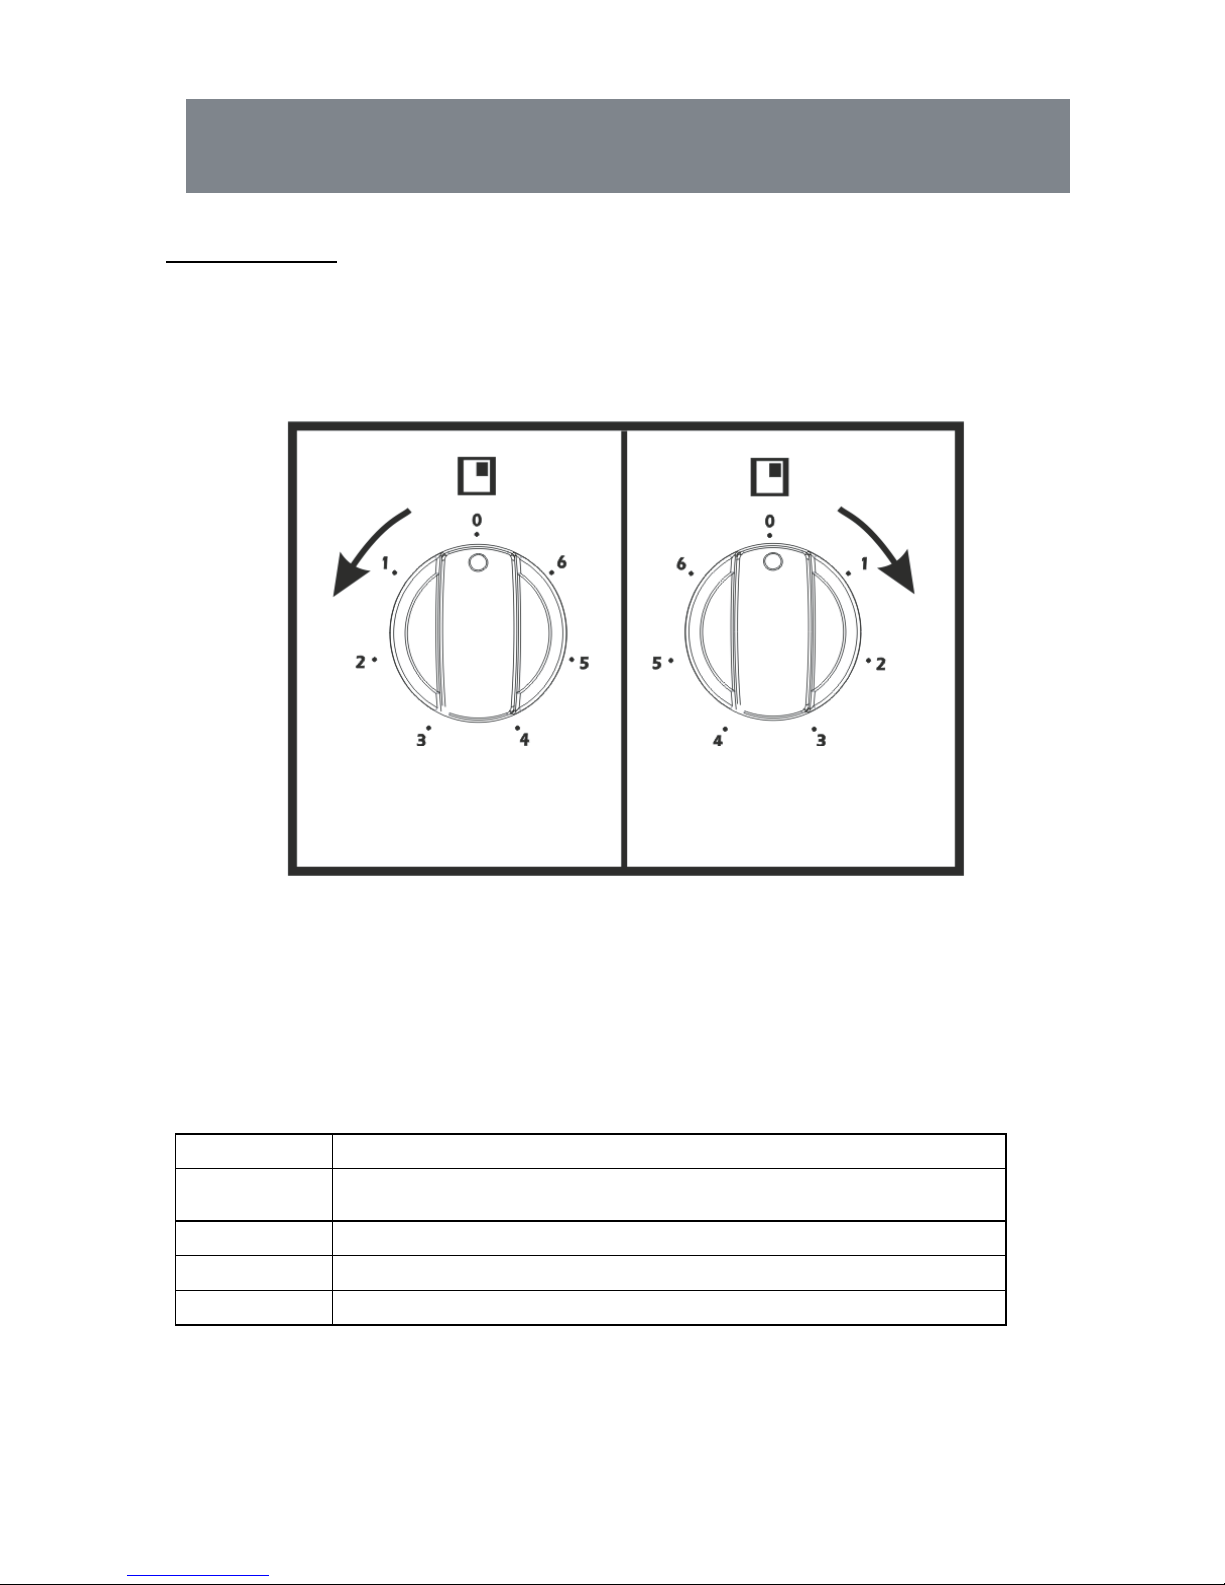
Oven controls - the function and temperature controls
To use an oven function, first select the function with the left hand dial, then
set the temperature of the function with the right hand dial. The thermostat
light will illuminate. When the temperature inside your oven reaches the
temperature you set, the thermostat will cut off the heating element and the
thermostat light will go off. When the temperature falls below the set
temperature, the heating element will again be turned on and the thermostat
light will illuminate again.
Control Panel
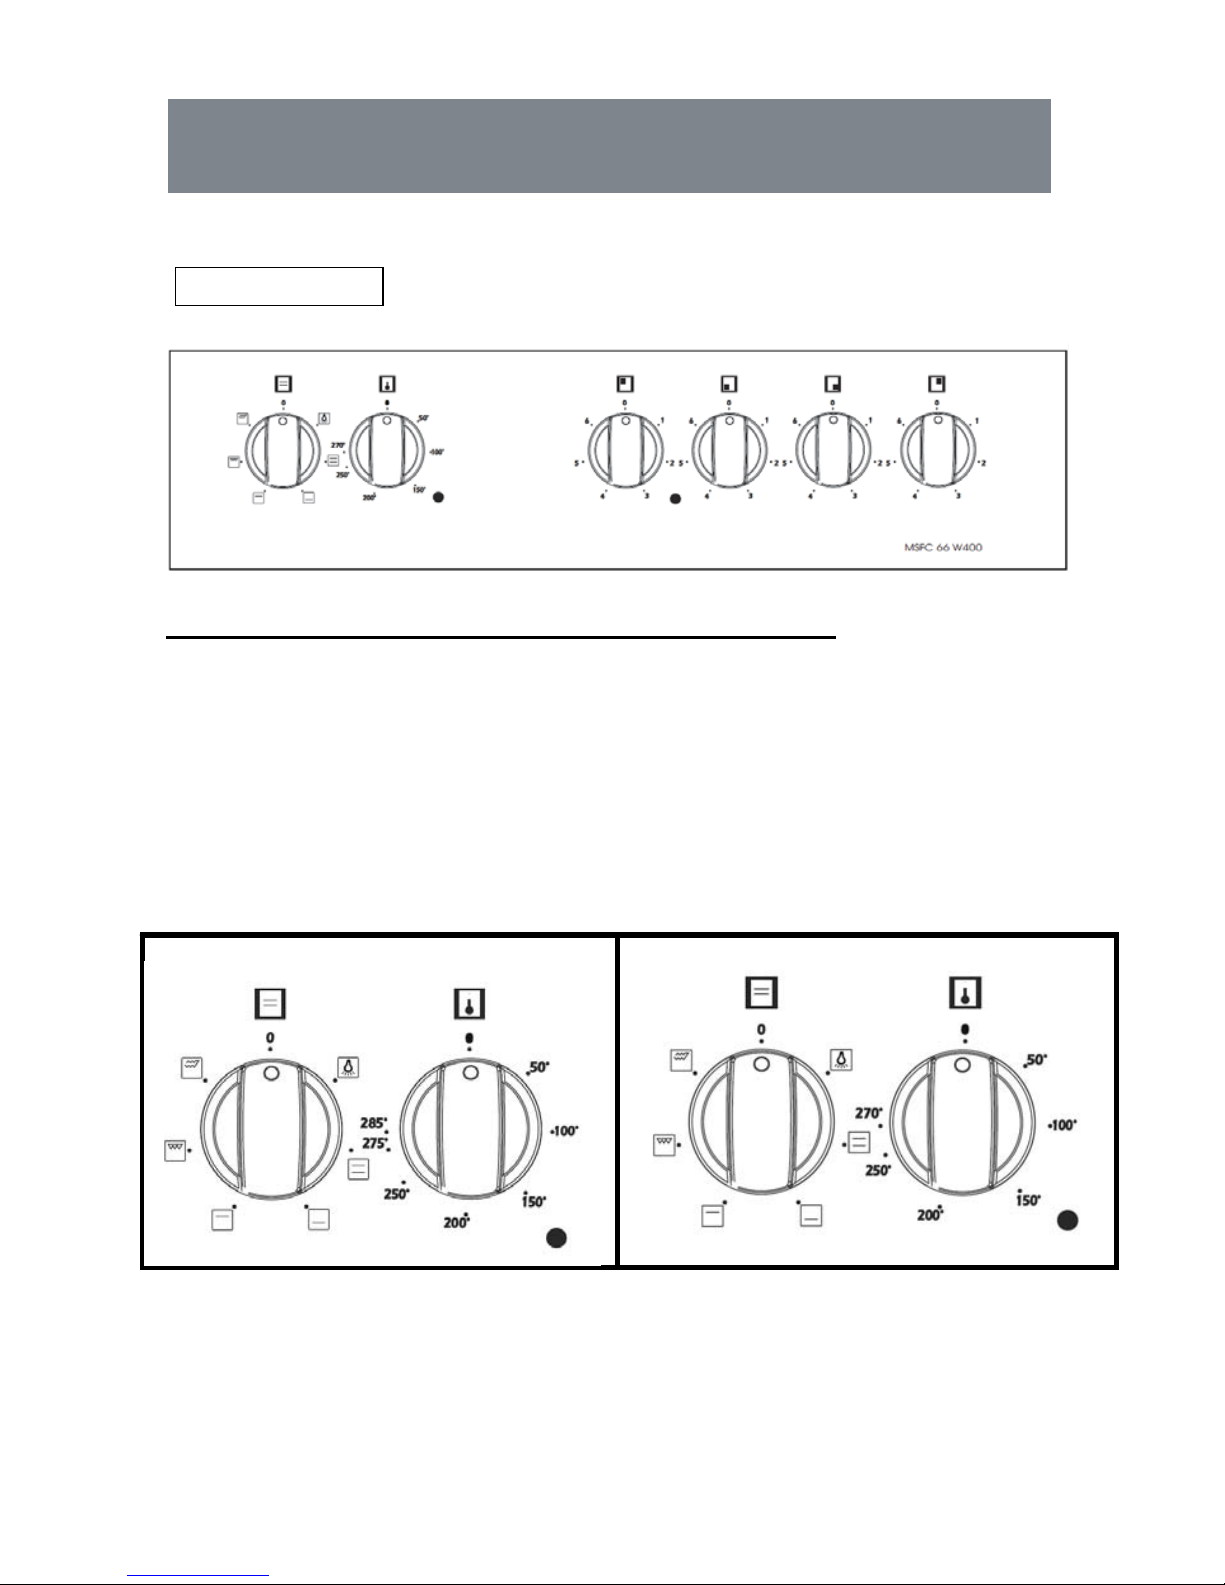
For models: MFSE561W - MFSC56W For models: MFSE66W - MFSC66W - MSFC66W400
Page 12
12
The oven light will be turned on.
Static cooking function
The oven’s thermostat light, the lower and upper heating
elements will be switched on.
The static cooking function emits heat, ensuring even cooking
of the lower and upper food, this is an excellent function for
making pastries, cakes, baked pasta, lasagne and pizza.
Lower heating function
The oven’s thermostat light, lower heating elements will be
switched on.
As the heat rises from the bottom of the oven, it warms food
up, rather then cooking the foods.
Upper heating function
The oven’s thermostat light, upper heating element will be
switched on.
Upper heating function is appropriate for heating the upper
side of already cooked food.
Grilling function
The oven’s thermostat, the grill heater will be switched on
This function is used for grilling foods such as cheese on
toast, always use the highest rack position available. Lightly
brush the grill rack with oil to stop foods sticking and place
the foods in the centre. The grill rack and oven tray should be
used together to catch the drips of oil.
Warning: The maximum temperature should be set to 190
0
C. This function must be used with the door closed
Faster grilling function
This function is similar to the grilling function but is used for
faster grilling and for covering a larger surface area, such as
grilling meats, which tend to take up more room on a grilling
rack.
Warning: The maximum temperature should be set to 190
0
C. This function must be used with the door closed
Control Panel
Page 13

13
Using the oven
When you first use your oven, odors may come from the insulation materials
and the heating elements. For this reason, before using your oven for the first
time, switch on the oven while empty, at its maximum temperature for 45
minutes.
1. Select the oven function you require. Select the temperature you require.
2. Before placing food in the oven you may need to pre-heat the oven for 10
minutes.
3. The red temperature light will go out when the chosen temperature has been
reached.
4. To switch the oven off turn the function control dial to the off position ‘0’.
Note: Under no circumstances should the oven be lined with aluminium foil,
do not place dishes or baking trays directly or onto the oven base as
overheating and damage may occur.
Instructions for use
Page 14
14
Using the hob
Your hob has four elements. Each knob has a symbol above it, which indicates
which element it controls. The hob is designed for operatring at 6 different
levels.
Using the Cooking zones
Care must ALWAYS be taken before touching any cooking appliance.
Settings Operation
0 Cooking zones off
1 - 2 Gentle simmering, slow warming
3 - 5 Reheating, rapid simmering
6 Maximum heat, Boiling, Saute and searing
Hotplate control
knob
Ceramic zone control
knob
Instructions for use
For models:
MFSE561W
MFSE66W
For models:
MFSC56W
MFSC66W
MSFC66W400
Page 15

15
1. Choose the element you want, by using the four control knob’s on the
control panel. Each hob has a symbol above it to indicate which element it
controls.
2. Switch the hob on by turning the knob to 1-6, depending on the temperature
required
3. There are two different types of elements. The large elements are suitable
for large pans and the two small elements are for smaller pans.
Hot hob warning indicators (Ceramic hobs)
(Models: MSFC56W, MSFC66W, MSFC66W400)
When a hot surface indicator light is on, it is indicating the cooking zone has
some residual heat. Be carefull not to place objects onto the glass surface.
Instructions for use
Page 16
16
Baking tips
1. Always place baking tins in the centre of the wire shelf.
2. Make sure you use bakeware that is oven proof.
3. Do not place bakeware too close to the rear or sides of the oven walls.
4. You can influence the degree of browning by changing the temperature
setting.
5. If a cake collapses after removing it from the oven:
- Use less liquid on your next attempt.
- Consider using a longer baking time or use a slightly lower temperature
setting.
Cookware
Hobs
Use heavy gauge, flat, smooth bottomed pans that are the same diameter as
the element. This will provide good contact with the glass and help reduce
cooking times.
Cookware with a stainless steel sandwich base or enameled cast iron base
will give you the best results.
Never use plastic or aluminium foil dishes on the hob.
Aluminium and copper bottomed cookware can cause a metalic residue to
remain on the hob. If left, this becomes difficult to remove. Clean the hob
after every use.
Hints and tips
Page 17
17
Energy Saving
1. During use of electrical cookers , it is required to use saucepans having flat
bases.
2. Choose a cookware of proper size .
3. Using a lid will reduce cooking times.
4. Minimise the amount of liquid or fat to reduce cooking times.
5. When liquid starts boling ,reduce the temperature setting.
6. Oven door should not be opened often during cooking.
Cleaning tips(Disconnect the appliance from the power supply.)
1. Wait until the oven has cooled before removing the wire shelves, wash
them separately in warm soapy water and dry thoroughly.
2. Wash the interior of the oven with hot soapy water and wipe down with a
damp cloth.
3. Leave the door open until the interior has dried, before replacing the wire
shelves.
4. Clean the oven after each use, especially after roasting or grilling, this will
prevent spilt or splattered food debris burning and becoming difficult to
remove.
5. Do not use abrasive pads to clean the interior of the oven as this may
remove the enamel, which will affect the efficiency of your oven.
6. Do Not use harsh, abrasive cleaners or sharp metal scrapers to clean the
oven door glass since they can scratch the surface ,which may result shattering
of the glass.
Cleaning the outside of the oven (Disconnect the appliance from the power
supply.)
1. You should regularly wipe over the control panel, oven door and oven sides
using a soft cloth and mild liquid detergent as spilt liquids may damage the
enamel.
2. Wash enameled or chrome plated parts of the oven with warm soapy water
or with non-abrasive detergents.
Hints and tips
Page 18
18
3. Never use abrasive pads to clean enameled, chromed or stainless steel
surfaces.
4. When using commercially available stainless steel cleaning products, avoid
cleaning any lettering or symbols, as they can become damaged.
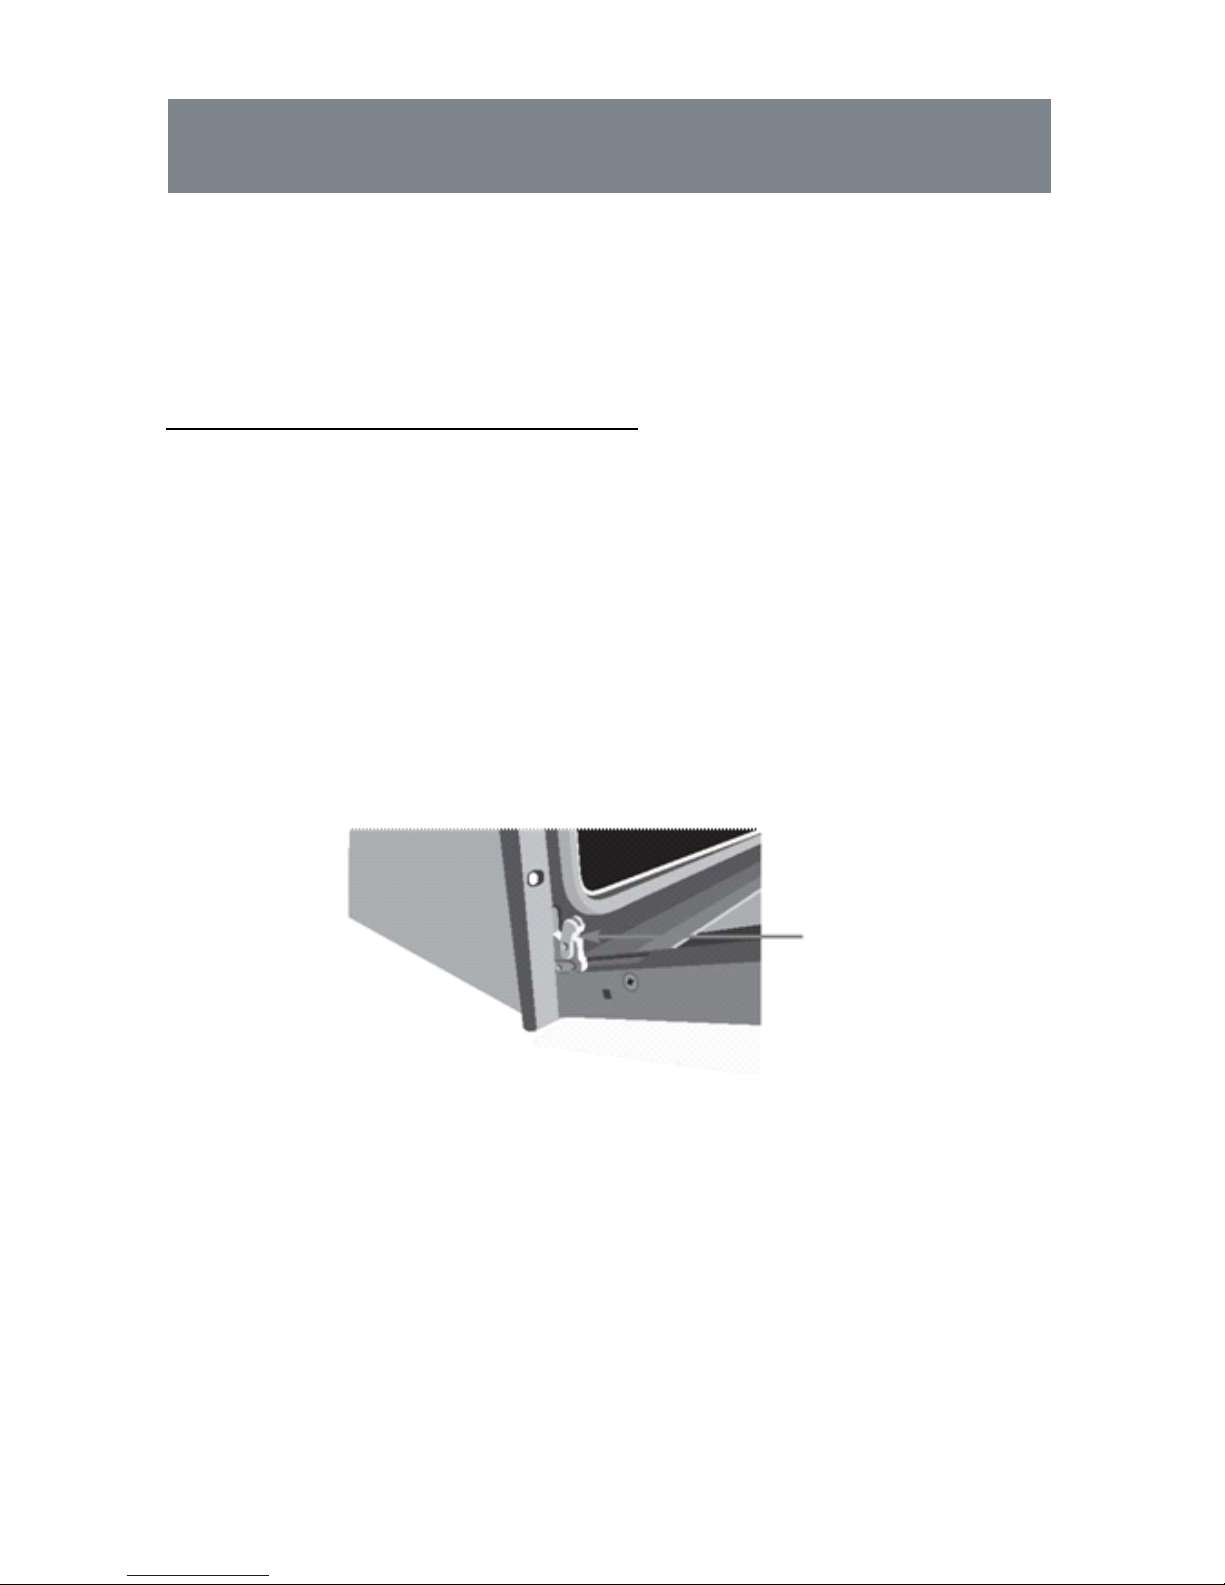
Removing the door for easier cleaning
We recommend you have someone to assist you during removal of the door.
1. Open the door completely.
2. The door hinge has a small latch. Lift the latch on both hinges.
3. Lift the door slightly as if closing, and then with both hands supporting the
door, pull it away from the oven.
4. To replace the door, hold the door in an open position and insert the latches
on both hinges back into place. Open and close the door to make sure that it has
been fitted correctly.
Latch
Hints and tips
Hints and tips
Page 19
19
Replacing the oven light
1. Switch off and disconnect the power from the oven. Ensure that the
internal parts are cool before touching internal parts.
2. Remove the lamp cover by turning it anti-clockwise (note, it may be stiff),
remove the bulb by turning it anti-clockwaise.
3. Insert the new bulb, which should be resistant to 300ºC.
For replacement bulbs contact your local service centre.
4. Re-fit the cover.
5. If in any doubt, consult a qualified electrician for help.
Hints and tips
Page 20
20
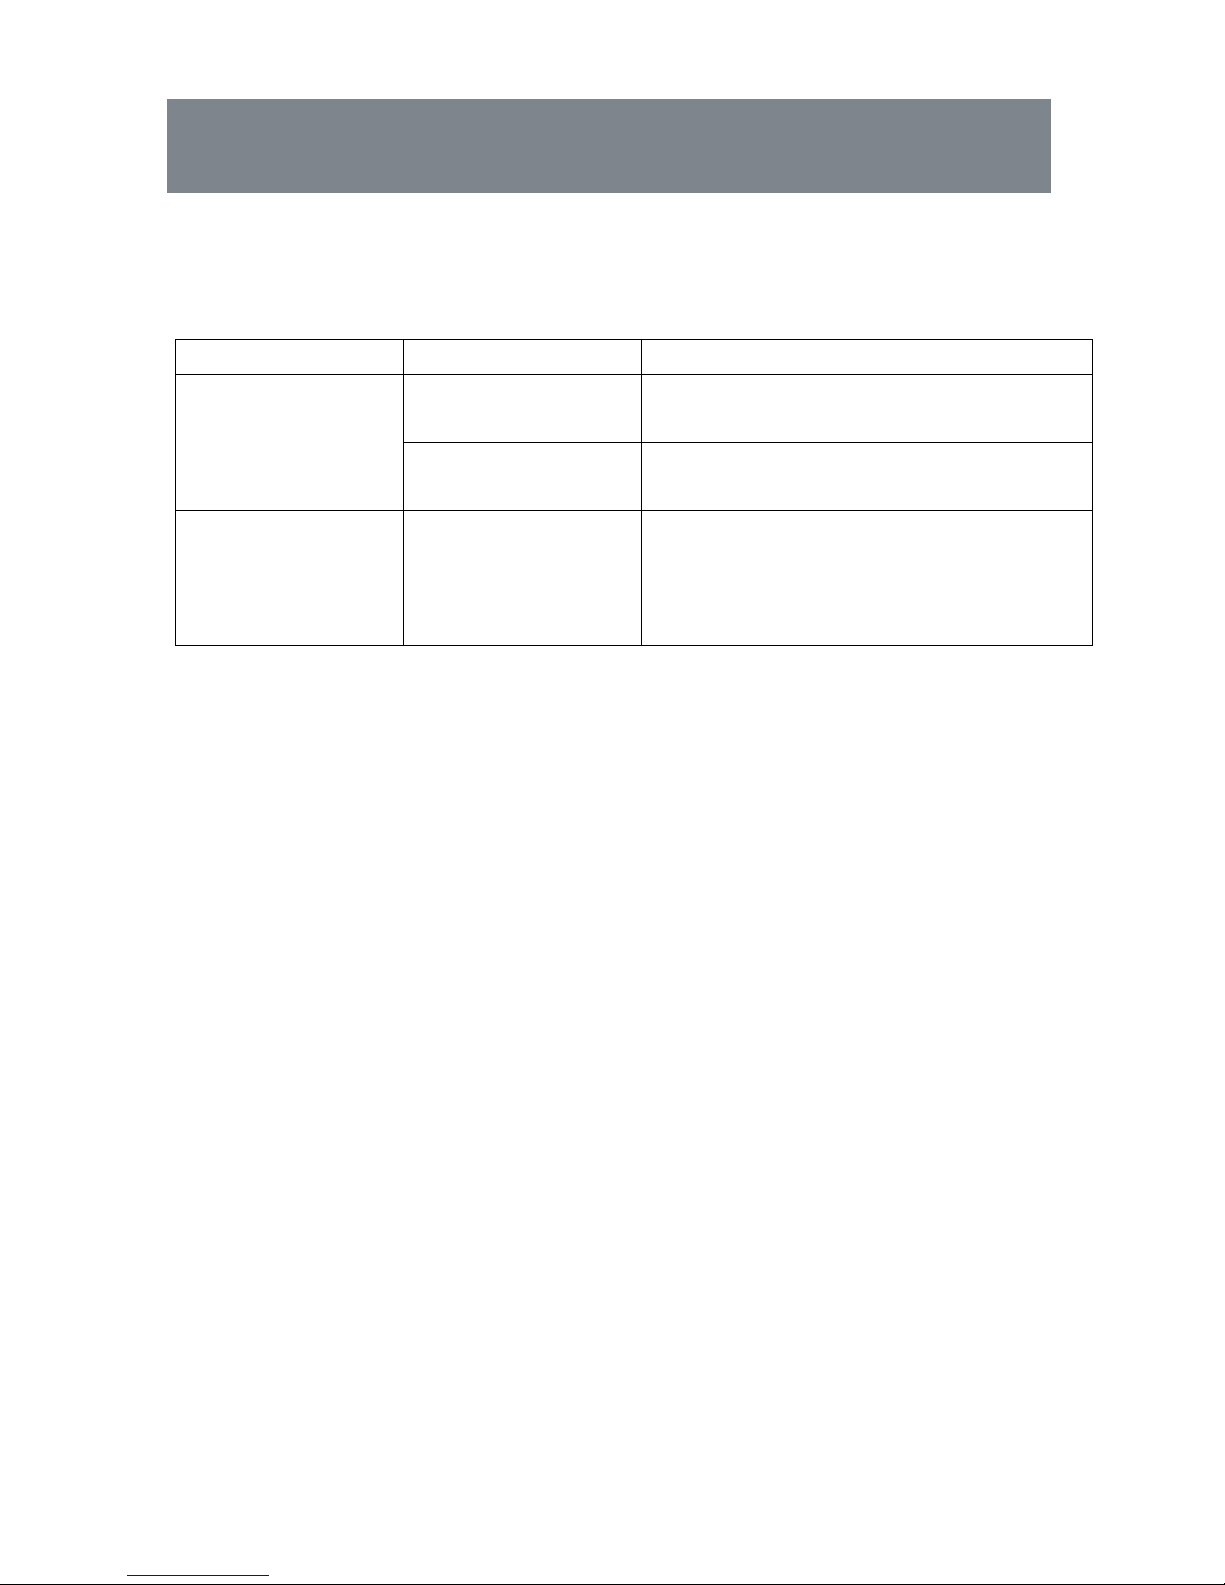
Should a malfunction ocur, it if often due to a minor fault. Please read the
follow instructions before calling the after-sales service:
Problem Possible Cause Please Check
Blown Fuse
Please check the fuse box that the
fuse is in working order
The oven does
not work
Incorrect setting Please check all controlls have
been turned to the desirde location
Some hob zones a
r
heating
Installation Please check that the appliances
terminal box has been correctly
installed (see installation
instructions)
Trouble Shooting
Page 21
21
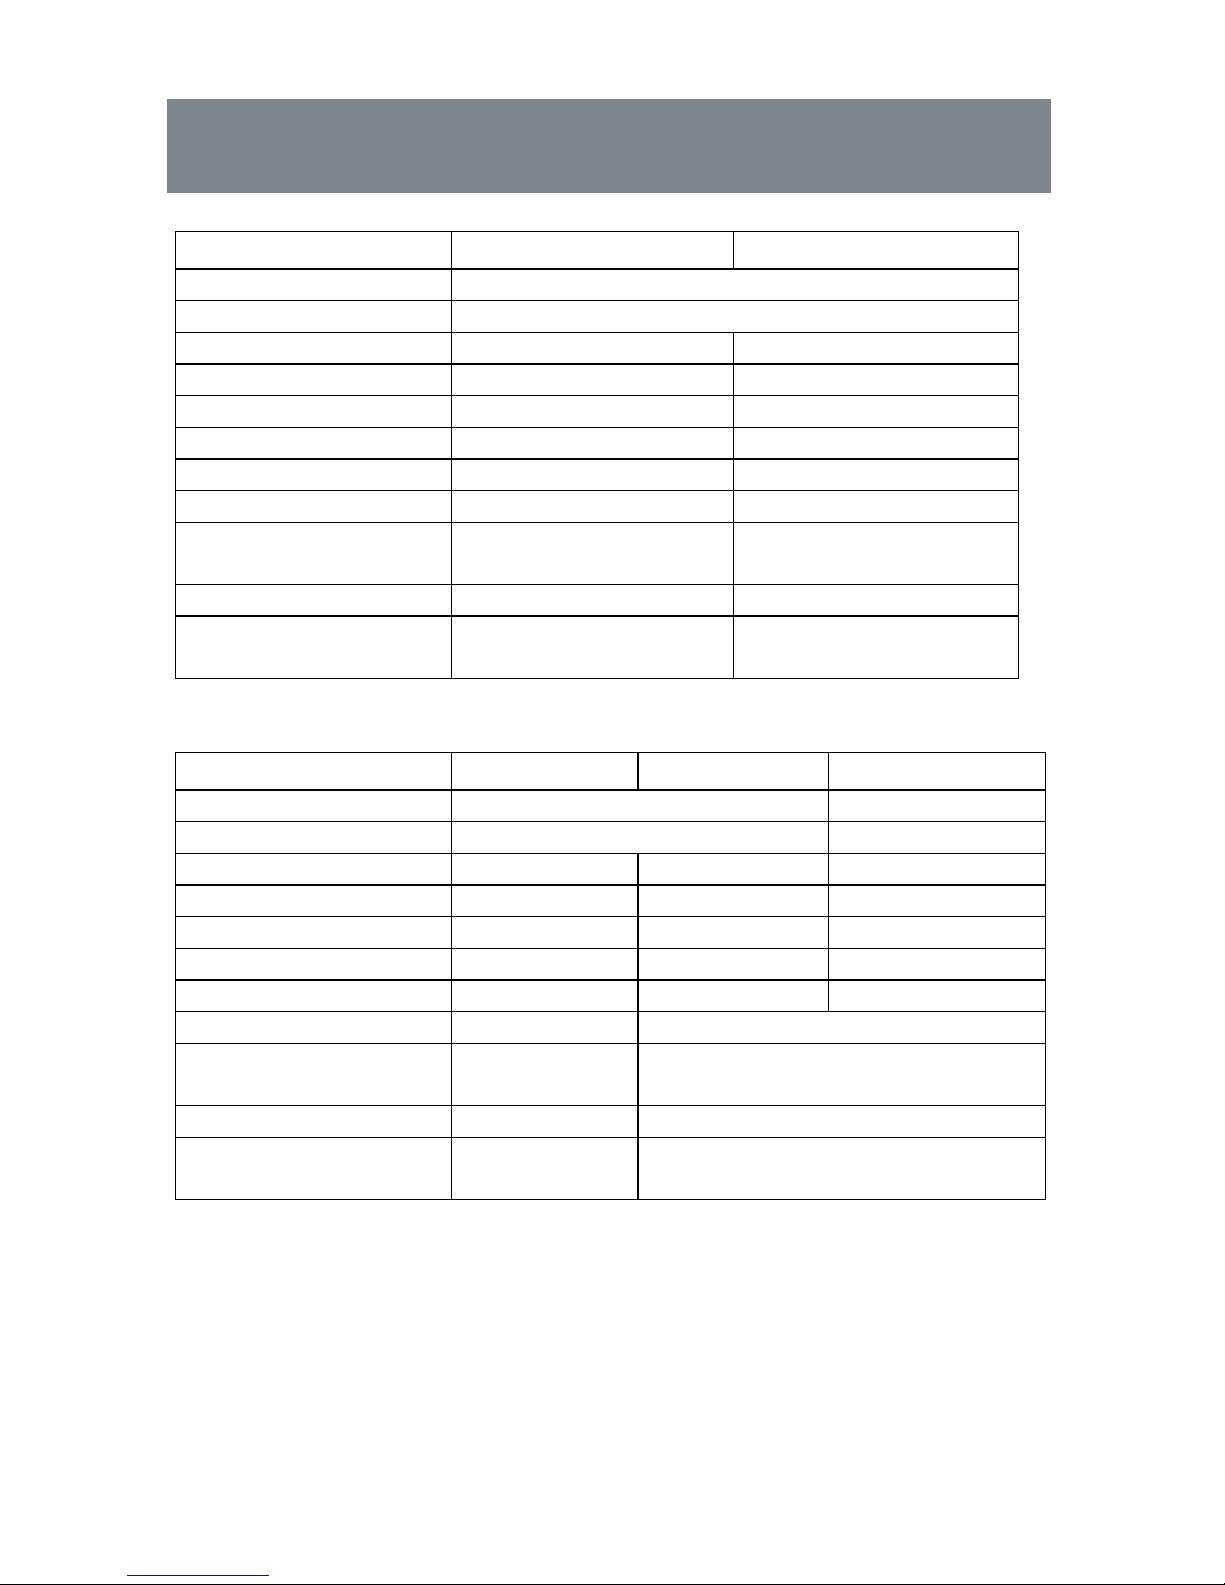
Model MFSE561W MFSE66W
Rated Voltage (V) 230-240 / 400
Rated Frequency (Hz) 50
Power (W) 7600-8300 8200-8900
Current (A) 33-35 36-37
Top element (W) 1000 1200
Bottom element (W) 1000 1100
Grill (W) 1600 2000
Net Weight (kg) 38 42
Product Dimensions
(cm)
50x60x90 60x60x90
Oven Capacity (lt) 52.5 61
Energy Efficiency
class
B B
Model
MFSC56W MFSC66W MSFC66W400
Rated Voltage (V) 230-240 / 400 400
Rated Frequency (Hz) 50
Power (W) 8600-9300 9200-10000 9700
Current (A) 37-39 40-41 25
Top element (W) 1000 1200 1200
Bottom element (W) 1000 1100 1100
Grill (W) 1600 2000 2000
Net Weight (kg) 37 41
Product Dimensions
(cm)
50x60x90 60x60x90
Oven Capacity (lt) 52.5 61
Energy Efficiency
class
B B
Specifications
Page 22
This symbol on the product or in the instructions means that your
electrical and electronic equipment should be disposed at the end of
its life separately from your household waste. There are separate
collection systems for recycling in the EU. For more information,
please contact the local authority or your retailer where you
purchased the product.
22
Page 23
Brugervejledning
Fritstående elektrisk komfur
Page 24

2
Introduktion til det fritstående komfur..................................................3
Vigtige sikkerhedsnotater.....................................................................6
Kontrolpanel.......................................................................................10
Brugervejledning ................................................................................ 13
Råd og tips..........................................................................................16
Fejlfinding ..........................................................................................20
Specifikationer.................................................................................... 21
Indhold
Page 25

3
Tak fordi, du valgte dette Matsui-komfur. Vi håber følgende oplysninger vil
hjælpe dig med at gøre dig fortrolig med komfurets funktioner og at bruge
det på en sikker og tryg måde.
Læs vejledningerne i denne brugervejledning, inden du bruger komfuret, og
gem den til senere referencebrug.
Denne instruktionsbog gælder for flere Matsui-modeller.
Introduktion til Fritstående komfur
Page 26
4
Fritstående komfur
Identificere forskellige dele til komfuret
1. Komfurets top (blus/plader) 7. Rist
2. Kontrolpanel 8. Grill
3. Håndtag til ovnens låge 9. Lys i ovnen
4. Justerbar sokkel 10. Kogezone (a. varmeplade/ b.keramisk)
5. Låge til ovn 11. Varm overfladeindikator (b. keramisk)
6. Ovnbakke
Model Størrelse BxDxH(cm) Type
MFSE561W 50x60x90 ELEKTRISK(10a)
MFSE66W 60x60x90 ELEKTRISK(10a)
MFSC56W 50x60x90 KERAMISK(10b)
MFSC66W 60x60x90 KERAMISK(10b)
MSFC66W400 60x60x90 KERAMISK(10b)
Introduktion til Fritstående komfur
Page 27
5
Rist x 1
Lav bakke x 1
Dyb bakke x 1
Børnesikring: For at åbne lågen
trykkes børnesikringen opad, derefter
trækkes lågen mod dig, og låsen til
lågen slippes.
Luk lågen på den normale måde, låsen
til lågen vil automatisk slå til.
Skuffe med klap: For at åbne sku f fen
skal du løfte håndtaget og trække
skuffens låg mod dig. Et let skub er
nok til at lukke skuffen.
Introduktion til Fritstående komfur
Håndtag
Børnesikring
Page 28

6
Vi har inkluderet dette afsnit af hensyn til din sikkerhed. Læs disse
oplysninger grundigt, inden du bruger komfuret.
• General sikkerhed
Disse advarsler gives af hensyn til din sikkerhed. Læs denne vejledning
grundigt, inden du anvender apparatet.
Opbevar denne vejledning på et sikkert sted, og videregiv
brugervejledningen til den nye ejer, hvis du sælger apparatet.
Serienummeret er også inkluderet i instruktionsbogen. Ved
serviceproblemer oplyses dette nummer, eller det videregives til
serviceingeniøren.
Dette apparat skal monteres af en faguddannet elektriker.
Dette husholdningsapparat er ikke beregnet til brug af personer (herunder
børn) med nedsat fysiske, motoriske eller mentale evner, eller mangel på
ekspertise eller viden, medmindre de har været under opsyn elle r fået
vejledning i brugen af apparatet af en person, der er ansvarlig for deres
sikkerhed.
• Før monteringen
Transportskade
Efter fjernelse af indpakningen efterses der for enhver skade, hvis en
sådan(-ne) findes, må du ikke forsøge at bruge apparatet, kontakt venligst
den butik, hvor det er købt.
Vigtige sikkerhedsbemærkninge
r
Page 29

7
Elektrisk tilslutning
Den elektriske tilslutning af dette komfur må kun udføres af en faguddannet
elektriker og i henhold til vejledningerne i denne vejledning og i
overensstemmelse med de gældende forskrifter.
Komfuret må kun tilsluttes af en godkendt fagtekniker. Tab som følge af skade
forårsaget af forkert tilslutning vil gøre erstatningskrav under garantien
ugyldige.
Kontrollér, at strømforsyningen passer til mærkepladen, inden du tilslutter
apparatet.
Dette apparat er udelukkende udformet til brug i hjemmet.
• Børns sikkerhed
Lad ikke børn lege med nogen del af indpakningen.
Lad ikke børn komme i nærheden af apparatet uden opsyn, tilgængelige dele
kan være varme under brug. Sørg for, at børn ikke leger med apparatet.
Lad ikke børn klatre op på eller sidde på lågen til ovnen.
Vigtige sikkerhedsanmærkninge
r
Vigtige sikkerhedsbemærkninge
r
Page 30

8
Sid eller stå ikke på lågen til ovnen.
Anbring ikke bagepladen, sølvpapir eller fade m.m.i bunden af ovnen. Dette
forårsager varmeopbygning. Bage- og stegetider vil ikke længere passe, og
emaljen kan tage skade.
Hold eller løft ikke komfuret i lågen til ovnen. Lågen kan ikke bære vægten
af komfuret og kan brække af.
Anbring ikke letantændelige genstande i ovnen. Disse kan bryde i brand.
Anvend ikke adaptere, multi-kontakter eller forlængerledninger.
Undgå, at elektriske apparaters ledninger bliver fanget i ovnens dør. Denne
ledningsisolering kan smelte. Der er risiko for kortslutning.
Forsøg ikke at ændre eller reparere strømkablet selv. Kontakt altid en
autoriseret servicerepræsentant.
Efterse lågens pakninger med jævne mellemrum. Hvis ovnens pakning er
meget beskidt, vil lågen til ovnen ikke længere lukke ordentligt, når ovnen er
i brug. Forsiderne på de tilstødende enheder kan tage skade. Hold pakningen
i ovnen ren.
Åbn lågen til ovn en forsigtigt, når du tilbereder mad. Varm damp kan slippe
ud.
Lad apparatet køle ned, før du rører de indre dele af ovnen. Visse dele af
apparatet kan forblive varme i lang tid efter, det er blevet slukket. Det
anbefales at lade apparatet køle ned med lågen lukket. Lad ikke noget
komme i klemme i lågen til ovnen. Selvom du kun lader lågen til ovnen åbne
lidt, kan siderne på de tilstødende enheder blive beskadiget over tid.
Lad lågen til ovnen være lukket under grill-funktion.
Vigtige sikkerhedsanmærkninge
r
Page 31

9
For keramiske modeller
Skær ikke brød på glasset på glaskogepladen. Glaspaneler bør ikke benyttes
som arbejdsoverflader.
Anvend ikke kogeområderne med tomme kogegrejer eller uden kogegrej
anbragt på området.
Når ovnen ikke er i brug, skal du sørge for, at kontrolviserne er i ‘0’ (slukket)position.
• Sikkerhed under rengøring:
Ved rengøring skal apparatet være slukket og have tid til at køle ned.
Anvend ikke damprensere til at rengøre kogeblussene og ovnens indre.
Anvend ikke krasse, slibende rengøringsmidler eller skarpe metalskrabere til
at rengøre glasset på ovnens låge, da disse kan ridse overfladen, hvilket kan
medføre splintring af glasset.
Bemærk: Alle foranstaltninger er truffet for at beskytte kundens sikkerhed.
Glas kan gå i stykker. Pas meget på, når du rengør glas, så du ikke ridser det.
Stød eller slå ikke glasset med tilbehør.
Vigtige sikkerhedsanmærkninge
r
Page 32

10
Modeller
MSFE561W MSFE66W
Knap til ovnfunktion Termostathåndtag Knap til styring af kogeplade
Modeller
MSFC56W MSFC66W
Kontrolpanel
Page 33

11
Modeller
MSFC66W400
Kontrolfunktioner til oven - funktions- og temperaturkontrolfunktioner
For at anvende en ovnfunktion skal du først vælge funktionen med den venstre
talskive, indstil derefter funktionens temperatur med den højre talskive.
Termostat lyset tændes. Når temperaturen indeni din oven, når den temperatur,
du har indstillet, vil termostaten afskære varmeelementet, og termostatlyset
bliver slukket. Når temperaturen når under den indstillede temperatur, vil
varmeelementet igen blive tændt, og termostatlyset vil tændes igen.
Kontrolpanel
For modeller: MFSE561W - MFSC56W
For modeller: MFSE66W - MFSC66W - MSFC66W400
Kontrolpanel
Page 34

12
Lyset i ovnen tændes.
Statisk kogefunktion
Ovnens termostatlys, varme nederst og øverst
elementer bliver tændt.
Den statiske kogefunktion udleder varme, og sikrer, at selv
tilberedning på nederste og øverste niveau. Dette er en
fortræffelig funktion til at lave bagværk, indbagt pasta,
lasagne og pizza.
Nedre varmefunktion
Ovnens termostatlys, nedre varmeelementer bliver tændt.
Efterhånden som varmen stiger op fra bunden af ovnen,
varmer den maden op i stedet for at koge maden.
Øvre varmefunktion
Ovnens termostatlys, øvre varmeelementer bliver tændt.
Øvre varmefunktion er velegnet til opvarmning at den øverste
del af allerede opvarmet mad.
Grill-funktion
Ovnens termostat, grill-varmelegemet tændes.
Denne funktion bliver brug t til at grille mad, såsom ost på
toast, brug altid den højeste stativposition. Børst grill-stativet
let med olie for at forhindre, at madvarer klæber, og anbring
madvarerne i midten. Grill-stativet og ovnbakken bør
anvendes sammen for at opfange dryppende olie.
Advarsel: Maksimumstemperaturen bør indstilles til 190ºC.
Denne funktion skal anvendes med lågen lukket
Hurtigere grill-funktion
Denne funktion er lig med grill-funktionen, men bliver brugt
til hurtigere stegning og til at dække større overflader som fx
til at grille kød, som fylder mere på grill-hylden.
Advarsel: Maksimumstemperaturen bør indstilles til 190ºC.
Denne funktion skal anvendes med lågen lukket
Kontrolpanel
Page 35

13
Brug af ovnen
Når du først bruger ovnen, kan lugte komme fra isoleringsmaterialet og
varmeelementerne. Af denne grund - og før du bruger ovnen første gang - skal
du tænde ovnen, mens den er tom, på dens maksimumstemperatur i 45
minutter.
1. Vælg den ovnfunktion, du har brug for. Vælg den temperatur, du har brug
for.
2. Inden du anbringer madvarer i ovnen, kan det være nødvendigt at forvarme
ovnen i 10 minutter.
3. Det røde temperaturlys vil blive slukket, når den valgte temperatur er nået.
4. For at slukke ovnen skal du dreje funktionsskiven til den slukkede position ‘0’.
Bemærk: Under ingen omstændigheder må ovnen beklædes med sølvpapir,
anbring ikke fade eller bageplader direkte eller på ovnens bund, da
overophedning og skade kan opstå.
Brugervejledning
Page 36

14
Brug af kogeblusset
Dit kogeblus har fire elementer. Hver knap har et symbol på toppen, som
anviser hvilke elementer, det kontrollerer. Knappen er udformet til at fungere
på seks forskellige niveauer.
Brug af kogezoner
Forsigtighed skal altid udvises, før man rører ved kogeapparater.
Indstillinger Brug
0 Kogezoner slukket
1 - 2 Let småkogning, langsom opvarmning
3 - 5 Genopvarmning, hurtig småkogning
6 Maksimal varme, kogning, sautere og bruning
Kontrolknap
til varme
p
lade
Kontrolknap
til keramisk zone
For modeller:
MFSE561W
MFSE66W
For modeller:
MFSC56W
MFSC66W
MSFC66W400
Brugervejledning
Page 37

15
1. Vælg det element, du ønsker ved hjælp af de fire kontrolknapper på
kontrolpanelet. Hver knap har et symbol på toppen, som anviser hvilke
elementer, det kontrollerer.
2. Tænd blusset ved at dreje knappen til 1-6, afhængigt af den påkrævede
temperatur.
3. Der er to forskellige typer af elementer. De store elementer er egnet til store
gryder og de to små elementer er til mindre gryder.
Advarselsindikatorer (keramiske blus)
(Modeller: MSFC56W, MSFC66W, MSFC66W400)
Når et indikatorlys for varm overflade bliver tændt, viser det, at kogezonen
indeholder restvarme. Anbring ikke genstande på glasoverfladen.
Brugervejledning
Page 38

16
Råd til bagning
1. Anbring altid bageformer i midten af risten.
2. Sørg for, at du anvender ovnfaste bageforme.
3. Anbring ikke bageforme m.m. for tæt til bagsiden eller siderne på ovnen.
4. Du kan påvirke graden af bruning ved at ændre temperaturindstillingen.
5. Hvis en kage klasker sammen, efter du har taget den ud af ovnen:
- Brug mindre væske næste gang, du prøver.
- Overvej en længere bagetid eller brug en lidt lavere temperaturindstilling.
Kogegrejer
Blus
Brug solide, flade, glatbundede gryder og pander med samme diameter som
elementet. Dette giver god kontakt med glasset og hjælper med at reducere
kogetider.
Kogegrejer med en rustfri sandwichformet bund eller emaljeret støbejern
giver de bedste resultater.
Anvend aldrig fade af plastik eller sølvpapir på blusset.
Kogegrejer med aluminiums- eller kobberbund efterlade metalrester på
blusset. Disse er svære at fjerne. Rengør altid blusset efter brug.
Råd og tips
Page 39

17
Energibesparelse
1. Under brug af elektriske komfurer er det påkrævet at benytte gryder med
flade bunde.
2. Vælg kogegrejer med egent størrelse.
3. Brug af et låg vil nedsætte kogetider.
4. Minimér mængden af væske eller fedt for at reducere kogetider.
5. Når væsken begynder at koge, skal du reducere temperaturindstillingen.
6. Lågen til ovnen må ikke åbnes hyppigt under tilberedningen.
Rengøringstips (frakobl apparatet fra strømforsyningen.)
1. Vent, indtil ovnen er kølet ned, før du fjerner ristene, vask dem separat i
koldt varmt, vand, og aftør dem grundigt.
2. Vask det indvendige af ovnen med varmt, sæbevand og tør af med en
fugtig klud.
3. Lad lågen stå åben, indtil den indvendige del er tør, inden du udskifter
ristene.
4. Rengør ovnen efter hvert brug, især efter stegning eller grill, dette
forhindrer, at spildt eller overstænkede madvarerester brænder eller er svære
at fjerne.
5. Anvend ikke slibepuder til at rengøre ovnens indre, da dette kan fjerne
emalje, som vil påvirke ovnens effektivitet.
6. Anvend ikke grove, slibende rengøringsmidler eller skarpe metalskrabere til
at rengøre ovnens glaslåge, da disse kan ridse overfladen, hvilket kan medføre
splintring af glasset.
Rengøring af ovnens ydre (frak obl apparatet fra strømforsyningen.)
1. Du bør jævnligt aftørre kontrolpanelet, ovnens låge og ovnens sider med en
blød klud og et mildt, flydende vaskemiddel, da spildte væsker kan skade
emaljen.
2. Vask emaljerede eller forkromede dele af ovnen med varmt sæbevand eller
ikke-slibende sæbemidler.
Råd og tips
Råd og tips
Page 40

18
3. Anvend aldrig slibepuder til at rengøre emaljerede, forkromede eller rustfri
stål overflader.
4. Når du anvender kommercielt tilgængelige rengøringsprodukter til rustfrit
stål, skal du undgå at rengøre bogstaver eller symboler, da de kan blive
beskadigede.
Fjernelse af døren for nemmere rengøring
Vi anbefaler, at du har en, der hjælper dig under fjernelsen af lågen.
1. Åbn døren helt.
2. Hængslet til lågen har en lille lås. Løft låsen i begge hængsler.
3. Løft lågen let, som om du ville lukke den, og træk den derefter - med begge
hænder, der understøtter lågen - væk fra ovnen.
4. For at udskifte lågen skal du holde døren i en åben position og sætte låsene i
begge hængsler tilbage på plads. Åbn og luk lågen for at sikre, at den sidder
korrekt.
Lås
Råd og tips
Page 41

19
Udskiftning af lys til ovnen
1. Sluk for og frakobl strømmen fra ovnen. Sørg for, at alle interne dele er
nedkølet, før berøring af de indre dele.
2. Fjern dækslet til lampen ved at dreje det mod uret (bemærk: det kan sidde
stramt), fjern pæren ved at dreje mod uret.
3. Indsæt den nye pære, som skal kunne tåle op til 300ºC.
Kontakt dit lokale servicecenter mht. udskiftningspærer.
4. Sæt dækslet på igen.
5. Kontakt en faguddannet elektriker, hvis du er i tvivl.
Fejlfinding
Råd og tips
Page 42

20
Hvis en fejlfunktion opstår, skyldes det ofte en mindre fejl. Læs venligst
følgende instruktioner, før du ringer til eftersalgsservice:
Problem Mulig årsag Kontroller
Sprunget sikring
Kontroller, at sikringerne fungerer
i sikringsboksen
Ovnen virker
ikke
Forket indstilling Kontroller, at alle
kontrolfunktioner er indstillet til
den ønskede lokalitet
Visse blus-zoner
varmer ikke
Montering Kontroller, at apparatets
terminalboks er korrekt monteret
(se monteringsinstruktioner)
Specifikatione
r
ejlfinding
Page 43

21
Model MFSE561W MFSE66W
Nominel spænding (V) 230-240 / 400
Nominal frekvens (Hz) 50
Strømstyrke (W) 7600-8300 8200-8900
Strøm (A) 33-35 36-37
Topelement (W) 1000 1200
Bundelement (W) 1000 1100
Grill (W) 1600 2000
Nettovægt (kg) 38 42
Produkt dimensioner (cm) 50x60x90 60x60x90
Ovnkapacitet (l) 52,5 61
Energiklasse B B
Model
MFSC56W MFSC66W MSFC66W400
Nominel spænding (V) 230-240 / 400 400
Nominal frekvens (Hz) 50
Strømstyrke (W) 8600-9300 9200-10000 9700
Strøm (A) 37-39 40-41 25
Topelement (W) 1000 1200 1200
Bundelement (W) 1000 1100 1100
Grill (W) 1600 2000 2000
Nettovægt (kg) 37 41
Produkt dimensioner (cm) 50x60x90 60x60x90
Ovnkapacitet (l) 52,5 61
Energiklasse B B
Specifikationer
Page 44

22
Dette symbol på produktet eller i vejledningerne betyder, at du skal
skaffe dig af med dit elektriske og elektroniske udstyr, når dets
levetid udløber, og dette skal være adskilt fra dit husholdningsaffald.
Der er separate opsamlingssystemer til genbrug i EU. Kontakt dine
lokale myndigheder eller forhandler, der hvor du købte produktet,
for yderligere oplysninger.
Page 45

käyttöopas
Vapaasti seisova sähköliesi
Page 46

2
Tutustuminen vapaasti seisovaan sähkölieteen. . . . . . . .. . . . . . . . . . . . 3
Tärkeitä turvallisuushuomautuksia. . . . . . . . . . . . . . . . . . . . . . . . . . . . . 6
Ohjauspaneeli. . . . . . . . . . . . . . . . . . . . . . . . . . . . . . . . . . . . . . . . . . . . 10
Käyttöohjeet. . . . . . . . . . . . . . . . . . . . . . . . . . . . . . . . . . . . . . . . . . . . . 13
Vinkkejä. . . . . . . . . . . . . . . . . . . . . . . . . . . . . . . . . . . . . . . . . . . . . . . . . 16
Vianetsintä. . . . . . . . . . . . . . . . . . . . . . . . . . . . . . . . . . . . . . . . . . . . . . . 20
Tekniset tiedot. . . . . . . . . . . . . . . . . . . . . . . . . . . . . . . . . . . . . . . . . . . . 21
Sisältö
Page 47

3
Kiitos, että valitsit tämän vapaana seisovan Matsui-sähkölieden. Toivomme,
että seuraavista tiedoista on hyötyä lieden toimintoihin tutustuessasi ja sen
käyttämisessä oikein ja turvallisesti.
Lue tämän käyttöoppaan ohjeet ennen sähkölieden käyttöä ja säilytä se
tulevaa käyttöä varten.
Tämä ohjekirja soveltuu useille Matsui-malleille.
Tutustuminen vapaasti seisovaan sähkölieteen
Page 48

4
Vapaana seisova sähköliesi
Sähkölieden osat:
1. Lieden yläpinta (liesitaso) 7. Ritilä
2. Ohjauspaneeli 8. Grilli
3. Uunin luukun kahva 9. Uunin lamppu
4. Säädettävät jalat
5. Uunin luukku
10. Kuumennusvyöhyke
(a. Salamalevy - b. Ke raaminen)
6. Uunipelti 11. Kuuman pinnan ilmaisin
(b. Keraaminen)
Malli Koko LxSxK (cm) Tyyppi
MFSE561W 50x60x90 SÄHKÖ (10a)
MFSE66W 60x60x90 SÄHKÖ (10a)
MFSC56W 50x60x90 KERAAMINEN (10b)
MFSC66W 60x60x90 KERAAMINEN (10b)
MFSC56W400 60x60x90 KERAAMINEN (10b)
Tutustuminen vapaasti seisovaan sähkölieteen
Page 49

5
Ritilä x 1
Matala uunipelti x 1
Syvä uunipelti x 1
Lapsilukko: Avaa luukku painamalla
lapsilukkoa ylöspäin ja vedä sitten
luukkua itseäsi kohti ja vapauta
luukun lukitus.
Sulje luukku normaalisti, lukitus
menee päälle automaattisesti.
Vedettävä laskutaso: Avaa laskutaso
nostamalla kahvaa ja vetämällä
laskutason kantta itseäsi kohti.
Laskutason sulkemiseen riittää kevyt
työntö.
Tutustuminen vapaasti seisovaan sähkölieteen
Lapsilukko
Page 50

6
Olemme ottaneet tämän osan mukaan turvallisuutesi vuoksi. Lue nämä
tiedot huolellisesti ennen kuin käytät liettä.
• Yleinen turvallisuus
Nämä varoitukset on annettu turvallisuuttasi silmällä pitäen. Lue tämä
käyttöopas huolellisesti ennen lieden käyttöä.
Säilytä käyttöopasta turvallisessa paikassa, ja jos myyt lieden, anna se
uudelle omistajalle.
Lieden sarjanumero on merkitty myös ohjekirjaan. Viittaa tähän numeroon,
tilatessasi uunin huollon tai kerro se tarvittaessa huoltoteknikolle.
Lieden saa asentaa vain pätevä sähköteknikko.
Lapset eivätkä fysiikaltaan, tuntoaisteiltaan tai henkiseltä kunnoltaan
heikentyneet henkilöt saa k äyttää tätä laitetta. Laitetta ei saa myöskään saa
käyttää ilman asiantuntemusta ja laitetuntemusta ennen ohjauksen tai
opastuksen saamista käyttäjän turvallisuudesta vastaavalta henkilöltä.
• Ennen asennusta
Kuljetuksen aikana syntyneet vahingot
Kun poistat lieden pakkauksesta, tarkista se vahinkojen varalta. Jos
huomaat lieden vahingoittuneen, älä yritä käyttää sitä vaan ota yhteys
liikkeeseen, josta ostit lieden.
Tärkeitä turvallisuushuomautuksia
Page 51

7
Sähköliitäntä
Tämän uunin sähköliitäntä on jätettävä pätevän sähköteknikon tehtäväksi
tämän käyttöoppaan ohjeiden ja nykyisten säädösten mukaisesti.
Sähkölieden liitännän saa tehdä vain valtuutettu ammattilainen. Takuu ei
korvaa menetyksiä, jotka johtuvat väärän liitännän aiheuttamista vahingoista.
Tarkista, että virransyöttö vastaa lieden arvokilven arvoja ennen sähköliitännän
tekemistä.
Tämä laite on tarkoitettu vain kotikäyttöön.
• Lapsiturvallisuus
Älä anna lasten leikkiä millään pakkaustarvikkeilla.
Älä päästä lapsia lieden lähelle ilman valvontaa, sillä kosketettavissa olevat
osat voivat olla kuumia lieden ollessa käytössä. Varmista, että lapset eivät
leiki liedellä.
Älä anna lasten kiivetä uunin luukulle tai istua sen päällä.
Tärkeitä turvallisuushuomautuksia
Page 52

8
Älä tai seiso uunin luukulla.
Älä aseta leivontapeltiä, alumiinifoliota tai astioita uunin pohjalle. Tämä
aiheuttaa ylikuumenemista. Paistoajat eivät ole enää oikeita ja emalointi voi
vahingoittua.
Älä pitele tai kanna liettä luukun kahvasta. Oven kahva ei kestä lieden painoa
ja se voi murtua irti.
Älä laita helposti syttyviä kohteita uuniin. Se muodostaa tulipalon vaaran.
Älä käytä sähköliitännässä sovittimia, jakorasioita ja jatkojo htoja.
Älä anna sähkölaitteiden johtojen joutua kosketuksiin kuuman uunin luukun
kanssa. Johtojen eriste voi sulaa. Se muodostaa oikosulun vaaran.
Älä vaihda tai korjaa virtakaapelia itse. Ota aina yhteys valutettuun
huoltoedustajaan.
Tarkista luukun tiivisteet säännöllisesti. Jos uunin tiiviste on hyvin likainen,
luukku ei enää sulkeudu kunnolla, kun uunia käytetään. Viereisten
yksiköiden etupinnat voivat vahingoittua. Pidä uuniin tiivisteet puhtaina.
Avaa uunin luukku varovasti ruokaa laittaessasi. Luukusta voi tulla kuumaa
höyryä.
Anna lieden jäähtyä ennen kuin kosketat sen sisäosia. Jotkut lieden osat
voivat pysyä kuumina pitkän ajan, kun sähkö on kytketty pois päältä. On
suositeltavaa jättää liesi jäähtymään luukku kiinni. Älä anna minkään jäädä
suljetun uunin luukun väliin. Vaikka jättäisit uunin luukun vain vähän
raolleen, viereisten yksiköiden etupinnat voivat vahingoittua ajan kuluessa.
Pidä uunin luukku suljettuna grillauksen aikana.
Tärkeitä turvallisuushuomautuksia
Page 53

9
Keraamiset mallit
Älä leikkaa leipää liesitason lasin päällä. Lasipaneeleita ei saa käyttää
työskentelyalustoina.
Älä käytä kuumennusvyöhykettä, jos sen päällä on tyhjiä
ruoanvalmistusvälineitä tai jos vyöhykkeellä ei ole niitä lainkaan.
Kun uuni ei ole käytössä, varmista että säätönupit ovat ”0” (Pois päältä) asennossa.
• Turvallisuus puhdistuksessa:
Liesi on sammutettava ja sen on annettava jäähtyä ennen puhdistusta.
Älä käytä höyrypuhdist imia keittotasojen ja uunin syvennyksen
puhdistamiseen.
Älä käytä karheasti hankaavia puhdistusaineita tai teräviä metallikaapimia
uunin lasin puhdistamiseen, sillä ne voivat naarmuttaa pintaa, mikä voi
aiheuttaa lasin rikkoutumisen.
Huomautus: Kaikki nämä varoitukset on annettu asiakkaan turvallisuuden
varmistamiseksi. Lasi voi rikkoutua. Ole hyvin varovainen puhdistaessasi lasia,
ettet naarmuta sitä. Älä kolhaise lasia lisävarusteilla.
Tärkeitä turvallisuushuomautuksia
Page 54

10
Mallit
MSFE561W MSFE66W
Uunin toimintovalitsin Termostaatin valitsin Lieden säätönupit
Mallit
MSFC56W MSFC66W
Ohjauspaneeli
Page 55

11
Mallit
MSFC66W400
Uunin säätimet - toiminnon ja lämpötilan säätimet
Voit käyttää uunitoimintoa valitsemalla ensin toiminnon vasemmanpuoleisella
säätimellä ja asettamalla sitten toiminnon lämpötilan oikeanpuoleisella
säätimellä. Termostaatin valo syttyy. Kun uunin sisälämpötila saavuttaa
asettamasi lämpötilan, termostaatti sammuttaa kuumennuselementin ja
termostaatin valo sammuu. Kun lämpötila laskee alle asetetun lämpötilan,
kuumennuselementti käynnistyy uudelleen ja termostaatin valo syttyy.
Ohjauspaneeli
Mallit: MFSE561W, MFSE56W Mallit: MFSE66W - MFSC66W - MSFC66W400
Page 56

12
Uunin valo syttyy.
Staattinen ruoanvalmistustoiminto
Uunin termostaattivalo, ala- ja yläkuumennuselementit
kytkeytyvät päälle.
Staattinen ruoanlaittotoiminto säteilee kuumuutta varmistaen
tasaisen lämmön ruoan ylä- ja alapuolelle. Tämä on
erinomainen toiminto leivonnaisten, kakkujen, paistetun
pastan, lasagnen ja pizzan paistoon.
Alakuumennustoiminto
Uunin termostaatti syttyy, alakuumennuselementit
kytkeytyvät päälle.
Koska kuumuus kohoaa uunissa pohjalta ylöspäin, se
ennemminkin kuumentaa ruokaa alhaalta ylös kuin kypsentää
sitä päältä.
Yläkuumennustoiminto
Uunin termostaatti syttyy, yläkuumennuselementit
kytkeytyvät päälle.
Yläkuumennustoiminto sopii valmiin ruoan yläpuolelta
tapahtuvaan kuumennukseen.
Grillaustoiminto
Uunin termostaatti ja grillikuumennin kytkeytyvät päälle.
Tätä toimintoa käytetään grillattujen ruokien, kuten kuumien
juustovoileipien valmistamiseen. Käytä aina ylintä ritilätasoa.
Sivele grilliritilä kevyesti öljyllä estääksesi ruoan tarttumisen
ritilään ja aseta ruoat keskelle. Grilliritilää tulee käyttää
yhdessä uunipellin kanssa tippuvan öljyn keräämiseksi.
Varoitus: Maksimilämpötilaksi tulee asettaa 190° C asteeseen.
Tätä toimintoa käytettäessä luukun on oltava kiinni.
Nopeampi grillaustoiminto
Toiminto on muuten sama kuin grillaustoiminto, mutta sitä
käytetään nopeampaan grillaamiseen ja kattamaan suurempi
pinta-ala, kuten grillatessa lihaa, mikä yleensä vie enemmän
tilaa grillausritilällä.
Varoitus: Maksimilämpötilaksi tulee asettaa 190°
C asteeseen.
Tätä toimintoa käytettäessä luukun on oltava kiinni.
Ohjauspaneeli
Page 57

13
Uunin käyttö
Kun käytät uunia ensimmäistä kertaa, eristeistä ja kuumennuselementeistä
saattaa lähteä hajuja. Kytke sen vuoksi uunia ensimmäistä kertaa käyttäessäsi
tyhjä uuni päälle maksimilämpötilaan 45 minuutiksi.
1. Valitse haluamasi uunitoiminto. Valitse tarvittava lämpötila.
2. Ennen kuin asetat ruoan uuniin, uunia on ehkä esilämmitettävä 10 minuuttia.
3. Punainen lämpötilan merkkivalo sammuu, kun valittu lämpötila on
saavutettu.
4. Voit sammuttaa uunin kytkemällä toiminnon säätönupin asentoon ”0”.
Huomautus: Uunia ei saa missään tapauksessa vuorata alumiinifo liolla. Älä
aseta astioita tai uunipeltiä suotaan uunin pohjalle, sillä ne voivat aiheuttaa
ylikuumenemista ja vahinkoja.
Käyttöohjeet
Page 58

14
Keittotason käyttö
Keittotasossa on neljä elementtiä. J okaisen nupin yläpuolella on symboli, joka
osoittaa mitä elementtiä se säätää. Keittotaso on suunniteltu käytettäväksi
kuudella eri tasolla.
Kuumennusvyöhykkeiden käyttö
Ole AINA varovainen, ennen kuin kosketat liettä.
Asetukset Käyttö
0 Kuumennusvyöhykkeet pois päältä
1 - 2 Hiljalleen kiehuttaminen, hidas kuumennus
3 - 5 Uudelleen kuumennus, nopea kiehuttaminen
6 Maksimikuumuus, keittäminen, ruskistaminen ja
kiehuttaminen
Käyttöohjeet
Mallit:
MFSE561W
MFSE66W
Mallit:
MFSC56W
MFSC66W
MSFC66W400
Salamalevyn
säätönu
pp
i
Keraamisen
v
yöhy
kkeen
Page 59

15
1. Valitse haluamasi elementti jollakin ohjau spaneelin neljästä säätö nupista.
Jokaisen nupin yläpuolella on symboli, joka osoittaa mitä elementtiä se
säätää.
2. Kytke keittolevy päälle kiertämällä nuppi asentoon 1-6, halutun
lämpötilan mukaan.
3. Kuumennuselementtejä on kahta tyyppiä. Suuret elementit sopivat
suurille pannuille ja kaksi pientä elementtiä sopivat pienille pannuille.
Kuuman levyn varoitusvalot (keraamiset liedet)
(Mallit: MSFC56W, MSFC66W, MSFC66W400)
Kun kuuman pinnan merkkivalo palaa, se osoittaa, että
kuumennusvyöhykkeellä on vielä jälkilämpöä. Älä aseta esineitä
lasipinnalle.
Käyttöohjeet
Page 60

16
Leivontavihjeitä
1. Aseta leivontavuoat aina ritilän keskelle.
2. Varmista, että käyttämäsi leivontaväline on tulenkestävä.
3. Älä aseta leivontavälinettä liian lähelle uunin taka- tai sivuseiniä.
4. Voit vaikuttaa ruskistumisasteeseen muuttamalla lämpötila-asetusta.
5. Jos kakku laskee otettuasi sen uunista:
- Käytä seuraavalla kerralla vähemmän nestettä.
- Harkitse leivonta-ajan pidentämistä tai matalamman lämpötila-asetuksen
käyttämistä.
Ruoanvalmistusvälineet
Keittolevyt
Käytä painavia, tasapohjaisia kattiloita, joiden halkaisija on sama kuin
elementillä. Tämä antaa hyvän kosketuksen lasipintaan ja lyhentää
ruoanlaittoaikaa.
Ruoanlaittovälineet, joissa on ruostumattomasta teräksestä valmistettu
sandwich-pohja tai emaloitu valurautapohja, antavat parhaat tulokset.
Älä koskaan käytä keittolevyllä muovi- tai alumiinifolioastioita.
Alumiini- ja kuparipohjaiset ruoanlaittovälineet voivat aiheuttaa
metallijäämien tarttumista keittolevyyn. Jos niin käy, sitä on vaikea poistaa.
Puhdista keittolevy jokaisen käytön jälkeen.
Vinkkejä
Page 61

17
Energian säästö
1. Sähköliedellä on käytettävä tasapohjaisia paistinpannuja.
2. Valitse sopivankokoiset ruoanlaittovälineet.
3. Kannen käyttö lyhentää ruoanvalmistusaikaa.
4. Käytä mahdollisimman vähän nestettä tai rasvaa ruoanvalmistusajan
lyhentämiseksi.
5. Kun neste alkaa kiehua, pienennä lämpötila-asetusta.
6. Uunin luukkua ei saisi avata usein ruoanlaiton aikana.
Puhdistusvinkkejä (Irrota liesi verkkovirrasta)
1. Odota kunnes uuni on jäähtynyt ennen kuin poistat ritilät. Pese ne erikseen
lämpimällä astianpesuaineliuoksella ja kuivaa huolellisesti.
2. Pese uunin sisäosa kuumalla astianpesuaineliuoksella ja pyyhi kostealla
liinalla.
3. Jätä luukku auki, kunnes sisäosa on kuivunut ennen kuin asetat ritilät
takaisin.
4. Puhdista uuni jokaisen käytön jälkeen, erityisesti paahtamisen tai
grillaamisen jälkeen. Tämä estää roiskuneiden tai läikkyneiden
ruoanjätteiden palamisen ja muuttumisen vaikeasti poistettavaksi.
5. Älä käytä hiovia tuppoja uunin sisäpintojen puhdistamiseen, sillä ne voivat
poista emaloinnin, mikä vaikuttaa uunin tehokkuuteen.
6. Älä käytä karheasti hankaavia puhdistusaineita tai teräviä metallikaapimia
uunin lasin puhdistamiseen, sillä ne voivat naarmuttaa pintaa, mikä voi
aiheuttaa lasin rikkoutumisen.
Lieden ulkopinnan puhdistaminen (Irrota liesi verkkovirrasta)
1. Ohjauspaneeli, uunin luukku ja lieden sivukannet tulee pyyhkiä
säännöllisesti miedolla nestemäisellä pu hdistusaineella, sillä läikkynyt neste
voi vahingoittaa emalointia.
2. Pese lieden emali- tai kromipäällysteiset osat lämpimällä
astianpesuaineliuoksella tai hiomattomilla puhdistusaineilla.
Vinkkejä
Page 62

18
3. Älä koskaan käytä hiovia tuppoja emalista, kromista tai ruostumattomasta
teräksestä valmistettujen pintojen puhdistamiseen.
4. Jos käytät markkinoilla saatavana olevia puhdistustuotteita, vältä kirjaimien
ja symbolien pyyhkimistä, sillä ne voivat vahingoittua.
Luukun irrottaminen puhdistuksen helpottamiseksi
Suosittelemme toisen henkilön hankkimista avuksi luukun irrottamiseen.
1. Avaa luukku kokonaan.
2. Luukun saranassa on pieni salpa. Nosta molempien saranoiden salpa.
3. Nosta luukkua hieman aivan kuin sulkisit sen ja vedä se sitten molemmin
käsin luukkua tukien irti uunista.
4. Aseta luukku takaisin paikoilleen pitämällä sitä auki-asennossa ja aseta
molemmat sal vat molemmissa saranoissa takaisin paikoilleen. Avaa ja sulje
luukku varmistaaksesi, että se on kiinnitetty oikein.
Salpa
Vinkkejä
Page 63

19
Uunin lampun vaihtaminen
1. Sammuta liesi ja irrota se verkkovirrasta. Varmista, että sisäosat ovat
jäähtyneet ennen kuin kosketat niitä.
2. Irrota lampun kansi kiertämällä sitä vastapäivään (huomaa, että se voi olla
tiukka), irrota lamppu kiertämällä sitä vastapäivään.
3. Aseta uusi lamppu paikoilleen. Lampun tulee kestää kuumuutta 300 ºC asteeseen saakka.
Ota yhteys paikalliseen huoltokeskukseen, kun tarvitset vaihtolampun.
4. Kiinnitä kansi takaisin paikoilleen.
5. Jos epäilet lampun vaihtamisen onnistumista, ota yhteys pätevään
sähköteknikkoon.
Vinkkejä
Page 64

20
Toimintahäiriöt johtuvat usein pikkuvioista. Lue seuraavat ohjeet ennen kuin
soitat takuuhuoltoon:
Ongelma Mahdollinen syy Tarkista
Palanut sulake
Tarkista sulaketaulusta, että
sulake on toimintakunnossa
Liesi ei toimi
Väärä asetus Tarkista, että kaikki säätönupit
on käännetty haluttuun
asentoon
Jotkut
kuumennusvyöhykk
eet eivät kuumene
Asennus Tarkista, että lieden
liitäntärasia on asennettu
oikein (katso asennusohjeet)
Vianetsintä
Page 65

21
Malli MFSE561W MFSE66W
Nimellisjännite (V) 230-240 / 400
Nimellistaajuus (Hz) 50
Teho (W) 7600-8300 8200-8900
Virta (A) 33-35 36-37
Yläelementti (W ) 1000 1200
Alaelementti (W ) 1000 1100
Grilli (W) 1600 2000
Nettopaino (kg) 38 42
Tuotteen mitat (cm) 50x60x90 60x60x90
Uunin tilavuus (l) 52,5 61
Energiatehokkuusluokka B B
Malli
MFSC56W MFSC66W MSFC66W400
Nimellisjännite (V) 230-240 / 400 400
Nimellistaajuus (Hz) 50
Teho (W) 8600-9300 9200-10000 9700
Virta (A) 37-39 40-41 25
Yläelementti (W ) 1000 1200 1200
Alaelementti (W ) 1000 1100 1100
Grilli (W) 1600 2000 2000
Nettopaino (kg) 37 41
Tuotteen mitat (cm) 50x60x90 60x60x90
Uunin tilavuus (l) 52,5 61
Energiatehokkuusluokka B B
Tekniset tiedot
Page 66

22
Tämä symboli tuotteessa tai käyttöohjeissa tarkoittaa, että
sähköinen ja elektroninen laite on hävitettävä käyttöikänsä
lopussa erillään kotitalousjätteestä. Euroopan unionin
alueella on erilliset kierrätysjärjestelmät. Jos haluat
lisätietoja, ota yhteys paikallisviranomaisiin tai
jälleenmyyjään, jolta ostit tuottee
Page 67

bruksanvisn
Frittstående elektrisk komfyr
Page 68

2
Bli kjent med den frittstående komfyren . . . . . . .. . . .. . . . . . . . . . . . . 3
Viktige sikkerhetsmerknader . . . . . . . . . . . . . . . . . . . . . . . . . . . . . . . 6
Kontrollpanel . . . . . . . . . . . . . . . . . . . . . . . . . . . . . . . . . . . . . . . . . . . . 10
Instruksjoner for bruk . . . . . . . . . . . . . . . . . . . . . . . . . . . . . . . . . . . . . 13
Hint og tips . . . . . . . . . . . . . . . . . . . . . . . . . . . . . . . . . . . . . . . . . . . . . . 16
Feilsøking . . . . . . . . . . . . . . . . . . . . . . . . . . . . . . . . . . . . . . . . . . . . . . . 20
Spesifikasjoner . . . . . . . . . . . . . . . . . . . . . . . . . . . . . . . . . . . . . . . . . . 21
Innholdsfortegn
Page 69

3
Takk for at du valgte denne frittstående Matsui-komfyren. Vi håper følgende
informasjon vil hjelpe deg å bli kjent med funksjonene i komfyren, og til å
bruke komfyren riktig og sikkert.
Les instruksjonene i denne bruksanvisningen før du tar i bruk komfyren, og
behold dem for fremtidig henvisning.
Denne bruksanvisningen gjelder for flere Matsui-modeller.
Bli kjent med den frittstående komfyren
Page 70

4
Frittstående elektrisk komfyr
Bli kjent med delene på komfyren:
1. Koketopp (Plate) 7. Rist
2. Kontrollpanel 8. Grill
3. Håndtak til døren 9. Ovnslampe
4. Justerbare føtter
5. Ovnsdør
10. Tilberedningsområde
(a.Kokeplate –b.Keramisk)
6. Langpanne
11. Varm overflate-indikator (b.
Keramisk)
Modell
Størrelse BxDxH (cm)
Type
MFSE561W 50x60x90 Elektrisk (10a )
MFSE66W 60x60x90 Elektrisk (10a)
MFSC56W 50x60x90 Keramisk (10b)
MFSC66W 60x60x90 Keramisk (10b)
MSFC66W400 60x60x90 Keramisk (10b)
Bli kjent med den frittstående komfyren
Page 71

5
Rist x 1
Stekeplate x 1
Langpanne x 1
Barnelås: Du åpner døren ved å
skyve barnelåsen oppover før du
trekker døren mot deg og så slipper
opp dørlåsen.
Lukk døren på vanlig måte; dørlåsen
vil automatisk kobles til.
Varmeskuff: Du åpner varmeskuffen
ved å løfte håndtaket og trekke
skuffen mot deg. Et lite dytt vil være
nok til å lukke skuffen.
Bli kjent med den frittstående komfyren
Håndtak
Barnelås
Page 72

6
Vi har tatt med dette avsnittet med tanke på sikkerheten din. Les denne
informasjonen nøye før du tar i bruk komfyren.
• Generell sikkerhet
Disse advarslene blir gitt med tanke på sikkerheten din. Les denne
bruksanvisningen nøye før du tar i bruk komfyren.
Oppbevar denne bruksanvisningen på et trygt sted, og overdra
bruksanvisningen til den nye eieren hvis du selger komfyren.
Serienummeret står også i bruksanvisningen; ved service må dette
nummeret oppgis til serviceteknikeren.
Komfyren må mont eres av en kvalifisert tekniker.
Komfyren er ikke ment å bli brukt av personer (deriblant barn) med
reduserte fysiske, sensoriske eller mentale evner, eller mangel på erfaring
og kunnskap, med mindre de er under overoppsyn eller har fått opplæring i
bruk av komfyren fra en person som står ansvarlig for sikkerheten deres.
• Før montering
Skader under transport
Etter å ha fjernet emballasjen, må du undersøke om komfyren er skadet på
noen måte; er den det, må du ikke prøve å bruke den, men kontakte
forhandleren der du kjøpte den.
Viktige sikkerhetsmerknade
r
Page 73

7
Elektrisk tilkobling
Den elektriske tilkoblingen av denne komfyren må utføres av en kvalifisert
elektriker i henhold til instruksjonene i denne bruksanvisningen og i
overholdelse med gjeldende forskrifter.
Komfyren må bare kobles til av en godkjent spesialist. Tap som følge av
skader som er forårsaket av feil tilkobling, vil ugyldiggjøre garantien.
Sjekk at strømforsyningen hos deg stemmer overens med den på merkeplaten
før du kobler til komfyren.
Denne komfyren er kun beregnet på bruk i hjemmet.
• Barnesikkerhet
Ikke la barn leke med noen del av emballasjen.
Ikke la barn være i nærheten av komfyren uten oppsyn; deler de kan nå, kan
være varme når komfyren er i bruk. Sørg for at barn ikke leker med komfyren.
Ikke la barn klatre eller sitte på ovnsdøren.
Viktige sikkerhetsmerknader
Page 74

8
Ikke stå eller sitt på ovnsdøren.
Ikke plasser langpannen, aluminiumsfolie eller tallerkener på ovnsgulvet.
Dette vil føre til oppsamling av varme. Bake- og steketider vil ikke lenger
være korrekte, og emaljebelegget kan bli skadet.
Ikke hold eller løft komfyren i dørhåndtaket. Dørhåndtaket bærer ikke
vekten av komfyren, og kan ryke.
Ikke plasser lettantennelige gjenstander i ovnen. Dette kan medføre risiko for
brann.
Ikke bruk adaptere, flyttbare stikkontakter med flere uttak eller
skjøteledninger.
Ikke la ledninger fra elektrisk utstyr sitte fast i den varme ovnsdøren.
Isoleringen rundt ledningen kan smelte, og
ddette kan medføre risiko for
kortslutning.
Ikke bytt ut eller reparer strømledningen på egenhånd. Kontakt alltid en
autorisert servicetekniker.
Du må sjekke tetningene i døren med jevne mellomrom. Hvis ovnens
tetninger er veldig skitne, vil ikke ovnsdøren lukkes skikkelig når ovnen er i
bruk. Forsiden på møbler og apparater som står ved siden av, kan bli skadet.
Hold ovnens tetninger rene.
Du må åpne ovnsdøren forsiktig når du lager mat. Det kan forekomme varm
damp.
Du må la komfyren kjøle seg ned før du rører ved delene inne i komfyren.
Noen deler av komfyren kan være varme i lang tid etter at den er skrudd av.
Det anbefales å la komfyren kjøle seg ned med døren lukket. Ikke la noe sitte
fast i ovnsdøren. Selv om døren bare står litt åpen, kan forsiden på møbler
eller apparater som står ved siden av, bli skadet over tid.
Hold ovnsdøren lukket når stekeovnen er i bruk.
Viktige sikkerhetsmerknader
Page 75

9
For keramiske modeller
Ikke skjær brød på glasset til koketoppen. Glassplater må aldri benyttes som
arbeidsoverflater.
Ikke bruk tomme kjeler og kasseroller på tilberedningsområdene, og ikke bruk
tilberedningsområdet uten kjeler eller kasseroller på.
Når komfyren ikke er i bruk, må du sjekke at kontrollhjulene står i
posisjonen ”0” (av).
• Sikkerhet ved rengjøring:
Når komfyren skal rengjøres, må den være avskrudd og ha hatt tid til å bli
nedkjølt.
Ikke bruk damprensere til å rengjøre koketoppen og hulrommet inne i
komfyren.
Ikke bruk grove, slipende rengjøringsmidler eller skarpe metallskraper til å
rengjøre glasset i ovnsdøren med. Disse kan skrape opp overflaten, noe som
kan føre til at glasset knuser.
Merk: Alle hensyn er tatt for å ivareta kundens sikkerhet. Glass kan knuse.
Vær veldig forsiktig når du rengjør glasset så du ikke lager riper i det. Ikke
bank på eller treff glasset med annet utstyr.
Viktige sikkerhetsmerknader
Page 76

10
Modeller
MSFE561W MSFE66W
Ovnsfunksjonshjul Termostathjul Kontrollhjul for koketopp
Modeller
MSFC56W MSFC66W
Kontrollpanel
Page 77

11
Modeller
MSFC66W400
Ovnskontroller – funksjons- og temperaturkontroller
Du bruker en ovnsfunksjon ved først å velge funksjon med hjulet på venstre
side og så angi temperaturen til funksjonen med hjulet på høyre side.
Termostatlyset vil lyse opp. Når temperaturen inne i ovnen når temperaturen
du har angitt, vil termostaten slå av varmeelementet, og termostatlyset vil
slukke. Når temperaturen faller under angitt temperatur, vil varmeelementet bli
slått på igjen, og termostatlyset vil lyse opp på nytt.
Kontrollpanel
For modellene: MFSE561W - MFSC56W For modellene: MFSE66W - MFSC66W - MSFC66W400
Page 78

12
Lyset i ovnen går på.
Statisk tilberedning
Termostatlyset og de øvre og nedre varmeelementene vil slås
på.
Under statisk tilberedning avgir komfyren varme, noe som
sikrer jevn tilberedning av maten oppe og nede. Dette er en
glimrende funksjon ved til beredning av bakverk, kaker, bakt
pasta, lasagne og pizza.
Oppvarming nedenfra
Termostatlyset og de nedre varmeelementene vil slås på.
Når varme stiger opp fra bunnen av ovnen, vil den varme opp
maten i stedet for å tilberede den.
Oppvarming ovenfra
Termostatlyset og de øvre varmeelementene vil slås på.
Oppvarming ovenfra bør brukes når man skal varme
oversiden av mat som allerede er tilberedt.
Grillfunksjon
Ovnens termostat og det øvre grillelementet vil slås på.
Denne funksjonen brukes ved steking av mat som fo r
eksempel brødskiver med ost; set t alltid risten på den øverst
tilgjengelige posisjonen. Pensle risten lett med olje for å
unngå at mat setter seg fast, og plasser maten på midten av
risten. Risten og langpannen bør brukes samtidig slik at olje
som drypper, fanges opp.
Advarsel: Maksimal temperatur bør være 190°
C. Ha alltid
døren lukket når du bruker denne funksjonen.
Rask grillfunksjon
Denne funksjonen ligner på grillfunksjonen, men brukes for
raskere stekin g og for å dekke et større overflateområde, for
eksempel når man skal steke kjøtt, som ofte tar opp større
plass på risten.
Advarsel: Maksimal temperatur bør være 190°
C. Ha
alltid døren lukket når du bruker denne funksjonen.
Kontrollpanel
Page 79

13
Bruke stekeovnen
Når du bruker ovnen første gang, kan det komme lukt fra isolasjonsmaterialene
og varmeelementene. Derfor må du, før du bruker stekeovnen for første gang,
la stekeovnen stå på ved maksimal temperatur i 45 minutter.
1. Velg ønsket ovnsfunksjon. Velg ønsket temperatur.
2. Før du setter mat i stekeovnen, må den forvarmes i ti minutter.
3. Den røde temperaturlampen vil slukke når stekeovnen har nådd valgt
temperatur.
4. Du skrur av stekeovnen ved å vri funksjonskon trollhjulet til avposisjonen ”0”.
Merk: Under ingen omstendighet må stekeovnen bli kledd innvendig med
aluminiumsfolie. Ikke plasser tallerkener eller langpanner rett på gulvet i
stekeovnen siden overoppheting og skader kan oppstå.
Instruksjoner for bruk
Page 80

14
Bruke koketoppen
Koketoppen har fire elementer. Over hvert hjul er det et symbol som forteller
hvilket element det styrer. Koketoppen er laget for å operere på seks u like
nivåer.
Bruke tilberedningsområdene
Du må ALLTID være oppmerksom før du rører ved et matlagingsapparat.
Innstillin
ger
Virkeområde
0 Tilberedningsområdene er av
1 - 2 Forsiktig småkoking, sakte o ppv arming
3 - 5 Gjenoppvarming, koke opp raskt
6 Maks. varme, koking, sautering og steking
Kontrollhjul for
koke
p
late
Kontrollhjul for
keramisk område
Instruksjoner for bruk
For modellene:
MFSE561W
MFSE66W
For modellene:
MFSC56W
MFSC66W
MSFC66W400
Page 81

15
1. Velg elementet du vil bruke, ved å bruke de fire kontrollhjulene på
kontrollpanelet. Over hvert hjul er det et symbol som forteller hvilket element
det styrer.
2. Du skrur på kokeplaten ved å vri hjulet til 1-6, avhengig av hvilken
temperatur du ønsker
3. Det er to ulike typer elementer. De store elementene er egnet for store kjeler,
og de to mindre elementene er egnet for mindre kjeler.
Advarselsindikator om varme koketopper (keramiske topper)
(Modeller: MSFC56W, MSFC66W, MSFC66W400)
Når lyset som indikerer en varm overflate, er på, betyr det at det
tilberedningsområdet fremdeles er varmt. Pass på ikke å plassere gjenstander
på glassoverflaten.
Instruksjoner for bruk
Page 82

16
Tips for baking
1. Plasser alltid kakeformer på midten av risten.
2. Sørg for å bruke bakeredskaper som er ovnsikre.
3. Ikke plasser bakeredskaper for nærme veggene bak i eller på sidene av
stekeovnen.
4. Du kan påvirke bruningen ved å endr e temperaturinnstillingen.
5. Hvis en kake faller sammen etter at du har tatt den ut fra stekeovnen:
- Bruk mindre væske ved neste forsøk.
- Prøv å bake kaken lenger eller ved en noe lavere temperatur.
Kjeler og panner
Koketopper
Bruk flate panner med tykk og jevn bunn som har samme diameter som
elementet. Dette vil gjøre at pannen får god kontakt med glasset og bidra til å
redusere tilberedningstiden.
Panner og kjeler med sandwichbunn i rustfritt stål eller emaljert
støpejernsbunn vil gi best resultat.
Bruk aldri tallerkener av plastikk eller aluminium på koketoppen.
Panner og kjeler av aluminium og kopper kan etterlate metallrester på
koketoppen. Når restene først er der, kan de være vanskelige å fjerne.
Rengjør koketoppen for hver gang du har brukt den.
Hint og tips
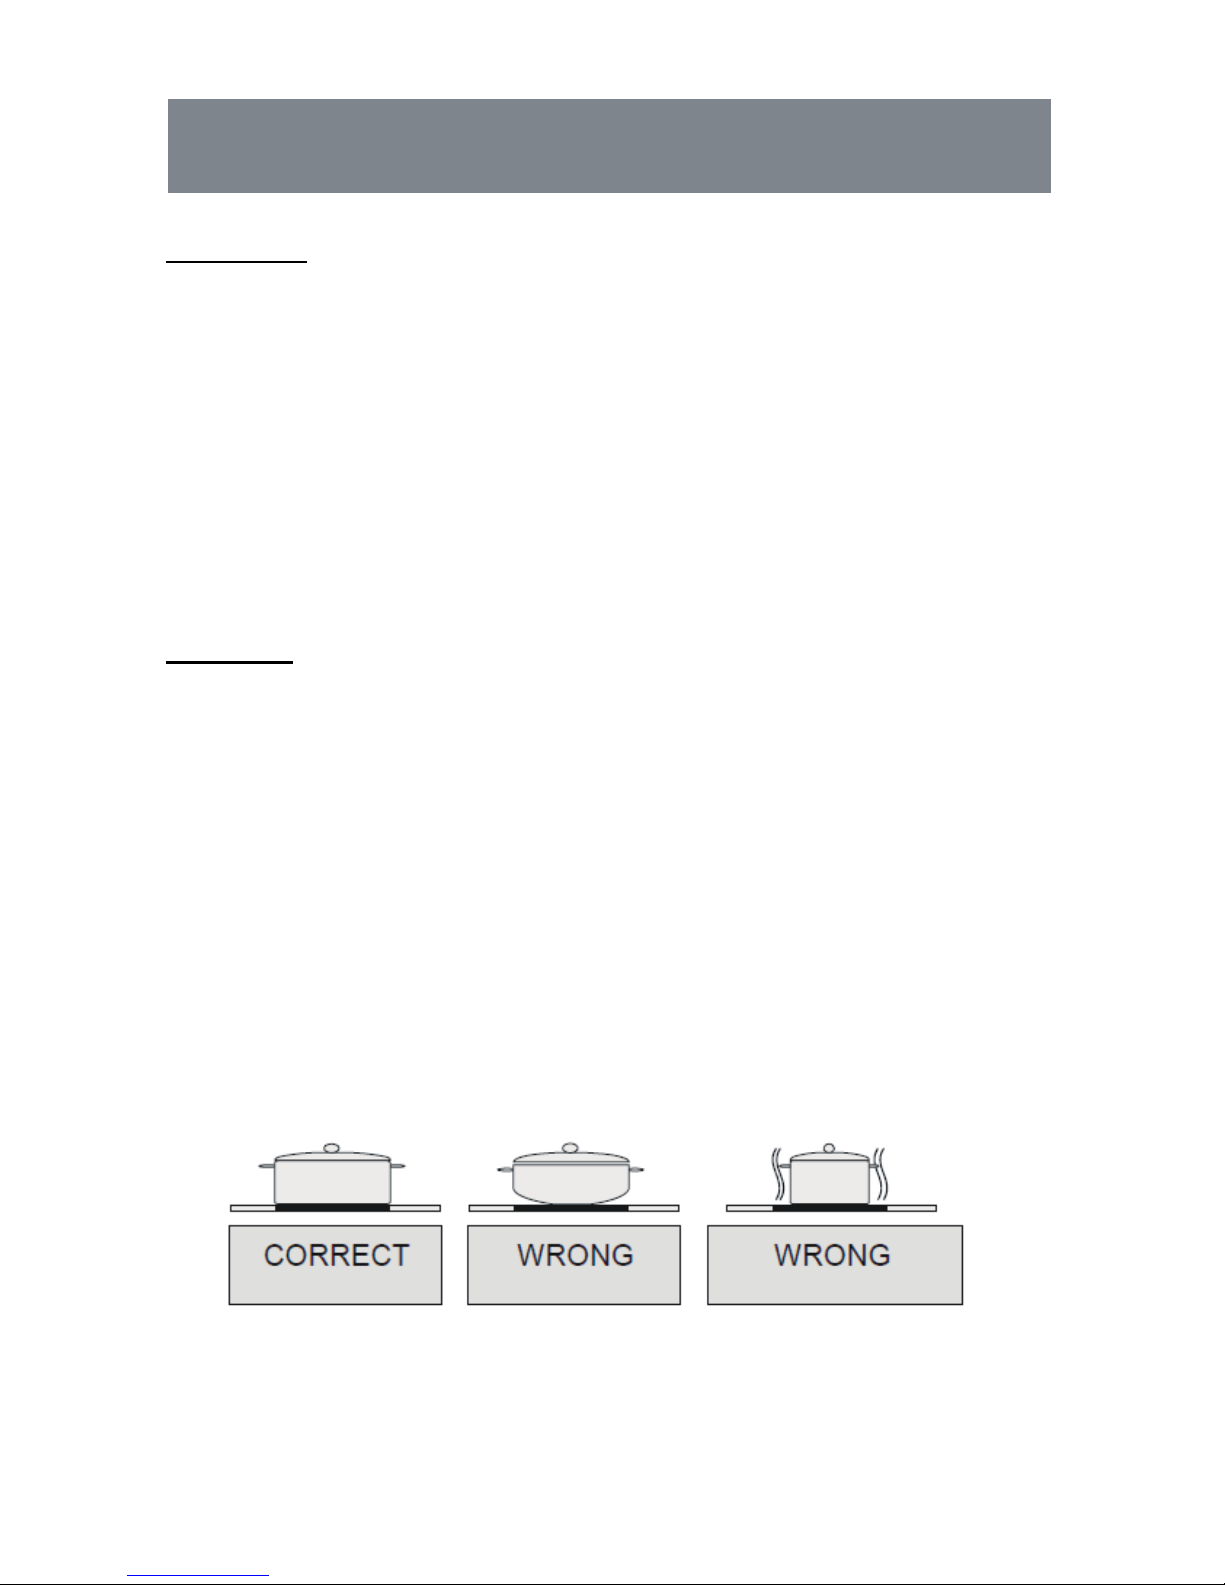
RIKTIG FEIL
FEIL
Page 83

17
Energisparing
1. Ved bruk av elektriske komfyrer må man bruke kasseroller med flat bunn.
2. Velg kjeler og panner i riktig størrelse.
3. Du kan redusere tilberedningstiden gjennom å bruke lokk.
4. Ved å bruke mindre væske eller fett kan du redusere tilberedningstiden.
5. Når væsken begynner å koke, kan du redusere temperaturen.
6. Ovnsdøren bør ikke åpnes ofte mens maten tilberedes.
Rengjøringstips (koble komfyren fra strømforsyningen).
1. Vent til stekeovnen er blitt nedkjølt før du tar ut rister, vask dem hver for
seg i varmt såpevann og la dem tørke godt.
2. Vask innsiden av stekeovnen med varmt såpevann, og tørk av med en
fuktig klut.
3. La døren stå åpen inntil innsiden har tørket før du setter inn ristene igjen.
4. Rengjør stekeovnen for hver gang du har brukt den, spesielt etter steking
og grilling. Dette vil forhindre at sølt matavfall brenner seg fast og blir
vanskelig å fjerne.
5. Ikke bruk grove svamper til å gjøre rent inne i stekeovnen. Dette kan gjøre
at emaljen forsvinner, noe som kan føre til at stekeovnen fungerer mindre
effektivt.
6. Ikke bruk grove, slipende rengjøringsmidler eller skarpe metallskraper til å
rengjøre glasset i ovnsdøren. Disse kan skrape opp overflaten, noe som kan
føre til at glasset knuser.
Rengjøre utsiden av stekeovnen (koble komfyren fra strømforsyningen).
1. Du bør regelmessig tørke over kontrollpanelet, ovnsdøren og sidene av
ovnen med en myk klut og et mildt rengjøringsmiddel siden sølt væske kan
skade emaljen.
2. Vask de delene av ovnen som er emaljert eller kledd i krom med varmt
såpevann eller med ikke-slipende rengjøringsmidler.
Hint og tips
Page 84

18
3. Bruk aldri grove svamper til å rengjøre overflater som er emaljerte eller av
krom eller rustfritt stål.
4. Når du bruker allment tilgjengelige rengjøringsprodukter for rustfritt stål,
bør du unngå å rengjøre skrift eller symboler siden disse kan bli skadet.
Fjerning av døren for enklere rengjøring
Vi anbefaler at du får noen til å hjelpe deg med å ta av døren.
1. Åpne døren helt.
2. Det er en liten smekklås på dørhengselet. Løft smekklåsen på begge
hengslene.
3. Løft døren litt, på samme måte som når du skal lukke den. Deretter støtter du
døren med begge hender mens du trekker den vekk fra stekeovnen.
4. Du setter døren på igjen ved å holde døren i åpen posisjon og sette
smekklåsene på begge hengslene på plass igjen. Åpne og lukk døren for å være
sikker på at den er riktig satt på.
Smekklås
Hint og tips
Hints and tips
Page 85

19
Bytte pære i ovnslyset
1. Skru av komfyren og trekk ut støpselet fra kontakten. Sjekk at delene inni
stekeovnen er kalde før du rører ved dem.
2. Ta av lampedekselet ved å skru det mot klokken (vær oppmerksom på at
det kan sitte godt), og ta ut pæren ved å skru den mot klokken.
3. Sett i en ny pære, som må tåle 300 °C.
Kontakt det lokale servicesenteret for ekstra pærer.
4. Sett på dekselet igjen.
5. Hvis du er i tvil om noe, så kontakt en kvalifisert tekniker for å få hjelp.
Hint og tips
Page 86

20
Funksjonsfeil skyldes ofte mindre feil. Les følgende instruksjoner før du ringer
kundeservice:
Problem Mulig årsak Undersøk dette
Sikringen har gått
Undersøk i sikringsskapet at
sikringen fungerer.
Komfyren
fungerer ikke
Feil innstilling Undersøk om alle kontrollene er
stilt til riktig posisjon.
Noen områder
på topplaten
varmes ikke
opp
Montering Undersøk om koplingsboksen på
komfyren er riktig montert (se
monteringsinstruksjonene).
Feilsøking
Page 87

21
Modell MFSE561W MFSE66W
Merkespenning (V) 230-240 / 400
Merkefrekvens (Hz) 50
Effekt (W) 7600-8300 8200-8900
Strømstyrke (A) 33-35 36-37
Toppelement (W) 1000 1200
Bunnelement (W) 1000 1100
Grill (W) 1600 2000
Nettovekt (kg) 38 42
Produktets mål (cm) 50x60x90 60x60x90
Stekeovnens kapasitet (l) 52,5 61
Energieffektivitetsklasse B B
Modell
MFSC56W MFSC66W MSFC66W400
Merkespenning (V) 230-240 / 400 400
Merkefrekvens (Hz) 50
Effekt (W) 8600-9300 9200-10000 9700
Strømstyrke (A) 37-39 40-41 25
Toppelement (W) 1000 1200 1200
Bunnelement (W) 1000 1100 1100
Grill (W) 1600 2000 2000
Nettovekt (kg) 37 41
Produktets mål (cm) 50x60x90 60x60x90
Stekeovnens kapasitet (l) 52,5 61
Energieffektivitetsklasse B B
Spesifikasjoner
Page 88

22
Dette symbolet på produktet eller i instruksjonene betyr at det
elektriske og elektroniske utstyret må kastes adskilt fra
husholdningsa v f allet ved slutten av levetiden. Det finnes flere ulike
gjenvinningsopplegg i EU. For mer informasjon kan du kontakte
lokale myndigheter eller forhandleren der du kjøpte produktet.
Page 89

användarha
Fristående elektrisk spis
Page 90

2
Lär känna din fristående spis . . . . . . . . . . . . . . . . . . . . . . . . . . . . . . . . . 3
Viktiga säkerhetsinstruktioner . . . . . . . . . . . . . . . . . . . . . . . . . . . . . . . . 6
Kontrollpanel . . . . . . . . . . . . . . . . . . . . . . . . . . . . . . . . . . . . . . . . . . . . . 10
Användarinstruktioner . . . . . . . . . . . . . . . . . . . . . . . . . . . . . . . . . . . . . 13
Tips och råd . . . . . . . . . . . . . . . . . . . . . . . . . . . . . . . . . . . . . . . . . . . . . . 16
Felsökning . . . . . . . . . . . . . . . . . . . . . . . . . . . . . . . . . . . . . . . . . . . . . . . 20
Specifikationer: . . . . . . . . . . . . . . . . . . . . . . . . . . . . . . . . . . . . . . . . . . . 21
Innehåll
Page 91

3
Tack för att du valde en Matsui fristående spis. Vi hoppas att följande
information ska hjälpa dig att förstå spisens egenskaper och hur den används
på ett framgångsrikt och säkert sätt.
Läs igenom instruktionerna i den här användarguiden före användning och
behåll dem för framtida bruk.
Den här instruktionshandboken gäller flera Matsui-modeller.
Lär känna din fristående spis
Page 92

4
Fristående spis
Identifiera spisens delar
1. Spiselhäll 7. Galler
2. Kontrollpanel 8. Grill
3. Ugnsluckans handtag 9. Ugnslampa
4. Justerbara fötter
5. Ugnslucka
10. Matlagningszon
(a.värmeplatta – b.keramik)
6. Ugnsplåt 11. Indikator för het yta (b. keramik)
Modell Mått bxdxh (cm) typ
MFSE561W 50x60x90 ELEKTRI SK (10a)
MFSE66W 60x60x90 ELEKTRISK (10a)
MFSC56W 50x60x90 KERAMI SK (10 b )
MFSC66W 60x60x90 KERAMI SK (10 b )
MFSC66W40 60x60x90 KERAMI S K (10 b )
Lär känna din fristående spis
Page 93

5
Galler x 1
Grund plåt x 1
Djup plåt x 1
Barnlås: Öppna luckan genom att
trycka barnlåset uppåt och sedan dra
dörren mot dig och släppa barnlåset.
Stäng luckan som vanligt, låset
kopplas in automatiskt.
Låda: Öppna lådan genom att lyfta
handtaget uppåt och dra lådan emot
dig. En lätt knuff räcker för att stänga
lådan.
Lär känna din fristående spis
Handtag
Barnlås
Page 94

6
Vi har inkluderat det här avsnittet för din säkerhet. Läs noga igenom denna
information innan du använder din spis.
• Allmän säkerhet
De här varningarna ges för att värna om din säkerhet. Läs noggrant igenom
den här handboken innan du använder utrustningen.
Förvara handboken på en säker plats och leverera den tillsammans med
spisen om du säljer den vidare.
Serienumret är också inkluderat i handboken. Vid service, ange numret
eller ge det till serviceteknikern.
Utrustningen m å ste installeras av en behörig elektriker.
Denna utrustning är inte avsedd att användas av personer (t.ex. barn) med
nedsatt fysisk, sensorisk eller mental kapacitet, eller person som saknar
erfarenhet och kunskap, såvida de inte övervakas eller har givits
instruktioner om utrustningens användning av någon som är ansvarig för
deras säkerhet.
• Före installation
Transportskada
När förpackningen avlägnsats, kontrollera om skador uppstått. Om skada
påträffas, försök inte använda utrustningen och kontakta inköpsstället.
Viktiga säkerhetsinstruktione
r
Page 95

7
Elektrisk anslutning
Spisens elanslutning måste utföras av behörig elektriker enligt
instruktionerna i den här guiden samt uppfylla gällande föreskrifter.
Spisen får endast anslutas av godkänd specialist. Förlust p.g.a. skada som
uppstår som resultat av felaktig anslutning ogiltigförklarar varje garantikrav.
Kontrollera att strömförsörjningen överensstämmer med märkningsetiketten
innan utrustningen ansluts.
Den här utrustningen är endast avsedd för bruk i hemmet.
• Barnsäkerhet
Låt inte barn leka med delar av förpackningen.
Låt inte barn vistas i närheten av utrustningen utan övervakning. Åtkomliga
delar kan vara heta under användning. Se till att barn inte leker i närheten av
utrustningen.
Låt inte barn klättra eller sitta på ugnsluckan.
Viktiga säkerhetsinstruktione
r
Page 96

8
Du bör inte stå eller sitta på ugnsluckan.
Du bör inte placera bakplåt, aluminumfolie eller tallrikar på ugnsgolvet.
Det leder till värmeansamling. Bakning och grilltider blir felaktiga och
emaljen kommer att skadas.
Du bör inte hålla eller bära spisen i luckhandtaget. Det klarar inte av att bära
ungsvikten och kan gå sönder.
Du bör inte placera lättantändliga föremål i ugnen. Brand kan uppstå.
Du bör inte använda adaptrar, flera uttag eller förlängningssladdar.
Du bör inte låta sladdar till elutrustning klämmas fast i den heta ugnsluckan.
Kabelisoleringen kan smälta. Det kan leda till kortslutning.
Du bör inte själv ändra eller reparera elsladden. Kontakta alltid behörig
servicetekniker.
Du bör kontrollera luckans tätningslist med jämna mellanrum. Om
tätningslisten är väldigt smutsig kan luckan inte längre stängas ordentligt vid
användning. Framsidan på intilliggande utrustning kan skadas. Håll
tätningslisten ren.
Du bör öppna ugnsluckan försiktigt vid matlagning. Het ånga kan komma ut.
Du bör låta utrustningen svalna innan du vidrör insidan av ugnen. Visa delar
kan vara heta en lång stund efter att utrustningen stängts av. Det är
rekommenderat att utrustningen får svalna med ugnsluckan stängd. Låt
ingenting fastna i ugnsluckan. Även om du bara lämnar ugnsluckan en aning
öppen kan framsidan på intilliggande utrustning skadas med tiden.
Du bör se till att ugnsluckan är stängd i grilläge.
Viktiga säkerhetsinstruktione
r
Page 97

9
För keramiska modeller
Du bör inte skära bröd på spiselhällens glasyta Glaspaneler ska inte användas
som arbetsyta.
Du bör inte använda matlganingszoner med tomma kokkärl eller utan kokkärl
i zonen.
När ugnen inte används, se till att kontrollvreden är ställda i läge ‘0’ (av).
• Säkerhet vid rengöring:
Vid rengöring måste utrustningen stängas av och ges tid att svalna.
Du bör inte använda ångrengörare vid rengöring av spiselhäll och
ugnsutrymme.
Du bör inte använda grova rengöringsmedel eller vassa metallskrapor vid
rengöring av ugnsluckans fönster eftersom det kan repa ytan vilket i sin tur kan
leda till att glaset spricker.
Obs: Vi gör allt vikan för att värna om kundens säkerhet. Glas kan gå sönder.
Var försiktig vid rengöring av glaset så att det inte repas. Slå inte på glaset med
tillbehören.
Viktiga säkerhetsinstruktione
r
Page 98

10
Modeller
MSFE561W MSFE66W
Ugnsfunktionsknapp Termostatknapp Spiselhällens kontrollknappar
Modeller
MSFC56W MSFC66W
Kontrollpanel
Page 99

11
Modeller
MSFC66W400
Ugnskontroller - funktions- och temperaturkontrollerna
Vid användning av ugnsfunktionen, välj funktionen med det vänstra vredet och
ställ sedan in temperaturfunktionen med det högra vredet. Termostatindikatorn
tänds. När ugnstemperaturen når den inställda temperaturen stänger
termostaten av värmeelementet och termostatindikatorn släcks. När
temperaturen faller under den inställda temperaturen går värmeelementet igång
igen och termostatindikatorn tänds.
Kontrollpanel
För modeller: MFSE561W - MFSC56W
För modeller: MFSE66W - MFSC66W - MSFC66W400
Page 100

12
Ugnsbelysningen tänds.
Statisk tillagningsfunktion
Ugnens termostatlampa, de nedre och de övre värme
elementen startar.
Den statiska tillagningsfunktionen avger hetta för att
garantera jämn tillagning av mat upptill och nedtill. Detta är
en utmärkt funktion för tillagning av bakverk, tårtor, bakad
pasta, lasagne och pizza.
Den nedre värmefunktionen
Ugnens termostatlampa och de nedre värmeelementen startas.
Efterhand som värmen stiger från ugnens nedre del så värms
maten upp istället för att tillagas.
Den övre värmefunktionen
Ugnens termostatlampa och de övre värmeelementen startas.
Den övre värmefunktionen är lämplig för uppvärmning av
översidan av redan tillagad mat.
Grillfunktionen
Ugnens termostat- och strömindikator tänds och grillvärmaren
startar.
Den här funktionen används för grillning av maträtter, t.ex.
ost på bröd. Använd alltid den högsta möjliga positionen.
Pensla med lätt hand lite olja på grillgallret så att maten inte
fastnar och placera sedan maten i mitten. Grillgallret och
ungsplåten bör användas tillsammans så att droppande olja
och fett fångas upp.
Varning: Maxtemperaturen bör ställas in till 190
0
C.
Ugnsluckan mpste vara stängd när en här funktionen används.
Snabbgrillfunktionen
Den här funktionen liknar grillfunktionen men används vid
snabbare grillning och vid täckning av större yta, t.ex. vid
grillning av kött sombrukar ta upp mer plats på grillgallret.
Varning: Maxtemperaturen bör ställas in till 190
0
C.
Ugnsluckan mpste vara stängd när en här funktionen används.
Kontrollpanel
 Loading...