

Page 1
TABLE TOP DISHWASHER
INSTALLATION/INSTRUCTION MANUAL
MDWTT11E
BENKOPPVASKMASKIN
INSTALLASJONS/BRUKERVEILEDNING
PÖYTÄASTIANPESUKONE
ASENNUS/KÄYTTÖOPAS
BÄNKDISKMASKIN
INSTALLATIONS/BRUKSANVISNING
BORDOPVASKEMASKINE
INSTALLATIONS/OG BRUGERVEJLEDNING
NO
FI
SE
DK
TABLE TOP DISHWASHER
INSTALLATION/INSTRUCTION MANUAL
GB
Page 2

Contents
GB
Unpacking ........................................................................................5
Installation .......................................................................................6
Location ...........................................................................................6
Product Overview .............................................................................9
Front View ...................................................................................9
Rear View ....................................................................................9
Dishwasher Basket and Cutlery Basket ......................................10
Internal View .............................................................................10
Control Panel .............................................................................11
Wash Cycle Table ............................................................................ 12
Before Operating ............................................................................13
To Open the Door .......................................................................13
To Close the Door .......................................................................13
Items Not Suitable for Use in the Dishwasher ............................13
Adding Detergent or Detergent Tablet ...........................................14
Adding Rinse Aid ............................................................................15
Adjusting the Rinse Aid Reservoir..............................................15
Adding Salt ...............................................................................16
Loading the Dishwasher .................................................................17
Before Loading the Dishwasher .................................................17
Dishwasher Basket ....................................................................18
– Hinged Cup Rack ............................................................18
– Hinged Spikes ................................................................18
– Loading the Dishwasher Basket for 6 Place Settings ......19
Cutlery Basket ...........................................................................19
– Loading the Cutlery Basket ............................................19
Starting a Wash Cycle ..................................................................... 20
Changing a Programme .................................................................20
At the End of a Programme ............................................................20
Switching O the Unit ....................................................................21
Unloading the Dishwasher .............................................................21
Cleaning After Use ..........................................................................22
External Care .............................................................................22
– The Door and the Door Seal............................................22
– The Control Panel ...........................................................22
Internal Care ..............................................................................22
– Filtering System .............................................................22
Spray Arms ................................................................................23
Frost Precaution .............................................................................23
Moving the Dishwasher .................................................................23
Maintenance After a Prolonged Period of Non-Operation ..............23
Hints and Tips .................................................................................24
Fault Code .................................................................................24
Technical Problems ....................................................................24
Disposal of the Dishwasher ............................................................26
Disposal of Packing Material ..........................................................26
Specications .................................................................................27
Safety Warnings ...........................................................................120
Innhold
NO
Pakke opp ......................................................................................28
Installasjon ....................................................................................29
Plassering..................................................................................29
Produktoversikt ..............................................................................32
Sett forfra ..................................................................................32
Sett bakfra ................................................................................32
Oppvaskmaskinkurv og bestikkurv ............................................33
Sett fra innsiden ........................................................................33
Kontrollpanel ............................................................................34
Vasketabell.....................................................................................35
Før du begynner .............................................................................36
Åpne døren ...............................................................................36
Lukke døren ..............................................................................36
Elementer som ikke egner seg for oppvaskmaskinen ................36
Fylle på vaskemiddel eller legge inn oppvasktablett ......................37
Fylle på glansemiddel ....................................................................38
Justere glansemiddelbeholderen ..............................................38
Fylle på salt ...............................................................................39
Sette inn i oppvaskmaskinen..........................................................40
Før du setter inn i oppvaskmaskinen .........................................40
Oppvaskmaskinkurv ..................................................................41
– Hengslet koppstativ .......................................................41
– Hengslete spisser ...........................................................41
Bestikkurv .................................................................................42
– Sette inn bestikkurven ...................................................42
– Sette inn 6 kuverter i oppvaskmaskinkurven .................42
Starte en vaskesyklus .....................................................................43
Endre et program ...........................................................................43
Ved slutten av et program ..............................................................43
Slå av enheten ...............................................................................44
Ta ut av oppvaskmaskinen .............................................................44
Rengjøring etter bruk .....................................................................45
Utvendig vedlikehold ................................................................45
– Døren og dørpakningen .................................................45
– Kontrollpanelet ..............................................................45
Innvendig vedlikehold ...............................................................45
– Filtreringssystem ...........................................................45
Spylearmer ................................................................................46
Forholdsregler ved frost .................................................................46
Flytte oppvaskmaskinen ................................................................46
Vedlikehold etter en lang periode uten bruk ..................................46
Råd og tips .....................................................................................47
Feilkode.....................................................................................47
Tekniske problemer ...................................................................47
Avhending av oppvaskmaskinen ....................................................49
Kassere emballasje .........................................................................49
Spesikasjoner ...............................................................................50
Sikkerhetsadvarsler ......................................................................121
Page 3

Innehållsförteckning
SE
Packa upp ......................................................................................51
Installation .....................................................................................52
Placering ...................................................................................52
Produktöverblick ............................................................................55
Frontvy ......................................................................................55
Baksida .....................................................................................55
Diskkorg och bestickkorg ...........................................................56
Insidan ......................................................................................56
Kontrollpanel ............................................................................57
Diskcykeltabell ...............................................................................58
Innan användning ..........................................................................59
För att öppna luckan .................................................................59
För att stänga luckan .................................................................59
Föremål som inte är lämpliga att använda i diskmaskinen ........59
Tillsätta diskmedel eller diskmedelstablett ....................................60
Sköljmedel .....................................................................................61
Inställning sköljmedelsbehållaren ............................................61
Lägga till salt.............................................................................62
Ladda diskmaskinen ......................................................................63
Innan diskmaskinen laddas .......................................................63
Diskmaskinskorg .......................................................................64
– Fällbart koppställ ...........................................................64
– Nedfällbara piggar .........................................................64
– Ladda diskmaskinskorgen med 6 kuvert ........................65
Bestickkorg................................................................................65
– Ladda bestickkorgen ......................................................65
Start av diskcykeln .........................................................................66
Byte av program .............................................................................66
Vid slutet av programmet ..............................................................66
Stänga av enheten .........................................................................67
Urplockning av diskmaskinen ........................................................67
Rengöring efter användning ..........................................................68
Yttre vård ..................................................................................68
– Luckan och lucktätningen ..............................................68
– Kontrollpanelen .............................................................68
Inre vård ....................................................................................68
– Filtreringssystem ...........................................................68
Sprayarmar ...............................................................................69
Frostskydd ......................................................................................69
Flyttning av diskmaskinen .............................................................69
Underhåll efter en lång period utan användning ...........................69
Tips och råd ....................................................................................70
Felkod .......................................................................................70
Tekniska problem ......................................................................70
Avyttring av diskmaskinen .............................................................72
Avyttring av förpackningsmaterial .................................................72
Specikationer ...............................................................................73
Säkerhetsvarningar ......................................................................122
Sisältö
FI
Pakkauksesta purkaminen .............................................................74
Asennus .........................................................................................75
Paikka .......................................................................................75
Tuotteen yleiskatsaus .....................................................................78
Näkymä edestä .........................................................................78
Näkymä takaa ...........................................................................78
Astianpesukoneen kori ja ruokailuvälinekori .............................79
Näkymä sisältä ..........................................................................79
Ohjauspaneeli ...........................................................................80
Pesuohjelmataulukko ....................................................................81
Ennen käyttöä ................................................................................82
Luukun avaaminen ....................................................................82
Luukun sulkeminen ...................................................................82
Astianpesukoneessa käytettäväksi sopimattomat kohteet ........82
Pesuaineen tai pesuainetabletin lisääminen ..................................83
Huuhtelukirkasteen lisääminen .....................................................84
Huuhtelukirkastesäiliön säätö ...................................................84
Suolan lisääminen .....................................................................85
Astianpesukoneen täyttö ...............................................................86
Ennen astianpesukoneen täyttöä ..............................................86
Astianpesukoneen kori ..............................................................87
– Kaatuva kuppiteline .......................................................87
– Kaatuvat pidikkeet .........................................................87
– Ruokailuvälinekori .........................................................88
Ruokailuvälinekorin täyttäminen ..............................................88
– Ruokailuvälinekorin täyttäminen ..................................88
Pesuohjelman käynnistäminen ......................................................89
Pesuohjelman muuttaminen .........................................................89
Pesuohjelman lopussa ...................................................................89
Koneen sammuttaminen ...............................................................90
Astianpesukoneen tyhjentäminen .................................................90
Puhdistus käytön jälkeen ...............................................................91
Ulkopuolen ylläpito ...................................................................91
– Ovi ja oven tiiviste ..........................................................91
– Ohjauspaneeli ................................................................91
Sisäpuolen ylläpito ....................................................................91
– Suodatusjärjestelmä ......................................................91
Suihkuvarret ..............................................................................92
Jäätymisvarotoimet .......................................................................92
Astianpesukoneen siirtäminen ......................................................92
Kunnossapito pitkän käyttämättömyysjakson jälkeen ...................92
Vihjeitä ja vinkkejä .........................................................................93
Vikakoodi ..................................................................................93
Tekniset ongelmat .....................................................................93
Astianpesukoneen hävittäminen ...................................................95
Pakkausmateriaalin hävittäminen .................................................95
Tekniset tiedot ...............................................................................96
Turvallisuusvaroitukset ................................................................123
Page 4

Indholdsfortegnelse
DK
Udpakning .....................................................................................97
Installation .....................................................................................98
Placering ...................................................................................98
Produktoversigt............................................................................101
Set forfra .................................................................................101
Set bagfra................................................................................101
Opvaskekurv og bestikkurv .....................................................102
Indeni ......................................................................................102
Kontrolpanel ...........................................................................103
Skema over vaskecyklus ...............................................................104
Før brug .......................................................................................105
Sådan åbnes lågen ..................................................................105
Sådan lukkes lågen .................................................................105
Emner, der ikke er egnede til vask i opvaskemaskinen ............105
Tilføjelse af opvaskemiddel eller opvaskemiddeltablet ................106
Tilføjelse af skyllemiddel ..............................................................107
Justering af skyllemiddelbeholder ..........................................107
Tilføjelse af salt .......................................................................108
Fyldning af opvaskemaskinen ......................................................109
Før opvaskemaskinen fyldes ....................................................109
Opvaskekurv............................................................................110
– Hængslet hylde til kopper ............................................110
– Hængslede spyd...........................................................110
– Fyldning af opvaskekurven til 6 kuverter .....................111
Bestikkurv ............................................................................... 111
– Fyldning af bestikkurv .................................................111
Start af vaskecyklus ......................................................................112
Skift af program ...........................................................................112
Ved programmets afslutning .......................................................112
Slukning af enheden ....................................................................113
Tømning af opvaskemaskinen ......................................................113
Rengøring efter brug....................................................................114
Udvendig pleje ........................................................................114
– Låge og lågepakning ...................................................114
– Kontrolpanelet .............................................................114
Indvendig pleje .......................................................................114
– Filtersystem .................................................................114
Spray-arme .............................................................................115
Frostsikring ..................................................................................115
Flytning af opvaskemaskinen .......................................................115
Vedligeholdelse efter længere periode ude af drift ......................115
Gode råd ......................................................................................116
Fejlkode...................................................................................116
Tekniske problemer .................................................................116
Kassering af opvaskemaskinen .....................................................118
Kassering af emballage ................................................................118
Specikationer .............................................................................119
Sikkerhedsadvarsler .....................................................................124
Page 5
5
GB
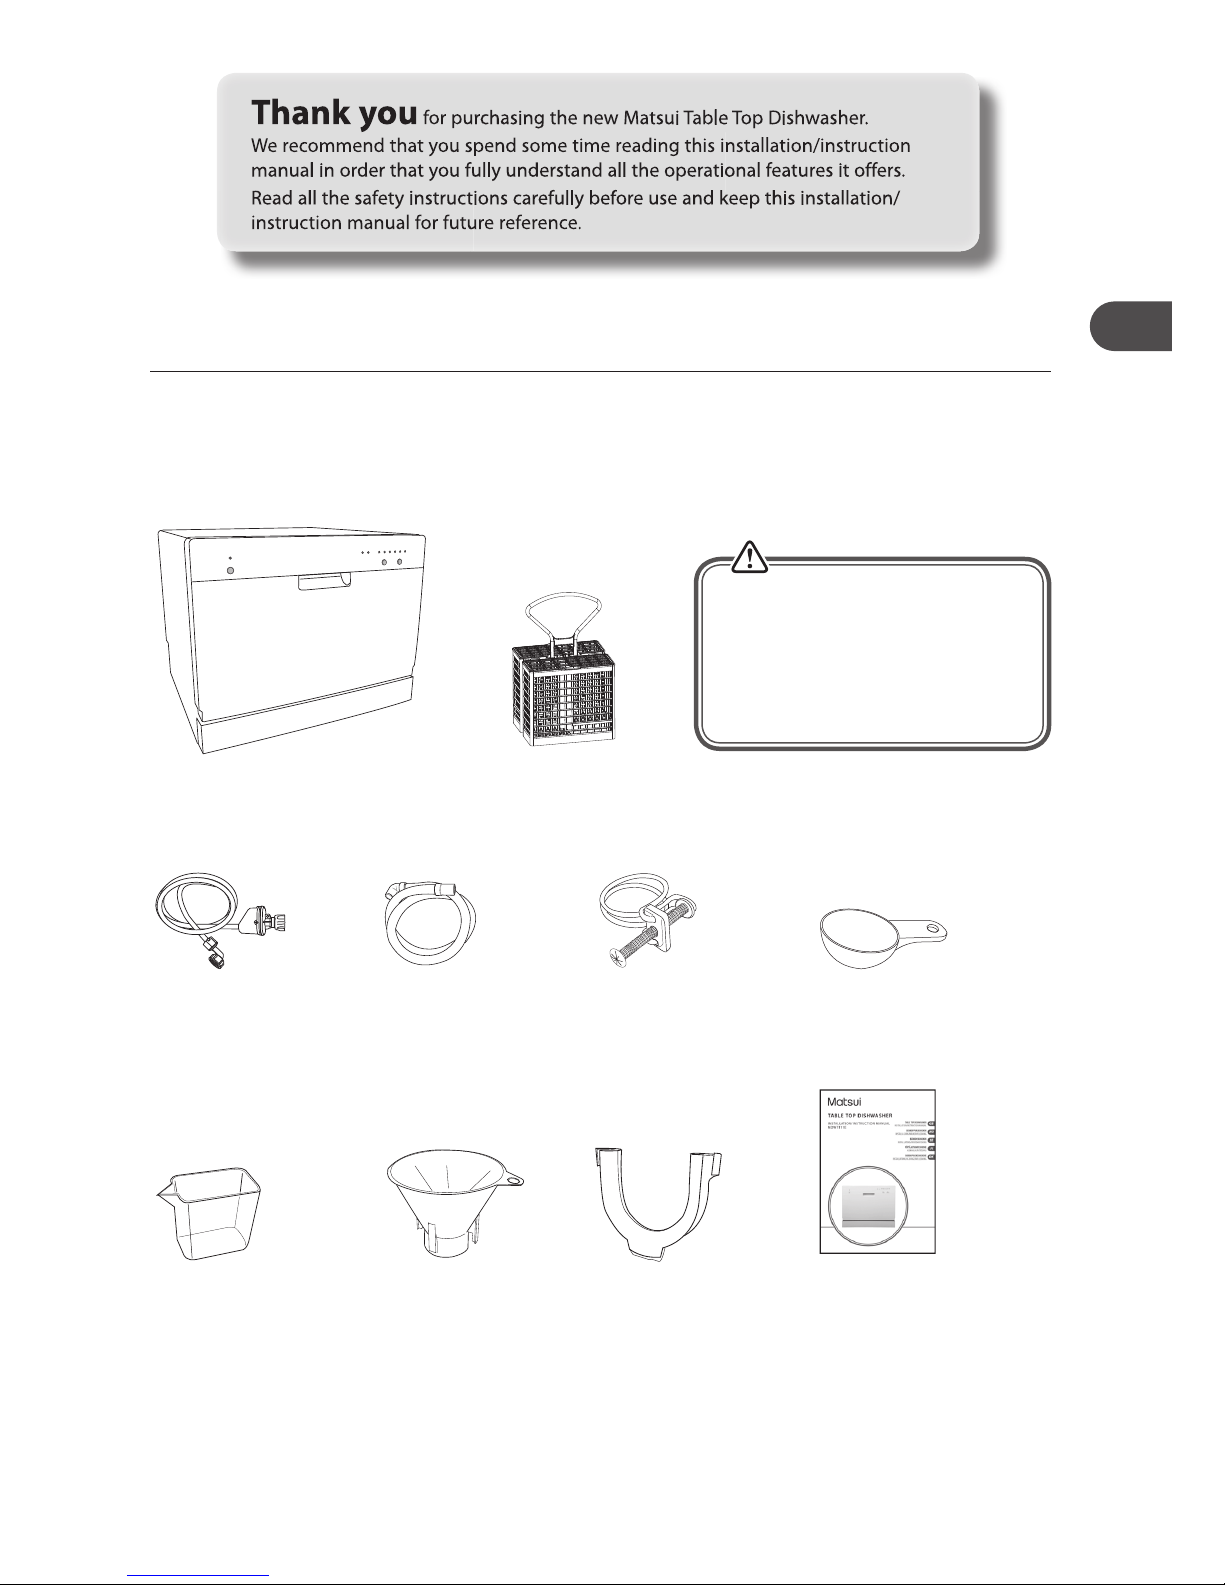
Unpacking
Remove all packaging from the unit. Retain the packaging. If you dispose of it please do so according to
local regulations.
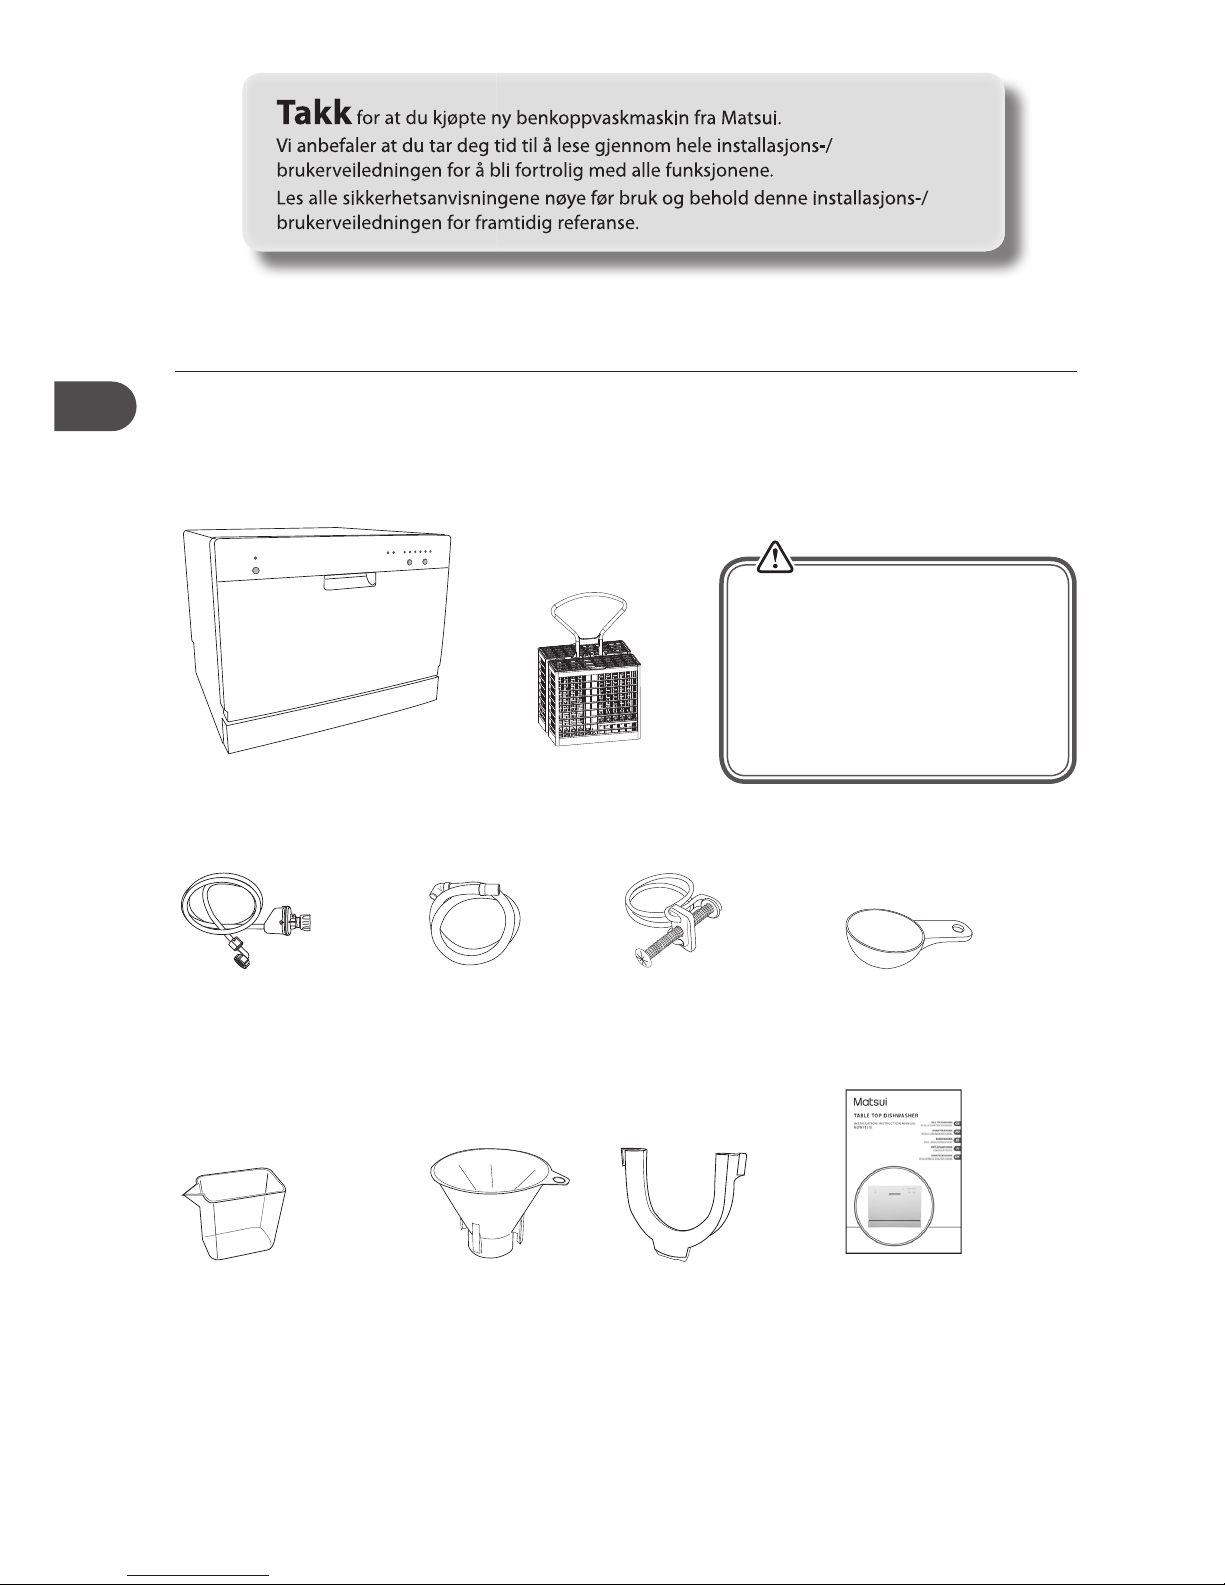
The following items are included:
The Main Unit
Drain Hose Mounting
Clamp X 1
P.N.: 672005400002
Detergent Measuring Spoon X 1
1 full spoon = 20g (approx.)
P.N.: 673002200079
Instruction Manual X 1
P.N.: MDWTT11E-000
U-Shape Hose Holder X 1
P.N.: 673006200003
Salt Funnel X 1
P.N.: 673002200001
Drain Hose X 1
P.N.: 673005400041
Measuring Cup X 1
60ml (approx.)
P.N.: 673006200004
Safety Supply Hose X 1
P.N.: 673000900093
Cutlery Basket
P.N.: 673006200014
This product has been wet tested
to ensure correct operation. As
a result some water may remain
inside the unit. This is normal and
safe. Remove any water droplets
from the exterior if necessary.
Page 6

6
INSTALLATION
GB
1. Please ensure the dishwasher is installed by a
qualified technician. Refer to the tools required.
Location
When selecting a position for your table top
dishwasher you should make sure the installation
surface is flat and firm, and the room is well
ventilated. Avoid locating your dishwasher near a
heat source, eg. cooker, boiler or radiator. Extreme
cold ambient temperatures may also cause the
appliance not to perform properly. This dishwasher
is not designed for use in a garage or outdoor
installation.
Do not drape the dishwasher with any covering.
When installing, ensure that free space is left at the
sides.
2. Ensure there is clearance each side of the unit
to allow slight sideways movement for servicing
when required. Good levelling is essential for
correct closure and sealing of the door. When
the unit is correctly levelled, the door should
not catch the inner liner on either side of the
cabinet.
The dimension of the dishwasher is 550(W) x
500(D) X 438(H) in mm. The figure outlines the
minimum dimensions required to accommodate
the table top dishwasher. Protect plastic parts
and cables from high temperatures.
All parts removed must be saved to do
the reinstallation in the future. Ensure
the dishwasher is unplugged and empty.
We recommend that 2 people handle the
dishwasher during installation.
550mm
438mm
500mm
50mm
or
more
150mm or more
50mm or more
150mm or more
unit in mm
Page 7
7
INSTALLATION
GB
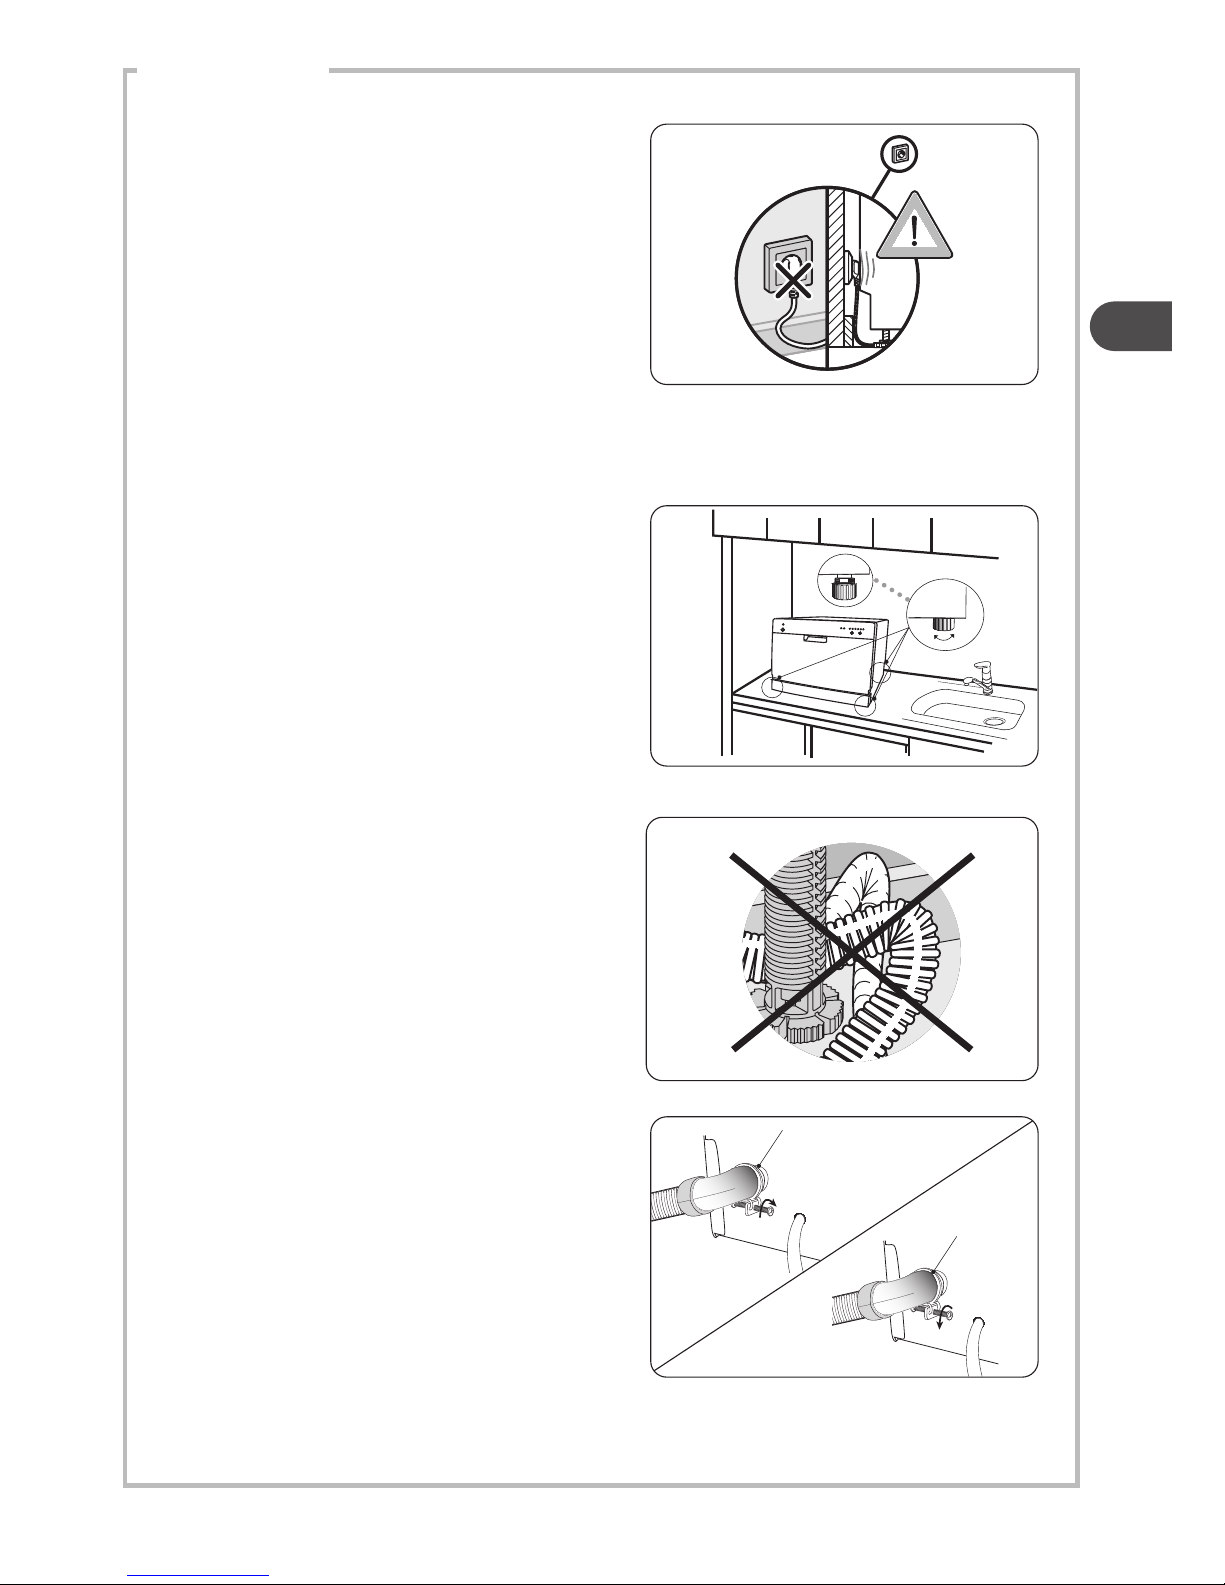
4. The electrical connection conditions must
correspond with the specifications on the rating
plate of the dishwasher. Do not use extension
cables.
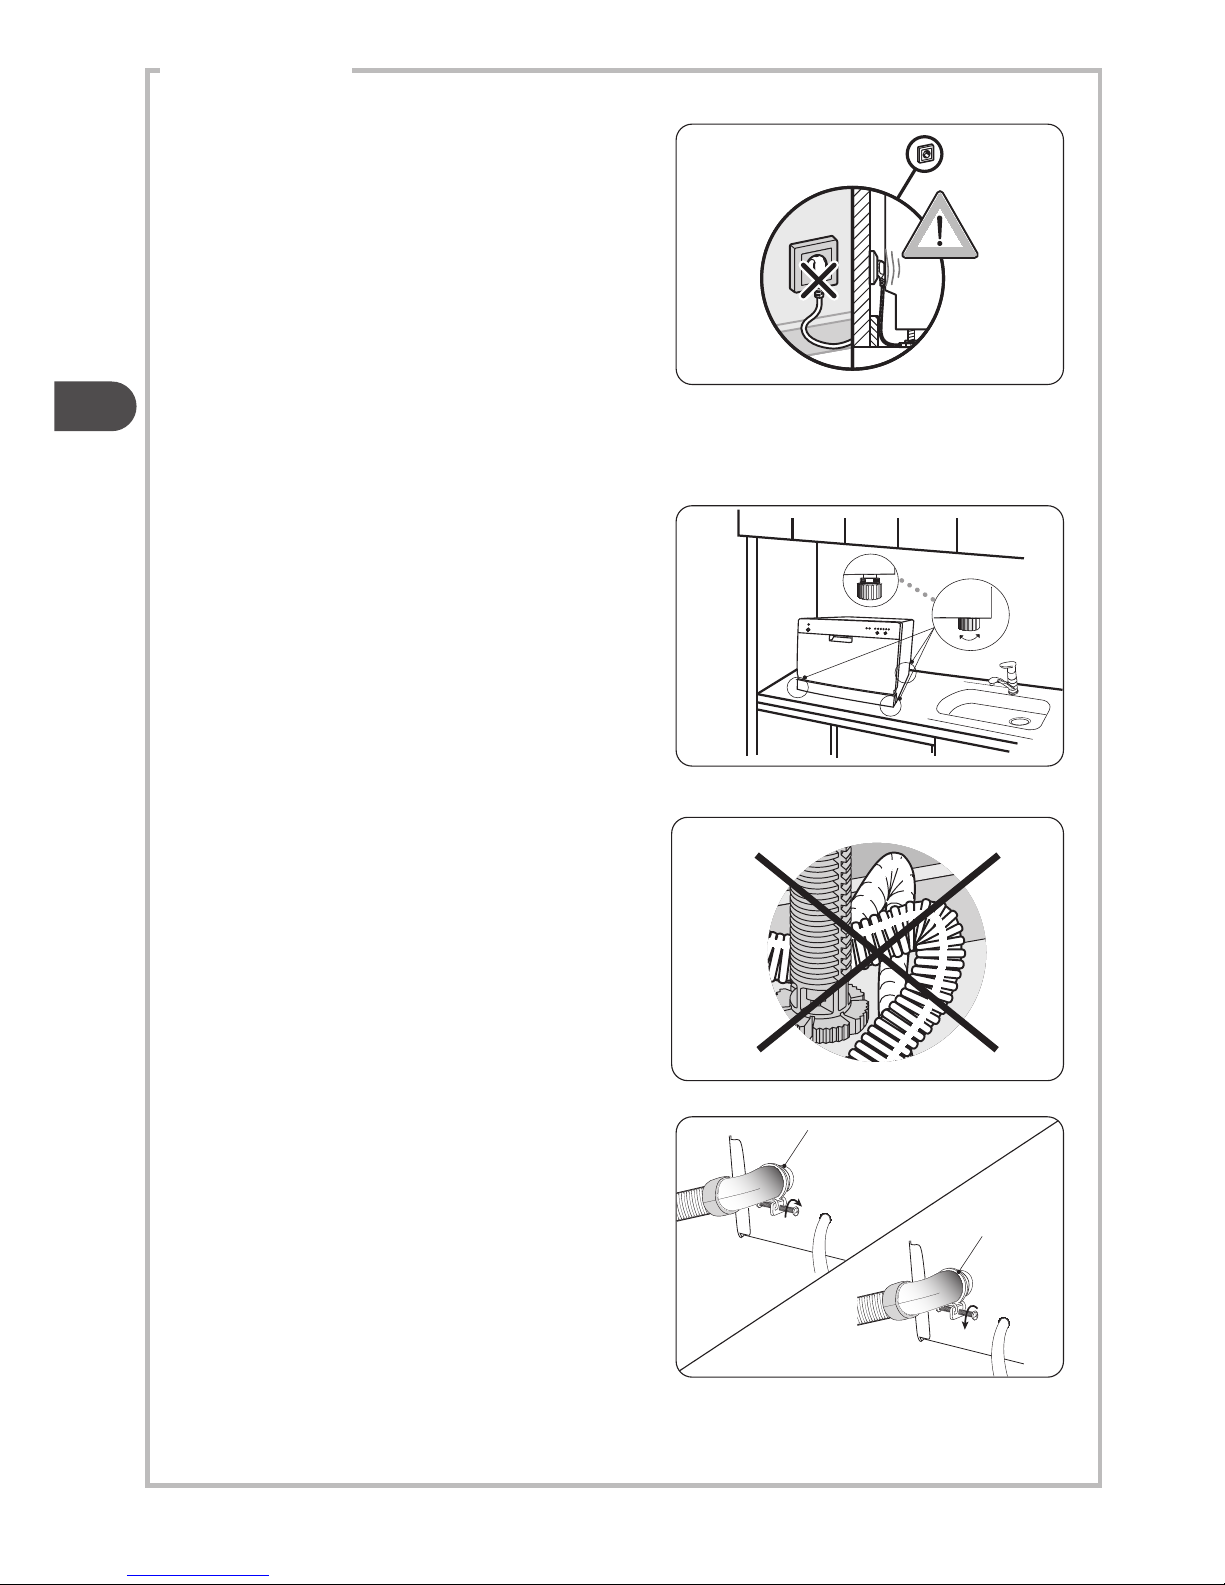
5. Position the unit next to a water tap and a drain.
Level the unit if needed.
3. Do not connect the unit to the mains socket
before installation. Ensure you are not installing
the unit right in front of the mains socket. This
is to avoid potential damage to the back of the
unit.
After installing the appliance, ensure that the
mains plug is easily accessible.
6. Ensure the water inlet and drain hoses are not
kinked or squashed. The unit must not stand on
the electrical supply cable.
7. Loosen the rings of the drain hose clamp by
turning the screw in anti-clockwise direction.
Then, insert the drain hose through the rings
of the Drain Hose Clamp to the drain outlet
firmly. Tighten the drain hose clamp by turning
the screw in clockwise direction to secure the
connection between the drain hose and the
drain outlet.
up down
level
Rings of Drain
Hose Clamp
Clockwise to
tighten
Anti-clockwise
to loosen
Rings of Drain
Hose Clamp
Page 8

8
INSTALLATION
GB
• Secure the water drain hose to the waste pipe to
avoid it coming off during the washing process.
8. Make sure your plumbing is suitable for use with the
dishwasher. If in doubt contact a qualified plumber.
This unit MUST BE connected to COLD WATER MAINS
using the new water inlet hose. OLD HOSE SETS
MUST NOT BE RE-USED. The water pressure from the
water mains needs to be at a minimum of 0.04 MPa
and a maximum of 1.00MPa.
• Connect one end with aqua stop of the safety
water supply hose to your dishwasher, and then
connect the other end of the hose to your water
mains. Please ensure the black rubber seal is in
place.
• After connecting the hose, turn on your water
mains and check for leaks.
• Connect the dishwasher to the mains socket.
You may use a Y-adaptor (not
included) for an additional water
feed for another appliance, for
example a washing machine. This
is only applicable for cold water
mains. A Y-adaptor is available
from most DIY stores.
About the Safety Supply Hose
The safety supply hose consists of the double
walls. The hose’s system guarantees its
intervention by blocking the flow of water in
case of the supply hose breaking and when
the air space between the supply hose itself
and the outer corrugated hose is full of water.
• The waste pipe must only be connected
to the foul drains and not the surface
water drainage system.
• The water drain hose should be placed
lower than 10cm from the table top and
must not be extended, otherwise the
unit may not be able to expel the waste
water properly.
• You may use the u-shaped drain hose
holder to secure your drain hose and to
avoid bending it.
• Do not bend your drain hose.
• Do not lift the drain hose higher than 10 cm from
the table top, otherwise the unit may not be able
to expel the waste water properly.
water mains
Y-Adaptor
(not included)
Connect
to another
appliance if
required.
water supply hose
max.
10cm
Please close the hydrant after using.
Page 9
9
GB
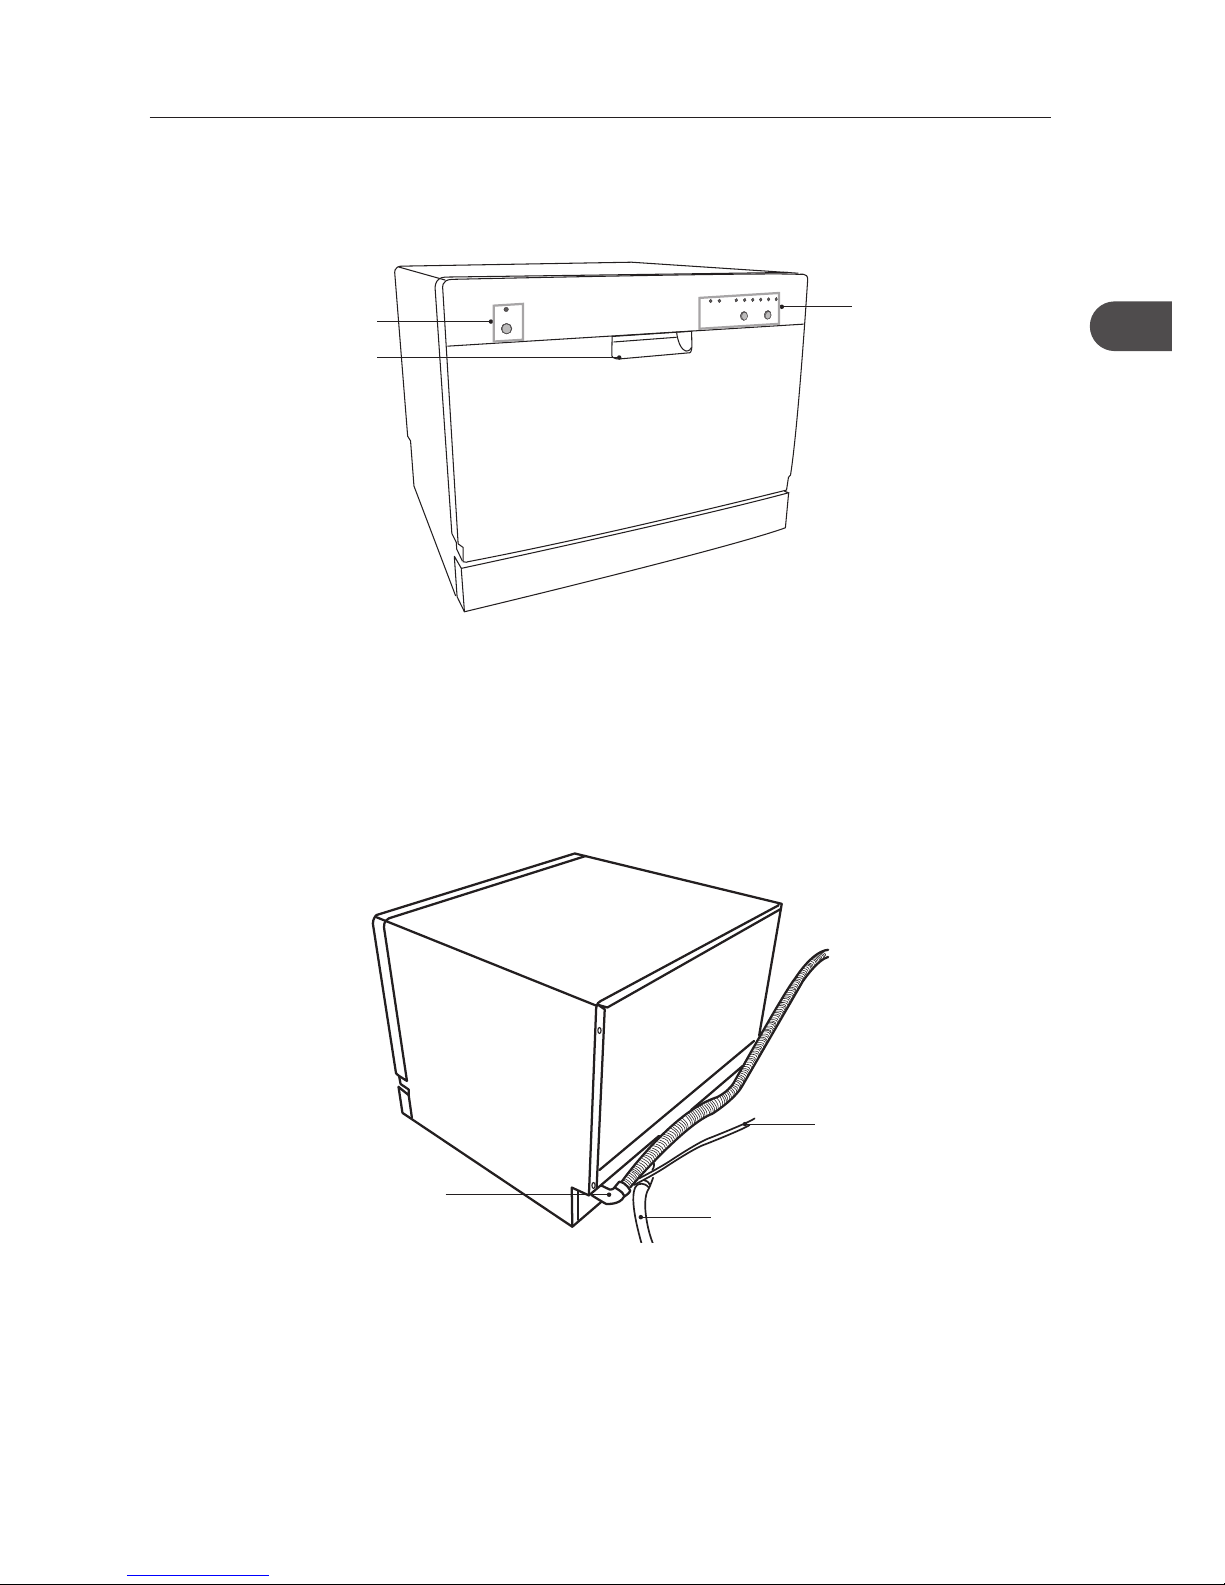
Product Overview
Front View
Rear View
1. Power Button and Indicator Light
2. Control Panel
3. Door Handle
4. Drain hose
5. Mains Cable (Connect To Electrical Mains Socket)
6. Water Inlet (Connect To Supply Hose)
4
2
5
6
1
3
Page 10

10
GB
Dishwasher Basket and Cutlery Basket
Internal View
9. Salt Reservoir
10. Spray Arms
11. Filtering System
12. Cutlery Basket
13. Detergent Dispenser (Dual Compartment)
14. Rinse Aid Dispenser
7
12
9
10
8
11
13
14
7. Spikes
8. Cup Racks
Page 11
11
GB
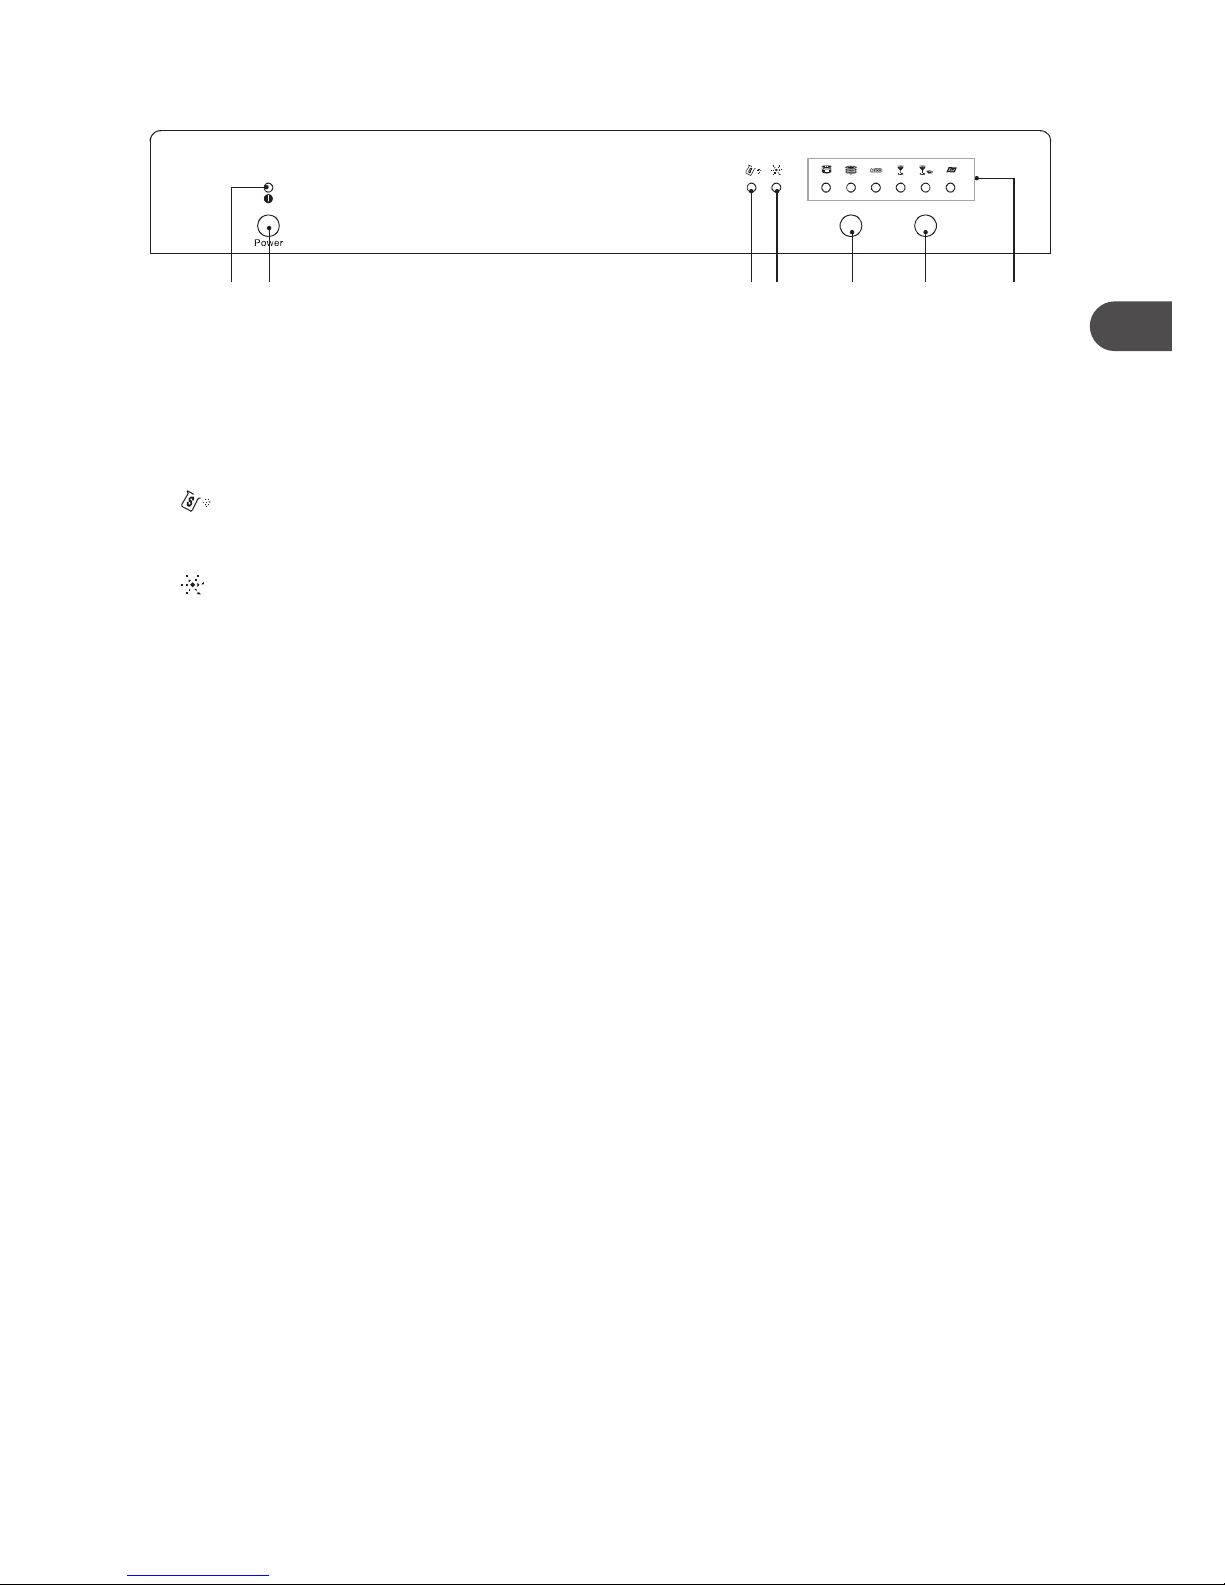
1. Power Indicator
• The LED light will illuminate when the
dishwasher is on.
2. On / Off Button
• To turn the dishwasher on and off.
3.
Salt Refill Warning Light
• Illuminates when the salt reservoir needs
refilling.
4.
Rinse Aid Refill Warning Light
• Illuminates when the rinse aid dispenser
needs refilling.
Start/PauseProgram
Control Panel
3 4 721 5 6
5. Programme Button
• To select your required washing programme.
• Each press of this button switches from one
washing programme to another.
6. Start/Pause button
• To confirm and start the selected washing
programme.
• To reset the washing programme.
7. Programme Indicators
• Illuminate when the washing programme
has been selected.
• Flashes when the selected washing
programme is running.
Page 12

12
GB
Wash Cycle Table
Programme Cycle
Cycle
Selection
Information
Process
Detergent
Amount
(Pre-wash/
Main wash)
Running
Time
(min.)
Energy
Consumption
(Kwh)
Water
Consumption
(I)
Rinse
Aid
Intensive • Pots,
utensils and
cutlery.
• Highly
soiled.
• Pre-wash
(50°C)
• Wash (70°C)
• Rinse (70°C)
• Drying
• Pre-wash
(3g)
• Main Wash
(15g)
145 0.94 11
Normal • Pots,
utensils and
cutlery.
• Normally
soiled.
• Pre-wash
• Wash (60°C)
• Rinse (70°C)
• Drying
• Pre-wash
(3g)
• Main Wash
(15g)
125 0.7 8.4
Economy*
(EN50242)
• A shorter
wash for
lightly
soiled
items.
• Pre-wash
• Wash (55°C)
• Rinse (70°C)
• Drying
• Pre-wash
(3g)
• Main Wash
(15g)
170 0.65 8.5
Glass • Glasses,
crystal and
fine china.
• Lightly
soiled.
• Pre-wash
• Wash (45°C)
• Rinse (60°C)
• Drying
• Main Wash
(15g)
75 0.48 6.8
Rapid • Glasses and
cups.
• Lightly
soiled.
• Wash (40°C)
• Rinse (45°C)
• Main Wash
(15g)
30 0.3 6
3-in-1 • Utensils and
cutlery.
• Normally
soiled.
• Pre-wash
• Wash (60°C)
• Rinse (70°C)
• Drying
• Use 3 in 1
detergent
tablet only.
140 0.7 8.4
* To comply with Standards of Performance, i.e. EN50242, please ensure to use economy washing cycle for
the test.
Condensing dry technology
• Energy is saved by drying the dishes using the remaining heat after the last rinse cycle.
• Wash cycle times are extended due to this drying method.
• Some wash programmes do not have a drying function, please refer to the Wash Cycle Table for
more details.
Page 13
13
GB
●
●
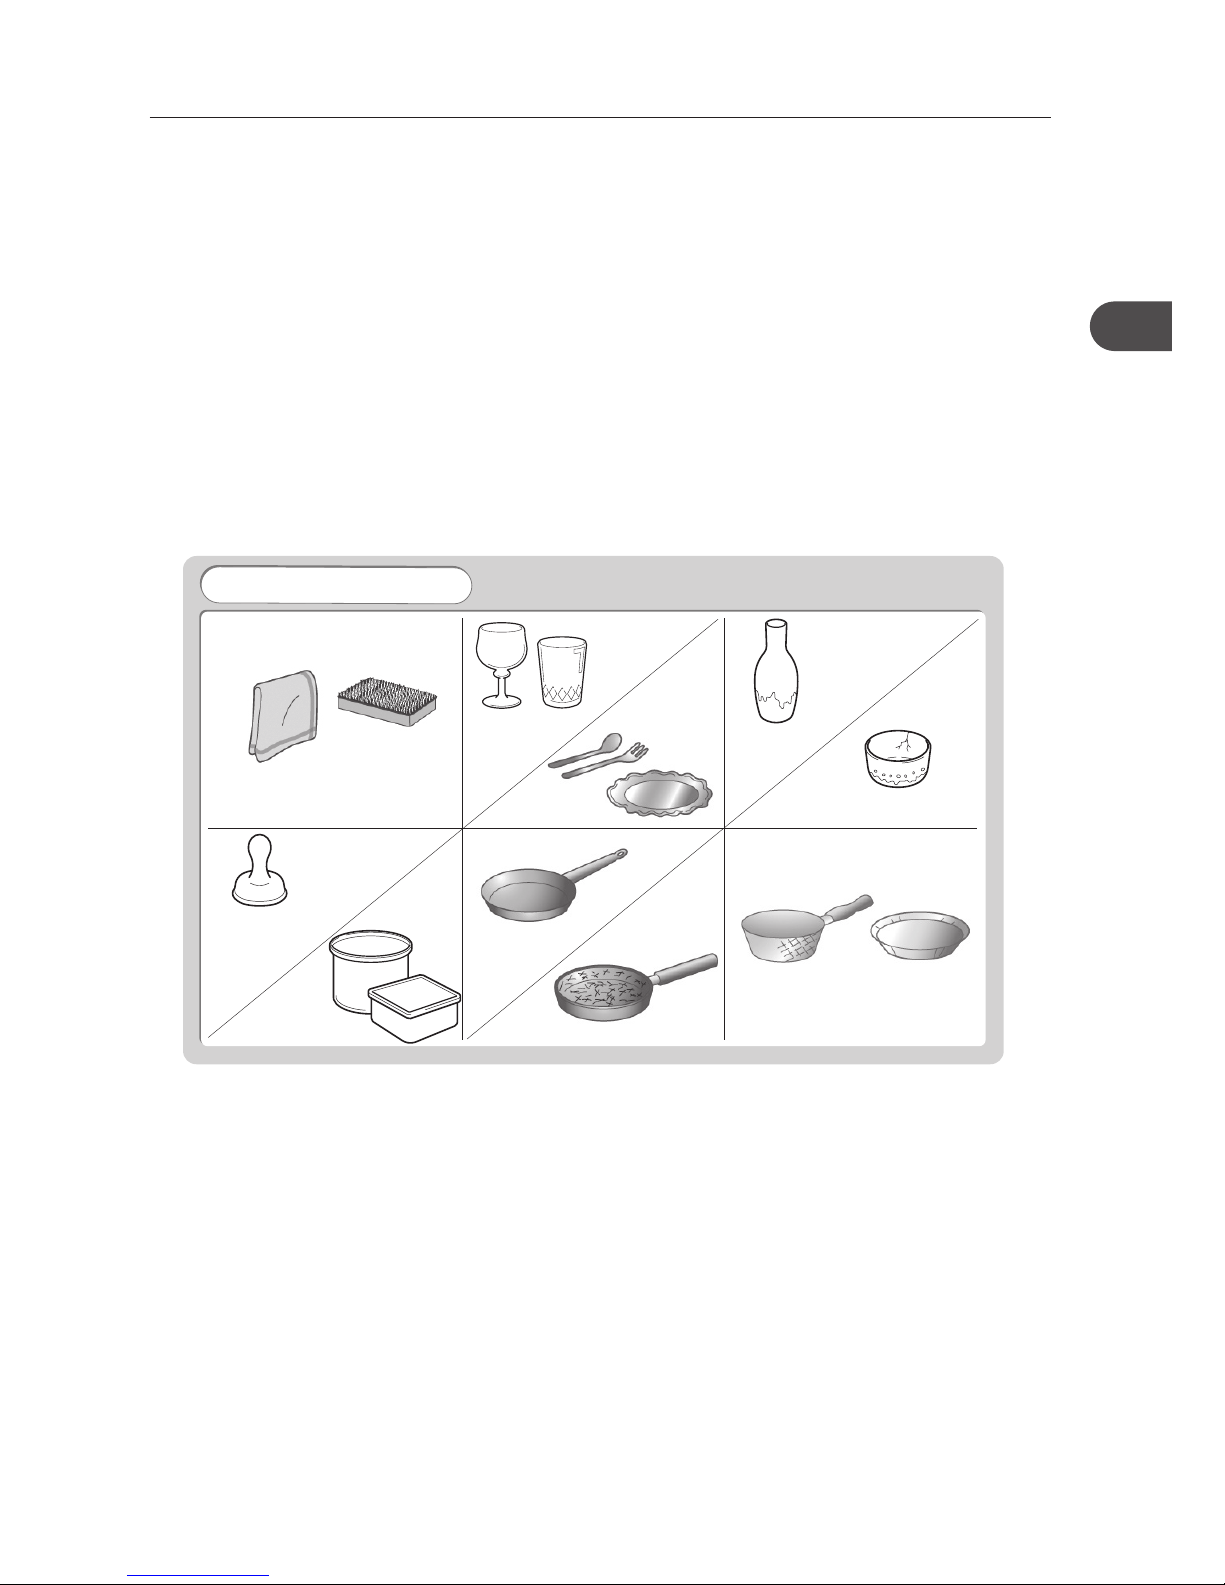
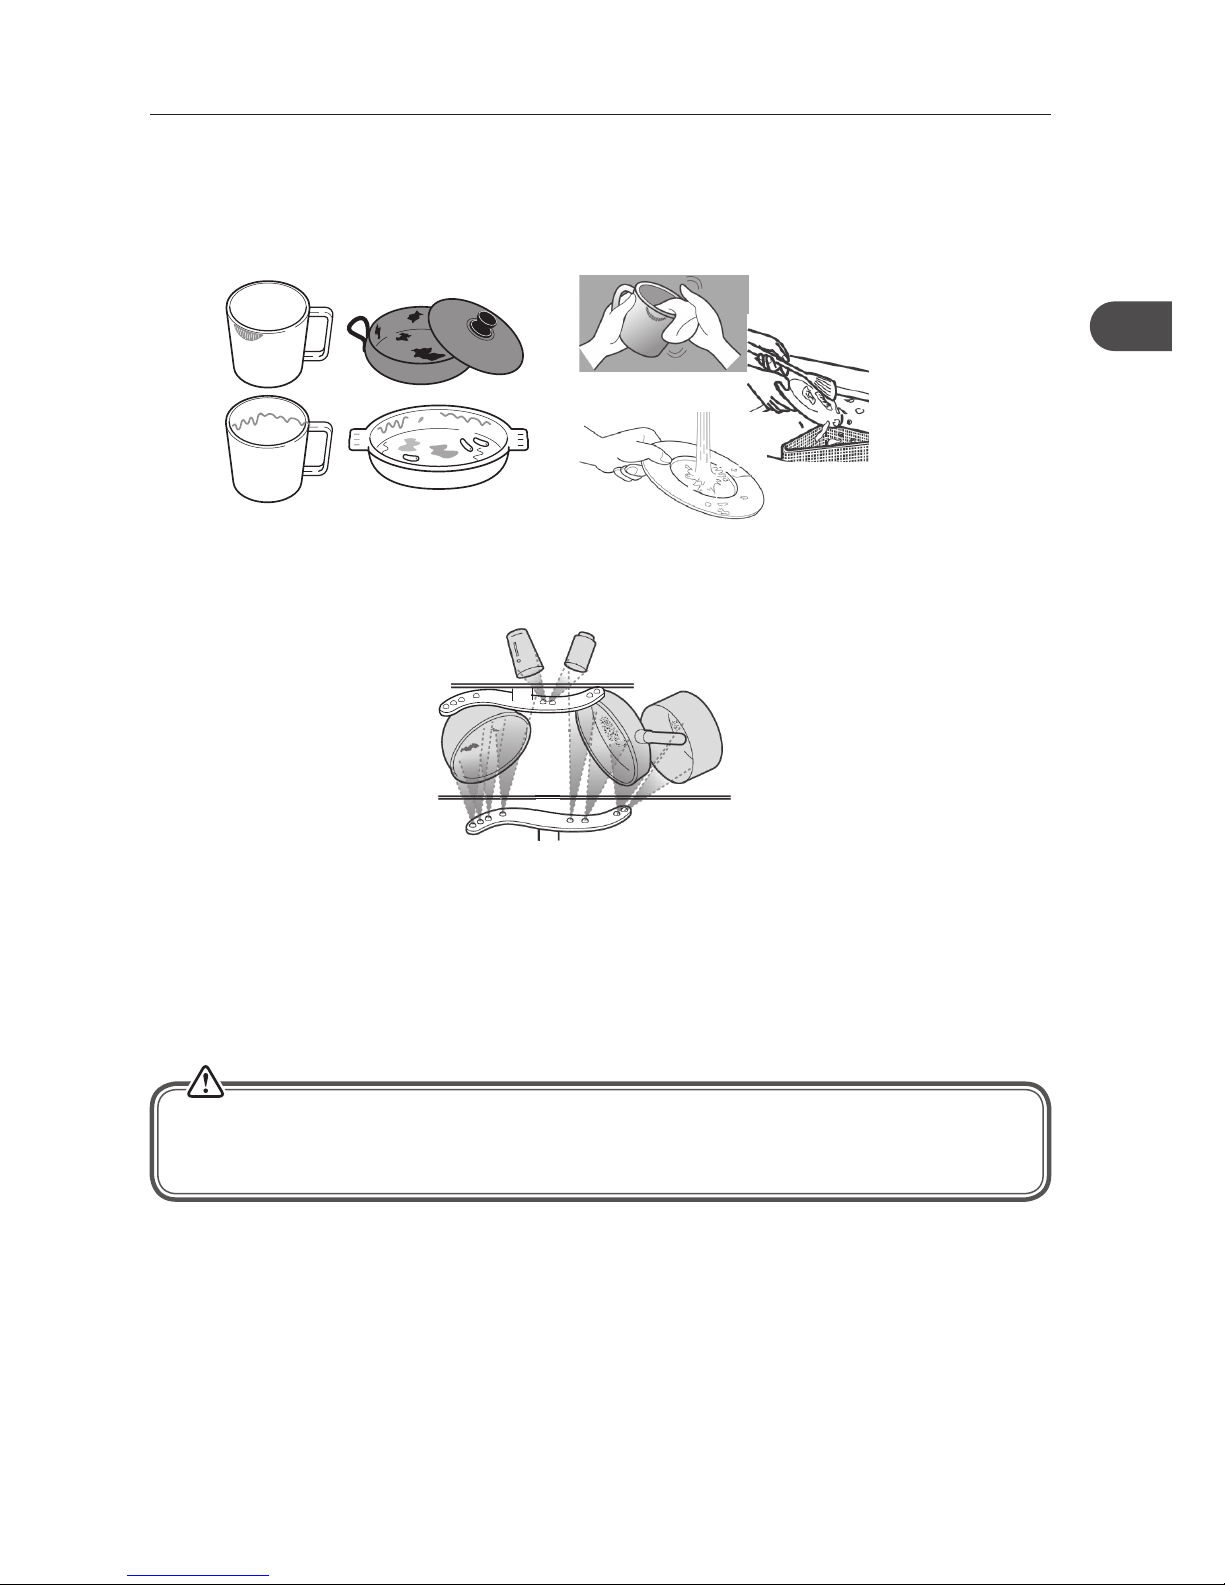
The Following Items Are Not Suitable
Towels and sponges
Crystal glasses
Silverware
Valuable vases
Cracked / Chipped china
Small plastic items
(Milk bottle nipple)
Cast iron pans
Scratched non-stick cookware
Copper pots and pans
Plastic items that
are not dishwasher safe
Before Operating
To Open the Door
• Pull the door handle.
• If the door is opened during operation all functions are automatically interrupted.
To Close the Door
• After loading the dishes, push the basket fully into the dishwasher.
• Lift the door upwards and push until it clicks into position.
• Do not slam the dishwasher door.
Items Not Suitable for Use in the Dishwasher
When purchasing new crockery and cutlery, please make sure they are dishwasher-proof. Some items are
not suitable for dishwashers.
• Wooden cutlery and crockery or items with wooden parts may discolour and fade. The glue used in
these items is not dishwasher-proof and wooden handles may come loose after being washed in a
dishwasher.
• Craft items, antiques, valuable vases and decorative glassware are also not suitable for dishwashers.
• Plastic items (e.g. tupperware) which are not heat resistant may melt or loose shape due to the high
temperature in the dishwasher.
• Copper, brass, tin and aluminium items may discolour or become matt.
• Clouding may occur on glasses and delicate glassware after frequent washing. Do not wash delicate
glassware, or glassware containing lead crystal in a dishwasher. Wash delicate glassware by hand
instead.
• Silver and aluminium parts have a tendency to discolour during washing. Residues like egg white, egg
yolk and mustard often cause discolouring and staining on silver. Therefore, please clean the residues
from silver immediately after use.
Page 14
14
GB
Bleach and
Countertop detergent
Bleach and
Countertop detergent
• Keep out of the reach of children
• Irritating to eyes.
• Avoid contact with eyes. In case of contact with eyes, rinse immediately
with plenty of water and seek medical advice.
• If swallowed, seek medical advice immediately.
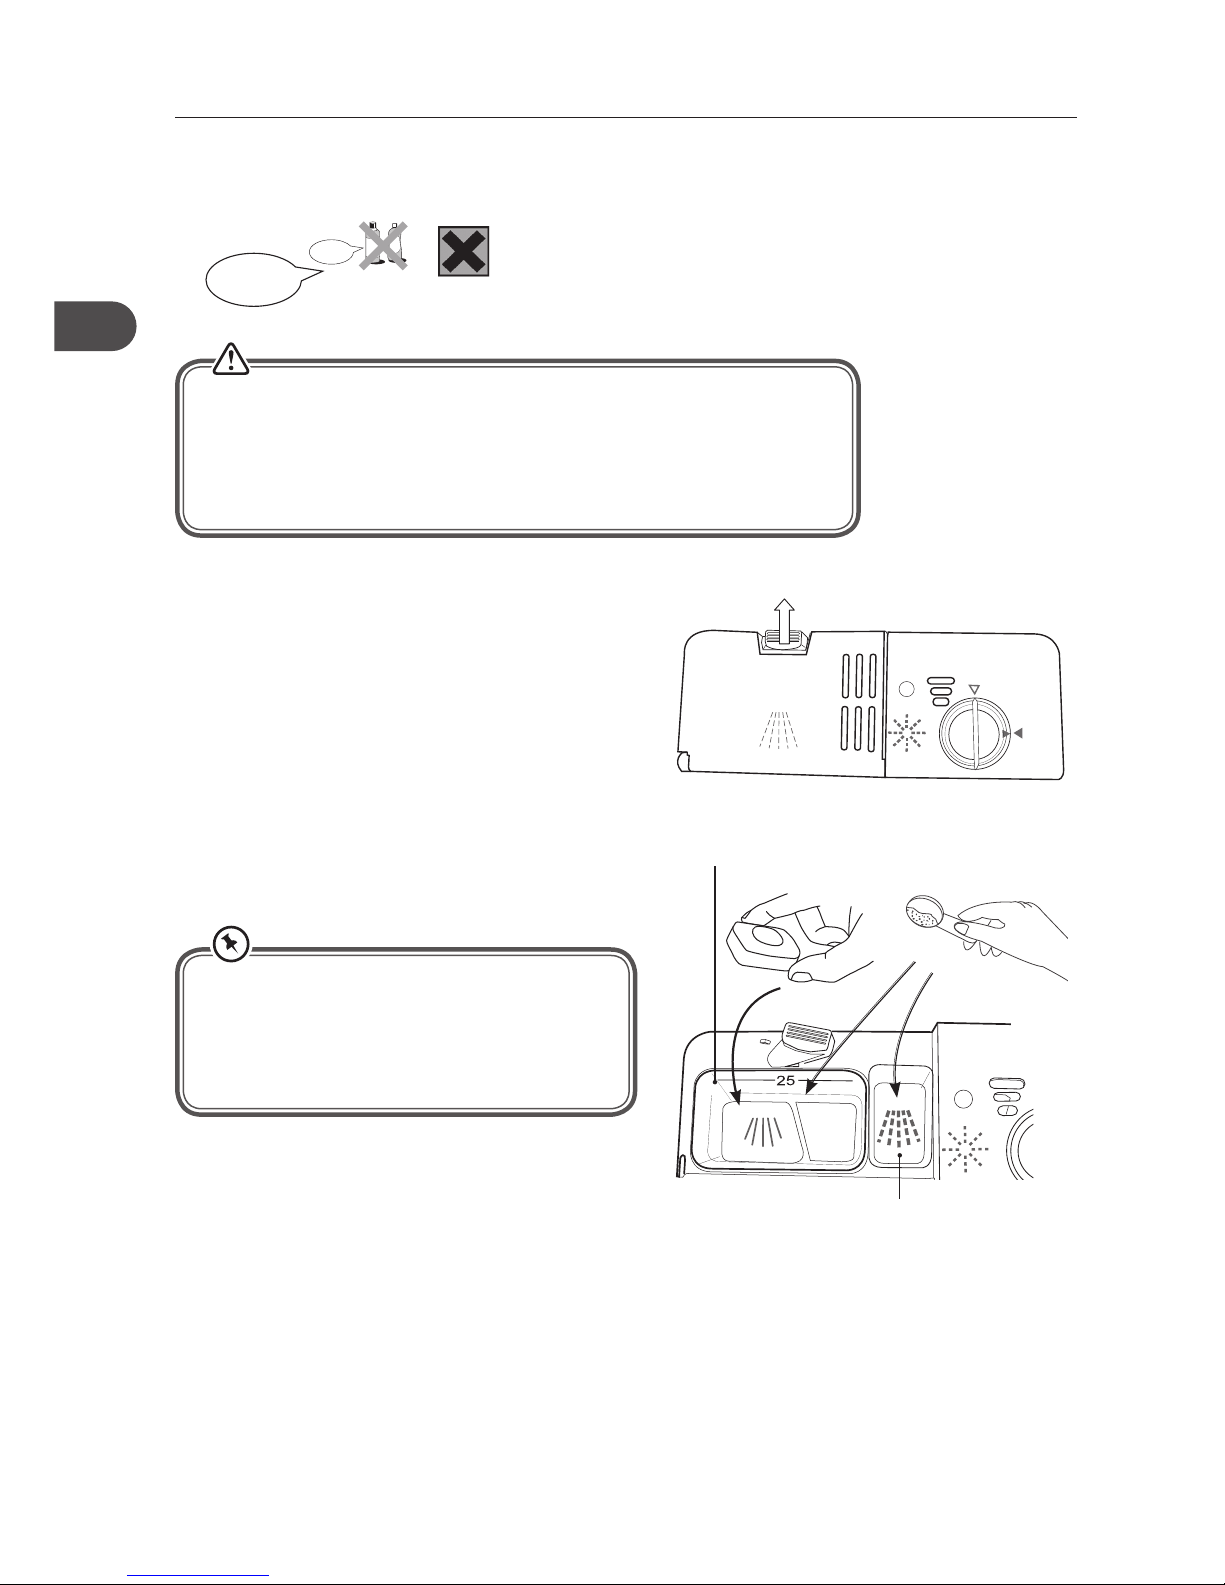
Adding Detergent or Detergent Tablet
Only use detergents specifically designed for use in dishwashers. To be more environmentally friendly,
please use no more than the correct amount of detergent.
Please follow the steps below to fill the detergent dispenser.
1. Push the button on the lid of the detergent
dispenser in the direction of the arrow until the
flap springs open.
2. Fill the detergent dispenser with detergent
powder or insert the detergent tablet. The
marking indicates the filling level.
Irritant
pre-wash detergent chamber
main wash detergent chamber
or
3. All programmes with pre-wash need an additional
detergent dosage that must be placed in the prewash detergent chamber (please refer to the wash
cycle table). This detergent will take effect during
the pre-wash phase.
4. Close the lid firmly so that it clicks into place.
You can choose to add a detergent tablet
alone or to add detergent powder to both
the main wash detergent chamber and the
pre-wash detergent chamber for your selected
wash cycle.
push up from the right side
Page 15
15
GB
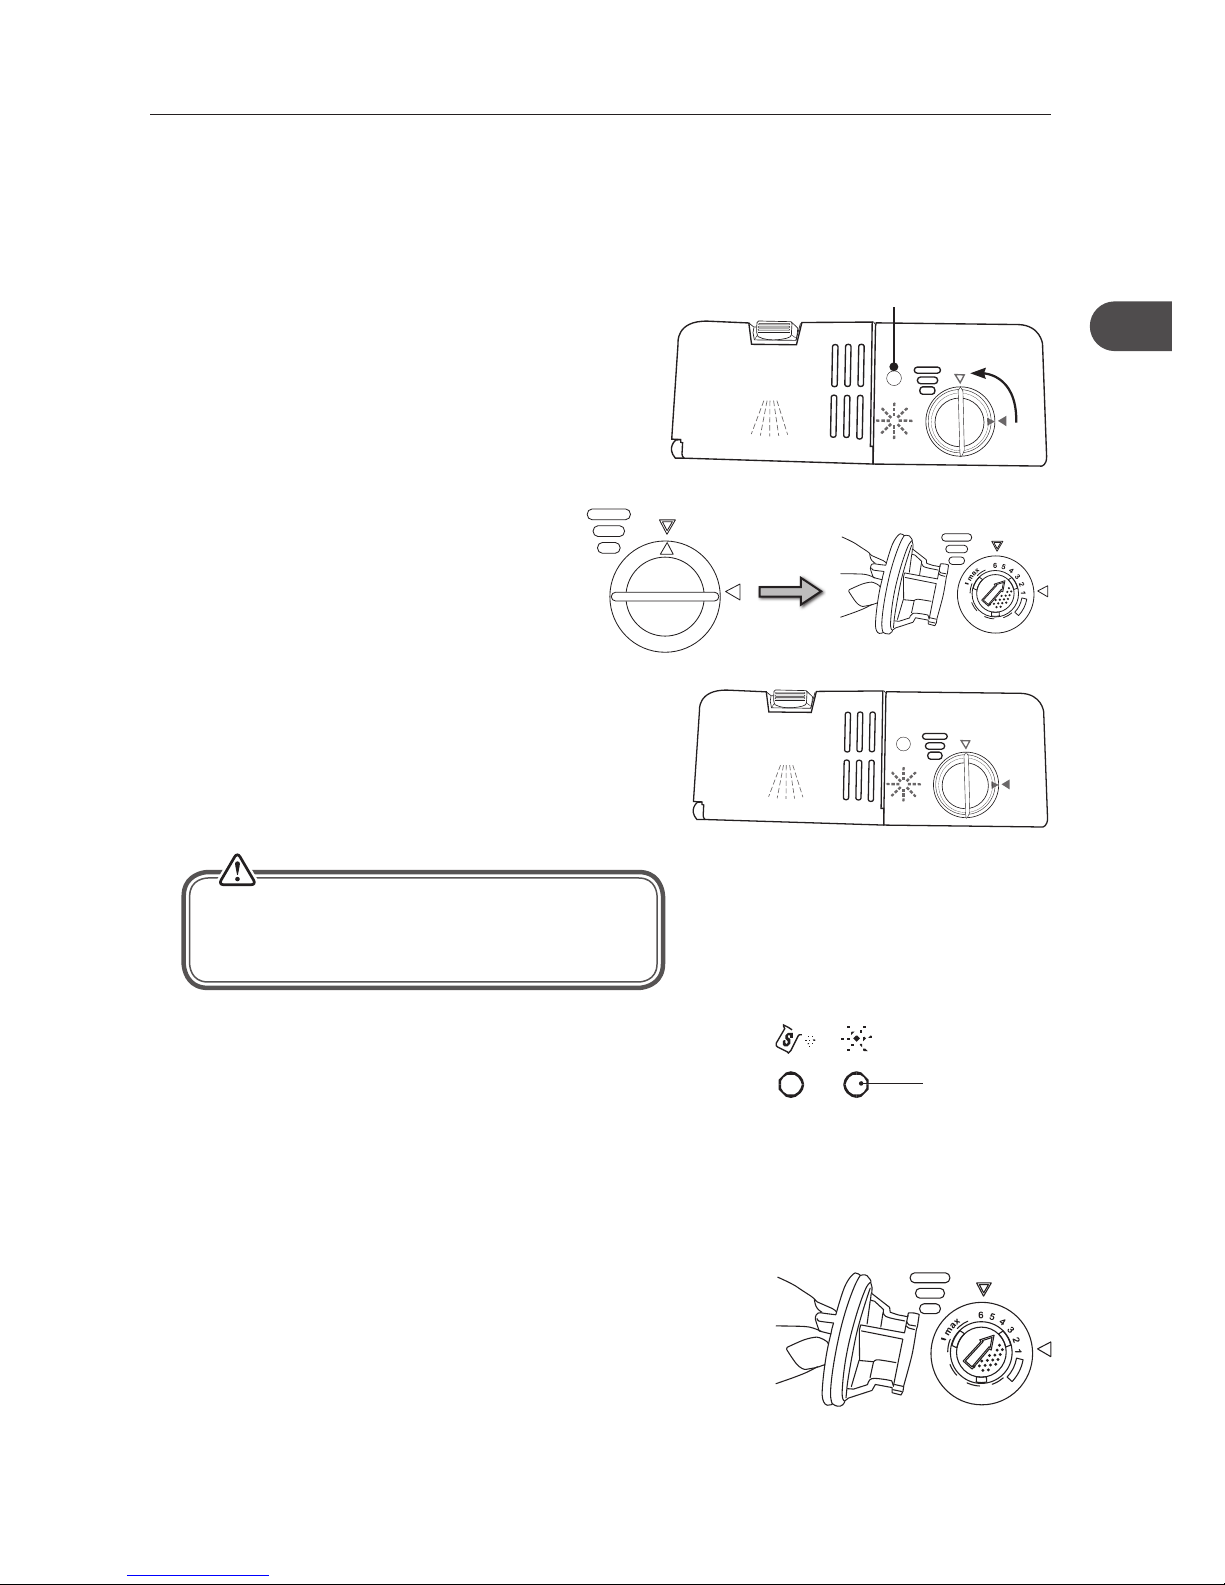
Alternatively, you can judge the amount of rinse aid by checking the rinse aid indicator right next to the
reservoir’s cap. When the indicator is black, it means it is full. When it is clear, it means it is almost empty.
Adjusting the Rinse Aid Reservoir
The rinse aid reservoir has six settings. Both the recommended
setting and the factory setting is “4”. If the dishes are not drying
properly or are spotted, adjust the dial to the next higher number
until your dishes are spot-free.
Adding Rinse Aid
Rinse aid helps to ensure water does not cling and leave marks on crockery during the drying phase and
helps crockery dry faster after it has been washed. Only pour rinse aid that is for domestic dishwashers into
the reservoir. This model is designed to use liquid rinse aids only.
Please follow the steps below to pour the rinse aid into the storage reservoir, and the amount will dispense
automatically.
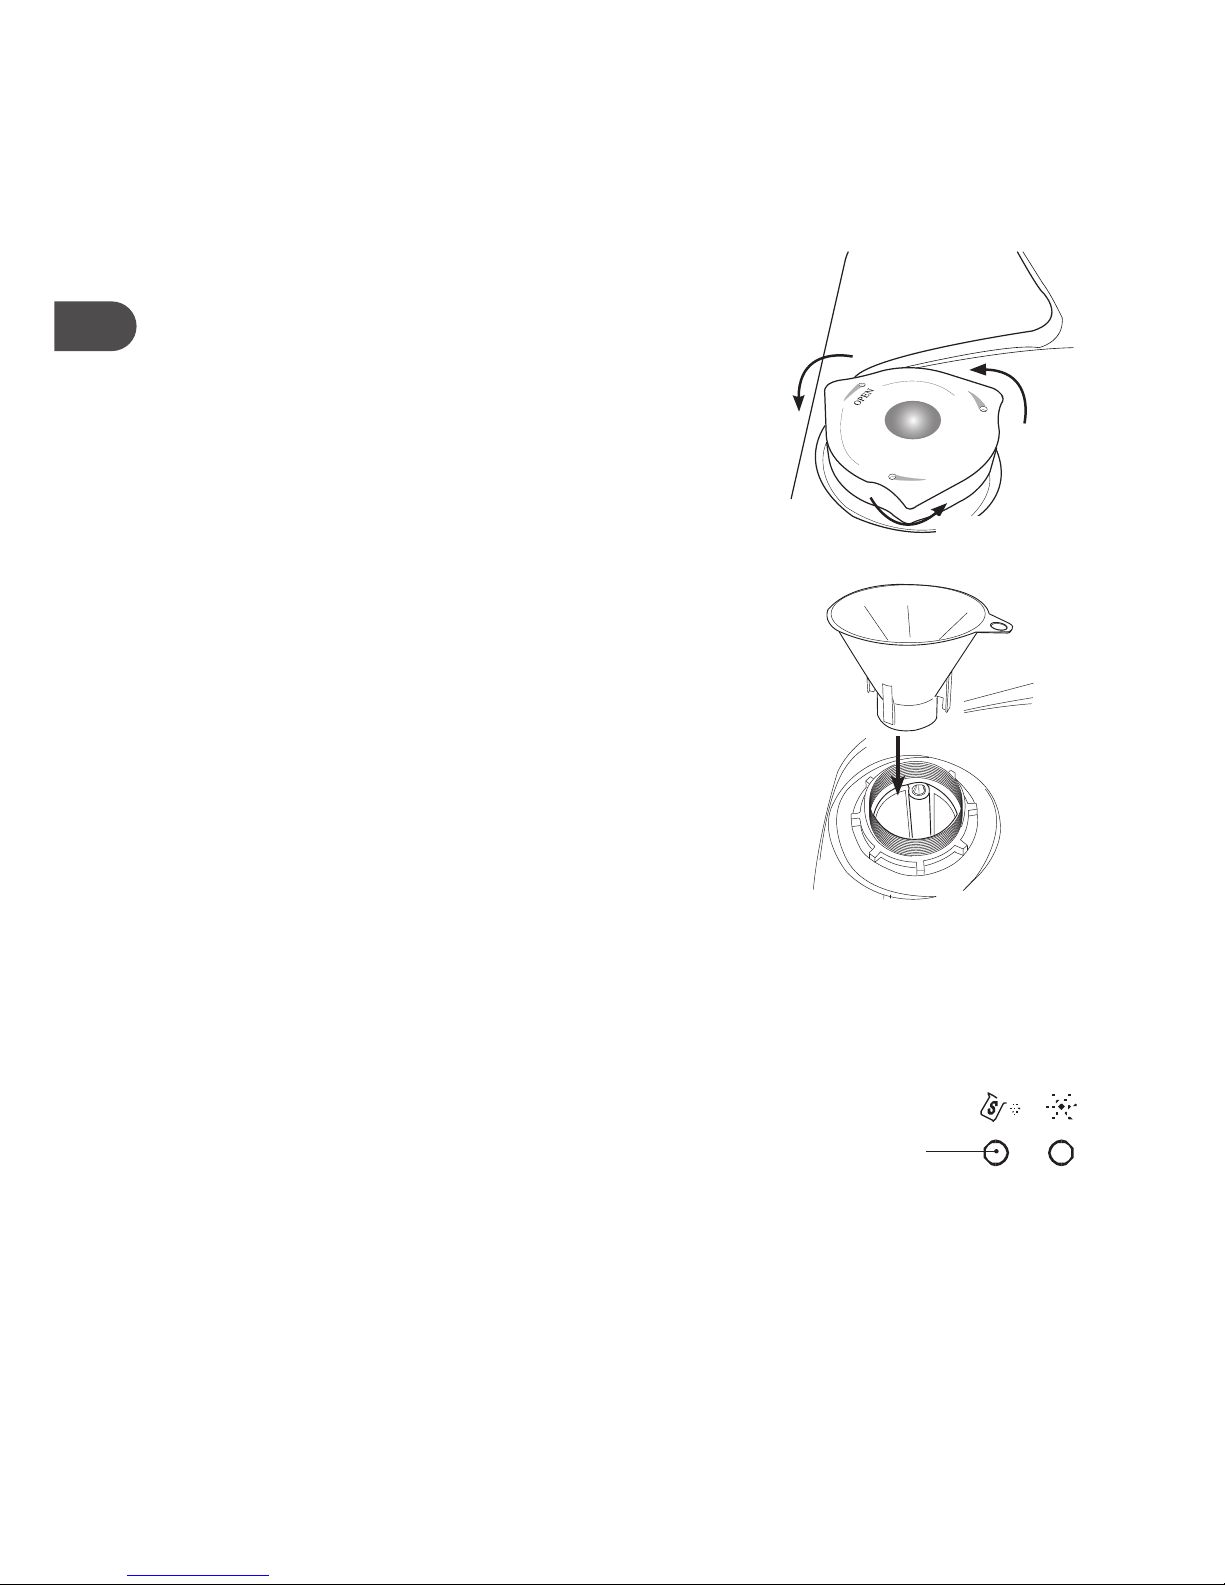
1. Turn the cap and open as indicated.
2. When the cap open marking is aligned, you
may lift the cap up.
3. Pour the rinse aid in until the level indicator
turns completely black in colour and close the
cap.
4. Be careful not to overfill the reservoir. Wipe
up any spills. The approximate volume of the
rinse aid reservoir is 110ml.
open
rinse aid indicator
Rinse aid warning light will illuminate when the reservoir is
running out of rinse aid and requires refilling.
rinse aid
warning light
If the water hardness in your area is soft, you may
not need rinse aid as it may cause white film to
develop on your dishes.
Page 16
16
GB
Adding Salt
If the water in your area is hard, deposits will form on your dishes and
utensils. This appliance contains a salt reservoir for you to reduce the
hardness of the water.
Please follow the steps below to pour the salt into the salt reservoir and
it must be set to correspond to the water hardness level in your area.
1. Remove the basket and unscrew the reservoir cap.
2. Fill the reservoir with approximately 500ml of water (first use only).
3. Place the funnel provided over the salt reservoir.
4. Pour in approximately 1.2kg of dishwasher salt depending on the
brand used.
5. Clean any excess salt from around the reservoir opening and then
screw the cap on again firmly.
6. Run the “eco” wash programme immediately (without any crockery in
the dishwasher) to remove any traces of salt from the compartment.
The salt warning light will illuminate when the reservoir is
running out of salt and requires re-filling.
The salt warning light will cease to illuminate within a few
days depending on how quickly the salt dissolves.
salt warning
light
OPEN
open
open
open
Page 17
17
GB
Loading the Dishwasher
Before Loading the Dishwasher
Please observe the following notes before loading your cutlery and crockery into the basket.
• Remove lipstick stains and any food residues from crockery and dishes. Rinse if necessary.
• Dishes and cutlery must not lay inside one another, or cover each other.
• Load your cutlery and crockery so that water can access all surfaces.
• Ensure all items are securely positioned.
• Hollow items such as cups, glasses, pans, etc. must be placed upside down in the basket.
• Wide based items should be placed at an angle so that water can run off them freely.
• The spray arms must not be blocked by items which are too tall or hang through the basket. If in doubt,
test for free movement by manually rotating the spray arms.
• Ensure that small items cannot fall through the holders in the basket.
Do not wash items soiled with ash, sand, wax, lubricating grease or paint in the dishwasher. Ash
does not dissolve and can distribute in the dishwasher. Wax, sand, lubricating grease and paint can
cause damage to the dishwasher.
Page 18
18
GB
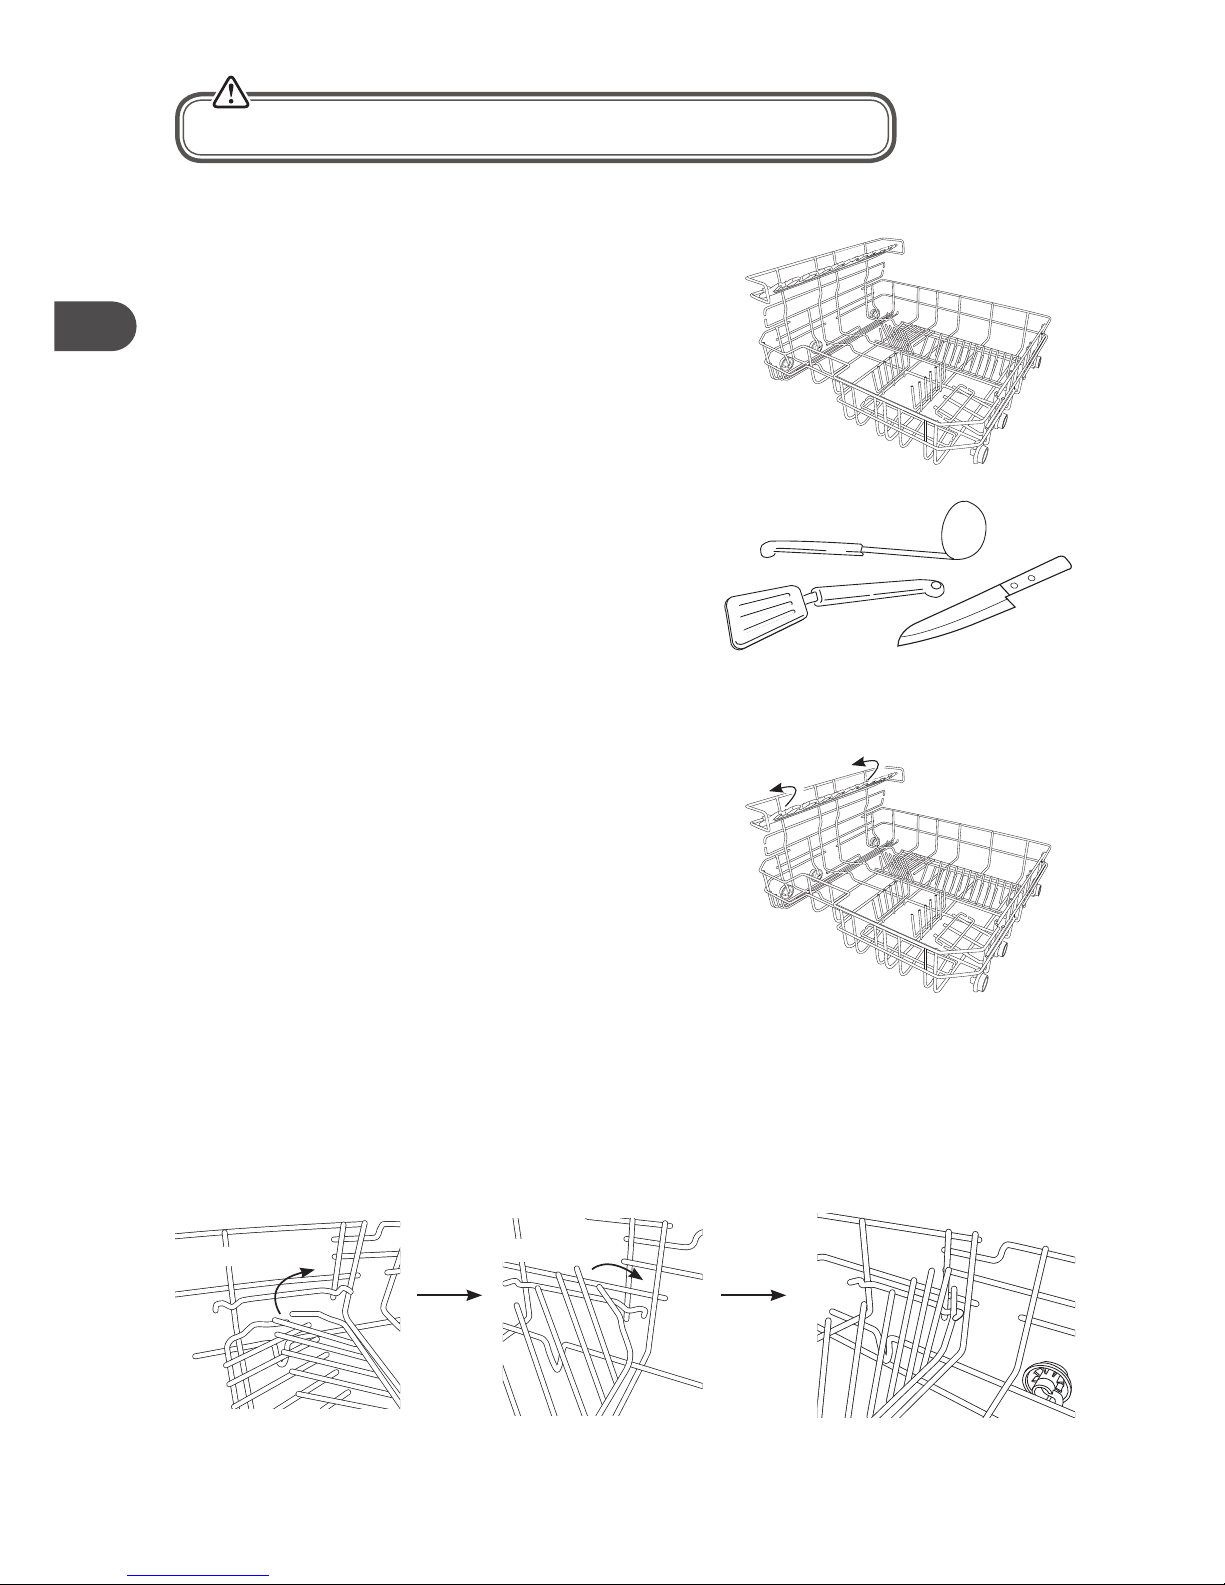
Dishwasher Basket
Please use the dishwasher basket for small and lightweight
items such as cups, saucers, glasses, dessert bowls, etc.
Long items such as soup ladles, mixing spoons and long
knives should be placed lying down across the front of the
basket.
Hinged Cup Rack
To make room for taller items in the dishwasher basket, raise
the cup rack upwards. You can then lean the tall glasses
against it. You can also remove it when it is not required for
use.
Raise upwards
Fold backwards
Push and snap
Hinged Spikes
The spikes are used for holding plates and a platter. They can be lowered to make more room for large
items. Please refer below for the steps to open up the spikes.
For safety reasons, do not operate the dishwasher without the basket in place.
Page 19

19
GB
Cutlery Basket
Loading the Cutlery Basket
To make unloading much easier, cutlery should be grouped
in zones and placed in the cutlery basket. Please refer to the
table below for placement method.
Number Item
1 Forks
2 Soup spoons
3 Dessert spoons
4 Teaspoons
5 Knives
6 Serving spoons
7 Gravy ladle
8 Serving fork
Loading the Dishwasher Basket for 6 Place Settings
For loading the dishwasher basket, please refer to the table below.
Number Item
1 Cups
2 Medium serving bowl
3 Glasses
4 Saucers
5 Dish
6 Oval platter
7 Dinner plates
8 Soup plates
9 Dessert dishes
10 Cultery basket
• Do not let any items extend through the
bottom of basket.
• To avoid the risk of injury, please load your
knives and forks with handles upwards. Do
not hold them by their sharp edges.
• The cutlery basket comes with covers, and
they are designed for you to load the cutlery
into the appropriate slots. If you use the
basket without the cover, it may reduce the
washing results of your cutlery.
• Please ensure the cover is securely locked to
the basket before operation.
• To comply with Standards of Performance, i.e.
EN50242, all cutlery must be loaded according
to the instructions in this manual.
1
6
9
8
7
3
5
1
2
4
3
10
3
IN
6 1 6
2
1
1
1
2
5
55
1
2
5
5
1
4
3
3
3
3
4
4
4
7
3
5
4
4 8
3
2
2 2
IN
Page 20
20
GB
Starting a Wash Cycle
Please follow the steps below to start a wash cycle.
1. Ensure the unit is connected to the mains power and the water supply is on (water pressure between
0.04MPa and 1.00MPa).
2. Open the door. Pull out the dishwasher basket, load the dishes and push the basket back.
3. Pour in the detergent or place the detergent tablet in the detergent compartment and close firmly
afterwards.
4. Close the dishwasher door. A click sound should be heard when the door is closed correctly. Do not
slam the door.
5. Press the On/Off button.
6. Select the wash cycle programme based on the loading and soil requirements. Please refer to the
“Wash Cycle Table” (page 11).
7. The power indicator light of the selected programme indicator light will illuminate.
8. Press the Start/Pause button, the washing cycle will begin shortly.
Changing a Programme
To change the programme if the washing cycle has already started, follow the steps below.
1. Open the door slightly to check if the unit has dispensed the detergent or detergent tablet. This will
depend on how long the washing cycle was running for.
2. If the detergent dispenser lid is opened, we suggest you to allow the wash cycle to complete.
3. If the detergent dispenser lid is still closed, press the On/Off button to cancel the programme. You
may then close the dishwasher door and press the On/Off button again. Then, press the required new
programme button and confirm the selection by pressing the Start/Pause button. The unit will start
the new washing cycle shortly.
At the End of a Programme
At the end of a programme, the dishwasher will make an audible sound.
If you open the dishwasher door during the washing cycle and then close it, the dishwasher will
continue the current washing programme after 10 seconds. However, if the door is not closed
correctly after 1 minute, the dishwasher will make an audible sound at 1 minute intervals.
Page 21

21
GB
Switching O the Unit
To save energy, remember to switch the dishwasher off using the ON/OFF button. The dishwasher will
continue to use electricity until it is switched off with the ON/OFF button.
If the dishwasher is not going to be used for a long period of time, e.g. whilst on holiday, disconnect the
unit from the mains supply.
Unloading the Dishwasher
Allowing dishes to cool down before unloading is important as dishes tend to break and chip more easily
when they are hot. Therefore, if you open the dishwasher door fully after switching off, it will allow the
dishes to cool down much faster.
Page 22
22
GB
Internal Care
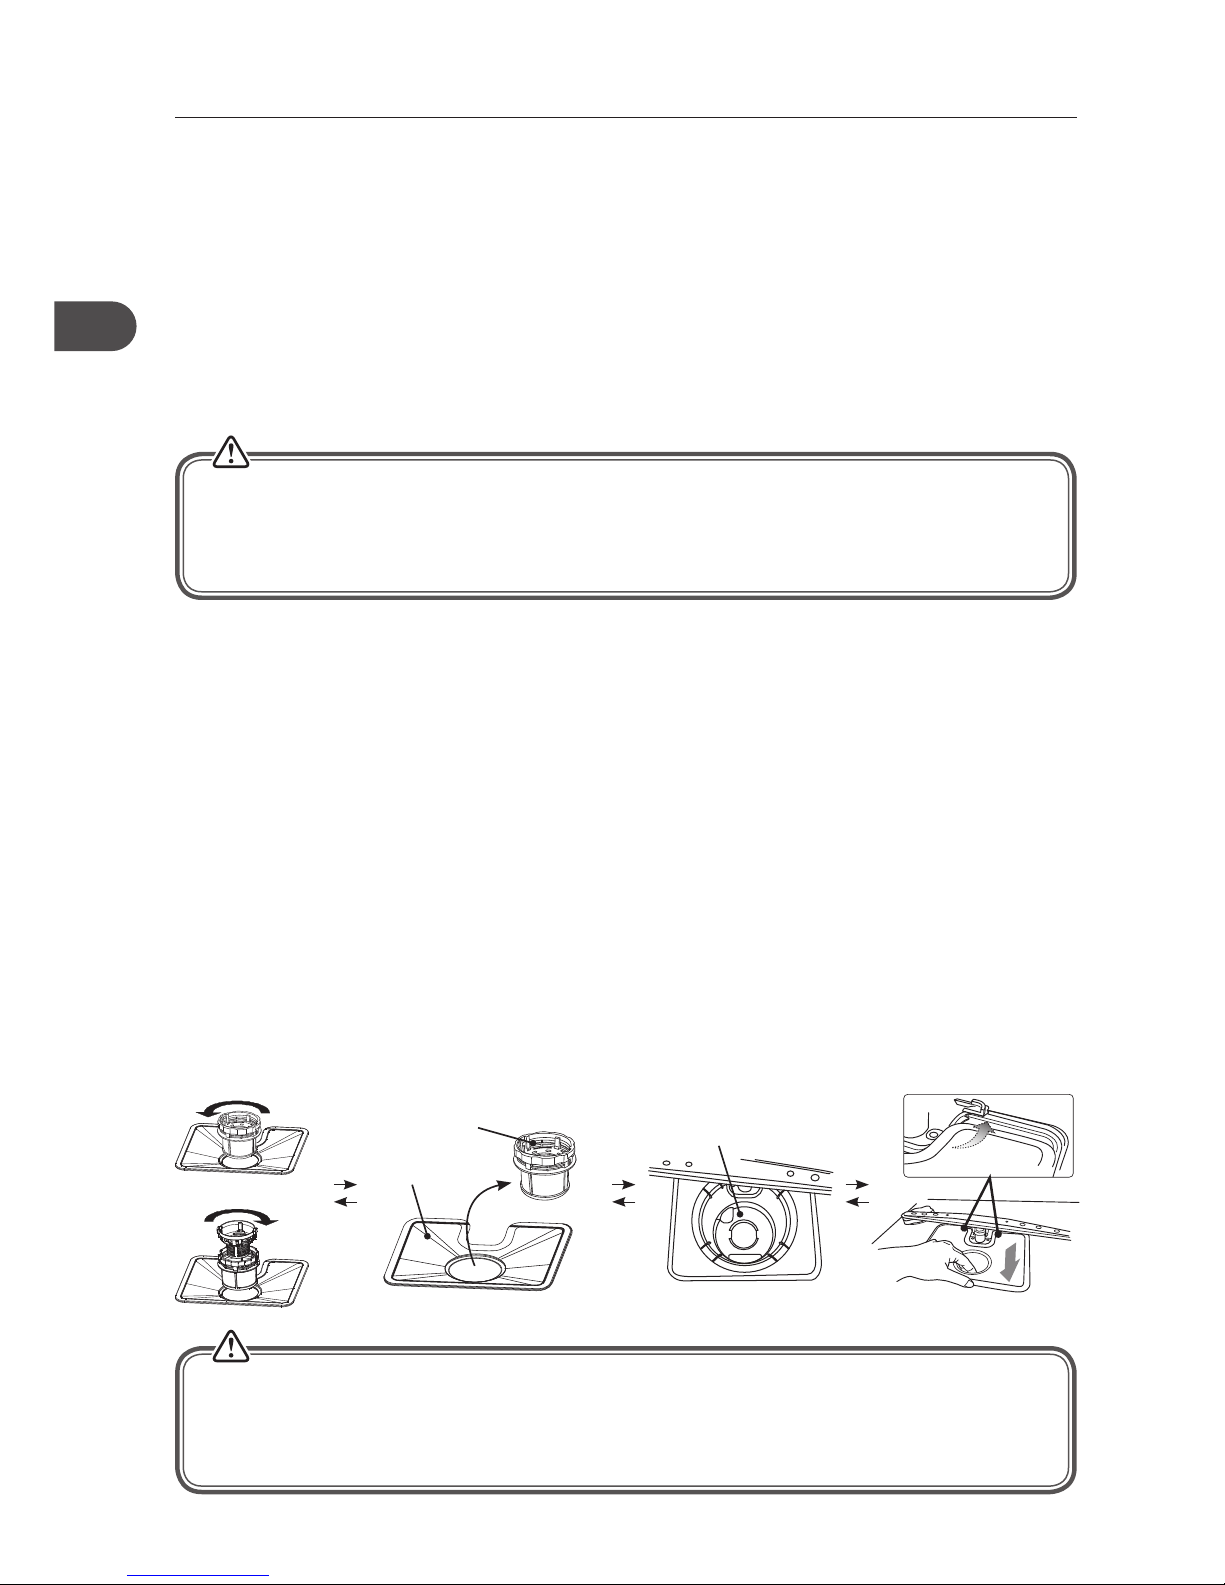
Filtering System
The filtering system in the base of the wash cabinet captures large particles of suds solution. Build up of
these particles may cause the filters to block. Check the condition of the filters regularly and clean them if
necessary under running water.
Follow the steps below to clean the filters in the wash cabinet.
1. Ensure the dishwasher is switched off.
2. Unscrew the coarse and fine filter.
3. Gently lift the coarse and fine filter out.
4. Gently lift the main filter with care.
5. Rinse all the filters under running water, including the filter cylinder, and then refit all filters in the
following order.
6. Gently refit the main filter back with care.
7. Gently rescrew the course and fine filter in clockwise direction.
Cleaning After Use
External Care
The Door and the Door Seal
• Clean the door seals regularly with a soft damp cloth to remove food deposits.
• When the dishwasher is being loaded, food and drink residues may drip onto the sides of the
dishwasher door. These surfaces are outside the wash cabinet and are not accessed by water from the
spray arms. Any deposits should be wiped off before the door is closed.
The Control Panel
If cleaning is required, the control panel should be wiped with a soft damp cloth ONLY.
Close
Open
Main Filter
Coarse and
Fine Filter
Filter cylinder without
the lters
Push
down
Slide in
• To avoid penetration of water into the door lock and electrical components, do not use a spray
cleaner of any kind.
• Never use abrasive cleaners or scouring pads on the outer surfaces because they may scratch the
finish. Some paper towels may also scratch or leave marks on the surface.
• Do not over tighten the filters. Put the filters back in the filter cylinder in sequence securely,
otherwise the residue could get into the system and cause a blockage.
• NEVER use the dishwasher without the filters in place. Improper replacement of the filters may
reduce the performance level of the appliance and damage dishes and utensils.
Page 23
23
GB
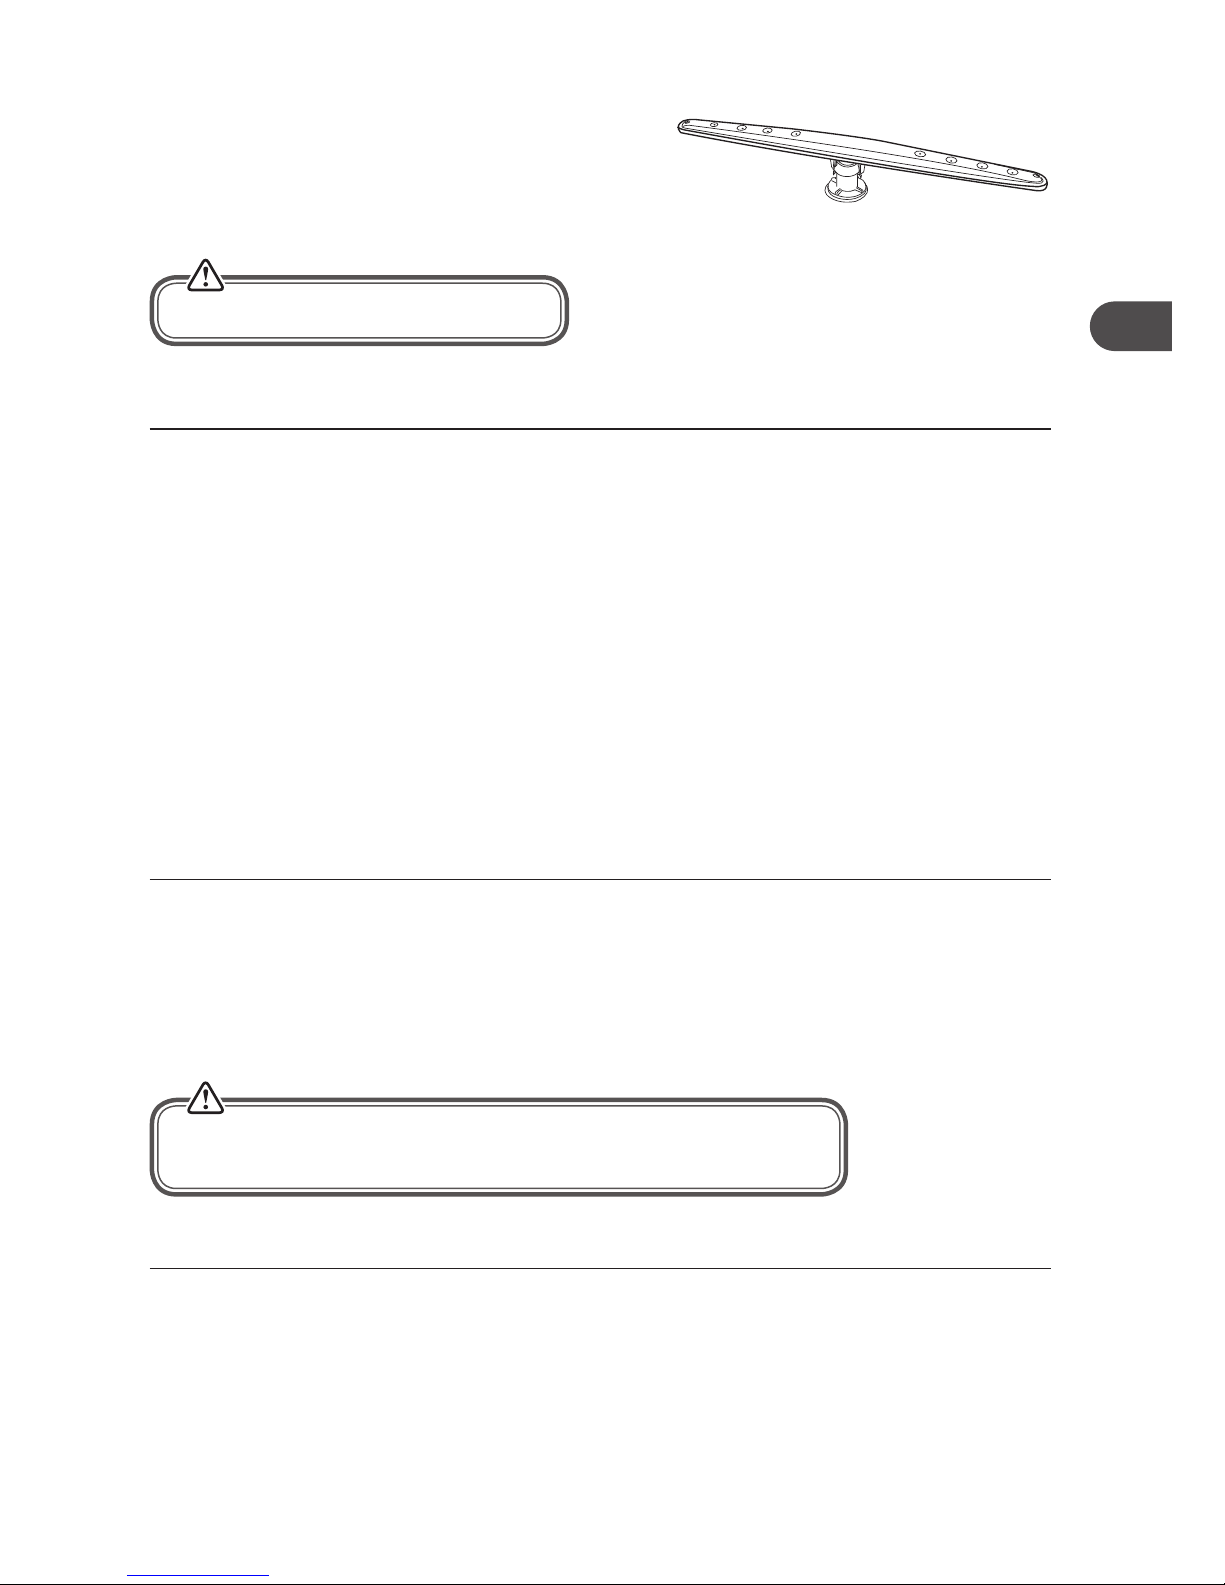
Spray Arms
Particles of food can get stuck in the spray arm jets and
bearings. The spray arms should therefore be checked and
cleaned regularly.
• Use a pointed object, e.g. a cocktail stick, to loosen food
particles in the spray arms’ jets.
Frost Precaution
Avoid placing the dishwasher in a location where the temperature is below 0°C. If your appliance is left in
an unheated place over the winter, you are advised to:
1. Disconnect the unit from the water inlet.
2. Turn on the unit. Select any washing cycle and let it run for 1 minute only. This will allow all the
excessive water that remains in the unit to drain out.
3. Disconnect from the mains.
4. Empty the dishwasher.
5. Close the dishwasher’s door.
6. Disconnect the unit from the water drain. Use a suitable receptacle to catch the water.
Should you encounter any difficulties with the above steps, please ask a service technician for assistance.
Moving the Dishwasher
If you have to move the unit, for instance due to moving house, you are advised to:
1. Disconnect the dishwasher from the mains.
2. Disconnect the unit from the water inlet and drain. Use a suitable receptacle to catch the water.
3. Remove the unit from the current location with the hoses discharged.
4. Pull the unit out together with the hoses.
Maintenance After a Prolonged Period of Non-Operation
If you are not going to use the unit for a prolonged period of time, you are advised to:
1. Disconnect the dishwasher from the mains.
2. Disconnect the unit from the water inlet and drain. Use a suitable receptacle to catch the water.
3. Open the door slightly to prevent unpleasant smells building up in the compartment.
4. Ensure the washing compartment of the dishwasher is clean.
Do not attempt to remove the spray arms.
• Avoid over tilting the unit during transportation.
• We recommend that 2 people handle the dishwasher during installation.
Page 24
24
GB
Hints and Tips
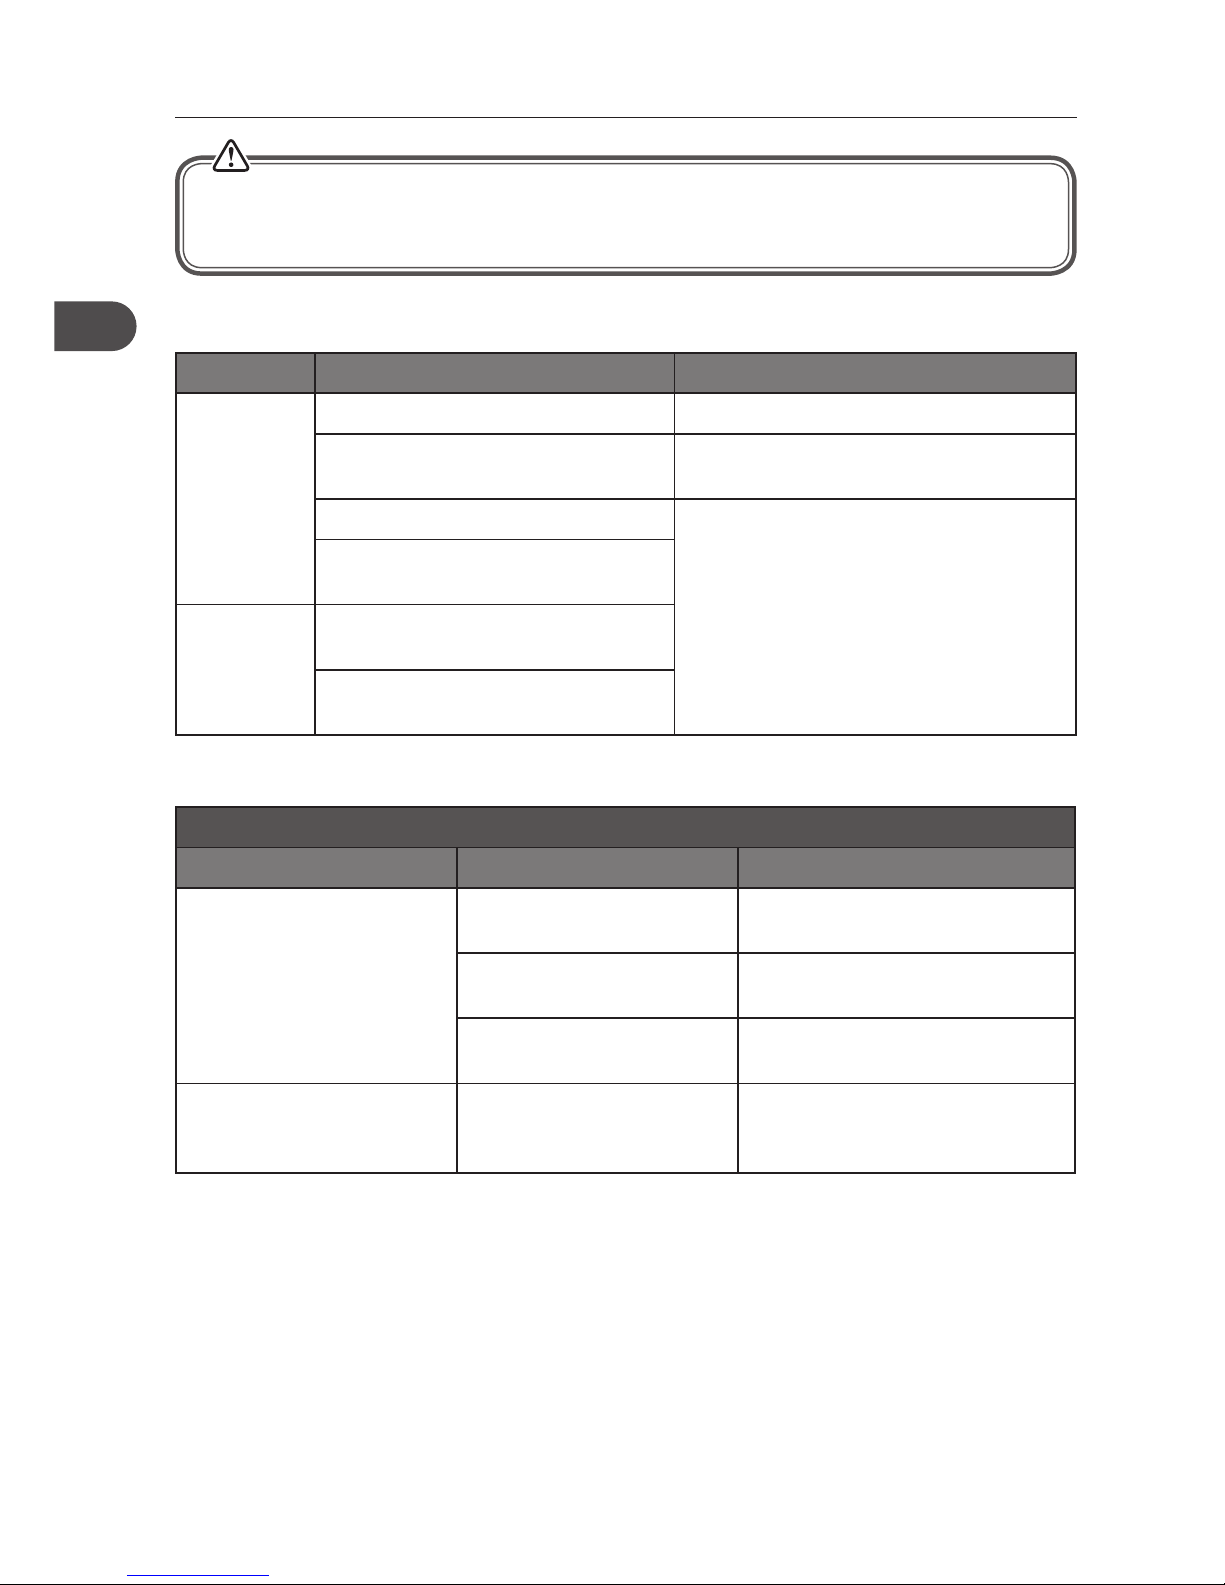
Fault Code
Codes Possible Causes Remedy
3 in 1
program light
is blinking
Water tap is not turned on. Turn on the water tap.
Low water pressure (<0.04MPa) Turn on the water tap and ensure it is in full
position.
Flow meter is broken.
• Disconnect from the mains.
• Disconnect the water inlet.
• Call a qualified technician.
The wire terminals which connect the
flow meter are loose.
Glass program
light is
blinking
The float switch is broken or PCB is
faulty.
The wire terminal connected to the float
switch is loose or broken.
Technical Problems
Technical Problems
Problem Possible Causes Remedy
The dishwasher does not start.
The door is not properly
closed.
Close the door firmly.
The unit is not connected to
the mains.
Connect the plug to the mains.
The unit is not switched on. Press the “on” button and select a
programme.
The drain pump is not working
properly.
The anti-flooding system has
operated.
• Disconnect from the mains.
• Disconnect the water inlet.
• Call a qualified technician.
Repairs should only be carried out by a qualified technician in strict accordance with current local
and national safety regulations. Unauthorised or incorrect repairs could cause personal injury or
damage to the unit.
Page 25
25
GB
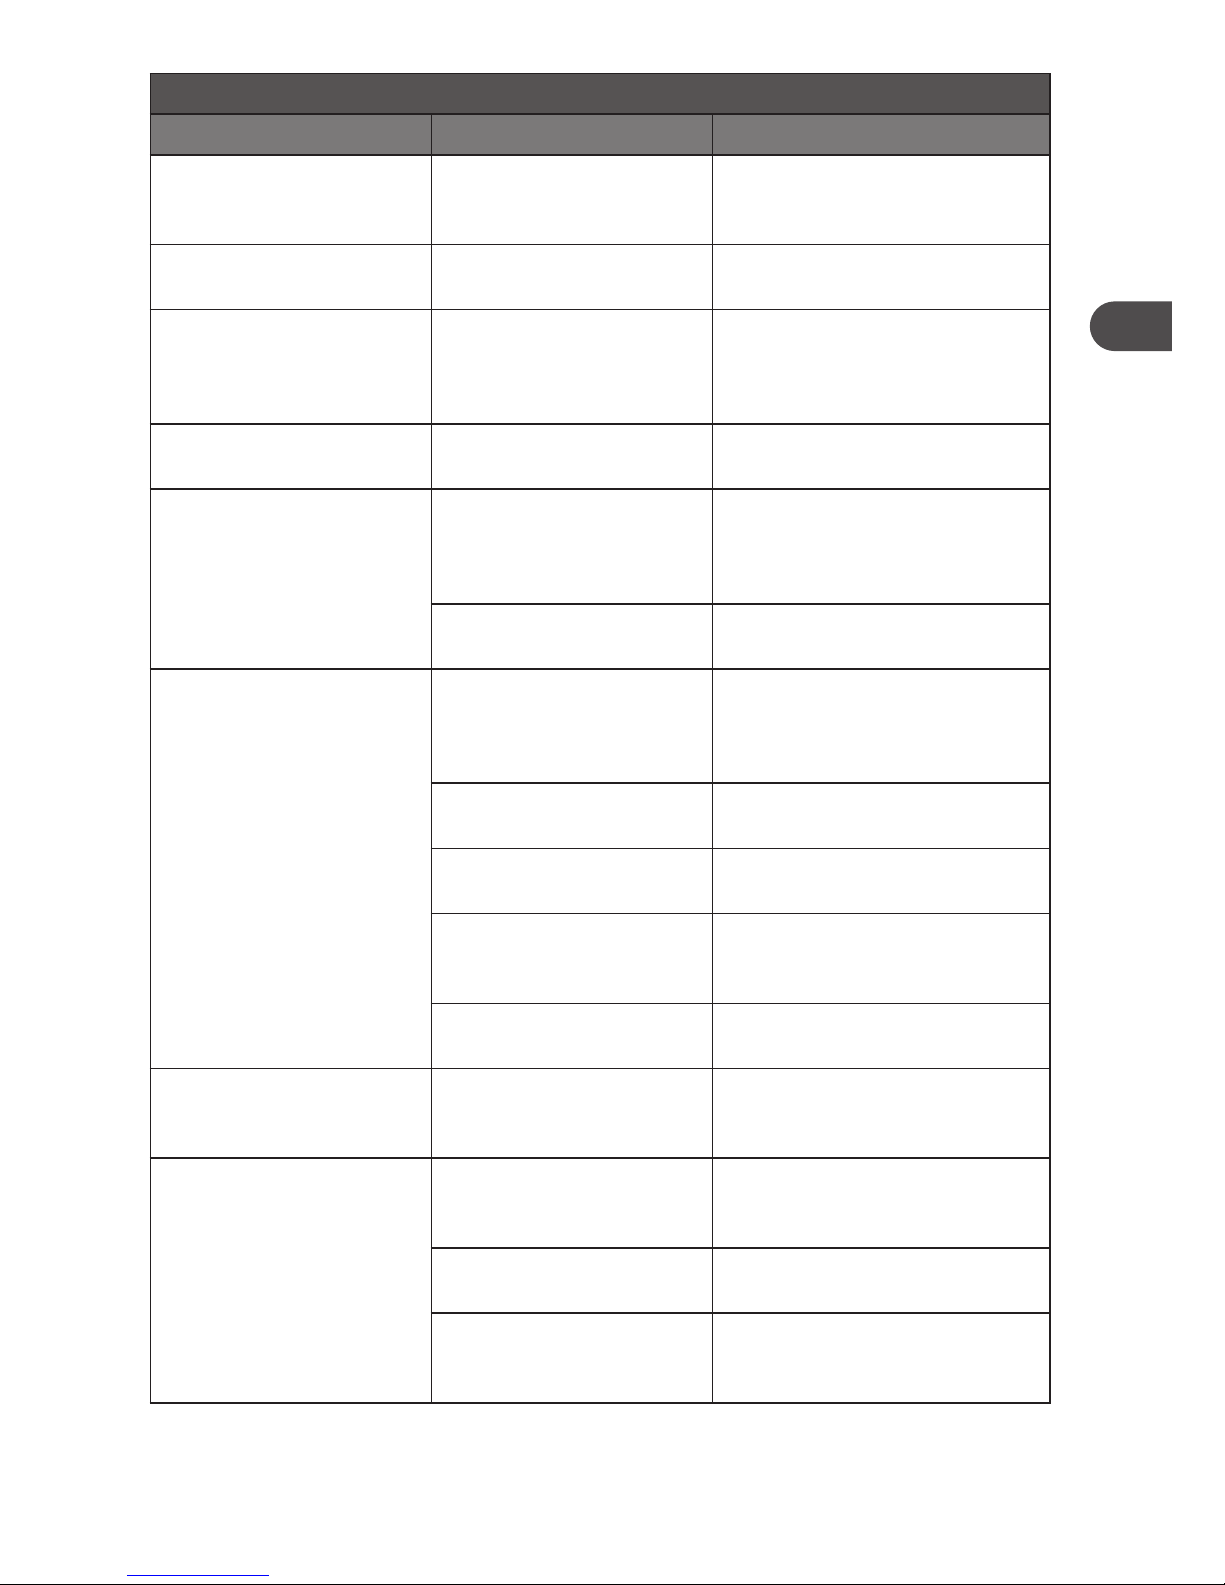
General Problems
Problem Possible Causes Remedy
Detergent residue is left in the
dispenser at the end of the
programme.
The detergent dispenser was
still damp when detergent was
added.
Make sure the dispenser is dry before
adding detergent.
The detergent dispenser lid
cannot be closed properly.
Clogged detergent residue is
blocking the catch.
Clean the catch.
Knocking noise in the wash
cabinet.
A spray arm is knocking
against an item in a basket.
Interrupt the programme, and
rearrange the items which are
obstructing the spray arm. See the
section “Loading the Dishwasher”.
Smearing appears on
glassware and cutlery.
The rinse aid dosage is set too
high.
Adjust the dial of the rinse aid
dispenser to a lower setting.
Dishes, cutlery and glasses are
not dry.
The amount of rinse aid may
be insufficient, or the rinse aid
reservoir is almost empty.
Replenish the reservoir, adjust the
rinse aid dispenser dial to a higher
setting or change the brand of rinse
aid.
Crockery was taken out of the
dishwasher too soon.
Leave the crockery in the dishwasher
until you hear an audible sound.
White residue is visible on
cutlery and crockery, clouding
occurs on glassware; film can
be wiped off.
Not enough rinse aid was
used.
Replenish the reservoir, adjust the
rinse aid dispenser dial to a higher
setting or change the brand of rinse
aid.
There is not enough salt in the
salt reservoir.
Fill the salt reservoir.
The salt reservoir cap has not
been screwed on correctly.
Ensure that it is screwed back on
correctly.
Unsuitable detergent has been
used.
Change your detergent. Use a
dishwasher standard powder
detergent.
The salt consumption setting
is too low.
Select a higher salt consumption
setting.
Glassware is dull and
discoloured; film cannot be
wiped off.
The glassware is not
dishwasher proof. The surfaces
are affected.
Wash the non-dishwasher proof
glassware by hand.
Tea or lipstick stains have not
been completely removed.
The wash temperature of the
selected programme was too
low.
Select a programme with a higher
wash temperature.
The bleaching effect of the
detergent used is too low.
Change your detergent.
Forgot to pre-rinse or remove
the stains with a napkin prior
to washing.
Pre-rinse or remove the stains with a
napkin prior to washing.
Page 26

26
GB
Disposal of the Dishwasher
• When disposing your old dishwasher, first make it unusable. Disconnect the hoses and unplug the
mains cable. Cut off the mains cable from the dishwasher. Make the door lock inoperative, so that
children cannot accidentally shut themselves in. Make appropriate arrangements for the disposal of the
dishwasher.
• At the end of its working life, the product must not be disposed of as urban waste. It must be taken
to a special local authority differentiated waste collection centre or to a dealer providing this service.
Disposing of a household appliance separately avoids possible negative consequences for the
environment and health deriving from inappropriate disposal and enables the constituent materials
to be recovered to obtain significant savings in energy and resources. As a reminder of the need to
dispose of household appliances separately the product is marked with a crossed out wheeled dustbin.
• Please ensure that it presents no danger to children while being stored for disposal.
Disposal of Packing Material
Please dispose of the plastic wrappings and bags safely and keep out of the reach of babies and young
children.
Page 27
27
GB
Specications
Model MDWTT11E
Dimensions 550 mm (W) x 500 mm (D) x 438 mm (H)
Capacity 6 Place Settings
Water Pressure Required 0.04 - 1.00MPa
Power Consumption 1280W
Rated Voltage 230V~50Hz
Off Mode Power Consumption 0.7W
Left-on Mode Power Consumption 0.73W
Energy Efficiency Class
1
A
Annual Energy Consumption
2
185 kWh
Energy Consumption of the Standard Cleaning Cycle 0.65 kWh
Annual Water Consumption
3
2380 liter
Drying Efficiency Class
4
B
Standard Cleaning Cycle
5
ECO 55°C
Program Duration of the Standard Cleaning Cycle 170 min
Noise Level 55 dB(A) re 1 pW
Mounting Free standing
Could be built-in Yes
Features and specifications are subject to change without prior notice.
Note:
1
A + + + (highest efficiency) to D (lowest efficiency)
2
Energy consumption “185” kWh per year, based on 280 standard cleaning cycles using cold water fill
and the consumption of the low power modes. Actual energy consumption will depend on how the
appliance is used.
3
Water consumption “2380” litres per year, based on 280 standard cleaning cycles. Actual water
consumption will depend on how the appliance is used.
4
A (highest efficiency) to G (lowest efficiency)
5
This program is suitable for cleaning soiled normally soiled tableware and that it is the most efficient
programme in terms of its combined energy and water consumption for that type of tableware.
The device meets the European standards and the directives in the current version at delivery:
- LVD 2006/95/EC
- EMC2004/108/EC
- ERP 2009/125/EC
The above values have been measured in accordance with standards under specified operating
conditions. Results may vary greatly according to quantity and pollution of the dishes, water hardness,
amount of detergent, etc.
Page 28
28
NO
Pakke opp
Fjern all emballasje fra enheten. Ta vare på emballasjen. Ta hensyn til lokale bestemmelser om
avfallshåndtering hvis du kaster emballasjen.
Følgende elementer er inkludert:
Hovedenhet
Monteringsklemme for
avløpsslange x 1
DELNR.: 672005400002
Målekopp for vaskemiddel x 1
1 full skje = 20g (ca.)
DELNR.: 673002200079
Brukerveiledning x 1
DELNR.: MDWTT11E-000
U-formet slangeholder x 1
DELNR.: 673006200003
Salttrakt x 1
DELNR.:
673002200001
Avløpsslange x 1
DELNR.:
673005400041
Målekopp x 1
60ml (ca.)
DELNR.: 673006200004
Sikkerhetsforsyningsslange
x 1
DELNR.: 673000900093
Bestikkurv
DELNR.:
673006200014
Dette produktet har blitt testet
med vann for å sikre riktig
operasjon. Som et resultat av
dette, kan noe vann være igjen
i enheten. Dette er normalt og
trygt. Fjern eventuelle vanndråper
fra utsiden hvis nødvendig.
Page 29

29
NO
INSTALLASJON
1. Sørg for at oppvaskmaskinen er installert av en
kvalifisert tekniker. Se hvilke verktøy som kreves.
Plassering
Når du skal velge hvor benkoppvaskmaskinen skal
stå, må du sørge for at overflaten er horisontal
og stabil og at rommet er godt ventilert. Unngå
å plassere oppvaskmaskin i nærheten av en
varmekilde, f.eks. komfyr, varmtvannsbereder
eller radiator. Svært kalde omgivelser kan også
føre til at maskinen ikke yter som den skal. Denne
oppvaskmaskinen er ikke beregnet for bruk i en
garasje eller utendørs installasjon.
Ikke dekk til oppvaskmaskinen med noe slags
materiale. Påse at det er åpent rom på sidene når du
installerer.
2. Sørg for at det er nok klarering på hver side av
enheten for å tillate noe sideveis bevegelse for
service når det er nødvendig. Riktig rettstilling
er viktig for at døren skal lukkes riktig og at
forseglingen skal være riktig. Når enheten er
riktig rettstilt, bør ikke døren fanges på den indre
innlegget på noen av sidene til kabinettet.
Oppvaskmaskinens mål er 550 mm (B) x 500 mm
(D) x 438 mm (H). Tallene viser hvilken dimensjon
benkoppvaskmaskinen krever som minimum.
Beskytt plastdeler og kabler fra å bli utsatt for
høy temperatur.
Alle deler som fjernes må oppbevares for
å kunne foreta en full installasjon senere.
Kontroller at oppvaskmaskinen er slått av og
tom. Vi anbefaler at to personer håndterer
oppvaskmaskinen under installasjonen.
550mm
438mm
500mm
50mm
eller
mer
150mm eller mer
50mm eller mer
150mm eller mer
mål i mm
Page 30
30
NO
INSTALLASJON
4. De elektriske spesifikasjonene for stikkontakten
må tilsvare spesifikasjonene som er angitt
på oppvaskmaskinens merkeplate. Ikke bruk
skjøtekabler.
5. Plasser enheten ved siden av en vannkran og et
avløp. Kontroller at enheten står i vater.
3. Ikke kople enheten til stikkontakten før
installasjon. Pass på at du ikke installerer
enheten rett foran stikkontakten. Dette er for å
unngå eventuell skade på baksiden av enheten.
Påse at stikkontakten er lett tilgjengelig etter
installasjonen.
6. Sørg for at vanninntaks- og avløpsslangene ikke
er knekt eller klemt. Enheten må ikke stå på
strømledningen.
7. Løsne ringene på klemmen til avløpsslangen
ved å dreie skruen moturs. Tre deretter
avløpsslangen gjennom ringene på klemmen til
avløpsslangen og sett den fast på avløpet. Stram
klemmen til avløpsslangen ved å dreie skruen
medurs slik at forbindelsen mellom avløpet og
avløpsslangen blir tett.
opp ned
i vater
Ringene på klemmen
til avløpsslangen
Medurs for
å stramme
Moturs for
å løsne
Ringene på klemmen
til avløpsslangen
Page 31

31
NO
INSTALLASJON
• Sikre vannavløpsslangen til avløpsrøret for å
unngå at den kommer løs mens maskinen går.
8. Sørg for at røropplegget ditt passer for bruk med
oppvaskmaskinen. Ta kontakt med en kvalifisert
rørlegger hvis du er i tvil. Denne enheten Må koples
til en KALDTVANNSKRAN ved å bruke den nye
vanninntaksslangen. GAMLE SLANGER MÅ IKKE
BRUKES PÅ NYTT. Vanntrykket fra vannkranen må
være minst 0,04 MPa og maksimalt 1,00 MPa.
• Kople enden med vannsikring på
sikkerhetsvannslangen til oppvaskmaskinen, og
kople deretter den andre enden av slangen til
vannkranen. Sørg for at den svarte pakningen er
på plass.
• Etter at du har koplet til slangen, må du slå på
vannkranen og kontrollere at det ikke er lekkasjer.
• Kople oppvaskmaskinen til stikkontakten.
Du kan bruke en Y-adapter (ikke
inkludert) for ekstra vanntilførsel
til et annet apparat, for eksempel
en vaskemaskin. Dette gjelder
kun for kaldtvannsinntaket. En
Y-adapter er tilgjengelig i de
fleste jernvarebutikker.
Om sikkerhetsforsyningsslangen
Sikkerhetsforsyningsslangen består av doble
vegger. Dette slangesystemet sørger for å
blokkere vanngjennomstrømningen ved
brudd på tilførselsslangen og når luftrommet
mellom tilførselsslangen og den ytre
korrugerte slangen fylles med vann.
• Avløpsrøret må koples til avløpet
for gråvann og ikke til avløpet for
overflatevann.
• Avløpsslangen må plasseres under 10 cm
fra benken og den må ikke forlenges. I
motsatt fall kan det bli umulig for enheten
å tømme ut det brukte vaskevannet
skikkelig.
• Du kan bruke den U-formede
avløpsslangeholderen til å sikre
avløpsslangen og for å unngå å bøye den.
• Ikke bøy avløpsslangen.
• Ikke løft avløpsslangen høyere enn 10 cm fra
benken. I motsatt fall kan det bli umulig for
enheten å tømme ut det brukte vaskevannet
skikkelig.
vannkran
Y-adapter
(ikke vedlagt)
Kople til
et annet
apparat hvis
nødvendig.
vannforsyningsslange
maks.
10 cm
Lukk vannkranen etter bruk.
Page 32

32
NO
Produktoversikt
Sett forfra
Sett bakfra
1. På/av-bryter og
strømindikatorlampe
2. Kontrollpanel
3. Dørhåndtak
4. Avløpsslange
5. Strømledning (kople til elektrisk stikkontakt)
6. Vanninntak (kople til vannforsyning)
4
2
5
6
1
3
Page 33

33
NO
Oppvaskmaskinkurv og bestikkurv
Sett fra innsiden
9. Saltbeholder
10. Spylearmer
11. Filtreringssystem
12. Bestikkurv
13. Vaskemiddeldispenser (dobbeltbeholder)
14. Glansemiddeldispenser
7
12
9
10
8
11
13
14
7. Spisser
8. Koppstativer
Page 34

34
NO
1. Strømindikator
• Den røde LED-lampen tennes når
oppvaskmaskinen er på.
2. På/av-knapp
• For å slå oppvaskmaskinen på og av.
3.
Advarselslampe for saltnivå
• Lyser når saltbeholderen må etterfylles.
4.
Advarselslampe for glansemiddelnivå
• Lyser når glansemiddeldispenseren må
etterfylles.
Start/PauseProgram
Kontrollpanel
3 4 721 5 6
5. Programknapp
• For å velge ønsket oppvaskprogram.
• Hvert trykk på denne knappen veksler fra
det ene oppvaskprogrammet til det neste.
6. Start/pause-knappen
• For å bekrefte og starte det valgte
oppvaskprogrammet.
• For å tilbakestille oppvaskprogrammet.
7. Programindikatorer
• Lyser når oppvaskprogrammet er valgt.
• Blinker når det valgte oppvaskprogrammet
er i gang.
Page 35

35
NO
Vasketabell
Program Syklus
Informasjon om
syklusvalg
Prosess
Vaskemiddel
Mengde (forvask/
hovedvask)
Kjøretid
(min)
Strømforbruk
(kWh)
Vannforbruk
(liter)
Glansemiddel
Intensiv • Kasseroller,
redskaper og
bestikk.
• Svært
tilsmusset.
• Forvask (50°C)
• Vask (70°C)
• Skylling (70°C)
• Tørking
• Forvask (3g)
• Hovedvask (15g)
145 0,94 11
Normal • Kasseroller,
redskaper og
bestikk.
• Normalt
tilsmusset.
• Forvask
• Vask (60°C)
• Skylling (70°C)
• Tørking
• Forvask (3g)
• Hovedvask (15g)
125 0,7 8,4
Økonomi*
(EN50242)
• En kortere
vask for lett
tilsmusset
innhold.
• Forvask
• Vask (55°C)
• Skylling (70°C)
• Tørking
• Forvask (3g)
• Hovedvask (15g)
170 0,65 8,5
Glass • Glass, krystall
og fint
porselen.
• Lett
tilsmusset.
• Forvask
• Vask (45°C)
• Skylling (60°C)
• Tørking
• Hovedvask (15g) 75 0,48 6,8
Hurtig • Glass og
kopper.
• Lett
tilsmusset.
• Vask (40°C)
• Skylling (45°C)
• Hovedvask (15g) 30 0,3 6
3-i-1 • Redskaper og
bestikk.
• Normalt
tilsmusset.
• Forvask
• Vask (60°C)
• Skylling (70°C)
• Tørking
• Bruk kun 3-i-1oppvasktablett.
140 0,7 8,4
* For å overholde standarden for ytelse, dvs. EN50242, må du sørge for å bruke en økonomisk vaskesyklus
for testen.
Kondenseringstørketeknologi
• Energi spares ved å tørke serviset med restvarmen etter den siste skyllingen.
• Tiden for vaskesyklus forlenges pga. denne tørkemetoden.
• Enkelte vaskeprogrammer har ikke en tørkefunksjon. Se «Vasketabell» for flere detaljer.
Page 36

36
NO
●
●
Følgende elementer egner seg ikke
Håndklær og svamper
Krystallglass
Sølvtøy
Verdifulle vaser
Porselen med sprekker/hakk
Små plastgjenstander
(melkeflaskesmokk)
Støpejernskjeler
Kokekar med ripet slippbelegg
Gryter og kjeler av kopper
Plastelementer som
ikke er oppvaskmaskinsikre
Før du begynner
Åpne døren
• Trekk i håndtaket på døren.
• Hvis døren åpnes mens maskinen går, avbrytes alle funksjoner automatisk.
Lukke døren
• Etter at serviset er satt inn, skyves kurven helt inn i oppvaskmaskinen.
• Løft døren oppover og skyv til den klikker på plass.
• Ikke smell igjen oppvaskmaskindøren.
Elementer som ikke egner seg for oppvaskmaskinen
Når du kjøper nytt steintøy og bestikk, må du forsikre deg om at det er oppvaskmaskinsikkert. Noen
elementer egner seg ikke for oppvaskmaskiner.
• Bestikk og steintøy av tre eller elementer med tredeler kan bli misfarget og blekne. Limet som brukes
i disse elementene er ikke oppvaskmaskinsikkert, og trehåndtak kan løsne etter at de har blitt vasket i
oppvaskmaskinen.
• Hobbyelementer, antikkvarer, verdifulle vaser og dekorative glass egner seg heller ikke for
oppvaskmaskiner.
• Plastelementer som ikke tåler varme (f.eks. tupperware) kan smelte eller miste fasong på grunn av den
høye temperaturen i oppvaskmaskinen.
• Gjenstander av kopper, messing, tinn og aluminium kan bli misfarget eller matt.
• Drikkeglass og skjøre glassgjenstander kan bli uklare etter mange oppvasker. Ikke vask skjøre
glassgjenstander eller krystallglass i en oppvaskmaskin. Vask skjøre glassgjenstander for hånd i stedet.
• Sølv- og aluminiumsdeler har en tendens til å bli misfarget under oppvask. Rester som eggehvite,
eggeplomme og sennep forårsaker ofte misfarging og flekker på sølvtøy. Derfor bør du skylle av
restene fra sølvtøyet snarest mulig etter bruk.
Page 37

37
NO
Bleach and
Countertop detergent
Blekemidler og vanlige
oppvaskmidler
• Oppbevares utilgjengelig for barn
• Irriterer øynene.
• Unngå kontakt med øynene. Ved kontakt med øyne må de øyeblikkelig
skylles grundig med store mengder vann og medisinsk hjelp må søkes.
• Ved svelging må du straks oppsøke medisinsk hjelp.
Fylle på vaskemiddel eller legge inn oppvasktablett
Bruk kun vaskemidler som er spesielt laget for oppvaskmaskiner. For å være miljøvennlig skal du ikke bruke
mer enn riktig mengde vaskemiddel.
Følg trinnene under for å fylle i vaskemiddeldispenseren.
1. Trykk på knappen på lokket til
vaskemiddeldispenseren i retning av pilen til
klaffen åpnes.
2. Fyll vaskemiddeldispenseren med vaskemiddel
eller legg i oppvasktabletten. Markeringen viser
fyllnivået.
Irriterende
forvaskemiddelrom
hovedvaskemiddelrom
eller
3. Alle programmer med forvask krever en ekstra
porsjon med vaskemiddel som må legges i
forvaskemiddelrommet (se vasketabellen). Dette
vaskemidlet brukes under forvasken.
4. Lukk lokket ordentlig slik at det klikker på plass.
Du kan velge å legge inn bare en
oppvasktablett eller fylle på vaskemiddel
i både hovedvaskemiddelrommet og
forvaskemiddelrommet for den valgte
vaskesyklusen.
skyv opp fra høyre side
Page 38

38
NO
Du kan også se mengden glansemiddel ved å sjekke glansemiddelindikatoren ved siden av lokket til
beholderen. Når indikatoren er svart, betyr det at den er full. Når den er klar, er den nesten tom.
Justere glansemiddelbeholderen
Glansemiddelbeholderen har seks innstillinger. Både den anbefalte
innstillingen og fabrikkinnstillingen er «4». Hvis serviset ikke tørker
ordentlig eller er flekkete, kan du justere skiven til det neste høyere
nummeret til koppene er flekkfrie.
Fylle på glansemiddel
Glansemidlet hjelper til med å sikre at vann ikke fester seg og lager merker på steintøy under tørkingen,
og gjør tørkingen raskere etter at steintøyet er vasket. Fyll kun på glansemidler som er beregnet på
husholdningsoppvaskmaskiner i beholderen. Denne modellen er designet for å bruke bare flytende
glansemidler.
Følg trinnene under for å helle glansemidlet i beholderen, så vil riktig mengde fordeles automatisk.
1. Vri lokket og åpne som indikert.
2. Når åpningsmerket for lokket er innrettet, kan
du løfte lokket opp.
3. Hell glansemidlet inn til nivåindikatoren blir
helt svart og lukk lokket.
4. Ikke fyll for mye i beholderen. Tørk opp
eventuelt søl. Glansemiddelbeholderen tar
omtrent 110ml.
åpne
glansemiddelindikator
Advarselslyset for glansemiddel lyser når beholderen er
nesten tom for glansemiddel og må fylles opp.
advarselslys for
glansemiddel
Hvis vannet i området ditt er mykt, trenger du
kanskje ikke glansemiddel da dette kan føre til at
det dannes en hvit film på serviset.
Page 39

39
NO
Fylle på salt
Hvis vannet der du bor er hardt, dannes det avleiringer av kalk på servise
og redskaper. Derfor har dette apparatet en saltbeholder for å redusere
hardheten i vannet.
Følg trinnene under for å helle salt i saltbeholderen, og still deretter inn
forbruket etter hardhetsgraden på vannet der du bor.
1. Fjern kurven og skru av lokket på beholderen.
2. Fyll opp beholderen med ca. 500 ml vann (kun første gang).
3. Sett trakten som følger med over saltbeholderen.
4. Hell inn omtrent 1,2 kg med oppvaskmaskinsalt avhengig av merket
du bruker.
5. Fjern eventuelt søl fra området rundt beholderåpningen og skru
deretter lokket godt på igjen.
6. Kjør «øko»-programmet umiddelbart (uten noe steintøy i
oppvaskmaskinen) for å fjerne alle spor av salt fra maskinen.
Advarselslyset for salt lyser når beholderen har lite salt og må
fylles opp.
Advarselslyset for salt slutter å lyse etter et par dager
avhengig av hvor fort saltet løses opp.
advarselslampe for
saltnivå
OPEN
åpne
åpne
åpne
Page 40

40
NO
Sette inn i oppvaskmaskinen
Før du setter inn i oppvaskmaskinen
Følg disse merknadene når du setter bestikk og steintøy inn i kurven.
• Fjern alle matrester og flekker fra leppestift fra steintøy og servise. Skyll hvis nødvendig.
• Servise og bestikk må ikke ligge inni hverandre eller dekke til hverandre.
• Sett inn bestikket og steintøyet slik at vannet kan komme til alle overflater.
• Sørg for at alle elementer er riktig plassert.
• Hule gjenstander som kopper, glass, kjeler osv. må plasseres opp ned i kurven.
• Større gjenstander må plasseres i en vinkel slik at vann lett kan renne av.
• Spylearmene må ikke blokkeres av gjenstander som er for høye eller som henger gjennom kurven. Hvis
du er i tvil, kan du forsikre deg om at spylearmene har fri bevegelse ved å rotere dem manuelt.
• Sørg for at små gjenstander ikke faller gjennom holderne i kurven.
Ikke vask gjenstander som er tilsmusset med aske, sand, voks, smørefett eller maling i
oppvaskmaskinen. Aske løses ikke opp og kan spre seg i oppvaskmaskinen. Voks, sand, smørefett
og maling kan skade oppvaskmaskinen.
Page 41

41
NO
Oppvaskmaskinkurv
Bruk oppvaskmaskinkurven for små og lette elementer som
kopper, tefat, glass, dessertskåler osv.
Lange elementer som suppeskjeer, visper og lange kniver må
legges ned på tvers fremst i kurven.
Hengslet koppstativ
For å lage plass for større elementer i oppvaskmaskinkurven,
kan du heve koppstativet. Du kan deretter lene de høye
glassene mot det. Du kan også fjerne stativet når det ikke
brukes.
Hev oppover
Brett bakover
Trykk og smekk
Hengslete spisser
Spissene brukes for å holde tallerkener og et fat. De kan senkes for å gi rom for større elementer. Trinnene
for å åpne spissene vises nedenfor.
Av sikkerhetsmessige årsaker må du ikke bruke oppvaskmaskinen uten at
kurven står riktig på plass.
Page 42

42
NO
Bestikkurv
Sette inn bestikkurven
For å gjøre det enklere å ta ut av maskinen, bør bestikk
grupperes inn i soner og plasseres i bestikkurven. Se tabellen
under for plasseringsmetode.
Nummer Element
1 Gafler
2 Suppeskjeer
3 Dessertskjeer
4 Teskjeer
5 Kniver
6 Serveringsskjeer
7 Sausøse
8 Serveringsgaffel
Sette inn 6 kuverter i oppvaskmaskinkurven
Du kan sette inn i oppvaskmaskinkurven i henhold til tabellen under.
Nummer Element
1 Kopper
2 Middels stor serveringsbolle
3 Glass
4 Tefat
5 Skål
6 Ovalt fat
7 Tallerkener
8 Suppefat
9 Dessertfat
10 Cultery basket
• Ikke la noen gjenstander stikke ut gjennom
bunnen av kurven.
• For å unngå faren for skader må du sette inn
kniver og gafler med håndtakene opp. Ikke
hold dem i den spisse enden.
• Bestikkurven leveres med deksler, og de er
designet for at du skal kunne laste bestikket
inn i de riktige rommene. Hvis du bruker
kurven uten dekslet, kan dette redusere
vaskeresultatet av bestikket.
• Sørg for at dekslet er sikkert festet til kurven
før bruk.
• For å overholde ytelsesstandarden, dvs.
EN50242, må du sørge for alt bestikk settes
inn i henhold til instruksjonene i denne
håndboken.
1
6
9
8
7
3
5
1
2
4
3
10
3
INN
6 1 6
2
1
1
1
2
5
55
1
2
5
5
1
4
3
3
3
3
4
4
4
7
3
5
4
4 8
3
2
2 2
INN
Page 43

43
NO
Starte en vaskesyklus
Følg trinnene under for å starte en vaskesyklus.
1. Kontroller at enheten er koplet til stikkontakten og at vannforsyningen er på (vanntrykk mellom 0,04
MPa og 1,00 MPa).
2. Lukk døren. Trekk ut oppvaskmaskinkurven, sett inn serviset og skyv kurven på plass.
3. Hell inn vaskemiddel eller legg i oppvasktabletten i vaskemiddelrommet og lukk igjen lokket.
4. Lukk oppvaskmaskindøren. Du skal høre et klikk når døren er lukket riktig. Ikke smell igjen døren.
5. Trykk på På/av-knappen.
6. Velg vaskeprogrammet basert på hva du vasker og hvor tilsmusset det er. Se «Vasketabell» (side 11).
7. Indikatorlampen for det valgte programmet tennes.
8. Trykk på Start/pause-knappen, så starter vaskesyklusen straks.
Endre et program
Følg trinnene under for å endre programmet hvis vaskesyklusen allerede har startet.
1. Åpne døren på gløtt for å se om enheten har sluppet ut vaskemidlet eller oppvasktabletten. Dette vil
avhenge av hvor lenge vaskesyklusen har kjørt.
2. Hvis vaskemiddellokket er åpent, foreslår vi at du lar vaskesyklusen bli fullført.
3. Hvis vaskemiddellokket fremdeles er lukket, kan du trykke på På/av-knappen for å avbryte
programmet. Deretter kan du lukke oppvaskmaskindøren og trykke på På/av-knappen igjen. Deretter
kan du trykke på den nye programknappen og bekrefte valget ved å trykke på Start/pause-knappen.
Enheten vil starte den nye vaskesyklusen straks.
Ved slutten av et program
Ved slutten av et program avgir oppvaskmaskinen en lyd.
Hvis du åpner oppvaskmaskindøren under vaskesyklusen og deretter lukker den igjen, fortsetter
oppvaskmaskinen med det gjeldende vaskeprogrammet etter 10 sekunder. Men dersom døren
ikke lukkes igjen etter omtrent 1 minutt, vil oppvaskmaskinen avgi en lyd hvert minutt.
Page 44

44
NO
Slå av enheten
Husk å slå av oppvaskmaskinen med På/av-knappen for å spare strøm. Oppvaskmaskinen vil fortsette å
bruke strøm til den slås av med På/av-knappen.
Hvis oppvaskmaskinen ikke skal brukes på en lang stund, f.eks. mens du er på ferie, må du kople enheten
fra stikkontakten.
Ta ut av oppvaskmaskinen
Det er viktig å la serviset kjøle seg ned før du tar det ut av maskinen, fordi servise lettere sprekker og får
hakk når det er varmt. Hvis du derfor åpner oppvaskmaskindøren helt etter at oppvasken er ferdig, vil
serviset kjøle seg raskere ned.
Page 45

45
NO
Innvendig vedlikehold
Filtreringssystem
Filtreringssystemet i bunnen av vaskerommet fanger opp store partikler fra vaskevannet. Oppsamling
av disse partiklene kan føre til at filtrene blir tette. Kontroller filtrene regelmessig og rengjør dem under
rennende vann hvis nødvendig.
Følg trinnene under for å rengjøre filtrene i vaskerommet.
1. Sørg for at oppvaskmaskinen er slått av.
2. Skru løs det grove og det fine filteret.
3. Løft det grove og det fine filteret forsiktig ut.
4. Løft hovedfilteret forsiktig ut.
5. Skyll alle filtrene, inkludert filtersylinderen, under rennende vann og sett dem inn igjen i følgende
rekkefølge.
6. Sett hovedfilteret forsiktig på plass.
7. Skru det grove og det fine filteret forsiktig til igjen med urviseren.
Rengjøring etter bruk
Utvendig vedlikehold
Døren og dørpakningen
• Rengjør dørpakningen regelmessig med en fuktet klut for å fjerne matrester.
• Når du setter inn i oppvaskmaskinen, kan matrester og væske dryppe ned på sidene av
oppvaskmaskindøren. Disse overflatene er utenfor vaskerommet og spyles ikke av vannet fra
spylearmene. Alle rester må tørkes av før du lukker døren.
Kontrollpanelet
Hvis det er nødvendig med en rengjøring, må kontrollpanelet KUN tørkes av med en fuktet klut.
Lukk
Åpne
Hovedlter
Grovt og nt
lter
Filtersylinder uten
ltrene
Trykk
ned
Skyv inn
• For å unngå at vann kommer inn i dørlåsen og elektriske komponenter, må du ikke bruke noen
form for sprayrengjøringsvæske.
• Bruk aldri skurende rengjøringsmidler eller skuresvamper på de ytre overflatene fordi de kan lage
riper i overflaten. Enkelte tørkepapirer kan også lage riper eller etterlate merker på overflaten.
• Ikke stram filtrene for mye. Sett filtrene tilbake i filtersylinderen i riktig rekkefølge. I motsatt fall
kan rester komme inn i systemet og forårsake en blokkering.
• IKKE bruk oppvaskmaskinen uten at filtrene er på plass. Hvis du setter filtrene tilbake på feil
måte, kan maskinens ytelse bli redusert og servise og redskaper kan bli skadet.
Page 46

46
NO
Spylearmer
Matrester kan sette seg fast i dysene og lagrene til
spylearmene. Du må derfor kontrollere og rengjøre
spylearmene regelmessig.
• Bruk en spiss gjenstand, f.eks. en tannpirker, til å løsne
matrester i dysene på spylearmene.
Forholdsregler ved frost
Ikke plasser oppvaskmaskinen på et sted hvor temperaturen er under 0 ˚C. Hvis apparatet skal stå på et
sted uten varme over vinteren, må du:
1. Kople enheten fra vanninntaket.
2. Skru på enheten. Velg en hvilken som helst vaskesyklus og la den gå i bare ett minutt. Dette tømmer ut
eventuelt vann som er igjen i enheten.
3. Kople fra stikkontakten.
4. Tøm oppvaskmaskinen.
5. Lukk oppvaskmaskindøren.
6. Kople enheten fra vannavløpet. Bruk en passende beholder til å fange opp vannet med.
Hvis du møter på problemer med trinnene over, kan du be en servicetekniker om hjelp.
Flytte oppvaskmaskinen
Hvis du må flytte enheten, for eksempel til et annet hus, må du:
1. Kople oppvaskmaskinen fra stikkontakten.
2. Kople enheten fra vanninntaket og -avløpet. Bruk en passende beholder til å fange opp vannet med.
3. Fjern enheten fra den gjeldende plasseringen med slangene koplet fra.
4. Dra enheten ut sammen med slangene.
Vedlikehold etter en lang periode uten bruk
Hvis du ikke har tenkt å bruke enheten på en lang stund, bør du:
1. Kople oppvaskmaskinen fra stikkontakten.
2. Kople enheten fra vanninntaket og -avløpet. Bruk en passende beholder til å fange opp vannet med.
3. Åpne døren på gløtt for å hindre at det oppstår vond lukt i vaskerommet.
4. Sørg for at oppvaskmaskinens vaskerom er rent.
Ikke prøv å fjerne spylearmene.
• Ikke tipp enheten under transport.
• Vi anbefaler at to personer håndterer oppvaskmaskinen under installasjonen.
Page 47

47
NO
Råd og tips
Feilkode
Koder Mulige årsaker Løsning
3-i-1-
programlyset
blinker
Vannkranen er ikke skrudd på. Skru på vannkranen.
Lavt vanntrykk (<0,04 MPa) Skru på vannkranen og påse at den er helt
åpen.
Strømningsmåleren er ødelagt.
• Kople fra stikkontakten.
• Kople fra vanninntaket.
• Tilkall en kvalifisert tekniker.
Ledningsterminalene som er tilkoplet
strømningsmåleren er løse.
Glass-
programlyset
blinker
Flottørbryteren er ødelagt eller
kretskortet har en feil.
Ledningsterminalene som er tilkoplet
flottørbryteren er løse eller brukne.
Tekniske problemer
Tekniske problemer
Problem Mulige årsaker Løsning
Oppvaskmaskinen starter ikke.
Døren er ikke helt lukket. Lukk døren godt.
Enheten er ikke koblet til
stikkontakten.
Sett støpslet inn i stikkontakten.
Enheten er ikke slått på. Trykk på «på/av»-knappen og velg et
program.
Tømmepumpen fungerer ikke
som den skal.
Antioversvømmelsessystemet
har vært i bruk.
• Kople fra stikkontakten.
• Kople fra vanninntaket.
• Tilkall en kvalifisert tekniker.
Reparasjoner må kun utføres av en kvalifisert tekniker i streng overholdelse med gjeldende lokale
og nasjonale sikkerhetsforskrifter. Uautorisert eller feilaktige reparasjoner kan føre til personskade
eller skade på enheten.
Page 48

48
NO
Generelle problemer
Problem Mulige årsaker Løsning
Det er rester av vaskepulver
i dispenseren ved slutten av
programmet.
Vaskemiddeldispenseren var
fremdeles fuktig da du fylte
vaskemiddel i den.
Sørg for at dispenseren er tørr før du
fyller vaskemiddel i den.
Kan ikke stenge
vaskemiddellokket.
En opphopning av
vaskepulverrester blokkerer
låsehaken.
Rengjør låsehaken.
Bankelyd i vaskerommet.
En spylearm banker mot noe i
en kurv.
Avbryt programmet og flytt på det
som blokkerer spylearmen. Se avsnittet
«Sette inn i oppvaskmaskinen».
Hinne vises på glass og bestikk.
Du bruker for mye
glansemiddel.
Juster skiven på
glansemiddeldispenseren til en lavere
innstilling.
Servise, bestikk og glass er ikke
tørre.
Mengden glansemiddel
kan være utilstrekkelig, eller
glansemiddelbeholderen er
nesten tom.
Fyll på glansemiddel, juster skiven
på glansemiddeldispenseren til en
høyere innstilling eller bytt til et annet
glansemiddelmerke.
Steintøy ble tatt ut av
oppvaskmaskinen for fort.
La steintøyet være oppvaskmaskinen
til du hører en lyd.
Hvite rester er synlig på bestikk
og steintøy, skygger vises på
glass; film som kan tørkes av.
Ikke nok glansemiddel ble brukt. Fyll på glansemiddel, juster skiven
på glansemiddeldispenseren til en
høyere innstilling eller bytt til et annet
glansemiddelmerke.
Det er ikke nok salt i
saltbeholderen.
Fyll opp saltbeholderen.
Lokket på saltbeholderen har
ikke blitt riktig skrudd på.
Påse at det er skrudd riktig på.
Feil vaskemiddel har blitt brukt. Skift vaskemiddel. Bruk vanlig
vaskemiddel for oppvaskmaskiner.
Saltforbruksinnstillingen er for
lav.
Velg en høyere saltforbruksinnstilling.
Glass er matte og misfargede;
film kan ikke tørkes av.
Glasset er ikke
oppvaskmaskinsikkert.
Overflatene er påvirket.
Vask glass som ikke er
oppvaskmaskinsikkert for hånd.
Te- eller leppestiftflekker har
ikke blitt fullstendig fjernet.
Vasketemperaturen til det valgte
programmet var for lav.
Velg et program med en høyere
temperatur.
Vaskemidlet som brukes er for
lite blekende.
Skift vaskemiddel.
Skylling eller fjerning av flekker
på forhånd ble utelatt.
Forhåndsskyll eller fjern flekkene med
en serviett før oppvask.
Page 49

49
NO
Avhending av oppvaskmaskinen
• Når du avhender den gamle oppvaskmaskinen, må du først gjøre den umulig å bruke. Kople fra
slangene og kople fra strømledningen. Klipp av strømledningen fra oppvaskmaskinen. Ødelegg
dørlåsen, slik at barn ikke kan stenge seg inne ved et uhell. Sørg for forsvarlig avhending av
oppvaskmaskinen.
• Produktet må ikke kastes som husholdningsavfall når det ikke lenger skal brukes. Den må tas med til
et innsamlingssted for elektrisk og elektronisk avfall eller til en forhandler som utfører denne tjenesten.
Separat avhending av et husholdningsapparat avverger eventuelle negative konsekvenser for miljøet
og helsen som kan forekomme ved feilaktig avhending og gjør det mulig å bruke enkelte deler om
igjen, noe som betyr betydelig redusert energi- og ressursforbruk. Som en påminnelse om å avhende
husholdningsapparatet separat fra annet avfall, er produktet merket med en overkrysset søppelkasse.
• Sørg for at den ikke utgjør noen fare for barn mens den oppbevares for avhending.
Kassere emballasje
Kast plastemballasjen og posene på en forsvarlig måte og hold dem utenfor barns rekkevidde.
Page 50

50
NO
Spesikasjoner
Modell MDWTT11E
Mål 550 mm (B) x 500 mm (D) x 438 mm (H)
Kapasitet 6 kuvertinnstillinger
Nødvendig vanntrykk 0,04 – 1,00 MPa
Strømforbruk 1280 W
Spenningskrav 230V 50Hz vekselstrøm
Strømforbruk avslått 0,7 W
Strømforbruk i ventemodus 0,73 W
Energieffektivitetsklasse
1
A
Årlig strømforbruk
2
185 kWh
Strømforbruk i en standard rengjøringssyklus 0,65 kWh
Årlig vannforbruk
3
2380 liter
Tørkeeffektivitetsklasse
4
B
Standard rengjøringssyklus
5
ØKO 55°C
Programvarighet i en standard rengjøringssyklus 170 min
Støynivå 55 dB(A) re 1 pW
Montasje Frittstående
Kan være innebygd Ja
Funksjoner og spesifikasjoner kan endres uten varsel.
Merk:
1
A + + + (høyeste effektivitet) til D (laveste effektivitet)
2
Strømforbruk «185» kWh per år, basert på 280 standard rengjøringssykluser med tilkopling til kaldt
vann og bruk av strømsparende innstillinger. Virkelig strømforbruk avhenger av hvordan apparatet
brukes.
3
Vannforbruk «2380» liter per år, basert på 280 standard rengjøringssykluser. Virkelig vannforbruk
avhenger av hvordan apparatet brukes.
4
A (høyeste effektivitet) til G (laveste effektivitet)
5
Dette programmet passer for rengjøring av normalt tilsmusset dekketøy og er det mest effektive
programmet sett ut fra dets kombinerte forbruk av energi og vann for denne typen dekketøy.
Enheten imøtekommer europeiske standarder og EU-direktiver i den gjeldende versjonen ved
leveranse:
- LVD 2006/95/EC
- EMC2004/108/EC
- ERP 2009/125/EC
Verdiene ovenfor er målt i samsvar med standarder under angitte driftsbetingelser. Resultater kan
variere sterkt i forhold til mengde og tilsmussing av serviset, vannets hardhet, mengde oppvaskmiddel
osv.
Page 51

51
SE
Packa upp
Ta bort alt förpackningsmaterial från produkten. Spara förpackningen. Om förpackningen kastas ska du
följa gällande lokala föreskrifter.
Följande delar medföljer:
Huvudenhet
Monteringsklämma för
avloppsslang x 1
Art.nr.: 672005400002
Mätsked X 1
1 full sked = ca 20g
Art.nr.: 673002200079
Bruksanvisning X 1
Art.nr.: MDWTT11E-000
U-formad slanghållare X 1
Art.nr.: 673006200003
Salttratt X 1
Art.nr.:
673002200001
Avloppsslang X 1
Art.nr.:
673005400041
Mätkopp X 1
ca 60ml
Art.nr.: 673006200004
Säkerhetsinloppsslang
X 1
Art.nr.: 673000900093
Bestickkorg
Art.nr.:
673006200014
Denna produkt har testats för att
garantera korrekt funktion. Som
resultat kan det finnas vatten
kvar inuti enheten. Detta är
normalt och säkert. Ta bort alla
vattendroppar från utsidan om så
behövs.
Page 52

52
SE
INSTALLATION
1. Se till att diskmaskinen installeras av en
kvalificerad tekniker. Se vilka verktyg som
behövs.
Placering
När du väljer en tänkbar plats för din
bänkdiskmaskin, ska du se till att installationsytan
är plan och fast, och att rummet är väl ventilerat.
Undvik att placera diskmaskinen i närheten av
värmekällir som spis, kokare eller element. Extremt
kall miljö kan också skada produkten så att den inte
fungerar riktigt. Diskmaskinen är inte avsedd att
användas i garage eller i utomhusinstallation.
Täck inte över diskmaskinen. När den installeras, se
till att det finns fritt utrymme kvar på sidorna.
2. Se till att det finns spelrum på varje sida av
enheten för att möjliggöra lätt sidoförflyttning
när service krävs. Bra avvägning är väsentligt
för att luckan skall kunna stängas och tillslutas
korrekt. När enheten är korrekt avvägd skall
luckan inte ta tag i innerbeläggningen på någon
sida av skåpet.
Diskmaskinens mått är 550 (B) x 500 (D) X
438 (H) i mm. Siffrorna anger minimimåtten
som krävs för att bänkdiskmaskinen ska få
plats. Skydda plastdelar och sladdar från höga
temperaturer.
Alla borttagna delar måste sparas för att
återinstalleras senare. Se till att diskmaskinen
är tom och kontakten är urdragen. Vi
rekommenderar att 2 personer tar hand om
diskmaskinen när den installeras.
550mm
438mm
500mm
50mm
eller
mer
150mm eller mer
50mm eller mer
150mm eller mer
enhet i mm
Page 53

53
SE
INSTALLATION
4. Elektriska anslutningar måste uppfylla alla
specifikationer på diskmaskinens märkplåt.
Använd inte förlängningssladdar.
5. Placera produkten i närheten av en vattenkran
och ett vattenavlopp. Jämna ut höjden vid
behov.
3. Anslut inte enheten till eluttaget innan den
installerats. Se till att inte installera enheten
direkt framför eluttaget. Detta för att undvika
eventuella skador på enhetens baksida.
När produkten installerats, se till att kontakten är
lätt att komma åt.
6. Se till att vatten- och avloppsslangen inte vrider
sig eller kläms. Enheten får inte stå ovanpå
elsladden.
7. Lossa ringarna på avloppsslangens klämma
genom att vrida skruven moturs. Sätt
därefter i avloppsslangen genom ringarna
på avloppsslangens klämma för att tömma
avloppet ordentligt. Spänn avloppsslangens
klämma genom att vrida skruven medurs för att
fästa anslutningen mellan avloppsslangen och
avloppet.
upp ner
nivå
Ringar på avloppsslangens klämma
Medurs för att
dra åt
Moturs
för att lossa
Ringar på avloppsslangens klämma
Page 54

54
SE
INSTALLATION
• Fäst avloppsslangen till avloppet för att undvika
att den faller av under diskprocessen.
8. Se till att ditt rörsystem är lämpligt för att användas
med diskmaskinen. Om du är tveksam kontakta
en rörmokare. Denna enhet MÅSTE anslutas till
KALLVATTEN med den nya vattenslangen som
medföljer. GAMLA VATTENSLANGAR FÅR INTE
ANVÄNDAS. Vattentrycket från vattenledningarna
måste vara minst 0,04 MPa och maximalt 1,00 MPa.
• Anslut ena änden med aquastop av
säkerhetsvattenslangen till diskmaskinen
och anslut den andra änden av slangen
till vattenledningen. Se till att den svarta
gummiförseglingen finns på plats.
• Efter att slangen anslutits, vrid på vattenkranen
och kontroller om det finns läckor.
• Anslut diskmaskinens kontakt till vägguttaget.
Du kan använda en Y-adapter
(medföljer inte) för ytterligare
vattenutmatning för någon
annan apparat, exempelvis
en tvättmaskin. Denna är
endast lämplig för anslutning
till kallvatten. En Y-adapter
finns tillgänglig i de flesta
byggvaruhusen.
Om säkerhetstilloppsslangenOm
Säkerhetsinloppsslangen
Säkerhetstilloppsslangen har dubbla
väggar. Slangens system garanterar att den
ingriper genom att blockera vattenflödet
om tilloppsslangen går sönder och när
mellanrummet mellan tilloppsslangen och
den yttre förstärkta slangen är full med vatten.
• Avloppsröret får endast anslutas till
avloppet och inte till dagvattensystemet.
• Avloppsslangen bör placeras mellan
10 cm över bänkskivan och får inte
förlängas, i annat fall kan inte enheten
tömma ut smutsvattnet ordentligt.
• Du kan använda den u-formade
slanghållare för att fästa avloppsslangen
och för att undvika att den böjs.
• Böj inte avloppslangen.
• Lyft inte avloppsslangen högre än 10 cm från
bänkskivan, för annars kan inte produkten tappa
ut avloppsvattnet riktigt.
vattenledning
Y-adapter
(medföljer ej)
Anslut andra
apparater om
så behövs.
vatteninloppsslang
max.
10 cm
Stäng vattenposten efter användning.
Page 55

55
SE
Produktöverblick
Frontvy
Baksida
1. Strömbrytare och
indikationslampa
2. Kontrollpanel
3. Luckhandtag
4. Avloppsslang
5. Elsladd (Anslut till eluttaget)
6. Vattenintag (Anslut till inloppsslang)
4
2
5
6
1
3
Page 56

56
SE
Diskkorg och bestickkorg
Insidan
9. Saltbehållare
10. Sprayarmar
11. Filtreringssystem
12. Bestickkorg
13. Diskmedelsfack (dubbelt fack)
14. Sköljmedelsfack
7
12
9
10
8
11
13
14
7. Piggar
8. Koppställ
Page 57

57
SE
1. Strömförsörjningsindikator
• LED-lampan tänds när diskmaskinen är
påslagen.
2. På/Av-knapp
• För att slå på och stänga av diskmaskinen.
3.
Varningslampa salt påfyllning
• Lyser när saltbehållaren behöver fyllas på.
4.
Varningslampa påfyllning sköljmedel
• Lyser när sköljmedlet behöver fyllas på.
Start/PauseProgram
Kontrollpanel
3 4 721 5 6
5. Programknapp
• Välja diskprogram.
• Varje tryckning på knappen växlar från ett
diskprogram till ett annat.
6. Start-/Paus knapp
• Bekräfta och starta ett valt diskprogram.
• Återställa diskprogrammet.
7. Programindikatorer
• Tänds när diskprogrammet har valts.
• Blinkar när det valda diskprogrammet körs.
Page 58

58
SE
Diskcykeltabell
Program Period
Valinformation
cykel
Process
Diskmedel
Mängd (Fördisk / huvuddisk)
Körtid
(min.)
Energiförbrukning
(Kwh)
Vattenförbrukning
(I)
Sköljmedel
Intensiv • Grytor,
redskap
och bestick.
• Mycket
smutsiga.
• Fördisk (50°C)
• Disk (70°C)
• Sköljning
(70°C)
• Torkning
• Fördisk (3g)
• Huvuddisk (15g)
145 0,94 11
Normal • Grytor,
redskap
och bestick.
• Normalt
smutsad.
• Fördisk
• Disk (60°C)
• Sköljning
(70°C)
• Torkning
• Fördisk (3g)
• Huvuddisk (15g)
125 0,7 8,4
Ekonomi*
(EN50242)
• En kortare
disk för lätt
smutsad
disk.
• Fördisk
• Disk (55°C)
• Sköljning
(70°C)
• Torkning
• Fördisk (3g)
• Huvuddisk (15g)
170 0,65 8,5
Glas • Glas, kristall
och fint
porslin.
• Lätt
smutsade.
• Fördisk
• Disk (45°C)
• Sköljning
(60°C)
• Torkning
• Huvuddisk (15g) 75 0,48 6,8
Snabb • Glas och
koppar.
• Lätt
smutsade.
• Disk (40°C)
• Sköljning
(45°C)
• Huvuddisk (15g) 30 0,3 6
3-i-1 • Redskap
och bestick.
• Normalt
smutsad.
• Fördisk
• Disk (60°C)
• Sköljning
(70°C)
• Torkning
• Använd enbart 3-i-1
maskindisktablett
140 0,7 8,4
* För att uppfylla standardprestanda, d.v.s. EN50242, se till att använda ekonomidiskcykeln för testet.
Kondenstorkteknik
• Sparar energi genom att torka disken med restvärmen från den sista sköljningen.
• Diskprogramtiderna utökas genom denna torkmetod.
• Vissa diskprogram har ingen torkfunktion, se diskprogramtabellen för mer information.
Page 59

59
SE
●
●
Följande saker är inte lämpliga
Handdukar och svampar
Kristallglas
Silverbestick
Värdefulla vaser
Porslin som är spräckta eller med
flisor borta
Små plastföremål
(Nappflaskor)
Gjutjärnsstekpannor
Repiga teflonbehandlade köksredskap
Koppargrytor och pannor
Plastföremål som inte
tål att diskas i diskmaskin
Innan användning
För att öppna luckan
• Dra i luckhandtaget.
• Om luckan öppnas under driften kommer alla funktioner att avbrytas automatiskt.
För att stänga luckan
• Efter att fyllt på disk, skjut in korgen helt i diskmaskinen.
• Lyft luckan uppåt och skjut in den tills den klickar på plats.
• Smäll inte igen diskmaskinens lucka.
Föremål som inte är lämpliga att använda i diskmaskinen
När du köper nytt porslin och matbestick se till att de är godkända för diskmaskinen. Vissa föremål är inte
lämpliga för diskmaskiner.
• Träredskap och lerkärl eller föremål med träddetaljer kan missfärgas och blekna. Limmet som används i
dessa föremål tål inte maskindisk och trähandtag kan lossna efter att de diskats i en diskmaskin.
• Hantverk, antikviteter, värdefulla vaser och dekorerade glasföremål är inte heller lämpliga för
diskmaskinen.
• Plastföremål (t.ex. tupperware) som inte är värmetåliga kan smälta eller tappa formen på grund av den
höga temperaturen i diskmaskinen.
• Koppar, mässing, tenn och aluminium kan missfärgas eller bli matta.
• Grumlighet kan uppträda på glas och fina glasföremål efter regelbunden diskning. Diska inte fina
glasföremål eller glasförmål som innehåller blykristall i diskmaskinen. Diska fina glasföremål för hand
istället.
• Silver och aluminiumdelar har en tendens att missfärgas under maskindiskning. Rester såsom äggvita,
ägggula och senap ger ofta missfärgning och fläckar på silver. Därför bör dessa rester tas bort från
silver omedelbart efter anvädningen.
Page 60

60
SE
Bleach and
Countertop detergent
Blekmedel och
toppmatningsdiskmedel
• Förvaras utom räckhåll för barn
• Irriterar ögonen.
• Undvik kontakt med ögon. Vid kontakt med ögonen, skölj omedelbart
med rikligt med vatten och kontakta läkare.
• Om det sväljs kontakta läkare omedelbart.
Tillsätta diskmedel eller diskmedelstablett
Använd endast diskmedel som speciellt tillverkats för att användas i diskmaskiner. För att vara mer
miljövänlig bör endast korrekt mängd maskindiskmedel användas.
Följ nedanstående steg för att fylla på diskmedelsfacket.
1. Tryck på knappen på locket till diksmedelsfacket i
pilens riktning tills locket öppnas av fjädern.
2. Fyll diskmedelsfacket med maskindiskmedel eller
lägg i en diskmedelstablett. Markeringen indikerar
påfyllnadsnivån.
Irriterande
diskmedel fördisk
diskmedelsfack huvuddisk
eller
3. Alla program med fördisk behöver ytterligare
diskmedelsdosering som måste placeras i
fördiskfacket (se diskprogramtabellen). Detta
diskmedel får effekt under fördisken.
4. Stäng locket noga så att det klickar på plats.
Du kan välja att bara lägga till en
maskindisktablett eller att lägga till
maskindiskpulver både i huvuddiskfacket och i
fördiskfacket för ditt valda diskprogram.
skjut upp från höger sida
Page 61

61
SE
Alternativt kan du bedöma mängden sköljmedel genom att kontrollera sköljmedelsindikatorn bredvid
diskmedelslocket. När indikatorn är svart betyder det att behållaren är full. När den är ljus betyder det att
den är nästan tom.
Inställning sköljmedelsbehållaren
Sköljmedelsbehållaren har sex inställningar. Både den
rekommenderade inställningen och fabriksinställningen är “4”. Om
disken inte torkar ordentligt eller har fläckar, ställ in skivan på nästa
högre siffra tills din disk är fläckfri.
Sköljmedel
Sköljmedel hjälper till så att vatten inte fastnar och lämnar märken på porslin under torkfasen och hjälper
porslin att torka snabbare efter att de diskats. Häll endast sköljmedel som är till för hushållsdiskmaskiner i
behållaren. Denna modell är konstruerad för att endast använda flytande sköljmedel.
Följ stegen nedan för att hälla sköljmedlet i behållaren och medlet kommer att fördelas automatiskt.
1. Vrid på locket och öppna såsom indikeras.
2. När märkningarna på locket är i linje kan du
lyfta upp locket.
3. Häll i sköljmedlet till nivåindikatorn blir helt
svart och stäng locket.
4. Var noga med att inte överfylla behållaren.
Torka upp eventuellt spill. Den ungefärliga
volymen hos sköljmedelsbehållaren är 110ml.
öppen
sköljmedelsindikator
Sköljmedlets varningslampa kommer att lysa när behållaren
börjar bli tom och behöver fyllas på.
varningslampa
för sköljmedel
Om vattnet i ditt område är mjukt behöver du
inget sköljmedel eftersom det kan göra att det
bildas en vit film på disken.
Page 62

62
SE
Lägga till salt
Om vatten i ditt område är hårt kommer avlagringar att bildas på disken
och redskapen. Denna apparat har en saltbehållare som är till för att
minska hårdheten hos vattnet.
Följ stegen nedan för att hälla salt i saltbehållaren och den måste ställas
in så att den motsvarar vattnets hårdhet i ditt område.
1. Ta bort korgen och skruva av behållarens lock.
2. Fyll behållaren med ungefär 500ml vatten (endast vid första
användningen).
3. Placera den medföljande tratten över saltbehållaren.
4. Häll i ungefär 1,2 kg diskmaskinssalt bveroende på vilket varumärke
som används.
5. Ta bort överskottssalt runt behållarens öppning och skruva sedan
fast locket igen.
6. Kör "eco"-programmet omedelbart (utan något porslin i
diskmaskinen) för att ta bort alla spår av salt från innandömet.
Saltvarningslampan kommer att lysa när behållaren börjar få
slut på salt och behöver fyllas på.
Saltvarningslampan kommer att sluta att lysa inom fem dagar
beroende på hur snabbt saltet löses upp.
saltvarningslampa
OPEN
öppen
öppen
öppen
Page 63

63
SE
Ladda diskmaskinen
Innan diskmaskinen laddas
Observera följande noteringar innan du fyller på med bestick och porslin i korgen.
• Ta bort läppstiftsfläckar och matrester från porslin och skålar. Skölj om så behövs.
• Skålar och bestick bör inte ligga inuti varandra eller täcka varandra.
• Ladda bestick och porslin så att vattnet kan komma åt alla sidor.
• Se till att alla poster är säkert placerade.
• Ihåliga poster såsom koppar, glas, pannor etc måste placeras upp och ned i korgen.
• Poster med bred bas måste placeras i vinkel så att vattnet fritt kan rinna av dem.
• Sprayarmarna får inte blockeras med föremål som är för stora eller hänger ut ur korgen. Om du är
tveksam prova att manuellt rotera på sprejarmarna.
• Se till att små föremål inte faller igenom hållarna i korgen.
Diska inte föremål som är nedsmutsade med aska, sand, vax, smörjfett eller färg i diskmaskinen.
Aska löses inte upp och kan finfördelas i diskmaskinen. Vax, sand, smörjfett och färg kan skada
diskmaskinen.
Page 64

64
SE
Diskmaskinskorg
Använd diskmaskinskorgen för små och lätta föremål som
koppar, tefat, glas, dessertskålar osv.
Långa föremål såsom soppslevar, slevar och långa knivar bör
placeras liggande på tvären mot korgens framsida.
Fällbart koppställ
För att ge plats åt större föremål i diskmaskinen, lyft upp
koppstället. Du kan luta de stora glasen mot det. Du kan
också ta bort det när det inte behövs.
Lyft uppåt
Vik bakåt
Skjut och knäpp
Nedfällbara piggar
Piggarna används för att hålla fast tallrikar och uppläggningsfat. De kan sänkas ned för att göra plats för
större föremål. Se nedan för hur piggarna öppnas setgvis.
Av säkerhetsskäl skall inte diskmaskinen användas utan att korgen finns på plats.
Page 65

65
SE
Bestickkorg
Ladda bestickkorgen
För att göra urplockningen enklare bör besticken grupperas
i zooner och placeras i bestickkorgen. Se tabellen nedan för
placeringsmetod.
Antal Post
1 Gafflar
2 Soppskedar
3 Dessertskedar
4 Teskedar
5 Knivar
6 Serveringsskedar
7 Såsslevar
8 Serveringsgaffel
Ladda diskmaskinskorgen med 6 kuvert
För laddning av diskmaskinskorgen, se tabellen nedan.
Antal Post
1 Koppar
2 Mellanstora serveringsskålar
3 Glas
4 Fat
5 Disk
6 Ovala uppläggningsfat
7 Mattallrikar
8 Sopptallrikar
9 Dessertfat
10 Bestickkorg
• Låt inget föremål sticka ut genom botten på
korgen.
• För att undvika risken för skador placera
knivar och gafflar med skaftet uppåt. Håll inte
dem i deras vassa kanter.
• Bestickkorgen levereras med lock som är
konstruerade så att du kan placera besticken
i lämpliga fack. Om du använder korgen
utan locket kan det försämra resultatet för
sköljningen av besticken.
• Se till att locket är fastlåst på korgen innan
diskningen.
• För att uppfylla standardprestandan, d.v.s.
EN50242, måste alla besticken placeras i
enlighet med instruktionen i denna manual.
1
6
9
8
7
3
5
1
2
4
3
10
3
IN
6 1 6
2
1
1
1
2
5
55
1
2
5
5
1
4
3
3
3
3
4
4
4
7
3
5
4
4 8
3
2
2 2
IN
Page 66

66
SE
Start av diskcykeln
Följ stegen nedan för att starta en diskcykel.
1. Se till att enheten är ansluten till elströmmen och att vattenförsörjningen är på (vattentryck mellan 0,04
MPa och 1,00 MPa).
2. Öppna dörren. Dra ut diskmaskinskorgen, ladda disken och skjut tillbaka korgen.
3. Häll i maskindiskmedel eller placera diksmedelstabletten i facket och stäng ordentligt efteråt.
4. Stäng diskmaskinens lucka. Ett klickljud hörs är luckan är stängd korrekt. Smäll inte igen luckan.
5. Tryck på På/Av-knappen.
6. Välj diskprogram baserat på kraven efter hur mycket disk det är och hur smutsig den är. Se
"Diskprogramtabell" (sidan 11).
7. Strömindikatorlampan för det valda programmet tänds.
8. Tryck på Start/Paus-knappen, så startar strax diskprogrammet.
Byte av program
För att byta programmet när diskcykeln redan har startat, följ stegen nedan.
1. Öppna luckan något för att kontrollera om enheten har tömt diskmedlet eller diskmedelstabletten.
Detta beror på hur länge diskningen har pågått.
2. Om diskmedelsfacket är öppet föreslår vi att du låter diskningen avslutas.
3. Om locket till diskmedelsfacket fortfarande är stängt, tryck på På/Av-knappen för att avbryta
programmet. Du kan därefter stänga diskmaskinens lucka och trycka på På/Av-knappen igen. Tryck
sedan på önskad programknapp och bekräfta valet genom att trycka på Start/Paus-knappen. Enheten
kommer att starta den nya diskcykeln strax efter.
Vid slutet av programmet
Vid slutet av programmet kommer diskmaskinen att avge ett ljud.
Om du öppnar diskmaskinens lucka under diskningen och sedan stänger den igen kommer
nuvarande diskprogram att fortsätta diskningen efter 10 sekunder. Om luckan inte stängs korrekt
efter 1 minut kommer diskmaskinen att avge ett ljud i intervaller om 1 minut.
Page 67

67
SE
Stänga av enheten
För energibesparing kom ihåg att stänga av diskmaskinen med PÅ/AV-knappen. Diskmaskinen fortsätter
att använda elektricitet tills den stängs av med PÅ/AV-knappen.
Om diskmaskinen inte kommer att användas under en längre period, t.ex. vid semester, bör enheten
kopplas ur strömuttaget.
Urplockning av diskmaskinen
Att låt disken svalna innan den plockas ut är viktigt eftersom disken tenderar att gå sönder och flisas lättare
när den är het. Därför, om du öppnar diskmaskinens lucka helt efter avstängningen, kommer disken att
svalna mycket fortare.
Page 68

68
SE
Inre vård
Filtreringssystem
Filtreringssystemet i botten av diskmaskinen samlar upp större partiklar av smutslösningar. Koncentration
av dessa partiklar kan göra att filtret blockeras. Kontrollera filtret regelbundet och rengör om så behövs
under rinnande vatten.
Följ stegen nedan för att göra rent filtret i diskmaskinen.
1. Se till att diskmaskinen är avstängd.
2. Skruva loss grov- och finfiltret.
3. Lyft försiktigt ut grov- och finfiltren.
4. Lyft finfiltret försiktigt.
5. Skölj alla filter under rinnande vatten, inklusive filtercylindern, och sätt sedan tillbaka filtren i följande
ordning.
6. Sätt tillbaka finfiltret försiktigt.
7. Skruva försiktigt tillbaka grovfiltret i medurs riktning.
Rengöring efter användning
Yttre vård
Luckan och lucktätningen
• Rengör luckans tätning regelbundet med en mjuk fuktad trasa och ta bort matrester.
• När diskmaskinen laddas kan matrester och vätska droppa ned på sidan av diskmaskinens lucka.
Dessa ytor på utsidan av diskmaskinens hölje är inte åtkomliga för vattnet från sprejarmarna. Alla
beläggningar bör torkas av innan luckan stängs.
Kontrollpanelen
Om rengöring krävs bör kontrollpanelen ENDAST torkas av med en fuktig trasa.
Stäng
Öppna
Huvudlter
Grov- och
nlter
Filtercylinder utan
ltret
För
ner
Skjut in
• För att undvika att vatten tränger in i luckans lås och elektriska komponenter skall inte någon
form av sprejrengöring användas.
• Använd aldrig slipande rengöringsmedel eller skurkuddar på yttre ytor eftersom de kan skrapa
ytans finish. Vissa pappershanddukar kan också skrapa eller lämna märken på ytan.
• Dra inte åt filtren för hårt. Sätt tillbaka filtren ordentligt i filtercylindern, så att inte rester kan
komma in i systemet och täppa till.
• Använd ALDRIG diskmaskinen utan att filtren sitter på plats. Felaktig placeing av filtren kan
försämra prestandan hos apparaten och skada porslin och redskap.
Page 69

69
SE
Sprayarmar
Matpartiklar kan fastna i sprejarmarnas munstycken och
lager. Sprejarmarna bör därför kontrolleras och rengöras
regelbundet.
• Använd ett spetsigt föremål t.ex. en tandpetare för att
lossa matpartiklar i sprejarmarnas munstycken.
Frostskydd
Undvik att placera diskmaskinen på platser där temperaturen är under 0 °C. Om apparaten lämnas i ett
ouppvärmt utrymme över vintern bör du:
1. Koppla ifrån enheten från vattenuttaget.
2. Starta enheten. Välj någon diskcykel och låt den köras endast 1 minut. Detta möjliggör tömning av allt
kvarvarande vatten i enheten.
3. Koppla bort den från elnätet.
4. Töm diskmaskinen.
5. Stäng diskmaskinens lucka.
6. Koppla ifrån enheten från vattenavloppet. Använd ett lämpligt kärl för att samla upp vattnet.
Skulle du stöta på några svårigheter med ovanstående steg, rådfråga en servicetekniker om hjälp.
Flyttning av diskmaskinen
Om du måste flytta enehten, exempelvis om du flyttar bör du:
1. Koppla bort diskmaskinen från elnätet.
2. Koppla ifrån enheten från vattenintaget och avloppet. Använd ett lämpligt kärl för att samla upp
vattnet.
3. Ta bort enheten från nuvarande placering med slangarna bortkopplade.
4. Dra ut enheten tillsammans med slangarna.
Underhåll efter en lång period utan användning
Om du inte kommer att använda enheten under en längre period bör du:
1. Koppla bort diskmaskinen från elnätet.
2. Koppla ifrån enheten från vattenintaget och avloppet. Använd ett lämpligt kärl för att samla upp
vattnet.
3. Öppna luckan något för att förhindra att obehaglig lukt uppstår i maskinen.
4. Se till att diskmaskinens insida är ren.
Försök inte att ta bort sprejarmarna.
• Undvik att luta enheten under transporten.
• Vi rekommenderar att 2 personer tar hand om diskmaskinen när den installeras.
Page 70

70
SE
Tips och råd
Felkod
Koder Möjlig orsak Möjlig åtgärd
3-i-1-
programlampan
blinkar
Vattenkranen är inte öppnad. Öppna vattenkranen.
Lågt vattentryck (<0,04MPa) Vrid på vattenkranen och se till att den är helt
öppnad.
Flödesmätaren är trasig.
• Koppla bort den från elnätet.
• Koppla ifrån vattenintaget.
• Ring efter en kvalificerad tekniker.
Ledningsterminalen där
flödesmätaren är ansluten är lös.
Glasprogramlampan
blinkar
Flödesbrytaren är trasig eller PCB
är fel.
Ledningsterminalen som är ansluten
till flödesbrytaren är lös eller trasig.
Tekniska problem
Tekniska problem
Problem Möjlig orsak Möjlig åtgärd
Diskmaskinen startar inte.
Luckan är inte ordentligt stängd. Stäng luckan.
Enheten är inte ansluten till
elnätet.
Anslut kontakten till vägguttaget.
Enheten är påslagen. Tryck “på” knappen och välj ett
program.
Tömningspumpen fungerar inte
ordentligt.
Översvämningsskyddet har varit
igång.
• Koppla bort den från elnätet.
• Koppla ifrån vattenintaget.
• Ring efter en kvalificerad tekniker.
Reparationer bör endast utföras av en kvalificerad tekniker i strikt överensstämmelse med
nuvarande lokala och nationella säkerhetsbestämmelser. Obehörig eller felaktig reparation kan
orsaka personskador eller skador på enheten.
Page 71

71
SE
Allmänna problem
Problem Möjlig orsak Möjlig åtgärd
Rester av maskindiskmedlet
finns kvar i facket när
programmet är avslutat.
Diskmedelsfacket var
fortfarande fuktigt när
diskmedlet hälldes i.
Se till att facket är torrt innan
diskmedlet hälls i.
Diskmedelsfackets lucka kan
inte stängas ordentligt.
Tilltäppta rester av diskmedel
blockerar haken.
Rengör haken.
Knackande ljud i diskmaskinen.
En sprejarm knackar mot något
föremål i korgen.
Avbryt programmet och placera om
föremålen som påverkar sprejarmen.
Se avsnittet "ladda diskmaskinen".
Fläckar visas på glas och bestick.
Sköljmedelsdosen är för högt
inställd.
Ändra ratten för sköljmedelsdispensern
till en lägre nivå.
Tallrikar, bestick och glas är inte
torra.
Mängden sköljmedel kanske är
otillräckligt eller så är behållaren
nästan tom.
Fyll på behållaren, justera mängden
sköljmedel till en högre inställning eller
byt märke på sköljmedlet.
Porslinet har tagits ut från
diskmaskinen för tidigt.
Låt porslinet vara kvar i diskmaskinen
tills du hör ett ljudligt ljud.
Vita beläggningar är synliga
på besticken och porslinet,
grumlighet uppstår på
glasföremål, film kan torkas
bort.
Inte tillräckligt med sköljmedel
används.
Fyll på behållaren, justera mängden
sköljmedel till en högre inställning eller
byt märke på sköljmedlet.
Det finns inte tillräckligt med
salt i saltbehållaren.
Fyll på saltbehållaren.
Saltbehållarens lock har inte
skruvats på korrekt.
Se till att den skruvas tillbaka korrekt.
Fel diskmedel har använts. Byt diskmedel. Använd ett standard
diskmaskinspulver.
Saltförbrukningen är inställd för
lågt.
Välj en högre inställning för
saltförbrukningen.
Glasföremål är matta och
missfärgade, film kan inte torkas
bort.
Glasföremålet är inte
diskmaskinssäkert. Ytorna är
påverkare.
Tvätta glasföremål som inte är
diskmaskinssäkra för hand.
Te eller läppstiftsfläckar har inte
tagits bort helt och hållet.
Disktemperaturen hos det valda
programmet är för låg.
Välj ett program med en högre
disktemperatur.
Blekeffekten som diskmedlet
som används är för låg.
Byt diskmedel.
Glömt att skölja bort eller ta
bort fläckar med en servett
innan diskningen.
Förskölj eller ta bort fläckar med en
servett innan diskningen.
Page 72

72
SE
Avyttring av diskmaskinen
• När du avyttrar din gamla diskmaskin gör den först obrukbar. Koppla ifrån slangarna och koppla bort
elkabeln. Klipp bort elkabeln från diskmaskinen. Gör lucklåset obrukbart så att barn inte oavsiktligt kan
stänga in sig själva. Kasta diskmaskinen på ett lämpligt sätt.
• Vid slutet av sin livstid får inte produkten kastas som hushållsavfall. Den måste lämnas in hos ditt
lokala avfallshanteringscenter eller till en återförsäljare som tillhandahåller denna tjänst. Kasseras
en hushållsmaskin separat förhindrar man negativa effekter på miljö och hälsa genom felaktig
avfallshantering och gör det möjligt att återanvända materialet i produkten och spara energi och
naturresurser. Produkten är markerad med en överkryssad soptunna på hjul för att påminna om att den
ska kasseras separat från hushållsavfall.
• Se till att den inte utgör någon fara för barn när den förvaras för avyttring.
Avyttring av förpackningsmaterial
Kassera plastförpackningen/påsarna på ett säkert sätt och håll utom räckhåll för spädbarn och små barn.
Page 73

73
SE
Specikationer
Modell MDWTT11E
Mått 550 mm (B) x 500 mm (D) x 438 mm (H)
Kapacitet 6 kuvert
Vattentryck som krävs 0,04 - 1,00MPa
Strömförbrukning 1280W
Märkspänning 230V~50Hz
Elförbrukning i Av-läge 0,7W
Strömförbrukning på viloläge 0,73W
Energieffektivitetsklass
1
S
Energiförbrukning
2
185 kWh
Energiförbrukning för normalt diskprogram 0,86 kWh 0,65 kWh
Energiförbrukning
3
2380 liter
Torkeffektivitetsklass
4
B
Normalt diskprogram
5
ECO 55°C
Programmets längd för normalt diskprogram 0,86
kWh
170 min
Bullernivå 55 dB(A) re 1 pW
Montering fristående
Kan byggas in Ja
Egenskaper och specifikationer kan ändras utan föregående meddelande.
Notera:
1
A + + + (mest effektiv) till D (minst effektiv)
2
Energiförbrukning “185” kWh per år, basedrat på 280 standarddiskprogram med påfyllning av kallt
vatten och förbrukningen på lågenergilägena. Faktisk energiförbrukning beror på hur produkten
används.
3
Vattenförbrukning “2380” liter per år, baseras på 280 standarddiskprogram. Faktisk vattenförbrukning
beror på hur produkten används.
4
A (mest effektiv) till G (minst effektiv)
5
Detta program lämparsig för att diska normalt smutsad matservis och det är det mest effektiva
programmet när det gäller kombinationen av energi- och vattenförbrukning för den typen av
matservis.
Produkten uppfyller europeisk standard och direktiven i nuvarande version vid leveransen:
- LVD 2006/95/EG
- EMC2004/108/EG
- ERP 2009/125/EG
Ovanstående värden har uppmätts i enlighet med standarder under spcificerade arbetsförhållanden.
Resultaten kan variera mycket beroende på mängden och nersmutsningen av disken, vattnets hårdhet,
mängden diskmedel osv.
Page 74

74
FI
Pakkauksesta purkaminen
Poista kaikki pakkausmateriaali laitteesta. Säilytä pakkaus. Jos hävität pakkauksen, tee se paikallisten
säädösten mukaisesti.
Seuraavat nimikkeet kuuluvat toimitukseen:
Laite
Poistoletkun
kiinnityskiristin x 1
Osanro: 672005400002
Pesuainemittalusikka x 1
1 täysi lusikallinen = 20g (noin)
Osanro: 673002200079
Käyttöopas x 1
Osanro: MDWTT11E-000
U:n muotoinen
letkunpidike x 1
Osanro: 673006200003
Suolasuppilo x 1
Osanro:
673002200001
Poistoletku x 1
Osanro:
673005400041
Mittakuppi x 1
60ml (noin)
Osanro: 673006200004
Veden
varmuussyöttöletku x 1
Osanro: 673000900093
Ruokailuvälinekori
Osanro:
673006200014
Tämä tuote on märkätestattu
oikean toiminnan varmistamiseksi.
Sen seurauksena laitteen sisään
on saattanut jäädä hieman vettä.
Tämä on normaalia ja turvallista.
Poista vesipisarat ulkopinnalta, jos
on tarpeen.
Page 75

75
FI
ASENNUS
1. Varmista, että pätevä asentaja asentaa
astianpesukoneen. Katso lisätietoja vaadittavista
työkaluista.
Paikka
Kun valitset paikkaa pöytäastianpesukoneelle,
varmista, että asennustaso on tasainen ja luja,
ja että huone on hyvin tuuletettu. Älä sijoita
astianpesukonetta lähelle lämmönlähdettä, kuten
liesi, boileri tai lämpöpatteri. Myös hyvin kylmä
ympäristö voi saada koneen toimimaan huonosti.
Tätä astianpesukonetta ei ole tarkoitettu autotallitai ulkokäyttöön.
Älä päällystä astianpesukonetta millään peitteellä.
Kun asennat, varmista, että kummallekin puolelle jää
tyhjää tilaa.
2. Varmista, että laitteen kummallakin puolella
on riittävästi tilaa, joka sallii tarvittaessa pienen
sivuttaisliikkeen huoltoa varten. Hyvä vaaitus
on olennaista luukun oikean sulkeutumisen
ja tiiviyden kannalta. Kun laite on oikein
vaaitettu, luukun ei pitäisi tarttua sisävaippaan
kummallakaan puolella kaappia.
Astianpesukoneen mitat ovat 550 (L) x 500 (S) X
438 (K) mm. Luvut osoittavat minimimitat tilalle,
johon pöytäastianpesukone sijoitetaan. Suojaa
muoviosat ja kaapelit korkeilta lämpötiloilta.
Kaikki poistetut osat on säästettävä
uudelleenasennusta varten tulevaisuudessa.
Varmista, että astianpesukone on
kytketty pois päältä ja tyhjennetty. On
suositeltavaa, että kaksi henkilö käsittelee
astianpesukonetta asennuksen aikana.
550mm
438mm
500mm
50mm tai
enemmän
150mm tai enemmän
50mm tai enemmän
150mm tai
enemmän
mitat
millimetreinä
Page 76

76
FI
ASENNUS
4. Sähköliitännän on oltava astianpesukoneen
tehokilven määritysten mukainen. Älä käytä
jatkojohtoja.
5. Sijoita astianpesukone vesihanan ja
tyhjennysputken viereen. Säädä kone
tasapainoon.
3. Älä liitä laitetta pistorasiaan ennen asennusta.
Varmista, ettet asenna laitetta aivan pistorasian
eteen. Tällä vältetään laitteen takaosan
mahdollinen vahingoittuminen.
Kun olet asentanut koneen, varmista että
virtapistoke on helppopääsyisessä paikassa.
6. Varmista ettei veden tulo- ja tyhjennysletkut ole
vääntyneitä tai litistyneitä. Laitetta ei saa asentaa
virtakaapelin päälle.
7. Löysää tyhjennysputken kiristimen renkaita
kiertämällä ruuvia vastapäivään. Aseta sitten
tyhjennysletku tyhjennysletkun kiristimen
renkaiden läpi lujasti vedenpoistoon. Kiristä
poistoletkun kiristin kiertämällä ruuvia
myötäpäivään kiristääksesi poistoputken ja
vedenpoiston liitännän.
ylös alas
taso
Poistoletkurenkaat
Letkun kiristin
Myötäpäivään
kiristys
Vastapäivään
löysääminen
Poistoletkurenkaat
Letkun kiristin
Page 77

77
FI
ASENNUS
• Kiinnitä vedenpoistoletku poistoputkeen
välttääksesi sen irtoamisen pesun aikana.
8. Varmista, että vesijohtoputkisto on sovelias
astianpesukonekäyttöön. Jos et ole varma, ota
yhteys pätevään putkimieheen. Tämän laitteen SAA
kytkeä vain KYLMÄVESIJOHTOHANAAN uudella
vedensyöttöletkulla. VANHOJA LETKUSARJOJA
EI SAA KÄYTTÄÄ UUDELLEEN. Vesihanan veden
paineen on oltava vähintään 0,04 MPa ja enintään
1,00 MPa
• Liitä veden turvasyöttöletkun vesipysäyttimen
toinen pää astianpesukoneeseen ja sen jälkeen
toinen pää vesihanaan. Varmista, että musta
kumitiiviste on paikoillaan.
• Kun olet liittänyt letkun, avaa vesihana ja tarkista
vuodot.
• Liitä astianpesukoneen sähköpistoke
seinäpistorasiaan.
Voit käyttää Y-sovitinta (ei kuulu
toimitukseen) lisävedensyöttöä
varten toiselle laitteelle, esim.
pesukoneelle. Tämä soveltuu vain
kylmävesihanaan. Y-sovittimen
voi hankkia useimmista alan
liikkeistä.
Tietoja veden varmuussyöttöletkusta
Varmuussyöttöletku koostuu kakoisseinämistä.
Letkun järjestelmä takaa sen toiminnan
estämällä veden tuloletkun veden virtauksen
letkun rikkoutuessa, ja kun ilmatila vesiletkun
itsensä ja ulkoisen aaltopintaisen putken
välillä on täynnä vettä.
• Poistoputken saa liittää vain
viemäriputkistoon, ei pintavesien
kuivausjärjestelmään.
• Vedenpoistoletku tulee liittää alle 10 cm
korkeudelle lattiatasosta eikä sitä saa jatkaa,
muuten laite ei ehkä kykene poistamaan
vettä kunnolla.
• Voit käyttää poistoletkun kiinnittämiseen
U:n muotoista poistoletkun pidikettä
välttääksesi letkun taittamisen.
• Älä taita vedenpoistoletkua
• Älä nosta poistoletkua yli 10 cm korkeammalle
pöydän pintaa, muuten kone ei pysty poistamaan
vettä kunnolla.
Vesihana
Y-sovitin
(ei kuulu
toimitukseen)
Liitä toiseen
laitteeseen,
jos on
tarpeen.
vedensyöttöletku
enint.
10cm
Sulje vesiposti käytön jälkeen.
Page 78

78
FI
Tuotteen yleiskatsaus
Näkymä edestä
Näkymä takaa
1. Virtapainike ja merkkivalo
2. Ohjauspaneeli
3. Luukun kahva
4. Poistoletku
5. Virtakaapeli (Liitä sähköpistorasiaan)
6. Veden tulo (vedensyöttöletkun liittämiseen)
4
2
5
6
1
3
Page 79

79
FI
Astianpesukoneen kori ja ruokailuvälinekori
Näkymä sisältä
9. Suolasäiliö
10. Suihkuvarret
11. Suodatusjärjestelmä
12. Ruokailuvälinekori
13. Pesuaineannostelija (kaksiosastoinen)
14. Huuhtelukirkasteannostelija
7
12
9
10
8
11
13
14
7. Pidikkeet
8. Kuppitelineet
Page 80

80
FI
1. Virran merkkivalo
• LED-merkkivalo palaa, kun astianpesukone
on päällä.
2. Päälle/Pois -painike
• Astianpesukoneen kytkemiseen päälle ja
pois.
3.
Suolan täyttövaroitusvalo
• Syttyy, kun sulasäiliö kaipaa täyttämistä.
4.
Huuhtelukirkasteen täyttövaroitusvalo
• Syttyy, kun huuhtelukirkasteen annostelija
kaipaa täyttöä.
Start/PauseProgram
Ohjauspaneeli
3 4 721 5 6
5. Pesuohjelmapainike
• Halutun pesuohjelman valitsemiseen.
• Jokainen tämän painikkeen painallus vaihtaa
ohjelmasta toiseen.
6. Käynnistä/Keskeytä-painike
• Vahvista ja käynnistä valittu pesuohjelma.
• Pesuohjelman nollaaminen.
7. Ohjelmailmaisimet
• Palaa, kun pesuohjelma on valittu.
• Vilkkuu, kun valittu pesuohjelma on
käynnissä.
Page 81

81
FI
Pesuohjelmataulukko
Ohjelma Ohjelma Ohjelmavalintatiedot Prosessi
Pesuaine
Määrä (Esipesu/Pääpesu)
Kestoaika
(min)
Energiankulutus
(KWh)
Vedenkulutus
(I)
Huuhtelukirkaste
Intensiivinen • Kasarit,
keittiövälineen ja
ruokailuvälineet.
• Hyvin likaiset.
• Esipesu
(50°C)
• Pesu
(70°C)
• Huuhtelu
(70°C)
• Kuivaus
• Esipesu (3g)
• Pääpesu (15g)
145 0,94 11
Normaali • Kasarit,
keittiövälineen ja
ruokailuvälineet.
• Normaalisti
likaiset.
• Esipesu
• Pesu (60°C)
• Huuhtelu
(70°C)
• Kuivaus
• Esipesu (3g)
• Pääpesu (15g)
125 0,7 8,4
Virransäästö*
(EN50242)
• Lyhyempi
pesu kevyesti
likaantuneille
tiskeille.
• Esipesu
• Pesu (55°C)
• Huuhtelu
70°C)
• Kuivaus
• Esipesu (3g)
• Pääpesu (15g)
170 0,65 8,5
Lasi • Lasit, kristalli ja
hieno posliini.
• kevyesti likaiset.
• Esipesu
• Pesu
(45°C)
• Huuhtelu
(60°C)
• Kuivaus
• Pääpesu (15g) 75 0,48 6,8
Nopea • Lasit ja kupit.
• kevyesti likaiset.
• Pesu (40°C)
• Huuhtelu
(45°C)
• Pääpesu (15g) 30 0,3 6
Kolme
yhdessä (3
In -1)
• Keittiö- ja
ruokailuvälineet
• Normaalisti
likaiset.
• Esipesu
• Pesu (60°C)
• Huuhtelu
(70°C)
• Kuivaus
• Käytä
ainoastaan 3 in 1
-pesuainetablettia.
140 0,7 8,4
* Varmista suorituskykystandardeihin mukautumiseksi (EN50242), että käytät testaukseen
virransäästöpesuohjelmaa.
Kondensaatioveden kuivaustekniikka
• Energiaa säästetään kuivaamalla tiskit käyttämällä jälkilämpöä viimeisen huuhteluohjelman
jälkeen.
• Pesuohjelma-ajat pitenevät tämän kuivausmenetelmän johdosta.
• Joissakin pesuohjelmissa ei ole kuivaustoimintoa. Katso lisätietoja pesuohjelmataulukosta.
Page 82

82
FI
●
●
Seuraavat kohteet eivät sovi
konepestäviksi
Pyyhkeet ja sienet
Kristallilasit
Pöytähopeat
Arvokkaat
maljakot
Halkeillut/sirpaloitunut
posliini
Pienet muoviesineet
(Tuttipullon tutti)
Valurautaiset
paistinpannut
Naarmuuntuneet tarttumattomat
ruoanvalmistusvälineet
Kuparikattilat ja -pannut
Muoviesineet, jotka
eivät ole konepestäviä
Ennen käyttöä
Luukun avaaminen
• Vedä luukun kahvasta.
• Jos luukku avataan käytön aikana, kaikki toiminnot keskeytyvät automaattisesti.
Luukun sulkeminen
• Kun tiskit on asetettu koneeseen, työnnä kori kokonaan pesukoneeseen.
• Nosta luukku ylöspäin ja työnnä sitä, kunnes se naksahtaa paikoilleen.
• Älä läimäytä astianpesukoneen luukkua kiinni.
Astianpesukoneessa käytettäväksi sopimattomat kohteet
Kun ostat uusia talousastioita ja ruokailuvälineitä, varmista, että ne ovat konepesunkestäviä. Eräät kohteet
eivät ole sopivia astianpesukoneessa pestäviksi.
• Puiset ruokailuvälineet ja talousastiat ja kohteet, joissa on puuosia, voivat muuttaa väriä ja haalistua.
Näissä kohteissa käytetty liima ei ole konepesunkestävää ja puiset kädensijat voivat löystyä
astianpesukoneessa pestynä.
• Taidekäsityöt, antiikki, arvokkaat maljakot ja koristeelliset lasitavarat eivät myöskään ole sopivia
astianpesukoneessa pestäviksi.
• Muoviesineet (esim. Tupperware), jotka eivät ole kuumuudenkestäviä, voivat sulaa tai vääntyä
astianpesukoneen korkeassa lämpötilassa.
• Kupari-, messinki-, tina- ja alumiinikohteet voivat haalistua ja tulla mattapintaisiksi.
• Lasien ja hienon lasitavaran kirkkaus voi samentua, jos niitä pestään säännöllisesti astianpesukoneella.
Älä pese astianpesukoneessa hienoa lasitavaraa tai laseja, jotka sisältävät lyijykristallia. Pese hieno
lasitavara sen asemesta käsin.
• Hopea- ja alumiiniosilla on taipumus haalistua konepesussa. Ainejäämät, kuten munan valkuainen,
keltuainen ja sinappi aiheuttavat usein hopean himmenemistä ja värjääntymistä. Puhdista sen vuoksi
ainejäämät hopeista heti käytön jälkeen.
Page 83

83
FI
Bleach and
Countertop detergent
Valkaisu- ja tiskipesuaine
• Pidä lasten ulottumattomissa
• Silmiä ärsyttävää
• Vältä kosketuksiin joutumista silmien kanssa. Jos ainetta joutuu
kosketuksiin silmien kanssa, huuhtele heti runsaalla vedellä ja hae
lääkärin apua
• Jos ainetta niellään, hae heti lääkärin apua.
Pesuaineen tai pesuainetabletin lisääminen
Käytä ainoastaan erityisesti astianpesukoneisiin tarkoitettuja pesuaineita. Ollaksesi ympäristöystävällisempi,
älä käytä oikeaa annostusta suurempaa määrää pesuainetta.
Täytä pesuaineannostelija seuraavien ohjeiden mukaisesti.
1. Paina pesuaineannostelijan kannessa olevaa
painiketta nuolen suuntaan, kunnes läppä
avautuu.
2. Täytä pesuaineannostelija pesujauheella tai laita
sisään pesuainetabletti. Täyttötaso on osoitettu
merkinnällä.
Ärsyttävä aine
esipesun pesuainelokero
varsinaisen pesun pesuainelokero
tai
3. Kaikki ohjelmat, joihin sisältyy esipesu, tarvitsevat
lisäpesuaineannoksen, joka on laitettava esipesun
pesuainelokeroon (katso pesuohjelmataulukko).
Tämä pesuaine vaikuttaa esipesu-vaiheessa.
4. Sulje kansi lujasti, niin että se naksahtaa
paikoilleen.
Voit valita lisäätkö vain pesuainetabletin
vai lisäätkö pesujauhetta sekä
pääpesun pesuainelokeroon ja esipesun
pesuainelokeroon valitsemaasi pesuohjelmaa
varten.
työnnä ylös oikealta puolelta
Page 84

84
FI
Vaihtoehtoisesti voit arvioida huuhtelukirkasteen määrän tarkistamalla huuhtelukirkasteen ilmaisimen
säiliön tulpan vieressä. Kun ilmaisin on musta, säiliö on täysi. Kun se on väritön, säiliö on melkein tyhjä.
Huuhtelukirkastesäiliön säätö
Huuhtelukirkastesäiliöllä on kuusi asetusta. Sekä suositeltu asetus
että tehdasasetus on ”4”. Jos tiskit eivät kuivu kunnolla tai ovat
läikikkäitä, säädä säädin seuraavaan korkeampaan numeroon, kunnes
tiskeistä tulee läikättömiä.
Huuhtelukirkasteen lisääminen
Huuhtelukirkaste auttaa varmistamaan, ettei vesi kiteydy ja jätä tahroja talousastioihin kuivausvaiheessa
ja nopeuttaa niiden kuivumista pesun jälkeen. Kaada säiliöön ainoastaan kotitalouskäyttöön tarkoitettua
huuhtelukirkastetta. Tämä malli on suunniteltu vain nestemäisillä huuhtelukirkasteilla käytettäväksi.
Kaada huuhtelukirkastetta säiliöön seuraavien ohjeiden mukaisesti, jolloin oikea määrä annostellaan
automaattisesti.
1. Kierrä tulppaa ja avaa kuten kuvassa.
2. Kun tulppa on auki-merkinnän kohdalla, voit
nostaa tulpan pois.
3. Kaada huuhtelukirkastetta kunnes täyttötason
merkintä muuttuu kokonaan mustaksi ja sulje
tulppa.
4. Varo, ettet ylitäytä säiliötä. Pyyhi pois
mahdolliset jäämät. Huuhtelukirkastesäiliön
tilavuus on noin 110ml.
auki
huuhtelukirkasteen ilmaisin
Huuhtelukirkasteen varoitusvalo syttyy, kun säiliö alkaa olla
tyhjä ja vaatii täyttöä.
huuhtelukirkasteen
varoitusvalo
Jos veden kovuus alueellasi on laadultaan
pehmeää, sinun ei ehkä kannata käyttää
huuhtelukirkastetta, sillä se voi muodostaa
vähitellen valkoisen kalvon tiskien päälle.
Page 85

85
FI
Suolan lisääminen
Jos vesi on alueellasi kovaa, astioihin ja keittiövälineisiin muodostuu
kalkkisaostumia. Tässä laitteessa on suolasäiliö, jota käyttämällä voit
vähentää veden kovuutta.
Kaada suolaa suolasäiliöön seuraavien ohjeiden mukaisesti. Säiliö on
asetettava vastaamaan alueesi veden kovuuden tasoa.
1. Poista kori ja kierrä säiliön tulppa auki.
2. Kaada säiliöön vettä noin 500ml (vain ensimmäinen käyttö).
3. Aseta toimitukseen kuuluva suppilo suolasäiliön päälle.
4. Kaada noin 1,2 kg astianpesukonesuolaa käytetyn tuotemerkin
mukaan.
5. Pyyhi ylimääräinen suola säiliön aukon ympäriltä ja kierrä tulppa
lujasti kiinni.
6. Käytä heti "virransäästö" pesuohjelma (ilman, että koneessa on
talousastioita) poistaaksesi kaikki suolajäämätä osastosta.
Suolan varoitusvalo syttyy, kun säiliöstä on suola lopussa ja se
vaatii täyttöä.
Suolan varoitusvalo sammuu muutamassa päivässä sen
mukaan, miten nopeasti suola liukenee.
suolan
varoitusvalo
OPEN
auki
auki
auki
Page 86

86
FI
Astianpesukoneen täyttö
Ennen astianpesukoneen täyttöä
Toimi seuraavien ohjeiden mukaisesti ennen kuin laitat ruokailuvälineitä ja talousastioita koriin.
• Poista huulipunatahrat ja mahdolliset ruokajäämät talousastioista ja lautasilta. Huuhtele, jos on
tarpeen.
• Astioita ja ruokailuvälineitä ei saa asettaa sisäkkäin tai toisiaan peittäen.
• Aseta ruokailuvälineet ja talousastiat niin, että vesi pääsee niihin kaikilta puolilta.
• Varmista, että kaikki kohteet ovat kunnolla paikoillaan.
• Kuperat astiat, kuten kupit, lasit, pannut jne. on asetettava koriin alassuin.
• Leveäpohjaiset kohteet tulee asettaa kulmaan, jossa vesi pääsee virtaamaan niistä vapaasti.
• Suihkuvarsia ei saa tukkia kohteilla, jotka ovat liian suuria tai riippuvat korin läpi. Jollet ole varma, testaa
suihkuvarsien vapaa liike kiertämällä niitä käsin.
• Varmista, etteivät pienet esineet pääse putoamaan korin pidikkeistä.
Älä pese astianpesukoneessa kohteita, jotka ovat likaantuneet tuhkasta, hiekasta, vahasta,
voitelurasvasta tai maalista. Tuhka ei liukene ja sitä voi joutua astianpesukoneen koneistoon. Vaha,
hiekka, voitelurasva ja maali voivat vahingoittaa astianpesukonetta.
Page 87

87
FI
Astianpesukoneen kori
Aseta astianpesukoneen koriin pieniä ja kevyitä kohteita,
kuten kuppeja, lautasia, laseja, jälkiruoka-astioita jne.
Pitkät kohteet, kuten keittokauhat, sekoituslastat ja pitkät
veitset kannattaa asettaa pitkälleen korin etuosaan.
Kaatuva kuppiteline
Saat astianpesukoneen koriin lisätilaa suuremmille kohteille
kääntämällä kuppitelinettä ylöspäin. Sen jälkeen voit asettaa
suuret nojalleen sitä vasten. Voit myös poistaa sen, kun sitä ei
tarvita.
Nosta ylöspäin
Taita taaksepäin
Työnnä ja napsauta
Kaatuvat pidikkeet
Pidikkeitä käytetään lautasten ja tarjottimien pitämiseksi paikoillaan. Ne voidaan laskea lisätilan saamiseksi
suurille kohteille. Katso alta, kuinka pidikkeet avataan.
Älä käytä turvallisuussyistä astianpesukonetta ilman paikoillaan olevaa koria.
Page 88

88
FI
Ruokailuvälinekori
Ruokailuvälinekorin täyttäminen
Korin tyhjentämisen helpottamiseksi ruokailuvälineet
kannattaa ryhmitellä omiksi ryhmikseen ja asettaa
ne ruokailuvälinekoriin. Katso seuraavasta taulukosta
sijoittamistapa.
Lukumäärä Kohta
1 Haarukat
2 Keittolusikat
3 Jälkiruokalusikat
4 Teelusikat
5 Veitset
6 Tarjoilulusikat
7 Kastikekauha
8 Tarjoiluhaarukka
Astianpesukoneen korin täyttö 6-paikkaisella asetuksella
Täytä astianpesukoneen kori seuraavan taulukon mukaisesti.
Lukumäärä Kohta
1 Kupit
2 Keskikokoinen tarjoilukulho
3 Lasit
4 Lautaset
5 Tiski
6 Soikea tarjotin
7 Päivällislautaset
8 Keittolautaset
9 Jälkiruoka-astiat
10 Ruokailuvälinekori
• Älä anna minkään esineen ulottua korin
pohjan läpi.
• Välttääksesi loukkaantumisvaaran aseta
veitset ja haarukat varret ylöspäin. Älä pitele
niitä terävistä reunoista kiinni pitäen.
• Ruokailuvälinekoreihin kuuluvat kannet
ja ne on suunniteltu niin, että voi lisätä
ruokailuvälineet asianmukaisiin osastoihin.
Korin käyttö ilman kantta voi huonontaa
ruokailuvälineiden pesutulosta.
• Varmista ennen käyttöä, että kansi on
lukkiutunut kunnolla paikalleen koriin.
• Suorituskykystandardeihin (EN50242)
mukautumiseksi varmista, että kaikki
ruokailuvälineet on asetettu tämän
käyttöoppaan ohjeiden mukaisesti.
1
6
9
8
7
3
5
1
2
4
3
10
3
IN
6 1 6
2
1
1
1
2
5
55
1
2
5
5
1
4
3
3
3
3
4
4
4
7
3
5
4
4 8
3
2
2 2
IN
Page 89

89
FI
Pesuohjelman käynnistäminen
Käynnistä pesuohjelma seuraavien ohjeiden mukaisesti.
1. Varmista, että laite on liitetty verkkovirtaan, ja että vedensyöttö on päällä (vedenpaineen on oltava
välillä 0,04 MPa - 1,00 MPa).
2. Sulje luukku. Vedä astianpesukoneen kori ulos, täytä pestävillä astioilla ja työnnä kori takaisin.
3. Kaada pesuainetta tai laita pesuainetabletti pesuainelokeroon ja sulje se sitten kunnolla.
4. Sulje astianpesukoneen luukku. Oven sulkeutuessa kunnolla pitäisi kuulua naksahtava ääni. Älä
läimäytä luukkua kiinni.
5. Paina Päälle/Pois-painiketta.
6. Valitse täyttö- ja likaantumisasteen mukainen pesuohjelma. Katso lisätietoja "Pesuohjelmataulukosta"
(sivu 11).
7. Valitun pesuohjelman merkkivalo syttyy.
8. Käynnistä ohjelma painamalla Käynnistä/Keskeytä -painiketta, pesuohjelma käynnistyy pian.
Pesuohjelman muuttaminen
Jos pesuohjelma on jo käynnistynyt, voit muuttaa pesuohjelman seuraavien ohjeiden mukaisesti.
1. Raota luukkua tarkistaaksesi onko laite annostellut pesuaineen tai pesuainetabletin. Tämä riippuu siitä,
miten pitkään pesuohjelma on ollut käynnissä.
2. Jos pesuaineannostelijan kansi on auki, on suositeltavaa antaa pesuohjelman käydä loppuun.
3. Jos pesuaineannostelijan kansi on yhä kiinni, peruuta pesuohjelma painamalla Päälle/Pois-painiketta.
Sen jälkeen voit sulkea astianpesukoneen luukun ja painaa Päälle/Pois-painiketta uudelleen. Paina
sitten haluttua uuden ohjelman painiketta ja vahvista valinta painamalla Käynnistä/Keskeytä
-painiketta. Laite aloittaa uuden pesuohjelman hetken kuluttua.
Pesuohjelman lopussa
Pesuohjelman lopussa astianpesukoneesta kuuluu merkkiääni.
Jos avaat astianpesukoneen luukun pesuohjelman aikana ja sitten suljet sen, astianpesukone jatkaa
nykyistä pesuohjelmaa 10 sekunnin kuluttua. Jos luukkua ei kuitenkaan suljeta oikein 1 minuutin
kuluessa, astianpesukone antaa äänimerkin 1 minuutin välein.
Page 90

90
FI
Koneen sammuttaminen
Muista energian säästämiseksi kytkeä astianpesukone pois päältä Päälle/Pois -painikkeella.
Astianpesukone kuluttaa sähköä, kunnes se kytketään pois päältä Päälle/Pois -painikkeella.
Jos astianpesukonetta ei tulla käyttämään pitkään aikaan, esim. loman aikana, irrota laite verkkovirrasta.
Astianpesukoneen tyhjentäminen
On tärkeää antaa astioiden jäähtyä ennen tyhjentämistä, sillä ne rikkoutuvat ja säröytyvät helpommin
kuumina. Sen vuoksi kannattaa astianpesukoneen luukkua pitää auki virran pois kytkemisen jälkeen, jolloin
astiat jäähtyvät paljon nopeammin.
Page 91

91
FI
Sisäpuolen ylläpito
Suodatusjärjestelmä
Saippuavaahdon suuret hiukkaset jäävät pesuosaston pohjalla olevaan suodatusjärjestelmään. Näiden
hiukkasten kertyminen voi johtaa suodattimien tukkeutumiseen. Tarkista suodattimien tila säännöllisesti, ja
jos on tarpeen, puhdista ne juoksevalla vedellä.
Puhdista pesuosaston suodattimet seuraavien ohjeiden mukaisesti.
1. Varmista, että astianpesukone on kytketty pois päältä.
2. Kierrä karkea ja hieno suodatin auki.
3. Nosta karkea ja hieno suodatin varovasti pois.
4. Nosta pääsuodatin varovasti.
5. Huuhtele kaikki suodattimet ja suodatinsylinteri juoksevassa vedessä ja aseta ne takaisin seuraavassa
järjestyksessä.
6. Aseta pääsuodatin varovasti takaisin paikalleen.
7. Kierrä karkea ja hieno suodatin myötäpäivään päivään takaisin paikalleen.
Puhdistus käytön jälkeen
Ulkopuolen ylläpito
Ovi ja oven tiiviste
• Puhdista oven tiivisteet ruokajäämistä säännöllisesti pehmeällä, kostealla liinalla.
• Kun astianpesukonetta täytetään, ruoka- ja juomajäämiä voi tippua astianpesukoneen luukun sivuille.
Nämä pinnat jäävät pesuosaston ulkopuolelle, eikä suihkuvarsien vesi pääse huuhtelemaan niitä. Kaikki
jäämät tulisi pyyhkiä pois ennen luukun sulkemista.
Ohjauspaneeli
Jos ohjauspaneelin puhdistus on tarpeen, sitä saa pyyhkiä AINOASTAAN pehmeällä, kostealla liinalla.
Sulje
Avoin
Pääsuodatin
Karkea ja hieno
suodatin
Suodatinsylinteri
ilman suodattimia
Työnnä
alas
Liu'uta sisään
• Välttääksesi veden tunkeutumisen luukun lukkoon ja sähköosiin älä käytä puhdistukseen
minkäänlaisia suihkeita.
• Älä koskaan käytä hankaavia puhdistusaineita tai hankaustuppoja ulkopinnan puhdistukseen,
sillä ne voivat naarmuttaa pintaa. Myös jotkut paperipyyhkeet voivat naarmuttaa tai jättää jälkiä
pintaan.
• Älä kiristä suodattimia liian tiukkaan. Aseta suodattimet järjestyksessä tiukasti takaisin
suodatinsylinteriin, muuten järjestelmään saattaa kertyä jäämiä, jotka voivat aiheuttaa tukoksen.
• ÄLÄ KOSKAAN käytä astianpesukonetta ilman suodattimia. Suodattimien väärä asennus voi
huonontaa laitteen tehoa ja vahingoittaa astioita ja keittiövälineitä.
Page 92

92
FI
Suihkuvarret
Ruokahiukkaset voivat juuttua suihkuvarsien suuttimiin
ja laakereihin. Suihkuvarret on sen vuoksi tarkistettava ja
puhdistettava säännöllisesti.
• Käytä teräväkärkistä esinettä, esim. cocktail-tikkua,
ruokahiukkasten irrottamiseen suihkuvarsien suuttimista.
Jäätymisvarotoimet
Vältä sijoittamasta astianpesukonetta paikkaan, jossa lämpötila laskee alle 0˚C -asteen. Jos laite jätetään
lämmittämättömään tilaan talveksi, on suositeltavaa tehdä seuraavat toimenpiteet:
1. Irrota laite vesijohdosta.
2. Käynnistä laite Valitse mikä tahansa pesuohjelma ja anna sen käydä vain 1 minuutti. Tämä poistaa
laitteeseen jäävän liian veden.
3. Irrota laite verkkovirrasta.
4. Tyhjennä astianpesukone.
5. Sulje astianpesukoneen luukku.
6. Irrottaa laite viemärijohdosta. Kokoa valuva vesi sopivaan astiaan.
Jos jokin edellä mainituista vaiheista tuottaa ongelmia, pyydä apua huoltoteknikolta.
Astianpesukoneen siirtäminen
Jos astianpesukonetta on siirrettävä esimerkiksi muuton takia, on suositeltavaa toimia seuraavasti:
1. Irrota astianpesukone verkkovirrasta.
2. Irrota laite vesi- ja viemärijohdosta. Kokoa valuva vesi sopivaan astiaan.
3. Irrota laite nykyisestä sijainnista letkut tyhjennettyinä.
4. Vedä laite ulos letkuineen.
Kunnossapito pitkän käyttämättömyysjakson jälkeen
Jollet aio käyttää laitetta pitkään aikaan, on suositeltavaa toimia seuraavasti:
1. Irrota astianpesukone verkkovirrasta.
2. Irrota laite vesi- ja viemärijohdosta. Kokoa valuva vesi sopivaan astiaan.
3. Jätä luukku hieman raolleen estääksesi epämiellyttävän hajun muodostumisen pesuosastoon.
4. Varmista, että astianpesukoneen pesuosasto on puhdas.
Älä yritä irrottaa suihkuvarsia.
• Vältä kallistamasta laitetta liikaa kuljetuksen aikana.
• On suositeltavaa, että kaksi henkilö käsittelee astianpesukonetta
asennuksen aikana.
Page 93

93
FI
Vihjeitä ja vinkkejä
Vikakoodi
Koodit Mahdolliset syyt Korjaava toimenpide
3 in 1
-ohjelman
merkkivalo
vilkkuu
Vesihanaa ei ole avattu. Avaa vesihana.
Alhainen vedenpaine (<0,04 MPa) Avaa vesihana ja varmista, että se on täysin
auki -asennossa.
Virtausmittari on rikki.
• Irrota laite verkkovirrasta.
• Sulje vesihana.
• Ota yhteys pätevään huoltoon.
Virtausmittarin johtoliitännät ovat
löystyneet.
Lasiohjelman
merkkivalo
vilkkuu
Uimurikytkin on rikki tai painopiirilevy on
viallinen.
Liukukytkimeen liitetty johtopääte on
löysällä tai rikki.
Tekniset ongelmat
Tekniset ongelmat
Ongelma Mahdolliset syyt Korjaava toimenpide
Astianpesukone ei käynnisty.
Luukku ei ole kunnolla kiinni. Sulje luukku tiukasti.
Laitetta ei ole liitetty
verkkovirtaan.
Liitä sähköpistoke seinäpistorasiaan.
Laitetta ei ole kytketty päälle. Paina "päälle"-painiketta ja valitse
ohjelma.
Tyhjennyspumppu ei toimi
kunnolla.
Tulvimisenestojärjestelmä on
toiminut.
• Irrota laite verkkovirrasta.
• Sulje vesihana.
• Ota yhteys pätevään huoltoon.
Korjauksia saa tehdä vain pätevä teknikko tarkoin paikallisten ja kansallisten säädösten mukaisesti.
Valtuuttamattomat tai väärin tehdyt korjaukset voivat johtaa henkilövahinkoon tai laitteen
vahingoittumiseen.
Page 94

94
FI
Yleisiä ongelmia
Ongelma Mahdolliset syyt Korjaava toimenpide
Annostelijaan jää
pesuainejäämiä ohjelman
lopussa.
Pesuaineannostelija oli vielä
kostea, kun pesuainetta lisättiin.
Varmista, että annostelija on kuiva
ennen pesuaineen lisäämistä.
Pesuaineannostelijan kantta ei
voi sulkea kunnolla.
Takertunut pesuainejäämä on
tukkinut kiinnikkeen.
Puhdista kiinnike.
Pesutilasta kuuluu koputtavaa
ääntä.
Suihkuvarsi osuu johonkin
kohteeseen korissa.
Keskeytä ohjelma ja järjestele
uudelleen kohteet, jotka ovat
suihkuvarren tiellä. Katso osa
"Astianpesukoneen täyttö".
Lasitavaraan ja
ruokailuvälineisiin ilmaantuu
läikkiä.
Huuhtelukirkasteannos on
asetettu liian suureksi.
Säädä huuhtelukirkastevalitsin
matalampaan asetukseen.
Astiat, ruokailuvälineet ja lasit
eivät ole kuivia.
Huuhtelukirkasteen määrä
voi olla riittämätön tai
huuhtelukirkastesäiliö voi olla
melkein tyhjä.
Täytä säiliö, säädä
huuhtelukirkastevalitsin
korkeampaan asetukseen tai vaihda
huuhtelukirkastemerkkiä.
Talousastiat on otettu pois
astianpesukoneesta liian
aikaisin.
Jätä talousastiat astianpesukoneeseen,
kunnes kuulet äänimerkin.
Ruokailuvälineissä ja
talousastioissa näkyy valkoisia
jäämiä, lasitavarassa on
samentumia; kalvon voi pyyhkiä
pois.
Huuhtelukirkastetta on käytetty
liian vähän.
Täytä säiliö, säädä
huuhtelukirkastevalitsin
korkeampaan asetukseen tai vaihda
huuhtelukirkastemerkkiä.
Suolasäiliössä ei ole riittävästi
suolaa.
Lisää suolaa säiliöön.
Suolasäiliön tulppaa ei ole
kierretty kiinni oikein.
Varmista, että tulppa on kierretty kiinni
oikein.
On käytetty sopimatonta
pesuainetta.
Vaihda pesuainemerkkiä.
Käytä astianpesukoneen
standardipesujauhetta.
Suolankulutusasetus on liian
matala.
Valitse korkeampi suolankulutusasetus.
Lasitavara on himmeää ja
haalistunutta; kalvoa ei voi
pyyhkiä pois.
Lasitavara ei ole
konepesunkestävää. Pinnat ovat
kuluneet.
Pese konepesua kestämätön lasitavara
käsin.
Tee- tai huulipunatahrat eivät
poistu kokonaan.
Valitun pesuohjelman lämpötila
on liian matala.
Valitse ohjelma, jossa on korkeampi
lämpötila.
Käytetyn pesuaineen
puhdistusteho on liian matala.
Vaihda pesuainemerkkiä.
Esihuuhtelu tai tahrojen poisto
liinalla ennen pesua unohtui.
Esihuuhtele tai poista tahrat liinalla
ennen pesua.
Page 95

95
FI
Astianpesukoneen hävittäminen
• Kun hävität vanhan astianpesukoneen, tee se ensin käyttökelvottomaksi. Irrota letkut ja virtakaapeli.
Leikkaa astianpesukoneen virtakaapeli poikki. Tee oven lukko käyttökelvottomaksi niin, että lapset eivät
voi vahingossa lukita itseään sisään. Tee asianmukaiset järjestelyt astianpesukoneen hävittämiseksi.
• Tuotteen käyttöiän lopussa sitä ei saa hävittää yhdyskuntajätteenä. Se tulee viedä erityiseen
paikalliseen jätteenkeräyspisteeseen tai jälleenmyyjälle Kodinkoneiden erillään hävittämisellä
vältetään epäasianmukaisesta hävittämisestä johtuvat mahdolliset ympäristöön ja terveyteen
kohdistuvat negatiiviset vaikutukset, ja mahdollistetaan ainesosana olevien materiaalien talteenotto,
jolloin säästyy paljon energiaa ja luonnonvaroja. Muistutuksena kodinkoneiden erillään hävittämisen
tarpeellisuudesta tuotteeseen on merkitty pyörillä varustettu roskasäiliö yliviivattuna.
• Varmista, ettei laite muodosta vaaraa lapsille sen ollessa varastoituna hävittämistä varten.
Pakkausmateriaalin hävittäminen
Hävitä muovikääreet ja -pussit turvallisesti ja säilytä ne vauvojen ja pienten lasten ulottumattomissa.
Page 96

96
FI
Tekniset tiedot
Malli MDWTT11E
Mitat 550 mm (L) x 500 mm (S) x 438 mm (K)
Kapasiteetti 6 paikka-asetusta
Vedenpainevaatimus 0,04 - 1,00 MPa
Tehonkulutus 1280 W
Nimellisjännite 230 V~50 Hz
Virrankulutus Pois-tilassa 0,7 W
Virrankulutus jätettynä Päälle-tilaan 0,73 W
Energiatehokkuusluokka
1
A
Vuotuinen energiankulutus
2
185 kWh
Vakiopesuohjelman energiankulutus 0,65 kWh
Vuotuinen vedenkulutus
3
2380 litraa
Kuivaustehokkuusluokka
4
B
Vakiopesuohjelma
5
ECO 55°C
Vakiopesuohjelman ohjelmakesto 170 min
Melutaso 55 dB(A) re 1 pW
Kiinnitys Vapaasti seisovana
Voi olla sisäänrakennettu Kyllä
Ominaisuudet ja tekniset tiedot voivat muuttua ilman erillistä ilmoitusta.
Huomaa:
1
A + + + (korkein tehokkuus) - D (matalin tehokkuus)
2
Energiankulutus ”185” kWh/vuosi perustuu 280 kylmää vettä käyttävään vakio-ohjelmaan ja matalan
virrankulutuksen tiloihin. Todellinen virrankulutus on koneen käytön mukainen.
3
Veden kulutus ”2380” litraa vuodessa perustuu 280 vakiopesuohjelmaan. Todellinen vedenkulutus on
koneen käytön mukainen.
4
A (korkein tehokkuus) - G (matalin tehokkuus)
5
Tämä sopii normaalisti likaantuneiden astioiden pesemiseen ja se on tehokkain ohjelma yhdistetyn
energian ja veden kulutuksen kannalta tämän tyyppisille astioille.
Laite on toimitettaessa seuraavien eurooppalaisten standardien ja direktiivien mukainen:
- LVD 2006/95/EY
- EMC2004/108/EY
- ERP 2009/125/EY
Yllä olevat arvot on mitattu standardien mukaisesti määritetyissä käyttöympäristöissä. Tulokset voivat
vaihdella suuresti tiskien määrän ja likaisuuden, veden kovuuden, pesuainemäärän jne. mukaan.
Page 97

97
DK
Udpakning
Fjern alt emballagen fra apparatet. Behold emballagen. Hvis du ønsker at bortskaffe emballagen, bedes du
venligst gøre dette i henhold til den lokale lovgivning.
Følgende dele er inkluderet:
Hovedenheden
Monteringsspændebånd
til a øbsslange x 1
P.N.: 672005400002
Måleske til
opvaskemiddel x 1
1 fuld ske = 20g (ca.)
P.N.: 673002200079
Brugsvejledning x 1
P.N.: MDWTT11E-000
U-formet slangeholder x 1
P.N.: 673006200003
Salttragt x 1
P.N.: 673002200001
A øbsslange x 1
P.N.: 673005400041
Målekop x 1
60ml (ca.)
P.N.: 673006200004
Sikkerhedsvandtilførselsslange x 1
P.N.: 673000900093
Bestikkurv
P.N.: 673006200014
Denne maskine er blevet
vådtestet for at sikre korrekt drift.
Derfor kan der være vand inde
i maskinen. Dette er normalt og
sikkert. Fjern alle vanddråber fra
ydersiden om nødvendigt.
Page 98

98
DK
INSTALLATION
1. Sørg for at opvaskemaskinen installeres af
en autoriseret elektriker. Der henvises til de
nødvendige værktøjer.
Placering
Når du vælger en position for din
bordopvaskemaskine, skal du sikre dig, at
installationsfladen er flad og fast, og at rummet
er godt ventileret. Undgå at placere din
opvaskemaskine når en varmekilde, f.eks. et komfur,
et fyr eller en radiator. Meget kolde omgivende
temperaturer kan også forårsage, at apparatet ikke
fungerer korrekt. Denne opvaskemaskine er ikke
designet til at bruges i en garage eller udendørs.
Tildæk ikke opvaskemaskinen med nogen form for
dækning. Under installationen skal det sikres, at der
er plads rundt om siderne.
2. Sørg for at der er frit på hver side af maskinen,
så den kan flyttes lidt til siden når den skal
serviceres. God nivellering er essentiel for korrekt
lukning og forsegling af lågen. Når maskinen er
nivelleret korrekt, må lågen hverken berøre den
indvendige kant eller siderne af kabinettet.
Opvaskemaskinens mål er 550 (B) x 500 (D) X 438
(H) i mm. Figuren viser, hvor meget mindsteplads
bordopvaskemaskinen skal have. Beskyt
plastikdele og kabler mod høje temperaturer.
Alle fjernede dele skal gemmes, så de kan
bruges igen ved eventuel geninstallation i
fremtiden. Sørg for, at opvaskemaskinens
el-ledning ikke er tilsluttet til stikkontakten
og at den er tom. Vi anbefaler, at der er 2
personer til at håndtere opvaskemaskinen
under installation.
550mm
438mm
500mm
50mm
eller
mere
150mm eller mere
50mm eller mere
150mm eller mere
enhed i mm
Page 99

99
DK
INSTALLATION
4. Den elektriske forbindelse skal svare til
specifikationerne på opvaskemaskinens
mærkeplade. Brug ikke forlængerkabler.
5. Placér apparatet ved siden af vandhane og afløb.
Nivellér om nødvendigt apparatet.
3. Du må ikke forbinde enheden til stikkontakten
før installation. Sørg for at du ikke installerer
maskinen lige foran stikkontakten. Dette for
at undgå eventuel beskadigelse af maskinens
bagside.
Efter apparatet er installeret skal du sikre, at
stikkontakten er let tilgængelig.
6. Sørg for at vandindtaget og afløbsslangen ikke
bliver knækket eller klemt. Apparatet må ikke stå
ovenpå el-ledningen.
7. Løsn ringene i afløbsslangens spændebånd ved
at dreje skruen mod urets retning. Indfør derefter
afløbsslangen gennem ringene i afløbsslangens
spændebånd for at tømme udløbet helt. Spænd
afløbsslangens spændebånd ved at dreje skruen
med uret for at fastgøre forbindelsen mellem
afløbsslangen og udløbet.
op ned
i vater
Ringe i aøb
Spændebånd til slange
Med uret for
at spænde
Mod uret for
at løsne
Ringe i aøb
Spændebånd til slange
Page 100

100
DK
INSTALLATION
• Sæt vandafløbsslangen godt fast på afløbsrøret for
at undgå at den hopper af under vaskeprocessen.
8. Sørg for at din rørlægning passer til brug med en
opvaskemaskine. Hvis du er i tvivl, skal du kontakte
en autoriseret rørlægger. Maskinen SKAL forbindes til
KOLDT VAND med den nye tilførselslange. GENBRUG
IKKE GAMLE SLANGER. Vandtrykket fra vandledningen
skal være min. 0,04 MPa og maks. 1,00 MPa.
• Forbind den ende af
sikkerhedsvandforsyningsslangen med vandlåsen
til opvaskemaskinen og forbind derefter den anden
ende af slangen til din vandforsyning. Sørg for at
den sorte gummipakning sidder, hvor den skal.
• Efter at du har forbundet slangen, tænd for
vandtilførselen og kontroller for lækager.
• Forbind opvaskemaskinen til stikkontakten.
Du kan benytte et Y-stykke (ikke
inkluderet) til ekstra vandtilførsel
til endnu en maskine, for eksempel
en vaskemaskine. Dette gælder
kun for koldtvandsledningen. Du
kan købe et Y-stykke i de fleste
isenkrambutikker.
Om sikkerhedsvandtilførselsslangen
Sikkerhedsvandtilførselsslangen har
dobbelte vægge. Slangesystemet garanterer,
at vandstrømmen blokeres i tilfælde af,
at forsyningsslangen går i stykker og når
luftrummet mellem selve forsyningsslangen og
den ydre ribbede slange er fuld af vand.
• Afløbsrøret må kun tilsluttes
spildevandsafløb, ikke overfladevandafløb.
• Afløbsslangen skal placeres lavere end 10 cm
fra køkkenbordet og må ikke forlænges, ellers
vil maskinen evt. ikke være i stand til at sørge
for korrekt afløb af spildevandet.
• Du kan anvende den u-formede
afløbsslangeholder til at sikre din
afløbsslange og undgå at bøje den.
• Afløbsslangen må ikke bøjes.
• Løft ikke afløbsslangen mere end 10 cm over
køkkenbordet, da apparatet ellers ikke kan udstøde
vandet korrekt.
vandforsyning
Y-stykke
(medfølger ikke)
Forbindes
om
nødvendigt
til en anden
enhed.
vandforsyningsslange
maks.
10 cm
Placer tæt ved standrøret efter brug.
 Loading...