

Page 1
Freezer
Instruction Book
Model MCF97W
MCF150W
Page 2

Contents
Page 1 Contents
Page 2 Safety Information
Page 3 Freezer Controls
Prior to in stallati on
Install ation
Child Saf ety
During Us e
Green ind icator lig ht
Amber Boos t switch
Temperat ure Contro l
Positio ning
Before us e
Mainten ance and cle aning
Servici ng
At the end of th e Appliance l ife
Switchi ng on
Open/Cl osing the Li d
Freezin g fresh food
Externa l cleaning
When the App liance is no t in use
Lubrica tion
Page 4 Installation
Page 5 Operation
Page 6 Operation (continued)
Using th e fr ee ze r
Storin g pr e- pa cked food
Storag e ti me s
Normal O pe ra ti ng Sounds
7
Page Maintenance
Defros ti ng
Cleani ng
Comple te D ef ro sting
Conden sa ti on o n the freezer
Power fa il ur e
If the fre ez er f ai ls to operate
8
Page Problems
E l e c t r i c a l I n f o r m a t i o n
R600a safety instructions
9
Page
Sp ec if ic at io ns
Waste disposal
10
Page
1
Page 3
Safety Information
These wa rn in gs a re provided in the in te re st s of your safety.
Ensure y ou u nd er stand them all befo re i ns ta lling this applia nc e
Prior to i ns ta ll ation
Check th e ap pl ia nce for transport d am ag e. U nder no circumsta nc es
should a d am ag ed a ppliance be ins ta ll ed . In t he event of damage
please c on ta ct y our supplier.
Child sa fe ty
Instal la ti on
* The appl ia nc e is h eavy. Car e should be taken whe n mo vi ng i t.
* It is dang er ou s to a lter the specific at io ns o r attempt to modify i t.
* Do not all ow c hi ld ren to tamper with th e co nt ro ls or play with the
applia nc e.
* There is a r is k of s uf fo ca ti on!
Keep pac ka gi ng m aterial away from t he c hi ld ren.
During U se
* This app li an ce i s designed for dome st ic u se o nly, sp ec ifically for
the stor ag e of e di ble foodstuffs.
It is not in te nd ed f or commercial or in du st ri al use.
* Contai ne rs w it h flammable gasse s or l iq ui ds can leak at low
temper at ur es .
Do not sto re a ny c on tainers of flamma bl e ma te rials, such as spra y
cans and f ir e ex ti nguishers refil l ca rt ri dges in the freezer.
* Frozen f oo d sh ou ld not be refrozen on ce i t ha s th awed out.
* Do not pla ce c ar bo nated or fizzy drin ks i n th e fr eezer.
* Ice loll ie s ca n ca use frost/freez er b ur ns i f consumed straig ht f ro m
the free ze r.
* Do not rem ov e it em s from the freezer if y ou r ha nd s are damp/wet,
as it may ca us e sk in
* Bottle s an d ca ns m ust not be stored in th e fr ee ze r, as they can burst
when the c on te nt s freeze.
* Ensure t he a pp li ance does not stand o n th e el ec trical power cabl e.
If the pow er c ab le i s damaged, it must be r ep la ce d by a qualified
electr ic ia n.
* Any elec tr ic al w ork required to ins ta ll t hi s appliance shoul d be
comple te d by a q ua lified electric ia n.
* Parts th at h ea t up s hould not be expose d. Wh e ne ver possible, the
back of th e ap pl ia nce should be close t o a wa ll , bu t leaving the
requir ed d is ta nce for ventilati on .
* The free ze r sh ou ld be left for 12 hours a ft er i ns tallation befor e it i s
turned o n, i n or de r to allow the refrig er an t to s ettle.
2
Page 4
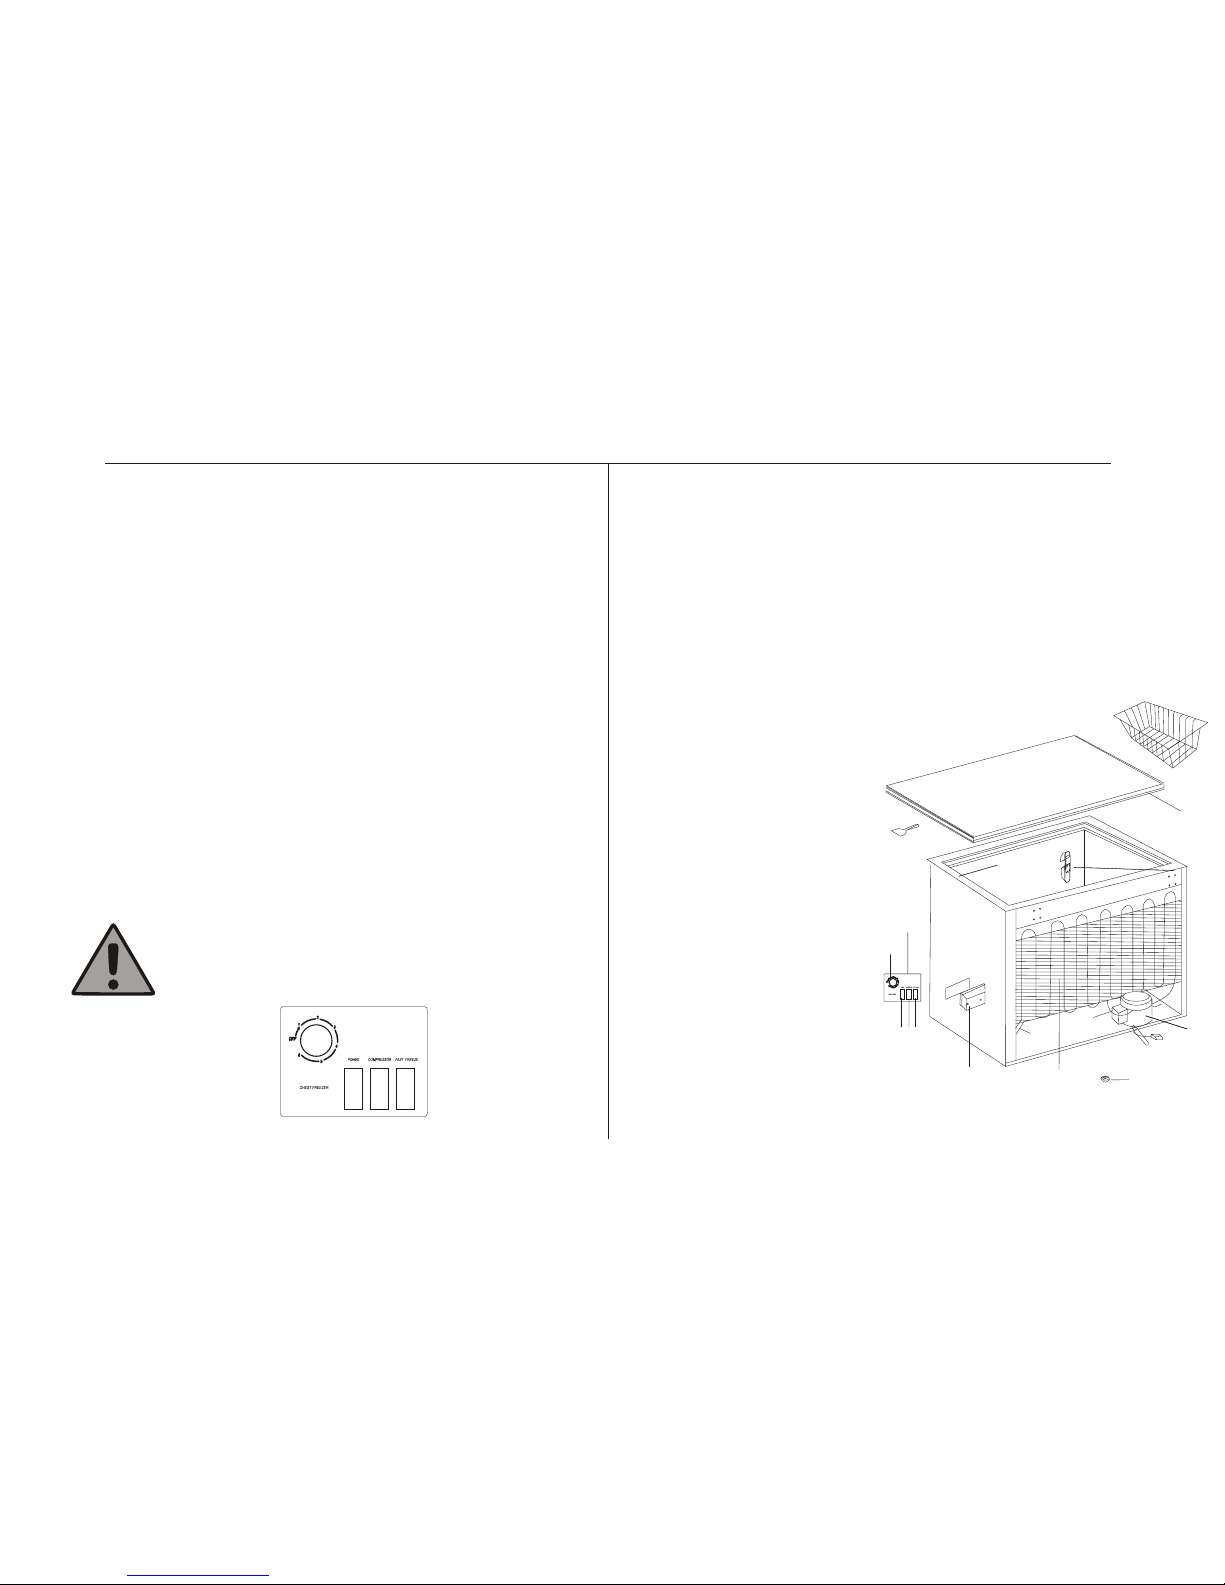
Freezer Controls Freezer Diagram
Green In di ca to r Light (9)
This lig ht s ho ws t hat mains electri ci ty i s co nnected to the free ze r.
The Gree n li gh t do es not give any indic at io n of t he temperature
inside t he f re ez er.
Red Indicator Light (10)
This illuminates to show when the compressor is running
Amb er Bo os t Sw it ch (11)
(Push On /O ff) This will gl ow w hi ls t th e boost switch is on. The switc h
overri de s th e th ermostat and the co mp re ss or will operate con ti nu ou sly
to lower t he c ab in et temperature fu rt he r.
At t he mi n imum positi on , the thermos ta t ma y be switch ed
OFF! There will be a c li ck w he n this happens. The freezer
will not r un i f th e th ermostat is switc he d OF F.
Temp erature Con tr ol
The norm al s to ra ge temperature of y ou r fr ee zer should be -18°C ( 0° F) .
The ther mo st at c ontrol, located a t th e fr on t of the freezer, shou ld b e
set to pos it io n" 4" t o obtain the correc t te mp er ature for storing
alread y fr oz en f ood. Thi s setting may have to b e va ri ed d epending
upon the f re qu en cy of opening and clo si ng t he l id and for a room
temper at ur e in e xcess of 25°C (77°F ). L ow er t emperatures may b e
obtain ed a t th e ex pense of higher run ni ng c os ts, with little
corres po nd in g benefit.
1: Lid
2: Ice Scr ap er
3:Gask et
4: Hinge
5: Seal
6: Cabin et
7: Contr ol P an el
8: Thermostat Kn ob
9: Green I nd ic at or Light
10:Com pr es so r ON Light
11: Boost S wi tch
12: Cond en se r
13: Cont ro l Re ar C over
14: Drie r
15: Glid er s
16: Powe r Co rd
17: Comp re ss or
(MCF97W,Loca ted at re ar. )
(MCF150W, Loc ated at s ide.)
18: Stor ag e Ba sk et
MCF 97W/ MCF 15 0W o nly
3
1
12
14
15
16
17
18
13
2
3
4
5
6
7
8
9 10 11
Page 5

Installation
Positi on in g
Locate t he f re ez er away from source s of h ea t su ch as stoves,
radiat or s, e tc a nd do not locate it in di re ct s un light or where the
temper at ur e ri ses due to the effects of the sun .
Place th e fr ee ze r horizontally on a ffirm su rf ac e. U se wooden
block or s im il ar o bject to compensa te f or a n un even surface.
Ensure t ha t th er e is suffi cient space betwe en t he f re ezer and
the wall f or c or re ct air circulatio n an d op en ing the lid, and a
minimu m cl ea ra nce of 25mm (one inch ) at e ac h si de.
The free ze r sh ou ld not be positione d wh er e it w ill be aff ected
by draug ht s or d am pness.
Whilst t he f re ez er can be used in an outb ui ld in g or garage, this
may affect its per fo rm an ce.
Before u se
Remove a ll p ac ka ging from the outsi de a nd i ns ide of the
applia nc e. Wash the inte ri or o f th e fr eezer using a sol ut io n of o ne
teaspo on o f bi ca rbonate of soda to ea ch p in t of w arm water and
dry very t ho ro ug hly with a clean dry cl ot h. D et ergents or soap
should n ot b e us ed a s they leave a trace of o do ur. Ab ra sive
cleani ng p ow de rs must not be used in an y in te ri or, as they may
affect the finis h.
The free ze r mu st b e allowed to stand wi th t he l id o pen for a
period o f at l ea st 1 2 hours after deliv er y be fo re it is switched on.
This all ow s th e re frigerant to sett le a ft er t he disturbance in
transi t.
Manufa ct ur er 's recommended st or ag e ti mes should be adher ed t o.
Refer to r el ev an t instructions.
Mainte na nc e an d cleaning
Before c le an in g, always switch off the appl ia nc e an d disconnect
from the e le ct ri cal power supply.
When unp lu gg in g, always pull the pl ug f ro m th e mains socket, do
not pull o n th e ca bl e.
Servic in g
This app li an ce s hould be serviced b y an a ut ho rized enginee r an d
only gen ui ne s pa re parts should be us ed .
Under no c ir cu ms tances should you a tt em pt t o repair the
applia nc e yo ur self. Repairs car ri ed o ut b y inexperienced p er so ns
may caus e in ju ry o r serious malfunc ti on in g.
At the end o f th e Appliance life
When dis po si ng o f your appliance, u se a n au th orized disposal s it e.
Remove t he p lu g, l ock or hinges, to ens ur e th at a c hild cannot get
trappe d in si de . If they will not unsc re w, kn oc k them off w ith a
suitab le h am me r.
4
Page 6

Operation
Using th e Fr ee ze r
Switch in g on
When the f re ez er i s first installed , sw it ch o n the Boost switch (11)
(Amber l ig ht w il l show) and run for at le as t 4 ho ur s before putting in
frozen f oo d. Thi s wi ll e ns ure that the cabine t is t ho ro ughly chilled
before f oo d is p ut i n. The n tu rn off t he B oo st switch. If the cab in et
temper at ur e is c onsidered to be inc or re ct a djust the thermos ta t (8 )
to a highe r se tt in g. If the appliance s ti ll d oe s not get below -18°C ,
contac t yo ur s er vice agent.
Open/C lo si ng t he Lid
Do not ope n th e li d fr equently or leave i t op en l on ger than necessar y.
The lid is f it te d wi th a tightly closin g se al ( 3) t o prevent moistur e
enteri ng t he f re ezer and increasi ng t he a mo unt of frost formed .
When the l id i s op en ed, the air inside th e fr ee ze r becomes slightl y
warmer a nd e xp an ds. Wh en the lid is clo se d ag ai n, the air is cooled
immedi at el y. This may cau se a v ac uu m wh ich makes it hard t o op en
the lid ag ai n. Thi s is q ui te n ormal.
Wai t fo r a fe w minutes until the v ac uu m ha s subsided, then op en
gently. Never use e xc es si ve force on the handl e.
Freezi ng f re sh f ood
When loa di ng y ou r freezer with fres h fo od , pl ace the food in conta ct
with the w al ls o f th e freezer. If necess ar y, the fo od m ay b e pl ac ed
betwee n al re ad y frozen food and the c ab in et w alls. Th e amount of fresh
food the a pp li an ce will freeze in 24 ho ur s is o n th e table inside the fr on t
cover.
Extern al c le an ing
The outs id e of t he f reezer should be cl ea ne d re gularly with a clea n cl ot h,
wrung ou t in a m il d de tergent solutio n.
When the a pp li an ce is not in use
When swi tc hi ng o ff y ou r fr eezer for a long peri od e .g .: h olidays), it shou ld
be disco nn ec te d from the electric it y su pp ly, cle an ed inside and left wi th
the lid in a n op en p os ition to prevent st ag na ti on of any food residu e.
Lubric at io n
Regula r lu br ic ation of the hinges i s re co mm ended to prevent cr ac ki ng
noises .
5
Page 7

Installation
Using th e Fr ee ze r Storag e ti me s
Norma l O pe ra ti ng Sounds
You ma y he ar a gurgling sound .
This is th e re fr ig erant being pumpe d ar ou nd t he system.
When the c om pr es sor is on, you may hear a w hi rr in g sound from it.
The ther mo st at w hich controls the c om pr es sor makes a distinc t
‘click ' wh en i t tu rns on and off.
At any tim e wh en l oa ding appreciabl e qu an ti ties of unfrozen
foods, r un t he f re ezer with the Boost s wi tc h (11 ) on f or a t le as t
8 hours be fo re p la cing the food is froz en . Alw ay s allow 24 hours to
ensure c om pl et e freezing.
When add in g al re ady frozen food, it w il l no t be n ecessary to turn
the Boos t sw it ch ( 11) o n.
If the Boo st s wi tc h is accidently lef t on , th e fr eezer will not be
damage d, b ut e ne rgy will be wasted. The insid e of t he f re ezer
will be ve ry c ol d.
Storin g pr e- pa cked food
Pre-pa ck ed f ro zen food should be st or ed i n ac cordance with the
manufa ct ur er s instructions. P la ce p ac kets of frozen food i nt o th e
freeze r as q ui ck ly as possible afte r pu rc ha se. If there are
instru ct io ns o n the packet, caref ul ly f ol low these regardi ng s to ra ge
times.
Storag e ti me s
The free ze r is i nt ended for long term s to ra ge o f frozen food. The
storag e li fe o f fr ozen foods varies a nd t he r ec ommended storag e
times sh ou ld n ot b e exceeded. The following i nf or ma tion is just a
guide an d is n ot c om prehensive.
6
1-3 mont hs F is h Co oked dish Bread She ll -f is h
4-6 mont hs E gg p ro ducts Pork Butter I ce c re am
7-9 mont hs M us hr ooms Lamb Cheese Fr ui t
10-12 mo nt hs G am e Beef Vegitables Po ul tr y
Page 8

Maintenance
Defros ti ng
Defros ti ng
Before a ny m ai nt enance or cleanin g is c ar ri ed our,
you must D IS CO NN ECT th e ap pliance from the
electr ic it y su pply.
Never us e ab ra si ve cleaning mater ia ls o r st rong
chemic al s on a ny p art of the freezer
Intern al C le an ing
Was h th e in terior of the freez er u si ng a s olution of one teas po on
of bicar bo na te o f soda, to each pint of w ar m wa te r and dry very
thorou gh ly w it h a clean dry cloth.
Deterg en ts o r so ap should not be used a s th ey l ea ve a trace of
odour.
Remova l of f ro st
As time go es o n, f ro st will form on the ins id e of t he c abinet near
the top. This fros t sh ou ld b e scraped away when i t is
approx im at el y 6mm(1/4”) thick , us in g a wo oden or plastic scr ap er.
Never us e me ta l in struments or you wi ll d am ag e the finish on
your fre ez er. C ov er the food with a clea n cl ot h an d hold a tray
agains t th e in si de of the cabinet to ca tc h th e fr ost as you scrape
it away.
It is not ne ce ss ar y to switch off the freezer whi le d ef ro st ing.
Comple te D ef ro sting
The inst ru ct io ns regarding the ca re o f fr oz en foods should be fo ll ow ed
when def ro st in g the freezer. Howev er c ar ef ul you are, complet e
defros ti ng w il l in course of time, be co me n ec essary. Thi s sh ou ld
be carri ed o ut i f th e frost build up cann ot b e sc ra ped away, or if i t
begins t o in te rf ere with the food sto ra ge . Ch oose a time when the st oc k
of froze n fo od i s lo w and proceed as foll ow s.
1)Tu rn t he f reezer OFF at the ele ct ri ca l supply and leave th e li d op en .
2)Take the fr oz en f oo d out. Ideally, the food shoul d be p ut i nt o an other
freeze r. If t hi s is n ot possible, wrap i t in a c om pa ct block, first in
sheets o f ne ws pa per and then in a thick b la nk et a nd keep in a cool
place……N OT on a metal sur fa ce .
3)Scrap e aw ay a s mu ch frost as possibl e.
4)Thawi ng o f th e re mainder can be acce le ra te d by holding hot clot hs
agains t th e in si de of the cabinet. As th e so li d fr ost loosens, pris e it
away wit h a wo od en o r plastic scraper.
5)Clean t he i ns id e as described in Cle an in g- I nternal Clean in g.
6)Wh en th e ca bi ne t is completely cle an a nd d ry, c lo se t he l id, switch
on again a t th e po we r supply and turn on th e Bo os t sw itch (11) .
7)Leave t he c ab in et to cool down for an ho ur a nd t he n replace the
frozen f oo d. Tu rn o ff t he B oo st switch after not l es s th an a f ur ther
2 hours.
Provid in g ou r re commendations a re f ol lo wed, this complet e de fr os ting
can be car ri ed o ur e asily within 2 hour s. As l on g as y ou protect the
frozen f oo d du ri ng defrosting as de sc ri be d above and it is still h ar d, i t
can be put b ac k in to t he freezer for norm al s to ra ge.
If the def ro st in g takes longer than 2 h ou rs , so me of the frozen food m ay
start to t ha w. If i t ha s not thawed comple te ly, it ma y be r ef ro ze n, but
should b e us ed a s qu ickly as possible .
Food tha t ha s th aw ed completely mus t no t be p ut b ack into the freeze r.
7
Page 9

Problems
Conden sa ti on o n the outside of the fr ee ze r
The siti ng o f fr ee zers in unheated ou th ou se s, cellars and gara ge s
may, in cold weathe r, gi ve r is e to condensation f or mi ng o n the outer
surfac e of t he f re ezer…… It is not a faul t.
This occ ur s pa rt icularly when the h um id it y is high and will gene ra ll y
disapp ea r wi th d rier weather. Ho we ve r, th e co ndensation sh ou ld b e
remove d by w ip in g with a dry cloth.
It is caus ed b y th e ca binet being cold du e to h av in g a rear condenser
instea d of a s ki n co ndenser. The outside of a free ze r wi th a s kin
conden se r wa rm s up each time the comp re ss or c omes on. It can
usuall y be r ed uc ed by turning the the rm os ta t down to a lower setti ng .
Power fa il ur e
In any cas e of f ai lu re, keep the lid clos ed . Du e to t he thickness of the
insula ti on , it w ill take a consider ab le a mo unt of time for the foo d to
thaw, par ti cu la rly if the cabinet is f ul l of f oo d.
Food at th e to p of t he c abinet will thaw sl ig ht ly m ore quickly than
food low er d ow n, b ut it will be safe for at l ea st 1 8 ho urs. Thi s does
not appl y to i ce c re am and similar prod uc ts w hi ch thaw faster.
If the fre ez er f ai ls to operate
If the tem pe ra tu re inside the freez er h as r is en, this can mean tha t an
excess iv e lo ad o f fresh food has been p ut i n fo r fr eezing, or the lid ha s
been lef t op en . Tur n the Boost switch( 11 ) on f or a f ew hours until the
temper at ur e re turns to normal.
If this is n ot t he c as e, check the electr ic it y su pply.
1)Ensur e th at t he f reezer is connect ed t o th e ou tlet socket and thi s is
switch ed o n. The g re en l ig ht on the freezer sho ul d sh ow.
2)Check t he h ou se f uses or circuit bre ak er s( this may be checked b y
pluggi ng a no th er electrical app li an ce i nto the same socket ).
3)Tu rn o n th e Boost switch( 11). If the com pr es so r starts, leave the
Boost sw it ch o n an d check the storage t em pe ra ture.
4)If the fr ee ze r st ill does not operat e, c on ta ct your supplier or s er vi ce a gent.
Rememb er t ha t yo u may be charged for a se rv ic e ca ll(even during th e
guaran te e pe ri od), if nothing is fo un d to b e wr ong with the applia nc e.
Always c he ck t he i nstructions to ma ke s ur e yo u have not missed
anythi ng .
8
Page 10

Electrical Information R600a Safety Instructions
This app li an ce c omplies with the fo ll ow in g EC Regulation s.
No:67/ 30 8 EE C (I nterference sup pr es si on)
No:73/ 23 E EC 1 9. 02.1973 (Low-vo lt ag e di rective)
and subs eq ue nt m od ifications.
No:89/ 33 6 EE C 03 .05.1989 (Elect ro -m ag netic compatibi li ty )
with fol lo w- up a me ndments.
This pro du ct i s el ectrically safe , in a cc or dance with:
EN 60335-2 -2 4: 19 94
and EN 603 35 -1 : 19 98
plus ame nd me nt s.
The manu fa ct ur er strongly recom me nd s th at all fridges
and free ze rs b e co nnected via tampe r pr oo f mo ulded plug provid ed .
Contin uo us s to pping and startin g of t he a pp liance, may short en t he
life of th e Co mp re ssor.
The refr ig er at ion system may cont ai n is o- butane(R600a) , a na tu ra l
gas char ac te ri zed by a high level of en vi ro nm ental compatibi li ty, how ev er
still fl am ma bl e.
When tra ns po rt ing and setting up th e ap pl ia nce, when handing , cl ea ni ng
and subs eq ue nt ly disposing of it wh en i t is b ei ng taken out of use, en su re
that no da ma ge i s ca used to any part of the c oo la nt c ircuit.
If any lea k ca us ed b y mechanical dama ge , co in cides with a source o f
igniti on , an e xp losion may occur. Fo r th is r ea son, no household
applia nc es d ri ven by an electric mo to r( e. g.:stirrers, mi xe rs , or i ce cream
beater s) s ho ul d be operated insid e th e ap pl iance. Nor should a ny
heatin g or a ny o th er source of igniti on b e in tr oduced into the app li an ce .
This par ti cu la rly applies to nake d fl am es , this is also applic ab le t o th e
area sur ro un di ng the appliance op en in gs . As the coolant is he av ie r th an
air, it acc um ul at es at ground level. I f a fa ul t sh ould occur, the room
contai ni ng t he a ppliance must be ke pt w el l ve ntilated.
Before c ar ry in g out any work on the app li an ce s uch as cleaning,
defros ti ng , ch anging bulbs, rep la ci ng d oor seals, settin g up o r in st alling,
either p ul l ou t th e mains supply plug o r sw it ch o ff a t th e ci rcuit breaker, or
remove t he f us e.
Danger o f ex pl os ion!
Do not sto re f la mm able liquids or gas se s in t he a ppliance!
Pay part ic ul ar a ttention when che ck in g th e coolant circuit f or d am ag e.
Never us e an y el ec trical heater, hot a ir f an , ha ir dryer, steam clea ne r or
any othe r so ur ce o f heat!
9
Page 11

RoHS
COM PLIA NT
Specifications
Technical Speci fi ca ti on s
Model: M CF 97 W MC F1 50W
Voltage R at in g( V) 230 230
Freque nc y Ra ti ng(Hz): 50 50
Power Ra ti ng (W) : 55 85
Energy C la ss : B B
Total Stor ag e vo lu me(Litres): 97 150
Cubic fe et c ap ac ity: 3. 5 5. 4
Overal l Di me ns ions: 885x702x5 80 8 85 x7 65x660
(high) (w id e) (deep)
Freezi ng c ap ac ity kgs/24h 8 10
Refrig er an t: R 60 0a R600a
Weight and dimen si on s ar e approximate.
The Was te o f Elctrical and Ele ct ro ni c Equipment (WEEE ) Di re ct ive
has been i ns ta ll ed to dispose and rec yc le w as te products using t he
best tec hn iq ue s, minimizing the a ffect On t he E nv ir onment.
The abov e sy mb ol s hown on the applian ce a nd i ns tructions, iden ti fi es
the prod uc t ha s an E lectrical or Elec tr on ic d evice and should no t be
despos ed w it h yo ur Household wa st e.
When you h av e no f ur ther use for this app li an ce , please dispose of i t
via your l oc al a ut horities recycl in g fa ci lities.
For furt he r in fo rmation, please c on ta ct y our local anthori ty o r th e
retail er t ha t yo u purchased this ap pl ia nc e from.
RoHS Res tr ic ti on of the use of Certai n Ha za rd ous Substances.
The free ze r ha s be en produced to meet t he R oH S Di rective, which
bans ele ct ri ca l and electronic de vi ce s fr om the EU market that h av e
higher l ev el s th an agreed of Lead, Me rc ur y, He xa va le nt Chromium,
Polybr om in at ed biphenyl and Pol yb ro mi nated dipheny l et he r.
10
 Loading...