

Page 1

COLOUR TELEVISION WITH REMOTE CONTROL
FÄRG TV MED FJÄRRKONTROLL
EΓXPΩMH THΔEOPAΣH
FARVE - TV MED FJERNETJENING
OPERATING INSTRUCTIONS
Oδηγίες Xρήσως
BRUKSANVISNING FÖR
BETJENINGSVEJLEDNING
01-ENG-37737W-42737W-1072 UK-37-42 INCH 17MB15 OEM-(HD READY)(WO VGA-WO PIP)(S)-50101853.p6502.04.2007, 11:171
Page 2
-2 -
Safety Precautions
Pleasereadthe followingrecommended safety precautions carefully for your safety
1. Power Source
The set should be operated only from a 220-240V
AC, 50 Hz. outlet. Please check your household
voltageis the same as the rated voltage ofthe set,
or if in doubt consult a qualified electrician.
2. Power Cord
Do not place the set, a piece of furniture,etc. on the
powercord(mainslead) orpinch thecord. Handle the
power cord by the plug. Do not pull out the plug by
tugging thecordand nevertouch thepowercordwhen
your hands are wetas this could cause a shortcircuit
orelectric shock.Nevermakeaknotinthecordortieit
with other cord. The power cord should be placed in
such a way that theyare not likely to be stepped on.
A damaged power cord can cause fire or give you
anelectricshock.Whenitisdamagedandneedtobe
changed, it should be done by qualified technician.
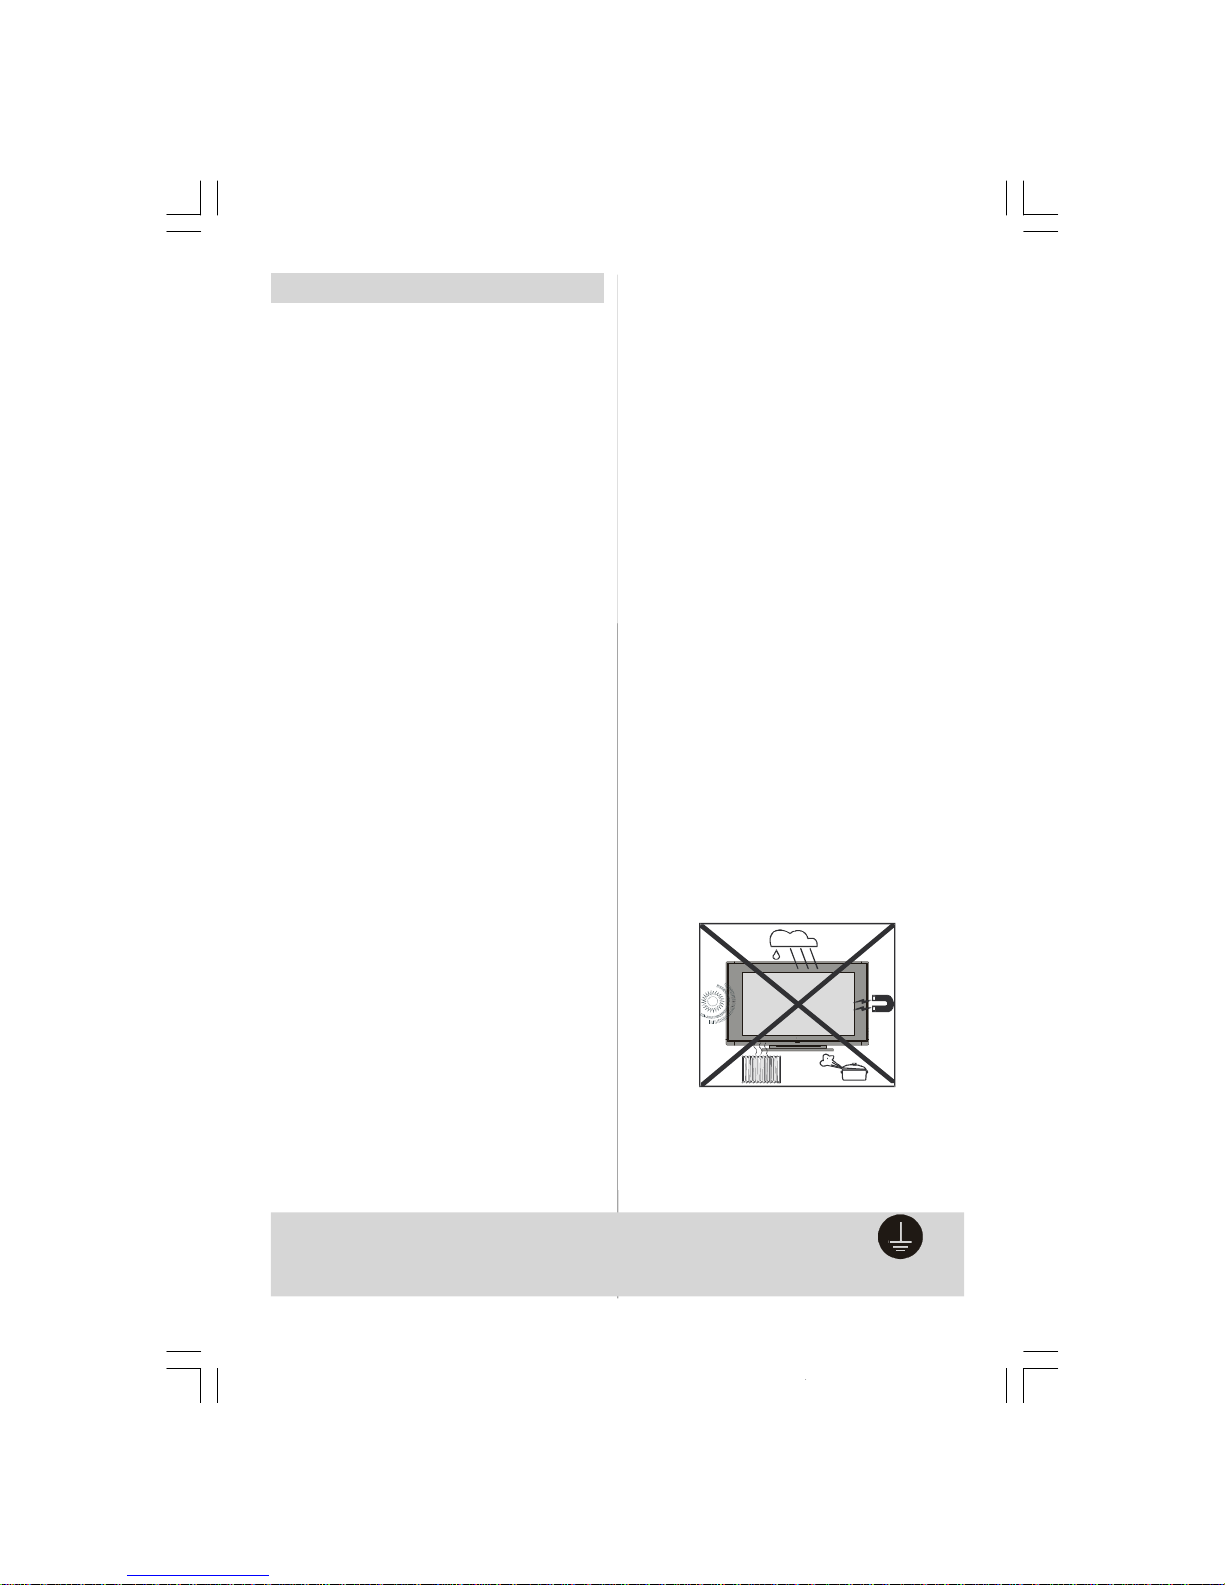
3. Moisture and Water
Donotusethisequipmentin ahumidanddamp place
(avoidthe bathroom,thesinkin the kitchen,andnear
thewashingmachine). Donotexpose thisequipment
torainor water,as thismaybe dangerous anddo not
place objects filled with liquids,such as flower vases
on topof the set.Avoidfrom drippingor splashing.
Ifanysolid objector liquidfallsintothecabinet,unplug
the set and have it checked by qualified personnel
before operating it any further
4. Cleaning
Before cleaning, unplugthe set from thewall outlet. Do
not useliquidoraerosolcleaners.Usesoftanddrycloth.
5. Ventilation
The slots and openings on the back cover are intended for ventilation and to ensure reliable operation. To prevent overheating, these openings must
not be blocked or covered in anyway.
6.Heat and Flames
The set should not be placed near to naked flames
and sources of intense heat, such as an electric
heater. Ensure that no naked flame sources, such
as lighted candles, are placed on top of the set
7. Lightning
In caseof storm and lightning or when going on holiday, disconnect the power cord from the wall outlet.
8. Replacement Part
Whenreplacement parts are required,be sure theservice technician hasused replacement parts which are
specifiedby themanufacturer orhave thesamespecificationsastheoriginalone.Unauthorisedsubstitutions
mayresult in fire, electrical shock, or other hazards.
9 . Servicing
Pleaserefer all servicing to qualifiedtechnician. Do
not remove the cover yourself as this may result in
an electric shock.
WARNING: When the device is not in use for a
long time, disconnect from power.
Instructions for waste disposal:
• Packagingand packagingaids are recyclableand
shouldprincipallyberecycled.Packagingmaterials,
suchas foil bag, must be kept awayfrom children.
• Battery, including those which is heavy metal-free,
should not be disposed of with household waste.
Please dispose of used battery in an environmentally sound manner. Find out about the legal regulations which apply in your area.
• Cold cathode fluoresant lamp in LCD PANEL contains a small amount of mercury, please follow local
ordinates or regulations for disposal.
• The mains plug i s used to disconnect the TV
from the mains a nd therefore it s hall remain
readily operable.
Warning: To prevent injury, this device must be
securely attached to the floor/wall in accordance with the installation instrutions.
“DO NOTLEAVE YOUR TVAT STAND-BYOR OPERATINGWHENYOU LEAVEYOURHOUSE”
"The LCD panel is very high technology product
with about a million thin film transistors, giving you
fine picture details. Occasionally, a few non-active
pixelsmay appear on the screen as a fixed point of
blue, green or red. Please note that this does not
affect the performance of your product."
Be sure to ground the connection properly.
Connect the ground terminal of TV with the ground terminal provided at the power
outlet using the enclosed power cord. If the provided plug does not fit your outlet,
consult an electrician for replacement of the obsolete outlet.
Surelyconnect
01-ENG-37737W-42737W-1072 UK-37-42 INCH 17MB15 OEM-(HD READY)(WO VGA-WO PIP)(S)-50101853.p6502.04.2007, 11:172
Page 3
-3 -
TV Accessory
1 2
4 5
8
7
I
II
WIDE
SOUND PICTURE
ABC
STU
YZ
PQRJKL MNO
A
-/--
P<P
Remote Control
PartNumber: 30037770
Battery
PartNumber: 30002391
Contents
Safety Precautions ...............................................................................................................................2
TV Accessory...................................................................................................................................... 3
Preparation...........................................................................................................................................4
Before Switching On Your TV..............................................................................................................4
LCDTV.................................................................................................................................................5
Remote Control Buttons ........................................................................................................................ 5
PeripheralEquipment Connections .......................................................................................................6
Switching The TV ON/OFF ...................................................................................................................7
InitialSettings........................................................................................................................................7
Operating The TV .................................................................................................................................8
MenuSystem ........................................................................................................................................8
Other Features ...................................................................................................................................13
Teletext...............................................................................................................................................14
ConnectPeripheralEquipment ............................................................................................................16
Tips ....................................................................................................................................................17
Specifications .....................................................................................................................................18
Aerial Connection ...............................................................................................................................19
01-ENG-37737W-42737W-1072 UK-37-42 INCH 17MB15 OEM-(HD READY)(WO VGA-WO PIP)(S)-50101853.p6502.04.2007, 11:173
Page 4

-4 -
Preparation
Forventilation, leave a space of at least10 cm freeall
aroundthe set. To prevent any fault and unsafesituations,pleasedonotplace anyobjectsontopoftheset.
Use this apparatus in moderate climates.
Features
• Remote controlled colour television.
• 100 programmes from VHF, UHF bands or cable
channels can be preset.
• It cantune cablechannels.
• Controllingthe TV is veryeasy by its menu driven
system.
• It has2 SCART sockets forexternal devices (such
as video,video games, audio set, etc.)
• Stereosound system (German+Nicam).
• Full function Teletext .
Fastext (1000 Pages), TOP text.
• Headphone connection.
• Direct channel access.
•A.P.S. (Automatic Programming System).
•All programmes can be named.
• Forward or backward automatic tuning.
• Sleeptimer.
• Child Lock.
•Automatic soundmute when no transmission.
• NTSC Playback.
•AV in and S-VHS in are available.
• It has an HDMI connector for Digital Video and
Audio.This connectionis alsodesignedto accept
HighDefinition signals.
•AVL(Automatic Volume Limiting)
•When novalid signal isdetected,after 5 minutes the
TV switches itselfautomatically to stand-by mode.
• PLL (Frequency Search)
• Stereo PC Audio Input
• 3D CombFilter
•Audio Line Out
Before Switching On Your TV
Power Connection
IMPORTANT: The TV set is designed to operate
on 220-240V AC, 50 Hz.
•Afterunpacking,allowtheTV settoreach room temperature before you connect the set to themains.
Connections To TheAerial InputSocket
VHF/UHF
REAR OF THE TV
NOTE : Connectthe aerialorcableTVplug totheAerial
input socket located at therearof theTV and
connect thecableplugcomingoutfrom theTV
out socketlocatedonthedevices(VCR,DVB-T
etc.)to thissocketas well.
HowTo Connect Other Devices
IMPORTANT: Switch off the TV before connecting
any external device.
Sockets for external connections are at the rear
side of the TV. For connection of other devices via
SCARTrefer to the manuals of the related devices.
Inserting Batteries In The Remote
Control Handset
• Remove the battery coverlocated on the back of
the handset by gently pulling downwards from
the indicated part.
• Insert two AAA/R03 or equivalent type batteries
inside.Place the batteries in the right direction.
• Replace the battery cover.
NOTE: Remove the bat te ries from remo te
control handset when it is not to be used for
a long period.Otherwise it can be damaged
due to any leakage of batteries.
01-ENG-37737W-42737W-1072 UK-37-42 INCH 17MB15 OEM-(HD READY)(WO VGA-WO PIP)(S)-50101853.p6502.04.2007, 11:174
Page 5
-5 -
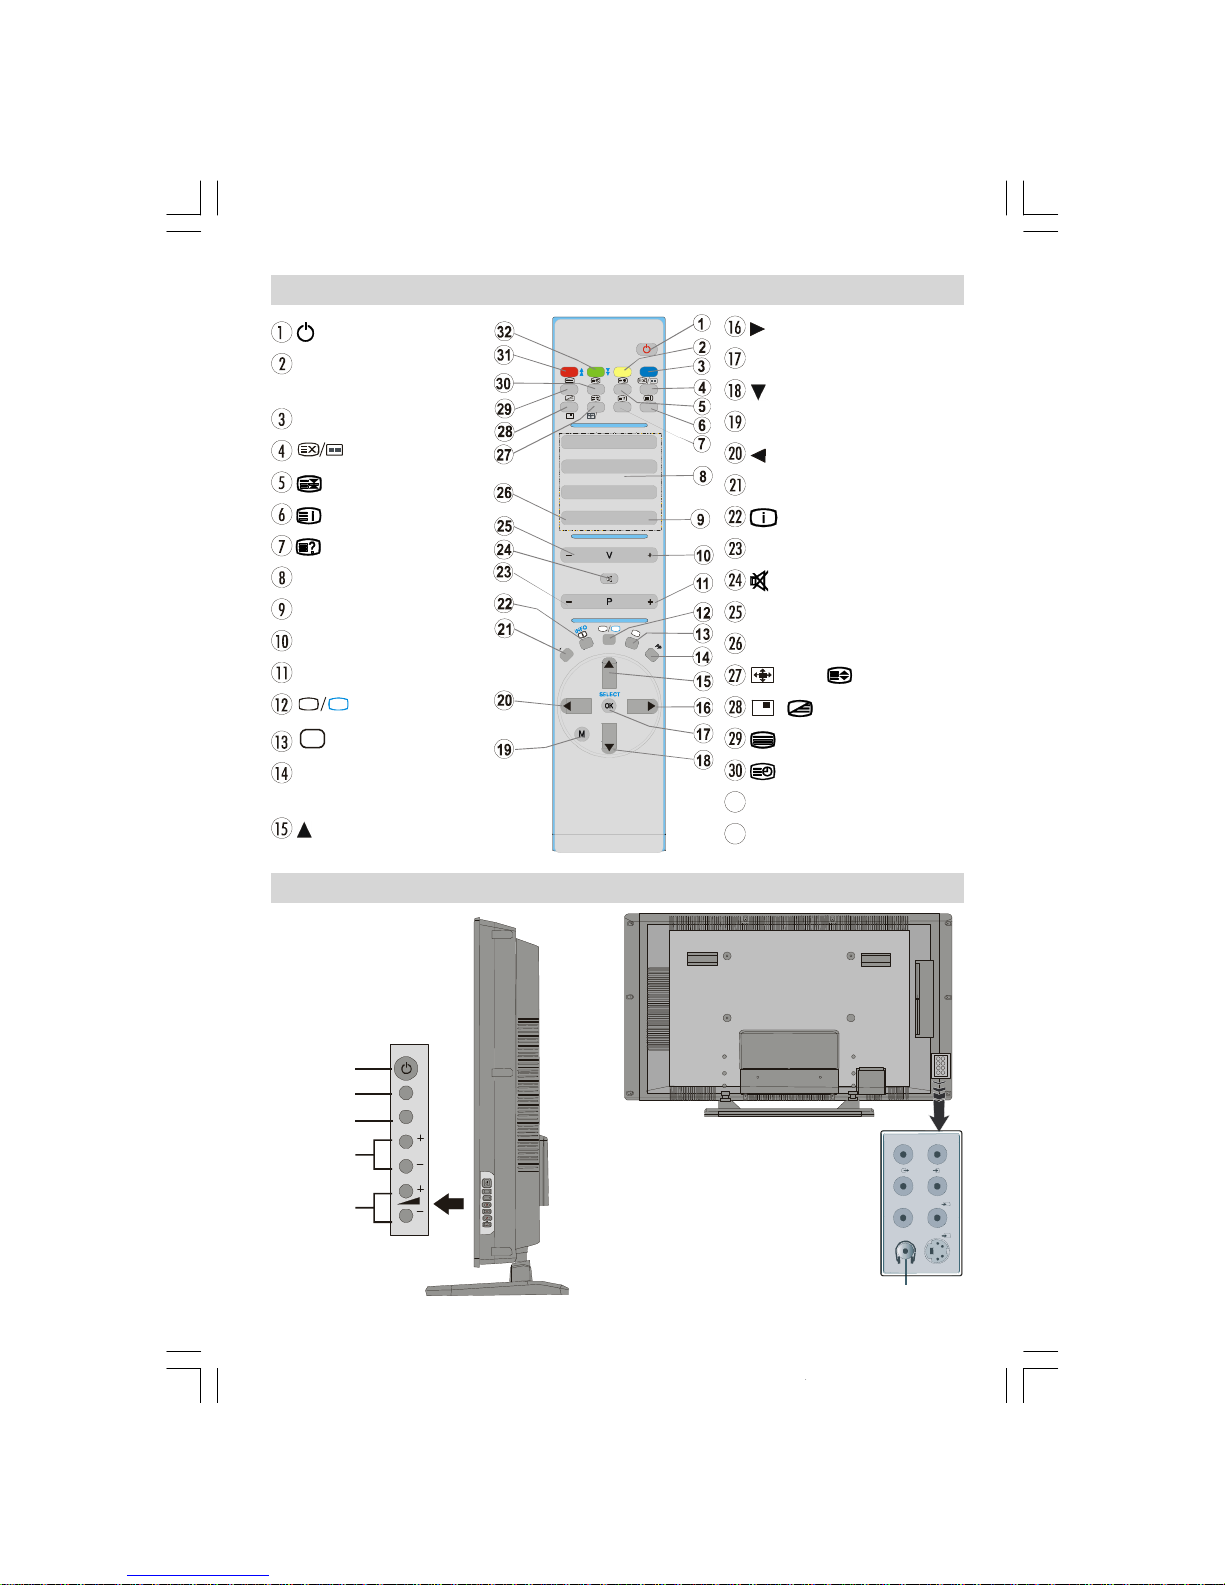
Remote Control Buttons
= StandBy
YELLOW /FEATURE =
FeatureMenu
BLUE / INSTALL= InstallMenu
= Update /NoFunction
=Hold
/GUIDE=IndexPage
/PC=Reveal/ NoFunction
0 - 9 =DirectProgramme
-/--/ EXIT = NoFunction
V+ = VolumeUp
P +=ProgrammeUp
TV
= TV / Quit Menu
AV
= Source Select
PP= Picture ModeSelection
(Natural,Cinema, Dynamic)
= Cursor Up
1
4
7
I
I
I
WIDE
SOUND
FEATURE
PC
GHI
VWX
YZ
PQRJKL MNO
A
P<P
LCD TV
TV/AV
MENU
P/CH
MENU
P/CH
Stand-By
TV/AV
Menu
-Program+
-Volume+
L
R
Headphone
= CursorRight
OK/SELECT=Okay/FreezePicture
= Cursor Down
M = MainMenu
= Cursor Left
I-II = Mono/Stereo- DualA-B
/INFO=Info
- P =ProgrammeDown
=Mute
- V = VolumeDown
P<P =PreviousProgramme
/WIDE/ = Wide / Expand
/ =No Function/Mix
=Teletext
=Time/ Subpage
RED /SOUND= SoundMenu
GREEN/ PICTURE = PictureMenu
01-ENG-37737W-42737W-1072 UK-37-42 INCH 17MB15 OEM-(HD READY)(WO VGA-WO PIP)(S)-50101853.p6502.04.2007, 11:175
Page 6
-6 -
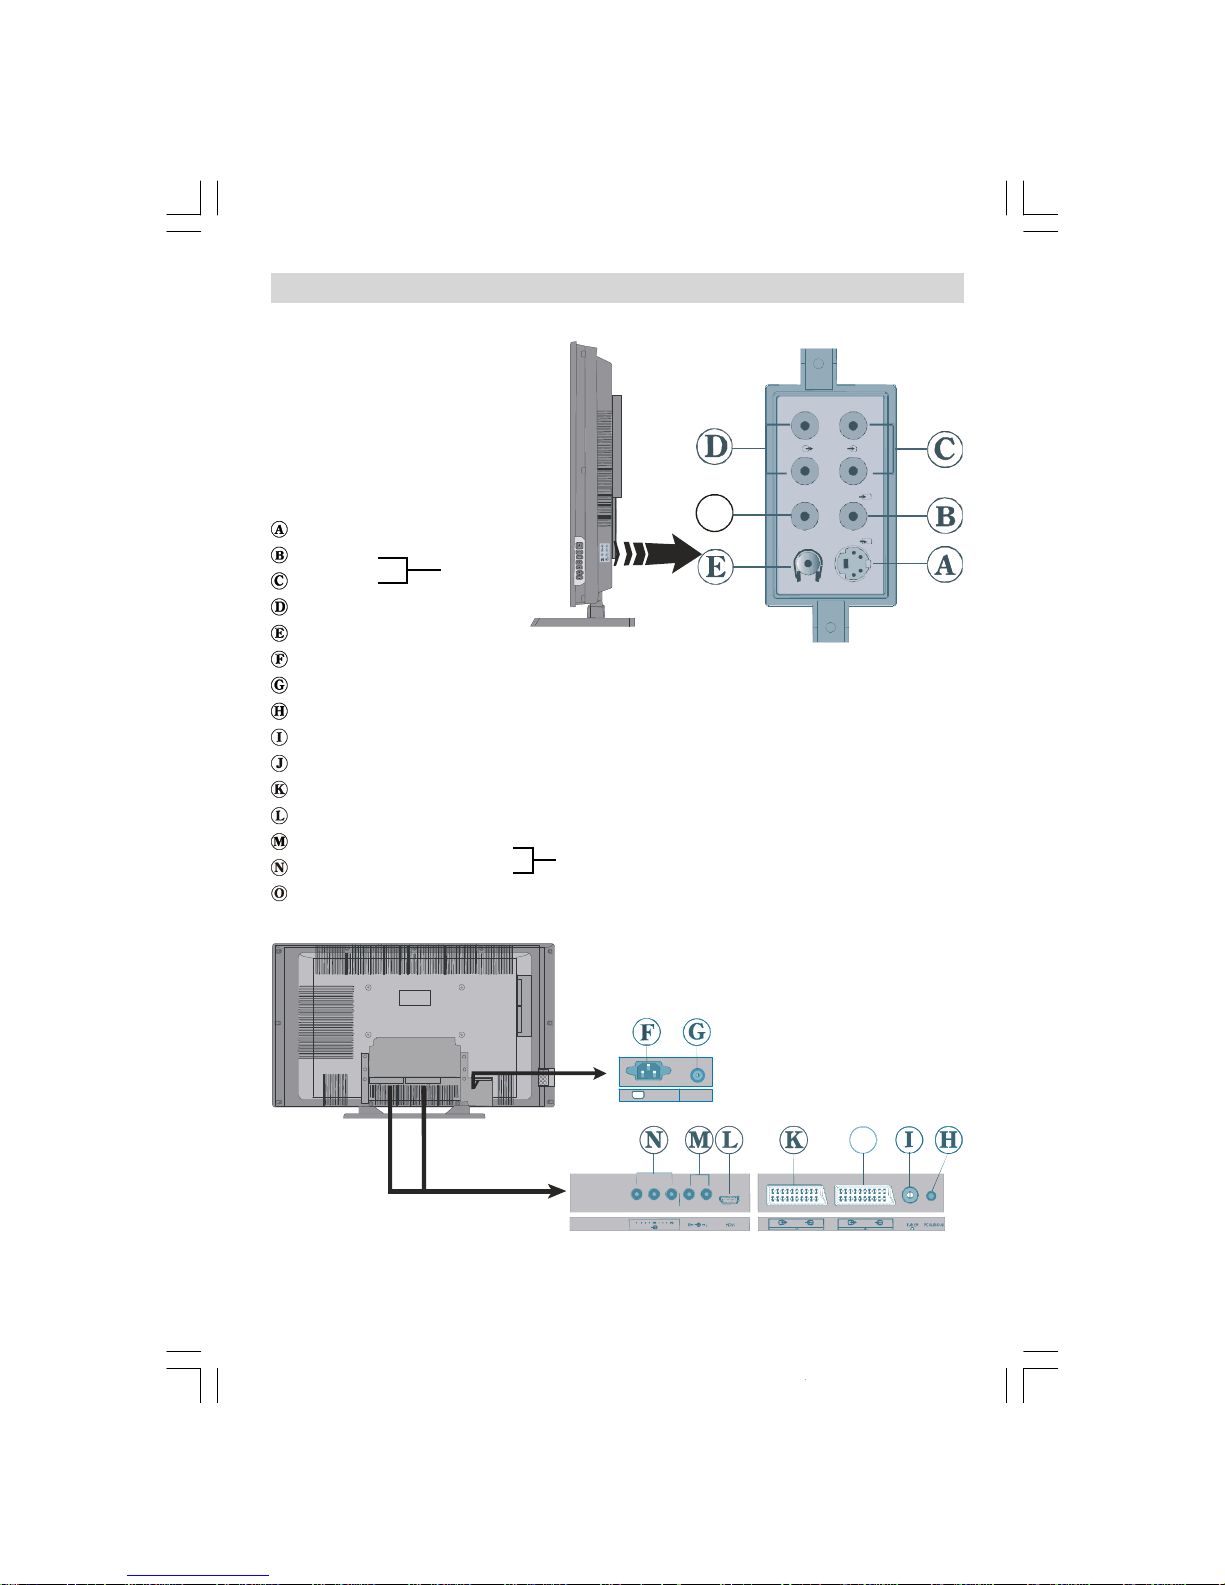
S-VHS Input ------>EXT-4S
Video Input
Audio Inputss
Audio Line Out
Headphone
Power cord input
Power On/Off switch
PCAudioinput
Aerial
SCART 2 (EXT-2)
SCART 1 (EXT-1)
HDMI Input (EXT-5)
Component Audio Inputss
Component Video (YPbPr) Inputs
Subwoofer Out
EXT-4
EXT-3
Peripheral Equipment Connections
TV/AV
MENU
P/CH
L
R
S
LRL
R
SUB-O U T
O
AC~50Hz
POWER
01-ENG-37737W-42737W-1072 UK-37-42 INCH 17MB15 OEM-(HD READY)(WO VGA-WO PIP)(S)-50101853.p6502.04.2007, 11:176
Page 7

-7 -
Switching The TV ON/OFF
To switchtheTV on:
Your TV will switch on in two steps:
1- Connect the power supply cord to the system.
Press On/Off switch at the rear of the TV.Then
the TV switches itself to stand-by mode and the
LED becomes BLUE located on the front of the
TV.
2- To switch on the TV from stand-by mode either:
Press a digit button on the remote control so that a
programmenumber is selected,
or,
Press “ ”, "-P/CH" or "P/CH+" button on the right
side of the TV or press “-P/CH” or “P/CH+” button
on the remote control, so that last switched off
programmeis selected.
By either ways the TV will switch on and the LED
will turn off.
To switchtheTV off:
• Press the “stand-by” button on the remote control, so the TV will switch to stand-by mode and
theLED will become BLUE,
or,
Press the “ ” button located on the right side of
the TV, so the TV will switch off and the LED will
become BLUE.
To power down the TV completely, press On/Off
switch,
or
unplug thepower cord from the mains socket.
InitialSettings
Initial APS (Automatic Programming
System)
The following menuwill be displayed on thescreen
when you turn your TV on for the first time. APS,
searches and sorts all channels and stores them
automatically on your TV, according to the transmission of programme systems in your area.
AUTO PROGRAM
PLEASE CHECK ANTENNA CABLE
Language
AUTO. PROGRAMMING SYSTEM
Country
First of all choose Language andCountry by using “
” or “
” and “” or “
” buttons. This will
affect the sort process in APS. To startAPS, press
the REDor “OK” button.
APS is running...
UK - I 155,25 Mhz
01 - C-01
AfterAPS is finalized, the programme table will appear on the screen.In the programme tableyou will
see the programme numbers and names assigned
to the programmes.
If you do not accept the locations and / or the
programme namesofprogrammes,youcanchange
them from theProgramMenu.
01-ENG-37737W-42737W-1072 UK-37-42 INCH 17MB15 OEM-(HD READY)(WO VGA-WO PIP)(S)-50101853.p6502.04.2007, 11:177
Page 8

-8 -
• For a two digit programme number enter the sec-
ond digit after pressing the firstdigit within 2 seconds.
Menu System
Your TV has been designed with a menusystem to
provide easy manipulation of a multifunction system.
Press the “M” buttonto enterthe menu. Press “
”
or “
” button to select a menu title and then “
” or
“
” button to select a menu item and “
” or “
” or
“OK” button to enter the menu item.
You can access themenusdirectly by pressing the
coloured buttons on the remote control:
RedButton SoundMenu
Green Button PictureMenu
Yellow Button FeatureMenu
BlueButton Install Menu
• Press the“M” or button to return tothe pre-
vious menu.
Picture menu
By pressing “
” or “
” button, select the first icon.
Picture menu appears on the screen.
Mode Cinema
Contrast
PAL 50Hz
Brightness
Sharpness
Colour
Colour Temp Warm
Noise Reduction
Reset
10
24
62
32
Film Mode
Off
3D Comb
Off
Off
Mode
By pressing“
” or “” button,select Mode. Press
“
” or “” button to choose one of these options:
Natural, Cinema and Dynamic.
Picture Mode can be directly changed via pressing
the “PP” button on the remote control.
Operating The TV
You can operate your TV using both the remote
control handset and the buttons on the set.
Operatingwith the buttons on the TV set
Volume setting and programme selection can be
made by using the buttons on the control panel at
the top of the TV.
Volume Setting
Press the "VOLUME-" button to decrease volume
orthe"+ VOLUME"buttontoincreasevolume,so a
volume level scale (slider) will be displayed at the
bottom of the screen.
Programme Selecting
Press the "+P/CH" button to select the next
programmeor the "P/CH-" button to select the previousprogramme.
EnteringThe Menu
Press the “M” button on the control panel at the top
of the TV to enter the menu.
"+P/CH" /"PCH-"and"VOLUME -" /"+ VOLUME"
buttons on the TV are used as navigation buttons in
themenu.
AV Mode
Press the "TV / AV" button on the control panel at
the top of the TVto switchyour TV to EXT modes.
Operating With Remote Control
The remote control handset of your TV is designed
to controlall the functions of yourTV. The functions
will be describedin accordance with the menu system of yourTV.
Functionsofthe menu systemaredescribedinMenu
System section.
Volume Setting
Press the “V+” button to increase volume. Press
the“- V” button todecreasevolume.Avolumelevel
scale (slider) will be displayed at the bottom of the
screen.
Programme Selecting
(Previous or next programme)
• Press the “-P” button to select the previous
programme.
• Press the “ P+” button to select the next
programme.
Programme Selecting (direct access):
Pressdigit buttonson theremote control handsetto
select programmes between 0 and 9. The TV will
switch to the selected programme after a short
delay.
01-ENG-37737W-42737W-1072 UK-37-42 INCH 17MB15 OEM-(HD READY)(WO VGA-WO PIP)(S)-50101853.p6502.04.2007, 11:178
Page 9

-9 -
Contrast
By pressing “
” or “
” button, select Contrast.
Press “
” button to increase contrast. Press “
”
button to decrease contrast. Contrast level can be
adjusted between 0 and 63.
Brightness
By pressing “
” or “
” button, select Brightness.
Press “
” button to increase brightness. Press “
”
buttonto decreasebrightness. Brightness level can
be adjusted between 0 and 63.
Sharpness
By pressing “
” or “
” button, select Sharpness.
Press “
” button to increase sharpness. Press “
”
buttonto decreasesharpness.Sharpnesslevel can
be adjusted between 0 and 31.
Colour
By pressing “
” or “
” button, select Colour .
Press “
” button to increase colour. Press “
” buttonto decreasecolour.Colourlevelcan be adjusted
between 0 and 99.
Hue
This item is displayedin picture menu when the TV
receives an NTSC signal. By pressing “
” or “
”
button, select Hue. Press “
” button to increase
hue level. Press “
” button to decrease hue level.
Hue level can be adjusted between -31 and 31.
Colour Temp
By pressing “
” or “
” button, select Colour
Temp. Press “
” or “
” button to choose one of
these options: Cool, Normal and Warm.
Noise Reduction
This item is used to reduce the image noise and
improve the picture quality at weak signals.
By pressing “
” or “
” button, select Noise Re-
duction. Press “
” or “
” button to set Noise re-
duction level to Off, Low, Medium or High.
FilmMode
Films are recorded at a different number of frames
per second to normal television programmes.
By pressing “
” or “
” button, select Film Mode.
Press “
” or “
” button to set this feature On or Off.
Turn this feature on when you are watchingfilms to
see the fast motion scenes clearly.
3D Comb
3D Comb is usedto improve colour transitions and
colour quality of pictures.
By pressing “
” or “
” button, select 3D Comb.
Press “
” or “
” button to set this feature On or Off.
Reset
By pressing“
” or“
” button,select Reset.Press
“
” or “
” or “OK” button to reset the picture modes
to factory default settings.
Sound menu
By pressing “
” or “
” button, select the second
icon. Sound menu appears on the screen.
Balance
10
0
AVL
Effect
Off
Off
Off
Volume
By pressing “
” or “
” button, select Volume.
Press“
” buttonto increasevolumelevel.Press “
”
button to decrease volume level. Volume level can
be adjusted between 0 and 63.
Equalizer
By pressing “
” or “
” button, select Equalizer..
Press “
” or “” or “OK” button to enter equalizer
menu.
500Hz
1.5kHz
5kHz
0
0
0
0
0
SOUND
01-ENG-37737W-42737W-1072 UK-37-42 INCH 17MB15 OEM-(HD READY)(WO VGA-WO PIP)(S)-50101853.p6502.04.2007, 11:179
Page 10

-10 -
Inequalizermenuthe soundmode can be changed
to User, Pop, Rock, Jazz, Flat and Classic by
pressing“
” or “
” button. Equalizer menu settings
can be changed only when Sound Mode is User.
Select the desired frequency by “
” or “
” button
and increase or decrease the frequency gain by
pressing “
” or “
” button.
Pressthe“M” buttontoreturnto theprevious menu.
Balance
By pressing “
” or “
” button, select Balance.
Press “
” button to increase balance to the right.
Press “
” button to increase balance to the left.
Balancelevel can be adjustedbetween-31 and31.
Headphone
By pressing “
” or “
” button, select Headphone.
Press“
”or“”or“OK”buttontoenterhedphonemenu.
Sound Mode
Balance
10
0
Volume
volume
By pressing “
” or “
” button, select Volume.
Press “
” button to increase hp volume level.
Press “
” button to decrease hp volume level.
Headphone volume level can be adjusted between 0 and 63.
sound mode
Bypressing“”or“
”button,selectSound Mode.
Press“
”or “
”buttonto change soundmode.
Soundmodeisusedtoidentifysound modeof the
headphone and can be set to mono, stereo,
dual A or dual B according to the transmission.
balance
By pressing“
” or “
” button,select Balance.
Press“
”buttonto increasebalanceto theright.
Press“
” buttonto decreasebalance tothe left.
Balancelevel can be adjusted between -31 and
31.
Press the “M” button to return to the previous
menu.
Sound Mode
By pressing “
” or “
” button, select Sound
Mode. Press“
” or “
” button to change themode.
You can select Mono, Stereo, Dual A or Dual B
mode,onlyif theselectedchannelsupportsthatmode.
In case of bilingual broadcast (Dual Sound), you
can select original ordubbedlanguage usingmode
option.
AVL
Automatic Volume Limiting (AVL) function adjusts
the sound to obtain fixed output levelbetween programs, having different sound levels.
Pressing “
”or “
”button will turnthis featureonor off.
Effect
You can use this feature to switchthe soundeffect
on or off. If the current sound system is Mono and
the sound effect is switched on, then the sound will
be heard as if it is Stereo. If thecurrent sound system is Stereo, switching this effect on will give a
more spatial effect.
Pressing “
”or “
”button will turnthis featureonor off.
Dynamic Bass
Dynamic Bass is used to increase bass effect of
the TV set.
Bypressing“
”or“
”button,select DynamicBass.
By pressing “
” or “
” button set Dynamic bass to
Low,HighorOff.Itisnotrecommended toselect High
iflisteningathighvolumelevels. There isa subwoofer
output that can accept an active subwoofer if you
wish to create very high levels of Bass.
Subwoofer is active only if Dynamic Bass is set to
Off.
SubWoofer
It is possible to connect an external, active
subwoofer to the set to give a much deeper bass
effect.
By pressing “
” or “
” button, select Subwoofer..
Subwoofer can be set to On or Off.
DynamicBass is not available if Subwooferis set to
On.
Set Subwoofer to On when you connect an exter-
nal subwoofer to the set.
01-ENG-37737W-42737W-1072 UK-37-42 INCH 17MB15 OEM-(HD READY)(WO VGA-WO PIP)(S)-50101853.p6502.04.2007, 11:1710
Page 11

-11 -
Feature menu
By pressing “” or “
” button, select the third icon.
Featuremenu appears on the screen.
Sleep Timer
Language
Ext-2 Out
Off
Off
English
EXT - 1
Panoramic
Translucent
30 sec
West
FEATURE
Sleep Timer
Bypressing “
” or“
” button,select Sleep Timer..
The timer can be programmed between Off and 2
hours in steps of 10 minutes by pressing “” or “
”
button. If sleep timer is activated, at the end of the
selectedtime,the TVautomaticallygoes intostandby mode.
ChildLock
You can use this feature to prevent children from
turning the TV on or changing programmes or adjustments etc. without remote control.
The child lock feature can be set by “
” or “
” button to eitherOn or Off. WhenOff isselected, there
will be no difference in the operation of your TV.
When Onis selected,the TV canonly be controlled
by the remote control handset. In this case the control panel buttons, except the Power on/off button,
at the rear side of the TV will not work. If one of
these buttons is pressed, “Child Lock On” will be
displayed on the screen.
Language
By pressing “
” or “
” button, select Language.
By pressing “
” or “
” button, you can select the
language.
Ext-2 Out
By pressing “
” or “
” button, select Ext-2 Out.
You can setExt-2 Out to TV, EXT-1, EXT-3, EXT-4
or EXT-5 by pressing “
” or “
” button.
Note: Only audio output is available forEXT-3 and
EXT-5. Theotheroptionshavebothaudioand
video outputs.
Default Zoom
By pressing “
” or “
” button, select Default
Zoom. You can set Default Zoom to Panoramic,
4:3 or 14:9 Zoom by pressing “
” or “
” button.
If there is no WSS or aspect ratio (picture size)
information and zoom mode is selected as Auto by
pressing the “WIDE” button, then the zoom mode
will automatically change to Default Zoom setting.
See also Zoom Modes on page 13.
Menu Background
By pressing “
” or “
” button, select Menu Back-
ground. Youcanchange menubackgroundto Trans-
lucent or Opaque by pressing “
” or “” button.
Menu Timeout
By pressing “
” or “
” button, select Menu
Timeout. Press “
” or “
” button to change menu
timeout to 15 sec, 30 sec or 60 sec.
Teletext Language
By pressing “
” or “
” button, select Teletext
Language. Press “
” or “
” button to change Teletext Language to West, East, Cyrillic, Turk/Gre
or Arabic. This will normally be set to West for
Western Europe.
Install menu
By pressing“
” or “
” button,select the fourthicon.
Install menu appears on the screen.
Program
By pressing “
” or “
” button, select Pro-
gram. Press “
” or “
” button to select the pro-
gram number. You can also enter a number via
01-ENG-37737W-42737W-1072 UK-37-42 INCH 17MB15 OEM-(HD READY)(WO VGA-WO PIP)(S)-50101853.p6502.04.2007, 11:1711
Page 12

-12 -
digit buttons on the remote control. There are
100 program storage between 0 and 99.
Band
Bandcanbe selectedeither“C” or“S” by press-
ing “
” or “
” button.
Channel
Channel can be changed by “
” or “
” button
or Digit Buttons.
Colour System
By pressing “
” or “
” button, select Colour
System. Press “
” or “
” button to change the
colour systemtoPAL, SECAM, PAL60 orAUTO.
If Sound Systemis set to I, SECAM is not avail-
able for the Colour System.
Note:In EXTmode,you canchooseNTSC3.58
and NTSC 4.43 as well.
Sound System
By pressing “
” or “
” button, select Sound
System. Press “
” or “
” button to change the
sound system toBG, DK, I, L or LP.
FineTune
Bypressing “
”or“
”button,select FineTune.
Press “
” or “
” button to adjust the tuning.
Search
By pressing “
” or “
” button, select Search.
Press “
” or “
” button to start program searching. The searching will stop when a signal is
found. You can also enter a frequency value
directly by pressing the digit buttons.
VCR (Video Cassette Recorder)
• If youwantto watch aVCR source thenit will be
betterto setVCR mode“on”. For this, while the
cursor is onthis itempressthe“
” or “
” buttons
toset it “On”.
• If you want to watch a DVD, then you must
set this item “Off”.
Store Program
By pressing “
” or “
” button, select Store
Program. Press “
” or “
” or “OK” button to
store the adjustments.“Program Stored”will be
displayed on the screen.
Program menu
By pressing “” or “
” button, select the fifth icon.
Program menu appears on thescreen.
11 C - 43
12 C - 64
13 C - 68
16 - - - - 17 - - - - 18 - - - - 19 - - - - 20 - - - - -
APS
By moving the cursor in four directions you can
reach 20 programmes in the same page. You can
scroll the pages up or down by pressing the navigation buttons toseeall theprogrammesinTV mode
(except theAVmode).By cursor action, programme
selectionis doneautomatically.
Name:
To changethe name of a decided programme, select the programmeand press the RED button.
The first letter of the selected name starts to blink.
Press “
” or “
” button to change that letter and
“
”or “”button toselect theother letters. Bypress-
ing theRED button, you can store thename.
Insert:
Select the programme which you want to insert by
navigationbuttons.Press theGREENbutton.By navigation buttons move the selected programme to the
decidedprogrammespaceandpresstheGREEN buttonagain.
Delete:
To deletea programme,press the YELLOWbutton.
Pressingthe YELLOW button againerases the selectedprogrammefrom theprogramme list, and the
programmes below shift one up.
APS (Automatic Programming System)
Whenyoupress theBLUEbutton forAPS, the following warning screen will be displayed.
01-ENG-37737W-42737W-1072 UK-37-42 INCH 17MB15 OEM-(HD READY)(WO VGA-WO PIP)(S)-50101853.p6502.04.2007, 11:1712
Page 13

-13 -
UK
All prestored programs
Cancel
will be deleted
Press the BLUE button to cancel APS if you do not
want to delete your existing programme list.
To continue APS, first select the country by pressing
“
”or“
”buttonandthenpresstheREDor“OK”button.
APS is running...
UK - I 155,25 Mhz
01 - C-01
AfterAPS is finalized, the programme table will appear on the screen.
Source menu
By pressing “
” or “
” button, select the sixth icon.
Sourcemenu appears on the screen.
EXT - 1
EXT - 2
EXT - 2S
EXT - 3
EXT - 4S
EXT - 4
EXT - 5
In sourcemenu, highlighta source by pressing“
”
or “
” button and switch to that mode by pressing
“
” or “
” or “OK”button.
Other Features
TVStatus
Programme Nu mb er , Programme Name,
Sound Indicator and Zoom Mode are displayed
on the upper right side of the screen when a new
programme is entered, button is pressed.
Mute Indicator
It is placedin the upper left side of the screenwhen
enabled.
To cancel mute, thereare twoalternatives; the first
one is pressing the button and the second one
is increasing/decreasing the volume level.
Freeze Picture
You can freeze the picture on the screen by pressingthe OK button.
ZoomModes
Zoom modecan be changedby pressingthe WIDE
button. You can change the screen size according
to the picture aspect ratio. Select the optimum one
from the following ZOOM modes.
Auto:
When a WSS (Wide Screen Signalling) signal,
which shows the aspect ratio of the picture, is
included in the broadcast signal or the signal from
an external device, the TV automatically changes
the ZOOM mode accordingto the WSS signal.
• When the AUTO modedoes not function correctly
due to poor WSS signal quality or when you
want to change the ZOOM mode, change to anotherZOOM mode manually.
Full:
This uniformlystretches the left and right sides of a
normal picture (4:3 aspect ratio) to fill the wide TV
screen.
• For 16:9 aspect ratio pictures that have been
squeezedinto a normal picture (4:3aspect ratio),
use the Full mode to restore the picture to its
original shape.
Cinema:
This zooms up the wide picture (16:9 aspect ratio)
to the full screen.
01-ENG-37737W-42737W-1072 UK-37-42 INCH 17MB15 OEM-(HD READY)(WO VGA-WO PIP)(S)-50101853.p6502.04.2007, 11:1713
Page 14

-14 -
16:9 Subtitle:
This zooms up the wide picture (16:9 aspect ratio)
with subtitles to the full screen.
“Default Zoom” Modes:
4:3
Use to view a normal picture (4:3 aspect ratio) as
this is its original shape.
14:9 Zoom:
This zooms up the wide picture (14:9 aspect ratio)
to the upper and lower limits of the screen.
Panoramic:
This stretches the left and right sides of a normal
picture (4:3 aspect ratio) to fill the screen, without
making the picture appearunnatural.
Thetop andbottom ofthe pictureare slightlycutoff.
Teletext
Teletext is an information system that displays text
on your TV screen. Using the Teletext information
system you can view a page of information on a
subject that is available in the list of contents (index).
To Operate Teletext
• Select a TV stationwhere Teletext is beingtransmitted.
• Press the button. Usually the list of contents
(index)is displayed on the screen.
WIDE
To Select A Page Of Teletext
• Press the appropriate digit buttons for the requiredTeletext page number.
The selected page number is displayed in the top
left corner of the screen. TheTeletext page counter
searchesuntilthe selectedpagenumberis located,
the desired page is then displayed on the screen.
• Press the “
” or “P +” button to move the Tele-
text screen forward one page at a time.
• Press the “
” or “- P” button to move the Tele-
text screen backward one page at a time.
To Select Index Page
• To select thepage number of the index (generally
page 100), press the button.
To Select Teletext With A TV
Programme
• Press the button. The text is now superimposed over the programme on the screen.
• Pressthe buttonagainto return to theTeletext
page.
To Select Double Height Text
• Press the button for the top half of the informationpage to be displayed in double height text.
• Press the button again for the bottom half of
the information page to be displayed in double
01-ENG-37737W-42737W-1072 UK-37-42 INCH 17MB15 OEM-(HD READY)(WO VGA-WO PIP)(S)-50101853.p6502.04.2007, 11:1714
Page 15

-15 -
height text.
• Pressthe buttononcemore for the fullpage of
normal height text.
To Reveal “Concealed” Information
• Pressing the button once will reveal answers
on a quiz or gamespage.
• Pressing the button again will conceal the revealed answers.
To Stop Automatic Page Change
The teletext page you have selected may contain
more information than what is on the screen; the
rest of the information will be displayed after a period of time.
• Press the button to stop the automatic page
change.
• Press the button again to allow the next page
to be displayed.
To Select A Subcode Page
Subcode pages are subsections of long Teletext
pagesthat can onlybe displayedon the screenone
sectionat a time.
• Select the required Teletext page.
• Press the button.
• Select the required subcode page number by
pressing four digit buttons (e.g. 0001).
• If the selected subcode page is notdisplayed in a
short time, press the button. TV programme
will be displayed on the screen.
• Teletext page numberwill be displayed on the upper left corner of the screen when the selected
page is found.
• Press the button to display the selected Teletext page.
To Exit Teletext
• Press the button.The screen will switchto TV
mode.
To Display The Time
• While watching a TV programme with Teletext
transmission press the button. The current
time information, captured from Teletext will be
displayed on the screen.
• If the programme being watched does not have
Teletext transmission, noinformation will be displayed.
Fastext
Your TV supports the 1000 page Teletext system.
When the pagenumber of any of the 1000 pages in
memory is entered, the system will not search for
the requested page; instead it will display the page
automatically.Ifthe requested pageisnotinmemory,
thesystem will search for the requestedpage numberandsavethe1000 pagesincludingtherequested
page into memory after findingit.
• Press the “
” button to move the Teletextscreen
forward one page at a time.
• Press the “
” button to move the Teletextscreen
backward one page at a time.
For Fastext
Thesubject-heading for theinformationmay have a
particular colour.
• Press an appropriateRED, GREEN, YELLOW or
BLUE button in order to reach the relevant page
quickly.
For TOP text
TOP text mode of operation will be activated automatically according to the transmission.
• If TOP text transmission is present, colour coded
buttons will appear in status row.
• If TOP text transmission isnot present,status row
will not appear.
The subject-heading for information may belocated
in coloured box.
In Top mode the “
” or “
” commands will re-
questthe nextor previouspagerespectively. If TOP
text transmissionis not available, in case of operation of these commands, wraparound occurs. For
example page 100 appears to be one greater than
page 199.
01-ENG-37737W-42737W-1072 UK-37-42 INCH 17MB15 OEM-(HD READY)(WO VGA-WO PIP)(S)-50101853.p6502.04.2007, 11:1715
Page 16

-16 -
Connect Peripheral Equipment
Thereis a widerangeof audioand videoequipment
that can be connected to your TV.
The following connection diagrams show you where
thedifferent (Optional)equipmentshouldbeconnected
at therearsideof the TV.
High Definition
Your LCD Television is capable of displaying High
Definition pictures from devices such as a High
Definition Satellite Receiver or DVD Player. These
devices must be connected via the HDMI socket
(EXT-5)orComponentSocket(EXT-3).Thesesockets can accept either 720p or 1080i signals.
Note: For proper connection of a device to HDMI
input of your TV via using a DVI-to-HDMI
cable, useExtAudioIn(PCAudioIn)forsound
connection.
Via The SCART
LCD TV has 2 SCARTsockets. If youwant to connect peripherals (e.g. video, decoder, etc.) which
have SCART sockets to the TV, use SCART 1 or
SCART2.
If an external device is connected via the SCART
sockets, the TV will be switched to AV mode automatically.
• Do not connect Digital Set Top Box devices via
SCART1. UseSCART 2.
Via Aerial Input
If you want to connect to your TV, peripherals like
video recorders or decoders, but the device you
want to connect does not have a SCART socket,
you should connect it to the Aerial input of the TV.
If the VCR is connected via Aerial input it is
suggested to use Programme 0.
Decoder
CableTV offers youa wide choice of programmes.
Most of them are free, others are to be paid for by
the viewer. This means that you will need to subscribe to the broadcasting organisation whose
programmesyou wish to receive. This organisation
will supply you a corresponding decoder unit to
allow the programmes to be unscrambled.
For further information ask your dealer. See also
the booklet supplied with your decoder.
Connect a decoder with an aerial socket
to the TV
• Connect the aerial cable.
Connect a decoder without an aerial
socket to the TV
• Connect the decoder to the TV with a SCART
cable to SCART 1.
TV And Video Recorder
• Connect the aerial cables.
Better picture quality can be obtained if you also
connect a SCART cable to SCART sockets.
Playback NTSC
To use this option you can;
• Connect an NTSC VCRplayerto a SCART socket
at the rear side of the TV.
• Connect an NTSCVCRplayerto RCAJacksat the
right side of the TV.
Then,pressAVbuttontoselectappropriatesource.
Copy Facility
Source selection for VCR recording.
• Select Feature menu.
• Select Ext-2 Out by pressing “
” or “” button.
• Select a source to copy the picture from that
source.
Search For And Store The Test Signal
Of The Video Recorder
• Unplug the aerial cable from the aerial socket of
your video recorder.
• Switch on your TV andput the video recorder on
the test signal. (See the booklet for your videorecorder.)
• Enter the Install menu and select search.
• Search for the test signal of your video recorder
in the same way as you searched for and stored
the TV signals. Store the test signal under
programme number 0.
• Replace the aerial cable in the aerial socket of
yourvideo recorderonce you have stored the test
signal.
Camera And Camcorder
To Connect To AV Input
Connect your camera or camcorder toAV (EXT-4)
input at the right sideof the TV.
• Connect your equipment to theTV via VIDEO (yellow),AUDIO R (red)and AUDIO L (white) inputs.
You mustconnect thejacks to theinput using the
samecolour.
01-ENG-37737W-42737W-1072 UK-37-42 INCH 17MB15 OEM-(HD READY)(WO VGA-WO PIP)(S)-50101853.p6502.04.2007, 11:1716
Page 17

-17 -
To Connect To S-VHS Input
Connect your camera or camcorder S-VHS input
(EXT-4S) at the right side of the TV.
• Connect yourequipment to the TV viaS-VHS input
and audio inputs of AV inputs by using S-VHS
cables.
EXT-2 S Mode
If the equipment connectedto your TV set supports
S-Video (Y/C) output from Euroconnector, you can
have a better picture quality by selecting EXT-2 S
mode and connectingyour equipment to the EXT.2
(EXT-2 S) terminal of TV. See your equipment’s
booklet to check if your equipment has such feature.
Connect The Decoder To The Video
Recorder
SomevideorecordershaveaspecialSCARTsocket
for decoder.
• Connect a SCART cable to theSCART socket of
yourdecoder and to the special SCARTsocket of
your video recorder. Refer to the booklet of your
video recorder.
• To connect your video recorder to the TV,
refer to the TV and Video Recorder section.
If you want to connect more equipment to your TV,
consult your dealer.
ConnectingHeadphones
Use the stereo headphone socket at theright side
of the TV, to connect headphones.
ConnectingSubwoofer
Use Subwoofer Out socket to connect an exter-
nal, active subwoofer to the set to give a much
deeper bass effect.
Connecting External Equipment
To connect audio amplifiers or home theatre systems to your TV, use theAudio Line Outs of the TV.
Tips
Care Of The Screen
Cleanthescreen with aslightly damp,soft cloth.Do
not use abrasivesolvents as they may damage the
TV screen coating layer.
Poor Picture
Have you selected the correct TV system? Is your
TV set or house aerial located too close to nonearthedaudio equipment or neon lights, etc.?
Mountains or high buildings can cause double picturesor ghostimages. Sometimesyou canimprove
the picture quality by changing the direction of the
aerial.
Is the picture or Teletext unrecognisable? Check if
you have entered the correct frequency.
The picture quality may degrade when two peripherals are connected to the TV at the same time. In
such a case, disconnect one of the peripherals.
NoPicture
Is theaerial connectedproperly?Are the plugs connectedtightlytothe aerialsocket?Isthe aerialcable
damaged? Are suitable plugs used to connect the
aerial? If you are in doubt, consult your dealer.
No Picture couldmean that your TV is not receiving a transmission. Have you selected the correct
button on the remote control?
Sound
Has the mute button been pressed?
Sound is coming from only one of the speakers. Is
thebalance set to one extreme?SeeSound menu.
Remote Control
Your TV no longer responds to the remote control.
Perhaps the batteries areexhausted. If so you can
still use the local buttons at the side of the TV.
Haveyou selectedthe wrongmenu? Press the
buttonto return to TV modeor press the “M” button
to return to the previous menu.
Nosolution:
Do not attemt to repair the TV yourself. Contact a
qualified service engineer.
01-ENG-37737W-42737W-1072 UK-37-42 INCH 17MB15 OEM-(HD READY)(WO VGA-WO PIP)(S)-50101853.p6502.04.2007, 11:1717
Page 18

-18 -
Connect Peripheral Equipment
Aerial Connection
75
Round 75 ohm coaxial cable
Rear of TV
Outdoor Aerial Connection
S
LRL
R
SUB-OUT
ANT.IN
AV-1
AV-2
LCD TV
RF Lead to Aerial
RF Lead from
Satellite to TV
Aerial
EXT-1 on TV.
TV VCR
...or through a VCR and satellite decoder.
ANT.IN
ANT.IN
RF Lead to
Aerial
RF Lead
from VCR to
Satellite
RF Lead from
VCR to TV
Aerial
VCR
• Scart Lead to
on T V.EXT-1
AV-1
TV VCR
AV-2
LCD TV
either connect the aerial straight to your TV...
Aerial (RF) Socket
wall
socket
Aerial (RF)
Lead
...or connect th e aerial through a VCR...
Aerial (RF) Socket
wall
socket
Aerial (RF)
Lead
Aerial (RF) Socket VCR
Optimal Scart Lead
TV to VCR
(RF) connector(RF) connector
lead VCR to TV
A/VIN/OUT
• It is recommended thata scart lead should be fitted between your TV and
VCR to enhance your picture and sound quality.Scartleadsare essential
if you have a stereoTVand VCR and wish to obtain stereo sound from
your equipment.Theseleadscanbe purchhasedfromyourdealer
or any good High Street electrical retailer.
01-ENG-37737W-42737W-1072 UK-37-42 INCH 17MB15 OEM-(HD READY)(WO VGA-WO PIP)(S)-50101853.p6502.04.2007, 11:1718
Page 19

-19 -
Specifications
TVBROADCASTING
PAL/SECAMB/GD/KK'I/I'L/L'
RECEIVING CHANNELS
VHF(BANDI/III)
UHF(BANDU)
HYPERBAND
CABLE TV (S1-S20/ S21-S41)
NUMBEROFPRESETCHANNELS 100
CHANNELINDICATOR
On Screen Display
RFAERIAL INPUT
75 Ohm (unbalanced)
OPERATINGVOLTAGE
220-240V AC, 50 Hz.
AUDIO
German+NicamStereo
AUDIOOUTPUT POWER (W
RMS.
) (%10 THD)
2 x 8
PANEL
16:9 display, 37” Screen Size
POWERCONSUMPTION (W)
180 W
2,3 W (Stand-by)
D L H
Weight (kg)
With foot
Without foot
250
128
1062
1062
646
607
21,2
19,4
PANEL
16:9 display, 42” Screen Size
POWERCONSUMPTION (W)
210 W
1,3 W (Stand-by)
D L H
Weight (kg)
With foot
Without foot
285
124
1185
1185
744
693
29,2
26,4
HDMI Display Modes List
Horizontal pixe ls x
Vertica l Scan Line
Front Rate Aspe ct Ratio
1920x1080i 60Hz 16:9
1920x1080i 50Hz 16:9
1280x720p 60Hz 16:9
1280x720p 50Hz 16:9
720x576p 50Hz 16:9
720x480p 60Hz 16:9
720x576i 50Hz 16:9
720x480i 60Hz 16:9
640x480 60Hz 4:3
01-ENG-37737W-42737W-1072 UK-37-42 INCH 17MB15 OEM-(HD READY)(WO VGA-WO PIP)(S)-50101853.p6502.04.2007, 11:1719
 Loading...