

Master Forge FL-6107-2SQ, FL-6002H-2S User Manual
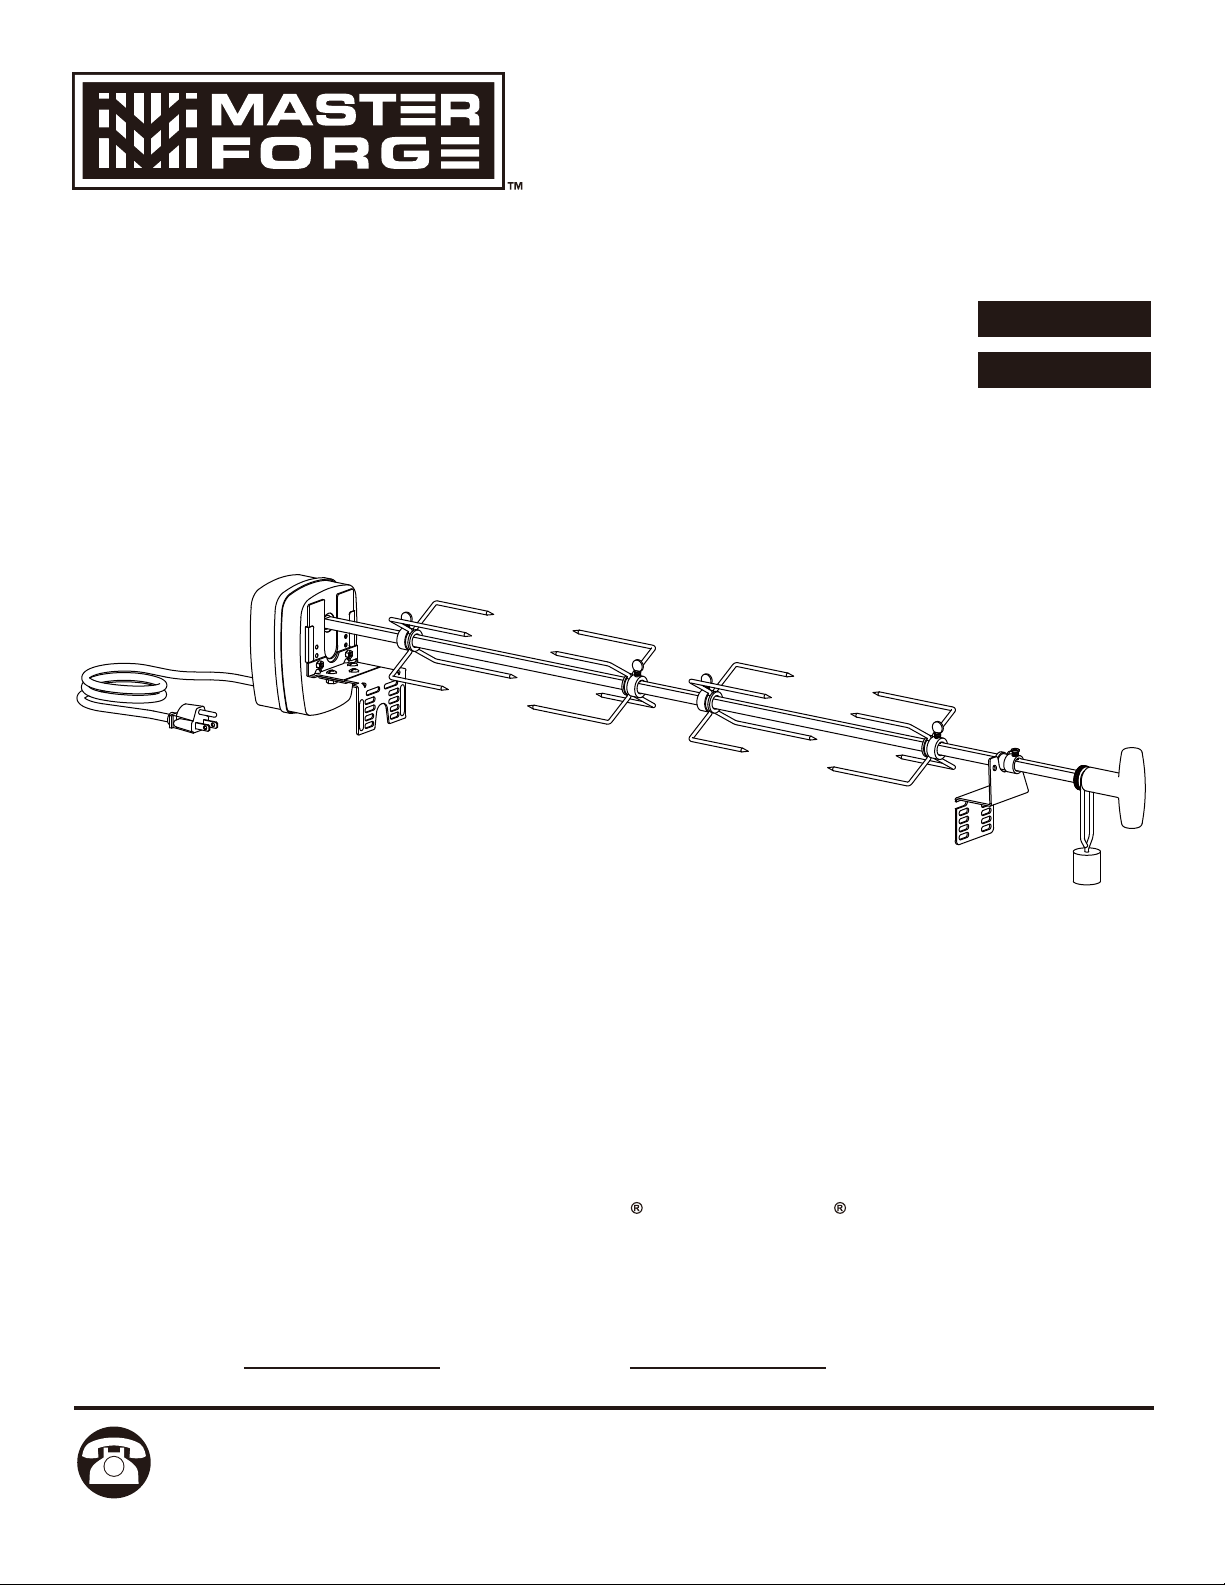
ITEM #0297956
40 IN. STAINLESS STEEL
UNIVERSAL ROTISSERIE
MODEL #FL-6107-2SQ
Français p. 10
Español p. 19
NOTE: THIS ROTISSERIE DOES NOT FIT WEBER GRILLS. (Weber is a registered mark of
Weber-Stephen Products Co.)
ATTACH YOUR RECEIPT HERE
Serial Number
Questions, problems, missing parts? Before returning to your retailer, call our customer
service department at 1-800-963-0211, 8 a.m. - 6 p.m., EST, Monday - Thursday, 8 a.m. - 5
p.m., EST, Friday.
Purchase Date
1
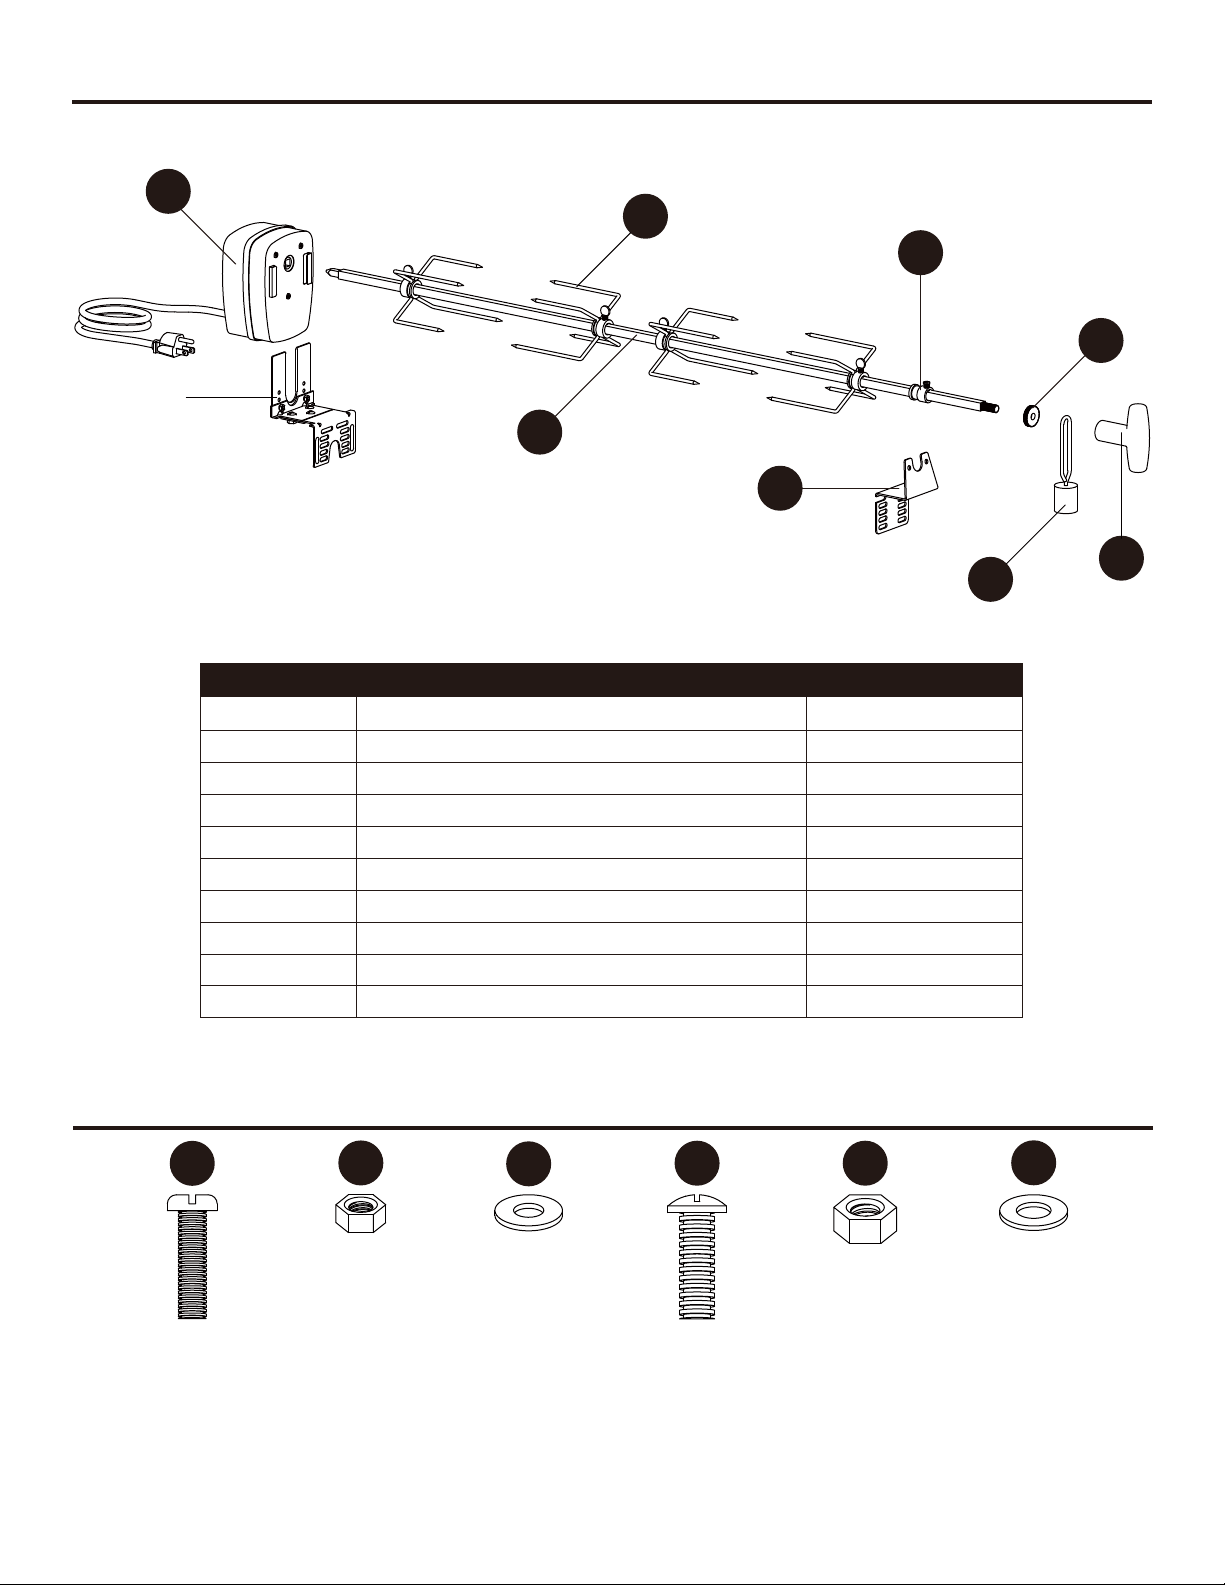
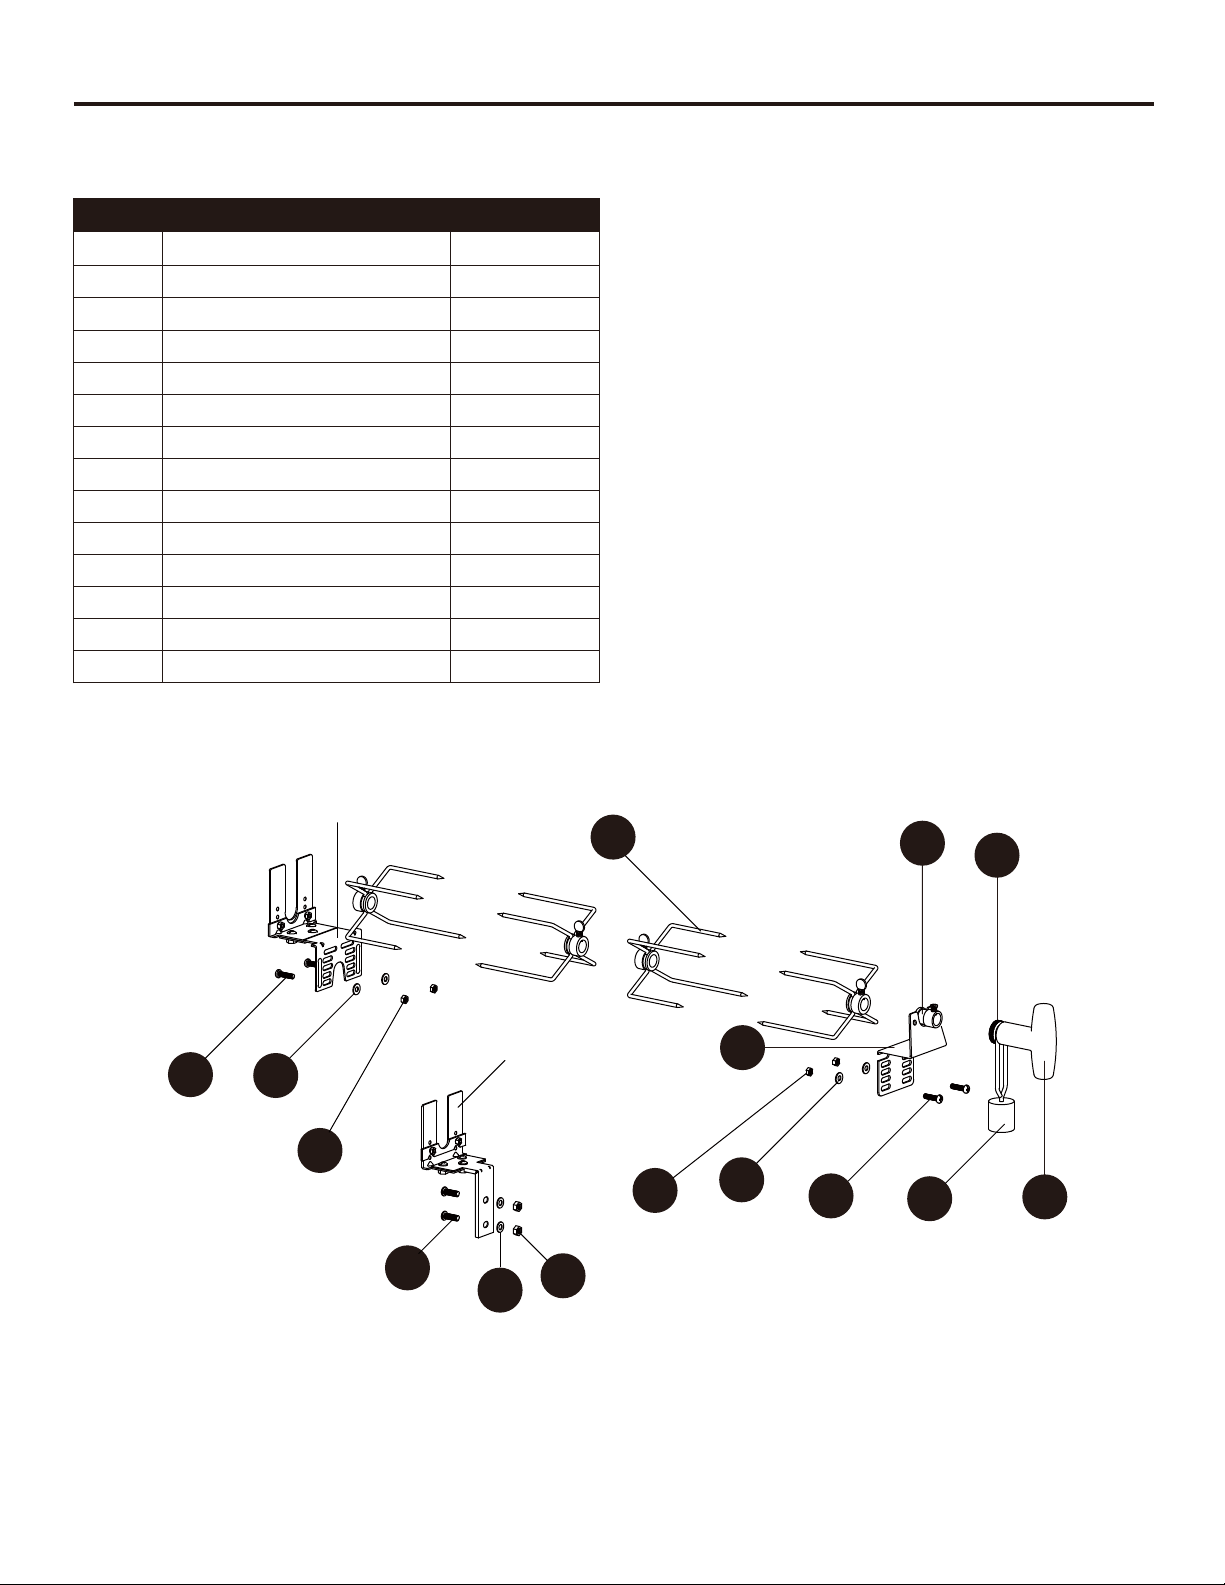
PACKAGE CONTENTS
A
X-Y-Z
C
E
F
B
H
D
G
PART DESCRIPTION QUANTITY
A Rotisserie Motor 1
B
C
D
E
F
G
H
W
X-Y-Z
HARDWARE CONTENTS (shown actual size)
AA
Bolt
Qty. 4
BB
Nut
Qty. 4
Counterweight Washer
Alternate Piece for Motor Bracket
Spit Rod
4-Prong Meat Fork
Handle
Counterweight
Spit Rod Bracket
Motor Bracket
CC
Washer
Qty. 4
Collar
DD EE
Alternate
Bolt
Qty. 2
Alternate
Nut
Qty. 2
1
4
1
1
1
1
1
1
1
FF
Alternate
Washer
Qty. 2
2

SAFETY INSTRUCTIONS
Please read and understand this entire manual before attempting to assemble, operate or install the
product. If you have any questions regarding the product, please call customer service at
1-800-963-0211, 8 a.m. - 6 p.m., EST, Monday - Thursday, 8 a.m. - 5 p.m., EST, Friday.
WARNING: TO PROTECT AGAINST SHOCK HAZARD, CONNECT ONLY TO PROPERLY
GROUNDED OUTLET. DO NOT TAKE APART ANY COMPONENTS OF THE MOTOR.
1. Read all instructions before assembly, installation, and use.
2. Do not touch hot surface with bare hands.
3. To protect against electrical shock, do not immerse cord, plug, or motor in water or other liquid.
4. Close supervision is necessary when any appliance is used by or near children.
5. Unplug from outlet when not in use and before cleaning. Allow to cool before putting on or taking
off parts. Do not clean this product with a water spray or the like.
6. Do not operate any appliance with a damaged cord or plug or after the appliance has been
damaged in any manner.
7. The use of other accessory attachments is not recommended by the appliance manufacturer as it
may cause injuries.
8. Do not let the electrical cord touch hot surfaces or hang over edge of table or counter.
9. Do not place on or near a hot gas or electrical burner or in a heated oven.
10. Caution must be used when assembling the pointed end of spit rod and the meat forks as the
ends are sharp.
11. Always attach plug to appliance first, then plug cord into the wall outlet. If the plug does not fit in
the outlet, contact a qualified electrician. DO NOT attempt to modify the plug or override the
safety feature indicated on the product's warning label and in this manual.
12. Do not use appliance for other than intended use.
13. Any type of fuel and/or charcoal briquettes are not to be used with this appliance.
14. Do not expose product to rain.
15. To ensure continued protection against risk of electrical shock, connect only to properly grounded
outlets.
16. A short power supply cord is provided to reduce the risk of becoming entangled in or tripping over
a longer cord.
17. Longer detachable power-supply cords or extension cords may be used if care is exercised in
their use.
18. If a longer detachable power-supply cord or extension cord is used, the marked electrical rating of
the cord should be at least as great as the electrical rating of the appliance, and the cord should
be arranged so that it will not drape over the countertop or tabletop where it can be pulled on by
children or tripped over.
19. To reduce the risk of electrical shock, keep extension cord connection dry and off the ground.
20. When not using the item, store indoors and out of the reach of children.
21. Always follow the directions provided with the rotisserie as each unit differs in design and
capabilities.
22. Always follow all safety procedures as stated in the rotisserie and grill manuals.
23. To avoid injury let the grill cool down before removing the drip pan.
SAVE THESE INSTRUCTIONS
3
PREPARATION
Before beginning assembly or operation, make sure all parts are present. Compare parts with
package contents list and diagram above. If any part is missing or damaged, do not attempt to
assemble or operate the product. Contact customer service for replacement parts.
• Estimated Assembly Time: 20 minutes
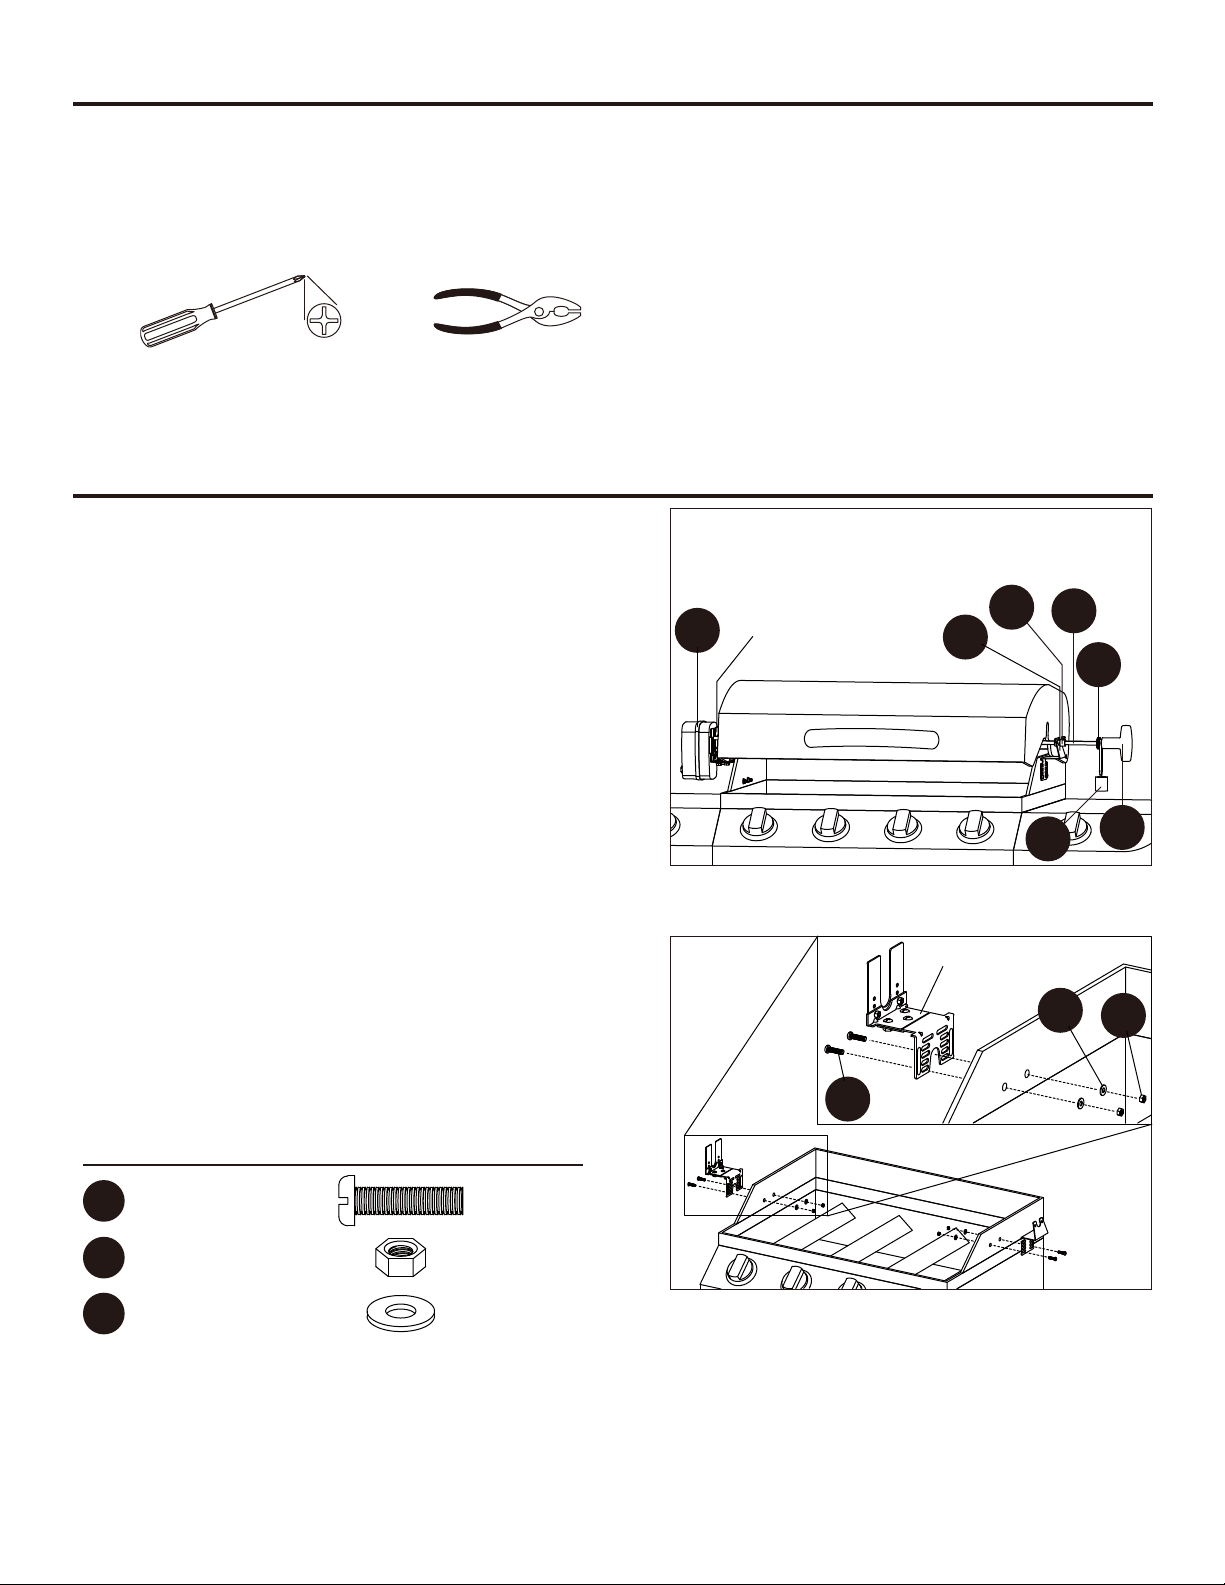
• Tools Required for Assembly (not included): Phillips screwdriver, Pliers
ASSEMBLY INSTRUCTIONS
1. Measure the proper position where the spit rod (B)
should be placed. Make sure it won't interfere with
the grill hood or any part of grill. Then decide which
holes of motor bracket (X-Y-Z) and
spit rod bracket (H) to attach to grill.
2. Use bolt (AA) to attach motor bracket (X-Y-Z) to the
outside of the grill's left side (or right, depending on
the grill). Place a washer (CC) on the end of each
bolt (AA) and secure assembly with nuts (BB).
Note: Do not overtighten. Attach spit rod bracket (G)
to the opposite side of the motor bracket (X-Y-Z)
using the same procedure.
Hardware Used
Fig. 1
Test it by closing the grill hood to check no parts
interfere with the grill hood.
X-Y-Z
A
Fig. 2
E
H
X-Y-Z
AA
B
G
CC
F
D
BB
AA
BB
CC
Bolt
Nut
Washer
x 4
x 4
x 4
4
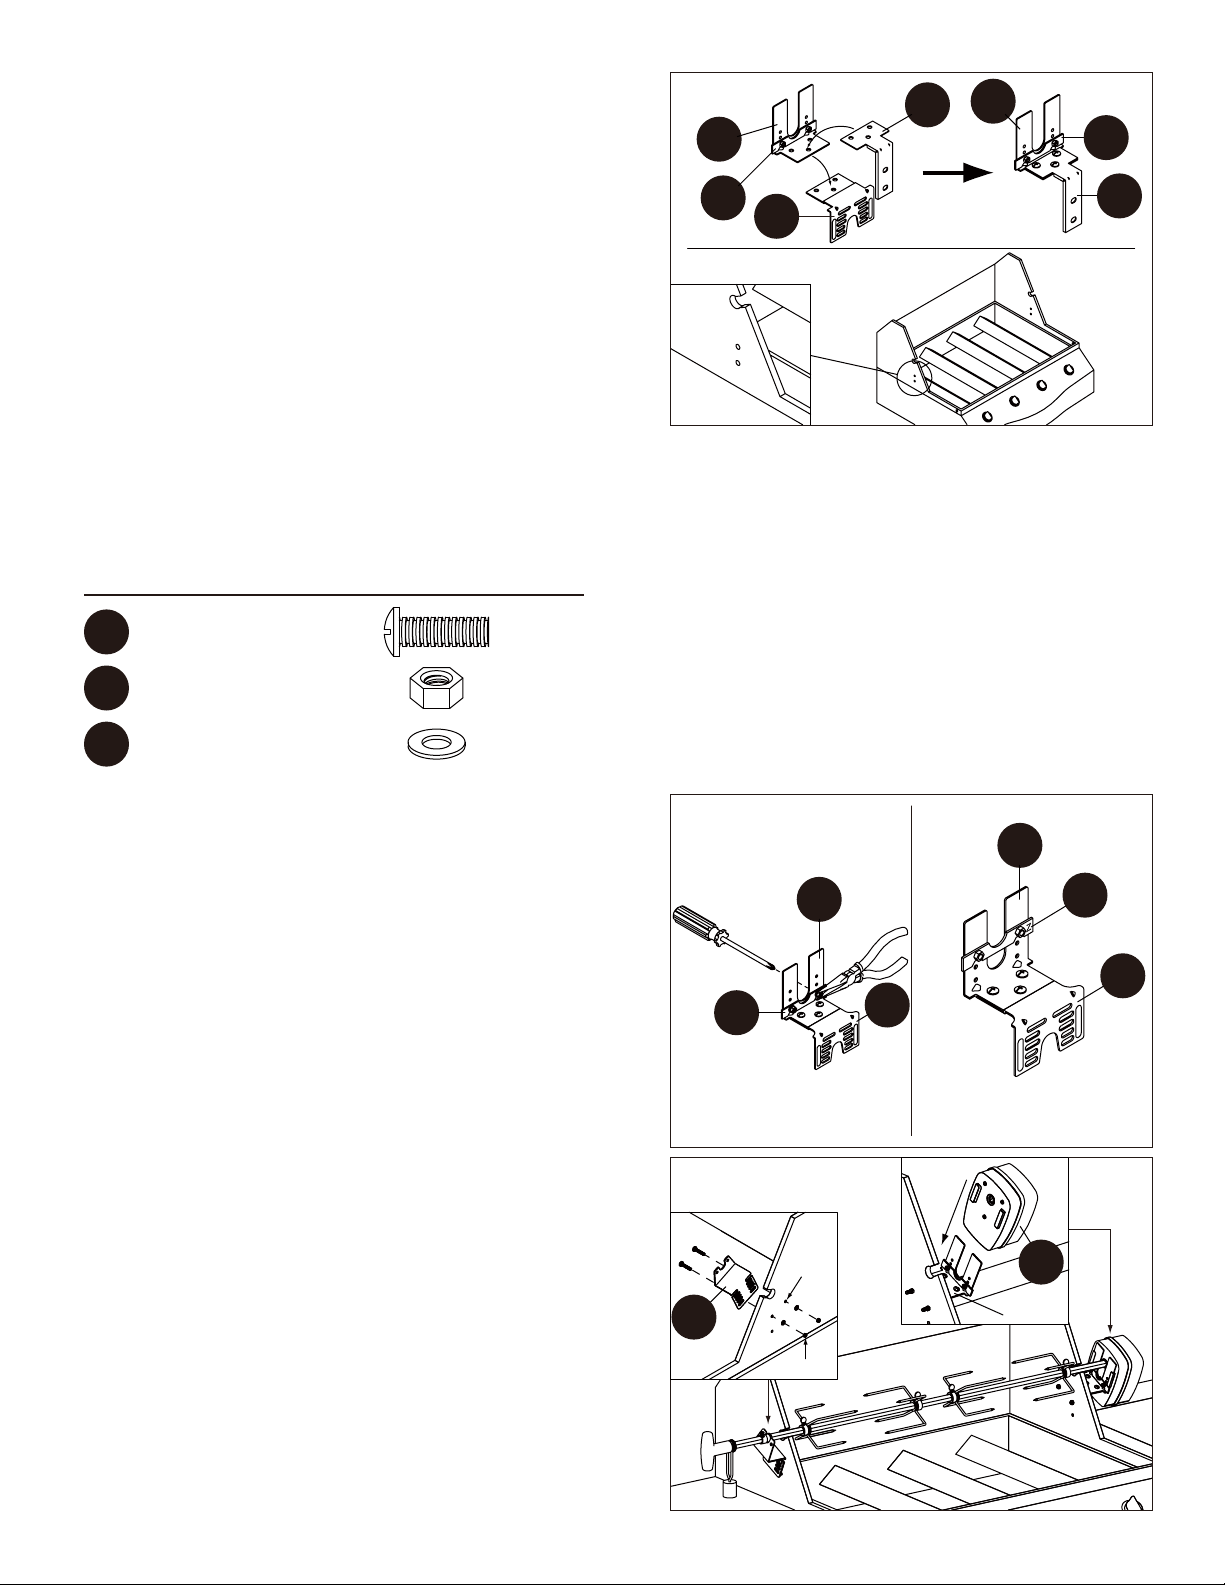
3. For some grills, the holes for attaching the rotisserie
are vertically lined up. If you are using this type of
grill, step 1 and 2 are not applicable. Follow this
step to reassemble the motor mounting bracket.
a) Find the motor mounting bracket (X-Y-Z). Loosen
the three screws that hold together Part X and
Part Y. Replace the Part X with Part W and tighten
the three screws. The new bracket consists of part Y
and Z and W.
b) Attach the newly assembled motor mounting
bracket (W-Y-Z) to grill.
NOTE: If the holes of your grills are horizontally lined
up, do not attempt to reassemble the motor bracket
to W-Y-Z motor bracket. The W-Y-Z motor bracket is
not applicable for any grills of horizontal holes.
Hardware Used
Fig. 3
Y
Z
X
Z
W
W
X
Y
Z
Z
W
W
DD
EE
FF
Alternate Bolt
Alternate Nut
Alternate Washer
x 2
x 2
x 2
4. To accommodate several styles/designs of grills, the
motor bracket (X-Y-Z) is adjustable. Should the
motor bracket (X-Y-Z) as assembled not fit your grill,
please adjust the piece: Use a Phillips screwdriver
and pliers to loosen the screws on part Z of
motor bracket (X-Y-Z). Decide where you want to
mount the motor on the grill and move part Z to the
proper hole, tightening the screws securely.
5. If you are using Item #0135116, please follow the
steps below:
Attach the motor bracket (X-Y-Z) and
spit rod bracket (H) to your grill at an angle using the
proper holes of your grill.
Fig. 4
Z
Fig. 5
H
Y
hole
Y
Z
X
X
A
X-Y-Z
nut
5
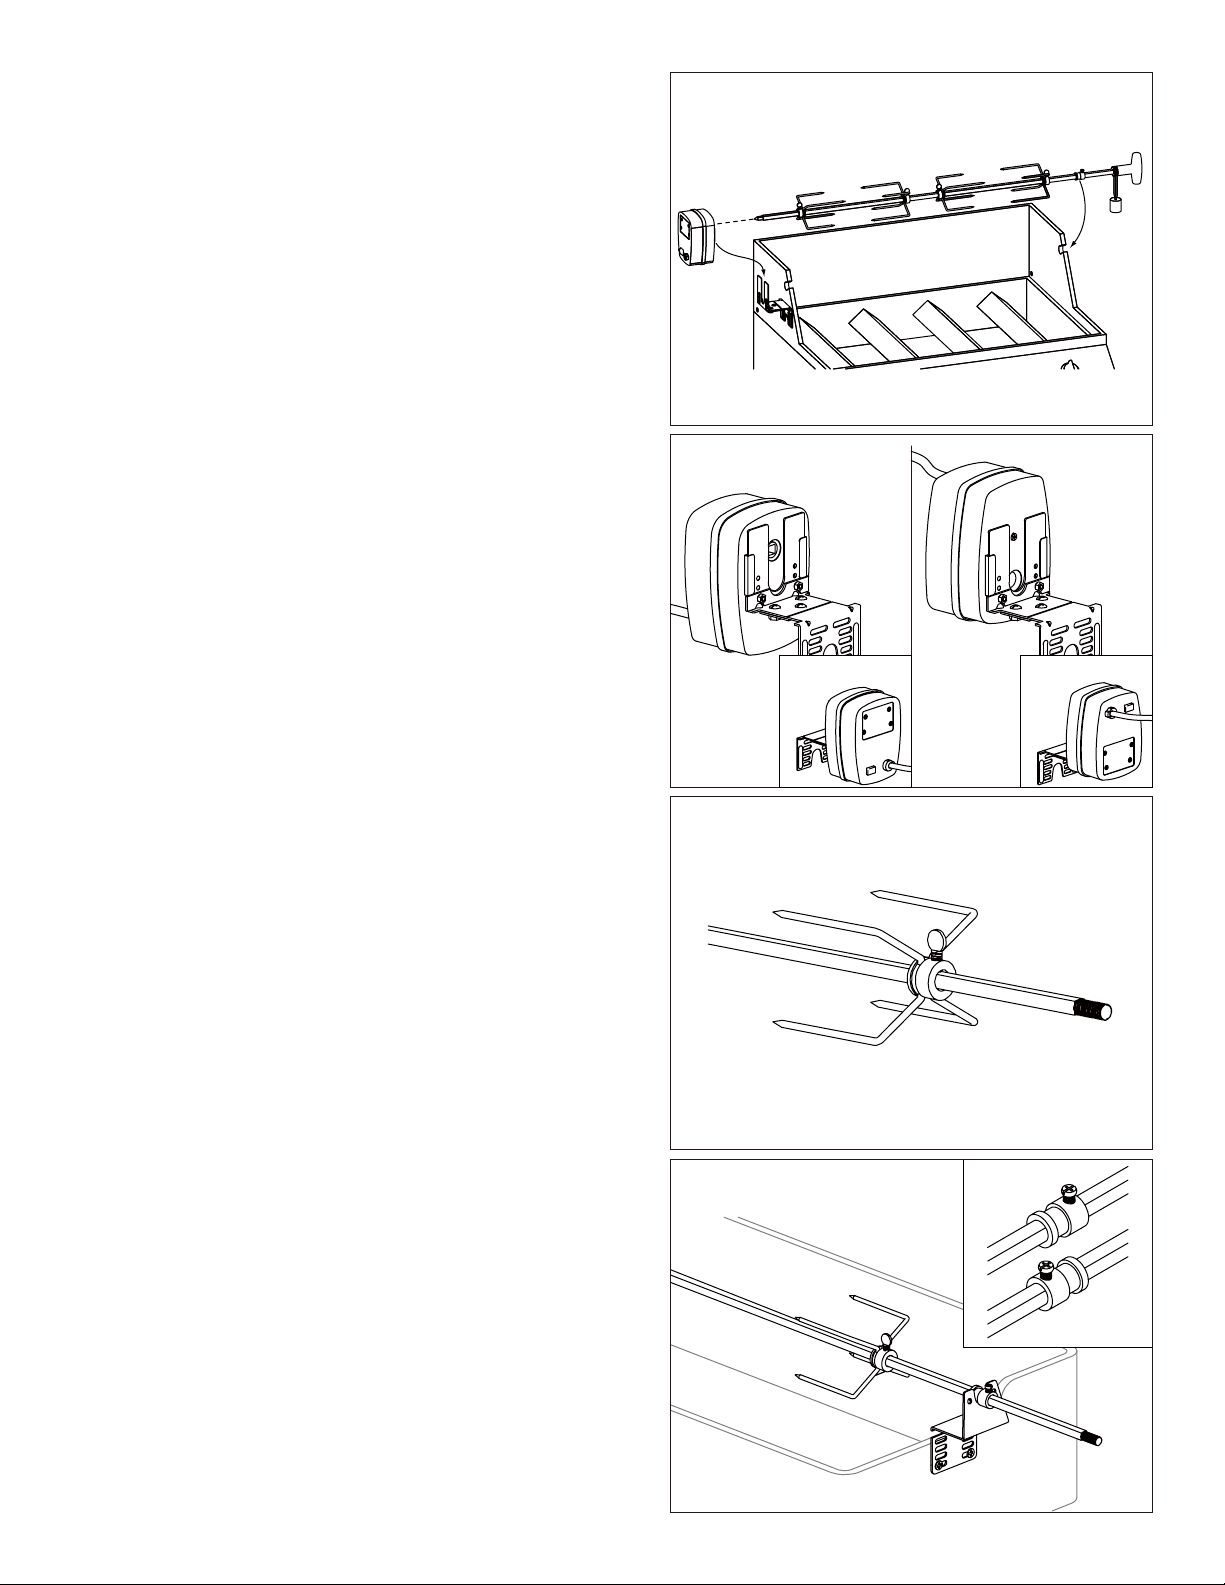
6. Some grills have a spit rod slot on the firebox and
it is possible that the spit rod bracket (H) might not
fit your grill. In that case, slide the collar (E) onto
the spit rod (B). Let the collar (E) rest in the slot in
the side of firebox.
Fig. 6
7. Slide rotisserie motor (A) over motor bracket (X-Y-Z).
The rotisserie motor (A) can be mounted one of two
ways, depending on if you want the spit rod (B)
higher or lower on the grill.
8. Place the 4-prong meat forks (C) onto the
spit rod (B).
Fig. 7
Fig. 8
This side up
This side up
9. Place the collar (E) onto the spit rod (B) and attach it
to the support notch on spit rod bracket (H) on the
grill. The rod should turn smoothly. The collar (E)
can be positioned in two ways, as shown in the inset.
Choose the position that works best with your grill.
6
Fig. 9
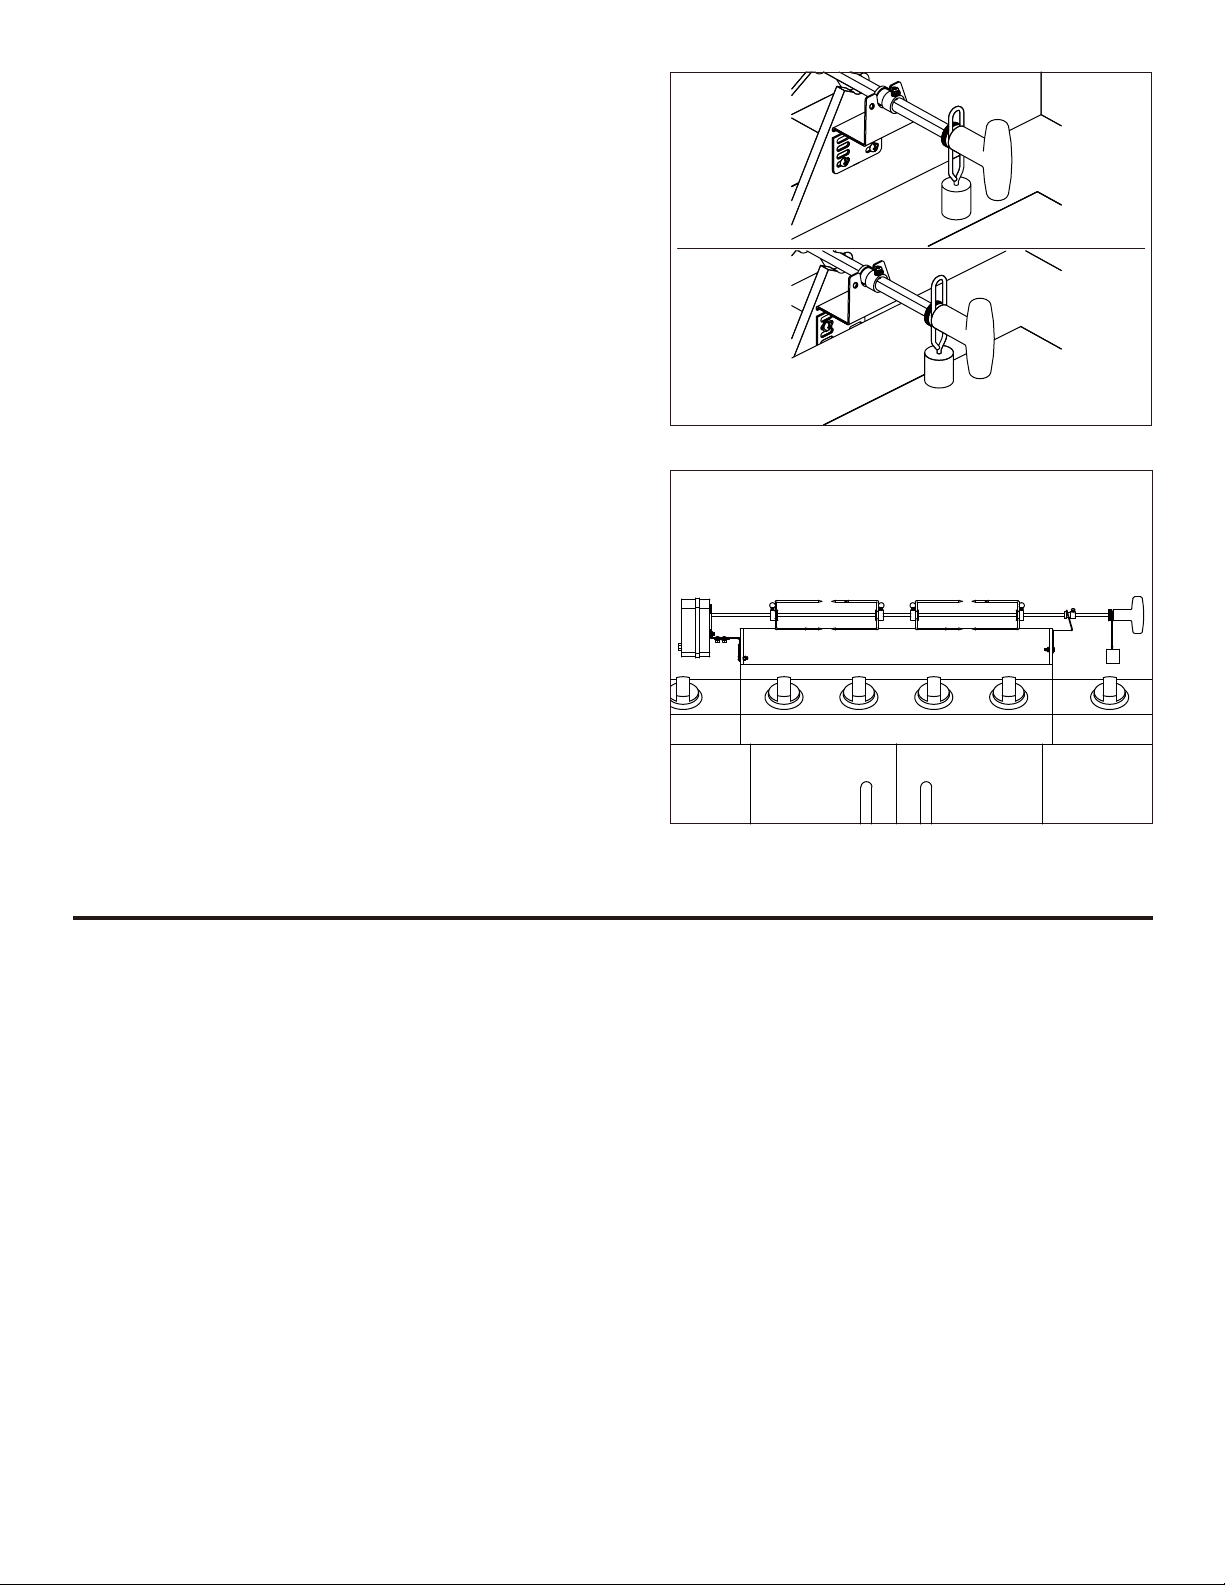
10.Place counterweight washer (F) onto the spit rod (B)
followed by the counterweight (G). Then attach the
handle (D) to the spit rod (B) securely.
Note: The counterweight (G) should be in the space
between the counterweight washer (F) and the
handle (D). If the counterweight (G) interferes with
the side table on your grill, adjust the height of the
counterweight (G) by loosening the handle (D).
Fasten the counterweight (G) to the proper position
with the loop on counterweight (G).
Fig. 10
11.Place the end of the spit rod (B) into the
rotisserie motor (A). Make sure the spit rod (B)
is aligned properly with the rotisserie motor (A)
before turning on power.
OPERATION INSTRUCTIONS
IMPORTANT: If your grill is equipped with a rotisserie burner, use only that burner for cooking when
the rotisserie is mounted and in operation. Turn the main burners OFF when the Rotisserie Burner is
in use.
IMPORTANT: Do not use the rotisserie burner and the main burner at the same time while using the
rotisserie. To prevent burning, do not use the side burners and the rotisserie simultaneously.
Fig. 11
1. Slide one of the meat prongs onto the rod (prongs toward the food). Center the food on the rod,
followed by the other meat prongs. Then push the meat forks firmly together. Tighten the
thumbscrews. Wrap food with butcher’s string (never use nylon or plastic string) to secure loose
portions.
2. Once the food is secure, insert the pointed end of the rotisserie rod into the motor assembly and
rest the other end on the support on the other side of the grill.
3. Check for clearance with the cooking grates. The grates can be removed if additional clearance is
required. IMPORTANT: If grates are removed, make sure food is not touching burner(s).
NOTE: If you are using the grill model #296447, do not close the grill hood.
4. Place a shallow drip pan underneath the food to catch drippings and make for easier cleanup.
7

5. Plug the unit into an electrical outlet. Turn the power switch to the “ON” position to start the
rotisserie motor. To begin, turn burners to the lowest setting.
6. Check for constant speed of the rotisserie rod. If the rod does not turn at a constant speed,
reposition the food on the forks and adjust the weight so it is balanced on the rod. An unbalanced
rotisserie rod will damage the motor.
7. Check food frequently and adjust burner temperature based on observations. This will require
some experimentation as each grill has different heating and cooking characteristics.
8. Do not attempt to load the rotisserie with more than 50 lbs. of food at one time.
NOTE: Do not attempt to use rotisserie on a two (2) burner grill because of insufficient heat from a
single burner and difficulty in balancing the rotisserie rod.
Follow steps as outlined above except do not use the main burners directly below the food on the
rotisserie rod. Using these burners will burn the food and may cause dangerous flare ups.
CARE AND MAINTENANCE
Turn off, unplug, and remove the rotisserie kit when not in use. After using, clean all metal parts by
wiping clean using a damp rag. Do not immerse any parts in water. Wipe completely dry before
storing. Store in a dry place.
TROUBLESHOOTING
Problem Possible Cause Corrective Action
The rod is not rotating
at a constant speed
1. Food is not balanced on the forks.
2. The counterweight is not adjusted.
1. Reposition the food on the forks
and rod to adjust the weight so
that it is balanced.
2. Adjust the counterweight to
balance the rod.
8
REPLACEMENT PARTS LIST
For replacement parts, call our customer service department at 1-800-963-0211, 8 a.m. - 6 p.m., EST,
Monday - Thursday, 8 a.m. - 5 p.m., EST, Friday.
PART DESCRIPTION PARTS #
C
D
E
F
G
X-Y-Z
H
W
AA
BB
CC
DD
EE
FF
4-Prong Meat Fork
Handle
Collar
Counterweight Washer
Counterweight
Motor Bracket
Spit Rod Bracket
Part of Motor Bracket
Bolt
Nut
Washer
Alternate
Alternate
Alternate
Bolt
Nut
Washer
X-Y-Z
C
D
E
F
G
X-Y-Z
H
W
AA
BB
CC
DD
EE
FF
C
E
F
AA
CC
BB
DD
W-Y-Z
FF
EE
H
BB
CC
AA
G
D
Printed in China
9
 Loading...