

Page 1
BMH 45-XE
Bedienungsanleitung
Operating Instructions
Istruzioni d’uso
Notice d’utilisation
Instrucciones para el manejo
Instruções de utilização
Gebruiksaanwijzing
Betjeningsvejledning
Bruksanvisning
Käyttöohje
Bruksanvisning
Οδηγίες χειρισµού
Kullanım kılavuzu
Instrukcja obs∆ugi
Kezelési Utasítás
Návod k obsluze
Návod na obsluhu
Instrucøiuni de utilizare
Navodila za uporabo
Ръководство на потребителя
Kasutusjuhend
Vartojimo informacijà
EkspluatÇcijas instrukcija
Руководство по эксплуатации
Page 2

Page 3
A
B
A
1
2
C
60
20
ca.60
1
2
60 60
4
60
ca.40
60
15
30
5
5,0 r
90
30
15
2,5 r
45
50
15
53
Page 4

GB
For Your Safety
Working safely with this machine
is possible only when the operating and safety information are
read completely and the instructions contained therein are strictly
followed. In addition, the general
safety instructions in the enclosed booklet must
be followed. Before using for the first time, ask
for a practical demonstration.
The machine must not be damp and
must also not be operated in damp
surroundings.
Wear protective glasses and hear-
ing protection.
For long hair, wear hair protection.
Work only with closely fitting
clothes.
❏ When working with the machine, always hold
it firmly with both hands and provide for a
secure stance. The power tool is guided more
secure with both hands.
❏ Secure the workpiece. A workpiece clamped
with clamping devices or in a vice is held more
securely than by hand.
❏ Do not work materials containing asbestos.
Asbestos is considered carcinogenic.
❏ Always wait until the machine has come to a
complete stop before placing it down. The tool
insert can jam and lead to loss of control over
the power tool.
❏ Do not use a machine with a damaged mains
cable. Do not touch the damaged cable and
pull the mains plug when the cable is damaged while working. Damaged cables
increase the risk of an electric shock.
❏ Connect machines that are used in the open
via a residual current device (RCD).
❏ Wear hearing protection. Exposure to noise
can cause hearing loss.
❏ Always use the auxiliary handle supplied with
the machine. Loss of control can cause personal
injury.
❏ Use suitable detectors to determine if utility
lines are hidden in the work area or call the
local utility company for assistance.
Contact with electric lines can lead to fire and
electric shock. Damaging a gas line can lead to
explosion. Penetrating a water line causes
property damage or may cause an electric
shock.
❏ Hold the power tool only by the insulated
gripping surfaces when performing an operation where the cutting tool may contact hidden
wiring or its own power cord. Contact with a
“live” wire will also make exposed metal parts
of the power tool “live” and shock the operator.
❏ Do not drill into housing or attach rivets in
order to mark the machine. The double insula-
tion is then no longer ensured. Use stickers.
❏ Use only original Würth parts and accesso-
ries.
For further notes on safety refer to the enclosed sheet
☞
Machine Elements
1 Dust protection cap
2 Locking sleeve
3 Mode selector switch
4 On/Off switch
5 Thumbwheel for speed preselection
6 Service indicator
7 Auxiliary handle
Not all of the accessories illustrated or described are included
as standard delivery.
10
Intended Use
The machine is intended for hammer drilling in concrete, brick and stone as well as for chiselling. It is
also suitable for drilling without impact in wood,
metal, ceramic and plastic.
The user is responsible for damage caused by usage
other then intended.
Page 5

Tool Specifications
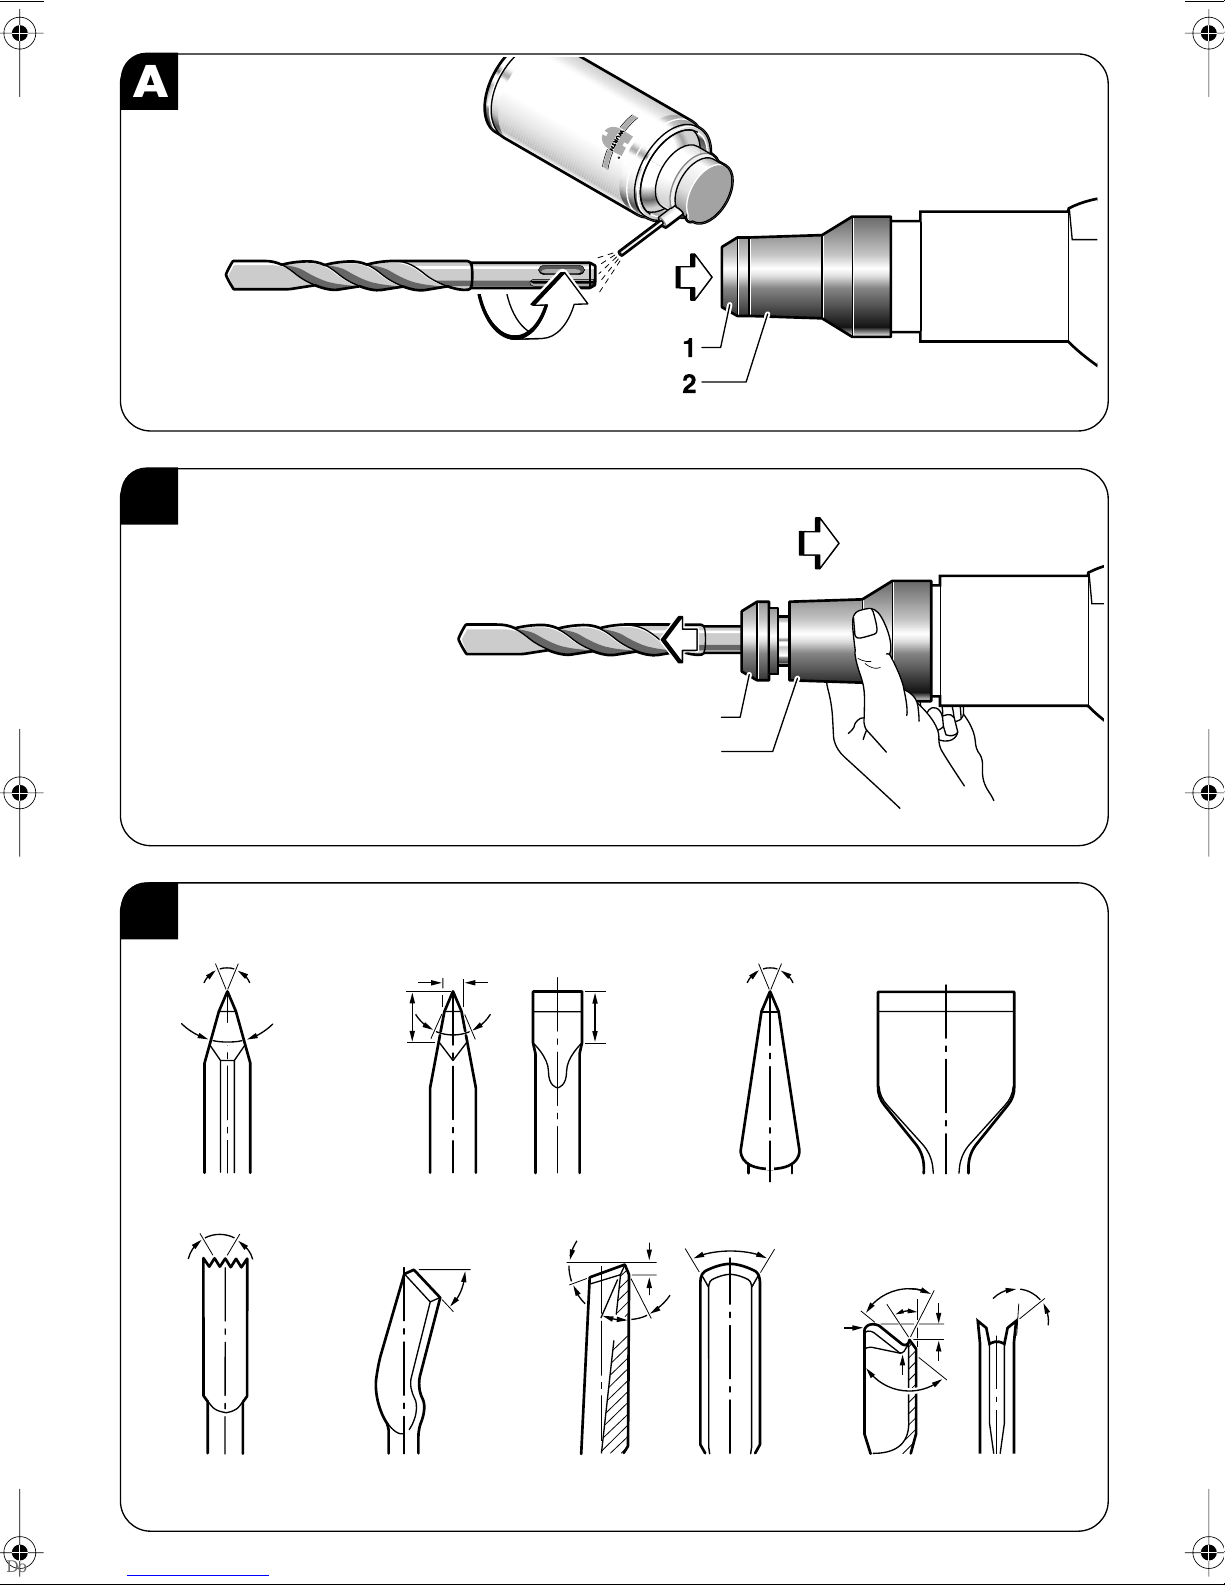
Inserting (see figure )
Clean and grease the shank end of the tool.
A
Rotary Hammer BMH 45-XE
Article number 0702 556 X
Rated power input 1 350 W
Rated speed 145 – 280 rpm
Impact rate
Drilling mode 1 350 – 2 700 bpm
Chiselling mode 1 375 – 2 800 bpm
Impact energy per stroke at
output-/nominal capacity 2 – 13/15 J
Chisel positions 12
Chiselling capacity in
concrete of medium hardness 190 kg/h
Tool holder SDS-max
Lubrication Permanent central
lubrication
Maximum drilling Ø
Concrete (twist drill bit) 45 mm
Concrete (break-through
drill bit) 80 mm
Brickwork (core bit) 150 mm
Weight. approx. 8.2 kg
Protection class / II
Insert the tool in a twisting manner into the tool
holder until it locks. Check if it has locked by pulling
the tool.
Removing (see figure )
Push back the locking sleeve 2 of the tool holder and
remove the tool. Let go of the locking sleeve 2 again.
B
Starting Operation
Observe correct mains voltage: The voltage of the
power source must agree with the voltage specified
on the nameplate of the machine.
Switching On/Off in drilling mode
To start the machine, press the On/Off switch 4 and
keep it depressed.
To switch off the machine, release the On/Off
switch 4.
Switching On/Off in chiselling mode
Auxiliary Handle
❏ Operate the machine only with the auxiliary han-
dle 7.
Loosen the handle by turning to the left. Rotate the
auxiliary handle 7 and adapt to the working position.
Afterwards tighten the handle again by turning in
clockwise direction.
Changing the Tool
❏ Before any work on the machine itself, pull the
mains plug.
With the SDS-max tool holder, simple and convenient tool changing is possible without additional
aids.
Grease the shank end of the tool regularly.
The dust protection cap 1 largely prevents the entry
of drilling dust during operation. When inserting the
tool, take care that the dust protection cap 1 is not
damaged.
I
0
For starting operation of the machine, press the
On/Off switch 4 from above until it latches (I).
For switching off the machine, press the On/Off
switch 4 to the bottom (0) and release.
☞
For low temperatures, the machine reaches
the full hammer/impact capacity only after a
certain time.
This start-up time can be shortened by striking
the drill/chisel against the floor one time.
11
Page 6

Speed/Impact Rate and Impact
Force Selection
The regulating electronics make possible the continuous setting of a speed/impact rate and impact
force that is suited to the material to be worked. The
adjustment takes place with the thumbwheel 5.
The “Constant Electronics” hold the selected speed/
impact rate/impact force nearly constant and
ensures uniform working performance.
Position “Drilling” “Chisel-
ling”
Adjustment Knob
Position 5
1 145 1 375 1 375
2 170 1 625 1 675
3 200 1 975 2 000
4 225 2 175 2 200
5 255 2 475 2 600
6 280 2 700 2 800
Rotational
Speed
(rpm)
Impact
Rate
(bpm)
Impact
Rate
(bpm)
Safety Clutch
If the tool insert becomes caught or jammed,
the drive to the drill spindle is interrupted.
Because of the forces that occur, always hold the
power tool firmly with both hands and provide for
a secure stance.
If the drilling tool jams, switch the machine off and
loosen the drilling tool. When switching the machine
on with the drilling tool jammed, high reaction torques can occur!
Changing the Chiselling
Position
The chisel can be locked in 12 positions. In this manner, the optimum working position can be set for
each application.
Insert the chisel in the tool holder.
Turn the mode selector switch 3 to “Changing the
chiselling position”.
Turn the tool holder to the desired chiselling position.
Mode Selector Switch
❏ Operate the mode selector switch 3 only when
the machine is at a standstill.
Set the mode selector switch 3 to the required position.
Hammer drilling
Changing the Chiselling Position
Chiselling (rotation off)
Allow the mode selector switch 3 to latch in the
“Chiselling” position. The tool holder is locked in this
position.
Sharpening Chisels
Sharpen chiselling tools using grinding wheels (e. g.
ceramic bonded corundum wheel) with a steady
supply of water. Reference values are shown in
Fig. C. Take care that no annealing coloration
appears on the cutting edges, otherwise the hardness of the chiselling tools will be impaired.
Maintenance and Cleaning
❏ Before any work on the machine itself, pull the
mains plug.
❏ For safe and proper working, always keep the
machine and its ventilation slots clean.
❏ Keep the tool holder clean at all times.
In the “Chiselling” position, the selected impact rate
is automatically increased when the machine is
switched on. In this mode, the machine operates with
increased performance during chiselling.
12
Changing the Dust Protection Cap
A damaged dust protection cap should be changed
immediately. We recommend having this carried
out by an after-sales service.
Page 7

Service Indicator 6
When the carbon brushes are worn out, the machine
switches itself off. This is indicated approx. eight
hours beforehand by the lighting or blinking of the
service indicator 6. The machine must then be sent to
customer service for maintenance (for addresses,
see Section “Service and Customer Assistance”).
If the machine should fail despite the care taken in
manufacturing and testing, repair should be carried
out by a Würth Master-Service agent.
In all correspondence and spare parts orders,
please always include the 8-digit order number
given on the nameplate of the machine.
Warranty
For this Würth tool, we provide a warranty in
accordance with statutory/country-specific regulations from the date of purchase (proof of purchase
by invoice or delivery note). Damage that has
occurred will be corrected by replacement or repair.
Damage caused by normal wear, overloading or
improper handling is excluded from the warranty.
Claims can be recognised only when the tool is presented undisassembled to a Würth branch office or
a Würth field service employee.
For the current spare parts list of this machine, log
into the Internet under “http://www.wuerth.com/
partsmanager” or ask for a copy at your nearest
Würth branch office.
Environmental Protection
Recycle raw materials instead of disposing as
waste.
The machine, accessories and packaging should be
sorted for environmental-friendly recycling.
The plastic components are labelled for categorized
recycling.
Noise/Vibration Information
Measured values determined according to
EN 60 745.
Typically the A-weighted noise levels of the machine
are: sound pressure level 95 dB (A); sound power
level 106 dB (A). Measurement
uncertainty K = 3 dB.
Wear hearing protection!
The typically weighted acceleration is 11 m/s
2
.
Declaration of Conformity
We declare under our sole responsibility that this
product is in conformity with the following standards
or standardization documents: EN 60745 according to the provisions of the regulations
89/336/EEC, 98/37/EC.
05
Adolf Würth GmbH & Co. KG
P. Zürn R. Bauer
13
Page 8

Würth
worldwide:
Würth Albania Ltd.
Rr. Asim Vokshi
Pall 49/1 Ap. 9
AL-Tirana
Albania
Tel. ++355/42/29748
Fax. ++355/42/29748
wuerthal@icc.al.eu.org
Würth Armenia Co. Ltd.
63 Tigran Mets Ave.
AM-375005 Yerevan
Armenia
Tel. ++3741/559970
Fax. ++3741/559972
wuerth@arminco.com
Würth Handelsges.m.b.H.
Würth Strasse 1
AT-3071 Böheimkirchen
Austria
Tel. ++43/2743/70700
Fax. ++43/2743/70703333
info@wuerth.at
Würth Australia Pty Ltd
4 Redwood Drive
AU-Dingley VIC 3172
Australia
Tel. ++61/3/95517244
Fax. ++61/3/95512994
info@wurth.com.au
Wurth Aztur Ltd
Mir Galal Str.63.
AZ-370134 Baku
Azerbaijan
Tel. ++994/12/601934
Fax. ++994/12/601934
wurth@azdata.net
Wurth BH d.j.l.
Dzemal Biedia 162
BA-71000 Sarajevo,BIH
Bosnia
Tel. ++387/33/461770
Fax. ++387/33/461825
Würth Belux N.V.
Everdongenlaan 29
BE-2300 Turnhout
Belgium
Tel. ++32/14/445566
Fax. ++32/14/423077
info@wurth.be
Wuerth Bulgaria EOOD
Iskarsko Chaussee Boul. 12
BG-1592 Sofia
Bulgaria
Tel. ++359/2/9659955
Fax. ++359/2/9659966
wuerth_bg@ibm.net
Würth Belarus Ltd.
Botanitscheskaja Str. 5a-603
BY-220038 Minsk
Belarus
Tel. ++375/172/363919
Fax. ++375/172/852512
wuerthbel@open.by
Würth AG
Dornwydenweg 11
CH-4144 Arlesheim
Switzerland
Tel. ++41/61/7059111
Fax. ++41/61/7059494
infos@wuerth-ag.ch
Würth Guangzhou
International Trading Co., Ltd.
Room 601, North Tower,
Nantian Building,
3 Jiangong Road
Tianhe High and New
Technology
Industry Development Zone
CN-510665 Guangzhou
China
Tel. ++86/20/85552840
Fax. ++86/20/855550245
wurthgz@public.guangzhou.gd.
cn
Würth Hong Kong Co. Ltd.
Unit B 6/f Prince Ind Bidg
106 King Fuk St.,
San Po Kong, Kowloon
CN-Hong Kong
China
Tel. ++8/52/27508118
Fax. ++8/52/27530084
info@wuerth-hk.com
Wuerth China-Shanghai
Langsheng Trading Co., Ltd.
2nd Floor (West)
No. 18 Factory Site
No. 481 Gui Ping Road
CN-200233 Shanghai
China
Tel. ++86/21/64951418
Fax. ++86/21/64848610
wuerthcn@public3.sta.net.cn
Würth Tianjin International
Trade Co., Ltd.
Jie Fang Nan Lu Str. 518-1
CN-300221 Tianjin
China
Tel. ++86/22/88242263
Fax. ++86/22/88243813
tjwuerth@public.tpt.tj.cn
Wuerth Cyprus LTD
Strovolos industrial estate
P.O. Box 8899
CY-2083 Nicosia
Cyprus
Tel. ++357/2/512086
Fax. ++357/2/512091
wuerthcy@cytanet.com.cy
Würth, spol. s r.o.
Sazecská 2
CZ-10800 Praha 10
Czech Republic
Tel. ++420/2/72106111
Fax. ++420/2/72106119
info@wuerth.cz
Adolf Würth GmbH
& Co. KG
Postfach
D-74650 Künzelsau
Reinhold-Würth-Str. 12-16
DE-74653 Künzelsau
Germany
Tel. ++49/7940/15/0
Fax. ++49/7940/15/1000
info@wuerth.com
Würth Danmark A/S
Montagevej 6
DK-6000 Kolding
Denmark
Tel. ++45/79/323232
Fax. ++45/75/517250
Würth Estonia AS
Liimi 3 A
EE-10621 Tallinn
Estonia
Tel. ++372/6563509
Fax. ++372/6563494
wuerth@wuerth.ee
Würth Egypt for Trading
S.A.E.
27th. Km Alexandria Cairo
Desert Road, Behind Mercedes
EG-Amriya Alexandria
Egypt
Tel. ++2/03/4700432
Fax. ++2/03/4700432
wurth@wurthegypt.com
Würth España S.A.
Poligono Riera de Caldes
Carrer Dels Joiers 21-23
ES-08184 Palau de Plegamans
Barcelona
Spain
Tel. ++34/93/8629500
Fax. ++34/93/8646203
webmaster@wurth.es
Würth Oy
Herajoki
FI-11710 Riihimäki
Finland
Tel. ++358/19/7701
Fax. ++358/19/729010
Würth France S.A.
Z.I. Ouest
Rue Georges Besse
FR-67158 Erstein Cedex
France
Tel. ++33/3/88645300
Fax. ++33/3/88646200
Wurth U.K. Ltd.
1 Centurion Way
Erith
GB-Kent DA 18 4 AE
Great Britain
Tel. ++44/208/3196000
Fax. ++44/208/3196400
info@wurth.co.uk
Würth Georgia Ltd.
Marshal Gelovani Avenue 36
GE-380059 Tbilisi
Georgia
Tel. ++995/32/530610
Fax. ++995/32/250610
gewuerth@caucasus.net
Würth Hellas S.A.
23. Klm. National Road
Athens-Lamia
145 68 Krioneri Attikis
P.O. Box 51877
Attikis
GR-145 02 Agios Stefanos
Attikis
Greece
Tel. ++30/1/6290800
Fax. ++30/1/8134756
info@wurth.gr
Würth- Hrvatska d.o.o.
Franje Lucica 23/III
HR-10000 Zagreb
Croatia
Tel. ++385/1/3498784
Fax. ++385/1/3498783
wurth.hrvatska@zg.hinet.hr
Würth Szereléstechnika KFT
Gyár utca 2
HU-2040 Budaörs
Hungary
Tel. ++36/23/418130
Fax. ++36/23/421777
wuerth@wuerth.hu
PT Wuerth Indah
JI. Meruya Ilir Raya No. 82 A-B
ID-Jakarta 11360
Indonesia
Tel. ++62/21/5860036
Fax. ++62/21/5861043
wuerth@idola.net.id
Würth Ireland Ltd.
Monaclinoe Industrial Estate
Ballysimon Road
IR-Limerick
Ireland
Tel. ++353/61/412911
Fax. ++353/61/412428
Würth Israel Ltd.
Alon Hatavor 2
Zone 1
IL-Caesarea Industrial Park
P.O. Box 3585
IL-Caesarea Industrial Park
Zip 38900
Israel
Tel. ++972/4/6273939
Fax. ++972/4/6270999
Wuerth India Pvt. Ltd.
33, Santosh Building,
Marol Co-operative Industrial
Estate,
M V Road, Andheri (East)
IN-Mumbai 400 059
India
Tel. ++91/22/8507023
Fax. ++91/22/8507020
wuerth@bom4.vsnl.net.in
Würth Teheran Ltd.
Pasdaran St.-Corner of
Negarestane 5-No.183
IR-16619 Teheran-Iran
Iran
Tel. ++98/21/2842828
Fax. ++98/21/2856171
wuerthtehran@irost.com
Würth á Íslandi ehf.
Veslurhraun 5
IS-210 Gar∂abær
Iceland
Tel. ++354/5302000
Fax. ++354/5302001
ebse@wurth.is
Würth S.r.l. - GmbH
Via Stazione, 51
I - 39044 Egna (BZ)
Tel. ++39/0471/828 111
Fax. ++39/0471/828 600
vendite@wuerth.com
Wurth- Jordan Co. Ltd.
Al-yadoudeh
P.O. Box 951
JO-Amman-11592
Jordan
Tel. ++962/6/4122512
Fax. ++962/6/4122510
wurthjor@go.com.jo
Würth Japan Co., Ltd.
MT Building
33 Sanmaicho, Kanagawa-ku
JP-Yokohama 221-0862
Japan
Tel. ++81/45/4884186
Fax. ++81/45/4884187
sat_ueda@wuerth.co.jp
jun_ando@wuerth.co.jp
Würth Nippon GmbH
& Co. KG
6F Tsuruga Bldg., 1-29-15
Shinyokohama, Kohoku-Ku
JP-Yokohama 222-0033
Japan
Tel. ++81/45/4704633
Fax. ++81/45/4704621
jj.wn@poem.ocn.ne.jp
Wuerth Kenya Ltd.
P.O. BOX 16751
Meru Road
KE-Mombasa
Kenya
Tel. ++254/11/312403
Fax. ++254/11/312437
wuerth@africaonline.co.ke
Würth Foreign Swiss
Company Ltd.
3 Erkindik Boulevard
KG-Bishkek, 720040
Kyrgyzstan
Tel. ++996/312/227976
Fax. ++996/312/661025
wurth@imfiko.bishkek.su
Würth Kosova
No. 36 Pashe Dibra
Bregu i diellit
Prishtina
Tel. ++377/44/186514
wurthkosova@hotmail.com
Wurth Korea Co. Ltd.
128-1, O-Keum Dong,
KR-Song Pa-Gu, Seoul, Korea
(138-859)
South Korea
Tel. ++82/2/4009311
Fax. ++82/2/4009315
wurth-kr@wurth.co.kr
Wuerth Kazakhstan Ltd.
Abai 125, 2nd floor
KZ-480008, Almaty
Kazakhstan
Tel. ++7/3272/622432
Fax. ++7/3272/622495
wurthkaz@kaznet.kz
Würth Lietuva
Dariaus ir Gireno 21
LT-2038 Vilnius
Lithuania
Tel. ++370/2/263045
Fax. ++370/2/264108
info@wurth.lt
Würth Reinsurance
Company, S.A.
B.P. 2217
L-1022 Luxembourg
Siège social
65, Avenue de la gare
LU-1611 Luxembourg
Tel. ++352/494177
Fax. ++352/494188
Würth Maroc SARL
48 Avenue Pasteur
MA-Casablanca 20150
Marocco
Tel. ++212/2/2405700
Fax. ++212/2/2405706
Würth Moldova Ltd.
b-dul Stefan cel Mare, nr 4
Hotel National
MD-Chisinau
Moldavia
Tel. ++373/2/540398
Fax. ++373/2/540398
Würth Makedonien GmbH
ul. Gorce Petrov 108a
MK-91000 Skopje
Macedonia
Tel. ++389/233/2230
Fax. ++389/233/2083
wurthmak@unet.com.mk
Würth Caraibes Sarl
Z.I. Cocotte Canal
MQ-97224 Ducos-Martinique
Tel. ++596/560701
Fax. ++596/564369
wurth.caraibes@wanadoo.fr
Würth Limited
Würth House
Triq il- Masgar
MT-Qormi QRM09
Malta
Tel. ++356/494604
Fax. ++356/441081
wuerth@maltanet.net
Wuerth (Malaysia) Sdn.
Bhd.
6, Jalan Permas 9/13
Taman Permas Jaya
MY-81750 Masai Johor
Malaysia
Tel. ++60/7/3876280
++60/7/3881712
Fax. ++60/7/3884391
wuerth@po.jaring.my
Würth Nederland B.V.
Moeskampweg 13
NL-5222 AW 's-Hertogenbosch
Postbus 344
NL-5201 AH 's-Hertogenbosch
Netherlands
Tel. ++31/73/6291911
Fax. ++31/73/613137
info@wurth.nl
Würth Norge AS
Postboks 84
NO-1483 Skytta
Morteveien 12, Gjellerasen
Naeringspark
NO-1481 Hagan
Tel. ++47/670/62500
Fax. ++47/670/62711
kontakt@wuerth.no
Würth New Zealand Ltd.
42 Hobill Avenue,
P.O. Box 97079
Manukau City
NZ-South Auckland/Mail Centre
New Zealand
Tel. ++64/9/2623040
Fax. ++64/9/2623030
info@wurth.co.nz
Wuerth Philippines, Inc.
Air-Rich Building
Km. 19.5 East Service Road,
South Expressway
PH-Parañaque City,
Philippines
Tel. ++63/2/8382697
Fax. ++63/2/8382195
wuerthphils@pacific.net.ph
Würth Polska Sp. z o.o.
ul. Plochinska 33
PL-03-044 Warzawa
Poland
Tel. ++48/22/819041
Fax. ++48/22/8117190
biuro@wurth.pl
Würth Portugal Tecnica
de Montagem, Ldo.
Estrada Nacional, 249-4
Abrunheira
P-2710-089 Sintra
Portugal
Tel. ++351/21/9157200
Fax. ++351/21/9151038
wurth.portugal@mail.telepac.pt
Würth Romania S.R.L.
Zapada Mielior 16-18
Sector 1
P.O. 18-85
RO-Bucarest 71529
Romania
Tel. ++40/1/2323282
Fax. ++40/1/2328933
wuerth@moon.ro
Wuerth Mittelrussland
c/o Logovaz
Transportnaja Ul. 20
RU-394043 Voronezh
Russia
Tel. ++7/0732/727065
Fax. ++7/0732/727065
wurth@wurth.vrn.ru
Würth Irtysch
Ul. Dobrovolskogo 8/1
RU-644099 Omsk
Russia
Tel. ++7/3812/245291
Fax. ++7/3812/245291
rus@wuerth.omsk.su
Würth Russia
Bulwar Generala
Karbyschewa, 8, Of.504
RU-123154 Moskau
Russia
Tel. ++7/095/9468028
Fax. ++7/095/9468028
sale@wurth.ru
Würth Nordkaukasus Ltd.
Krasnoarmejskaja Str. 206
RU-344010 Rostow am Don
Russia
Tel. ++7/8632/618051
Fax. ++7/8632/618054
wuerthnk@icomm.ru
ZAO Wuerth-Siberia
Serebrennikovskaja, 14, of. 501
RU-630007 Novosibirsk
Russia
Tel. ++7/3832/234673
Fax. ++7/3832/234673
wuerthsb@drbit.ru
Würth St. Petersburg
Prospekt Dunaiski 68
RU-192 288 St. Petersburg
Russia
Tel. ++7/812/1726166
Fax. ++7/812/1726085
web@wurth.spb.ru
ZAO Wuerth-Ural
Institutskaja, 6, of. 202
RU-620016 Ekaterinburg
Russia
Tel. ++7/3432/432393
Fax. ++7/3432/432393
wurth_ur@etel.ru
ZAO Wuerth-Volga
Novosadovaja st., 221, of. 205
RU-443011 Samara
Russia
Tel. ++7/8462/703252
Fax. ++7/8462/703252
wurth_ur@etel.ru
Page 9

Niederlassungen:
Aachen
Jülicher Straße 236-248
52070 Aachen
Telefon (02 41) 5 68 79-0
Telefax (02 41) 5 68 79 50
nl.aachen@wuerth.com
Aalen
Robert-Bosch-Straße 47
73431 Aalen
Telefon (0 73 61) 92 30-0
Telefax (0 73 61) 92 30 50
nl.aalen@wuerth.com
Augsburg
Flotowstraße 15
86368 Gersthofen
Telefon (08 21) 2 97 61 20
Telefax (08 21) 2 97 61 50
nl.augsburg@wuerth.com
Backnang
Gewerbegeb. Backnang-Süd
Beim Erlenwäldchen 8
71522 Backnang
Telefon (0 71 91) 90 40-0
Telefax (0 71 91) 90 40 50
nl.backnang@wuerth.com
Bad Mergentheim
Industriepark Würth, Gebäude 1
97980 Bad Mergentheim
Telefon (0 79 31) 9 24 05-0
Telefax (0 79 31) 92 40 59
nl.badmergentheim@wuerth.com
Bamberg
Biegenhofstraße 24
96103 Hallstadt
Telefon (09 51) 7 00 84-0
Telefax (09 51) 7 00 84 50
nl.bamberg@wuerth.com
Bayreuth
Hasenweg 6
95448 Bayreuth
Telefon (09 21) 7 92 05-0
Telefax (09 21) 7 92 05 50
nl.bayreuth@wuerth.com
Berlin-Charlottenburg
Spandauer Damm 60-64
14059 Berlin
Telefon (0 30) 32 67 84 30
Telefax (0 30) 32 67 83 51
nl.berlin-charlottenburg
@wuerth.com
BerlinHohenschönhausen
Grenzgrabenstraße 4
13053 Berlin
Telefon (0 30) 98 60 01-0
Telefax (0 30) 98 60 01 55
nl.berlin-hohenschoenhausen
@wuerth.com
Berlin-Reinickendorf
Osramhöfe
Seestraße/Oudenarderstraße 16
13347 Berlin
Telefon (0 30) 45 08 27 60
Telefax (0 30) 45 08 27 53
nl.berlinreinickendorf@wuerth.com
Biberach
Riss-Center
Riss-Straße 19
88400 Biberach
Telefon (0 73 51) 5 87 98-0
Telefax (0 73 51) 5 87 98 50
nl.biberach@wuerth.com
Bielefeld
Obere Hillegosser Str. 37
33699 Bielefeld
Telefon (05 21) 9 24 18-0
Telefax (05 21) 9 24 18 27
nl.bielefeld@wuerth.com
Bochum
Harpener Feld 27
44805 Bochum
Telefon (02 34) 9 55 43-0
Telefax (02 34) 9 55 43 50
nl.bochum@wuerth.com
Böblingen
Hanns-Klemm-Straße 46
71034 Böblingen-Hulb
Telefon (0 70 31) 2 11 76-0
Telefax (0 70 31) 2 11 76 50
nl.boeblingen@wuerth.com
Braunschweig
- Printed in Germany - Imprimé en Allemagne MWV-OSW-03/05 • © by Adolf Würth & Co. KG • Nachdruck, auch auszugsweise, nur mit Genehmigung.
Hansestraße 66
38112 Braunschweig
Telefon (05 31) 3 54 78-0
Telefax (05 31) 3 54 78 90
nl.braunschweig@wuerth.com
Bremen
Gewerbegebiet Bayernstraße
Straubinger Straße 11
28219 Bremen
Telefon (04 21) 3 99 88-0
Telefax (04 21) 3 99 88 51
nl.bremen@wuerth.com
Chemnitz
Gewerbegebiet
Südring/Neefestraße
Carl-Hamel-Straße 5
09116 Chemnitz
Telefon (03 71) 2 71 47-0
Telefax (03 71) 2 71 47 50
nl.chemnitz@wuerth.com
Cottbus
Gewerbegebiet
An der Reichsbahn
Am Gleis 15
03042 Cottbus-Sandow
Telefon (03 55) 7 56 61-0
Telefax (03 55) 7 56 61 50
nl.cottbus@wuerth.com
Crailsheim
Industriegebiet Zur Flügelau
Roßfelder Straße 60
74564 Crailsheim
Telefon (0 79 51) 96 37-0
Telefax (0 79 51) 96 37 50
nl.crailsheim@wuerth.com
Darmstadt
Weiterstadt Park
Brunnenweg 19
64331 Weiterstadt
Telefon (0 61 50) 18 18-0
Telefax (0 61 50) 18 18 50
nl.darmstadt@wuerth.com
Dortmund
Wilhelmstraße 35A
59439 Holzwickede
Telefon (0 23 01) 9 12 62-0
Telefax (0 23 01) 91 26 50
nl.dortmund@wuerth.com
Dresden-Löbtau
Malterstraße 37
01159 Dresden
Telefon (03 51) 4 38 47-0
Telefax (03 51) 4 38 47-50
nl.dresden-loebtau@wuerth.com
Dresden-Mickten
Marie-Curie-Straße 6
01139 Dresden
Telefon (03 51) 4 14 53-0
Telefax (03 51) 4 14 53-50
nl.dresden-mickten@wuerth.com
Düsseldorf
Lierenfelder Straße 53
40231 Düsseldorf
Postfach 105532
40046 Düsseldorf
Telefon (02 11) 9 73 06-0
Telefax (02 11) 9 73 06 50
nl.duesseldorf@wuerth.com
Erfurt
Über dem Feldgarten 11
99198 Erfurt-Linderbach
Telefon (03 61) 4 20 57-0
Telefax (03 61) 4 20 57 50
nl.erfurt@wuerth.com
Essen
Heinz-Bäcker-Straße 15
45356 Essen
Telefon (02 01) 8 66 45-0
Telefax (02 01) 8 66 45 50
nl.essen@wuerth.com
Esslingen
Plochinger Straße 45
73779 Deizisau
Telefon (0 71 53) 92 94-0
Telefax (0 71 53) 92 94 50
nl.esslingen@wuerth.com
Frankfurt
Weiskirchen, Gewerbegeb. Ost
Daimlerstraße 19
63110 Rodgau
Telefon (0 61 06) 84 01-0
Telefax (0 61 06) 84 01 50
nl.rodgau@wuerth.com
Frankfurt II
Hanauer Landstraße 338
60314 Frankfurt/Main
Telefon (0 69) 42 69 38-0
Telefax (0 69) 42 69 38 50
nl.frankfurt-main@wuerth.com
Freiburg
Industriegebiet Nord
Mitscherlichstraße 5
79108 Freiburg
Telefon (07 61) 5 59 66-0
Telefax (07 61) 5 59 66 50
nl.freiburg@wuerth.com
0702 556 X BA 0503
Postfach · 74650 Künzelsau · Telefon (0 79 40) 15-0 · Telefax (0 79 40) 15 10 00
Gera
Gewerbegebiet Bieblach Ost
Heinrich-Hertz-Straße 14
07552 Gera
Telefon (03 65) 4 37 28-0
Telefax (03 65) 4 37 28 50
nl.gera@wuerth.com
Gießen
Gewerbegebiet Gießen-West
Robert-Bosch-Straße 16
35398 Gießen
Telefon (06 41) 9 62 36-0
Telefax (06 41) 9 62 36 50
nl.giessen@wuerth.com
Göppingen
Industriegebiet Ost
Heilbronner Straße 12
73037 Göppingen
Telefon (0 71 61) 6 80 61
Telefax (0 71 61) 6 89 00
nl.goeppingen@wuerth.com
Goslar
Gewerbegebiet Bassgeige
Alte Heerstraße 15
38644 Goslar
Telefon (0 53 21) 35 19 30-0
Telefax (0 53 21) 3 51 93 50
nl.goslar@wuerth.com
Halle (Saale)
Delitzscher Straße 70
06112 Halle (Saale)
Telefon (03 45) 6 85 90 10
Telefax (03 45) 5 75 56 54
nl.halle-saale@wuerth.com
Hamburg
Industriegebiet Nettelkrögen
Gutenbergring 44
22848 Norderstedt
Telefon (0 40) 53 43 61-0
Telefax (0 40) 53 43 61 50
nl.hamburg@wuerth.com
Hamburg-Süd
Helmspark Hittfeld
Helmsweg 6-16
21218 Seevetal-Hittfeld
Telefon (0 41 05) 58 44-0
Telefax (0 41 05) 58 44 50
nl.seevetal@wuerth.com
Hannover
Gewerbegebiet Godshorn
Bayernstraße 37
30855 Langenhagen-Godshorn
Telefon (05 11) 7 86 80-0
Telefax (05 11) 7 86 80 50
nl.hannover@wuerth.com
Heidelberg
Gewerbegebiet Rohrbach-Süd
Redtenbacher Straße 1/1
69126 Heidelberg
Telefon (0 62 21) 5 89 88-0
Telefax (0 62 21) 5 89 88 50
nl.heidelberg@wuerth.com
Heilbronn
Dieselstraße 8
74076 Heilbronn
Telefon (0 71 31) 95 56-0
Telefax (0 71 31) 95 56 50
nl.heilbronn@wuerth.com
Ingolstadt
Eriagstraße 8
85053 Ingolstadt
Telefon (08 41) 95 67 78 70
Telefax (08 41) 9 31 87 51
nl.ingolstadt@wuerth.com
Jena
Löbstedter Straße 80
07749 Jena
Telefon (0 36 41) 45 12-0
Telefax (0 36 41) 45 12 50
nl.jena@wuerth.com
Karlsruhe
Printzstraße 2a
76139 Karlsruhe
Handwerk Holz:
Telefon (07 21) 62 52 2-0
Telefax (07 21) 6 25 22 50
nl.karlsruhe@wuerth.com
Kassel
Industriegebiet Waldau West
Otto-Hahn-Straße 18
34123 Kassel
Telefon (05 61) 9 98 68-0
Telefax (05 61) 9 98 68 50
nl.kassel@wuerth.com
Kempten
Messerschmittstraße 16
87437 Kempten
Telefon (08 31) 5 74 48-0
Telefax (08 31) 5 74 48 50
nl.kempten@wuerth.com
Kiel
Seekoppelweg 7a
24113 Kiel
Telefon (04 31) 6 47 40-0
Telefax (04 31) 6 47 40 50
nl.kiel@wuerth.com
Koblenz
Auf dem Hahnenberg 51
56218 Mülheim-Kärlich
Telefon (0 26 30) 94 70-0
Telefax (0 26 30) 94 70 50
nl.koblenz@wuerth.com
Köln
Köhlstraße 43
50827 Köln-Ossendorf
Telefon (02 21) 95 64 42-0
Telefax (02 21) 95 64 42 50
(08 00) 8 65 13 90
nl.koeln@wuerth.com
Künzelsau-Gaisbach
Verkaufsniederlassung
Schliffenstraße 22
74653 Gaisbach
Telefon (0 79 40) 15 25 55
Telefax (0 79 40) 15 45 55
nl.gaisbach@wuerth.com
Landshut
Sonnenring 17a
84032 Altdorf
Telefon (08 71) 9 53 71-0
Telefax (08 71) 9 53 71 50
nl.landshut@wuerth.com
LE Stetten
Industriegebiet Stetten
Sielminger Straße 65
70771 LE-Stetten
Telefon (07 11) 22 06 29-0
Telefax (07 11) 22 06 29 50
nl.leinfelden-echterdingen
@wuerth.com
Leipzig
Zum Bahnhof 20
04178 Leipzig/Rückmarsdorf
Telefon (03 41) 4 90 14-0
Telefax (03 41) 4 90 14 40
nl.leipzig@wuerth.com
Würth Service-Container
Am Airport 2000
Postfach 1244
04029 Leipzig
Telefon (03 41) 2 24 19 76
Telefax (03 41) 2 24 19 77
Funk (01 70) 6 33 70 73
andre.grieger@wuerth.com
Leonberg
Hertichstraße 10
71229 Leonberg-Eltingen
Telefon (0 71 52) 9 28 24-0
Telefax (0 71 52) 9 28 24 29
nl.leonberg@wuerth.com
Lübeck
Taschenmacherstraße 10
23556 Lübeck (RoggenhorstNord)
Telefon (04 51) 8 71 92-0
Telefax (04 51) 8 71 92 50
nl.luebeck@wuerth.com
Magdeburg
Silberbergweg 29
39128 Magdeburg
Telefon (03 91) 2 55 87-0
Telefax (03 91) 2 55 87 50
nl.magdeburg@wuerth.com
Mainz
Carl-Zeiss-Straße 13
55129 Mainz-Hechtsheim
Telefon (0 61 31) 6 27 39-0
Telefax (0 61 31) 6 27 39 50
Mannheim
Fraunhoferstraße 7
68309 Mannheim
Telefon (06 21) 7 27 46-0
Telefax (06 21) 7 27 46 50
nl.mannheim@wuerth.com
Minden
Ringstraße 49-51
32427 Minden
Telefon (05 71) 82 97 68 60
Telefax (05 71) 3 98 38 53
nl.minden@wuerth.com
Mönchengladbach
Gewerbegebiet Engelbleck
Borsigstraße 13
41066 Mönchengladbach
Telefon (0 21 61) 4 77 69-0
Telefax (0 21 61) 4 77 69 50
(08 00) 7 24 16 70
nl.moenchengladbach@wuerth.c
om
München
Am Lenzenfleck 2
85737 Ismaning
Telefon (0 89) 96 07 03-0
Telefax (0 89) 96 07 03 50
nl.muenchenismaning@wuerth.com
München 2
Ridlerstraße 65
80339 München
Telefon (0 89) 43 19 72-0
Telefax (0 89) 43 19 72 50
nl.muenchen-tuev@wuerth.com
Münster
Harkortstraße 11
48163 Münster
Telefon (02 51) 2 65 37-0
Telefax (02 51) 2 65 37 50
nl.muenster@wuerth.com
Neubrandenburg
Gneisstraße 8
17036 Neubrandenburg
Telefon (03 95) 4 30 48-0
Telefax (03 95) 4 30 48 50
nl.neubrandenburg@wuerth.com
Nordhausen
Freiherr-vom-Stein-Straße 30c
99734 Nordhausen
Telefon (0 36 31) 4 78 93-0
Telefax (0 36 31) 47 89 50
nl.nordhausen@wuerth.com
Nürnberg
Lenkersheimer Straße 10a
90431 Nürnberg
Telefon (09 11) 9 31 92-0
Telefax (09 11) 9 31 92 50
nl.nuernberg@wuerth.com
Offenburg
Robert-Bosch-Straße 2
77656 Offenburg-Elgersweier
Telefon (07 81) 9 69 84-0
Telefax (07 81) 9 69 84 50
nl.offenburg@wuerth.com
Oldenburg
Ammerländer Heerstaße 246
26129 Oldenburg
Telefon (04 41) 2 19 89-0
Telefax (04 41) 2 19 89 50
nl.oldenburg@wuerth.com
Osnabrück
Hettlicher Masch 12
49084 Osnabrück
Telefon (05 41) 9 09 01-0
Telefax (05 41) 9 09 01 50
nl.osnabrueck@wuerth.com
Paderborn
Frankfurter Weg 70-72
33106 Paderborn
Telefon (0 52 51) 8 71 91 30
Telefax (0 52 51) 8 73 67 50
nl.paderborn@wuerth.com
Papenburg
Siemensstraße 22-24
26871 Papenburg
Telefon (0 49 61) 66 87-0
Telefax (0 49 61) 66 87 50
nl.papenburg@wuerth.com
Passau
Regensburger Straße 14
94036 Passau
Telefon (08 51) 9 56 62-0
Telefax (08 51) 9 56 62 50
nl.passau@wuerth.com
Pforzheim
Gewerbegebiet
Wilferdinger Höhe
Rastatter Straße 36
75179 Pforzheim
Telefon (0 72 31) 56 86 80
Telefax (0 72 31) 56 87 99
nl.pforzheim@wuerth.com
Potsdam
Am Verkehrshof 1
14478 Potsdam
Telefon (03 31) 88 88 40
Telefax (03 31) 8 88 84 50
nl.potsdam@wuerth.com
Regensburg
Franz-Hartl-Straße 4
93053 Regensburg
Telefon (09 41) 7 83 98-0
Telefax (09 41) 7 83 98 50
nl.regensburg@wuerth.com
Reutlingen
Industriegebiet West
Ferdinand-Lassalle-Straße 55
72770 Reutlingen
Telefon (0 71 21) 56 95-0
Telefax (0 71 21) 56 95 50
nl.reutlingen@wuerth.com
Rhein-Sieg
Redcarstraße 2b
53842 Troisdorf-Spich
Telefon (0 22 41) 2 34 02-0
Telefax (0 22 41) 2 34 02 50
nl.rhein-sieg@wuerth.com
Rodgau
siehe bei Frankfurt/Main
Rosenheim
Isarstraße 1A
83026 Rosenheim
Telefon (0 80 31) 2 30 89-0
Telefax (0 80 31) 2 30 89 50
nl.rosenheim@wuerth.com
Adolf Würth GmbH & Co. KG
Internet: http://www.wuerth.com · e-mail: info@wuerth.com
Rostock
Gewerbegebiet
Neu-Roggentiner-Straße 4
18184 Roggentin
Telefon (03 82 04) 6 16-0
Telefax (03 82 04) 6 16 50
nl.rostock@wuerth.com
Saarbrücken
Im Rotfeld 21
66115 Saarbrücken
Telefon (06 81) 9 48 65-0
Telefax (06 81) 9 48 65-50
nl.saarbruecken@wuerth.com
Schwäbisch Hall
Industriegebiet Hessental-Ost
Schmollerstraße 41
74523 Schwäbisch Hall
Telefon (07 91) 4 07 23-0
Telefax (07 91) 4 07 23 50
nl.schwaebisch-hall@wuerth.com
Siegen
(Kaan-Marienborn)
Hauptstraße 84
57074 Siegen
Telefon (02 71) 6 60 49-0
Telefax (02 71) 6 60 49 29
nl.siegen@wuerth.com
Sinsheim
In der Au 22
74889 Sinsheim
Telefon (0 72 61) 40 21-0
Telefax (0 72 61) 40 21 50
nl.sinsheim@wuerth.com
Stuttgart
Kölner Straße 10
Hallschlag
70376 Stuttgart
Telefon (07 11) 9 55 73-20
Telefax (07 11) 9 55 73 50
nl.stuttgart@wuerth.com
Trier
Ohmstraße 6-8
54292 Trier
Telefon (06 51) 4 36 99-0
Telefax (06 51) 4 36 99 50
nl.trier@wuerth.com
Ulm/Neu-Ulm
Carl-Zeiss-Straße 3
89231 Neu-Ulm
Telefon (07 31) 9 78 98-0
Telefax (07 31) 9 78 98 50
nl.ulm-neu-ulm@wuerth.com
Urbach
Schorndorfer Straße 22
73660 Urbach
Telefon (0 71 81) 4 88 66-0
Telefax (0 71 81) 48 86 56
nl.urbach@wuerth.com
Villingen-Schwenningen
Industriegebiet Vockenhausen
Heinrich-Hertz-Straße 9
78052 VS-Villingen
Telefon (0 77 21) 87 19-0
Telefax (0 77 21) 87 19 50
nl.villingen-schwenningen
@wuerth.com
Weingarten/Ravensburg
Hähnlehofstraße 5
88250 Weingarten
Telefon (07 51) 5 61 04-0
Telefax (07 51) 5 61 04 50
nl.weingarten-ravensburg
@wuerth.com
Weißenburg
Dettenheimer Straße 11
91781 Weißenburg
Telefon (0 91 41) 99 55-0
Telefax (0 91 41) 99 55 50
nl.weissenburg@wuerth.com
Wiesbaden
Hagenauer Straße 17-19
65203 Wiesbaden
Telefon (06 11) 1 86 97-0
Telefax (06 11) 1 86 97 50
nl.wiesbaden@wuerth.com
Wuppertal
Industriegebiet
Nächstebreck
Möddinghofe 21
42279 Wuppertal
Telefon (02 02) 6 47 71-0
Telefax (02 02) 6 47 71 25
nl.wuppertal@wuerth.com
Würzburg
Gewerbegebiet Ost
Sandäcker 11
97076 Würzburg
Telefon (09 31) 2 79 89-0
Telefax (09 31) 2 79 89 18
nl.wuerzburg@wuerth.com
1 619 929 673
 Loading...