


eMOTION XLS Anschlussanleitung
eMOTION XLS Installation Manual
Version 2016

Inhaltsverzeichnis
Information & Hinweise ....................
1.
Lieferumfang .....................................
1.1
Beschreibung (Funktionsumfang) .....
1.2
Wichtige Hinweise .............................
1.3
Table of Contents
Information .......................................
Description ........................................
Scope of Supply ................................
Warnung Notes .................................
3
3
3
4
Inbetriebnahme .................................
2.
Einbauhinweise .................................
2.1
Grundeinstellungen ...........................
2.2
Motor- und Gleisanschluß .................
2.3
Lautsprecheranschluß .......................
2.4
Erweiterte Einstellungen ....................
3
Anschlüsse auf der Obsereite ............
3.1
Anschlüsse auf der Unterseite ...........
3.2
Einbau & Anschluss ..........................
4
Einbau ohne Schnittstelle ..................
4.1
LGB DCC Schnittstelle .......................
4.2
LGB Decoder-Schnittstelle ................
4.3
Licht und Funktionsausgänge ...........
4.4
Spannungspuffer (BC) ......................
4.5
Reedkontakte ....................................
4.6
Bus Anschluss ..................................
4.7
Sonderfunktion der F-Ausgänge ........
4.8
Technische Daten ..............................
5
Garantie, Reparatur, Kundendienst ...
6
Hotline ..............................................
7
Hook-Up ............................................
Installation Notes ..............................
Basic factory default settings ............
Motor and track connection ..............
Connection of Speaker ......................
Advanced Settings ............................
Terminals on the top side ..................
Connections on the bottom side .......
Installation & Hook-Up ......................
Installation without interface .............
LGB DCC Interface ............................
LGB Decoder Interface ......................
Light and Function Outputs ...............
Power Buffer (BC) .............................
Reed Contacts ...................................
Bus Connection .................................
Special Functions of F. Outputs .........
Technical Data ...................................
Warranty & Service ...........................
Hotline ..............................................
6
6
6
7
9
10
10
13
14
14
14
15
16
18
19
20
20
21
21
22
2

WICHTIG: Bitte lesen Sie diese
Bedienungsanleitung vor Inbetriebnahme gründlich durch.
IMPORTANT: Please read this
manual thoroughly before installing
or using this product.
1. Information & Hinweise
Wir gratulieren Ihnen zum Kauf
dieses Massoth Sounddecoders.
Diese Anschlussanleitung erklärt
den Anschluss des Decoders
Schritt für Schritt. Die separate
Kongurationsanleitung erklärt
die Funktionen des Decoders und
dazu notwendigen Einstellungen.
1.1 Lieferumfang
• eMOTION XLS Sounddecoder
• Anschlussanleitung
• Kongurationsanleitung
• Lautsprecher (abhängig von Art.)
• Beipackbeutel (mit Anschlusskabel
und Schrauben)
1.2 Beschreibung (Funktionsumfang)
Der eMOTION XLS Sounddecoder
ist besonders für den Einsatz in
zweimotorigen Loks der Spurweite II, IIm, I, usw. Hier einige
Details des Funktionsumfangs:
• Digital- und analogfähiger
Fahr-/Sounddecoder
• max. Belastbarkeit 4 Ampere
• max. Motorstrom 3 Ampere
• NMRA/DCC kompatibel
1. Information & Notes
Congratulations on your purchase
of this Massoth Sounddecoder.
This installation manual explains
the installation of this Decoder step by step. The seperate
Conguration Manual explains
the functions of the Decoder
and the required settings.
1.1 Scope of Supply
• eMOTION XLS Sounddecoder
• Installation Manual
• Conguration Manual
• Loudspeaker (depends on item)
• Accessory Bag (with connecting
cables and screws)
1.2 Description
The eMOTION XLS Sounddecoder
has been designed to operate
G-Scale, Gauge 1 and Gauge 2
locomotives with up to to motors.
Here are some important specs:
• Sound/Driving Decoder for
Digital and Analog Operation
• max. load 4A
• max. motor load 3A
• NMRA/DCC compatible
3

• LGB MZS kompatibel
• Parallele + Serielle Funktiondaten
• 14, 28 und 128 Fahrstufen
• 10239 Lokadressen
• Lastregelung Digital + Analog
• Rangiergang
• einfaches Funktionsmapping
• Überlast- und Temperaturschutz
• Resetfunktion für alle CV-Werte
• Firmware updatefähig
• Soundprojekte updatefähig
• Class D Verstärker (2,8W, 8 Ohm)
• 6-Kanal Soundwiedergabe
• 16 kHz Wiedergabefrequenz
• 3 Lichtanschlüsse
• 8 Funktionsausgänge
• 2 Kontakteingänge
• 1 Servoanschluss
• 1 Taktgeberanschluss
• 1 Entkuppleranschluss
• 1 Pufferanschluss
• 1 Lautstärkeregleranschluss
• LGB MTS compatible
• parallel and serial Function Data
• 14, 28 and 128 Speed Steps
• 10239 Loco Addresses
• Load Control digital + analog
• Switching Gear
• easy function mapping
• load and temperatur protection
• Reset function for all CV-values
• Firmware updateable
• Sound Projects updateable
• Class D Amplier (2,8W, 8 Ohms)
• 6-channel Audio
• 16 kHz Playback frequency
• 3 Light connections
• 8 Function connections
• 2 Contact inputs
• 1 Servo connection
• 1 clock / hall sensor connection
• 1 Uncoupler connection
• 1 Buffer connection
• 1 Volume Control connection
1.3 Wichtige Hinweise
• Die Spannung der Licht- und
Funktionsausgänge ist im Auslieferungszustand auf volle Gleisspannung eingestellt! Vergewissern Sie
sich VOR Inbetriebnahme, dass die
Spannung für den angeschlossenen Verbraucher richtig eingestellt
ist!
• Der Sounddecoder ist kein
Spielzeug! Betreiben Sie ihn nicht
4
1.3 Warning Notes
• The function outputs are set per
default to full track voltage! Make
sure the CVs of the function
outputs are set to the appropriate
value before hooking up any lights
or other accessories. Massoth
cannot be responsible for any
damage if this is disregarded.
• The Decoder is not a toy! Do not
operate it unattended. It is intend-

unbeaufsichtigt! Er ist nur für den
Einsatz in Modelleisenbahnen vorgesehen. Eine Andere Verwendung
ist nicht zulässig.
• Schützen Sie den Decoder vor
Nässe und Feuchtigkeit!
• Der Decoder ist generell gegen
Kurzschlüsse oder Überlastung
gesichert. Werden jedoch beim
Einbau Kabel vertauscht oder
Kabel verschiedener Funktionen
kurzgeschlossen, kann diese
Sicherung nicht wirken und der
Decoder wird zerstört.
• Blanke Kabelenden immer isolieren! Kabel dürfen sich niemals
gegenseitig oder Metallteile der
Lok berühren! Bei der Lokmontage Kabel nicht quetschen oder
Kurzschlüsse verursachen.
• Wickeln Sie den Decoder niemals
in Isolierband ein. Die Wärmeableitung muss immer gewährleistet
sein, sonst droht Überhitzung!
• Achten Sie beim Einbau des
Lautsprechers auf vorsichtige
Handhabung. Druck kann den
Lautsprecher, insbesondere die
Membran beschädigen.
• Anschlussarbeiten nur OHNE
Betriebsspannung durchgeführen.
• Wenn nötig, zügig an den vorgesehenen Stellen löten! Verwenden
Sie einen kleinen Lötkolben!
ed only for use in model railways.
No other use is permitted.
• Protect the Decoder from moisture
and humidity!
• Generally the Decoder is protected
against short circuits and overload. However, if cables are mixed
up during installation or shorted
during operation, this fuse can
not work and the decoder will be
damaged.
• Always insulate bare wire ends!
Wires may never short circuit or
touch metal parts of the locomotive. Make sure that cables are not
pinched or short circuit during
loco assembly.
• Never wrap the Decoder in insulating tape. The heat dissipation must
be guaranteed, otherwise likely to
overheat!
• Be careful when mounting the
loudspeaker. Pressure may damage the speaker, especially the
membrane.
• Perform installation and connection works only WITHOUT any
connected power.
• If necessary, solder the correct
positions quickly! Only use a small
soldering iron!
5

2. Inbetriebnahme
2.1 Einbauhinweise
Bauen Sie den Decoder sorgfältig
nach den folgenden Anschlussplänen ein. Die Ränder können
bei Bedarf abgebrochen werden.
2. Hook-Up
2.1 Installation Notes
Install your decoder in compliance
with the following connecting
diagrams. To reduce the size of the
decoder, rims may be snapped off.
2.2 Grundeinstellungen
Grundeinstellung
Lokadresse 3
Fahrstufen 14
Funktionsauslösung parallel + seriell
Spannung am
Funktionsausgang
Funktionsausgang A1 Funktionstaste: F7
Funktionsausgang A2 Funktionstaste: F2
Funktionsausgang A3 Funktionstaste: F3
Funktionsausgang A4 Funktionstaste: F4
Funktionsausgang A5 Funktionstaste: F5
Funktionsausgang A6 Funktionstaste: F6
Funktionsausgang A7 Funktionstaste: F13
Funktionsausgang A8 Funktionstaste: F14
22 Volt (Gleissp.)
5V (A5-A8)
Möchten Sie eine hohe Lokadresse
ab 128 verwenden, müssen Sie
CV17 und CV18, sowie CV29 entsprechend ändern. Fahren Sie die
Lokomotive an Stelle dessen mit
28 Fahrstufen, muss CV29 - Bit 1
(Wert „2“) aktiviert werden, denn
sonst lässt sich das Licht nicht
schalten, bzw. blinkt beim Fahren.
2.2 Basic factory default settings
Basic settings sound decoder (XLS)
Loco address 3
Speed Steps 14
Function operation parallel + serial
Function voltages 22 Volt (track volt.)
5V (A5-A8)
Function output A1 Function key: F7
Function output A2 Function key: F2
Function output A3 Function key: F3
Function output A4 Function key: F4
Function output A5 Function key: F5
Function output A6 Function key: F6
Function output A7 Function key: F13
Function output A8 Function key: F14
If you would like to use a loco
address from 128 or higher,
CV17+CV18 and CV29 need
altered. If operated with 28
Speed Steps are used, CV29
needs to be altered, otherwise
the light function will be faulty.
It may not work or will ash
while changing speed steps.
6

2.3 Motor- und Gleisanschluss
Verbinden Sie das gelbe Kabel mit
Motor (+) und das grüne Kabel mit
Motor (-) am bzw. im Getriebe.
Verbinden Sie anschließend das
weiße Kabel mit Gleis (+) und das
braune Kabel mit Gleis (-). Bei LGB
ist in Fahrtrichtung links Gleis (+).
Abbildung 1: Anschluss an Motor + Gleis
Illustration 1: Connection diagram track / motor
Die angegeben Kabelfarben
können vom Aufdruck am Getriebe
abweichen! Bei manchen Loks
sind die Getriebe 180° gedreht
eingebaut. Bei anderen Herstellern
sind unter Umständen ganz andere
Farben und Belegungen relevant.
Nachfolgende Abbildung (Abb.
2) zeigt den korrekten Anschluss an ein LGB Getriebe.
2.3 Motor and track connection
Connect the yellow wire to Motor
(+) and the green wire to Motor
(-) at the gear box. Then connect
the white wire to Track (+) and
the brown wire to Track (-) wire
to the track power leads of the
gear box. Track (+) is left in
direction of travel (LGB only)!
The stated wire colors may differ
on the gear box description!
Some locomotives may have
gear box construction with 180°
rotation. Other manufacturers
may have different wire colors
and connections. Always read the
documentation! The following
illustration shows the connection
to a standard LGB gear box.
7

Gleis +
ge
ws = Gleis +
br = Gleis gn = Motor -
Abbildung 2: Anschluss an ein LGB Getriebe
Illustration 2: Installation on a LGB gear box
ws
bn
gn
Fahrtrichtungge = Motor +
Gleis -
8

2.4 Lautsprecheranschluss
An die Lautsprecher-Buchse
wird der 8 Ohm Lautsprecher angeschlossen.
Lautsprecher
Loudspeaker
Abbildung 3: Anschluss des Lautsprechers
Illustration #3: Connection of loudspeaker
2.4 Connection of speaker
The 8 Ohm loudspeaker is connected to the Speaker-outlet.
9
3. Erweiterte Einstellungen
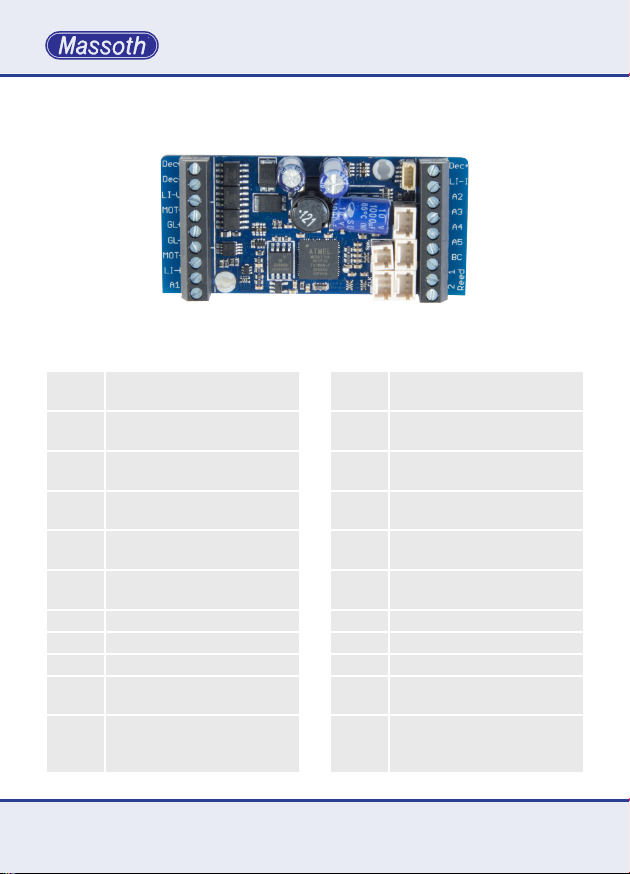
3.1 Anschlüsse auf der Oberseite
3. Advanced settings
3.1 Terminals on the top side
Dec (+)
Licht vorne/Light front (-)
Licht hinten/Light rear (-)
Dec (-)
Motor (+)
Gleis/Track (+)
Gleis/Track (-)
Motor (-)
A1 (-)
Abbildung 4: eMOTION Decoder Anschlüsse
Illustration #4: eMOTION contact assignment
Gleis (-) Braunes Kabel zum
GL-
Getriebeanschluss
Gleis (+) Weißes Kabel zum
GL+
Getriebeanschluss
Motor (-) Grünes Kabel zum
MOT-
Getriebeanschluss
Motor (+) Gelbes Kabel zum
MOT+
Getriebeanschluss
Dec-
Dauerhafter (-) Pol. für Puffer
(GND)
und A5..8
Dec+
Gemeinsamer Anschluss (+) für
(+ 22V)
Licht + Funktion A1..4
LI-V Licht vorne (-)
LI-H Licht hinten (-)
LI-I Licht innen (-)
Funktionsausgang 1 (-), div.
A1
Blinkfunktionen, Impuls
Funktionsausgang 2 (-), div.
A2
Blinkfunktionen, Impuls,
Wechselblinker
track (-) brown wire to the motor
GL-
block
track (+) white wire to the motor
GL+
block
motor (-) green wire to the
MOT-
motor block
motor (+) yellow wire to the
MOT+
motor block
GND (-) e. g. for a power buffer
GND
and A5..8
Common terminal (+)
+ 22V
for light and function A1..4
LI-V front light (-)
LI-H rear light (-)
LI-I interior light (-)
function output 1 (-), some
A1
ashing functions, pulse
function output 2 (-), some
A2
ashing functions, pulse, alternate ashing
Dec (+)
Licht innen/light interior (-)
A2 (-)
A3 (-)
A4 (-)
A5 (+)
Buffer Control (-)
Reedeingang/Reed 1 (+)
Reedeingang/Reed 2 (+)
10

Funktionsausgang 3 (-), div.
A3
Blinkfunktionen, Impuls
Funktionsausgang 4 (-), div.
A4
Blinkfunktionen, Impuls,
Wechselblinker, Entkuppler
Funktionsausgang 5 (+), div.
A5
Blinkfunktionen, Impuls
BC Buffer Control (-)
Kontakteingang 1,
Reed1
Soundauslösung
Kontakteingang 2,
Reed2
Soundauslösung
Auf der Oberseite des eMOTION XLS Sounddecoders sind
sechs zusätzliche Anschlussbuchsen (Abb. 5) vorhanden:
Lautsprecher
Loudspeaker
Taktgeber #1
Clock #1
function output 3 (-),
A3
some ashing functions, pulse
function output 4 (-), some
A4
ashing functions, pulse, alternate ashing, decoupler
function output 5 (+), some
A5
ashing functions, pulse
BC Buffer Control (-)
contact input 1,
Reed1
Trigger sound
contact input 2,
Reed2
Trigger sound
The eMOTION XLS Sound Decoder
features six additional connectors
(illustration #5) on the top side:
Dec(-)
RXD
Bus (SUSI, etc.)
TXD
Dec(+)
Dec(-)
Entkuppler
A4(-)
Uncoupler
Dec(+)
Dec(-)
LS1
LS2
Dec(-)
Clock1
6,5V(+)
5V(+)
Dec(-)
Clock2
6,5V(+)
Potentiometer
Poti
Volume Control
Taktgeber #2
Clock #2
Abbildung 5: Anschlussbuchsen auf der Oberseite
Illustration #5: Connectors on the upper surface
11

•Taktgeber 1: Anschluss für einen
externen Taktgeber. Benutzen Sie
hierzu ausschließlich den Taktgeber Nr. 8242030/35.
•Taktgeber 2: Anschluss für einen
2. externen Taktgeber für Zahnraddampf oder Zweikraftlok.
•Lautsprecher: Hier wird der 8
Ohm Lautsprecher angeschlossen.
•Poti: Bei Bedarf kann hier eine ex-
terne Potentiometerplatine Art.Nr.:
8242010 angeschlossen werden.
•A4 (Entkuppler): Diese Buchse
ist zum direkten Anschluss eines
Entkupplers. Man kann aber A4
auch einzeln benutzen, dabei wird
Dec- nicht benutzt.
Bei Anschluss eines Entkupplers
darf die A4 Schraubklemme nicht
benutzt werden! A4 darf nicht
gedimmt sein!
•Bus-Buchse: Der Busanschluss ist
vorgesehen zur Steuerung weiterer
Komponenten. Für den Anschluss
an die Funktionsausgänge
empfehlen wir die verschiedenen
MiniCT Anschlusskabel (8312001,
8312002, 8312003). Die Belegung
können Sie Abbildung 5 entnehmen.
•Clock 1: Connector for an external
pulse generator. Please use
only our pulse generator unit
#8242030/35.
•Clock 2: Connection for a second
pulse generator to supporing Cogwheel Locomotives or Dual Power
Locomotives.
•Speaker: The Speaker connector
connects a loudspeaker (8 Ohm).
•Poti: The Poti connector connects
an external potentiometer for
manual volume control (item #
8242010).
•A4 (Uncoupler): This connector
supports the Automatic Uncoupler.
If A4 is used individually, DEC- is
not used. If an Uncoupler is oper-
ated, the A4 Function Output may
not be used! Do not dimm!
•Bus Connector: The Bus Con-
nector is provided to control additional components. We suggest
to use the micro decoder cables
(8312001, 8312002, 8312003) to
connect the components to the
decoder. The connector assign-
ment is illustrated in g. #5.
12

3.2 Anschlüsse auf der Unterseite
Auf der Unterseite nden Sie
noch die Anschlüsse A6-A8
und je einmal Dec- (GND).
Diese sind mit je 10mA belastbar.
A6 kann als Steuerleitung für
einen Servo genutzt werden.
A8 (+)
DEC (-)
DEC (-)
A7 (+)
A6 (+)
DEC (-)
Abbildung 6: eMOTION Decoder Anschlüsse unten
Illustration #6: eMOTION contact assignment lower surface
3.2 Connectors on the bottom side
On the lower side you can nd
the A6-A8 and for each a Dec(GND) contact. These outputs
has a load capacity of 0.01
amps each. A6 may be used as
control output for a servo.
13

4. Einbau & Anschluss
4.1 Einbau ohne Schnittstelle
Generell lässt sich der Decoder in
Loks ohne Schnittstelle besonders
einfach einbauen. Dabei wird
der Decoder mit Hilfe der mit gelieferten Kabel direkt am Getriebe
angeschlossen. Der Aufbau des
Getriebes kann abhängig vom
Hersteller unterschiedlich sein.
ACHTUNG: Bei Piko®-G Loks
sind die Motor- und Gleisanschlüsse gegenüber LGB®Getrieben vertauscht!
4. Installation & Hook Up
4.1 Installation without interface
Installation in a locomotive without
interface is pretty simple. The
decoder must be connected to the
4 leads of the motor block utilizing
the color coded wires provided.
The design of the motor block
may vary with the manufacturer.
Note: The motor and track connection with PIKO®-G locos is
switched compared to LGB®.
4.2 LGB DCC Schnittstelle
4.2 LGB DCC Interface
Mit dem 10 poligen Schnittstellenkabel (#8312062) kann
der XLS Sounddecoder (Abb.
7) an die LGB DCC Schnittstelle angeschlossen werden.
Abbildung 7: Einbau in Lok mit LGB® DCC Schnittstelle
Illustration #7: Installation with a LGB® DCC interface
14
The eMOTION XLS Decoder
is available with the 10-pin
DCC plug for the LGB DCC
interface under #8312062.

4.3 LGB Decoderschnittstelle
Mit dem LGB Schnittstellenkabel
(#8312061) kann der Decoder
zusätzlich in LGB Loks mit der
Decoderschnittstelle eingebaut
werden (Abb. 8). Über dieses
Kabel können die Licht- und
Soundfunktionen der Lok gesteuert werden.
Abbildung 8: Einbau in Lok mit LGB® Decoder-Schnittstelle
Illustration #8: Installation with LGB® decoder interface
4.3 LGB Decoder interface
Using the LGB® decoder interface
cable (8312061) the eMOTION
XLS can be easily installed in
LGB® locomotives with a decoder
interface (Illustr. #8). The light and
sound functions will be handled via
this cable.
15

4.4 Licht und Funktionsausgänge
Der eMOTION XLS verfügt
über verschiedene Licht- und
Funktionsausgänge. Es benden
sich 3 Lichtanschlüsse auf dem
Decoder. Dabei handelt es sich
um Frontlicht, Rücklicht und
zusätzlich die Innenbeleuchtung.
Die Front- und Rückbeleuchtung
werden fahrtrichtungsabhängig
geschaltet. Die Innenbeleuchtung ist dauerhaft an, wenn die
Beleuchtung eingeschaltet ist.
Nutzen Sie diese Funktion um den
Innenraum Ihrer Lokomotive oder
das Getriebe bzw. Gestänge Ihrer
Dampok zu beleuchten, oder um
z.B. die typische Rückbeleuchtung
der RhB Lokomotiven zu realisieren. Denn diese Leuchten brennen
immer. (Gesamtstromverbrauch
der angeschlossenen Lampen
max. 300mA je Anschluss).
4.4 Light and Function Outputs
The eMOTION XLS Sound Decoder
features 3 light outputs, front light,
rear light, and interior light. The
front light and rear light are
switched according to the driving
direction, the front light output is
“on” when driving forward, and
the rear light is illuminated when
driving in reverse. The interior light
is steadily “on” when the lights are
switched “on”. You may use this
function to illuminate the interior
of the cab of your locomotive or
to illuminate the connecting rods
of a steam locomotive or to implement the typical rear light of RhB
locomotives because these lights
are always “on”. (The limit is 300
mAmps per output). The eMOTION
XLS Sound Decoder features 8 additional function outputs which may
be used in different ways. Five out-
Abbildung 9: Licht- und Funktionsausgänge
Illustration #9: Light- and Function Outputs
16

Der eMOTION XLS Sounddecoder
verfügt zudem über 8 separate
Funktionsausgänge, die unterschiedlich genutzt werden können.
Auf der Oberseite benden sich
5 Funktionsausgänge auf den
Schraubklemmen, 3 weitere als
Lötkontakt auf der Unterseite des
Decoders (A6-A8). Alle Licht- und
Funktionsausgänge A1-A4 des
eMOTION XLS Sounddecoders
sind bei der Auslieferung auf
maximale Ausgangsspannung
eingestellt (einstellbar in CV 50,
53, 112). Die Ausgänge 5-8 haben
nur eine Spannung von 5 Volt und
dürfen mit max. 10 mA belastet
werden. Funktionen der einzelnen
Licht- und Funktionsausgänge
können über die Programmierung
eingestellt werden. Die Lichtausgänge sowie die Funktionsaus-
470R
puts are located on the upper side
on a jack and three on the rear
side as solderable contact (A6A8). The factory setting of the
light and function outputs A1-A4
gives full track voltage to them
(adjustable in CV 50, 53, 112).
The voltage supplied by the outputs
7+8 is 5Volts, and the maximum
allowable load is 10 mAmps. The
function (e.g. F-key assignment,
light display according to driving
direction, ashing and short term
function) as well as the voltage of
output A1-A4 may be programmed
by setting the respective CV’s.
For details please review the
CV-table. The outputs may be
controlled by NMRA/DCC commands or with serial LGB® pulse
strings. The light outputs and the
outputs A1 to A4 are dimmable.
Abbildung 10: Licht und Funktionsausgang auf der Unterseite
Illustration #10: Light and function output on bottom side
17

gänge A1-A4 sind dimmbar.
Für A5-A8 sind Schutzwiderstände
auf dem Decoder, welche den
Strom auf 10mA begrenzen.
ACHTUNG: Die Lichtfunktion ist abhängig von der gewählten Fahrstufenanzahl. Ist die Einstellung (CV 29) nicht
mit der Einstellung des Digitalsystems
identisch, blinkt das Licht oder ist
immer aus. (Bei 128 Fahrstufen ist dies
jedoch nicht relevant)
A5 to A8 are protected by resistors and limited to 10mA.
NOTE: The proper operation of the
light functions depends on the selected
speed steps. In case CV 29 (speed
steps) does not carry the same setting
as the digital system the lights may
icker or might not work at all (not
relevant for 128 speed steps)
4.5 Spannungspuffer (BC)
Über 3 Anschlüsse an den
Schraubklemmen kann man einen
Spannungspuffer (8151601 +
8151701) anschließen. Massoth Powercaps besitzen eine
zusätzliche Steuerleitung, die
Störungen beim Einschalten oder
Programmieren verhindert. Der
Anschluss erfolgt an „DEC+“ (rt),
„DEC-“ (sw) und wenn vorhanden,
die Steuerleitung an „BC“ (ws).
Die Stromaufnahme beim Laden
darf höchstens 500mA betragen.
Der Puffer arbeitet im Digital/
Analogbetrieb gleichermaßen. Im
Analogbetrieb arbeitet der Puffer
vollautomatisch und schaltet
im Stand nach den Standgeräuschen den Decoder ab. Für den
Digitalbetrieb sollte der Analog-
18
4.5 Power buffer (BC)
The eMOTION XLS features a separate connector for power buffers
(Massoth 8151601 + 8151701).
The power buffer bridges brief
power interruptions caused by
contaminated tracks or bad power
supply on switches. The power
buffer is to be connected to the
connectors marked “DEC+“ (red),
“DEC-“ (black) und “BC“ (white) on
the decoder board. The maximum
charging Amperage is 500mAmps.
The power buffer works in analog
as well as in digital operation. In
analog operation the power buffer
works fully automatic. After the
locomotive has stopped, the power
buffer switches off the decoder
after the standing noises were
released. The buffer runtime can be

betrieb gesperrt werden (CV 29
Bit 2). Die Nachlaufzeit der Lok
kann man mit CV 47 einstellen.
adjusted in CV 47.
4.6 Reedkontakte (Auslösen von Glo-
4.6 Reed contacts (triggering bell and
cke / Pfeife durch Gleismagnete)
Möchten Sie die Auslösung eines
Sounds durch Gleismagnete
nutzen, so können bis zu zwei
Reedkontakte (potentialfrei) über
die Reedkontaktanschlüsse des
eMOTION XLS Sounddecoders
gegen GND angeschlossen werden
(Abb. 5). In der CV-Konguration
(CV 190, 191) legen Sie fest, welche Geräusche beim Schalten der
Reedkontakte ausgelöst werden
sollen. Eine besondere Funktion ist
die richtungsabhängige Auslösung
der zugewiesenen Geräusche bei
Vorwärts- und Rückwärtsfahrt
(aktivierbar in CV 149, Bit 4).
Abbildung 11: Anschluss der Reedkontakte
Illustration #11: Connection Scheme for Reed Contacts
whistle with track magnets)
You may utilize up to two reed contacts to trigger sounds with track
magnets. The CV conguration
(see Conguration Manual) denes
which sound is to be triggered by
which reed contact. (Illustr. #5)
With the CV conguration (CV
190, 192) you may assign which
sounds will be played when the
reed contacts are triggered.
A special feature is the possibility to trigger a sound depending on the driving direction.
1919

4.7 Bus-Anschluss
(SUSI/Massoth/Märklin-Zug-Bus)
Der Busstecker unterstützt
verschiedene Busprotokolle. Neben SUSI und LGB/
MASSOTH wird auch der
Märklin Zugbus unterstützt.
4.7 Bus Connection
(SUSI/Massoth/Märklin-Train-Bus)
This 4-pole terminal may be
used for e.g. pulsed smoke
generators or sound modules
in compliance with the SUSI
norm or the Märklin Train Bus.
4.8 Sonderfunktionen der
Funktionsausgänge
• A3 kann als Taktausgang benutzt
werden, um einen gepulsten
Verdampfer mit dem Sound zu
synchronisieren.
• A6 kann als Steuerausgang für
einen Servo genutzt werden.
20 20
4.8 Special Functions
of Function Outputs
• A3 may be used as clock output to
synchronise a pulsed smoke with
the sound unit.
• A6 may be used as control output
for a servo.

5. Technische Daten
•Spannungsversorgung
0...24V DC/DCC (kurzz. bis 27V)
•Gesamtbelastbarkeit
max. 4A
•Maximaler Motorstrom
3,5A
•Maximaler Funktionsstrom
1,2A, davon:
A1-A4 je 0,6A (max 22V)
A5-A8 je 10mA (max 5V)
•Stromaufnahme
30-500 mA (ohne Motor + Funkt.)
•Verstärker (Lautsprecher)
2,8 Watt bei 8 Ohm (mind. 1,5W)
•Temperaturbereich
-20 - 45°C
•Abmessungen
60 x 32 x 18 mm (L x B x H)
5. Technical Data
•Power supply
0...24V DC/DCC (max. peak 27V)
•Maximum Load
max. 4A
•Maximum Motor Current
3,5A
•Maximum Function Current
1,2A, with
A1-A4 each 0,6A (max. 22V)
A7-A8 each 10mA (max. 5V)
•Current Draw
30-500 mA (w/o motor + functions)
•Amplier(Loudspeaker)
2.8 Watts at 8 Ohm (at least 1,5W)
•Temperature range
-20°C - 45°C / -4°F to 113°F
•Measurements
60 x 32 x 18 mm (L x W x H)
Hinweis zur Temperatur: Um Kondenswasserbildung zu vermeiden
benutzen Sie die Elektronik bei
Temperaturen unter 0°C nur, wenn
diese vorher aus einem beheizten
Raum kommt. Die Eigenwärme des
Fahrbetriebs reicht aus um Kondenswasserbildung zu verhindern.
6. Gewährleistung & Kundendienst
MASSOTH gewährt die Fehlerfreiheit dieses Produkts im Rahmen
der gesetzlichen Vorgaben,
mindestens jedoch für 1 Jahr ab
Note: In case you intend to utilize
this decoder below freezing temperatures, make sure it was stored
in a heated environment before
operation to prevent the generation of condensed water. The heat
generated during operation is suf-
cient to prevent condensed water.
6. Warranty & Service
MASSOTH warrants this product
against defects in materials and
workmanship for one year from
the original date of purchase. Other
21

Kaufdatum. Um Reparatur- oder
Serviceleistungen in Anspruch zu
nehmen, übergeben Sie das Produkt bitte Ihrem Fachhändler oder
senden es direkt an den Hersteller.
Unfreie Sendungen werden nicht
angenommen. Eine Kopie des
Kaufbelegs sowie ein einwandfreies
Prüfetikett auf dem Produkt werden
vorausgesetzt. Für Schäden durch
unsachgemäße Behandlung oder
Fremdeingriff oder Veränderung
des Produkts besteht kein Garantieanspruch. Der Anspruch auf
Serviceleistungen erlischt unwider-
ruich. Verschleißteile sind von der
Garantieleistung ausgeschlossen.
Auf unserer Internetseite nden Sie
die jeweils aktuellen Broschüren,
Produktinformationen, Dokumentation und Softwareprodukte rund
um MASSOTH Produkte. Irrtümer
und Änderungen vorbehalten.
countries may have different legal
warranty situations. Normal wear
and tear, consumer modications
as well as improper use or installation are not covered. Peripheral
component damage is not covered
by this warranty. Valid warranty
claims will be serviced without
charge within the warranty period.
For warranty service please return
the product to you dealer or send
it directly to the manufacturer.
Return shipping charges are not
covered by MASSOTH. Please
include your proof of purchase
with the returned goods.
Please check our web site for
up to date brochures, product
information, documentation
and software updates. Errors and changes excepted.
7. Hotline
Gerne stehen wir Ihnen für
Rückfragen zu diesem Produkt zur
Verfügung. Sie erreichen uns per
eMail unter: hotline@massoth.de
Die telefonische Hotline ist unter
+49 (0)6151-35077-38
zu bestimmten Zeiten geschaltet.
Die Telefonzeiten werden angesagt.
22
7. Hotline
We will be happy to answer your
questions about this product.
You may reach us via eMail at:
hotline@massoth.de
The phone hotline is available at
+49 (0)6151-35077-38
at specic operational hours.
Operational hours are announced.

23

QUALITY
MADE IN
GERMANY
RoHS
COMPLIANT
Massoth Elektronik GmbH
Frankensteiner Str. 28 · D-64342 Seeheim · Germany
FON: +49 (0)6151-35077-0 · FAX: +49 (0)6151-35077-44
eMail: info@massoth.de · www.massoth.de
032377o
991089 BDA eMOTION XLS 2016.04
 Loading...