

Page 1

Refrigerated Wine Chiller
Installation
Operation &
Maintenance
Instructions
Part of AGA Foodservice Group
Page 2
Inspection
Remove Packaging
Your wine cabinet has been packed for shipment with all
parts that could be damaged by movement securely fastened. Before using, be sure all packing materials and
tape have been removed.
Important
Keep your carton packaging until your wine cabinet has
been thoroughly inspected and found to be in good condition. If there is damage, the packaging will be needed
as proof of damage in transit.
Note to Customer
This merchandise was carefully packed and thoroughly
inspected before leaving our plant. Responsibility for its
safe delivery was assumed by the carrier upon acceptance of the shipment. As directed on the side of your
packing carton, claims for loss or damage sustained in
transit must be made on the carrier as follows:
Exterior Damage
Make thorough damage notation on your delivery receipt
and have driver acknowledge by signature and date.
Send a written request asking for an inspection report
from carrier. Include the name of carrier representative
and the date the inspection was requested. Retain
inspection report and receipt for filing of a claim.
Concealed Damage
This must be reported to the carrier within fifteen days.
Obtain inspection report from the carrier. Retain the
inspection report for filing the claim. DO NOT RETURN
DAMAGED MERCHANDISE TO MANUFACTURER FILE THE CLAIM WITH THE CARRIER.
How to Install Your
Refrigerated Wine Cabinet
Select Location: The proper location will ensure peak
performance of your appliance. Choose a location
where the unit will be out of direct sunlight and away
from heat sources. Best performance will be maintained when installed within the following parameters:
Cabinet Clearance: Ventilation is required from the
bottom front section of the unit. Keep this area open
and clear of any obstructions.
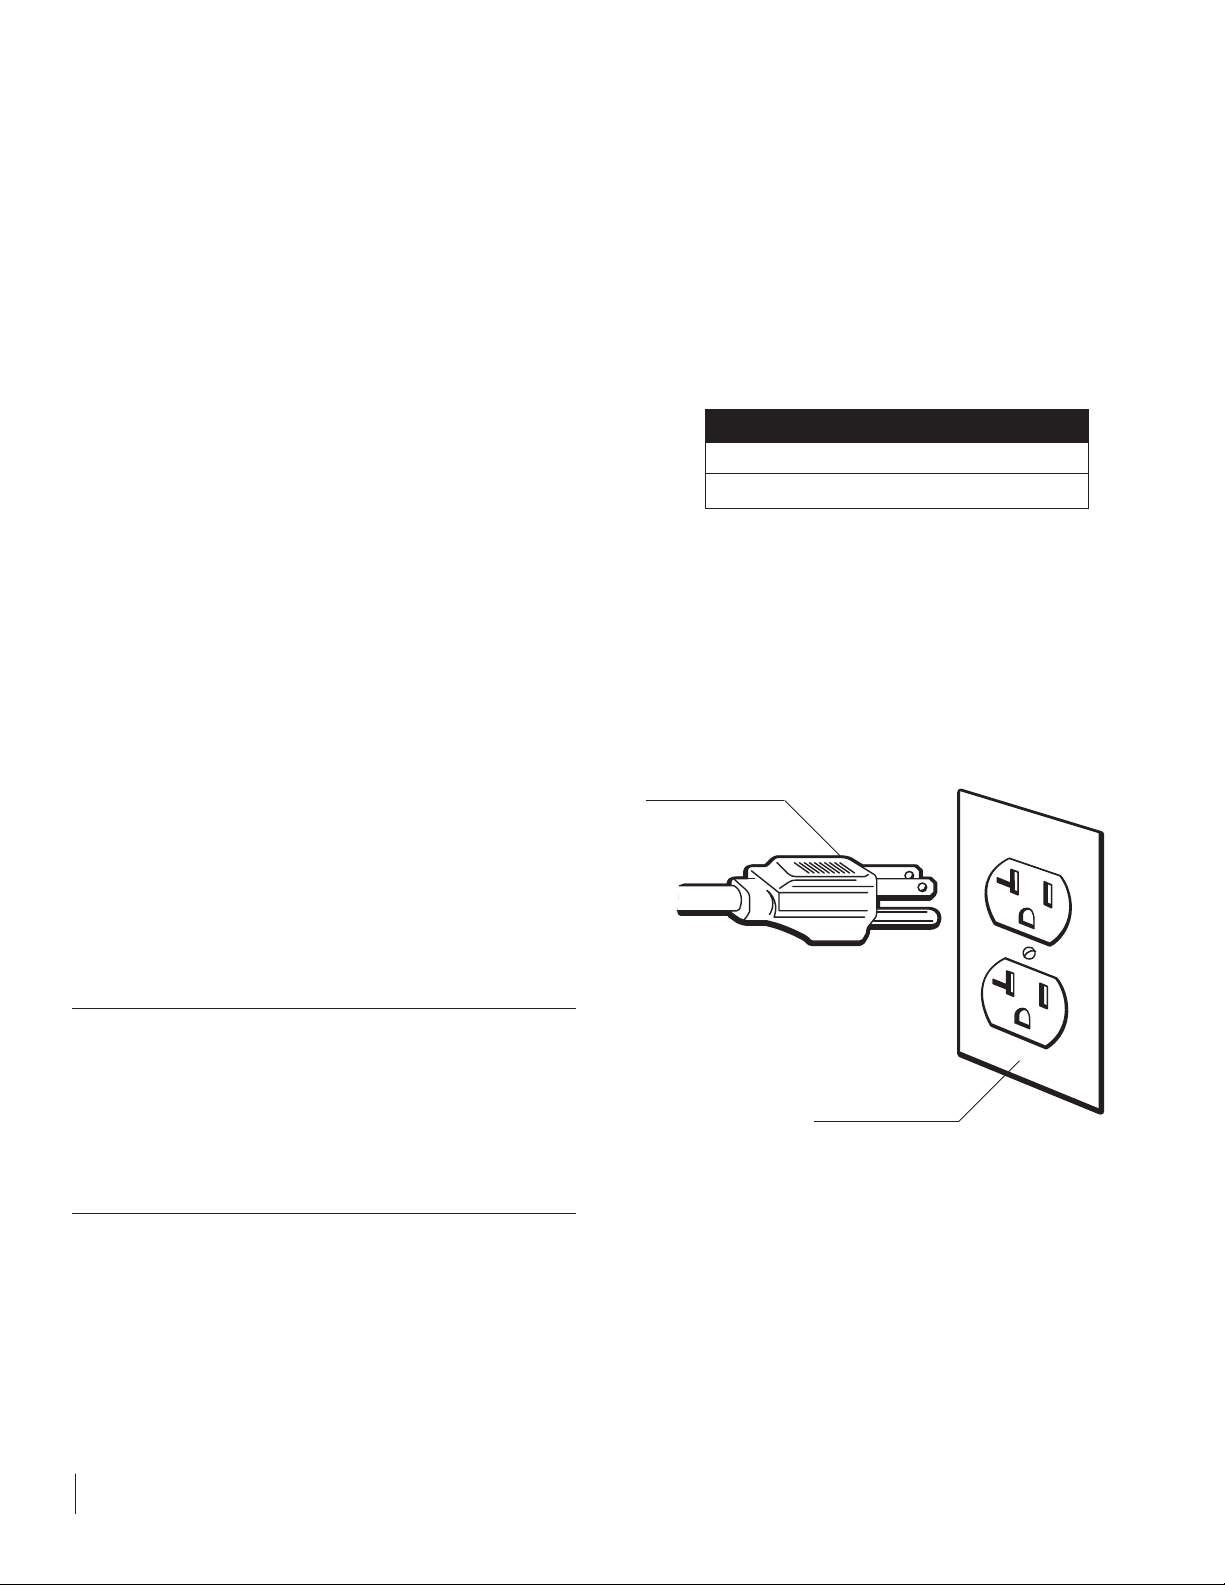
Electrical Connection: Use nominal 115 volt, 60
cycle AC only. DO NOTUSE AN EXTENSION CORD
1
Ideal Ambient T emperature Range
Built-in 65° – 80°F
Free-Standing 65° – 90°F
Power Supply Cord
with 3-Prong
Grounding Plug*
Grounding Type
Wall Receptacle
Figure 1
Page 3
Grounding Method: This product is factory
equipped with a power supply cord that has a threepronged grounded plug. It must be plugged into a
mating grounding type receptacle in accordance with
the National Electrical Code and applicable local
codes and ordinances (see figure 1). If the circuit
does not have a grounding type receptacle, it is the
responsibility and obligation of the customer to
exchange the existing receptacle in accordance with
the National Electrical Code and applicable local
codes and ordinances. The third ground prong
should not, under any circumstances, be cut or
removed. All U.L. listed refrigerated products are
equipped with this type of plug.
How to Operate Your
Refrigerated Wine Cabinet
Set the Control: The total available temperature
range of the unit is from the low forties to the mid sixties. The middle range on the control is approximately 55°F. The temperature can be lowered or raised by
turning the control clockwise or counterclockwise,
respectively. As with any
refrigeration product, there
is a slight temperature variance at different locations
within the cabinet. For
example, the coolest bottles
will be in the rear of the four
middle shelves. The bottles on the top two shelves
will be 3° to 7° warmer. This is the warmest location.
The bottles in the front of the middle fours shelves will
be 1° to 4° warmer than the rear of the shelves.
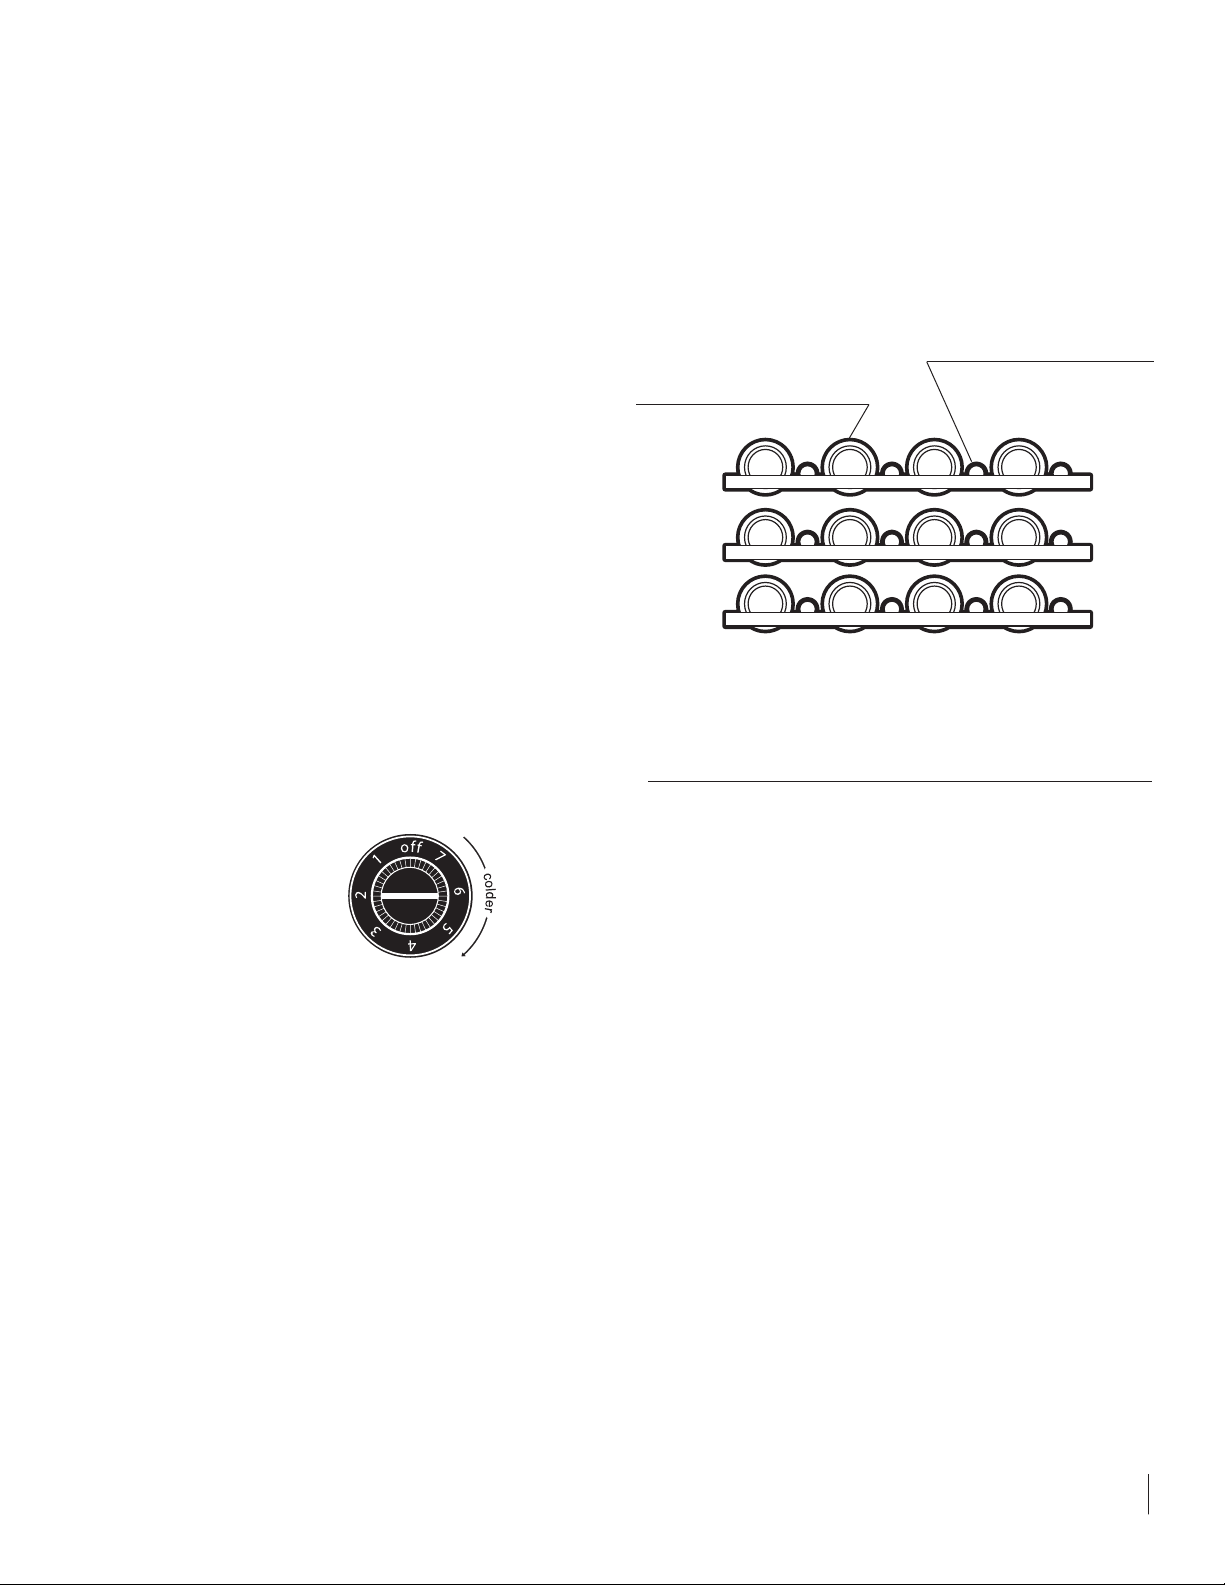
Position your wine inventory accordingly. To start
your appliance, use a screwdriver to turn the control
clockwise to the middle thermostat setting (see figure
2). Once the bottles are loaded, allow at least 48
hours for the unit to stabilize before making any
adjustments to the initial setting.
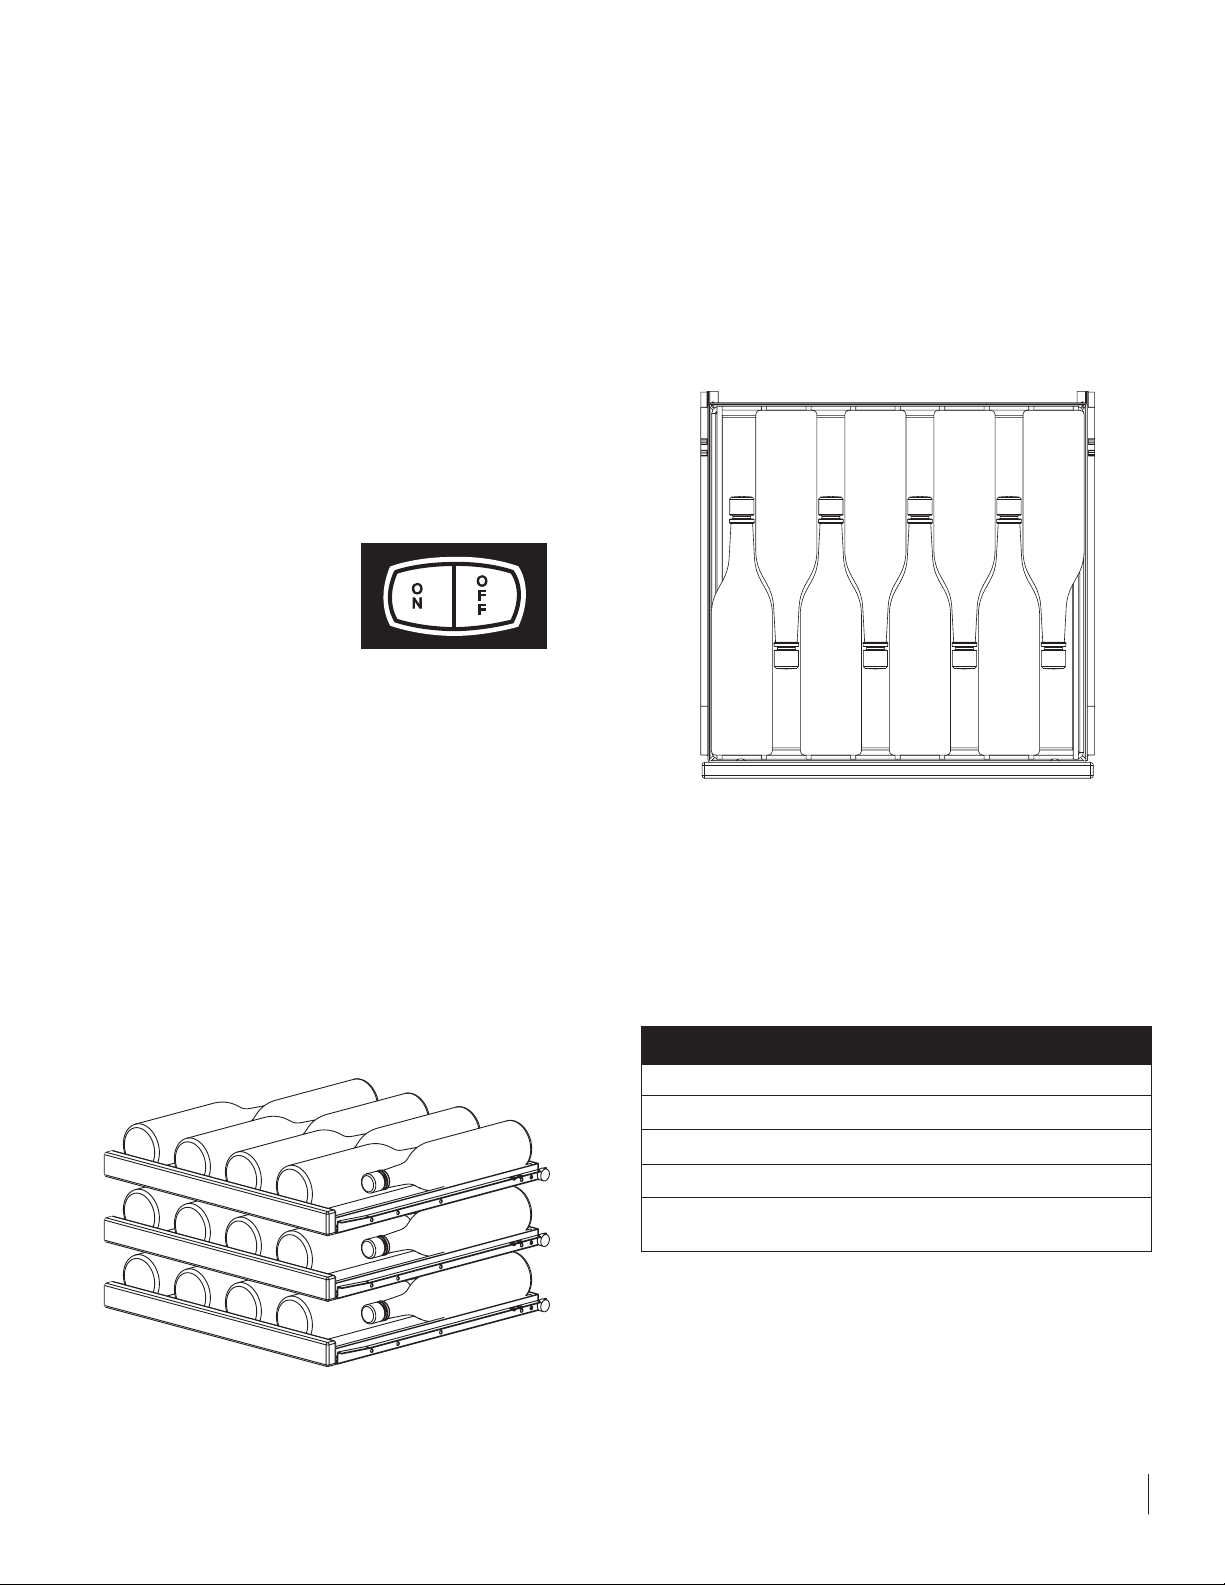
Insert Wine Bottles: The six roll-out shelves each
hold eight bottles. The bottom rack holds six bottles
that are loaded with necks facing the rear. Tall bottles
should not be loaded on the bottom rack because
they may prevent the door from closing.
Loading Tips and Suggestions
Bottom rack may be removed for storing "jug" wines.
You may store magnums and other large bottles on the
upper right and left positions of the cabinet shelving or
on any of the middle racks by removing the rack directly
above them.
Position white wines on the middle or lower racks and
red wines on the upper racks.
The bottles on the top rack directly under the light will
be exposed to a slightly higher temperature when the
light is on. Position you wines accordingly and
REMEMBER TO TURN OFF THE LIGHT WHEN IT IS
NO LONGER NEEDED.
Keep wines that you plan to use for everyday drinking
and entertaining on the front half of the racks where
labels are completely visible. Place wines for aging or
longer term storing in rear.
2
Figure 2
Control Knob
Front Bottles (Necks Facing Rear)
Rear Bottles (Necks Facing Front)
Figure 3
Page 4

How to Clean and
Maintain Your Wine Chiller
Condenser: The condenser tubing inside the cabinet
does not require frequent cleaning; however, satisfactory cooling depends on adequate ventilation over
the coils. Be sure that nothing obstructs the required
air flow openings in front of the cabinet. At least once
or twice a year brush or vacuum lint and dirt from the
condenser for efficient performance by unscrewing
the grille on the bottom front of the cabinet.
Cabinet: The painted cabinet can be washed with
mild soap and water and thoroughly rinsed with clear
water. Never use abrasive scouring powders.
Interior: Wash interior compartment with mild soap
and water. Do not use an abrasive powder, solvent,
polish cleaner or undiluted detergent.
Glass Door: Use a glass cleaner or mild soap and
water and soft cloth to clean the glass door model.
Do not use any abrasive powders.
Door Gasket: The vinyl gasket may be cleaned with
mild soap and water, a baking soda solution or a mild
scouring powder.
Light T ube Replacement: WARNING! DISCONNECT
THE POWER CORD BEFORE ATTEMPTING LIGHT
TUBE REPLACEMENT. Failure to do so may result in
an electrical shock that could severely injure you.
This product uses two, 6 watt light tubes to illuminate
the interior of the wine chiller. The light tubes are very
reliable electrical components, but should either or
both light tubes not function properly, please call the
dealer you purchased your wine chiller from for
replacement light tubes. Use only original equipment
light tubes from your dealer or manufacturer.
Light tube replacement consists of using a small
phillips head screwdriver to remove the two screws
that hold a cover plate over the back section of the
light tube. Set the screws and cover plate aside for
re-assembly later.
Using a small flat-blade screwdriver, gently lever the
front section of the light tube down to allow it to be
pulled clear of the light housing.
Disconnect the two insulated electrical connectors
from the cabinet’s electrical cable and discard the old
light tube. Reconnect the insulated electrical connector of the new light tube to the cabinet’s electrical
cable connectors. Make sure they are secure and
fully inserted.
Carefully realign the light tube’s electrical terminals
back into the rear of the light enclosure channel making sure not to crimp them. Gently insert the light tube
along the length of the light enclosure channel. Press
the light tube gently into the light enclosure channel.
Only a small part of the light tube should project
below the ceiling of the wine chiller. DO NOT USE A
HAMMER TO FIT THE LIGHT TUBE.
Place the light tube terminal cover plate back in its
original position on the light enclosure’s flange. Reuse the original two screws to secure it in place. Plug
the wine chiller into the electrical socket. Check to
see if the light tubes operate properly. Your light
tube’s replacement is complete.
The light tubes are not covered by your guarantee.
Replacement tubes can be obtained from your service provider or from Marvel Industries.
What to do in
the Event of a Power Failure
Most power failures are corrected within two hours
and will not affect the unit’s temperature providing you
minimize the number of door openings while the
power is off. A gradual rise in temperature should not
have any adverse effect on your wine if power is out
for a longer period. If it is extremely hot, you may
want to move your wines to the coolest location you
can find until power is restored.
3
Page 5
4
Appliance Features
Adjustable Temperature Control: The temperature
control is fully adjustable from the low forties to the
mid sixties. The range allows flexibility of temperature
preferences and provides the ideal wine aging and
storing temperatures.
Interior Light and Switch:
The interior light makes it
easy to view your wine
labels and enhances the display of your collection. When
the switch is in the “OFF”
position, the light will come
on when the door is opened.
Roll-out Racks: The six-roll out wine racks may be
pulled out approximately 14 inches to facilitate adding or
removing bottles. Do not lean on or press down heavily
on the wine shelves. Doing so may damage the shelves
and the wine bottles stored on them. Pull the wine racks
out gently and carefully to minimize unsettling your wine
collection. Avoid pulling out more than one rack at any
time to maintain stability.
Single Bottle Racks: Because bottles are not stacked
on top of each other, you can easily view and access
your inventory without disturbing other bottles.
Under Counter Wine Chiller Specifications
Dimensions W x H x D (in.) 237/8 x 34 x 241/4
Weight 156 lbs.
Capacity 54 Wine Bottles
Temperature 41-63°F
Power Supply 115V
supplied with a 15 amp plug
Page 6
Before Calling for Service
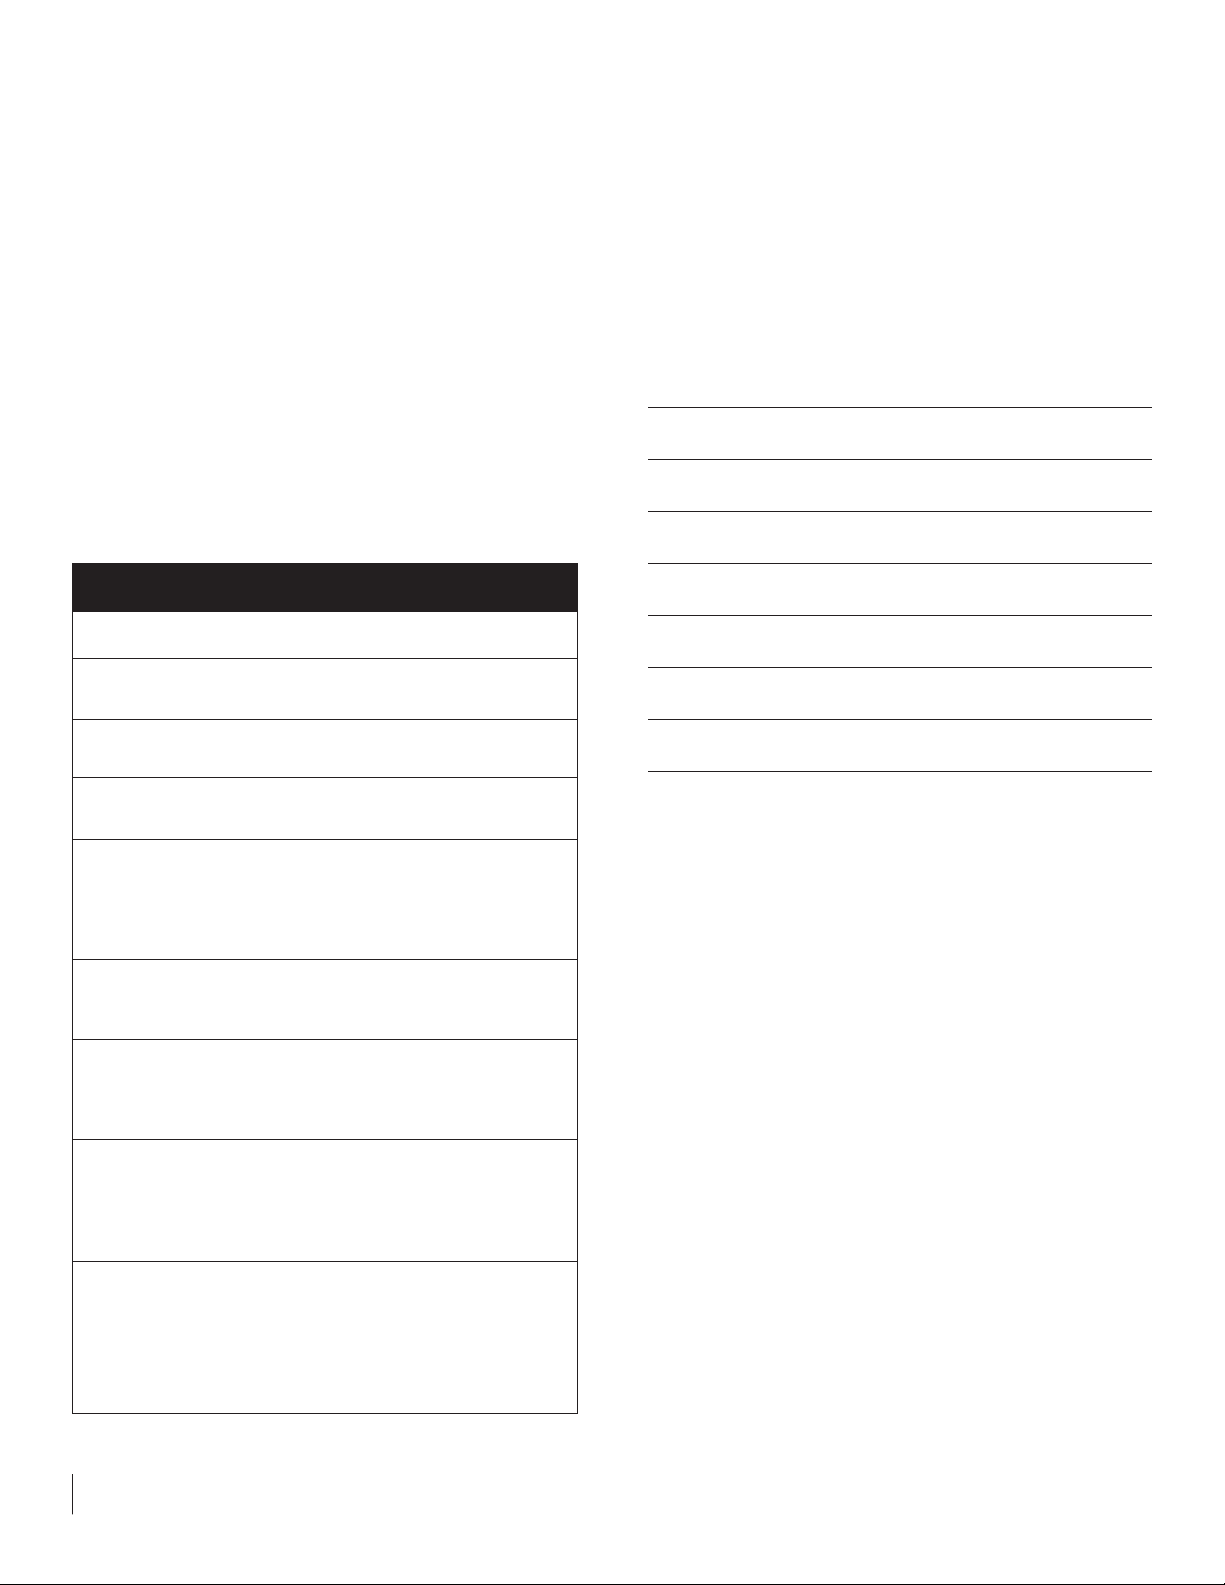
Before calling for service, check the trouble shooting
table on this page. This table lists possible problems
that you can remedy without difficulty to avoid an unnecessary service call.
If you do need service, contact your dealer or the manufacturer. In any correspondence, refer to the model
number and serial number of your unit which is located
on the lower front cabinet flange. Retain you proof of
purchase. You may want to record these numbers in the
space provided on this page. Follow the procedure outlined on page 6.
If You Do Need Service
In the event that you do need service, be sure to report the
model number, serial number and proof of purchase to your
service representative. Model number and serial number
are found on the serial plate which is located on the lower
front cabinet flange. For your convenience you may want to
record the following information for your records.
Date of purchase
Dealer’s Name
Dealer’s Address
Dealer’s City
Dealer’s State Zip
Appliance Serial Number
Model Number
Date Warranty Card Sent (Must be within 10 Days of Purchase)
How to Obtain Service
Your refrigerated wine chiller requires little service
because the best and most up to date materials, equipment and quality methods are employed throughout the
manufacturing process.
If trouble occurs during normal operation, first check the
troubleshooting chart on this page to see if any of these
simple steps may correct the problem. If service
becomes necessary:
Contact the dealer where your appliance was purchased
or the manufacturer for the name of your nearest
authorized service representative. The service representatives will have full authority tom make any repair
deemed necessary.
If you are in an area where there is no service representative, write or call the manufacturer directly. We
will make recommendations as to the proper procedure for correction. Service work and replacement parts, if required, will be provided as covered by your
limited warranty.
5
Problem
Odor in cabinet
Noisy operation
Cabinet vibrates
Cabinet light not working
Appliance will not run
Appliance runs too long
Moisture collects inside
Moisture collects on outside
surface
Interior too hot/too cold
Possible
Causes/Solutions
•Interior needs cleaning
•Cabinet not level
•Weak floor
•Cabinet not level
•Weak floor
•Tube burned out
•No power at outlet
•Temperature control turned
to “OFF”
•Line cord not plugged in
•No power at electrical outlet
•House fuse blown
•Prolonged door openings
•Control set too cold
•Condenser needs cleaning
•Too many door openings
•Prolonged door openings
•Hot, humid weather
increases condensation
•Hot, humid weather
increases condensation. As
humidity decreases,
moisture will disappear.
•Control improperly set.
•Control improperly set
•Faulty thermometer
•Relocate thermometer to
center of cabinet and
recheck
Page 7

IT IS IMPORTANT THAT YOU SEND IN YOUR
WARRANTY RECORD CARD IMMEDIATELY
AFTER TAKING DELIVERY OF YOUR REFRIGERATION APPLIANCE.
Every new refrigeration appliance that leaves the factory
contains this Owner's Guide in a safe place for convenient reference.
Five-Year Limited Warranty
This limited warranty is given by the manufacturer (herein after referred to as the Company) to the original purchaser of the equipment supplied by the Company as
long as the equipment remains the possession of the
original purchaser.
First Year of Limited Warranty
The mechanical system of you refrigerator is warranted against defects in workmanship or material for a
period of one year from date of purchase under the
following provisions:
Warranty card must be filled in and mailed back to the
Company within 10 days from the purchase date.
Defects must be proven to the satisfaction of the
Company to have been caused by defects in workmanship or material. It may be requested that defective parts
be returned to the Company for inspection at the purchaser's expense.
The owner is responsible for all items as detailed as the
normal responsibilities of the owner.
In-warranty repair should be performed by factory
authorized service centers. If there is no service center
in your area, contact your dealer of the manufacturer. Inwarranty repair charges not authorized by the Company
will be payable at the Company's discretion.
Additional 2nd Through 5th
Year Limited Warranty
During the four years following the First Year Limited
Warranty, the company will supply replacement parts for
the sealed refrigeration system that are proven to the
Company's satisfaction to be defective due workmanship or material. Other parts, labor costs, and freight
charges will be the responsibility of the owner.
Normal Responsibilities
of the Owner Include
All freight charges.
Damage sustained in transit (see page 1)
Mileage charge(s) for service calls.
Proper installation.
Alterations to original equipment.
Removal or installation of additional equipment.
IN NO EVENT SHALL THE COMPANY BE LIABLE FOR
INCIDENTAL OR CONSEQUENTIAL DAMAGES
INCLUDING, BUT NOT LIMITED TO, CONTENT LOSS.
Some states do not allow limitations on length of time
implied warranty may last, so the above limitations may
not apply to you.
This warranty gives you specific legal rights. You may
also have other rights which very from state to state.
Help prevent tragedies
Each year children die because they climb inside a
discarded refrigeration product, get trapped inside
and suffocate. Take precautions to prevent such
tragedies by removing the door, taping or chaining it
shut before discarding.
6
Page 8

41008880 Rev A
WWW.MARVELINDUSTRIES.COM
Phone: (765) 962-2521 Fax: (765) 962-2493
Marvel Industries
Part of AGA Foodservice Group
233 Industrial Parkway
P.O. Box 997
Richmond, IN 47375-0997
 Loading...