

Page 1
MAC Quantum Wash™
USER GUIDE
Page 2

© 2013-2015 Martin Professional ApS. Information subject to change without notice. Martin Professional and all affiliated companies
disclaim liability for any injury, damage, direct or indirect loss, consequential or economic loss or any other loss occasioned by the
use of, inability to use or reliance on the information contained in this document. The Martin logo, the Martin name, the Harman name
and all other trademarks in this document pertaining to services or products by Martin Professional or its affiliates and subsidiaries
are trademarks owned or licensed by Martin Professional or its affiliates or subsidiaries.
P/N 35000277, Rev. C
User Documentation update information
Any important changes in the MAC Quantum Wash User Guide are listed below.
Revision C
Corrects mistake in text before Table 5, top of page 28, listing DMX channels used to control FX.
Revision B
RGB control in Basic mode now 16-bit. New FX added to Extended mode. Covers MAC Quantum Wash firmware
version 2.0.0 (including possible need for pan/tilt adjustment after update from firmware v.1.x.x).
Revision A
First version released. Covers MAC Quantum Wash firmware version 1.1.0
Page 3

Contents
Introduction . . . . . . . . . . . . . . . . . . . . . . . . . . . . . . . . . . . . . . . . . . . . . . . . . . . . . . . . . . . . . . . . . . . . . . . . 4
Effects. . . . . . . . . . . . . . . . . . . . . . . . . . . . . . . . . . . . . . . . . . . . . . . . . . . . . . . . . . . . . . . . . . . . . . . . . . . . . 5
Beam zones. . . . . . . . . . . . . . . . . . . . . . . . . . . . . . . . . . . . . . . . . . . . . . . . . . . . . . . . . . . . . . . . . . . . . . . 5
Color control . . . . . . . . . . . . . . . . . . . . . . . . . . . . . . . . . . . . . . . . . . . . . . . . . . . . . . . . . . . . . . . . . . . . . . 5
Beam Twister. . . . . . . . . . . . . . . . . . . . . . . . . . . . . . . . . . . . . . . . . . . . . . . . . . . . . . . . . . . . . . . . . . . . . . 5
Color temperature control . . . . . . . . . . . . . . . . . . . . . . . . . . . . . . . . . . . . . . . . . . . . . . . . . . . . . . . . . . . . 5
Electronic shutter and strobe effects . . . . . . . . . . . . . . . . . . . . . . . . . . . . . . . . . . . . . . . . . . . . . . . . . . . . 5
Dimming. . . . . . . . . . . . . . . . . . . . . . . . . . . . . . . . . . . . . . . . . . . . . . . . . . . . . . . . . . . . . . . . . . . . . . . . . . 6
Zoom . . . . . . . . . . . . . . . . . . . . . . . . . . . . . . . . . . . . . . . . . . . . . . . . . . . . . . . . . . . . . . . . . . . . . . . . . . . . 6
Pan and tilt. . . . . . . . . . . . . . . . . . . . . . . . . . . . . . . . . . . . . . . . . . . . . . . . . . . . . . . . . . . . . . . . . . . . . . . . 6
FX: pre-programmed effects . . . . . . . . . . . . . . . . . . . . . . . . . . . . . . . . . . . . . . . . . . . . . . . . . . . . . . . . . . 6
Control panel operations. . . . . . . . . . . . . . . . . . . . . . . . . . . . . . . . . . . . . . . . . . . . . . . . . . . . . . . . . . . . 7
DMX address . . . . . . . . . . . . . . . . . . . . . . . . . . . . . . . . . . . . . . . . . . . . . . . . . . . . . . . . . . . . . . . . . . . . . . 8
DMX modes . . . . . . . . . . . . . . . . . . . . . . . . . . . . . . . . . . . . . . . . . . . . . . . . . . . . . . . . . . . . . . . . . . . . . . . 9
Fixture ID . . . . . . . . . . . . . . . . . . . . . . . . . . . . . . . . . . . . . . . . . . . . . . . . . . . . . . . . . . . . . . . . . . . . . . . . . 9
Personality. . . . . . . . . . . . . . . . . . . . . . . . . . . . . . . . . . . . . . . . . . . . . . . . . . . . . . . . . . . . . . . . . . . . . . . . 9
Factory defaults . . . . . . . . . . . . . . . . . . . . . . . . . . . . . . . . . . . . . . . . . . . . . . . . . . . . . . . . . . . . . . . . . . . 10
Custom settings . . . . . . . . . . . . . . . . . . . . . . . . . . . . . . . . . . . . . . . . . . . . . . . . . . . . . . . . . . . . . . . . . . . 10
Fixture information readouts . . . . . . . . . . . . . . . . . . . . . . . . . . . . . . . . . . . . . . . . . . . . . . . . . . . . . . . . . 11
DMX signal monitoring. . . . . . . . . . . . . . . . . . . . . . . . . . . . . . . . . . . . . . . . . . . . . . . . . . . . . . . . . . . . . . 11
Test sequences . . . . . . . . . . . . . . . . . . . . . . . . . . . . . . . . . . . . . . . . . . . . . . . . . . . . . . . . . . . . . . . . . . . 11
Manual control . . . . . . . . . . . . . . . . . . . . . . . . . . . . . . . . . . . . . . . . . . . . . . . . . . . . . . . . . . . . . . . . . . . . 11
Adjusting settings via DMX . . . . . . . . . . . . . . . . . . . . . . . . . . . . . . . . . . . . . . . . . . . . . . . . . . . . . . . . 12
Resetting . . . . . . . . . . . . . . . . . . . . . . . . . . . . . . . . . . . . . . . . . . . . . . . . . . . . . . . . . . . . . . . . . . . . . . . . 12
Illuminating the display . . . . . . . . . . . . . . . . . . . . . . . . . . . . . . . . . . . . . . . . . . . . . . . . . . . . . . . . . . . . . 12
Control menu setting overrides . . . . . . . . . . . . . . . . . . . . . . . . . . . . . . . . . . . . . . . . . . . . . . . . . . . . . . . 12
Changing calibration offsets using DMX . . . . . . . . . . . . . . . . . . . . . . . . . . . . . . . . . . . . . . . . . . . . . . . . 12
RDM . . . . . . . . . . . . . . . . . . . . . . . . . . . . . . . . . . . . . . . . . . . . . . . . . . . . . . . . . . . . . . . . . . . . . . . . . . . . . 14
RDM ID . . . . . . . . . . . . . . . . . . . . . . . . . . . . . . . . . . . . . . . . . . . . . . . . . . . . . . . . . . . . . . . . . . . . . . . . . 14
RDM communication . . . . . . . . . . . . . . . . . . . . . . . . . . . . . . . . . . . . . . . . . . . . . . . . . . . . . . . . . . . . . . . 14
Software service functions . . . . . . . . . . . . . . . . . . . . . . . . . . . . . . . . . . . . . . . . . . . . . . . . . . . . . . . . . 15
Service utilities. . . . . . . . . . . . . . . . . . . . . . . . . . . . . . . . . . . . . . . . . . . . . . . . . . . . . . . . . . . . . . . . . . . . 15
Calibration . . . . . . . . . . . . . . . . . . . . . . . . . . . . . . . . . . . . . . . . . . . . . . . . . . . . . . . . . . . . . . . . . . . . . . . 15
Firmware installation . . . . . . . . . . . . . . . . . . . . . . . . . . . . . . . . . . . . . . . . . . . . . . . . . . . . . . . . . . . . . . . 16
Updating from firmware version 1.x.x to 2.0.0 . . . . . . . . . . . . . . . . . . . . . . . . . . . . . . . . . . . . . . . . . . . . 17
DMX protocol . . . . . . . . . . . . . . . . . . . . . . . . . . . . . . . . . . . . . . . . . . . . . . . . . . . . . . . . . . . . . . . . . . . . . 18
Basic mode . . . . . . . . . . . . . . . . . . . . . . . . . . . . . . . . . . . . . . . . . . . . . . . . . . . . . . . . . . . . . . . . . . . . . . 18
Extended mode . . . . . . . . . . . . . . . . . . . . . . . . . . . . . . . . . . . . . . . . . . . . . . . . . . . . . . . . . . . . . . . . . . . 22
FX: pre-programmed effects . . . . . . . . . . . . . . . . . . . . . . . . . . . . . . . . . . . . . . . . . . . . . . . . . . . . . . . . . 28
Color temperature control data . . . . . . . . . . . . . . . . . . . . . . . . . . . . . . . . . . . . . . . . . . . . . . . . . . . . . . . 29
Control panel menus . . . . . . . . . . . . . . . . . . . . . . . . . . . . . . . . . . . . . . . . . . . . . . . . . . . . . . . . . . . . . . 30
Service and display messages. . . . . . . . . . . . . . . . . . . . . . . . . . . . . . . . . . . . . . . . . . . . . . . . . . . . . 33
Warning messages . . . . . . . . . . . . . . . . . . . . . . . . . . . . . . . . . . . . . . . . . . . . . . . . . . . . . . . . . . . . . . . . 33
Error messages . . . . . . . . . . . . . . . . . . . . . . . . . . . . . . . . . . . . . . . . . . . . . . . . . . . . . . . . . . . . . . . . . . . 34
Page 4

Introduction
Warning! Before using the MAC Quantum Wash™, read the latest version of the product’s Safety
and Installation Manual, paying particular attention to the Safety Precautions section.
This User Guide is a supplement to the Installation and Safety Manual that is supplied with the MAC
Quantum Wash. Both these documents are available for download from the Martin™ website at
www.martin.com. This User Guide contains information that is mainly of interest for lighting designers and
operators, whereas the Safety and Installation Manual contains important information for all users,
especially installers and technicians.
We recommend that you check the Martin™ website regularly for updated documentation, because we
publish revised versions each time we can improve the quality of the information we provide and each time
we release new firmware with changes or new features. Each time we revise this guide, we list any
important changes on page 2 so that you can keep track of updates.
4 MAC Quantum Wash User Guide
Page 5

Effects
This section gives details of the effects that can be controlled via DMX. See the DMX protocol tables
starting on page 18 for details of the channels used to control them.
Where fine control is available, the main control channel sets the first 8 bits (the most significant byte or
MSB), and the fine channel sets the second 8 bits (the least significant byte or LSB) of the 16-bit control
byte. In other words, the fine channel works within the position set by the coarse channel.
Beam zones
The LED array in the MAC Quantum Wash can be controlled in three beam zones plus the Aura:
•Center spot
• Middle ring
• Outer ring
• Aura (backlight effect)
Zones can be controlled together in various combinations or independently.
Color control
The ‘color wheel effect’ channel offers a range of single-color presets which control the fixture’s beam zones
together, plus a range of split-color presets in which center, middle and outer rings display different colors to
give multicolored beam and projection effects.
In Extended DMX control mode the ‘color wheel effect’ can be applied to all the beam zones as one unit.
8-bit RGB color mixing is available for each of the beam zones independently. The ‘color wheel’ can also be
applied to the Aura (backlight).
In Basic DMX control mode from software version 2.0.0, the ‘color wheel effect’ can be applied to all the
beam zones together. 16-bit RGB color control for all the beam zones together is also available.
White LEDs are not controlled separately but are deployed automatically as required during color mixing.
Beam Twister
The MAC Quantum Wash uses a rotating lens array over the outer ring of LEDs to provide ‘Beam Twister’
effects. Combining use of the rotating lens array, the zoom system and the fixture’s different beam zones
gives complex and dynamic multicolored mid-air beam, projection and front glass effects.
In Extended mode, you can set the Beam Twister effect to an indexed angle or rotate it with variable speed
in either direction You can also select from a range of pre-programmed Beam Twister effects that combine
lens rotation, zoom and multicolored beam zones.
Color temperature control
The MAC Quantum Wash provides white output with CTC (color temperature control) that is controllable
from 2000 K to 10 000 K in precise 50 K increments.
Electronic shutter and strobe effects
Electronic shutter/strobe effects include instant blackout and snap open as well as a regular or random
strobe with variable speed from 1 Hz to 20 Hz.
Effects 5
Page 6

Dimming
16-bit resolution overall dimming is available in both Basic and Extended modes.
Zoom
The zoom system lets you vary the beam angle to allow wide or tight washlight and mid-air beam effects.
The zoom adds visual impact to beam effects when combined with the Beam Twister.
Pan and tilt
8-bit and 16-bit pan and tilt control are available in both Basic and Extended modes.
FX: pre-programmed effects
From software version 2.0.0, a library of pre-programmed effects is available via DMX in Extended mode.
These effects are called FX in this manual and in the fixture menus. The library is available twice in the DMX
channel layout with identical functions and effects, and two different FX can be combined and run
simultaneously with one ‘superimposed’ over the other.
See “FX: pre-programmed effects” on page 28 for an overview of the FX available.
Some FX make one function depend on another (AURA COLOR OFFSET makes the Aura color follow
changes in the color of the other beam zones but with an offset on the color circle, for example). Other FX
consist of repeating cycles of effects.
You select an FX on DMX channel 14 or 16. If you want to run two FX in combination, make a selection on
both channel 14 and 16.
Where modification is possible, the selected FX can be modified using its FX adjust channel. Modifications
can include speed, amount, offset, smoothness, etc. depending on the FX selected.
FX Sync
If two or more fixtures are set to display the same FX (and if the FX consists of a repeating cycle), its start
point and duration can be synchronized in multiple fixtures by sending commands on the FX
Synchronization channel. For synchronization to work, you must send the commands to all the fixtures at
the same time.
Synchronized and sync shift FX display
You can set fixtures so that they all start the FX cycle at the same time or you can shift a fixture’s FX start
time so that it displays its FX in sync with other fixtures but with a time offset (delayed start). If you send a
180° offset command, for example, the fixture will start its FX cycle halfway through the cycle of a fixture
that has no offset.
Random operation
The random start option randomizes the starting points of FX cycles in multiple fixtures. The overall speed
of the FX is controlled on its adjust channel.
The random duration option randomizes the duration of FX. If you set multiple fixtures to random duration,
the duration of an FX cycle will be different in the different fixtures. You can use each fixture’s FX adjust
channel to set an upper limit for the speed of the FX cycle in that fixture.
FX priority and overriding
If an FX is activated, it overrides any other settings for the parameters that the FX modifies. For example, an
FX that modifies the zoom will override any zoom angle set on the zoom channel.
If the same FX is selected on both the FX1 select and FX2 select channels, only the FX1 adjust channel is
active. The FX2 adjust channel is ignored.
If different FX are selected on the FX1 select and FX2 select channels, FX2 is superimposed onto FX1 and
FX2 overrides FX1 whenever both FX modify the same parameter.
6 MAC Quantum Wash User Guide
Page 7
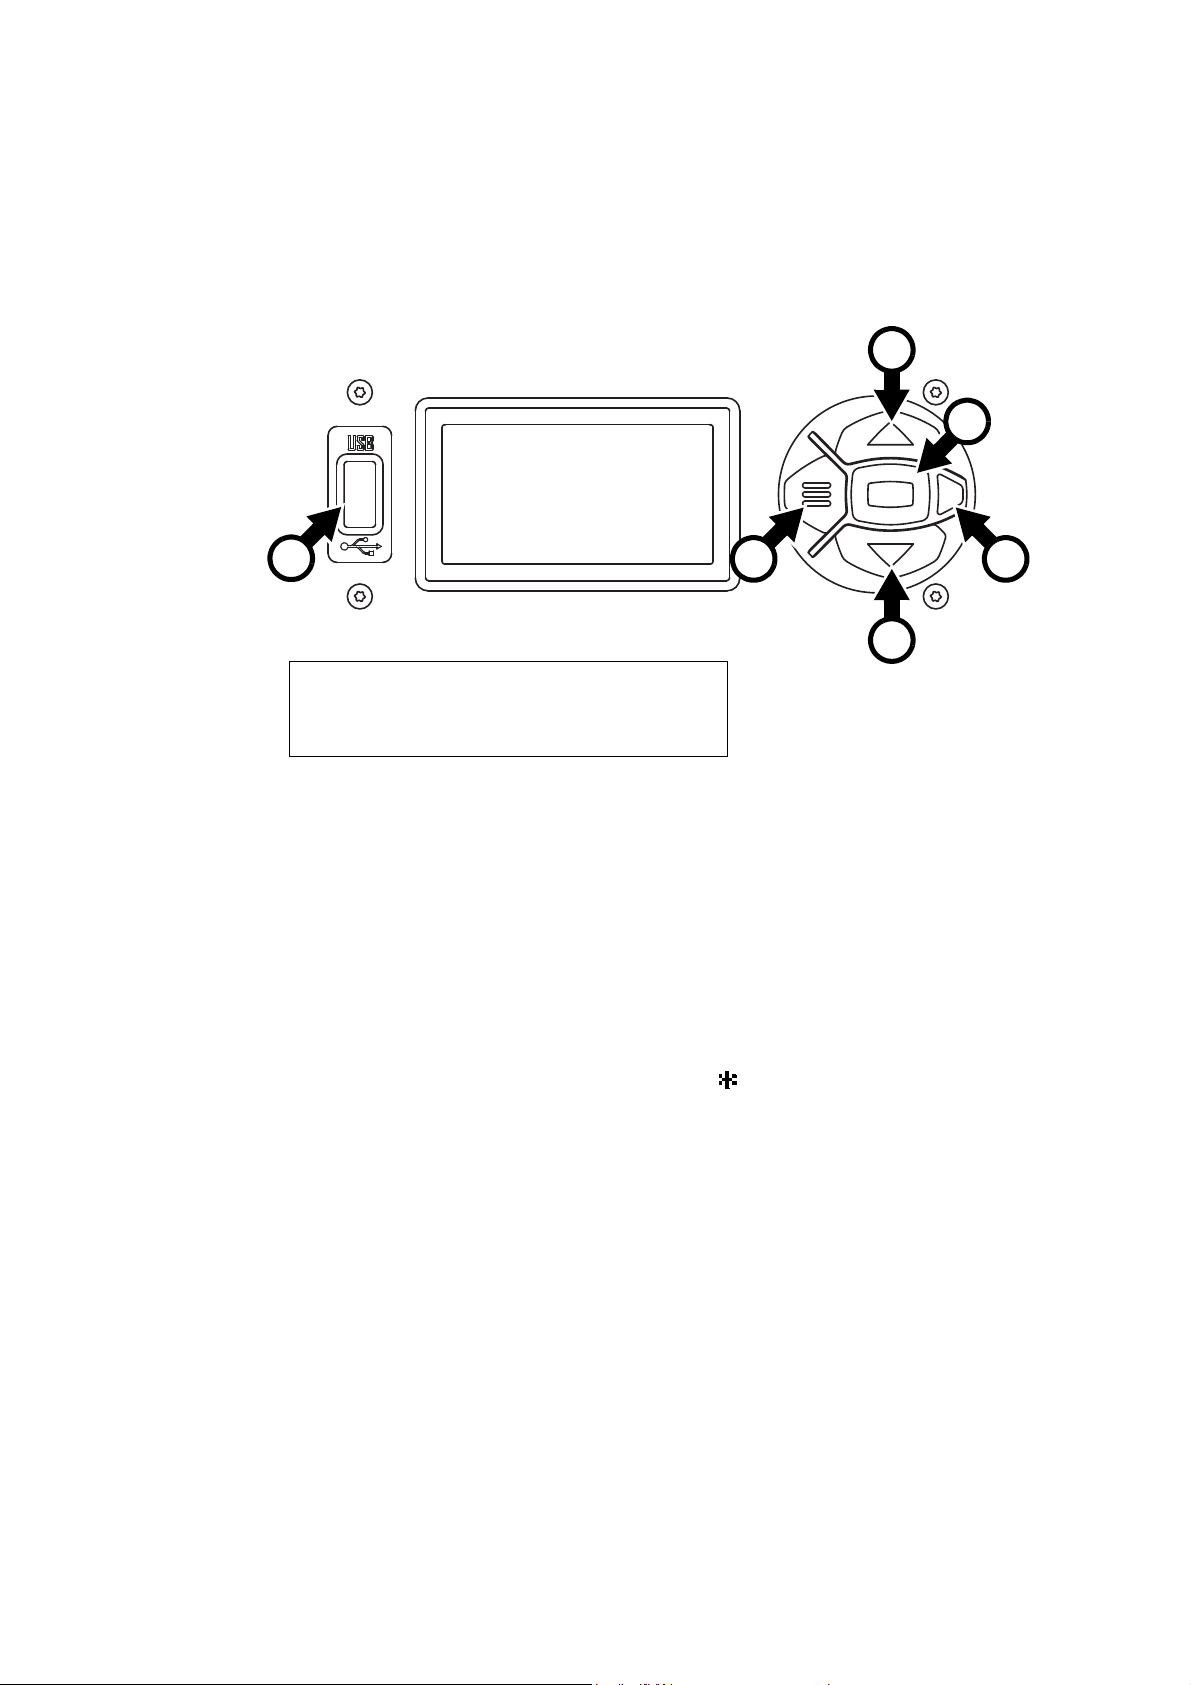
Control panel operations
C
Figure 1: Display and control panel
1
DMX ADDRESS
DMX RANGE 1–33
E
D
A
B
B
A - Menu
B - Up/Down
C - Enter
D - Status LED
E - USB port
You can configure individual fixture settings (such as the MAC Quantum Wash’s DMX address), read out
data, execute service operations and view error messages using the fixture’s backlit graphic display and
control panel.
When the MAC Quantum Wash is powered on, it first boots and resets, then it displays its DMX address (or
its fixture ID number, if one has been set) and any status messages (see page 33) in the display A.
The display can be set to automatically rotate to match standing or hanging fixture orientation in the
PERSONALITY → DISPLAY menu or the Shortcuts menu (see “Shortcuts” on page 8).
Using the control panel
• Press the Menu button A or Enter button C to access the menus.
• Use the Up and Down buttons B to scroll up and down menus.
• Press the Enter button C to enter a menu or make a selection.
• The currently selected item in a menu is indicated by a star .
• Press the Menu button A to step backwards through the menus.
Status LED
The LED D next to the control buttons indicates fixture status depending on the color displayed and DMX
status depending on whether the LED flashes or lights constantly:
• GREEN: All parameters normal.
• AMBER: Warning (service interval exceeded, for example).
If ERROR MODE is set to Normal, the warning message will be shown in the display. If ERROR MODE is
set to Silent, the display must be activated by pressing the Enter button C to display the warning
message.
• RED: Error detected.
If ERROR MODE is set to Normal, the error message will be shown in the display. If ERROR MODE is set
to Silent, display the error message BY GOING TO NORMAL OR SERVICE - ERROR LIST.
• FLASHING: No DMX signal detected.
• CONSTANT: Valid DMX signal detected.
Control panel operations 7
Page 8

Battery power
The MAC Quantum Wash’s onboard battery gives access to the most important functions in the control
panel when the fixture is not connected to AC power. The following functions are available on battery power:
• DMX address
• DMX control mode (Basic/Extended)
• Fixture ID
• All personality settings (pan/tilt, cooling, fan clean mode, dimming curve, DMX reset, parameter shortcuts,
all display settings, error mode)
• Default settings
• Information (Power On Hours and Power Cycles counters, Software version)
• Error list
To activate the display when the fixture is not connected to power, press the Menu button A. Press again to
enter the menus. The display extinguishes after 10 seconds with no user input and the control panel is
de-activated after 1 minute with no user input. Press the Menu button A again to re-activate.
Shortcuts
If you hold the Menu button A pressed in for 2 - 3 seconds, a shortcut menu with the most important
commands appears. Select a command with the Up and Down buttons B and press the Enter button C to
activate, or press the Menu button again to cancel.
• RESET ALL resets the whole fixture
• ROTATE DISPLAY rotates the MAC Quantum Wash display 180°.
Settings stored permanently
The following settings are stored permanently in the fixture memory and are not affected by powering the
MAC Quantum Wash off and on or by updating the fixture software:
• DMX address
• DMX control mode (Basic/Extended)
• Fixture ID
• All personality settings (pan/tilt, cooling, fan clean mode, dimming curve, DMX reset, parameter shortcuts,
all display settings, error mode)
• Resettable counters
• Service settings (calibration, firmware)
These settings can be returned to factory defaults using the control menus or via DMX.
Service mode
Holding the Menu and Enter buttons A and C both pressed in while powering the fixture on puts the fixture
into service mode, in which pan and tilt are disabled and a SERV warning appears in the display. Service
mode removes the risk of unexpected head movement during lamp adjustment. Cycling power and allowing
the fixture to start normally takes it out of service mode.
DMX address
The DMX address, also known as the start channel, is the first channel used to receive instructions from the
controller. For independent control, each fixture must be assigned its own control channels. If you give two
MAC Quantum Wash fixtures the same address, they will behave identically. Address sharing can be useful
for diagnostic purposes and symmetrical control, particularly when combined with the inverse pan and tilt
options.
DMX addressing is limited to make it impossible to set the DMX address so high that you are left without
enough control channels for the fixture.
To set the fixture’s DMX address:
1. Press Enter to open the main menu.
2. Press Enter to enter the DMX ADDRESS menu, then scroll to the desired address and press Enter to
save.
3. Press Menu to exit.
8 MAC Quantum Wash User Guide
Page 9
DMX modes
Output
DMX % DMX % DMX % DMX %
Output
Output
Output
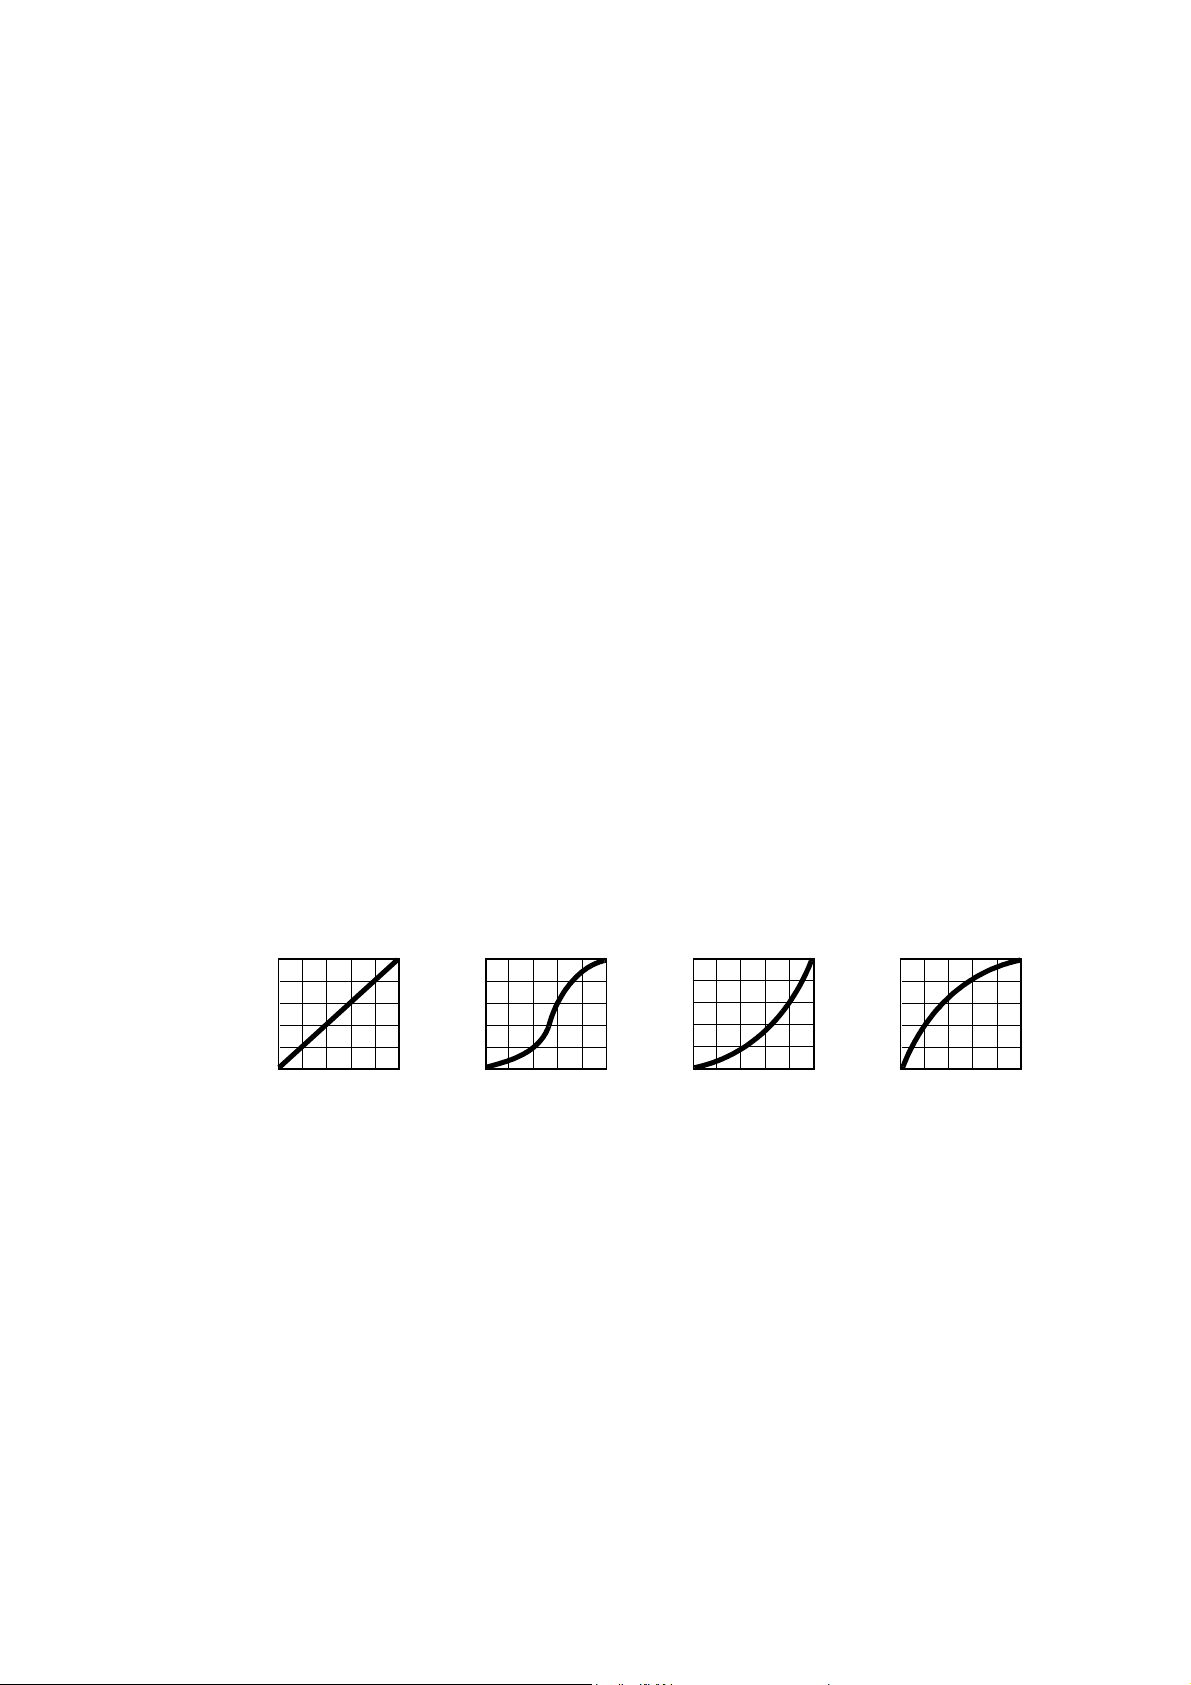
Linear S-curve Square law Inverse square law
Figure 2: Dimming curve options
The CONTROL MODE menu lets you set the MAC Quantum Wash to one of the two DMX operating modes,
basic 16-bit and extended 16-bit:
• Basic 16-bit mode offers coarse control of all effects plus fine control of RGB, dimmer, pan and tilt.
• Extended 16-bit mode provides coarse control only of RGB plus all the features of basic 16-bit mode plus
control of the Beam Twister effect and independent control of the different beam zones Outer, Middle,
Center and Aura. It also gives access to the range of pre-programmed FX.
To set the fixture’s DMX mode:
1. Press Enter to enter the main menu.
2. Scroll to CONTROL MODE, then press Enter. Scroll to select either BASIC or EXTENDED, then press
Enter to save.
3. Press Menu to exit.
Fixture ID
The MAC Quantum Wash lets you set a four-digit ID number to ease identification of the fixtures in an
installation. When a fixture is powered on for the first time, it displays its DMX address by default. As soon
as you set an ID number other than 0 in FIXTURE ID, the MAC Quantum Wash will display this ID number
by default, and indicate FIXTURE ID in the display.
Personality
The MAC Quantum Wash provides several options that let you optimize the fixture for different applications
in the PERSONALITY menu:
• The PAN/TILT menu lets you swap and/or invert pan and tilt.
• The SPEED menu lets you set PAN/TILT to NORMAL, FAST (optimized for speed) or SLOW (optimized
for smooth movement – useful for slow movements in long-throw applications). Likewise, you can select
an overall speed for all the effects by setting EFFECT speed to NORMAL, FAST or SLOW. You can also
set effect speed to FOLLOW P/T, in which effects will always use whatever speed is set for pan and tilt.
• DIMMER CURVE provides four dimming options (see Figure 2):
- LINEAR – (optically linear) the increase in light intensity appears to be linear as DMX value is
increased.
- S-CURVE – light intensity control is finer at low levels and high levels and coarser at medium levels.
This curve emulates the RMS voltage dimming characteristics of an incandescent lamp such as the
tungsten halogen lamp of the Martin™ MAC TW1™.
- SQUARE LAW – light intensity control is finer at low levels and coarser at high levels.
- INV SQUARE LAW – light intensity control is coarser at low levels and finer at high levels.
• COLOR MODE offers two options that affect color saturation and evenness between fixtures:
- Extended Color mode optimizes LED deployment for color saturation and gets the deepest color
saturation possible from the LEDs. The white color point is calibrated and even across different fixtures,
but as the fixture approaches full color saturation there can be very small differences in color rendition
between different fixtures.
Control panel operations 9
Page 10

- Calibrated Color mode (called Common Color mode in fixture software v.1.1.0) optimizes LED
deployment for even color rendition between fixtures. All fixtures display identical color from white point
to full color saturation, and maximum color saturation levels are limited slightly to ensure this.
• VIDEO TRACKING optimizes performance if the MAC Quantum Wash is used with a video source.
In normal use, the fixture processes the DMX signal it receives, tracking (or smoothing out) changes in
values in order to ensure smooth fading between colors and/or intensities. This signal processing takes
fractions of a second and is normally invisible, but if the fixture is used to display video (using Martin P3™
video system components to convert video to DMX, for example) the processing can interfere with video
response times. If you enable video tracking, the fixture does not ‘smooth out’ DMX input but instead
snaps instantly when a DMX value changes.
For best results, we recommend that you enable video tracking during video display and disable it (the
default setting) during normal DMX control.
• DMX RESET defines whether the fixture or individual effects can be reset by sending a DMX command
on the fixture settings channel. Setting it to OFF can help you avoid accidentally sending a Reset
command during a show, for example.
• EFFECT SHORTCUT determines whether the effects take the shortest path between two positions
(shortcuts enabled) or not (shortcuts disabled). If shortcuts are enabled, the virtual color wheel effect can
go through a virtual open position during changes from one color to another just as a mechanical color
wheel would.
• COOLING MODE lets you select between two cooling fan options depending on whether your priority is
highest light output or quietest cooling fan operation:
- REGULATE FANS optimizes cooling fan operation for light output. It controls fixture temperature by
varying cooling fan speed up to the maximum speed available and does not limit light intensity.
- REGULATE INTENSITY optimizes cooling fan operation for quietness. It limits cooling fan speed to a
level that causes minimal noise and controls fixture temperature by limiting light intensity when
necessary.
• DISPLAY offers the following options for the LCD display:
- DISPLAY SLEEP determines whether the display remains on permanently, or goes into sleep mode 2,
5 or 10 minutes after the last time a control panel button is pressed.
- DISPLAY INTENSITY lets you define the brightness of the display backlighting. Select Auto for
automatic adjustment to match the ambient light level, or manually set the intensity to a level from 0% to
100%.
- DISPLAY ROTATION lets you rotate the display manually through 180° so that it can be read easily no
matter how the fixture is oriented. If set to Auto, the MAC Quantum Wash senses its orientation and
rotates the display automatically.
- DISPLAY CONTRAST lets you define the contrast of the backlit graphic display. Select Auto for
automatic adjustment to match display intensity, or manually set the contrast to a level from 0% to
100%.
• ERROR MODE enables or disables error warnings. If set to NORMAL, the display is activated and lights
up if the fixture needs to report an error. If set to SILENT, the fixture does not light the display with error
warnings but error messages can still be read when the display is activated manually. In both NORMAL
and SILENT modes, the status LED lights amber to indicate a warning and red to indicate an error.
Factory defaults
FACTORY DEFAULT lets you reload the fixture’s factory default settings. Effect calibration settings are not
affected, so any changes you have made to zoom, pan and tilt offsets will be kept.
Custom settings
The custom configuration function CUSTOM 1 - CUSTOM 3 allows you to save and recall up to three sets of
fixture settings. The savable settings comprise:
• all the settings in the PERSONALITY menu,
• the fixture’s DMX address, and
• the fixture’s DMX control mode: Extended 16-bit or Basic 16-bit mode.
10 MAC Quantum Wash User Guide
Page 11

Fixture information readouts
The following fixture information can be called up in the display:
• POWER ON TIME provides two counters:
- The TOTAL counter is not user-resettable and displays total hours powered on since manufacture.
- The RESETTABLE counter is user-resettable and displays the number of hours the fixture has been
powered on since the counter was last reset.
• POWER ON CYCLES also provides two counters:
- The TOTAL counter is not user-resettable and displays the total number of power on/off cycles since
manufacture.
- The RESETTABLE counter is user-resettable and displays the number of power on/off cycles since the
counter was last reset.
• SW VERSION displays the currently installed firmware (fixture software) version.
• RDM UID displays the fixture’s factory-set unique ID for identification in RDM systems.
• FAN SPEEDS provides separate status readouts from the fixture’s cooling fans.
• TEMPERATURES provides separate PCB temperature readouts.
DMX signal monitoring
The MAC Quantum Wash provides data on the DMX signal it is receiving in the DMX LIVE menu. This
information can be useful for troubleshooting control problems.
RATE displays the DMX refresh rate in packets per second. Values lower than 10 or higher than 44 may
result in erratic performance, especially when using tracking control.
QUALITY displays the quality of the received DMX data as a percentage of packets received. Values much
below 100 indicate interference, poor connections, or other problems with the serial data link that are the
most common cause of control problems.
START CODE displays the DMX start code. Packets with a start code other than 0 may cause irregular
performance.
The remaining options under DMX LIVE display the DMX values in a range from 0 - 255 that are being
received on each channel. The DMX channels displayed depend on whether the fixture is in Basic or
Extended mode.
Test sequences
TEST activates effects in sequence, allowing you to test all effects, pan and tilt movement only, or effects
only (i.e. without pan and tilt movement) without a DMX controller:
• Select a test type and press Enter to start the test.
• Press Menu to stop the test.
Manual control
The MANUAL CONTROL menu lets you reset the MAC Quantum Wash and operate the fixture without a
DMX controller. To execute commands in the MANUAL CONTROL menu, select a menu item for the effect
that you want to control, then enter a value from 0 to 255 to apply a command. The menu items and values
correspond to the commands listed in the DMX protocol on page 18.
Control panel operations 11
Page 12

Adjusting settings via DMX
Certain fixture settings and parameters can be adjusted from the DMX controller on the Fixture
control/settings channel.
Commands sent on the fixture control channel override any settings entered in the fixture’s onboard control
menus.
To help you avoid accidentally applying a setting that may disrupt a light show, for example, most of the
commands must be held for a certain time before they are applied. For example, the command that turns off
the display illumination must be held for one second to activate it. The command that resets the fixture must
be held for five seconds to activate it. The times required to apply DMX commands on the Fixture
control/settings channel are listed for each command on page 21 in the DMX protocol.
Resetting
Either the entire fixture or individual effects can be reset to their initial positions. Resetting individual effects
can allow on-the-fly recovery if an effect loses its correct position, for example, without having to reset the
entire fixture.
Illuminating the display
The fixture’s display panel can be brought out of sleep mode with a DMX command. This makes it possible
to read the fixture’s DMX address while the fixture is installed in the rig.
After being illuminated in this way, the display will return to sleep mode according to the setting entered in
the onboard control menus.
Control menu setting overrides
The following fixture settings can be adjusted via DMX, overriding the settings entered in the onboard
control menus. See under “Control panel menus” on page 30 for details of these settings.
• Dimming curve
• Pan and tilt speed
• Parameter shortcuts (beam twister shortcuts)
• Video tracking
• Color mode
• Fan speed
• Pan/tilt and zoom calibration offsets
Changing calibration offsets using DMX
The Fixture control/settings DMX channel allows pan, tilt and zoom to be calibrated by changing their
factory default offsets IN PERCENT from the DMX controller.
To set an effect offset:
1. Set the effect you want to calibrate to a specific value via DMX (for example, set all the fixtures in a
group to DMX value 200 on the zoom channel).
2. Select ‘Enable calibration’ on the Fixture control/settings channel and hold for 5 seconds to activate.
3. The DMX control channels for pan, tilt and zoom now adjust the calibration offsets for those effects.
Adjust each offset until the effect is in the required position (for example, adjust the zoom offset on each
fixture in the group until the beam angle on all fixtures is identical – this is the position you will obtain
when you send DMX value 200).
4. Send a ‘Store ...’ command for the effect on the Fixture control/settings channel and hold for 5 seconds
to activate. Calibration offsets are now stored in memory and normal DMX control is restored.
12 MAC Quantum Wash User Guide
Page 13

Calibration offsets that are stored in memory are not affected by powering the fixture off and on or by
updating the fixture software.
You can reset all calibration offsets to their default values by sending a DMX value on the Fixture
control/settings channel. You must hold the value for 5 seconds. The fixture will return to factory default
calibration values. If you have overwritten the factory default values by applying a CALIBRATION → SAVE
DEFAULTS command in the SERVICE menu, the fixture will return to the last default calibration values that
were saved).
Adjusting settings via DMX 13
Page 14

RDM
The MAC Quantum Wash can communicate using RDM (Remote Device Management) in accordance with
ESTA’s American National Standard E1.20-2006: Entertainment Technology RDM Remote Device
Management Over DMX512 Networks.
RDM is a bi-directional communications protocol for use in DMX512 control systems, it is the open standard
for DMX512 device configuration and status monitoring.
The RDM protocol allows data packets to be inserted into a DMX512 data stream without affecting existing
non-RDM equipment. It allows a console or dedicated RDM controller to send commands to and receive
messages from specific fixtures.
RDM ID
Each MAC Quantum Wash has a factory-set RDM UID (unique identification number) that makes it
addressable and identifiable in RDM systems. The number can be found in the control panel
INFORMATION menu under RDM UID.
RDM communication
The MAC Quantum Wash supports the standard RDM PIDs (Parameter IDs) required by ESTA plus a range
of manufacturer-specific PIDs. Sending SUPPORTED_PARAMETERS and PARAMETER_DESCRIPTION
commands from an RDM controller will call up a list of the PIDs supported in the firmware version installed
in the fixture.
14 MAC Quantum Wash User Guide
Page 15

Software service functions
Service utilities
The control panel SERVICE menu provides utilities for technicians rigging or servicing the fixture:
• ERROR LIST displays any error messages that are stored in internal memory.
• FAN CLEAN lets you set all cooling fans to run at maximum speed for short periods for cleaning
purposes.
• PT FEEDBACK lets you disable feedback to the fixture software from the pan, tilt and effects positioning
systems. If feedback is set to ON and a pan, tilt or effect position error is detected, the shutter closes and
the effect resets. This feature can be disabled by setting feedback to OFF.
The OFF setting is not saved when the fixture is powered off, and the system will be re-enabled the next
time the fixture starts. If a pan/tilt position error occurs and the system cannot correct pan/tilt position
within 10 seconds, feedback is automatically disabled.
• ADJUST contains only one menu item that the user may need: it lets you adjust pan and tilt if you
upgrade the fixture’s firmware from version 1.x.x to version 2.0.0 or later. If your fixture is running firmware
2.0.0 or later, you have no need to enter this menu. Fixtures from early 2015 are supplied with firmware
version 2.0.0 installed at the factory. Do not open any other items in the ADJUST menu.
• CALIBRATION lets you set new default positions for calibration purposes, set effects to their factory
default positions or overwrite the factory default positions with new values. See ”Calibration” below.
• USB lets you updates the firmware (fixture software) using a USB memory device. For a detailed guide to
updating the firmware, see ”Installing using a USB memory device” later in this chapter.
Important! BEAM TWISTER ZERO POS and BEAM TWISTER FINE in the SERVICE
useful function for the end user and are for use by Martin™ Service and its authorized agents with
service documentation from Martin™ only. Do not use these menu items, or you may cause damage
that is not covered by the product warranty.
→
ADJUST menu have no
Calibration
Martin™ fixtures are adjusted and calibrated at the factory, and further calibration will normally only be
necessary if fixtures have been subjected to abnormal shocks during transport, if normal wear and tear has
affected alignment after an extended period of use. You can also use calibration to fine-tune fixtures for a
particular location or application.
The CALIBRATION menu lets you define offsets in the fixture software to adjust the positions of pan, tilt and
zoom relative to the DMX values the fixture receives. This allows you to fine-tune fixtures and achieve
uniform behavior in different fixtures.
Calibration can be carried out using the fixture’s onboard control panel and via DMX (see ”Changing
calibration offsets using DMX” on page 12).
A recommended procedure is to set pan, tilt and zoom to the same DMX values in multiple fixtures and then
calibrate each fixture using its onboard control panel while comparing its light output with a reference fixture.
The calibration range available for each effect varies. Calibration values are expressed as percentages.
After selecting a value, press Enter to set the effect to that value.
Loading and storing default calibration offsets
In the SERVICE → CALIBRATION menu, LOAD DEFAULTS lets you erase the calibration offsets that you
have defined and reload the default calibration offsets that are stored in memory.
SERVICE → CALIBRATION → SAVE DEFAULTS lets you overwrite the factory default calibration offsets
that are stored in memory with any new offsets that you have defined. Overwriting is permanent, so once
you have saved new default offsets, LOAD DEFAULTS will load the new defaults, not the original factory
defaults.
Software service functions 15
Page 16

Firmware installation
See the notes at the end of this section on updating from firmware version
The currently installed firmware (fixture software) version can be viewed in the control panel INFORMATION
menu. Firmware updates are available from the Martin™ website and can be installed using a USB memory
stick or a Windows PC running the Martin Uploader application and either a Martin Universal USB Duo™
USB-DMX interface device or a Martin DABS1™ USB-DMX interface device.
Calibration data is stored in the relevant modules wherever possible so that a module will stay calibrated if is
removed from the fixture or installed in another fixture.
Do not switch the fixture off during a firmware update, or firmware will be corrupted.
Installing using a USB memory device
Important! Do not remove a USB memory device while the fixture is updating files.
The following are required in order to install firmware using a USB memory device:
• The MAC Quantum Wash ‘.BANK’ firmware update file, available for download from the Martin website at
http://www.martin.com.
• A USB memory stick or other USB memory device with the update file copied from a PC into the USB
stick’s root directory.
To install the MAC Quantum Wash firmware:
1. Download the ‘.BANK’ firmware file from the MAC Quantum Wash Product Support page at
www.martin.com, read the firmware release notes carefully to check for any instructions or warnings,
and copy the firmware file to the root directory of a USB stick.
2. Disconnect the data link from the MAC Quantum Wash.
3. Insert the USB stick in the MAC Quantum Wash’s USB host socket. The fixture should recognize the
USB stick and illuminate the display. If the fixture does not recognize the USB stick, navigate to
SERVICE
4. AVAILABLE FIRMWARE will appear in the display. You can now scroll through the firmware versions
available.
5. To install a firmware version, select it and press Enter. The MAC Quantum Wash asks you to confirm
installation of the new firmware. Press Enter to confirm and press Menu to exit without confirming.
6. Allow the fixture to install the firmware and reboot.
7. Remove the USB stick. The newly-installed firmware version will now be displayed in the
INFORMATION menu.
8. Reconnect the data link.
9. If you have installed a new firmware version, check the Martin™ website to see whether an updated
User Guide is available for this firmware.
Fixture information and settings, are not affected when new software is uploaded.
→ USB in the control panel.
Installing using a PC and hardware interface
The following are required in order to install firmware using a PC:
• The MAC Quantum Wash firmware ‘.MU3’ update file, available for download from the Product Support
area of the Martin website at http://www.martin.com.
• A Windows PC running the latest version of the Martin Uploader™ application (also available for
download free of charge from www.martin.com) and loaded with the firmware update file.
• A USB-DMX hardware interface device such as the Martin USB Duo™ or Martin DABS1™.
To install the MAC Quantum Wash firmware:
1. Download the firmware ‘.MU3’ file from the MAC Quantum Wash support page on the Martin website to
the PC.
2. Read the firmware release notes carefully to check for any instructions or warnings.
3. Follow the instructions for an auto upload/upload via DMX in the Martin Uploader application help files
and supplied with the hardware interface.
16 MAC Quantum Wash User Guide
Page 17

Updating from firmware version 1.x.x to 2.0.0
A
B
Figure 3: Pan/tilt adjustment positions
Firmware versions 1.0.0 and 1.1.0 did not feature the FX in Extended mode and 16-bit RGB control in Basic
mode (as well as other improvements) that are available in v. 2.0.0. Updating to v. 2.0.0 will give you access
to these features, but bear in mind that v. 2.0.0 is a major update and that you cannot roll back to an earlier
firmware version once you have installed v. 2.0.0.
Pan and tilt adjustment after updating to version 2.0.0
Firmware version 2.0.0 introduces more precise pan/tilt control functionality. If you are running a fixture with
v. 1.0.0 or v. 1.1.0 and update to v. 2.0.0, the fixture will probably display a PTCM short error code and a P/T
SENSOR ADJUST message because of the new functionality. If the fixture displays this error code, you
must adjust pan and tilt before using the fixture. Adjustment takes approximately two minutes.
To adjust pan and tilt:
1. Make sure that the fixture is held securely and
apply power.
2. Enter the menus and go to SERVICE →
ADJUST → PAN/TILT AT END STOP.
3. Select STEP 1 and press ENTER.
4. See Figure 3. Take the yoke in your hands
and rotate it clockwise A (when looking from
the top of the head towards the base) until it
reaches the end stop at the limit of clockwise
pan. Then tilt the head B as far as possible
away from the power cable side of the base
towards the display side.
5. Be prepared for the head to move suddenly.
Press ENTER again and give the head a few
seconds to move and carry out basic
self-adjustment.
6. When the head has finished moving, press
MENU to exit STEP 1. Scroll to STEP 2 and
press ENTER.
7. Repeat steps 4. and 5. as described above
and give the head approximately two minutes
to move and carry out more precise
self-adjustment.
8. When the head has finished moving, press and hold MENU to exit the control menus. Pan and tilt are
now correctly adjusted for firmware version 2.0.0.
Software service functions 17
Page 18

DMX protocol
Basic mode
MAC Quantum Wash firmware version 2.0.0.
Channel DMX Value Percent Function
Strobe/shutter effect
Shutter closed
Shutter open
Strobe, slow → fast
Shutter open
Random strobe, slow → fast
Dimmer fade (MSB)
Closed → open
Dimmer fade, fine (LSB) Fade 0
Red (MSB)
0 → 100%
Red, fine (LSB) Fade 0
Green (MSB)
0 → 100%
Green, fine (LSB) Fade 0
Blue (MSB)
0 → 100%
Blue, fine (LSB) Fade 0
CTC
Disabled
Color temp. from 2000 K to 10 000 K in 50 K steps (see Table 4 on page
29)
10 000 K
1
2
3
4
5
6
7
8
9
10
0 - 19
20 - 49
50 - 200
201 - 210
211 - 255
0 - 65535 0 - 100
0 - 65535 0 - 100
0 - 65535 0 - 100
0 - 65535 0 - 100
0 - 10
11 - 171
171 - 255
0 - 7
8 - 19
20 - 78
79 - 82
82 - 100
0 - 4
4- 67
67 - 100
Fade
Default
type
value
Snap 30
Fade 0
Fade 0
Fade 0
Fade 0
Fade 101
Table 1: DMX Protocol - Basic mode
18 MAC Quantum Wash User Guide
Page 19

Channel DMX Value Percent Function
‘Color wheel’ color selection effect
Open. RGB color mixing enabled
Color 1 - LEE 790 - Moroccan pink
Color 2- LEE 157 - Pink
5
Color 3 - LEE 332 - Special rose pink
6
Color 4 - LEE 328 - Follies pink
7
Color 5 - LEE 345 - Fuchsia pink
Color 6 - LEE 194 - Surprise pink
Color 7 - LEE 181 - Congo Blue
9
Color 8 - LEE 071 - Tokyo Blue
10
Color 9 - LEE 120 - Deep Blue
11
Color 10 - LEE 079 - Just Blue
Color 11 - LEE 132 - Medium Blue
Color 12 - LEE 200 - Double CT Blue
13
Color 13 - LEE 161 - Slate Blue
14
Color 14 - LEE 201 - Full CT Blue
Color 15 - LEE 202 - Half CT Blue
Color 16 - LEE 117 - Steel Blue
16
Color 17 - LEE 353 - Lighter Blue
17
Color 18 - LEE 118 - Light Blue
18
Color 19 - LEE 116 - Medium Blue Green
Color 20 - LEE 124 - Dark Green
Color 21 - LEE 139 - Primary Green
20
Color 22 - LEE 089 - Moss Green
21
Color 23 - LEE 122 - Fern Green
Color 24 - LEE 738 - JAS Green
Color 25 - LEE 088 - Lime Green
23
Color 26 - LEE 100 - Spring Yellow
24
Color 27 - LEE 104 - Deep Amber
25
Color 28 - LEE 179 - Chrome Orange
Color 29 - LEE 105 - Orange
Color 30 - LEE 021 - Gold Amber
27
Color 31 - LEE 778 - Millennium Gold
28
Color 32 - LEE 135 - Deep Golden Amber
29
Color 33 - LEE 164 - Flame Red
Color 34 - Magenta
30
Color 35 - Medium Lavender
31
Color 36 - White
32
11
0 - 10
11 - 12
13 - 14
15 - 16
17 - 18
19 - 20
21 - 22
23 - 24
25 - 26
27 - 28
29 - 30
31 - 32
33 - 34
35 - 36
37 - 38
39 - 40
41 - 42
43 - 44
45 - 46
47 - 48
49 - 50
51 - 52
53 - 54
55 - 56
57 - 58
59 - 60
61 - 62
63 - 64
65 - 66
67 - 68
69 - 70
71 - 72
73 - 74
75 - 76
77 - 78
79 - 80
81 - 82
0 - 4
4 - 5
7 - 8
8 - 9
11 - 12
12 - 13
14 - 15
15 - 16
18 - 19
19 - 20
21 - 22
22 - 23
25 - 26
26 - 27
29 - 30
Fade
Default
type
value
Snap 0
Table 1: DMX Protocol - Basic mode
DMX protocol 19
Page 20

Channel DMX Value Percent Function
‘Color wheel rotation’ effect
Clockwise, fast
41
Stop (this will stop wherever the color is at the time)
Counter-clockwise, slow
Split color
Color preset 1
50
Color preset 2
51
Color preset 3
52
Color preset 4
Color preset 5
Color preset 6
54
Color preset 7
55
Color preset 8
Color preset 9
Color preset 10
57
Color preset 11
58
Color preset 12
59
Color preset 13
Color preset 14
Color preset 15
61
Color preset 16
62
Color preset 17
63
Color preset 18
Color preset 19
64
Color preset 20
65
Color preset 21
66
Color preset 22
Color preset 23
Color preset 24
68
Color preset 25
69
Color preset 26
70
Color preset 27
Color preset 28
71
Color preset 29
72
Color preset 30
73
Color preset 31
Color preset 32
Color preset 33
75
Color preset 34
76
Color preset 35
77
Color preset 36
‘Color wheel rotation’ effect
Clockwise, fast
Stop (this will stop wherever the color is at the time)
Counter-clockwise, slow
Open
Zoom
Flood → spot
Overdrive min. → max.
Pan, 16-bit (MSB and LSB)
Left → right (32768 = neutral)
Tilt, 16-bit (MSB and LSB)
Up → down (32768 = neutral)
11
(cont.)
12
13
14
15
16
83 - 103
104 -106
107 - 127
128 - 129
130 - 131
132 - 133
134 - 135
136 - 137
138 - 139
140 - 141
142 - 143
144 - 145
146 - 147
148 - 149
150 - 151
152 - 153
154 - 155
156 - 157
158 - 159
160 - 161
162 - 163
164 - 165
166 - 167
168 - 169
170 - 171
172 - 173
174 - 175
176 - 177
178 - 179
180 - 181
182 - 183
184 - 185
186 - 187
188 - 189
190 - 191
192 - 193
194 - 195
196 - 197
198 - 199
200 - 220
221 - 224
225 - 245
246- 255
0 - 200
201 - 255
0 - 65535 0 - 100
0 - 65535 0 - 100
32 - 40
42 - 50
52 - 53
53 - 54
55 - 56
56 - 57
59 - 60
60 - 61
63 - 64
66 - 67
67 - 68
70 - 71
73 - 74
74 - 75
77 - 78
78 - 86
86 - 88
88 - 96
96 - 100
0 - 78
79 - 100
→ slow
→ slow
→ fast
→ fast
Fade
Default
type
value
Snap 0
Fade 200
Fade 32768
Fade 32768
Table 1: DMX Protocol - Basic mode
20 MAC Quantum Wash User Guide
Page 21

Channel DMX Value Percent Function
Fixture control/settings
(hold for number of seconds indicated to activate)
No function (disables calibration) – 5 sec.
Reset entire fixture – 5 sec.
Reset shutter/dimmer only – 5 sec.
6
Reset color only – 5 sec.
6
Reset beam only– 5 sec.
7
Reset pan and tilt only – 5 sec.
7
No function
Linear dimming curve – 1 sec.
9
(menu override, setting unaffected by power off/on)
Square law dimming curve – 1 sec.
9
(menu override, factory default setting, setting unaffected by power
off/on)
Inverse square law dimming curve – 1 sec.
10
(menu override, setting unaffected by power off/on)
S-curve dimming curve– 1 sec.
10
(menu override, setting unaffected by power off/on)
No function
11
Fast pan and tilt speed – 1 sec.
11
(default setting, menu override - setting returns to MENU setting after
power on/off)
Smooth pan and tilt speed – 1 sec.
11
(menu override - setting returns to MENU setting after power on/off)
Parameter shortcuts = ON (default)
12
Parameter shortcuts = OFF
12
No function
Enable video tracking
14
Disable video tracking
14
Extended color (default)
15
Calibrated color
15
No function
Regulated fan speed, fixed intensity (default)
20
Fixed fan speed, regulated intensity
20
Turn on control panel display – 1 sec.
20
Turn off control panel display – 1 sec.
21
No function
Enable calibration – 5 sec.
39
Store pan and tilt calibration – 5 sec.
39
Store dimmer calibration – 5 sec.
40
No function
Store Beam Twister calibration – 5 sec.
43
No function
44
Store zoom calibration – 5 sec.
45
45
Store pan calibration – 5 sec.
45
Store tilt calibration – 5 sec.
No function
78
Reset all calibration values to defaults – 5 sec.
No function
17
0 - 9
10 - 14
15
16
17
18
19 - 22
23
24
25
26
27
28
29
30
31
32 - 35
36
37
38
39
40 - 49
50
51
52
53
54 - 99
100
101
102
103 - 110
111
112 - 113
114
115
116
117 - 198
199
200 - 255
0 - 4
4 - 5
7 - 9
13 - 14
16 - 19
21 - 39
40 - 43
46 -77
78 - 100
Fade
Default
type
value
Snap 0
MSB = Most significant byte
LSB = Least significant byte
Table 1: DMX Protocol - Basic mode
DMX protocol 21
Page 22

Extended mode
MAC Quantum Wash firmware version 2.0.0.
Channel DMX Value Percent Function
Strobe/shutter effect
0 - 19
1
2
20 - 49
50 - 200
201 - 210
211 - 255
0 - 65535 0 - 100
0 - 7
8 - 19
20 - 78
79 - 82
82 - 100
3
4
5
0 - 10
11 - 171
171 - 255
0 - 10
11 - 12
13 - 14
15 - 16
17 - 18
19 - 20
21 - 22
23 - 24
25 - 26
27 - 28
29 - 30
31 - 32
33 - 34
35 - 36
37 - 38
39 - 40
41 - 42
43 - 44
45 - 46
47 - 48
49 - 50
51 - 52
53 - 54
55 - 56
57 - 58
59 - 60
61 - 62
63 - 64
65 - 66
67 - 68
69 - 70
71 - 72
73 - 74
75 - 76
77 - 78
79 - 80
81 - 82
0 - 4
4- 67
67 - 100
0 - 4
4 - 5
7 - 8
8 - 9
11 - 12
12 - 13
14 - 15
15 - 16
18 - 19
19 - 20
21 - 22
22 - 23
25 - 26
26 - 27
29 - 30
Shutter closed
Shutter open
Strobe, slow → fast
Shutter open
Random strobe, slow → fast
Dimmer fade (MSB)
Closed → open
Dimmer fade, fine (LSB) Fade 0
CTC
Disabled
Color temp. from 2000 K to 10 000 K in 50 K steps (see Table 4 on page
29)
10 000 K
‘Color wheel’ color selection effect
Open. RGB color mixing enabled
Color 1 - LEE 790 - Moroccan pink
Color 2- LEE 157 - Pink
5
Color 3 - LEE 332 - Special rose pink
6
Color 4 - LEE 328 - Follies pink
7
Color 5 - LEE 345 - Fuchsia pink
Color 6 - LEE 194 - Surprise pink
Color 7 - LEE 181 - Congo Blue
9
Color 8 - LEE 071 - Tokyo Blue
10
Color 9 - LEE 120 - Deep Blue
11
Color 10 - LEE 079 - Just Blue
Color 11 - LEE 132 - Medium Blue
Color 12 - LEE 200 - Double CT Blue
13
Color 13 - LEE 161 - Slate Blue
14
Color 14 - LEE 201 - Full CT Blue
Color 15 - LEE 202 - Half CT Blue
Color 16 - LEE 117 - Steel Blue
16
Color 17 - LEE 353 - Lighter Blue
17
Color 18 - LEE 118 - Light Blue
18
Color 19 - LEE 116 - Medium Blue Green
Color 20 - LEE 124 - Dark Green
Color 21 - LEE 139 - Primary Green
20
Color 22 - LEE 089 - Moss Green
21
Color 23 - LEE 122 - Fern Green
Color 24 - LEE 738 - JAS Green
Color 25 - LEE 088 - Lime Green
23
Color 26 - LEE 100 - Spring Yellow
24
Color 27 - LEE 104 - Deep Amber
25
Color 28 - LEE 179 - Chrome Orange
Color 29 - LEE 105 - Orange
Color 30 - LEE 021 - Gold Amber
27
Color 31 - LEE 778 - Millennium Gold
28
Color 32 - LEE 135 - Deep Golden Amber
29
Color 33 - LEE 164 - Flame Red
Color 34 - Magenta
30
Color 35 - Medium Lavender
31
Color 36 - White
32
Fade
Default
type
value
Snap 30
Fade 0
Fade 101
Snap 0
Table 2: DMX Protocol - Extended mode
22 MAC Quantum Wash User Guide
Page 23

Channel DMX Value Percent Function
‘Color wheel rotation’ effect
Clockwise, fast
41
Stop (this will stop wherever the color is at the time)
Counter-clockwise, slow
Split color
50
Color preset 1
51
Color preset 2
52
Color preset 3
Color preset 4
Color preset 5
54
Color preset 6
55
Color preset 7
Color preset 8
Color preset 9
57
Color preset 10
58
Color preset 11
59
Color preset 12
Color preset 13
Color preset 14
61
Color preset 15
62
Color preset 16
63
Color preset 17
Color preset 18
64
Color preset 19
65
Color preset 20
66
Color preset 21
Color preset 22
Color preset 23
68
Color preset 24
69
Color preset 25
70
Color preset 26
Color preset 27
71
Color preset 28
72
Color preset 29
73
Color preset 30
Color preset 31
Color preset 32
75
Color preset 33
76
Color preset 34
77
Color preset 35
Color preset 36
‘Color wheel rotation’ effect
Clockwise, fast
Stop (this will stop wherever the color is at the time)
Counter-clockwise, slow
Open
Zoom
Flood → spot
Overdrive min. → max.
5
(cont.)
6
83 - 103
104 -106
107 - 127
128 - 129
130 - 131
132 - 133
134 - 135
136 - 137
138 - 139
140 - 141
142 - 143
144 - 145
146 - 147
148 - 149
150 - 151
152 - 153
154 - 155
156 - 157
158 - 159
160 - 161
162 - 163
164 - 165
166 - 167
168 - 169
170 - 171
172 - 173
174 - 175
176 - 177
178 - 179
180 - 181
182 - 183
184 - 185
186 - 187
188 - 189
190 - 191
192 - 193
194 - 195
196 - 197
198 - 199
200 - 220
221 - 224
225 - 245
246- 255
0 - 200
201 - 255
32 - 40
42 - 50
52 - 53
53 - 54
55 - 56
56 - 57
59 - 60
60 - 61
63 - 64
66 - 67
67 - 68
70 - 71
73 - 74
74 - 75
77 - 78
78 - 86
86 - 88
88 - 96
96 - 100
0 - 78
79 - 100
→ slow
→ slow
→ fast
→ fast
Fade
Default
type
value
Snap 0
Fade 200
Table 2: DMX Protocol - Extended mode
DMX protocol 23
Page 24

Channel DMX Value Percent Function
Beam twister, 16-bit (MSB and LSB)
Index 0
Disable
Rotation CW Fast
77
No rotation (lens stops at its current position)
Rotation CCW Slow
92
Disable
92
Position 1: Wide
92
Position 2: Smooth
92
Position 3: Texture
92
Position 4: Dots
93
Position 5: Eye
93
Position 6: Donut
93
Position 7: Beam
93
Position 8: Beam 2
93
Position 9: Beam 3
93
Position 10: Beam 4
94
Position 11: Mixed
94
Position 12: Separation
94
Position 13: Separation 2
94
Position 14: Rays
94
Position 15: Halo
94
Position 16: Two Areas
94
Position 17: Clean Colors
95
Position 18: Crossover
95
No function
Disable
Pan, 16-bit (MSB and LSB)
Left → right (32768 = neutral)
Tilt, 16-bit (MSB and LSB)
Up → down (32768 = neutral)
7
and
8
9
10
11
12
0 - 32768
32769 - 40000
40001 - 49990
49991 - 50000
50001 - 59990
59991 - 59999
60000 - 60099
60100 - 60199
60200 - 60299
60300 - 60399
60400 - 60499
60500 - 60599
60600 - 60699
60700 - 60799
60800 - 60899
60900 - 60999
61000 - 61099
61100 - 61199
61200 - 61299
61300 - 61399
61400 - 61499
61500 - 61599
61600 - 61699
61700 - 61799
61800 - 61999
62000 -65355
0 - 65535 0 - 100
0 - 65535 0 - 100
95 - 100
0 - 50
50 - 61
61 - 77
77 - 92
→ 360
→ CW Slow
→ CCW Fast
Fade
Default
type
value
Snap 0
Fade 32768
Fade 32768
Table 2: DMX Protocol - Extended mode
24 MAC Quantum Wash User Guide
Page 25

Channel DMX Value Percent Function
Fixture control/settings
(hold for number of seconds indicated to activate)
No function (disables calibration) – 5 sec.
Reset entire fixture – 5 sec.
Reset shutter/dimmer only – 5 sec.
6
Reset color only – 5 sec.
6
Reset beam only– 5 sec.
7
Reset pan and tilt only – 5 sec.
7
No function
Linear dimming curve – 1 sec.
9
(menu override, setting unaffected by power off/on)
Square law dimming curve – 1 sec.
9
(menu override, factory default setting, setting unaffected by power
off/on)
Inverse square law dimming curve – 1 sec.
10
(menu override, setting unaffected by power off/on)
S-curve dimming curve– 1 sec.
10
(menu override, setting unaffected by power off/on)
No function
11
Fast pan and tilt speed – 1 sec.
11
(default setting, menu override - setting returns to MENU setting after
power on/off)
Smooth pan and tilt speed – 1 sec.
11
(menu override - setting returns to MENU setting after power on/off)
Parameter shortcuts = ON (default)
12
Parameter shortcuts = OFF
12
No function
Enable video tracking
14
Disable video tracking
14
Extended color (default)
15
Calibrated color
15
No function
Regulated fan speed, fixed intensity (default)
20
Fixed fan speed, regulated intensity
20
Turn on control panel display – 1 sec.
20
Turn off control panel display – 1 sec.
21
No function
Enable calibration – 5 sec.
39
Store pan and tilt calibration – 5 sec.
39
Store dimmer calibration – 5 sec.
40
No function
Store Beam Twister calibration – 5 sec.
43
No function
44
Store zoom calibration – 5 sec.
45
45
Store pan calibration – 5 sec.
45
Store tilt calibration – 5 sec.
No function
78
Reset all calibration values to defaults – 5 sec.
No function
FX1 selection (see Table 3 on page 28)
Effect selection (adjust on DMX channel 15)
FX1 adjustment
Effect reversed fast → slow
Effect stops
50
Effect slow → fast
FX2 selection (see Table 3 on page 28)
Effect selection (adjust on DMX channel 17)
FX2 adjustment
Effect reversed fast → slow
Effect stops
50
Effect slow → fast
13
14
15
16
17
0 - 9
10 - 14
15
16
17
18
19 - 22
23
24
25
26
27
28
29
30
31
32 - 35
36
37
38
39
40 - 49
50
51
52
53
54 - 99
100
101
102
103 - 110
111
112 - 113
114
115
116
117 - 198
199
200 - 255
0 - 255 0 - 100
0 - 126
127 - 128
129-255
0 - 255 0 - 100
0 - 126
127 - 128
129-255
0 - 4
4 - 5
7 - 9
13 - 14
16 - 19
21 - 39
40 - 43
46 -77
78 - 100
0 - 49
51-100
0 - 49
51-100
Fade
Default
type
value
Snap 0
Snap 0
Fade 128
Snap 0
Fade 128
Table 2: DMX Protocol - Extended mode
DMX protocol 25
Page 26

Channel DMX Value Percent Function
FX synchronization
No sync
0
0
1
1
2
2
2
3
3
4
4
4
5
5
5
6
6
7
7
7
8
8
9
9
9
10
10
11
11
11
12
12
13
13
13
14
14
14-39
39-47
47-55
55-100
Offset shift 10°
Offset shift 20°
Offset shift 30°
Offset shift 40°
Offset shift 50°
Offset shift 60°
Offset shift 70°
Offset shift 80°
Offset shift 90°
Offset shift 100°
Offset shift 110°
Offset shift 120°
Offset shift 130°
Offset shift 140°
Offset shift 150°
Offset shift 160°
Offset shift 170°
Offset shift 180°
Offset shift 190°
Offset shift 200°
Offset shift 210°
Offset shift 220°
Offset shift 230°
Offset shift 240°
Offset shift 250°
Offset shift 260°
Offset shift 270°
Offset shift 280°
Offset shift 290°
Offset shift 300°
Offset shift 310°
Offset shift 320°
Offset shift 330°
Offset shift 340°
Offset shift 350°
Synchronized: all fixtures start FX cycles at same time
Reserved
Random start (FX 1 adjust controls overall speed)
Random duration
Reserved
18
0
1
2
3
4
5
6
7
8
9
10
11
12
13
14
15
16
17
18
19
20
21
22
23
24
25
26
27
28
29
30
31
32
33
34
35
36
37 - 100
101 - 120
121 - 140
141 - 255
Fade
Default
type
value
Snap 0
Color - Center
19
20
21
0 - 255 0 - 100
0 - 255 0 - 100
0 - 255 0 - 100
Red
0 → 100%
Green
0 → 100%
Blue
0 → 100%
Color - Middle
22
23
24
0 - 255 0 - 100
0 - 255 0 - 100
0 - 255 0 - 100
Red
0 → 100%
Green
0 → 100%
Blue
0 → 100%
Color - Outer
25
26
26 MAC Quantum Wash User Guide
0 - 255 0 - 100
0 - 255 0 - 100
Red
0 → 100%
Green
0 → 100%
Table 2: DMX Protocol - Extended mode
Fade 255
Fade 255
Fade 255
Fade 255
Fade 255
Fade 255
Fade 255
Fade 255
Page 27

Channel DMX Value Percent Function
27
0 - 255 0 - 100
Blue
0 → 100%
Aura
Strobe/shutter effect
Shutter closed
Shutter open
Strobe, slow → fast
Shutter open
Random strobe, slow → fast
Dimmer (MSB)
Closed → open
Red
0 → 100%
Green
0 → 100%
Blue
0 → 100%
‘Color wheel’ color selection effect
Open. RGB color mixing enabled
Color 1 - LEE 790 - Moroccan pink
Color 2- LEE 157 - Pink
Color 3 - LEE 332 - Special rose pink
Color 4 - LEE 328 - Follies pink
Color 5 - LEE 345 - Fuchsia pink
Color 6 - LEE 194 - Surprise pink
Color 7 - LEE 181 - Congo Blue
Color 8 - LEE 071 - Tokyo Blue
Color 9 - LEE 120 - Deep Blue
Color 10 - LEE 079 - Just Blue
Color 11 - LEE 132 - Medium Blue
Color 12 - LEE 200 - Double CT Blue
Color 13 - LEE 161 - Slate Blue
Color 14 - LEE 201 - Full CT Blue
Color 15 - LEE 202 - Half CT Blue
Color 16 - LEE 117 - Steel Blue
Color 17 - LEE 353 - Lighter Blue
Color 18 - LEE 118 - Light Blue
Color 19 - LEE 116 - Medium Blue Green
Color 20 - LEE 124 - Dark Green
Color 21 - LEE 139 - Primary Green
Color 22 - LEE 089 - Moss Green
Color 23 - LEE 122 - Fern Green
Color 24 - LEE 738 - JAS Green
Color 25 - LEE 088 - Lime Green
Color 26 - LEE 100 - Spring Yellow
Color 27 - LEE 104 - Deep Amber
Color 28 - LEE 179 - Chrome Orange
Color 29 - LEE 105 - Orange
Color 30 - LEE 021 - Gold Amber
Color 31 - LEE 778 - Millennium Gold
Color 32 - LEE 135 - Deep Golden Amber
Color 33 - LEE 164 - Flame Red
Color 34 - Magenta
Color 35 - Medium Lavender
Color 36 - White
‘Color wheel rotation’ effect
Clockwise, fast
Stop (this will stop wherever the color is at the time)
Counter-clockwise, slow
Random colors
Fast
Medium
Slow
28
29
30
31
32
33
0 - 19
20 - 49
50 - 200
201 - 210
211 - 255
0 - 255 0 - 100
0 - 255 0 - 100
0 - 255 0 - 100
0 - 255 0 - 100
0 - 10
11 - 15
16 - 20
21 - 25
26 - 30
31 - 35
36 - 40
41 - 45
46 - 50
51 - 55
56 - 60
61 - 65
66 - 70
71 - 75
76 - 80
81 - 85
86 - 90
91 - 95
96 - 100
101 - 105
106 - 110
111 - 115
116 - 120
121 - 125
126 - 130
131 - 135
136 - 140
141 - 145
146 - 150
151 - 155
156 - 160
161 - 165
166 - 170
171 - 175
176 - 180
181 - 185
186 - 190
191 - 214
215 - 219
220 - 243
244 - 247
248 - 251
252 - 255
0 - 7
8 - 19
20 - 78
79 - 82
82 - 100
0 - 4
4 - 6
6 - 8
8 - 10
10 - 12
12 - 14
14 - 16
16 - 18
18 - 20
20 - 21
22 - 23
24 - 25
26 - 27
28 - 29
30 - 31
32 - 33
34 - 35
36 - 37
38 - 39
39 - 41
41 - 43
43 - 45
45 - 47
47 - 49
49 - 51
51 - 53
53 - 55
55 - 57
57 - 59
59 - 61
61 - 63
63 - 64
65 - 66
67 - 68
69 - 70
71 - 72
73 - 74
75 - 84
84 - 86
86 - 95
95 - 96
97 - 98
98 - 100
→ slow
→ fast
Fade
Default
type
value
Fade 255
Snap 30
Fade 0
Fade 255
Fade 255
Fade 255
Snap 0
MSB = Most significant byte
LSB = Least significant byte
Table 2: DMX Protocol - Extended mode
DMX protocol 27
Page 28

FX: pre-programmed effects
The table below lists the pre-programmed dynamic effects (macros) that can be controlled using channels
14 - 18 in Extended mode.
You select effects on channels 14 and 16 by sending the values listed in the table. Adjust effect parameters
such as speed and intensity on channels 15 and 17, and adjust synchronization of effects across different
fixtures on channel 18.
Applicable when running MAC Quantum Wash firmware version 2.0.0.
DMX
value
Effect
1 AURAALLSYNCCENTER 35 AURA RAMP 161 EYE CANDY 2
2 AURAALLSYNCMIDDLE 36 AURARAMP
3 AURAALLSYNCOUTSIDE 37 BEAMRAMP
4 AURA COLOR OFFSET 38 BEAMAURA RAMP 164 EYE CANDY 5
5 DIMMER SYNC 39 RING RAND STROBE UNI 165 EYE CANDY 6
6 STROBE SYNC 46 ELECTRIC ARC 166 EYE CANDY 7
7 DIMMERSTROBE SYNC 47 THUNDERSTORM
9 BEAM COLOR TUNER 48 THUNDERSTORM 168 EYE CANDY 9
10 RING CHASE FADE 49 WELDING 169 EYE CANDY 10
11 RING CHASE RAMP 50 RAINBOW FADE 170 EYE CANDY 11
12 SINEWAVE ROLL 51 RAINBOW SOLID 171 EYE CANDY 12
13 RING CHASE FADE
RAND
14 RING PULSE VU 53 RGB FADE 173 EYE CANDY 14
15 RING ROLL 54 RGB STEP 174 EYE CANDY 15
16 RING STROBE 55 RGB ROLL 175 EYE CANDY 16
17 RING STROBE RAND 56 CMY FADE 176 EYE CANDY 17
18 RING RAND STROBE
MIDFAST
19 RING CHASE UNI
STROBE
20 RING RAND STROBE UNI 59 BEAM RED WHITE BLUE
21 RING CHASE RAND
STROBE
22 RING RAND STROBE
RAND
23 RING RAND STROBE
MIDFAST UNI
24 FLASH RINGSCROLL 63 BEAM RANDOM COLOR
25 STROBE ALTERNATE1 64 BEAM COLOR FLICKER 211 ANI TWIST ALL
26 STROBE ALTERNATE2 80 TWISTER ANIMATE 1 212 ANI TWIST RINGS
27 STROBE ALTERNATE3 81 TWISTER ANIMATE 2 213 TWIST AURA
28 3STEP STROBE 90 ZOOM RAMP 214 CRAZY TWISTER
29 TICK TOCK 91 ZOOM SAWTOOTH
30 TICK TOCK RAND 92 ZOOM DIM RAMP
32 BEAM PULSE 93 ZOOM DIM SAWTOOTH
33 BEAM RAMP 94 ZOOM SAW COLOR
34 AURA PULSE 160 EYE CANDY 1
DMX
value
Effect
BEAMFLASH
AURAFLASH
ATO M I C
52 RAINBOW ROLL 172 EYE CANDY 13
57 CMY STEP 177 EYE CANDY 18
58 CMY ROLL 178 EYE CANDY 19
WHITE
60 BEAM RED WHITE 180 EYE CANDY 21
61 BEAM WHITE CHASE 181 EYE CANDY 22
62 BEAM RANDOM WHITE
CHASE
RINGS
WHITE
DMX
value
162 EYE CANDY 3
163 EYE CANDY 4
167 EYE CANDY 8
179 EYE CANDY 20
182 EYE CANDY 23
210 ANI TWIST FADE
Effect
Table 3: FX in the MAC Quantum Wash
28 MAC Quantum Wash User Guide
Page 29

Color temperature control data
The table below gives the color temperatures obtained when specific DMX values are sent on the color
temperature control channel.
DMX
value
11 2000 51 4000 91 6000 131 8000
12 2050 52 4050 92 6050 132 8050
13 2100 53 4100 93 6100 133 8100
14 2150 54 4150 94 6150 134 8150
15 2200 55 4200 95 6200 135 8200
16 2250 56 4250 96 6250 136 8250
17 2300 57 4300 97 6300 137 8300
18 2350 58 4350 98 6350 138 8350
19 2400 59 4400 99 6400 139 8400
20 2450 60 4450 100 6450 140 8450
21 2500 61 4500 101 6500 141 8500
22 2550 62 4550 102 6550 142 8550
23 2600 63 4600 103 6600 143 8600
24 2650 64 4650 104 6650 144 8650
25 2700 65 4700 105 6700 145 8700
26 2750 66 4750 106 6750 146 8750
27 2800 67 4800 107 6800 147 8800
28 2850 68 4850 108 6850 148 8850
29 2900 69 4900 109 6900 149 8900
30 2950 70 4950 110 6950 150 8950
31 3000 71 5000 111 7000 151 9000
32 3050 72 5050 112 7050 152 9050
33 3100 73 5100 113 7100 153 9100
34 3150 74 5150 114 7150 154 9150
35 3200 75 5200 115 7200 155 9200
36 3250 76 5250 116 7250 156 9250
37 3300 77 5300 117 7300 157 9300
38 3350 78 5350 118 7350 158 9350
39 3400 79 5400 119 7400 159 9400
40 3450 80 5450 120 7450 160 9450
41 3500 81 5500 121 7500 161 9500
42 3550 82 5550 122 7550 162 9550
43 3600 83 5600 123 7600 163 9600
44 3650 84 5650 124 7650 164 9650
45 3700 85 5700 125 7700 165 9700
46 3750 86 5750 126 7750 166 9750
47 3800 87 5800 127 7800 167 9800
48 3850 88 5850 128 7850 168 9850
49 3900 89 5900 129 7900 169 9900
50 3950 90 5950 130 7950 170 9950
Col.
temp.
DMX
value
Col.
temp.
DMX
value
Col.
temp.
DMX
value
171 10000
temp.
Col.
Table 4: DMX Values and color temperature
DMX protocol 29
Page 30

Control panel menus
MAC Quantum Wash firmware version 2.0.0.
Menu level 1 Menu level 2 Menu level 3 Menu level 4 Notes (Default settings in bold print)
DMX address (default address = 1). The
DMX ADDRESS 1 – XXX
CONTROL MODE
FIXTURE ID 0 – 9999 User-settable fixture ID number
PERSONALITY
BASIC Basic DMX mode
EXTENDED Extended DMX mode
PA N/ T I LT
SPEED
DIMMER CURVE
COLOR MODE
VIDEO
TRACKING
DMX RESET
EFFECT
SHORTCUT
COOLING MODE
PAN INVERT ON/OFF Inverse DMX pan control: right → left
TILT INVERT ON/OFF Inverse DMX tilt control: down → up
FAST Optimize pan/tilt movement for speed
PA N/ T I LT
EFFECT
LINEAR Optically linear dimming curve
SQUARE LAW Square law dimming curve
INV SQ LAW Inverse square law dimming curve
S-CURVE
EXTENDED COLOR Color mixing optimized for saturation
CALIBRATED COLOR
(COMMON COLOR in SW v.1.1.0)
ENABLED
DISABLED Color fading optimized for smoothness
ON Fixture can be reset via DMX
OFF
ON
OFF
REGULATE FANS
REGULATE INTENSITY
SMOOTH
FOLLOW P/T
FAST Optimize effects movement for speed
SLOW
DMX address range is limited so that the
fixture will always have enough DMX
channels within the 512 available.
0
Optimize pan/tilt movement for
smoothness
Effects speed follows the speed setting
applied to pan and tilt via DMX or in
control menu
Optimize effects movement for
smoothness
S-curve (fixture emulates incandescent
lamp voltage linear RMS dimming curve)
Color mixing optimized for even color
rendition across fixtures
Color fading optimized for speed of color
changes
Fixture cannot be reset via DMX (can be
overridden: see DMX protocol)
Effects take shortest route during
changes, crossing open positions if
necessary
Effects avoid open positions during effects
changes
Fans optimized for light intensity
(temperature controlled by regulating
fan speed, light output unaffected)
Fans optimized for quietness
(temperature controlled by regulating light
output, fan speed kept low)
Table 5: Control menus
30 MAC Quantum Wash User Guide
Page 31

Menu level 1 Menu level 2 Menu level 3 Menu level 4 Notes (Default settings in bold print)
ON Display permanently on
Display goes into sleep mode 2 minutes
after last key press
Display goes into sleep mode 5 minutes
after last key press
Display goes into sleep mode 10 minutes
after last key press
Display orientation normal or rotated 180°
Enable error messages and warnings in
display
Disable error messages and warnings in
display (the status LED will still light to
indicate fixture status if an error has been
detected or the fixture has a warning)
Return all settings (except calibrations) to
factory defaults
Load Custom Settings 1
Save fixture’s current settings as Custom
Settings 1
Load Custom Settings 2
Save fixture’s current settings as Custom
Settings 2
Load Custom Settings 3
Save fixture’s current settings as Custom
Settings 3
Display hours fixture has been powered on
since manufacture (not user-resettable)
Display hours fixture has been powered on
since last counter reset (user-resettable)
Display number of times fixture has been
powered on since manufacture
(not user-resettable)
Display number of times fixture has been
powered on since last counter reset (userresettable)
Scroll to displays current speed of each
cooling fan (head and base)
DMX transmission speed in packets per
second
Scroll to see values received on each DMX
channel in Extended mode
DMX transmission speed in packets per
second
Scroll to see values received on each DMX
channel in Basic mode
PERSONALITY
(continued)
DEFAULT
SETTINGS
INFORMATION
DMX LIVE*
2 MINUTES
DISPLAY SLEEP
DISPLAY
DISPLAY
INTENSITY
DISPLAY
ROTATION
DISPLAY
CONTRAST
NORMAL
ERROR MODE
SILENT
FAC TORY
DEFAULT
CUSTOM 1
CUSTOM 2
CUSTOM 3
POWER ON TIME
POWER ON
CYCLES
SW VERSION* XX.XX.XX Displays currently active software version
RDM UID* 4D50.XXXXXXXX Displays fixture’s unique RDM ID
FAN SPEEDS*
TEMPERATURES*
EXTENDED
MODE
BASIC MODE
LOAD
LOAD
SAVE
LOAD
SAVE
LOAD
SAVE
TOTAL 0 ... XXX HR
RESETTABLE
TOTAL 0 ...
RESETTABLE
HEAD FAN 1 ...
BASE FAN 3
PA N/ T I LT ... DCDC
PCB
RATE 0 - 44 HZ
QUALITY 0 - 100% Percent of packets received
START CODE 0 - 255 Value of the DMX start code
STROBE ... AURA
COLOR WHEEL
RATE 0 - 44 HZ
QUALITY 0 - 100% Percent of packets received
START CODE 0 - 255 Value of the DMX start code
STROBE ...
CONTROL
5 MINUTES
10 MINUTES
10 ... 100 Set display intensity in % (default = 100)
NORMAL /
ROTATE 180
1 ...100 Adjust contrast of display (default = 41)
ARE YOU SURE?
YES/NO
ARE YOU SURE?
YES/NO
ARE YOU SURE?
YES/NO
ARE YOU SURE?
YES/NO
ARE YOU SURE?
YES/NO
ARE YOU SURE?
YES/NO
ARE YOU SURE?
YES/NO
CLEAR
COUNTER? YES/
NO
XXX HR
CLEAR
COUNTER? YES/
NO
0 - XXX RPM
X C Displays temperature in °C of all PCBs
XXX
XXX
Table 5: Control menus
Control panel menus 31
Page 32

Menu level 1 Menu level 2 Menu level 3 Menu level 4 Notes (Default settings in bold print)
Run test sequence of all functions
To test a specific function, se Up/Down
buttons to scroll through functions and
pause. Press Enter to restart test
sequence.
Press Menu button to exit test
Run test sequence of LEDs only.
To test a specific LED group, se Up/Down
buttons to scroll through groups and
pause. Press Enter to restart test
sequence.
Press Menu button to exit test
Run test sequence of zoom functions.
Press Menu button to stop test
Run test sequence of Beam Twister
functions. Press Menu button to stop test
Run test sequence of pan functions. Press
Menu button to stop test
Run test sequence of tilt functions. Press
Menu button to stop test
Scroll through effects to manually control
an effect
To adjust, move head to P/T adjustment
position, then press Enter
To adjust, move head to P/T adjustment
position again, then press Enter
agents only – use without Martin Service
documentation may cause damage
Enable pan/tilt position feedback
systems
Replace factory default calibration settings
with current calibration settings
No USB device present or no firmware on
USB device
Fixture updating internal memory from
USB device
Select firmware from versions stored in
internal memory. Scroll to select version,
then press Enter and confirm your choice
to update
TEST*
MANUAL
CONTROL*
SERVICE
TEST ALL
TEST LEDS
ZOOM
TEST EFFECTS
BEAM TWISTER
PA N
TEST PAN/TILT
TILT
EXTENDED
MODE
RESET RESET Reset fixture
STROBE ... AURA
BLUE
ERROR LIST Empty or up to 20 errors Display any errors in memory
FAN CLEAN ON/OFF Activate fan cleaning
ADJUST
PT FEEDBACK
CALIBRATION
USB
BASIC MODE
STROBE -- CONTROL
PA N / T I LT AT E N D
STOP
BEAM TWISTER ZERO POS For use by Martin Service or its authorized
BEAM TWISTER FINE
ON
OFF Disable pan/tilt position feedback
ZOOM 0.00 ...+/- xx% Define zoom home position
PAN 0.00 ...+/- xx% Define pan home position
TILT 0.00 ...+/- xx% Define tilt home position
LOAD DEFAULTS LOAD Load factory default calibration settings
SAVE DEFAULTS SAVE
NO DEVICE
UPDATING FILES
AVAI LABLE
FIRMWARE
STEP 1
STEP 2
XX.XX.XX ...
XX.XX.XX
Table 5: Control menus
* Menus marked * are available only when the fixture is connected to mains power. All other menus are available in mains- and
battery-powered operation.
32 MAC Quantum Wash User Guide
Page 33

Service and display messages
The MAC Quantum Wash gives service and maintenance information by displaying a large 3- or 4-character
short code and a smaller full-text message in the fixture’s display. The short code is visible at a distance,
allowing easier reading with the fixture still in the rig, for example, while the full-text message gives more
detailed information.
Warning messages
Warning messages indicate that either:
• problems might appear in the future if no action is taken, or
• the user needs to pay special attention to a function or procedure when working with the fixture.
The MAC Quantum Wash communicates warnings as follows:
• Warning codes are shown continuously in the display and disappear when the user reacts to the warning.
• If more than one warning is detected, all warnings are displayed in sequence.
• If the display is inactive, the fixture’s status LED (see Figure 1 on page 7) flashes orange to indicate that
there is a warning. Activating the display will show the warning.
The possible warning messages are listed in Table 6 below
:
Short code
AUTW
BANK
BETW
DCTW
LDTW
PFTW
PTTW
SERV
SL W
UITW
ZFTW
Long message and explanation
AURA TMP HIGH
Aura temperature sensor detects abnormally high operating temperature.*
BANK NO ACCESS
Error unpacking firmware bank during/after software upload. Fixture will continue to operate on
existing firmware. Warning message is cleared by a successful software upload or at the next
power off/on cycle.
BEAM TEMP HIGH
Beam temperature sensor detects abnormally high operating temperature.*
DC TEMP HIGH
DC PCB sensor detects abnormally high operating temperature.*
LED DRV TMP HIGH
LED driver temperature sensor detects abnormally high operating temperature.*
PFC TEMP HIGH
PFC unit temperature sensor detects abnormally high operating temperature.*
PT TEMP HIGH
Pan/tilt PCB sensor detects abnormally high operating temperature.*
SERVICE MODE
Fixture in service mode.
SAFETY LOOP
A safety loop error occurred but is no longer active. Warning message is cleared at the next
power off/on cycle.
UI TEMP HIGH
User interface (LCD display and control panel) PCB sensor detects abnormally high operating
temperature.*
ZF TEMP HIGH
Zoom PCB sensor detects abnormally high operating temperature.*
Table 6: Warning messages
*High temperature warnings are canceled as soon as temperature returns to normal. If temperature reaches
cutoff level, the warning is replaced by a cutoff error message.
Service and display messages 33
Page 34

Error messages
Error messages indicate that a problem is present. The MAC Quantum Wash communicates errors as
follows:
• Error messages flash in the display.
• If more than one error is detected, the fixture flashes all errors three times each.
• Errors are shown in the display regardless of display status: they override an inactive display and any
other information that the display might be showing.
• If an error is present, the status LED flashes red.
The possible error messages are listed in Table 7 below
:
Short code
ACER
AUTC
AUTE
BCER
BETC
BETE
BSER
BTER
BTSA
CELD
COLD
DCTC
DCTE
FAN BASE 1 FAN ERR
FAN BASE 2 FAN ERR
FAN BASE 3 FAN ERR
FAN HEAD FAN 1 ERR
FAN HEAD FAN 1 ERR
FAN HEAD FAN 1 ERR
FAN HEAD FAN 1 ERR
FBEB
FBEP
FBET
FBEZ
Long message and explanation
AURA CALIB ERROR
Aura calibration error.
AURA TMP SEN ERR
Aura temperature sensor error.
AURA TMP SEN ERR
Aura temperature sensor error.
BEAM CALIB ERROR
Beam calibration error.
BEAM TMP SEN ERR
Beam temperature sensor error.
BEAM TMP SEN ERR
Beam temperature sensor error.
BEAM TWIST SENSOR ERR
Beam twister position indexing system timeout.
BEAM TWIST ERR
Beam twister error.
BEAM TWIST SENSOR ADJ
Beam twister sensor adjustment error.
COM ERR LED DRV
LED driver communication error.
FIXTURE COLD
Fixture too cold. Physical movement of effects is disabled until fixture has warmed up.
DC TEMP CUT OFF
DC PCB temperature cutoff.
DC TEMP SEN ERR
DC PCB temperature sensor error.
BEAM TWIST FBACK ERR
Beam twister position feedback system timeout. Fixture is unable to correct beam twister
position.
PA N F B ACK ER R
Pan position magnetic indexing system timeout. Fixture is unable to correct pan position (but
pan movement will often still be possible).
TILT FBACK ERR
Tilt position magnetic indexing system timeout. Fixture is unable to correct tilt position (but tilt
movement will often still be possible).
ZOOM FBACK ERR
Zoom position indexing system timeout. Fixture is unable to correct zoom position.
Table 7: Error messages
34 MAC Quantum Wash User Guide
Page 35

Short code
LDTC
LDTE
MMER
PA ER
PFTC
PFTE
PSER
PTCM
SLER
TIER
TSER
UELD
UITC
ZSER
Long message and explanation
LED TEMP SEN ERR
LED board temperature sensor error.
LED TEMP SEN ERR
LED board temperature sensor error.
MISSING MODULE ERR
Impossible to communicate with a module that should be present. Module missing or not
correctly connected.
PA N E R RO R
Pan position electrical indexing system timeout.
PFC TEMP CUT OFF
Power factor correction system temperature cutoff.
PFC TEMP SEN ERR
Power factor correction system temperature sensor error.
PAN SENSOR ERROR
Fixture unable to retrieve reliable data from pan position sensor.
P/T SENSOR ADJUST
Pan/tilt sensors are incorrectly adjusted.
SAFETY LOOP
Safety loop circuit activated. A temperature circuit breaker has shut down LEDs. Circuit breaker
resets automatically after temperature has returned to normal operating range.
TILT ERROR
Tilt position electrical indexing circuit timeout.
TILT SENSOR ERR
Fixture unable to retrieve reliable data from tilt position sensor.
UPL ERR LED DRV
Could not upload new LED driver firmware during a firmware upload. Error cleared when new
firmware is uploaded successfully or power is cycled off and on.
UI TEMP CUTOFF
User interface (LCD display and control panel) temperature cutoff activated.
ZOOM SENSOR ERR
Zoom position electrical indexing system timeout.
Table 7: Error messages
The fixture reports a calibration error if valid calibration data is not detected in EEPROM. The fixture may be
unable to read/write calibration data to EEPROM.
Service and display messages 35
Page 36

www.martin.com • Olof Palmes Allé 18 • 8200 Aarhus N • Denmark
Tel: +45 8740 0000 • Fax +45 8740 0010
 Loading...