

Martin Pro Exterior PixLine 10 Users Manual
Exterior PixLine™ Family
User Manual
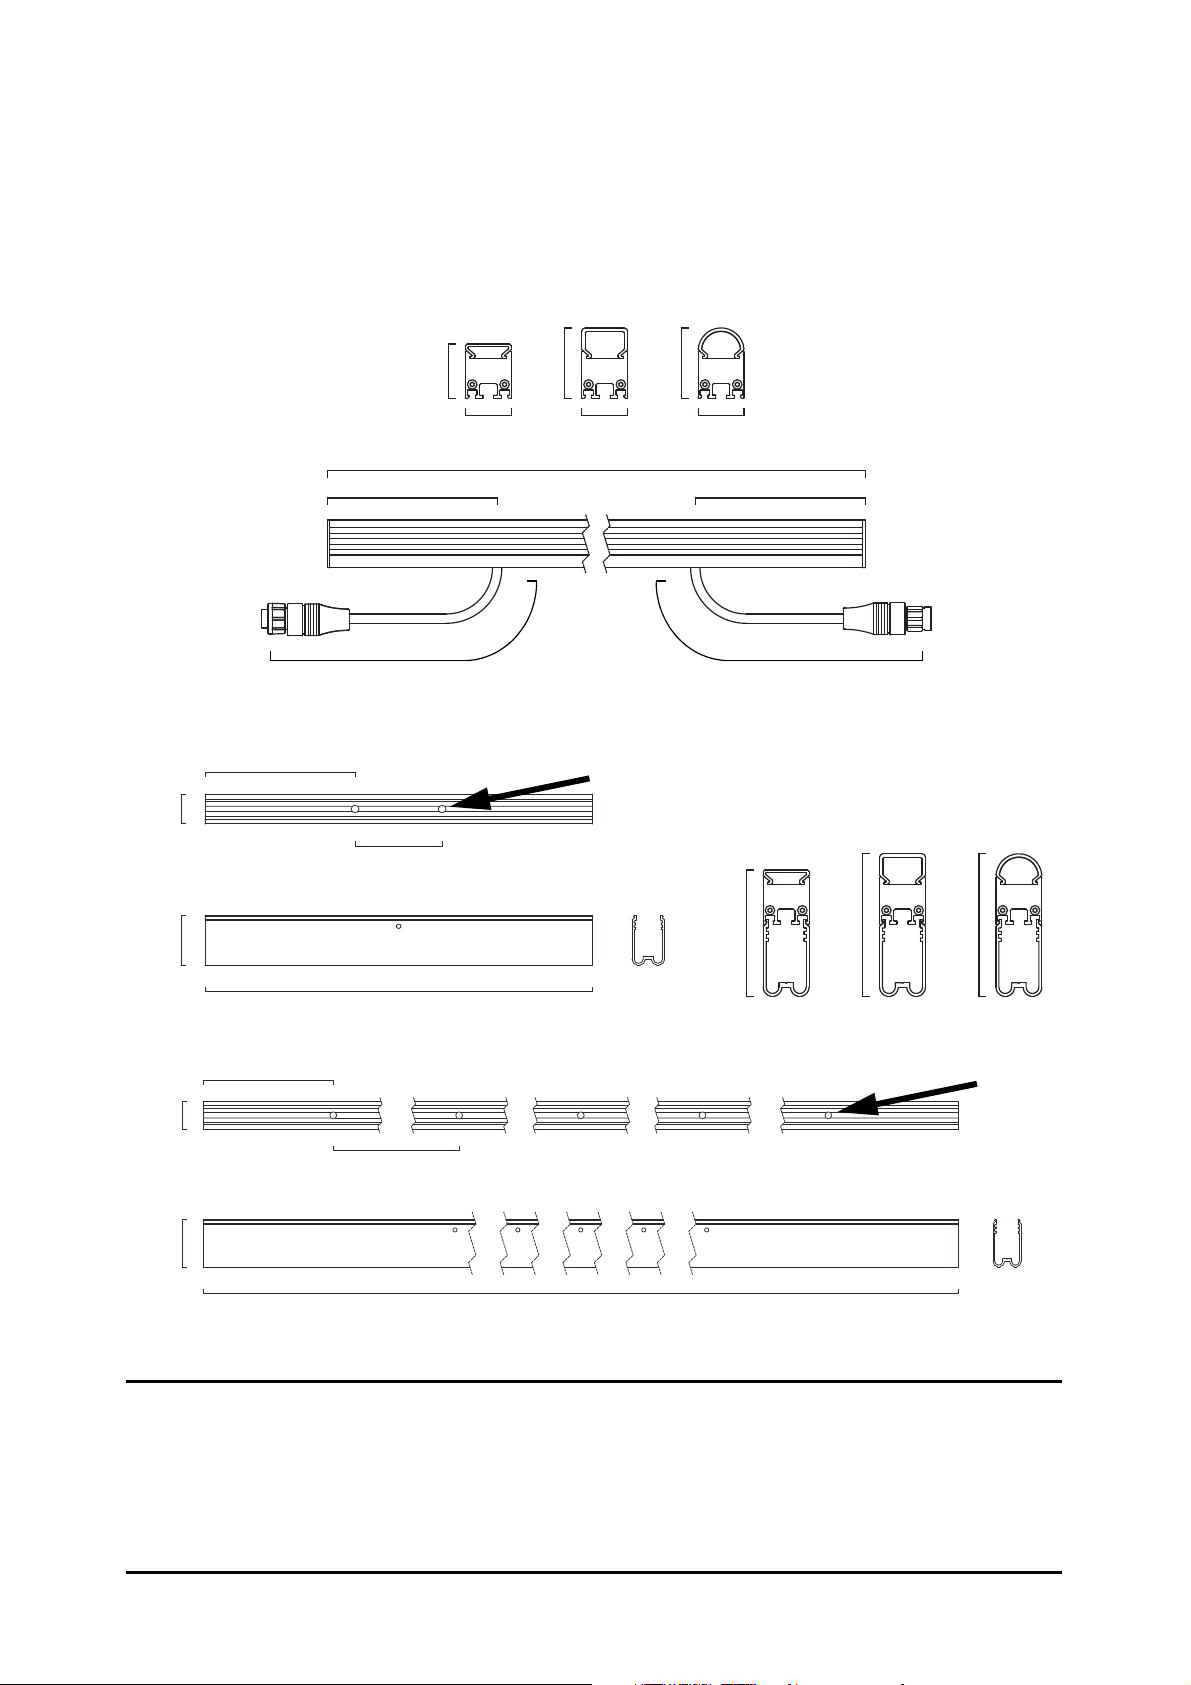
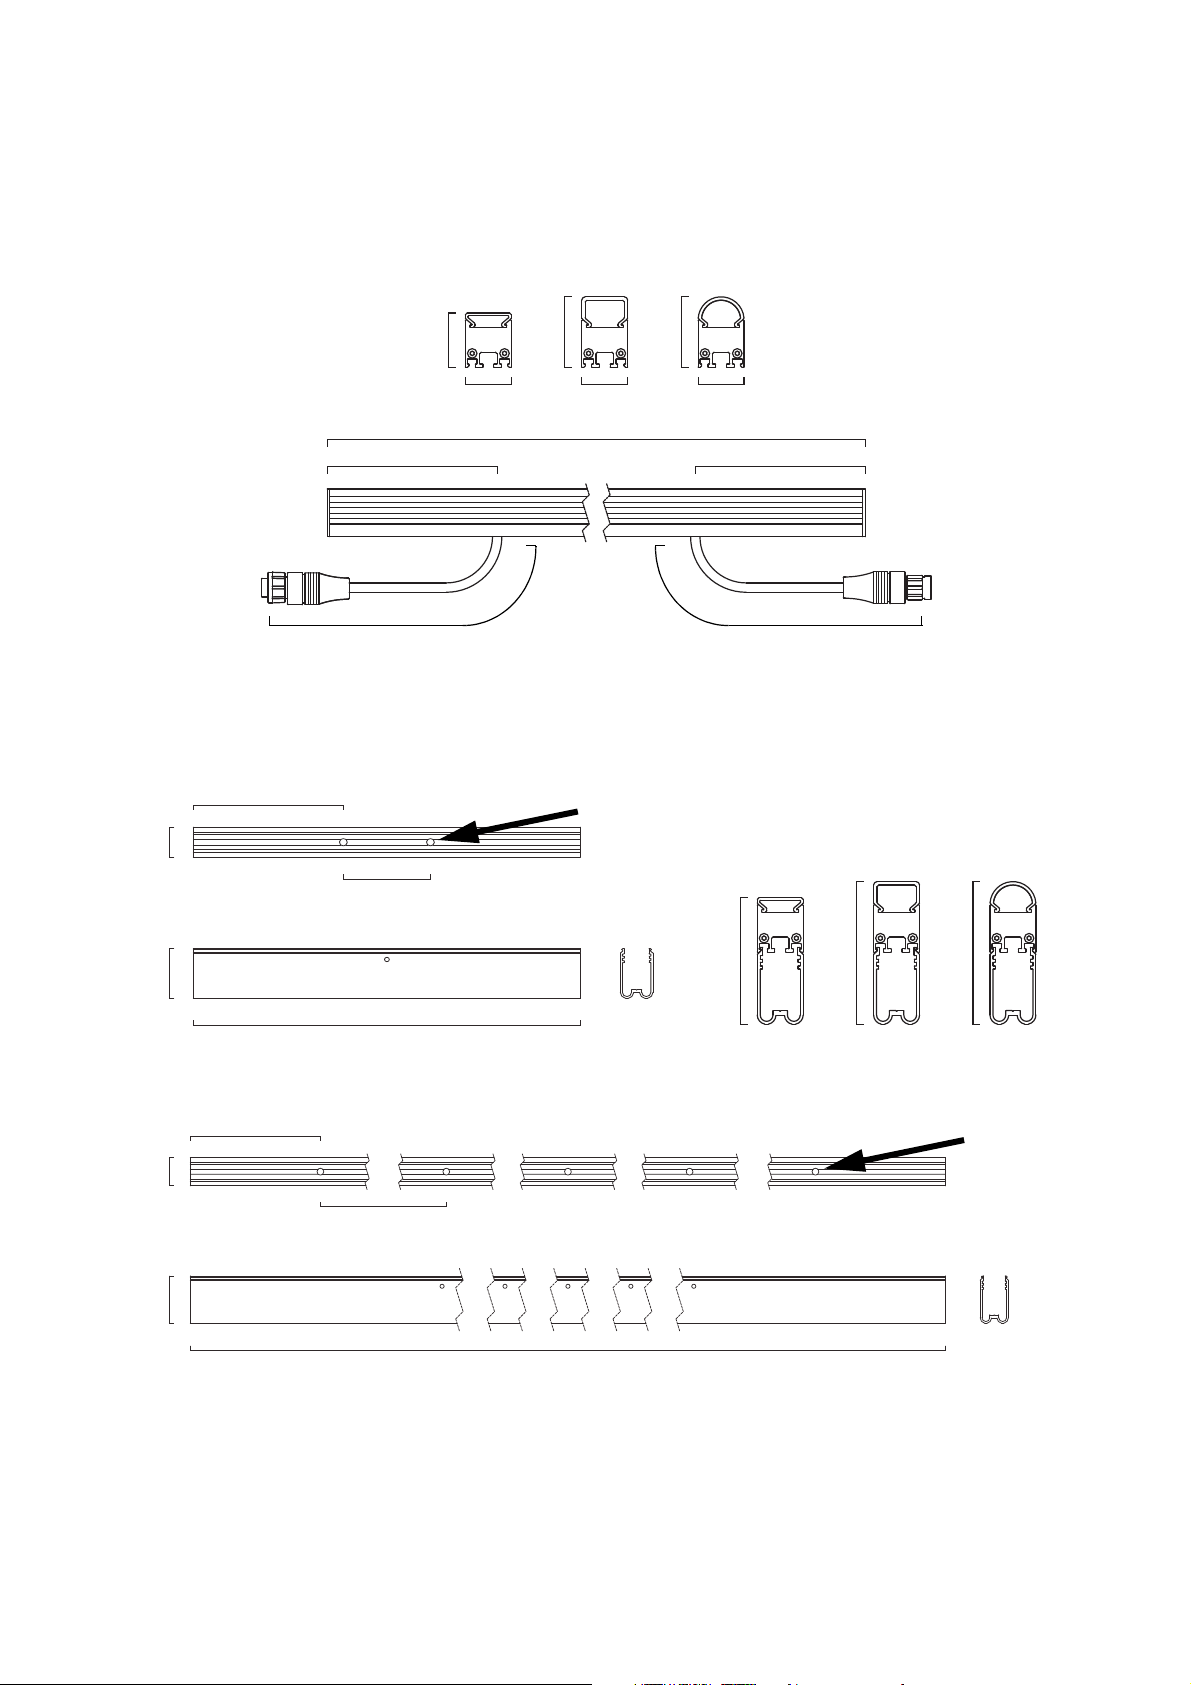
Dimensions
27 27 27
32
42 42
100 100
PixLine 10
Flat diffuser/
Clear window
Square
diffuser /
Asymmetric
graze lens
Round
diffuser
27
PixLine 10 mounting profile
320 / 1280
45
72
320
Ø 6.5
258
124
1280
27
45
124
All dimensions are in millimeters
Ø 6.5
74
84 84
Flat diffuser/
Clear window
Square
diffuser /
Asymmetric
graze lens
Round
diffuser
Input Throughput
150 150
© 2015-2017 Martin Professional ApS. Information subject to change without notice. Martin Professional™ and all affiliated companies disclaim liability for any injury, damage, direct or indirect loss, consequential or economic loss or any other loss occasioned by
the use of, inability to use or reliance on the information contained in this document. Martin™, Harman™ and all other trademarks in
this document pertaining to services or products by Martin Professional™ or its affiliates and subsidiaries are registered as the property of Harman International Industries. Martin Exterior PixLine products are covered by patent application EP 15165618.8 and/or
one or more other intellectual property rights, including one or more intellectual property rights listed on www.martin.com/ipr
Exterior PixLine User Manual P/N 35000289 Rev. F
27 27 27
32
42 42
100 100
PixLine 20, PixLine 40
Flat diffuser/
Clear window
Square
diffuser /
Asymmetric
graze lens
Round
diffuser
27
PixLine 20, PixLine 40 mounting profile
310 / 1270
45
64
310
Ø 6.5
256
123
1270
27
45
123
All dimensions are in millimeters
Ø 6.5
74
84 84
Flat diffuser/
Clear window
Square
diffuser /
Asymmetric
graze lens
Round
diffuser
Input Throughput
150 150
Dimensions 3

Contents
Dimensions . . . . . . . . . . . . . . . . . . . . . . . . . . . . . . . . . . . . . . . . . . . . . . . . . . . . . . . . . . . . . . . . . . . . . . . . 2
Safety information. . . . . . . . . . . . . . . . . . . . . . . . . . . . . . . . . . . . . . . . . . . . . . . . . . . . . . . . . . . . . . . . . . 5
Introduction . . . . . . . . . . . . . . . . . . . . . . . . . . . . . . . . . . . . . . . . . . . . . . . . . . . . . . . . . . . . . . . . . . . . . . . 10
Precautions to avoid damage . . . . . . . . . . . . . . . . . . . . . . . . . . . . . . . . . . . . . . . . . . . . . . . . . . . . . . . . 10
Exterior PixLine™ overview. . . . . . . . . . . . . . . . . . . . . . . . . . . . . . . . . . . . . . . . . . . . . . . . . . . . . . . . 11
Physical installation . . . . . . . . . . . . . . . . . . . . . . . . . . . . . . . . . . . . . . . . . . . . . . . . . . . . . . . . . . . . . . . 12
Avoiding damage when installing . . . . . . . . . . . . . . . . . . . . . . . . . . . . . . . . . . . . . . . . . . . . . . . . . . . . . 12
Installing using mounting profile . . . . . . . . . . . . . . . . . . . . . . . . . . . . . . . . . . . . . . . . . . . . . . . . . . . . . . 14
Installing directly on a surface or structure . . . . . . . . . . . . . . . . . . . . . . . . . . . . . . . . . . . . . . . . . . . . . . 16
System installation . . . . . . . . . . . . . . . . . . . . . . . . . . . . . . . . . . . . . . . . . . . . . . . . . . . . . . . . . . . . . . . . 17
Installing a P3 system . . . . . . . . . . . . . . . . . . . . . . . . . . . . . . . . . . . . . . . . . . . . . . . . . . . . . . . . . . . . . . 17
Installing a DMX-controlled system . . . . . . . . . . . . . . . . . . . . . . . . . . . . . . . . . . . . . . . . . . . . . . . . . . . . 19
System setup . . . . . . . . . . . . . . . . . . . . . . . . . . . . . . . . . . . . . . . . . . . . . . . . . . . . . . . . . . . . . . . . . . . . . 24
Pixels and segments . . . . . . . . . . . . . . . . . . . . . . . . . . . . . . . . . . . . . . . . . . . . . . . . . . . . . . . . . . . . . . . 24
Setting up for P3 display . . . . . . . . . . . . . . . . . . . . . . . . . . . . . . . . . . . . . . . . . . . . . . . . . . . . . . . . . . . . 24
Setting up for DMX control. . . . . . . . . . . . . . . . . . . . . . . . . . . . . . . . . . . . . . . . . . . . . . . . . . . . . . . . . . . 24
RDM . . . . . . . . . . . . . . . . . . . . . . . . . . . . . . . . . . . . . . . . . . . . . . . . . . . . . . . . . . . . . . . . . . . . . . . . . . . . . 26
Using the Exterior PixLine . . . . . . . . . . . . . . . . . . . . . . . . . . . . . . . . . . . . . . . . . . . . . . . . . . . . . . . . . 27
P3 display . . . . . . . . . . . . . . . . . . . . . . . . . . . . . . . . . . . . . . . . . . . . . . . . . . . . . . . . . . . . . . . . . . . . . . . 27
DMX control . . . . . . . . . . . . . . . . . . . . . . . . . . . . . . . . . . . . . . . . . . . . . . . . . . . . . . . . . . . . . . . . . . . . . . 27
Magnetic ‘control button’ . . . . . . . . . . . . . . . . . . . . . . . . . . . . . . . . . . . . . . . . . . . . . . . . . . . . . . . . . . . . 27
Service and maintenance. . . . . . . . . . . . . . . . . . . . . . . . . . . . . . . . . . . . . . . . . . . . . . . . . . . . . . . . . . 29
Cleaning. . . . . . . . . . . . . . . . . . . . . . . . . . . . . . . . . . . . . . . . . . . . . . . . . . . . . . . . . . . . . . . . . . . . . . . . . 29
Condensation and pressure relief valve . . . . . . . . . . . . . . . . . . . . . . . . . . . . . . . . . . . . . . . . . . . . . . . . 29
LED performance. . . . . . . . . . . . . . . . . . . . . . . . . . . . . . . . . . . . . . . . . . . . . . . . . . . . . . . . . . . . . . . . . . 29
Installing new software . . . . . . . . . . . . . . . . . . . . . . . . . . . . . . . . . . . . . . . . . . . . . . . . . . . . . . . . . . . . . 30
Troubleshooting . . . . . . . . . . . . . . . . . . . . . . . . . . . . . . . . . . . . . . . . . . . . . . . . . . . . . . . . . . . . . . . . . . 31
DMX protocols . . . . . . . . . . . . . . . . . . . . . . . . . . . . . . . . . . . . . . . . . . . . . . . . . . . . . . . . . . . . . . . . . . . . 32
RGB Mode. . . . . . . . . . . . . . . . . . . . . . . . . . . . . . . . . . . . . . . . . . . . . . . . . . . . . . . . . . . . . . . . . . . . . . . 32
Basic Mode . . . . . . . . . . . . . . . . . . . . . . . . . . . . . . . . . . . . . . . . . . . . . . . . . . . . . . . . . . . . . . . . . . . . . . 32
Segment Mode . . . . . . . . . . . . . . . . . . . . . . . . . . . . . . . . . . . . . . . . . . . . . . . . . . . . . . . . . . . . . . . . . . . 33
Pixel Mode. . . . . . . . . . . . . . . . . . . . . . . . . . . . . . . . . . . . . . . . . . . . . . . . . . . . . . . . . . . . . . . . . . . . . . . 34
Pre-programmed FX . . . . . . . . . . . . . . . . . . . . . . . . . . . . . . . . . . . . . . . . . . . . . . . . . . . . . . . . . . . . . . . 35
Specifications . . . . . . . . . . . . . . . . . . . . . . . . . . . . . . . . . . . . . . . . . . . . . . . . . . . . . . . . . . . . . . . . . . . . . 36
4 Exterior PixLine™ User Manual
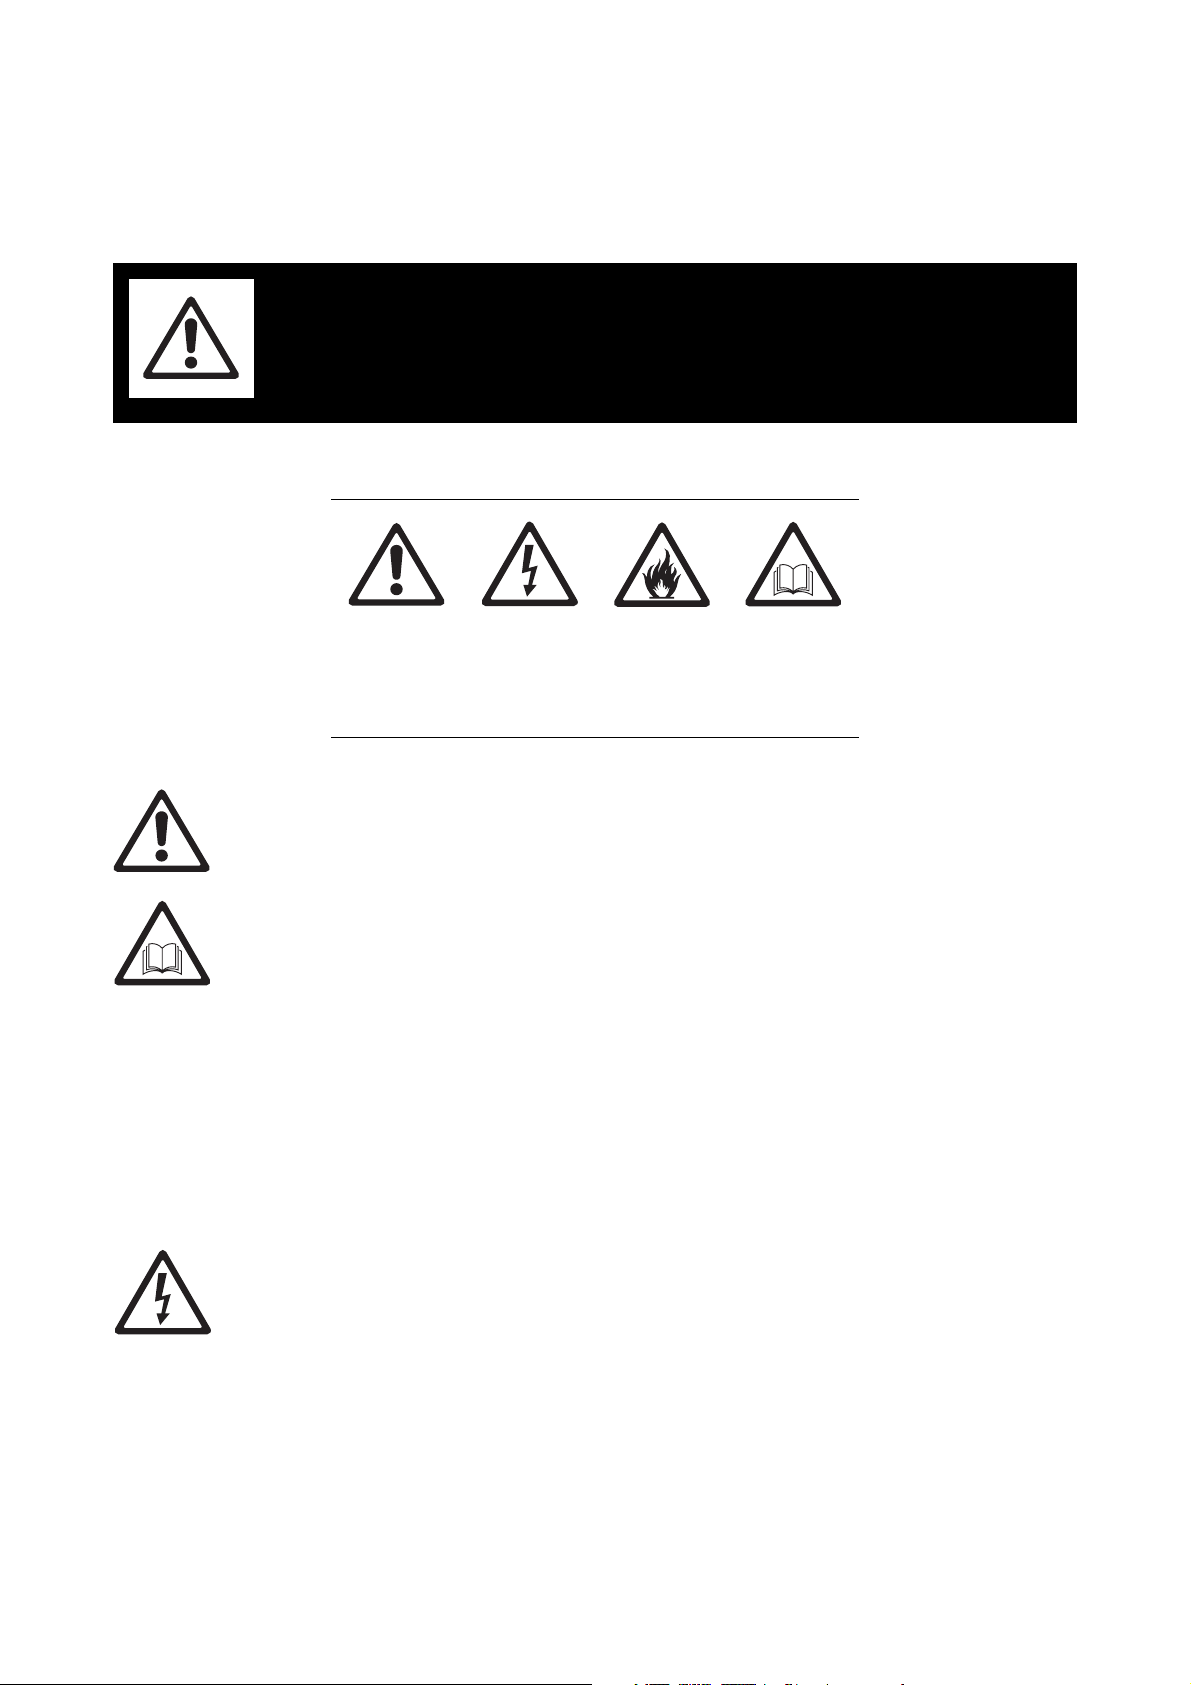
Safety information
WARNING!
Read the safety precautions in this section before
installing, powering, operating or servicing this
product.
The following symbols are used to identify important safety information on the product and in this document:
Warning!
Safety hazard.
Risk of severe
injury or
death.
Warning!
• Read this user manual before installing and operating the Martin Exterior PixLine™. Keep this
manual for future reference.
• Follow the safety precautions given in this user manual and in the manuals of all the devices you
connect to it. Observe all warnings given in manuals and printed on devices. Make sure that
everyone who is involved in working on or using the Exterior PixLine has read and understood
these safety precautions and warnings.
• Install, connect, operate and service devices only as described in this manual and in connected
devices’ manuals and only in accordance with local laws and regulations. All Martin™ manuals
are supplied with devices and are also available for download from www.martin.com.
• The Exterior PixLine is not for household use. It presents risks of severe injury or death due to fire
and burn hazards, electric shock and falls. It must be installed by qualified technicians only.
• The Exterior PixLine does not have user-serviceable parts. Refer any operation not described in
this manual to Martin™ Global Service or Martin™ authorized service agents.
If you have any questions about how to operate the Exterior PixLine safely, please contact your Martin™
supplier or call the Martin™ 24-hour service hotline on +45 8740 0000, or in the USA on 1-888-tech-180.
Warning!
Hazardous
voltage. Risk
of severe or
lethal electric
shock.
Warning!
Fire hazard.
Warning!
Refer to user
manual.
PROTECTION FROM ELECTRIC SHOCK
• Read and respect the directions given in the user manuals of all the devices that you intend to connect to
the Exterior PixLine, particularly the instructions, warnings and limits that apply to:
- system layout,
- connections to other devices,
- specified cables,
- maximum cable lengths, and
- maximum number of devices that can be connected.
• Use only the cables specified in this manual and on the Martin™ website at www.martin.com to
interconnect devices in the installation. If the specified cables are not long enough for an intended cable
run, consult Martin™ for assistance in finding or creating a safe alternative solution.
Safety information 5

• Provide a means of locking out AC mains power that allows power to the installation to be shut down and
made impossible to reapply, even accidentally, during work on the installation.
• Shut down power to the installation during service and when it is not in use.
• Before applying power to the installation, check that all power distribution equipment and cables are in
perfect condition and rated for the current requirements of all connected devices.
• Isolate the installation from power immediately if any product, power cable or power plug is in any way
damaged, defective, or if it shows signs of overheating.
• Do not immerse the Exterior PixLine fixture in water.
• Do not allow the total length (including fixtures and cable) of a linked chain of Exterior PixLine fixtures to
exceed 50 m (164 ft.) from the 48 VDC power source (Martin P3 PowerPort 1500™, Martin P3 PowerPort
1000 IP™, Martin™ IP66 PSU or other external PSU) to the last Exterior PixLine at the end of the chain.
• If you supply a chain of Exterior PixLine fixtures with DC power from a generic 48 VDC external PSU and
the DC output used does not have constant overcurrent protection that limits current to 8 A, install an
inline fuseholder with a 7.5 A or 8 A fuse on the circuit that you connect to that DC output.
Safety limits for connecting devices
Do not exceed the maximum safety limits given in the following tables.
Martin P3 PowerPort 1500™ safety limits
If you supply Exterior PixLine fixtures with DC power from a Martin P3 PowerPort 1500™:
• Do not connect more than one chain of fixtures to one DC output on the P3 PowerPort 1500™. Since the
P3 PowerPort 1500™ has four DC outputs, you can connect a maximum of four chains of fixtures to one
P3 PowerPort 1500™.
• Do not exceed the maximum total length of fixtures (including standard and custom lengths) that you can
include in one chain (see Table 1).
• Do not exceed a maximum total length of 50 m (164 ft.) for a chain, including fixtures and cable, measured
from the P3 PowerPort 1500™ to the end of the chain (see Table 1).
Type of fixture in
chain
Maximum total length of
fixtures in chain
Maximum total length of
chain (fixtures and
cable)
Exterior PixLine 10 10 m 50 m
Exterior PixLine 20 20 m 50 m
Exterior PixLine 40 40 m 50 m
Table 1: Maximum length of Exterior PixLine fixtures and chain per P3 PowerPort 1500™ output
Besides the above limits, each output of a P3 PowerPort 1500™ can drive a maximum of 63 fixtures
regardless of the length of the fixtures. This may affect the Exterior PixLine 40. If you are creating a chain
containing Exterior PixLine 40 320 mm fixtures, you must stop and create a new chain if you reach 63
fixtures.
6 Exterior PixLine™ User Manual

Martin P3 PowerPort 1000 IP™ safety limits
If you supply Exterior PixLine fixtures with DC power from an output on a Martin P3 PowerPort 1000 IP™:
• Do not connect more than one linked chain of Exterior PixLine fixtures to one DC output. Since the P3
PowerPort 1000 IP™ has four DC outputs, you can connect a maximum of four chains of fixtures to one
P3 PowerPort 1000 IP™.
• Do not exceed the maximum total length of fixtures (including standard and custom lengths) that you can
include in one chain given (see Table 2).
• Do not exceed a maximum total length of 50 m (164 ft.) for a chain, including fixtures and cable, measured
from the P3 PowerPort 1000 IP™ to the end of the chain (see Table 2).
Type of fixture in
chain
Maximum total length of
fixtures in chain
Maximum total length of
chain (fixtures and
cable)
Exterior PixLine 10 7 m 50 m
Exterior PixLine 20 14 m 50 m
Exterior PixLine 40 27 m 50 m
Table 2: Maximum number of Exterior PixLine fixtures per P3 PowerPort 1000 IP™ output
Besides the above limits, each output of a P3 PowerPort 1000™ can drive a maximum of 63 fixtures
regardless of the length of the fixtures. This may affect the Exterior PixLine 40. If you are creating a chain
containing Exterior PixLine 40 320 mm fixtures, you must stop and create a new chain if you reach 63
fixtures.
Martin™ IP66 PSU safety limits
You can supply Exterior PixLine fixtures with DC power from a Martin™ IP66 PSU 240W external power
supply unit (this unit was previously called the ‘Martin™ Tripix Power IP66’). If you use this unit to supply DC
power:
• Do not connect more than one linked chain of Exterior PixLine fixtures to the DC power output of the
Martin™ IP66 PSU.
• Do not exceed the maximum total length of fixtures (including standard and custom lengths) that you can
include in one chain given (see Table 3).
• Do not exceed a maximum total length of 50 m (164 ft.) for a chain, including fixtures and cable, measured
from the Martin™ IP66 PSU to the end of the chain (see Table 3).
Type of fixture in
chain
Maximum total length of
fixtures in chain
Maximum total length of
chain (fixtures and
cable)
Exterior PixLine 10 7 m 50 m
Exterior PixLine 20 14 m 50 m
Exterior PixLine 40 27 m 50 m
Table 3: Maximum number of Exterior PixLine fixtures per Martin™ IP66 PSU
Generic 48 VDC external PSU safety limits
If you supply a chain of Exterior PixLine fixtures with DC power from a 48 VDC external PSU (power
supply unit) that you obtain yourself, you must not exceed the lowest of these limits:
• Do not create a chain that will exceed the maximum power rating of the PSU output used to supply that
chain with power (to find the power consumption of the chain, multiply the number of fixtures in the chain
with the wattage per fixture according to Table 4).
• Do not exceed the maximum total length of fixtures and the maximum total length of cable that you can
connect in one chain (see Table 4). Include the length of all standard and all custom fixtures when
calculating the total length of fixtures.
• Do not create a chain with a total length of more than 50 m (164 ft.).
Safety information 7
Each time you reach (a) the maximum total length of fixtures in one chain, or (b) 50 m (164 ft.) total length of
the chain, or (c) the PSU output’s maximum power rating – whichever you reach first – you must create a
new chain of fixtures that is connected to a new 48 VDC power output.
Type of fixture in
chain
Exterior PixLine 10,
1280 mm
Exterior PixLine 10,
320 mm
Exterior PixLine 10,
custom lengths
Exterior PixLine 20,
1280 mm
Exterior PixLine 20,
320 mm
Exterior PixLine 20,
custom lengths
Exterior PixLine 40,
1280 mm
Exterior PixLine 40,
320 mm
Exterior PixLine 40,
custom lengths
Wattage per fixture
44 W
11 W
Allow 36 W per meter
22 W
5.5 W
Allow 18 W per meter
11 W
3 W
Allow 9 W per meter
Maximum total length
of fixtures in chain
10 m 50 m
20 m 50 m
40 m 50 m
Maximum total length
of chain (fixtures and
cable)
Table 4: Maximum number of Exterior PixLine fixtures per 48 VDC external PSU (provided that PSU
rating in watts is not exceeded).
PROTECTION FROM BURNS AND FIRE
• The Exterior PixLine is cooled by convection. Ensure sufficient ventilation by providing free airflow and
keep a minimum distance of 10 mm (0.4 in.) between the fixture and any surfaces or objects around it.
• Do not operate the Exterior PixLine if the ambient temperature (Ta) around the fixture exceeds 55° C
(131° F).
• Do not modify the Exterior PixLine in any way not described in this manual or install other than genuine
Martin™ parts. Use only accessories approved by Martin™.
PROTECTION FROM INJURY
• Read carefully the chapter “Physical installation” on page 12 and respect the limits and instructions given
in that chapter.
• Ensure that the installation hardware and supporting surface or structure can hold at least 10 times the
weight of all the devices they support.
• Block access below the work area and work from a stable platform whenever installing, servicing or
moving the Exterior PixLine.
• Make sure that all items are securely installed, taking into consideration all possible environmental
conditions including temperature variation and wind. Make sure that it is impossible for items to fall,
causing injury or damage.
• Use grade 8.8 strength fasteners that are suitable for their purpose and the installation environment.
• Fasten 310 mm and 320 mm fixtures to the supporting surface or structure with a minimum of two
fasteners (screws, bolts, etc.) per fixture. Fasten 1270 mm and 1280 mm fixtures to the supporting
surface or structure with a minimum of five fasteners (screws, bolts, etc.) per fixture.
• Either use self-locking nuts or use lockwashers with standard nuts on all bolts.
• Use a torque driver when tightening bolts on mounting profile locks and tighten to a torque of 1 Nm
(0.75 ft.-lbs.).
8 Exterior PixLine™ User Manual

• In all installations where fixtures may be exposed to temperature variation of +/- 5° C (+/- 9° F) or more,
allow as described in this manual a 10 mm gap between fixtures to allow for thermal expansion. This
requirement applies in all indoor locations that are not maintained at constant temperature and in all
outdoor locations.
Safety information 9

Introduction
Thank you for selecting a product from the Martin Exterior PixLine™ family. These compact LED-based
display fixtures are designed to integrate into a Martin P3™ video system, where they can display video
from a variety of sources. They can also be controlled using DMX. Use of an RDM-compliant DMX controller
such as the Martin M-PC™ allows two-way communication and remote management of Exterior PixLine
fixtures from the controller.
The Exterior PixLine combines flexibility and simplicity with high-quality video display capabilities. Multiple
Exterior PixLine fixtures can be combined in ways that give exceptional creative potential. Fixtures are
supplied in a range of optical configurations including left and right side wallwasher versions designed for
illuminating surfaces. A hybrid (power and data) cabling system allows Exterior PixLine fixtures to be
daisy-chained for easy setup and minimal cabling.
The Exterior PixLine consists of a linear array of LEDs encapsulated in resin in an aluminum profile with a
diffuser or other front cover that is permanently sealed onto the profile to give a rugged IP66-rated fixture. It
offers the following features:
• IP66-rated fixtures and connectors
• Fast, flexible mounting options
• Clear anodized as standard, custom RAL colors available by special order
• Range of optical variants: clear front, flat diffuser, round diffuser, square diffuser and graze (asymmetric
wallwasher) lens options
• Three pixel pitch (LED center-to-center distance) options: 10, 20 or 40 mm
• Short 310/320 mm (12.2/12.6 in.) and long 1270/1280 mm (50.0/50.4 in.) models
• Individually controllable pixels
• High-quality 16-bit per color RGB image processing technology
• Pixel-level brightness and color calibration for optimal image quality
• P3 and DMX control with automatic protocol detection
• Intuitive pixel mapping and addressing using a Martin P3™ system controller
• Single hybrid cable transmits both power and data
• External power and data processor (Martin P3 PowerPort 1500™ or P3 PowerPort 1000 IP™) and simple
cabling system.
Custom lengths from 300 mm to 2000 mm can be made to special order. Please consult your Martin™
supplier for details.
For detailed dimensions drawings in various file formats of all the products in the Exterior PixLine family,
please see the Exterior PixLine Product Support pages on the Martin™ website at www.martin.com
Martin™ user documentation is supplied with products and available for download from www.martin.com,
where you can also find the latest specifications, firmware updates and support information for all Martin™
products.
At Martin™ we welcome input from users. Comments or suggestions regarding this manual can be e-mailed
to service@martin.dk or posted to: User Documentation, Martin Professional ApS, Olof Palmes Allé 18,
DK-8200 Aarhus N, Denmark.
Precautions to avoid damage
Important! To get the best out of the Exterior PixLine and avoid causing damage that is not covered
by the product warranty, read the following information carefully. Make sure that everyone who is
involved in installing, working on or using the Exterior PixLine has read and understood this
information.
Cleaning
Excessive dirt buildup causes overheating and may damage the product. Damage caused by inadequate
cleaning is not covered by the product warranty.
10 Exterior PixLine™ User Manual
Operating temperature precautions
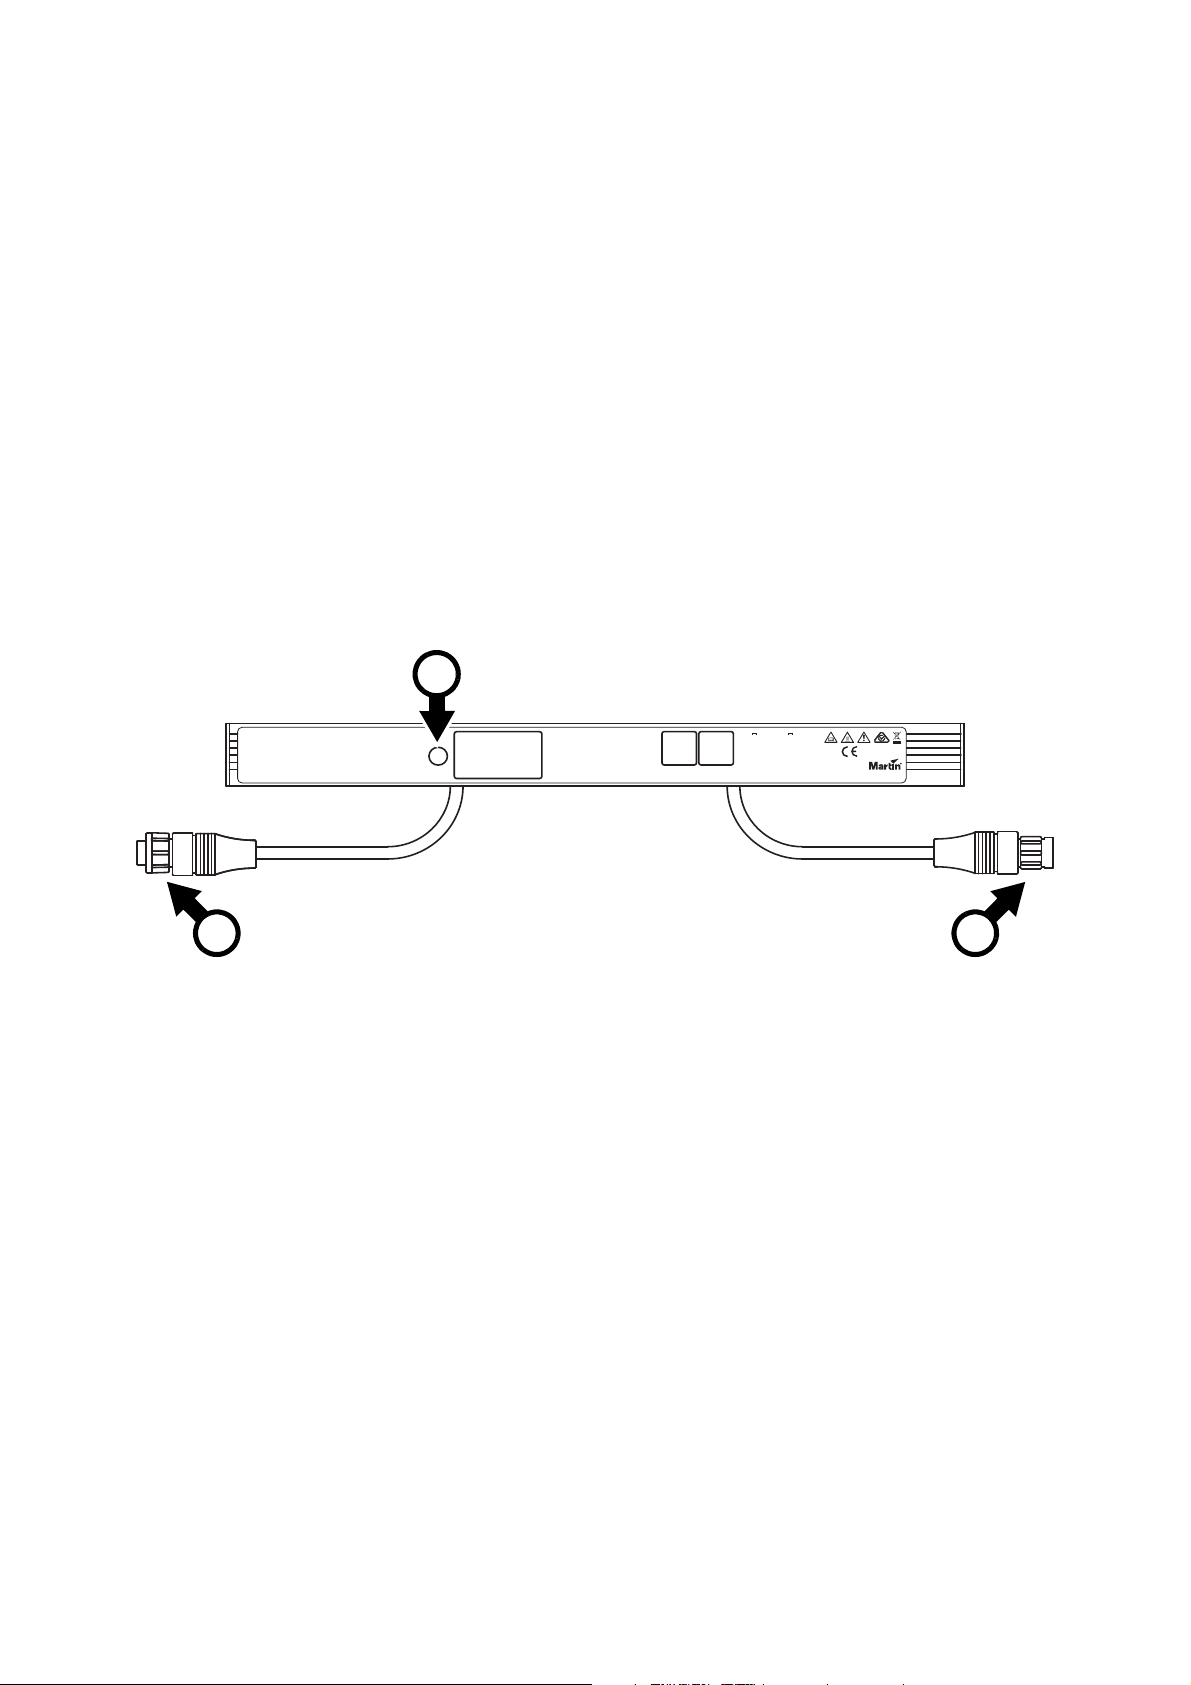
Figure 1: Overview
A - 48 VDC power + video data male BBD-type input connector
B - 48 VDC power + video data female BBD-type output (thru) connector
C - Magnetic control sensor (encased inside fixture) – can be activated using accessory tool
320 mm fixture illustrated
A B
C
• Operating the Exterior PixLine in an ambient temperature that exceeds the specified maximum of 55° C
(131° F) for showing average video content may reduce the lifetime of the product.
• Exterior PixLine fixtures have an internal thermal sensor. If the sensor measures excessive temperature,
a thermal protection cutout shuts down the fixture. The fixture will not function normally again until the
temperature has fallen to a safe level.
• When using a Martin P3™ System Controller you can enable "thermal throttling" functionality. This feature
gradually dims fixtures if they get hot, avoiding full thermal shutdowns.
Sealing unused connectors with blanking caps
Blanking caps for female BBD connectors can be ordered separately in sets of 10 (see “Connectors” on
page 38). Install blanking caps on all unused female BBD connectors to seal them against water and dirt,
otherwise short-circuits and damage may occur.
Exterior PixLine™ overview
Serial no. label
Swipe Magnet Once:
Display status
Swipe Again: Step
through test patterns
Swipe and Hold till
4 LEDs Blue:
Reboot
Swipe and Hold till
4 LEDs White: Factory Reset
WARNING!
• For safety instructions see user guide.
• Disconnect from mains before servicing.
Test /
Reset
• Refer servicing to qualified service personnel.
• Maximum ambient temperature Ta = 55°C.
• Risk of fire and electric shock.
• Not for household use.
• Secure fixture with safety cable when suspending.
• Do not connect or disconnect live power cables.
Supplier
label
This device complies with part
15, class A of the FCC rules.
48 V INPUT / 48 V OUT
See user manual before
Calib.
connecting to THRU connector.
label
Do not link products in a chain
that will exceed 345 W total wattage.
IP 66
SUITABLE FOR WET LOCATIONS
CONVIENT AUX EMPLACEMENTS MOUILLÉS
Olof Palmes Allé 18
DK-8200 Aarhus N
Designed in Denmark
Assembled in Hungary
Exterior PixLine™ overview 11

Physical installation
Warning! Read “Safety information” on page 5 before installing the Exterior PixLine and read all of
this ‘Physical installation’ chapter before starting work.
Warning! Thermal expansion can create a safety hazard and cause damage if fixtures are installed
end-to-end without a gap between them and exposed to temperature variations of +/- 5° C (+/- 9° F)
or more. In outdoor locations and all locations where significant temperature variations are present,
all Exterior PixLine mounting profiles and fixtures must be installed with a 10 mm gap between the
ends of fixtures to allow for thermal expansion.
You can install the Exterior PixLine on a surface or structure using two methods:
• You can fasten Exterior PixLine mounting profile into position first and then secure fixtures on the profile.
This option lets you conceal up to two cable runs inside the profile and gives a clean appearance.
• You can bolt Exterior PixLine fixtures directly to a structure or surface, using the channels in the base of
fixtures as tracks to hold M6 bolt heads.
The Exterior PixLine can be installed in any orientation.
Allow free airflow and 10 mm (0.4 in.) minimum clearance around the fixture. You must also allow clearance
around mounting locks for access with a wrench or Allen key (see Figure 4 on page 15).
The Exterior PixLine is designed to withstand water projections such as rainfall and low-pressure water jets
and can be installed outdoors, but do not submerge it and do not install it in a location where water can build
up around the fixture. If necessary, provide drainage at the installation location.
Optimizing optical characteristics
If you install multiple fixtures that run parallel at the same angle, install the fixtures with their male
connectors at the same end, running extension cables between female and male connectors if necessary
(see “Cables” on page 38). This will give the most even optical characteristics.
Installing Exterior PixLine fixtures vertically in columns will give the most even light output when viewing the
installation from the side. There is only a minor difference compared to fixtures installed horizontally in rows,
however, and any unevenness in horizontal fixtures will only be visible when they are viewed from the side.
Avoiding damage when installing
Avoid causing damage that is not covered by the product warranty by following these instructions carefully.
Keeping connections dry
Moisture on connectors can cause short circuits and damage to products. Check that all connectors are
perfectly dry before you connect them. Do not install the Exterior PixLine during wet weather conditions or if
condensation is visible on any surfaces.
Avoiding shocks and stress
Do not expose the Exterior PixLine to physical shocks (by dropping onto a hard surface, for example).
Do not apply pressure to or otherwise stress diffusers or lenses.
Do not stress cables (by bending them sharply, for example). Protect cables from sharp edges.
Protection from corrosion
Fixtures and profiles are manufactured in corrosion-resistant anodized aluminum, but you must take
precautions to avoid direct contact between aluminum and other metals, as this can cause galvanic
corrosion:
• Use an electrically insulating material (such as rubber or plastic) or a coating between aluminum fixtures
or mounting profiles and any other metal.
• Use a non-conductive coating such as Delta Seal on fasteners (screws, bolts, washers, etc.) where they
come into contact with fixtures or mounting profiles.
12 Exterior PixLine™ User Manual
Thermal expansion, end-to-end gaps and pixel pitch
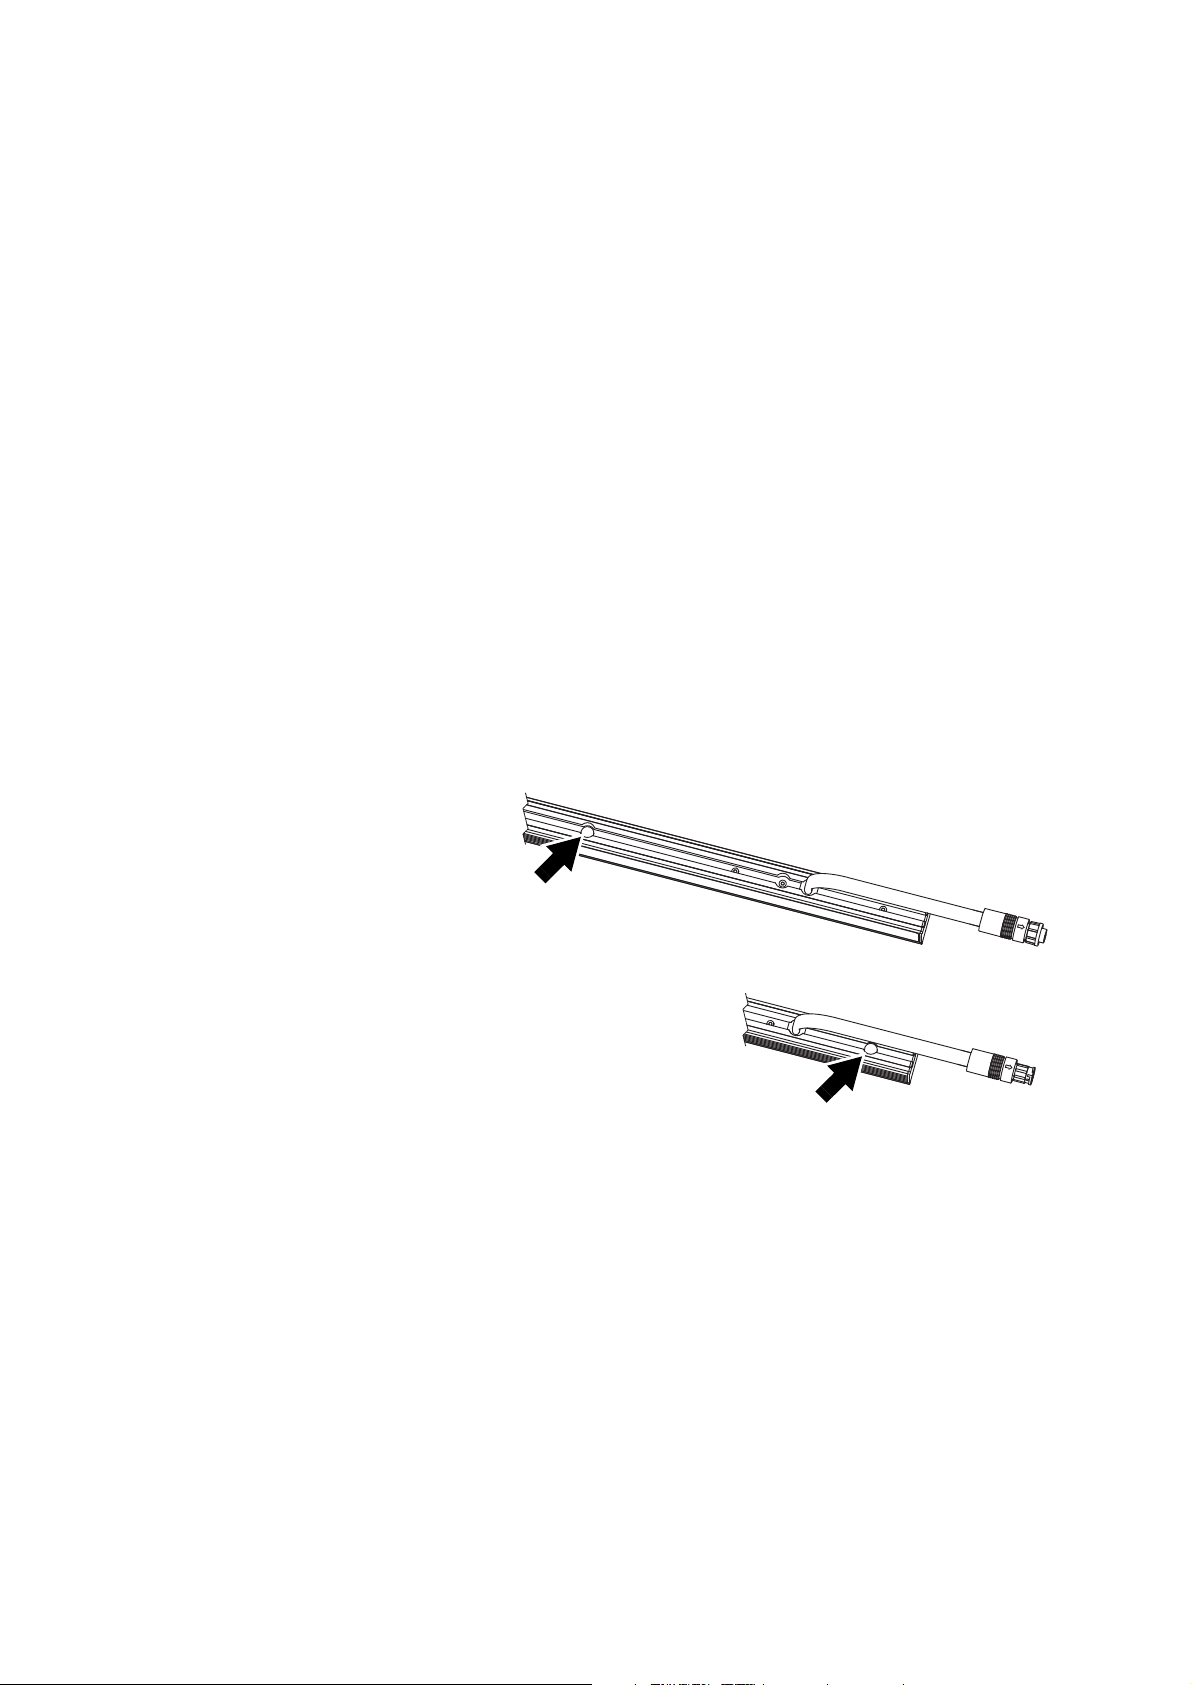
Figure 2: Pressure relief valves
In indoor locations at room temperature and similar locations where Exterior PixLine fixtures are subject to
minimal temperature variations only, it is not necessary to leave end-to-end gaps between Exterior PixLine
10 fixtures to allow for thermal expansion, but you must still leave a gap of approximately 10 mm between
Exterior PixLine 20 and Exterior PixLine 40 fixtures if you want to maintain a uniform pixel pitch. If
maintaining exact pixel pitch is important, adjust the position of fixtures until the end-to-end gaps give the
most even pixel pitch.
To avoid damage to fixtures from thermal expansion and obtain the best visual results, follow these
instructions carefully:
Exterior PixLine 20 and 40
Exterior PixLine 20 and Exterior PixLine 40 standard length fixtures are 310 mm or 1270 mm long.
• In all locations, install standard and custom length fixtures with an end-to-end gap of approximately
10 mm between them. This gap maintains even pixel pitch in a line of fixtures and allows for thermal
expansion.
Exterior PixLine 10
Exterior PixLine 10 standard length fixtures are 320 mm or 1280 mm long.
• In all locations where there may be temperature variations of +/- 5° C (+/- 9° F) or more, install
standard and custom length Exterior PixLine 10 fixtures with an end-to-end gap of approximately10 mm
between them. This means that there will be a one-pixel gap between Exterior PixLine 10 fixtures.
• In indoor locations that remain at constant temperature, you can install fixtures with no end-to-end
gap between them. This will maintain a constant 10 mm pixel pitch across two or more fixtures and avoid
the one-pixel gap between fixtures.
Pressure relief valve
The air inside fixtures expands
and contracts as they warm up
and cool down. See Figure 2. To
equalize the resulting pressure
variations without allowing water
into the fixture, the Exterior
PixLine features a pressure relief
valve (arrowed) with a Gore-Tex
membrane.
Do not allow pressure relief
valves to become blocked.
If a valve is not in perfect
condition, do not operate the
fixture. Contact Martin™ Service
for valve replacement.
Physical installation 13
Installing using mounting profile
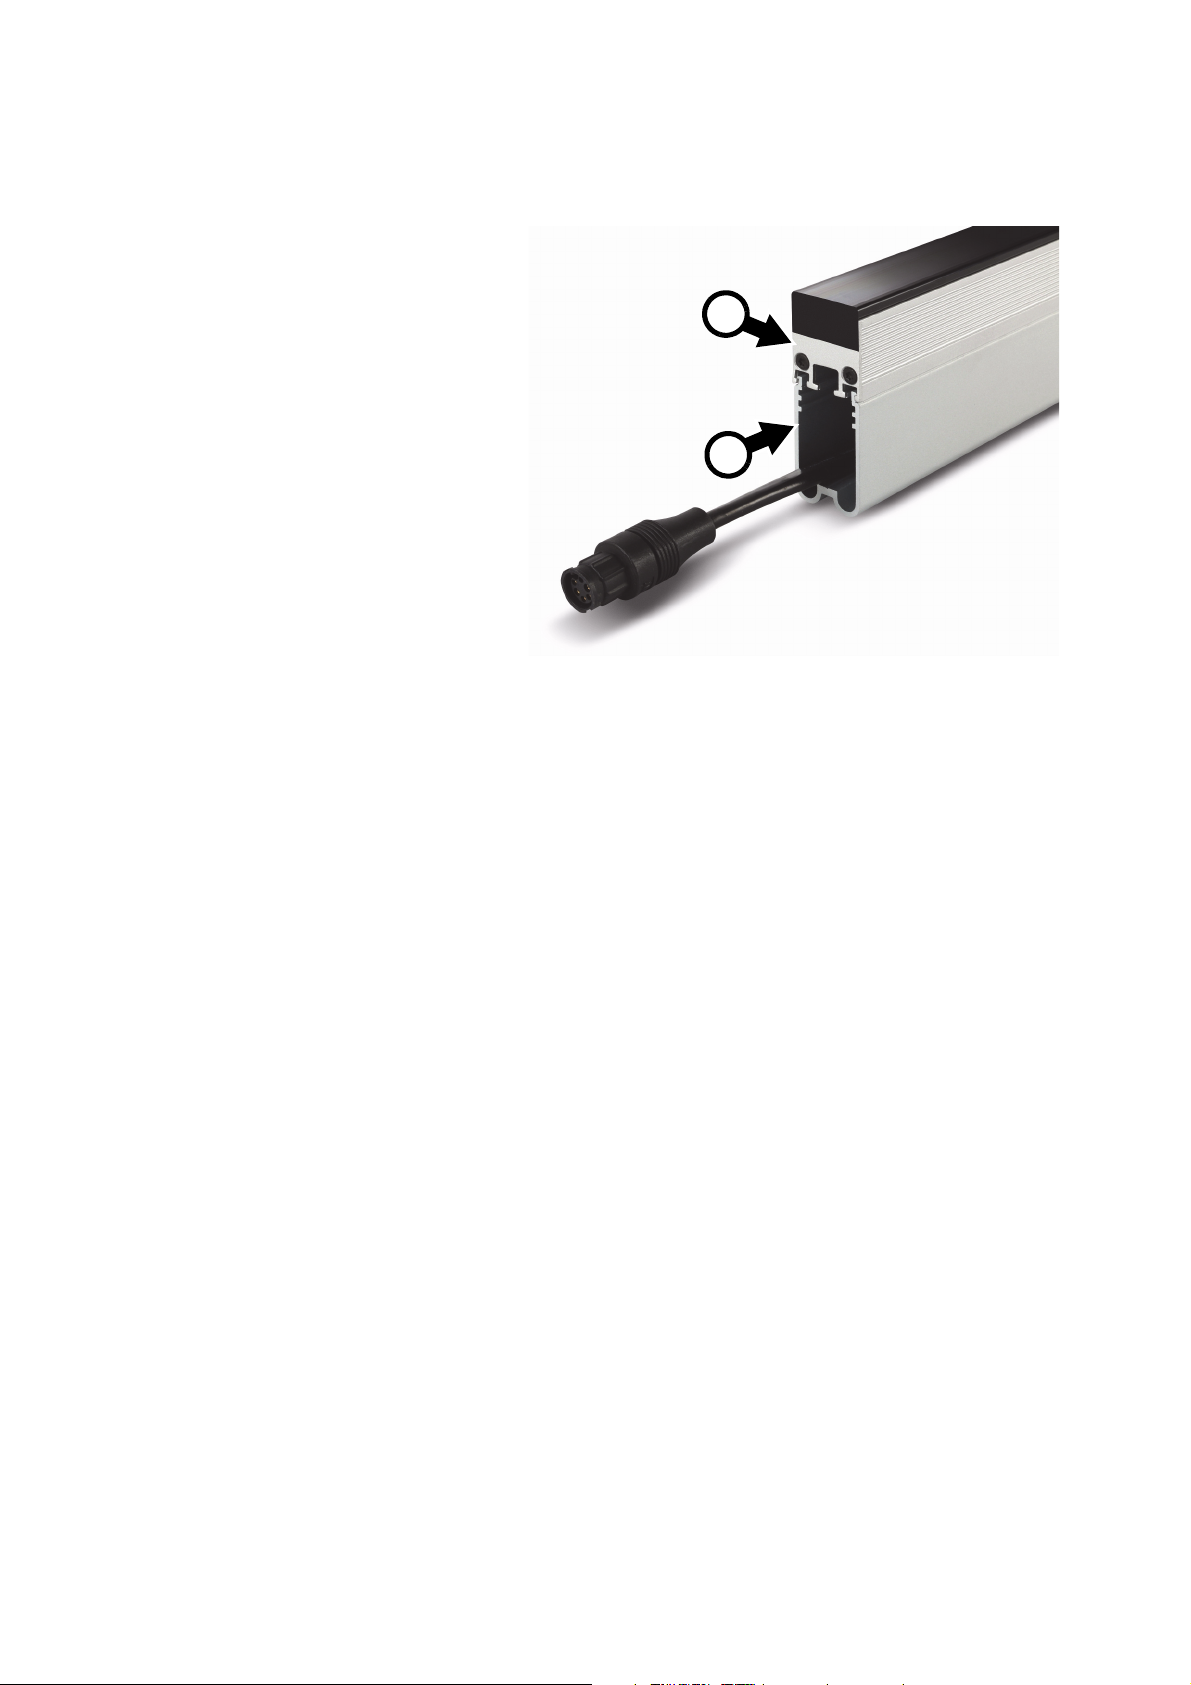
Figure 3: Mounting profile: end view
A
B
To simplify installation on a surface, you can install Exterior PixLine mounting profiles on the surface and
then fasten fixtures into the profiles. The profiles are deep enough to conceal a total of three cable runs.
See Figure 3. To install an
Exterior PixLine fixture A on a
surface using the mounting
profile B designed for the
product:
1. Make sure that you have the
same length of mounting
profile as the length of the
fixtures.
2. If necessary, allow a 10 mm
end-to-end gap between
profiles (see “Thermal
expansion, end-to-end gaps
and pixel pitch” on page 13).
3. With reference to
“Dimensions” on page 2,
mark up the mounting surface
or structure and prepare
holes to accept the fasteners
that you will pass through the
mounting profiles in the
installation. Insert screw plugs
if necessary for a secure
installation.
4. Obtain grade 8.8 strength 6 mm diameter fasteners (screws, screwbolts, bolts, etc.) that are suitable for
the application. You will need one fastener per 6.5 mm diameter hole in the mounting profile. Apply an
electrically insulating coating such as Delta Seal to fasteners to prevent contact between the aluminum
profile and the fasteners. If necessary, use electrically insulating material to prevent contact between the
aluminum profile and any other metals when the profile is installed. Fasten each mounting profile to the
surface or structure.
5. There is space for you to conceal up to two cable runs in the mounting profile.
14 Exterior PixLine™ User Manual
 Loading...