

Page 1
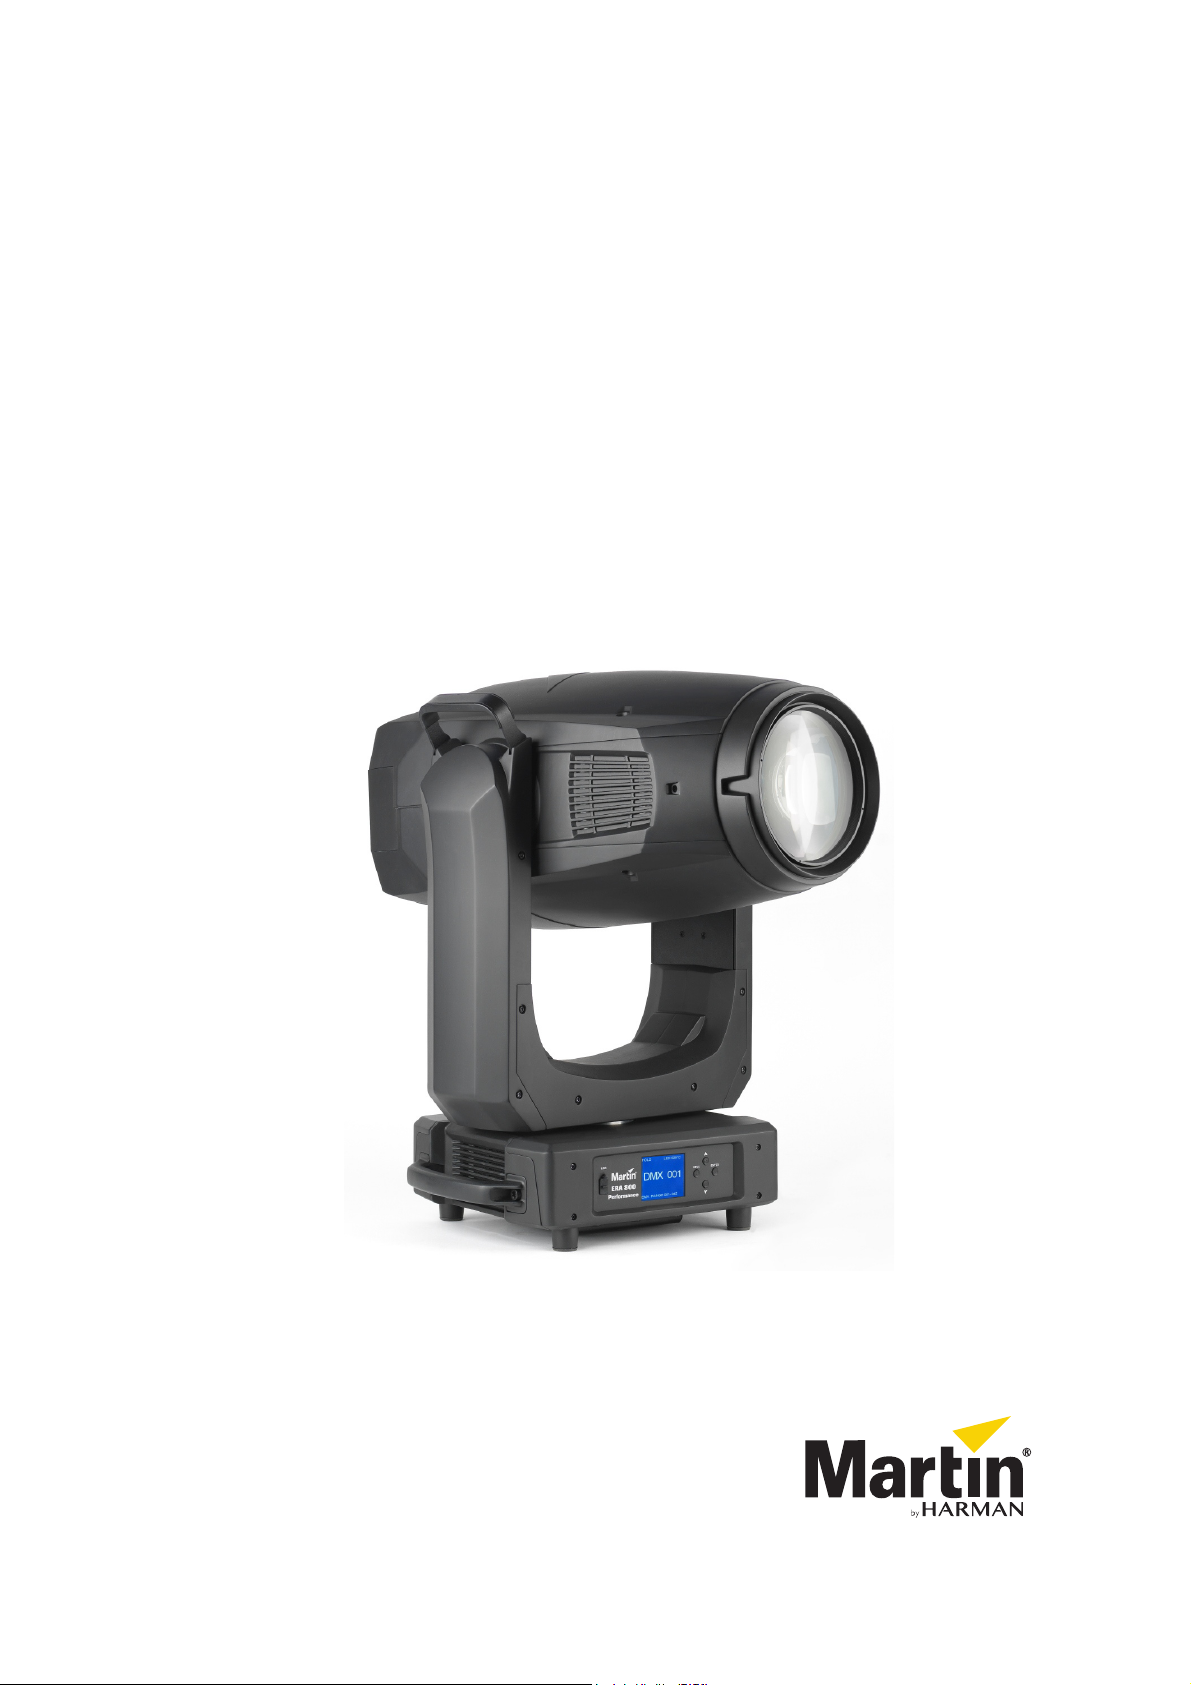
ERA 800 Performance
ERA 800 Profile
User Guide
Page 2

User Documentation update information
Any important changes in the ERA 800 Performance / Profile User Guide are listed below.
Revision E
Updated to include ERA 800 Profile.
Revision D
Covers firmware version 2.3.0. Theater Mode added. Calibration settings management improved. Minor corrections
to control panel menus.
Revision C
Not released. Revisions go from B directly to D in order to stay parallel with Safety and Installation Manual.
Revision B
Zoom control via DMX corrected: operates from narrow to wide as DMX values are increased.
Revision A
First version released. Covers ERA 800 Performance firmware version 1.1.0
©2019-2020 HARMAN PROFESSIONAL DENMARK ApS. All rights reserved. Features, specifications and appearance are subject
to change without notice. HARMAN PROFESSIONAL DENMARK ApS and all affiliated companies disclaim liability for any injury,
damage, direct or indirect loss, consequential or economic loss or any other loss occasioned by the use of, inability to use or reliance
on the information contained in this document. Martin is a registered trademark of HARMAN PROFESSIONAL DENMARK ApS
registered in the United States and/or other countries.
HARMAN PROFESSIONAL DENMARK ApS
, Olof Palmes Allé 44, 8200 Aarhus N, Denmark
HARMAN PROFESSIONAL SOLUTIONS U.S.
, 8500 Balboa Blvd., Northridge CA 91329, USA
www.martin.com
ERA 800 Performance / Profile User Guide, P/N 5124284-00 Rev. E
Page 3

Contents
Introduction . . . . . . . . . . . . . . . . . . . . . . . . . . . . . . . . . . . . . . . . . . . . . . . . . . . . . . . . . . . . . . . . . . . . . . . . 4
Operating the fixture . . . . . . . . . . . . . . . . . . . . . . . . . . . . . . . . . . . . . . . . . . . . . . . . . . . . . . . . . . . . . . . . 4
Effects . . . . . . . . . . . . . . . . . . . . . . . . . . . . . . . . . . . . . . . . . . . . . . . . . . . . . . . . . . . . . . . . . . . . . . . . . . . . . 5
Shutter and strobe effects . . . . . . . . . . . . . . . . . . . . . . . . . . . . . . . . . . . . . . . . . . . . . . . . . . . . . . . . . . . . 5
Dimming. . . . . . . . . . . . . . . . . . . . . . . . . . . . . . . . . . . . . . . . . . . . . . . . . . . . . . . . . . . . . . . . . . . . . . . . . . 5
Color mixing. . . . . . . . . . . . . . . . . . . . . . . . . . . . . . . . . . . . . . . . . . . . . . . . . . . . . . . . . . . . . . . . . . . . . . . 5
Color temperature control . . . . . . . . . . . . . . . . . . . . . . . . . . . . . . . . . . . . . . . . . . . . . . . . . . . . . . . . . . . . 5
Color wheel . . . . . . . . . . . . . . . . . . . . . . . . . . . . . . . . . . . . . . . . . . . . . . . . . . . . . . . . . . . . . . . . . . . . . . . 5
Rotating gobos. . . . . . . . . . . . . . . . . . . . . . . . . . . . . . . . . . . . . . . . . . . . . . . . . . . . . . . . . . . . . . . . . . . . . 6
Static gobos . . . . . . . . . . . . . . . . . . . . . . . . . . . . . . . . . . . . . . . . . . . . . . . . . . . . . . . . . . . . . . . . . . . . . . . 8
Animation wheel . . . . . . . . . . . . . . . . . . . . . . . . . . . . . . . . . . . . . . . . . . . . . . . . . . . . . . . . . . . . . . . . . . . 9
Frost. . . . . . . . . . . . . . . . . . . . . . . . . . . . . . . . . . . . . . . . . . . . . . . . . . . . . . . . . . . . . . . . . . . . . . . . . . . . . 9
Rotating prisms . . . . . . . . . . . . . . . . . . . . . . . . . . . . . . . . . . . . . . . . . . . . . . . . . . . . . . . . . . . . . . . . . . . . 9
Iris . . . . . . . . . . . . . . . . . . . . . . . . . . . . . . . . . . . . . . . . . . . . . . . . . . . . . . . . . . . . . . . . . . . . . . . . . . . . . . 9
Framing (ERA 800 Performance) . . . . . . . . . . . . . . . . . . . . . . . . . . . . . . . . . . . . . . . . . . . . . . . . . . . . . . 9
Zoom and focus . . . . . . . . . . . . . . . . . . . . . . . . . . . . . . . . . . . . . . . . . . . . . . . . . . . . . . . . . . . . . . . . . . . . 9
Pan and tilt. . . . . . . . . . . . . . . . . . . . . . . . . . . . . . . . . . . . . . . . . . . . . . . . . . . . . . . . . . . . . . . . . . . . . . . . 9
Control panel . . . . . . . . . . . . . . . . . . . . . . . . . . . . . . . . . . . . . . . . . . . . . . . . . . . . . . . . . . . . . . . . . . . . . 10
Control options. . . . . . . . . . . . . . . . . . . . . . . . . . . . . . . . . . . . . . . . . . . . . . . . . . . . . . . . . . . . . . . . . . . . 12
DMX. . . . . . . . . . . . . . . . . . . . . . . . . . . . . . . . . . . . . . . . . . . . . . . . . . . . . . . . . . . . . . . . . . . . . . . . . . . . 12
RDM. . . . . . . . . . . . . . . . . . . . . . . . . . . . . . . . . . . . . . . . . . . . . . . . . . . . . . . . . . . . . . . . . . . . . . . . . . . . 12
Fixture setup . . . . . . . . . . . . . . . . . . . . . . . . . . . . . . . . . . . . . . . . . . . . . . . . . . . . . . . . . . . . . . . . . . . . . . 14
Fixture ID . . . . . . . . . . . . . . . . . . . . . . . . . . . . . . . . . . . . . . . . . . . . . . . . . . . . . . . . . . . . . . . . . . . . . . . . 14
Personality . . . . . . . . . . . . . . . . . . . . . . . . . . . . . . . . . . . . . . . . . . . . . . . . . . . . . . . . . . . . . . . . . . . . . . . 14
Factory defaults . . . . . . . . . . . . . . . . . . . . . . . . . . . . . . . . . . . . . . . . . . . . . . . . . . . . . . . . . . . . . . . . . . . 15
Test sequences . . . . . . . . . . . . . . . . . . . . . . . . . . . . . . . . . . . . . . . . . . . . . . . . . . . . . . . . . . . . . . . . . . . 15
Fixture information readouts . . . . . . . . . . . . . . . . . . . . . . . . . . . . . . . . . . . . . . . . . . . . . . . . . . . . . . . . . 15
DMX signal monitoring. . . . . . . . . . . . . . . . . . . . . . . . . . . . . . . . . . . . . . . . . . . . . . . . . . . . . . . . . . . . . . 16
Manual control . . . . . . . . . . . . . . . . . . . . . . . . . . . . . . . . . . . . . . . . . . . . . . . . . . . . . . . . . . . . . . . . . . . . 16
Service. . . . . . . . . . . . . . . . . . . . . . . . . . . . . . . . . . . . . . . . . . . . . . . . . . . . . . . . . . . . . . . . . . . . . . . . . . 16
Adjusting settings via DMX . . . . . . . . . . . . . . . . . . . . . . . . . . . . . . . . . . . . . . . . . . . . . . . . . . . . . . . . 17
Resetting . . . . . . . . . . . . . . . . . . . . . . . . . . . . . . . . . . . . . . . . . . . . . . . . . . . . . . . . . . . . . . . . . . . . . . . . 17
Illuminating the display . . . . . . . . . . . . . . . . . . . . . . . . . . . . . . . . . . . . . . . . . . . . . . . . . . . . . . . . . . . . . 17
Control menu setting overrides . . . . . . . . . . . . . . . . . . . . . . . . . . . . . . . . . . . . . . . . . . . . . . . . . . . . . . . 17
DMX protocol . . . . . . . . . . . . . . . . . . . . . . . . . . . . . . . . . . . . . . . . . . . . . . . . . . . . . . . . . . . . . . . . . . . . . 18
ERA 800 Performance. . . . . . . . . . . . . . . . . . . . . . . . . . . . . . . . . . . . . . . . . . . . . . . . . . . . . . . . . . . . . . 18
ERA 800 Profile . . . . . . . . . . . . . . . . . . . . . . . . . . . . . . . . . . . . . . . . . . . . . . . . . . . . . . . . . . . . . . . . . . . 22
Control panel menus . . . . . . . . . . . . . . . . . . . . . . . . . . . . . . . . . . . . . . . . . . . . . . . . . . . . . . . . . . . . . . 26
Status messages. . . . . . . . . . . . . . . . . . . . . . . . . . . . . . . . . . . . . . . . . . . . . . . . . . . . . . . . . . . . . . . . . . 28
Page 4

Introduction
Warning! Before installing, operating or servicing the ERA 800 Performance / Profile, read the latest
version of the product’s Safety and Installation Manual, paying particular attention to the Safety
Precautions section. The Safety and Installation Manual is supplied with the fixture. The latest
version is also available for download from the ERA 800 Performance / Profile area of the Martin®
website at www.martin.com.
This User Guide is a supplement to the Installation and Safety Manual that is supplied with the ERA 800
Performance / Profile. Both these documents are available for download from the ERA 800 Performance /
Profile area of the Martin website at www.martin.com. This User Guide contains information that is mainly of
interest for lighting designers and operators, whereas the Safety and Installation Manual contains important
information for all users, especially installers and technicians.
We recommend that you check the Martin website regularly for updated documentation, because we
publish revised versions each time we can improve the quality of the information we provide and each time
we release new firmware with changes or new features. Each time we revise this guide we list any important
changes on page 2 so that you can keep track of updates.
ERA 800 Performance and Profile models
The ERA 800 Performance and ERA 800 Profile fixtures share the effects described in this user guide apart
from one difference – the ERA 800 Performance has a four-blade rotating framing module while the ERA
800 Profile has an additional rotating gobo wheel with six rotating gobos.
Spare parts available from Martin let you convert fixtures from ERA 800 Performance to ERA 800 Profile
and vice versa. You can find details of the parts required and the conversion procedure in the ERA 800
Performance / Profile Safety and Installation Manual.
From firmware version 2.3.0, the same firmware is installed in the ERA 800 Performance and ERA 800
Profile. When running version 2.3.0 or later, the fixture automatically recognizes its physical configuration
(Performance or Profile) and adapts its DMX protocol, control panel menus and RDM PIDs to match the
correct fixture type. The fixture type appears in the control panel display at startup and can be called up in
the INFORMATION menu in the control panel at any time.
ERA 800 Profile fixtures feature a lithium battery that can power the control panel, letting you set up the
fixture without being connected to mains power. A fully charged battery can hold a charge for up to 3
months. Connecting a fixture that has been in storage or a new fixture to mains power for at least two hours
will fully charge the battery.
Operating the fixture
Before applying power to or operating the ERA 800 Performance / Profile:
• Read the ‘Safety Information’ section of the fixture’s Safety and Installation Manual.
• Check that the installation is safe and secure.
• Check that the base is fastened securely so that the torque reaction when the head moves will not cause
the base to move.
• Check that the head tilt lock is released.
• Be prepared for the fixture to light up suddenly. Check that no-one is looking at the fixture from close
range.
• Be prepared for the head to move suddenly. Check that there will be no risk of collision with persons or
objects.
The ERA 800 Performance / Profile does not have an On/Off switch. To apply power to the fixture, apply
power to the power input cable. The fixture’s Neutrik powerCON TRUE1 connectors can also be connected
live or under load.
4
ERA 800 Performance / Profile User Guide
Page 5
Effects
Figure 1: Color wheel
Open
Deep Blue
Lavender
Red 627
Medium
Deep Green
Orange 581
Blue 132
498
500-544
471
Deep
16
25
34
This section gives details of the effects available in the ERA 800 Performance / Profile. See the DMX
protocol table on page 18 for a list of channels and commands used to control the effects via DMX.
Where fine control is available, the main control channel sets the first 8 bits (the most significant byte or
MSB), and the fine channels set the second 8 bits (the least significant byte or LSB) of the 16-bit control
byte. In other words, the fine channel works within the position set by the coarse channel.
Shutter and strobe effects
The ERA 800 Performance / Profile’s electronic shutter effect provides instant blackout and snap open as
well as regular or random strobe and pulse effects with variable speed from approx. 1Hz to 20 Hz.
Dimming
Smooth 0-100% overall dimming is available with 16-bit control resolution. Four dimming curves are
available (see Figure 7 on page 14).
Color mixing
The ERA 800 Performance / Profile features dichroic CMY color filters, with 16-bit continuous color mixing
available on six DMX channels.
Color temperature control
16-bit color temperature control is available on two dedicated CTO channels. You can adjust the fixture’s
color temperature smoothly and continuously from 6500 K to 2700 K.
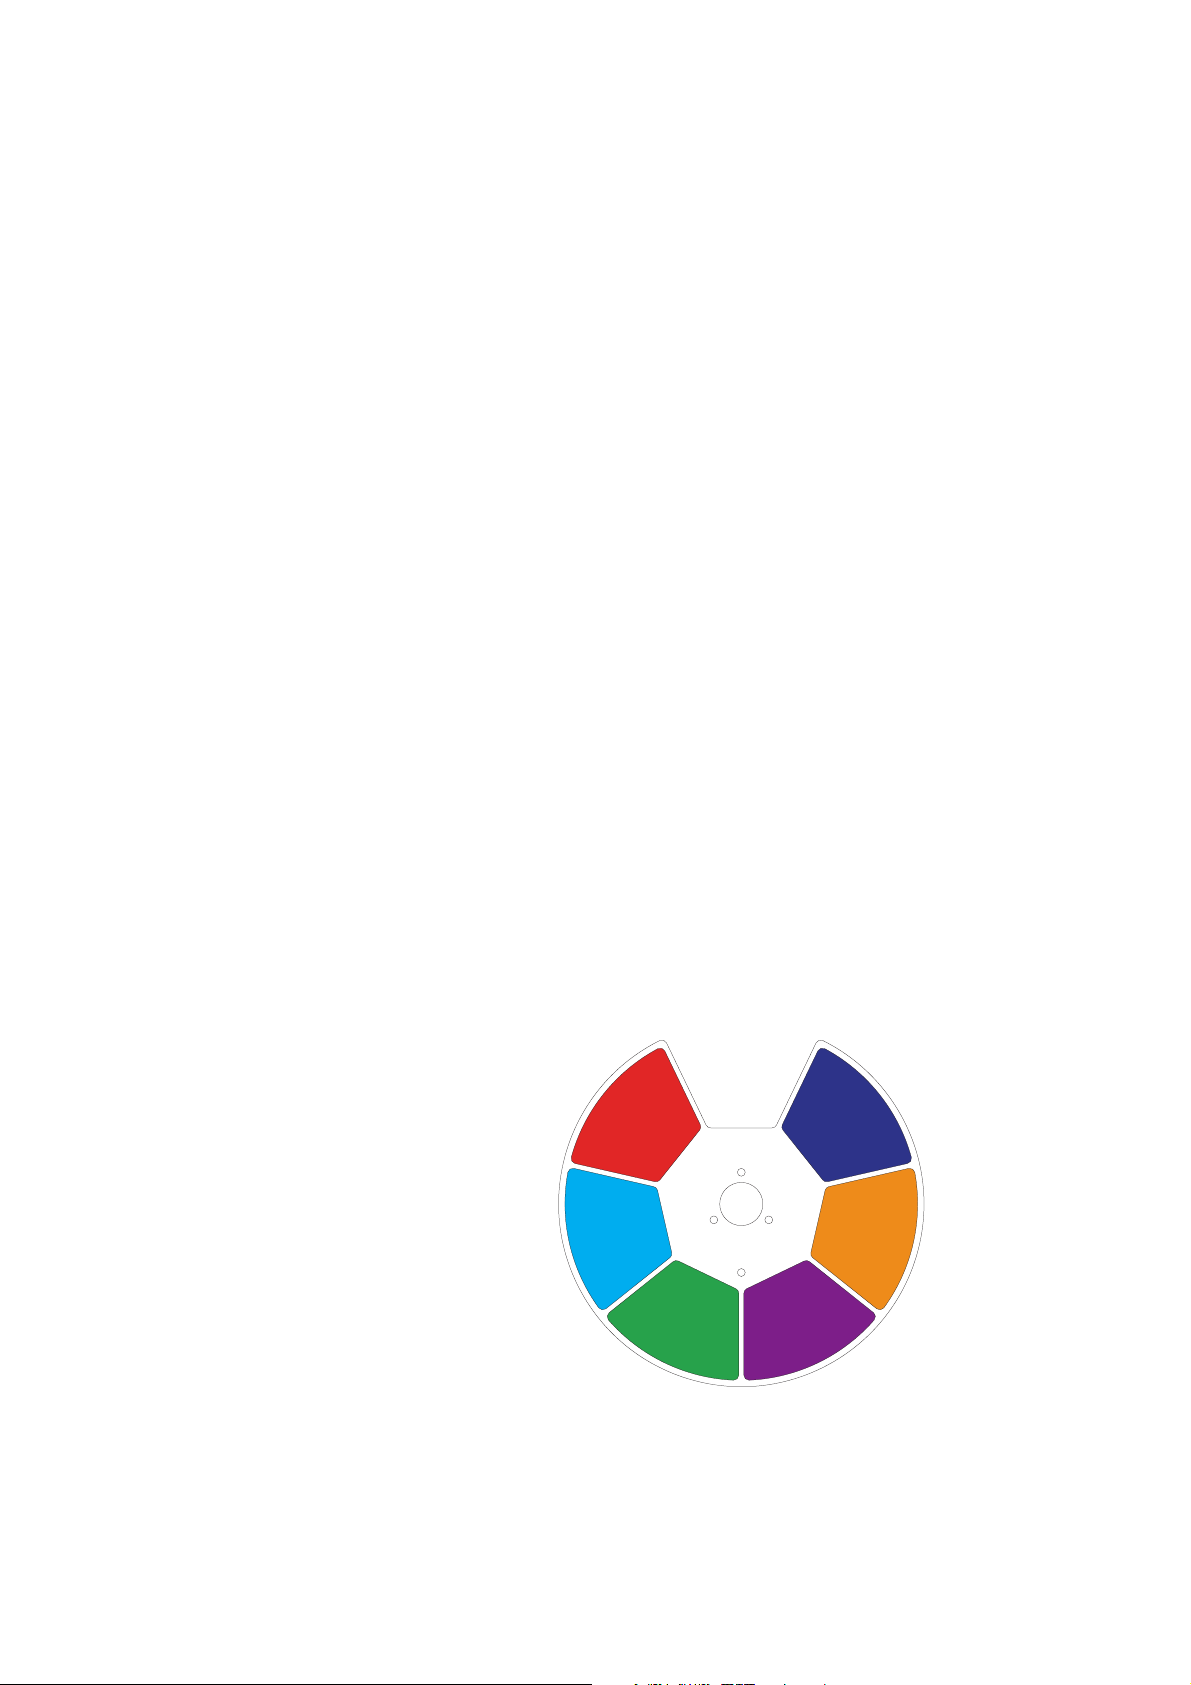
Color wheel
The ERA 800
Performance / Profile
provides a color wheel
that lets you select
from six dichroic color
filters plus open (see
Figure 1).
The color wheel can
be scrolled
continuously with
variable speed and
direction.
All color filters are
interchangeable.
Effects
5
Page 6
Rotating gobos
5
1
2
3
1
1
9
-
0
0
-
B
D
e
s
i
g
n
o
w
n
e
d
b
y
M
a
r
t
i
n
b
y
H
A
R
M
A
N
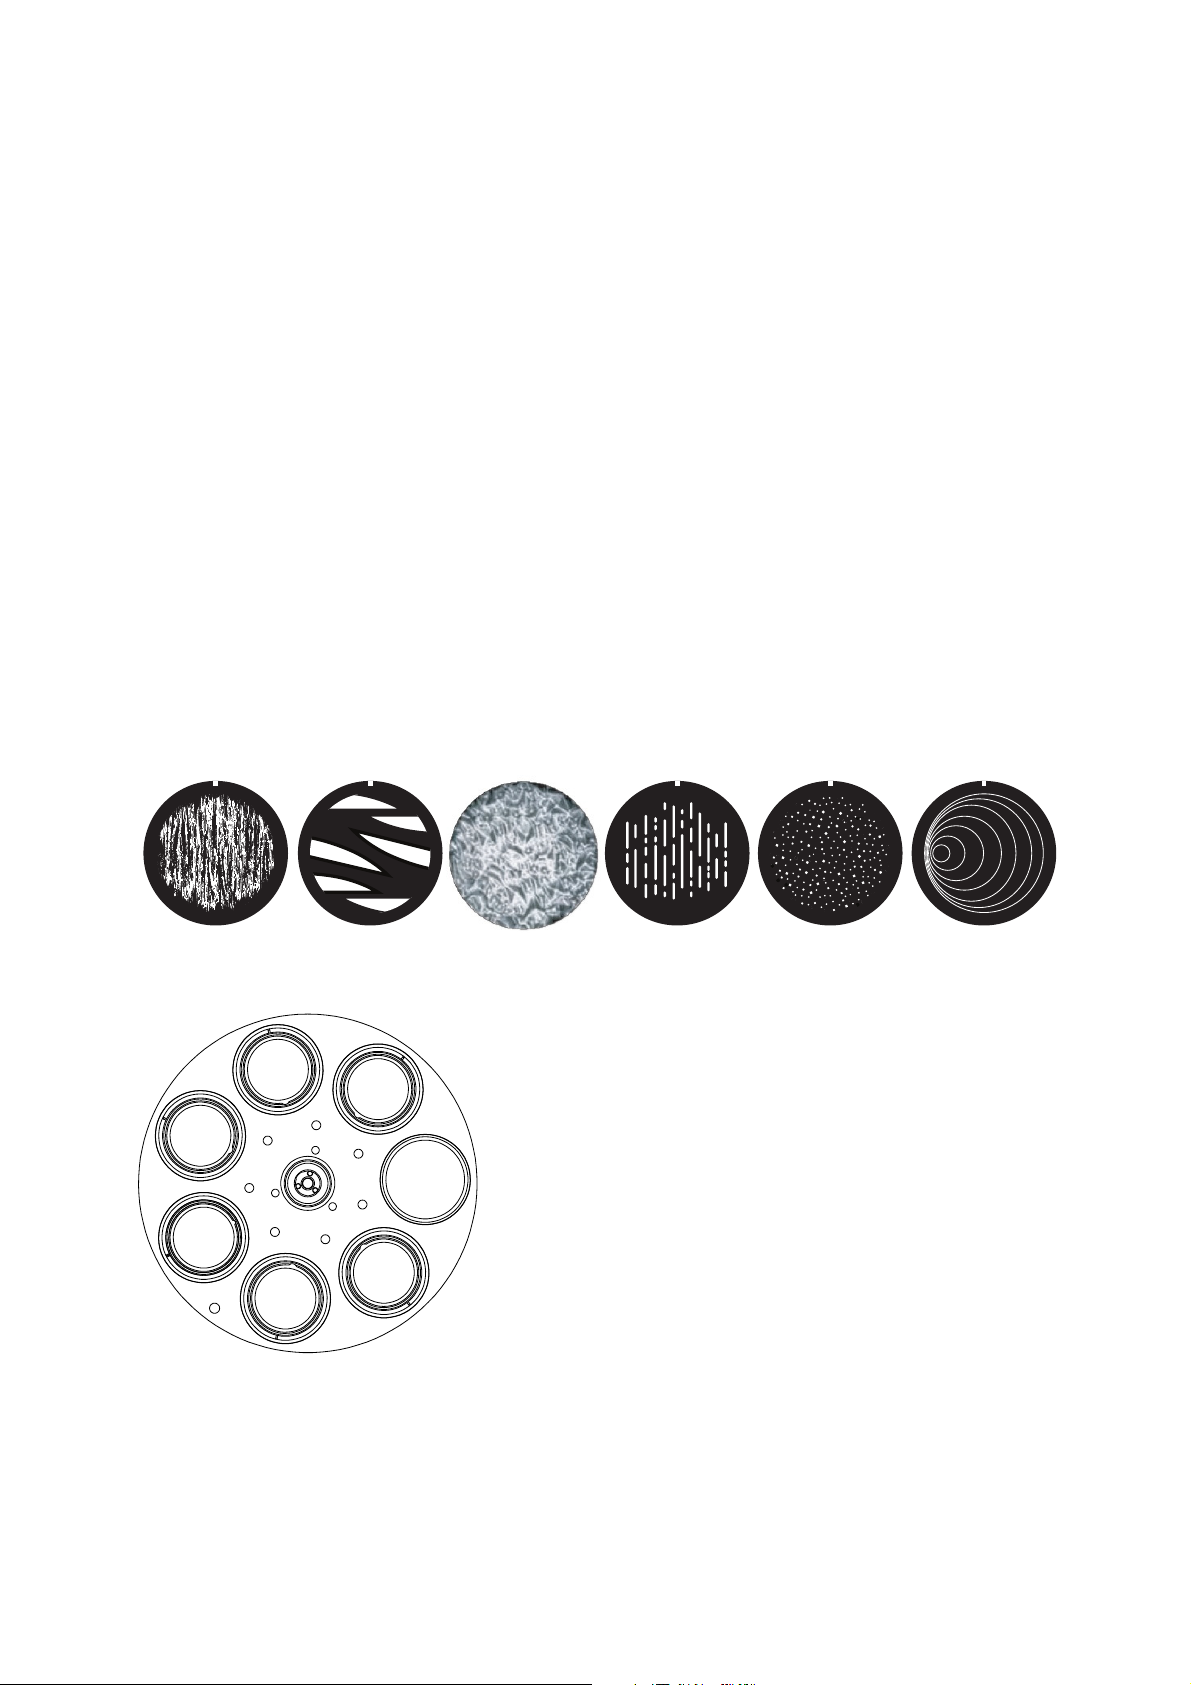
Figure 2: Rotating gobos installed as standard
Slot - Gobo Part number
1. Ray Brush ............................................ P/N 5123119-00
2. Too Many Doctors ................................ P/N 5123120-00
3. Limbo (fused glass)..............................P/N 5123121-00
4. Light Lines............................................ P/N 5123122-00
5. Dots in Space....................................... P/N 5123123-00
6. Sonar.................................................... P/N 5123124-00
6
5
4
3
2
Rotating gobo wheel seen from LED side
5
1
2
3
1
2
0
-
0
0
-
A
D
e
s
i
g
n
o
w
n
e
d
b
y
M
a
r
t
i
n
b
y
H
A
R
M
A
N
5
1
2
3
1
2
2
-
0
0
-
A
D
e
s
i
g
n
o
w
n
e
d
b
y
M
a
r
t
i
n
b
y
H
A
R
M
A
N
5
1
2
3
1
2
3
-
0
0
-
A
D
e
s
i
g
n
o
w
n
e
d
b
y
M
a
r
t
i
n
b
y
H
A
R
M
A
N
12345
1
5
1
2
3
1
2
4
-
0
0
-
A
D
e
s
i
g
n
o
w
n
e
d
b
y
M
a
r
t
i
n
b
y
H
A
R
M
A
N
6
The ERA 800 Performance has one rotating gobo wheel (Gobo Wheel 1) and a rotating framing effect, while
the ERA 800 Profile has two rotating gobo wheels (Gobo Wheel 1 and Gobo Wheel 3) and no framing
effect.
The gobos on Gobo Wheel 3 in the ERA 800 Profile have the same dimensions and specifications as those
on Gobo Wheel 1 and are therefore interchangeable, but the goboholders on the two gobo wheels are
slightly different and are not interchangeable.
A CRI (color rendering index) boost filter is available from Martin as an accessory (see the product
specifications at www.martin.com). If you replace one of the gobos with the CRI boost filter, you can obtain
a CRI of over 80.
Martin is making parts available that allow you to convert between Performance and Profile models by
swapping Gobo Wheel 3 and framing modules. See the ERA 800 Performance / Profile Safety and
Installation Manual for details.
Gobo Wheel 1
Gobo Wheel 1 in the ERA 800 Performance / Profile has six rotating gobos that can be selected, indexed
(positioned at an angle), rotated continuously and shaken (bounced). The gobo wheel itself can also be
scrolled continuously or shaken. Gobo selection and control type (indexing, continuous gobo rotation, gobo
shake or continuous gobo wheel scrolling) are selected on channel 13. Depending on what is selected on
this channel, the gobo indexed angle or gobo rotation speed are set on channels 14 and 15 with 16-bit
control resolution.
The standard gobos are shown in the correct order in Figure 2. All gobos are interchangeable except Gobo
3 (Limbo), which is fused glass and is glued into a special goboholder. The ERA 800 Performance / Profile
Safety and Installation Guide contains details of gobo replacement procedures.
6
ERA 800 Performance / Profile User Guide
Page 7
Gobo Wheel 3 (ERA 800 Profile)
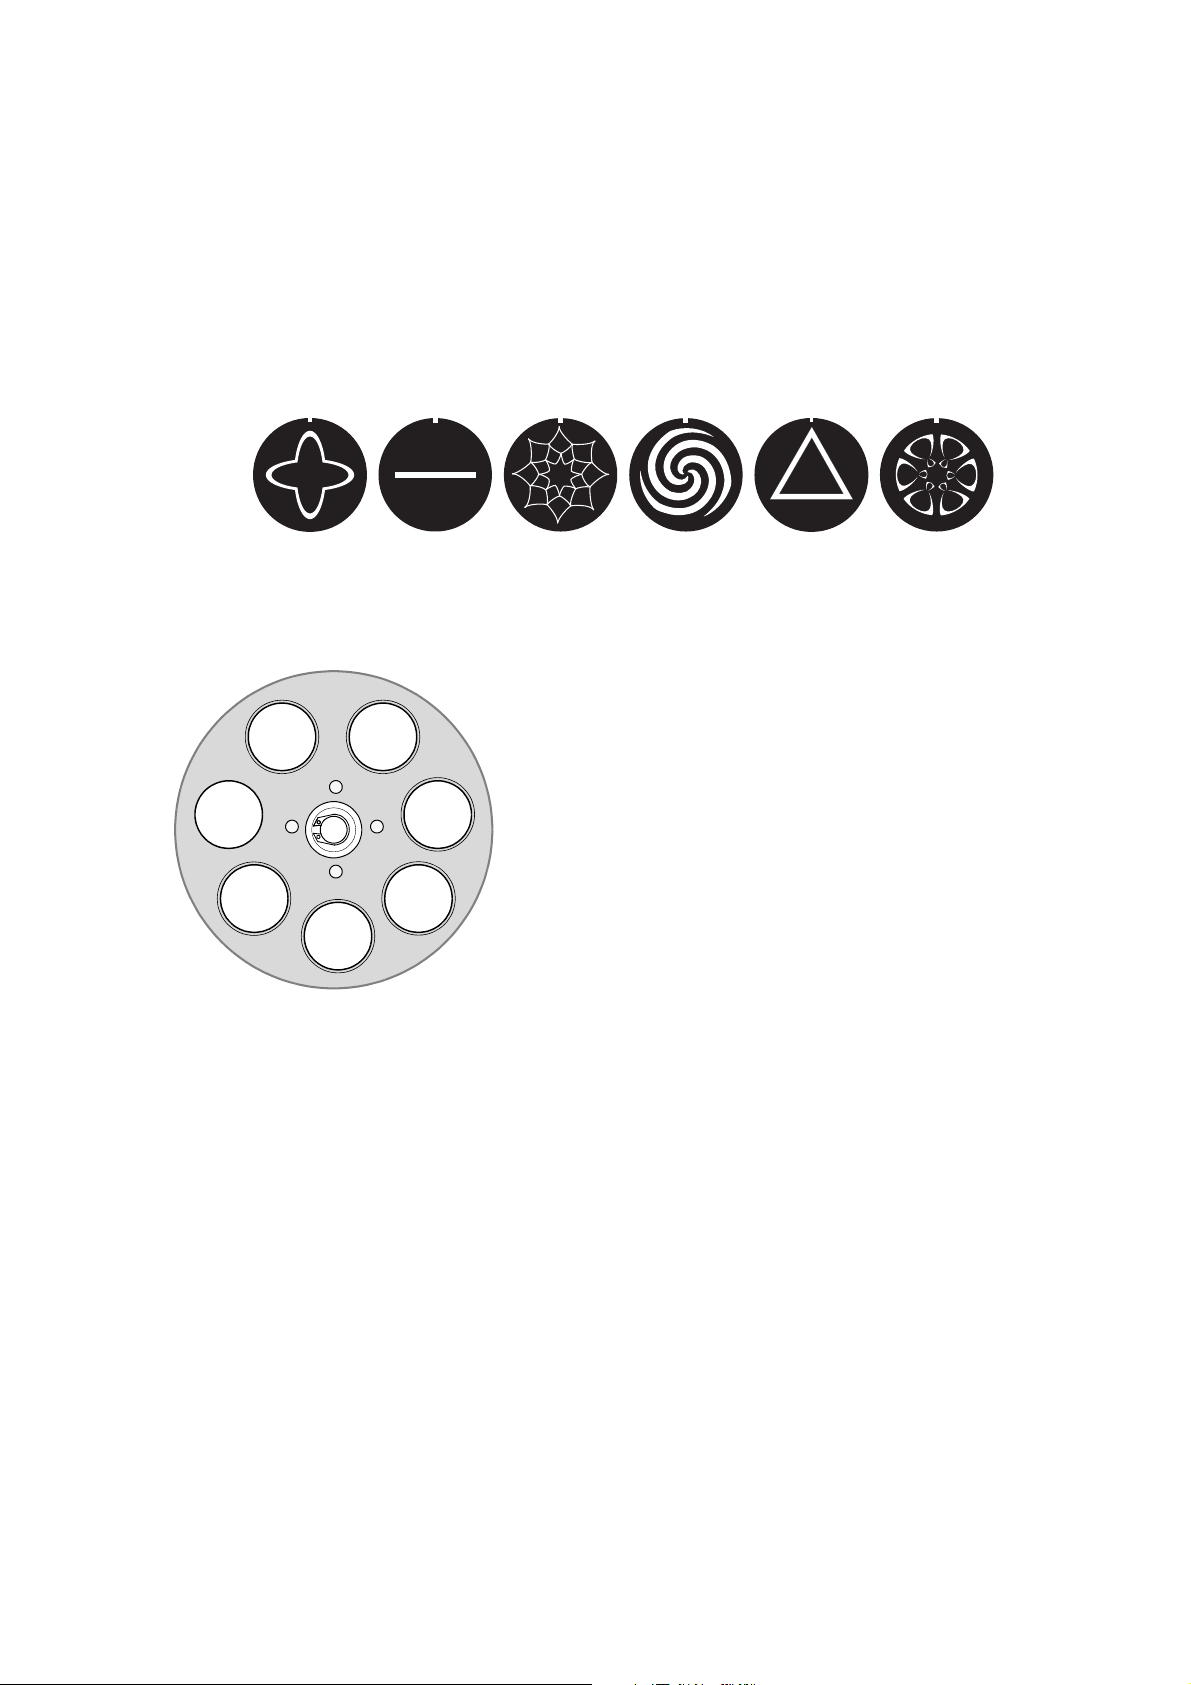
Figure 3: Rotating gobos installed on Gobo Wheel 3 as standard
Slot - Gobo Part number
1. 4D Cone ................................ P/N 5127163-00
2. Bar......................................... P/N 5127164-00
3. Spidey 1 ................................ P/N 5127165-00
4. Spiral ..................................... P/N 5127166-00
5. Triangle ................................. P/N 5127167-00
6. Bite It ..................................... P/N 5127168-00
4
5
6
2
Gobo Wheel 3 seen from LED light source side
1234516
3
Gobo Wheel 3 in the ERA 800 Profile has six rotating gobos that can be selected, indexed (positioned at an
angle), rotated continuously and shaken (bounced). The gobo wheel itself can also be scrolled continuously
or shaken. Gobo Wheel 3 selection and control type (indexing, continuous gobo rotation, gobo shake or
continuous gobo wheel scrolling) are selected on channel 17. Depending on what is selected on this
channel, the gobo indexed angle or gobo rotation speed are set on channels 18 and 19 with 16-bit control
resolution.
The standard gobos are shown in the correct order in Figure 3. All gobos are interchangeable. The ERA 800
Performance / Profile Safety and Installation Guide contains details of gobo replacement procedures.
Effects
7
Page 8
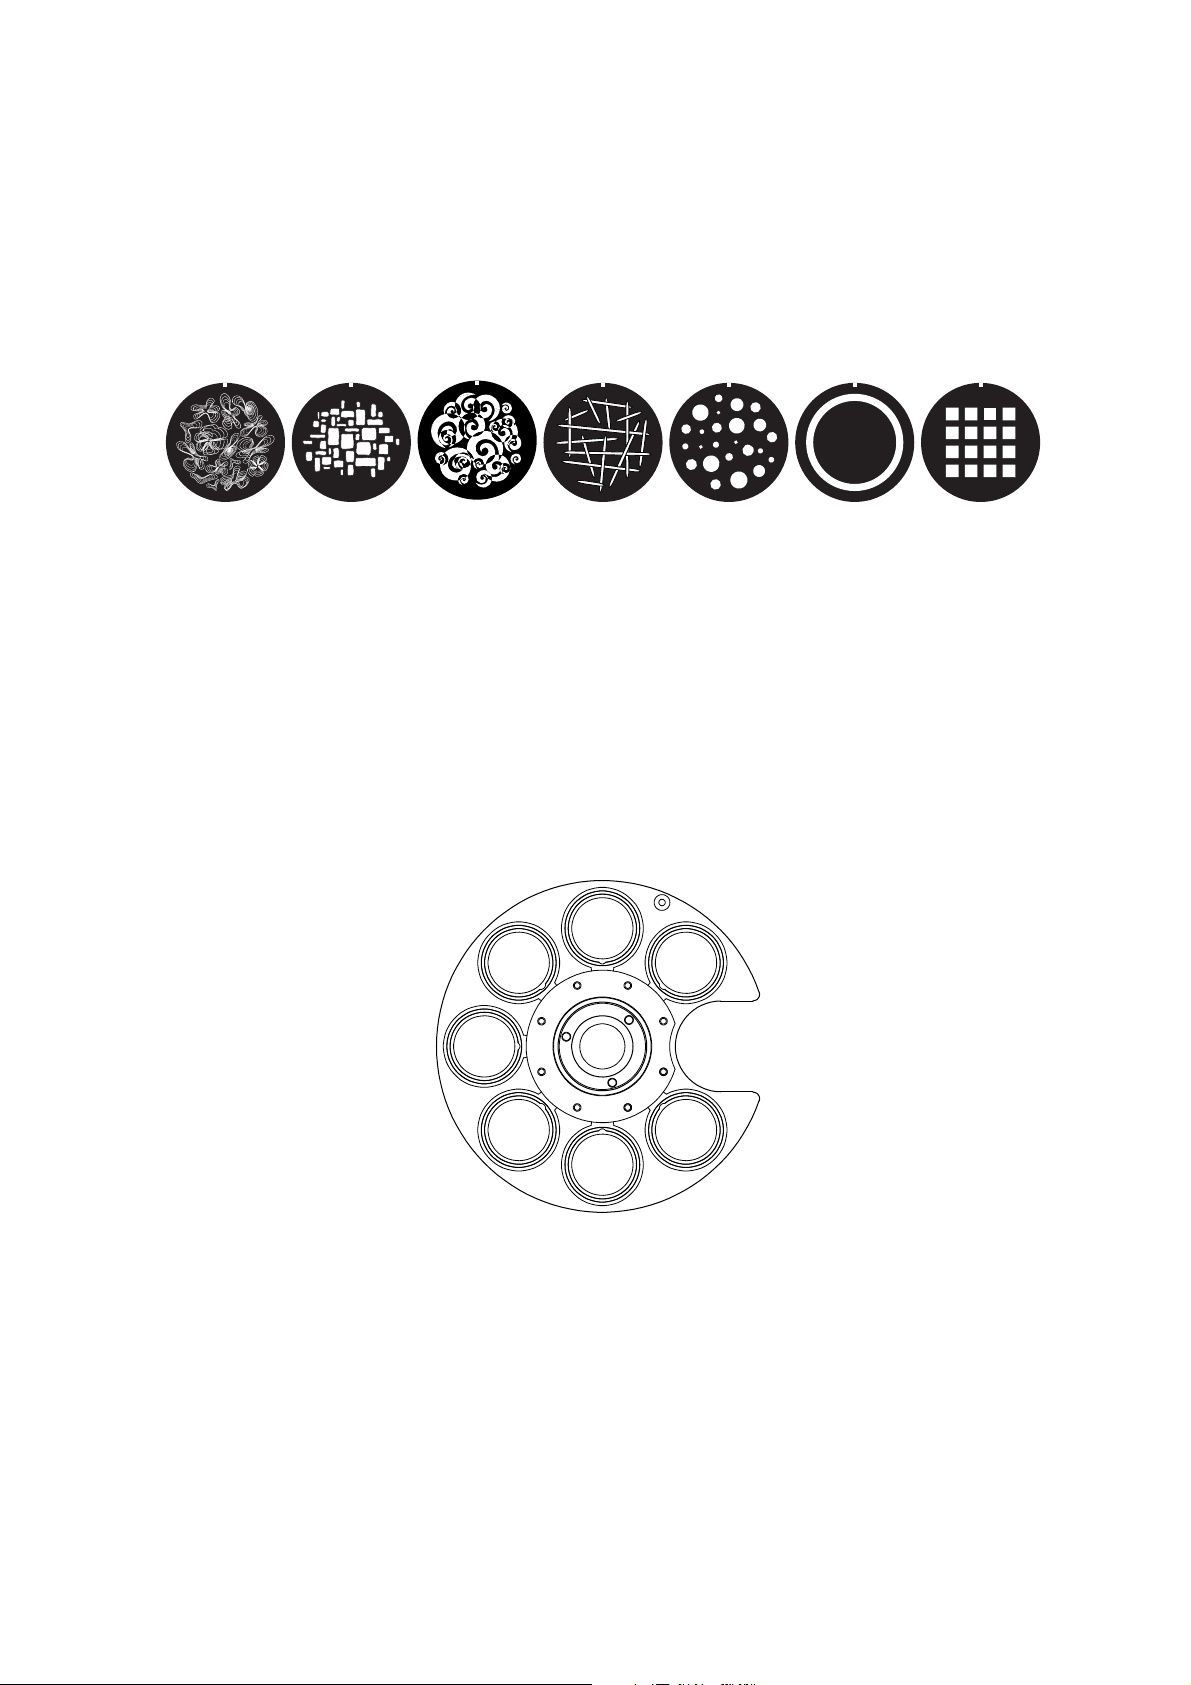
Static gobos
5
1
2
3
1
6
3
-
0
0
-
A
D
e
s
i
g
n
o
w
n
e
d
b
y
M
a
r
t
i
n
b
y
H
A
R
M
A
N
Figure 4: Static gobos installed as standard
Slot - Gobo Part number
1. Ray Flowers ......................................... P/N 5123163-00
2. Brick It.................................................. P/N 5123164-00
3. Happy................................................... P/N 5123165-00
4. Mikado ................................................. P/N 5123166-00
5. Dots...................................................... P/N 5123167-00
6. Lasercone Single ................................. P/N 5123168-00
7. Squares................................................ P/N 5123169-00
7
5
4
3
2
Static gobo wheel seen from LED side
5
1
2
3
1
6
4
-
0
0
-
A
D
e
s
i
g
n
o
w
n
e
d
b
y
M
a
r
t
i
n
b
y
H
A
R
M
A
N
5
1
2
3
1
6
6
-
0
0
-
A
D
e
s
i
g
n
o
w
n
e
d
b
y
M
a
r
t
i
n
b
y
H
A
R
M
A
N
5
1
2
3
1
6
7
-
0
0
-
A
D
e
s
i
g
n
o
w
n
e
d
b
y
M
a
r
t
i
n
b
y
H
A
R
M
A
N
5
1
2
3
1
6
5
-
0
0
-
A
D
e
s
i
g
n
o
w
n
e
d
b
y
M
a
r
t
i
n
b
y
H
A
R
M
A
N
12345
1
5
1
2
3
1
6
8
-
0
0
-
A
D
e
s
i
g
n
o
w
n
e
d
b
y
M
a
r
t
i
n
b
y
H
A
R
M
A
N
6
5
1
2
3
1
6
9
-
0
0
-
A
D
e
s
i
g
n
o
w
n
e
d
b
y
M
a
r
t
i
n
b
y
H
A
R
M
A
N
7
6
The static gobo wheel in the ERA 800 Performance / Profile has seven static gobos. The static gobo wheel
can be scrolled continuously or shaken. Gobo selection and control type (indexing, continuous gobo
rotation, gobo shake or continuous gobo wheel scrolling) are selected on channel 6. Depending on what is
selected on this channel, the gobo indexing angle or gobo rotation speed are set on channels 7 and 8,
where 16-bit control is available.
The standard gobos are shown in the correct order in Figure 4.
Static gobos may be replaced by Martin Global Service or its authorized agents only.
8
ERA 800 Performance / Profile User Guide
Page 9

Animation wheel
Figure 5: ‘Radial Breakup’ animation wheel
The ERA 800 Performance / Profile is
supplied with the “Radial Breakup”
animation wheel installed. The wheel can
be used to add animation effects to gobo
projections.
When using gobo animation, adjust the
fixture’s focus to obtain the most realistic
results.
Frost
The ERA 800 Performance / Profile has
two frost effects: a soft and a heavy frost.
You can use the frost filters to give
wash-type projections and soften gobo
outlines.
Rotating prisms
The ERA 800 Performance / Profile has
two rotating prisms: one four-facet circular
prism and one six-facet linear prism. Both
prisms can be inserted into the beam at
indexed angles or rotated with variable direction and speed.
Iris
The iris diameter can be varied continuously from fully open to almost closed. Opening and closing pulse
effects with variable speed are also available.
Framing (ERA 800 Performance)
The 4-blade framing module in the ERA 800 Performance can be rotated to an indexed position within a
total range of 120°.
The framing blades have independent control of angle and amount of insertion for each blade. By adjusting
these parameters you can form the beam into any shape with three or four sides.
Zoom and focus
Adjusting focus lets you vary the sharpness of projected images at different distances. It can be particularly
effective when used together with gobos and the animation wheel.
The ERA 800 Performance / Profile’s zoom lens varies the focused beam angle from 7° to 56°. Wide zoom
angles allow sharp focus on projection surfaces close to the fixture. At narrower zoom angles, sharp focus is
only possible further from the fixture.
Long-range focus can always be set to infinity.
Pan and tilt
The ERA 800 Performance / Profile offers 540° of pan and 260° of tilt.
16-bit pan and tilt control are available. In each case, the second (LSB) DMX channel adjusts the position
set on the first (MSB) channel.
Effects
9
Page 10
Control panel
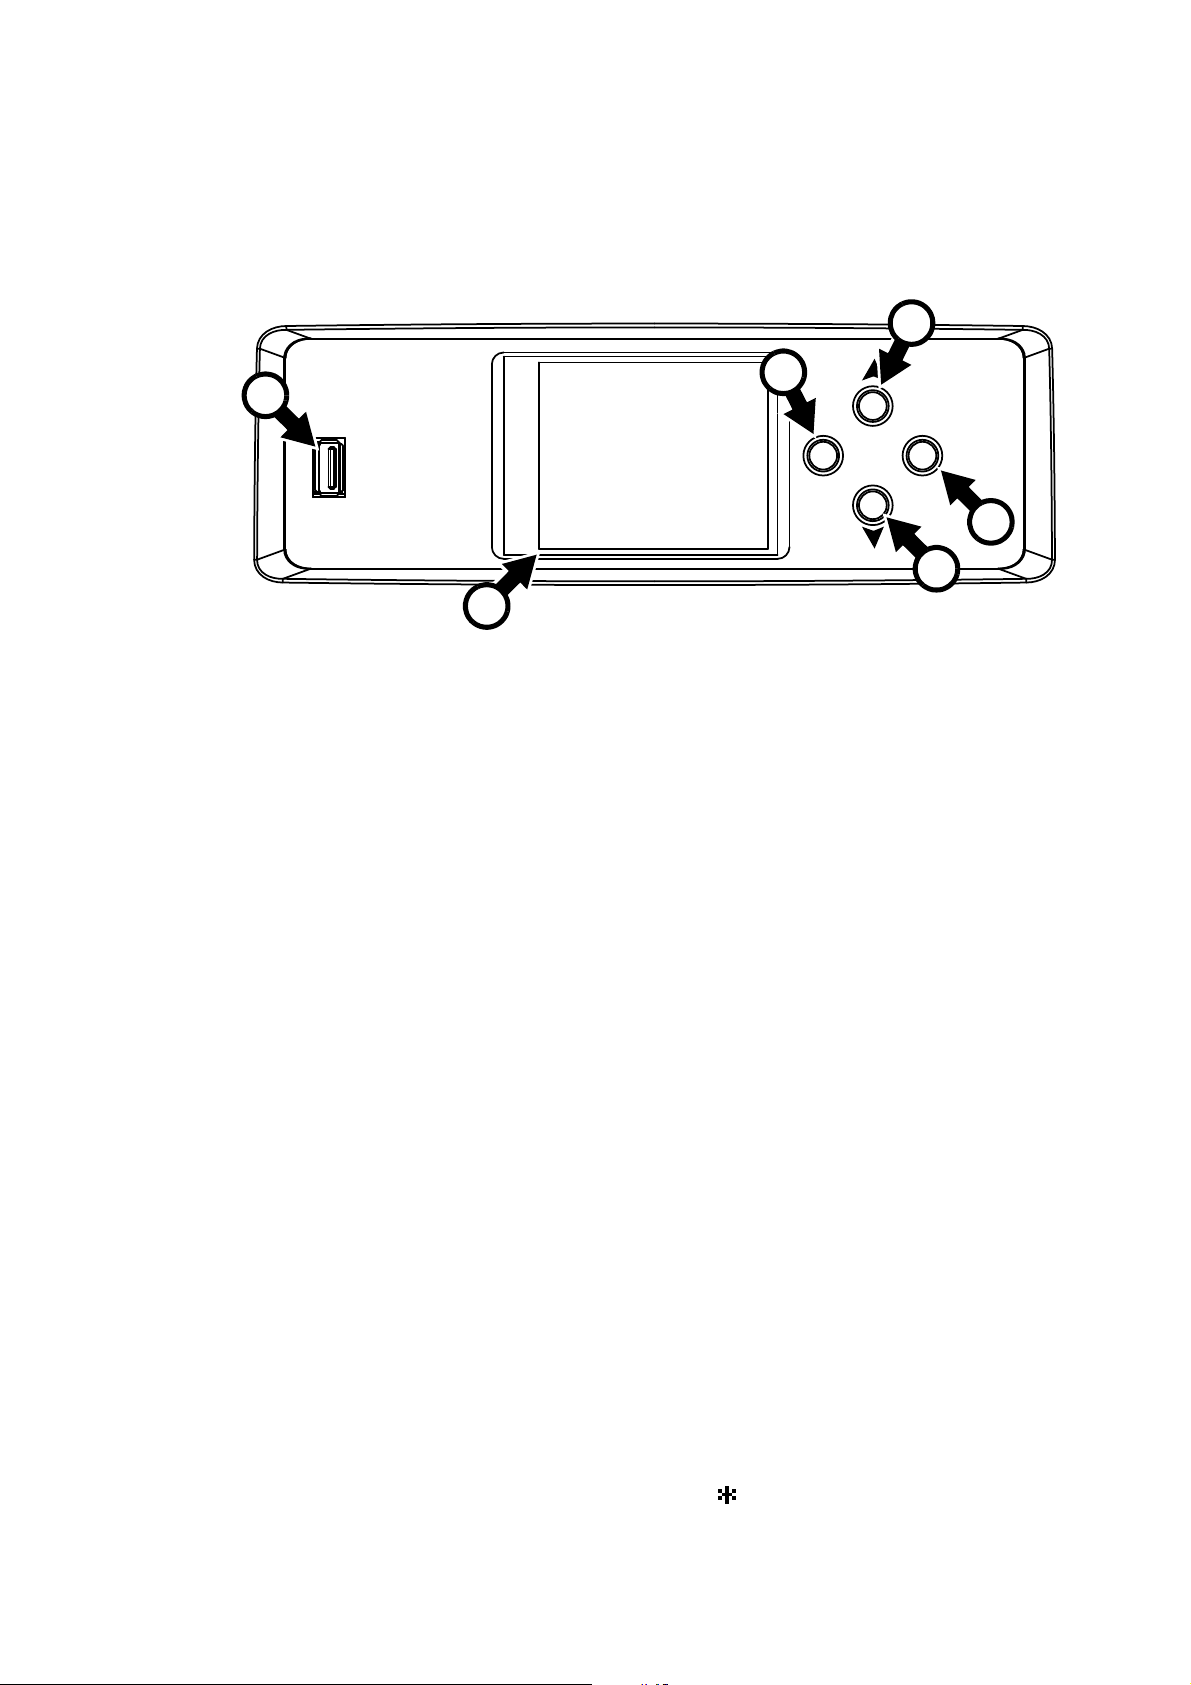
Figure 6: Display and control panel
DMX 001
HOLD
DMX RANGE: 001-042
B
F
A - USB port
B - LCD display
C - Menu button
D - Up button
E- Down button
F - Enter button
A
C
LED: 029°C
USB
ENTERMENU
D
E
You can configure individual fixture settings (such as the fixture’s DMX address), read out data, execute
service operations and view error messages using the fixture’s backlit graphic display and control panel.
When the fixture is powered on, it boots and carries out a reset. Then it shows the default information
display shown in Figure 6:
• Fixture’s DMX address
• ‘No data’ mode setting (in Figure 6 it is set to HOLD)
• Current LED temperature sensor reading.
• DMX channels occupied by the fixture. If the DMX address is set to 001, for example, an ERA 800
Performance fixture will occupy channels 001–042.
Status messages
If the fixture has registered any error or warning messages while it boots, the display will show a red
warning triangle. Press the ENTER button to see the messages.
Display appearance
The display flashes if no DMX signal is being received.
The display enters sleep mode and blacks out after 60 seconds with no activity. If you want to see the
display of a fixture that is hanging in a rig, for example, you can bring it out of sleep mode remotely by
sending a ‘Display ON’ command on the Control / Settings DMX channel.
The display can be rotated to match standing or hanging fixture orientation in the PERSONALITY →
DISPLAY menu.
Using the control panel
• Press the Menu button C or Enter button F to access the menus.
• Use the Up and Down buttons D and E to scroll up and down menus.
• Press the Enter button F to enter a menu or make a selection.
• The currently selected item in a menu is indicated by a star .
• Press the Menu button C to step backwards through the menus.
10
ERA 800 Performance / Profile User Guide
Page 11

Key combination shortcuts
The following control panel key combinations have special functions:
• Hold the MENU button pressed in – opens a shortcut menu with two menu items:
- RESET ALL
- ROTATE DISPLAY
• Hold the MENU button pressed in and press the UP button – makes the fixture carry out a reset.
• Hold both the MENU and ENTER buttons pressed in when you apply power to the fixture – puts the fixture
into Service mode (pan and tilt motors powered off, head can be moved freely by hand). To take the
fixture out of Service mode, power the fixture off and then apply power normally.
• Hold both the UP button pressed in and press the DOWN button – rotates the display 180°.
Settings stored permanently
The following settings are stored permanently in the fixture memory and are not affected by powering the
ERA 800 Performance / Profile off and on or by updating the fixture software:
• DMX address
• Fixture ID
• All personality settings (pan/tilt, cooling mode, dimming curve, display settings etc.)
• Resettable counters
• Service settings
Using the control panel on battery power (ERA 800 Profile)
The ERA 800 Profile contains a lithium battery that lets you use the control panel to set up the fixture even
when it is not connected to mains power.
All the main setup options in the control panel are accessible on battery power but the DMX LIVE and
MANUAL CONTROL menus are not available.
Control panel
11
Page 12

Control options
DMX
The ERA 800 Performance / Profile accepts a DMX-512A data signal.
DMX setup
The DMX address, also known as the start channel, is the first channel used to receive instructions from the
controller. For independent control, each fixture must be assigned its own control channels. If you give two
fixtures of the same type the same address, they will behave identically. Address sharing can be useful for
diagnostic purposes and symmetrical control, particularly when combined with the inverse pan and tilt
options.
DMX addressing is limited to make it impossible to set the DMX address so high that you are left without
enough control channels for the fixture.
To set the fixture’s DMX address:
1. Press Menu to open the main menu. Scroll to DMX SETUP.
2. Press Enter to enter the DMX ADDRESS menu, then scroll to the desired address and press Enter to
save.
3. Press Menu to exit.
RDM
The ERA 800 Performance / Profile can communicate using RDM (Remote Device Management) in
accordance with ESTA’s American National Standard E1.20-2010.
RDM is a bi-directional communications protocol for use in DMX512 control systems, it is the open standard
for DMX512 device configuration and status monitoring.
The RDM protocol allows data packets to be inserted into a DMX512 data stream without affecting existing
non-RDM equipment. It allows a console or dedicated RDM controller to send commands to and receive
messages from specific fixtures.
Note that a firmware update can sometimes expand a fixture’s RDM functionality. If this happens, the
firmware release notes will give details.
RDM ID
Each ERA 800 Performance / Profile has a factory-set RDM UID (unique identification number) that makes
it addressable and identifiable in RDM systems. The number can be found in the control panel
INFORMATION menu under RDM UID.
Supported RDM PIDs
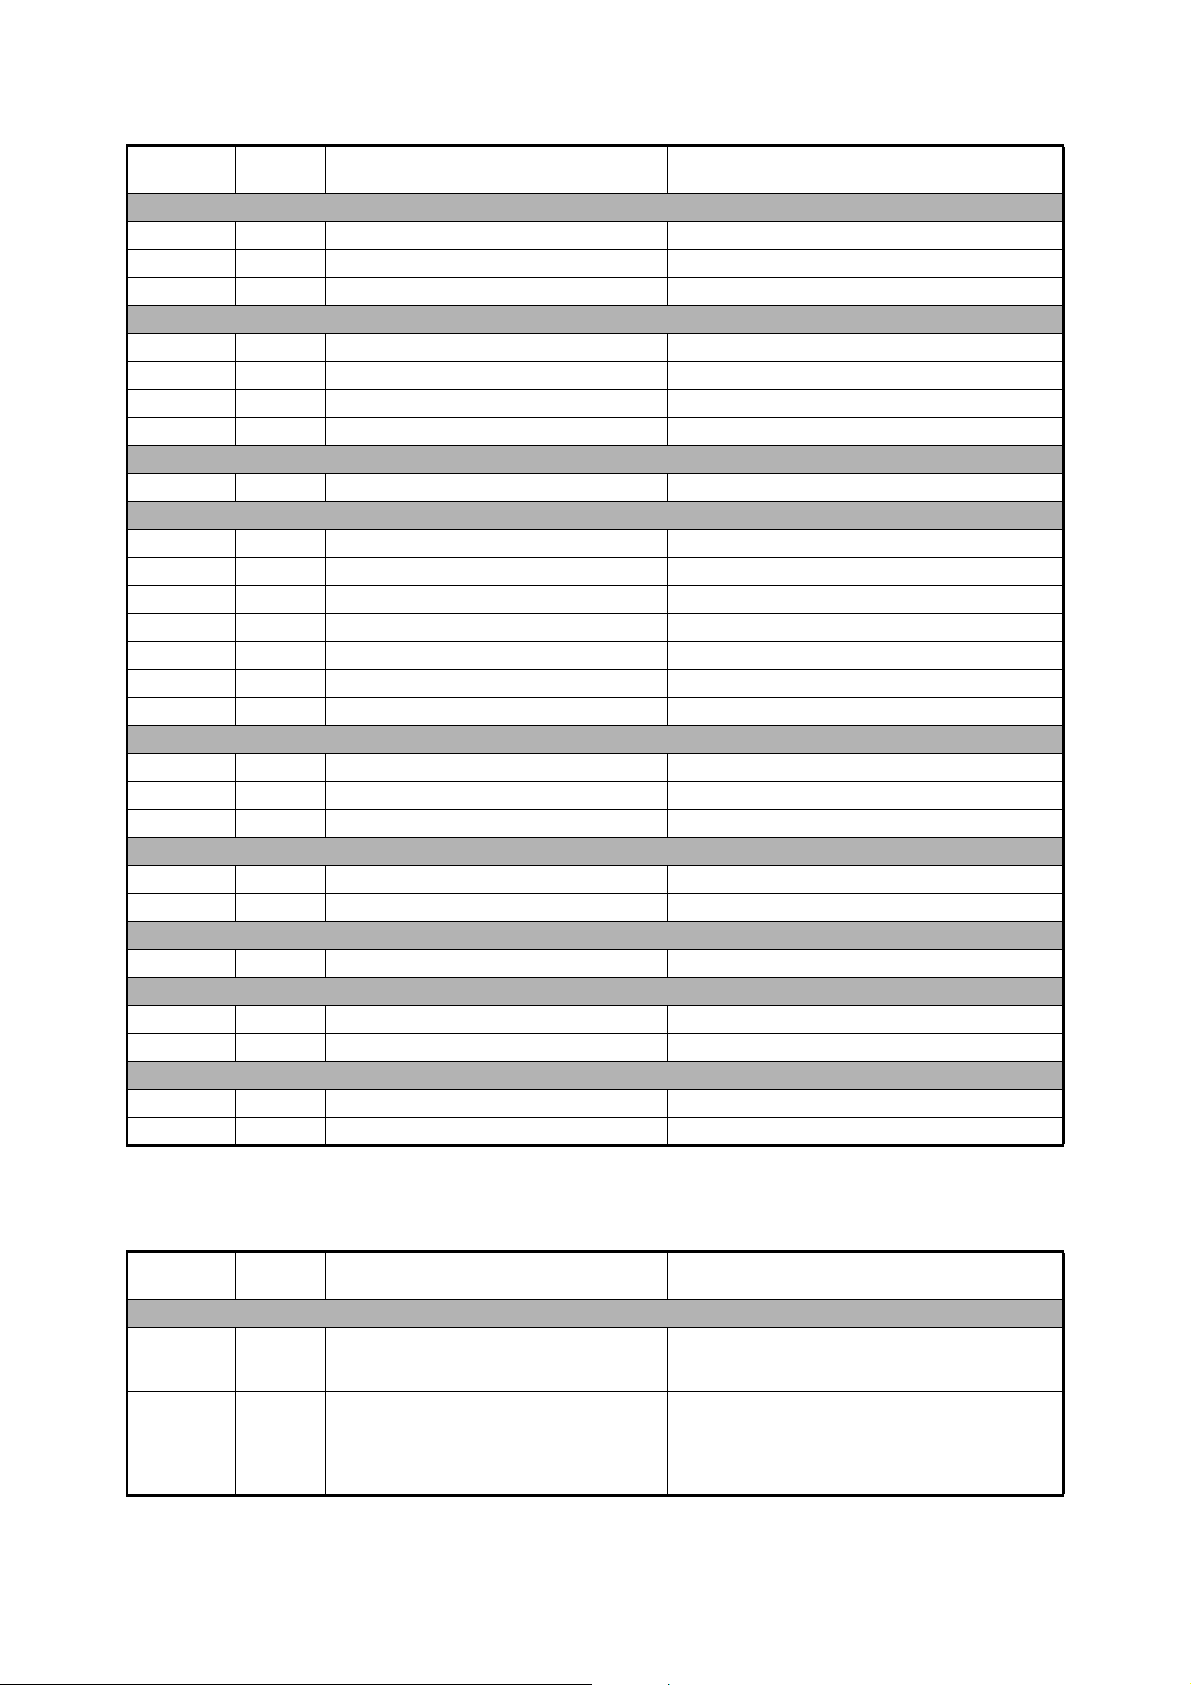
The ERA 800 Performance / Profile supports the standard RDM PIDs (Parameter IDs) required by ESTA
plus two manufacturer-specific PIDs that:
• Set how the fixture behaves if the DMX signal is lost
• Select from one of the four available dimming curves.
See the following tables.
12
ERA 800 Performance / Profile User Guide
Page 13
Standard RDM Parameter IDs
GET
allowed
Network Management
Status Collection
QUEUED_MESSAGE
STATUS_MESSAGES
STATUS_ID_DESCRIPTION
RDM Information
SUPPORTED_PARAMETERS
Product information
DEVICE_INFO
DEVICE_MODEL_DESCRIPTION
MANUFACTURER_LABEL
DEVICE_LABEL
SOFTWARE_VERSION_LABEL
BOOT_SOFTWARE_VERSION_ID
COMMS_STATUS
DMX Setup
DMX_PERSONALITY
DMX_PERSONALITY_DESCRIPTION
DMX_START_ADDRESS
Sensors
SENSOR_DEFINITION
SENSOR_VALUE
Usage information
DEVICE_HOURS
Configuration
PAN_INVERT
TILT_INVERT
Control
IDENTIFY_DEVICE
SET
allowed RDM parameter IDs Notes
DISC_UNIQUE_BRANCH
DISC_MUTE
DISC_UN_MUTE
CLEAR_STATUS_ID
RESET_DEVICE
Manufacturer-specific RDM Parameter IDs
GET
allowed
Fixture behavior
SET
allowed RDM parameter ID’s (slot 21-22) Notes
LAST_STATE (0XA004) Behavior if loss of DMX signal. Set to:
00 BLACKOUT
01 HOLD
DIMMER_CURVE (0X0343) Set dimming curve to:
00 LINEAR
01 SQUARE LAW
02 INV SQ LAW
03 S-CURVE
Control options
13
Page 14
Fixture setup
Output
DMX %DMX %DMX %DMX %
Output
Output
Output
Linear S-curve Square law Inverse square law
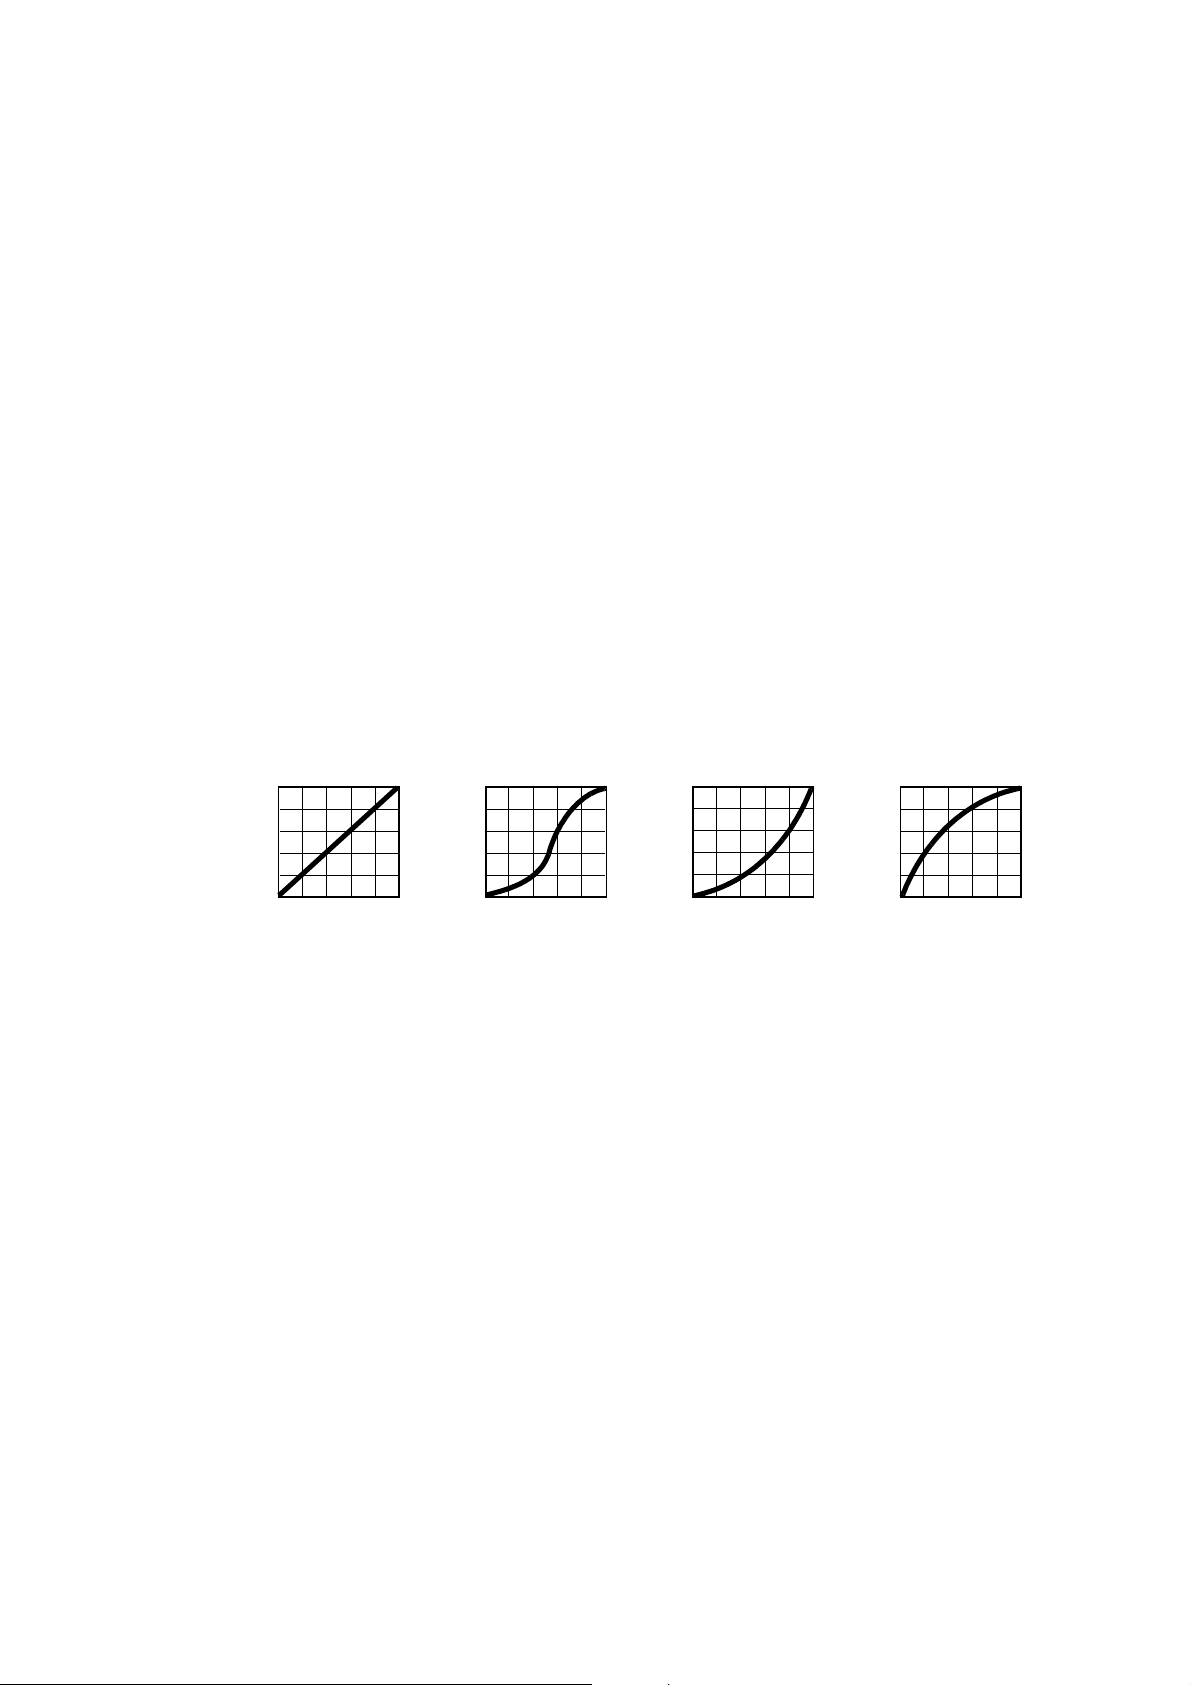
Figure 7: Dimming curve options
The onboard control panel (see “Effects” on page 5) and the Control / settings DMX channel let you
configure the fixture via a range of fixture settings.
Fixture ID
The ERA 800 Performance / Profile lets you set a four-digit ID number to ease identification of the fixtures in
an installation. When a fixture is powered on for the first time, it displays its DMX address by default. As
soon as you set an ID number other than 0 in FIXTURE ID, the ERA 800 Performance / Profile will display
this ID number by default, and indicate FIXTURE ID in the display.
Personality
The ERA 800 Performance / Profile provides several options that let you optimize the fixture for different
applications in the PERSONALITY menu:
• PAN INVERSE and TILT INVERSE let you invert the direction of pan and tilt movement. This can be a fast
way of setting symmetrical action in multiple fixtures with no need to reprogram cues.
• PAN/TILT SPEED lets you set pan and tilt movement to FAST (optimized for speed) or SLOW (optimized
for smooth movement – useful for slow movements in long-throw applications).
• DIMMER CURVE provides four dimming options (see Figure 7) that you can scroll through in the selection
pane:
- LINEAR – (optically linear) the increase in light intensity appears to be linear as DMX value is
increased.
- S-CURVE – light intensity control is finer at low levels and high levels and coarser at medium levels.
This curve emulates the RMS voltage dimming characteristics of an incandescent lamp such as the
tungsten halogen lamp of the Martin™ MAC TW1™.
- SQUARE LAW – light intensity control is finer at low levels and coarser at high levels.
- INV SQUARE LAW – light intensity control is coarser at low levels and finer at high levels.
• DIMMING SPEED lets you select a speed for reactions to changes in dimming level. At the FA S T setting,
the fixture reacts immediately to any change in dimming level and snaps to the new level. At the SLOW
setting, the fixture will always carry out a short, smooth fade from one dimming level to the next.
• NO DATA MODE defines how the fixture reacts if it is powered on but not receiving a DMX signal (for
example, if the DMX signal is lost during a show). If set to BLACKOUT, the fixture will black out. If set to
HOLD, the fixture will hold all the last DMX values that it received and continue to show its current scene.
It will continue to show this scene until it receives new DMX signals or it is powered off.
14
ERA 800 Performance / Profile User Guide
Page 15

• COOLING MODE lets you select between three cooling fan options:
- REGULATED FANS optimizes cooling fan operation for light output. It controls fixture temperature by
varying cooling fan speed up to the maximum speed available and does not limit light intensity provided
that the ambient temperature does not exceed the specified maximum of 40° C (104° F).
- FULL optimizes cooling fan operation for the lowest possible temperature by setting cooling fans to run
constantly at full speed.
- THEATER MODE optimizes the fixture to obtain the lowest possible noise levels. It limits maximum light
output to 70% of the normal maximum level, it sets cooling fans to run at REGULATED speed (see
above) and it sets the LED PWM frequency to 19 200 Hz.
• DISPLAY offers the following options for the LCD display:
- DISPLAY ROTATION lets you rotate the display manually through 180° so that it can be read easily no
matter how the fixture is oriented.
- DISPLAY INTENSITY lets you adjust the brightness of the display backlighting by setting the intensity
to a level from 10% to 100%.
- TEMPERATURE UNIT lets you choose whether the fixture should display all temperature readings in
Celsius or Fahrenheit.
Factory defaults
DEFAULT SETTINGS lets you reload the fixture’s factory default settings. Effect calibration settings are not
affected, but all other user settings are returned to factory defaults.
Test sequences
The FIXTURE TEST menu lets you test:
• all the fixture’s effects
• dimming functionality
• each individual mechanical effect, or
• pan and tilt only.
Before you run a test, prepare for the head to move and the fixture to light up suddenly without warning.
To run a test:
• In the FIXTURE TEST menu, scroll to TEST ALL, TEST DIMMER, TEST EFFECTS or TEST PAN/TILT
and press Enter.
• In the TEST EFFECTS menu, scroll to the effect you want to test and press Enter to start a test sequence
for that effect.
• In the TEST PAN/TILT menu, choose PAN or TILT, make sure that the fixture is held securely and that
there is no danger of the head colliding, then press Enter to start the test sequence.
• Press Menu to stop the test sequence.
Fixture information readouts
The following fixture information can be called up in the display:
• POWER ON TIME is a non user-resettable counter that displays total hours the fixture has been powered
on since manufacture.
• LED HOURS is a non user-resettable counter that displays total hours the LEDs have been powered on
since manufacture.
• SW VERSION displays the currently installed firmware (fixture software) version.
• FIXTURE ID lets you set a custom four-digit ID number for the fixture.
• RDM UID displays the fixture’s factory-set unique ID for identification in RDM systems.
• TEMPERATURES displays the current PCB temperature readouts for the fixture’s base and LED array.
• FIXTURE TYPE displays the current fixture configuration: ERA 800 Performance or ERA 800 Profile. If
you convert the fixture by removing the Performance’s framing module and replacing it with the Profile’s
Gobo Wheel 3 module, for example, the fixture will automatically detect the new module and switch to the
Fixture setup
15
Page 16

ERA 800 Profile fixture type. It will adapt its DMX control functions to match the Gobo Wheel 3 module.
The FIXTURE TYPE readout lets you check which module is installed (or check that the fixture has
updated itself after you have carried out a conversion).
DMX signal monitoring
The DMX LIVE menu lets you scroll through all the fixture’s DMX channels and display the DMX values from
0 - 255 that are being received on each channel.
Manual control
The MANUAL CONTROL menu lets you reset the ERA 800 Performance / Profile and operate the fixture
without a DMX controller.
To execute commands in the MANUAL CONTROL menu, select the effect that you want to control, then
enter a value from 0 to 255 to apply a command. The menu items and values correspond to the commands
listed in the DMX protocol in this User Manual.
When you exit the MANUAL CONTROL menu, the fixture reverts to default positions and settings.
Service
Servicing the fixture and the contents of the SERVICE menu are covered in the ERA 800 Performance /
Profile Safety and Installation Manual supplied with fixtures and available for download from the product
pages on the Martin website at www.martin.com.
16
ERA 800 Performance / Profile User Guide
Page 17

Adjusting settings via DMX
Certain fixture settings and parameters can be adjusted from the DMX controller on Channel 42, the Fixture
control/settings channel.
Commands sent on the fixture control channel override any settings entered in the fixture’s onboard control
menus.
To help you avoid accidentally applying a setting that may disrupt a light show, for example, the commands
must be held for a certain time before they are applied. For example, the command that turns off the display
illumination must be held for one second to activate it. The command that resets the fixture must be held for
five seconds to activate it. The DMX protocol table in this user manual gives details of times required.
Resetting
Either the entire fixture or individual effects can be reset to their initial positions. Resetting individual effects
can allow on-the-fly recovery if an effect loses its correct position, for example, without having to reset the
entire fixture.
Illuminating the display
The fixture’s display panel can be set to ON or OFF with a DMX command. This makes it possible to read
the fixture’s DMX address while the fixture is installed in the rig but black out the display panel during a
show.
If the display is set to ON via DMX, it will enter sleep mode and black out after a short period of inactivity. To
bring it out of sleep mode, set the display to ON again via DMX.
Control menu setting overrides
The following fixture settings can be adjusted via DMX, overriding the settings entered in the onboard
control menus. Changes to these settings are not affected by cycling power off and on.
• Dimming curve
• Pan and tilt speed
• Cooling mode
See the Control/Settings channels in the DMX protocols later in this User Guide for full details of the options
available.
Adjusting settings via DMX
17
Page 18
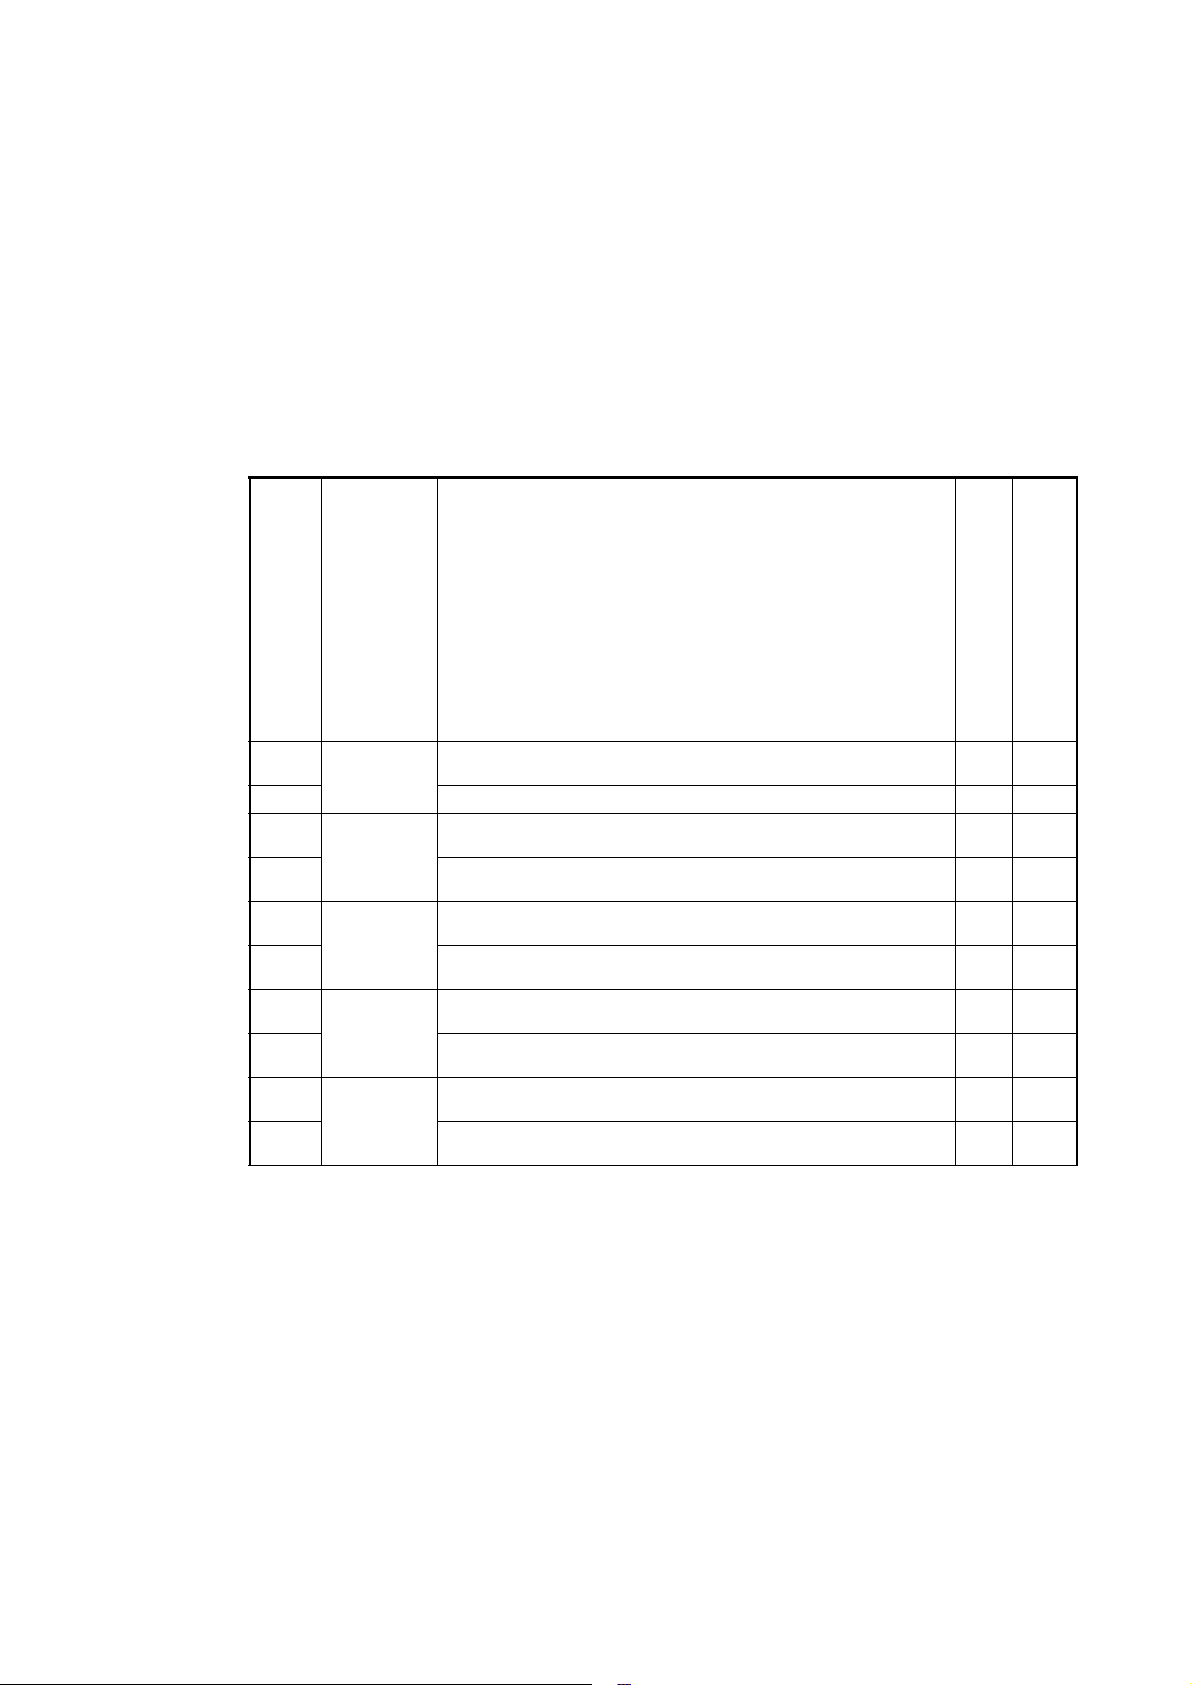
DMX protocol
This chapter lists the DMX control commands implemented in firmware version 2.3.0. The fixture recognizes
automatically its physical configuration (Performance or Profile) and adapts its DMX protocol to match the
correct fixture type.
ERA 800 Performance
Channel DMX Value Function
Strobe/shutter effect
Shutter closed
Shutter open
Strobe, slow → fast
Shutter open
Opening pulse, slow → fast
Shutter open
Closing pulse, slow → fast
Shutter open
Random strobe, slow → fast
Shutter open
Random opening pulse, slow → fast
Shutter open
Dimmer fade (MSB)
Closed → open
Dimmer fade, fine (LSB) Fade 0
Cyan (MSB)
0 → 100%
Cyan fine (LSB)
0 → 100%
Magenta (MSB)
0 → 100%
Magenta fine (LSB)
0 → 100%
Yellow (MSB)
0 → 100%
Yellow fine (LSB)
0 → 100%
CTO (MSB)
0 → 100%
CTO fine (LSB)
0 → 100%
10
11
0 - 19
20 - 24
25 - 64
65 - 69
70 - 84
1
2
85 - 89
90 - 104
105 - 109
110 - 124
125 - 129
130 - 144
145 - 255
0 - 65535
3
4
0 - 65535
5
6
0 - 65535
7
8
0 - 65535
9
0 - 65535
Fade
Default
type
value
Snap 0
Fade 0
Fade 0
Fade 0
Fade 0
Fade 0
Fade 0
Fade 0
Fade 0
Fade 0
18
Table 1: ERA 800 Performance DMX Protocol
ERA 800 Performance / Profile User Guide
Page 19
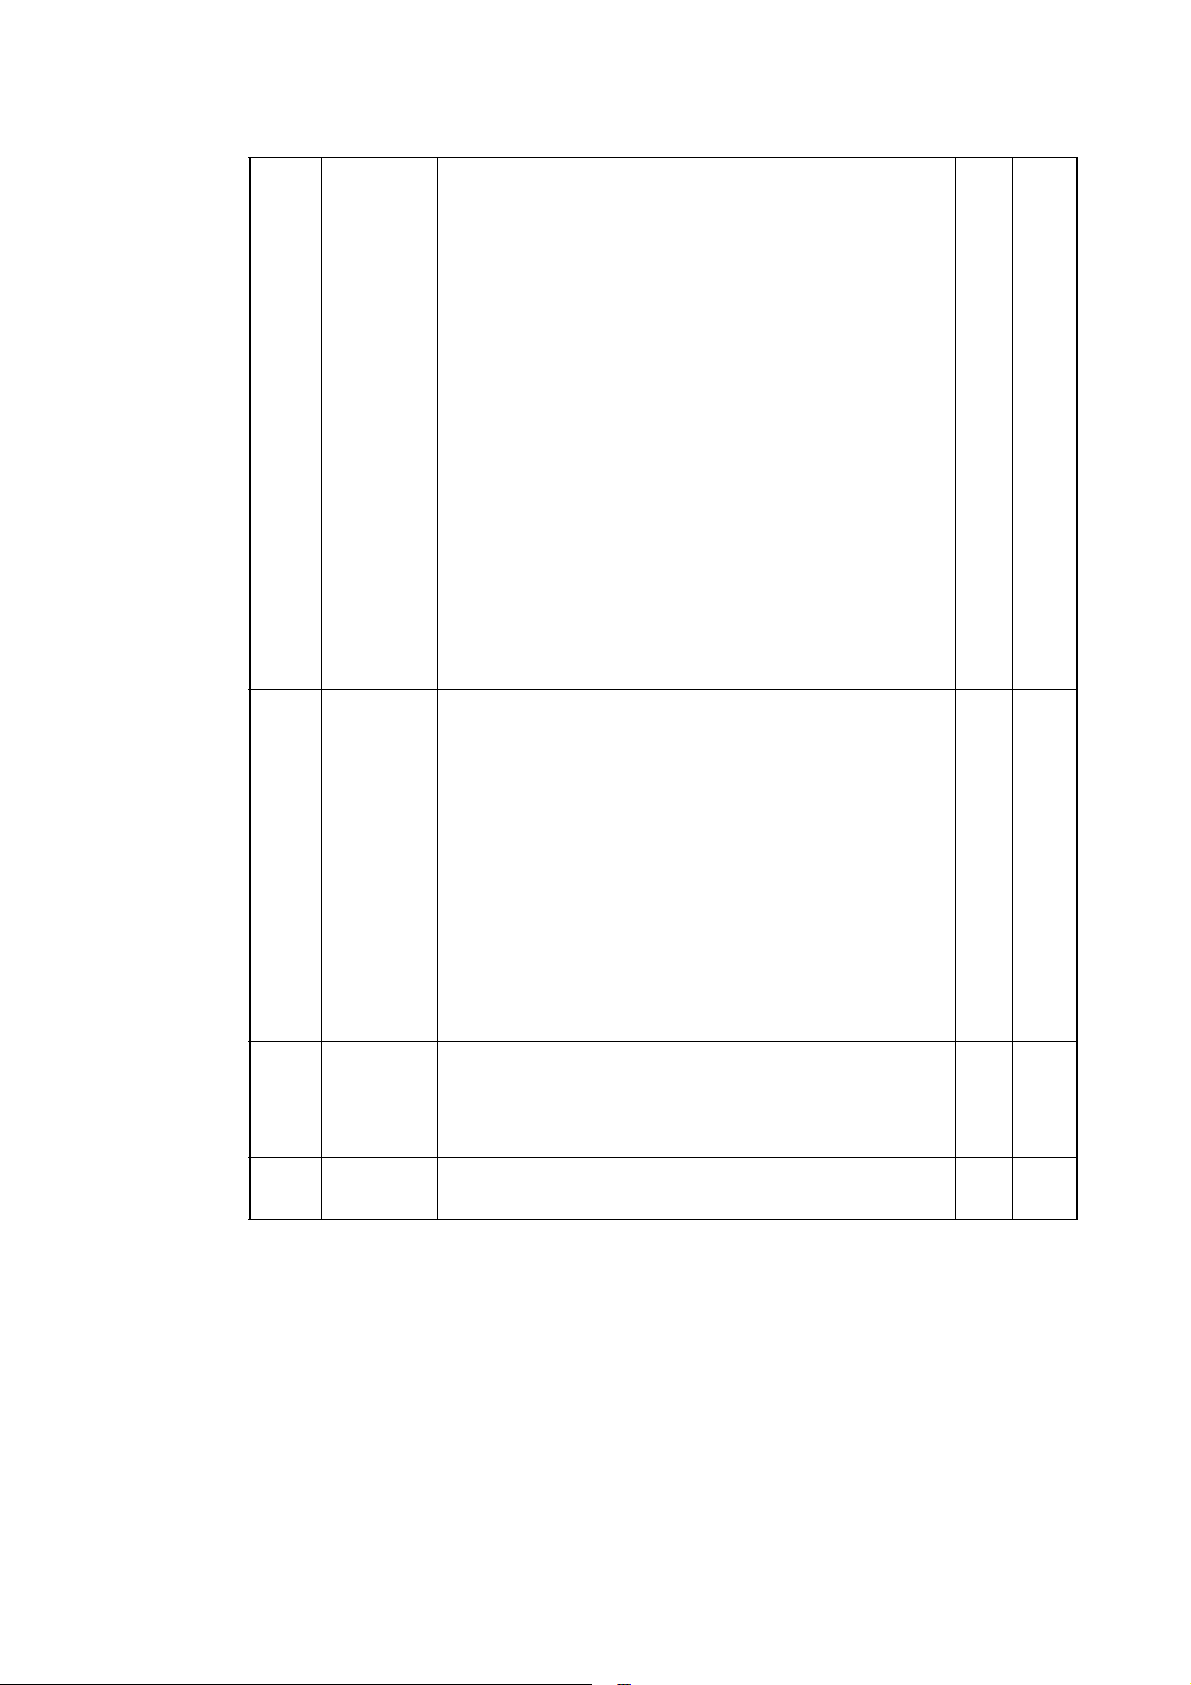
Channel DMX Value Function
Color wheel
Indexing
Solid colors
Open
Color 1 (Red)
Color 2 (Medium Blue)
Color 3 (Deep Green)
Color 4 (Lavender)
Color 5 (Deep Orange)
Color 6 (Deep Blue)
Split colors (continuous color wheel indexing)
Open
Open → Color 1
Color 1 (Red)
Color 1 → Color 2
Color 2 (Medium Blue)
Color 2 → Color 3
Color 3 (Deep Green)
Color 3 → Color 4
Color 4 (Lavender)
Color 4 → Color 5
Color 5 (Deep Orange)
Color 5 → Color 6
Color 6 (Deep Blue)
Color 6 → open
Continuous rotation
CW, fast → slow
Stop (wheel stops at current position)
CCW slow → fast
Gobo wheel 1 (rotating gobos)
Gobo selection
Open
Gobo 1 (Ray Brush)
Gobo 2 (Too Many Doctors)
Gobo 3 (Limbo)
Gobo 4 (Light Lines)
Gobo 5 (Dots in Space)
Gobo 6 (Sonar)
Gobo 1 shake
Gobo 2 shake
Gobo 3 shake
Gobo 4 shake
Gobo 5 shake
Gobo 6 shake
Continuous gobo wheel rotation
CCW fast → slow
Stop (wheel stops at current position)
CW slow → fast
Gobo wheel 1
Gobo indexing/rotation
Gobo indexing 0 - 360°
Gobo rotation CW fast → slow
Stop
Gobo rotation CCW slow → fast
Gobo wheel 1
Gobo indexing/rotation fine
Indexed position / rotation speed fine
12
13
14
15
0 - 6
7 - 13
14 -20
21 - 27
28 - 34
35 - 41
42 - 48
49 - 51
52 - 61
62
63 - 72
73
74 - 83
84
85 - 94
95
96 - 105
106
107 - 116
117
118 - 127
128 - 190
191 - 192
193 - 255
0 - 6
7 - 13
14 -20
21 - 27
28 - 34
35 - 41
42 - 48
49 - 55
56 - 62
63 - 69
70 - 76
77 - 83
84 - 90
91 - 171
172 - 174
175 - 255
0 - 127
128 - 190
191 - 192
193 - 255
0 - 255
Fade
Default
type
value
Fade 0
Snap 0
Snap 0
Fade 0
Table 1: ERA 800 Performance DMX Protocol
DMX protocol
19
Page 20
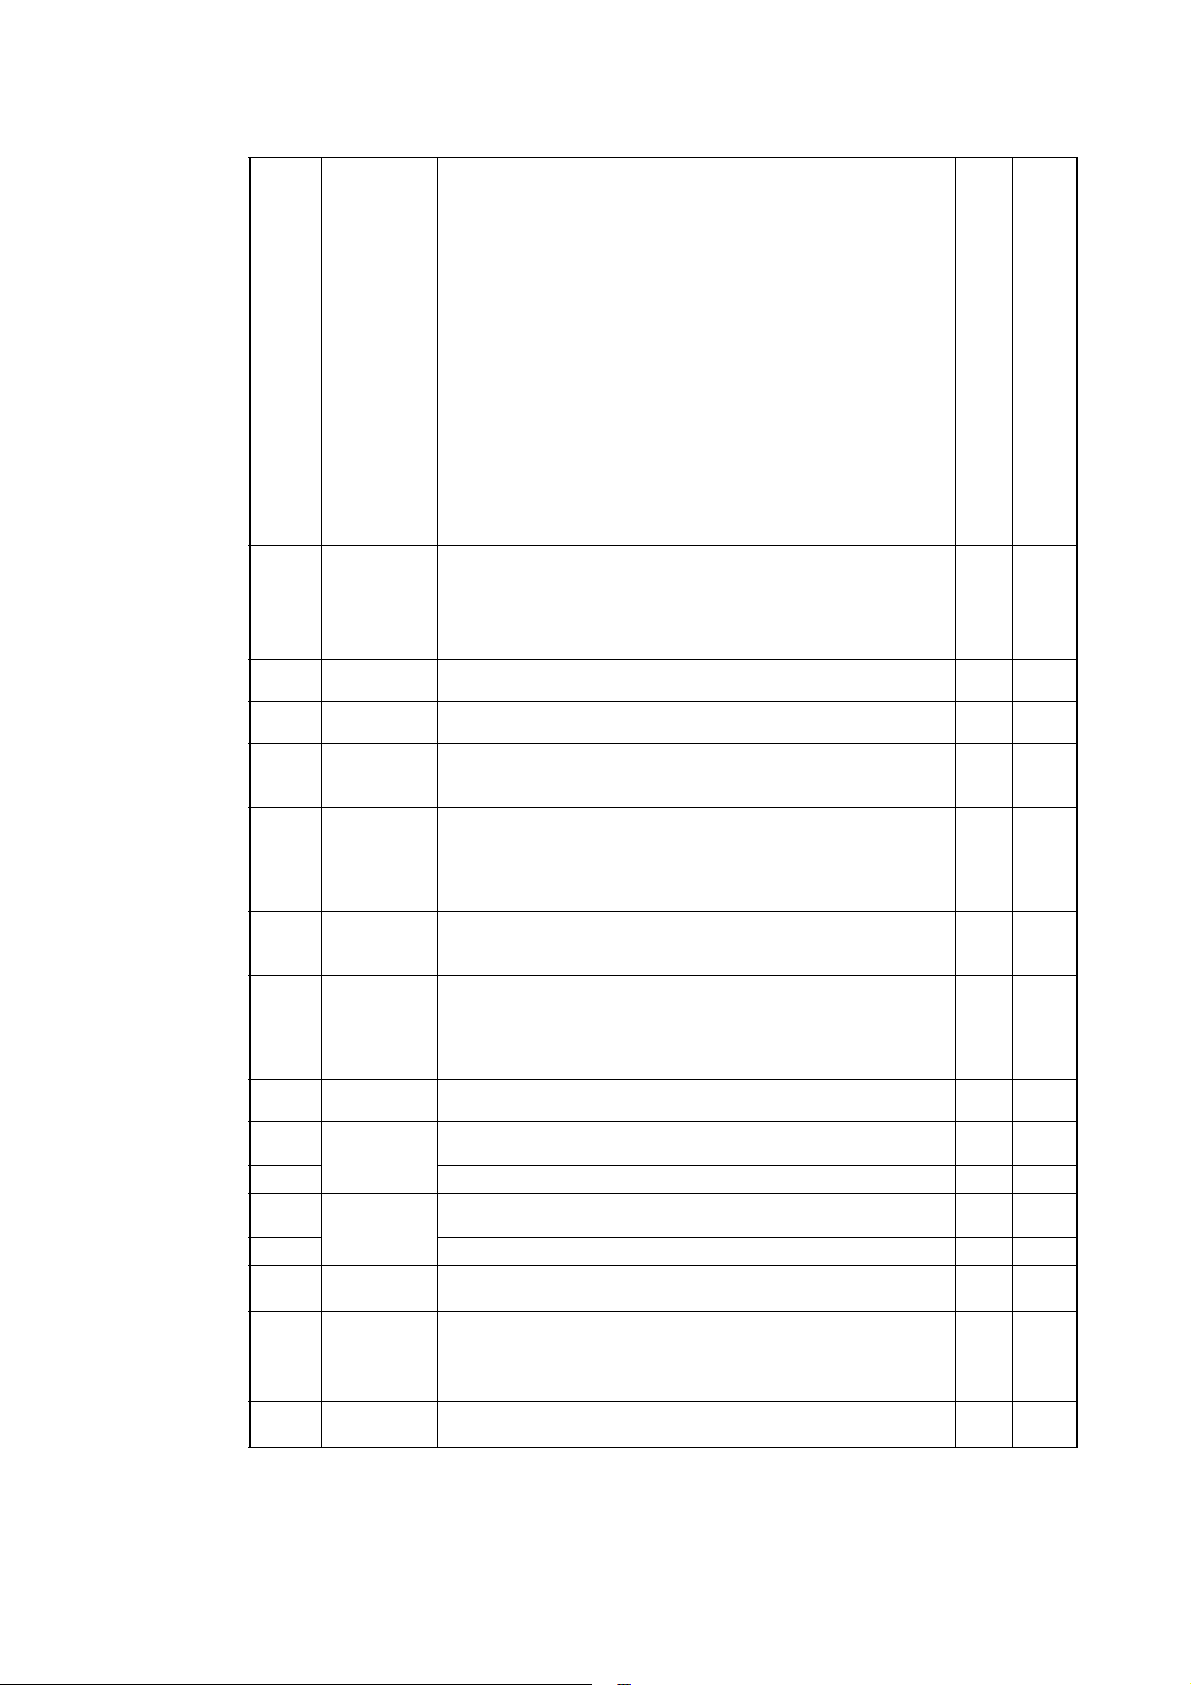
Channel DMX Value Function
Gobo wheel 2 (static gobos)
Gobo selection
Open
Gobo 1 (Ray Flowers)
Gobo 2 (Brick It)
Gobo 3 (Happy)
Gobo 4 (Mikado)
Gobo 5 (Dots)
Gobo 6 (Lasercone Single)
Gobo 7 (Squares)
Gobo 1 shake
Gobo 2 shake
Gobo 3 shake
Gobo 4 shake
Gobo 5 shake
Gobo 6 shake
Gobo 7 shake
Continuous gobo wheel rotation
CCW fast → slow
Stop (wheel stops at current position)
CW slow → fast
Animation
Open
Indexing CCW 0° → 540°
Continuous rotation CW fast → slow
Stop
Continuous rotation CCW slow → fast
Frost 1: Light frost
No frost → full frost
Frost 2: Heavy frost
No frost → full frost
Rotating Prism 1 deployment
Off
On
Rotating Prism 1 movement
Indexing 0° - 360°
Rotation CW fast → slow
Stop
Rotation CCW slow → fast
Rotating Prism 2 deployment
Off
On
Rotating Prism 2 movement
Indexing 0° - 360°
Rotation CW fast → slow
Stop
Rotation CCW slow → fast
Iris
Open → closed
Zoom (MSB)
Narrow → wide
Zoom fine (LSB) Fade 0
Focus (MSB)
Infinity → near
Focus fine (LSB) Fade 0
Framing blade 1: position
Out → in
Framing blade 1: angle
Angle –
Para ll el
Angle +
Framing blade 2: position
Out → in
16
17
18
19
20
21
22
23
24
25
26
27
28
29
30
31
0 - 6
7 - 13
14 -20
21 - 27
28 - 34
35 - 41
42 - 48
49 - 55
56 - 62
63 - 69
70 - 76
77 - 83
84 - 90
91 - 97
98 - 104
105 - 178
179 - 182
183 - 255
0 - 5
6 - 128
129 - 191
192
193 - 255
0 - 255
0 - 255
0 - 10
11 - 255
0 - 127
128 - 190
191 - 192
193 - 255
0 - 10
11 - 255
0 - 127
128 - 190
191 - 192
193 - 255
0 - 255
0 - 65535
0 - 65535
0 - 255
0 -126
127 - 128
129 - 255
0 - 255
Fade
Default
type
value
Snap 0
Snap 0
Fade 0
Fade 0
Snap 0
Snap 0
Snap 0
Snap 0
Fade 0
Fade 0
Fade 0
Fade 0
Fade 127
Fade 0
20
Table 1: ERA 800 Performance DMX Protocol
ERA 800 Performance / Profile User Guide
Page 21
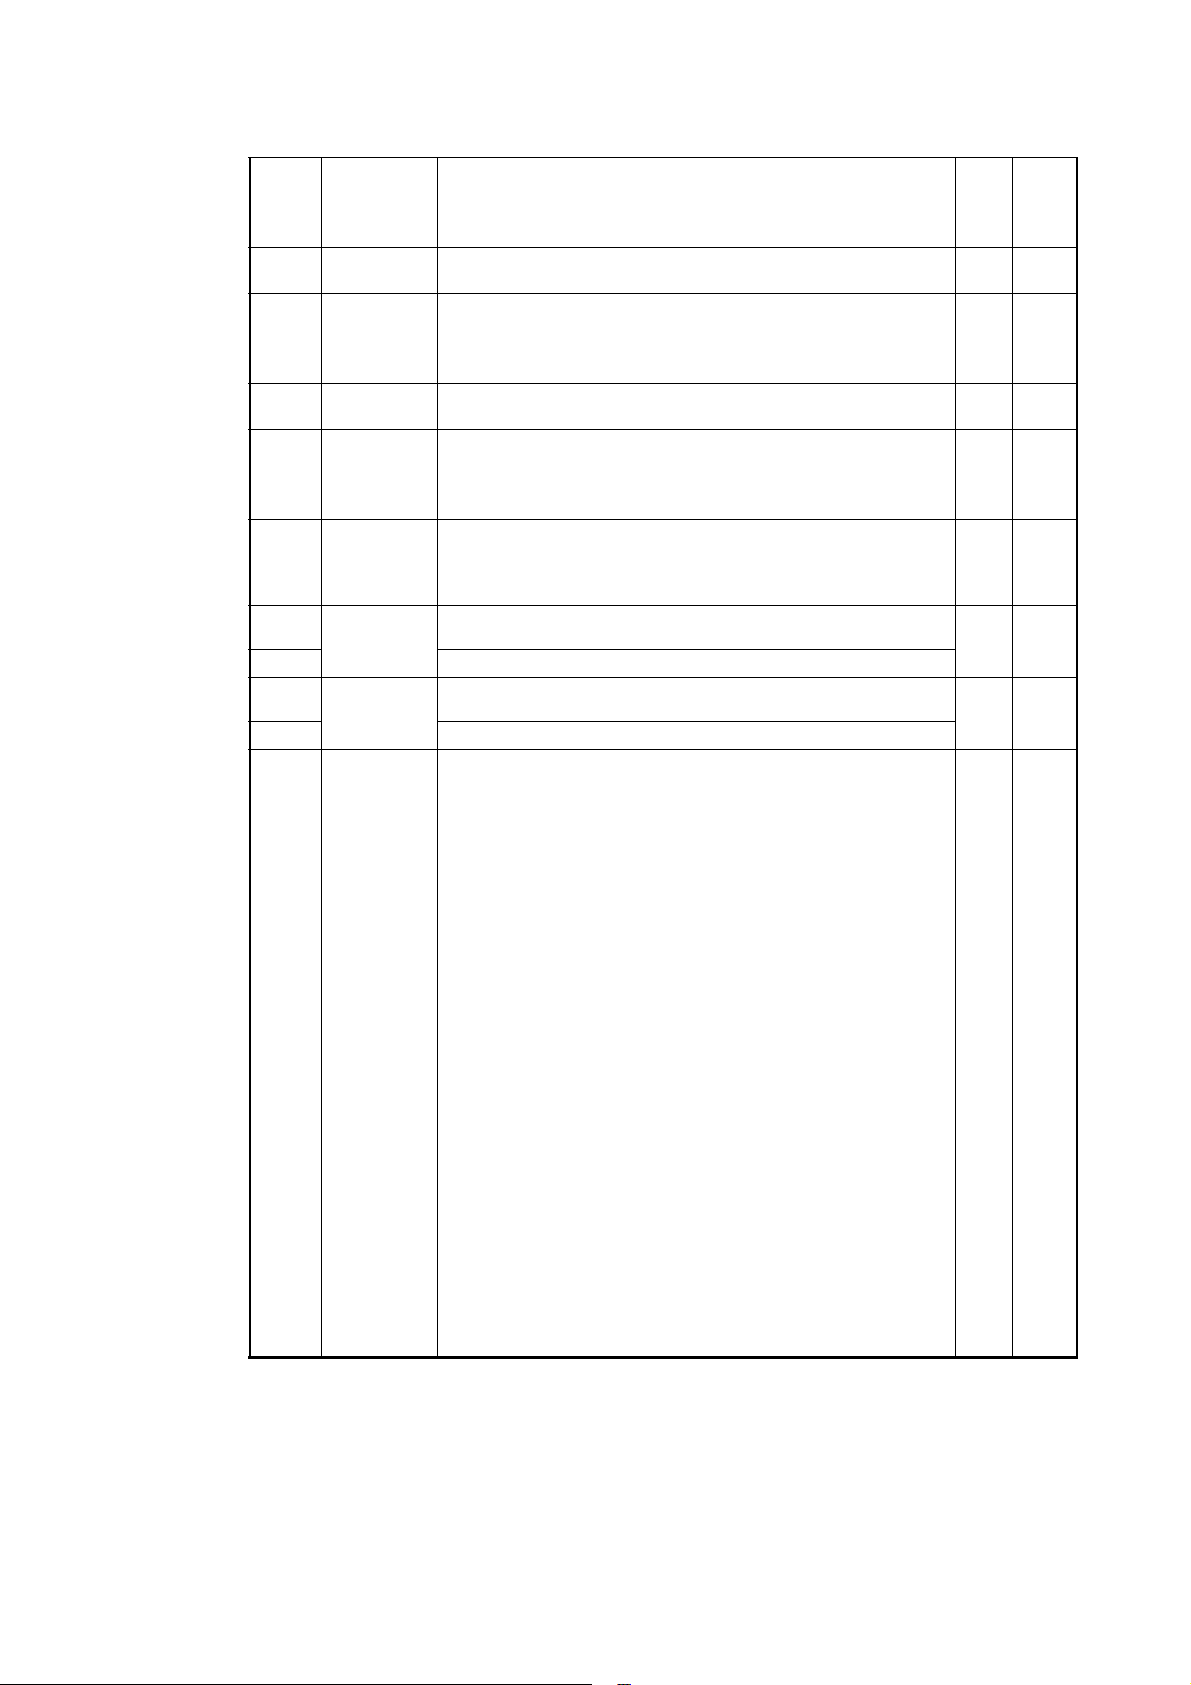
Channel DMX Value Function
Framing blade 2: angle
32
33
34
35
36
37
38
39
40
41
42
0 -126
127 - 128
129 - 255
0 - 255
0 -126
127 - 128
129 - 255
0 - 255
0 -126
127 - 128
129 - 255
0 -126
127 - 128
129 - 255
0 - 65535
0 - 65535
0 - 9
10 - 14
15
16
17
18
19 - 22
23
24
25
26
27
28
29
30 - 51
52
53
54
55
56
57 - 255
Angle –
Para ll el
Angle +
Framing blade 3: position
Out → in
Framing blade 3: angle
Angle –
Para ll el
Angle +
Framing blade 4: position
Out → in
Framing blade 4: angle
Angle –
Para ll el
Angle +
Framing module angle
Minimum (-60°)
0°
Maximum (+60°)
Pan (MSB)
Left → right
Pan, fine (LSB)
Tilt (MSB)
Up → down
Tilt, fine (LSB)
Fixture control/settings
(hold for number of seconds indicated to activate)
No function
Reset entire fixture – 5 sec.
No function
Reset color – 5 sec.
Reset beam only– 5 sec.
Reset pan and tilt only – 5 sec.
No function
Linear dimming curve – 1 sec.
(menu override)
Square law dimming curve – 1 sec.
(menu override, default setting)
Inverse square law dimming curve – 1 sec.
(menu override)
S-curve dimming curve – 1 sec.
(menu override)
No function
Fast pan and tilt speed – 5 sec.
(menu override, default setting)
Smooth pan and tilt speed – 5 sec.
(menu override)
No function
Control panel display = ON – 1 sec.
Control panel display = OFF – 1 sec.
Regulated fan speed, fixed light output intensity – 1 sec.
(menu override, default setting)
Full fan speed, regulated light output intensity – 1 sec.
(menu override)
Theater mode: reduced light output, low-noise operation – 1 sec.
(menu override)
No function
Fade
Default
type
value
Fade 127
Fade 0
Fade 127
Fade 0
Fade 127
Fade 127
Fade 32768
Fade 32768
Snap 0
Table 1: ERA 800 Performance DMX Protocol
DMX protocol
21
Page 22
ERA 800 Profile
Channel DMX Value Function
0 - 19
20 - 24
25 - 64
65 - 69
70 - 84
1
2
3
4
5
6
7
8
9
10
11
12
85 - 89
90 - 104
105 - 109
110 - 124
125 - 129
130 - 144
145 - 255
0 - 65535
0 - 65535
0 - 65535
0 - 65535
0 - 65535
0 - 6
7 - 13
14 -20
21 - 27
28 - 34
35 - 41
42 - 48
49 - 51
52 - 61
62
63 - 72
73
74 - 83
84
85 - 94
95
96 - 105
106
107 - 116
117
118 - 127
128 - 190
191 - 192
193 - 255
Fade
Default
type
value
Strobe/shutter effect
Shutter closed
Shutter open
Strobe, slow → fast
Shutter open
Opening pulse, slow → fast
Shutter open
Closing pulse, slow → fast
Shutter open
Random strobe, slow → fast
Shutter open
Random opening pulse, slow → fast
Shutter open
Dimmer fade (MSB)
Closed → open
Dimmer fade, fine (LSB) Fade 0
Cyan (MSB)
0 → 100%
Cyan fine (LSB)
0 → 100%
Magenta (MSB)
0 → 100%
Magenta fine (LSB)
0 → 100%
Yellow (MSB)
0 → 100%
Yellow fine (LSB)
0 → 100%
CTO (MSB)
0 → 100%
CTO fine (LSB)
0 → 100%
Color wheel
Indexing
Solid colors
Open
Color 1 (Red)
Color 2 (Medium Blue)
Color 3 (Deep Green)
Color 4 (Lavender)
Color 5 (Deep Orange)
Color 6 (Deep Blue)
Split colors (continuous color wheel indexing)
Open
Open → Color 1
Color 1 (Red)
Color 1 → Color 2
Color 2 (Medium Blue)
Color 2 → Color 3
Color 3 (Deep Green)
Color 3 → Color 4
Color 4 (Lavender)
Color 4 → Color 5
Color 5 (Deep Orange)
Color 5 → Color 6
Color 6 (Deep Blue)
Color 6 → open
Continuous rotation
CW, fast → slow
Stop (wheel stops at current position)
CCW slow → fast
Snap 0
Fade 0
Fade 0
Fade 0
Fade 0
Fade 0
Fade 0
Fade 0
Fade 0
Fade 0
Fade 0
22
Table 2: ERA 800 Profile DMX Protocol
ERA 800 Performance / Profile User Guide
Page 23
Channel DMX Value Function
Gobo wheel 1 (rotating gobos)
Gobo selection
Open
Gobo 1 (Ray Brush)
Gobo 2 (Too Many Doctors)
Gobo 3 (Limbo)
Gobo 4 (Light Lines)
Gobo 5 (Dots in Space)
Gobo 6 (Sonar)
Gobo 1 shake
Gobo 2 shake
Gobo 3 shake
Gobo 4 shake
Gobo 5 shake
Gobo 6 shake
Continuous gobo wheel rotation
CCW fast → slow
Stop (wheel stops at current position)
CW slow → fast
Gobo wheel 1
Gobo indexing/rotation
Gobo indexing 0 - 360°
Gobo rotation CW fast → slow
Stop
Gobo rotation CCW slow → fast
Gobo wheel 1
Gobo indexing/rotation fine
Indexed position / rotation speed fine
Gobo wheel 2 (static gobos)
Gobo selection
Open
Gobo 1 (Ray Flowers)
Gobo 2 (Brick It)
Gobo 3 (Happy)
Gobo 4 (Mikado)
Gobo 5 (Dots)
Gobo 6 (Lasercone Single)
Gobo 7 (Squares)
Gobo 1 shake
Gobo 2 shake
Gobo 3 shake
Gobo 4 shake
Gobo 5 shake
Gobo 6 shake
Gobo 7 shake
Continuous gobo wheel rotation
CCW fast → slow
Stop (wheel stops at current position)
CW slow → fast
Gobo wheel 3 (rotating gobos)
Gobo selection
Open
Gobo 1 (4D Cone)
Gobo 2 (Bar)
Gobo 3 (Spidey 1)
Gobo 4 (Spiral)
Gobo 5 (Triangle)
Gobo 6 (Bite It)
Gobo 1 shake
Gobo 2 shake
Gobo 3 shake
Gobo 4 shake
Gobo 5 shake
Gobo 6 shake
Continuous gobo wheel rotation
CCW, fast → slow
Stop (wheel stops at current position)
CW slow → fast
13
14
15
16
17
0 - 6
7 - 13
14 -20
21 - 27
28 - 34
35 - 41
42 - 48
49 - 55
56 - 62
63 - 69
70 - 76
77 - 83
84 - 90
91 - 171
172 - 174
175 - 255
0 - 127
128 - 190
191 - 192
193 - 255
0 - 255
0 - 6
7 - 13
14 -20
21 - 27
28 - 34
35 - 41
42 - 48
49 - 55
56 - 62
63 - 69
70 - 76
77 - 83
84 - 90
91 - 97
98 - 104
105 - 178
179 - 182
183 - 255
0 - 6
7 - 13
14 -20
21 - 27
28 - 34
35 - 41
42 - 48
49 - 55
56 - 62
63 - 69
70 - 76
77 - 83
84 - 90
91 - 171
172 - 174
175 - 255
Fade
Default
type
value
Snap 0
Snap 0
Fade 0
Snap 0
Snap 0
Table 2: ERA 800 Profile DMX Protocol
DMX protocol
23
Page 24
Channel DMX Value Function
Gobo wheel 3
Gobo indexing/rotation
18
19
20
21
22
23
24
25
26
27
28
29
30
31
32
33
34
35
0 - 127
128 - 190
191 - 192
193 - 255
0 - 255
0 - 5
6 - 128
129 - 191
192
193 - 255
0 - 255
0 - 255
0 - 10
11 - 255
0 - 127
128 - 190
191 - 192
193 - 255
0 - 10
11 - 255
0 - 127
128 - 190
191 - 192
193 - 255
0 - 255
0 - 65535
0 - 65535
0 - 65535
0 - 65535
Gobo indexing 0 - 360°
Gobo rotation CW fast → slow
Stop
Gobo rotation CCW slow → fast
Gobo wheel 3
Gobo indexing/rotation fine
Indexed position / rotation speed fine
Animation
Open
Indexing CCW 0° → 540°
Continuous rotation CW fast → slow
Stop
Continuous rotation CCW slow → fast
Frost 1: Light frost
No frost → full frost
Frost 2: Heavy frost
No frost → full frost
Rotating Prism 1 deployment
Off
On
Rotating Prism 1 movement
Indexing 0° - 360°
Rotation CW fast → slow
Stop
Rotation CCW slow → fast
Rotating Prism 2 deployment
Off
On
Rotating Prism 2 movement
Indexing 0° - 360°
Rotation CW fast → slow
Stop
Rotation CCW slow → fast
Iris
Open → closed
Zoom (MSB)
Narrow → wide
Zoom fine (LSB) Fade 0
Focus (MSB)
Infinity → near
Focus fine (LSB) Fade 0
Pan (MSB)
Left → right
Pan, fine (LSB)
Tilt (MSB)
Up → down
Tilt, fine (LSB)
Fade
Default
type
value
Snap 0
Fade 0
Snap 0
Fade 0
Fade 0
Snap 0
Snap 0
Snap 0
Snap 0
Fade 0
Fade 0
Fade 0
Fade 32768
Fade 32768
24
Table 2: ERA 800 Profile DMX Protocol
ERA 800 Performance / Profile User Guide
Page 25
Channel DMX Value Function
Fixture control/settings
(hold for number of seconds indicated to activate)
No function
Reset entire fixture – 5 sec.
No function
Reset color – 5 sec.
Reset beam only– 5 sec.
Reset pan and tilt only – 5 sec.
No function
Linear dimming curve – 1 sec.
(menu override)
Square law dimming curve – 1 sec.
(menu override, default setting)
Inverse square law dimming curve – 1 sec.
(menu override)
S-curve dimming curve – 5 sec.
(menu override)
No function
Fast pan and tilt speed – 5 sec.
(menu override, default setting)
Smooth pan and tilt speed– 5 sec.
(menu override)
No function
Control panel display = ON – 1 sec.
Control panel display = OFF – 1 sec.
Regulated fan speed, fixed light output intensity – 1 sec.
(menu override, default setting)
Full fan speed, regulated light output intensity – 1 sec.
(menu override)
Theater mode: reduced light output, low-noise operation – 1 sec.
(menu override)
No function
36
0 - 9
10 - 14
15
16
17
18
19 - 22
23
24
25
26
27
28
29
30 - 51
52
53
54
55
56
57 - 255
Fade
Default
type
value
Snap 0
Table 2: ERA 800 Profile DMX Protocol
DMX protocol
25
Page 26
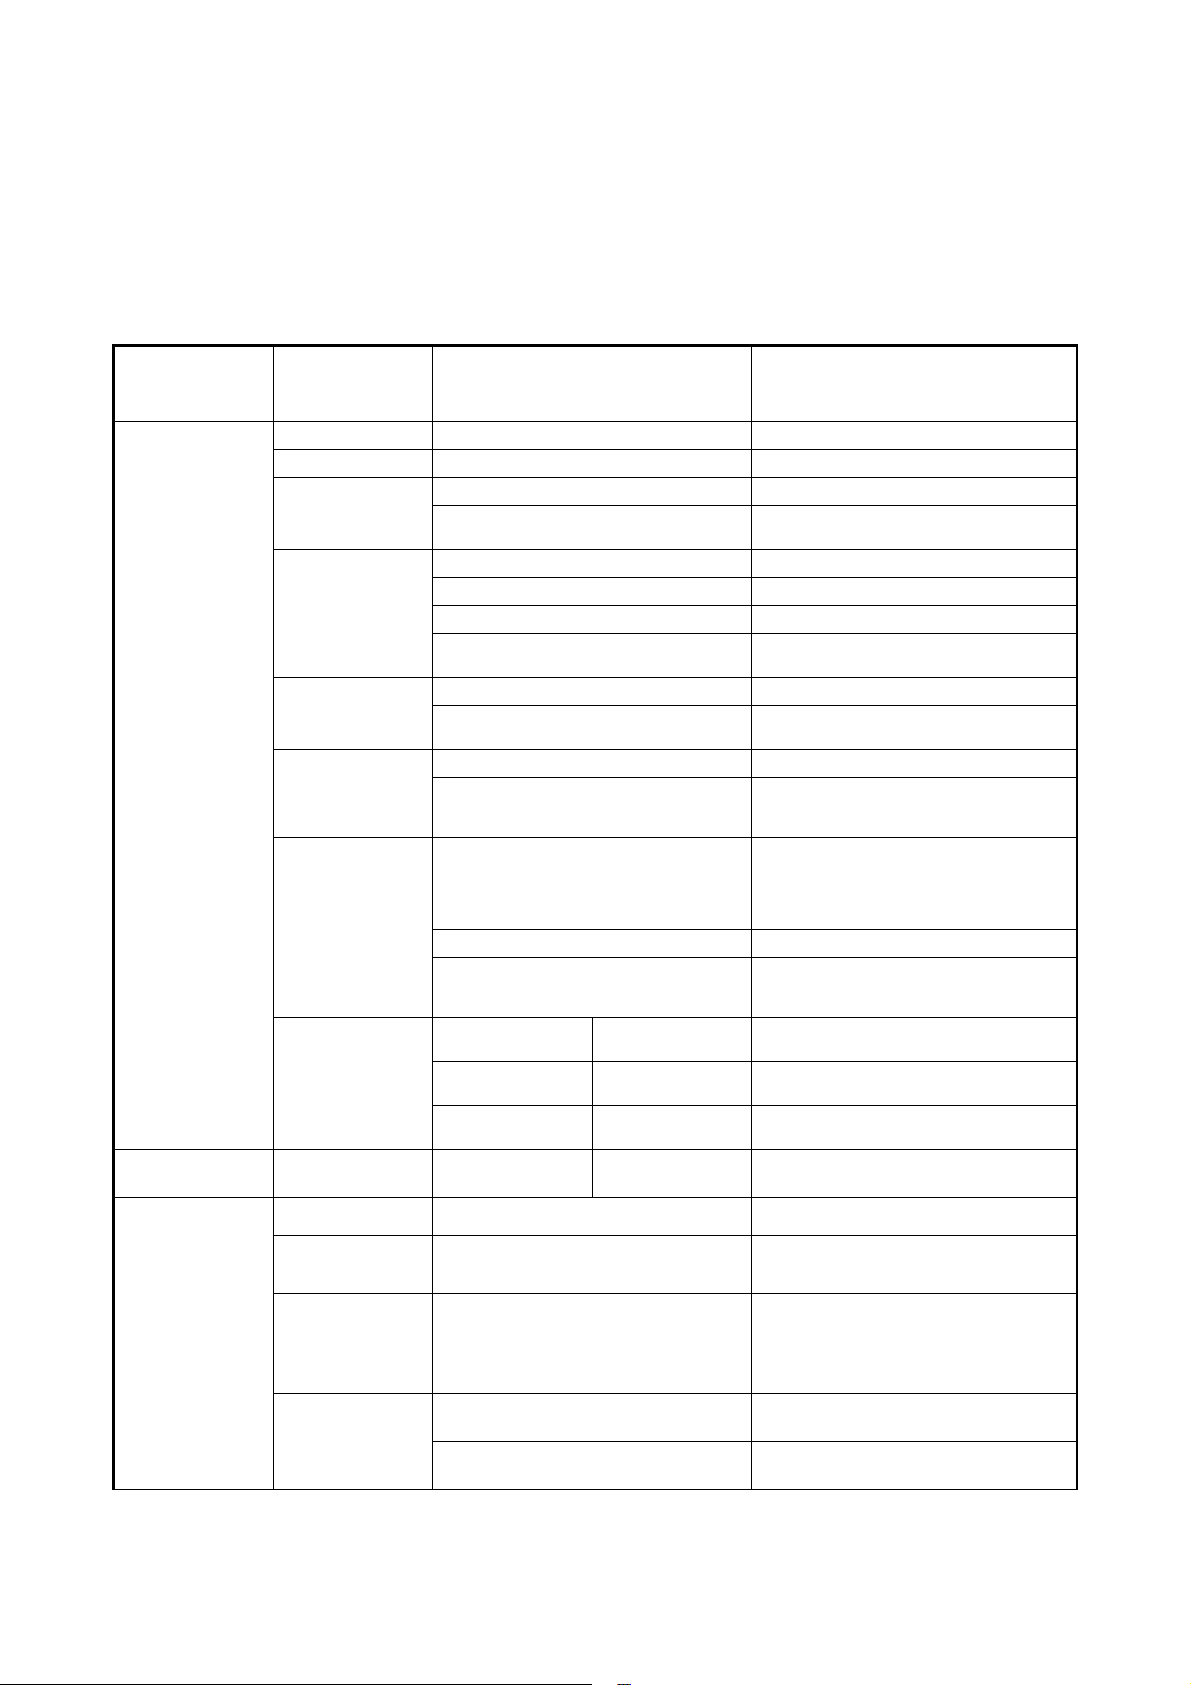
Control panel menus
ERA 800 Performance / Profile firmware version 2.3.0.
Menu level 1 Menu level 2 Menu level 3 Menu level 4 Notes (Default settings in bold print)
DMX address (default address = 1). The
DMX SETUP DMX ADDRESS 1 – XXX
PAN INVERSE NO/YES Inverse DMX pan control: right → left
TILT INVERSE NO/YES Inverse DMX tilt control: down → up
FAST Optimize pan/tilt movement for speed
PERSONALITY
DEFAULT
SETTINGS
FIXTURE TEST
PAN/TILT SPEED
DIMMER CURVE
DIMMING SPEED
NO DATA MODE
COOLING MODE
DISPLAY
FAC TORY
DEFAULT
TEST ALL TESTING
TEST DIMMER DIMMER
TEST EFFECTS
TEST PAN/TILT
SLOW
LINEAR Optically linear dimming curve
SQUARE LAW Square law dimming curve
INV SQ LAW Inverse square law dimming curve
S-CURVE
FAST Snap dimmer reaction
SLOW
BLACKOUT If data signal stops, fixture blacks out
HOLD
REGULATED FANS
FULL Fans run at constant full speed
THEATER MODE
DISPLAY
ROTATION
DISPLAY
INTENSITY
TEMPERATURE
UNIT
LOAD
CYAN
...
BLADE 4 ANGLE
PA N
TILT
NORMAL /
ROTATE 180
10 ... 100 % Set display intensity in % (default = 100)
°C / °F
ARE YOU SURE?
YES/NO
DMX address range is limited so that the
fixture will always have enough DMX
channels within the 512 available.
Optimize pan/tilt movement for
smoothness
S-curve (fixture emulates incandescent
lamp voltage linear RMS dimming curve)
Short crossfade when dimmer value
changes
If data signal stops, fixture holds last
received data on all channels (holds
current scene)
Fan speed optimized for light intensity:
temperature-controlled by regulating
fan speed, light output unaffected as
long as ambient temperature is within
specified range, max. 40° C (104° F)
Low-noise mode. Maximum output limited
to 70%, fans set to Regulated, PWM
frequency set to 19 200 Hz.
Display orientation normal or rotated 180°
Set temperature readouts to display in
Celsius / Fahrenheit
Return all settings (except calibrations) to
factory defaults
Run test sequence of all LEDs and all
effects
Run dimming test sequence. Press Enter
to pause and to restart test sequence.
Press Menu button to exit test
Run test sequence of effects.
To test a specific effect, use Up/Down
buttons to scroll to effect. Press Enter to
pause and restart test sequence.
Press Menu button to exit test
Run test sequence of pan functions.
Press Menu button to exit test
Run test sequence of tilt functions.
Press Menu button to exit test
26
Table 3: Control menus
ERA 800 Performance / Profile User Guide
Page 27
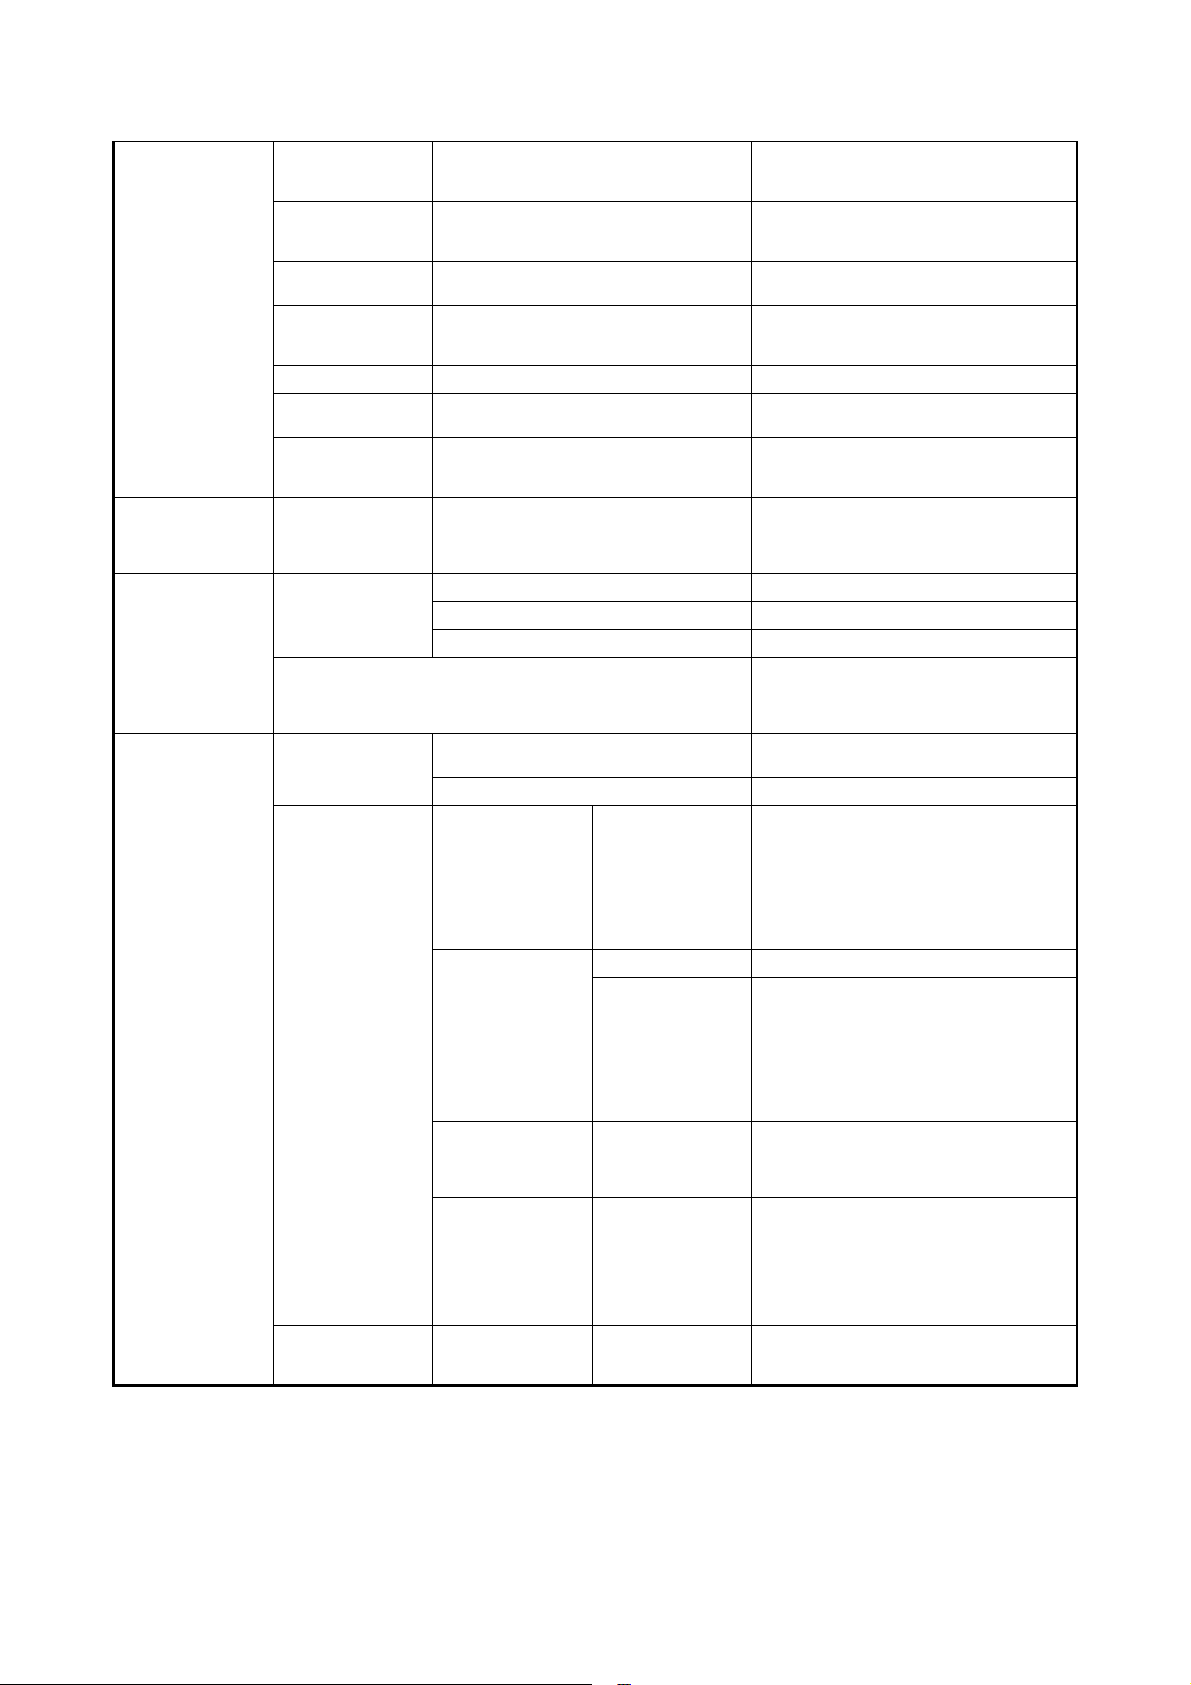
Menu level 1 Menu level 2 Menu level 3 Menu level 4 Notes (Default settings in bold print)
Display number of hours fixture has been
powered on since manufacture (not
user-resettable)
Display number of hours LEDs have been
powered on since manufacture (not
user-resettable)
Displays currently active fixture software
(firmware) version
User-settable ID number. Use Up and
Down buttons to scroll to the chosen ID
number. Use Enter to confirm.
Scroll through current readings on all PCB
temperature sensors
Displays the configuration that the
firmware has recognized: Performance or
Profile
Scroll to see values currently being
received on each DMX channel
Scroll through effects, then manually
control an effect
Enable pan/tilt position feedback
system
Scroll through effects, press ENTER to
select effect. Adjust home position from
-127 to +128 and press ENTER to confirm
the new custom setting.
Important! If you want to keep custom
settings you must apply a SAVE SETTING
→
SAVE command before you leave the
CALIBRATION menu.
Save current custom calibration settings
as default settings.
Important! Applying LOAD DEFAULTS →
SAVE and confirming with SAVE
SETTING → SAVE will permanently
overwrite the factory default calibration
settings and should normally be used by
Martin Service only!
Confirm any changes made to calibration
values and any changes made in the
LOAD DEFAULTS and CLEAR ALL
VALUES menus
Reset all calibration values to zero.
Important! Applying CLEAR ALL VALUES
→ RESTORE and confirming with SAVE
SETTING → SAVE will permanently
overwrite the factory default calibration
settings and should normally be used by
Martin Service only!
Displays firmware upload status
INFORMATION
DMX LIVE
MANUAL
CONTROL
SERVICE*
POWER ON TIME 0 ... XXXH
LED HOURS 0 ... XXXH
SW VERSION V.X.X.X
FIXTURE ID 0000 - 9999
RDM UID 4D50XXXXXXXX Displays fixture’s unique RDM ID
TEMPERATURES
FIXTURE TYPE
STROBE
...
PAN/TILT SPEED
RESET
STROBE
...
TILT FINE
PA N/ T I LT
FEEDBACK
CALIBRATION
USB UPDATING FILES
LED / BASE
ERA 800 PERFORMANCE /
ERA 800 PROFILE
0 - 255
ALL Reset fixture
PAN / TILT Reset pan and tilt only
EFFECTS Reset effects only
ON
OFF Disable pan/tilt position feedback system
PA N
...
BLADE4 ANGLE
(in Performance
fixtures) or
FOCUS
(in Profile fixtures)
LOAD DEFAULTS
SAVE SETTING SAVE
CLEAR ALL
VAL UE S
-127 – +128
...
-127 – +128
LOAD Load the factory default calibration settings
SAVE
RESTORE
ERA800 1.1.0
...
ERA800 X.X.X
Table 3: Control menus
* See the fixture’s Safety and Installation manual for full details of the SERVICE control menu functions
Control panel menus
27
Page 28

Status messages
The ERA 800 Performance / Profile monitors its own performance and has a diagnostic error recognition
system that lets it display messages with information about any problem detected.
If the fixture has a status message to report, a red warning triangle appears in the bottom right of the control
panel display. If the red triangle is present, pressing the Enter button displays any active status messages.
Excessively high temperatures
If any of the temperature sensors reports that the fixture has exceeded its recommended temperature
range, the fixture reports a temperature warning and reduces light output to reduce its temperature. If the
temperature reaches a dangerous level, light output is shut down completely.
Temperature warnings are canceled and full light output becomes available again as soon as the
temperature returns to normal.
Status message list
The status messages that the fixture can display are listed in Table 4 below:
Code Notes
Animation 1 Animation wheel error
BaseFan Base cooling fan warning
BaseTemp Base temperature warning
Blade Framing module error
CoolFan1 LED cooling fan 1 warning
CoolFan2 LED cooling fan 2 warning
CoolFan3 LED cooling fan 3 warning
CoolFan4 LED cooling fan 4 warning
CoolFan5 Cooling fan 5 warning
CoolFan6 Cooling fan 6 warning
CMYFan1 CMY module cooling fan 1 error
CMYFan2 CMY module cooling fan 2 error
CPU1 CPU 1 (Display PCB) error
CPU2 CPU 2 (Pan/tilt control) error
CPU3 CPU 3 (CMY control) error
CPU4 CPU 4 (Gobo/color wheel control) error
CPU5 CPU 5 (Framing control) error
CPU6 CPU 6 (Zoom/focus control) error
CPU7 CPU 7 (Prism/frost control) error
CPU8 CPU 8 (LED control) error
CTO Color Temperature Control color flag error
Cyan Cyan color flag error
FixedGobo Fixed gobo wheel error
Focus Focus error
Frost1 Frost 1 (Light Frost) error
Frost2 Frost 2 (Heavy Frost) error
GoboFan Gobo wheel cooling fan warning
GoboRot Gobo rotation error
28
Table 4: Status messages
ERA 800 Performance / Profile User Guide
Page 29

Code Notes
HeadFan1 Head cooling fan 1 error
HeadFan2 Head cooling fan 2 error
HeadTemp Head temperature warning
Magenta Magenta color flag error
Pan Pan error
Prism1 Prism 1 error
Prism1Rot Prism 1 rotation error
Prism2 Prism 2 error
Prism2Rot Prism 2 rotation error
RotGobo Rotating gobo wheel error
Tem p LED temperature error
Tilt Tilt error
Yellow Yellow color flag error
Zoom Zoom error
Table 4: Status messages
Status messages
29
Page 30

www.martin.com
 Loading...