


From Jim Marshall
I would like to take this opportunity to personally congratulate you on
choosing this Haze amplifier from Marshall.
As a musician myself I fully understand the thrill and enjoyment of
playing live music - whether that be on a stage to thousands, or in
the bedroom to yourself - there’s nothing quite like it. I also
appreciate the need for high quality equipment that not only delivers
the sound you’re looking for, but that also has the dynamic
play-ability and feature set that separates a good amp from a truly
fantastic one.
With these ideals firmly in mind, I set the Marshall team the
challenge of turning them into a range of all-valve driven amplifiers
that would be affordable, portable and look the part too. I must say I
was delighted when they presented me with what has now become
the Haze Series. Using the latest technology and good old fashioned
craftsmanship, these amplifiers have squeezed pure Marshall tone,
custom designed digital effects and innovative footswitching
technology into both a compact 40W combo and 15W Ministack.
Perfect for either the gigging musician or those seeking their very
own valve Marshall stack at home.
As with all Marshall products, the Haze Series undergoes stringent
quality control checks throughout its meticulous construction,
ensuring that the end result is fit for purpose and continues the high
standards expected of a Marshall amplifier.
Whether this is your first ever Marshall or the latest addition to your
arsenal of amps, the versatility, response and tone of the Haze
Series will only add to the guitar playing pleasure you’re no-doubt
accustomed to.
I wish you every success with your new Marshall amplifier. Welcome
to the family...
Yours Sincerely,
Dr. Jim Marshall OBE
Overview
Presenting the Haze series – 40 Watt combo and 15 Watt
head. Developed and engineered in the UK, these two
channel valve amplifiers, inspired by the British tones of the
60s and 70s, provides that classic Marshall roar with a
modern edge.
The MHZ40C 40Watt combo offers a dedicated overdrive
boost and series effects loop in a classic top loading 1x12"
combo loaded with a Celestion Marquee (G12-66) speaker –
custom designed in partnership with Marshall.
The MHZ15 15 Watt head can be paired with the optional
cabinets MHZ412A and MHZ412B to form a valve powered
mini stack
The Basics
Mains Input & Fuse
Your amp is provided with a detachable mains (power) lead,
which is connected on the rear panel. The specific mains input
voltage rating that your amplifier has been built for is indicated
on the back panel.
WARNING: Before going any further, make sure your
amplifier is compatible with your electrical supply. If you have
any doubt, please get help from a qualified technician - Your
Marshall dealer can help you in this respect.
Getting Started & Powering Up
1. Make sure that the speakers/cabinet(s) are connected to
the correct impedance LOUDSPEAKER jack(s) on the rear
panel.
See the Speaker Output guides in this handbook for specifics
regarding impedance matching. When using an extension
cabinet make sure that you’re using a proper speaker cable.
Never use a screened (shielded) guitar cable for this purpose.
WARNING! Failure to do any of the above will damage
your amp.
2. Ensure that the two VOLUME controls on the front panel
are set to zero.
3. Connect the supplied mains (power) lead into the MAINS
INPUT on the rear panel first and then into an electrical outlet.
4. Plug your guitar into the INPUT jack socket on the front
panel.
5. Turn the front panel POWER switch on. The switch’s LED
will illuminate and then wait a couple of minutes.
The vintage voiced effects section stores its settings per
channel for instant recall and provides a choice of classic
echo, vibe or chorus alongside a reverb providing the warmth
and transparency of a spring tank.
The reverb and effects are routed in parallel to the direct
signal so that no degradation of the direct signal occurs. By
turning the special reverb level and effects depth pots to
minimum ‘past the click’ and bypassing the effects loop on the
MHZ40C, the effect section is true bypassed, mechanically
removing the circuit from the amplifier – leaving the Haze
amps with an all-valve signal path.
The correct value of mains fuse is specified on the rear panel
of the amplifier. NEVER attempt to bypass the fuse or fit one
of the incorrect value.
Haze 40 Only
6. After waiting, engage the STANDBY switch.
STANDBY Switch (17)
The Standby switch is used in conjunction with the Power
Switch (18) to ‘warm up’ the valves in the amplifier before
use and to mute the amplifier when required, such as when
you are changing guitars. When powering up the amplifier
we suggest engaging the Power Switch (18) first, leaving
the Standby switch in the ‘OFF’ position for two minutes to
allow the valves to heat up.
When switching the amplifier off, always disengage the
Standby Switch a couple of seconds prior to the main
Power Switch.
7. Your amp is ready to play.
ENGLISH
1
0 10OFFOFF MAX MAX0 100 100 100 100 10
0 100 10
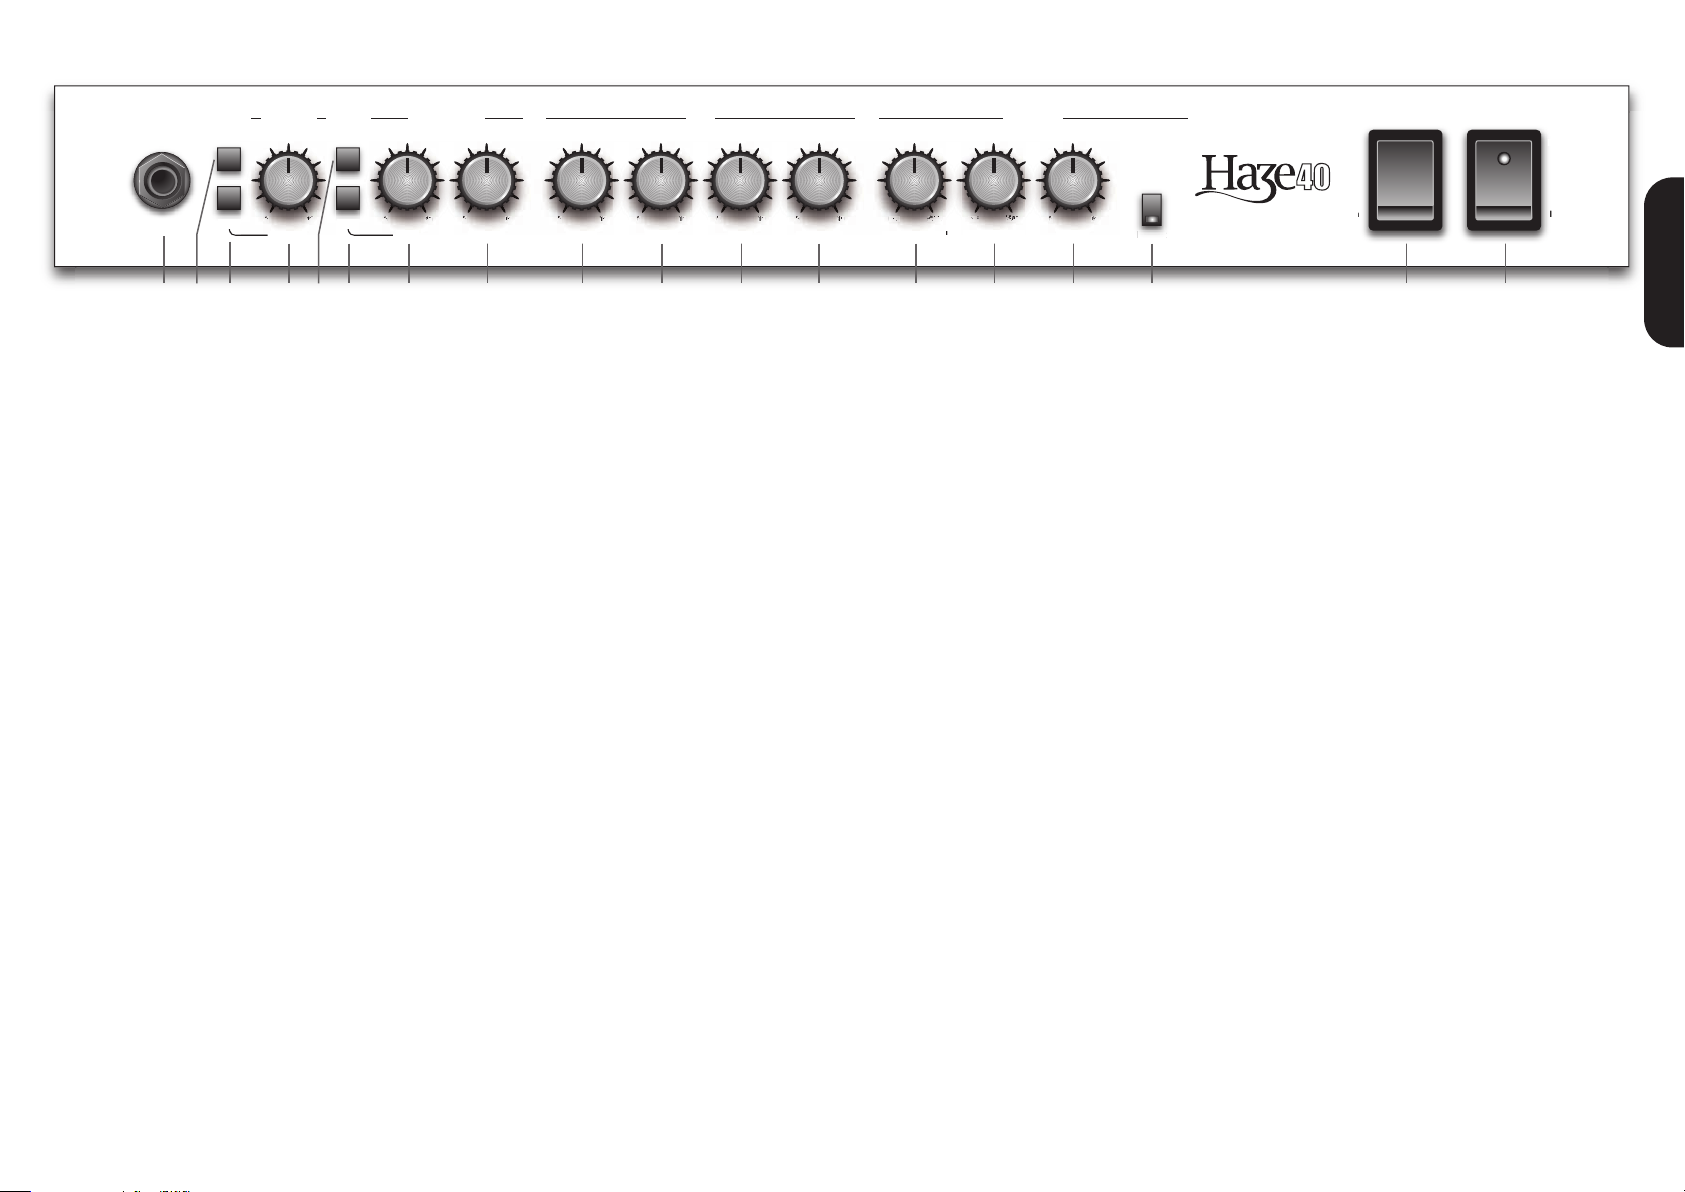
EffectAdjustEffect DepthReverb LevelPresenceBassMiddleTrebleVolumeVolume Gain
Bright
Channel
Green - Echo
Orange - Vibe
Red - Chorus
Input
O
I
Off
On
Standby
Power
Overdrive EQ EffectsNormal
Boost Boost
00010
010
OFF
OFF
010
Haze 40 Watt combo front panel
ENGLISH
1 23 4 6 7 8 9 10 11 12 13 14 15 16 17 18
1. Input Jack Socket
Jack input for your guitar. You must always use a screened
(shielded) guitar cable and never use an unscreened
(unshielded) speaker cable. Also, this cable should be one of
good quality. If you are in any doubt regarding this, your
Marshall dealer will be more than happy to help and advise you.
2. Bright
Pushing this switch ‘in’ enables the Bright function. This
control works on both the Normal and Overdrive controls.
On the Normal channel the Bright works in the traditional way,
interacting with the Normal Volume control. At lower settings
the Bright has an increased effect which lessens as the
Normal Volume is increased.
On the Overdrive channel it adds a little extra bite to the
sound and works at all volumes.
Normal Channel
3. Boost
Pushing this switch ‘in’ enables the Boost function in the
Normal channel.
With the Boost off the sound remains cleaner for longer as the
Volume control is increased providing a greater range of clean
sounds.
With the Boost selected, the channel turns into a classic
Marshall Normal channel, starting clean with a thicker sound,
overdriving the power amp sooner and bringing out that
vintage Marshall non-master volume tone.
4. Volume Control
This control adjusts the volume of the Normal Channel. At low
levels the sound will be clean. As the volume control is
increased, in true Marshall style, the power amplifier will start
to overdrive giving a classic, controllable distortion which
cleans up beautifully from the guitar’s volume control.
5. Channel Switch
Selects between Normal (out) and Overdrive (in) channels.
Note: When using the 2-way footswitch this front panel switch
is disabled. When using the optional 4-way footswitch this
switch operates in ‘catch up mode’ - This top panel switch
must first match the current footswitch setting before it will
have an effect.
Overdrive Channel
6. Boost
Pushing this switch ‘in’ enables the Boost function.
5
With the Boost off the tone is a controlled, easy to play,
dynamic sound with plenty of scope available to clean up the
sound from the guitar volume control.
At lower volume settings, the sound is very much the classic
Marshall Master Volume sound. At higher volume settings,
this channel is brilliant at overdriving the power amp for some
truly inspiring tones.
Enable the Boost for a big step up in gain taking an
un-boosted rhythm sound into serious lead territory.
HINT - At higher volumes you’ll find you will need less preamp gain as the power amp starts to overdrive. Experiment to
find your favourite balance.
Note: When using the optional 4-way footswitch this switch
operates in ‘catch up mode’ - This top panel switch must first
match the current footswitch setting before it will have an
effect.
7. Gain
Controls the level of signal entering the pre-amp. At lower
settings the sound will be cleaner and the amount of distortion
is more controllable from your guitar or your playing style. At
higher settings, more distortion is available.
8. Volume
Controls the amount of signal fed to the power amp. At lower
settings, this will act as a volume control. At higher settings, it
will control the amount of power amp distortion.
EQ Section
The treble, middle and bass controls form a traditional
Marshall interactive EQ section – adjusting one control will
affect how the others work.
9. Treble
By adjusting the Treble control you can add or take away the
higher frequencies in your guitar tone. By increasing the
amount of treble you will make your tone brighter, ideal for
more percussive playing styles.
10. Middle
Adjusts the middle frequencies. Turning the control
anticlockwise will yield a more hollow sound with the bass and
treble frequencies appearing to be more accentuated. Turning
it back clockwise increases the middle adding body to the
sound.
11. Bass
Turning the Bass control will affect the amount of low
frequencies or bottom end in your guitar tone. Rotating this
clockwise will increase the amount of lower tones generally
making your bass sound deeper and is especially useful at
lower volumes. Turning this control anti-clockwise will reduce
the bass frequencies in your tone producing a more cutting
tone – especially useful at higher volumes.
12. Presence
This control emphasises the high frequencies in your tone.
Turning this control up (clockwise), adds crispness and bite.
Effects Section
All effect and reverb settings are automatically stored in
Normal, Overdrive and Overdrive Boost allowing you to set
different effects and/or reverb levels in each of these three
modes. Set a clean Normal sound with a lush chorus and a
huge reverb, change to Overdrive and set a sparse reverb
and a slap back echo and these sounds will be remembered
each time you change channel.
For this reason, the position of the effects controls will not
always show the effects settings in use. If one of the controls
is changed, the value will ‘jump’ to the control’s new position.
The Reverb Level and Effects Depth controls use special
controls that include switches that allow a part or all of the
section to be globally disabled.
Turn the Reverb Level to minimum ‘past the click’ and it will
globally disable the reverb.
Turn the Effect Depth to minimum ‘past the click’ and it will
globally disable the effects.
Turn both the Reverb and Effect Depth to minimum and the
entire effects section will be globally disabled. If the effects
loop is also turned off via the rear panel switch a further click
will be heard from within the amplifier as the effect section is
true bypassed mechanically removing the circuit from the
amplifier – leaving an all-valve amplifier signal path.
13. Reverb Level
This control sets the amount of signal sent to the reverb.
Turning the control down ‘past the ‘click’ to off globally
disables the reverb. However turning the control down to
minimum ‘before the click’ turns the reverb off for the current
channel only but does not globally disable the reverb.
When using the optional 4-Way footcontroller its Reverb LED
will turn off when the Reverb control is muted or turned to
minimum. The reverb cannot be footswitched when the control
is set to minimum or disabled. .
14. Effect Depth
This control sets the depth of the chorus and vibe or the level
of the echo.
Turning the control down ‘past the click’ to off globally disables
the effects and the light on the effect switch will turn off.
The effects cannot be footswitched while disabled.
15. Effects Adjust Control
This control allows you to adjust the modulation speed of the
Chorus and Vibe effects or the delay time of the Echo. As the
delay time is decreased so are the number of repeats –
creating long trailing echoes that reduce to short slap backs
and further down to double tracking.
When changing from a channel with Echo to one without, the
effect will naturally spill between channels. When changing
from a channel with Echo to a channel with Echo set to a
different delay time, the delay effect will not spill between
channels. The maximum delay time is 1 second.
16. Effects
Pressing this switch cycles between the 3 effects, Echo
(green), Vibe (orange) Chorus (red) and Off (no light). When
the effects are muted via the 2-way footswitch or optional
4-way footcontroller the light will slowly flash when the
selected effect is muted.
When using the optional 4-Way footcontroller its FX LED will
turn off when the effects are muted or set to off.
17. Standby
The Standby switch is used in conjunction with the Power
Switch (18) to ‘warm up’ the amplifier before use and to mute
the amplifier when required, such as when you are changing
guitars. When powering up the amplifier we suggest engaging
the Power Switch (18) first, leaving the Standby switch in the
‘OFF’ position for two minutes to allow the valves to heat up.
When switching the amplifier off, always disengage the
Standby Switch a couple of seconds prior to the main Power
Switch.
18. Power Switch
This is the On/Off switch for the mains electric power to the
amplifier. The LED will light up when your amplifier is turned
on and will not be lit when the amplifier is switched off.
Note: Please ensure the amplifier is switched off and
unplugged from the mains electricity supply whenever it is
moved!
32
WARNING!: RISK OF HAZARDOUS ENERGY
AVIS!: ENERGIE ELECTRIQUE DANGEREUSE!
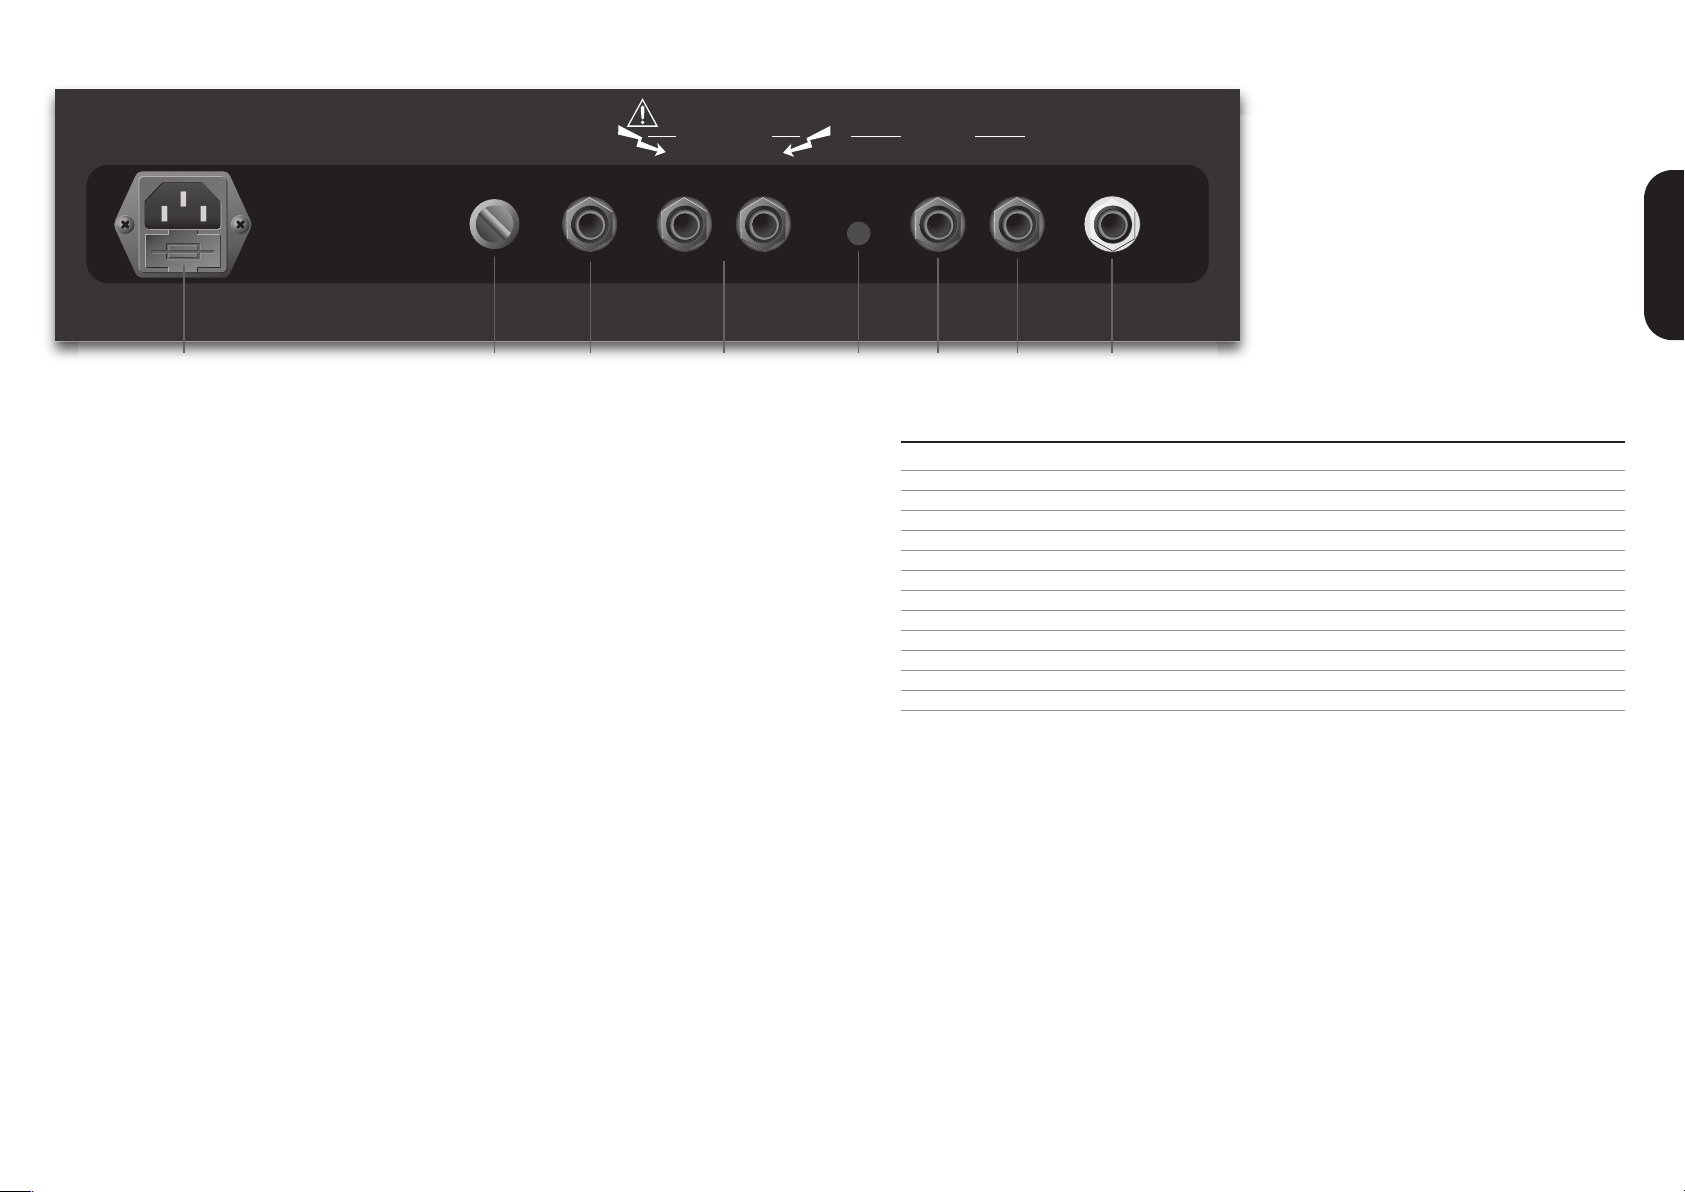
HT Fuse
T500mAE 250V FootswitchReturn
Emulated
Line Out Send
Connect speakers before use
Output: 40 Watts RMS
Speaker Outputs
8 Ohm16 Ohm
Effects Loop
On / Off
Haze 40 Watt combo rear panel
1 2 3 4 5 6 7 8
ENGLISH
1. Mains Input Socket with Mains Fuse
Your amp is provided with a detachable mains (power) lead,
which is connected here on the rear panel – see ‘The Basics’
section at the start of this handbook for more information.
2. HT Fuse
The correct value of this H.T. fuse is specified on the rear
panel of the amplifier. NEVER attempt to bypass the fuse or fit
one of the incorrect value!
3. Emulated Line Out Socket
The amplifier’s output processed through a speaker cabinet
emulator is made available at this connector. Use this socket
to connect your amp directly to a PA mixer or recording
equipment.
4. Speaker Outputs
WARNING! Never use the amplifier without a load (speaker
cabinet/s) attached!
There are 2 speaker outputs available on the rear panel. They
are labelled according to the intended impedances:
16 Ohm: connect any 16 Ohms guitar cabinet to this jack.
Also used for the internal speaker.
8 Ohm: connect any 8 Ohms guitar cabinet to this jack.
WARNING: Although there are 2 speaker outputs, never
attempt to connect speakers to more than one socket at any
time. The safe combinations are 1x16 Ohm or 1x8 Ohm only.
Any other speaker configuration may stress the power
amplifier section and in extreme cases may lead to valve
and/or output transformer failure.
ALWAYS ensure you use good quality speaker (unshielded)
cables. NEVER use guitar (shielded) cables. ALWAYS use a
non-screened Marshall approved speaker lead when
connecting an extension cabinet to these units.
5. Effects Loop Switch
When ‘out’ this switch completely bypasses the circuitry
involved in the effects loop. Push this switch in to enable the
loop.
Note: If this switch is accidentally pushed in and there is
nothing plugged in to the loop, the signal will still pass through
from send to return by means of an internal link on the
switching jacks. This link is disconnected when something is
plugged into the return socket. The send socket has no effect
on the status of the internal link and could therefore be used
as a line out to a tuner for example if no external FX are
connected.
6 & 7. FX Loop - Send & Return
The FX Return socket (6) on the rear panel is used to connect
the OUTPUT of the effects processor or pedal you are using
in the effects loop. The FX loop is series and set at instrument
level so both guitar FX or professional units can be
connected. The FX Send socket (7) on the rear panel is used
to connect to the INPUT of the unit you are using in the effects
loop.
8. Footswitch
Connect the supplied 2-way footswitch here. The footswitch
enables you to change the channels, Normal or Overdrive,
and globally turn the effects on and off.
Note: When the 2-way footswitch is connected the front panel
channel switch will not function.
The optional extra 4-way footcontroller (not supplied)
PEDL-10049 expands the functionality of the Haze amplifier.
Four footswitches enables you to select between normal and
overdrive channels, switch between overdrive and overdrive
boost, enable / mute the internal reverb and enable / mute the
internal effects.
Four status LEDs reflect the current status of the amplifier –
channel, boost, reverb and effect.
Mute settings are stored per channel rather than globally
applied.
MHZ40C Combo Technical Specification
Power (RMS) 40W
Speaker Output 1x 16 Ohm / 1x 8 Ohm
Pre-Amp Valves 3x ECC83
Power Amp Valves 2x EL34
Channels 2
Boost Switch
Bright Switch
Reverb
Effects
Footswitch 2 way supplied
Main Guitar - Input Impedance 1MΩ
Dimensions (mm) W, H, D 590 x 486 x 254
Weight (kg) 20.3
54
010
Adjust
OFF MAX MAX
Effect Depth
OFF
Reverb Level
010
Bass
010
Middle
010
Treble
010
Volume
010
Gain
010
Volume Input
Effect
Green - Echo
Orange - Vibe
Red - Chorus
Bright
Channel
O
I
Power
Overdrive NormalEQEffects
OFF
rb L
el
00000000000
0
l
th
0
0
Haze 15 Watt head front panel
12
ENGLISH
1 2 3 4 5 6 7 8 9 10 11
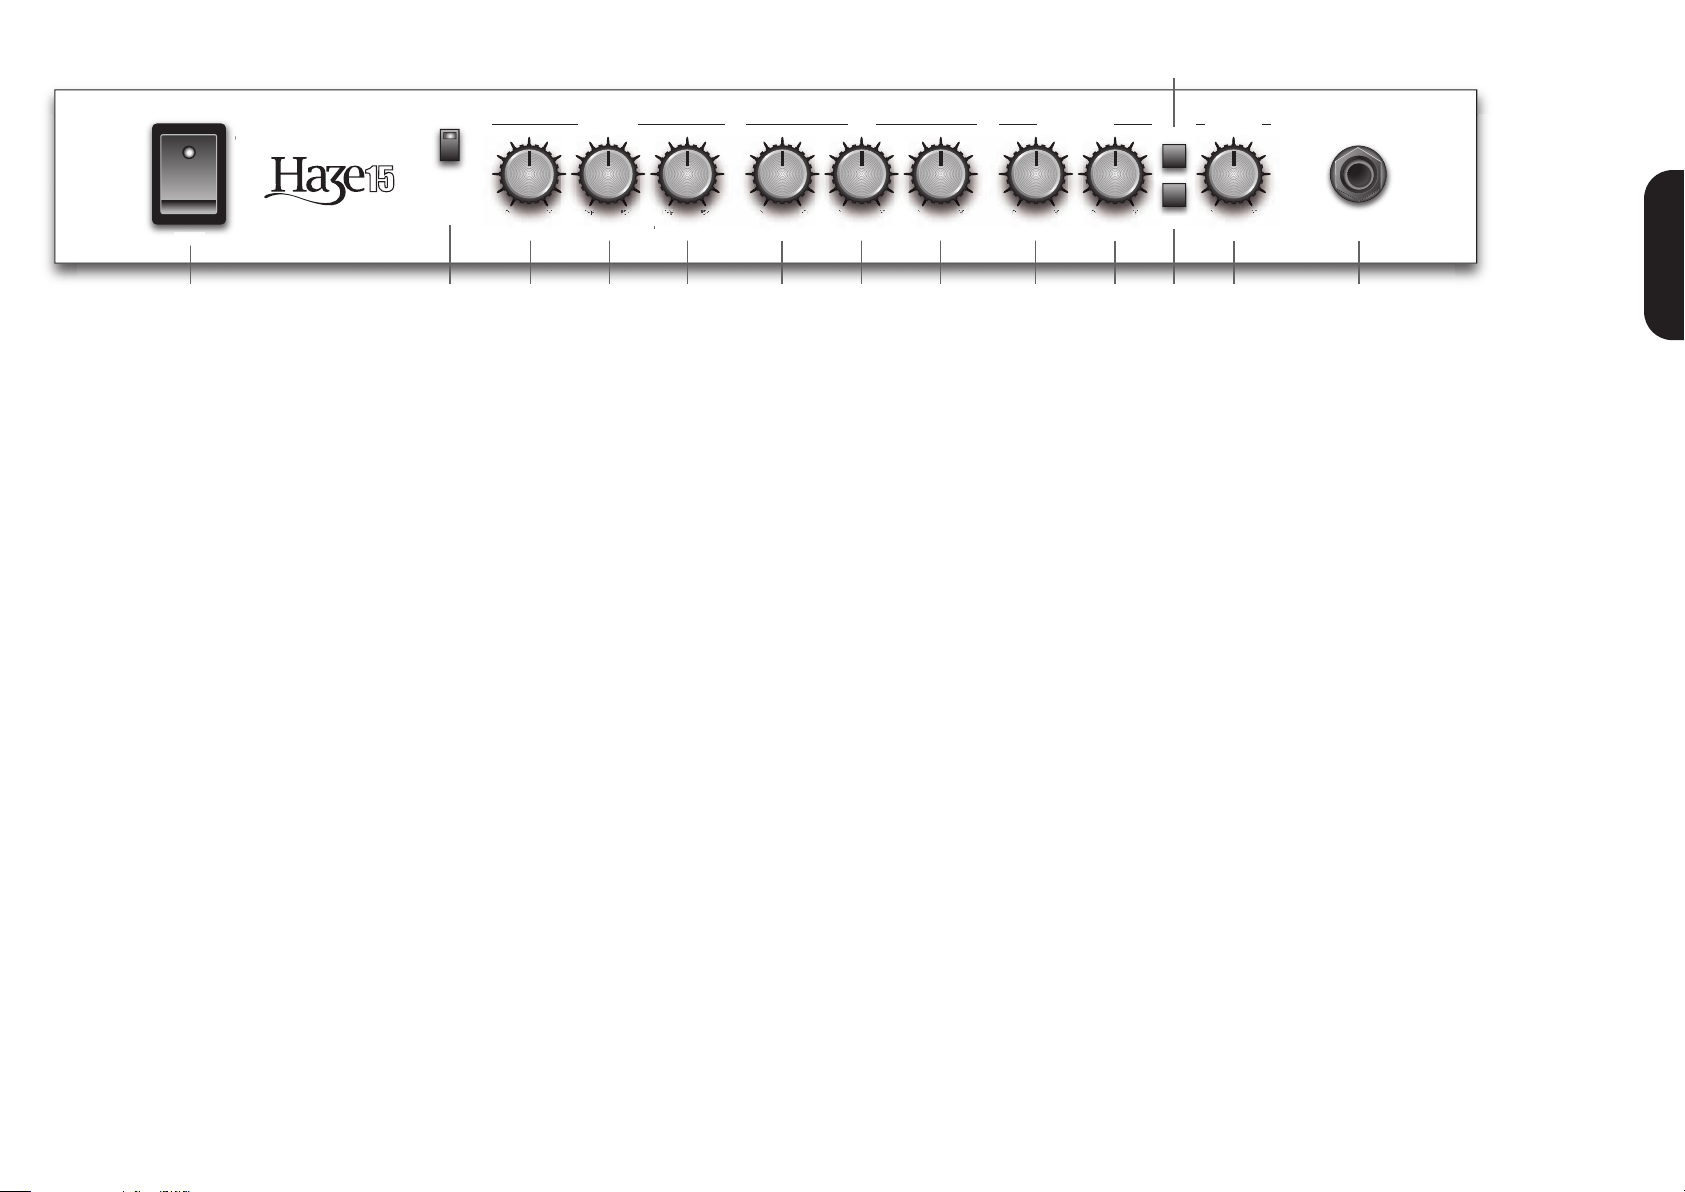
1. Power Switch
This is the On/Off switch for the mains electric power to the
amplifier. The LED will light up when your amplifier is turned
on and will not be lit when the amplifier is switched off.
Note: Please ensure the amplifier is switched off and
unplugged from the mains electricity supply whenever it is
moved!
Effects Section
All effect and reverb settings are automatically stored in
Normal and Overdrive allowing you to set different effects
and/or reverb levels in each of these channels. Set a clean
Normal sound with a lush chorus and a huge reverb, change
to Overdrive and set a sparse reverb and a slap back echo
and these sounds will be remembered each time you change
channel.
For this reason, the position of the effects controls will not
always show the effects settings in use. If one of the controls
is changed, the value will ‘jump’ to the control’s new position.
The Reverb Level and Effects Depth controls use special
controls that include relays allowing the effect section to be
globally disabled.
Turn both the Reverb and Effect Depth to minimum, past the
click, and a click will be heard from within the amplifier as the
effect section is true bypassed mechanically removing the
circuit from the amplifier – leaving an all-valve amplifier signal
path.
2. Effects
Pressing this switch cycles between the 3 effects, Echo
(green), Vibe (orange) Chorus (red) and Off (no light). When
the effects are muted via the 2-way footswitch the light will
slowly flash when the selected effect is muted.
3. Effects Adjust Control
This control allows you to adjust the modulation speed of the
Chorus and Vibe effects or the delay time of the Echo. As the
delay time is decreased so are the number of repeats –
creating long trailing echoes that reduce to short slap backs
and further down to double tracking.
When changing from a channel with Echo to one without, the
effect will naturally spill between channels. When changing
from a channel with Echo to a channel with Echo set to a
different delay time, the delay effect will not spill between
channels. The maximum delay time is 1 second.
4. Effect Depth
This control sets the depth of the chorus and vibe or the level
of the echo.
5. Reverb Level
This control sets the amount of signal sent to the reverb
allowing it to naturally spill between channels.
Turning the control down to minimum ‘before the click’ turns
the reverb off for the current channel only.
EQ Section
The bass, middle and treble controls form a traditional
Marshall interactive EQ section – adjusting one control will
affect how the others work.
6. Bass
Turning the Bass control will affect the amount of low
frequencies or bottom end in your guitar tone. Rotating this
clockwise will increase the amount of lower tones, generally
making your bass sound deeper and is especially useful at
lower volumes. Turning this control anti-clockwise will reduce
the bass frequencies in your tone producing a more cutting
tone – especially useful at higher volumes.
7. Middle
Adjusts the middle frequencies. Turning the control
anticlockwise will yield a more hollow sound with the bass and
treble frequencies appearing to be more accentuated. Turning
it back clockwise increases the middle adding body to the
sound.
8. Treble
By adjusting the Treble control you can add or take away the
higher frequencies in your guitar tone. By increasing the
amount of treble you will make your tone brighter, ideal for
more percussive playing styles.
Overdrive Channel
9. Volume Control
This control adjusts the volume of the Overdrive Channel.
From minimum to about half way, this control increases the
volume of the overdriven sound. From halfway onwards, the
power amp will start to overdrive adding extra power and
complexity to the tone.
10. Gain Control
Controls the level of signal entering the pre-amp. At lower
settings the sound will be cleaner and the amount of distortion
is more controllable from your guitar or your playing style. At
higher settings, more distortion is available.
11. Bright Switch
Pushing this switch ‘in’ enables the Bright function. This
control works on both the Normal and Overdrive controls.
On the Normal channel the Bright works in the traditional way,
interacting with the Normal Volume control. At lower settings
the Bright has an increased effect which lessens as the
Normal Volume is increased.
On the Overdrive channel it adds extra bite to the sound and
works at all volumes.
12. Channel Switch
Selects between Normal (out) and Overdrive (in) channels.
Note: When using the 2-way footswitch this front panel switch
is disabled.
Normal Channel
13. Volume Control
This control adjusts the volume of the Normal Channel. At low
levels the sound will be clean. As the volume control is
increased, in true Marshall style, the power amplifier will start
to overdrive giving a classic, controllable distortion which
cleans up beautifully from the guitar’s volume control.
14. Input Jack Socket
Jack input for your guitar. You must always use a screened
(shielded) guitar cable and never use an unscreened
(unshielded) speaker cable. Also, this cable should be one of
good quality. If you are in any doubt regarding this, your
Marshall dealer will be more than happy to help and advise
you.
6 7
13 14

Footswitch 1 x 16 Ohm
1 x 8 Ohm
2 x 16 Ohm
WARNING!:
DO NOT OBSTRUCT
VENTILATION GRILLES
ATTENTION!:
NE PAS OBSTRUER
LES GRILLES DE
VENTILATION
MODEL: MHZ15
HT Fuse
T250mAE 250V
Connect speakers before use. Output: 15 Watts RMS
Speaker Outputs
WARNING!: RISK OF HAZARDOUS ENERGY
AVIS!: ENERGIE ELECTRIQUE DANGEREUSE!
Haze 15 Watt head rear panel
1 2 3 4
ENGLISH
1. Footswitch Socket
Connecting the 2-Way footswitch here enables you to perform
two functions; you can change the channels, Normal or
Overdrive, and turn the effects on and off.
Note: When the 2-way footswitch is connected the front panel
channel switch will not function.
2. Speaker Outputs
WARNING! Never use the amplifier without a load (speaker
cabinet/s) attached!
There are 3 speaker outputs available on the rear panel. They
are labelled according to the intended impedances:
1x16 Ohm: connect any 16 Ohms guitar cabinet to this jack.
1x8 Ohm or 2x16 Ohm: connect any 8 Ohms guitar cabinet,
or two 16 Ohm guitar cabinets, to these jacks.
WARNING: The safe combinations for speaker cabinet
connection are 1x16 Ohm, 1x8 Ohm or 2x16 Ohm. Any other
speaker configuration may stress the power amplifier section
and in extreme cases may lead to valve and/or output
transformer failure.
ALWAYS ensure you use good quality speaker (unshielded)
cables. NEVER use guitar (shielded) cables. ALWAYS use a
non-screened Marshall approved speaker lead when
connecting an extension cabinet to these units.
3. HT Fuse
The correct value of this H.T. fuse is specified on the rear
panel of the amplifier. NEVER attempt to bypass the fuse or fit
one of the incorrect value!
4. Mains Input Socket with Mains Fuse
Your amp is provided with a detachable mains (power) lead,
which is connected here on the rear panel – see ‘The Basics’
section at the start of this handbook for more information.
MHZ15 Head Technical Specification
Power (RMS) 15W
Speaker Output 1x 16 Ohm / 1x 8 Ohm / 2x 16 Ohm
Pre-Amp Valves 3x ECC83
Power Amp Valves 2x 6V6
Channels 2
Bright Switch
Reverb
Effects
Footswitch 2 way included
Main Guitar - Input Impedance 1MΩ
Dimensions (mm) W, H, D 498 x 223 x 224
Weight (kg) 9.3
* EUROPE ONLY - Note:
(Environments E1, E2 and E3 EN 55103-1/2) and the Low Voltage Directive in the E.U.
* EUROPE ONLY - Note:
Note:
This equipment has been tested and found to comply with the limits for a Class B digital device, pursuant to part 15 of the FCC rules.
These limits are designed to provide reasonable protection against harmful interference in a residential installation. This equipment generates,
uses and can radiate radio frequency energy and, if not installed and used in accordance with the instructions, may cause harmful interference
to radio communications. However, there is no guarantee that interference will not occur in a particular installation. If this equipment does cause
harmful interference to radio or television reception, which can be determined by turning the equipment off and on, the user is encouraged to try
to correct the interference by one or more of the following measures:
*
Reorient or relocate the receiving antenna.
*
Increase the separation between the equipment and the receiver.
*
Connect the equipment into an outlet on a circuit different from that to which the receiver is connected.
*
Consult the dealer or an experienced radio/TV technician for help.
This equipment has been tested and found to comply with the requirements of the EMC Directive
The Peak Inrush current for the MHZ15 is 18 amps.
The Peak Inrush current for the MHZ40 is 18 amps.
Follow all instructions and heed all warnings
KEEP THESE INSTRUCTIONS !
98

0 10OFFOFF MAX MAX0 100 100 100 100 10
0100 10
EffectAdjustEffectDepthReverb LevelPresenceBassMiddleTrebleVolumeVolume Gain
Bright
Channel
Green- Echo
Orange- Vibe
Red- Chorus
Input
O
I
Off
On
Standby
Power
Overdrive EQ EffectsNormal
Boost Boost
01001
0
010
010
010
010
010
OFF
MAX
010
0 10OFFOFF MAX MAX0 100 100 100 100 10
0100 10
EffectAdjustEffectDepthReverb LevelPresenceBassMiddleTrebleVolumeVolume Gain
Bright
Channel
Green- Echo
Orange- Vibe
Red- Chorus
Input
O
I
Off
On
Standby
Power
Overdrive EQ EffectsNormal
Boost Boost
0
10010
010
010
010
010
010
OFF
MAX
010
0 10OFFOFF MAX MAX0 100 100 100 100 10
0100 10
EffectAdjustEffectDepthReverb LevelPresenceBassMiddleTrebleVolumeVolume Gain
Bright
Channel
Green- Echo
Orange- Vibe
Red- Chorus
Input
O
I
Off
On
Standby
Power
Overdrive EQ EffectsNormal
Boost Boost
01001
0
010
010
010
010
010
OFF
MAX
010
Green
010
Adjust
OFF MAX MAX
EffectDepth
OFF
ReverbLevel
010
Bass
010
Middle
010
Treble
010
Volume
010
Gain
010
Volume Input
Effect
Green- Echo
Orange- Vibe
Red- Chorus
Bright
Channel
O
I
Power
Overdrive NormalEQEffects
MAXMAOFF
rb L
el
00000000000
0
l
OFF
MA
MA
th
0
0
010
Adjust
OFF MAX MAX
EffectDepth
OFF
ReverbLevel
010
Bass
010
Middle
010
Treble
0 10
Volume
0 10
Gain
0 10
Volume Input
Effect
Green- Echo
Orange- Vibe
Red- Chorus
Bright
Channel
O
I
Power
Overdrive NormalEQEffects
MAXMAOFF
rb L
el
00000000000
0
l
OFF
MA
MA
th
0
0
010
Adjust
OFF MAX MAX
EffectDepth
OFF
ReverbLevel
010
Bass
010
Middle
010
Treble
0 10
Volume
0 10
Gain
0 10
Volume Input
Effect
Green- Echo
Orange- Vibe
Red- Chorus
Bright
Channel
O
I
Power
Overdrive NormalEQEffects
MAXMAOFF
rb L
el
00000000000
0
l
OFF
MA
MA
th
0
0
Green
Suggested Settings - Configuraciones que sugerimos - Soundvorschläge
Exemples de Réglages - m
Normal Boost: blues for single coil pick up + reverb
Overdrive: raw crunch
Overdrive Boost: high gain solo + reverb + delay
Normal: clean + reverb
Normal: crunch
Overdrive: lead + reverb + delay
Marshall Amplification plc
Denbigh Road, Bletchley, Milton Keynes, MK1 1DQ, England.
Tel : +44 (0)1908 375411 Fax : +44 (0)1908 376118
Whilst the information contained herein is correct at the time of publication, due to our policy of constant improvement
and development, Marshall Amplification plc reserve the right to alter specifications without prior notice.
www.marshallamps.com
BOOK-90026-01 / 2 / 09
 Loading...