

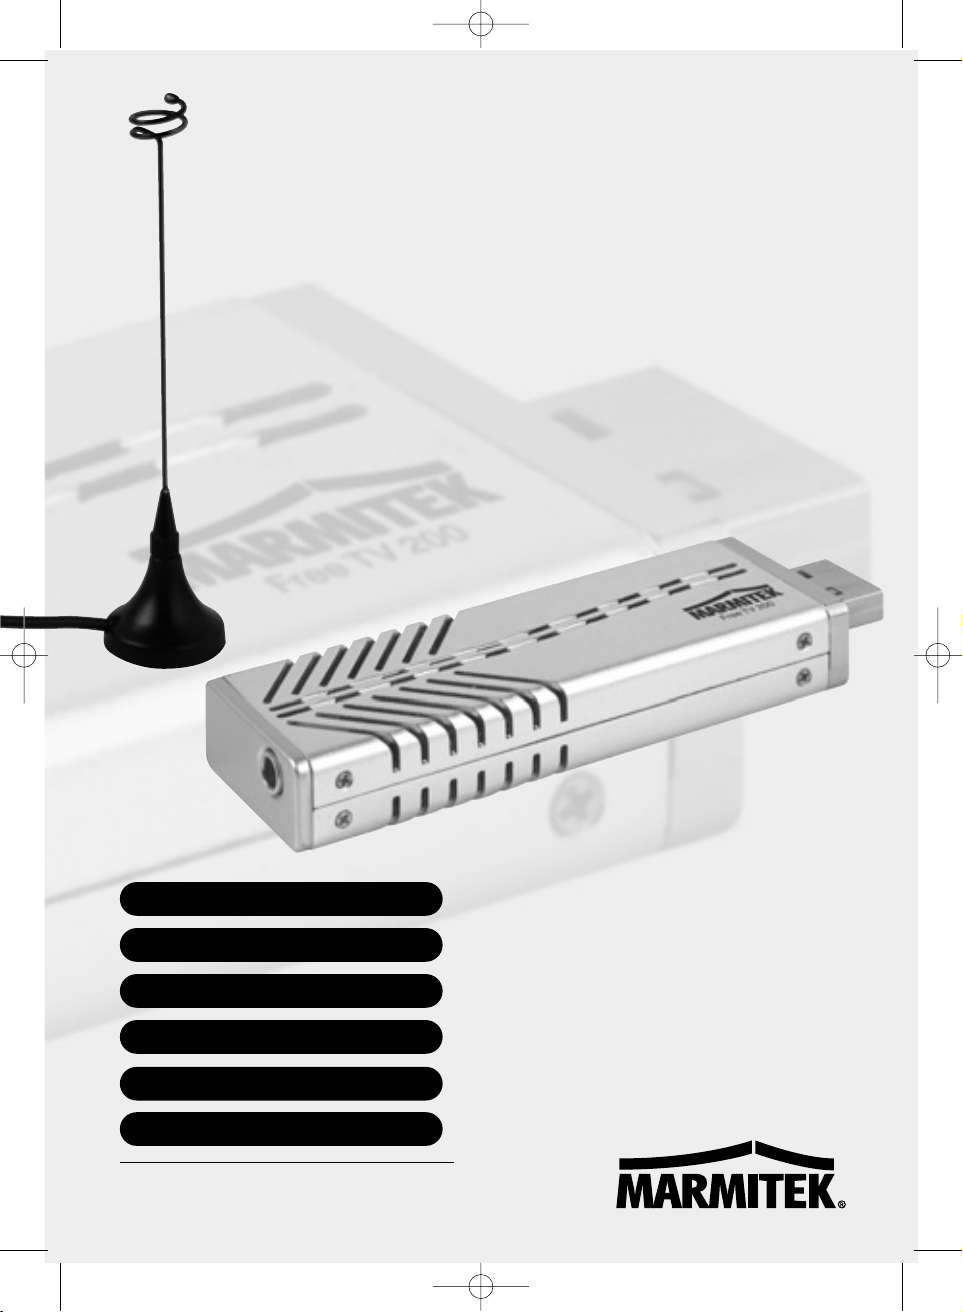
Marmitek FREE TV 200 Owner's Manual
20120/20060620 • FreeTV200tm
© ALL RIGHTS RESERVED MARMITEK®2006
FREE TV 200
tm
OWNER’S MANUAL 3
BETRIEBSANLEITUNG 15
MODE D’EMPLOI 27
MODO DE EMPLEO 39
MANUALE ISTRUZIONE 51
GEBRUIKSAANWIJZING 63
FreeTV200_20120_20060620_man 20-06-2006 10:42 Pagina 1

2 MARMITEK
FreeTV200_20120_20060620_man 20-06-2006 10:42 Pagina 2

SAFETY WARNINGS
• To prevent short circuits, this product should only be used inside and only in dry spaces.
Do not expose the components to rain or humidity. Do not use the product close to a
bath, swimming pool etc.
• Do not expose the components of your systems to extremely high temperatures or bright
light sources.
• Do not open the product: The device contains live components. The product should only
be repaired or serviced by a qualified repairman.
• In case of improper usage or if you have opened, altered and repaired the product yourself,
all guarantees expire. Marmitek does not accept responsibility in case of improper usage of
the product or when the product is used for other purposes than specified. Marmitek does
not accept responsibility for additional damage other than covered by the legal product
responsibility.
All rights reserved. No part of this publication may be reproduced, stored in a database and/or
published, in any form or by any means – electronic, mechanical, photocopying, recording or
otherwise – without Marmitek’s prior written permission.
PowerCinema IS DELIVERED ‘UNALTERED, WITHOUT ANY GUARANTEE, EITHER EXPLICITLY OR
IMPLICITLY, INCLUDING BUT NOT LIMITED TO GUARANTEE RELATING TO INFORMATION, SERVICES OR PRODUCTS DELIVERED THROUGH OR IN CONNECTION WITH POWERCINEMA AND
IMPLICIT GUARANTEE RELATING TO THE MARKETABILITY OR SUITABILITY FOR A CERTAIN
OBJECTIVE, PRIVACY EXPECTATION OR GUARANTEE THAT THE SOFTWARE PRODUCT IS NOT
INFRINGING.
BY USING THIS SOFTWARE YOU AGREE THAT MARMITEK IS NOT LIABLE FOR DIRECT, INDIRECT
OR CONSEQUENTIAL DAMAGE OR LOSS CAUSED BY THE USE OF THE SOFTWARE OR MATERIALS CONTAINED IN THIS PACKAGE.
PowerCinema is a registered trademark and, just like the other company and product names in
this publication, is used for identification purposes. All trademarks will remain the exclusive
property of their respective owners.
Contents
1. Introduction
2. Set content
3. System Requirements
4. How does FreeTV200 work?
5. Installation
5.1 Connect FreeTV200
5.2 Device Driver Installation for Windows XP
5.3 Install the DirectX
6. PowerCinema 4
6.1 The TV Entertainment Center for the Digital Home
6.2 TV
6.3 Videos
6.4 Installing PowerCinema 4
6.5 First time startup of PowerCinema 4
7. Remote
7.1 Using the Remote Control
7.2 Installing batteries
7.3 Remote controller functions
8. Troubleshooting
9. Technical information
ENGLISH
3FREE TV200tm
FreeTV200_20120_20060620_man 20-06-2006 10:42 Pagina 3

1. Introduction
Congratulations on your purchase of the Marmitek FreeTV200. The FreeTV200 enables you to
watch Free to Air digital television (DVB-T) on your PC or laptop; wherever you are. DVB
(Digital Video Broadcasting) is a European standard for the digital transmission of television
channels. Most European countries broadcast free-to-air channels via DVB-T (Terrestrial).
The Marmitek FreeTV200 is ideal for watching TV in your caravan, holiday home or simply at
home. No cables, satellite connections or extra antenna required.
2. Set contents
• CD with Installation Software
• FreeTV200 Tuner
• Remote Control
• Digital TV Antenna
• USB cable
• Adapter cable
• This User’s Guide or Quick Installation Guide
3. System Requirements
• IBM PC or compatible
• Minimum: Intel Pentium III 1.6 GHz CPU
-Recommended: Intel Pentium 4 2.6 GHz or higher (higher CPU speed will yield
higher video quality)
• 256 MB of RAM
-Recommended: 512 MB or more
• DirectX-compatible display adapter for 16-bit colors display
-Recommended:32-bit colors
-When using 3D UI mode, a graphic card with 64 MB or more of video memory is
recommended.
• One free USB2.0 slot
• Microsoft Windows XP (Home edition or Professional edition SP2)
-DirectX 9 or above
-Windows Media Player 9 or above
• DVD-ROM, DVD-R/RW, DVD-RAM, DVD+R/RW, DVD-Dual, DVD-ROM/CD-RW, or DVD
Multi-drive with 1394, USB 2.0, ATAPI, SCSI, or Card Bus interface.
• Hard Disk: 5400 RPM or above (7200 RPM preferred)
-200 MB of available hard disk space required for installation
-500 MB required for running the program,
-1 GB of free disk space is required for running the TV always time-shifting function).
• Windows-compatible mouse or pointing device.
• Windows-compatible display with at least 1024x768 resolution.
4. How does FreeTV200 work?
After inserting the USB stick in a USB 2.0 port on your PC or laptop, install the software.
Position the mini antenna so that you can receive signals. With the supplied Cyberlink
PowerCinema 4 software and compact remote control, you can search for TV channels and
watch your favourite programmes. The time-shift function enables you to pause
live programmes so you can watch them later. You can also record your favourite TV programmes
on your computer’s hard disk.
4 MARMITEK
FreeTV200_20120_20060620_man 20-06-2006 10:42 Pagina 4

5. Installation
5. To install the FreeTV200 Drivers for Window XP carry out the following:
1. Do not connect the FreeTV200 to a USB port yet (if you have already plugged it in,
disconnect it).
2. Place the FreeTV200 CD in your CD-ROM drive.
3. The installation window will appear on screen.
4. Select "FreeTV200 Drivers".
5. Select "next" in the driver setup menu.
6. Select "next" again in the Start Copying Files menu.
7. If the "Software Installation" menu is displayed again (2x), select "Continue Anyway".
8. After the FreeTV200 drivers have been installed, restart your computer before continuing.
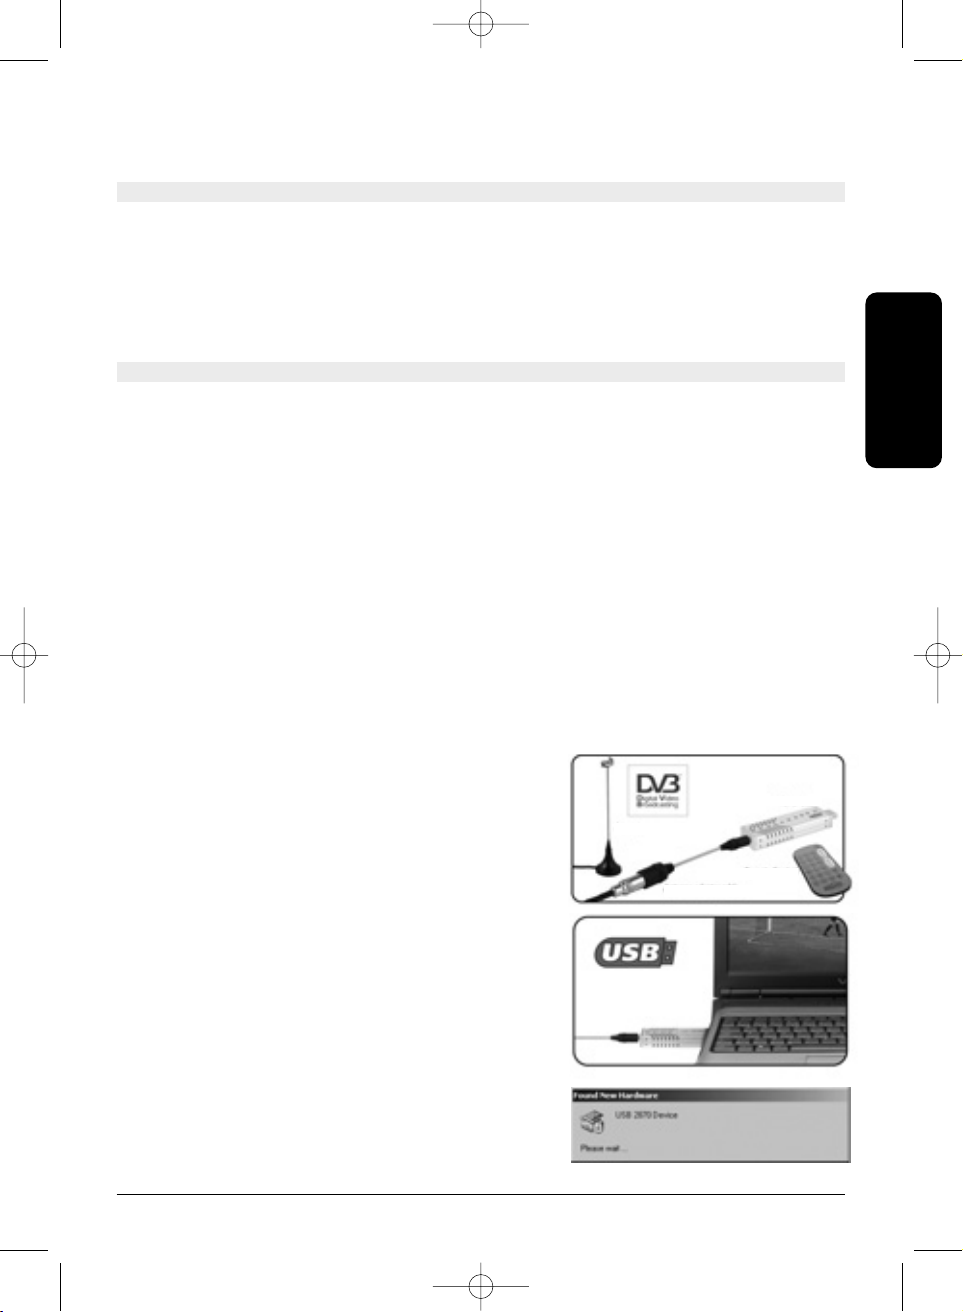
5.1 Connect FreeTV200
Digital Antenna Cable, Antenna adapter cable, Remote Control, Tuner USB
To install the FreeTV200 into your computer, follow the steps below:
1. Connect the DVB-T antenna cable to
the connector.
2. Connect the Device to PC USB Hub.
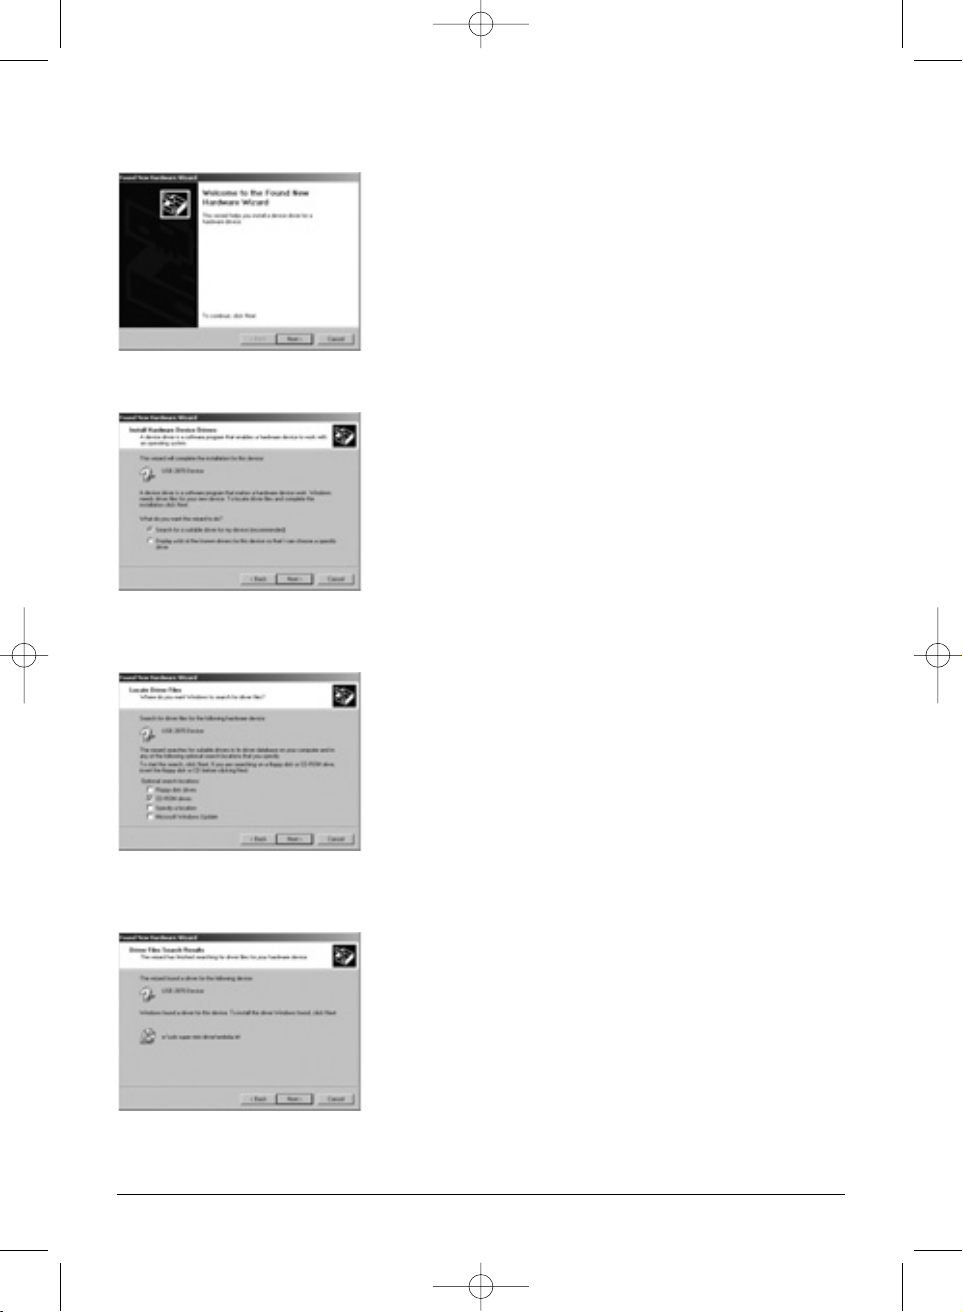
5.2 Device Driver Installation for
Windows XP
Once you connect the FreeTV200 to the
USB port, you can just follow the system’s
prompted message to finish the driver installation.
When you insert the FreeTV200, system will
appear with the “Found New Hardware”
dialogue.
Click “Next” to start installation.
ENGLISH
5FREE TV200tm
FreeTV200_20120_20060620_man 20-06-2006 10:42 Pagina 5
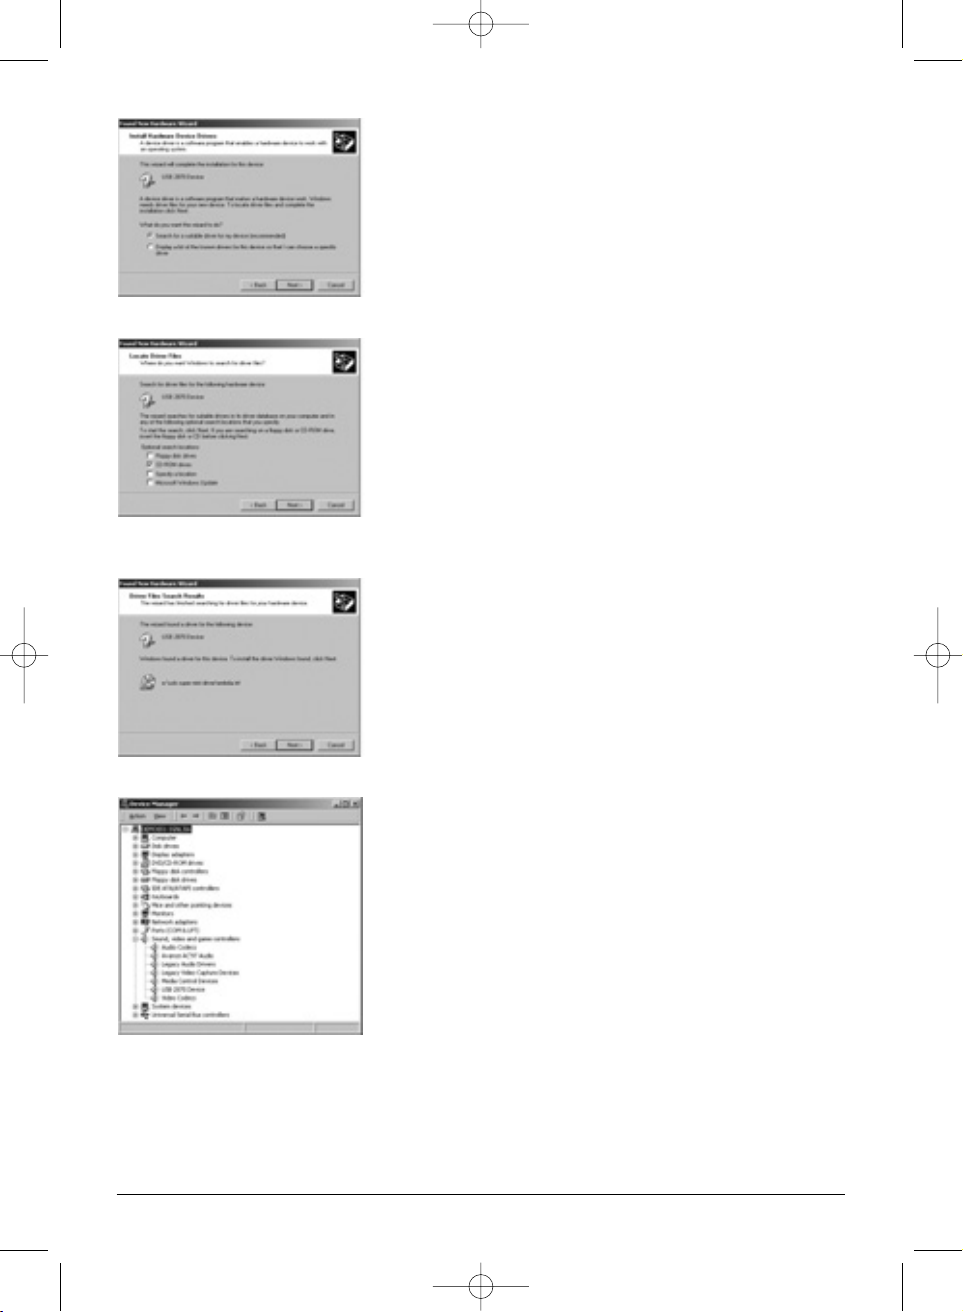
Select “Search for a suitable driver for my device [recommended]” and click “Next”.
Select “CD-ROM drive” , put the CD in the drive and click “Next” button to search
for driver files.
Click “Next” to continue the installing.
Check your driver ”BDA 2870 Device” from Device Manager after installation.
6 MARMITEK
FreeTV200_20120_20060620_man 20-06-2006 10:42 Pagina 6
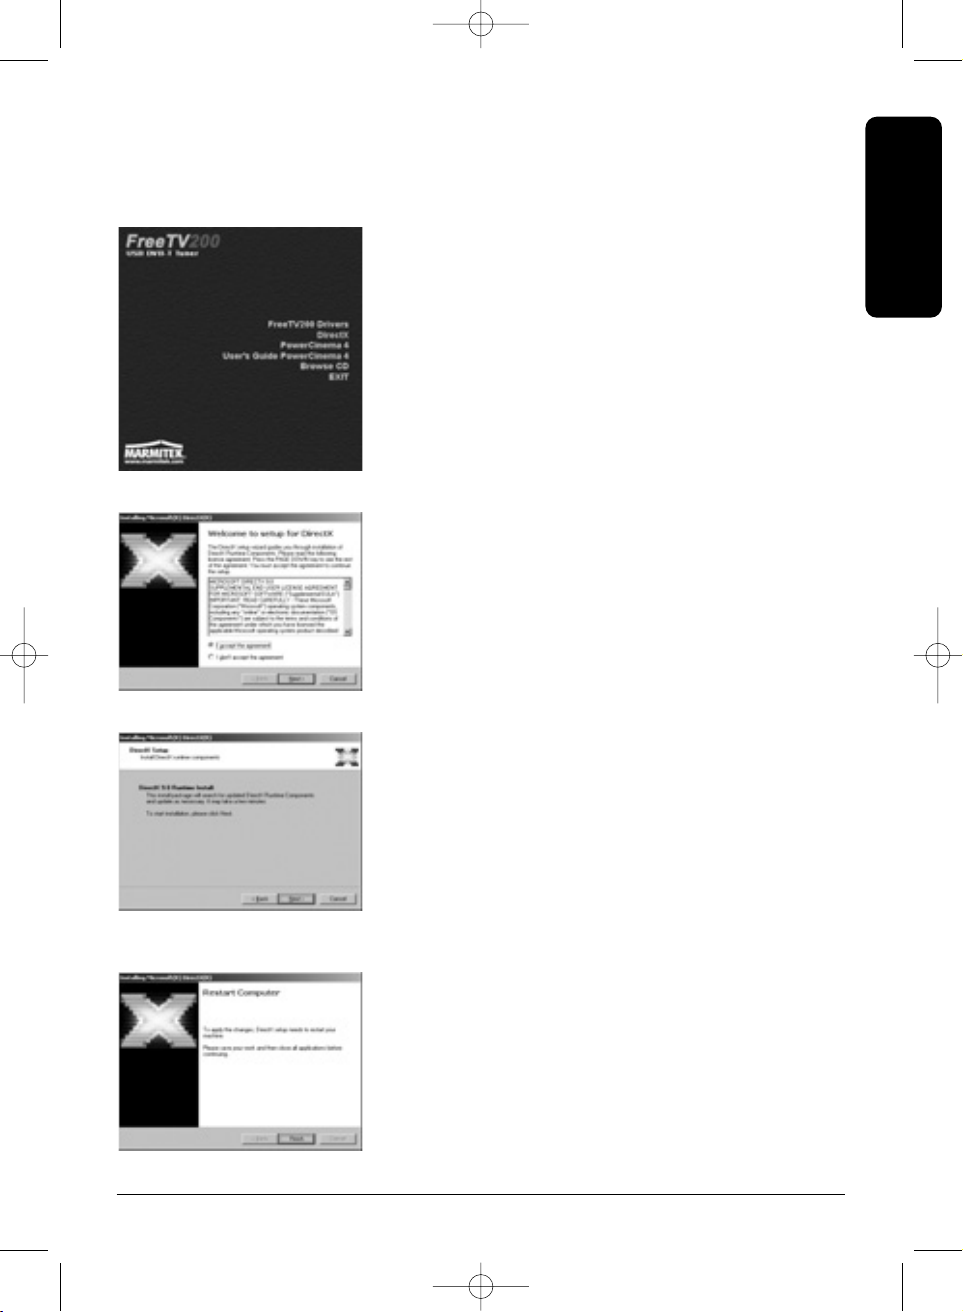
5.3 Install the DirectX
Microsoft DirectX allows 3D hardware acceleration support in Windows XP.
Insert the CD installation disc into your CD-ROM drive or double click the CD drive icon in My
Computer to bring up the auto-run screen.
Click “DirectX”.
Click DirectX
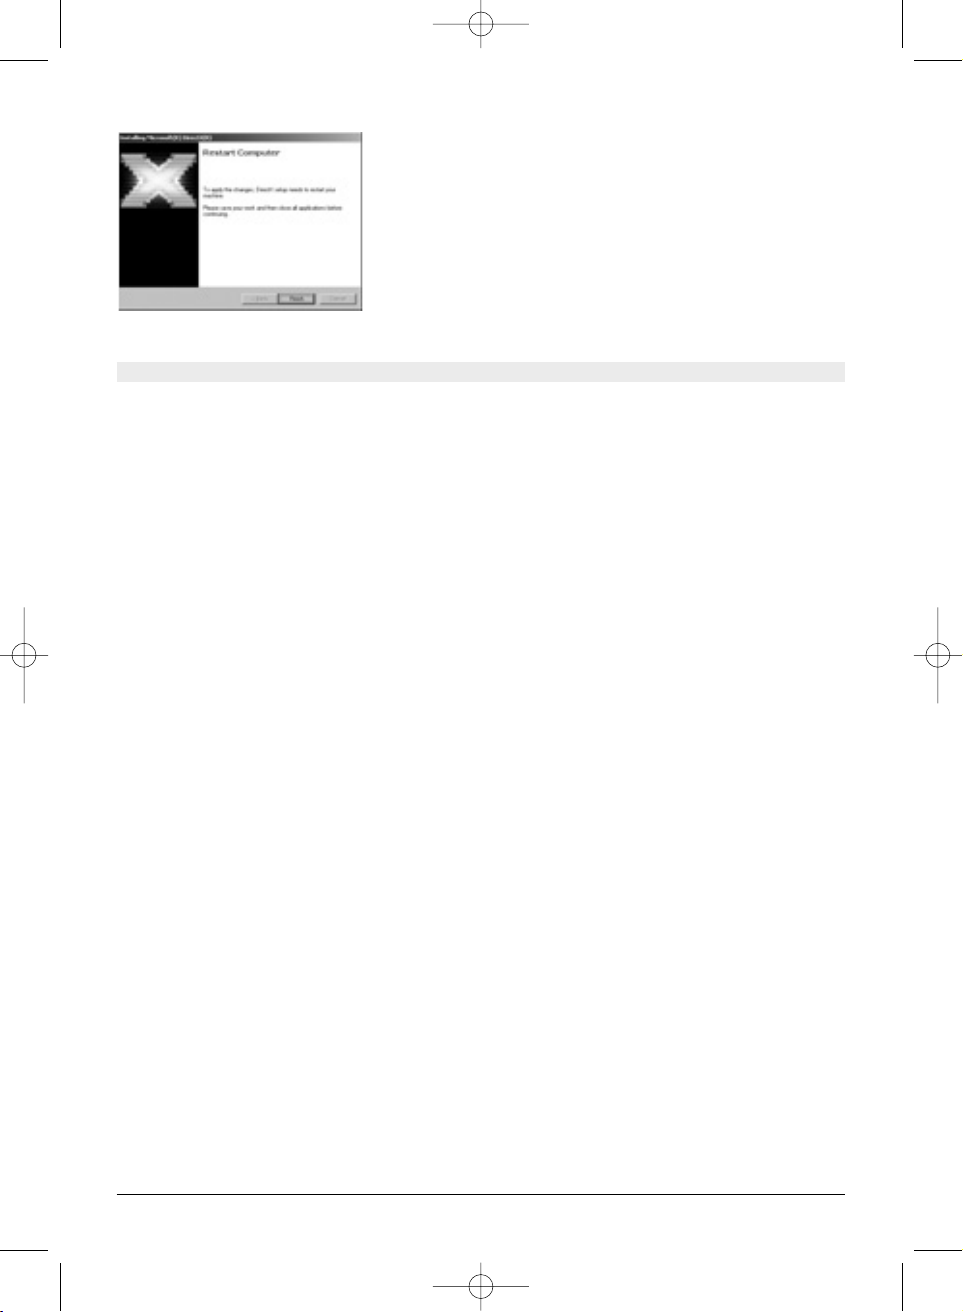
The DirectX® setup box appears. Click “Next” button to install the driver.
The installation program will automatically install the DirectX into your system.
Setup will prompt when it has finished copying all the files to your computer. Click Next.
Click “Finish” to finish the installation.
7FREE TV200tm
ENGLISH
FreeTV200_20120_20060620_man 20-06-2006 10:42 Pagina 7
6. PowerCinema 4
6.1 The TV Entertainment Center for the Digital Home
• Experience home theater audio and virtual surround sound
• Schedule TV programs and record to your PC
• Create photo slideshows, rip CDs and listen to music
• Watch DVDs with unsurpassed video and audio quality
6.2 TV
• Record your favorite programs to your PC
• Time-shift through TV commercials
• Fast-forward programs with undistorted audio
• Preview 12 stations at a time
• Quickly search for your favourite TV channels
6.3 Videos
• Enjoy the quality of playing high-definition MPEG-2 and WMV-HD files.
• PowerCinema plays DivX 5 and DivX Pro video files.
• Access recently viewed video files.
• Support for ASF, WMV, MPEG-1, MPEG-2, DVR-MS, and AVI files.
• Fast-forward your videos at 2x speed or in play in slo-mo at 0.5x speed, all the while
enjoying audible audio with no pitch distortion.
6.4 Installing PowerCinema 4
Insert the software CD in your drive and autorun will start. Select PowerCinema 4 and follow
the instructions on the screen to complete the installation. You need the CD key which is
located on the CD case.
8 MARMITEK
FreeTV200_20120_20060620_man 20-06-2006 10:42 Pagina 8
9FREE TV200tm
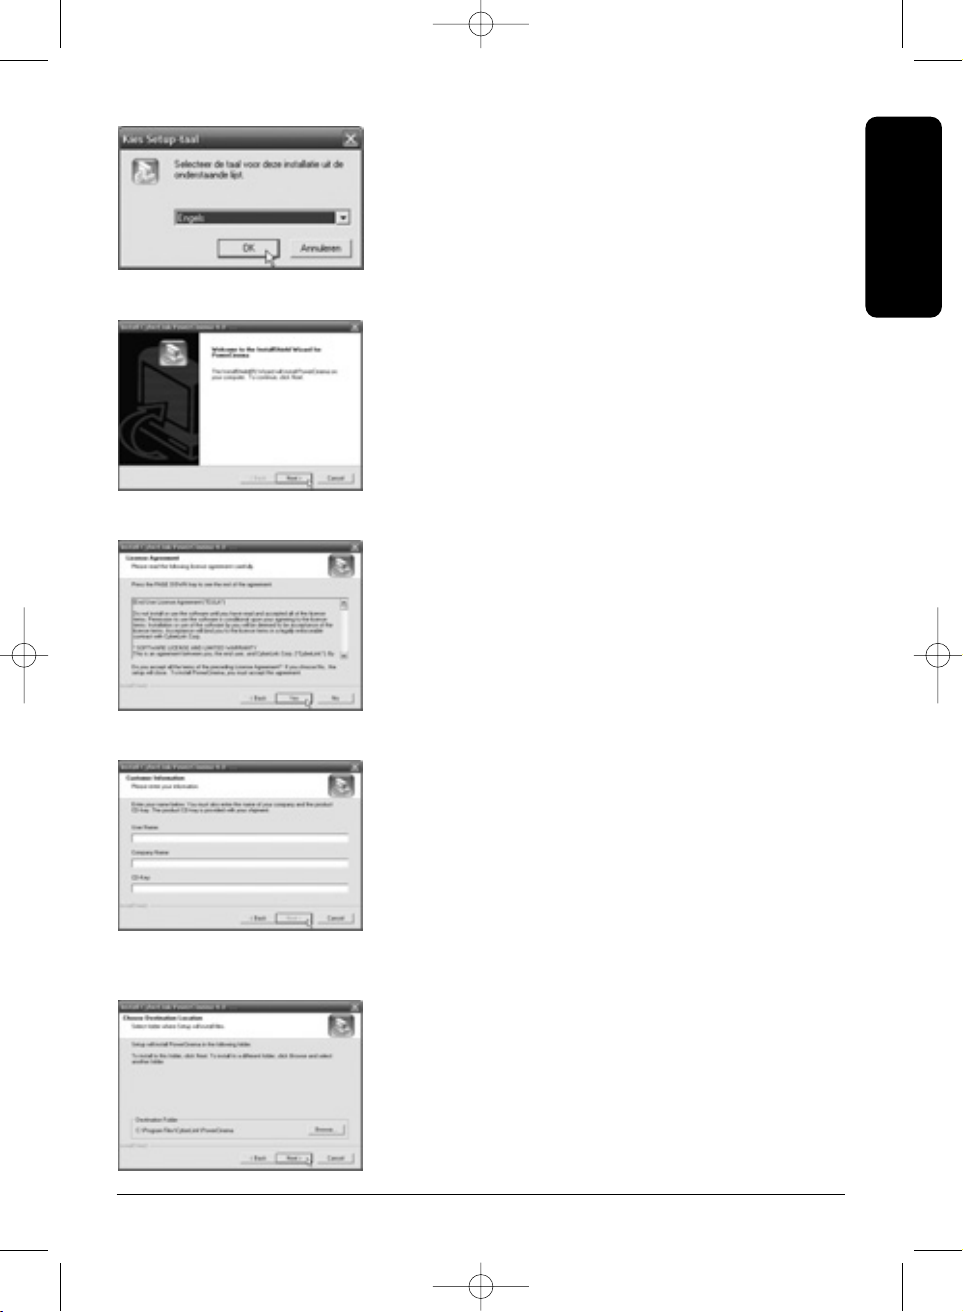
Select your language and click “OK”
Click “Next” to continue the installing
Please read the License Agreement and click “Yes” to continue.
Fill in your user name and Company name and the CD key. You can find the CD key at the
back of the CD sleeve.
ENGLISH
FreeTV200_20120_20060620_man 20-06-2006 10:42 Pagina 9
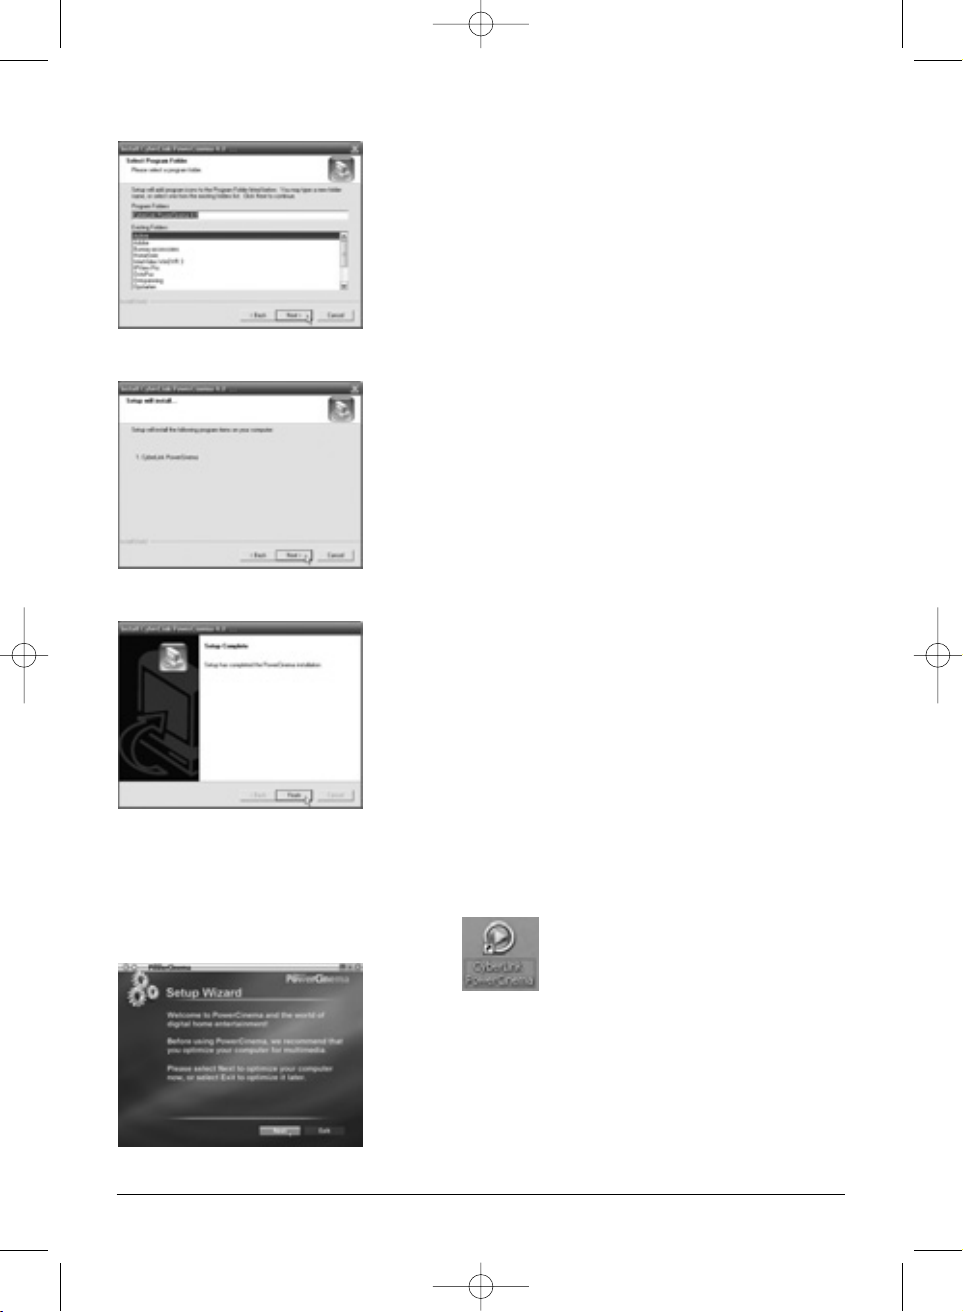
Click “Next” button or choose other setup folder for installation.
Click “Next” button or choose other program folder.
Click “Next” to continue
Click “Finish to complete the installation of the PowerCinema 4 software”
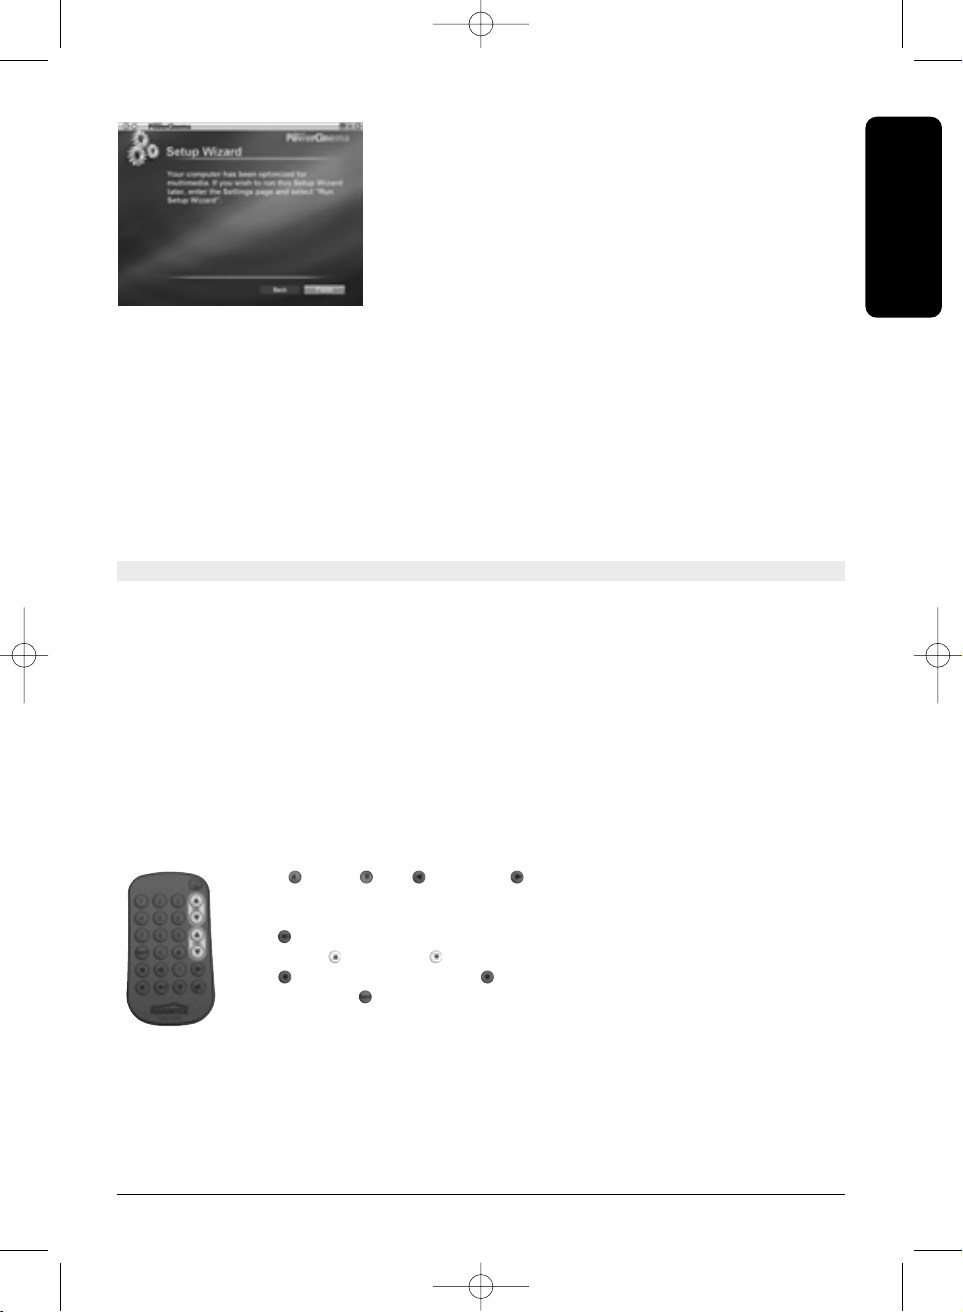
6.5 First time startup of PowerCinema 4
Choose start > Programs > Cyberlink PowerCinema 4.0 > PowerCinema to start the program
or Double click on the icon on the desktop.
Click “Next” to continue
10 MARMITEK
FreeTV200_20120_20060620_man 20-06-2006 10:42 Pagina 10
11FREE TV200tm
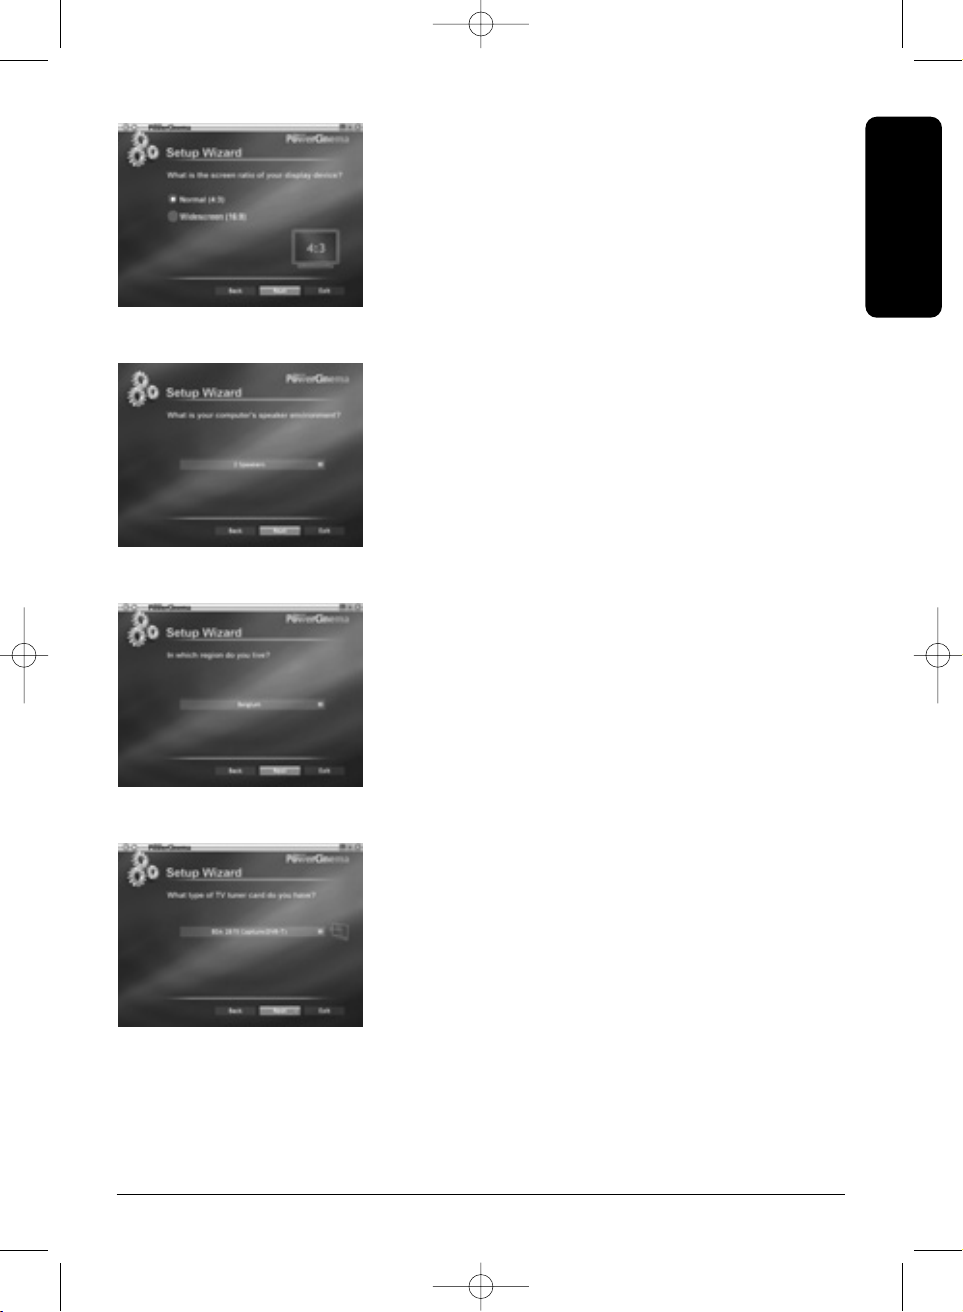
Select your screen ratio and click “Next”
Select the right speaker environment and click “Next”
Select your region and click “Next”
Select the BDA 2870 Capture card and click “Next”
ENGLISH
FreeTV200_20120_20060620_man 20-06-2006 10:42 Pagina 11
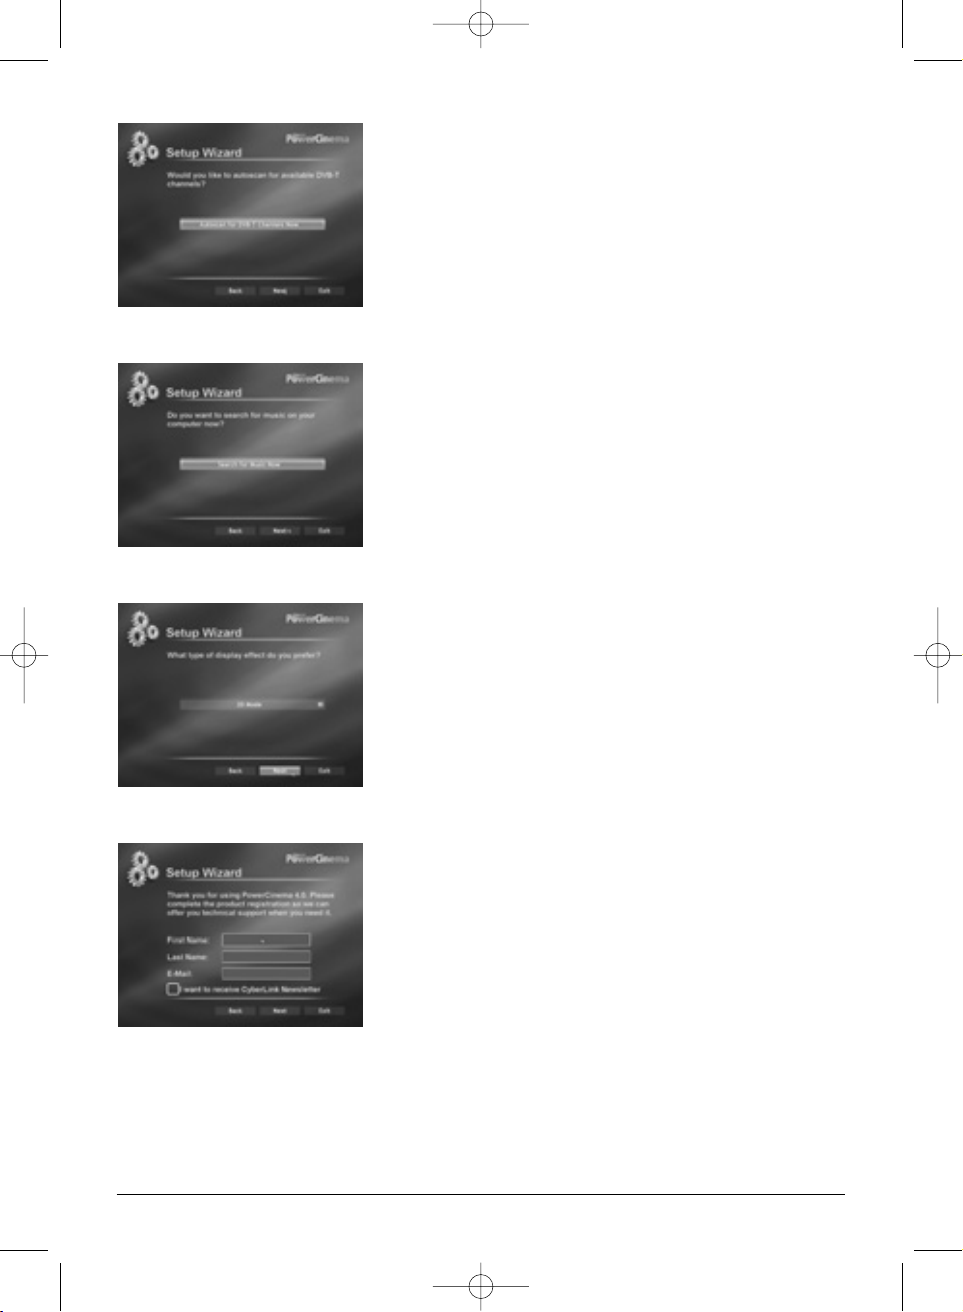
Select autoscan for available DVB-T channels and click “Next”
Select if you want to search for music on your computer and click “Next”
Select the type of display effect and click “Next”
Fill in the product registration and click “Next”
12 MARMITEK
FreeTV200_20120_20060620_man 20-06-2006 10:42 Pagina 12
13FREE TV200tm
Click “Finish” to complete your setup.
PowerCinema 4 is an integrated multimedia player. On the homepage you can check out the
available media types. Use the mouse, the arrow keys Up and Down on the keyboard or the
Up and Down buttons on the remote control in order to select the desired media type.
To start with, select a media type on the homepage.
PowerCinema 4 will switch over to the selected media type, and playback buttons and other
options will appear.
Read the User’s Guide on the CD to familiarize yourself with PowerCinema 4.
7. Remote Control
7.1 Using the Remote Control
The Remote control allows you to operate PowerCinema 4, such as turning your TV on/off,
viewing the TV, and changing the channels and volume. Aim the front of the Remote Control
at the FreeTV200 tuner and press the control buttons.
7.2 Installing Batteries
Before use, remove the plastic strip from the bottom of the remote control.
If the battery is empty, you can replace it yourself. Open the battery compartment at the back
and insert the Lithium Cell CR2025.
7.3 Remote controller functions
ENGLISH
The up , down , left , and right buttons navigate through
PowerCinema.
Press OK to accept a selection.
Press to return to a previous page.
With the up and down you can go through the TV channels.
The “ ” starts recording, the “ ” stops recording.
With “Snapshot ” you can make a snapshot of the current image.
FreeTV200_20120_20060620_man 20-06-2006 10:42 Pagina 13

8. Troubleshooting
Any more questions? Click www.marmitek.com > Customer Service for an up-to-date
FreeTV200 FAQ.
9. Technical information
Tuner for DVB-T TV signals USB 2.0
Record in MPEG DVD quality (720x576 pixels, 570 to 1080Kb/s)
Suitable for Windows XP (Home or Pro edition SP2)
Tuner powered via USB
Tuner dimensions: 96x26x12 mm
Suitable for DVB-T "Free-To-Air" broadcasts
14 MARMITEK
FreeTV200_20120_20060620_man 20-06-2006 10:42 Pagina 14

DEUTSCH
15FREE TV200tm
SICHERHEITSHINWEISE
• Um Kurzschluss vorzubeugen, dieses Produkt bitte ausschließlich innerhalb des Hauses und
nur in trockenen Räumen nutzen.
Setzen Sie die Komponenten nicht Regen oder Feuchtigkeit aus.
Niemals neben oder nahe eines Bades, Schwimmbades usw. verwenden.
• Setzen Sie die Komponente Ihres Systems nicht extrem hohen Temperaturen oder starken
Lichtquellen aus.
• Das Produkt niemals öffnen: Das Gerät enthält Bestandteile mit lebensgefährlicher
Stromspannung. Überlassen Sie Reparaturen oder Wartung nur Fachleuten.
• Bei zweckwidriger Verwendung, selbst angebrachten Veränderungen oder selbst
ausgeführten Reparaturen erlöschen sämtliche Garantieansprüche. Marmitek übernimmt
bei einer falschen Verwendung des Produkts oder bei einer anderen Verwendung des
Produktes als für den vorgesehenen Zweck keinerlei Produkthaftung. Marmitek übernimmt
für Folgeschäden keine andere Haftung als die gesetzliche Produkthaftung.
• Batterien: Halten Sie Batterien außerhalb der Reichweite von Kindern. Entsorgen Sie
die Batterien als chemischen Kleinabfall. Verwenden Sie niemals alte und neue oder
unterschiedliche Typen von Batterien durcheinander. Wenn Sie das System längere
Zeit nicht benutzen, entfernen Sie dann die Batterien. Achten Sie beim Einlegen der
Batterien auf die Polarität (+ / -): Ein falsches Einlegen kann zu Explosionsgefahr führen.
Alle Rechte vorbehalten. Der Inhalt dieser Ausgabe darf ohne vorherige, schriftliche Einwilligung
Marmiteks nicht vervielfältigt, in einem Datensystem gespeichert und/oder mittels elektronischer
oder mechanischer Übertragung veröffentlicht, kopiert, aufgenommen oder auf irgendeine
andere Weise verändert werden.
PowerCinema WIRD “UNVERÄNDERT” GELIEFERT, OHNE JEGLICHE GARANTIE, SEI ES
AUSDRÜCKLICH ODER IMPLIZIT, INKLUSIV, JEDOCH NICHT BEGRENZT AUF GARANTIE HINSICHTLICH INFORMATIONEN, SERVICELEISTUNGEN ODER PRODUKTE DIE ÜBER ODER IM ZUSAMMENHANG MIT PowerCinema GELIEFERT WERDEN UND IMPLIZITER GARANTIE HINSICHTLICH DER
VERKÄUFLICHKEIT ODER DER EIGNUNG FÜR EINEN BESTIMMTEN ZWECK, ERWARTUNGEN IM
PRIVATEN BEREICH ODER DER GARANTIE, DASS DAS SOFTWAREPRODUKT NICHT AUF DIE
RECHTE EINGREIFT.
DURCH ANWENDUNG DIESER SOFTWARE ERKLÄREN SIE SICH DAMIT EINVERSTANDEN, DASS
MARMITEK FÜR DIREKTE, INDIREKTE ODER FOLGESCHÄDEN, ENTSTANDEN DURCH ANWENDUNG DER SOFTWARE ODER MATERIALIEN IN DIESEM PAKET NICHT HAFTBAR IST.
PowerCinema ist eine registrierte Handelsmarke und wird, ebenso wie die anderen Betriebs- und
Produktnamen in dieser Ausgabe, zu Identifikationszwecken verwendet. Alle Handelsmarken
bleiben exklusiver Eigentum ihrer jeweiligen Eigentümer.
Inhaltsverzeichnis
1. Einführung
2. Verpackungsinhalt
3. Systemanforderungen
4. Wie funktioniert FreeTV200?
5. Installation
5.1 FreeTV200 anschließen
5.2 Installation des Gerätetreibers für Windows XP
5.3 DirectX installieren
6. PowerCinema 4
6.1 Das TV Entertainment Center für das digitale Haus.
6.2 TV
6.3 Videos
FreeTV200_20120_20060620_man 20-06-2006 10:42 Pagina 15

16 MARMITEK
6.4 PowerCinema 4 installieren
6.5 PowerCinema 4 das erste Mal starten.
7. Fernbedienung
7.1 Inbetriebnahme der Fernbedienung.
7.2. Batterien einlegen
7.3 Funktionsleiter der Fernbedienung.
8. Problemlösungen
9. Technischen Daten
1. Einführung
Herzlichen Glückwunsch zum Erwerb des Marmitek FreeTV200. Mit dem FreeTV200 können
Sie auf Ihrem PC oder Notebook digital (DVB-T) fernsehen; Wo immer Sie auch sind. DVB
(Digital Video Broadcasting) ist ein europäischer Standard für die digitale Übertragung von
Fernsehsendern. Die meisten europäischen Länder übertragen über DVB-T (terrestrische
Fernsehstandards) kostenlos zu empfangene Sender. Der Marmitek FreeTV200 ist ideal um
z.B. in Ihrem Wohnwagen, Ferienhaus oder einfach zuhause fern zu sehen. Sie benötigen
keinen Kabelanschluss, Satellitenanschluss oder extra Antenne.
2. Verpackungsinhalt
Vergewissern Sie sich darüber, dass die nachfolgenden Items nach Erhalt Ihrer FreeTV200 in
der Verpackung enthalten sind.
• FreeTV200 USB Tuner
• Fernbedienung mit Batterie (CR2025)
• Digitale Fernsehantenne
• USB Verlängerungskabel
• Antenne-Adapterkabel
• Installations CD mit Cyberlink PowerCinema 4 Software
• Gebrauchsanleitung Deutsch.
3. Systemanforderungen
• IBM PC oder vergleichbar.
• Minimum: Intel Pentium III 1.6 GHz CPU
-Empfohlen: Intel Pentium 4 2.6 GHz oder höher(höhere CPU Auslastung bewirkt
eine bessere Videoqualität.)
• 256 MB RAM Speicher
-Empfohlen: 512 MB oder mehr.
• DirectX-Compatible Bildschirmadapter mit 16 Bit Farbbildwiedergabe
-Empfohlen: 32 Bit Farbbild.
-Wenn die 3-D Anwender Schnittstelle verwendet wird, so empfehlen wir eine
Grafikkarte mit 64 Mb oder mehr Video-Speicher.
• Einen freien USB Anschluss.
• Microsoft Windows XP (Home- oder Professional SP2)
-DirectX 9 oder höher
-Windows Mediaplayer 9 oder höher.
• DVD-ROM, DVD-R/RW, DVD-RAM, DVD+R/RW, DVD-Dual, DVD-ROM/CD-RW, CD-ROM,
oder DVD Multi-drive mit 1394, USB 2.0, ATAPI, SCSI, oder Card Bus Interface.
• Hard Disk: 5400 RPM oder schneller (7200 RPM wird empfohlen)
-200 MB freier Festplattenraum für die Installation
-500 MB für die Funktionalität der Software,
-1 GB freier Festplattenspeicherraum ist nötig, um jederzeit von Time-Shift bei
Fernsehempfang Gebrauch machen zu können.
FreeTV200_20120_20060620_man 20-06-2006 10:42 Pagina 16
DEUTSCH
17FREE TV200tm
• Windows- kompatibel Maus oder Anzeigegerät.
• Windows-kompatibel Display mit einer Auflösung von 1024x768.
4. Wie funktioniert FreeTV200?
Nach dem Einstecken der USB-Stift in den USB 2.0 Anschluss Ihres PC, installieren Sie den
Software. Positionieren Sie die kleine Antenne so, dass Sie Empfang haben. Mit der im
Lieferumfang enthaltenen Cyberlink PowerCinema 4 Software und der kompakten
Fernbedienung können Sie Fernsehkanäle suchen und sich Ihr Lieblingsprogramm ansehen.
Mit Time-Shift pausieren Sie Direktübertragungen, um kurze Zeit später weiter fern zu sehen.
Sie können Ihr Lieblings-programm wenn gewünscht auch auf der Festplatte speichern
5. Installation
Befolgen Sie zur Installation des FreeTV200 Treibers für Window XP nachfolgende Schritte:
1. Schließen Sie den FreeTV200 noch nicht an den USB Anschluss an.
(Wenn Sie diesen bereits angeschlossen hatten, lösen Sie dann die Verbindung).
2. Schieben Sie die FreeTV200 CD in Ihre CD-ROM Eingabestation.
3. Die Installationsschablone erscheint auf Ihrem Bildschirm.
4. Wählen Sie "FreeTV200 Drivers".
5. Wählen Sie "next" im Treiber Setup Menü.
6. Wählen Sie nochmals "next" im Start Copying Files Menü.
7.
Sollte das Menü "Software Installation" erscheinen (2x), wählen Sie dann "Dennoch fortfahren".
8. Fahren Sie Ihren Rechner, wenn die FreeTV200 Treiber installiert sind, erneut hoch, bevor
Sie weiter verfahren.
5.1 FreeTV200 anschließen
Digital Antenna Cable, Antenna adapter cable, Remote Control, Tuner USB
Um den FreeTV200 an Ihren Computer anzuschließen befolgen Sie nachfolgende Schritte:
1. Schließen Sie die Antenne an den Tuner
an.
2. Schließen Sie den Tuner an den USB
Anschluss Ihres PC an. (Benutzen Sie
eventuell das USB Verlängerungskabel um
Ihren Tuner in Sichtweite der
Fernbedienung zu installieren)
5.2 Installation des Gerätetreibers für Windows XP
Befolgen Sie die Anweisungen auf dem Schirm, wenn Sie
den FreeTV200 an Ihren USB-Anschluss anschließen.
Fernsehantenne
Antenne-Adapterkabel
Fernbedienung
Tuner USB
FreeTV200_20120_20060620_man 20-06-2006 10:42 Pagina 17
18 MARMITEK
Wenn Sie den FreeTV200 anschließen startet die Installation automatisch.
Klicken Sie auf "Next" um mit der Installation zu beginnen.
Legen Sie die Installations CD in das Laufwerk. Selektieren Sie "Die software automatisch
installieren (empfohlen)"und klicken Sie auf "Next".
Wenn Sie die Meldung erhalten, dass die Software nicht den Anforderungen von Windows
Logo-Test entspricht, klicken Sie dann auf "Next".
Klicken Sie auf "Next" um die Installation abzurunden.
FreeTV200_20120_20060620_man 20-06-2006 10:42 Pagina 18

DEUTSCH
19FREE TV200tm
Überprüfen Sie, ob der Treiber in "Geräteverwaltung" richtig installiert ist.
5.3 DirectX installieren.
Microsoft DirectX bewirkt eine 3D Hardware Beschleunigungsunterstützung in Windows XP.
Legen Sie die Installations CD in das CD ROM Laufwerk und doppelklicken Sie auf die Laufwerkikone des CD-Spielers in "Mein Computer" um die Installations-Bildanzeige aufzurufen.
Klick auf DirectX
Selektieren Sie “I accept the agreement” und klicken Sie auf Next.
Wenn Sie nochmals auf "Next" klicken, so wird mit der Installation begonnen.
FreeTV200_20120_20060620_man 20-06-2006 10:42 Pagina 19
20 MARMITEK
Starten Sie den PC neu, wenn hierum gefragt wird.
6. PowerCinema 4
6.1 Das TV Entertainment Center für das digitale Haus
• Erleben Sie Heimkino Audio und virtuellen Surround-Sound
• Programmieren Sie die Aufnahmezeiten Ihrer favoriten Fernsehprogramme
und speichern Sie diese auf Ihrem PC.
• Machen Sie Dia-Vorstellungen, importieren Sie Audio-CD's nach MP3 und hören
Ihre Musik.
• Schauen Sie sich Ihre DVD's mit hervorragender Bild- und Tonqualität an
6.2 TV
• Speichern Sie Ihre Lieblingsfernsehprogramme auf Ihrem PC.
• Verwenden Sie Time-Sift, um beispielsweise Werbesendungen zu überspringen.
• Gehen Sie 2 Mal so schnell durch Ihre Videoaufnahmen unter Beibehaltung des Tons.
• Schauen Sie sich eine Übersicht von 12 Fernsehsendungen zugleich an.
• Suchen Sie schnell Ihre beliebtesten Fernsehsender.
6.3 Videos
• Erfreuen Sie sich beim Abspielen von hochauflösenden MPEG-2 und WMV-HD Dateien
an der hohen Qualität.
• PowerCinema 4 spielt sowohl DivX 5 wie auch DivX Pro Videodateien ab.
• Schneller Zugriff zu den aktuellsten Aufnahmen
• Unterstützt ASF, WMV, MPEG-1, MPEG-2, DVR-MS, und AVI Dateien.
• Spielen Sie Ihre Videodateien 2 x schneller oder mit halber Geschwindigkeit mit
Tonwiedergabe und ohne Tonhöhenverformung ab.
FreeTV200_20120_20060620_man 20-06-2006 10:42 Pagina 20
DEUTSCH
21FREE TV200tm
6.4 PowerCinema 4 installieren
Legen Sie die Software CD in das CD ROM Laufwerk und das Installationsmenü erscheint.
Selektieren Sie PowerCinema 4 und befolgen Sie die Anweisungen auf dem Schirm.
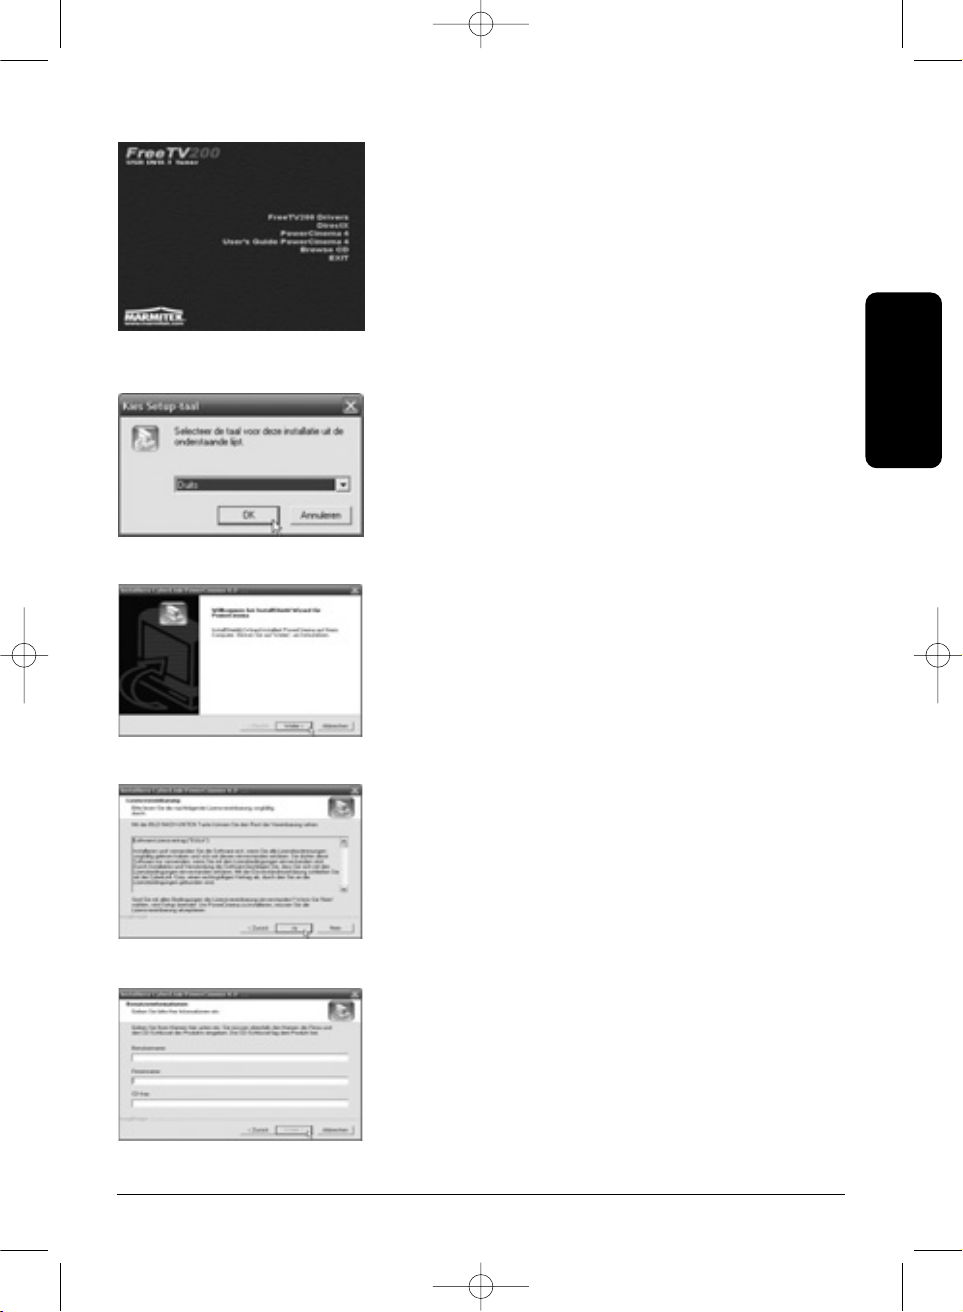
Selektieren Sie Ihre Sprache und klicken Sie auf "OK"
Klicken Sie auf "Weiter" um mit der Installation fortzufahren.
Lesen Sie die Lizenzbedingungen durch und klicken Sie auf "Ja" um fortzufahren.
Geben Sie Ihren Benutzernamen, Ihren Betriebsnamen und den CD Key ein. Sie finden den
CD Key auf der Rückseite der CD-Hülle.
FreeTV200_20120_20060620_man 20-06-2006 10:42 Pagina 21
22 MARMITEK
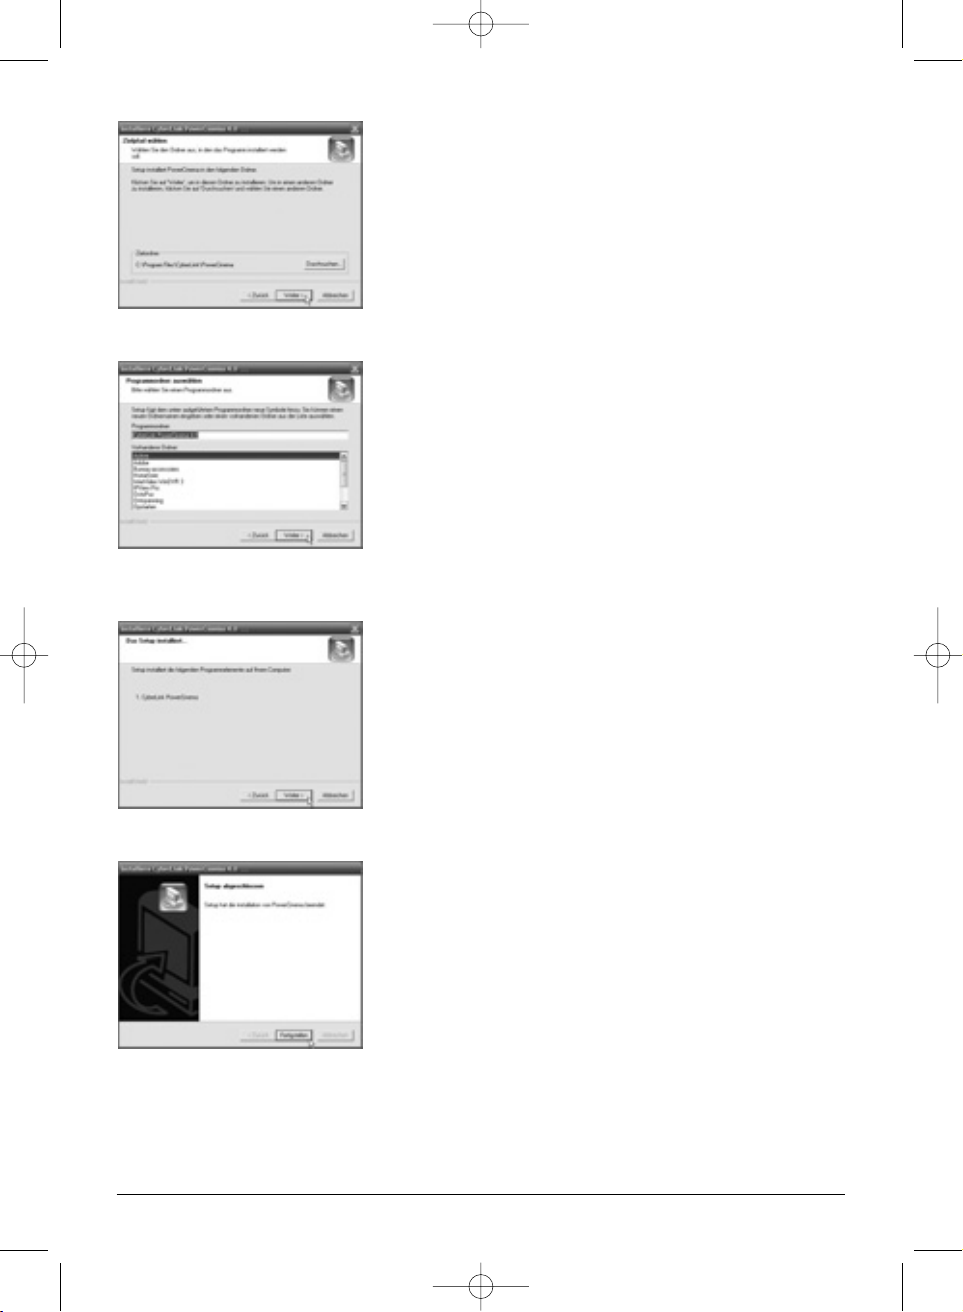
Wählen Sie eventuell eine andere Zielmappe und klicken Sie auf "Weiter"um fortzufahren.
Wählen Sie eventuell ein anderes Programmm-Verzeichnis und klicken Sie auf "Weiter"um
fortzufahren.
Klicken Sie auf "Weiter" um fortzufahren.
Klicken Sie auf "Fertigstellen" um die Installation zu vollenden.
FreeTV200_20120_20060620_man 20-06-2006 10:42 Pagina 22
DEUTSCH
23FREE TV200tm
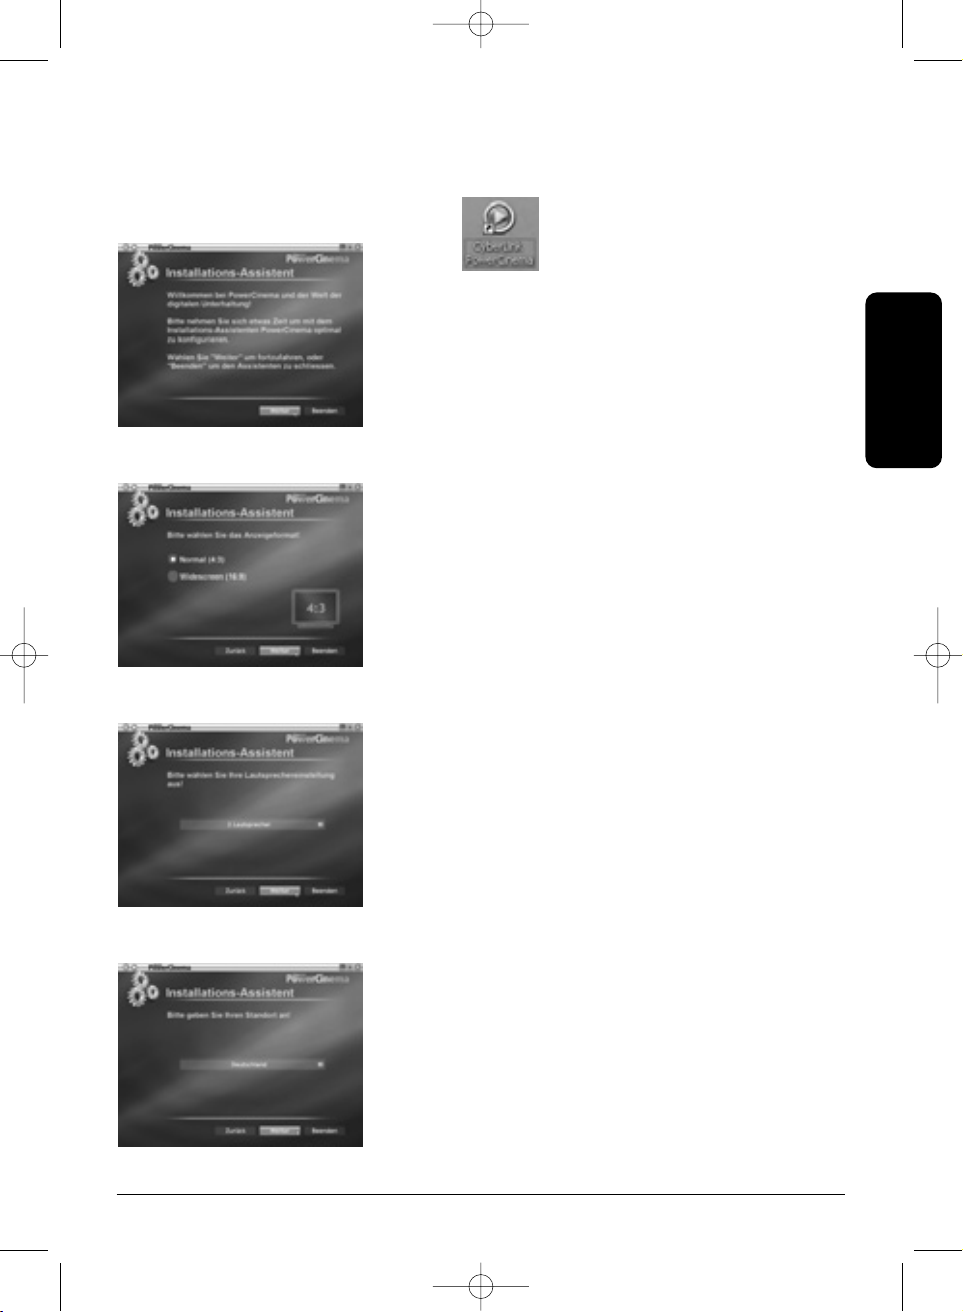
6.5 PowerCinema 4 das erste Mal starten.
Wählen Sie Start > Alle Programme > Cyberlink PowerCinema 4.0 >
PowerCinema um das Programm zu starten, oder doppelklicken Sie auf das
PowerCinema Symbol auf Ihrem Desktop
Klicken Sie auf "Weiter" um fortzufahren.
Wählen Sie die Bildschirmabmessung und klicken Sie auf "Weiter".
Selektieren Sie die entsprechende Lautsprecherkonfiguration und klicken Sie auf "Weiter".
Selektieren Sie das Land in dem Sie leben und klicken Sie auf "Weiter".
FreeTV200_20120_20060620_man 20-06-2006 10:42 Pagina 23
 Loading...