

Page 1

20656/20160128 • DOORGUARD 470
TM
© ALL RIGHTS RESERVED MARMITEK®
DOORGUARD 470
3
19
35
51
67
83
USER MANUAL
GEBRAUCHSANLEITUNG
GUIDE UTILISATEUR
MODO DE EMPLEO
MANUALE D’ISTRUZIONI
GEBRUIKSAANWIJZING
Page 2

© MARMITEK
2
Page 3

DoorGuard 470
3
ENGLISH
SAFETY WARNINGS
x To prevent a short circuit, this product should only be used inside and
only in dry spaces. Do not expose the components to rain or
moisture. Do not use adjacent to or near a bathtub, swimming pool,
etc.
x Do not expose the components of your system to extremely high
temperatures or bright light sources.
x This product is not a toy. Keep out of reach of children.
x Never open the product: the device may contain parts with deadly
voltage. Repairs or service should only be performed by qualified
personnel.
x Connect the adapter to the mains only after you have verified that the
line voltage corresponds to the value specified on the type plates.
Never connect a power adapter if it's damaged. In such cases,
please contact your supplier.
x Improper use, self-installed modifications or repairs will void any and
all warranties. Marmitek does not accept any product responsibility
for incorrect use of the product or use other than for which the
product is intended. Marmitek does not accept liability for any
consequential damage other than the legal product responsibility.
Page 4

© MARMITEK
4
TABLE OF CONTENTS
1
INTRODUCTION .............................................................................. 5
2 SET CONTENTS ............................................................................. 6
2.1 DoorGuard 470 Set (DG470 set) ...................................................... 6
2.2 Optional additional camera doorbell (OCW470) ............................... 6
2.3 Optional additional monitor (CM470) ................................................ 6
3 CAMERA DOORBELL ..................................................................... 7
3.1 Required cable type ......................................................................... 8
3.2 Electric door opener ......................................................................... 9
3.3 Mounting the camera doorbell .......................................................... 9
4 MONITOR ...................................................................................... 10
4.1 Mounting monitor ........................................................................... 11
4.2 Wiring diagram ............................................................................... 11
4.3 Using the monitor ........................................................................... 12
4.4 Monitor display settings .................................................................. 12
4.4.1 Call tone menu ................................................................. 12
4.4.2 Image menu ...................................................................... 12
4.4.3 Time menu ........................................................................ 12
4.4.4 Camera menu ................................................................... 13
4.4.5 Video menu ...................................................................... 13
5 A VISITOR RINGS THE DOORBELL ............................................ 14
6 LOOKING OUTSIDE ...................................................................... 15
7 FREQUENTLY ASKED QUESTIONS ............................................ 16
8 TECHNICAL DATA ........................................................................ 17
9 COPYRIGHTS ............................................................................... 18
Page 5

DoorGuard 470
5
ENGLISH
1 INTRODUCTION
Congratulations on your purchase of the Marmitek DoorGuard 470™.
This video door intercom enables you to see and hear who is at your door
before you decide to open it. The camera delivers good image quality,
even in the dark.
x Handsfree LCD video intercom with video memory – colour
x See who's at the door, a safe feeling
x Luxurious design; neat looks and Hands Free.
x Provided with a 7", 17.5 cm colour LCD screen.
x Save a video from every visitor on a SD memory card (not included).
x Always perfect sound and clear picture, also in the dark.
x Narrow front door unit that fits onto the doorframe.
x Solid weatherproof housing with unique 100º wide angle lens.
x Open the door remotely by electric door opener (optional).
x Optional connection of 1 additional camera doorbell (sold separately).
x Includes camera and rain hood.
How does it work? The moment a visitor rings the bell on the camera
doorbell, their image appears instantly on the monitor in the house. You
will instantly see who rang the bell and you can decide to open the door
or not. To talk with the visitor, simply press the intercom button. If you
installed an electric door opener, you can open the door via the monitor.
Page 6

© MARMITEK
6
2 SET CONTENTS
2.1 DoorGuard 470 Set (DG470 set)
1 x Monitor with display
1 x Wall plate for the monitor
1 x Camera doorbell with rain hood
1 x Power adapter
1 x 10 metres 4-wire cable to connect the camera
2 x 30 cm 4-wire cable with connector for use with own cable
1 x Various mounting and screw materials
1 x User manual
2.2 Optional additional camera doorbell (OCW470)
1 x Camera doorbell with rain hood
1 x Various mounting materials and screws
2.3 Optional additional monitor (CM470)
1 x Monitor with display
1 x Wall plate for the monitor
1 x Power Adapter
1 x 10 metres 4-wire cable to connect to 1st monitor
2 x 30 cm 4-wire cable with connector
1 x Various mounting materials and screws
Page 7
DoorGuard 470
7
ENGLISH
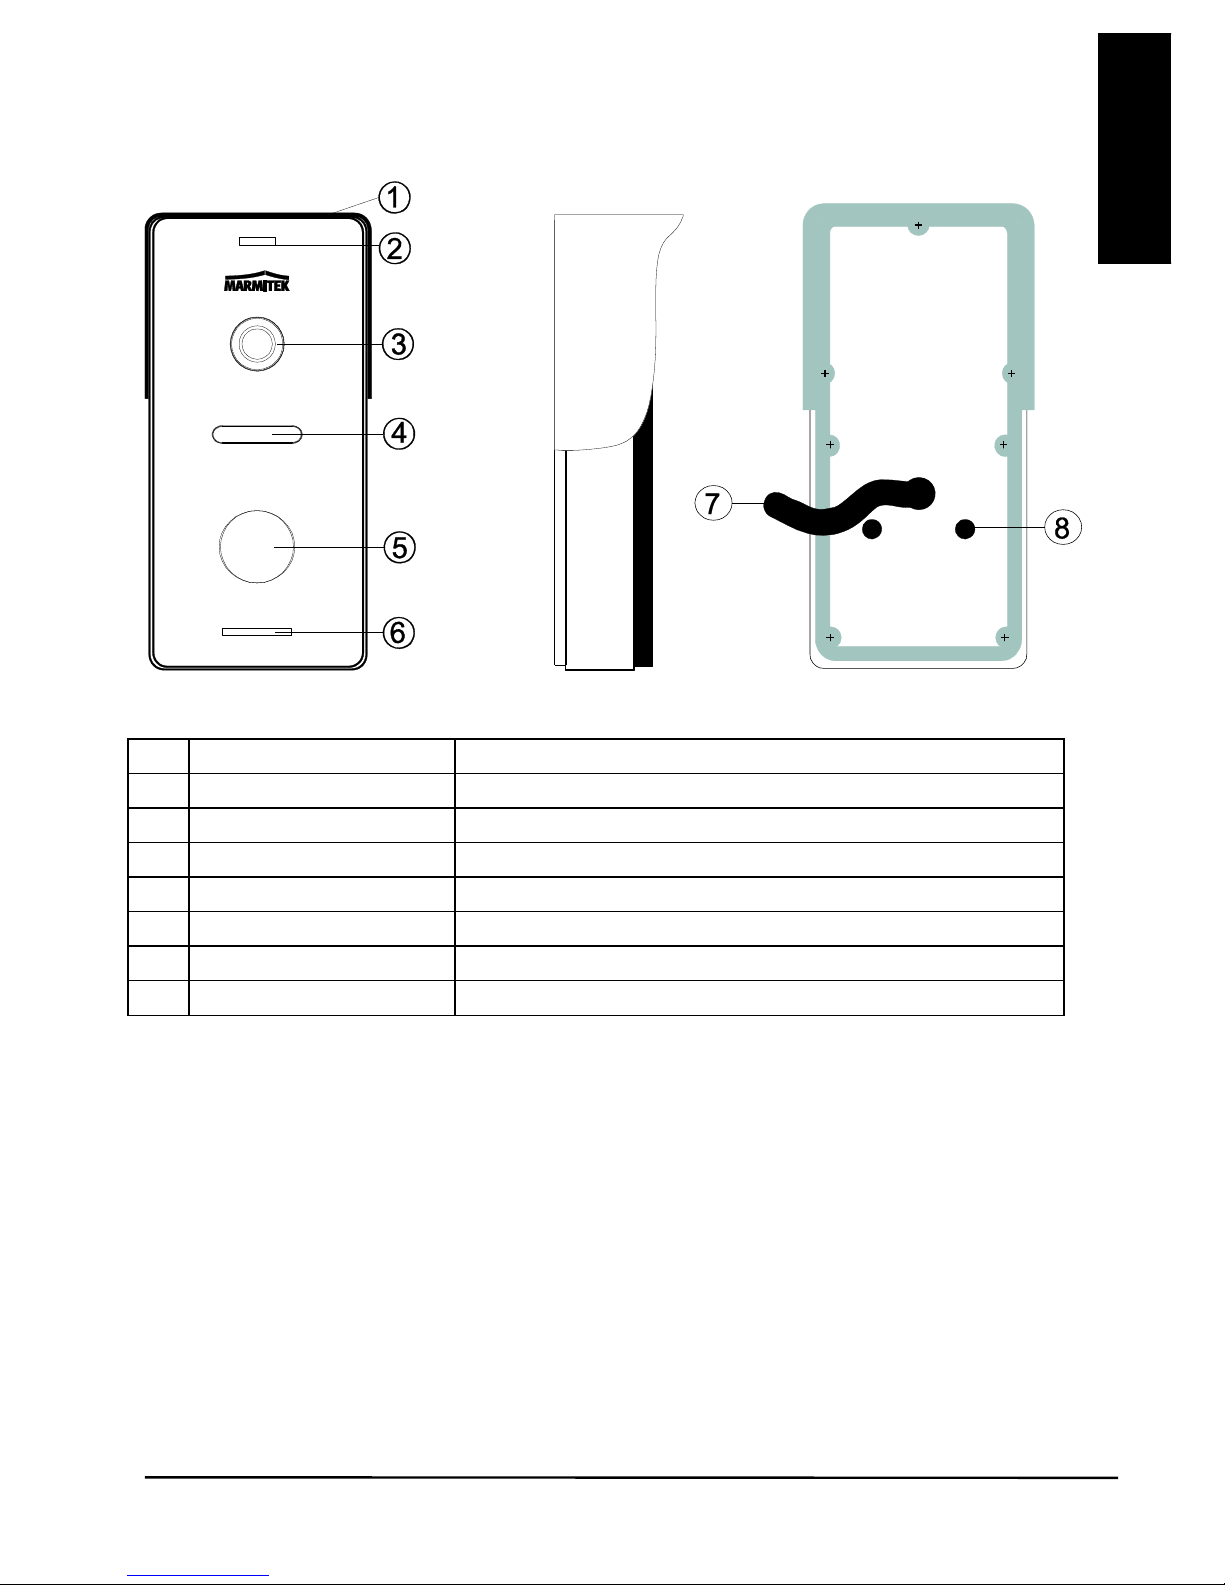
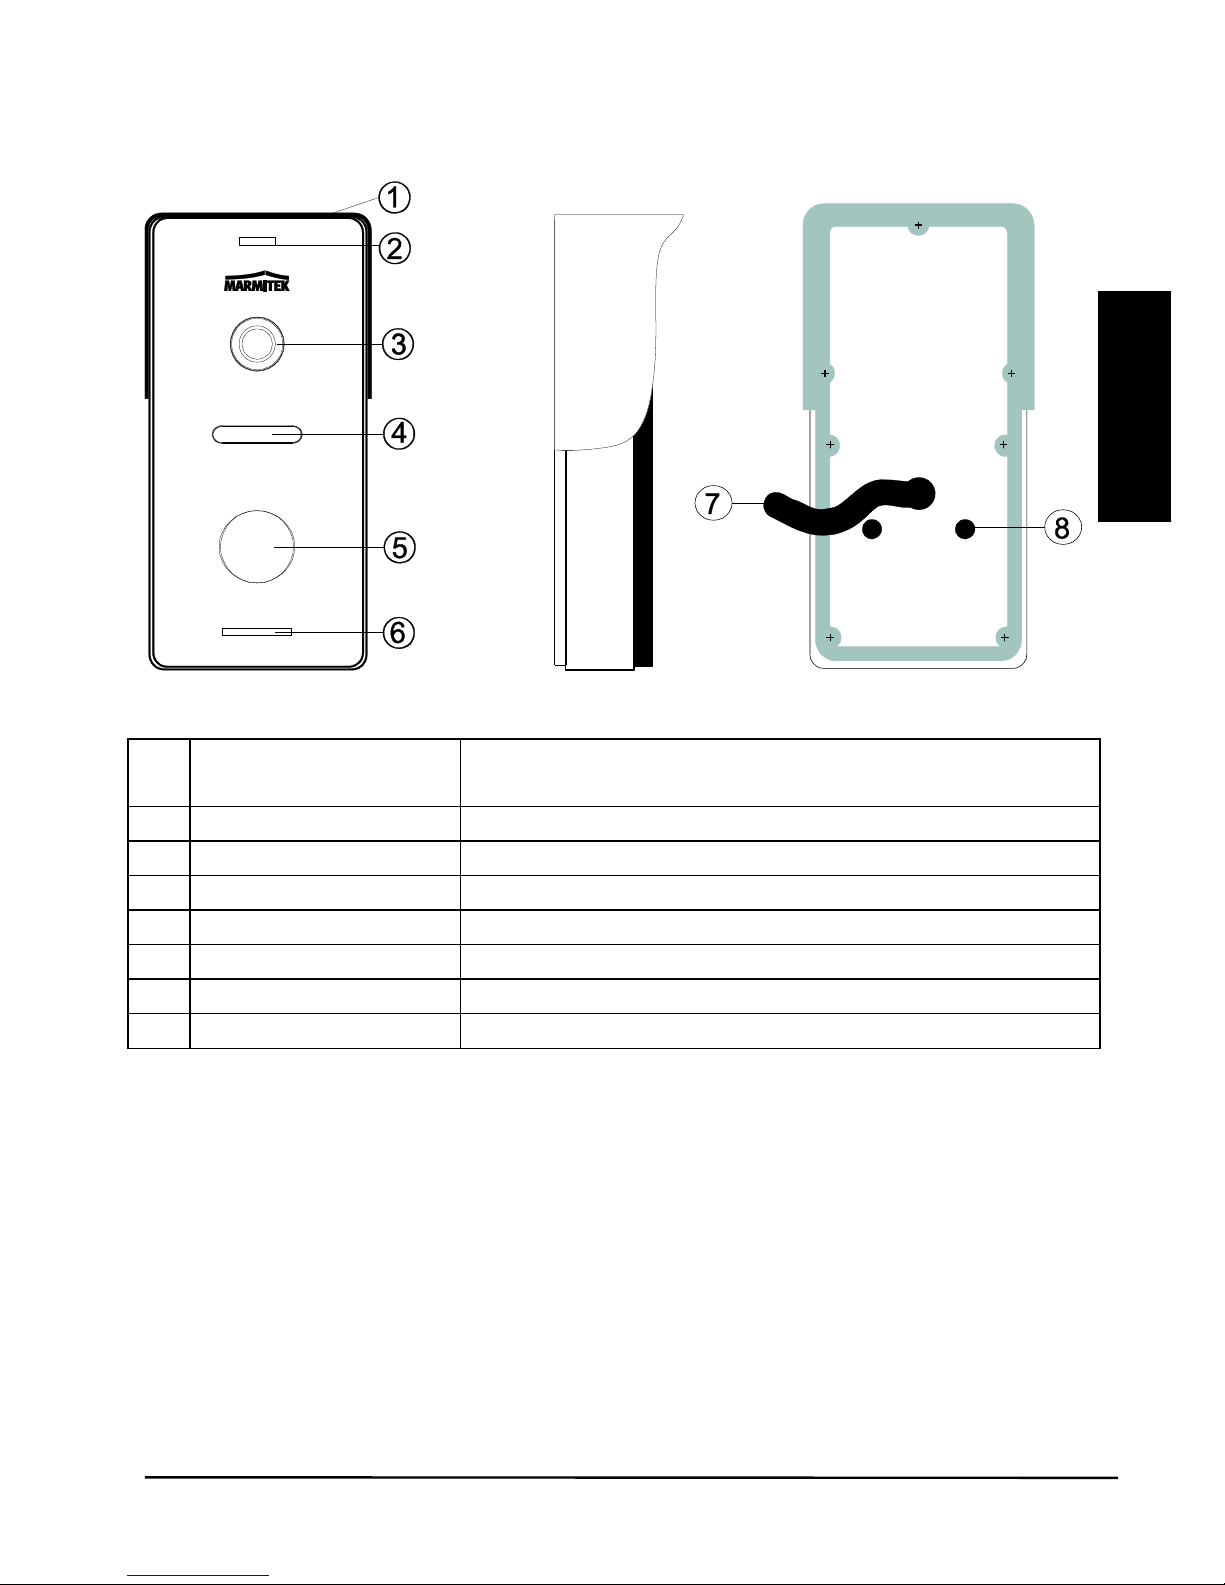
3 CAMERA DOORBELL
1
Rain hood
Protects the outdoor unit against the weather
2
Microphone
Sound to the monitor
3
Camera
Creates the image on the monitor
4
IR LEDs
Infrared lighting for better visibility
5
Doorbell
Ring to communicate
6
Speaker
Sound from the monitor
7
Connecting cable
Connection to monitor and door opener
8
Volume control
To adjust the speaker volume
Page 8
© MARMITEK
8
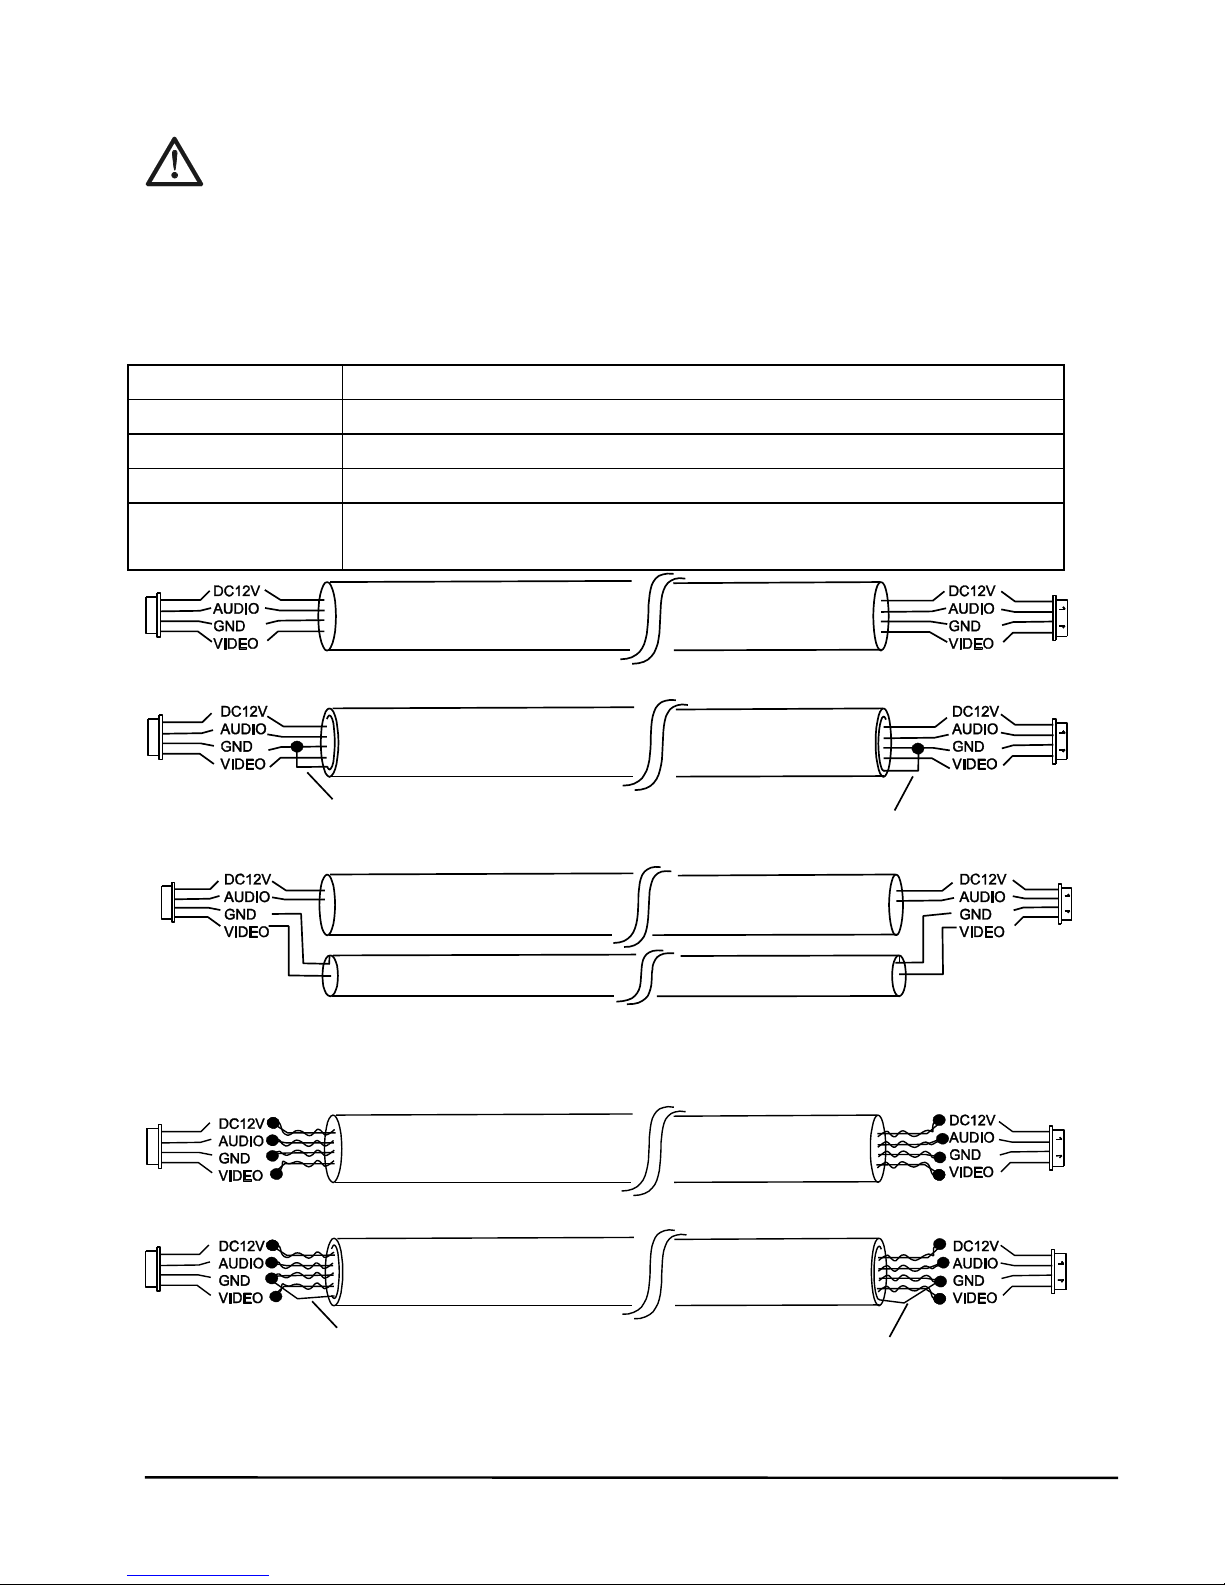
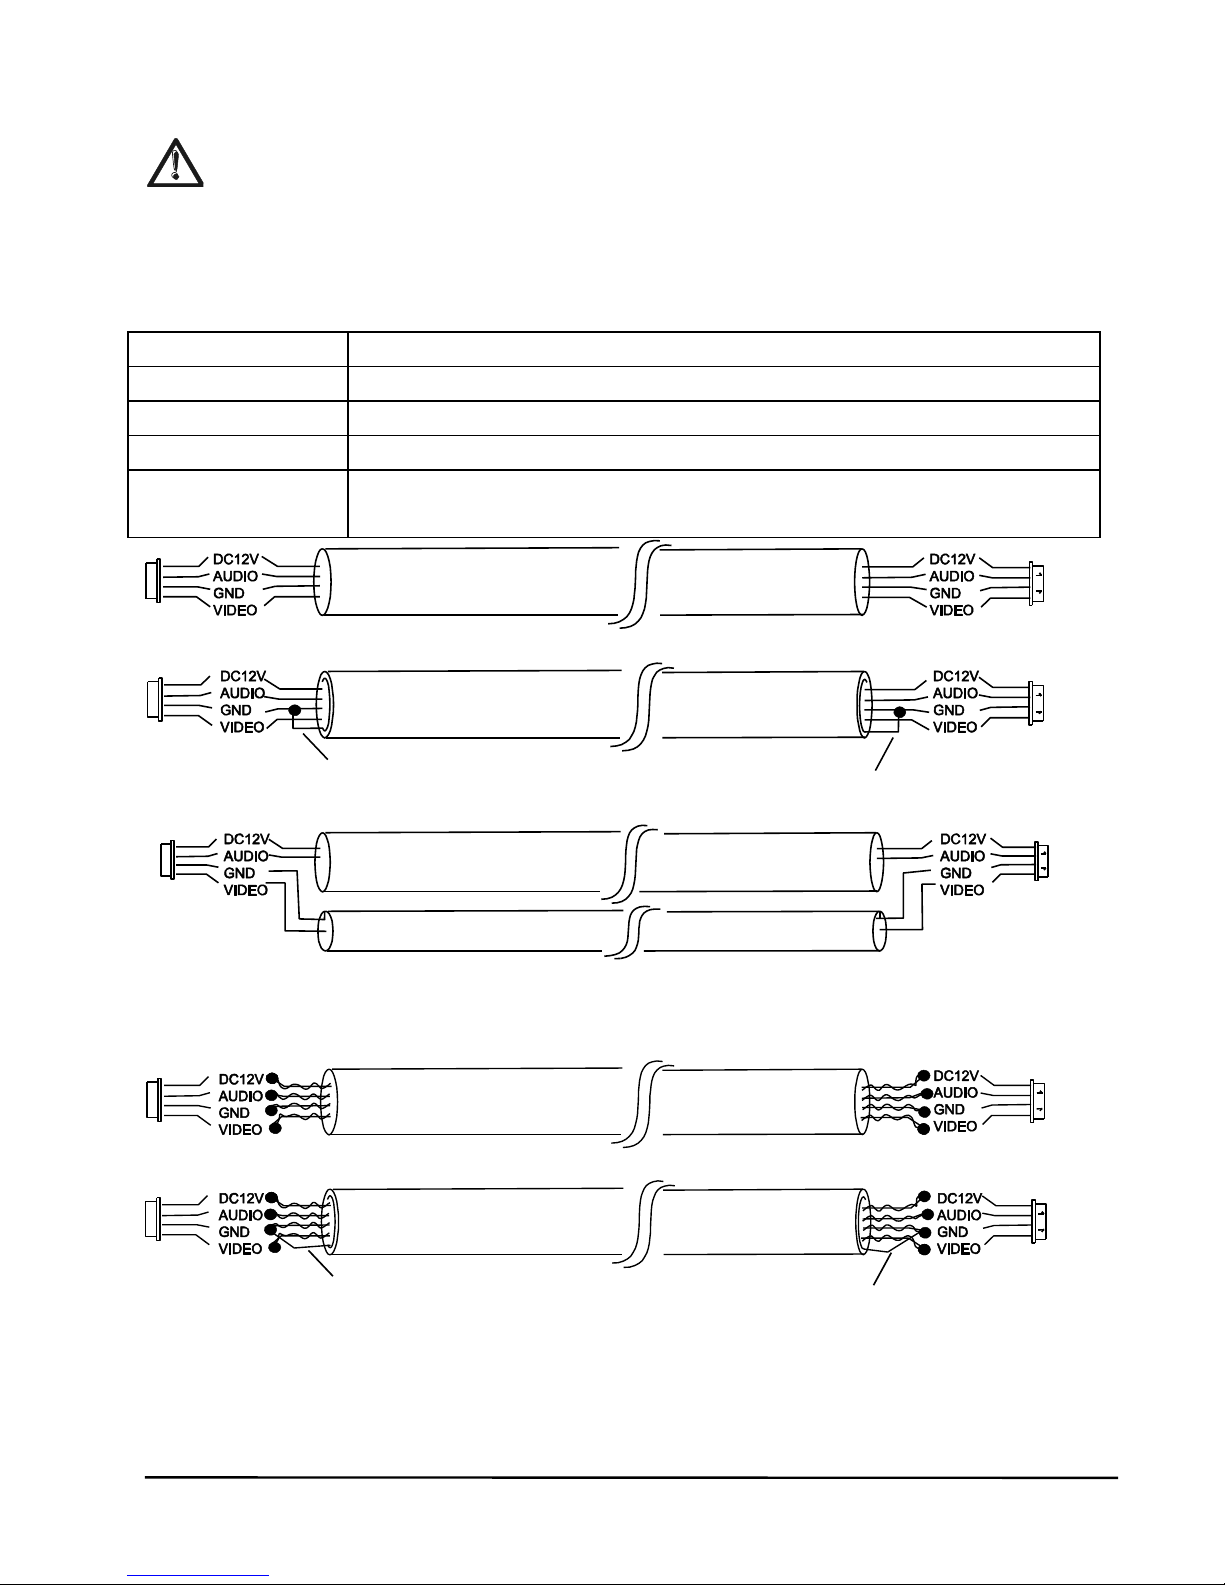
3.1 Required cable type
Please ensure that the power to the system is off during
installation.
To connect the camera doorbell to the monitor, you can use the supplied
4-wire cable.
Should you want to cross a longer distance, please refer to the following
table for the required type of cable:
Cable length
Required cable type
1-25m
4-wire cable of minimum 4x 0.2mm2, unshielded
25-50m
4-wire cable of minimum 4x 0.3mm2, shielded
50-80m
4-wire cable of minimum 4x 0.5mm2, shielded
80-100m
coaxial cable, 75 ohm of minimum 1.55mm2 + 2-wire
audio cable of 0.55mm
2
CAT5 or CAT6 network cable connections (not recommended)
You can use the two included additional connectors for this.
Unshielded cable (<25m)
Shielded cable (<80m)
Coaxial cable + 2-wire audio cable (<100m)
Unshielded network cable (<25m)
Shielded network cable (<50m)
Afscherming
Afscherming
Page 9

DoorGuard 470
9
ENGLISH
3.2 Electric door opener
The electric door opener is optional (Item no. 09774).
The system supports door openers with a Normally Open (NO)
door unlocking method. This means that in the normal state, the dry
contact is open. If the release button is pressed, the open contact will be
closed for a set period of time. (dry contact: the contact will not supply
power to the door opener. If you use the Marmitek electric door opener,
you can use the camera's power for this. If you use another door opener,
please ensure it is possible to use the camera's 12V for this, and that it
does not use more than 0.6A. Otherwise, use a separate power supply for
the door opener.)
3.3 Mounting the camera doorbell
The camera is equipped with a wide angle lens. Even if a visitor is not directly in
front of the camera, you'll still get a good view.
x Determine the correct height for the camera.
x Drill a hole through the frame at the height where you want to mount the
doorbell.
x Attach the mounting plate to the frame using the four screws.
x Now slide the doorbell's cable through the mounting plate and the hole in
the frame.
x Then mount the doorbell on the mounting plate, using the included two
screws.
Page 10
© MARMITEK
10
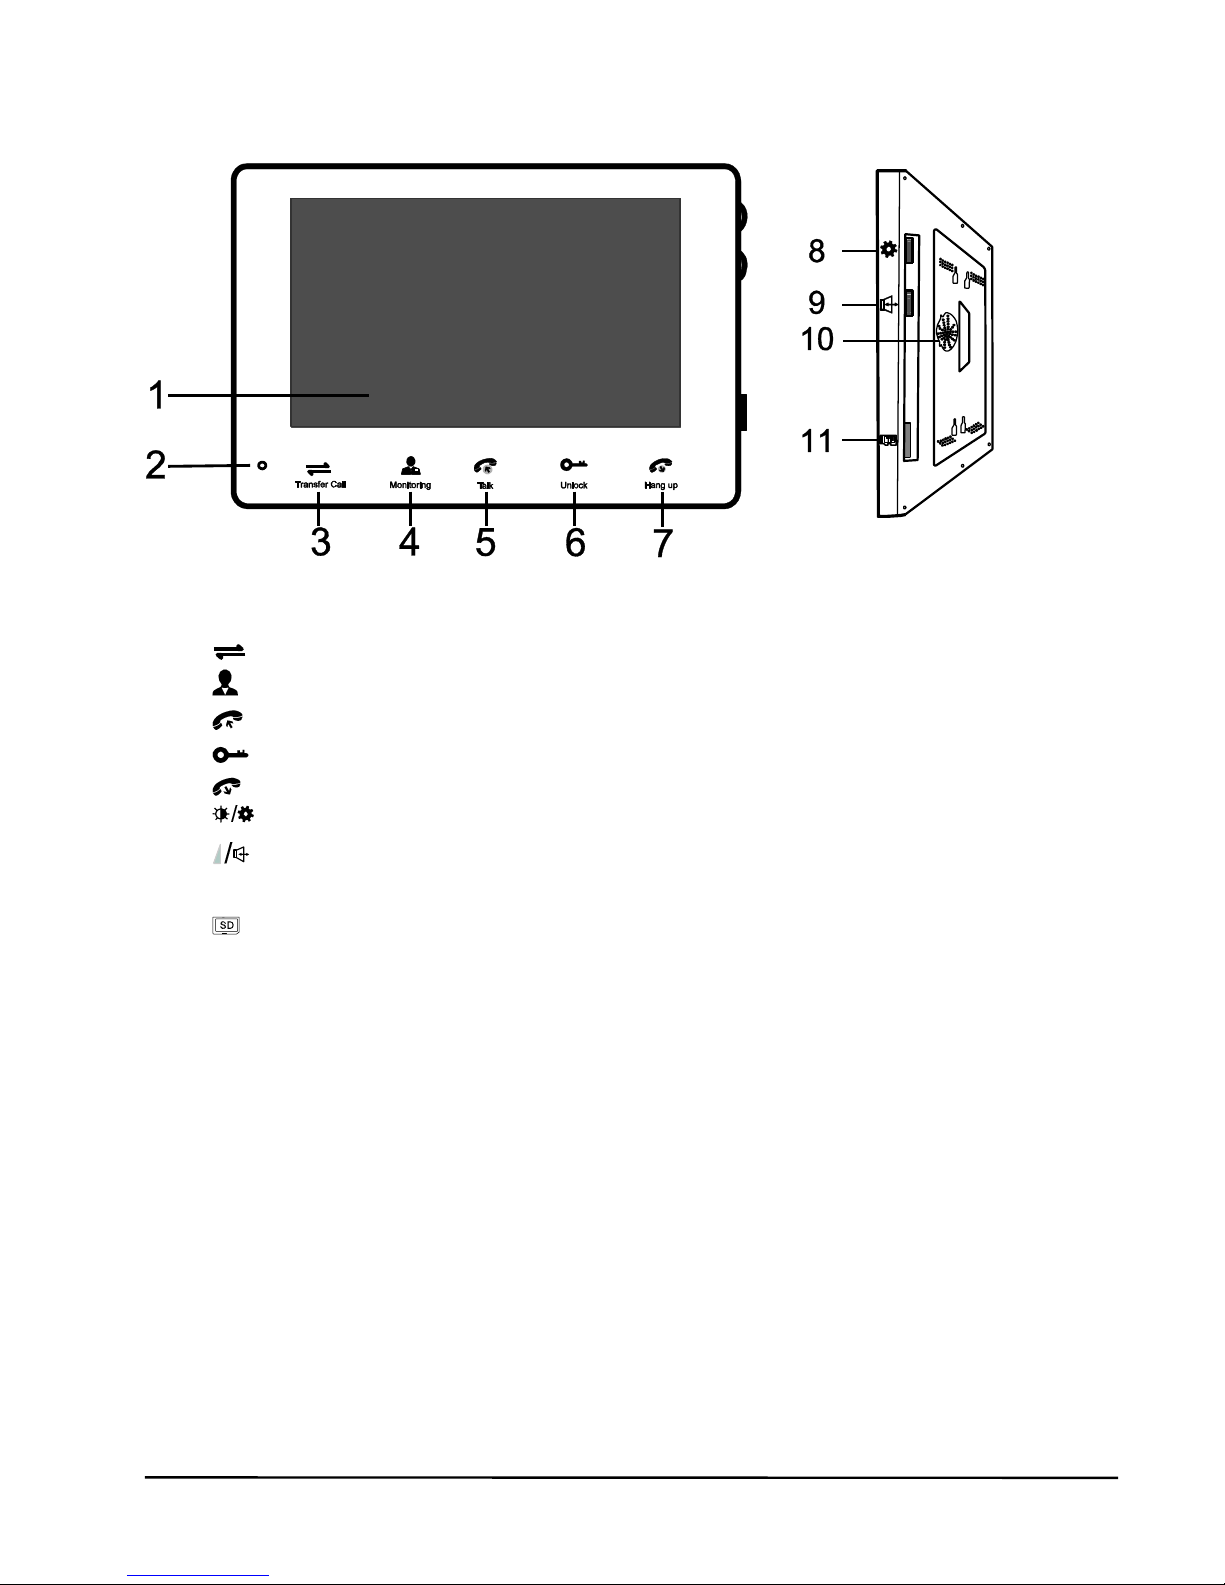
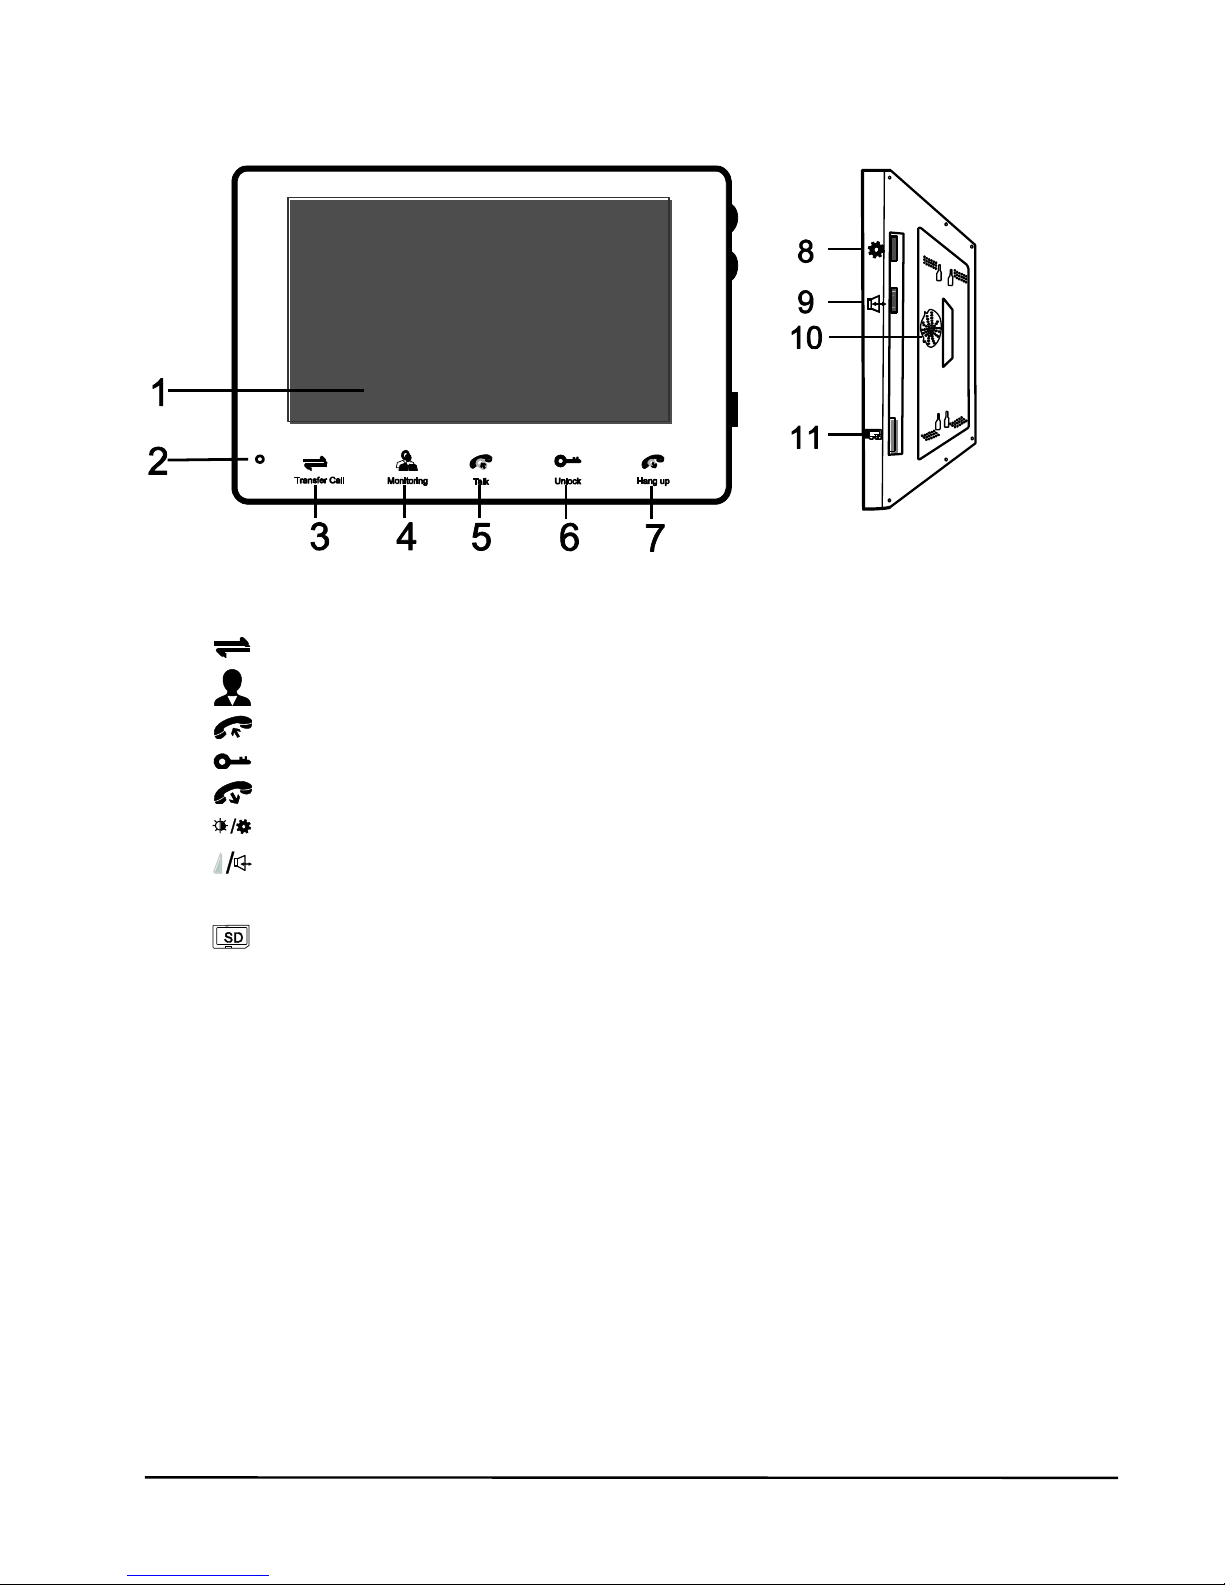
4 MONITOR
1 TFT screen
2 Microphone
3 Transfer button (to another monitor)
4 Monitor button (to activate camera)
5 Intercom button (to activate speech)
6 Door opener button
7 Disconnect button
8 Display settings
9 Monitor speaker volume
10 Speaker
11 SD card slot (SD card: up to 32GB, FAT32, Class 10 or higher,
not included)
Page 11

DoorGuard 470
11
ENGLISH
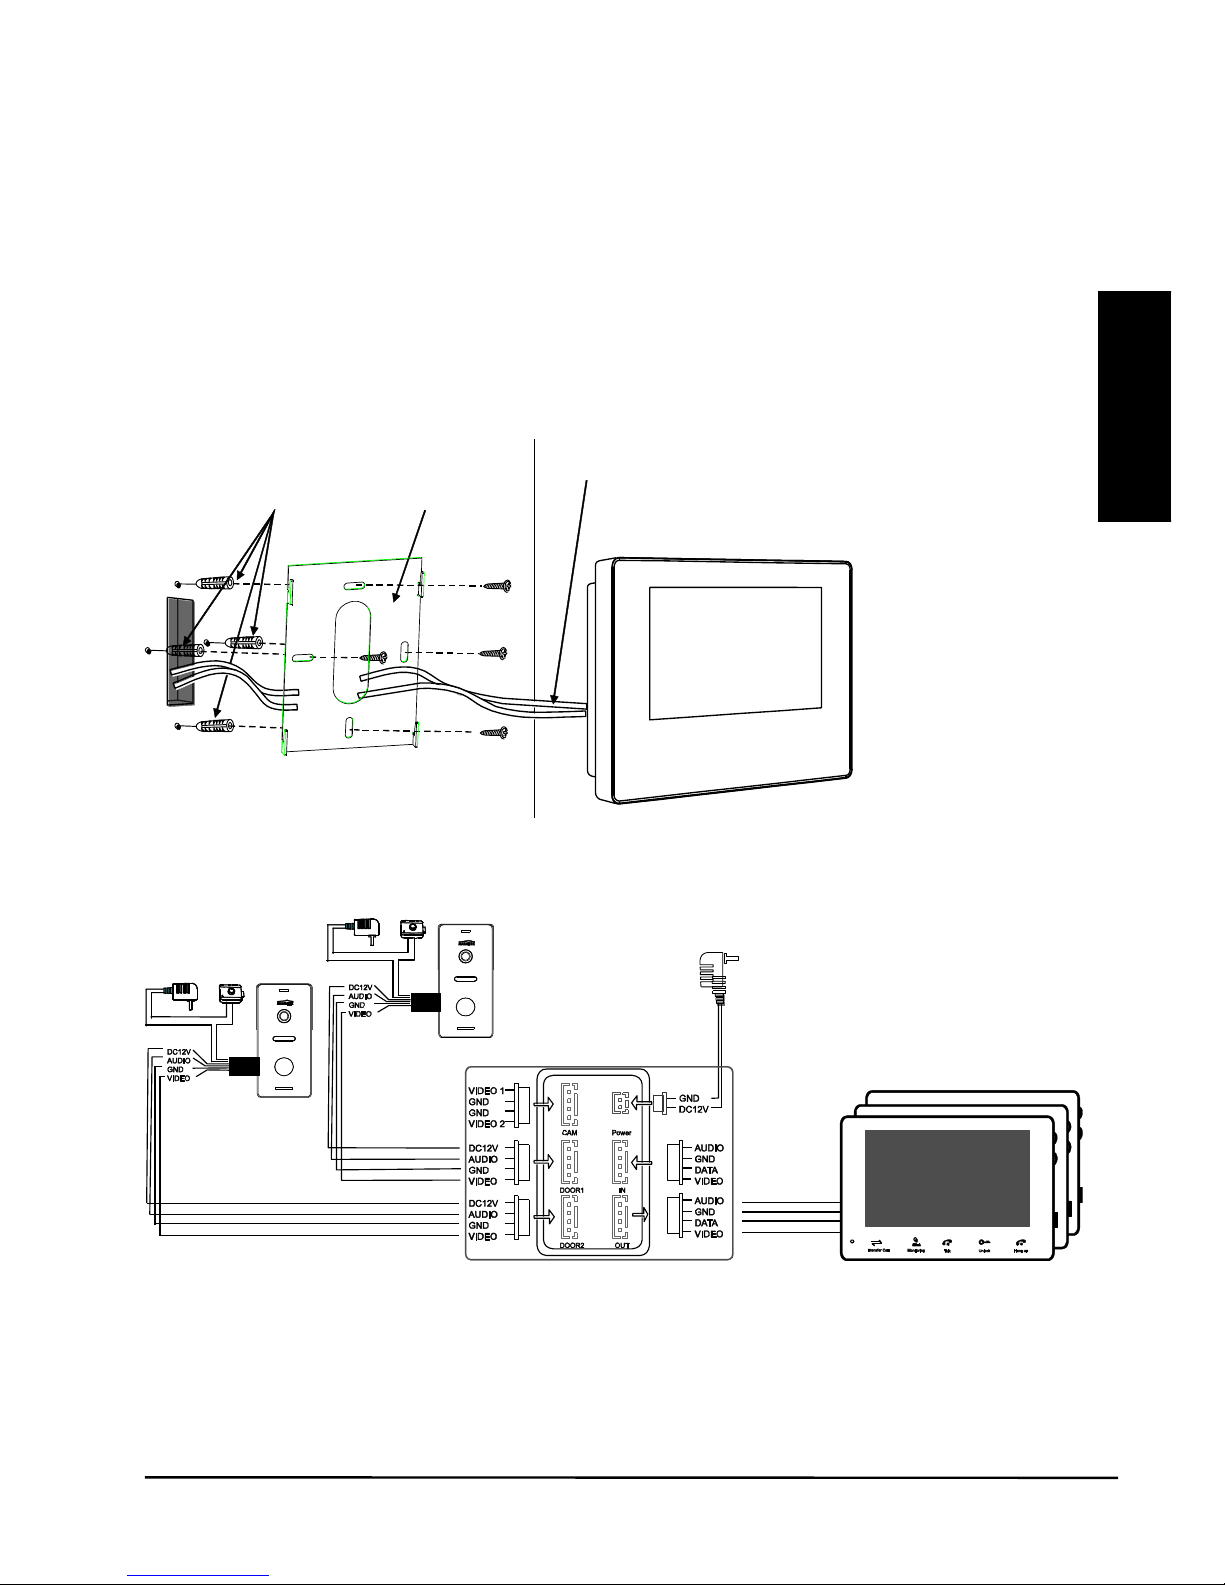
4.1 Mounting monitor
x Avoid installing the monitor near intense radiation, such as from a
TV, video recorder or PC.
x Choose an ideal position, with the monitor installed at eye level.
x Before installing the monitor, please ensure that it is de-energised.
x Please ensure that the power supply is installed at least 30 cm away
from the monitor, to prevent interference.
Follow the diagram below to install the monitor:
4.2 Wiring diagram
Two doorbells with camera and one external camera can be connected to
the monitor. Up to three additional monitors can be looped through to the
monitor.
Plugs
Wall plate
Connection cables to doorbells with camera,
2nd monitor and power cable
Door 2
Door 1
Door opener
Door opener
Next monitor
Power
supply
1st monitor
Wall
Page 12

© MARMITEK
12
4.3 Using the monitor
Follow these steps to connect your monitor to the camera doorbell:
x Connect the supplied 4-wire cable to the doorbell.
x Connect the other end to your monitor, DOOR1.
x Connect the adapter to the power jack.
Supply adapter with voltage.
The monitor will now start up.
After a few seconds you will hear a 'beep', indicating that the system has
booted.
4.4 Monitor display settings
On the monitor, press button 8 briefly to activate the display settings.
By rotating the button downward, you cycle through the 5 main menus.
Make your selection by briefly pressing the button.
In the sub menu, you can make your selection by rotating the button down
or up and briefly pressing it to confirm the selection.
You can then adjust the selection again by turning the button up or down
and briefly pressing it to confirm the adjustment.
4.4.1 Call tone menu
x Select call tone: Choice of 16 melodies.
x Call tone duration: can be set between 5 and 30 seconds.
x Call tone volume 1, 2 and 3: You can set the call tone volume for 3
time spans.
For example, loud during the day, a little softer in the evening and
very soft at night.
4.4.2 Image menu
x Language: EN, DE, FR, ES, IT or NL
x Clear
x Colour
x Contrast
4.4.3 Time menu
x Time: setting date and time
x Key tone: turn on/off key confirmation tone
x Reboot: reboot monitor
x Version: monitor firmware version
Page 13

DoorGuard 470
13
ENGLISH
4.4.4 Camera menu
x Unlock time: When using an electric door opener, unlock duration
can be set between 2 and 10 seconds.
x Function: Master or Slave. Choose Master if this monitor is the first or
only monitor. Choose Slave if this monitor is a 2nd, 3rd or 4th
monitor.
x DOOR2: On, if you are using a 2nd camera doorbell, otherwise Off.
x CAM1: On, if you are using an additional camera, otherwise Off.
x CAM2: On, if you are using an additional camera, otherwise Off.
4.4.5 Video menu
x Record: On, when using an SD card in the monitor to automatically
make a video recording when the bell rings.
x Play: Automatically plays all recordings. Button 8 lets you scroll
through all the recordings.
x Formatting: Formats the inserted SD card.
x FW Update (SD): this allows any available firmware updates to be
installed from the SD card.
Choose Close to exit the menu. (Menu will automatically close 1 minute
after making your last choice)
Page 14

© MARMITEK
14
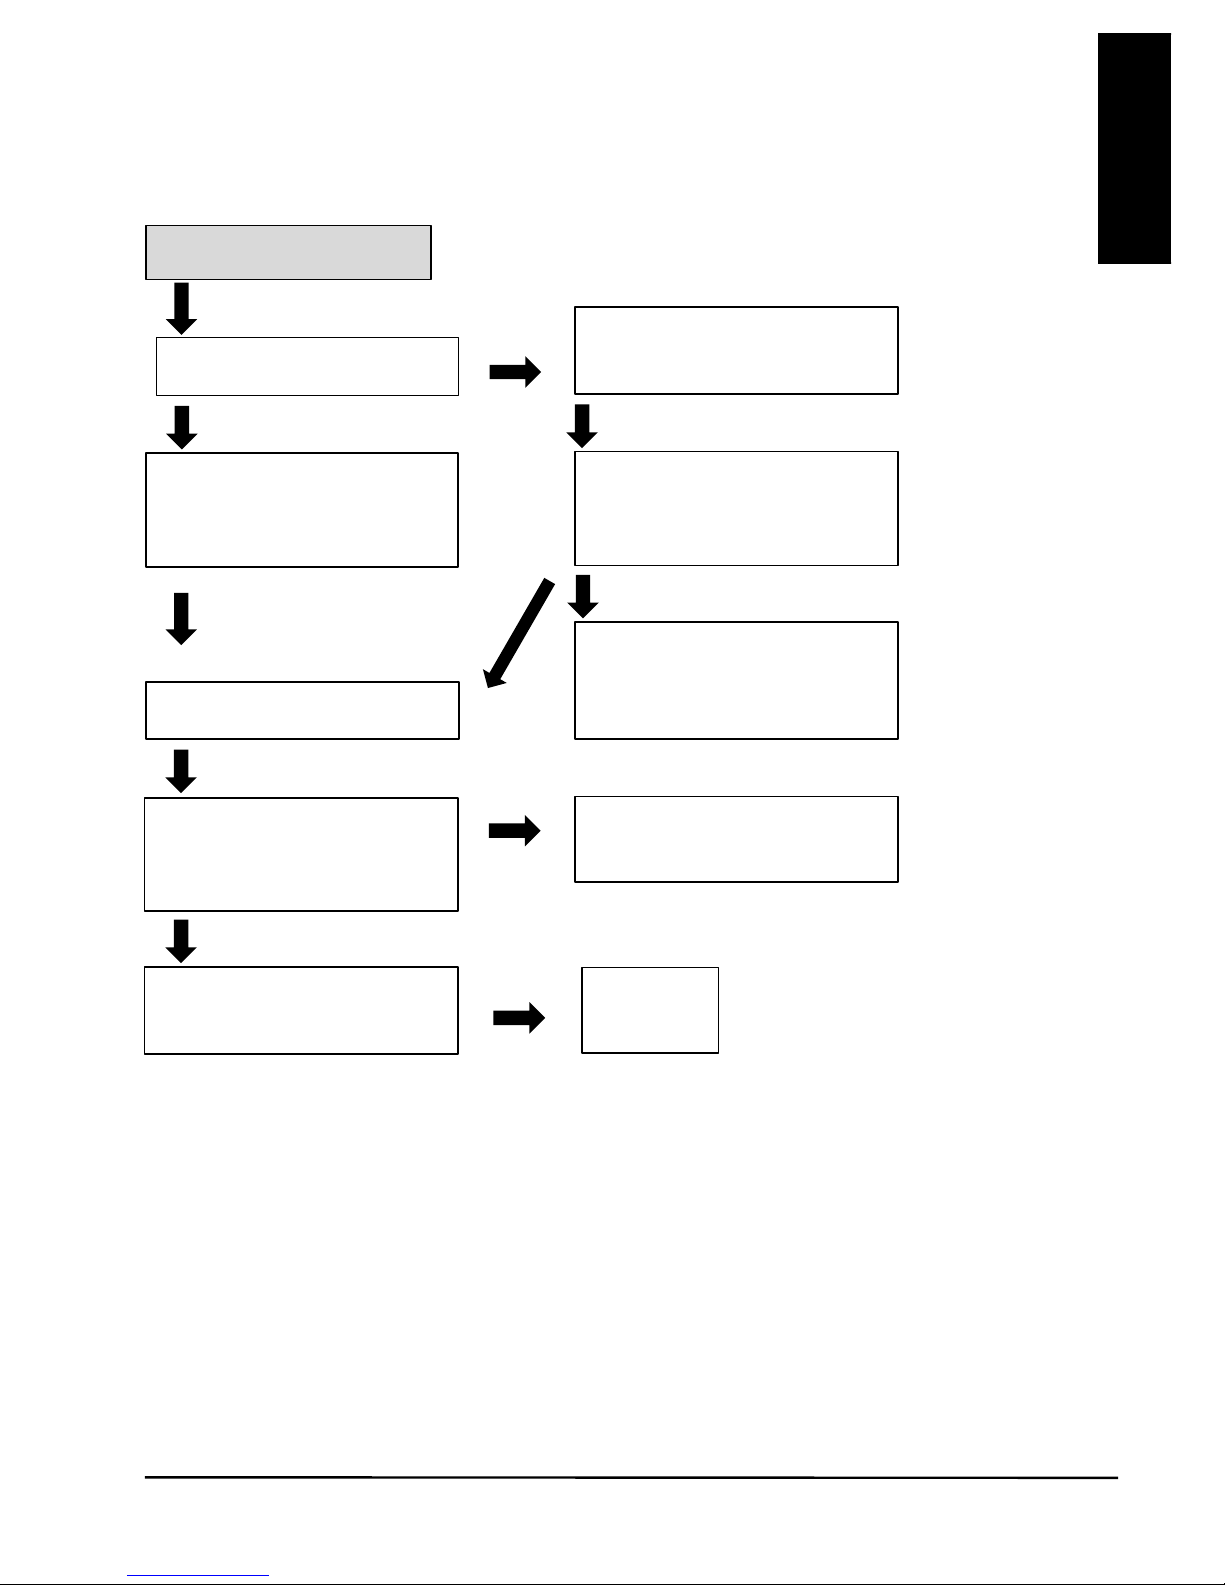
5 A VISITOR RINGS THE DOORBELL
In this example, 2 camera doorbells are connected.
Please refer to the left column if you only have 1 doorbell.
Both the image and the voice of the visitor remain active for 20
seconds when the door opener is operated. This enables you to
verify that the door opener has worked well.
If an SD card is installed in the monitor, a video recording will be
made each time the bell is rung.
STANDBY mode
The visitor rings doorbell 1
For 5...30 seconds
you will hear a
melody, both inside
and outside.
(1 out of
16 selectable melodies)
The image of the visitor
will automatically appear
on the monitor.
Press the intercom button
(5).
The melody will stop.
You can now start a
conversation via
doorbell 1.
The conversation stops
automatically after 120
seconds.
P
ress the door opener
button (6) (or walk to the
door if it is not installed)
The door opener is
activated.
Press the disconnect
button (7).
Standby
The visitor rings doorbell 2
If both doorbell 1 and 2 are rang at the same time, the
doorbell that was pressed first will be connected to the
monitor. On the monitor, you will now hear 3 short
tones to indicate that the other doorbell was also
pressed.
If the camera of the outdoor unit is blocked, and you
do not see an image of the visitor, press the monitor
button to switch to a 2
nd
camera. Press the monitor
button again to return to the image from the outdoor
unit.
The monitor will automatically enter standby mode
when the intercom button is not pressed within 60
seconds.
Page 15
DoorGuard 470
15
ENGLISH
6 LOOKING OUTSIDE
If you only use 1 camera doorbell, you can also go to standby by pressing
the disconnect button (7).
If the monitor function is active on the monitor and someone rings the
doorbell, the monitor will automatically switch to the image of this
doorbell's location.
STANDBY mode
The display stops
automatically after
60 seconds.
Press the monitor button (4).
The image of the first camera
is displayed.
Press the intercom button (5).
You can now start a
conversation via the camera.
Press the disconnect button
(7).
Standby
P
ress the monitor button (4
)
again.
The image of the second
camera is displayed.
P
ress the monitor button (4
)
again to enter standby.
Press the door opener button
(6
) to activate it.
Page 16

© MARMITEK
16
7 FREQUENTLY ASKED QUESTIONS
Can I set the speaker volume of the doorbell?
On the back of the doorbell, there is a small volume control located
behind the rubber sealing cap. Using a small screwdriver, you can gently
fine-tune the volume.
What is the recommended height for mounting the doorbell?
The recommended height is 1.60 metres. Also, pay attention to incident
light from the sun, streetlights and the like.
Can I connect multiple monitors in parallel?
No, a second monitor is connected to the first monitor. A third monitor is
then connected to the second monitor and a fourth monitor to the third
monitor. Next, go to the settings menu of each monitor to set it as either a
Master or a Slave monitor. The first monitor is always a Master; the other
three monitors are Slaves. (Please refer to 4.4.4 Camera menu.)
If I want to install a door opener, can I operate it from each monitor?
Yes, you can operate the door opener from each monitor.
Can I set the monitor's call tone?
You can choose from 16 different call tones, set the duration and adjust
the volume for three time spans. You can set this individually for each
monitor. (Please refer to 4.4.1
Call tone menu.)
I hear a clearly audible humming noise during the conversation.
A humming noise can be caused by interference with other types of
installations. High AC voltage cables next to intercom cables will almost
certain result in a humming noise in the door intercom. If it is unavoidable
that the intercom cable runs along 230V cables, please ensure that
shielded cables are used. (Please refer to 3.1 Required cable type.)
What is the function of the three extra wires on the doorbell cable?
The blue and brown wires are the switching wires for the door opener.
The red/white wire supplies 12 volts when the camera is active. It can be
used, for example, to control an external DVR.
Do you still have questions?
Please check out www.marmitek.com for more information.
.
Page 17

DoorGuard 470
17
ENGLISH
8 TECHNICAL DATA
OCW470 camera doorbell with rain hood
Resolution 420TVL
Camera ¼” CMOS colour
Lens and angle 100°
Light sensitivity 0.1 LUX
Night vision 4 infrared LEDs (60°)
Night vision range 0.5 ~1 m
Sound Built-in microphone and speaker
Door open switch Dry contact, N.O., Max 1A.
Unlock time 2…10 seconds (configurable)
Active consumption 200mA Max.
Adapter Powered by indoor unit
Mounting Surface mounting
Dimensions 125 x 60 x 35 mm (h x b x d)
Ambient temperature -40 ~ +50°C (in use)
Humidity ≤ 85% RH
CM470 Monitor
Display 7 inch TFT LCD
Resolution 800(H) x 3 (RGB) x 480 (V)
Video system PAL/NTSC compatible
Intercom mode Semi-duplex communication
Call duration 120 seconds
Standby consumption 300 mA max.
Active consumption 600 mA max.
Call tone selection Choice of 16 melodies
Call tone duration 5…30 seconds
Call tone volume Can be set time-dependent
SD card slot Up to 32 GB
FAT32 formatted
Class 10 or above
Adapter DC12V
Ambient temperature -10 ~ +60°C (in use)
Mounting Surface mounting
Dimensions 194 x 124 x 18 mm
Page 18

© MARMITEK
18
Environmental Information for Customers in the European
Union
European Directive 2002/96/EC requires that the equipment
bearing this symbol on the product and/or its packaging must
not be disposed of with unsorted municipal waste. The symbol
indicates that this product should be disposed of separately from regular
household waste streams. It is your responsibility to dispose of this and
other electric and electronic equipment via designated collection facilities
appointed by the government or local authorities. Correct disposal and
recycling will help prevent potential negative consequences to the
environment and human health. For more detailed information about the
disposal of your old equipment, please contact your local authorities,
waste disposal service, or the shop where you purchased the product.
9 COPYRIGHTS
Marmitek is a trademark of Pattitude B.V.
DoorGuard 470™ is a trademark of Marmitek B.V. All rights reserved.
Every effort has been made to ensure that the information in this manual
is accurate. Marmitek is not responsible for printing or clerical errors.
Copyright and all other proprietary rights in the content (including but not
limited to model numbers, software, audio, video, text and photographs)
rests with Marmitek B.V. Any use of the Content, but without limitation,
distribution, reproduction, modification, display or transmission without the
prior written consent of Marmitek is strictly prohibited. All copyright and
other proprietary notices shall be retained on all reproductions. Other
company and product names mentioned herein may be trademarks of
their respective companies. Mention of third-party products is for
informational purposes only and constitutes neither an endorsement nor a
recommendation. Marmitek assumes no responsibility with regard to the
performance or use of these products.
MARMITEK BV - P.O. BOX 4257 - 5604 EG EINDHOVEN
THE NETHERLANDS
Page 19

DoorGuard 470
19
DEUTSCH
SICHERHEITSHINWEISE
x Um Kurzschluss vorzubeugen, dieses Produkt bitte
ausschließlich innerhalb des Hauses und nur in trockenen
Räumen nutzen. Setzen Sie die Komponenten nicht Regen oder
Feuchtigkeit aus. Nicht neben oder nahe eines Bades,
Schwimmbades usw. verwenden.
x Setzen Sie die Komponente Ihres Systems nicht extrem hohen
Temperaturen oder starken Lichtquellen aus.
x Dieses Produkt ist kein Spielzeug. Außer Reichweite von
Kindern halten.
x Das Produkt niemals öffnen: Das Gerät kann Teile enthalten,
worauf lebensgefährliche Stromspannung steht. Überlassen Sie
Reparaturen oder Wartung nur Fachleuten.
x Schließen Sie den Netzadapter erst dann an das Stromnetz an,
nachdem Sie überprüft haben, ob die Netzspannung mit dem auf
dem Typenschild angegeben Wert übereinstimmt. Schließen Sie
niemals einen Netzadapter an, wenn diese beschädigt sind. In
diesem Fall nehmen Sie Kontakt mit Ihrem Lieferanten auf.
x Bei einer zweckwidrigen Verwendung, selbst angebrachten
Veränderungen oder selbst ausgeführten Reparaturen verfallen
alle Garantiebestimmungen. Marmitek übernimmt bei einer
falschen Verwendung des Produkts oder bei einer anderen
Verwendung des Produktes als für den vorgesehenen Zweck
keinerlei Produkthaftung. Marmitek übernimmt für Folgeschäden
keine andere Haftung als die gesetzliche Produkthaftung.
Page 20

© MARMITEK
20
INHALTSVERZEICHNIS
1
EINFÜHRUNG ............................................................................... 21
2 VERPACKUNGSINHALT ............................................................... 22
2.1 DoorGuard 470 Set (DG470 Satz) ................................................. 22
2.2 Optional, extra Klingel mit Kamera (OCW470) ............................... 22
2.3 Optional, extra Monitor (CM470) .................................................... 22
3 KLINGELTASTER MIT KAMERA ................................................... 23
3.1 Benötigte Kabelart .......................................................................... 24
3.2 Elektrischer Türöffner ..................................................................... 25
3.3 Montage Klingeltaster mit Kamera ................................................. 25
4 MONITOR ...................................................................................... 26
4.1 Montieren Monitor .......................................................................... 27
4.2 Anschlussplan ................................................................................ 27
4.3 Monitor in Gebrauch nehmen ......................................................... 28
4.4 Monitor Bildschirmeinstellungen ..................................................... 28
4.4.1 Menü Klingelsignal ............................................................ 28
4.4.2 Menü Bild .......................................................................... 28
4.4.3 Menü Zeit .......................................................................... 28
4.4.4 Menü Kamera ................................................................... 29
4.4.5 Menü Video ...................................................................... 29
5 EIN BESUCHER KLINGELT .......................................................... 30
6 HINAUSSCHAUEN ........................................................................ 31
7 HÄUFIG GESTELLTE FRAGEN .................................................... 32
8 TECHNISCHE DATEN ................................................................... 33
9 COPYRIGHT .................................................................................. 34
Page 21

DoorGuard 470
21
DEUTSCH
1 EINFÜHRUNG
Herzlichen Glückwunsch zum Erwerb des Marmitek DoorGuard 470™.
Mit dieser Video Türsprecheinrichtung können Sie sehen und hören, wer
an ihrer Tür steht, bevor Sie beschließen, sie zu öffnen. Die Bildqualität
der Kamera ist sehr gut und das auch im Dunkeln.
x Freisprech LCD Video Türsprecheinrichtung mit Videospeicher –
Farbe
x Sehen wer vor der Tür steht: ein sicheres Gefühl
x Schicke Formgebung; ebenmäßiges Design und Handsfree.
x Mit einem luxuriösen 17,5 cm Farbbild LCD Bildschirm.
x Speichern Sie von jedem Besucher eine Videoaufnahme auf einer
SD Speicherkarte (nicht enthalten)
x Stets ausgezeichnete Ton- und Bildqualität, auch im Dunkeln.
x Schmale Türeinheit, die an jeden Türpfosten passt.
x Solides und witterungsbeständiges Gehäuse mit einzigartigem 100º
Weitwinkelobjektiv.
x Öffnen Sie die Tür über eine elektrische Fernbedienung (optional
erhältlich).
x Optional 3 extra Monitore (einzeln erhältlich) in anderen Räumen
anschließbar.
x Optional 1 zusätzlicher Türklingeltaster mit Kamera (einzeln
erhältlich) anschließbar.
x Mit Kamera und Regenschutz.
Wie funktioniert es? Sobald Besuch an der Türsprechanlage klingelt,
erscheint Bild auf dem Monitor im Haus. Sie sehen sofort wer klingelt und
können die Tür öffnen oder eben beschließen, es nicht zu tun. Zum
Sprechen mit dem Besucher drücken Sie einfach die Freisprechtaste.
Wenn Sie einen elektrischen Türöffner montiert haben, können Sie die
Tür über den Monitor öffnen.
Page 22

© MARMITEK
22
2 VERPACKUNGSINHALT
2.1 DoorGuard 470 Set (DG470 Satz)
1 x Monitor mit Bildschirm
1 x Wandplatte für den Monitor
1 x Klingeltaster mit Kamera und Regenschutz
1 x Speisungsadapter
1 x 10 Meter 4-adriges Kabel zum Anschließen der Kamera
2 x 30 cm 4 adriges Kabel mit Steckverbinder zur Verwendung mit
eigenem Kabel
1 x Verschiedenes Montage- und Schraubmaterial
1 x Gebrauchsanleitung
2.2 Optional, extra Klingel mit Kamera (OCW470)
1 x Klingeltaster mit Kamera und Regenschutz
1 x Verschiedenes Montage- und Schraubmaterial
2.3 Optional, extra Monitor (CM470)
1 x Monitor mit Bildschirm
1 x Wandplatte für den Monitor
1 x Speisungsadapter
1 x 10 Meter 4-adriges Kabel zum Anschließen zum ersten Monitor
2 x 30 cm 4-adriges Kabel mit Steckverbinder
1 x Verschiedenes Montage- und Schraubmaterial
Page 23
DoorGuard 470
23
DEUTSCH
3 KLINGELTASTER MIT KAMERA
1
Regenschutz
Schutz der Außeneinheit vor
Witterungseinflüssen
2
Mikrofon
Ton zum Monitor
3
Kamera
Sorgt für Bild auf dem Monitor
4
IR LEDs:
Infrarot Licht für verbesserte Sicht
5
Klingeltaster
Klingeln zur Kommunikation
6
Lautsprecher
Ton des Monitors
7
Anschlussschnur
Verbindung zu Monitor und Türöffner
8
Lautstärkeregler
Zum Einstellen der Lautsprecherlautstärke
Page 24
© MARMITEK
24
3.1 Benötigte Kabelart
Machen Sie das Gerät während der Installation spannungsfrei.
Zum Anschließen der Klingeltaster mit Kamera an den Monitor können
Sie das enthaltene, 4-adrige Kabel verwenden.
Sehen Sie in nachstehender Tabelle, welche Kabelart Sie benötigen,
wenn Sie eine größere Entfernung überbrücken möchten:
Kabellänge
Benötigte Kabelart
1-25m
4 adriges Kabel von minimal 4x 0,2mm2 ,nicht geschirmt
25-50m
4 adriges Kabel von minimal 4x 0,3mm2 , geschirmt
50-80m
4 adriges Kabel von minimal 4x 0,5mm2 , geschirmt
80-100m
Koaxialkabel, 75 Ohm von minimal 1.5mm2 + 2 adriges
Audiokabel 0,5mm
2
CAT5 oder CAT6 Netzwerkkabelanschlüsse (nicht empfohlen)
Sie können dazu die 2 zusätzlich enthaltenen Anschlüsse verwenden.
Nicht geschirmtes Kabel (<25m)
Geschirmtes Kabel (<80m)
Koaxialkabel + 2 adriges Audiokabel (<100)
Nicht geschirmtes Netzwerkkabel (<25m)
Geschirmtes Netzwerkkabel (<50m)
Afscherming
Afscherming
Page 25

DoorGuard 470
25
DEUTSCH
3.2 Elektrischer Türöffner
Der elektrische Türöffner ist optional erhältlich. (Art.-Nr. 09774)
Das System unterstützt Türöffner mit einem Normally Open (NO)
Türentriegelungssystem. Das bedeutet, dass der potenzialfreie Kontakt
bei einem Normalbetrieb geöffnet ist. Wird die Entriegelungstaste betätigt,
so wird der potenzialfreie Kontakt für eine von Ihnen eingestellte Zeit
geschlossen. (Potenzialfreier Kontakt: Der Kontakt liefert somit keine
Speisung für den Türöffner. Verwenden Sie den Marmitek elektrischen
Türöffner, dann können Sie die Speisung der Kamera dazu nutzen.
Überprüfen Sie, wenn Sie einen anderen Türöffner nutzen, ob es möglich
ist, dazu die 12V der Kamera zu nutzen und ob dieser nicht mehr als 0,6
A verbraucht. Verwenden Sie ansonsten eine separate Speisung für den
Türöffner).
3.3 Montage Klingeltaster mit Kamera
Die Kamera ist mit einem Weitwinkelobjektiv ausgestattet. Auch wenn jemand
nicht direkt vor der Kamera steht haben Sie gute Sicht.
x Bestimmen Sie die richtige Kamerahöhe.
x Bohren Sie in der gewünschten Montagehöhe des Klingeltasters ein Loch
durch den Rahmen.
x Montieren Sie die Montageplatte mit den vier Schrauben an den Rahmen.
x Schieben Sie das Kabel des Klingeltasters jetzt durch die Montageplatte
und das Loch im Rahmen.
x Montieren Sie den Klingeltaster nun mit den enthaltenen 2 Schrauben an
die Montageplatte.
Page 26
© MARMITEK
26
4 MONITOR
1 TFT Bildschirm
2 Mikrofon
3 Durchstellen Taste (zu einem anderen Monitor)
4 Monitortaste (zur Aktivierung der Kamera)
5 Sprechanlage Taste (zur Sprechaktivierung)
6 Türöffner Taste
7 Verbindung abbrechen Taste
8 Bildschirm Einstellungen
9 Monitor Lautsprecher Lautstärke
10 Lautsprecher
11 SD Kartenschloss (SD Karte: max 32 GB, fat 32, class 10 oder
höher, nicht enthalten)
Page 27
DoorGuard 470
27
DEUTSCH
4.1 Montieren Monitor
x Vermeiden Sie Anbringung des Monitors nahe starker Strahlung wie
TV, Video Rekorder oder PC.
x Wählen Sie eine gute Position und installieren Sie den Monitor in
Augenhöhe.
x Sorgen Sie, bevor Sie den Monitor installieren, dass dieser
spannungsfrei ist.
x Der Speisungsadapter sollte mindestens 30 cm vom Monitor entfernt
installiert werden, um einer möglichen Interferenz vorzubeugen.
Folgen Sie dem Schema, um den Monitor zu installieren:
4.2 Anschlussplan
An den Monitor können 2 Klingeltaster mit Kamera und 1 externe Kamera
angeschlossen werden. Es können maximal 3 zusätzliche Monitore zum
Monitor durchgeschleift werden.
Dübel
Wandplatte
Verbindungskabel zu (den) Turklingel(n) mit Kamera,
2. Monitore und Speisungskabel
Tür 2
Tür 1
Türöffner
Türöffner
Nächster Monitor
Speisung
1e Monitor
Wand
Page 28

© MARMITEK
28
4.3 Monitor in Gebrauch nehmen
Befolgen Sie nachstehende Schritte, um den Monitor an den Klingeltaster
mit Kamera zu koppeln:
x Schließen Sie das enthaltene, 4-adriges Kabel an den Klingeltaster
an.
x Schließen Sie die andere Seite an Ihren Monitor, DOOR1, an.
x Schließen Sie den Adapter an den Power Anschluss an.
Versehen Sie den Adapter mit Strom.
Der Monitor schaltet sich nun ein.
Nach wenigen Sekunden hören Sie einen Signalton, der angibt, dass das
System betriebsbereit ist.
4.4 Monitor Bildschirmeinstellungen
Sie aktivieren die Bildschirmeinstellungen am Monitor, indem Sie Taste 8
kurz betätigen.
Wenn Sie die Taste acht nach unten drehen, blättern Sie durch die 5
Hauptmenüs. Drücken Sie die Taste kurz, um eine Wahl zu treffen.
Im Untermenü können Sie eine Wahl treffen, indem Sie die Taste nach
unten oder nach oben drehen und sie zur Bestätigung Ihrer Wahl kurz
drücken.
Daraufhin können Sie Ihre Wahl wieder anpassen indem Sie die Taste
nach oben oder unten drehen und die Anpassung durch kurzen
Tastendruck bestätigen.
4.4.1 Menü Klingelsignal
x Klingelsignal auswählen: 16 Melodien zur Auswahl.
x Klingelsignal Zeitdauer: Zwischen 5 und 30 Sekunden einstellbar
x Klingelsignal Lautstärke 1, 2 und 3: Sie können die Klingellautstärke
auf 3 Zeitzonen einstellen.
Zum Beispiel tagsüber laut, abends leiser und nachts ganz leise.
4.4.2 Menü Bild
x Sprache: EN, DE, FR, ES, IT oder NL
x Helligkeit
x Farbe
x Kontrast
4.4.3 Menü Zeit
x Zeit: Datum und Zeit einstellen
x Tastenton: Taste Bestätigungston ein/ausschalten
x Reboot: Monitor erneut starten
Page 29

DoorGuard 470
29
DEUTSCH
x Version Firmware Version des Monitors
4.4.4 Menü Kamera
x Entriegelungszeit: Entriegelungszeit bei Verwendung eines
elektrischen Türöffners kann zwischen 2 und 10 Sekunden eingestellt
werden.
x Funktion: Master oder Slave. Wählen Sie Master, wenn dieser
Monitor der erste oder einzige Monitor ist. Wählen Sie Slave, wenn
dieser Monitor ein zweiter, dritter oder vierter Monitor ist.
x TÜR2: AN, wenn Sie einen zweiten Klingeltaster mit Kamera nutzen,
sonst AUS.
x CAM1: AN, wenn Sie eine zusätzliche Kamera nutzen, sonst AUS.
x CAM2: AN, wenn Sie eine zusätzliche Kamera nutzen, sonst AUS.
4.4.5 Menü Video
x Aufnehmen: AN bei Verwendung einer SD Karte im Monitor, um
automatisch eine Videoaufnahme zu machen, wenn geklingelt wird.
x Abspielen: Spielt automatisch alle Aufnahmen ab. Mit Taste 8
können Sie durch die Aufnahmen blättern.
x Formatieren: Formatiert die eingesetzte SD Karte.
x FW Update (SD):Damit kann ein eventuell verfügbarer Firmware
Update von der SD Karte installiert werden.
Wählen Sie Abschließen, um das Menü zu verlassen. (Das Menü wird
nach der letzten Auswahl nach 1 Minute automatisch beendet)
Page 30
© MARMITEK
30
5 EIN BESUCHER KLINGELT
In diesem Beispiel sind 2 Klingeltaster mit Kamera angeschlossen.
Folgen Sie nur der linken Spalte, wenn Sie nur 1 Klingeltaster haben.
Sowohl Bild wie Sprache des Besuchers bleibt 20 Sekunden lang
aktiv, wenn der Türöffner bedient wird. So können Sie kontrollieren,
ob der Türöffner gut funktioniert hat.
Ist eine SD Karte im Monitor installiert, wird bei jedem Klingeln eine
Videoaufnahme gemacht werden.
STAND-BY Modus
Der Besucher klingelt am
Klingeltaster 1
Sie hören 5…30
Sekunden lang
innen wie au
ßen
eine Melodie
(1 von
16 wahlweisen
Melodien)
Das Bild des Besuchers
erscheint automatisch im
Monitor.
Drücken Sie die
Sprechtaste (5).
Die Melodie stoppt.
Sie können jetzt über
Klingeltaster 1 mit dem
Besucher reden
Das Gespräch wird
nach 120 Sekunden
automatisch beendet.
Betätigen Sie die
Türöffnertaste
(6
) (oder
gehen Sie zur Tür, wenn
diese nicht installiert ist)
Der Türöffner wird
aktiviert
Dr
ücken Sie die
Verbindung abbrechen
Taste (7)
Stand-by
Der Besucher klingelt am
Klingeltaster 2
Wenn sowohl am Klingeltaster 1 wie 2 gleichzeitig
geklingelt wird, wird der zuerst genutzte Klingeltaster
mit dem Monitor weiterverbunden.
Am Monitor hören
Sie dann 3 kurze Töne, um anzuzeigen, dass auch am
anderen Klingeltaster geklingelt wurde.
Wird die Kamera der Außeneinheit blockiert und Sie
empfangen kein Bild vom
Besucher, drücken Sie
dann
die Monitortaste, um zur zweiten Kamera
umzuschalten. Drücken Sie nochmals die
Monitortaste, um wieder Bild von der Außeneinheit
zu empfangen.
Der Monitor g
eht automatisch in den Stand-
by Modus,
wenn die Sprechanlagetaste in
nerhalb von 60
Sekunden nicht bet
ätigt wird.
Page 31

DoorGuard 470
31
DEUTSCH
6 HINAUSSCHAUEN
Wenn Sie nur 1 Klingeltaster mit Kamera verwenden, können Sie auch in
den Stand-by gehen, indem Sie die Verbindung unterbrechen Taste (7)
drücken.
Wenn die Monitorfunktion auf dem Monitor aktiv ist und jemand dann
klingelt, schaltet der Monitor automatisch auf den Klingeltaster mit
Kamera um, auf dem geklingelt wird.
STAND-BY Modus
Drücken Sie die Monitortaste
(4).
Das Bild der ersten Kamera
wird wiedergegeben.
Die Wiedergabe wird
nach 60 Sekunden
beendet.
Drücken Sie die Sprechtaste
(5).
Sie können jetzt über die
Kamera mit dem Besucher
reden
Drücken Sie die Verbindung
abbrechen Taste (7
).
Stand-by
Drücken Sie nochmals die
Monitortaste (4
).
Das Bild der zweiten Kamera
wird wiedergegeben.
Drücken Sie nochmals die
Monitortaste (4), um in den
Stand
-
by Modus zu gehen.
D
rücken Sie die
Türöffnertaste (6), um diese
zu aktivieren
Page 32

© MARMITEK
32
7 HÄUFIG GESTELLTE FRAGEN
Kann ich die Lautsprecherlautstärke im Klingeltaster einstellen?
Auf der Rückseite des Klingeltasters befindet sich unter der Gummiabdichtung ein
kleiner Lautstärkenregler. Sie können die Lautstärke mit einem kleinen
Schraubenzieher fine tunen.
Welche Montagehöhe wird für den Klingeltaster empfohlen?
Wir empfehlen eine Montagehöhe von 1.60 Meter. Achten Sie auch auf Blendung
durch direktes Sonnenlicht, Straßenbeleuchtung und dergleichen.
Kann ich mehrere Monitore parallel anschließen?
Nein, einen zweiten Monitor schließen Sie an den ersten Monitor an. Einen dritten
Monitor wieder an den zweiten und den vierten Monitor wieder an den dritten
Monitor. Daraufhin müssen Sie im Menü Einstellungen eines jeden Monitors
einstellen, ob es sich um einen Master oder Slave Monitor handelt. Der erste
Monitor ist immer der Master, die anderen drei sind Slave Monitoren. (Sehen Sie
4.4.4 Menü Kamera)
Kann ich einen installierten Türöffner von jedem Monitor aus bedienen?
Ja, Sie können den Türöffner von jedem Monitor aus bedienen.
Kann ich das Klingelsignal des Monitors einstellen?
Sie können aus 16 verschiedenen Klingelmelodien wählen, die Zeitdauer einstellen
und die Lautstärke für 3 Zeitzonen anpassen. Die Einstellungen können Sie pro
Monitor vornehmen.
(Sehen Sie 4.4.1 Menü Klingelsignal)
Ich höre einen deutlich wahrnehmbaren Brummton während des Gesprächs.
Ein brummendes Geräusch kann durch Interferenz mit anderen Anlagearten
verursacht werden. Kabel mit hoher Wechselspannung neben
Sprechanlagenkabeln sind oftmals eine Garantie dafür, dass in der
Türsprechanlage ein Brummton entsteht. Sorgen Sie für abgeschirmte Kabel, wenn
es nicht zu vermeiden ist, dass ein Teil des Sprechanlagekabels entlang 230V
Leitungen verlaufen muss. (Sehen Sie 3.1 Benötigte Kabelart
)
Warum befinden sich an der Klingeltasterschnur 3 zusätzliche Kabel?
Das blaue und braune Kabel sind die Schaltkabel für den Türöffner.
Das rot/weiße Kabel liefert 12 Volt wenn die Kamera aktiv ist. Damit kann z.B. ein
externer DVR gesteuert werden.
Sie haben noch weitere Fragen?
Besuchen Sie www.marmitek.com.
Page 33

DoorGuard 470
33
DEUTSCH
8 TECHNISCHE DATEN
OCW470 Klingeltaster mit Kamera und Regenschutz
Auflösung 420TVL
Kamera ¼”CMOS Farbe
Objektiv und Winkel 100°
Lichtempfindlichkeit 0,1 LUX
Nachtsicht 4 Infrarot LEDs (60°)
Nachtsicht Entfernung 0,5 ~ 1 m
Ton Eingebautes Mikrofon und
Lautsprecher
Türöffnungsschalter Dry Contact, N.O., Max 1A.
Türentriegelungszeit 2…10 Sekunden (einstellbar)
Aktiver Verbrauch 200mA – Max.
Adapter wird von der Inneneinheit gespeist
Montage Aufbau
Maße 125 x 60 x 35 mm (H B T)
Umgebungstemperatur -40 ~ +50°C (in Betrieb)
Luftfeuchte ≤ 85% RH
CM470 Monitor
Bildschirm 7 Inch TFT LCD
Auflösung 800(H) x 3 (RGB) x 480 (V)
Videosystem PAL/NTSC Kompatibel
Sprechanlage Halbduplex Kommunikation
Gesprächsdauer 120 Sekunden
Stand-by Verbrauch 300 mA max.
Aktiver Verbrauch 600 mA max.
Klingel auswählen: 16 Melodien zur Auswahl
Klingel Zeitdauer 5…30 Sekunden
Klingellautstärke zeitabhängig einstellbar
SD Karten Steckplatz max 32 GB
Fat 32 formatiert
Class 10 oder höher
Adapter DC12V
Umgebungstemperatur -10 ~ +60°C (in Betrieb)
Montage Aufbau
Maße 194 x 124 x 18 mm
Spezifikationen und/oder Entwürfe ohne vorherige Ankündigung zu ändern.
Page 34

© MARMITEK
34
Umweltinformation für Kunden innerhalb der Europäischen
Union
Die Europäische Richtlinie 2002/96/EC verlangt, dass technische
Ausrüstung, die direkt am Gerät und/oder an der Verpackung mit diesem
Symbol versehen ist nicht zusammen mit unsortiertem Gemeindeabfall
entsorgt werden darf. Das Symbol weist darauf hin, dass das Produkt von
regulärem Haushaltmüll getrennt entsorgt werden sollte. Es liegt in Ihrer
Verantwortung, dieses Gerät und andere elektrische und elektronische
Geräte über die dafür zuständigen und von der Regierung oder örtlichen
Behörden dazu bestimmten Sammelstellen zu entsorgen.
Ordnungsgemäßes Entsorgen und Recyceln trägt dazu bei, potentielle
negative Folgen für Umwelt und die menschliche Gesundheit zu
vermeiden. Wenn Sie weitere Informationen zur Entsorgung Ihrer
Altgeräte benötigen, wenden Sie sich bitte an die örtlichen Behörden oder
städtischen Entsorgungsdienste oder an den Händler, bei dem Sie das
Produkt erworben haben.
9 COPYRIGHT
Marmitek BV ist ein Warenzeichen von Pattitude
DoorGuard 470™ ist ein Warenzeichen von Marmitek BV Alle Rechte
vorbehalten.
Weitergehende Ansprüche sind ausgeschlossen, insbesondere
übernimmt Marmitek BV keine Gewähr für die Richtigkeit des Inhalts
dieses Handbuchs.
Urheber- und andere Eigentumsrechte am Inhalt (einschließlich aber
nicht beschränkt auf, Modellnummern, Software, Audio, Video, Text und
Fotos begrenzt) liegt bei Marmitek BV. Jegliche Nutzung von Inhalten,
aber ohne Begrenzung, Verteilung, Vervielfältigung, Änderung, Anzeige
oder Übermittlung ohne die vorherige schriftliche Erlaubnis von Marmitek
ist strengstens untersagt. Alle Urheber- und andere Eigentumsrechte
muss auf allen Reproduktionen beibehalten werden.
Die Rechte an anderen in diesem Handbuch erwähnten Markenund
Produktnamen können bei ihren Inhabern liegen und werden hiermit
anerkannt. Die Nennung von Produkten, die nicht von Marmitek sind,
dient ausschließlich Informationszwecken und stellt keine Werbung dar.
Marmitek übernimmt hinsichtlich der Auswahl, Leistung oder
Verwendbarkeit dieser Produkte keine Gewähr.
MARMITEK BV - PO BOX 4257 - 5604 EG EINDHOVEN –
NIEDERLANDE
Page 35

DoorGuard 470
35
FRANÇAIS
CONSIGNES DE SÉCURITÉ
x Afin d'éviter un court-circuit, ce produit ne doit être utilisé qu'à
l'intérieur et uniquement dans des endroits secs. Ne pas exposer
les composants à la pluie ou à l'humidité. Ne pas utiliser à côté
ou à proximité d'une baignoire, piscine, etc.
x Ne pas exposer les composants de votre système à des
températures extrêmement élevées ou à des sources de lumière
trop fortes.
x Ce produit n'est pas un jouet. Tenir hors de portée des enfants.
x Ne jamais ouvrir le produit : L'appareil peut contenir des
éléments qui sont sous tension très dangereux. Confier les
réparations et l'entretien exclusivement à un personnel qualifié.
x Ne brancher l’adaptateur secteur sur le réseau électrique
qu’après avoir vérifié que la tension d’alimentation corresponde
à la valeur indiquée sur les plaques d’identification. Ne jamais
brancher un adaptateur secteur ou un câble d’alimentation
lorsque celui-ci est endommagé. Dans ce cas, veuillez contacter
votre fournisseur.
x La garantie n'est plus valable en cas d'usage inapproprié, de
modifications ou de réparations effectuées par des personnes
non agréées. Marmitek se dégage de toute responsabilité du fait
des produits en cas d'usage inapproprié du produit ou
d'utilisation non conforme à l'usage auquel le produit est destiné.
Marmitek se dégage de toute responsabilité en cas de dommage
conséquent, autre que la responsabilité civile du fait des
produits.
Page 36

© MARMITEK
36
TABLE DES MATIÈRES
1
INTRODUCTION ............................................................................ 37
2 CONTENU DE L’EMBALLAGE ...................................................... 38
2.1 DoorGuard 470 Set (DG470 set) .................................................... 38
2.2 En option, un bouton d’appel supplémentaire avec caméra
(OCW470) 38
2.3 En option, un moniteur supplémentaire (CM470) ........................... 38
3 BOUTON D’APPEL AVEC CAMÉRA ............................................. 39
3.1 Type de câble requis ...................................................................... 40
3.2 Ouvre-porte électrique ................................................................... 41
3.3 Montage du bouton d’appel avec caméra ...................................... 41
4 MONITEUR .................................................................................... 42
4.1 Installation du moniteur .................................................................. 43
4.2 Schéma de câblage ....................................................................... 43
4.3 Mise en service du moniteur .......................................................... 44
4.4 Ecran de configuration du moniteur ............................................... 44
4.4.1 Menu Sonnerie ................................................................. 44
4.4.2 Menu Image ...................................................................... 44
4.4.3 Menu Temps ..................................................................... 44
4.4.4 Menu Caméra ................................................................... 45
4.4.5 Menu Vidéo ...................................................................... 45
5 UN VISITEUR SONNE ................................................................... 46
6 REGARDER À L’EXTÉRIEUR ....................................................... 47
7 FOIRE AUX QUESTIONS .............................................................. 48
8 CARACTÉRISTIQUES TECHNIQUES .......................................... 49
9 DROITS D'AUTEUR ....................................................................... 50
Page 37

DoorGuard 470
37
FRANÇAIS
1 INTRODUCTION
Félicitations pour l'achat du Marmitek DoorGuard 470™. Grâce à cet
interphone vidéo vous pouvez voir et entendre qui se trouve devant votre
porte avant de décider d’ouvrir. La caméra offre une bonne qualité
d’image même dans l’obscurité.
x Interphone vidéo LCD mains libres avec mémoire vidéo - couleur
x Voir qui est à la porte, une idée rassurante
x Modèle de luxe, design sobre et Mains libres.
x Avec un écran LCD couleur 17,5 cm.
x Enregistrez un film vidéo de chaque visiteur sur une carte mémoire
SD (non fournie)
x Son et image toujours parfaits, même dans l’obscurité.
x Unité de porte de faibles dimensions qui peut être posée sur le
montant de porte.
x Robuste boîtier, résistant aux intempéries doté d’un objectif unique
grand angle de 100º.
x Ouvrez la porte à distance avec un ouvre-porte électrique
(disponible en option).
x En option, possibilité de connecter 3 moniteurs supplémentaires
(vendus séparément) pour dans d'autres pièces.
x En option, possibilité de connecter 1 bouton d'appel supplémentaire
avec caméra (vendu séparément).
x Avec caméra et visière de protection contre la pluie
Comment cela fonctionne-t-il ? Lorsqu’un visiteur sonne, l’image apparaît
directement sur le moniteur à l’intérieur. Vous voyez donc tout de suite
qui a sonné et vous pouvez ouvrir la porte ou décider de ne pas le faire.
Pour parler avec le visiteur, vous appuyez simplement sur le bouton
interphone. Si vous avez installé un ouvre-porte électrique, vous pouvez
ouvrir la porte par le biais du moniteur.
Page 38

© MARMITEK
38
2 CONTENU DE L’EMBALLAGE
2.1 DoorGuard 470 Set (DG470 set)
1 x Moniteur avec écran
1 x Support mural pour le moniteur
1 x Bouton d’appel avec caméra et visière de protection contre la pluie
1 x Adaptateur secteur
1 x 10 m de câble 4 fils pour connecter la caméra
2 x 30 cm de câble 4 fils avec connecteur pour une utilisation avec ses
propres câbles
1 x Matériel divers de fixation et de vissage
1 x Manuel d'utilisation
2.2 En option, un bouton d’appel supplémentaire avec
caméra (OCW470)
1 x Bouton d’appel avec caméra et visière de protection contre la pluie
1 x Matériel divers de fixation et de vissage
2.3 En option, un moniteur supplémentaire (CM470)
1 x Moniteur avec écran
1 x Support mural pour le moniteur
1 x Adaptateur secteur
1 x 10 m de câble 4 fils pour la connexion au 1er moniteur
2 x 30 cm de câble 4 fils avec connecteur
1 x Matériel divers de fixation et de vissage
Page 39

DoorGuard 470
39
FRANÇAIS
3 BOUTON D’APPEL AVEC CAMÉRA
1
Visière de
protection contre
la pluie
Protège l’unité extérieure contre les
intempéries
2
Microphone
Son vers le moniteur
3
Caméra
Envoie l’image vers le moniteur
4
LEDs IR
Eclairage infrarouge pour une meilleure
visibilité
5
Bouton d’appel
Sonner pour établir la communication
6
Haut-parleur
Son du moniteur
7
Cordon
d’alimentation
Connexion vers le moniteur et l’ouvre-porte
8
Contrôle du
volume
Pour régler le volume du haut-parleur
Page 40

© MARMITEK
40
3.1 Type de câble requis
Permet que le système soit hors tension pendant l’installation.
Pour la connexion du bouton d’appel avec caméra au moniteur vous
pouvez utiliser le câble 4 fils fourni.
Si vous souhaitez surmonter une distance plus importante, veuillez
consulter le tableau suivant pour connaître le type de câble requis :
Longueur
Câble :
Type de câble requis
1-25m
Câble 4 fils d'au moins 4x 0,2mm2, non blindé
25-50m
Câble 4 fils d'au moins 4x 0,3mm2, blindé
50-80m
Câble 4 fils d'au moins 4x 0,5mm2, blindé
80-100m
câble coaxial, 75 ohm d’au moins 1.5mm2 + 2 fils
câble audio 0,5mm
2
Connexions câble de réseau CAT5 ou CAT6 (pas conseillé)
A cet effet vous pouvez utiliser les 2 connecteurs supplémentaires
fournis.
Câble non blindé (<25m)
Câble blindé (<80m)
Câble coaxial + câble audio 2 fils (<100)
Câble de réseau non blindé (<25m)
Câble de réseau blindé (<50m)
Protection
Protection
Page 41

DoorGuard 470
41
FRANÇAIS
3.2 Ouvre-porte électrique
L’ouvre porte électrique est en option. (No art. 09774)
Le système est compatible avec les ouvre-portes dotés d’un type
de déverrouillage de porte Ouverture Normale (NO). Cela signifie qu’en
situation normale le contact sec est ouvert. Si l’on appuie sur le bouton de
déverrouillage, le contact d’ouverture sera fermé pendant une durée
programmée. (contact sec : le contact ne fournit donc pas l’alimentation
pour l’ouvre-porte. Si vous utilisez l’ouvre-porte électrique de Marmitek,
vous pouvez utiliser à cet effet l’alimentation de la caméra. Si vous
utilisez un autre type d’ouvre-porte, veuillez vérifier s’il est possible
d'utiliser l’alimentation 12V de la caméra et que celui-ci ne consomme
pas plus de 0,6 A. Sinon utilisez une alimentation séparée pour l’ouvre-
porte)
3.3 Montage du bouton d’appel avec caméra
La caméra est dotée d'un objectif grand angle. Même si les visiteurs ne sont
pas en face de la caméra, vous aurez tout de même une bonne vision.
x Déterminez la bonne hauteur pour la caméra.
x Percez un trou dans l’encadrement, à la hauteur où vous souhaitez
installer le bouton d’appel.
x Fixez le support sur l’encadrement avec les quatre vis.
x Faites passer maintenant le câble du bouton d’appel à travers le support et
le trou dans l’encadrement.
x Fixez maintenant le bouton d’appel sur le support avec 2 vis (fournis).
Page 42

© MARMITEK
42
4 MONITEUR
1 Ecran TFT
2 Microphone
3 Bouton de communication (vers un autre moniteur)
4 Bouton de moniteur (pour activer la caméra)
5 Bouton interphone (pour activer la conversation)
6 Bouton d'ouverture de porte
7 Bouton de fin de communication
8 Réglages de l'écran
9 Volume du haut-parleur du moniteur
10 Haut-parleur
11 Fente pour carte SD (carte SD : max 32 GB, fat 32, classe 10 ou
supérieure, non fournie)
Page 43

DoorGuard 470
43
FRANÇAIS
4.1 Installation du moniteur
x Evitez d’installer le moniteur à proximité d’appareils à forts
rayonnements tels qu’un téléviseur, un magnétoscope vidéo ou un
PC.
x Choisissez une position idéale, de sorte que le moniteur soit installé
à hauteur d’yeux.
x Avant d’installer le moniteur veillez à ce qu’il soit hors tension.
x Veillez à ce que l’adaptateur secteur soit installé à au moins 30 cm
du moniteur afin d’éviter des interférences.
Suivez le schéma ci-dessous pour installer le moniteur :
4.2 Schéma de câblage
Il est possible de connecter au moniteur 2 boutons d’appel avec caméra
et 1 caméra extérieure. Il est possible de connecter en boucle jusqu’à 3
moniteurs supplémentaires.
Cheville
s
Support
mural
Câbles de connexion vers les boutons
d’appel avec caméra, 2ème moniteur et câble
Porte 2
Porte 1
Ouvre-porte
Ouvre-porte
Moniteurs suivants
Alimentation
1er Moniteur
Mur
Page 44

© MARMITEK
44
4.3 Mise en service du moniteur
Procédez comme suit pour connecter votre moniteur au bouton d’appel
avec caméra :
x Connectez le câble 4 fils fourni au bouton d’appel.
x Connectez l'autre extrémité au moniteur, DOOR1.
x Connectez l'adaptateur sur la prise de connexion Power.
Mettez l’adaptateur sous tension.
Le moniteur démarre maintenant.
Après quelques secondes vous entendrez un ‘bip’, pour signaler que le
système a démarré.
4.4 Ecran de configuration du moniteur
Pour activer l’écran de configuration appuyez brièvement sur le bouton 8
du moniteur.
Pour faire défiler les 5 menus principaux tournez le bouton vers le bas.
Pour faire votre choix appuyez brièvement sur le bouton.
Dans le sous-menu vous pouvez maintenant faire votre choix en tournant
le bouton vers le bas ou vers le haut et en appuyant brièvement pour
confirmer la sélection.
Vous pouvez ensuite modifier votre sélection en tournant le bouton vers
le bas ou vers le haut et en appuyant brièvement pour confirmer la
modification.
4.4.1 Menu Sonnerie
x Sélection de sonnerie : 16 mélodies au choix.
x Durée de Sonnerie : peut être réglée entre 5 et 30 secondes.
x Volume de sonnerie 1, 2 et 3 : Vous pouvez régler le volume de la
sonnerie en 3 laps de temps.
Par exemple pendant la journée fort, le soir plus faible et la nuit très
faible.
4.4.2 Menu Image
x Langue : EN, DE, FR, ES, IT ou NL
x Netteté
x Chrominance
x Contraste
4.4.3 Menu Temps
x Temps : paramétrage date et heure
x Touche de tonalité : marche/arrêt de la touche de confirmation de
tonalité
Page 45

DoorGuard 470
45
FRANÇAIS
x Reboot: redémarrage du moniteur
x Version : version firmware du moniteur
4.4.4 Menu Caméra
x Temps de déverrouillage : lorsqu’on utilise une ouvre-porte électrique
le temps de déverrouillage peut être réglé entre 2 et 10 secondes.
x Fonction : Master ou Slave. Sélectionnez Master si ce moniteur est le
premier ou le seul moniteur. Sélectionnez Slave si ce moniteur est un
2ème, 3ème ou 4ème moniteur.
x PORTE2 : Sur Marche, si vous utilisez un 2ème bouton d’appel avec
caméra, autrement sur Arrêt.
x CAM1 : Sur Marche, si vous utilisez une caméra supplémentaire,
autrement sur Arrêt.
x CAM2 : Mettre toujours sur arrêt.
4.4.5 Menu Vidéo
x Enregistrer : Sur Marche, si l’on utilise une carte SD dans le moniteur
pour faire un enregistrement vidéo automatique lorsque quelqu'un
sonne.
x Lecture : Visionne automatiquement tous les enregistrements. Le
bouton 8 permet de faire défiler les enregistrements.
x Formater : Formate la carte SD insérée.
x Mise à jour FW (SD): Permet d’installer une mise à jour firmware
éventuellement disponible depuis la carte SD.
Sélectionnez fermer pour quitter le menu. (Le menu se ferme
automatiquement 1 minute après votre dernière sélection)
Page 46

© MARMITEK
46
5 UN VISITEUR SONNE
Dans cet exemple 2 boutons d’appel avec caméra sont connectés.
Si vous n’avez que 1 bouton d'appel, suivez uniquement la colonne de
gauche.
L’image et la voix du visiteur restent actives pendant 20 secondes
lorsque l’ouvre-porte est actionné. Vous pouvez ainsi contrôler si
l’ouvre-porte a fonctionné correctement.
Si une carte SD est installée dans le moniteur, chaque fois que
quelqu'un sonnera un enregistrement vidéo sera effectué.
Mode VEILLE
Le visiteur sonne sur le
bouton d’appel 1
Vous entendez une
mélodie pendant 5…30
secondes aussi bien à
l’intérieur qu’à
l’extérieur.
(1 des 16
mélodies que l’on peut
sélectionner)
L’image du visiteur est
affichée automatiquement
sur l’écran.
Appuyez sur le bouton
interphone (5).
La mélodie s’arrête.
Vous pouvez maintenant
commencer une
conversation par le biais
du bouton d’appel 1.
La communication est
coupée automatiquement
après 120 secondes.
Appuyez sur l
e bouton
d’ouverture de porte (6)
(ou allez à la porte si celui-
ci n’est pas installé).
L’ouvre-porte est activé.
Appuyez sur le bouton de
fin de communication (7).
Mode veille
Le visiteur sonne sur le
bouton d’appel 2
Si l’on sonne simultanément sur les boutons d’appel 1
et 2, le bouton d’appel sur lequel on a sonné en
premier sera connecté au moniteur. Vous entendez
ensuite sur le moniteur 3 brefs signaux sonores pour
indiquer que l’on a également sonné sur l’autre bouton
d’appel.
Si la caméra de l’unité extérieure est bloquée et si
vous ne pouvez pas voir l’image du visiteur, appuyez
alors sur le bouton moniteur pour basculer sur une
2ème caméra. Appuyez encore une fois sur le
bouton moniteur pour revenir sur l’image de l’unité
extérieure.
L’écran passe automatiquement en mode veille si l’on
n’appuie pas sur le bouton interphone dans les 60
sec
ondes qui suivent.
Page 47

DoorGuard 470
47
FRANÇAIS
6 REGARDER À L’EXTÉRIEUR
Si vous n’utilisez que 1 bouton d’appel avec caméra, vous pouvez
également passer en mode veille en appuyant sur le bouton de fin de
communication (7).
Si la fonction moniteur est activée sur le moniteur et si quelqu’un sonne,
le moniteur affiche automatiquement l’image où l’on sonne.
Mode VEILLE
Appuyez sur le bouton
interphone (4).
L’image de la première
caméra est affichée.
L’affichage est coupé
automatiquement après
60 secondes.
Appuyez sur le bouton
interphone (5
).
Vous pouvez maintenant
commencer une conversation
par le biais de la caméra.
Appuyez sur le bouton de fin
de communication (7
).
Mode veille
Appuyez encore une fois sur
le bouton moniteur (4
).
L’image de la
deuxième
caméra est affichée.
Appuyez encore une fois sur
le bouton moniteur (4) pour
revenir en mode veille.
Appuyez sur l
e bouton
d’ouverture de porte (6) pour
l’activer
Page 48

© MARMITEK
48
7 FOIRE AUX QUESTIONS
Est-il possible de régler le volume du haut-parleur du bouton
d’appel ?
Sur la face arrière du bouton d’appel, derrière une protection en caoutchouc, il y a
un petit régulateur de volume. Vous pouvez régler minutieusement le volume avec
un petit tournevis.
Quelle est la hauteur recommandée pour installer le bouton
d’appel ?
La hauteur recommandée est de 1,60 mètre. Faites également attention à lumière
directe du soleil, aux réverbères et autres.
Peut-on connecter en parallèle plusieurs moniteurs ?
Non, vous devez connecter un deuxième moniteur au premier moniteur. Un
troisième au deuxième moniteur et le quatrième moniteur au troisième moniteur.
Vous devez ensuite définir dans le menu de configuration pour chaque moniteur s’il
s’agit d’un moniteur Master ou Slave. Le premier moniteur est toujours Master, les
3 autres moniteurs sont Slave. (Voir 4.4.4 Menu Caméra)
Si l’on souhaite installer un ouvre-porte, peut-on le contrôler depuis
n’importe quel moniteur ?
Oui, vous pouvez contrôler l’ouvre-porte depuis n’importe quel moniteur.
Peut-on régler la sonnerie du moniteur ?
Vous pouvez choisir entre 16 mélodies, régler la durée de sonnerie et modifier le
volume sur 3 laps de temps. Ce réglage peut être effectué sur chaque moniteur.
(Voir 4.4.1 Menu Sonnerie)
On entend un ronflement pendant la conversation.
Le ronflement peut être causé par des interférences avec d'autres types
d’installations. Si des câbles avec un courant alternatif élevé se trouvent à
proximité des câbles d’un interphone cela peut provoquer sans aucun doute un
ronflement dans l’interphone. Si l’on ne peut pas éviter qu’une partie des câbles de
l’interphone passe le long de câbles 230V, utilisez des câbles blindés. (Voir 3.1
Type de câble
requis)
A quoi servent les 3 fils supplémentaires du câble du bouton
d’appel ?
Les fils bleu et marron sont les fils de commutation pour l’ouvre-porte.
Le fil rouge/blanc fournit une alimentation de 12 volts lorsque la caméra est active.
Cela permet de contrôler par exemple un magnétoscope vidéo numérique (DVR)
externe.
Vous avez d’autres questions?
Allez sur le site internet www.marmitek.com.
Page 49

DoorGuard 470
49
FRANÇAIS
8 CARACTÉRISTIQUES TECHNIQUES
OCW470 Bouton d’appel avec caméra et visière de protection contre
la pluie
Résolution 420TVL
Caméra ¼”CMOS couleur
Objectif et angle 100°
Sensibilité à la lumière 0,1 LUX
Vison nocturne 4 LEDs infrarouges (60°)
distance de vision nocturne 0,5 ~1 m
Son Microphone et haut-parleur intégrés
Interrupteur d’ouverture de porte Contact sec, N.O., Max 1A.
Temps de déverrouillage 2…10 secondes (réglable)
Consommation en mode actif 200mA max.
Adaptateur est alimenté depuis l’unité intérieure
Montage Apparent
Dimensions 125 x 60 x 35 mm (h l p)
Température ambiante -40 ~ +50°C (Fonctionnement)
Humidité de l'air ≤ 85% RH
Moniteur CM470
Ecran 7 pouces TFT LCD
Résolution 800(H) x 3 (RGB) x 480 (V)
Système vidéo compatible PAL/NTSC
Mode interphone Communication semi-duplex
Durée de communication 120 secondes
Consommation en mode veille 300 mA max.
Consommation en mode actif 600 mA max.
Sélection de sonneries 16 mélodies au choix
Durée de sonnerie 5…30 secondes
Volume de sonnerie réglage temporisé
Fente pour carte SD max 32 GB
Formaté Fat 32
Classe 10 ou supérieure
Adaptateur DC12V
Température ambiante 0°C ~ +60°C (Fonctionnement)
Montage Apparent
Dimensions 194 x 124 x 18 mm
Page 50

© MARMITEK
50
Informations environnementales pour les clients de l’Union
européenne
La directive européenne 2002/96/CE exige que l’équipement sur
lequel est apposé ce symbole sur le produit et/ou son emballage ne soit
pas jeté avec les autres ordures ménagères. Ce symbole indique que le
produit doit être éliminé dans un circuit distinct de celui pour les déchets
des ménages. Il est de votre responsabilité de jeter ce matériel ainsi que
tout autre matériel électrique ou électronique par les moyens de collecte
indiqués par le gouvernement et les pouvoirs publics des collectivités
territoriales. L’élimination et le recyclage en bonne et due forme ont pour
but de lutter contre l’impact néfaste potentiel de ce type de produits sur
l’environnement et la santé publique. Pour plus d’informations sur le
mode d’élimination de votre ancien équipement, veuillez prendre contact
avec les pouvoirs publics locaux, le service de traitement des déchets, ou
l’endroit où vous avez acheté le produit.
9 DROITS D'AUTEUR
Marmitek est une marque déposée de Pattitude BV
DoorGuard 470™ est une marque déposée de Marmitek BV. Tous droits
réservés.
Tout a été mis en œuvre pour que les informations présentées dans ce
manuel soient exactes. Marmitek n’est pas responsable des erreurs de
reproduction ou d’impression.
Les droits d'auteur et tout autres droits de propriété concernant le
contenu (comprenant mais pas limités aux numéros de modèle, logiciels,
audio, vidéo, textes et photos) appartiennent à Marmitek B.V. Toute
utilisation du contenu, mais sans restriction, concernant la distribution, la
reproduction, toute modification, la publication ou la diffusion est
strictement interdite sans l'autorisation préalable par écrit de Marmitek.
Tous les droits d'auteur et autres droits de propriété doivent être
respectés pour toutes reproductions.
Les autres noms de produits et de sociétés peuvent être des marques de
leurs détenteurs respectifs. Les produits commercialisés par des
entreprises tierces ne sont mentionnés que pour information, sans
aucune intention de préconisation ni
de recommandation. Marmitek décline toute responsabilité quant à
l’utilisation et au fonctionnement de ces produits.
MARMITEK BV - PO BOX 4257 - 5604 EG EINDHOVEN – PAYS-BAS
Page 51

DoorGuard 470
51
ESPAÑOL
AVISOS DE SEGURIDAD
x Para evitar un cortocircuito, este producto solamente se usa en
casa y en habitaciones secas. No exponga los componentes del
sistema a la lluvia o a la humedad. No se use cerca de una
bañera, una piscina, etc.
x No exponga los componentes del sistema a temperaturas
extremamente altas o a focos de luz fuertes.
x Este producto no es un juguete. Asegúrese de que está fuera
del alcance de los niños.
x Nunca abra el producto: Puede contener piezas que se
encuentren bajo una tensión mortal. Deja las reparaciones o
servicios a personal experto.
x No conecte el adaptador de red a la red de alumbrado antes de
que haya controlado si la tensión de red corresponde con el
valor indicado en la estampa de tipo. Nunca conecte un
adaptador de si ése está dañado. En este caso, por favor entre
en contacto con su proveedor.
x En caso de uso indebido o modificaciones y reparaciones
montados por su mismo, la garantía se caducará. En caso de
uso indebido o impropio, Marmitek no asume ninguna
responsabilidad para el producto. Marmitek no asume ninguna
responsabilidad para daños que resultan del uso impropio,
excepto según la responsabilidad para el producto que es
determinada por la ley.
Page 52

© MARMITEK
52
CONTENIDO
1
INTRODUCCIÓN ........................................................................... 53
2 CONTENIDO DEL EMBALAJE ...................................................... 54
2.1 DoorGuard 470 Set (DG470 set) .................................................... 54
2.2 Opcional: botón de timbre adicional con cámara (OCW470) ......... 54
2.3 Opcional: monitor adicional (CM470) ............................................. 54
3 TIMBRE CON CÁMARA ................................................................ 55
3.1 Tipos de cable ................................................................................ 56
3.2 Portero eléctrico ............................................................................. 57
3.3 Montaje timbre con cámara ............................................................ 57
4 MONITOR ...................................................................................... 58
4.1 Montaje monitor ............................................................................. 59
4.2 Diagrama de cableado ................................................................... 59
4.3 Empleo del monitor ........................................................................ 60
4.4 Ajustes de la pantalla del monitor .................................................. 60
4.4.1 Menú Timbre .................................................................... 60
4.4.2 Menú Imagen .................................................................... 60
4.4.3 Menú Hora ........................................................................ 60
4.4.4 Menú Cámara ................................................................... 61
4.4.5 Menú video ....................................................................... 61
5 ALGUIEN TOCA EL TIMBRE ......................................................... 62
6 VER QUIEN ESTA FUERA ............................................................ 63
7 PREGUNTAS FRECUENTES ........................................................ 64
8 ESPECIFICACIONES TÉCNICAS ................................................. 65
Page 53

DoorGuard 470
53
ESPAÑOL
1 INTRODUCCIÓN
Felicidades por la compra del Marmitek DoorGuard 470™. Este video
interfono le proporciona una vista clara al visitante quien está delante de
la puerta, así que puede decidir tranquilamente si desea de abrir la puerta
o no. La cámara ofrece una buena calidad de imagen incluso a oscuras.
x Interfono LCD manos libres con memoria de video – color.
x Ver quién está delante de la puerta, un sentimiento de seguridad
x De diseño elegante y sencillo: Manos libres.
x Dispone de una pantalla LCD de colores de 17,5 cm.
x Guarda un video de cada visitante en una tarjeta de memoria SD (no
incluida).
x Siempre sonido y imagen perfectos, también a oscuras.
x Unidad de puerta muy delgada para cualquier tipo de marco.
x Cáscara robusta e impermeable con lente gran angular de 100º.
x Abrir la puerta a distancia p.e. con un portero eléctrico
(opcionalmente asequible).
x Opcional: 3 monitores adicionales (se venden sueltos) para otras
habitaciones.
x Opcional: un timbre adicional (se vende suelto).
x Con cámara y protección contra la lluvia.
¿Cómo funciona? Cuando alguien toca el timbre, la imagen de la persona
se reproduce en el monitor dentro de casa. De esta manera se ve
inmediatamente quien ha tocado y se puede decidir si se quiere abrir la
puerta o no. Para hablar con el visitante, simplemente se pulsa el botón
del interfono. Si la puerta está equipada con un portero eléctrico, se
puede abrir con un botón en el monitor.
Page 54

© MARMITEK
54
2 CONTENIDO DEL EMBALAJE
2.1 DoorGuard 470 Set (DG470 set)
1 x Monitor con pantalla
1 x Placa mural para monitor
1 x Timbre con cámara y protección contra la lluvia
1 x Adaptador de alimentación
1 x 10 metros de cable de 4 hilos para conectar la cámara
2 x 30 cm de cable de 4 hilos con conector para uso con cable presente
1 x Material de montaje
1 x Instrucciones
2.2 Opcional: botón de timbre adicional con cámara
(OCW470)
1 x Timbre con cámara y protección contra la lluvia
1 x Material de montaje
2.3 Opcional: monitor adicional (CM470)
1 x Monitor con pantalla
1 x Placa mural para monitor
1 x Adaptador de alimentación
1 x 10 metros de cable de 4 hilos para conectar con el primer monitor
2 x 30 cm de cable de 4 hilos con conector
1 x Material de montaje
Page 55

DoorGuard 470
55
ESPAÑOL
3 TIMBRE CON CÁMARA
1
Protección contra
lluvia
Protege la unidad externa contra la lluvia
2
Micrófono
Transfiere el sonido al monitor
3
Cámara
Transfiere la imagen al monitor
4
LEDs IR
Iluminación infrarroja para mejor vista
5
Timbre
Botón timbre para comunicar
6
Altavoz
Transfiere sonido del monitor
7
Cable de
conexión
Conexión con monitor y portero
8
Control de
volumen
Ajusta el volumen del altavoz
Page 56

© MARMITEK
56
3.1 Tipos de cable
Quita la tensión del sistema para la instalación.
Para conectar el timbre con cámara con el monitor, emplea el cable de 4
hilos suministrado. Para distancias más grandes, vea la tabla siguiente
para los tipos de cables:
Longitud
cable
Tipo de cable
1 – 25 m
Cable de 4 hilos, mínimo 4x 0,2 mm2, sin aislamiento
25 – 50 m
Cable de 4 hilos, mínimo 4x 0,3 mm2, con aislamiento
50 – 80 m
Cable de 4 hilos, mínimo 4x 0,5 mm2, con aislamiento
80 – 100 m
Cable coaxial, 75 ohm, mínimo 1,5 mm
2
+ cable de
audio de 2 hilos 0,5 mm
2
Conexiones de cable de red CAT5 o CAT6 (no recomendados)
Emplea los 2 conectores adicionales suministrados.
Cable sin aislamiento (< 25 m)
Cable con aislamiento (< 80 m)
Cable coaxial + cable de audio de 2 hilos (< 100 m)
Cable de red sin aislamiento (< 25 m)
Cable de red con aislamiento (< 50 m)
Afscherming
Afscherming
Page 57

DoorGuard 470
57
ESPAÑOL
3.2 Portero eléctrico
El portero eléctrico es opcional (no. art. 09774).
El sistema es compatible con porteros que tienen un sistema de
normal abierto (NA). Esto significa que, en estado normal, el contacto
seco está abierto. Al pulsar el botón de desbloqueo, el contacto se cierre
durante un periodo ajustable (contacto seco: el contacto no alimenta el
portero). El portero eléctrico de Marmitek se puede alimentar con la
tensión de la cámara. Si emplea otro tipo de portero, hay que controlar si
este se puede alimentar con la tensión de 12 V de la cámara. No debe
gastar más que 0,6 A. Si es necesario, hay que emplear una alimentación
adicional.
3.3 Montaje timbre con cámara
La cámara dispone de una lente gran angular para ofrecer una buena
vista aun cuando el visitante no está puesto directamente delante de la
cámara.
x Determina la altura adecuada para la cámara.
x Taladra un agujero en el marco donde quiere montar el timbre.
x Monta la placa de montaje encima del marco usando los 4 tornillos.
x Desliza el cable del timbre por la placa de montaje y el agujero en el
marco.
x Monta el timbre encima de la placa de montaje usando los 2 tornillos
suministrados.
Page 58

© MARMITEK
58
4 MONITOR
1 Pantalla TFT
2 Micrófono
3 Botón cambiar (a otro monitor)
4 Botón monitor (para activar la cámara)
5 Botón interfono (para activar la comunicación)
6 Botón portero (para abrir la puerta)
7 Botón cortar comunicación
8 Ajustes de pantalla
9 Volumen de altavoz del monitor
10 Altavoz
11 Cierre tarjeta SD (tarjeta SD: máx. 32 GB, fat. 32, clase 10 o más
alta, no suministrada)
Page 59

DoorGuard 470
59
ESPAÑOL
4.1 Montaje monitor
x No monte el monitor en la cercanía de radiación fuerte como de
televisores, grabadoras de video u ordenadores.
x Determina la posición adecuada para el monitor a la altura de los
ojos.
x Quita la tensión del monitor antes del montaje.
x Instala el adaptador de alimentación a una distancia mínima de
30 cm del monitor para evitar interferencias.
Sigue el esquema de instalación:
4.2 Diagrama de cableado
Con el monitor se pueden conectar dos timbres con cámara y una
cámara externa. Se pueden conectar hasta 3 monitores adicionales con
el primer monitor.
Tacos
Placa
mural
Cables de conexión a timbres con cámara,
segundo monitor y cable de alimentación
Puerta 2
Puerta 1
Portero
Portero
Monitor adicional
Alimentación
Monitor 1
Muro
Page 60

© MARMITEK
60
4.3 Empleo del monitor
Sigue los pasos para acoplar el monitor con el timbre con cámara:
x Conecta el cable de 4 hilos suministrado con el timbre.
x Conecta el otro extremo del cable con el monitor, DOOR1.
x Conecta el adaptador con la conexión de alimentación (POWER).
Enchufa el adaptador.
El monitor se inicia.
Después de algunos segundos suena un “bliep”, el sistema se ha
iniciado.
4.4 Ajustes de la pantalla del monitor
Para activar los ajustes de la pantalla, pulsa brevemente botón 8.
Para recorrer los 5 menús principales, gira el botón hacia abajo. Para
elegir una opción, pulsa el botón brevemente.
En el submenú selecciona una opción girando el botón hacia arriba o
hacia abajo y confirmando con un breve pulse en el botón.
Para cambiar la opción, gira el botón otra vez hacia arriba o hacia abajo y
pulsa brevemente para confirmar.
4.4.1 Menú Timbre
x Seleccionar tono de timbre: 16 opciones.
x Duración de tono de timbre: entre 5 y 30 segundos.
x Volumen de timbre: 1, 2 y 3: el volumen se puede ajustar para tres
fases del día.
Por ejemplo por la mañana: alto, por la tarde: más bajo y por la
noche muy bajo.
4.4.2 Menú Imagen
x Idioma: EN, DE, FR, ES, IT o NL
x Claridad
x Color
x Contraste
4.4.3 Menú Hora
x Hora: ajustar la fecha y hora
x Tono de teclas: encender/apagar el tono de las teclas
x Reiniciar: reiniciar el monitor
x Versión: versión del firmware del monitor
Page 61

DoorGuard 470
61
ESPAÑOL
4.4.4 Menú Cámara
x Tiempo de desbloqueo: empleando un portero eléctrico, el tiempo de
desbloqueo se puede ajustar entre 2 y10 segundos.
x Función: Master o Slave. Si este monitor es el primer o el único
monitor que se emplea, elige Master. Si este monitor es el 2., 3. o 4.
Monitor, elige Slave.
x PUERTA 2: Cuando emplea un segundo timbre con cámara:
Encendido, si no: Apagado.
x CAM1: Si emplea una cámara adicional: Encendido, si no: Apagado.
x CAM2: Si emplea una cámara adicional: Encendido, si no: Apagado.
4.4.5 Menú video
x Grabar: Cuando el monitor lleva una tarjeta SD y quiere grabar un
video cada vez que se toca el timbre: Encendido.
x Reproducir: Reproduce automáticamente todas las grabaciones.
Recurre los videos con botón 8.
x Formatear: Formatea la tarjeta SD.
x Actualización FW (SD): Para instalar actualizaciones del firmware
desde la tarjeta SD.
Elige Cerrar para salir del menú (menú cierre automáticamente 1 minuto
después de la última elección).
Page 62

© MARMITEK
62
5 ALGUIEN TOCA EL TIMBRE
En este ejemplo están conectados dos timbres con cámara. Si solo usa
un timbre, sigue exclusivamente el colon de izquierdo.
Al activar el portero, la imagen y la voz del visitante quedan activos
durante 20 segundos más. De esta manera puede controlar si la
puerta se ha abierto correctamente.
Cuando está instalada una tarjeta SD en el monitor, se graba un
video cada vez que se toca el timbre.
Modo STANDBY
El visitante toca timbre 1
Durante 5 … 30
segundos suena una
melodía dentro y
fuera de la casa
(16
opciones de melodías)
.
La imagen del visitante
aparece en el monitor.
Pulsa el botón de interfono
(5).
La melodía deja de
sonar.
Inicia la conversación con
botón de timbre
1.
La comunicación se
interrumpe automáticamente
después de
120
segundos.
Pulsa el botón del portero
(6) (o abre la puerta si no
tiene portero).
El portero se activa.
Pulsa el botón para cortar
la comunicación
(7).
Standby
El visitante toca timbre 1
Cuando los dos timbres se tocan a la vez, el timbre que
fue tocado primero se comunica con el monitor. El
monitor emite 3 tonos breves para indicar que el otro
timbre también fue tocado.
Cuando la imagen de la cámara externa está
bloqueada y no recibe una imagen del visitante,
pulsa el botón
del monitor para cambiar a la 2a
cámara. Pulsa otra vez para recibir la imagen de la
1a
cámara externa.
Cuando el botón del interfono no se pulsa dentro de 60
segundos, el monitor pasa automáticamente al modo
standby.
Page 63

DoorGuard 470
63
ESPAÑOL
6 VER QUIEN ESTA FUERA
Cuando solo usa un timbre con cámara, puede volver al modo standby
pulsando el botón para cortar la comunicación (7).
Cuando se toca el timbre mientras el monitor está activo, el monitor
cambia automáticamente a la cámara del timbre que fue tocado.
Modo STANDBY
Pulsa el botón del monitor (4).
Se reproduce la imagen de
cámara 1.
La reproducción de la imagen
se corta automáticamente
después de 6
0 segundos.
Pulsa el botón del interfono (5)
Inicia la
conversación
con la
cámara.
Pulsa el botón para cortar la
comunicación (7).
Standby
Pulsa el botón del monitor (4)
otra vez
.
Se reproduce la imagen de
cámara 2.
Pulsa el botón del monitor (4)
otra vez para volver al modo
standby.
Pulsa el boton del portero (6)
para abrir la puerta.
Page 64

© MARMITEK
64
7 PREGUNTAS FRECUENTES
¿Puedo ajustar el volumen del altavoz en el timbre?
En la parte trasera del timbre se encuentra un regulador de volumen
debajo de una tapa de goma. El volumen se puede ajustar empleando un
destornillador.
¿Cuál es la altura recomendada para montar el timbre?
La altura recomendada es de 1,60 m. Tenga en cuenta la incidencia de
luz (solar, faroles etc).
¿Puedo conectar varios monitores paralelamente?
No, el segundo monitor se conecta con el primero, el tercero con el
segundo y el cuarto con el tercero. Luego tiene que elegir en el menú de
ajustes para cada monitor si es un Master o Slave. El primer monitor
siempre es Master, los otros 3 monitores son Slave (vea 4.4.4 Menú ).
¿Si instalo un portero, este se puede controlar con cualquier de los
monitores?
Si.
¿Puedo elegir un tono de timbre para el monitor?
Tiene 16 opciones de melodías, puede ajustar la duración del tono y
elegir el volumen para tres fases distintas del día. Estos ajustes se
pueden hacer por monitor (vea 4.4.1 Menú Timbre).
Escucho un sonido sonoro durante la comunicación.
Este sonido sonoro probablemente se causa por interferencias con otras
instalaciones. Cables con altas corrientes alternas al lado de cables de
interfono suelen causar este tipo de sonido sonoro. Si no se puede evitar
que los cables del interfono por parte se instalan al lado de cables de
230 V, emplea cables con asilamiento (vea 3.1 Tipos de cables).
¿Para qué sirven los 3 hilos adicionales del cable de timbre?
El hilo azul y el hilo marrón son hilos de interrupción para el portero.
El hilo rojo/blanco suministra una tensión de 12 V cuando la cámara está
activa por ejemplo para controlar un DVR.
Para otras preguntas,
consulte www.marmitek.com.
Page 65

DoorGuard 470
65
ESPAÑOL
8 ESPECIFICACIONES TÉCNICAS
OCW470 Timbre con cámara y protección de lluvia
Resolución 420 TVL
cámara ¼”CMOS color
Lente a ángulo 100°
Sensibilidad lumínica 0,1 LUX
Visión nocturna 4 LEDs IR (60°)
Distancia visión nocturna 0,5 ~1 m
Sonido Micrófono y altavoz incorporados
Interruptor portero Contacto seco NA, máx. 1 A
Tiempo de desbloqueo 2…10 segundos (ajustable)
Consumo activo Max. 200 mA
Adaptador Alimentado por unidad externa
Montaje Encima de muro
Dimensiones 125 x 60 x 35 mm (a x a x p)
Temperatura ambiental -40 ~ +50° C (en uso)
Humedad ≤ 85 % RH
CM470 Monitor
Pantalla 7 inch TFT LCD
Resolución 800(H) x 3 (RGB) x 480 (V)
Sistema de video Compatible PAL/NTSC
Modo interfono Comunicación semi-duplex
Duración comunicación 120 segundos
Consumo standby Max. 300 mA
Consumo activo Max. 600 mA
Opciones timbre 16 melodías
Duración tono timbre 5…30 segundos
Volumen tono timbre Ajustable por fases de día
Cierre tarjeta SD Max. 32 GB
Fat 32 formateado
Clase 10 o más alta
Adaptador DC 12 V
tura ambiental -10 ~ +60°C (en uso)
Montaje Encima de muro
Dimensiones 194 x 124 x 18 mm
Page 66

© MARMITEK
66
Información medioambiental para clientes de la Unión Europea
La Directiva 2002/96/CE de la UE exige que los equipos que lleven este
símbolo en el propio aparato y/o en su embalaje no deben eliminarse junto
con otros residuos urbanos no seleccionados. El símbolo indica que el producto en
cuestión debe separarse de los residuos domésticos convencionales con vistas a
su eliminación. Es responsabilidad suya desechar este y cualesquiera otros
aparatos eléctricos y electrónicos a través de los puntos de recogida que ponen a
su disposición el gobierno y las autoridades locales. Al desechar y reciclar
correctamente estos aparatos estará contribuyendo a evitar posibles
consecuencias negativas para el medio ambiente y la salud de las personas. Si
desea obtener información más detallada sobre la eliminación segura de su
aparato usado, consulte a las autoridades locales, al servicio de recogida y
eliminación de residuos de su zona o pregunte en la tienda donde adquirió el
producto.
DERECHOS DE PROPIEDAD INTELECTUAL
Marmitek es una marca registrada de Pattitude BV
DoorGuard 470™ es una marca registrada de Marmitek BV. Todos los derechos
reservados.
En la realización de este manual se ha puesto el máximo cuidado para asegurar la
exactitud de la información que en él aparece. Marmitek no se responsabiliza de
los posibles errores de impresión o copia.
Propiedades intelectuales y todos los demás derechos de propiedad al contenido
(incluso pero no limitado a números de modelos, software, audio, video, texto y
fotos) pertenecen a Marmitek BV. Cada uso del contenido, cada distribución,
reproducción, cambio, publicación y envío sin previo aviso en forma escrita por
Marmitek es estrictamente prohibido.
Todos los derechos de propiedad intelectual y otros derechos de propiedad son
aplicables a todas las reproducciones.
Los nombres de otras empresas y productos mencionados en este manual pueden
ser marcas comerciales de sus respectivas empresas. La mención de productos
de terceras partes tiene únicamente propósitos informativos y no constituye
aprobación ni recomendación. Marmitek declina toda responsabilidad referente al
uso o el funcionamiento de estos productos.
MARMITEK BV - PO BOX 4257 - 5604 EG EINDHOVEN – PAÍSES BAJOS
Page 67

DoorGuard 470
67
ITALIANO
PRECAUZIONI DI SICUREZZA
x Per evitare il pericolo di cortocircuito utilizzare questo prodotto
esclusivamente al coperto e in luoghi asciutti. Non esporre i
componenti di questo prodotto a pioggia o umidità. Non utilizzare
vicino alla vasca da bagno, piscina, ecc.
x Non esporre i componenti del sistema a temperature
eccessivamente alte o a fonti intense di luce.
x Questo prodotto non è un giocattolo: tenerlo lontano dalla portata
dei bambini.
x Non aprire mai il prodotto: L’apparecchio può contenere
componenti la cui tensione è estremamente pericolosa.
Riparazioni o modifiche devono essere effettuate esclusivamente
da parte di personale esperto.
x Collegare l’alimentatore alla presa di corrente solamente dopo
avere controllato che la tensione della rete elettrica corrisponda
alle indicazioni riportate sulla targhetta. Non utilizzare mai un
alimentatore danneggiato. In tal caso rivolgersi al proprio
rivenditore.
x In caso di utilizzo scorretto, di riparazioni o modifiche apportate
personalmente decade qualsiasi garanzia. Marmitek declina ogni
responsabilità per i danni derivanti da un utilizzo non appropriato
del prodotto o da utilizzo diverso da quello per cui il prodotto è
stato creato. Marmitek declina ogni responsabilità per danni
consequenziali ad eccezione della responsabilità civile sui
prodotti.
Page 68

© MARMITEK
68
INDICE
1
INTRODUZIONE ............................................................................ 69
2 CONTENUTO DELLA CONFEZIONE ............................................ 70
2.1 Kit DoorGuard 470 (kit DG470) ...................................................... 70
2.2 Accessorio, unità campanello con camera aggiuntiva (OCW470) .. 70
2.3 Accessorio, monitor aggiuntivo (CM470) ....................................... 70
3 UNITÀ CAMPANELLO CON CAMERA .......................................... 71
3.1 Tipo di cavo richiesto ..................................................................... 72
3.2 Apriporta elettrico ........................................................................... 73
3.3 Montaggio dell’unità campanello con camera ................................ 73
4 MONITOR ...................................................................................... 74
4.1 Montaggio del monitor .................................................................... 75
4.2 Schema di cablaggio ...................................................................... 75
4.3 Messa in servizio del monitor ......................................................... 76
4.4 Impostazioni dello schermo monitor ............................................... 76
4.4.1 Menu del campanello ........................................................ 76
4.4.2 Menu dell’immagine .......................................................... 76
4.4.3 Menu del tempo ................................................................ 76
4.4.4 Menu della camera ........................................................... 77
4.4.5 Menu del video ................................................................. 77
5 SUONA UN VISITATORE .............................................................. 78
6 GUARDARE FUORI ....................................................................... 79
7 DOMANDE FREQUENTI ............................................................... 80
8 CARATTERISTICHE TECNICHE .................................................. 81
Page 69

DoorGuard 470
69
ITALIANO
1 INTRODUZIONE
Congratulazioni con l’acquisto del DoorGuard 470™ di Marmitek. Con
questo videocitofono puoi vedere chi suona alla porta, prima di aprirla. La
telecamera offre una buona qualità d’immagine, anche al buio.
x Videocitofono a schermo LCD a colori vivavoce con memoria.
x Sentirsi sempre al sicuro sapendo chi suona alla porta.
x Design di lusso; forma essenziale e comunicazione a mani libere.
x Con bello schermo LCD a colori, da 17,5 cm.
x Memoria interna (scheda SD, non fornita in dotazione) per acquisire le
immagini di ogni visitatore.
x Audio e video sempre perfetti, anche al buio.
x Il design sottile lo rende adattabile a qualsiasi porta.
x La telecamera antivandalo ha un ampio angolo di vista di 100 º.
x Aprire la porta a distanza con apriporta elettrico (disponibile in
opzione).
x Opzione: 3 monitor aggiuntivi (disponibili separatamente) da collegare
in altri vani.
x Opzione: 1 unità campanello con camera aggiuntiva (disponibile
separatamente).
x Con camera en tettuccio antipioggia.
x Come funziona? Quando qualcuno suona alla porta, la sua immagine
viene visualizzata sul monitor domestico. In questo modo saprai
sempre chi suona alla porta prima di aprirla, oppure far finta che non
sei in casa. Per parlare al chiamante, premi semplicemente il pulsante
"parla". Se hai installato anche un apriporta elettrico, puoi aprire la
porta con l'aiuto del monitor.
Page 70

© MARMITEK
70
2 CONTENUTO DELLA CONFEZIONE
2.1 Kit DoorGuard 470 (kit DG470)
1 x monitor con schermo
1 x staffa a parete per il monitor
1 x unità campanello con camera e tettuccio antipioggia
1 x adattatore di alimentazione
1 x cavo a 4 fili da 10 metri per il collegamento della camera
2 x cavo a 4 fili da 30 cm con connettore per l’uso con cavo proprio
1 x vari materiali di fissaggio e montaggio
1 x istruzioni per l’uso
2.2 Accessorio, unità campanello con camera aggiuntiva
(OCW470)
1 x unità campanello con camera en tettuccio antipioggia
1 x vari materiali di fissaggio e montaggio
2.3 Accessorio, monitor aggiuntivo (CM470)
1 x monitor con schermo
1 x staffa a parete per il monitor
1 x adattatore di alimentazione
1 x cavo a 4 fili da 10 metri per il collegamento del 1
o
monitor
2 x cavo a 4 fili da 30 cm con connettore
1 x vari materiali di fissaggio e montaggio
Page 71

DoorGuard 470
71
ITALIANO
3 UNITÀ CAMPANELLO CON CAMERA
1
Tettuccio
antipioggia
Protegge l’unità esterna dagli agenti atmosferici
2
Microfono
Suono al monitor
3
Camera
Crea l’immagine sul monitor
4
Led IR
Luci a infrarossi per una visone migliore
5
Campanello
Suonare il campanello per la comunicazione
6
Altoparlante
Il suono del monitor
7
Cavo di
collegamento
Collegamento al monitor e apriporta
8
Regolatore di
volume
Per regolare il volume dell’altoparlante
Page 72

© MARMITEK
72
3.1 Tipo di cavo richiesto
Disinserire la tensione prima dell'installazione!
Per il collegamento dell’unità campanello con camera al monitor, si può
utilizzare il cavo a 4 fili fornito in dotazione.
Per coprire una distanza maggiore, vedere la tabella seguente per il tipo di
cavo richiesto:
Lunghezza
cavo
Tipo di cavo richiesto
1-25 m
Cavo a 4 fili da 4x 0,2mm2 al minimo, non schermato
25-50 m
Cavo a 4 fili da 4x 0,3mm2 al minimo, schermato
50-80 m
Cavo a 4 fili da 4x 0,5mm2 al minimo, schermato
80-100 m
Cavo coax, 75 ohm da 1.5mm2 + cavo audio a 2 fili da
0,5mm
2
Collegamenti a cavo di rete CAT5 o CAT6 (non raccomandati)
È possibile usare i 2 connettori aggiuntivi forniti in dotazione.
Cavo non schermato (<25m)
Cavo schermato (<80m)
Cavo coax + cavo audio a 2 fili (<100)
Cavo di rete non schermato (<25m)
Cavo di rete schermato (<50m)
Protezione
Protezione
Page 73

DoorGuard 470
73
ITALIANO
3.2 Apriporta elettrico
L’apriporta elettrico è un accessorio (no. art. 09774).
Il sistema supporta gli apriporta dotati da un sistema di sblocco
porta a contatto NO (normalmente aperto). Questo significa che
normalmente il contatto secco è aperto. Se si preme il pulsante di sblocco,
il contatto aperto è chiuso per un tempo impostabile.
(Contatto secco: il contatto non alimenta l’apriporta. Quando si usa
l’apriporta elettrico di Marmitek, si può usare l’alimentazione della camera.
Quando si usa un altro apriporta, controllare se è possibile usare i 12V
della camera e se esso non usa più di 0,6 A. Altrimenti un’alimentazione
separata per l’apriporta.)
3.3 Montaggio dell’unità campanello con camera
La camera è dotata di un obiettivo grandangolare. Anche se uno non è proprio di
fronte alla camera, hai ancora una buona vista.
x Determinare l’altezza giusta per la camera.
x Praticare un foro nello stipite dove vuoi montare l’unità campanello.
x Montare la staffa sullo stipite con le quattro viti.
x Poi mettere il cavo dell’unità campanello attraverso la staffa di montaggio e
il foro nello stipite.
x Ora montare l’unità campanello tramite le 2 viti fornite in dotazione, sulla
staffa di montaggio.
Page 74

© MARMITEK
74
4 MONITOR
1 Schermo TFT
2 Microfono
3 Pulsante di trasferimento (ad un altro monitor)
4 Pulsante monitor (per attivare la camera)
5 Pulsante di comunicazione (per poter parlare)
6 Pulsante apriporta
7 Pulsante di fine chiamata
8 Impostazioni dello schermo
9 Volume altoparlante monitor
10 Altoparlante
11 Slot scheda SD (scheda SD: max. 32 GB, fat 32, classe 10 o
superiore, non fornita in dotazione)
Page 75

DoorGuard 470
75
ITALIANO
4.1 Montaggio del monitor
x Evitare l’installazione del monitor vicino a forti radiazioni come
televisore, registratore video o PC.
x Scegliere una posizione ideale, di modo che il monitor sia installato a
livello degli occhi.
x Prima dell’installazione, assicurarsi che il monitor sia privo di
tensione.
x Assicurarsi che l'alimentatore sia installato almeno 30 cm dal monitor
per evitare interferenze.
Seguire la seguente diagramma per installare il monitor:
4.2 Schema di cablaggio
È possibile collegare 2 unità campanello con camera e 1 camera esterna
al monitor. Al massimo 3 monitor aggiuntivi possono essere collegati al
monitor.
Tasselli
Apriporta
Staffa a
parete
Porta 2
Porta 1
Apriporta
Monitor seguente
Alimentazione
Cavi di collegamento all’unità campanello con
camera, 2
o
monitor e cavo di alimentazione
1o monitor
Parete
Page 76

© MARMITEK
76
4.3 Messa in servizio del monitor
Seguire la seguente procedura per collegare il monitor all’unità
campanello con camera:
x Collegare il cavo a 4 fili fornito in dotazione all’unità campanello.
x Collegare l’altra estremità al monitor, DOOR1.
x Collegare l’adattatore al connettore Power.
Alimentare l’adattatore, poi il monitor si avvia.
Dopo qualche secondo si sente un ‘bip’, indicando che il sistema è stato
avviato.
4.4 Impostazioni dello schermo monitor
Premendo brevemente il tasto 8 sul monitor, si attiva le impostazioni dello
schermo. Ruotando verso il basso il tasto, si scorre i 5 menu principali.
Premendo brevemente il tasto, si fa la scelta.
Nel sottomenu si può selezionare, ruotando verso l’alto o verso il basso, il
tasto e premendolo brevemente si può confermare la scelta.
Poi si può modificare la scelta ruotando il tasto di nuovo verso l’alto o
verso il basso e premendolo brevemente si può confermare la modifica.
4.4.1 Menu del campanello
x Selezione campanello: scelta da 16 melodie.
x Durata campanello: regolabile tra i 5 e 30 secondi.
x Volume campanello 1, 2 e 3: è possibile regolare il volume del
campanello in tre periodi di tempo. Per esempio ad alto volume
durante il giorno, a volume più basso durante la sera ed a volume
molto basso durante la notte.
4.4.2 Menu dell’immagine
x Lingua: EN, DE, FR, ES, IT o NL
x Luminosità
x Colori
x Contrasto
4.4.3 Menu del tempo
x Tempo: impostare data e tempo
x Suono del tasto: (dis)attivare il del suono di conferma del tasto
x Reboot: riavviare il monitor
x Versione: versione firmware del monitor
Page 77

DoorGuard 470
77
ITALIANO
4.4.4 Menu della camera
x Tempo di sblocco: si può regolare il tempo di sblocco in caso di un
apriporta elettrico tra i 2 e 10 secondi.
x Funzione: Master o Slave. Selezionare Master se il monitor è il primo
o l’unico monitor. Selezionare Slave se il monitor è un secondo, terzo
o quarto monitor.
x PORTA2: Attivata in caso di una seconda unità campanello con
camera, altrimenti Disattivata.
x CAM1: Attivata in caso di una camera aggiuntiva, altrimenti
Disattivata.
x CAM2: Attivata in caso di una camera aggiuntiva, altrimenti
Disattivata.
4.4.5 Menu del video
x Registrazione: Accesa in caso dell’uso di una scheda SD nel monitor
per creare automaticamente una registrazione video quando suona il
campanello.
x Riproduzione: riproduce automaticamente le registrazioni. Con il tasto
8 è possibile scorrere le immagini.
x Formattare: per formattare la scheda SD inserita.
x Aggiornamento FW (SD): un eventuale aggiornamento del firmware
può essere installato dalla scheda SD.
Selezionare chiudere per chiudere il menu. (Il menu si chiude
automaticamente 1 minuto dopo l’ultima scelta.)
Page 78

© MARMITEK
78
5 SUONA UN VISITATORE
In questo esempio sono state collegate 2 unità campanello con camera.
In caso di un’unica unità campanello, seguire solo la colonna sinistra.
Sia il video che l’audio del visitatore rimangono attivi durante 20
secondi dopo l’attivazione dell’apriporta. In tal modo è possibile
verificare che ha funzionato bene l’apriporta.
Se è stata inserita una scheda SD nel monitor, ogni volta qualcuno
suona il campanello viene creata una registrazione video.
Modo di STANDBY
Il visitatore suona l’unità
campanello 1
Durante 5…30
secondi si sente una
melodia, sia dentro
che fuori
(1 delle 16
melodie disponibili)
L’immagine del visitatore
apparisce automaticamente
sul monitor.
Premere il tasto di
comunicazione (5).
La melodia si spegne.
Ora puoi
avviare una
conversazione via l’unità
campanello 1
La chiamata finisce
automaticamente dopo
120 secondi.
Premere il tasto
dell’apriporta (6) (o andare
alla porta, se non c’è stato
montato un apriporta).
L’apriporta viene
attivato
.
P
remere il tasto fine
chiamata (7
)
Standby
Il visitatore suona l’unità
campanello 2
Quando suona contemporaneamente sia il campanello
dell’unità 1 che quello dell’unità 2, l’unità campanello
suonata per primo è trasferita al monitor. Sul monitor si
sentono poi 3 toni brevi indicando che anche l’altra
unità campanello è stata suonata.
Se è bloccata la camera dell’unità esterna e non si
può vedere l’immagine del visitatore, premere il tasto
del monitor per passare alla seconda camera.
Premere di nuovo il tasto del monitor per ri
cevere
immagini dall’unità esterna.
Se il tasto di comunicazione non è stato premuto entro
60 secondi, il monitor passa automaticamente al modo
di standby.
Page 79

DoorGuard 470
79
ITALIANO
6 GUARDARE FUORI
Se si usa solo 1 unità campanello con camera, è anche possibile di
passare al modo di standby, premendo il tasto di fine chiamata (7).
Se la funzione monitor è attivata sul monitor e non viene suonato, il
monitor passa automaticamente all’immagine dove è suonato.
Modo di STANDBY
Premere il tasto monitor (4).
È riprodotta l’immagine della
prima camera.
La riproduzione si
arresta in modo
automatico dopo 60
secondi.
Premere il tasto di
comunicazione (5).
Ora si può avviare un
conversazione tramite la
camera.
P
remere il tasto fine
chiamata (7
).
Standby
Prem
ere di nuovo il tasto
monitor (4
).
È riprodotta l’immagine della
seconda camera.
Premere di nuovo il tasto del
monitor (
4) per passare al
modo di standby.
Premere il tasto dell’apriporta
(6
) per attivarlo.
Page 80

© MARMITEK
80
7 DOMANDE FREQUENTI
È possibile regolare il volume dell’altoparlante nell’unità
campanello?
Sul retro dell’unità campanello, dietro il cappuccio di gomma, si trova un
piccolo regolatore di volume. Con un cacciavite piccolo si può regolare il
volume.
Qual’è l’altezza raccomandata per il montaggio dell’unità
campanello?
L’altezza raccomandata è di 1,60 m. Anche prestare attenzione alla luce
incidente dal sole, lampioni e simili.
È possibile collegare in parallelo più monitor?
No, un secondo monitor deve essere collegato al primo monitor. Un terzo
monitor al secondo monitor, un quarto monitor al terzo monitor. Poi si deve
impostare nel menu di impostazioni di ogni monitor se si tratta di un
monitor Master o Slave. Il primo monitor è sempre Master, gli altri 3
monitor sono Slave (vedere 4.4.4 Menu della camera).
Se voglio installare un apriporta, posso comandarlo da ogni
monitor?
Sì, è possibile comandare l’apriporta da ogni monitor.
È possibile regolare la melodia del monitor?
Si, è possibile scegliere tra 16 diverse melodie della suoneria, impostarne
la durata e regolare il volume di 3 periodi di tempo. Si può regolare tutto
questo per ogni singolo monitor (vedere 4.4.1 Menu del campanello).
Durante la chiamata sento un ronzio chiaramente udibile.
Il ronzio può essere causato da interferenze con altri impianti. Cavi ad alta
tensione in corrente alternata lungo cavi del citofono garantiscono spesso
un ronzio nel citofono. Se è inevitabile che una parte del cavo del citofono
si trova lungo i cavi da 230V, assicurarsi che i cavi siano schermati
(vedere 3.1 Tipo di cavo richiesto).
A quale scopo servono i 3 fili aggiuntivi al cavo dell’unità
campanello?
Il filo blu e marrone sono i fili in tensione per l’apriporta.
Il filo rosso/bianco fornisce 12 volt se la camera è attiva. Con questo filo è
possibile comandare un VRD esterno.
Per domande a cui non trovi risposta qui sopra,
visita il nostro sito web www.marmitek.com.
Page 81

DoorGuard 470
81
ITALIANO
8 CARATTERISTICHE TECNICHE
OCW470 - Unità campanello con camera e tettuccio antipioggia
Risoluzione 420TVL
Camera ¼” colore CMOS
Obiettivo ed angolo 100°
Sensibilità alla luce 0,1 LUX
Visione notturna 4 LED a infrarossi (60°)
Distanza visione notturna 0,5 ~1 m
Suono microfono e altoparlante interni
Interruttore apriporta contatto secco, NO (NA), max. 1A
Tempo di sblocco 2…10 secondi (regolabile)
Consumo modo attivo 200mA al massimo
Adattatore alimentazione dall’unità interna
Montaggio esterno
Dimensioni 125 x 60 x 35 mm (a x l x l)
Temperatura ambientale -40 ~ +50°C (in esecizio)
Umidità ≤ 85% RH
CM470 - Monitor
Schermo LCD 7 pollici TFT LCD
Risoluzione 800(H) x 3 (RGB) x 480 (V)
Sistema video compatibile PAL/NTSC
Modo citofono comunicazione semi-duplex
Durata chiamata 120 secondi
Consumo modo di standby 300 mA max.
Consumo modo attivo 600 mA max.
Selezione campanello scelta da 16 melodie
Durata campanello 5…30 secondi
Volume campanello regolabile tempo dipendente
Slot scheda SD max 32 GB
Fat 32 formattato
Classe 10 o superiore
Adattatore DC12V
Temperatura ambientale -10 ~ +60°C (esercizio)
Montaggio esterno
Dimensioni 194 x 124 x 18 mm
Al fine di migliorare ulteriormente il prodotto, Marmitek si riserva il diritto di modificare le
specifiche e/o il design senza alcun preavviso.
Page 82

© MARMITEK
82
Informazioni relative all’ambiente per i clienti residenti nell’Unione
Europea
La direttiva europea 2002/96/EC richiede che le apparecchiature
contrassegnate con questo simbolo sul prodotto e/o sull’imballaggio non siano
smaltite insieme ai rifiuti urbani non differenziati. Il simbolo indica che questo
prodotto non deve essere smaltito insieme ai normali rifiuti domestici. È la
responsabilità del proprietario smaltire sia questi prodotti sia le altre
apparecchiature elettriche ed elettroniche mediante le specifi che strutture di
raccolta indicate dal governo o dagli enti pubblici locali. Il corretto smaltimento ed il
riciclaggio aiuteranno a prevenire conseguenze potenzialmente negative per
l’ambiente e per la salute dell’essere umano. Per ricevere informazioni più
dettagliate circa lo smaltimento delle vecchie apparecchiature in vostro possesso, vi
invitiamo a contattare gli enti pubblici di competenza, il servizio di smaltimento rifiuti
o il negozio nel quale avete acquistato il prodotto.
DIRITTI D’AUTORE
Marmitek è un marchio commerciale di Pattitude BV
DoorGuard 470™ è un marchio commerciale di Marmitek BV. Tutti i diritti riservati.
Marmitek si è impegnata perché le informazioni contenute in questo manuale
fossero il più possibile precise. Marmitek declina ogni responsabilità per eventuali
errori di stampa.
I diritti d'autore e tutti gli altri diritti di proprietà intellettuale sul contenuto (inclusi ma
non limitati a numeri di modelli, software, audio, video, testi e fotografie) spettano a
Marmitek BV.
È strettamente proibito ogni uso del Contenuto, incluse senza limitazioni la
distribuzione, riproduzione, modifica, pubblicazione o trasmissione senza previa
autorizzazione scritta da parte di Marmitek.
Tutti i diritti d’autore e altri diritti di proprietà intellettuale su tutte le riproduzioni
devono essere conservati.
I nomi di altre società e prodotti qui menzionati potrebbero essere marchi delle
rispettive società. La citazione di prodotti di terze parti è a solo scopo informativo e
non costituisce alcun impegno o raccomandazione. Marmitek declina ogni
responsabilità riguardo l’uso e le prestazioni di questi prodotti.
MARMITEK BV - PO BOX 4257 - 5604 EG EINDHOVEN – PAESI BASSI
Page 83

DoorGuard 470
83
NEDERLANDS
VEILIGHEIDSWAARSCHUWINGEN
x Om kortsluiting te voorkomen, dient dit product uitsluitend
binnenshuis gebruikt te worden, en alleen in droge ruimten. Stel de
componenten niet bloot aan regen of vocht. Niet naast of vlakbij een
bad, zwembad, etc. gebruiken.
x Stel de componenten van uw systeem niet bloot aan extreem hoge
temperaturen of sterke lichtbronnen.
x Dit product is geen speelgoed. Buiten bereik van kinderen houden.
x Het product nooit openmaken: de apparatuur kan onderdelen
bevatten waarop levensgevaarlijke spanning staat. Laat reparatie of
service alleen over aan deskundig personeel.
x Sluit de voedingsadapter pas op het lichtnet aan nadat u hebt
gecontroleerd of de netspanning overeenkomt met de waarde die op
de typeplaatjes is aangegeven. Sluit een voedingsadapter nooit aan
wanneer deze beschadigd is. Neem in dat geval contact op met uw
leverancier.
x Bij oneigenlijk gebruik, zelf aangebrachte veranderingen of
reparaties, komen alle garantiebepalingen te vervallen. Marmitek
aanvaardt geen productaansprakelijkheid bij onjuist gebruik van het
product of door gebruik anders dan waarvoor het product is bestemd.
Marmitek aanvaardt geen aansprakelijkheid voor volgschade anders
dan de wettelijke productaansprakelijkheid.
Page 84

© MARMITEK
84
INHOUDSOPGAVE
1
INLEIDING ..................................................................................... 85
2 INHOUD VAN DE VERPAKKING .................................................. 86
2.1 DoorGuard 470 Set (DG470 set) .................................................... 86
2.2 Optioneel, extra beldrukker met camera (OCW470) ...................... 86
2.3 Optioneel, extra monitor (CM470) .................................................. 86
3 BELDRUKKER MET CAMERA ...................................................... 87
3.1 Benodigde type kabel ..................................................................... 88
3.2 Elektrische deur opener ................................................................. 89
3.3 Monteren beldrukker met camera .................................................. 89
4 MONITOR ...................................................................................... 90
4.1 Monteren monitor ........................................................................... 91
4.2 Bedradingsdiagram ........................................................................ 91
4.3 Monitor in gebruik nemen ............................................................... 92
4.4 Monitor beeldscherm instellingen ................................................... 92
4.4.1 Menu Bel .......................................................................... 92
4.4.2 Menu Beeld ...................................................................... 92
4.4.3 Menu Tijd .......................................................................... 92
4.4.4 Menu Camera ................................................................... 93
4.4.5 Menu Video ...................................................................... 93
5 EEN BEZOEKER BELT AAN ......................................................... 94
6 NAAR BUITEN KIJKEN.................................................................. 95
7 VEELGESTELDE VRAGEN ........................................................... 96
8 TECHNISCHE SPECIFICATIES .................................................... 97
Page 85

DoorGuard 470
85
NEDERLANDS
1 INLEIDING
Gefeliciteerd met de aankoop van de Marmitek DoorGuard 470™. Met
deze video deurintercom kunt u zien en horen wie er aan uw deur staat
voordat u besluit om open te doen. De camera levert goede
beeldkwaliteit, zelfs in het donker.
x Handsfree LCD video deurintercom met videogeheugen – kleur
x Zien wie er aan de deur staat, een veilig gevoel
x Luxe vormgeving; strak design en handsfree.
x Voorzien van een luxe 17,5 cm kleuren LCD scherm.
x Bewaar van iedere bezoeker een video op een SD geheugen kaart
(niet meegeleverd)
x Altijd perfect geluid en beeld, ook in het donker.
x Smalle voordeur unit die past op de deurpost.
x Solide weerbestendige behuizing met unieke 100 º groothoeklens.
x Open de deur op afstand m.b.v. elektrische deuropener (optioneel
verkrijgbaar).
x Optioneel 3 extra monitoren (apart verkrijgbaar) aan te sluiten voor in
andere vertrekken.
x Optioneel 1 extra beldrukker met camera (apart verkrijgbaar) aan te
sluiten.
x Met camera en regenkap
Hoe werkt het? Zodra bezoek aanbelt op de deurbelcamera, verschijnt
het beeld direct op de monitor in huis. U ziet meteen wie heeft aangebeld
en u kunt de deur openen of juist besluiten om dit niet te doen. Om te
praten met de bezoeker drukt u eenvoudig op de intercom knop. Als u
een elektrische deuropener heeft gemonteerd, kunt u de deur via de
monitor openen.
Page 86

© MARMITEK
86
2 INHOUD VAN DE VERPAKKING
2.1 DoorGuard 470 Set (DG470 set)
1 x Monitor met beeldscherm
1 x Wandplaat voor de monitor
1 x Beldrukker met camera en regenkap
1 x Voedingsadapter
1 x 10 meter 4 aderige kabel voor het aansluiten van de camera
2 x 30 cm 4 aderige kabel met connector voor gebruik met eigen kabel
1 x Diverse bevestiging- en schroefmaterialen
1 x Gebruiksaanwijzing
2.2 Optioneel, extra beldrukker met camera (OCW470)
1 x Beldrukker met camera en regenkap
1 x Diverse bevestiging- en schroefmaterialen
2.3 Optioneel, extra monitor (CM470)
1 x Monitor met beeldscherm
1 x Wandplaat voor de monitor
1 x Voedingsadapter
1 x 10 meter 4 aderige kabel voor het aansluiten naar 1e monitor
2 x 30 cm 4 aderige kabel met connector
1 x Diverse bevestiging- en schroefmaterialen
Page 87

DoorGuard 470
87
NEDERLANDS
3 BELDRUKKER MET CAMERA
1
Regen kap
Beschermt de buitenunit tegen weersinvloeden
2
Microfoon
Geluid naar de monitor
3
Camera
Zorgt voor het beeld op de monitor
4
IR LED’s
Infrarood verlichting voor beter zicht
5
Bel
Aanbellen voor communicatie
6
Luidspreker
Geluid van de monitor
7
Aansluitsnoer
Verbinding naar monitor en deuropener
8
Volume regelaar
Om het luidspreker volume aan te passen
Page 88

© MARMITEK
88
3.1 Benodigde type kabel
Zorg dat het systeem tijdens de installatie spanningsvrij is.
Voor het aansluiten van de beldrukker met camera op de monitor kunt u
de meegeleverde 4 aderige kabel gebruiken.
Wilt u een grotere afstand overbruggen, zie dan de volgende tabel voor
het benodigde type kabel:
Kabel Lengte
Benodigd type kabel
1-25m
4 aderige kabel van minimaal 4x 0,2mm2 ,niet
afgeschermd
25-50m
4 aderige kabel van minimaal 4x 0,3mm2 , afgeschermd
50-80m
4 aderige kabel van minimaal 4x 0,5mm2 , afgeschermd
80-100m
coax kabel, 75 ohm van minimaal 1.5mm2 + 2 aderige
audiokabel 0,5mm
2
CAT5 of CAT6 netwerk kabel aansluitingen (niet aanbevolen)
U kunt hiervoor de 2 extra meegeleverde connectoren gebruiken.
Niet afgeschermde kabel (<25m)
Afgeschermde kabel (<80m)
Coax kabel + 2 aderige audio kabel (<100)
Niet afgeschermde netwerk kabel (<25m)
Afgeschermde netwerk kabel (<50m)
Afscherming
Afscherming
Page 89

DoorGuard 470
89
NEDERLANDS
3.2 Elektrische deur opener
De elektrische deur opener is optioneel. (Art.nr. 09774)
Het systeem ondersteunt deur openers met een Normaal Open
(NO) deur ontgrendeling methode. Dit betekent dat in de normale
toestand het droge contact geopend is. Als de ontgrendelknop wordt
ingedrukt ,wordt het open contact voor een in te stellen tijd gesloten.
(droog contact: het contact levert dus niet de voeding voor de
deuropener. Gebruikt u de Marmitek elektrische deur opener, dan kunt u
de voeding van de camera hiervoor gebruiken. Gebruikt u een andere
deuropener, controleer dan of het mogelijk is hiervoor de 12V van de
camera te gebruiken en deze niet meer dan 0,6 A verbruikt. Gebruik
anders een aparte voeding voor de deuropener)
3.3 Monteren beldrukker met camera
De camera is uitgerust met een groothoeklens. Ook als men niet recht voor de
camera staat, heeft u toch een goed zicht.
x Bepaal de juiste hoogte voor de camera
x Boor een gat door het kozijn, ter hoogte van waar u de beldrukker wilt
monteren.
x Monteer de montageplaat op het kozijn door middel van de vier schroeven.
x Schuif de kabel van de beldrukker nu door de montageplaat en het gat in
het kozijn.
x Monteer nu de beldrukker met de meegeleverde 2 schroeven op de
montageplaat.
Page 90

© MARMITEK
90
4 MONITOR
1 TFT scherm
2 Microfoon
3 Doorverbinden knop (naar andere monitor)
4 Monitor knop (om camera te activeren)
5 Intercom knop (om spreken te activeren)
6 Deuropener knop
7 Verbinding verbreek knop
8 Beeldscherm instellingen
9 Monitor luidspreker volume
10 Speaker
11 SD kaart slot (SD kaart: max 32 GB, fat 32, class 10 of hoger, niet
meegeleverd)
Page 91

DoorGuard 470
91
NEDERLANDS
4.1 Monteren monitor
x Vermijd installatie van de monitor in de buurt van sterke straling,
zoals TV, video recorder of PC.
x Kies een ideale positie, zodat de monitor op ooghoogte geïnstalleerd
wordt.
x Zorg, voordat u de monitor installeert, dat deze spanningsvrij is.
x Zorg dat de voedingsadapter minimaal 30 cm van de monitor
geïnstalleerd wordt om interferentie te voorkomen.
Volg het volgende schema om de monitor te installeren:
4.2 Bedradingsdiagram
Er kunnen 2 beldrukkers met camera en 1 externe camera op de monitor
aangesloten worden. Er kunnen maximaal 3 extra monitoren op de
monitor doorgelust worden.
Pluggen
Wandplaat
Verbindings kabels naar beldrukkers met
camera, 2e monitor en voedingskabel
Deur 2
Deur 1
Deuropener
Deuropener
Volgende monitor
Voeding
1e Monitor
Wand
Page 92

© MARMITEK
92
4.3 Monitor in gebruik nemen
Volg de volgende stappen om uw monitor met de beldrukker met camera
te koppelen:
x Sluit de meegeleverde 4 aderige kabel aan op de beldrukker.
x Sluit de andere kant aan op uw monitor, DOOR1.
x Sluit de adapter aan op de Power aansluiting.
Voorzie de adapter van spanning.
De monitor start nu op.
Na een paar seconden hoort u een ‘beep’, ten teken, dat het systeem
opgestart is.
4.4 Monitor beeldscherm instellingen
Op de monitor activeert u met knop 8 de beeldscherm instellingen door er
kort op te drukken.
Door de knop naar beneden te draaien, stapt u door de 5 hoofdmenu’s
heen. Door kort op de knop te drukken maakt u uw keuze.
In het sub menu kunt u uw keuze maken door de knop naar beneden of
naar boven te draaien en kort in te drukken om de keuze te bevestigen.
Vervolgens kunt u de keuze weer aanpassen door de knop naar boven of
beneden te draaien en kort in te drukken om de aanpassing te
bevestigen.
4.4.1 Menu Bel
x Bel Selecteren: Keuze uit 16 melodieën.
x Bel Tijdsduur: in te stellen tussen de 5 en 30 seconden.
x Bel Volume 1, 2 en 3: U kunt over 3 tijdspannes het bel volume
instellen.
Bijvoorbeeld overdag hard, ’s avonds iets zachter, en ’s nachts erg
zacht.
4.4.2 Menu Beeld
x Taal: EN, DE, FR, ES, IT of NL
x Helderheid
x Kleur
x Contrast
4.4.3 Menu Tijd
x Tijd: datum en tijd instellen
x Toetstoon: toets bevestigingstoon aan/uit zetten
x Reboot: monitor opnieuw opstarten
x Versie: firmware versie van de monitor
Page 93

DoorGuard 470
93
NEDERLANDS
4.4.4 Menu Camera
x Ontgrendel tijd: ontgrendel tijd bij gebruik van een elektrische
deuropener is tussen de 2 en 10 seconden in te stellen.
x Functie: Master of Slave. Kies Master als deze monitor de eerste of
enige monitor is. Kies Slave als deze monitor een 2e, 3e of 4e
monitor is.
x DEUR2: Aan, als u gebruik maakt van een 2e beldrukker met
camera, anders Uit.
x CAM1: Aan, als u gebruik maakt van een extra camera, anders Uit.
x CAM2: Aan, als u gebruik maakt van nog een extra camera, anders
Uit.
4.4.5 Menu Video
x Opnemen: Aan, bij gebruik van een SD kaartje in de monitor om
automatisch een video opname te maken als er aangebeld wordt.
x Afspelen: Speelt automatisch alle opnames af. Met knop 8 kunt u
door de opnames stappen.
x Formatteren: Formatteert het geplaatste SD kaartje.
x FW Update (SD):Hiermee kan een eventueel beschikbare firmware
update vanaf het SD kaartje geïnstalleerd worden.
Kies afsluiten om het menu af te sluiten.(Menu sluit na uw laatste keuze
automatisch na 1 minuut af)
Page 94

© MARMITEK
94
5 EEN BEZOEKER BELT AAN
In dit voorbeeld zijn er 2 beldrukkers met camera aangesloten.
Heeft u maar 1 beldrukker, volg dan alleen de linker kolom.
Zowel het beeld als de spraak van de bezoeker blijft gedurende 20
seconden actief als de deuropener bediend wordt. Zo kunt u
controleren of de deuropener goed gewerkt heeft.
Als er een SD kaart in de monitor is geïnstalleerd, zal bij elke keer
aanbellen een video opname gemaakt worden.
STANDBY modus
De bezoeker belt aan bij
beldrukker
1
U hoort gedurende
5…30
seconden
zowel binnen als
buiten een
melodie
.
(1 van de 16 te kiezen
melodieën)
Het beeld van de
bezoeker verschijnt
automatisch op de
monitor.
Druk op de intercom knop
(5).
De melodie
stopt.
U kunt nu een conversatie
starten via
beldrukker 1
Het gesprek stopt
automatisch na 120
seconden.
Druk op de deuropener
knop (6) (of loop naar de
deur als deze niet is
geïnstalleerd)
De deuropener wordt
geactiveerd.
Druk op de verbinding
verbreek knop (7)
Standby
De bezoeker belt aan bij
beldrukker 2
Als op zowel beldrukker 1 als 2 tegelijk aangebeld
wordt, wordt de beldrukker waar het eerst op gedrukt is
doorverbonden met de monitor. Op de monitor hoor je
vervolgens 3 korte tonen ten teken dat er op de andere
beldrukker ook aangebeld is.
Als de camera van de buitenunit geblokkeerd wordt,
en u geen beeld van de bezoeker kunt zien, druk
dan op de monitor knop om naar een 2
e
camera over
te schakelen. Druk nogmaals
op de monitor knop om
weer beeld te krijgen van de buitenunit.
De monitor gaat automatisch in de standby modus als
er binnen 60 seconden niet op de intercom knop is
gedrukt.
Page 95

DoorGuard 470
95
NEDERLANDS
6 NAAR BUITEN KIJKEN
Als u maar 1 beldrukker met camera gebruikt, kunt u ook naar standby
gaan door op de verbinding verbreek knop (7) te drukken.
Als op de monitor de monitor functie actief is, en er wordt dan aangebeld,
dan schakelt de monitor automatisch over naar het beeld waar aangebeld
wordt.
STANDBY modus
Druk op de monitor knop (4).
Het beeld van de eerste
camera wordt weer gegeven.
De weergave stopt
automatisch na 60
seconden.
Druk op de intercom knop (5).
U kunt nu een conversatie
starten via de camera
Druk op de verbinding
verbreek knop (7).
Standby
Druk
nogmaals op de
monitor
knop
(4).
Het beeld van de tweede
camera wordt weer gegeven.
Druk
nogmaals op de
monitor
knop
(4) om naar standby te
gaan
.
Druk op de deuropener knop
(6) om deze te activeren
Page 96

© MARMITEK
96
7 VEELGESTELDE VRAGEN
Kan ik het speaker volume in de beldrukker instellen?
Op de achterkant van de beldrukker bevindt zicht achter het rubberen
afsluitdopje een kleine volume regelaar. Met een kleine schroevendraaier
kunt u voorzichtig het volume bijregelen.
Wat is de advieshoogte voor het monteren van de beldrukker?
De advieshoogte is 1,60 meter. Let ook op invallend licht van de zon,
straatverlichting en dergelijke.
Kan ik meerdere monitoren parallel aansluiten?
Nee, een tweede monitor sluit u aan op de eerste monitor. Een derde
monitor weer op de tweede monitor en de vierde monitor weer op de
derde monitor. Vervolgens dient u in het instellingen menu van iedere
monitor in te stellen of het een Master of Slave monitor is. De eerste
monitor is altijd Master, de andere 3 monitoren zijn Slave. (Zie 4.4.4 Menu
Camera)
Als ik een deuropener wil installeren, kan ik die dan vanaf iedere
monitor bedienen?
Ja, u kunt de deuropener vanaf iedere monitor bedienen.
Kan ik het belsignaal van de monitor instellen?
U kunt uit 16 verschillende belmelodiën kiezen, de tijdsduur instellen en
voor 3 tijdspannes het volume aanpassen. Dit kunt u per monitor
instellen.
(Zie 4.4.1 Menu Bel)
Ik heb een duidelijk hoorbare brom tijdens het gesprek.
Brom kan veroorzaakt worden door interferentie met andere type
installaties. Kabels met hoge wisselspanningen naast intercomkabels is
veelal een zekerheid dat er brom gaat ontstaan in de deurintercom. Als
het niet te vermijden is, dat een gedeelte van de intercomkabel langs
230V leidingen moet lopen, zorg dan voor afgeschermde kabels. (zie 3.1
Benodigde type kabel)
Waarvoor zijn de 3 extra draden aan het beldrukker snoer?
De blauwe en bruine draad zijn de schakeldraden voor de deuropener.
De rood/witte draad levert 12 volt als de camera actief is. Daar kan
bijvoorbeeld een externe DVR mee aangestuurd worden.
Heeft u vragen die hierboven niet beantwoord worden?
Kijk dan op www.marmitek.com.
Page 97

DoorGuard 470
97
NEDERLANDS
8 TECHNISCHE SPECIFICATIES
OCW470 Beldrukker met camera en regenkap
Resolutie 420TVL
Camera ¼”CMOS kleur
Lens en hoek 100°
Lichtgevoeligheid 0,1 LUX
Nachtzicht 4 Infrarood LED’s (60°)
nachtzicht afstand 0,5 ~1 m
Geluid Ingebouwde microfoon en luidspreker
Deuropen schakelaar Dry contact, N.O., Max 1A.
Ontgrendel tijd 2…10 seconden (instelbaar)
Actief verbruik 200mA Max.
Adapter wordt vanuit binnenunit gevoed
Montage Opbouw
Afmetingen 125 x 60 x 35 mm (h b d)
Omgevingstemperatuur -40 ~ +50°C (Bedrijf)
Luchtvochtigheid ≤ 85% RH
CM470 Monitor
Beeldscherm 7 inch TFT LCD
Resolutie 800(H) x 3 (RGB) x 480 (V)
Video systeem PAL/NTSC compatible
Intercom modus Semi-duplex communicatie
Gespreksduur 120 seconden
Standby verbruik 300 mA max.
Actief verbruik 600 mA max.
Bel selectie Keuze uit 16 melodiën
Bel tijdsduur 5…30 seconden
Bel volume tijdafhankelijk in te stellen
SD kaart slot max 32 GB
Fat 32 geformatteerd
Class 10 of hoger
Adapter DC12V
Omgevingstemperatuur -10 ~ +60°C (Bedrijf)
Montage Opbouw
Afmetingen 194 x 124 x 18 mm
Met het oog op verdere verbetering van het product behoudt Marmitek zich het recht voor om
specificaties en/of ontwerpen zonder voorafgaande kennisgeving te wijzigen.
Page 98

© MARMITEK
98
Milieu-informatie voor klanten in de Europese Unie
De Europese Richtlijn 2002/96/EC schrijft voor dat apparatuur die is
voorzien van dit symbool op het product of de verpakking, niet mag worden
ingezameld met niet-gescheiden huishoudelijk afval. Dit symbool geeft aan dat het
product apart moet worden ingezameld. U bent zelf verantwoordelijk voor de
vernietiging van deze en andere elektrische en elektronische apparatuur via de
daarvoor door de landelijke of plaatselijke overheid aangewezen
inzamelingskanalen. De juiste vernietiging en recycling van deze apparatuur
voorkomt mogelijke negatieve gevolgen voor het milieu en de gezondheid. Voor
meer informatie over het vernietigen van uw oude apparatuur neemt u contact op
met de plaatselijke autoriteiten of afvalverwerkingsdienst, of met de winkel waar u
het product hebt aangeschaft.
AUTEURSRECHTEN
Marmitek is een handelsmerk van Pattitude BV
DoorGuard 470™ is een handelsmerk van Marmitek BV Alle rechten
voorbehouden.
Deze handleiding is met uiterste zorg samengesteld. Marmitek aanvaardt geen
aansprakelijkheid voor druk- of typefouten. Auteursrechten en alle andere
eigendomsrechten op de inhoud (inclusief maar niet beperkt tot model nummers,
software, audio, video, tekst en foto's) berust bij Marmitek BV. Elk gebruik van de
inhoud, maar zonder beperking, distributie, reproductie, wijziging, openbaarmaking
of verzending zonder de voorafgaande schriftelijke toestemming van Marmitek is
strikt verboden. Alle auteursrechten en andere eigendomsrechten dienen te
worden behouden op alle reproducties.
Andere in deze handleiding genoemde bedrijfs- of productnamen kunnen
handelsmerken van de desbetreffende bedrijven zijn. Producten van andere
fabrikanten worden alleen genoemd ter informatie. Dit betekent niet dat deze
producten door Marmitek worden aanbevolen of door Marmitek zijn goedgekeurd.
Marmitek aanvaardt geen enkele aansprakelijkheid met betrekking tot de
betrouwbaarheid van deze producten.
MARMITEK BV - POSTBUS 4257 - 5604 EG EINDHOVEN – NEDERLAND
Page 99

DoorGuard 470
99
NEDERLANDS
Page 100

 Loading...