

Page 1
Page 2

2
© MARMITEK
Page 3

3
1 Table of contents
1 Table of contents .................................................................... 3
2 Safety instructions................................................................... 4
3 Your product ........................................................................... 5
3.1 Introduction ............................................................................. 5
3.2 Package contents ................................................................... 6
3.3 Product overview .................................................................... 6
3.4 LED status .............................................................................. 8
3.4.1 Transmitter LED status ................................................ 8
3.4.2 Receiver LED status, battery power ............................. 8
3.4.3 Receiver LED status, USB power ................................ 8
4 Getting started ........................................................................ 9
4.1 First use .................................................................................. 9
4.2 Installing the transmitter .......................................................... 9
4.3 Installing the receiver .............................................................. 9
4.4 Pairing the transmitter and receiver ....................................... 10
4.5 Setting the volume ................................................................ 10
5 Connection options transmitter .............................................. 11
5.1 Analogue input ...................................................................... 11
5.2 Digital Toslink input ............................................................... 11
5.3 USB input ............................................................................. 11
6 Additional receiver ................................................................ 11
7 Signal booster ....................................................................... 11
8 Technical specifications ........................................................ 12
9 Frequently asked questions (FAQs) ...................................... 15
10 Notification ............................................................................ 16
10.1 Declaration of Conformity ...................................................... 16
10.2 Recycling .............................................................................. 17
10.3 Copyrights ............................................................................ 17
ENGLISH
Audio Anywhere 725
Page 4

4
2 Safety instructions
Please read these instructions thoroughly before you use the
device and keep them for future reference.
Only for indoor use.
Do not use the product in a damp environment or near water.
Do not expose the product to extremely high or low
temperatures, strong light sources or direct sunlight.
This product is not a toy. Keep out of reach of children.
Connect the adapter to the mains only after you have verified
that the line voltage corresponds to the value specified on
the type plates.
Never connect a power adapter if it's damaged. In such
cases, please contact your supplier.
Disconnect the AC/DC power adapter from the mains when
this device is not in use for prolonged time.
Never open the product: the device may contain parts with
deadly voltage.
Repairs or service should only be performed by qualified
personnel.
Improper use, self-installed modifications or repairs will void
any and all warranties.
Marmitek does not accept any product responsibility for
incorrect use of the product or use other than for which the
product is intended.
Marmitek does not accept liability for any consequential
damage other than the legal product responsibility.
© MARMITEK
Page 5

5
3 Your product
3.1 Introduction
Congratulations on your purchase of the Marmitek
Audio Anywhere 725. The Audio Anywhere 725 consists of a
transmitter and a receiver. The signal is transmitted at 2.4GHz
and can therefore go through walls and ceilings.
The transmitter/receiver can be used to transmit (stereo) audio
signals wirelessly.
Digital Wireless Audio sender
Wirelessly enjoy music and TV audio.
Wirelessly send your TV's or computer's audio to your stereo
system, speakers or headphones.
Listen to the music you are playing in the living room and in
other rooms (e.g. kitchen/conservatory) simultaneously.
Digital audio transmission in HD quality via improved 2.4GHz
interference-free technology.
Ideal as a portable solution due to the receiver's built-in
battery and dedicated volume control.
Multiple receivers can be connected to one transmitter.
Use secured pairing to use multiple sets (up to 6) in the
same surroundings.
Via the Audio Anywhere 725, you can playback TV audio or music
on your audio system, without using cables to connect your audio
source to the audio system. The audio source could, for example,
be a PC or laptop, or a TV. You can then use the audio source to
select the music and adjust the volume on the transmitter or
receiver, without having to walk to your audio system.
The receiver has a built-in battery, so you can, for example, also
make your wired headphones or active speakers wireless.
The Audio Anywhere 725 has a range of approx. 40 metres,
enabling you to enjoy your audio in the same or adjoining room
without limitations.
ENGLISH
Audio Anywhere 725
Page 6
6
3.2 Package contents
A. 1 x Audio Anywhere 725 transmitter.
B. 1 x Audio Anywhere 725 receiver.
C. 2 x Micro USB cable.
D. 2 x USB power adapter.
E. 1 x Mini-jack cable.
F. 1 x User Manual.
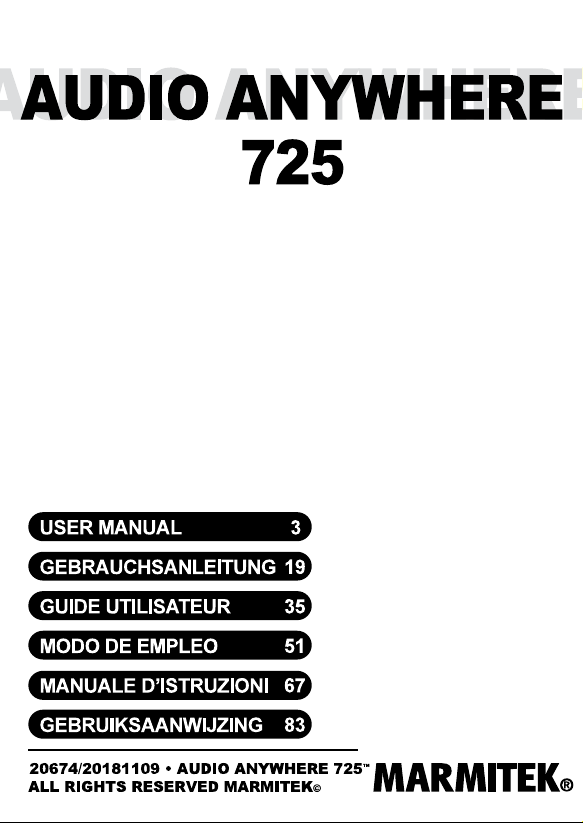
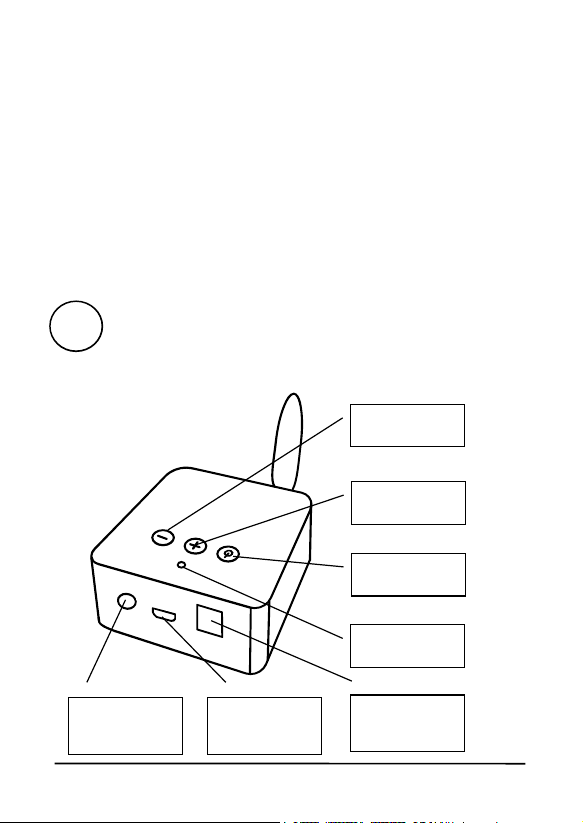
3.3 Product overview
Transmitter
A
Volume -
Volume +
On/off
LED
Aux in
Micro USB
jack
Toslink
input
© MARMITEK
Page 7
7
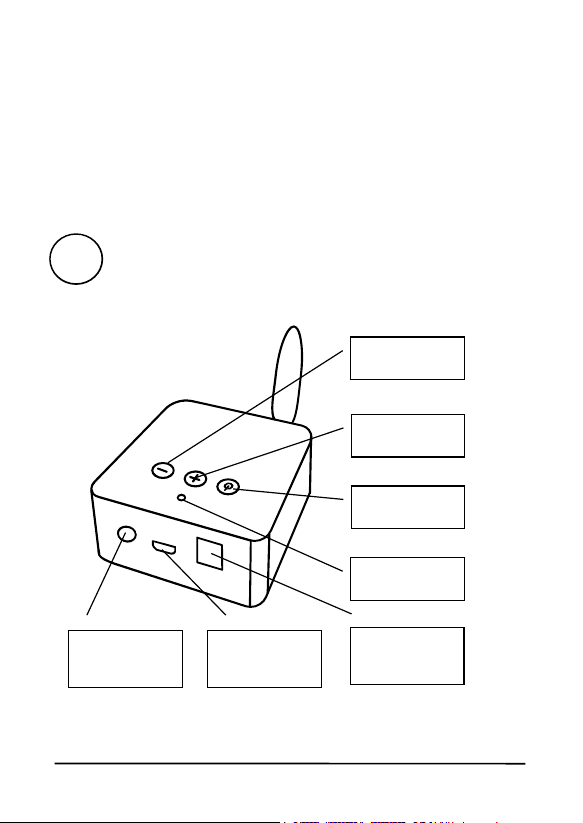
B
Receiver
Volume +
Volume -
ENGLISH
On/off
Micro USB
jack
Jack out
Aux out
C
Micro USB power cable
This cable enables you to power the Audio Anywhere 725.
D
USB power adapter
Connect D to C and power the Audio Anywhere
725.
Audio Anywhere 725
LED
Page 8
8
LED status
Description
LED status
Description
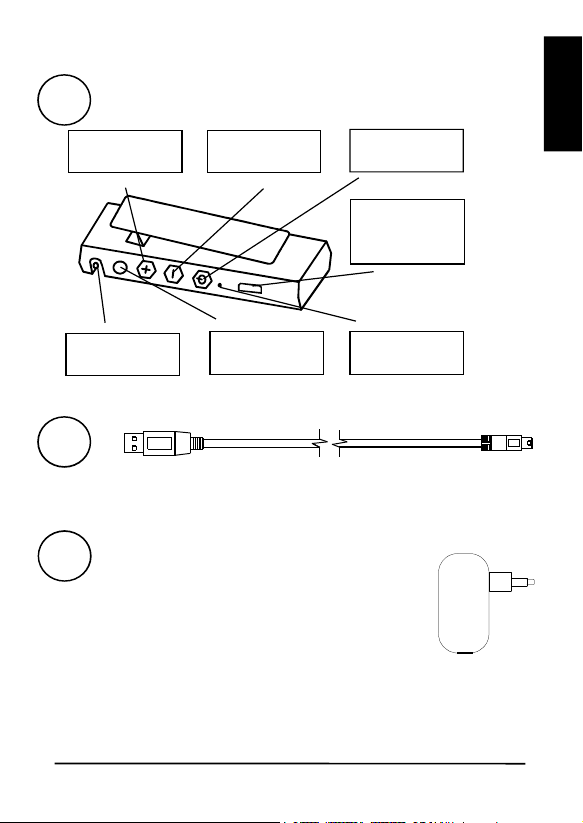
E
Mini jack cable
This cable connects to the audio input of the Audio Anywhere
transmitter.
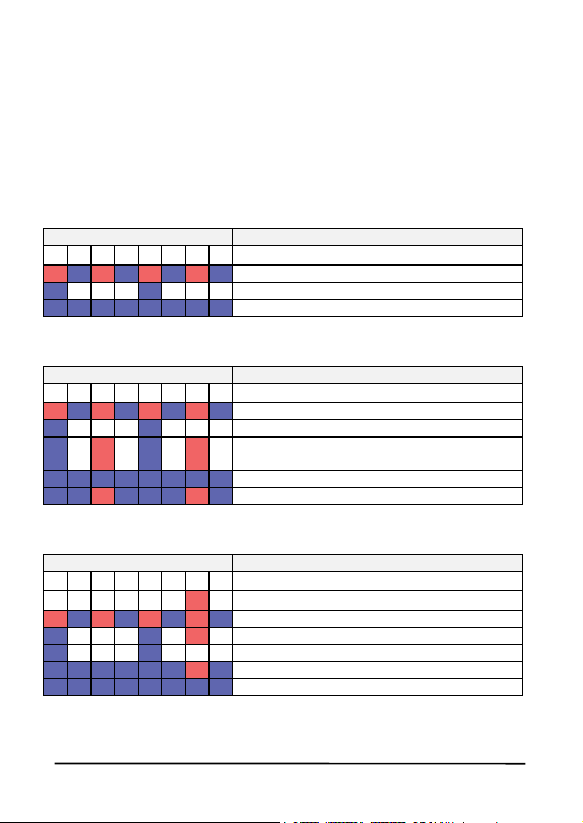
3.4 LED status
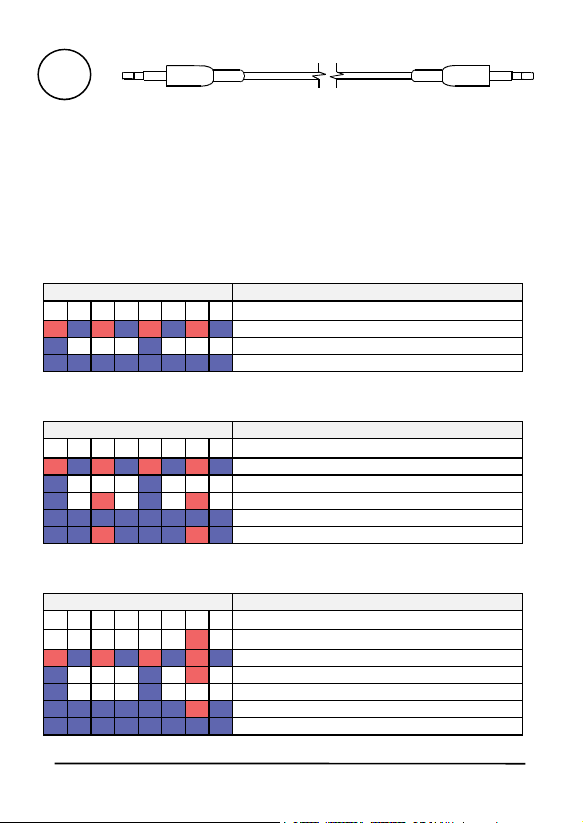
3.4.1 Transmitter LED status
The LED can be red (R) or blue (B). The speed and sequence of
flashes indicate the status.
R B R B R B R B
B B
B B B B B B B B
Pairing
Waiting for connection
Connected
3.4.2 Receiver LED status, battery power
Off
R B R B R B R B
B B
B R B R
B B B B B B B B
B B R B B B R B
Off
Pairing
Waiting for connection
Waiting for connection, low battery
Connected
Connected, low battery
3.4.3 Receiver LED status, USB power
LED status Description
R B R B R B R B
B B R
B B
B B B B B B R B
B B B B B B B B
Off, battery charged
R
Off, battery charging
Pairing
Waiting for connection, battery charging
Waiting for connection, battery charged
Connected, battery charging
Connected, battery charged
© MARMITEK
Page 9

9
4 Getting started
Please take the following steps before using the product:
Installing the transmitter.
Installing the receiver.
Connecting the transmitter and receiver.
Setting the volume.
Enjoy!
We will now explain this step by step.
4.1 First use
The Audio Anywhere 725 receiver has a built-in rechargeable
battery.
Upon first use, we recommend that you fully charge the battery
first. To do this, use the included USB cable and connect it to the
supplied adapter. During charging, the red LED will flash slowly.
It is normal for the first charge to take about 2 hours. Once the
battery of the Audio Anywhere 725 receiver is fully charged, the
red LED will switch off.
4.2 Installing the transmitter
Any audio source can be connected to the transmitter such as a
TV, computer or audio system.
Connect the mini jack plug to, for example, the headphones jack
of your TV, smartphone or radio/CD player.
1. Connect the adapter to the micro USB port and plug the
adapter into the wall socket.
2. Press the on/off button. The blue LED will now start to flash
slowly.
3. Let your audio source produce sound.
4.3 Installing the receiver
1. Connect the mini jack plug (jack out) to, for example, the
AUX IN of an active speaker, headphones or a radio/CD
player.
ENGLISH
Audio Anywhere 725
Page 10

10
2. Connect the adapter to the micro USB port and plug the
adapter into the wall socket. The red LED flashes slowly
when the battery is charging.
3. Press the on/off button. The Audio Anywhere 725 receiver
will now switch on and the blue LED will flash slowly. (The
red LED flashes occasionally when the battery is still
charging.)
4.4 Pairing the transmitter and receiver
Upon first use, the receiver must be paired with the transmitter.
Make sure the transmitter and receiver are switched off.
1. Press and hold the transmitter's on/off button for 2 seconds.
The red/blue LED will now start to flash. The transmitter is
now in pairing mode for 20 seconds.
2. Shortly press the receiver's on/off button. The red/blue LED
will now start to flash, after which the blue LEDs on the
transmitter and receiver will light up continuously to indicate
successful pairing. (If the LEDs continue to flash rapidly, the
transmitter was probably in pairing mode for more than 20
seconds, cancelling the pairing. You will then need to put the
transmitter into pairing mode again and re-try pairing the
transmitter and receiver.)
4.5 Setting the volume
On the transmitter, you can adjust the volume to all receivers
using the + and - buttons.
On the receiver, you can adjust the volume per receiver.
© MARMITEK
Page 11

11
5 Connection options transmitter
The transmitter features the following connection options:
5.1 Analogue input
Used to connect any analogue output such as an MP3 player,
smartphone, TV or audio system.
5.2 Digital Toslink input
Used to connect the Toslink output of your audio system or TV.
Make sure that the Toslink setting on your audio system or TV is
set to stereo.
5.3 USB input
Used to connect your PC's USB connection, in order to use it as
an audio output.
6 Additional receiver
Additional receiver for your Audio Anywhere 725.
An additional receiver allows you to receive the transmitter's
signal at multiple locations in the home.
You can connect up to 16 receivers to 1 transmitter.
Follow the instructions in chapter 4.4 to add an additional receiver.
7 Signal booster
The transmitter and receiver have an indoor range of about 10
metres, through walls and ceilings.
If that is insufficient, you can purchase an additional set and
connect the receiver to the transmitter to act as a signal booster.
In this situation, you connect the first transmitter to the first
receiver. Connect the audio output of the first receiver to the audio
input of the second transmitter, and connect the second
transmitter to the second receiver. You now have a range of 20
metres. You can repeat this as many times as necessary to cover
the required distance.
ENGLISH
Audio Anywhere 725
Page 12

12
8 Technical specifications
Transmitter
Power supply 100-240 VAC 50/60 Hz, 5V DC
DC Power 5V, trough Micro USB
Power Consumption < 0.2W
Linking (pairing) Automatic Pairing and connection
-Frequency Response 10Hz to 22kHz.
Total audio delay 16 ms
Support Multipair party mode Up to 16 devices simultaneously.
Electric performance RF
Audio transfer method Digital
Pairing Automatically
Data transfer speed Up to 2 Mbps, GFSK modulation
Transmitter frequency 2.4 GHz
Frequency Hopping Triple carrier hopping
Channels 79 channels
Transmit Power (Class 2) 10 dBm
Operating range Up to 40 m free field, up to 10 m
Input
Interface audio Input 3.5 mm stereo jack
Audio
Audio Input Level (Max) 1.2V (RMS)
Audio Frequency Range 20Hz ~ 22kHz
Dynamic Range Typ. 95 dBA
Channel separation 85 dB
Signal to noise ratio
Total Harmonic Distortion 1.5%
DAC DSP Co-Processor 16-bit Internal
Sample Rate 48 kHz / 16 bits
Physical
Audio Functions Volume+, Volume-, Power
LEDs Power, Link
adapter
through walls and ceilings
USB digital stereo
Toslink digital stereo
Stereo CODEC with -95dB SNR.
© MARMITEK
Page 13

13
Antenna Extern, omnidirectional
Antenna Gain 2 dBi
Antenna Port Impedance 50 ohm
Dimension 65 x 55 x 25 mm
Weight 60 grams.
Operation Temperature 0 ~ +50°C
Receiver
Power supply 100-240 VAC 50/60 Hz, 5VDC via
Micro USB
DC Power 5V, via Micro USB
Power Consumption < 0.1W standby
< 3W operation
1.5W for charging
Power Micro USB or battery
Power Consumption < 0.2W
Battery Li-ion 3.7 V
- Battery Charging Voltage 5 V
- Battery Capacity 545mAh
-Stand-by Time Up to 280 hours
- Battery working time 8 hours
-Charging Time 2 hours
-Working Current 65 mA
Automatic shutdown 10 minutes
Control Auto Pairing and connection
Electric performance RF
AV RF transmission digital
Pairing Automatically
RF Data Rate Up to 2 Mbps, GFSK modulation
RF Frequency 2.4 GHz
Frequency 2402~2480 MHz
Frequency Hopping 500 hops/seconds
Channels 79 channels
Transmit Power (Class 2) 4 dBm (Max)
Transmission Range Up to 40 m free field, up to 10 m
through walls and ceilings
Output
Interface audio output 3.5 mm stereo jack
Output Power 20 mW RMS
ENGLISH
Audio Anywhere 725
Page 14

14
Audio Output Level (Max) 1,2V ( RMS )
Frequency characteristic 20Hz ~ 22kHz
Dynamic Range Typ. 95 dBA
Channel Separation Audio R/L 85 dB
Signal to noise ratio
Total harmonic distortion 0.05%
DAC DSP Co-Processor 16-bit Internal
Stereo CODEC with -95dB SNR.
Sample Rate Up to 44,1 kHz
Sample Rate 48kHz / 16 bits
Physical
Audio Functions Volume+, Volume-, Power
LEDs Power, Link
Antenna Internal, omnidirectional
Antenna Gain 2 dBi
Dimension 80 x 30 x 20 mm with clip
Weight 30 grams.
Ambient temperature 0 ~ +50°C
In order to continue improving the product, Marmitek
reserves the right to change specifications and/or designs
without prior notice.
© MARMITEK
Page 15

5
9 Frequently asked questions (FAQs)
I cannot pair my Audio Anywhere 725.
Please check the following:
1. Ensure that the mains adapter is connected and the LED is lit
or flashing.
2. Make sure that the distance between the transmitter and
receiver does not exceed 10 metres and there are no major
obstacles between them.
There is no sound coming from my audio system
Make sure that the audio cable is connected properly (AUX
IN), the correct input is selected on your audio system and
the volume of your audio system is set to the desired level.
Check that the volume on the transmitter or receiver is not
set to low.
I have paired my TV's audio wirelessly with my audio system,
but the sound is not in sync with the video.
For best results, connect the Audio Anywhere 725 transmitter to
your TV's audio output, instead of the audio output of your set-top
box or satellite receiver.
Connecting the transmitter to the headphone output turns off your
TV speakers and allows you to continue using your TV's remote
control to control the volume through the Audio Anywhere 725.
Can I connect my speakers to the receiver directly?
In order to hear sound or music, connect the receiver to an
amplifier with separate (built-in) speakers or so-called active
speakers (with built-in amplifier). You cannot connect passive
speakers directly to the receiver. You can, however, connect
passive headphones to the receiver.
ENGLISH
Can I also connect my transmitter/receiver's USB cable to a
USB connector of, for example, my amplifier or TV?
Yes, you can. The transmitter will then automatically switch on
and off, in line with the amplifier or TV. (auto power on)
Audio Anywhere 725 1
Page 16

16
Do you have any other questions that have not been resolved by
the above information? Please go to http://www.marmitek.com.
10 Notification
10.1 Declaration of Conformity
Hereby, Marmitek BV, declares that this
Audio Anywhere 725 is in compliance with the
the following Directives:
Directive 2014/53/EU of the European Parliament and of the
Council of 16 April 2014 on the harmonisation of the laws of the
Member States relating to the making available on the market of
radio equipment and repealing Directive 1999/5/EC.
Directive 2011/65/eu of the European parliament and of the
council of 8 June 2011 on the restriction of the use of certain
hazardous substances in electrical and electronic equipment.
Commission Regulation (EC) No 278/2009 of 6 April 2009
implementing Directive 2005/32/EC of the European Parliament
and of the Council with regard to eco-design requirements for noload condition electric power consumption and average active
efficiency of external power supplies.
You can read the full Declaration of Conformity at
http://www.marmitek.com
essential requirements and other relevant provisions of
© MARMITEK
Page 17

17
10.2 Recycling
Environmental Information for Customers in the
European Union and other European countries with
separate collection systems.
This symbol on the product or on its packaging indicates that this
product shall not be treated as household waste. Instead it shall
be handed over to the applicable collection point for the recycling
of electrical and electronic equipment. It is your responsibility to
dispose of this and other electric and electronic equipment via
designated collection facilities appointed by the government or
local authorities. Correct disposal and recycling will help prevent
potential negative consequences to the environment and human
health. For more detailed information about the disposal of your
old equipment, please contact your local authorities, waste
disposal service, or the shop where you purchased the product.
10.3 Copyrights
Marmitek is a trademark of Germatron B.V.
Audio Anywhere 725
All rights reserved. Every effort has been made to ensure that the
information in this manual is accurate. Marmitek is not responsible
for printing or clerical errors. Copyright and all other proprietary
rights in the content (including but not limited to model numbers,
software, audio, video, text and photographs) rests with Marmitek
B.V. Any use of the Content, but without limitation, distribution,
reproduction, modification, display or transmission without the
prior written consent of Marmitek is strictly prohibited. All copyright
and other proprietary notices shall be retained on all
reproductions. Other company and product names mentioned
herein may be trademarks of their respective companies. Mention
of third-party products is for informational purposes only and
constitutes neither an endorsement nor a recommendation.
Marmitek assumes no responsibility with regard to the
performance or use of these products.
ENGLISH
Audio Anywhere 725
Marmitek BV - PO Box 4257 - 5604 EG Eindhoven
The Netherlands
Page 18

18
© MARMITEK
Page 19
19
1 Inhaltsverzeichnis
1 Inhaltsverzeichnis ................................................................. 19
2 Sicherheitshinweise .............................................................. 20
3 Ihr Produkt ............................................................................ 21
3.1 Einführung ............................................................................ 21
3.2 Verpackungsinhalt ................................................................ 22
3.3 Produktübersicht ................................................................... 22
3.4 LED Anzeige ......................................................................... 24
3.4.1 LED Anzeige Sender ................................................. 24
3.4.2 LED Status Empfänger, Batteriespeisung .................. 24
3.4.3 LED Status Empfänger, USB Speisung ..................... 24
4 ............................................................................. 25
4.1 Erste Anwendung.................................................................. 25
4.2 Installation des Senders ........................................................ 25
4.3 Installation des Empfängers .................................................. 26
4.4 Sender und Empfänger koppeln ............................................ 26
4.5 Lautstärke einstellen ............................................................. 26
5 Anschlussmöglichkeiten Sender ........................................... 27
5.1 Analoger Eingang ................................................................. 27
5.2 Digitaler Toslink Eingang ...................................................... 27
5.3 USB Eingang ........................................................................ 27
6 Extra Empfänger ................................................................... 27
7 Signalverstärker .................................................................... 27
8 Technische Daten ................................................................. 28
9 Häufig gestellte Fragen (FAQs) ............................................. 31
10 Hinweis ................................................................................. 32
10.1 Konformitätserklärung ........................................................... 32
10.2 Recycling .............................................................................. 33
10.3 Urheberrechte ....................................................................... 33
DEUTSCH
Audio Anywhere 725
Page 20

20
2 Sicherheitshinweise
Lesen Sie diese Gebrauchsanleitung sorgfältig durch, bevor
Sie das Gerät in Betrieb nehmen und bewahren Sie diese
Anleitung bitte für eventuelle, spätere Bedarfsfälle auf.
Ausschließlich für Verwendung in Innenräumen.
Dieses Produkt nicht in einer feuchten Umgebung oder nahe
Wasserquellen verwenden.
Setzen Sie dieses Produkt nicht extrem hohen oder
niedrigen Temperaturen, starken Lichtquellen und direkter
Sonneneinstrahlung aus.
Dieses Produkt ist kein Spielzeug. Außer Reichweite von
Kindern halten.
Schließen Sie den Netzadapter erst dann an das Stromnetz
an, nachdem Sie überprüft haben, ob die Netzspannung mit
dem auf dem Typenschild angegeben Wert übereinstimmt.
Schließen Sie niemals einen Netzadapter an, wenn diese
beschädigt sind. In diesem Fall nehmen Sie Kontakt mit
Ihrem Lieferanten auf.
Entfernen Sie den AC/DC Speisungsadapter aus der
Steckdose, wenn Sie das Gerät längere Zeit nicht nutzen.
Das Produkt niemals öffnen: Das Gerät kann Teile enthalten,
worauf lebensgefährliche Stromspannung steht.
Überlassen Sie Reparaturen oder Wartung nur Fachleuten.
Bei einer zweckwidrigen Verwendung, selbst angebrachten
Veränderungen oder selbst ausgeführten Reparaturen
verfallen alle Garantiebestimmungen.
Marmitek übernimmt bei einer falschen Verwendung des
Produkts oder bei einer anderen Verwendung des Produktes
als für den vorgesehenen Zweck keinerlei Produkthaftung.
Marmitek übernimmt für Folgeschäden keine andere Haftung
als die gesetzliche Produkthaftung.
© MARMITEK
Page 21

21
3 Ihr Produkt
3.1 Einführung
Herzlichen Glückwunsch zum Erwerb des Marmitek
Audio Anywhere 725. Der Audio Anywhere 725 setzt sich
aus einem Sender und einem Empfänger zusammen. Das
Signal wird auf 2,4 GHZ ausgestrahlt und kann somit durch
Wände und Decken hindurch empfangen werden.
Mit dem Sender/Empfänger können (Stereo) Audiosignale
drahtlos übertragen werden.
Drahtloser Digital-Audiosender
Hören Sie Musik und TV-Ton drahtlos
Versenden Sie den Ton Ihres TV oder PC drahtlos zu
Audioanlage, Lautsprechern oder Kopfhörern.
Hören Sie in einem anderen Raum (z.B. Küche,
Wintergarten) dieselbe Musik wie im Wohnzimmer.
Digitale Audioübertragung in HD Qualität über verbesserte
und störungsfreie 2,4 GHz Technik.
Durch eigene Regelung der Lautstärke und eingebauten
Akku die ideale mobile Lösung.
An den Sender können mehrere Empfänger gekoppelt
werden.
Nutzen Sie durch Secured Pairing mehrere Sets (max. 6) in
derselben Umgebung.
Sie können die Musik einer Tonquelle über den Audio Anywhere
725 auf Ihrer Audioanlage abspielen, ohne Ihre Tonquelle dazu
mit Kabeln verbinden zu müssen. Das kann beispielsweise ein PC
oder Laptop sein, aber auch ein TV. Sie können dann die Musik
über Ihre Tonquelle auswählen und den Ton am Sender oder
Empfänger einstellen, ohne sich zur Audioanlage begeben zu
müssen.
Der Empfänger enthält einen eingebauten Akku, was beinhaltet,
dass Sie auch Ihre verdrahteten Kopfhörer oder aktiven
Lautsprecher drahtlos machen können.
DEUTSCH
Audio Anywhere 725
Page 22
22
Der Audio Anywhere 725 hat eine Reichweite von ca. 40 Metern,
sodass Sie Ihre Musik im selben Raum oder Nebenzimmer
uneingeschränkt regeln können.
3.2 Verpackungsinhalt
A. 1 x Audio Anywhere 725 Sender.
B. 1 x Audio Anywhere 725 Empfänger.
C. 2 x Mikro USB Kabel
D. 2 x USB Speisungsadapter
E. 1 x Mini-Klinkensteckerkabel
F. 1 x Gebrauchsanleitung
3.3 Produktübersicht
Sender
A
Volumen -
Volumen +
Ein/Aus
Aux ein
Mikro USB
Anschluss
LED
Toslink
Eingang
© MARMITEK
Page 23

23
B
Empfänger
Volumen +
Volumen -
Ein / Aus
Mikro USB
Anschluss
Jack aus
Aux aus
LED
C
Mikro USB Speisungskabel
Mit diesem Kabel können Sie den Audio Anywhere 725 mit Strom
versehen.
D
USB Speisungsadapter
Schließen Sie D an C an und speisen Sie den
Audio Anywhere 725 mit Strom.
E
DEUTSCH
Audio Anywhere 725
Page 24
24
Mini-Klinkensteckerkabel
LED Status
Beschreibung
LED Status
Beschreibung
LED Status
Beschreibung
Dieses Kabel wird mit dem Audioeingang des Audio Anywhere
725 Senders verbunden.
3.4 LED Anzeige
3.4.1 LED Anzeige Sender
Die LED Leuchte kann rot (R) oder blau (B) aufleuchten.
Blinkgeschwindigkeit und -Reihenfolge zeigen den Status an.
R B R B R B R B
B B
B B B B B B B B
Koppeln
Warten auf Verbindung
Verbunden
3.4.2 LED Status Empfänger, Batteriespeisung
Aus
R B R B R B R B
B B
B R B R
B B B B B B B B
B B R B B B R B
Aus
Koppeln
Warten auf Verbindung
Warten auf Verbindung, Batterie fast
erschöpft
Verbunden
Verbunden, Batterie fast erschöpft
3.4.3 LED Status Empfänger, USB Speisung
Aus, Batterie geladen
R
R B R B R B R B
B B R
B B
B B B B B B R B
B B B B B B B B
Aus, Batterie lädt auf
Koppeln
Warten auf Verbindung, Batterie lädt auf
Warten auf Verbindung, Batterie geladen
Verbunden, Batterie lädt auf
Verbunden, Batterie geladen
© MARMITEK
Page 25
25
4
Befolgen Sie nachfolgende Schritte, um das Produkt in Betrieb zu
nehmen:
Installation des Senders
Installation des Empfängers
Sender und Empfänger koppeln
Lautstärke einstellen
Noch einmal alles Schritt für Schritt erklärt.
4.1 Erste Anwendung
Der AudioAnywhere 725 ist mit einer eingebauten, aufladbaren
Batterie versehen.
Für die erste Verwendung empfehlen wir, die Batterie zuvor
vollständig aufzuladen. Verwenden Sie dazu das enthaltene USB
Kabel und schließen Sie dieses an den enthaltenen Adapter an.
Die rote LED wird während des Ladevorgangs langsam blinken.
Dieser Ladevorgang dauert beim ersten Mal in der Regel ca. 2
Stunden. Die rote LED erlischt, wenn die Batterie des Audio
Anywhere 725 Empfängers vollständig geladen ist.
4.2 Installation des Senders
An den Sender kann jegliche Audioquelle angeschlossen werden
wie ein TV, PC oder eine Audioanlage.
Schließen Sie den Mini Buchsenanschluss beispielsweise an den
Kopfhöreranschluss Ihres Fernsehers, Smartphones oder
Radio/CD Players an.
1. Schließen Sie den Adapter an den Mikro USB-Port an und
verbinden Sie den Adapter mit der Steckdose.
2. Drücken Sie die Ein/Aus Taste. Die blaue LED wird nun
langsam blinken.
3. Schalten Sie Ihre Audioquelle ein.
DEUTSCH
Audio Anywhere 725
Page 26

26
4.3 Installation des Empfängers
1. Schließen Sie den Mini Buchsenanschluss (Aus)
beispielsweise an den AUX IN eines aktiven Lautsprechers,
Ihrer Kopfhörer oder Radio/CD Players an.
2. Schließen Sie den Adapter an den Mikro USB-Port an und
verbinden Sie den Adapter mit der Steckdose. Die rote LED
wird langsam blinken, wenn die Batterie geladen wird.
3. Drücken Sie die Ein/Aus Taste. Der Audio Anywhere 725
Empfänger wird sich nun einschalten und die blaue LED
blinkt langsam. (Die rote LED blinkt ab und zu, wenn die
Batterie noch geladen wird).
4.4 Sender und Empfänger koppeln
Koppeln Sie vor der ersten Nutzung Sender und Empfänger
miteinander. Achten Sie dabei darauf, dass sowohl Sender wie
Empfänger ausgeschaltet sind.
1. Halten Sie die Ein/Aus Taste des Senders 2 Sekunden lang
fest. Die rote LED wird nun langsam blinken. Der Sender
befindet sich nun 20 Sekunden lang im Koppelmodus.
2. Drücken Sie kurz die Ein/Aus Taste des Empfängers. Die rot
blaue LED wird nun blinken und daraufhin wird die blaue
LED am Sender und Empfänger kontinuierlich leuchten was
bedeutet, dass die Kopplung (das Pairing) erfolgreich
verlaufen ist. (Blinken die LEDs weiterhin schnell, so stand
der Sender wahrscheinlich länger als 20 Sekunden im
Koppelmodus und wurde aufgehoben. In diesem Fall muss
der Sender erneut in den Koppelmodus gebracht werden.
Sender und Empfänger koppeln dann nachträglich
nochmals).
4.5 Lautstärke einstellen
Sie können die Lautstärke am Sender mit der + und Taste für
alle Empfänger einstellen.
Am Empfänger kann die Lautstärke pro Empfänger eingestellt
werden.
© MARMITEK
Page 27

27
5 Anschlussmöglichkeiten Sender
Der Sender hat nachfolgende Anschlussmöglichkeiten:
5.1 Analoger Eingang
An diesen können Sie jeden analogen Ausgang anschließen wie
ein MP3 Player, Smartphone, TV oder Audioanlage.
5.2 Digitaler Toslink Eingang
Daran können Sie den Toslink Ausgang Ihrer Audioanlage oder
Ihres TV anschließen. Beachten Sie, dass die Toslink Einstellung
an Ihrer Audioanlage oder Ihrem TV auf Stereo eingestellt ist.
5.3 USB Eingang
An diesen Eingang können Sie den USB Anschluss Ihres PC
anschließen, um diesen als Audioausgang zu nutzen.
6 Extra Empfänger
Extra Empfänger für Ihren Audio Anywhere 725.
Mit diesem extra Empfänger können Sie an mehreren Orten im
Haus das Signal des Senders empfangen.
An einen Sender können maximal 16 Empfänger gekoppelt werden.
Befolgen Sie die Schritte in Kapitel 4.4, um einen extra Empfänger
hinzuzufügen.
7 Signalverstärker
Sender und Empfänger haben innerhalb des Hauses eine Reichweite
von ca. 10 Metern durch Wände und Decken hindurch.
Sollte das nicht genügen, so können Sie ein zweites Set anschaffen
und den Empfänger an den Sender anschließen, um als
Signalverstärker zu fungieren.
Dazu koppeln Sie den ersten Sender an den ersten Empfänger.
Schließen Sie den Audioausgang des ersten Empfängers an den
Audioeingang des zweiten Senders an und koppeln Sie den zweiten
Sender mit dem zweiten Empfänger. Die Reichweite beträgt nunmehr
20 Meter. Dieser Vorgang kann beliebig oft wiederholt werden, um
den gewünschten Abstand zu überbrücken.
DEUTSCH
Audio Anywhere 725
Page 28

28
8 Technische Daten
Sender
Speisung 100-240 VAC 50/60 Hz, 5V DC
DC Speisung 5V, über Micro-USB
Stromverbrauch < 0.2W
Koppeln (Pairing) Automatisch koppeln und
-Frequenzbereich 10Hz bis 22kHz
Gesamte Audioverzögerung 16 ms
Unterstützung Multi Pair Partymode Bis zu 16 geräte
Elektrische Ausführung RF
RF AV Datentransfer Digital
Pairing Automatisch
Datenverarbeitungsgeschwindigkeit Bis zu 2 Mbps, GFSK
Senderfrequenz 2,4 GHz
Frequenzsprung Triple carrier hopping
Kanäle 79 Kanäle
Sendeleistung ( Klasse 2 ) 10 dBm
Verwendungsfähige Reichweite bis zu 40m freies Feld, bis zu 10m
Eingang
Interface Audioeingang 3,5 mm Stereo Stecker Anschluss
Ton
Audio Eingangspegel ( Max ) 1,2V ( RMS )
Audio-Frequenzbereich 20Hz ~ 22kHz
Dynamikumfang Nom. 95 dBA
Kanaltrennung
Signal / Rauschverhältnis
Gesamte Harmonische Verzerrung 1,50%
DAC DSP Co-Processor 16-bit Internal
adapter
verbinden.
gleichzeitig
Frequenzumtastung
durch Wände und Decken
hindurch.
USB digital Stereo
Toslink digital Stereo
Stereo CODEC with -95dB SNR.
© MARMITEK
Page 29

29
Abtastgeschwindigkeit 48 kHz / 16 bits
Physikalisch
Audiofunktionen Volumen+, Volumen-, Power
LED's Power, Link
Antenne Extern, omnidirektional
Antennenverstärkung 2 dBi
Impedanz Antennenanschluss 50 ohm
Maßangaben (H x B x D) 65 x 55 x 25 mm
Gewicht 60 gramm
Betriebstemperatur 0 ~ +50°C
Empfänger
Speisung 100-240 VAC 50/60 Hz, 5VDC
über Mikro USB
DC Speisung 5V, über Mikro USB
Stromverbrauch < 0.1W standby
< 3W in Betrieb
1,5W für den Ladevorgang
Speisung Mikro USB oder Batterie
Stromverbrauch < 0.2W
Akku Li-ion 3,7 V
- Akku Ladespannung 5 V
- Akkuleistung 545mAh
-Stand-by Zeit Bis zu 280 Stunden
-Betriebszeit 8 Stunden
-Ladedauer 2 Stunden
-Stromverbrauch 65 mA
Automatische Abschaltung 10 Minuten
Verbindung Automatisch koppeln und
verbinden.
Elektrische Ausführung RF
RF AV Datentransfer Digital
Pairing Automatisch
RF Datenrate Bis zu 2 Mbps, GFSK
Frequenzumtastung
RF Frequenz 2,4 GHz
Frequenz 2402~2480 MHz
Frequenzsprung 500 Hops / Sekunde
Kanäle 79 Kanäle
DEUTSCH
Audio Anywhere 725
Page 30

30
Sendeleistung ( Klasse 2 ) 4 dBm ( Max )
Reichweite Bis zu 40m freies Feld, bis zu
Ausgang
Interface Audioausgang 3,5 mm Stereo Stecker Anschluss
Ausgangsleistung 20 mW RMS
Audio Ausgangspegel ( Max ) 1,2V ( RMS )
Frequenzgang 20Hz ~ 22kHz
Dynamikumfang Nom. 95 dBA
Kanalabstand Audio R / L
Signal / Rauschverhältnis
Gesamte Naturtonreihe 0.05%
DAC DSP Co-Processor 16-bit Internal
Abtastgeschwindigkeit Bis zu 44,1 kHz
Abtastgeschwindigkeit 48kHz / 16 bits
Physikalisch
Audiofunktionen Volumen+, Volumen-, Power
LED's Power, Link
Antenne Intern, omnidirektional
Antennenverstärkung 2 dBi
Maßangaben (H x B x D) 80 x 30 x 20 mm mit Clip
Gewicht 30 gramm
Umgebungstemperatur 0 ~ +50°C
Hinsichtlich weiterer Produktverbesserungen behält sich Marmitek
das Recht vor, Spezifikationen und/oder Entwürfe ohne vorherige
Ankündigung zu ändern.
10m durch Wände und Decken
hindurch.
Stereo CODEC with -95dB SNR.
© MARMITEK
Page 31

31
9 Häufig gestellte Fragen (FAQs)
Ich kann meinen Audio Anywhere 725 nicht koppeln.
Achten Sie auf Nachfolgendes:
1. Überprüfen Sie, ob der Netzadapter angeschlossen ist und
die LED leuchtet oder blinkt.
2. Halten Sie einen Abstand unter 10 Metern zwischen Sender
und Empfänger ohne große, im Weg stehende Hindernisse
ein.
Meine Audioanlage bleibt still
Überprüfen Sie, ob das Audiokabel richtig angeschlossen ist
(AUX IN), der richtige Eingang auf Ihrer Stereoanlage
gewählt wurde und der Ton Ihrer Stereoanlage auf das
gewünschte Niveau eingestellt ist.
Prüfen Sie, ob Sender oder Empfänger auch nicht auf
Stumm eingestellt ist.
Ich habe den Ton meines Fernsehers drahtlos an meine
Audioanlage gekoppelt, doch Bild und Ton laufen nicht
synchron.
Das beste Ergebnis erzielen Sie, wenn Sie den Audio Anywhere
Sender an den Audioausgang Ihres Fernsehers anschließen und
nicht an den Audioausgang Ihrer Settop-Box oder Ihres
Satellitenempfängers.
Wenn Sie den Sender an den Kopfhörerausgang anschließen,
werden die Lautsprecher Ihres Fernsehers ausgeschaltet und
können Sie die Fernbedienung Ihres Fernsehers weiter
verwenden, um den Ton über den Audio Anywhere 725 zu regeln.
Kann ich meine Lautsprecher auch unmittelbar an den
Empfänger anschließen?
Um Ton oder Musik hören zu können, schließen Sie den
Empfänger an einen Verstärker mit losen (Einbau) Lautsprechern
oder so genannten aktiven Lautsprechern (mit eingebautem
Verstärker) an. Sie können passive Lautsprecher nicht unmittelbar
an den Empfänger anschließen. Es ist jedoch möglich, passive
Kopfhörer an den Empfänger anzuschließen.
DEUTSCH
Audio Anywhere 725
Page 32

32
Kann ich das USB Kabel meines Senders/Empfängers auch
an einen USB Anschluss beispielsweise meines Verstärkers
oder Fernsehers anschließen?
Ja, das ist möglich. Der Sender schaltet dann automatisch mit
dem Verstärker oder TV (Auto-Power On) ein und aus.
Sie haben noch Fragen, die im Obigen nicht beantwortet wurden?
Schauen Sie dann auf http://www.marmitek.com
10 Hinweis
10.1 Konformitätserklärung
Hiermit erklärt Marmitek BV die Übereinstimmung des
Audio Anywhere 725
Festlegungen der Richtlinien:
Richtlinie 2014/53/EU des Europäischen Parlaments und des
Rates vom 16. April 2014 über die Harmonisierung der
Rechtsvorschriften der Mitgliedstaaten über die Bereitstellung von
Funkanlagen auf dem Markt und zur Aufhebung der Richtlinie
1999/5/EG.
Richtlinie 2011/65/EU des Europäischen Parlaments und des
Rates vom 8. Juni 2011 zur Beschränkung der Verwendung
bestimmter gefährlicher Stoffe in Elektro- und Elektronikgeräten.
Verordnung (EG) Nr. 278/2009 der Kommission vom 6. April 2009
zur Durchführung der Richtlinie 2005/32/EG des Europäischen
Parlaments und den Bestimmungen im Hinblick auf die
Festlegung von Ökodesign-Anforderungen an die
Leistungsaufnahme externer Netzteile bei Nulllast sowie ihre
durchschnittliche Effizienz im Betrieb.
Anforderungen und den anderen relevanten
Sie können die vollständige Konformitätserklärung unter
http://www.marmitek.com lesen.
© MARMITEK
Page 33

33
10.2 Recycling
Umweltinformation für Kunden innerhalb der Europäischen
Union und anderen europäischen Ländern mit einem separaten
Sammelsystem für diese Geräte.
Das Symbol auf dem Produkt oder seiner Verpackung weist darauf hin,
dass dieses Produkt nicht als normaler Haushaltsabfall zu behandeln ist,
sondern an einer Annahmestelle für das Recycling von elektrischen und
elektronischen Geräten abgegeben werden muss. Es liegt in Ihrer
Verantwortung, dieses Gerät und andere elektrische und elektronische
Geräte über die dafür zuständigen und von der Regierung oder örtlichen
Behörden dazu bestimmten Sammelstellen zu entsorgen.
Ordnungsgemäßes Entsorgen und Recyceln trägt dazu bei, potentielle
negative Folgen für Umwelt und die menschliche Gesundheit zu vermeiden.
Wenn Sie weitere Informationen zur Entsorgung Ihrer Altgeräte benötigen,
wenden Sie sich bitte an die örtlichen Behörden oder städtischen
Entsorgungsdienste oder an den Händler, bei dem Sie das Produkt
erworben haben.
10.3 Urheberrechte
Marmitek BV ist ein Warenzeichen von Germatron BV. Audio Anywhere 725
ist ein Warenzeichen von Marmitek BV Alle Rechte vorbehalten. Weitergehende
Ansprüche sind ausgeschlossen, insbesondere übernimmt Marmitek BV keine
Gewähr für die Richtigkeit des Inhalts dieses Handbuchs. Urheber- und andere
Eigentumsrechte am Inhalt (einschließlich aber nicht beschränkt auf,
Modellnummern, Software, Audio, Video, Text und Fotos begrenzt) liegt bei
Marmitek BV. Jegliche Nutzung von Inhalten, aber ohne Begrenzung, Verteilung,
Vervielfältigung, Änderung, Anzeige oder Übermittlung ohne die vorherige
schriftliche Erlaubnis von Marmitek ist strengstens untersagt. Alle Urheber- und
andere Eigentumsrechte muss auf allen Reproduktionen beibehalten werden.
Die Rechte an anderen in diesem Handbuch erwähnten Marken und
Produktnamen können bei ihren Inhabern liegen und werden hiermit anerkannt.
Die Nennung von Produkten, die nicht von Marmitek sind, dient ausschließlich
Informationszwecken und stellt keine Werbung dar. Marmitek übernimmt
hinsichtlich der Auswahl, Leistung oder Verwendbarkeit dieser Produkte keine
Gewähr.
DEUTSCH
Marmitek BV PO Box 4257 - 5604 EG Eindhoven Niederlande
Audio Anywhere 725
Page 34

34
© MARMITEK
Page 35

35
1 Table des matières
1 Table des matières ............................................................... 35
2 Consignes de sécurité .......................................................... 36
3 Votre produit ......................................................................... 37
3.1 Introduction ........................................................................... 37
3.2 ........................................................ 38
3.3 Description du produit ........................................................... 38
3.4 Statut du voyant LED ............................................................ 40
3.4.1 Statut du voyant LED du transmetteur ....................... 40
3.4.2 Statut du voyant LED du récepteur, alimentation pile . 40
3.4.3 Statut du voyant LED du récepteur, alimentation USB 40
4 Au travail ............................................................................... 41
4.1 Première utilisation ............................................................... 41
4.2 Installation du transmetteur ................................................... 41
4.3 Installation du récepteur ........................................................ 42
4.4 Appairage du transmetteur et du récepteur ........................... 42
4.5 Réglage du volume ............................................................... 42
5 Prises de connexion du transmetteur .................................... 43
5.1 Entrée analogique ................................................................. 43
5.2 Entrée numérique Toslink ..................................................... 43
5.3 Entrée USB ........................................................................... 43
6 Récepteur supplémentaire .................................................... 43
7 Amplificateur de signal .......................................................... 43
8 Spécifications techniques ...................................................... 44
9 Foire aux questions (FAQ) .................................................... 47
10 Notification ............................................................................ 48
10.1 Déclaration de conformité ..................................................... 48
10.2 Recyclage ............................................................................. 49
10.3 Droits d'auteur....................................................................... 49
FRANÇAIS
Audio Anywhere 725
Page 36

36
2 Consignes de sécurité
ultérieure si nécessaire.
N'utilisez pas le produit dans un environnement humide ou à
élevées ou basses, à des sources de lumière trop fortes ou
à la lumière directe du soleil.
Ce produit n'est pas un jouet. Tenir hors de portée des
enfants.
correspond à la valeur indiquée sur les plaques
Ne jamais brancher un adaptateur secteur lorsque celui-ci
est endommagé. Dans ce cas, veuillez contacter votre
fournisseur.
Débranchez l'adaptateur AC/DC de la prise de courant
lorsque celui-ci n'est pas utilisé pendant une longue période.
Ne jamais ouvrir le produit : L'appareil peut contenir des
éléments qui sont sous tension très dangereux.
Confier les réparations et l'entretien exclusivement à un
personnel qualifié.
La garantie n'est plus valable en cas d'usage inapproprié, de
modifications ou de réparations effectuées par des
personnes non agréées.
Marmitek se dégage de toute responsabilité en cas d'usage
inapproprié du produit ou d'utilisation non conforme à l'usage
auquel le produit est destiné.
Marmitek se dégage de toute responsabilité en cas de
dommage conséquent, autre que la responsabilité civile du
fait des produits.
-le pour consultation
© MARMITEK
Page 37

37
3 Votre produit
3.1 Introduction
Félicitations pour l'achat du Marmitek Audio Anywhere 725.
L'Audio Anywhere 725 se compose d'un transmetteur et d'un
récepteur. Le signal est transmis sur une fréquence de 2,4 GHz et
peut donc être capté à travers les murs et les plafonds.
Grâce au transmetteur/récepteur des signaux audio (stéréo)
peuvent être transmis sans fil.
Transmetteur audio numérique sans fil.
Profitez de votre musique et du son de votre téléviseur sans
fil.
vers votre chaîne hifi, vos enceintes ou votre casque.
Ecoutez dans une autre pièce (p. ex. dans la cuisine ou dans
la véranda) la même musique que dans le séjour.
Transmission audio numérique en qualité HD par le biais
Idéal comme solution portable grâce à une pile intégrée dans
le récepteur et à sa propre commande de volume.
Il est possible de connecter plusieurs récepteurs à un seul
transmetteur.
Utilisez plusieurs sets (maximum 6) dans le même espace
Vous pouvez écouter sur votre système audio de la musique en
provenance d'une source audio, par le biais de l'Audio Anywhere
725, sans avoir besoin de connecter votre source audio à votre
système audio avec des câbles. La source audio peut être par
exemple un PC, un ordinateur portable ou un téléviseur. Vous
pouvez ensuite sélectionner la musique par le biais de votre
source audio et régler le volume sur le transmetteur ou sur le
récepteur sans avoir à vous déplacer vers votre système audio.
FRANÇAIS
exemple de transformer votre casque filaire ou vos enceintes
actives en un casque ou en enceintes sans fil.
Audio Anywhere 725
Page 38

38
L'Audio Anywhere 725 a une portée d'environ 40 mètres, de sorte
que vous pouvez régler votre musique sans restriction dans la
même pièce ou dans les pièces adjacentes.
3.2
A. 1 x Transmetteur Audio Anywhere 725.
B. 1 x Récepteur Audio Anywhere 725.
C. 2 x Câbles micro USB.
D. 2 x Adaptateurs d'alimentation USB.
E. 1 x Câble mini-jack.
F.
3.3 Description du produit
Transmetteur
A
Volume
Volume +
Marche/arrêt
Entrée Aux
Prise micro
USB
Voyant LED
Entrée
Toslink
© MARMITEK
Page 39

39
B
Récepteur
Volume +
Sortie Jack
Volume
Entrée Aux
C
Câble d'alimentation micro USB
tension.
D
Adaptateur secteur USB
Connectez D avec C et mettez
Anywhere725 sous tension.
Marche/Arrêt
Prise micro USB
Voyant LED
Anywhere 725 sous
FRANÇAIS
Audio Anywhere 725
Page 40

40
Statut du voyant LED
De
scription
Statut du voyant LED
Description
E
Câble mini-jack
Connectez ce câble
Audio Anywhere 725.
3.4 Statut du voyant LED
3.4.1 Statut du voyant LED du transmetteur
Le voyant LED peut s'allumer en rouge (R) ou en bleu (B). La
vitesse et la séquence de clignotement indiquent le statut.
R B R B R B R B
B B
B B B B B B B B
Appairage
En attente de connexion
Connecté
3.4.2 Statut du voyant LED du récepteur, alimentation pile
Sortie
R B R B R B R B
B B
B R B R
B B B B B B B B
B B R B B B R B
Sortie
Appairage
En attente de connexion
En attente de connexion, pile faible
Connecté
Connecté, pile faible
3.4.3 Statut du voyant LED du récepteur, alimentation USB
Statut du voyant LED Description
R B R B R B R B
B B R
B B
B B B B B B R B
B B B B B B B B
Eteint, pile chargée
R
Eteint, pile en charge
Appairage
En attente de connexion, pile en charge
En attente de connexion, pile chargée
Connecté, pile en charge
Connecté, pile chargée
© MARMITEK
Page 41

41
4 Au travail
Avant de pouvoir utiliser le produit veuillez procéder comme suit :
Installez le transmetteur.
Installez le récepteur.
Appairage du transmetteur et du récepteur.
Réglage du volume
Prenez du bon temps !
Explication de chaque étape.
4.1 Première utilisation
Avant la première utilisation nous recommandons de charger
complètement la pile. Utilisez à cet effet le câble USB fourni et
connectezlentement pendant la charge.
La première charge dure normalement environ 2 heures. Dès que
Anywhere 725 est complètement chargée, le
voyant LED rouge s'éteint.
4.2 Installation du transmetteur
Le transmetteur peut être connecté à n'importe quelle source
audio, telle que par exemple un téléviseur, un ordinateur ou un
système audio.
Connectez la fiche mini jack sur par exemple la prise casque de
votre téléviseur, de votre smartphone ou de votre radio/lecteur
CD.
1. Connectez l'adaptateur sur le port micro USB et branchez
l'adaptateur sur la prise électrique.
2. Appuyez sur le bouton marche/arrêt. Le voyant LED bleu
clignote maintenant lentement.
3. Laissez votre source audio reproduire les sons.
FRANÇAIS
Audio Anywhere 725
Page 42

42
4.3 Installation du récepteur
1. Connectez la fiche mini jack (sortie jack) sur par exemple
radio/lecteur CD.
2. Connectez l'adaptateur sur le port micro USB et branchez
l'adaptateur sur la prise électrique. Le voyant LED rouge
clignote lentement lorsque la pile est en charge.
3. Appuyez sur le bouton marche/arrêt. Le récepteur Audio
Anywhere 725 se connectera et le voyant LED bleu
clignotera lentement. (Le voyant LED rouge clignote de
temps en temps lorsque la pile est encore en charge).
4.4 Appairage du transmetteur et du récepteur
Avant la première utilisation le récepteur doit être appairé au
transmetteur. Assurez-vous que le transmetteur et le récepteur
soient éteints.
1. Appuyez pendant 2 secondes sur le bouton marche/arrêt du
transmetteur. Le voyant LED rouge/bleu clignote alors
lentement. Le transmetteur est maintenant pendant 20
secondes en mode d'appairage.
2. Appuyez brièvement sur le bouton marche/arrêt du
récepteur. Le voyant LED rouge/bleu clignote alors puis les
voyants LED bleus sur le transmetteur et sur le récepteur
continuent de clignoter rapidement, alors le transmetteur
secondes et celui-ci a été annulé. Vous devez ensuite
remettre le transme
nouveau le transmetteur et le récepteur.)
4.5 Réglage du volume
Vous pouvez régler le volume avec le bouton + et - du
transmetteur vers tous les récepteurs.
chaque récepteur.
© MARMITEK
Page 43

43
5 Prises de connexion du transmetteur
Le transmetteur est doté des prises de connexion suivantes :
5.1 Entrée analogique
Vous pouvez connecter ici toute sortie analogique, telle qu'un
lecteur MP3, un smartphone, un téléviseur ou un système audio.
5.2 Entrée numérique Toslink
Vous pouvez connecter ici la sortie Toslink de votre système
audio ou de votre téléviseur. Assurez-vous que le réglage Toslink
de votre système audio ou de votre téléviseur soit sur stéréo.
5.3 Entrée USB
Vous pouvez connecter ici la prise USB de votre PC pour l'utiliser
comme sortie audio.
6 Récepteur supplémentaire
Un récepteur supplémentaire vous permet de recevoir le signal du
transmetteur à plusieurs endroits dans la maison.
Vous pouvez appairer au maximum 16 récepteurs à 1
transmetteur.
Suivez les instructions du chapitre 4.4 pour ajouter un récepteur
supplémentaire.
7 Amplificateur de signal
FRANÇAIS
n'est pas suffisant, vous pouvez acheter un set supplémentaire et
comme amplificateur de signal. Vous appairez ensuite le premier
transmetteur au premier récepteur. Connectez la sortie audio du
appairez le 2
maintenant une portée de 20 mètres. Vous pouvez répéter ceci
aussi souvent que nécessaire pour surmonter la distance
souhaitée.
Audio Anywhere 725
ème
transmetteur au 2
ème
récepteur. Vous avez
lafonds. Si cela
ème
transmetteur, et
Page 44

44
8 Spécifications techniques
Émetteur
Alimentation 100-240 VAC 50/60 Hz, 5V DC
Alimentation DC 5V, via micro USB
Puissance absorbée < 0.2W
Appairage Appairage et connexion
- Plage de fréquence 10Hz à 22kHz.
Retard audio total 16 ms
Appairage multiple party mode Jusqu'à 16 appareils
Performance électrique RF
Méthode de transmission audio Numérique
Mode d'appairage Automatique
Vitesse de transfert de données Jusqu'à 2 Mbps, modulation
Fréquence du transmetteur 2,4 GHz
Sauts de fréquence Triple carrier hopping
Canaux 79 canaux
Puissance d'émission (classe 2) 10 dBm
Plage de fonctionnement Jusqu'à 40m en champ libre,
Entrée
Interface Entrée audio Connecteur stéréo de 3,5 mm
Audio
Niveau d'Entrée Audio ( Max.) 1,2V ( RMS )
Plage de fréquence audio 20Hz ~ 22kHz
Portée dynamique Nom. 95 dBA
Séparation de canaux
Signal/rapport signal sur bruit
Distorsion Harmonique Totale (Total Harmonic Distortion, THD)
adapter
automatiques
simultanément
GFSK
jusqu'à 10m à travers les sols et
les murs
Numérique USB stéréo
Toslink numérique stéréo
1,50%
© MARMITEK
Page 45

45
DAC Coprocesseur DSP Résolution
interne16bit Stéréo CODEC avec
SNR de 95dB.
Fréquence d'échantillonnage 48 kHz / 16 bits
Physique
Fonctions audio Volume+, Volume-, Alimentation
LEDs Power, Link
Antenne Externe, omnidirectionnelle
Gain d'antenne 2 dBi
Impédance du port d'antenne 50 ohm
Dimensions (L x l x H) 65 x 55 x 25 mm
Poids 60 gram
Température de fonctionnement 0°C ~ +50°C
Récepteur
Alimentation 100-240 VAC 50/60 Hz, 5VDC via
micro USB
Alimentation DC 5V, via micro USB
Consommation de courant < 0.1W standby
< 3W en fonctionnement
1,5W pour recharger
Alimentation Micro USB ou batterie
Puissance absorbée < 0.2W
Batterie Li-ion 3,7 V
-Tension de charge de batterie 5 V
- Puissance de la batterie 545mAh
-En veille Jusqu'à 280 heures
-Autonomie de fonctionnement 8 heures
-Temps de charge 2 heures
-Consommation de courant 65 mA
Arrêt automatique 10 minutes
Connexion Appairage et connexion
automatiques
Performance électrique RF
Transmission AV RF Numérique
Mode d'appairage Automatique
Débit de données RF Jusqu'à 2 Mbps, modulation
GFSK
Fréquence Radio (RF) 2,4 GHz
FRANÇAIS
Audio Anywhere 725
Page 46

46
Fréquence 2402~2480 MHz
Sauts de fréquence 500 hops / seconde
Canaux 79 canaux
Puissance d'émission (classe 2) 4 dBm ( Max.)
Portée Jusqu'à 40m en champ libre,
Sortie
Interface Sortie audio connecteur stéréo de 3,5 mm
Puissance de sortie 20 mW RMS
Niveau de sortie Audio ( Max.) 1,2V ( RMS )
Caractéristique de fréquence 20Hz ~ 22kHz
Portée dynamique Nom. 95 dBA
Séparation des Canaux Audio D / G
Signal/rapport signal sur bruit
Distorsion harmonique totale 0.05%
DAC Coprocesseur DSP Résolution
Fréquence d'échantillonnage Jusqu'à 44,1 kHz
Fréquence d'échantillonnage 48kHz / 16 bits
Physique
Fonctions audio Volume+, Volume-, Alimentation
LEDs Power, Link
Antenne Intérieur, omnidirectionnelle
Gain d'antenne 2 dBi
Dimensions (L x l x H) 80 x 30 x 20 mm avec clip
Poids 30 grammes.
Température ambiante 0°C ~ +50°C
En vue d'améliorer encore plus le produit, Marmitek se réserve le
droit de modifier sans préavis les spécifications et/ou la
conception.
jusqu'à 10m à travers les sols et
les murs
interne16bit Stéréo CODEC avec
SNR de 95dB.
© MARMITEK
Page 47

47
9 Foire aux questions (FAQ)
Je ne peux pas appairer mon Audio Anywhere 725.
Contrôlez les points suivants :
1. Assurez-vous que l'adaptateur secteur soit branché et que le
2. Assurez-vous que la distance entre le transmetteur et le
récepteur ne soit pas supérieure à 10 mètres et qu'il n'y ait
pas d'obstacles majeurs entre eux.
Absence de son sur mon système audio
Assurez-vous que le câble audio soit bien connecté
(ENTRÉE AUX), que l'entrée correcte soit sélectionnée sur
votre système audio et que le volume de votre système
audio soit réglé sur le niveau souhaité.
Assurez-vous que le volume sur le transmetteur ou sur le
récepteur ne soit pas trop faible.
J'ai connecté le son de mon téléviseur sans fil à mon
système audio, mais le son n'est pas synchronisé avec
l'image.
Pour obtenir le meilleur résultat, connectez le transmetteur Audio
Anywhere 725 sur la sortie audio de votre téléviseur et non sur la
sortie audio de votre settopbox ou de votre récepteur satellite.
Si vous connectez le transmetteur à la sortie casque, les
enceintes de votre téléviseur sont désactivées et vous pouvez
continuer à utiliser la télécommande de votre téléviseur pour
régler le volume du son par le biais de l'Audio Anywhere 725.
Est-il également possible de connecter directement mes
enceintes au récepteur ?
Afin de pouvoir entendre le son ou de la musique, connectez le
récepteur à un amplificateur doté d'enceintes séparées (intégrées)
que l'on appelle enceintes actives (avec amplificateur intégré).
Vous ne pouvez pas connecter directement des enceintes
passives au récepteur. Vous pouvez cependant connecter un
casque passif au récepteur.
FRANÇAIS
Audio Anywhere 725
Page 48

48
Est-il également possible de connecter le câble USB de mon
transmetteur/récepteur sur une prise de connexion USB de
par exemple mon amplificateur ou de mon téléviseur ?
Oui, c'est possible. Le transmetteur s'allume ou s'éteint
automatiquement avec l'amplificateur ou le téléviseur. (auto power
on).
Les informations ci-dessus n'ont pas répondu à vos
questions? Veuillez consulter www.marmitek.com.
10 Notification
10.1 Déclaration de conformité
Par la présente Marmitek BV déclare que l'appareil
Audio Anywhere
directives:
Directive 2014/53/UE du Parlement Européen et du Conseil du 16
avril 2014 relative à l'harmonisation des législations des États
membres concernant la mise à disposition sur le marché
d'équipements radioélectriques et abrogeant la directive
1999/5/CE.
Directive 2011/65/UE du Parlement Européen et du Conseil du 8
substances dangereuses dans les équipements électriques et
électroniques.
Règlement (CE) no 278/2009 de la Commission du 6 avril 2009
portant application de la directive 2005/32/CE du Parlement
européen et du Conseil en ce qui concerne les exigences
essentielles et aux autres dispositions pertinentes des
charge et au rendement moyen en mode actif des sources
Vous pouvez lire la déclaration de conformité complète à
http://www.marmitek.com
© MARMITEK
Page 49

49
10.2 Recyclage
européenne et aux autres pays européens disposant de
systèmes de collecte sélective.
Ce symbole, apposé sur le produit ou sur son emballage, indique que ce
produit ne doit pas être traité avec les déchets ménagers. Il doit être remis
à un point de collecte approprié pour le recyclage des équipements
électriques et électroniques. Il est de votre responsabilité de jeter ce
matériel ainsi que tout autre matériel électrique ou électronique par les
moyens de collecte indiqués par le gouvernement et les pouvoirs publics
sur le mode
contact avec les pouvoirs publics locaux, le service de traitement des
nion
10.3 Droits d'auteur
Marmitek est une marque déposée de Germatron BV.
Audio Anywhere
d'auteur et tout autres droits de propriété concernant le contenu
(comprenant mais pas limités aux numéros de modèle, logiciels, audio,
vidéo, textes et photos) appartiennent à Marmitek B.V. Toute utilisation du
contenu, mais sans restriction, concernant la distribution, la reproduction,
toute modification, la publication ou la diffusion est strictement interdite
sans l'autorisation préalable par écrit de Marmitek. Tous les droits d'auteur
et autres droits de propriété doivent être respectés pour toutes
reproductions. Les autres noms de produits et de sociétés peuvent être des
marques de leurs détenteurs respectifs. Les produits commercialisés par
des entreprises tierces ne sont mentionnés que pour information, sans
aucune intention de préconisation ni de recommandation. Marmitek décline
produits.
Audio Anywhere 725
Marmitek BV - Boîte postale 4257 - 5604 EG Eindhoven
Pays-Bas
FRANÇAIS
Page 50

50
© MARMITEK
Page 51

51
1 Contenido
1 Contenido .................................................................. 51
2 Instrucciones de seguridad ................................................... 52
3 El producto ........................................................................... 53
3.1 Introducción .......................................................................... 53
3.2 Contenido del embalaje ........................................................ 54
3.3 Vista general del producto .................................................... 54
3.4 Señal LED ............................................................................ 56
3.4.1 LED de estado transmisor ......................................... 56
3.4.2 LED de estado receptor, alimentación por batería ..... 56
3.4.3 LED de estado receptor, alimentación por USB ......... 56
4 Primeros pasos ..................................................................... 57
4.1 Puesta en marcha ................................................................. 57
4.2 Instalación del transmisor ..................................................... 57
4.3 Instalación del receptor ......................................................... 58
4.4 Acoplamiento de transmisor y receptor ................................. 58
4.5 Ajuste de volumen ................................................................ 58
5 Conectores del transmisor .................................................... 59
5.1 Entrada analógica ................................................................. 59
5.2 Entrada digital Toslink ........................................................... 59
5.3 Entrada USB ......................................................................... 59
6 Receptor adicional ................................................................ 59
7 Amplificador de señal ............................................................ 59
8 Especificaciones técnicas ..................................................... 60
9 Preguntas frecuentes (FAQs) ................................................ 60
10 Notificación ........................................................................... 64
10.1 Declaración de conformidad.................................................. 64
10.2 Reciclaje ............................................................................... 65
10.3 Derechos de propiedad intelectual ........................................ 65
ESPAÑOL
Audio Anywhere 725
Page 52

52
2 Instrucciones de seguridad
Lee este modo de empleo atentamente antes de usar el
dispositivo y guárdalo para consultarlo si necesario.
Exclusivamente para el uso en sitios interiores.
No use el producto en un ambiente húmedo o en la cercanía
de agua.
No exponga el producto a temperaturas extremamente altas
o bajas, fuentes de luz muy potentes o luz solar directa.
Este producto no es un juguete. Asegúrese de que está
fuera del alcance de los niños.
No conecte el adaptador de red a la red de alumbrado antes
de que haya controlado si la tensión de red corresponde con
el valor indicado en la estampa de tipo.
Nunca conecte un adaptador de si ése está dañado. En este
caso, por favor entre en contacto con su proveedor.
Quite el adaptador de corriente AC/DC de la toma si no usa
el dispositivo durante mucho tiempo.
Nunca abra el producto: Puede contener piezas que se
encuentren bajo una tensión mortal.
Deja las reparaciones o servicios a personal experto.
En caso de uso indebido o modificaciones y reparaciones
montados por su mismo, la garantía se caducará.
En caso de uso indebido o inapropiado, Marmitek no acepta
ninguna responsabilidad de producto.
Marmitek no acepta la responsabilidad para daños
consecuenciales que difieren de la responsabilidad de
producto legal.
© MARMITEK
Page 53

53
3 El producto
3.1 Introducción
Felicidades por la compra del Marmitek Audio Anywhere 725. El
Audio Anywhere 725 se compone de un transmisor y un receptor.
La señal se transmite en 2,4 GHz y traviesa paredes y techos.
Este transmisor/receptor transmite señales de audio (estéreo)
inalámbricamente.
Transmisor de audio digital inalámbrico.
Disfrutar de la música y del sonido del TV inalámbricamente.
Enviar el sonido del TV u ordenador inalámbricamente al
equipo de estéreo, a los altavoces o al auricular.
Escuchar la misma música en el salón y en otras
habitaciones (cocina, invernadero).
Transmisión digital de audio en calidad HD y sin
interferencias con mejorada tecnología 2.4GHz.
Perfecta solución portable gracias a la batería incorporada y
el control de volumen en el receptor.
Varios receptores se pueden conectar a un transmisor.
Emplear varios sets (máx. 6) en el mismo espacio con
secured pairing .
Con el Audio Anywhere 725 se puede reproducir la música de una
fuente de sonido en un equipo de estéreo sin establecer una
conexión cableada. Ejemplos de fuentes son ordenadores,
portátiles o televisores. La música se selecciona en la fuente de
audio y el volumen se controla por el transmisor o el receptor sin
necesidad de acercarse al equipo de estéreo.
El receptor tiene una batería incorporada de manera que sirve
para convertir un auricular cableado u unos altavoces activos en
dispositivos inalámbricos.
El Audio Anywhere 725 tiene un alcance de más o menos
40 metros que permite el control del audio en cualquier rincón de
la habitación e incluso desde la habitación de al lado.
ESPAÑOL
Audio Anywhere 725
Page 54

54
3.2 Contenido del embalaje
Apagar
A. 1 x Transmisor Audio Anywhere 725
B. 1 x Receptor Audio Anywhere 725
C. 2 x Cable micro USB
D. 2 x Adaptador de alimentación USB
E. 1 x Cable mini-jack
F. 1 x Modo de empleo
3.3 Vista general del producto
Transmisor
A
Volumen -
Volumen +
Encender/
LED
Entrada
Aux
Conector
micro USB
Entrada
Toslink
© MARMITEK
Page 55

55
B
Receptor
Volumen +
Volumen -
Encender/
Apagar
Conector
micro USB
Salida Jack
Salida Aux
LED
C
Cable de alimentación micro USB
Este cable suministra electricidad al Audio Anywhere 725.
D
Adaptador de alimentación USB
Conecta D con C para suministrar electricidad al
Audio Anywhere 725.
ESPAÑOL
Audio Anywhere 725
Page 56

56
L
ED de estado
Descripción
L
ED de estado
Descripción
E
Cable mini-jack
Enchufa este cable en la entrada de audio del transmisor
Audio Anywhere 725.
3.4 Señal LED
3.4.1 LED de estado transmisor
El LED puede resplandecer en rojo (R) o azul (A). La velocidad y
el ritmo del parpadeo indican el estado.
R A R A R A R A
A A
A A A A A A A A
Acoplando
Esperando conexión
Conectado
3.4.2 LED de estado receptor, alimentación por batería
Apagado
R A R A R A R A
A A
A R A R
A A A A A A A A
A A R A A A R A
Apagado
Acoplando
Esperando conexión
Esperando conexión, batería casi vacía
Conectado
Conectado, batería casi vacía
3.4.3 LED de estado receptor, alimentación por USB
LED de estado Descripción
R G R G R G R G
G
G G
G G G G G G R G
G G G G G G G G
G R
Apagado, batería cargada
R
Apagado, batería cargando
Acoplando
Esperando conexión, batería cargando
Esperando conexión, batería cargada
Conectado, batería cargando
Conectado, batería cargada
© MARMITEK
Page 57

57
4 Primeros pasos
Antes de emplear el producto hay que realizar los siguientes
pasos:
Instalar el transmisor
Instalar el receptor
Acoplar el transmisor con el receptor
Ajustar el volumen
¡A disfrutar!
En lo sucesivo explicamos cada uno de los pasos.
4.1 Puesta en marcha
El receptor del AudioAnywhere 725 tiene una incorporada batería
recargable.
Le aconsejamos de cargar la batería completamente antes de la
puesta en marcha. Conecta el cable USB suministrado con el
adaptador de alimentación suministrado. Mientras la batería está
cargando, el LED rojo parpadea lentamente.
El primer proceso de carga normalmente dura más o menos 2
horas. El LED rojo se apaga cuando la batería del
Audio Anywhere 725 está completamente cargada.
4.2 Instalación del transmisor
Con el transmisor se puede conectar cualquier fuente de audio,
como por ejemplo TV, ordenador o equipo de sonido. Enchufa la
clavija mini Jack por ejemplo en el conector de auricular del TV,
Smartphone o radio/reproductor CD.
1. Conecta el adaptador con el puerto micro USB y enchúfalo
en la toma de corriente.
2. Pulsa el botón de encender/apagar. El LED azul empieza a
parpadear lentamente.
3. Activa la reproducción de sonido de la fuente de audio.
ESPAÑOL
Audio Anywhere 725
Page 58

58
4.3 Instalación del receptor
1. Conecta el conector mini Jack (salida Jack) por ejemplo con
la entrada AUX de un altavoz activo, un auricular o un
radio/reproductor CD.
2. Conecta el adaptador con el puerto micro USB y enchúfalo
en la toma de corriente. El LED rojo parpadea lentamente
mientras la batería se está cargando.
3. Pulsa el botón de encender/apagar. El receptor del
Audio Anywhere 725 se enciende y el LED azul empieza a
parpadear lentamente (si la batería todavía está cargando, el
LED rojo parpadea de vez en cuando)
4.4 Acoplamiento de transmisor y receptor
Cuando el dispositivo se pone en marcha la primera vez, el
receptor y el transmisor se tienen que acoplar. Apaga el
transmisor y el receptor.
1. Pulsa el botón de encender/apagar del transmisor durante 2
segundos. El LED rojo-azul empieza a parpadear. El
transmisor se queda en modo de acoplamiento durante 20
segundos.
2. Pulsa brevemente el botón de encender/apagar del receptor.
El LED rojo-azul empieza a parpadear y a continuación los
LEDs azuls del transmisor y del receptor resplandecen
continuamente indicando que la conexión se ha establecido
con éxito (si los LES siguen parpadeando rápidamente, han
pasado más que 20 segundos y el transmisor ha salido del
modo de acoplamiento. Pon el transmisor en modo de
acoplamiento de nuevo para realizar el acoplamiento).
4.5 Ajuste de volumen
El transmisor tiene un botón de + y para controlar el volumen de
todos los receptores. En el receptor mismo se puede arreglar el
volumen por cada receptor individualmente.
© MARMITEK
Page 59

59
5 Conectores del transmisor
El transmisor dispone de los siguientes conectores:
5.1 Entrada analógica
Para la conexión de cualquier salida analógica, como reproductor
MP3, Smartphone, TV o equipo de sonido.
5.2 Entrada digital Toslink
Para la conexión de la salida Toslink del equipo de sonido o TV.
Pon los ajustes Toslink del equipo de sonido o TV en estéreo.
5.3 Entrada USB
Para la conexión USB del ordenador y emplearla de salida de
audio.
6 Receptor adicional
Un receptor adicional para el Audio Anywhere 725.
El empleo de un receptor adicional le permite la recepción de la
señal del transmisor en varios lugares de la casa.
Con 1 transmisor se pueden acoplar hasta 16 receptores.
Para añadir un receptor adicional, sigue las instrucciones en
capítulo 4.4.
7 Amplificador de señal
Dentro de casa, el transmisor y el receptor tienen un alcance de
más o menos 10 metros, atravesando paredes y techos.
Para ampliar el alcance, conecta el receptor de un set adicional
con el transmisor. De esta manera la señal será amplificada.
Acopla el primer transmisor con el primer receptor, luego conecta
la salida de audio del primer receptor con la entrada de audio del
segundo transmisor y acopla el segundo transmisor con el
segundo receptor. El resultado es un alcance de 20 metros. El
procedimiento se puede repetir tantas veces como es necesario
para cubrir la distancia deseada.
ESPAÑOL
Audio Anywhere 725
Page 60

60
8 Especificaciones técnicas
Transmisor
Alimentación 100-240 VAC 50/60 Hz, 5V DC
Alimentación de corriente 5V, por micro USB
Tensión < 0.2W
Acoplamiento (pairing) Empareja y conecta
- Intervalo de frecuencia de 10Hz a 22kHz.
Retraso de audio total 16 ms
Soporta Multi Pair Partymode Hasta 16 dispositivos a la vez
Prestación electrónica RF
Método de transmisión de audio Digital
Emparejamiento Automático
Velocidad transmisión de datos Hasta 2 Mbps, GFSK modulación
Frecuencia de transmisor 2,4 GHz
Salto de frecuencia Triple carrier hopping
Canales 79 canales
Potencia de transmisión (clase 2 ) 10 dBm
Alcance operacional Hasta 40 m en campo libre, hasta
Entrada
Entrada de audio interfaz Conector estéreo plug 3,5 mm
Audio
Nivel de entrada de audio (máx) 1,2 V ( RMS )
Rango de frecuencia audio 20Hz ~ 22kHz
Alcance dinámico 95 dBA nom.
División de canales
Proporción señal/interferencia:
Total distorsión harmónica 1,50%
DAC DSP Co-Processor 16-bit Internal
Tasa de muestreo 48 kHz / 16 bits
Apariencia
adapter
automáticamente
10 m a través de muros y techos
USB digital estéreo
Toslink digital estéreo
Stereo CODEC con -95dB SNR.
© MARMITEK
Page 61

61
Funciones audio Volumen+, Volumen-,
Encender/apagar
LEDs Power, Link
Antena: Externs, omnidireccional
Alcance antena 2 dBi
Impedancia puerto antena 50 ohm
Dimensiones (L x A x A) 65 x 55 x 25 mm
Peso 60 g
Temperatura de funcionamiento0 ~ +50° C
Receptor
Alimentación 100-240 VAC 50/60 Hz, 5VDC por
Micro USB
Alimentación de corriente 5V, por Micro USB
Consumo de energía < 0.1W standby
< 3W en funcionamiento
1,5W para cargar
Alimentación Micro USB o pila
Tensión < 0.2W
Pila Li-ion 3,7 V
- Tensión de carga de pila 5 V
- Potencia de pila 545mAh
- Duración standby Hasta 280 horas
- Duración de operación 8 horas
- Duración cargo 2 horas
- Consumo de energía 65 mA
Apago automático 10 minutos
Conexión Empareja y conecta
automáticamente
Prestación electrónica RF
A/V transmisión RF Digital
Emparejamiento Automático
RF data rate Hasta 2 Mbps, GFSK modulación
Frecuencia RF 2,4 GHz
Frecuencia 2402~2480 MHz
Salto de frecuencia 500 saltos/segundo
Canales 79 canales
Potencia de transmisión (clase 2 ) 4 dBm (como máx.)
ESPAÑOL
Audio Anywhere 725
Page 62

62
Alcance Hasta 40 m en campo libre, hasta
Salida
Salida audio interfaz Conector estéreo plug 3,5 mm
Potencia de salida 20 mW RMS
Nivel de salida de audio (máx) 1,2 V ( RMS )
Rango de frecuencia 20Hz ~ 22kHz
Alcance dinámico 95 dBA nom.
Separación de canales Audio d/i
Proporción señal/interferencia:
Desfase armónico total 0,05%
DAC DSP Co-Processor 16-bit Internal
Tasa de muestreo Hasta 44,1 kHz
Tasa de muestreo 48kHz / 16 bits
Apariencia
Funciones audio Volumen+, Volumen-,
LEDs Power, Link
Antena: Interno, omnidireccional
Alcance antena 2 dBi
Dimensiones (L x A x A) 80 x 30 x 20 mm con clip
Peso 30 g
Temperatura ambiental 0 ~ +50° C
Respecto a posibles mejoras Marmitek se reserva el derecho de
cambiar las especificaciones y/o diseños sin previo aviso.
10 m a través de muros y techos
Stereo CODEC con -95dB SNR.
Encender/apagar
© MARMITEK
Page 63

63
9 Preguntas frecuentes (FAQs)
No puedo acoplar el Audio Anywhere 725
Intenta lo siguiente:
1. Controla si el adaptador de red está enchufado y si el LED
resplandece o parpadea.
2. La distancia entre transmisor y receptor no debe superar los
10 metros y no deben encontrarse obstáculos grandes en
medio.
Mi equipo de sonido no emite ningún sonido
Controla si el cable de audio esta correctamente conectado
(AUX IN), si la correcta entrada del equipo está seleccionada
y si el volumen del equipo de sonido está ajustado al nivel
deseado.
Controla si el volumen del transmisor y del receptor está
bastante alto.
He acoplado el sonido del TV inalámbricamente con el equipo
de audio, pero imagen y sonido no se reproducen
sincrónicamente.
Para el mejor resultado conecta el transmisor del
Audio Anywhere 725 con la salida de audio del TV en vez de
conectarlo con la salida de audio del set-top box o receptor de
satélite.
Al conectar el transmisor con la salida del auricular, los altavoces
del TV se silencian. Para controlar el volumen a través del
Audio Anywhere 725 puede emplear el mando a distancia del TV.
¿Puede conectar los altavoces directamente con el receptor?
Para escuchar música o sonido, hay que conectar el receptor con
un amplificador con altavoces independientes (empotrados) o
altavoces activos (con amplificador incorporado). Los altavoces
pasivos no se pueden conectar directamente con el receptor. Si
se pueden conectar auriculares pasivos con el receptor.
ESPAÑOL
Puedo conectar el cable USB del transmisor/receptor también
con por ejemplo un amplificador o TV?
Audio Anywhere 725
Page 64

64
Si. El transmisor se enciende y apaga automáticamente cuando el
amplificador o el TV se enciende o apaga.
¿Tiene más u otras preguntas? Visite http://www.marmitek.com.
10 Notificación
10.1 Declaración de conformidad
Marmitek BV declara que este Audio Anywhere
cumple con las exigencias esenciales y con las demás
reglas relevantes de la directriz:
Directiva 2014/53/UE del Parlamento Europeo y del Consejo de
16 de abril de 2014 relativa a la armonización de las legislaciones
de los Estados miembros sobre la comercialización de equipos
radioeléctricos, y por la que se deroga la Directiva 1999/5/CE.
Directiva 2011/65/UE del Parlamento Europeo y del Consejo de 8
de junio de 2011 sobre restricciones a la utilización de
determinadas sustancias peligrosas en aparatos eléctricos y
electrónicos.
Reglamento (CE) no 278/2009 de la Comisión de 6 de abril de
2009 por el que se desarrolla la Directiva 2005/32/CE del
Parlamento Europeo y del Consejo en lo concerniente a los
requisitos de diseño ecológico aplicables a la eficiencia media en
activo de las fuentes de alimentación externas y a su consumo de
energía eléctrica durante el funcionamiento en vacío.
Puede leer la Declaración de conformidad completa en
http://www.marmitek.com
© MARMITEK
Page 65

65
10.2 Reciclaje
Información medioambiental para clientes de la Unión Europea y
en países europeos con sistemas de tratamiento selectivo de
residuos.
Este símbolo en el equipo o en su embalaje indica que el presente
producto no puede ser tratado como residuos doméstico normal. Debe
entregarse en el correspondiente punto de recogida de equipos eléctricos y
electrónicos. Es responsabilidad suya desechar este y cualesquiera otros
aparatos eléctricos y electrónicos a través de los puntos de recogida que
ponen a su disposición el gobierno y las autoridades locales. Al desechar y
reciclar correctamente estos aparatos estará contribuyendo a evitar
posibles consecuencias negativas para el medio ambiente y la salud de las
personas. Si desea obtener información más detallada sobre la eliminación
segura de su aparato usado, consulte a las autoridades locales, al servicio
de recogida y eliminación de residuos de su zona o pregunte en la tienda
donde adquirió el producto.
10.3 Derechos de propiedad intelectual
Marmitek es una marca registrada de Germatron BV.
Audio Anywhere
derechos reservados. En la realización de este manual se ha puesto el
máximo cuidado para asegurar la exactitud de la información que en él
aparece. Marmitek no se responsabiliza de los posibles errores de
impresión o copia. Propiedades intelectuales y todos los demás derechos
de propiedad al contenido (incluso pero no limitado a números de modelos,
software, audio, video, texto y fotos) pertenecen a Marmitek BV. Cada uso
del contenido, cada distribución, reproducción, cambio, publicación y envío
sin previo aviso en forma escrita por Marmitek es estrictamente prohibido.
Todos los derechos de propiedad intelectual y otros derechos de propiedad
son aplicables a todas las reproducciones. Los nombres de otras empresas
y productos mencionados en este manual pueden ser marcas comerciales
de sus respectivas empresas. La mención de productos de terceras partes
tiene únicamente propósitos informativos y no constituye aprobación ni
recomendación. Marmitek declina toda responsabilidad referente al uso o el
funcionamiento de estos productos.
ESPAÑOL
Marmitek BV - Apartado de correos 4257 - 5604 EG Eindhoven
Audio Anywhere 725
Países Bajos
Page 66

66
© MARMITEK
Page 67

67
1 Indice
1 Indice ..................................................................................... 67
2 Precauzioni di sicurezza ......................................................... 68
3 Il prodotto ............................................................................... 69
3.1 Introduzione ........................................................................... 69
3.2 Contenuto della confezione .................................................... 70
3.3 Panoramica del prodotto ........................................................ 70
3.4 Stato LED .............................................................................. 72
3.4.1 Stato LED trasmettitore.............................................. 72
3.4.2 Stato LED ricevitore, alimentazione a batteria ............ 72
3.4.3 Stato LED ricevitore, alimentazione a USB ................ 72
4 Per iniziare ............................................................................. 73
4.1 Primo utilizzo .......................................................................... 73
4.2 Installazione del trasmettitore ................................................. 73
4.3 Installazione del ricevitore ...................................................... 74
4.4 Accoppiare il trasmettitore e il ricevitore ................................. 74
4.5 Regolare il volume ................................................................. 74
5 Possibilità di connessione trasmettitore .................................. 75
5.1 Ingresso analogico ................................................................. 75
5.2 Ingresso Toslink digitale ......................................................... 75
5.3 Ingresso USB ......................................................................... 75
6 Ricevitore aggiuntivo .............................................................. 75
7 Amplificatore di segnale ......................................................... 75
8 Specificazioni tecniche ........................................................... 76
9 Domande frequenti (FAQ) ...................................................... 79
10 Notifica ................................................................................... 80
10.1 Dichiarazione di conformità ....................................... 80
10.2 Riciclaggio ................................................................ 81
10.3 ............................................................ 81
ITALIANO
Audio Anywhere 725
Page 68

68
2 Precauzioni di sicurezza
Leggere
questo prodotto e conservarle per riferimento futuro.
Non utilizzare il prodotto in ambienti umidi o in prossimità di
acqua.
Non esporre il prodotto a temperature eccessivamente alte o
basse, fonti di luce forte o luce diretta del sole.
Questo prodotto non è un giocattolo: tenerlo lontano dalla
portata dei bambini.
dopo avere controllato che la tensione della rete elettrica
corrisponda alle indicazioni riportate sulla targhetta.
Non utilizzare mai un alimentatore danneggiato. In tal caso
rivolgersi al proprio rivenditore.
lungo periodo di tempo.
lizzato per un
componenti la cui tensione è estremamente pericolosa.
Riparazioni o modifiche devono essere effettuate
esclusivamente da parte di personale esperto.
In caso di utilizzo scorretto, di riparazioni o modifiche
apportate personalmente decade qualsiasi garanzia. della
responsabilità civile sui prodotti.
Marmitek declina ogni responsabilità per i danni derivanti da
un utilizzo non appropriato del prodotto o da utilizzo diverso
da quello per cui il prodotto è stato creato.
Marmitek declina ogni responsabilità per danni
consequenziali ad eccezione della responsabilità civile sui
prodotti.
© MARMITEK
Page 69

69
3 Il prodotto
3.1 Introduzione
Marmitek. Audio Anywhere 725 consiste di un trasmettitore e un
ricevitore. Il segnale viene trasmesso a 2,4 GHz e di conseguenza
può attraversare pareti e soffitti.
Tramite il trasmettitore/ricevitore è possibile trasmettere in
modalità wireless i segnali audio (stereo).
Trasmettitore audio digitale senza fili
Godere senza fili la musica e il suono del televisore
Invia il suono del televisore o del computer in modalità
Ascoltare in un altro spazio (p.e. cucina, veranda) la stessa
musica di quella nel soggiorno.
Trasmissione audio digitale in qualità HD grazie alla migliore
tecnologia senza interferenze a 2,4 GHz.
Ideale soluzione portatile grazie alla batteria incorporata nel
ricevitore e al proprio controllo del volume.
È possibile collegare più ricevitori ad un solo trasmettitore.
Utilizzare più kit (max. 6) nello stesso ambiente tramite
l'accoppiamento protetto (secured pairing).
Grazie a Audio Audio Anywhere 725 è possibile riprodurre musica
Anywhere 725 di
può essere, per esempio, un PC, portatile o televisore. Di seguito
è possibile scegliere la musica tramite la sorgente sonora, e
regolare il volume sul trasmettitore e ricevitore, senza avvicinarsi
Il ricevitore ha una batteria incorporata, quindi puoi anche rendere
senza fili per esempio le cuffie cablate o gli altoparlanti attivi.
Audio Anywhere 725 ha un raggio d'azione di circa 40 metri, in
modo che tu possa organizzare senza restrizioni l'audio nella
stessa stanza o in quella adiacente.
Audio Anywhere 725
ITALIANO
Page 70

70
3.2 Contenuto della confezione
A. 1 x trasmettitore Audio Anywhere 725.
B. 1 x ricevitore Audio Anywhere 725.
C. 2 x cavo di alimentazione Micro USB.
D. 2 x adattatore di alimentazione USB.
E. 1 x cavo Mini-Jack.
F. 1 x istruzioni per l'uso.
3.3 Panoramica del prodotto
Trasmettitore
A
Volume -
Volume +
Tasto di
accensione
LED
Ingresso
Aux
presa
Micro USB
Ingresso
Toslink
© MARMITEK
Page 71

71
accensione
B
Ricevitore
Volume +
Volume -
Tasto di
presa Micro
USB
Uscita Jack
Uscita Aux
LED
C
Cavo di alimentazione Micro USB
Con questo cavo puoi alimentare Audio Anywhere 725.
D
Adattatore di alimentazione USB
Collegare D a C per alimentare
Audio Anywhere 725.
ITALIANO
Audio Anywhere 725
Page 72

72
Stato LED
Descrizione
Stato LED
Descrizione
E
Cavo Mini-jack
Audio Anywhere 725.
3.4 Stato LED
3.4.1 Stato LED trasmettitore
La spia LED può accendersi in rosso (R) o azzurro (A). La velocità
e la sequenza dei lampeggi indicano lo stato.
R A R A R A R A
A A
A A A A A A A A
Accoppiamento
Aspetta il collegamento
Collegato
3.4.2 Stato LED ricevitore, alimentazione a batteria
Spento
R A R A R A R A
A A
A R A R
A A A A A A A A
A A R A A A R A
Spento
Accoppiamento
Aspetta il collegamento
Aspetta il collegamento, batteria quasi
scarica
Collegato
Collegato, batteria quasi scarica
3.4.3 Stato LED ricevitore, alimentazione a USB
Stato LED Descrizione
R A R A R A R A
A A R
A A
A A A A A A R A
A A A A A A A A
Spento, batteria carica
R
Spento, batteria si carica
Accoppiamento
Aspetta il collegamento, batteria si carica
Aspetta il collegamento, batteria carica
Collegato, batteria si carica
Collegato, batteria carica
© MARMITEK
Page 73

73
4 Per iniziare
Prima della messa in servizio del prodotto, eseguire i seguenti
passi:
Installare il trasmettitore.
Installare il ricevitore.
Accoppiare il trasmettitore e il ricevitore.
Regolare il volume.
Buon divertimento!
Ora ti spiegheremo tutto questo passo dopo passo.
4.1 Primo utilizzo
Il ricevitore Audio Anywhere 725 ha una batteria ricaricabile
integrata.
Al primo utilizzo, si consiglia prima di caricare completamente la
batteria. Utilizzare il cavo USB in dotazione e collegarlo
all'adattatore in dotazione. Durante la carica il LED rosso
lampeggia lentamente.
È normale che la prima volta ci vogliono circa 2 ore. Quando la
batteria del ricevitore Audio Anywhere 725 è completamente
carica, il LED rosso si spegne.
4.2 Installazione del trasmettitore
Ogni sorgente audio può essere collegata al trasmettitore, ad
esempio una TV, un computer o un sistema audio.
Collegare il connettore Mini-Jack a per esempio la presa cuffie del
televisore, smartphone o radio/lettore cd.
1. Collegare l'adattatore alla porta Micro USB e inserire
l'adattatore nella presa a muro.
2. Premere il pulsante di accensione. Il LED azzurro inizierà a
lampeggiare lentamente.
3. Adesso la sorgente sonora può riprodurre musica.
ITALIANO
Audio Anywhere 725
Page 74

74
4.3 Installazione del ricevitore
1. Collegare il connettore Mini-Jack a per esempio l'ingresso
AUX IN di un altoparlante attivo, cuffie o radio/lettore cd.
2. Collegare l'adattatore alla porta Micro USB e inserire
l'adattatore nella presa a muro. Il LED rosso inizierà a
lampeggiare lentamente quando la batteria viene caricata.
3. Premere il pulsante di accensione. Adesso il ricevitore Audio
Anywhere 725 si accenderà e il LED azzurro lampeggerà
lentamente. (Il LED rosso lampeggia occasionalmente
quando la batteria è ancora in carica.)
4.4 Accoppiare il trasmettitore e il ricevitore
Al primo utilizzo il ricevitore deve essere accoppiato al
trasmettitore. Assicurarsi che trasmettitore e ricevitore siano
spenti.
1. Premere il pulsante di accensione sul trasmettitore per 2
secondi. Adesso il LED azzurro inizierà a lampeggiare
lentamente. Il trasmettitore è ora in modalità di
accoppiamento per 20 secondi.
2. Premere brevemente il pulsante di accensione sul ricevitore.
Poi il LED rosso azzurro lampeggerà e quindi il LED azzurro
sul trasmettitore e sul ricevitore si accenderanno
continuamente e l'accoppiamento è riuscito. (Se i LED
continuano a lampeggiare rapidamente, il trasmettitore era
probabilmente in modalità di accoppiamento per più di 20
secondi ed esso è stato annullato. Si deve quindi rimettere il
trasmettitore in modalità di accoppiamento e poi accoppiare il
trasmettitore e il ricevitore.)
4.5 Regolare il volume
Sul trasmettitore è possibile regolare il volume con i pulsanti + e per tutti i ricevitori.
È possibile regolare il volume sul ricevitore per ogni ricevitore.
© MARMITEK
Page 75

75
5 Possibilità di connessione
trasmettitore
Il trasmettitore ha le seguenti opzioni di connessione:
5.1 Ingresso analogico
Qui si può collegare qualsiasi uscita analogica, come un lettore
MP3, smartphone, televisore o impianto audio.
5.2 Ingresso Toslink digitale
Qui si può collegare l'uscita Toslink del tuo sistema audio o
audio o televisore sia su stereo.
5.3 Ingresso USB
Qui si può collegare il connettore USB del PC, per usarlo come
uscita audio.
6 Ricevitore aggiuntivo
Ricevitore aggiuntivo per Audio Anywhere 725.
Con un ricevitore aggiuntivo si può ricevere il segnale del
trasmettitore in diversi luoghi della casa.
È possibile collegare un massimo di 16 ricevitori a 1 trasmettitore.
Seguire le istruzioni nel capitolo 4.4 per aggiungere un ricevitore
extra.
7 Amplificatore di segnale
circa 10 metri, attraverso pareti e soffitti. Se non è sufficiente, è
possibile acquistare un set aggiuntivo e collegare il ricevitore al
trasmettitore per funzionare come amplificatore di segnale. Poi si deve
accoppiare il primo trasmettitore al primo ricevitore. Collegare l'uscita
audio del primo ricevitore all'ingresso audio del secondo trasmettitore
e collegare il secondo trasmettitore al secondo ricevitore. Ora si ha un
necessario per coprire la distanza desiderata.
Audio Anywhere 725
ITALIANO
Page 76

76
8 Specificazioni tecniche
Trasmettitore
Alimentazione 100-240 VAC 50/60 Hz, 5V DC
Alimentatore CC 5V, via micro USB
Potenza assorbita < 0.2W
Collegamento Accoppiare e collegare
- Portata frequenza 10Hz a 22kHz.
Ritardo audio totale 16 ms
Supporto modo Multipair party Fino a 16 dispositivi
Prestazione elettrica RF
Modalità di trasmissione audio Digitale
Accoppiamento (pairing) Automaticamente
Velocità trasmissione dati Fino a 2 Mbps, modulazione GFSK
Frequenza trasmettitore 2,4 GHz
Frequency Hopping Triple carrier hopping
Canali 79 canali
Potenza di trasmissione (classe 2 ) 10 dBm
Portata operativa Fino a 40m campo libero, fino a 10m
Ingresso
Interfaccia ingresso audio Connettore stereo 3,5 mm
Audio
(max.) 1,2V ( RMS )
Portata di frequenza audio 20Hz ~ 22kHz
Portata dinamica nom. 95 dBA
Separazione dei canali
Rapporto segnale/rumore
Distorsione Armonica Totale 1,50%
DAC DSP Co-Processor 16-bit Internal
Frequenza di campionamento 48 kHz / 16 bits
Costruzione
Funzioni audio Volume+, volume-, power,
LED Power (accensione) , Link
Antenna Esterna, onnidirezionale
adapter
automaticamente
contemporaneamente
attraverso pareti e soffitti.
Digitale USB stereo
Digitale Toslink stereo
Stereo CODEC con -95dB SNR.
(collegamento)
© MARMITEK
Page 77

77
Antenna Guadagno 2 dBi
Impedanza porta di antenna 50 ohm
Dimensioni (L x L x A) 65 x 55 x 25 mm
Peso 60 grammi
temperatura di esercizio 0 ~ +50°C
Ricevitore
Alimentazione 100-240 VAC 50/60 Hz, 5VDC via
Micro USB
Alimentatore CC 5V, via Micro USB
Consumo di energia < 0.1W standby
< 3W in funzionamento
1,5W per la carica
Alimentazione Micro USB o batteria
Potenza assorbita < 0.2W
Batteria Li-ion 3,7 V
- Tensione di carica batteria 5 V
- Capacità batteria 545mAh
-Tempo di attesa Fino a 280 ore
-Tempo di funzionamento 8 ore
-Tempo di caricamento 2 ore
-Consumo di energia 65 mA
Spegnimento automatico 10 minuti
Collegamento Accoppiare e collegare
automaticamente
Prestazione elettrica RF
Trasmissione RF AV Digitale
Accoppiamento (pairing) Automaticamente
trasmissione data RF Fino a 2 Mbps, modulazione GFSK
Frequenza RF 2,4 GHz
Frequenza 2402~2480 MHz
Frequency Hopping 500 salti/secondo
Canali 79 canali
Potenza di trasmissione (classe 2 ) 4 dBm (max.)
Fino a 40m campo libero, fino a 10m
attraverso pareti e soffitti.
Uscita
Interfaccia uscita audio Connettore stereo 3,5 mm
Potenza di uscita 20 mW RMS
Livello di uscita audio (max.) 1,2V ( RMS )
Caratteristica di frequenza 20Hz ~ 22kHz
Portata dinamica nom. 95 dBA
Separazione dei canali audio D/S
Rapporto segnale/rumore
Distorsione armonica totale 0.05%
ITALIANO
Audio Anywhere 725
Page 78

78
DAC DSP Co-Processor 16-bit Internal
Frequenza di campionamento Fino a 44,1 kHz
Frequenza di campionamento 48kHz / 16 bits
Costruzione
Funzioni audio Volume+, volume-, power,
LED Power (accensione) , Link
Antenna Interno, onnidirezionale
Antenna Guadagno 2 dBi
Dimensioni (L x L x A) 80 x 30 x 20 mm con clip
Peso 30 grammi
Temperatura ambiente 0 ~ +50°C
Al fine di migliorare ulteriormente il prodotto, Marmitek si riserva il diritto di
modificare le specifiche e/o il design senza alcun preavviso.
Stereo CODEC con -95dB SNR.
(collegamento)
© MARMITEK
Page 79

79
9 Domande frequenti (FAQ)
Non riesco a connettere Audio Anywhere 725.
Nota quanto segue:
1. Assicurarsi che l'adattatore di rete sia collegato e che il LED
sull'alimentatore sia acceso o lampeggiante.
2. Assicurarsi che la distanza tra trasmettitore e ricevitore non
superi i 10 metri e che non ci siano ostacoli principali tra di
loro.
Non c'è audio dal mio impianto audio
Assicurarsi che il cavo audio sia collegato correttamente
sul livello desiderato.
Controllare che il volume sul trasmettitore o sul ricevitore non
sia troppo basso.
Ho collegato in modalità wireless il suono del televisore
Per risultati ottimali, si deve collegare il trasmettitore Audio
Anywhere 725 all'uscita audio del televisore e non all'uscita audio
del set-top box o ricevitore satellitare.
Se si collega il trasmettitore all'uscita cuffie, gli altoparlanti del
televisore verranno spenti e sarà possibile continuare a utilizzare il
telecomando del televisore per controllare il volume tramite Audio
Anywhere 725.
Posso anche collegare direttamente i miei altoparlanti al
ricevitore?
Per ascoltare suoni o musica, si deve collegare il ricevitore a un
amplificatore con altoparlanti (integrati) separati o i cosiddetti
altoparlanti attivi (con amplificatore integrato). Non è possibile
collegare direttamente gli altoparlanti passivi al ricevitore. È
invece possibile collegare cuffie passive al ricevitore.
ITALIANO
Audio Anywhere 725
Page 80

80
Posso collegare anche il cavo USB del mio
trasmettitore/ricevitore a una presa USB di, per esempio, il
mio amplificatore o televisore?
Sì, è possibile. Il trasmettitore si accende e spegne
automaticamente con l'amplificatore o il televisore (accensione
automatica).
Ancora domande che non sono state risposte qui sopra?
Visitare www.marmitek.com
10 Notifica
10.1 Dichiarazione di conformità
Con ciò, Marmitek BV, dichiara che
Audio Anywhere
essenziali ed altre disposizioni relative alla Direttiva:
Direttiva 2014/53/UE del Parlamento Europeo e del Consiglio del
16 aprile 2014 concernente l'armonizzazione delle legislazioni
degli Stati membri relative alla messa a disposizione sul mercato
di apparecchiature radio e che abroga la direttiva 1999/5/CE.
Direttiva 2011/65/UE del Parlamento Europeo e del Consiglio
d
sostanze pericolose nelle apparecchiature elettriche ed
elettroniche.
Regolamento (CE) n. 278/2009 della Commissione del 6 aprile
2009 recante misure di esecuzione della direttiva
2005/32/CE del Parlamento europeo e del Consiglio per quanto
riguarda le specifiche di progettazione ecocompatibile relative al
consumo di energia elettrica a vuoto e al rendimento medio in
modo attivo per gli alimentatori esterni.
È possibile leggere l'intero Dichiarazione di Conformità all'indirizzo
http://www.marmitek.com.
© MARMITEK
Page 81

81
10.2 Riciclaggio
raccolta differenziata.
Questo simbolo sul prodotto o sulla confezione indica che il prodotto non
deve essere considerato come un normale rifiuto domestico, ma deve
invece essere consegnato ad un punto di raccolta appropriato per il riciclo
di apparecchi elettrici ed elettronici. È responsabilità del proprietario
smaltire sia questi prodotti sia le altre apparecchiature elettriche ed
elettroniche mediante le specifiche strutture di raccolta indicate dal governo
o dagli enti pubblici locali. Il corretto smaltimento ed il riciclaggio aiuteranno
smaltimento delle vecchie apparecchiature in tuo possesso, ti invitiamo a
contattare gli enti pubblici di competenza, il servizio di smaltimento rifiuti o il
negozio nel quale hai acquistato il prodotto.
10.3
Marmitek è un marchio commerciale di Germatron BV.
Audio Anywhere
Tutti i diritti riservati. Marmitek si è impegnata perché le informazioni
contenute in questo manuale fossero il più possibile precise. Marmitek
declina ogni responsabilità per eventuali errori di stampa. I diritti d'autore e
tutti gli altri diritti di proprietà intellettuale sul contenuto (inclusi ma non
limitati a numeri di modelli, software, audio, video, testi e fotografie)
spettano a Marmitek BV. È strettamente proibito ogni uso del contenuto,
incluse senza limitazioni la distribuzione, riproduzione, modifica,
pubblicazione o trasmissione senza previa autorizzazione scritta da parte di
proprietà intellettuale su tutte le riproduzioni. I nomi di altre società e
prodotti qui menzionati potrebbero essere marchi delle rispettive società. La
citazione di prodotti di terze parti è a solo scopo informativo e non
costituisce alcun impegno o raccomandazione. Marmitek declina ogni
prodotti.
ITALIANO
Audio Anywhere 725
Marmitek BV - PO Box 4257 - 5604 EG Eindhoven
Paesi Bassi
Page 82

82
© MARMITEK
Page 83

83
1 Inhoudsopgave
1 Inhoudsopgave ..................................................................... 83
2 Veiligheidsinstructies ............................................................ 84
3 Uw product ........................................................................... 85
3.1 Introductie ............................................................................. 85
3.2 Inhoud van de verpakking ..................................................... 86
3.3 Overzicht van het product ..................................................... 86
3.4 Led status ............................................................................. 88
3.4.1 Led status zender ...................................................... 88
3.4.2 Led status ontvanger, batterij voeding ....................... 88
3.4.3 Led status ontvanger, USB voeding ........................... 88
4 Aan de slag ........................................................................... 89
4.1 Eerste gebruik ....................................................................... 89
4.2 Installeren van de zender ...................................................... 89
4.3 Installeren van de ontvanger ................................................. 90
4.4 De zender en ontvanger koppelen ........................................ 90
4.5 Volume instellen ................................................................... 90
5 Aansluitmogelijkheden zender .............................................. 91
5.1 Analoge ingang ..................................................................... 91
5.2 Digitale Toslink ingang .......................................................... 91
5.3 USB ingang .......................................................................... 91
6 Extra ontvanger .................................................................... 91
7 Signaalversterker .................................................................. 91
8 Technische specificaties ....................................................... 92
9 Veelgestelde vragen ............................................................. 95
10 Kennisgeving ........................................................................ 96
10.1 Verklaring van overeenstemming .......................................... 96
10.2 Recycling .............................................................................. 97
10.3 Auteursrechten ..................................................................... 97
Audio Anywhere 725
NEDERLANDS
Page 84

84
2 Veiligheidsinstructies
Lees deze gebruiksaanwijzing zorgvuldig door voordat u het
apparaat gaat gebruiken en bewaar deze gebruiksaanwijzing
om deze indien nodig te kunnen raadplegen.
Uitsluitend voor gebruik binnenshuis.
Gebruik het product niet in een vochtige omgeving of nabij
water.
Stel het product niet bloot aan extreem hoge of lage
temperaturen, sterke lichtbronnen of direct zonlicht.
Dit product is geen speelgoed. Buiten bereik van kinderen
houden.
Sluit de voedingsadapter pas op het lichtnet aan als u zeker
weet dat de netspanning overeenkomt met de waarde op de
typeplaatjes.
Sluit een voedingsadapter nooit aan wanneer deze
beschadigd is. Neem in dat geval contact op met uw
leverancier.
Haal de AC/DC voedingsadapter uit het stopcontact wanneer
u het apparaat langere tijd niet gebruikt.
Het product nooit openmaken: de apparatuur kan onderdelen
bevatten waarop levensgevaarlijke spanning staat.
Laat reparatie of service alleen over aan deskundig
personeel.
Bij oneigenlijk gebruik, zelf aangebrachte veranderingen of
reparaties, komen alle garantiebepalingen te vervallen.
Marmitek aanvaardt geen productaansprakelijkheid bij onjuist
gebruik van het product of door gebruik anders dan waarvoor
het product is bestemd.
Marmitek aanvaardt geen aansprakelijkheid voor volgschade
anders dan de wettelijke productaansprakelijkheid.
© MARMITEK
Page 85

85
3 Uw product
3.1 Introductie
Gefeliciteerd met de aankoop van de Marmitek
Audio Anywhere 725. De Audio Anywhere 725 bestaat uit een
zender en een ontvanger. Het signaal wordt uitgezonden op 2,4
GHz en kan daardoor door muren en plafonds gaan.
Met de zender/ontvanger kunnen (stereo) audiosignalen
draadloos worden overgezonden.
Digitale draadloze audio zender.
Geniet draadloos van muziek en tv geluid.
Stuur het geluid van tv of computer draadloos naar je stereo,
speakers of hoofdtelefoon.
Luister in een andere ruimte (bv. keuken, serre) naar
dezelfde muziek als in de woonkamer.
Digitale audio overdracht in HD kwaliteit via verbeterde
2.4GHz storingsvrije techniek.
Ideaal als portable oplossing door ingebouwde batterij in de
ontvanger en eigen volume regeling.
Aan een zender kunnen meerdere ontvangers gekoppeld
worden.
Gebruik meerdere sets (max 6) in dezelfde omgeving door
middel van secured pairing.
U kunt muziek van een geluidsbron, via de Audio Anywhere 725,
afspelen op uw geluidsinstallatie, zonder dat u daarvoor uw
geluidsbron met kabels aan hoeft te sluiten op de
geluidsinstallatie. De geluidsbron kan bijvoorbeeld een pc of
laptop zijn, of een tv. U kunt vervolgens de muziek via uw
geluidsbron selecteren en het volume op de zender of ontvanger
instellen, zonder dat u naar uw geluidsinstallatie hoeft te lopen.
De ontvanger heeft een ingebouwde batterij, zodat u bijvoorbeeld
ook uw bedrade hoofdtelefoon of actieve speakers draadloos kunt
maken.
De Audio Anywhere 725 heeft een bereik van ongeveer 40 meter,
zodat u onbeperkt uw audio in de zelfde of aansluitende ruimte
kunt regelen.
NEDERLANDS
Audio Anywhere 725
Page 86

86
3.2 Inhoud van de verpakking
A. 1 x Audio Anywhere 725 zender.
B. 1 x Audio Anywhere 725 ontvanger.
C. 2 x Micro USB kabel.
D. 1 x USB voedings adapter.
E. 1 x Mini-jack kabel.
F. 1 x Gebruiksaanwijzing.
3.3 Overzicht van het product
Zender
A
Volume -
Volume +
Aan/uit
Led
Aux in
Micro USB
aansluiting
Toslink
ingang
© MARMITEK
Page 87

87
B
Ontvanger
Volume +
Volume -
Aan / uit
Micro USB
aansluiting
Jack uit
Aux uit
Led
C
Micro USB voedingskabel
Met deze kabel kunt u de Audio Anywhere 725 van voeding
voorzien.
D
USB voedingsadapter
Sluit D op C aan en voorzie de
Audio Anywhere 725 van voeding.
NEDERLANDS
Audio Anywhere 725
Page 88

88
Led status
Omschrijving
Led status
Omschrijving
E
Mini-jack kabel
Deze kabel gaat in de audio input van de Audio Anywhere 725
zender.
3.4 Led status
3.4.1 Led status zender
Het Led lampje kan rood (R) of blauw (G) oplichten. De snelheid
en de volgorde van knipperen geven de status aan.
R B R B R B R B
B B
B B B B B B B B
Koppelen
Wacht op verbinding
Verbonden
3.4.2 Led status ontvanger, batterij voeding
Uit
R B R B R B R B
B B
B R B R
B B B B B B B B
B B R B B B R B
Uit
Koppelen
Wacht op verbinding
Wacht op verbinding, batterij bijna leeg
Verbonden
Verbonden, batterij bijna leeg
3.4.3 Led status ontvanger, USB voeding
Led status Omschrijving
R B R B R B R B
B B R
B B
B B B B B B R B
B B B B B B B B
Uit, batterij geladen
R
Uit, batterij laadt op
Koppelen
Wacht op verbinding, batterij laadt op
Wacht op verbinding, batterij geladen
Verbonden, batterij laadt op
Verbonden, batterij geladen
© MARMITEK
Page 89

89
4 Aan de slag
Voor u het product in gebruik kunt nemen moeten de volgende
stappen ondernomen worden:
Installeer de zender.
Installeer de ontvanger.
De zender en ontvanger koppelen.
Volume instellen.
Genieten maar!
We zullen dit nu stap voor stap aan u uitleggen.
4.1 Eerste gebruik
De AudioAnywhere 725 ontvanger heeft een ingebouwde
oplaadbare batterij.
Bij eerste gebruik raden wij aan om de batterij eerst volledig op te
laden. Gebruik hiervoor de meegeleverde USB kabel en sluit deze
aan op de meegeleverde adapter. Gedurende het laden zal de
rode led langzaam knipperen.
Het is normaal dat bij de eerste keer laden dit ongeveer 2 uur
duurt. Als de batterij van de Audio Anywhere 725 ontvanger
volledig is opgeladen gaat de rode led uit.
4.2 Installeren van de zender
Op de zender kan elke audiobron worden aangesloten,
bijvoorbeeld een tv, computer of geluidsinstallatie.
Sluit de mini jack plug aan op bijvoorbeeld de hoofdtelefoon
aansluiting van uw tv, smartphone of radio/cd speler.
1. Sluit de adapter aan op de micro USB poort en steek de
adapter in het stopcontact.
2. Druk op de aan/uit knop. De blauwe led gaat nu langzaam
knipperen.
3. Laat uw audio bron geluid weer geven.
NEDERLANDS
Audio Anywhere 725
Page 90

90
4.3 Installeren van de ontvanger
1. Sluit de mini jack plug aansluiting (jack uit) aan op
bijvoorbeeld de AUX IN van een actieve speaker,
hoofdtelefoon of radio/cd speler.
2. Sluit de adapter aan op de micro USB poort en steek de
adapter in het stopcontact. De rode led gaat langzaam
knipperen wanneer de batterij wordt opgeladen.
3. Druk op de aan/uit knop. De Audio Anywhere 725 ontvanger
zal nu inschakelen en de blauwe led gaat nu langzaam
knipperen. (De rode led knippert af en toe wanneer de
batterij nog opgeladen wordt.)
4.4 De zender en ontvanger koppelen
Bij eerste gebruik dient de ontvanger met de zender gekoppeld te
worden. Zorg dat de zender en ontvanger uitstaan.
1. Druk 2 seconden op de aan/uit knop van de zender. De rood
blauwe led gaat nu knipperen. De zender staat nu 20
seconden in de koppelstand.
2. Druk kort op de aan/uit knop van de ontvanger. De rood
blauwe led gaat nu knipperen en daarna gaat de blauwe led
op de zender en ontvanger continue branden en is de
koppeling gelukt. (Blijven de leds snel knipperen, dan stond
de zender waarschijnlijk langer dan 20 seconden in de
koppelstand en is deze opgeheven. U dient de zender dan
opnieuw in de koppelstand te zetten en zender en ontvanger
koppelen dan alsnog.)
4.5 Volume instellen
Op de zender kunt u het volume met de + en knop instellen naar
alle ontvangers.
Op de ontvanger kunt u het volume per ontvanger instellen.
© MARMITEK
Page 91

91
5 Aansluitmogelijkheden zender
De zender heeft de volgende aansluitmogelijkheden:
5.1 Analoge ingang
Hier kunt u iedere analoge uitgang op aansluiten, zoals een MP3
speler, smartphone, tv of geluidsinstallatie.
5.2 Digitale Toslink ingang
Hier kunt u de Toslink uitgang van uw geluidsinstallatie of tv op
aansluiten. Zorg dat de Toslink instelling op uw geluidsinstallatie
of tv op stereo staat.
5.3 USB ingang
Hier kunt u de USB aansluiting van uw pc op aansluiten om deze
als audio uitgang te gebruiken.
6 Extra ontvanger
Extra ontvanger voor uw Audio Anywhere 725.
Met een extra ontvanger kunt u op meerdere plaatsen in huis het
signaal van de zender ontvangen.
U kunt maximaal 16 ontvangers aan 1 zender koppelen.
Volg de instructies bij hoofdstuk 4.4 om een extra ontvanger toe te
voegen.
7 Signaalversterker
De zender en ontvanger hebben binnenshuis een bereik van
ongeveer 10 meter door muren en plafonds.
Als dat niet voldoende is, kunt u een extra set aanschaffen en de
ontvanger aansluiten op de zender om zo als signaalversterker te
functioneren.
U koppelt dan de eerste zender aan de eerste ontvanger. Sluit de
audio uitgang van de eerste ontvanger aan op de audio ingang
van de 2e zender, en koppelt de 2e zender met de 2e ontvanger. U
heeft nu een bereik van 20 meter. U kunt dit zo vaak herhalen als
nodig is om de gewenste afstand te overbruggen.
NEDERLANDS
Audio Anywhere 725
Page 92

92
8 Technische specificaties
Zender
Voeding 100-240 VAC 50/60 Hz, 5V DC
DC Voeding 5 V, via micro USB
Opgenomen vermogen < 0.2 W
Koppelen (pairing) Automatisch koppelen en verbinden
Frequentiebereik 10 Hz to 22 kHz.
Totale audiovertraging 16 ms
Multi pair partymode Tot 16 ontvangers gelijktijdig.
Elektrische Performance
Audio overdrachtsmethode Digitaal
Koppelen Automatisch
Snelheid dataoverdracht tot 2 Mbps, GFSK modulatie
Zenderfrequentie 2,4 GHz
Frequency Hopping Triple carrier hopping
Kanalen 79 kanalen
Zendvermogen ( klasse 2 ) 10 dBm
Operationeel bereik Tot 40 m vrije veld, tot 10 m door
Ingang
Interface audio Ingang jack 3,5 mm stereo
Audio
Audio input level (max ) 1,2 V (RMS)
Audio frequentiebereik 20 Hz ~ 22 kHz
Dynamisch bereik Nom. 95 dBA
Kanaalscheiding 85 dB
Signaal/ruisverhouding
Totale Harmonische Vervorming 1,50%
DAC DSP Co-Processor 16-bit Internal
sampling rate 48 kHz / 16 bits
Fysiek
Audiofuncties Volume +, Volume-, Aan/uit
Leds Power, link
Antenne Extern, omnidirectioneel
Antenne Gain 2 dBi
Impedantie antennepoort 50 ohm
Afmetingen (L x B x H) 65 x 55 x 25 mm
Gewicht 60 gram
adapter
vloeren en muren
USB digitaal stereo
Toslink digitaal stereo
Stereo CODEC with -95 dB SNR.
© MARMITEK
Page 93

93
Bedrijfstemperatuur 0 ~ +50°C
Ontvanger
Voeding 100-240 VAC 50/60 Hz, 5 VDC via
Micro USB
DC Voeding 5 V, via Micro USB
Energieverbruik < 0.1 W
< 3 W in werking
1,5 W voor opladen
Voeding Micro USB of batterij
Opgenomen vermogen < 0.2 W
Batterij Li-ion 3,7 V
- Batterij Laadspanning 5 V
- Batterijvermogen 545 mAh
- Stand-by tijd Tot 280 uur
- Bedrijfsduur 8 uur
- Oplaad tijd 2 uur
- Stroomverbruik 65 mA
Automatische uitschakeling 10 minuten
Verbinding Automatisch koppelen en verbinden
Elektrische Performance RF
RF AV overdracht Digitaal
Koppeling Automatisch
RF data snelheid Tot 2 Mbps, GFSK modulatie
RF frequentie 2,4 GHz
Frequentie 2402~2480 MHz
Frequency Hopping 500 hops / seconde
Kanalen 79 kanalen
Zendvermogen ( klasse 2 ) 4 dBm ( Max )
Bereik Tot 40 m vrije veld, tot 10 m door
vloeren en muren
Uitgang
Interface audio uitgang Jack 3,5 mm stereo
Uitgangsvermogen 20 mW RMS
Audio Output Level ( Max ) 1,2 V ( RMS )
Frequentiekarakteristiek 20 Hz ~ 22 kHz
Dynamisch bereik Nom. 95 dBA
Kanaalscheiding Audio R / L 85 dB
Signaal/ruisverhouding
Totale harmonische afwijking 0.05%
DAC DSP Co-Processor 16-bit Internal
Stereo CODEC with -95dB SNR.
Sample rate tot 44,1 kHz
Sampling rate 48 kHz / 16 bits
Fysiek
NEDERLANDS
Audio Anywhere 725
Page 94

94
Audiofuncties Volume +, volume-, aan/uit.
Leds Power, link
Antenne Intern, omnidirectioneel
Antenne Gain 2 dBi
Afmetingen (L x B x H) 80 x 30 x 20 mm, met clip
Gewicht 30 gram
Omgevingstemperatuur 0 ~ +50°C
Met het oog op verdere verbetering van het product behoudt Marmitek zich
het recht voor om specificaties en/of ontwerpen zonder voorafgaande
kennisgeving te wijzigen.
© MARMITEK
Page 95

95
9 Veelgestelde vragen
Ik kan mijn Audio Anywhere 725 niet koppelen.
Let u eens op het volgende:
1. Verzeker u ervan dat de netadapter is aangesloten en de led
brandt of knippert.
2. Zorg er voor dat de afstand tussen zender en ontvanger niet
groter is dan 10 meter en er geen grote obstakels tussen
staan.
Er komt geen geluid uit mijn geluidsinstallatie
Zorg er voor dat de audio kabel juist is aangesloten (AUX
IN), de juiste ingang is geselecteerd op uw audio installatie
en het volume van uw audio installatie is ingesteld op het
gewenste niveau.
Controleer of het volume op de zender of ontvanger niet op
laag staat.
Ik heb het geluid van mijn tv draadloos gekoppeld met mijn
audio installatie, maar het geluid loopt niet synchroon met
het beeld.
Sluit voor het beste resultaat de Audio Anywhere 725 zender aan
op de audio-uitgang van uw tv en niet op de audio uitgang van uw
settopbox of satelliet ontvanger.
Als u de zender aansluit op de hoofdtelefoon-uitgang, worden de
luidsprekers van uw tv uitgeschakeld en kunt u de
afstandsbediening van uw TV blijven gebruiken om het volume te
regelen via de Audio Anywhere 725.
Kan ik ook rechtstreeks mijn luidsprekers op de ontvanger
aansluiten?
Om geluid of muziek te kunnen horen, sluit u de ontvanger aan op
een versterker met losse (inbouw)luidsprekers of zg. actieve
luidsprekers (met ingebouwde versterker). U kunt passieve
luidsprekers niet rechtstreeks op de ontvanger aansluiten. U kunt
wel een passieve hoofdtelefoon op de ontvanger aansluiten.
NEDERLANDS
Audio Anywhere 725
Page 96

96
Kan ik de USB kabel van mijn zender/ontvanger ook op een
USB aansluiting van bijvoorbeeld mijn versterker of TV
aansluiten?
Ja dat kan. De zender schakelt dan automatisch mee in en uit met
de versterker of TV.(auto power on)
Heeft u vragen die hierboven niet beantwoord worden?
Kijk dan op http://www.marmitek.com.
10 Kennisgeving
10.1 Verklaring van overeenstemming
Bij deze verklaart Marmitek BV, dat deze
Audio Anywhere 725
aan de overige relevante bepalingen van Richtlijnen:
Richtlijn 2014/53/EU van het Europees Parlement en de Raad van 16 april
2014 betreffende de harmonisatie van de wetgevingen van de lidstaten
inzake het op de markt aanbieden van radioapparatuur en tot intrekking van
Richtlijn 1999/5/EG.
Richtlijn 2011/65/EU van het Europees Parlement en de Raad van 8 juni
2011 betreffende beperking van het gebruik van bepaalde gevaarlijke
stoffen in elektrische en elektronische apparatuur.
Verordening (EG) Nr. 278/2009 van de Commissie van 6 april 2009
houdende tenuitvoerlegging van Richtlijn 2005/32/EG van het Europees
Parlement en de Raad, wat betreft voorschriften inzake ecologisch ontwerp
voor het elektrisch opgenomen vermogen van externe stroomvoorzieningen
in niet-belaste toestand en de gemiddelde actieve efficiëntie van externe
stroomvoorzieningen.
U kunt de volledige conformiteitsverklaring lezen op
http://www.marmitek.com
© MARMITEK
Page 97

97
10.2 Recycling
Milieu-informatie voor klanten in de Europese Unie en andere
Europese landen met gescheiden inzamelingssystemen.
Dit symbool op het product of op de verpakking wijst erop dat dit
product niet als huishoudelijk afval mag worden behandeld. Het moet
echter naar een inzamelingspunt worden gebracht waar elektrische en
elektronische apparatuur wordt gerecycled. U bent zelf verantwoordelijk
voor de vernietiging van deze en andere elektrische en elektronische
apparatuur via de daarvoor door de landelijke of plaatselijke overheid
aangewezen inzamelingskanalen. De juiste vernietiging en recycling van
deze apparatuur voorkomt mogelijke negatieve gevolgen voor het milieu en
de gezondheid. Voor meer informatie over het vernietigen van uw oude
apparatuur neemt u contact op met de plaatselijke autoriteiten of
afvalverwerkingsdienst, of met de winkel waar u het product hebt
aangeschaft.
10.3 Auteursrechten
Marmitek is een handelsmerk van Germatron BV. Audio Anywhere 725
een handelsmerk van Marmitek BV. Alle rechten voorbehouden. Deze
handleiding is met uiterste zorg samengesteld. Marmitek aanvaardt geen
aansprakelijkheid voor druk- of typefouten. Auteursrechten en alle andere
eigendomsrechten op de inhoud (inclusief maar niet beperkt tot model
nummers, software, audio, video, tekst en foto's) berust bij Marmitek BV.
Elk gebruik van de inhoud, maar zonder beperking, distributie, reproductie,
wijziging, openbaarmaking of verzending zonder de voorafgaande
schriftelijke toestemming van Marmitek is strikt verboden. Alle
auteursrechten en andere eigendomsrechten dienen te worden behouden
op alle reproducties. Andere in deze handleiding genoemde bedrijfs- of
productnamen kunnen handelsmerken van de desbetreffende bedrijven
zijn. Producten van andere fabrikanten worden alleen genoemd ter
informatie. Dit betekent niet dat deze producten door Marmitek worden
aanbevolen of door Marmitek zijn goedgekeurd. Marmitek aanvaardt geen
enkele aansprakelijkheid met betrekking tot de betrouwbaarheid van deze
producten.
Marmitek BV - Postbus 4257 - 5604 EG Eindhoven Nederland
Audio Anywhere 725
NEDERLANDS
Page 98

98
© MARMITEK
Page 99

Audio Anywhere 725
99
NEDERLANDS
Page 100

 Loading...