

Page 1

Plug the EDL-Net into your LAN.
The network DHCP server assigns an address
to the new device on the LAN.
“To find the logger’s assigned address, go to
the Windows Start Button, click All Programs,
and scroll down to MDAS-Pro. Then run the
“Find edlNet” program.
Make sure the box is checked for Only Marathon Products
• Click on Discover IP
Addresses
The program will find and list
all Marathon Products devices
on the same subnet.
For future reference make a
note of the address for the
EDL-Net logger.
• Click on the logger entry
which will open a web browser with the address and host
information filled in.
EDL Net
QUICK START GUIDE
Page 2
• Choose SOFTWARE PROGRAM, to begin the installation process of the
software.
• If for some reason, the CD program does not start, please go to START, RUN,
BROWSE (go to your cd-rom drive), and SETUP, to begin the installation
process.
• A screen will appear with the message Initializing Setup. You will be asked
where to install the program. The default is c:\programs\MDAS-PRO. If you
wish to install the MDAS-PRO program on a different drive or in a different
directory, type the drive and directory name.
• The installation program will now transfer files to your destination drive and
directory.
• Following the installation of the program files, a Marathon program directory
and two icons will be created: MDAS-PRO Software and the Alarm Monitor.
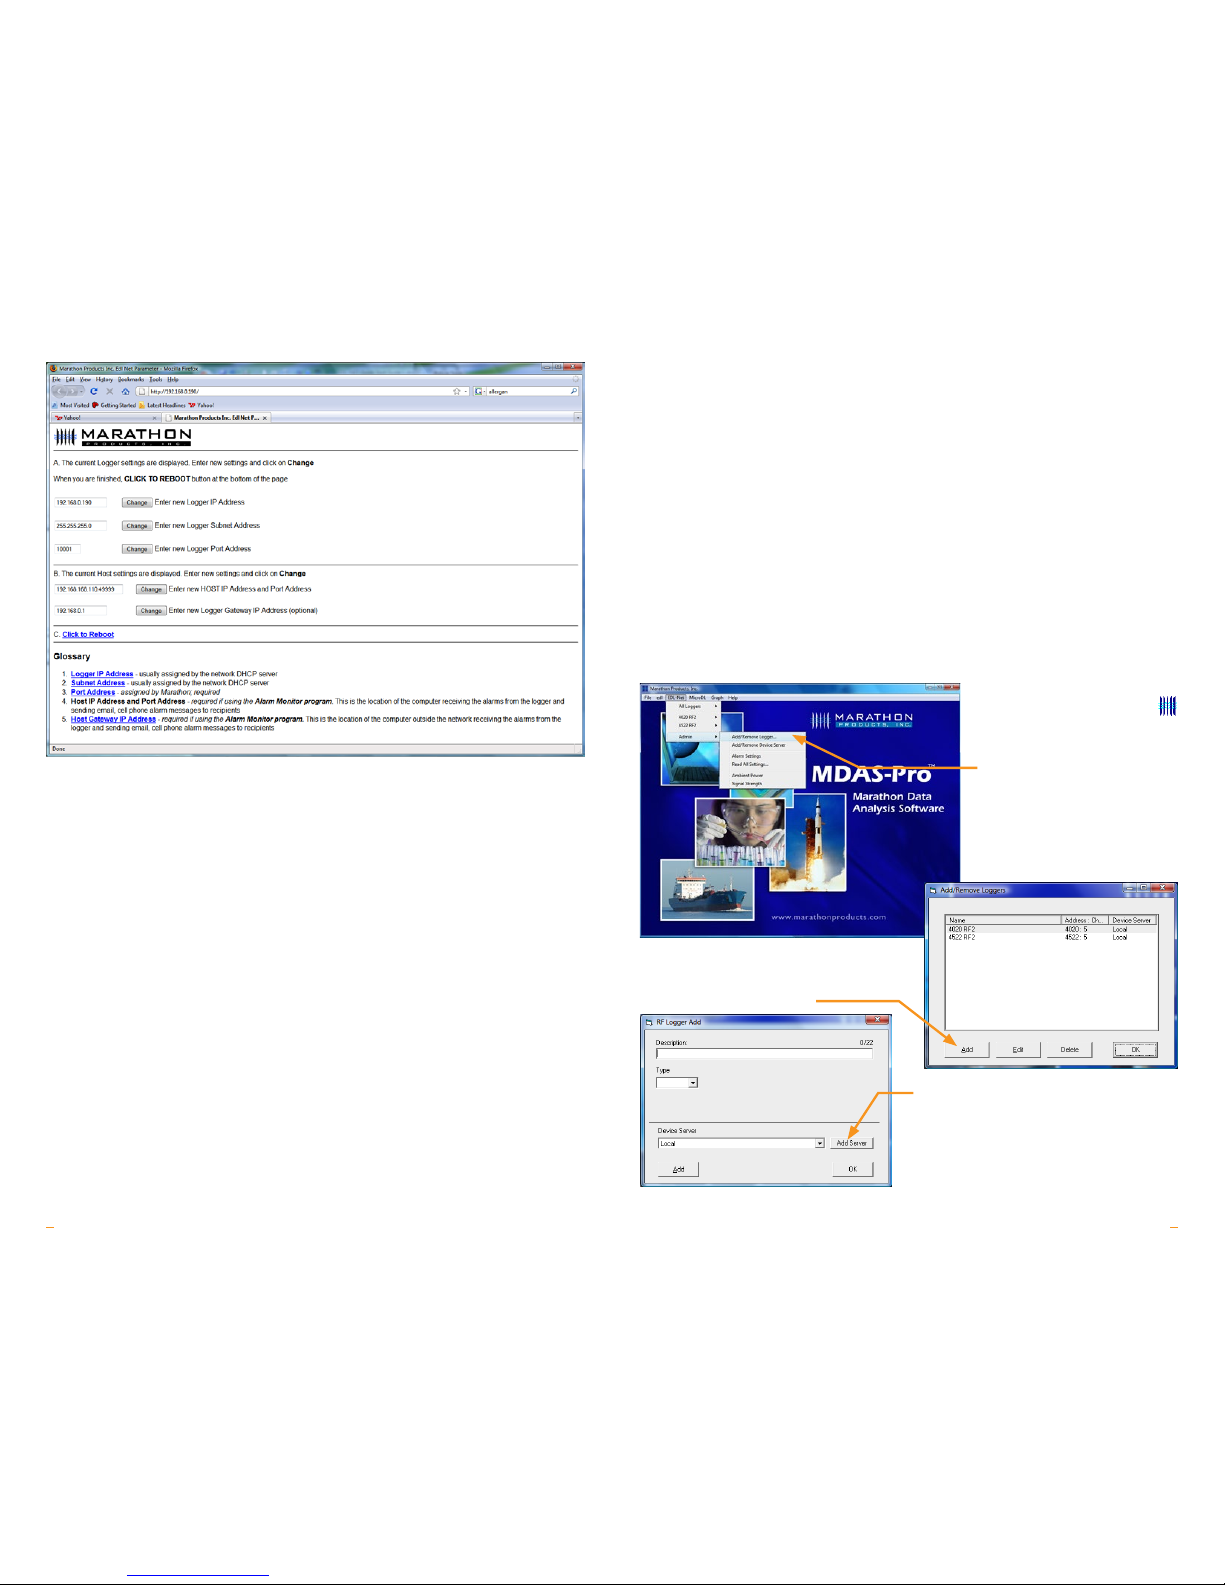
Add Loggers
To start the software doubleclick on the software icon
or, go to Start, Programs,
MDAS-PRO.
•
Click on the EDL-Net menu
item and select Admin, Add/
Remove Logger.
•
Click on Add to create a new
Logger definition. The “RF Logger
Add” window will open.
•
At this stage, leave settings as is and
click on Add Server. (We will return to
this window later.) the “Add Device
Server” window will open.
If you want to you can change the address to a new address that will not be
changed by the DHCP server. This should be done with the help of your IT department. If you change the address, or other information in A, click on Change and
click on C. Click on Click to Reboot to reboot the logger.
Before leaving this form make a note of the “Logger Port Address” this will be
used later.
For the Alarm Monitor to work the logger needs to know where to send the alarm
message. The Alarm Monitor software should be run on a computer that is on 24
hours a day. The IP address of that computer running the Alarm Monitor software
is entered as the “Host IP Address” on the form. Note that on the form the entry
is represented as Address:Port. The default port is 49999.
Also be aware that the computer running the Alarm Monitor program may have
a firewall also running. This firewall will probably block messages coming in on
port 49999. You will need to modify the firewall settings so that messages coming
in on port 49999 go to the Alarm Monitor.
Close the browser window.
MDAS-Pro Software Installation
MDAS-Pro software runs on Microsoft Windows XP and Vista operating systems.
• The CD-ROM will begin installation when inserted in the drive.
43
Page 3

FILL IN:
•
Type a description of the EDL-Net log-
ger (see example: “Demo 1”),
•
Under Host, put the address of the
EDL-Net you wrote down earlier (example: “192.168.0.190”),
•
The TCP Port is the “Logger Port
Address” you wrote down earlier (example: “10001”).
•
Click Test to test the connection for
the server.
•
Then click on Add. You will return to
the “RF Logger Add” window.
ENTER:
•
A description of the EDL-Net
logger (you can use the same
description as the server),
•
Select EDLNet from the drop
down list,
•
Select the server you just
entered in the previous step.
•
Then click OK.
Logger Initialization:
To configure the logger
•
In the MDAS-Pro menu bar
click on EDL-Net.
•
In the drop-down menu
click on the Logger you just
entered.
•
Click on Logger
Initialization.
The Logger Initialization screen
allows you to set up your
parameters for the EDL-Net
logger by using the four tabs:
Setup, Measurement,
Alarms, and Properties.
SETUP TAB
• Description: Enter alpha or numeric
information, such as the location of the
unit.
• Tracking Number: Enter any numeric
information. We recommend using the
same number as the logger address.
• Logger Clock: Set the time manually
in the window provided or to set the
logger-time based on the computer
time as registered on your personal
computer.
• Battery Status: The EDL-Net logger comes with two sets of batteries: one set
powers the RF module and the other one powers the logger. The percentage
bar in this section displays the estimated battery life based on the date when
the logger battery was first installed or replaced.
MEASUREMENT TAB
• Start Delay: Set a time delay in hours,
minutes, or seconds before the EDLNet will begin to record.
• Measurement Times: Set the length
of time in days or hours that you wish
to record data. Please note that the
“Duration of Recording” and “Interval
Between Measurements” are dynamically linked. Setting the “Duration of
Recording” will automatically calculate
the “Interval Between Measurements”.
Conversely, setting the “Interval Between Measurements”, will automatically
calculate the “Duration of Recording”.
For example, for a 32K model, if you set the “Duration of Recording” to 365
Days, it will automatically calculate the “Interval Between Measurements” as
16 minutes and 58 seconds. Or, if you set the “Interval Between Measurements” at 10 minutes, it will automatically calculate the “Duration of
Recording” to 215 days and 9 hours.
5 6
Page 4

ALARMS
• Temperature Greater Than: Allows
you to set the maximum temperature
for an alarm condition to be triggered.
• Temperature Less Than: Allows you
to set the minimum temperature for an
alarm condition to be triggered.
• Alarm Time: Alarm conditions are
checked when measurements are
made. If measurements are made
every 5 minutes, then the valid intervals for the Alarm conditions are 0, 5, 10, 15, … etc. A zero time is interpreted
as a single measurement. In this example, five minutes would require two
measurements outside the alarm limits to cause an alarm condition.
The loggers support two different methods of measuring the time for an alarm
condition. The default method is “Cumulative Time”. The total time beyond the
limit is counted. The alarm limits may be exceeded only once or several times as
the total time is added together. The second method is called “Continuous
Interval”. The alarm will activate only when the alarm limit has exceed the full time
specified. If the temperature returns to the acceptable range the time count will
be reset.
ADVANCED ALARM MODES (NOTIFICATION):
• Single Alarm Notification: with “Single Alarm Notification” the logger must
be reinitialized to reset the alarm. This option allows you to set alarm time.
• Manual Reset: With “manual reset” you can reset the alarm by pressing the
Start button. This option allows you to set alarm time.
• Temperature Notification: With “Temperature Notification” the EDL-Net will
send an email every time the temperature reaches the alarm limit, in other
words, it resets itself. You cannot set an alarm time with this option. You can
control the frequency of the emails from Admin/ Alarm Setting/ Time between
email notifications.
PROPERTIES
• Stop Condition: The Push Start but-
ton on the EDL-Net logger may be
enabled as a “Stop” button mechanism. This option is not recommended
if you are using the manual alarm reset
notification.
• Memory Configuration: The default
is Record to End of Memory.
Note: The recording can also be stopped
by using the remote stop from the
software.
• When you are finished entering your settings click OK.
You are now ready to begin recording.
• Simply manually press the Start button or click on remote start from the software, EDLNet_(logger description)_Start_Recording_Now.
• The green LED indicator light will blink three times in succession.
© 2016 MARATHON PRODUCTS, INC. R:08042016
7 8
 Loading...