

Marantz VP-8600 Service Manual
Service
VP8600
VP8600 /
F S/U1S
Manual
DLP Projector
TABLE OF CONTENTS
SECTION PAG E
1. TECHNICAL SPEC I FI CA TIONS ........................................................................................... 1
2. SERVICE MODE ................................................................................................................... 3
3. DISASSEMBLE PROCEDURE ............................................................................................. 4
4. WIRING DIAGRAM .............................................................................................................15
5. BLOCK DIAGRAM ..............................................................................................................17
6. PWB LOCATION ................................................................................................................. 19
7. EXPLODED VIEW AND PARTS LIST ................................................................................. 21
Please use this service manual with referring to the user guide ( D.F.U. ) without fail.
VP8600
Part no. 90M20AV855010
First Issue 2005.12
MZ
MARANTZ DESIGN AND SERVICE
Using superior design and selected high grade components,
Only original
MARANTZ
parts can insure that your
MARANTZ
MARANTZ
product will continue to perform to the specifi cations for which
company has created the ultimate in stereo sound.
it is famous.
Parts for your
MARANTZ
ORDERING PARTS :
equipment are generally available to our National Marantz Subsidiary or Agent.
Parts can be ordered either by mail or by Fax.. In both cases, the correct part number has to be specifi ed.
The following information must be supplied to eliminate delays in processing your order :
1. Complete address
2. Complete part numbers and quantities required
3. Description of parts
4. Model number for which part is required
5. Way of shipment
6. Signature : any order form or Fax. must be signed, otherwise such part order will be considered as null and void.
USA
MARANTZ AMERICA, INC
1100 MAPLEWOOD DRIVE
ITASCA, IL. 60143
USA
PHONE : 630 - 741 - 0300
FAX : 630 - 741 - 0301
AUSTRALIA
QualiFi Pty Ltd,
24 LIONEL ROAD,
MT. WAVERLEY VIC 3149
AUSTRALIA
PHONE : +61 - (0)3 - 9543 - 1522
FAX : +61 - (0)3 - 9543 - 3677
EUROPE / TRADING
MARANTZ EUROPE B.V.
P. O. BOX 8744, BUILDING SILVERPOINT
BEEMDSTRAAT 11, 5653 MA EINDHOVEN
THE NETHERLANDS
PHONE : +31 - 40 - 2507844
FAX : +31 - 40 - 2507860
THAILAND
MRZ STANDARD CO., LTD
746 - 754 MAHACHAI ROAD.,
WANGBURAPAPIROM, PHRANAKORN,
BANGKOK, 10200 THAILAND
PHONE : +66 - 2 - 222 9181
FAX : +66 - 2 - 224 6795
CANADA
MARANTZ CANADA INC.
5-505 APPLE CREEK BLVD.
MARKHAM, ONTARIO L3R 5B1
CANADA
PHONE : 905 - 415 - 9292
FAX : 905 - 475 - 4159
SINGAPORE
WO KEE HONG DISTRIBUTION PTE LTD
No.1 JALAN KILANG TIMOR
#08-03 PACIFIC TECH CENTRE
SINGAPORE 159303
PHONE : +65 6376 0338
FAX : +65 6376 0166
NEW ZEALAND
WILDASH AUDIO SYSTEMS NZ
14 MALVERN ROAD MT ALBERT
AUCKLAND NEW ZEALAND
PHONE : +64-9-8451958
FAX :+64-9-8463554
JAPAN
D&M Holdings Inc.
35- 1, 7- CHOME, SAGAMIONO
SAGAMIHARA - SHI, KANAGAWA
JAPAN 228-8505
PHONE : +81 42 748 1013
FAX : +81 42 741 9190
Technical
TAIWAN
PAI- YUING CO., LTD.
6 TH FL NO, 148 SUNG KIANG ROAD,
TAIPEI, 10429, TAIWAN R.O.C.
PHONE : +886 - 2 - 25221304
FAX : +886 - 2 - 25630415
MALAYSIA
WO KEE HONG ELECTRONICS SDN. BHD.
2ND FLOOR BANGUNAN INFINITE CENTRE
LOT 1, JALAN 13/6, 46200 PETALING JAYA
SELANGOR DARUL EHSAN, MALAYSIA
PHONE : +60 - 3 - 7954 8088
FAX : +60 - 3 - 7954 7088
KOREA
MARANTZ KOREA CO., LTD.
ROOM 604, ELECTRO OFFICE, 16-58,
HANGGANG-RO 3GA, YONGSAN-KU,
SEOUL, 140-013, KOREA
PHONE : +82 - 2 - 323 - 2155
FAX :+82-2-323-2154
CHINA
MARANTZ SHANGHAI TRADING LTD.
ROOM.506 SHANGHAI LIGHT INDUSTRY MANSION
1578 NANJING (WEST) ROAD SHANGHAI
CHINA
TEL : 021 - 6248 - 1064
FAX : 021 - 6248 - 3565
SHOCK, FIRE HAZARD SERVICE TEST :
CAUTION : After servicing this appliance and prior to returning to customer, measure the resistance between either primary AC
cord connector pins ( with unit NOT connected to AC mains and its Power switch ON ), and the face or Front Panel of product and
controls and chassis bottom.
Any resistance measurement less than 1 Megohms should cause unit to be repaired or corrected before AC power is applied,
and verifi ed before it is return to the user/customer.
Ref. UL Standard No. 60950.
In case of diffi culties, do not hesitate to contact the Technical
Department at above mentioned address.
051121MZ

1. TECHNICAL SPECIFICATIONS
❖ Optical characteristics
Panel 0.8 inch 16:9
1280 x 720 pixels
Digital Micromirror Device
Lamp 200W AC
Lens f: 32.5 to 44.0mm
F: F2.5
Projection size
60 to 300 inches
❖ Input/Output
VIDEO IN RCA x 1
NTSC-3.58/PAL-4.43/SECAM
Composite video 1.0Vp-p/
75 Ohm
S-VIDEO IN S-Connector x 1
NTSC-3.58/PAL-4.43/SECAM
S-Video
COMPONENT 3RCA x 1(Y, P
B, PR)
IN 5RCA x 1
(G/Y, B/P
B, R/PR, H, V)
RGB/HD IN D-sub M 15 pin x 1
Analog RGB
DIGITAL IN DVI-D x 1
AC IN 3 Prong Grounding Type
TRIG.1 OUT, Mini Jack x 2
TRIG.2 OUT Output: DC12V or 0V
RS-232C
RS-232C receptacle plug x 1
❖ General
Power requirement
AC 100-240V,
47–63 Hz
Power consumption
255 W
Standby consumption
1.3 W at 100 V AC
1.6 W at 240 V AC
Safety UL60950
CAN/CSA-C22-2
NO-60950
EMC FCC Part-15 Class-B
EN55022 Class-B
Dimensions
17 2/16(W) x 14 12/16
(D)
x 7 1/16 (H) inch
435(W) x 375(D) x 179.4(H) mm
Net weight 14.1 kg
OperatingTemperature
10 to 35 °C
Operating humidity
30 to 85%
Storage Temperature
– 20 to 60 °C
Storage humidity 30 to 85%
❖ 光学特性
パネル 0.8インチ16:9
921,600画素(1280×720)
DigitalMicromirrorDevice(DMD)
ランプ 200WAC
レンズ f:24.1〜32.3mm
F:F2.2−2.5
1.34倍マニュアルズーム
投影サイズ 60〜300インチ
❖ 入出力端子
ビデオ入力端子 RCA1系統
NTSC-3.58/PAL-4.43/
SECAM
コンポジットビデオ1.0Vp-p/
75Ω
Sビデオ S端子1系統
入力端子 NTSC-3.58/PAL-4.43
Sビデオ
コンポーネント 3RCA1系統(Y、P
B、PR)
入力 5RCA1系統
(G/Y、B/P
B、R/PR、H、V)
RGB/HD入力 ミニD-sub15ピン1系統
アナログRGB
デジタル入力 DVI-D1系統
電源コード アース付き3ピンプラグ
接続端子
トリガー1出力端子、
ミニジャック2系統
トリガー2出力端子
出力:DC12Vまたは0V
RS-232C端子 RS-232C1系統
❖ 全般
電源要件
AC100V50/60Hz
消費電力
255W
外形寸法 435(W)x375(D)x
179.4(H)mm
質量 14.1kg
動作温度 10〜35℃
動作湿度 30〜85%
保存温度 −20〜60℃
保存湿度 30〜85%
❖ 付属品
• レンズキャップ×1
• リモコン×1
• 単四形乾電池×2
• 電源コード×1
• DVI-HDMIアダプター×1
• 取扱説明書×1
• 保証書×1
• ご愛用者登録カード×1
❖ Accessories
• Lens cap x 1
• Remote controller x 1
• Batteries x 2
• Mains code x 1
• DVI-HDMI Connector
• User Guide
• Warranty Card
(1 copy each for USA, CANADA)
1
Replace Lamp Module
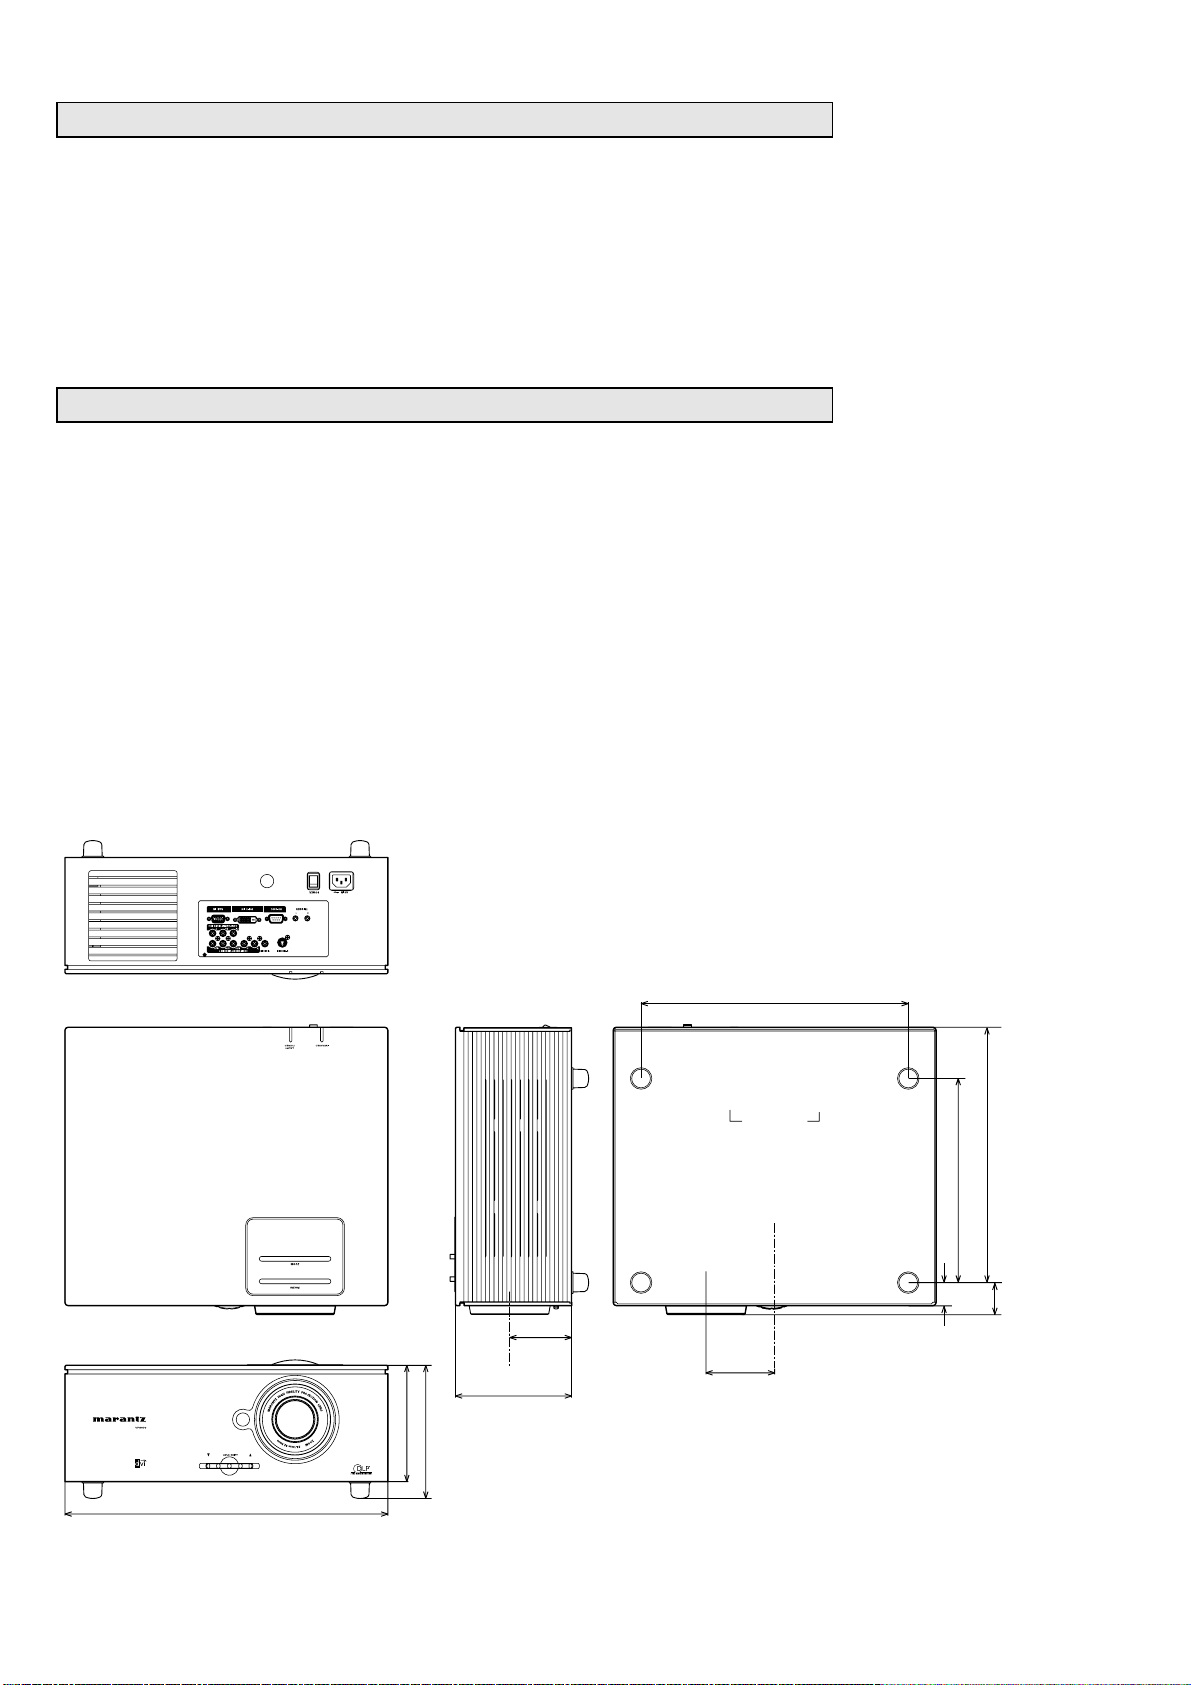
Unit : inch (mm)
See "Step 2--Remove the Lamp Module (LU8600VP)" in "3. DISASSEMBLE PROCEDURE"
section.
• Service Spare Parts no. (Lamp module LU8600VP) : 90M-ZK000560R
ランプの交換
"3. DISASSEMBLE PROCEDURE" の "Step 2--Remove the Lamp Module
(LU8600VP)"
を参照して
ください。
サービス パーツ 部品番号
•
Dimensions
(
交換ランプ
LU8600VP)
: 90M-ZK000560R
14 3/16 (360.0)
17 2/16 (435.0)
6 3/16 (156.7)
1/16 (179.4)
7
3
4/16
(83.3)
6 3/16 (156.4)
9/16 (344.0)
13
10 13/16 (275.0)
11/16 (43.0)
1
4/16
1
3
10/16
(92.5)
(31.0)
2
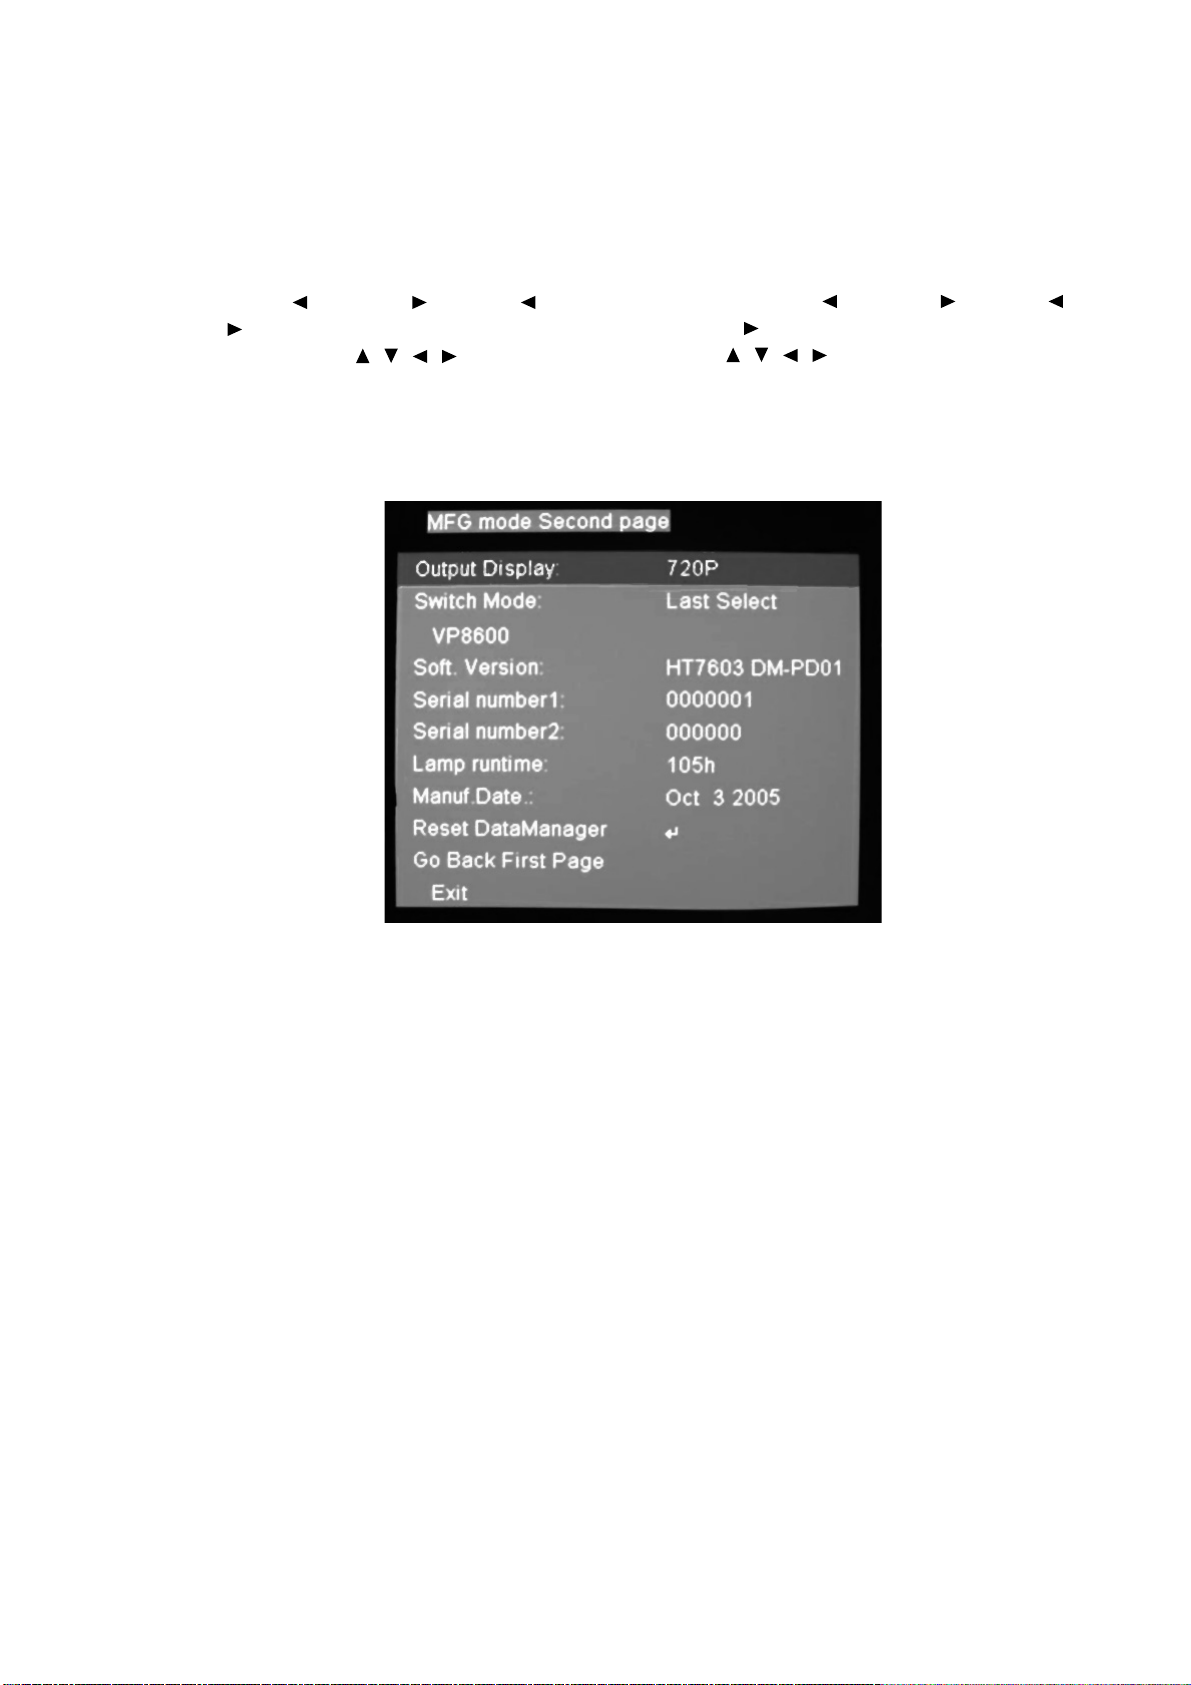
2. SERVICE MODE
• How to enter the Service Mode
Operate by using [Remote controller RC8600VP]. The unit is
no-signal conditions.
1. Press the Main power switch to turn on the unit.
2. Press the LEFT(
) → RIGHT( ) → LEFT( )
→
RIGHT ( ) button on the remote controller.
3. Press the arrow buttons ( / / / ), select "Go to
second Page"
4. Press the ENTER button.
5. The micro-processor version is displayed on the following
"MFG mode Second page".
サービスモードの入り方
•
セットは無信号状態で、リモコン
ます。
RC8600VP にて操作を行い
1. 主電源スイッチを押しセットの電源を入れます。
2. リモコンの LEFT( ) → RIGHT( ) → LEFT( ) →
RIGHT( ) ボタンを押します。
3. 矢印 ( / / / ) ボタンを押し、"Go to second Page"
を選択します。
4.
ENTER
ボタンを押します。
5. マイコンのバージョンが "MFG mode Second page" に表
示されます。
• How to exit Service Mode
Press the EXIT button, return to normal operation.
サービスモードの抜け方
•
EXIT ボタンを押すと通常モードに戻ります。
3
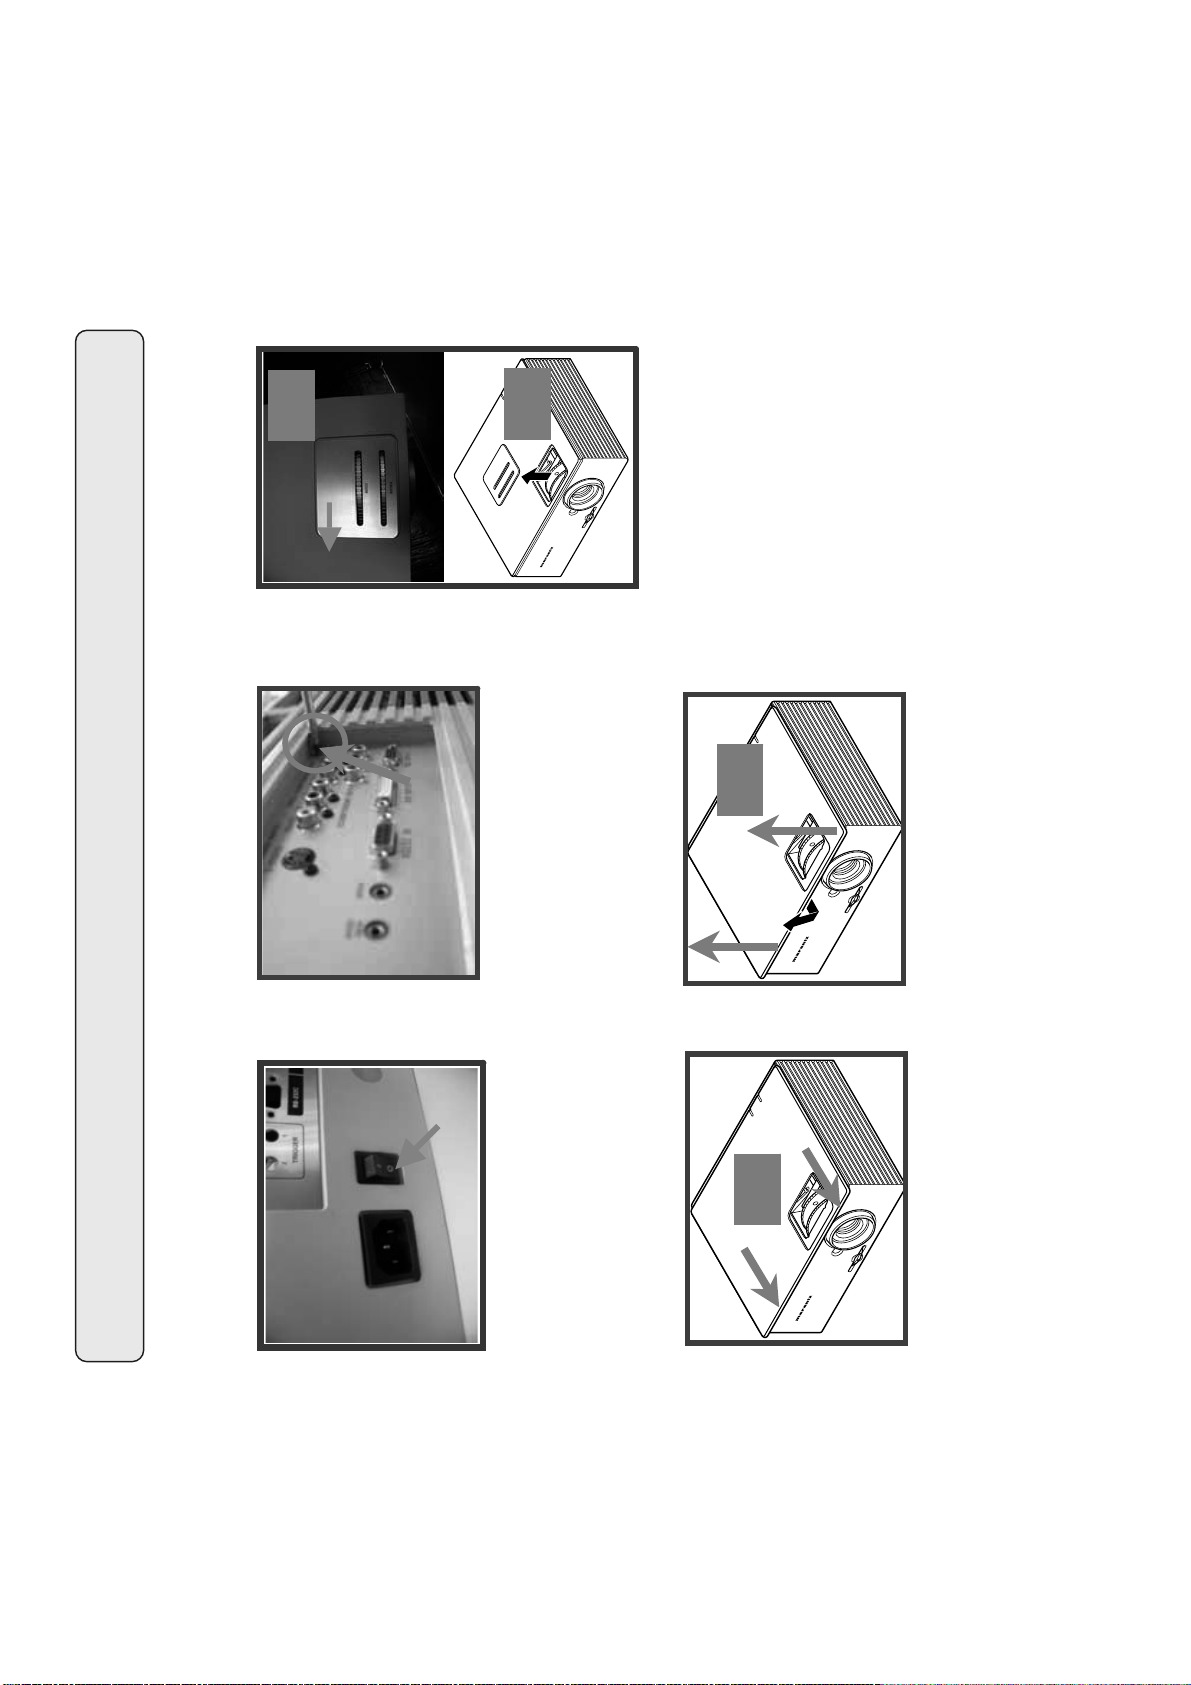
3. DISASSEMBLE PROCEDURE
Cover
1
2
2.-Screw off one screw
of the I/O panel.
3.-Disassembly top guide.
2
5.-Pull up the top cover
from projector.(step2)
Step 1--Remove the Top
1.-Turn of the power
button. Disconnect the
4
mains cord.
1
4.-Push forward the top cover
from projector.(step1.)
ランプ交換手順
準備:
ランプの交換は、プロジェクターの電源を切り、冷却ファン停止後、電源
コードをコンセントから抜き、60分待ってランプが充分冷えたことを確認
してから行なってください。
REPLACINGTHELAMP
Preparation:
When replacing the lamp, turn off the power for the projector. After the
cooling fan stops, disconnect the power cord and wait for 60 minutes until
the lamp is cooled completely, then replace the lamp.
English
日本語
REMPLACEMENTDELALAMPE
Préparation:
Veuillez éteindre le projecteur lorsque vous remplacez la lampe. Lorsque le
ventilateur de refroidissement s’arrête, débranchez le cordon d’alimentation
et attendez 60 minutes pour que la lampe soit complètement refroidie et
remplacez ensuite la lampe.
REEMPLAZODELABOMBILLA
Preparación:
Al reemplazar la lámpara, apague el proyector. Después que el ventilador de
enfriamiento se detiene, desconecte el cordón de alimentación y espere por
60 minutos, hasta que la lámpara se enfríe completamente, luego reemplace
la lámpara.
EspañolFrançais
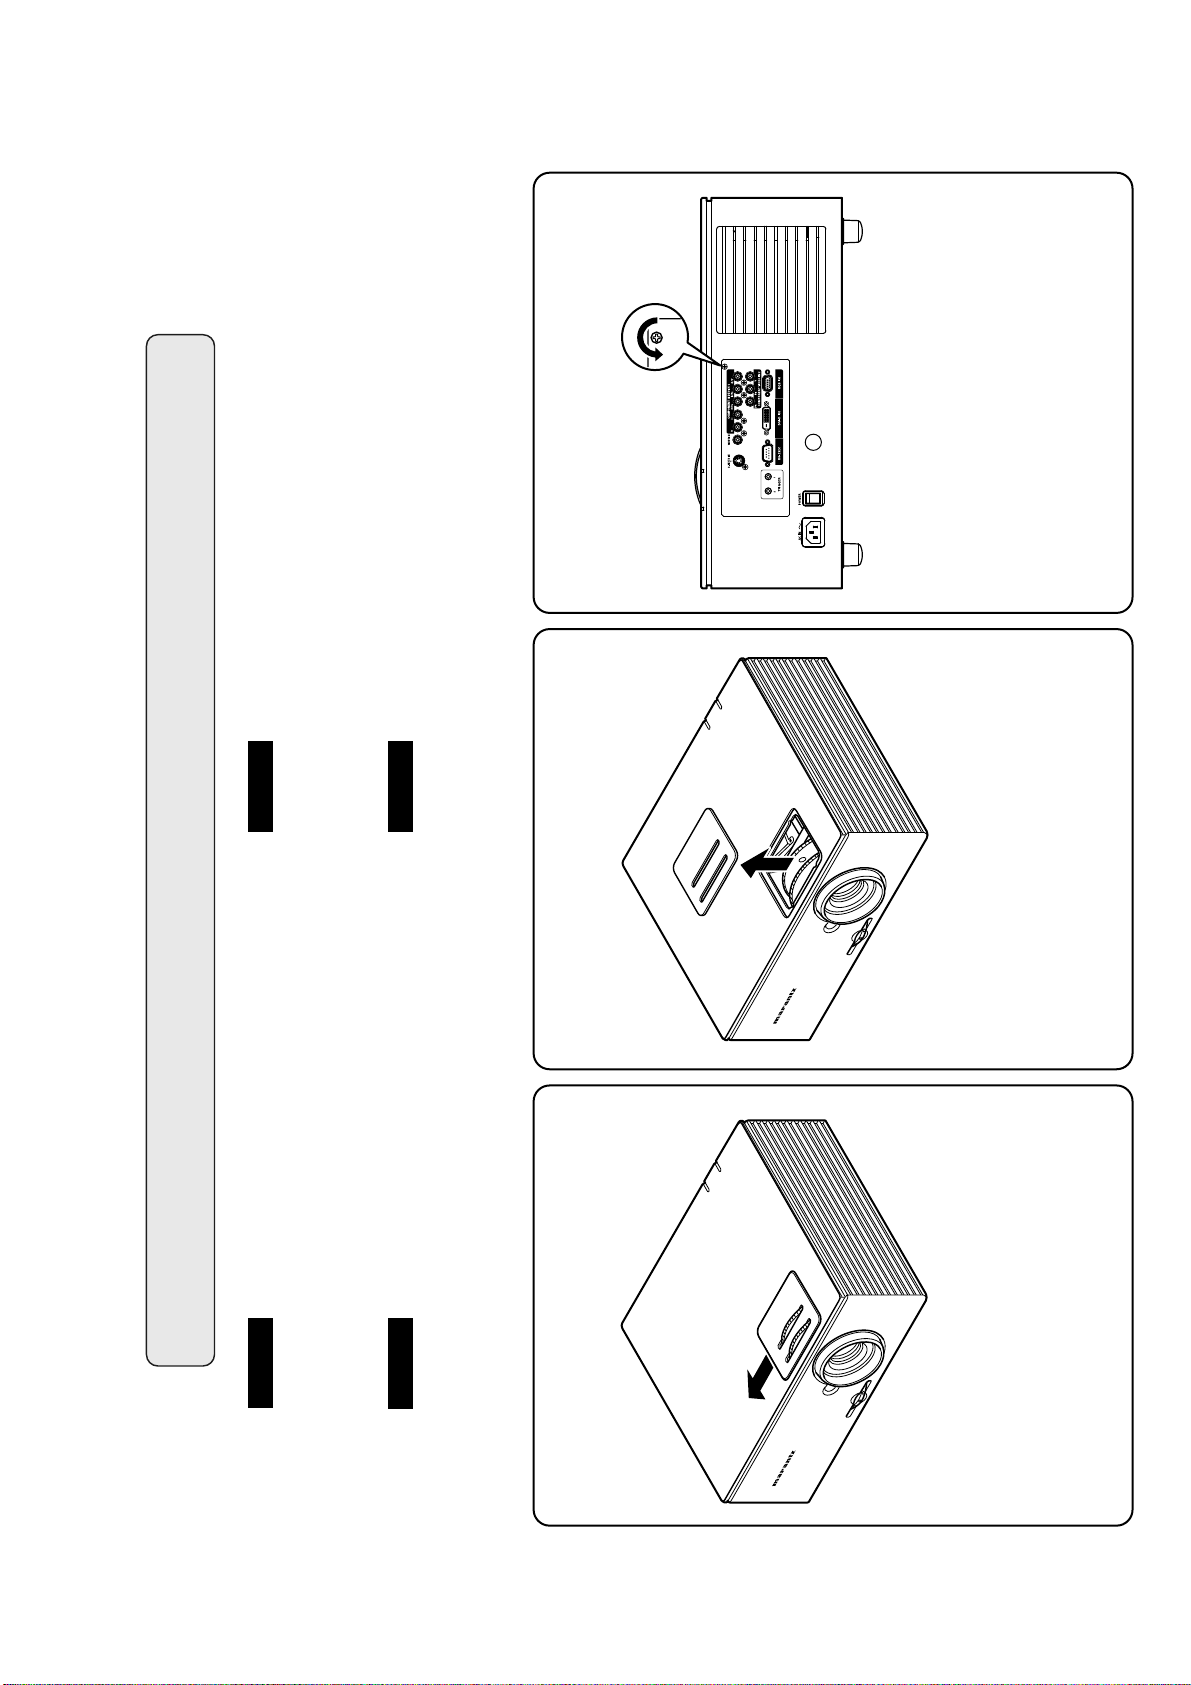
1
• プレートを矢印の方向へ動かします。
• Move the plate in the direction of the arrow.
• Déplacez la plaque dans le sens de la flèche.
• Mueva la placa en la dirección de la flecha.
2
• プレートを矢印の方向へ外します。
• Remove the plate in the direction of the arrow.
• Retirez la plaque dans le sens de la flèche.
• Saque la placa en la dirección de la flecha.
3
• 端子板にある右上のネジを外します。
• Remove the screw from the upper right side of the
terminal board.
• Retirez la vis du côté supérieur droit de la planche de
bornes.
• Quite el tornillo de la parte superior derecha del
tablero de terminales.
Step 2--Remove the Lamp Module (LU8600VP)
5
 Loading...