

Page 1

Model VP-10S1 User Guide
DLP
TM
Projector
Page 2
i
The lightning flash with arrowhead symbol
within an equilateral triangle is intended to alert
the user to the presence of uninsulated
“dangerous voltage” within the product’s
enclosure that may be of sufficient magnitude
to constitute a risk of electric shock to persons.
The exclamation point within an equilateral
triangle is intended to alert the user to the
presence of important operating and
maintenance (servicing) instructions in the
literature accompanying the product.
CAUTION
RISK OF ELECTRIC SHOCK
DO NOT OPEN
CAUTION: TO REDUCE THE RISK OF ELECTRIC SHOCK,
DO NOT REMOVE COVER (OR BACK)
NO USER-SERVICEABLE PARTS INSIDE
REFER SERVICING TO QUALIFIED SERVICE PERSONNEL
WARNING
TO REDUCE THE RISK OF FIRE OR ELECTRIC SHOCK,
DO NOT EXPOSE THIS PRODUCT TO RAIN OR MOISTURE.
CAUTION: TO PREVENT ELECTRIC SHOCK, MATCH WIDE
BLADE OF PLUG TO WIDE SLOT, FULLY INSERT.
ATTENTION: POUR ÉVITER LES CHOCS ÉLECTRIQUES,
INTRODUIRE LA LAME LA PLUS LARGE DE LA FICHE DANS LA
BORNE CORRESPONDANTE DE LA PRISE ET POUSSER
JUSQU’AU FOND.
For the customers in the USA:
This equipment has been tested and found to comply with the
limits for a Class B digital device, pursuant to Part 15 of the
FCC Rules. These limits are designed to provide reasonable
protection against harmful interference in a residential
installation. This equipment generates, uses and can radiate
radio frequency energy and, if not installed and used in
accordance with the instructions, may cause harmful
interference to radio communications. However, there is no
guarantee that interference will not occur in a particular
installation. If this equipment does cause harmful interference
to radio or television reception, which can be determined by
tuning the equipment off and on, the user is encouraged to try
to correct the interference by one or more of the following
measures:
- Reorient or relocate the receiving antenna.
- Increase the separation between the equipment and
receiver.
- Connect the equipment into an outlet on a circuit different
from that to which the receiver is connected.
- Consult the dealer or an experienced radio/TV technician
for help.
NOTE:
Changes or modifications not expressly approved by the party
responsible for compliance could void the user’s authority to
operate the equipment.
For the customers in Canada:
This Class B digital apparatus meets all requirements of the
Canadian Interference-Causing Equipment regulations.
Page 3
ii
IMPORTANT SAFETY
INSTRUCTIONS
READ BEFORE OPERATING EQUIPMENT
This product was designed and manufactured to meet strict quality and safety standards. There are, however, some installation and operation
precautions which you should be particularly aware of.
1. Read these instructions - All the safety and operating instructions should be read before the product is operated.
2. Keep these instructions - The safety and operating instructions should be kept for future reference.
3. Heed all warnings - All warnings on the product and in the operating instructions should be adhered to.
4. Follow all instructions - All operating and use instructions should be followed.
5. Do not use this apparatus near water - Do not use this product near water-for example, near a bath tub, wash bowl, kitchen sink, or laundry tub,
in a wet basement, or near a swimming pool, and the like.
6. Clean only with dry cloth - Unplug this product from the wall outlet before cleaning. Do not use liquid cleaners or aerosol cleaners. Use a dry
cloth for cleaning.
7. Do not block any ventilation openings. Install in accordance with the manufacture's instructions.
8. Do not install near any heat sources such as radiators, heat registers, stoves, or other apparatus (including amplifiers) that produce heat.
9. Do not defeat the safety purpose of the polarized or grounding-type plug. A polarized plug has two blades with one wider than the other. A
grounding type plug has two blades and a third grounding prong. The wide blade or the third prong are provided for your safety. If the provided plug
does not fit into your outlet, consult an electrician for replacement of the obsolete outlet.
AC GROUNDING-TYPE PLUG
10. Protect the power cord from being walked on or pinched particularly at plugs, convenience receptacles, and the point where they exit from the
apparatus.
11. Only use attachments/accessories specified by the manufacturer.
12. Use only with the cart, stand, tripod, bracket, or table specified by the manufacturer, or sold with the apparatus. When a cart is used, use
caution when moving the cart/apparatus combination to avoid injury from tip-over.
13. Unplug this apparatus during lightning storms or when unused for long periods of time.
14. Refer all servicing to qualified service personnel. Servicing is required when the apparatus has been damaged in any way, such as powersupply cord or plug is damaged, liquid has been spilled or objects have fallen into the apparatus, the apparatus has been exposed to rain or
moisture, does not operate normally, or has been dropped.
15. This product should not be placed in a built-in installation such as a bookcase or rack unless proper ventilation is provided or the manufacturer's
instructions have been adhered to.
16. To prevent fire or shock hazard, do not place objects filled with liquids, such as vases, on the apparatus.
This Class B digital apparatus complies with Canadian ICES-003.
Cet appareil numérique de la Classe B est conforme à la norme NMB-003 du Canada.
Page 4

iii
Lamp Handling Precautions
DANGER
The P-VIP lamp is a high voltage glass mercury vapor lamp. The
lamp can break or fail to light if handled wrongly during replacement
or because of temperature in the room where the projector is being
used or stored.
Lamp life also varies according to the lamp with some even breaking or
burning out as soon as they are used the first time. If the lamp breaks,
glass fragments may be scattered inside the lamp unit and projector,
and mercury gas from the bulb may seep from the projector’s vent.
Before use, carefully read the User Guide of the projector and the
Lamp Replacement Instructions. Remember to handle the lamp with
care. In the event of serious trouble, call for Marantz authorized dealer.
• Never look directly into the lamp with unprotected eyes while lit.
The bright light can cause sore eyes and impair vision.
• Never directly expose skin to the light of the lamp. Direct exposure
can inflame the skin.
• Do not drop, impact, subject to excessive force or otherwise damage
the lamp.
• Replacing the lamp runs the risk of burns and electric shock,
therefore shut off power supply, unplug the AC power cable from
its electrical outlet and wait at least 60 min for the lamp to cool
down before attempting to replace it.
• If the lamp breaks, unplug the AC power cable from its electrical
outlet and call for Marantz authorized dealer to replace it. Do not
replace the lamp yourself or clean up broken glass inside the
projector as this can result in cuts as well as scratching inside the
projector.
• If the projector is hung from a ceiling or installed in a high place,
it is extremely dangerous to replace the lamp. In this case, do not
replace or service the lamp yourself.
CAUTION
• The chance of the lamp breaking is high after extended use. It is
recommended to replace the lamp when near the end of its
designed life. Do not use a lamp beyond the maximum lighting
time.
• Use only Marantz original lamp units. Check the model code of
the lamp unit matches that in this User Guide.
• Before replacing the lamp, read carefully “Lamp Unit Replacement”
in this User Guide. Replace the lamp as explained therein.
• Entrust disposal of a used lamp to a licensed industrial waste
handler or return it to the place of purchase. Do not break the
lamp or discard with general waste.
• If the lamp breaks, leave the area immediately and stay away for
at least 30 min, and ventilate the room so as not to inhale the
mercury vapor.
• If you inhale the mercury vapor, see a physician immediately.
Précautions à prendre pour
manipuler la lampe
DANGER
La lampe P-VIP est une lampe à vapeur de mercure en verre à haute
tension. La lampe peut se casser ou ne pas s'allumer si elle est
manipulée de manière incorrecte pendant son remplacement ou du
fait de la température dans la pièce où le projecteur est utilisé ou
rangé.
La durée de service des lampes varie aussi en fonction de la lampe,
certaines se cassant ou grillant même dès leur première utilisation.
Si la lampe se casse, des fragments de verre peuvent s'éparpiller à
l'intérieur de l'unité lampe et du projecteur, et le mercure de
l'ampoule peut fuir par l'orifice de ventilation du projecteur.
Avant d'utiliser la lampe, lisez attentivement le Guide de l'utilisateur
du projecteur et les Instructions de remplacement de la lampe.
Pensez à manipuler la lampe avec précautions. En cas de problème
sérieux, contactez un distributeur agréé Marantz.
• Ne regardez jamais directement la lampe sans vous protéger les
yeux lorsqu'elle est allumée. La forte lumière pourrait irriter vos
yeux et affaiblir votre vue.
• N'exposez jamais directement la peau à la lumière de la lampe.
Une exposition directe peut enflammer la peau.
• Ne laissez pas tomber la lampe, ne la heurtez pas, ne lui appliquez
pas de force excessive ou ne la détériorez pas.
• Le remplacement de la lampe fait courir un risque de brûlures et de
décharge électrique ; coupez l'alimentation, débranchez le câble
d'alimentation secteur de sa prise électrique et attendez au moins 60
min. que la lampe refroidisse avant d'essayer de la remplacer.
• Si la lampe se casse, débranchez le câble d'alimentation secteur
de sa prise électrique et contactez un distributeur agréé Marantz
pour qu'il la remplace. Ne remplacez pas la lampe vous-même ni
ne nettoyez le verre brisé à l'intérieur du projecteur, car vous
pourriez vous couper et rayer également l'intérieur du projecteur.
• Si le projecteur est suspendu à un plafond ou est installé dans un
endroit en hauteur, il est extrêmement dangereux de remplacer
la lampe. Dans ce cas, ne remplacez pas ni n'entretenez la
lampe vous-même.
ATTENTION
• Le risque que la lampe se casse est élevé après une utilisation
prolongée. Il est recommandé de remplacer la lampe lorsque la
fin de sa durée de service spécifiée est proche. N'utilisez pas
une lampe au-delà de la durée d'éclairage maximum.
• N'utilisez que des unités lampes d'origine Marantz. Vérifiez que le
code de modèle de l'unité lampe correspond à celui indiqué dans
ce Guide de l'utilisateur.
• Avant de remplacer la lampe, lisez attentivement la section
"Remplacement de l'unité lampe" dans ce Guide de l'utilisateur.
Remplacez la lampe conformément aux explications qui y sont
données.
• Pour jeter une lampe usée, remettez-la à un éliminateur de
déchets industriels agréé ou rapportez-la à l'endroit où vous
l'avez achetée. Ne cassez pas la lampe ni ne la jetez avec les
ordures ménagères.
• Si la lampe se casse, sortez immédiatement de la pièce et n'y
rentrez pas pendant au moins 30 min., puis aérez la pièce afin
de ne pas inhaler la vapeur de mercure.
• Si vous inhalez la vapeur de mercure, consultez immédiatement
un médecin.
FRANÇAISENGLISH
Page 5

1
ENGLISH
TABLE OF CONTENTS
PRECAUTIONS IN USE ............................................................................................................2
Precautions in Relocation......................................................................................................................2
Precautions in Installation .....................................................................................................................2
Precautions in Operation.......................................................................................................................2
Lamp Replacement Precautions ...........................................................................................................3
Lens Changes .......................................................................................................................................3
FEATURES ................................................................................................................................4
ACCESSORIES .........................................................................................................................5
NAMES AND FUNCTIONS OF PARTS.....................................................................................6
Front and Top........................................................................................................................................6
Rear and Terminals...............................................................................................................................7
Bottom ...................................................................................................................................................7
Remote Controller .................................................................................................................................8
Remote Controller Operating Range.....................................................................................................9
How to Load Batteries into the Remote Controller ................................................................................9
INSTALLATION .......................................................................................................................10
How to Install.......................................................................................................................................10
Screen Size and Projection Distance (16:9 Screen) - (inch) ...............................................................11
Screen Size and Projection Distance (16:9 Screen) - (m)...................................................................12
Screen Size and Projection Distance (4:3 Screen) - (inch) .................................................................13
Screen Size and Projection Distance (4:3 Screen) - (m).....................................................................14
CONNECTIONS.......................................................................................................................15
Connecting the AC Power Cable.........................................................................................................15
Connecting to Video Equipment..........................................................................................................15
Connecting to an HD-Video, Satellite, Cable Tuner or PC..................................................................16
Connecting to a Home Theater System ..............................................................................................16
INITIAL SETTING ....................................................................................................................17
Activating the Power............................................................................................................................17
Focusing and Zooming........................................................................................................................17
Positioning the Projected Image..........................................................................................................18
Keystone Correction............................................................................................................................19
BASIC OPERATIONS .............................................................................................................20
Activating the Power............................................................................................................................20
Shutting Power OFF............................................................................................................................20
Selecting an Input signal .....................................................................................................................21
Selecting Aspect Mode........................................................................................................................21
When Using a 16:9 Screen .................................................................................................................22
When Using a 4:3 Screen ...................................................................................................................23
MENU OPERATIONS ..............................................................................................................24
Menu Structure....................................................................................................................................24
How to Operate Menus .......................................................................................................................25
Picture Adjust ......................................................................................................................................26
Fine Menu ...........................................................................................................................................27
Setting .................................................................................................................................................29
System ................................................................................................................................................30
Display.................................................................................................................................................31
Configuration .......................................................................................................................................32
Trigger 2 ..............................................................................................................................................33
Preset ..................................................................................................................................................34
MAINTENANCE.......................................................................................................................35
Lamp Life and Replacement ...............................................................................................................35
Lamp Unit Replacement......................................................................................................................36
Color Temperature Adjustment ...........................................................................................................38
Lens Cleaning .....................................................................................................................................39
Replacement Parts..............................................................................................................................39
Optional Accessories...........................................................................................................................39
SPECIFICATIONS ...................................................................................................................40
GLOSSARY .............................................................................................................................41
TROUBLESHOOTING.............................................................................................................42
ERROR MODE.........................................................................................................................43
ON SCREEN MESSAGE .........................................................................................................43
DIMENSIONS...........................................................................................................................44
Page 6
2
ENGLISH
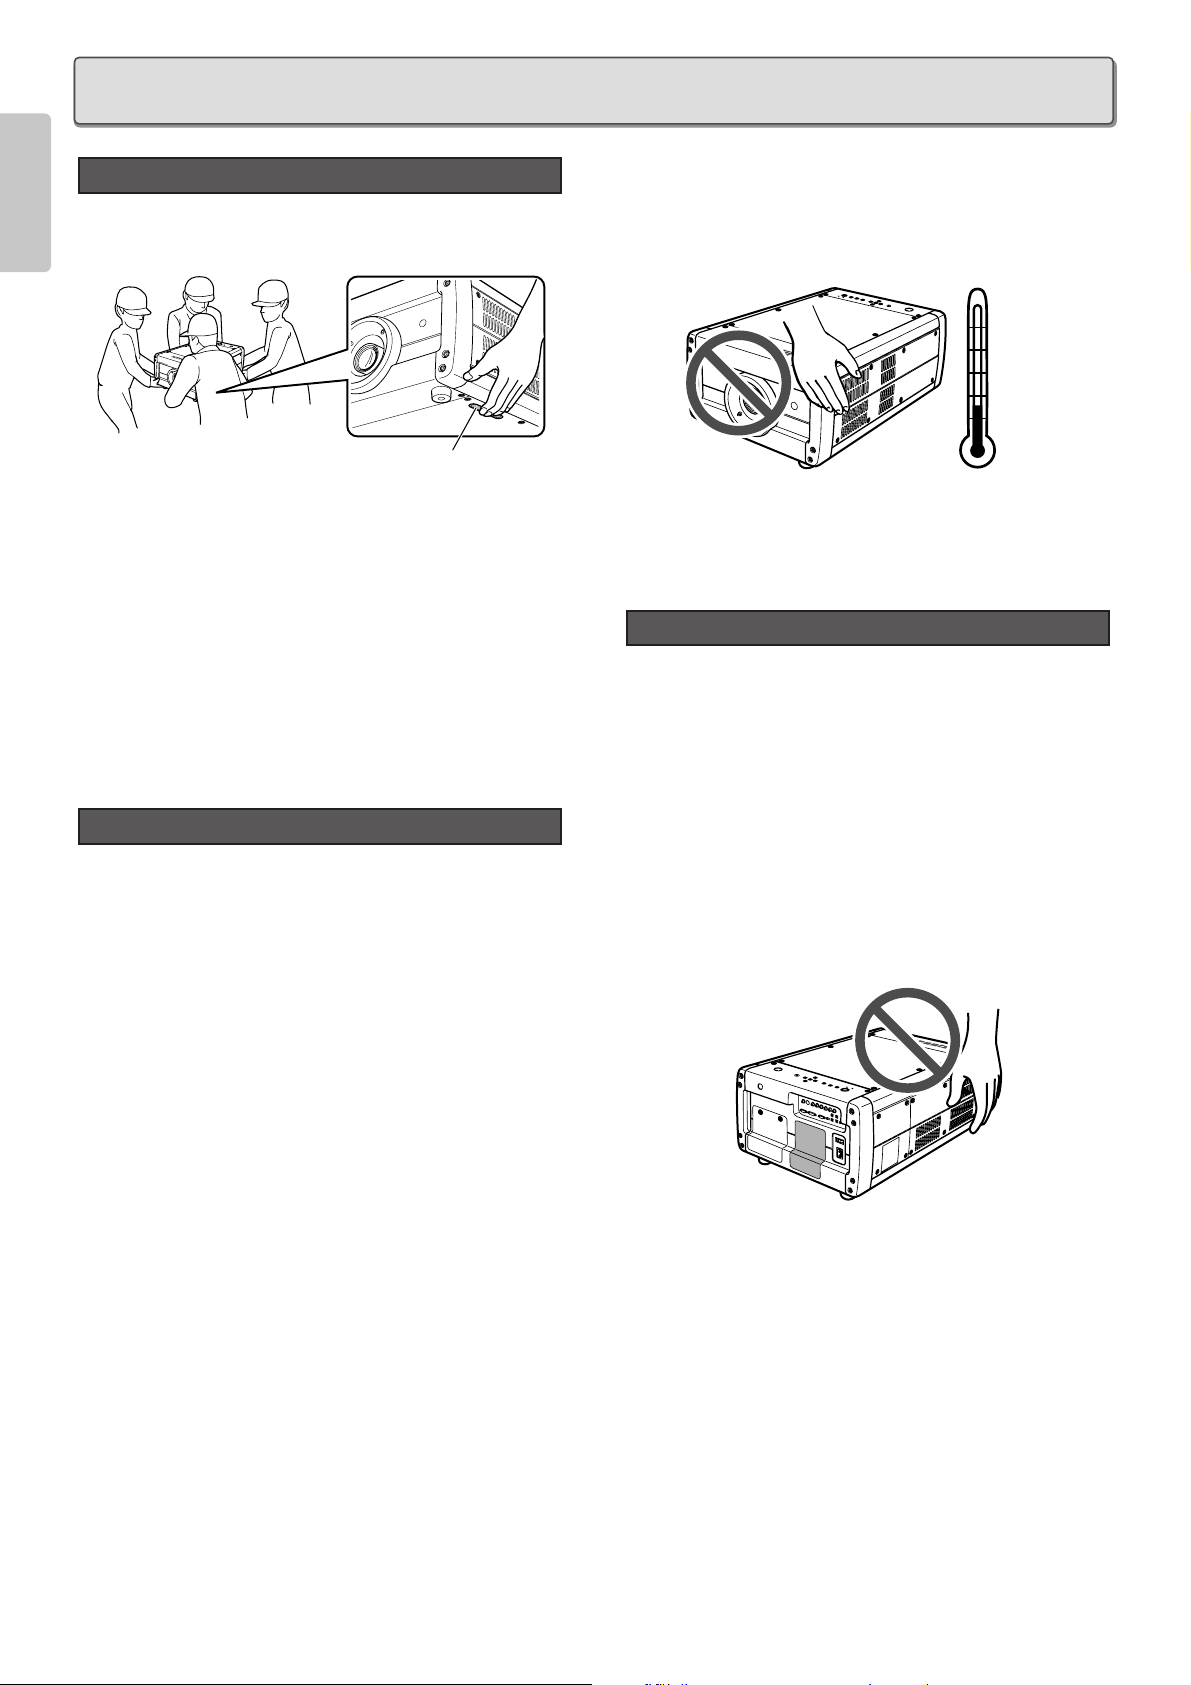
• Hold the projector by the grooves in the bottom when
relocating. Work in group of 4 or more to carry the projector.
• Ensure sufficient space around the projector when
relocating the unit. Do not carry the projector through narrow
places, up/down stairs or anywhere that poses danger.
• Never drag or roll the projector when relocating the unit.
• Unplug the AC power cable and disconnect any other
cables from the projector before relocating the unit.
• If the projector is hung from a ceiling or installed in a high
place, do not detach and relocate the unit yourself.
Contact your nearest Marantz Authorized Dealer or
Service Center.
• This projector is heavy. Use due caution not to drop it or
strain your back when lifting the unit.
• If installing the projector on a flat surface, select a location
that is level, stable and sturdy enough to support the
projector’s weight.
• Keep the projector 11 13/16 inch (30 cm) or more from
walls and other equipment when installed. If locating in a
rack or similar arrangement, ensure a clearance of 3
15/16 inch (10 cm) or more from the top surface of the
equipment below it as well as a clearance of 11 13/16
inch (30 cm) or more from objects on all sides.
• To hang the projector from a ceiling, contact the Marantz
Authorized Dealer or Service Center. To ensure safe
installation, the ceiling must be reinforced to support the
projector’s weight. Do not install the projector yourself.
Hanging the projector from the ceiling requires a
separately solder hanger and pole.
• Use a 100-120V/220-240V AC, 50/60 Hz, 5 A power
supply to run the projector.
• To maintain projector performance, do not install the
projector in humid, dusty or smoky places.
• Do not install the projector in extremely hot or cold places.
Operating temperature : 50°F to 95°F (10°C to 35°C)
Storage temperature : -4°F to 140°F (- 20°C to +60°C)
Altitude : 0 to 4,900 ft (0 to 1,500 m)
above sea level
• If installed on a flat surface, keep objects off the projector.
• If installed on a ceiling, do not hang from or hook anything
on the projector.
• Never look directly into the lamp with unprotected eyes
while lit.
• Never directly expose skin to the light of the lamp.
• When used in a dark room, the projected images (special
images, flashing lights and images, flashing vivid reds,
inverted images of strong contrast, sudden scene
changes, etc.) may have harmful effects on viewers. Keep
the room as bright as possible for viewing and watch from
a suitable distance.
• The vent, lamp cover and adjacent areas may get
extremely hot during use. Do not touch these areas
during use as it may result in burns.
Also, wait at least 60 min after shutting off the power for
the projector to cool down.
• If the cooling fan vent is blocked, a protective circuit trips
and automatically shuts off the lamp. However, there is
nothing wrong with the equipment. In such case, unplug
the AC power cable from its electrical outlet and wait at
least 10 min. Then, remove the obstruction from in front of
the vent and plug the power cable back into its electrical
outlet. The projector will resume normal operation.
• This projector is not intended for business use. Marantz
assumes no responsibility whatsoever for damages
caused directly or indirectly during use for business
purposes or by trouble that occurs during such use.
Precautions in Operation
95˚F
(+35˚C)
50˚F
(+10˚C)
Precautions in Installation
Precautions in Relocation
PRECAUTIONS IN USE
Hold projector by this groove.
Page 7
3
ENGLISH
• Replacing the lamp runs the risk of burns and electric
shock, therefore shut off power supply, unplug the AC
power cable from its electrical outlet and wait at least 60 min
for the lamp to cool down before attempting to replace it.
• If the lamp breaks, contact your nearest Marantz Authorized
Dealer or Service Center.
• Before replacing the lamp, read carefully “Lamp Handling
Precautions” (
☞
pg. iii) and “Lamp Unit Replacement”
(
☞
pg. 36). Replace the lamp as explained therein.
• The lens of this projector can be changed as liked. (LN10VP32/LN-10VP40/LN-10VP53) With the right lens, you
can set the projection distance and screen size according
to the environment of use.
* The above projections distances are given for a
screen with an aspect ratio of 16:9. For screen sizes
and projection distances by lens, see pg. 11-14.
• To change the lens, contact your nearest Marantz
Authorized Dealer or Service Center.
Do not change the lens yourself.
• The lenses used with this projector are as follows.
Lens Changes
WARNING
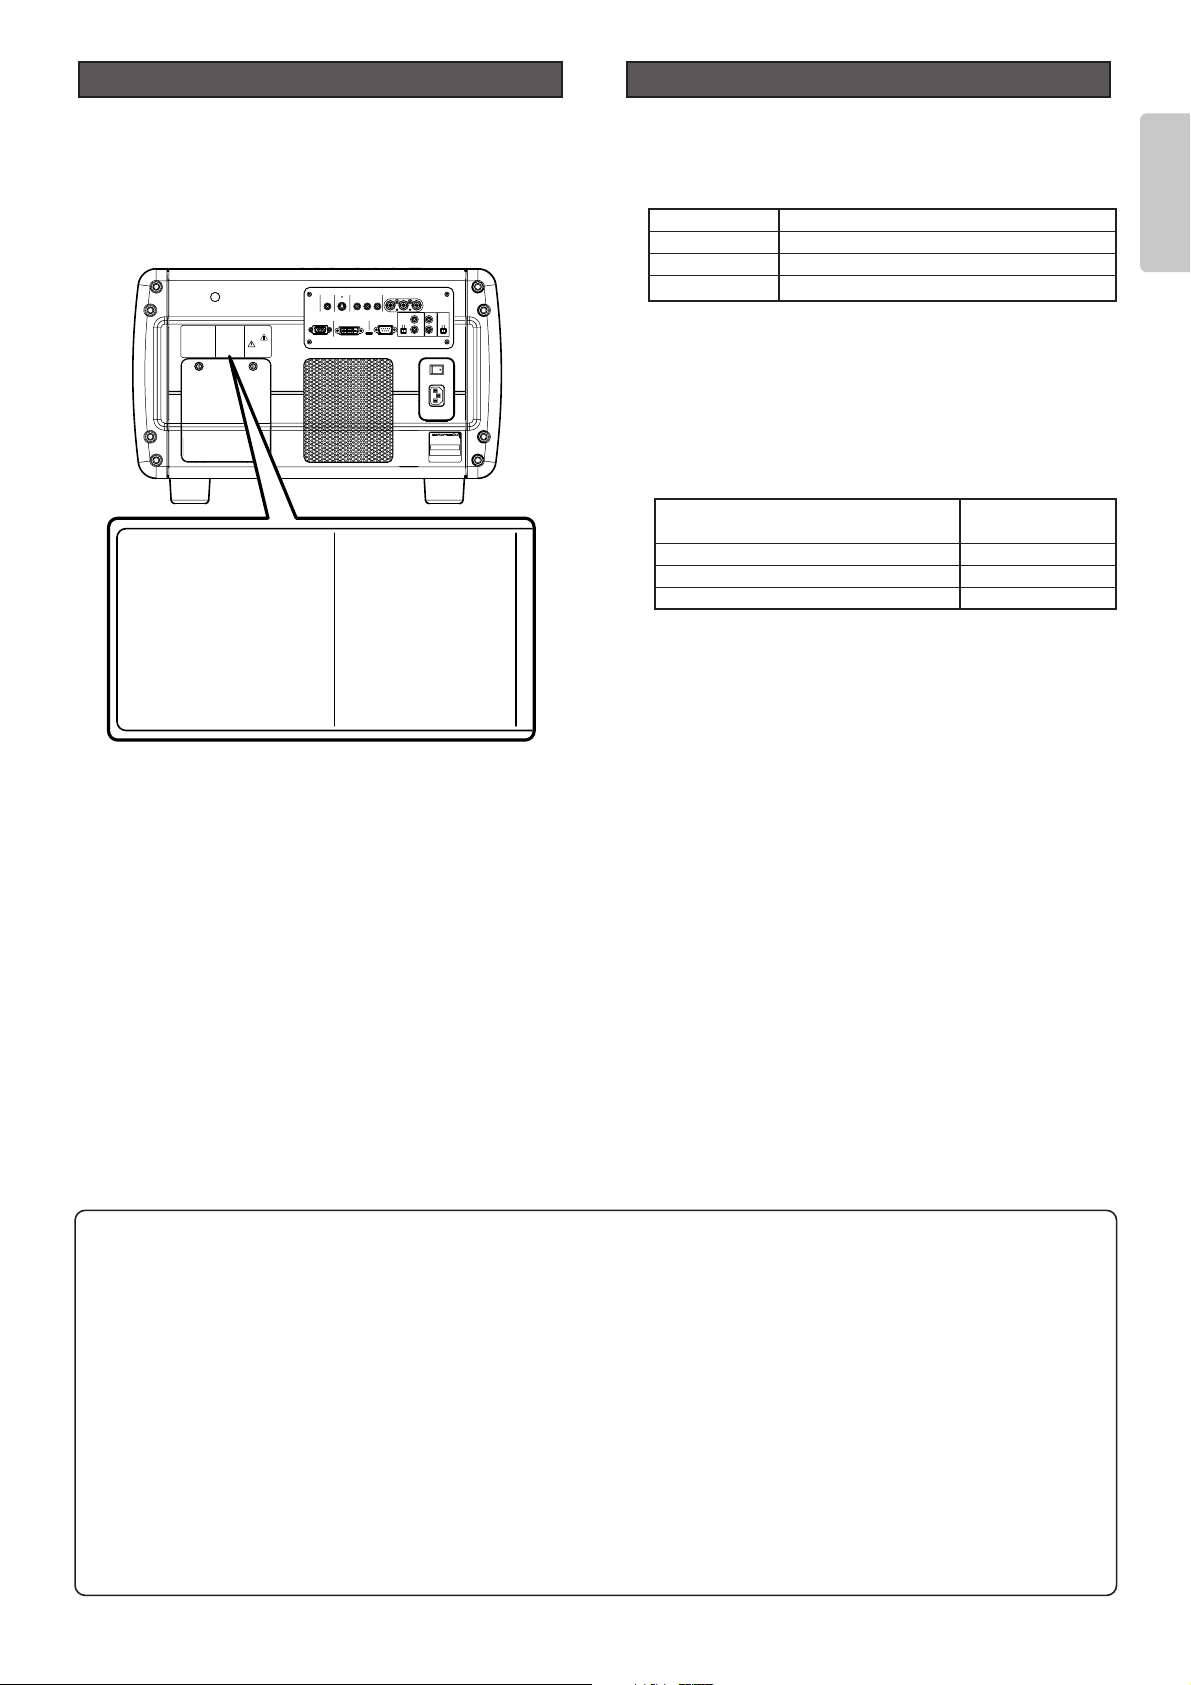
THISCOVERISPROVIDEDWITH
INTERLOCKTOREDUCETHERISKOF
EXCESSIVEULTRAVIOLETRADIATION.
DONOTDEFEATITSPORPOSEOR
ATTEMPTTOSERVICEWITHOUT
REMOVINGCOVERCOMPLETELY.
RECYCLEORDISPOSE
ASHAZARDOUSWASTE
DON'TPUTINTRASH.
CONTAINSMERCURY,
CAUTION
Jordforbindaltidudstyret
Alwaysgroundtheequipment
Jordaalltidutrustningen
AC120V〜 60Hz X.XA
MADE IN JAPAN
MODEL NO.VP10S1/U1M
FABRIQUE AU JAPON
SERIALNO.
AUDIO/VIDEO APPARATUS
36VB
VP10S1/UIM
WithFCCStandards
TestedToComply
MARANTZ
FORHOMEOROFFICEUSE
No.4300
〜
ACIN
ON
OFF
RS-232CDVI-D INRGB IN
EXT.INT.
IN
OUT
OFFON
1
2
TRIG. LIGHT
REMOTE
VIDEO IN
S-VIDEO IN COMPONENT VIDEO IN 1 COMPONENT VIDEO IN 2
YP
B/CBPR/CR
YPB/CBPR/C
R
CAUTION
HIGH-PRESSURE LAMP MAY EXPLODE IF IMPROPERLY
HANDLED. REFER SERVICING TO QUALIFIED SERVICE
PERSONNEL.
CAUTION HOT
UNPLUG THE POWER CORD AND WAIT 60
MINUTES BEFORE CHANGING THE LAMP.
ATTENTION
LA LAMPE SOUS HAUTE PRESSION PEUT EXPLOSER
SI ELLE, N'EST PAS MANIPULEE CORRECTEMENT,
CONFIER L'OPERATION A UN PERSONNEL D'ENTRETIEN
QUALIFIE.
VORSICHT
BEI FALSCHER HANDHABUNG KANN DIE
HOCHDRUCKLAMPE EXPLODIEREN UBERLASSEN SIE
WARTUNGSARBEITEN NUR FACHPERSONAL.
ATTENTION CHAUD
DEBRANCER LE CORD ON D'ALIMENTION ET
ATENDER 60 MINUTES AVANT DE CHANGER
LAMPE.
WARNUNG HEISS
ZIEHEN SIE DEN NETZSTECKER AB UND
WARTEN SIE 60 MINUTEN BEVOR SIE DIE
GLUHLAMPE WECHSELN.
ランプ交換は、電源プラグをコン
セントから抜いて60分待ってから
行ってください。
高温注意
高圧ランプは誤った扱いをすると
破裂する恐れがあります。万一の
際はサービスマンに依頼をしてく
ださい。
警告
CAUTION
HIGH-PRESSURE LAMP MAY EXPLODE IF IMPROPERLY
HANDLED. REFER SERVICING TO QUALIFIED SERVICE
PERSONNEL.
CAUTION HOT
UNPLUG THE POWER CORD AND WAIT 60
MINUTES BEFORE CHANGING THE LAMP.
ATTENTION
LA LAMPE SOUS HAUTE PRESSION PEUT EXPLOSER
SI ELLE, N'EST PAS MANIPULEE CORRECTEMENT,
CONFIER L'OPERATION A UN PERSONNEL D'ENTRETIEN
QUALIFIE.
VORSICHT
BEI FALSCHER HANDHABUNG KANN DIE
HOCHDRUCKLAMPE EXPLODIEREN UBERLASSEN SIE
WARTUNGSARBEITEN NUR FACHPERSONAL.
ATTENTION CHAUD
DEBRANCER LE CORD ON D'ALIMENTION ET
ATENDER 60 MINUTES AVANT DE CHANGER
LAMPE.
WARNUNG HEISS
ZIEHEN SIE DEN NETZSTECKER AB UND
WARTEN SIE 60 MINUTEN BEVOR SIE DIE
GLUHLAMPE WECHSELN.
ラン
セン
行っ
高圧
破裂
際は
ださ
Lamp Replacement Precautions
Lens Projection distance of 100 inch image
LN10VP32 Approx. 125.51 to 156.88 inch
LN10VP40 Approx. 159.88 to 209.18 inch
LN10VP53 Approx. 209.18 to 313.77 inch
Projector Lens
(Found on rear panel nameplate)
VP10S1/U1S SHT(32) LN10VP32
VP10S1/U1S STD(40) LN10VP40
VP10S1/U1S LNG(53) LN10VP53
Note: Pixel defects
DMD
TM
(Digital Micromirror DeviceTM) is one of the most
advanced technologies for consumer products. The DMD
TM
made by high precision technology, however some pixel
defects may be found on the projected image. We are
trying our best to control the quality in order to reduce the
number of defective pixels. It is almost impossible to have
zero pixel defects, even using the most advanced
technology. This is not a problem only for Marantz, but all
DLP
TM
projector manufactures. Therefore we have to note
that the warranty does not cover the DMD
TM
for pixel
defects. We appreciate your understandings.
Note: Lamp
P-VIP lamp is one of the most advanced technologies for
consumer products. The lamp made by high precision
technology, however some lamps might be failing before it
reaches its life. And projector’s brightness is getting darker
along with accumulated lamp usage hours. We are trying
our best to control the quality in order to reduce lamp
failures. It is almost impossible to have zero failure, even
using the most advanced technology. This is not a problem
only for Marantz, but all projector manufactures. Therefore
we have to note that the warranty does not cover the P-VIP
lamp for lamp failures: explosion, and non-lighting except
initial use. And also we have to note that the warranty does
not cover the P-VIP lamp for lamp failures: flickering, and
getting darker along with accumulated lamp usage hours.
We appreciate your understandings.
Page 8

4
ENGLISH
- High Picture Quality Technology -
❖ DLP
TM
technology to deliver a high
contrast ratio (3600:1)
• Incorporates three HD2 DMD
TM
elements (1280 x 720
pixel, 16:9 wide panel) to distinctly reproduce R/G/B
colors. Using an optimized system for movie viewing with
the below image circuit and optical parts, the VP-10S1
brings high color reproduction and rich tones that balance
pitch black with bright white to images.
❖ Built-in image processing IC by Faroudja
to project high quality video images
• Images are sharply detailed, smooth and high quality
owing to a powerful 3-chip set that builds into a dedicated
processor an image processing IC featuring Faroudja’s
proud “DCDi
TM
” high quality contouring technology, “high
performance adaptive IP conversion” and “2-3 pull-down
capabilities”.
- Wide Array of Features -
❖ Motorized zoom, focus and vertical /
horizontal lens shift
•
Using the included remote controller or by operating
buttons on the projector, the user can zoom in/out, focus
the image, and vertically and horizontally shift the lens.
❖ Automatic color temperature adjustment
• Using the included color temperature sensor, the VP-
10S1 automatically adjusts color temperature after lamp
changes or as lighting changes over time.
❖ Image quality adjustment capabilities for
making images as one prefers
•
4 picture modes to select as demanded by the listening /
viewing environment and image source (Theater, Standard,
Dynamic and User)
• Fine-adjustment menus that allow the user to adjust images
as they like
• 12 user memory for saving adjusted images
• Color temperature setting (5250K, 5800K, 6500K, 7500K,
9300K)
• Black level adjustment (0 IRE, 7.5 IRE/ EXPAND, NORMAL
[For DVI-D input])
- Create a Comfortable Home Theater
Environment -
❖ Versatile input support including high-
vision satellite broadcast
• Supports input of NTSC, PAL, SECAM and high-vision
satellite broadcasts (480i, 480p, 720p, 1035i, 1080i).
• Rich array of input jacks including HDCP supported DVI-D
digital input jack and dual system component jacks
❖ Easy to install and operate
• Motorized lens shift feature for vertically and horizontally
positioning the projection point
•
Digital correction of horizontal-vertical keystone distortion
• Projection modes for ceiling-mount projection and rear
projection
• Light-up luminous remote control
• Light-up I/O jacks for easy connections and setup in dark
environments
• Equipped with RS-232C port and 12V trigger terminal for
custom installation
• Marantz system bus port
❖ Designed for silence and safety
•
Low operating noise thanks to double-shielded construction
and fan speed control
• Highly rigid to minimize radiating noise
•
1,500 hr long-life 250W P-VIP lamp
– DLP, Digital Micromirror Device and DMD are trademarks
of Texas Instruments.
– “DCDi” is a trademark of Faroudja. Faroudja is a wing of
Genesis Microchip Inc.
– The DVI logo is a trademark of the DDWG (Digital Display
Working Group).
– All trademarked product names mentioned in this manual
are the property of their respective companies.
FEATURES
Page 9
5
ENGLISH
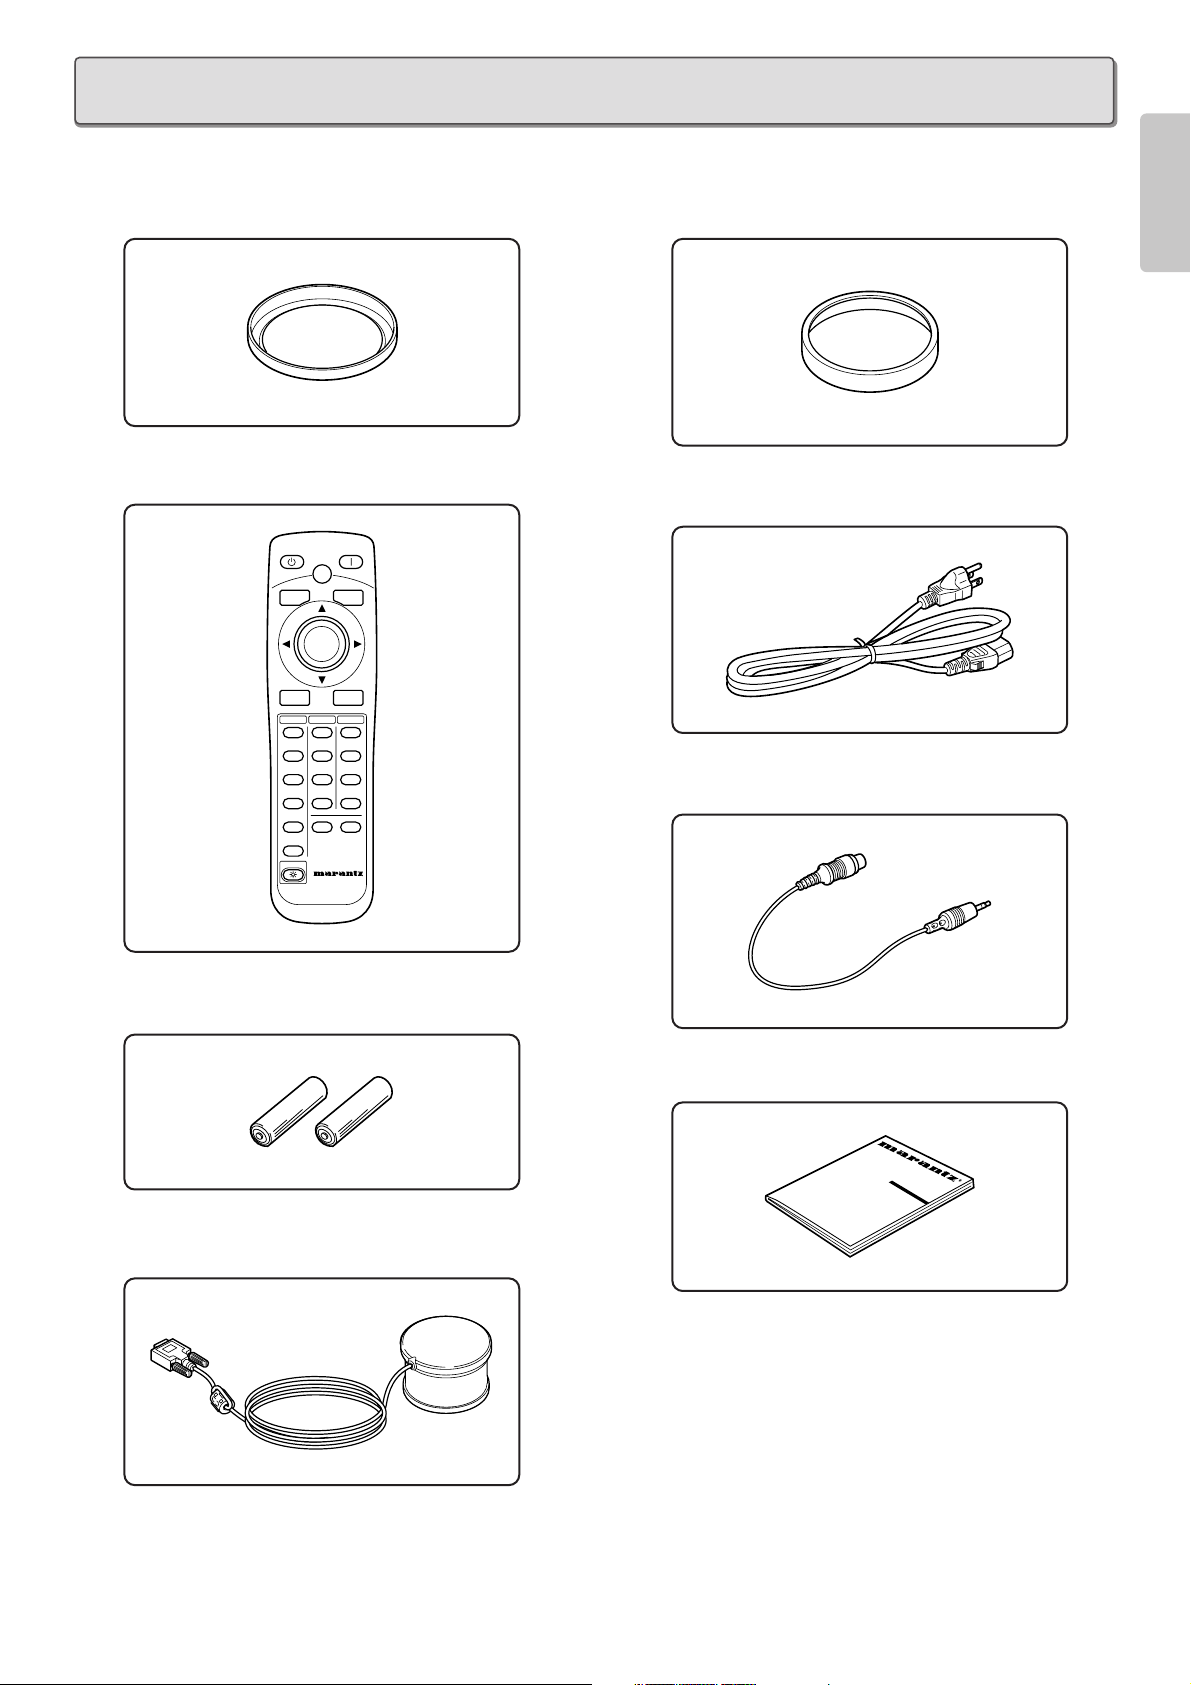
• Lens cap x 1
• Remote controller x 1
• AA batteries x 2
• Color temperature sensor x 1
• Attachment for Color temperature sensor x 1
• AC power cable x 1
• Control adapter cable (RCA miniature jack) x 1
• User Guide x 1
• Warranty Card (1 copy each for USA, CANADA)
R
COMP.1
PATT.
INPUT
ASPECT
MENU
V-MUTE
COMP.2
S-VIDEO
VIDEO
RGB
AUX
REMOTE CONTROLLER
RC-12VPS3
INPUT1
ENTER
PATTERN
STANDBY POWER ON
THEATER
STD
DYNA.
USER
CINEMA
MODE
FULL
NORMAL
ZOOM
THROUGH
INFO
ASPECT
LIGHT
After opening the package, check the below accessories have been included.
ACCESSORIES
Page 10
6
ENGLISH
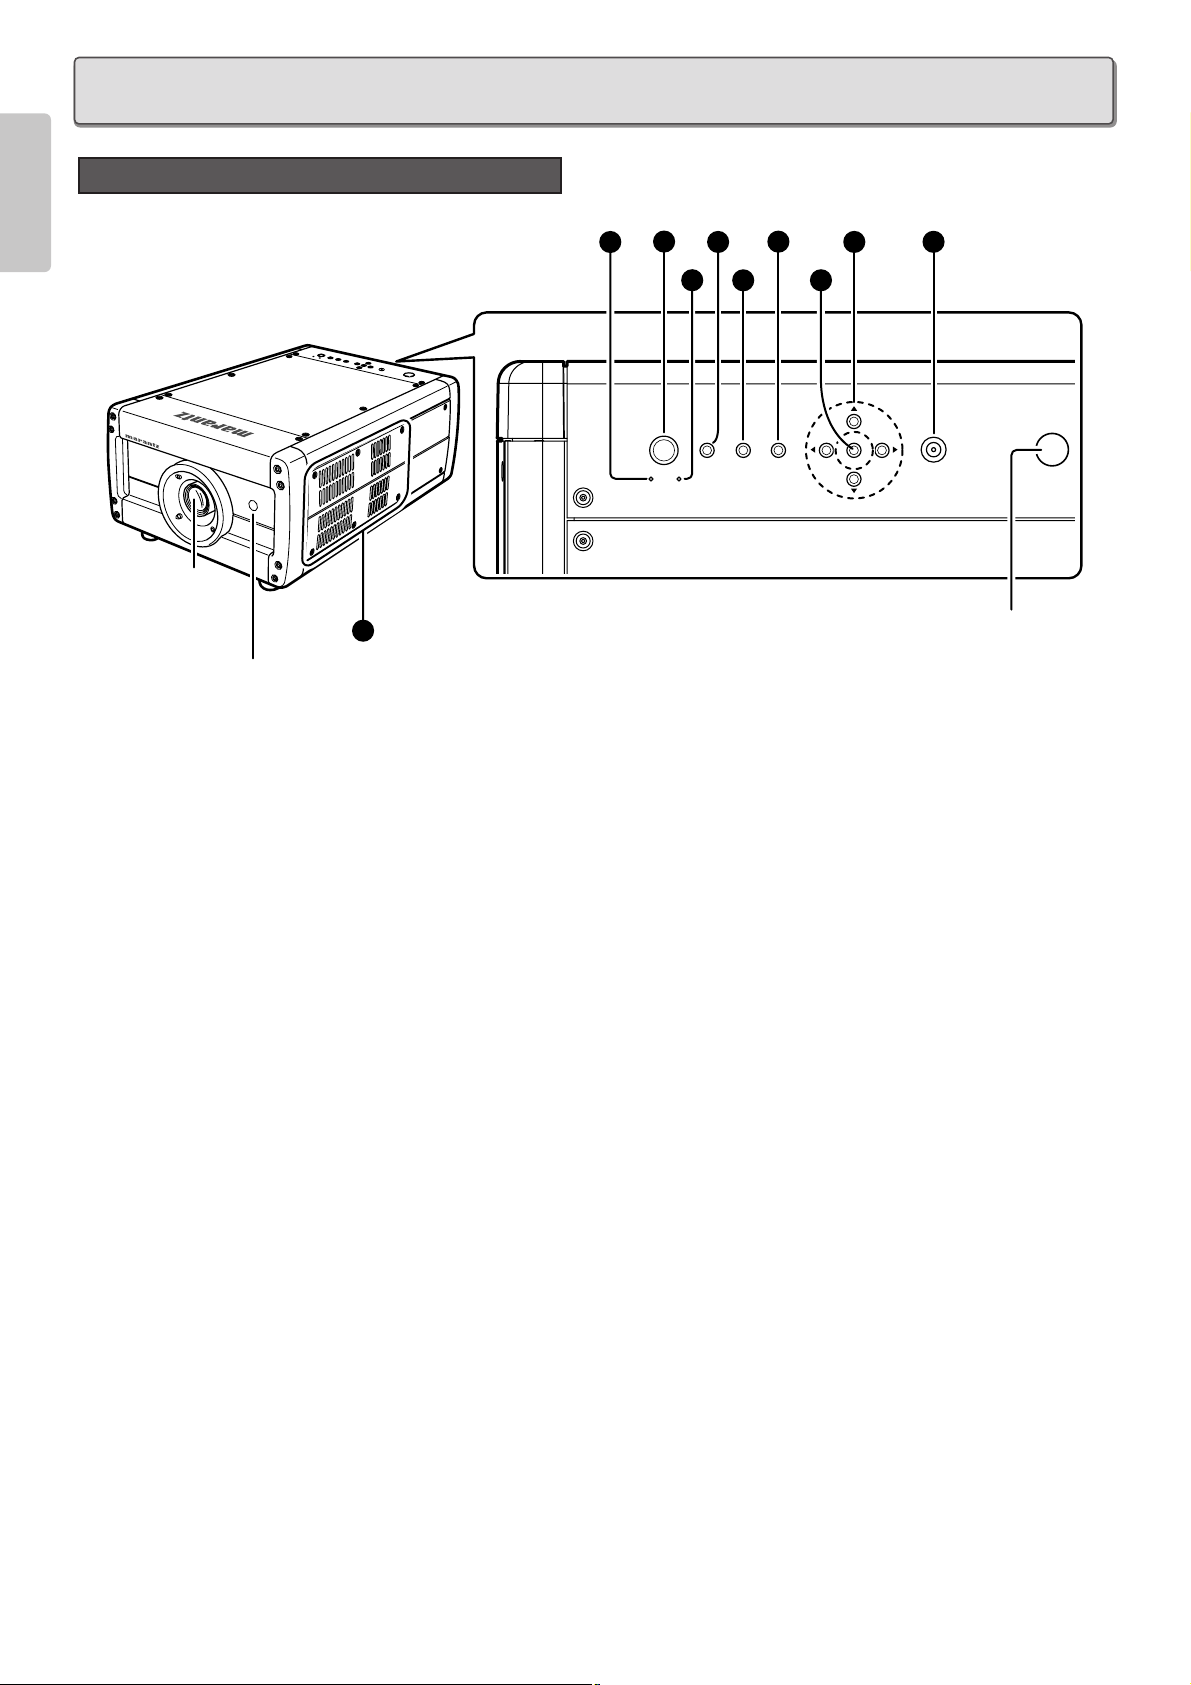
Front and Top
q POWER button (
☞
pg. 20)
Switches power ON/OFF (standby).
w MENU button (
☞
pg. 25)
Displays the on-screen menu (*OSD).
* OSD: Acronym for On Screen Display. With this projector,
OSD entails menus for making adjustments and
settings.
e INPUT button (
☞
pg. 21)
Selects the Input signal.
Pressing the button one time displays the currently selected
Input signal. Every time the button is pressed after that, the
Input signal rotates in the order of COMPONENT 1
➔
COMPONENT 2 ➔S-VIDEO ➔VIDEO ➔RGB ➔AUX.
r PATTERN button (
☞
pg. 17)
Projects a focus pattern on the screen. The focus and zoom
can then be set using the cursor buttons.
t ENTER button
Enters items selected on menus and settings.
y Cursor buttons
Press the cursor buttons (3[UP], 4[DOWN], 1[LEFT],
2[RIGHT]) to select menu items.
u POWER ON indicator
Lights up blue when power is on. When power is shut off, the
lamp flashes for about 1 min before going out.
i STANDBY indicator
Lights up red when the projector is on standby.
o WARNING indicator
Lights up or flashes if trouble occurs with the projector.
For error mode, see the list in “Error Mode List” (
☞
pg. 43).
!0 Vents (Exhaust / Intake)
Notes:
• Keep hands away from the exhaust vent as hot air is blown
from inside the projector.
• Do not block the intake vent. This prevents cooling and
causes the protective circuit to trip. (
☞
pg. 2)
!1 ON/OFF switch
This is the main power switch.
!2 AC IN socket (
☞
pg. 15)
Connect the included AC power cable here to supply power to
the projector.
NAMES AND FUNCTIONS OF PARTS
Projection
Lens
IR sensor
IR sensor
10
1
7
2
8
POWER
STANDBY ON
4
3
MENUINPUTPATTERN
6
9
5
N
N
N
I
I
I
R
R
R
N
N
N
A
A
A
G
G
G
W
W
W
W
W
W
G
G
G
A
A
A
N
N
N
R
R
R
I
I
I
N
N
ENTER
N
Page 11
7
ENGLISH
Rear and Terminals
RS-232CDVI-D INRGB IN
EXT.INT.
IN
OUT
OFF ON
1
2
TRIG. LIGHT
REMOTE
VIDEO IN
S-VIDEO IN COMPONENT VIDEO IN 1 COMPONENT VIDEO IN 2
YP
B/CBPR/CR
YPB/CBPR/C
R
1
11 9 8 610
11
12
5
2 3 4
10
10
7
❖ Terminals
z VIDEO IN jack
Connect to the video (composite) output of a video device.
x S-VIDEO IN jack
Connect to the S-video output of a video device.
c COMPONENT VIDEO IN 1 & 2 jacks
Jacks 1 and 2 have each Y, PB /CBand PR /CRjacks.
Connect to the component video output of a video device, AV
amp/processor, DVD player, etc.
v TRIG. 1 (TRIGGER 1) jack
Use to control an external unit from this projector by
interlocking the external unit to power ON/OFF (standby) on
this projector. The TRIG. 1 jack outputs 0 V when the projector
is on standby and 12 V when POWER button is in the on
position.
Note:
To connect with external devices, use an ordinal 3.5mm miniplug (mono) cable.
b LIGHT ON/OFF switch
Switches the terminal lamps on/off.
n TRIG. 2 (TRIGGER 2) jack
The TRIG. 2 jack outputs 12 V in each aspect ratio mode (Full,
Normal, Zoom or Through). For setting instructions, see “Trigger
2” (
☞
pg. 33).
Notes:
• Do not use the TRIG. 1 or 2 jack for power supply.
• To connect with external devices, use an ordinal 3.5mm mini-
plug (mono) cable.
m REMOTE IN / OUT jacks
Use to control this projector when combined with Marantz
products into a system. Connect the REMOTE CONTROL OUT
of the other Marantz product to the REMOTE CONTROL IN of
this projector and the REMOTE CONTROL IN of this other
Marantz product to the REMOTE CONTROL OUT of this
projector.
Note:
Use the included bus control adapter cable to connect this
projector to other Marantz products.
, REMOTE switch (INT. / EXT.)
Set to “EXT.” to control this projector from another connected
Marantz product, whereas set to “INT.” to control this
projector and other connected products from this projector.
. RS-232C port
This is the control terminal for custom installers.
⁄0 DVI-D IN jack
Connect to the RGB digital output of a video device or PC.
Note: When using the DVI-D IN jack, operate the projector
as explained in the precautions on pg. 16.
⁄1 RGB IN jack
Connect to the RGB output of a video device or PC.
!3 Screw holes for ceiling mount kit
Use to hang the projector from a ceiling. To hang the projector
from a ceiling, contact your nearest Marantz Authorized Dealer
or Service Center.
13
Bottom
Lamp cover
Lamp cover
securing screw
IR sensor
Terminals
Page 12
8
ENGLISH
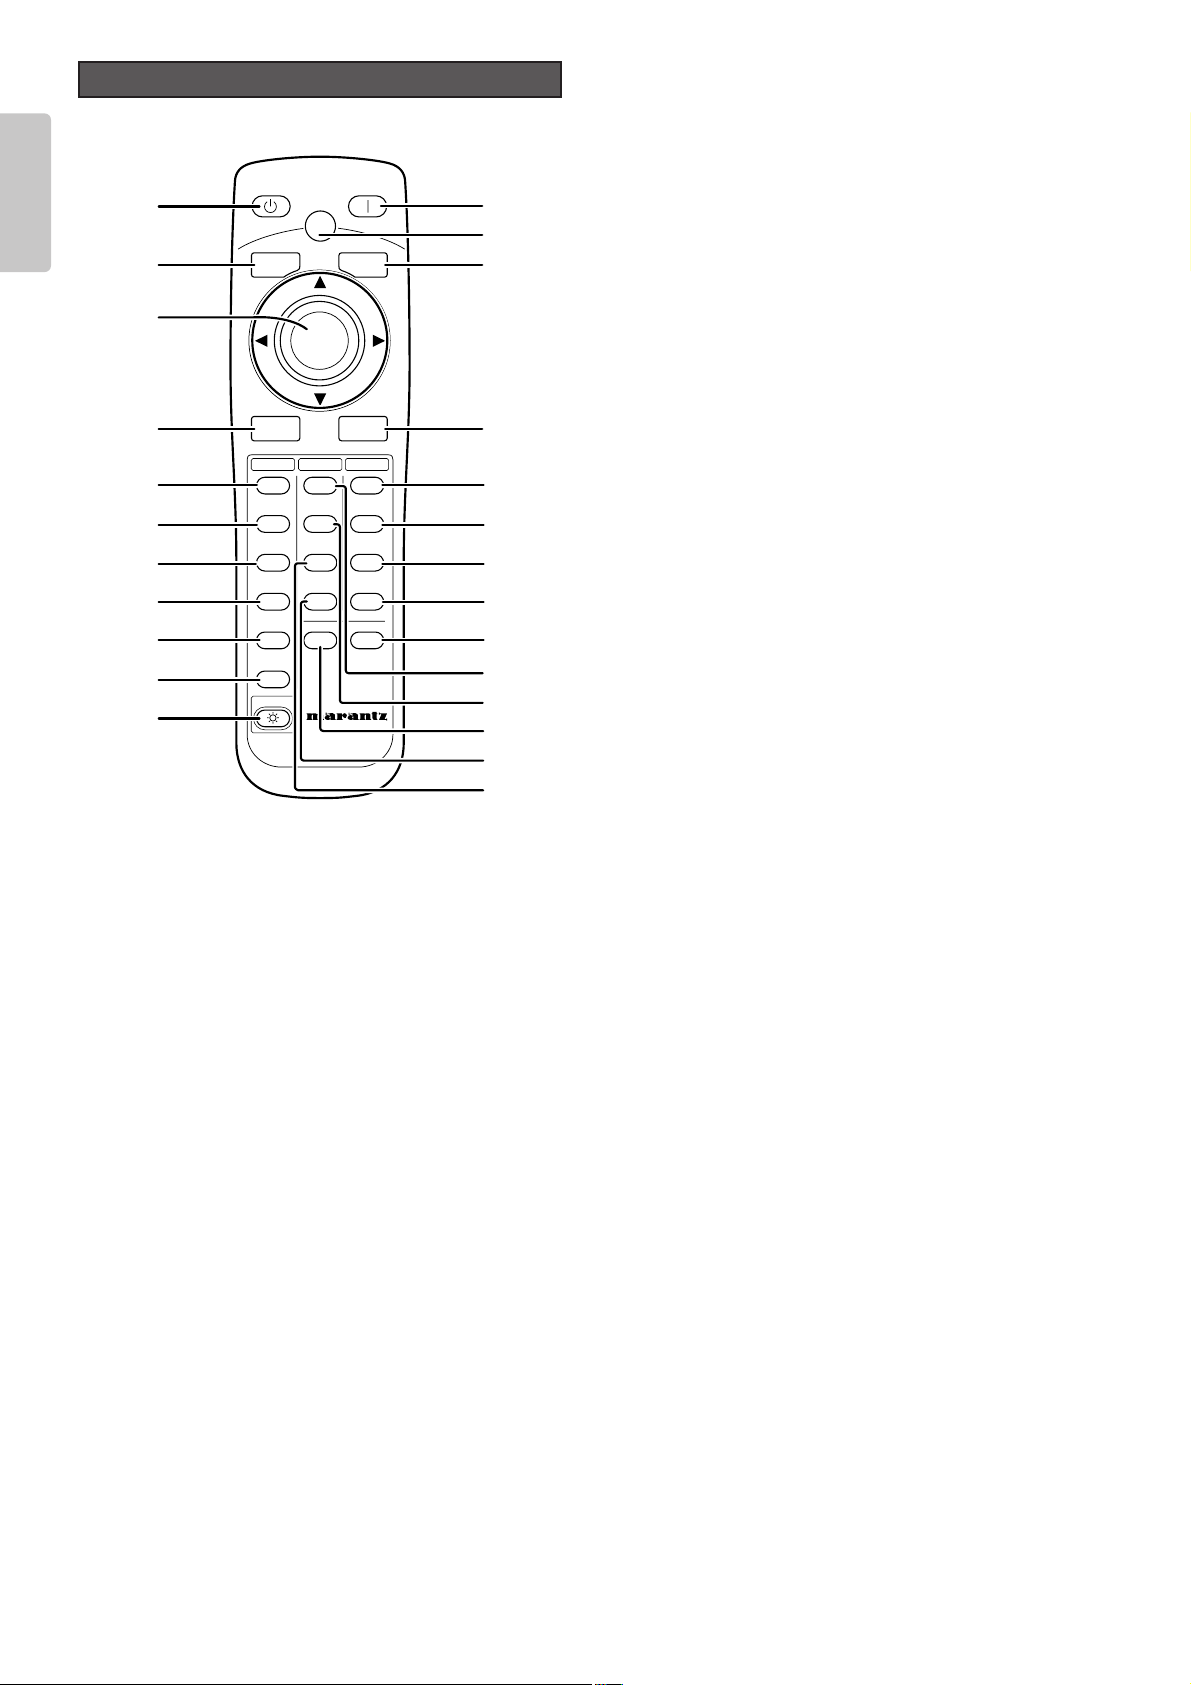
Remote Controller
a STANDBY button (
☞
pg. 20)
Sets the projector on standby provided power to the projector
is on.
s MENU button (
☞
pg. 25)
Displays the on-screen menu (*OSD).
* OSD: Acronym for On Screen Display. With this projector,
OSD entails menus for making adjustments and
settings.
d 3 / 4 / 1 / 2 / ENTER button
Press the cursor buttons (3[UP], 4[DOWN], 1[LEFT],
2[RIGHT]) to select menu items. Press the button at its center
to enter the selected item.
f INPUT button (
☞
pg. 21)
Selects the Input signal.
Pressing the button one time displays the currently selected
Input signal. Every time the button is pressed after that, the
Input signal rotates in the order of COMPONENT 1
➔
COMPONENT 2 ➔S-VIDEO ➔VIDEO ➔RGB ➔AUX.
g COMP. 1 (Component video in 1) button
(
☞
pg. 21)
Selects the device connected to the COMPONENT VIDEO IN 1
jack as the Input signal.
h COMP. 2 (Component video in 2) button
(
☞
pg. 21)
Selects the device connected to the COMPONENT VIDEO IN 2
jack as the Input signal.
j S-VIDEO button (
☞
pg. 21)
Selects the device connected to the S-VIDEO IN jack as the
Input signal.
k VIDEO button (
☞
pg. 21)
Selects the device connected to the VIDEO IN jack as the
Input signal.
l RGB button (
☞
pg. 21)
Selects the device connected to the RGB IN jack as the Input
signal.
¡0 AUX button (
☞
pg. 21)
Selects the device connected to the DVI-D IN jack as the
Input signal.
¡1 LIGHT button
Lights up backlit buttons (POWER ON, STANDBY, MENU, VMUTE, INPUT, ASPECT, PATTERN) for about 7 sec.
¡2 POWER ON button (
☞
pg. 17)
Turns on power to the projector.
¡3 PATT. (Pattern) button (
☞
pg. 17)
Projects a focus pattern on the screen. The focus and zoom
can then be set using the cursor buttons.
¡4 V-MUTE button
Blacks out the projected image. Pressing the button again
returns the image.
¡5 ASPECT (Aspect select) button (
☞
pg. 21)
Selects the aspect ratio.
Pressing the button one time displays the currently selected
aspect ratio. Every time the button is pressed after that, the
aspect ratio mode rotates in the order of Full ➔Normal ➔Zoom
➔
Through.
¡6 FULL button (
☞
pg. 21)
Selects the full mode as the aspect ratio.
¡7 NORMAL button (
☞
pg. 21)
Selects the normal mode as the aspect ratio.
¡8 ZOOM button (
☞
pg. 21)
Selects the zoom mode as the aspect ratio.
¡9 THROUGH button (
☞
pg. 21)
Selects the through mode as the aspect ratio.
™0 INFO. button (
☞
pg. 35)
Displays information on settings. Pressing the button again
disappears the information display.
™1 THEATER button (
☞
pg. 25)
Selects the theater mode.
The theater mode is for enjoying movie software because of
its high fidelity reproduction of black. Every time the button is
pressed, the selection rotates in the order of Theater 1
➔
Theater 2 ➔Theater 3 ➔Default.
™2 STD button (
☞
pg. 25)
Selects the standard mode.
The standard mode is for enjoying normal image software.
Every time the button is pressed, the selection rotates in the
order of Standard 1 ➔Standard 2 ➔Standard 3 ➔Default.
COMP.1
PATT.
INPUT
ASPECT
MENU
V-MUTE
COMP.2
S-VIDEO
VIDEO
RGB
AUX
REMOTE CONTROLLER
RC-12VPS3
INPUT
ENTER
PATTERN
STANDBY POWER ON
THEATER
STD
DYNA.
USER
CINEMA
MODE
FULL
NORMAL
ZOOM
THROUGH
INFO
ASPECT
LIGHT
¡2
¡3
¡4
¡5
a
s
f
g
h
j
k
l
¡6
¡7
¡8
¡9
™0
¡0
¡1
d
™1
™2
™4
™3
™5
Page 13
9
ENGLISH
™3 CINEMA button
Pressing the button one time displays the currently selected
cinema mode. Pressing the button after that switches the 2-3
pull-down feature between Auto/Off.
™4 USER button (
☞
pg. 25)
Selects the user mode.
The user mode is for enjoying images at a user-selected
gamma curve.
Every time the button is pressed, the selection rotates in the
order of User 1 ➔User 2 ➔User 3.
™5 DYNA. button (
☞
pg. 25)
Selects the dynamic mode.
The dynamic mode is for enjoying visually dynamic images.
Every time the button is pressed, the selection rotates in the
order of Dynamic 1 ➔Dynamic 2 ➔Dynamic 3 ➔Default.
Use the remote controller within 16.4 ft (5 m) of the projector.
The projector may not respond to the remote controller if the
remote controller is pointed in a different direction from the
projector, if there are objects between the remote controller and
projector or if strong light shines on the projector’s IR sensor.
MENUINPUTPATTERN
ENTER
POWER
STANDBYON
W
A
R
N
I
N
G
W
A
R
N
I
N
G
W
A
R
N
I
N
G
W
A
R
N
I
N
G
W
A
R
N
I
N
G
W
A
R
N
I
N
G
ON
LIGHT
OFFEXT. OUT
IN
2
1
TRIG.REMOTE
RS-232CDVI-D INRGB IN
VIDEO IN
S-VIDEO INCOMPONENT VIDEO IN 1 COMPONENT VIDEO IN 2
YP
B/CBPR/CRYPB/CBPR/CR
INT.
〜
ACIN
ON
OFF
60
16.4ft
(5m)
60
16.4ft
(5m)
60
16.4ft
(5m)
60
16.4ft
(5m)
VP-10S1
60
16.4ft
(5m)
VP-10S1
60
16.4ft
(5m)
VP-10S1
Remote Controller Operating Range
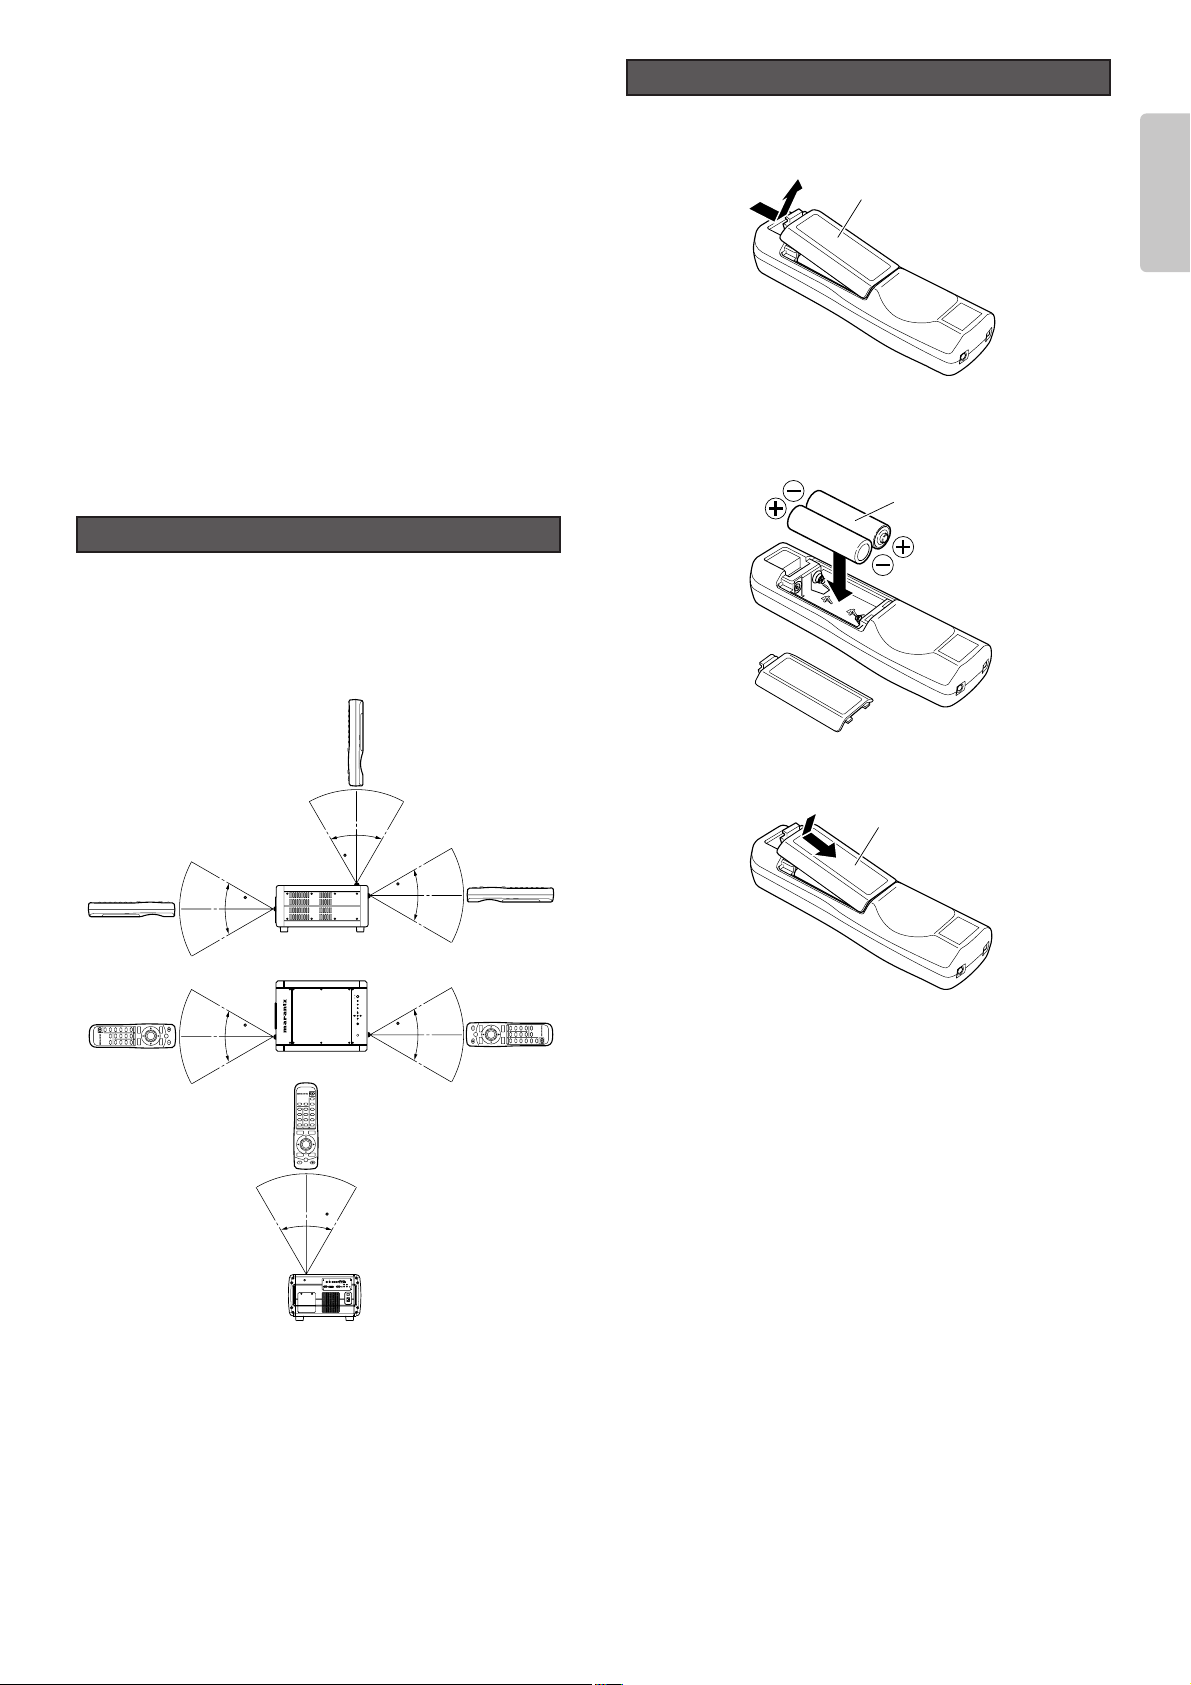
1. Detach the battery case cover from the back of the remote
controller.
2. Insert two AA batteries with their +/– poles matching the
indications inside the battery compartment.
3. Reattach the battery case cover as before.
CAUTION
– The available battery types are limited: manganese dry cell
and alkaline dry cell.
– Do not mix different battery types.
– Do not mix old and new batteries.
– Only batteries of the same type are to be used.
– Remove exhausted batteries from the Remote Controller.
– Do not attempt to recharge non-rechargeable batteries.
– Do not use rechargeable batteries.
– Batteries are to be inserted with the correct polarity.
– The supply terminals are not to be short-circuited.
– Never throw batteries in a fire or attempt to open up its outer
casing.
– If the user does not intend to use the Remote Controller for
a long time, remove the batteries.
– Keep away from heat.
– Do not be subjected to strong shock.
– Do not be subjected to moisture. If the unit gets moistured,
wipe it off immediately.
– The Remote Controller operation may not function if the
projector’s IR sensors are exposed to direct sun light or
strong artificial light, or if there is an obstacle between the
IR sensors and the Remote Controller.
How to Load Batteries into the Remote Controller
Battery case cover
AA batteries
Remote
Controller
Remote
Controller
Remote
Controller
Remote
Controller
Remote
Controller
Remote
Controller
Battery case cover
Page 14
10
ENGLISH
Note :
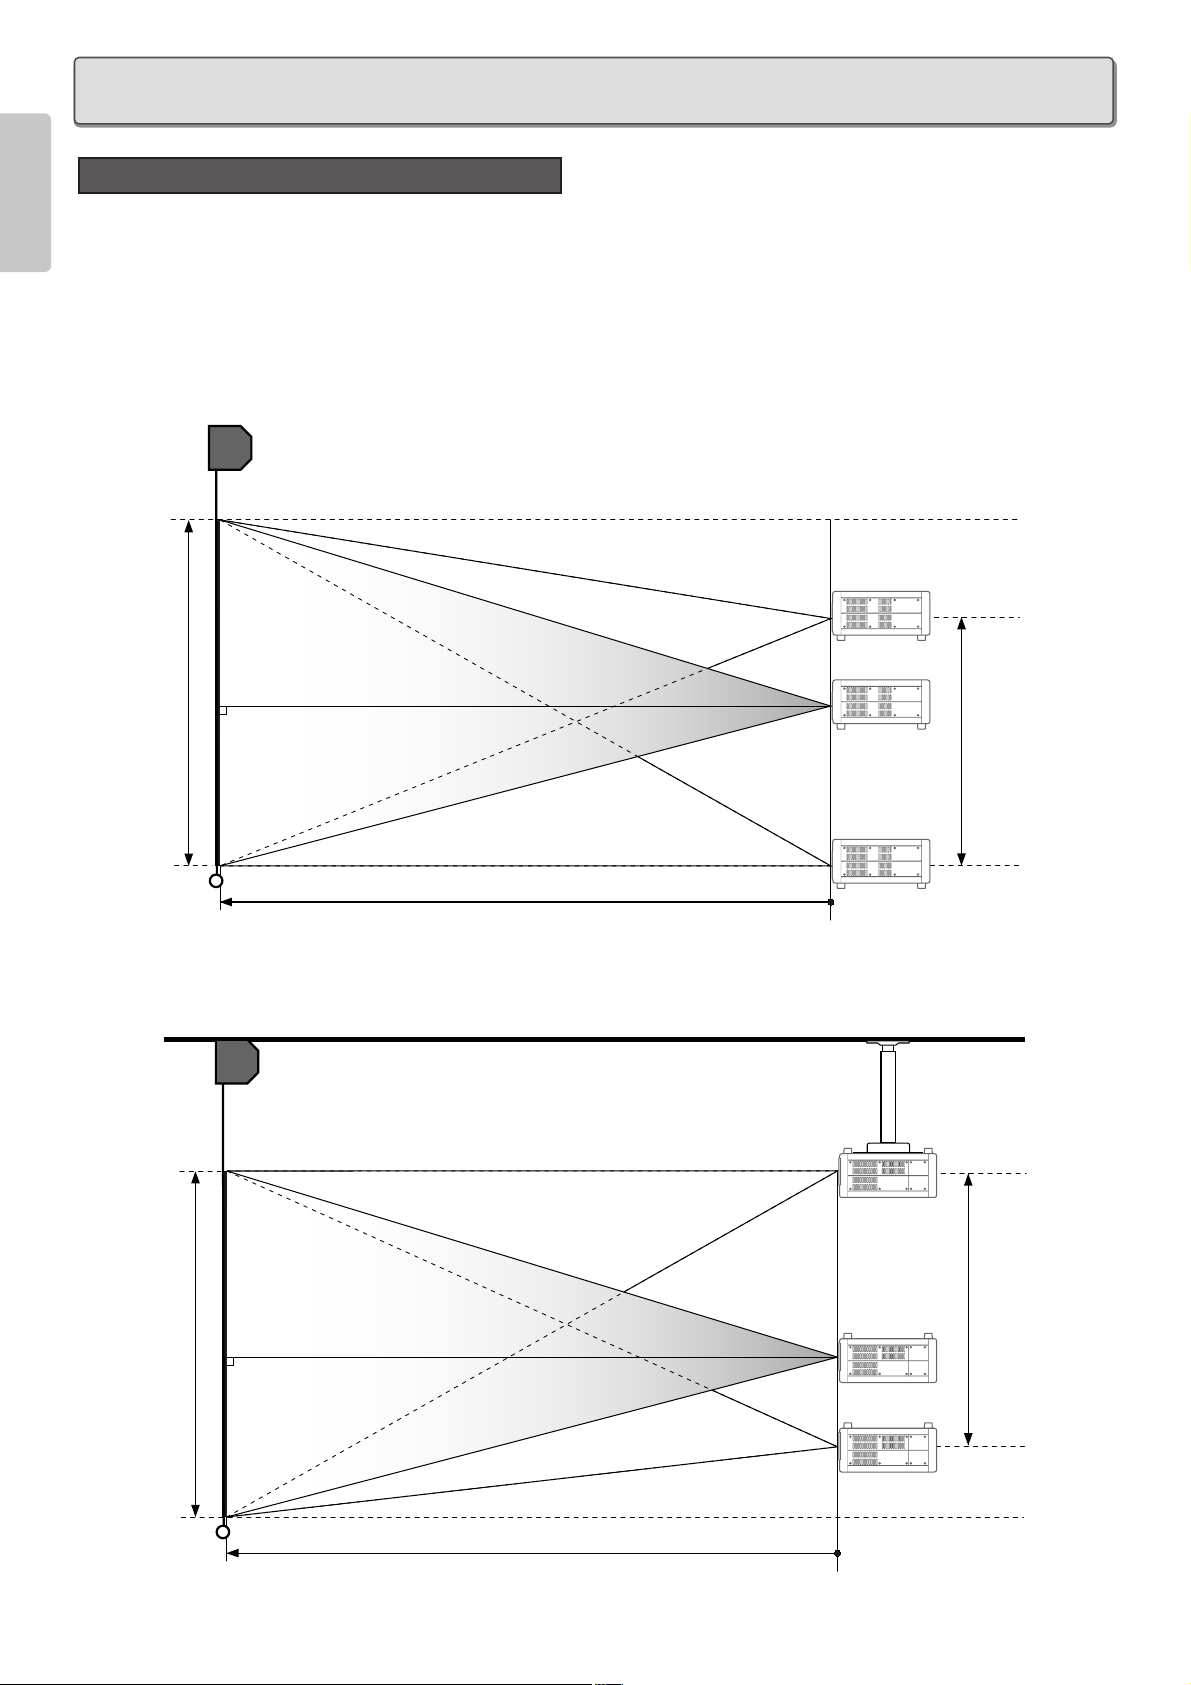
• Before installing the projector, carefully read “Precautions in Use” (
☞
pg. 2) in this User Guide.
• Specialized skill is required to hang this projector from a ceiling. For safety reasons, do not install the projector yourself.
Contact your nearest Marantz Authorized Dealer or Service Center. Hanging the projector from the ceiling requires a
separately solder hanger and pole.
• Do not look through the lens with power to the projector on. Exposure to the lamp can harm eyes.
❖ When installing on a flat surface
❖ When mounting on a ceiling
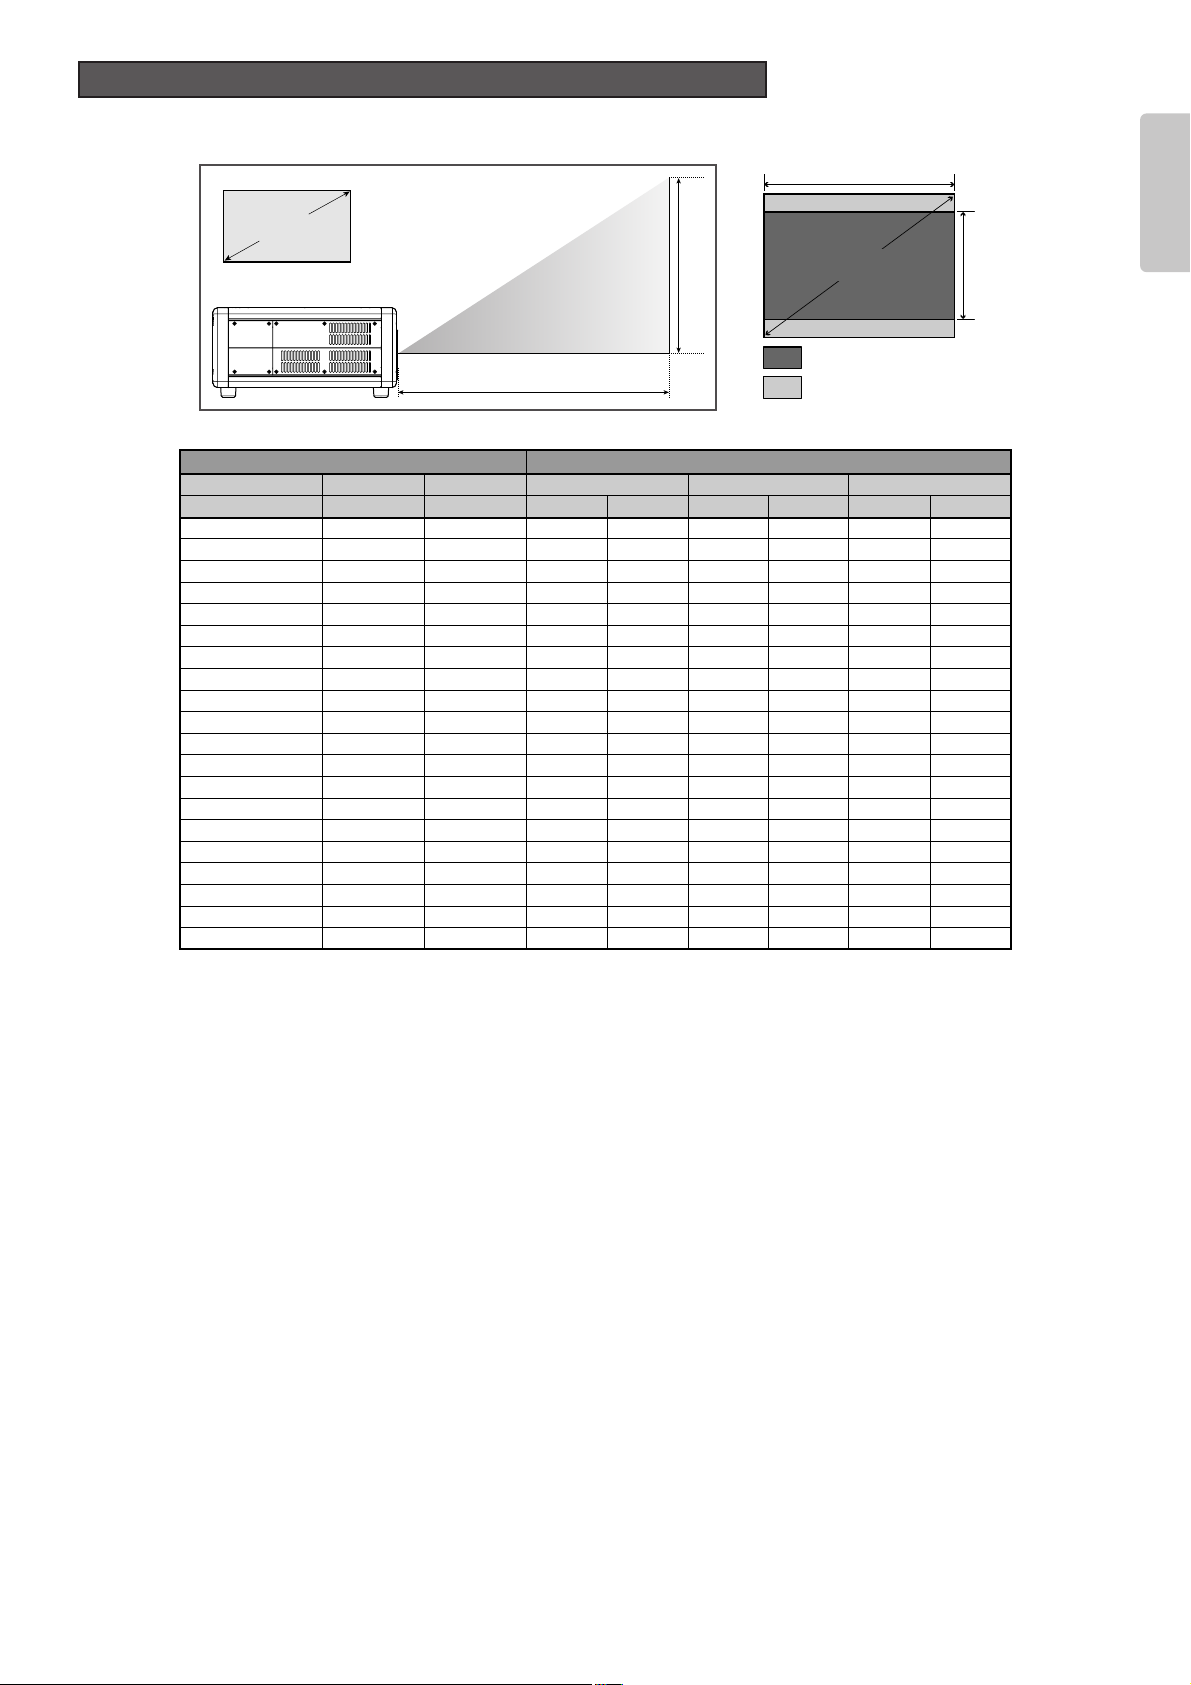
How to Install
INSTALLATION
Screen
Screen upper end
Height range as
installed
Screen size (vertical)
Screen lower end
Projection distance
Screen
Screen upper end
Height range as
installed
Screen size (vertical)
Screen lower end
Projection distance
Page 15
11
ENGLISH
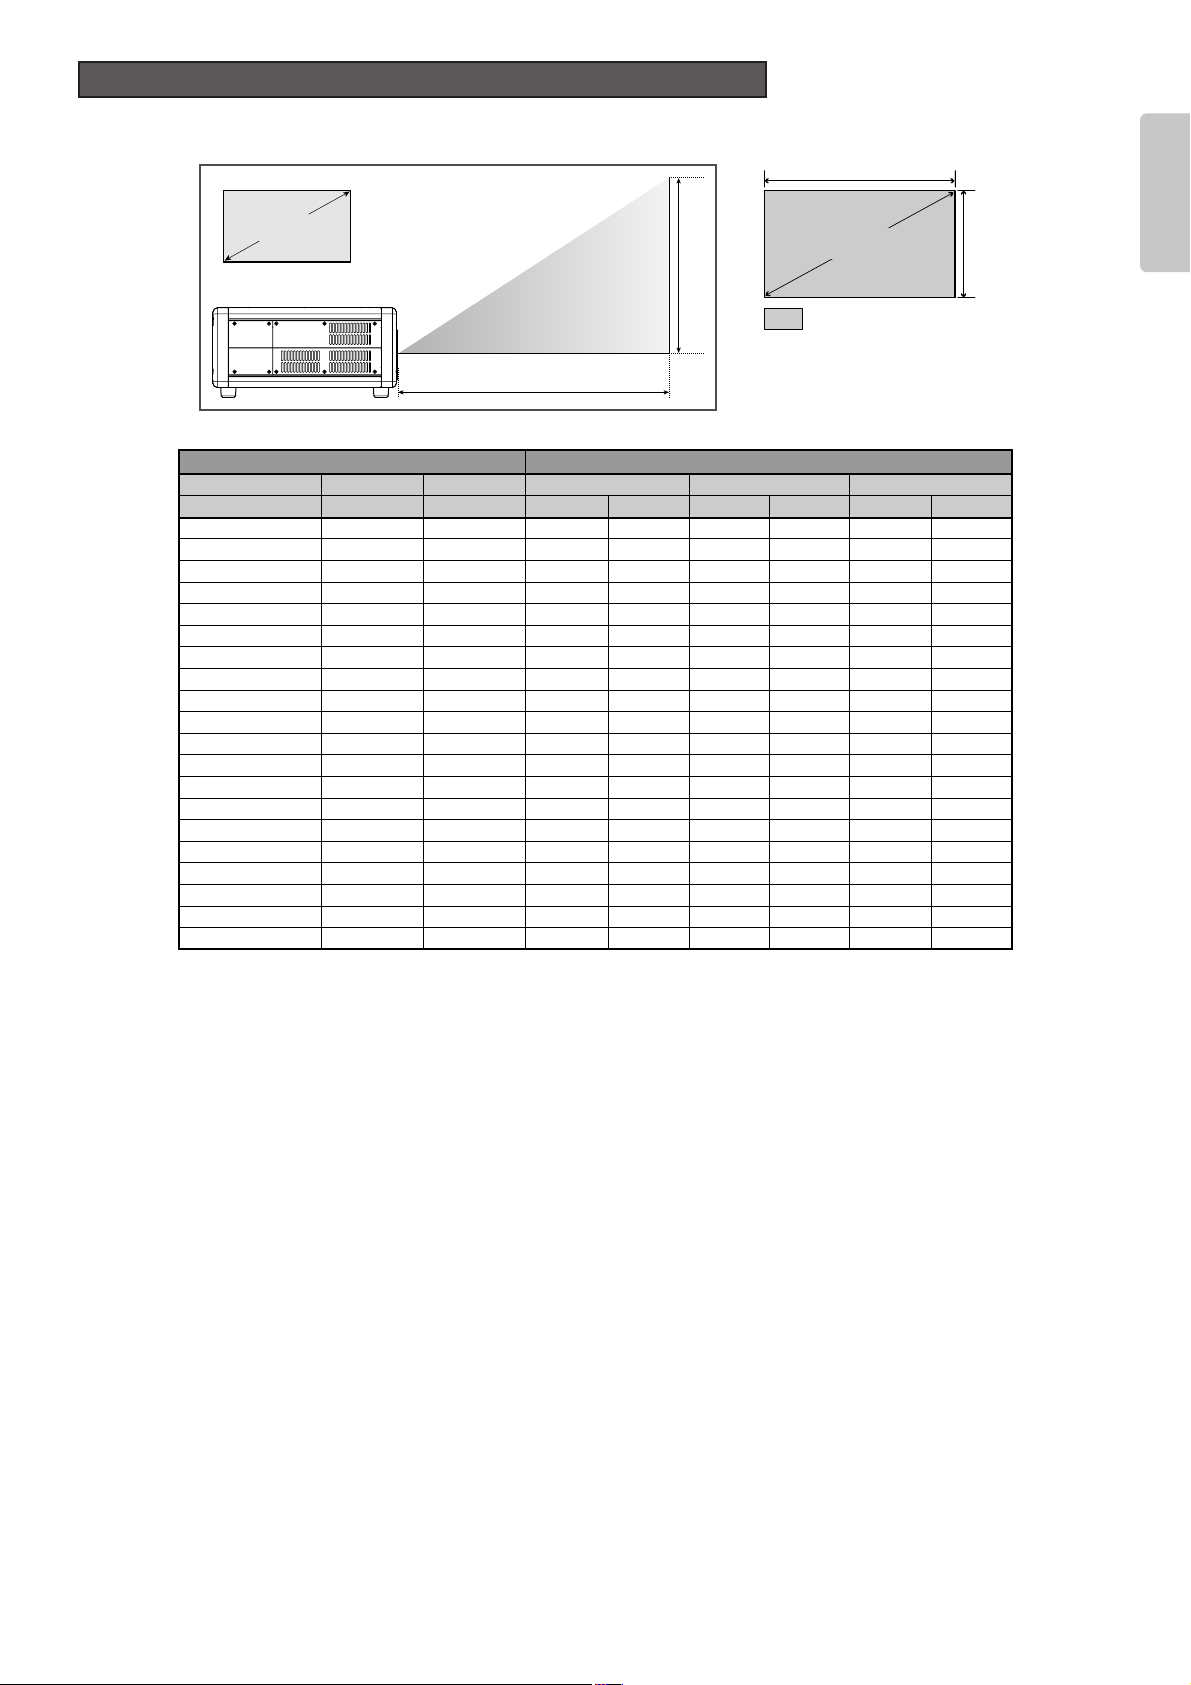
The projection distance for projecting a 16:9 image on a 16:9 screen is shown below.
Note : When installing the projector, allow for ±5% tolerance in the above projection distances.
❖ How to calculate projection distance
• When using the LN10VP32 lens
Min. projection distance (inch) = Diagonal (inch) x 1.255
Max. projection distance (inch) = Diagonal (inch) x 1.5688
• When using the LN10VP40 lens
Min. projection distance (inch) = Diagonal (inch) x 1.5688
Max. projection distance (inch) = Diagonal (inch) x 2.0918
• When using the LN10VP53 lens
Min. projection distance (inch) = Diagonal (inch) x 2.0918
Max. projection distance (inch) = Diagonal (inch) x 3.1377
16:9 Screen
Image width Image hight
(inch)
60
70
72
80
82
84
90
92
100
106
110
120
123
133
135
150
170
200
250
300
Screen size
Throw distance (inch)
LN10VP32 LN10VP40 LN10VP53
(inch)
52.29
61.01
62.75
69.73
71.47
73.21
78.44
80.18
87.16
92.39
95.87
104.59
107.20
115.92
117.66
130.74
148.17
174.32
217.89
261.47
(inch)
29.42
34.32
35.30
39.22
40.20
41.18
44.12
45.10
49.03
51.97
53.93
58.83
60.30
65.20
66.19
73.54
83.34
98.05
122.57
147.08
Min
87.85
90.36
100.41
102.92
105.43
112.96
115.47
125.51
133.04
138.06
150.61
154.37
166.92
169.43
188.26
213.36
251.01
313.77
376.52
Max
94.13
109.82
112.96
125.51
128.64
131.78
141.20
144.33
156.88
166.30
172.57
188.26
192.97
208.66
211.79
235.33
266.70
313.77
392.21
Min
109.82
112.96
125.51
128.64
131.78
141.20
144.33
156.88
166.30
172.57
188.26
192.97
208.66
211.79
235.33
266.70
313.77
392.21
470.65
Max
125.51
146.42
150.61
167.34
171.53
175.71
188.26
192.44
209.18
221.73
230.10
251.01
257.29
278.21
282.39
313.77
355.60
418.36
522.95
Min
146.42
150.61
167.34
171.53
175.71
188.26
192.44
209.18
221.73
230.10
251.01
257.29
278.21
282.39
313.77
355.60
418.36
522.95
627.53
Max
188.26
219.64
225.91
251.01
257.29
263.56
282.39
288.67
313.77
332.59
345.14
376.52
385.93
417.31
423.59
470.65
533.40
627.53
784.42
941.30
Screen Size and Projection Distance (16:9 Screen) - (inch)
Image width
Image height
: Projected image = Screen size
Diagonal
Diagonal
Projection distance
Screen
Page 16
12
ENGLISH
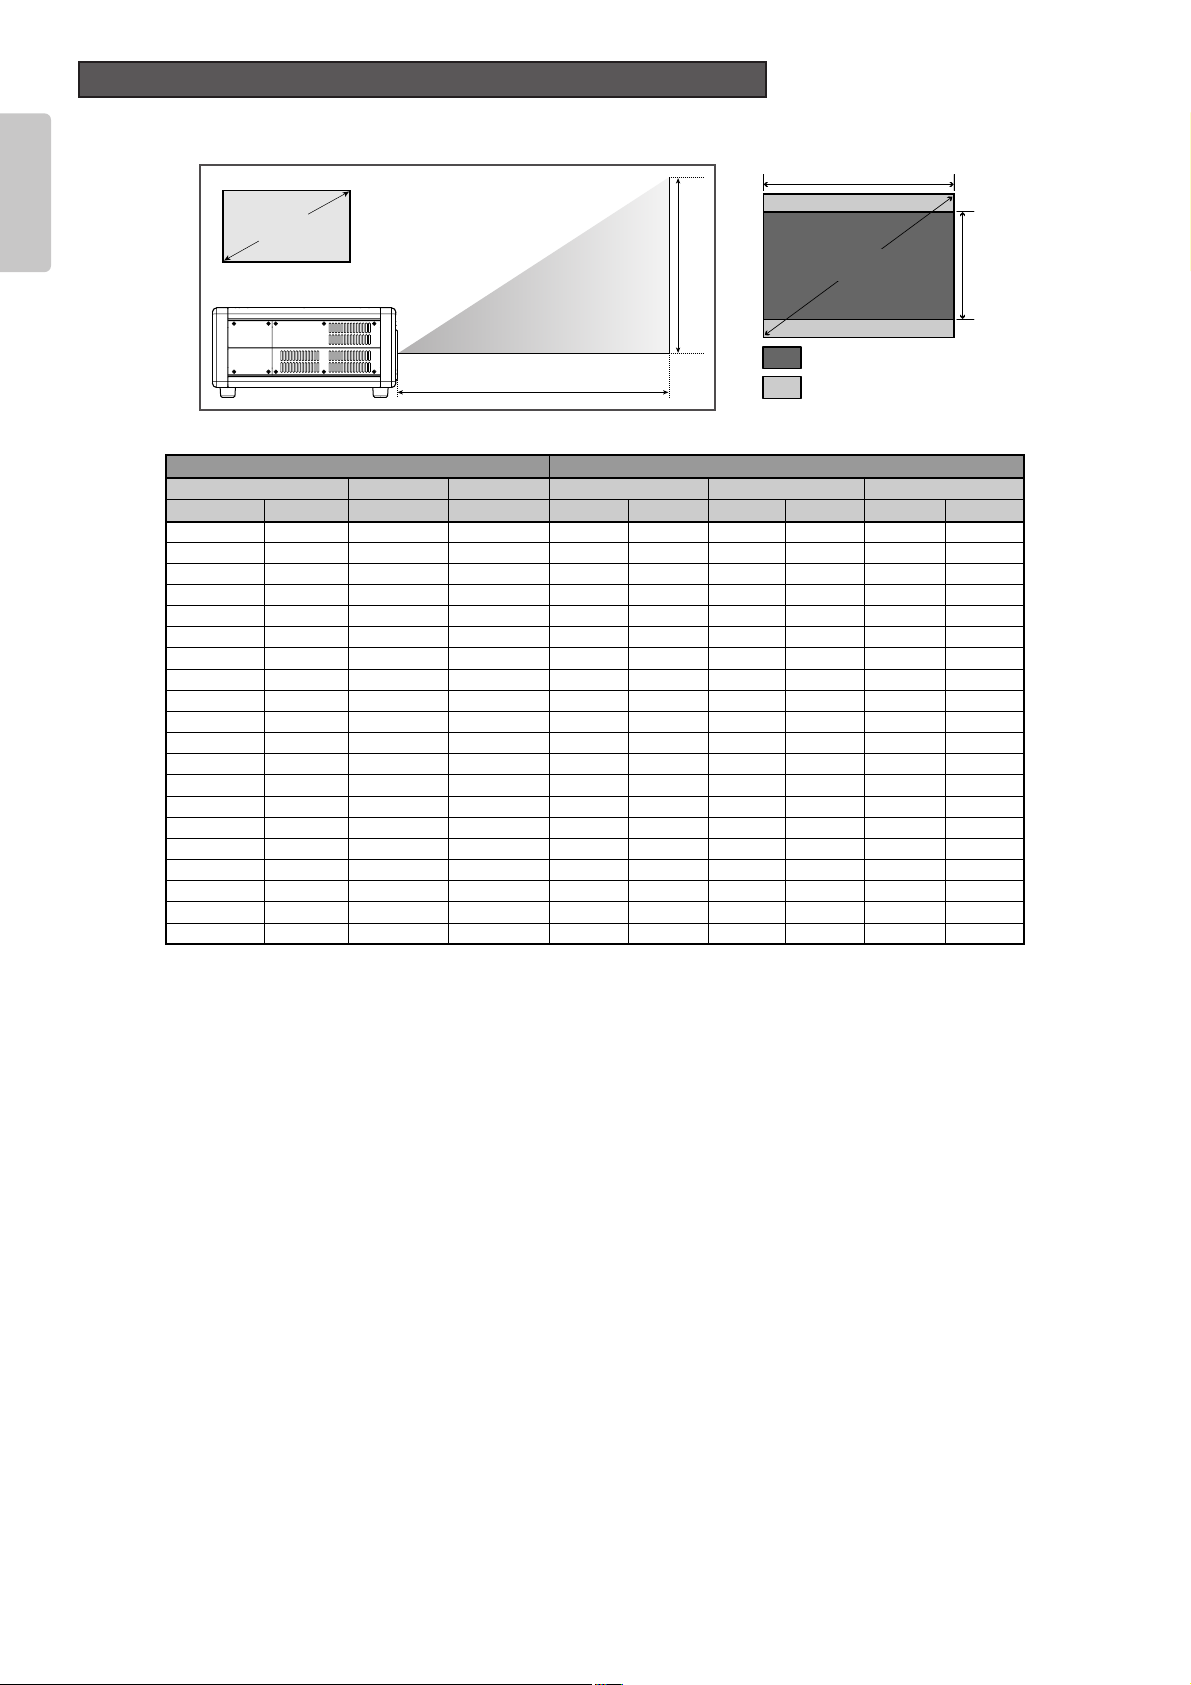
The projection distance for projecting a 16:9 image on a 16:9 screen is shown below.
Note : When installing the projector, allow for ±5% tolerance in the above projection distances.
❖ How to calculate projection distance
• When using the LN10VP32 lens
Min. projection distance (m) = Diagonal (inch) x 3.188/100
Max. projection distance (m) = Diagonal (inch) x 3.985/100
• When using the LN10VP40 lens
Min. projection distance (m) = Diagonal (inch) x 3.985/100
Max. projection distance (m) = Diagonal (inch) x 5.313/100
• When using the LN10VP53 lens
Min. projection distance (m) = Diagonal (inch) x 5.313/100
Max. projection distance (m) = Diagonal (inch) x 7.970/100
16:9 Screen
Image width Image hight
(m)(inch) (m) (m) Min Max Min Max Min Max
1.5260 1.33 0.75 2.39 3.19 4.78
1.7870 1.55 0.87 2.23 2.79 2.79 3.72 3.72 5.58
1.8372 1.59 0.90 2.30 2.87 2.87 3.83 3.83 5.74
2.0380 1.77 1.00 2.55 3.19 3.19 4.25 4.25 6.38
2.0882 1.82 1.02 2.61 3.27 3.27 4.36 4.36 6.54
2.1384 1.86 1.05 2.68 3.35 3.35 4.46 4.46 6.69
2.2990 1.99 1.12 2.87 3.59 3.59 4.78 4.78 7.17
2.3492 2.04 1.15 2.93 3.67 3.67 4.89 4.89 7.33
2.54100 2.21 1.25 3.19 3.98 3.98 5.31 5.31 7.97
2.69106 2.35 1.32 3.38 4.22 4.22 5.63 5.63 8.45
2.79110 2.44 1.37 3.51 4.38 4.38 5.84 5.84 8.77
3.05120 2.66 1.49 3.83 4.78 4.78 6.38 6.38 9.56
3.12123 2.72 1.53 3.92 4.90 4.90 6.54 6.54 9.80
3.38133 2.94 1.66 4.24 5.30 5.30 7.07 7.07 10.60
3.43135 2.99 1.68 4.30 5.38 5.38 7.17 7.17 10.76
3.81150 3.32 1.87 4.78 5.98 5.98 7.97 7.97 11.95
4.32170 3.76 2.12 5.42 6.77 6.77 9.03 9.03 13.55
5.08200 4.43 2.49 6.38 7.97 7.97 10.63 10.63 15.94
6.35250 5.53 3.11 7.97 9.96 9.96 13.28 13.28 19.92
7.62300 6.64 3.74 9.56 11.95 15.94 23.91
Screen size
Throw distance (m)
LN10VP32 LN10VP40 LN10VP53
Screen Size and Projection Distance (16:9 Screen) - (m)
Image width
Image height
: Projected image = Screen size
Diagonal
Diagonal
Projection distance
Screen
Page 17
13
ENGLISH
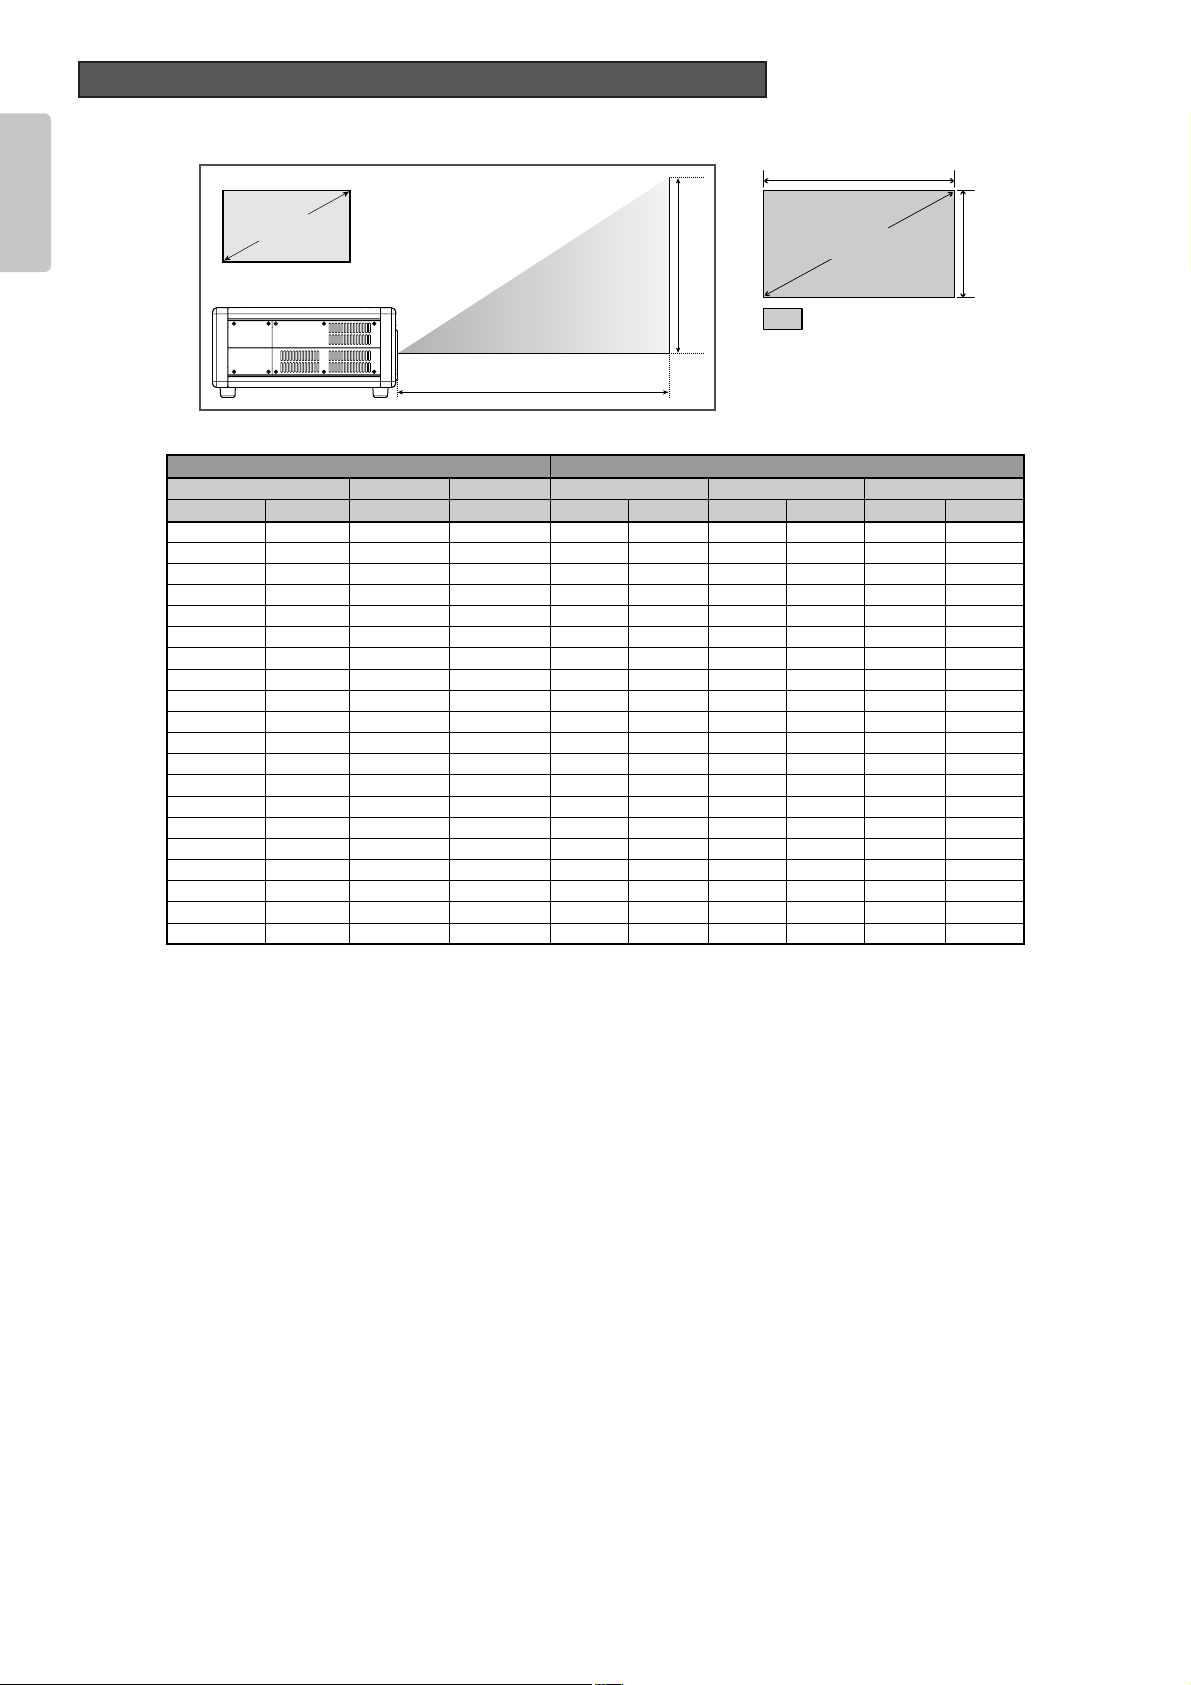
The projection distance for projecting a 16:9 image on a 4:3 screen is shown below.
Note : When installing the projector, allow for ±5% tolerance in the above projection distances.
❖ How to calculate projection distance
• When using the LN10VP32 lens
Min. projection distance (inch) = Diagonal (inch) x 1.1520
Max. projection distance (inch) = Diagonal (inch) x 1.4400
• When using the LN10VP40 lens
Min. projection distance (inch) = Diagonal (inch) x 1.4400
Max. projection distance (inch) = Diagonal (inch) x 1.9200
• When using the LN10VP53 lens
Min. projection distance (inch) = Diagonal (inch) x 1.9200
Max. projection distance (inch) = Diagonal (inch) x 2.8800
16:9 Screen
Image width Image hight
(inch)
60
70
72
80
82
84
90
92
100
106
110
120
123
133
135
150
170
200
250
300
Screen size
Throw distance (inch)
LN10VP32 LN10VP40 LN10VP53
(inch) (inch) Min Max Min Max Min Max
48.00 27.00 115.20 172.80
56.00 31.50 100.80 134.40 201.60
57.60 32.40 103.68 138.24 207.36
64.00 36.00 92.16 115.20 115.20 153.60 153.60 230.40
65.60 36.90 94.46 118.08 118.08 157.44 157.44 236.16
67.20 37.80 96.77 120.96 120.96 161.28 161.28 241.92
72.00 40.50 103.68 129.60 129.60 172.80 172.80 259.20
73.60 41.40 105.98 132.48 132.48 176.64 176.64 264.96
80.00 45.00 115.20 144.00 144.00 192.00 192.00 288.00
84.80 47.70 122.11 152.64 152.64 203.52 203.52 305.28
88.00 49.50 126.72 158.40 158.40 211.20 211.20 316.80
96.00 54.00 138.24 172.80 172.80 230.40 230.40 345.60
98.40 55.35 141.70 177.12 177.12 236.16 236.16 354.24
106.40 59.85 153.22 191.52 191.52 255.36 255.36 383.04
108.00 60.75 155.52 194.40 194.40 259.20 259.20 388.80
120.00 67.50 172.80 216.00 216.00 288.00 288.00 432.00
136.00 76.50 195.84 244.80 244.80 326.40 326.40 489.60
160.00 90.00 230.40 288.00 288.00 384.00 384.00 576.00
200.00 112.50 288.00 360.00 360.00 480.00 480.00 720.00
240.00 135.00 345.60 432.00 432.00 576.00 576.00 864.00
Screen Size and Projection Distance (4:3 Screen) - (inch)
Image width
Image height
: Projected image
Diagonal
: Screen size
Diagonal
Projection distance
Screen
Page 18
The projection distance for projecting a 16:9 image on a 4:3 screen is shown below.
Note : When installing the projector, allow for ±5% tolerance in the above projection distances.
❖ How to calculate projection distance
• When using the LN10VP32 lens
Min. projection distance (m) = Diagonal (inch) x 2.927/100
Max. projection distance (m) = Diagonal (inch) x 3.658/100
• When using the LN10VP40 lens
Min. projection distance (m) = Diagonal (inch) x 3.658/100
Max. projection distance (m) = Diagonal (inch) x 4.877/100
• When using the LN10VP53 lens
Min. projection distance (m) = Diagonal (inch) x 4.877/100
Max. projection distance (m) = Diagonal (inch) x 7.315/100
4:3 Screen
Image width Image hight
(m)(inch)
1.5260
1.7870
1.8372
2.0380
2.0882
2.1384
2.2990
2.3492
2.54100
2.69106
2.79110
3.05120
3.12123
3.38133
3.43135
3.81150
4.32170
5.08200
6.35250
7.62300
Screen size
Throw distance (m)
LN10VP32 LN10VP40 LN10VP53
(m)
1.22
1.42
1.46
1.63
1.67
1.71
1.83
1.87
2.03
2.15
2.24
2.44
2.50
2.70
2.74
3.05
3.45
4.06
5.08
6.10
(m)
0.69
0.80
0.82
0.91
0.94
0.96
1.03
1.05
1.14
1.21
1.26
1.37
1.41
1.52
1.54
1.71
1.94
2.29
2.86
3.43
Min Max Min Max Min Max
2.93 4.39
2.56 3.41 5.12
2.63 3.51 5.27
2.34 2.93 2.93 3.90 3.90 5.85
2.40 3.00 3.00 4.00 4.00 6.00
2.46 3.07 3.07 4.10 4.10 6.14
2.63 3.29 3.29 4.39 4.39 6.58
2.69 3.36 3.36 4.49 4.49 6.73
2.93 3.66 3.66 4.88 4.88 7.32
3.10 3.88 3.88 5.17 5.17 7.75
3.22 4.02 4.02 5.36 5.36 8.05
3.51 4.39 4.39 5.85 5.85 8.78
3.60 4.50 4.50 6.00 6.00 9.00
3.89 4.86 4.86 6.49 6.49 9.73
3.95 4.94 4.94 6.58 6.58 9.88
4.39 5.49 5.49 7.32 7.32 10.97
4.97 6.22 6.22 8.29 8.29 12.44
5.85 7.32 7.32 9.75 9.75 14.63
7.32 9.14 9.14 12.19 12.19 18.29
8.78 10.97 10.97 14.63 14.63 21.95
Screen Size and Projection Distance (4:3 Screen) - (m)
14
ENGLISH
Image width
Image height
: Projected image
Diagonal
: Screen size
Diagonal
Projection distance
Screen
Page 19

15
ENGLISH
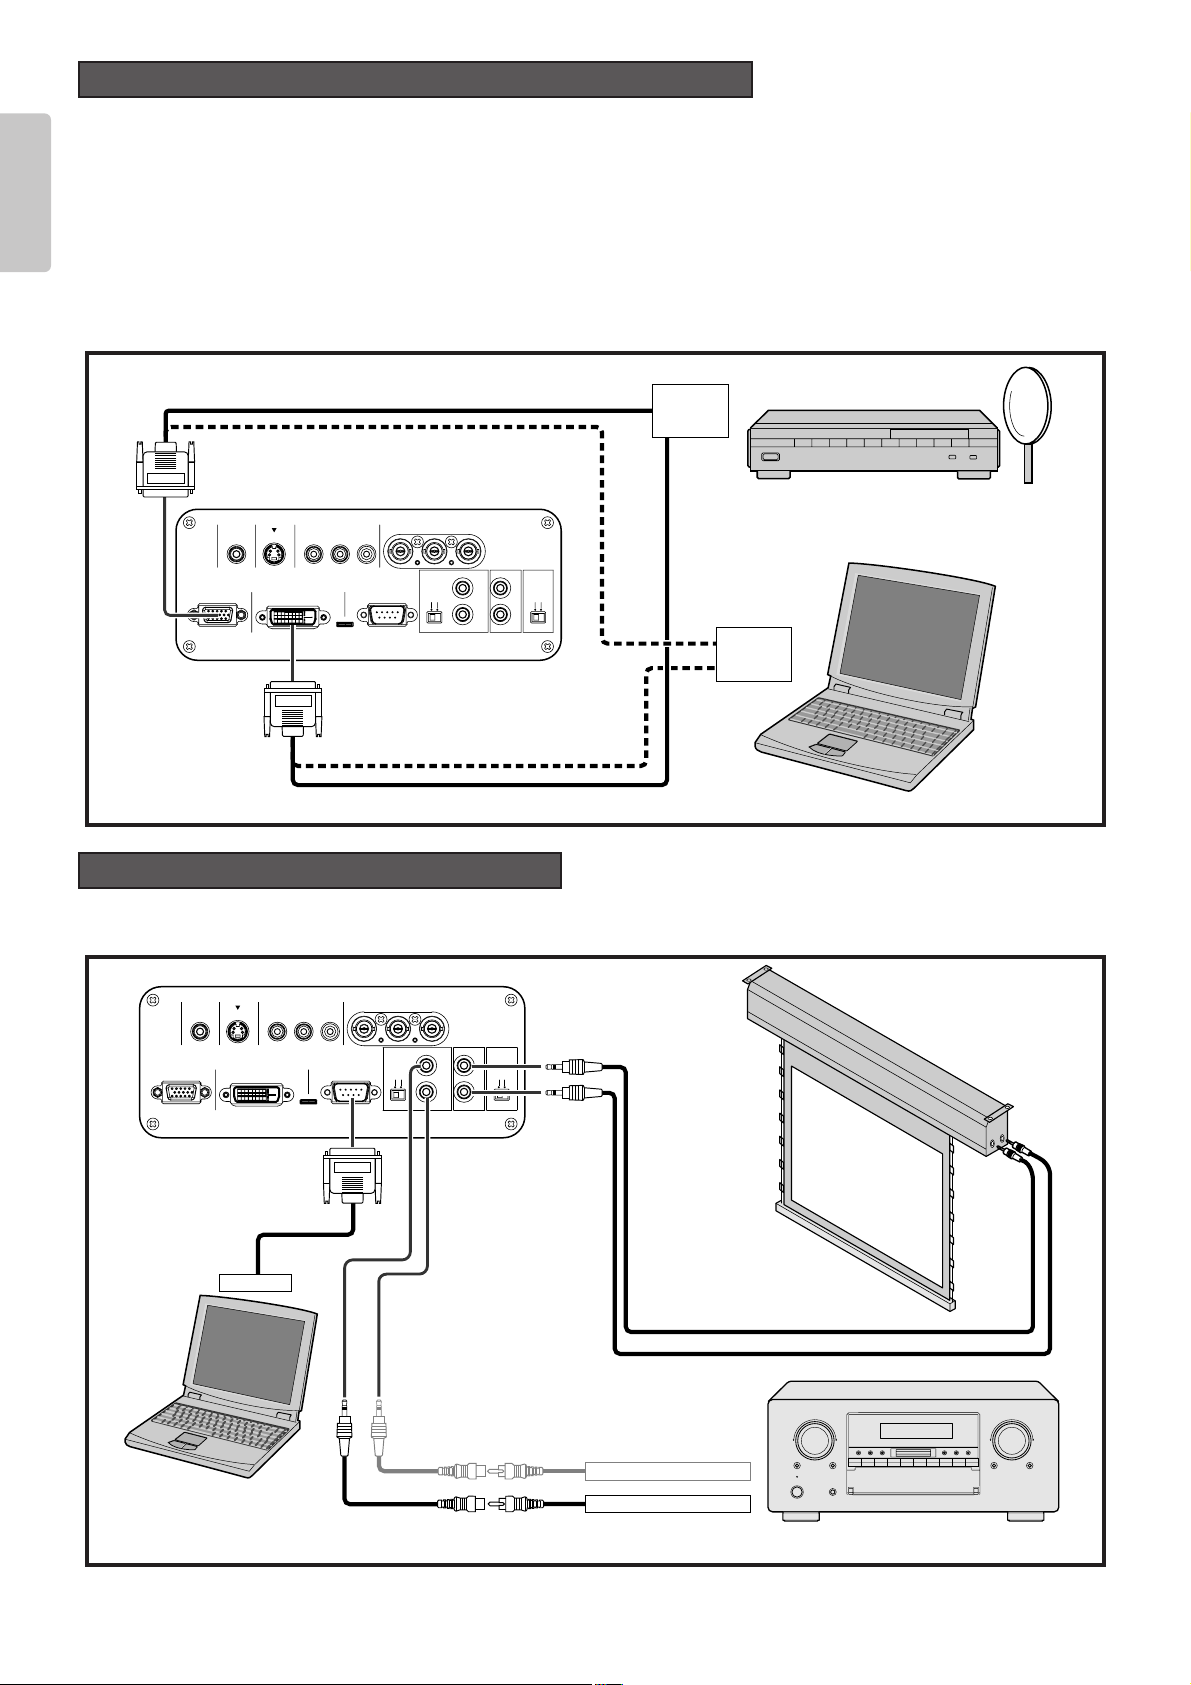
❖ When making connections be sure to:
• Turn off the projector and any connected equipment before making any connections.
• Use the proper cables for each connection. See the instruction manual of each connected device.
• Securely insert the plug into the jack to connect cables. Loose connections can lead to trouble.
❖ When disconnecting cables:
• Grab the plug and not the cable itself. Pulling on the cable can damage the cable and cause incomplete connections later on.
Connect the included AC power cable to the AC IN socket on
the projector rear and plug the other end into an electrical
outlet (100-120/220-240V AC, 50/60 Hz, 5 A or more).
Keep the ON/OFF switch in the off position until all devices
have been connected.
Note :
• Check the AC power cable is securely inserted into the
AC IN socket on the projector rear.
• Before connecting the AC power cable, attach a grounding
wire to the plug end. Before detaching the grounding wire,
always unplug the AC power cable from its electrical outlet.
This projector can connect to VCR, DVD player and other type of video equipment.
Connecting a video equipment to the S-VIDEO IN and VIDEO IN jacks
1. Connect one end of an S-video cable to the S-VIDEO IN jack on the projector rear. Similarly, connect one end of a video cable
to the VIDEO IN jack on the projector rear.
2. Connect the other end of the S-video cable to the S-video output jack on the VCR. Similarly, connect the other end of the
video cable to the video output jack on the VCR.
Connecting a DVD player to the COMPONENT VIDEO IN 1 or 2 jack
(Devices can be connected to both terminals at the same time.)
1. Connect the pin-jacks on one end of the component video cable to the COMPONENT VIDEO IN 1 or 2 jack on the projector rear.
2. Connect the pin-jacks on the other end of the cable to the corresponding jacks on the DVD player.
FL OFF
STANDBY
FL OFF
STANDBY
RS-232CDVI-D INRGB IN
EXT.INT.
IN
OUT
OFF ON
1
2
TRIG. LIGHT
REMOTE
VIDEO IN
S-VIDEO IN COMPONENT VIDEO IN 1 COMPONENT VIDEO IN 2
YP
B/CBPR/CR
YPB/CBPR/C
R
S-VIDEO OUT
VIDEO OUT
COMPONENT VIDEO OUT
COMPONENT VIDEO OUT
Connecting to Video Equipment
Connecting the AC Power Cable
CONNECTIONS
Component cable
(commercially available)
DVD
VCR
S-video cable (commercially available)
Video cable (commercially available)
DVD
Component cable
(commercially available)
Page 20
16
ENGLISH
You can connect this projector to an HD-Video or PC using the RGB IN jack as well as to a satellite, cable tuner or PC using the
DVI-D input jack.
1. Connect one end of an RGB cable (or DVI-D cable) to the RGB IN jack (or DVI-D IN jack) on the projector rear.
2. Connect the other end of the cable to the RGB output jack of the HD-Video or PC (or the DVI-D output jack of the satellite,
cable tuner or PC).
Note : To project images from a device connected to the DVI-D jack, do as follows. The images can be distorted if you do not
follow the procedure. For details on DVI-D jack of the connected device, see the instruction manual of that device.
1. Turn on power to the projector. (
☞
pg. 17)
2. Set the Input signal of the projector to AUX (DVI-D IN). (
☞
pg. 21)
3. Turn on power to the device (i.e. DVD player) connected to the projector’s DVI-D jack.
You can control an entire home theater system using a PC and Marantz receiver equipment.
To install the below system, contact your nearest Marantz Authorized Dealer or Service Center.
RS-232CDVI-D INRGB IN
EXT.INT.
IN
OUT
OFF ON
1
2
TRIG. LIGHT
REMOTE
VIDEO IN
S-VIDEO IN COMPONENT VIDEO IN 1 COMPONENT VIDEO IN 2
YP
B/CBPR/CR
YPB/CBPR/C
R
REMOTE CONTROL IN
REMOTE CONTROL OUT
RS-232C
Connecting to a Home Theater System
RS-232CDVI-D INRGB IN
EXT.INT.
IN
OUT
OFF ON
1
2
TRIG. LIGHT
REMOTE
VIDEO IN
S-VIDEO IN COMPONENT VIDEO IN 1 COMPONENT VIDEO IN 2
YP
B/CBPR/CR
YPB/CBPR/C
R
Connecting to an HD-Video, Satellite, Cable Tuner or PC
RGB (D-Sub monitor) cable
(commercially available)
HD-Video / Satellite
/ Cable Tuner
Monitor output
IBM VGA or
Compatible PC
RGB OUT
or
DVI-D out
RGB OUT
or
DVI-D out
DVI-D cable (commercially available)
RS-232C cable
(straight type,
commercially available)
External Controller
Screen
3.5mm Mini Plug (Mono)
(commercially available)
Control Adapter cable
(commercially available)
Receiver equipment
Control Adapter cable
(supplied)
Page 21
17
ENGLISH
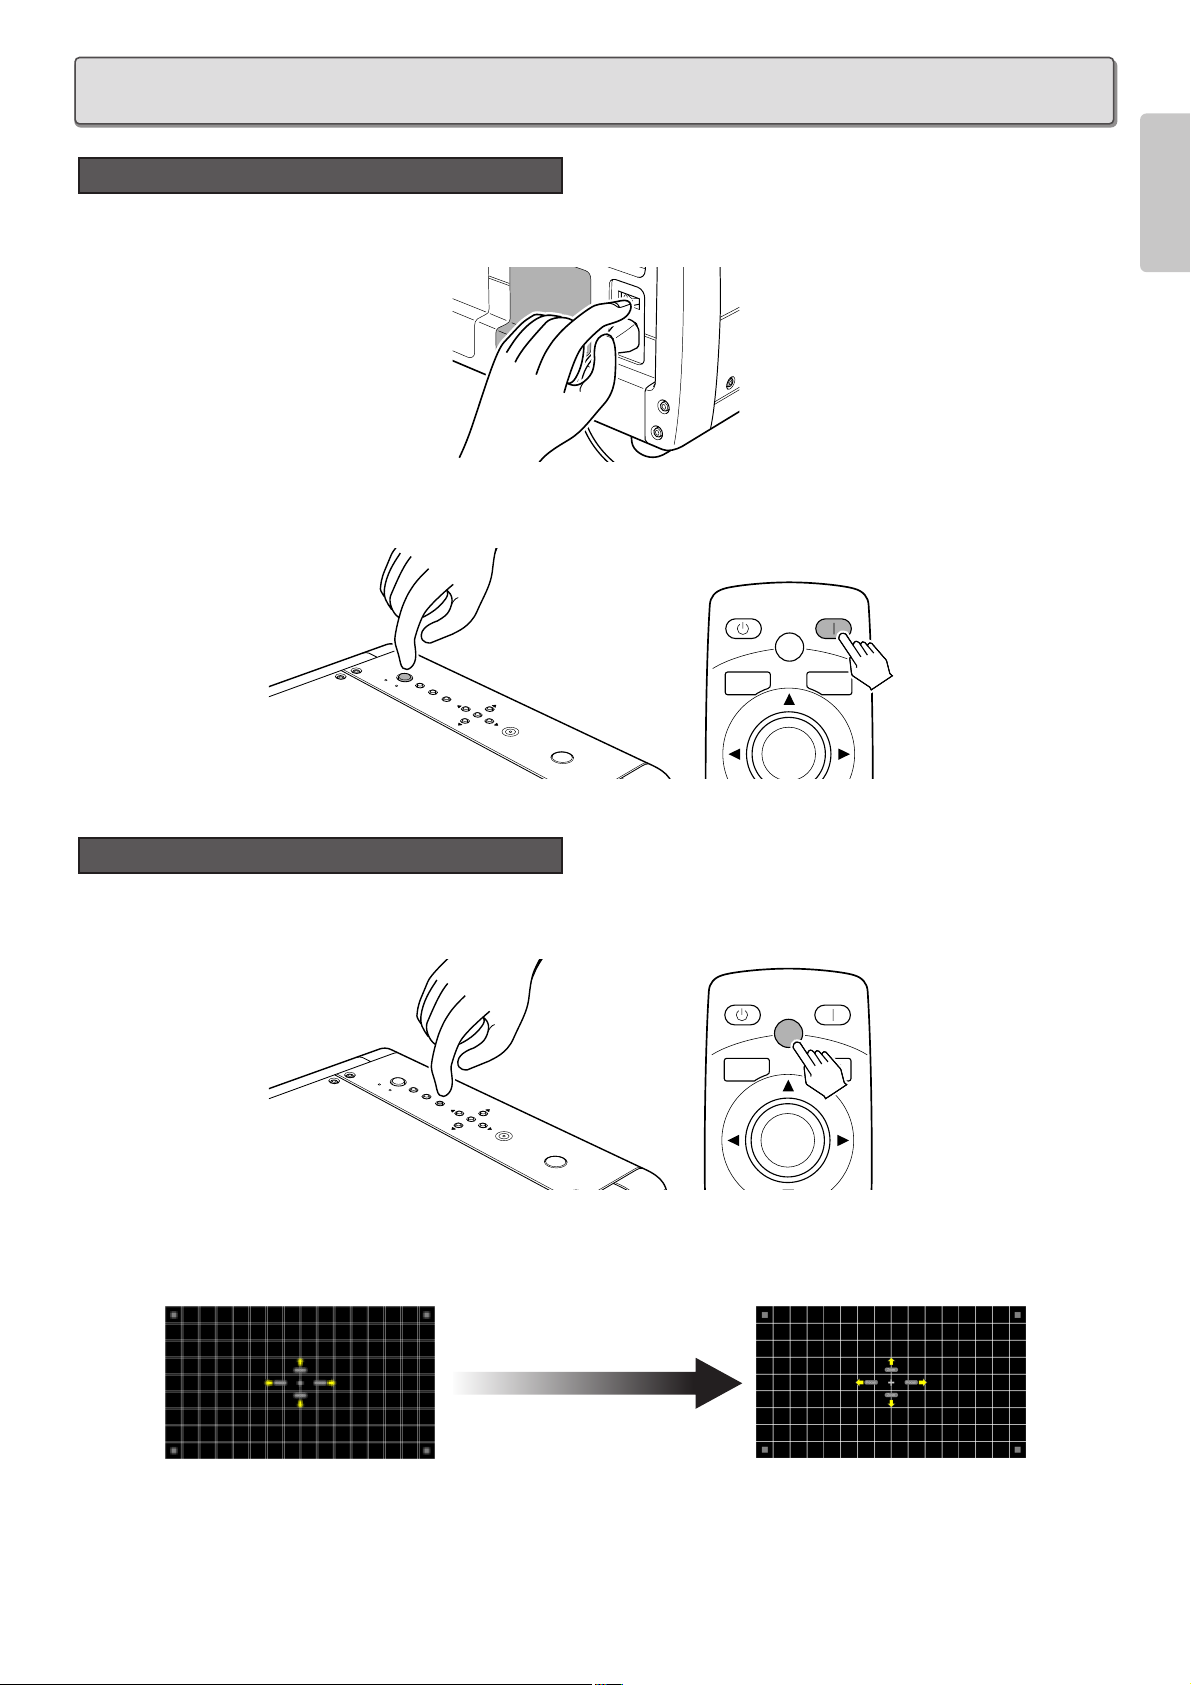
1. Connect the included AC power cable. (
☞
pg. 15)
2. Set the ON/OFF switch on the projector rear in the on position. The STANDBY indicator on the projector will light up.
3. Press the POWER ON button on the remote controller or the POWER button on the projector.
The POWER ON indicator on the projector will light up.
You can adjust the focus and projected image size using the focus pattern.
1. Press the PATTERN button to project the focus pattern on the screen.
2. To focus the pattern, press the 1 / 2 buttons on the remote controller or projector. Tapping the buttons fine-adjusts the focus.
Holding the buttons down quickly changes the focus. Adjust the focus so that the focus pattern appears its sharpest, as shown
below.
3. To adjust the size of the projected image, press the 3 / 4 buttons on the remote controller or projector. Tapping the buttons
fine-adjusts the size. Holding the buttons down quickly changes the size.
4. Press the PATTERN button again to cancel the focus pattern. This completes focusing and zooming.
Focusing and Zooming
Activating the Power
INITIAL SETTING
STANDBY POWER ON
PATTERN
PATT.
R
E
ON
W
O
P
MENU
STANDBY
INPUT
PATTERN
R
E
T
N
E
MENU
V-MUTE
ENTER
STANDBY POWER ON
PATTERN
PATT.
R
E
ON
W
O
P
MENU
STANDBY
INPUT
PATTERN
R
E
T
N
E
MENU V-MUTE
ENTER
Page 22

18
ENGLISH
You can position the projected image on the screen using the “Lens shift” feature in the menu (OSD).
(For an explanation of this feature, see “Configuration”
☞
pg. 32.)
First, project an image on the screen. (If you haven’t an Input signal, display the focus pattern.)
1. Press the MENU button on the remote controller or projector to display the menu.
2. Select “Config” using the 3 / 4 buttons, then press the 2 button.
3. Select “Lens shift” using the 3 / 4 buttons, then press the 2 button.
(If you haven’t an Input signal at this point, display the focus pattern.)
4. Position the projected image vertically on the screen using the 3 / 4 buttons on the remote controller or projector.
5. Position the projected image horizontally on the screen using the 1 / 2 buttons on the remote controller or projector.
MENUINPUTPATTERN
ENTER
POWER
STANDBY ON
W
A
R
N
I
N
G
W
A
R
N
I
N
G
W
A
R
N
I
N
G
W
A
R
N
I
N
G
W
A
R
N
I
N
G
W
A
R
N
I
N
G
PATT
Positioning the Projected Image
Upward
Side view
Downward
To right
To left
Top view
.
1
2, 3, 4, 5
MENU V-MUTE
1
2, 3,
N
O
POWER
Y
B
D
N
A
MENU
T
S
INPUT
PATTERN
R
E
T
N
E
ENTER
4, 5
INPUT ASPECT
Page 23

19
ENGLISH
If the projected image appears trapezoidal in shape, you can correct it using the “Keystone V” and “Keystone H” features in the
menu (OSD). (For an explanation of this feature, see “Display”
☞
pg. 31.)
1. Press the MENU button on the remote controller or projector to display the menu.
2. Select “Display” using the 3 / 4 buttons, then press the 2 button.
3. Select “Keystone V” or “Keystone H” using the 3 / 4 buttons, then press the 2 button.
4. Correct in the vertical or horizontal distortion using the 1 / 2 buttons on the remote controller or projector.
- Vertical keystone correction - - Horizontal keystone correction -
Note : Horizontal keystone is best corrected when the projector is installed on a flat surface and the image is shifted to the
maximum height using the “Lens shift” feature in the menu.
M
E
N
U
I
N
P
U
T
P
A
T
T
E
R
N
E
N
T
E
R
P
O
W
E
R
S
T
A
N
D
B
Y
O
N
W
A
R
N
I
N
G
W
A
R
N
I
N
G
W
A
R
N
I
N
G
W
A
R
N
I
N
G
W
A
R
N
I
N
G
W
A
R
N
I
N
G
M
E
N
U
I
N
P
U
T
P
A
T
T
E
R
N
E
N
T
E
R
P
O
W
E
R
S
T
A
N
D
B
Y
O
N
W
A
R
N
I
N
G
W
A
R
N
I
N
G
W
A
R
N
I
N
G
W
A
R
N
I
N
G
W
A
R
N
I
N
G
W
A
R
N
I
N
G
PATT
Keystone Correction
.
1
N
O
POWER
Y
B
D
N
A
T
S
MENU
INPUT
2, 3, 4
PATTERN
R
E
T
N
E
MENU V-MUTE
ENTER
1
2, 3, 4
INPUT ASPECT
Page 24

20
ENGLISH
1. Connect the included AC power cable. (
☞
pg. 15)
2. Set the ON/OFF switch in the on position. The STANDBY indicator will light up.
3. Press the POWER ON button on the remote controller or the POWER button on the projector. The POWER ON indicator on
the projector will light up.
1. Press the STANDBY button on the remote controller or the POWER button on the projector.
2. The fan will continue running for about 1 min to internally cool the projector. In the meantime, the POWER ON indicator on the
projector will flash blue and the buttons on the projector and the remote controller will be irresponsive to touch. After the fan
stops, the POWER ON indicator stops flashing and the STANDBY indicator lights up to indicate that the projector is on
standby.
3. Set the ON/OFF switch in the off position. The STANDBY indicator will go out.
Note :
• Until the projector goes on standby, the cooling fan turns to internally cool the project. Do not unplug the AC power cable until
you set the ON/OFF switch in the off position in the above procedure. Shutting off power prematurely can damage the projector.
• While the projector is on standby, power is not completely off. If not planning to use the projector for a long period of time, set
the ON/OFF switch in the off position and unplug the AC power cable from its electrical outlet.
• If the WARNING indicator lights up or flashes red, check the fan has stopped, set the ON/OFF switch in the off position and
unplug the AC power cable from its electrical outlet.
• Immediately after shutting off the power, power cannot be reactivated from either the POWER button on the projector or the
POWER ON button on the remote controller. Check the projector is on standby and then press the POWER button on the
projector or the POWER ON button on the remote controller.
Shutting Power OFF
Activating the Power
BASIC OPERATIONS
STANDBY POWER ON
PATTERN
PATT.
R
E
ON
W
O
P
ENU
M
STANDBY
INPUT
PATTERN
R
E
T
N
E
MENU
V-MUTE
ENTER
STANDBY POWER ON
PATTERN
PATT.
R
E
ON
W
O
P
MENU
STANDBY
INPUT
PATTERN
R
E
T
N
E
MENU V-MUTE
ENTER
Page 25

21
ENGLISH
You can select the Input signal from amongst the devices connected to the projector.
Every time the INPUT button on the projector or the remote controller is pressed, the Input signal rotates in the order of
COMPONENT 1 ➔COMPONENT 2 ➔S-VIDEO ➔VIDEO ➔RGB ➔AUX. The Input signal can also be switched to a specific
source by pressing the COMP.1, COMP.2, S-VIDEO, VIDEO, RGB or AUX button.
You can set the aspect ratio of the projected image to any of four modes, using the remote controller.
Every time the ASPECT button on the remote controller is pressed, the aspect mode rotates in the order of Full ➔Normal ➔Zoom
➔
Through. The aspect ratio can also be switched to a specific mode by pressing the FULL, NORMAL, ZOOM or THROUGH
button. And the aspect mode can also be selected from the menu. (
☞
pg. 29)
To set the aspect mode for your screen, see the next page.
Select an aspect mode.
Selecting Aspect Mode
COMP.1
INPUT ASPECT
COMP.2
S-VIDEO
VIDEO
RGB
AUX
INPUT1
THEATER
STD
DYNA.
USER
CINEMA
MODE
FULL
NORMAL
ZOOM
THROUGH
INFO
ASPECT
PATTERN
E
N
T
E
R
INPUT
MENU
P
O
W
E
R
STANDBY
ON
Select an Input signal.
Selecting an Input signal
INPUT ASPECT
INPUT1
MODE
THEATER
STD
DYNA.
USER
CINEMA
ASPECT
FULL
NORMAL
ZOOM
THROUGH
INFO
COMP.1
COMP.2
S-VIDEO
VIDEO
RGB
Page 26
22
ENGLISH
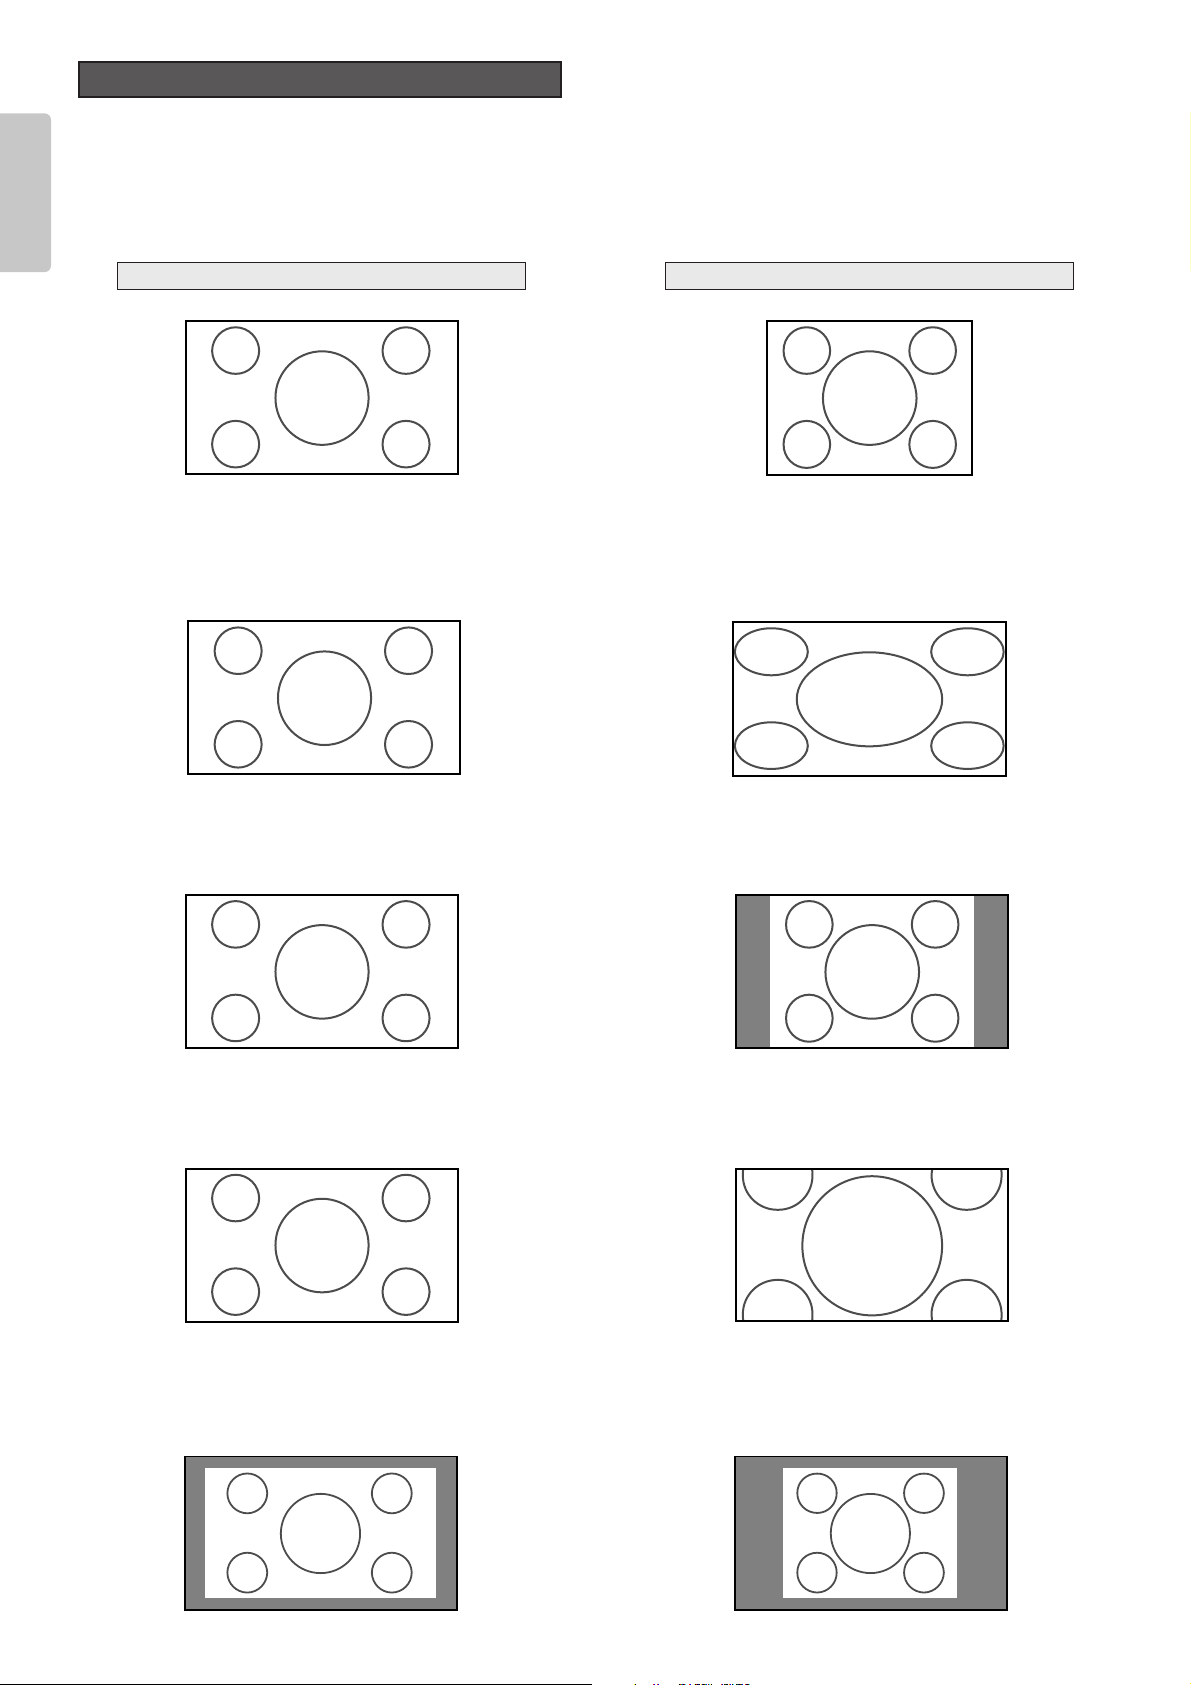
• To project a video source of a 4:3 aspect ratio, use either the Full, Normal or Zoom mode.
• To project a video source of a 16:9 aspect ratio such as 1080i, 1035i or 720p, use the Full mode.
• To project squeezed video sources, use the Full mode.
See “Setting” (☞pg. 29).
When Using a 16:9 Screen
❖ Original image
❖ Full mode
A wide image of a 16:9 aspect ratio is projected in the proper
vertical-to-horizontal proportions.
❖ Normal mode
❖ Zoom mode
A 4:3 image appears horizontally elongated when projected.
A 4:3 image is projected in the proper vertical-to-horizontal
proportions.
The image is enlarged to the maximum height and width of
the screen, regardless of the aspect ratio of the 4:3 image.
4:3 Video Source16:9 Video Source
❖ Through mode
The image is displayed at the same resolution as an RGB/Video signal of 720 or less scanning lines.
Page 27
23
ENGLISH
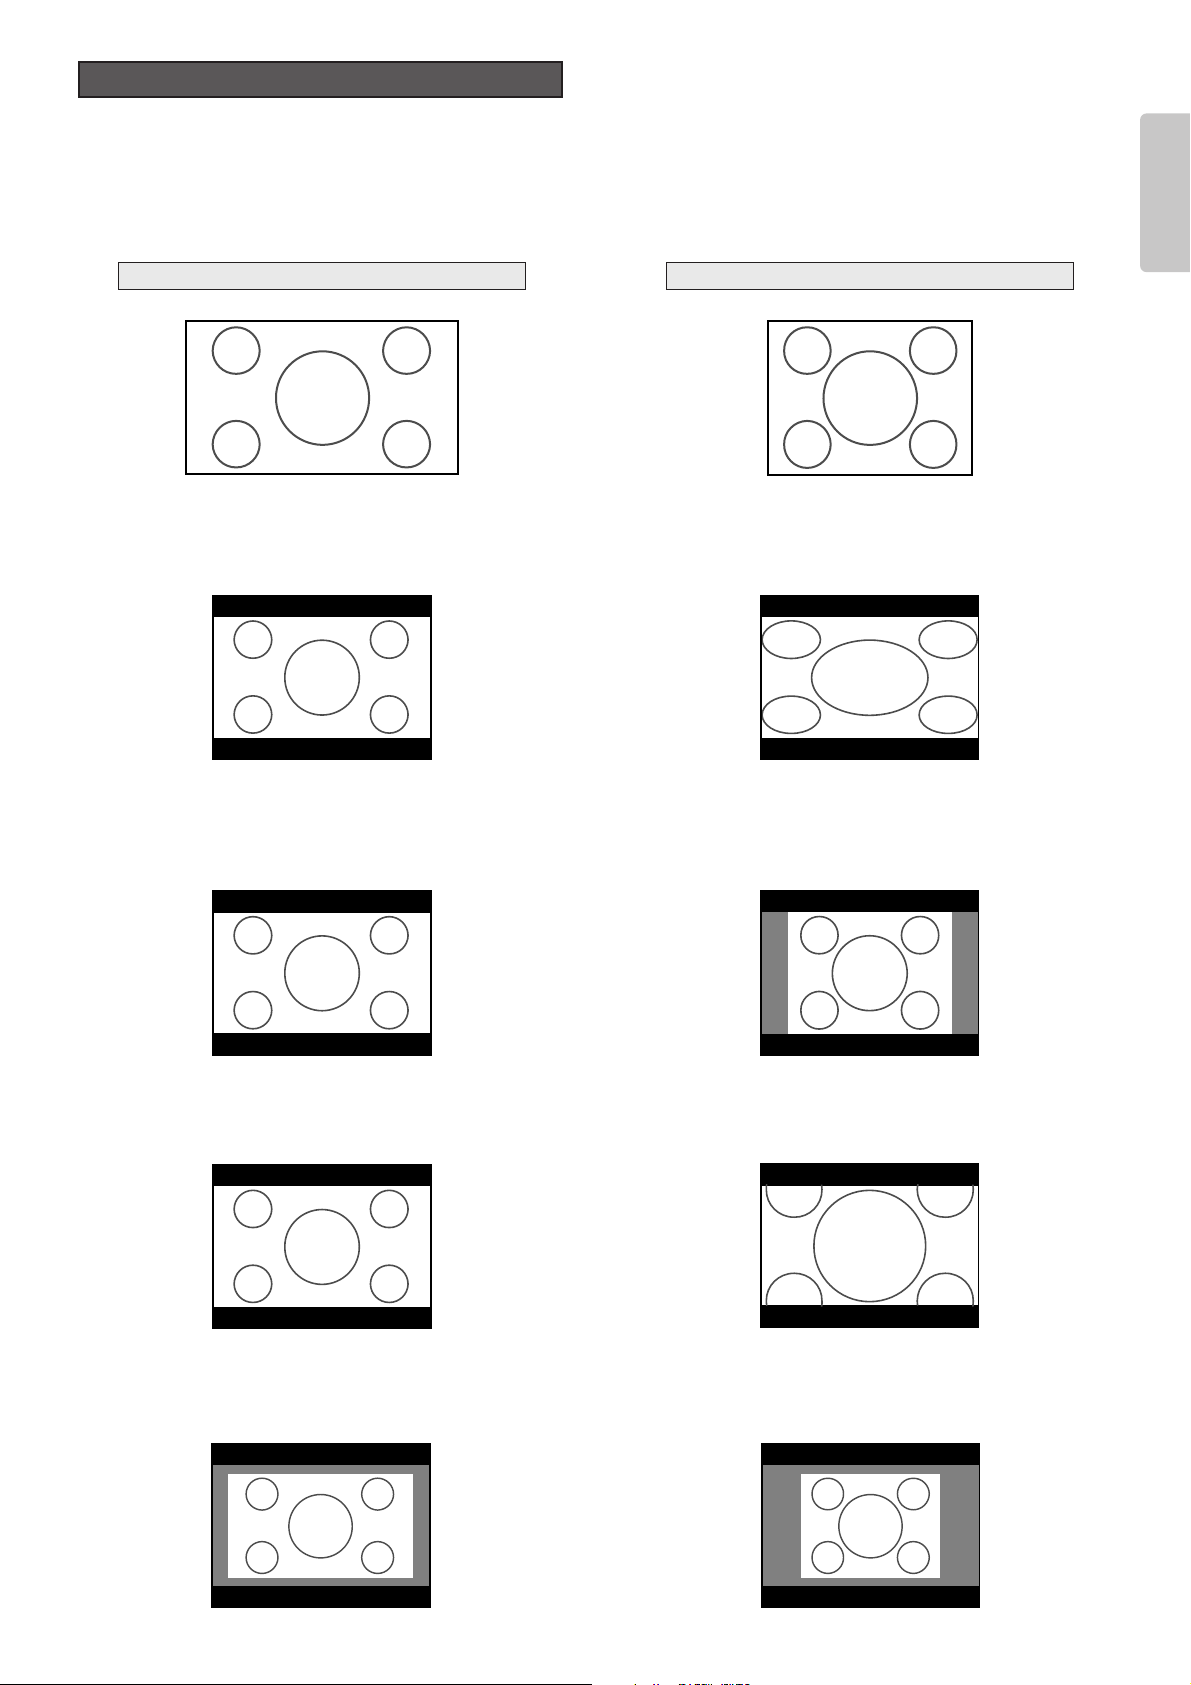
• To project a video source of a 4:3 aspect ratio, use either the Full, Normal or Zoom mode.
• To project a video source of a 16:9 aspect ratio such as 1080i, 1035i or 720p, use the Full mode.
• To project squeezed video sources, use the Full mode.
See “Setting” (☞pg. 29).
When Using a 4:3 Screen
❖ Original image
❖ Full mode
A wide image of a 16:9 aspect ratio is projected in the proper
vertical-to-horizontal proportions.
❖ Normal mode
❖ Zoom mode
A 4:3 image appears horizontally elongated when projected.
A 4:3 image is projected in the proper vertical-to-horizontal
proportions.
The image is enlarged to the maximum height and width of
the screen, regardless of the aspect ratio of the 4:3 image.
4:3 Video Source16:9 Video Source
❖ Through mode
The image is displayed at the same resolution as an RGB/Video signal of 720 or less scanning lines.
Page 28

24
ENGLISH
Menu Structure
* : The menu item does not appear or adjustment is not possible with some
input signals and settings.
MENU OPERATIONS
During DVI input, “NORMAL” or “EXPAND” is shown.
Main Menu
Picture Adjust
*
pg. 26
Setting
pg. 29
System
pg. 30
Item
Contrast
Brightness 0 100
Color 0 100
*
Sharpness 0 31
*
Tint R50 G50
*
Noise Reduction 0 63
*
Color Temp. (Temperature) 1 5
*
Fine Menu
Lamp mode High / Low
High Bright On / Off
Aspect
OSD Position
VCR Mode On / Off
*
Cinema Auto / Off
*
Black Setup 0IRE / 7.5IRE
*
0 100
Full
Normal
Through
Zoom
16:9
4:3
Through
Component 1
Component 2
S-Video System Auto
Video System
RGB System
DVI System RGB
Auto
NTSC
PAL
480p
540p
576p
720p
1035i
1080i
Auto
NTSC
PAL
480p
540p
576p
720p
1035i
1080i
NTSC
PAL
SECAM
Auto
NTSC
PAL
SECAM
Auto
NTSC
PAL
480p
540p
576p
720p
1035i
1080i
Y PB PR
Y CB CR
Fine Menu
Luminance
*
Chrominance
*
Sub Control
Miscellaneous
Main Menu
Display
*
pg. 31
Config (Configuration)
pg. 32
Trigger 2 Full On / Off
pg. 33
Preset Mode Theater/ Standard/
*
Keystone V (Vertical)
Keystone H (Horizontal)
Auto Adjust
*
Picture Shift V (Vertical)
*
Picture Shift H (Horizontal)
*
Size V (Vertical)
*
Size H (Horizontal)
*
Phase
*
Auto Power Off
Installation Front / F. Ceiling
Language
Focus / Zoom
Lens Shift
Color Temp. Calibration Yes / No
*
Reset Lamp Life Yes / No
Reset All Yes / No
Normal On / Off
Through On / Off
Zoom On / Off
H Detail Gain
H Detail Threshold
H Edge Gain
H Edge Threshold
V Detail Gain
V Detail Threshold
V Edge Gain
V Edge Threshold
H Edge Gain
H Edge Threshold
V Edge Gain
Enhancement
*
Delay
Contrast Red
Contrast Green
Contrast Blue
Brightness Red
Brightness Green
Brightness Blue
Clamp Position
*
Clamp Width
*
DCDi
*
FRC
CCS
*
Sharpness Filter
*
Item
pg. 34
Index
031
031
031
031
031
031
031
031
031
031
031
031
0+3–3
0 255
0 255
0 255
0 255
0 255
0 255
-128 127
-128 127
On / Off
Auto / On
On / Off
04
030–30
030–30
Yes / No
050–50
050–50
050–50
050–50
031
Enable / Disable
Rear / R. Ceiling
English
Français
Deutsch
Español
Italiano
Português
Dynamic/ User
1 / 2 / 3 / Default
Page 29

This projector uses menus to make setting and adjustment easy.
1. Press the MENU button. The MENU screen will appear on the screen.
2. Use the 3 and 4 buttons to select a main menu (Picture Adjust, Setting, System, Display, Config, Trigger 2, Preset) and
press the
2 button.
3. Use the 3 and 4 buttons to select a menu item and press the 2 button.
4. Use the 3, 4, 1 and 2 buttons to make the setting or adjustment of the selected item.
• The current setting or adjustment level of all items is displayed along the right side of each the menu item.
5. Press the MENU button again to close the menu. The MENU screen will go out.
❖ Picture Mode and Memory
This projector offers 4 pictures modes: Theater, Standard, Dynamic and User. Select them by pressing the THEATER, STD,
DYNA. and USER buttons on the remote controller. Moreover, each of these picture modes has 3 indexes for saving picture
quality adjustments.
Picture mode Index
Theater 1, 2, 3, Default
Standard 1, 2, 3, Default
Dynamic 1, 2, 3, Default
User 1, 2, 3
As suggested by the above table, adjust picture quality to your liking and save the adjustments in indexes 1, 2 and 3.
See “Preset” (
☞
pg. 34)
PATT
How to Operate Menus
25
ENGLISH
Main menu
Menu item
Setting or adjustment level
Menu Standard 1
Picture Adjust
Setting
System
Display
Config
Trigger 2
Preset
Contrast
Brightness
Color
Sharpness
Tint
Noise Reduction
Color Temp.
Fine Menu
50
44
58
7
0
0
3
.
1, 5
2, 3, 4
N
O
POWER
Y
B
D
N
A
MENU
T
S
INPUT
PATTERN
R
E
T
N
E
MENU V-MUTE
ENTER
1, 5
2, 3, 4
INPUT ASPECT
Page 30

You can adjust picture quality to your liking in each of the picture modes and save those adjustments in memory.
This projector makes 3 memory indexes (1, 2 and 3) available for each picture mode.
❖ For a video signal input, the following adjustments can be made.
Note:
• Some menu items cannot be adjusted depending on the input signal.
• If default is selected as the index, picture quality cannot be adjusted. To adjust picture quality, select an index from 1 to 3.
See “Preset” (
☞
pg. 34)
❖ Contrast
❖ Color Temp. (Color Temperature)
1 : Red comes out strong. Color temperature is about 5250 K.
2 : Red is mildly strong. Color temperature is about 5800 K.
3 : Normal. Color temperature is about 6500 K.
4 : Blue is mildly strong. Color temperature is about 7500 K.
5 : Blue comes out strong. Color temperature is about 9300 K.
❖ Adjusting Picture Quality
1. Select the desired menu item and press the 2 button. An adjustment bar appears on the screen.
2. Use the 1 and 2 buttons to adjust the item.
3. Press the 3 button to enter the setting and return to menu item selection.
Picture Adjust
26
ENGLISH
Menu item
Contrast
Brightness
Color
Sharpness
Tint
Noise Reduction
Color Temp. (Color Temperature)
Adjustment range
0 100
Weak Strong
0 100
Dark Bright
0 100
Light Deep
031
Soft Sharp
R50 G50
Purple Green
063
Weak Strong
123 45
Red Blue
Menu Standard 1
Picture Adjust
Setting
System
Display
Config
Trigger 2
Preset
Contrast
Brightness
Color
Sharpness
Tint
Noise Reduction
Color Temp.
Fine Menu
50
44
58
7
0
0
3
Contrrast 50
Color Temp. 2
MENU V-MUTE
3.
ENTER
1, 2
INPUTPATTERN
ENTER
3.
1, 2
Page 31
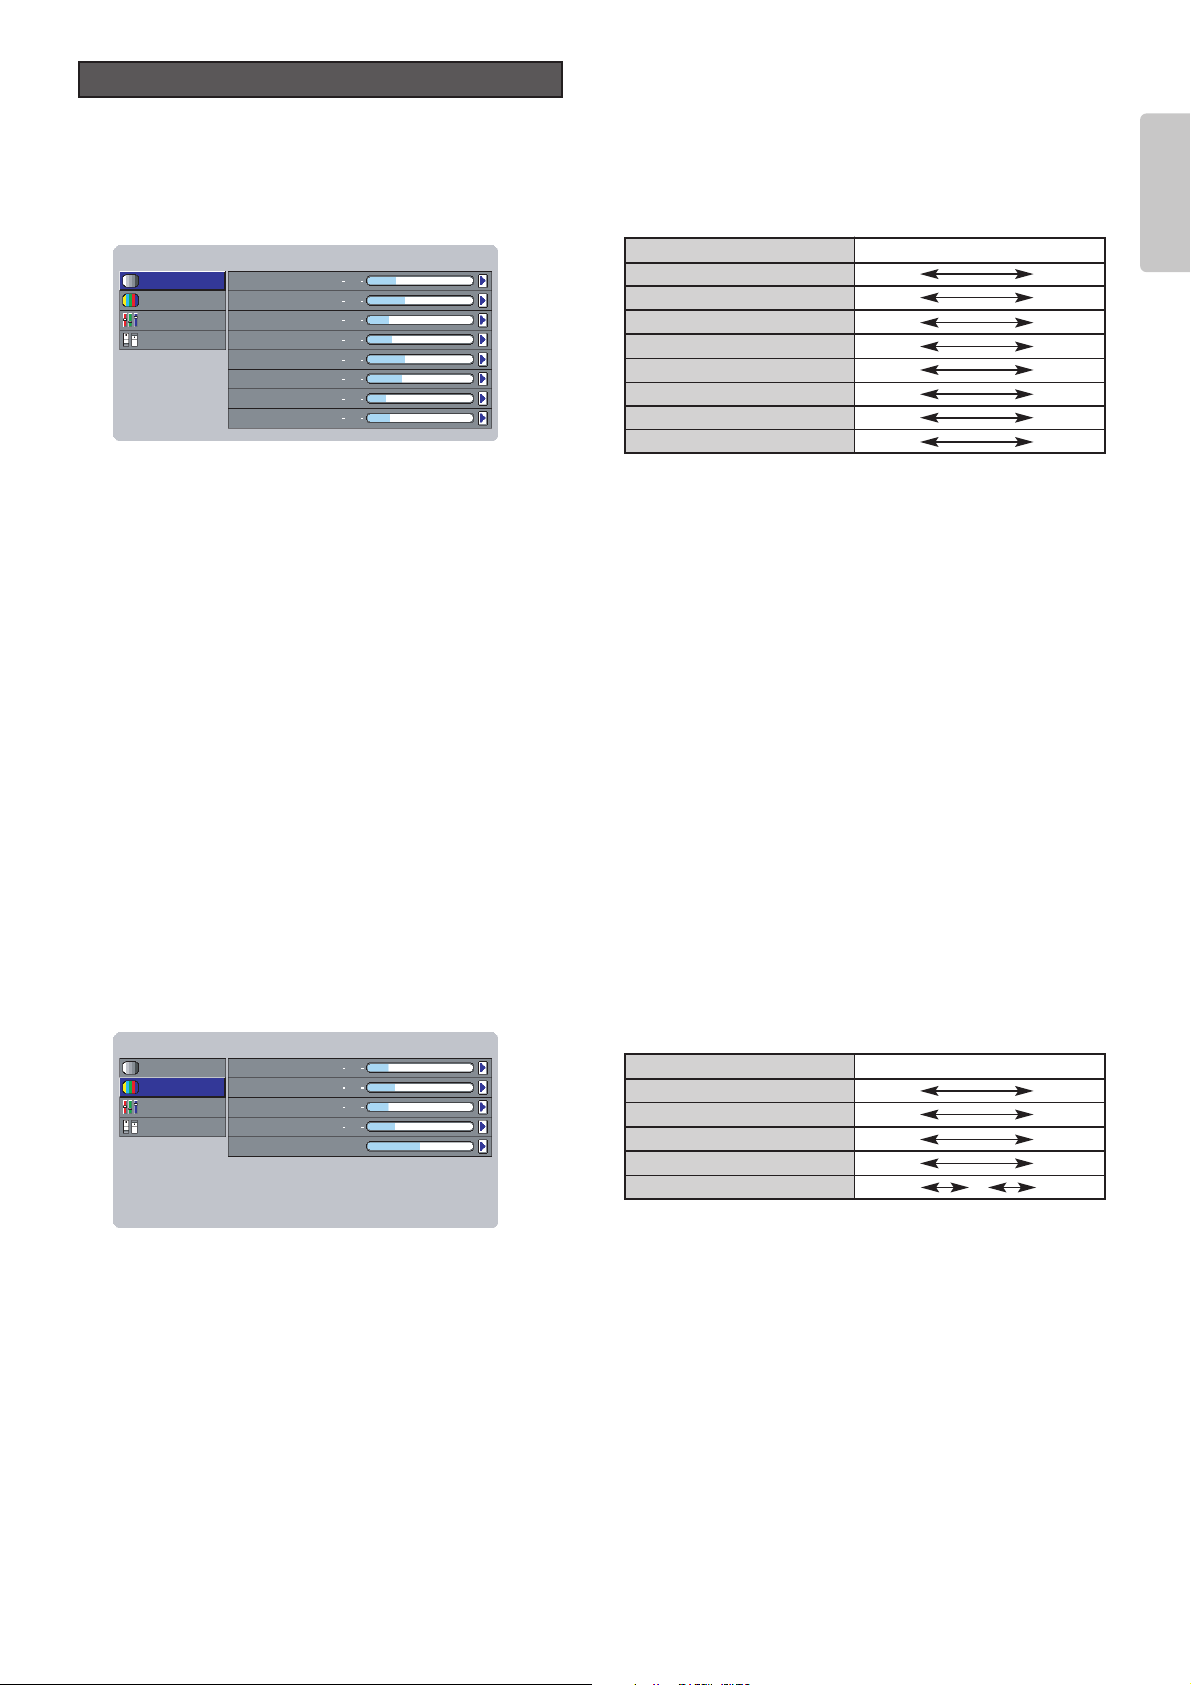
27
ENGLISH
Picture quality can be fine-adjusted from the Fine Menu.
Note : Some menu items cannot be adjusted depending on the input signal.
❖ Luminance
H Detail Gain (Horizontal Detail Processing Gain)
: Sets the degree of detail enhancement in the horizontal direction.
H Detail Threshold (Horizontal Detail processing Threshold)
: Sets the minimum luminance signal level accepted for horizontal detail gain processing.
H Edge Gain (Horizontal Large Edge Enhancement Gain)
: Sets the contour enhancement level in the horizontal direction.
H Edge Threshold (Horizontal Large Edge Enhancement Threshold)
: Sets the minimum luminance signal level accepted for processing horizontal edge gain.
V Detail Gain (Vertical Detail Processing Gain)
: Sets the degree of detail enhancement in the vertical direction.
V Detail Threshold (Vertical Detail Processing Threshold)
: Sets the minimum luminance signal level accepted for vertical detail gain processing.
V Edge Gain (Vertical Large Edge Enhancement Gain)
: Sets the contour enhancement level in the vertical direction.
V Edge Threshold (Vertical Large Edge Enhancement Threshold)
: Sets the minimum luminance signal level accepted for vertical edge gain processing.
Note : Sharpness controls overall gain. If the brightness signal is ineffective, raise the Sharpness.
❖ Chrominance
H Edge Gain (Horizontal Large Edge Enhancement Gain)
: Sets the contour enhancement gain of the color signal in the horizontal direction.
H Edge Threshold (Horizontal Large Edge Enhancement Threshold)
: Sets the minimum signal level accepted for color signal horizontal edge gain processing.
V Edge Gain (Vertical Large Edge Enhancement Gain)
: Sets the contour enhancement gain of the color signal in the vertical direction.
Enhancement (Enhancer Gain)
: Sets the overall enhancement of the color signal.
Delay
: Sets the time delay of the chrominance signal with respect to the luminance signal.
Luminance
Chrominance
Sub Control
Miscellaneous
H Edge Gain
H Edge Threshold
V Edge Gain
Enhancement
Delay
6
8
6
8
0
FineMenu Standard 1
Luminance
Chrominance
Sub Control
Miscellaneous
H Detail Gain
H Detail Threshold
H Edge Gain
H Edge Threshold
V Detail Gain
8
11
6
7
11
V Detail Threshold
V Edge Gain
V Edge Threshold
10
5
13
FineMenu Standard 1
Fine Menu
Menu item
H Detail Gain
H Detail Threshold
H Edge Gain
H Edge Threshold
V Detail Gain
V Detail Threshold
V Edge Gain
V Edge Threshold
Adjustment range
031
031
031
031
031
031
031
063
Menu item
H Edge Gain
H Edge Threshold
V Edge Gain
Enhancement
Delay
Adjustment range
031
031
031
031
– 30+ 3
Page 32
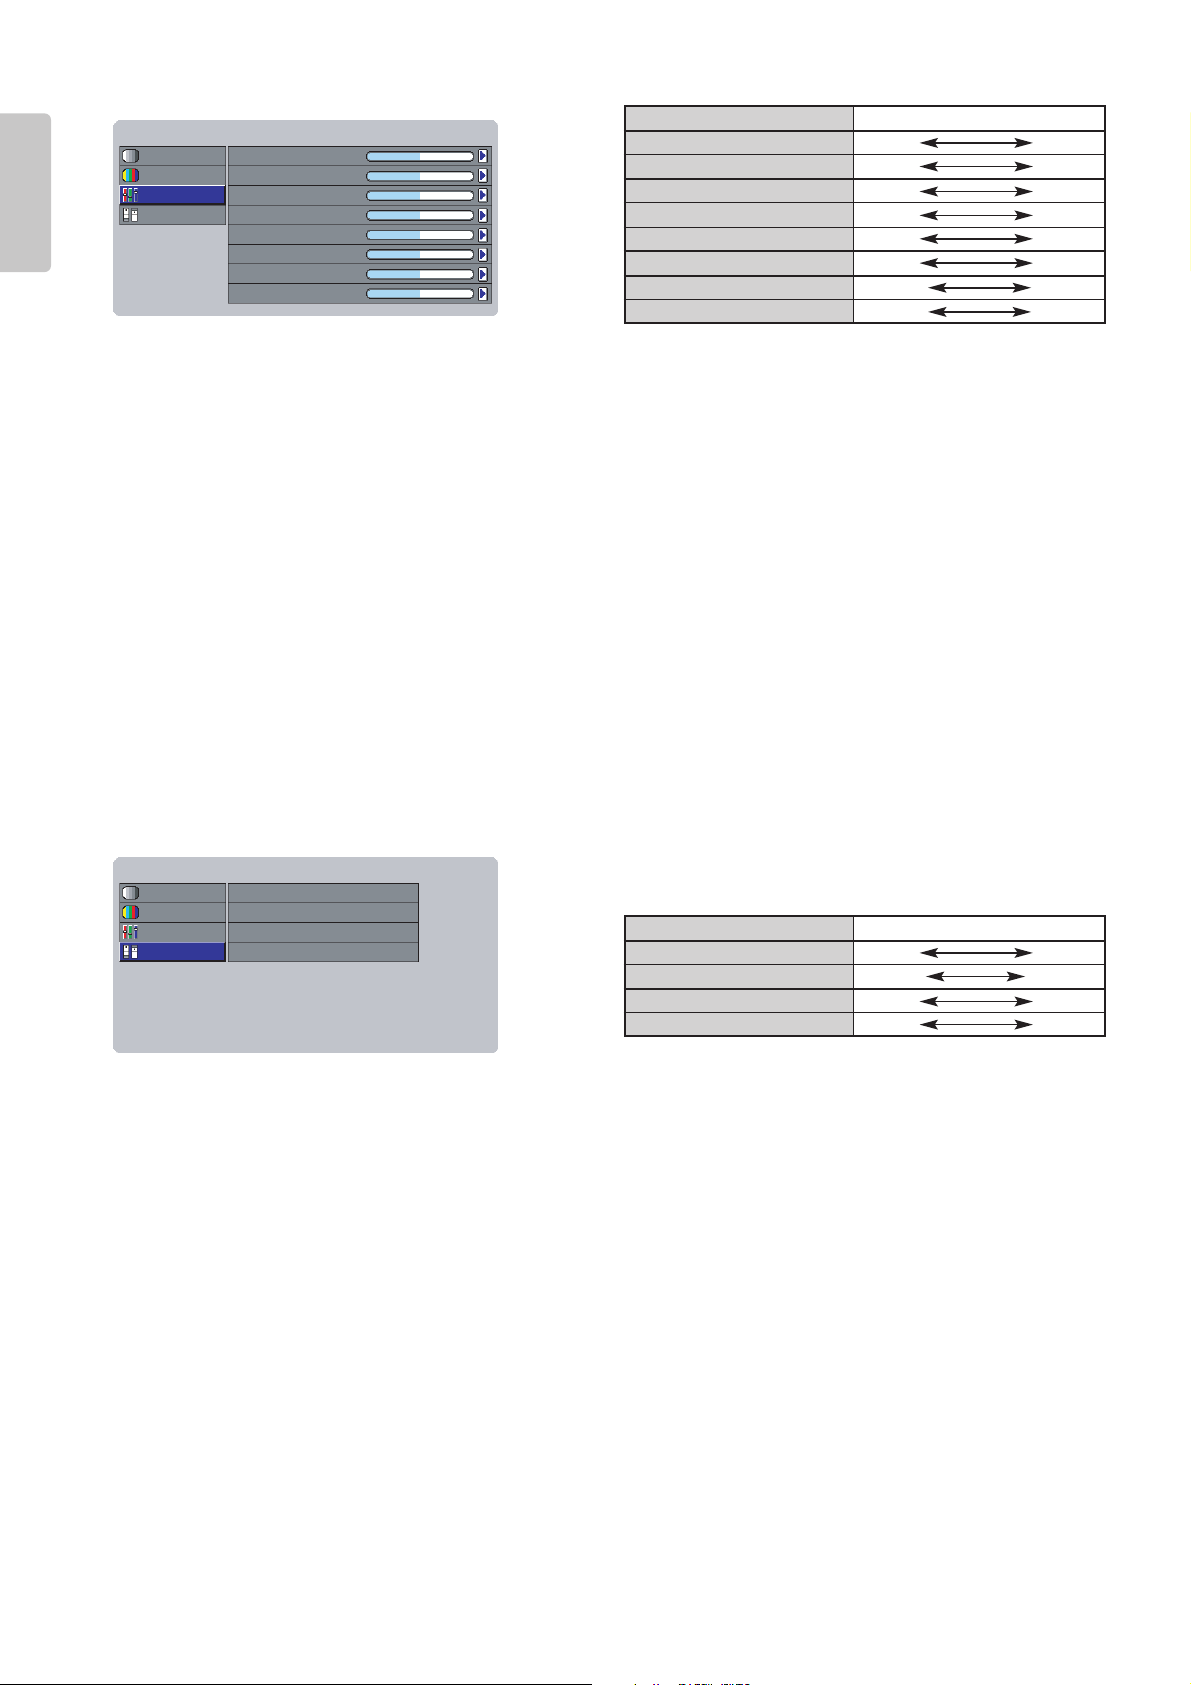
28
ENGLISH
❖ Sub Control
Contrast Red
: Sets how much red contrast comes out in images.
Contrast Green
: Sets how much green contrast comes out in images.
Contrast Blue
: Sets how much blue contrast comes out in images.
Brightness Red
: Sets how bright red comes out in images.
Brightness Green
: Sets how bright green comes out in images.
Brightness Blue
: Sets how bright blue comes out in images.
Clamp Position
: Sets the clamp position.
Clamp Width
: Sets the clamp width.
❖ Miscellaneous
DCDi
: Turns the DCDi feature on/off.
FRC (Frame Rate Conversion)
Auto : Basically disables frame rate conversion, but it is enabled by the vertical frequency of the input signal.
On : Enables frame rate conversion. All input signals are converted to 60 Hz.
CCS (Cross Color Suppression Function)
On : Enables cross color suppression.
Off : Disables cross color suppression. Use this mode for sources that do contain cross colors, such as progressive
scanning DVD players.
Sharpness Filter
: Sets the sharpness of DVI and RGB images.
Luminance
Chrominance
Sub Control
Miscellaneous
DCDi
FRC
CCS
Sharpness Filter
On
Auto
Off
2
FineMenu Standard 1
Luminance
Chrominance
Sub Control
Miscellaneous
Contrast Red
Contrast Green
Contrast Blue
Brightness Red
Brightness Green
Brightness Blue
0
0
0
0
0
0
Clamp Position
Clamp Width00
FineMenu Standard 1
Menu item
Contrast Red
Contrast Green
Contrast Blue
Brightness Red
Brightness Green
Brightness Blue
Clamp Position
Clamp Width
Adjustment range
0 255
0 255
0 255
0 255
0 255
0 255
-128 127
-128 127
Menu item
DCDi
FRC
CCS
Sharpness Filter
Adjustment range
On Off
Auto On
On Off
04
Page 33

You can make the following settings.
Lamp Mode High / Low
High Bright On, Off
High Bright On : Display brightest image.
Aspect Full, Normal, Zoom, Through
OSD Position 16:9, 4:3, Through
VCR Mode On, Off
Cinema Auto, Off
Cinema mode: 2-3 pulldown for NTSC, 2-2
for PAL
Black Setup 0IRE, 7.5IRE
/NORMAL, EXPAND (For DVI input)
Adjusts black level to the source.
– OSD Position
You can select from three positions: 16:9, 4:3 and Through.
– VCR Mode
On : Stabilizes the picture. Use to play back video or input TV signals of weak electromagnetic waves if the image
is unstable when the mode is off.
Off : Normally use this mode.
❖ How to Operate the Setting Menu
1. Select the desired menu item and press the 2 button.
The setting item will appear on the screen.
2. Use the 3 and 4 buttons to set the item.
3. Press the 1 button to enter the setting and return to menu item selection.
OSD position for ThroughOSD position for 4:3OSD position for 16:9
Picture Adjust
Menu
Standard 1
Setting
Display
System
Config
Trigger 2
Preset
Contrast
Brightness
Coior
Sharpness
Tint
Noise Reduction
Color Temp.
Fine Menu
50
44
58
7
0
0
3
Picture Adjust
Menu
Standard 1
Setting
Display
System
Config
Trigger 2
Preset
Contrast
Brightness
Coior
Sharpness
Tint
Noise Reduction
Color Temp.
Fine Menu
50
44
58
7
0
0
3
Picture Adjust
Menu
Standard 1
Setting
Display
System
Config
Trigger 2
Preset
Contrast
Brightness
Coior
Sharpness
Tint
Noise Reduction
Color Temp.
Fine Menu
50
44
58
7
0
0
3
Picture Adjust
Setting
System
Display
Config
Trigger 2
Preset
Lamp Mode
Aspect
OSD Position
VCR Mode
Cinema
Black Setup
High
Full
High Bright Off
16:9
Off
Auto
0 IRE
Menu Standard 1
Setting
29
ENGLISH
2
ENTER
1,3
MENU V-MUTE
INPUTPATTERN
ENTER
INPUT ASPECT
2.
1, 3
Page 34
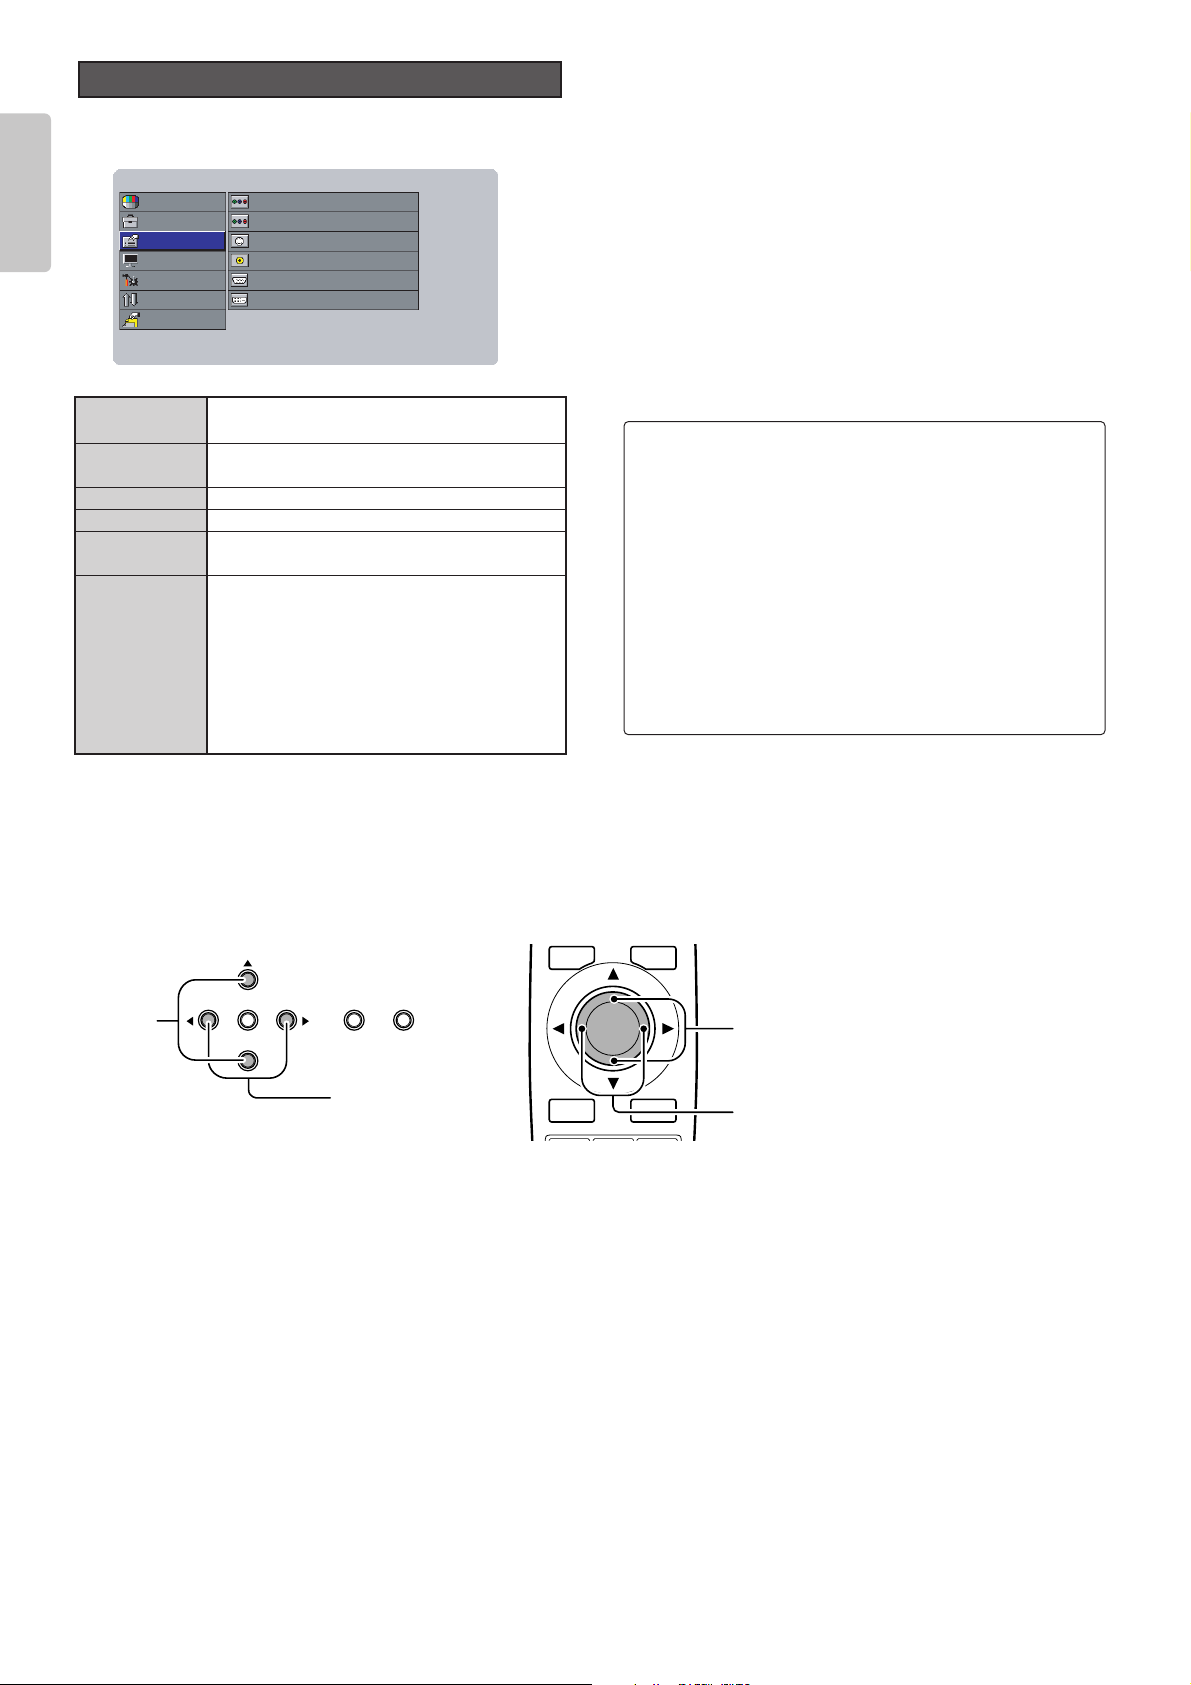
You can make the following settings.
Component 1 Auto, NTSC, PAL, 480p, 540p, 576p,
720p, 1035i, 1080i
Component 2 Auto, NTSC, PAL, 480p, 540p, 576p,
720p, 1035i, 1080i
S-Video Auto, NTSC, PAL, SECAM
Video Auto, NTSC, PAL, SECAM
RGB Auto, NTSC, PAL, 480p, 540p, 576p,
720p, 1035i, 1080i
DVI RGB, YPBPR, YCBC
R
Sets the color space conversion for DVI
input.
RGB: Does not convert color space.
YP
BPR
: Suitable for high definition TV
signals such as 720p and 1080i.
YC
BCR
: Suitable for signals such as 480p
and 576p.
❖ How to Operate the System Menu
1. Select the desired menu item and press the 2 button.
The setting item will appear on the screen.
2. Use the 3 and 4 buttons to set the item.
3. Press the 1 button to enter the setting and return to menu item selection.
System
30
ENGLISH
NTSC (3.58)
: Conventional analog broadcasting format
used mainly in Japan, the USA, Canada,
Taiwan and Korea.
PAL (4.43) : Conventional analog broadcasting format
used mainly in the UK and Germany.
SECAM : Conventional analog broadcasting format
used mainly in the France and Russia.
480p : Standard digital broadcasting format.
540p : Special digital broadcasting format
(i.e., RCA DTC100).
576p : Standard digital broadcasting format.
720p /1080i : High Definition digital broadcasting format.
1035i : Japanese “High-Vision” broadcasting format.
Menu Standard 1
Picture Adjust
Setting
System
Display
Config
Trigger 2
Preset
Component 1
Component 2
S-Video
Video
RGB Auto
DVI RGB
Auto
Auto
Auto
Auto
MENU V-MUTE
1,3
INPUTPATTERN
ENTER
INPUT ASPECT
2
ENTER
2.
1, 3
Page 35
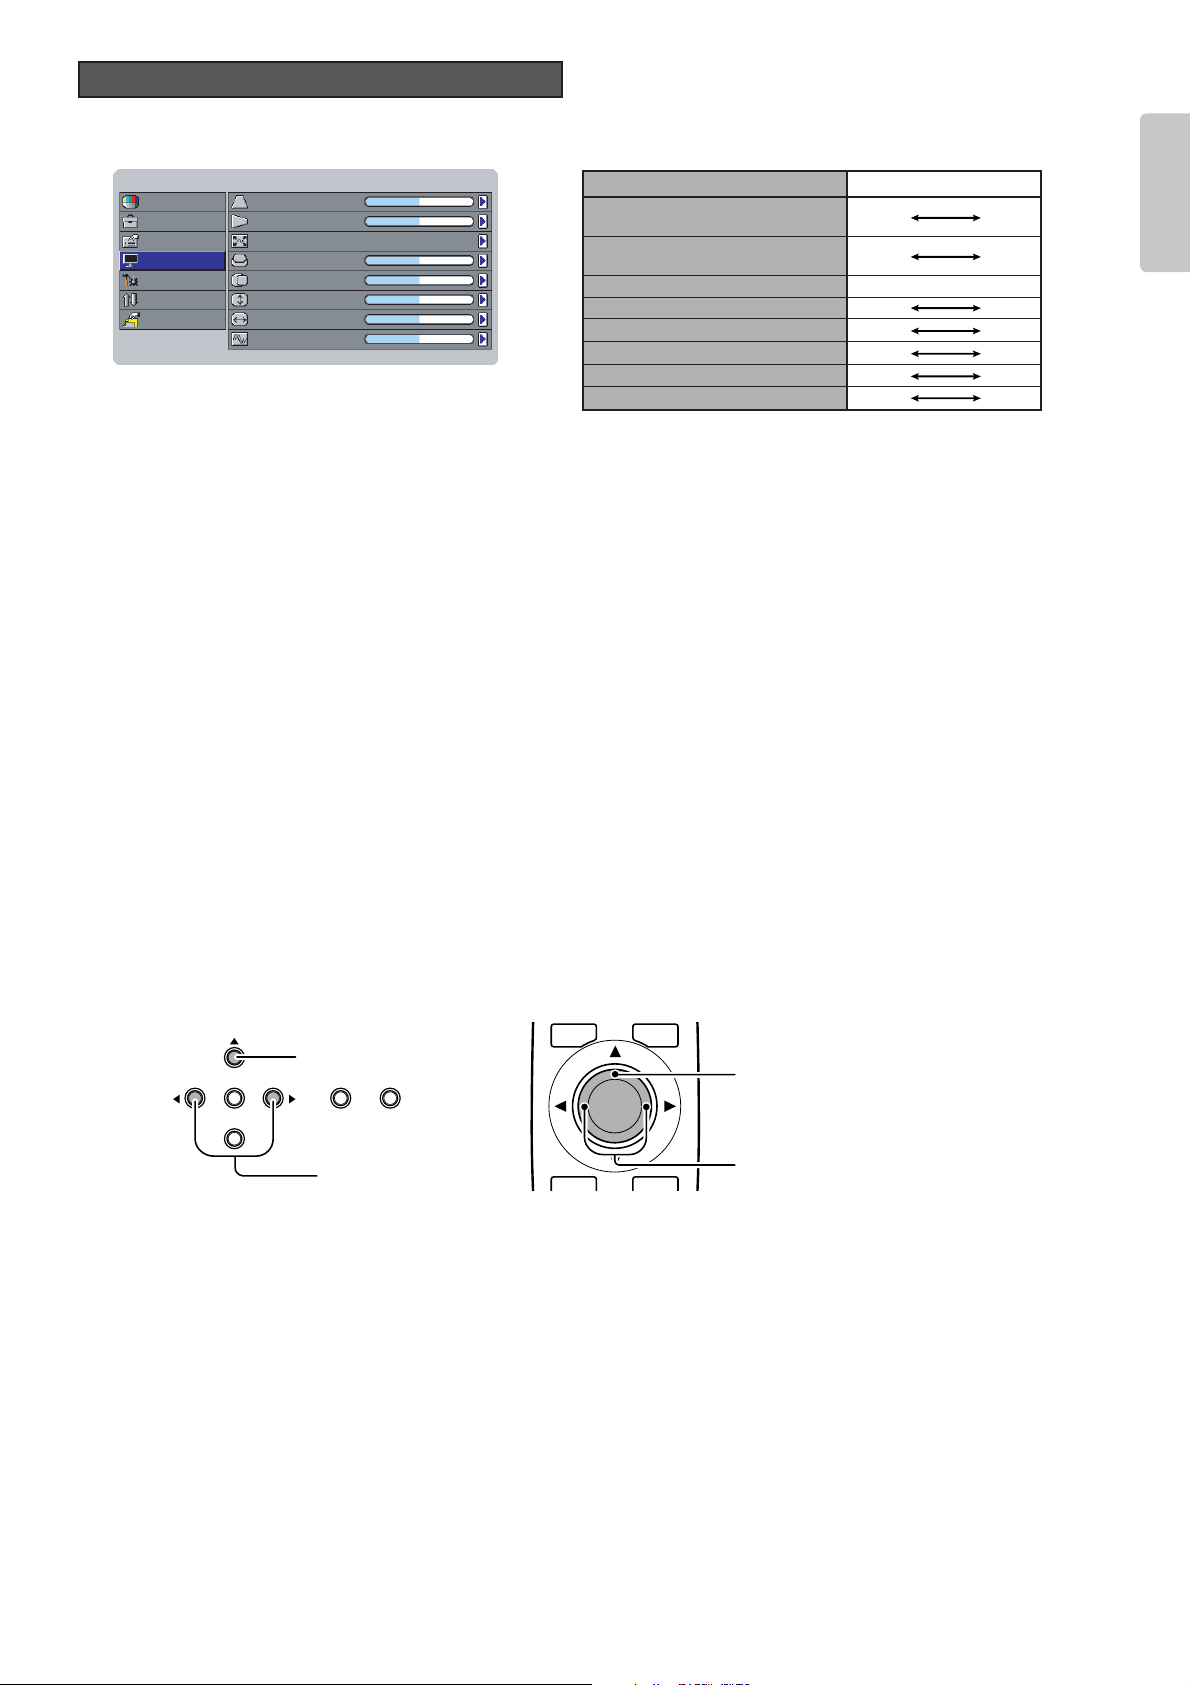
31
ENGLISH
You can make the following settings.
– Keystone V / H
Corrects the trapezoidal shape of the projected image. (For details, “Keystone Correction”
☞
pg. 19.)
– Auto Adjust
Use this mode for RGB input when RGB System on the System menu is set to “Auto”.
Yes : The Picture Shift V/H, vertical/horizontal resolution and Phase of the RGB signal are set automatically.
No : Disables automatic image adjustment. Set Picture Shift V/H, Size V/H and Phase yourself.
Select “Yes” with the
1 and 2 buttons and press the ENTER button.
– Picture Shift V / H
Shifts the position of the image. Picture Shift V shifts the image up/down, while Picture Shift H shifts the image left/right.
– Size V / H
Sets the vertical and horizontal size of the image.
– Phase
Sets the phase of the analog RGB signal from the computer and the clock phase of the A/D converter. Adjust the image to
where it looks the clearest.
❖ How to Operate the Display Menu
1. Select the desired menu item and press the 2 button.
The setting item will appear on the screen.
2. Use the 1 and 2 buttons to set the item.
3. Press the 3 button to enter the setting and return to menu item selection.
Display
Menu Standard 1
Picture Adjust
Setting
System
Display
Config
Trigger 2
Preset
Keystone V
Keystone H
Auto Adjust
Picture Shift V
Picture Shift H
Size V
Size H
Phase
0
0
0
0
0
0
16
Keystone V (Electronic vertical
keystone correction)
Keystone H (Electronic horizontal
keystone correction)
Auto Adjust
Picture Shift V
Picture Shift H
Size V
Size H
Phase
Menu item Adjustment range
-30
-30
-50
-50
-50
-50
0
Yes / No
30
30
50
50
50
50
31
MENU V-MUTE
3.
ENTER
1, 2
INPUTPATTERN
ENTER
3.
1, 2
Page 36

You can configure the projector from the following settings.
– Auto Power Off
When the auto power off feature is turned on, the below message appears on the screen if no signals are received and no
operations are performed for 9 consecutive minutes. Power to the projector then shuts off automatically if the situation
continues for another minute.
About 1 minute after the message appears on the screen, power to the projector shuts off.
Note:
After the above message appears on the screen, pressing any button on the projector other than the POWER button or any
button on remote controller other than the POWER ON or STANDBY button resets the auto power off feature. The auto power
off feature will start counting the time off any time after that, the moment that the projector goes without receiving any signals or
being operated in anyway.
– Installation
Sets the projector installation mode.
Front : Select this mode when the projector is installed on a flat surface in front of the screen.
F. Ceiling : Select this mode when the projector is mounted on a ceiling in front of the screen.
Rear* : Select this mode when the projector is installed on a flat surface behind the screen.
R. Ceiling* : Select this mode when the projector is mounted on a ceiling behind the screen.
* When projecting the image from behind the screen, use a rear-projection screen.
– Focus/Zoom
Adjusts the focus and size of the projected image.
– Lens shift
Positions (all directions) the projected image on the screen. (For details, see “Positioning the Projected Image”
☞
pg. 18.)
– Color Temp. Calibration
After replacing the lamp or otherwise when the lighting changes, you can adjust the color temperature using the color
temperature sensor. For instructions on how to adjust color temperature, see “Color Temperature Adjustment” (
☞
pg. 38).
– Reset Lamp Life
If you replace the lamp before the 1,500 hour lamp life, be sure to reset the lamp life counter. To do this, select “Reset Lamp
Life” from the Config menu. When you do so, the below message appears on the screen.
Select “Yes” and press the ENTER button. This will reset the lamp life counter.
Yes No
Reset Lamp Life
It will be standby mode soon.
Auto Power Off
Picture Adjust
Menu Standard 1
Setting
Display
System
Config
Trigger 2
Preset
Auto Power Off
Installation
Language
Focus/Zoom
Lens Shift
Color Temp. Calibration
Reset Lamp Life
Reset All
Disable
Front
English
Configuration
Auto Power Off
Enable / Disable
Installation Front, F.Ceiling, Rear, R.Ceiling
Language English, Français, Deutsch, Español,
Italiano, Português
Focus/Zoom Adjusts the focus and size of the projected
image.
Lens shift Positions (all directions) the projected
image on the screen.
Color Temp. Yes / No
Calibration
Reset Lamp Life
Yes / No
Reset All Yes / No
32
ENGLISH
Page 37

33
ENGLISH
– Reset All
Resets all settings to their factory defaults except the user-selected gamma curve and the lamp life counter. When you select
“Yes”, the following message appears on the screen.
Select “Yes” and press the ENTER button.
❖ How to Operate the Config Menu
1. Select the desired menu item and press the 2 button.
The setting item will appear on the screen.
2. Use the 3 and 4 buttons to set the item.
3. Press the 1 button to enter the setting and return to menu item selection.
You can turn the trigger signal output from the TRIG. 2 jack on (12 V output)/off (no output) for each of the aspect modes: Full,
Normal, Zoom and Through. This trigger signal can be used to automatically match the screen aspect mode to projector operation,
though it requires a powered dual aspect screen.
On: 12 V output
Off: No output
❖ How to Operate the Trigger 2 Menu
1. Select the desired menu item and press the 2 button.
The setting item will appear on the screen.
2. Use the 3 and 4 buttons to set the item.
3. Press the 1 button to enter the setting and return to menu item selection.
Trigger 2
Reset All ?
Yes No
MENU V-MUTE
1,3
INPUTPATTERN
ENTER
INPUT ASPECT
2.
1, 3
2
ENTER
Menu Standard 1
Picture Adjust
Setting
System
Display
Config
Trigger 2
Preset
Full
Normal
Through
Zoom
On
On
On
On
MENU V-MUTE
1,3
INPUTPATTERN
ENTER
INPUT ASPECT
2
ENTER
2.
1, 3
Page 38

34
ENGLISH
You can select a picture mode from the MENU screen. This projector offers 4 pictures modes: Theater, Standard, Dynamic and
User. Moreover, each of these picture modes has 3 indexes for saving picture quality adjustments.
• Theater : Reproduces the kind of black suited for movie software.
• Standard : Suited for normal movie software.
• Dynamic : Suited for visually dynamic movie software.
• User : Enables you to adjust the gamma curve as preferred.
Note : Each picture mode has 3 indexes (1, 2 and 3) and a default setting. When default is selected, “Picture Adjust” cannot be
selected from the menu.
– Saving settings in an index
Select “Mode” from the above menu using the remote controller, then select an image mode from Theater, Standard, Dynamic
and User. Next, select “Index” and set a value from “1” to “3”. Return to “Picture Adjust” in the main menu and adjust picture
quality to your liking. The adjustment made here is automatically saved in memory.
❖ How to Operate the Preset Menu
1. Select the desired menu item and press the 2 button.
The setting item will appear on the screen.
2. Use the 3 and 4 buttons to set the item.
3. Press the 1 button to enter the setting and return to menu item selection.
Preset
Menu Standard 1
Picture Adjust
Setting
System
Display
Config
Trigger 2
Preset
Mode
Index
Standard
1
MENU V-MUTE
2
ENTER
INPUTPATTERN
ENTER
2.
1,3
INPUT ASPECT
1, 3
Page 39
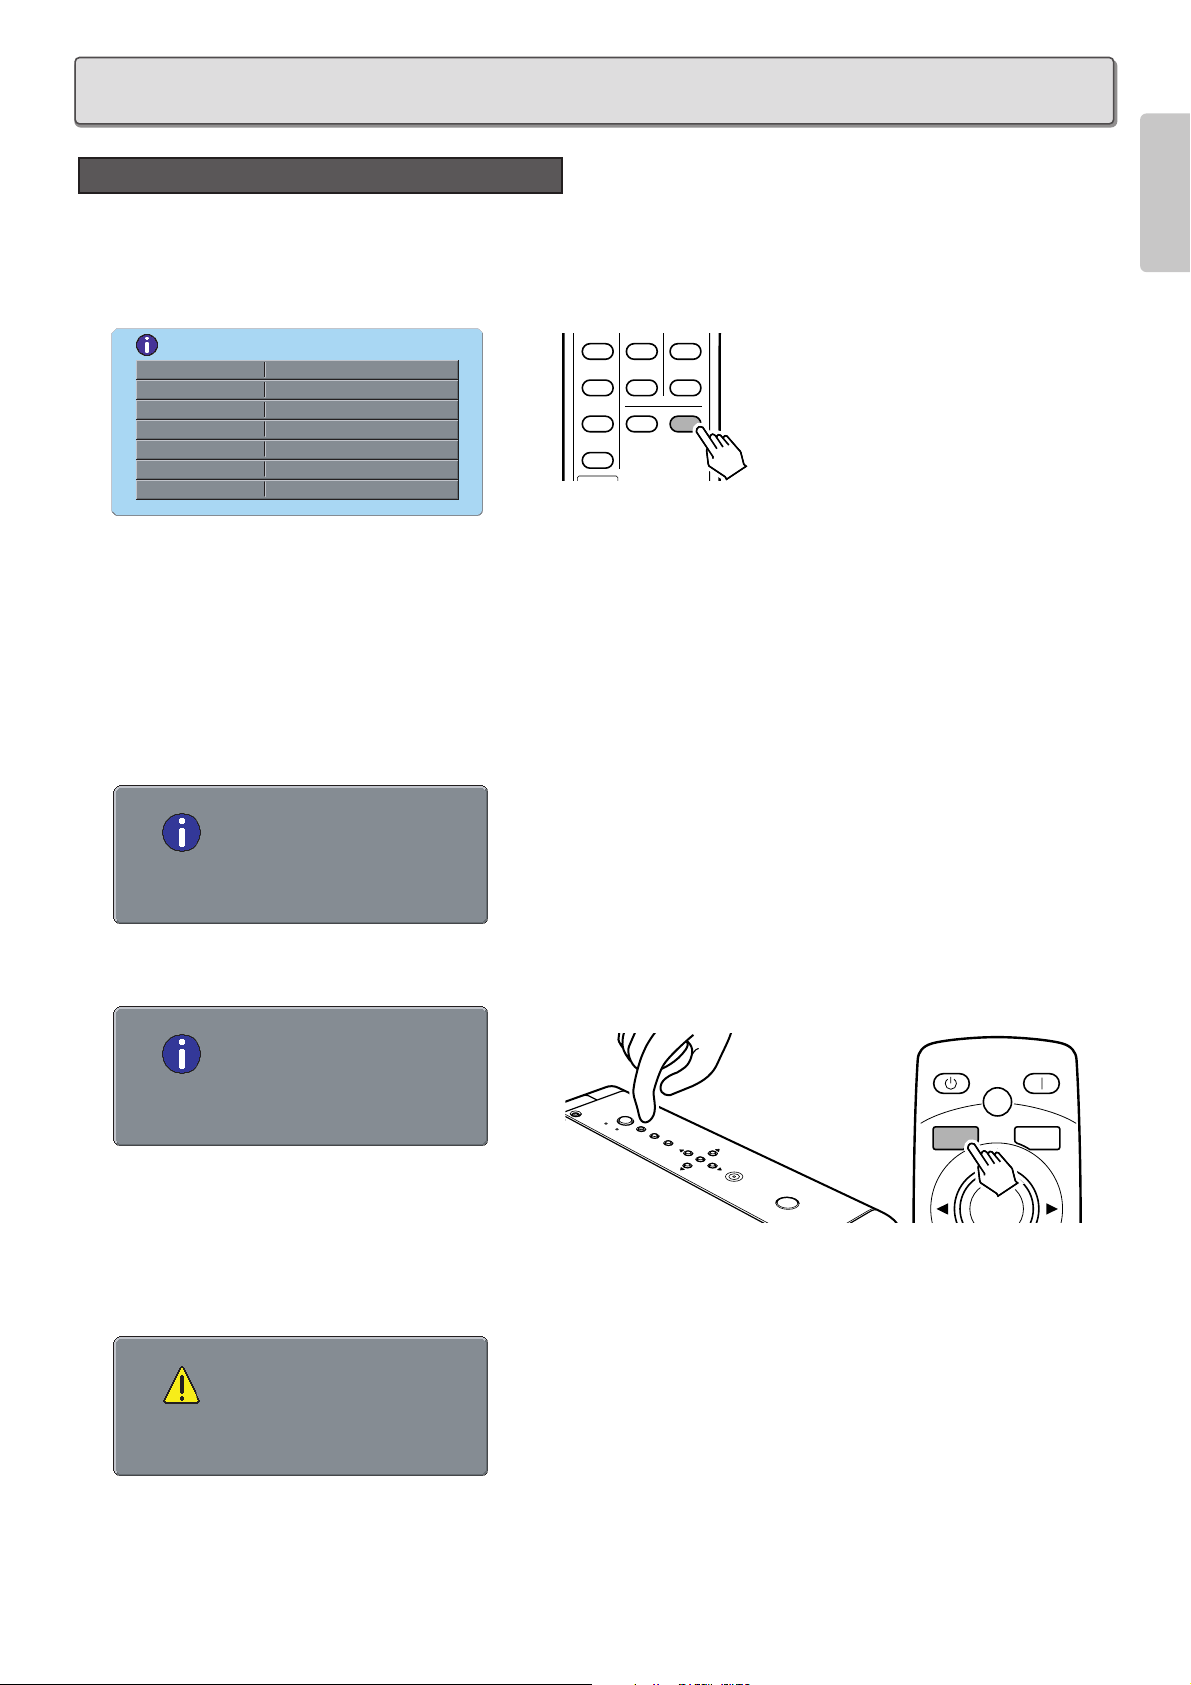
35
ENGLISH
❖ Lamp Life
Pressing the INFO. button on the remote controller displays the below message on the screen.
The remaining lamp life appears on the second from last line.
Note:
• The lamp lasts a maximum of 1,500 hours. Although every possible effort has gone into quality, the lamp can – though rarely burn out after 1,000 hours of lighting. Therefore, it is recommended to replace the lamp promptly when lamp life falls under 500
hours. The lamp must not be used in excess of the maximum lamp life.
• This product is subjected to strict quality controls before shipping from the factory. The “Total Hours” item on the Information
screen includes this checking time, therefore the “Total Hours” may not be “0” when the projector is used for the first time.
– When remaining lamp life drops below 100 hours and the projector is on, the below message with the remaining lamp life
appears on the screen.
– When remaining lamp life drops below 5 hours, the below message appears on the screen.
Press the MENU button to clear the message from
the screen.
– Approximately 2 minutes after the lamp reaches the end of its life, power to the projector shuts off and the WARNING indicator
lights up red. If the below message appeared on the screen before power shut off, promptly replace the lamp with a new one.
(See “Lamp Unit Replacement”
☞
pg. 36.)
LampLife 0 Hours
Warning
Lamp Life and Replacement
MAINTENANCE
Information
Video Input
Preset User A1
Cinema Mode Auto
Aspect Full
Trigger 2 On
Lamp Life 927 Hours
Total Hours 3653 Hours
Component-1080i
S-VIDEO
VIDEO
RGB
AUX
DYNA.
USER
CINEMA
ZOOM
THROUGH
INFO
Warning
LampLife 100 Hours
Warning
LampLife 5 Hours
ER
N
O
POW
Y
B
U
D
N
N
E
A
M
T
S
T
U
P
IN
N
R
E
T
T
A
P
R
E
T
N
E
STANDBY POWER ON
PATTERN
PATT.
MENU V-MUTE
ENTER
Page 40

36
ENGLISH
❖ Resetting the Lamp Life Counter
The lamp lasts a maximum of 1,500 hours. The projector is
designed to shut off power if the lamp is used beyond this
1,500 hours. In such case, replace the lamp and reset the lamp
life counter as follows.
1. After the “Lamp Life 0 Hours” message appears on the
screen, power to the projector shuts off. Promptly replace
the lamp with a new one. (See “Lamp Unit Replacement”
☞
pg. 36.)
2. After replacing the lamp, press either the POWER button
on the projector or the POWER ON button on the remote
controller.
The below message will appear on the screen for about
120 seconds.
3. Select “Yes” using the 1 and 2 buttons.
4. Press the ENTER button to reset the lamp life counter.
Note:
• The lamp is very hot while lit and shortly after being turned
off. Do not touch the lamp or lamp unit while hot. Wait at
least 1 hour for the lamp to cool down before handling it.
• Do not loosen any screws except those specifically
mentioned in the below procedure.
• The lamp may break under excessive force or mechanical
shock.
• Use only the Marantz original lamp unit LU10VPS1 (sold
separately).
❖ How to Replace the Lamp
Preparation:
Turn off power to the projector before replacing the lamp.
After the cooling fan stops, unplug the AC power cable
and wait at least 1 hour for the lamp to cool down. Then,
replace it.
1. Press the STANDBY button on the remote controller or
the POWER button on the projector to shut off power to
the projector.
2. After the cooling fan stops, set the ON/OFF switch in the
OFF position and unplug the AC power cable.
3. Wait at least 1 hour for the projector to cool down
sufficiently.
4. Locate the lamp cover on the projector rear (see below).
Read the caution and warning labels on the cover.
Lamp Unit Replacement
Lamp cover
WARNING
THISCOVERISPROVIDEDWITH
INTERLOCKTOREDUCETHERISKOF
EXCESSIVEULTRAVIOLETRADIATION.
DONOTDEFEATITSPORPOSEOR
ATTEMPTTOSERVICEWITHOUT
REMOVINGCOVERCOMPLETELY.
RECYCLEORDISPOSE
ASHAZARDOUSWASTE
DON'TPUTINTRASH.
CONTAINSMERCURY,
CAUTION
Jordforbindaltidudstyret
Alwaysgroundtheequipment
Jordaalltidutrustningen
AC120V〜 60Hz X.XA
MADE IN JAPAN
MODEL NO.VP10S1/U1M
FABRIQUE AU JAPON
SERIALNO.
AUDIO/VIDEO APPARATUS
36VB
VP10S1/UIM
WithFCCStandards
TestedToComply
MARANTZ
FORHOMEOROFFICEUSE
No.4300
〜
ACIN
ON
OFF
RS-232CDVI-D INRGB IN
EXT.INT.
IN
OUT
OFFON
1
2
TRIG. LIGHT
REMOTE
VIDEO IN
S-VIDEO IN COMPONENT VIDEO IN 1 COMPONENT VIDEO IN 2
YP
B/CBPR/CRYPB/CBPR/CR
CAUTION
HIGH-PRESSURE LAMP MAY EXPLODE IF IMPROPERLY
HANDLED. REFER SERVICING TO QUALIFIED SERVICE
PERSONNEL.
CAUTION HOT
UNPLUG THE POWER CORD AND WAIT 60
MINUTES BEFORE CHANGING THE LAMP.
ATTENTION
LA LAMPE SOUS HAUTE PRESSION PEUT EXPLOSER
SI ELLE, N'EST PAS MANIPULEE CORRECTEMENT,
CONFIER L'OPERATION A UN PERSONNEL D'ENTRETIEN
QUALIFIE.
VORSICHT
BEI FALSCHER HANDHABUNG KANN DIE
HOCHDRUCKLAMPE EXPLODIEREN UBERLASSEN SIE
WARTUNGSARBEITEN NUR FACHPERSONAL.
ATTENTION CHAUD
DEBRANCER LE CORD ON D'ALIMENTION ET
ATENDER 60 MINUTES AVANT DE CHANGER
LAMPE.
WARNUNG HEISS
ZIEHEN SIE DEN NETZSTECKER AB UND
WARTEN SIE 60 MINUTEN BEVOR SIE DIE
GLUHLAMPE WECHSELN.
ランプ交換は、電源プラグをコン
セントから抜いて60分待ってから
行ってください。
高温注意
高圧ランプは誤った扱いをすると
破裂する恐れがあります。万一の
際はサービスマンに依頼をしてく
ださい。
警告
CAUTION
HIGH-PRESSURE LAMP MAY EXPLODE IF IMPROPERLY
HANDLED. REFER SERVICING TO QUALIFIED SERVICE
PERSONNEL.
CAUTION HOT
UNPLUG THE POWER CORD AND WAIT 60
MINUTES BEFORE CHANGING THE LAMP.
ATTENTION
LA LAMPE SOUS HAUTE PRESSION PEUT EXPLOSER
SI ELLE, N'EST PAS MANIPULEE CORRECTEMENT,
CONFIER L'OPERATION A UN PERSONNEL D'ENTRETIEN
QUALIFIE.
VORSICHT
BEI FALSCHER HANDHABUNG KANN DIE
HOCHDRUCKLAMPE EXPLODIEREN UBERLASSEN SIE
WARTUNGSARBEITEN NUR FACHPERSONAL.
ATTENTION CHAUD
DEBRANCER LE CORD ON D'ALIMENTION ET
ATENDER 60 MINUTES AVANT DE CHANGER
LAMPE.
WARNUNG HEISS
ZIEHEN SIE DEN NETZSTECKER AB UND
WARTEN SIE 60 MINUTEN BEVOR SIE DIE
GLUHLAMPE WECHSELN.
ラン
セン
行っ
高圧
破裂
際は
ださ
New Lamp ?
Yes No
4
STANDBY ON
ENTER
MENUINPUTPATTERN
POWER
STANDBY POWER ON
PATTERN
ER
N
O
W
O
P
Y
B
U
D
N
N
E
M
STA
T
U
P
N
I
N
R
E
T
T
A
P
R
E
T
N
E
PATT.
MENU V-MUTE
ENTER
STANDBY POWER ON
3
PATTERN
PATT.
MENU V-MUTE
ENTER
2.
4.
3.
2
Page 41
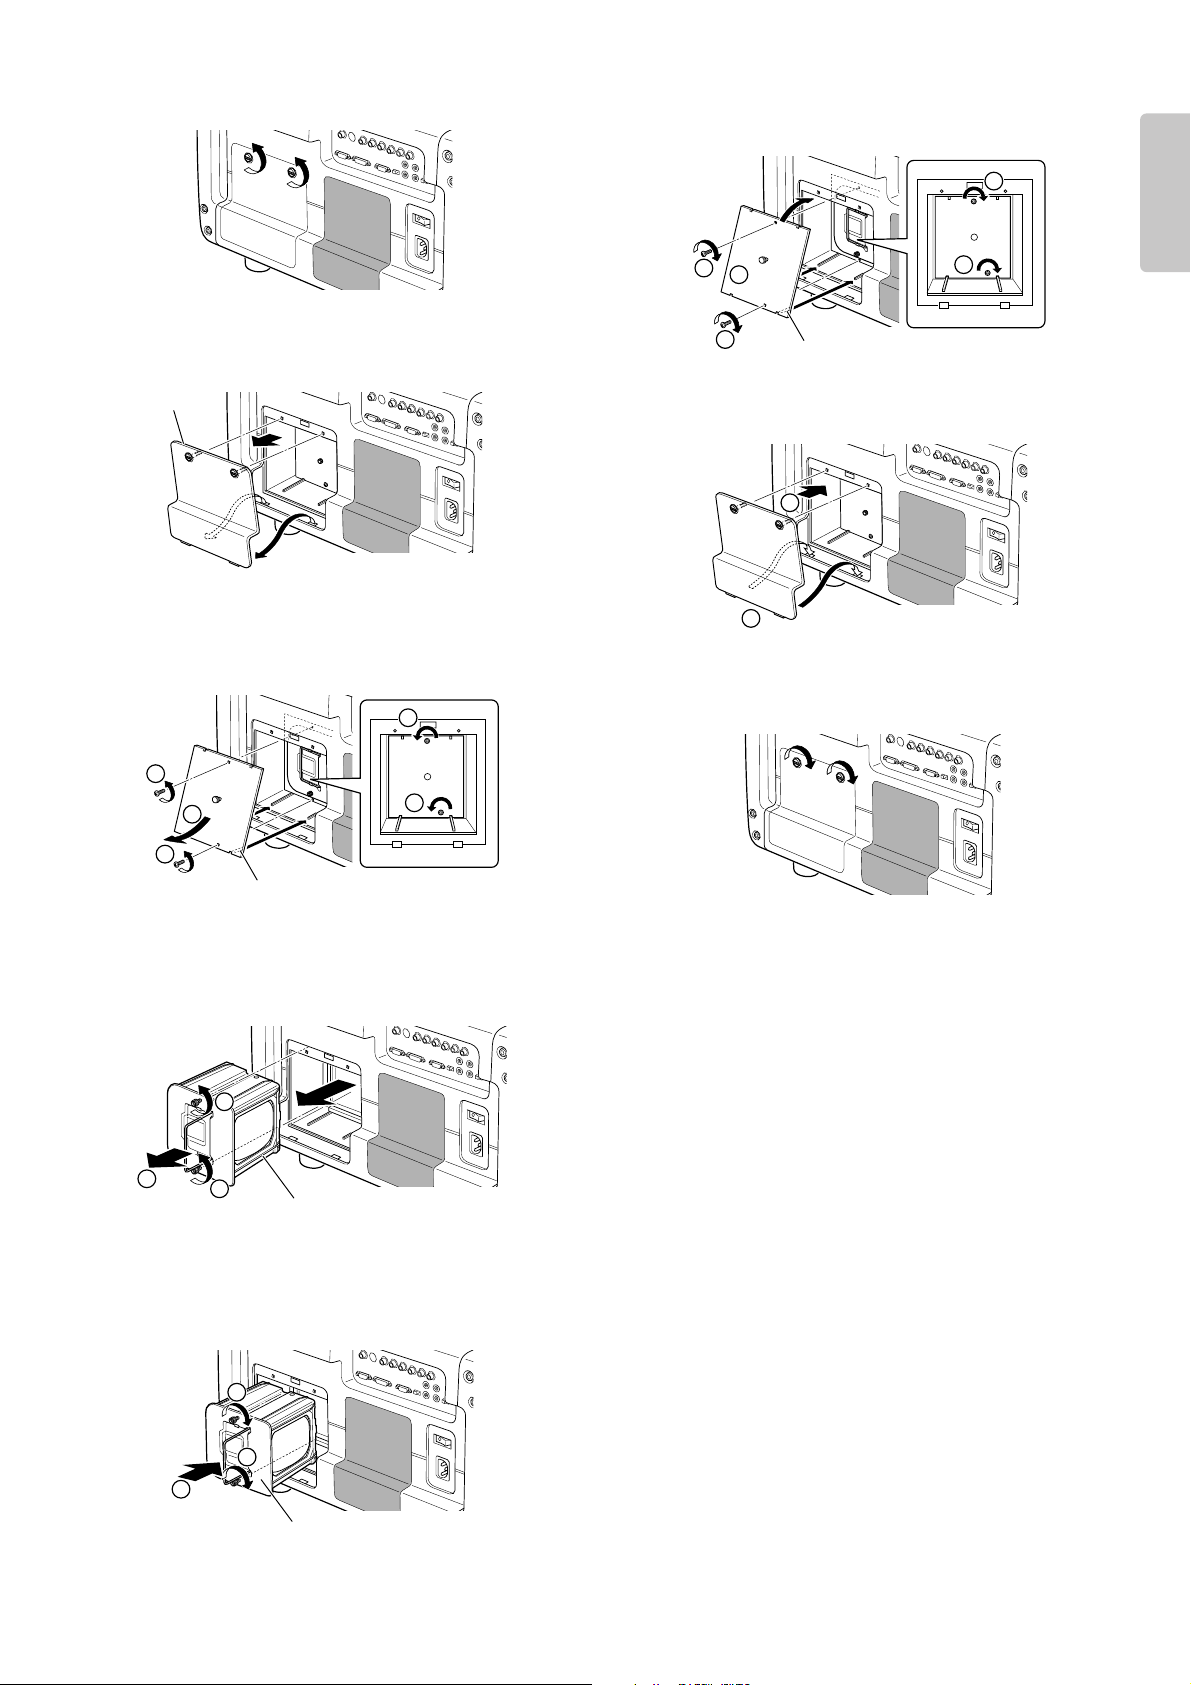
37
ENGLISH
5. Loosen the 2 screws that lock down the lamp cover.
(Slotted head screwdriver required.)
6. Detach the lamp cover in the direction of the arrow.
7. Remove the 2 screws that lock down the lamp shield.
(Phillips screwdriver required.) Pull the lamp shield
downward as indicated in the below figure and detach.
8. Loosen the 2 screws that lock down the lamp unit.
(Slotted head screwdriver required.) Grab the lamp unit
by the handle and pull the unit out toward you.
9. Install a new lamp unit securely in the correct orientation.
Lock the lamp unit in place with the 2 screws. (Slotted
head screwdriver required.) Fold the handle over as it
was before.
10. Fit the top end of the lamp shield back into place as
shown below, followed by the bottom end. Lock the lamp
shield in place with the 2 screws removed in step 7.
(Phillips screwdriver required.)
11. Fit the bottom end of the lamp cover back into place as
shown below, followed by the top end.
12. Lock the lamp cover in place with the 2 screws loosed in
step 5. (Slotted head screwdriver required.)
13. Plug in the AC power cable, turn on the projector and
project an image.
• If you replaced the lamp before 1,500 hours of service,
see “Reset Lamp Life” (
☞
pg. 32).
• If you replaced the lamp after 1,500 hours of service,
see “Resetting the Lamp Life Counter” (
☞
pg. 36).
Lamp cover
Lamp unit
Lamp shield
Lamp shield
New lamp unit
2
2
1
2
1
1
2
1
1
2
2
1
1
2
1
2
2
1
Page 42

38
ENGLISH
After replacing the lamp or otherwise when the lighting changes,
you can adjust the color temperature using the included color
temperature sensor. In the adjustment procedure, you must first
initialize the sensor itself before adjusting color temperature. It
takes about 10 minutes from when power to the projector is
activated for the lamp’s brightness to stabilize. Wait for lamp
brightness to stabilize before adjusting color temperature.
1. Connect the cable of the color temperature sensor to the
RS-232C port.
2. Press the MENU button, select “Color Temp. Calibration”
from the menu and press the
2 button. The below
message appears on the screen.
3. Use 1 and 2 buttons to select "Yes" and press the
ENTER button. The below message appears on the
screen.
Before pressing the ENTER button, turn the color
temperature sensor over on its dark side as shown in the
below figure, to prevent outside light from penetrating to
the sensor’s receptacle.
4. Press the ENTER button. The below message appears
on the screen for a few seconds as the sensor itself is
being initialized.
5. Fit the color temperature sensor onto the lens and press
the ENTER button. The lens automatically shifts to the best
position for performing color temperature adjustment. Color
temperature adjustment then starts and the projector’s
WARNING and STANDBY indicators begin flashing
simultaneously.
When installed on a flat surface
When mounted on a ceiling
6. When the WARNING and STANDBY indicators go out,
color temperature adjustment is complete. Adjustment
takes about 4 to 5 min. When the color temperature
sensor is detached from the lens, the below message
appears on the screen.
Press "ENTER" to exit
Complete
Color Temperature Adjustment
Receptacle
Attach the color temperature sensor so
that the cable is to the bottom side of the
projector as shown in the figure.
Attach the color temperature sensor so that
the cable is to the bottom side of the projector
(now upside-down) as shown in the figure.
Attachment for Color
temperature sensor
Attachment for Color
temperature sensor
Initializing...
Color Temp.Calibration ?
Yes No
Initialize
Press "ENTER" to start
Page 43
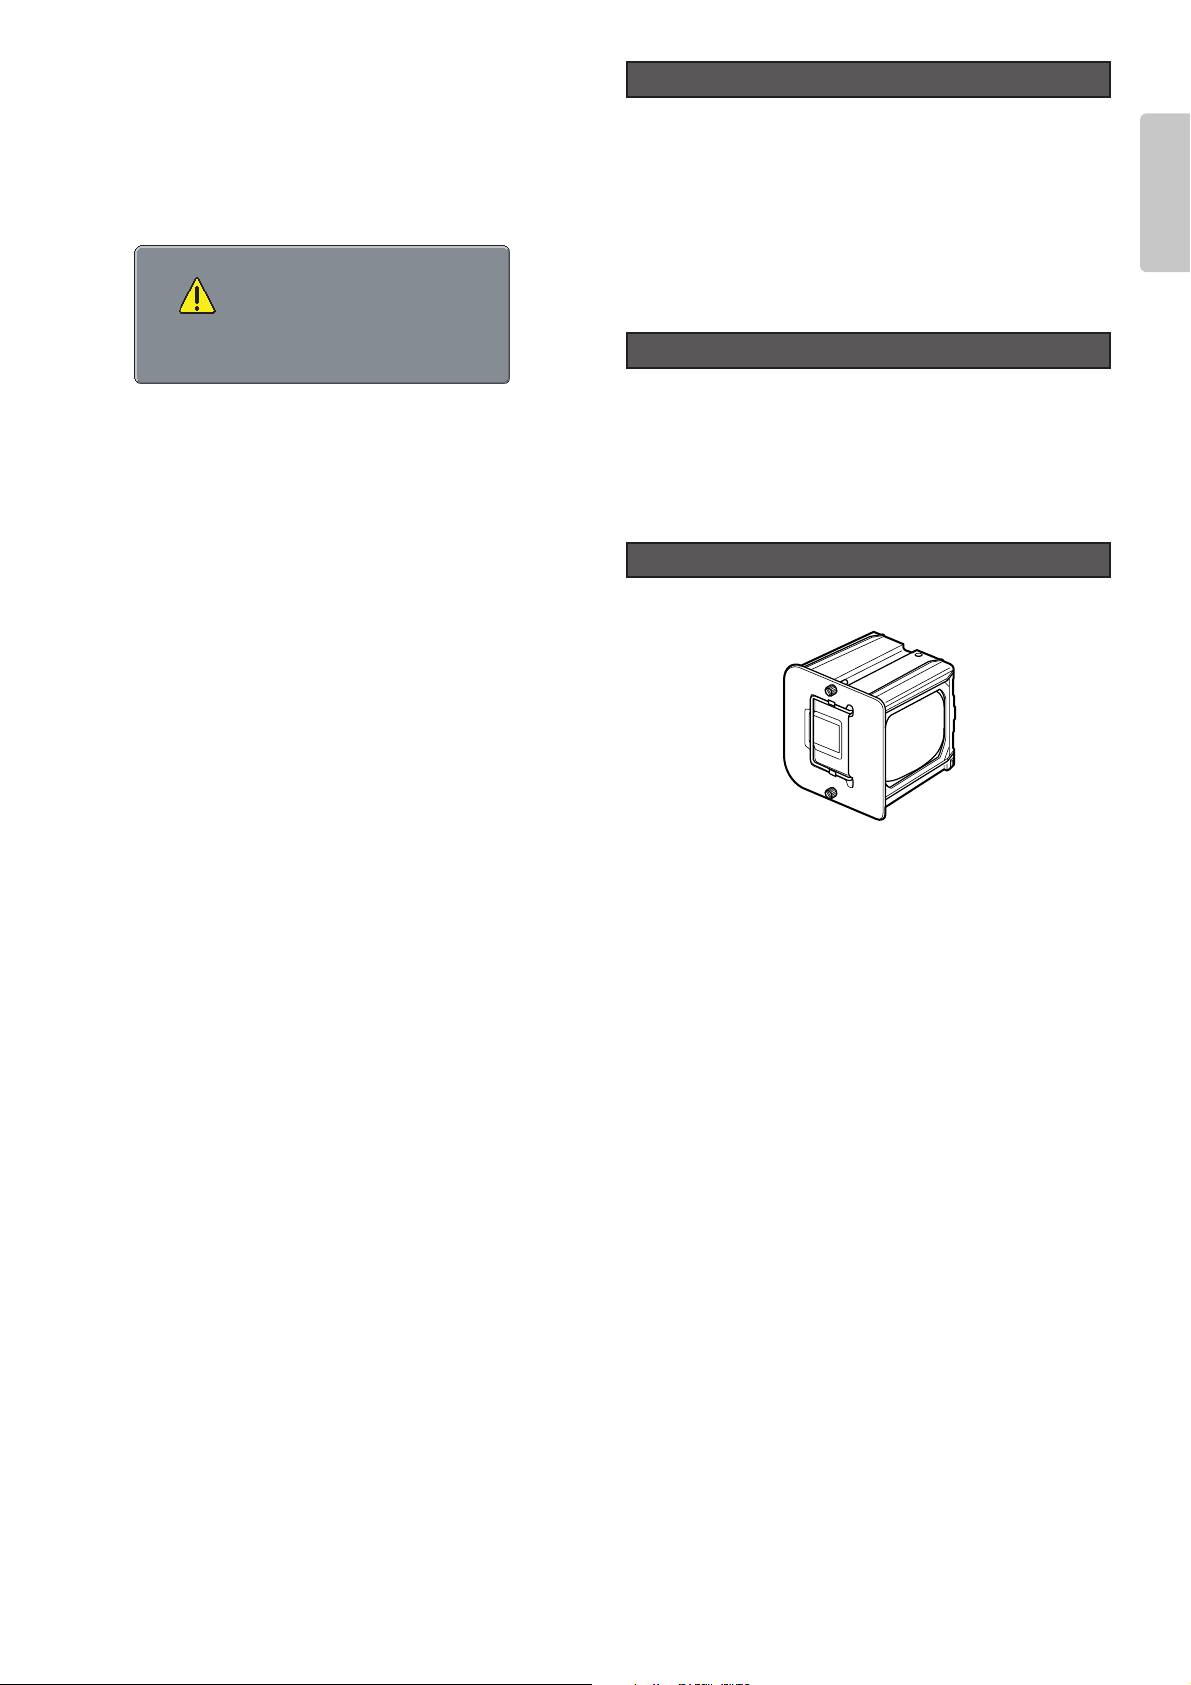
39
ENGLISH
7. Press the ENTER button to return to the menu and
disconnect the cable of the color temperature sensor from
the projector.
Note:
If color temperature adjustment is not correctly processed
or if adjustment processing is interrupted in course by
pressing the MENU button or for some other reason, the
below message appears on the screen.
Also, adjustment processing can be interrupted by pressing
the MENU button.
8. Reposition the picture on the screen (up, down, left and
right) using the “Lens shift” feature on the Config menu.
(See “Configuration”
☞
pg. 32.)
❖ Color Temperature Sensor Protection
If no operations are performed for approximately 10 minutes
from the moment color temperature adjustment processing
ends, power to the projector shuts off automatically in order
to protect the color temperature sensor. If power is shut off to
protect the color temperature sensor, do the following.
•
If the WARNING indicator is not lit
When color temperature adjustment ends successfully and
the sensor protection feature trips, the projector goes on
standby. As usual, activate power by pressing either the
POWER ON button on the remote control or the POWER
button on the projector.
•
If the WARNING indicator is lit
If color temperature adjustment does not end successfully
and the sensor protection feature trips, the projector’s
WARNING and STANDBY indicators light simultaneously
to indicate the error mode. Set the ON/OFF switch in the
off position, unplug the AC power cable and then plug it
back in. Then, set the ON/OFF switch in the on position
and press either the POWER ON button on the remote
control or the POWER button on the projector to reactivate
power.
If the lens becomes dirty or smudged, clean it with a soft
dry cloth and an optical lens cleaner that is approved for
eyeglasses or cameras. Do not use a dampened cloth,
detergent, thinner or other harsh substances. These
substances may damage the lens or leave stains. Do not
clean the lens while the lamp is on. Always shut off power
to the projector and wait at least 60 minutes before
cleaning the lens.
If replacement parts are needed, contact your nearest
Marantz dealer or authorized service center. Use only
replacement parts specified by Marantz. Unauthorized
substitutes may result in fire, electric shock or other
hazards, and will forfeit warranted servicing.
• Lamp unit : LU10VPS1
Optional Accessories
Replacement Parts
Lens Cleaning
Press "ENTER" to exit
Quit
Page 44

40
ENGLISH
Specifications and appearance are subject to change without notice.
❖ Optical characteristics
Technology 3-chip DLP
TM
Panel 0.8 inch 16:9
1280 x 720 pixels
Digital Micromirror Device
TM
Lamp P-VIP 250W AC
Lens 1.44 – 1.80:1 (LN10VP32)
1.80 – 2.40:1 (LN10VP40)
2.40 – 3.60:1 (LN10VP53)
Projection size 60 to 300 inch
(when using 16:9 screen)
Light output 1200 ANSI LUMEN typical
(Lamp Mode : High)
1000 ANSI LUMEN typical
(Lamp Mode : Low)
❖ Input/Output
VIDEO IN RCA x 1
NTSC-35.8 / PAL-4.43/SECAM
Composite video 1.0Vp-p / 75 ohm
S-VIDEO IN S jack x 1
NTSC-35.8/PAL-4.43 / SECAM
S-video
COMPONENT VIDEO IN
RCA x 1
BNC x 1
Y, C
B/PB
, CR/P
R
RGB/HD IN D-sub M 15-pin x 1
Analog RGB, Y/P
B/PR
DVI-D IN DVI-D 24-pin x 1
T.M.D.S. compliant (Single link only)
REMOTE CONTROL IN
Miniature jack type x 1
REMOTE CONTROL OUT
Miniature jack type x 1
AC IN 3-prong grounding type
Trig. 1 Out/Trig. 2 Out Miniature jack x 2
Output voltage: 12V DC or 0V
RS232C RS232C receptacle plug x 1
❖ General specifications
Power requirement AC 100-120V / 220-240V, 50/60 Hz
Power consumption < 380 W
Standby consumption < 2.0 W
Chassis isolution Class-1
Safety UL60950
CSA C22.2 No.60950
EN60950
EMC FCC Part-15 Class-B
EN55022 Class-B
Dimensions 20.1(W) x 26.5(D) x 12.8(H) inch
510(W) x 672(D) x 326(H) mm
Net Weight 90.3 lb (41 kg)
Operating temperature 50°F to 95°F (10 to 35°C)
Operating humidity 20 to 80%
Storage temperature -4°F to 140°F (-20 to +60°C)
Storage humidity 5 to 80%
Operating altitude 0 to 4,921 ft (0 to 1,500 m)
❖ Accessories
• Lens cap x 1
• Remote controller x 1
• AA batteries X 2
• AC power cable x 1
• Color temperature sensor x 1
• Attachment for Color temperature sensor x 1
• Control adapter cable (mini jack to RCA) x 1
• User Guide x 1
• Warranty Card (1 copy each for USA, CANADA)
SPECIFICATIONS
Page 45

41
ENGLISH
Aspect ratio
Width and height ratio of an image. The aspect ratio of
ordinary computer monitors and TV screens is 4:3. The
aspect ratio for wide screens ranges from 16:9 to 21:9.
Black level
The level of brightness in black areas or the absence of
light, which incidentally is black.
For NTSC of the US, it is 7.5IRE.
NORMAL: 16 (Black) to 235 (White)
For NTSC in Japan, it is 0IRE.
EXPAND: 0 (Black) to 246 (White).
Color temperature
Hue of white light. An image of low color temperature has
a warm feeling (more yellow and red). An image of high
color temperature has a cold feeling (more blue).
Keystone
Distortion of an image caused by projection to wrong
vertical and horizontal angles.
A/D converter (Analog/Digital signal converter)
With this projector, all video signals are digitally processed
by an A/D converter. The A/D converter converts analog
video signals into data that supports digital processing.
❖ Timing chart
NTSC
PAL-B/G
SECAM
480/60p
576/50p
1035/60i
1080/60i
1080/50i
1080/48i
720/60p
720/50p
720/48p
540/60p
640x350
#1
640x350
#1
640x400
#1
640x400
#1
640x480
640x480
#1
640x480
#1
640x480
#1
800x600
800x600
800x600
#1
800x600
#1
800x600
#1
1024x768
1024x768
1024x768
#1
1024x768
#1
1024x768
#1
768x240
960x287.5
960x287.5
720x480
720x576
1920x518
1920x540
1920x540
1920x540
1280x720
1280x720
1280x720
1920x540
640x350
640x350
640x400
640x400
640x480
640x480
640x480
640x480
800x600
800x600
800x600
800x600
800x600
1024x768
1024x768
1024x768
1024x768
1024x768
59.94 / 60
50
50
59.94 / 60
50
59.94 / 60
59.94 / 60
50
48
59.94 / 60
50
48
59.94 / 60
70
85
70
85
60
72
75
85
56
60
72
75
85
43
60
70
75
85
15.73
15.63
15.63
31.5
31.3
33.8
33.8
28.1
27.0
45.0
37.5
36.0
33.8
31.5
37.9
31.5
53.7
31.5
37.9
37.5
43.3
35.2
37.9
48.1
46.9
53.7
35.5
48.4
56.5
60.0
68.7
I
I
I
P
P
I
I
I
I
P
P
P
P
P
P
P
P
P
P
P
P
P
P
P
P
P
P
P
P
P
P
NTSC
PAL-B/G
SECAM
Video 60Hz
Video 50Hz
480/60p
576/50p
1035/60i
1080/60i
1080/50i
1080/48i
720/60p
720/50p
720/48p
540/60p
640x350@70Hz
640x350@85Hz
640x400@70Hz
640x480@60Hz
640x480@72Hz
640x480@75Hz
640x480@85Hz
800x600@56Hz
800x600@60Hz
800x600@72Hz
800x600@75Hz
800x600@85Hz
1024x768@60Hz
1024x768@70Hz
1024x768@75Hz
X
X
X
–
–
–
–
–
–
–
–
–
–
–
–
–
–
–
–
–
–
–
–
–
–
–
–
–
–
–
#2
#2
#2
#2
#2
#2
VESA#901101
VESA#900601
VESA#900602
VESA#900603A
X
X
X
–
–
–
–
–
–
–
–
–
–
–
–
–
–
–
–
–
–
–
–
–
–
–
–
–
–
–
–
–
–
X
X
X
X
X
X
X
X
X
X
X
X
–
–
–
–
–
–
–
–
–
–
–
–
–
–
–
–
–
–
X
X
X
X
X
X
X
X
X
X
X
X
X
X
X
X
X
X
X
X
X
X
X
X
X
X
X
–
–
–
–
–
X
X
X
X
X
X
X
X
X
X
X
X
–
X
–
–
–
X
X
–
–
–
X
–
–
System
Resolution
V(Hz)H(KHz)Scan
Signal
Video S-Video RGB DVI
Component
Note
Notes:
• The systems marked #1 are not displayed properly.
• Any signals not in the list above may not be projected properly.
I : Interlaced signal
P : Progressive signal
Input Signal
#2 : both of 59.94 and 60Hz
GLOSSARY
Page 46

42
ENGLISH
No power
Image is not displayed.
Poor color.
Picture is too dark.
Picture is not clear.
Picture rolls.
The Remote Controller
does not work.
Color temperature
cannot be adjusted.
AC power cord is not connected correctly.
Lamp cover is not closed correctly.
A signal cable is not connected correctly.
Selected input is incorrect.
The picture mute is active.
Picture is not adjusted properly.
Lamp life is running out.
Contrast or brightness is not adjusted properly.
Picture is out of focus.
Dew is on the lens.
A signal cable is not properly connected.
Batteries are exhausted.
The distance to the unit is too far.
IR sensor on unit is obstructed.
The “EXTERNAL” position on the connector
panel is selected.
Is the sensor cable disconnected?
Was the sensor correctly initialized?
Is the lens shift knob set to the correct
(center) position?
Connect the AC power cord properly.
Close the cover properly.
Connect a signal cable properly.
Select the correct input source .
Press the MUTE button to release the mute.
Adjust the picture in the MENU mode.
Replace the lamp.
Adjust contrast or brightness properly.
Adjust the focus.
Run the projector for about two hours.
Connect a signal cable properly.
Replace batteries.
Make the distance between the unit and the
remote control closer.
Remove any obstacles.
Select the “INTERNAL” position.
Correctly connect the sensor cable.
Initialize the sensor by taking the correct
procedures.
Set the lens shift knob to the correct (center)
position by taking the correct procedures.
Note:
• If the lamp still does not function after the replacement and initialization of the lamp life, contact a Marantz authorized dealer, or
service center.
Note: This projector uses a microcomputer. External noise can cause malfunctions. In such case, shut power OFF and unplug the
power cable from AC power outlet. Then, plug the AC power cable back in, press the POWER button on the projector or the
POWER ON button on the remote control and check operation.
Possible CauseSymptom Remedy
Try the following troubleshooting before calling for service.
1. Are the connections made properly ?
2. Are you operating the unit properly, following the
instructions ?
If the unit does not operate properly, check the items shown
in the following table.
If any trouble cannot be solved by the instructions below,
malfunction of the internal circuitry is suspected; immediately
unplug the AC power cord and contact Marantz dealer or
service center.
TROUBLESHOOTING
Page 47

43
ENGLISH
WARNING indicator, POWER ON indicator, and STANDBY indicator diagnose error mode of the projector as follows.
The lamp cover is not
closed properly.
The lamp has failed, or
the lamp is completely
worn out.
Projector internal
temperature is higher
than the allowed level.
Trouble has occurred
with the fan.
Internal program error
Color temperature
adjustment failed.
Close the cover correctly.
Replace the lamp and
reset lamp life.
Check if anything is
blocking the exhaust vent.
Retry adjustment.
Shut power OFF and
ON again.
Other
Color temperature
adjustment
Fan
Temperature
Lamp
Lamp cover
Flashing
Flashing
Flashing
ON
ON
ON
OFF
OFF
OFF
OFF
OFF
OFF
Flashing
ON
OFF
Flashing
OFF
ON
Indicators
Error mode
WARNING POWER ON STANDBY
Possible Cause Recommendation
ERROR MODE
NO SIGNAL
REPLACE LAMP!
OUT OF RANGE
No input signal.
The lamp has reached the end of its life.
Improper signal feed to the projector.
Properly connect the cables.
Replace the lamp and reset lamp life.
Adjust resolution, V(Hz) : refresh rate of the
equipment, referring to the Timing Chart.
MeaningMessage Remedy
Use the list below to check the message displayed on the screen.
ON SCREEN MESSAGE
Page 48
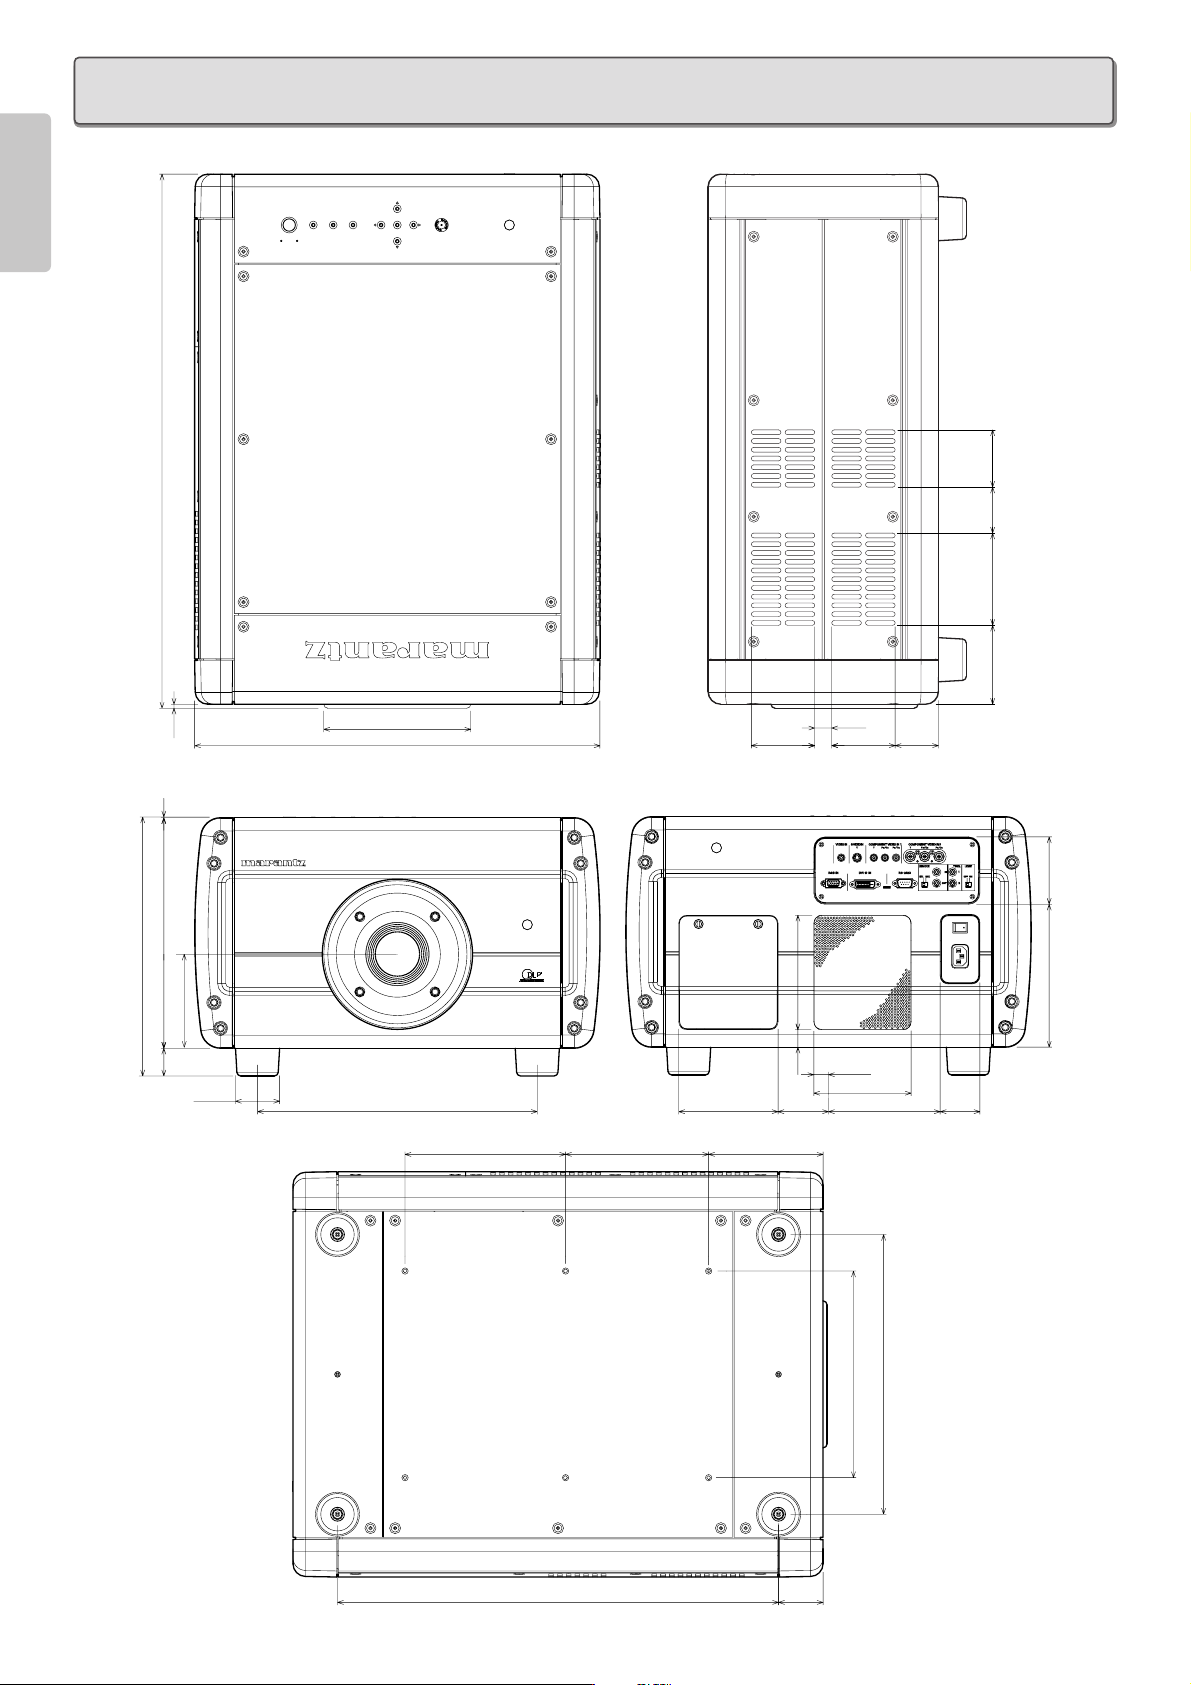
44
ENGLISH
❖ Top
❖ Front
❖ Rear
❖ Bottom
DIMENSIONS
Unit : inch (mm)
267/16(672.0)
ENTER
PATTERN
INPUT
MENU
POWER
ON
STANDBY
(72.0)
213/16
21/4
(57.9)
49/16
(116.0)
(99.3)
315/16
3/16
1/16
117/16(290.0)
1213/16(326.0)
13/8
(5.0)
(1.0)
45/8(118.2)
(35.0)
φ23/16
(55.5)
φ75/16(185.0)
201/16(510.0)
137/8(352.0)
715/16
(202.0)
71/16
(180.0)
415/16
(125.0)
511/16
31/8
(79.8)
(144.0)
13/16
511/16(144.0)
413/16(122.5)
14/16(22.0)
21/2
(63.5)
(21.3)
31/8
(79.8)
3/4(18.5)
59/16(140.5)
21/8
(54.5)
ON
OFF
ACIN
〜
115/16
(50.0)
(84.7)
35/16
71/16
(179.9)
217/8(555.0) 23/16
(56.0)
101/4(260.0)
137/8(352.0)
Page 49

www.marantz.com
You can find your nearest authorized distributor or dealer on our website.
JAPAN Marantz Japan, Inc. 35-1 Sagami Ohno 7-Chome, Sagamihara-shi, Kanagawa 228-8505, Japan
U.S.A. Marantz America, Inc. 1100 Maplewood Drive, Itasca, IL 60143, U.S.A.
EUROPE Marantz Europe B.V. P.O. Box 8744, 5605 LS Eindhoven, The Netherlands
Printed in Japan 01/2004 ECMf 09AV851250
is a registered trademark.
R
 Loading...