

Page 1
Model SA-11S1 User Guide
Super Audio CD Player
CLASS 1 LASER PRODUCT
LUOKAN 1 LASERLAITE
KLASS 1 LASERAPPARAT
Page 2

ENGLISH
DEUTSCH
ITALIANO
SVENSKA
WARRANTY
For warranty information, contact your local Marantz distributor.
RETAIN YOUR PURCHASE RECEIPT
Your purchase receipt is your permanent record of a valuable
purchase. It should be kept in a safe place to be referred to as
necessary for insurance purposes or when corresponding with
Marantz.
IMPORTANT
When seeking warranty service, it is the responsibility of the
consumer to establish proof and date of purchase. Your purchase
receipt or invoice is adequate for such proof.
FOR U.K. ONLY
This undertaking is in addition to a consumer's statutory rights
and does not affect those rights in any way.
FRANÇAIS
GARANTIE
Pour des informations sur la garantie, contacter le distributeur
local Marantz.
CONSERVER L'ATTESTATION D'ACHAT
L'attestation d'achat est la preuve permanente d'un achat de
valeur. La conserver en lieu sur pour s'y reporter aux fins
d'obtention d'une couverture d'assurance ou dans le cadre de
correspondances avec Marantz.
IMPORTANT
Pour l'obtention d'un service couvert par la garantie, il incombe
au client d'établir la preuve de l'achat et d'en corroborer la date.
Le reçu ou la facture constituent des preuves suffisantes.
GARANTIE
Bei Garantiefragen wenden Sie sich bitte an Ihren MarantzHändler.
HEBEN SIE IHRE QUITTING GUT AUF
Die Quittung dient Ihnen als bleibende Unterlage für Ihren
wertvollen Einkauf Das Aufbewahren der Quittung ist wichtig,
da die darin enthaltenen Angaben für Versicherungswecke oder
bei Korrespondenz mit Marantz angeführt werden müssen.
WICHTIG!
Bei Garantiefragen muß der Kunde eine Kaufunterlage mit
Kaufdatum vorlegen. Ihren Quittung oder Rechnung ist als
Unterlage ausreichend.
NEDERLANDS
GARANTIE
Voor inlichtingen omtrent garantie dient u zich tot uw plaatselijke
Marantz.
UW KWITANTIE, KASSABON E.D. BEWAREN
Uw kwitantie, kassabon e.d. vormen uw bewijs van aankoop
van een waardevol artikel en dienen op een veilige plaats
bewaard te worden voor evt, verwijzing bijv, in verbend met
verzekering of bij correspondentie met Marantz.
BELANGRIJK
Bij een evt, beroep op de garantie is het de verantwoordelijkheid
van de consument een gedateerd bewijs van aankoop te tonen.
Uw kassabon of factuurzijn voldoende bewijs.
ESPAÑOL
GARANTIA
Para obtener información acerca de la garantia póngase en
contacto con su distribuidor Marantz.
GUARDE SU RECIBO DE COMPRA
Su recibo de compra es su prueba permanente de haber
adquirido un aparato de valor, Este recibo deberá guardarlo en
un lugar seguro y utilizarlo como referencia cuando tenga que
hacer uso del seguro o se ponga en contacto con Marantz.
IMPORTANTE
Cuando solicite el servicio otorgado por la garantia el usuario
tiene la responsabilidad de demonstrar cuándo efectuó la
compra. En este caso, su recibo de compra será la prueba
apropiada.
GARANZIA
L’apparecchio è coperto da una garanzia di buon funzionamento
della durata di un anno, o del periodo previsto dalla legge, a
partire dalla data di acquisto comprovata da un documento
attestante il nominativo del Rivenditore e la data di vendita. La
garanzia sarà prestata con la sostituzione o la riparazione
gratuita delle parti difettose.
Non sono coperti da garanzia difetti derivanti da uso improprio,
errata installazione, manutenzione effettuata da personale non
autorizzato o, comunque, da circostanze che non possano
riferirsi a difetti di funzionamento dell’apparecchio. Sono inoltre
esclusi dalla garanzia gli interventi inerenti l’installazione e
l’allacciamento agli impianti di alimentazione.
Gli apparecchi verranno riparati presso i nostri Centri di
Assistenza Autorizzati. Le spese ed i rischi di trasporto sono a
carico del cliente.
La casa costruttrice declina ogni responsabilità per danni diretti o
indiretti provocati dalla inosservanza delle prescrizioni di
installazione, uso e manutenzione dettagliate nel presente manuale
o per guasti dovuti ad uso continuato a fini professionali.
PORTUGUÊS
GARANTIA
Para informações sobre a garantia, contactar o distribuidor
Marantz local.
GUARDAR O RECIBO DE COMPRA
O recibo é o registo permanente da compra que fez. Deve ser
guardado num local seguro, para ser apresentado em questões
relacionadas com o seguro ou para quando tiver de contactar a
Marantz.
IMPORTANTE
Quando procurar assisténcia técnica ao abrigo da garantia, é
da responsabilidade do consumidor estabelecer a prova e data
de compra. O recibe é prova adequada.
GARANTI
För information om garantin, kontakta Marantz lokalagent.
SPAR KVITTOT
Kvittot är ett inköpsbevis på en värdefull vara. Det skall förvaras
säkert och hänvisas till vid försäkringsfall eller vidkorrespondens
mod Marantz.
VIKTIGT
Fö att garantin skall gälla är det kundens sak att framställa bevis
och datum om köpet. Kvitto eller faktura är tillräokligt bevis fö
detta.
DANSK
GARANTI
Henvend dem til Deres MARANTZ-forhandler angående
inrformation om garantien.
GEM DERES KVITTERING
Deres købskvittering er Deres varige bevis på et dyrt køb. Den
bør gemmes godt og anvendes som bevis, hvis De vil tegne en
forsikring, eller hvis De kommunikerer med Marantz.
VIGTIGT
Det påhviler forbrugeren at skaffe bevis for købet og købsdatoen,
hvis han eller hun ønsker garantiservice. Deres købskvittering eller
faktura er et fuldgyldigt bevis herpå.
Page 3

CE MARKING
English
The SA-11S1 is in conformity with the EMC directive and low-voltage directive.
Français
Le SA-11S1 est conforme à la directive EMC et à la directive sur les basses tensions.
Deutsch
Das Modell SA-11S1 entspricht den EMC-Richtlinien und den Richtlinien für
Niederspannungsgeräte.
Nederlands
De SA-11S1 voldoet aan de EMC eisen en de vereisten voor laag-voltage.
Español
El SA-11S1 está de acuerdo con las normas EMC y las relacionadas con baja tensión.
Italiano
Il SA-11S1 è conforme alle direttive CEE ed a quelle per i bassi voltaggi.
Português
O SA-11S1 conforma com as diretrizes EMC e de baixa voltagem.
Svenska
SA-11S1 är tillverkad i enlighet med EMC direktiven och direktiven för lågvoltsutrusning.
Dansk
Model SA-11S1 er i overensstemmelse med EMC-direktiveet og direktivet om
lavspænding.
English
WARNINGS
-
Do not expose the equipment to rain or moisture.
- Do not remove the cover from the equipment.
-
Do not insert anything into the equipment through
the ventilation holes.
- Do not handle the mains lead with wet hands.
-
Do not cover the ventilation with any items such as
tablecloths, newspapers, curtains, etc.
-
No naked flame sources, such as lighted candles,
should be placed on the equipment.
-
When disposing of used batteries, please comply
with governmental regulations or environmental
public instruction’s rules that apply in your
country or area.
-
Do not place anything about 0.1 meter above the
top panel.
-
Make a space of about 0.1 meter around the unit.
Français
AVERTISSEMENTS
- Ne pas exposer l’appareil à la pluie ni à l’humidité.
- Ne pas essayer de retirer le boîtier de l’appareil.
- Ne rien insérer dans l’appareil par les orifices de
ventilation.
- Ne pas manipuler le cordon d’alimentation avec
les mains mouillées.
- Ne pas recouvrir les ouïes de ventilation avec un
objet quelconque comme une nappe, un journal,
un rideau, etc.
- Ne placer aucune source de flamme nue,
comme une bougie allumée, sur l'appareil.
- Pour mettre au rebut les piles usées, respecter
les lois gouvernementales ou les règlements
officiels concernant l’environnement qui
s'appliquent à votre pays ou région.
- Ne placez aucun object à moins de 0,1 mètre
environ du panneau supérieur.
- Veiller à ce qu’aucun objet ne soit à moins de
0,1 mètre des côtés de l'appareil.
Deutsch
WARNHINWEISE
- Das Gerät nicht Regen oder Feuchtigkeit
aussetzen.
- Die Abdeckung nicht vom Gerät abnehmen.
- Keine Gegenstände durch die Belüftungsschlitze stecken.
- Das Netzkabel nicht mit feuchten oder nassen
Händen anfassen.
- Decken Sie die Lüftungsöffnungen nicht mit
einem Tischtuch, einer Zeitung, einem Vorhang
usw. ab.
- Es dürfen keine Gegenstände mit offener
Flamme, wie etwa brennende Kerzen, auf dem
Gerät aufgestellt werden.
- Beachten Sie bei der Entsorgung der verbrauchten Batterien alle geltenden lokalen und überregionalen Regelungen.
- Darauf achten, daß über dem Gerät ein Freiraum von mindestens 0,1 meter vorhanden ist.
- Auf allen Geräteseiten muß ein Zwischenraum
von ungefähr 0,1 meter vorhanden sein.
Nederlands
WAARSCHUWINGEN
- Stel het apparaat niet bloot aan regen of vocht.
- Verwijder de afdekplaat van het apparaat niet.
- Duw niets door de ventilatieopeningen in het
apparaat.
- Raak het netsnoer niet met natte handen aan.
- Bedek de ventilatieopeningen niet met enige
voorwerpen, zoals tafelkleden, kranten,
gordijnen, enz.
- Plaats geen brandende voorwerpen, zoals
kaarsen, op het apparaat.
- Volg bij het weggooien van verbruikte batterijen
de overheidswetgeving of milieuvoorschriften op
die van kracht zijn in het land of de regio waarin
u zich bevindt.
- Zorg dat er tenminste 0,1 meter vrije ruimte
boven het toestel is.
- Zorg dat er 0,1 meter vrije ruimte rond het
toestel is.
Page 4

Español
ADVERTENCIAS
-
No exponga el equipo a la lluvia ni a la humedad.
- No extraiga la tapa del equipo.
- No introduzca nada en el interior del equipo a
través de los orificios de ventilación.
- No maneje el cable de alimentación con las
manos mojadas.
- No cubra la ventilación con objetos como manteles, periódicos, cortinas, etc.
- No deben colocarse sobre el equipo elementos
con fuego, por ejemplo velas encendidas.
- Cuando se eliminen baterías usadas, deben
cumplirse las reglamentaciones oficiales o las
normas de protección medioambiental aplicables en su país o en su zona.
- No ponga nada a menos de 0,1 metro por
encima del panel superior.
- Deje un espacio de unos 0,1 metro alrededor de
la unidad.
Italiano
AVVERTENZE
- Non esporre l’apparecchio alla pioggia o all’umidità.
- Non rimuovere il coperchio dell’apparecchio.
- Non introdurre oggetti all’interno dell’apparecchio attraverso i fori di ventilazione.
- Non toccare il cavo di alimentazione con le mani
bagnate.
- Non coprire le fessure di ventilazione con
tovaglie, giornali, tende od oggetti analoghi.
- Non posare sull'apparecchio sorgenti di fiamme
scoperte quali candele accese.
- Smaltire le pile usate in conformità alle norme
governative o disposizioni ambientali vigenti nel
proprio paese o zona.
- Non posare alcun oggetto sopra il pannello
superiore, lasciando libero uno spazio di circa
0,1 m.
- Lasciare 0,1 metro liberi tutto intorno l'unità.
Português
ADVERTÊNCIAS
-Não exponha o equipamento à chuva nem à
humidade.
-Não retire a tampa do equipamento.
-Não atire nada para dentro do equipamento
através dos orificíos de ventilação.
-Não manuseie o cabo de alimentação com as
mãos molhadas.
-Não cobrir os orifícios de ventilação com objec-
tos tais como toalhas de mesa, jornais, cortinas,
etc.
-Não colocar chamas abertas tais como velas
acesas, sobre o aparelho.
- Ao deitar foras as pilhas usadas, favor observar
os regulamentos governamentais ou as regras
com respeito ao meio ambiente que se aplicam
no seu país ou área de residência.
- Deixar um espaço completamente livre de cerca
de 0,1 metro acima do painel superior.
- Deixar um espaço de cerca de 0,1 metro ao
redor do aparelho.
Svenska
VARNINGAR
- Utsätt inte utrustningen för regn eller fukt.
- Ta inte bort utrustningens hölje.
-
För inte in föremål i utrustningen genom ventilationshålen.
- Hantera inte nätsladden med våta händer.
-Täck inte för ventilationsöppningarna med några
föremål som till exempel bordsdukar, dagstidningar, gardiner e.d.
- Inga föremål med öppen låga, som till exempel
tända stearinljus, bör placeras på utrustningen.
-Följ de lagar och miljöskyddsråd som gäller i det
land eller område där du bor när du gör dig av
med batterier.
- Placera inte någonting närmare än 0,1 meter
ovanför apparaten eller enheten.
- Se till att det finns omkring 0,1 meter fri plats
runt omkring enheten.
Dansk
ADVARSLER
- Udsæt ikke udstyret for regn eller fugt.
- Fjern ikke dækslet fra udstyret.
- Stik ikke noget ind i udstyret gennem ventilationshullerne.
-Rør ikke ved netledningen med våde hænder.
- Tildæk ikke ventilationsåbningerne med ting
som duge, aviser, gardiner og lignende.
- Kilder til åben ild, som for eksempel tændte
sterarinlys, må ikke anbringes på apparatet.
-Når du skiller dig af med gamle batterier, bedes
du gøre dette i overensstemmelse med de love,
regler og miljøm æssige forskrifter, som er
gældende i dit land eller område.
- Anbring ikke noget nærmere end 0,1 m over
apparatets overside,
-Sørg for, at der er et frit område på omkring 0,1
m omkring apparatet.
Page 5
CONTENTS
FOREWORD ........................................ 1
EQUIPMENT MAINS WORKING SETTING ..
•
COPYRIGHT ............................................. 1
•
INTRODUCTION.................................. 1
PRODUCT FEATURES ............................. 2
•
ABOUT SUPER AUDIO ............................. 2
•
PLAYING CD-RW DISCS .......................... 2
•
APPLICABLE DISCS TO THE UNIT .......... 2
•
BEFORE USING .................................. 2
NOTES ABOUT THE DISCS ..................... 2
•
INAPPROPRIATE PLACES FOR INSTAL-
•
LATION ...................................................... 3
PRECAUTIONS ......................................... 3
•
USING REMOTE CONTROL UNIT ........... 3
•
LOADING BATTERIES .............................. 3
•
NAMES AND FUNCTIONS ................. 4
FRONT PANEL .......................................... 4
•
REMOTE CONTROLLER .......................... 5
•
REAR PANEL ............................................ 6
•
DISPLAY .................................................... 7
•
CONNECTIONS................................... 8
OPERATION ........................................ 9
CONNECTING THE POWER SUPPLY ..... 9
•
NORMAL PLAYBACK ................................ 9
•
START SOUND MODE ............................ 10
•
MAKING YOUR FAVORITE AUDIO SET-
•
1
TINGS ...................................................... 10
PLAYING YOUR FAVORITE TRACKS OF A
•
DISC ........................................................ 11
PLAYING YOUR FAVORITE PARTS OF A
•
DISC (SEARCH) ...................................... 11
REPEATED DISC PLAY (REPEAT PLAY) ..
•
PLAYING TRACKS IN A RANDOM SE-
•
QUENCE (RANDOM PLAYBACK) ........... 11
PLAYING TRACKS IN A SPECIFIC
•
SEQUENCE (PROGRAM PLAY) ............. 11
SEARCHING YOUR FAVORITE TRACKS
•
(AMS (AUTOMATIC MUSIC SCAN) PLAY) ..
QUICK REPLAY ....................................... 12
•
ABOUT THE TEXT INFORMATION
•
DISPLAY .................................................. 12
CHANGING THE TEXT BRIGHTNESS ON THE
•
LCD (LCD CONTRAST ADJUSTMENT) ......
TURNING OFF THE DISPLAY AND
•
ILLUMINATION (DISPLAY OPERATION) ..
TIMER PLAY ............................................ 13
•
ABOUT BALANCED JACKS.................... 13
•
TROUBLE SHOOTING...................... 14
SPECIFICATIONS
FOREWORD
This section must be read before any connection is
made to the mains supply.
EQUIPMENT MAINS WORKING
SETTING
Your Marantz product has been prepared to
comply with the household power and safety
11
requirements that exist in your area.
SA-11S1 can be powered by 230V AC only.
COPYRIGHT
Recording and playback of any material may
require consent. For further information refer to the
12
following:
— Copyright Act 1956
— Dramatic and Musical Performers Act 1958
— Performers Protection Acts 1963 and 1972
— Any subsequent statutory enactments and
orders
13
13
INTRODUCTION
Thank you for selecting the Marantz SA-11S1 Super
Audio CD Player for your Audio system.
This Player incorporates a number of features
designed to enhance the listening of your favorite
audio sources.
Please read these operating instructions carefully.
We recommend that you read the entire user guide
before you attempt to connect or operate the player.
After you have reviewed the contents of this
manual,we suggest that you make all system
connections before you attempt to operate the unit.
ENGLISH
1
Page 6
ENGLISH
PRODUCT FEATURES
This unit can playback the outstanding sound
performance in Super Audio CD. This unit has the
following unique features.
• Low-noise low-distortion filter circuit and highspeed current-feedback-type output amplifier with
the differential input type HDAM.
• Text information display function that can display
disc titles, track titles etc. in Super Audio CD.
• CD-R/CD-RW discs can be played.
ABOUT SUPER AUDIO
The Super Audio standard is based on Direct Stream
Digital (DSD) technology. This new direct-stream
digital format comprises a 1-bit system that has a
digital sampling frequency that is 64 times higher than
that of conventional audio CD. The results are
spectacular: a frequency response of over 100k Hz
and a 120 dB dynamic range over the entire audible
spectrum. Mixed with as many of the original
frequencies as possible, the audio information
audible for human ears sounds much more natural.
All audible frequencies are, after all, embedded in
the frequency range as emitted by the sound source.
A better reproduction does not exist! For the first time
your ears will relive reality.
PLAYING CD-RW DISCS
This unit can play back the CD-RW (ReWritable)
discs as well as ordinary Audio CD and CD-R
(Recordable) discs.
• The CD-R and CD-RW discs should contain
properly-recorded TOC information so that they
can be played back. In CD recorders, the task of
writing TOC information is referred to as finalizing
the disc. Discs that are not finalized cannot be
properly recognized as an Audio CD and played
back by regular CD players and Super Audio CD
players. For details, please read the instruction
manual provided with a CD recorder.
* TOC stands for Table Of Contents and contains
information such as the total number of tracks
and total playing time of the disc.
• This unit can play only the discs recorded in the
CD-DA format designed for music reproduction.
Do not attempt to play a disc containing other
data, such as a CD-ROM for PCs, on this unit.
• As the playback of a CD-RW disc necessitates
partial change of the player setup, it may take
longer time for reading the TOC information than
when an Audio CD or CD-R disc is played.
APPLICABLE DISCS TO THE UNIT
1. Super Audio CD
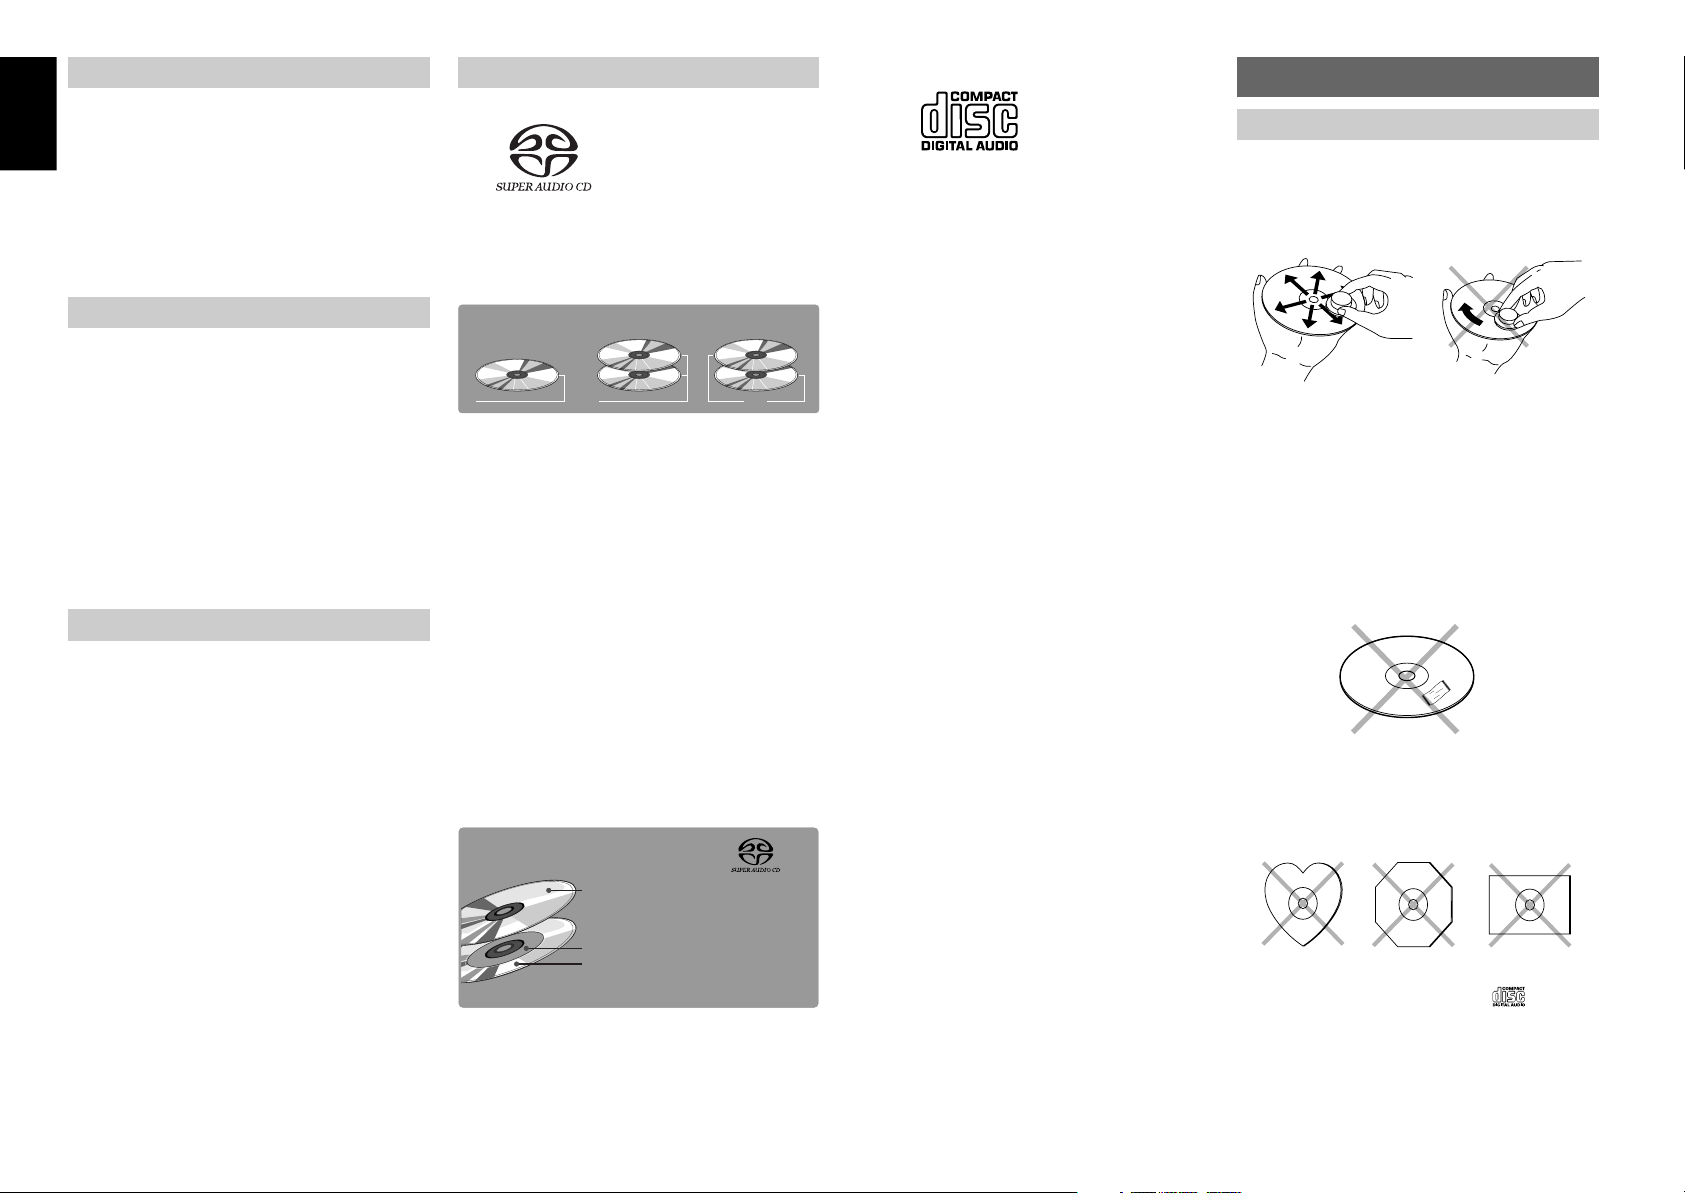
There are three types of Super Audio CDs.
• Single-layer Disc
• Dual-layer Disc
• Hybrid-layer Disc
Disc Types
Single-layer Disc
HD layer HD layer CD layer HD layer
And each type may contain two areas of recorded
information.
• High quality stereo area
• High quality multi-channel area**
• Single Layer Disc
It can contain both high quality stereo area and
high quality multi-channel area** information.
• Dual Layer Disc
It can contain both high quality stereo area and
high quality multi-channel area** information. And
a double amount of information can be stored on
the disc thanks to the second layer.
• Hybrid Layer Disc
Not only does this disc contain both high sound
quality stereo area and high sound quality multichannel area** information, it also has a CD layer
in the second layer, so it can be played on a CD
player.
Hybrid Super Audio
CD Disc
The number of tracks recorded may vary per layer. It
will be shown on the display window of the unit.
** This unit is a stereo-only player, and so it cannot
play high-quality multi-channel audio areas. (It
does not recognize multi-channel areas.)
Dual-layer Disc
1 CD layer that plays on any of your
existing CD players
High-Density layer containing:
2 - High sound quality stereo
3 -
High sound quality multi-channel
Hybrid-layer Disc
**
2. Audio CD (CDDA)
Audio CDs contain music tracks only.
BEFORE USING
NOTES ABOUT THE DISCS
* Handle the discs carefully so as not to scratch
their surfaces.
* Keep the surfaces of the discs clean at all times.
When cleaning the surfaces of discs, always be
sure to use the special cleaner and wipe the
surfaces in the directions shown in the figure below.
•
•
Wipe the surface
radially from the
center.
* Do not attach pieces of paper or stickers to the
label surfaces of the discs.
When a disc has a piece of plastic tape or rental
CD label with paste protruding from the edge or
when a disc still bears traces of sticky tape or
adhesive labels, do not attempt to play it. If such a
disc is played on the CD player, you may find that
you cannot remove it or that some other kind of
malfunctioning may occur.
* Do not use discs which come in special shapes.
Do not attempt to play heart-shaped or octagonal
discs or discs with any other special shapes. You
may find that you cannot remove them or that some
other kind of malfunctioning may occur in the player.
* Use discs which satisfy the CD standards such
as those with the “CD logo” or “ ” mark on
their disc label surfaces.
No guarantees are made for playback if discs which
do not satisfy the appropriate CD standards are
used.
Similarly, no guarantees are made for their sound
quality even if it is possible to play such discs.
Do not wipe the surface in
the circumferential
direction.
2
Page 7
* To protect your discs from damage, avoid
PAUSE
STOP
PLAY
OPEN/
SOUND
POWER ON/OFF
SUPER AUDIO CD PLAYER SA-11S1
CLOSE
MODE
DISPLAY OFF
60°
placing them in the following locations.
• Where they will be exposed to direct sunlight or
where they will be close to a heater or other heatradiating appliance
• Where the humidity level is high or it is very dusty
• Near a window or other such location where they
may be exposed to rain
* Get into the habit of putting the discs back in
their cases after use.
INAPPROPRIATE PLACES FOR
INSTALLATION
To keep your player in perfect working order for the
longest possible time, avoid installing the player in
the following locations.
• Wherever it will be exposed to direct sunlight
• Wherever it will be close to a heater or other heat-
radiating appliance
• Wherever the humidity is high or ventilation is poor
• Wherever it is very dusty
• Wherever it will be subject to vibration
• On top of a rickety stand or in an unstable location
which is tilted at an angle
• In an audio rack with little space at the top and
bottom or other location where the heat
dissipation will be obstructed
To ensure proper heat dissipation, install the
player while leaving clearances between the
player and wall or other components, as shown
in the figure below.
• On top of an amplifier or other component which
dissipates a great deal of heat
* The quality of the laser and other components
can be harmed if the player is placed directly
on top of an amplifier or other device which
generates heat.
0.1 m or more
0.1 m or more
0.1 m or more
0.1 m or more
DO NOT PLACE OBJECTS ON TOP
• Refrain from placing any objects on top of the
player.
CAUTIONS ON HANDLING POWER CORD
• Do not touch the power cord with wet hands.
• When disconnecting the power cord, always make
sure that you take hold of the plug. Yanking out
or bending the cord can damage it and/or cause
electric shocks or a fire.
• Get into the habit of disconnecting the power plug
before leaving home.
DO NOT ATTEMPT REPAIRS YOURSELF
• Refrain from lubricating the player: doing so can
cause malfunctioning.
• Only qualified engineers with specialized
expertise are authorized to repair the pick-up and
parts inside the player.
PRECAUTIONS
• In winter, droplets of water form on the insides of
the windows of a heated room: this is called
condensation. This player uses an optical lens,
so the condensation may form in the following
cases.
- In a room immediately after the heating has
been turned on
- In a room where the humidity level is high
- When the player has been suddenly brought
from a cold location into a warm room
Since, in cases like this, the track numbers may
not be read and the player is prevented from
operating properly, wait about 30 minutes, and
then operate the player.
• This player may cause interference on a tuner or
TV set. If this is the case, place it further away
from the tuner or TV set.
• Compact discs have much less noise than analog
records and hardly any noise is heard before play
starts. Bear in mind, therefore, that if the volume
control on the amplifier is set too high, you will
risk damaging other audio components.
• This player is designed to play Super Audio CD
and normal Audio CDs only. It cannot play CDROMs used with personal computers, game CDs,
video CDs or DVDs (video/audio).
• We do not recommend the use of lens cleaners.
USING REMOTE CONTROL UNIT
Cautions on handling batteries
Misuse of the batteries can result in electrolyte
leakage, rupturing, corrosion, etc.
Bear in mind the following points when using
batteries.
• Remove the batteries from the remote control
unit if the unit is not going to be used for a
prolonged period (a month or more).
• Do not use an old battery together with a new
one.
• Insert the batteries while ensuring that their
and poles are properly aligned with
the corresponding markings on the remote
control unit.
• Batteries with the same shape may have
different voltages. Do not use different types
of batteries together.
• If electrolyte has leaked, thoroughly wipe the
inside of the battery compartment, and then
insert new batteries.
• When batteries which are no longer required
are to be discarded, follow the directions
(regulations) laid down by the local authorities
in the area concerned for their disposal.
LOADING BATTERIES
Batteries in this remote control unit have a life of
approximately 1 year under normal operating
conditions. If the remote control unit is not going to
be used for an extended period of time, remove the
batteries. Also, if you notice that the batteries are
starting to run down, replace them as soon as
possible.
q Remove the battery cover.
w Insert the batteries with correct +/– orientation.
Two AAA-size (R03) batteries
ENGLISH
e Close the battery cover until it clicks shut.
REMOTE CONTROL
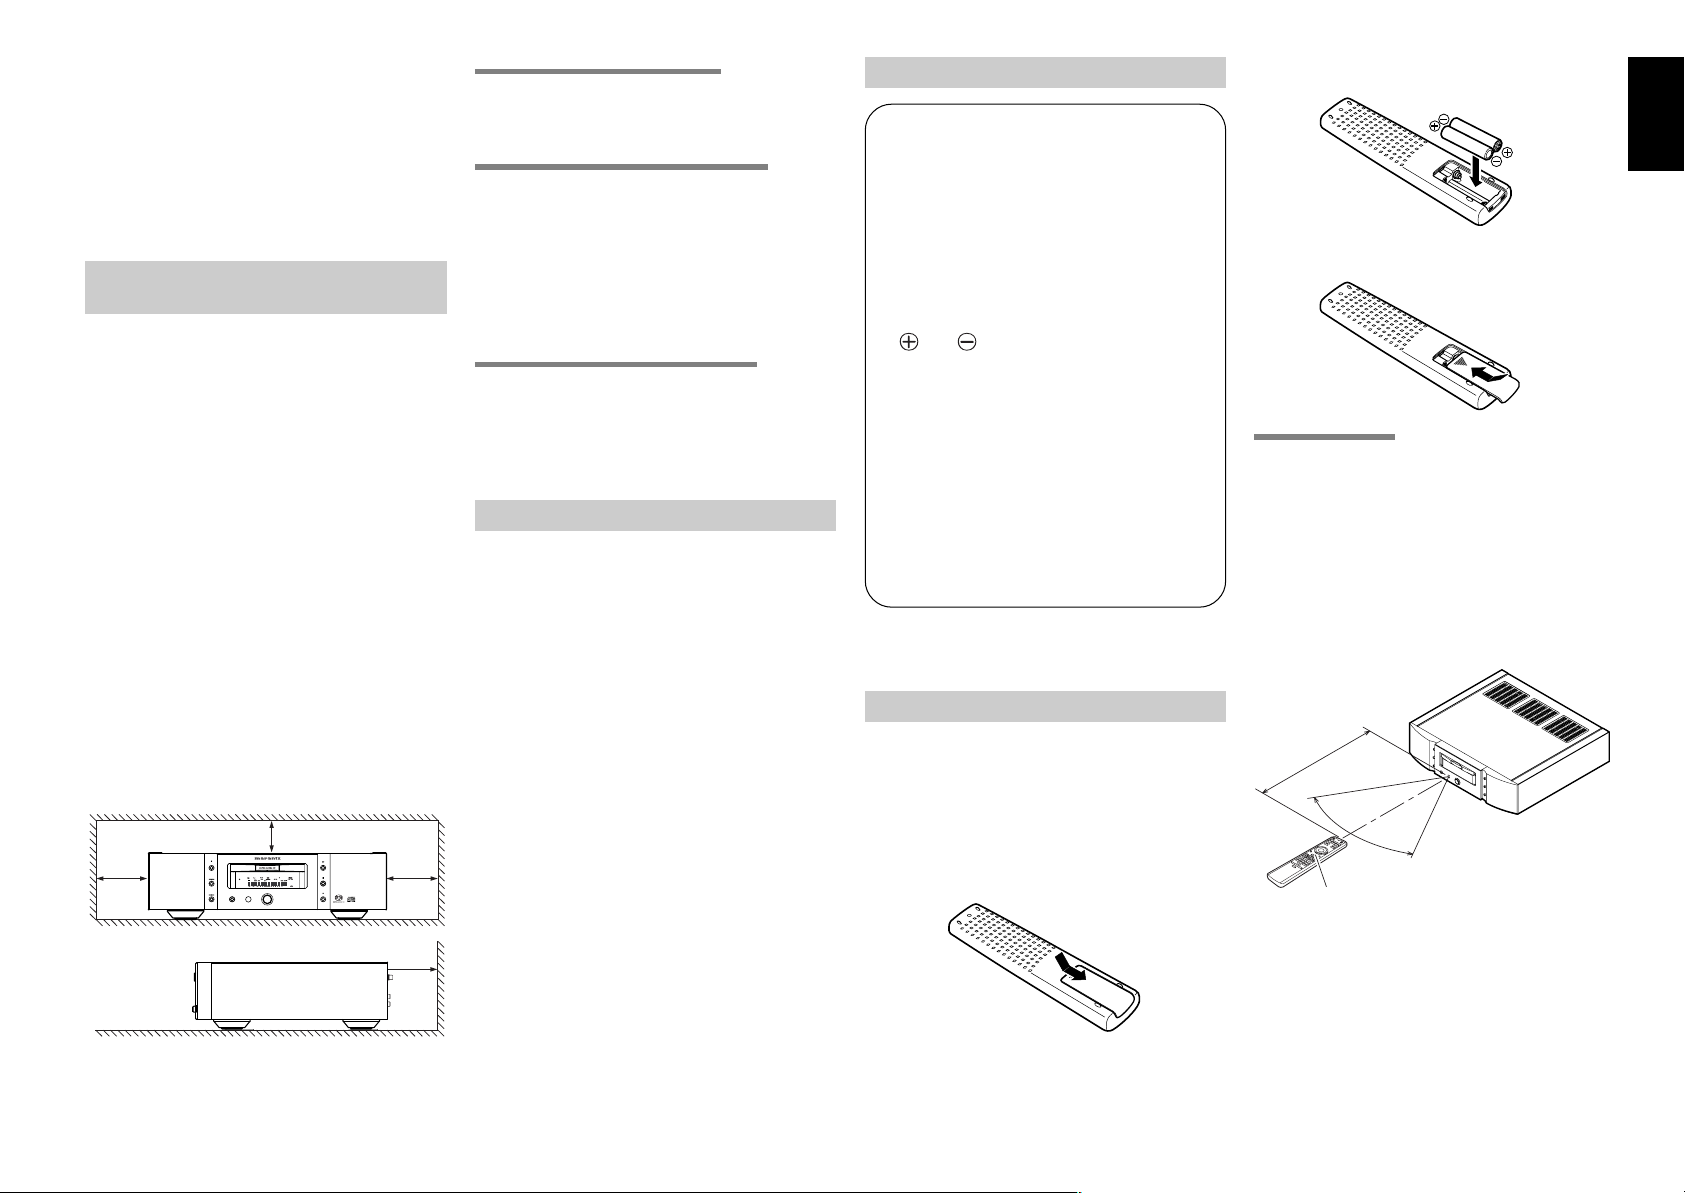
Operate the remote control unit (RC-11SAS1) within
a distance of approx. 5 m from the infrared signal
reception window (remote sensor) on the front of the
Super Audio CD player.
Remote control operation may not be possible if the
remote control unit’s transmitter is not pointing in the
direction of the remote sensor or if there is an
obstruction between the transmitter and the remote
sensor.
Remote control operating range
Approx. 5m
Remote control unit (RC-11SAS1)
3
Page 8
ENGLISH
SOUND MODE
PAUSE
STOP
PLAY
OPEN/CLOSE
PAUSE
STOP
PLAY
DISPLAY OFF
OPEN/
SOUND
POWER ON/OFF
SUPER AUDIO CD PLAYER SA-11S1
CLOSE
MODE
bÚ1 c z xv mnÚ0Ú2 , .
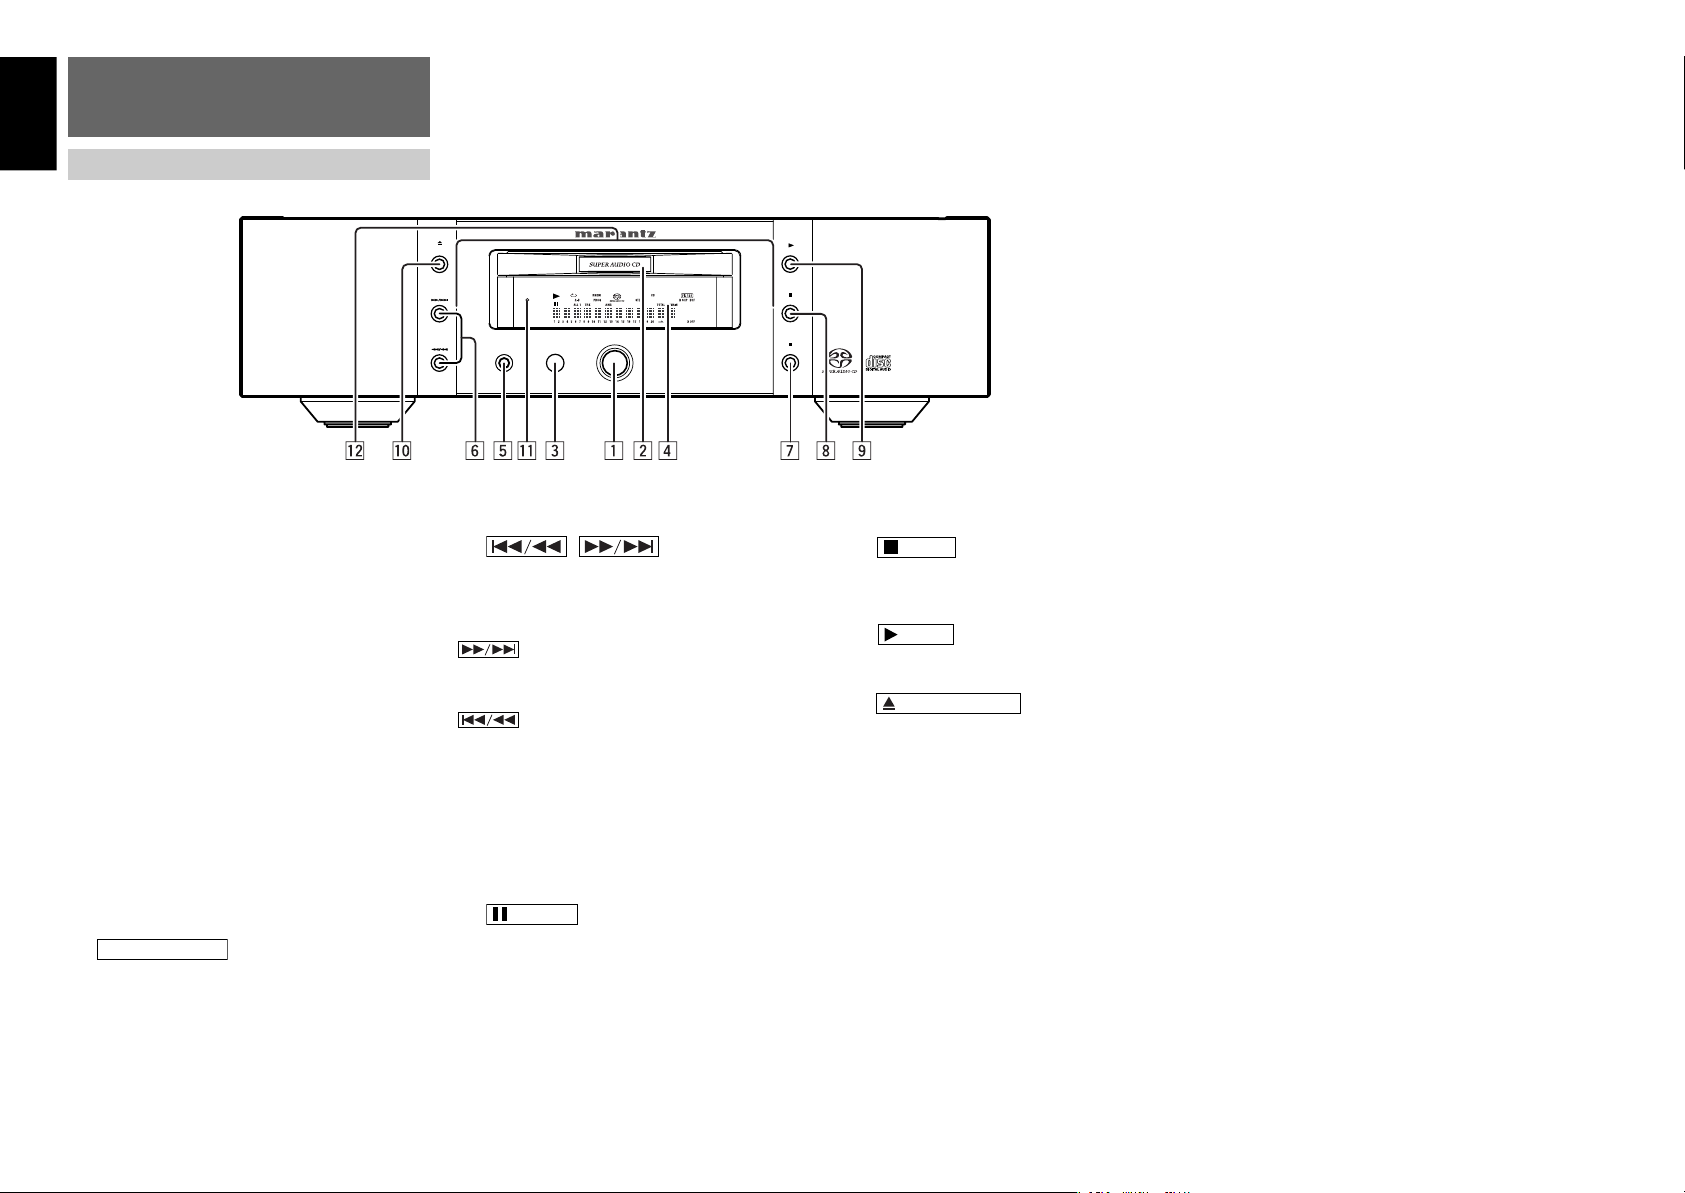
NAMES AND
FUNCTIONS
FRONT PANEL
z
POWER ON/OFF switch
This switch is used to turn the power ON and OFF.
When it is pressed, the display window lights up, and
the power comes on. When it is pressed again, the
display window is extinguished, and the power goes
off.
x
Disc tray
The disc to be played is placed on the tray.
* Close the tray by pressing the operation button,
not by pressing it in with your hand.
c
Remote sensor
The infrared control signal emitted from the remote
control unit are sensed here.
v
LCD
This screen shows the operating status.
b
Press this button to select the Super Audio CD sound
mode. Super Audio CD (stereo) or Audio CD (if discs
are supported) (See page 9)
button
n
, (Track Skip/Search
buttons)
These buttons can be used as both track skip and
track search buttons. (The buttons on the main unit
only.)
: Each time this button is pressed, the
track being played is skipped forward.
When this button is held down, tracks
are searched forward (Fast Forward).
: When this button is pressed, the unit
goes back to the beginning of the
current track. If the button is pressed
more times, the track being played is
skipped back. When this button is held
down, tracks are searched backward
In program play, Fast Forward and Fast Rewind can
be done in the playing track only.
m
Press this button to pause playback. If pressed again,
the unit returns to playback.
Holding down this button for two or more seconds
while a track is stopped starts LCD Contrast
Adjustment mode. (See page 13)
(Fast Rewind).
button
,
Press this button to stop playback. Also this button is
used to clear all programs.
.
Press this button to start playback.
⁄0
Press this button to open the tray. Put on a disk label
side up. Press the button again to close the tray.
⁄1
DISPLAY OFF indicator
This indicator turns on when the LCD screen is turned
off (Off mode).
⁄2
Illumination lamp
This lamp lights when the display window lights.
This lamp may always remain off for certain settings.
(See page 13)
button
button
button
4
Page 9
SOUND MODE
PAUSE
STOP
PLAY
OPEN/CLOSE
TIME
TEXT
DISPLAY
PROG.
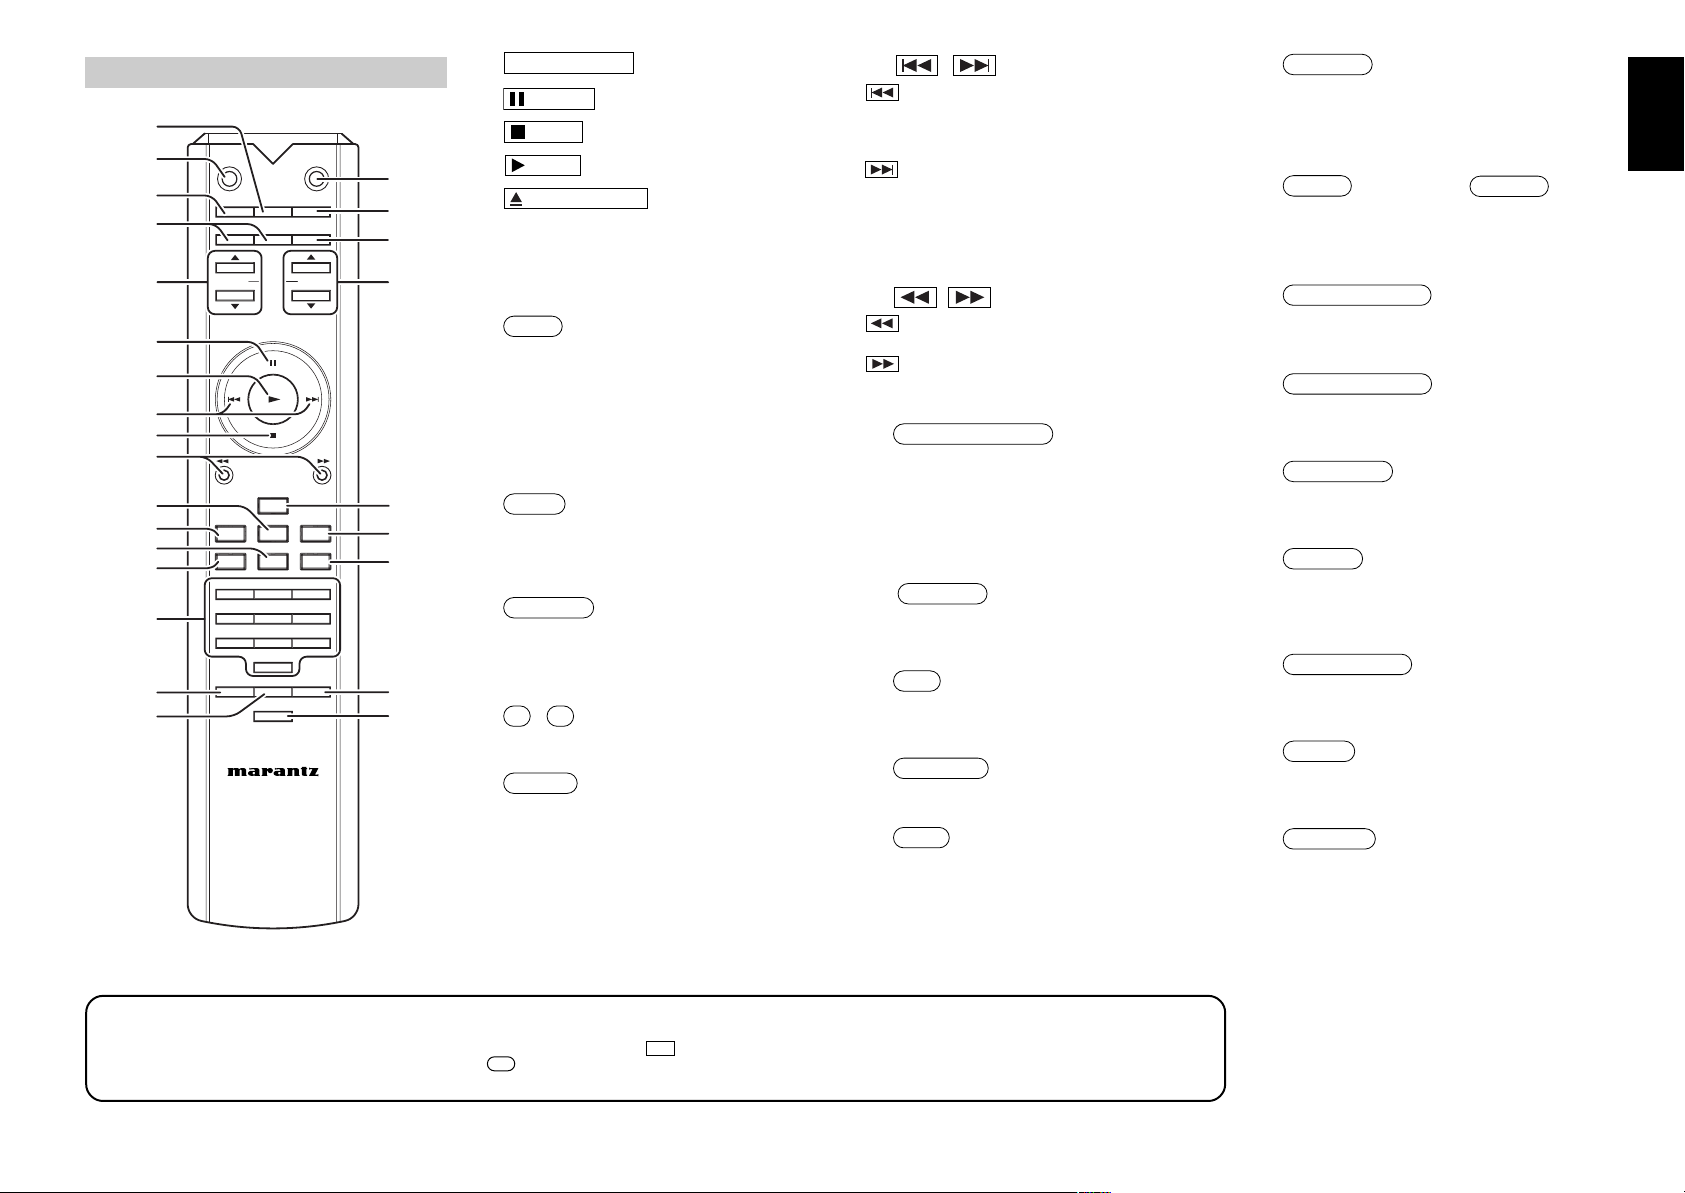
REMOTE CONTROLLER
RECALL/SCROLL
CANCEL
A-B
RANDOM
AMS
REPEAT
MENU
ENTER
QUICK REPLAY
NOISE SHAPER
DC FILTER
FILTER
DIGITAL OUT
INPUT
VOLUME
CANCEL
A-B
SOUND
INPUT
QUICK
VOLUME
OPEN/
RECALL
NOISE
RC-11SAS1
MODECLOSE
DISPLAY TIME TEXT
MENU SCROLLENTER
AMP
REPLAY
AMS
PROG
RANDOM
REPEAT
4
123
56
789
0
DIGITAL OUT
DC FILTERSHAPER FILTER
⁄3
⁄0
⁄5
¤6
‹2
m
.
⁄8
,
⁄9
¤2
¤4
¤1
⁄7
¤8
⁄6
¤9 ‹1
‹0
¤3
¤5
¤7
‹3
¤0
⁄4
b
b
m
,
.
⁄0
The buttons listed above are the same to the buttons
on the front panel of the main unit.
Please see the correspond items in “Front Panel”
section.
⁄3
This button is used to switch from the text display to
the time display when using a text-compatible Super
Audio CD. It is also used to change the time display.
Each time that it is pressed, the displayed time cycles
from track elapsed time → track remaining time →
total remaining time → track elapsed time . (See page
9)
⁄4
This button is pressed to switch the main screen from
the time display to the text display when using a textcompatible Super Audio CD. (See page 12)
button
button
⁄5
This button switches the display screen on and off.
The ⁄1 indicator turns on when Display Off is set.
(See page 13)
button
button
button
button
button
button
⁄60 - 9 (Numerical buttons)
Use these buttons to select tracks directory.
⁄7
This button is for program play. (See page 11)
button
⁄8
* Search buttons are provided separately for the
remote control unit. Use ⁄9 Search buttons for
search function.
⁄9
¤0
Use this button to scroll text while displaying text
information in a Super Audio CD disc that supports
TEXT.
This button is also used for checking the programmed
tracks during a program or when a program is
stopped. (See page 12)
¤1
Use this button to cancel a programmed track. (See
page 12)
¤2
This button is to determine starting and ending points
for A-B repeat play. (See page 11)
¤3
This button is for random play. (See page 11)
¤4
Use this button for AMS play. (See page 12)
, (Track skip buttons)
: When this button is pressed, the unit goes
back to the beginning of the current track. If
the button is pressed more times, the track
being played is skipped back.
: Each time this button is pressed, the track
being played is skipped forward.
, (Search buttons)
: While this button is pressed during playback,
tracks are searched backward.
: While this button is pressed during playback,
tracks are searched forward.
button
button
(A-B Repeat button)
button
(Automatic Music Scan button)
¤5
This button is for repeat play. Each time this button is
pressed, repeat mode changes as follows. “All
Repeat” → “Track Repeat” → “Repeat Off” (See page
11)
¤6
button
button and
button
(Menu setup)
These buttons are used to set the time for quick
replay. (See page 12)
¤7
This button is used to do quick replay of the tracks.
(See page 12)
¤8
This button is pressed to turn the noise shaper on
and off. (See page 10)
¤9
This button is pressed to turn the DC filter on and
off. (See page 10)
‹0
This button is pressed to make the digital filter
settings. Each time it is pressed, the settings cycle
from FIL1 → FIL2 → FIL3 → FIL1. (See page 10)
button
‹1
This button is pressed to turn the digital output for
the Audio CD signal on and off. (See page 10)
‹2
This button switches the input selector (INPUT) of
the Marantz PM-11S1 amplifier.
button
‹3
This button is used to increase or decrease the
volume of the Marantz PM-11S1 amplifier.
(Quick replay) button
button
button
button
button
ENGLISH
* In this instruction manual, some operations can only be performed with the remote control. For operations that can be performed with buttons both on the
main unit and on the remote control, the button names are shown in the
remote control, the button names are shown in the mark.
mark. And for operations that can only be performed with buttons on the
5
Page 10
ENGLISH
AB CDEFG
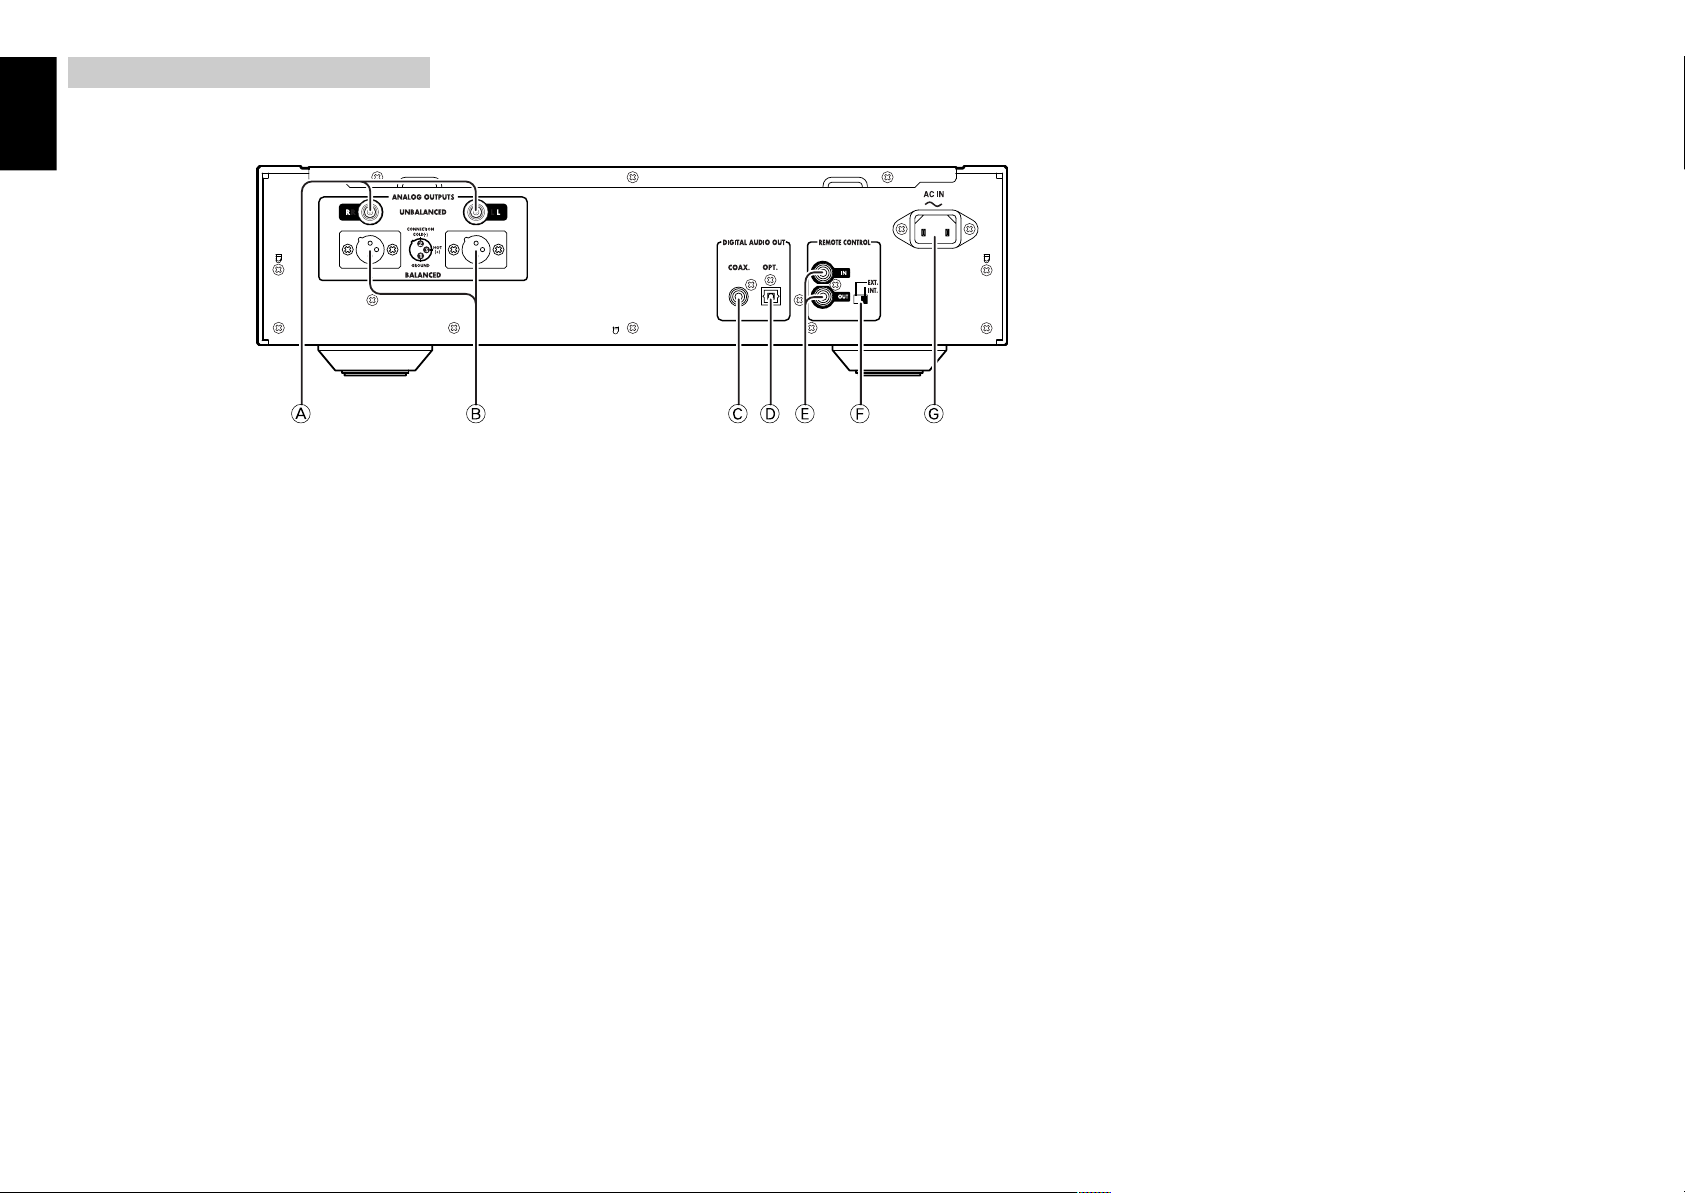
REAR PANEL
A
ANALOG OUTPUTS UNBALANCED connectors
These are the unbalanced output jacks of the analog
audio signals. The supplied analog connection cord
can be connected to the CD, AUX, or other
connectors on an amplifier. Be sure to connect the L
and R channels correctly to the corresponding jacks.
* Never connect to the PHONO connector on the
amplifier.
B
ANALOG OUTPUTS BALANCED connectors
These are the balanced output jacks of the analog
audio signals. A balanced connection cord (available
commercially) can be connected to the balanced
input jack of the amplifier. Be sure to connect the L
and R channels correctly to the corresponding jack.
(See page 13)
* If connecting the balanced output jacks, be sure to
leave the unbalanced jacks unconnected. (The
balanced and unbalanced connectors cannot be
used at the same time.)
C
DIGITAL AUDIO OUT COAX.
It outputs the playing Audio CD signal in digital format.
This jack is to be connected with a recording device,
amplifier, D/A converter, etc that has coaxial digital
input using an optional coaxial digital cable.
* Nothing is output when digital output is set to off.
* No signal will be output when a Super Audio CD is
played.
D
DIGITAL AUDIO OUT OPT.
It outputs the playing Audio CD signal in digital format.
This jack is to be connected with a recording device,
amplifier, D/A converter, etc that has optical digital
input using an optional square type optical digital
cable.
* Nothing is output when digital output is set to off.
* No signal will be output when a Super Audio CD is
played.
E
REMOTE CONTROL IN, OUT (input and
output) connectors
When the remote control connectors on the player
and on a Marantz AV component are connected using
the accessory remote control connecting cables, the
components can be operated as a system by remote
control.
• When connecting to a component which is
equipped with remote control connectors, the
player’s REMOTE CONTROL IN connector must
always be connected to the REMOTE CONTROL
OUT connector on the other component to be
connected.
• When connecting a component which is not
equipped with an infrared remote sensor, this
component must always be connected to the
player’s REMOTE CONTROL OUT connector.
F
EXT./INT. (Ext./Internal switch)
When this unit is used as a standalone component,
set this switch to the INT. side. When it is used
connected to external component by a remote
connecting cable and to audio component with a
remote sensor that supports remote controls by
Maranz, set this switch to the EXT. side.
* If the unit is used as standalone and the switch
is set to EXT. position, remote control unit
cannot be used.
G
AC POWER INPUT JACK
Connect the supplied power cord to this jack and a
household AC power outlet.
6
Page 11
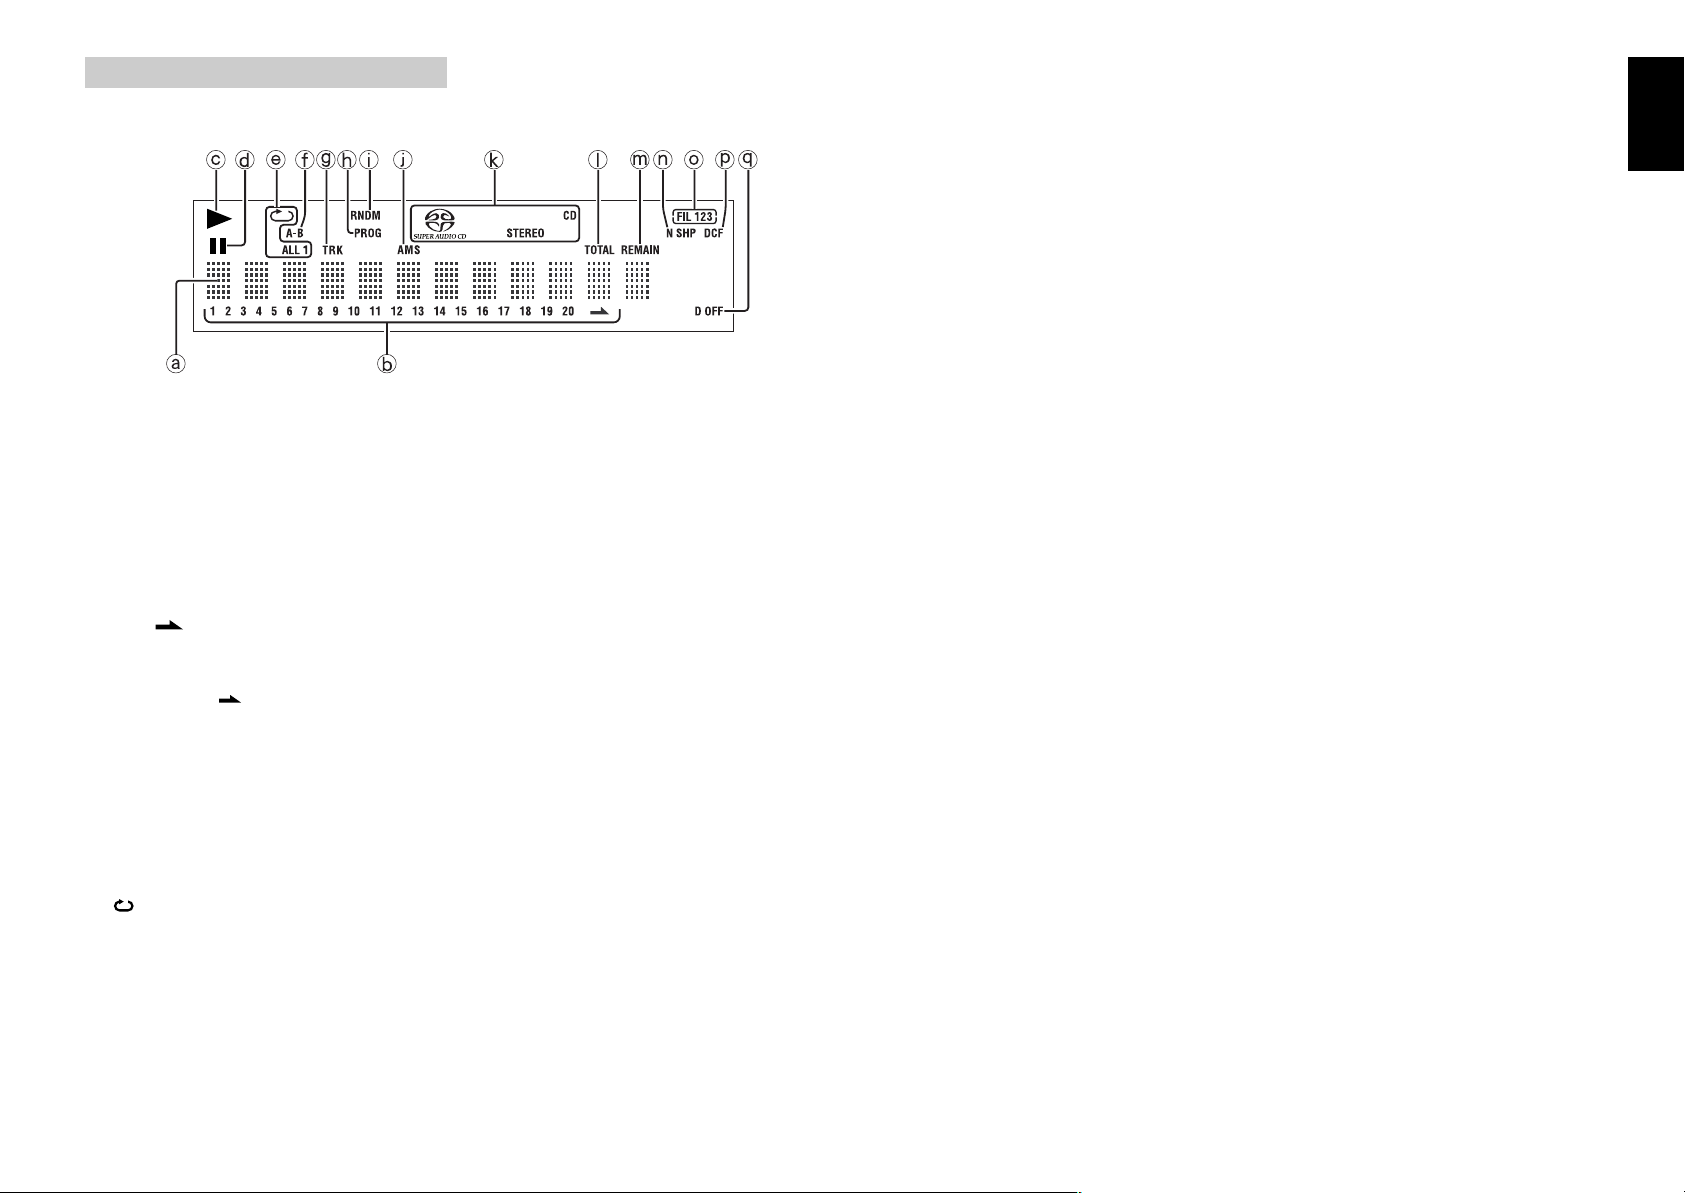
DISPLAY
a b
ced fgh j l m o qpnki
a
Main display
The time display and text information of the disc to
be played as well as the setting menus and other
displays appear on the main display.
b
1-20, (music calendar)
The number of tracks recorded on the disc to be
played, the number of remaining tracks to be played,
and the number of tracks programmed by program
play appear here. “ ” light when 21 or more tracks
have been recorded on the disc.
c 3
(play) indicator
This lights during disc play.
d 8
(pause) indicator
This lights when play is paused (temporarily stopped).
e
, ALL, 1 (repeat) indicator
This lights during repeat play.
g
TRK (track) indicator
This lights above the display of the track number now
playing, for instance.
h
PROG (program) indicator
This lights during program play.
i
RNDM (random) indicator
This lights during random play.
j
AMS (auto music search) indicator
This lights during AMS playback.
k
CD, SACD, STEREO Disc indicator
This indicates the type of disc on the disc tray.
l
TOTAL (total time) indicator
When the total remaining time or the total program
time is displayed, this lights above the display.
n
N SHP (noise shaper) indicator
This lights when the noise shaper is turned on. (See
page 10)
o
FIL 1 2 3 (filter 1, filter 2, filter 3) indicator
This indicates which filter among filter 1, filter 2, or
filter 3 is currently selected. (See page 10)
p
DCF (DC filter) indicator
This lights when the DC filter is turned on. (See page
10)
q
D OFF (digital output off) indicator
This lights when the digital output setting for the CD
signal is set to off. (See page 10)
ENGLISH
f
A-B (A-B repeat) indicator
This lights during A-B repeat play.
m
REMAIN (remaining time) indicator
When the remaining playback time of a track is
displayed, this lights above the display.
7
Page 12
ENGLISH
INTEGRARED AMPLIFIER PM-11S1
POWER ON/OFF
PHONES
VOLUME
A
TONE
SPEAKER
B
SPEAKER
REC OUT
PRE OUT
ATT.
MC
OPERATE
PHONO
DISPLAY
SELECTOR
INPUT
CONNECTIONS
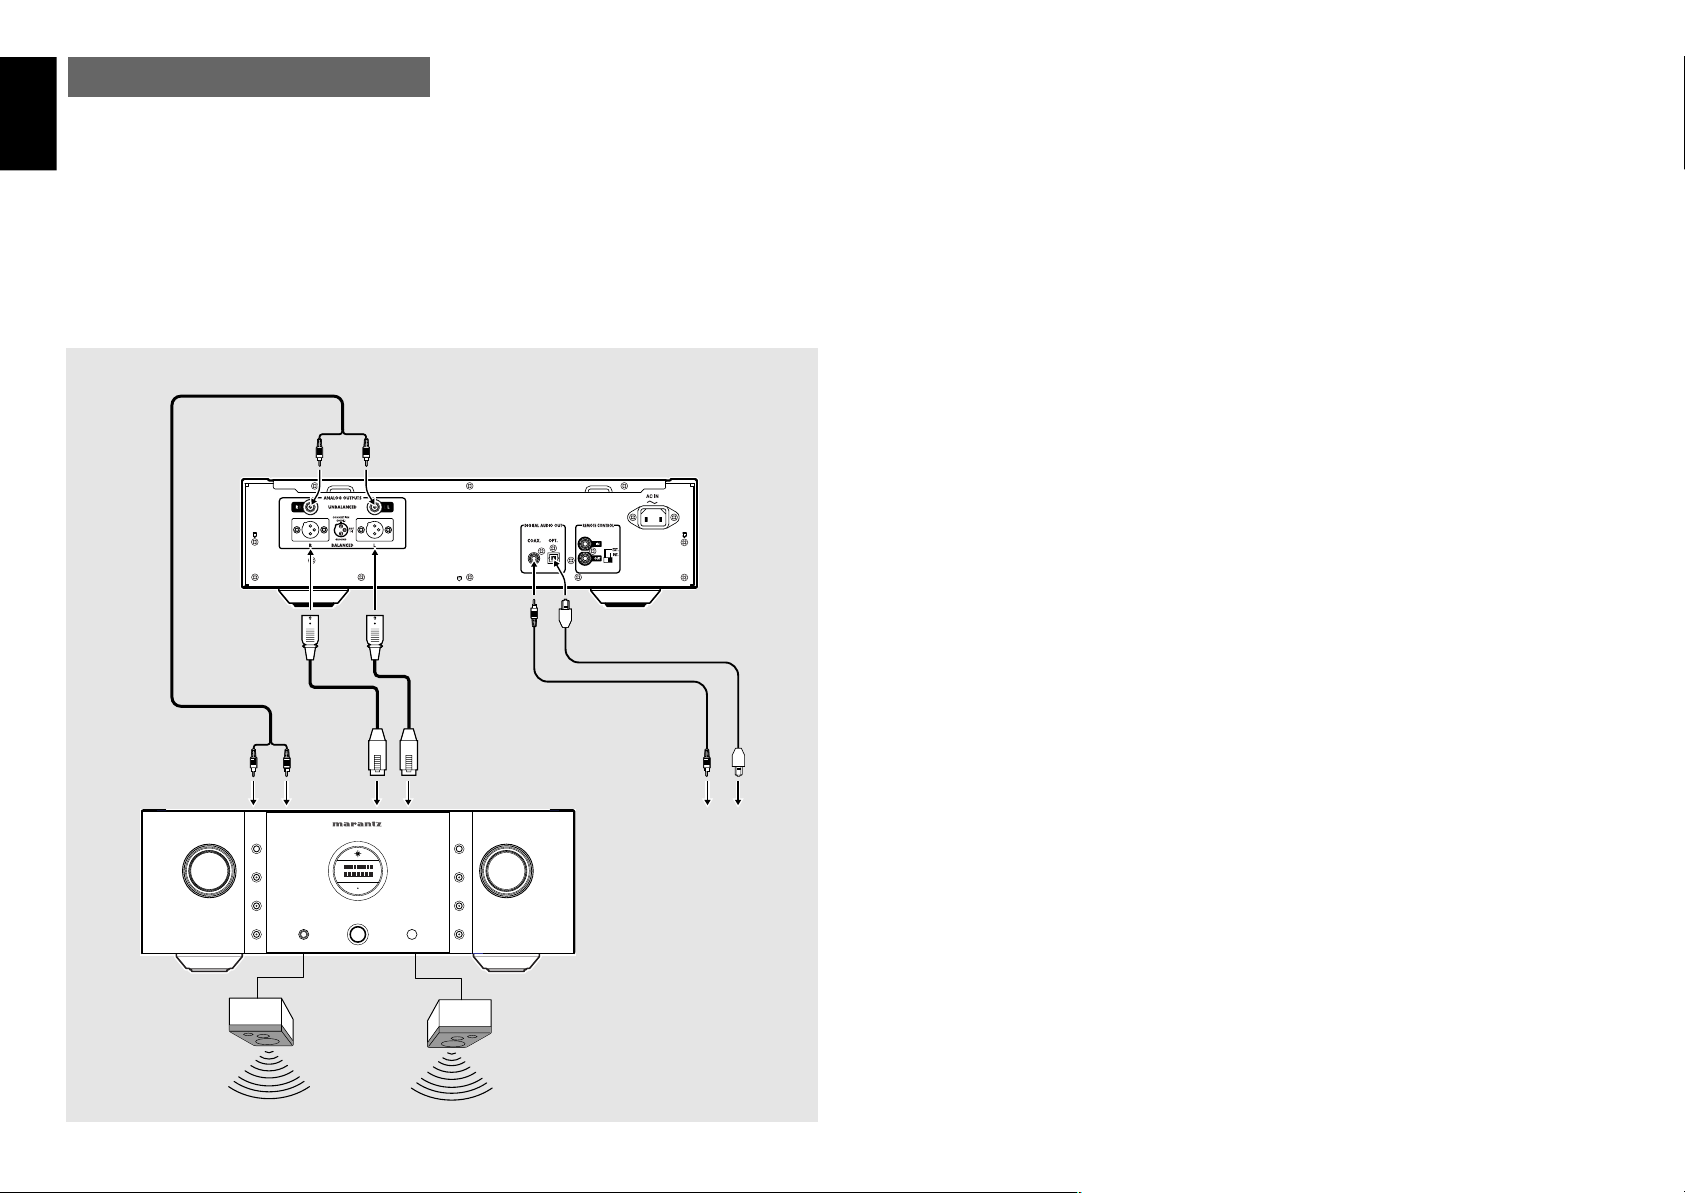
Depending on your amplifier/receiver/Stereo System, there are various ways to connect to this player. For
correct connection please refer to instruction manuals of stereo system to be connected.
Caution: Do not connect output from this unit to PHONO input of your audio system.
1. Connect the audio cable q to this unit’s front speaker outputs and the stereo inputs on your amplifier,
receiver or stereo system.
2. Connect the optical cable w, coaxial cable e to the digital input on your AV amplifier, D/A converter, CD-
R, etc..
* Signal will be output from the digital audio out jacks (OPT./COAX.) only when an Audio CD disc is played.
No signal is output when playing a Super Audio CD.
To Analog Audio output
Audio cable q
(Supplied)
To audio input
terminals on amplifier
(red)
(white)
To Digital Audio
output
w
(Optional)
Balanced
connection cord
(Optional)
To balanced
input terminals
on amplifier
q
Example)
PM-11S1
e
(Optional)
Connect to digital input
terminals of receiver, D/A
converter or CD recorder,
etc..
Left
speaker
Right
speaker
8
Page 13

OPERATION
PAUSE
STOP
PLAY
OPEN/
SOUND
POWER ON/OFF
SUPER AUDIO CD PLAYER SA-11S1
CLOSE
MODE
qw,er
DISPLAY OFF
OPEN/CLOSE
OPEN/CLOSE
PLAY
SOUND MODE
AC IN
PLAY
STOP
OPEN/CLOSE
PAUSE
PAUSE
PLAY
TIME
TIME
TIME
TEXT
PAUSE
STOP
PLAY
OPEN/
SOUND
POWER ON/OFF
SUPER AUDIO CD PLAYER SA-11S1
CLOSE
MODE
DISPLAY OFF
SOUND MODE
SOUND MODE
PLAY
SOUND MODE
SOUND MODE
PLAY
SOUND MODE
* In this instruction manual, some operations can only be performed with the remote control. For
operations that can be performed with buttons both on the main unit and on the remote control, the
button names are shown in the mark. And for operations that can only be performed with
buttons on the remote control, the button names are shown in the mark.
q
CONNECTING THE POWER SUPPLY
1 Plug the power cable into AC IN jack on the back
panel.
2 Turn on the power switch of the audio unit
(amplifier, etc.) that is connected with this unit.
Set the selector on the connected unit to this unit.
3 Plug the power cable into an AC outlet.
NORMAL PLAYBACK
SUPER AUDIO CD PLAYER PLAYBACK
Press POWER switch to turn on.
LCD
The display cycles from TOC Reading → No
Disc (when no disc is loaded) → Super Audio
CD (when the start sound mode setting is Super
Audio CD).
w
Press the
The disc tray comes out. Place the disc with label
side up on the tray.
To play a single (8cm) CD, place the disc with
the indentation at the center of the tray.
e
Press
r
Press
Disc type is automatically detected and playback
is started. Track number and track elapsed
time(minute, second) appear on the display.
* For Super Audio CD/CD hybrid-layer discs (See
page 2), the layer that is set in the start sound
mode (See page 10) is played. To change the
layer, use the
9)
(Exp.:Track 6, Elapsed time 2 min 8 sec)
Number of current track
button.
Minutes Seconds
button
button.
button. (See page
To start playback form the first track
Press
button.
To stop playback
Press
button.
To eject disc
Press
and take the disc off. Press the button again to close
the tray.
Disc tray must be closed when the unit is not be
used.
button to open the disc tray
To pause playback
Press
PAUSE indicator will light and playback is paused at
the point that the button is pressed. To restart
playback, press
button.
button again or press
button.
To change time display
Press the
Each time
change in the following order. “Track elapsed time”
→ “Track remaining time” → “Total remaining time”
→ “Track elapsed time”.
• Track remaining time
(The remaining playing time from the playing
point to the end of the current track)
• Total remaining time
(The remaining playing time from the playing
point to the end of the last track)
button on the remote control.
button is pressed, display will
“REMAIN”
“–” is displayed
“–” is displayed
is displayed
“TOTAL REMAIN”
is displayed
SWITCHING SOUND MODE (SUPER AUDIO CD)
Button
q
Press
button in stop mode
(not playing).
The currently selected layer or area is shown on
the LCD. (CD or Super Audio CD)
If
button is pressed again, a
playable layer or area will be shown, and the layer
or area will be switched to new one.
* When layer or area is switched, TOC will be
read again.
* The sound mode cannot be changed for Audio
CDs and discs with only a Super Audio CD
area.
* The sound mode on hybrid layer discs will be
changed in the following order.
Super Audio CD stereo area → CD layer →
Super Audio CD stereo area
* Sound mode can be selected while the tray is
open. Select a desired layer or area and press
button then the tray will close and
playback will be started.
w
Press the
button during
playback.
The currently selected layer or area is shown on
the LCD. (CD or Super Audio CD)
If
playback is stopped, and the layer or area will
be switched to new one.
When you want to listen at that area, press
started.
button is pressed again, the
button again. The playback will be
ENGLISH
Remaining track numbers
Playback automatically stops at the end of the
final track.
* If
button is pressed when Super Audio CD
disc that supports text is in use, time display is given
priority and the text information will not be displayed
afterward. To see the text information, press
button.
9
Page 14
ENGLISH
SOUND MODE
SOUND MODE
NOISE SHAPER
DC FILTER
DIGITAL OUT
START SOUND MODE
When a Super Audio CD hybrid layer discs that has
both a Super Audio CD high sound quality stereo
area and an Audio CD area information are to be
played, this player makes it possible to set the layer/
area (Super Audio CD or Audio CD) to be
preferentially played.
This setting can be made when the tray is closed
and there is no disc in the disc tray.
q Press
The currently selected layer/area is displayed.
If the Super Audio CD is selected: Super Audio CD
If the Audio CD is selected : CD
w Press the
the layer/area to be played first, and then leave
the setting for at least two seconds to register the
setting for the start sound mode.
Caution
* Start sound mode has a memory retention function
where the settings remain stored and unchanged
even when the disc is changed or the power is
turned off.
* At the time of shipment, the sound mode is set to
Super Audio CD.
button on the player.
button again to display
10
MAKING YOUR FAVORITE AUDIO
SETTINGS
The settings can be made using the remote control
(RC-11SAS1). The settings are retained even if the
power is turned off so that you can always enjoy
tracks with your favorite characteristics.
To change the settings again, make the changes
using the same procedure. The settings can be
changed when the track is stopped.
PLAYING THE CD LAYER OF AN AUDIO CD OR
SUPER AUDIO CD
q
Noise shaper operation
In this unit, you can select noise shaper on or off for
playing tracks.
The noise shaper is turned on and off by pressing
the
stopped. When turned on, the NSHP indicator lights
up on the LCD.
* Noise shaping is a type of digital feedback used in
the algorithms for oversampling. This digital
feedback enables improved linearity for low levels
(-70 to -90 dB) and better noise characteristics in
the audible band. However, this digital feedback is
still feedback nonetheless. Generally, in amplifiers
and other equipment, the sound quality changes
based on the amount of feedback. Low feedback is
said to result in poor audio characteristics but good
sound.
Although no measurement differences are shown
in the SA-11S1, the sound quality is changed.
Therefore, make the setting according to your
preferences.
w
DC filter operation
The DC filter is turned on and off by pressing the
turned on, the DCF indicator lights up on the LCD.
* The DC filter is effective when the speakers vibrate
abnormally for discs with recorded audio having
extremely low noise characteristics. (The cutoff
frequency is set to 1.7Hz.)
e
Digital output off operation
The digital output function is turned on and off by
pressing the
stopped. When digital output is turned off, the D OFF
indicator lights up on the LCD.
* When digital output is not used, setting to digital
output off enables you to enjoy better sound quality.
button while the track is stopped. When
Note
* The noise shaper, DC filter, and digital output off
have a memory retention function where the
settings remain stored and unchanged even when
the disc is changed or the power is turned off.
button while the track is
button while the track is
AUDIO CD, CD LAYER OF SUPER AUDIO CD, AND
HIGH SOUND QUALITY STEREO AREA
Filter operations
The filter settings can be made while the track is
stopped. The filters shown in the table below are
available for providing distinctive filtering according
to the operation and Audio CD or Super Audio CD.
Each time the button is pressed, the filter types cycle
from FIL1 → FIL2 → FIL3 → FIL1.
The filter setting has a memory retention function so
that the setting remains stored and unchanged even
when the disc is changed or the power is turned off.
Filter Selection Table
Filter type
FILTER 1
FILTER 2
FILTER 3
Note: When playing back the high sound quality stereo area in Super Audio CDs, the analog output level
varies slightly in each filter.
This is an original filter using short FIR
with asymmetric preecho and postecho
in the impulse response. The analog
characteristics exhibit slow roll-off.
creates a sound venue with richness,
smoothness, and depth consistent with
the image of analog record performances.
This is a filter without preecho or
postecho in the impulse response. It
is a special short coefficient FIR filter
which gives priority to fs (original sample
data).
acts as a slow roll-off filter to improve
sound quality by faithfully reproducing
music signals from deep bass to
midrange.
This is a long coefficient FIR filter with
symmetric preecho and postecho in
the impulse response. With analog
characteristics, it acts as a standard sharp
roll-off filter. It copies the SAA7220PB
coefficient of 4fs operation that Marantz
adopted in the past with the CD-94,
CD-95, CD-95SE and others as a
referential digital filter for audio CD,
but then boosts operation 8-fold.
Audio CD
This
With analog characteristics, it
Super Audio CD
This is a direct mode that does not
perform any filtering on the DSD data.
The original source data is reproduced
without any alteration.
This filter attenuates sections of the
DSD data that exceed 100kHz. In the
DAC, operation is also asymmetric for
giving priority to DAC resolution and
raising the multilevel performance to
approximately 40 levels.
This filter attenuates sections of the
DSD data that exceed 100kHz. In the
DAC, it provides fully symmetric
operation for 23 levels.
Page 15

PLAYING YOUR FAVORITE TRACKS
2
REPEAT
REPEAT
REPEAT
REPEAT
REPEAT
A–B
A–B
A–B
RANDOM
PLAY
STOP
RANDOM
REPEAT
RANDOM
PROG.
PLAY
OF A DISC
SPECIFY TRACK NUMBER TO PLAY (DIRECT
SEARCH)
Specify track number with numerical buttons (0-9)
on the remote
(example)
3rd track : Press 3.
12th track : Press 1 and then press
(within approximately 1.5
seconds).
If the first pressed number is only in the digit of ones
and not in the digit of tens, search begins
approximately 0.5 second after.
If a wrong number is pressed
Press correct number again.
* If a track number that is not in the disc is specified,
“No Track” will be shown on the main display. Please
specify a correct track.
SKIPPING TO THE PREVIOUS OR NEXT TRACK
(TRACK SKIP)
To listen to a track posterior to the current track
Press buttons on the main unit or
button on the remote the number of times you want
to proceed tracks.
To listen to a track prior to the current track
Press buttons on the main unit or
button on the remote go back to the beginning of the
current track. Then press buttons on the
main unit or button on the remote the number
of times you want to go back.
PLAYING YOUR FAVORITE PARTS
OF A DISC (SEARCH)
If , buttons on the main unit or
, buttons on the remote are kept pressing
during playback, track search begins. Release the
button when the point you want to listen to gets close.
* No sound is output during the search operation.
REPEATED DISC PLAY (REPEAT
PLAY)
ALL TRACK REPEAT
When
“ ” “ALL” indicator will light up and all track repeat
play begins.
To Return to Normal Play
Press
indicator will disappear, repeat mode will be off and
it returns to normal play mode.
* If
mode, programmed tracks are played repeatedly.
ONE TRACK REPEAT
Press
“ ”, “1” indicators will light and the track will be
played repeatedly.
To Exit from One Track Repeat
Press
disappear, repeat mode will be off and it returns to
normal play mode.
A-B REPEAT
q Press
starting point. The “A-” indicator will blink.
w
Press
point. “A-B
section will be played repeatedly.
To Exit from A-B Repeat
Press
will disappear, A-B repeat mode will be off and it
returns to normal play mode.
* A-B repeat cannot be done when random play is
going on.
* The end point (where “A-” indicator is blinks) of the
repeat section cannot be set before the time of the
starting point (where “A-B” indicator light up) of the
repeat section.
button on the remote is pressed,
button two times. “ ” “ALL”
button is pressed when in program
button on the remote two times.
button. “ ” “ 1” indicator will
button on the remote at your chosen
button again at your chosen end
” indicator will light up and the chosen
button on the remote.
“A-B
” indicator
PLAYING TRACKS IN A RANDOM
SEQUENCE
When
in stop mode, and then
the unit shuffles track order automatically and plays
all the tracks in the shuffled order. The RNDM
(random) indicator lights.
• The gap between tracks will be approximately 2
seconds during random play.
(RANDOM PLAY)
button on the remote is pressed
button is pressed,
PLAYING TRACKS IN A SPECIFIC
SEQUENCE
You can arrange and play tracks in a specific
sequence. Up to 30 tracks to be played can be
programmed.
(Example: To program the 7th track after 15th
track in a disc with 25 tracks)
To Exit from Random Play and Return to Normal Play
Press the
button while playback is stopped.
The RNDM (random) indicator goes off, and random
play is released.
button, and then press the
q Press
“PROG” indicator will blink and it goes to program
mode.
If buttons on the main unit or button
on the remote are Pressed during Random Play
It jumps to the next track of the shuffled order.
If , buttons on the main unit or
, buttons on the remote are Pressed during
Random Play
Search will be done only in the current track. Search
does not go to the previous or next track.
w Choose a track to be programmed with numeric
buttons on the remote.
(Example: The 15th track is chosen and it’s
length is 4min30sec)
To Listen to Random Play Repeatedly
Press
random play. Every time the order will be shuffled.
• If
play, the programmed tracks will be shuffled.
button on the remote once during
button is pressed during program
1st track programmed
e With the sequence described in step w above,
program another track. Repeat that sequence to
program all the tracks you want. You can program
up to 30 tracks.
(Example: The 7th track is chosen and total
length of 7th and 15th is 7min50sec)
Total programmed number
r Press
programmed order.
* When 21 or more tracks are programmed, will
light up instead of the track number indicator.
(PROGRAM PLAY)
ENGLISH
button on the remote in stop mode.
Lights up
Lights up
Only the numbers of
programmed tracks light up
Lights up
Total playing time of
programmed tracks
button to starts playback in
11
Page 16

ENGLISH
RECALL/SCROLL
RECALL/SCROLL
CANCEL
CANCEL
STOP
STOP
OPEN/CLOSE
REPEAT
RANDOM
AMS
AMS
AMS
PLAY
AMS
QUICK REPLAY
QUICK REPLAY
MENU
ENTER
MENU
TEXT
TEXT
TEXT
To Check the Programmed Tracks
Press the
control during the program or when the program is
stopped (“PROG” lights up).
Every time press
programmed tracks will be displayed one after the
other in order.
button on the remote
button, the
To Delete a Programmed Track
q
Press
has been made (When “PROG” indicator is
lighting up).
Every time press
w
tracks are deleted in order from the last track
programmed.
Also, the deleted track’s track number indicator
will disappear.
button in stop mode when program
button, the programmed
Q&A
• How many tracks can be programmed?
Up to 30 tracks can be programmed for
program play.
• Can I listen to program play repeatedly?
Press
indicator will light and program play will
be repeated.
• Can I shuffle the programmed track order?
Press
button once. “ ” “ALL”
button in stop mode.
QUICK REPLAY
When
playback, the unit goes back to the amount of time
set by the MENU and starts playback from there.
* Playback that goes beyond the track is not allowed.
Also, when the total time of the track being played
is shorter than the time set for quick replay, or when
the playback time is shorter than the time set for
quick replay, if
the track will be goes back to the start of that track
and playback is started from there.
To Set Quick Replay Time
q If a disc is loaded in the disc tray, eject the disc
and close the tray.
w Press the
button is pressed during
button is pressed,
button on the remote control.
ABOUT THE TEXT INFORMATION
DISPLAY
The following items of text information in Super Audio
CD discs can be displayed by pressing
on the remote.
Nevertheless, which items of information are
recorded depends on discs so some information may
not be displayed. This unit skips unrecorded
information to display.
• During playback
When
Title” of the currently playing will be displayed.
• In Stop Mode
Each time
text information will be displayed in the following
order.
button is pressed on the remote, “Tra c k
button on the remote is pressed,
button
To Clear Whole Program
Press
play. In the stop mode, press
Program can also be cleared by pressing
button two times while in program
button once.
key to open the disc tray.
To Add Tracks to Program
Tracks can be added to the end of program when
program is remaining (“PROG” indicator is lighting
up) and in stop mode.
However tracks cannot be added to the program
when the RNDM (random) indicator is lit up.
* Please be careful about the following matters.
• When programming 1st through 9th tracks in a
disc that has over 10 tracks by using numeric
buttons. For instance, programming the 3rd track
after programming the 1st track, press 3 button
more than approximately 1.5 seconds after 1
button is pressed. When a program is finalized,
the time is updated.
• Likewise, when programming a track at 10th or
after. For example, to program 13th track, press
3 button within approximately 1.5 seconds after
1 button is pressed.
• When programming a track in a disc that has less
than 9 tracks. For instance, to program the 5th
track after 4th track has been programmed, press
5 button more than approximately 0.5 second after
4 button is pressed.
SEARCHING YOUR FAVORITE TRACKS
(AMS (AUTOMATIC MUSIC SCAN) PLAY)
This feature is convenient to search where your
favorite track is.
If the
stopped, the AMS indicator lights up, and the first
ten seconds of each track on the disc will be played
starting from the first track.
Also, if the
the AMS indicator lights up, and the program jumps
to the next track after approximately 10 seconds
elapses on the display time.
Once you find a song that you want to listen to, press
the
The AMS indicator turns off, and normal playback
resumes from the current track.
* If the
programmed, only the programmed tracks are
played by AMS.
button is pressed while a track is
button is pressed during playback,
Light up
button again or press the
button is pressed after the tracks are
button.
e Press the
while Quick Replay is displayed (approx. 3
seconds). The current time setting appears on the
LCD. (The default setting is 10 seconds.)
r Use the or button to set the time. (5 to
60 seconds)
t After making the setting, press the
twice. The LCD returns to the normal display.
y The time setting is retained even when the power
is turned off.
button on the remote control
button
Caution:
* When there is no key input for about 3 seconds
during this series of operations, the setting will be
configured to the conditions at that time and the
display will return the time display.
Time Display
Album Title
Album Artist
• This unit can display 12 characters in one time. If
information is longer than 12 characters, the
display will scroll right to left.
• This unit can display only alphabets, numeric
numbers and symbols. Chinese and Japanese
characters cannot be displayed. If information is
in Chinese and Japanese characters, the unit
displays nothing.
12
Page 17
CHANGING THE TEXT BRIGHTNESS ON
STOP
PAUSE
STOP
DISPLAY
OPEN/CLOSE
STOP
STOP
DISPLAY
DISPLAY
wq
e
GND
HOT
COLD
wq
e
GND
COLD
HOT
THE LCD (LCD CONTRAST ADJUSTMENT)
Changing procedure (Changes can be made from
the main unit when operation is stopped.)
q If playback is in progress, press the
button to stop playback.
w Hold down the
for at least two seconds. (This operation does not
work on the remote control.)
After holding down the button for two seconds,
the current contrast value is displayed. Within two
seconds while it is displayed, press the
button to increase the contrast, or press the
button to reduce the contrast. Changes
can be made to the contrast level over the entire
range (+8 to -8).
If the or button is not pressed
within two seconds, the contrast is automatically
set to the currently displayed level.
Display example: Contrast +-0
e Pressing the
setting returns to the default setting (+-0).
* Any changes made to the LCD contrast setting
are retained even when the power is turned off.
button on the main unit
button while changing the
TURNING OFF THE DISPLAY AND
ILLUMINATION (DISPLAY OPERATION)
This function is used to turn the LCD and illumination
lamps (blue) on and off. (Two display statuses are
available.)
1. Mode where LCD and illumination lamp (blue) turn
on
Each time the
playback, the LCD and illumination lamp (blue)
switch on and off.
When Display Off is set, the Display Off indicator
(red) lights up.
* When any related button is pressed (such as
when the
button, or button is used), the display is
automatically turned on, but the Display Off
indicator (red) remains lit. If a track is started in
this state, the display is automatically turned off
two seconds later.
* When a track is stopped, the Display Off
indicator (red) and illumination lamp (blue) light
up alternately.
button is pressed during
button,
2. Setting for turning on only LCD (illumination lamp
(blue) remains off)
In the default state, the illumination lamp (blue) is
lit. In this state, the illumination lamp (blue)
remains off regardless of whether the LCD is
turned on or off.
Changing procedure (Changes can be made
when operation is stopped.)
q If playback is in progress, press the
button to stop playback. To make the setting, hold
down the
seconds from the remote control (RC-11SAS1).
w If the illumination lamp (blue) is lit, it is turned off
and is set off. To change the setting from off to
on, hold down the same operation
button for at least two seconds to turn on.
* The illumination lamp (blue) off setting is retained
even when the power is turned off, and this setting
remains until the setting is changed to the on
setting.
* The LCD display on/off setting is not retained when
the power is turned off. (This enables you to enjoy
operation each time you use it.)
button for at least two
TIMER PLAY
This unit can perform timer play by cooperating with
your audio timer.
Connect this unit’s power cord to the audio timer’s
power socket and the timer’s power cord to power
outlet.
* For connection to audio timer and it’s operation,
please refer to the instruction manual of your audio
timer.
Audio Timer
Setting method of Timer Play
q Press POWER switch to turn ON the power.
w Insert the disc to be played.
* In timer play mode, tracks are played normally.
e Set the audio timer.
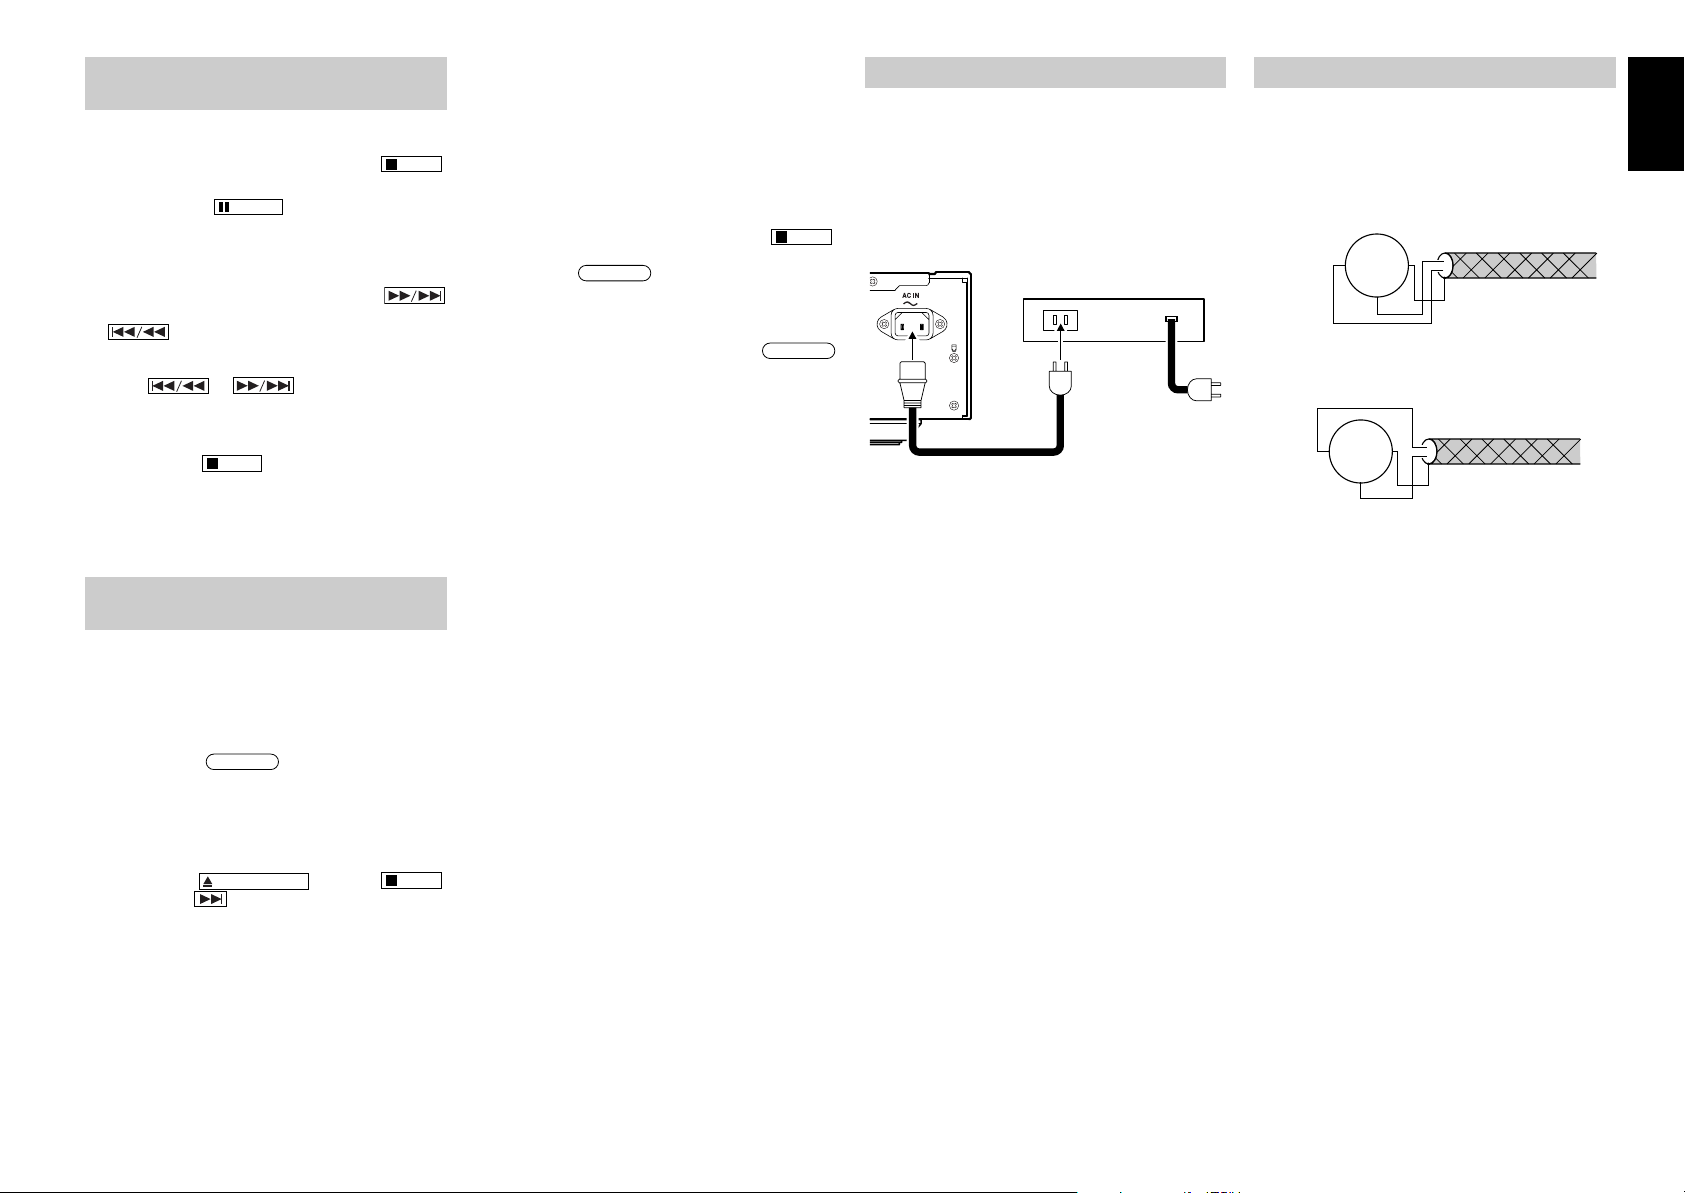
ABOUT BALANCED JACKS
q The balanced output connector uses a XLR
connector.
w The XLR connector for professional use is
internally wired in either of the following two
systems.
1. USA system (Pin w = COLD, Pin e = HOT)
2.
European system (Pin w = HOT, Pin e = COLD)
e The SA-11S1 uses the 1. USA system.
When a preamp or main amplifier adopting the
European system is connected using a cable with
XLR balanced connectors, the reproduced signal
may be inverted of phase.
In this case, correct the wiring of the one of the
XLR connectors on the extremities of the cable
to the USA system by exchanging the connections
of pins w and e. This will make it possible to
play the signal with the correct phase.
ENGLISH
13
Page 18

ENGLISH
TROUBLE
SHOOTING
If you think a malfunction has occurred, first check
the points listed below. The problem is likely to have
been caused by a simple operational error or a
connection problem. If the problem cannot be
corrected even after carrying out the following checks,
consult your dealer or nearest Marantz sales office
or service counter.
• Remote control operation is not possible.
1. Is the transmitter of the remote control unit (RC11SAS1) pointed correctly at the remote sensor
on the front of the player (this unit)?
Or is there an obstruction between the transmitter
and the remote sensor?
2. Are the batteries in the remote control unit
exhausted?
3. Is there another strong light (from a window, etc.)
striking the Super Audio CD player’s remote
sensor?
• The disc fails to rotate.
1. Is the mains lead plugged in properly?
2. Is the POWER switch ON?
3. Is the disc placed in the correct position on the
disc tray?
4. Is the disc placed properly with the label side
facing up?
5. Is the disc dirty?
6. Is the disc scratched?
7. Is the disc warped?
• The disc is rotating but no sound is heard.
1. Are the amplifier and speakers connected
properly?
2. Is the amplifier switch ON?
3. Is the amplifier’s function or selector switch set to
“CD” or “AUX” or such (to whatever you have
connected this unit to)?
4. Is the amplifier’s volume control set at the
minimum level?
• The disc stops in mid-operation.
The sound drops out or noise is heard.
1. Is the disc dirty?
2. Is the disc scratched?
3. Is the disc warped?
* In the case of a CD-R or CD-RW disc, this problem
may occur when the conditions under which its data
was originally written were substandard or when
the quality of the disc itself is poor.
* This condition may occur in Mixed-Mode CDs, CD
Extra, and other discs that have CDDA format mixed
with other data.
Noise may also be heard momentarily when
skipping tracks.
• A Super Audio CD cannot be played.
1. Is the disc scratched, dirty or warped?
2. Is the amplifier’s input selector set to digital?
* Digital audio signal will not be output when a Super
Audio CD is played.
3. Is the disc a Super Audio CD multi-channel only
disc? (This unit does not support Super Audio
CD multi-channel.)
• A CD-R/CD-RW disc cannot be played.
1. Is the disc placed upside down?
2. Is the disc contains properly written TOC?
3. Is the recorded information in an audio (CD-DA)
format?
• A specific CD cannot be played
Copy control CDs (CDs with copy guard) are
special discs that do not comply with current CD
standards. Marantz cannot guarantee the ability
to play such discs on your CD player.
When normal CDs can be played without a
problem and problems occur only when playing
these special discs, it is not a problem with this
unit.
Please ask the seller of the copy control CD for
detailed information regarding copy control CDs.
• The unit makes a clicking sound when the tray
closes
This is the adhesion click of the clamper for
securing the disc. This does not cause any
problem in using the unit.
• While the disc is spinning, a spinning sound
is heard or a slight vibration occur.
Depending on the disc, a spinning sound may
occur or the unit may vibrate slightly due to disc
eccentricity or such. This is not a problem with
this unit.
14
Page 19
www.marantz.com
You can find your nearest authorized distributor or dealer on our website.
JAPAN Marantz Japan, Inc. 35-1 Sagami Ohno 7-Chome, Sagamihara-shi, Kanagawa 228-8505, Japan
U.S.A. Marantz America, Inc. 1100 Maplewood Drive, Itasca, IL 60143, U.S.A.
EUROPE Marantz Europe B.V. P.O. Box 8744, 5605 LS Eindhoven, The Netherlands
is a registered trademark.
08/2004 00M18AK851310 ecms-bPrinted in Japan
 Loading...