

Page 1
Network Integrated Amplier
PM7000N
ENGLISH
DEUTSCH
FRANÇAIS
ITALIANO
ESPAÑOL
NEDERLANDS
Quick Start Guide
Kurzanleitung / Guide de démarrage rapide / Guida di Avvio Rapido /
Guía de inicio rápido / Snelhandleiding / Snabbstartsguide /
Краткое руководство пользователя / Skrócona instrukcja obsługi
Read Me First....
Bitte zuerst lesen... / Lisez-moi en premier.... / Nota preliminare.... /
Lea esto primero.... / Lees mij eerst... / Läs detta först... /
Прочитайте в первую очередь... / Przeczytaj to najpierw....
SVENSKA
РУССКИЙ
POLSKI
Page 2
Welcome Before You Begin
Thank you for choosing a Marantz network
integrated amplifier. This guide provides stepby-step instructions for setting up your network
integrated amplifier.
Please do not return this unit to the store –
call for assistance.
If you need help… :
If you need additional help in solving problems,
contact Marantz customer service in your area.
www.marantz.com
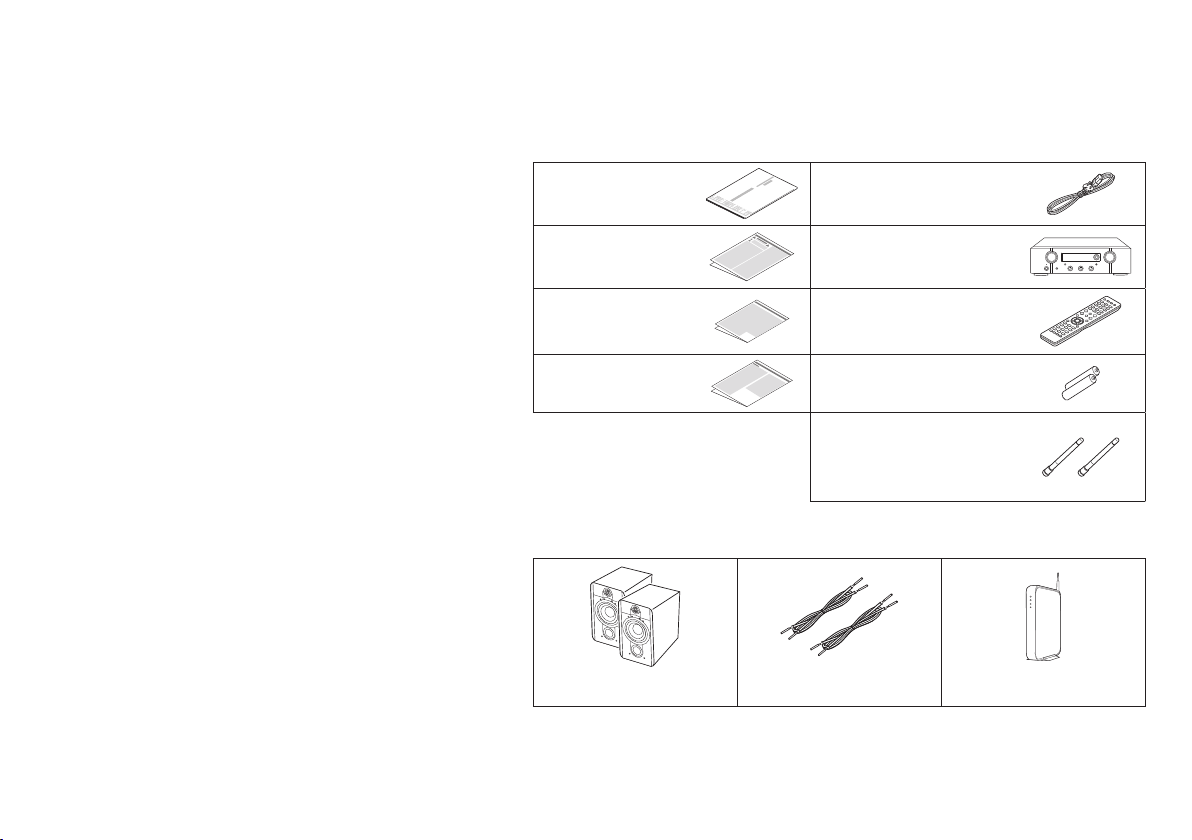
What’s In the Box
Quick Start
Guide
Safety
Instructions
Cautions on
Using Batteries
Notes on radio R03/AAA batteries
Power cord
Network Integrated
Amplifier
Remote control unit
(RC004PM)
External antennas for
Bluetooth/wireless
connectivity
Required for Setup
Speaker systems Speaker cables Router
1
Page 3
Optional
TV Optical cable iOS device
Router with WPS LAN cable
• These drawings are for illustrative purposes only and may not represent
the actual product(s).
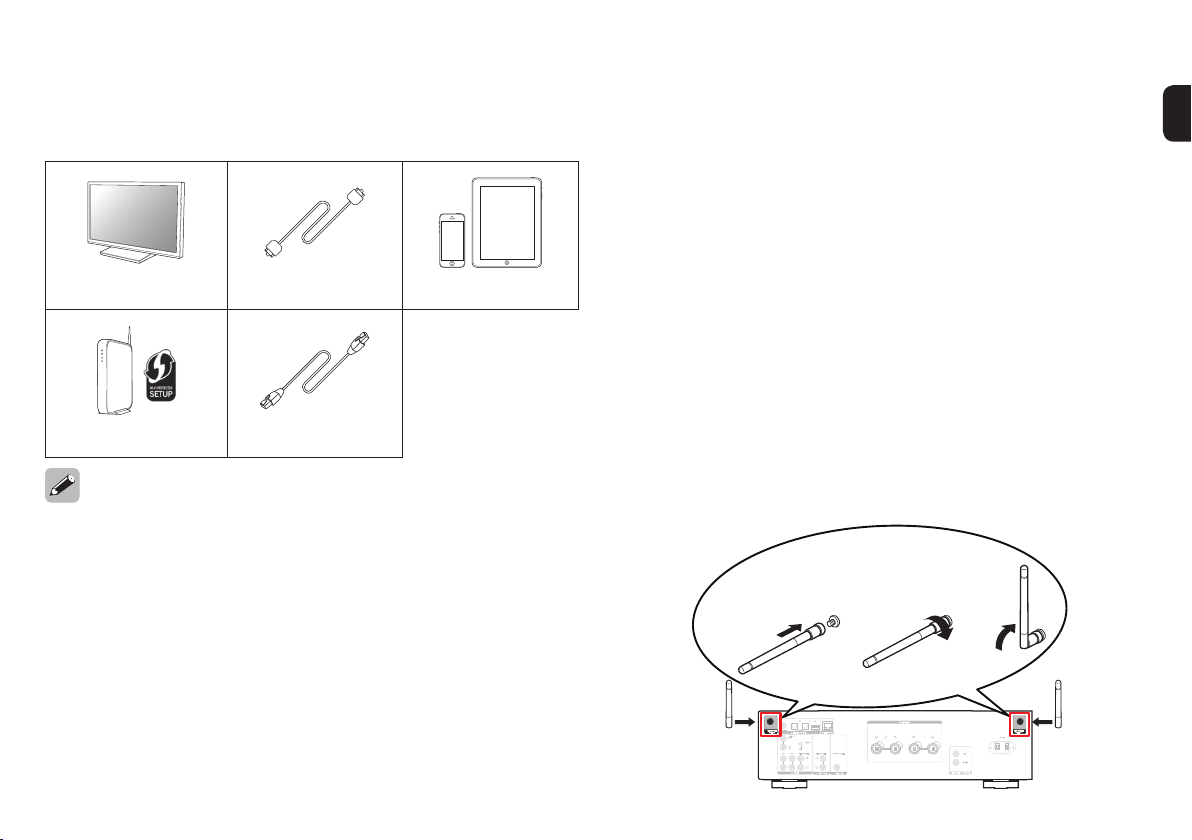
Important: External Antennas
The removable external antennas are required for both
Bluetooth and Wireless network connectivity. Please make
sure to connect the antennas before attempting to use the
Bluetooth or Wi-Fi features of the PM7000N.
n Connecting the external antennas for
Bluetooth/Wireless connectivity
For each of the two antennas:
q Place the antenna evenly over the antenna terminal
located at the upper left or right corner of the rear
panel.
w Turn the antenna clockwise until it is fully connected.
Do not over tighten.
e Rotate the antenna upwards for the best possible
reception.
q w e
COAXIAL OPTICAL
CD AUX
DIGITAL AUDIO IN
PHONO
SIGNAL
GND
RECORDER
RECORDER
SUBWOOFER
AUDIO IN
AUDIO OUT PRE OUT
AC IN
2
Page 4
Setup
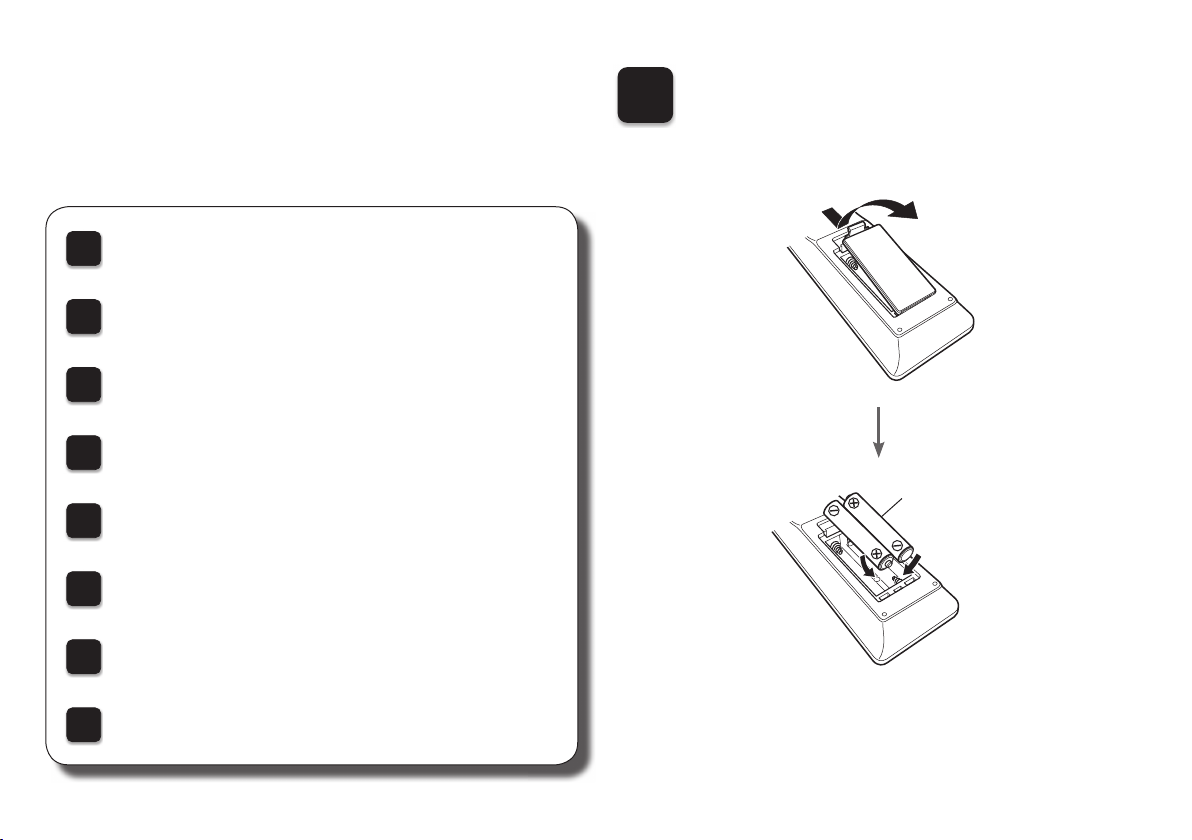
There are eight steps to the setup
process.
Installing batteries in the remote control unit
1
Connect the speakers to the amplifi er
2
Connect the TV to the amplifi er (Optional)
3
Plug the power cord into a power outlet
4
Connect to the network
5
Enjoying your music!
6
Listening to sound from your TV
7
Installing batteries in the
1
remote control unit
Batteries
Download the HEOS App
8
3
Page 5
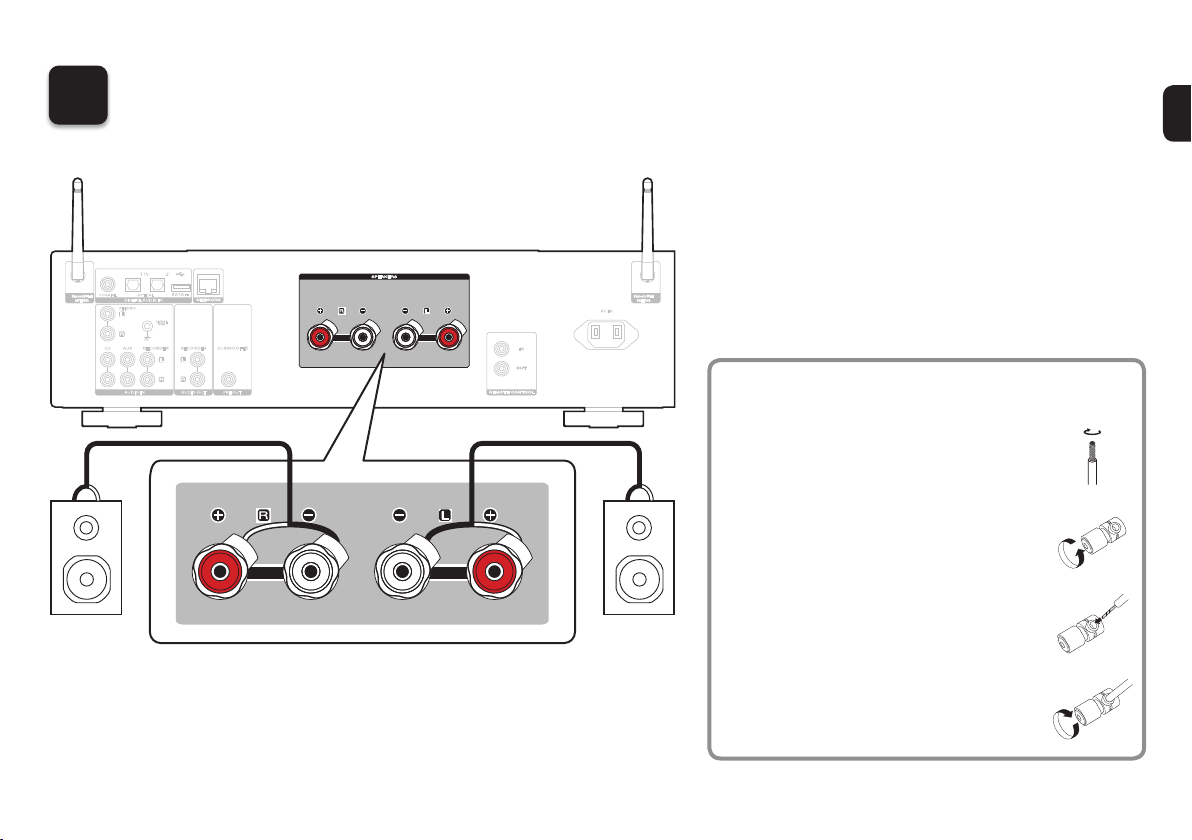
Connect the speakers to the amplifi er
2
COAXIAL OPTICAL
DIGITAL AUDIO IN
PHONO
SIGNAL
GND
CD AUX
RECORDER
RECORDER
SUBWOOFER
AC IN
w q
(R)
AUDIO IN
AUDIO OUT PRE OUT
Connecting the speaker cables
q Peel o about 10 mm of sheathing
from the tip of the speaker cable,
w q
then either twist the core wire
tightly or apply solder to it.
w Turn the speaker terminal
counterclockwise to loosen it.
e Insert the speaker cable’s core
(L)
wire to all the way into the
speaker terminal.
r Turn the speaker terminal
clockwise to tighten it.
4
Page 6
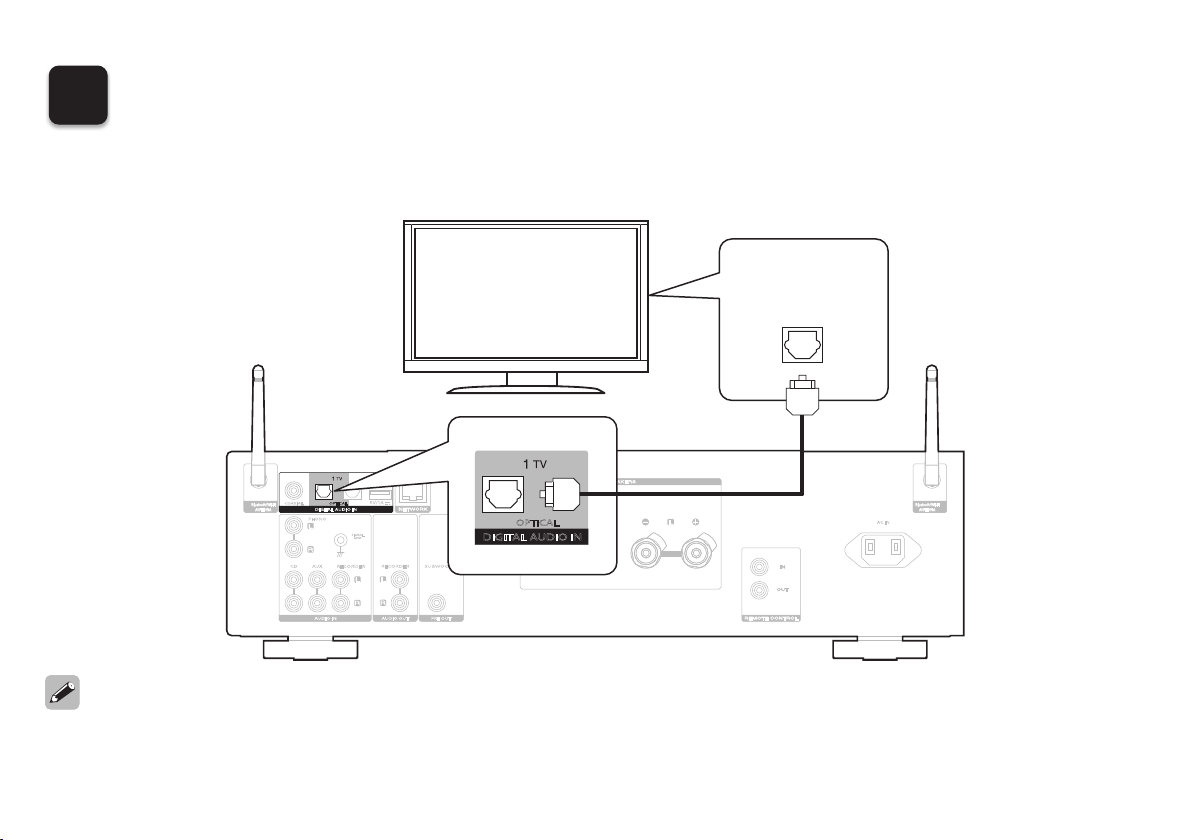
Connect the TV to the amplifi er (Optional)
3
For high-quality TV audio, connect your TV to the amplifier’s D/A input.
Connect your TV to the amplifi er as shown below.
COAXIAL OPTICAL
DIGITAL AUDIO IN
CD AUX
PHONO
SIGNAL
GND
RECORDER
RECORDER
SUBWOOFER
OPTICAL
DIGITAL AUDIO IN
OPTICAL
OUT
AC IN
AUDIO IN
AUDIO OUT PRE OUT
• When connecting a TV to this unit, turn off the audio output of the TV’s internal speakers. See the owner’s manual of your TV for details.
5
Page 7
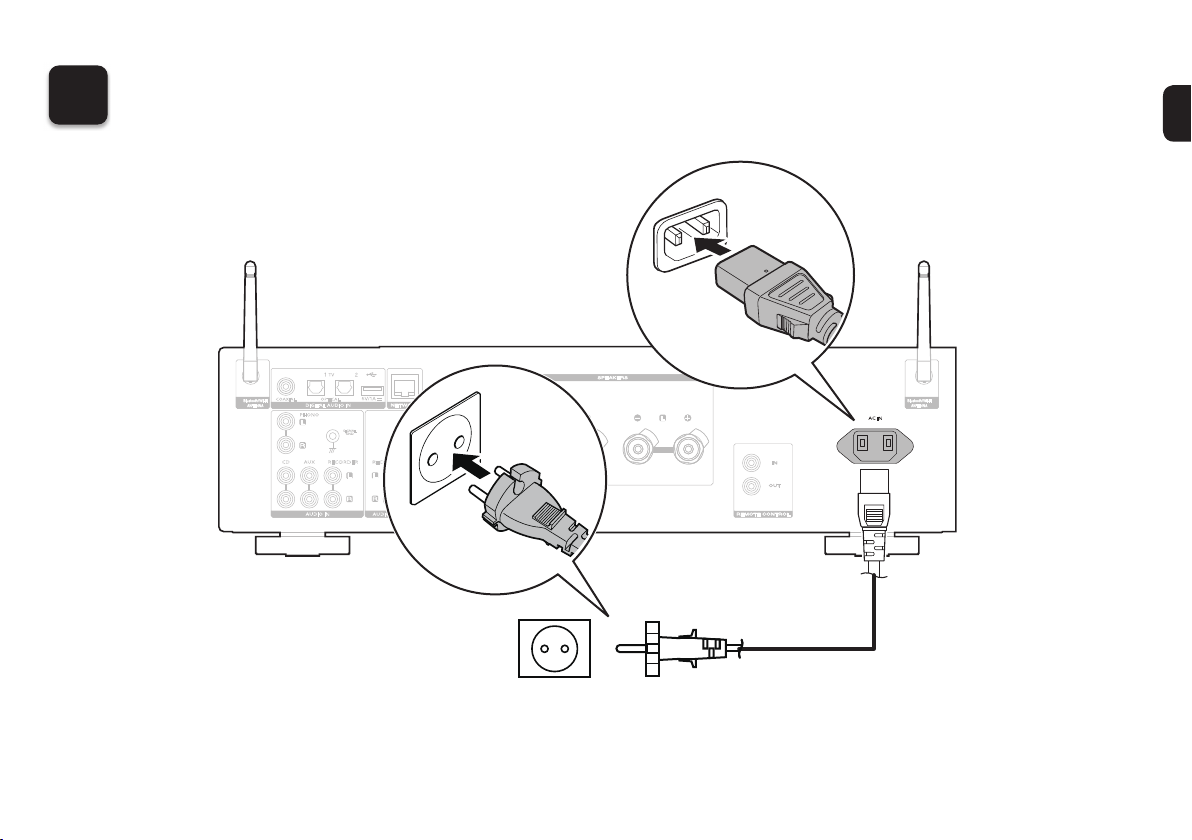
Plug the power cord into a power outlet
4
COAXIAL OPTICAL
DIGITAL AUDIO IN
PHONO
SIGNAL
GND
CD AUX
RECORDER
RECORDER
SUBWOOFER
AC IN
AUDIO IN
AUDIO OUT PRE OUT
Connect to household
power outlet
(AC 230 V, 50/60 Hz)
Power cord
(supplied)
6
Page 8
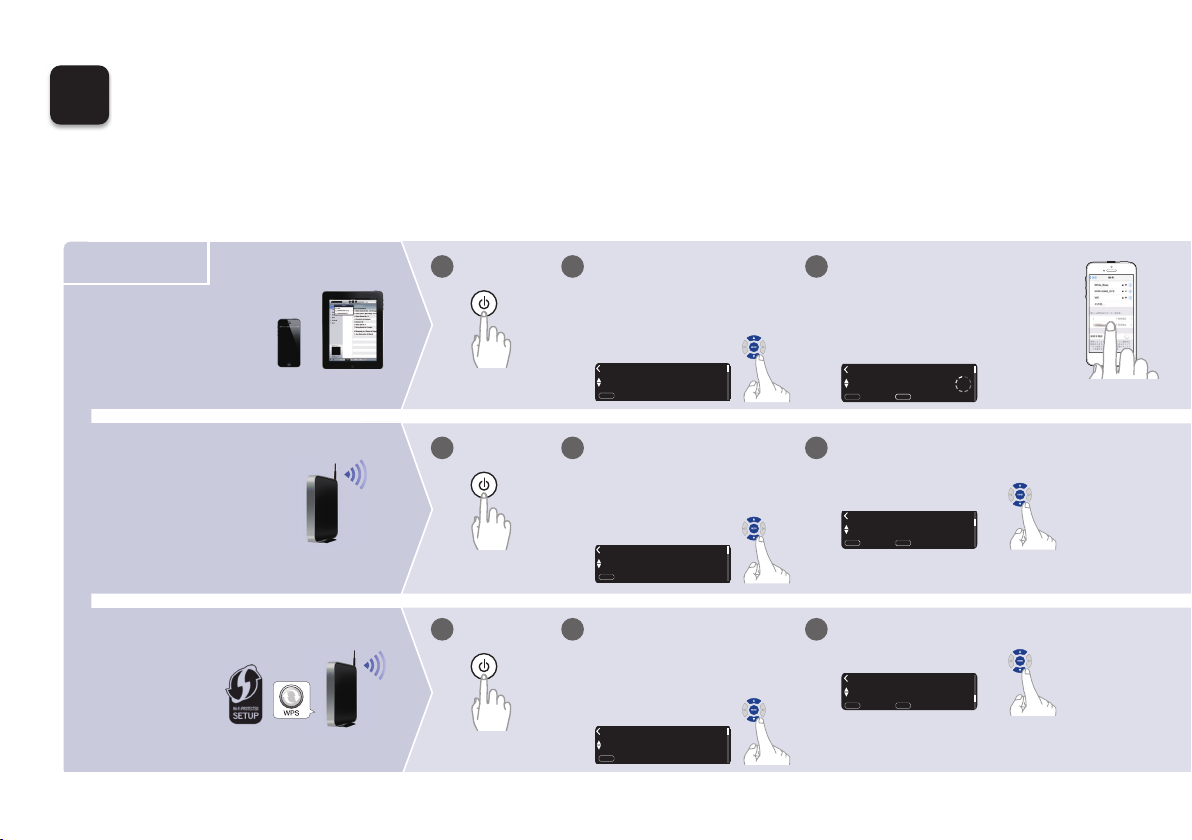
Connect to the network
English
Select Language
:
enter
ENTER
Wi-Fi - scan
Select Connection Method
:
cancel
:
enter
ENTER
BACK
Marantz PM7000N
WPS Router
Select Connection Method
:
cancel
:
enter
ENTER
BACK
WAC - use your Apple
Select Connection Method
:
cancel
BACK
:
enter
ENTER
English
Select Language
:
enter
ENTER
English
Select Language
:
enter
ENTER
5
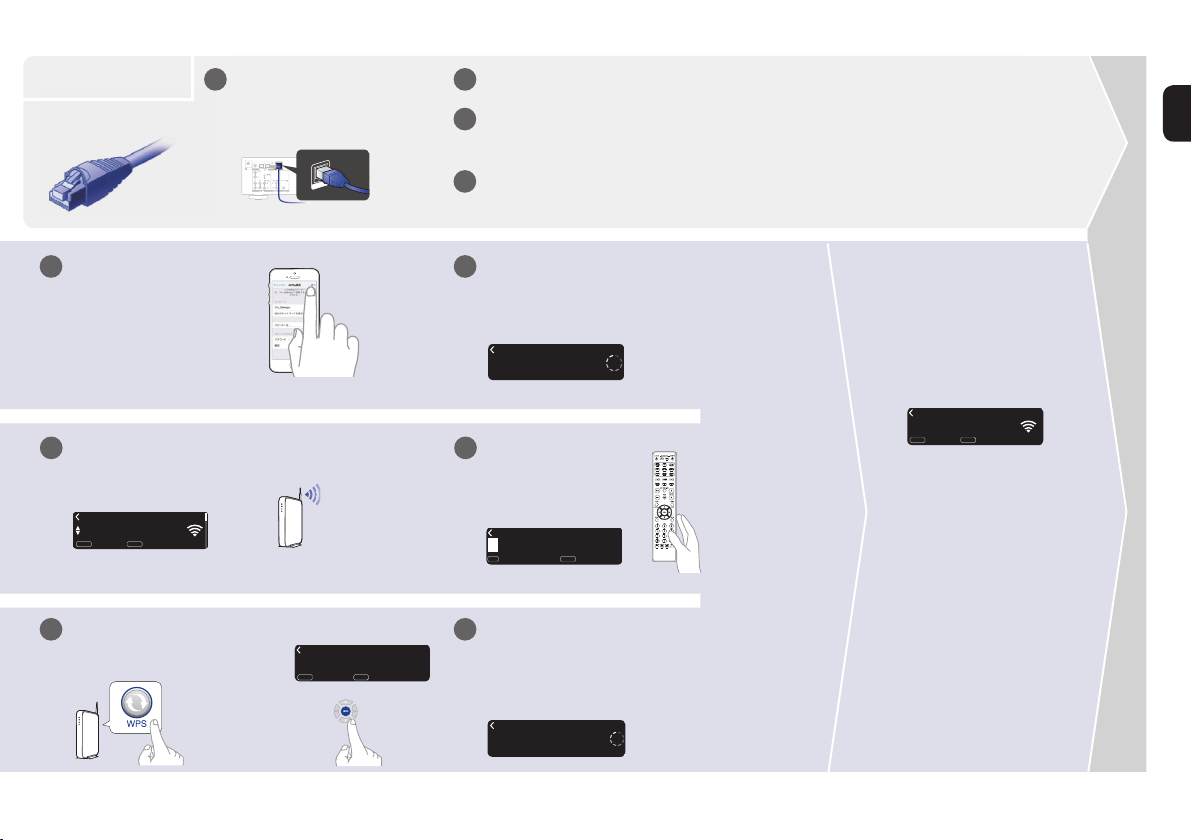
Choose from one of the following options.
Wireless
iOS device
iOS version 7
or later
Router without
WPS button
WPS router
7
Wi-Fi router
Wi-Fi router
1
Power on. Select language.
1 2 3
1
Power on. Select language.
1 2
1
Power on. Select language.
1 2
(After selecting a language, please
be patient while the network
settings initialize. Expect to wait a
few minutes.)
(After selecting a language, please
be patient while the network
settings initialize. Expect to wait a
few minutes.)
(After selecting a language, please
be patient while the network
settings initialize. Expect to wait a
few minutes.)
Make sure your iOS device is
connected to your Wi-Fi Network.
Select the network named “Marantz
PM7000N” from the Settings/Wi-Fi
screen on your device.
Select “Wi-Fi - scan” and wait as
3
your PM7000N looks for available
networks.
Select “WPS Router”.
3
Marantz PM7000N
Page 9
Network name
Select Network
:
back
:
enter
ENTER
BACK
Enter Wi-Fi Password
:
a
:
character type
+10
1~9
Please wait as completing...
Quick Setup
Wired
Sharing the network...
Quick Setup
Press the WPS button...
Quick Setup
:
back
:
connect
ENTER
BACK
Access Point 1
Wi-Fi Connected
:
back
:
next
ENTER
BACK
AC IN
NETWORK
Connect a network cable
between your PM7000N and
your router.
(cable not included)
COAXIAL OPTICAL
DIGITAL AUDIO IN
PHONO
SIGNAL
GND
CD AUX
RECORDER
RECORDER
SUBWOOFER
AUDIO IN
AUDIO OUT PRE OUT
Power on.
21
Select language.
3
Please wait while your PM7000N
4
connects to your wired network.
Connected!
Follow the instructions
4
and tap Next.
Select your network name.
4
(If your network name is not listed,
select “Rescan”.)
Press the WPS button on
4
your router. Within 2 minutes,
press the ENTER button.
Please wait as completing the connection
5
can take a few minutes.
(The front panel of the PM7000N will show the status of
Marantz PM7000N
the connection.)
Press the ENTER button.
Enter your network
5
password using the
number keys on the
remote control.
Wi-Fi
Connected!
If the signal strength
of your wireless
network is weak, to
improve reception,
please turn the
antenna on the back
of your PM7000N or
move your router to
the PM7000N.
Please wait as completing
5
the connection can take a
few minutes.
(The front panel of the PM7000N will
show the status of the connection.)
8
Page 10
On
Auto-Update
Feature updates are automatically do...
Off
Auto-Update
Feature updates are not automatically...
Central European Tim...
Select your time zone
:
back
:
enter
ENTER
BACK
Yes
Send usage data
To help us improve our products and...
No
Send usage data
To help us improve our products and...
Network Control
On
Network Control
Press ENTER to use the Marantz “HEOS”...
Off
Network Control
Press ENTER to use low power mode...
Setting
Auto-Update
Setting
Usage Data
Setting
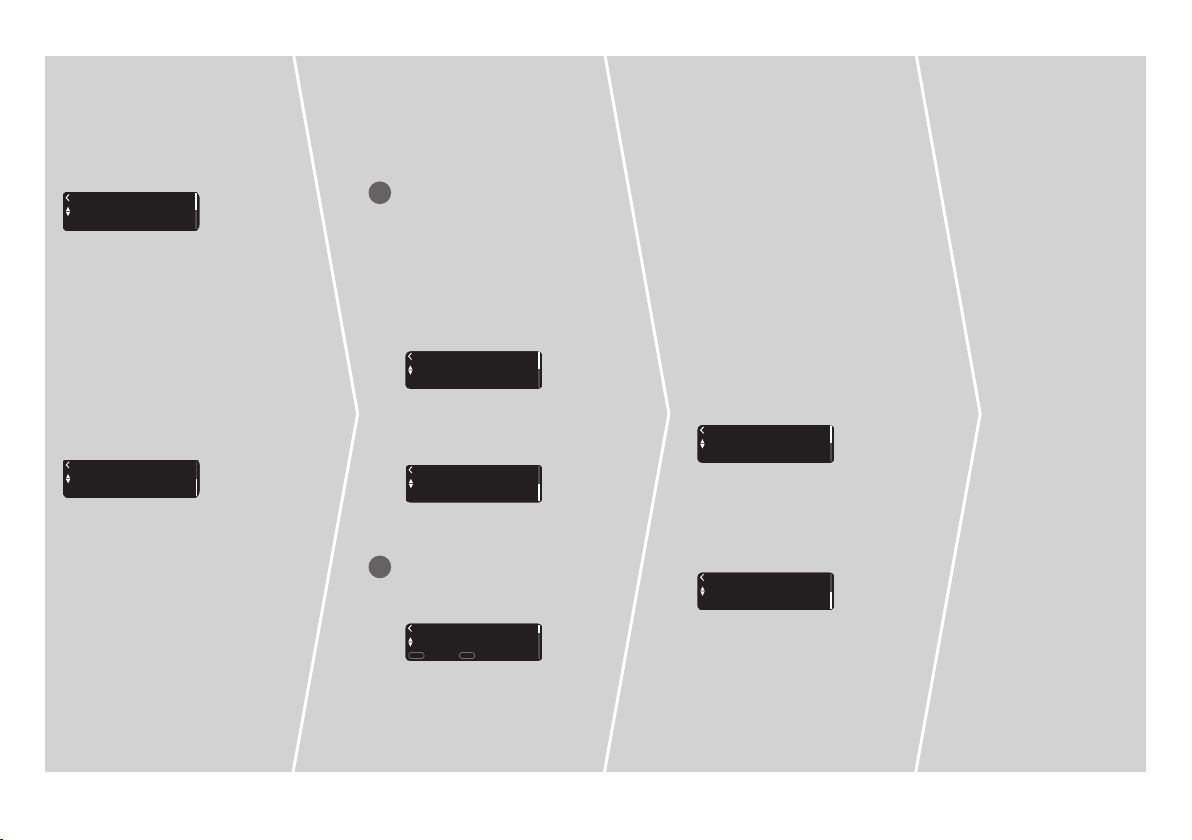
Select Network Control ON to
control PM7000N from your
smartphone, use Bluetooth/
Apple AirPlay®/HEOS App and
maintain constant network
access. Power Consumption
during standby power will be
slightly higher.
Select Network Control OFF
to reduce power consumption
during standby. You can not
turn on your PM7000N from
your smartphone or use
Bluetooth/Apple AirPlay/HEOS
App until your PM7000N
is powerd on manually and
connects to your network.
Turns on Auto-Update so
1
that future updates are
automatically downloaded and
installed when your PM7000N
is in standby mode.
Select “On” to turn on
Auto-Update.
Select “O” to turn o
Auto-Update.
Sets the time zone that
2
matches the area where
you live.
To help us improve our
products and customer service,
Marantz collects anonymous
information about how you use
your PM7000N. Marantz will
never provide any information
we collect to third parties.
Select “Yes” to provide
information on the operating
status of this unit.
Select “No” to not provide
information on the operating
status of this unit.
Setup
Complete!
9
Page 11
Enjoying your music!
6
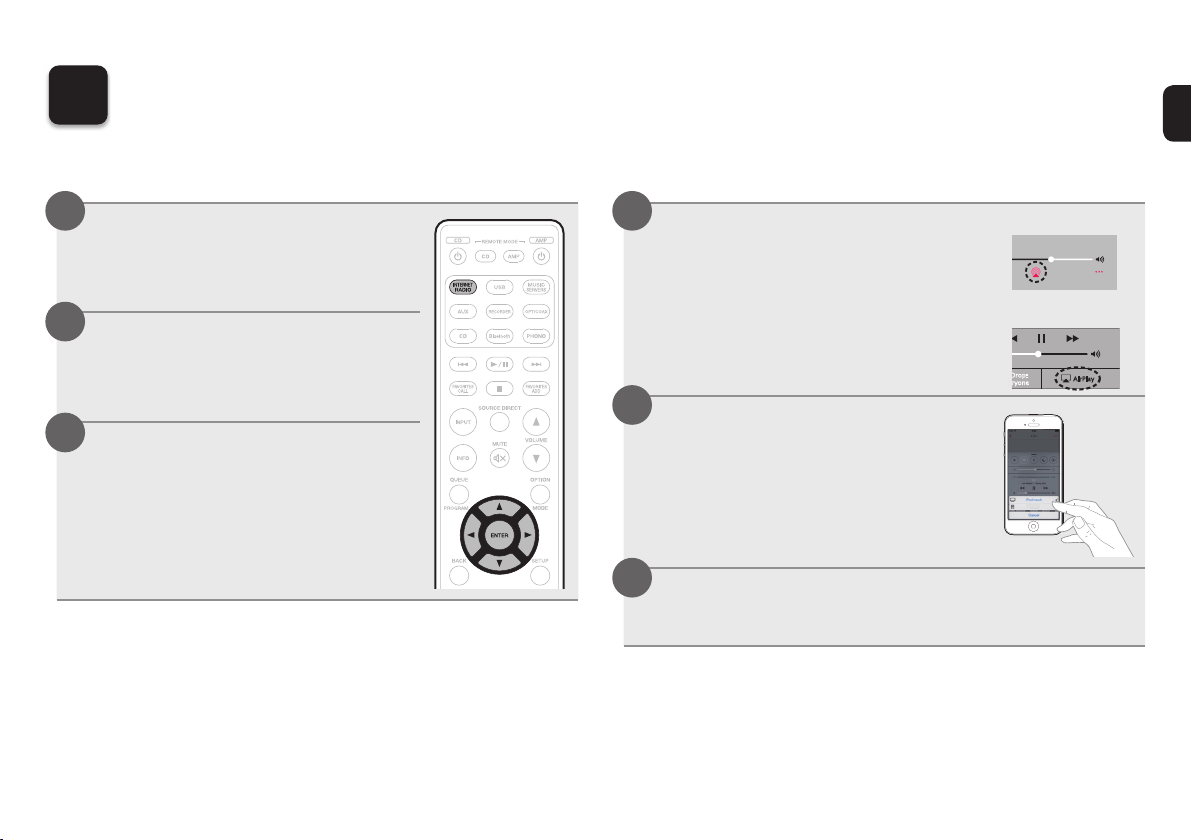
n Enjoying Internet Radio
1
2
3
Press INTERNET
RADIO.
Select the station you
want to play, then
press ENTER.
Select “Play Now”,
then press ENTER.
n Enjoying music using Apple AirPlay
1
2
3
Open Control Center
(iOS 7 and later) by
swiping up from the
bottom of your screen,
then tap AirPlay.
Select the “Marantz
PM7000N” from the
AirPlay Device list.
Play the song on your iPhone, iPod
touch or iPad.
【Example】iOS 12
【Example】iOS 9
rop:
AirPlay
e
Marantz PM7000N
10
Page 12
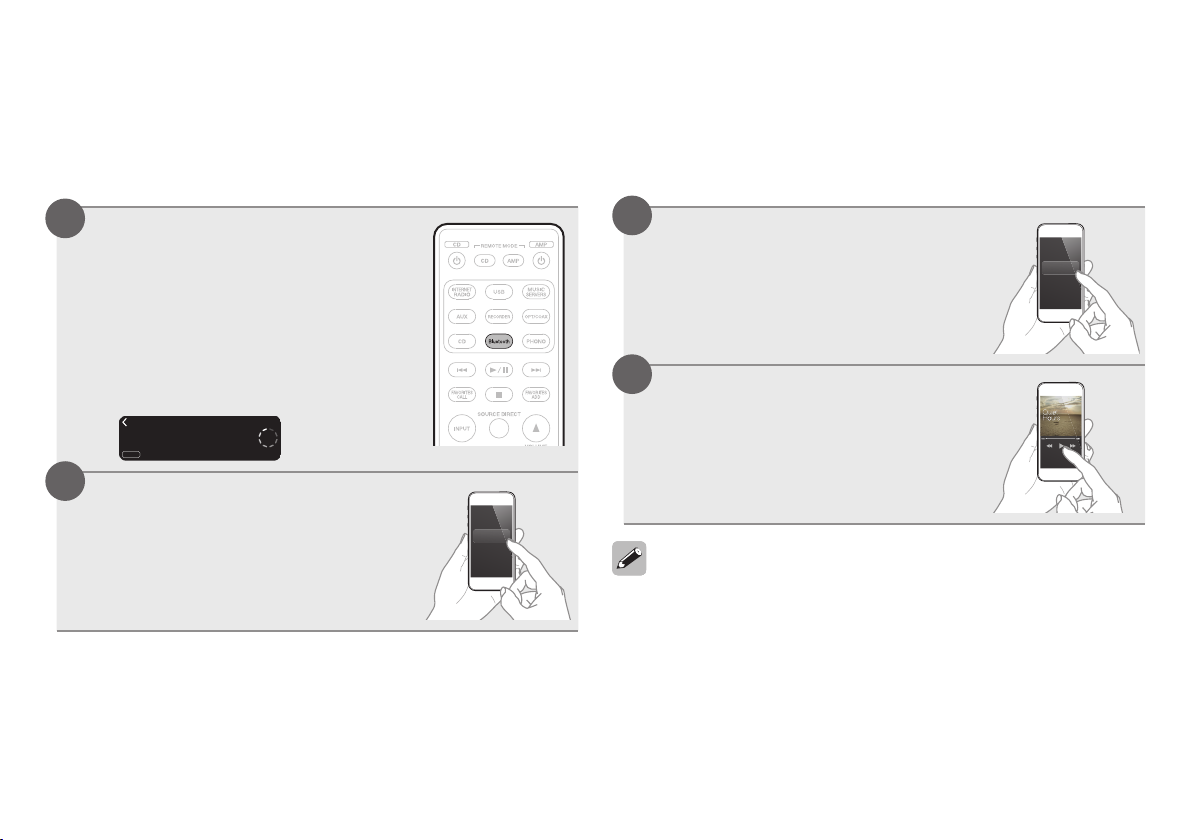
n Enjoying music using Bluetooth
Turn on Bluetooth fr...
Bluetooth Pairing Mode
:
cancel
BACK
Bluetooth ON
1
Press Bluetooth to
select Bluetooth.
When using for the fi rst time,
the unit will go into the pairing
mode automatically and
“Bluetooth Pairing Mode” will
appear on the display of the unit.
2
Activate Bluetooth on
your mobile device.
11
Bluetooth ON
3
Select “Marantz
PM7000N” from the
Bluetooth
Marantz PM7000N
Bluetooth device list on
your mobile device.
4
Play music using any
app on your device.
• To pair with other Bluetooth devices, press and hold Bluetooth on the
remote control until “Bluetooth Pairing Mode” is displayed on the unit.
Page 13
Audio
Setup
:
back
:
enter
ENTER
BACK
Listening to sound from your TV
Auto-Play (Off)
TV Input
:
back
:
enter
ENTER
BACK
On
Auto-Play
:
back
:
enter
ENTER
BACK
7
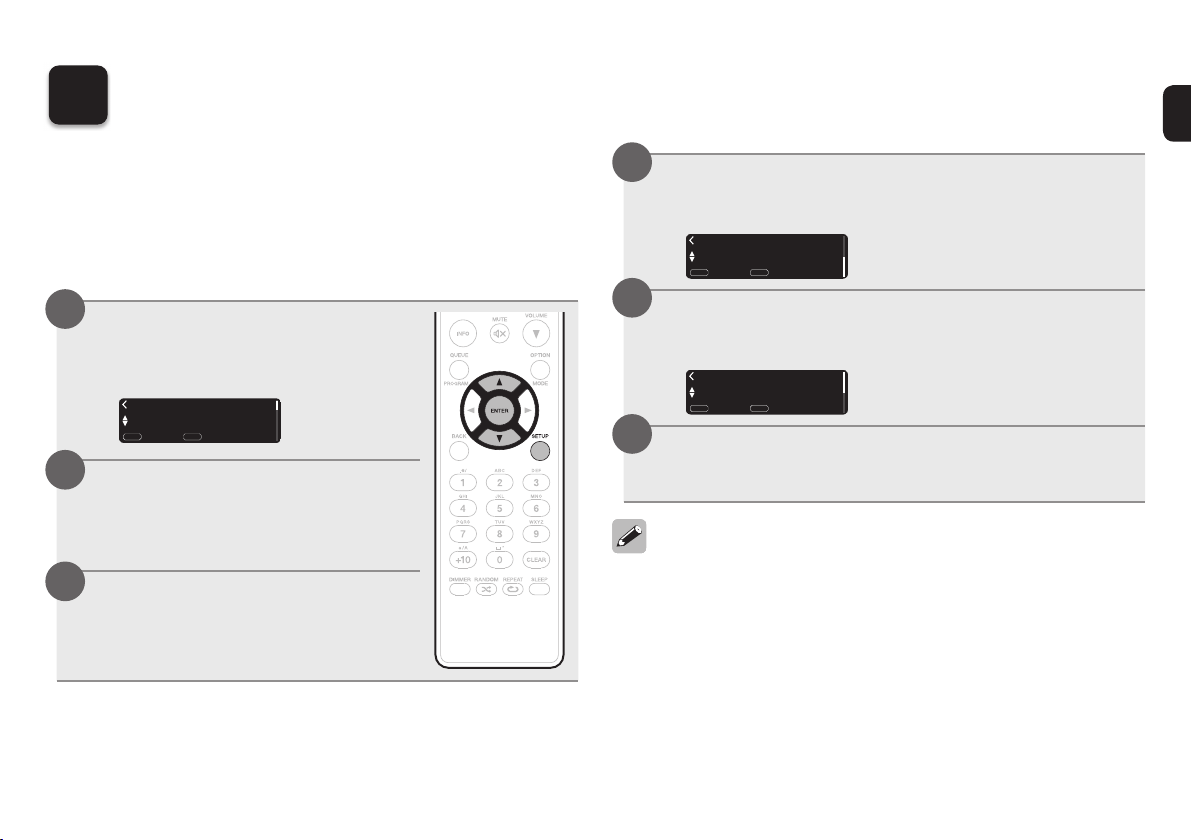
Equipped with an automatic audio playback function. This
starts after the amplifi er automatically turns on when the
power of a TV that it is digitally connected to is turned on.
To use this function, follow the steps below to turn it on.
(Default: O )
1
Press SETUP.
You can see the following on the
display.
2
Use ui to select
“General”, then press
ENTER.
3
Use ui to select “TV
Input”, then press
ENTER.
4
Use ui to select “Auto-Play”, then
press ENTER.
5
Use ui to select “On”, then press
ENTER.
6
Press SETUP to exit the setup
menu.
• Make sure this unit's input is set to the optical input the TV is
connected to.
• Make sure the digital output of the TV is set to PCM audio and not
bitstream, Dolby or multichannel.
12
Page 14
Download the HEOS App
8
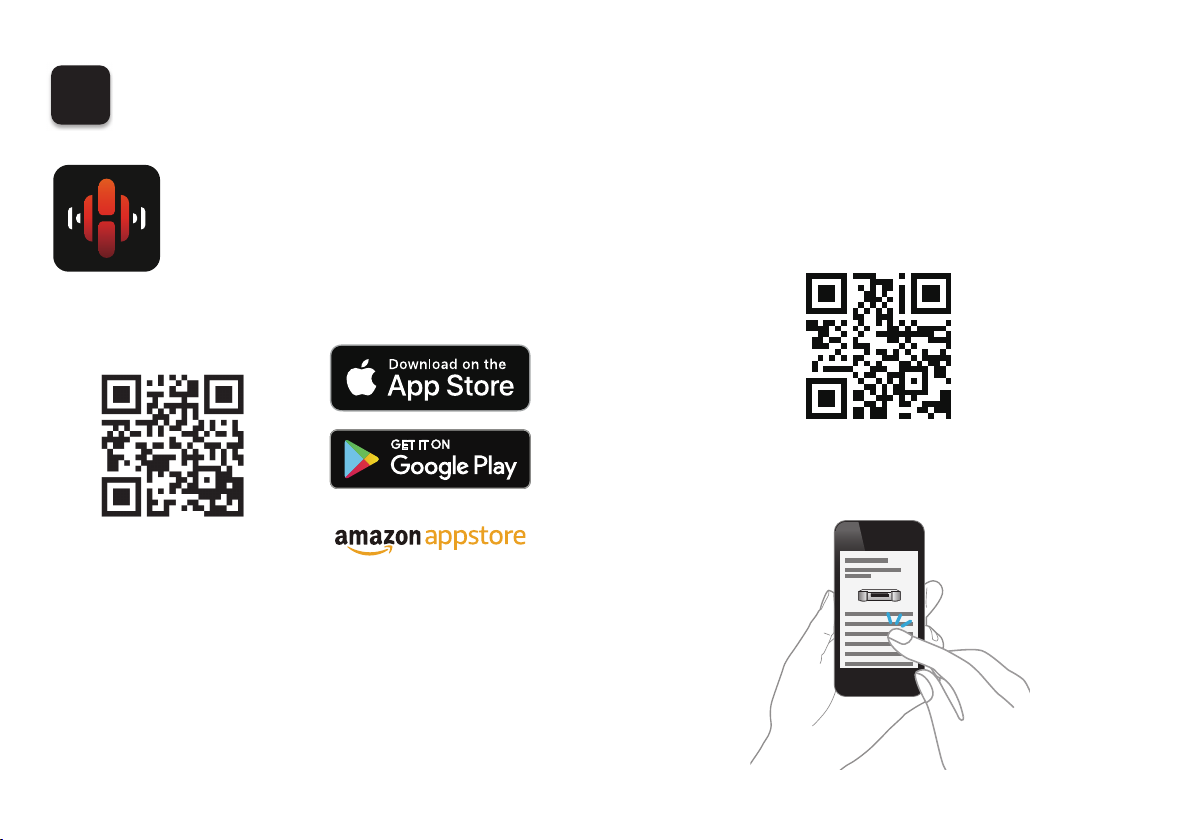
The HEOS App lets you control your
PM7000N from anywhere in your home.
Use HEOS to explore, browse, and play
music from many online streaming services
or from your own music library.
Owner’s Manual
• For more information, visit www.marantz.com
• Refer to the Online Manual for other functions
information and operation procedure details.
manuals.marantz.com/PM7000N/EU/EN/
Online Manual
13
Page 15

Page 16

Copyright © 2019 D&M Holdings Inc. All Rights Reserved.
Printed in Vietnam 5411 11775 00AM
 Loading...