

Maquet VASOVIEW 7 Training Manual
TRAINING MANUAL
VASOVIEW
7
ENDOSCOPIC VESSEL
HARVESTING SYSTEM
VASOVIEW 7 | Training Manual | English | v1
Copyright MAQUET Gmbh

Introduction
This training manual for endoscopic vessel harvesting (EVH) using the VASOVIEW 7 xB is
designed to provide the operator with step-by-step instructions for performing the EVH
procedure. Included in this document are preoperative considerations, intra-operative
technique tips, postoperative recommendations, and troubleshooting suggestions. This
document is not intended to replace reading the product Instructions For Use nor is it intended
to replace the independent judgement of the medical professional performing the procedure.
VASOVIEW 7 Training Manual
MAQUET has a strong history pioneering and advancing endoscopic vessel harvesting
systems.
The VASOVIEW 7 xB Endoscopic Vessel Harvesting System is the product of multiple
generations of learning and experience. MAQUET combines leading-edge advances in product
design with a solid history of surgical success to provide the most advanced and effective
EVH solutions available. VASOVIEW products are supported by clinical consultants who have
both hospital surgical experience and industry-leading training in EVH. The VASOVIEW System
provides real options to cardiac surgeons and their surgical team and real benefits to the
patients they serve.
VASOVIEW 7 | Training Manual | English | v1
Copyright MAQUET Gmbh

TABLE OF CONTENTS
| MAQUET Medical Systems USA | ENDOSCOPIC VESSEL HARVESTING |
1 Endoscopic Vessel Harvesting Saphenous Vein | 4
Procedure-at-a-Glance
2 Endoscopic Vessel Harvesting Radial Artery | 5
Procedure-at-a-Glance
3 Operating Room Instrumentation and Equipment | 6
4 Equipment Testing | 7
5 Endoscopic Vessel Harvesting Procedure: | 8
Saphenous Vein
Patient Positioning and Preparation | 8
Incision Site | 10
Inserting the 7 mm Endoscope With Attached | 11
Dissection Tip
CO
Insufflation | 12
2
Endoscopic Dissection | 13
Branch Cauterization and Transection | 16
Optimizing Visualization | 19
Guidelines for Safe and Effective Use: | 20
BiSECTOR™ Bipolar Ligating Forceps
Running the Vein | 21
Distal Transection and Ligation | 21
Vein Removal and Preparation | 22
Closing and Dressings | 22
6 Endoscopic Vessel Harvesting Procedure: | 23
Radial Artery
Patient Positioning and Preparation | 23
Incision and Tourniquet Deployment | 24
Endoscopic Dissection | 24
Fasciotomy | 26
Branch Cauterization and Transection | 26
Transection and Retrieval of the Radial Artery | 27
Hemostasis and Conduit Preparation | 28
Closing and Dressings | 28
7 Documentation | 29
8 Nursing Considerations | 30
9 Case Setup | 31
10 Postoperative Procedures | 32
12 Troubleshooting | 33
13 Appendix A: Eight Steps for Tying a Ligation Loop | 34
3 |
VASOVIEW 7 | Training Manual | English | v1
Copyright MAQUET Gmbh
| 4
| ENDOSCOPIC VESSEL HARVESTING | MAQUET Medical Systems USA |
ENDOSCOPIC VESSEL HARVESTING
SAPHENOUS VEIN PROCEDURE-AT-A-GLANCE
Incision
Create an incision in the area near the knee, over the greater
saphenous vein. Attach the Dissection Tip to the end of the
7 mm endoscope. Insert the 7 mm endoscope into the
incision and visualize on the video monitor.
Initiating CO2 Insufflation
Advance the Short Port Blunt Tip Trocar (BTT) into position,
and insufflate CO
posterior and branch dissection with the Dissection Tip.
gas to create a tunnel. Perform anterior,
2
Cauterizing and Transecting Branches
Insert the VASOVIEW 7 Harvesting Cannula to cauterize and
transect branches, using the BiSECTOR™ Bipolar Ligating
Forceps.
Enhanced Visualization
For enhanced visualization during vessel branch cauterization and transection, transfer the CO
Insufflation Port to the Distal Insufflation CO2 Port on the
CO
2
source from the BTT
2
VASOVIEW Harvesting Cannula.
Running the Vessel
Deploy the C-Ring from the VASOVIEW Harvesting Cannula,
engage the vein with the C-Ring and run the length of the vein
to ensure that it is completely free and no branches remain.
VASOVIEW 7 | Training Manual | English | v1
Copyright MAQUET Gmbh
Transection and Retrieval
Make a stab wound over the distal end of the tunnel, clamp
the saphenous vein, externalize it through the stab wound.
Transect the vein. Ligate the terminal end of the vein. Retrieve
the harvested vein from the original incision at the knee.

| MAQUET Medical Systems USA | ENDOSCOPIC VESSEL HARVESTING |
ENDOSCOPIC VESSEL HARVESTING
RADIAL ARTERY PROCEDURE-AT-A-GLANCE
Incision
Beginning just proximal to the wrist crease, create a
longitudinal incision. Attach the Dissection Tip to the end of
the 7 mm endoscope. Insert the 7 mm endoscope into the
incision and visualize on the video monitor.
Initiating CO2 Insufflation
Insert the Short Port Blunt Tip Trocar (BTT) into position and
begin CO
dissection of the radial artery pedicle with the Dissection Tip
on the 7 mm endoscope.
insufflation. Perform anterior, posterior, and lateral
2
5 |
Fasciotomy
Insert the VASOVIEW 7 Harvesting Cannula. Using the
BiSECTOR™ Bipolar Ligating Forceps, release the fascia,
cutting it from the distal to the proximal forearm.
Cauterizing and Transecting Branches
Use the C-Ring to protect the radial artery pedicle and expose
the branches. Using the BiSECTOR tool, cauterize and
transect branches.
Running the Vessel
Deploy the C-Ring from the VASOVIEW 7 Harvesting Cannula,
engage the radial artery with the C-Ring and run the length of
the artery to ensure that it is completely free and that no branches remain.
Transection and Retrieval
Make a stab incision near the elbow, clamp the radial artery
pedicle and externalize it through the stab incision. Transect
the radial artery. Ligate the proximal radial artery, and then in
retrograde fashion, retrieve the radial artery pedicle from the
original incision at the wrist.
VASOVIEW 7 | Training Manual | English | v1
Copyright MAQUET Gmbh

| 6
| ENDOSCOPIC VESSEL HARVESTING | MAQUET Medical Systems USA |
OPERATING ROOM
INSTRUMENTATION AND EQUIPMENT
VASOVIEW 7 xB Endoscopic Vessel Harvesting System
7 mm Extended Length Endoscope
7 mm Endoscope Seal
Harvesting Cannula
Harvesting Cannula Seal
Port for distal insufflation
BiSECTOR™
Tool
Dissection Tip CO2 Insufflation
Syringe
for BTT
port with
one-way valve
Short Port Blunt
Tip Trocar (BTT)
Additional Items:
Anti-fog Solution
Surgical instruments used for open harvest
Bipolar Cord
Bovie
Syringe for
scope wash
Port for scope wash
Video Equipment:
Camera Box
Video Monitor
Light Source
Insufflator
Insufflator tubing
CO2 Source
Fiber Optic Cable with appropriate Scope Adaptor End
Camera compatible to Endoscope
VASOVIEW 7 | Training Manual | English | v1
Copyright MAQUET Gmbh

EQUIPMENT TESTING
| MAQUET Medical Systems USA | ENDOSCOPIC VESSEL HARVESTING |
7 |
Prior to starting the EVH procedure, turn on all of the
equipment on the video tower (video monitor, camera, light
source, and insufflator). Be sure that the electric cords are
attached to the back of each piece of equipment. Once all
equipment checks are performed, turn the system com-
pletely off until the procedure begins.
The monitor should show color bars until a camera head is
plugged into the camera box. If the color bars are not balanced, press the reset button to bring them back to the factory setting.
The camera head should be plugged into the camera box to
check for a clear picture prior to sterilization (except in the
case of terminal sterilization).
The light source should be checked to be sure that light is
coming from the unit. Do not look directly into the light.
If the fiber optic light cable will be sterilized with the camera
head, it should be checked for damaged fiber optics. To do
this, hold one end toward a direct light source and look into
the other end. If it illuminates with no more than one-third of
the area grayed, the cable is in good order. If any part of the
cable does not illuminate (reflects a blackened area), use a
different cable. If the fiber optic cables need to be terminally
sterilized, this quality-control procedure should take place
prior to sterilization.
The endoscope should be checked in two ways prior to
sterilization. First, look through the endoscope eyepiece and
be sure that the image is clear. Second, hold the light post
up to a direct light source and look directly into the distal
end of the endoscope. A complete circle of light should be
visible around the distal tip.
Turn the CO
gas tank to the open position and check to be
2
sure there is either a full tank of gas or an extra tank available in the room. Be sure that the gas is flowing from the
unit when the insufflator is turned on. Set the insufflator at
3 – 5 L/min flow and 10 – 12 mmHg pressure.
Be sure that the bipolar foot pedal is connected to the
correct port of the electrocautery generator.
VASOVIEW 7 | Training Manual | English | v1
Copyright MAQUET Gmbh

| 8
| ENDOSCOPIC VESSEL HARVESTING | MAQUET Medical Systems USA |
ENDOSCOPIC VESSEL HARVESTING PROCEDURE
SAPHENOUS VEIN
PATIENT POSITIONING AND PREPARATION
Patient Positioning
Place the patient in a supine position. Externally rotate the leg
with the knee flexed and with support behind the knee and
the thigh. (Figure 1)
Surgical Preparation and Vein Location
Prior to the skin prep, assess the patient to select the incision
site around the knee area. Once the intended incision site is
identified, mark the area with a surgical marker.
Figure 1
The saphenous vein can usually be found by using anatomical
landmarks. For morbidly obese patients, an ultrasonic
doppler may be used to help locate the vein. If needed, use
the doppler prior to the patient prep and then mark the site
with a surgical marker. If appropriate, vein mapping may be
performed preoperatively. Note that the saphenous vein in
its natural position lies fairly posterior in relationship to the
patella. Perform skin prep according to hospital protocol.
VASOVIEW 7 | Training Manual | English | v1
Copyright MAQUET Gmbh

| MAQUET Medical Systems USA | ENDOSCOPIC VESSEL HARVESTING |
9 |
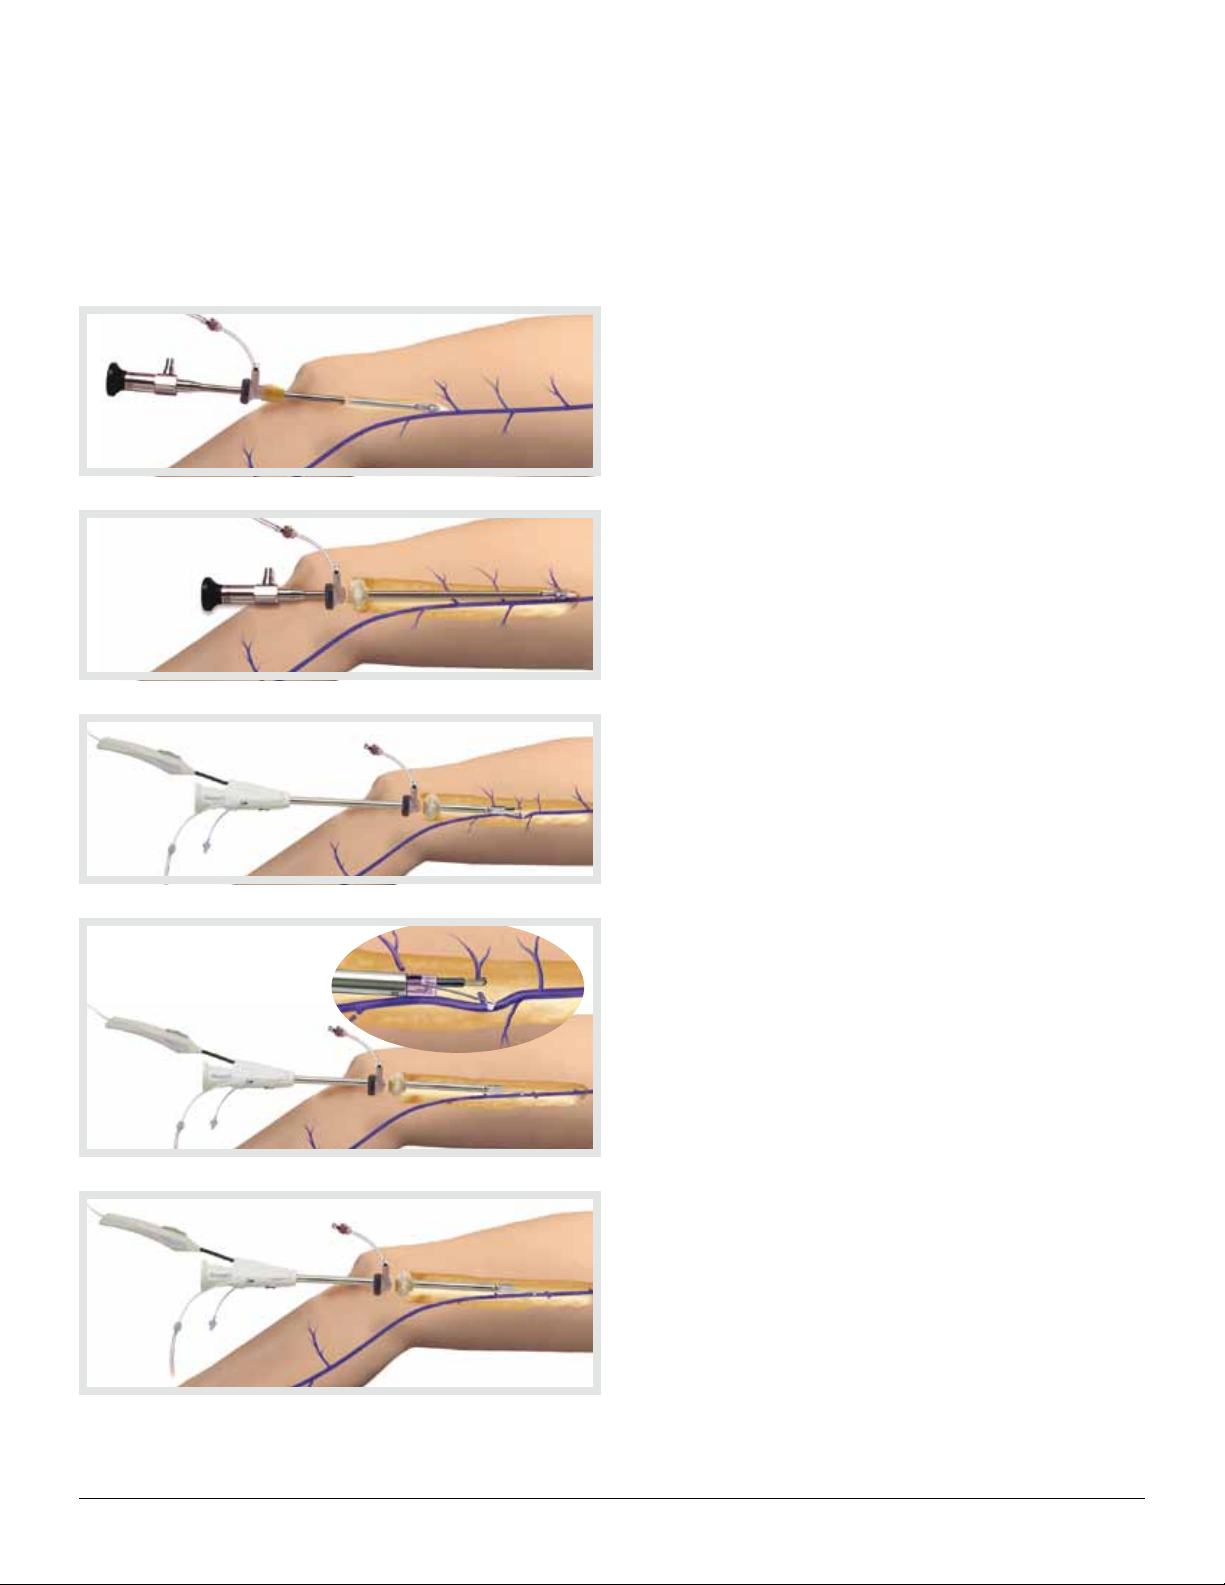
Product Assembly
Attach the 7 mm Extended Length Endoscope to the
camera coupler. Attach the light cable to the post on the
endoscope. Focus the endoscope on a gauze pad and
white balance the video camera as described below. Ensure
proper orientation of the camera head. It is important to
maintain correct orientation throughout the procedure.
Thread the Dissection Tip onto the distal end of the endoscope until the proximal edge of the Dissection Tip lines up
with the indicator etched on the endoscope shaft. (Figures 2
and 3)
Insert the endoscope with attached Dissection Tip through
the BTT. Ensure that the Endoscope Seal is on the BTT (it
comes packaged with this seal attached). (Figure 4)
Figure 2
Proper White Balancing
White balancing is the process by which the camera learns
what “white” is. This process sets the full range of color
through the camera.
To white balance the camera, attach the camera head and
fiber optic cables to the endoscope and hold a piece of
white gauze approximately 1.5 inches from the distal end of
the endoscope. (Figure 5)
Focus the camera and ensure that only white is visible.
Press the white-balance button from either the camera head
or camera box, depending on the camera system. Hold the
camera and endoscope still until the system indicates white
balance is completed.
Figure 3
Figure 4
Figure 5
VASOVIEW 7 | Training Manual | English | v1
Copyright MAQUET Gmbh

| 10
| ENDOSCOPIC VESSEL HARVESTING | MAQUET Medical Systems USA |
INCISION SITE
Selecting the Incision Site
There are several factors to consider when selecting the incision site, such as operator preference, number of grafts needed, and whether the upper or lower leg is used for the vein
harvest.
There are two commonly used incision sites (Figure 6):
Below the knee: Palpate along the tibia until reaching the
medial tibial epicondyle. Make a 2 cm incision along the
posterior border of the tibial epicondyle. (Figure 7)
Above the knee: Make a 2 cm incision in the thigh where the
vein lies in the groove between the sartorius and gracilis
muscles. (Figure 8)
Making the Incision
Once the site has been identified, make a 2 cm skin incision
directly over the vein.
A transverse, longitudinal or oblique incision may be used
depending on operator preference.
Under direct visualization, dissect the subcutaneous tissue
to expose the greater saphenous vein.
Continue dissection of the anterior surface of the vein in the
direction of planned harvesting, creating a small space
approximately the length of the distal end of the BTT to
ensure easy insertion.
Figure 6
Figure 7 Figure 8
VASOVIEW 7 | Training Manual | English | v1
Copyright MAQUET Gmbh
INSERTING THE 7 MM ENDOSCOPE WITH ATTACHED
DISSECTION TIP
Under direct visualization, insert the Dissection Tip into the
space created, and place it onto the anterior surface of the
saphenous vein. Note (on the video monitor) the color of the
vein and the surrounding yellow fatty tissue. It is important
to always identify the vein prior to advancement of the
instrument. (Figure 9)
Advance the endoscope approximately 4 cm, then slide the
BTT through the incision site and into the previously
dissected space. (Figure 10)
| MAQUET Medical Systems USA | ENDOSCOPIC VESSEL HARVESTING |
Figure 9
11 |
Figure 10
VASOVIEW 7 | Training Manual | English | v1
Copyright MAQUET Gmbh

| 12
| ENDOSCOPIC VESSEL HARVESTING | MAQUET Medical Systems USA |
CO2 INSUFFLATION
Connect the CO
insufflation tubing to the clear flexible CO2
2
Insufflation Port on the BTT and begin insufflation of CO
Ensure the CO
Insufflator is set to the proper flow and
2
pressure settings.
Flow: 3 – 5 L/min
CO
2
Pressure: 10 – 12 mmHg
CO
2
The goal is to delineate a tissue plane for easier dissection
and to maintain the tunnel.
If desired pressure is not obtained in the tunnel, the slip tip
syringe provided can be used to inflate the balloon on the
BTT. Inflate the balloon with the minimal amount of air
needed to create an adequate seal (0 – 25 cc’s of air). If
there is obvious leakage around the incision, use a pursestring suture to ensure a tight seal around the BTT port.
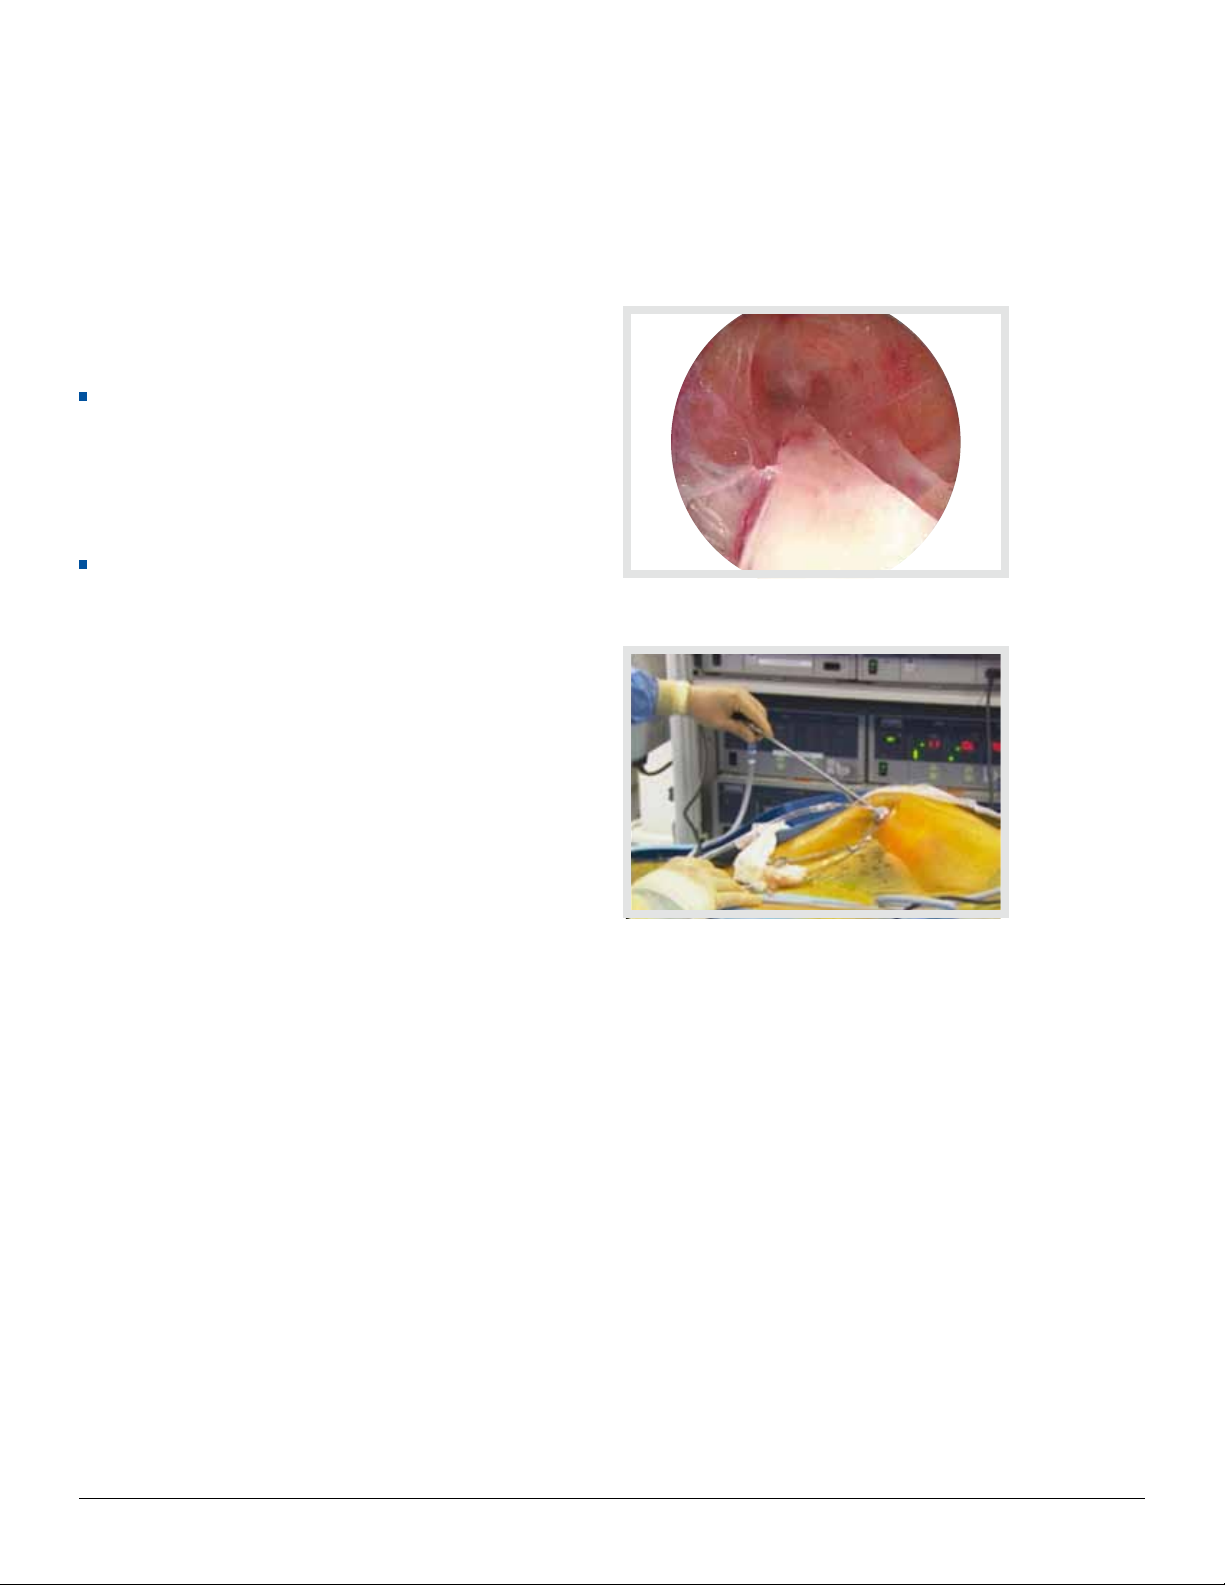
Once the CO
insufflation has begun, note the initial
2
“webbing” effect or partial separation of tissues from the
saphenous vein. (Figure 11)
.
2
Figure 11
Technique Tips
If partial separation of tissue from saphenous vein is not
observed, check that the CO
is flowing, the pressure
2
setting is 10 – 12 mmHg, and the tubing is connected to the
BTT and the insufflator. Also, check the CO
tank to ensure
2
that it is in the open position, with an adequate amount of
. (See Troubleshooting Section)
CO
2
VASOVIEW 7 | Training Manual | English | v1
Copyright MAQUET Gmbh
 Loading...