

Manta LED5002 User Manual
●
●
●
●
●
Power failure or unstable voltage.
Abnormal sound or smell from the device.
AC power cord is damaged.
TV set is damaged due to falling off, knock or impact.
Any liquid or foreign matters enter into the TV set.
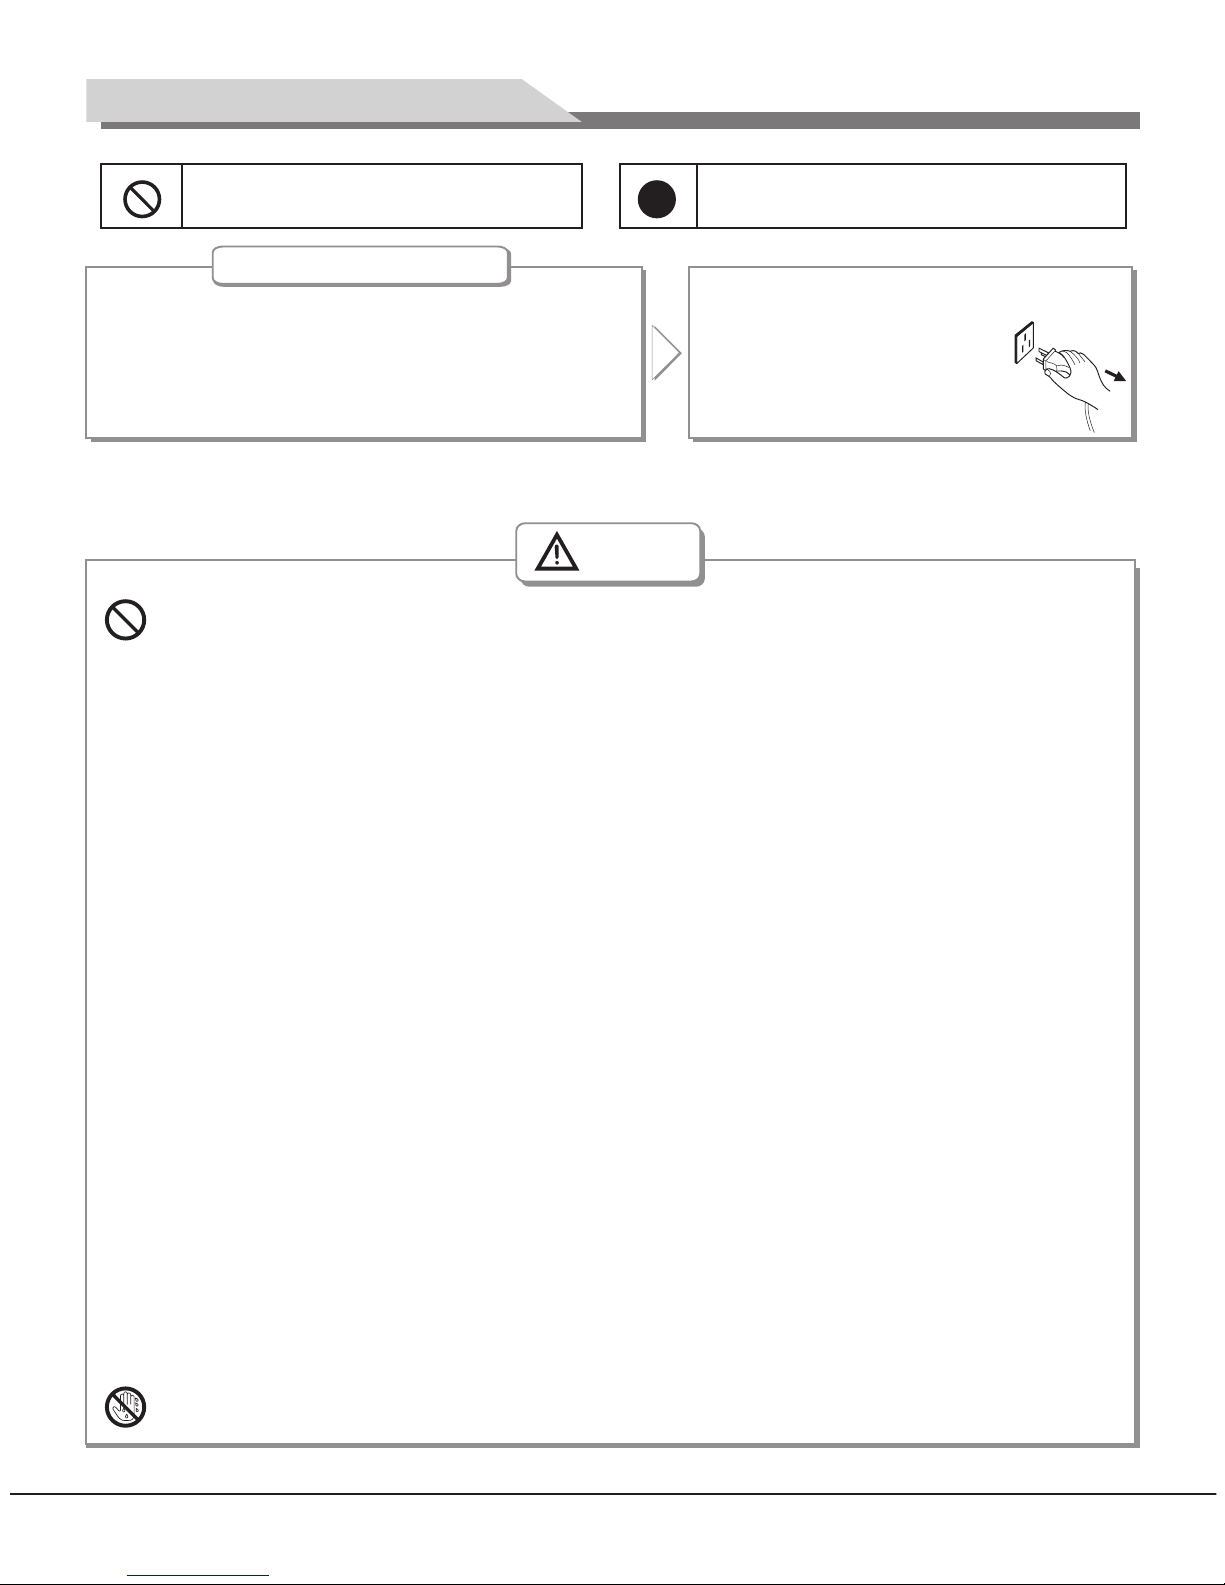
Under Following Conditions
Turn off the TV set immediately,
unplug the power cord from the
power outlet, and contact
authorized maintenance
personnel.
● If coal gas or other flammable gases leak, do not unplug the power cord of the TV set or other electric
appliances; instead, close the valve of the gas immediately and open the doors and windows.
●
●
●
●
●
●
●
●
●
●
●
●
●
Only use 240VAC 60/50Hz power supply.
All cables can be connected or pull out only after power supply is turned off.
Do not fix the TV set on instable position, or else it may cause falling off, damage, or even
fire.
Do not put the TV set in the environment:
1. With direct sunshine, moisture, overheating, undercooling or heavy dust;
2. With flammable or explosive substance;
3. With flammable or corrosive gas;
4. In bathroom, kitchen, etc.
Do not use damaged or improper power socket, and ensure that the plug and socket are
connected properly.
Keep the power plug and socket free of dust and metal pieces.
Do not damage the power cord:
1. It is prohibited to refit the power cord;
2. Do not put heavy object on the power cord;
3. Keep the power cord away from heat source;
4. Do not drag the power cord when unplugging.
Do not connect too many appliances to one power strip, or else it may cause fire due to high
power consumption.
Do not let open flame (e.g. lit candle) approach the TV set, or else it may cause electric shock
or fire.
Do not put the container filled with water on the TV set, to avoid electric shock or fire caused
by water drop of splashing.
Do not penetrate any sharp object, metal or liquid into the signal connector or air vents, to
avoid short circuit and product damage as well as electric shock.
100-
This TV must be connected to a three pin socket outlet for safety.
The slots on the case is designed to release heat so as to assure that all inside components
will not reach an extra high temperature and can work normally for a long time. Please do not
cover the holes while place it.
Warning
Do not touch the plug with wet hands, or else it may cause electric shock.
Indicate the behaviors that must be
prohibited
Indicate the operations that must be
performed
2
Safety Warning and Notice

●
●
●
●
●
●
●
●
●
●
" "
●
●
●
●
●
Do not let children climb onto the TV set.
Keep the small accessories away from children's reach to avoid swallowing.
If the TV set won't be used for a long time, please turn off the device and unplug the power cord.
Before cleaning the TV set, unplug the power cord and wipe with soft cloth; do not use chemical
reagents and avoid foreign substances entering into the device. Improper cleaning may damage
the appearance or erase the printing information on the product.
To adjust the position or angle of the TV set, please disconnect all wires and move slowly to
avoid falling off.
Do not rub with hard object, knock at, bend or squeeze the screen.
Do not use machine immediately after transfering machine to the places with high temperature
from low temperature, which will cause fogging inside machine and failures.
If the screen is broken and the liquid splashes on skin, please wash with clean water immediately
for 15 minutes, and go to see your doctor.
To carry the TV set with hands, please grasp the corners and hold the bottom; do not apply force
on the panel.
Displaying the same image for a long time or active image with fixed words, icons will leave
image persistence on screen which will not disappear after powering off for a long time. This
undesirable phenomenon is not covered by warranty.
Healthy TV watching: Watch in appropriate light; poor light or long time watching may hurt your
eyes.
Unplug the power cord of the device to cut off the power supply.
If a power plug or appliance coupler is used as disconnecting device, it should ensure easy
operation.
Power plug shall be connected reliably. Loose power plugs may cause sparkle and fire.
All the technical specifications in the user manual and on the packaging are subject to changes
without prior notice. If there is slight deviation between the user manual and actual operation,
the latter shall prevail.
Attention
Mounting and Connecting
1. The TV set; 2. User Manual; 3: Remote control; 4: Power cord: 1 (or attached to TV set)
Packing list
Warning
Do not disassemble the TV set by yourself, or else it may cause electric shock or fire. Contact
qualified personnel for maintenance.
Do not turn on the TV set in thunderstorm weather; instead, unplug the power plug and antenna
connector to avoid lightning strike.
3
Safety Warning and Notice
4
● The TV set should be mounted near the AC power socket for easy plugging and unplugging.
● For your safety, please select appropriate wall mount bracket or base.
● To avoid hurt, it is required to place the TV set on stable plane, or fix on firm wall.
● Ask qualified personnel to mount the TV set on the wall. Improper mounting may result in instable TV set.
●
●
●
●
Do not place the TV set at any place susceptible to mechanical vibration.
Do not place the TV set at any place that insects may enter.
Do not mount the TV set against air conditioner, or else the internal panel of the display may
condense moisture and cause failure.
Do not place the TV set at any place with strong magnetic field, or else it may be interfered with
and damaged by electromagnetic wave.
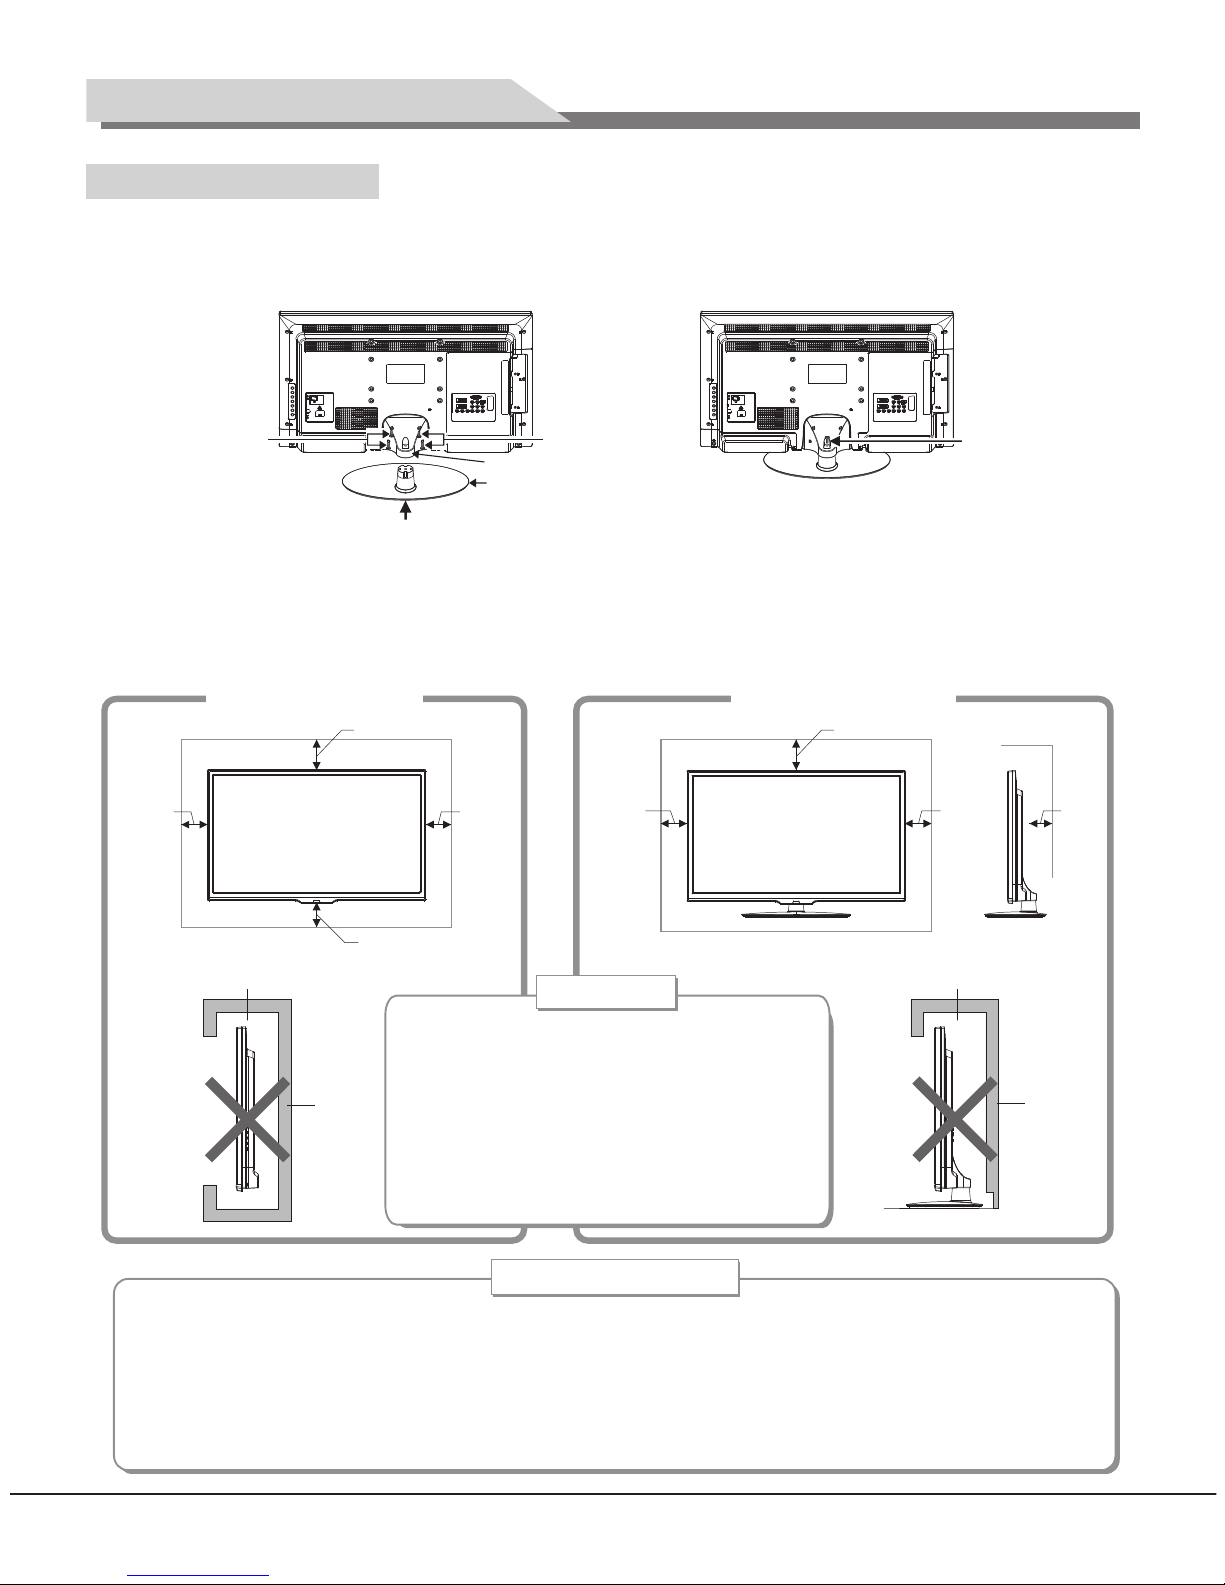
Tips on Installation
Mounting the TV set
Remark: The actual base and appearance may be different from the picture; please refer to the device.
Fasten the base supporting cover to the back cover of machine (It needn't to operate this step when base
support cover had been installed.), and then Insert base assembly to supporting shield hole of complete
machine back cover as illustrated direction of arrow, to make supporting shield and supporting hole center in
the same line, finally fasten the screw.
Mounting and Connecting
The base
Base supp ortin g cover
Screw
ScrewsScrews
30cm
10cm10cm
10cm
●
,
●
●
Please keep this space at least around
the TV as shown in the figure.
Do not cover the air vents or insert any
object into the enclosure.
Do not put the device in limited space,
e.g. bookcase or embedded closet,
unless the TV set is properly ventilated.
10cm
10cm
7cm
30cm
Mount on the wall
Mount on the base
Obstruct the air circula ti on
Ventilation
Wal l
Obstruct the air circula ti on
Wal l
5
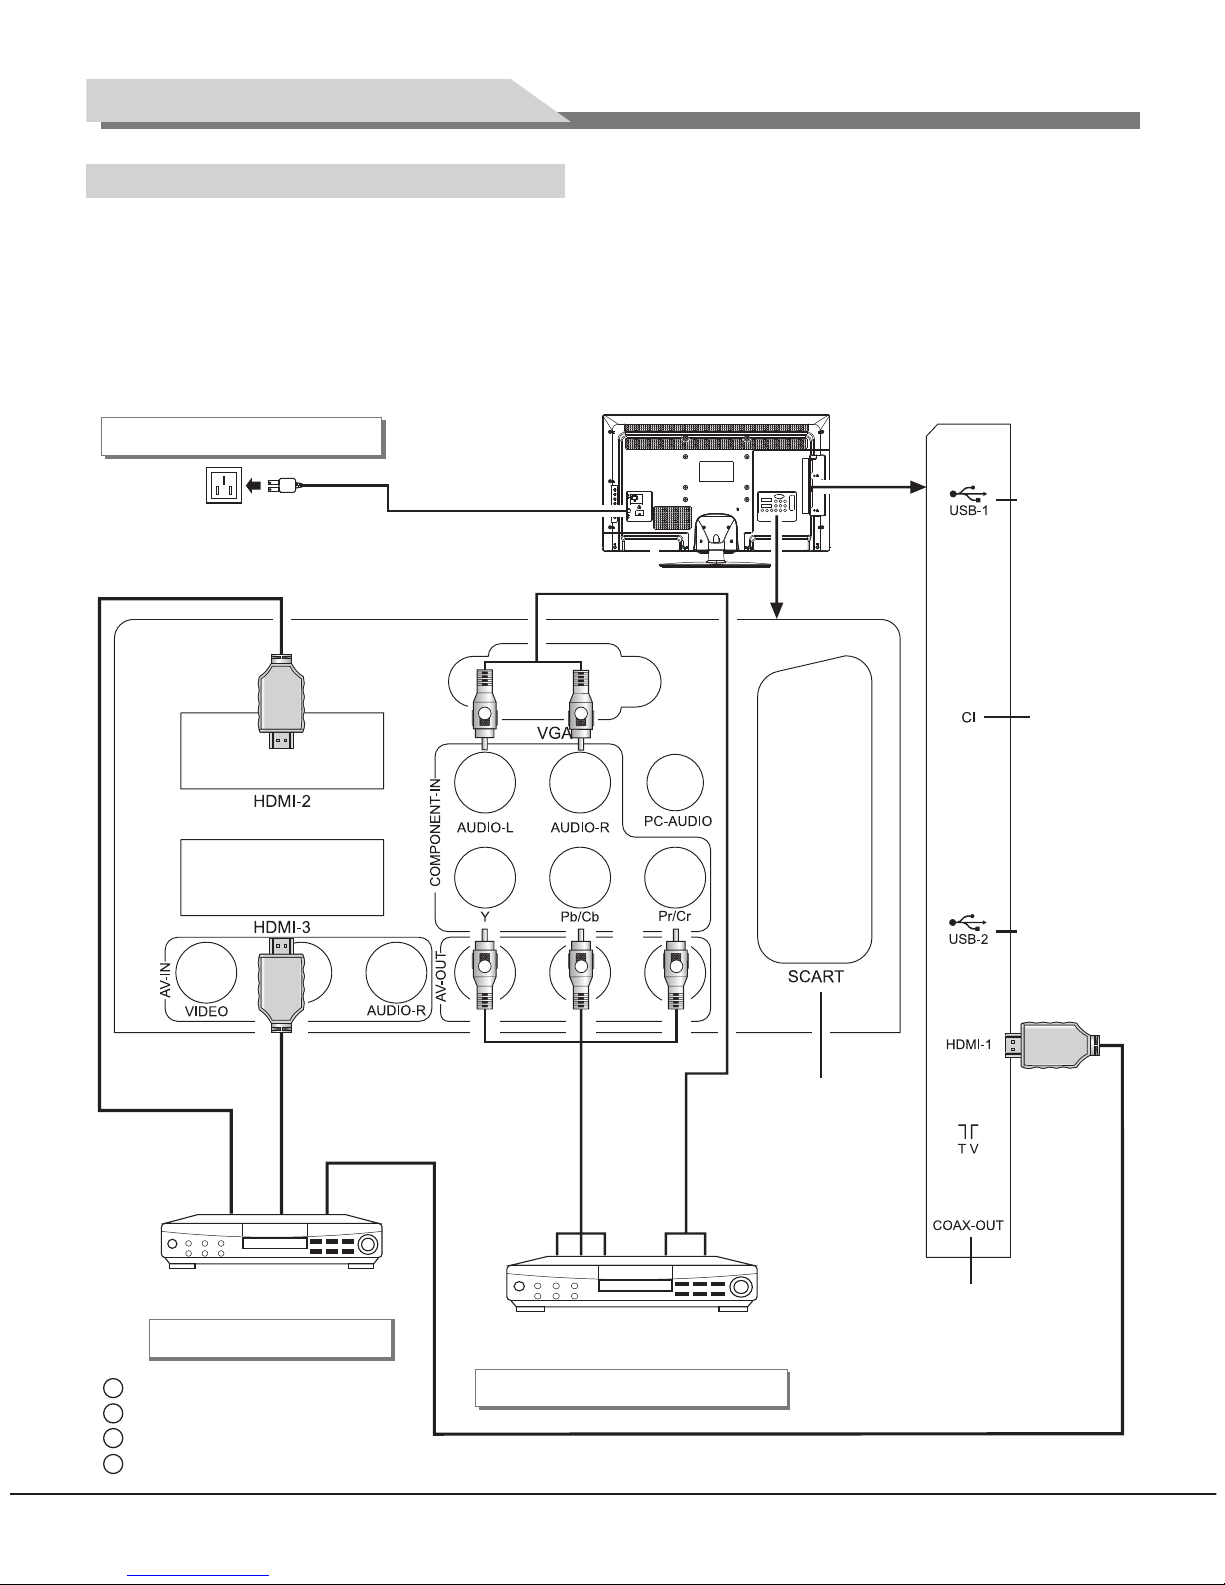
Connecting power supply
To power socket
(100-240VAC 60/50Hz)
Power cord
G
B R
W
R
HDMI signal cable
YPbPr/YCbCr cable
Connect to the AV device
with HDMI interface
HDMI input connection
Connect t
output interface
o the device with
YPbPr/YCbCr
Component input connection
Audio cable
HDMI signal cable
Connecting peripheral equipment
You can connect various devices to the TV set and view high quality images. If the video device has HDMI,
YPbPr/YCbCr, AV, PC, SCART and other video output/input ports. You can select one of them and connect to
corresponding input or output ports of the TV set. After connected, press "SOURCE" key, then menu of signal
source will be displayed on the screen. Press the "▲/▼" key to select the input signal, and press "OK" key to
confirm. The connecting mode is shown in the figure.
USB 1 inter fa ce
USB 2 inter fa ce
Coaxial c ab le interf ac e
Note:
2. The peripheral equipment and cables described in this manual should be purchased separately.
1. USB and HDMI interfaces are alterable; please refer to the actual configuration.
SCART interfac e
G Green (Y s ignal cab le )
B Blue (Pb /Cb signa l ca ble)
W White(A UD IO-L sign al c able)
R Red (AUD IO-R and Pr /C r signal ca bl es)
CI CARD
Mounting and Connecting
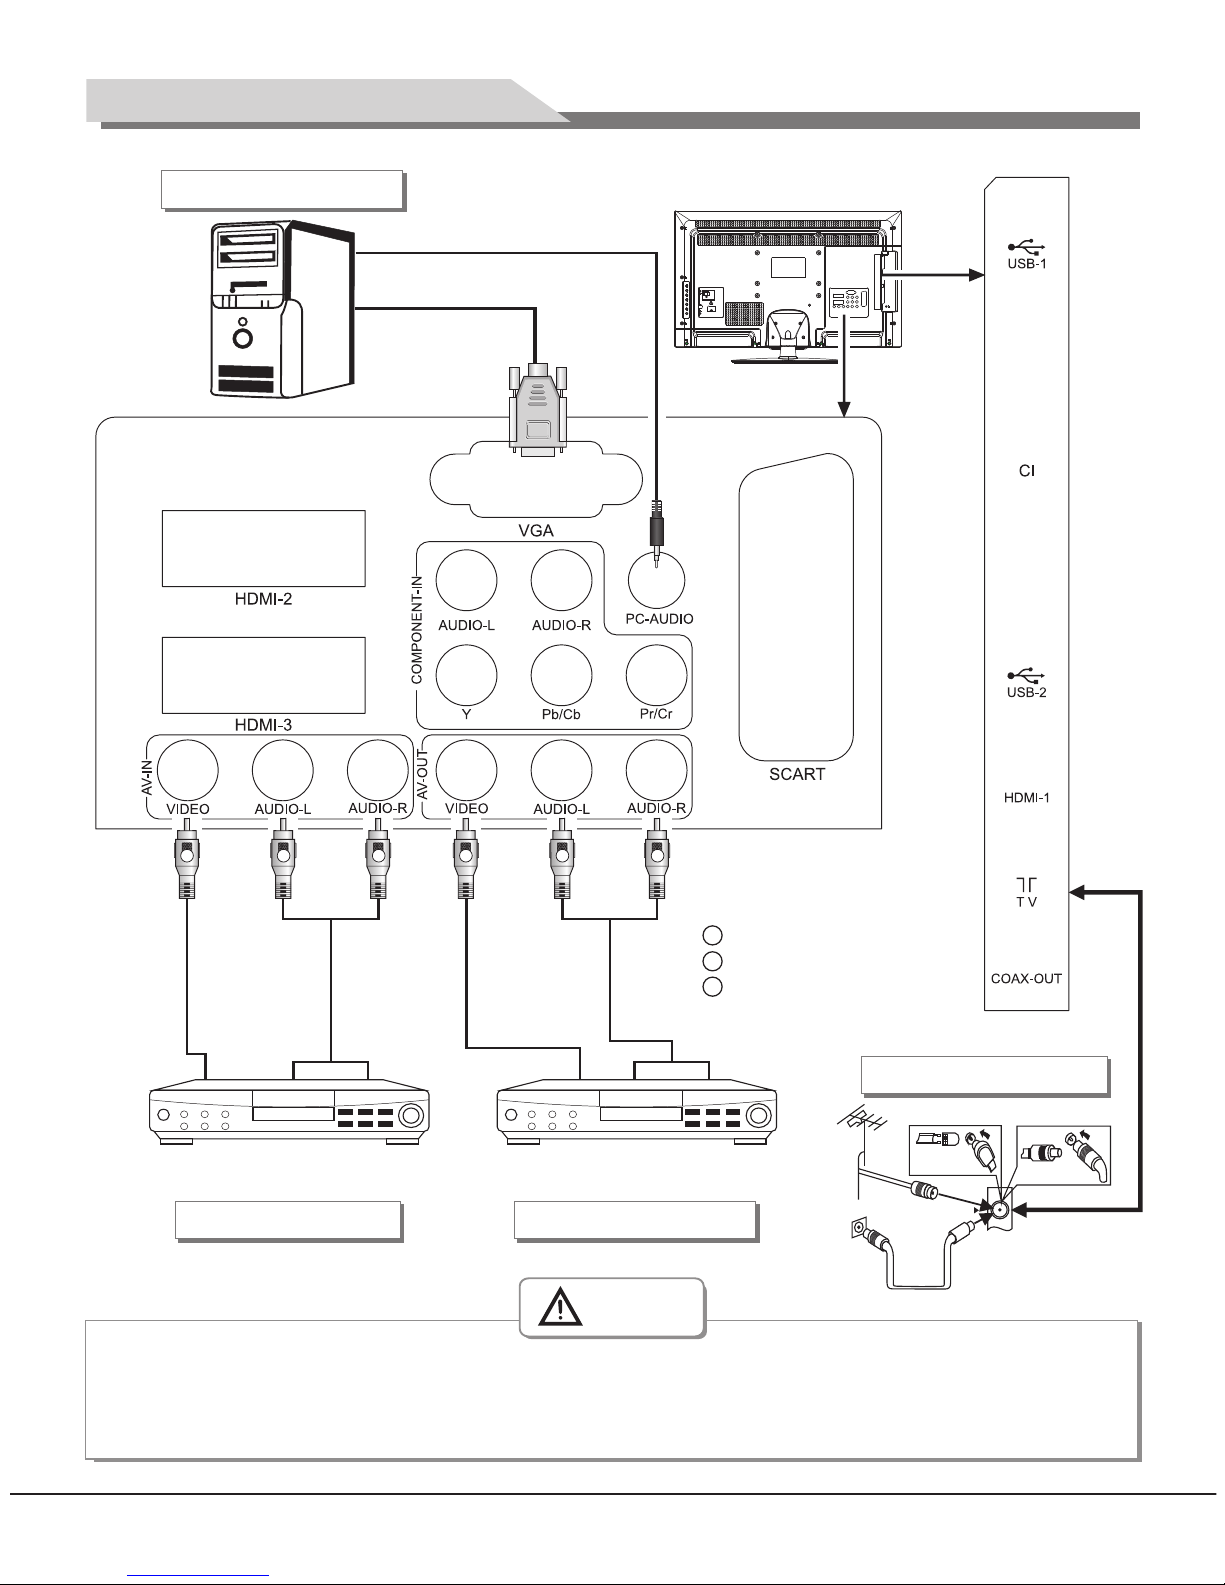
Y Yell ow (VIDEO s ig nal cable )
W White(A UD IO-L sign al c able)
R Red (AUD IO-R sign al c ables)
Connect to the devices with AV output
interface (e.g. DVD, VCR, game console)
AV input connection
Video cable
Audio cable
Connect to the devices with AV
input interface (e.g. Monitor)
AV output connection
VGA input connection
PC audio cable
VGA cable
R F
Antenna connection
When connecting outdoor antenna to signal port of the TV set, please turn off the main power switch
of the TV set first. Do not approach the outdoor antenna to high voltage mains power line to avoid
electric shock. The wired network antenna connected to this TV set must be isolated from the
protective grounding, or else it will cause fire or other hazards.
Warning
Video cable
Audio cable
Y
W R R
Y
W
6
Mounting and Connecting
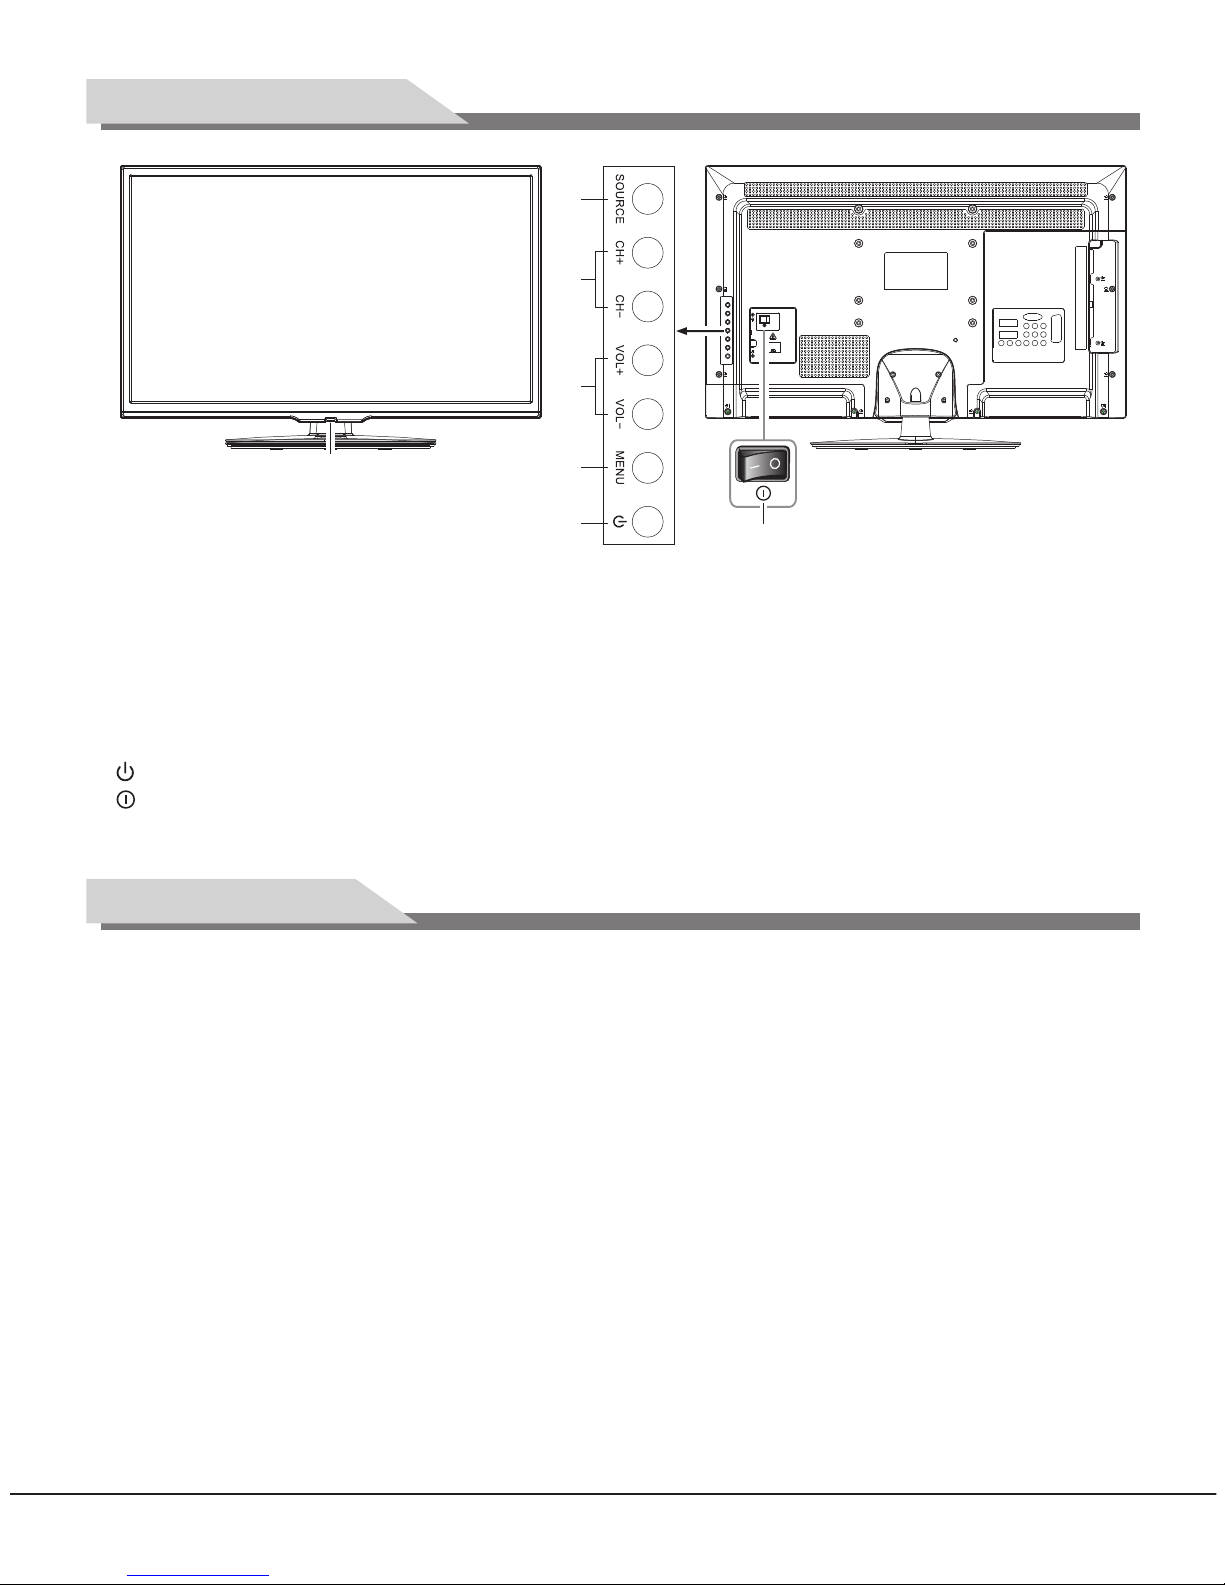
Panel Control Keys
Remote Control
Installing battery
Remove the battery cover, and insert two AAA (1.5V) batteries; make sure that the polarity of the battery is
consistent with the marks "+/-" in the battery slot.
Precautions of remote control usage
Point the remote control to the receiver window. The objects between remote control and the receiver
window may disturb the normal operation.
Keep the remote control away from strong vibration. In addition, do not set or put the remote control in direct
sunshine, which may result in deformation of the remote control.
The remote control may be invalid if the receiver window is in direct sunshine or strong light; in this case,
please adjust the angle of the light or the device, or approach the remote control to the receiver window.
The effective range of the remote control may be affected if the battery voltage is low; in this case, please
replace with a new battery; if the remote control won't be used or battery voltage is too low, please take out
the battery to avoid corrosion due to battery liquid leakage.
Do not mix different types of batteries, or used and new batteries.
Do not throw the batteries into fire, charge or break up, or charge, short circuit, disassemble, heat or burn
the used batteries. Please follow the environmental protection regulations to disposal of the batteries.
●
●
●
●
●
●
7
1) Power LED indicator and remote receiving window.
2) SOURCE: Press this key to enter the menu of signal source and choose signal source.
3) CH+/CH-: Press these two keys to select the channel. In OSD menu, press the two keys to adjust the items,
which have the same functions as ▲/▼ key on the remote control.
4) VOL+/VOL-: Press these two keys to add or reduce volume. In OSD menu, press the two keys to adjust the
analog value of selected item, which have the same functions as t/u key on the remote control.
5) MENU: Press this key to enter main menu.
6) Power on/Standby.
7) Power switch (press '' I '' end to turn power on, and press ''O'' end to turn power off)
Note: Different models may have different appearances; please refer to the actual device.
2
3
4
5
6
1
7
 Loading...