

Page 1
SOTTO™ Ice Machines
UG Models
Installation, Operation and Maintenance Manual
This manual is updated as new information and models are released. Visit our website for the latest manual.
Part Number: 040002628 8/13
Page 2
Safety Notices
! Warning
!
Caution
Important
!
Caution
Important
! Warning
As you work on Manitowoc equipment, be sure to pay
close attention to the safety notices in this manual.
Disregarding the notices may lead to serious injury and/
or damage to the equipment.
Throughout this manual, you will see the following types
of safety notices:
Text in a W arning bo x alerts yo u to a po tential
personal inju ry situ ation. Be su re to re ad th e
Warning st atement before pr oceeding, and wor k
carefully.
Text in a Ca ution b ox ale rts yo u to a s ituation in
which you could damage the equipment. Be sure to
read the Caution statement before proceeding, and
work carefully.
Procedural Notices
As you work on Manitowoc equipment, be sure to read
the procedural notices in this manual. These notices
supply helpful information which may assist you as you
work.
Read These Before Proceeding:
Proper ins tallation, ca re an d m aintenance a re
essential fo r ma ximum pe rformance an d tro ublefree operation of your Manitowoc equipment. Read
and understand this m anual. It con tains valuable
care and maintenance information. If you encounter
problems not cover ed by th is manual, do no t
proceed, co ntact Manitowoc Fo odservice Group.
We will be happy to provide assistance.
Routine ad justments an d maintenance pr ocedures
outlined in th is ma nual are not co vered by th e
warranty.
PERSONAL INJURY POTENTIAL
Do not operate e quipment that h as been misused,
abused, ne glected, da maged, or altered/modified
from that of original manufactured specifications.
NOTE: SAVE THESE INSTRUCTIONS.
Throughout this manual, you will see the following types
of procedural notices:
Text in an Important box pr ovides yo u with
information that may help you perform a procedure
more ef ficiently. Disr egarding this information will
not cause damage or inju ry, bu t it m ay slow you
down as you work.
NOTE: Text set off as a Note provides you with
simple, but useful, extra information about the
procedure you are performing.
We reserve the right to make product improvements at any time.
Specifications and design are subject to change without notice.
Page 3

Section 1
General Information
General................................................................................................................. 1-1
Model Numbers ................................................................................................ 1-1
Model Numbers Identification.................................................................... 1-1
Model/Serial Number Location................................................................... 1-2
Owner Warranty Registration Card.......................................................... 1-3
Section 2
Installation Instructions
General................................................................................................................. 2-1
Ice Machine Dimensions............................................................................... 2-1
Location of Ice Machine................................................................................ 2-2
Table of Contents
Section 3
Operation
Leveling the Ice Machine.............................................................................. 2-2
Electrical Service............................................................................................. 2-3
VOLTAGE ………………………………………………………………………… 2-3
FUSE/CIRCUIT BREAKER …………………………………………………… 2-3
TOTAL CIRCUIT AMPACITY ………………………………………………… 2-3
Water Service/Drains...................................................................................... 2-4
WATER SUPPLY ………………………………………………………………… 2-4
WATER INLET LINES…………………………………………………………… 2-4
DRAIN CONNECTIONS………………………………………………………… 2-4
WATER SUPPLY AND DRAIN LINE SIZING/CONNECTIONS …………… 2-4
Installation Checklist...................................................................................... 2-6
Before Starting the Ice Machine
Component Identification............................................................................. 3-1
Component Removal...................................................................................... 3-2
................................................................ 2-6
Ice Making Sequence of Operation................................................ 3-5
Operational Checks........................................................................................ 3-6
Part Number 040003628 08/13 i
Page 4

Section 4
Maintenance
Table of Contents (continued)
General................................................................................................................ 4-1
Cleaning the Condenser ............................................................................... 4-2
Interior Cleaning and Sanitizing................................................................ 4-3
GENERAL ……………………………………………………………………… 4-3
CLEANING & SANITIZING PROCEDURE ………………………………… 4-3
Exterior Cleaning............................................................................. 4-4
Removal from Service/Winterization
Section 5
Before Calling for Service
Checklist............................................................................................................. 5-1
....................................................... 4-4
ii Part Number 040003628 08/13
Page 5
Section 1
!
Warning
!
Warning
General Information
General
It is recommended that this ice machine be inspected
and installed by a qualified service technician.
Follow all recommendations and instructions for proper
installation and safe operation of this ice machine.
If you do not understand the procedures or the
safety precautions that must be followed, call your
local service representative to perform the
necessary installation procedures for you.
Model Numbers:
This manual covers the following models:
Self-Contained Air-Cooled Self-Contained Water-Cooled
UG018A N/A
UG020A N/A
UG030A UG030W
UG040A N/A
UG050A UG050W
UG065A N/A
UG080A N/A
Model Numbers Identification:
PERSONAL INJURY POTENTIAL
Do not operate equipment that has been misused,
abused, neglected, damaged, or altered/modified
from that of original manufactured specifications.
UG 040 A C - 2 5 1 F
Ice Machine Model
018= Model 18
020= Model 20
030= Model 30
040= Model 40
050= Model 50
065= Model 65
080= Model 80
Part Number 040003628 08/13 1-1
A – Air Cooled
W – Water Cooled
Blank: Non-market specific
S: Saudi Arabic
K: Korea
C: China
G: GS approved
E : WRAS approved
B: Brazil
1= 115V
2= 230V
5= 50Hz
6= 60Hz
I= Oblique Flat Blades with Ground
B = 115V Grounded Power Cord
1= 1 Phase
F= Schuko
G= Blade
Z= No Plug/Bare Lead
Page 6
General Information Section 1
Model/Serial Number
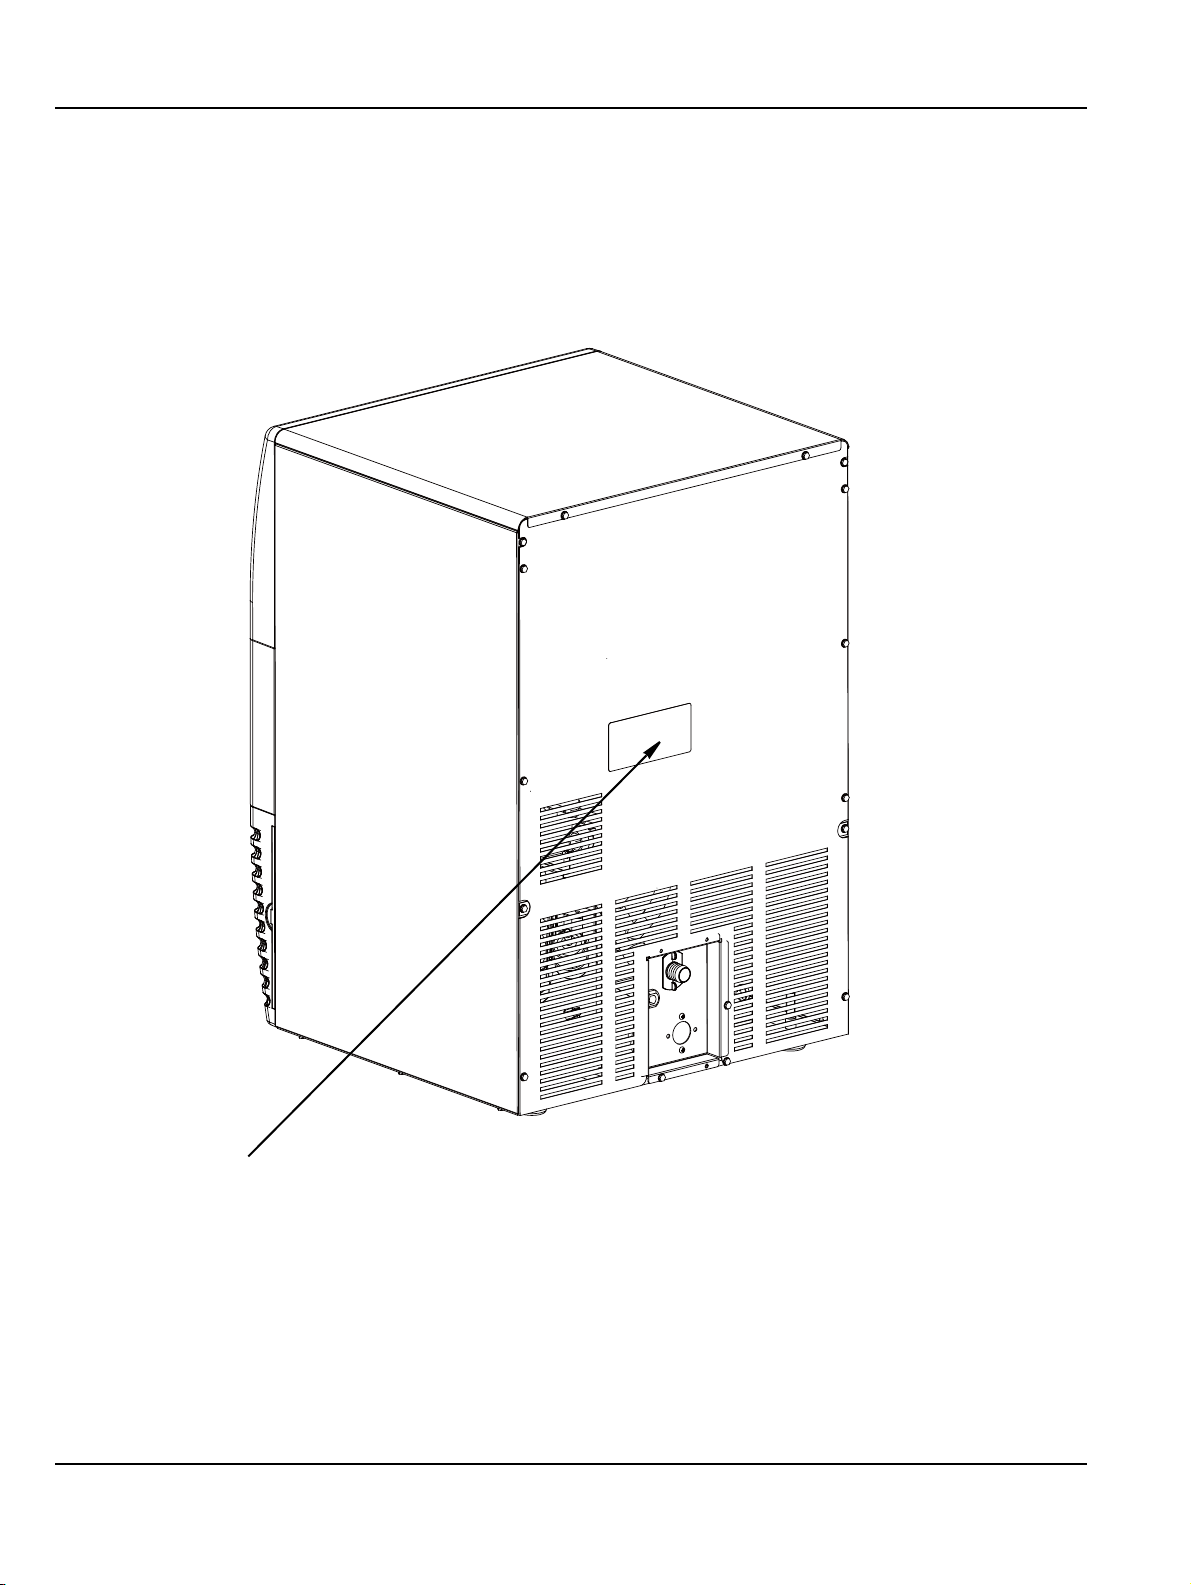
Location
Model/Serial Number Location
Record the model and serial number of your ice machine
and bin or dispenser in the space provided below. These
numbers are required when requesting information from
your local Manitowoc distributor, or Manitowoc Ice, Inc.
The model and serial number are listed on the OWNER
WARRANTY REGISTRATION CARD. They are also
listed on the MODEL/SERIAL NUMBER DECAL affixed
to the ice machine, remote condenser and storage bin.
Model/Serial Number Location
Model:______________________ Serial Number:______________________
1-2 Part Number 040003628 08/13
Page 7

Section 1 General Information
Important
Owner Warranty Registration Card
GENERAL
The packet containing this manual also includes
warranty information. Warranty coverage begins the day
your new ice machine is installed.
Complete and mail the OWNER W ARRANTY
REGISTRATION CARD as s oon as pos sible to
validate the installation date.
If you do not return your OWNER WARRANTY
REGISTRATION CARD, Manitowoc will use the date of
sale to the Manitowoc Distributor as the first day of
warranty coverage for your new ice machine.
COMMERCIAL WARRANTY COVERAGE
General
The following Warranty outline is provided for your
convenience. For a detailed explanation, read the
warranty bond shipped with each product.
Contact your local Manitowoc representative or
Manitowoc Ice, Inc. if you need further warranty
information.
Parts
Manitowoc warrants the ice machine against defects in
materials and workmanship, under normal use and
service for two (2) years from the date of original
installation.
Labor
Labor required to repair or replace defective
components is covered for one (1) year from the date of
original installation.
Exclusions
The following items are not included in the ice machine’s
warranty coverage:
1. Normal maintenance, adjustments and cleaning as
outlined in this manual.
2. Repairs due to unauthorized modifications to the ice
machine or use of non-standard parts without prior
written approval from Manitowoc Ice, Inc.
3. Damage caused by improper installation of the ice
machine, electrical supply, water supply or drainage,
or damage caused by floods, storms, or other acts of
God.
4. Premium labor rates due to holidays, overtime, etc.;
travel time; flat rate service call charges; mileage
and miscellaneous tools and material charges not
listed on the payment schedule. Additional labor
charges resulting from the inaccessibility of
equipment are also excluded.
5. Parts or assemblies subjected to misuse, abuse,
neglect or accidents.
6. Damage or problems caused by installation,
cleaning and/or maintenance procedures
inconsistent with the technical instructions provided
in this manual.
Authorized Warranty Service
To comply with the provisions of the warranty, a
refrigeration service company, qualified and authorized
by your Manitowoc distributor, or a Contracted Service
Representative must perform the warranty repair.
NOTE: If the dealer you purchased the ice machine from
is not authorized to perform warranty service, contact
your Manitowoc distributor or Manitowoc Ice, Inc. for the
name of the nearest authorized service representative.
Service Calls
Normal maintenance, adjustments and cleaning as
outlined in this manual are not covered by the warranty.
If you have followed the procedures listed in this manual,
and the ice machine still does not perform properly, call
your authorized service company.
Part Number 040003628 08/13 1-3
Page 8

General Information Section 1
PAGE INTENTIONALLY LEFT BLANK
1-4 Part Number 040003628 08/13
Page 9
Section 2
Installation Instructions
General
These instructions are provided to assist the qualified installer.
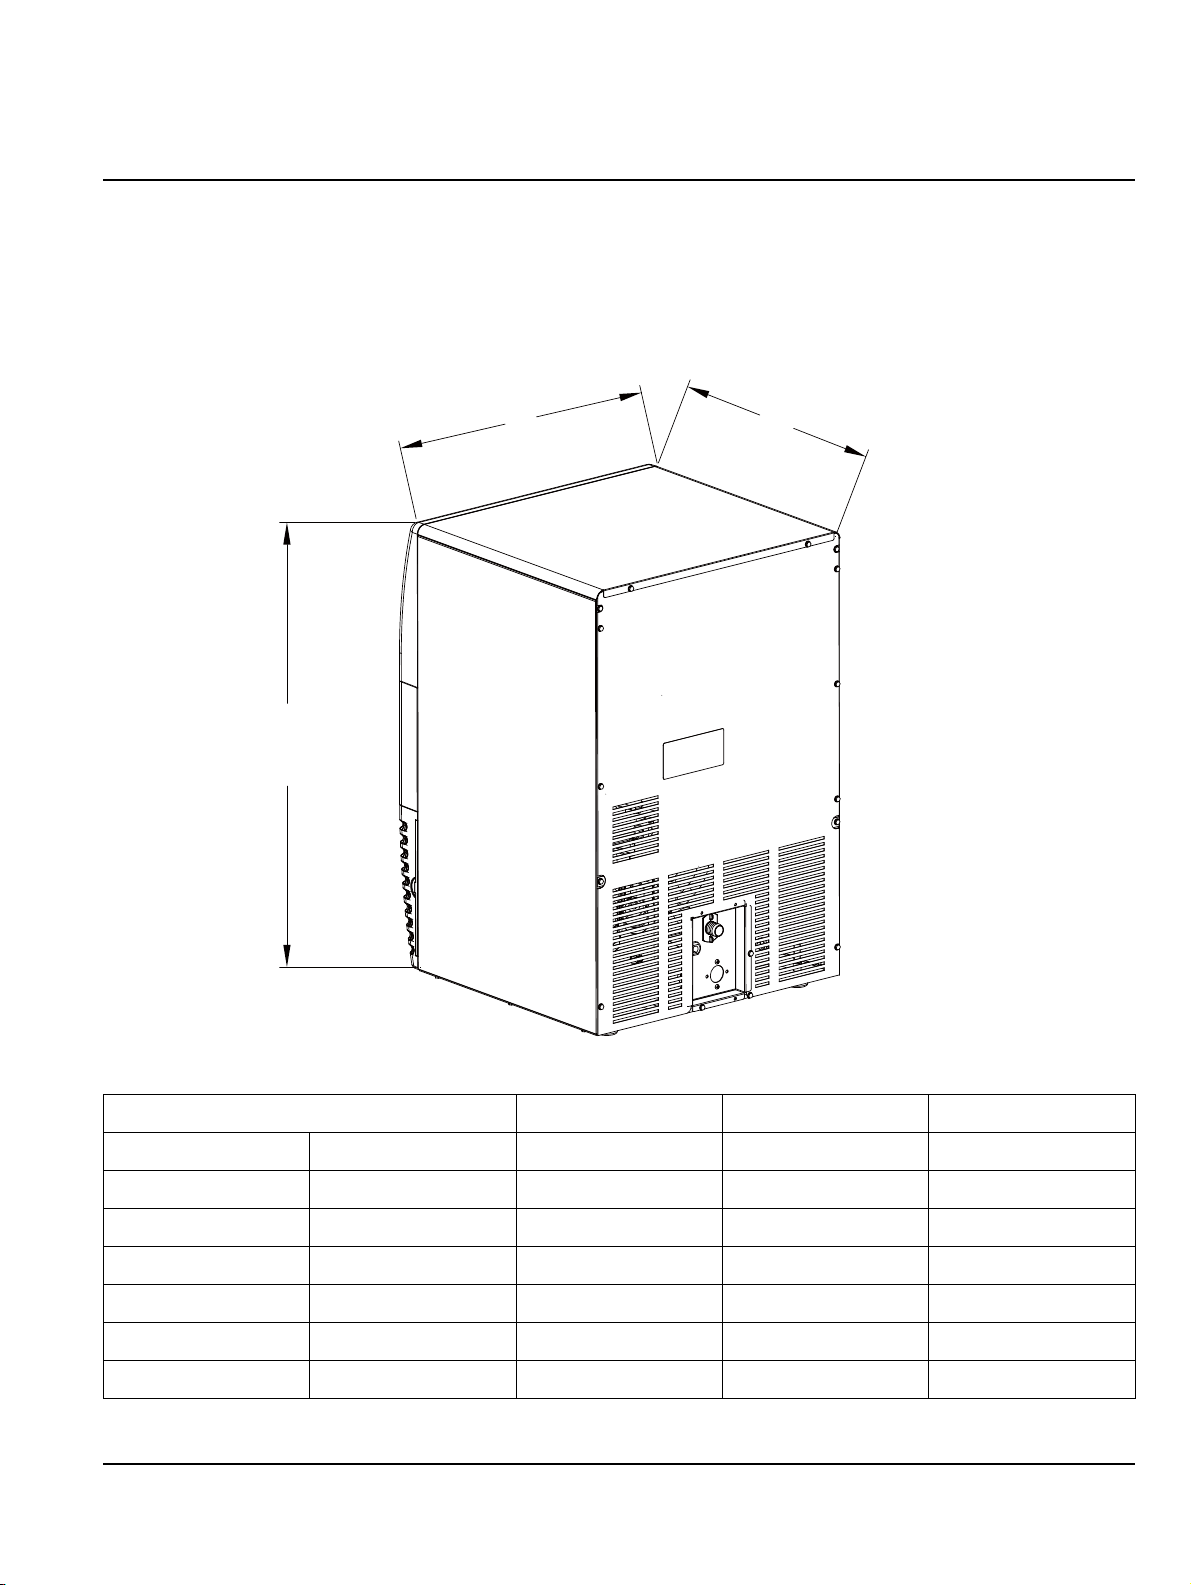
Ice Machine Dimensions
+
/
:
Model L W H
UG018 mm 343 450 635
UG020 mm 450 475 650
UG030 mm 450 475 650
UG040 mm 550 550 800
UG050 mm 550 550 800
UG065 mm 700 600 902
UG080 mm 700 600 902
Part Number 040003628 08/13 2-1
Page 10

Installation Instructions Section 2
!
Caution
Location of Ice Machine
The location selected for the ice machine must meet the
following criteria. If any of these criteria are not met,
select another location.
• The location must be indoors.
• The location must be free of airborne and other
contaminants.
• The air temperature must be at least 10C (50F), but
must not exceed 43C (110F).
• The location must not be near heat-generating
equipment or in direct sunlight.
• The location must be capable of supporting the
weight of the ice machine and a full bin of ice.
• The location must allow enough clearance for water,
drain and electrical connections in the rear of the ice
machine.
• The location must not obstruct airflow through or
around the ice machine (condenser airflow is in and
out the front). Refer to the chart below for clearance
recommendations:
Leveling the Ice Machine
Levelers are included with all ice machine. Legs are an
available option.
1. Screw the legs or levelers into the bottom of the ice
machine.
2. Screw the foot of each leg or leveler in as far as
possible. Move the ice machine into its final position.
Self-Contained
Air-Cooled
Top/Sides 8” (203 mm)* 5” (127 mm)*
Back 5” (127 mm)* 5” (127 mm)*
NOTE: The ice machine may be built into a cabinet.
*There is no minimum clearance requirement for the top
or left and right sides of the ice machine. The listed
values are recommended for efficient operation and
servicing only.
The ice mac hine must be protec ted if it will be
subjected to temp eratures below 0 C (32 F).
Failure ca used by exposur e to fre ezing
temperatures is not covered by the warranty.
Self-Contained
Water-Cooled
Checking Ice Machine Level
3. Level the ice machine correctly. Use a level on top of
the ice machine. Turn each foot as necessary to
level the ice machine from front to back and side to
side.
2-2 Part Number 040003628 08/13
Page 11

Section 2 Installation Instructions
Electrical Service
!
Warning
All wiring must conform to local, state and national
codes.The ice machine must be grounded in
accordance with national and local electrical codes.
VOLTAGE
The maximum allowable voltage variation is ±6% of the
rated voltage on the ice machine model/serial number
plate at start-up (when the electrical load is highest).
All ice machines are factory pre-wired with a 2 meter (6
ft) power cord, no plug is supplied.
FUSE/CIRCUIT BREAKER
A separate fuse/circuit breaker must be provided for
each ice machine. An electrical disconnect switch must
be provided if the ice machine is hard wired (wired
without a plug).
TOTAL CIRCUIT AMPACITY
The total circuit ampacity is used to help select the wire
size of the electrical supply.
The wire size (or gauge) is also dependent upon
location, materials used, length of run, etc., This must be
determined by a qualified electrician.
RISK OF ELECTRICAL SHOCK
FOR H ARD WIRED(WIRED WITHOUT A PLUG)
MACHINE, IT MUST BE PR OPERLY GROUNDED AND
CONNECTED T O THE FIELD WIRING TERMINAL IN
ACCORDANCE WITH ALL APPLICAB LE NA TIONAL
AND LOCAL ELECTRICAL CODES BY A QUALIFIED
ELECTRICIAN. BEFOR E CONNECTING WIRES,
DISCONNECT POWER AT THE ELECTRICAL
DISCONNECT AND LOCK OUT T O PREVENT
ACCIDENTALLY ENERGIZING .CONNECT AL L
ELECTRICAL WIRING BEFORE USE - DO NOT
ENERGIZE ICE MACHINE UNTIL INST ALLATION IS
COMPLETE.
1. Connect –the three supply lead wires (Blue, Brown,
and Yellow/Green) to the field wiring terminal, “L”,
“N”, and “G”, the Yellow/Green wire must connect to
the “G”(ground).
2. After connecting the wiring to the terminal strip, the
supply lead must be secured to the cabinet with a
strain relief near the terminal strip.
3. Verify wiring is contained in the electrical wiring box.
!
Warning
Air-Cooled Water-Cooled
Ice Machine
Maximum Fuse/
Circuit Breaker
Tot a l A mp s
Maximum Fuse/
Circuit Breaker
Tot a l A mp s
UG018 230/1/50 10 2.0 N/A N/A
230/1/50 10 2.3 N/A N/A
UG020
60 10 2.3 N
230/1/
/A N/A
230/1/50 15 2.8 15 2.5
UG030
1/60 15 2.8 N
230/
15/1/
1
60 15 5.5 N/
/1/50 15 3.0 N/A N/A
230
/A N/A
A N/A
UG040
230/1/60 15 3.0 N/A N/A
230/1/50 15 4.0 15 2.8
UG050
230/1/60 15 4.0 N/A N/A
115/1/60 15 6.8
230
/1/50 15 4.5 N/A N/A
N/A N/A
UG065
230/1/60 15 4.5 N/A N/A
230/1/50 15 5.5 N/A N/A
UG080
230/1/60 15 5.5 N/A N/A
Part Number 040003628 08/13 2-3
Page 12

Installation Instructions Section 2
Important
Water Service/Drains
WATER SUPPLY
Local water conditions may require treatment of the
water to inhibit scale formation, filter sediment, remove
chlorine, and improve taste and clarity.
If you are inst alling a wa ter filter system, make
sure that you use a separate line for water-cooled
condenser. Filter life will be greatly reduced if
filtered water is used for water-cooled condenser.
WATER INLET LINES
Follow these guidelines to install water inlet lines:
• Do not connect the ice machine to a hot water
supply. Be sure all hot water restrictors installed for
other equipment are working. (Check valves on sink
faucets, dishwashers, etc.)
• Water pressure to the machine should be between
1.4 to 5.5 bar (20 to 80 psi).
• If water pressure exceeds the maximum 5 bar
recommended pressure, obtain a water pressure
regulator from your Manitowoc distributor. Adjust
pressure to 2.5 bar (37 psi).
• Install a water shut-off valve.
• Connect to a potable water supply only.
DRAIN CONNECTIONS
Follow these guidelines when installing drain lines to
prevent drain water from flowing back into the ice
machine and storage bin:
• Drain lines must have a 3.8 cm (1.5 inch) drop of run
for each meter (3 feet), and must not create traps.
• The floor drain must be large enough to
accommodate drainage from all drains.
• Run separate bin and water-cooled condenser drain
lines. Insulate them to prevent condensation by
temperature.
WATER SUPPLY AND DRAIN LINE SIZING/CONNECTIONS
Water
Temperature
*Ice Making
Water Inlet
**Drain
Connection
Outlet
Condenser
Water Inlet
Condenser
Water Outlet
* Water Inlet Hose Supplied With Machine.3/4” Female Pipe Thread/ 2 meters long.
** Drain Hose Supplied With Machine.7/8” (22.2mm) Hose/ 2 Meters Long.
10ºC (50F) Min.
32.2ºC (90F) Max.
—— ——
0.6ºC (33F) Min.
32.2ºC (90F) Max.
—— ——
1.4 Bar (20 Psi) Min.
5.5 Bar (80 Psi) Max
1.4 Bar (20 Psi) Min.
10.3 Bar (150 Psi) Max
Water
Pressure
Ice Machine
Fitting
3/4” Male Pipe
Thread
7/8” Fitting Barbed 18mm (3/4”) Minimum
3/8” Female pipe
Thread
1/2” Female pipe
Thread
Tubing Size Up to Ice
Machine Fitting
15mm (1/2”) Inside
Diameter Minimum
Inside Diameter
15mm (1/2”) Inside
Diameter Minimum
15mm (1/2”) Minimum
Inside Diameter
2-4 Part Number 040003628 08/13
Page 13

Section 2 Installation Instructions
Water Cooled
Condenser Inlet
Water Cooled
Condenser Outlet
Ice Making Water Inlet
Drain
Electrical
WATER SUPPLY AND DRAIN LINE CONNECTIONS
Part Number 040003628 08/13 2-5
Page 14

Installation Instructions Section 2
!
Warning
Installation Checklist Before Starting the Ice Machine
All ice machines are factory-operated and adjusted
Is the ice machine level?
Has all of the internal packing been removed?
Have all of the electrical and water connections
been made?
Has the supply voltage been tested and
checked against the rating on the nameplate?
Are all components installed
Has the ice machine been installed where
ambient temperatures will remain in the range
of 10 - 43C (50 - 110F)?
before shipment. Normally, new installations do not
require any adjustment.
To ensure proper operation, follow the Operational
Checks in section 3 of this manual. Starting the ice
machine and completing the Operational Checks are the
responsibilities of the owner/operator.
Adjustments and maintenance procedures outlined
in this manual are not covered by the warranty.
PERSONAL INJURY POTENTIAL
Do not operate equipment that has been misused,
abused, n eglected, damaged, or a ltered/modified
from that of original manufactured specifications.
Has the ice machine been installed where the
incoming water temperature will remain in the
range of 10 - 32.2C (50 - 90F)?
Is there a separate drain line for the watercooled condenser?
Are all electrical leads free from contact with
refrigeration lines and moving equipment?
Has the owner/operator been instructed
regarding maintenance and the use of
Manitowoc Cleaner and Sanitizer?
Has the owner/operator completed the warranty
registration card?
Has the ice machine and bin been sanitized?
Has this manual been given to the owner/
operator?
Is the ice -off - wash switch set to the ice
position?
2-6 Part Number 040003628 08/13
Page 15

Component Identification
Water Curtain
Water Sump
Trough
Air Cooled
Condenser
Evaporator
Ice Chute
Spray Bar
Spray
Nozzles
Toggle Switch
Control board
On/Off/Wash
Toggle Switch
Section 3
Operation
Part Number 040003628 08/13 3-1
Page 16

Operation Section 3
Remove Two Screws – Slide
Cover Back To Remove
Align Door Pins With Track Slots,
Then Lift Door Out Of Track
Component Removal
TOP COVER
For easiest access to the evaporator compartment, the
top cover can be removed.
1. Remove two screws on the rear of the ice machine.
2. Slide top cover back to disengage the three pins
from the front panel.
BIN DOOR
Allows access to the storage bin.
1. Remove top cover.
2. Slide door up until rear pins align with slot in door
tracks.
3. Lift rear door pins out and slide door up until front
door pins align with slot.
4. Lift door out of door track.
3-2 Part Number 040003628 08/13
Page 17

Section 3 Operation
Water Curtain
Ice Chute
WATER CURTAIN
The water curtain is designed to keep the spraying water
from escaping the evaporator compartment. Removal of
the bin door is not required, but enhances access.
1. Grasp the ice curtain and lift up.
2. To re-install into ice machine,pivot the water curtain
and pull down into position. Make sure tabs are
secure in grooves.
ICE CHUTE
The ice chute is positioned over the spray nozzles and
allows the ice to easily fall into the bin. It must be firmly
positioned over the Spray Bar Assembly, with the front
edge inside the water trough or the spray nozzles will not
be aligned with the spray holes, and spray water will fall
into bin.
1. Grab protruding spray holes on one end and lift up.
2. Pivot ice chute and remove.
3. To re-install ice chute, grasp protruding spray holes
and position over Spray Bar Assembly. Make sure
rear supports are over Spray Bar Assembly, and
front edge is inside of water trough.
Part Number 040003628 08/13 3-3
Page 18

Operation Section 3
Overflow Tube
SPRAY BAR
The spray bar supplies water to the individual icemaking cups. Water from the Water Pump sprays
through the nozzles, located on the upper portion of the
tubes.
1. Grasp one end of the spray bar, lift up and remove
from seat formed in water trough.
2. Remove both plastic clips on water inlet tubing by
grasping both ears on clip and separating.
3. Apply food grade lubricate to ease re-assembly of
spray bar components when necessary.
4. To re-install spray bar, position water inlet tubing on
inlet ports, and squeeze clips until tight.
5. Reposition assembly on water trough seat.
Nozzles and inserts can be removed for cleaning by
unscrewing nozzles. Inserts are located inside the spray
bar ports. The spray bar also disassembles for easy
cleaning.
SUMP DRAIN OVERFLOW TUBE
The sump drain overflow tube is located in the
evaporator water sump.
1. Remove shutters and ice chute.
2. Lift spray bar or disconnect and remove for easiest
access.
3. Pull up on over flow tube to remove.
4. To replace plug, insert in hole, and push with force to
make a tight seal.
3-4 Part Number 040003628 08/13
Page 19

Section 3 Operation
Ice Making Sequence of Operation
INITIAL START-UP
1. Water Inlet and Pressure Equalization
Turn the toggle switch to”ON” positon,the water fill valve
and harvest valve are energized, 210 seconds later, the
water fill valve is de-energized. 20seconds after the
harvest valve solenoid is energized, the compressor is
energized. 300seconds after the compressor is
energized, the harvest valve solenoid is de-energized,
the water pumpand the fan motor are
energized,machine goes into freeze cycle.
2. Freeze Cycle
The pump sprays water into the inverted cups. The
water freezes layer by layer, until an ice cube forms in
each cup.
3. Harvest Cycle
The compressor continues to operate and the water
pump is de-energized. The hot gas valve energizes,
allowing hot gas to enter and warm the evaporator. The
water valve is also energized, aiding with harvest, as
well as filling up the sump with fresh water for a new
freeze cycle.
at the point of 2 minutes to freeze end , board will read
the ” liquid line temperature”again and calculate the
“harvest time”
The ice falls from the cups and is directed into the bin by
the ice chute. The harvest cycle continues until the
harvest time has elapsed,then machine goes into a new
freeze cycle
When the”water temperature”is equal to or less than 2
for more than 5 seconds, control will read
the” liquid line temperature” and dip switch setting , get
the” freeze postpone time” and “fan shut off time”.Board
will shut the Fan before the end of the freeze cycle to
assist harvest. When the ” freeze postpone time” has
elapsed, the harvest cycle is initiated.
℃
4. Automatic Shut-Off
When the storage bin is full, the ice will come in contact
with the bin thermostat which is located inside the bin.
The machine will stop after approximately 45seconds of
continuous ice contact with the bin thermostat probe.
The ice machine remains off until a 3 minutes delay has
elapsed and enough ice has been removed from the
storage bin to allow the ice to fall clear of the bin
thermostat probe. As the ice clears the probe, the bin
thermostat warms up and the machine starts another
freeze cycle.
Part Number 040003628 08/13 3-5
Page 20

Operation Section 3
Important
dip switch
Factory
Default
Setting
Decreas
e
Cube
Size
Increase
Cube
Size
Operational Checks
GENERAL
Your ice machine was factory-operated and adjusted
before shipment. Normally, a newly installed ice machine
does not require any adjustment.
To ensure proper operation, always follow these
Operational Checks when starting the ice machine:
• for the first time
• after a prolonged out of service period
• after cleaning and sanitizing
Routine adjustments and maintenance procedures
outlined in this manual are not covered by the warranty.
It is recommended that adjustments made to this ice
machine be m ade by a qu alified te chnician.
Improper adjustment, may seriously affect the life of
this ice machine.
ICE CUBE THICKNESS CHECK
The ice cube thickness is factory-set to maintain the ice
cube thickness at the proper size and weight.
1. Allow the ice machine to operate for three complete
cycles. The cubes should have a small dimple in the
center.
2. Cycle times vary, according to surrounding air and
water inlet temperatures.
3. If cubes are not full (large dimple), raise the “dip
switch” level to increase cube size. Allow ice
machine to complete three cycles, then check cube.
4. If cubes are too full, ( no dimple), lower the “dip
switch” level to decrease cube size.Allow ice
machine to operate three complete cycles.
5. The “dip switch” can be adjusted to five levels: -2/-1/
0/+1/+2, and ensure that only one level switch is
pressed.
CUBE SHAPE
the standard cube has an average weight of 19 grams,
Notice the normal dimple in the center of the cube.
Dimple
3-6 Part Number 040003628 08/13
Standard Cube 19g
34
Page 21

Section 4
!
Caution
Maintenance
General
The end user is responsible for maintaining the ice
machine in accordance with the instructions in this
manual. Maintenance procedures are not covered by the
warranty.
If you d o not understand the pr ocedures o r the
safety precautions th at must be followed, call yo ur
local service repres entative to perform the
necessary maintenance procedures for you.
Basic hygiene and maintenance of your Ice Machine, will
increase its reliability, increase performance, and help
save on water and power consumption. Ice production
will be maintained within the manufacturers guidelines,
and unwanted repairs due to maintenance issues will be
minimized.
The chart below is an overview of the maintenance that
the end user and service technician should perform, and
the frequency. These figures are the minimum required.
If the Ice Machine is supplied with hard water, more
frequent evaporator cleaning should be performed. If the
condenser air filter is totally blocked, after one week,
more frequent cleaning is recommended.
Maintenance Weekly Monthly Semi Annual Annual After
prolonged
shutdown
Clean cabinet exterior X X X
Sanitize Ice Bin X X X
Clean Evaporator X S S
Sanitize Evaporator X S S S
Clean Condenser Coil X S S
Check Ice Quality X S S S
X=End User
S=Service Company
At Start-up
Part Number 040003628 08/13 4-1
Page 22

Maintenance Section 4
!
Warning
!
Warning
Cleaning the Condenser
WATER-COOLED CONDENSER AND WATER REGULATING VALVE
Disconnect electric power to the ice machine at the
electric se rvice switch be fore pe rforming
maintenance on equipment.
AIR-COOLED CONDENSER
A dirty condenser restricts airflow, resulting in
excessively high operating temperatures. This reduces
ice production and shortens component life.
Clean the condenser at least every six months.
1. Remove Plastic Front Grill removing two Phillips
head screws. Clean Grill openings before replacing.
2. Clean the outside of the condenser with a soft brush
or a vacuum with a brush attachment. Clean from
top to bottom, not side to side. Be careful not to
bend the condenser fins.
3. Shine a flashlight through the condenser to check
for dirt between the fins. If dirt remains:
A. Blow compressed air through the condenser
fins. Be careful not to bend the fan blades.
B. If dirt or grease remains between fins, consult
your service representative.
The water-cooled condenser and water-regulating valve
may require cleaning due to scale build-up.
Low ice production, high water consumption and high
operating temperatures and pressures all may be
symptoms of restrictions in the condenser water circuit.
Because the cleaning procedures require special pumps
and cleaning solutions, qualified maintenance or service
personnel must perform them.
The con denser fins ar e shar p. Use ca re wh en
cleaning them.
4-2 Part Number 040003628 08/13
Page 23

Section 4 Maintenance
!
Caution
!
Warning
!
Caution
Interior Cleaning and Sanitizing
GENERAL
Clean and sanitize the ice machine every six months for
efficient operation. If the ice machine requires more
frequent cleaning and sanitizing, consult a qualified
service company to test the water quality and
recommend appropriate water treatment.
An extremely dirty ice machine must be taken apart for
cleaning and sanitizing.
Use only app roved Ice Ma chine Clean er and
Sanitizer. Read and understand all labels printed on
bottles before use. Do not mix Ice Machine Cleaner
and Sanitizer solutions together
Wear rubber gloves and safety goggles (and/or face
shield) when ha ndling Ice Machin e Clean er or
Sanitizer.
Step 5 While components are soaking; use nylon brush
to scrub inside of ice bin. Scrub inside of door, door
track, bin, sump trough, and evaporator moldings. With
clean water, rinse all of these areas thoroughly.
Step 6 Replace sump overflow tube and pour remaining
2 liters of mixture into the water sump. Replace all parts.
Step 7 To start a cleaning cycle, set the toggle switch to
the WASH position.
Step 8 After 13.5 minutes, set the toggle switch to the
OFF position. Remove water curtain, ice chute and over
flow tube from the water sump. Allow all water to drain
from the sump. Replace drain plug . Set toggle switch to
WASH and circulate for 12minutes.
Step 9 Wait until the cleaning cycle(12 minutes) is
complete then place the toggle switch in the OFF
position.Remove water curtain, ice chute, water sump
over flow tube. Drain water from sump and replace tube.
Step 10 Mix 60 ml of sanitizer with 12 l of water in a
plastic or stainless steel container.
CLEANING & SANITIZING PROCEDURE
Ice machine cleaner is used to remove lime scale or
other mineral deposits. Sanitizer is used to remove
algae or slime.
Mix 4 liters of water with 500 ml of cleaner in a plastic or
stainless container.
Cleaner Water
500 ml (16 oz) 4 l (1 gal)
Step 1 Set the toggle switch to the OFF position at the
end of a Harvest Cycle, after ice releases from the
evaporator. Or, set the switch to the OFF position and
allow the ice to melt off the evaporator.
Never use anything to force ice from the evaporator.
Damage may result.
Step 2 Remove all ice from the bin.
Step 3 Remove all parts as described in Section 3,
Component Identification & Removal.
Step 4 Take all components to sink and with 2 liters
Cleaner/Water mixture clean all components with a soft
nylon brush. Disassemble spray bar, remove nozzles
and inserts and soak for 5 minutes. For heavily scaled
parts, soak in solution for 15–20 minutes. Rinse all
components with clean water.
Sanitizer Water
60 ml (2 oz) 12 l (3 gal)
Step 11 Remove Water Curtain and Ice Chute as
described in Section 3, Component Identification &
Removal.
Step 12 Take all components to sink and with 10 liters
Sanitizer/Water mixture sanitize all components with a
soft nylon brush or cloth. Do not rinse components.
Step 13 Use brush or cloth to sanitize the inside of ice
bin. Scrub inside of door, door track, bin, water sump,
water distribution assembly and evaporator moldings.
Do not rinse.
Step 14 Replace sump drain over flow tube, and
transfer remaining 2 liters of solution to the sump trough.
Replace all components.
Step 15 To start a sanitizing cycle, set the toggle switch
to the WASH position.
Step 16 After 13.5 minutes, set the toggle switch to the
OFF position. Remove water curtain and ice chute
Remove over flow tube from water sump and allow all
water to drain from sump. Replace drain plug. Set toggle
switch to WASH and circulate for 12 minutes.
Step 17 Wait until the cleaning cycle (12 minutes) is
complete then place the toggle switch in the OFF
position. Remove water curtain, ice chute, water sump
over flow tube. Drain water from sump and replace tube.
Part Number 040003628 08/13 4-3
Page 24

Maintenance Section 4
!
Caution
Step 18 Replace all parts.
Step 19 Place toggle switch to ON position,ice machine
will go into ice making cycle.
Exterior Cleaning
Clean the area around the ice machine as often as
necessary to maintain cleanliness and efficient
operation.
Sponge any dust and dirt off the outside of the ice
machine with mild soap and water. Wipe dry with a
clean, soft cloth.
A commercial grade stainless steel cleaner and polish
may be used.
Removal from Service/Winterization
GENERAL
Special precautions must be taken if the ice machine is
to be removed from service for an extended period of
time or exposed to ambient temperatures of 0C (32F)
or below.
If water is allowed to re main in the ice mac hine in
freezing tem peratures, sever e d amage to some
components could result. Damage of this nature is not
covered by the warranty.
AIR-COOLED ICE MACHINES
1. Disconnect the electric power at the circuit breaker
or the electric service switch.
2. Turn off the water supply.
3. Drain the water from the water sump and water
pump by disconnecting the water pump tubing.
4. Disconnect and drain the incoming ice-making water
line and disconnect the tubing from the water inlet
valve outlet and allow water to drain.
5. Blow compressed air in the drain opening and water
valve outlet hose, then reattach.
6. Make sure water is not trapped in any of the water or
drain lines.
WATER-COOLED ICE MACHINES
1. Perform steps 1-6 under “Air-Cooled Ice Machines.”
2. Disconnect the incoming water and drain lines from
the water-cooled condenser.
3. Insert a large screwdriver between the bottom spring
coils of the water regulating valve. Pry upward to
open the valve.
4. Hold the valve open and blow compressed air
through the condenser until water no longer exits.
Follow the applicable procedure below.
Pry Open the Water Regulating Valve
4-4 Part Number 040003628 08/13
Page 25

Section 5
Before Calling for Service
Checklist
If a problem arises during operation of your ice machine, follow the chart below before calling for service. Routine
adjustments and maintenance procedures are not covered by the warranty.
Problem Cause Correction
Ice Machine Will Not Run No Power – Breaker off, fuse blown,
unplugged
Toggle switch is not in ice position Place toggle switch in ice position
The storage bin is full Remove enough ice from the bin and wait
Ice machine runs and no ice is
produced
Freeze cycle long – low production Dirty condenser Clean condenser
Shallow, incomplete or white ice
cubes
Will not initiate a harvest cycle liquid line thermistor faulty replace the thermistor
No water to ice machine Correct water supply
Water sump overflow tube out of position Reposition/install overflow tube
Water sump thermistor or liquid line
thermistor faulty
Control board problem Call for service
Water temperature too high Connect to a cold water supply, verify
Refrigeration problem Call for service
Ice machine is dirty Clean & sanitize the ice machine
Water pressure supply incorrect Verify water pressure is correct
Air temperature around ice machine is too
high
Dip switch incorrectly adjusted Adjust Dip switch
Restore power
for 3 minutes delay to expire.
replace the thermistor
check valves in faucets and other
equipment work properly
Vent area or move ice machine
Control board problem Call for service
Ice cubes do not release Ice machine is dirty Clean and sanitize the ice machine
Low ambient around ice machine move ice machine to warmer area
Dip switch incorrectly adjusted (cubes too
large)
Adjust Dip switch
Part Number 040003628 08/13 5-1
Page 26

Before Calling for Service Section 5
PAGE INTENTIONALLY LEFT BLANK
5-2 Part Number 040003628 08/13
Page 27

PAGE INTENTIONALLY LEFT BLANK
Page 28

MANITOWOC FOODSERVICE – ICE MACHINE DIVISION
2110 SOUTH 26TH STREET, MANITOWOC, WI 54220
800-545-5720
WWW.MANITOWOCICE.COM
Every new piece of Manitowoc Foodservice equipment comes with KitchenCare™ and you choose the level of service that meets
your operational needs from one restaurant to multiple locations.
StarCare – Warranty & lifetime service, certied OEM parts, global parts inventory, performance audited
ExtraCare — CareCode, 24/7 Support, online/mobile product information
LifeCare – Install & equipment orientation, planned maintenance, KitchenConnect™, MenuConnect
Talk with KitchenCare™ • 1-844-724-CARE • www.mtwkitchencare.com
To learn how Manitowoc Foodservice and its leading brands can equip you, visit our global web site at
www.manitowocfoodservice.com, then discover the regional or local resources available to you.
©2014 Manitowoc Foodservice except where explicitly stated otherwise. All rights reserved. Continuing product improvement may necessitate change of specications without notice.
Part Number: 040003628 8/13
 Loading...