

Page 1
Flake / Chiplet Model
Ice Machines
Flake Models QF0400/QF0800/
QF2300 with RFC2385
Chiplet Models QC0700
Installation,
Use and Care
Manual
Thank you for selecting a Manitowoc Ice Machine, the dependability leader in ice making equipment and related products.
With proper installation, care and maintenance, your new Manitowo c Ice Machine will provide you with many years of
reliable and economical performance.
Part Number 000002688
07/2007
Page 2
Safety Notices
!
Warning
!
Warning
!
Caution
Important
!
Caution
Important
Procedural Notices
When using or servicing a Flake / Chiplet Series Ice
Machine, be sure to pay close attention to the safety
notices in this manual. Disregarding the notices may
lead to serious injury and/or damage to the ice machine.
Throughout this manual, you will see the following types
of safety notices:
PERSONAL INJURY POTENTIAL
Do not operate equipment that has been misused,
abused, neglected, damaged, or altered/modified
from that of original manufactured specifications.
Text in a Warning box alerts you to a potential
personal injury situation. Be sure to read the
Warning statement before proceeding, and work
carefully.
Text in a Caution box alerts you to a situation in
which you could damage the ice machine. Be sure
to read the Caution statement before proceeding,
and work carefully.
When using or servicing a Flake / Chiplet Series Ice
Machine, be sure to read the procedural notices in this
manual. These notices supply helpful information which
may assist you as you work.
Throughout this manual, you will see the following types
of procedural notices:
Text in an Important box provides you with
information that may help you perform a procedure
more efficiently. Disregarding this information will
not cause damage or injury, but it may slow you
down as you work.
NOTE: Text set off as a Note provides you with simple,
but useful, extra information about the procedure you
are performing
Read These Before Proceeding:
Proper installation, care and maintenance are
essential for maximum ice production and troublefree operation of you Manitowoc Ice Machine.
Read and understand this manual. It contains
valuable care and maintenance information. If you
encounter problems not covered by this manual, do
not proceed, contact Manitowoc Ice, Inc. We will be
happy to provide assistance.
Routine adjustments and maintenance procedures
outlined in this manual are not covered by the
warranty.
We reserve the right to make product improvements at any time.
Specifications and design are subject to change without notice.
Page 3

Section 1
General Information
Table of Contents
Model Numbers . . . . . . . . . . . . . . . . . . . . . . . . . . . . . . . . . . . . . . . . . . . . . . . . . . 1-1
How to Read a Model Number . . . . . . . . . . . . . . . . . . . . . . . . . . . . . . . . . . . . . . 1-1
Remote Condensing Unit . . . . . . . . . . . . . . . . . . . . . . . . . . . . . . . . . . . . . . . . . . 1-1
Accessories . . . . . . . . . . . . . . . . . . . . . . . . . . . . . . . . . . . . . . . . . . . . . . . . . . 1-1
Bin Caster . . . . . . . . . . . . . . . . . . . . . . . . . . . . . . . . . . . . . . . . . . . . . . . . . . . 1-1
Ice Bagger . . . . . . . . . . . . . . . . . . . . . . . . . . . . . . . . . . . . . . . . . . . . . . . . . . . 1-1
Arctic Pure Water Filter System . . . . . . . . . . . . . . . . . . . . . . . . . . . . . . . . . . 1-1
Manitowoc Cleaner and Sanitizer . . . . . . . . . . . . . . . . . . . . . . . . . . . . . . . . . 1-1
Model/Serial Number Location . . . . . . . . . . . . . . . . . . . . . . . . . . . . . . . . . . . . . . 1-2
Owner Warranty Registration Card . . . . . . . . . . . . . . . . . . . . . . . . . . . . . . . . . . 1-3
General . . . . . . . . . . . . . . . . . . . . . . . . . . . . . . . . . . . . . . . . . . . . . . . . . . . . . 1-3
Warranty Coverage . . . . . . . . . . . . . . . . . . . . . . . . . . . . . . . . . . . . . . . . . . . . . . . 1-3
General . . . . . . . . . . . . . . . . . . . . . . . . . . . . . . . . . . . . . . . . . . . . . . . . . . . . . 1-3
Parts . . . . . . . . . . . . . . . . . . . . . . . . . . . . . . . . . . . . . . . . . . . . . . . . . . . . . . . 1-3
Labor . . . . . . . . . . . . . . . . . . . . . . . . . . . . . . . . . . . . . . . . . . . . . . . . . . . . . . . 1-3
Exclusions . . . . . . . . . . . . . . . . . . . . . . . . . . . . . . . . . . . . . . . . . . . . . . . . . . . 1-3
Authorized Warranty Service . . . . . . . . . . . . . . . . . . . . . . . . . . . . . . . . . . . . 1-3
Service Calls . . . . . . . . . . . . . . . . . . . . . . . . . . . . . . . . . . . . . . . . . . . . . . . . . 1-3
Section 2
Installation Instructions
Ice Machine Dimensions . . . . . . . . . . . . . . . . . . . . . . . . . . . . . . . . . . . . . . . . . . . 2-1
Ice Machine Head Section and Remote Condensing Unit Dimensions . . . . . 2-2
Ice Storage Bin Dimensions . . . . . . . . . . . . . . . . . . . . . . . . . . . . . . . . . . . . . . . . 2-3
Large Capacity Ice Storage Bin Dimensions . . . . . . . . . . . . . . . . . . . . . . . . . . 2-4
Location of Ice Machine . . . . . . . . . . . . . . . . . . . . . . . . . . . . . . . . . . . . . . . . . . . 2-5
Ice Machine Head Section Clearance Requ ire me nt s . . . . . . . . . . . . . . . . . . . . 2-5
Ice Machine Heat of Rejection . . . . . . . . . . . . . . . . . . . . . . . . . . . . . . . . . . . . . . 2-5
Location of Remote Condensing Unit . . . . . . . . . . . . . . . . . . . . . . . . . . . . . . . . 2-5
Leveling the Ice Storage Bin . . . . . . . . . . . . . . . . . . . . . . . . . . . . . . . . . . . . . . . 2-6
Condenser Air Baffle . . . . . . . . . . . . . . . . . . . . . . . . . . . . . . . . . . . . . . . . . . . . . . 2-6
Electrical Service . . . . . . . . . . . . . . . . . . . . . . . . . . . . . . . . . . . . . . . . . . . . . . . . . 2-7
Electrical Requirements . . . . . . . . . . . . . . . . . . . . . . . . . . . . . . . . . . . . . . . . . . . 2-8
For United Kingdom Only . . . . . . . . . . . . . . . . . . . . . . . . . . . . . . . . . . . . . . . . . . 2-8
QF400 Air Cooled Ice Machine . . . . . . . . . . . . . . . . . . . . . . . . . . . . . . . . . . . 2-1
QC700/QF800 Water Cooled Ice Machine . . . . . . . . . . . . . . . . . . . . . . . . . . 2-1
QC700/QF800 Air Cooled Ice Machine . . . . . . . . . . . . . . . . . . . . . . . . . . . . 2-1
QF2300 Head Section and RFC2385 Remote Condensing Unit . . . . . . . . . 2-2
22 Inch (56 cm) Ice Storage Bins . . . . . . . . . . . . . . . . . . . . . . . . . . . . . . . . . 2-3
30 inch (76 cm) Ice Storage Bins . . . . . . . . . . . . . . . . . . . . . . . . . . . . . . . . . 2-3
48 Inch (130 cm) Ice Storage Bins . . . . . . . . . . . . . . . . . . . . . . . . . . . . . . . . 2-3
30 Inch (76 cm) . . . . . . . . . . . . . . . . . . . . . . . . . . . . . . . . . . . . . . . . . . . . . . . 2-4
48 Inch (122 cm) & 60 Inch (152 cm) . . . . . . . . . . . . . . . . . . . . . . . . . . . . . . 2-4
Condensing Unit Clearance Requirements . . . . . . . . . . . . . . . . . . . . . . . . . . 2-5
Voltage . . . . . . . . . . . . . . . . . . . . . . . . . . . . . . . . . . . . . . . . . . . . . . . . . . . . . 2-7
Fuse/Circuit Breaker . . . . . . . . . . . . . . . . . . . . . . . . . . . . . . . . . . . . . . . . . . . 2-7
Total Circuit Ampacity . . . . . . . . . . . . . . . . . . . . . . . . . . . . . . . . . . . . . . . . . . 2-7
Minimum Circuit Ampacity . . . . . . . . . . . . . . . . . . . . . . . . . . . . . . . . . . . . . . 2-7
Part Number 000002688 1
Page 4

Table of Contents (continued)
Ice Machine Head Section Electrical Wiring Connections . . . . . . . . . . . . . . . 2-9
QC700C/QF800C Ice Machine Head Section . . . . . . . . . . . . . . . . . . . . . . . 2-9
QC700C/QF800C Ice Machine Head Section . . . . . . . . . . . . . . . . . . . . . . . 2-9
QF2300 Ice Machine Head Section . . . . . . . . . . . . . . . . . . . . . . . . . . . . . . . 2-9
Remote Electrical Wiring Connections . . . . . . . . . . . . . . . . . . . . . . . . . . . . . . . 2-10
RFC2385 Remote Condensing Unit . . . . . . . . . . . . . . . . . . . . . . . . . . . . . . . 2-10
Water Supply and Drains . . . . . . . . . . . . . . . . . . . . . . . . . . . . . . . . . . . . . . . . . . 2-11
Potable Water Supply . . . . . . . . . . . . . . . . . . . . . . . . . . . . . . . . . . . . . . . . . . 2-11
Potable Water Inlet Lines . . . . . . . . . . . . . . . . . . . . . . . . . . . . . . . . . . . . . . . 2-11
Drain Connections . . . . . . . . . . . . . . . . . . . . . . . . . . . . . . . . . . . . . . . . . . . . 2-11
Cooling Tower Applications
(Water-Cooled Models) . . . . . . . . . . . . . . . . . . . . . . . . . . . . . . . . . . . . . . . . . . . . 2-11
Water Supply and Drain Line Sizing/Connections . . . . . . . . . . . . . . . . . . . . 2-12
Refrigeration System Installation . . . . . . . . . . . . . . . . . . . . . . . . . . . . . . . . . . . 2-13
(QF2300/RFC2385 Only) . . . . . . . . . . . . . . . . . . . . . . . . . . . . . . . . . . . . . . . 2-13
Usage with Non-Manitowoc
Condensing Units . . . . . . . . . . . . . . . . . . . . . . . . . . . . . . . . . . . . . . . . . . . . . 2-13
Refrigeration Line Set Installation . . . . . . . . . . . . . . . . . . . . . . . . . . . . . . . . . . . 2-14
General . . . . . . . . . . . . . . . . . . . . . . . . . . . . . . . . . . . . . . . . . . . . . . . . . . . . . 2-14
A. Line Set Length . . . . . . . . . . . . . . . . . . . . . . . . . . . . . . . . . . . . . . . . . . . . 2-14
B. Line Set Rise or Drop . . . . . . . . . . . . . . . . . . . . . . . . . . . . . . . . . . . . . . . . 2-14
C. Suction Line Oil Traps . . . . . . . . . . . . . . . . . . . . . . . . . . . . . . . . . . . . . . . 2-15
Typical Remote System Installation . . . . . . . . . . . . . . . . . . . . . . . . . . . . . . . 2-20
Installation Checklist . . . . . . . . . . . . . . . . . . . . . . . . . . . . . . . . . . . . . . . . . . . . . 2-21
Remote Air-Cooled Only . . . . . . . . . . . . . . . . . . . . . . . . . . . . . . . . . . . . . . . . 2-21
Before Starting the Ice Machine . . . . . . . . . . . . . . . . . . . . . . . . . . . . . . . . . . . . 2-22
Section 3
Ice Machine Operation
Component Identification . . . . . . . . . . . . . . . . . . . . . . . . . . . . . . . . . . . . . . . . . . 3-1
Ice Machine Head Section . . . . . . . . . . . . . . . . . . . . . . . . . . . . . . . . . . . . . . 3-1
Remote Condensing Unit . . . . . . . . . . . . . . . . . . . . . . . . . . . . . . . . . . . . . . . 3-2
Operational Checks . . . . . . . . . . . . . . . . . . . . . . . . . . . . . . . . . . . . . . . . . . . . . . 3-3
General . . . . . . . . . . . . . . . . . . . . . . . . . . . . . . . . . . . . . . . . . . . . . . . . . . . . . 3-3
Water Level Check . . . . . . . . . . . . . . . . . . . . . . . . . . . . . . . . . . . . . . . . . . . . 3-3
Interior Cleaning and Sanitizing . . . . . . . . . . . . . . . . . . . . . . . . . . . . . . . . . . . . 3-4
General . . . . . . . . . . . . . . . . . . . . . . . . . . . . . . . . . . . . . . . . . . . . . . . . . . . . . 3-4
Exterior Cleaning . . . . . . . . . . . . . . . . . . . . . . . . . . . . . . . . . . . . . . . . . . . . . 3-4
Cleaning the Condenser . . . . . . . . . . . . . . . . . . . . . . . . . . . . . . . . . . . . . . . . 3-5
Manitowoc’s Cleaning Technology . . . . . . . . . . . . . . . . . . . . . . . . . . . . . . . . 3-6
Preventative Maintenance Cleaning Procedure . . . . . . . . . . . . . . . . . . . . . . 3-6
Cleaning Procedure . . . . . . . . . . . . . . . . . . . . . . . . . . . . . . . . . . . . . . . . . . . 3-8
Sanitizing Procedure . . . . . . . . . . . . . . . . . . . . . . . . . . . . . . . . . . . . . . . . . . 3-9
Procedure to Clean Heavily Scaled Flake/Chiplet Ice Machines . . . . . . . . . 3-10
Removal of Parts For Cleaning/Sanitizing . . . . . . . . . . . . . . . . . . . . . . . . . . 3-11
Removal from Service/Winterization . . . . . . . . . . . . . . . . . . . . . . . . . . . . . . . . . 3-18
General . . . . . . . . . . . . . . . . . . . . . . . . . . . . . . . . . . . . . . . . . . . . . . . . . . . . . 3-18
Water Cooled Condensing Unit . . . . . . . . . . . . . . . . . . . . . . . . . . . . . . . . . . 3-18
2 Part Number 000002688
Page 5

Table of Contents (continued)
Section 4
Ice Machine Sequence of Operation
QF400/QC700/QF800 . . . . . . . . . . . . . . . . . . . . . . . . . . . . . . . . . . . . . . . . . . . . . . 4-1
Prior to Start-Up . . . . . . . . . . . . . . . . . . . . . . . . . . . . . . . . . . . . . . . . . . . . . . . 4-1
Initial Start-Up . . . . . . . . . . . . . . . . . . . . . . . . . . . . . . . . . . . . . . . . . . . . . . . . 4-1
Automatic Shut-Off . . . . . . . . . . . . . . . . . . . . . . . . . . . . . . . . . . . . . . . . . . . . 4-1
Flush Sequence in the “ICE” Position . . . . . . . . . . . . . . . . . . . . . . . . . . . . . . 4-1
QF2300 . . . . . . . . . . . . . . . . . . . . . . . . . . . . . . . . . . . . . . . . . . . . . . . . . . . . . . . . . . 4-2
Prior to Start-Up . . . . . . . . . . . . . . . . . . . . . . . . . . . . . . . . . . . . . . . . . . . . . . . 4-2
Initial Start-Up . . . . . . . . . . . . . . . . . . . . . . . . . . . . . . . . . . . . . . . . . . . . . . . . 4-2
Automatic Shut-Off . . . . . . . . . . . . . . . . . . . . . . . . . . . . . . . . . . . . . . . . . . . . 4-2
Flush Sequence in the “ICE” Position . . . . . . . . . . . . . . . . . . . . . . . . . . . . . . 4-2
Section 5
Before Calling Service
Checklist . . . . . . . . . . . . . . . . . . . . . . . . . . . . . . . . . . . . . . . . . . . . . . . . . . . . . . . . 5-1
Safeguard Feature . . . . . . . . . . . . . . . . . . . . . . . . . . . . . . . . . . . . . . . . . . . . . . . . 5-2
Reset Procedure . . . . . . . . . . . . . . . . . . . . . . . . . . . . . . . . . . . . . . . . . . . . . . 5-2
Standby Mode . . . . . . . . . . . . . . . . . . . . . . . . . . . . . . . . . . . . . . . . . . . . . . . . 5-2
SafeGuard Indicator Lights . . . . . . . . . . . . . . . . . . . . . . . . . . . . . . . . . . . . . . 5-2
SafeGuard Modes . . . . . . . . . . . . . . . . . . . . . . . . . . . . . . . . . . . . . . . . . . . . . 5-3
Part Number 000002688
3
Page 6

Table of Contents (continued)
4 Part Number 000002688
Page 7
Section 1
!
Warning
Q F 0807 W
ICE MACHINE
MODEL
ICE TYPE
F FLAKE
C CHIPLET
# ICE TYPE
6 FLAKE
7 FLAKE
8 CHIPLET
9 CHIPLET
CONDENSER TYPE
AIR-COOLED
WATER-COOLED
AIR-COOLED
WATER-COOLED
A SELF-CONTAINED AIR-COOLED
W SELF-CONTAINED WATER-COOLED
N REMOTE AIR-COOLED
9 REMOTE
AIR-COOLED
CONDENSER TYPE
ICE MACHINE
SERIES
SV3106
RFC 2385
CONDENSING
UNIT MODEL
CONDENSING
UNIT SERIES
SV3107
General Information
Model Numbers
This manual covers the following models:
Condensing
Unit
Undercounter
Self-Contained
Air-Cooled
Self-Contained
Air-Cooled
Self-Contained
Water Cooled
Remote
Air-Cooled
Flake Ice Chiplet Ice
QF0406A NA NA
QF0806A QC0708A NA
QF0807W QC0709W NA
QF2396N NA RFC2385
PERSONAL INJURY POTENTIAL
Do not operate equipment that has been misused,
abused, neglected, damaged, or altered/modified
from that of original manufactured specifications.
How to Read a Model Number
Accessories
BIN CASTER
Replaces standard legs.
ICE BAGGER
Maximize profits from bagged ice sales with this
convenient accessory. This sturdy unit rests on the bin
door frame, and adapts for left or right side filling.
ARCTIC PURE WATER FILTER SYSTEM
Engineered specifically for Manitowoc ice machines,
This water filter is an efficient, dependable, and
affordable method of inhibiting scale formation, filtering
sediment, and removing chlorine taste and odor.
MANITOWOC CLEANER AND SANITIZER
Manitowoc Ice Machine Cleaner is available in
convenient 16 oz. (473 ml) bottles. Manitowoc Ice
Machine Sanitizer is available in 16 oz. (473 ml) and 1
gal (3.78 l) bottles. These are the only cleaner and
sanitizer approved for use with Manitowoc products.
Cleaner Part Number Sanitizer Part Number
16 0z. 000000084 16 0z. 94-0565-3
1 Gallon 94-0581-3
NOTE: The Manitowoc Automatic Cleaning System
(AuCS) accessory cannot be used with Flake/Chiplet Ice
Machines.
BIN THERMOSTAT KIT
Bin thermostat kit K00363 is required on QF0400 ice
machines using reverse osmosis or deionized water.
Failure to install this kit will result in overfilling of the bin.
Remote Condensing Unit
Part Number 000002688 1-1
Page 8
General Information Section 1
SV2019
MODEL / SERIAL
NUMBERS DECAL
(QF800/QC700/QF2300)
SV2047
MODEL / SERIAL
NUMBERS DECAL
(QF400)
Located on Back
Panel
Model/Serial Number Location
These numbers are required when requesting
information from your local Manitowoc distributor,
service representative, or Manitowoc Ice, Inc. Record
the model and serial number of your ice machine in the
space provided below.
The model and serial number are listed on the OWNER
WARRANTY REGISTRATION CARD. They are also
listed on the MODEL/SERIAL NUMBER DECAL affixed
to the ice machine head section and condensing unit.
Ice Machine
Model Number
Serial Number
1-2
Model/Serial Number Location
Part Number 000002688
Page 9

Section 1 General Information
Important
Owner Warranty Registration Card
GENERAL
The packet containing this manual also includes
warranty information. Warranty coverage beg ins the day
the ice machine is installed.
Complete and mail the OWNER WARRANTY
REGISTRATION CARD as soon as possible to
validate the installation date.
If the OWNER WARRANTY REGISTRATION CARD is
not returned, Manitowoc will use the date of sale to the
Manitowoc Distributor as the first day of warranty
coverage for your new ice machine.
Commercial Warranty Coverage
GENERAL
The following Warranty outline is provided for your
convenience. For a detailed explanation , re ad the
warranty bond shipped with each product.
Contact your local Manitowoc Distributor or Manitowoc
Ice, Inc. if you need further warranty information.
PARTS
1. Manitowoc warrants the ice machine against defects
in materials and workmanship, under normal use
and service for two (2) years from the date of
original installation.
2. The compressor is covered by an additional three
(3) year (five years total) warranty beginning on the
date of the original installation.
LABOR
1. Labor required to repair or replace defective
components is covered for two (2) years from the
date of original installation.
EXCLUSIONS
The following items are not included in the ice machine’s
warranty coverage:
1. Normal maintenance, adjustments and cleaning as
outlined in this manual.
2. Repairs due to unauthorized modifications to the ice
machine or use of non-standard parts without prior
written approval from Manitowoc Ice, Inc.
3. Damage caused by improper installation of the ice
machine, electrical supply , water supp ly or drainage,
or damage caused by floods, storms, or other acts of
God.
4. Premium labor rates due to holidays, overtime,
etc.; travel time; flat rate service call charges;
mileage and miscellaneous tools and material
charges not listed on the payment schedule.
Additional labor charges resulting from the
inaccessibility of equipment are also excluded.
5. Parts or assemblies subjected to misuse, abuse,
neglect or accidents.
6. Damage or problems caused by installation,
cleaning and/or maintenance procedures
inconsistent with the technical instructions provided
in this manual.
AUTHORIZED WARRANTY SERVICE
To comply with the provisions of the warranty, a
refrigeration service company qualified and authorized
by a Manitowoc distributor, or a Contracted Service
Representative must perform the warranty repair.
NOTE: If the dealer you purchased the ice machine from
is not authorized to perform warranty service; contact
your Manitowoc distributor or Manitowoc Ice, Inc. for the
name of the nearest authorized service representative.
SERVICE CALLS
Normal maintenance, adjustments and cleaning as
outlined in this manual are not covered by the warranty.
If you have followed the procedures listed in this manual,
and the ice machine still does not perform properly, call
your Local Distributor or the Service Department at
Manitowoc Ice, Inc.
Part Number 000002688 1-3
Page 10

General Information Section 1
RESIDENTIAL ICE MACHINE LIMITED WARRANTY
WHAT DOES THIS LIMITED WARRANTY COVER?
Subject to the exclusions and limitations below,
Manitowoc Ice, Inc. (“Manitowoc”) warrants to the
original consumer that any new ice machine
manufactured by Manitowoc (the “Product”) shall be
free of defects in material or workmanship for the
warranty period outlined below under normal use and
maintenance, and upon proper installation and start-up
in accordance with the instruction manual supplied with
the Product.
HOW LONG DOES THIS LIMITED WARRANTY
LAST?
Product Covered
Warranty Period
Ice Machine Twelve (12) months
from the sale date
WHO IS COVERED BY THIS LIMITED WARRANTY?
This limited warranty only applies to the original
consumer of the Product and is not transferable.
WHAT ARE MANITOWOC ICE’S OBLIGATIONS
UNDER THIS LIMITED WARRANTY?
If a defect arises and Manitowoc receives a valid
warranty claim prior to the expiration of the warranty
period, Manitowoc shall, at its option: (1) repair the
Product at Manitowoc’s cost, including standard straight
time labor charges, (2) replace the Product with one that
is new or at least as functionally equivalent as the
original, or (3) refund the purchase price for the Pr oduct.
Replacement parts are warranted for 90 days or the
balance of the original warranty period, whiche ve r is
longer. The foregoing constitutes Manitowoc’s sole
obligation and the consumer’s exclusive remedy for any
breach of this limited warranty. Manitowoc’s liability
under this limited warranty is limited to the purchase
price of Product. Additional expenses including, without
limitation, service travel time, overtime or premium labor
charges, accessing or removing the Product, or
shipping are the responsibility of the consumer.
WHAT IS NOT COVERED?
This limited warranty does not cover, and you are solely
responsible for the costs of: (1) periodic or routine
maintenance, (2) repair or replacement of the Product
or parts due to normal wear and tear, (3) defects or
damage to the Product or parts resulting from misuse,
abuse, neglect, or accidents, (4) defects or damage to
the Product or parts resulting from improper or
unauthorized alterations, modifications, or changes; and
(5) defects or damage to any Product that has not been
installed and/or maintained in accordance with the
instruction manual or technical instructions provided by
Manitowoc. To the extent that warranty exclusions are
not permitted under some state laws, these exclusions
may not apply to you.
E
XCEPT AS STATED IN THE FOLLOWING SENTENCE, THIS
L
IMITED WARRANTY IS THE SOLE AND EXCLUSIVE
W
ARRANTY OF MANITOWOC WITH REGARD TO THE
P
RODUCT. ALL IMPLIED WARRANTIES ARE STRICTLY
L
IMITED TO THE DURATION OF THE LIMITED WARRANTY
A
PPLICABLE TO THE PRODUCTS AS STATED ABOVE,
I
NCLUDING BUT NOT LIMITED TO, ANY WARRANTY OF
M
ERCHANTABILITY OR OF FITNESS FOR A PARTICULAR
P
URPOSE.
Some states do not allow limitations on how long an
implied warranty lasts, so the above limitation may not
apply to you.
I
N NO EVENT SHALL MANITOWOC OR ANY OF ITS
A
FFILIATES BE LIABLE TO THE CONSUMER OR ANY OTHER
P
ERSON FOR ANY INCIDENTAL, CONSEQUENTIAL OR
S
PECIAL DAMAGES OF ANY KIND (INCLUDING, WITHOUT
L
IMITATION, LOSS PROFITS, REVENUE OR BUSINESS)
A
RISING FROM OR IN ANY MANNER CONNECTED WITH THE
P
RODUCT, ANY BREACH OF THIS LIMITED WARRANTY, OR
A
NY OTHER CAUSE WHATSOEVER, WHETHER BASED ON
C
ONTRACT, TORT OR ANY OTHER THEORY OF LIABILITY.
Some states do not allow the exclusion or limitation of
incidental or consequential damages, so the above
limitation or exclusion may not apply to you.
HOW TO OBTAIN WARRANTY SERVICE
To obtain warranty service or information regarding your
Product, please contact us at:
MANITOWOC ICE, INC.
2110 So. 26th St.
P.O. Box 1720,
Manitowoc, WI 54221-1720
Telephone: 920-682-0161 Fax: 920-683-7585
www.manitowocice.com
1-4
HOW STATE LAW APPLIES
This limited warranty gives you specific legal rights, and
you may also have rights that vary from state to state or
from one jurisdiction to another.
REGISTRATION CARD
To secure prompt and continuing warranty service, this
warranty registration card must be completed and sent
to Manitowoc within thirty (30) days from the sale date.
Complete the registration card and send it to
Manitowoc.
Part Number 000002688
Page 11
Section 2
Important
26”
(66 CM)
19”
(48.2 CM)
32.5”
(82.55 CM)
6”
(15.24 CM)
7.2”
(18.2 CM)
3.03”
(7.7 CM)
3.04”
(7.72 CM)
1.36”
(3.5 CM)
26.5”
(67.3 CM)
SV2050
11.13”
(28.3 CM)
1.9”
(4.8 CM)
2”
(5.1 CM)
5.6”
(14.3 CM)
11.5”
(29.2 CM)
13.5”
(34.3 CM)
26.5”
(67.3 CM)
SV2004
22”
(55.88 CM)
24.5”
(62.23 CM)
26.5”
(67.3 CM)
5.9”
(15 CM)
2.9”
(7.3 CM)
3”
(7.6 CM)
1.6”
(4 CM)
SV2003
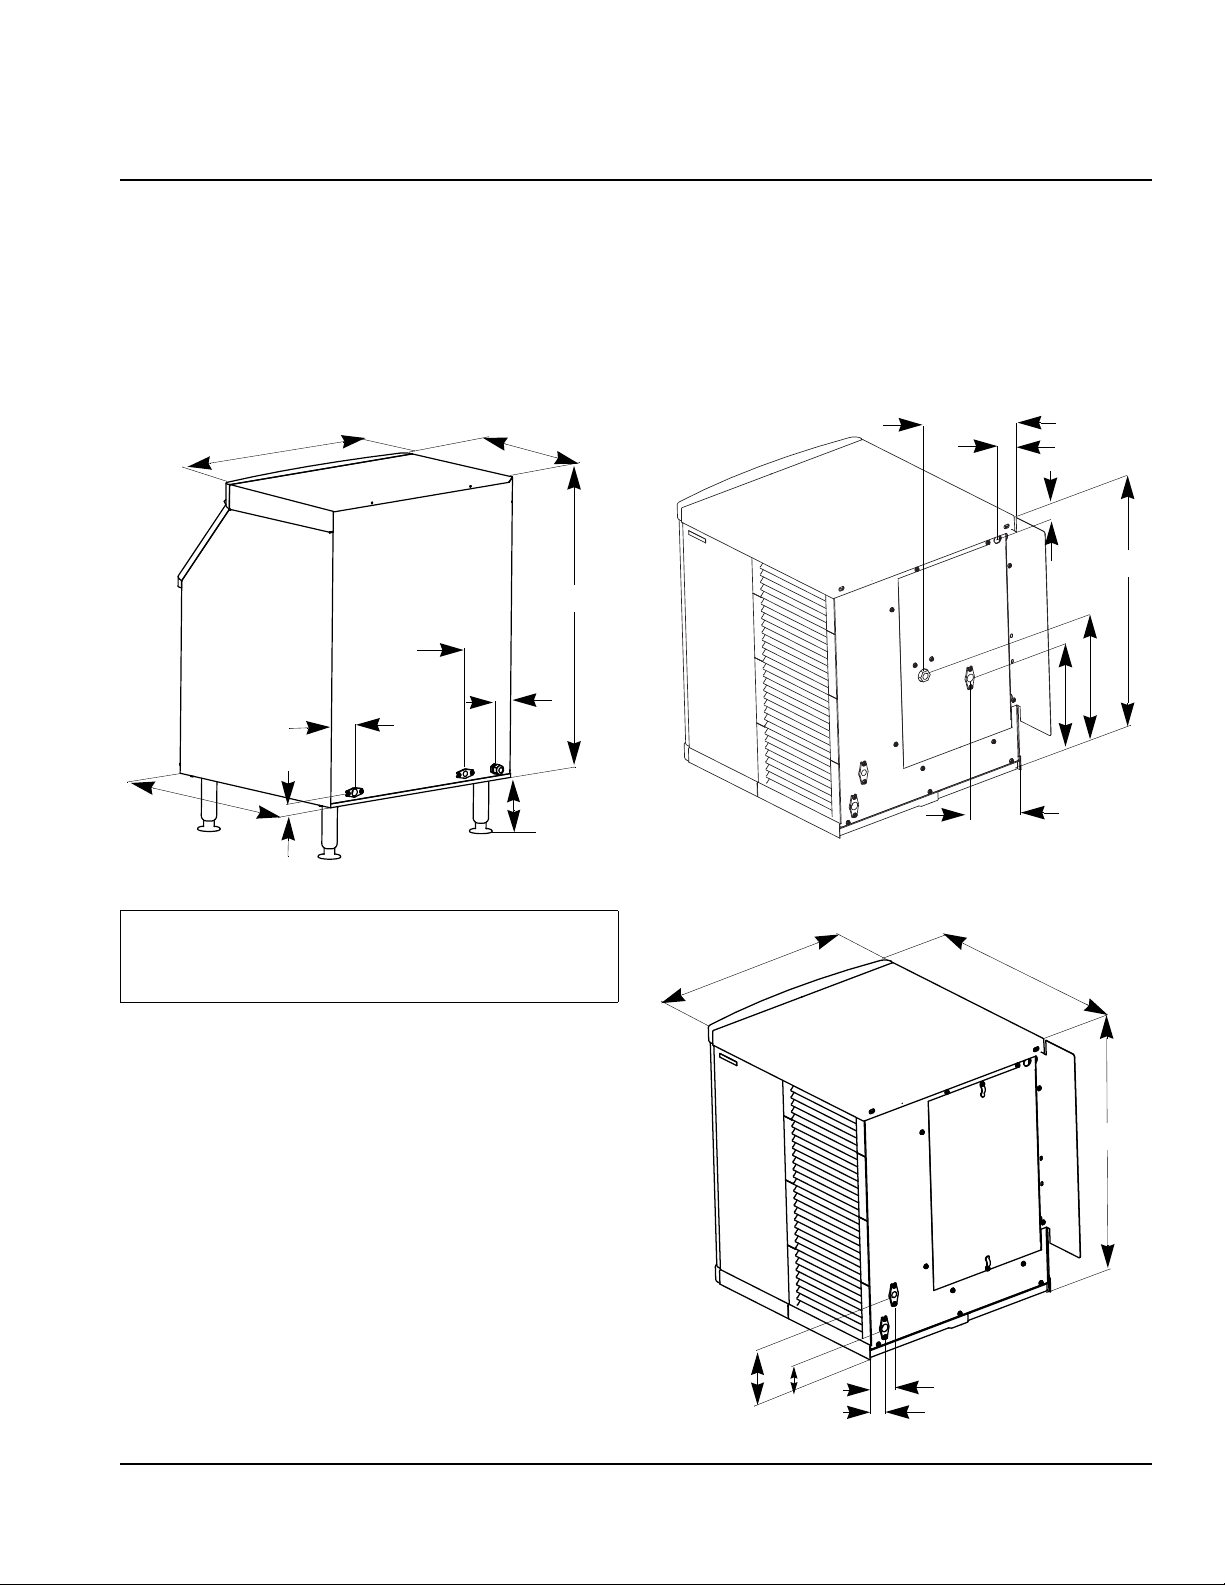
Installation Instructions
Ice Machine Dimensions
These instructions are provided to assist the qualified
installer. Check your local Yellow Pages for the name of
the nearest Manitowoc distributor, or call Manitowoc Ice,
Inc. for information regarding start-up services.
QF400 AIR COOLED ICE MACHINE QC700/QF800 WATER COOLED ICE MACHINE
QC700/QF800 AIR COOLED ICE MACHINE
Failure to follow these installation guidelines may
affect warranty coverage.
Part Number 000002688 2-1
Page 12
Installation Instructions Section 2
SV1758
10.75”
(27.3 CM)
14.5”
(36.8 CM)
9.5”
(24.1 CM)
14.5”
(36.8 CM)
25.75”
(65.4 CM)
34”
(86.4 CM)
24.13”
(53.7 CM)
30”
(76.2 CM)
24.5”
(62.23 CM)
2.25”
(5.72 CM)
23.5”
(67.3 CM)
9.8”
(24.89 CM)
2.8”
(7.12 CM)
1.8”
(4.6 CM)
SV1784
4.5”
(11.43 CM)
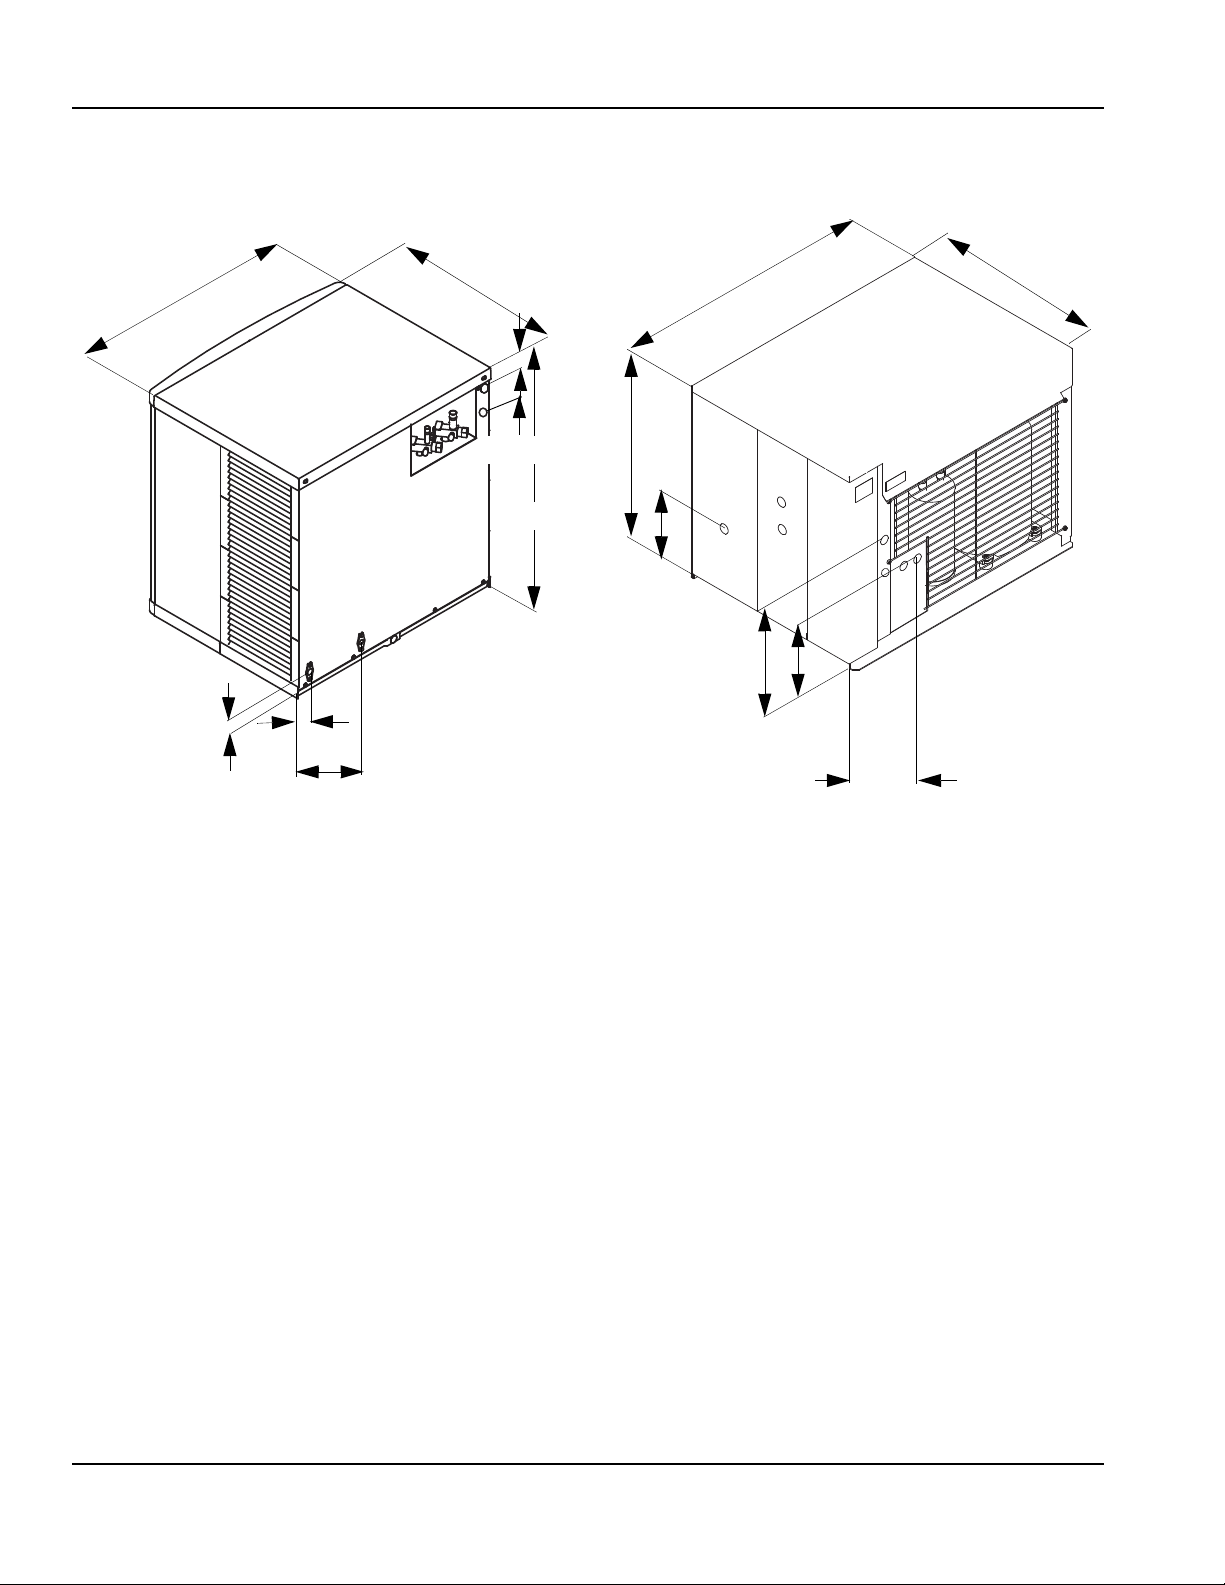
Ice Machine Head Section and Remote Condensing Unit Dimensions
QF2300 HEAD SECTION AND RFC2385 REMOTE CONDENSING UNIT
2-2
Part Number 000002688
Page 13
Section 2 Installation Instructions
SV1614
SV1609
SV1297
B970
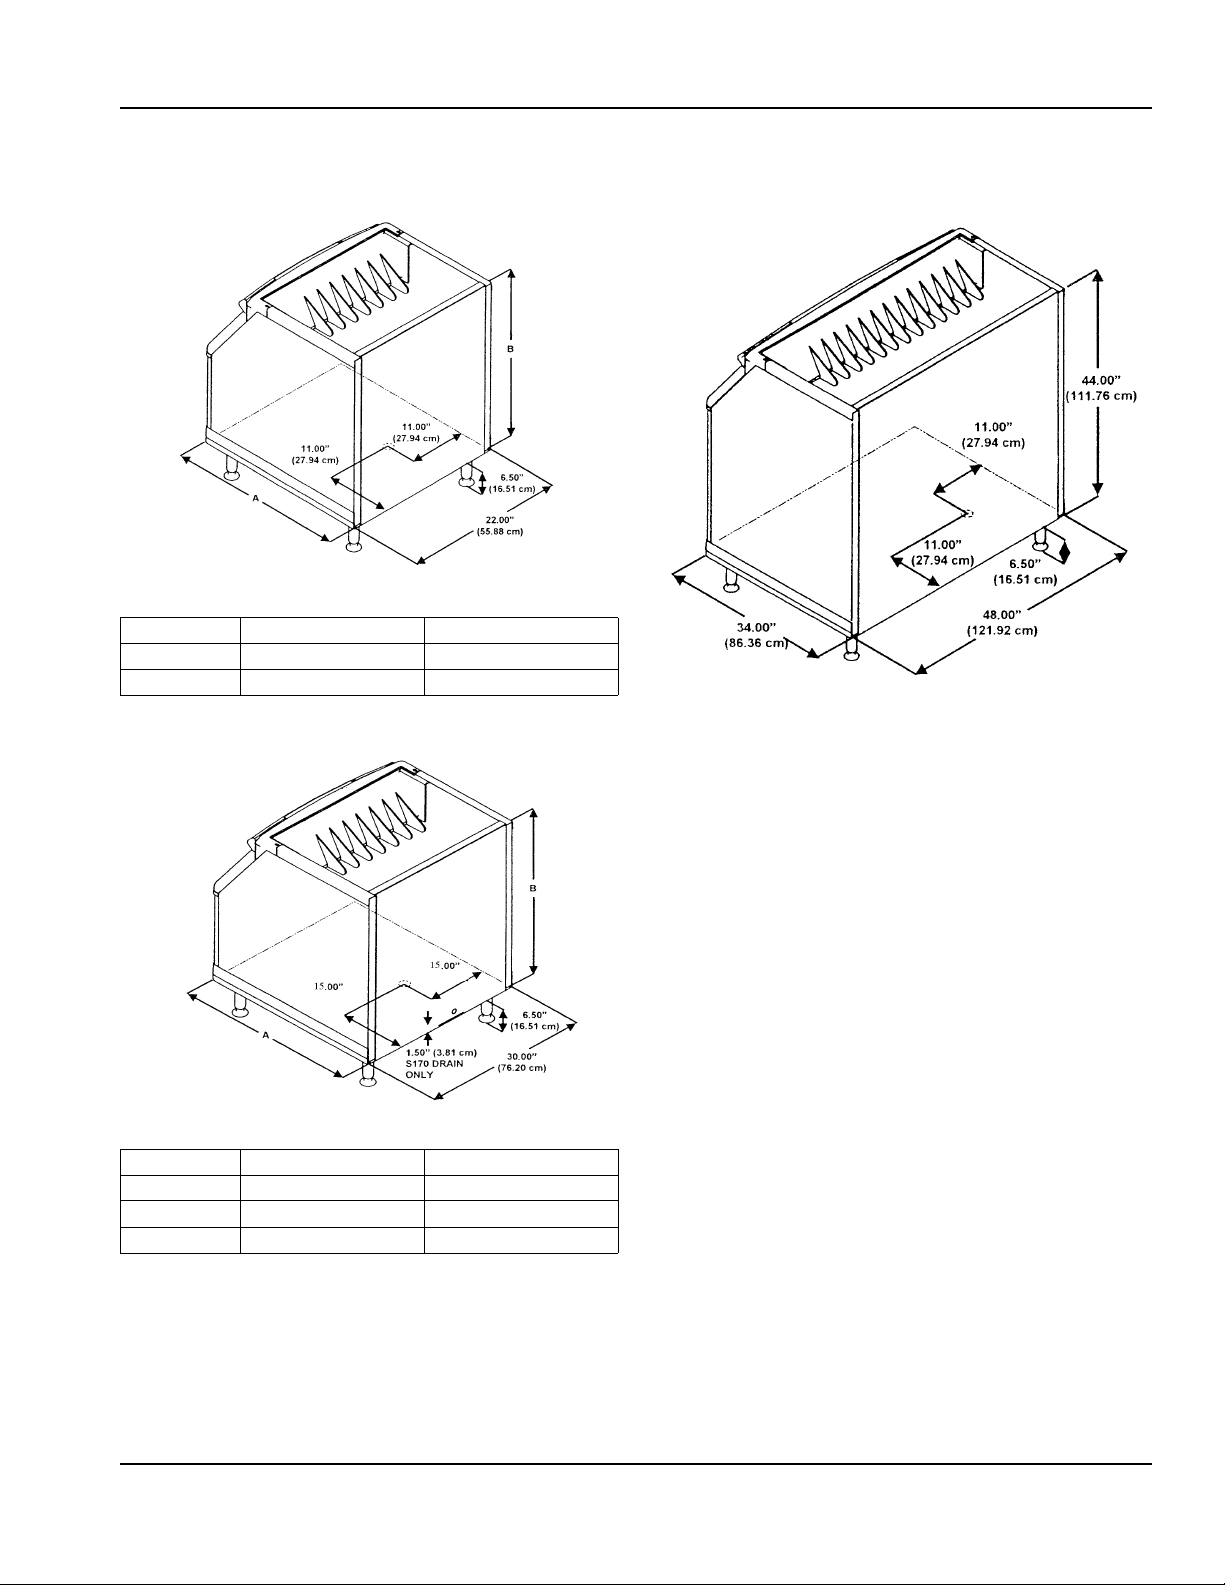
Ice Storage Bin Dimensions
22 INCH (56 CM) ICE STORAGE BINS
Bin Model Dimension A Dimension B
B320 34.0 in (86.3 cm) 32.0 in (81.3 cm)
B420 34.0 in (86.3 cm) 44.0 in (111.7 cm)
30 INCH (76 CM) ICE STORAGE BINS
48 INCH (130 CM) ICE STORAGE BINS
Bin Model Dimension A Dimension B
B170 29.5 in (74.9 cm) 19.1 in (48.5 cm)
B400 34.0 in (86.3 cm) 32.0 in (81.3 cm)
B570 34.0 in (86.3 cm) 44.0 in (111.7 cm)
Part Number 000002688 2-3
Page 14
Installation Instructions Section 2
!
Warning
!
Caution
A
34” (86.4 cm)
25.25”
(64.1 cm)
6”
(15.2 cm)
B
43.6”
(110.81 cm)
Large Capacity Ice Storage Bin Dimensions
30 INCH (76 CM)
A
34” (86.4 cm)
All Manitowoc ice machines require the ice storage
system (bin, dispenser, etc.) to incorporate an ice
deflector.
Manitowoc ice machines require adding Manitowoc
Ice Deflector Kit when installing with non-Manitowoc
ice storage systems.
Prior to using a non-Manitowoc ice storage system
B
with other Manitowoc ice machines, contact the
manufacturer to assure their ice deflector is
compatible with Manitowoc ice machines.
25.25”
(64.1 cm)
43.6”
(110.81 cm)
30” large capacity ice storage bins must be
attached to the wall with the bracket provided with
the bin.
6”
(15.2 cm)
Bin Model Dimension A (Width) Dimension B (Height)
B750 30 in. (76.2 cm.) 58 in. (147.3 cm.)
B1050 30 in. (76.2 cm.) 78 in. (198.1 cm.)
The bin drain is exactly in the center of the bin.
48 INCH (122 CM) & 60 INCH (152 CM)
Bin Model Dimension A (Width) Dimension B (Height)
B1100 48 in. (121.9 cm.) 55.0 in. (139.7 cm.)
B1400 60 in. (152.4 cm.) 55.0 in. (139.7 cm.)
The bin drain is exactly in the center of the bin.
2-4
Part Number 000002688
Page 15
Section 2 Installation Instructions
!
Caution
Location of Ice Machine
The location selected for the ice machine must meet the
following criteria. If any of these criteria are not met,
select another location.
• The location must be free of airborne and other
contaminants.
• The air temperature must be at least 45°F (7°C), but
must not exceed 110°F (43.4°C).
• The water temperature must be at least 45°F (7°C),
but must not exceed 90°F (32.2°C).
• The location must not be near heat-generating
equipment or in direct sunlight.
• The location must be capable of supporting the
weight of the ice machine and a full bin of ice.
• The location must allow enough clearance for water,
drain and electrical connections in the rear of the ice
machine.
• The location must not obstruct airflow through or
around the ice machine. QF400 airflow is in and out
of the front of the ice machine. Refer to below for
clearance requirements.
Ice Machine Head Section Clearance
Requirements
QF400
Top/Sides 5” (12.7 mm) NA
Back 5” (12.7 mm) NA
Self-Contained
Air-Cooled
Self-Contained
Water-Cooled
Ice Machine Heat of Rejection
Series
Condensing Unit
QF400 4000
QC700 7800
QF800 7800
QF2300/RFC2385 21000
*B.T.U. / Hour
Ice machines, like other refrigeration equipment, reject
heat through the condenser. It is helpful to know the
amount of heat rejected by the ice machine when sizing
the air conditioning equipment where self-contained aircooled ice machines are installed. QF2300 ice machines
add an insignificant amount of load to a conditioned
space.
Heat of Rejection*
Location of Remote Condensing Unit
The location selected for the Remote Condensing Unit
must meet the following criteria. If any of these criteria
are not met, select another location.
• The air temperature must be at least -20°F (-28.9°C)
but must not exceed 120°F (49°C).
• The location must not allow exhaust fan heat and/or
grease to enter the condenser.
• The location must not obstruct airflow through or
around the condensing unit. Refer to the chart below
for clearance requirements.
CONDENSING UNIT CLEARANCE REQUIREMENTS
QC700/QF800
Top/Sides 8” (20.3 mm) 5” (12.7 mm)
Back 5” (12.7 mm) 5” (12.7 mm)
QF2300
Top/Sides NA 5” (12.7 mm)
Back NA 5” (12.7 mm)
Self-Contained
Air-Cooled
Self-Contained
Air-Cooled
Self-Contained
Water-Cooled
Remote
Air-Cooled
Top/Sides There is no minimum clearance required,
Front/Back 4’ (1.2 M)
Ice Machine Condensing Unit
although 6” (12.7 cm) is recommended for
efficient operation and servicing only.
The ice machine head section must be protected if it
will be subjected to temperatures below 32°F (0°C).
Failure caused by exposure to freezing
temperatures is not covered by the warranty. See
“Removal from Service/Winterization”.
Part Number 000002688 2-5
Page 16
Installation Instructions Section 2
!
Caution
SV1606
THREAD LEVELING
LEG INTO BASE OF
CABINET
THREAD ‘FOOT’ IN AS
FAR AS POSSIBLE
SV1607
AIR
BAFFLE
SCREWS
Leveling the Ice Storage Bin
1. Screw the leveling legs onto the bott om of th e bin.
2. Screw the foot of each leg in as far as possible.
The legs must be screwed in tightly to prevent them
from bending.
3. Move the bin into its final position.
4. Level the bin to assure that the bin door closes and
seals properly. Use a level on top of the bin. Turn
each foot as necessary to level the bin.
5. Inspect bin gasket prior to ice machine installation.
(Manitowoc bins come with closed cell foam gasket
installed along the top surface of the bin.)
6. Install ice machine on bin.
NOTE: An optional caster assembly is available for use
in place of the legs. Installation instructions are supplied
with the casters.
Condenser Air Baffle
(QC700/QF800 Air-Cooled Ice Machines Only)
The air-cooled baffle prevents condenser air from
recirculating. To install:
1. Remove the back panel screws next to the
condenser.
2. Align the mounting holes in the air baffle with the
screw holes and reinstall the screws.
2-6
Leveling Leg and Foot
Air Baffle
Part Number 000002688
Page 17

Section 2 Installation Instructions
!
Warning
!
Warning
Electrical Service
All wiring must conform to local, state and national
codes.
VOLTAGE
The maximum allowable voltage variation is ±1 0% of the
rated voltage on the ice machine model/serial number
plate at start-up (when the electrical load is highest).
GROUND FAULT INTERRUPTER CIRCUIT (GFIC)
Ground Fault Circuit Interrupter protection is a system
that shuts down the electric circuit (opens it) when it
senses an unexpected loss of power, presumably to
ground. Manitowoc Ice, Inc. does not recommend the
use of a GFCI/GFI circuit protection with our equipment.
If code requires the use of a GFCI/GFI then you must
follow the local code. The circuit must be dedicated
(accept QuietQubes), sized properly and there must be
a panel GFCI/GFI breaker. We do not recommend GFCI/
GFI outlets as they are known for more intermittent
nuisance trips than panel breakers.
FUSE/CIRCUIT BREAKER
A separate fuse/circuit breaker must be provided for
each ice machine. Circuit breakers must be H.A.C.R.
rated (does not apply in Canada).
The ice machine must be grounded in accordance
with national and local electrical codes.
TOTAL CIRCUIT AMPACITY
QF400 Only
The total circuit ampacity is used to help select the wire
size of the electrical supply.
The wire size (or gauge) is also dependent upon
location, materials used, length of run, etc., so it must be
determined by a qualified electrician.
MINIMUM CIRCUIT AMPACITY
QC700/QF800/QF2300 Only
The minimum circuit ampacity is used to help select the
wire size of the electrical supply. (Minimum circuit
ampacity is not the ice machine’s running amp load.)
The wire size (or gauge) is also dependent upon
location, materials used, length of run, etc., so it must be
determined by a qualified electrician.
QF400 115/60/1 ice machines are factory pre-wired
with a power cord and 5-15P plug confirmation.
QF400 230/50/1 ice machines are factory pre-wired
with a power cord, no plug is supplied.
QF2300 with Remote Condensing Unit the ice
machine head section and remote condensing unit are
wired independent of each other. A separate dedicated
fuse/circuit breaker must be provided
Circuit breakers must be H.A.C.R. rated (does not apply
in Canada).
for each section.
Part Number 000002688 2-7
Page 18
Installation Instructions Section 2
Electrical Requirements
Ice Machine Head Section
Fuse/
Circuit
Remote
Air-Cooled
Minimum
Circuit
Amps
Water Cooled
Maximum
Fuse/Circuit
Breaker
Minimum
Circuit
Amps
Air-Cooled
Ice
Machine
QF400
Before Serial
Number
110638713
QF400
After Serial
Number
110638713
QC700
QF800
QF2300
Interconnecting wiring (115/60/1) is required between the ice machine and condensing unit to energize the contactor coil.
Voltage
Phase
Cycle
1 15/1/60 15 NA 9.8 NA NA NA NA
230/1/50 15 NA 4.2 NA NA NA NA
1 15/1/60 15 NA 6.9 NA NA NA NA
230/1/50 15 NA 4.2 NA NA NA NA
1 15/1/60 30 18.9 NA NA NA 30 17.9
230/1/50 20 8.8 NA NA NA 20 8.4
230/1/60 15 8.7 NA NA NA 15 8.3
1 15/1/60 30 18.9 NA NA NA 30 17.9
230/1/50 20 8.8 NA NA NA 20 8.4
230/1/60 15 8.7 NA NA NA 15 8.3
1 15/1/60 NA NA NA 15 5.5 NA NA
230/1/50 NA NA NA NA NA NA NA
230/1/60 NA NA NA NA NA NA NA
Maximum
Fuse/Circuit
Breaker
Minimum
Circuit
Amps
Total
Circuit
Amps
Maximum
Breaker
Remote Condensing Unit
Condensing Unit
RFC2385
Vo ltage Phase
Cycle
208-230/1/60
208-230/3/60
Maximum Fuse/Circuit
Breaker
30 18.5
20 12.8
Minimum Circuit Amps
For United Kingdom Only
As the colours of the wires in the mains lead of the appliance may not correspond with the coloured markings
identifying the terminals in your plug, proceed as follows:
• The wire which is coloured green and yellow
the letter E or by the earth ground symbol or coloured green or green and yellow.
• The wire coloured blue
• The wire coloured brown
must be connected to the terminal which is marked with the letter N or coloured black.
must be connected to the terminal which is marked with the letter L or coloured red.
must be connected to the terminal in the plug which is ma rked with
2-8
Part Number 000002688
Page 19

Section 2 Installation Instructions
!
Warning
L
1
L
1
N=115V
OR
L2=208-230V
GROUND
GROUND
ICE MACHINE
CONNECTIONS
SV1258
L
1
L
1
N
N
GROUND
GROUND
ICE MACHINE
CONNECTIONS
TO SEPARATE
FUSE/BREAKER.
DISCONNECT ALL
POLES.
SV1191
C
1
C
1
N = 115V
GROUND
GROUND
ICE MACHINE
CONNECTIONS
TO FUSE/BREAKER.
DISCONNECT ALL
LINE VOLTAGE DO
NOT DISCONNECT
GROUND.
C
2
C
2
L
1
L
1
N = 115V
CONDENSING UNIT
CONNECTIONS
Ice Machine Head Section Electrical Wiring Connections
QC700C/QF800C ICE MACHINE HEAD SECTION
These diagrams are not intended to show proper
wire routing, wire sizing, disconnects, etc., only the
correct wire connections.
All electrical work, including wire routing and
grounding, must conform to local, state and national
electrical codes.
Though wire nuts are shown in the drawin gs, th e ice
machine field wiring connections may use either
wire nuts or screw terminals.
QC700C/QF800C ICE MACHINE HEAD SECTION
115/1/60 or 208-230/1/60
230/1/50
QF2300 ICE MACHINE HEAD SECTION
115/60/1
Part Number 000002688 2-9
Page 20

Installation Instructions Section 2
!
Warning
C
1
C
1
L2 = 208-230V
GROUND
GROUND
CONDENSING UNIT
CONNECTIONS
C
2
C
2
L
1
L
1
TO FUSE/
BREAKER.
DISCONNECT ALL
LINE VOLTAGE DO
NOT DISCONNECT
GROUND.
L2 = 208-230V
ICE MACHINE
CONNECTIONS
Remote Electrical Wiring Connections
These diagrams are not intended to show proper
wire routing, wire sizing, disconnects, etc., only the
correct wire connections.
All electrical work, including wire routing and
grounding, must conform to local, state and national
electrical codes.
Though wire nuts are shown in the drawin gs, th e ice
machine field wiring connections may use either
wire nuts or screw terminals.
RFC2385 REMOTE CONDENSING UNIT
208-230/1/60
2-10
Part Number 000002688
Page 21

Section 2 Installation Instructions
Important
Important
Water Supply and Drains
POTABLE WATER SUPPLY
Local water conditions may require treatment of the
water to inhibit scale formation, filter sediment, and
remove chlorine odor and taste.
If you are installing a Manitowoc water filter system,
refer to the Installation Instructions supplied with the
filter system for ice making water inlet connections.
POTABLE WATER INLET LINES
Follow these guidelines to install water inlet lines:
• Do not connect the ice machine to a hot water
supply. Be sure all hot water restrictors installed for
other equipment are working. (Check valves on sink
faucets, dishwashers, etc.)
• If water pressure exceeds the maximum (80 psig
551.5 kPA) recommended pressure, obtain a water
pressure regulator from your Manitowoc distributor.
• Install a water shut-off valve and union for both the
ice making and condenser water lines.
• Insulate water inlet lines to prevent condensation.
DRAIN CONNECTIONS
Follow these guidelines when installing drain lines to
prevent drain water from flowing back into the ice
machine and storage bin:
• Drain lines must have a 1.5 inch drop per 5 feet of
run (2.5 cm per meter), and must not create traps.
• The floor drain must be large enough to
accommodate drainage from all drains.
• Run separate bin and water-cooled condenser drain
lines. Insulate them to prevent condensation.
• Vent the bin and ice machine drain to the
atmosphere. The ice machine drain requires an 18”
vent. Do not vent the condenser drain on watercooled models.
• Drains must have a union or other suitable means to
allow in place disconnection from the ice machine
when servicing is required.
Cooling Tower Applications
(Water-Cooled Models)
A water cooling tower installation does not require
modification of the ice machine. The water regulator
valve for the condenser continues to control the
refrigeration discharge pressure.
It is necessary to know the amount of heat rejectio n, and
the pressure drop through the condenser and water
valves (inlet and outlet) when using a cooling tower on
an ice machine.
• Water entering the condenser must not exceed 90°F
(32.2°C).
• Water flow through the con denser must not exceed 5
gallons (19 liters) per minute.
• Allow for a pressure drop of 7 psi (48 kPA) between
the condenser water inlet and the outlet of the ice
machine.
• Water exiting the condenser must no exceed 110°F
(43.3°C).
The Commonwealth of Massachusetts requires that
all water-cooled models must be connected only to
a closed loop, cooling tower system.
Part Number 000002688 2-11
Page 22
Installation Instructions Section 2
!
Caution
SV1626
VENT TUBE
8” (20CM)
LONG
BIN DRAIN
ICE MAKING
WATER INLET
TUBING 3/8” MIN.
I.D. (.95 SM)
WATER
SHUT-OFF
VALVE
WATER SUPPLY AND DRAIN LINE SIZING/CONNECTIONS
Plumbing must conform to state and local codes.
Location Water Temperature Water Pressure Ice Machine Fitting
Ice Making
Water Inlet
Condenser
Water Inlet
Condenser
Water Drain
45°F (6°C) Min.
90°F (32.2°C) Max.
33°F (0.6°C) Min.
90°F (32.2°C) Max.
--- ---
Bin Drain --- ---
Large Capacity
--- ---
Bin Drain
20 psi (137.9 kPA) Min.
80 psi (551.5 kPA) Max.
20 psi (137.9 kPA) Min.
150 psi (1034.2 kPA) Max.
3/8" Female
Pipe Thread
1/2" Female
Pipe Thread
1/2" Female
Pipe Thread
3/4" Female
Pipe Thread
1” Female Pipe Thread
Tubing Size Up to Ice
Machine Fitting
3/8" (9.5 mm) minimum
inside diameter
1/2" (12.7 mm) minimum
inside diameter
1/2" (12.7 mm) minimum
inside diameter
3/4" (19.1 mm) minimum
inside diameter
1” (25.4 mm) min. inside
diameter
2-12
Typical Water Supply Drain Installation
Part Number 000002688
Page 23

Section 2 Installation Instructions
!
Warning
!
Caution
!
Caution
!
Warning
Refrigeration System Installation
(QF2300/RFC2385 ONLY)
QuietQube®
Ice Machine
RFC2300 RFC2385
Line Set Suction Line Liquid Line
RC 20/30/50
USAGE WITH NON-MANITOWOC
CONDENSING UNITS
Manitowoc Condensing Units are specifically designed
for usage with a Manitowoc Flake/Chiplet Ice Machine
Head Sections. Manitowoc Flake/Chiplet Ice Machines
will not operate with non-Manitowoc condensing units.
Installation of a Remote Condensing Unit may require the
use of special equipment for placement. Trained and
qualified personnel are required for proper rigging and
lifting.
The 60-month compressor warranty (including the
24-month labor replacement warranty) will not apply if
the Manitowoc Ice Machine and remote Manitowoc
Condensing Unit are not installed according to
specifications. This warranty also will not apply if the
refrigeration system is modified with a condenser,
heat reclaim device, or other parts or assemblies not
manufactured by Manitowoc Ice, Inc.
Remote Single
Circuit
Condenser
3/4 inch
(19.1 mm)
1/2 inch
(12.7 mm)
Line Set*
RC-20
RC-30
RC-50
Insulation
Thickness
1/2” (13mm)
Suction Line
1/4” (7mm)
Liquid Line
Factory Equipment Refrigeration Amounts
ICE MACHINE HEAD SECTION
Each ice machine head section ships from the factory
with a R-404A refrigerant charge appropriate for line
sets up to 50’ in length (12.5 lbs.). The serial tag on the
ice machine indicates the refrigerant charge. Additional
refrigerant must be added for line set lengths between
50’ and 100’ (1.5 lbs.) see chart below.
Series Charge
QF2200/QF2300
RFC2085/
RFC2385
0’ to 50’ linesets 12.5 lbs (5.7 kg)
50’ to 100’ linesets 14.0 lbs (6.4 kg)
Never add more than nameplate charge to the
refrigeration system for any application.
Potential Personal Injury Situation
The ice machine head section contains the refrigerant
charge. Installation and brazing of the line sets must be
performed by a properly trained and EPA certified
refrigeration technician aware of the dangers of dealing
with refrigerant charged equipment.
REMOTE CONDENSING UNIT
Each condensing unit ships from the factory pressurized
with 50/50 nitrogen helium mixture that must be
removed during the installation process (approximately
20 psig).
REFRIGERATION LINE SETS/TRAPS KIT
Refrigeration Rated Tubing and Trap Kits are shipped
capped with atmospheric pressure.
Part Number 000002688 2-13
Page 24

Installation Instructions Section 2
!
Warning
!
Warning
Important
35’ (10.7 M)
MAX.
DISTANCE
SV1751
15’ (4.5 M)
MAX.
DISTANCE
SV1750
Refrigeration Line Set Installation
GENERAL
Refrigeration line set installations consist of vertical and
horizontal line set distances between the ice machine
and the condensing unit. The following guidelines,
drawings and calculation methods must be followed to
assure proper oil return and condensing unit/ice
machine operation.
The refrigeration line set installer must be USA
Government-Environmental Protection Agency (EPA)
certified in proper refrigerant handling and servicing
procedures.
Disconnect electrical power to the ice machine head
section and the remote condensing unit before
proceeding.
The ice machine head section contains refrigerant
charge. The ice machine he ad sectio n contains thre e
(3) refrigeration valves that must remain closed until
proper installation of the line set is completed.
Step 1 Verify Ice Machine and Remote Condensing
Unit Locations Are Within Guidelines.
Prior to installation of the ice machine and remote
condensing unit be sure that the distance between then
is within the line set routing guidelines outlined in this
manual.
Roof/Wall Penetration
If required, cut a 3-inch (76.2 mm) circular hole in the
wall or roof for routing of refrigeration tubing. A qualified
person must perform all roof penetra tio ns .
A. LINE SET LENGTH
100 feet (30.5 m) Length: The maximum measured
length the line set can be.
The receiver is designed to hold a charge sufficient to
operate the ice machine in ambient temperatures
between -20°F (-28.9°C) and 120°F (49°C), with line set
lengths of up to 100 feet (30.5 m).
The ice machines will not function with line sets
greater than 100 feet (30.5 m). Do not attempt to go
beyond this distance and add refrigerant charge to
compensate!
B. LINE SET RISE OR DROP
35 feet (10.7 m) Rise: The maximum distance the
remote condensing unit can be above the ice machine.
Step 2 Route Refrigeration Tubing
Properly route refrigeration tubing between the ice
machine head section and the remote condensing unit.
2-14
15 feet (4.5 m) Drop: The maximum distance the
remote condensing unit can be below the ice machine .
Part Number 000002688
Page 25

Section 2 Installation Instructions
!
Caution
21’ OR MORE
RISE
ADDITIONAL
TRAP KIT
REQUIRED
SV1751
SV1760
!
Caution
!
Caution
C. SUCTION LINE OIL TRAPS
Do not form unwanted traps in refrigeration lines.
Never coil excess refrigeration tubing.
0 to 20 feet (0 to 6.1 m) Rise: The ice machine head
section has one oil trap built in which allows for a
maximum condenser rise of 20 feet (6.1 m) without
additional traps in the suction line.
21 to 35 feet (6.4 to 10.7 m) Rise: The suction line
requires an additional Oil Trap (“S” type) to be installed.
Install the trap as close as possible to midpoint between
the ice machine head section and remote cond en sin g
unit. S-Trap Kits are available from Manitowoc (refer to
chart).
Service Loop
A service loop in the line set permits easy access to the
ice machine for cleaning and service.
• The supplied service loop is an installation
requirement.
• A service loop is not considered an oil trap.
• The service loop is not included when calculating
length, rise or drop of the tubing run.
• Do not use hard rigid copper for the service loop.
If a line set has a rise followed by a drop, another rise
cannot be made. Likewise, if a line set has a drop
followed by a rise, another drop cannot be made.
Step 3 Lengthening or Reducing Line Set Lengths
Do not form unwanted traps in refrigeration lines.
Never coil excess refrigeration tubing.
When the line set required shortening or lengthening, do
so before connecting the line set to the ice machine
head section or the remote condensing unit.
Manitowoc S-Trap Kit
Model
QF2300 K00166
S-Trap Kit
Number
Continued on Next Page...
Tubing Size
3/4 inch
(19.1 mm)
Part Number 000002688 2-15
Page 26

Installation Instructions Section 2
!
Warning
!
Warning
VALVES MUST REMAIN
CLOSED AND BE
PROTECTED FROM
HEAT WHEN BRAZING
(WRAP WITH WET RAG)
SV1757
SV2100
MINIMIZE THE TIME THE REFRIGERATION
SYSTEM IS EXPOSED TO THE ATMOSPHERE
(15 MINUTES MAXIMUM)
SUCTION
FILTER
SUCTION
LINE
Step 4 Connecting the line set.
To prevent oxidation of the copper, purge line set and
condensing unit with dry nitrogen while brazing.
Connect The Line Set To The Ice Machine Head
Section
The ice machine head section contains refrigerant
charge. The ice machine he ad sectio n contains thre e
(3) refrigeration valves that must remain closed until
proper installation of the line sets is completed.
The line set shut off valves at the back of the ice
machine must remain closed and be protected from heat
during the brazing process. Wrap the valves in a wet rag
or other type of heat sink prior to brazing. Cool braze
joint with water immediately after brazing to pr event heat
migration to the valve.
Connect The Line Set To The Remote Condensing
Unit
The compressor oil rapidly absorbs moisture. Be
prepared to complete line set installation and start your
evacuation process in order to minimize the time the
compressor is exposed to the atmosphere. (Maximum
amount of time the system can be exposed to the
atmosphere is 15 minutes).
The line set can be routed for entry through the front or
left side of the condensing unit.
• Remove knockout for preferred location.
• Insert supplied plastic bushings in knockout holes to
prevent tubing from contacting sheet metal.
• Use the supplied 90° elbows to route tubing.
• Cut the tubing ends of the suction and liquid lines
and braze the line sets to the condensing unit.
The condensing unit ships from the factory
pressurized with a 50/50 mixture of nitrogen/helium.
Bleed off pressure from both suction and liquid line
access ports prior to cutting into refrigeration lines.
2-16
Part Number 000002688
Page 27
Section 2 Installation Instructions
CONNECT
VACUUM PUMP TO
LINE SET SHUT
OFF VALVES
SV1757
ALTERNATE CONNECTIONS AT
CONDENSING UNIT SCHRADER VALVES
SV2085
!
Caution
SV1784
USE ALLEN WRENCH TO OPEN
(TURN COUNTERCLOCKWISE)
LIQUID AND SUCTION LINE
SHUT-OFF VALVES
Step 5 Pressure Test and Evacuate The Line Set
and Remote Condensing Unit
Schrader valve core removal tools that allow for removal
and installation of the valve cores without removing
manifold gauge set hoses are recommended to
decrease the evacuation time.
Leave the line set shut off valves closed (front seated).
Pressure test the line sets and remote condensing unit
with 150 psig of dry nitrogen. Add nitrogen at the line set
shut off valves located at the back of the ice machine.
Complete the pressure test, verify no leaks are present
and remove the nitrogen from the system before
connecting the vacuum pump. Connect a vacuum pump
to both of the line set shut off valves located at the back
of the ice machine head section. Evacuate to 250
microns (or less). To completely evacuate the Remote
condensing unit, continue the evacuation for 30 minutes
after reaching the 500 micron point.
Step 6 Open The Valves Prior To Starting The Ice
Machine.
A. Slowly backseat (open-turn counterclockw ise)
the suction line shut off valve.
B. Slowly backseat (open-turn counterclockw ise)
the liquid line shut off valve.
C. Slowly backseat (open-turn counterclo ckwise)
the receiver service valve.
NOTE: Y ou will not hear refrigerant flow when the valves
are opened. Refrigerant will not flow until the toggle
switch is placed in the ice position and the liquid line
solenoid valve opens.
If required, the line set and condensing unit can be
evacuated from the schrader valves located in the
remote condensing unit. Schrader valve core removal
tools (that allow for putting the cores back in without
removing vacuum pump hoses) must be us ed if
evacuating from the condensing unit side.
Isolate the vacuum pump from the line set shut off
valves and/or condensing unit access ports prior to
proceeding. Open refrigeration system shut off valves.
The suction line, liquid line and receiver service valves
are closed during shipment and installation.
OPEN SUCTION AND LIQUID LINE SHUT OFF VALVES
After opening suction, discharge and receiver service
valves, refrigerant pressure will not be detected until
the toggle switch is placed in the ICE position and the
liquid line solenoid valve energizes.
Verify O-ring in schrader valve caps are intact and
reinstall on shut off valves to prevent refrigerant leakage.
Replace shut off valve access caps and torque to the
following specifications.
Torque Value’s
Stem 18-20 ft. lbs.
Caps 12-15 ft. lbs.
Schrader Core 1.5-3 in. lbs.
Part Number 000002688 2-17
Page 28
Installation Instructions Section 2
Important
TURN
COUNTERCLOCKWISE
SV1756
RECEIVER SERVICE V ALVE CAP
(TURN COUNTERCLOCKWISE
TO REMOVE)
Important
Replace cap on receiver service valve and tighten.
Open Receiver Service Valve
There is a liquid line solenoid valve at the outlet of the
receiver; refrigerant will not flow to the condensing unit
until the ice machine head section is started. Connect
power to both the ice machine head section and the
Remote condensing unit. Place the ICE/OFF/CLEAN
toggle switch into the ICE position, this will allow
refrigerant to enter the line set and condensing unit.
All refrigeration valve caps must be reinstalled to
prevent future refrigeration leaks.
Step 7 Leak Check The Refrigeration System
Leak check the new line set connections at the ice
machine head section, condensing unit and S trap as
well as all factory joints throughout the entire system.
Disconnect power to the remote condensing unit. Place
the ICE/OFF/CLEAN toggle switch into the ICE position.
This allows the low side and high side pressures to
equalize. Place the ICE/OFF/CLEAN toggle switch in the
OFF position. Connect power to the remote condensing
unit and allow system to pump down.
Step 8 Insulation Requirements
To prevent condensation the entire suctio n line including
the shut-off valve must be insulated. All insulation must
be airtight and sealed at both ends.
The following insulation requirements prevent
condensation at 90°F (32.2°C) ambient 70% Relative
Humidity. If higher humidity is expected, increase
insulation thickness.
The entire line set, including the suction service valve
located on the back of the ice machine requires:
Suction
Line
3/4 inch
(19.1 mm)
Liquid
Line
1/2 inch
(12.7 mm)
Min. Insulation
Thickness
1/2”(13mm) Suction Line
1/4” (7mm) Liquid Line
To prevent condensation the entire suction line
including the shut off valve must be insulated. All
insulation must be airtight and sealed at both ends.
The minimum requirements are for conditions at or
below 70% humidity and 90°F (32.2°C) ambient.
When higher humidity will be experienced, insulation
wall thickness will need to be increased.
2-18
Part Number 000002688
Page 29

Section 2 Installation Instructions
PRE-FORMED
INSULATION
SV3084
TIGHTEN VALVE CAPS
TO SPECIFICATIONS
SV3085
PLACE TAB BETWEEN
VALVE BODY AND PANEL
SV3086
FOLD INSULATION OVER
RIGHT SIDE OF VAL VE AND
SECURE WITH
ELECTRICAL TAPE
Suction Shut Off Valve Insulation
The pre-formed suction shut-off valve insulation is
located in the plastic bag taped to the water curtain.
A. Verify valve and schrader caps are tightened to
specifications (see Step 6).
B. Place insulation over schrader valve cap and left
side of valve. Position the tab between the
mounting bracket and rear panel.
C. Fold insulation and hold against right hand side
of valve while securing with electrical tape. Seal
the line set insulation to the shut off valve
insulation with electrical tape.
Part Number 000002688 2-19
Page 30

Installation Instructions Section 2
SV3021
ICE MACHINE
HEAD SECTION
SUCTION
REFRIGERANT
SHUT-OFF VALVE
LIQUID
REFRIGERANT
SHUT-OFF VALVE
LIQUID LINE
SUCTION LINE
ELECTRICAL
DISCONNECT
CONDENSING
UNIT
INTERCONNECTING
WIRING
(QF2300 ONLY)
TYPICAL REMOTE SYSTEM INSTALLATION
2-20
Part Number 000002688
Page 31

Section 2 Installation Instructions
Installation Checklist
Is the Ice Machine level?
Has all of the internal packing been removed?
Have all of the electrical and water connections
been made?
Has the supply voltage been tested and checked
against the rating on the nameplate?
Is there proper clearance around the ice machine
for air circulation?
Has the ice machine been installed where
ambient temperatures will remain in the range of
45° - 110°F (7° - 43.3°C)?
Has the ice machine been installed where the
incoming water temperature will remain in the
range of 45° - 90°F (7° - 32.2°C)?
Has the toggle switch been placed in the ice
position? (Switch is located behind front cover)
REMOTE AIR-COOLED ONLY
Has the ice machine receiver service valve been
opened 100%?
Are the ice machine line set shut-off valves open
100%?
Does the condenser fan motor operate properly
after start-up?
Have all the refrigeration fittings and joints been
leak checked?
Is the line set routed properly?
Is a refrigeration oil trap (S-trap) installed?
Are the ice machine and bin drains separately
vented?
Are all electrical leads free from contact with
refrigeration lines and moving equipment?
Has the owner/operator been instructed regard ing
maintenance and the use of Manitowo c Cleane r
and Sanitizer?
Has the warranty registration card been sent to
the factory?
Has the ice machine and bin been sanitized?
Has this manual been given to the owner/
operator?
Is the water level (float valve) set correctly?
Have the refrigeration lines been insulated and
secured properly to prevent vibration?
Has the remote condensing unit been located
where ambient temperatures will remain in the
range of -20° to 120°F (-29° to 49°C)?
Is the lineset length, rise and drop within
guidelines?
Part Number 000002688 2-21
Page 32
Installation Instructions Section 2
!
Warning
Before Starting the Ice Machine
All Manitowoc ice machines are factory-operated and
adjusted before shipment. Normally, new installations do
not require any adjustment.
To ensure proper operation, follow the Operational
Checks in Section 3 of this manual. Starting the ice
machine and completing the Operational Checks are the
responsibilities of the owner/operator.
The float valve setting must be checked to verify it is
correctly set. An adjustment may be necessary to
obtained the proper water level.
Adjustments and maintenance procedures outlined in
this manual are not covered by the warranty.
Potential Personal Injury Situation
Do not operate equipment that has been misused.
abused, neglected, damaged, or altered/modified
from that of original manufactured specifications.
2-22
Part Number 000002688
Page 33

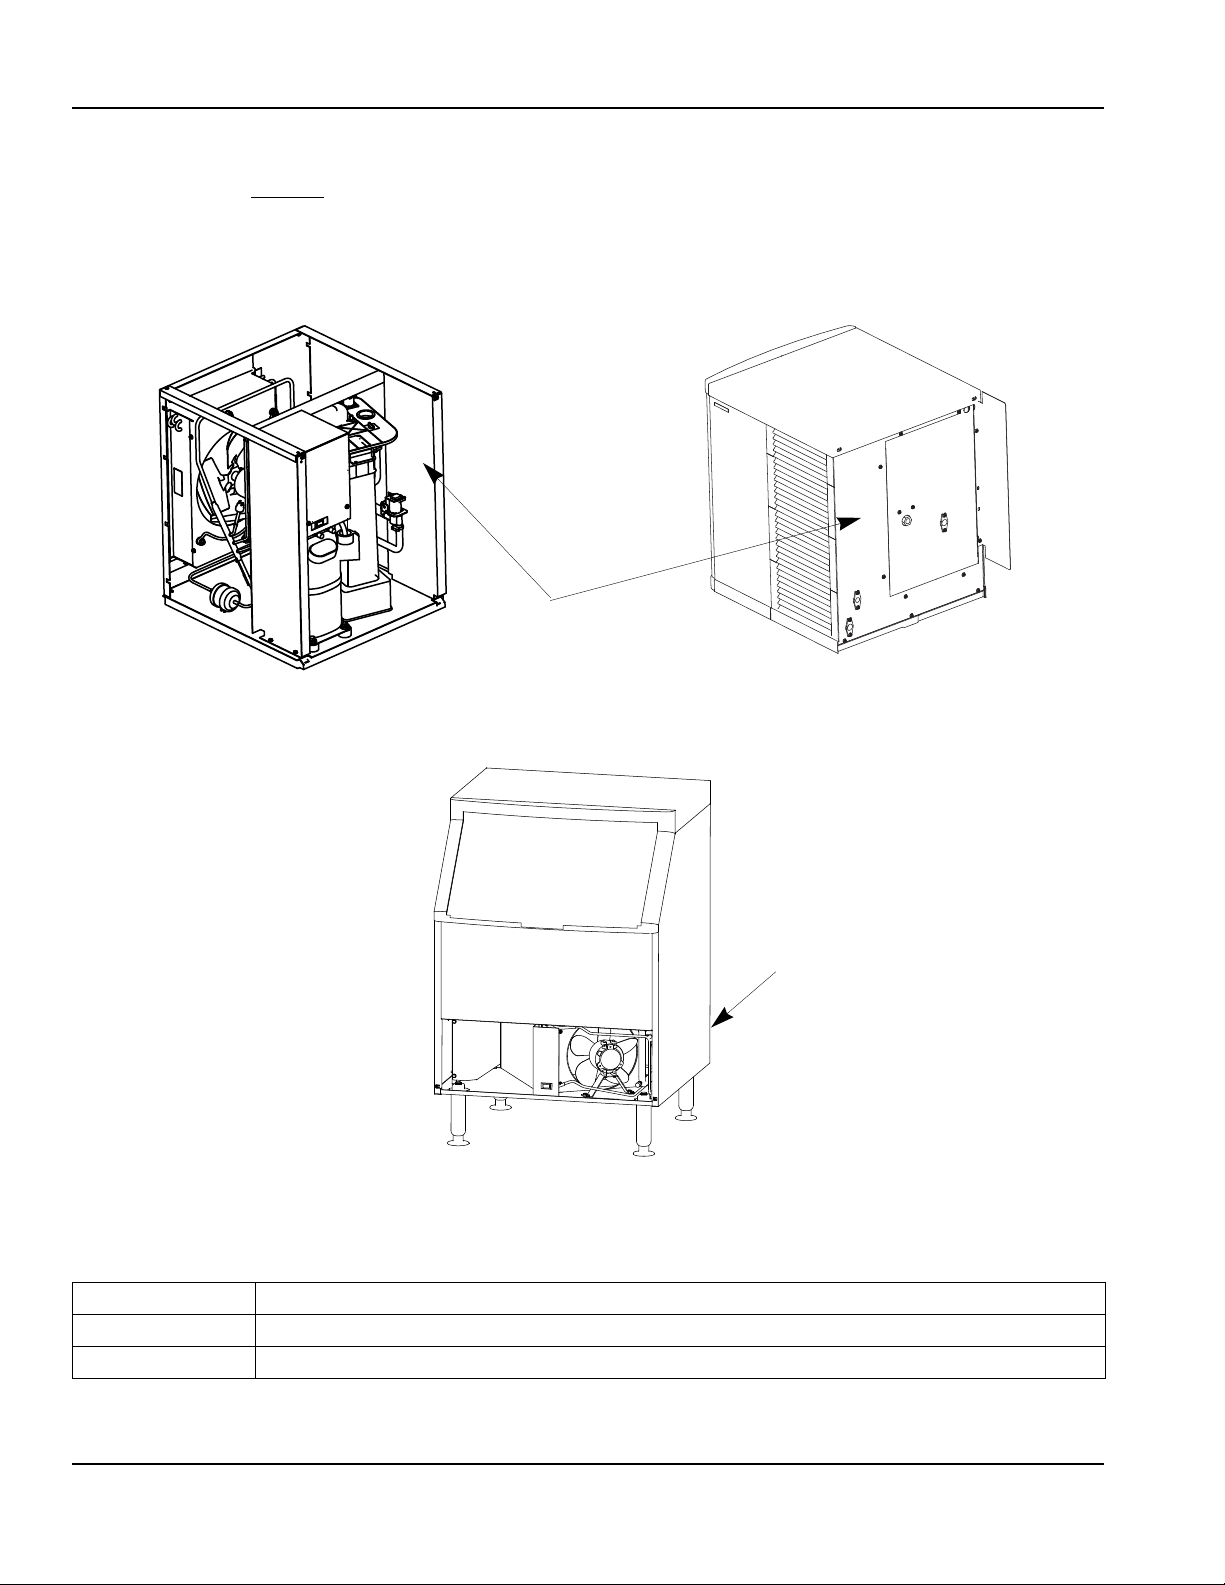
Component Identification
SV2022
SV2019
CONDENSER FAN
MOTOR
ICE/OFF/CLEAN
TOGGLE SWITCH
ICE CHUTE
DUMP VALVE
CLEANING
SOLUTION FILL
HOLE
WATER LEVEL
PROBE
WATER FLOAT
VALVE COIL
WA TER INLET QUICK
DISCONNECT
FITTING
GEARMOTOR
CONDENSER
AIR FILTER
QUARTER TURN
THUMBSCREWS
POTABLE WATER
DRAIN
POTABLE
WATER
INLET
SV2053
SV2044
WATER LEVEL
PROBES
WATER FLOAT
VALVE COIL
CONTROL
BOX
EVAPORATOR
GEAR MOTOR /
GEAR BOX
ASSEMBLY
ICE/OFF/CLEAN
TOGGLE SWITCH
CONDESER
FAN/ MOTOR
WA TER INLET QUICK
DISCONNECT
ICE
CHUTE
DUMP
VALVE
AIR COOLED
CONDENSER
POTABLE
WATER DRAIN
ICE MACHINE HEAD SECTION
QC700/QF800
Section 3
Ice Machine Operation
QF400
Part Number 000002688 3-1
Page 34

Ice Machine Operation Section 3
SV2102
CLEANING
SOLUTION FILL
HOLE
ICE/OFF/
CLEAN
TOGGLE
SWITCH
ICE CHUTE
RETAINING
CLAMP
ICE CHUTE
EVAPORATOR
GEAT MOTOR/
GEAR BOX
ASSEMBLY
WATER LEVEL
PROBES
FLOAT VAL V E
DUMP
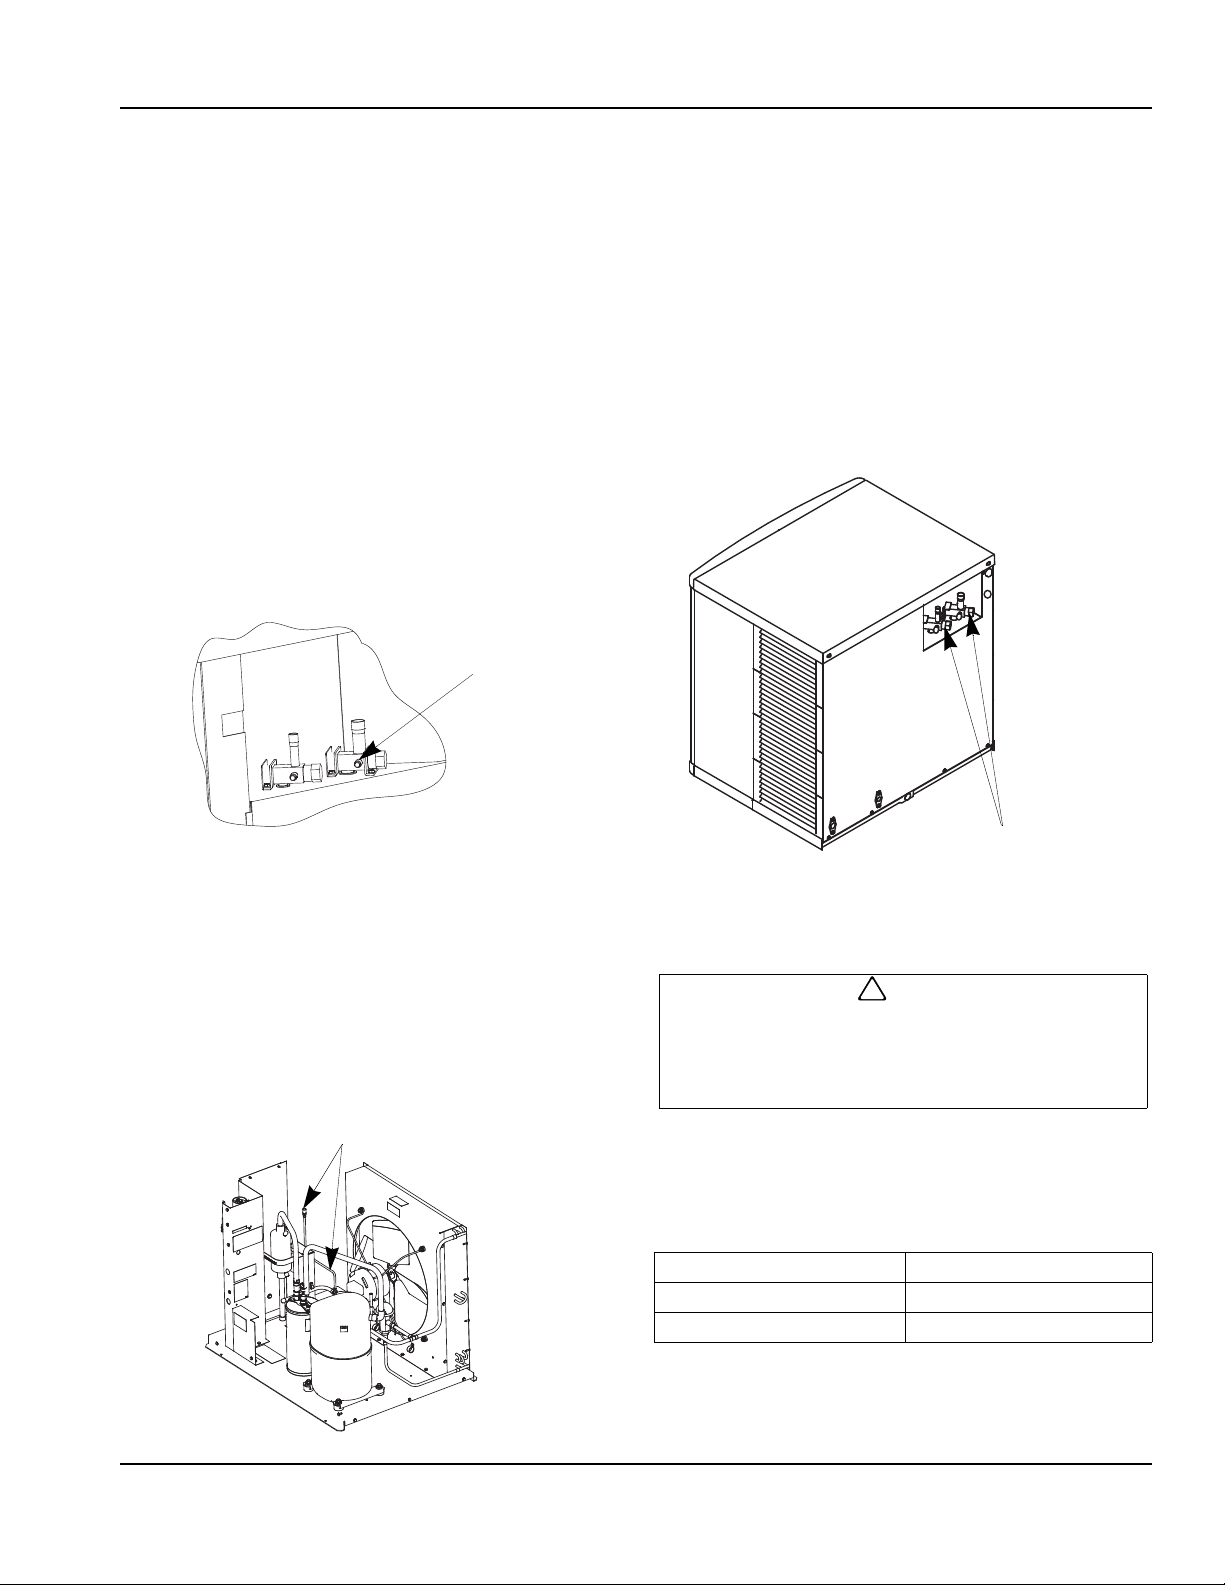
VALVE
ICE CHUTE
ELBOW
WATER
RESERVOIR
CLEANING
SOLUTION
FILL HOLE
SV2100
HEAD
PRESSURE
CONTROL
VALVE
ELECTRICAL
COMPARTMENT
CONDENSER
FAN MOTOR
AIR
CONDENSER
COMPRESSOR
SUCTION
FILTER
RFC2385 Remote Condensing Unit
QF2300
3-2
Part Number 000002688
Page 35

Section 3 Ice Machine Operation
SV2029
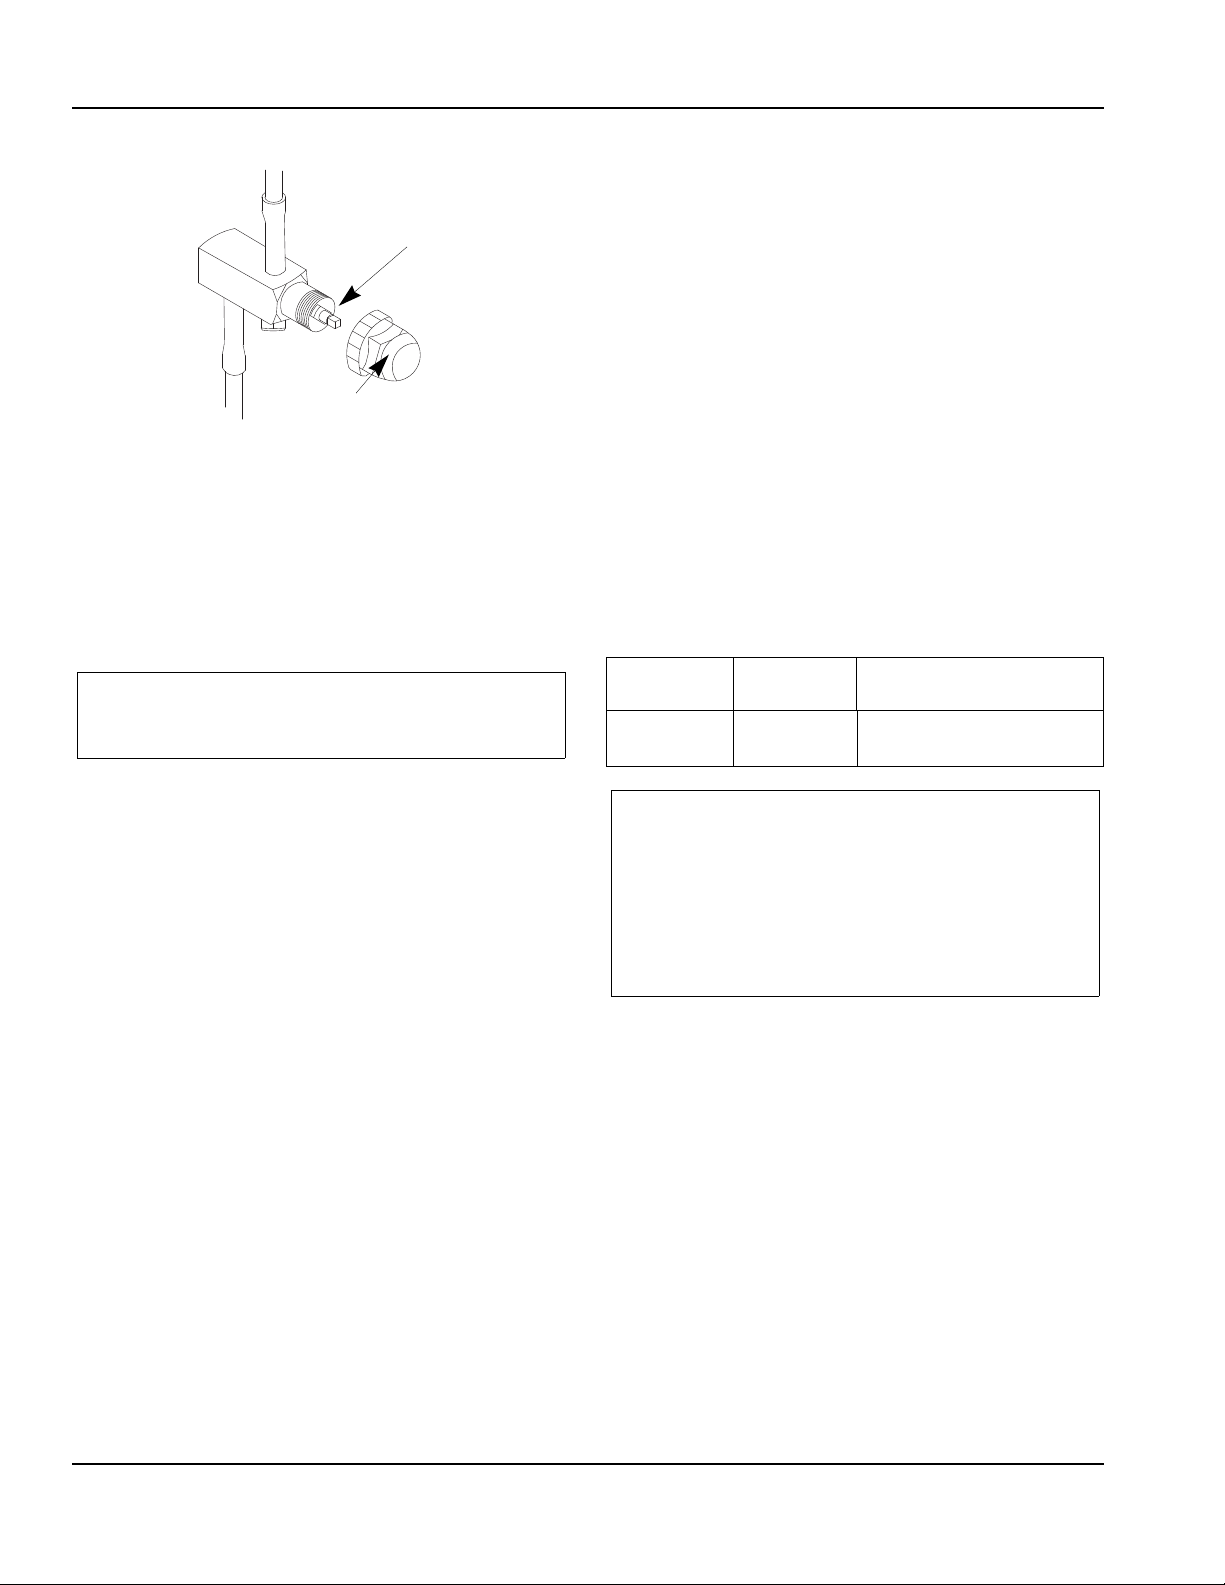
VERIFY WATER
OUTLET DOES
NOT POINT
STRAIGHT
DOWN IT MAY
INTERFERE
WITH FLOAT
WATER LEVEL
PROBE
WATER FLOAT
ROTATE TO
ADJUST WA TER
LEVEL
WATER FLOAT
VALVE
WATER FLOAT
VAL VE SOLENOID
COIL
Operational Checks
GENERAL
Manitowoc ice machines are factory-operated and
adjusted before shipment. Normally , a newly installed ice
machine does not require any adjustment.
To ensure proper operation, always follow the
Operational Checks:
• when starting the ice machine for the first time
• after a prolonged out of service period
• after cleaning and sanitizing
NOTE: Routine adjustments and maintenanc e
procedures outlined in this manual are not covered by
the warranty.
WATER LEVEL CHECK
The float valve maintains the correct water level. The
water level must allow the water level probes to maintain
water contact throughout the freeze cycle. The water
level is factory set and normally will not require
adjustment. Check the water level during the freeze
cycle. The water level is correct if the water level
indicator light is energized (compressor is running) and
no water is entering the overflow tube. (Check for
overflow water exiting the ice machine drain line at the
floor drain).
If adjustments are necessary:
A. Rotate float clockwise to increase water level
B. Rotate float counterclockwise to decrease water
level
C. Verify the outlet for the water float valve is at a
20 to 30 degree angle to prevent contact with
the float.
Part Number 000002688 3-3
Page 36

Ice Machine Operation Section 3
!
Caution
!
Caution
!
Warning
Interior Cleaning and Sanitizing
GENERAL
You are responsible for maintaining the ice machine in
accordance with the instructions in this manual.
Maintenance procedures are not covered by the
warranty.
Clean and sanitize the ice machine every six months for
efficient operation. If the ice machine requires more
frequent cleaning and sanitizing, consult a qualified
service company to test the water quality and
recommend appropriate water treatment. An extremely
dirty ice machine must be taken apart for cleaning and
sanitizing.
Manitowoc Ice Machine Cleaner and Sanitizer are the
only products approved for use in Manitowoc ice
machines.
Use only Manitowoc approved Ice Machine Cleaner
(part number 000000084) and Sanitizer (part
number 94-0565-3). It is a violation of Federal law to
use these solutions in a manner inconsistent with
their labeling. Read and understand all labels
printed on bottles before use.
Do not mix Cleaner and Sanitizer solutions together.
It is a violation of Federal law to use these solutions
in a manner inconsistent with their labeling.
Wear rubber gloves and safety goggles ( and/or face
shield) when handling ice machine Cleaner or
Sanitizer.
Manitowoc Ice Machines have three separate cleaning
procedures.
Preventative Maintenance Cleaning Procedure
Procedure starts on Page 3-6
Perform this procedure as required for your water
conditions.
• Allows cleaning the ice machine without removing all
of the ice from the bin
• Removes mineral deposits from areas or surfaces
that are in direct contact with water during the freeze
cycle (reservoir, evaporator, auger, drain lines).
Cleaning/Sanitizing Procedure
Procedure starts on Page 3-8
This procedure must be performed a minimum of once
every six months.
• All ice must be removed from the bin
• The ice machine and bin must be disassembled
cleaned and sanitized
• The ice machine produces ice with the cleaner and
sanitizer solutions
• All ice produced during the cleaning and sanitizing
procedure must be discarded
Heavily Scaled Cleaning Procedure
Procedure starts on Page 3-10
Perform this procedure if you have some or all of these
symptoms.
• Grinding, popping or squealing noises from the
evaporator
• Grinding noise from gearbox
• Ice machine trips speed sensor
NOTE: A Cleaning/Sanitizing Procedure must be
performed after this procedure.
3-4
EXTERIOR CLEANING
Remove dust and dirt off exterior surfaces with mild
household dish-washing detergent and warm water.
Wipe dry with a clean, soft cloth.
Part Number 000002688
Page 37

Section 3 Ice Machine Operation
!
Warning
!
Caution
SV1608
AIR FILTER
!
Caution
CONDENSER
SV1515
FIN COMB
“COMB”
DOWN
ONLY
CLEANING THE CONDENSER
Disconnect electric power to the ice machine and
the remote condenser at the electric service switch
before cleaning the condenser.
Air-Cooled Condenser
(SELF-CONTAINED AND REMOTE MODELS)
A dirty condenser restricts airflow, resulting in
excessively high operating temperatures. This reduces
ice production and shortens component life. Clean the
condenser at least every six months. Follow the steps
below.
The condenser fins are sharp. Use care when
cleaning them.
1. The washable aluminum filter on self-contained ice
machines is designed to catch dust, dirt, lint and
grease. This helps keep the condenser clean. Clean
the filter with a mild soap and water solution.
3. Shine a flashlight through the condenser to check
for dirt between the fins. If dirt remains:
A. Blow compressed air through the condenser fin s
from the inside. Be careful not to bend the fan
blades.
B. Use a commercial condenser coil cleaner.
Follow the directions and cautions supplied with
the cleaner.
4. Straighten any bent condenser fins with a fin comb.
Self-Contained Air-Cooled Filter
2. Clean the outside of the condenser (bottom of a
remote condenser) with a soft brush or a vacuum
with a brush attachment. Clean from top to bottom,
not side to side. Be careful not to bend the
condenser fins.
Straighten Bent Condenser Fins
5. Carefully wipe off the fan blades and motor with a
soft cloth. Do not bend the fan blades. If the fan
blades are excessively dirty, wash with warm, soapy
water and rinse thoroughly.
If you are cleaning the condenser fan blades with
water, cover the fan motor to prevent water
damage.
Part Number 000002688 3-5
Page 38

Ice Machine Operation Section 3
MANITOWOC’S CLEANING TECHNOLOGY
Manitowoc Flake/Chiplet Ice Machines include technology that allows the initiation and completion of a cleaning or
sanitizing cycle at the flip of a switch. This cycle will permit cleaning of all surfaces that come in contact with the water
distribution system. Periodic maintenance must be performed that includes sanitizing the bin and adjacent surface
areas, which are not contacted by the wate r distribution system.
Depending on local water conditions Manitowoc recommends initiating preventative maintenance cleaning
procedures between the 6 month cleanings.
This preventive maintenance removes mineral build-up from the evaporator, which results in peak efficiency and
lower operating costs.
This technology will also allow initiation and completion of a clean or sanitize cycle, after which the ice machine
automatically starts ice making again.
Refer to the cleaning/sanitizing procedure for complete details.
PREVENTATIVE MAINTENANCE CLEANING PROCEDURE QC700/QF800/QF2300
Use Ice machine cleaner part number 000000084
only.This cleaner is used to remove lime scale or other
mineral deposits. It is not used to remove algae or slime.
Refer to “Cleaning/Sanitizing Procedure” for removal of
algae and slime. To initiate a cleaning cycle using
Manitowoc’s Cleaning Technology use the following
procedure.
Step 1 Remove front and top covers and set the toggle
switch to the OFF position.
Step 2 T o st art a cleaning cycle, move the toggle switch
to the CLEAN position. Water will flow through the water
dump valve and down the drain. The flush, gear motor,
speed, dump valve and water solenoid lights will
energize to indicate the ice machine is in the clean
mode.
Step 3 Remove the 1 1/2” yellow plug from the top
cover of the water reservoir. Wait about one minute or
until the dump valve light de-energizes, then add the
proper amount of Manitowoc Ice Machine Cleaner and
re-install plug.
Step 4 .The ice machine will automatically time out four
flush and rinse cycles, and then stop. The flush light
remains energized until the toggle switch is moved to the
OFF position. This entire cycle lasts approximately 11
minutes.
Model
QC700/QF800/QF2300 3 ounces (90 ml)
NOTE: Periodic cleaning must be performed on adjacent
surface areas not contacted by the water distribution
system.
Manitowoc recommends disassembling, cleaning and
sanitizing the ice machine and bin/dispenser ev er y six
months.
NOTE: The ice machine may be set to start and finish a
cleaning procedure, and then automatically start ice
making again. Wait about one minute into the cleaning
cycle (until the dump valve light de-energizes), then
move the switch from CLEAN to ICE position.
When the cleaning cycle is complete, the flush light will
de-energize and ice making will start automatically
Amount of Cleaner
Part Number 000000084
3-6
Part Number 000002688
Page 39

Section 3 Ice Machine Operation
PREVENTATIVE MAINTENANCE CLEANING PROCEDURE QF400
Use Ice machine cleaner part number 000000084 only.
This cleaner is used to remove lime scale or other
mineral deposits. It is not used to remove algae or slime.
Refer to “Cleaning/Sanitizing Procedure” for removal of
algae and slime. To initiate a cleaning cycle using
Manitowoc’s Cleaning Technology use the following
procedure.
Step 1 Set the toggle switch to the OFF position. Open
the bin door and remove the 2 thumbscrews and white
plastic panel.
Step 2 T o st art a cleaning cycle, move the toggle switch
to the CLEAN position. Water will flow through the water
dump valve and down the drain. The flush, gear motor,
speed, dump valve and water solenoid lights will
energize to indicate the ice machine is in the clean
mode.
Step 3 Wait about one minute or until the dump valve
light de-energizes. Lift the front cover on the water
reservoir and add the proper amount of Manitowoc Ice
Machine Cleaner.
Step 4 The ice machine will automatically time out four
flush and rinse cycles, and then stop. The flush light
remains energized until the toggle switch is moved to the
OFF position. This entire cycle lasts approximately 11
minutes.
NOTE: Periodic cleaning must be performed on adjacent
surface areas not contacted by the water distrib utio n
system.
Manitowoc recommends disassembling, cleaning and
sanitizing the ice machine and bin/dispenser every six
months.
NOTE: The ice machine may be set to start and finish a
cleaning procedure, and then automatically start ice
making again. Wait about one minute into the cleaning
cycle (until the dump valve light de-energizes), then
move the switch from CLEAN to ICE position.
When the cleaning cycle is complete, the flush light will
de-energize and ice making will start automatically
Model
QF400 3 ounces (90 ml)
Amount of Cleaner
Part Number 000000084
Part Number 000002688 3-7
Page 40

Ice Machine Operation Section 3
CLEANING/SANITIZING PROCEDURE QC700/QF800/QF2300
Use Ice machine cleaner part number 000000084.
Use Ice machine sanitizer part number 94-0565-3.
Step 1 Remove front and top covers and set the toggle
switch to the OFF position.
Step 2 Remove all ice from the bin.
Step 3 Disconnect water supply line at float valve quick
disconnect by depressing stainless steel lever.
Step 4 Remove the top cover from water reservoir.
Step 5 Remove the water level probes from the top
cover and with the wires attached, place the water level
probes (stand upright) inside the water reservoir.
Step 6 Follow the chart and premix cleaner and water.
Amount of Water
1 gallon (3.8 Liters) 3 ounces (90 ml)
Amount of Cleaner
Part Number 000000084
Step 7 To start cleaning, move the toggle switch to the
ICE position.
Step 8 Wait about 45 seconds until the dump valve light
de-energizes. Fill the evaporator and reservoir with
cleaning solution. The ice machine will make ice with the
cleaning solution and deposit the ice in the bin. Add the
remaining cleaner/water solution when the water level in
the reservoir drops.
NOTE: Do not allow the water level to drop below the
water level probes. The ice machine will discontinue the
cycle when the water level probes open (lose water
contact) for more than 30 seconds.
Step 9 After all of the cleaner/water solution has been
added reconnect the water supply line to the float valve.
Continue the freeze cycle for 10 minutes to remove the
cleaning solution from the water circuit.
Step 17 Remove the water level probes from the top
cover and with the wires attached, place the water level
probes (stand upright) inside the water reservoir.
Step 18 Refer to chart and premix water and sanitizer.
Amount of Water Amount of Sanitizer
6 Gallons (23L) Cool Water 4 ounces (120 ml)
Step 19 To start sanitizing, move the toggle switch to
the ICE position.
Step 20 Wait about 45 seconds until the dump valve
light de-energizes. Fill the evaporator and reservoir with
sanitizer/water solution. The ice machine will make ice
with the sanitizer/water solution and deposit the ice in
the bin. Add the remaining sanitizer/water solution when
the water level in the reservoir drops.
NOTE: Do not allow the water level to drop below the
water level probes. The ice machine will discontinue the
cycle when the water level probes open (lose water
contact) for more than 30 seconds.
Step 21 After all of the sanitizer/water solution has
been added to the reservoir, reconnect the water supply
line at the float valve quick disconnect.
Continue the sanitize cycle for 10 minutes to remove the
sanitizing solution from the water circuit.
Step 22 Place the toggle switch in the Off position, then
disassemble the ice machine and hand sanitize all parts
(refer to disassembly for cleaning/sanitizing for
procedure).
Step 23 Remove and discard all ice produced in the
sanitizing process, then reassemble the ice machine
and reconnect the water supply.
Step 10 Place the toggle switch in the Off position.
Step 11 Disassemble the ice machine and hand clean
all parts (refer to disassembly for cleaning/sanitizing).
Step 12 Hand sanitize all parts (refer to disassembly for
cleaning/sanitizing for procedure).
Step 13 Remove and discard all ice produced during
the cleaning process.
Step 14 Reassemble ice machine.
Step 15 Disconnect water supply line at float valve
quick disconnect by depressing stainless steel lever.
Step 16 Remove the top cover from water reservoir.
3-8
Part Number 000002688
Page 41

Section 3 Ice Machine Operation
CLEANING/SANITIZING PROCEDURE QF400
Use Ice machine cleaner part number 000000084.
Use Ice machine sanitizer part number 94-0565-3.
Step 1 Set the toggle switch to the OFF position and
remove all ice from the bin.
Step 2 Remove the 2 thumbscrews and white plastic
panel.
Step 17 Remove the water level probes from the top
cover and with the wires attached, place the water level
probes (stand upright) inside the water reservoir.
Step 18 Refer to chart and premix water and sanitizer.
Amount of Water Amount of Sanitizer
6 Gallons (23L) Cool Water 4 ounces (120 ml)
Step 3 Disconnect water supply line at float valve quick
disconnect by depressing stainless steel lever.
Step 4 Remove the top cover from water reservoir.
Step 5 Remove the water level probes from the top
cover and with the wires attached, place the water level
probes (stand upright) inside the water reservoir.
Step 6 Follow the chart and premix cleaner and water.
Amount of Water
1 gallon (3.8 Liters) 3 ounces (90 ml)
Amount of Cleaner
Part Number 000000084
Step 7 To start cleaning, move the toggle switch to the
ICE position.
Step 8 Wait about 45 seconds until the dump valve light
de-energizes. Fill the evaporator and reservoir with
cleaning solution. The ice machine will make ice with the
cleaning solution and deposit the ice in the bin. Add the
remaining cleaner/water solution when the water level in
the reservoir drops.
NOTE: Do not allow the water level to drop below the
water level probes. The ice machine will discontinue the
cycle when the water level probes open (lose water
contact) for more than 30 seconds.
Step 9 After all of the cleaner/water solution has been
added reconnect the water supply line to the float valve.
Continue the freeze cycle for 10 minutes to remove the
cleaning solution from the water circuit.
Step 19 To start sanitizing, move the toggle switch to
the ICE position.
Step 20 Wait about 45 seconds until the dump valve
light de-energizes. Fill the evaporator and reservoir with
sanitizer/water solution. The ice machine will make ice
with the sanitizer/water solution and deposit the ice in
the bin. Add the remaining sanitizer/water solution when
the water level in the reservoir drops.
NOTE: Do not allow the water level to drop below the
water level probes. The ice machine will discontinue the
cycle when the water level probes open (lose water
contact) for more than 30 seconds.
Step 21 After all of the sanitizer/water solution has
been added to the reservoir, reconnect the water supply
line at the float valve quick disconnect.
Continue the sanitize cycle for 10 minutes to remove the
sanitizing solution from the water circuit.
Step 22 Place the toggle switch in the Off position, then
disassemble the ice machine and hand sanitize all parts
(refer to disassembly for cleaning/sanitizing for
procedure).
Step 23 Remove and discard all ice produced in the
sanitizing process, then reassemble the ice machine
and reconnect the water supply.
Step 10 Place the toggle switch in the Off position.
Step 11 Disassemble the ice machine and hand clean
all parts (refer to disassembly for cleaning/sanitizing).
Step 12 Hand sanitize all parts (refer to disassembly for
cleaning/sanitizing for procedure).
Step 13 Remove and discard all ice produced during
the cleaning process.
Step 14 Reassemble ice machine.
Step 15 Disconnect water supply line at float valve
quick disconnect by depressing stainless steel lever.
Step 16 Remove the top cover from water reservoir.
Part Number 000002688 3-9
Page 42

Ice Machine Operation Section 3
PROCEDURE TO CLEAN HEAVILY SCALED FLAKE/CHIPLET ICE MACHINES QF400/QC700/QF800/QF2300
Step 1 Remove front and top covers, set the toggle
switch to the OFF position.Remove all ice from the bin.
Step 2 Remove front and top covers and set the toggle
switch to the OFF position.
Step 3 Disconnect water supply line at float valve quick
disconnect by depressing stainless steel lever.
Step 4 Refer to chart below:
Step 5 Remove all water from the evaporator and water
reservoir. S tart an ice making cycle by moving the toggle
switch to the ICE position. Water will flow through the
water dump valve and down the drain for 45 seconds.
After 45 seconds move the toggle switch to the OFF
position. Remove the plug from the top cover of the
water reservoir. Add the entire cleaner/water solution
and re-install the plug.
Premix cleaner with lukewarm water in a nonmetallic container.
Mix Cleaner and W a ter
Water
Model
QF400 48 oz (1.4 L) 32 oz (0.94 L) 16 oz (0.5 L)
QF800/
QC700
QF2300 72 oz (2.1 L) 48 oz (1.4 L) 24 oz (0.7 L)
Reservoir
Capacity
48 oz (1.4 L) 32 oz (0.94 L) 16 oz (0.5 L)
Use Ice machine cleaner
part number 000000084
only
Cleaner Water
Leave the cleaner/water sol ut io n in th e ev ap o r at o r
for a minimum of 4 hours.
Step 6 Move the toggle switch from OFF to ICE. The
cleaner/water solution will flow through the water dump
valve and down the drain for 45 seconds.
Step 7 Move the toggle switch to the OFF position,
then follow the standard cleaning and sanitizing
procedures for the model ice machine you are cleaning.
3-10
Part Number 000002688
Page 43

Section 3 Ice Machine Operation
!
Warning
!
Warning
!
Caution
REMOVAL OF PARTS FOR CLEANING/SANITIZING
3. Soak the removed part(s) in a properly mixed
solution of cleaner and water.
Disconnect electric power to the ice machine at the
electric switch box before proceeding.
Wear rubber gloves and safety goggles ( an d/or face
shield) when handling Ice Machine Cleaner or
Sanitizer.
Do not mix Cleaner and Sanitizer solutions together.
It is a violation of Federal law to use these solutions
in a manner inconsistent with their labeling.
1. Turn off the water supply to the ice machine at the
water service valve or disconnect water supply line
at float valve quick disconnect by depressing
stainless steel lever and pulling the fitting off.
2. Remove the components listed on the following
pages for cleaning and sanitizing.
Solution Type Water Mixed With
Cleaner 1 gal. (4 l) 16 oz (500 ml) cleaner
Part Number 000000084
4. Use a soft-bristle brush or sponge (NOT a wire
brush) to carefully clean the parts.
5. Use the solution and a brush or sponge to clean all
disassembled components and the inside of the bin.
6. Rinse all cleaned parts with clear water.
7. Mix a solution of sanitizer and water.
Solution Type Water Mixed With
Sanitizer 3 gal. (11.4 l) 2 oz (60 ml) sanitizer
Part Number 94-0565-3
8. Soak the parts in the sanitizer /water solution for 10
minutes. Use the sanitizer/water solution and a
sponge to sanitize all removed components and the
inside of the bin. Do not rinse the sanitized parts.
9. Install the removed parts in the ice machine.
10. Turn on the water and electrical supply.
Part Number 000002688 3-11
Page 44
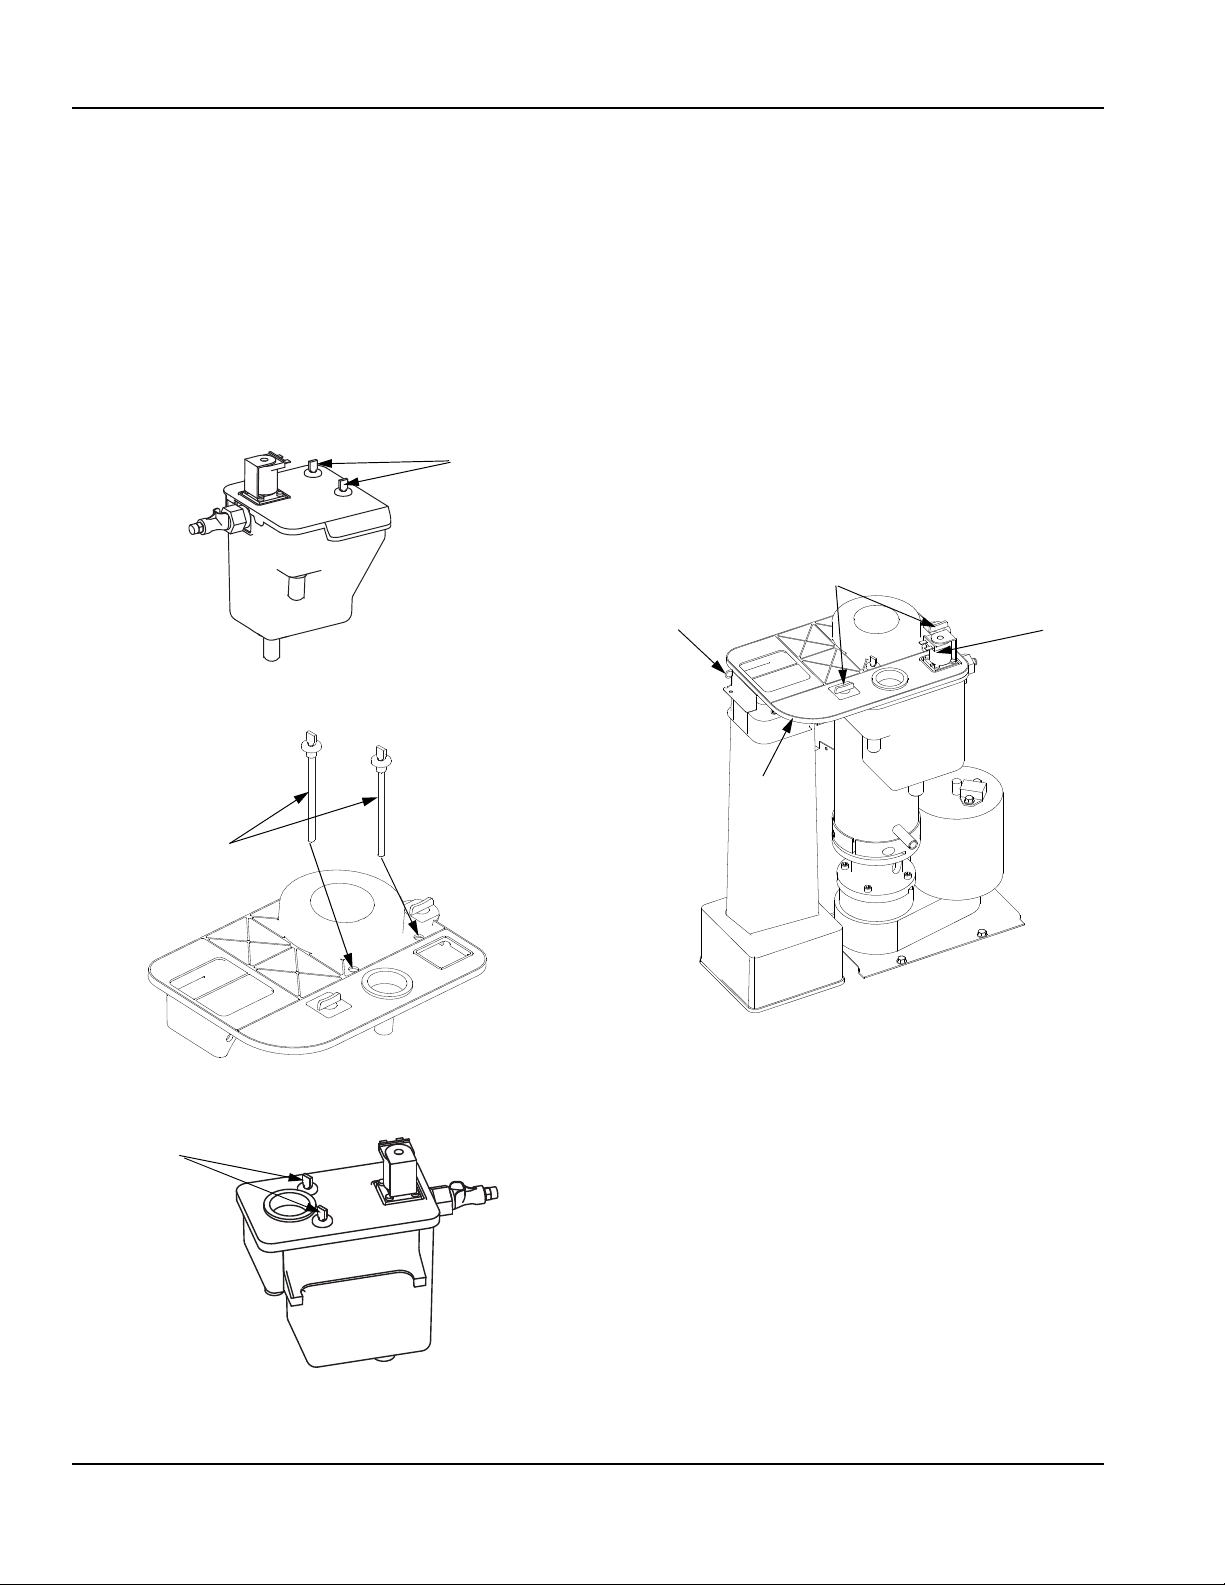
Ice Machine Operation Section 3
WATER LEVEL
PROBES
SV2043
WATER LEVEL
PROBES
SV2028
WATER LEVEL
PROBES
SV1791
3
4
5
6
SV2030
Water Level Probe Removal
QF400/QC700/QF800/QF2300
Water Level Probe Removal
1. Place the toggle switch in the OFF position, turn off the
water supply and disconnect electrical power to the ice
machine.
2. Disconnect water supply line at float valve quick disconnect
by depressing stainless steel lever.
3. Pull up on water level probes to remove.
4. Disconnect wires from water level probes or control board.
QF400
Water Reservoir Cover Removal
1. Place the toggle switch in the OFF position, turn off
the water supply and disconnect electrical power to
the ice machine.
2. Remove water level probes.
3. Remove water float valve coil.
4. Depress coil and rotate 1/4 turn counterclockwise.
5. With coil wires attached, lift coil off enclosure tube.
6. QF0800/QC0700 ONLY Rotate quarter turn
fasteners counterclockwise.
7. QF0800/QC0700 ONLY Remove cotter key and pin
from ice chute.
8. Remove top cover from float reservoir.
3-12
QC700/QF800 Shown
QC700/QF800
QF2300
Part Number 000002688
Page 45

Section 3 Ice Machine Operation
2
3, 4, 5
6
SV1791
FLOAT VALVE
SV2015
Water Reservoir Cover Removal
QF2300
1. Place the toggle switch in the OFF position, turn off
the water supply and disconnect electrical power to
the ice machine.
2. Remove water level probes.
3. Remove water float valve coil.
4. Depress coil and rotate 1/4 turn counterclockwise.
5. With coil wires attached, lift coil off enclosure tube.
6. Remove top cover from float reservoir.
Float Valve Removal
1. Place the toggle switch in the OFF position, turn off
the water supply and disconnect electrical power to
the ice machine.
2. Disconnect water supply line at float valve quick
disconnect by depressing stainless steel lever.
3. Remove water float valve coil.
4. Depress coil and rotate 1/4 turn coun te rc loc kwise.
5. With coil wires attached, lift coil off enclosure tube.
6. QF0800/QC0700/QF2300 ONL Y Rotate quarter tu rn
fasteners counterclockwise.
7. QF0800/QC0700 ONLY Remove cotter key and pin
from ice chute.
8. Remove top cover from float reservoir.
9. Lift float valve out of float reservoir.
QF2300 Shown
QC700/QF800 Shown
Part Number 000002688 3-13
Page 46

Ice Machine Operation Section 3
WATER
RESERVOIR
EVAPORATOR
ASSEMBLY
SV2024
3
2
SV2052
LOCATE BIN LEVEL SENSOR 4.5”
FROM EDGE OF WHITE PANEL
Water Reservoir Removal
1. Place the toggle switch in the OFF position and turn
off the water supply to the ice machine at the water
service valve.
2. Disconnect water supply line at float valve quick
disconnect by depressing stainless steel lever.
3. Place the toggle switch in the ICE position. The dump
valve will open and the float reservoir will empty.
4. After the reservoir is empty, place the toggle switch
in the OFF position and disconnect power to the ice
machine at the service disconnect.
5. Remove water float valve coil.
A. Depress coil and rotate 1/4 turn
counterclockwise.
B. With coil wires attached, lift coil off enclosure
tube.
5. QF0800/QC0700 ONLY Rotate quarter turn
fasteners counterclockwise.
6. QF0800/QC0700 ONLY Remove cotter key and pin
from ice chute.
7. Remove top cover from float reservoir.
8. Lift float valve out of float reservoir.
Ice Diverter Removal
QF0400
1. Place the toggle switch in the OFF position, turn off the
water supply and disconnect electrical power to the ice
machine.
2. Remove thumbscrews and lift panel forward.
3. Remove bin level sensor from white plastic panel.
4. Remove ice diverter from bin.
5. When the bin level sensor is reinstalled the correct position
is 4.5” (114 mm) from the left edge of the white panel.
9. Disconnect the drain lines from reservoir.
10. Lift reservoir off of evaporator assembly.
QC700/QF800 Shown
3-14
Part Number 000002688
Page 47

Section 3 Ice Machine Operation
2
3
4
5
6
SV2011
SV1787
4
2
5
6
3
8
7
Ice Chute Removal
QC700/QF800
QF2300
1. Follow steps to remove float reservoir.
2. The ice chute and ice chute grommet will be
removed as a unit. Pull forward on the top of the ice
chute, and slide the ice chute and grommet off the
end of the evaporator spout.
3. Remove evaporator spout insulation.
4. Lift ice chute out of the base.
5. Remove insulation from the bottom of the ice chute.
6. Remove bin level sensor (stainless steel plate) from
ice chute. (Bin level sensor can be disconnected
from the control board for complete removal from
the ice machine.)
NOTE: Clean and sanitize the base and all ice chute
components before reinstalling.
1. Place the toggle switch in the OFF position, turn off
the water supply and disconnect electrical power to
the ice machine.
2. Remove ice chute retaining clamp from top of
evaporator.
3. Remove vinyl hose from ice chute spout.
4. Follow steps to remove water reservoir.
5. The ice chute elbow and the ice chute will be
removed separately. Support the ice chute and pull
forward on the elbow to remove.
6. Lift ice chute out of the base, tip bottom forward and
remove bin level sensor (stainless steel plate) from
the top of the ice chute. (Bin level sensor can be
disconnected from the control board for complete
removal from the ice machine.)
7. Remove insulation from ice chute elbow and ice
chute base.
8. Remove evaporator spout o-ring.
NOTE: Clean and sanitize the base, spout and all ice
chute components before re-installing.
Part Number 000002688 3-15
Page 48

Ice Machine Operation Section 3
Track Slot
Slide Door Forward
SV2068
Press Down to
Release Door
Remove 3 Screws
From Each Side
SV2044
Remove Back
Panel screws
SV2069
Bin Door Removal
QF0400
Door removal allows easier access for cleaning and
sanitizing.
1. Disconnect the electrical power to the ice machine
and remove ice from bin.
2. Grasp the rear of the bin door and pull bin door
forward approximately 5”.
3. Slide bin door to the rear while applying upward
pressure (the rear door pins will ride up into the track
slot).
4. Slide the rear door pins off the end and then below
the door track. Slide bin door forward allowing the
back of the door to lower into the bin. Continue
forward with the bin door until the front pins bottom
out in the track.
5. Lift the right side of the bin door until the front pin
clears the track.
6. Remove door from bin.
Cabinet Removal
QF0400
1. Remove all ice from bin and disconnect power.
2. Remove thumbscrews and evaporator panel.
3. Remove three screws from the bottom of the left and
right side of cabinet.
4. Remove nine screws from back panel.
5. Disconnect drain line clamp.
6. Slide cabinet forward and remove from base.
3-16
Part Number 000002688
Page 49

Section 3 Ice Machine Operation
!
Warning
Important
SPRING
PLUNGER
DIAPHRAM
VALVE BODY
COIL
MOUNTING BRACKET
NYLON GASKET
Water Dump Valve
The water dump valve normally does not require
removal for cleaning. To determine if removal is
necessary:
The plunger and the inside of the enclosing tube
must be completely dry before assembly.
1. Locate the water dump valve.
2. Set the toggle switch to ICE.
3. While the ice machine is in the freeze mode, check
the water trough to determine if the dump valve is
leaking. If there is no or little water in the water
trough (during the freeze cycle) the dump valve is
leaking.
A. If the dump valve is leaking, remove,
disassemble and clean it.
B. If the dump valve is not leaking, do not remove
it. Instead, follow the “Ice Machine Cleaning
Procedure”.
Follow the procedure below to remove the dump valve.
Disconnect the electric power to the ice machine at
the electric service switch box and turn off the water
supply before proceeding.
1. If so equipped, remove the water dump valve shield
from its mounting bracket.
NOTE: During cleaning, do not stretch or damage the
spring.
6. Remove the tubing from the dump valve by twisting
the clamps off.
7. Remove the valve body, twist off.
2. Leaving the wires attached, twist coil and rotate it
3. Lift the coil assembly off the valve body.
4. Remove the spring, plunger, and nylon gaske t from
5.
NOTE: At this point, the water dump valve can easily be
cleaned. If complete removal is desired, continue with
step 5.
counter-clockwise1/4 turn.
the valve body.
Dump Valve Disassembly
Part Number 000002688 3-17
Page 50

Ice Machine Operation Section 3
!
Caution
SV1624
Removal from Service/Winterization
GENERAL
Special precautions must be taken if the ice machine
head section is to be removed from service for an
extended period of time or exposed to ambient
temperatures of 32°F (0°C) or below.
If water is allowed to remain in the ice machine in
freezing temperatures, severe damage to some
components could result. Damage of this nature is
not covered by the warranty.
Follow the applicable procedure below.
1. Disconnect the electrical power at the circuit breaker
or the electric service switch.
2. Turn off the water supply.
3. Disconnect and drain the incoming ice-making water
line at the rear of the ice machine.
4. Disconnect drain tubing (from the inlet to dump
valve) and drain water into container and discard.
WATER COOLED CONDENSING UNIT
1. Perform steps 1-6 in previous colum n.
2. Disconnect the incoming water and drain lines from
the water-cooled condenser.
3. Insert a large screwdriver between the bottom spring
coils of the water regulating valve. Pry upward to
open the valve.
5. Make sure water is not trapped in any of the water
lines, drain lines, distribution tubes, etc.
Pry Open the Water Regulating Valve
4. Hold the valve open and blow compressed air
through the condenser until no water remains.
3-18
Part Number 000002688
Page 51

QF400/QC700/QF800
Section 4
Ice Machine Sequence of Operation
PRIOR TO START-UP
When the toggle switch is placed in the “ice” position the
following must occur prior to starting an ice making
cycle.
A. The bin level probe must be open (bin level
light off). If the probe is closed, (bin level light
on) when the toggle switch is moved to ICE, the
control system waits until the bin level probe
opens, (bin level light off) before starting an ice
making sequence. If the bin level probe is
removed/disconnected the ice machine will not
start.
B. The water level probe must be closed (water
level light on) to start the compressor. If the
water level probe is open, (water level light off)
the control system waits until the water level
probe closes before starting the compressor.
INITIAL START-UP
1A. Flush
Immediately after placing the toggle switch into ICE, the
dump valve solenoid, and gearbox are energized. After
45 seconds the dump valve de-energizes.
1B. Water Fill
After 45 seconds the water float valve solenoid is
energized.
2. Freeze Cycle
When water contacts the water level probe, the
compressor and condenser fan motor energize
(condenser fan motor is wired through a fan cycling
control).
The gear motor, compressor, condenser fan motor and
water float valve solenoid remain energized as the ice
machine makes ice. The water float valve will open and
close automatically to maintain the proper water level.
AUTOMATIC SHUT-OFF
3A. Ice Run Out
Ice will build up in the bin until it contacts the bin level
probe. After ice contacts the bin level probe for 30
continuous seconds the compressor de-energizes. To
allow excess ice to run out, the gear motor and th e water
float valve solenoid remain energized for an additional
45 seconds, then de-energize.
3B. Water Drain
To allow water to drain from the evaporator, the dump
valve energizes for 90 seconds, then de-energizes.
An 8-minute lockout starts when the compressor deenergizes. When the ice drops away from the bin level
probe the ice machine will begin an initial start-up cycle,
provided the “8-minute lockout” has expired.
8 Minute Lockout
The bin level light will flash until the 8-minute lockout
expires.
After the 8 minute lockout expires the bin level light will
de-energize.
The 8 minute lockout time can be overridden by moving
the ON/OFF/CLEAN toggle switch from ICE to OFF then
back to ICE.
FLUSH SEQUENCE IN THE “ICE” POSITION
After the ice machine has run for 100 hours the ice
machine will stop making ice and perform a flush
sequence. The flush sequence will remove minerals that
have settled in the bottom of the evaporator. The entire
flush sequence lasts approximately 11 minutes, after
which the ice machine automatically resumes ice
making and the 100 hour counter in the control board
resets to zero.
NOTE: Flake ice machines use an auger to remove ice
from the evaporator . Occasional noises (creaks, groa ns,
or pops) are a normal part of the ice making process.
Part Number 000002688 4-1
Page 52

Ice Machine Sequence of Operation Section 4
QF2300
PRIOR TO START-UP
When the toggle switch is placed in the “ice” position the
following must occur prior to starting an ice making
cycle.
A. The bin level probe must be open (bin level
light off). If the probe is closed, (bin level light
on) when the toggle switch is moved to ICE, the
control system waits until the bin level probe
opens, (bin level light off) before starting an ice
making sequence. If the bin level probe is
removed/disconnected the ice machine will not
start.
B. The water level probe must be closed (water
level light on) to start the compressor. If the
water level probe is open, (water level light off)
the control system waits until the water level
probe closes before starting the compressor.
INITIAL START-UP
1A. Flush
Immediately after placing the toggle switch into ICE, the
dump valve solenoid, and gearbox are energized. After
45 seconds the dump valve de-energizes.
1B. Water Fill
After 45 seconds the water float valve solenoid is
energized.
2. Freeze Cycle
When water contacts the wate r level probe the liquid line
solenoid valve, equalization valve, compressor and
condenser fan motor energize (condenser fan motor is
wired through a fan cycling control).
The gear motor, compressor, condenser fan motor and
water float valve solenoid remain energized as the ice
machine makes ice. The water float valve will open and
close automatically to maintain the proper water level.
AUTOMATIC SHUT-OFF
3A. Ice Run Out
Ice will build up in the bin until it contacts the bin level
probe. After ice contacts the bin level probe for 30
continuous seconds the liquid line solenoid valve,
equalization valve and compressor de-energizes.
To allow excess ice to run out, the gear motor and the
water float valve solenoid remain energized for an
additional 4 minutes, then de-energize.
3B. Water Drain
To allow water to drain from the evaporator, the dump
valve energizes for 90 seconds, then de-energizes.
An 8-minute lockout starts when the compressor deenergizes. When the ice drops away from the bin level
probe the ice machine will begin an initial start-up cycle,
provided the “8-minute lockout” has expired.
8 Minute Lockout
The bin level light will flash until the 8-minute lockout
expires.
After the 8 minute lockout expires the bin level light will
de-energize.
The 8 minute lockout time can be overridden by moving
the ON/OFF/CLEAN toggle switch from ICE to OFF then
back to ICE.
FLUSH SEQUENCE IN THE “ICE” POSITION
After the ice machine has run for 100 hours the ice
machine will stop making ice and perform a flush
sequence. The flush sequence will remove minerals that
have settled in the bottom of the evaporator. The entire
flush sequence lasts approximately 11 minutes, after
which the ice machine automatically resumes ice
making and the 100 hour counter in the control board
resets to zero.
4-2
NOTE: Flake ice machines use an auger to remove ice
from the evaporator . Occasional noises (creaks, groa ns,
or pops) are a normal part of the ice making process.
Part Number 000002688
Page 53

Section 5
Before Calling Service
Checklist
If a problem arises during operation of your ice machine, follow the checklist below before calling for service. Routine
adjustments and maintenance procedures are not covered by the warranty.
Problem Possible Cause To Correct
Ice machine does not operate. No electrical power to the ice machine. Replace the fuse/reset the breaker/turn on
Control Board fuse open
ICE/OFF/CLEAN toggle switch set improperly. Move toggle switch to the ICE position.
8 minute lockout has not expired. Bin level light will flash to indicate 8 minute
Bin level sensor is disconnected or is
contacting the ice.
High Pressure Control is open. Clean condenser, check fan motor, check high
Gear Motor runs but
compressor will not start.
Remotes Only No electrical power to condensing unit Replace the fuse/reset the breaker/turn on the
Ice machine stops and can be
restarted by moving the toggle
switch to OFF and back to ICE.
Ice quality is poor. Poor incoming water quality . Contact a qualified service company to test the
Low ice capacity. Water float valve screen is dirty. Remove and clean the filter screen.
Air-Cooled Models Only Objects stacked around ice machine, blocking
Water reservoir is empty. (Water must contact
the water level probe to start the compressor).
Water level probes out of position Correct water level probe position.
The SafeGuard feature is stopping the ice
machine.
Water filtration is poor. Replace filter.
Incoming water temperature is above 90
°C)
(32.3
Water pressure is low. Water pressure must remain between 20 and
Water softener is working improperly (if
applicable).
Incoming water supply is shut-off. Open the water service valve.
Water dump valve is leaking. Clean the dump valve.
Water Pressure is low. Water pressure must remain between 20 and
Incoming water temperature is above 90
°C)
(32.2
Water float valve stuck open or leaking. Remove the float valve and clean it.
airflow to condenser.
High air temperature around ice machine. Air temperature must not exceed 110
Inadequate clearance around the ice machine. Provide adequate clearance.
The condenser is dirty. Clean the condenser.
°F
°F
main power switch/plug cord into receptacle.
lockout has not expired. Refer to Sequence of
Operation
Connect bin level sensor or remove ice
contacting probe.
pressure control operation.
Open water service valve or clean float valve
screen.
main power switch.
Refer to “SafeGuard Feature” in this sectio n
quality of the incoming water and check filter.
Correct water temperature. (Verify check/
mixing valves in other equipment are working
properly). Connect the ice machine to a cold
water supply.
80 psig.
Repair the water softener.
80 psig.
Correct water temperature. (verify check/
mixing valves in other equipment is working
properly)
Remove items blocking airflow.
°F
°C)
(43.3
Part Number 000002688 5-1
Page 54

Before Calling Service Section 5
Safeguard Feature
In addition to standard safety controls, your Manitowoc ice machine features built-in SafeGuards. The ice machine will
stop when conditions arise that would cause major component failure.
RESET PROCEDURE
1. Move the ICE/OFF/CLEAN toggle switch to OFF
and then back to ICE.
SAFEGUARD INDICATOR LIGHTS
During a SafeGuard Mode the corresponding light (disch
temp, water level or speed) will flash continuously.
A. If a safeguard feature has stopped the ice
machine, it will restart after a short delay.
Proceed to step 2.
B. If the ice machine does not restart, see “Ice
Machine Does Not Operate” on previous page.
2. Allow the ice machine to run to determine if the
condition is reoccurring.
A. If the ice machine continues to run, the condition
has corrected itself. Allow the ice machine to
continue running.
B. If the ice machine stops again, the condition has
reoccurred.
SafeGuards
•No Water
• Gear Motor Speed is Incorrect
• QF400/QC700/QF800 Only
too high or low during the freeze cycle.
STANDBY MODE
The first time a failure occurs, the ice machine deenergizes and initiates a Standby Mode. The ice
machine will remain off for 60 minutes, then
automatically restart to see if the problem reoccurs.
During the Standby Mode the corresponding light
flashes continuously (disch temp, water level or speed).
If the same failure keeps occurring, the ice machine will
initiate a SafeGuard Mode and remain off until manually
restarted.
- Discharge line temp. is
The SafeGuard will remain in memory for 48 hours of ice
making time. After 48 hours of ice making time the
SafeGuard will automatically be erased. If power is
interrupted during the 48 hours, the timing will resume
when power is applied to the ice machine.
Placing the toggle switch in the OFF position:
The corresponding light will flash continuously.
Placing the toggle switch in the ICE position:
The light will de-energize and a start-up sequence will
initiate.
The corresponding light will flash anytime the toggle
switch is placed in the OFF position provided
48 hours of ice making time has not been exceeded.
5-2
Part Number 000002688
Page 55

Section 5 Before Calling Service
Analyzing Why SafeGuards May Stop the
Ice Machine
According to the refrigeration industry , a high percentage
of compressor failure are the result of external causes.
These can include flooding or starving expan sion valves,
dirty condensers, water loss to the ice machine, etc.
SafeGuards protect the ice machine (primarily the
compressor) from external failures by stopping ice
machine operation before major component damage
occurs.
Refrigeration and electrical component failures may also
trip a safeguard. Eliminate all electrical component s and
external causes first. If it appears that the refrigeration
system is causing the problem, use the charts,
checklists, and other references to determine the cause.
NOTE: The following checklists are designed to assist
the service technician in analysis. However, because
there are many possible external problem s, do not limit
your diagnosis to only the items listed.
SAFEGUARD MODES
No Water
During the Freeze cycle if the water level prob e opens or
remains open for more than 30* continuous seconds, the
ice machine will de-energize the compressor and gear
motor, continuously flash the water level light and initiate
a 60 minute Standby Mode.
During the Standby Mode the water level light will
continually flash to indicate a Standby Mode.
After the 60 -minute Standby Mode, the ice machine will
de-energize the water level light and initiate a start-up
sequence.
WATER CONTACTS THE WATER LEVEL PROBE:
The ice machine continues to make ice.
WATER LEVEL PROBE OPENS OR REMAINS OPEN
FOR MORE THAN 90 CONTINUOUS SECONDS:
The ice machine will start another 60-minute Standby
Mode.
The ice machine repeats the above sequence until:
Water contacts the water level probe
or
The toggle switch is moved to the OFF position.
*Note: There are two control boards, early version
boards must remain open for 90 seconds before deenergizing.
INDICATOR LIGHT
Before 48 hours have elapsed:
After a Standby Mode has been initiated the water level
light will flash anytime the toggle switch is placed in the
OFF position.
After 48 hours have elapsed:
The SafeGuard will be automatically erased from
memory and the water level will not flash.
No Water Checklist
Possible Problem List Corrective Action List
No water Restore water supply.
Quick disconnect removed from water float valve Restore water supply.
Water float valve screen blocked Clean screen.
Water float valve solenoid coil defective Replace coil (see Water float valve diagnostics).
Water float valve improperly adjusted Adjust valve (see Water level check).
Dump valve leaking Repair or replace dump valve.
Water level probes disconnected or removed Connect and correctly position probes.
Part Number 000002688 5-3
Page 56

Before Calling Service Section 5
Gear Motor Speed
Anytime the motor speed sensor detects the motor
speed (rpm) is below the minimum range for
3 continuous seconds, the ice machine will:
1. De-energize the compressor and/or gear motor.
2. Continuously flash the Gear Motor Speed light.
3. Initiate a 60-minute Standby Mode.
During the Standby Mode the Motor Speed Sensor light
will flash to indicate a Standby Mode.
After the 60-minute Standby Mode, the ice machine will
de-energize the Motor Speed light and initiate a start-up
sequence.
Gear motor speed normal:
The ice machine continues to make ice.
Gear motor speed below minimum range for
3 continuous seconds:
The ice machine will start another 60-minute Standby
Mode.
During the SafeGuard Mode the Motor Speed Sensor
light will continually flash to indicate a SafeGuard Mode.
The ice machine remains off until:
• The toggle switch is moved from OFF to ICE.
• Line voltage is interrupted and restored.
INDICATOR LIGHT
Before 48 hours have elapsed:
After a S tandby Mode has been initiated the Gear Motor
Speed light will flash anytime the toggle switch is placed
in the OFF position.
After 48 hours have elapsed:
The SafeGuard will be automatically erased from
memory and the Gear Motor Speed light will not flash.
If the gear motor speed drops below the minimum r ange
for 3 continuous seconds during 7 consecutive cycles,
the ice machine will initiate a SafeGuard Mode.
Gear Motor Speed Checklist
Possible Problem List Corrective Action List
Low water pressure Verify water pressure is between 20 and 80 psig.
Defective motor speed sensor Replace motor speed sensor.
Defective motor Replace motor.
Defective coupler Replace coupler.
Defective evaporator/auger assembly Replace evaporator assembly.
Low voltage Verify voltage is within
± 10% of nameplate voltage.
Ice frozen to auger/evaporator Allow evaporator to thaw.
5-4
Part Number 000002688
Page 57

Section 5 Before Calling Service
Temperature is Too High or Low
QF400/QC700/QF800
The temperature sensor (thermistor) is mounted on the
compressor discharge line. The temperature sensor
provides input to the control board. The control board
monitors the temperature anytime the compressor is
energized.
If the thermistor detects 245°F or hig her for 15
continuous seconds:
1. The ice machine will de-energize the compressor
and gear motor and initiate a SafeGuard Mode.
2. The control board “Disch Temp” light will continue to
flash twice then pause, to indicate the ice machine
has shut off on high temperature.
3. The ice machine will remain off until the toggle
switch is moved from ICE to OFF, and back to ICE.
or
Line voltage is interrupted and restored.
If the thermistor detects 155°F or less for 3
continuous minutes:
1. The control board ignores the low temperature limit
for the first 30 minutes of compressor run time.
2. The ice machine will de-energize the compressor
and gear motor , continuously flash the control boa rd
“Disch Temp” light and initiate a 60-minute Standby
Mode.
3. After the 60-minute Standby Mode, the ice machine
will de-energize the “Disch Temp” light and initiate a
start-up sequence.
4. After 30 minutes of compressor run time, the ice
machine will check the discharge line temperature.
Discharge line temperature normal:
The ice machine continues to make ice.
Discharge line temperature below 155°F after 30
minutes of run time:
The ice machine will start another 60-minute
Standby Mode.
If the discharge line temperature drops below 155°F for
3 continuous minutes during 7 consecutive cycles the
ice machine will start a SafeGuard Mode.
During the SafeGuard Mode the ”Disch Temp” light will
continually flash to indicate a Safeguard Mode. The ice
machine remains off until:
• The toggle switch is moved from ICE to OFF, then
back to ICE.
• Line voltage is interrupted and restored.
INDICATOR LIGHT
Before 48 hours have elapsed:
After a Standby Mode has been initiated the Control
Board “Disch Temp“ light will flash anytime the toggle
switch is placed in the OFF position.
After 48 hours have elapsed:
The SafeGuard will be automatically erased from memory
and the “Disch Temp” light will not flash.
Temperature Sensor Checklist
Possible Problem List Corrective Action List
Thermistor is not properly insulated Insulate thermistor.
Thermistor loose Secure thermistor to discharge line.
Thermistor mounted in the wrong location Position thermistor on discharge line 6 in. from compressor
discharge port.
Thermistor defective Refer to CHECK PROCEDURE under “Thermistor.”
Flooding expansion valve Replace expansion valve.
Refrigerant overcharge or undercharge Recover and weigh in nameplate charge.
Low ambient temperature Verify a mbi e nt temperature remains above 45°F (7.2°C).
Defective compressor Replace compressor.
Insufficient or low water pressure Verify water pressure is between 20 and 80 psig.
Part Number 000002688 5-5
Page 58

Before Calling Service Section 5
THIS PA GE INTENTIO NALLY LEFT BLANK
5-6
Part Number 000002688
Page 59

Page 60

Manitowoc Foodservice International
S.A.S.
18 Chemin de Charbonnières
F-69132 Ecully Cedex
Téléphone : +33 (0)4 72 18 22 50
Fax : +33 (0)4 72 18 22 60
Site Web – www.manitowocice.com
Manitowoc Ice, Inc.
2110 South 26th Street
P.O. Box 1720
Manitowoc, WI 54221-1720
Phone: (920) 682-0161
Service Fax: (920) 683-7585
Web Site - www.manitowocice.com
Manitowoc (China) International Refrigeration
Company, LTD
No. 151 Jiam Ye Road
Hangzhou Hi-Tech Industry Development Zone
(Bin Jiang)
Hangzhou, Zhejiang 310052
P.R. China
Telephone: 86-571-86888688
Service Fax: 86-571-86622707
Web Site – www.manitowoc.com.cn
MANITOWOC ICE, INC.
Web Site - www.manitowocice.com
© 2006 Manitowoc Ice, Inc.
 Loading...