

Page 1
INSTRUCTIONS
MVG460 & MVG460FFR
Page 2

Catalogue
1. Product Overview ......................................................... 4
2. Start to use ................................................................... 7
2.1 Battery Charging ........................................................................7
2.2 Battery Installation ...................................................................... 7
2.3 Handle Installation ...................................................................... 8
2.4 Positioning Lock ......................................................................... 8
2.5 Versatile Arm Installation ............................................................9
2.6 Camera Installation ................................................................... 10
2.7 Gimbal Balancing .....................................................................11
2.8 Power ON/OFF ......................................................................... 13
2.9 Download the Manfrotto Gimbal app. ......................................13
3. Connecting App ......................................................... 14
4. Funcion Operation ...................................................... 15
4.1 Function / Modes Introduction .................................................15
4.2 Button Operation Introduction ................................................16
4.3 USB Ports ................................................................................. 20
4.4 Touch Screen ............................................................................21
4.5 Modes Setting ..........................................................................22
4.6 Auto-rotation Mode ..................................................................24
4.7 Gimbal Initialization ..................................................................26
4.8 Manual Lock ............................................................................. 27
5. How to connect Camera with Wi-Fi ........................... 27
6. Accessories Introduction ............................................ 29
6.1 Accessories ..............................................................................29
6.2 Accessories for Pro Kit .............................................................30
2
Page 3

Introduction
MVG460 is a professional 3-axis Gimbal specially designed by Feiyutech for
DSLR and mirrorless cameras, which is compatible with most pupular cameras in
the market. It is designed with detachable versatile arm handle, supporting single
hand and low angle shooting, and can be mounted on tripod and other accessories.
MVG460 is designed with function buttons and LCD touch screen, which can
switch the Gimbal working mode, control the rotation and parameters setting
with one hand. The camera shutter cable as equipped can be used to directly
control the photography, video recording and follow focus on Gimbal.
Download Manfrotto Gimbal App.
32
Page 4
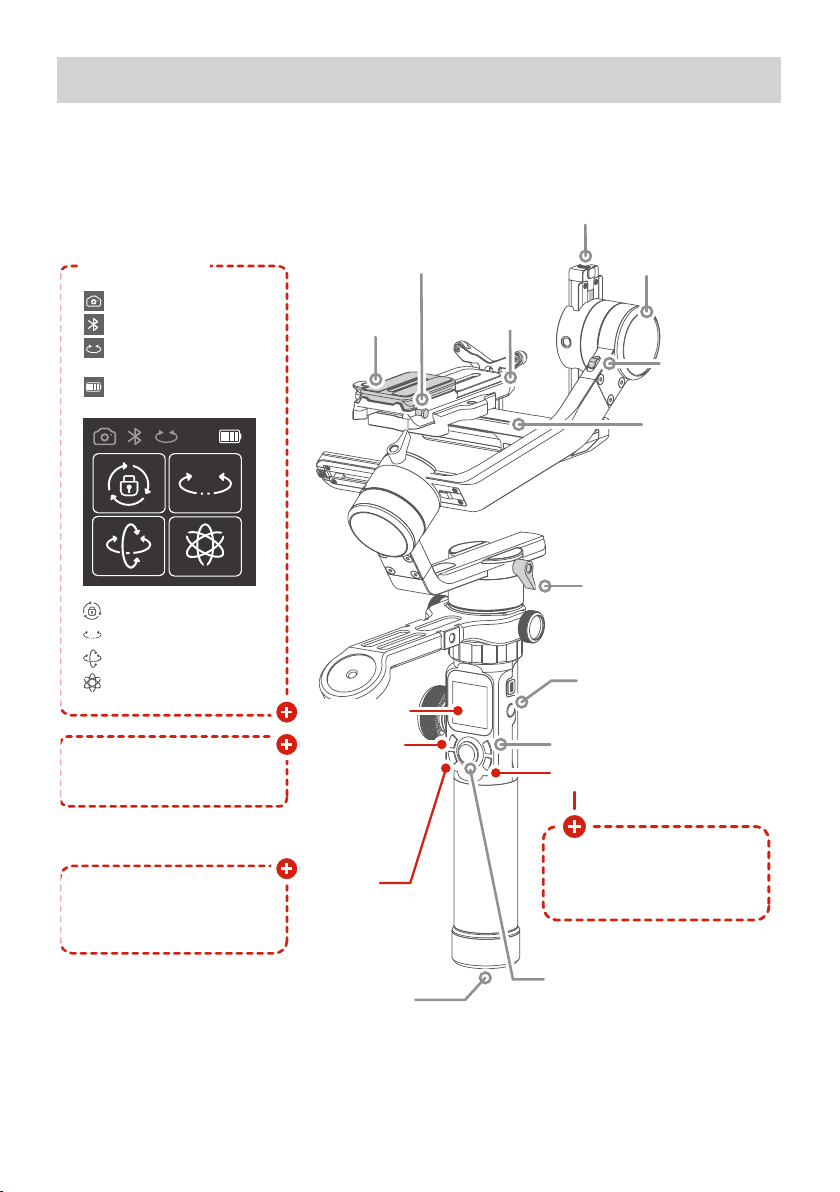
1. Product Overview
Overview
Pan axis
Pan axis
positioning lock
Screw
Sliding arm
lock screw
Sliding arm
Lens supporting frame
Max. Tilting Range 230° Operation Time 12 Hours
Max. Rolling Range 360° Weight About 1656g (Not including the batteries)
Max. Panning Range 360° Payload 4600g (in center of gravity balanced state)
Tilting Speed 2°/s ~ 75°/s Adapter Cameras* Canon, SONY, Panasonic and others.
Panning Speed 3°/s ~ 150°/s
Specifications
Professional 3-axis gimbal designed for DSLR and mirrorless cameras, designed with
function buttons and LCD touch screen.
* Please download the detailed manual for the specific compatible camera and lens.
This product does not include the camera.
1/4 inch Thread Hole
Touch Screen
Camera mode
Bluetooth
Multifunction Knob Control
Battery Level
Lock Mode
Panning Mode
Follow Mode
All Follow Mode
Switch between multiple
working modes
Secondary quick
release plate
Anti-drop column
Quick release
plate
Touch screen
Made button
Tilt axis
Tilt axis
positioning
lock
Fixed Plate
Vertical Arm Lock Screw
Function button
Power button
Recording button
Control camera to take photo,
need to connect to camera
1/4 inch Thread Hole
Capturing
button
Control camera to shoot
video, need to connect to
camera
Joystick
4
Page 5
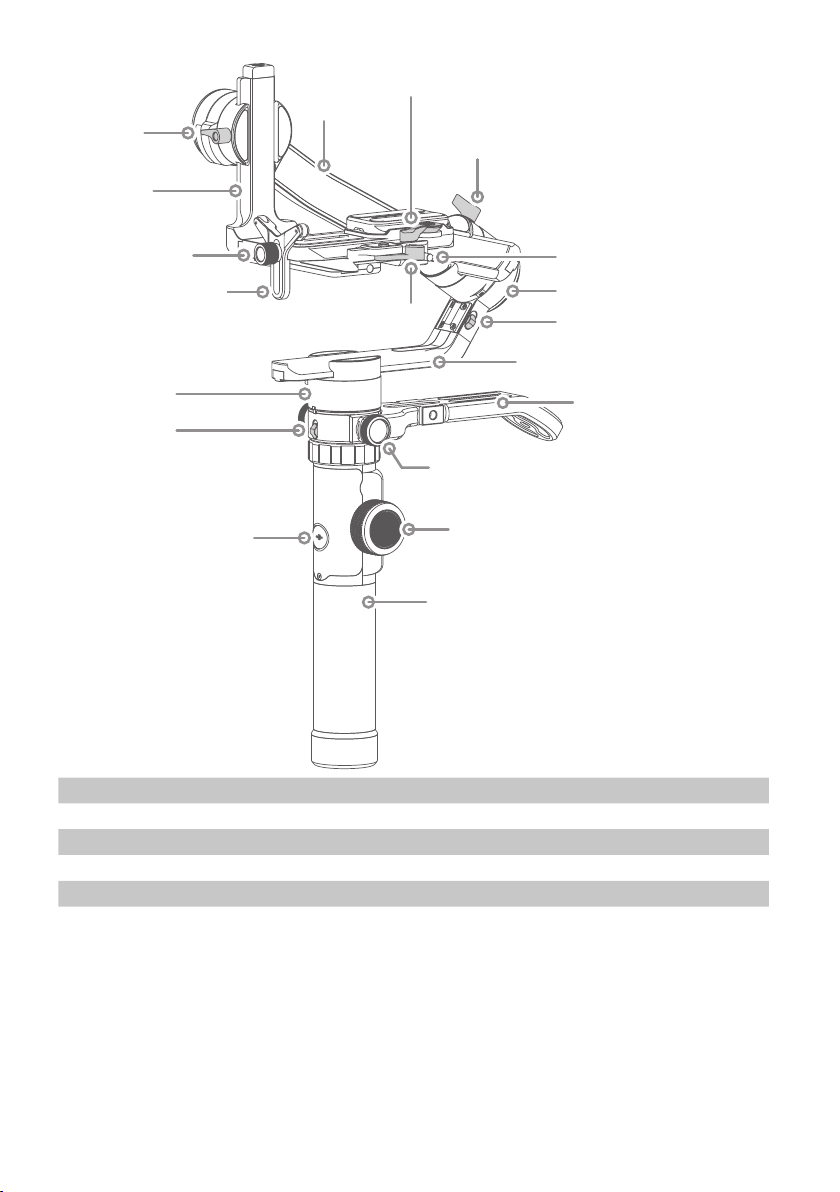
Sliding arm
lock screw
Sliding arm
Secondary quick release plate safety lock
Cross arm
Cross arm
lock screw
Screw
Lens supporting frame
Pan axis
Pan axis
positioning lock
Shortcut
button
Quick release plate
safety lock
Screw
Multifunction knob
Handle
Anti-drop colum of quick
release plate
Roll axis
Roll axis positioning lock
Vertical arm
Versatile arm
Specifications
Max. Tilting Range 230° Operation Time 12 Hours
Max. Rolling Range 360° Weight About 1656g (Not including the batteries)
Max. Panning Range 360° Payload 4600g (in center of gravity balanced state)
Tilting Speed 2°/s ~ 75°/s Adapter Cameras* Canon, SONY, Panasonic and others.
Panning Speed 3°/s ~ 150°/s
This product does not include the camera.
54
Page 6
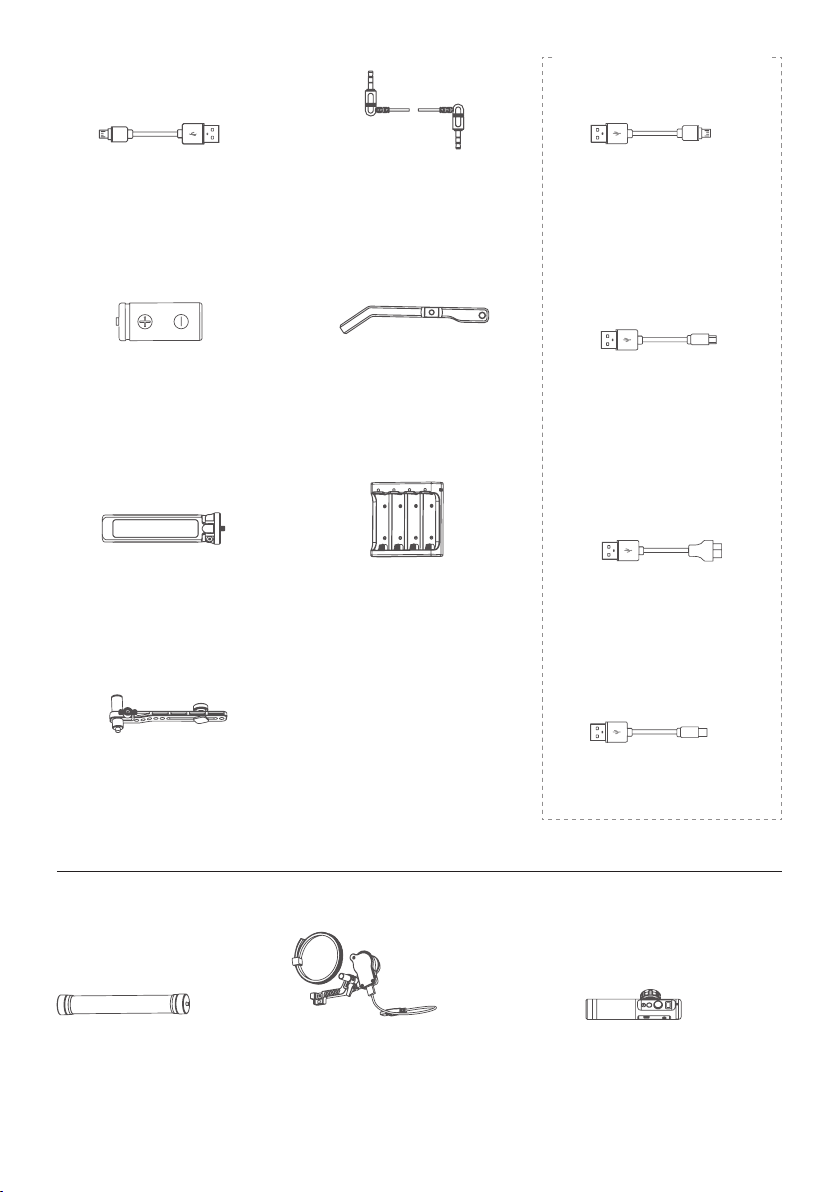
Accessories
Camera Control Cable
Micro USB Cable
x1
18650 Li-ion Battery
x1
Tripod
x1
Panasonic Lumix
Shutter Cable
x1
Versatile Arm
x1
Charger
x1
USB 2.0 to Micro
x1
USB 2.0 to Mini
x1
USB 3.0 to Micro 3.0
x1
Multifunctional Bracket
x1
Pro kit accessories
Extension Rod
x1
Follow Focus (FF)
x1
USB 2.0 to Type C
x1
Gimbal Remote Controller (MVGRC)
x1
6
Page 7

2. Start to use
Read the detailed manual before using this products.
⚠
TIPS
(1) Please install the camera before powering on the Gimbal.
(2) When the battery is low, please charge the Gimbal.
(3) When not in use, turn off the Gimbal and then remove the batteries.
(4) For quick start, utilising MVG640 basic features follow the steps below.
2.1 Battery Charging
Charge the batteries with charger.
*Please fully charge the batteries before power on the Gimbal for the first time.
Micro USB
Cable
(not included)
2.2 Battery Installation
Remove the tail cap, open the batteries compartment, and install the batteries
correctly.
Please fully charge the
⚠
batteries before powering on
the Gimbal for the first time.
76
Page 8
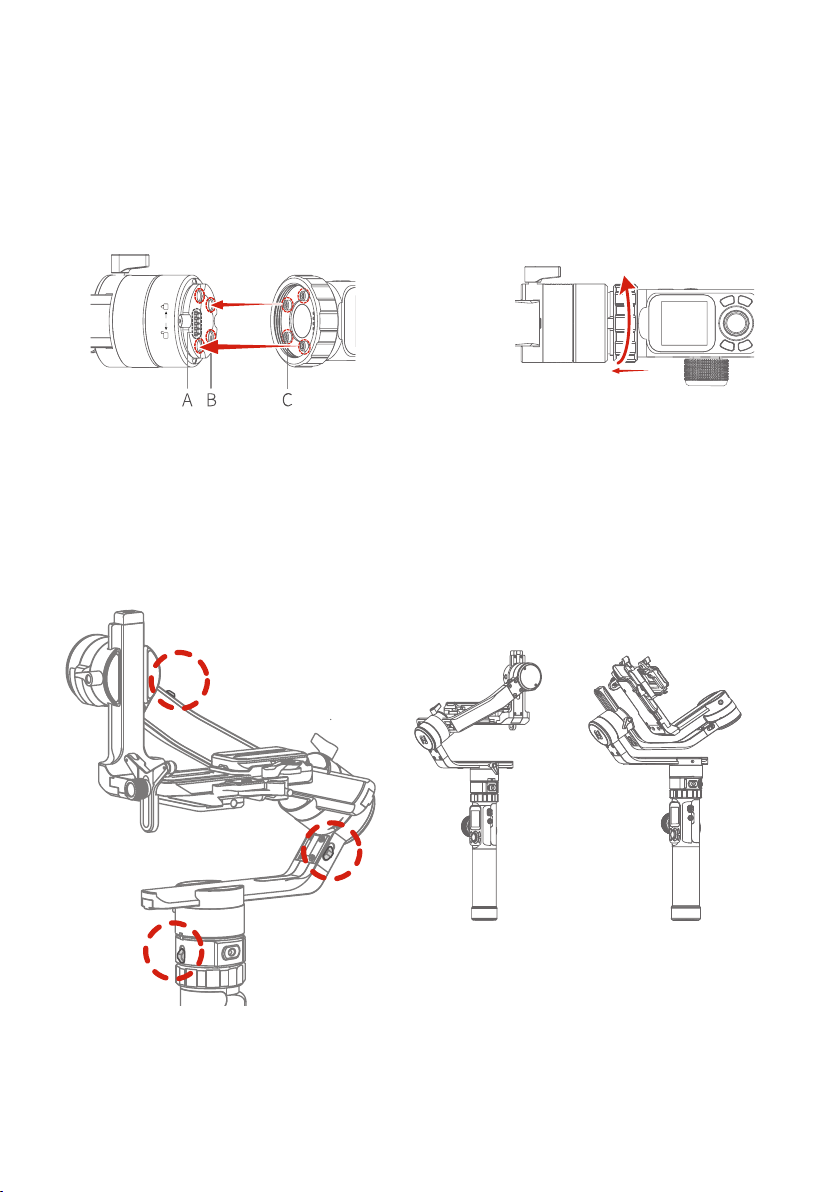
2.3 Handle Installation
Align the handle positioning screw with the corresponding positioning holes
under the pan axis machine and then tighten the fixing ring.
The four positioning screws must be aligned with the corresponding
⚠
positioning holes and then tighten the fixing ring.
Tight
Alignment
Alignment
A. Stylus
B. Positioning hole
C. Positioning screw
Loose
2.4 Positioning Lock
Each of the three rotating axis has one positioning lock for convenient
positioning and storage purposes. Be sure to unlock them before using the
Gimbal.
Balanced lock Stored lock
8
Page 9
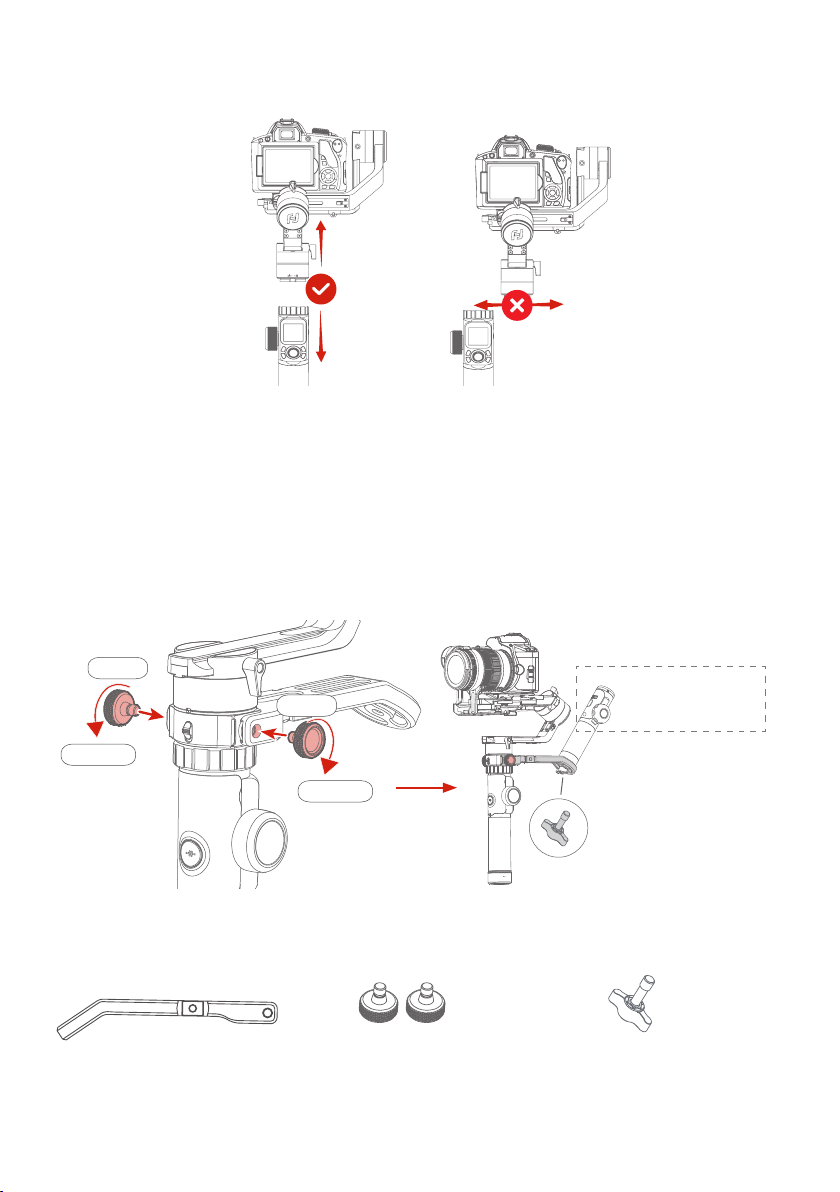
When installing or removing handle, please keep Gimbal in vertical position.
Do not move left or right, to prevent the stylus from damage.
2.5 Versatile Arm Installation
1. Install versatile arm as picture shown, tighten the screws at left and right side
after aligning it's thread hole with Gimbal handle's one.
2. Tighten Hyperlink remote control (comes with standard version of MVG460) to
the versatile arm tail. Or you can also tighten tripod at it's tail directly for an option.
Use longer screw to fix the bottom of the remote handle when mounting remote
control or other accessories with 1/4 inch threaded hole.
DO NOT turn around
remoter control's handle
Loose
Loose
Place the display and
function button of the
remote outwards
Tighten
Accessories needed:
Versatile Arm
X1
Tighten
Fixed Screw
X2
Tighten the bottom
of the handle
Screw
X1
98
Page 10
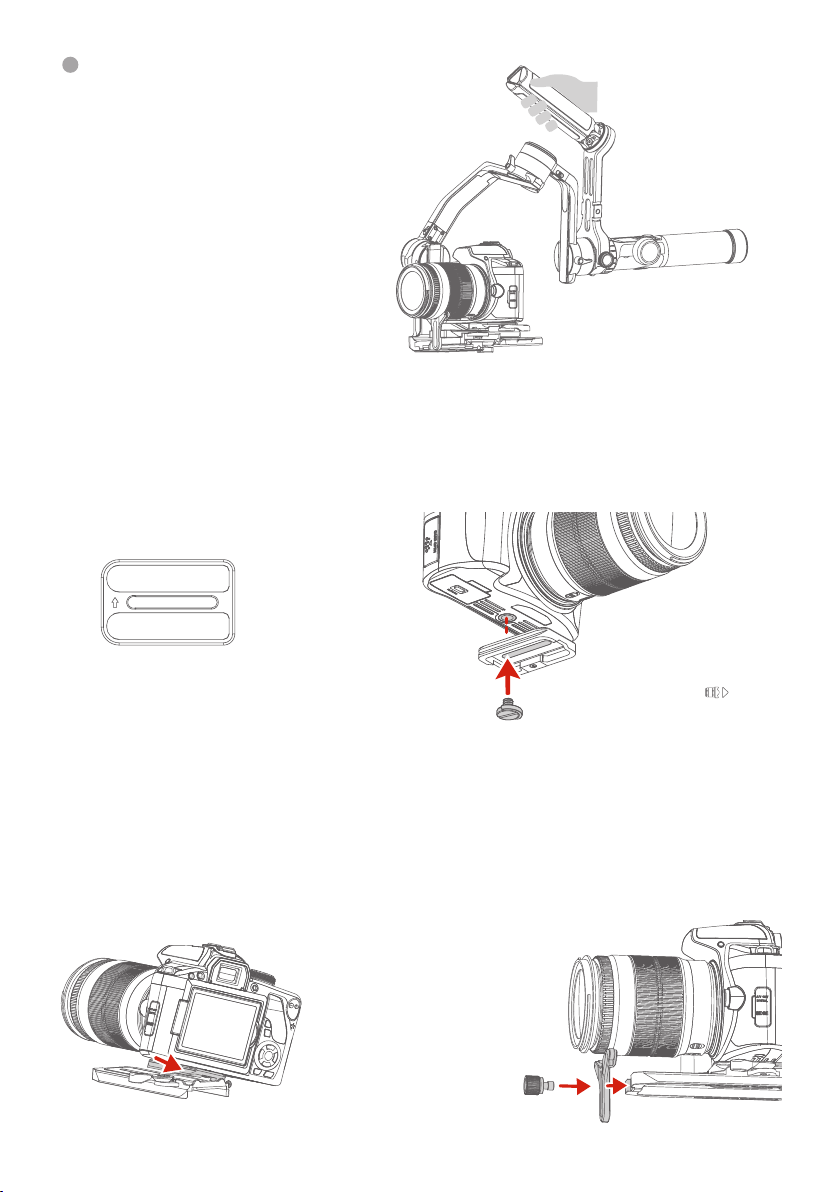
After installation, you can use
versatile arm for low angle shots.
2.6 Camera Installation
(1) Install the quick release plate to
the fixed plate and take out the secondary quick release plate.
Secondary quick release plate
(3) Insert the secondary quick release
plate and press down. The secondary
quick release plate safety lock automatically locks and locks the secondary
quick release plate safety lock.
⚠
Make sure the battery and memory
card are loaded before installation.
(2) Fix the secondary quick release
plate to the bottom of the camera.
Please follow
⚠
the direction of
the icon on
the back of the
secondary quick
release plate to
install.
(4) Install the lens support frame
to ensure that the lens holder can
hold the lens firmly.
Insert the secondary quick release plate.
10
Page 11
2.7 Gimbal Balancing
Before balancing the Gimbal, lock the Gimbal to the balance lock state
⚠
at first, unlock each axis positioning lock in stages during the balancing
process.
TIPS
(1) Before balancing the Gimbal, the lens cover should be removed from the
camera and the memory card needs to be inserted to the camera to complete
all the connections to ensure that the camera is ready for shooting.
(2) During balancing the Gimbal, make sure the camera is powered off and the
Gimbal is turned off.
(3) If you add accessories after the balancing is completed, Gimbal will need to
be re-balanced.
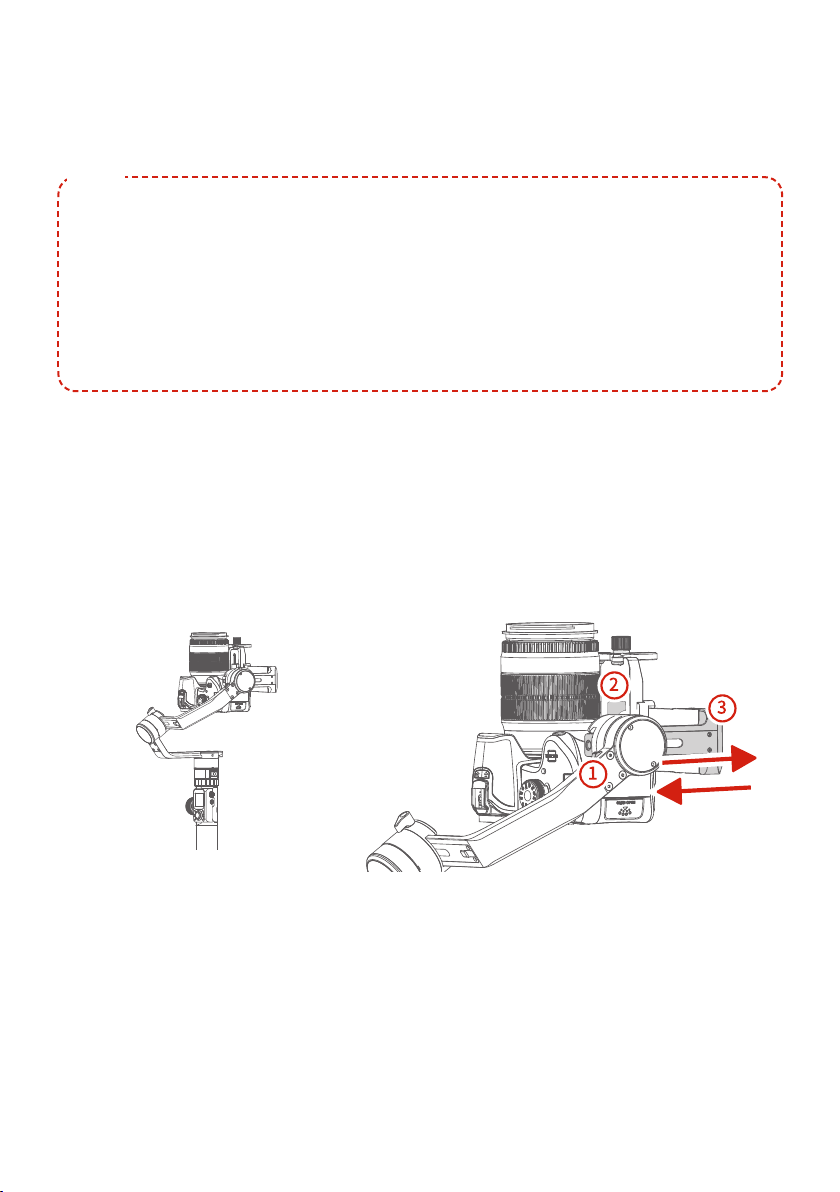
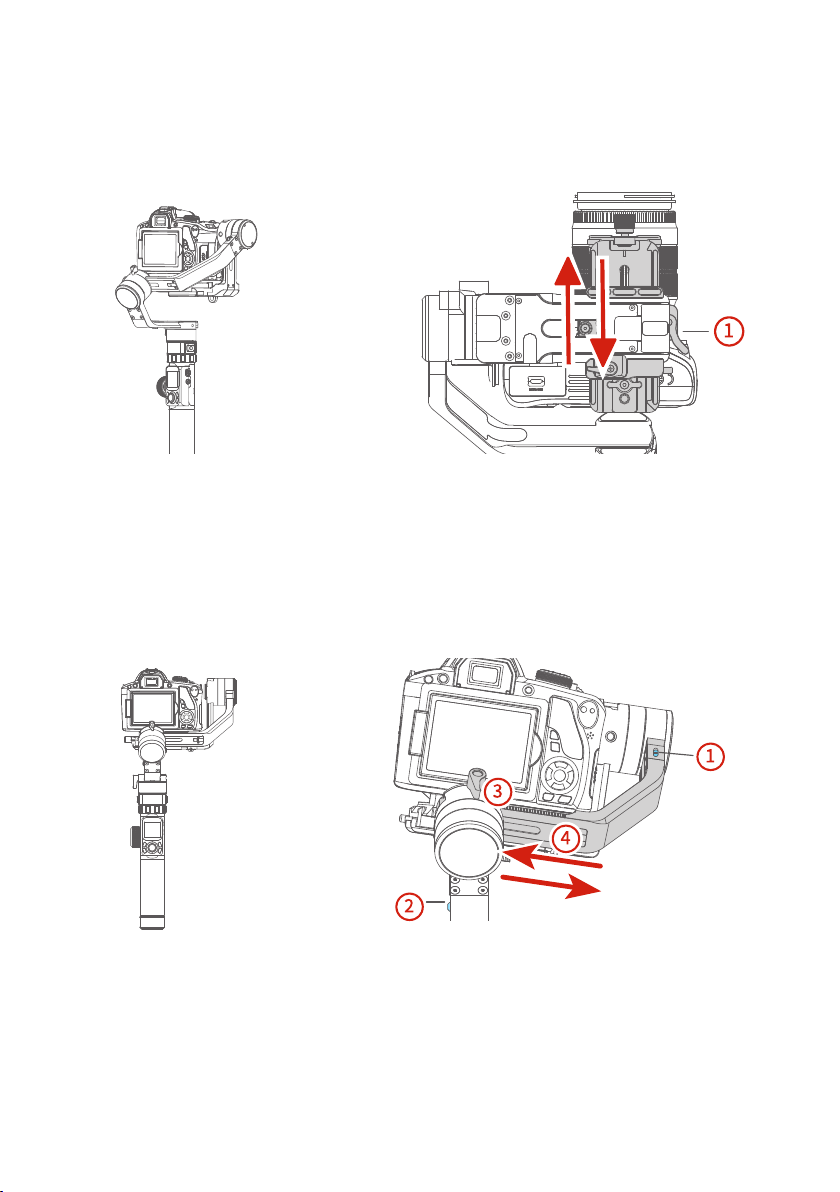
2.7.1 Balance Adjustment of the Tilting Axis
(1) a. Unlock the tilt axis positioning lock ①, place the camera lens vertically
upwards, determine the camera's center of gravity.
b. Loosen the sliding arm lock screw ②, slide the sliding arm ③ to balance the
camera position.
c. Tighten the sliding arm lock screw ②, if the camera lens can stay vertically
upwards that means balanced.
1110
Page 12
(2) a. Place the camera lens vertically upwards, determine the camera's center of
gravity.
b. Unlock the quick release plate safety lock ①, balance the camera position.
c. Tighten the quick release plate safety lock ① and tilt the camera up or down, if
it stays stable, it means balanced.
2.7.2 Balance Adjustment of the Rolling Axis
a. Tighten the tilt axis positioning lock ①, release the roll axis positioning lock ②,
and observe the camera tilt state.
b. Loosen the cross arm lock screw ③, slide the cross arm ④ to balance the
camera position.
c. Tighten the cross arm lock screw ③ and tilt the camera to the left or right, if it
stays stable, it means balanced.
12
Page 13

2.7.3 Balance Adjustment of the Panning Axis
a. Tighten the pan axis positioning lock ①, loosen the pan axis positioning lock
②, keep the handle part of the Gimbal parallel to the ground and the vertical arm
parallel to the ground, and observe the camera rotation after the releasing.
b. Loosen the vertical arm lock screw ③, slide the vertical arm ④ to balance the
camera position.
c. Tighten the vertical arm lock screw ③ to rotate the pan axis to any angle, if it
stays stable, it means balanced.
2.8 Power ON/OFF
Before powering on the Gimbal, need to
⚠
unlock all the axis positioning lock.
Long press the power button, release it when
the display shows
2.9 Download the Manfrotto Gimbal app.
Download Manfrotto Gimbal app.
Power
button
1312
Page 14

3. Connecting App
(1) Turn on the mobile phone Bluetooth and start the Gimbal.
(2) Open the App, and connect to MVG460 according to the App prompts. After
the connection is successful, you can control MVG460 on the App.
Detailed Manual
Download the detailed user manual from official website manfrotto.com
Connect Manfrotto Gimbal App
(1) Power on the Gimbal.
(2) On smartphone, enable bluetooth and open Manfrotto Gimbal App. Login or
register, follow instruction and connect to the Gimbal.
Once the connection is successful, the Gimbal can be controlled on the App,
including remote direction, switching mode, setting parameters and etc.
Upgrade
Back
Gimbal information
Camera information Switch: photo/recording
Remote Control
Tutorial
Setting
Lock
mode
Panning
mode
Horizontal angle control
Reset
Virtual Joystick
Follow
mode
14
Page 15

4. Funcion Operation
4.1 Function / Modes Introduction
Panning Mode (Default mode)
①
The roll and tilt direction are fixed, and the smartphone moves according to the
left-right movements of the user’s hand.
Follow Mode
②
The roll direction is fixed, and the smartphone moves according to the left-right
movements, up-down movements of the user’s hand.
All follow Mode
③
The camera moves according to the user’s hand.
Lock Mode
④
The orientation of the camera is fixed.
Reset
⑤
Return to panning mode, three axises return to default position.
①
④
Default mode
②
⑤
③
Follow and rotate
Lock the position
1514
Page 16

⑥ Manual Lock
Slide the tilt axis to one position for shooting.
Auto-rotation
⑦
Auto-rotation mode is design for cooperating time laps shooting with camera,
can set up route and time.
Inception Mode
⑧
Click the “360 rotation” option to enter inception mode, can set up rotation speed
and direction.
Selfie Mode
⑨
Turn camera 180°horizontally, allow shooting selfies.
Vertical Shooting Mode
⑩
Click the “Portrait” option to enter vertical shooting.
4.2 Button Operation Introduction
4.2.1 Power Button
Long time press — Power on / off
Long time press the power button, and
release it when the display show
4.2.2 Mode Button
Single click — Panning mode / Lock mode
Single click to switch between panning
mode and lock mode
Power Button
Mode Button
16
Page 17

4.2.3 Capturing Button
Single click — Focus, click again to take a photo within 3 seconds
Long press — Burst Mode
Manual
capturing
Single click the camera button to focus and single tap again within
3 seconds to take photos. When there is no operation within 3 seconds after clicking for focus, the focus state shall be cleared.
*Need to connect to the camera shutter cable.
Capturing
Button
4.2.4 Recording Button
Shutter cable connection Figure
Single click — Start shooting / Stop shooting
Recording
Button
1716
Page 18

4.2.5 Joystick
Upward
(1) Camera lens upward
(2) Select the option above
Move to left
(1) Camera lens move to left
(2) Select the option on the
left
Downward
(1) Camera lens downward
(2) Select the option below
4.2.6 Shortcut button
Long press — Follow mode
Double — Reset
4.2.7 Function Button
Single click — Return/ Lock screen/ Unlock screen
Move to right
(1) Camera lens move to right
(2) Select the option on the
right
On other interfaces, single click the function button
to return to the main interface.
Single click the function key on the main interface
to enter the lock screen/unlock screen
When screen is locked, interface is not usable.
Unlock to resume control.
18
Page 19

4.2.8 Multifunction Knob
Rotate — Control the current axial rotation / follow focus and zoom
Long time press — Switch between the follow focus & zoom options and the axial options
Single — Switch adjustment option
1918
Page 20

4.3 USB Ports
Fixed plate has USB port, connect to Camera to control shooting/recording, or
focusing on some Cameras.
UART1 / UART2 port can use for connecting Auto Focus
Camera Control USB port can use USB 2.0 to Type C / USB 2.0 to Mini / USB
3.0 to Micro 3.0/ Panasonic Lumix Shutter Cable use 3.5mm jack to connect.
Connecting Panasonic
Lumix Shutter Cable
20
Page 21

4.4 Touch Screen
Screen interface
Display
icon
Mode/Status
Bluetooth is connected Panning mode
Bluetooth is not connected Follow mode
Battery Level All follow mode
Camera connected Lock mode
Camera is not connected Tilt Axis Enabled
Multifunctional knob
control enabled
Multifunctional knob
control disabled
Zoom Status
Follow Focus Status
Display
icon
Mode/Status
Roll Axis Enabled
Pan Axis Enabled
2120
Page 22

Switch screens
First screen
Home Page
Second screen
Inception Mode
Motion Timelapse
Common gesture operations of touch screen
Slide to left — Switch screen to the left
Slide to right — Switch screen to the right / Back to previous
Click — Check this option
Lock/unlock screen
Single click the
function button
Lock screen statusLock screen promptHome Page Unlock screen prompt
Portrait
Single click
the function
button again
Third screen
Payload setting
Shooting Mode
Knob Setting
Se ttings
4.5 Modes Setting
4.5.1 Auto-rotation mode setting
Please refer to the chapter "Auto-rotation Mode" in page 20
Time setting Route setting
Photos:
PA N
TIL T
Slide to
righ t
INVL
DWELL
Star t
point
se tting
OK ESC
22
Page 23

4.5.2 Inception Mode Setup
Click the "360 rotation" option to enter inception mode, hold the Gimbal horizontally, and set the rotation speed/direction on screen. After choosing setting it will
start automatically.
Slide to
righ t
4.5.3 Portrait Shooting Mode
Hold the Gimbal horizontally, click the "Portrait" option to enter portrait mode,
the Gimbal will turn camera to portrait shooting.
4.5.4 Other Settings
Setting motor power according to camera weight
Slide to
right
Setting scene modes.
Slide to
right
2322
Page 24

Higher sensitivity gives faster reaction of Gimbal/camera.
Sensitivity setting Control object
WL W /T&F /F
Slide to
right
USB C trl
MVG460
System settings
Slide to
right
4.6 Auto-rotation Mode
Auto-rotation Mode Parameter Setting
Method 1:
Enter the Manfrotto Gimbal App to set the Motion-timelapse mode parameters.
Enter the parameter setting interface to select the Motion-timelapse mode for
setting. The maximum interval time is 59 seconds, while maximum staying time
for long exposure photograhy
is 58 seconds.
(Note: The photographing interval setting must be longer than the photographing
stop time and less than the panning rotation time or the tilting rotation time.)
Method 2:
Set the Motion-timelapse mode parameters by entering the “Motion Timelapse”
interface through the touch screen.
24
Page 25

Operate with joystick to set up time setting parameter on touch screen.
Photos:
PA N
TIL T
INVL
DWELL
Display icon Mode/Status
Minimum time
setting
Maximum time
setting
PAN (T1) Pan axis rotation time period 00:00:00 07:59:59
TILT (T2) Tilting axis rotation time period 00:00:00 07:59:59
INVL (t) Photographic interval 00:00:00 00:00:59
DWELL (P) Photography waiting time 00:00:00 00:00:58
* T1/T2 > t > P
PAN: Time required for the panning axis to rotate from the start point to the end point.
TILT : Time required for the tilting axis to rotate from the start point to the end point.
INVL: The time between the end of the previous shooting and the end of the next shooting.
DWELL: Gimbal staying time after sending a photographing command for long exposure.
Auto- rotation mode setting
(1) Select auto-rotation to enter the
auto-rotation mode on the display
interface.
(2) Set rotation start position
Rotate the panning axis or tilting axis
to the start position and stay for half
a second, and click OK option on the
screen to record the start position.
Tilt Axis
Pan Axis
Start
point
se tting
OK ESC
2524
Page 26

(3) Set rotation end position
Rotate the panning axis or tilting axis
to the end position and stay for half
a second, and click OK option on the
screen again to record the end position.
Tilt Axis
Pan Axis
Ending
point
se tting
OK ESC
(4) Start auto rotation movements
The Gimbal automatically returns to
the start position, the tilting axis and
panning axis start to rotate to the
end position according to the set parameters.
FOTO
PA N
TILT
E S C
Completed photos/ Total photos
Exit
Double click the Shortcut button
or click the ESC option on the screen
Exit the auto-rotation mode
and reset
4.7 Gimbal Initialization
You can initialize your Gimbal when:
(1) When camera is not balance.
(2) If not use for a long period of time.
(3) In case of extreme temperature variations.
Steps:
(1) Select Settings - Calibration on the display to enter the Gimbal initialization.
(2) Place the Gimbal on the table, and the Gimbal automatically initializes. If the
touch screen prompts that the calibration is successful, the initialization ends,
otherwise the initialization fails.
26
Page 27

Calibrating....
Do Not Move it
E S C
(3) After the initialization is successful, slide the touch screen interface to the
left/right or click the “ESC” on the screen to wake up.
4.8 Manual Lock
Manually move camera to desired position,and hold for half a second. New tilt
and/or pan positions are automatically saved.
5. How to connect Camera with Wi-Fi
Connect Camera with Wi-Fi
(1) Power on the Gimbal.
(2) Turn on Bluetooth and Manfrotto Gimbal App, APP automatically connects to
Gimbal with the strongest signal of Bluetooth. The Bluetooth icon on display
will be lighted after successfully connected.
(3) Obtain camera’s Wi-fi name and password.
(4) Switch on Manfrotto Gimbal App, select the camera connection icon
in the virtual joystick interface, select corresponding camera brand
and camera you used, choose right camera Wi-Fi name and input pass-
2726
Page 28

Remote Control
word.
Waiting for 5~10 seconds, After the connection is
successful, the camera interface will display corresponding tips and changes.(Canon camera is needed to tap “confirm”), And automatically return to the
main shooting interface, the camera icon on Gimbal’s touching screen light up at same time, connection is done. You can exit APP after connected.
Connect camera Wi-Fi again
After the first successful connection to the camera Wi-Fi, gimal will remember
the camera’s Wi-Fi and password. To connect the previous camera again, simply
open the camera’s Wi-Fi connection interface and the Gimbal will automatically establish the connection. When the camera icon of the Gimbal on touch
screen lights up, the camera can be controlled.
Fail to connect Camera
In the APP interface, selected wrong camera Wi-Fi name, the Wi-Fi password input error (not distinguishing between upper and lower case letters), and the Gimbal Wi-Fi is occupied, which may fail to connect and control the camera.
Please confirm the Wi-Fi name and password are entered correctly. If the connection is failed again, it is recommended to disconnect the Wi-Fi connection
and reconnect again.
Disconnect Wi-Fi
Disconnect current Wi-Fi when Gimbal failed to connect camera
Wi-Fi, or Gimbal need to connect new camera.
How to disconnect: keep Gimbal ON, slide touching screen to
left ,enter setting menu , Press and hold the trigger button at
the back side, move up the joystick, select “system setting” on
screen, click “Clear Wi-Fi”, disconnect successfully.
Payload setting
Shooting Mode
Knob Setting
Se ttings
28
Page 29

6. Accessories Introduction
6.1 Accessories
6.1.1 Extension rod and tripod
6.1.2 Multifunctional bracket
2928
Page 30

6.2 Accessories for Pro Kit
*For standard kit
6.2.1 Hyperlink Remote Controller
Setting Button
Joystick
Function Button
Shutter Button
Trigger
button
Smartphone holder
Adapter
Horizontal Adjustment
Button
MVG460
Multifunction
Knob
Connect to Gimbal
(1) Turn on MVG460 and the remote
(2) Click on remote setting button to enter menu options. Choose "BLE scan" and
connect to corresponding Gimbal.
(3) After successful connection, can use control buttons of the remote to control
MVG460, or use motion sensing to control MVG460 pan/tilt movement.
Please operate on remote
MVG460
MVG220
Single click
the setting
button
30
Page 31

6.2.2 Follow focus (FF) - only on model MVG460FFR
(1) Fix the lens gear to the camera's focus ring position.
(2) Fasten the fixed bracket to the quick release plate of the Gimbal with a hexagonal screw, and insert the aluminum tube.
(3) Insert the follower into the aluminum tube, lock the fixed thumb screw on the
follower, move the aluminum tube to adjust the front and rear position so as to
make the follower gear and the lens gear engage, and lock the fixed thumb screw
on the fixed bracket.
(4) Insert the data cable into the USB port of the fixed plate and the installation is
completed.
Disclaimer
Thanks for using Manfrotto Gimbal. The information in this document affects
your safety and your legal rights and responsibilities. Read the entire document
carefully to ensure proper configuration before use, Failure to read and follow instructions and warnings in this document may result in serious injury to yourself
or others, or damage to your products or damage to other objects in the vicinity.
By using this product, you hereby signify that you have read this disclaimer and
warning carefully and that you understand and agree to abide by the terms and
conditions herein. You agree that you are solely responsible for your own conduct
while using this product, and for any consequences thereof. You agree to use this
product only for purposes that are proper and in accordance with all applicable
laws, rules, and regulations, and all terms, precautions, practices, policies and
guideline Manfrotto has made and may make available.
Manfrotto accepts no liability for damage, injury or any legal responsibility incurred directly or indirectly from the use of product.
Manfrotto will not provide any service for any product obtained from abnormal
channels.
3130
Page 32

Notice
1. Make sure motor spinning is not blocked by external force when Gimbal is
power on.
2. Gimbal DO NOT contact water or other liquid if the Gimbal is not mark waterproof or splash-proof. Waterproof and splash-proof product DO NOT contact sea
water or other corrosive liquid.
3. DO NOT disassembly the Gimbal except is detachable available. It need send
to Manfrotto after-sales or authorized service center to fix it if you accidently disassembly and cause abnormal work. The relevant costs are borne by user.
4. Prolonged continuous operation may cause the motor surface temperature to
rise, please operate carefully.
Storage and Maintenance
1. Keep the Gimbal and battery out of the reach of children and pets.
2. DO NOT leave the Gimbal and battery near heat sources such as a furnace or
heater. DO NOT leave the Gimbal and battery inside of a vehicle on hot days.
3. Please storage the battery in dry environment.
4. DO NOT overcharge or overuse the battery, otherwise it will cause damage to
the battery core.
5. Never use the Gimbal and battery when the temperature is too high or too low.
6. Please take out batteries from Gimbal if long time without using Gimbal.
Battery Safety Guidelines
1. To avoid fire, serious injury, and property damage, observe the following safety
guidelines when using, charging or storing the battery.
(1) DO NOT allow the battery to come into contact with any kind of liquid. DO
NOT leave the battery out in the rain or near a source of moisture. DO NOT drop
the battery into water.
(2) If the battery falls into water by accident, put it in a safe and open area immediately. Maintain a safe distance from the battery from the battery until it is completely dry. Never use the battery again.
(3) If batteries catch fire, use water, water mister, sand, fire blanket, dry powder,
carbon dioxide fire extinguisher to extinguish the fire immediately. It is prone to
explosion after a large fire. Please choose the fire extinguishing method according to above recommended order according to the actual situation.
(4) DO NOT use or charge swollen, leaky or damage battery.
(5) DO NOT disassemble or pierce the batteries in any way or the battery may
leak.
(6) DO NOT drop or strike batteries. DO NOT place heavy objects on the battery
or charger.
(7) DO NOT use the battery if it falls.
(8) DO NOT heat batteries.
(9) DO NOT use the batteries in strong electrostatic or electromagnetic environments. Otherwise, the battery may occur short circuit.
Page 33

(10) Electrolytes in the battery are highly corrosive. If any electrolytes make
contact with your skin or eyes, immediately wash the affected area with fresh
running water for at least 15 minutes, and then see a doctor immediately.
(11) Please use official batteries are provided by Manfrotto. If you need replace the battery, please purchase at Manfrotto official website or authorized
dealer. Manfrotto will not be responsible for the battery accident and devices
malfunction cause by batteries use from unofficial provided.
2. DO NOT drop or strike batteries. If the battery is abnormal, contact Manfrotto After-sales support.
Page 34

Via Valsugana, 100 36022 Cassola (VI) Italy07/20
Vitec Imaging Solutions Spa
Copyright © 2020
 Loading...