

Page 1

1 of 22
Manfrotto Digital Director App User Manual
Please visit manfrotto.com for the latest information
Index
DIGITAL DIRECTOR SET UP ................................................................................................................................ 2
CAMERA COMPATIBILITY.................................................................................................................................... 2
APP AND FIRMWARE UPDATE ............................................................................................................................ 3
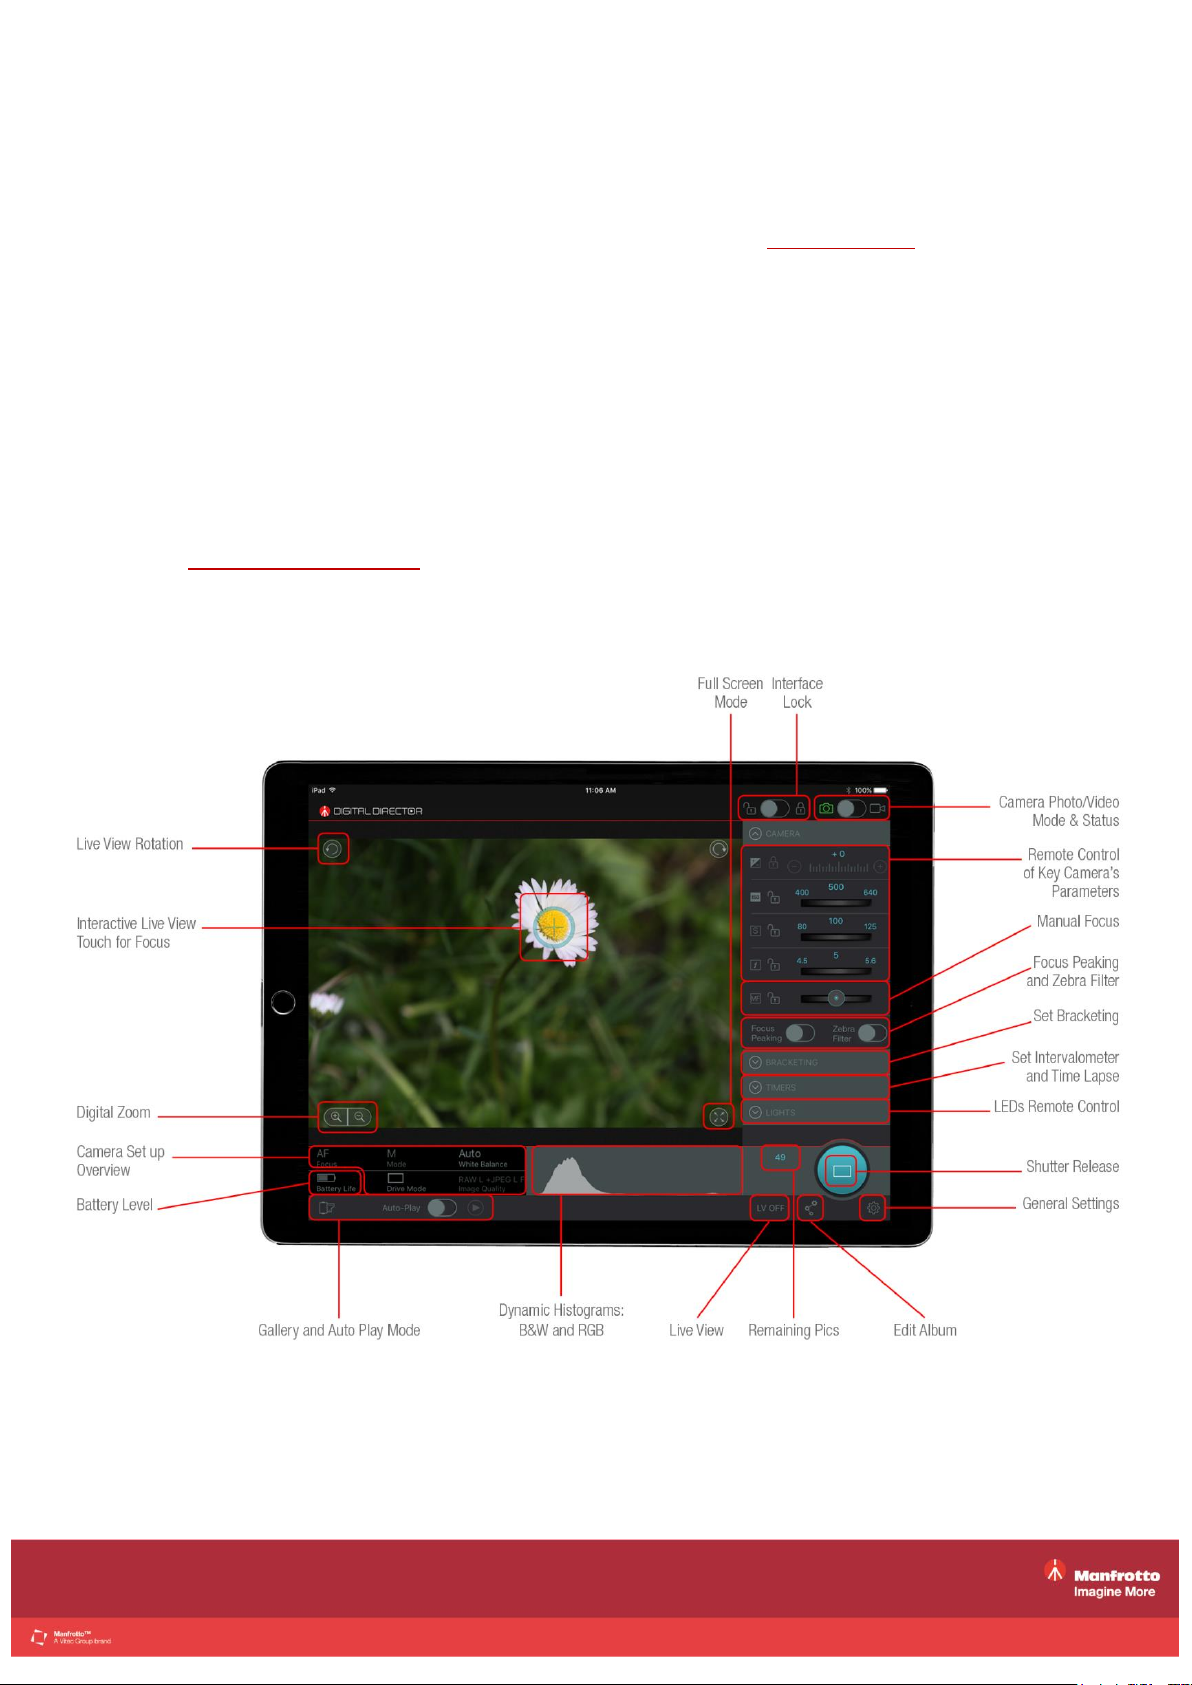
DIGITAL DIRECTOR APP ...................................................................................................................................... 3
INTERFACE LOCK ................................................................................................................................................ 4
CAMERA PHOTO/VIDEO MODE & STATUS ........................................................................................................ 4
REMOTE CONTROL OF KEY CAMERA PARAMETERS ..................................................................................... 4
FOCUS PEAKING FILTER ..................................................................................................................................... 4
ZEBRA FILTER ................................................................................................................................ ...................... 5
BRACKETING ........................................................................................................................................................ 5
TIMERS – INTERVALOMETER & TIME LAPSE ................................................................................................... 5
INTERACTIVE LIVE VIEW, FOCUS CONTROL & DIGITAL ZOOM ..................................................................... 6
DEPTH OF FIELD PREVIEW ................................................................................................................................. 7
CAMERA SET UP OVERVIEW .............................................................................................................................. 7
BATTERY LEVEL ................................................................................................................................................... 8
DYNAMIC HISTOGRAMS ...................................................................................................................................... 8
LIVE VIEW (ON/OFF) ............................................................................................................................................. 8
REMAINING PICS .................................................................................................................................................. 8
EDIT ALBUM .......................................................................................................................................................... 8
GALLERY ............................................................................................................................................................... 8
AUTO PLAY MODE ................................................................................................................................................ 8
SHUTTER RELEASE ............................................................................................................................................. 9
LIVE VIEW ROTATION .......................................................................................................................................... 9
MICROPHONE LEVEL, REC/START/STOP, TIME CODE .................................................................................. 10
LEDs REMOTE CONTROL .................................................................................................................................. 10
LAYOUT TYPE ..................................................................................................................................................... 12
GALLERY ............................................................................................................................................................. 13
KEYWORDS ......................................................................................................................................................... 15
RATING ................................................................................................................................................................ 15
POST PRODUCTION ........................................................................................................................................... 16
SHARING ............................................................................................................................................................. 17
GENERAL SETTINGS .......................................................................................................................................... 18
MANFROTTO DIGITAL DIRECTOR PLUG-IN FOR Adobe® Lightroom® ........................................................ 20
Manfrotto Digital Director App User Manual V1.3 - June 2016
Page 2

2 of 22
DIGITAL DIRECTOR SET UP
The Digital Director App runs exclusively with DIGITAL DIRECTOR hardware. Please follow
the steps below for correct install the App:
DIGITAL DIRECTOR POWER OPTIONS
- Power Batteries: 4 Rechargeable (NiMH) or normal (alkaline) AA batteries - battery
autonomy up to 15 hours (batteries not included).
To charge the batteries, use the charger supplied.
Please note that the batteries power DIGITAL DIRECTOR but do not charge the
iPad.
- With Power Supply
Use the AC adapter supplied
1. Choose the appropriate plug
2. Connect the AC power adaptor to DIGITAL DIRECTOR
3. Connect to the power outlet
Connecting to the power outlet charges the iPad and powers DIGITAL DIRECTOR.
Connecting to the power outlet does not charge DIGITAL DIRECTOR batteries.
CONNECTING THE CAMERA TO DIGITAL DIRECTOR VIA USB CABLE
1. Connect the USB cable to the camera body
2. Connect the USB cable to DIGITAL DIRECTOR AND SWITCH THE EQUIPMENT
ON in the following sequence:
Switch ON iPad
Switch ON DIGITAL DIRECTOR (ready when the LED flashes)
Switch ON camera
CONNECT iPad TO DIGITAL DIRECTOR
1. Unlock the Safety lock
To avoid scratching the iPad, ensure Digital Director’s surface is clean before
connecting.
2. Insert the iPad, starting from the Lightning connector side first until it is firmly locked
3. Enable the Safety lock
4. Start the App
CAMERA COMPATIBILITY
All compatible Nikon and Canon camera models and any info on specific camera features
are listed in the Camera Compatibility Chart in the Digital Director App and on the Manfrotto
website.
Manfrotto Digital Director App User Manual V1.3 - June 2016
Page 3
3 of 22
APP AND FIRMWARE UPDATE
For the best experience, we recommend regularly checking for new app and/or firmware
versions. New versions of the App can be downloaded from the iPad App Store as soon as
they are released.
To check for firmware updates, please connect your iPad via Wi-Fi or data:
- If a new version is available, a red dot will appear next to the “General Settings” icon.
Go to the “General Setup” menu and choose the “Info” tab to download the new
firmware.
DIGITAL DIRECTOR APP
The Digital Director iOS App runs on iPad.
The App works in both horizontal landscape and vertical portrait orientation modes.
Manfrotto Digital Director App User Manual V1.3 - June 2016
Page 4

4 of 22
INTERFACE LOCK
The Digital Director interface can be locked by sliding the selector from left to right. When
locked, only the shutter release button in photo/video mode and the start/stop rec button in
video mode can be operated.
CAMERA PHOTO/VIDEO MODE & STATUS
Switch between photo and video modes by simply sliding the selector.
The camera symbol turns different colors:
Green: the camera is connected and working properly
Yellow: there is a communication or mode mismatch between the camera and Digital
Director
Please note: with Canon cameras, when you change between photo and video modes in the
app, you also need to change the camera photo/video selector accordingly
Red: there is no communication between the camera and Digital Director
REMOTE CONTROL OF KEY CAMERA PARAMETERS
Key parameters can be set according to the shooting mode:
Exposure
ISO
Shutter speed
Aperture
If a parameter is disabled, its control bar turns light grey.
“Manual Focus” gradually changes the focus on a selected focus point. This control is
available only if the camera lens supports it and is set to AF.
All the above parameters can be locked/unlocked anytime by touching the lock icon next to
each of them.
FOCUS PEAKING FILTER
Focus Peaking highlights the focused profiles on the image.
From the General settings menu’s Digital Director Options you can select and adjust
Intensity: makes the focus peaking more or less sensitive to the focus area
Color: selects the peaking between red, blue, green and yellow
Manfrotto Digital Director App User Manual V1.3 - June 2016
Page 5
5 of 22
ZEBRA FILTER
The Zebra filter helps correct exposure. It highlights the over- and/or underexposed areas of
the image using striped patterns.
From the General set-up menu’s Digital Director Options you can set the zebra pattern to
show the overexposed and/or underexposed areas and the related threshold.
e.g.: if you set overexposure to 100%, the zebra-stripe patterns will only appear in the
areas of the images that are already burnt out. 70% is usually used for interviews for
correct exposure of a person’s face.
BRACKETING
This function is available in photo mode only.
When activated, bracketing makes it possible to take three shots of the same subject
applying different camera parameters (i.e. if shooting in manual mode, the app will change
the shutter speed; if shooting in shutter speed, aperture priority, or program modes, the app
will change the exposure compensation).
When activated, Bracketing also works in combination with Intervalometer and Time Lapse.
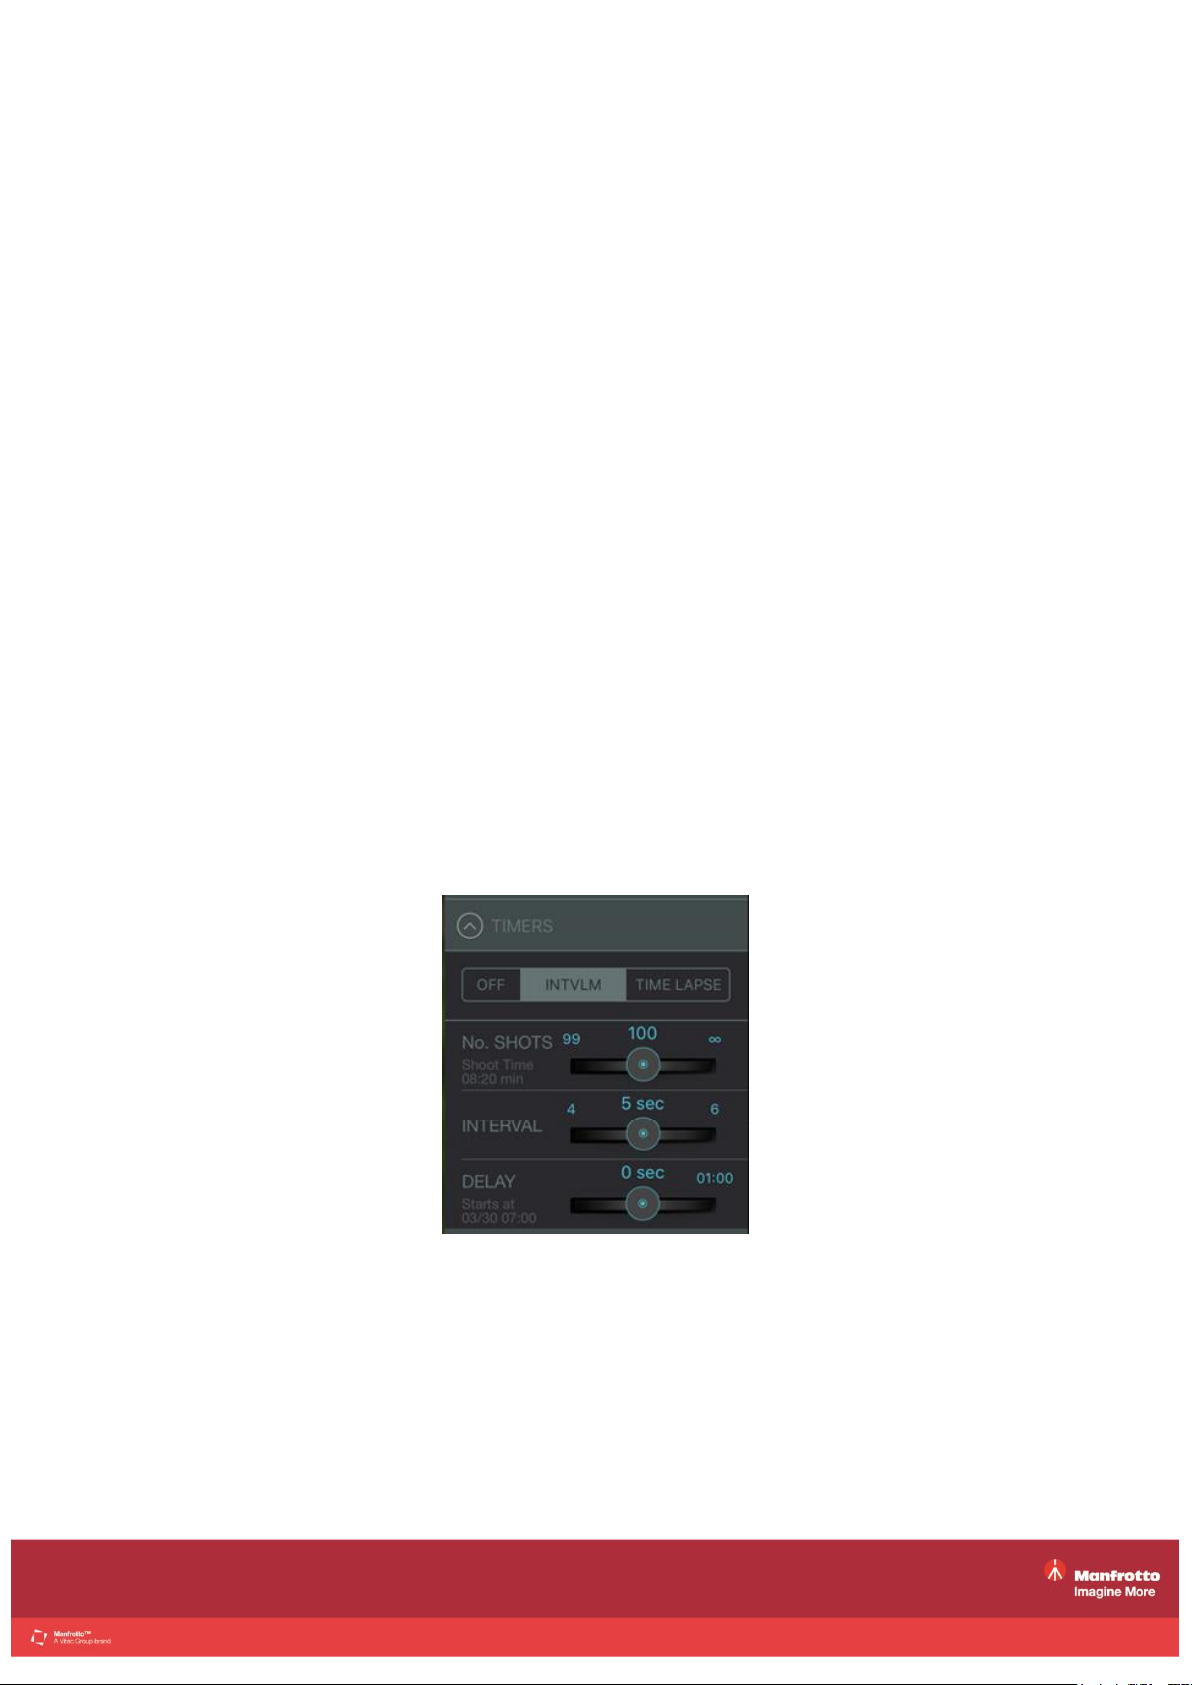
TIMERS – INTERVALOMETER & TIME LAPSE
Intervalometer allows to select the number of shots the camera will take and the interval at
which it will take them. The shoot time will be automatically calculated based on the number
of shots and the interval selected.
An optional start delay can also be configured.
Manfrotto Digital Director App User Manual V1.3 - June 2016
Page 6
6 of 22
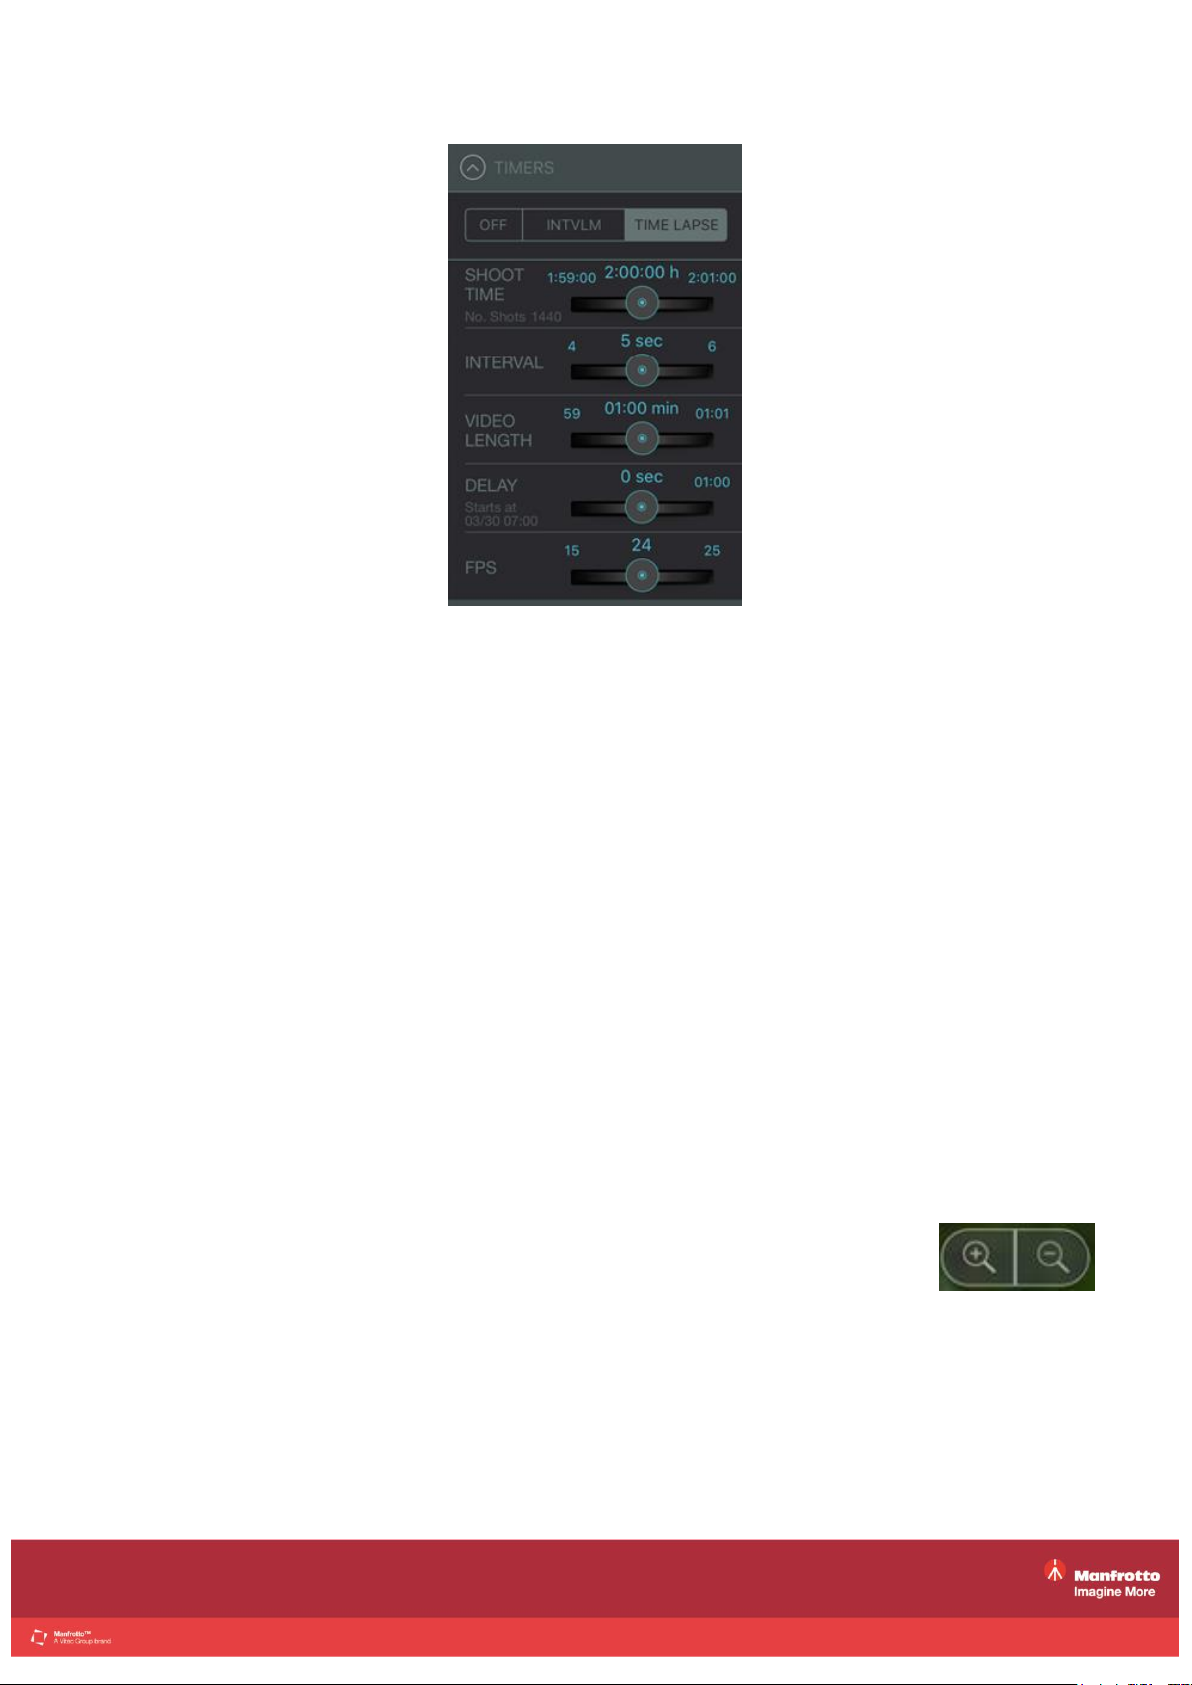
Time lapse is easily set up: based on a given shoot time (i.e. the total duration of the time
lapse session) and the FPS (planned frames per second of the final edited time lapse video),
Digital Director will automatically calculate:
the required interval between shots, according to the desired video length set
OR
the resulting video length, according to the interval set between shots
Shoot time and FPS will not vary if any other parameters are changed.
An optional delay on start time can also be set.
Please note: if bracketing is activated we recommend choosing an interval long enough to
give the camera enough time to take the three bracketing shots.
INTERACTIVE LIVE VIEW, FOCUS CONTROL & DIGITAL ZOOM
Live View shows what the camera is streaming.
Streaming quality depends on the camera model.
In Live View, simply touch the desired point on the iPad screen to select the
focus point. In order to verify that the focus point is the correct one, touch the
icon to digitally zoom in/out on the area and if necessary, change the focus
point within the digital zoom area.
1) NOTE:
- Canon allows single-step digital zoom
- Nikon allows multiple-step digital zoom
Manfrotto Digital Director App User Manual V1.3 - June 2016
Page 7

7 of 22
- touch focus is only active if the camera lens is set to AF (Auto Focus). Touch focus
mode cannot be used with camera lenses that do not support AF (Auto Focus).
However, the focus point ring can be positioned within the live-view image in order to
digitally zoom into a chosen point. Always check the camera compatibility chart for any
particular notes regarding specific camera models and their focus modes.
- The focus point can be locked/unlocked by keeping the focus point pressed for more
than one second.
- The focus point ring cannot be positioned in the outer edges of the image.
- Canon cameras can also display the live view image on the camera’s LCD.
- Nikon cameras do not allow any physical control of the camera while live view is active
in Digital Director.
DEPTH OF FIELD PREVIEW
Depth of field preview is available for certain camera models only.
Nikon: depending on the camera model, the “real” change of aperture occurs only with Live
View off. While it is active, only an exposure simulation is shown. In order to see the effect of
a variation of aperture with Live View, turn Live View off/on from the app ( “LV OFF” / “LV
ON” icon ).
Canon: for depth of field preview, please tap the dedicated “depth-of-field” icon on
the live view next to the digital zoom icons.
CAMERA SET UP OVERVIEW
The camera set up overview shows some of the camera’s other parameters:
Focus: AF- lens is in auto focus / MF – lens is in manual focus
Mode: M/TV/AV/P (Canon). M/S/A/P (Nikon)
White balance: AWB (Auto) or manual color temperature in K (Kelvin); other custom
presets can be chosen via the camera menu. They will display as ”–“
Drive Mode: choose between single drive mode (the camera takes one picture at a
time) and continuous drive mode (the camera takes a burst of several pictures at a
time) NOTE: in Nikon cameras, you can choose the number of pictures taken in each
burst.
Image Quality/Video Quality: displays picture/video format
Manfrotto Digital Director App User Manual V1.3 - June 2016
Page 8

8 of 22
BATTERY LEVEL
Press to check the battery status for the camera, DIGITAL DIRECTOR and iPad.
A pop-up window appears if a battery is running low, stating which battery it is.
DYNAMIC HISTOGRAMS
Choose between two histogram types by pressing on the histogram:
B&W
RGB
LIVE VIEW (ON/OFF)
Live view streaming can be enabled or disabled.
e.g.: in some camera models, live view needs to be disabled in order to
access the menu on the physical camera.
REMAINING PICS
This shows how many pictures can still be saved on the camera’s memory card.
EDIT ALBUM
Selects the album in which pictures will be placed during the current shooting section.
Comments and keywords can be added to those pictures that will be placed in the album
currently in use during a shooting session.
GALLERY
This is where albums and pictures can be viewed.
AUTO PLAY MODE
With this mode on, pictures shot from the camera are automatically downloaded into the App
in real time and Digital Director displays them in full screen.
Manfrotto Digital Director App User Manual V1.3 - June 2016
Page 9

9 of 22
SHUTTER RELEASE
Press the shutter release to trigger the camera.
To capture multiple shots in Continuous Drive Mode, press and hold the shutter release
button with Canon cameras or press once to take the pre-set number of pics with Nikon
cameras.
LIVE VIEW ROTATION
Rotates live view.
If video mode is selected, Digital Director’s interface will change slightly
Manfrotto Digital Director App User Manual V1.3 - June 2016
Page 10

10 of 22
MICROPHONE LEVEL, REC/START/STOP, TIME CODE
MICROPHONE LEVEL
The microphone level indicates the audio level captured by the camera.
REC/START/STOP
Press to start or stop the camera recording.
TIME CODE
The time code checks running time while recording video.
LEDs REMOTE CONTROL
Remotely control up to 13 (thirteen) Manfrotto LYKOS and/or Litepanels ASTRA LED lights
via a dedicated Bluetooth® module.
To activate, ensure
Bluetooth Accessories option is enabled in the General Settings menu’s Bluetooth
Accessories section
Bluetooth is activated on the iPad
LED lights are on and the blue LED indicator on the dedicated Bluetooth module is
blinking
LED light batteries are charged or LED lights are connected to the power supply.
LED lights are not connected to another device via Bluetooth
When using the LEDs with Digital Director for the first time, please follow these steps:
Check the points above.
Press the Bluetooth dongle button to turn off the Bluetooth dongle.
Keep the Bluetooth dongle button pressed for 2/3 seconds until the blue light starts
blinking rapidly. A pop-up window will appear on the Digital Director App saying
“Bluetooth Paring Request”.
Select “Pair” in this window to pair the devices.
The devices are now connected.
Once the LEDs and Digital Director are connected, control the LEDs from the LIGHTS panel.
Manfrotto Digital Director App User Manual V1.3 - June 2016
Page 11

11 of 22
ON/OFF
CONTROL BAR AND LIGHT NAME - shows the general information for each light
LIGHT DETAILS - displays the name and battery level of each light; names can be edited
here
GROUP NAME - shows which group the light belongs to. Two or more lights can be grouped
or ungrouped by simply swiping left on the control bar. If two or more lights belong to the
same group and light dimming is changed for one light, the change is automatically applied
to all the lights in that same group.
CONNECT/DISCONNECT - a light can be disconnected by swiping right on its controls. To
enable Digital Director to recognize a light that has been disconnected, touch recover
disconnected lights under Bluetooth Accessories
NUMBER OF LIGHTS - shows the number of lights currently connected to Digital Director
MASTER - turns all lights on/off
SCENE DETAILS - a previously-saved lighting set-up can be recalled simply by touching a
scene. Scene details checks for any notes on a particular scene.
Manfrotto Digital Director App User Manual V1.3 - June 2016
Page 12

LAYOUT TYPE
12 of 22
Standard and full screen layouts are available for both horizontal landscape and vertical
portrait orientation positions.
NOTE: if the app’s interface does not automatically rotate when the iPad is rotated, please
check that the iPad “orientation lock” is not enabled.
Manfrotto Digital Director App User Manual V1.3 - June 2016
Page 13

13 of 22
In full screen layout, in both photo and video mode, key camera parameters, bracketing,
timers, connected LED lights and histograms can be checked and controlled remotely by
pressing the “+” icon and the icons that appear near the shutter release button. The shutter
release button and pop-up windows can be moved within the live view screen by touching
the icon. Windows can be closed anytime by pressing the icon.
GALLERY
The available albums and the thumbnails of pictures and videos associated with these
albums are located in the Gallery.
The top right section of the thumbnail shows the type and size of the file.
The top left section of the thumbnail:
is empty if the picture has not been downloaded
contains the icon if the picture has been downloaded to the App
contains the lock icon if the image is locked.
contains the icon if this file is a video
NOTE: Video cannot be downloaded or played back.
Manfrotto Digital Director App User Manual V1.3 - June 2016
Page 14

14 of 22
JPEG and RAW pictures can be downloaded.
To download RAW files, access the General Settings and enable download in the Digital
Director Options menu.
RAW files cannot be opened or edited with Digital Director. It is only possible to share them
via Wi-Fi web server, email or FTP.
If RAW download is disabled and the camera is set up to take RAW pictures only, these files
will be automatically converted into a JPEG file when downloaded in the Digital Director App.
If RAW download is enabled and the camera is set up to take RAW pictures only, these
RAW files will be download and automatically converted into a JPEG copy in the Digital
Director App.
Pictures can be sorted by rating or by date, name, type and rating – using the sort button.
Downloaded pictures can be reviewed even if the camera and iPad are not connected to
DIGITAL DIRECTOR.
Pictures taken when the camera is not connected to DIGITAL DIRECTOR can be
downloaded into the Digital Director App simply by connecting DIGITAL DIRECTOR to the
camera and iPad.
Pictures can be downloaded:
automatically when shooting in auto play mode
by simply touching the thumbnail
by selecting one or more pictures using the select button and touching the icon
Pictures can be deleted from the gallery. This action does not delete the pictures from the
camera’s memory card.
Pictures can be move to a different album.
Picture Keywords can be edited or deleted.
Picture thumbnails can be expanded or minimized.
Pictures can be locked so they cannot be deleted.
Pictures can be filtered by rating and keywords
Pictures can be shared.
Manfrotto Digital Director App User Manual V1.3 - June 2016
Page 15

15 of 22
KEYWORDS
Keywords can be assigned to a specific album so that during a photo session, all the images
assigned to that album will automatically have these keywords.
It is also possible to delete or add new keywords to a selected picture from the Digital
Director gallery.
RATING
Ratings can be assigned to individual or multiple pictures.
Select one or more pictures in the Gallery and by swiping on the stars at the bottom of the
App, from left to right or vice versa, rate the selected pictures.
This can also be done when a picture is open.
Manfrotto Digital Director App User Manual V1.3 - June 2016
Page 16

POST PRODUCTION
16 of 22
The downloaded JPEG pictures are ready for post-production
Once the picture is open in full screen, simply touch the edit tab button for the editing tools.
Choose from the following:
- Check picture INFO
- Check histogram (can be left open while post processing images to monitor how the
histogram varies according to the changes made)
- Crop freely or proportionally
- Rotate image
- Adjust exposure
- Adjust saturation
- Adjust contrast
- Adjust brightness
- Add blur
Any changes applied to an image can always be undone using the symbol in the tool bar.
Post-processed pictures can also be saved as copies.
Manfrotto Digital Director App User Manual V1.3 - June 2016
Page 17

SHARING
17 of 22
Downloaded images can be shared via Wi-Fi webserver, FTP, e-mail or using additional
sharing options, by posting them on a preferred social network, saving them to the iPad’s
camera roll, or even sending them to other apps on the iPad.
Images can be shared:
by touching the icon on the button on the left of the screen when the image is open
by selecting the pictures in the Gallery and then touching the icon on the top left of
the screen
It is possible to limit the size of the JPEG picture to 1024px or 2048 px (RAW pictures will
not be affected by this option).
Image ratings and keywords will be included in the JPEG file shared from Digital Director via
FTP, e-mail and Wi-Fi web server.
Moreover, when sharing via Wi-Fi web server, FTP or e-mail, it is possible to also share the
Digital Director metadata related to a specific picture so that this information can be seen in
Adobe Lightroom for desktop.
Manfrotto Digital Director App User Manual V1.3 - June 2016
Page 18

18 of 22
GENERAL SETTINGS
ALBUMS
Shows all available albums.
Touch the “+” icon on the top right of the screen to create a new one.
Touch an album’s name to edit it.
Delete or duplicate an album by pressing its name and sliding to the left
IMPORTANT: if an album is deleted, all its contents are also deleted.
CONNECTION PROFILES
Shows a memorized FTP.
A new FTP profile can be set up and saved by touching the + icon.
A connection profile can be deleted or duplicated by pressing the profile name and sliding it
to the left.
SHOOTING PROFILES
Shows all saved camera settings and any related notes.
To save a new profile, touch the + icon and when the window is open, touch to read the
camera: this populates all the camera parameters.
A shooting profile can be deleted or duplicated by touching it and sliding to the left
LIGHT SCENES
Shows all saved scenes.
Add a new one by touching the + icon.
A scene name and its notes can be edited by touching the name.
A light scene can be deleted or applied to the current shooting session by pressing the
scene name and sliding it to the left and selecting “Apply” or “Delete” on the right.
JOB MEMORIES
To check an existing photography job or create a new one.
Add a new Job memory by pressing the “+” icon on the top right part of the screen. The job
can be renamed and associated to a related album, or shooting and connection profiles.
Manfrotto Digital Director App User Manual V1.3 - June 2016
Page 19

19 of 22
DIGITAL DIRECTOR OPTIONS
These set up:
Live view grid (on or off)
Use high-precision manual focus control: when enabled, this allows the use of step
focus instead of “manual focus” in photo and video mode.
Nikon live view exposure simulation (photo mode): only available for some Nikon
cameras, turns exposure simulation in live view on or off in photo mode only. This
option can be used when shooting with flash.
Number of multi-shots with a Nikon: select the number of shots that can be taken in
continuous drive mode. For Nikon cameras only.
Focus Peaking options: set the focus peaking in terms of:
o Intensity: makes the focus peaking more or less sensitive to the focus area
o Color: selects the peaking color between red, blue, green and yellow
Zebra filter helps correct the exposure. This function uses striped patterns to show
the over- and/or underexposed areas of the image.
Downsize images while downloading can be selected if a picture needs to be
downsized when downloading it from the camera
Download raw files enables the download of both RAW and JPEG pictures from the
camera
Optimize gallery speed activates the fastest image synchronization mode between
the camera and Digital Director gallery. (Note: as this function’s priority is
synchronization speed, it is possible, though unlikely, that thumbnails may be
unavailable for new pictures. If this occurs, please disable this option.)
BLUETOOTH ACCESSORIES
Enables a connection with compatible Bluetooth accessories.
Bluetooth accessories can also be configured:
LIGHTS:
Maintain delta in group: when enabled, this function applies changes in light brightness to all
the lights in a group, maintaining the brightness delta (i.e. group one consists of three lights
– A / B /C. If light A’s brightness changes from 20% to 50%, the +30% delta change will also
be applied to the brightness of lights B/C)
USER MANUAL
Explains how to use DIGITAL DIRECTOR hardware
APP USER MANUAL
Explains how to use the Digital Director App
COMPATIBILITY CHART
Contains the most recent camera compatibility information associated with the installed
version of the Digital Director App
Manfrotto Digital Director App User Manual V1.3 - June 2016
Page 20

20 of 22
TROUBLESHOOTING
Contains the most recent troubleshooting information associated with the installed version of
the Digital Director App
INFO
Includes:
Information on the Camera model and lens currently used with Digital Director
DIGITAL DIRECTOR information (hardware and firmware version, serial number,
manufacturer and model number)
Check for update verifies if there are new firmware releases and installs them directly
from the App if applicable
Show help displays the principal Digital Director App screenshots—this is a quick
help solution to get started with the basics of Digital Director
MANFROTTO DIGITAL DIRECTOR PLUG-IN FOR Adobe® Lightroom®
The Manfrotto Digital Director plug-in allows the import of additional Digital Director
metadata related to pictures taken using Digital Director – into Adobe Lightroom for desktop.
Requirements:
• PC or MAC
• Adobe Lightroom for desktop 4+
Plug-in installation sequence
1. Go to dd.manfrotto.com and download the Manfrotto Digital Director Plug-in zip folder
from the “Downloads” section of the Digital Director product page
2. Extract the contents of the zip folder to a local folder on your computer
Important: In order to use the plug-in, Lightroom must always be able to access this folder.
Please ensure it is not deleted or moved once it has been installed
3. Open Adobe Lightroom
4. Open the “Plug-in Manager” by navigating to “File -> Plug-in Manager”
Note: Before proceeding, please remove any previously installed versions of the Manfrotto
Digital Director Plug-in. If applicable, select the previously installed Plug-in and click on the
“Remove” button
5. Click on the “Add” button
6. Navigate to the local folder created in step 2
7. Choose “digitaldirector.lrplugin” and click “Add Plug-in”
You will see the “Manfrotto Digital Director” plug-in listed once it has been added
8. Please make sure that the dot next to the plug-in is green: this indicates that the
plug-in is properly installed and enabled
Manfrotto Digital Director App User Manual V1.3 - June 2016
Page 21

21 of 22
Note: A new version of the Manfrotto Digital Director Plug-in may be available. Please
always make sure you are using the latest one.
How to use the plug-in
1. Export your photos from Digital Director to a local folder, via web server, FTP or email
2. Import photos into Adobe Lightroom from the local folder created in step 1
3. Open the plug-in from “File>Plug-in Extras>Import Digital Director metadata from
folder…”
4. Select the same local folder as in step 1
5. Click on the “Import” button
Manfrotto Digital Director App User Manual V1.3 - June 2016
Page 22

22 of 22
DISCLAIMER
The information contained in this document is subject of change without notice.
Manfrotto makes no warranty and shall not be liable for any errors on information contained in this document.
App Store is a service mark of Apple Inc.
iPad and Lightning are trademarks of Apple Inc.
Canon and Nikon trademarks are the property of their owner.
The Bluetooth word mark and logos are registered trademarks owned by Bluetooth SIG, Inc. and any use of such
marks is under license. Other trademarks and trade names are those of their respective owners.
“Adobe” and “Lightroom” are either registered trademarks or trademarks of Adobe Systems Incorporated in the
United States and/or other countries.
Manfrotto Digital Director App User Manual V1.3 - June 2016
 Loading...