

Page 1

Installation & Operating Instructions
Maverick
IP Sub Metering Appliance
Model IP-SM-101
Baird House, Units 6&7
Pensnett Estate • Kingswinford
West Midlands • DY6 7YA • United Kingdom
01384-271113 • Fax 01384-271114
RoHS
8189 Century Boulevard • Minneapolis, MN 55317-8002 • USA
800-843-5116 • 952-556-4900 • Fax 952-556-4997
[email protected] • www.mamacsys.com
4 Arminger Court, Unit 2
Holden Hill • S.A. 5088 • Australia
08-8395-4333 • Fax 08-8395-4433
® Registered trademark MAMAC SYSTEMS, Inc.
155 McIntosh Drive, Units 5&6 • Markham
Ontario • L3R ON6 • Canada
905-474-9215 • Fax 905-474-0876
No. 22 Lorong 21A Geylang #11-02
Prosper Industrial Building
Singapore • 388421
656-3927273 • Fax 656-3927276
Page 2

TABLE OF CONTENTS
SECTION 1: Maverick Overview
1.0.0: Conformance and Testing
1.1.0: Specifications
1.2.0: Appliance Overview
1.3.0: Installation
1.4.0: Wiring
SECTION 2: Initial Configuration
2.0.0: Initial Configuration
2.1.0: Internet Protocol
2.2.0: Password/Clock Configuration
2.3.0: Network & Email Configuration - Static IP
2.4.0: Network & Email Configuration - DHCP
2.5.0: Meter Configuration
Page 2
Page 3
Page 4
Page 5
Page 6
Page 7
Page 8
Page 9
Page 10
Page 10
Page 11
2.6.0: Email Alerts & Periodic Email Reports
SECTION 3: Operation
3.0.0: Network Configuration - Static IP
3.0.1: Network Configuration - DHCP IP
3.1.0: Main Page
3.1.2: Data Logging
3.2.0: Reset Button
3.3.0: XML
Username: admin Password: password
Page 12
Page 13
Page 14
Page 15
Page 15, 16
Page 16
Page 16, 17
® Registered trademark MAMAC SYSTEMS, Inc.
1 of 17
© Copyright 2009DN IS-IPSM101.1
Page 3

SECTION 1 - Conformance & Testing
1.0.0
1.0.1
FCC Testing -
- Rule Part 15, Subpart B - Unintentional Radiators Class B Limits 15.107 & 15.109.
EMC/EMI Testing -
- BS EN 55022:1998, CISPR 22:1997 Amendments 1 & 2.
- BS EN 55024:1998, CISPR 24:1997 Amendments 1 & 2.
- EN 61000-3-3: Limitations of voltage fluctuations and flicker in low-voltage supply systems <16A.
- EN 61000-4-2: Electrostatic Discharge (ESD).
- EN 61000-4-3: Radiated, radio frequency, Electromagnetic field immunity test.
- EN 61000-4-4: Electrical Fast Transient/burst immunity test (EFT).
- EN 61000-4-5: Surge Immunity Test (Mains).
- EN 61000-4-6: Immunity to conducted disturbances induced by radio frequency fields.
- EN 61000-4-11: Voltage dips, short interruptions and voltage variations immunity test.
1.0.2
RoHS Compliant -
MAMAC Systems, Inc., products designated “RoHS Compliant” comply with the European
Union’s Directive on the Restriction of the Use of Hazardous Substances 2002/95/EC (RoHS).
These products do not contain Joint Industry Guide (JIG) - 101 Level A substances above
threshold limits, except lead in RoHS exempt applications 5, 7a and 7c. These products do not
contain perfluorooctane sulfonates (PFOS).
- Cadmium (Cd) < 100 ppm
- Mercury (Hg) < 100 ppm
- Lead (Pb) < 1000 ppm
- Polybrominated Biphenyls (PBB) < 1000 ppm
- Polybrominated Diphenyl Ethers (PBDE) < 1000 ppm
- Hexavalent Chromium (CrVI) < 1000 ppm
DN IS-IPSM101.1
® Registered trademark MAMAC SYSTEMS, Inc.
2 of 17
© Copyright 2009
Page 4

SECTION 1 - Specifications
1.1.0
All you need is a web browser running on any laptop, PDA, or cell phone
anywhere in the world to monitor and log electric, gas, water or compressed
air consumption. Receive email alerts if consumption crosses a threshold.
The Maverick IP Sub Metering Appliance incorporates a web server, accepts
a pulse input from any energy meter (KWH, water, gas, steam or compressed
air) and displays consumption by the minute, hour, day, week and month. The
appliance logs the data in CSV format, and usage can be viewed as bar graphs
for the minute, hour, day, week and month. The appliance can also email
periodic consumption reports every hour, day, week or month which can be
imported into Excel, Word or any other application which accepts CSV data.
Data is also available formatted for XML and any application can retrieve the
data for storage or analysis.
Power the appliance with any 24VAC transformer, plug it into a hub/router,
launch any web browser, punch in the default IP and connect. No custom
software to load, no discovery routines, no custom cables or training. The
Sub Metering Maverick serves up static web pages with dynamic energy
consumption data updates every second or two. Most users can configure and
utilize the appliance without any training or support in less than five minutes.
For effective utilization of energy and natural resources, waste and inefficiency
have to be eliminated. This can only be accomplished by holding energy
consumers accountable. The Maverick IP Sub Metering Appliance provides an
ideal low cost solution for consumption data acquisition and analysis.
SPECIFICATIONS:
Supply Voltage: 24 VAC/VDC
Supply Current: 250 mA (6 VA)
Ethernet: 10-Base T
IP Assignment: Static or DHCP
Email: SMTP to two email addresses
Meter Pulse Input: Dry contact closure (1.0 mA load)
Environmental: 10-90%RH Non-Condensing
Operating Temp: -40˚F to 125˚F (-40˚C to 52˚C)
Storage Temp: -40˚F to 150˚F (-40˚C to 66˚C)
Termination: Removable terminal blocks
16 Ga max., RJ-45 Ethernet jack
Data Logging CSV Files:
Minute 1440 samples
Hour 744 samples
Day 366 samples
Week 53 samples
Month 12 samples
Data Logging Graphs:
Minute 60 samples
Hour 24 samples
Day 31 samples
Week 8 samples
Month 12 samples
Enclosure: UL 94V-5-O Polycarbonate plastic
Weight: 0.5 lbs. (.25 kg)
DN IS-IPSM101.1
® Registered trademark MAMAC SYSTEMS, Inc.
3 of 17
© Copyright 2009
Page 5
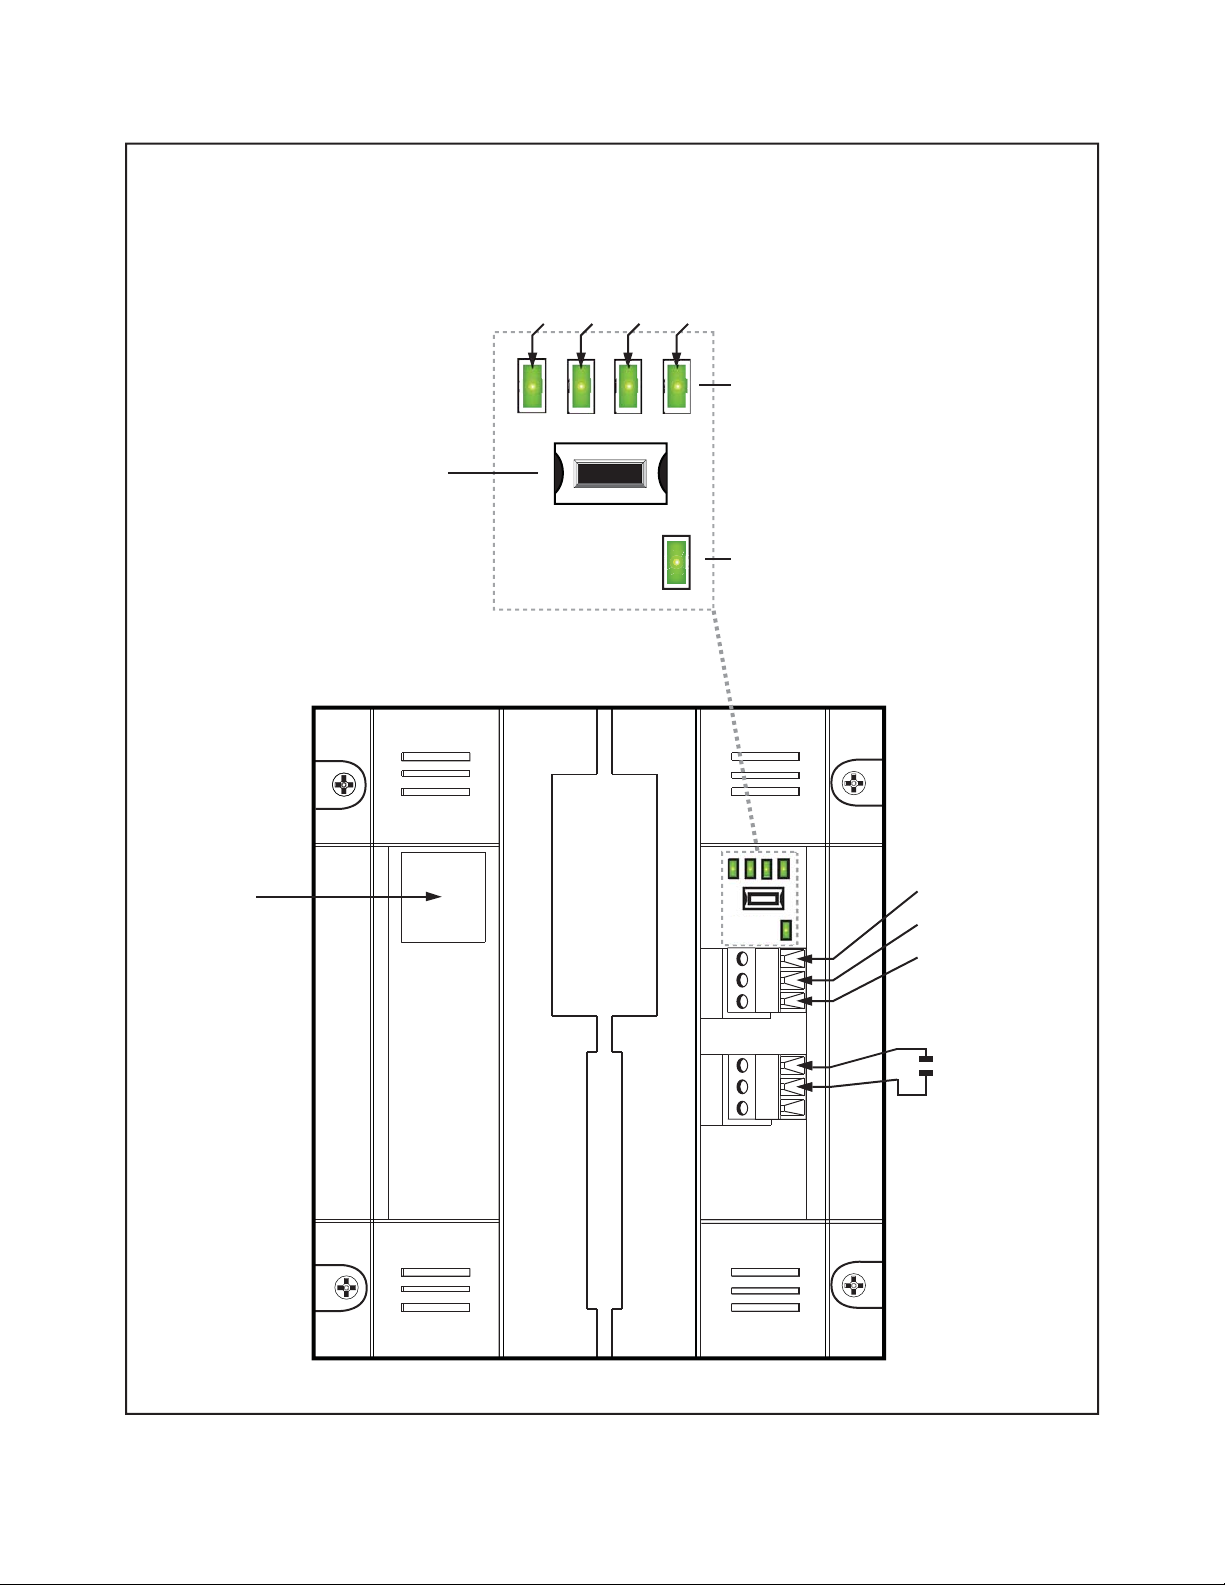
1.2.0
SECTION 1 - Appliance Overview
Figure 1
LAN
Link
Heartbeat
Power
LEDs
RESET
Button
Pulse
LAN
24 VAC/VDC
Neutral/Com
Ground/Earth
Pulse Dry
Contact Only
3.3 VDC <5.0 mA
MAMAC SYSTEMS
® Registered trademark MAMAC SYSTEMS, Inc.
4 of 17
© Copyright 2009DN IS-IPSM101.1
Page 6
SECTION 1 - Installation
1.3.0
1.3.1
INSPECTION:
Inspect the package for damage. If damaged, notify the appropriate carrier immediately.
REQUIREMENTS:
• Tools (not provided)
- Digital Volt-ohm Meter (DVM).
- Appropriate screwdriver for mounting screws.
- Appropriate drill and drill bit for mounting screws.
• Four #6 sheet metal screws.
• Training: Installer must be a qualified, experienced technician.
Warning:
• Disconnect power supply before installation to prevent electrical shock and equipment damage.
• Make all connections in accordance with national and local electrical codes. Use copper
conductors only.
Caution:
• Use electrostatic discharge precautions (e.g., use of wrist straps) during installation and wiring
to prevent equipment damage.
1.3.2
• Avoid locations where severe shock or vibration, excessive moisture or corrosive fumes are
present.
• Do not exceed ratings of the device.
MOUNTING:
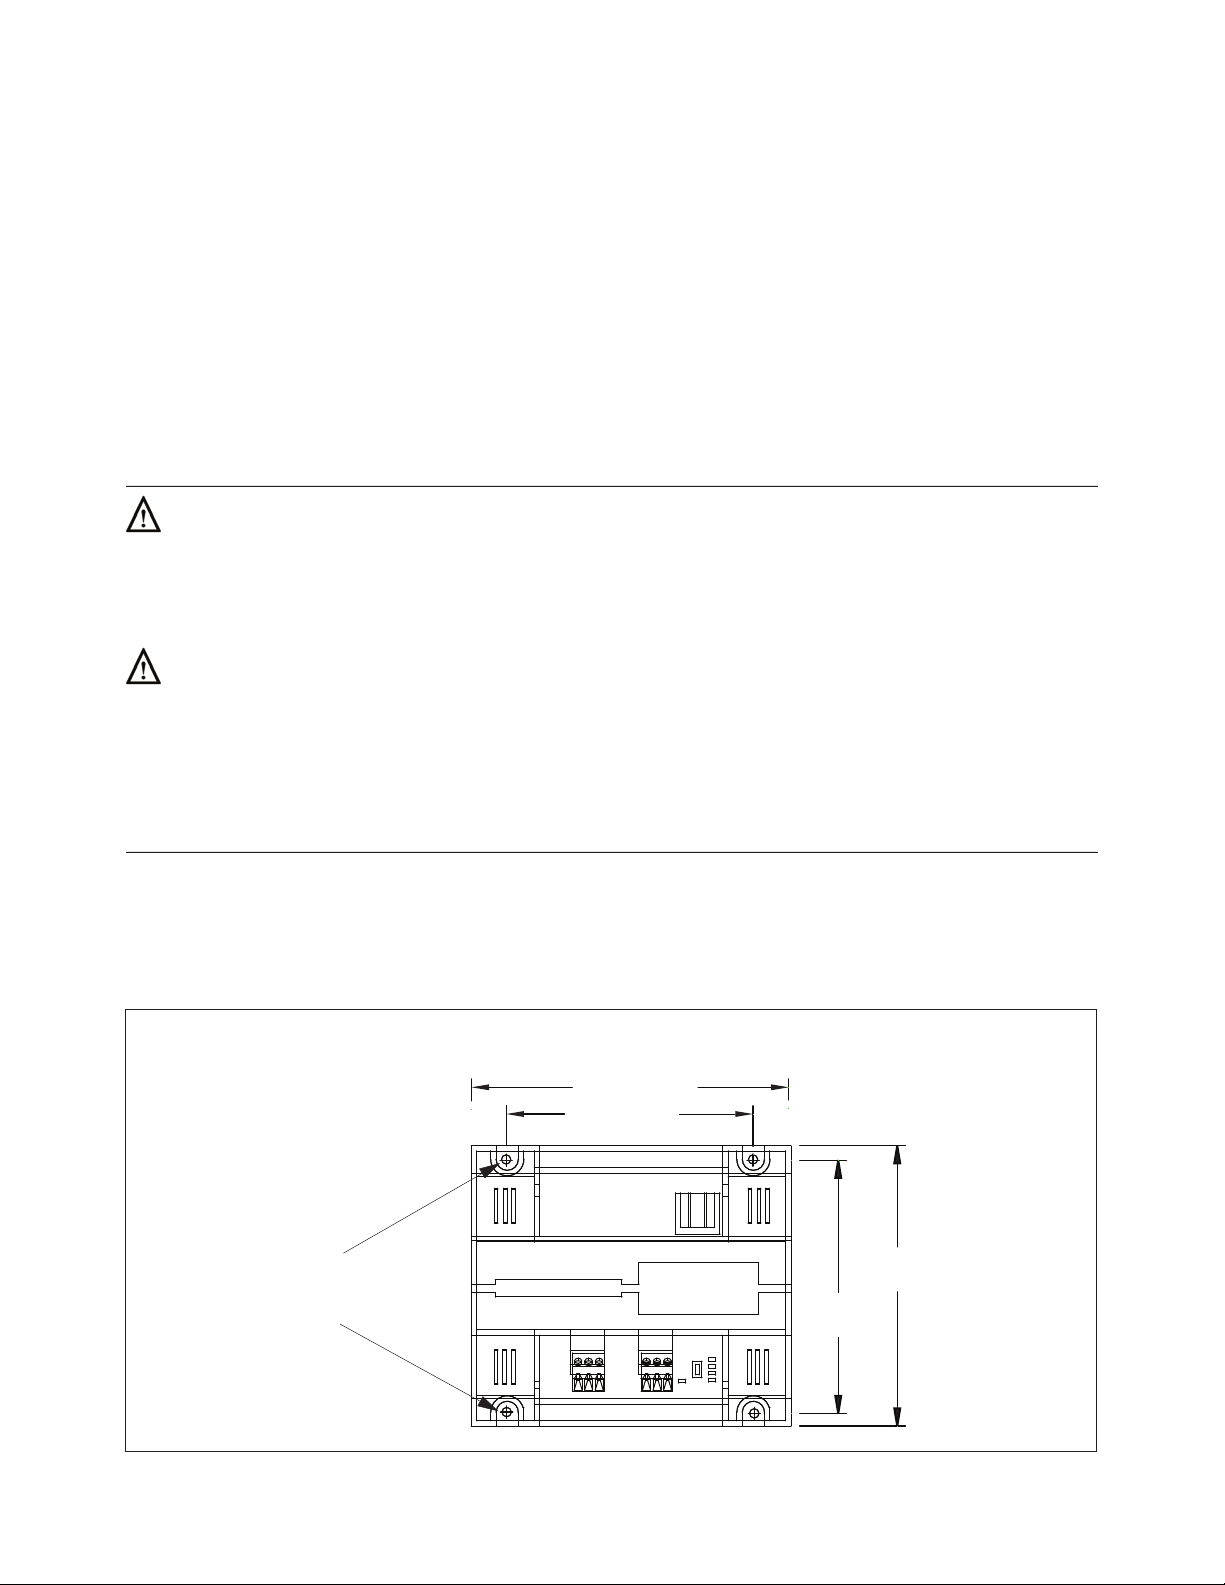
The Maverick IP Sub Metering Appliance must be mounted on a flat surface with four #6
sheet metal screws (not provided) as shown in Figure 2.
Figure 2
4.50” (114 mm)
3.61” (91 mm)
4x 0.156” use #6
sheet metal screws
(not included) to
mount appliance
MAMAC SYSTEMS
3.70”
(94 mm)
4.00”
(102 mm)
DN IS-IPSM101.1
® Registered trademark MAMAC SYSTEMS, Inc.
5 of 17
© Copyright 2009
Page 7
SECTION 1 - Wiring
1.4.0
1.4.1
1.4.2
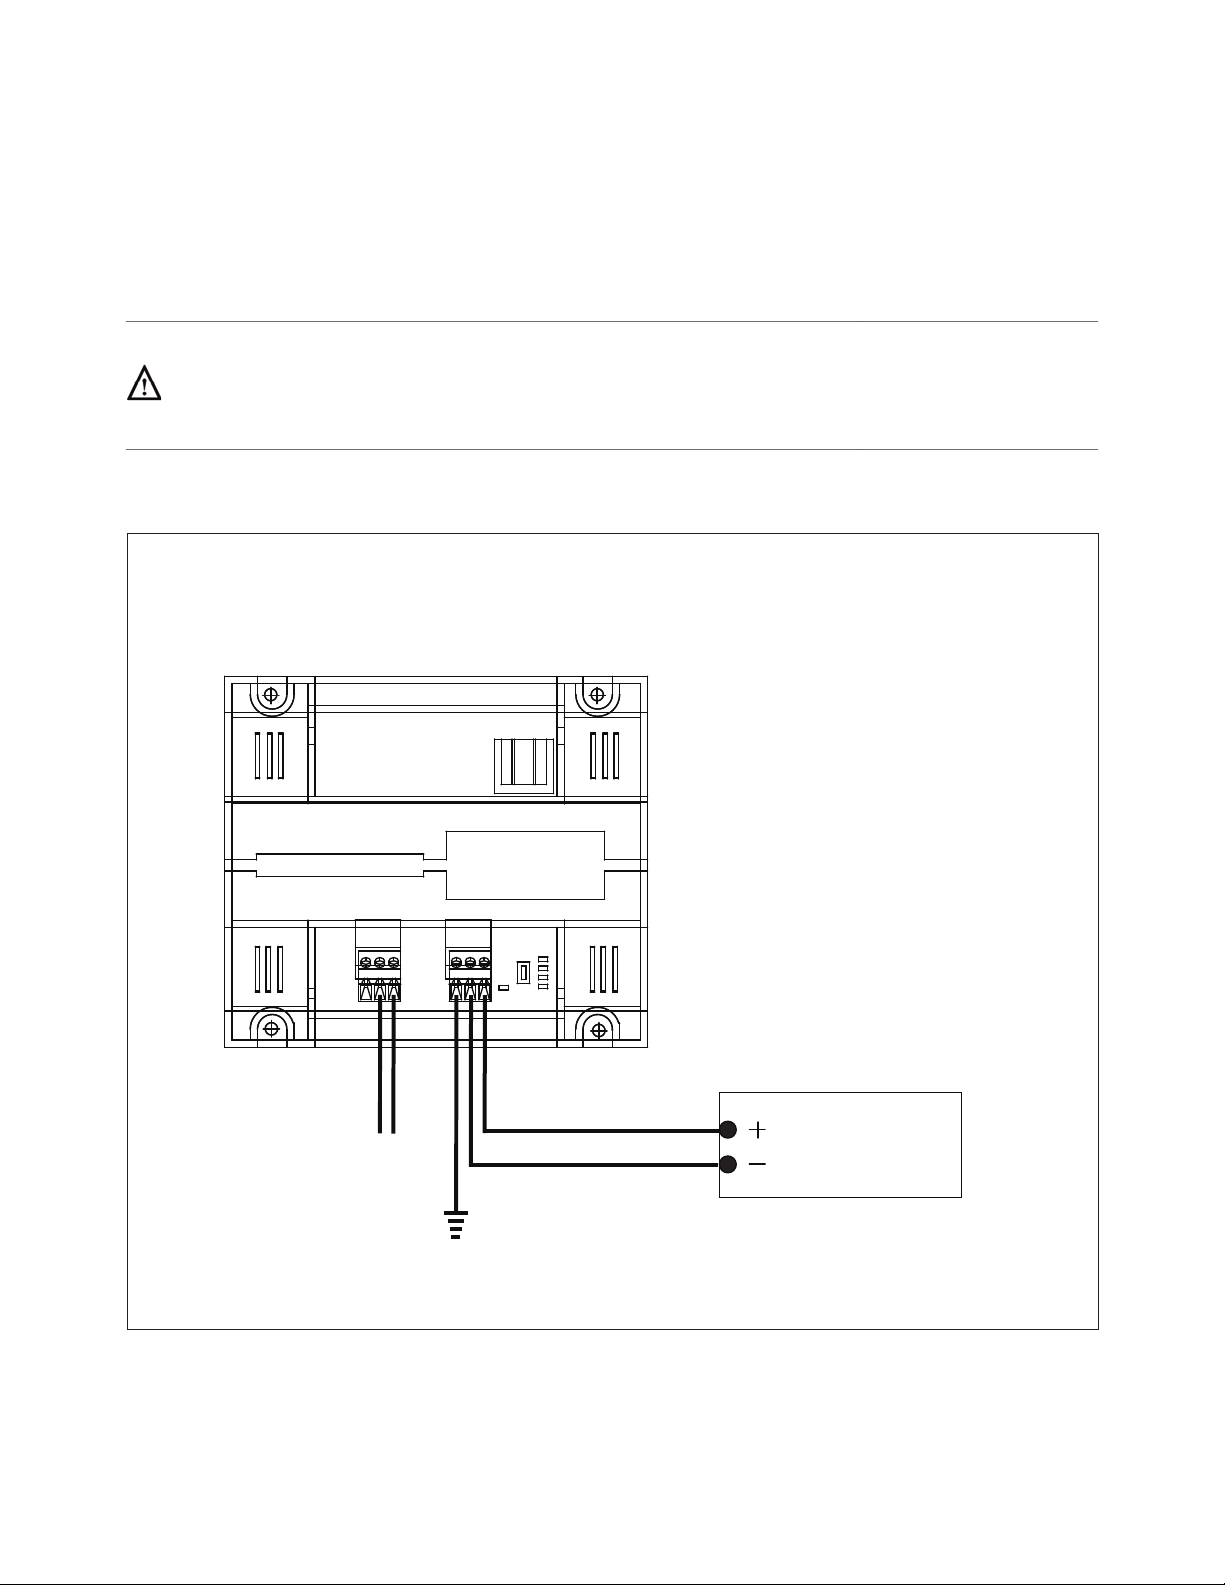
Terminate the IP Sub Metering Appliance as shown in Figure 3.
Use a UL rated 24VAC Class-2 transformer or a UL rated 24VDC power supply with
transformer isolation.
WARNING: Maximum supply voltage MUST NOT EXCEED 35VAC/35VDC.
Figure 3
Note: Use 18-gauge conductor
for ground.
MAMAC SYSTEMS
PULSE DRY
CONTACT ONLY
3.3 VDC < 5.0 mA
Note: Always disconnect power
from unit before wiring a sensor.
24 VAC/VDC
TRANSFORMER/
POWER SUPPLY
24 VDC/VAC
Neutral/Common
GROUND
DN IS-IPSM101.1
® Registered trademark MAMAC SYSTEMS, Inc.
6 of 17
© Copyright 2009
Page 8
SECTION 2 - Initial Configuration
2.0.0
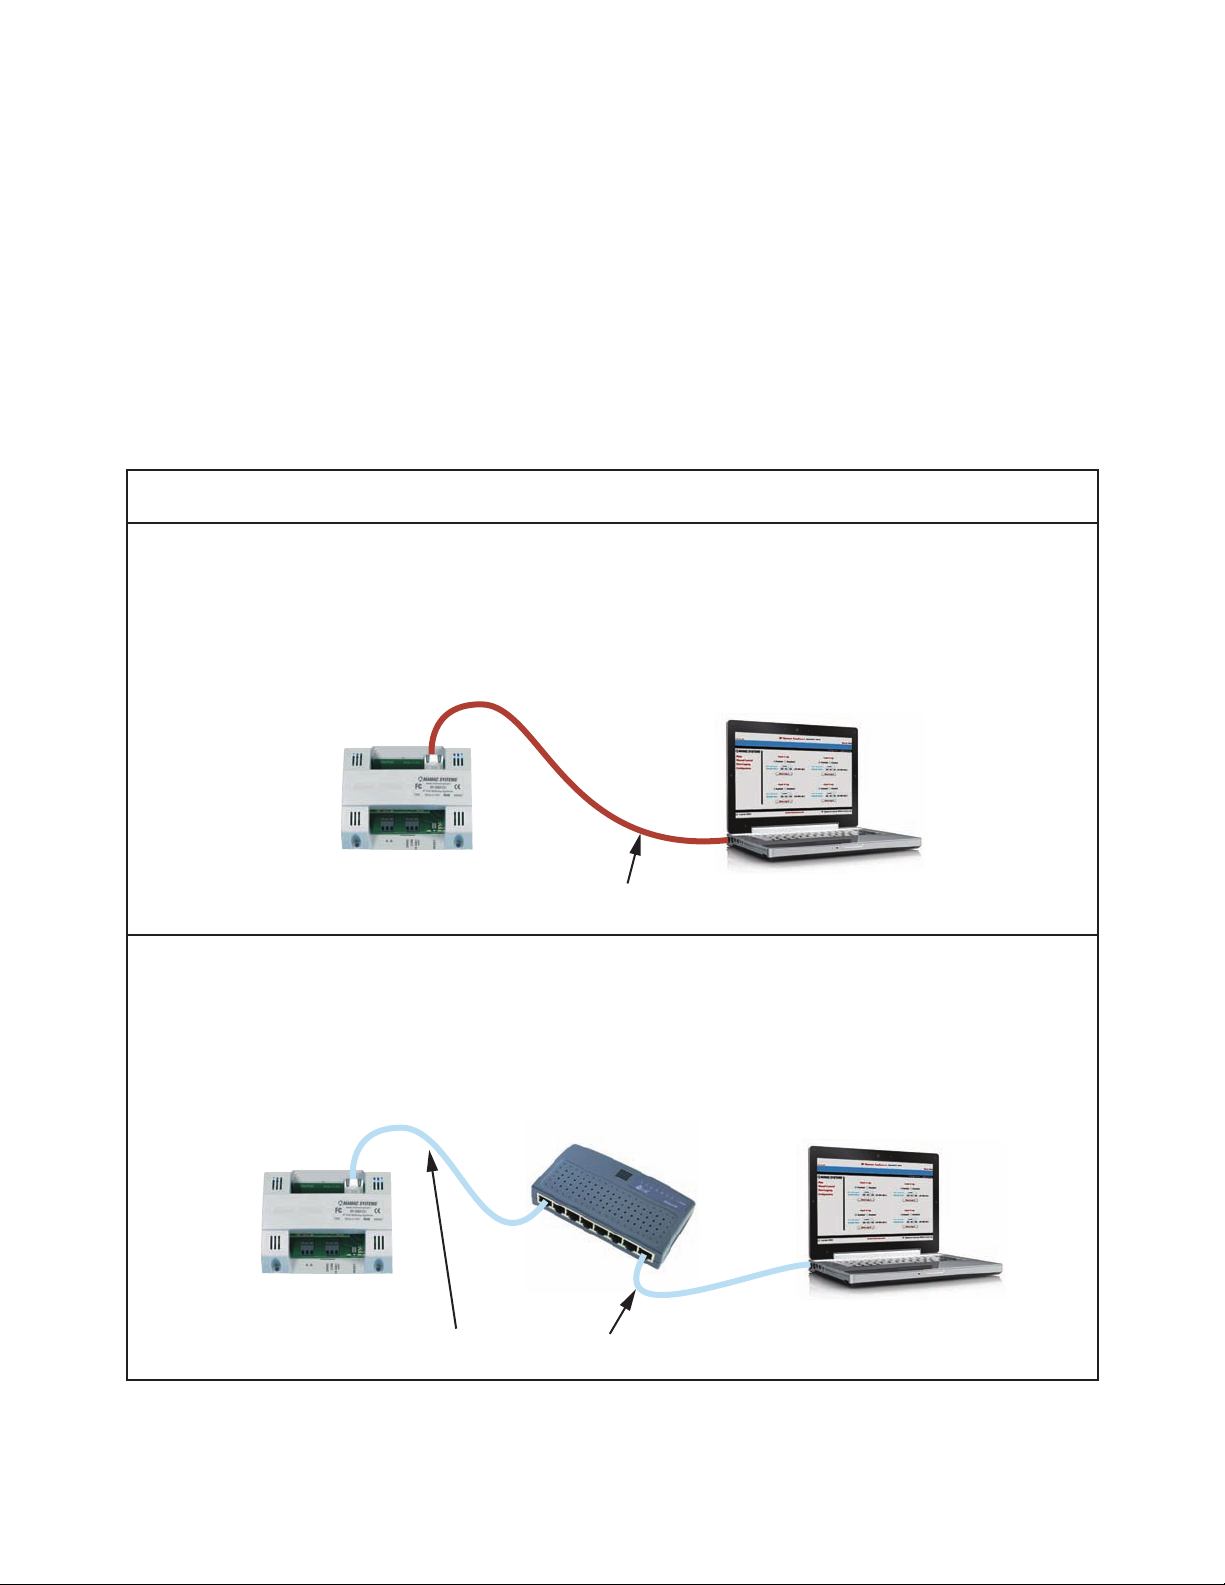
For first time start-up, a laptop/PC and a crossover cable is required. If a crossover cable is not
available, a hub can also be used as shown in Figure 4B. Terminate the appliance as shown in Figure 3.
Unplug the input and output terminal blocks and leave only the power terminal block plugged in.
Attach the crossover cable to the appliance and the other end to the laptop ethernet jack as shown in
Figure 4A. If using a hub, attach a CAT 5 patchcord between the appliance and the hub and another
CAT 5 patchcord between the hub and laptop as shown in Figure 4B.
Turn the power on. The Power LED will come on. After 10 seconds the Heartbeat LED will start
blinking at one pulse per second rate. The Link LED should light up if the appliance is correctly
connected to the laptop/PC.
Figures 4A and 4B
Figure 4A
Configuration 1
IP Sub Metering
Laptop/PC
Appliance
IP Sub Metering
Appliance
Cat 5 Crossover Cable
Figure 4B
Configuration 2
Ethernet Hub Laptop/PC
Cat 5 Patchcord Cable
DN IS-IPSM101.1
® Registered trademark MAMAC SYSTEMS, Inc.
7 of 17
© Copyright 2009
Page 9
SECTION 2 - Internet Protocol
2.1.0
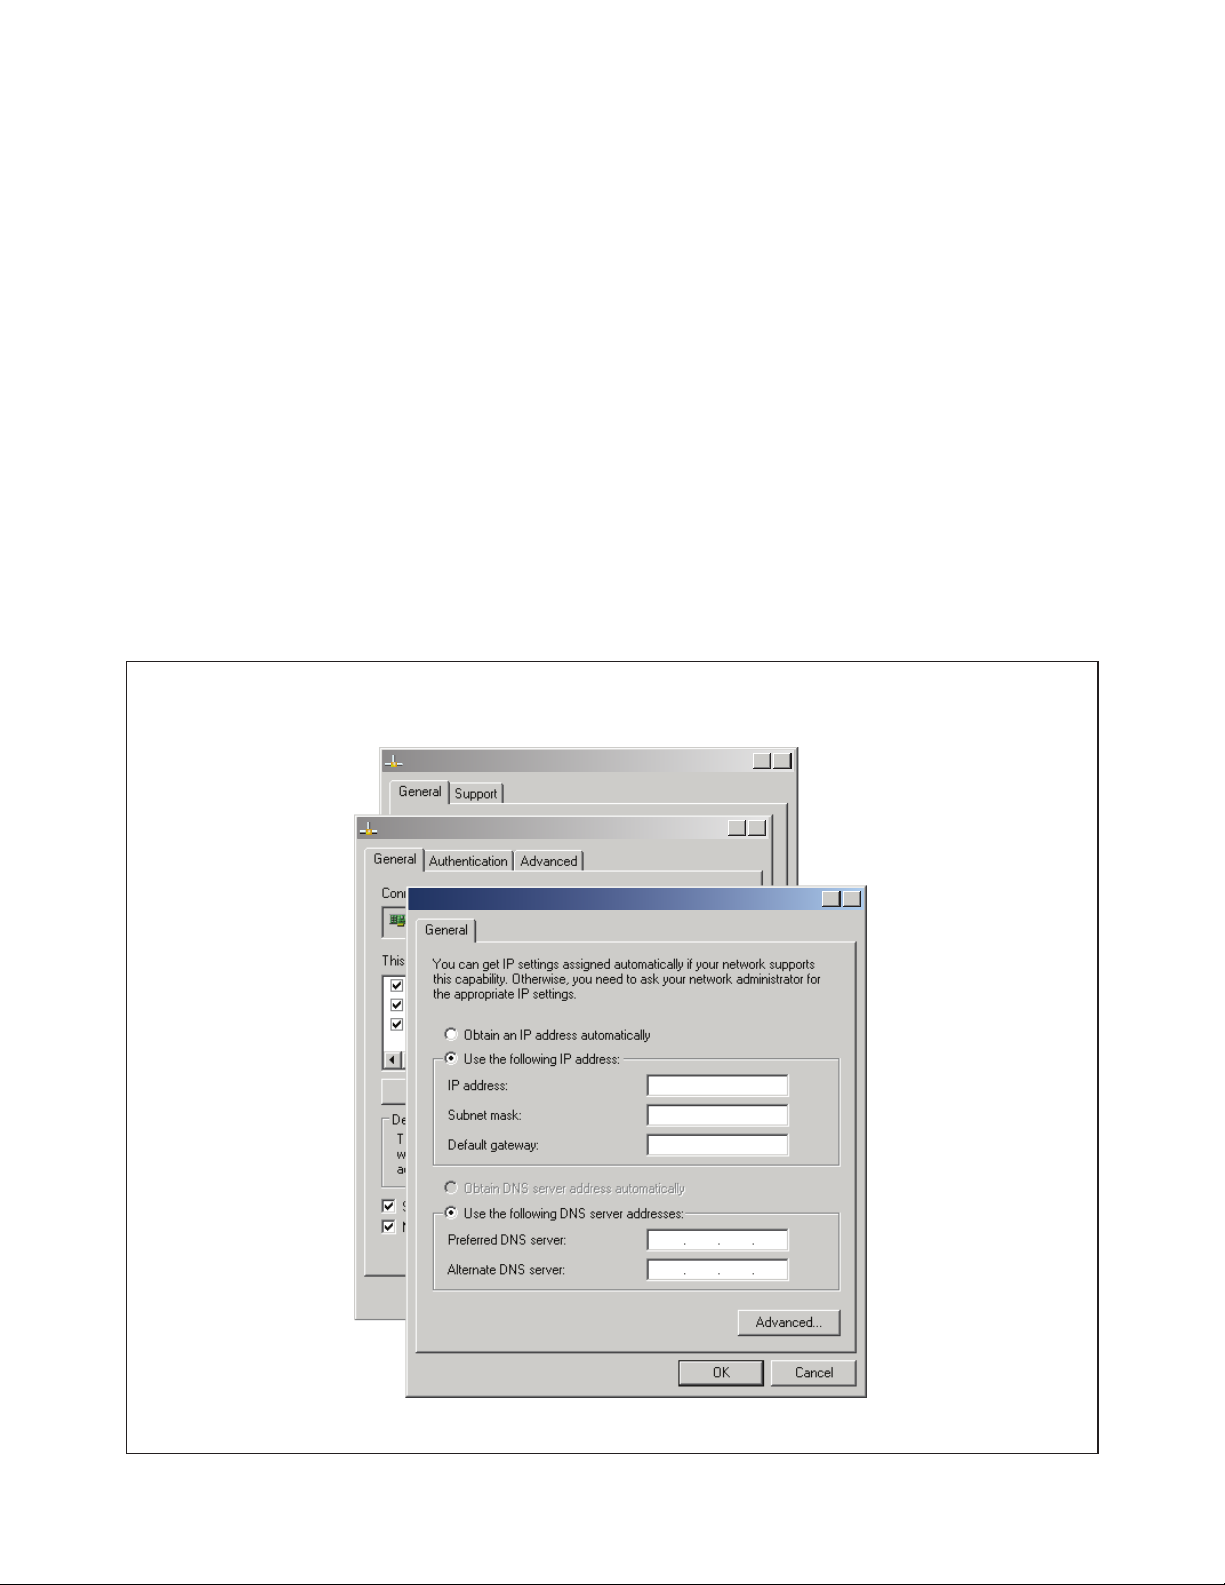
Insure that the laptop/PC network settings are set up correctly. From the Start menu, go to
Settings, click Network Connections. Double-click the Local Area Connection icon. Local
Area Connection Status screen will open. Click on the Properties tab. Local Area Connection
Properties page will open. Scroll down to Internet Protocol (TCP/IP) and click/highlight. Now
click on the Properties tab on the same screen. Internet Protocol (TCP/IP) Properties page will
open. Click the Use the following IP address: radio button. Now punch in a static IP address
with the same subnet as the appliance as shown in Figure 5. Example: 192.168.1.XX. The XX
can be any number except 10 because the Maverick default IP is 192.168.1.10. We recommend
using 192.168.1.11. Now click on the second line Subnet mask. It should automatically fill in
with 255.255.255.0. If it does not, please input the subnet as shown below. Default Gateway and
DNS setup is not required for initial setup. Fields can be left blank. Click OK. Now OK or Close
out of the Network Connections.
If Windows wants to restart the laptop/PC after the network configuration, please do so.
Laptop/PC is configured to do initial configuration of the appliance. Launch the Internet Explorer
or Firefox web browser. Delete everything in the address box and punch in the default IP
192.168.1.10. Press enter. The Maverick will connect, and the Password/Clock page will be
served up by the appliance to force the user to change the password.
Figure 5
Local Area Connection Status
Local Area Connection Properties
Internet Protocol (TCP/IP) Properties
?
X
?
192 . 168 . 1 . XX
255 . 255 . 255 . 0
. . .
X
X
?
DN IS-IPSM101.1
® Registered trademark MAMAC SYSTEMS, Inc.
8 of 17
© Copyright 2009
Page 10
SECTION 2 - Password/Clock Configuration
2.2.0
2.2.1
2.2.2
2.2.3
2.2.4
2.2.5
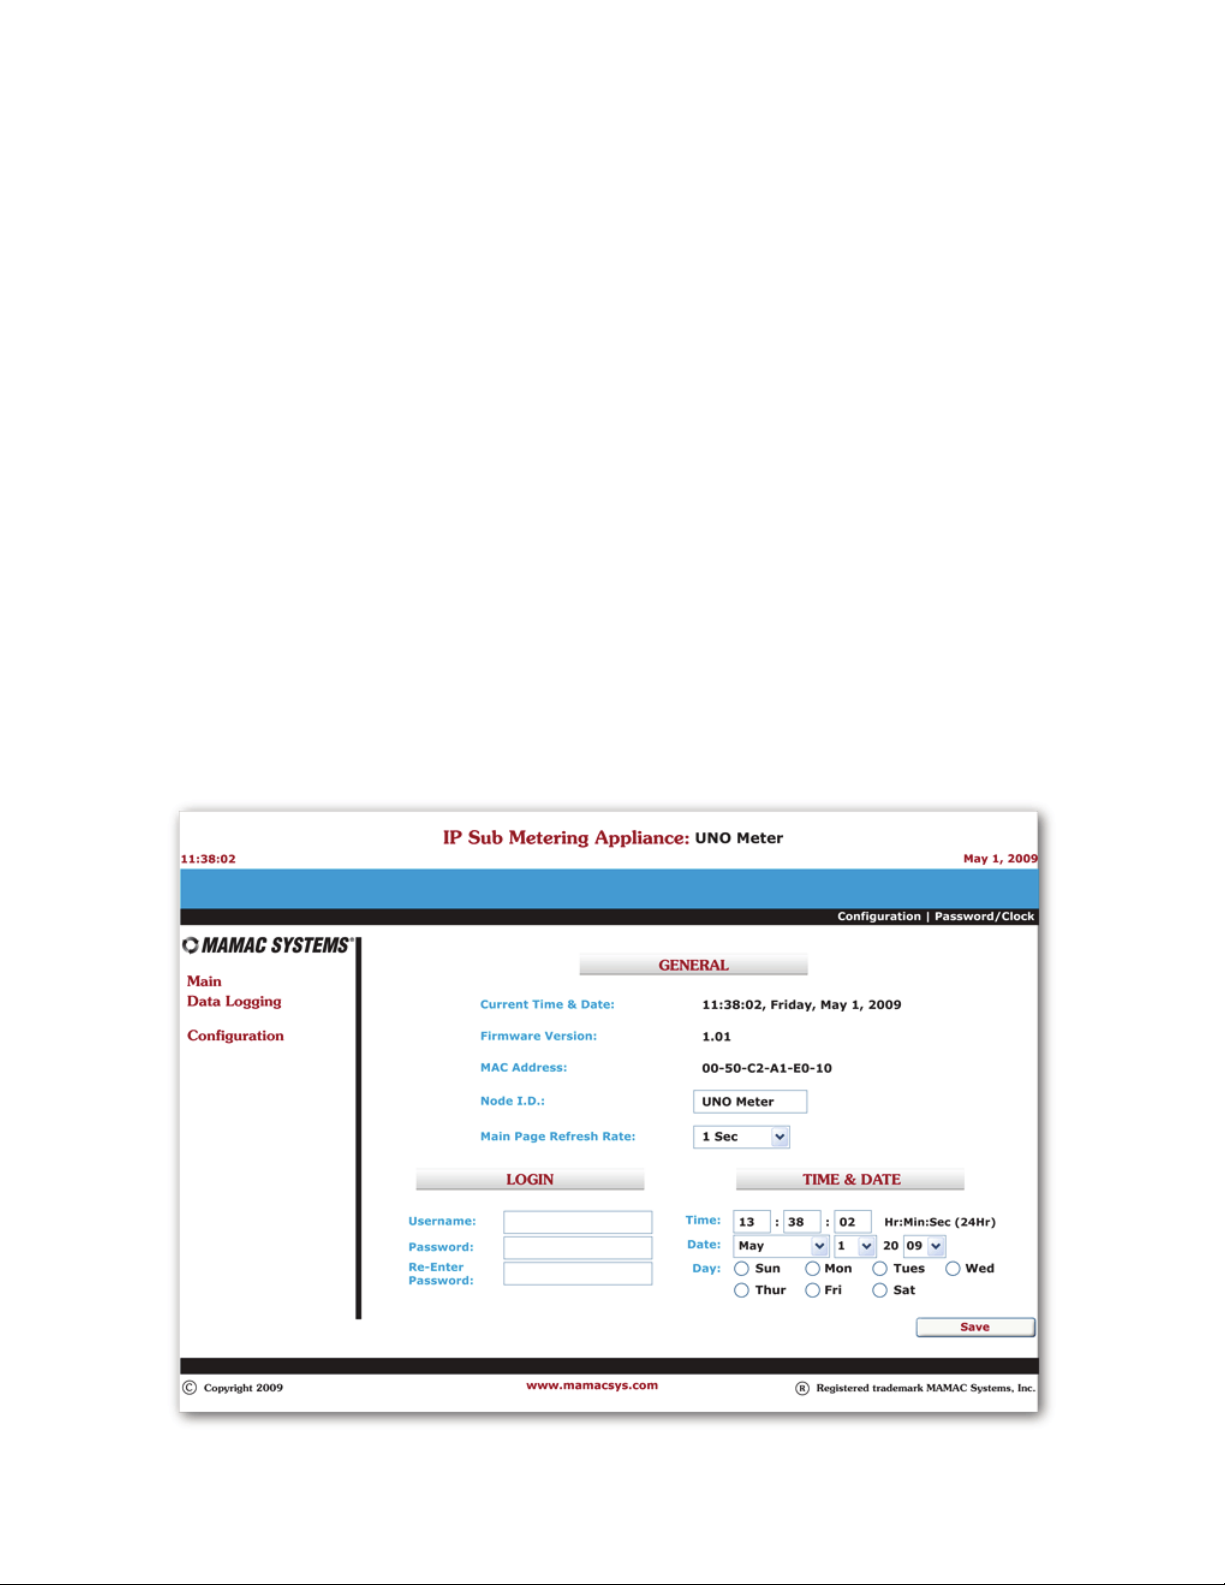
When connecting to the IP Sub Metering Appliance the first time, the Password/Clock page
will be served up by the Maverick to force the user to change the default password and
username. Current time, date, firmware version and MAC address is displayed on the
Password/Clock page for reference purposes.
Node I.D.: Please fill in the name of the appliance in this field. Maximum 20 alpha and/or
numeric characters (uppercase or lowercase).
Main Page Refresh Rate: The Maverick appliance uses AJAX and XML to automatically
refresh the Main page. The default refresh rate is 1.0 second. If the user desires to slow down
the refresh rate, click on the down arrow and pick the desired refresh rate.
Username: Default username is admin (Lowercase). Please enter a username up to 20 alpha
and/or numeric characters. Caution: Username field is case sensitive.
Password: The default password is password (Lowercase). Please enter a new password up
to 24 alpha and/or numeric characters. Caution: Password field is case sensitive.
Time & Date: The current time and date is displayed on the top of the page. Update time,
date and day as needed.
Click Save. All fields will update on the page.
DN IS-IPSM101.1
® Registered trademark MAMAC SYSTEMS, Inc.
9 of 17
© Copyright 2009
Page 11
SECTION 2 - Network & Email Configuration
2.3.0
2.4.0
Static IP Network Configuration
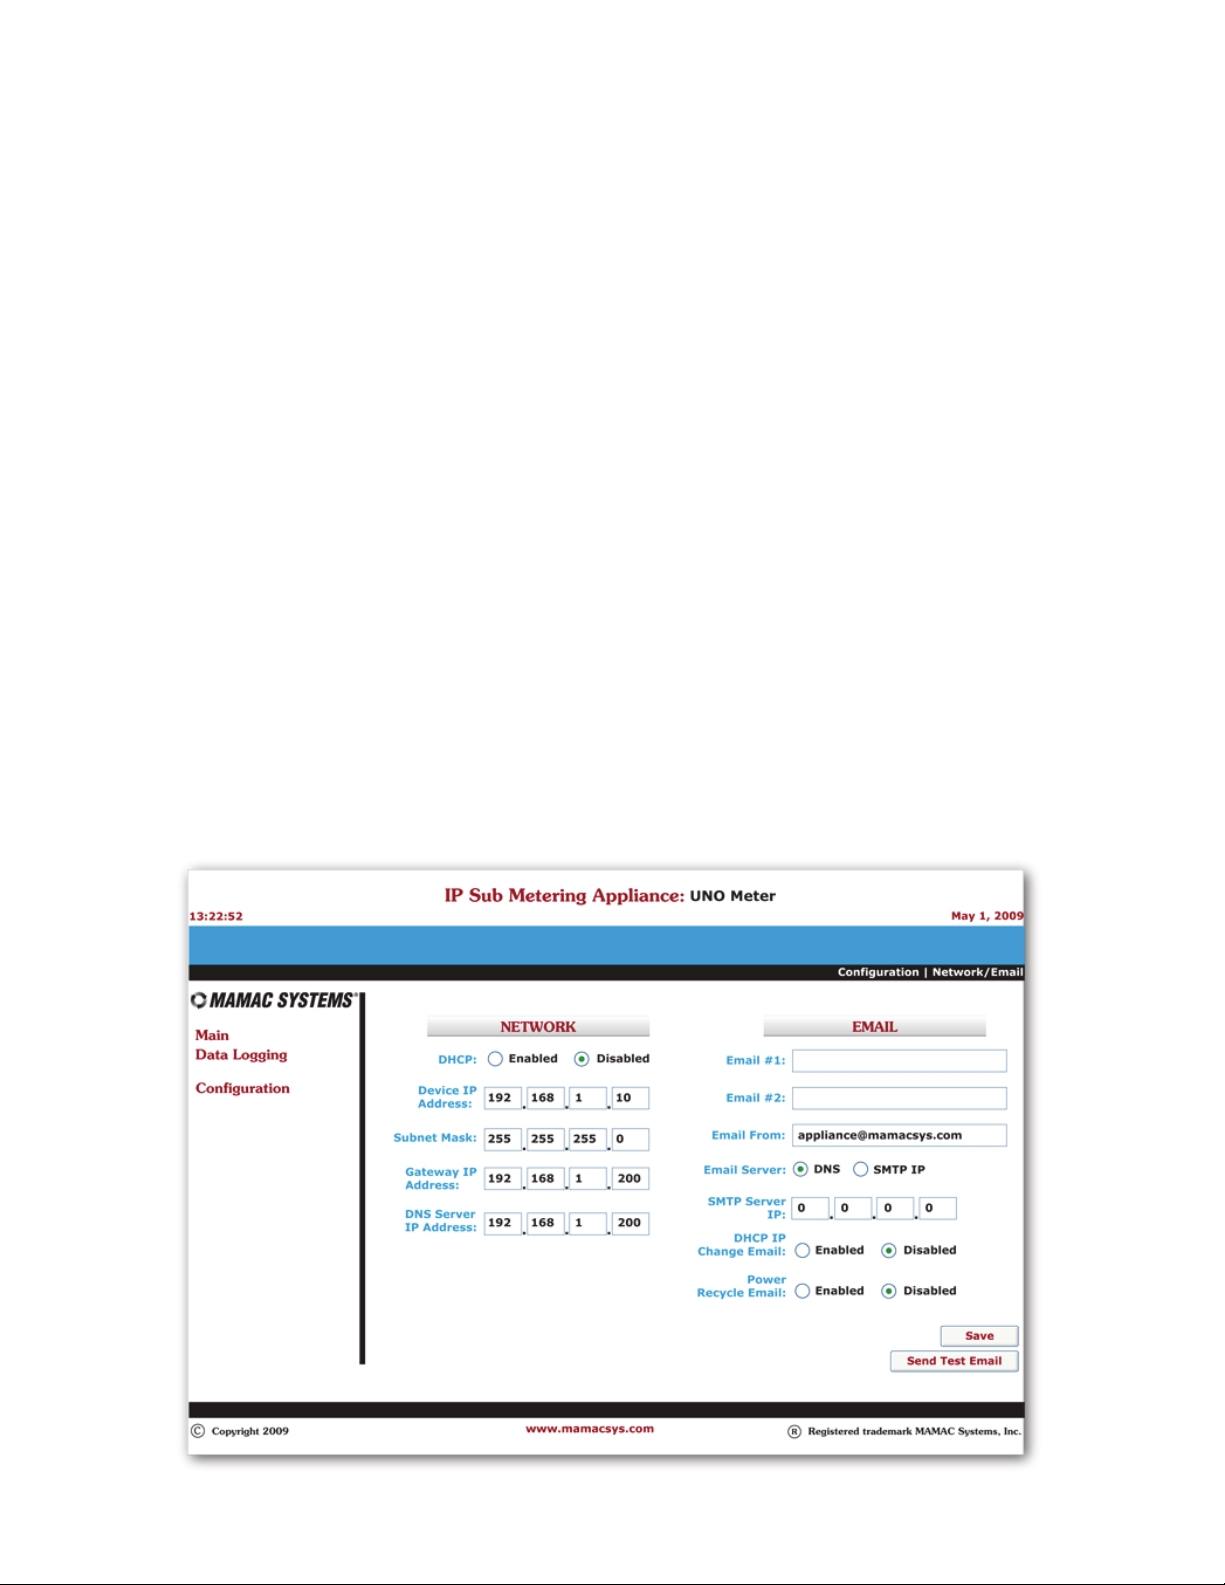
The Maverick appliance can be configured with a Static IP or DHCP. From the Main page select
Configuration and highlight Network/Email, and the appliance will serve up a new page. The default
configuration is Static IP (DHCP disabled). Fill in the Device IP Address, Subnet Mask, Default
Gateway and DNS Server in the appropriate fields. The Static IP set up is exactly the same as any
laptop/PC network configuration.
Enter up to two email addresses in the appropriate fields for the Maverick email alerts. Since the
Maverick sends a SMTP email directly without an ISP account, the Email From field must have a valid
email address, or some email servers/ISP may reject the email. For the Email Server based on
preference click the DNS or SMTP IP button. In most cases if not all, DNS (default) is used, and a DNS
(Domain Name System) server is available on the network to resolve the host name to an IP address. If
a power cycle email is desired, click the Enabled button. For static IP configuration, leave the DHCP
IP Change Email Disabled (default).
(Default Email From: [email protected].)
Click Save.
DHCP Network Configuration
Dynamic Host Communication Protocol is used if a static IP is not available. To configure the
appliance as DHCP click the DHCP Enabled radio button. Please insure that at least one valid email
is set up in the Email #1 or Email #2 field. Click DHCP IP Change Email radio button to
The email section is configured the same as above. Click
Save. WARNING: In DHCP
Enabled.
configuration insure that there is a valid email address in one of the fields and DHCP
IP Change Email is Enabled
user of its DHCP server-assigned IP address.
. This is required for the Maverick to send an email and inform the
DN IS-IPSM101.1
® Registered trademark MAMAC SYSTEMS, Inc.
10 of 17
© Copyright 2009
Page 12
SECTION 2 - Meter Configuration
2.5.0
2.5.1
2.5.2
2.5.3
2.5.4
2.5.5
2.5.6
Caution: Before starting the IP Sub Metering Appliance, please insure that the time and date
are configured to maintain data integrity.
Note: Disconnect the pulse input terminal block.
Reset Meter: Click the Reset Meter button to reset all data fields to zero.
Constant: Input the meter constant. The meter constant is the value per pulse. For
example, if each pulse is equal to 100 Watts and the unit of measure is KWH, the meter
constant will be 0.100. Similarly, if the water meter gives a pulse each gallon of flow per
minute and the units are GPM, the meter constant will be 1.000. Meter constant can be from
0.001 to a maximum of 9.999.
Units: Enter units of measure. Example: KWH, GPM, LPM, CFM, BTUH, MWH, etc.
Maximum 5 alpha and/or numeric characters (uppercase and/or lowercase).
Save: Click to save.
Note: Re-connect the pulse input terminal block. The IP Sub Metering Appliance is now
ready to log data.
12:57:39
Main
Data Logging
Configuration
c
Copyright 2009
IP Sub Metering Appliance:
METER CONFIGURATION
Constant:
www.mamacsys.com
1.000
Reset Meter
UNO Meter
Units:
Save
Configuration | Meter
KWH
R
Registered trademark MAMAC Systems, Inc.
May 1, 2009
® Registered trademark MAMAC SYSTEMS, Inc.
11 of 17
© Copyright 2009DN IS-IPSM101.1
Page 13
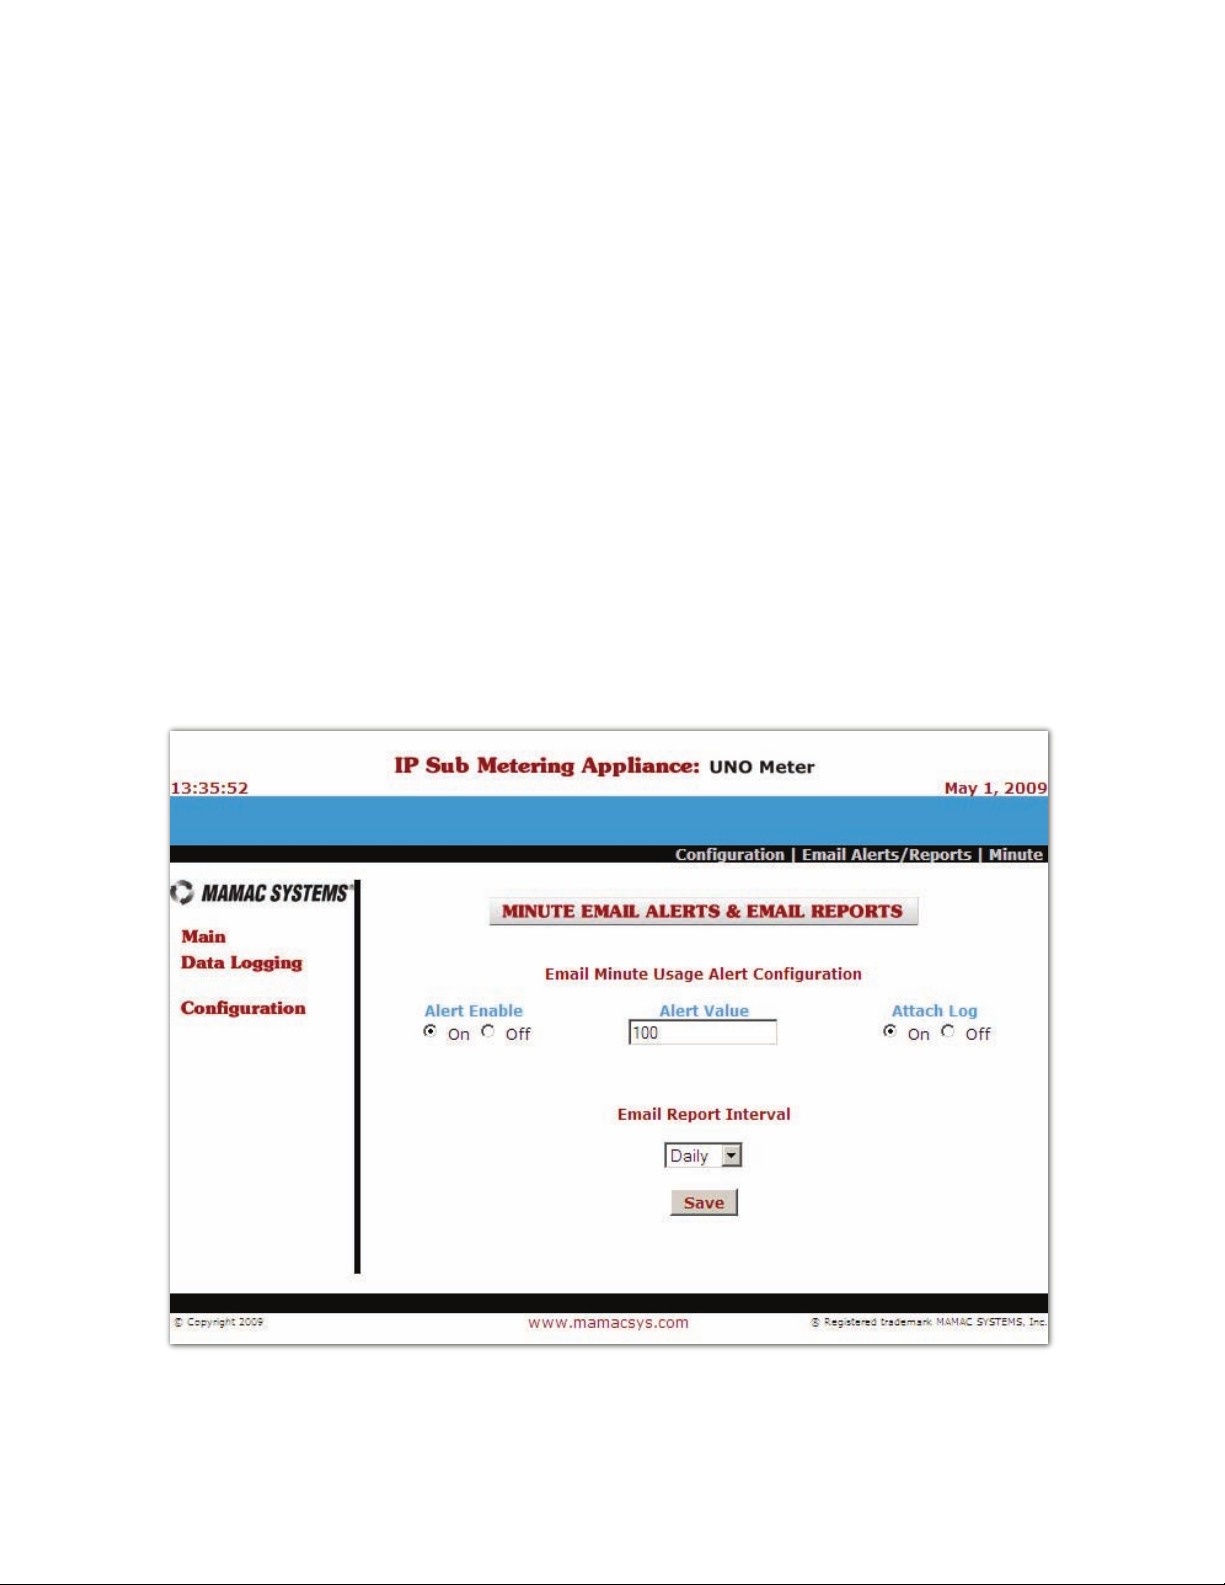
SECTION 2 - Email Alerts & Periodic Email Reports
2.6.0
2.6.1
From the navigation bar, click to highlight Configuration and select Email Alerts/Reports.
The appliance will serve up a new page to configure minute, hourly, daily, weekly or monthly
email alerts and periodic email reports.
Click on the desired email alert/periodic report. A new page will open for the specific time
period. If an email alert is desired, click on the Alert Enable radio button. Enter the value in
the Alert Value field. The value can be 1 to 155575069890.
The appliance also logs consumption by the minute, hour, day, week and month in a CSV file.
By clicking on the Attach Log radio button, the appliance will attach the log with the email
alert.
If a periodic email report is desired, click the down arrow in the Email Report Interval field
and select the appropriate report interval. The appliance will send an email at the end of each
configured period and attach a CSV log file for the consumption during that time period.
Multiple email alerts and periodic reports can be configured on the appliance.
® Registered trademark MAMAC SYSTEMS, Inc.
12 of 17
© Copyright 2009DN IS-IPSM101.1
Page 14
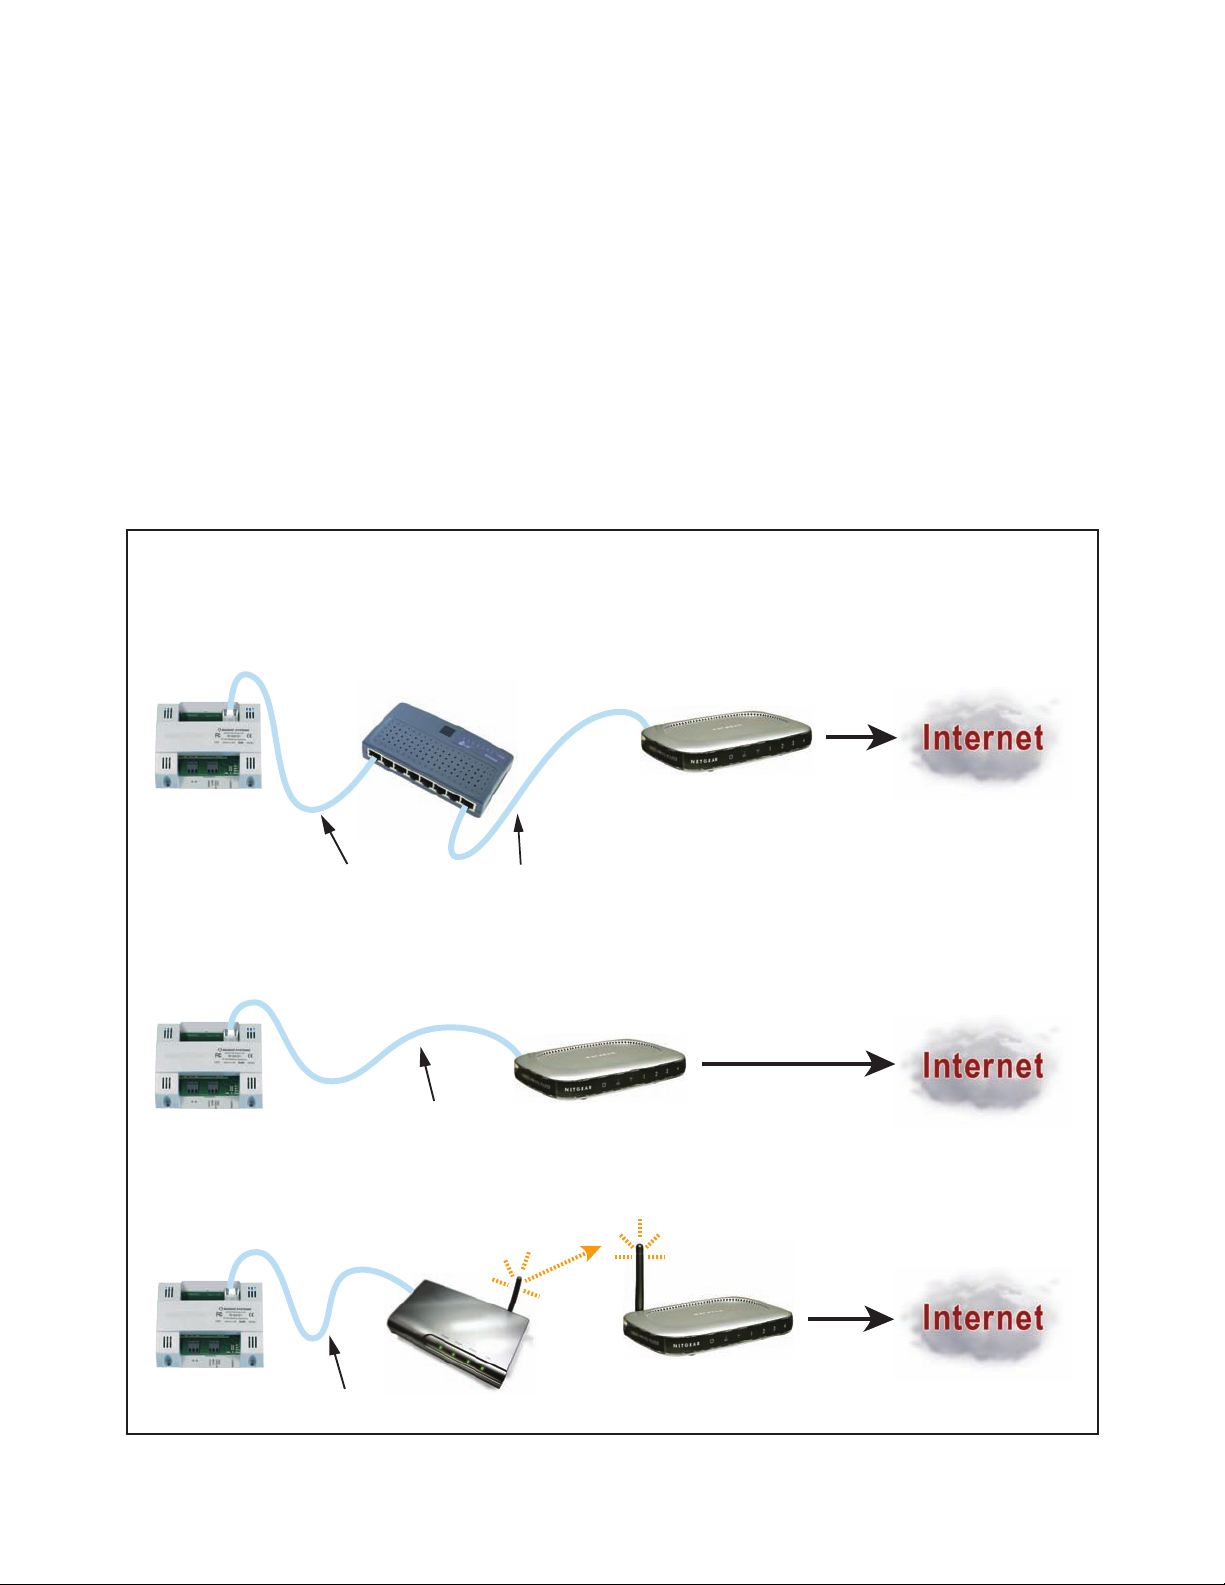
SECTION 3 - Network Configuration Options
3.0.0
Static IP Address: After the initial configuration, power down the appliance by unplugging the
power terminal block and disconnect the crossover cable. CAUTION: Each time the static IP
is changed, power cycle the appliance to load up the new static IP. Connect the
Maverick to the ethernet as shown in Figure 6. Three options are available -- 1) Use a CAT 5
patchcord and plug it into a hub or switch and connect the hub/switch to a router on the web. 2)
Use a CAT 5 cable to connect directly to the router. 3) Configure an Ethernet Bridge and router
and connect the appliance to the Bridge with a CAT 5 cable. For more information on wireless
802.11 B/G configuration, please refer to AN IP802.11.
Connect the pulse input as shown in Figure 3 (Section 1.4.2). Power up the appliance. To connect
to the appliance, launch a web browser (Internet Explorer or Firefox) on a laptop/PC, PDA or
web-enabled mobile/cell phone. Delete all text in the browser address bar and punch in the static IP
address and hit enter. The Maverick will connect and the Main page will launch. Have fun!
Figure 6
IP
Sub Metering
Appliance
Ethernet Hub
Configuration 1
Router
IP
Sub Metering
Appliance
IP
Sub Metering
Appliance
Cat 5 Patchcord Cable
Cat 5 Patchcord Cable
Configuration 2
Cat 5 Patchcord Cable
Configuration 3
Bridge
Router
Wireless Router
Router
DN IS-IPSM101.1
® Registered trademark MAMAC SYSTEMS, Inc.
13 of 17
© Copyright 2009
Page 15
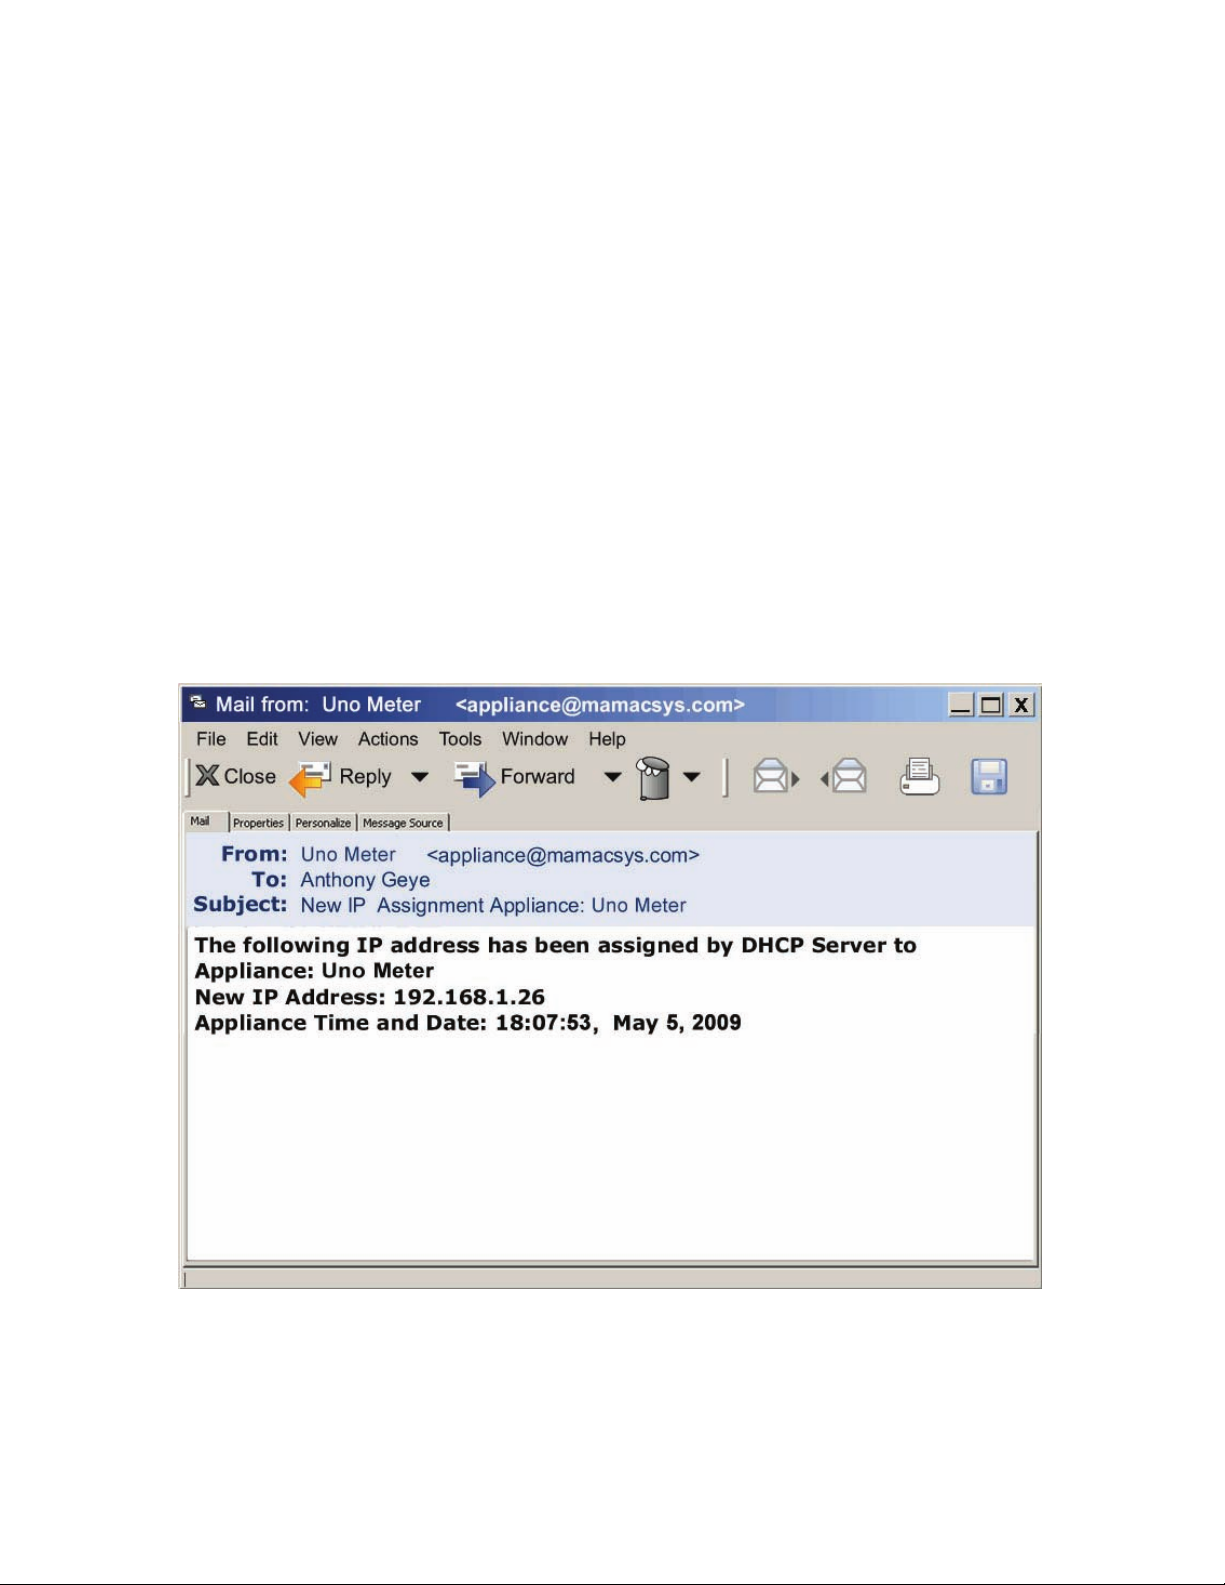
SECTION 3 - Network Configuration Options
3.0.1
DHCP IP Assignment: If during initial configuration DHCP was enabled, power down the
appliance and disconnect the crossover cable. Connect the Maverick to the ethernet as shown in
Figure 6. Three options are available -- 1) Use a CAT 5 patchcord and plug it into a hub or switch
and connect the hub/switch to a router on the web. 2) Use a CAT 5 cable to connect directly to
the router. 3) Configure an Ethernet Bridge and router and connect the appliance to the Bridge
with a CAT 5 cable. For more information on wireless 802.11 B/G configuration, please refer to
AN IP802.11.
Connect the pulse input as shown in Figure 3 (Section 1.4.2). Power up the appliance. As soon as
the Maverick comes on line, it will search for a DHCP server and lease a new IP assignment. As
soon as it gets a new DHCP IP, it will send an email to one or both email addresses with the new
DHCP IP. Once you receive the email, connect a laptop/PC, PDA or web-enabled mobile/cell
phone to the same network and launch the web browser. Enter the appliance internal IP address
and connect. Each time the DHCP server assigns a new IP to the appliance, an email will be
generated to keep the user abreast of the latest DHCP-assigned internal IP of the Maverick.
DN IS-IPSM101.1
® Registered trademark MAMAC SYSTEMS, Inc.
14 of 17
© Copyright 2009
Page 16
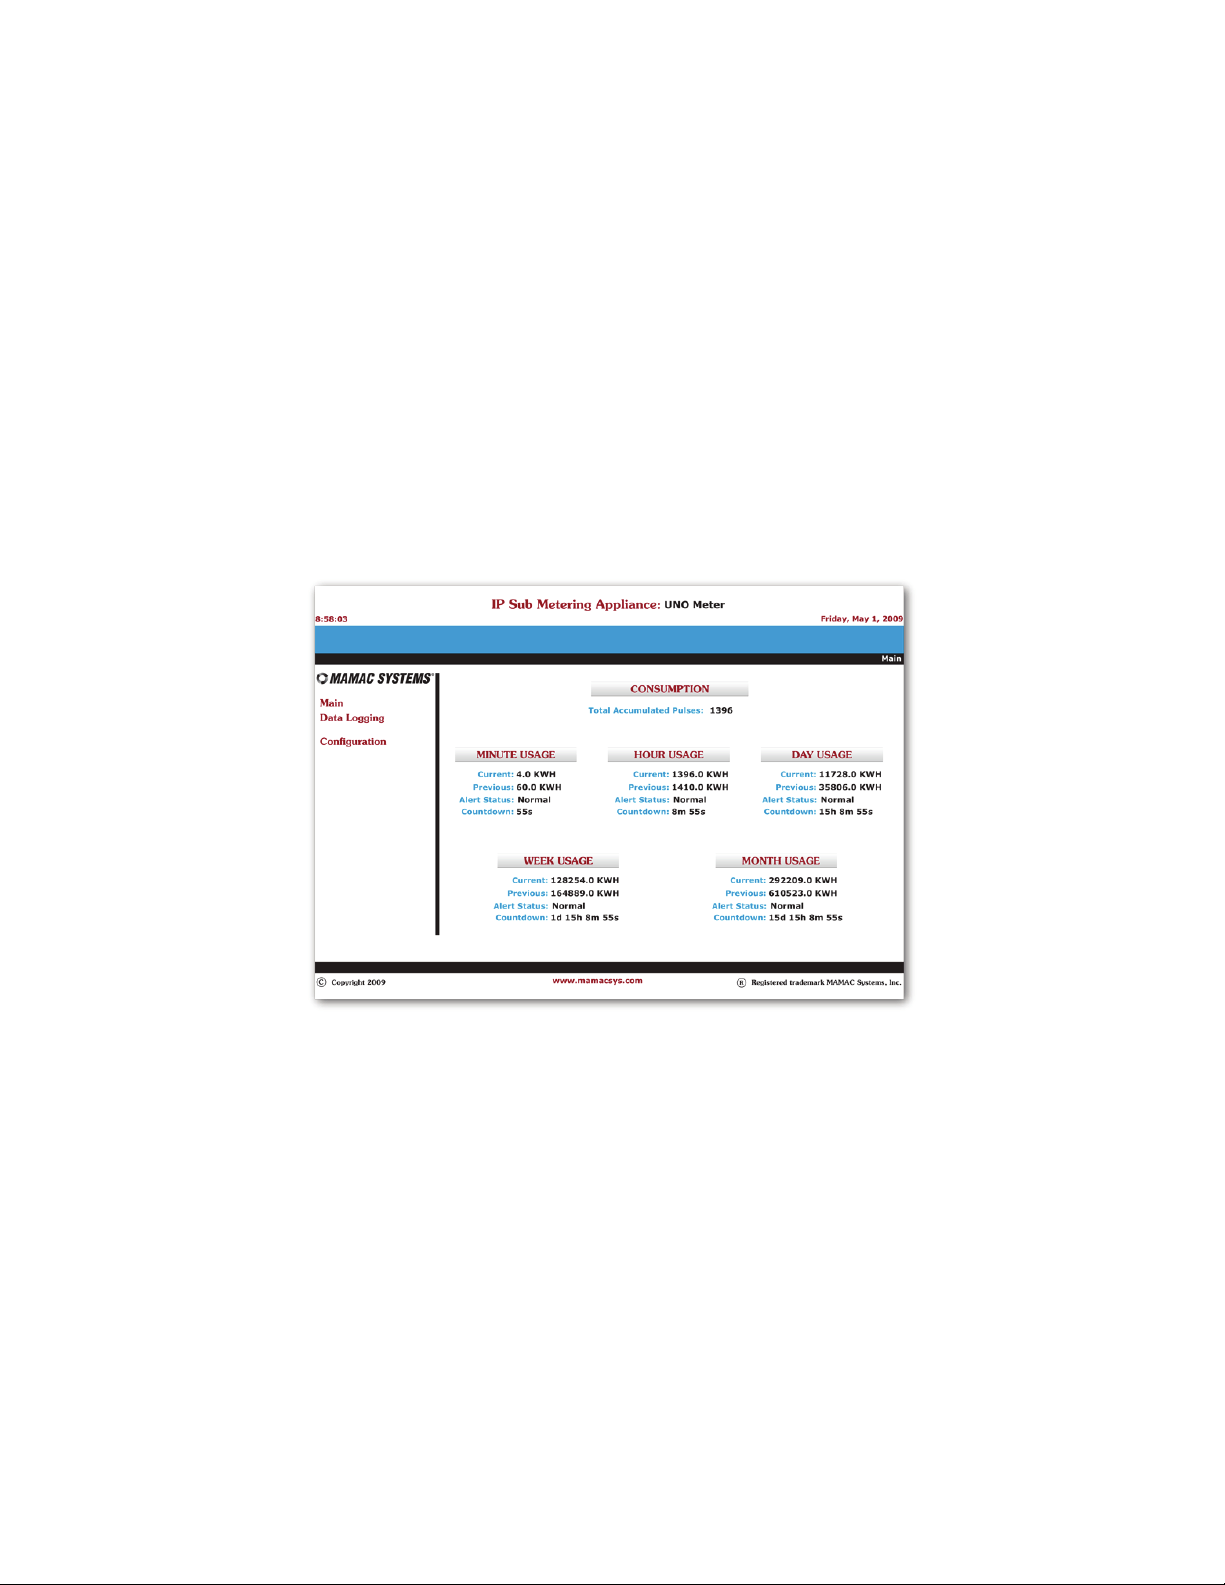
SECTION 3 - Main Page
3.1.0
3.1.1
After the initial configuration, any web browser running on a laptop/PC, PDA or a web-enabled
mobile/cell phone can connect to the appliance. The Maverick will serve up the Main page displaying
consumption by the Minute, Day, Week, Month and Year. For each time period, there is a countdown
timer for the time remaining in the current period. The previous period value is also displayed. Alert
Status for each period consumption is also shown. If consumption for any period crosses the
programmed value, the Alert Status will switch from Normal to Alert in red color. The appliance
uses AJAX and XML to update the values on the Main page without refreshing the whole page. As
a result, one second updates for consumption data is possible.
The Maverick also displays the Total Accumulated Pulses value on the Main page. This value is
the number of total pulses since the last reset. All current data (hour, day, week, month, year), except
current minute consumption, is stored in power-backed-up RAM memory and protected for seven (7)
days without power. In the event of a power outage, only the current minute data is lost. If the
previous minute, hour, day, week, month and year data needs to be protected, we recommend using
a small UPS.
3.1.2
SECTION 3 - Data Logging
Data Logging: The Maverick logs data in a CSV (Comma Separated Values) file which can be
imported into NotePad, WordPad, Word or Excel. To view a CSV file of the logged data, navigate to
the Data Logging icon on the navigation bar and highlight CSV. Click the desired time period:
Minute, Hour, Day, Week, Month or Year. The appliance will serve up the data. To Save or to
Import the CSV file, click File on the browser navigation bar and highlight Save As. Enter a file
name and save the data on the laptop/PC or PDA. Once saved, the file can be imported into any
application which accepts CSV file format or emailed.
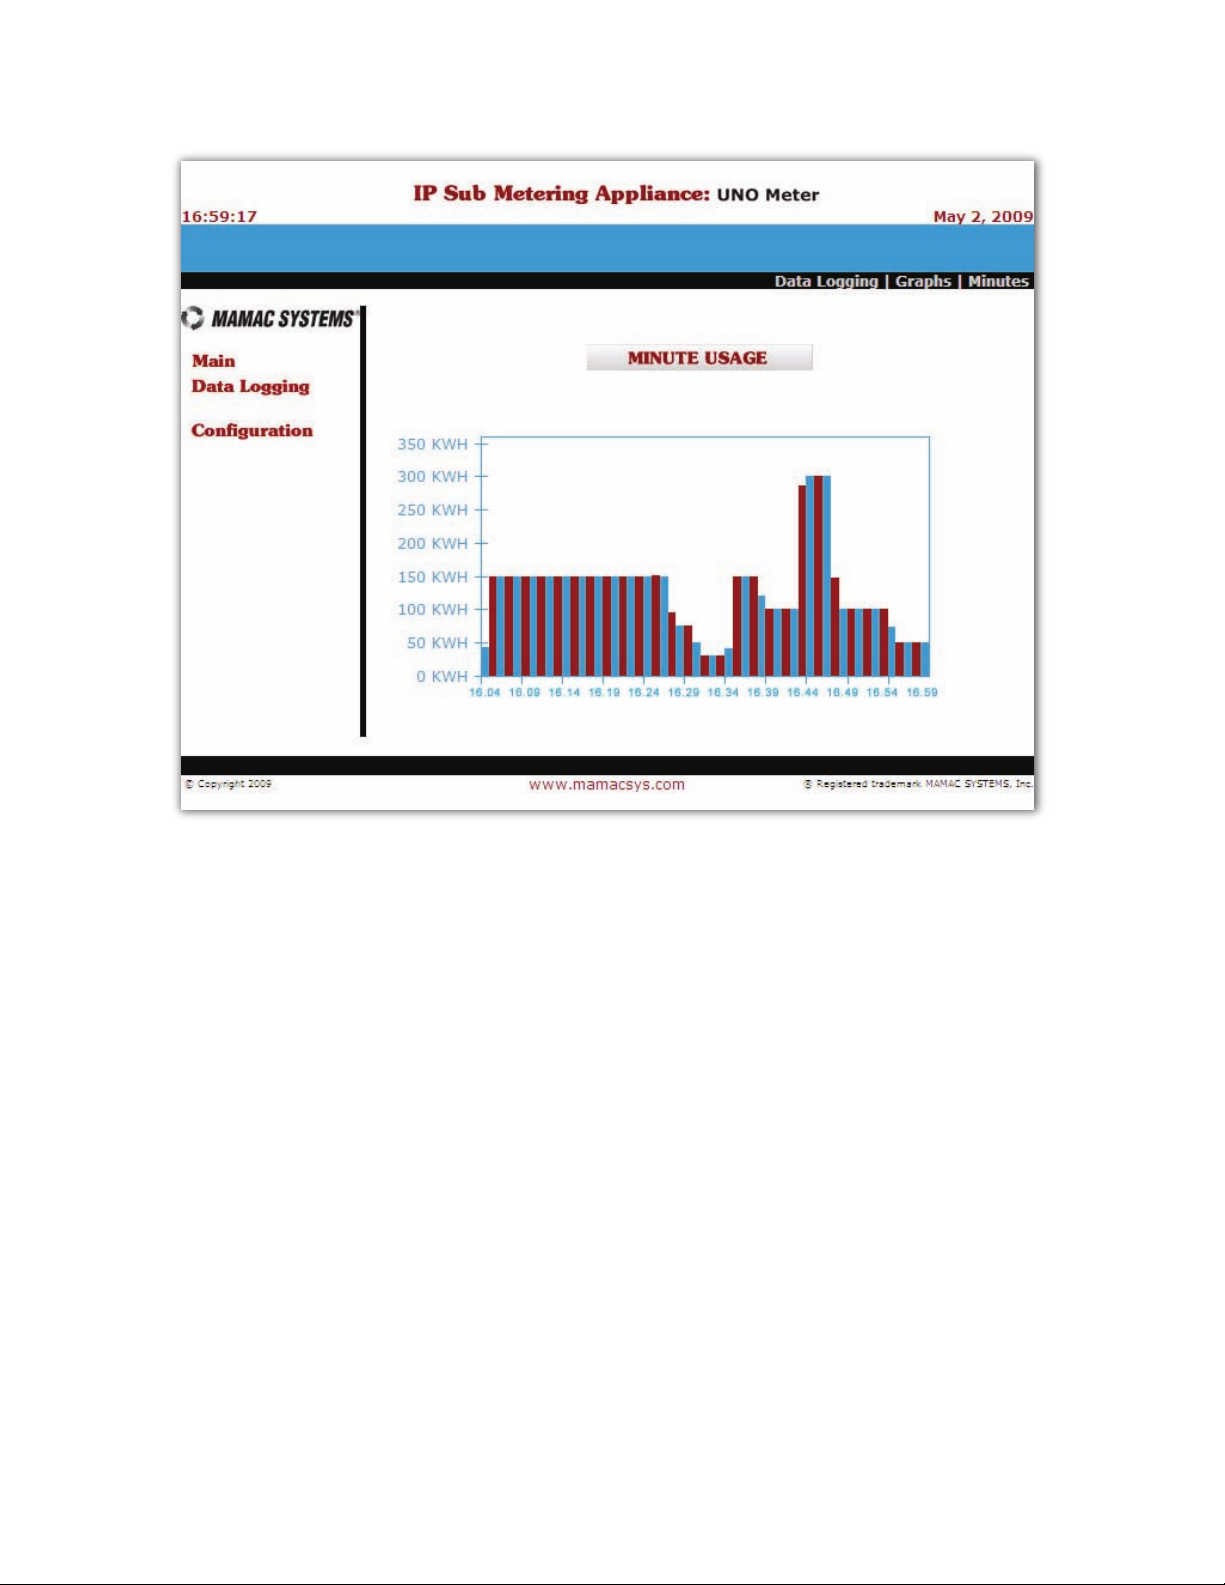
To view the logged data as a bar graph, again highlight Data Logging in the navigation bar, select
Graphs, and click the desired time period. The Maverick will initialize a JavaScript and graph the data.
DN IS-IPSM101.1
® Registered trademark MAMAC SYSTEMS, Inc.
15 of 17
© Copyright 2009
Page 17
SECTION 3 - Reset Button & XML
3.2.0
3.3.0
Reset Button: If the user misplaces the appliance IP address or forgets the password, the
RESET is designed as a Back Door. If any of the above happens, press and hold the RESET
button for more than 20 seconds until the Heartbeat LED stops pulsing; release the switch. The
Maverick IP Address, Username, and Password configuration will revert back to factory defaults.
XML: The appliance has XML embedded with formatted input and output data. Each data field
has an XML tag defined. To view all XML tags, connect to the Maverick with any browser and then
in the address bar of the browser enter the following: Appliance_IP/sm101.xml. As an
example, if the appliance is set up with the default IP to review XML tag page enter
192.168.1.10/sm101.xml in the browser address bar, and the Maverick will serve up the XML
TAG page as seen in Figure 7. For additional information on XML, please review TI IP XML.
® Registered trademark MAMAC SYSTEMS, Inc.
© Copyright 2009DN IS-IPSM101.1
16 of 17
Page 18

Figure 7
<?xml version="1.0" encoding="iso-8859-1" ?>
- <Maverick xmlns="http://mamacsys.com/sm101" version=”2.00”>
<NodeID>UNO Meter</NodeID>
<CurrentTime>15:16:51</CurrentTime>
<CurrentDate>Friday, May 1, 2009</CurrentDate>
<GlobalCount>15600</GlobalCount>
- <Minute id="minute">
<CurrentMinute>581</CurrentMinute>
<PreviousMinute>827</PreviousMinute>
<MinuteAlert>Normal</MinuteAlert>
<Units>KWH</Units>
</Minute>
- <Hour id="hour">
<CurrentHour>34860</CurrentHour>
<PreviousHour>49620</PreviousHour>
<HourAlert>Normal</HourAlert>
<Units>KWH</Units>
</Hour>
- <Day id="day">
<CurrentDay>836640</CurrentDay>
<PreviousDay>1190880</PreviousDay>
<DayAlert>Normal</DayAlert>
<Units>KWH</Units>
</Day>
- <Week id="week">
<CurrentWeek>5856480</CurrentWeek>
<PreviousWeek>8336160</PreviousWeek>
<WeekAlert>Normal</WeekAlert>
<Units>KWH</Units>
</Week>
- <Month id="month">
<CurrentMonth>175694400</CurrentMonth>
<PreviousMonth>250084800</PreviousMonth>
<MonthAlert>Normal</MonthAlert>
<Units>KWH</Units>
</Month>
</Maverick>
® Registered trademark MAMAC SYSTEMS, Inc.
17 of 17
© Copyright 2009DN IS-IPSM101.1
 Loading...