

Malber TD-800 Owner Manual

Condenser Tumble Dryer TD 800
Owner’s Manual
IMPORTANT!
To get the best performance
from your dryer, read all
operating instructions before
using it for the first time.
SAVE THESE INSTRUCTIONS FOR FUTURE REFERENCE

CONTENTS
IMPORTANT SAFETY INSTRUCTIONS 3
DESCRIPTION OF THE MACHINE 4
INSTALLATION INSTRUCTIONS 5
ELECTRICAL CONNECTIONS 6
REVERSING THE DOOR HINGES 7
INSTRUCTIONS FOR USING THE TUMBLE DRYER 8
CARE LABEL INSTRUCTIONS 9
THE CONTROL PANEL 10
RECOMMENDED PROGRAMS AND TEMPERATURE SETTINGS 11
CARE AND MAINTENANCE INSTRUCTIONS 12
CLEANING THE CONDENSER 13
TROUBLESHOOTING 14
QUICK START REFERENCE GUIDE 15
2

IMPORTANT SAFETY INSTRUCTIONS
WARNING!
To reduce the risk of fire, electric shock, or injury
to persons when using your appliance, read the
IMPORTANT SAFETY INSTRUCTIONS below:
♦ Read all instructions before using the appliance.
♦ Do not wash or dry articles that have been
previously cleaned in, washed in, soaked in, or
spotted with gasoline, dry-cleaning solvents,
cooking oils, other flammable or explosive
substances as they give off vapors that could
ignite or explode.
♦ Do not allow children to play on or in the
appliance. Children should be closely
supervised when near the appliance.
♦ Before the appliance is removed from service or
discarded, remove the door to the drying
compartment.
♦ Do not reach into the appliance if the drum is
moving.
♦ Do not install or store this appliance where it
will be exposed to the weather.
♦ Do not tamper with controls.
♦ Do not attempt to repair or replace any part of
the appliance or perform any servicing unless
specifically recommended in this guide.
♦ Do not use fabric softeners or dryer sheets unless
the manufacturer gives written assurance that the
product will not damage a tumble dryer.
♦ Do not heat-dry items containing:
• vinyl, plastic, foam rubber or similarly
textured rubberlike materials
• fiberglass
• wool unless the label specifies “washable”
♦ Clean the lint filter before or after each load.
♦ Keep the area around the exhaust opening and
adjacent surrounding areas free from the
accumulation of lint, dust and dirt.
♦ The interior of the machine should be cleaned
periodically by an authorized Eurotech service
agent.
♦ Do not place items exposed to cooking oils in
your dryer. Items contaminated with cooking oils
may contribute to a chemical reaction that could
cause a load to catch fire.
♦ Electrical installation, if required, must be done
by a licensed electrician.
♦ Do not operate appliance while away from the
home.
♦ The dryer is made and marked to facilitate
recycling. When it is no longer useful, contact
your local refuse collection service for advice
on how to properly dispose of the dryer for
purposes of recycling.
WARNING!
This appliance must be properly grounded.
GROUNDING INSTRUCTIONS
A) Grounding instructions for a grounded,
cord-connected appliance
In the event of malfunction or breakdown,
grounding will reduce the risk of electric shock by
providing a path of least resistance for electric
current. This appliance is equipped with a cord
having an equipment-grounding conductor and a
grounding plug. The plug must be plugged into an
appropriate outlet that is properly installed and
grounded in accordance with all local codes and
ordinances.
WARNING!
Improper connection of the equipment-grounding
conductor can result in a risk of electric shock.
Check with a qualified electrician or service
representative or personnel if you are in doubt as
to whether the appliance is properly grounded.
Do not modify the plug provided with the appliance.
If it will not fit the outlet, have a proper outlet
installed by a qualified electrician.
B) Grounding instructions for a permanently
connected appliance:
This appliance must be connected to a grounded
metal, permanent wiring system, or an equipmentgrounding terminal or lead on the appliance.
NOTE: This manual does not cover every possible
condition and situation that may occur. Use
common sense and caution when
installing, operating, and maintaining any
appliance.
♦ Do not heat dry items that have been dry-
cleaned.
SAVE THESE INSTRUCTIONS FOR FUTURE REFERENCE
3
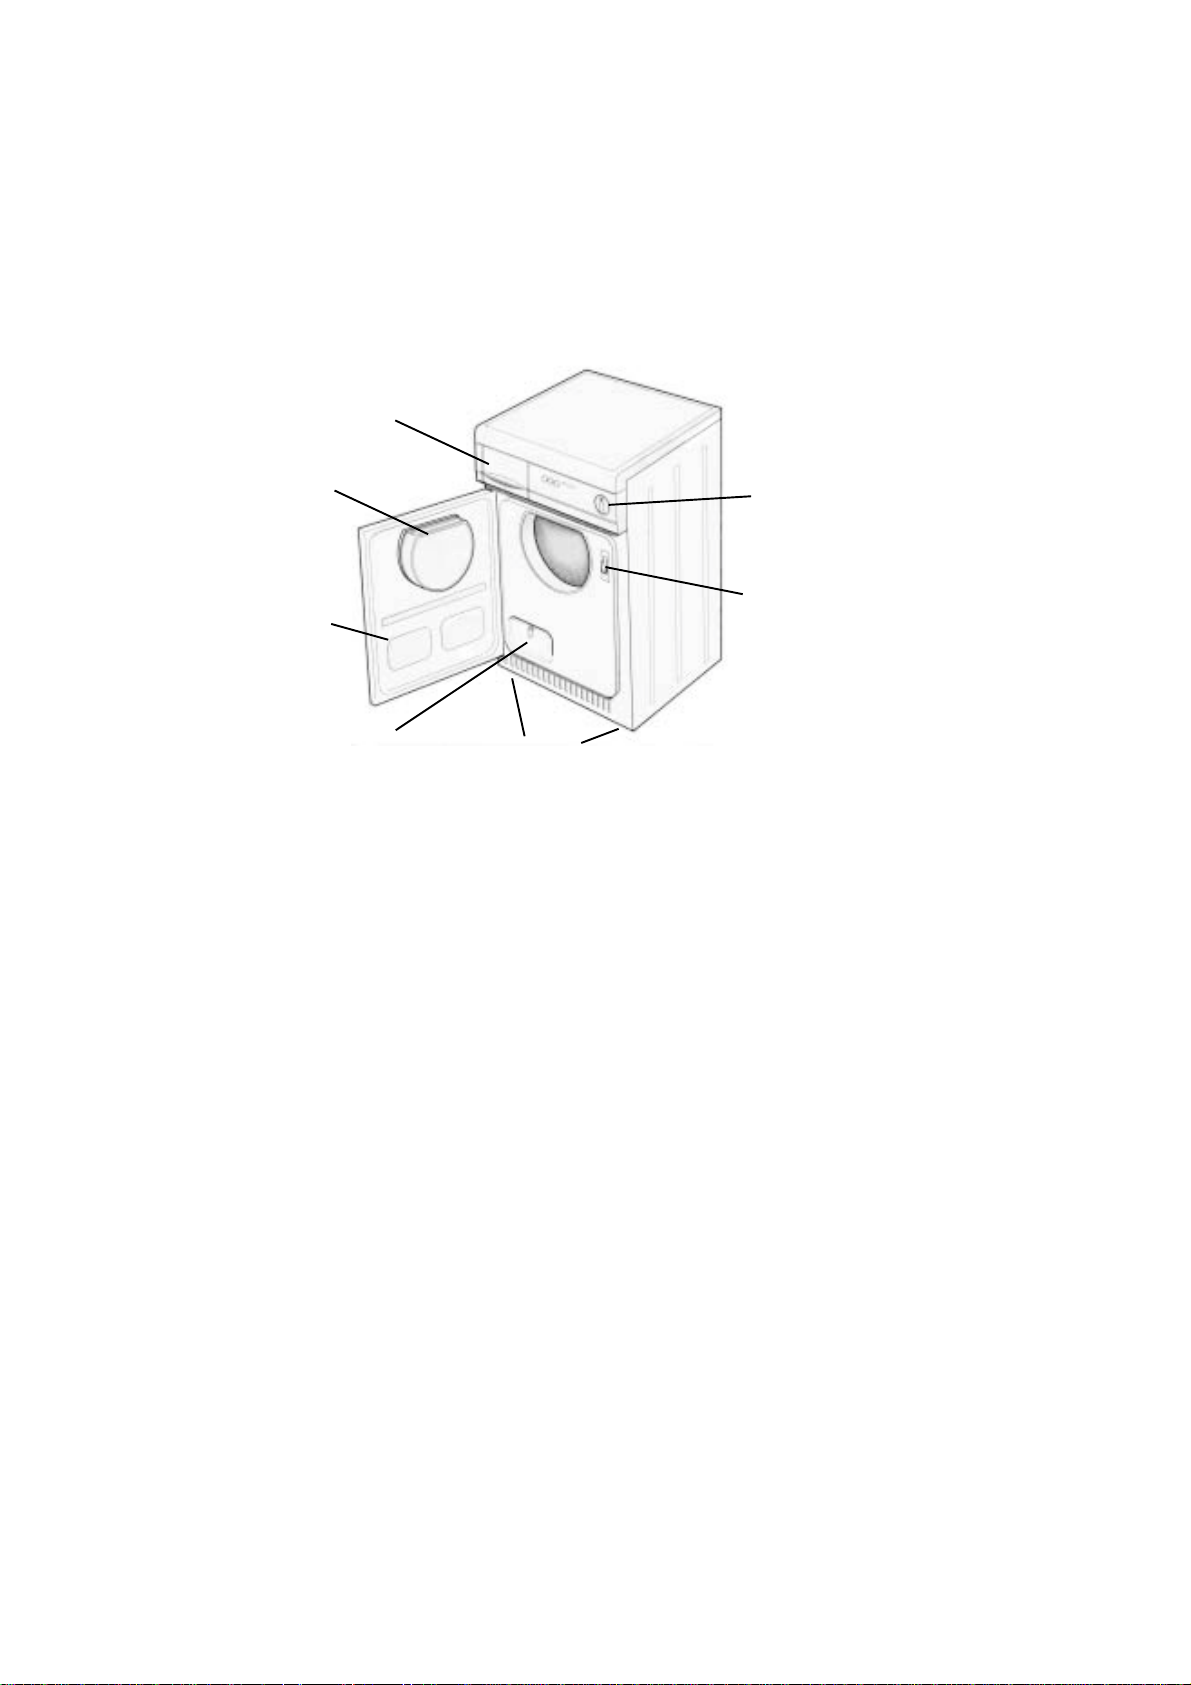
DESCRIPTION OF THE MACHINE
♦ The tumble dryer is constructed in sheet steel panels with a treated and painted finish that ensures its
aesthetic quality remains unaltered over time.
♦ The motor and all moving parts are designed to guarantee minimum noise levels.
♦ The stainless steel drum is large and well mounted to ensure a better quality tumble dryer and a longer
life of clothing.
♦ The control panel lets you use all the drying programs with ease.
♦ The door has a wide opening to facilitate easy loading and unloading of the laundry.
Condensed
water tank
Lint
Filter
Door
Condenser
Adjustable
legs
TECHNICAL INFORMA TION
Drying system Internal Condenser
Drum Capacity 103 liters
Voltage 208/230 V, 60 Hz
Heater 2500 W
Weight Approx . 88 lbs. (39 kg)
Control panel
Magnetic
door catch
DIMENSIONS
Height 33-1/4” (84.45 cm)
Width 23-3/8” (59.37 cm)
Depth w/door closed 22-3/8” (56.83 cm)
Depth w/door open 45-1/8” (114.62 cm)
For additional information, see the type plate located on the door facing.
4
INST ALLATION INSTRUCTIONS
Read these instructions carefully before you install the machine. The installation should be carried out by a
qualified person who is familiar with all local codes and ordinances for electrical connections. Incorrect
installation may cause damage and/or injury. If the integrity of the machine is in doubt, do not use it. Call
your dealer for qualified assistance.
The dryer can be installed in any room with a hard floor. Do not install it on carpeting with heavy pile.
Make sure the air vents on the front and rear of the machine are not covered.
To install the tumble dryer, follow the steps below:
1. Remove the outer wrapping and the polystyrene base. (Check for any cosmetic damage at this time.
2. Move the machine into place.
3. Adjust the levelling legs by lifting the front of the dryer slightly and adjusting the feet to the correct height.
Be careful not to screw the feet down too far and do not use a screwdriver.
NOTE: A badly leveled machine may result in damage to the bearings and premature wear, so we
recommend that you use a spirit level.
4. Connect the condensation hose to a drain (optional).
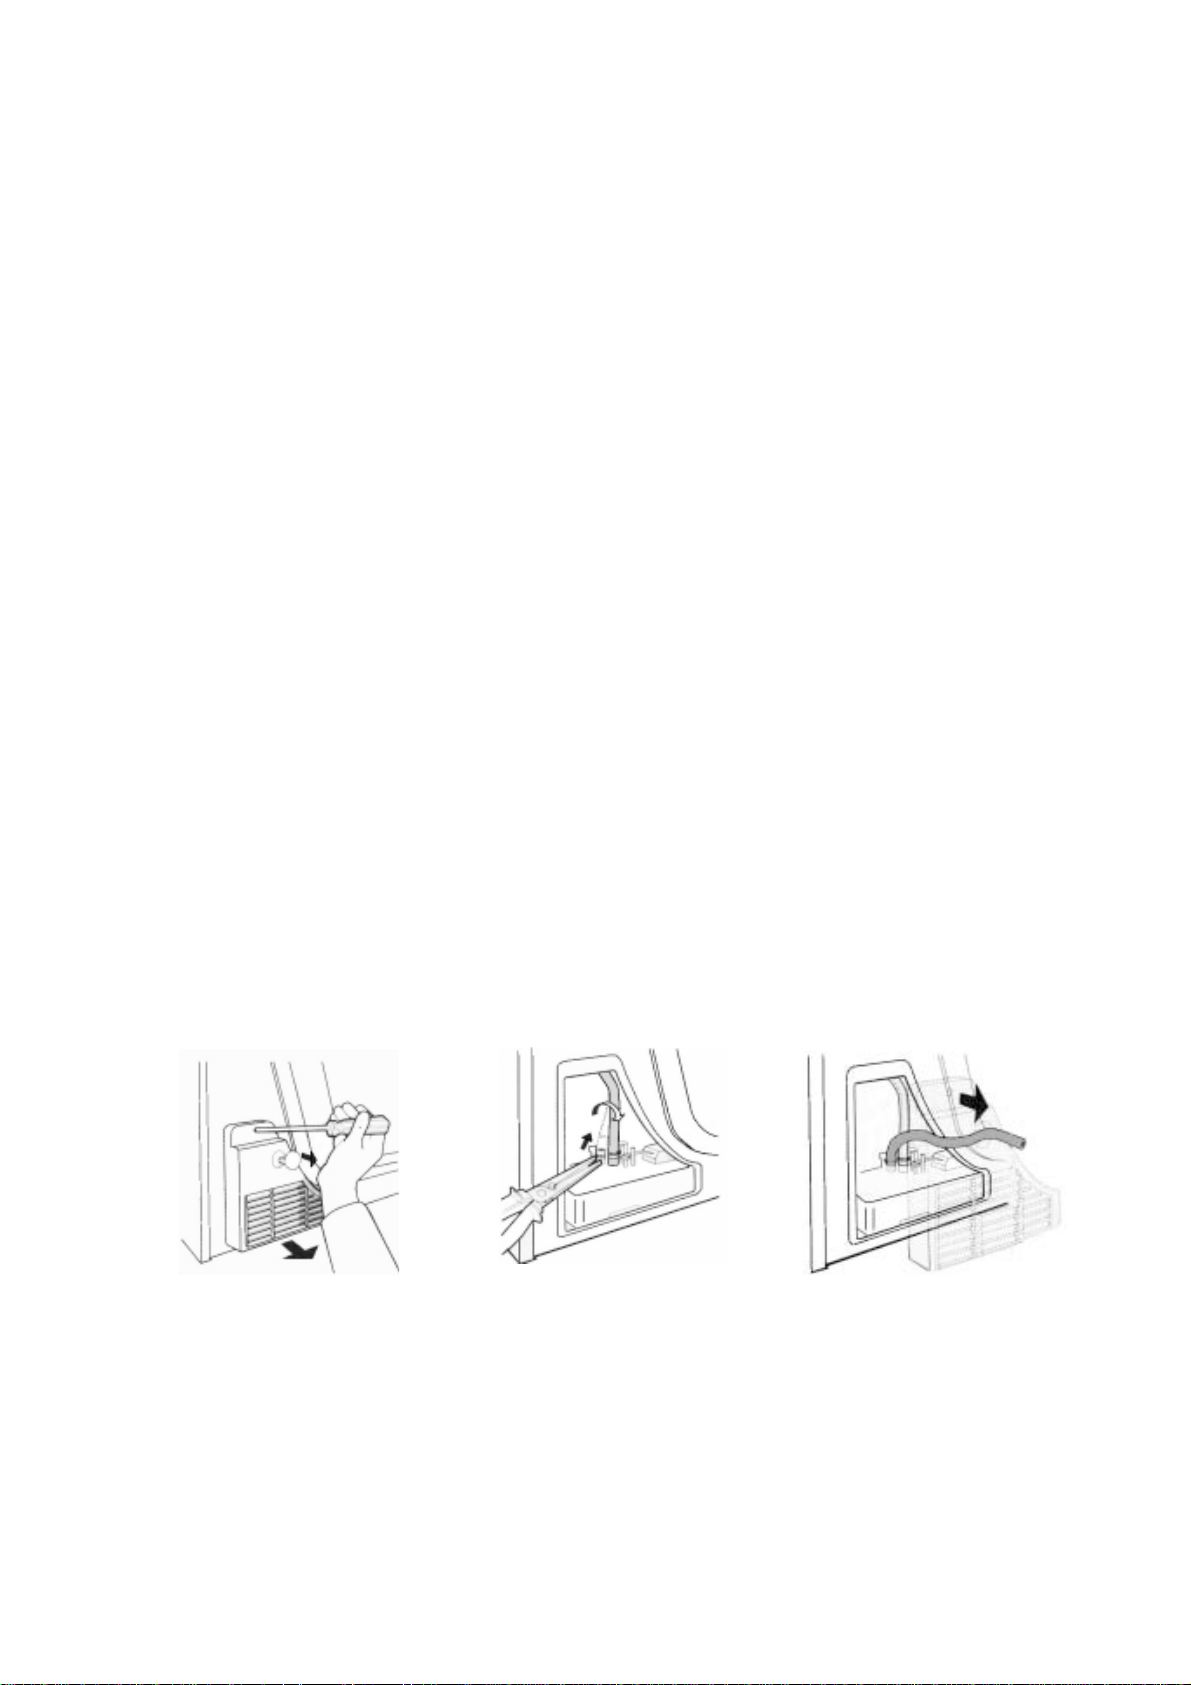
CONNECTING THE CONDENSA TION DRAIN HOSE
Your condenser dryer has a tank that collects the condensed water. If you prefer, however, you can install
the dryer to drain the water directly to a drain pipe. To do this, follow the steps below:
1. Unplug the dryer from the electrical outlet.
2. Remove the vent on the back of the machine (Fig 1).
3. Remove the clamp and carefully remove the hose (Fig 2).
4. Position the hose on the free inlet and reposition the clamp (Fig 3).
5. Position the hose provided on the front inlet and clamp it into place (Fig 3).
6. Remove the cover from the hole in the vent cover and insert the hose through the hole (Fig 3).
7. Replace the vent cover.
8. Insert the other end of the hose into the drain and secure into place.
Fig. 1 Fig. 2 Fig. 3
5
 Loading...