

Page 1

Washing machine
P 21
Installation and users' instruction
SAVE THESE INSTRUCTIONS FOR FUTURE REFERENCE
Page 2

Page 3

CONTENTS
SAFETY
DESCRIPTION OF THE MACHINE
INSTALLATION
WARNINGS
SETTING-UP THE MACHINE
USEFUL ADVICE
CLOTHING CARE LABELS
BEFORE WASHING
USING THE PROGRAMMES
FUNCTION BUTTONS
1
2
2
2
3
4
5
6
7
8
MAINTENANCE
IF THE APPLIANCE DOES NOT WORK
TECHNICAL CHARACTERISTICS
9
10
10
ENGLISH
SM891
Page 4

Thank you for having chosen our product.
This appliance is safe and easy to use. It has been constructed according to international safety
standards designed to protect the user. In order to familiarise yourself with the machine and
ensure its long working life, we strongly recommend that you read this instruction manual
carefully.
IMPORTANT SAFETY INSTRUCTIONS
WARNING
* To reduce the risk of fire, electric shock, or
injury to persons when using your
appliance, follow basic precautions,
including the following:
* Read all instructions before using the
appliance.
* Do not run appliance while you are out of
the home.
* Do not allow children to play on or in the
appliance. Close supervision of children is
necessary when the appliance is used near
children.
* Before the appliance is removed from
service or discarded, remove the door to
the washing compartment.
* Do not reach into the appliance if the drum
is moving.
* Do not install or store this appliance where
it will be exposed to the weather.
* Do not tamper with controls.
* Do not repair or replace any part of the
appliance or attempt any servicing unless
specifically recommended in the user-repair
instructions or in published user-repair
instructions that you understand and have
the skills to carry out.
* Do not add gasoline, dry-cleaning solvents,
or other flammable or explosive substances
to the wash water. These substances give
off vapors that could ignite or explode.
* Under certain conditions, hydrogen gas
may be produced in a hot water system
that has not been used for 2 weeks or more.
HYDROGEN GAS IS EXPLOSIVE. If the hot
water system has not been used for such a
period, before using a washing machine or
combination washer-dryer, turn on all water
faucets and let the water flow from each for
several minutes. This will release any
accumulated hydrogen gas. As the gas is
flammable, do not smoke or use an open
flame during this time.
in, or spotted with gasoline, dry-cleaning
solvents, cooking oils, or other flammable
or explosive substances because they give
off vapors that could ignite or explode.
GROUNDING INSTRUCTIONS
This appliance must be properly grounded.
In the event of malfunction pr breakdown,
grounding will reduce the risk of electric
shock by providing a path of least resistance
for electric current. This appliance
isequipped with a cord having an
equipment-grounding condutor and
grounding plug. The plug must be plugged
into an appliance outlet that is properly
installed and grounded in accordance with
all local codes and ordinances.
WARNING
Improper connection of the equipment
grounding conductor can result in a risk of
electric shock. Check with a qualified
electrician or serviceman if you are in doubt
as to whether the appliance is properly
grounded.
Do not modify the plug provided with the
appliance -if it will not fit the outle, have a
proper outlet installed by a qualified
electrician.
This manual does not cover every possible
condition and situation that may occur. Use
common sense and caution when installing,
operating, and maintaining any appliance.
SAVE THESE INSTRUCTIONS
Do not wash or dry articles that have been
previously cleaned in, washed in, soaked
1
SM891
Page 5
DESCRIPTION OF THE MACHINE
The washing machine is a domestic appliance capable of washing any type of fabric at any time.
* The machine has been constructed in steel panels which have been treated and painted to guarantees
that its aesthetic qualities remain unaltered over time.
* The motor and all moving parts have been designed and manufactured to guarantee the minimum
possible noise levels
* The large well-mounted stainless steel drum will ensure a better quality wash and help to prolong
the life of your washing
* The easy to use control panel will satisfy all your washing and drying needs (see control panel and
programme table).
* The wide door makes loading and unloading your washing much easier.
* The very high stability of the machine is the result of extensive research by our technicians on the
equilibrium of masses in movement.
INSTALLATION INSTRUCTIONS
Installation must be carried out by qualified personnel in line with the instructions supplied by the
manufacturer. Incorrect installation may result in damage or injury.
The machine can be installed anywhere providing the ambient temperature is not less than 3°C and
the wires or pipes on the rear of the machine are not squashed.
WARNINGS
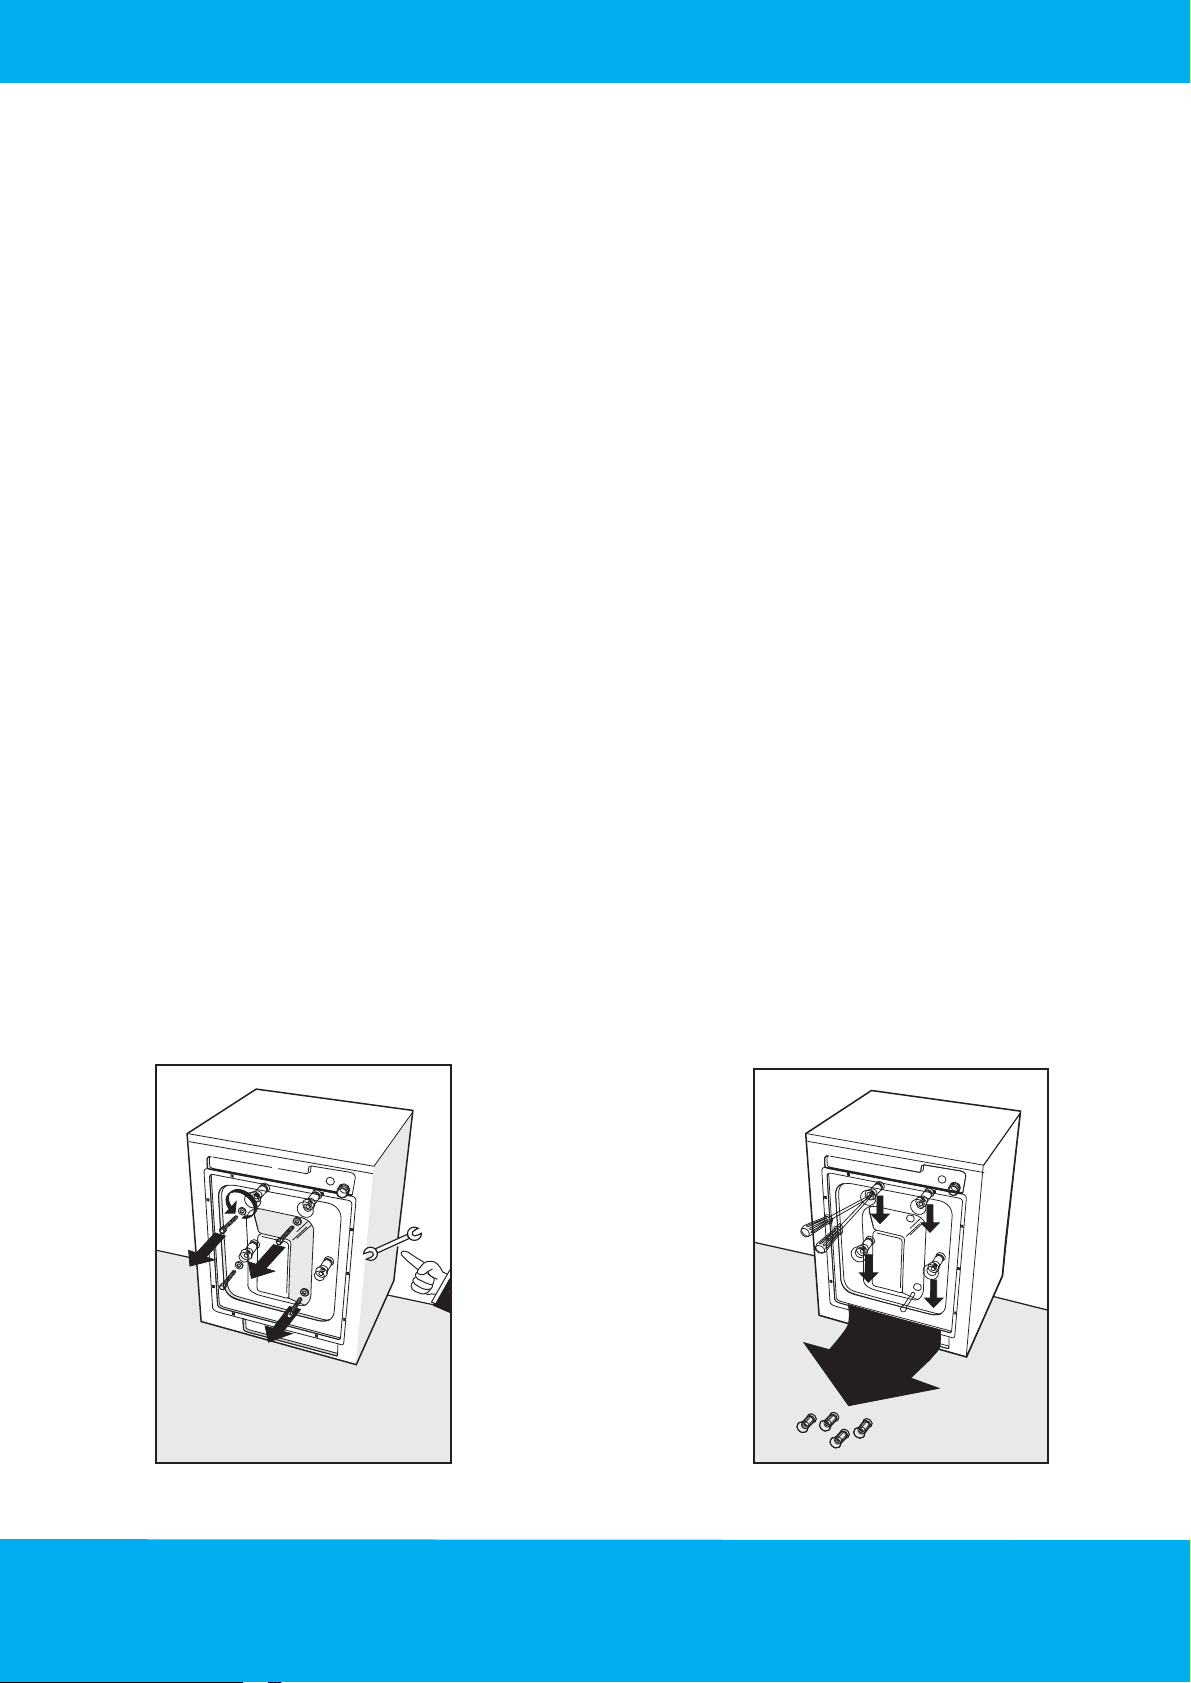
For transport reasons, the machine’s oscillating group is locked in place by 4 spacers and screws. Before
using the machine, remove the locking screws with a suitable wrench.
Insert a screwdriver in the holes and lever out the 4 plastic spacers as shown in the figure.
N.B. If the spacers cannot be removed from the machine in this way, open the rear panel, remove them
and replace the panel.
SM891
2
Page 6
SETTING-UP THE MACHINE
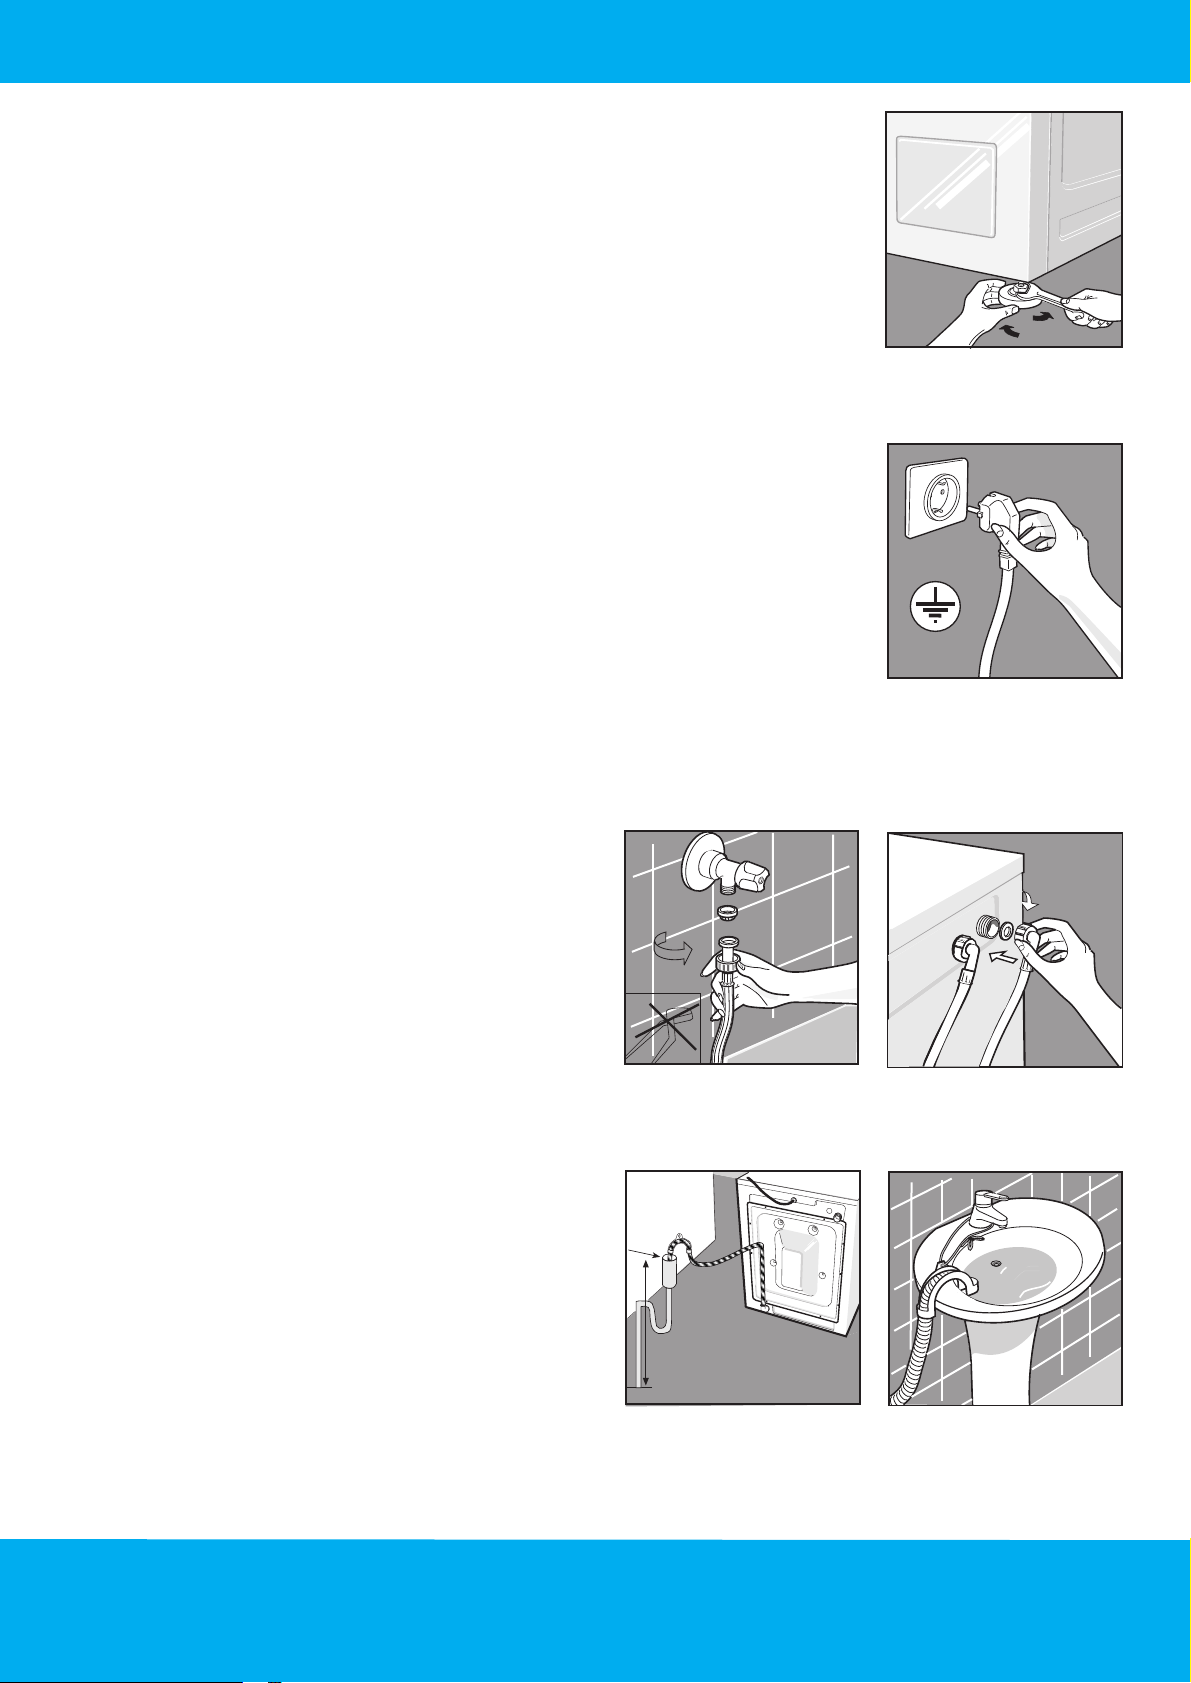
Place the machine near to the connection points and ensure that it is
level.
To do this, adjust the feet by screwing or unscrewing them as required.
When the machine is level, tighten the lock nuts on the feet using a
spanner.
ELECTRICAL CONNECTION
Check that the power supply and socket are correctly sized for the maximum
load demand of your machine. The power supply voltage is indicated on the
rating plate inside the door of the washing machine.
The domestic power supply must be equipped with an earth. If this requirement
is not complied with, the manufacturer will not be held responsible for any
damage or injury caused.
FIG. 4A
WATER CONNECTION
Allow a good quantity of water to flow out of the
system until it is clear and free of impurities,
especially if the plant is new or has not been used
for some time. Two separate hoses to two faucets;
one hot and one cold.
Connect the hose from the hot water tap to the valve
with red filter and the hose from the cold water tap
to the other valve. Check that the other end of the
pipe is tightened properly.
DRAIN REQUIREMENTS
Position the drain hose between a minimum of 60
cm and a maximum 90 cm from floor level.
N.B. To prevent siphoning, do not make the machine
drain hose connection air tight.
If the water system is not provided with a drain, use
the bracket supplied to position the drain pipe over
a washbasin then tie it to a tap.
A
MIN. 60 CM
MAX.90 CM
3
SM891
Page 7

USEFUL ADVICE
* Separate the washing according to type of fabric.
* Wash coloured and white articles separately.
* Check the clothing care labels affixed to the articles and set the appropriate programme and temperature.
* In order to obtain good results from the wash, distribute the washing evenly inside the machine
alternating small items with larger ones.
* In order not to waste water, energy and detergent, it is advisable to load the machine to its maximum
recommended capacity.
* Do not use the pre-wash unless it is strictly necessary. This will reduce water, energy consumption
and time by an average of 10%.
* Try to avoid overloading the machine with articles in towelling only.
* Carefully check that there are no objects left in the pockets of the articles to wash as these may block
the drain pump.
Stains exist that cannot be removed by machine washing alone.
The following paragraphs describe how to pre-treat stained fabrics before loading them in the machine.
This will help prevent an unsuccessful wash and the formation of stain rings.
* Wax: Scratch away as much of the wax as possible using a blunt knife, then iron with a piece of silk
paper between the iron itself and the stained item.
* Ball-point and felt-tip pens: Dab the stain with a cloth damped with 90° colourless alcohol. Take care
not to increase the stain.
* Ironing marks: If the fabric is discoloured, follow the same procedure described for “damp and mould”
stains.
* Rust: Use a rust remover, carefully following the manufacturer’s instructions.
* Chewing gum: Dilute it with acetone and remove using a clean cloth.
* Paint: Do not allow the paint to dry. Treat it immediately with the solvent indicated on the paint
container (water, Turps, trichloroethylene), soap it and rinse.
* Lipstick: Dab it with ether if the stain is on wool or cotton or use trichloroethylene if on silk.
* Nail varnish: Place the stained part of the item over a sheet of absorbent paper and then dampen the
reverse side of the item with acetone, frequently changing the absorbent paper under the stain. Repeat
the procedure until the stain has disappeared.
* Metal stain: Apply lemon juice until the stain has disappeared or greatly reduced in intensity.
* Grass: Soap it delicately and treat with diluted bleach.
For woollen items, 90° alcohol can produce good results.
SM891
4
Page 8
HOW CAN I WASH ALMOST ANYTHING?
Tennis shoes. Tennis shoes or plimsolls can be machine washed. Just remove any mud from them before
starting the wash cycle.
Net curtains should be washed alone. They should first be folded, to stop them creasing excessively, and then
placed in a net bag or pillowcase.
Quilted wind-cheaters can be machine washed. In this case limit the maximum machine load to just over 50%.
It is also advisable to carry out an extra rinse at the end of the wash cycle.
Printed T-shirts and shirts will last longer if washed inside out.
CLOTHING CARE LABELS
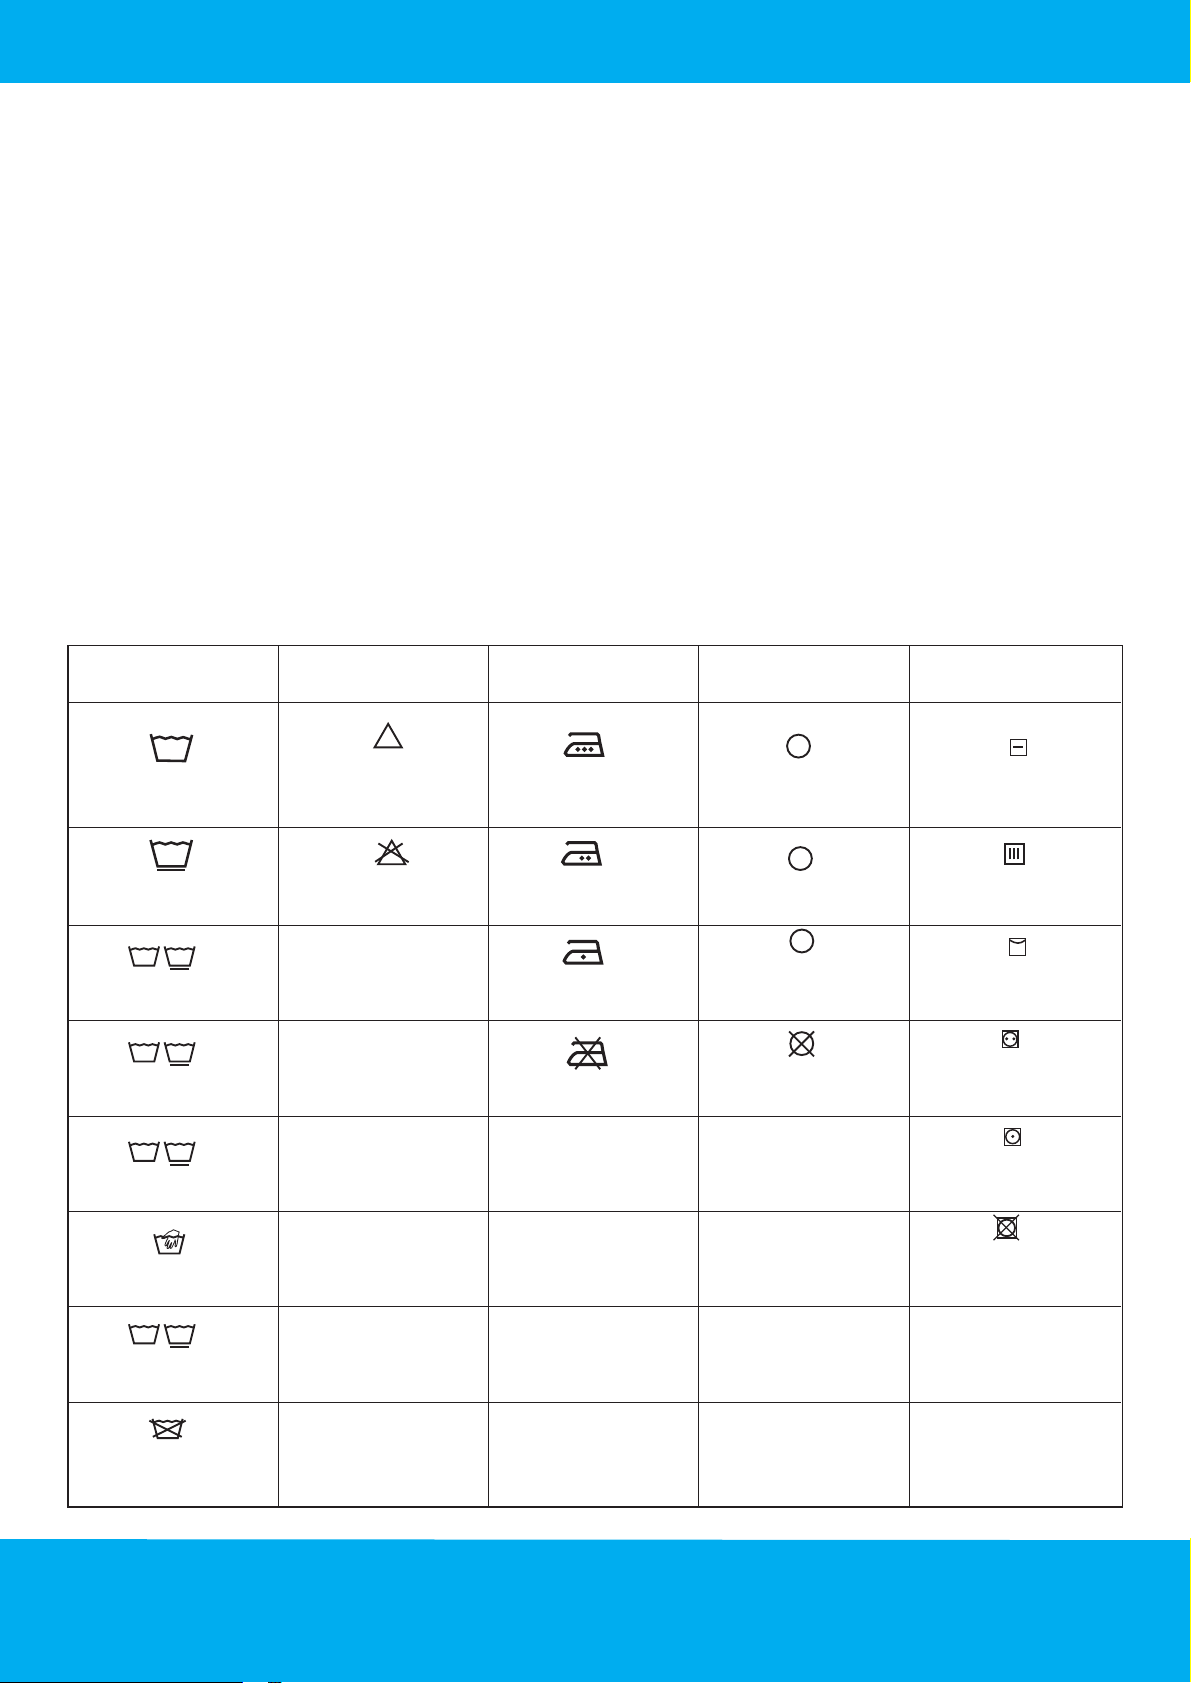
Learn to recognise the symbols on the clothing care labels to obtain a better wash and ensure that the articles
have a longer life.
Washing Bleach Dry cleaningIroning Drying
Resistant fabric
Delicate fabric
9595
Wash up to 95°C
6060
Wash up to 60°C
4040
Wash up to 40°C
Hand wash
cl
Bleach in cold
water
Do not bleach
Iron up to 200° max
Iron up to 150° max
Iron up to 100° max
Do not iron
A
Dry clean with
solvent
P
Do not dry clean
F
Dry clean only with:
perchloride, aviation fuel
pure alcohol, R 111 and R 113
Dry clean only with:
aviation fuel, pure
alcohol and R113
Dry flat
Hang to dry
Dry on clothes
hanger
Machine dry at normal
temperature
Machine dry at low
temperature
Do not machine dry
3030
Wash up to 30°C
Do not wash in water
5
SM891
Page 9
BEFORE WASHING
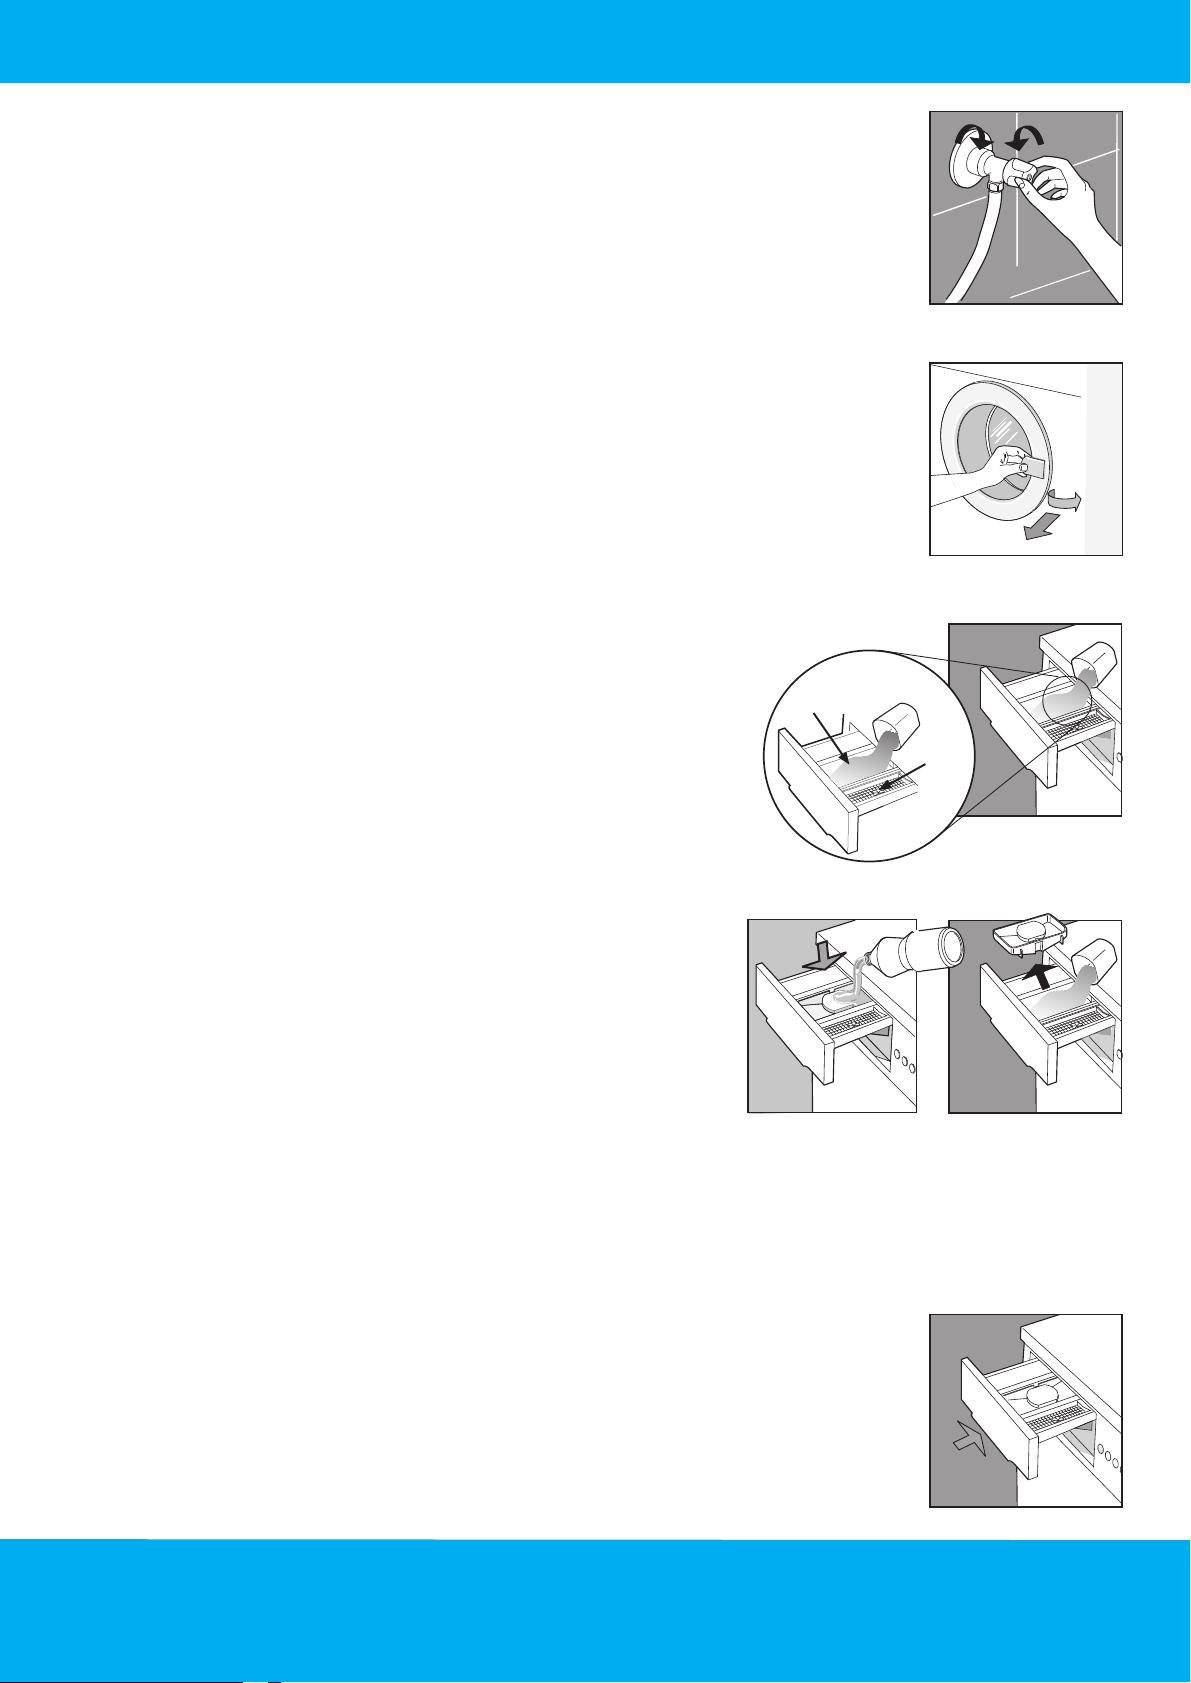
Before each wash ensure that:
- the water connections are correct, the drain
hose is properly positioned (see water
connection) and that the feed valve is open
- with dry hands, insert the plug in the mains socket.
- sort the wash into types of fabric (refer to clothing
care symbols).
-
check that there are no objects left in any of the
pockets of the items to wash, as these may damage
the washing, the appliance or the filter.
- open the door
- load the washing and close the door.
closed
opened
N.B. When adding detergent to the dispenser,
remember to avoid any spillage into the softener
compartment, in that this would create a soapy
rinse and stain the fabrics white. Vice versa, if
softener is added to the detergent compartment,
the quality of the wash will be compromised.
IF FORESEEN
CONTAINER
LIQUID
DETERGENT
- add low-suds detergent and softener (if required)
recommended for automatic washing machines.
Follow the dosage instructions written on the packet.
N.B. Excessive softener can damage the washing.
N.B. When using a liquid detergent
(recommended for programmes without prewash), use the special container (if provided)
and follow the manufacturer’s instructions.
Remember to remove the liquid detergent
container when using soap powder.
YES
NO
- close the detergent dispenser drawer.
Warning! do not attempt to remove the detergent
drawer while the appliance is operating, as this will
cause water to flow out.
- Select the required programme and temperature according to
the programme table.
SM891
6
Page 10
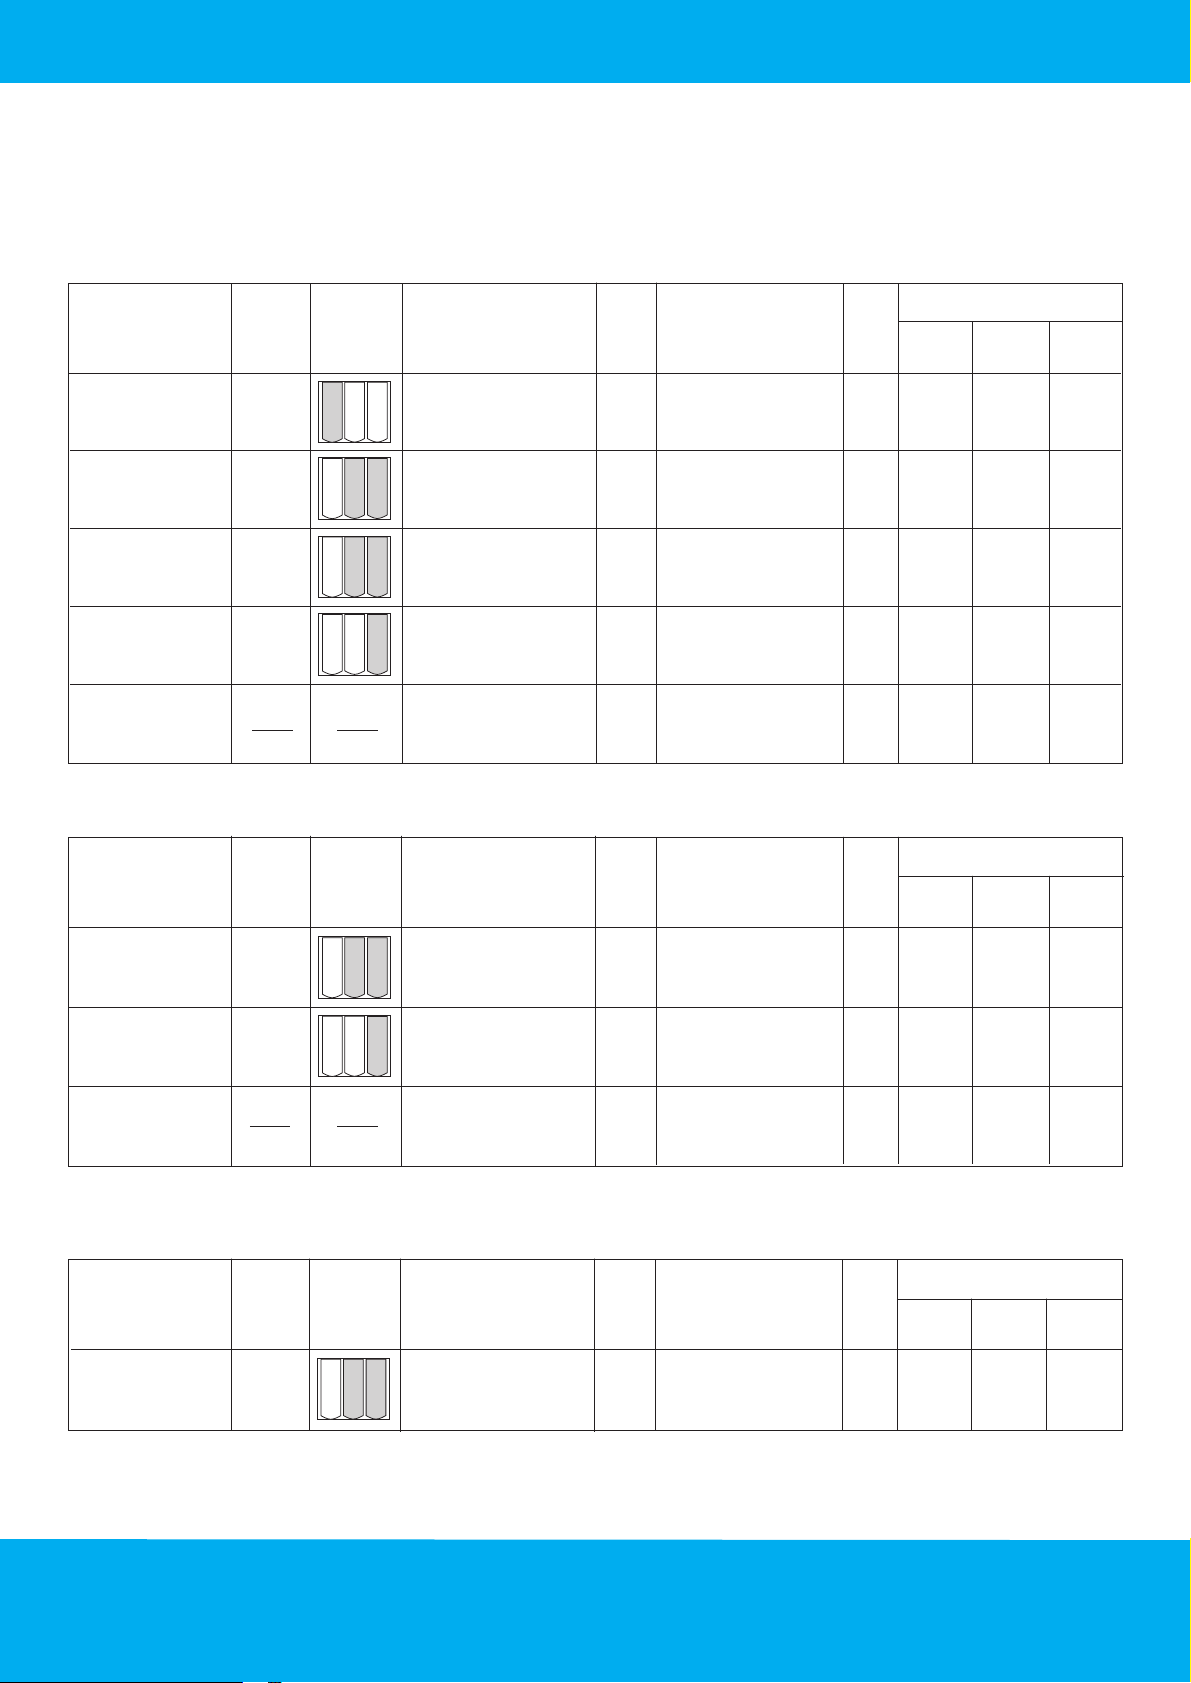
OPERATING INSTRUCTIONS
WARNING - To reduce the risk of fire, electric sckoc, or injury to persons, read the IMPORTANT
SAFETY INSTRUCTIONS before operating this appliance
Use of supplementary
Knob
(P)*
PREWASH
SUPER WASH
REGULAR WASH
RINSES
DRAIN SPIN
Temp
options
Any
Any
Any
Cold
Dispenser
compart-
ment
2
1
3
2
1
3
2
1
3
2
1
3
Examples and degree
of soiling
To rinse or refresh
articles fabrics that
have not been
used for some time
Sheets, white and solid
colour tablecloths,
towels, underwear;
normal soil
For articles in
cotton,linen or jute with
colours that may run.
To rinse or refresh
articles fabrics that
have not been
used for some time
Intensive spin
Quan-
tity in
Up to
Program
description
Wash for about 5
min.
5
Main wash, in about 55
Up to
min. with hot water
5
rinses, softener,
empty and final spin
Main wash,in about
Up to
Up to
Up to
35-40min.
rinses, softener,
5
empty and final spin
Rinses, softener,
empty and final spin
5
Empty
and final spin
5
Spin
speed
1000
WARM
RINSE
NO NO NO NO
requi-
red
requi-
1000
red
requi-
1000
red
1000
buttons
EXTRA
RINSE
As
As
requi-
red
As
As
requi-
red
As
As
requi-
red
NO NO
NO
SPIN
As
requi-
red
As
requi-
red
As
requi-
red
As
requi-
red
Knob
(P)*
QUICK WASH
RINSES
DRAIN SPIN
Knob
(P)*
WOOL /
HAND WASH
Temp
options
Any
Cold
Temp
options
Any
Dispenser
compart-
ment
2
1
3
2
1
3
Dispenser
compart-
ment
2
1
3
Examples and degree
of soiling
For articles in
cotton,linen or jute very
little dirty.
To rinse or refresh
articles fabrics that
have not been
used for some time
Delicate
spin
Examples and degree
of soiling
Machine washable
wool
Quan-
tity in
kg
Maxi
mum
2,5
Maxi
mum
Program
description
Main wash,in about 3540min, with cold and hot
water, rinses, softener,
empty and final spin
Rinses, softener,
empty and final spin
2,5
Maxi
Final spin
mum
2,5
Quan-
tity in
kg
Maxi
mum
1
Program
description
High water level wash,
in about 35 min
rinses, softener, empty
and final delicate spin
Spin
speed
800
800
800
Spin
speed
500
Use of supplementary
buttons
WARM
RINSE
As
requi-
red
As
requi-
EXTRA
RINSE
As
requi-
red
NO
red
NONO
Use of supplementary
buttons
As
EXTRA
RINSE
As
requi-
red
WARM
RINSE
requi-
red
NO
SPIN
As
requi-
red
As
requi-
red
As
requi-
red
NO
SPIN
As
requi-
red
* Position of programmer knob
7
SM891
Page 11
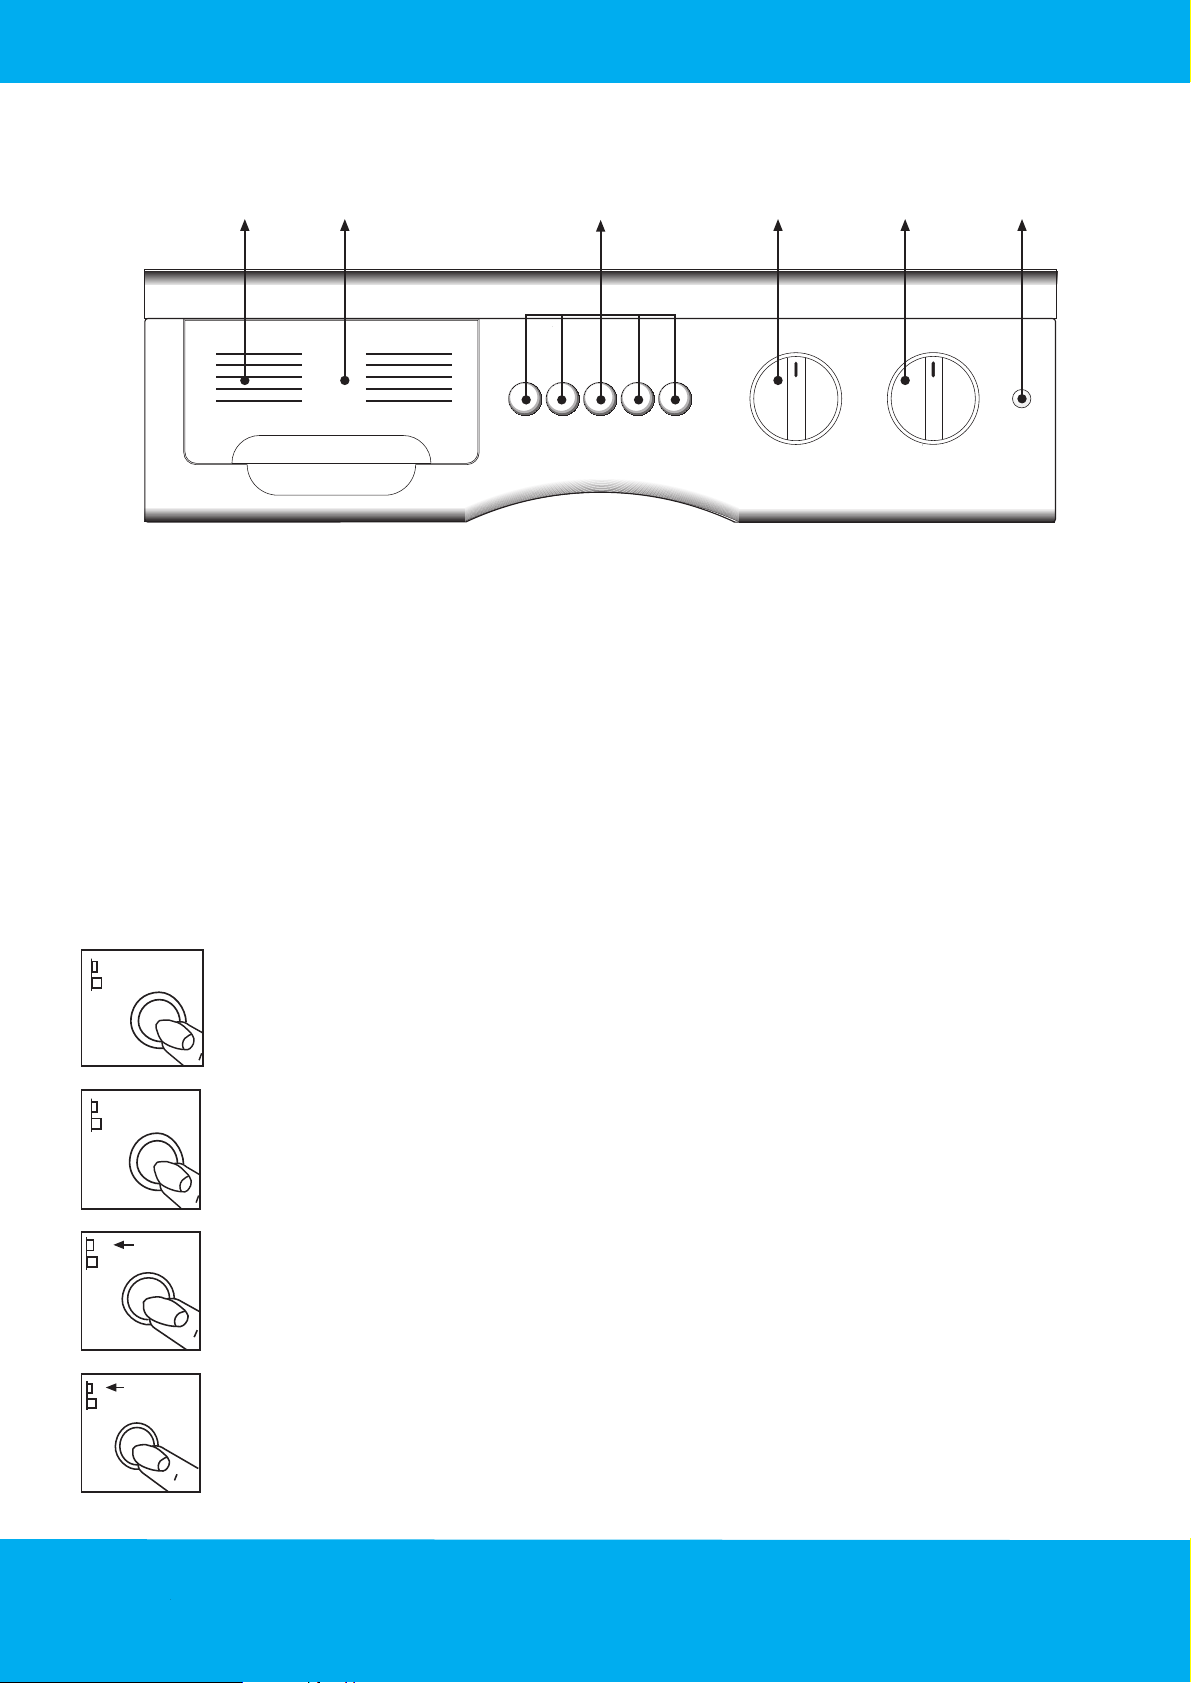
FUNCTION BUTTONS
A B C DPM
A- PROGRAM TABLE
B- DETERGENT DISPENSER
C- PUSH BUTTONS
D- PILOT LAMP
P- PROGRAMMER KNOB
M- TEMPERATURE CONTROL KNOB
Selecting the program and start-up
Select the program you require by turning the knob until the indicator coincides with the number of the program
to be selected The machine will start-up when the button or the knob are in the position "1" or "ON" .
Temperature control knob
The temperature Control Knob lets you select the best wash temperature for each load. The temperature options
are restricted on some of the programs (as show in the table on page 7).
LOW SPEED
HIGH SPEED
WARM
RINSE
SPIN SPEED ADJUSTMENT BUTTON
This function allows the spin speed to be altered by pressing the button
WARM RINSE BUTTON
Press this button to have last rinse warm. This function only on regular and perma press cycles.
1
EXTRA
0
RINSE
1
0
NO
SPIN
EXTRA RINSE BUTTON
The washing machine has been set up so that water consumption is reduced to a minimum;
three rinses are usually sufficient. If desired, it is possible to use an additional rinse cycle, by
selecting the button
NO SPIN BUTTON
To avoid any kind of spin select this button
SM891
8
Page 12
USER-MAINTENANCE INSTRUCTIONS
INTRODUCTION
The washing machine is a domestic appliance that does not need any special maintenance
in that it has been designed and built to last. Nevertheless, some precautions do need
to be taken (see chapter on warnings).
When carrying our the following operations, make sure that the plug has been removed
from the mains socket and that the water feed valve is closed.
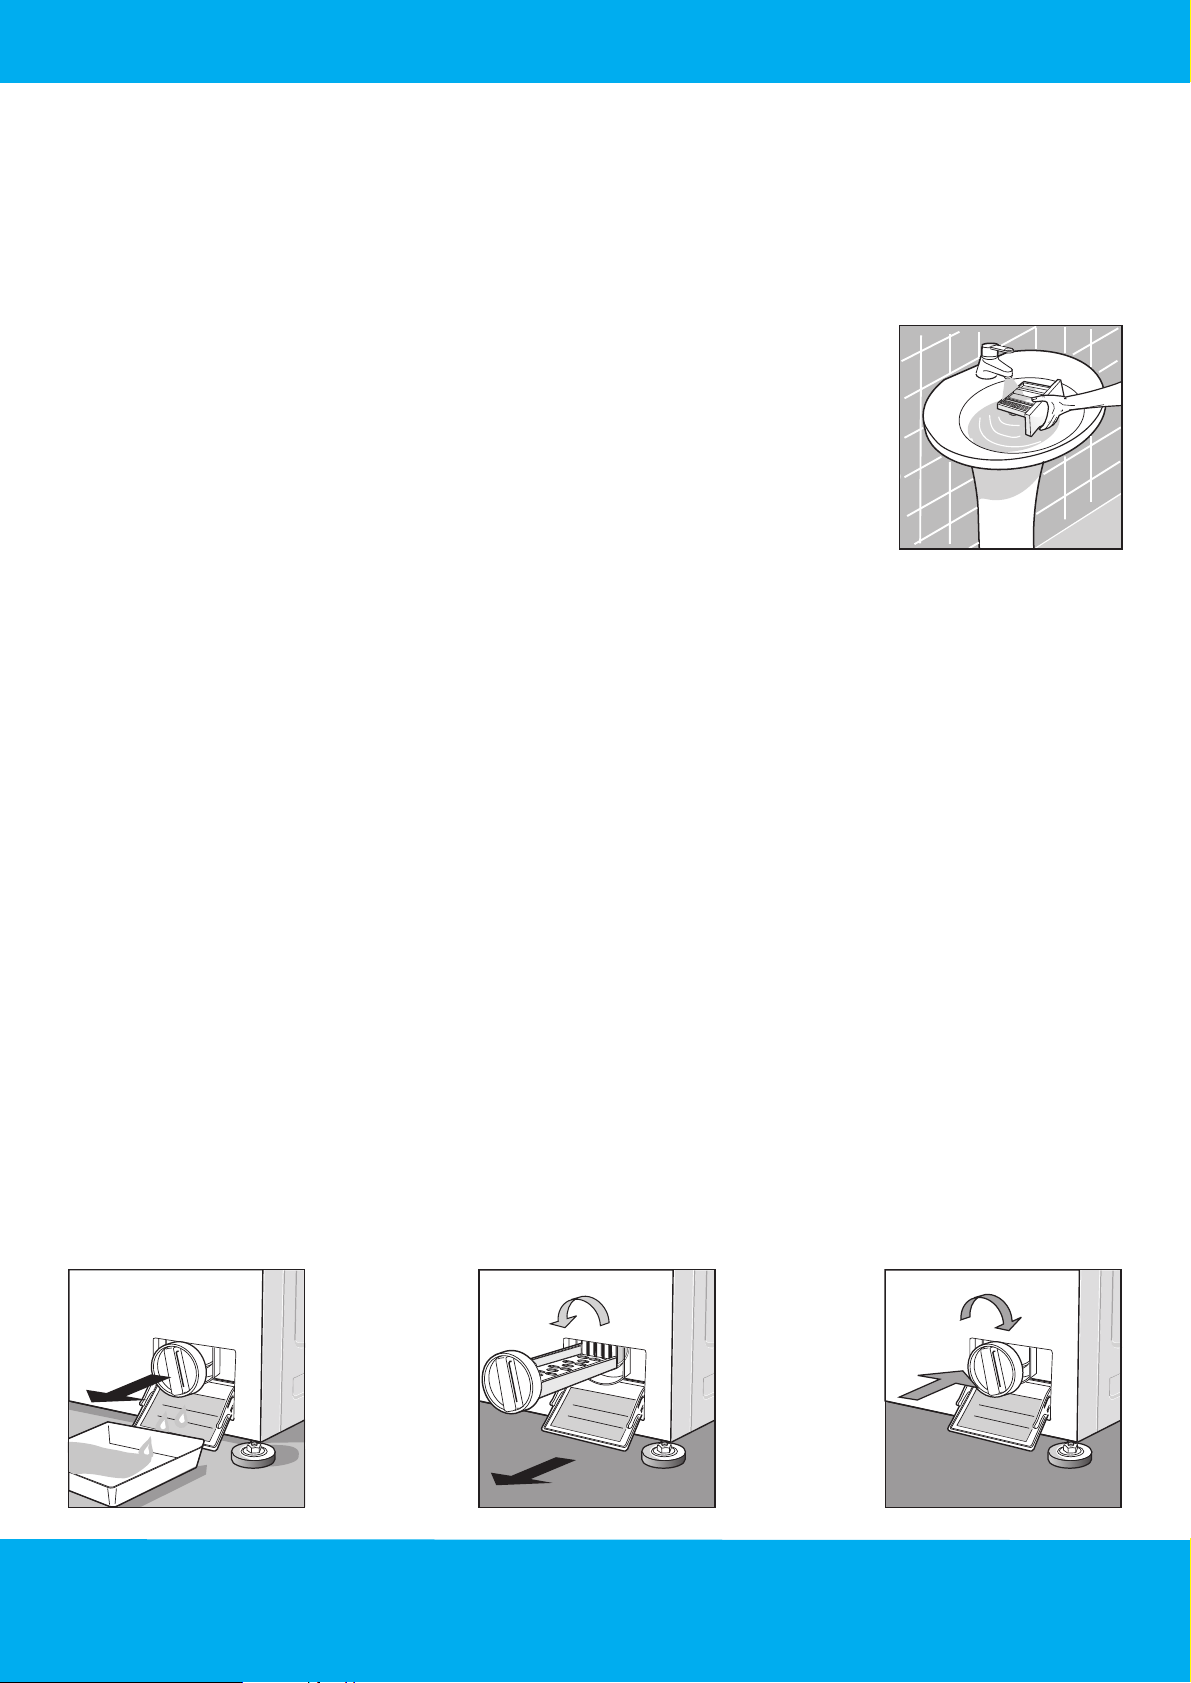
PERIODIC CLEANING OF THE DRAWER
The machine must not be cleaned with solvents, but merely using a damp and slightly soapy cloth.
The drawer should be cleaned whenever residual detergent starts to build up.
To extract the drawer, simply pull it from its housing and then clean it under running water.
CLEANING THE PUMP FILTER
This operation should be carried out at least once a month. When cleaning the filter, make sure that there is no
water left in the drum.
The operation is carried out by placing a shallow container or rag under the filter door to catch any water that
may spill out. Remove the filter from its housing by turning it anticlockwise half a turn and then pulling outwards.
The filter is cleaned by holding it under running water and ensuring that all the deposits are removed.
Then replace the filter in its housing, turning it clockwise. Make sure that it is seated properly and locked in its
housing.
9
SM891
Page 13

IF THE APPLIANCE DOES NOT WORK
Before calling for assistance, check that the operations described below have been carried out correctly as this
will save both time and money.
It will not start (indicator light off)
Make sure that:
1) Mains power is available
2) The plug is inserted properly in the socket
3) The programmer knob has been pulled out, or the
on/off button where fitted has been pressed (using
the washing machine).
4) The door is closed
It does not fill with water
Make sure that:
1) There is water in the supply system
2) The valve is open
3) There are no kinks in the feed hose
4) With the appliance disconnected from the mains,
clean the inlet filter between the valve and the water
feed hose.
The door will not open
1) Wait three minutes after the programme has finished
Try to start the appliance again to see whether the
problem has been solved.
If the problem persists, call the service centre stating:
1) The type of problem
2) The washing machine model
3) The serial number of the machine reported on the
rating plate inside the filter door
It will not start (with indicator light on)
Make sure that:
1) The programmer knob is set on the required
programme
2) See problem “does not fill" with water
I cannot see any water during the wash
This is simply because the new technology used in the
machine guarantees double the wash with half the
water, the environment is protected and you save
energy.
It will not drain or spin
Make sure that:
1) The drain hose is positioned correctly
2) There are no kinks in the drain hose
3) The quantity of detergent is not excessive
4) The detergent dispenser drawer is not blocked with
detergent
5) The detergent is that recommended for washing
machines
TECHNICAL CHARACTERISTICS
DIMENSIONS
WATER PRESSURE
WEIGHT OF CLOTHES
ELECTRICAL DATA
Width 59,5 cm - Height 85 cm - Dept 53 cm
0,05 MPa minimum - 1MPa maximum
5 kg
See plate with technical features inside the door
I can see too much foam
Make sure that:
1) The detergent is designed for washing machines
It vibrates or is noisy
Make sure that:
1) Large items have not become tangled (sheets,
tablecloths, etc.)
2) The washing machine is properly levelled
3) The four transport screws and spacers have been
removed.
MAXIMUM SPIN SPEED
1000 Rpm
SM891
10
Page 14

Page 15

Page 16

461304353 Stampa TLF 30/10/2002 SM891
 Loading...