

Page 1
Owner's
Manual
Wet/Dry
Model
FOR
COMMERCIAUNDUSTRIAL
Vacuum
XSV10
USE
Makita Limited One Year Warranty
Every Makita tool is thoroughly inspected and tested before leaving the factory. It is warranted to be free of defects from workmanship and materials for the period of ONE YEAR from the
date of original purchase. Should any trouble develop during this
one-year period, return the COMPLETE tool, freight prepaid, to
one of Makita's Factory or Authorized Service Centers.
tion shows the trouble
material, Makita will repair (or at
charge.
This Warranty does not apply where:
repairs have been made or attempted by others
repairs are required because
The tool has been abused, misused or improperly maintained
alterations have been made
IN NO EVENT SHALL MAKITA BE LIABLE
RECT, INCIDENTAL
THE SALE
APPLIES BOTH DURING AND AFTER THE TERM
WARRANTY.
MAKITA DISCLAIMS LIABILITY FOR ANY IMPLIED WAR-
RANTIES, INCLUDING IMPLIED WARRANTIES OF "MERCHANTABILITY" AND "FITNESS FOR A SPECIFIC PURPOSE," AFTER THE ONE-YEAR TERM
This Warranty gives you specific legal rights, and you may also
have other rights which vary from state to state. Some states
not allow the exclusion or limitation of incidental
damages,
you. Some states do not allow limitation on how long an implied
warranty lasts,
OR
so
the above limitation or exclusion may not apply to
is
caused by defective workmanship or
our
option, replace) without
of
normal wear and tear
to
the
tool.
OR
CONSEQUENTIAL DAMAGES FROM
USE OF THE PRODUCT. THIS DISCLAIMER
OF
THIS WARRANTY.
so
the above limitation may not apply to you.
If
inspec-
FOR
ANY INDI-
OF
THIS
or
consequential
do
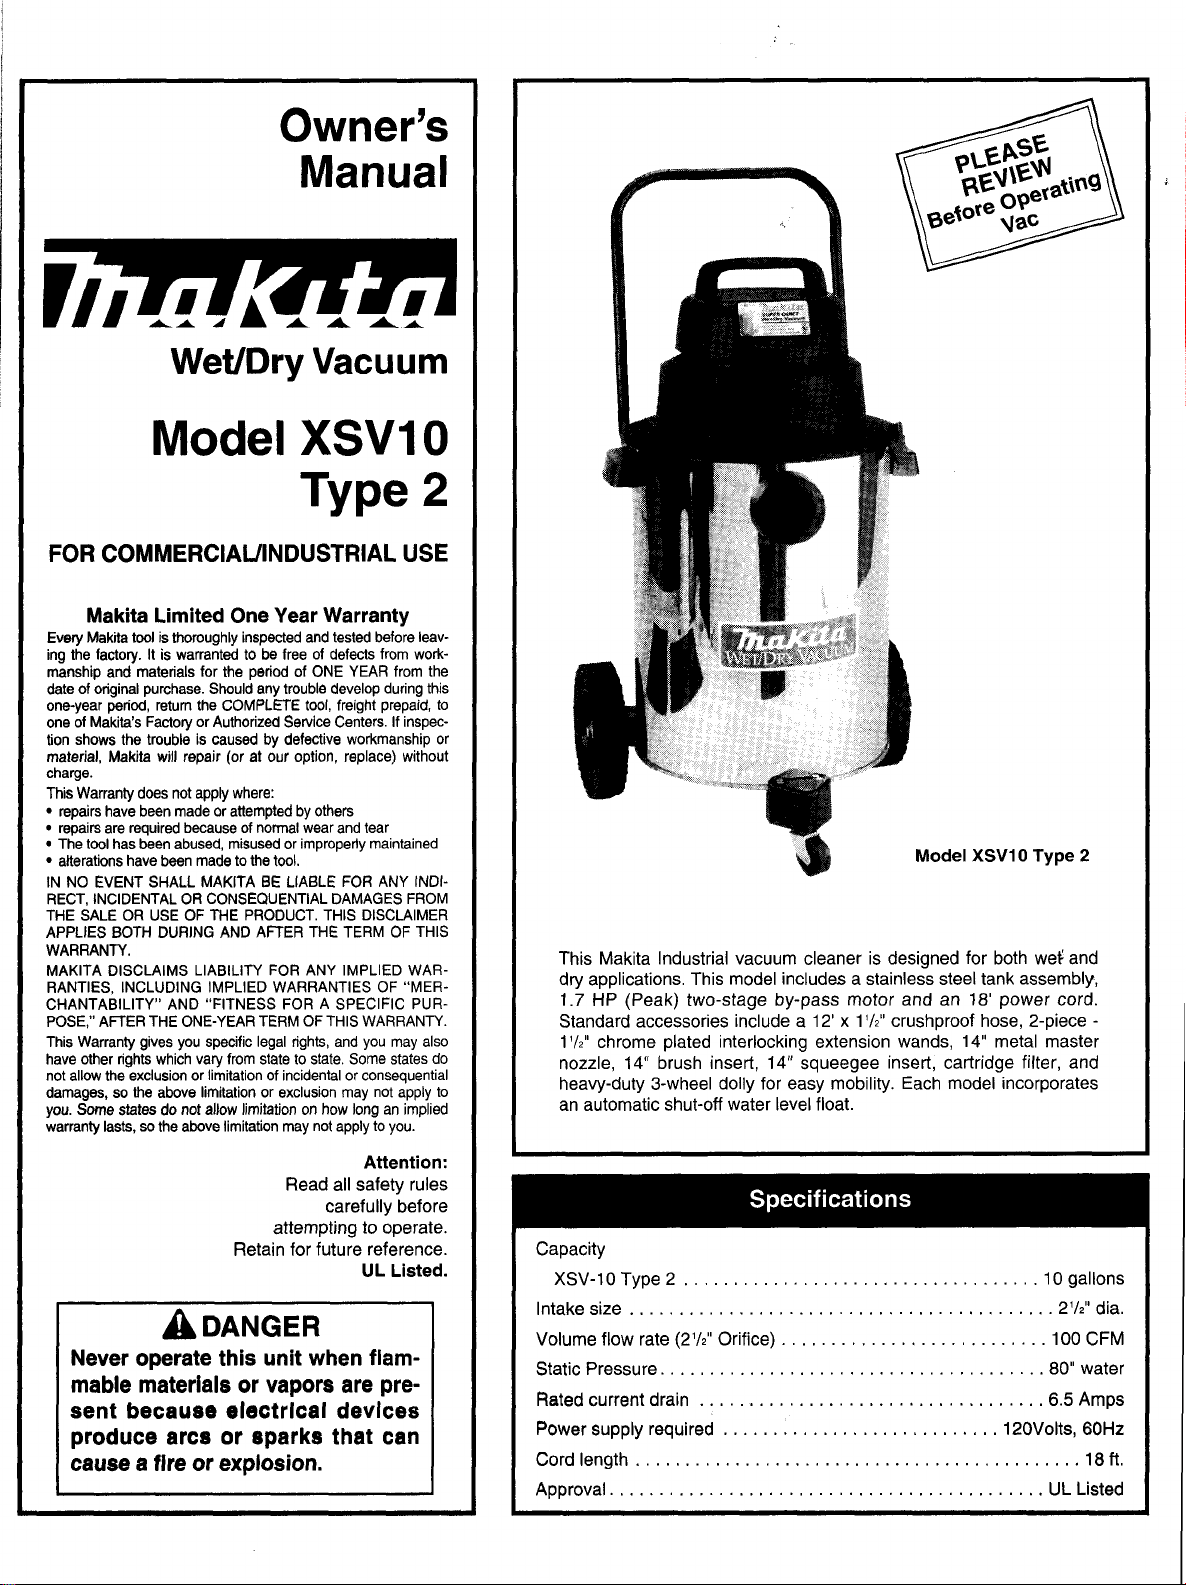
Model
XSVlO
This Makita Industrial vacuum cleaner is designed for both wet and
dry applications. This model includes a stainless steel tank assembly,
1.7
HP (Peak) two-stage by-pass motor and an 18' power cord.
Standard accessories include a 12'
1 l/~" chrome plated interlocking extension wands, 14" metal master
nozzle, 14" brush insert, 14" squeegee insert, cartridge filter, and
heavy-duty 3-wheel dolly for easy mobility. Each model incorporates
an automatic shut-off water level float.
x
1 '/2" crushproof hose, 2-piece
Type
2
-
Attention:
Read all safety rules
carefully before
to
operate.
UL Listed.
flam-
Retain for future reference.
A
DANGER
Never operate this
attempting
unit
when
mable materials or vapors are present because electrical devices
produce arcs or eparks that
cause a fire
or
explosion.
can
Capacity
XSV-10Type2
Intake size
Volume flow rate
Static Pressure.
Rated current drain
Power supply required
Cordlength
Approval
............................................
....................................
..........................................
(2'/2''
......................................
..................................
.............................................
Orifice)
...........................
............................
10gallons
.2l/2" dia.
100 CFM
80"
.6.5 Amps
120Volts,
ULListed
water
60Hz
18~.
Page 2
When using an electrical appliance, basic precautions should always be followed, including
the following:
A
1.
Do not leave appliance when plugged in. Unplug from outlet when not in
servicing. Connect to a properly grounded outlet only. See Grounding
Instructions.
Do not expose to rain-store indoors.
2.
Do not allow to be used
3.
children.
4.
Use
5.
Do not use with damaged cord or plug. If appliance is not working as
dropped, damaged, left outdoors or dropped into water, return
6.
Do not pull or carry by cord,
sharp edges or corners. Do not run appliance over cord. Keep cord away from heated
surfaces.
7.
Do not unplug by pulling on cord. To unplug, grasp the plug; not the cord.
Do
a.
9.
Do not put any object into openings. Do not use with any openings blocked; keep free of
dost, lint, hair and anything that may reduce air flow.
10.
Keep hair,
Pa&.
11.
Do
ashes.
READ
ALL
INSTRUCTIONS
WARN
SHOCK
only as described in this manual. Use only Manufacturer’s recommended attachments.
not
handle plug or appliance with wet hands.
not
pick up anything that is burning or smoking, such as cigarettes, matches or hot
I
NG
OR
INJURY:
as
use
loose
clothing, fingers and all parts of body away from openings and moving
BEFORE
USING THIS APPLIANCE.
-
TO
REDUCE THE
a toy. Close attention is necessary when used by or near
cord as a handle, close a door on cord or pull cord around
RISK
OF
FIRE, ELECTRIC
use
it
should, has been
it
to a service center.
and before
12.
Do not use without dust bag and/or filters in place.
13. Tum
off
all controls before unplugging.
14. Use extra care when cleaning on stairs.
15.
Do not use to pick up flammable or combustible liquids such
where they may be present.
16.
Do
17.
Do not vacuum toxic, carcinogenic, combustible or other hazardous materials such as
18.
19.
Use
20.
21. To avoid spontaneous combustion, empty tank after each use.
22. The operation of a utility vac can result in foreign objects being blown into eyes, which
23. STAY ALERT. Watch what you are doing and use common sense. Do not use vacuum
...
not
use
lacquers, household cleaners, etc.
asbestos, arsenic, barium, beryllium, lead, pesticides or other health endangering
materials. Specially designed units
Do not pick up wood or coal ash; soot, cement, plaster or drywall dust without
filter or collection filter bag in place. These are very fine particles that may pass through
the foam and disc filters and affect the performance of the motor or
into the air.
enclosed order form).
Don’t leave lhe cord lying on the floor once you have finished the cleaning job.
come a tripping hazard.
can result in eye damage. Always wear safety goggles when operating vacuum.
cleaner when you are tired, distracted or under the influence of drugs, alcohol
medication causing diminished control.
your cleaner as a sprayer of flammable liquids such as
Full
cloth filters and additional collection filter bags are available (see
special care when emptying heavily loaded tanks.
.~
~
are
available for these purposes.
as
gasoline or use in areas
oil
base paints,
full
be
exhausted back
It
can be-
cloth
or
This cleaner must be grounded. If
path of least resistance far electric current to reduce the risk of electric shock. This appliance
is equipped with a cord having an equipment-grounding conductor and grounding plug. The
plug must be inserted into an appropriate outlet that is properly installed and grounded in
accordance with all local codes and ordinances.
A
WARNING
it
should malfunction or breakdown, grounding provides a
-
IMPROPER CONNECTION
OF
THE
EQUIPMENT-
GROUNDING CONDUCTOR CAN RESULT IN A RISK OF ELECTRIC
OR
SHOCK. CHECK WITH A QUALIFIED ELECTRICIAN
IF
YOU ARE IN DOUBT AS TO WHETHER THE OUTLET
DO
GROUNDED.
ANCE
-
NOT MODIFY THE PLUG PROVIDED WITH THE APPLI-
IF IT WILL NOT FIT THE OUTLET, HAVE A PROPER OUTLET
SERVICE PERSON
IS
PROPERLY
INSTALLED BY A QUALIFIED ELECTRICIAN.
This cleaner is for use on a nominal 120-volt circuit, and has a grounded plug that looks like
When using the appliance at a distance where an extension cord becomes necessaiy, a
conductor grounding cord of adequate size must be used for safety, and to prevent
power and overheating.
using appliance, inspect power cord for
Make any needed repairs or replacements before using your appliance. Use only three-wire
outdoor extension cords which have three-prong grounding-type plugs and three-pole receptacks which accept the extension cord’s plug. When vacuuming liquids, be sure the extenSiOn cord connection
NOTE
STATIC SHOCKS ARE COMMON IN DRY AREAS
THE AIR
IS
ANCE.
IS
LOW. THIS
TO
REDUCE THE FREQUENCY OF STATIC SHOCKS IN
TO ADD MOISTURE TO THE AIR WITH A CONSOLE
Use
the table below to determine A.W.G. wire size required. Before
does
not come in contact with the liquid.
IS
ONLY TEMPORARY AND DOES NOT AFFECT THE USE OF THE APPLI-
loose
or exposed wires and damaged insulation.
OR
WHEN THE RELATIVE HUMIDITY
YOUR
OR
HOME, THE BEST REMEDY
INSTALLED HUMIDIFIER.
loss
3-
of
OF
the plug illustrated in sketch A. A temporary adapter that looks like the adapter illustrated in
sketches
B
B if a properly grounded outlet is not available. The temporary adapter should be used only
until a properly grounded outlet (sketch A) can be installed by a qualified electrician. The
green colored rigid ear, lug or the
like extending from the adapter
must be connected to a perma-
nent ground such as a properly
grounded outlet box cover.
Whenever the adapter is used,
must be held in place by a metal
screw.
NOTE
TEMPORARY ADAPTER
PERMITTED BY THE CANADIAN
and C may be used to connect this plug to a 2-pole receptacle as shown in sketch
Groundlnp
Methods
it
kE-1
IN CANADA, THE USE
Volts
120v
Ampere Rating
More
Than
Not
More AWG
Than
0-6 18
6-10
10-1 2
12-16
OF
A
IS
NOT
Total
25 50 100 150
18 16 14 12
16 16 14 12
14 12
\-
PIN
(A)
length of cord
I
16 16 14
in
OROUNOED
OUTLET
feet
-
BOX
IS)
Not
recommended
TAB FOR
OROUNDINO
(CI
SCREW
Your Makita Industrial Vac comes
from the carton alter unpacking the accessories. (Note that some accessories may have been
to
you completely assembled. Simply remove the machine
packed in the tank.) However,
heavy-duty vac dolly. (Please see the instructions in this manual)
it
is necessary to attach the tank handles and assemble the
Page 3

Caution:
Before plugging vacuum into outlet, make sure outlet voltage is same as voltage
rating given on
1.
Insert
2.
Attach cleaning tools to the other end of the hose.
3.
Prepare the unit for Dry Pick-Up or Wet Pick-Up as follows:
A.
Dry
a
vacuum
nameplate.
the
large
end
of
the
hose
into the
side
inlet
fitting.
Pick-Up Operation
WARN
WALL OUTLET BEFORE REMOVING THE TANK COVER. TO PICK UP DUST
AND DRY MATERIAL, YOU MUST ADD A CARTRIDGE FILTER TO ENSURE
PROPER FILTRATION. ENSURE CARTRIDGE FILTER
BEFORE OPERATION. BE SURE THAT CARTRIDGE FILTER
OVER THE FILTER CAGE COVERING ALL OPENINGS. SEE THE ENCLOSED
CARTRIDGE FILTER MAINTENANCE SHEET
IN
G
-
ALWAYS
DISCONNECT
FOR
INSTALLATION, OPERA-
THE
PLUG
IS
COMPLETELY DRY
IS
FROM
THE
IN POSITION
TION AND CLEANING OF THE CARTRIDGE FILTER.
a
CAUTION
Efficiency of the vacuum is largely dependent on the cartridge filter. A clogged filter can
cause overheating and possibly damage the cleaner. Filters should be removed periodically
and cleaned and be replaced as required. Should the cartridge filter be punctured
be replaced.
B. Wet Pick-Up Operation
a
WARNING:
WALL OUTLET BEFORE REMOVING THE TANK COVER. THE CARTRIDGE
FILTER CAN BE USED FOR BOTH WET AND DRY PICK-UP.
NOTE BE SURE CARTRIDGE FILTER
-KEEP
FILTERS
ALWAYS DISCONNECT THE PLUG FROM THE
IS
CLEAN PRIOR TO WET PICK-UP.
CLEAN.
-
it
must
a
WARN
BEFORE ATTEMPTING TO SERVICE
No lubrication is necessary as the motor is equipped with lifetime lubricated bearings.
a
DANGER
SWITCHES, MOTORS,
SPARKS, THAT CAN CAUSE AN EXPLOSION. WHEN LOCATED IN GASOLINEDISPENSING
HORIZONTALLY FROM THE EXTERIOR ENCLOSURE OF ANY DISPENSING
PUMP AND AT LEAST
IN
G
-
BE
SURE
TO
DISCONNECT
OR
REMOVE ANY COMPONENTS.
-
THIS
EQUIPMENT
OR
THE LIKE, THAT TEND TO PRODUCE ARCS
OR
SERVICE STATIONS INSTALL AND USE AT LEAST
18
INCHES ABOVE A DRIVEWAY
INCORPORATES
POWER
PARTS
OR
GROUND LEVEL.
SUPPLY
SUCH AS
OR
20
FEET
SHOULD SERVICING BE REQUIRED, REFER TO THE REPLACEMENT PARTS
ILLUSTRATION FOR PURPOSE OF DISASSEMBLY AND REASSEMBLY.
REPLACE ALL WORN
a
WARNING
BECOME DETACHED
ELECTRICAL COMPONENTS, OPERATION SHOULD BE DISCONTINUED
IMMEDIATELY TO AVOID PERSONAL INJURY
THE VACUUM. REPAIRS SHOULD BE MADE BEFORE USING THE VACUUM.
OR
DAMAGED PARTS.
-
IF
ANY
OF
THE
MOTOR
OR
BROKEN, EXPOSING THE MOTOR
HOUSING
OR
PARTS
OR
FURTHER DAMAGE TO
SHOULD
ANY OTHER
This cleaner is equipped with an automatic shut-off that
operates when picking up liquids.
rises, an internal float rises until
at the intake of the motor, shutting
happens, the motor
noise. To continue use, empty the liquid waste from the tank
as outlined in the previous paragraph.
IF
ACCIDENTLY TIPPED
NOTE
LOSE ITS SUCTION.
Before storing your cleaner, the tank should be emptied and cleaned. The power cord can be
wound around the housing of the unit for convenience, Accessories may be stored in
I I
will
develop a higher than normal pitch
IF
Symptom Possible Cause(s) Corrective Action
Vacuum will not start
Dust blowing
Loss of vacuum
As
the level of the liquid
it
seats itself against a seal
off
suction. When this
OVER,
THIS OCCURS, PLACE VAC IN
THE VACUUM COULD
the
1.
Defective switch
2.
Defective motor
Filters not functional
1.
Loose
hose
2.
Filter clogged
3.
Full tank
4.
Hole in hose
UPRIGHT POSITION AND TURN SWITCH OFF. THIS WILL ALLOW THE FLOAT TO RETURN TO
ITS NORMAL POSITION, AND YOU WILL BE ABLE TO CONTINUE OPERATION.
Using
Your Master Nozzle
Your wet/dry vacuum comes equipped with a revolution in vacuum
cleaners. ONE NOZZLE
The brush and squeegee inserts can be inserted in the nozzle by
aligning the insert with the opening in the nozzle and apply pressure
until the insert is firmly in place
while those that cannot be stored in the tank should be kept in the same area as the cleaner
so
tank
connection
they can be readily available. The cleaner should be stored indoors.
DOES
IT ALL!
1.
Replace switch
2.
Replace motor
Clean or replace filters
1.
Tighten hose connection
2.
Clean or replace filter
3.
Empty machine
4.
Replace hose
Page 4

7
-L-F
10-
Dolly
Assembly
a.
Remove head from tank and place tank upside down on a flat surface.
b.
Place wheels on rear frame/axle assembly with extended hub towards
dolly frame and place cap nut on axle and secure with hammer.
c.
Insert caster socket into front frame and secure with philips head screw.
d.
-1 1
Place groove in front frame into lip of tank and position
above inlet.
e.
Position grooves of rear frame on lip of tank and align
frames engage.
f.
Secure dolly frame to tank by placing hex head screws up through holes in
dolly frame. Insure head of screw is fully recessed in area provided. After
machine screw is inserted, tighten with
Drawing A).
g.
Insert caster in caster socket and apply downward pressure until caster
snaps into place.
h.
Place tank upright on dolly
'/4"
flat washer and hex nut. (See
so
frame is directly
so
rear and front
--16
17-
ITEM
1
2
3
4
5
6
7
8
9
10
11
12
Standard
hardware
DESCRIPTION
Cap Nut
Axle
Wheel
Rear Frame
Caster Socket
Front Frame
Screw
#8
x
Screw
Flatwasher
Hex Nut
Caster
Carriage Handle
VZ''
%-20
x % Lg. Hex Hd.
'h"
'/4
-
20
item,
purchase
PH Truss Type A
locally.
NO. USED
2
1
2
1
1
1
1*
6*
6'
6'
1
1
ITEM
____~
1
2
3
4
5
6
7
8
9
10
11
12
13
14
15
16
17
18
19
20
21
22
23
24
25
26
27
Standard hardware
Printed
in
USA.
PESCRIPTION
Screw Truss Hd
Screw
Handle
Motor Housing Cover Assembly
Cord
Foam Insert Cover
Cord Retainer
Switch Box
Switch
Motor Housing
Foam Motor Housing
Foam Motor Housing
Gasket
Ground Screw
Motor
Wire Nut
Gasket - Lower Motor
Motor Mounting Plate
Ball Float
Lid Latch
Lid and Cage
Cartridge Filter
Screw
Screw #10
Handle Package
Inlet
Fltthg
Tank Assembly
item,
V4"
x Type AB
#8
x
'/z"
Ph Pan Hd Type AB
-
-
-
Upper Motor
#lo-24
*
#lo
X
SL HX HD WASH AB
x
Vh"
Hex Head
purchase locally.
Inner
Outer
x
l/~"
Type F
NO.
USED
2*
1*
1
1
1
1
1
1
1
1
1
1
1
1*
1
1*
1
1
1
3
1
1
7'
2*
1
1
1
3
A
Your Makita Wet/Dry Vac includes a metal carriage handle for ease in transporting the vacuum. Place metal
handle between tank and plastic side handles, and fasten tightly with screws provided. Be sure to spread ends
of carriage handle when assembling
to
drum.
If your Makita WeVDry Vac ever needs repair or maintenance during the warranty period
or any time thereafter, there are Factory and Authorized Service Centers located across
the country. (Please see the accompanying list, current Makita catalog or consult your
local
yellow pages.)
Do not attempt to service your Makita WeVDry Vac beyond that described in the Owner's
Manual. For all other servicing, please refer to a qualified Makita Service Center.
I
to
prevent damage
La
Makita
14930
Mirada,
U.S.A.,
Northam
CA
90638-5753
8751
Inc.
Street
0-27
 Loading...