

Makita UH3000DW, UH3000D User Manual

Cordless Hedge Trimmer
300
300
mm
mm
(11-3/4”)
(11-3/4”)
MODEL
MODEL
INSTRUCTION MANUAL
UH3000D
UH3000DW
With Fast Charger
SPEC
IF
I
CAT
I
0
N
S
Model
UH3000D
Effective cutting blade length
300
mm (1 1.314”)
Battery Cartridge 7000
Voltage
7.2 V
*
Manufacturer reserves the right to change specifications without notice.
*
Note: Specifications may differ from country to country.
Strokes per min.
Hz
605 mm x 72 mm
(23-718”
-
60
Hz
950
Model DCJlOO Fast Charger
Input output Charging time
A.C. only 50
Dimensions
x
(L
2.718”
D.C.
x W x
7.2
x
110
x
4-318”)
V
HI
mm
Net weight
1,6
kg
1
Hr.
~~
(3,5
,bs)
IMPORTANT
SAFETY INSTRUCTIONS
(For
All Tools)
WARNING:
WHEN USING ELECTRIC TOOLS, BASIC SAFETY PRECAUTIONS SHOULD ALWAYS BE FOLLOWED TO
REDUCE THE RISK OF FIRE, ELECTRIC SHOCK, AND PERSONAL INJURY, INCLUDING THE FOLLOWING:
READ ALL INSTRUCTIONS.
1.
Be aware that this tool is always in an operating condition, because
not have to be plugged into an electrical outlet.
2.
DRESS PROPERLY
caught in moving parts. Use of sturdy gloves, nonskid footwear and safety
glasses is recommended.
3.
STAY ALERT - Watch what you are doing - use common sense.
operate trimmer when fatigued.
4.
DANGER - RISK
both hands on handles when power is on.
material nor hold material to be cut when blades are moving. Make sure trimmer switch is off when clearing jammed material from blades.
the exposed cutting blades or cutting edges of trimmer. CAUTION
coast after turn off.
5.
WARNING - Don't use trimmer in rain, in wet locations, or on wet hedges
of shrubbery.
6.
KEEP CHILDREN AWAY
Keep children a safe distance from work area.
7.
USE TRIMMER PROPERLY - Use only for trimming the type of shrub,
growth, and the like, described in the operating instructions.
trimmer.
8.
DON'T OVERREACH OR STAND ON UNSTABLE SUPPORT - Keep good footing and balance at all times.
9.
AVOID UNINTENTIONAL STARTING
with finger on switch.
IO.
AVOID LOCKING TRIMMER SWITCH ON - Never attempt to tape, wire or
fasten the switches
11.
MAINTAIN TRIMMER WITH CARE - Follow maintenance instructions given
in
manual.
12.
STORE TRIMMER INDOORS - When not in use store trimmer indoors in
a dry place where not accessible to children.
2
-
Do
not wear loose clothing or jewelry. They can be
OF
CUT - KEEP HANDS AWAY FROM BLADES - Keep
Do
not attempt to remove cut
-
Do
not permit children to use or touch trimmer.
Do
OF
TRIMMER - Don't carry trimmer
so
as to stay in the ON position.
Do
not grasp
-
not abuse
it
does
Do
not
Blades
13.
DO NOT ATTEMPT
dealer or repairman. See that only identical replacement parts are used.
14.
Hold the tool firmly with both hands.
15.
It
is extremely dangerous to grasp branches while cutting. If the blades jam,
because of a piece of wire or impacted branch, switch off immediately and
remove the material stuck
16.
Do not use hedge trimmer to cut grass or weeds.
17.
When not in use, be sure to cover the blades with the blade guard.
TO
REPAIR TRIMMER - Have repairs made by qualified
in
the blades.
IMPORTANT SAFETY INSTRUCTIONS
I.
SAVE THESE INSTRUCTIONS
contains important safety and operating instructions for battery charger.
2.
Before using battery charger, read all instructions and cautionary markings
on
(1)
battery charger,
3.
CAUTION - To reduce risk of injury, charge only MAKITA Battery
Other types of batteries may burst causing personal injury and damage.
4.
Do
not expose charger to rain or snow.
5.
Use of an attachment not recommended or sold by the battery charger
manufacturer may result in a risk of fire, electric shock, or injury to persons.
6.
To reduce risk of damage to electric plug and cord, pull by plug rather than
cord when disconnecting charger.
7.
Make sure cord is located
or otherwise subjected to damage or stress.
8.
An extension cord should not be used unless absolutely necessary. Use of
improper extension cord could result in a risk of fire and electric shock. If
extension cord must be used, make sure:
a. That pins on plug of extension cord are the same number, size, and shape
as those of plug on charger;
b. That extension cord is properly wired and in good electrical condition; and
c. That wire size is at least as large as the one specified in the table below.
RECOMMENDED MINIMUM AWG SIZE FOR
EXTENSION CORDS FOR BATTERY CHARGERS
(2)
battery, and
so
that
(3)
product using battery.
it
will not be stepped on, tripped over,
TABLE
1
-
This manual
7000.
Length of Cord (Feet)
AWG Size of Cord
25
18
50
100 150
18 18 16
3

9.
Do
not operate charger with damaged cord or plug - replace them im-
mediately.
IO.
Do not operate charger
otherwise damaged
11.
Do not disassemble charger or battery cartridge; take
serviceman when service or repair is required. Incorrect reassembly may
result
in
a risk of electric shock or fire.
12. To reduce risk of electric shock, unplug charger from outlet before attempting any maintenance or cleaning. Turning off controls will not reduce this risk.
if
it
has received a sharp blow, been dropped, or
in
any way; take
it
to a qualified serviceman.
it
to a qualified
ADDITIONAL SAFETY RULES
FOR
1.
Do not charge Battery Cartridge when temperature is BELOW
or ABOVE 4OoC (104OF).
2.
Do not attempt to use a step-up transformer, an engine generator or DC power
receptacle.
3.
Do not allow anything to cover or clog the charger vents.
4.
Always cover the battery terminals with the battery cover when the battery
cartridge is not used.
5.
A battery short can cause a large current flow, overheating, possible burns
and even a breakdown.
(1)
Do not touch the terminals with any conductive material.
(2)
Avoid storing battery cartridge
as nails, coins, etc.
(3)
Do not expose battery cartridge to water or rain.
6.
Do not store the tool and Battery Cartridge in locations where the tempera-
ture may reach or exceed 5OoC (122OF).
7.
Do
not incinerate the Battery Cartridge even if
completely worn out. The battery cartridge can explode
CHARGER
&
BATTERY CARTRIDGE
10°C
in
a container with other metal objects such
it
is severely damaged or is
in
a fire.
(50°
F)
SAVE THESE INSTRUCTIONS.
4
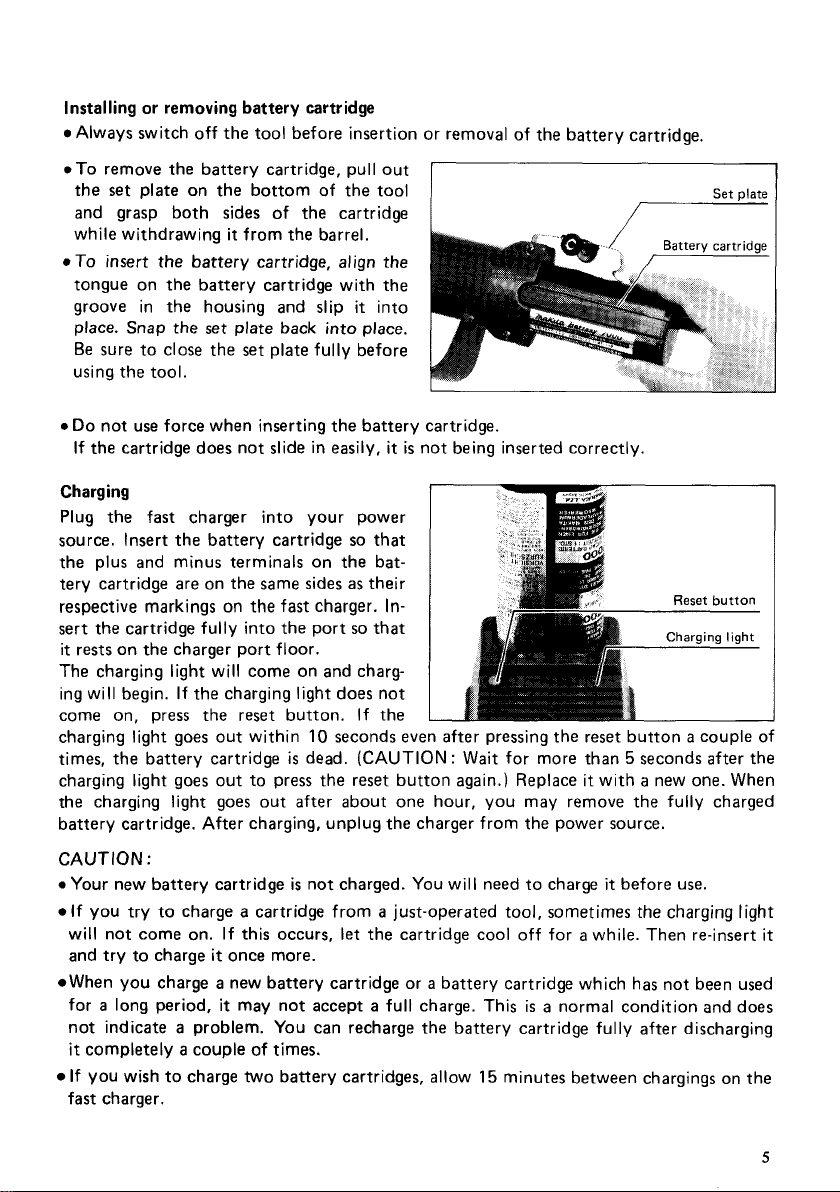
Installing or removing battery cartridge
Always switch off the tool before insertion or removal of the battery cartridge.
.To
remove the battery cartridge, pull out
the
set
plate on the bottom of the tool
and grasp both sides of the cartridge
while withdrawing
it
from the barrel.
.To insert the battery cartridge, align the
tongue on the battery cartridge with the
groove in the housing and slip
place. Snap the
set plate
Be sure to close the
back into place.
set
plate fully before
it
into
using the tool.
0
Do
not use force when inserting the battery cartridge.
it
is
If the cartridge does not slide in easily,
not being inserted correctly.
Charging
Plug the fast charger into your power
so
source. Insert the battery cartridge
that
the plus and minus terminals on the bat-
as
tery cartridge are on the same sides
their
respective markings on the fast charger. In-
so
sert the cartridge fully into the port
it
rests on the charger port floor.
that
The charging light will come on and charging will begin. If the charging light does not
come on,
charging light goes out within
times, the battery cartridge
charging light goes out to press the reset button again.) Replace
the charging
press
the
reset
button. If the
10
seconds even after pressing the reset button a couple
is
dead. (CAUTION
:
Wait
for more than 5 seconds after the
it
with a new one. When
light goes out after about one hour, you may remove the fully charged
battery cartridge. After charging, unplug the charger from the power source.
Set
plate
of
CAUTION
0
Your new battery cartridge
If
will not come on. If this occurs,
and try to charge
When
for
not indicate
it
completely a couple of times.
If
:
is
not charged. You will need to charge
it
before use.
you try to charge a cartridge from a just-operated tool, sometimes the charging light
let
the cartridge cool off for a while. Then re-insert
it
once more.
you
charge a new battery cartridge or a battery cartridge which has not been used
a
long period,
you wish to charge
it
may not accept a full charge. This
a
problem. You can recharge the battery cartridge fully after discharging
two
battery cartridges, allow
is
a
normal condition and does
15
minutes between chargings on the
fast charger.
it
5
 Loading...