

Page 1

Ударный гайковёрт
TW1000
Impact Wrench
Instruction Manual
Schlagschrauber
Betriebsanleitung
Klucz udarowy
Instrukcja obsługi
Инструкция по эксплуатации
Page 2
2
3
B
A
1
12
4
5
6
7
34
8
N m
1000
800
9
600
400
200
012345
M24
M22
M24
11
M22
6
10
5
2
Page 3

12
13
14
78
Symbols
The followings show the symbols used for the tool. Be sure that you understand their meaning before use.
Symbole
Die folgenden Symbole werden für die Maschine verwendet. Machen Sie sich vor der Benutzung unbedingt mit ihrer
Bedeutung vertraut.
Symbole
Poniższe symbole używane są do opisu urządzenia. Przed użyciem należy upewnić się, że rozumie się ich znaczenie.
Символы
Следующие объяснения показывают символы, используемые для инструмента. Убедитесь перед
использованием, что Вы понимаете их значение.
❏ Read instruction manual.
❏ Bitte Bedienungsanleitung lesen.
❏ Przeczytaj instrukcję obsługi.
❏ Прочитайте инструкцию по эксплуатации.
❏ DOUBLE INSULATION
❏ DOPPELT SCHUTZISOLIERT
❏ PODWÓJNA IZOLACJA
❏ ДВОЙНАЯ ИЗОЛЯЦИЯ
❏ Only for EU countries
Do not dispose of electric equipment together with household waste material!
In observance of European Directive 2002/96/EC on waste electrical and electronic equipment and
its implementation in accordance with national law, electric equipment that have reached the end of
their life must be collected separately and returned to an environmentally compatible recycling facility.
❏ Nur für EU-Länder
Werfen Sie Elektrowerkzeuge nicht in den Hausmüll!
Gemäß Europäischer Richtlinie 2002/96/EG über Elektro- und Elektronik-Altgeräte und Umsetzung in
nationales Recht müssen verbrauchte Elektrowerkzeuge getrennt gesammelt und einer umweltgerechten Wiederverwertung zugeführt werden.
❏ Dotyczy tylko państw UE
Nie wyrzucaj urządzeń elektrycznych wraz z odpadami z gospodarstwa domowego!
Zgodnie z Europejską Dyrektywą 2002/96/WE w sprawie zużytego sprzętu elektrotechnicznego i
elektronicznego oraz dostosowaniem jej do prawa krajowego, zużyte urządzenia elektryczne należy
posegregować i zutylizować w sposób przyjazny dla środowiska.
❏ Только для стран ЕС
Не выкидывайте электрическое оборудование вместе с бытовым мусором!
В соответствии с европейской директивой 2002/96/EC об утилизацияи старого
электрического и электронного оборудования и её применения в соответствии с местными
законами электрическое оборудование, бывшее в эксплуатации, должно утилизовываться
отдельно безопасным для окружающей среды способом.
3
Page 4

ENGLISH
1 Switch trigger
2 Side grip
3 Groove
4 Socket
5 Anvil
Explanation of general view
6O-ring
7Pin
8 High tensile bolt
9 Fastening torque
10 Fastening time
11 Limit mark
12 Protector
13 Brush holder cap
14 Screwdriver
SPECIFICATIONS
Model TW1000
Capacities
Standard bolt .............................................. M22 – M30
High tensile bolt .......................................... M22 – M24
Square drive ...................................................... 25.4 mm
No load speed (min
Impacts per minute ................................................. 1,500
Max. fastening torque ..................................... 1,000 N•m
Overall length ..................................................... 382 mm
Net weight .............................................................. 8.4 kg
Safety class ............................................................. /II
• Due to our continuing program of research and devel-
opment, the specifications herein are subject to change
without notice.
• Note: Specifications may differ from country to country.
Intended use
The tool is intended for fastening bolts and nuts.
Power supply
The tool should be connected only to a power supply of
the same voltage as indicated on the nameplate, and can
only be operated on single-phase AC supply. They are
double-insulated in accordance with European Standard
and can, therefore, also be used from sockets without
earth wire.
–1
) ............................................ 1,400
SAFETY INSTRUCTIONS
Warning! When using electric tools, basic safety precautions should always be followed to reduce the
risk of fire, electric shock and personal injury, including the following. Read all these instructions before
attempting to operate this product and save these
instructions.
For safe operation:
1. Keep work area clean
Cluttered areas and benches invite injuries.
2. Consider work area environment
Don’t expose power tools to rain. Don’t use power
tools in damp or wet locations. Keep work area well
lit. Don’t use power tools in presence of flammable
liquids or gases.
3. Guard against electric shock
Prevent body contact with grounded surfaces (e.g.
pipes, radiators, ranges, refrigerators).
4. Keep children away
Do not let visitors contact tool or extension cord. All
visitors should be kept away from work area.
5. Store idle tools
When not in use, tools should be stored in dry, high,
or locked-up place, out of the reach of children.
6. Don’t force tool
It will do the job better and safer at the rate for which
it was intended.
7. Use right tool
Don’t force small tools or attachments to do the job
of a heavy duty tool. Don’t use tools for purposes not
intended; for example, don’t use circular saw for cutting tree limbs or logs.
8. Dress properly
Do not wear loose clothing or jewelry. They can be
caught in moving parts. Rubber gloves and non-skid
footwear are recommended when working outdoors.
Wear protective hair covering to contain long hair.
9. Use safety glasses and hearing protection
Also use face or dust mask if cutting operation is
dusty.
10. Connect dust extraction equipment
If devices are provided for the connection of dust
extraction and collection facilities, ensure these are
connected and properly used.
11. Don’t abuse cord
Never carry tool by cord or yank it to disconnect it
from receptacle. Keep cord from heat, oil and sharp
edges.
12. Secure work
Use clamps or a vise to hold work. It’s safer than
using your hand and it frees both hands to operate
tool.
13. Don’t overreach
Keep proper footing and balance at all times.
14. Maintain tools with care
Keep tools sharp and clean for better and safer performance. Follow instructions for lubricating and
changing accessories. Inspect tool cords periodically and, if damaged, have repaired by authorized
service facility. Inspect extension cords periodically
and replace if damaged. Keep handles dry, clean
and free from oil and grease.
15. Disconnect tools
When not in use, before servicing, and when changing accessories such as blades, bits and cutters.
16. Remove adjusting keys and wrenches
Form the habit of checking to see that keys and
adjusting wrenches are removed from tool before
turning it on.
17. Avoid unintentional starting
Don’t carry plugged-in tool with finger on switch. Be
sure switch is off when plugging in.
18. Outdoor use extension cords
When tool is used outdoors, use only extension
cords intended for use outdoors and so marked.
19. Stay alert
Watch what you are doing. Use common sense. Do
not operate tool when you are tired.
4
Page 5

20. Check damaged parts
Before further use of the tool, a guard or other part
that is damaged should be carefully checked to
determine that it will operate properly and perform
its intended function. Check for alignment of moving
parts, binding of moving parts, breakage of parts,
mounting, and any other conditions that may affect
its operation. A guard or other part that is damaged
should be properly repaired or replaced by an authorized service center unless otherwise indicated elsewhere in this instruction manual. Have defective
switches replaced by an authorized service center.
Do not use tool if switch does not turn it on and off.
21. Warning
The use of any other accessory or attachment other
than recommended in this operating instruction or
the catalog may present a risk of personal injury.
22. Have your tool repaired by an expert
This electric appliance is in accordance with the relevant safety rules. Repairing of electric appliances
may be carried out only by experts otherwise it may
cause considerable danger for the user.
ADDITIONAL SAFETY RULES FOR TOOL
DO NOT let comfort or familiarity with product
(gained from repeated use) replace strict adherence
to impact wrench safety rules. If you use this tool
unsafely or incorrectly, you can suffer serious personal injury.
1. Hold tool by insulated gripping surfaces when
performing an operation where the cutting tool
may contact hidden wiring or its own cord. Contact with a “live” wire will also make exposed
metal parts of the tool “live” and shock the operator.
2. Wear ear protectors.
3. Check the socket carefully for wear, cracks or
damage before installation.
4. Hold the tool firmly.
5. Always be sure you have a firm footing.
Be sure no one is below when using the tool in
high locations.
6. The proper fastening torque may differ depending upon the kind or size of the bolt. Check the
torque with a torque wrench.
GEB009-1
SAVE THESE INSTRUCTIONS.
WARNING:
MISUSE or failure to follow the safety rules stated in
this instruction manual may cause serious personal
injury.
FUNCTIONAL DESCRIPTION
CAUTION:
• Always be sure that the tool is switched off and
unplugged before adjusting or checking function on the
tool.
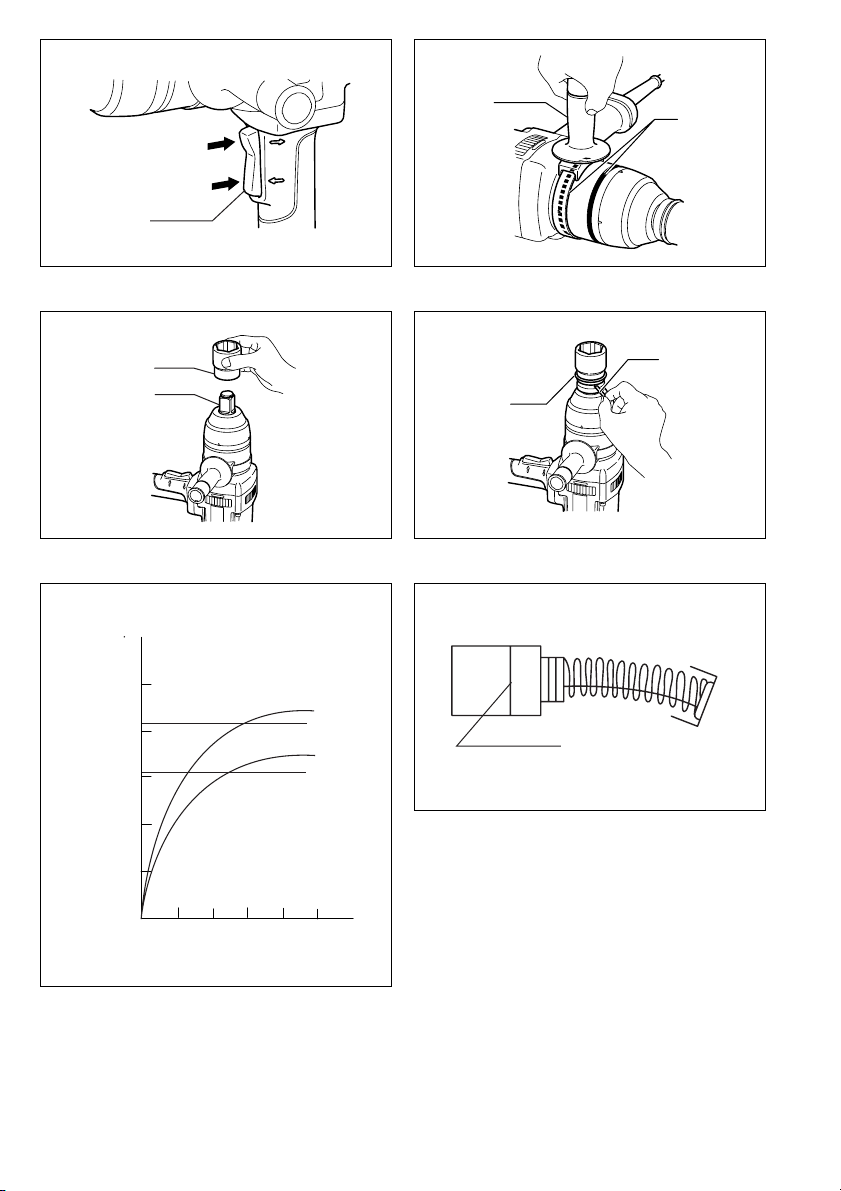
Switch action (Fig. 1)
CAUTION:
• Before plugging in the tool, always check to see that
the switch trigger actuates properly and returns to the
“OFF” position when released.
• Change the direction of rotation only when the tool
comes to a complete stop. Changing it before the tool
stops may damage the tool.
The switch is reversible, providing either clockwise or
counterclockwise rotation. To start the tool, simply pull
the lower part (A) of the switch trigger for clockwise, or
the upper part (B) for counterclockwise. Release the
switch trigger to stop.
ASSEMBLY
CAUTION:
• Always be sure that the tool is switched off and
unplugged before carrying out any work on the tool.
Installing side grip (auxiliary handle) (Fig. 2)
Fit the side grip into the groove on the hammer case and
fasten securely. The grooves for the side grip installation
are located in two positions. Install it at the proper position according to your work.
Selecting correct socket
Always use the correct size socket for bolts and nuts. An
incorrect size socket will result in inaccurate and inconsistent fastening torque and/or damage to the bolt or nut.
Installing or removing socket
CAUTION:
• Always be sure that the tool is switched off and
unplugged before installing or removing the socket.
For socket without O-ring and pin (Fig. 3)
To install the socket, push it onto the anvil of the tool until
it locks into place.
To remove the socket, simply pull it off.
For socket with O-ring and pin (Fig. 4)
Move the O-ring out of the groove in the socket and
remove the pin from the socket. Fit the socket onto the
anvil of the tool so that the hole in the socket is aligned
with the hole in the anvil. Insert the pin through the hole
in the socket and anvil. Then return the O-ring to the original position in the socket groove to retain the pin. To
remove the socket, follow the installation procedures in
reverse.
5
Page 6

OPERATION
The proper fastening torque may differ depending upon
the kind or size of the bolt, the material of the workpiece
to be fastened, etc. The relation between fastening
torque and fastening time is shown in Fig. 5. Hold the
tool firmly and place the socket over the bolt or nut. Turn
the tool on and fasten for the proper fastening time.
NOTE:
• Hold the tool pointed straight at the bolt or nut.
• Excessive fastening torque may damage the bolt/nut or
socket. Before starting your job, always perform a test
operation to determine the proper fastening time for
your bolt or nut.
The fastening torque is affected by a wide variety of factors including the following. After fastening, always check
the torque with a torque wrench.
1. Voltage
• Voltage drop will cause a reduction in the fastening
torque.
2. Socket
• Failure to use the correct size socket will cause a
reduction in the fastening torque.
• A worn socket (wear on the hex end or square
end) will cause a reduction in the fastening torque.
3. Bolt
• Even though the torque coefficient and the class of
bolt are the same, the proper fastening torque will
differ according to the diameter of the bolt.
• Even though the diameters of bolts are the same,
the proper fastening torque will differ according to
the torque coefficient, the class of bolt and the bolt
length.
4. The use of the universal joint or the extension bar
somewhat reduces the fastening force of the impact
wrench. Compensate by fastening for a longer
period of time.
5. The manner of holding the tool or the material of
driving position to be fastened will affect the torque.
MAINTENANCE
CAUTION:
• Always be sure that the tool is switched off and
unplugged before attempting to perform inspection or
maintenance.
Replacing carbon brushes
Remove and check the carbon brushes regularly.
Replace when they wear down to the limit mark. Keep
the carbon brushes clean and free to slip in the holders.
Both carbon brushes should be replaced at the same
time. Use only identical carbon brushes. (Fig. 6)
Remove the protector. Use a screwdriver to remove the
brush holder caps. Take out the worn carbon brushes,
insert the new ones and secure the brush holder caps.
(Fig. 7 & 8)
To maintain product SAFETY and RELIABILITY, repairs,
any other maintenance or adjustment should be performed by Makita Authorized or Factory Service Centres,
always using Makita replacement parts.
ACCESSORIES
CAUTION:
• These accessories or attachments are recommended
for use with your Makita tool specified in this manual.
The use of any other accessories or attachments might
present a risk of injury to persons. Only use accessory
or attachment for its stated purpose.
If you need any assistance for more details regarding
these accessories, ask your local Makita service center.
• Sockets
• Extension bar
• Side grip
• Plastic carrying case
For European countries only
Noise and Vibration
The typical A-weighted noise levels are
The typical weighted root mean square acceleration
value is 15 m/s2.
These values have been obtained according to
EN60745.
sound pressure level: 103 dB (A)
sound power level: 114 dB (A)
Uncertainty is 1 dB (A).
– Wear ear protection. –
ENG006-2-V4
EC-DECLARATION OF CONFORMITY
We declare under our sole responsibility that this product
is in compliance with the following standards of standardized documents,
in accordance with Council Directives, 73/23/EEC,
89/336/EEC and 98/37/EC.
EN60745, EN55014, EN61000
Yasuhiko Kanzaki
Director
CE 2004
ENH101-3
MAKITA INTERNATIONAL EUROPE LTD.
Michigan Drive, Tongwell, Milton Keynes,
Bucks MK15 8JD, ENGLAND
Responsible manufacturer:
Makita Corporation Anjo Aichi Japan
6
Page 7

DEUTSCH
1 Ein-Aus-Schalter
2 Seitengriff
3Führungsnut
4Steckschlüsseleinsatz
5 Antriebsvierkant
Übersicht
6 O-Ring
7Stift
8 Hochfeste Schraube
9 Anzugsmoment
10 Anzugszeit
11 Verschleißgrenze
12 Schutzkappe
13 Bürstenhalterkappe
14 Schraubendreher
TECHNISCHE DATEN
Modell TW1000
Arbeitsleistung
Standardschraube ....................................... M22 – M30
Hochfeste Schraube .................................... M22 – M24
Vierkantantrieb .................................................. 25,4 mm
Leerlaufdrehzahl (min
Schlagzahl pro Minute ............................................1 500
Max. Anzugsmoment ...................................... 1 000 N•m
Gesamtlänge ......................................................382 mm
Nettogewicht .......................................................... 8,4 kg
Sicherheitsklasse..................................................... /II
• Im Zuge der Entwicklung und des technischen Fort-
schritts behalten wir uns das Recht vor, Änderungen an
den technischen Daten ohne Vorankündigung vorzu-
nehmen.
• Hinweis: Die technischen Daten können von Land zu
Land unterschiedlich sein.
Vorgesehene Verwendung
Die Maschine ist für das Anziehen von Schrauben und
Muttern vorgesehen.
Netzanschluß
Die Maschine darf nur an die auf dem Typenschild angegebene Netzspannung angeschlossen werden und
arbeitet nur mit Einphasen-Wechselspannung. Sie ist
entsprechend den Europäischen Richtlinien doppelt
schutzisoliert und kann daher auch an Steckdosen ohne
Erdanschluß betrieben werden.
–1
) ........................................ 1 400
SICHERHEITSHINWEISE
Achtung! Beim Gebrauch von Elektrowerkzeugen
sind zum Schutz gegen elektrischen Schlag. Verletzungsund Brandgefahr folgende grundsätzlichen Sicherheitsmaßnahmen zu geachten.
Lesen und beachten Sie diese Hinweise, bevor
Sie das Gerät benutzen.
1. Halten Sie Ihren Arbeitsbereich in Ordnung
Unordnung im Arbeitsbereich ergibt Unfallgefahr.
2. Berücksichtigen Sie Umgebungseinflüsse
Setzen sie Elektrowerkzeuge nicht dem Regen aus.
Benützen Sie Elektrowerkzeuge nicht in feuchter
oder nasser Umgebung. Sorgen Sie für gute
Beleuchtung. Benützen Sie Elektrowerkzeuge nicht
in Nähe von brennbaren Flüssigkeiten oder Gasen.
3. Schützen Sie sich vor elektrischem Schlag
Vermeiden Sie Körperberührung mit geerdeten Teilen, zum Beispiel Rohren, Heizkörpern, Herden,
kühlschränken.
4. Halten Sie Kinder fern!
Lassen Sie andere Personen nicht das Werkzeug
oder Kabel berühren, halten Sie sie von Ihrem
Arbeitsbereich fern.
5. Bewahren Sie Ihre Werkzeuge sicher auf
Unbenutzte Werkzeuge sollten in trockenem, verschlossenem Raum und für Kinder nicht erreichbar
aufbewahrt werden.
6. Überlasten Sie Ihr Werkzeug nicht
Sie arbeiten besser und sicherer im angegebenen
Leistungsbereich.
7. Benützen Sie das richtige Werkzeug
Verwenden Sie keine zu schwachen Werkzeuge
oder Vorsatzgeräte für schwere Arbeiten.
Benützen Sie Werkzeuge nicht für Zwecke und
Arbeiten, Wofür sie nicht bestimmt sind; zum Beispiel benützen Sie keine Handkreissäge, um Bäume
zu flällen oder Äste zu schneiden.
8. Tragen Sie geeignete Arbeitskleidung
Tragen Sie keine weite Kleidung oder Schmuck. Sie
können von beweglichen Teilen erfaßt werden. Bei
Arbeiten im Freien sind Gummihandschuhe und
rutschfestes Schuhwerk empfehlenswert. Tragen
Sie bei langen Haaren ein Haarnetz.
9. Schutzbrille und Gehörschutz tragen
Verwenden Sie eine Atemmaske bei stauberzeugenden Arbeiten.
10. Schlleßen Sie eine Staubabsaugvorrichtung an
Wenn Geräte für den Anschluß von Staubabsaugund-sammelvorrichtungen ausgelegt sind, sorgen
Sie dafür, daß Jiese angeschlossen und korrekt
benutzi werden.
11. Zweckentfremden Sie nicht das Kabel
Tragen Sie das Werkzeug nicht am Kabel, und
benützen Sie es nicht, um den Stecker aus der
Steckdose zu ziehen. Schützen Sie das Kabel vor
Hitze, Öl und scharfen Kanten.
12. Sichern Sie das Werkstück
Benützen Sie Spannvorrichtungen oder einen
Schraubstock, um das Werkstück festzuhalten. Es
ist damit sicherer gehalten als mit Ihrer Hand und
ermöglicht die Bedienung der Maschine mit beiden
Händen.
13. Überdehnen Sie nicht Ihren Standbereich
Vermeiden Sie abnormale Körperhaltung. Sorgen
Sie für sicheren Stand, und halten Sie jederzeit das
Gleichgewicht.
14. Pflegen Sie Ihre Werkzeuge mit Sorgtalt
Halten Sie Ihre Werkzeuge scharf und sauber, um
gut und sicher zu arbeiten. Befolgen Sie die Wartungsvorschriften und die Hinweise für Werkzeugwechsel. Kontrollieren Sie regelmäßig den Stecker
und das Kabel, und lassen Sie diese bei Beschädigung von einem anerkannten Fachmann erneuern.
Kontrollieren Sie Verlängerungskabel regelmäßig
und ersetzen Sie beschädigte. Halten Sie Handgriffe
trocken und frei von Öl und Fett.
7
Page 8

15. Ziehen Sie den Netzstecker
Bei Nichtgebrauch, vor der Wartung und beim Werkzeugwechsel, wie zum Beispiel Sägeblatt, Bohrer
und Maschinenwerkzeugen aller Art.
16. Lassen Sie keine Werkzeugschlüssel stecken
Überprüfen Sie vor dem Einschalten, daß die
Schlüssel und Einstellwerkzeuge entfernt sind.
17. Vermeiden Sie unbeabsichtigten Anlauf
Tragen Sie keine an das Stromnetz angeschlossene
Werkzeuge mit dem Finger am Schalter. Vergewissern Sie sich, daß der Schalter beim Anschluß an
das Stromnetz ausgeschaltet ist.
18. Verlängerungskabel im Freien
Verwenden Sie im Freien nur dafür zugelassene
und entsprechend gekennzeichnete Varlängerungskabel.
19. Seien Sie stets aufmerksam
Beobachten Sie Ihre Arbeit. Gehen Sie vernünftig
vor. Verwenden Sie das Werkzeug nicht, wenn Sie
unkonzentriert sind.
20. Kontrollieren Sie Ihr Gerät auf Beschädigungen
Vor weiterem Gebrauch des Werkzeugs die Schutzeinrichtungen oder leicht beschädigte Teile sorgfältig auf ihre einwandfreie und bestimmungsgemäße
Funktion überprüfen. Überprüfen Sie, ob die Funktion beweglicher Teile in Ordnung ist, ob sie nicht
klemmen onder ob Teile beschädigt sind. Sämtliche
Teile müssen richtig montiert sein und alle Bedingungen erfüllen, um den einwandfreien Betrieb des
Gerätes zu gewährleisten.
Beschädigte Schutzvorrichtungen und Teile sollen
sachgemäß durch eine Kundendienstwerkstatt repariert oder ausgewechselt werden, soweit nichts
anderes in den Betriebsanleitungen angegeben ist.
Beschädigte Schalter müssen bei einer Kundendienstwerkstatt ersetzt werden. Benutzen Sie keine
Werkzeuge, bei denen sich der Schalter nicht ein
und ausschalten läßt.
21. Achtung!
Zu Ihrer eigenen Sicherheit, benützen Sie nur Zubehör und Zusatzgeräte, die in der Bedienungsanleitung angegeben oder vom Werkzeug-Hersteller
empfohlen oder angegeben werden. Der Gebrauch
anderer als der in der Bedienungsanleitung oder im
Katalog empfohlenen Einsatzwerkzeuge oder Zubehöre kann eine persönliche Verletzungsgefahr für
Sie bedeuten.
22. Reparaturen nur vom Elektrofachmann.
Dieses Elektrowerkzeug entspricht den einschlägigen Sicherheitsbestimmungen. Reparaturen dürfen
nur von einer Elektrofachkraft ausgeführt werden,
andernfalls können Unfälle für den Betreiber entstehen.
ZUSÄTZLICHE SICHERHEITSREGELN FÜR
DIE MASCHINE
Lassen Sie sich NICHT durch Bequemlichkeit oder
Vertrautheit mit dem Produkt (durch wiederholten
Gebrauch erworben) von der strikten Einhaltung der
Sicherheitsregeln für Schlagschrauber abhalten.
Wenn Sie dieses Werkzeug auf unsichere oder
unsachgemäße Weise benutzen, können Sie schwere
Verletzungen erleiden.
1. Halten Sie die Maschine nur an den isolierten
Griffflächen, wenn Sie Arbeiten ausführen, bei
denen die Gefahr besteht, dass verborgene
Kabel oder das eigene Kabel angebohrt werden.
Bei Kontakt mit einem stromführenden Kabel
werden die freiliegenden Metallteile der
Maschine ebenfalls stromführend, so dass der
Benutzer einen elektrischen Schlag erleiden
kann.
2. Tragen Sie Gehörschützer.
3. Überprüfen Sie den Steckschlüsseleinsatz vor
der Montage sorgfältig auf Risse oder Beschädigung.
4. Halten Sie die Maschine mit festem Griff.
5. Achten Sie stets auf sicheren Stand.
Vergewissern Sie sich bei Einsatz der Maschine
an hochgelegenen Arbeitsplätzen, daß sich
keine Personen darunter aufhalten.
6. Das korrekte Anzugsmoment kann je nach Art
oder Größe der Schraube unterschiedlich sein.
Überprüfen Sie das Anzugsmoment mit einem
Drehmomentschlüssel.
BEWAHREN SIE DIESE ANLEITUNG GUT AUF.
WARNUNG:
MISSBRAUCH oder Missachtung der Sicherheitsvorschriften in dieser Anleitung können schwere Verletzungen verursachen.
8
Page 9

FUNKTIONSBESCHREIBUNG
VORSICHT:
• Vergewissern Sie sich vor jeder Einstellung oder Funktionsprüfung der Maschine stets, dass sie ausgeschaltet und vom Stromnetz getrennt ist.
Schalterbedienung (Abb. 1)
VORSICHT:
• Vergewissern Sie sich vor dem Anschließen der
Maschine an das Stromnetz stets, dass der Ein-AusSchalter ordnungsgemäß funktioniert und beim Loslassen in die AUS-Stellung zurückkehrt.
• Schalten Sie die Drehrichtung erst um, nachdem das
Werkzeug völlig zum Stillstand gekommen ist. Andernfalls kann die Maschine beschädigt werden.
Die Maschine ist für Rechts- und Linkslauf ausgelegt. Für
Rechtslauf drücken Sie auf den unteren Ein-Aus-Schalter
(A), für Linkslauf auf den oberen Ein-Aus-Schalter (B).
Zum Ausschalten lassen Sie den Ein-Aus-Schalter in die
Ausgangsposition zurückspringen.
MONTAGE
VORSICHT:
• Vergewissern Sie sich vor der Ausführung von Arbeiten
an der Maschine stets, dass sie ausgeschaltet und vom
Stromnetz getrennt ist.
Montieren des Seitengriffs (Zusatzgriffs) (Abb. 2)
Passen Sie den Seitengriff in die Führungsnut des
Schlagschraubergehäuses ein, und befestigen Sie ihn
einwandfrei. Zwei Führungsnuten für die Seitengriffmontage sind vorhanden. Montieren Sie den Griff je nach
Ihrer Arbeit an der geeigneten Position.
Wahl des korrekten Steckschlüsseleinsatzes
Verwenden Sie stets einen passenden Steckschlüsseleinsatz für die jeweiligen Schrauben und Muttern. Ein
Steckschlüsseleinsatz der falschen Größe bewirkt ein falsches und ungleichmäßiges Anzugsmoment und/oder
Beschädigung der Schraube oder Mutter.
Montage und Demontage des
Steckschlüsseleinsatzes
VORSICHT:
• Vergewissern Sie sich vor der Montage oder Demontage des Steckschlüsseleinsatzes stets, dass die
Maschine ausgeschaltet und vom Stromnetz getrennt
ist.
Für Einsatzwerkzeug ohne O-Ring und Stift (Abb. 3)
Zum Anbringen das Einsatzwerkzeug auf den Antriebsvierkant des Werkzeugs schieben, bis es einrastet.
Zum Abnehmen das Einsatzwerkzeug einfach abziehen.
Für Einsatzwerkzeug mit O-Ring und Stift (Abb. 4)
Den O-Ring aus der Nut im Steckschlüsseleinsatz entfernen, und den Stift aus dem Steckschlüsseleinsatz herausziehen. Den Steckschlüsseleinsatz so in den Flansch
der Maschine einsetzen, daß die Bohrung im Steckschlüsseleinsatz auf die Bohrung im Flansch ausgerichtet ist. Den Stift durch die Bohrung in
Steckschlüsseleinsatz und Flansch einführen. Dann den
O-Ring wieder in die Nut des Steckschlüsseleinsatzes
einsetzen, um den Stift zu arretieren. Zum Demontieren
des Steckschlüsseleinsatzes ist das Montageverfahren
umgekehrt anzuwenden.
BETRIEB
Das korrekte Anzugsmoment hängt u.a. von der Art oder
Größe der Schrauben oder der Art der zu verschraubenden Materialien ab. Die Beziehung zwischen Anzugsmoment und Anzugszeit ist in Abb. 5. Halten Sie das
Werkzeug mit festem Griff, und setzen Sie den Steckschlüsseleinsatz auf die Schraube oder Mutter. Schalten
Sie das Werkzeug ein, und ziehen Sie die Schraube oder
Mutter mit der korrekten Anzugszeit an.
HINWEIS:
• Halten Sie das Werkzeug gerade auf die Schraube
oder Mutter gerichtet.
• Ein zu hohes Anzugsmoment kann zu einer Beschädigung der Schraube/Mutter oder des Steckschlüssels
führen. Führen Sie vor Arbeitsbeginn stets eine Probeverschraubung durch, um die geeignete Anzugszeit für
die jeweilige Schraube oder Mutter zu ermitteln.
Das Anzugsmoment unterliegt einer Reihe von Einflüssen, einschließlich der folgenden. Überprüfen Sie das
Anzugsmoment nach dem Anziehen stets mit einem
Drehmomentschlüssel.
1. Netzspannung:
• Ein Spannungsabfall/Unterspannung reduziert das
maximale Anzugsmoment.
2. Steckschlüsseleinsatz
• Ungleiche Schlüsselweiten der Steckschlüsseleinsätze und Schraubverbindungen vermindern das
Anzugsmoment.
• Ein abgenutzter Steckschlüsseleinsatz (Abnutzung am Sechskant oder Antriebs-Vierkant) verringert das Anzugsmoment.
3. Schrauben
• Das Anzugsmoment ist bei gleichem Schraubentyp bzw. Schraubfall abhängig vom Schraubendurchmesser.
• Schraubenlänge und Schraubenart bestimmen bei
gleichem Schraubdurchmesser das erzielbare
Anzugsmoment.
4. Bei Benutzung von Gelenkstücken, Verlängerungen,
etc. wird das Anzugsmoment verringert. Durch längere Einschraubzeit kann entgegengewirkt werden.
5. Die Art und Weise, wie das Werkzeug oder das
Material der Verschraubungsposition gehalten wird,
beeinflusst das Anzugsmoment.
9
Page 10

WARTUNG
VORSICHT:
• Denken Sie vor der Durchführung von Überprüfungen
oder Wartungsarbeiten stets daran, die Maschine auszuschalten und vom Stromnetz zu trennen.
Kohlebürsten wechseln
Die Kohlebürsten müssen regelmäßig entfernt und überprüft werden. Wenn sie bis zur Verschleißgrenze abgenutzt sind, müssen sie erneuert werden. Halten Sie die
Kohlebürsten stets sauber, damit sie ungehindert in den
Haltern gleiten können. Beide Kohlebürsten sollten
gleichzeitig erneuert werden. Verwenden Sie nur identische Kohlebürsten. (Abb. 6)
Entfernen Sie die Schutzkappe. Drehen Sie die Bürstenhalterkappen mit einem Schraubendreher heraus. Die
abgenutzten Kohlebürsten herausnehmen, die neuen
einsetzen, und dann die Bürstenhalterkappen wieder eindrehen. (Abb. 7 und 8)
Um die Sicherheit und Zuverlässigkeit dieses Gerätes zu
gewährleisten, sollten Reparatur-, Wartungs-, und Einstellarbeiten nur von durch Makita autorisierten Werkstätten oder Kundendienstzentren unter ausschließlicher
Verwendung von Makita-Originalersatzteilen ausgeführt
werden.
ZUBEHÖR
VORSICHT:
• Die folgenden Zubehörteile oder Vorrichtungen werden
für den Einsatz mit der in dieser Anleitung beschriebenen Makita-Maschine empfohlen. Die Verwendung
anderer Zubehörteile oder Vorrichtungen kann eine
Verletzungsgefahr darstellen. Verwenden Sie Zubehörteile oder Vorrichtungen nur für ihren vorgesehenen
Zweck.
Wenn Sie weitere Einzelheiten bezüglich dieser Zubehörteile benötigen, wenden Sie sich bitte an Ihre MakitaKundendienststelle.
• Steckschlüsseleinsatz
• Verlängerungsstücks
• Seitengriff
• Plastikkoffer
Nur für europäische Länder
Geräusch- und Vibrationsentwicklung
Die typischen A-bewerteten Geräuschpegel betragen:
Der gewichtete Effektivwert der Beschleunigung beträgt
15 m/s2.
Diese Werte wurden gemäß EN60745 erhalten.
Schalldruckpegel: 103 dB (A)
Schalleistungspegel: 114 dB (A)
Die Abweichung beträgt 1 dB (A).
– Gehörschutz tragen. –
ENG006-2-V4
CE-KONFORMITÄTSERKLÄRUNG
Hiermit erklärt wir unter unserer alleinigen Verantwortung, daß dieses Produkt gemäß den Ratsdirektiven 73/
23/EWG, 89/336/EWG und 98/37/EG mit den folgenden
Normen von Normendokumenten übereinstimmen:
EN60745, EN55014, EN61000.
Yasuhiko Kanzaki
CE 2004
Direktor
ENH101-3
MAKITA INTERNATIONAL EUROPE LTD.
Michigan Drive, Tongwell, Milton Keynes,
Bucks MK15 8JD, ENGLAND
Verantwortlicher Hersteller:
Makita Corporation Anjo Aichi Japan
10
Page 11

POLSKI
Wyjaśnienia dotyczące urządzenia i jego użycia
1 Spust włącznika
2 Uchwyt boczny
3Bruzda
4 Nasadka
5Kowadełko
6 Przetyczka
7 Pierścień okrągły
8 Śruby sprężające
9 Moment dokręcenia
10 Czas dokręcania
DANE TECHNICZNE
Model TW1000
Rozmiary dokręcanych śrub
Śruby zwykłe ............................................. M22 – M30
Śruby sprężające ....................................... M22 – M24
Śruby z łbem kwadratowym .............................. 25,4 mm
Prędkość bez obciążenia (min-1) ............................1 400
Liczba uderzeń na minutę ....................................... 1 500
Maksymalny moment dokręcający.................. 1 000 N•m
Całkowita długość ............................................... 382mm
Ciężar netto ............................................................ 8,4 kg
Klasa bezpieczeństwa .............................................. /II
• Ze względu na prowadzony program udoskonaleń i
badań, podane dane techniczne mogą zostać
zmienione bez uprzedzenia.
• Uwaga: Dane techniczne mogą się różnić w zależności
od kraju.
Przeznaczenie
Urządzenie jest przeznaczone do zakręcania śrub i
nakrętek.
Zasilanie
Urządzenie to, powinno być podłączone tylko do źródła
zasilania o takim samym napięciu jak pokazano na
tabliczce znamionowej i może być używane dla
zmiennego/stałego prądu jednofazowego. Zgodnie ze
standardami Unii Europejskiej zastosowano podwójną
izolację i dlatego też możliwe jest zasilanie z gniazda bez
uziemienia.
INSTRUKCJE BEZPIECZEŃSTWA
Ostrzeżenie! Używając urządzeń elektrycznych
podstawowe środki ostrożności muszą być zawsze
zachowane, aby zmniejszyć ryzyko ognia, porażenia
prądem i uszkodzenia ciała, włączając poniższe.
Przeczytaj wszystkie podane instrukcje przed próbą
użycia tego produktu i zachowaj je do wglądu.
Dla bezpiecznego użycia:
1. Utrzymuj miejsce pracy w czystości
Zabałaganione miejsca i stoły warsztatowe sprzyjają
wypadkom.
2. Zastanów się nad warunkami pracy
Nie wystawiaj urządzeń elektrycznych na deszcz. Nie
używaj urządzeń elektrycznych w wilgotnych lub
mokrych miejscach. Utrzymuj miejsce pracy dobrze
oświetlone. Nie używaj urządzeń elektrycznych w
obecności łatwopalnych płynów lub gazów.
3. Chroń się przed porażeniem prądem
Zapobiegaj kontaktom ciała z uziemionymi
powierzchniami (np. rurami, grzejnikami, kuchenkami,
lodówkami).
11 Znak limitu
12 Osłona
13 Pokrywa pojemnika na
szczoteczkę
14 Śrubokręt
4. Nie pozwalaj zbliżać się dzieciom
Nie pozwalaj wizytującym osobom dotykać
urządzenia lub przedłużacza. Wszystkie wizytujące
osoby nie powinny zbliżać się do miejsca pracy.
5. Zachowaj nieczynne urządzenia
Nieużywane urządzenia powinny być
przechowywane w suchych, wysokich lub
zamykanych miejscach tak, aby były niedostępne dla
dzieci.
6. Nie przeciążaj urządzenia
Wykona ono pracę lepiej i bezpieczniej, pracując w
sposób, dla którego zostało ono zaprojektowane.
7. Używaj poprawnego urządzenia
Nie nadużywaj małych lub dodatkowych urządzeń do
wykonania pracy urządzeń do dużej pracy. Nie
używaj urządzeń do celów, do których nie zostały
przeznaczone; na przykład, nie używaj piły tarczowej
do przecinania gałęzi lub kłód drzew.
8. Ubierz się odpowiednio
Nie noś luźnych ubrań lub biżuterii. Mogą one zostać
zahaczone o ruchome części. Gumowe rękawiczki i
przeciwpoślizgowe buty są wskazane przy pracy na
dworze. Zaleca się noszenie ochrony na głowę
przytrzymującej długie włosy.
9. Użyj okularów ochronnych i ochraniaczy uszu
Użyj masek na twarz lub masek przeciwpyłowych
jeżeli czynność cięcia wytwarza pyły.
10. Podłącz urządzenie usuwające pył
Jeżeli urządzenia posiadają podłączenia do urządzeń
do usuwania i składowania pyłu, upewnij się, że są
one poprawnie podłączone i użyte.
11. Uważaj na przewód sieciowy
Nigdy nie noś urządzenia trzymając za przewód i nie
odłączaj go od gniazda przez pociągnięcie przewodu.
Chroń przewód przed ciepłem, olejem i ostrymi
krawędziami.
12. Pewnie mocuj obrabiane elementy
Użyj ścisków lub imadła do zamocowania
obrabianych elementów. Jest to bezpieczniejsze niż
używanie rąk, a dodatkowo zwalnia obie ręce do
obsługiwania urządzenia.
13. Używając urządzenie, nie oddalaj go zbytnio od
siebie
Cały czas trzymaj dobrze ustawione nogi i
równowagę.
14. Pamiętaj o dobrej konserwacji urządzenia
Utrzymuj urządzenie ostre i czyste dla jego lepszego i
bezpieczniejszego działania. Wykonaj podane
instrukcje w celu smarowania lub wymiany
elementów wyposażenia. Regularnie sprawdzaj
przewody urządzenia, i jeżeli są uszkodzone, oddaj je
do naprawy do autoryzowanego serwisu. Regularnie
sprawdzaj przewody przedłużające i wymień je, jeżeli
są uszkodzone. Utrzymuj uchwyty suche, czyste i nie
zabrudzone olejem lub smarem.
11
Page 12

15. Odłącz urządzenia
Przed konserwacją urządzenia lub zmianą
wyposażenia takiego jak tarcze, końcówki robocze i
noże, gdy nie jest ono używane.
16. Wyjmij klucze regulacyjne
Nabierz zwyczaju sprawdzania czy klucze
regulacyjne są usunięte z urządzenia przed jego
użyciem.
17. Unikaj przypadkowych uruchomień
Nie noś podłączonego urządzenia z palcem na
włączniku. Upewnij się, że urządzenie jest wyłączone,
gdy je podłączasz do zasilania.
18. Zastosuj przedłużacz używając urządzenia na
dworze
Gdy urządzenie używane jest na dworze, stosuj tylko
przedłużacze przeznaczone i oznaczone do pracy na
dworze.
19. Bądź uważny
Patrz co robisz. Bądź rozsądny. Nie używaj
urządzenia, gdy jesteś zmęczony.
20. Sprawdzaj uszkodzone części
Przed dalszym użyciem urządzenia, osłona lub inne
części, które są uszkodzone, muszą być uważnie
sprawdzone, aby upewnić się, że będą poprawnie
działać i wykonywać przeznaczone im funkcje.
Sprawdzaj ustawienia ruchomych części, oprawy
ruchomych części, pęknięcia części, zamocowania, i
jakiekolwiek inne warunki, które mogą wpływać na
działanie. Osłona lub inne części, które są
uszkodzone, powinny być naprawione lub
wymienione przez autoryzowany serwis, jeżeli w
instrukcji nie podano inaczej. Uszkodzone
przełączniki powinny być wymienione przez
autoryzowany serwis. Nie używaj urządzenia, jeżeli
włącznik nie może go włączyć lub wyłączyć.
21. Ostrzeżenie
Użycie jakiegokolwiek innego wyposażenia lub części
dodatkowych innych niż zalecane w tej instrukcji
obsługi lub katalogu, może stworzyć ryzyko
uszkodzenia ciała.
22. Naprawy urządzenia powinny być wykonywane
tylko przez specjalistę
To urządzenie jest wykonane zgodnie z odpowiednimi
zasadami bezpieczeństwa. Naprawa urządzeń
elektrycznych może być wykonana wyłącznie przez
specjalistę, gdyż w przeciwnym wypadku może ono
stanowić zagrożenie dla użytkownika.
DODATKOWE ZALECENIA DOTYCZĄCE
BEZPIECZEŃSTWA
NIE pozwól, aby komfort i znajomość urządzenia
(uzyskane w wyniku wielokrotnego używania)
zastąpiły ścisłe stosowanie się do zasad bezpiecznej
pracy z kluczem udarowym. Jeżeli będziesz używał
urządzenia w sposób niebezpieczny, może dojść do
poważnych obrażeń.
1. Podczas wykonywania prac, w trakcie których
urządzenie tnące może wejść w kontakt z
ukrytymi przewodami elektrycznymi lub
własnym przewodem zasilania, trzymaj
urządzenie za izolowane powierzchnie uchwytu.
Kontakt z przewodem elektrycznym pod
napięciem sprawi, że odsłonięte, metalowe
części urządzenia znajdą się również pod
napięciem, co może doprowadzić do porażenia
prądem.
2. Zakładaj ochraniacze na uszy.
3. Przed założeniem sprawdź, czy nasadka nie jest
zużyta, popękana lub uszkodzona.
4. Trzymaj urządzenie pewnie.
5. Zawsze upewnij się, że stoisz na pewnej
podstawie. Podczas używania urządzenia na
wysokościach, upewnij się, czy pod Tobą nie ma
żadnych osób.
6. Właściwy moment dokręcenia może różnić się w
zależności od rodzaju i rozmiaru śruby. Sprawdź
moment kluczem dynamometrycznym.
ZACHOWAJ TĘ INSTRUKCJĘ.
OSTRZEŻENIE:
NIEWŁAŚCIWE UŻYWANIE lub niestosowanie się do
zasad bezpieczeństwa podanych w niniejszej
instrukcji obsługi może doprowadzić do poważnych
obrażeń.
OPIS DZIAŁANIA
OSTRZEŻENIE:
• Przed regulacjami lub sprawdzaniem działania
urządzenia zawsze upewnij się, czy jest ono
wyłączone i odłączone od zasilania.
Działanie przełącznika (Rys.1)
OSTRZEŻENIE:
• Przed podłączeniem urządzenia do zasilania zawsze
sprawdź, czy spust włącznika działa poprawnie i
powraca do położenia wyłączonego po zwolnieniu.
• Zmieniaj kierunek obrotów dopiero po całkowitym
zatrzymaniu się urządzenia. Zmiana dokonana przed
zatrzymaniem urządzenia może doprowadzić do jego
uszkodzenia.
Przełącznik jest dwukierunkowy, dając obroty zgodne z
ruchem wskazówek zegara lub przeciwne do ruchu
wskazówek zegara. Aby uruchomić urządzenie, po
prostu pociągnij za dolną część (A) przełącznika dla
obrotów zgodnie z ruchem wskazówek zegara, albo
górną cześć (B) dla obrotów przeciwnie do ruchu
wskazówek zegara. Aby zatrzymać, zwolnij przełącznik.
SKŁADANIE
OSTRZEŻENIE:
• Przed wykonywaniem jakiejkolwiek pracy nad
urządzeniem, zawsze upewnij się, czy jest ono
wyłączone i odłączone od zasilania.
Zakładanie uchwytu bocznego (pomocniczego)
(Rys. 2)
Włóż uchwyt boczny do bruzdy w obudowie młotka i
zamocuj pewnie. Bruzdy do zamocowania uchwytu
bocznego znajdują się w dwóch położeniach. Załóż
uchwyt boczny w położeniu odpowiednim dla
wykonywanej pracy.
Wybór właściwej nasadki
Do śrub i nakrętek używaj zawsze nasadki o właściwym
rozmiarze. Nasadka o niewłaściwym rozmiarze może
dać niedokładny i niezgodny moment dokręcenia oraz
uszkodzić śrubę lub nakrętkę.
12
Page 13

Zakładanie lub zdejmowanie nasadki
OSTRZEŻENIE:
• Przed zakładaniem lub wyjmowaniem nasadki, zawsze
upewnij się, czy urządzenie jest wyłączone i odłączone
od zasilania.
Nasadka bez pierścienia okrągłego i przetyczki
(Rys. 3)
Aby założyć nasadkę, wciśnij ją na kowadełko
urządzenia, aż zostanie zamocowana na miejscu.
Aby wyjąć nasadkę, wyciągnij ją.
Nasadka z pierścieniem okrągłym i przetyczką
(Rys. 4)
Wysuń pierścień okrągły poza bruzdę w nasadce i
wyjmij przetyczkę z nasadki. Załóż nasadkę na
kowadełko urządzenia tak, aby otwór w nasadce znalazł
się naprzeciwko otworu w kowadełku. Przełóż
przetyczkę przez otwory w nasadce i kowadełku.
Przesuń pierścień okrągły do pierwotnego położenia w
bruździe nasadki, aby zamocować przetyczkę. Aby
zdjąć nasadkę, wykonaj czynności zakładania w
odwrotnej kolejności.
POSTĘPOWANIE
Właściwy moment dokręcenia może różnić się w
zależności od rodzaju i rozmiaru śruby, skręcanego
materiału itp. Zależność pomiędzy momentem
dokręcenia a czasem dokręcania podana jest na Rys. 5.
Chwyć pewnie urządzenie i nałóż nasadkę na śrubę lub
nakrętkę. Włącz urządzenie i dokręcaj przez właściwy
czas.
UWAGA:
• Trzymaj urządzenie skierowane prosto na nakrętkę lub
śrubę.
• Nadmierny moment dokręcający może uszkodzić
śrubę/nakrętkę lub nasadkę. Przed rozpoczęciem
pracy zawsze wykonaj skręcanie próbne, aby określić
właściwy czas dokręcania dla danej śruby lub nakrętki.
Moment dokręcenia zależy od wielu czynników, między
innymi od następujących. Po zakręceniu zawsze
sprawdź moment dokręcenia kluczem
dynamometrycznym.
1. Napięcie
• Spadek napięcia może spowodować obniżenie
momentu dokręcenia.
2. Nasadka
• Nieużywanie nasadki o właściwym rozmiarze
może spowodować obniżenie momentu
dokręcenia.
• Zużyta nasadka (zużycie końca sześciokątnego
lub kwadratowego) może doprowadzić do
obniżenia momentu dokręcenia.
3. Śruba
• Nawet jeśli współczynnik momentu i klasa śruby
są takie same, właściwy moment dokręcenia
może się różnić zależnie od średnicy śruby.
• Nawet jeśli średnice śrub są takie same, właściwy
moment dokręcenia może się różnić zależnie od
współczynnika momentu, klasy śruby i jej
długości.
4. Stosowanie przegubu uniwersalnego lub
przedłużacza w pewnym stopniu obniża siłę
dokręcającą klucza udarowego. Skompensuj to
dokręcając dłużej.
5. Sposób trzymania urządzenia i skręcany materiał
mogą mieć wpływ na moment dokręcający.
KONSERWACJA
OSTRZEŻENIE:
• Przed oględzinami lub konserwacją urządzenia zawsze
upewnij się, czy jest ono wyłączone i odłączone od
zasilania.
Wymiana szczoteczek węglowych
Wyjmuj i sprawdzaj regularnie szczoteczki węglowe.
Wymień je, kiedy są starte do znaku limitu. Trzymaj
szczoteczki w czystości i gotowości do wsunięcia do
pojemników. Obie szczoteczki powinny być wymieniane
w tym samym czasie. Używaj wyłącznie jednakowych
szczoteczek. (Rys. 6)
Zdejmij osłonę. Użyj śrubokręta, aby zdjąć pokrywy
pojemników na szczoteczki. Wyjmij zużyte szczoteczki,
włóż nowe i zamknij pokrywy pojemników. (Rys. 7 i 8)
W celu zapewnienia BEZPIECZEŃSTAWA pracy i
NIEZAWODNOŚCI urządzenia naprawy, konserwacja i
regulacje powinny być wykonywane przez
autoryzowane lub fabryczne punkty napraw firmy
Makita, wyłącznie z użyciem części zamiennych firmy
Makita.
WYPOSAŻENIE
OSTRZEŻENIE:
• Niniejsze wyposażenie i nakładki są zalecane do
używania wraz z urządzeniem Makita określonym w tej
instrukcji obsługi. Używanie jakiegokolwiek innego
wyposażenia lub nakładek może spowodować
niebezpieczeństwo zranienia osób. Używaj
wyposażenia i nakładek wyłącznie w celu, który
podano.
Jeżeli potrzebujesz pomocy związanej z dalszymi
szczegółami dotyczącymi niniejszego wyposażenia,
zwróć się do miejscowego punktu usługowego Makita.
• Nasadki
• Pręt przedłużacza
• Złącze uniwersalne
• Uchwyt boczny
• Plastikowa walizka
13
Page 14

Tylko dla krajów europejskich
Szummy i drgania
ENG006-2-V4
Typowy A-ważone poziomy szumów
poziom ciśnienia dźwięku: 103 dB (A).
poziom dźwięku w trakcie pracy: 114 dB (A).
Niepewność pomiaru wynosi 1 dB (A).
Typowa wartość ważonej średniej kwadratowej
przyspieszenia jest 15 m/s2.
Wartości niniejsze otrzymano zgodnie z EN60745.
– Noś ochraniacze uszu. –
UE-DEKLARACJA ZGODNOŚCI
ENH001-3
Oświadczamy, biorąc za to wyłączną odpowiedzialność,
że niniejszy wyrób jest zgodny z następującymi
standardami standardowych dokumentów:
zgodnie z Zaleceniami Rady: 73/23/EEC i 89/336/EEC,
98/37/EC.
EN60745, EN55014, EN61000
Yasuhiko Kanzaki CE 2004
Dyrektor
MAKITA INTERNATIONAL EUROPE LTD.
Michigan Drive, Tongwell, Milton Keynes,
Bucks MK15 8JD, ENGLAND
Odpowiedzialny producent:
Makita Corporation, Anjo, Aichi, Japonia
14
Page 15

РУССКИЙ ЯЗЫК
Объяснения общего плана
1 Пусковой механизм
2 Боковой захват
3 Канавка
4 Гнездо
5Пятка
6Штифт
7 Уплотнительное кольцо
8 Высокопрочный болт
9 Крутящий момент
10 Время завинчивания
ТЕХНИЧЕСКИЕ ХАРАКТЕРИСТИКИ
Модель TW1000
Функциональные возможности
Стандартный болт .................................... M22 – M30
Высокопрочный болт ............................... M22 – M24
Квадратные привод ..........................................25,4 мм
Скорость в незагруженном
состоянии (мин
Ударов в минуту ..................................................... 1500
Макс. завинчивающий момент...................... 1000 N•m
Общая длина....................................................... 382 мм
Вес нетто............................................................... 8,4 кг
Класс безопасности .............................................. /II
• Вследствие нашей продолжающейся программы
поиска и разработок технические характеристики
могут быть изменены без уведомления.
• Примечание: Технические характеристики могут
различаться в зависимости от страны.
Предназначенное использование
Этот инструмент предназначен для завинчивания
болтов и гаек.
Источник питания
Инструмент должен быть подсоединен только к
источнику питания с напряжением, указанным в
табличке номиналов, и может функционировать
только от однофазного источника питания
переменного тока. В соответствии с Европейским
стандартом имеется двойная изоляция,
следовательно, возможно использование с розетками
без провода заземления.
–1
)................................................... 1400
ИНСТРУКЦИИ ПО МЕРАМ БЕЗОПАСНОСТИ
Предостережение! При использовании
электрических инструментов следует всегда
соблюдать основные меры безопасности для
уменьшения опасности пожара, поражения
электрическим током и персональных травм,
включая следующие.
Прочитайте эти инструкции перед тем, как
пытаться управлять этим изделием, и сохраните
эти инструкции.
Для безопасного функционирования:
1. Поддерживайте чистоту на рабочем месте
Захламленные места и подставки могут
привести к травмам.
2. Учитывайте рабочую окружающую среду
Не подвергайте инструменты с электроприводом
воздействию дождя. Не используйте инструменты с
электроприводом в сырых или влажных местах.
Поддерживайте хорошее освещение на рабочем
месте. Не используйте инструменты с
электроприводом в присутствии возгораемых
жидкостей или газов.
11 Ограничительная метка
12 Предохранитель
13 Крышка держателя щеток
14 Отвертка
3. Предохраняйтесь от поражения
электрическим током
Предотвращайте контакт тела с заземленными
поверхностями (например, трубами, радиаторами,
батареями, холодильниками).
4. Держитесь подальше от детей
Не позволяйте посетителям прикасаться к
инструменту или шнуру-удлинителю. Все
посетители должны находиться подальше от
рабочей области.
5. Правильно храните неработающие
инструменты
Если инструменты не используются, они должны
храниться в сухом, высоком или закрытом
месте, вне достижения детей.
6. Не прилагайте усилие к инструменту
Он будет выполнять работу лучше и безопаснее
при скорости, для которой он предназначен.
7. Используйте правильный инструмент
Не пытайтесь прилагать усилие к маленьким
инструментам или присоединениям для
выполнения работы инструмента тяжелого
назначения. Не используйте инструменты для
непредназначенных целей; например, не
используйте дисковую пилу для резки веток или
корней деревьев.
8. Одевайтесь правильно
Не одевайте свисающую одежду или украшения.
Они могут попасть в движущиеся части. При
работе на улице рекомендуется одевать
резиновые перчатки и нескользящую обувь.
Одевайте предохранительный головной убор для
убирания длинных волос.
9. Используйте защитные очки и
предохранительные приборы для слуха.
Если работа по резке является пыльной,
используйте также маску для лица или
пылезащитную маску
10. Подсоедините пылевсасывающее
оборудование
Если имеются подсоединения устройств для
всасывания и сбора пыли, убедитесь в том, что
они подсоединены и используются правильно.
11. Не прилагайте усилие к шнуру
Никогда не носите инструмент за шнур и не
дергайте за него для отсоединения его из
розетки. Держите шнур подальше от жарких
мест, масла и острых краев.
12. Закрепите рабочее изделие
Используйте зажимы или тиски для крепления
рабочего изделия. Это является более
безопасным, чем использование Вашей руки, и
при этом освобождаются две руки для
управления инструментом.
13. Не заходите слишком далеко
Сохраняйте правильную стойку и баланс все
время.
151515
Page 16

14. Осторожно обращайтесь с инструментами
Держите инструменты острыми и чистыми для
более лучшей и безопасной работы. Следуйте
инструкциям для смазки и смены
принадлежностей. Периодически проверяйте
шнуры инструмента, и, если они повреждены,
обращайтесь относительно ремонта в
уполномоченный центр по техобслуживанию.
Периодически проверяйте шнуры-удлинители и
заменяйте, если они повреждены. Держите ручки
сухими чистыми и свободными от масла или
смазки.
15. Отсоединяйте инструменты
Если не используются, перед техобслуживанием, и
при смене принадлежностей, таких, как лезвия,
резцы и резаки.
16. Убирайте регулировочные ключи и гаечные
ключи
Сформируйте привычку проверять, что
регулировочные ключи и гаечные ключи убраны
с инструмента перед его включением.
17. Избегайте случайных запусков
Не носите подсоединенный к сети инструмент с
пальцем, находящемся на переключателе. Перед
подсоединением инструмента к сети убедитесь,
что переключатель находится в положении
“выкл”.
18. Шнуры-удлинители для использования на
улице
Когда инструмент используется на улице,
используйте только шнуры-удлинители,
предназначенные для использования на улице с
указанием этого.
19. Будьте бдительны
Наблюдайте за тем, что Вы делаете. Используйте
разумный подход. Не управляйте инструментом,
если Вы устали.
20. Проверяйте поврежденные части
Перед дальнейшим использованием
инструмента, предохранитель или другая часть
должны быть тщательно проверены для
определения того, что они будут
функционировать правильно и выполнять
предназначенную функцию. Проверьте на
предмет совмещения движущихся частей,
соединения движущихся частей, поломки
частей, монтажа и других условий, которые
могут повлиять не их функционирование.
Предохранитель или другая часть должны быть
правильно отремонтированы или заменены в
уполномоченном центре по техобслуживанию,
если только не указано другое в этой
инструкции по эксплуатации. Дефектные
переключатели должны быть заменены в
уполномоченном центре по техобслуживанию.
Не используйте инструмент, если невозможно
его включение и выключение с помощью
переключателя.
21. Предостережение
Использование любой другой принадлежности
или присоединения, отличного от рекомендуемого
в этой инструкции по эксплуатации или каталоге,
может привести к опасности персональной
травмы.
22. Используйте для ремонта услуги
специалиста
Это электрическое оборудование соответствует
относящимся к нему правилам безопасности.
Ремонт электрического оборудования может
проводиться только специалистами, в
противном случае, он может вызвать
существенную опасность для пользователя.
ДОПОЛНИТЕЛЬНЫЕ ПРАВИЛА
БЕЗОПАСНОСТИ
НЕ допускайте того, чтобы комфорт и
уверенность в обращении с изделием
(приобретенные вследствие повторного
использования) заменили строгое соблюдения
правил безопасности для пневматического
гаечного ключа ударного действия. Если
используете этот инструмент небезопасно или
неправильно, Вы можете получить серьезную
травму.
1. При выполнении операций, когда режущий
инструмент может проконтактировать со
скрытой проводкой или своим собственным
проводом держите инструмент за
изолированные поверхности для захвата.
Контакт с “работающим” проводом может
сделать также “работающими” открытые
металлические части инструмента и
привести к поражению оператора
электрическим током.
2. Одевайте приборы для защиты слуха.
3. Перед установкой внимательно проверьте
гнездо на предмет износа, трещин или
повреждений.
4. Держите инструмент крепко.
5. Всегда будьте уверены, что у Вас имеется
устойчивая опора. Убедитесь в том, что внизу
никого нет, когда используете инструмент в
возвышенных местах.
6. Правильный крутящий момент может
различаться в зависимости от вида или
размера болта. Проверьте момент с помощью
гаечного ключа с ограничением по
крутящему моменту.
СОХРАНИТЕ ЭТУ ИНСТРУКЦИЮ.
ПРЕДОСТРЕЖЕНИЕ:
НЕПРАВИЛЬНОЕ ИСПОЛЬЗОВАНИЕ или
невыполнение правил безопасности,
приведенных в этой инструкции по эксплутации,
могут привести к серьёзной персональной
травме.
161616
Page 17

ФУНКЦИОНАЛЬНОЕ ОПИСАНИЕ
ПРЕДУПРЕЖДЕНИЕ:
• Следует всегда быть уверенным, что инструмент
выключен и отсоединен от сети перед
выполнением функций регулировки или проверки
на инструменте.
Действия при переключении (Рис. 1)
ПРЕДУПРЕЖДЕНИЕ:
• Перед подсоединением инструмента всегда
проверяйте, чтобы видеть, что пусковой механизм
действует правильно и возвращается в положение
“OFF” (выкл.) при высвобождении.
• Изменяйте направление вращения только тогда,
когда инструмент полностью остановится. Его
изменение до остановки инструмента может
привести к повреждению инструмента.
Переключатель является обратимым, обеспечивая
вращение либо по часовой, либо против часовой
стрелки. Для запуска инструмента просто нажмите
на нижнюю часть (A) переключателя для вращения
по часовой стрелки, и на верхнюю часть (B) для
вращения против часовой стрелки. Для остановки
высвободите переключатель.
СБОРКА
ПРЕДУПРЕЖДЕНИЕ:
• Следует убедиться, что инструмент выключен и
отсоединен от сети перед выполнением любой
работы на инструменте.
Установка бокового захвата (дополнительная
принадлежность) (Рис. 2)
Вставьте боковой захват в канавки с корпусе
гаечного ключа и плотно завинтите. Канавки для
установки бокового захвата расположены в двух
положениях. Установите его в правильном
положении в соответствии с Вашей работой.
Выбор правильного гнезда
Используйте гнездо правильного размера для
болтов и гаек. Гнездо неправильного размера может
привести к неточному и непостоянному крутящему
моменту и/или повредить болт или гайку.
Установка или удаление гнезда
ПРЕДУПРЕЖДЕНИЕ:
• Следует всегда быть уверенным, что инструмент
выключен и отсоединен от сети перед установкой
или удалением гнезда.
Для гнезда без уплотнительного кольца и
штифта (Рис. 3)
Для установки гнезда нажмите его на пятку
инструмента до его фиксации на месте.
Для удаления гнезда просто вытащите его.
Для гнезда с уплотнительным кольцом и
штифтом (Рис. 4)
Вытащите уплотнительное кольцо из канавки в
гнезде и удалите штырь из гнезда. Вставьте гнездо в
пятку инструмента так, чтоб отверстие в гнезде
совпало с отверстием в пятке. Вставьте штырь
через отверстие в гнезде и в пятке. Возвратите
уплотнительное кольцо в его первоначальное
положение в канавке гнезда для фиксации штыря.
Для удаления гнезда следуйте процедуре установки
в обратном порядке.
ЭКСПЛУАТАЦИЯ
Правильный крутящий момент может различаться в
зависимости от типа или размера болта, материала
рабочего изделия, в который выполняется
завинчивание и т.д. Соотношение между крутящим
моментом и временем завинчивания показано на
рис. 5. Держите инструмент крепко и поместите
гнездо сверху болта или гайки. Включите
инструмент и завинчивайте в течение правильного
времени завинчивания.
ПРИМЕЧАНИЕ:
• Держите инструмент прямо над болтом или гайкой.
• Чрезмерный крутящий момент может повредить
болт/гайку или гнездо. Перед началом Вашей
работы всегда выполняйте пробную операцию для
определения правильного времени завинчивания
для Вашего болта или гайки.
Крутящий момент подвержен воздействию
различных факторов, включая следующие. После
завинчивания всегда проверяйте крутящий момент с
помощью гаечного ключа с ограничением по
крутящему моменту.
1. Напряжение
• Падение напряжение приведет к уменьшению
крутящего момента.
2. Гнездо
• Выбор гнезда неправильного размера
приведет к уменьшению крутящего момента.
• Изношенное гнездо (износ на шестиугольном
конце или квадратном конце) приведет к
уменьшению крутящего момента.
3. Болт
• Даже если коэффициент момента и класс
болта являются одинаковыми, правильный
крутящий момент будет различаться в
соответствии с диаметром болта.
• Даже если диаметры болтов являются
одинаковыми, правильный крутящий момент
будет различаться в соответствии с
коэффициентом момента, классом болта и
длиной болта.
4. Использование универсального соединителя или
расширенной шины сократит в некоторой
степени силу завинчивания гаечного ключа
ударного действи. Скомпенсируйте путем
завинчивания в течение более длительного
периода времени.
5. На момент будут воздействовать способ
удерживания инструмента или материал
позиции завинчивания.
171717
Page 18

ОБСЛУЖИВАНИЕ
ПРЕДУПРЕЖДЕНИЕ:
• Следует всегда быть уверенным, что инструмент
выключен и отсоединен от сети перед
выполнением проверки или обслуживания.
Замена угольных щеток
Удаляйте и проверяйте угольные щетки регулярно.
Заменяйте, когда они износятся до ограничительной
метки. Держите угольные щетки в чистоте и
свободными от передвижения в держателях.
Следует заменять обе угольные щетки
одновременно. Используйте только одинаковые
угльные щетки. (Рис. 6)
Удалите предохранитель. Используйте отвертку для
удаления крышек угольных щеток. Выньте
изношенные угольные щетки, вставьте новые и
зафиксируйте крышки держателей щеток.
(Рис. 7 и 8)
Для поддержания БЕЗОПАСНОСТИ и
ДОЛГОВЕЧНОСТИ изделия, ремонт, любое другое
обслуживание или регулировка должны проводиться
в уполномоченных центрах по техобслуживанию или
заводских центрах Makita, используя всегда
запасные части Makita.
ПРИНАДЛЕЖНОСТИ
ПРЕДУПРЕЖДЕНИЕ:
• Эти принадлежности или приспособления
рекомендуются для использования с Вашим
инструментом Makita, указанном в руководстве.
Использование любых других принадлежностей
или приспособлений может вызвать риск
причинения травмы. Используйте принадлежности
или приспособления только для указанных целей.
Если Вам необходима какая-либо помощь
относительно дальнейших подробностей об этих
принадлежностях, обращайтесь в Ваш местный
центр по техобслуживанию Makita.
• Гнезда
• Удлинитель
• Боковой захват
• Пластиковая переносная сумка
Только для европейских стран
Шум и вибрация
ENG006-2-V4
Типичные А-взвешенные уровни шума составляют
уровень звукового давления 103 дБ (А).
уровень звуковой мощности 114 дБ (А).
Погрешность 1 дБ (A).
Типичное взвешенное значение квадратного корня
ускорения составляет 15 м/с2.
Эти значения были получены в соответствии с
EN60745.
– Надевайте защиту для ушей. –
ЕС ДЕКЛАРАЦИЯ СООТВЕТСТВИЯ
Мы заявляем под свою собственную
ответственность, что этот продукт находится в
соответствии со следующими стандартами
документов по стандартизации:
согласно сборникам директив 73/23/EEC, 89/336/EEC
и 98/37/EC.
EN60745, EN55014, EN61000
Ясухико Канзаки
Директор
CE 2004
ENH101-3
MAKITA INTERNATIONAL EUROPE LTD.
Michigan Drive, Tongwell, Milton Keynes,
Bucks MK15 8JD, ENGLAND
Ответственный производитель:
Корпорация Makita, Анжо, Айчи, Япония
181818
Page 19

191919
Page 20

Makita Corporation
Anjo, Aichi, Japan
884595C201
 Loading...